

Page 1

Contents
Audio Systems 2
Controls and Features 7
Display 16
Care and Cleaning 17
Radio Frequency Information 20
Index 21
1
Page 2
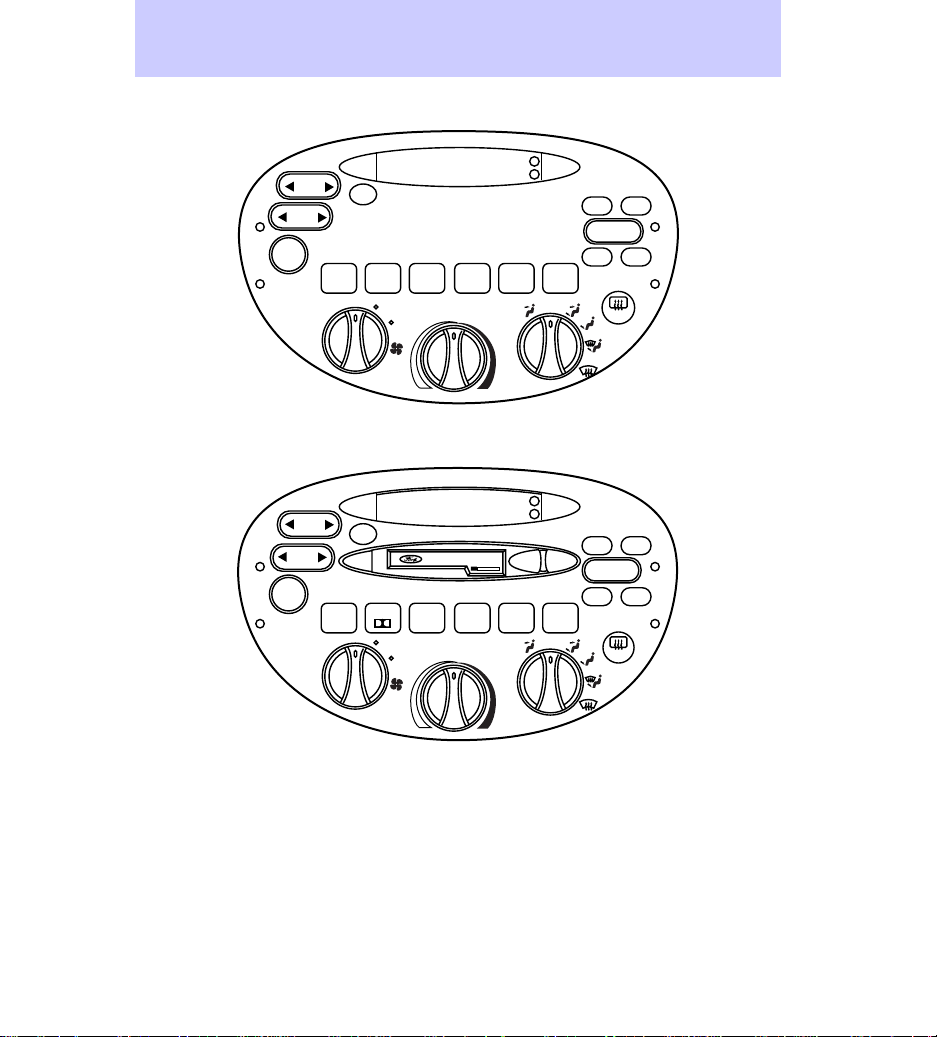
Audio Systems
Electronic Search Radio (ESR)
AM
SEEK
SCAN
TUNE
VOL
PUSH ON
1
2
LO
HI
Electronic Search Radio with
Cassette (ESC)
AM
FM
SEEK
SCAN
TUNE
VOL
PUSH ON
SIDE 1-2
1
LO
EJ
2
HI
34
DOLBY SYSTEM
34
MAX
MAX
A/C
A/C
A/C
A/C
H
M
5
H
M
REW FF
5
FM
OFF
TAPE
OFF
BASS TREB
6
BASS TREB
6
–+
BAL
FADE
R.DEF
–+
BAL
FADE
R.DEF
2
Page 3
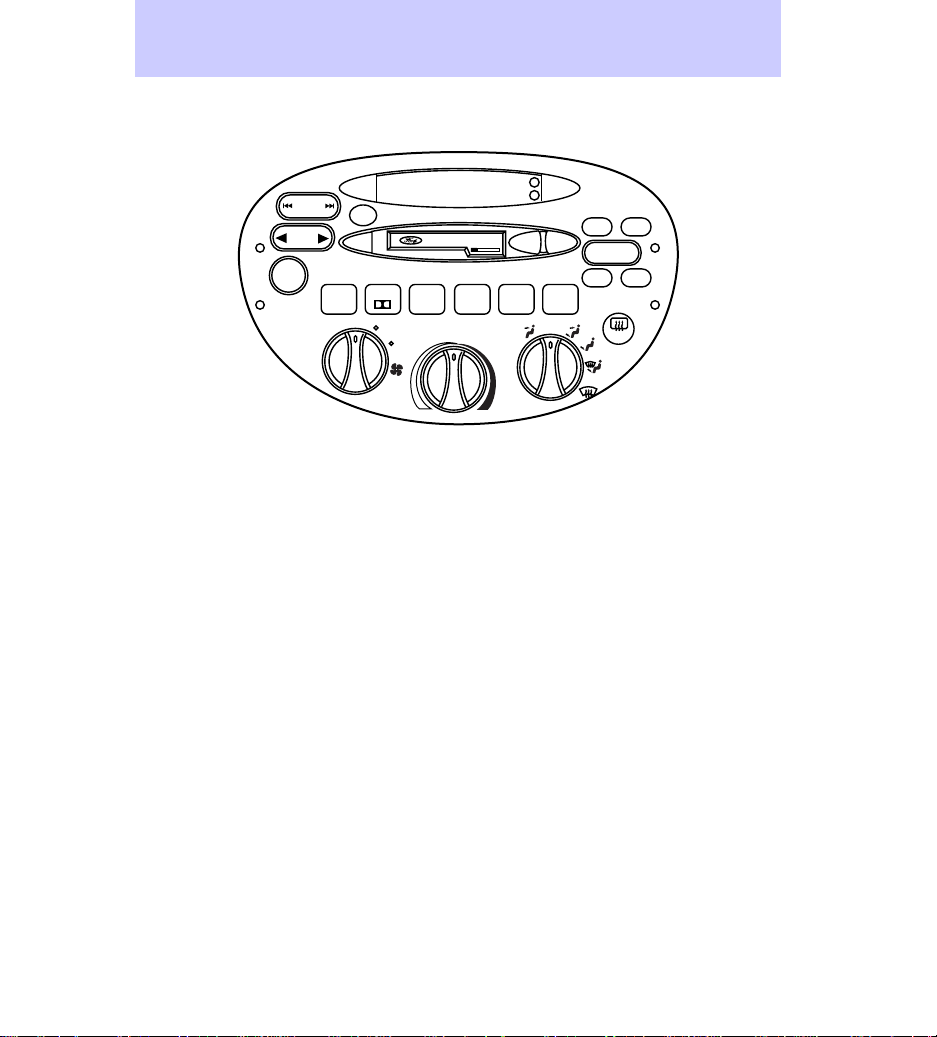
ESC with Cassette & CD DJ
(Compact Disc Changer)
Audio Systems
AM
FM
SEEK
TRACK
TUNE
DISCS
SCAN
2
HI
PREMIUM SOUND
34
EJ REW
VOL
PUSH ON
1
SIDE 1-2
LO
*Air conditioning systems optional
DOLBY SYSTEM
MAX
COMP
A/C
A/C
H
M
5
TAPE
OFF
CD
SHUF
FF
6
BASS TREB
–+
BAL
FADE
R.DEF
3
Page 4
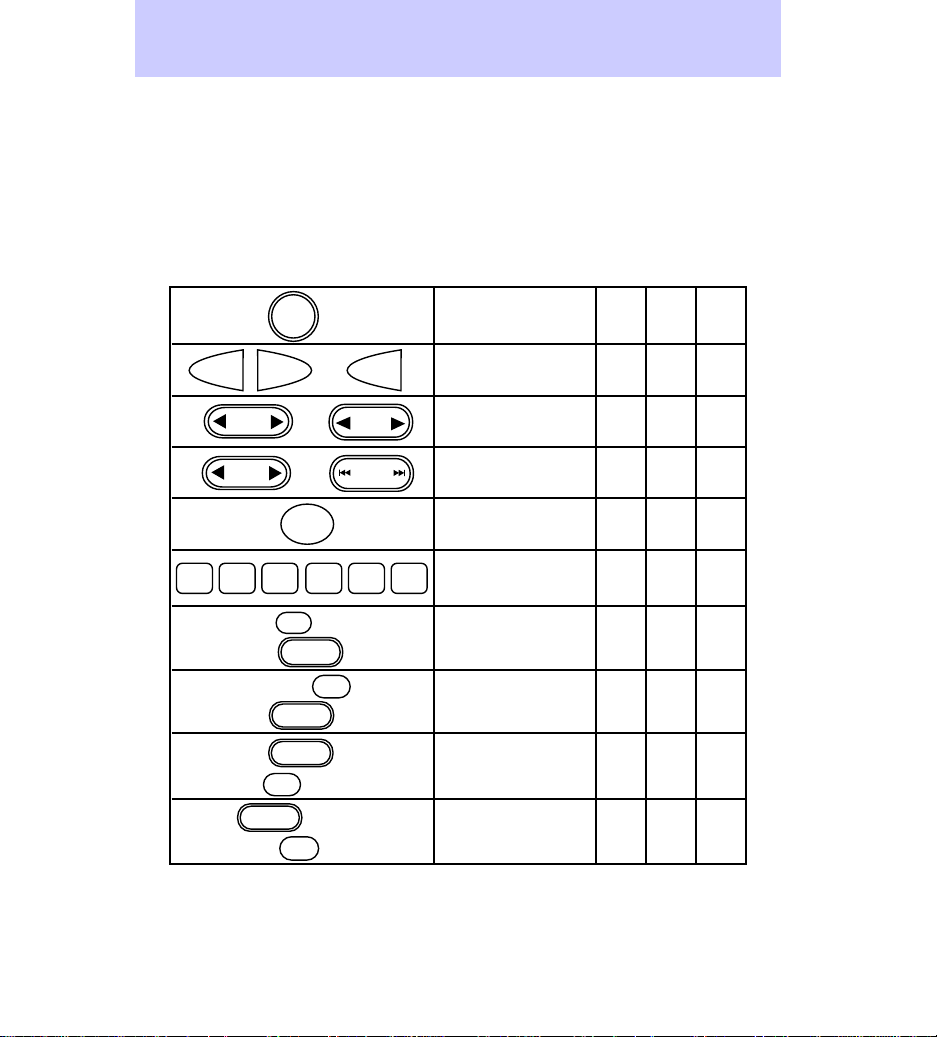
Audio Systems
Audio System Feature Audio System
VOL
PUSH ON
TREB
TUNE
DISCS
SEEK
TRACK
5
AM
FM
AM FM OR
TUNE
SEEK OR
12
= Feature included on audio system
✔
OR
SCAN
34
BASS
–+
–+
–+
BAL
–+
FADE
6
Name
Volume/Power
Control
AM/FM Select
Tune Adjust
Seek Function
Scan Function
Radio Station
Memory Preset
Bass Adjust
Treble Adjust
Speaker
Balance Adjust
Speaker
Fade Adjust
Electronic Search
Radio (ESR)
Electronic Search
Radio with
Cassette (ESC)
ESC with CD DJ
(Compact Disc
✔✔✔
✔
✔
✔
✔
✔
✔
✔
✔
✔
✔
✔
✔
✔
✔
✔
✔
✔
✔
✔
✔
✔
✔
✔
✔
✔
✔
✔
Changer)
4
Page 5
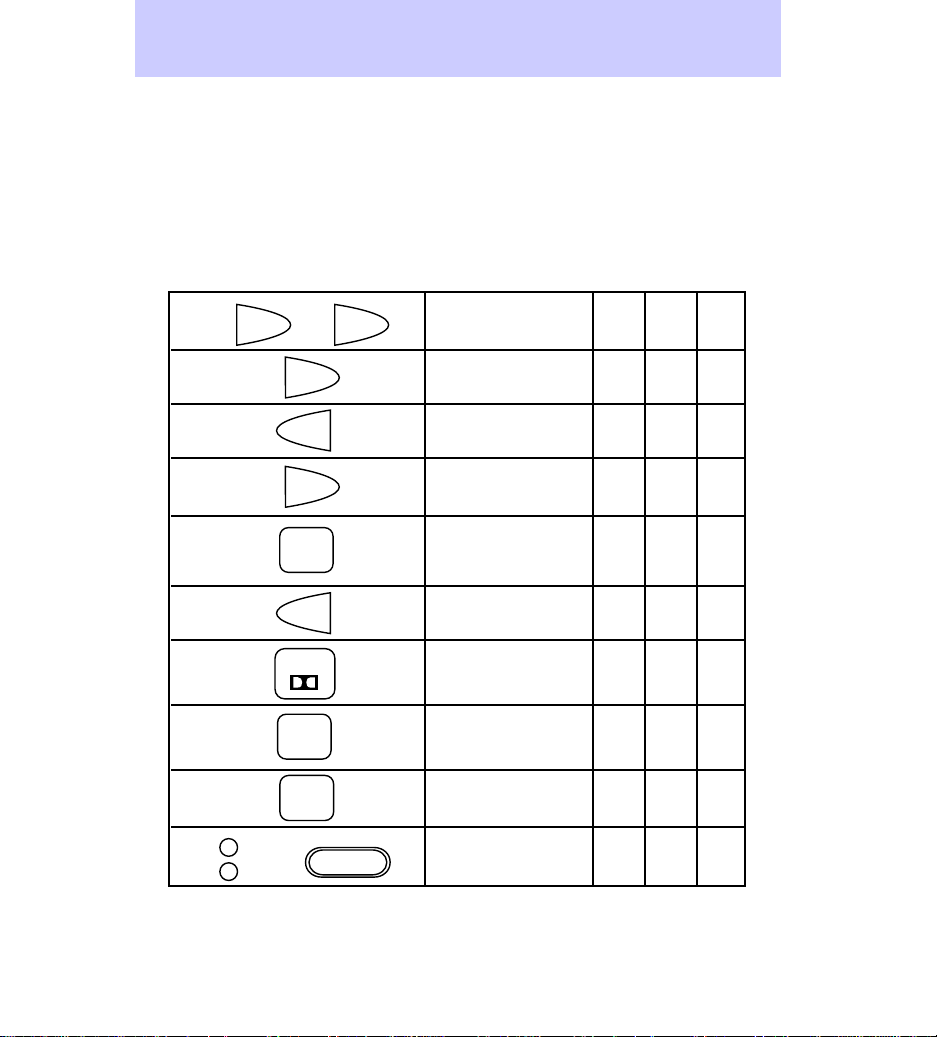
Audio Systems
Audio System Feature Audio System
TAPE
SIDE 1-2
COMP
H
AND
M
= Feature included on audio system
✔
CD
TAPE
CD
REW
FF
1
EJ
2
5
6
SHUF
–+
TAPE
OR
Name
Tape Play Select
CD Play Select
Rewind Function
Fast Forward
Function
Tape Direction
Select
Tape Eject
Dolby® Noise
Reduction
Compression Adjust
Shuffle Feature
Clock
Electronic Search
Radio (ESR)
Electronic Search
Radio with
Cassette (ESC)
ESC with CD DJ
(Compact Disc
✔✔
✔
✔✔
✔✔
✔✔
✔✔
✔✔
✔
✔
✔✔
✔
changer)
5
Page 6
Controls and Features
USING YOUR AUDIO SYSTEM
Turning the power on /
adjusting the volume
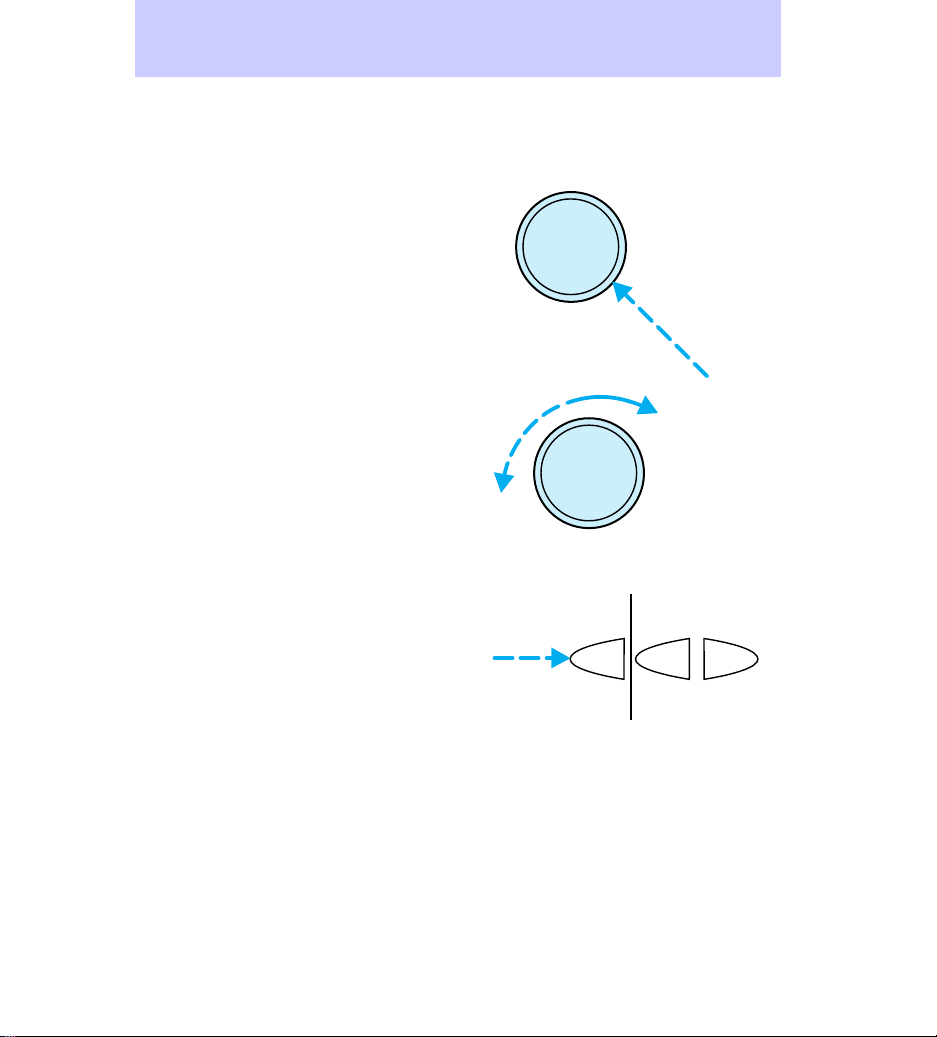
To turn the audio system on or off,
press the power knob.
To adjust the volume, turn the
volume knob.
If you turn off the ignition, the
audio system will come back on at
the preset medium level when the
ignition is turned back on.
• Turning the knob to the right
will increase the volume.
• Turning the knob to the left will
decrease the volume.
Using the AM/FM select
The AM/FM select button works in
radio, tape (if equipped), and CD
(if equipped) modes.
• In radio mode, the AM/FM select
buttons allow choice between
AM or FM frequency bands.
Pressing the buttons switches
between AM, FM1, and FM2
preset memory stations.
• In cassette mode, pressing the
AM/FM select buttons stops
cassette play and begins radio
play.
• In CD mode, pressing the
AM/FM select buttons stops CD
play and begins radio play.
FM
AM
VOL
PUSH ON
VOL
PUSH ON
AM
FM
6
Page 7
Using the tune adjust
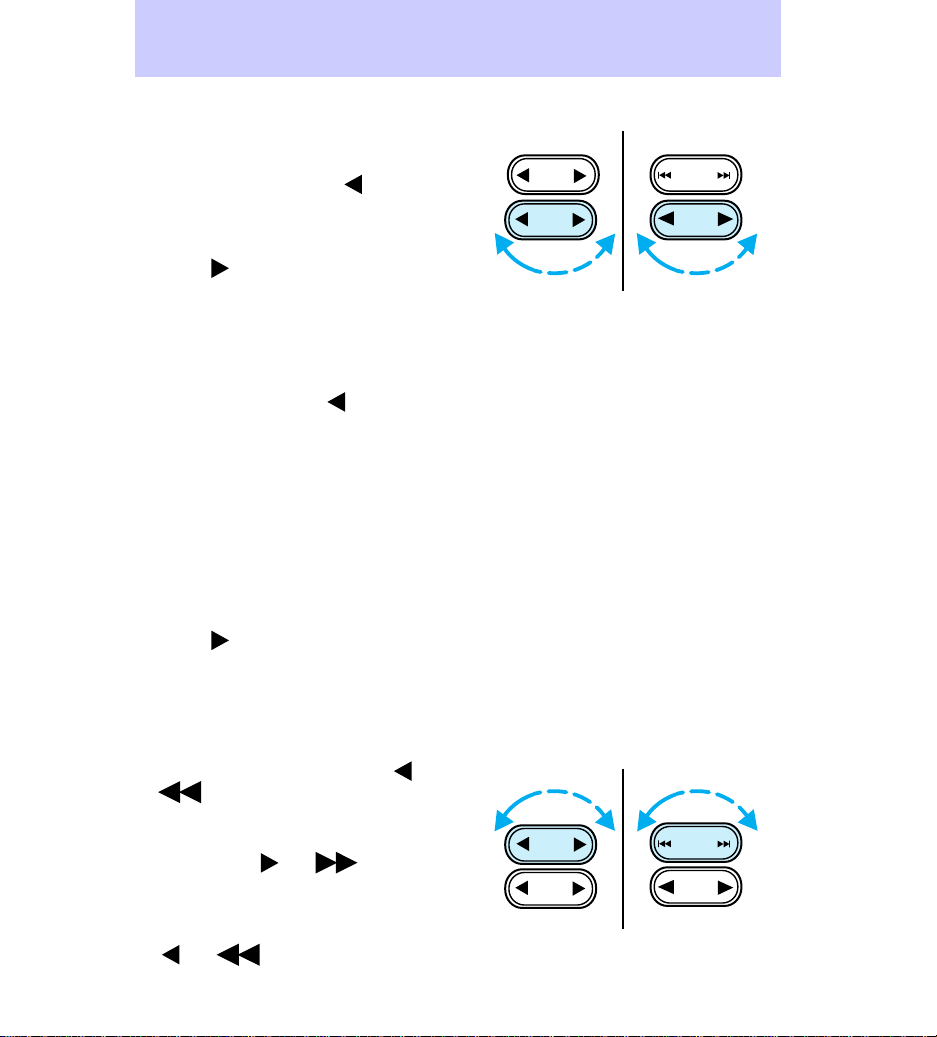
The tune button works in radio or
CD (if equipped) mode.
• In radio mode, push
to move
to the next frequency down the
band (whether or not there is a
listenable station located there).
Push
to move to the next
frequency up the band (whether
or not there is a listenable
station located there). Hold the
button down to move quickly
through the frequencies.
• In CD mode, push
to select
the previous disc in the CD
changer. (Play will begin with
the first track of the disc unless
the CD changer is in shuffle
mode. For more information on
the shuffle function, see Using
the shuffle function in this
guide.) Hold the button down to
continue reversing through the
discs.
• Push
to select the next disc
in the CD changer. Hold the
button down to fast forward
through the discs.
Controls and Features
SEEK
TUNE
SEEK
TRACK
TUNE
DISCS
Using the seek function
• In radio mode, press seek
to find the next listenable
station down the frequency
band.
• Press seek
or to find
the next listenable station up
the frequency band.
• In the tape mode, press seek
or to listen to the
previous tape selection.
or
SEEK
TUNE
SEEK
TRACK
TUNE
DISCS
7
Page 8
Controls and Features
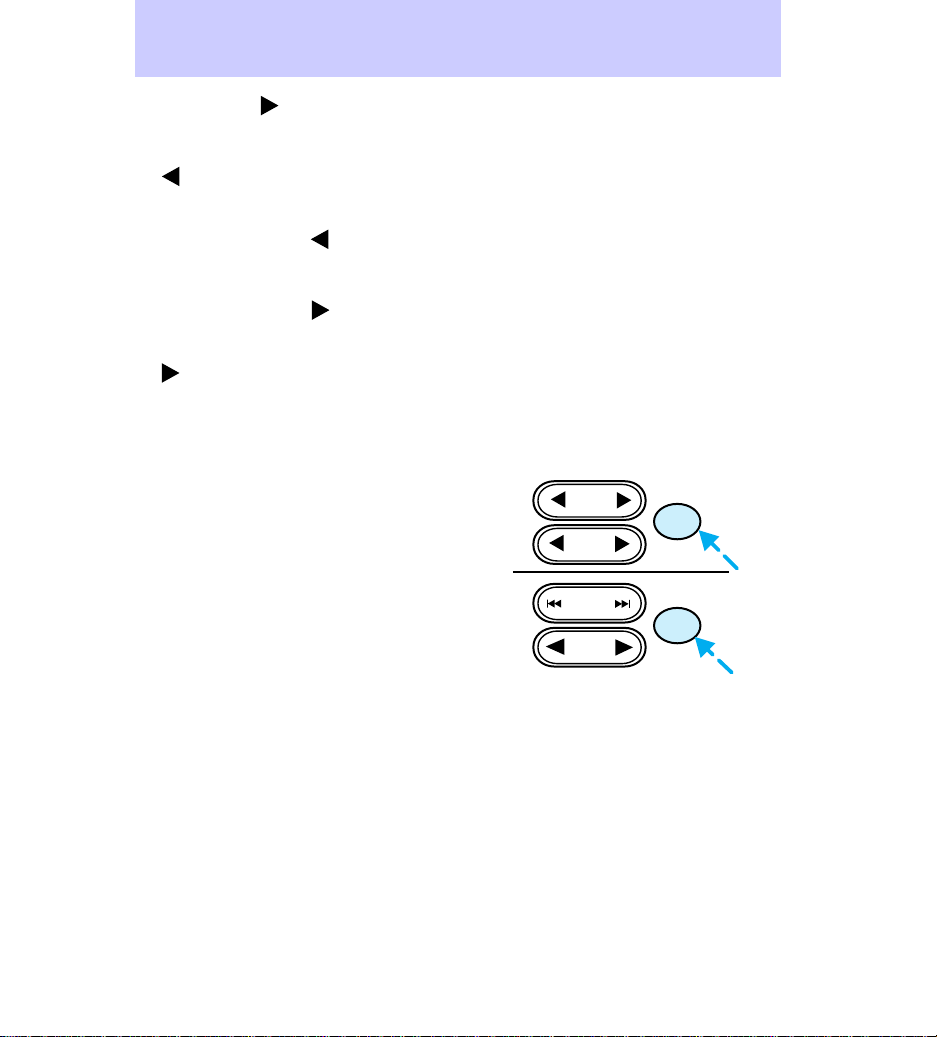
• Press seek to listen to the
next selection on the tape.
• In CD mode, press seek track
to listen to the previous CD
track. If a selection has been
playing for more than three
seconds and the
the CD will replay the selection
from the beginning.
• Press seek track
the next track on the CD. If you
are playing the last track when
is pressed, the disc will skip
back to the first track on the
CD.
Using the scan function
• In radio mode, press the scan
button to hear a five-second
sampling of all listenable
stations on the frequency band.
To stop the scan mode on a
particular station, press the
button again.
• In tape mode, press the scan
button to hear an eight-second
sampling of all tape selections.
(The tape scans in a forward
direction. At the end of the
tape’s first side, the direction
automatically reverses to the
opposite side of the tape.) To
stop at a particular tape
selection, press the scan button
again.
• In CD mode, press the scan
button to hear an eight-second
sampling of all CD selections.
(The CD scans in a forward
direction, wrapping back to the
is pressed,
to listen to
SEEK
TUNE
SEEK
TRACK
TUNE
DISCS
SCAN
SCAN
8
Page 9
first track at the end of the CD.)
To stop at a particular selection,
press the scan button again.
Using the radio station memory
preset
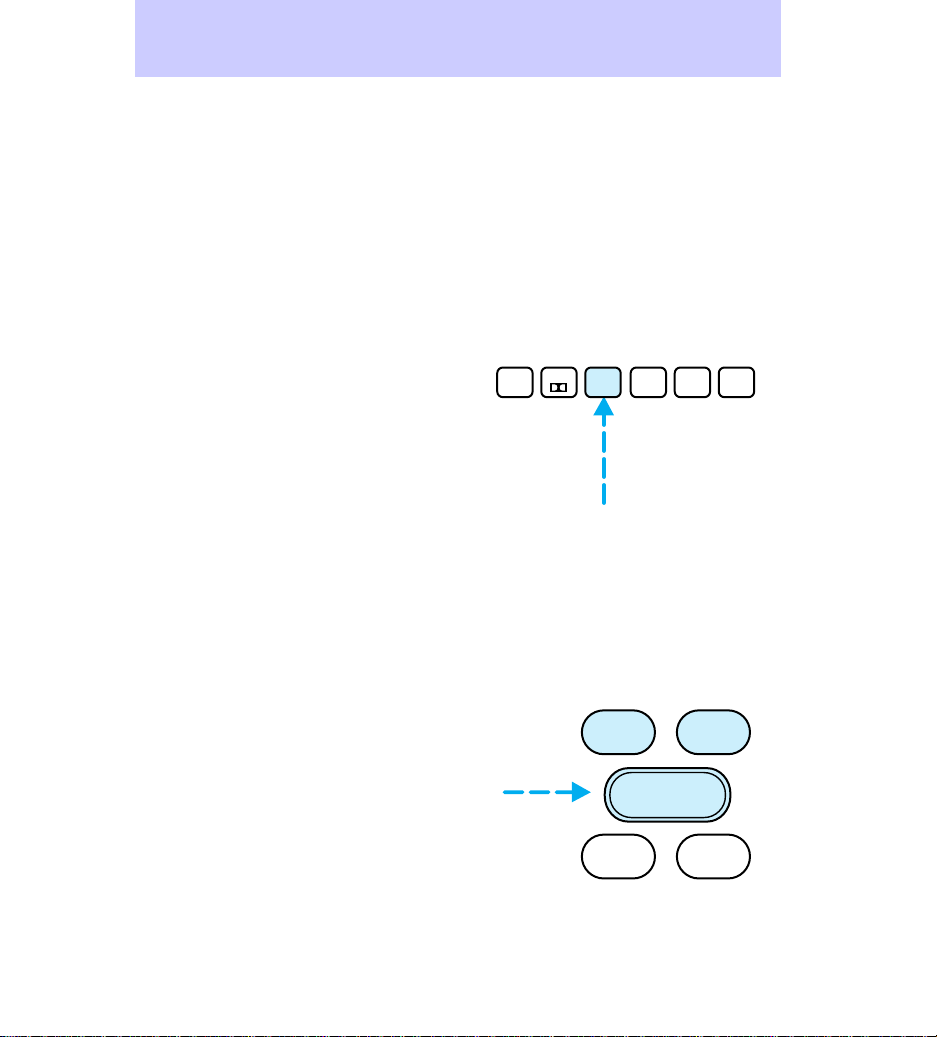
The radio is equipped with six
station memory preset buttons.
These buttons may be used to
select up to six preset AM stations
and twelve preset FM stations (six
in FM1 and six in FM2).
To preset stations:
1. Use the AM/FM select buttons
to choose a frequency band.
2. Select a station. For more
information on selecting a station,
see Using the tune adjust in this
guide.
3. Press and hold a memory preset
button until the sound resumes,
indicating that the station is held
in memory on the button that you
selected.
Controls and Features
1
SIDE 1-2
2
34
5
COMP
SHUF
6
Using the bass and treble
adjust
The bass and treble adjust buttons
allow you to increase (+) or
decrease (-) the bass and treble
output.
BASS TREB
–+
BAL
FADE
9
Page 10
Controls and Features
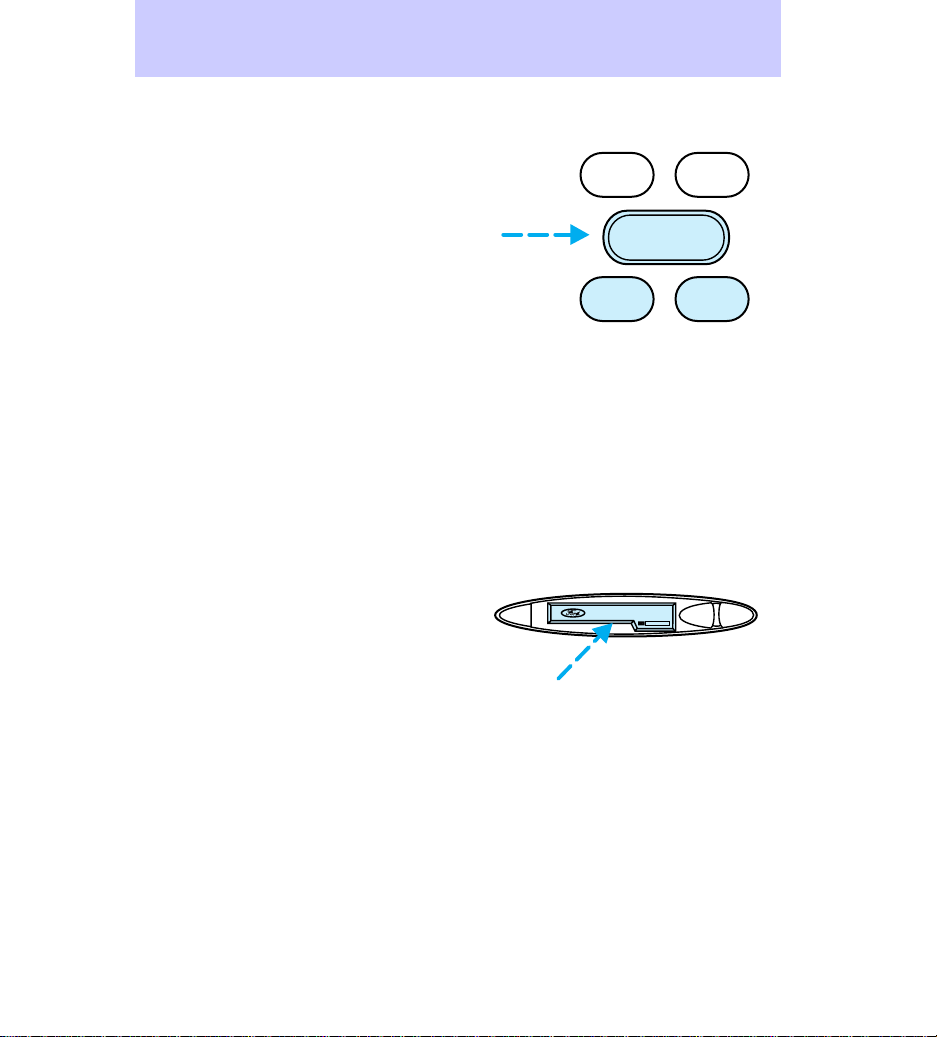
Using the speaker balance
adjust
Speaker sound distribution may be
adjusted between the right (+) and
left (-) speakers by using the
balance button.
Speaker sound distribution may be
adjusted between the front (+)
and back (-) speakers by using the
fade button.
To test speaker functions, press
and hold radio memory preset
buttons three and six. The audio
system will automatically run
through each of the possible
speaker outputs (front left, front
right, rear left, rear right). The
system display will show what
speaker is being tested.
Using your cassette player (if
equipped)
Push only slightly when inserting a
cassette tape (with the open edge
to the right). A cassette deck
loading mechanism pulls the tape
in the rest of the way. The ignition
and radio do not need to be on to
insert a tape.
You can switch from CD (if
equipped) to tape play by inserting
a tape into the cassette deck.
BASS TREB
–+
BAL
EJ REW FF
FADE
DOLBY SYSTEM
10
Page 11
Using the tape/CD select (if
equipped)
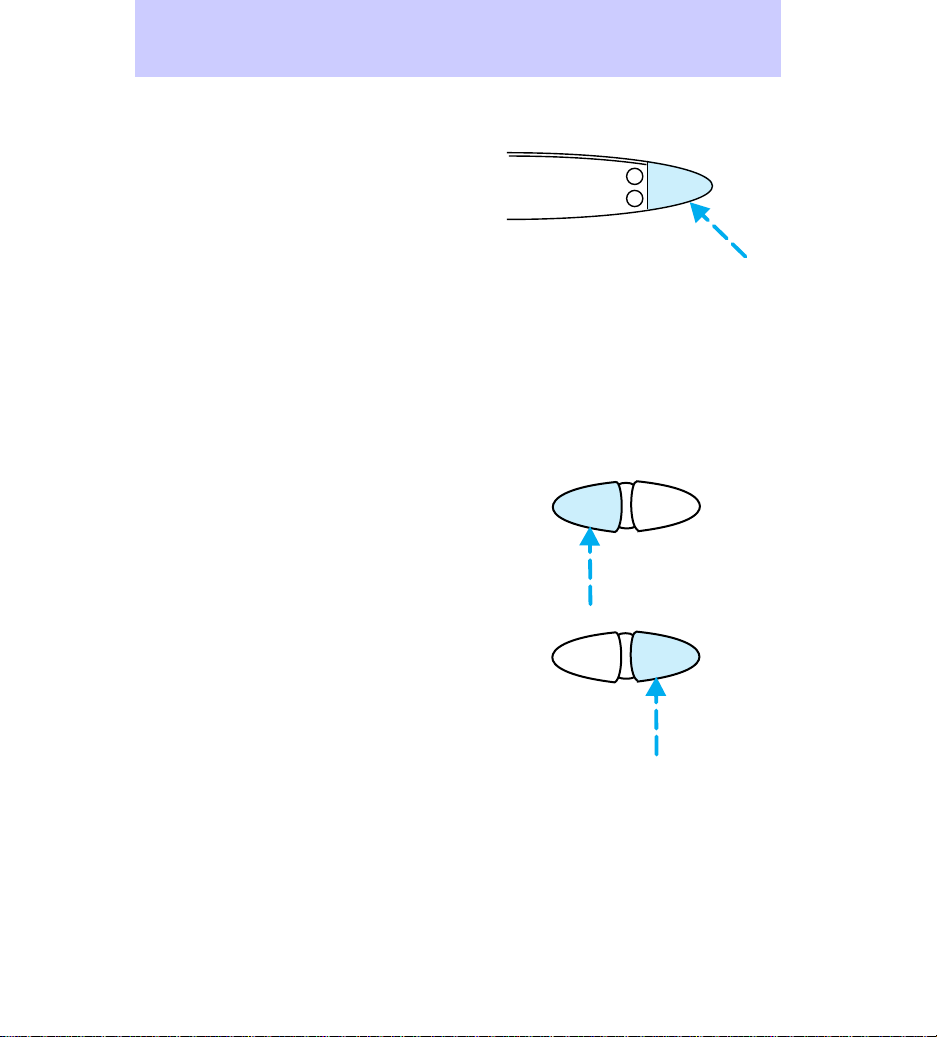
• To begin tape play (with a tape
loaded into the audio system),
while in the radio or CD mode,
press the tape button. Pressing
the button during rewind or fast
forwarding stops the rewind or
fast forward function.
• To begin CD play (if CDs are
loaded in the CD changer),
press the CD button. The first
track of the disc will begin
playing.
Using the rewind and fast
forward functions (if equipped)
To rewind a tape or CD, press the
rewind button.
To fast forward a tape or CD, press
the fast forward button.
• In tape mode, at the end of the
first side of the tape the
direction automatically reverses
and the opposite side of the
tape plays.
Controls and Features
H
TAPE
CD
M
REW FF
REW FF
11
Page 12
Controls and Features
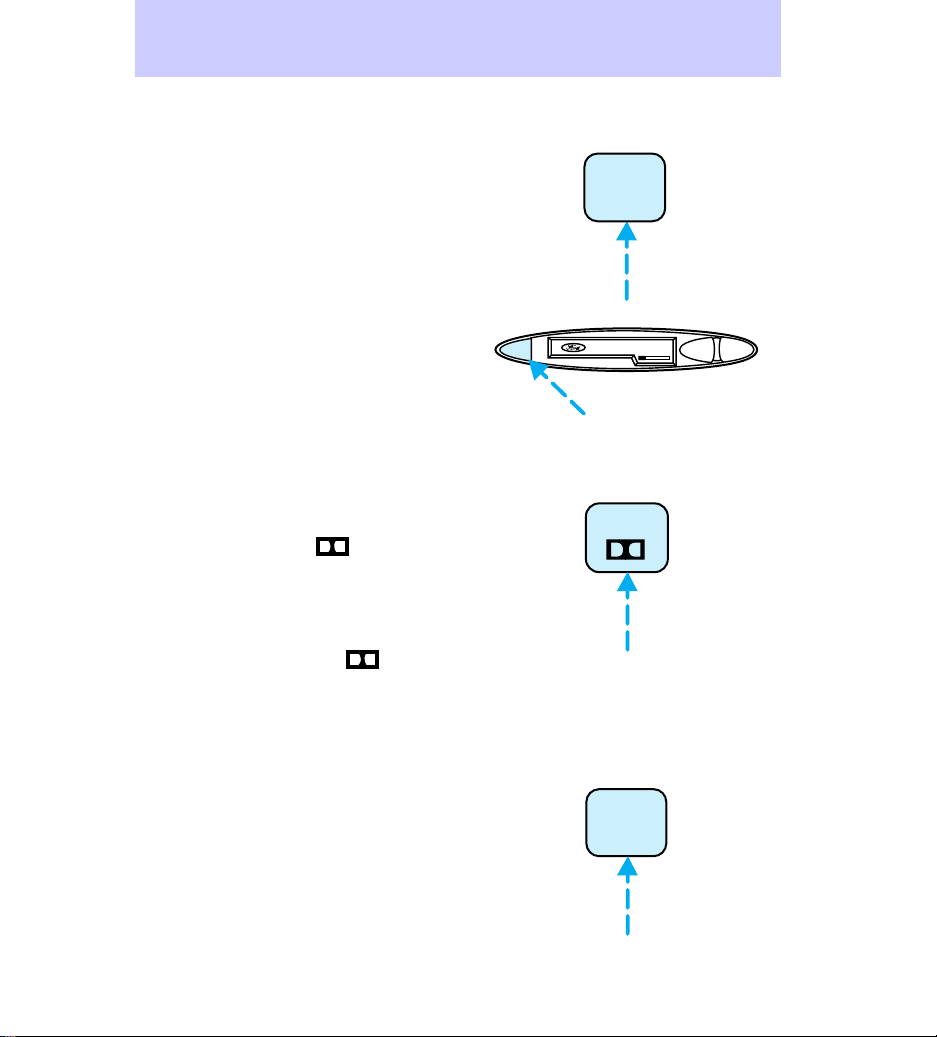
Using the tape direction select
(if equipped)
To play the alternate side of a
tape, press the tape direction
select button (preset #1).
1
SIDE 1-2
To stop and eject a cassette tape,
press the eject button. If the radio
power is on when you eject a tape,
the radio begins playing.
DolbyT noise reduction (if
equipped)
To activate and then deactivate the
Dolbyt noise reduction in tape or
CD mode, press the
(preset
#2).
The noise reduction system is
manufactured under license from
Dolbyt Labs Licensing
Corporation. Dolby and
are
trademarks of Dolbyt Laboratories
Licensing Corporation.
Using the compression adjust
(if equipped)
To bring soft and loud CD passages
closer together for a more
consistent listening level, press the
compression adjust button (preset
#5).
Press again to turn off the feature.
EJ REW FF
DOLBY SYSTEM
2
5
COMP
12
Page 13
Using the shuffle function ( if
equipped)
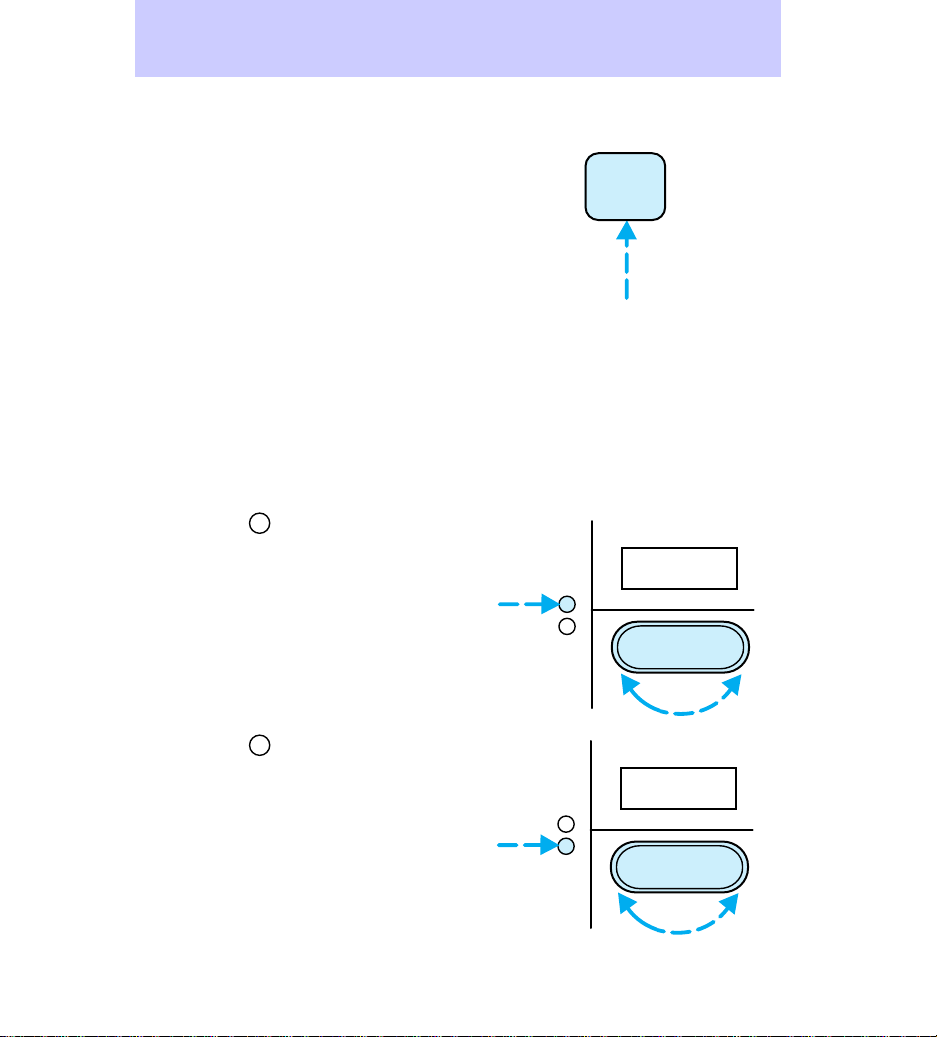
To listen to tracks on the current
CD in random order, press the
shuffle button (preset #6).
Random order play continues until
the button is pressed again.
Setting the clock
The time is displayed:
• until an audio function button is
pressed.
• approximately ten seconds after
each audio system change.
• when the audio system is off
and the ignition is ON.
To set the clock:
H
1. Press the
and use the bass/
treble/ speaker adjust button to
move to the desired hour.
Controls and Features
6
SHUF
12:
H
M
–+
2. Press the
M
and use the bass/
treble/ speaker adjust button to
move to the desired minute.
If you choose to adjust only the
hour or the minute (not both at
the same time), adjust and the
clock will automatically revert to
the new time (complete with both
adjusted and unadjusted digits
displayed).
:01
H
M
–+
13
Page 14
Controls and Features
Using the Ford compact disc
player (if equipped)
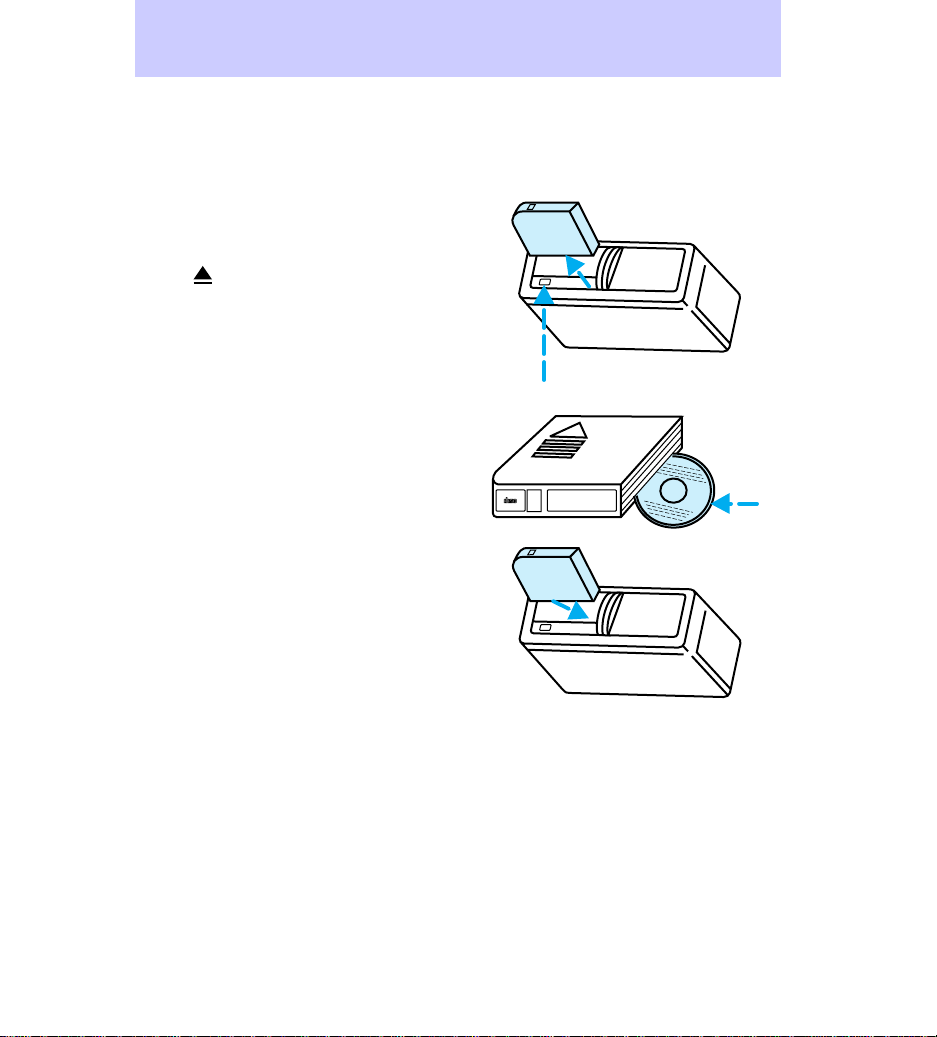
The CD changer is located in the
trunk of your vehicle.
To access the CD changer
magazine, slide the magazine’s left
door panel to the right.
Press
from the changer.
The CD magazine may be ejected
or inserted without the vehicle key
in the ignition and without the
radio power on.
Make sure that only one disc is
inserted in each slot, and that the
discs are inserted with the label
surface upward. You may insert up
to six discs.
Insert the CD magazine into the
changer.
to eject the CD magazine
DIGITAL AUDIO
COMPACT
6
5
4
6 COMPACT DISC MAGAZINE
3
2
1
The magazine does not need to be
full in order for the CD changer to
operate.
Radio power must be on in order
to play the CDs in the CD changer.
14
Page 15

The laser beam used in the
compact disc player is
harmful to the eyes; do not
attempt to disassemble the
player unit.
Controls and Features
15
Page 16
Display
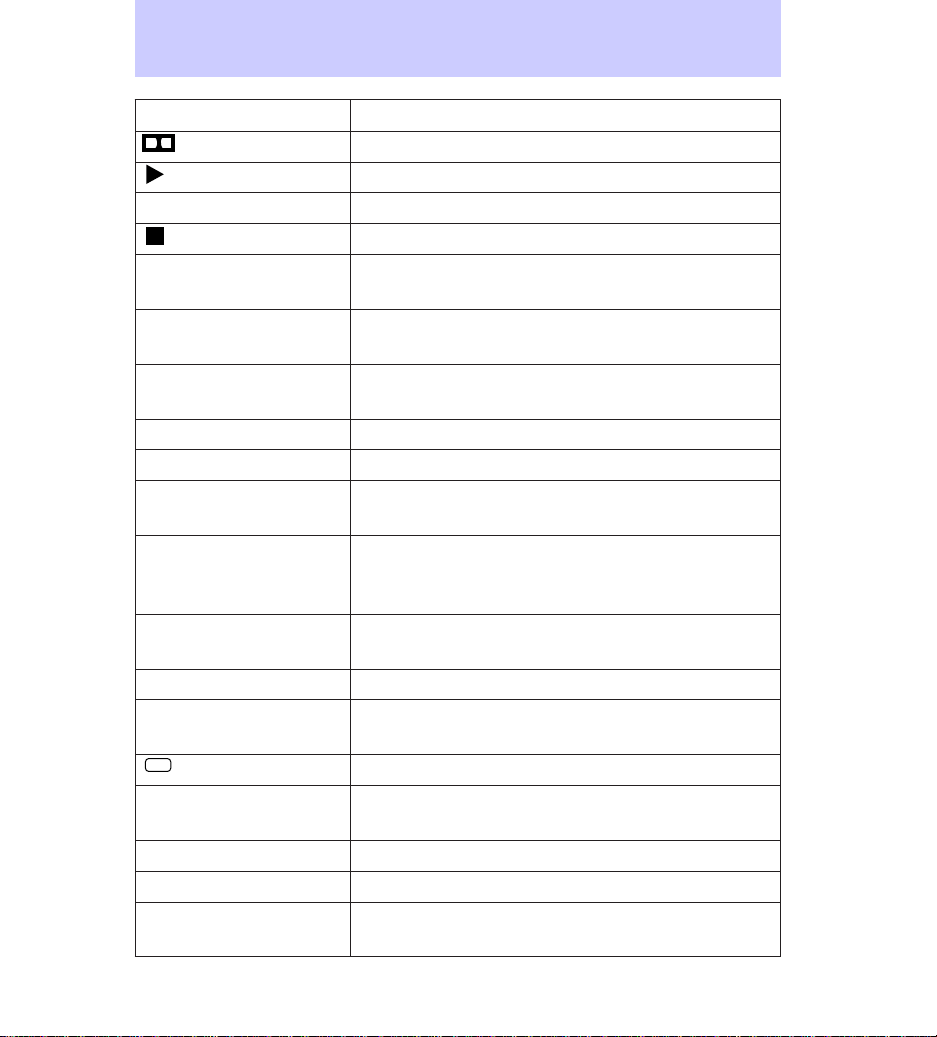
Display Information
t Indicates Dolbyt Noise Reduction activation
Indicates tape play
1 or 2 Indicates side of tape playing
Indicates tape is rewinding or fast forwarding
CD-## Indicates CD number playing (e.g., CD-01,
CD-02, etc.)
TR-## Indicates CD track number playing (e.g.,
TR-01, TR-02, etc.)
##-## Indicates CD number and track number (e.g.,
03-10, etc.)
NO DISC Indicates CD changer is empty
C Indicates CD compression factor activation
SHF ##-## Indicates shuffle feature activation and disc
and track number playing
NO CD Indicates empty slot, mechanical error,
unreadable disc, focus error, or system
shutdown due to high heat
NO DJ Indicates CD changer not connected or not
communicating
AM, FM1, FM2 Indicate frequency band audio system is in
87.9 to 107.9 FM (530
to 1610 AM)
ST
Illuminated bars
TAPE Indicates tape is playing
SC Indicates tape is scanning
NO TAPE Indicates no tape in player when tape select
Indicates currently playing radio station
Indicates stereo operation
Indicate volume, relative level of bass and treble,
and relative levels of speaker balance and fade
button is pushed
16
Page 17

Troubleshooting problems with
your compact disc player
If play does not begin once a disc
is inserted:
• the radio is not on.
• the unit is in the stop mode.
• moisture is condensed on the
lenses within the unit. Remove
the disc and wait approximately
one hour for moisture to
evaporate.
If the sound skips:
• you may be traveling on a rough
road or playing badly scratched
discs. Skipping will not scratch
the discs or damage the player.
If the CD player does not work:
• the disc is already loaded into
the player.
• the disc is inserted with the
label surface downward.
• the disc is dusty or defective.
• the player’s internal temperature
is above 75°C (167°F). Allow
the player to cool down before
operating.
• a disc with format and
dimensions not within industry
standards is inserted.
Care and Cleaning
Caring for your compact discs
and player (if applicable)
• Handle discs by their edges only.
Never touch the playing surface.
17
Page 18

Care and Cleaning
• Do not expose discs to direct
sunlight or heat sources for
extended periods of time.
• Do not insert more than one
disc into the CD player’s CD
slot.
Caring for your cassettes and
cassette player (if applicable)
• Only use cassettes that are 90
minutes long or less.
• Do not expose tapes to direct
sunlight, high humidity, extreme
heat, or extreme cold. Allow
tapes that may have been
exposed to extreme
temperatures to reach a
moderate temperature before
playing.
• Tighten very loose tapes by
inserting a finger or pencil into
the hole and turning the hub.
• Remove loose labels before
inserting tapes.
• Do not leave tapes in the
cassette player for an extended
period when not being played.
18
Page 19

Radio Frequency Information
RADIO FREQUENCY
INFORMATION
The Federal Communications
Commission (FCC) and the
Canadian Radio and
Telecommunications Commission
(CRTC) establish the frequencies
AM and FM stations may use for
their broadcasts. Allowable
frequencies are:
AM 530, 540—1600, 1610 kHz in
10 kHz steps
FM 87.9, 88.1—107.7, 107.9 Mhz
in .02 Mhz steps
Not all frequencies are used in a
given area.
Radio reception factors
Three factors primarily affect radio
reception:
• Distance/strength. The farther
an FM signal travels, the weaker
it is. The listenable range of the
average FM station is
approximately 40 km (24 miles).
This range can be affected by
signal modulation. Signal
modulation is a process radio
stations use to increase their
strength and/or volume relative
to other stations.
• Terrain. Hills, mountains, and
tall buildings between your
vehicle’s antenna and the radio
station signal can cause FM
signal reception problems. Static
can be caused on AM stations
by power lines, electric fences,
traffic lights, and thunderstorms.
19
Page 20

Radio Frequency Information
Moving away from the
interfering structure (out of its
“shadow”) returns your
reception to normal.
• Station overload. Weak
stations are sometimes captured
by stronger stations when you
pass a broadcast tower. A
stronger station may temporarily
overtake a weaker station and
play while the weak station ’s
frequency is displayed.
The audio system automatically
switches to single channel
reception if it will improve the
reception of a station normally
received in stereo.
20
Page 21

Index
AM/FM select ................................6
Audio power ..................................6
Bass adjust ....................................9
Cassette player
operation ..............................10,18
CD select .....................................11
Cleaning your vehicle
CD player and discs .................17
Clock
setting the clock .......................13
Compact disc changer
care ............................................17
operation ...................................14
troubleshooting .........................17
Compression adjust ....................12
Display .........................................16
Dolbyt noise reduction ..............12
Fast forward function .................11
Memory preset buttons ................9
Power button ................................6
Radio frequency
information ................................19
reception ...................................19
Rewind function ..........................11
Scan function ................................8
Seek function ................................7
Shuffle mode ...............................13
Speaker balance adjust ..............10
Stations
selecting ......................................9
Tape direction select ..................12
Tape select ..................................11
Treble adjust .................................9
Tune adjust ...................................7
21
 Loading...