

Page 1
This Quick Reference Guide is not intended to replace your vehicle
Owner’s Manual which contains more detailed information concerning the
features of your vehicle, as well as important safety warnings designed
to help reduce the risk of injury to you and your passengers. Please read
your entire Owner’s Manual carefully as you begin learning about your
new vehicle and refer to the appropriate chapters when questions arise.
All information contained in this Quick Reference Guide was accurate at
the time of duplication. We reserve the right to change features, operation
and/or functionality of any vehicle specification at any time. Your Ford
dealer is the best source for the most current information. For detailed
operating and safety information, please consult your Owner’s Manual.
Ford Motor Company Customer Relationship Center
U.S. • 1-800-392-3673 (FORD)
(TDD for the hearing impaired: 1-800-232-5952)
fordowner.com
Ford of Canada’s Customer Relationship Centre
Canada • 1-800-565-3673 (FORD)
ford.ca
Ford FLEX
December 2012 Third Printing
Quick Reference Guide
Litho in USA
DA8J 19G217 AA
FORDOWNER.COM
FORD.CA
LEARN HOW TO SYNC YOUR RIDE.
SYNC is a voice-activated technology personalized by
you. It is a hands-free, voice recognition system used for
entertainment, information and communication.
SYNCMYRIDE.COM U.S.
SYNCMYRIDE.CA CANADA
WARNING
Driving while distracted can result in loss of vehicle
control, accident and injury. Ford Motor Company strongly
recommends that drivers use extreme caution when using
any device or feature that may take their focus off the
road. Your primary responsibility is the safe operation of
the vehicle. We recommend against the use of any handheld device while driving, encourage the use of voice-
operated systems when possible and that you become
aware of applicable state and local laws that may affect
the use of electronic devices while driving.
2013 FLEX
QUICK REFERENCE GUIDE
Page 2
COMMONLY USED SYNC® VOICE COMMANDS
SYNC®. Say the Word.
Touch the voice button on the steering wheel, and then say:
SYNC
Must say “Services” rst, and then:
• What can I say?
• Trafc
• Directions
• Business search
• Operator (for direction or business search)
• Favorites
• News, sports, weather horoscopes,
• Help
Entertainment
• Audio list of commands
- You can also get detailed lists of
• Audio <On/Off>
• Radio:
- FM <87.7-107.9>
- FM preset <#>
• CD:
- Play track <1-512>
- Shufe <On/Off>
• USB:
- Play song <name>
- Play album <name>
• SiriusXM:
- <channel name>
- Preset <#>
*If equipped.
**Available only with MyFord Touch.
For Canadian customers: visit SyncMyRide.ca
or call 1-800-565-3673 (select option 1 or 2
for language, then Option 3).
Navigation**
• Navigation list of commands*
- Destination street address
<number, name, city>
- Destination home
- Navigation voice
<On/Off>
- Navigation volume
<increase/decrease>
- Repeat instruction
- Show
<map/north-up/heading-up/3D>
• Travel Link list of commands
- Trafc
- Weather
- Movie Listings
- Fuel prices
- Sports
<headlines/scores/schedule>
Some services may not be available in
your area. Refer to your Owner’s Manual,
visit the website or call the toll-free number.
Basic Commands
• What can I say?
• List of commands
• Main menu
• Previous
• Next
• Go back
• Exit
• Help
• Vehicle health
• Pair my phone
Phone
• Phone list of commands
• Dial
• Call <name> on cell/at
home/at work
• Call voicemail
• Do not disturb <On/Off>
• Listen to text message
(phone-dependent feature)
Climate**
• Climate control list
of commands
• Climate <On/Off>
• Climate my temperature
• Climate temperature
<60-85> degrees
For U.S. customers: visit SyncMyRide.com
or call 1-800-392-3673 (select option
1 or 2 for language, then Option 3).
®
Services*
stock quotes, movies or travel
commands for radio, USB, Bluetooth
audio, Sirius and SD Card.
TABLE OF CONTENTS
4 - 5
6 - 7
8 - 10
12 - 13
®
INSTRUMENT PANEL
GETTING STARTED WITH YOUR SYNC SYSTEM
SYNC WITH MYFORD TOUCH
CONVENIENCE
11
ESSENTIAL INFORMATION
FUNCTION
14
COMFORT
15
Page 3
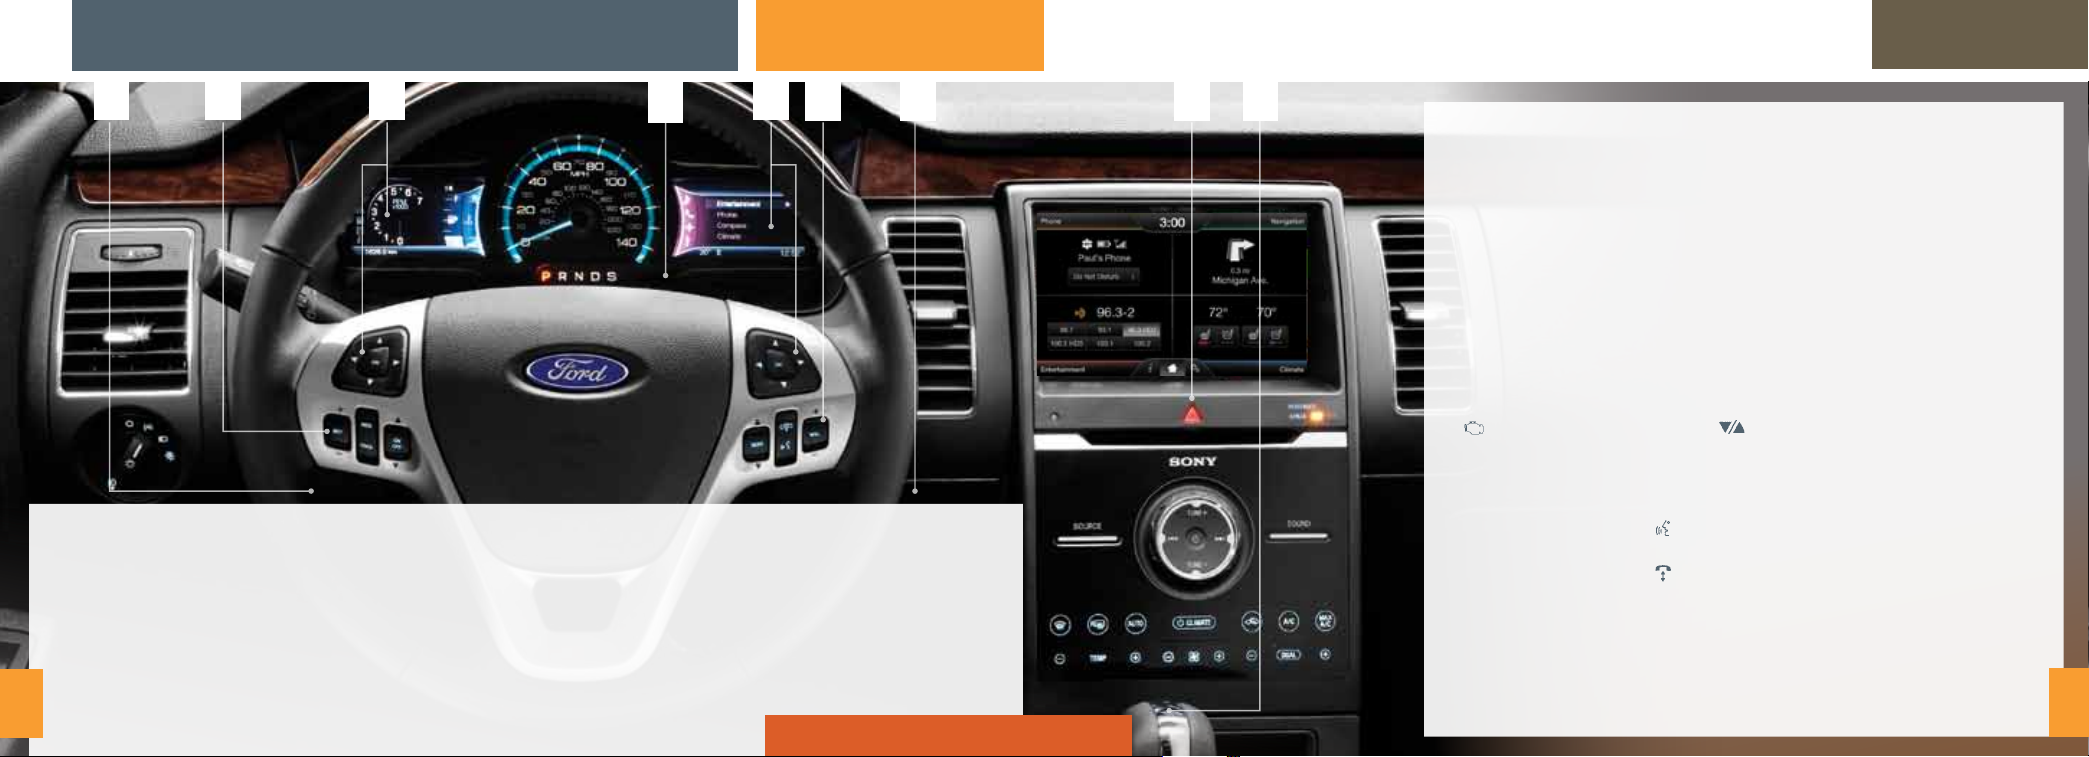
INSTRUMENT PANEL
FLEX
1 2 5 6 7
1 POWER TILT TELESCOPE
STEERING COLUMN*/
ADJUSTABLE PEDALS*
Use your controls to adjust the
steering wheel and pedals to
the desired position.
2 CRUI SE CONTROL
To set your cruise
control speed:
4
3
4
8
.
1. Press the ON control up
and release.
2. Accelerate to the
desired speed.
3. Press the SET control up and
release, then take your foot
off the accelerator.
After your speed has been set you
can press SE T +/- to adjust cruise
speed. To disable, press the OFF
control down.
ADAPTIVE CRUIS E CONTROL*
Allows you to set a ‘gap
distance’ between yourself and
the vehicle in front of you during
highway driving. When your cruise
control is active, press GAP up or
down to select the gap distance.
Refer to the Cruise Control
chapter of your Owner’s Manual
for more information.
Note: Driving aids do not replace
the need to watch where the
vehicle is moving and brake where
necessary. Refer to your Owner’s
Manual for safety information,
more detail and limitations.
9
3 LEFT INFORMATION
DISPLAY
Provides information
about various systems
on your vehicle. Use
the left, 5-way controls
located on the steering
wheel to choose and
confirm settings and
messages. Refer
to the Information
Displays chapter of
your Owner’s Manual
for more information.
4 SERVICE ENGINE
SOON LIGHT
Illuminates briey
when the ignition is
turned on. If it remains on
or is blinking after
the engine is started,
the on-board diagnostics
system (OBD-II) has
detected a malfunction.
Drive in a moderate
fashion and contact
your authorized dealer
as soon as possible.
5 RIGHT INFORMATION
DISPLAY*
Displays information about
Entertainment, Phone,
Navigation and Climate.
Use the right, 5-way
controls located on your
steering wheel to scroll
through, highlight and
make minor adjustments
within a selected menu.
Refer to the MyFord
Touch chapter in your
Owner’s Manual for
more information.
6 STEERING WHEEL
AUDIO CONTROLS
Press VOL +/- to
increase/decrease
volume levels. Press
SEEK to access
the next/previous
radio station preset,
CD track or preset
satellite radio channel*.
: Press to access
voice recognition.
: Press to
connect/disconnect
a phone call.
7 PUSH BUTTON START*
Allows you to start your
vehicle by pressing the
ENGI NE START/STOP
button while fully pressing
down on the brake pedal.
Press the button again to
turn the engine off.
Note: Your intelligent
access key* must be
inside the vehicle for
the ignition to start.
8 HAZARD CONTROL
9 SELECTSHIFT
AUTOMATIC
TRANSMISSION
Gives you the ability to
manually change gears if
you’d like. To use, move
the gearshift lever from
D (Drive) to S (Sport).
Then use the paddle
shifters located on your
steering wheel to make
shifts quickly. Pull the right
paddle (+) to upshift,
pull the left paddle (-)
to downshift. If your
vehicle is equipped with
+/- thumb switch on your
gearshift lever, press (+)
to upshift, press (-)
to downshift.
®
*IF EQUIPPED
5
Page 4

GETTING STARTED WITH YOUR SYNC® SYSTEM
FLEX
SYNC is a hands-free, voice recognition system used for entertainment,
information and communication.
SYNC….Say the word.
Before you get started:
1) Set up your owner account at SyncMyRide.com (U.S.) or
SyncMyRide.ca (Canada). Register by following the on-screen
instructions. After registering, you can see what available services
you are eligible for.
2) SYNC uses a wireless connection called
with your phone. Turn Bluetooth mode on in your phone’s menu
options. This lets your phone find SYNC. If you need more details
on setting up your phone with SYNC, visit SyncMyRide.com (U.S.) or
SyncMyRide.ca (Canada), or your phone manufacturer’s website.
PAIRING YOUR PHONE WITH SYNC
In order to use many of the features of SYNC, you must first pair and
connect your phone with SYNC.
To pair your phone for the rst time:
1) Make sure that your vehicle is in (P) park and both your ignition and
radio are turned on.
2) Press the phone button
Found press OK.
3) Take out your mobile phone and turn on Bluetooth. When Add
Bluetooth Device? appears in the SYNC display, press OK.
4) Select SYNC in the list of Bluetooth devices on your phone and enter
the code shown on the display screen. This code connects your phone
to your car.
5) The display will indicate when the pairing is successful.
, when the display indicates No Phone
Bluetooth® to communicate
Note: The system may prompt you to:
- Set your phone as primary/favorite (the primary phone will receive
messages and voice mails).
- Download your phone book (this is required to use the full set
of voice commands).
- Turn on 911 Assist
Tips:
- Make sure you accept SYNC’s request to access your phone.
- To pair subsequent phones, please refer to Pairing Subsequent
Phones in the SYN C chapter of your Owner’s Manual.
- If you are experiencing pairing problems, try performing a clean pairing
by deleting your device from SYNC, deleting the SYNC connection
from your phone, and then repeating the process.
®
.
USING VOICE COMMANDS
Every time you want to give SYNC a voice command you must first press
the voice button
a list of voice commands say “What can I say?”
Tips:
- Make sure the interior of the vehicle is as quiet as possible.
- After pressing the voice button, wait until after the tone sounds and
“Listening” appears in your vehicle’s display before saying a command.
- Speak naturally, without long pauses between words.
- At any time, you can interrupt the system while it is speaking by
pressing the voice button
and when prompted, speak your voice command. For
.
USING MY PHONE WITH SYNC
Note: Enter your phone book contacts with both first and last
names to increase SYNC’s ability to select the correct contact.
Remember to say the contact name exactly as it’s listed in your
phone book.
Making a phone call: Use SYNC to make a phone call to anyone in your
phone book by pressing the voice button and when prompted, give a
voice command:
For example, you could say “Call Jake Smith at home”. SYNC repeats the
command back to you and dials the number.
Note: You can also make phone calls by pressing the voice button
and when prompted, give the voice command “Dial”, then verbally
say the phone number.
Answering incoming calls: Whenever you have an incoming call, you
will be able to see the name and number of the person calling in your
display. Press the phone button to answer an incoming call. You
can hang up at any time by pressing and holding the phone button .
Do not disturb mode: This feature blocks incoming calls and text
messages and sends them to your voice mail and saves text messages
for later. You still have access to outgoing calls when this feature is active.
Say the voice command, “Do not disturb on” to enable and “Do not disturb
off” to disable.
USING SYNC TO ACCESS DIGITAL MEDIA
SYNC has a media hub with multiple inputs allowing you to access personal
media from your digital devices. Plug in your USB media devices such as
phones and MP3 players and use SYNC to play all of your favorite music.
Note: SYNC indexes your music; the more information that is
stored on your USB device, the longer it takes SYNC to index.
Using voice commands to play music:
1) Plug your media player into your USB port.
2) Press the voice button . When prompted say “USB”, then follow-up
saying one of the voice commands.
3) You will hear the command repeated back to you and the selected
item will play.
Why Do I Need a SYNC Owner Account?
A SYNC owner account is required for Vehicle Health Report activation
and the ability to view your reports online. You’ll also be able to take
advantage of all of SYNC’s Services and personalization features, such
as saving your Favorites and Points of Interest (POI). You’ll receive the
latest software updates that add new places, directions and information,
and if you have questions, you’ll get free customer support. Visit the
website or call the toll-free number for more information. See the inside
front cover of this guide for details.
*IF EQUIPPED
6 7
Page 5
SYNC® WITH MYFORD TOUCH
®*
FLEX
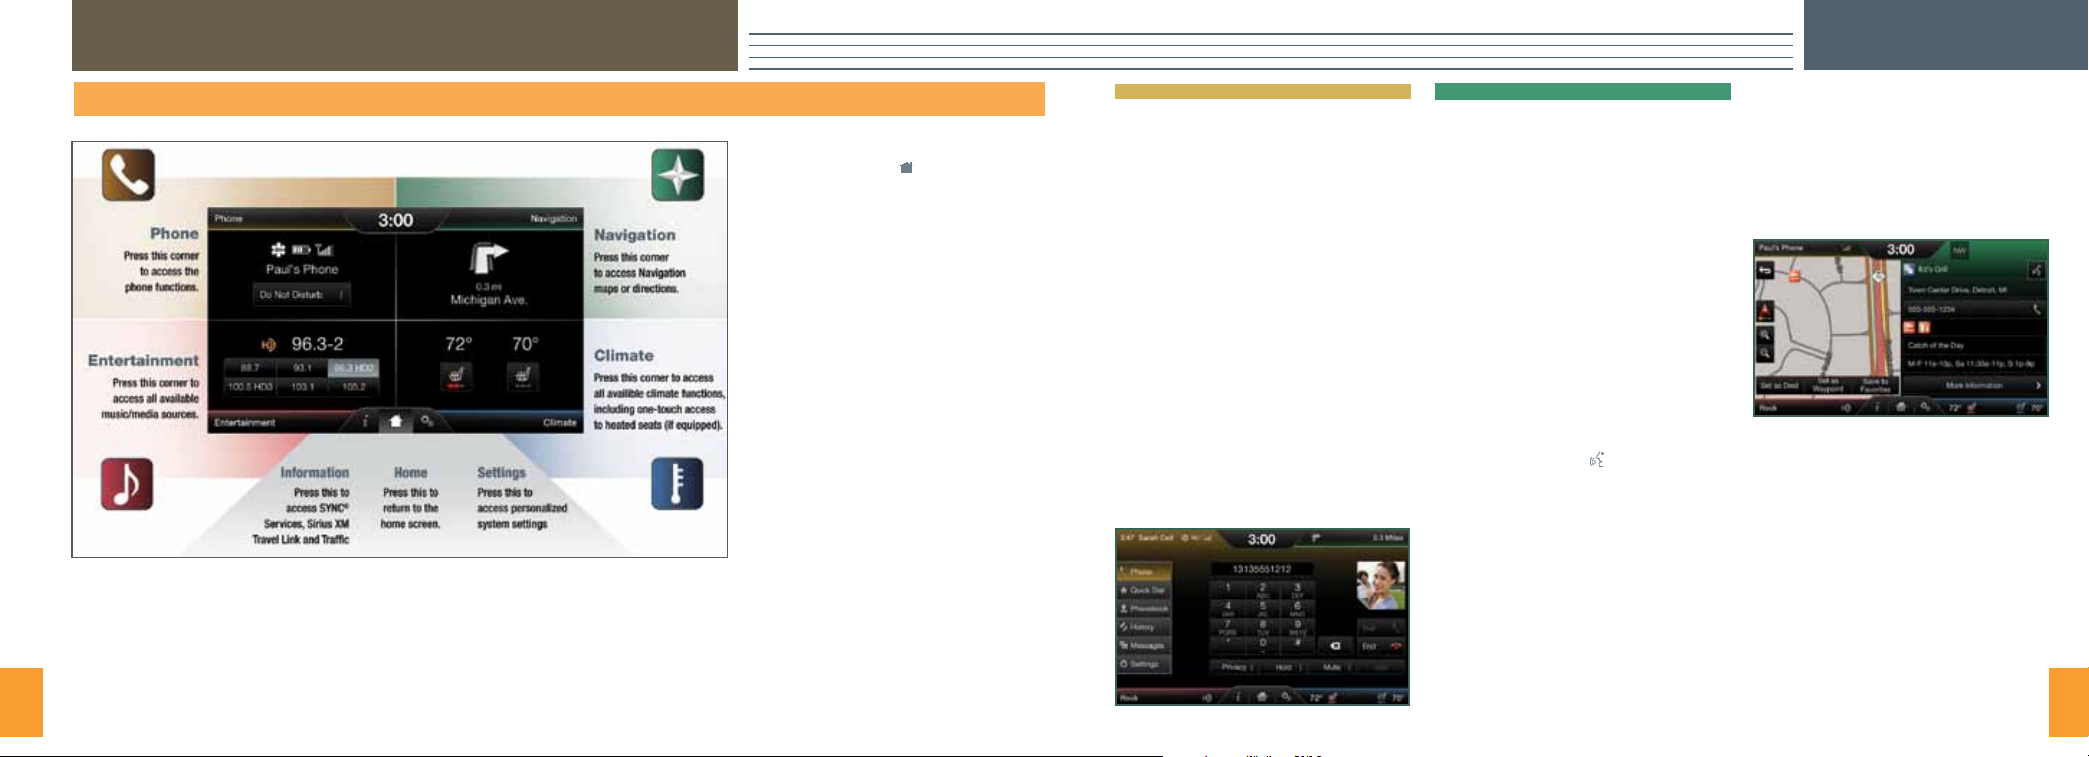
A REVOLUTIONARY WAY TO CONNECT WITH YOUR CAR.
Use the four-corner, four-color touch screen to explore and interact with your
vehicle. The touch screen works the same way that traditional controls, knobs
and buttons do. Press the various corners on your touch screen to personalize
the many features and settings of your vehicle all in one place. The
system provides easy interaction with your cellular phone, multimedia
entertainment, climate controls and navigation system*.
8
General Tips
Press the home icon
return to your home screen.
For additional support, refer to your
Owner’s Manual, visit the website
or call the toll-free number. See
the inside front cover of this guide
for details.
Before you get started:
- Pair your phone to SYNC before using
MyFord Touch (see Getting started with
your SYNC system in this guide for
instructions on how to do this).
- If you have the navigation SD card, make
sure that it is inserted into the media port
or your navigation will not work.
at any time to
*IF EQUIPPED
Phone
Voice-control your phone for hands-free calling
with your phone securely put away. With SYNC,
you won’t even need to know the phone number.
Just say the name of the person you want from
your contacts.
Your phone connects you with many other
features and SYNC Services:
- Connect to SYNC Services for trafc,
directions, business searches and
information favorites.
- Connect to Operator Assist to help locate a
listing or destination.
- Call for a Vehicle Health Report.
- Automatically connects with a 911 Operator
in the event of an accident.
- Transfer calls seamlessly from SYNC to
phone as you get in or out of your vehicle.
Refer to the SYNC chapter of your Owner’s
Manual for complete details.
Navigation
Get started with your navigation system
by pressing the upper-right, green corner.
The available voice-activated navigation
system includes:
- SiriusXM Trafc™
- Sirius Travel Link™
- Global positioning system (GPS) technology
- 3-D mapping
- Turn-by-turn navigation
Refer to the MyFord Touch chapter of your Owner’s
Manual for complete details.
Set a Destination
Set a destination through your touch screen
by using a street address, a city center, a place
on the map or point of interest (POI). The easiest
way, however, is by voice.
1) Press the voice button , then when prompted
say “Destination street address”.
2) The system will ask you to say the full address
and will display an example on-screen.
3) You can then speak the address naturally,
such as: “One two three Main Street, Anytown”.
While your vehicle is in P (Park), you can also
use the touch screen to enter a destination and
narrow your choices by city or street as you type.
You can choose from up to three different types
of routes:
- Fastest: Uses the fastest moving roads possible.
- Shortest: Uses the shortest distance possible.
- Eco (EcoRoute): Uses the most fuel
efficient route.
Tips:
- Save your favorite locations by touching “Save
to Favorites”.
- Change your map views from Direction
Headed, North Up or 3D.
*IF EQUIPPED
9
Page 6
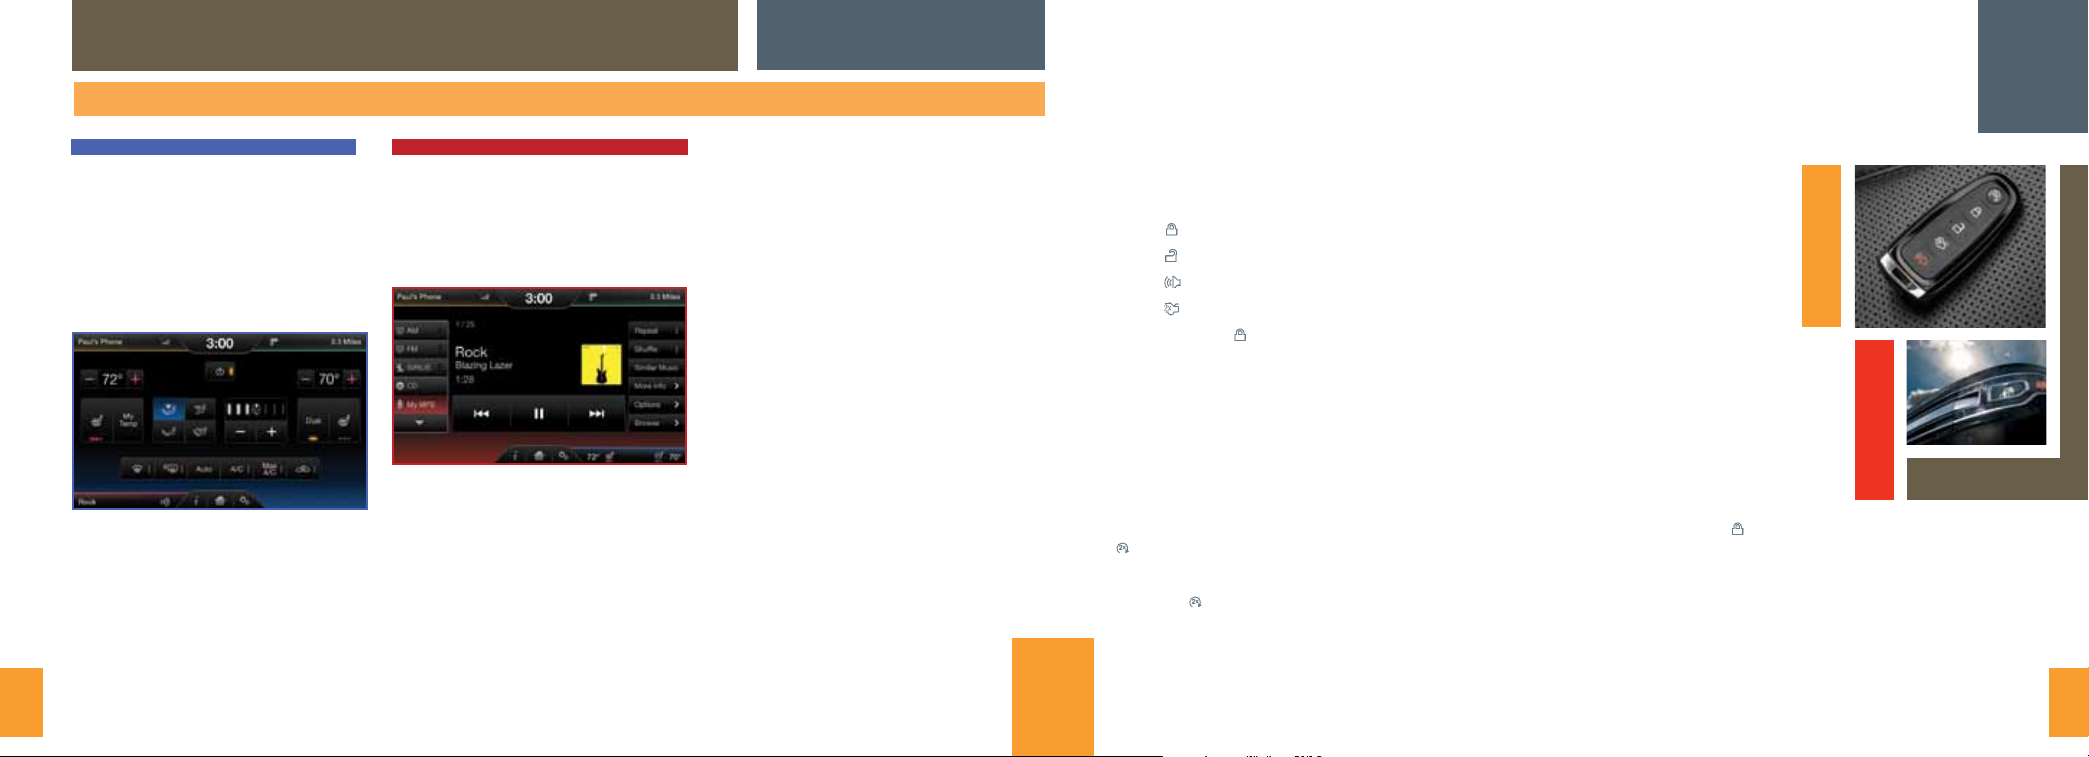
SYNC® WITH MYFORD TOUCH
®
FLEX
CONVENIENCE
A REVOLUTIONARY WAY TO CONNECT WITH YOUR CAR.
Climate
SYNC with MyFord Touch controls the temperature,
airow direction, fan speed, and activates other
climate features like heated/cooled front seats*
for you and your passenger.
To use voice commands to operate climate, say
a voice command like “Climate temperature
72 degrees” and MyFord Touch will make
that adjustment.
Set your MyTemp*
- Touch the lower-right, blue Climate corner on
the touch screen.
- Set your exact, desired temperature using
the arrows.
- Press and hold the MyTemp button until the
background color goes solid.
Entertainment
10
Entertainment
No matter how you store your music, SYNC
makes it yours to enjoy when you’re behind
the wheel. Just press the lower-left, red corner
of the touch screen. From here, you can
easily go between AM/FM, Sirius, and other
media sources.
Bring in Your Own Music
Gain access to any audio source by voice and
even control how each operates, like changing
radio stations, CD tracks or music on one of the
following devices:
- CD
- USB
- Bluetooth Streaming
- SD Card
- A/V In
Set Your Radio Presets
- Touch the lower-left, red corner on the
touch screen.
- Touch FM.
- Touch Direct Tune.
- Enter the desired station and touch Enter.
- Touch Presets and then touch and hold one
of the memory preset buttons to save it.
You’ll hear a brief mute and the sound will
return once the station is saved.
For additional support, refer to your Owner’s
Manual, visit the website or call the toll-free
number. See the inside front cover of this guide
for details.
*IF EQUIPPED
RAINSENSING WIPERS*
If activated, your wipers will automatically turn on when moisture is present on the windshield. The wiper speed will
vary based on the amount of moisture detected and on the sensitivity setting. To deactivate, turn your wiper controls off.
Note: Make sure that this feature is turned off before entering a car wash.
INTEGRATED KEYHEAD TRANSMITTER IKT AND INTELLIGENT
ACCESS IA REMOTE ENTRY ICONS*:
- Press once to lock all doors. Press again within three seconds to confirm all doors are locked.
- Press once to unlock the driver’s door. Press again within three seconds to unlock all doors.
- Press to activate the panic alarm. Press again or turn on the ignition to deactivate.
- Press twice within three seconds to open the liftgate.
- Car nder: Press twice within three seconds to locate your vehicle. The horn will sound and the
lamps will ash.
INTELLIGENT ACCESS IA KEY*
Note: Your intelligent access key must be within 3 feet (1 meter) of the vehicle for intelligent access to function properly.
Pull a front exterior door handle, and the door will unlock. To lock the doors, press and hold the door handle lock
sensor. To unlock and open the liftgate, press the exterior liftgate release button underneath the liftgate handle.
The intelligent access key also contains a mechanical key blade, which can be used to unlock the driver’s door
if necessary.
REMOTE START*
Remote start allows you to start the engine from outside your vehicle using your key. To start, press and then press
twice within three seconds. Once inside, apply the brake while pressing the ENGIN E START/STOP button. Shift
into D (Drive) and go. If you have an integrated keyhead transmitter, simply insert the key into the ignition and turn the
ignition on as you normally would before driving. To turn the engine off from outside the vehicle after using your remote
start, press once. You can personalize your settings within the Information Display. For complete information, refer
to the Information Display chapter in your Owner’s Manual.
MYKEY
MyKey allows you to program certain driving restrictions in order to promote good driving habits. You can program
things like: speed restrictions, limited volume levels and safety belt reminders. For complete information, refer to the
MyKey chapter in your Owner’s Manual.
®
*IF EQUIPPED
11
Page 7
ESSENTIAL INFORMATION
FLEX
ESSENTIAL INFORMATION
EASY FUEL® SYSTEM
With this system, you simply open the fuel door, insert the nozzle and begin fueling. It is self-sealing
and therefore protected against dust, dirt, water, snow and ice. Wait five seconds from the time the
refueling nozzle is shut-off until you remove the nozzle from the vehicle to allow residual fuel in
the nozzle to drain into the tank. When using a portable fuel container, slowly insert the fuel funnel
(located in the spare tire compartment) and pour the fuel into the funnel.
Note: Do not use aftermarket funnels as they will not work with the Easy Fuel system and may cause
damage. Properly clean the funnel after each use.
FUEL TANK CAPACITY/FUEL INFO
Your vehicle has an 18.6 gallon (70.4L) fuel tank capacity. Use only “Regular” unleaded gasoline with
an octane rating of 87 or higher. Do not use E85 fuels because your vehicle was not designed
to run on fuels with more than 15% ethanol.
REAR WINDOW BUFFETING
When one or both of your rear windows are open, you may hear a wind throb or buffeting noise. To
alleviate this, lower a front window until buffeting subsides.
COLLISION WARNING SYSTEM*
This system is designed to alert you of certain collision risks. Sensors detect if vehicles ahead of you,
moving in the same direction, may be a collision risk. The system will alert you with an audible tone
and a red warning light which will appear above the dash. If the risk of collision increases, the system
will increase brake support to help reduce collision speed.
SOS POSTCRASH ALERT SYSTEM™
The system ashes the turn signal lamps and sounds the horn (intermittently) in the event of a
serious impact that deploys an airbag equipped on your vehicle, such as front, side, side-curtain
or Safety Canopy®. The horn and lamps will turn off when the hazard control is pressed, the panic
button (if equipped) is pressed on the remote entry transmitter or your vehicle runs out of power.
*IF EQUIPPED *IF EQUIPPED
FUELEFFICIENT TRANSMISSION
Your vehicle has been designed to improve fuel economy by reducing fuel usage while coasting or decelerating. This may be
perceived as a light to medium braking sensation when removing your foot from the accelerator pedal.
LOCATION OF SPARE TIRE AND TOOLS
Your spare tire and tools are located beneath third row seats under the oor panel (you will need to unstow the seats to
access). The spare tire is designed for emergency use only and should be replaced as soon as possible. For complete details
on changing your tire, refer to Changing a Road Wheel in the Wheels and Tires chapter of your Owner’s Manual.
ROADSIDE ASSISTANCE
Your new Ford vehicle comes with the assurance and support of 24-hour emergency roadside assistance. To receive
roadside assistance in the United States, call 1 (800) 241-3673. In Canada, call 1 (800) 665-2006.
TRAILER TOW*
Before you tow, refer to your Owner’s Manual for complete information on weight, details and limitations, as well as safety
information and the proper equipment to use while towing.
Note: Do not tow with the mini spare tire installed.
TRAILER SWAY CONTROL
This system helps to reduce trailer sway while towing, by applying brake force to individual wheels and, if necessary, reducing
engine power. If the trailer does begin to sway, Trailer Sway Reduce Speed will appear in the information display. Safely
pull to the side of the road and check that your equipment is properly secured.
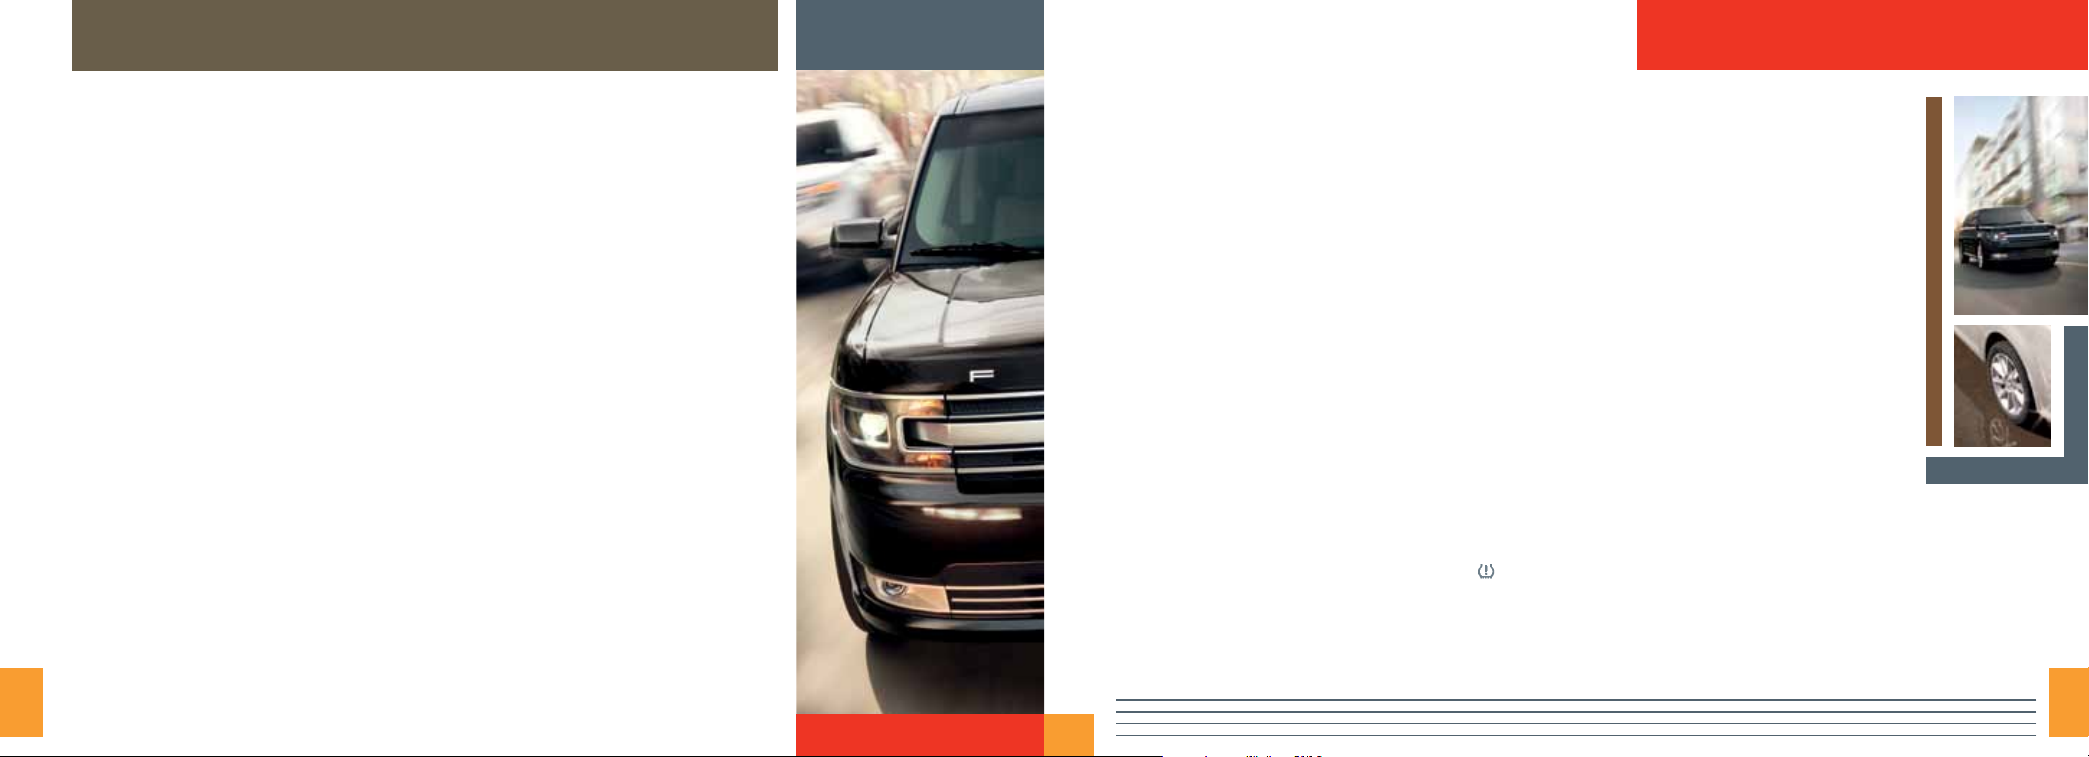
TIRE PRESSURE MONITORING SYSTEM
Your vehicle illuminates a low tire pressure warning light in your instrument cluster when one or more of your tires is
signicantly underinated. If this happens stop and check your tires as soon as possible. Inate them to the proper pressure.
Refer to the Inflating Your Tires section in the Wheels and Tires chapter of your Owner’s Manual for more information.
12 13
Page 8
FUNCTION COMFORT
FLEX
REAR VIEW CAMERA*
This system provides a visual display of
the area behind the vehicle. The display
automatically appears in the touch screen
when the vehicle is in R (Reverse) and uses
green, yellow and red guides to alert you
of your proximity to objects. For non-touch
screen vehicles, the image will appear in
the 4.2-inch instrument panel display.
REVERSE SENSING SYSTEM
This system sounds a warning tone if there
is an obstacle near the vehicle’s rear bumper
when the vehicle is in R (Reverse) and is
traveling less than 3 mph (5 km/h). The
warning tone will increase in frequency as
the object gets closer.
Note: Visibility aids do not replace the
need to watch where the vehicle is moving.
Refer to your Owner’s Manual for safety
information, details and limitations.
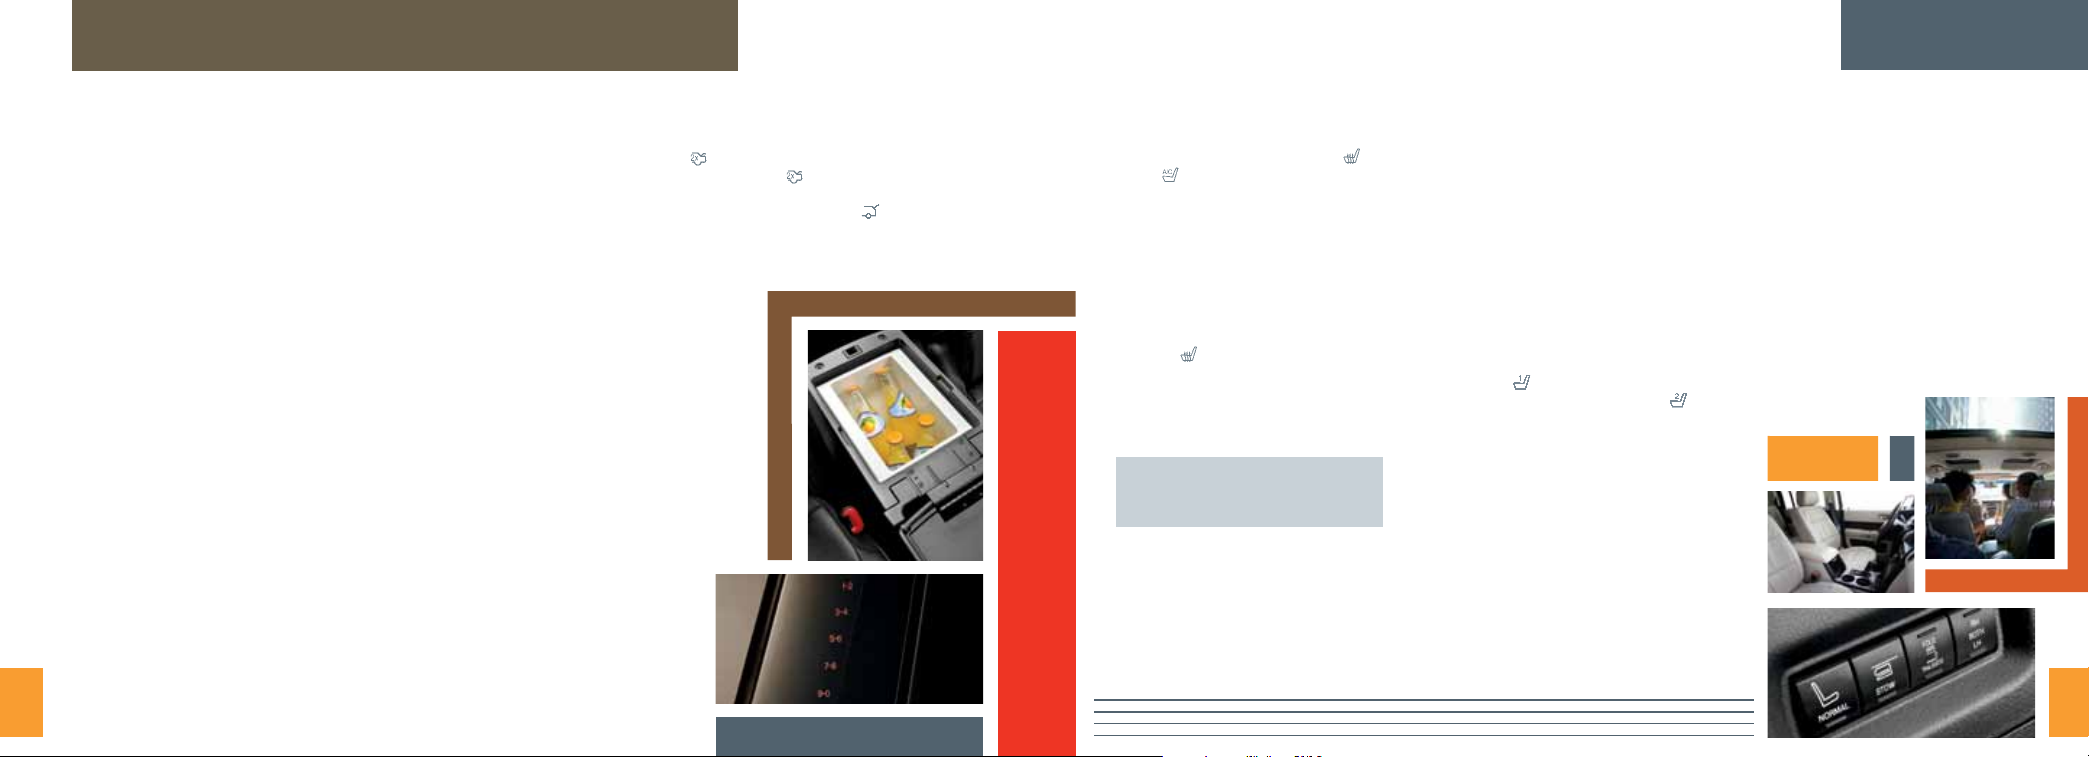
CONSOLE REFRIGERATOR/
FREEZER*
Before using, ip the console lid forward and
then remove the cover (make sure to reinstall
the cover to help maintain the temperature).
For the refrigerator, press the COOL control.
For the freezer, press the FREEZE control.
Press the selected control again to turn the
system off.
Note: Your ignition must be on for this
system to operate.
14 15
BLIND SPOT INFORMATION
SYSTEM BLIS® WITH CROSS
TRAFFIC ALERT CTA*
BLIS uses radar sensors to help you
determine if a vehicle may be in your blind
spot zone. The CTA feature alerts you if a car
is coming toward you when you are backing
out of a parking space. BLIS and CTA will
display a yellow indicator light in your exterior
mirrors and the CTA will also sound tones
and display messages to warn you which
direction vehicles are approaching. Refer to
the Driving Aids chapter in your Owner’s
Manual for more information.
SECURICODE™ KEYLESS
ENTRY KEYPAD
Allows you to lock or unlock the doors, recall
memory features* and arm or disarm the
anti-theft alarm*. The keypad, located near
the driver’s window, is invisible until touched
and then it lights up so you can see and
touch the buttons. To get started, you will
need your ve-digit factory code found on
your owner’s wallet card (located in the glove
box). Entering this code unlocks the driver’s
door. To lock all the doors, press and hold
7•8 and 9•0 at the same time. For complete
information, refer to the SecuriCode Keyless
Entry Keypad section in the Locks chapter of
your Owner’s Manual.
*IF EQUIPPED *IF EQUIPPED
POWER LIFTGATE*
Your liftgate has an automatic open and
closing feature. To open remotely, press
twice on your keyhead within three
seconds. Press twice again to close or
reverse the movement. You can also operate
the liftgate by pressing the button on the
instrument panel.
HEATED AND COOLED
FRONT SEATS*
To access, press the Climate corner on
your touch screen. Press the heated or
cooled seat icon(s) repeatedly to cycle
through the various heat or cool modes and
off. For non-touch screen vehicles, use the
hard button controls (indicated by the same
symbols) to cycle through the various modes
and off.
SECONDROW HEATED SEATS*
The second row heated seat controls are
located on the rear of the oor console.
Press the control repeatedly to cycle
through the various heat modes and off. A
light on the control will illuminate when the
system is turned on.
POWERFOLD® THIRDROW SEAT*
Note: The power fold seats work only
when the vehicle is in P (Park) and the
liftgate is open.
The third-row seat features a power one-
touch operation that allows you to adjust the
seats with the touch of a button. The buttons
are located behind the third-row seats on
the left-side, quarter-trim panel. To use,
press the RH/BOTH/LH button to select
the right seat, the left seat or both seats
you want to move. Then, select the desired
seat position:
- Press the STOW button to stow the seat
into the tub oor.
- Press the FOLD button (the top portion of
the button) to fold down the seat back.
- Press the NORMAL button to return the
seat to the normal seating position.
MEMORY FUNCTION*
Use the memory controls located on the
driver’s door to program and then recall
memory positions. To Program position 1,
press and hold until you hear a tone.
To set a second position, press and hold
until the same tone sounds. You can now
use these controls to recall the set positions.
TILTING HEAD RESTRAINTS
Your vehicle’s front row head restraints can be
adjusted. Pull up to raise the head restraint.
To lower, press the head restraint down while
pressing and holding the guide sleeve adjust/
release button. Tilt the head restraint for
additional comfort by gently pulling the top of
the head restraint forward. Once it is in the
forward-most position, tilting it forward once
more will release it to the upright position.
Note: Do not attempt to force the headrest
backward after it is tilted. Instead, continue
tilting it forward until the headrest releases
to the upright position.
MULTIPANEL VISTA ROOF®*
The multi-panel Vista Roof is equipped with
a one-touch, express opening and closing
feature. To open the front part of the Vista
Roof, press the SLIDE control. To close, pull
the SLIDE control. To stop motion at any
time, press the control a second time. To
vent the moonroof, press and release the
TILT control. Pull and hold the T I LT control
to close the moonroof. The sliding shade
can be manually opened or closed when the
moonroof is closed.
 Loading...