

Page 1

Card/Stickers/Pocket (Sleeve)
IMPORTANT:
• The Pro Trailer Backup Assist depends on
how and where you place the sticker.
• DO NOT ATTEMPT TO PLACE THE
STICKER UNTIL YOU READ THROUGH
This Quick Start Guide is not intended to replace your vehicle Owner’s Manual which contains more detailed information
concerning the features of your vehicle, as well as important safety warnings designed to help reduce the risk of injury to you and
your passengers. Please read your entire Owner’s Manual carefully as you begin learning about your new vehicle and refer to the
appropriate chapters when questions arise. All information contained in this Quick Start Guide was accurate at the time of
duplication. We reserve the right to change features, operation and/or functionality of any vehicle specification at any time. Your
Ford dealer is the best source for the most current information. For detailed operating and safety information, please consult your
Owner’s Manual.
WARNING
Driving while distracted can result in loss of vehicle control, crash and injury. We strongly recommend that you use extreme caution
when using any device that may take your focus o the road. Your primary responsibility is the safe operation of your vehicle. We
recommend against the use of any hand-held device while driving and encourage the use of voice-operated systems when possible.
Make sure you are aware of all applicable local laws that may aect the use of electronic devices while driving.
ALL OF STEP 3 ON PAGES 10 AND 11 FOR
STICKER PLACEMENT DETAILS.
• ADDITIONAL STICKERS CAN BE
PURCHASED THROUGH YOUR FORD
DEALER'S PART DEPARTMENT.
ProTrailerBackupAssist.com
Scan the QR code for a additional resources of the
Pro Trailer Backup Assist set up.
United States
Ford Customer Relationship Center
1-800-392-3673 (FORD)
(TDD for the hearing impaired:
1-800-232-5952)
owner.ford.com
@FordService
Canada
Ford Customer Relationship Centre
1-800-565-3673 (FORD)
(TDD for the hearing impaired:
1-888-658-6805)
ford.ca
@FordServiceCA
LEARN MORE ABOUT YOUR NEW VEHICLE
Scan the country-appropriate QR code with your smartphone
(make sure you have a scanner app installed) and you can
access even more information about your vehicle.
F-150 Pro Trailer Backup Assist
ford.ca (Canada)owner.ford.com (U.S.)
January 2017
Second Printing
Quick Start Guide
Litho in U.S.A.
HL3J 19G217 DA
2017 F-150 Pro Trailer Backup Assist
QUICK START GUIDE
Page 2
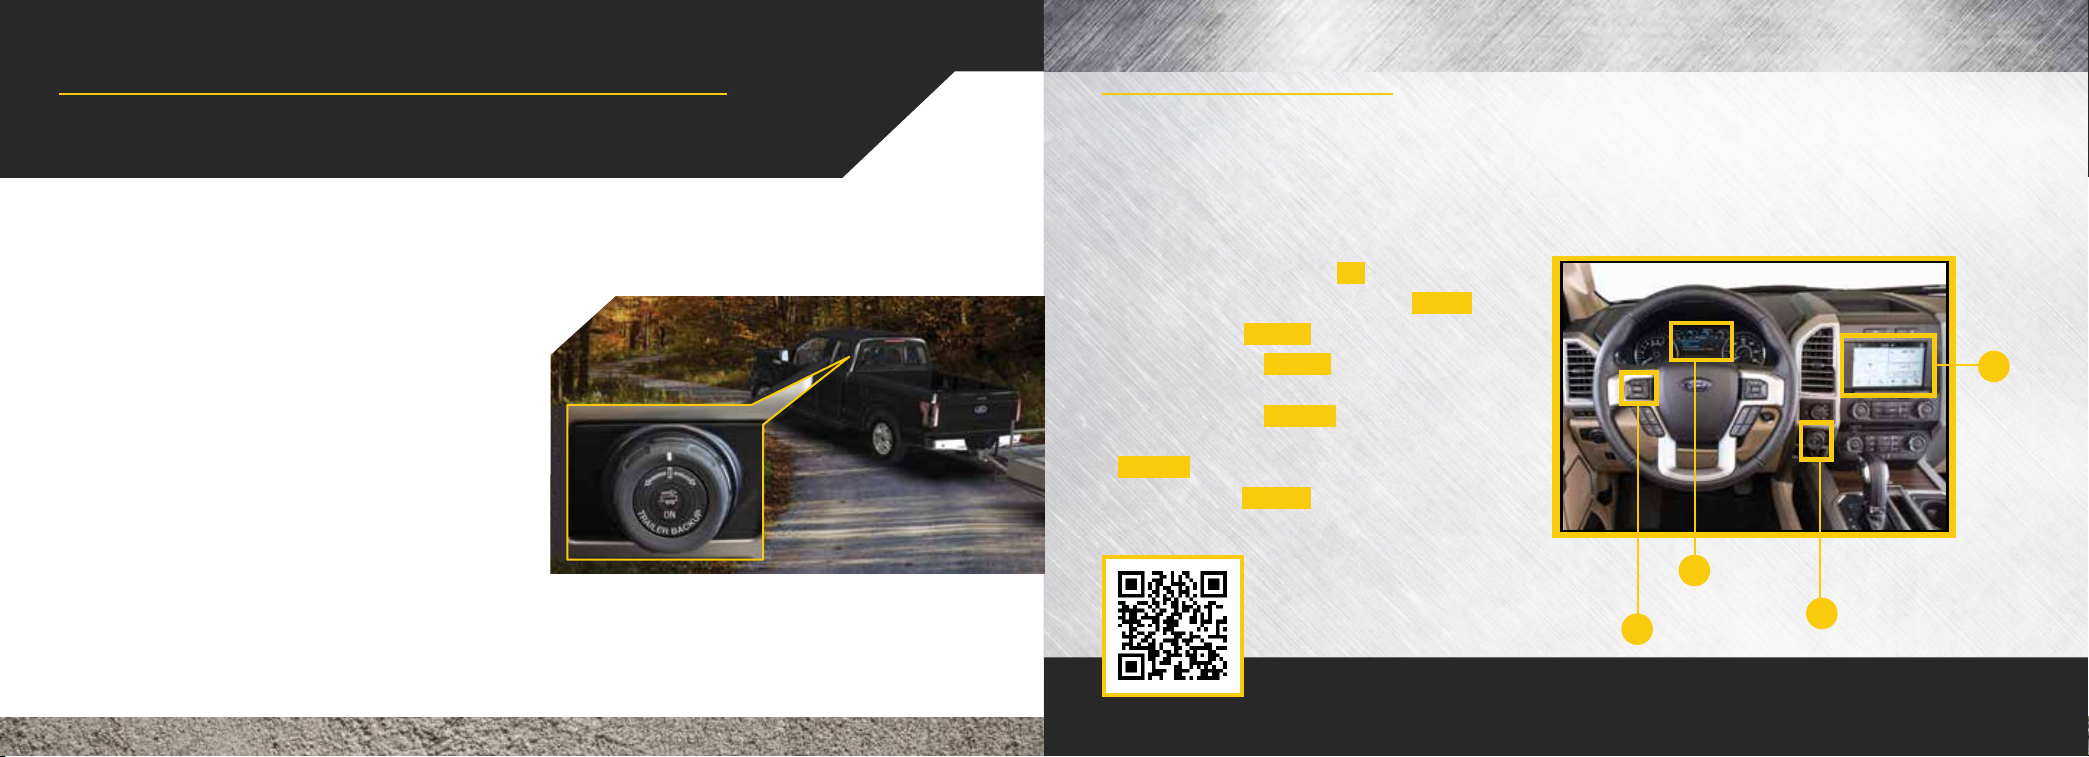
What is the Pro Trailer Backup Assist?
The Pro Trailer Backup Assist control knob on your
instrument panel will forever change how you look
at backing up a trailer.
Turn the knob in the direction you want the trailer to go and
the system takes over the steering to get it there. This frees
you to focus on monitoring the mirrors and applying the
brake and accelerator.
The setup starts with you placing a sticker in a specific spot
on your trailer, taking a few measurements and entering
them into the system.
It is very important to follow the setup procedure carefully to
ensure correct placement of the sticker. This guide walks
you through that process, step by step, and lets you be on
your way.
Let's get started!
How Do I Use It?
Set up this feature by following all six steps listed in
this guide. Scan the QR code with your smartphone
to see the step-by-step videos. See the next page for
what you need to complete the set up.
1. Position your truck and trailer. p 4.
2. Follow the information display prompts. pp 5–8.
3. Place the sticker. pp 9–10.
4. Measure key points. pp 11–12.
5. Enter your measurements into the
information display. pp 13–14.
6. Confirm the sticker location and calibrate the system.
pp 15–16.
Feature Operation. pp 17–21.
ProTrailerBackupAssist.com
Scan the QR code for step-by-step videos for the Pro Trailer Backup Assist set up.
To set up this feature, use the:
(a) 5-way controls on your steering column
(b) Information display in your instrument cluster
(c) Pro Trailer Backup Assist control knob
(d) Center display
Information
b
display
Control knob
5-way controls
a
c
d
Center
display
Page 3
Pro Trailer Backup Assist Feature Set Up
4 – 5
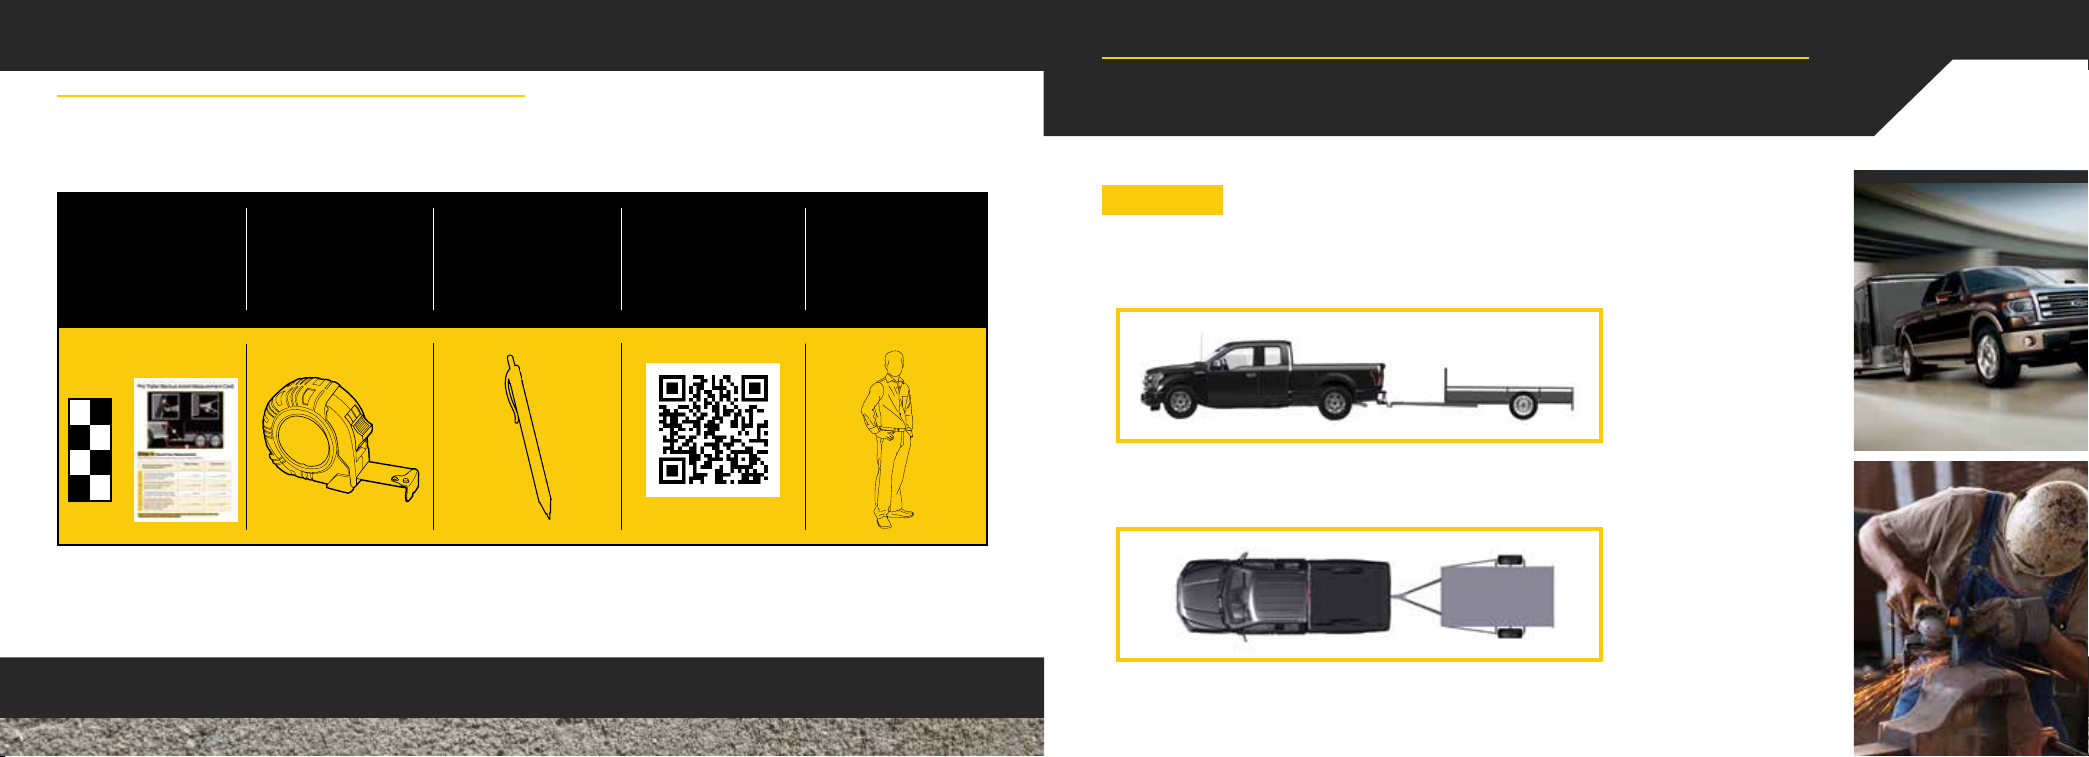
What You Need for Set Up
This guide with the
measurement card
and the stickers in
the inside back
cover pocket
Tape measure
(English or Metric)
Pen to record your
measurements
in the guide
Step-by-step videos
(optional)
ProTrailerBackupAssist.com
An adult or older
child assistant
to help you with
measurements
(optional)
Read and follow all of these steps carefully to get the best results.
Step 1: Position Your Truck and Trailer
• Hitch your conventional trailer to the truck. For additional information on
hitching your trailer, refer to the Towing chapter of your Owner's Manual.
• Park your truck and hitched trailer on a level surface.
• Make sure that the trailer and truck are in line with each other. You can do
this by putting the truck in drive (D) and pulling straight forward.
Note: For best results, use a drawbar with a rise or drop that allows the
trailer to sit level to the ground when attached to the vehicle.
Page 4
Pro Trailer Backup Assist Feature Set Up
6 – 7
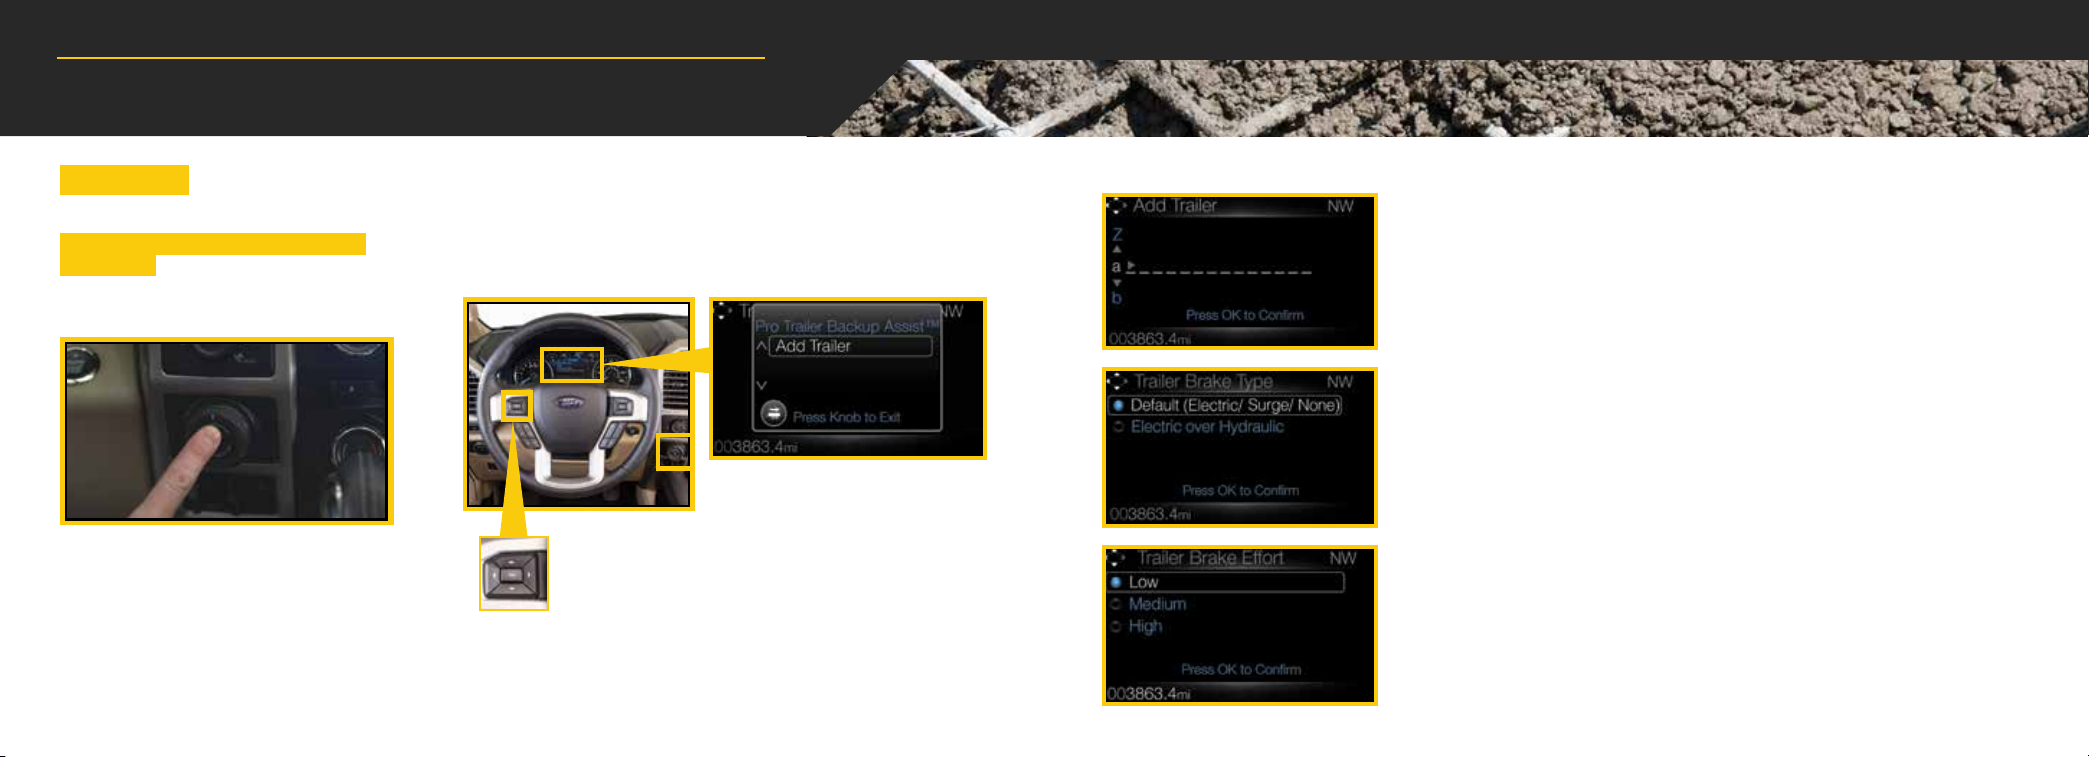
Step 2: Follow the Information Display Prompts
Once you begin the setup, do not shut o
your vehicle. Press the center button on the knob
located to the right of the steering wheel to begin
setting up the Pro Trailer Backup Assist.
Press the down arrow on the le hand-side of the 5-way steering wheel
controls to highlight Add Trailer. Press OK to confirm.
5-way controls
Set Up Your Trailer
Name your trailer.
Use the 5-way steering wheel controls to choose the alphanumeric characters.
Press the right arrow to advance to the next letter. When finished spelling out the
name of the trailer, press OK to confirm. To delete a letter, press the up or down
arrow key until you see a blank.
Select the type of brake system for your trailer.
Select Default if your trailer has electric, surge or no brakes.
Press OK to select and advance to the next screen.
Information display
Select the brake eort for your trailer.
The default value is Low and is the recommended setting for most trailers. If your
trailer's brakes require more initial voltage, or if you prefer more aggressive trailer
braking, then select either the Medium or the High setting.
Page 5

Pro Trailer Backup Assist Feature Set Up
Select your trailer type.
Use the images to the right to help
you determine your trailer type.
If you have a conventional trailer,
select Conventional.
Note: Pro Trailer Backup Assist only
supports conventional trailers.
Conventional Trailers Examples
Non-Conventional Trailers Examples
You cannot use the Pro Trailer Backup
Assist with Fih Wheel and Gooseneck
type trailers.
8 – 9
Next, a message appears in the information display asking if you
want to add Pro Trailer Backup Assist.
Straighten out the trailer, if necessary.
The information display directs you to this Quick Start Guide for
how to proceed.
Page 6

Pro Trailer Backup Assist Feature Set Up
10 – 11
Step 3: Placing the Sticker
You need to place the entire sticker in the green
zone on the trailer as outlined in the diagram on the
next page. The sticker is in the back cover pocket of
this guide.
Rear view
camera
Note: An assistant can help you complete the tasks on the
next page.
Make sure to gather the following items before exiting the vehicle:
Sticker and measurement
card (provided inside the back
cover pocket of this guide).
Tape measure and pen
(not provided).
Outside the Vehicle
• Take the measurement card and the sticker from the back of this
guide, a tape measure and a pen, and walk back to your trailer.
• Determine where to place the sticker. You must place it in the
green zone as indicated in the diagram below.
• Confirm that the sticker is visible using the center display. An
assistant can remain inside the vehicle to help you do this.
Sticker Placement Diagram
Note: You must place the entire sticker within the green zone. Once you place the
sticker, you cannot move it. Do not attempt to re-use stickers. Use a new sticker.
Sticker Placement Tips
• Perform sticker placement
when temperatures are
above 32° F (0° C).
• Put the sticker on a flat, dry,
clean horizontal surface.
• Using a tape measure, find
a place to put the entire
sticker in range
as shown below:
– Within the green zone.
– Between 7 inches
(17 cm) and 22 inches
(55 cm) from the trailer
ball hitch.
• Make sure no hardware
will obstruct the view from
the camera to the sticker
(jack handle, wiring, etc.)
• Place the sticker.
Page 7

Pro Trailer Backup Assist Feature Set Up
Step 4: Measuring Key Points
12 – 13
Outside the Vehicle
Now that the sticker is in place, you must take a few measurements.
For the system to perform its best, it is important to make sure that the measurements you take are accurate.
Record all four distances on your measurement card, located in the back cover pocket of this guide.
Measurement Tips
• When you take your measurements, round o your numbers to the nearest
half-inch increment.
• If a distance ends in one-quarter of a measurement unit or greater, round up to
the next half-increment. If not, round down. For example, 12 ¼ inches would be
rounded up to 12 ½. 12 �⁄₈ inches would be rounded down to 12.
• Be sure to use the measurement unit that is consistent with what your vehicle
uses. Use inches if your vehicle is set to U.S. units. Use centimeters if your vehicle
is set to Metric units.
Note: An easy way to check to see which units your vehicle uses is to look for
outside temperature readings or estimated fuel economy. Fahrenheit or miles
indicates U.S. units. Celsius or kilometers indicates Metric units.
Measurement A
The horizontal distance from the
license plate to the center of the ball
hitch on the trailer.
Measurement B
The horizontal distance from the
center of the ball hitch to the center
of the sticker.
Measurement C
The distance from the rear-view
camera to the center of the sticker.
Measurement D
The horizontal distance from the
tailgate to the center of the trailer axle
(single axle) OR the center of the trailer
axles (two or more axles).
Page 8

Pro Trailer Backup Assist Feature Set Up
Step 5: Enter Your Measurements into the Information Display
14 – 15
Inside the Vehicle
For this part of the setup, use the information display and your 5-way steering wheel controls
to enter the four measurements.
Entering Your Measurements
• Use the up/down arrows to increase or decrease the numbers as needed. Press OK to
confirm each measurement. The screen prompts you to add the next measurement.
• Refer to the measurements you recorded on your measurement card and enter each
one into the information display.
Once you add your last measurement, the information display shows you all of your
entered measurements. Review and confirm.
Note: If you want to revise your measurements, highlight Change and press OK.
Otherwise, press the arrow to highlight Confirm and press OK.
Page 9

16 – 17
Pro Trailer Backup Assist Feature Set Up
Step 6: Confirming the Sticker Location
Inside the Vehicle
Look for the circle in the center display.
Is that your sticker?
Use the steering wheel controls to select Yes or No.
If you select No, you may need to repeat the setup procedure from
the beginning.
Note: If your system cannot locate the sticker, try the following:
• Clean the rear view camera lens.
• Make sure you place the entire sticker between 7 inches (17 cm)
and 22 inches (55 cm) from the trailer ball hitch.
• Refer to your Owner's Manual for additional support.
You'll see a confirmation message
when you successfully confirm
the target.
Calibrating The System
To complete the setup, you need to drive the vehicle straight
forward between 4 to 24 mph (6 to 39 kph) as directed by
the information display.
Note: If you turn the steering wheel during this time, calibration
pauses. The information display then prompts you to drive
straight forward to complete the calibration.
The information display shows a message while the system
calibrates and another screen appears when the system
completes the calibration.
Note: For best results, we do not recommend calibrating
the system at night.
Page 10

Feature Operation
18 – 19
1. To use, press the center button on the knob and watch the information display screen.
Use the steering wheel controls to highlight your trailer, then press OK to select.
2. Once the system locates your sticker, the screen prompts you to shi into reverse (R) to
activate the feature.
Note: The system cannot operate if your hands are on the steering wheel.
Remove your hands from the steering wheel to resume system operation.
3. Continue following the screen prompts on the information display.
Note: You may need to drive forward to straighten your trailer.
Page 11

Feature Operation
• Take your hands o the steering wheel and turn the Pro Trailer Backup Assist knob instead. The knob acts as the
steering wheel for your trailer.
Note: The further you turn the knob, the sharper the trailer turns.
• Turn and hold the knob le (counterclockwise)
when you want the trailer to go to the le.
TIPS
• Find an area where you can safely become familiar
with the response of your vehicle and trailer when
using the system.
• Try backing up straight and then turning the knob
slowly in the direction you want to go.
• Turn and hold the knob to the right (clockwise)
when you want the trailer to go to the right.
• Quickly turning and releasing the knob results in
a jerky movement of the vehicle.
• Some lighting conditions may make it dicult for the
system to locate the sticker. If this occurs, moving
the truck and trailer can help the system find
the sticker.
20 – 2020 – 21
• Once you have the trailer moving in the direction you want it to go, release the knob. You control the accelerator and
brakes while the system steers the truck to keep the trailer moving straight back.
Note: If you attempt to accelerate beyond the system’s threshold, the system automatically limits your vehicle's speed.
TIPS
• As soon as you release the knob or turn it back to the
center position, the vehicle starts following the
trailer's path.
• Turn and hold the knob continuously for sharper
vehicle and trailer turns.
• A clean sticker provides optimal performance. Use
isopropyl alcohol to clean your sticker, if required.
• CAUTION: Always keep your hand close to the control
knob. You may need to redirect the trailer quickly.
• You may have to use the knob to correct the trailer
direction while attempting to move the trailer straight
back under some conditions.
Page 12

Feature Operation
Even when using the Pro Trailer Backup Assist feature, be sure to
use all visibility aids to help you to back up your trailer safely.
Use your vehicle mirrors as your primary aid. Be sure to include
the windows and the rear view camera image to view the trailer
direction and determine the trailer placement.
For more troubleshooting and information about Pro Trailer
Backup Assist feature, please see your Owner's Manual.
Note: Driving aids do not replace the need to watch where the
vehicle and trailer are moving and brake when necessary. Refer
to your Owner’s Manual for safety information, more details
and limitations.
Note: To prevent your trailer from accumulating miles and
the trailer information status appearing when you restart
your vehicle aer disconnecting your trailer, you need to
deactivate your trailer. Use the information display, go to
the Towing menu and then the Select Trailer option.
Choose No active trailer . To learn more about using your
information display, see the Information Displays
chapter in your Owner's Manual for details.
22 – 23
 Loading...