

Page 1

This Quick Reference Guide is not intended
to replace your vehicle Owner’s Manual,
which contains more detailed information
concerning the features of your vehicle, as
well as important safety warnings designed
to help reduce the risk of injury to you and
your passengers. Please read your entire
Owner’s Manual carefully as you begin
learning about your new vehicle and refer to
the appropriate chapters when questions
arise. All information contained in this Quick
Reference Guide was accurate at the time of
duplication. We reserve the right to change
features, operation and/or functionality of
any vehicle specification at any time. Your
Ford dealer is the best source for the most
current information. For detailed operating
and safety information, please consult your
Owner’s Manual.
LEARN MORE ABOUT
YOUR NEW VEHICLE
Scan the country-appropriate QR code with your
smartphone (make sure you have a scanner app
installed) and you can access even more
information about your vehicle.
owner.ford.com (U.S.) ford.ca (Canada)
June 2017
First Printing
Quick Reference Guide
EcoSport
2018 ECOSPORT
Litho in U.S.A.
QUICK REFERENCE GUIDE
WARNING
Driving while distracted can result in loss of
vehicle control, crash and injury. We strongly
recommend that you use extreme caution
when using any device that may take your
focus o the road. Your primary responsibility
is the safe operation of your vehicle. We
recommend against the use of any handheld device while driving and encourage the
use of voice-operated systems when
possible. Make sure you are aware of all
applicable local laws that may aect the
use of electronic devices while driving.
UNITED STATES
Ford Customer Relationship Center
1-800-392-3673 (FORD)
(TDD for the hearing impaired:
1-800-232-5952)
owner.ford.com
CANADA
Ford Customer Relationship Centre
1-800-565-3673 (FORD)
(TDD for the hearing impaired:
1-888-658-6805)
ford.ca
@FordService
@FordServiceCA
GN15 19G217 ZFA
Page 2

COMMONLY USED VOICE COMMANDS
Press the voice button on the steering wheel and then say:
Basic Commands
• Main menu
• Go back
• Cancel
• List of commands
• Next page
• Previous page
• Help
1
1
1
1
1
Phone
• Phone list of commands
• Pair phone
• Call
<name> <on cell/
at home/at work>
• Dial <number>
• Listen to message
Some services may not be available in your area. Refer to the SYNC 3 chapter in your Owner’s Manual, visit the website
or call the toll-free number for more information.
For U.S. customers: Visit owner.ford.com or call 1-800-392-3673 (select Option 1 or 2 for language, then Option 3).
For Canadian customers: Visit syncmyride.ca or call 1-800-565-3673 (select Option 1 or 2 for language, then Option 3).
1
Audio
• AM <530-1710>
• FM <87.9-107.9>
• Bluetooth audio
• USB
• Sirius <0-233>
• <Sirius channel name>
2
Apps
• List mobile apps
• Find new apps
2
Navigation
• Navigation list of commands
• Destination <home/
previous destination>
• Find <POI/intersection/
an address>
• Show route
• Where am I?
• SiriusXM Trac and Travel
Link
- Show <trac/weather
map/5-day forecast/
fuel prices>
- Help
1
Only available with SYNC 3
2
If equipped
1, 2
2
list of commands
2
TABLE OF CONTENTS
Instrument Panel 4 – 5
SYNC 6 – 7
SYNC 3 8 – 10
Convenience 11 – 12
Function 13 – 17
Essential Information 18 – 19
3
Page 3
1
CRUISE CONTROL
To Set Your Cruise Control Speed
A. Press and release ON.
B. Driv
C. Press and release SET + or
Aer you set a speed, you can press SET + or SET – to
adjust the cruise speed. To cancel the set speed, press and
release CAN or tap the brake pedal.
2
remains on or is flashing aer you start the engine, the
On-Board Diagnostics (OBD-II) system has detected a
problem. Drive in a moderate fashion and contact your
authorized dealer as soon as possible.
3
Provides information about various systems on your
vehicle. Use the le, 5-way controls located on the steering
wheel to choose and confirm settings and messages.
Refer to the Information Displays chapter in your Owner’s
Manual
4
e to the desired speed.
SET – , then
take your foot o the accelerator.
SERVICE ENGINE SOON LIGHT
Lights briefly when you switch on the ignition. If it
INFORMATION DISPLAY
for more information.
TILT AND TELESCOPE
STEERING COLUMN
Unlock the steering wheel by pulling the lever down. Adjust
the wheel to the desired position (in, out, up and down).
Push the lever back up to lock the steering wheel in place.
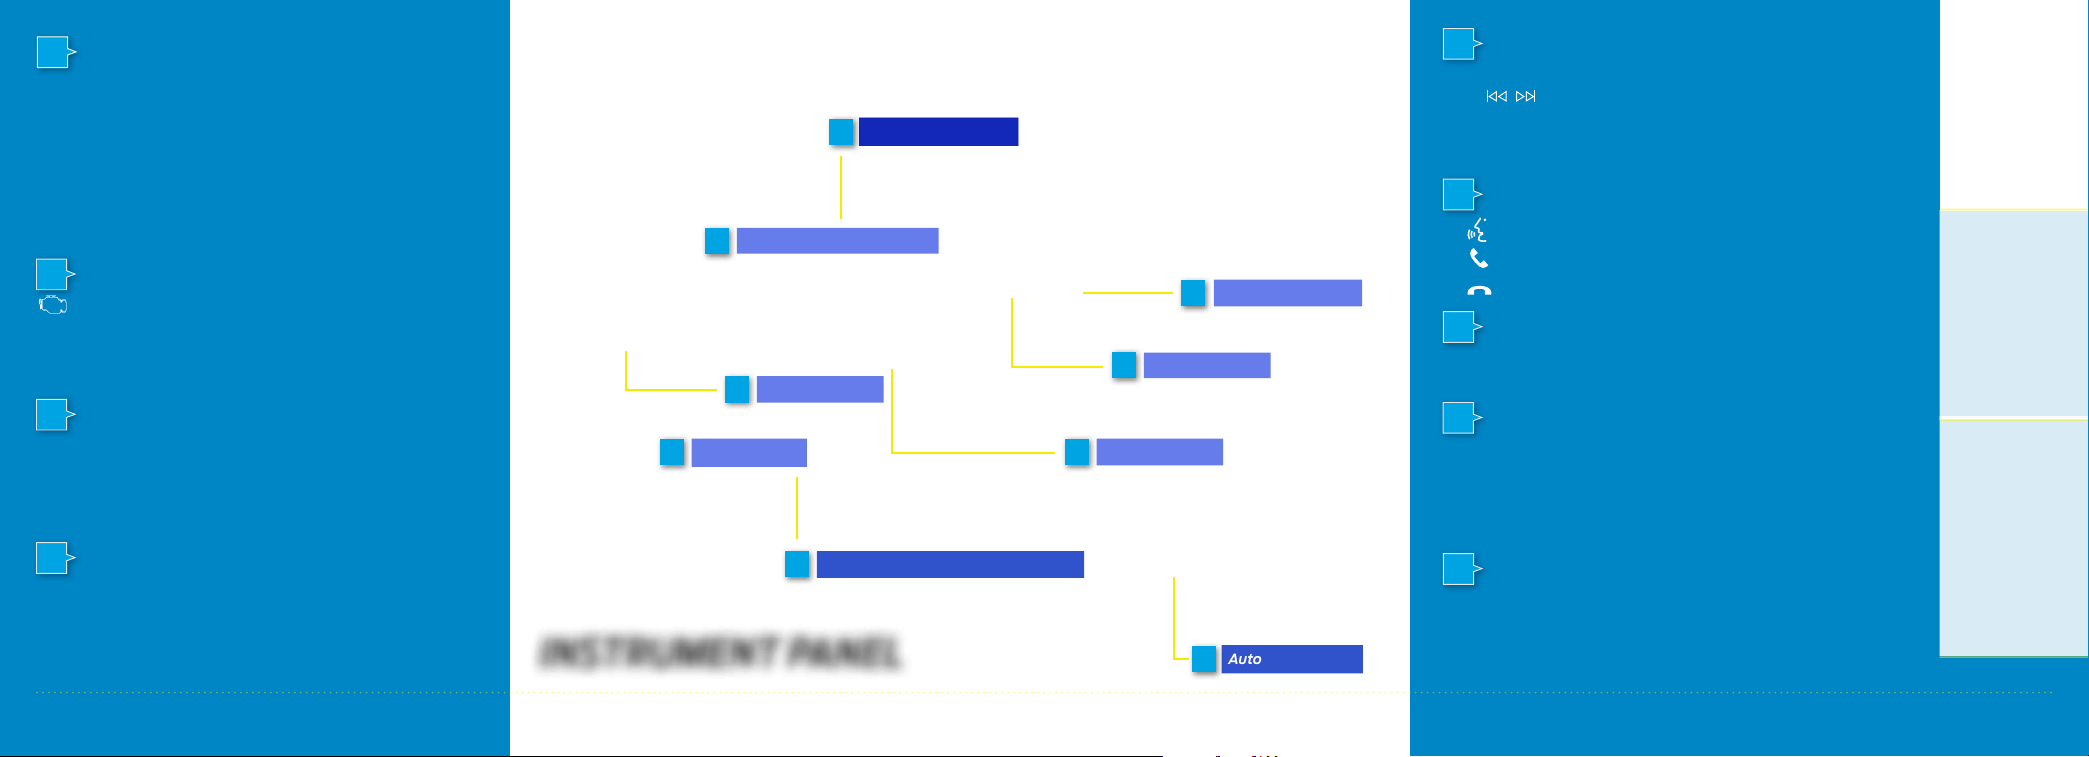
Information Display
3
Service Engine Soon Light
2
Media Controls
5
Cruise Control
1
Tilt and Telescope Steering Column
4
INSTRUMENT PANEL
7
Voice Controls
6
Push Button Start*
8
Wiper Controls
Auto-Start-Stop
9
5
STEERING WHEEL MEDIA CONTROLS
Press VOL + to increase or VOL - to decrease volume levels.
Press
MP3 track.
Press and hold to seek up or down the frequency band or
through MP3 tracks.
Press to access voice recognition.
Press and hold to exit phone mode or end a call.
Use the lever to adjust the wipe intervals. Pull the lever toward
you to wash the windshield.
Allows you to start your vehicle by pressing the START STOP
button when fully pressing down on the brake. Press the button
again to switch o the engine.
Note: Your intelligent access transmitter* must be inside the
vehicle to start the ignition.
For more information about Auto-Start-Stop, please see
page 18.
to hear the previous or next saved radio station or
6
VOICE CONTROLS
Press to answer an incoming call.
7
WIPER CONTROLS
8
PUSH BUTTON IGNITION*
9
AUTO-START-STOP
*if equipped
*if equipped
54
Page 4

SYNC®
SYNC is an in-vehicle communications system
that works with your Bluetooth enabled
phone and portable media player.
SUPPORT
SYNC support is available from your Ford regional website:
www.syncmyride.com
www.syncmyride.ca (Canada)
(Unite
DRIVING RESTRICTIONS
For your safety, certain features are speed-dependent
and restricted when your vehicle is traveling over
3 mph (5 km/h).
PAIRING YOUR PHONE WITH SYNC
Note: If you have SYNC 3*, see the pairing instructions on
page 8.
Wirelessly pairing your phone with SYNC allows you to
make and receive hands-free calls.
d States)
TO PAIR YOUR PHONE FOR THE FIRST TIME
1. Make sure to switch on your phone’s Bluetooth feature
before starting the search. See your device’s manual
if necessary.
2.
ess the Settings button.
Pr
3. Select Bluetooth from the menu.
4.
ess the OK button.
Pr
5. Select the option to add. This starts the pairing process.
6.
When a me
display, search for SYNC on your device.
7. When prompted on your phone’s display, confirm that
the PIN provided by SYNC matches the PIN displayed on
your phone. Your phone is now paired and the display
indicates that the pairing was successful. If you are
prompted to enter a PIN on your device, enter the PIN
displayed on the screen. The display indicates when the
pairing is successful.
Depending on your phone’s capability and your market, the
system may prompt you with questions, such as setting the
current phone as the primary phone and downloading your
phone book.
ssage to begin pairing appears in the audio
PHONE CONTROLS
You can use the phone buttons on your steering wheel to
answer, reject or end a call.
HELPFUL HINTS
• When using voice commands, make sure the interior of
your vehicle is as quiet as possible. Wind noise from
open windows and road vibrations may prevent the
system from correctly recognizing spoken commands.
• Before giving a voice command, wait for the system
announcement to finish, followed by a single tone. Any
command spoken before this does not register with
the system.
• Speak naturally, without long pauses between words.
• You can interrupt the system at any time while it is
speaking by pressing the voice button. You can cancel a
voice session by pressing and holding the voice button.
PHONE MENU
Through your phone menu, you can access your call
history, phone book, text messages, phone settings and
system settings.
Press the phone button to enter the phone menu. Then
you can scroll through the menu and select the feature
you want to view.
SYNC MOBILE APPS
The system enables voice and steering wheel control of
SYNC AppLink-enabled smartphone apps. When an app
is running through AppLink, you can control the main
features of the app through voice commands and steering
wheel controls.
Note: You must pair and connect your smartphone to SYNC to
access AppLink.
USING SYNC TO ACCESS DIGITAL MEDIA
Using the system, you can access media from your iPod,
Bluetooth device, and most USB drives. SYNC also supports
audio formats, such as MP3, WMA, WAV and ACC.
MEDIA SOURCES
Press the MEDIA button to view your sources. Use the
directional arrows and OK button to select your source. You
can also use the steering wheel audio controls.
6
*if equipped *if equipped
7
Page 5

SYNC 3
®
*
GET IN TOUCH USING YOUR TOUCHSCREEN
Use the feature bar at the bottom of the touchscreen to access the many features of SYNC 3.
USING SYNC 3
The SYNC 3 system allows you to interact with a variety of
features using the touchscreen and voice commands. By
integrating with your Bluetooth equipped phone, the
touchscreen provides easy interaction with audio,
multimedia, navigation, and your phone’s SYNC AppLink.
Press Settings on the feature bar on your
touchscreen to personalize the many features
and settings of your vehicle all in one place.
PAIRING YOUR PHONE WITH SYNC 3
Pair your Bluetooth equipped phone with the system before
using the functions in hands-free mode.
Switch on Bluetooth on your device to begin pairing.
See your phone’s manual if necessary.
1. Select Add Phone.
2.
ow the on-screen instructions.
Foll
3. A prompt alerts you to search for the system on your phone.
4. Select your vehicle’s make and model as it displays on
your phone.
5. Confirm that the six-digit number appearing on your phone
matches the six-digit number on the touchscreen.
6. The touchscreen indicates when the pairing is successful.
7. Your phone may prompt you to give the system permission
to access information. To check your phone’s compatibility,
see your phone’s manual or visit the website.
PHONE
Aer pairing your phone, you can access
more phone-dependent features:
• Recent call lists.
• Contacts: Sort alphabetically and
choose a specific letter to begin
viewing your entries.
• Phone settings: Pair another phone,
and set ring tones and alerts.
• Text messages.
• Do not disturb: Send all calls to your
voicemail, and all ring tones and alerts
are set to silent mode.
Refer to the SYNC 3 chapter in your
Owner’s Manual for details.
NAVIGATION*
Press the Navigation* icon to set your
destination. Select one of two ways to
find your destination:
•
Destination mode lets you key in a
specific address or use a variety of
search methods to locate where you
want to go.
• Map mode shows advanced viewing of
2D city maps, 3D landmarks and 3D
city models (when available).
Refer to the SYNC 3 chapter in your
Owner’s Manual for complete details.
Set a Destination
Press Destination on your touchscreen
and then press Search. Enter a street
address, intersection, city or a Point Of
Interest (POI).
Aer you choose your destination,
press Start. The system uses a variety
of screens and visible prompts to guide
you to your destination.
During your route, you can press the
maneuver arrow icon on the map if you
want the system to repeat the previous
route guidance instructions.
The navigation map shows your
estimated time of arrival, remaining
travel time or the distance to
your destination.
Navigation Menu
When you are on your route, you can
change your touchscreen view. To
change the view, touch Menu on the
bottom of the screen and then select
Screen View to choose from any of
the following:
• Full Map.
• Highway Exit Info displays on the right
side of the touchscreen. View POI
icons (restaurants, ATMs, etc.) as they
pertain to each exit. You can select a
POI as a waypoint.
• Turn List shows all of the available
turns on your current route.
• Trac List displays SiriusXM Trac
and Travel Link* information.
8
*if equipped *if equipped
9
Page 6

SYNC 3
®*
(CONTINUED)
CONVENIENCE
AUDIO
Press the Audio icon on the touchscreen
and select Sources. Choose from AM,
FM, SiriusXM*, USB, Bluetooth Stereo
or Apps.
Set Your Radio Presets
• Tune to the station and then press
and hold one of the preset buttons.
The audio mutes briefly while the
system saves the station, and then
the audio returns.
• Two preset banks are available for
AM and three banks for FM. To access
additional presets, tap the preset
button. The indicator on the preset
button shows which bank of presets
you are currently viewing.
10
*if equipped *if equipped
Using SYNC 3 to Access Digital Media
Play all of your favorite music from
phones, flash drives and other devices.
Plug your device into a USB port, select
Sources and then choose USB.
You can even create random playlists
using the Shue function.
SETTINGS
Touch the Settings icon to customize
information within your vehicle.
Adjust the clock, display, some vehicle
features and sound settings.
APPS
The system supports the use of certain
apps through a USB or Bluetooth-
enabled device. Each app gives you
dierent on-screen options depending
on the app’s content.
To find new apps, use the voice
command, “Find new apps”.
Refer to the SYNC 3 chapter of your
Owner’s Manual for more information.
SMARTPHONE CONNECTIVITY
SYNC 3 allows you to use Apple CarPlay
and Android Auto to access your phone
over a USB connection.
When you use Apple CarPlay or Android
Auto, you can:
•
Make c
•
Send and r
•
List
•
Use y
For more information, refer to the
SYNC 3 chapter in your Owner’s Manual
for details.
alls.
eceive messages.
en to music.
our phone’s voice assistant.
SYNC CONNECT*
Connect to your vehicle using the app
on your smartphone. The embedded
modem in your vehicle communicates
with the app and allows you to start,
lock, unlock and locate your vehicle
remotely. The app also connects you
with other vehicle resources like a
parking locator, roadside assistance,
dealer locations and Ford Support.
INTELLIGENT ACCESS*
You can unlock and lock the vehicle
without taking the key out of your
pocket or purse when your intelligent
access key is within 5 feet (1.5 meter) of
your vehicle.
To unlock, touch the unlock sensor on
the back of the door handle for a brief
period and then pull on the door handle,
being careful to not touch the lock
sensor at the same time or pull the door
handle too quickly.
To lock, touch the door handle lock
sensor on the door for approximately
one second, being careful to not touch
the unlock sensor on the back of the
door handle at the same time.
REMOTE ENTRY ICONS
• Press once to lock all of the doors.
Press it again within a few seconds to
confirm all doors are locked.
• Press
door. Press again within a few seconds
to unlock all of the doors.
• Press
alarm. To switch the panic alarm o,
press
the ignition.
Car finder: P
•
seconds to locate your vehicle. The
horn sounds and the direction
indicators flash.
once to unlock the driver
to switch on the panic
again or switch on
twice within a few
ress
AMBIENT LIGHTING*
You can access this feature through the
Settings menu for SYNC 3.
Tap a color to switch on ambient
lighting. Drag the colors up and down
to increase or decrease the intensity.
To switch ambient lighting o, press the
active color once or drag the active color
all the way down to zero intensity.
The ambient lighting turns on when you
switch on the ignition and the
headlamps.
OPENING THE SWING GATE*
The vehicle must be unlocked or an
intelligent access key must be within
3 feet (1 meter) to open the swing gate.
Press the release button located on the
swing gate right-hand tail lamp.
Note: For vehicles with a spare wheel,
when you unlatch the swing gate and
pull the exterior handle, the mechanism
fully opens the swing gate. When
closing, the mechanism slowly closes
the swing gate.
11
Page 7

CONVENIENCE (CONTINUED)
MOONROOF AND SUNSCREEN*
The moonroof has a one-touch open and close feature. To
stop it during a one-touch operation, press the control a
second time.
The sunscreen can be manually opened and closed when the
glass panel is closed.
Press and release the rear of the control to open the
moonroof. Press and release the front of the control to close
the moonroof.
TILTING FRONT-ROW HEAD RESTRAINTS
Tilt the head restraint forward
for additional comfort by
gently pulling the top of the
head restraint. Once it is in the
forward-most position, tilting it
forward again releases it to the
upright position.
SELECTSHIFT AUTOMATIC TRANSMISSION
This feature gives you the ability to change gears up or down
as desired.
In order to prevent engine stall, SelectShi automatically
downshis at low engine speeds.
If equipped with the toggle on the gearshi lever, press
the + toggle switch on the side of the gearshi lever to
activate SelectShi.
If equipped with steering wheel paddles, pull the + paddle on
the steering wheel to activate SelectShi.
•
Pull the right paddle (+) to upshi.
• Pull the le paddle (–) to downshi.
FUNCTION
REAR PARKING AID*
This system sounds audible warning tones if there
is an obstacle near the vehicle’s rear bumper. The
rear parking aid sensors automatically turn on
when you shi into reverse (R). As the vehicle
moves closer to the obstacle, the rate of the
warning tone increases in frequency.
The coverage area is up to 6 feet (1.8 meters) from
the rear bumper. There is decreased coverage at
the outer corners of the bumper.
Note: Visibility aids do not replace the need to
watch where the vehicle is moving. Refer to your
Owner’s Manual for safety information, more
details and limitations.
REAR VIEW CAMERA
This system provides a video image of the area
behind the vehicle. The image appears when the
vehicle is in reverse (R) and uses green, yellow and
red guides to alert you of your proximity to objects.
Note: If mud, water or debris obstructs the
camera’s view, clean the lens with a so, lint-free
cloth and non-abrasive cleaner.
BLIND SPOT INFORMATION SYSTEM
®
(BLIS
BLIS aids you in detecting vehicles that enter into
your blind spot zone. Cross trac alert warns you
of vehicles approaching from the sides when the
transmission is in reverse (R).
Both systems display an amber indicator light in
your exterior mirrors. Cross trac alert also
sounds tones and displays messages to warn you
from which direction vehicles are approaching.
Refer to the Driving Aids chapter in your Owner’s
Manual for more information.
) AND CROSS TRAFFIC ALERT*
12
*if equipped *if equipped
13
Page 8

FUNCTION (CONTINUED)
WIPER OPERATION
Adjust the wiper lever and its controls to operate the front
and rear wipers.
• Single wipe: Pull the lever down.
• Intermittent wipe: Raise the lever upward to position 1
and then rotate the control:
- Upward for short wipe intervals.
- Downward for long wipe intervals.
• Normal wipe: Raise the lever upward to position 2.
• High-speed wipe: Raise the lever to position 3, its
highest position.
WASHING THE WINDSHIELD
To operate the windshield washer, pull the wiper lever
toward you.
Speed Dependent Wipers
When your vehicle speed increases, the interval between
wipes decreases.
AUTOWIPERS*
The wipers operate when the system detects moisture on the
windshield and adjusts the wiper speed automatically. Use
the rotary control to adjust the sensitivity of the rain sensor.
14
*if equipped *if equipped
• Low sensitivity: The wipers automatically operate when the
sensor detects a large amount of moisture on the windshield.
• High sensitivity: The wipers automatically operate when the
sensor detects a small amount of moisture on the
windshield.
Note: Keep the outside of the windshield clean. Dirt, bugs and
excessive road debris can prevent it from detecting rain.
To Reduce Smearing, We Recommend the Following
• Lower the sensitivity of the autowipers.
• Switch to normal or high-speed wipe.
• Switch the autowipers o.
Note: Make sure you switch o the windshield wipers before
entering a car wash.
REAR WINDOW WIPER AND WASHER
To operate the wiper, press the rocker switch on the end of
the lever to change between o, intermittent and low speed.
When you switch on the front wipers and move the gearshi
lever to reverse (R), the rear intermittent wiper automatically
turns on.
To use the rear washer, push the wiper lever away from you.
When you release the lever, the rear wiper operates for a
short time.
HEATED STEERING WHEEL*
Press the heated steering wheel button under the climate
controls to switch the heated steering wheel on and o.
WINDSHIELD WIPER DE-ICER*
When you switch the heated rear window on, the windshield
wiper de-icer automatically turns on.
HEATED SEATS*
Press the heated seat symbol to cycle through
the various heat settings and o. Warmer settings
are indicated by more indicator lights.
15
Page 9

FUNCTION (CONTINUED)
110 VOLT POWER OUTLET*
The power outlet is on the rear of the center console. You can
use it to power electrical devices that require up to 150 watts.
CARGO DOWN HOOKS
There are 4 luggage anchor points in the load floor of the rear
of your vehicle.
ROOF LUGGAGE CROSSBARS*
You can use the crossbars on the top of your vehicle to carry
additional cargo and you can adjust them to fit your needs.
See the Load Carrying chapter of your Owner’s Manual
for details.
Note: Always make sure your load is securely fastened. Check
the tightness of the load before driving and at each fuel stop.
MYKEY®
MyKey allows you to program certain driving restrictions
in order to promote good driving habits. For complete
information, refer to the MyKey chapter in your
Owner’s Manual.
16
*if equipped *if equipped
EMERGENCY BRAKE ASSIST
Emergency brake assist detects when you brake heavily by
measuring the rate at which you press the brake pedal. It
provides maximum braking eciency as long as you press
the pedal. Brake assist can reduce stopping distances in
critical situations.
FRONT FOG LAMPS*
You can switch on the front fog lamps by pressing
the
button on the lighting control.
Note: Only use fog lamps during reduced visibility, for
example heavy fog, snow or heavy rain.
POWER POINT
Run the engine for full capacity use of the 12 volt power
point. To prevent the battery from being discharged, do not
use the power point for longer than necessary when the
engine is not running. It is strongly recommended that you
always disconnect the accessories from the power point
when leaving your vehicle. Power points are in the center
console and next to the rear seat on the right-hand side.
STORAGE COMPARTMENTS
Cool Box
The cool box allows you to direct cool air into the glove box
compartment. Air conditioning must be turned on. Use the
rotary control inside the glove box to enable this feature.
Glasses Holder
Your glasses must be placed in the glasses holder, in the
headliner console, with the lenses facing downward. If not,
the glasses may fall out when the glasses holder is opened.
17
Page 10

ESSENTIAL INFORMATION
FUEL TANK CAPACITY AND FUEL INFO
Your vehicle has a 13.7 gallon (52 liter) fuel tank capacity. We
recommend regular unleaded gasoline with a pump (R+M)/2
octane rating of 87. To provide improved performance, we
recommend premium fuel for severe duty usage such as trailer
towing. Do not use fuel ethanol (E85), diesel, fuel-methanol,
leaded fuel or any other fuel because it could damage or
impair the emission control system.
REFUELING
When Fueling Your Vehicle
•
Fully open the fuel t
• Insert the fuel pump nozzle up to the first notch on the
nozzle. Keep it resting on the cover of the fuel tank filler pipe
opening.
•
Hold the fuel pump no
Holding the fuel nozzle in a raised position can aect the
flow of fuel and shut o the fuel nozzle before the fuel tank
is full.
• Wait at least 10 seconds, then slightly raise the fuel pump
nozzle and then slowly remove it. Fully close the fuel
filler door.
ank filler door.
zzle in a level position when refueling.
Note: When adding fuel from a portable container, do not use
aermarket funnels as they do not work with the capless fuel
system and may cause damage. Properly clean the funnel aer
each use.
AUTO-START-STOP
The system helps reduce fuel
consumption by automatically
stopping and restarting the
engine when your vehicle has
stopped. The engine restarts
automatically when you
release the brake pedal.
You can switch the system o by pressing the
Auto-Start-Stop button located on the center console.
The button illuminates. This only deactivates the system
for the current ignition cycle. Press the button again to
restore Auto-Start-Stop function. The system automatically
enables every time you start your vehicle if all of the
necessary conditions are met.
Please see the Unique Driving Characteristics chapter of your
Owner’s Manual for more information.
TIRE SEALANT AND INFLATOR KIT*
Your vehicle may not have a spare wheel and tire. In these cases, it will be supplied
with a temporary mobility kit which will only repair one damaged tire. The kit is
located beneath the carpeted load floor in the rear of your vehicle. For complete
information on using the tire sealant and inflator kit, refer to the Wheels and Tires
chapter of your Owner’s Manual.
LOCATION OF SPARE TIRE AND TOOLS*
The optional spare tire is mounted to your vehicle swing gate. The tools are
located beneath the carpeted load floor in the rear of your vehicle. The temporary
spare tire is for emergency use only and you should replace it as soon as possible.
For complete details on changing your tire, refer to the Wheels and Tires chapter in
your Owner’s Manual.
TIRE PRESSURE MONITORING SYSTEM
Your vehicle shows a low tire pressure warning light in your instrument
cluster when one or more of your tires are significantly under-inflated. If this
happens, stop and check your tires as soon as possible. Inflate them to the proper
pressure. Refer to the Wheels and Tires chapter of your Owner’s Manual for
more information.
Note: Your spare wheel and tire* are not equipped with a Tire Pressure
Monitoring System.
REAR WINDOW BUFFETING
You may hear a pulsing noise when just one of the windows is open. Lower the
opposite window slightly to reduce this noise.
TOWING YOUR ECOSPORT
Towing your vehicle behind an RV or any other vehicle may be limited. Refer to
the Towing the Vehicle on Four Wheels section in the Towing chapter of your
Owner’s Manual.
ROADSIDE
ASSISTANCE
Your new Ford vehicle comes with the
assurance and support of 24-hour
emergency roadside assistance.
To receive roadside assistance in the
United States, call 1-800-241-3673.
In Canada, call 1-800-665-2006.
18
*if equipped *if equipped
19
 Loading...