

Page 1
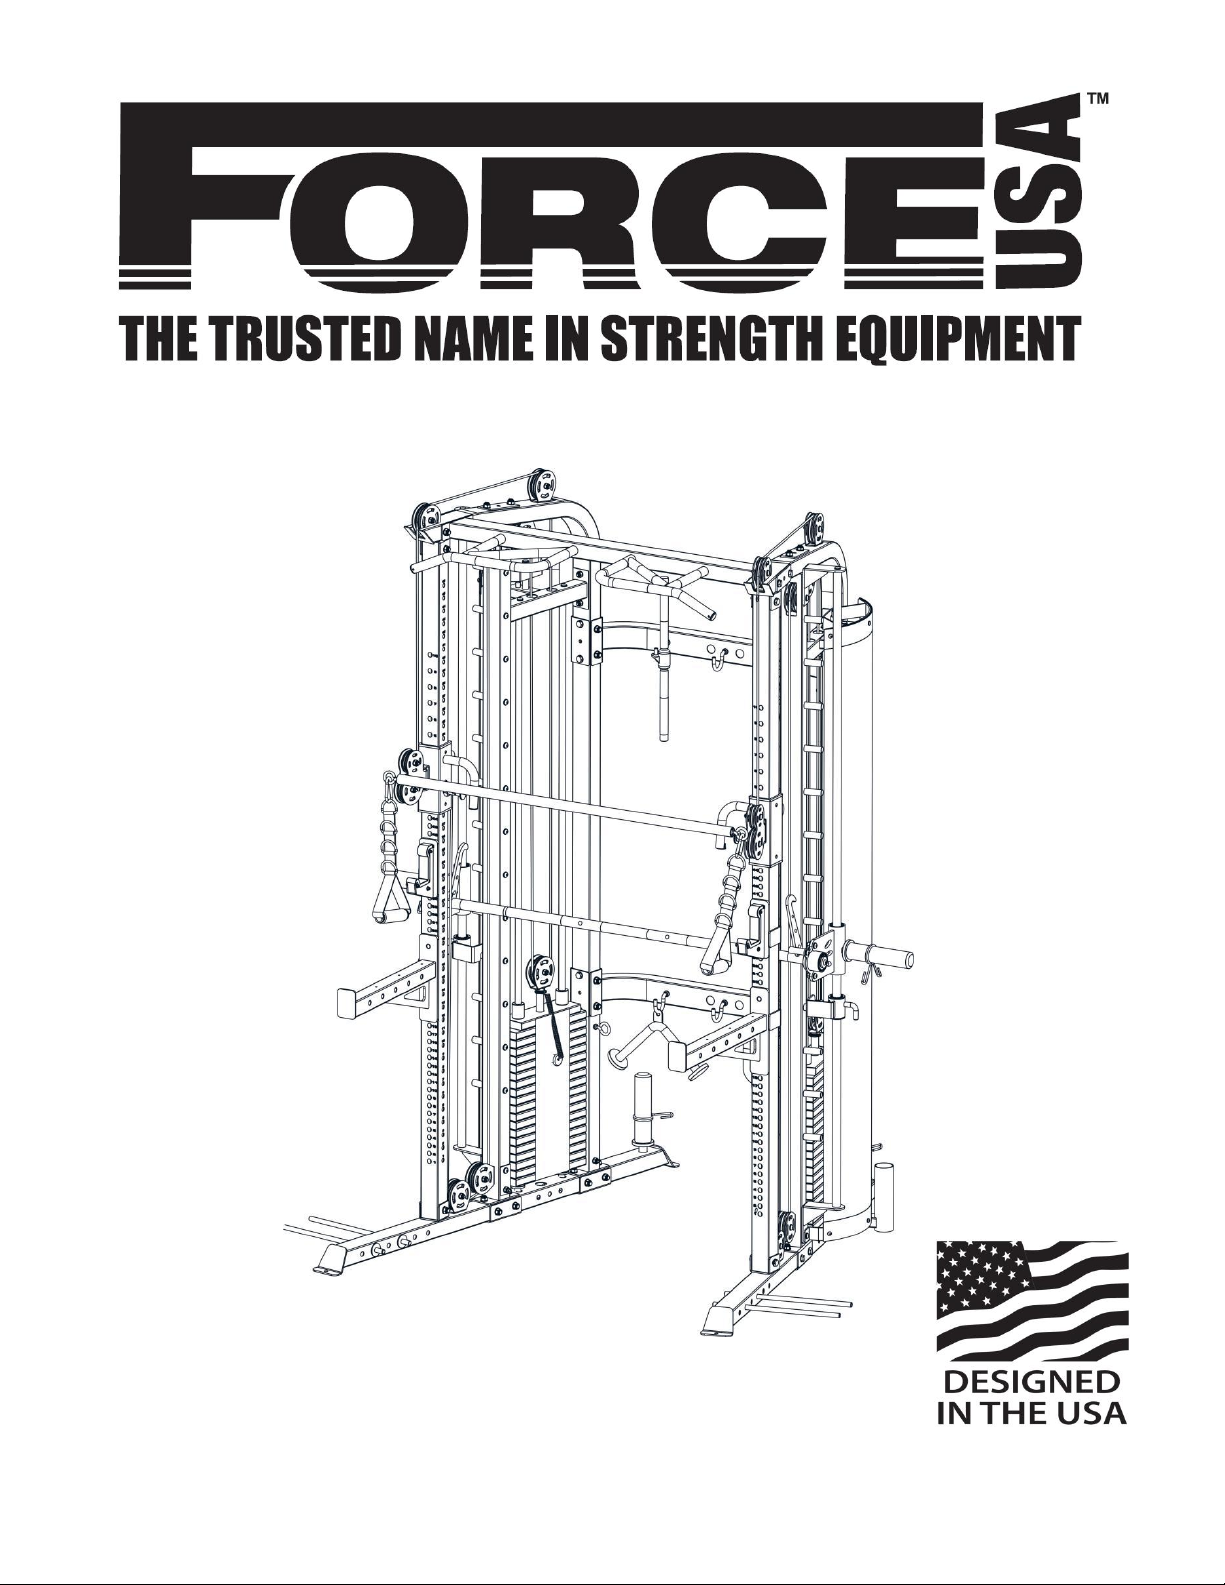
OWNER’S MANUAL
CAUTION!
Read all precautions and instructions in this manual before using this equipment.
F-G6
Page 2

ASSEMBLY MANUAL
FORCE USA F-G6
BEFORE YOU START
Remove all parts from the packaging then separate and count each various component to ensure everything has been correctly
provided.
Follow the instructions and consult both the individual assembly pages and the overall expanded views of the equipment.
Certain parts may arrive pre-assembled from the factory.
It is the owner’s responsibility to ensure that all users of this unit have read the owner’s manual and are familiar with the safety
precautions.
SAFETY PRECAUTIONS
Highly recommended for two or more people to assemble the equipment to avoid injury.
Assemble the equipment on a flat level surface.
Consider placing a mat under the equipment to protect your floor.
Wear appropriate footwear and clothing during assembly and use.
Only tighten nuts and bolts by hand until the whole equipment is assembled.
Ensure you correctly orientate each piece before attaching.
Do not allow children and pets to be unsupervised around the assembly or usage of this equipment.
Ensure all parts are in full working order before use.
Only one person should use the machine at any one time.
Do not use the equipment outdoors or around water.
Keep hair, fingers or clothing away from moving parts.
Only use attachments recommended by the manufacturer.
Never operate if any parts are not functioning correctly.
Always correctly stretch and warm up before using the equipment.
Stop immediately if you experience any pain, dizziness or nausea. See a doctor at once.
BEFORE STARTING ANY EXERCISE PROGRAM, CONSULT YOUR DOCTOR. ESPECIALLY IF YOU ARE OVER THE AGE
OF 35 OR HAVE PRE-EXISTING HEALTH PROBLEMS.
READ ALL INSTRUCTIONS BEFORE ASSEMBLING OR USING ANY FITNESS EQUIPMENT.
FORCE USA FITNESS EQUIPMENT ASSUMES NO RESPONSIBILITY FOR PERSONAL INJURY OR PROPERTY DAMAGE
SUSTAINED BY OR THROUGH THE USE OF THIS PRODUCT.
SAVE THESE INSTRUCTIONS.
Page 3

Parts list
Key No.
Description of part
Quantity
1#
right stabilizer
1
2#
right rear vertical frame
1
3#
left upper frame
1
4#
short connection frame
2
5#
right center vertical frame
1
6#
right front vertical frame
1
7#
Right moving frame
1
8#
cross beam
2
9#
L shape bracket
8
10#
upper connection frame
1
11#
weight plate holder
2
12#
pulley bracket
2
13#
barbell holder
2
14#
left chin up bar
1
15#
J-shape hook
6
16#
guide rod
4
17#
selector rod
2
18#
round hook
4
19#
barbell holder
28
20#
triangle bracket
4
21#
solid guide rod
2
22#
bearing frame
2
23#
bearing house
1
24#
barbell
1
25#
Left jook
1
26#
pin
4
Page 4
27#
bracket
4
28#
Push bar
1
29#
Weight plate cover bottom bracket
2
30#
Weight plate cover upper bracket
2
31#
left rear vertical frame
1
32#
weight stack inner bracket
4
33#
weight stack cover
2
34#
Left stabilizer
1
35#
light upper frame
1
36#
left center vertical frame
1
37#
right chin up bar
1
38#
pulley bracket
2
39#
Right safety bar
1
40#
Left bearing house
1
41#
bracket
4
42#
left front vertical frame
1
43#
Bracket fixing frame
2
44#
Left safety bar
1
45#
right safety bar
1
46#
Left crunch
1
47#
Right crunch
1
48#
Left moving frame
1
49#
adjustable washer
4
50#
LOGO board
1
51#
big hook
1
52#
Spring colar cover
8
53#
Lock pin
2
54#
weight stem
4
Page 5

55#
weight plate
38
56#
Plastic guide
4
57#
Weight stem
2
58#
Bearing
4
59#
bearing
4
60#
□75×□
60 sleeve
4
61#
pulley
16
62#
pulley
2
63#
7# Carabiner
2
64#
Adjustable single strap
2
65#
L=8270 cable
2
66#
Bushing
4
67#
Bearing
2
68#
V shape handle
1
69#
ankle strap
1
70#
Shiver bar
1
71#
triceps rope
1
72#
Rubber bumper
2
73#
M12×75 Hex bolt
20
74#
φ12 washer
90
75#
M12 Aircraft nut
44
76#
M12×95 Hex bolt
16
77#
M12×100 Hex bolt
4
78#
φ
10 washer
118
79#
M10×25 Allen bolt
30
80#
φ6 washer
36
81#
M6×15 Allen bolt
12
82#
M6 Aircraft nut
18
Page 6

83#
Big washer
4
84#
M12×85 Hex bolt
4
85#
M10×100 Allen bolt
2
86#
M10×95 Allen bolt
8
87#
M10 Aircraft nut
40
88#
M10×50 Allen bolt
16
89#
M10×85 Allen bolt
26
90#
M10×70 Allen bolt
4
91#
M10×60 Allen bolt
2
92#
M6×43 Allen bolt
6
93#
φ25×
2 End cap
2
94#
M10*25 Sunk bolt
4
95#
M12×90 Hex bolt
2
96#
φ10×80 pin
2
97#
φ40 bead flange
4
98#
φ
26 bead flange
2
99#
φ19×
1.5 End cap
4
100#
Rubber bumper
2
101#
M10×45 Allen bolt
2
102#
Long sleeve
2
103#
φ50×φ26.5×200 sleeve
2
104#
φ
49 spring collar
4
Page 7
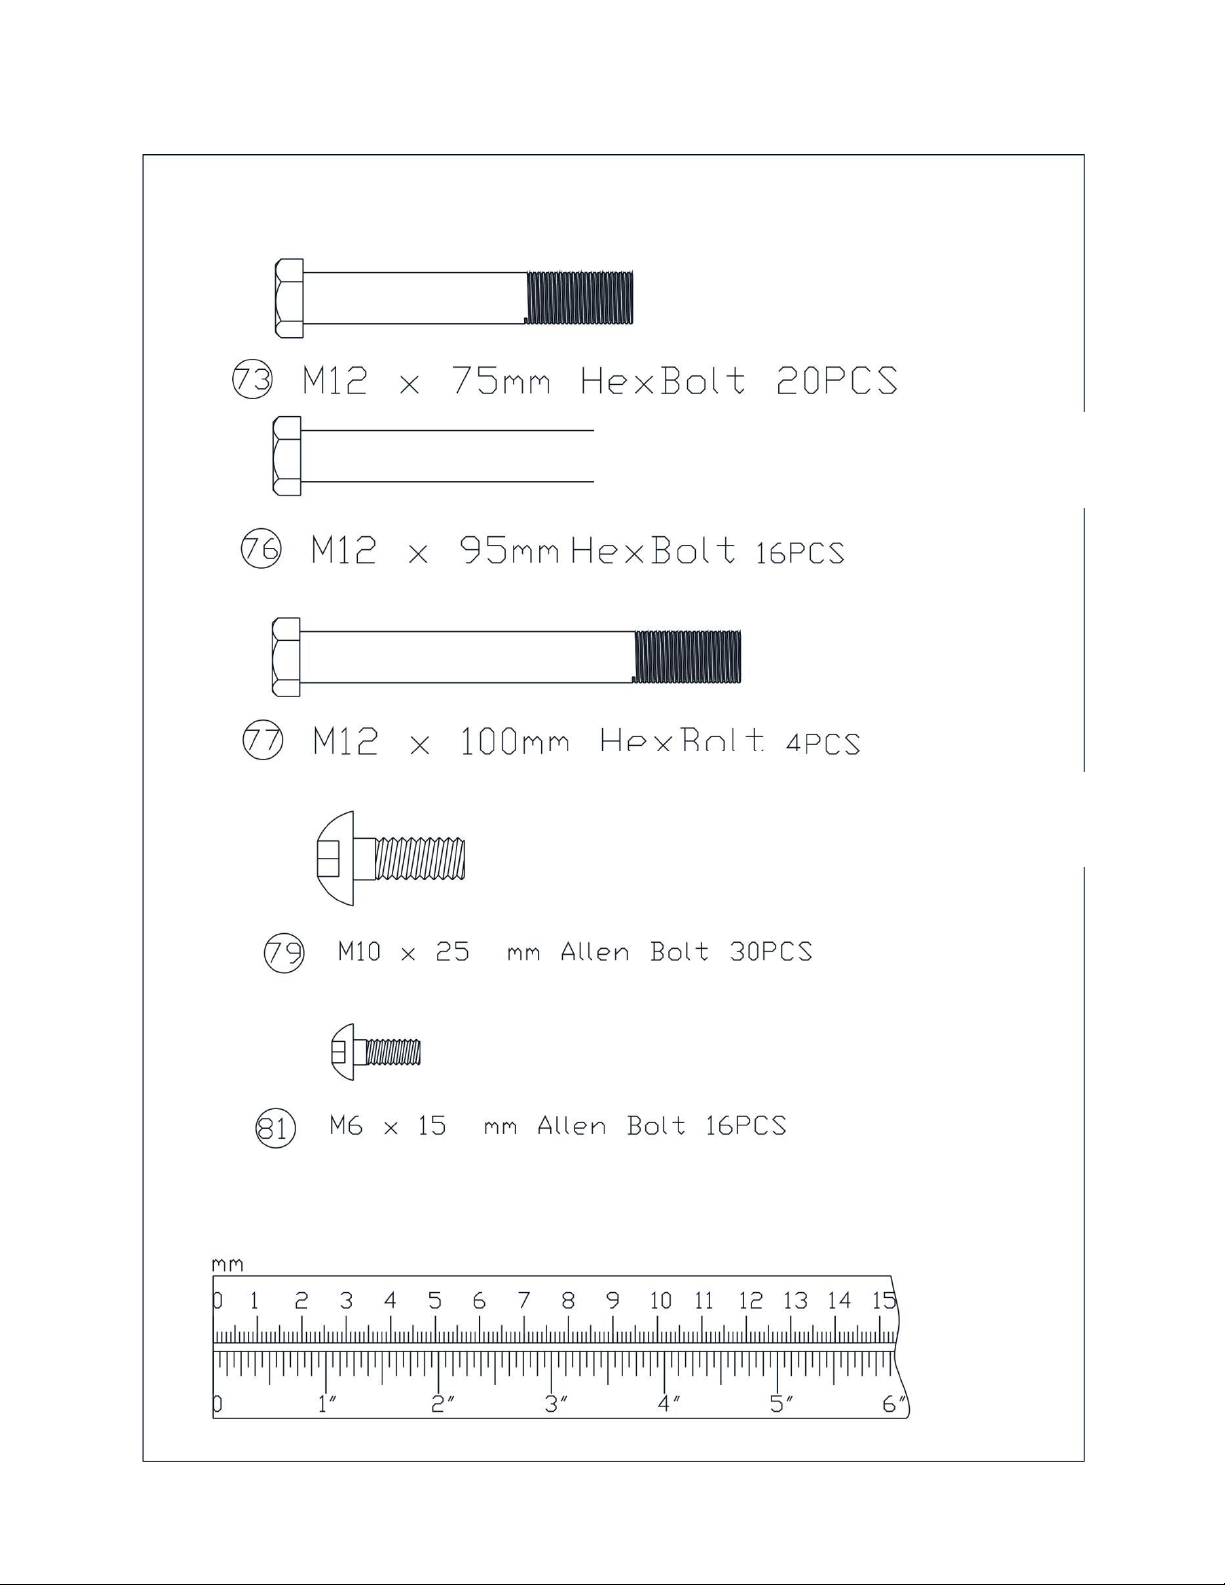
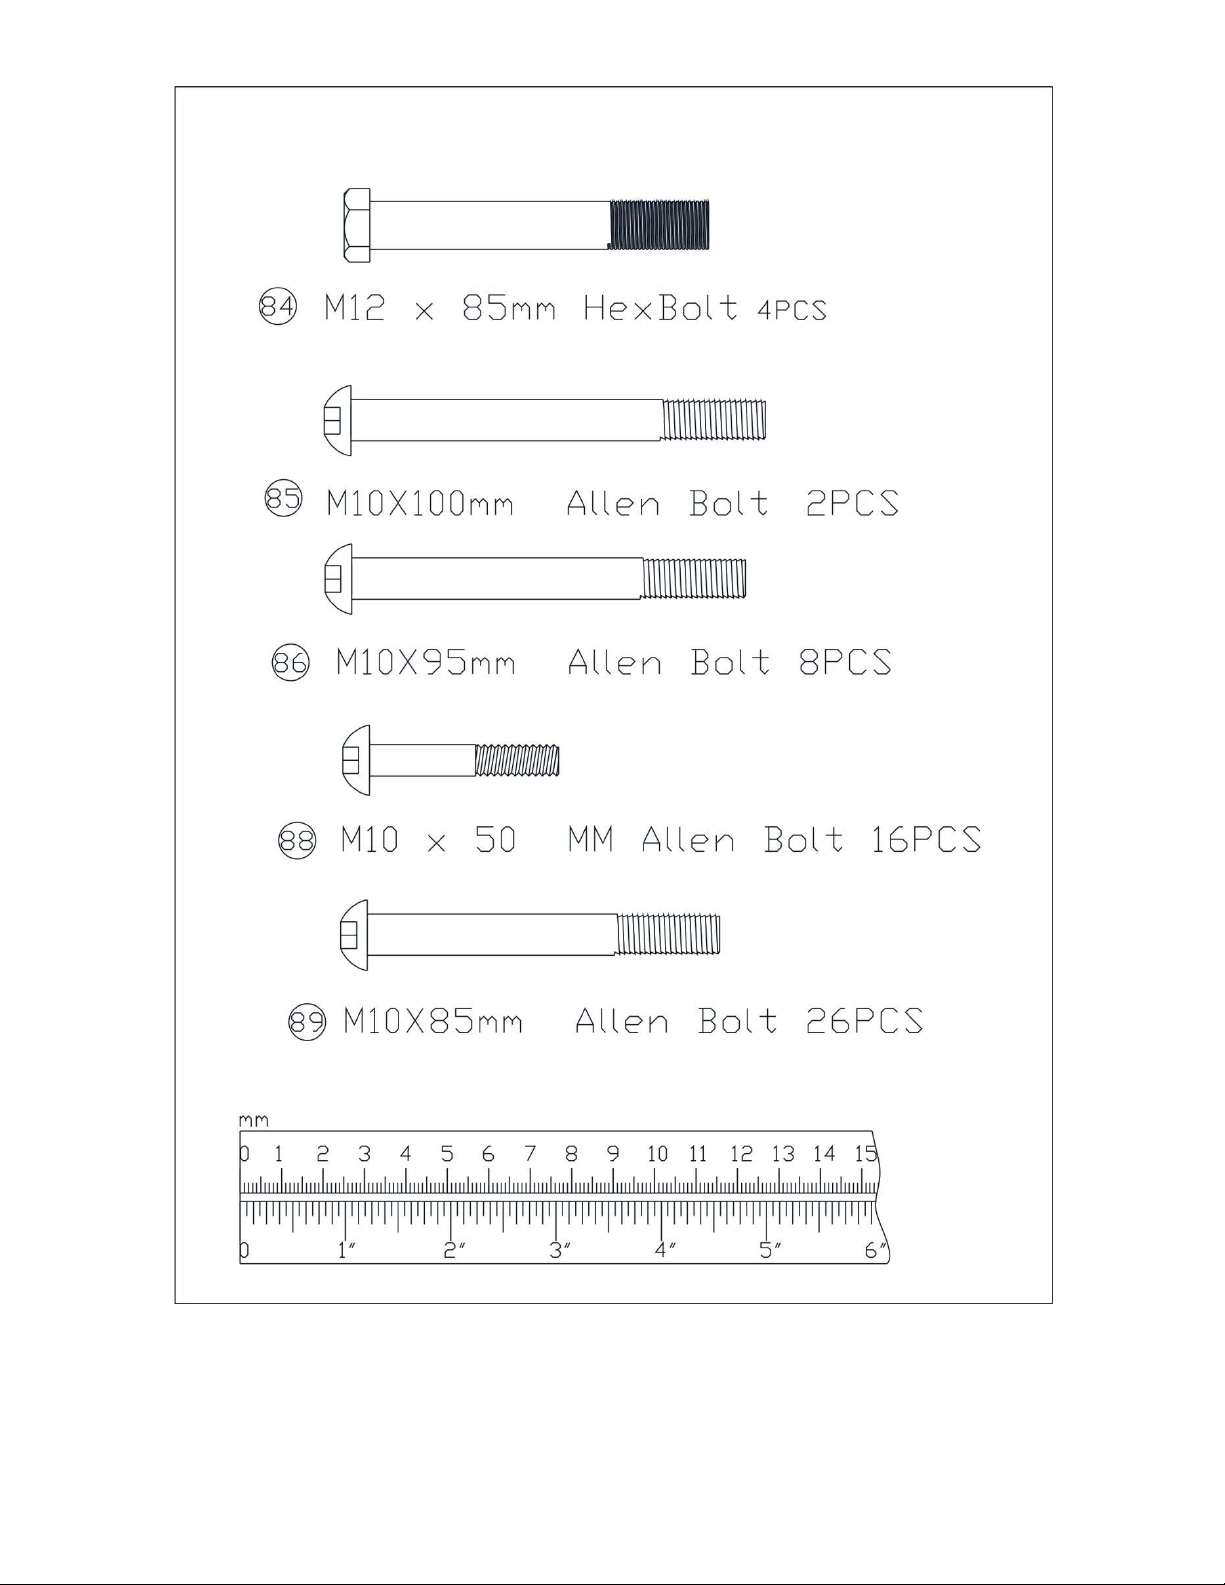
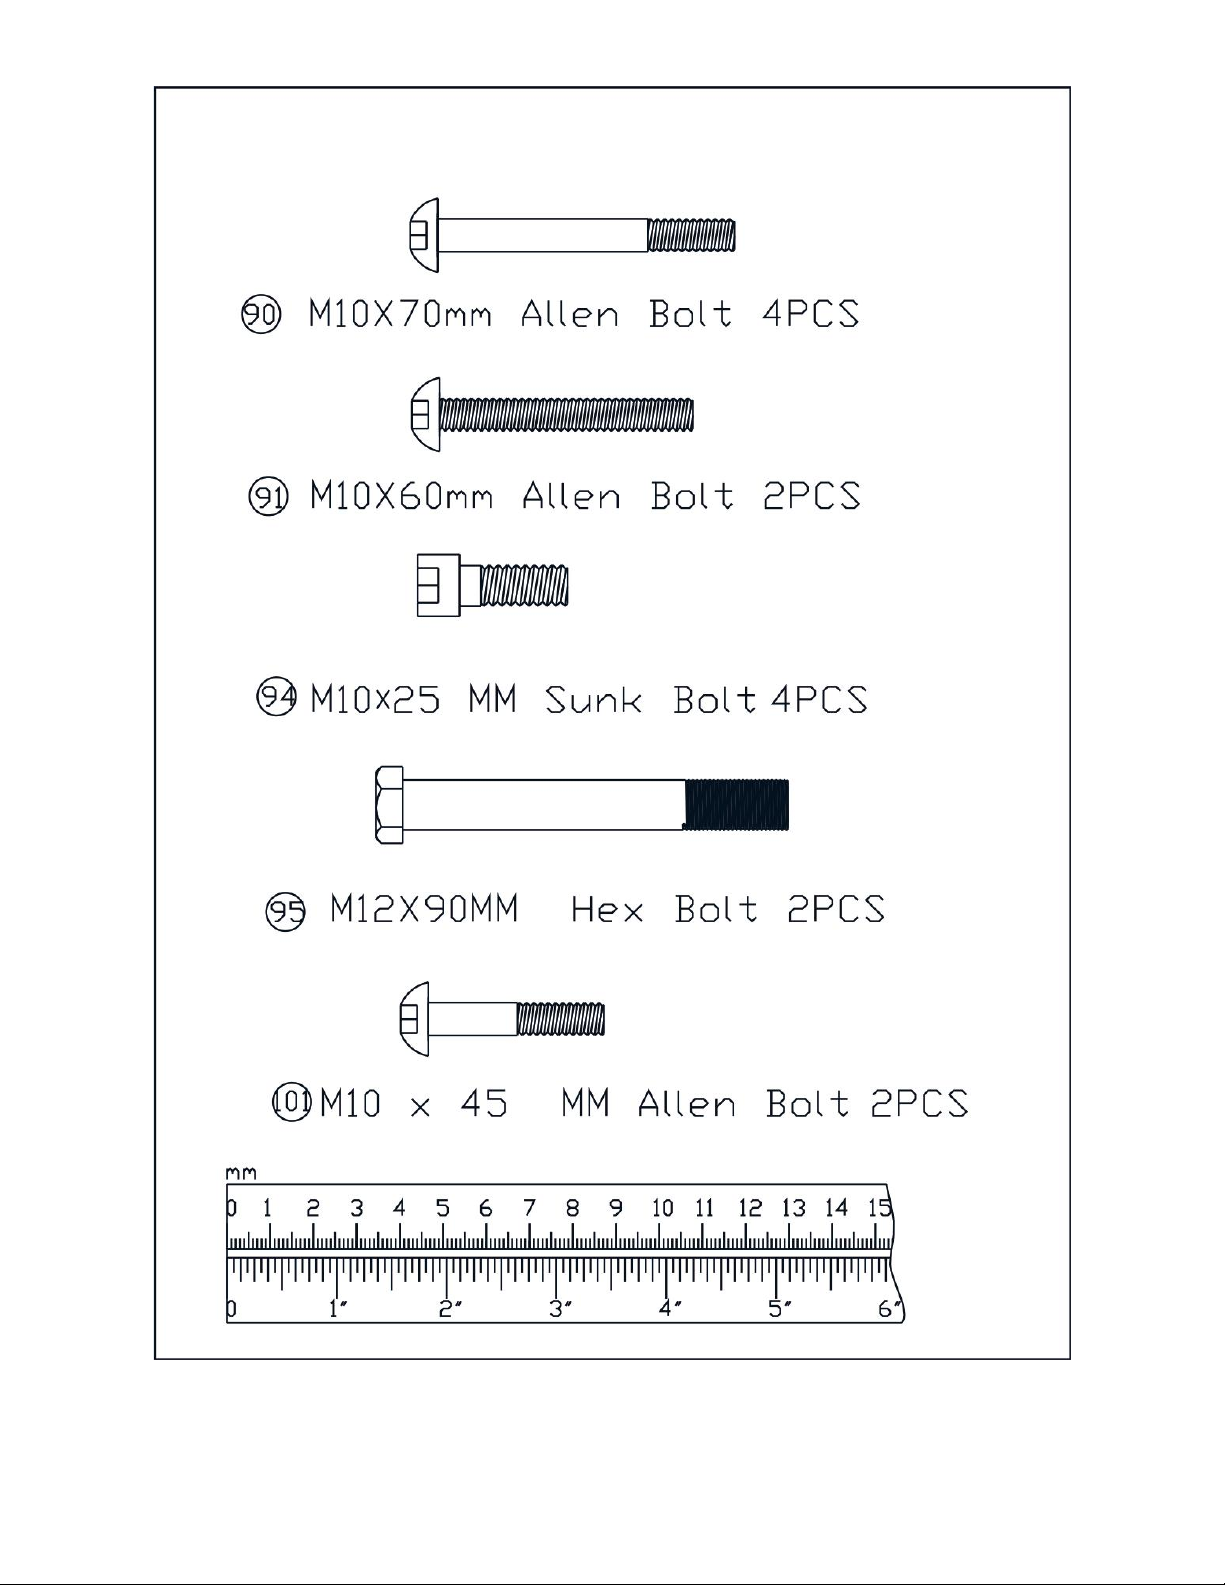
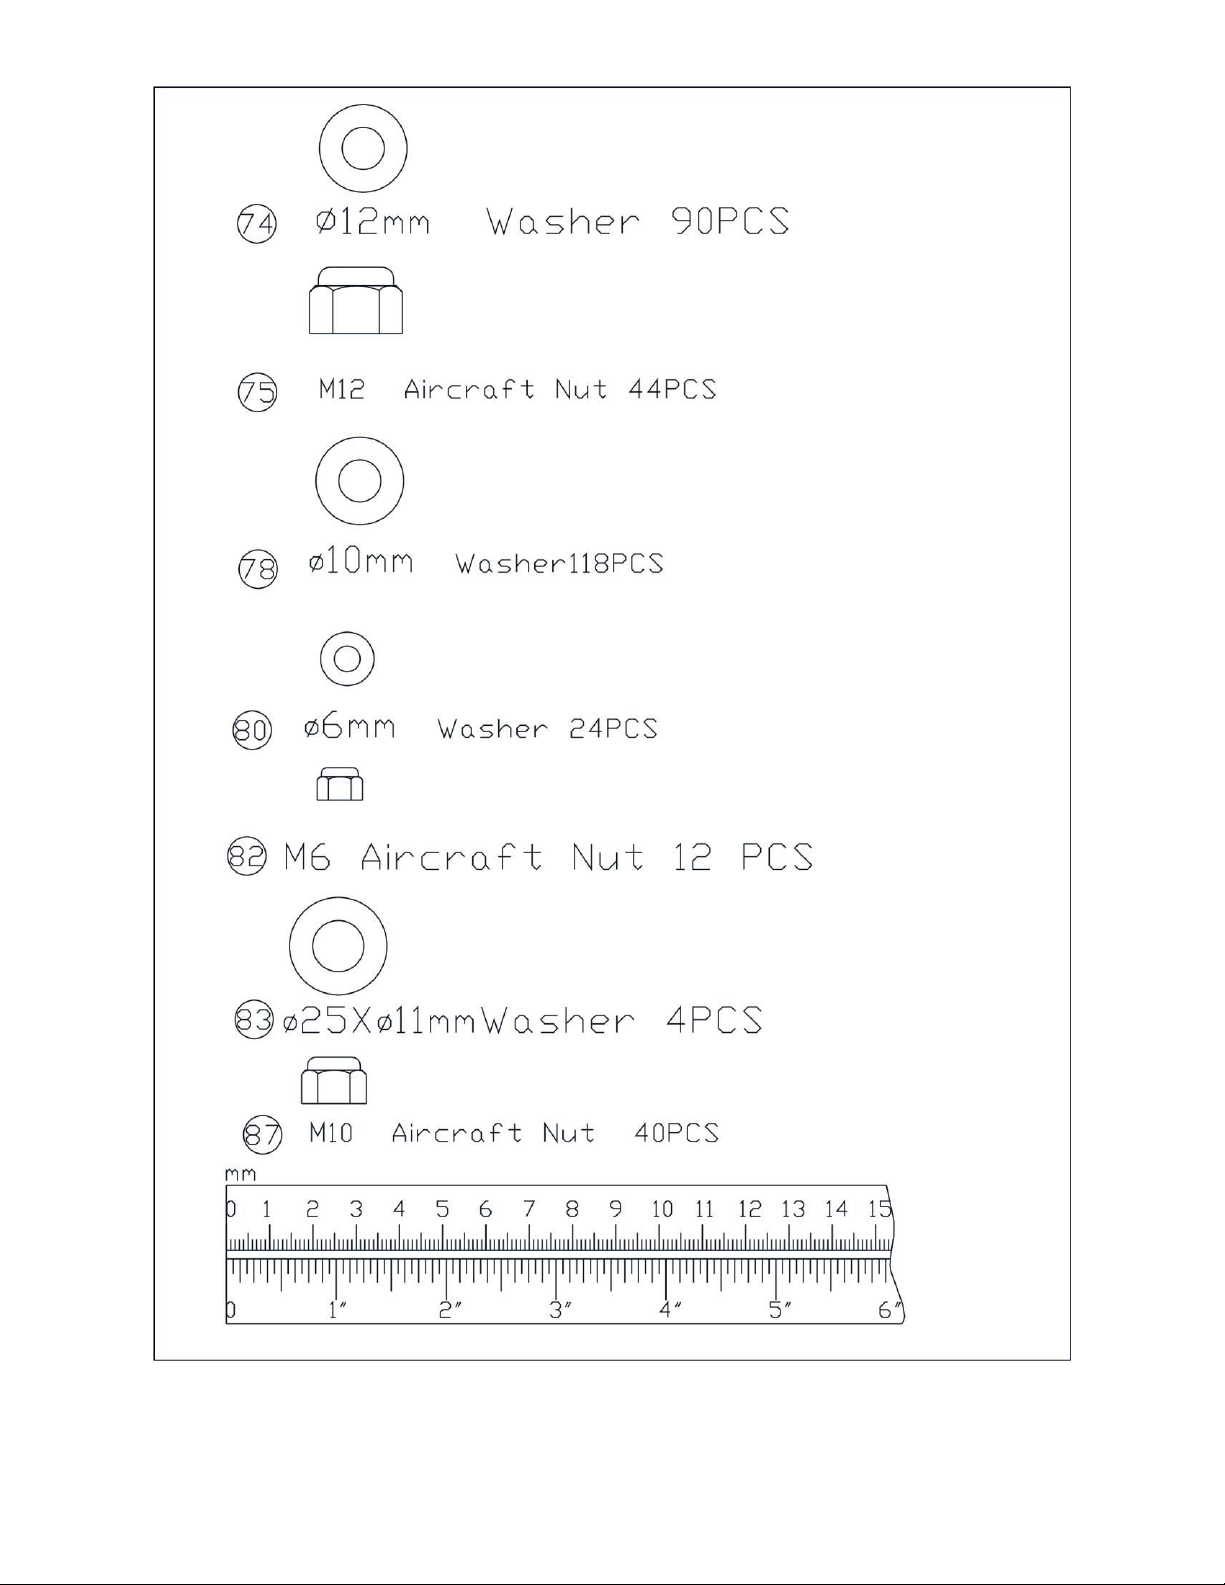
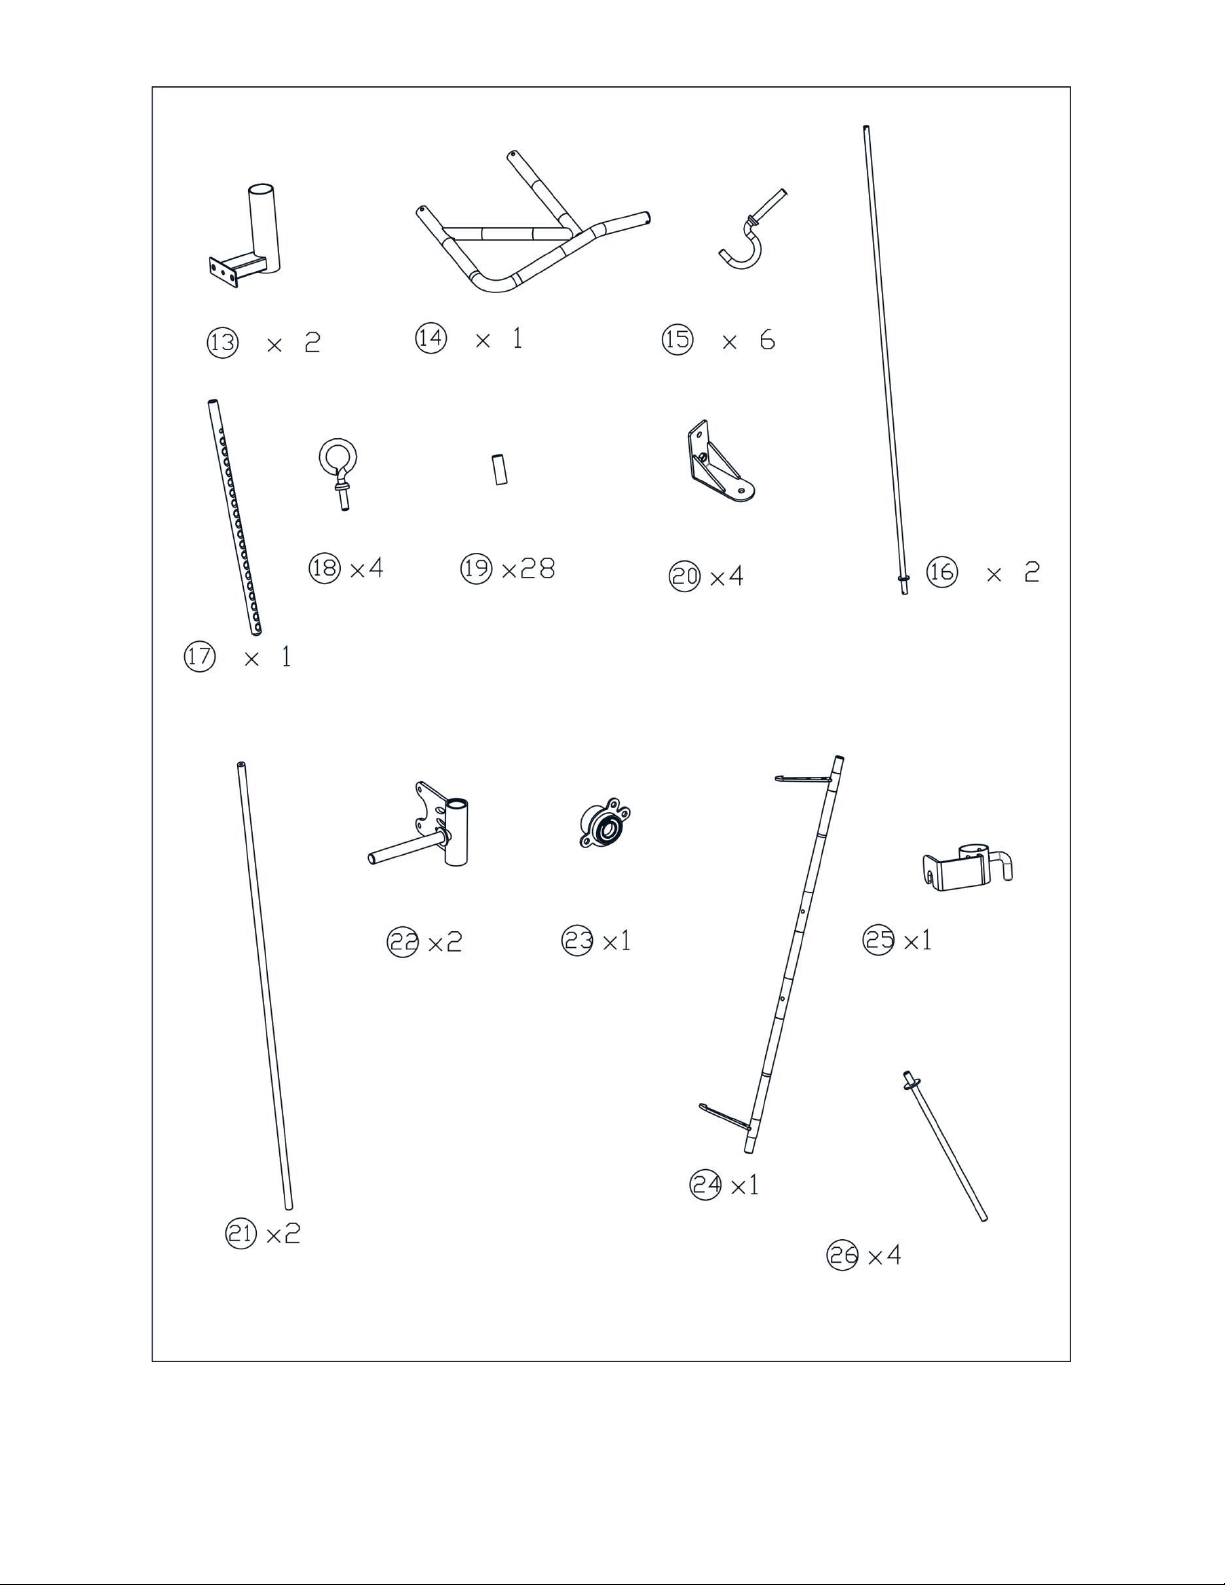
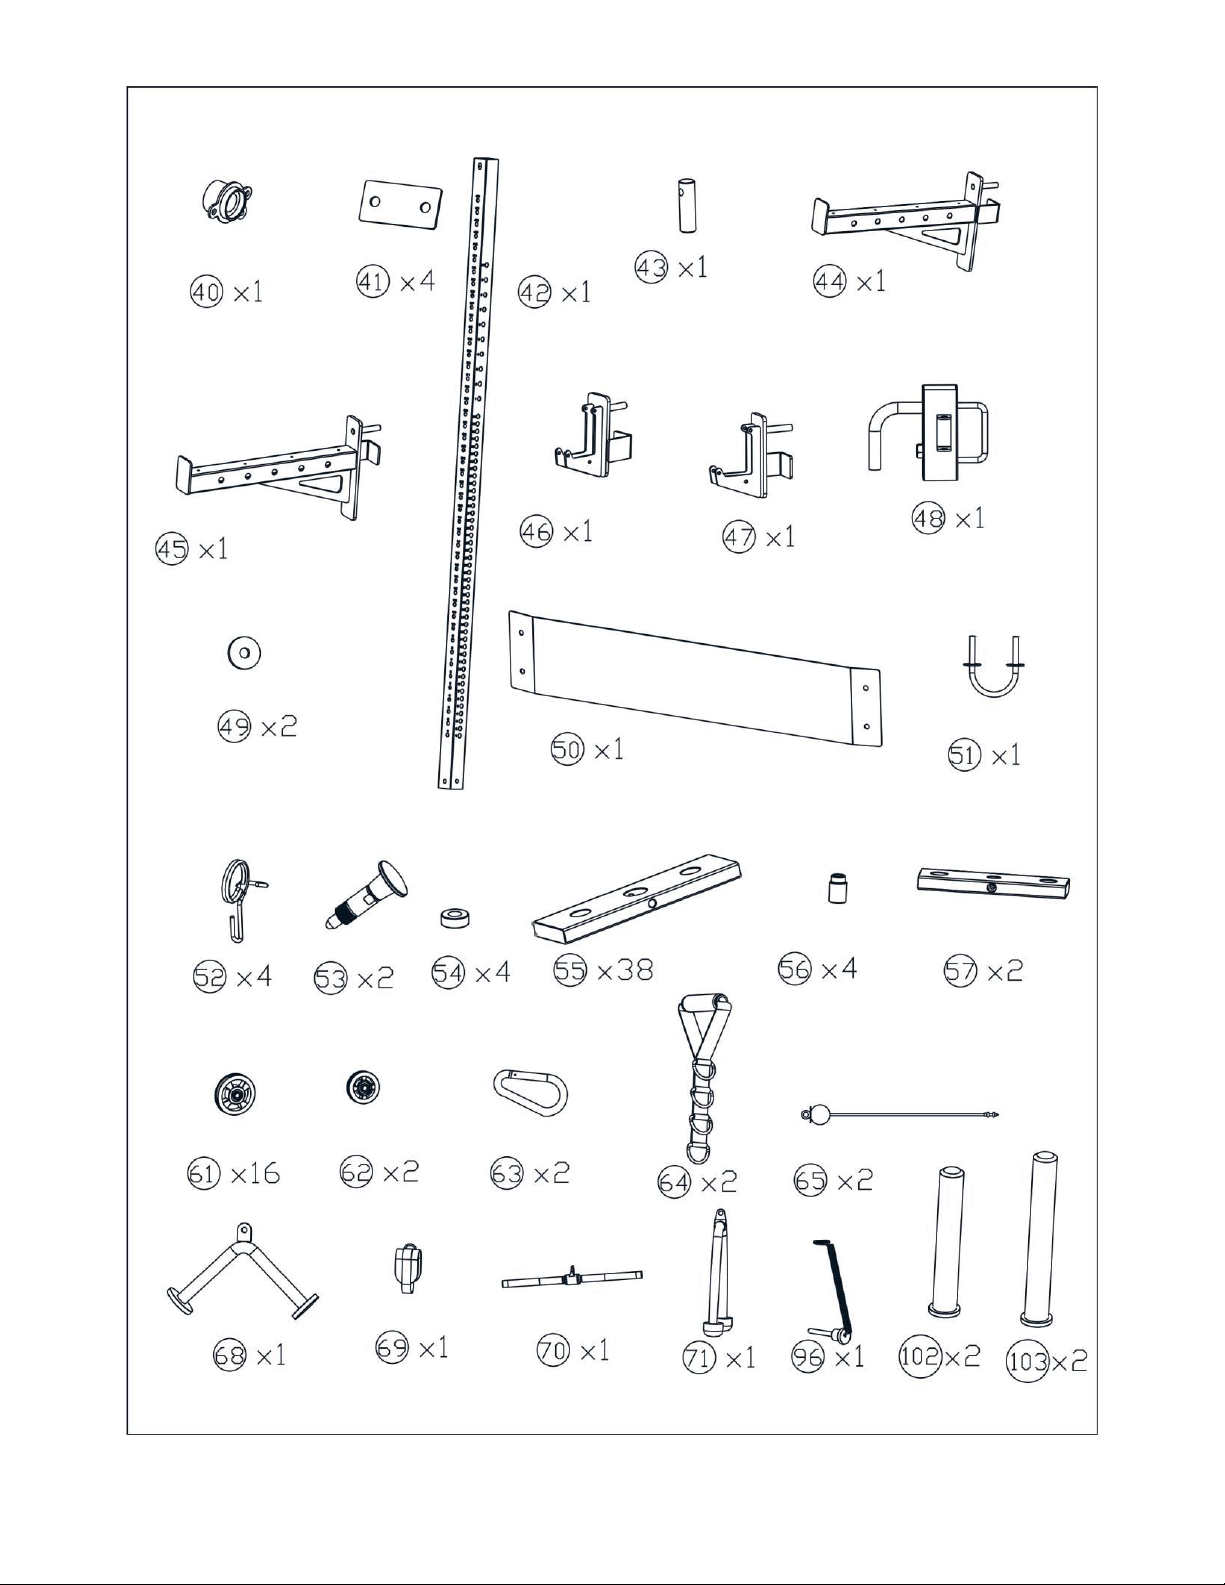
HARDWARE IDENTIFIER
Note: The following parts are not drawn to scale, Please use your own ruler to measure the size.
Page 8
Page 9
Page 10
Page 11

COMPONENT
Page 12
Page 13

Page 14
Page 15
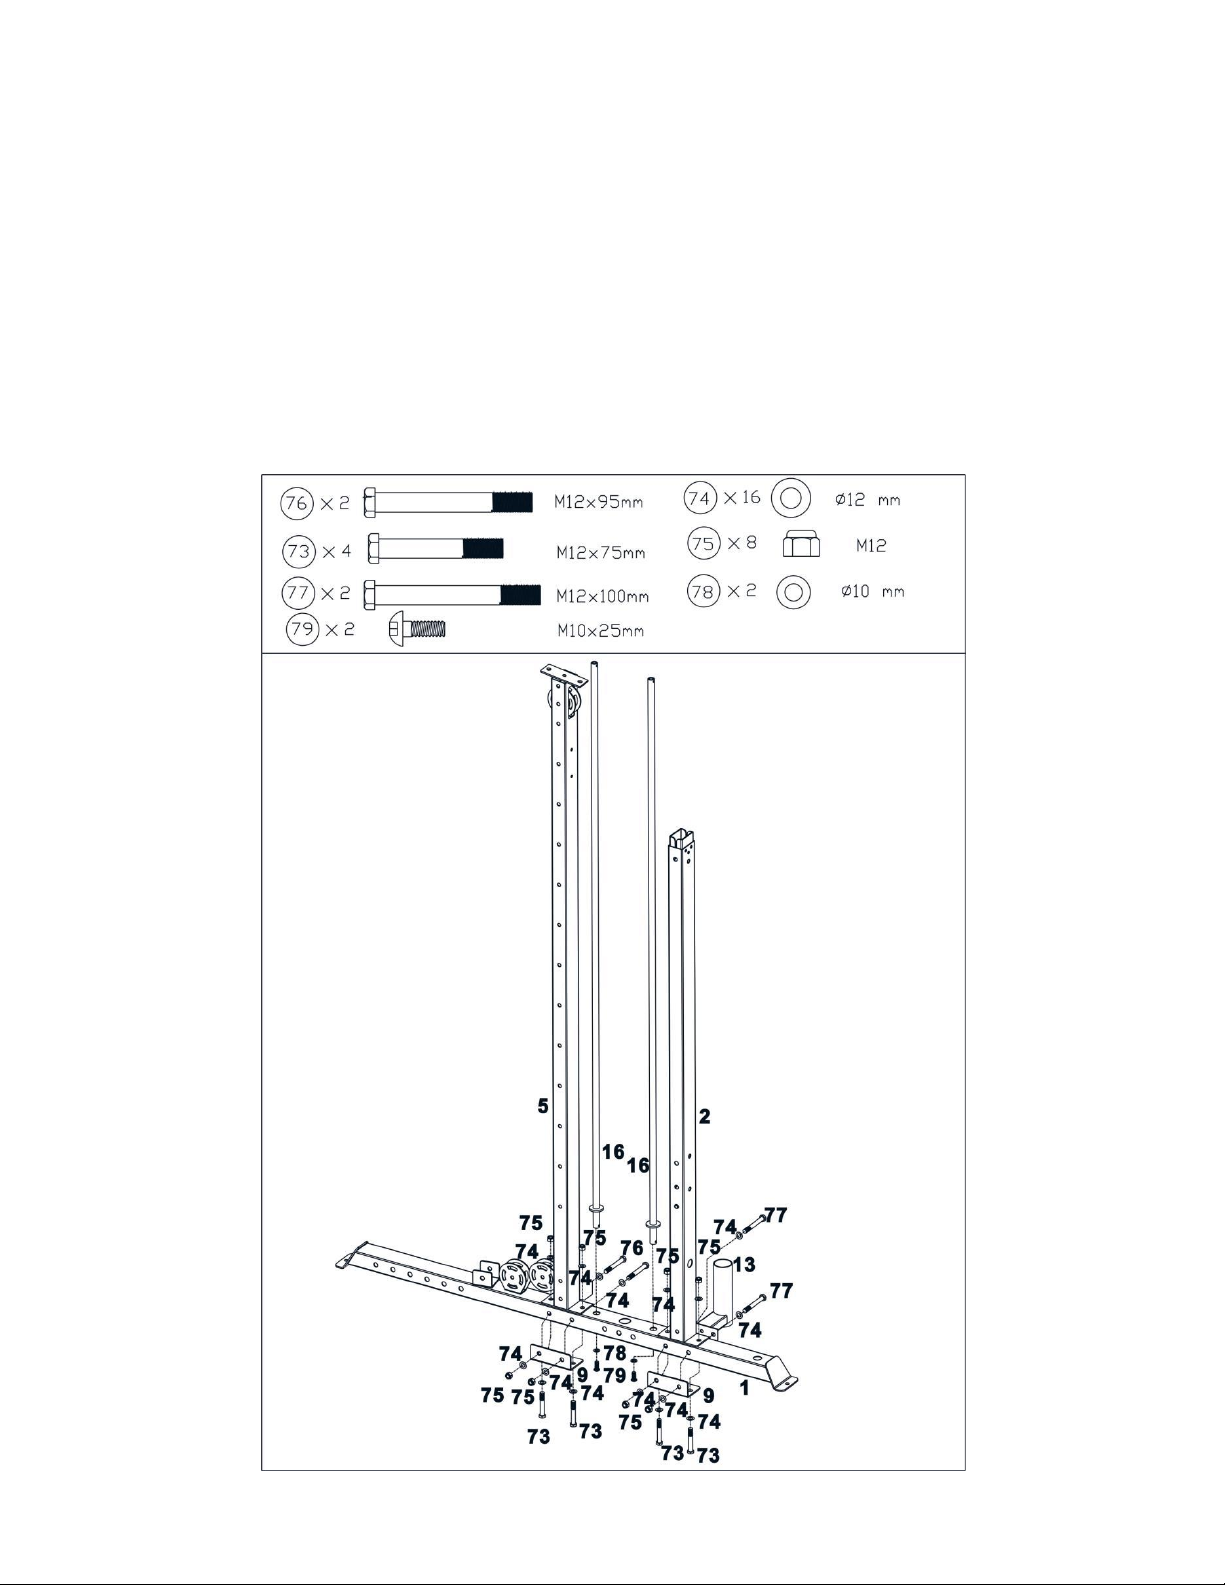
ASSEMBLY INSTRUCTION
Step 1
A.Attach the right center vertical frame(5#) onto the right stabilizer(1#),Secure them with 1 pc L shape
bracket(9#),2pcs M12*75 Hex bolt(73#),2pcs M12*95 Hex bolt(76#) ,8pcsφ12 washer (74#),4pcs M12 Aircraft nut
(75#).
B.Attach the right rear vertical frame(2#) onto the right stabilizer(1#), Secure them together with the barbell
holder(13#)together, with the same way in A and using 1 pc L shape bracket(9#),2pcs M12*75 Hex bolt(73#),2pcs
M12*100 Hex bolt(77#) ,8pcsφ12 washer (74#),4pcs M12 Aircraft nut (75#).
C. Insert the 2 pcs guide rods(16#) into the holes and secure them with 2pcs φ10 washer(78#),2pcsM10*25 Allen
bolt (79#) .
Page 16
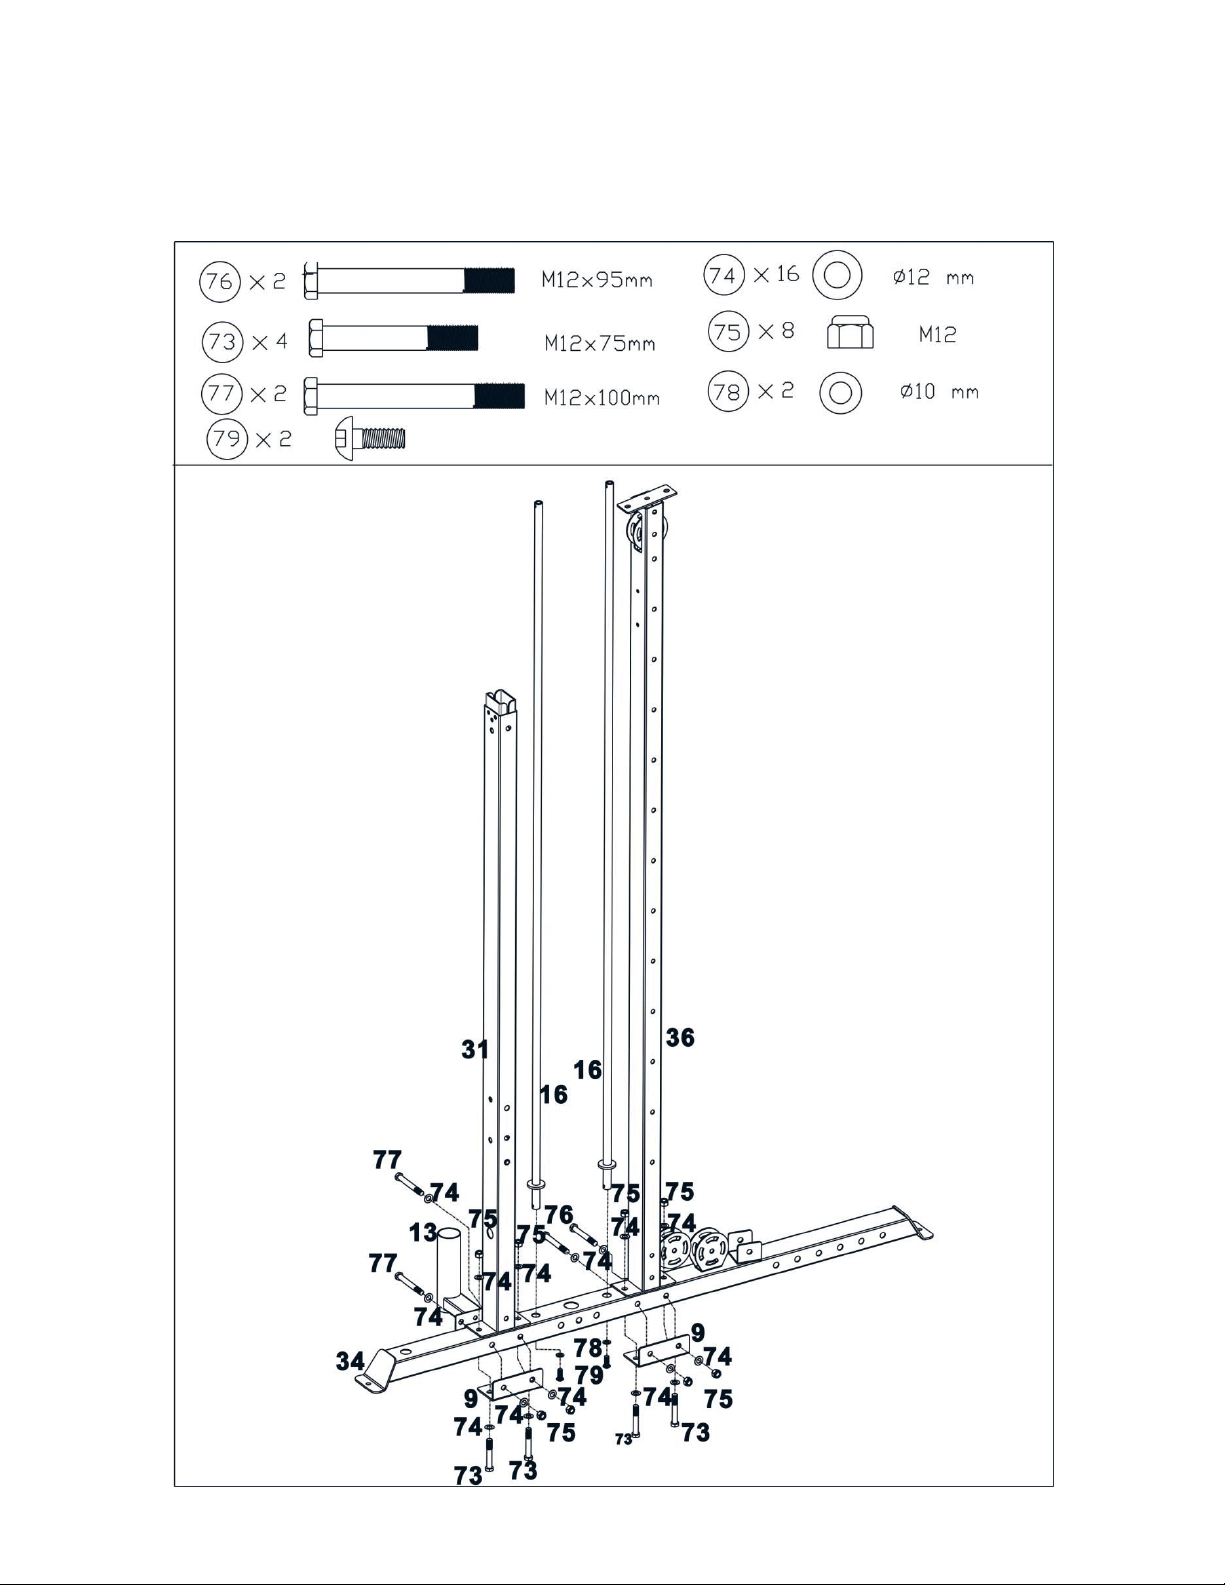
Step2
Using the same way in Step 1 to install the left rear vertical frame (31#),left center vertical frame(36#) and 2 pcs
guide rods(16#).
Page 17
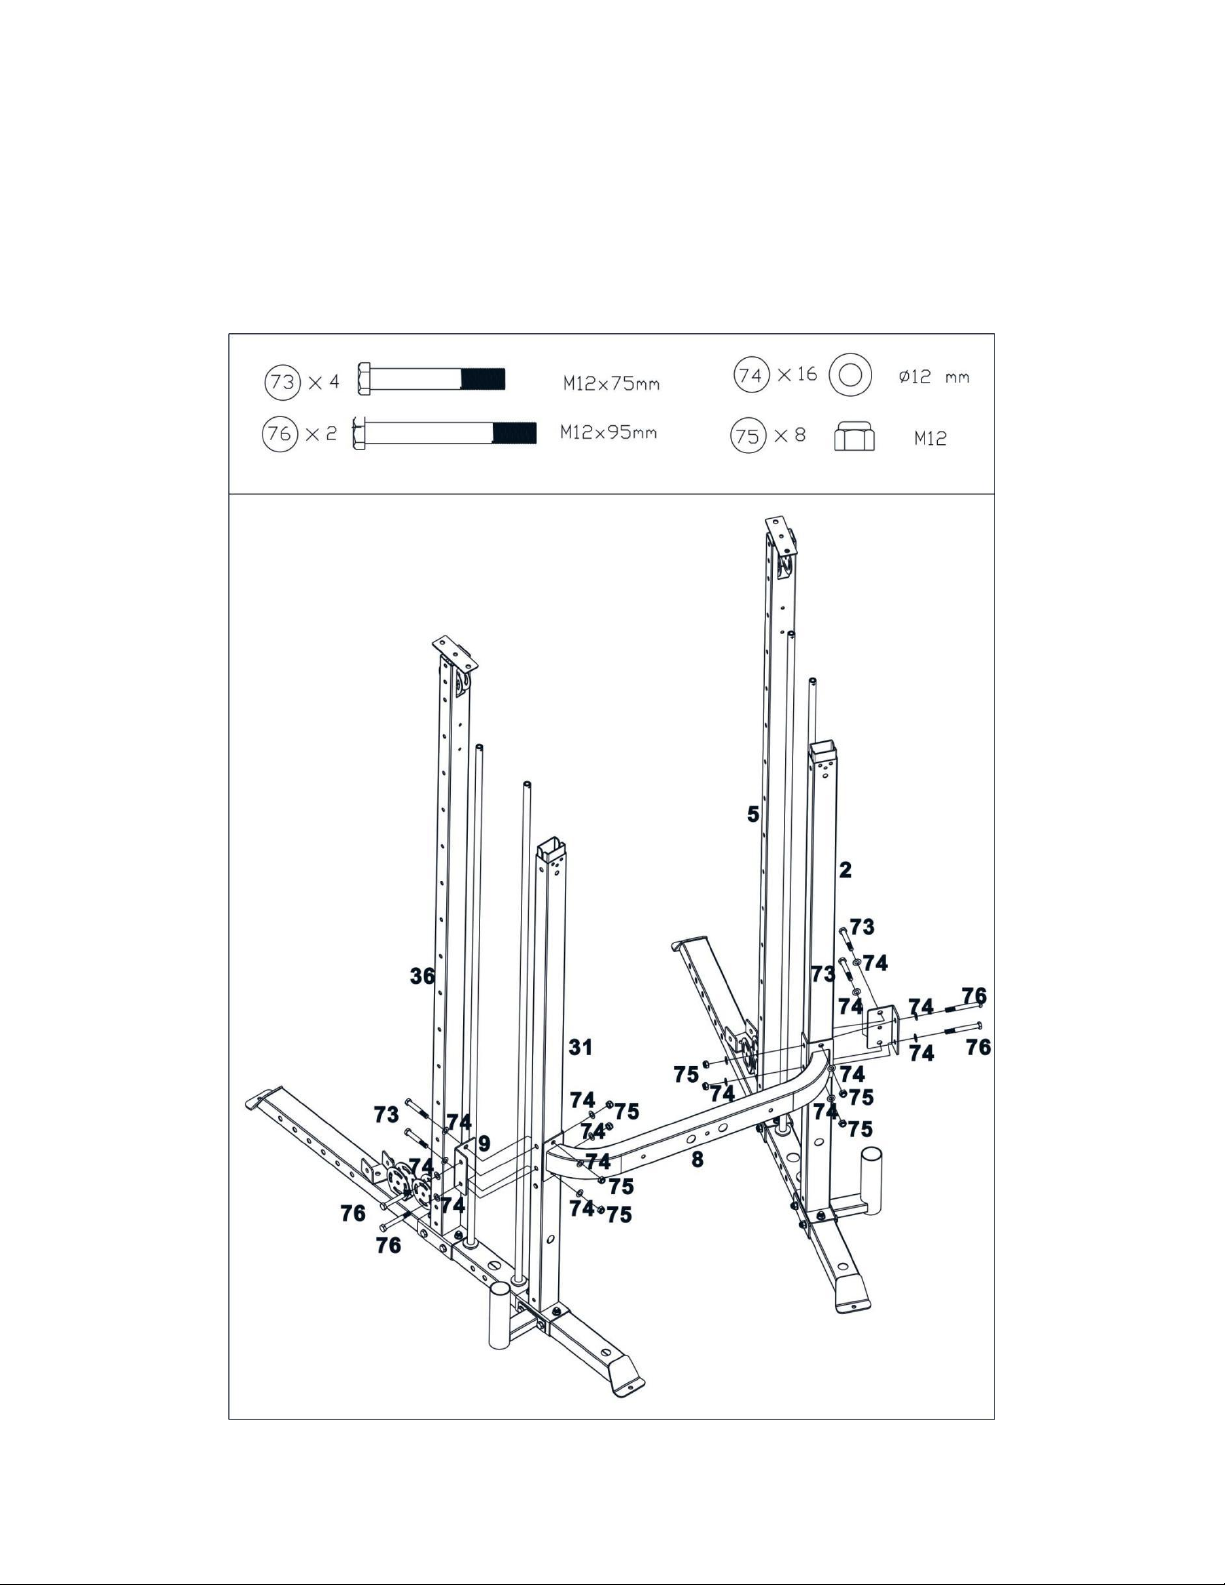
Step3
A.Attach the both end of the cross beam (8#)to the right rear vertical frame(2#) and left rear vertical frame (31#) as
the diagram shows. Secure one end with Secure them with 1 pc L shape bracket(9#),2pcs M12*75 Hex
bolt(73#),2pcs M12*95 Hex bolt(76#) ,8pcsφ12 washer (74#),4pcs M12 Aircraft nut (75#).
B.Assemble another end with the same way in A.
Page 18
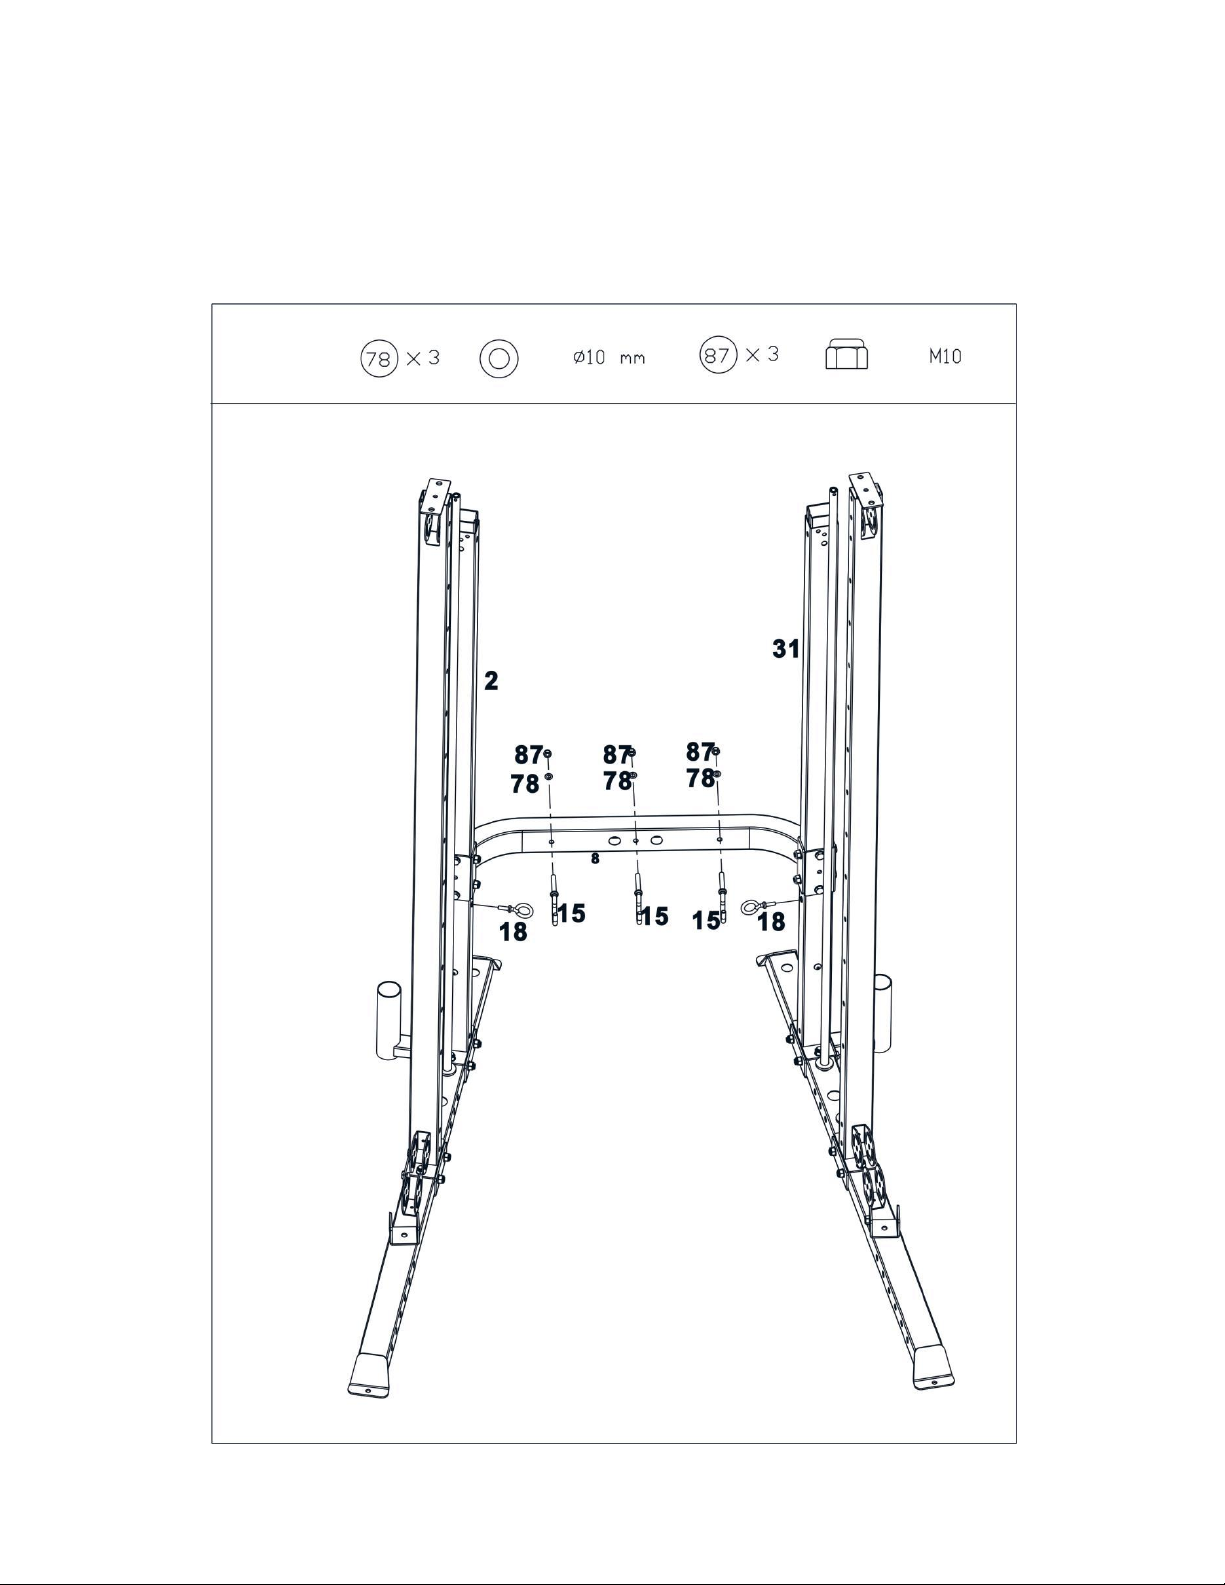
Step 4
Attach the 3pcs J-shape hook (15#)as the diagram shows and secure them with 3pcsφ10 washer(78#) and 3 pcs
M10 Aircraft nut(87#) separately.
Thread the 2 pcs round hook (18#) as the diagram shows.
Page 19
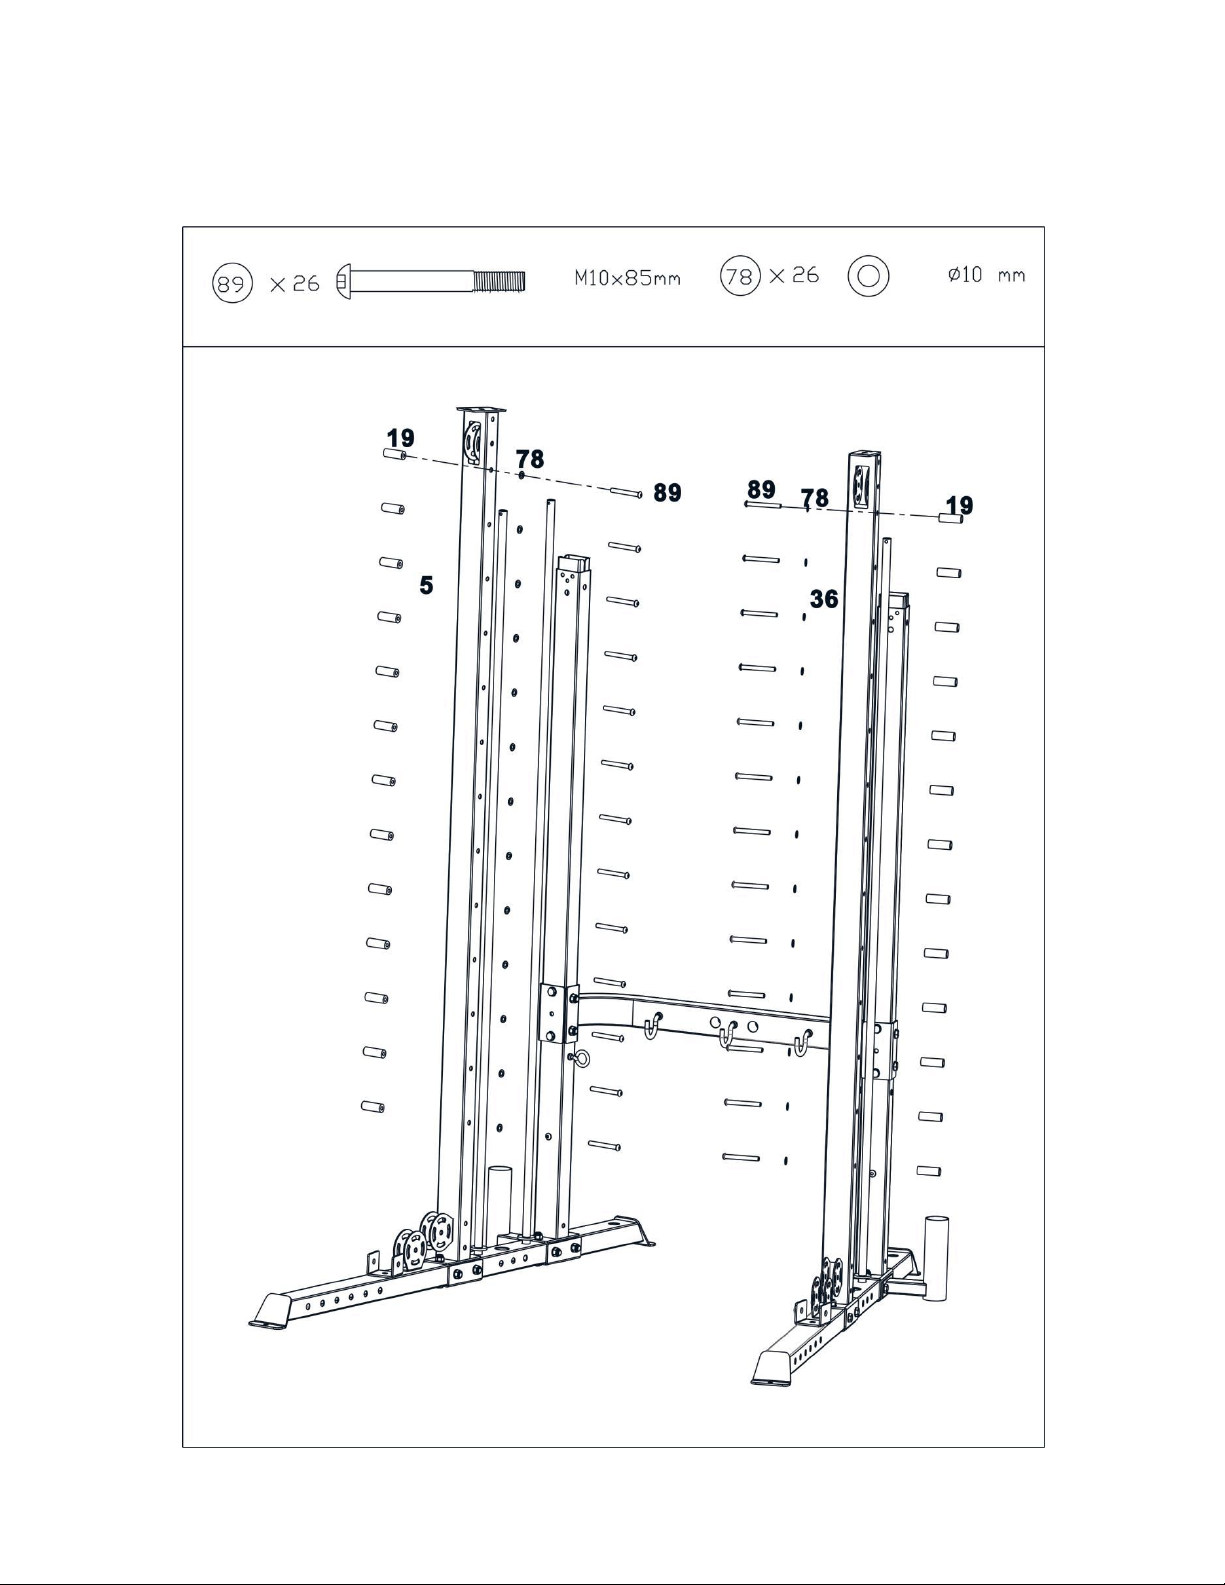
Step 5
Install the 46 pcs barbell holder (19#) into the holes and secure them with 46 pcs M10*85 Allen bolt(89#) and46 pcs
10 washer (78#).
φ
Page 20
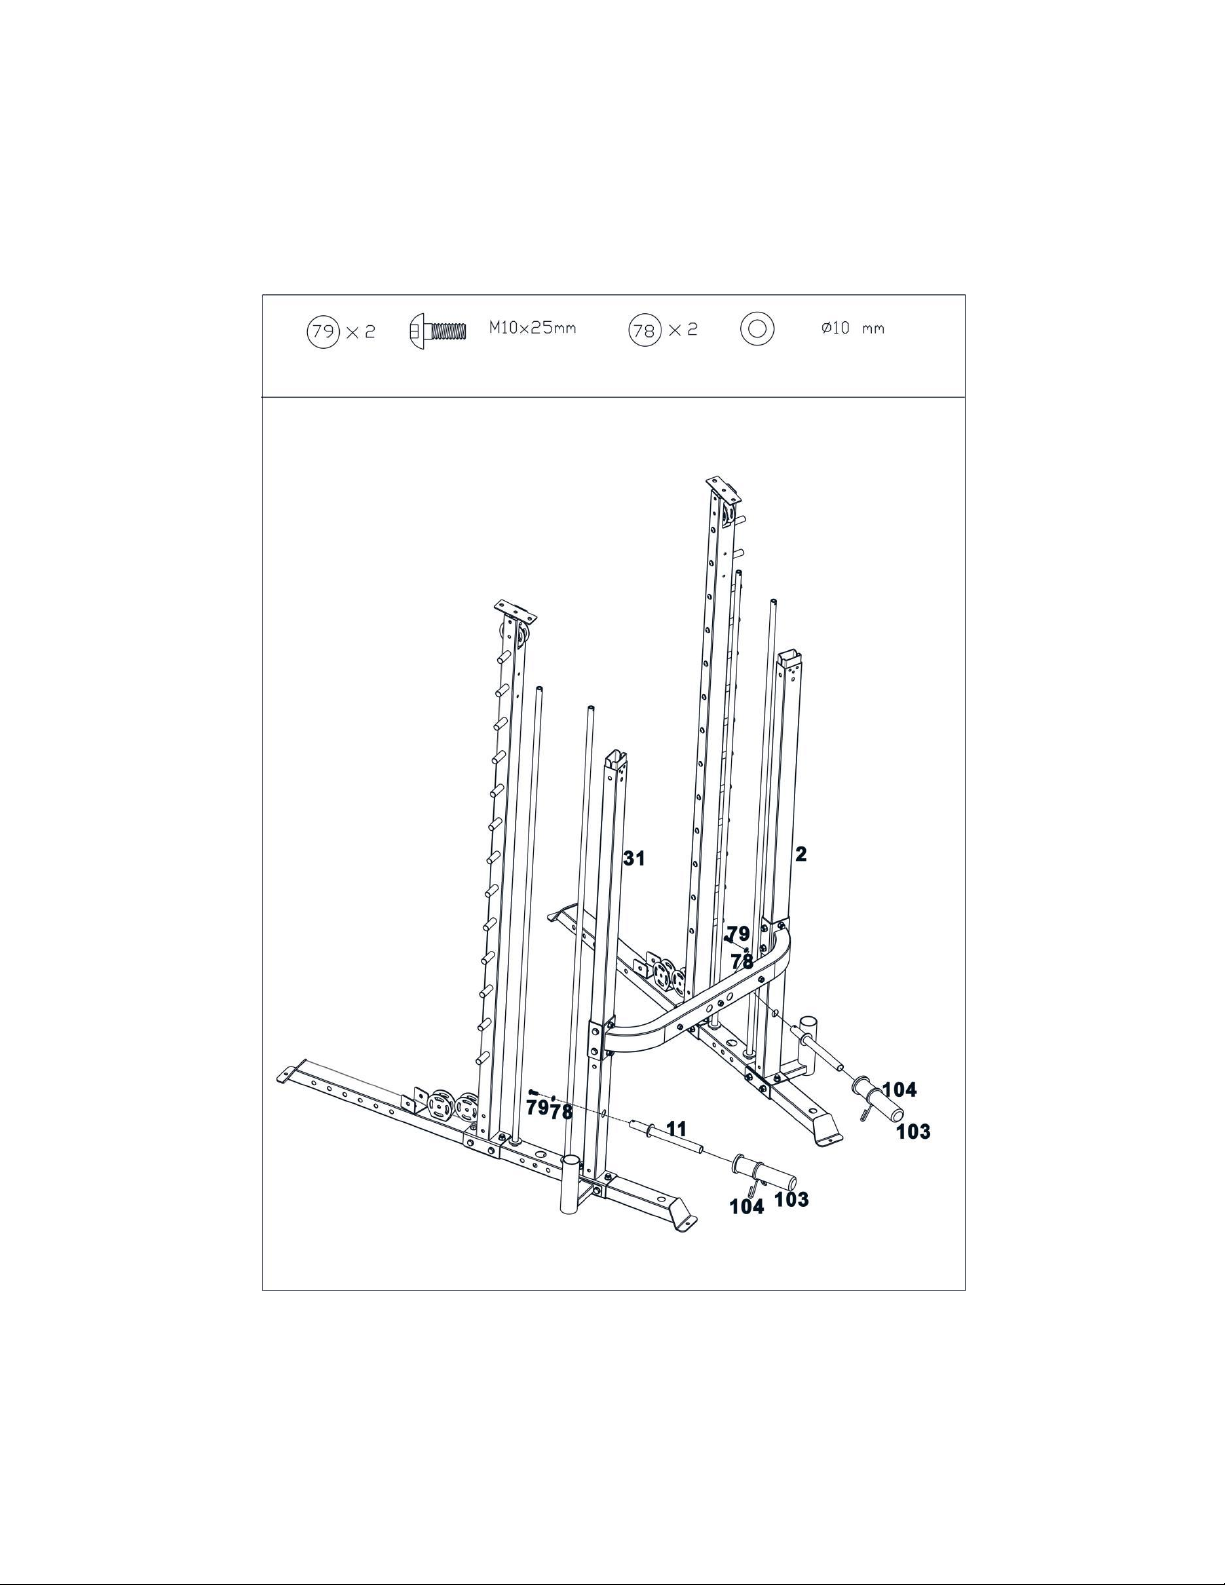
Step 6
Attach the weight plate holder(11#) into the hole as the diagram shows and secure it with M10*25 Allen bolt(79#)
andφ10 washer (78#). Attach the sleeve (103#) and spring collar (104#) as the diagram shows.
Repeat the same way to install another .
Page 21
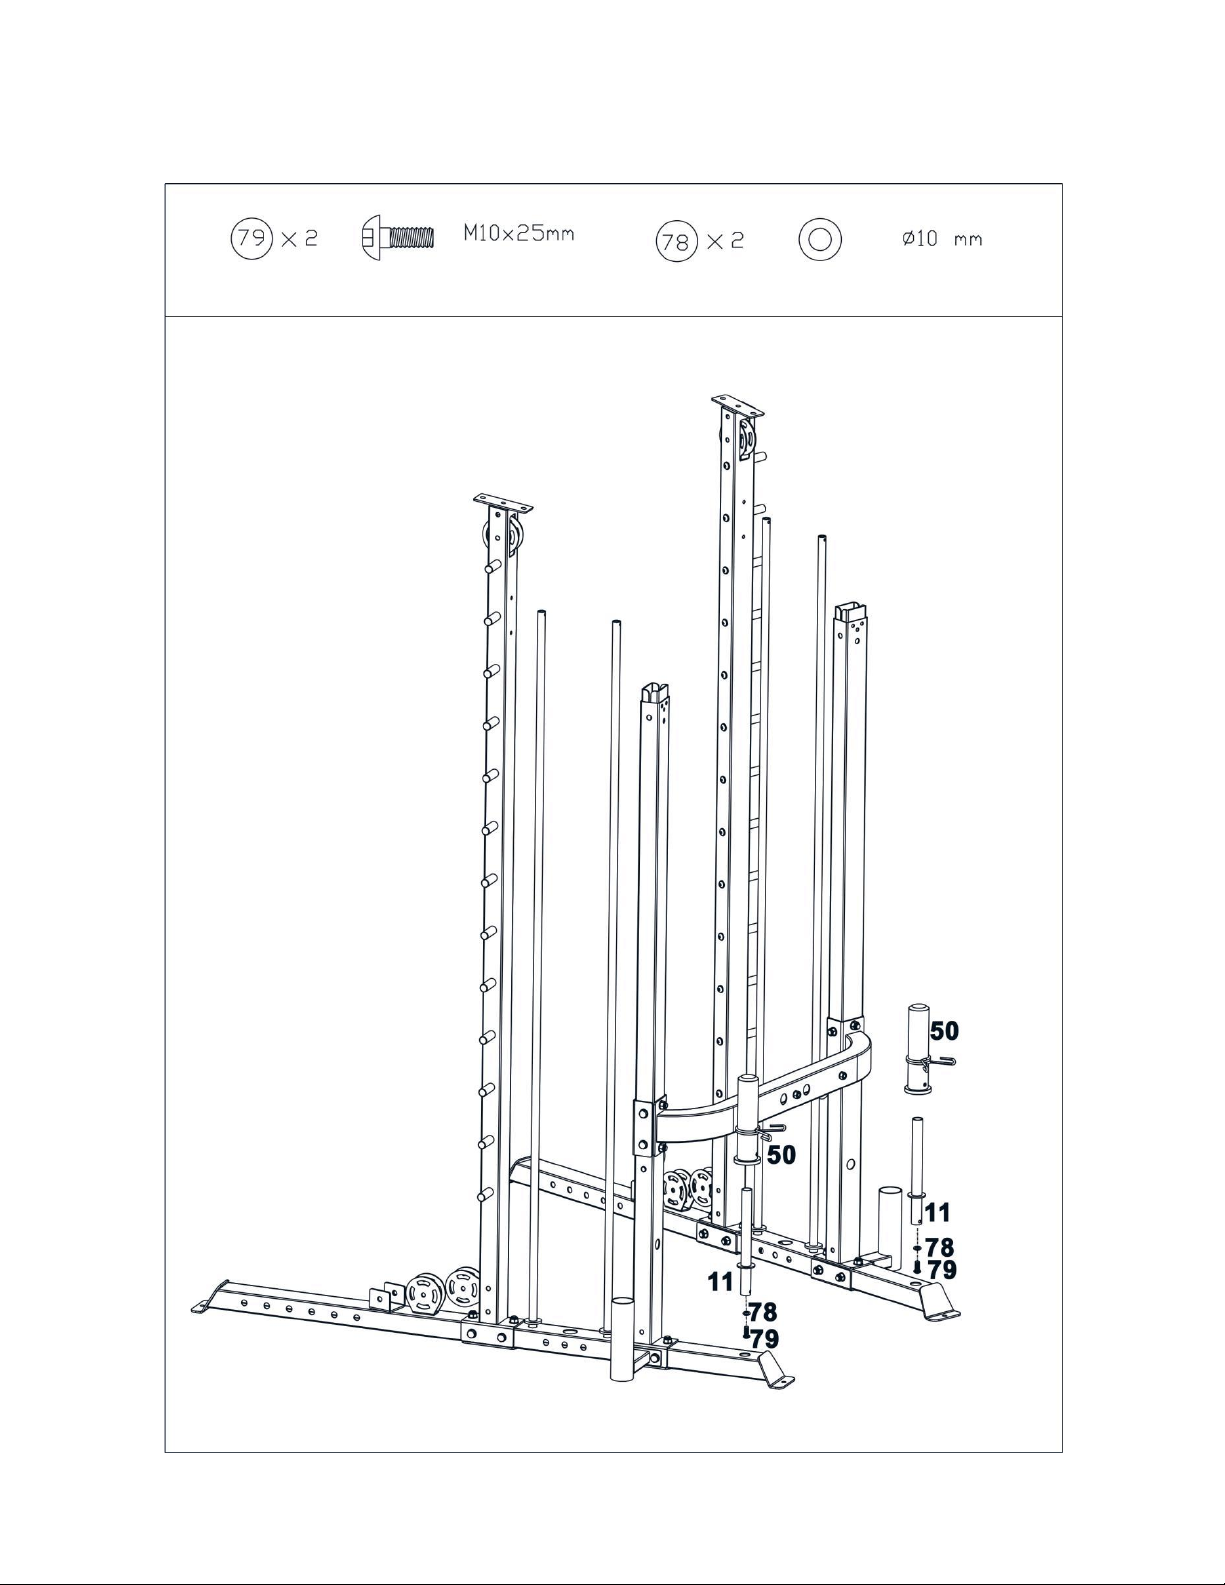
Step 7
Install the next 2 pcs weight plate holder(11#) as the diagram shows again with the same way in Step 6.
Page 22
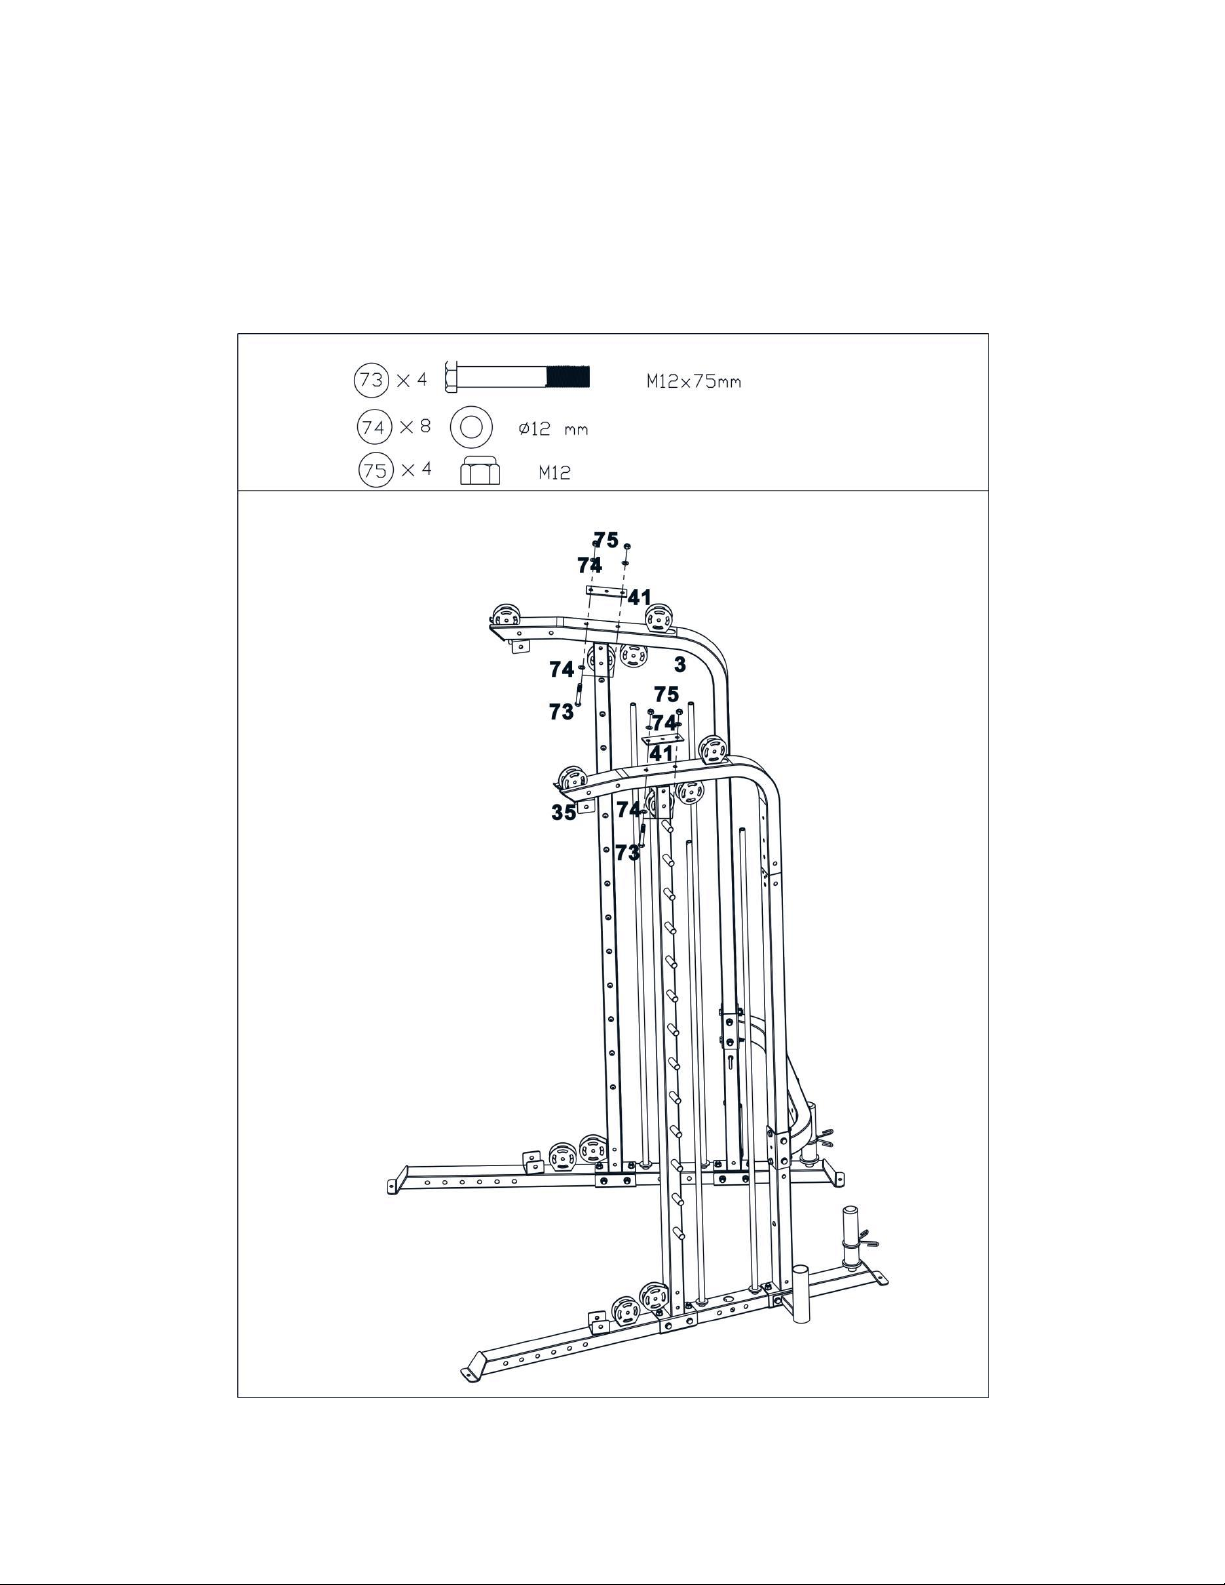
Step 8
A.Attach the left upper frame (3#) onto left center vertical frame(36#) ,Secure them with 2pcs M12*75Hex bolt
(73#),4pcs φ12 washer (74#),1 pc bracket (41#) and 2 pcs M12 Aircraft nut (75#).
B. Install the right upper frame(35#) with the same way in A.
Page 23
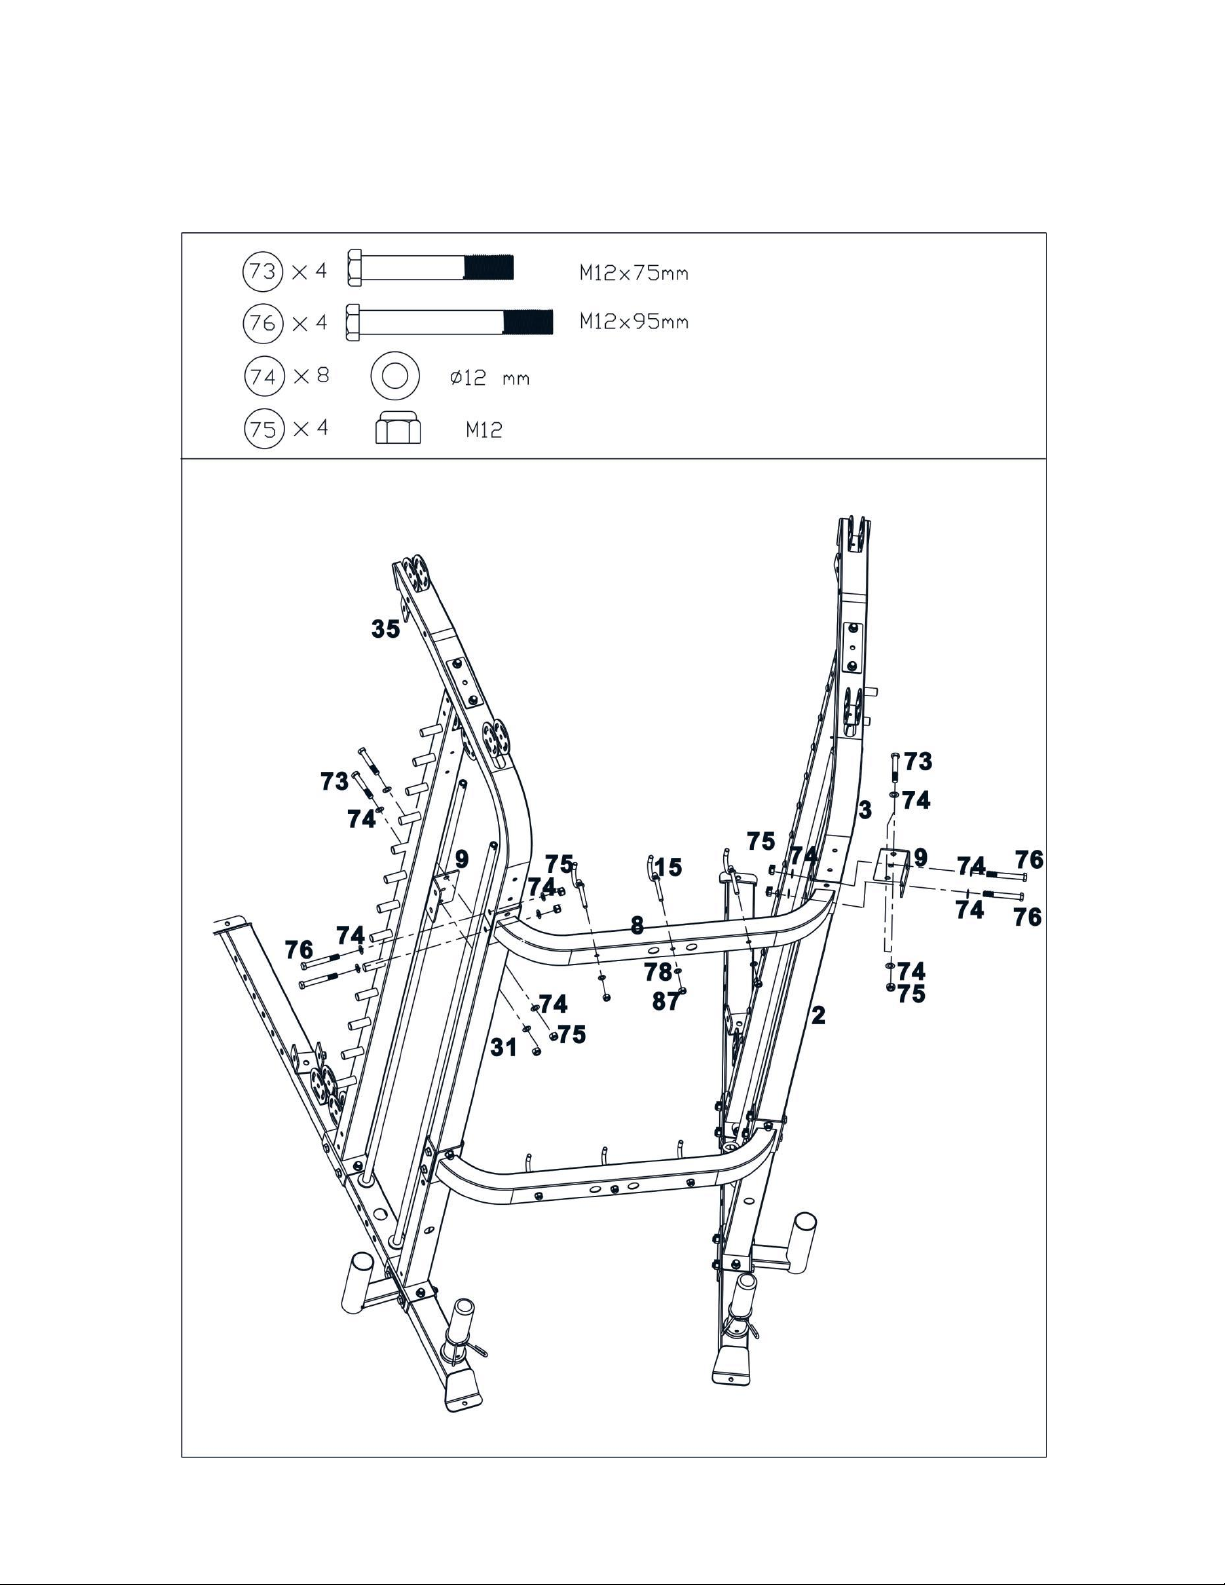
Step 9
Install the cross beam(8#) with the same way in STEP 3.
Page 24
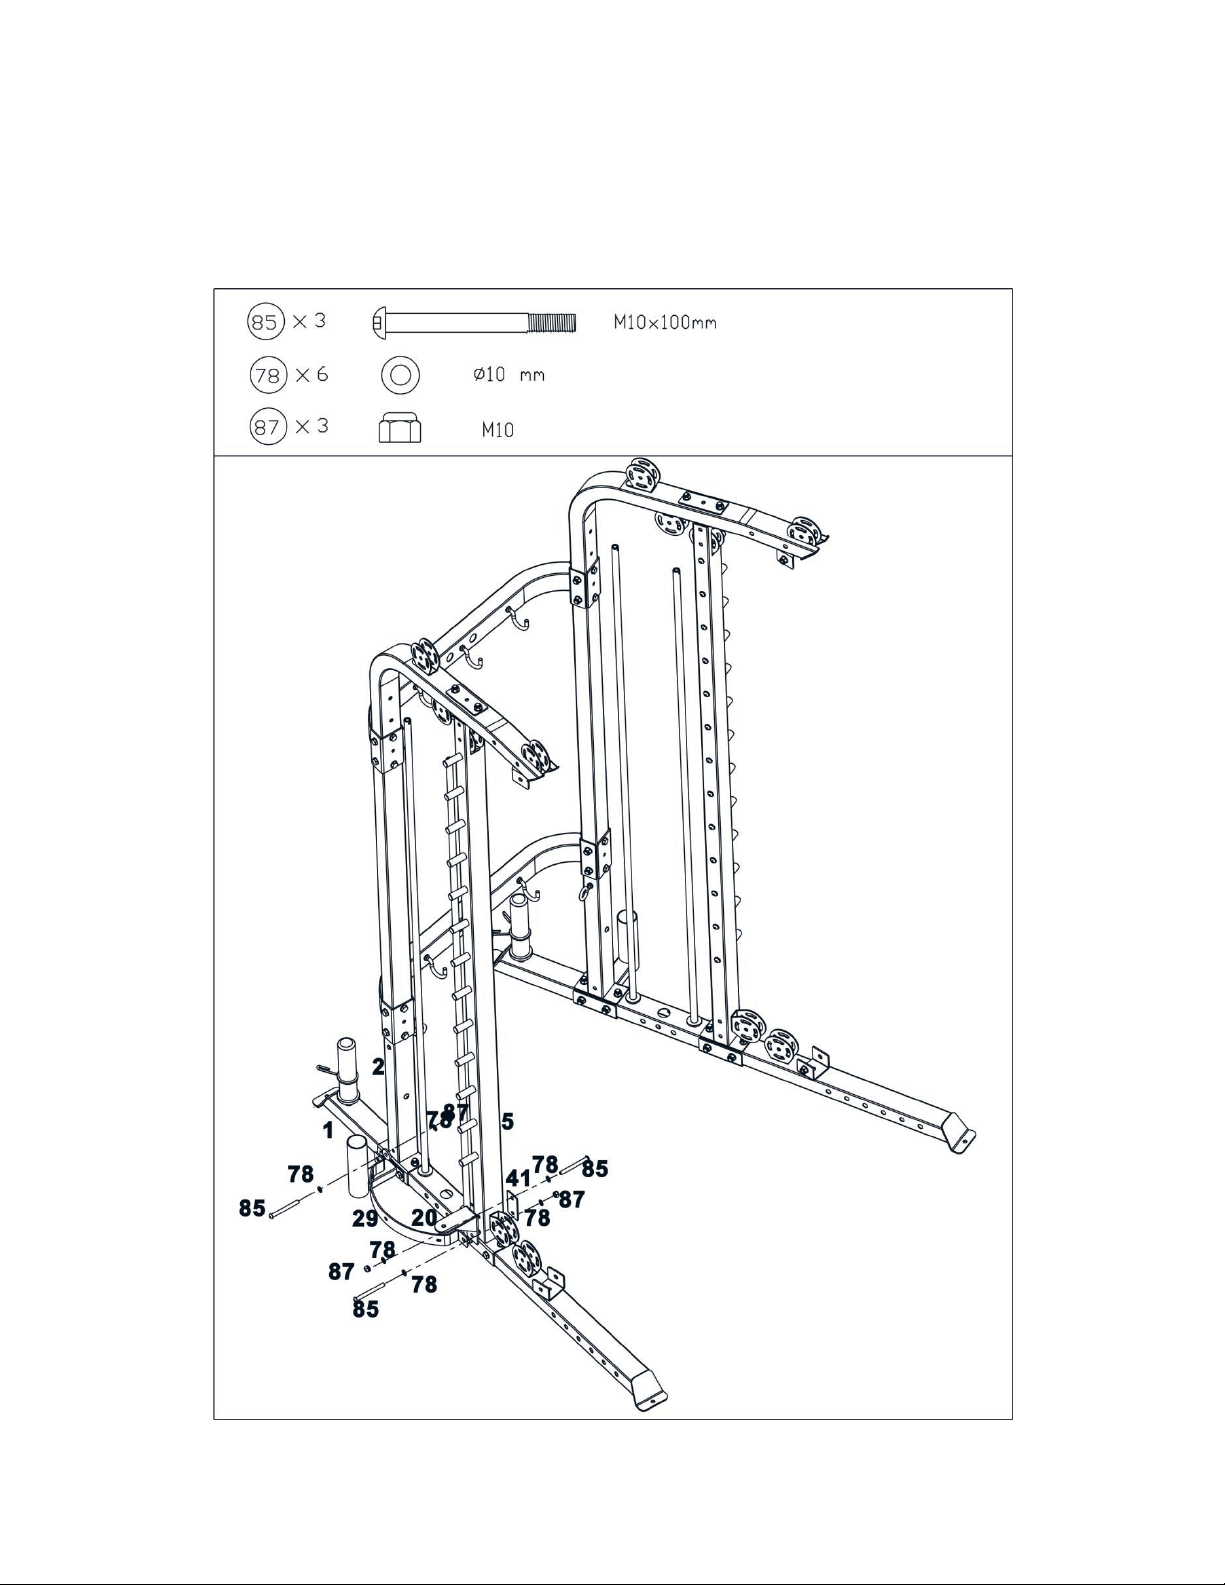
Step 10
Attach the weight stack cover bracket (29#) as the diagram shows , secure it with the triangle bracket(20#) using 2
pcs M10*100 Allen bolt(85#),4pcsφ10 washer (78#) , 1 pc bracket (41#),and 2pcs M10 Aircraft nut(87#).
Secure another end with the 1 pc M10*100 Allen bolt(85#),2pcsφ10 washer (78#) , 1 pc M10 Aircraft nut(87#).
Page 25
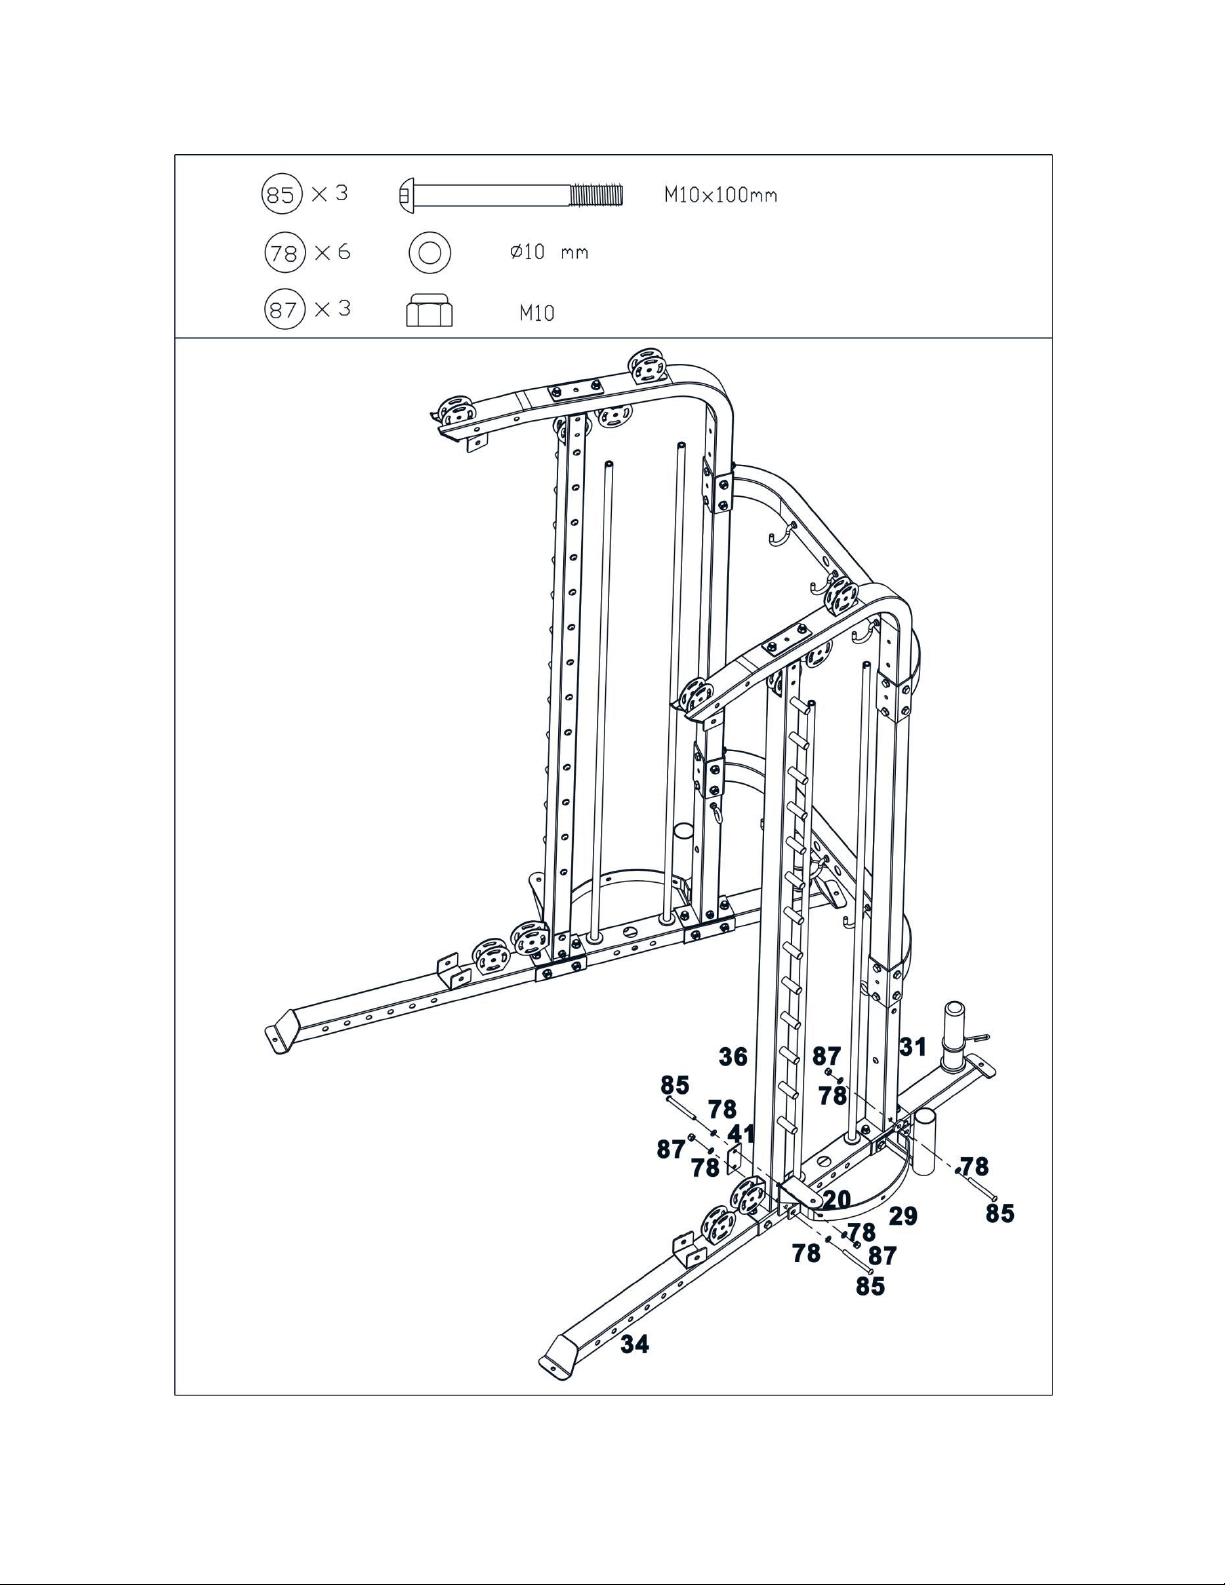
Step 11
Use the above way in Step 10 to install another side.
Page 26
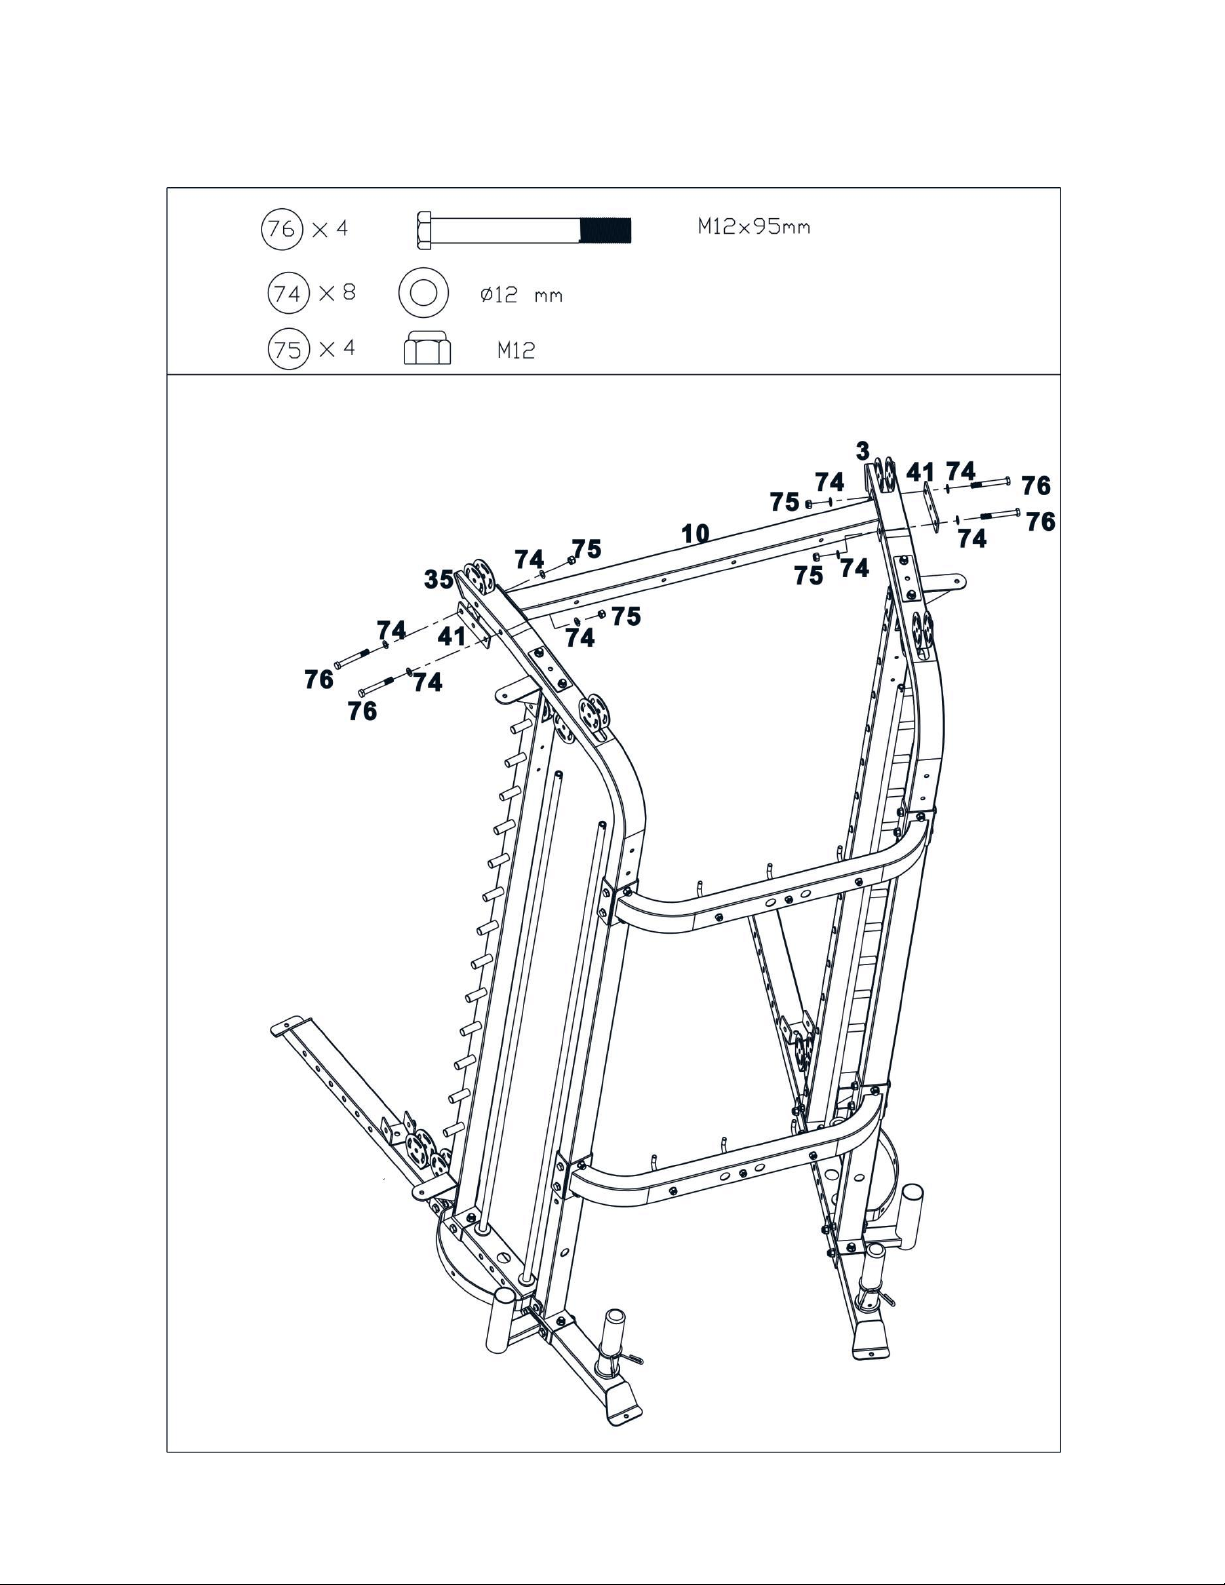
Step 12
Attach the upper connection frame (10#) between the light upper frame (35#) and the left upper frame (3#) ,Secure
them with 4 pcs M12*95 Hex bolt (76#),8pcsφ12 washer(74#)and 4pcs M12 Aircraft nut(75#).
Page 27
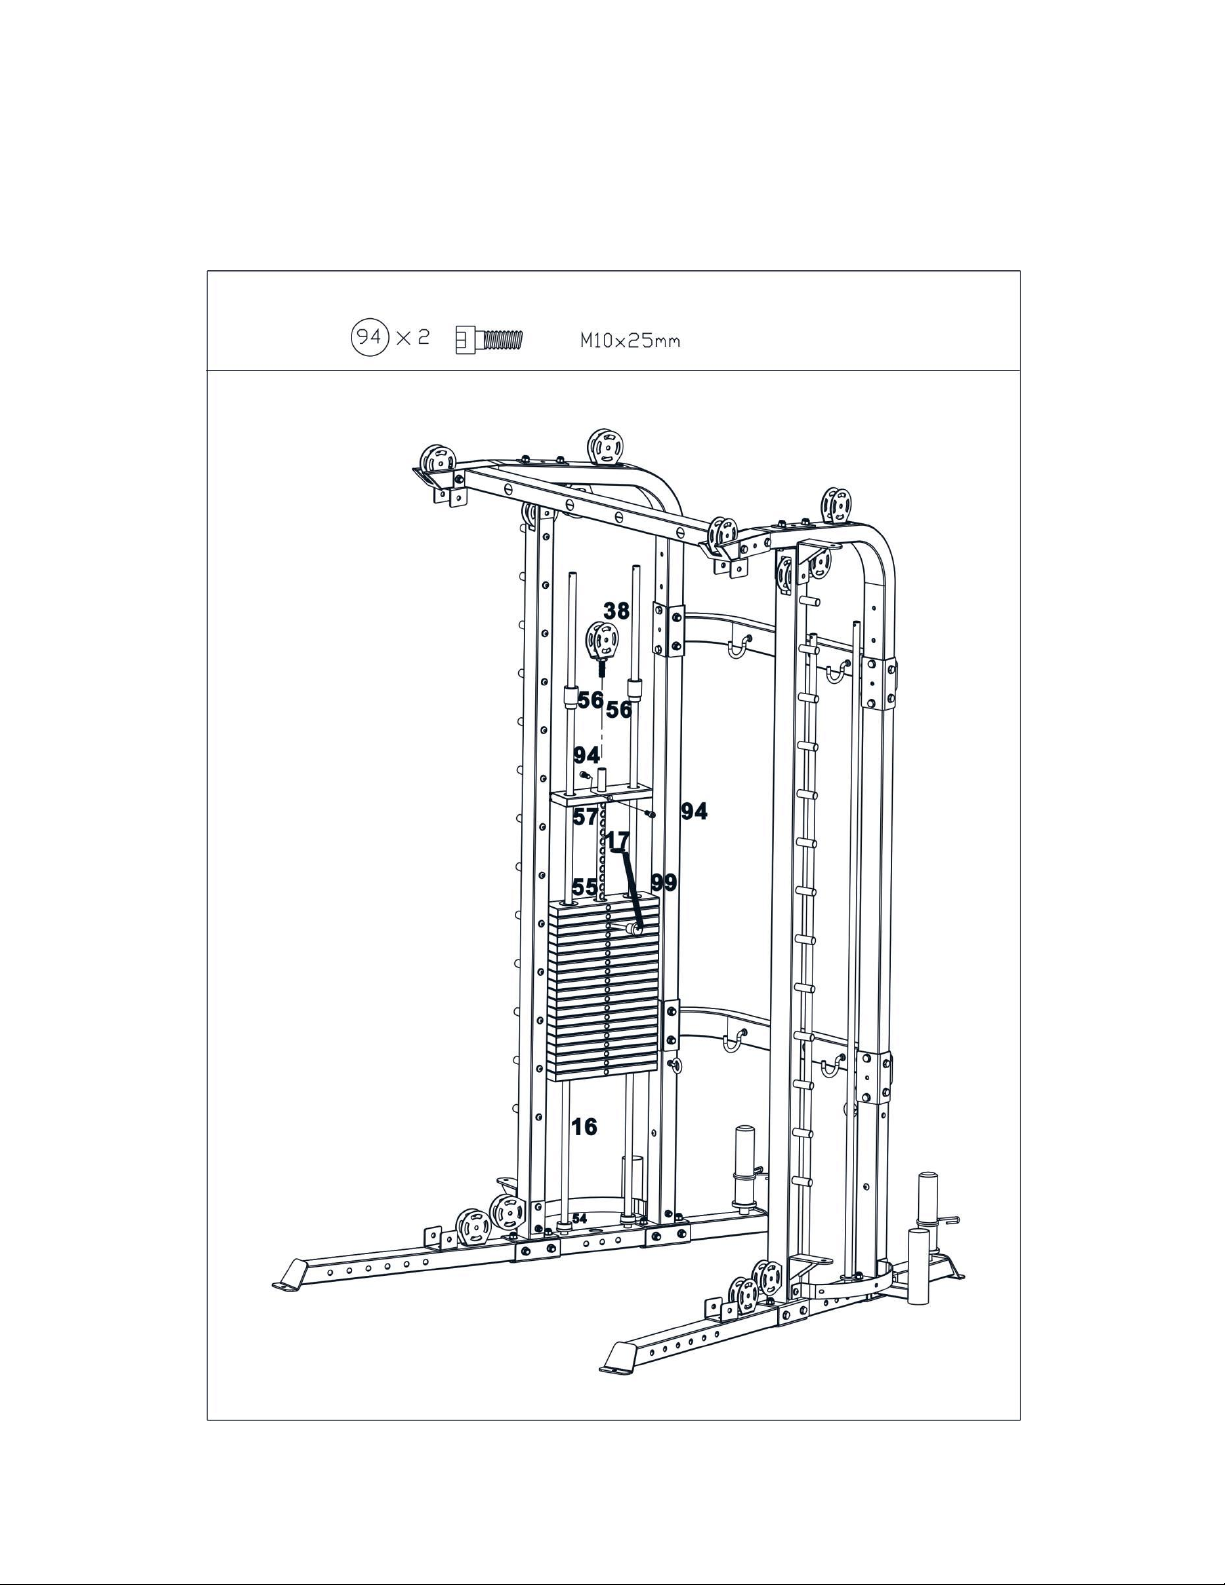
Step 13
A. Place 2pcs rubber bumper(54#) along the guide rod and then place 19 pcs weight plate (55#) along the guide rod,
insert the selector rod (17#) into the hole and place 1 pc weight stem(57#),Secure the weight stem(57#) with the
selector rod(17#) with 2pcs M10*25 Sunk bolt (94#).
insert the selector pin to select the desired weight when exercising.
B. Thread the pulley bracket (38#) to the upper opening of the selector rod (17#).
Page 28
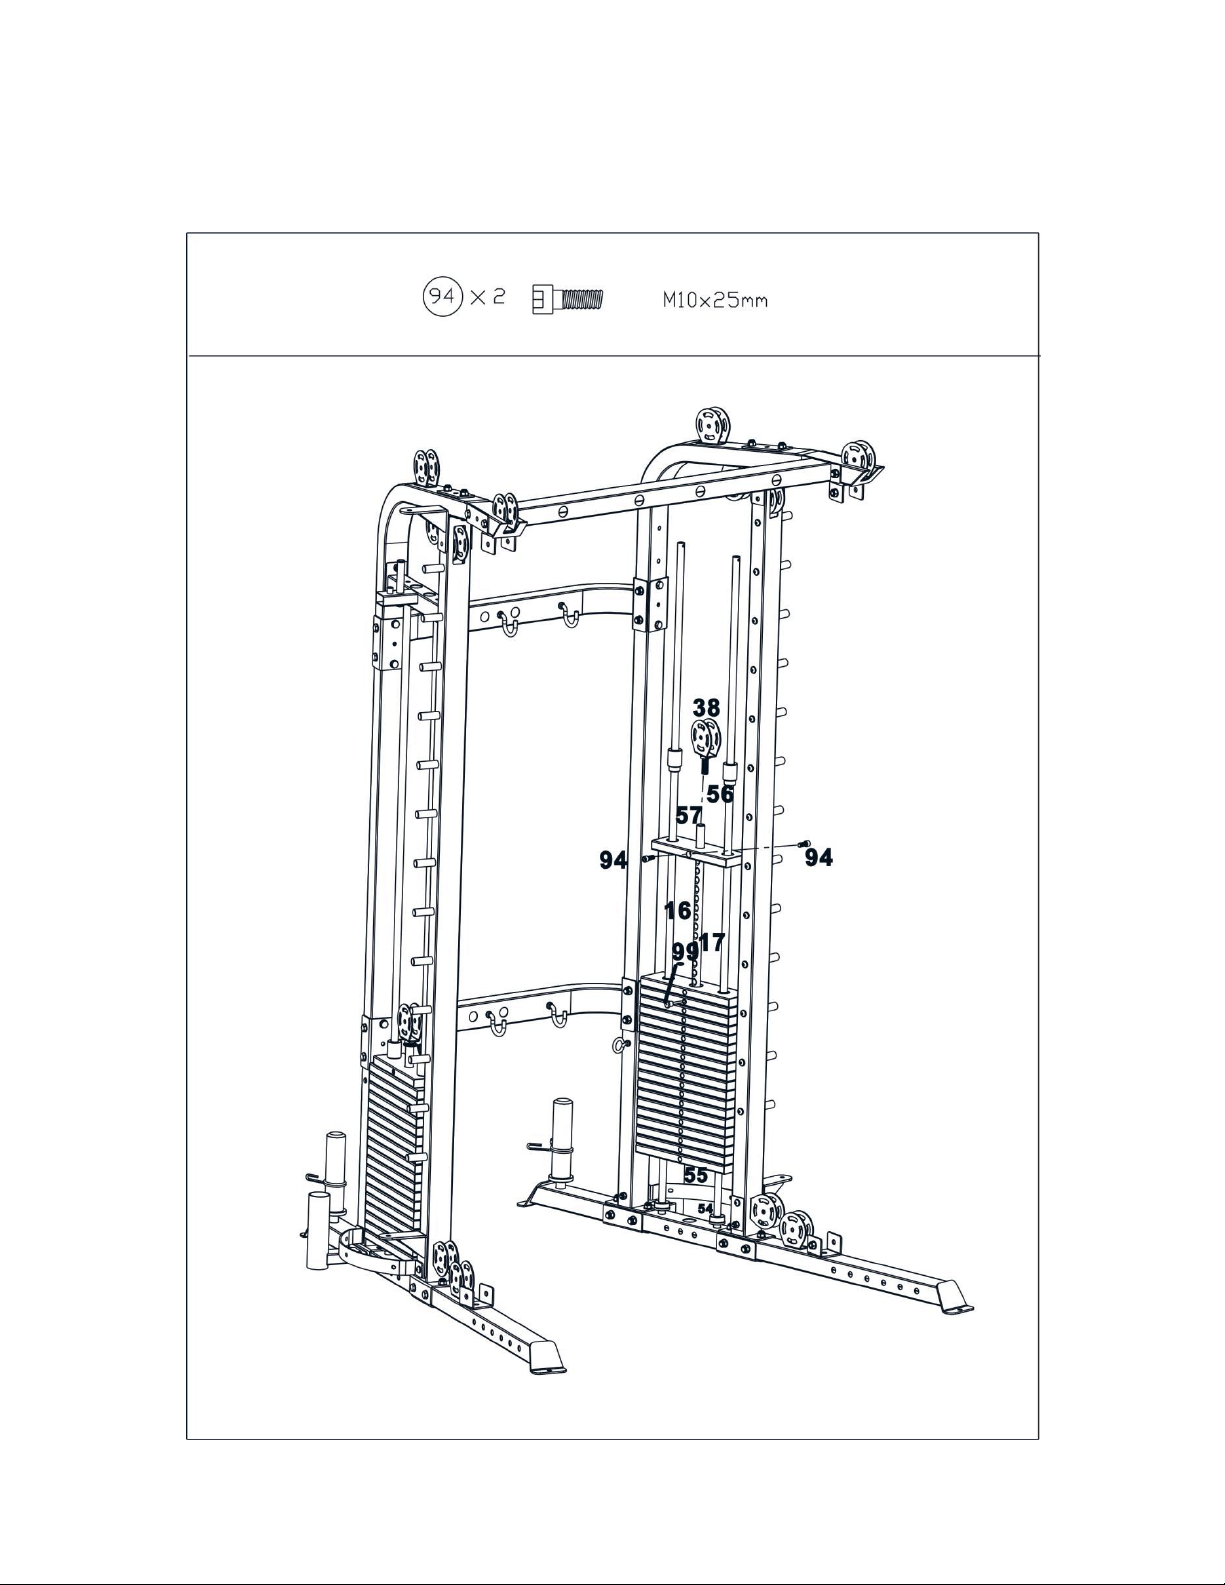
Step 14
Use the same way in step 13 to install another.
Page 29
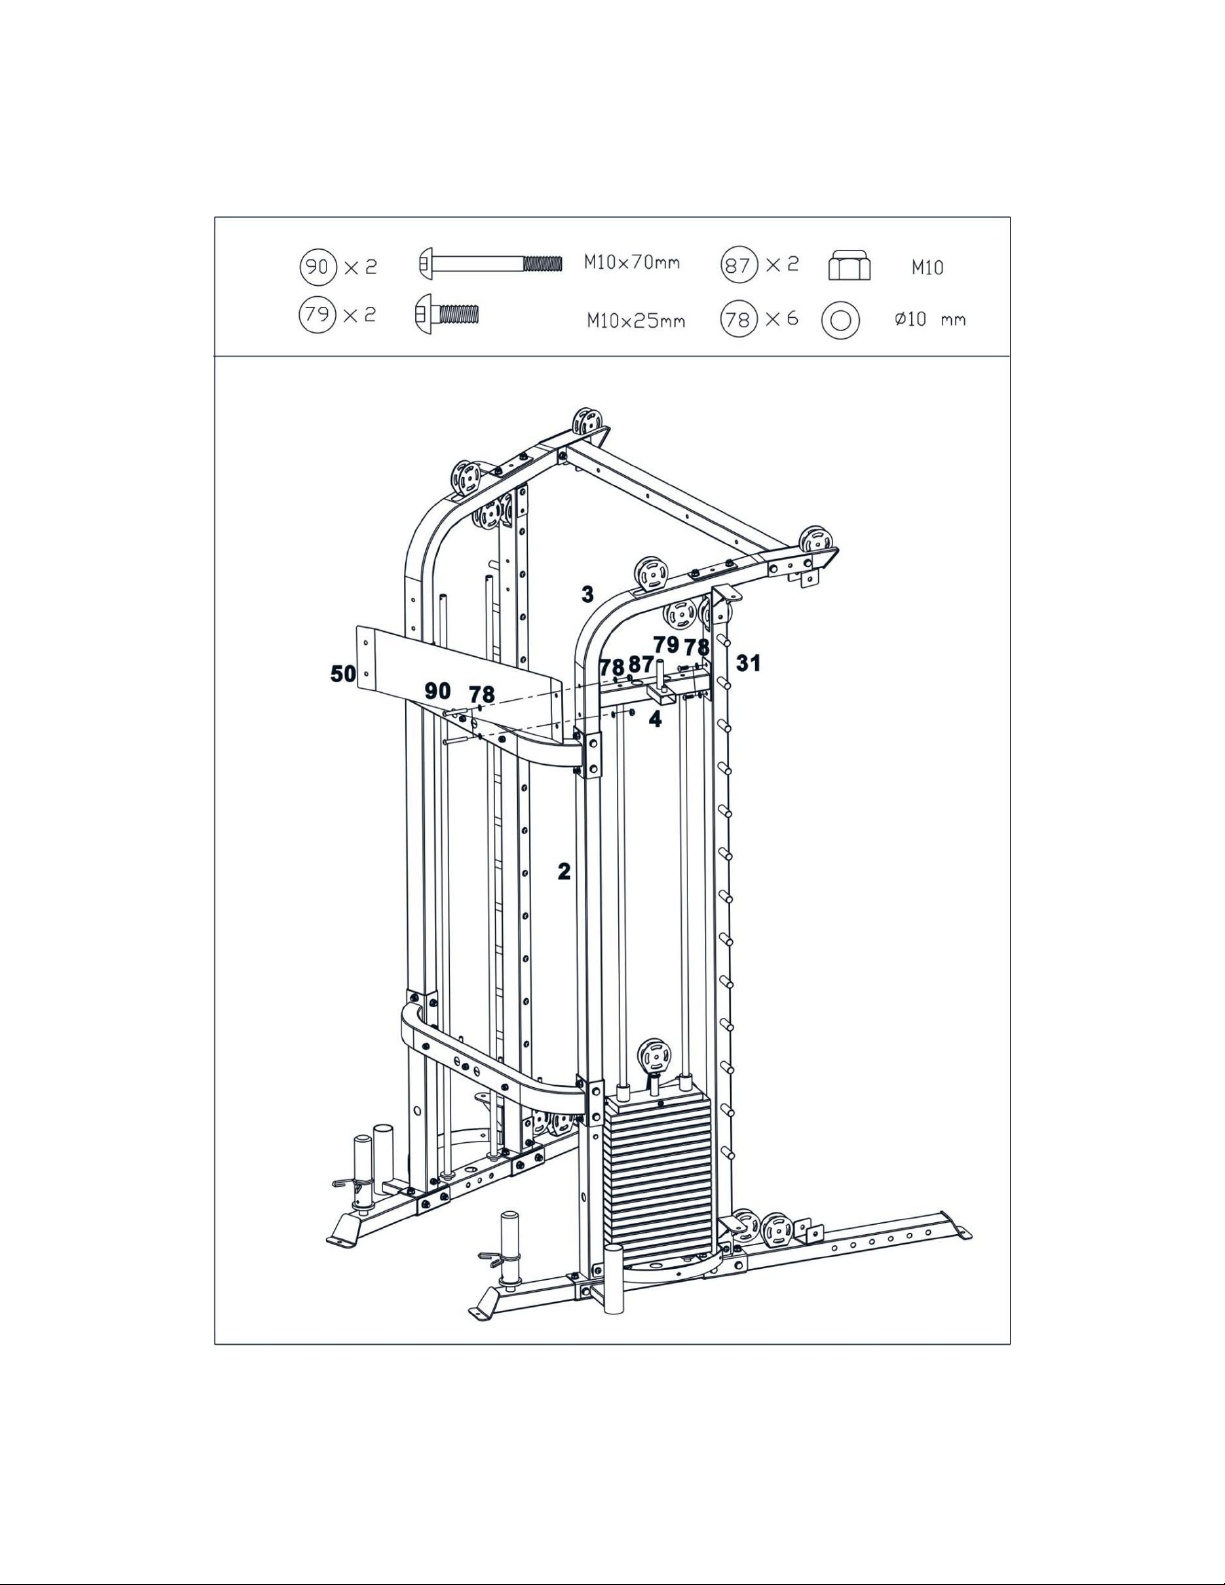
Step 15
Attach the short connection frame(4#)as the diagram shows. Attach the LOGO board (50#) together and secure
them with 2pcs M10*70 Allen bolt(90#),6pcsφ10 washer(78#),2pcs M10 Aircraft nut(87#).2pcs M10*25 Allen bolt
(79#).
Page 30
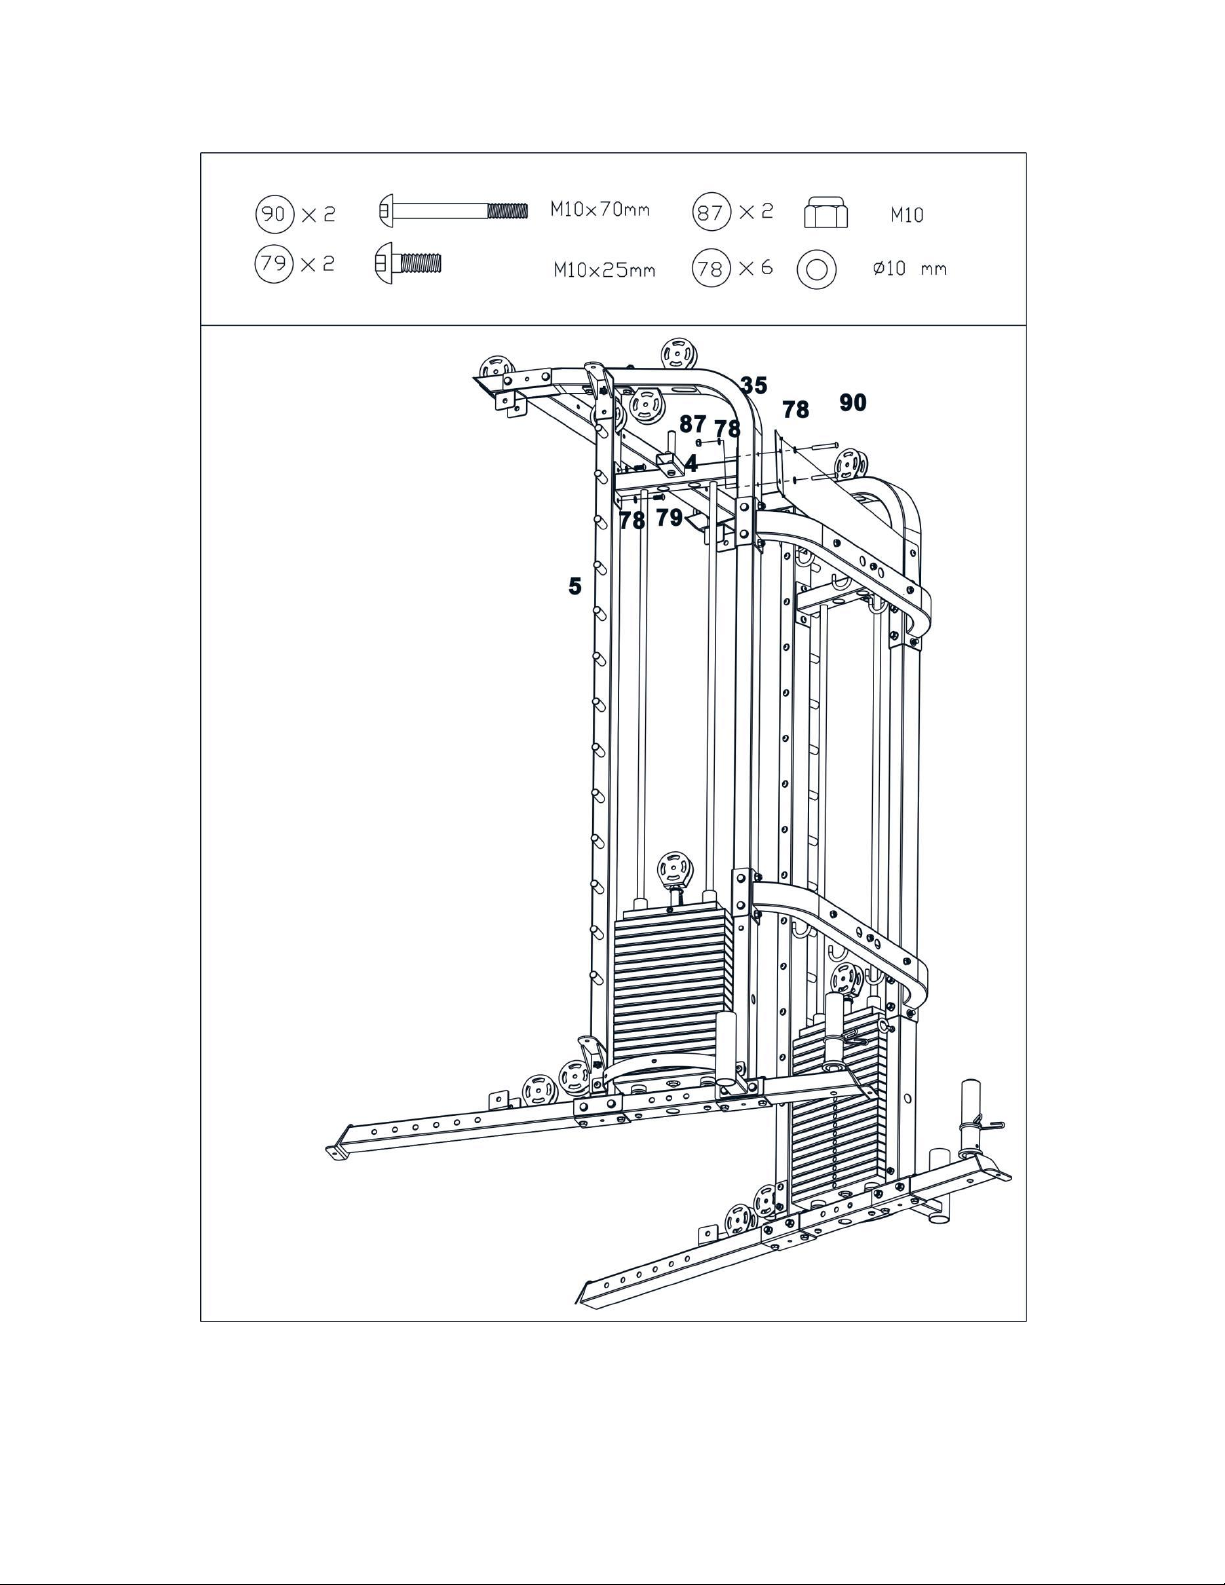
STEP 16
Use the same way in step 15.
Page 31
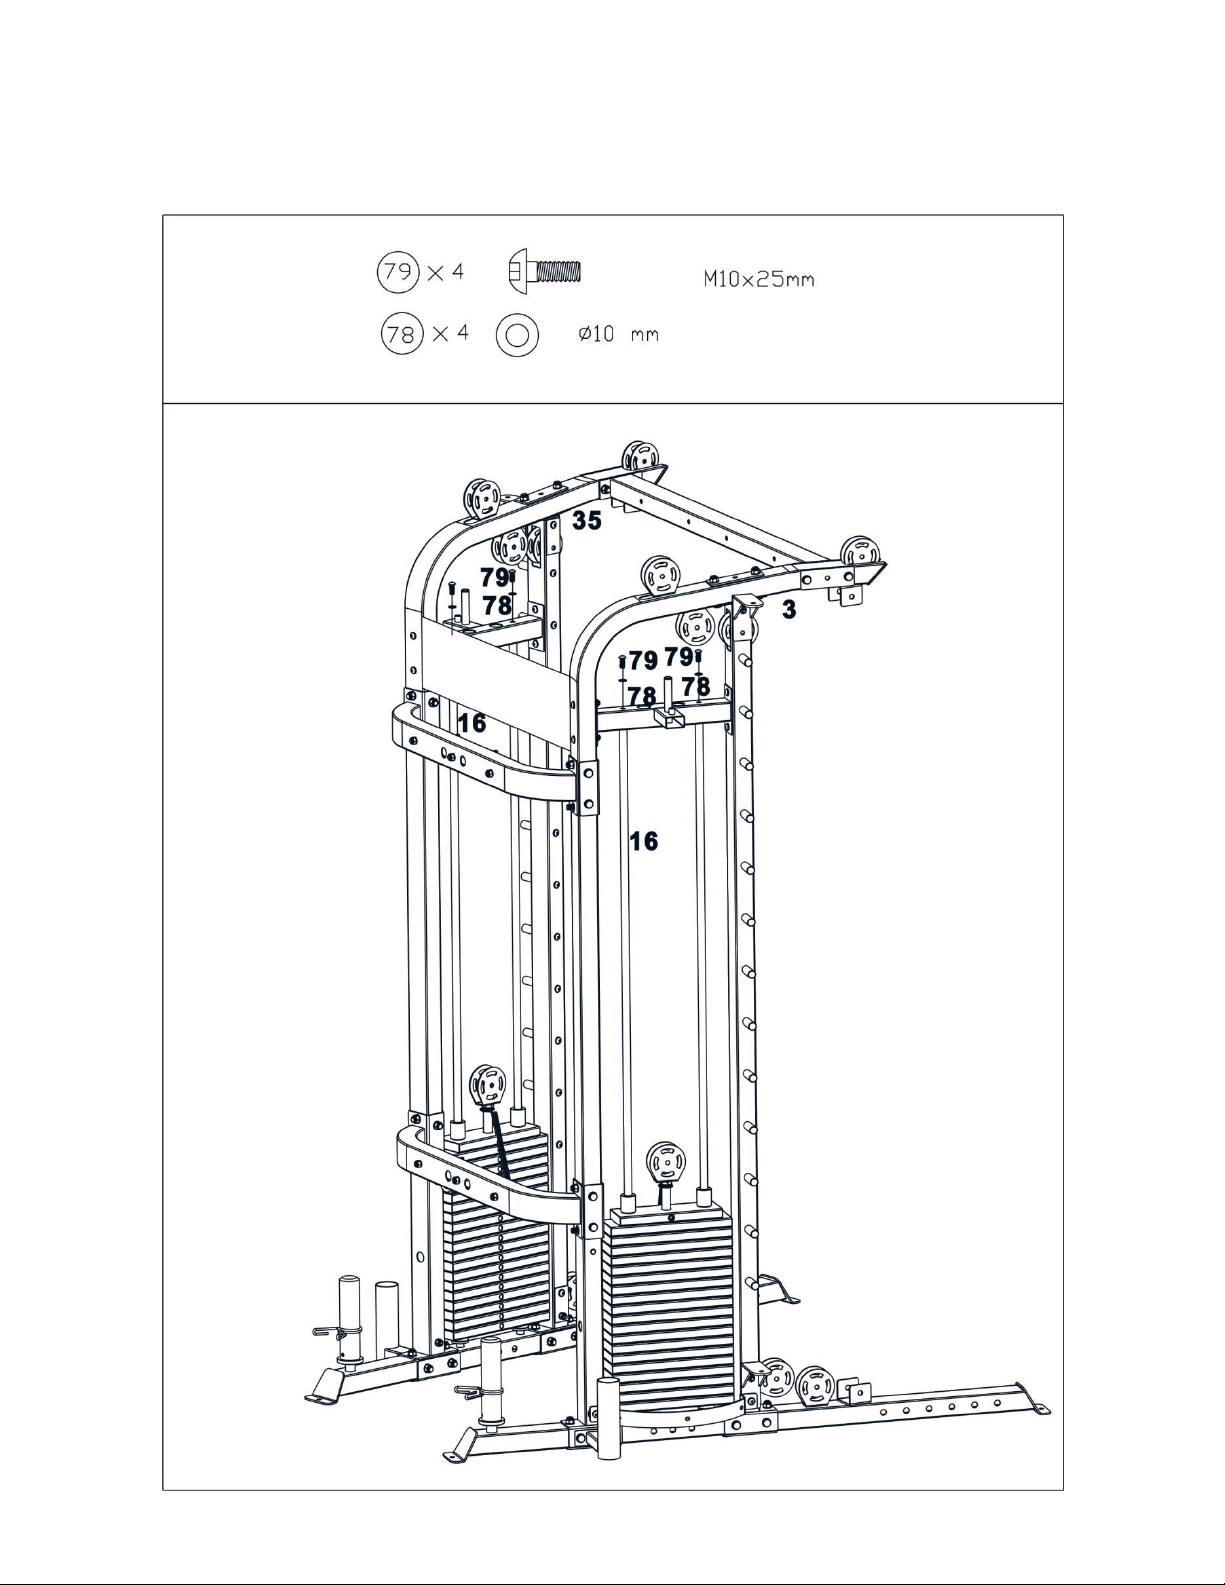
STEP 17
Secure the guide rod(16#) with the short connection frame(4#) together with 2pcsM10*25 Allen bolt (79#) and 2 pcs
φ10 washer (78#).
Install another with the same way .
Page 32
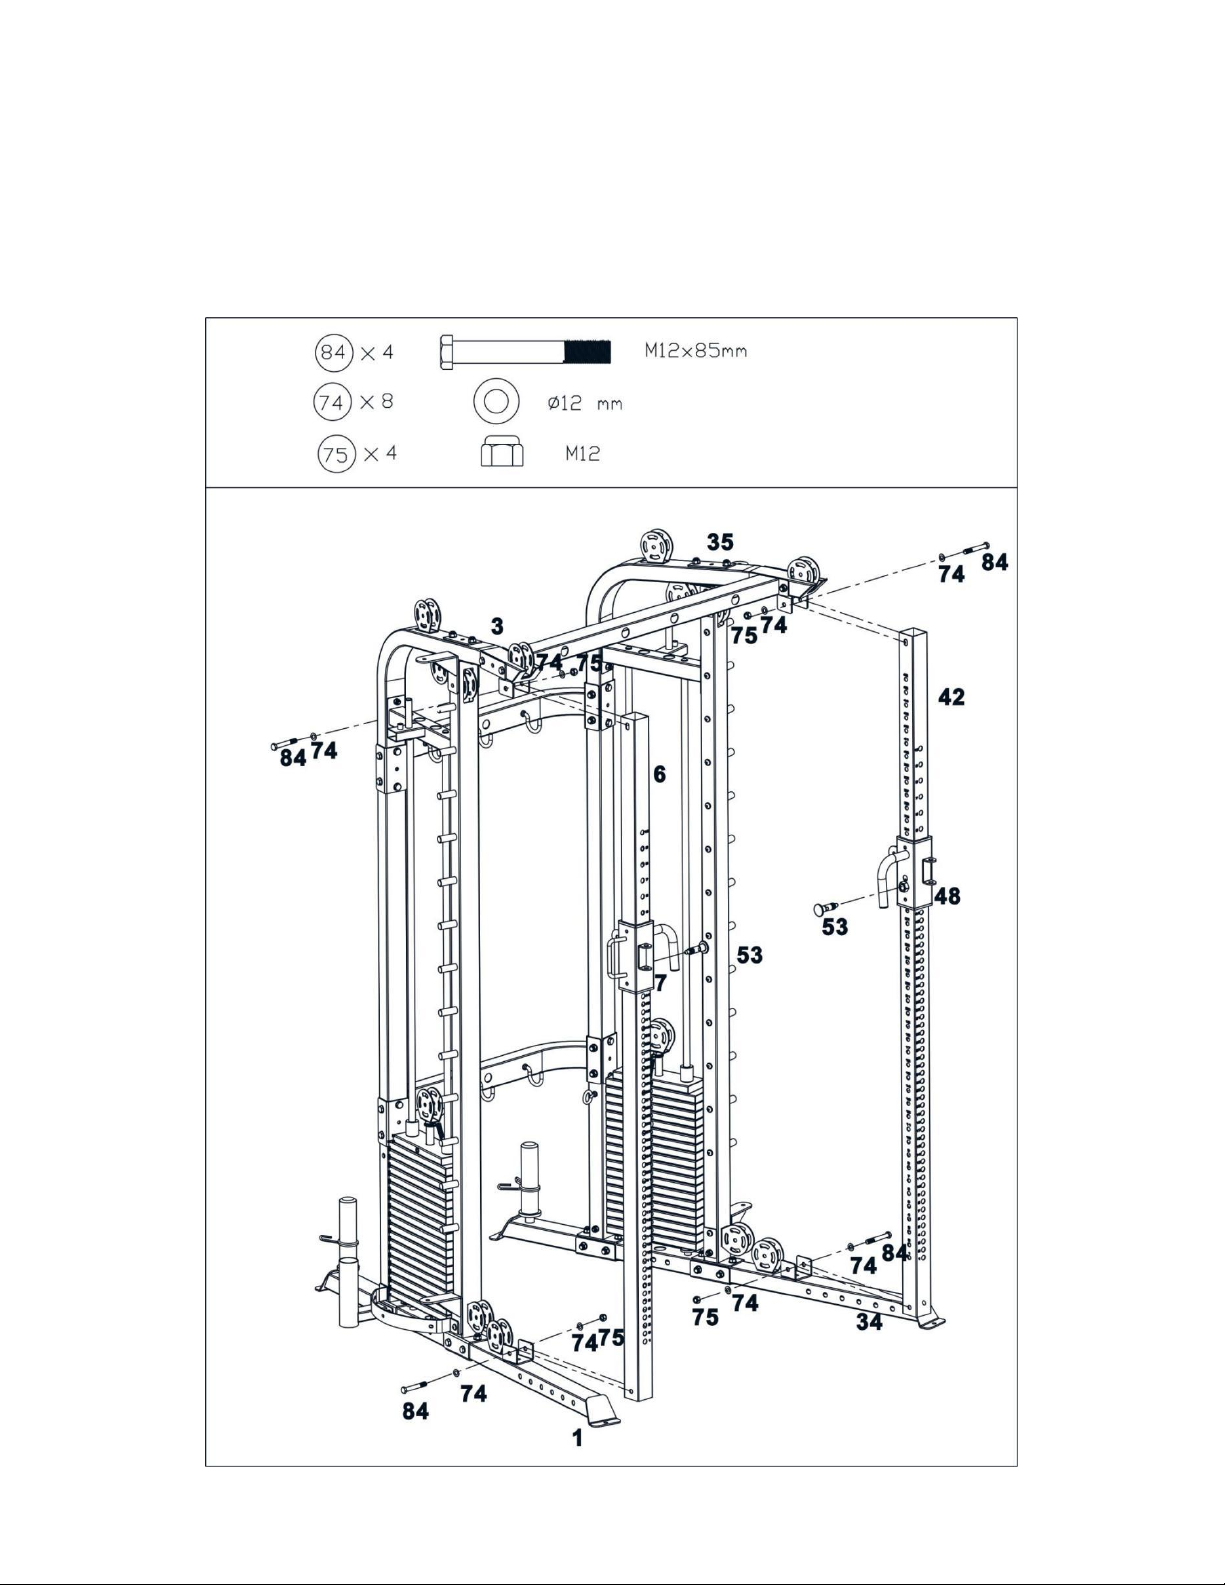
STEP 18
Attach the right front vertical frame(6#) onto the right stabilizer(1#), Secure them with 2pcs M12*85 Hex bolt
(84#),4pcs φ12 washer (74#) and 2 pcM12 Aircraft nut (75#).
Use the same way to install another one.
Page 33
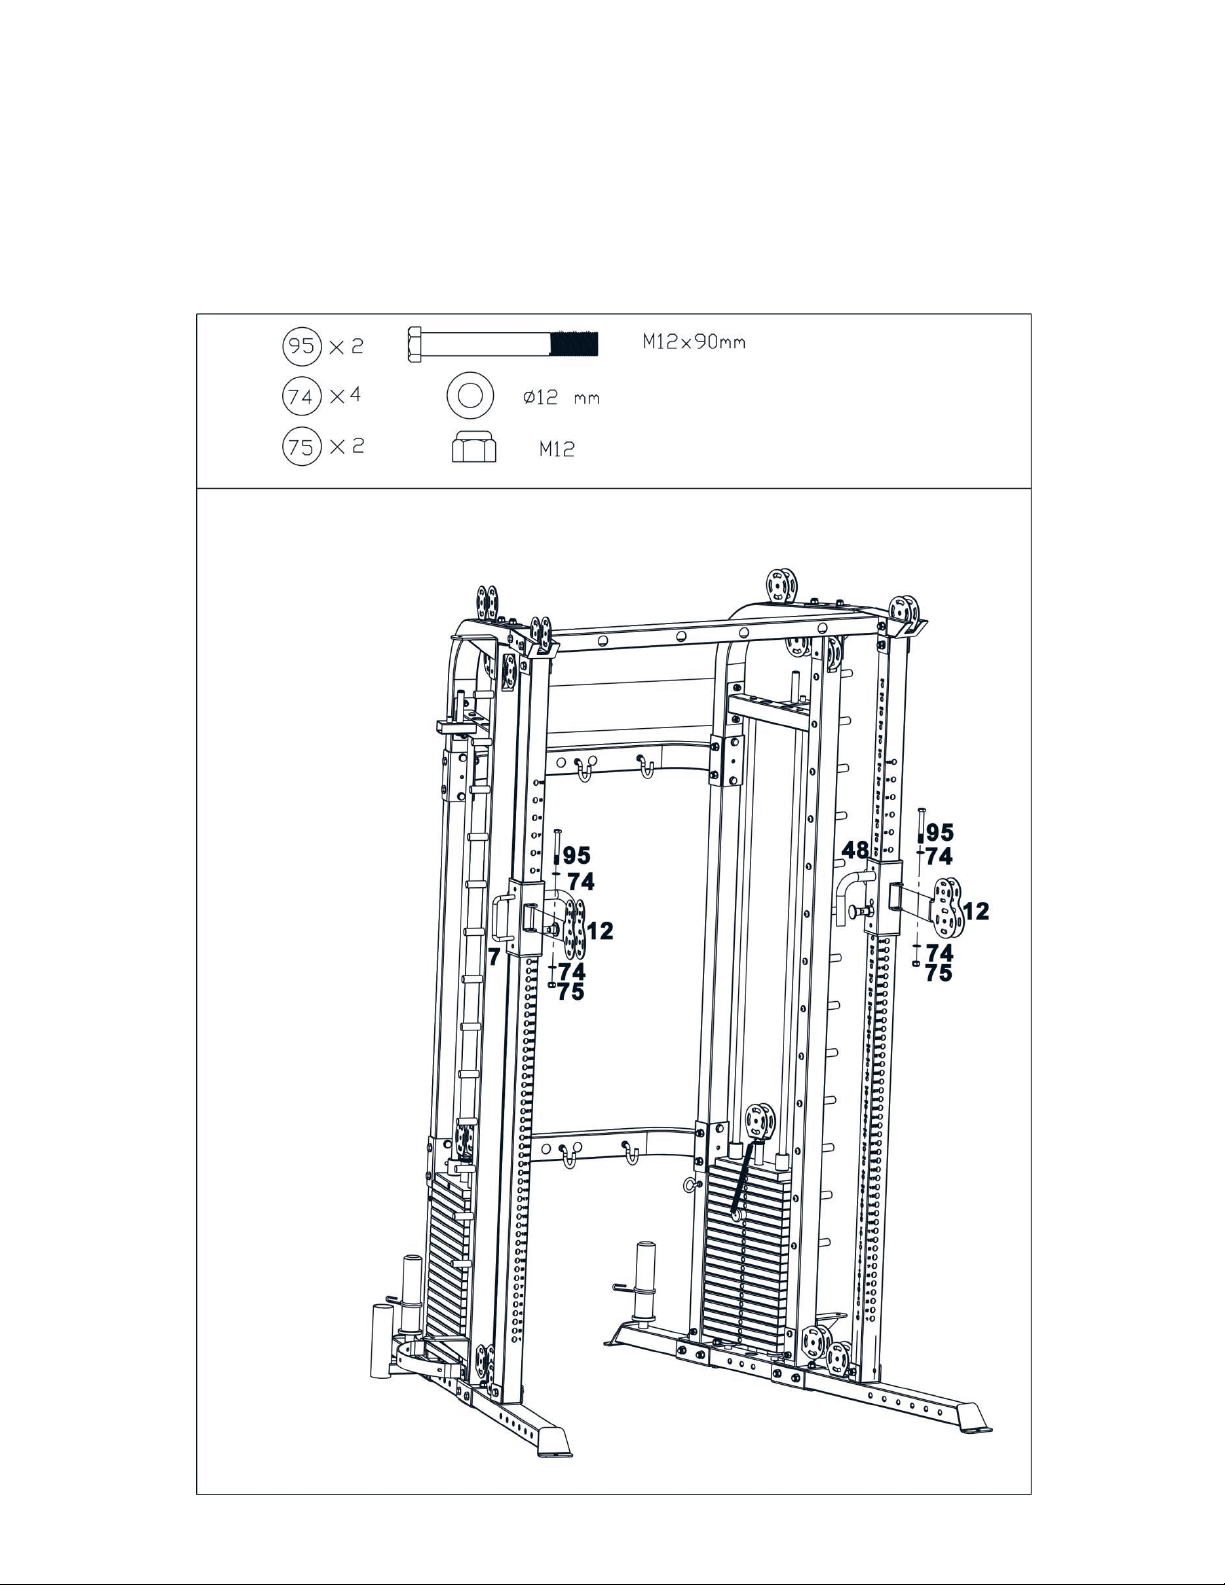
STEP 19
Attach the pulley bracket (12#) to the moving frame and secure them together with 1pc M12×90 Allen bolt(95#),
2pcsφ12 washer (74#) and 1 pcM12 Aircraft nut (75#).
Use the same way to install another.
Page 34
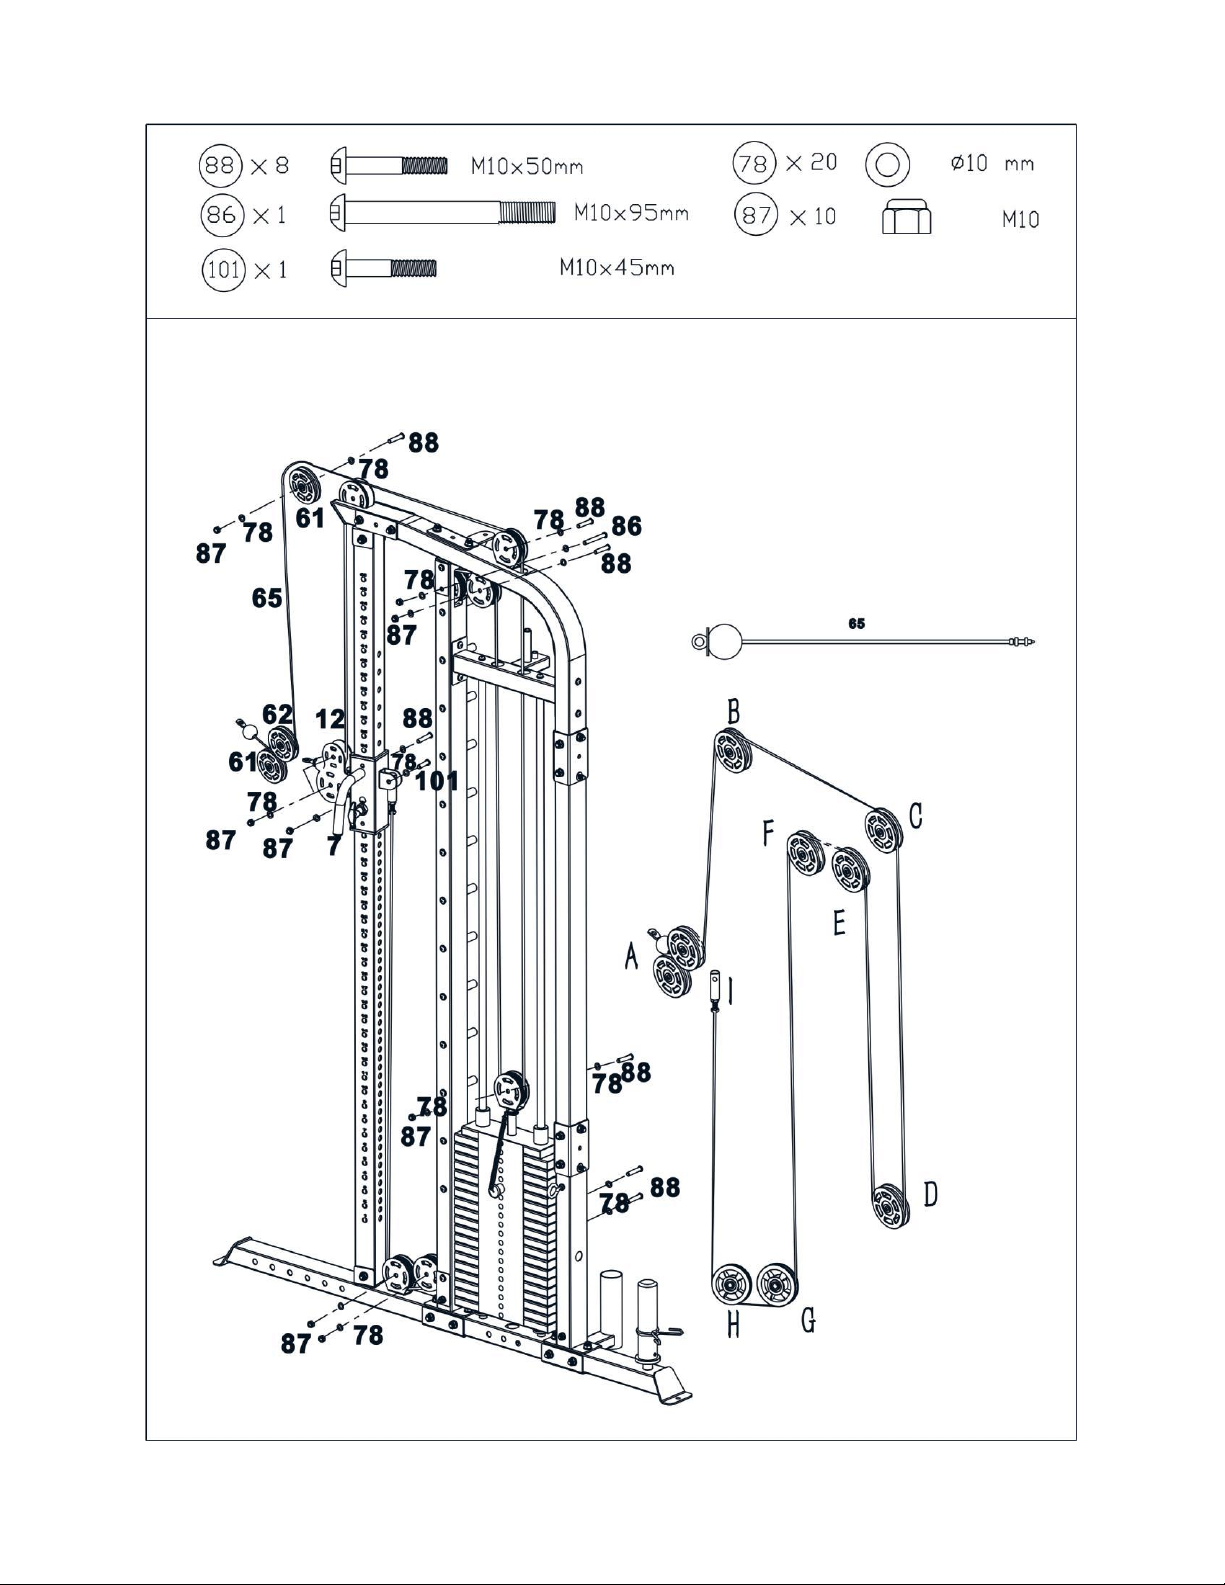
STEP 20
Page 35

A.Place 2 pcs pulleys onto & below the cable,Secure the pulleys with 2pcs M10 *50 Allen bolt (88#),4pcsφ10
washer (78#) and M10 Aircraft nut (87#).
B.Draw the cable around the pulley and upwards,Place 1 pc pulley below the cable and secure the pulley with the
C.Draw the cable around the pulley and backwards,Place the 3ND pulley below the cable and secure it with the
D.Draw the cable around the pulley and downwards,place 1 pc pulley onto the cable ,Secure the pulley with the
E.F Draw the cable around the pulley and upwards,place 2 pc pulley below the cable ,Secure the pulley with the
same way in A.
same way in A.
same way in A..
same way in A..
G. H Draw the cable around the pulley and downwards,Place 2 pcs pulley onto the cables , secure the pulley with
the same way in A .
I Draw the cable around the pulley and upwards,Thread the end of the cable to the bracket fixing
frame(43#) ,Secure it with 1pc M10 *45 Allen bolt (101#),2pcs φ10 washer (78#) and M10 Aircraft nut (87#).
Page 36

STEP 21
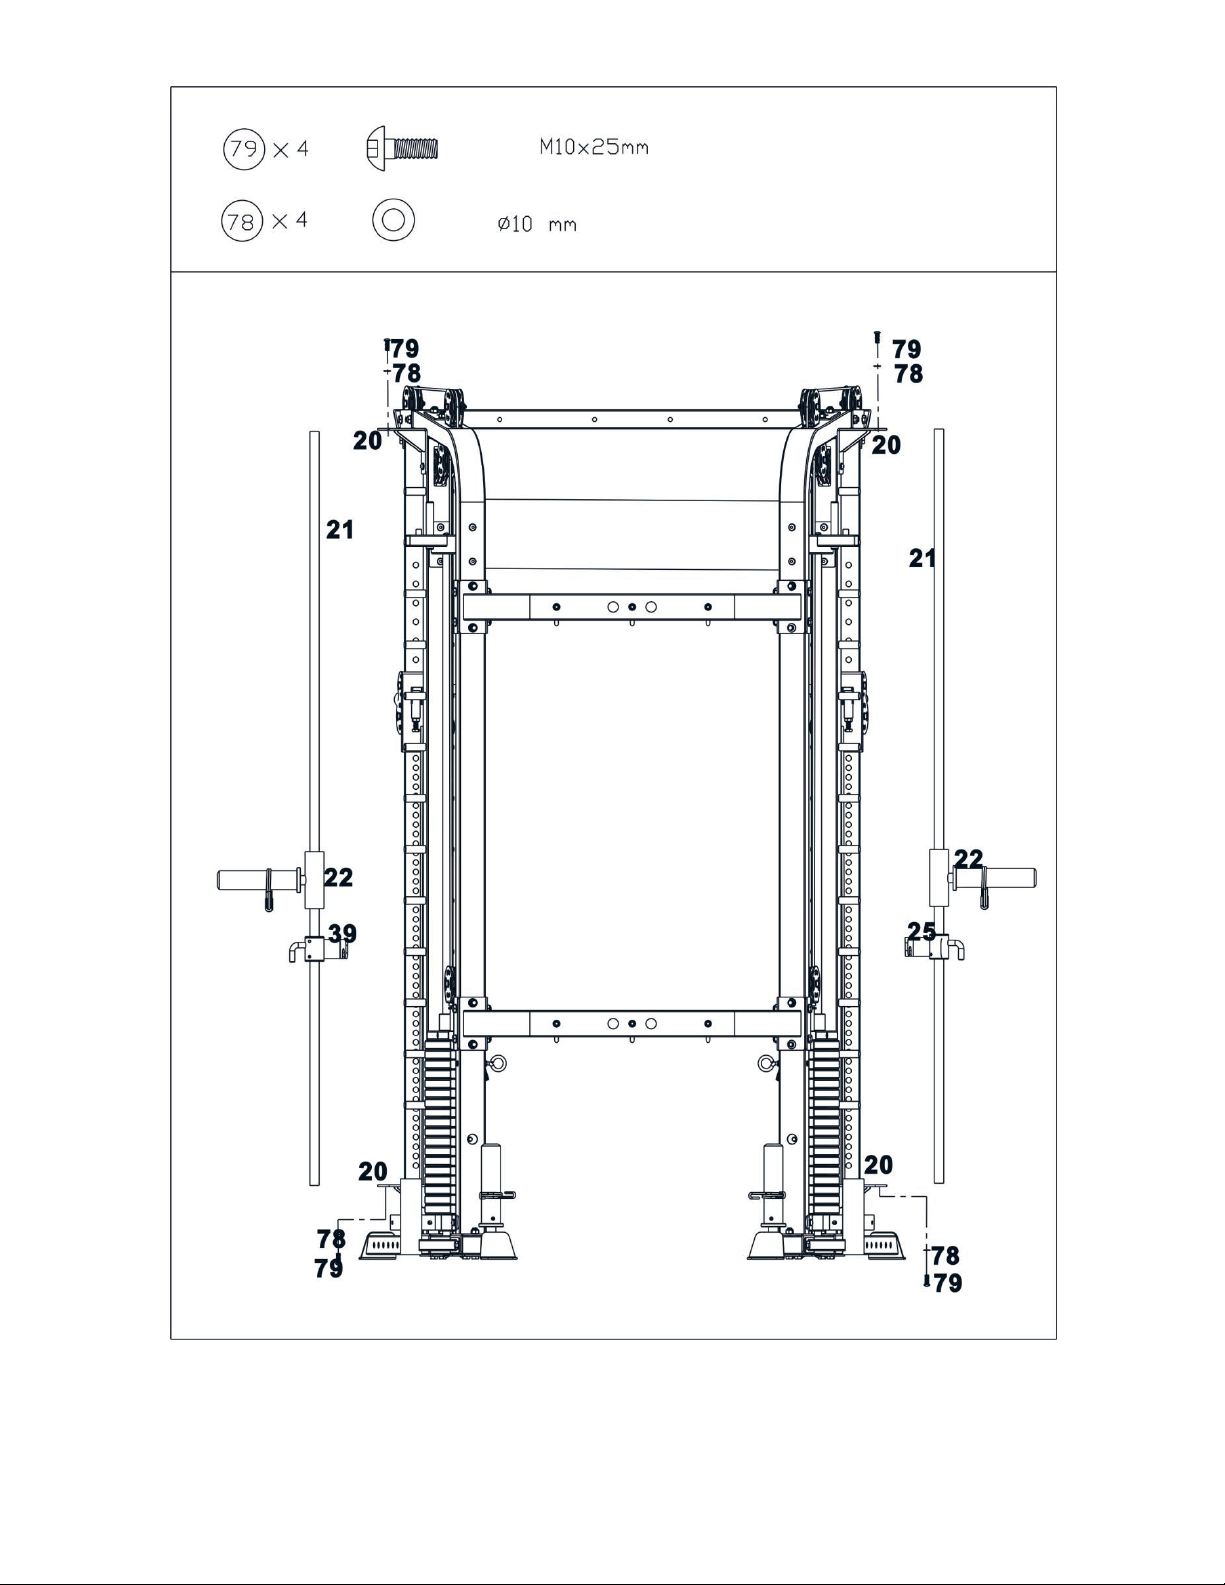
Slide the bearing frame(22#), crunch (39#)along the bearing guide rod(21#), Secure the guide rod with 2pcs M10×
25 allen bolt (79#) and 2pcsφ10 washer(78#).
Use the same way to install another.
Page 37
Page 38
STEP 22
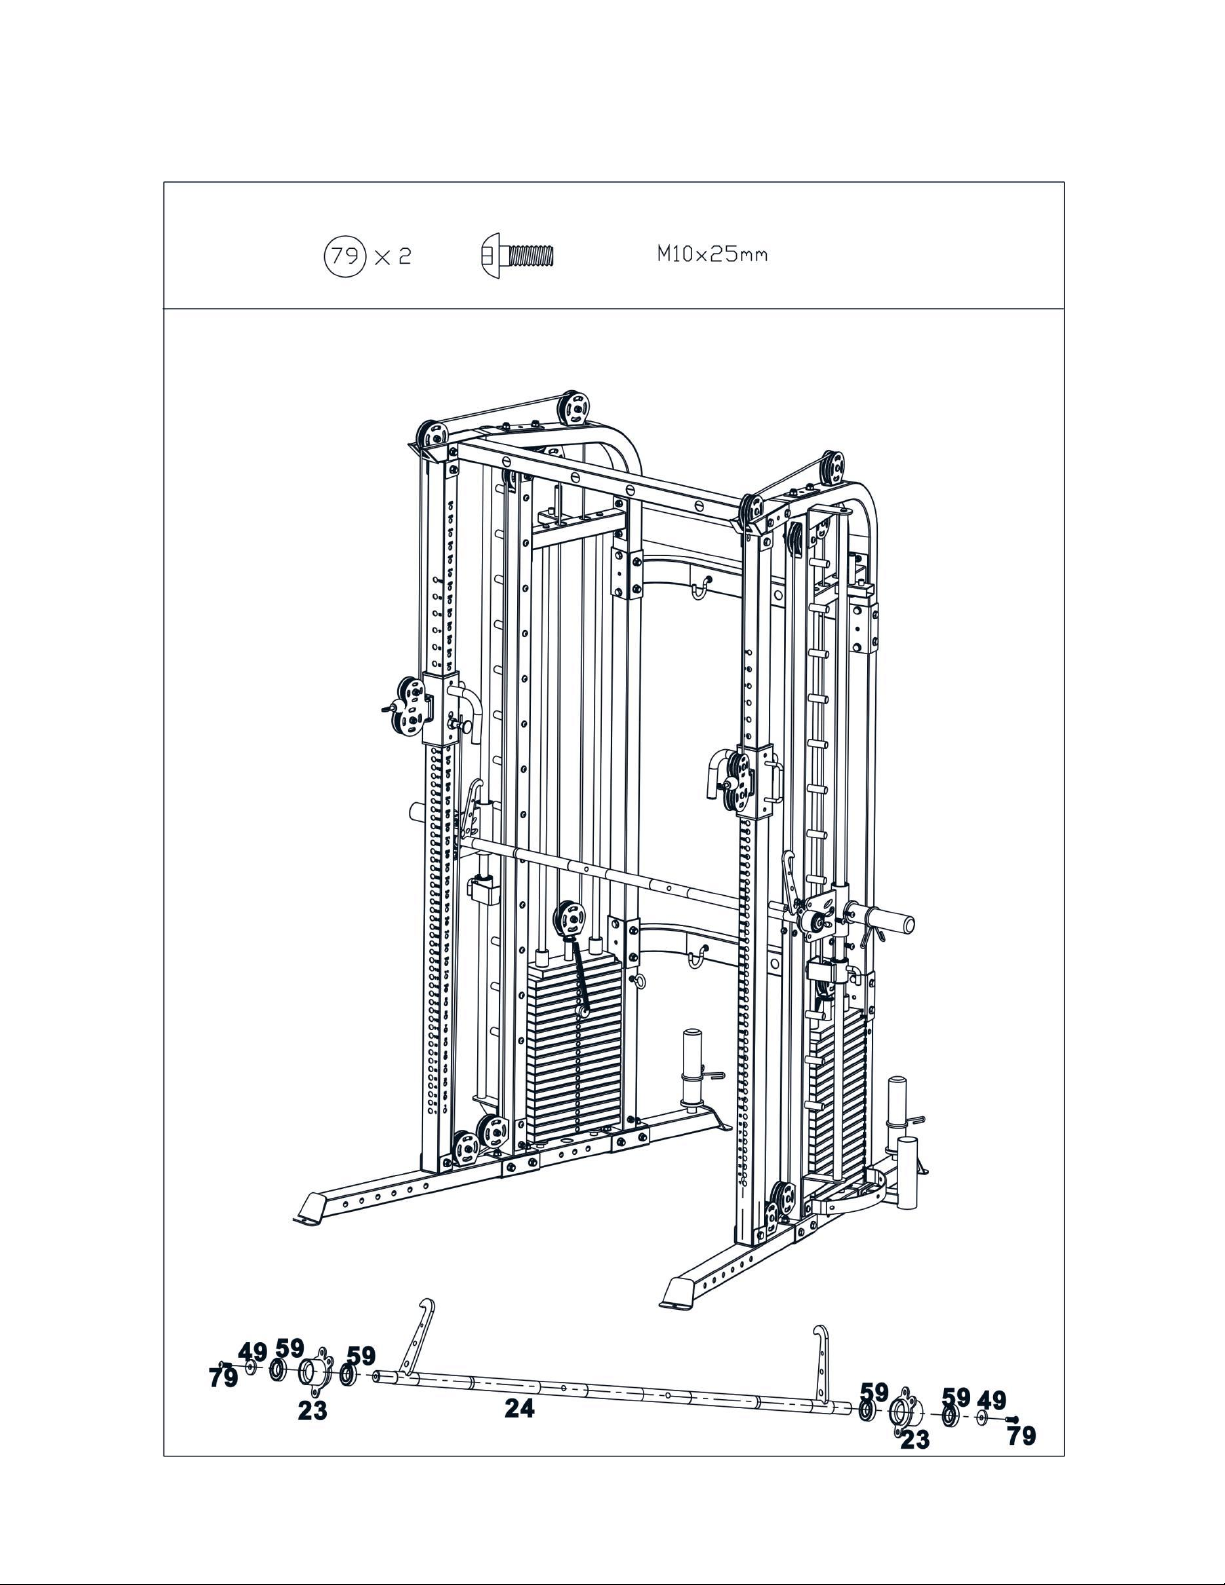
The 4 pcs bearing(59#),2pcs bearing house(23#),2pcs adjustable washer(49#) and 2pcs M10*25 Allen bolts were
installed in the factory.
Page 39
STEP 23
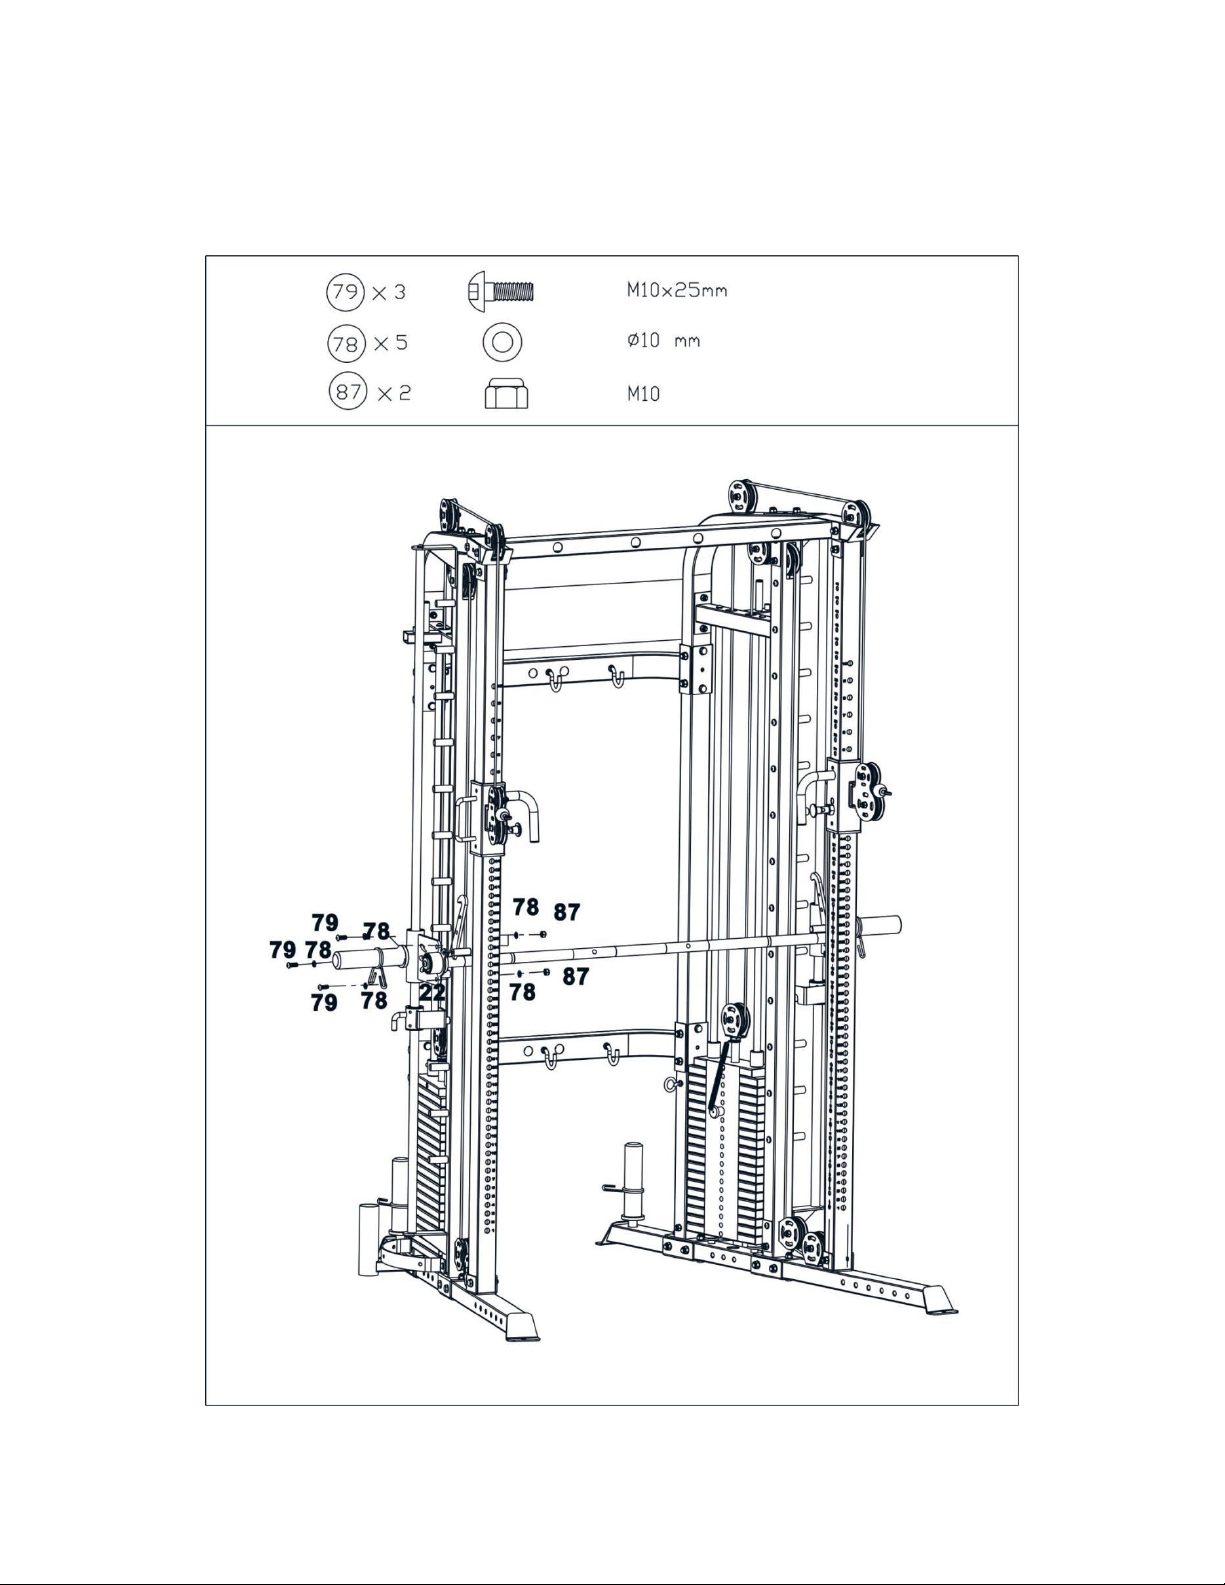
Attach the bearing frame (22#) with the barbell together and secure them with 3pcsM10×25 Allen bolt
(79#),5pcsφ10 washer(78#) and 2pcs M10 Aircraft nut (87#).
Page 40
STEP 24
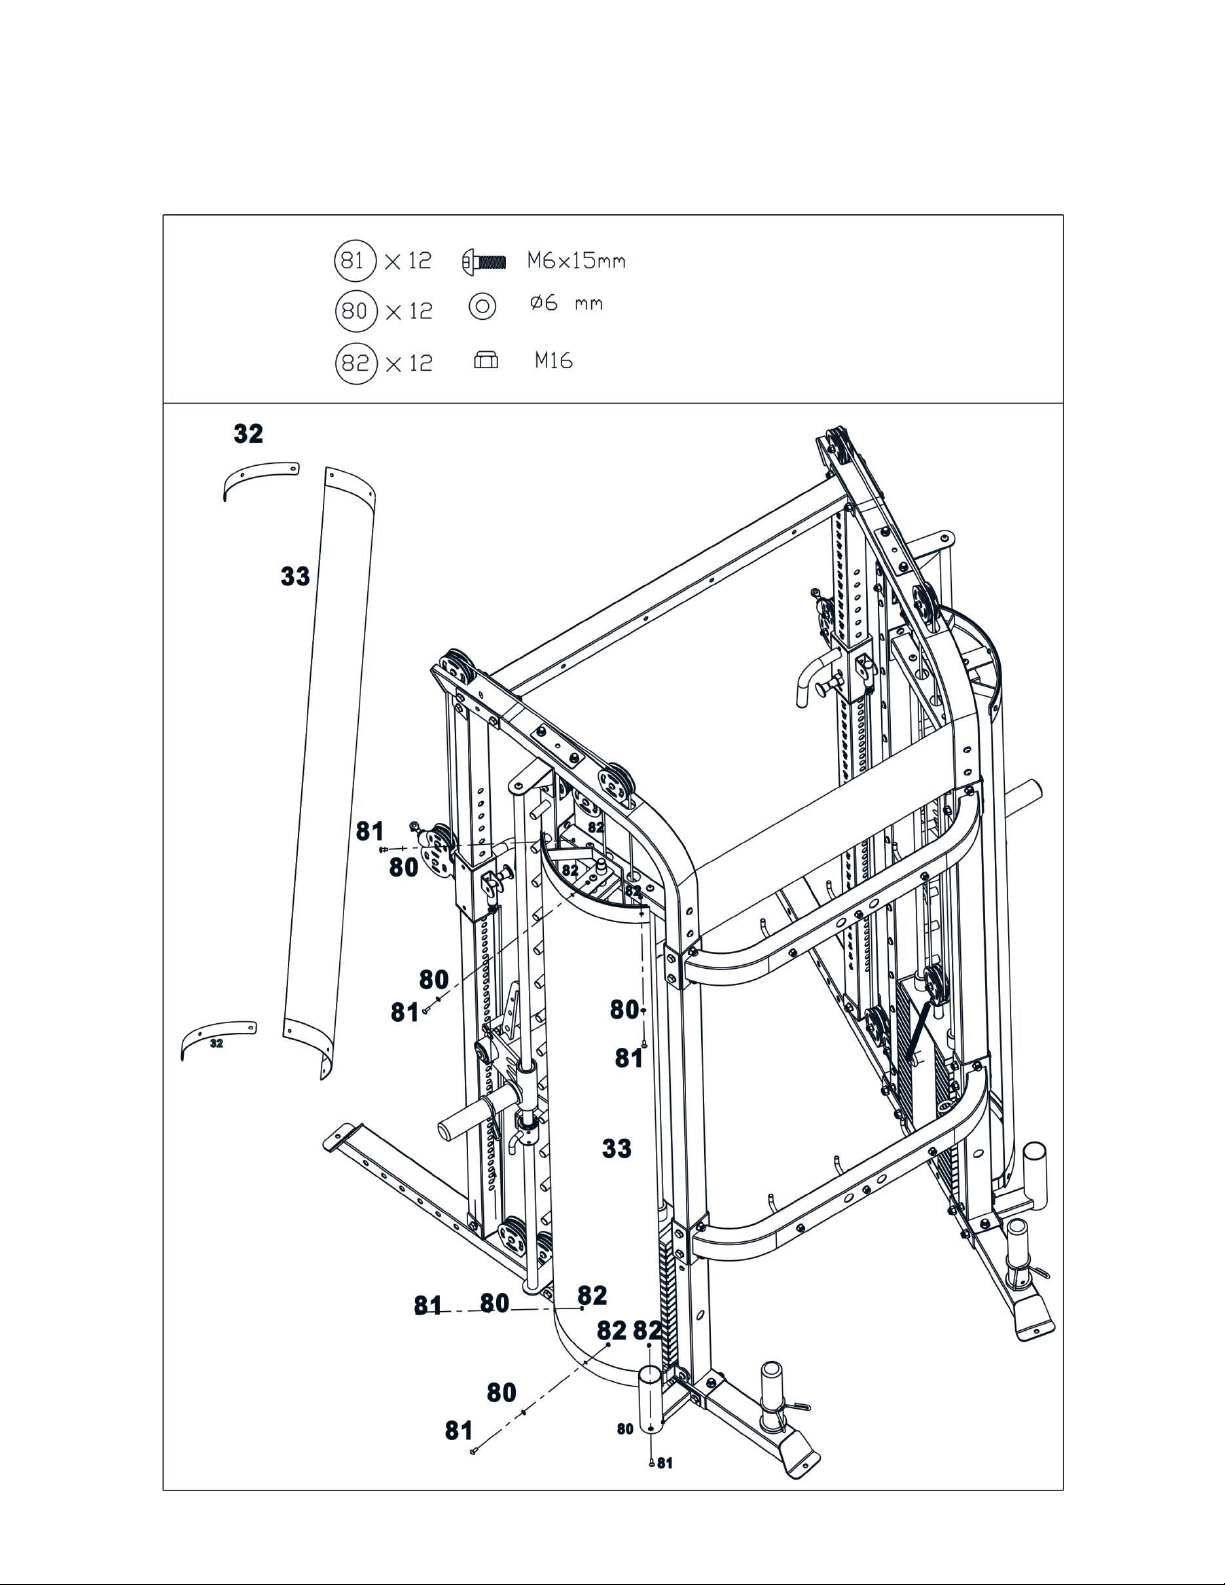
Attach the 2 pcs weight stack inner bracket(32#) through the upper & bottom opening of the weight stack cover (33#)
and secure the weight stack cover to the bracket with 6pcs M6*15 Allen bolt (81#) and 6 pcsφ6 washer (80#) and
6pcs M6 Aircraft nut(82#).
Page 41
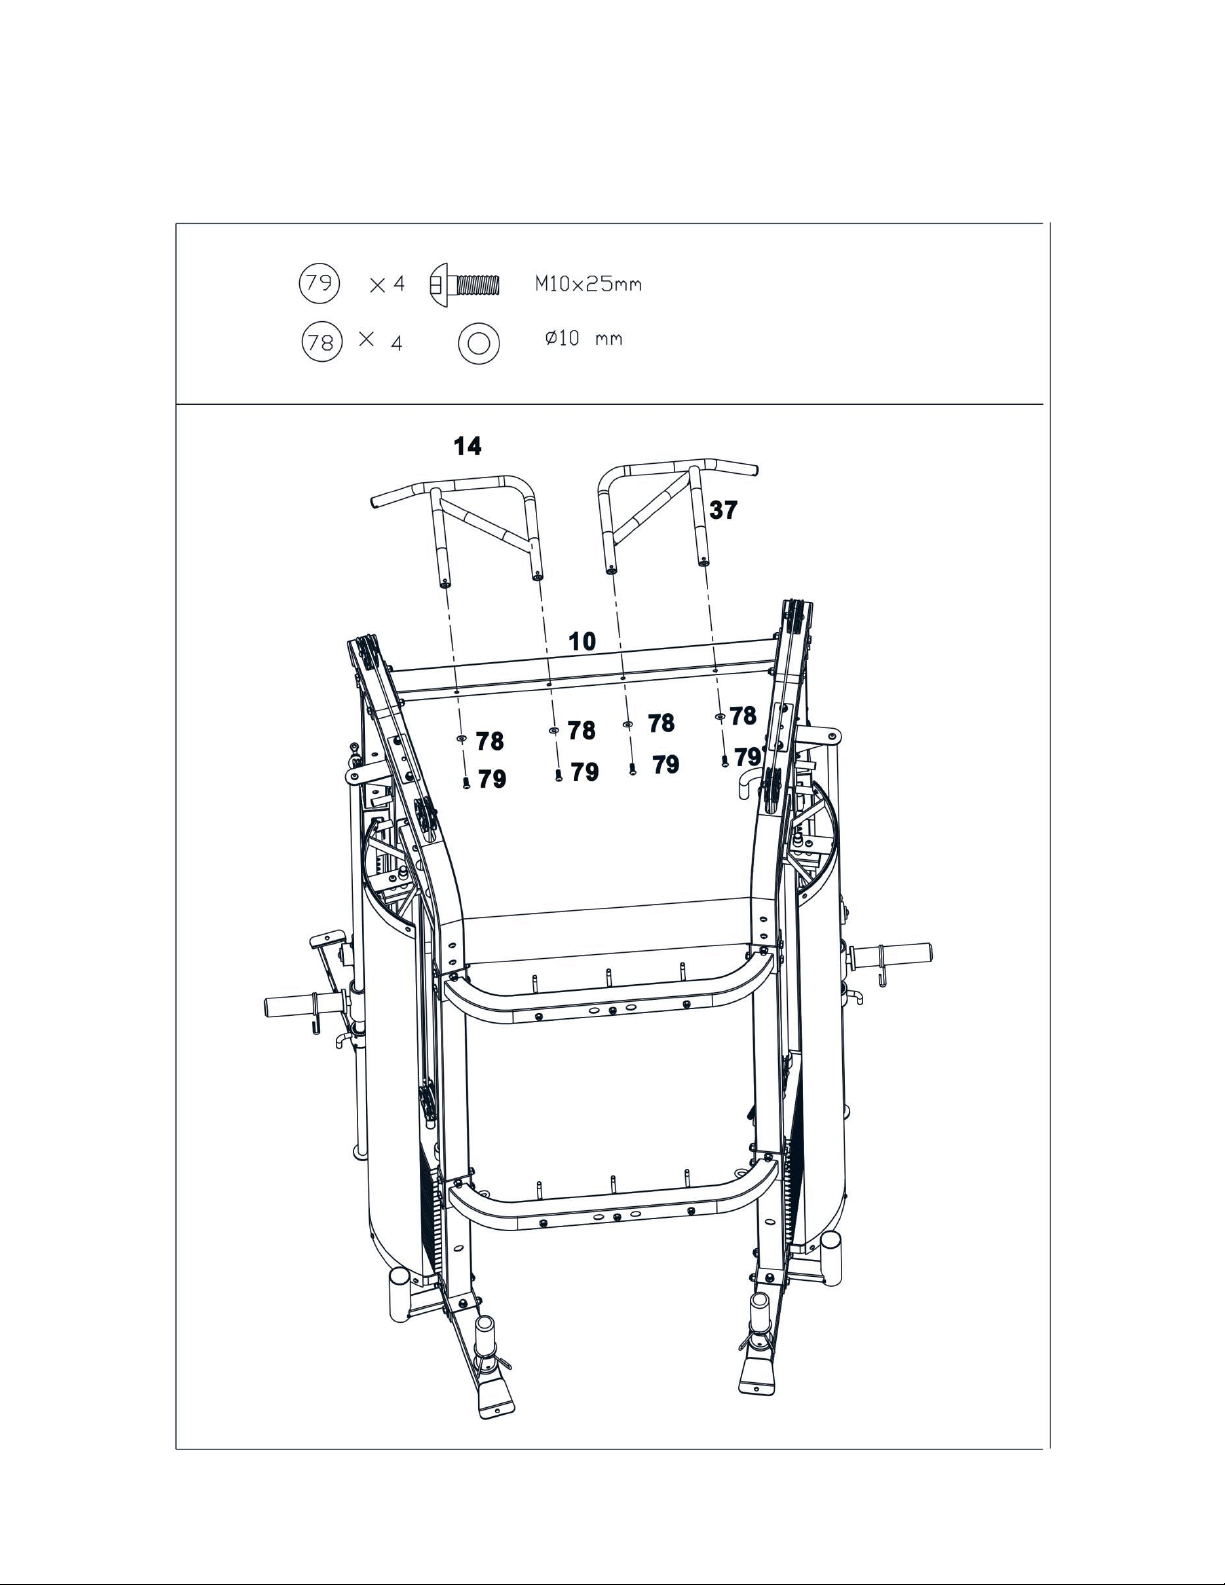
STEP 25
Attach the left & right chin up bar(14#&37#) to the upper connection frame(10#), secure them with 4pcs M10*25
Allen bolt(79#) and 4pcs φ10 washer(78#).
Page 42
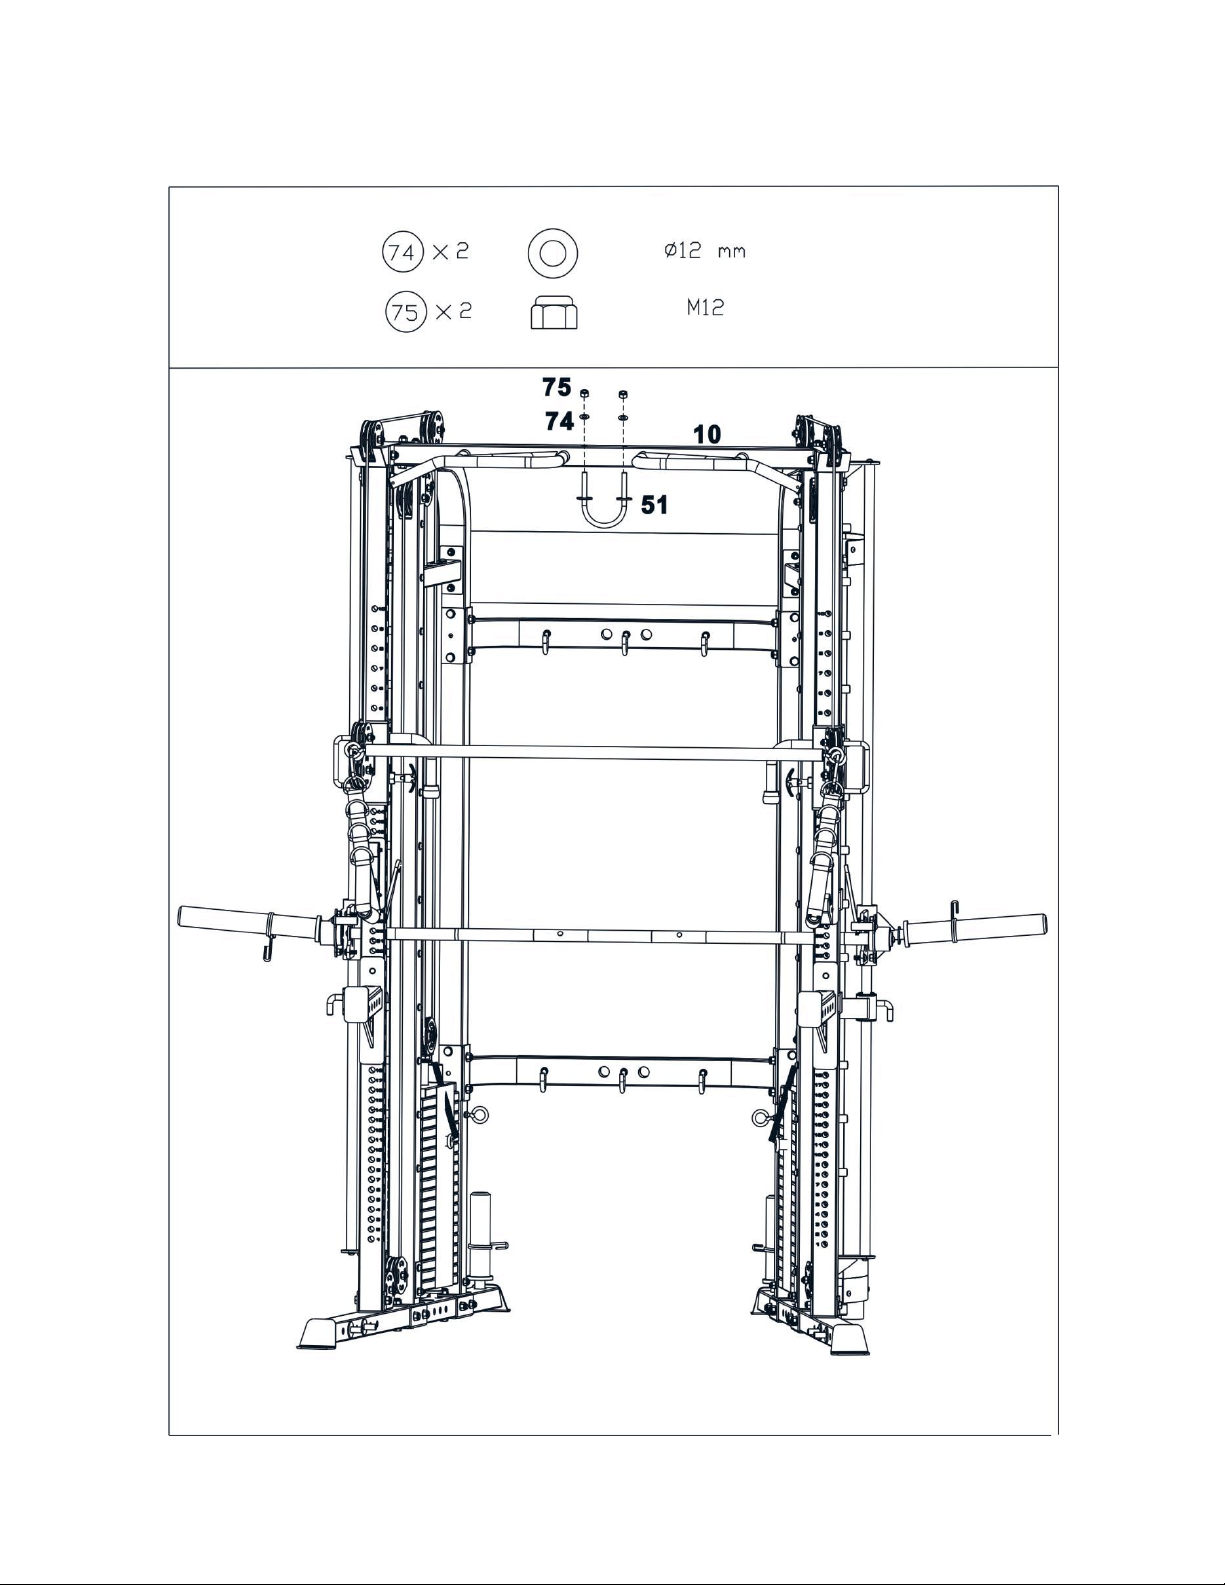
STEP 26
Attach the big hook (51#) through the hole and secure it with 2pcsφ12 washer (74#) and 2pcs M12 aircraft nut
(75#) .
Page 43
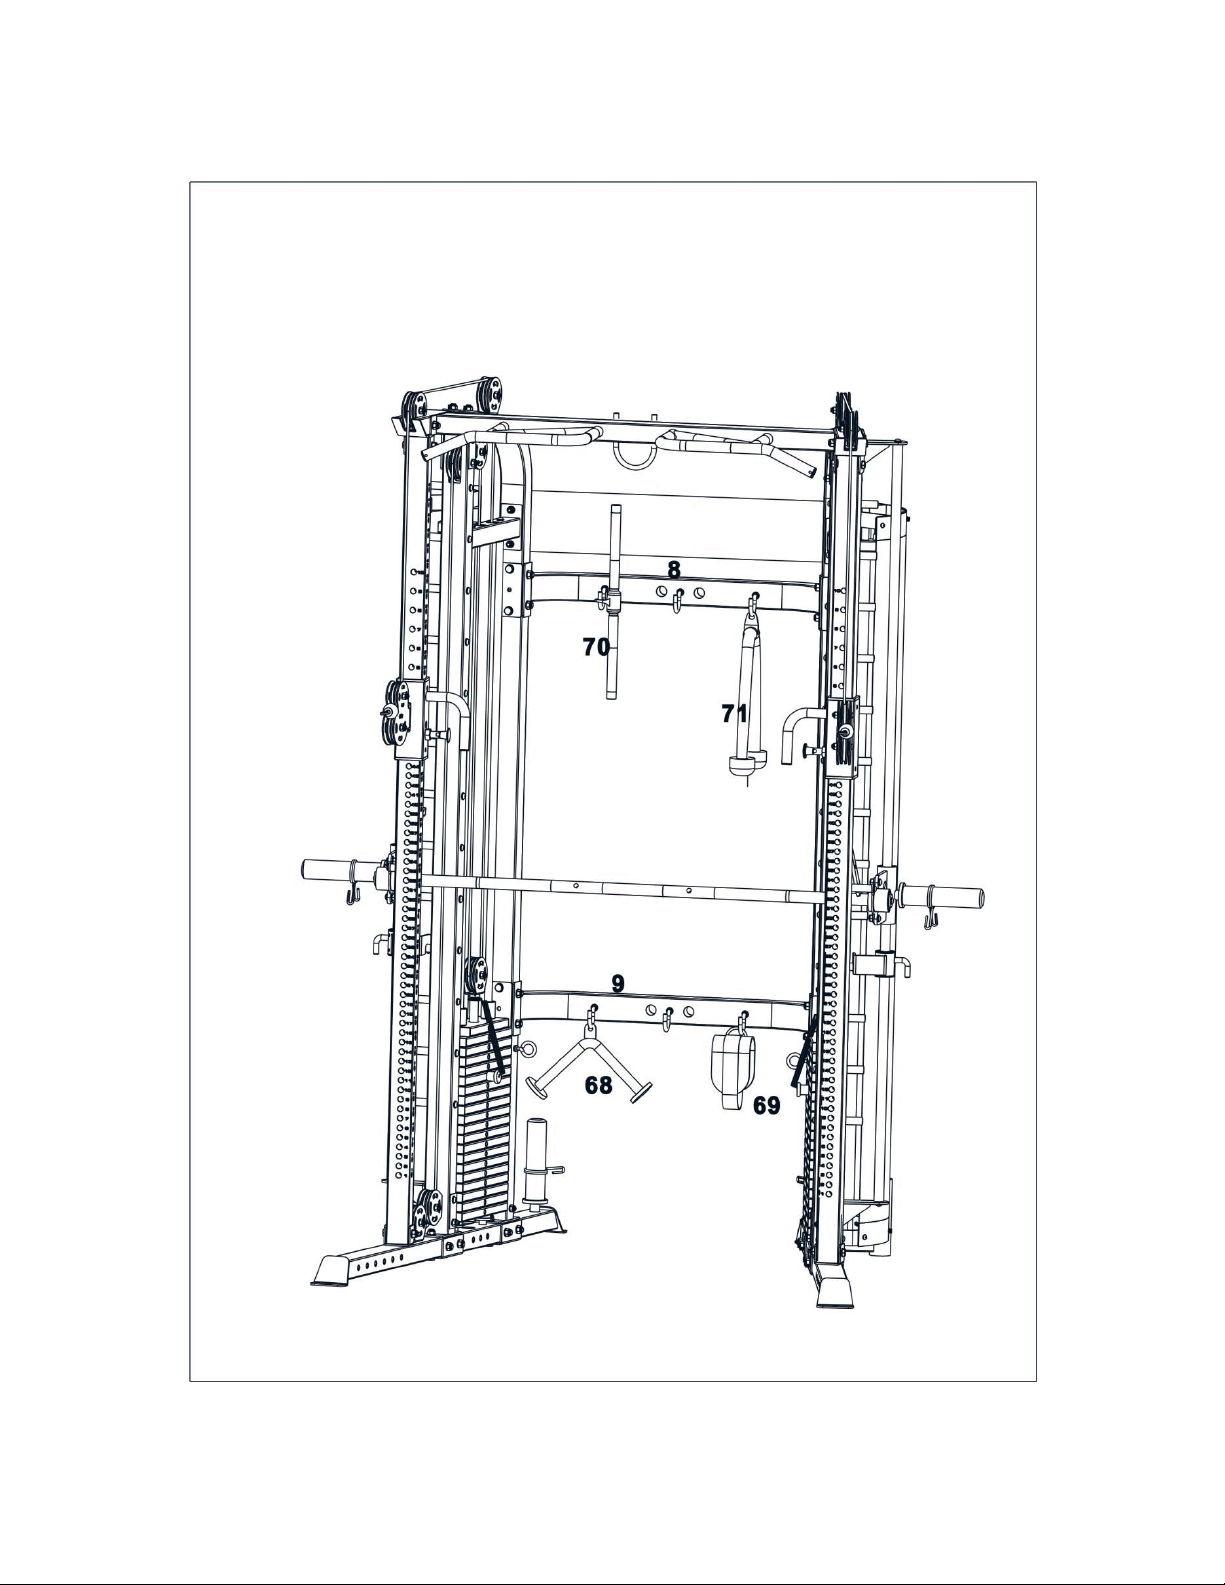
STEP 27
Attach the shiver bar (70#), triceps rope (71#),V shape handle(68#),ankle strap(69#) to the hooks separately as the
diagram shows.
Page 44
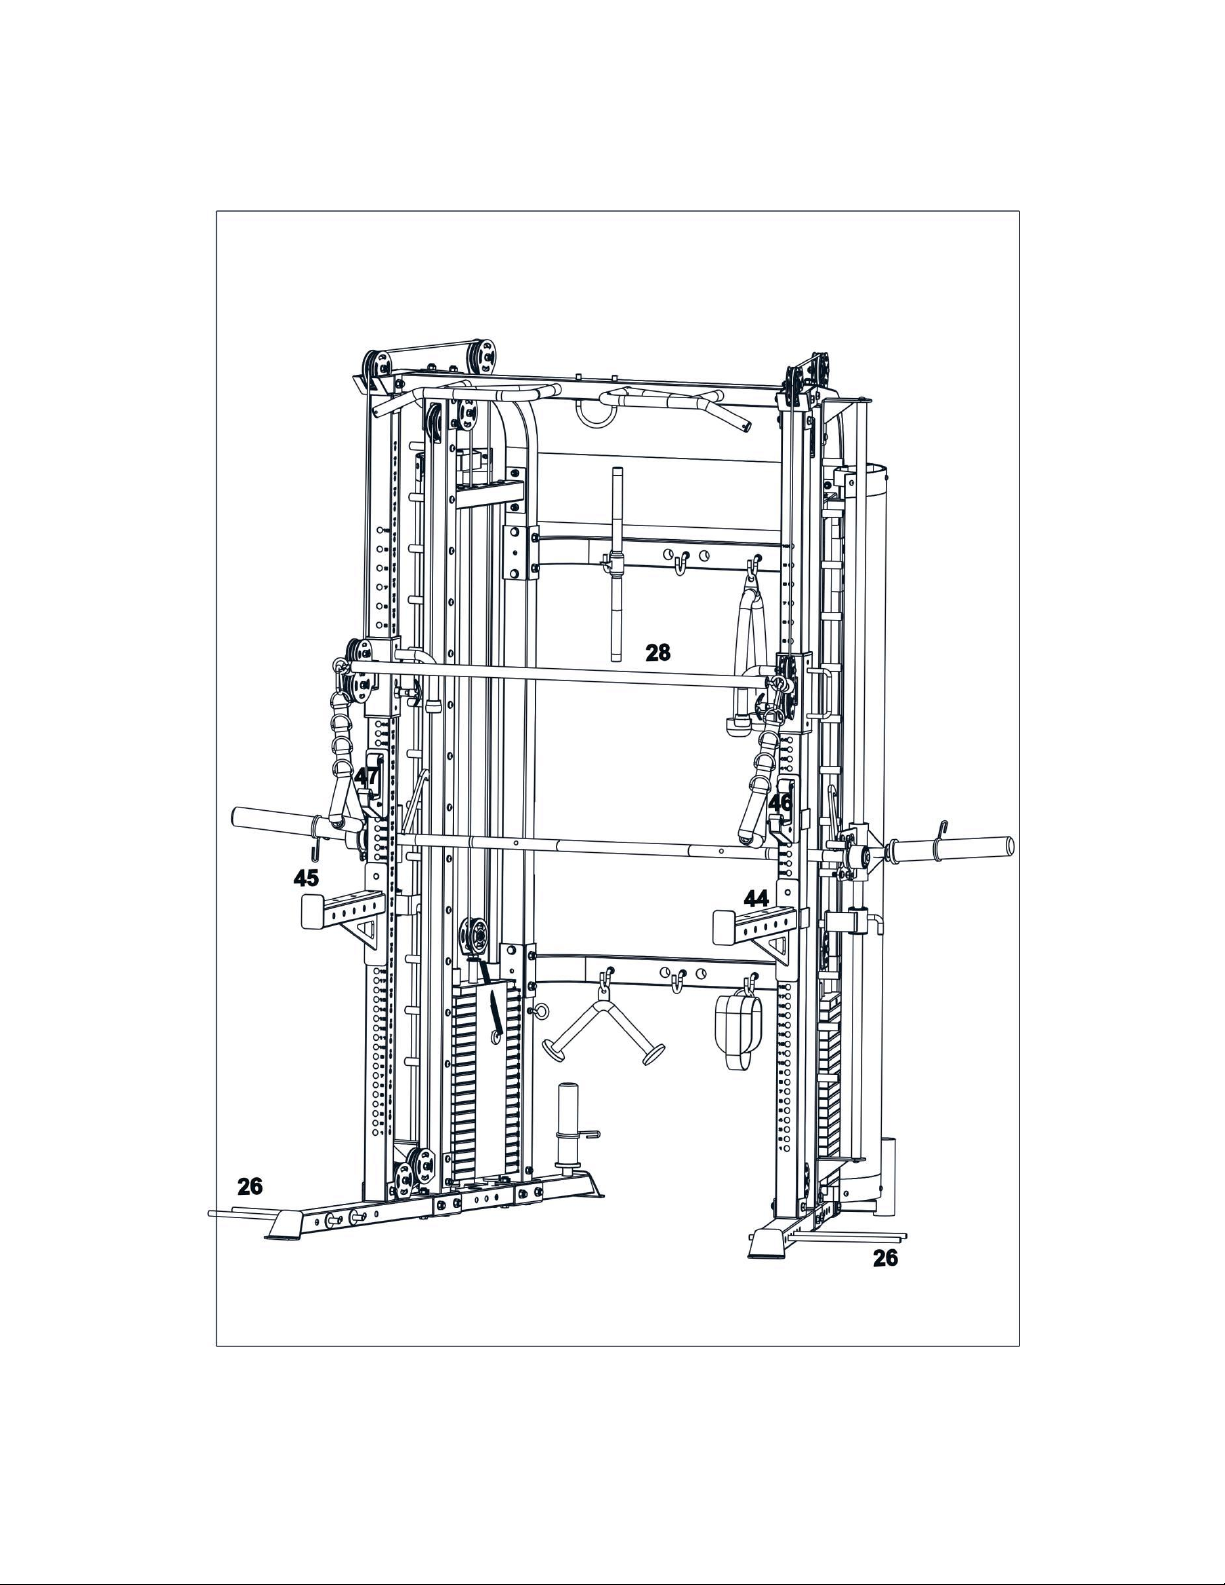
STEP 28
A. Attach the left& right safety bar(44#&45#) into the holes as the diagram shows.
B. Attach the left& right crunch (46#&47#) into the holes as the diagram shows.
C. Attach the 4pcs pin (26#) into the holes of the stabilizer.
Page 45
LIFETIME WARRANTY ON FRAME
Refer to forcefitnessequipment.com for comprehensive warranty details on components such as moving parts
Force USA, the Trusted Name in Strength Equipment™ was designed to be the best value strength
equipment for home use and proudly set the benchmark for our home use equipment around the world.
Offering one of the best warranties on the market for your peace of mind, each piece of Force USA
strength equipment is hand crafted for quality and we use state-of-the-art production methods for our entire
range. The Force USA range of strength equipment carries a Lifetime Structural Warranty. This warranty
applies to first owners and does not cover second hand equipment or re-sold equipment. This Force USA
warranty covers only failures due to defects in structural, cables and pulleys and workmanship that occur
during normal home use. It will not cover damage that occurs in transport/delivery or failure due to misuse,
abuse, neglect, mis-application, alteration or improper assembly of the product. This warranty does not
cover the use or failure of equipment in studio commercial applications. The replacement or repair provided
for under the Force USA warranty is the responsibility of the user and the customer will be responsible for
any freight charges applicable. Force USA will not be liable for any consequential damages or for breach of
any implied warranty on the range of Force USA strength equipment. Force USA reserves the right to
provide reconditioned parts and/or to request a return and repair existing defective parts on the Force USA
product.
VorTex by Force USA is a commercial grade upholstery used for all Force USA equipment. We use a high
grade commercial vinyl with rip-stop mesh backing which helps prevent rips and tears. Force USA, the
Trusted Name in Strength Equipment™ was designed to be the best value strength equipment for home
use and proudly set the benchmark for our home use equipment around the world.
Please visit our website for full warranty information.
www.forcefitnessequipment.com
 Loading...