

FoodSaver FSFSSL3840, FSFSSV3840, V3840 User Manual
www.foodsaver.com
User Guide 用户手册
Model •
型号
FSFSSL3840/V3840
VACUUM SEALING SYSTEM
不锈钢食品真空保鲜系统
READ AND SAVE ALL INSTRUCTIONS
BEFORE USING THIS APPLIANCE
使 用产品前先阅读此用户手册 并妥 善 保管
Quick Marinating Canister
快速腌渍罐子
www.foodsaver.com.cn

www.foodsaver.com.cn
1
Important Safeguards
For your own safety, always follow these basic
precautions when using a FoodSaver
®
appliance:
1. Read the User Manual carefully for operating
instructions. Read all instructions in this manual
before use.
2. Check if the voltage indicated on the appliance
corresponding to the local mains voltage before
you connect the appliance. For Mainland China,
standard electrical outlet is 220V~50Hz.
3. Do not use appliance on wet or hot surfaces,
or near a heat source.
4. To protect against electric shock, do not immerse
any part of the appliance, power cord or plug in
water or other liquid. Unplug from outlet when
not in use and before cleaning.
5. To disconnect, unplug power cord from electrical
outlet. Do not disconnect by pulling on cord.
6. Do not operate the appliance with a damaged
power cord or plug. Do not operate the
appliance if it malfunctions or is in any way
damaged.
7. Use appliance only for its intended use.
8. Caution: A short power cord is provided to
reduce risks from entanglement or tripping
over a longer cord. An extension cord may be
used when marked electrical rating is no less
than electrical rating of this appliance. All cords
should not drape over counter or tabletop
where cords can be tripped over or pulled on
unintentionally, especially by children.
9. Do not place on or near a hot gas or electric
burner, or heated oven. Extreme caution must
be used when moving products containing hot
liquids.
10. Wait 20 seconds between seals to allow
appliance to cool.
11. No user servicing.
12. FOODS INSIDE BAG CAN BE DEFROSTED BUT
NOT REHEATED IN MICROWAVE OVEN. When
reheating foods in FoodSaver
®
Bags make
sure to place them in water at a low simmering
temperature below 75°C (170°F).
13. When defrosting foods in the microwave in
FoodSaver® Bags make sure not to exceed maximum
power of 180 watts, maximum time of 2 minutes
and maximum temperature of 70°C (158°F).
14. This appliance is not intended for use by
persons (including children) with reduced
physical, sensory or mental capabilities, or lack
of experience and knowledge, unless they have
been given supervision or instruction concerning
use of the appliance by a person responsible for
their safety.
15. Close supervision is necessary when any
appliance is used by or near children to ensure
they do not play with the appliance.
For Household Use Only
SAVE THESE INSTRUCTIONS
Important Safeguards & Tips

2
Congratulations…
You are about to enjoy the freshness
benefits of FoodSaver
®
, The #1 Selling
Brand of Vacuum Packaging Systems. For
years, the FoodSaver
®
Vacuum Packaging
System has helped millions of households
keep food fresh longer in the refrigerator,
freezer and pantry. The FoodSaver
®
system
is designed to remove air and extend
freshness up to five times longer than
conventional storage methods. Keep your
FoodSaver
®
appliance on your worktop,
and you will soon discover its convenience
and versatility.
Why Vacuum Package?
Exposure to air causes food to lose nutrition and
flavour, and also causes freezer burn and enables
bacteria, mould and yeast to grow. The FoodSaver
®
vacuum packaging system removes air and seals
in flavour and quality. With a full line of FoodSaver
®
Bags, Canisters and Accessories to expand your
options, you can now enjoy the benefits of a
scientifically proven food storage method that
keeps food fresh up to five times longer.
The FoodSaver
®
Vacuum Packaging System Saves
Time and Money.
• Spend less money. With the FoodSaver® system,
you can buy in bulk or buy when needed and
vacuum package your food in desired portions
without wasting food.
• Save more time. Cook ahead for the week,
preparing meals and saving them in FoodSaver
®
Bags.
• Marinate in minutes. Vacuum packaging opens
up the pores of food so you can get that greatmarinated flavour in minutes instead of hours.
• Make entertaining a breeze. Make your
signature dish and holiday treats in advance
so you can spend quality time with your guests.
• Enjoy seasonal or specialty foods. Keep highly
perishable or infrequently used items fresh
longer.
• Control portions for dieting. Vacuum package
sensible portions and write calories and/or
fat content on the bag.
• Protect non-food items. Keep camping and
boating supplies dry and organised for outings.
Protect polished silver from tarnishing by
minimising exposure to air.
Do not return this product
to place of purchase.
Welcome to FoodSaver
®
Vacuum Sealing System
www.foodsaver.com.cn
3
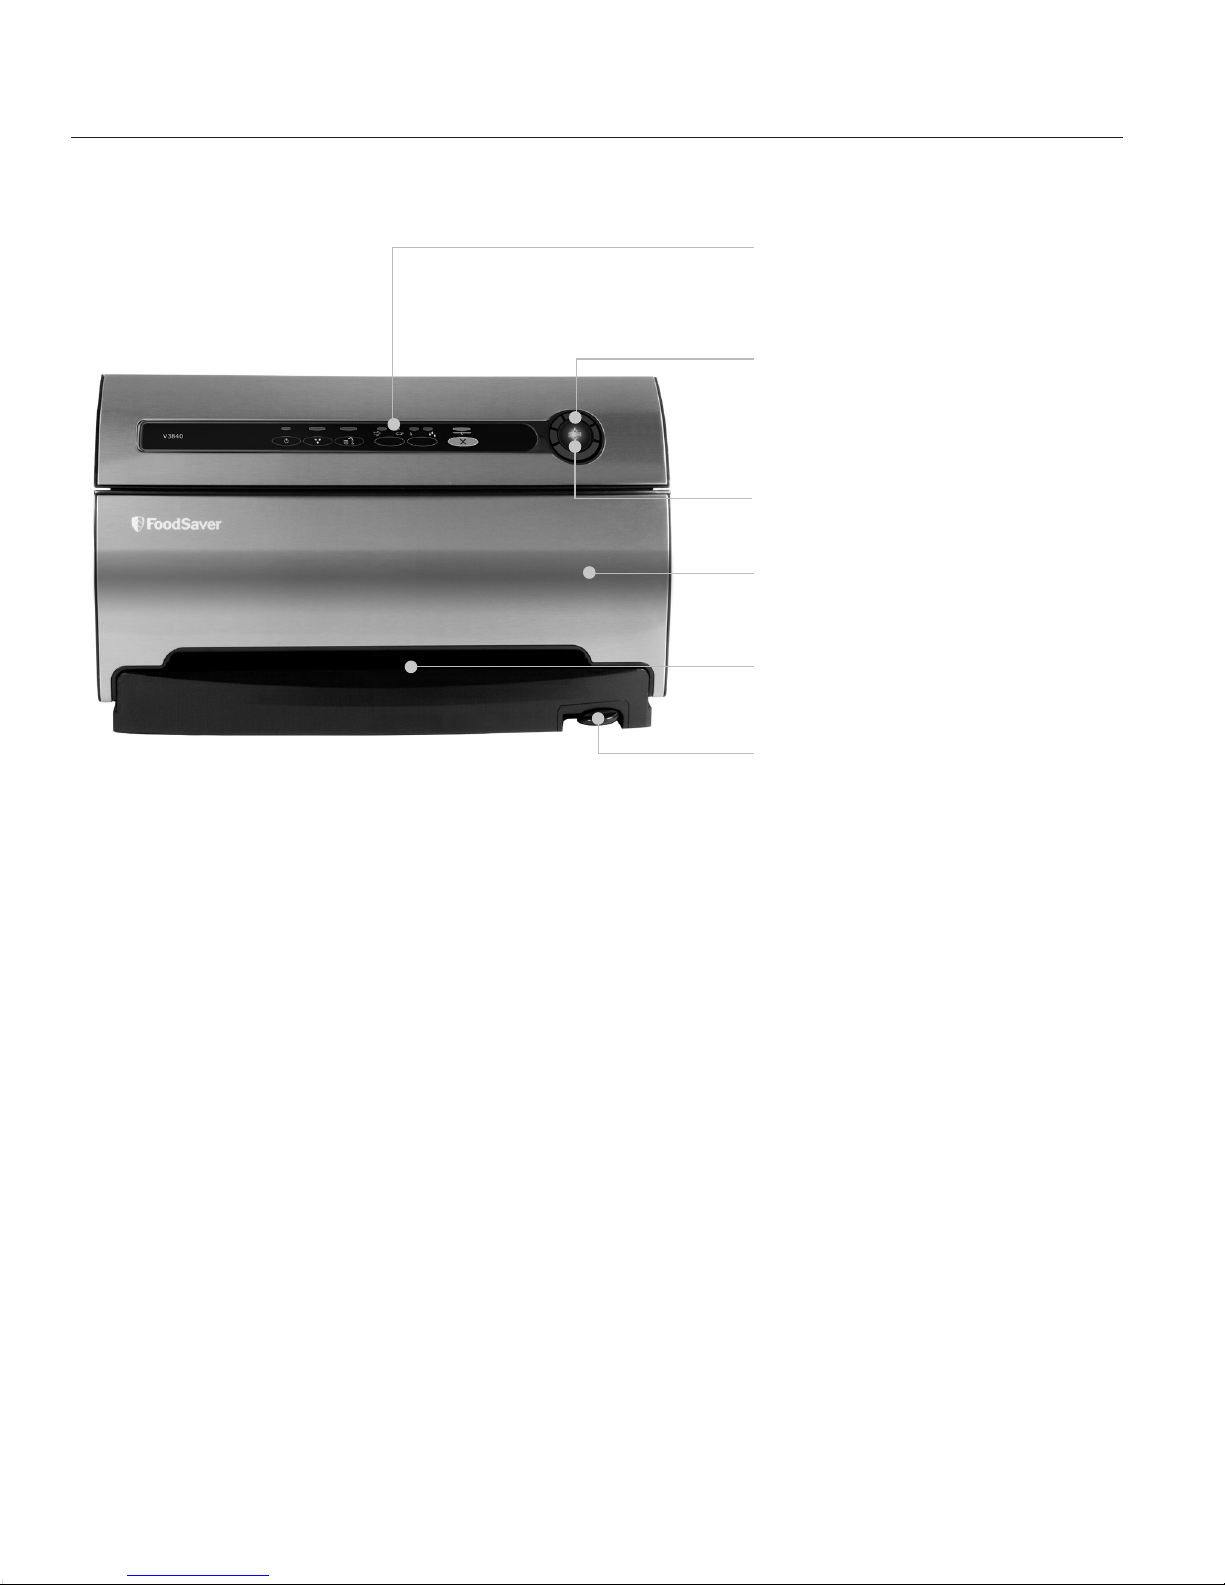
Features of Your FoodSaver® Appliance Features of Your FoodSaver
A. Controls and Indicator Lights
To indicate current setting, vacuum
progress and for added control.
B. Vacuum Progress Display
Blue lights signal progression of
vacuuming and sealing process.
All lights extinguish when the full
process is finished.
C. Seal Button
Crush Free Instant Seal feature.
Prevents crushing delicate items.
D. Appliance Door
Opens to access Built-in Roll Holder
and Cutter.
E. Vacuum Channel
Simply insert bag and the FoodSaver
®
appliance does the rest.
F. Retractable Accessory Hose/
Accessory Port
Accessory hose can be used with all
FoodSaver® Brand Accessories.
www.foodsaver.com.cn
4
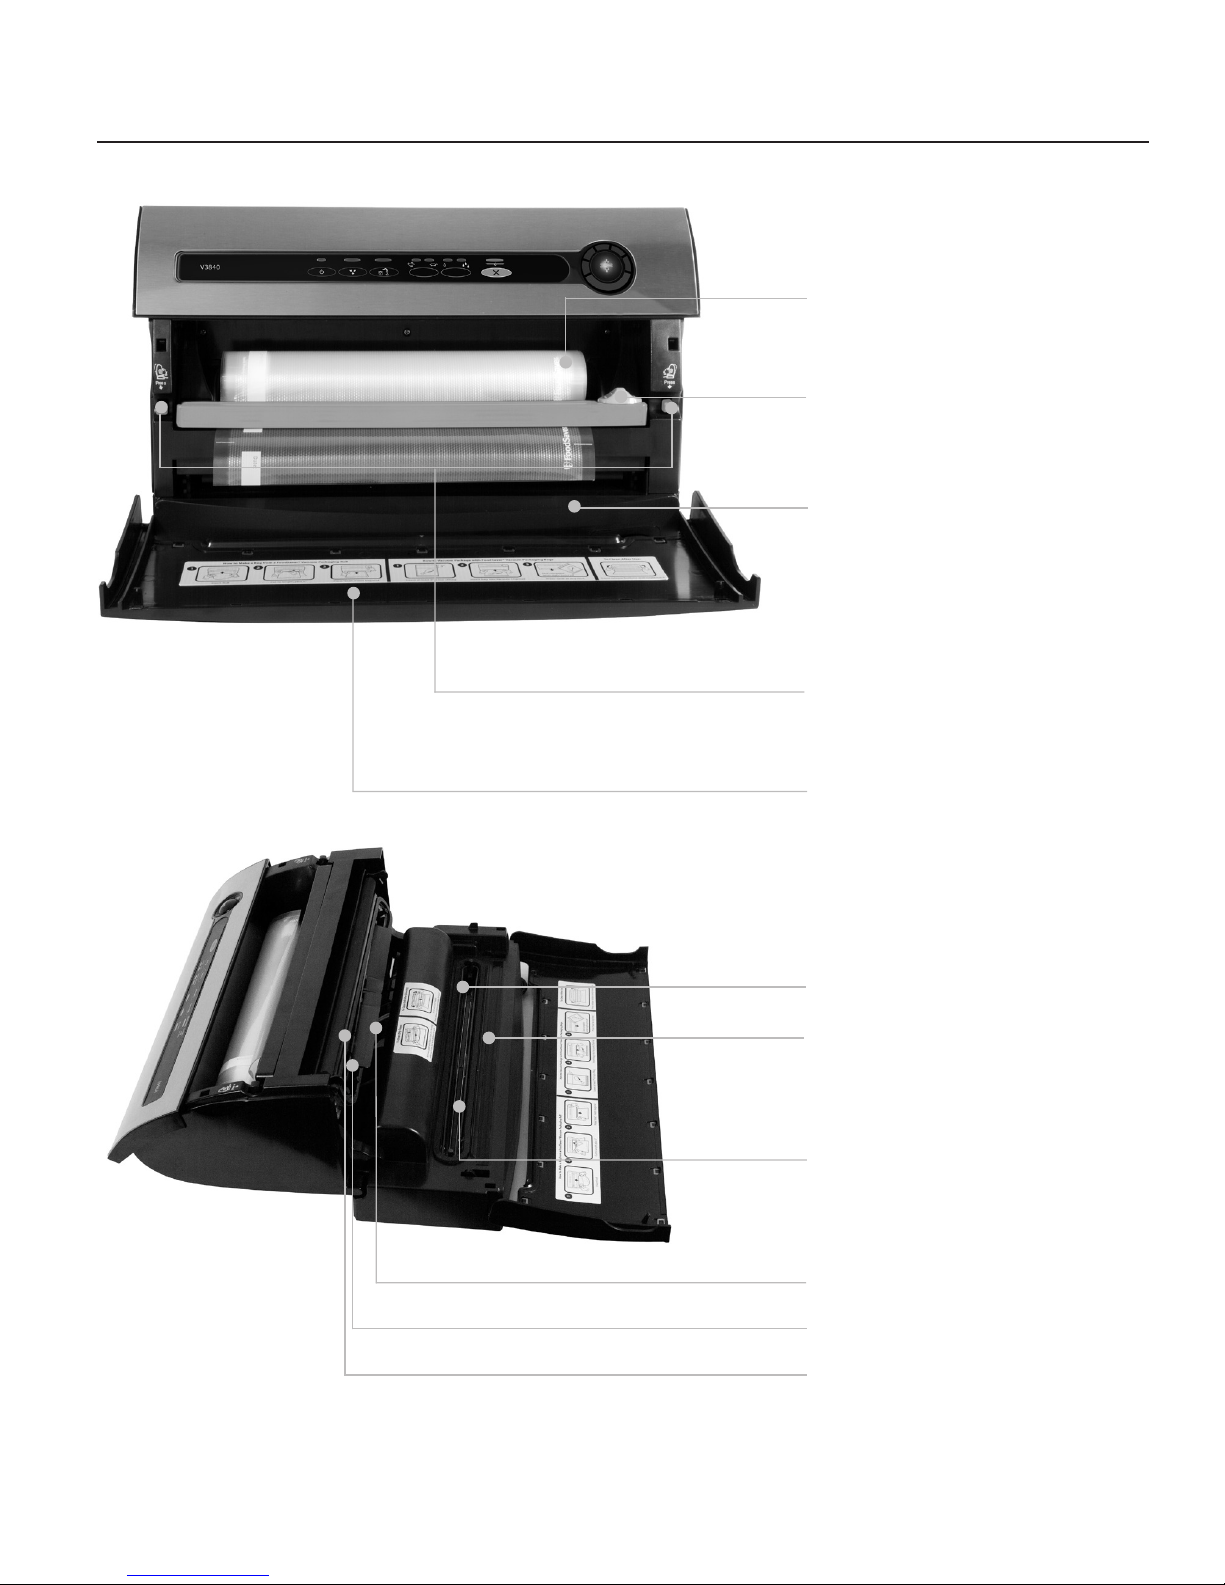
®
Appliance
L. Lower Gasket (glued)
M. Extra-wide Sealing Strip with
Non-stick Coating
Provides extra secure, airtight
seal that’s two times wider.
N. Drip Tray
Catches overflow liquids
and contains Food Sensors
to detect liquid.
O. Upper Bag Detection Tray
P. Upper Gasket (glued)
Q. Rubber Seal Profile
G. Built-in Roll Holder
For storage of FoodSaver
®
Vacuum Sealing Rolls.
H. Roll Cutter Bar
Simplifies making
custom-sized bags.
I. Auto Bag Sensing
Simply insert open end of bag
into the vacuum channel and the
machine will sense and grasp the
bag, vacuum, seal and shut-off
automatically.
J. Release Buttons
To open appliance
for cleaning.
K. Appliance Door
Opens to access Built-in
Roll Holder and Cutter.

www.foodsaver.com.cn
5
Features of Your FoodSaver® Appliance
1
POWER BUTTON
Press the power button to begin. The Power Indicator,
Speed Indicator and Food Indicator lights will become
illuminated. After Vacuum Sealing, press the Power
Button to turn the appliance Off. Note: After 12
minutes, the appliance will turn Off automatically.
2
TRAY FULL INDICATOR LIGHT
During the vacuum sealing process, small amounts of
liquids, crumbs or food particles can be inadvertently
pulled into the Drip Tray (N). When excess liquid fills
the Drip Tray, the unit will turn off and the Tray Full
Indicator 2 will activate. To resume normal operation,
remove the Drip Tray, empty liquid, wash in warm
soapy water or place in top rack of dishwasher. Dry and
replace the Drip Tray in trough. (See Care and Cleaning)
3
FOR USE WITH THE FOODSAVER® “QUICK MARINATING
CANISTER” ONLY
A ten-minute predetermined sequence of vacuum pulse
to rest ratio-allowing foods to get optimum flavour
infusion in the least amount of time. See “Marinating
with your FoodSaver®” section on page 10.
4
ACCESSORY BUTTON
Press to achieve best vacuum for canisters and
accessories. Push Canister Vacuum Button 4 to
begin vacuum process. Motor will run until Vacuum
Sealing Process is complete.
5
SPEED SETTINGS BUTTON
When vacuum sealing delicate items, press the Speed
Setting Button 5 so that the gentle speed indicator
light is illuminated. For more control you may press
the Seal Button
8
at any time to stop the vacuum
and begin the automatic the sealing process. Note:
Appliance will default to Normal speed upon pressing
the Power On Button or when power has been
interrupted.
6
ADJUSTABLE FOOD SETTINGS BUTTON
For optimal vacuuming and sealing of moist or juicy
foods, press the Adjustable Food Setting Button 6
until the Moist Indicator Light is illuminated. Choose
the dry food setting for foods without liquid.
The Moist Food Indicator light will flash when Food
Sealing Sensors automatically detect any moisture or
liquid in the Drip Tray (N). Note: Appliance will default
to Dry setting upon pressing the Power Button or when
power has been interrupted, unless liquid is detected
in the Drip Tray. (See Care and Cleaning section of this
User Manual).
7
CANCEL BUTTON
Immediately halts the current function opening the
Vacuum Channel.
8
SEAL BUTTON
Crush Free Instant Seal feature-
This button has three uses:
1. Press to immediately stop the vacuum process
and begin sealing the bag. This prevents crushing
delicate items such as bread, biscuits and pastries.
2. Press to create a seal when making bags from
a FoodSaver
®
Roll.
3. Press to create a seal on most Mylar bags (such as
a potato crisp bag) to keep food sealed airtight.
9
VACUUM PROGRESS DISPLAY
Displays vacuum levels as the bag/canister is
evacuated.
10
SEAL INDICATOR LIGHT
Constant Red light indicates sealing process is
engaged. (Flashing light indicates error)
Power Button
Tray Full
Indicator
Marinate
Button
Accessory
Button
Speed
Settings
Adjustable
Food Settings
Cancel
Button
Seal Indicator
Seal
Button
Vacuum
Progress
Display
Indicator
LEDs
4 5 6 7
2
8
9
10
3
1
 Loading...