

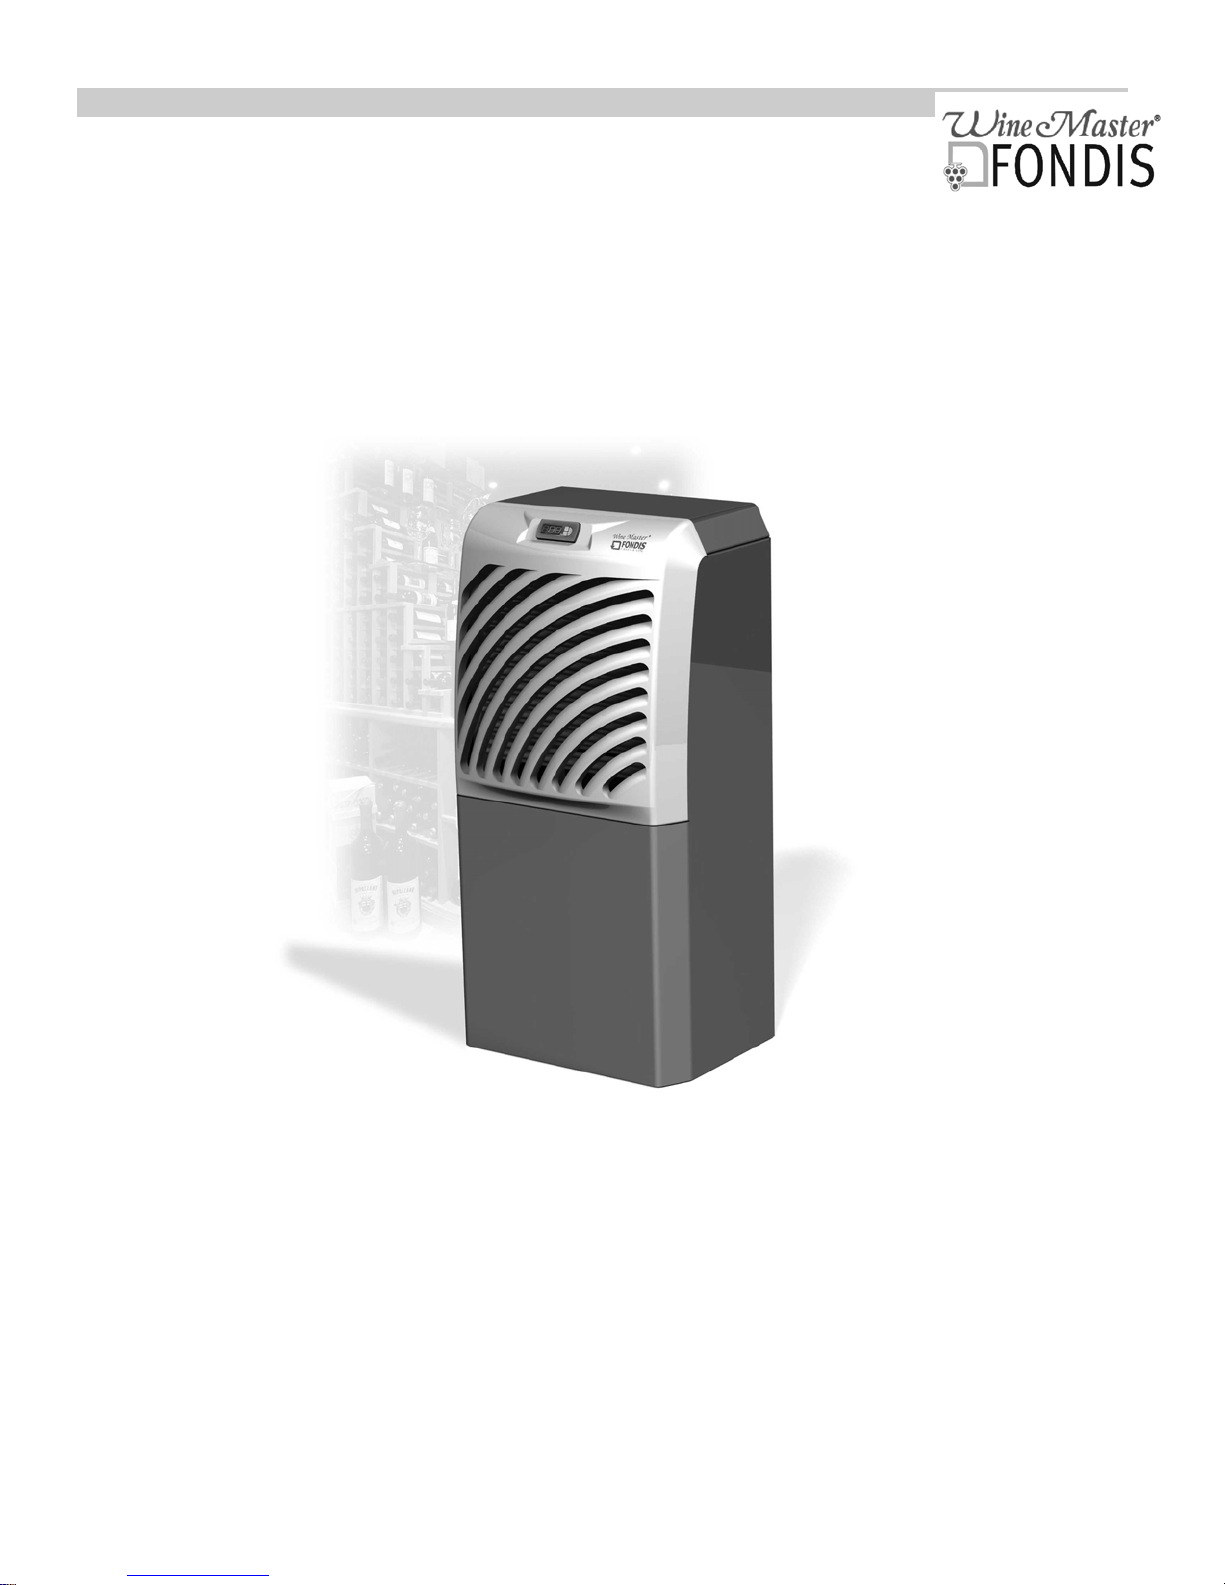
WINEMASTER
SP 100
Gebrauchsanweisung
Instruction for use
Mode d’emploi

CONTENTS
1 CHARACTERISTICS .......................................................................................................... 4
1.1 DIMENSIONS :........................................................................................................................ 4
2 LAYOUT OF PREMISES.................................................................................................... 5
2.1 INDOOR UNIT......................................................................................................................... 5
2.2 OUTSIDE UNIT ....................................................................................................................... 5
2.3 THE CELLAR .......................................................................................................................... 5
2.3.1 INSULATION............................................................................................................................ 5
2.3.2 CHOICE OF INSULATION ......................................................................................................... 6
2.3.3 WALL AND CEILING INSULATION ............................................................................................. 6
2.3.4 FLOOR INSULATION ................................................................................................................ 6
2.3.5 THE DOOR .............................................................................................................................. 7
2.3.6 INSULATION OF OTHER ITEMS................................................................................................. 7
3 INSTALLING THE OUTSIDE UNIT ................................................................................. 7
Make sure you have chosen the best place for fitting the outside unit : ....................................... 7
3.1 DRILLING THE WALL .......................................................................................................... 7
3.2 FLEXIBLE DISMOUNTING.................................................................................................. 7
3.2.1 THE COVER............................................................................................................................. 7
3.2.2 THE FIXING BRACKETS............................................................................................................ 8
3.2.3 THE REFRIGERANT CONNECTIONS .......................................................................................... 8
3.2.4 ELECTRICAL CONNECTOR....................................................................................................... 9
3.3 INSTALLATION OF THE OUTSIDE UNIT .......................................................................... 9
3.3.1 INSTALLATION OF THE WALL MOUNTING BRACKETS ............................................................... 9
3.3.2 ATTACHING THE OUTSIDE UNIT .............................................................................................. 9
4 INSTALLATION OF THE INSIDE UNIT........................................................................ 11
4.1 RE-CONNECTION OF THE FLEXIBLE ............................................................................. 11
4.2 INSTALLING THE CONDENSING WATER FLUE........................................................... 11
5 USING THE WINEMASTER SP100................................................................................. 12
5.1 CONNECTING THE AIR-CONDITIONER ......................................................................... 12
5.2 CONTROL PANEL................................................................................................................ 12
AUTOMATIC DEFROST.................................................................................................................. 12
6 SERVICING THE WINEMASTER AIR-CONDITIONER .............................................. 12
6.1 CHANGING THE FILTER.................................................................................................... 13
7 WARRANTY...................................................................................................................... 14
7.1 YEARS CONTRACTUAL WARRANTY............................................................................. 14
7.2 TERMS OF APPLICATION OF THE GUARANTEE.......................................................... 14
7.3 EXCLUSIONS AND LIMITS OF
GUARANTEE ................................................................ 14
2

FROM VINEYARD TO WINE
In former times, good french cellars were built to maintain a temperature not exceeding
14 to 16°C in all seasons
.
Today, this is rarely the case.
Nevertheless, a cellar worthy of the name must be protected against wide variations in
temperature, be as damp as necessary and ventilated, dark and free of vibration.
This is why, for more than fifteen years, we have used the expertise of specialists and
enthusiastic amateurs to design, develop, test and produce thousands of air-conditioners
destined to help in the storage and ageing of wine.
If you follow our advice and respect our recommendations Winemaster will provide the
optimal ageing conditions for your treasured wine collection.
You have to read the installation and operating guide for your FONDIS WINEMASTER cellar
air-conditioner.
Contact us if you have any questions :
So....even if there ay be long years to wait before the wine reaches perfection, the great
day will come when you face the delicate job of uncorking.
Hold the bottle carefully – do not remove the capsule on a level with the mouth – use a
good quality tool or lever – remove the cork without shaking the bottle and examine the “
mirror “..
But that’s another story......
SERVICE CLIENTS FONDIS
Phone 33 3 89 37 75 15/Fax 33 3 89 37 75 89
E-MAIL : contact@fondis.com
ATTENTION : Wait for 24 hours before switching on the air-conditioner.
3
1 CHARACTERISTICS
Setting the temperature
Maximum outdoor temperature 35°C**
Cooling power 2500W at 12°C**
Heating power 1000W
Electricity supply
Electrical power 1250W
Gas R407C without CFC
Refrigerant gas 1000g
Length of refrigerant flexible
connection
The circuit breaker must be at least 16 Amps.
* The insulation quality and thickness has to be in accordance with the volume of the cellar and the set
temperature.
** The cooling performance is dependant from the outside temperature. Therefore, the set temperature of 12°C
for the cellar cannot be maintained if the outside temperature of the cellar is maintained at 35°C.
Preset to 12°C, adjustable between 12 and 25°C*
230-240V 50Hz with earth connection ( supplied
with 3m cable )
5m
If the thermal safety functions to often, there is a risk for the condensator and starter to be damaged.
In all the cases, it must be avoided that the outside temperature remains at 35°C, this high
temperature should be limited to the summer period.
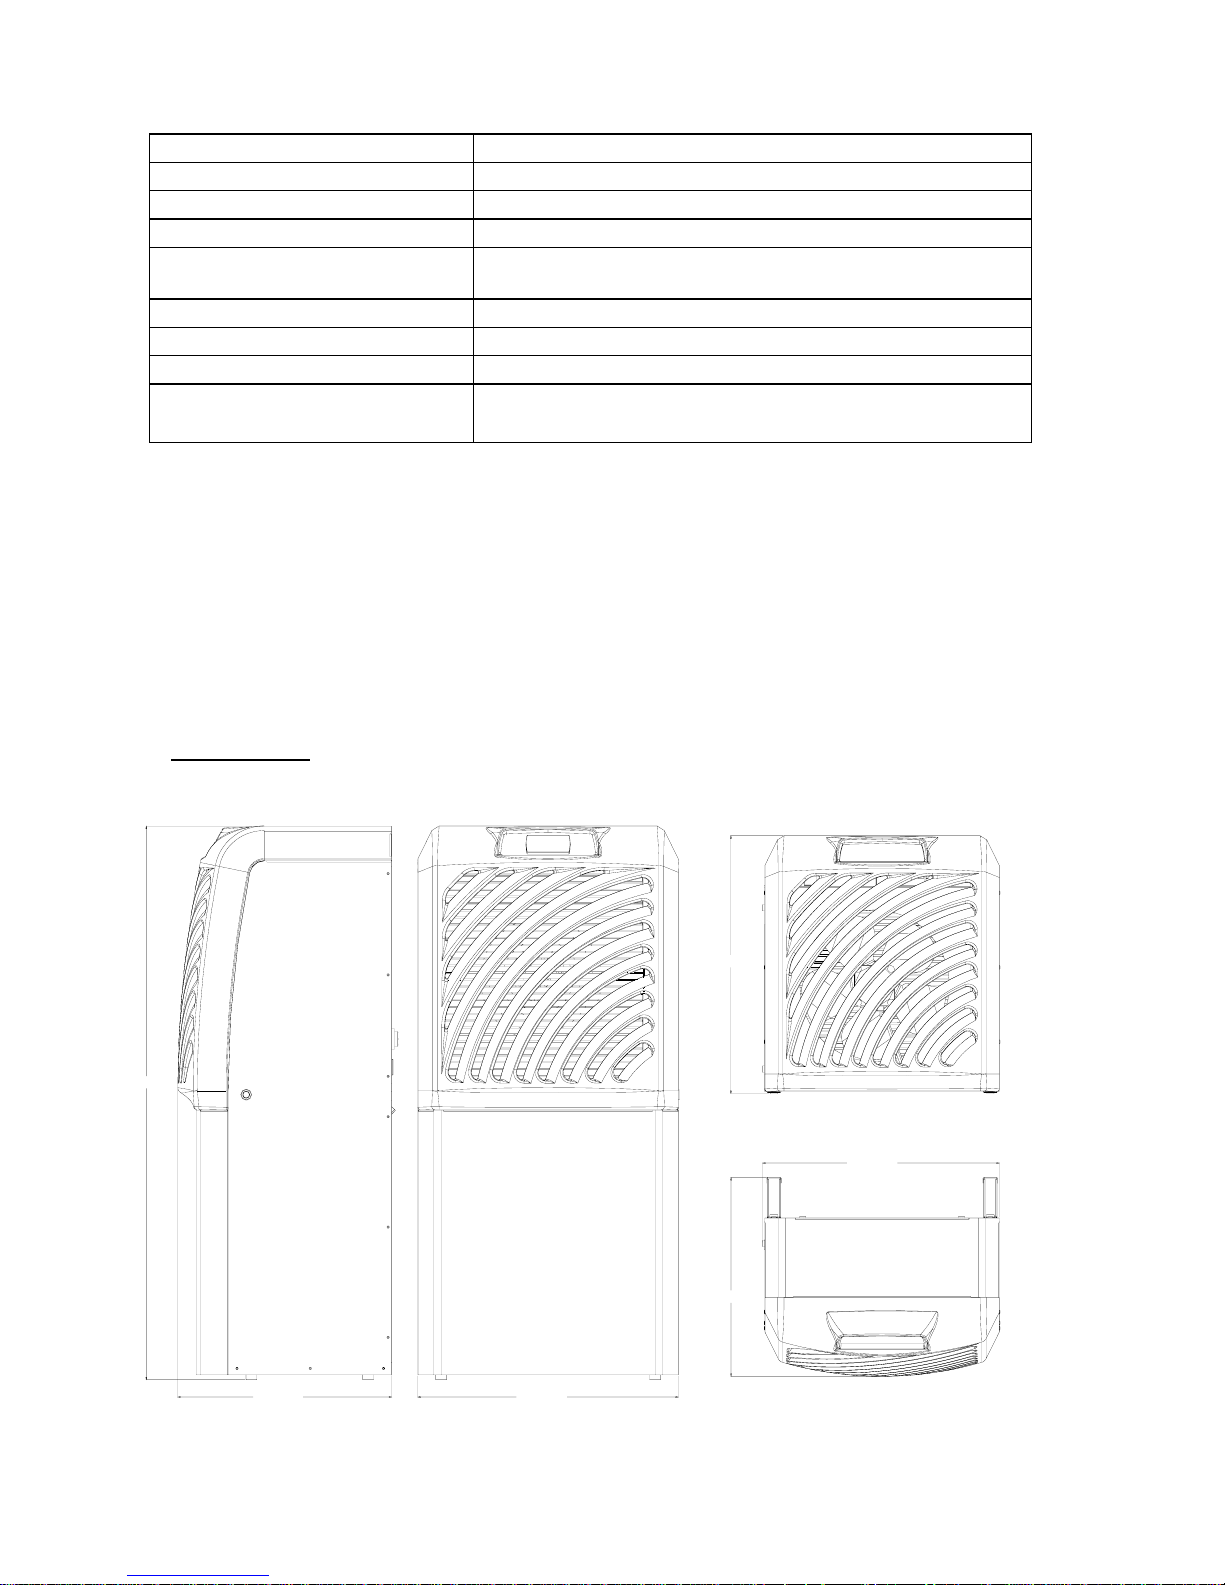
1.1 DIMENSIONS :
465mm
1005mm
435mm
360mm
480mm395mm
4

2 LAYOUT OF PREMISES
The air-conditioner is composed by two separate units which are connected by an electric and refrigerant flexible
cable of 5 mts. The distance between the two units cannot be more than 5 mts.
2.1 INDOOR UNIT
The indoor unit is entirely installad inside the cellar directly on the floor or fixed on the wall with adapted special
brackets.
2.2 OUTSIDE UNIT
The outside unit must be fixed on an outside wall in an area free from obstruction which may cause irregular air
distribution and/or return in front and back of the unit.
2.3 THE CELLAR
2.3.1 INSULATION
Insulation of the 4 walls, the door, the ceiling and the floor is essential for the Winemaster to work properly.
Adequate insulation helps to obtain the stability of the temperature and the humidity.
The board on the next page ( choice of insulation ) can be used to determine the type and the thickness of
insulation needed according to the internal volume of the cellar and a cellar temperature of 12°C.
Insulation continuity :
Insulation components must be assembled preferably by interlocking panels or glueing the panels together, to
ensure perfect continuity of insulation.
This is very important : it prevents heat and humidity entering from the outside which would counter the effects
of regulation.
The validity of the WINEMASTER guarantee depends on the values in the "Choice of insulation"
table being strictly respected, for all the cellar walls, including floor and ceiling + door, as well as
perfect continuity of insulation and installation in accordance to the user guide.
IMPORTANT
5
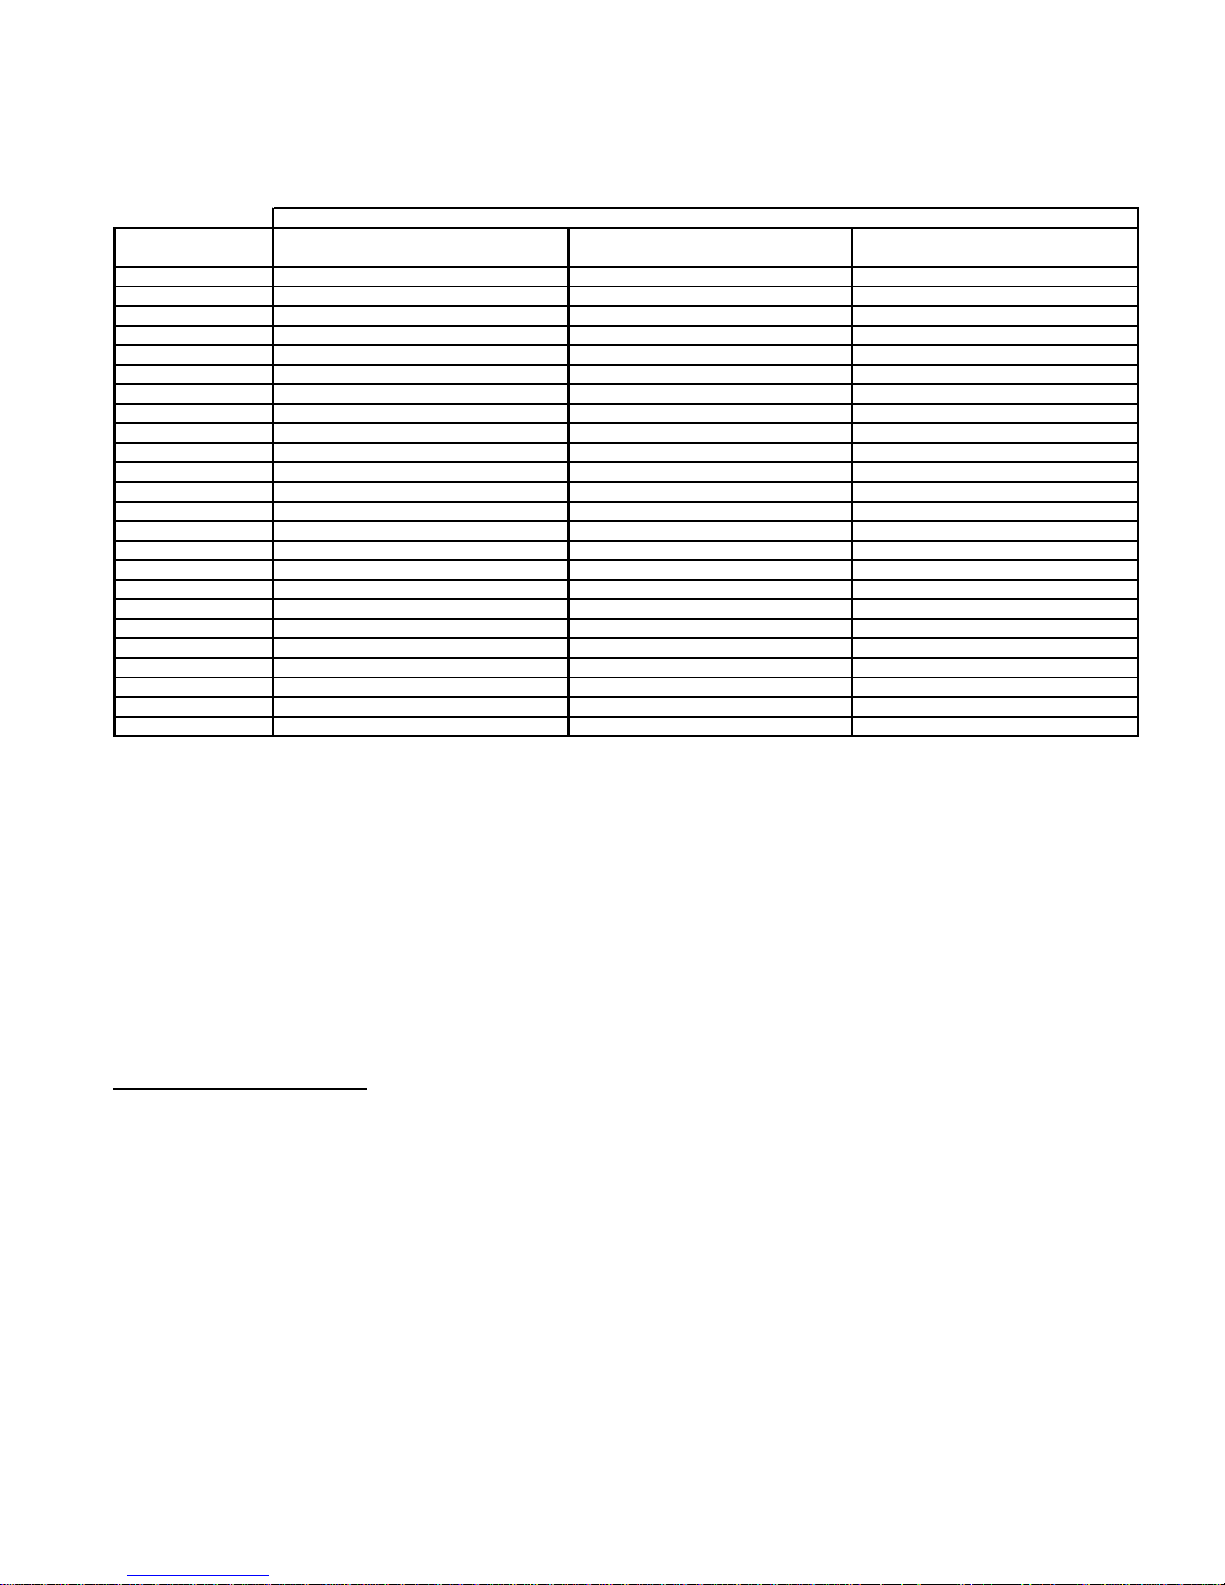
2.3.2 CHOICE OF INSULATION
MINIMUM THICKNESS OF INSULATION (mm )for 12°C cellar temperature
CELLAR
VOLUM E (m3)
14 60 40 30
16 60 40 40
18 70 50 40
20 70 50 40
22 70 50 40
24 80 60 50
26 80 60 50
28 90 60 50
30 90 60 50
32 100 70 60
34 100 70 60
36 100 70 60
38 110 80 60
40 110 80 70
42 120 80 70
44 120 80 70
46 120 90 70
48 130 90 70
50 130 90 80
60 150 100 90
70 170 120 100
80 190 130 110
90 200 140 120
100 220 150 130
EXPANDED POLYSTYRENE
λ =0,044 W /m °C
EXTRUDED POLYSTYRENE
λ =0,030 W /m °C
POLYURETHANE
FOAM λ = 0,0 2 5 W /m °C
2.3.3 WALL AND CEILING INSULATION
The manufacturers propose their insulation panels in several forms :
- insulation alone
- "complexes" : the insulation is lined with a facing ( plaster, mineral ….)
- “ sandwiches “ : the insulation is lined on each side with a wooden or plaster panel
The panel facing is important : it protects the insulation from shocks and guarantees long life.
Do not use mineral fibre insulation ( glasswool, stonewool…) because it stores humidity and loose its
insulation capacity.
Protection against rodents
Some insulating materials are damaged by rodents ( mice, rats…). It is therefore essential to make sure that
the walls of the cellar do not contain holes whichf would allow rodents access to the insulation.
This insulation must be lined, on the inner surface of the cellar, with a protective facing.
Polyurethane insulation, because of its chemical composition, is not attacked by rodents.
2.3.4 FLOOR INSULATION
The cellar floor must be able to support shelves and the wine stored on them.
You should therefore choose an insulating material with adequate compression resistance for this part.
Manufacturers recommend appropriate insulation or materials designed specifically for floor insulation, in their
documentation.
Puncture resistance ( feet of shelves in particular ) is provided :
- in using "complex" insulation panels lined, on the upper surface, with a strong panel .
- by facing the insulation with a panel of chipboard ( approx. 15 mm thick), or any other suitable covering
plaster and slab, for example
6

2.3.5 THE DOOR
It is part of the continuity of insulation.
There are two possible solutions :
- to insulate the existing door using the same type as insulation as was used for the cellar walls. Insert a
seal such a foam, between the door panel and the frame all around the edge.
- Use a FONDIS isothermal door, lined with polyurethane foam. It includes a seal around its periphery,
with a magnetic closure..
2.3.6 INSULATION OF OTHER ITEMS
A fridge or another appliance producing heat must not be placed inside the cellar. For example, any hot water
pipe going through the cellar must also be insulated.
3 INSTALLING THE OUTSIDE UNIT
Make sure you have chosen the best place for fitting the outside unit :
- Chose the best place in order that the length of the flexible connection will be shorter as
possible.
- There should not be any obstacle in front of the ventilation grid and the back of the unit, to
facilitate air flow
- The wall structure should be strong enough to carry the unit weight and avoid deformations
rupture, or vibration during operation
3.1 DRILLING THE WALL
Drill one hole of diametre 70mm to allow the connection of the flexible refrigerant tube to the unit.
3.2 FLEXIBLE DISMOUNTING
3.2.1 THE COVER
2
1
• Unscrew the two black platic screws 1.
• Open the cover like shown on the picture 2.
7

3.2.2 THE FIXING BRACKETS
2
1
3
- Unscrew the 5 screws 1 with a screwdriver PZ2 for unmounting the brackets 2 et 3.
3.2.3 THE REFRIGERANT CONNECTIONS
1
3
2
- Two wrenches 1 & 2 are supplied with the unit.
- Maintain the connection with the wrenche 1and unscre with the wrenche 2.
8

Attention : don’t stop unscrewing while gas leaks until the 2 elements are separated.The gas leak will
stop then ! Before and during remounting operations, protect the end of the flexible connection in order
to avoid dust goes out.
3.2.4 ELECTRICAL CONNECTOR
The ventilator of the outside unit is connected by an electric cable.
Disconnect the connector 3.
3.3 INSTALLATION OF THE OUTSIDE UNIT
3.3.1 INSTALLATION OF THE WALL MOUNTING BRACKETS
Ø10mm
150mm
300mm
443mm
3.3.2 ATTACHING THE OUTSIDE UNIT
Before attaching the outside unit, position two nylon washers 1 in the brackets holes.
1
9

• Position the outside unit so that the screws and washers 1 are engaged in the slot 2
1
2
• To finish, screw the kit screws and washer 1 under the unit.
1
10

4 INSTALLATION OF THE INSIDE UNIT
- Put the unit on the floor or on his horizontal support,
- It shouldn’t be any obstacle in front of the ventilation grid to facilitate the air flow
- The support or floor must be level and not transmit vibrations.
-
4.1 RE-CONNECTION OF THE FLEXIBLE
Pass the connecting flexible through the hole in the wall and re-connect the refrigerant fittings with the wrenches
and the electrical connecting wires to the outside unit. The reconnection can be done to any pipe.
Attention : open the ends of the flexible connection when you pass them through the wall in order to
keep the end clean for screwing again.
4.2 INSTALLING THE CONDENSING WATER FLUE
1
2
3
• Screw the plastic bend 1 supplied with the unit
• Slide the PVC tubing 2
• Screw up the ring clamp 3
• Connect the free end of the PVC tubing to a wastewater point or a retention tank ( mini content 25 litres).
Avoid “counter slopes “ or « siphons »
11

5 USING THE WINEMASTER SP100
5.1 CONNECTING THE AIR-CONDITIONER
Connect the male plug to a 230/16A power socket. Switch on the air-conditioner by pressing the green button
on the back of the inside unit..
The fan on the cellar side comes on immediately.
The compressor may not come on until 2 minutes later if the temperature in the cellar is higher than the set
temperature. If the cellar temperature matches the thermostat setting, the compressor will not come on.
5.2 CONTROL PANEL
The setting of the targeted temperature of the cellar is made on the thermostat .
Use the following process
Press the button 1 one seconde until the message o1 appears. Press then
the button 3, the set temperature of the cellar will appear. Use again the
button 1 to increase the temperature or the button 2 to lower the temperature.
When the right temperature is set, press the button 3 to confirm it.
:
AUTOMATIC DEFROST
The program of the thermostat from model WINEMASTER SP100 will run an automatic defrost time several
times a day. During this position, the compressor stops and only the fan in the cellar is functionning.
The condensate water produced during this period will b evacuated through the tube.
6 SERVICING THE WINEMASTER AIR-CONDITIONER
THE DUST FILTER
It is essential to replace the dust filter in the air-conditioner as soon as necessary and at least once a year. If it is
clogged, the air-conditioner could be seriously damaged.
12

6.1 CHANGING THE FILTER
2
1
3
• Unscrew the two plastic screws 1
• Remove the cover 2.
• Pull the tab 3 to release the filter
Replace it with a FONDIS filter only !
You can then replace the cover.
13

7 WARRANTY
7.1 YEARS CONTRACTUAL WARRANTY
The air-conditioner is guaranteed for two years against manufacturing defects.
During the contractual guarantee period, FONDIS will replace any part recognized as defective, following the
intervention of a qualified representative.
In the event of an electrical breakdown, FONDIS will replace any part recognized as defective following the
intervention of a qualified stockist or his representative.
In the event of cooling system breackdown, FONDIS can ask for the part to be returned for repair following the
intervention of a qualified representative. The equipment will be packed and held available for the FONDIS
carrier to collect it.
Operations and returns must be made with the written agreement of FONDIS after sales service.
7.2 TERMS OF APPLICATION OF THE GUARANTEE
The contractual guarantee applies to all devices installed and used in accordance with the « installation and
operating guide ". Application of the contractual guarantee depends on the guarantee card at the back of the
booklet being returnd within 15 days of purchase.
7.3 EXCLUSIONS AND LIMITS OF GUARANTEE
The guarantee is refused in the following cases :
- The cellar and installation have not been insulated in accordance with this guide.
- The damage is due to negligence, poor maintance, defective or inappropriate use of the Winemaster
- Part exchanges or remplacements under guarantee will not have the effect of extending it.
14

CERTIFICAT DE GARANTIE WINEMASTER FONDIS
Pour valider votre garantie contractuelle de 2 ans conformément aux conditions de garantie précisées
dans le guide d’utilisation,
Pour renvoyer votre bon de garantie à FONDIS, il vous suffit de le mettre dans une enveloppe sans
l’affranchir à l’adresse suivante :
TYPE
merci de nous retourner ce bon dûment rempli
dans les 15 jours suivant votre achat.
FONDIS SA
LIBRE REPONSE 90010
68804 THANN Cédex
CACHET DU POINT DE VENTE
N° DE SÉRIE
DATE D’ACHAT
DATE D’INSTALLATION
INSTALLATEUR
NOM ...................................................................... PRENOM .......................................................
ADRESSE......................................................................................................................................
....................................................................................................................................................
CODE POSTAL ...................... VILLE ................................................ PAYS ....................................
Nous vous remercions de nous préciser ci-dessous les conditions d’installation de votre climatiseur de cave.
Caractéristiques de l’isolation
Mur
Sol
Plafond
Porte
Comment avez-vous connu le Winemaster FONDIS ?
Descriptif matériaux et épaisseur Type d’isolant et épaisseur
Volume climatisé : . . . . . . . m3
Par le revendeur Par une foire Par un article rédactionnel Par la
publicité
Autre (à préciser) : ........................................................................................................................................................
........................................................................................................................................................................................
15

13/07/2004
GARANTIESCHEIN FÜR WINEMASTER FONDIS
Damit Ihre vertragliche 2-Jahres-Garantie wirksam werden kann, müssen Sie gemäß den
in der Gebrauchsanleitung beschriebenen Bedingungen diesen Garantieschein ausfüllen
und innerhalb von 2 Wochen nach dem Kaufdatum an FONDIS einsenden.
Sie können den Garantieschein in einem frankierten Umschlag an folgende Adresse
schicken :
FONDIS S.A.
F - 68801 THANN CEDEX
MODELL
STEMPFEL DES FACHGESCHÄFTES
SERIENNUMMER
KAUFDATUM
NAME ........................................................... VORNAME ...............................................
ADRESSE.......................................................................................................................
.....................................................................................................................................
PLZ ........................ ORT ..................................................LAND..................................
Bitte, geben Sie hier an, wie Ihre Weinklimaanlage installiert wurde.
Beschaffenheit der Dämmung
Klimatisierter Rauminhalt: . . . . . . . m3
Materialbeschreibung und Dicke Art des Dämmstoffs und Dicke
Wände
Boden
Decke
Tür
Wie sind Sie auf WINEMASTER von FONDIS aufmerksam geworden ?
Durch meinen Fachhändler Auf einer Verbrauchermesse
Durch einen Zeitungsartikel Durch Werbung
Sonstiges (bitte erläutern) : ....................................................................................................................

17
WARRANTY CERTIFICATE FONDIS
In order to validate your 2 year contractual warranty in accordance with the specified warranty
conditions stated in the WineMaster user manual, please complete and return this
warranty certificate within 15 days from the date of purchase to the following address:
FONDIS S.A.
F - 68801 THANN CEDEX
Model:______________________________________________
Serial number:_______________________________________
Purchase date:_______________________________________
Installation date:_____________________________________
Installer:____________________________________________
The volume of your wine cellar in meters squared: ________
FIRST NAME______________________________ LAST
NAME_____________________________________
ADDRESS________________________________________________________________________________
_
POSTAL CODE_______________ CITY_________________________
COUNTRY_______________________
In the following section, please specify the insulation characteristics of your cellar.
Type of material and thickness Type of insulation and thickness
Wall
Floor
Ceiling
Door
How did you learn about FONDIS WineMaster cellar air conditioning systems ?
through a trade show through a vendor
through an editorial article through an advertisement
other (please specify)
______________________________________________________________________
POINT OF SALE STAMP

18
 Loading...