

Follett FZR5PL Service Manual
FZR Series
-30 C Undercounter Plasma Freezer
Order parts online
www.follettice.com
Installation, Operation and Service Manual
Serial numbers C83253 and above
Serial numbers below C83253 equipped with evaporator defrost heater retrot kit
Following installation, please forward this manual
to the appropriate operations person.
801 Church Lane • Easton, PA 18040, USA
Toll free (800) 523-9361 • (610) 252-7301
Fax (610) 250-0696 • www.follettice.com
00939132R00

Contents
Specications . . . . . . . . . . . . . . . . . . . . . . . . . . . . . . . . . . . . . 3
Series specications . . . . . . . . . . . . . . . . . . . . . . . . . . . . 3
Electrical specications . . . . . . . . . . . . . . . . . . . . . . . . . . 3
Refrigeration specications . . . . . . . . . . . . . . . . . . . . . . . 3
Installation specications . . . . . . . . . . . . . . . . . . . . . . . . . 3
Installation . . . . . . . . . . . . . . . . . . . . . . . . . . . . . . . . . . . . . . . . 4
Installing legs – required . . . . . . . . . . . . . . . . . . . . . . . . . 4
Temperature surveillance module . . . . . . . . . . . . . . . . . . 4
Automated medication dispensing
and inventory systems interface. . . . . . . . . . . . . . . . . . . . 4
Reversing the door swing – optional . . . . . . . . . . . . . . . . 5
Controller operation . . . . . . . . . . . . . . . . . . . . . . . . . . . . . . . . . 6
To display temperature cut-out. . . . . . . . . . . . . . . . . . . . . 6
To change temperature cut-out . . . . . . . . . . . . . . . . . . . . 6
Controller security . . . . . . . . . . . . . . . . . . . . . . . . . . . . . . 7
To lock the controller . . . . . . . . . . . . . . . . . . . . . . . . . . . . 7
To unlock the controller . . . . . . . . . . . . . . . . . . . . . . . . . . 7
Controller programming key - “hot key” . . . . . . . . . . . . . . 7
Programming freezer from a controller
programming key - “hot key” (download) . . . . . . . . . . . . . 7
Operation . . . . . . . . . . . . . . . . . . . . . . . . . . . . . . . . . . . . . . . . . 8
Temperature control . . . . . . . . . . . . . . . . . . . . . . . . . . . . . 8
Defrosting . . . . . . . . . . . . . . . . . . . . . . . . . . . . . . . . . . . . . 8
Cleaning . . . . . . . . . . . . . . . . . . . . . . . . . . . . . . . . . . . . . . . . . 9
Interior . . . . . . . . . . . . . . . . . . . . . . . . . . . . . . . . . . . . . . . 9
Exterior . . . . . . . . . . . . . . . . . . . . . . . . . . . . . . . . . . . . . . . 9
Annual Cleaning and Inspection . . . . . . . . . . . . . . . . . . . 9
Removing drawers . . . . . . . . . . . . . . . . . . . . . . . . . . . . . . 9
Removing slides . . . . . . . . . . . . . . . . . . . . . . . . . . . . . . . . 9
Service . . . . . . . . . . . . . . . . . . . . . . . . . . . . . . . . . . . . . . . . . .10
Latch adjustment . . . . . . . . . . . . . . . . . . . . . . . . . . . . . . .10
Door gasket replacement . . . . . . . . . . . . . . . . . . . . . . . . .10
Slide-out compressor tray . . . . . . . . . . . . . . . . . . . . . . . .10
Controller replacement . . . . . . . . . . . . . . . . . . . . . . . . . . .11
Wiring diagram . . . . . . . . . . . . . . . . . . . . . . . . . . . . . . . . .11
Refrigeration system . . . . . . . . . . . . . . . . . . . . . . . . . . . .12
Checking refrigeration system pressures . . . . . . . . . . . . .12
Discharge and suction pressure table . . . . . . . . . . . . . . .12
Refrigeration system diagram . . . . . . . . . . . . . . . . . . . . .12
Freezer troubleshooting guide . . . . . . . . . . . . . . . . . . . . .13
Accessory Installation . . . . . . . . . . . . . . . . . . . . . . . . . . . . . . .14
Temperature surveillance module accessory . . . . . . . . .14
Temperature alarm accessory . . . . . . . . . . . . . . . . . . . . .14
Pedestal base . . . . . . . . . . . . . . . . . . . . . . . . . . . . . . . . .14
Stacking kit . . . . . . . . . . . . . . . . . . . . . . . . . . . . . . . . . . . .14
Replacement parts . . . . . . . . . . . . . . . . . . . . . . . . . . . . . . . . .15
Evaporator . . . . . . . . . . . . . . . . . . . . . . . . . . . . . . . . . . . .15
Condensing unit . . . . . . . . . . . . . . . . . . . . . . . . . . . . . . . .16
Hardware . . . . . . . . . . . . . . . . . . . . . . . . . . . . . . . . . . . . .17
Hardware & electrical components . . . . . . . . . . . . . . . . .18
Follett Corporation Equipment Return Policy
Follett equipment may be returned for credit under the following conditions:
1. The equipment is new and unused.
2. A return authorization number has been issued by customer service within 30 days after shipment.
3. Follett receives the equipment at the factory in Easton, PA within 30 days after issuance of the return authorization number.
4. The equipment must be returned in Follett packaging. If the packaging has been damaged or discarded, Follett will forward, at the customer’s expense, new
packaging.
Note: Return freight charges are the responsibility of the customer. If equipment is returned and is damaged because of improper packaging, Follett Corporation
will not be held responsible.
Credit will be issued when: The equipment has been inspected by Follett and deemed suitable to be returned to stock.
Note: A 15% restocking charge will be deducted from the credit. If the cost to return the product to stock exceeds 15%, the actual cost will be deducted.
2 FZR PL Series 00939132R00
Welcome to Follett
Follett equipment enjoys a well-deserved reputation for excellent performance, long-term reliability and outstanding
after-the-sale support. To ensure that this product delivers that same degree of service, we ask that you take a moment
to review this manual before beginning the installation. Should you have any questions or require technical help at any
point, please call our technical service group at (800) 523-9361 or (610) 252-7301.
Before you begin
After uncrating and removing all packing material, inspect the equipment for concealed shipping damage. If damage
is found, notify the shipper immediately and contact Follett Corporation so that we can help in the ling of a claim, if
necessary.
Check your paperwork to determine which item number you have. Follett item numbers are designed to provide
information about the type of freezer you are receiving. Following is an explanation of the different item numbers.
Model Number Item Number Stackable/Use with
Pedestal
FZR5PL FZR5PL-00STCR X X
FZR5PL-00ST00 X
Temperature
Surviellance Module
Specications
Series specications
FZR5-PL
34" (864mm) height ts below standard 36" (915mm) high counter
2 drawers - up to 40 (350ml) plasma cartons
Maximum drawer load - 35 lbs (16kg) each
Electrical specications
115V, 60Hz, 1 phase
Full load amps: 8.0
Minimum circuit ampacity: 15 amp
Maximum size of branch circuit overcurrent device: 15 amp
Refrigeration specications
Refrigerant – R404A
Charge size – 10 oz
Maximum design pressures: High side – 383 psi; Low side – 175 psi
Installation specications
Ambient temperature must not exceed 86 F (30 C). Relative humidity 60%.
The front louvered panel must be kept free of any cabinet trim or obstructions to ensure proper ventilation of the
refrigeration system.
CAUTION
• Equipment must be wired according to local NEC codes.
• Unplug equipment before servicing.
• Be sure to nd adequate storage for products prior to unplugging equipment.
FZR PL Series 00939132R00 Specications 3
Installation
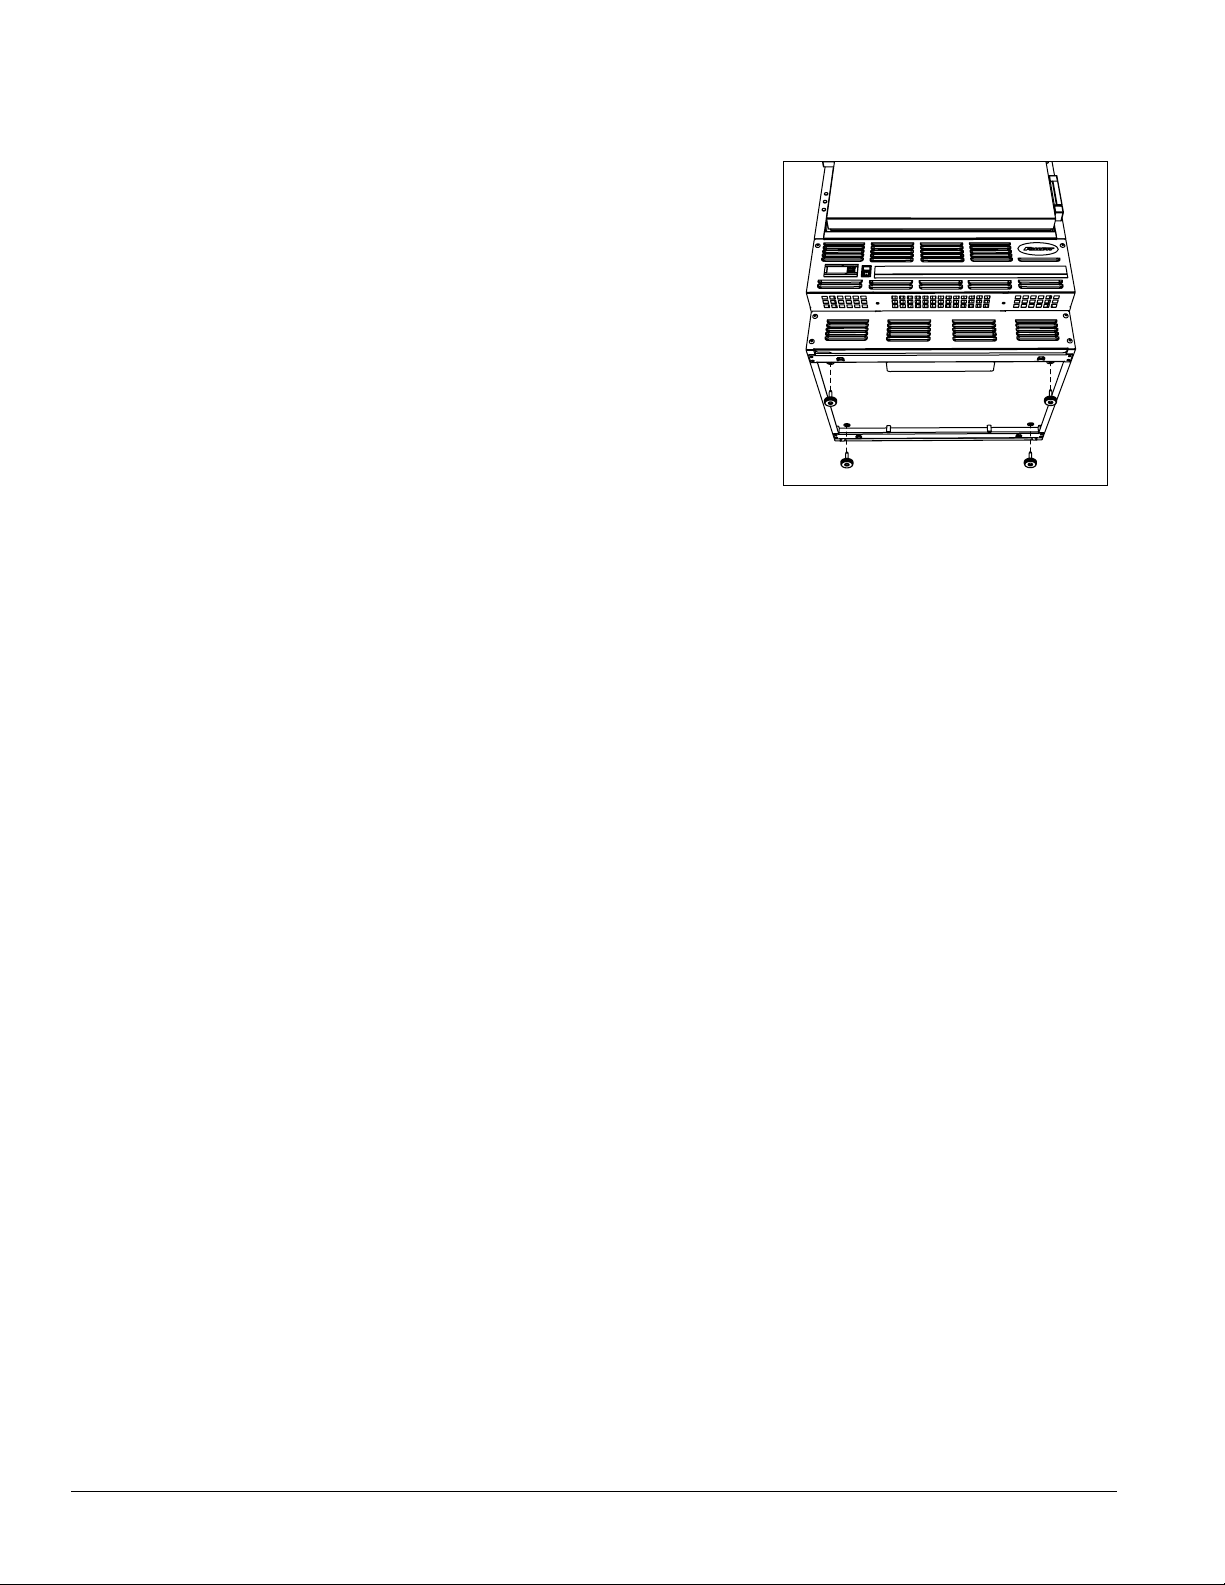
Installing legs – required
Fig. 1
1. Remove legs from plastic bag packed inside freezer.
2. Tip freezer back and screw legs in all the way to stop (they will extend 1/8"
(3.175mm) below base of freezer).
3. Adjust legs as needed to level freezer in both directions. To access legs,
remove the lower front panel. Turn legs clockwise to extend legs.
Temperature surveillance module
Follett’s all-in-one temperature alarm and chart recording module (manufactured for Follett by Dickson) may be
included with your FZR5-PL. Please refer to the instructions packed with this module for set-up and operation
instructions.
A quick set-up guide has also been included (form# 00168609). This instruction sheet is also available in the
download section of the Follett website (www.follettice.com).
If equipped with temperature surveillance module, Follett’s monitoring bottle and temperature probe has already been
installed in the Follett FZR5-PL. Simply plug the loose end of the probe wire into the back of the freezer surveillance
module to complete the install.
A box of sixty (6) -50 to +50 7-day charts have also been included with this module. Replacement charts and pens
can be ordered by visiting www.follettice.com and choosing “order parts”.
Item# 00162099 – Box of sixty (60), -50 to +50 7-day replacement charts
Item# 00162081 – Box of six (6) replacement red pens
Charts with different temperature scales are also available directly from Dickson www.dicksondata.com.
Automated medication dispensing and inventory systems interface
(Pyxis*, Omnicell*, MedSelect*, etc.)
Follett refrigerators and freezers are compatible with most major automatic medication and inventory systems.
In some cases a Follett bracket accessory is required. Contact factory for further information.
*
Pyxis is a registered trademark of Cardinal Health in the United States and other countries.
Omnicell is a registered trademark of Omnicell, Inc. in the United States.
MedSelect is a registered trademark of AmerisourceBergen Technology Group, in the United States.
4 Installation FZR PL Series 00939132R00
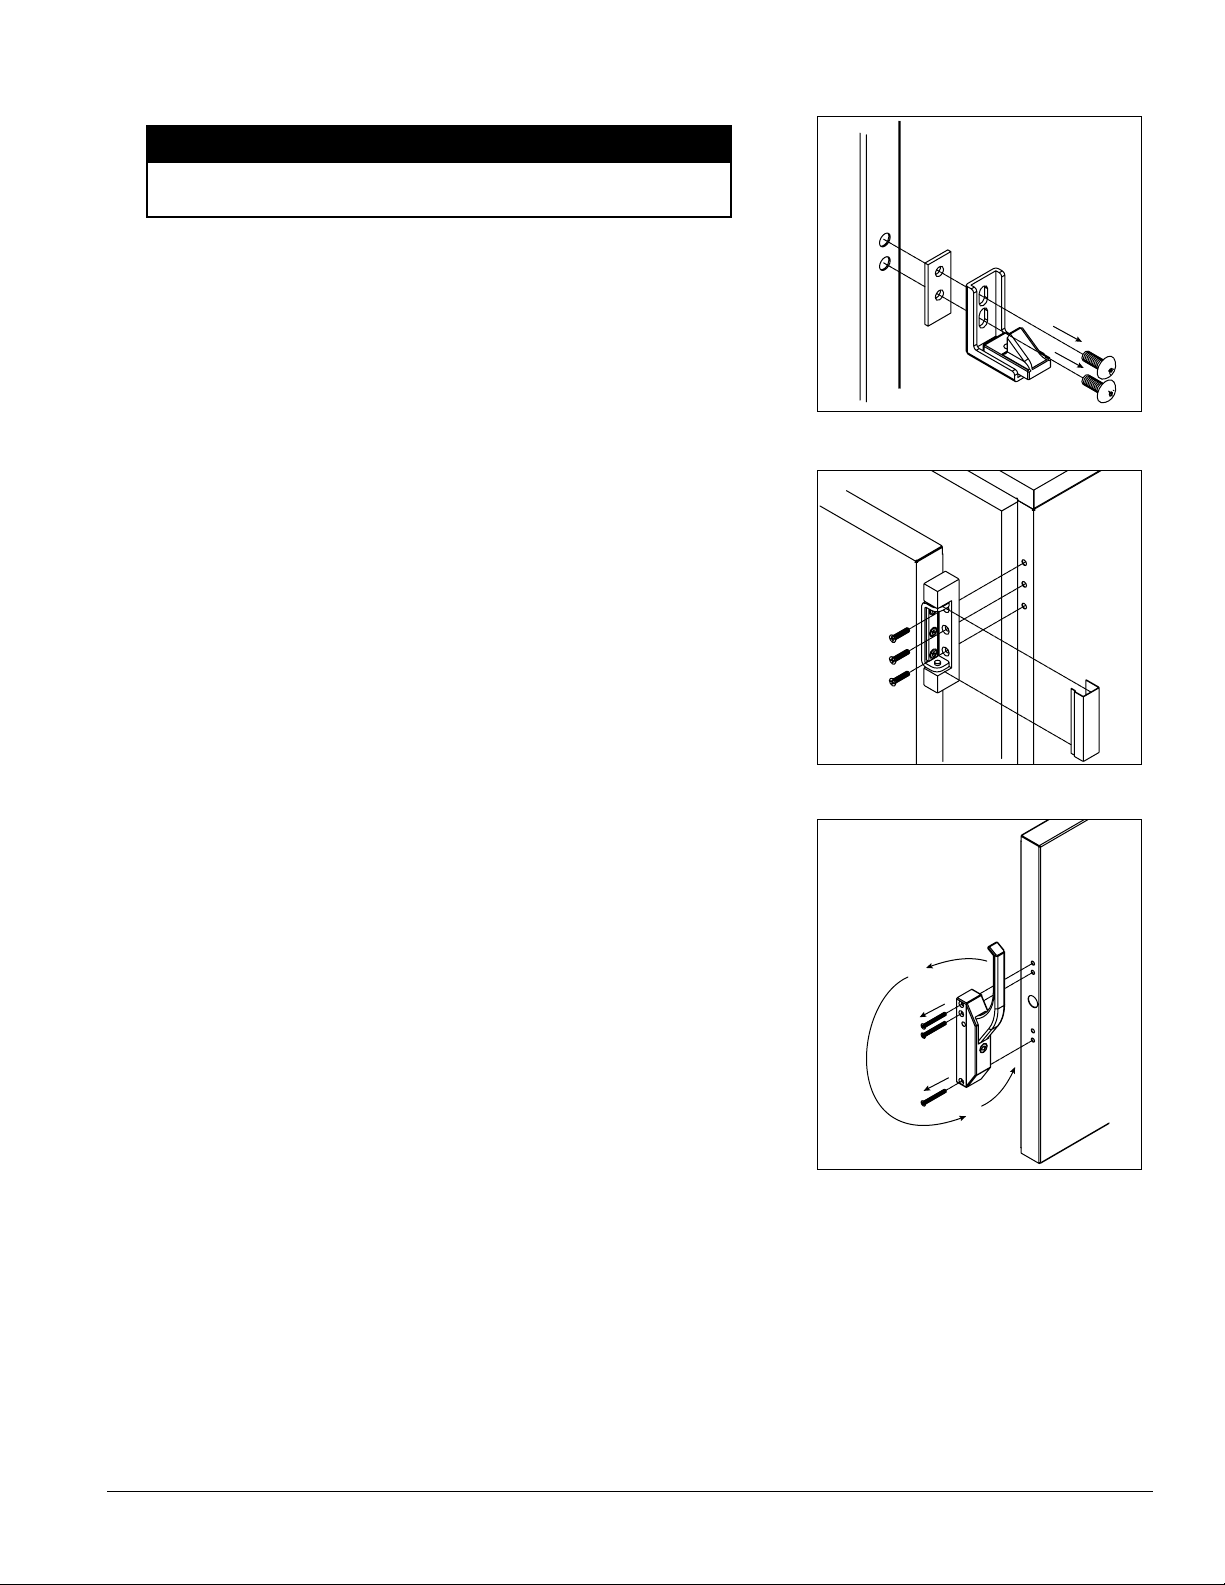
Reversing the door swing – optional
NOTICE
When reinstalling latch and hinge screws, 242 blue Loctite* MUST
be applied to screws. Torque screws to 25 in-lbs.
1. Remove screws and latch from refrigerator cabinet (Fig. 2.1).
2. Use at screwdriver to carefully remove (do not scratch) hinge
covers (Fig. 3.1).
3. Support door and remove screws attaching hinge to refrigerator cabinet
(Fig. 3.2).
4. Cover hinge screw holes with screw hole plugs removed from
opposite side.
5. Reverse door. Apply 242 blue Loctite to hinge screws and reinstall torqued
to 25 in-lbs.
6. Reinstall latch on opposite side.
Fig. 2
1
2
Fig. 3
2
1
7. Remove screws and handle from door (Fig. 4.1).
8. Rotate handle (Fig. 4.2).
9. Apply 242 blue Loctite to latch screws and reinstall torqued to 25 in-lbs.
Fig. 4
1
1
2
* Loctite is a registered trademark of Henkel Corporation in the United States and other countries.
FZR PL Series 00939132R00 Controller operation 5
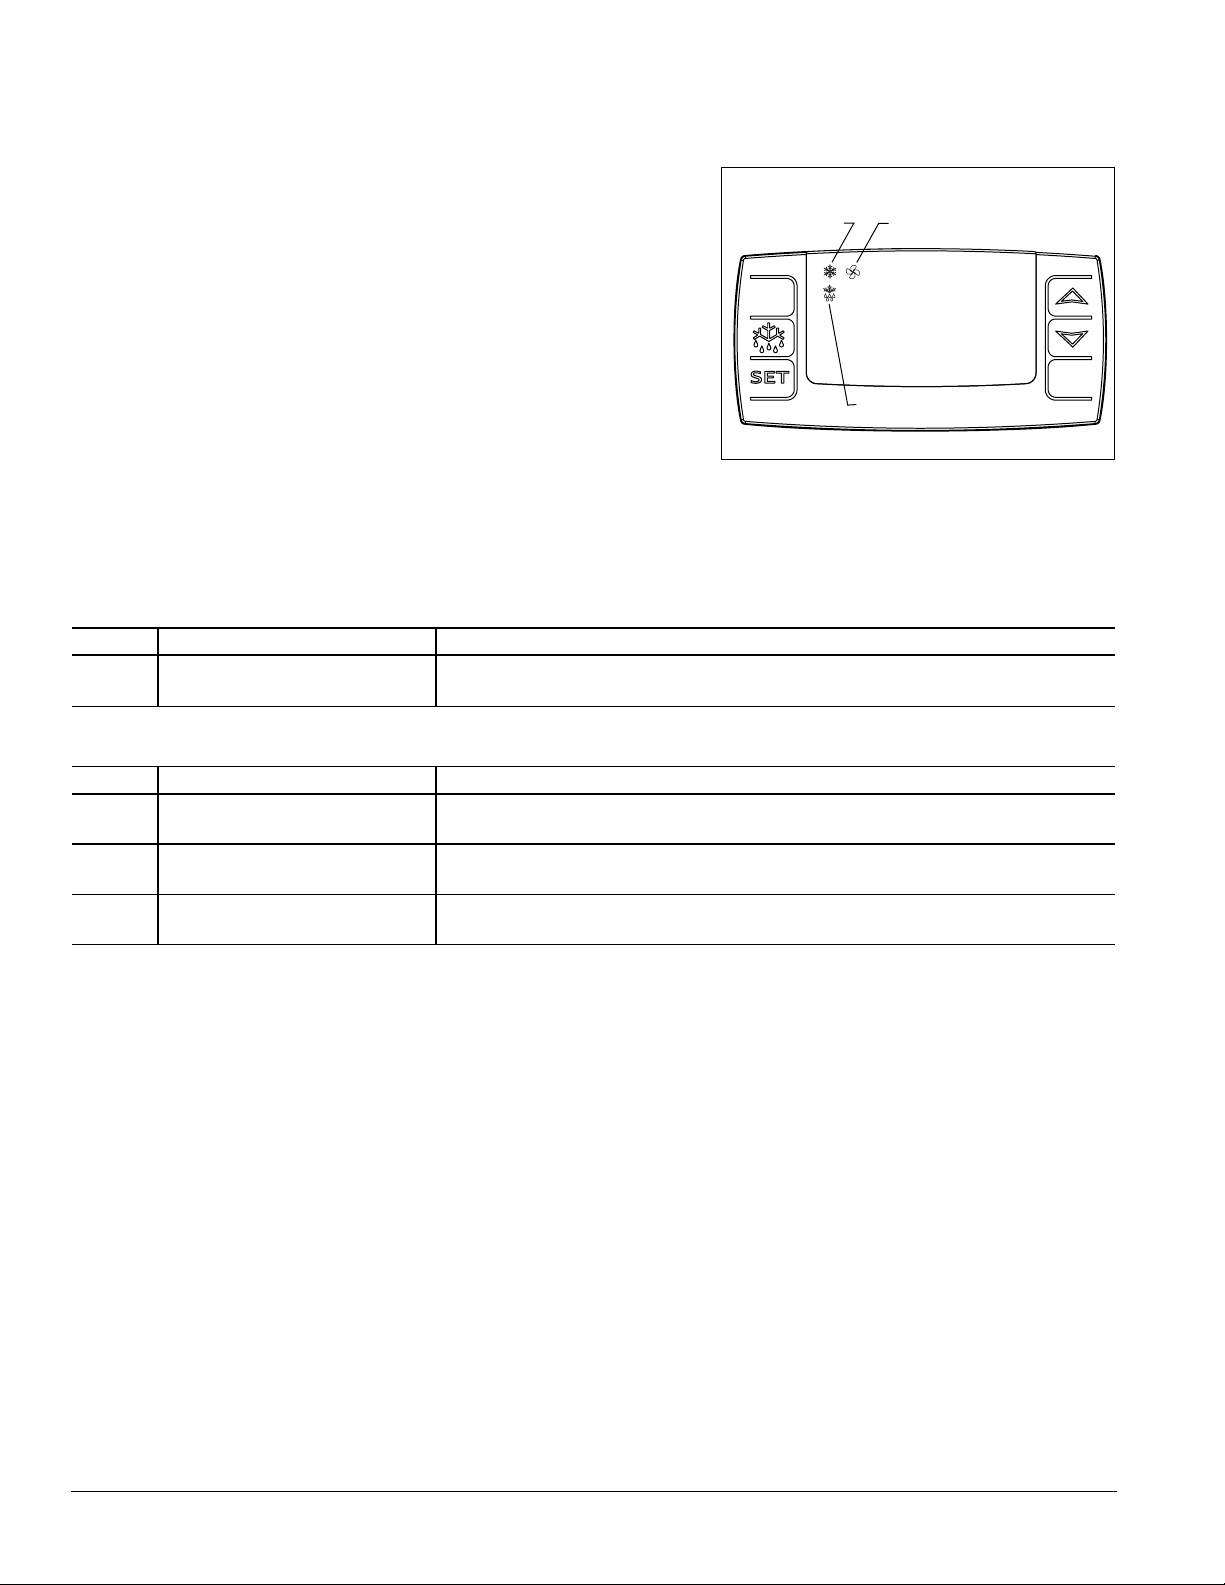
Controller operation
In normal operation the controller displays cabinet temperatures in
degrees C.
The controller is pre-programmed with a -35 C (-31 F) set point
which provides a compressor cut-in at -33 C (-27F) and cut-out at
-35 C (-31 F). The controller set point can be raised to -25 C
(-13 F) when a lower temperature is not desired. Follow instructions for
changing temperature cut-out below.
All set points have a 2 C differential. The 2 C differential means that with
a -35 C set point, for example, the compressor will turn off at -35 C (-31
F) and turn on when the cabinet reaches -33 C (-27 F).
This temperature may not reect the temperature of the blood products
in the freezer. The temperature of the blood products will be reected on
the recorder chart and the recorder’s digital temperature display. At times
there may be a difference between the two displayed temperatures.
Adjust the controller SET value to achieve your desired blood product
temperature as displayed on your chart recorder.
Fig. 7
refrigeration
system
energized
evaporator
fan
energized
- 35
defrost
To display temperature cut-out
STEP INPUT DISPLAY
1 Press and release SET Current cut-out temperature will display for approximately 5 seconds.
Display will return to current refrigerator temperature.
°C
To change temperature cut-out
STEP INPUT DISPLAY
1 Press and hold SET for 3
seconds
2 Press UP or DOWN arrows to
desired cut-out temperature
3 Press and release SET New cut-out temperature blinks three times, then current refrigerator
Current cut-out temperature displayed and °C will ash
New cut-out temperature displayed
temperature will display
6 Controller operation FZR PL Series 00939132R00
 Loading...