

Page 1

User Guide
Tell the world
Version 2
Focusrite.com
Page 2

CONTENTS
Contents
Overview ................................................ 3
Introduction ............................................ 3
Hardware features ....................................... 4
In the Box ............................................. 5
System requirements..................................... 5
Getting Started ........................................... 6
Easy Start Tool .......................................... 6
Mac Users: ...................................... 7
Windows Users: .................................. 8
iPad Users: ...................................... 9
All users: ...................................... 10
Manual Registration.............................. 10
Audio Setup in your DAW ................................ 10
Audio Setup in Hindenburg ....................... 11
Examples of use .......................................... 12
Recording with a microphone ............................. 12
Microphone Tips ................................ 13
Using Auto Gain ................................ 15
Manual gain adjustment .......................... 16
Microphone Mute ............................... 17
Using Enhance .................................. 17
Listening with headphones ............................... 18
Listening with speakers .................................. 19
Recording a phone ..................................... 20
Recording to a video camera ............................. 21
Vocaster Hub software ..................................... 22
Controlling the microphone .............................. 23
Controlling your mix .................................... 24
Recording sounds from your computer...................... 25
Example of Loopback usage ....................... 26
Recording Tracks into Software............................ 26
Hardware Features........................................ 27
Top Panel ............................................. 27
Rear Panel ............................................ 28
Specications ............................................ 29
Performance Specications ............................... 29
Troubleshooting........................................ 32
Copyright and Legal Notices.............................. 32
Credits ............................................... 32
focusrite.com 2Tell the world
Page 3

OVERVIEW
Overview
Introduction
Welcome to your new Vocaster One Studio
pack. The Vocaster One interface is designed
for podcasters, vloggers, voiceover artists,
streamers, audiobook creators, and more. You
now have a simple, compact and complete
solution for recording with a microphone
or directly from other audio sources. With
Vocaster One and the included Vocaster Hub
software you can record studio quality audio
with your computer and camera.
We’ve designed Vocaster One for users of all
experience levels. With features such as Auto
Gain and Enhance you can achieve clear and
consistent recordings quickly.
The Vocaster Hub software is designed with
simplicity in mind. It provides easy access for
controlling Vocaster’s settings, and gives you
full control of your show’s mix as you send
it to your choice of recording and streaming
software.
Connect Vocaster One to a computer via its
USB-C port and the cable provided. You can
either live-stream audio in real time, or record
sound for later edit and upload.
Vocaster One also allows two-way connection
to a phone, letting you record interviews or
other audio from your phone to your camera
or computer. You can also record to the
audio track of a camera in perfect sync with
your video. You can monitor your stream or
recording process on either headphones or
loudspeakers.
The Vocaster One interface and the included
Vocaster Hub control software support both
Mac and Windows.
Vocaster One is also compatible with Apple
iPads with a USB-C port, so you can take
advantage of the additional portability and
convenience the tablet format provides.
If you can’t nd what you need in this User
Guide, please visit support.focusrite.com,
which has a Getting Started section, setup
guides, and technical support.
A video series explaining how to set up and
use Vocaster One is available from our Get
Started pages.
focusrite.com Tell the world 3
Page 4

OVERVIEW
Hardware features
Vocaster One Studio includes a Vocaster One
audio interface, a Vocaster DM1 dynamic
microphone, Vocaster HP60v headphones and
access to all the necessary software to get
you started as quickly as possible.
The Vocaster One hardware interface allows
you to connect a high quality microphone
to a computer running macOS or Windows:
this will let you achieve a much better audio
recording than you would get by using the
microphone built into most laptops or tablets.
The microphone input accepts a range of
microphone models, including both dynamic
and condenser types. If you are using a
condenser microphone, Vocaster One can
provide the phantom power (48V) it needs
to work.
The Vocaster DM1 dynamic microphone
has been designed specically for speech
recording, but you can use any microphone of
your choice if you prefer.
The microphone signal routes to your
computer’s audio recording software via the
USB-C connection at up to 24-bit resolution,
and 48 kHz sample rate. (24-bit/48 kHz is the
standard for most podcasts.)
If you don’t already have recording software,
we recommend Hindenburg. This is included
in the software package available to you free
of charge as a Vocaster owner.
A 3.5 mm jack socket allows you to connect
a phone to Vocaster One: a second, similar
socket allows connection to a video camera.
The phone connector is a TRRS: TRRS means
you get audio both in and out of the phone,
so you can record audio from the phone,
and the phone can also hear the other audio
sources you are recording to your show.
Vocaster One has outputs for both
headphones and speakers: a front panel ¼’
TRS socket for headphones and two rear
panel ¼’ TRS sockets for connection
to speakers. A set of Vocaster HP60v
professional quality headphones is included
with your Studio pack.
The top panel has knobs for microphone gain
and listening level. The microphone control is
surrounded by “halo” meters, showing both
the microphone signal level and the gain
setting. Three illuminated buttons mute the
microphone, activate the Enhance feature and
start the Auto Gain function. There are also
LEDs to show when phantom power and the
USB connection are active.
focusrite.com Tell the world 4
Page 5

OVERVIEW
In the Box
Along with your Vocaster One you will nd:
• Vocaster DM1 dynamic microphone,
with microphone clip and 3/8”-to-5/8”
stand adaptor
• Vocaster HP60v headphones
• Microphone cable, XLR (M-F)
• USB cable, Type ‘A’ to Type ‘C’
• Getting Started Information (printed on
the inside of box lid)
• Important Safety Information
As a Vocaster One owner, you are also
entitled to a selection of third-party software,
including the Hindenburg DAW (Digital Audio
Workstation) recording application. Go to
focusrite.com/Vocaster to see
what’s available.
System requirements
The easiest way to check your computer’s
operating system (OS) is compatible with
the Vocaster One is to use our Help Centre’s
compatibility articles.
As new OS versions become available over
time, you can continue to check for further
compatibility information by searching our
Help Centre at support.focusrite.com.
focusrite.com Tell the world 5
Page 6
GETTING STARTED
Getting Started
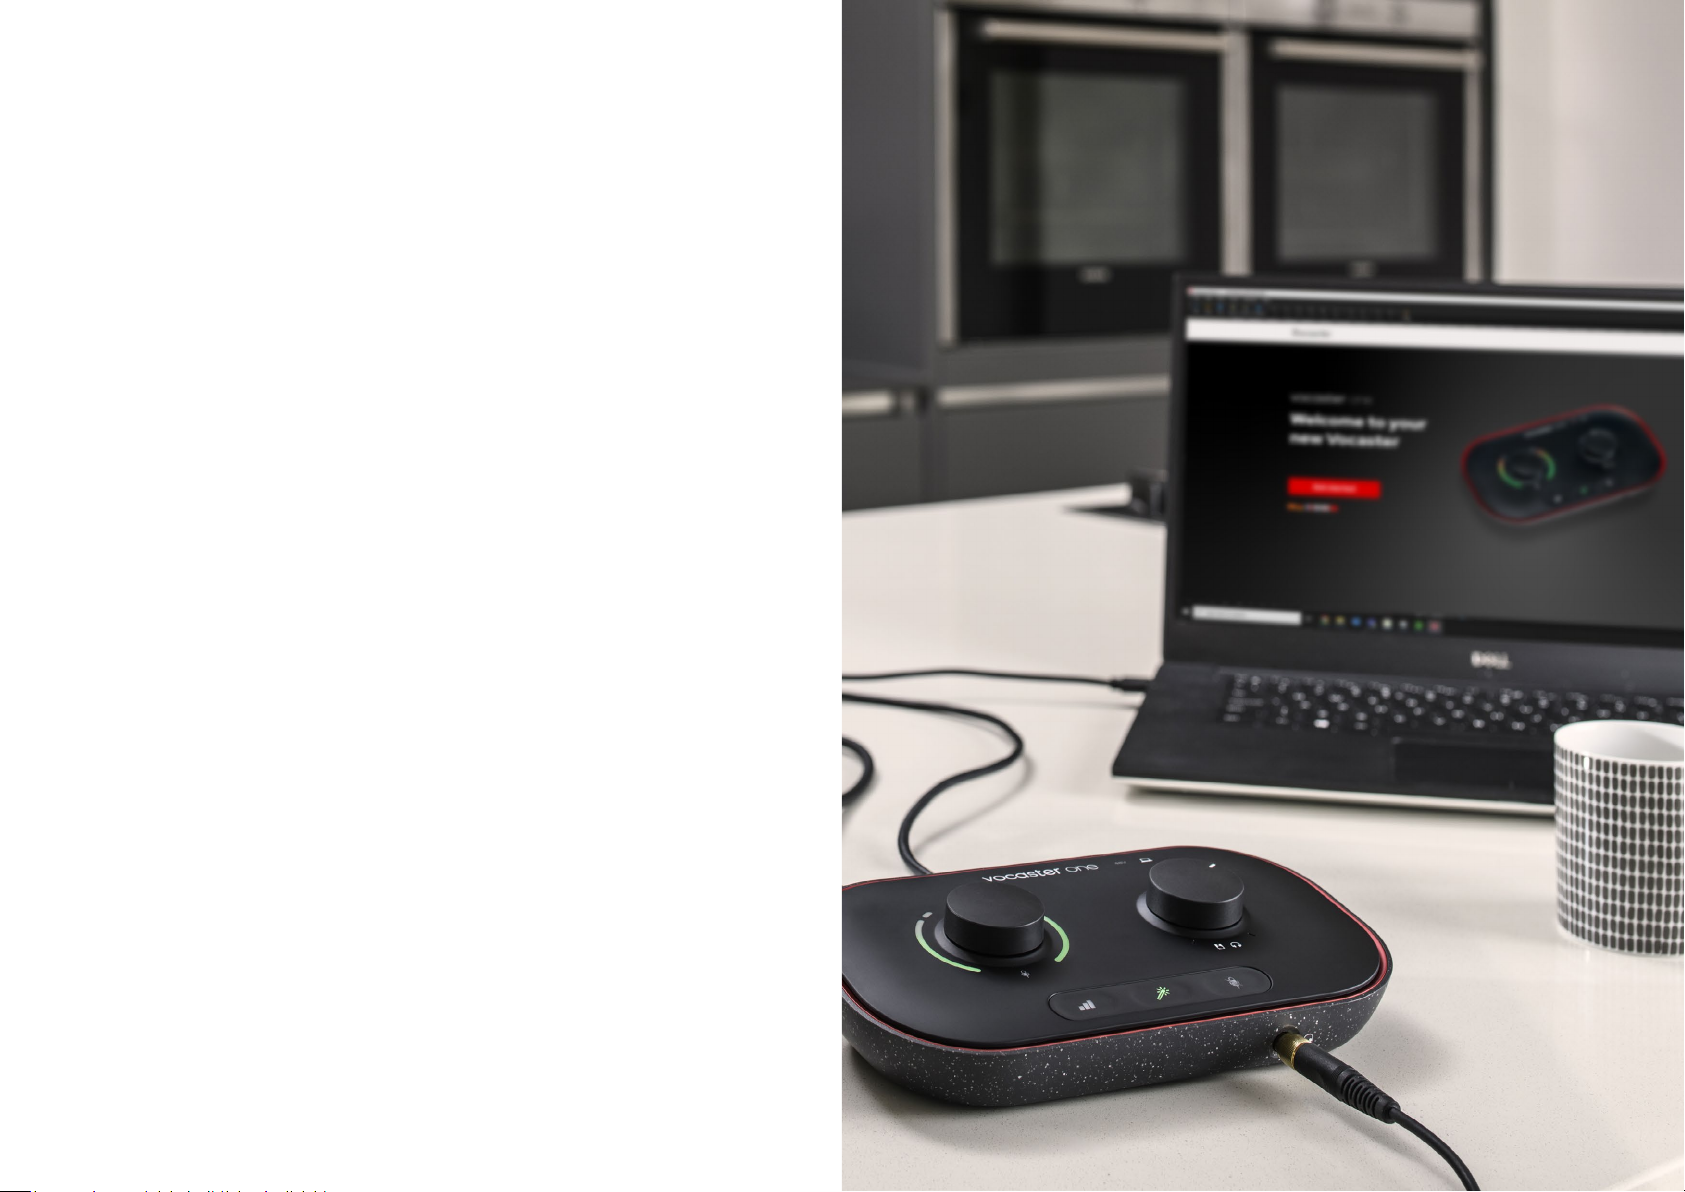
When you connect Vocaster One for the rst time, your computer
recognises it in the same way as if it were a USB memory stick.
Easy Start Tool
Getting up and running with your Vocaster One is made easy by our
Easy Start Tool. To use this, connect Vocaster One to your computer
with the USB cable supplied, and power it on by pressing the power
button next to the rear panel USB port.
The following steps show you what will appear on screen: these help
you get set up whether or not you’re new to audio interfaces.
focusrite.com Tell the world 6
Page 7
GETTING STARTED
Mac Users:
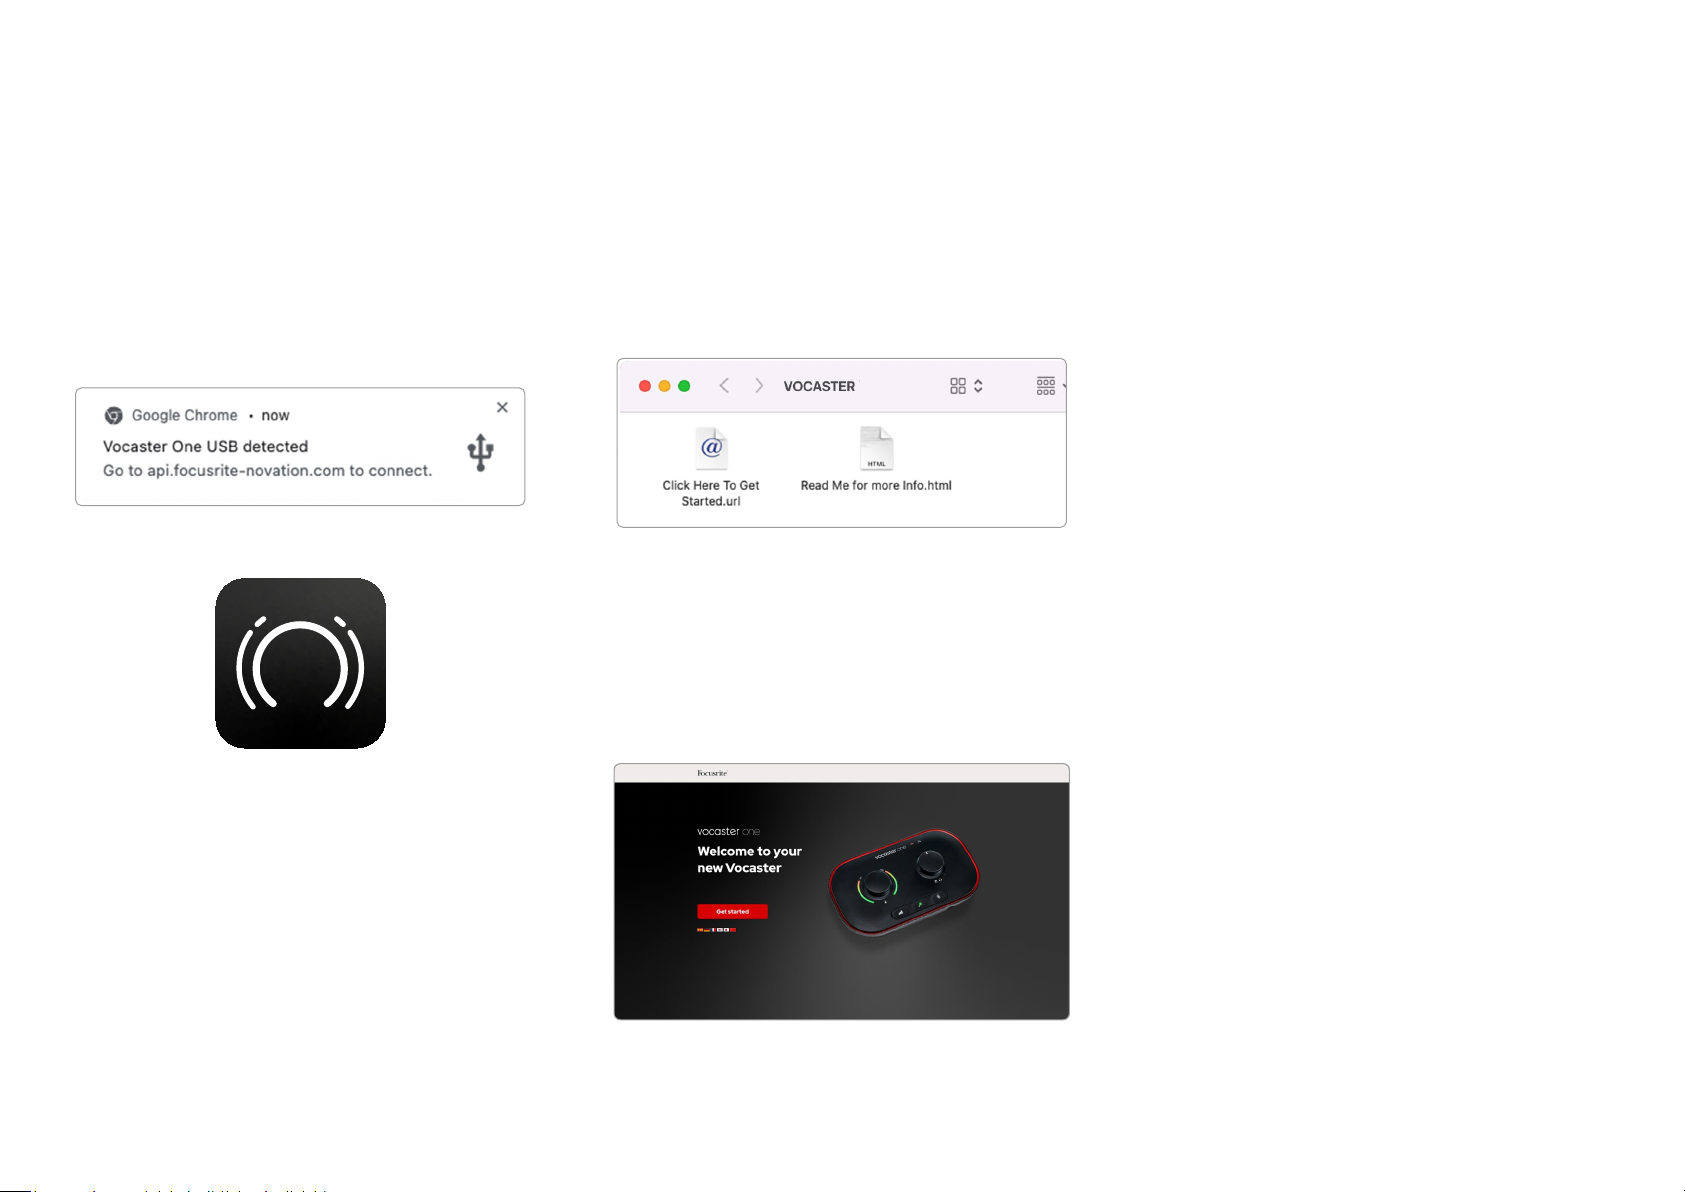
On connecting your Vocaster to your Mac you
will see a pop-up and/or a Vocaster icon will
appear on the desktop:
Google Chrome pop up
Double-click on the icon or pop-up to open
the Finder window shown below:
Double-click the Click Here to Get Started.
url icon. This redirects you to the Focusrite
website, where we recommend you register
your Vocaster to access to your included
software package:
After you submit the form you can either
follow our step-by-step setup guide, which
is tailored to how you want to use Vocaster
One, or go straight to your account and
download Vocaster Hub control software.
When you connect Vocaster One, your
computer should set it as your default audio
device. If this doesn’t happen, go to System
Preferences > Sound, and ensure the input
and output are set to Vocaster One USB.
Vocaster Easy Start icon
focusrite.com Tell the world 7
Page 8
GETTING STARTED
Windows Users:
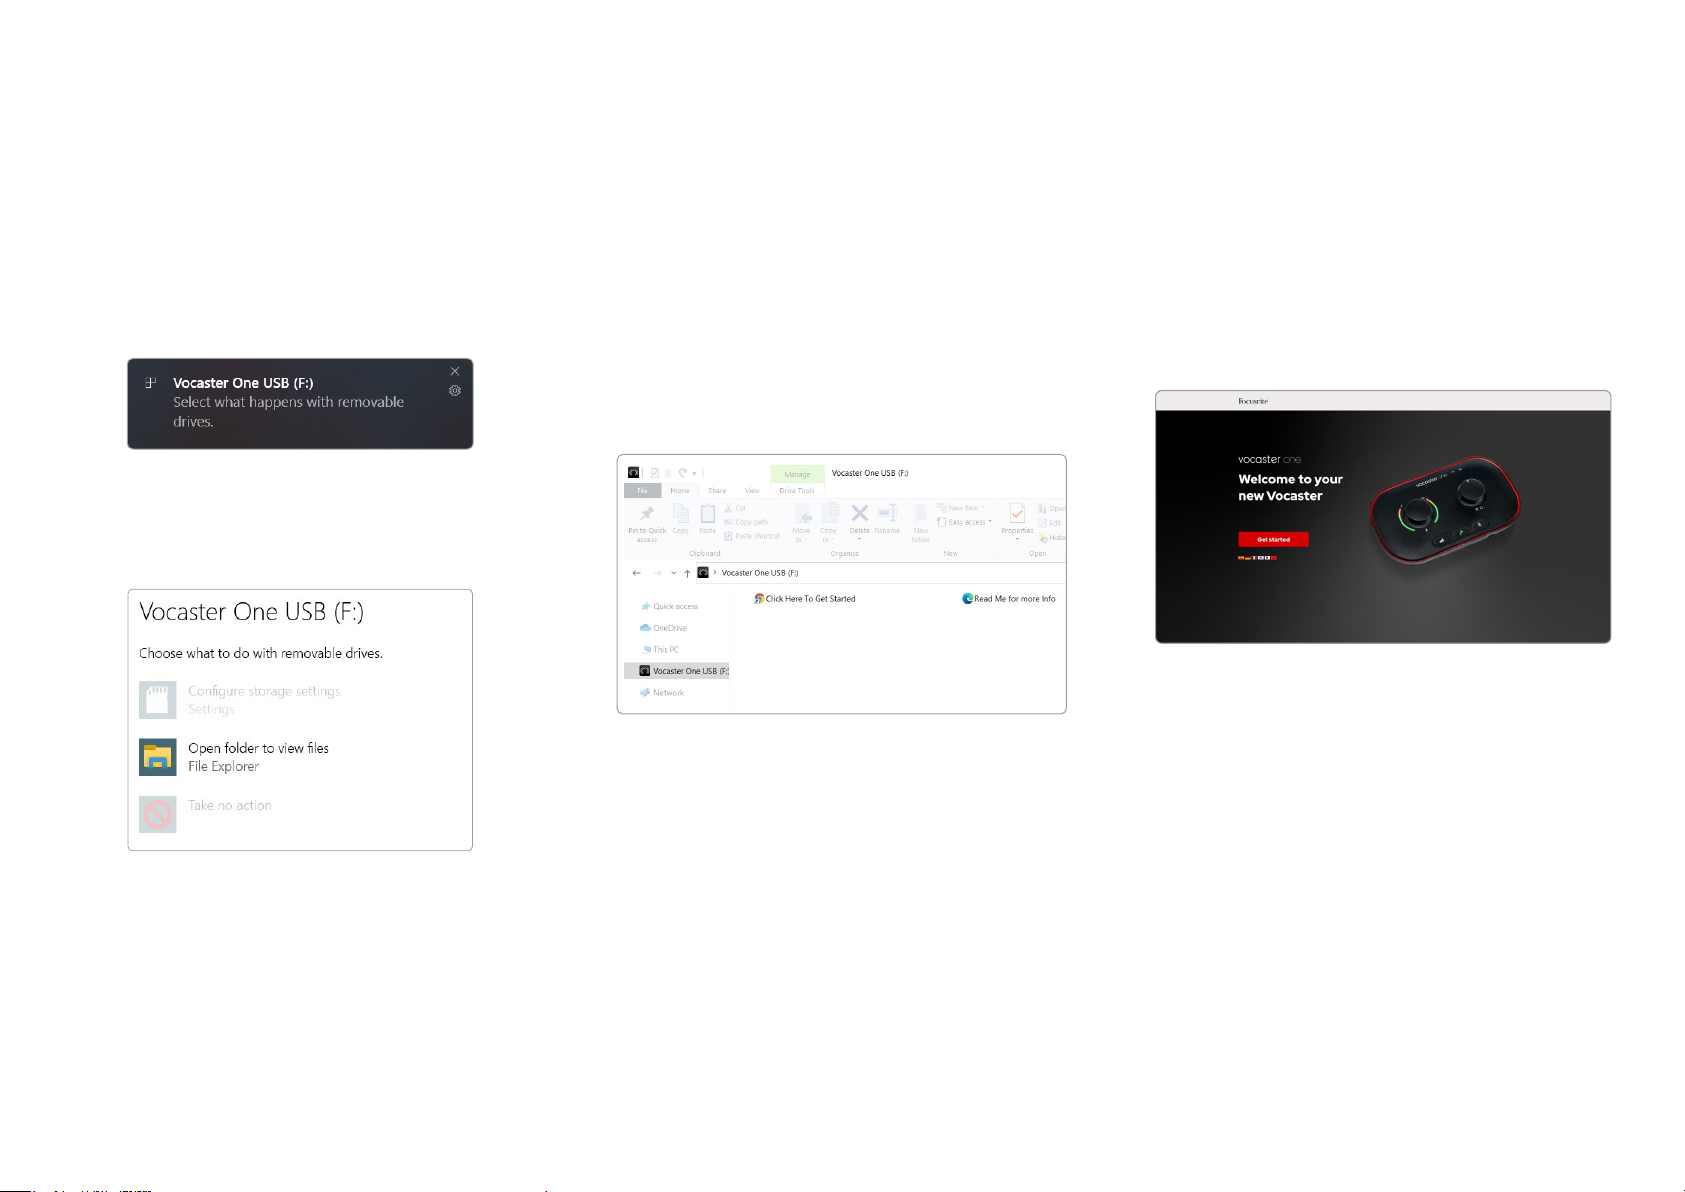
On connecting your Vocaster One to your PC,
this notication will appear:
Click on the notication to open the dialogue
box shown below:
Double-click:
Open folder to view les
this opens an Explorer window:
This redirects you to the Focusrite website,
where we recommend you register
your device:
After you submit the form you can either
follow our step-by-step setup guide, which
Double-click:
Click Here to Get Started
is tailored to how you want to use Vocaster
One, or go straight to your account and
download Vocaster Hub control software.
When you connect Vocaster One, your
computer should set it as your default audio
device. If this doesn’t happen, go to Settings
> System > Sound, and set Vocaster One as
the Input and Output Device.
focusrite.com Tell the world 8
Page 9
GETTING STARTED
iPad Users:
NOTE: Before connecting Vocaster One to
your iPad, we recommend you follow the
‘Getting Started’ section above to ensure
your hardware is up to date through
Vocaster Hub.
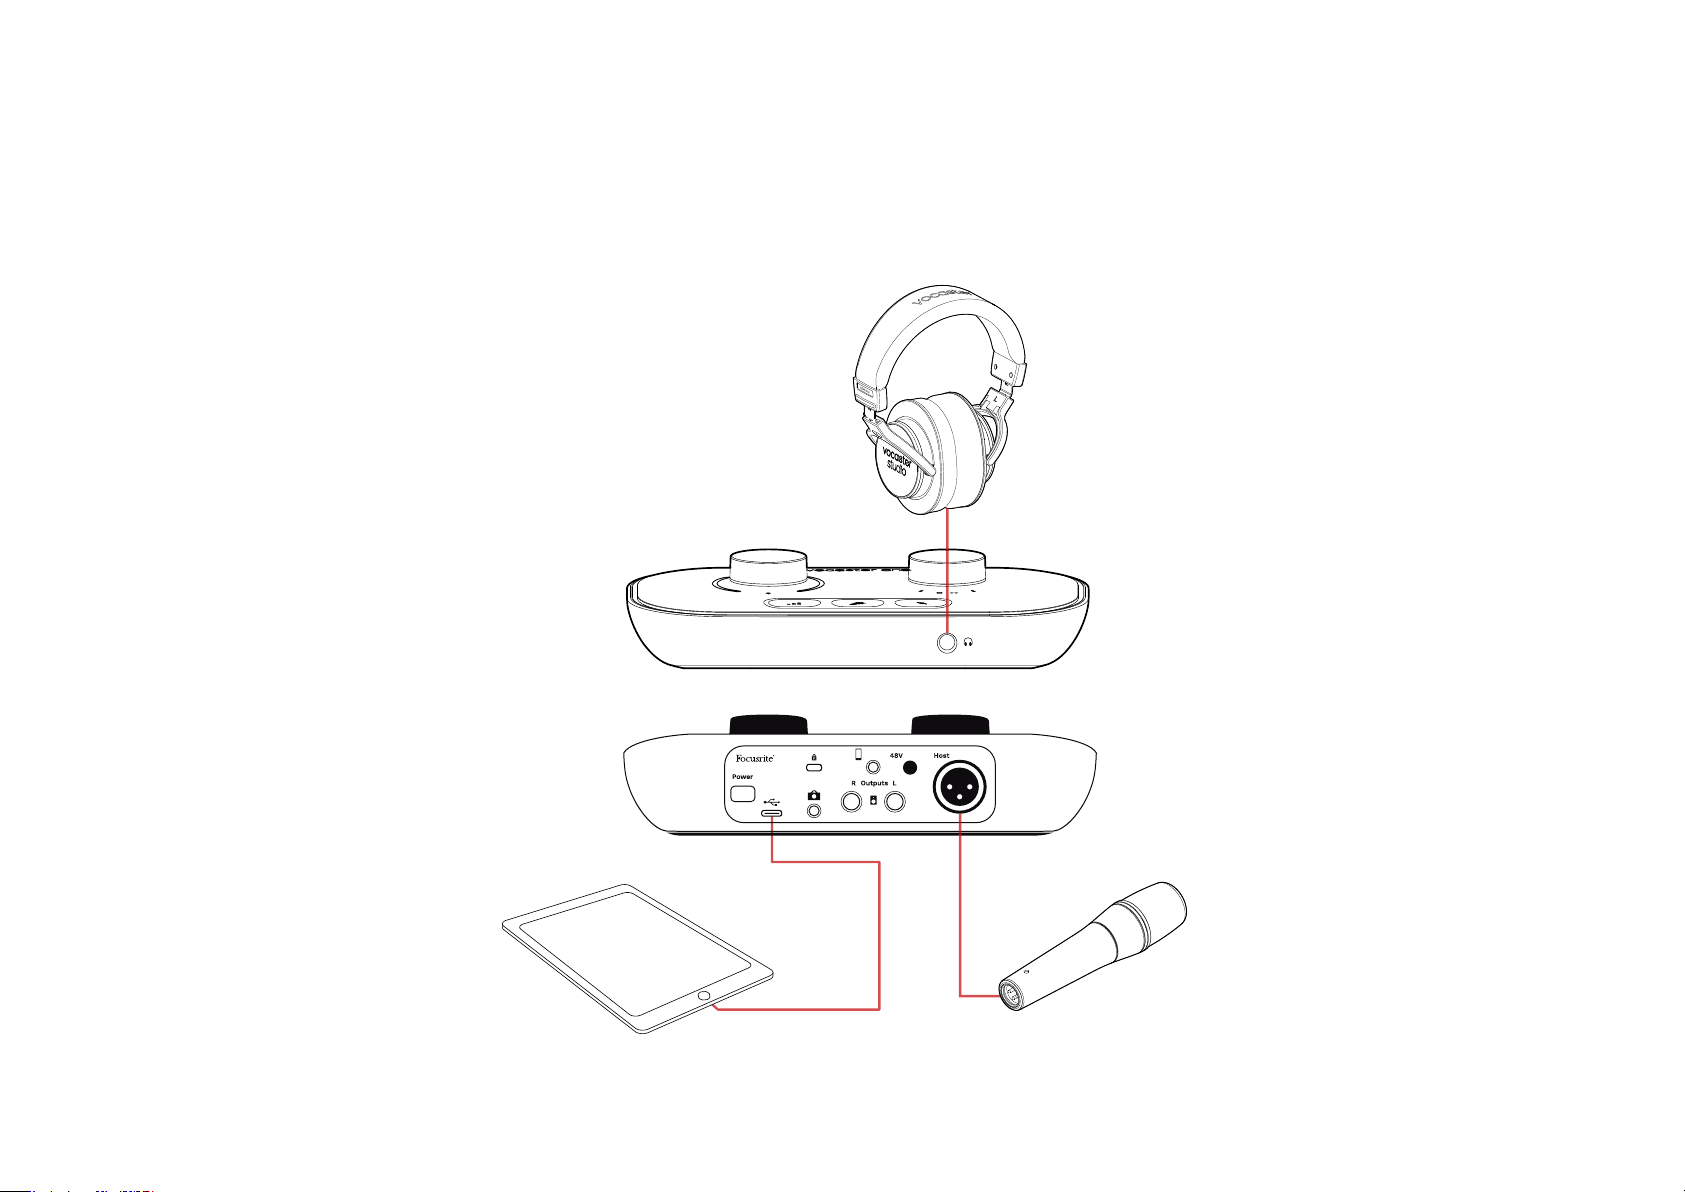
To make the connections:
1. Connect one end of the
USB Type-C to C cable (or adaptor) to
your iPad.
To connect your Vocaster One to an
iPadOS device you need:
• iPad with USB-C port
• USB-C to USB-C cable
(or the included cable and
an Apple USB-A to C adaptor*)
*This method may require a separate USB hub to
provide enough power to your Vocaster.
2. Connect the other end of the
USB type-C to your Vocaster One’s USB
port.
3. Connect your headphones or monitor
speakers to the Vocaster One.
Sound from the iPad routes to Vocaster
One’s outputs. You can route the
microphone and other sources connected
to the inputs of Vocaster One to iOS apps
that support audio recording.
focusrite.com Tell the world 9
Page 10

GETTING STARTED
All users:
If you have any issues using the Easy Start
tool, open the le More Info & FAQs, where
you should be able to nd answers to
your questions.
NOTE: When you install Vocaster Hub on a
Windows computer, the driver needed by
Vocaster One installs automatically. Vocaster
Hub and the Vocaster Windows driver are
always available to download at any time,
even without registering: see ‘Manual
Registration’.
Manual Registration
If you decide to register your Vocaster One
later you can do so at register. You need to
enter the Unique Product Number (UPN)
manually: this number is on the base of the
interface itself, and can also be found on the
barcode label on the side of the box.
We recommend you download and install our
Vocaster Hub software application, as this
unlocks the full potential of the interface. You
can download Vocaster Hub at any time from
downloads.focusrite.com.
Audio Setup in your DAW
Vocaster One is compatible with any
Windows-based Digital Audio Workstation
(this is the software you use to record and is
referred to as a ‘DAW’) that supports ASIO
or WDM, or any Mac-based DAW that uses
Core Audio. After following the Easy Start
procedure (see page 6), you can start
using Vocaster One with the DAW of
your choice.
Vocaster One lets you record all the sources
separately via the USB connection, for mixing
later, but also has a Show Mix input which is a
stereo mix from Vocaster Hub software.
To allow you to get started if you do not
already have a DAW application installed on
your computer, Hindenburg is included; this is
available to you once you’ve registered your
Vocaster One. If you need help installing this,
please visit our Getting Started pages here,
where a video tutorial is available.
Operating instructions for Hindenburg can
be found in the application’s Help les, or at
hindenburg.com/academy.
Please note - your DAW may not
automatically select Vocaster One as its
default Input/Output (I/O) device. In this
case, you must manually select Vocaster One/
Focusrite USB ASIO as the driver on your
DAW’s Audio Setup* page. Please refer to
your DAW’s documentation (or Help les) if
you are unsure where to select the ASIO or
Core Audio driver.
* Typical names. Terminology may differ slightly
between DAWs
focusrite.com Tell the world 10
Page 11
GETTING STARTED
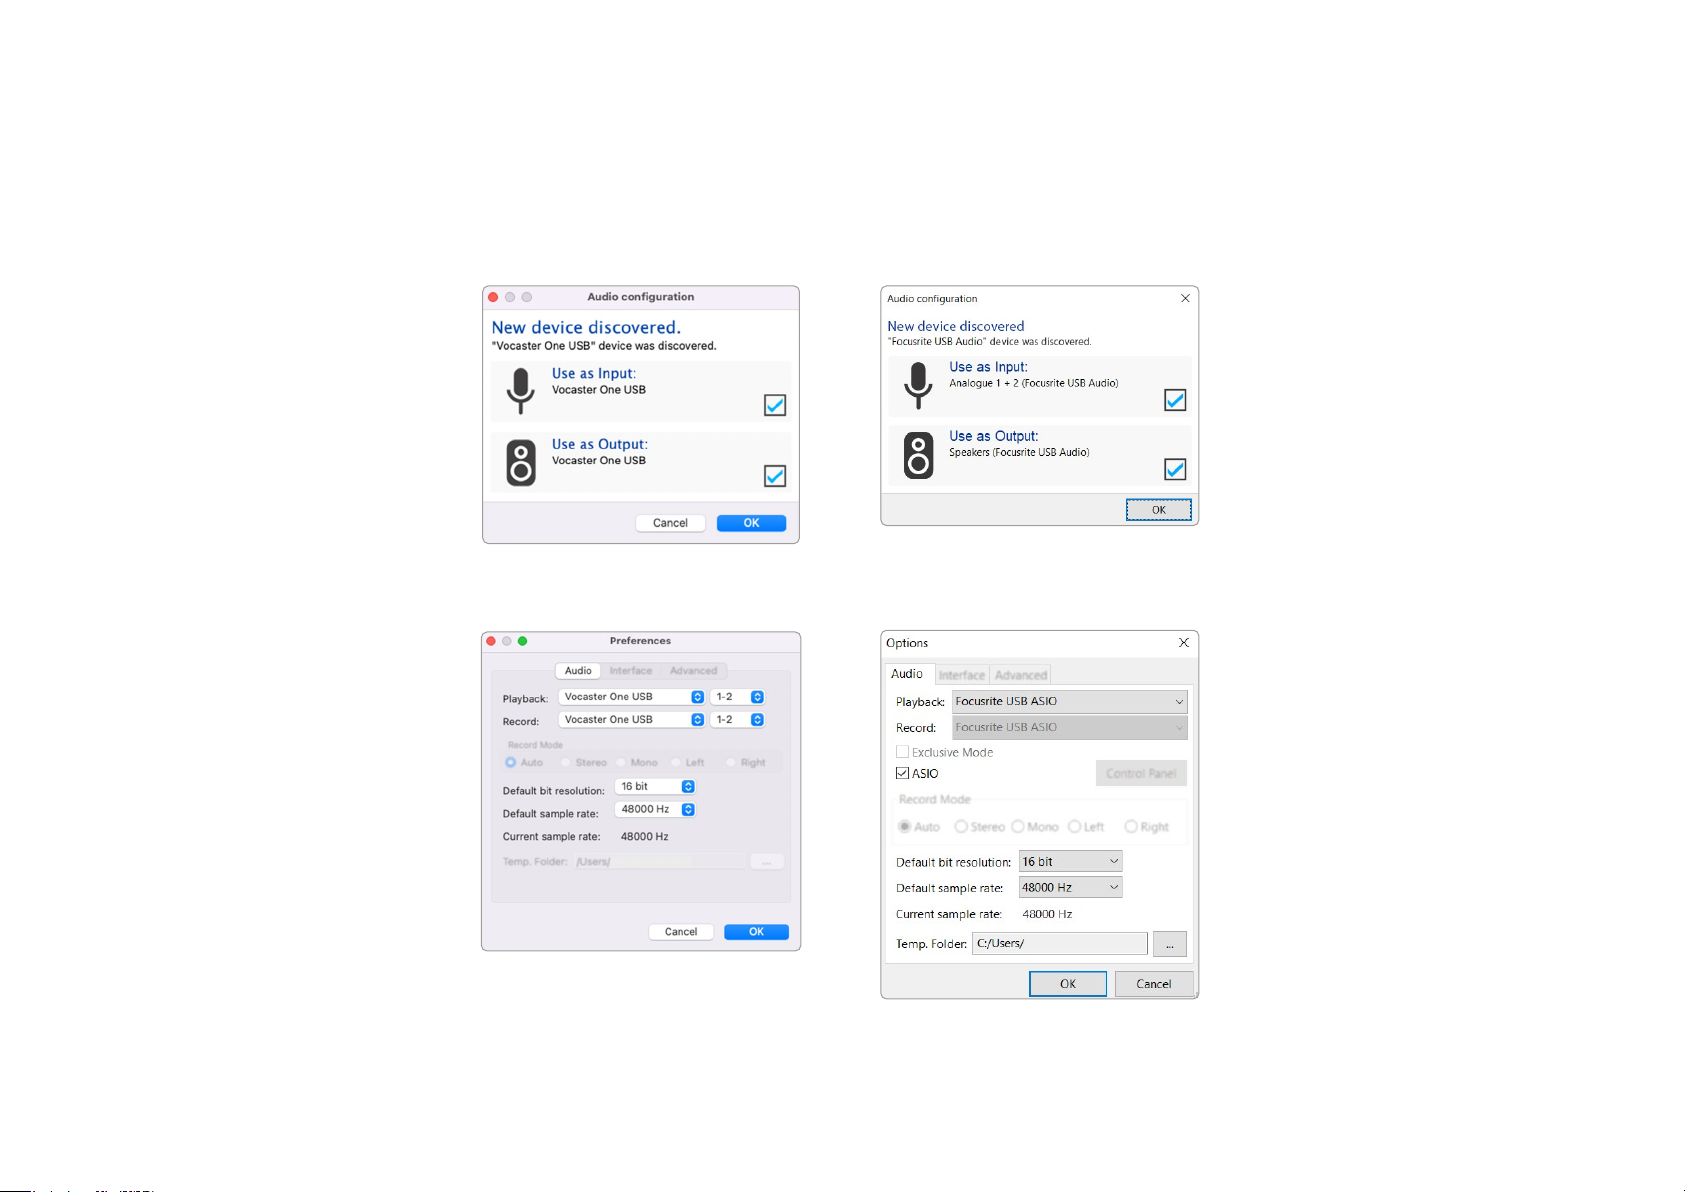
Audio Setup in Hindenburg
The examples opposite show
the correct conguration on the
Hindenburg audio preferences on
Windows and Mac. There are two
set ups, automatic and manual:
Preferences page (Mac version),
and at the
Tools > Options > Audio tab
(Windows version).
Tutorial videos explaining how to
set up and use Vocaster One with
various DAWs can be found at our
Getting Started pages.
Windows automatic setup
Mac automatic setup
Mac manual setup
Windows manual setup
focusrite.com Tell the world 11
Page 12
EXAMPLES OF USE
Examples of use
Vocaster One is the ideal audio interface for
live podcasting or voice recording, using a
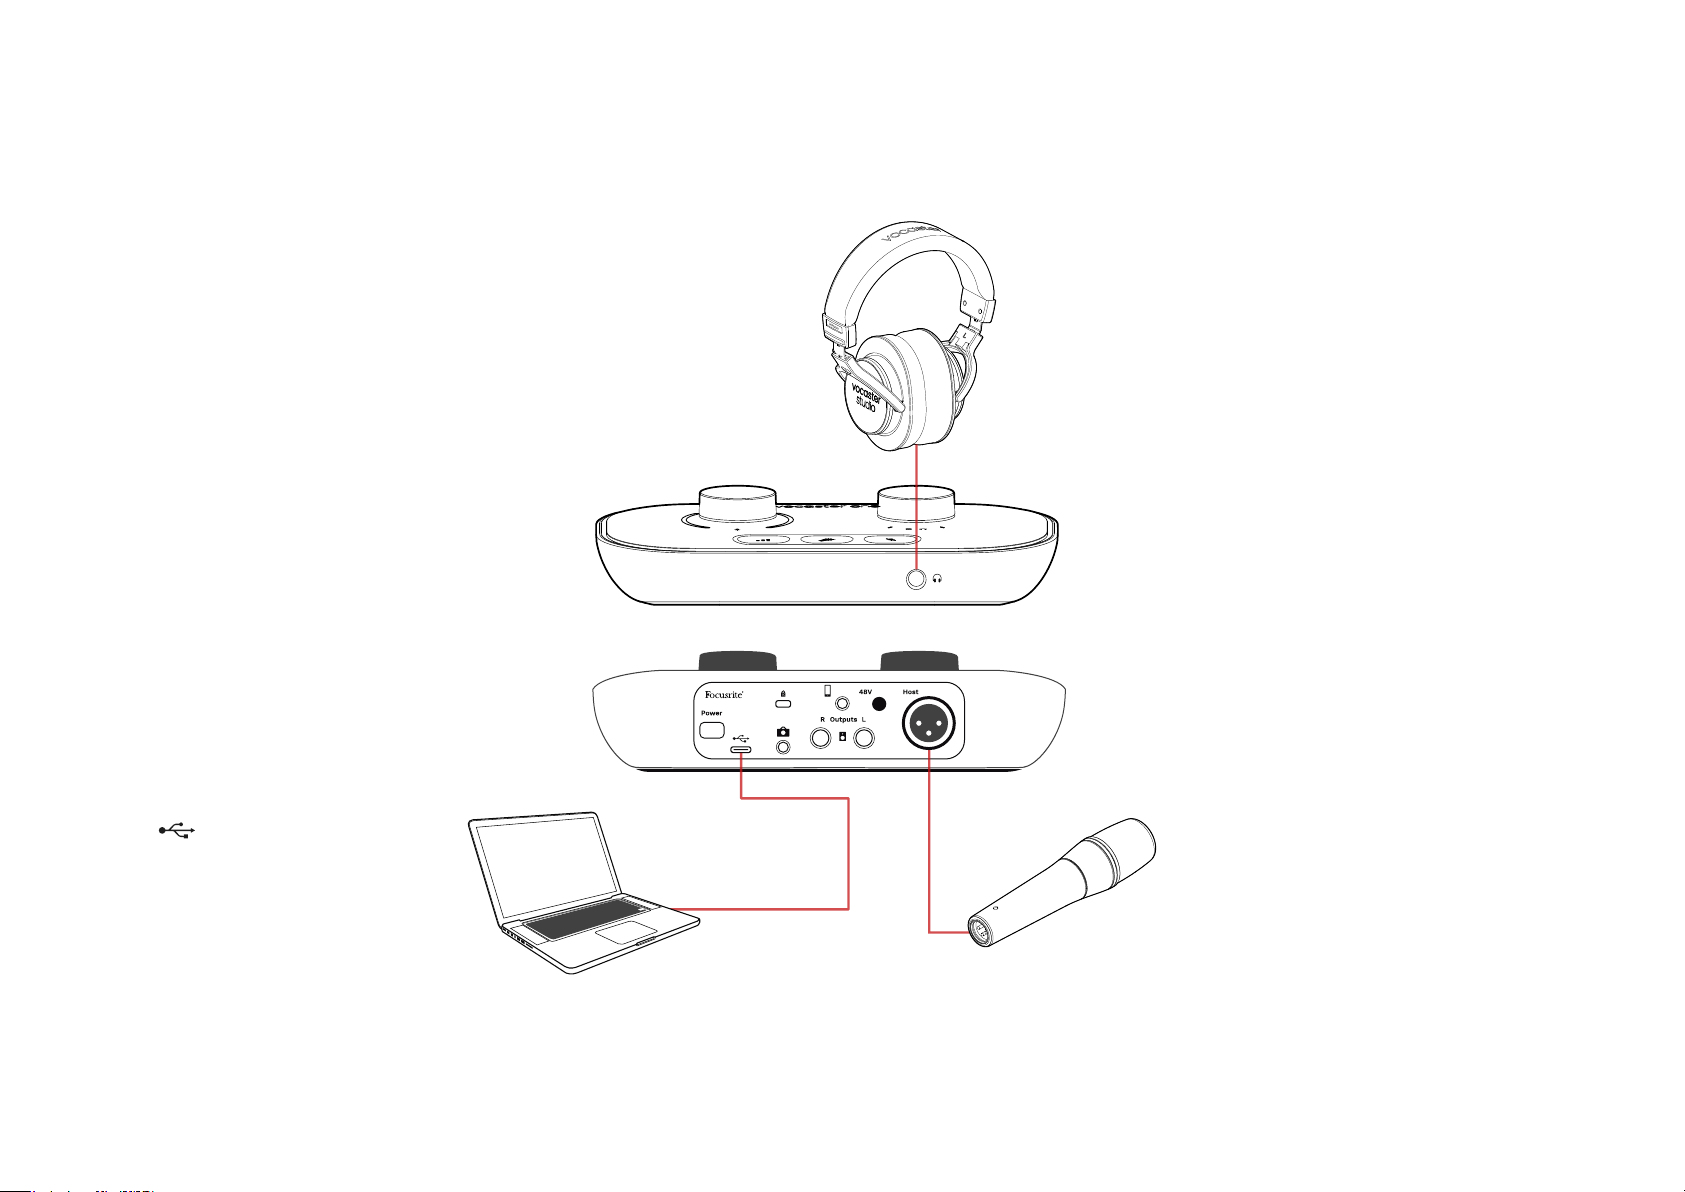
Mac, PC, or iPad. A typical set of connection
possibilities is shown below.
Recording with a microphone
This setup shows a typical conguration for
recording from a microphone using software
on your Mac, PC, or iPad. You can record your
voice while listening to yourself and any other
audio via headphones.
Apart from the headphone socket, all
Vocaster One’s connections are
on the rear panel. Connect your
computer or laptop to the USB port
(marked ) using the USB cable
supplied. Turn the unit on with the
Power button.
The microphone input is an XLR socket
and will work with microphones that have
an XLR connector: this includes the Vocaster
DM1 dynamic microphone supplied with the
Vocaster One Studio. Although the Vocaster
One interface can be used with condenser
and ribbon microphones as well as dynamic
types, we recommend the use of dynamic
microphones for speech recording for these
reasons:
• Dynamic microphones are typically less
sensitive than other types, so they will
pick up less room noise (typing, mic
adjustment etc.) which can ruin the quality
of voice recordings.
• To get the best isolation on a voice
recording you need to be close to
the microphone. You can get close to
dynamic microphones without hearing
lots of “plosives” (popping sounds
made by the lips) and breathing noise,
which more sensitive microphones may
pick up.
focusrite.com Tell the world 12
Page 13
EXAMPLES OF USE
Recording with a microphone (cont)
The Vocaster DM1 microphone supplied
with your Vocaster Studio is a dynamic
microphone optimised for voice recording,
and is suitable for Podcasting, Voice Over,
Audiobook Narration or any other spoken
word application. Connect the Vocaster DM1
to the Vocaster’s mic input using the included
XLR cable.
Dynamic microphones, such as the Vocaster
DM1 included in your Vocaster One Studio,
do not require phantom power. It’s rare,
but some microphones can be damaged by
phantom power. We recommend turning off
phantom power when you use a dynamic
microphone. If you are unsure whether your
microphone needs phantom power, please
check its documentation.
Microphone Tips
A guide to microphone technique is beyond
the scope of this User Guide but if you
are new to recording with a studio-quality
microphone, you should follow some
guidelines:
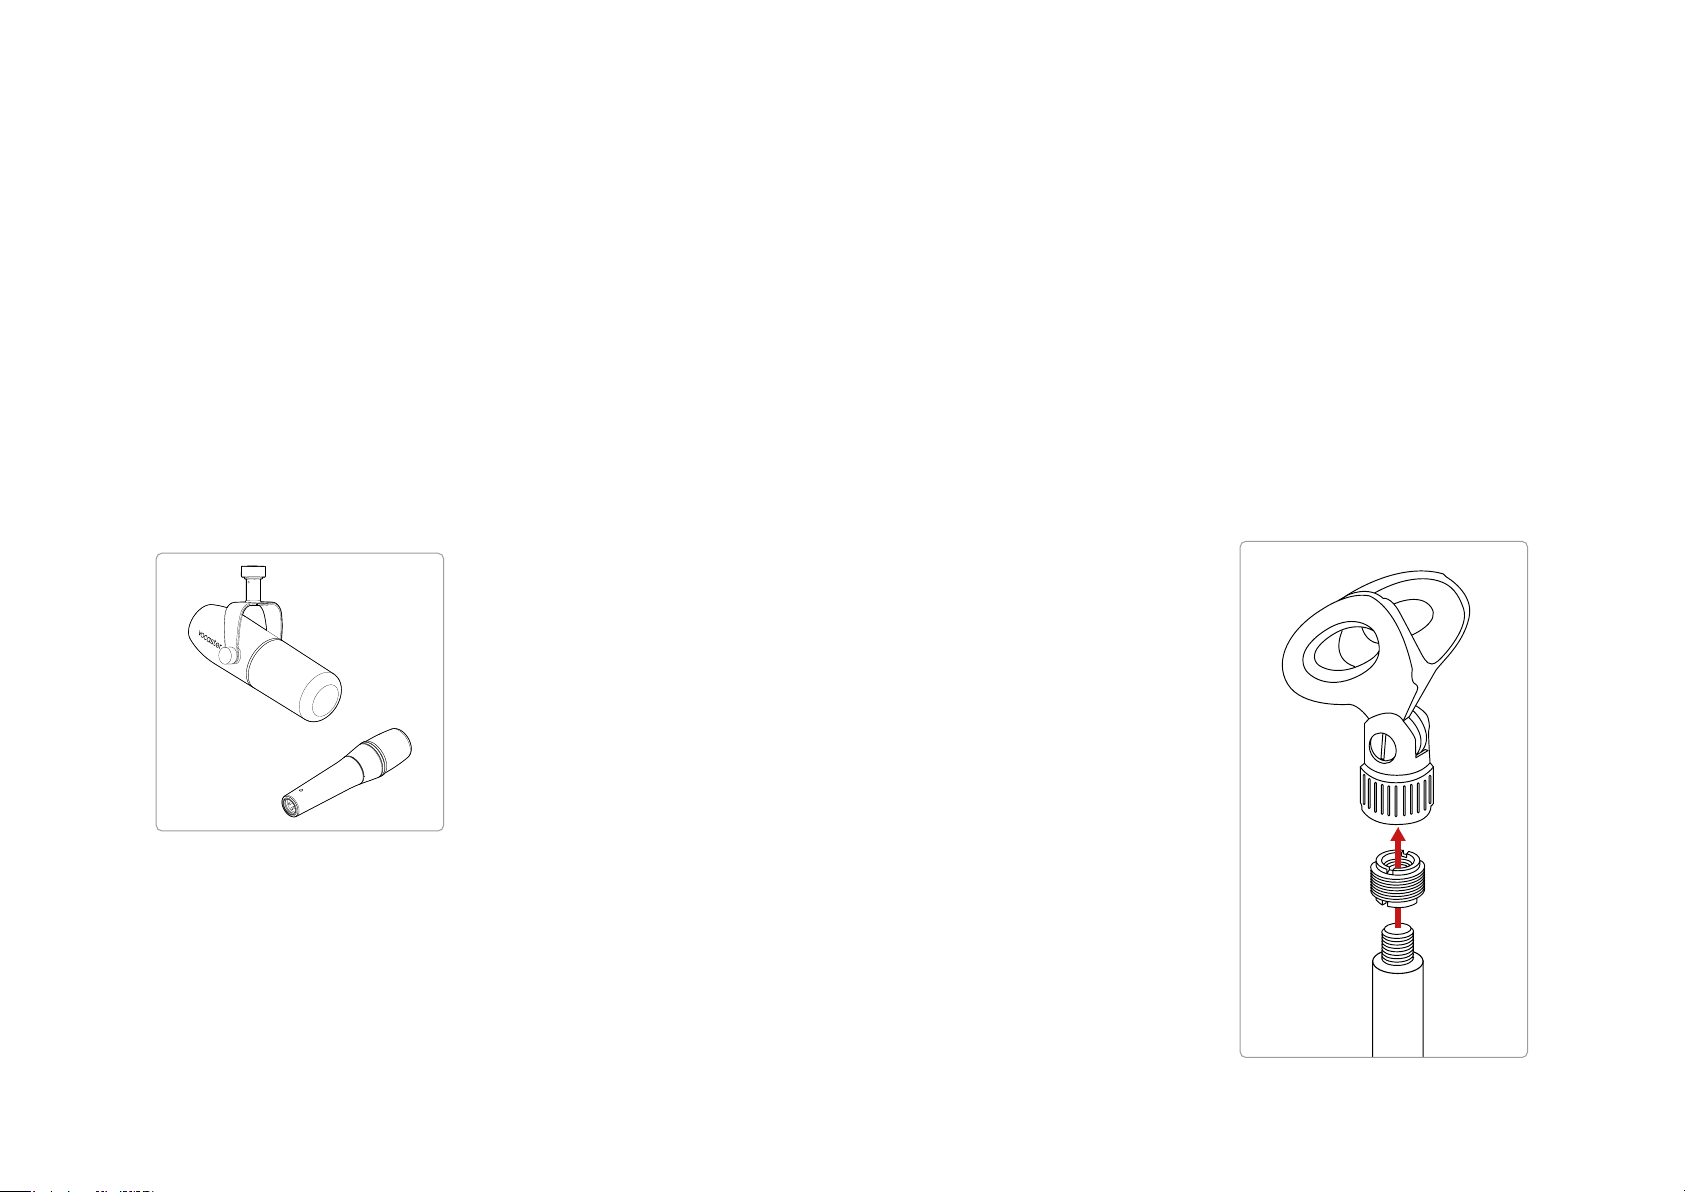
• Use a mic stand. As the Vocaster DM1
is a dynamic microphone, handling
noise is low but a microphone stand
is always a good idea. The Vocaster
DM1’s clip has a standard 5/8” thread
and a 3/8” adaptor is included. One
of these thread sizes will t almost any
microphone stand.
• Make sure you have the correct level.
Use Vocaster’s Auto Gain function to
Two types of dynamic microphone
get to a useful starting point. It’s not
unusual to turn the gain up high. If
Vocaster One can provide phantom power
(48 volts) at the XLR input if you’re using
a condenser microphone that needs it. To
enable phantom power, push the 48V button
on the rear panel: the 48V LED lights red to
conrm it’s active.
focusrite.com Tell the world 13
the level is too low, turn the gain up
or move closer, if the level is too high,
reduce the gain or move slightly further
from your microphone.
Top to bottom:
Microphone Clip, thread adaptor, microphone stand
Page 14

EXAMPLES OF USE
Microphone Dos and Don’ts (cont)
• Understand the microphone’s pick-up
pattern. The Vocaster DM1 is an ‘end
address’ microphone; you need to speak
into the end of the microphone and not the
side. If you point it the wrong way, it will
sound odd.
• Experiment with the angle of the
microphone. Recording with the
microphone pointing directly at you
can work great but if the sound is too
‘breathy’ or you hear plosives, angling the
microphone slightly ‘off-axis’ can reduce
these. (Plosives are the popping sounds you
sometimes hear with the letters like ‘P’ or
‘B’.) Try different angles to see what works
best for you.
• Experiment with your distance from
the microphone. Speaking close to the
microphone (about the length of a st)
reduces the effect of the room’s acoustics,
but increases the bass response, so your
voice might start to sound a bit boomy.
This can be good for voiceover work but
for a more natural voice sound, move away
from the microphone slightly (15-30 cm).
If the room you’re using doesn’t have
great acoustics, the further you are from
the microphone, the more aware you’ll
be of room sound when you listen to the
recording. Natural reverberation from a
room is neither good or bad, but often
inappropriate for spoken word recordings.
• Don’t blow into a microphone to test it!
Lightly rub or scratch the end instead.
• Don’t forget a microphone will pick up any
other sound source in the room: a clock, aircon, heating, a creaking chair etc.
You might not notice these sounds at the
time, but the microphone will, and you’ll
hear them on the recording.
Use Vocaster’s Enhance feature or a HighPass Filter (HPF) in your recording software
to reduce any unavoidable low-frequency
rumble.
focusrite.com Tell the world 14
Page 15
EXAMPLES OF USE
Using Auto Gain
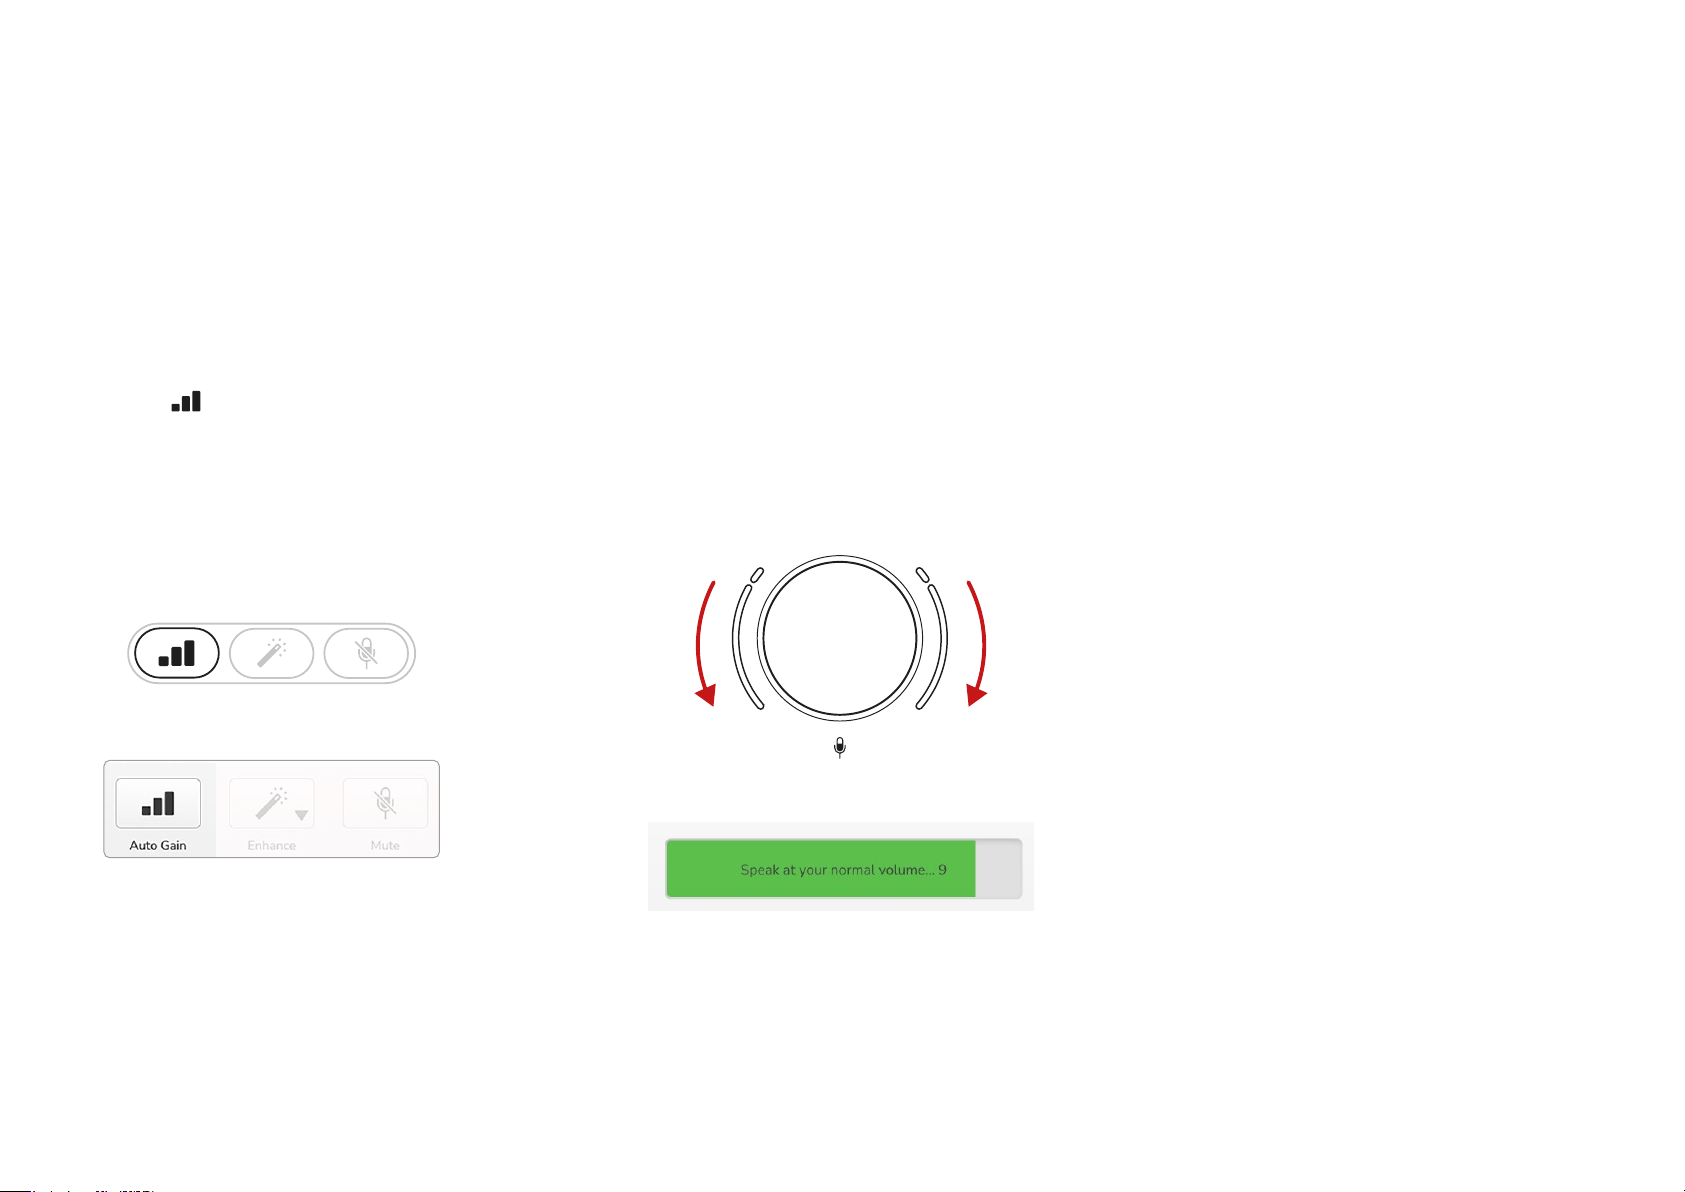
Vocaster One’s Auto Gain feature allows
you to get a good recording level
without guesswork.
Press the button to activate Auto
Gain or, if you have Vocaster Hub open
on your computer, by clicking on the
on-screen Auto Gain icon.
The Auto Gain button will pulse amber.
Vocaster One
Speak into the microphone for ten
seconds, using a normal speaking voice
you will use for the recording itself.
The halos acts as a count down timer,
starting fully white, then moving
towards the bottom. Vocaster Hub also
shows a progress bar.
Halo countdown on Vocaster
Auto Gain didn’t set my input level
If the halos ash amber the signal is too
loud or too quiet so Auto Gain couldn’t
set the correct level and sets it to the
minimum or maximum level.
If the halos ash red Auto Gain couldn’t
set a usable level. This could be due to
a Mic Level that was too low:
• Test a different microphone or
cable.
• Make sure 48V is on, if you’re
using a condenser microphone.
• Make sure you switch on your
microphone (if it has an on/off
switch).
Vocaster Hub
Vocaster Hub countdown
After ten seconds, Auto Gain sets the
input level for the microphone and
you’re ready to record.
focusrite.com Tell the world 15
Page 16
EXAMPLES OF USE
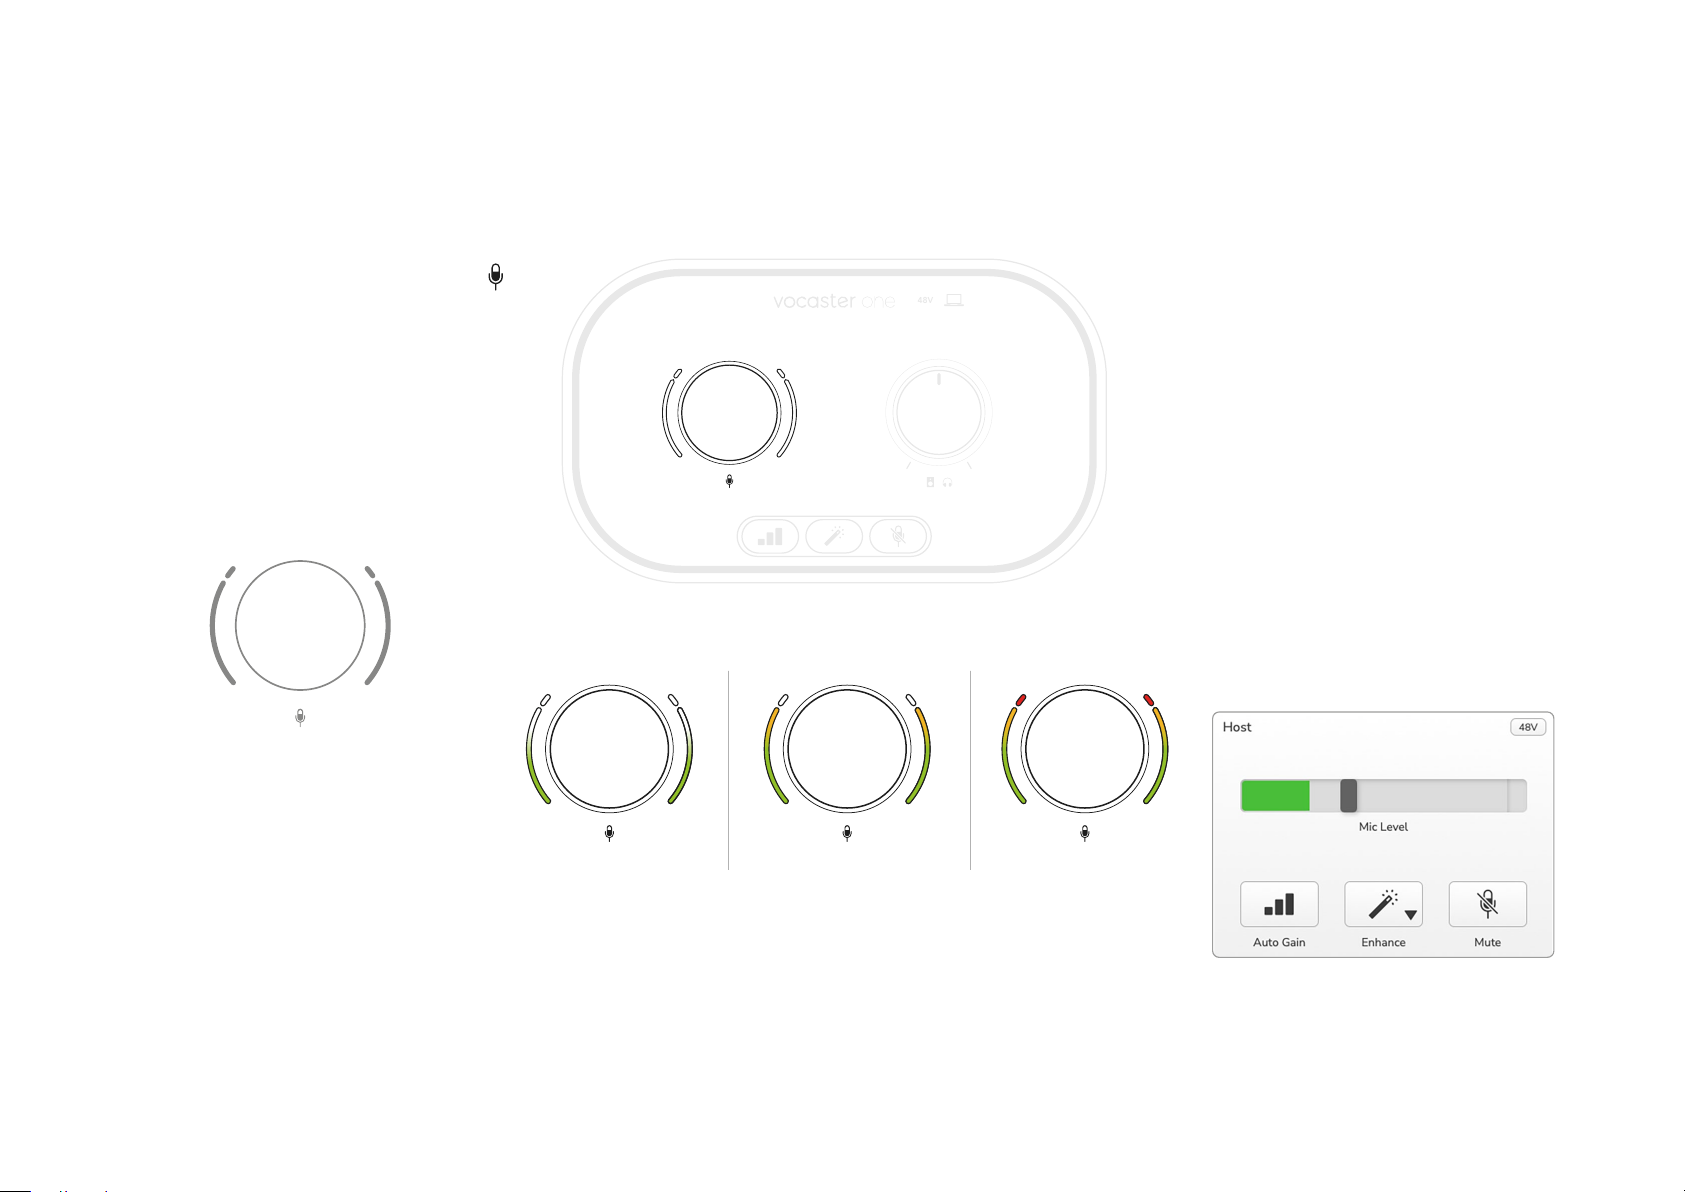
Manual gain adjustment
On Vocaster One, the large knob marked
sets the microphone gain, and the level to
your recording software.
The gain knob is surrounded by two LED
‘halo’ indicators, shaped as arcs. These light
in various colours to show the microphone
signal level.
To set your gain, speak into your microphone
48V
as if you were recording, adjust the gain knob
until the halo(s) just start to turn amber when
you speak at your loudest. At this point, turn
the knob down a bit until you don’t see any
amber. If the halos ever turn red, you will
denitely need to turn the gain knob down:
red means your recording is likely to distort.
(See diagrams below.)
You can also adjust the gain from Vocaster
Hub by moving the on-screen Mic Level
slider: drag it to the right to increase the gain.
When you’re adjusting the gain by turning
the knob, the left halo changes to white to
show the gain setting.
focusrite.com Tell the world 16
Good Level A bit too high
Your recording
will distort
Page 17
EXAMPLES OF USE
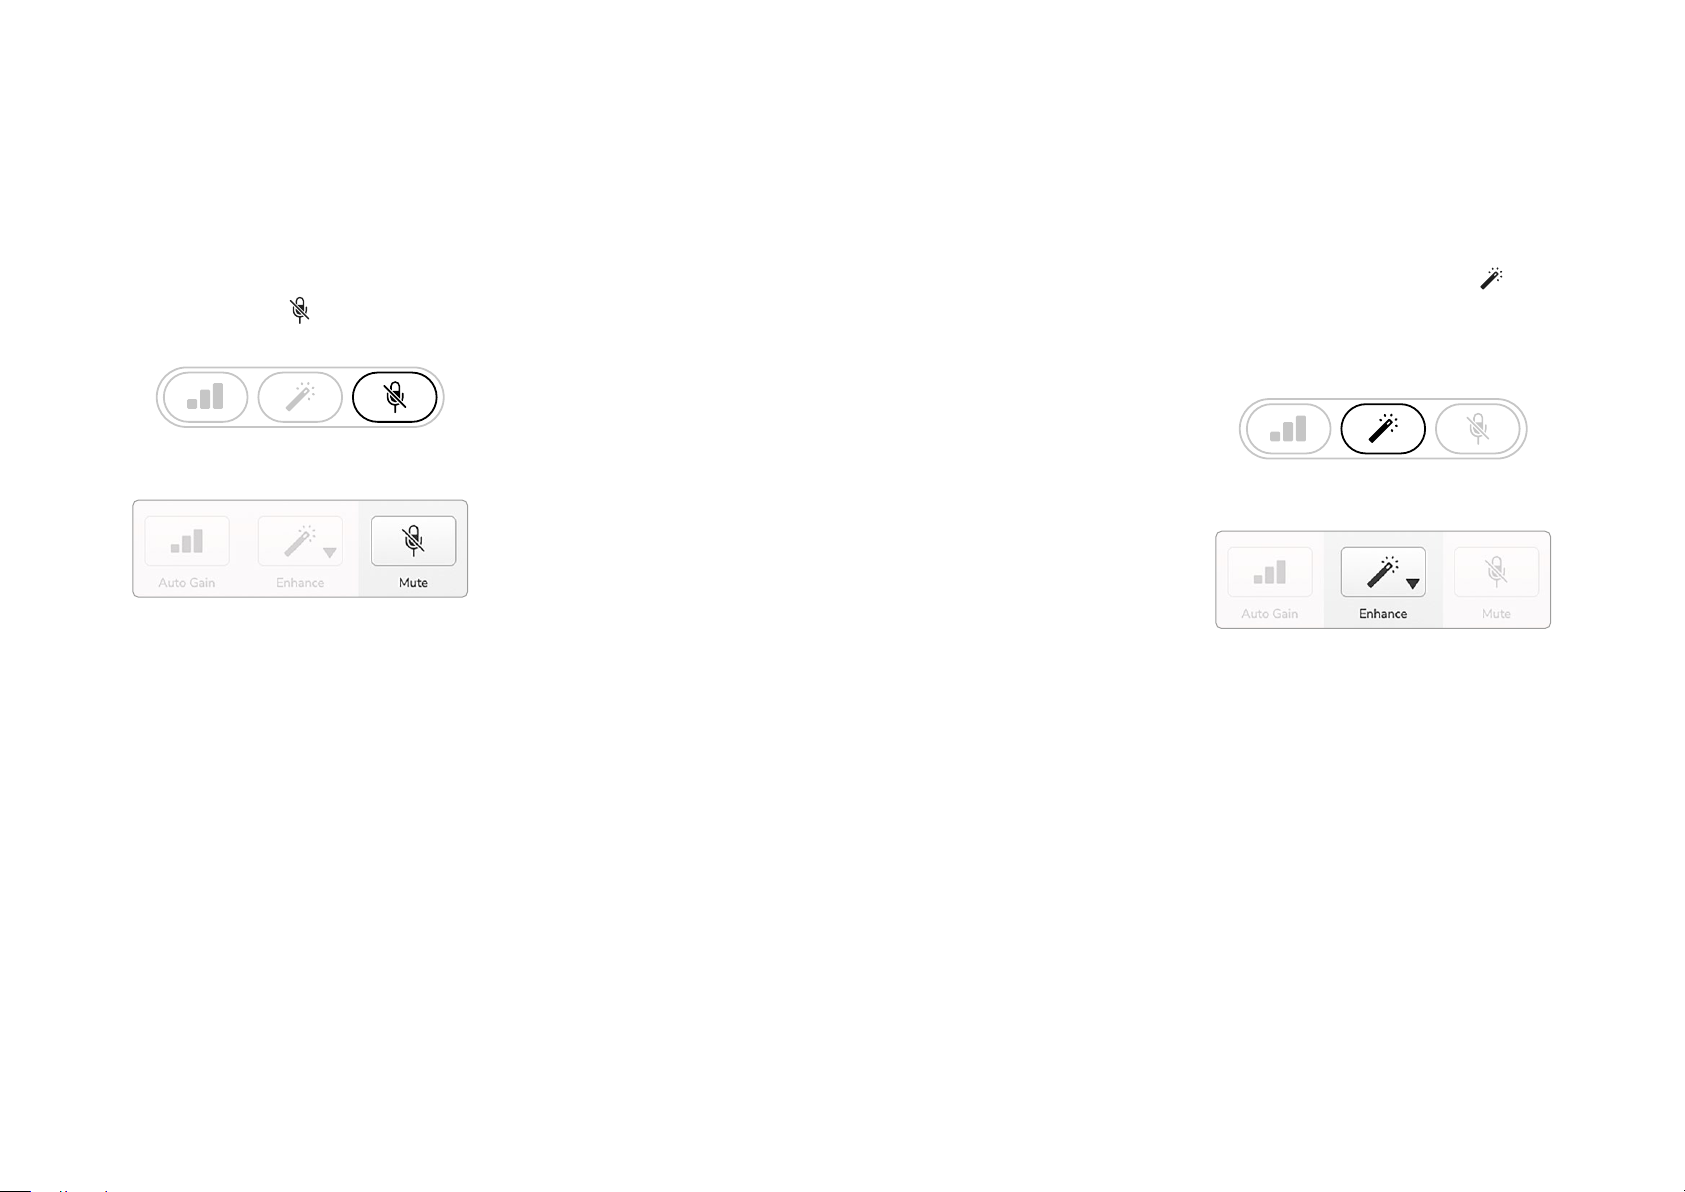
Microphone Mute
Vocaster One’s microphone channel has a
mute button, marked .
Vocaster One
Vocaster Hub
You can press this at any time to turn the
microphone ‘off’: the button lights red and
the gain halos pulse red while the microphone
is muted.
Using Enhance
Vocaster One’s Enhance feature optimises the
microphone’s audio processing to achieve the
best possible recording.
It uses compression to control the level of the
microphone signal, equalisation to help voice
recordings sound clearer and a high pass lter
to remove unwanted low frequencies such as
rumbling and microphone handling noise.
Enhance has four presets for you to tailor the
sound to your voice or your intended. You can
select one of the four presets using the dropdown arrow in Vocaster Hub:
• Clean
• Warm
To use Enhance, either press the button or,
if you have Vocaster Hub open, click the onscreen Enhance icon.
Vocaster One
Vocaster Hub
The button lights green when Enhance is on.
Press it again to turn Enhance off.
Press the button again to unmute. You can
also click the button with the same icon on
• Bright
• Radio
Vocaster Hub. (Broadcasters often refer to
this feature as a ‘cough switch’.)
focusrite.com Tell the world 17
Page 18
EXAMPLES OF USE
Listening with headphones
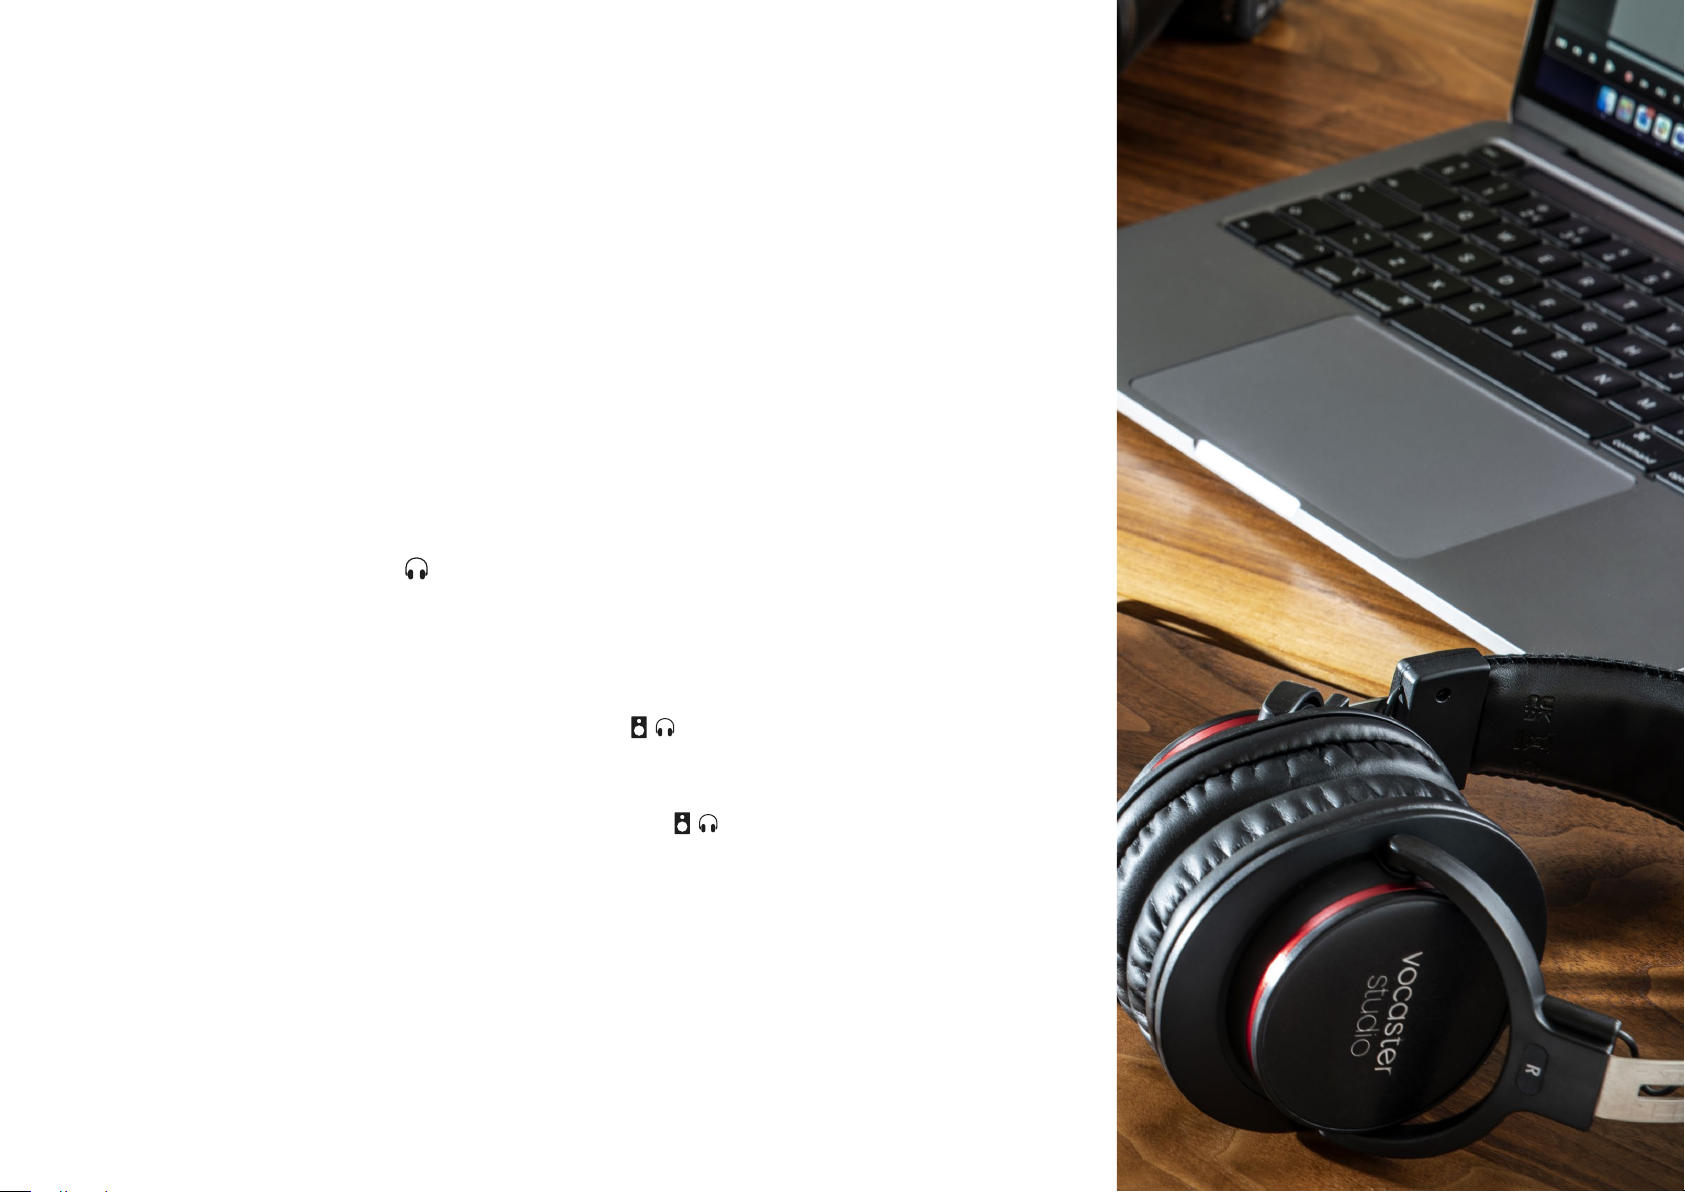
The Vocaster One Studio includes a set
of high quality HP60v headphones. They
are lightweight and durable, and should
prove comfortable to wear for extended
periods. The headband is adjustable.
The HP60v headphones are tted with
a ¼” (6.35 mm) 3-pole (TRS) jack plug.
You can connect headphones to the front
panel headphone socket marked to
hear what you are recording.
You can use this headphone output with
other headphones: if they have in a 3.5
mm TRS jack, use a TRS 3.5 mm-to-¼”
jack adaptor.
The headphones let you hear what you
are recording. This is a ‘default’ mix of
your microphone and any other audio
sources, such as audio from a phone
or computer playback (the Loopback
channels).
You can adjust the volume of individual
audio sources using the mixer in Vocaster
Hub.
You can adjust the volume in the
headphones with the control on Vocaster
One marked
: this control does not affect your
recording level.
The headphone output on Vocaster One
may not work correctly with headphones
terminating in a 3.5 mm TRRS connector.
The Host level controls both the
headphones and speaker outputs. When
you’re using headphones we suggest
muting your monitors in Vocaster Hub.
focusrite.com Tell the world 18
Page 19
EXAMPLES OF USE
Listening with speakers
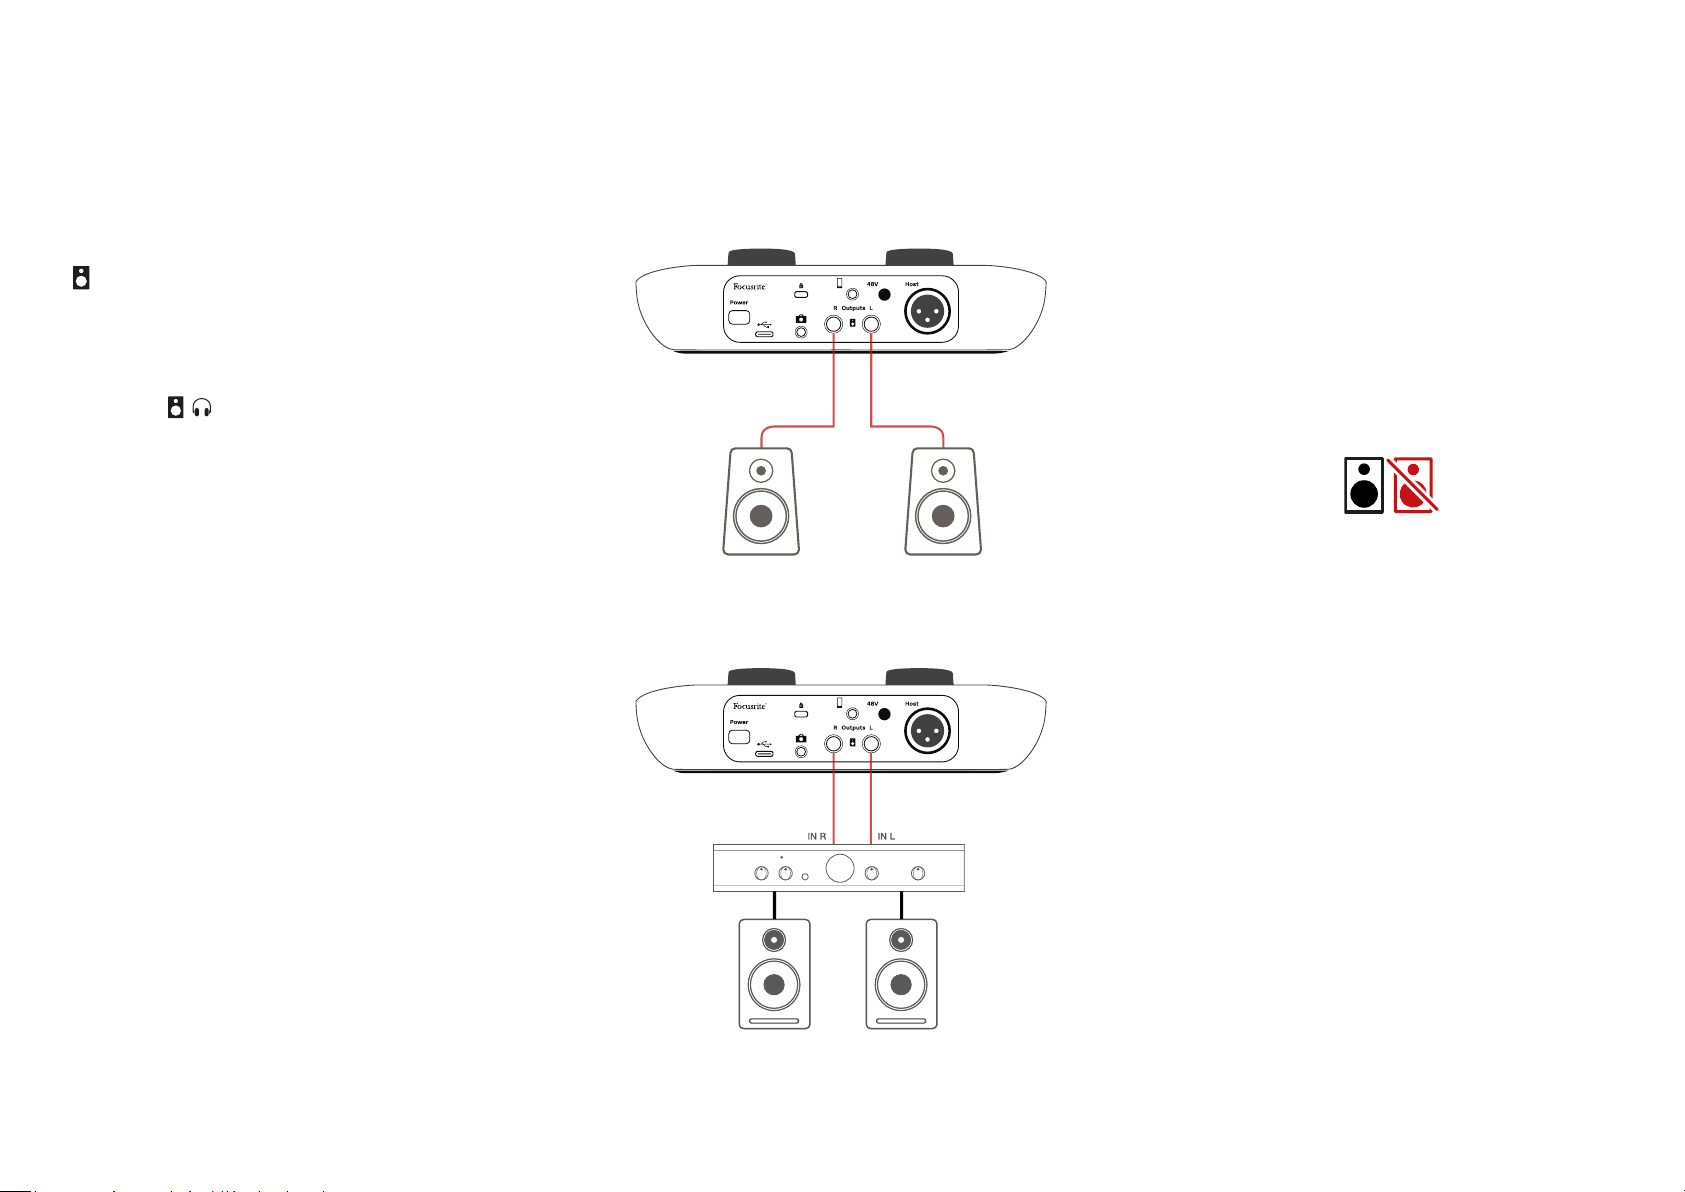
Use the ¼’ jacks marked Outputs R and L
to connect speakers. You can connect
powered monitors or an amplier to these
outputs. Speaker volume is controlled by
the same knob used for headphones
volume.
The outputs are balanced ¼’ TRS jack
sockets and provide line level. Small
powered monitors have unbalanced inputs,
typically a 3.5 mm jack plug intended for
direct connection to a computer. Separate
power ampliers are likely to have phono
(RCA) sockets.
Connecting to active speakers
You can also mute the speakers using
Vocaster Hub software. Click the speaker
icon in the top right of Vocaster Hub
software to toggle mute on (red) or off
(black)
NOTE: You can create an audio feedback
loop if your speakers are active at the same
time as a microphone! We recommend
you turn off your speakers while recording
podcasts, and use headphones for
monitoring.
Connecting to passive speakers
via an amplier
focusrite.com Tell the world 19
Page 20
VOCASTER HUB SOFTWARE
Recording a phone
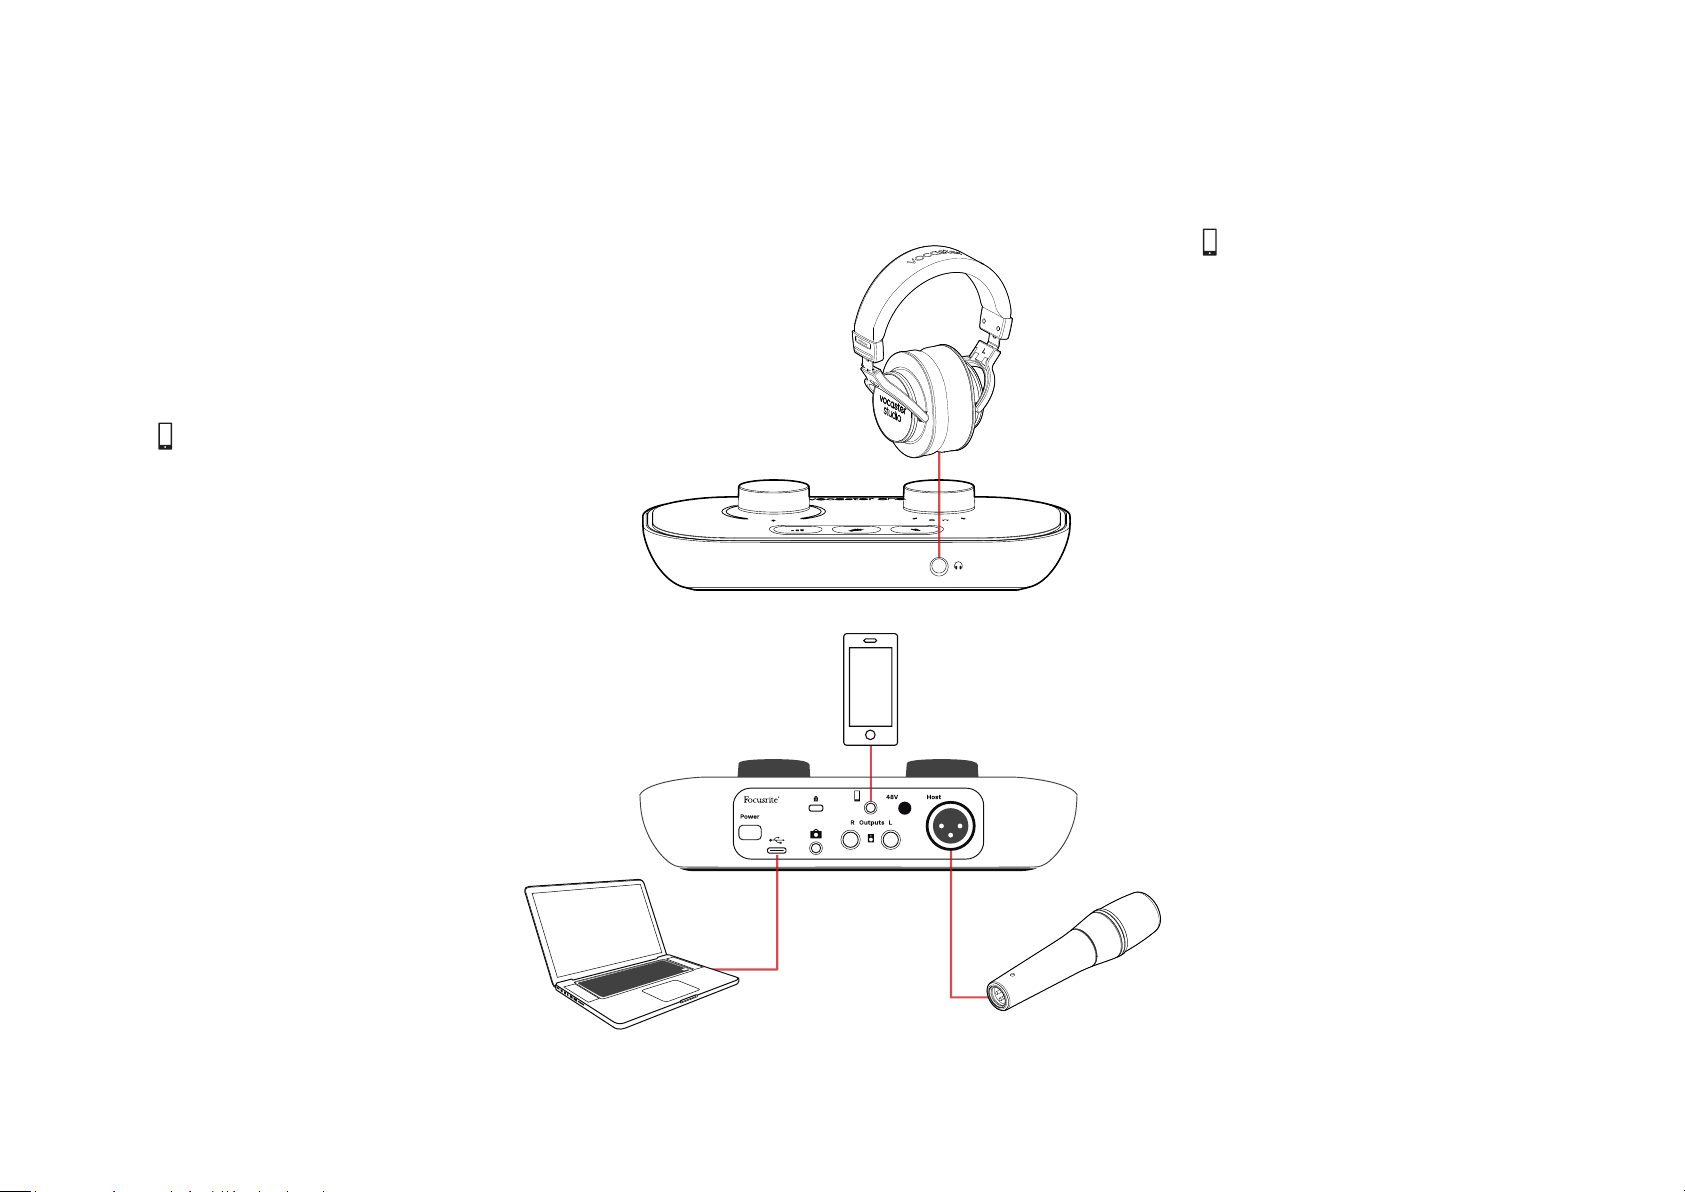
You can connect a phone to Vocaster One
to record a conversation, or to record music
from the phone.
The rear panel has a phone connector,
marked . This is a 3.5 mm TRRS jack socket,
use a 3.5mm TRRS jack cable to connect
to the phone’s headphone socket, which is
normally a 3.5 mm TRRS socket.
A 3.5mm TRS cable will work, but you may
not get two-way communication with your
phone guest.
If the phone does not have a 3.5 mm
headphone port, you can use a 3.5 mm TRRS
headphone adaptor.
The connector also feeds Vocaster One’s
output back to the phone so the person on
the phone call can hear the whole podcast
mix, but without their own voice. This type
of mix is known as ‘mix-minus’: it ensures the
caller will not hear their voice delayed or with
echoes.
The signal level to the phone depends on the
setting of the input channel sliders in Vocaster
Hub’s mixer, but is unaffected by the master
output slider. The signal fed to the phone is a
mono version of the stereo mix, because the
phone’s input is a mono microphone.
Vocaster One records audio from a phone in
mono.
focusrite.com Tell the world 20
Page 21
voice from phone
all audio
is routed
to camera
audio
to/from
computer
VOCASTER HUB SOFTWARE
Recording to a video camera
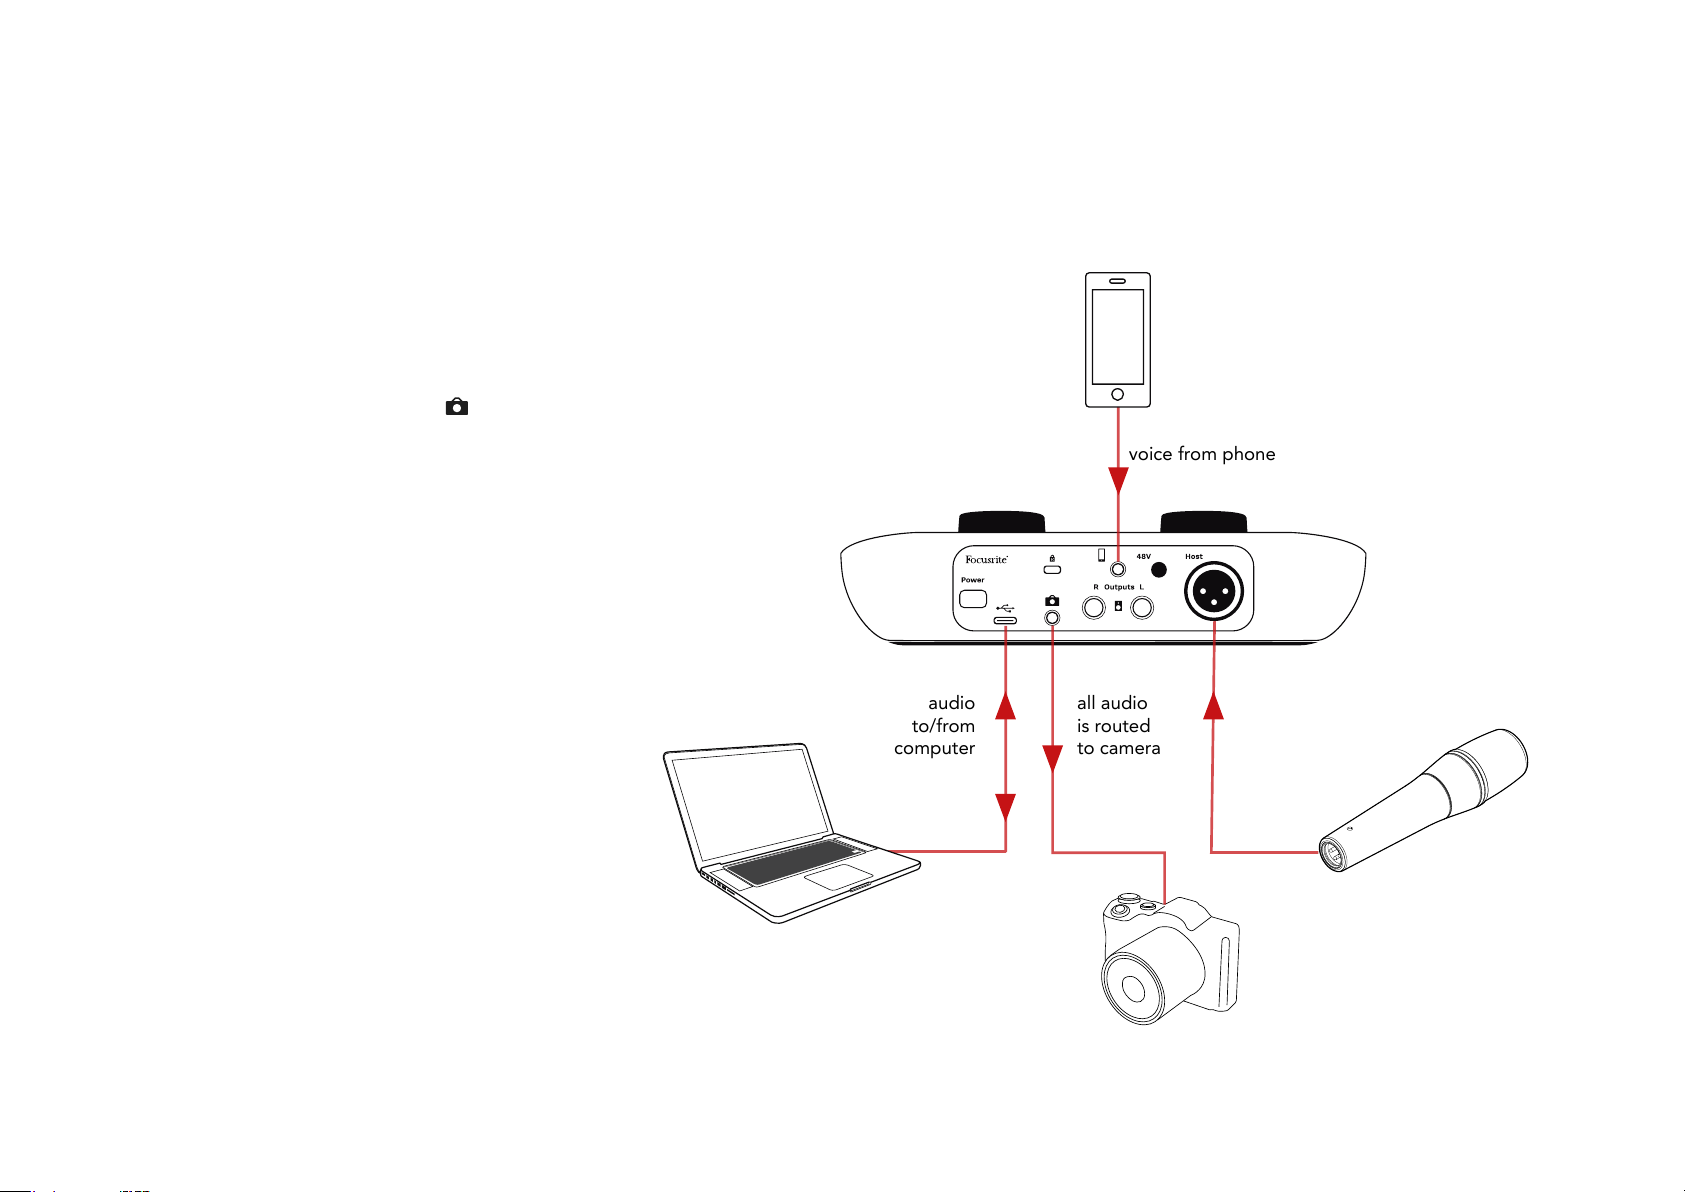
If you are working with video, you may want
to record your audio into a video camera.
Vocaster One has a dedicated output
connector for this purpose, the 3.5 mm TRS
jack socket on the rear panel marked .
You can connect this output to the audio/mic
input on your camera using a 3.5mm jack-tojack cable.
If your camera input uses a different
connector, use a suitable adaptor cable.
Ensure you select your camera’s external
audio source rather than its internal
microphone.
The camera output carries the same mix as
the USB recording output, and what you hear
in your speakers and headphone. You can set
the mix and levels going to the camera using
the sliders in Vocaster Hub’s mixer.
focusrite.com Tell the world 21
Page 22
VOCASTER HUB SOFTWARE
Vocaster Hub software
As part of the Easy Start registration process,
you’ll install Vocaster Hub software on your
computer. Vocaster Hub gives you access
to additional Vocaster One features - most
importantly, it lets you balance your voice
against any other audio in your mix.
IMPORTANT: A separate Vocaster Hub
User Guide can be downloaded from the
downloads area of the Focusrite website.
This describes the use of Vocaster Hub
in full detail. The following section of this
User Guide is limited to an overview of the
software’s primary features.
To open Vocaster Hub: After you install
Vocaster Hub on your computer this icon
appears in your applications:
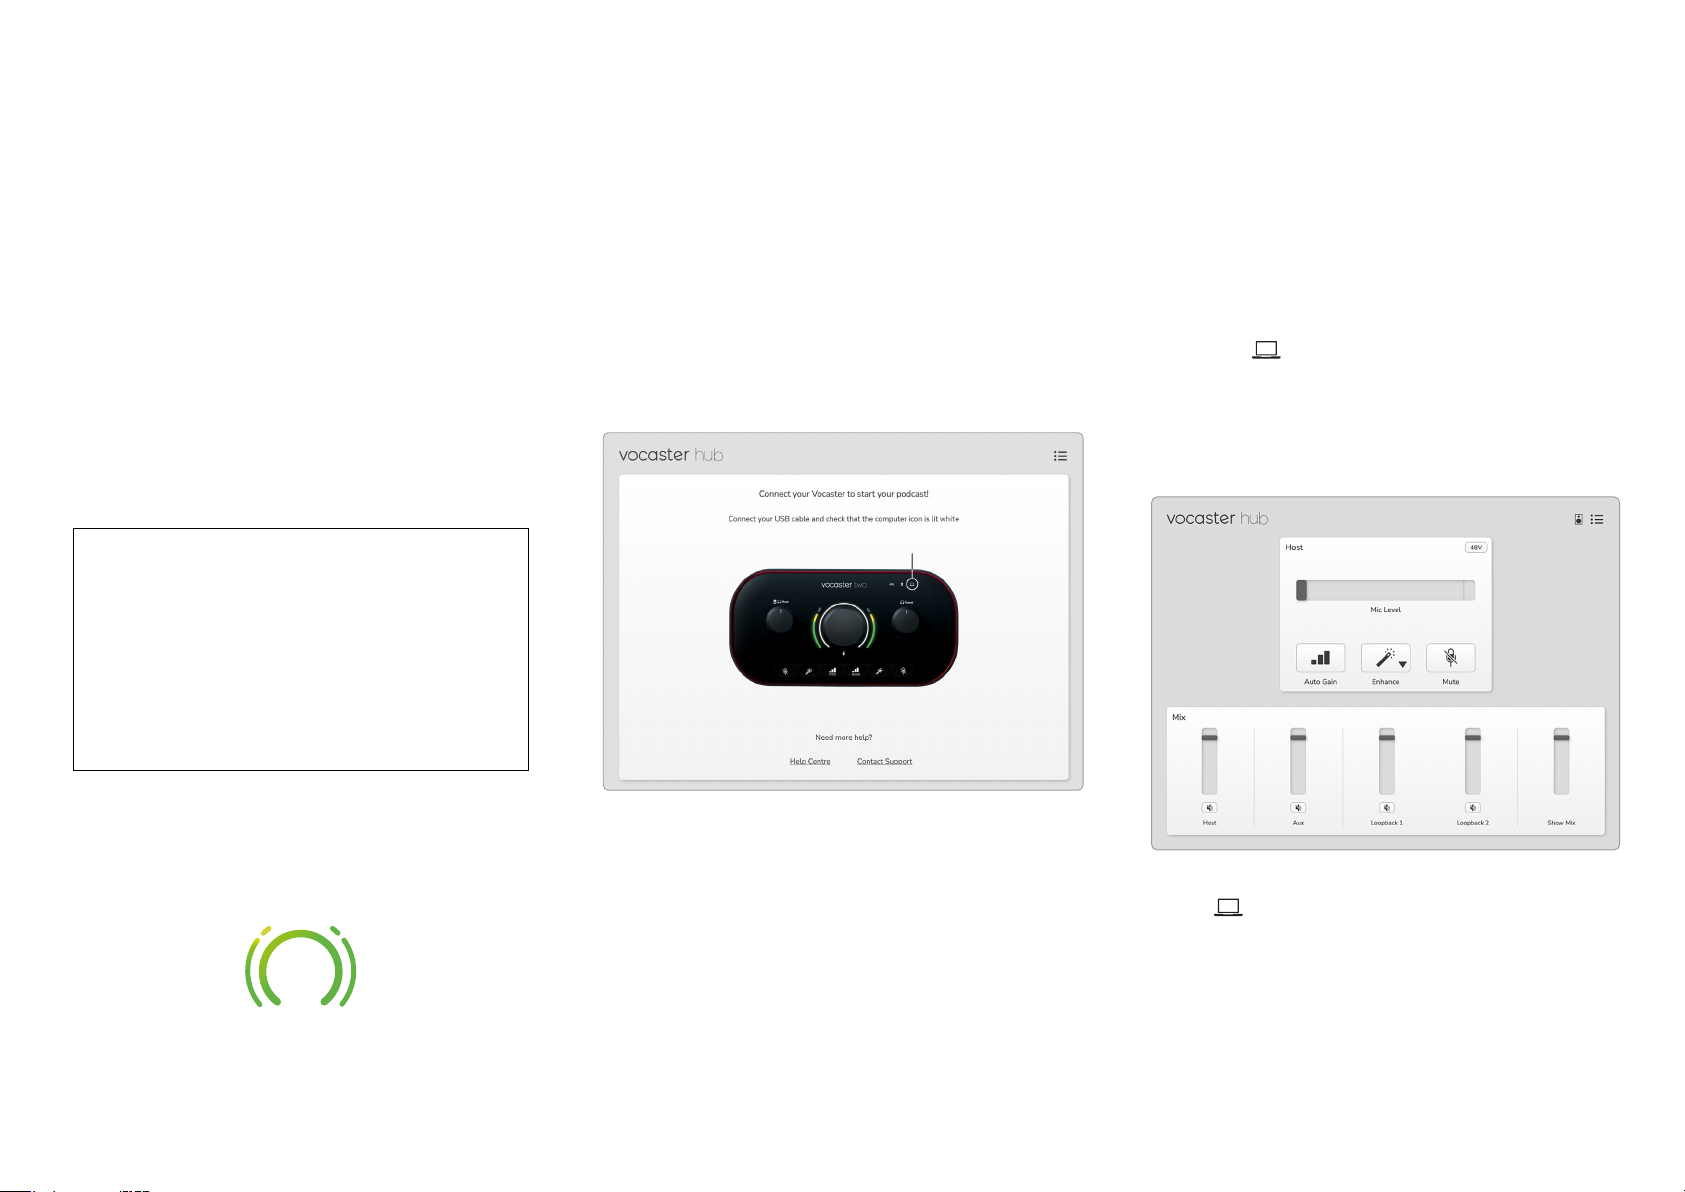
If your Vocaster One interface is not
connected to your computer and powered
on, you will see a Welcome Page.
Note the Help Centre or Contact Support
links. You can always return to this page by
turning the interface off. More guidance on
using Vocaster One, including tutorial videos,
are available at these links.
When you connect the interface and power
it on, the icon lights white to conrm
the interface is communicating with your
computer, and you’ll see Vocaster Hub’s
Control Page:
If the icon lights red, it shows Vocaster
One has not been able to communicate with
your computer, and you should check the
cable is plugged in correctly.
Click it to open Vocaster Hub.
focusrite.com Tell the world 22
Page 23
VOCASTER HUB SOFTWARE
Controlling the microphone
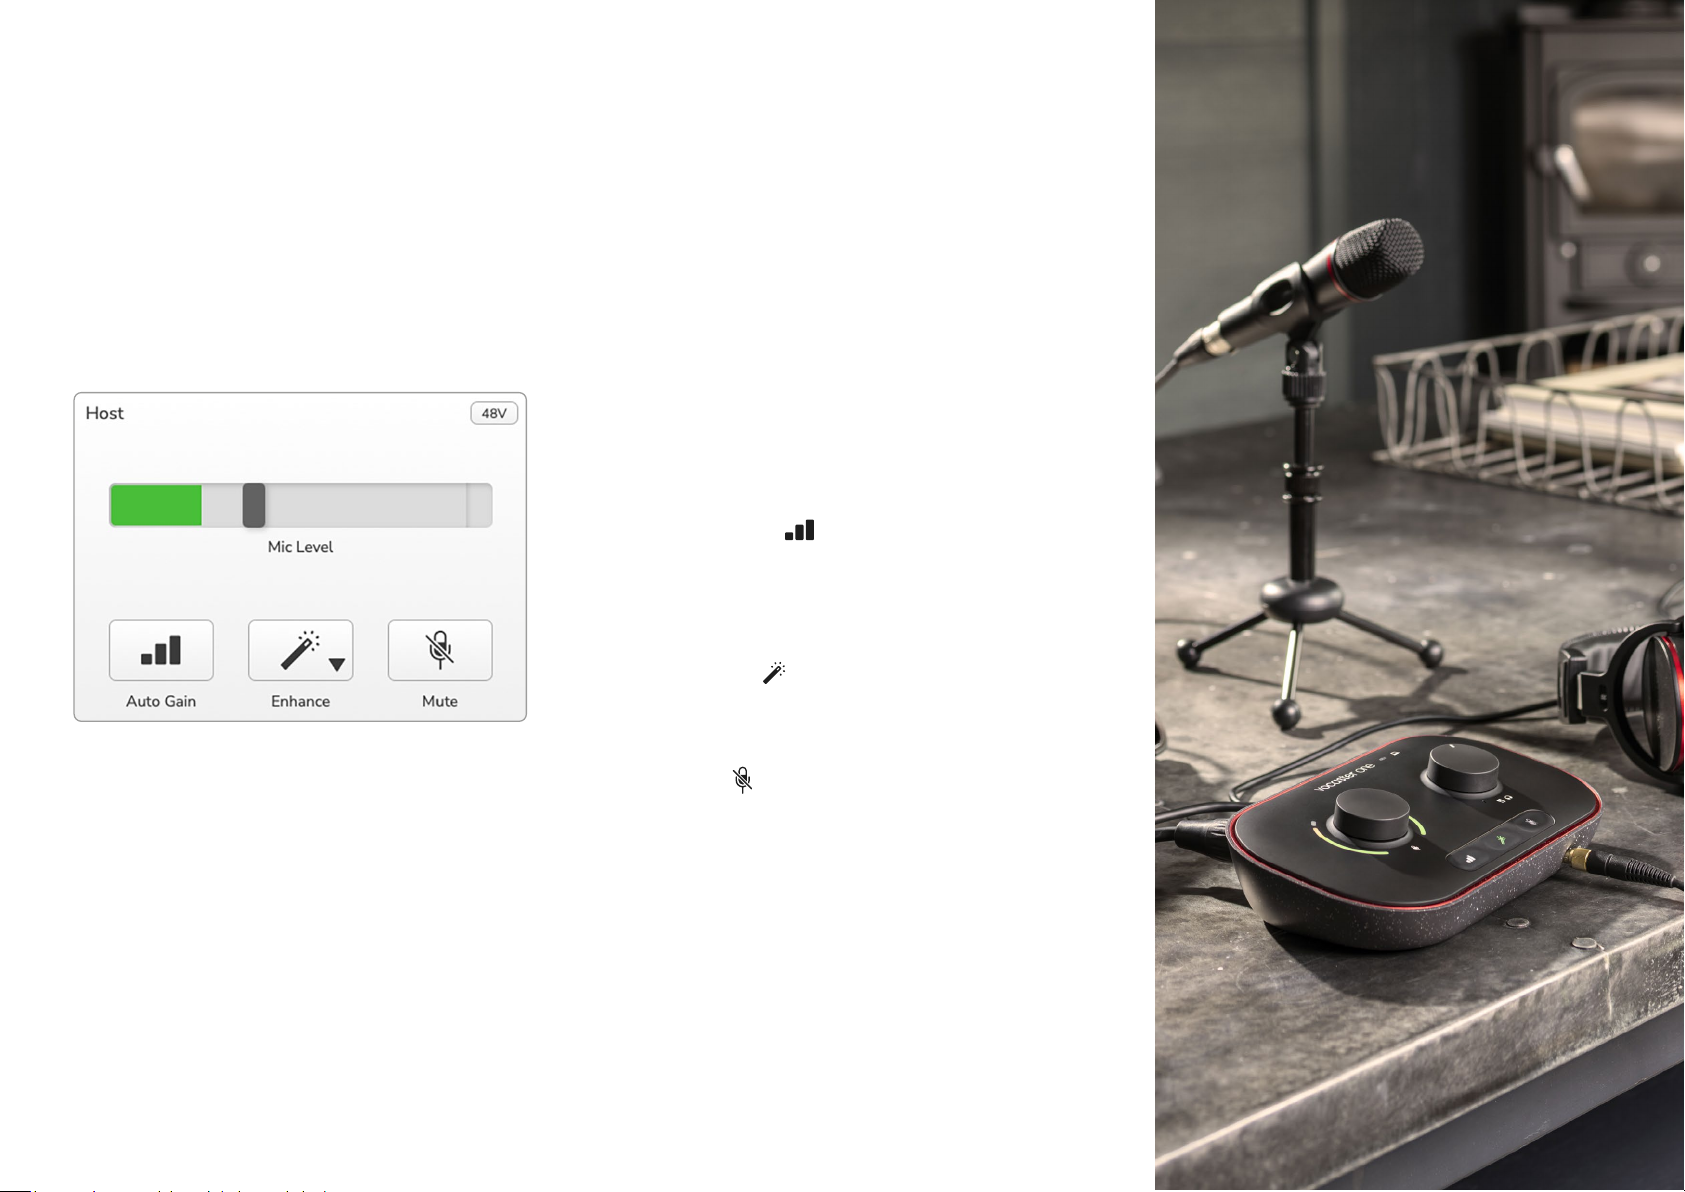
The Host Input panel is where you adjust
Vocaster One’s microphone channel:
The bar should remain green most of the
time, with amber showing only on the loudest
‘peaks’. If it goes red, the gain is set too high.
Below the meter/level display are three
buttons which duplicate those on the
interface top panel:
• Auto Gain – click this to start the
Auto Gain function; speak normally
into the microphone for 10 seconds to
calibrate the gain setting.
The Mic Level display is both a level meter
and a level control. Click and drag the grey
bar to adjust the gain. This control duplicates
the rotary gain knob on the interface, and you
can adjust the gain with either control. The
colour bar shows the microphone signal level,
and again, this duplicates the signal level halo
display on the interface.
• Enhance – click on this to activate
the Enhance feature; the button shows
green. Click again to deactivate.
• Mute – click on this to mute the
microphone; the button and the level
display show red when mute is active.
Click again to unmute.
Tell the worldfocusrite.com 23
Page 24
VOCASTER HUB SOFTWARE
Controlling your mix
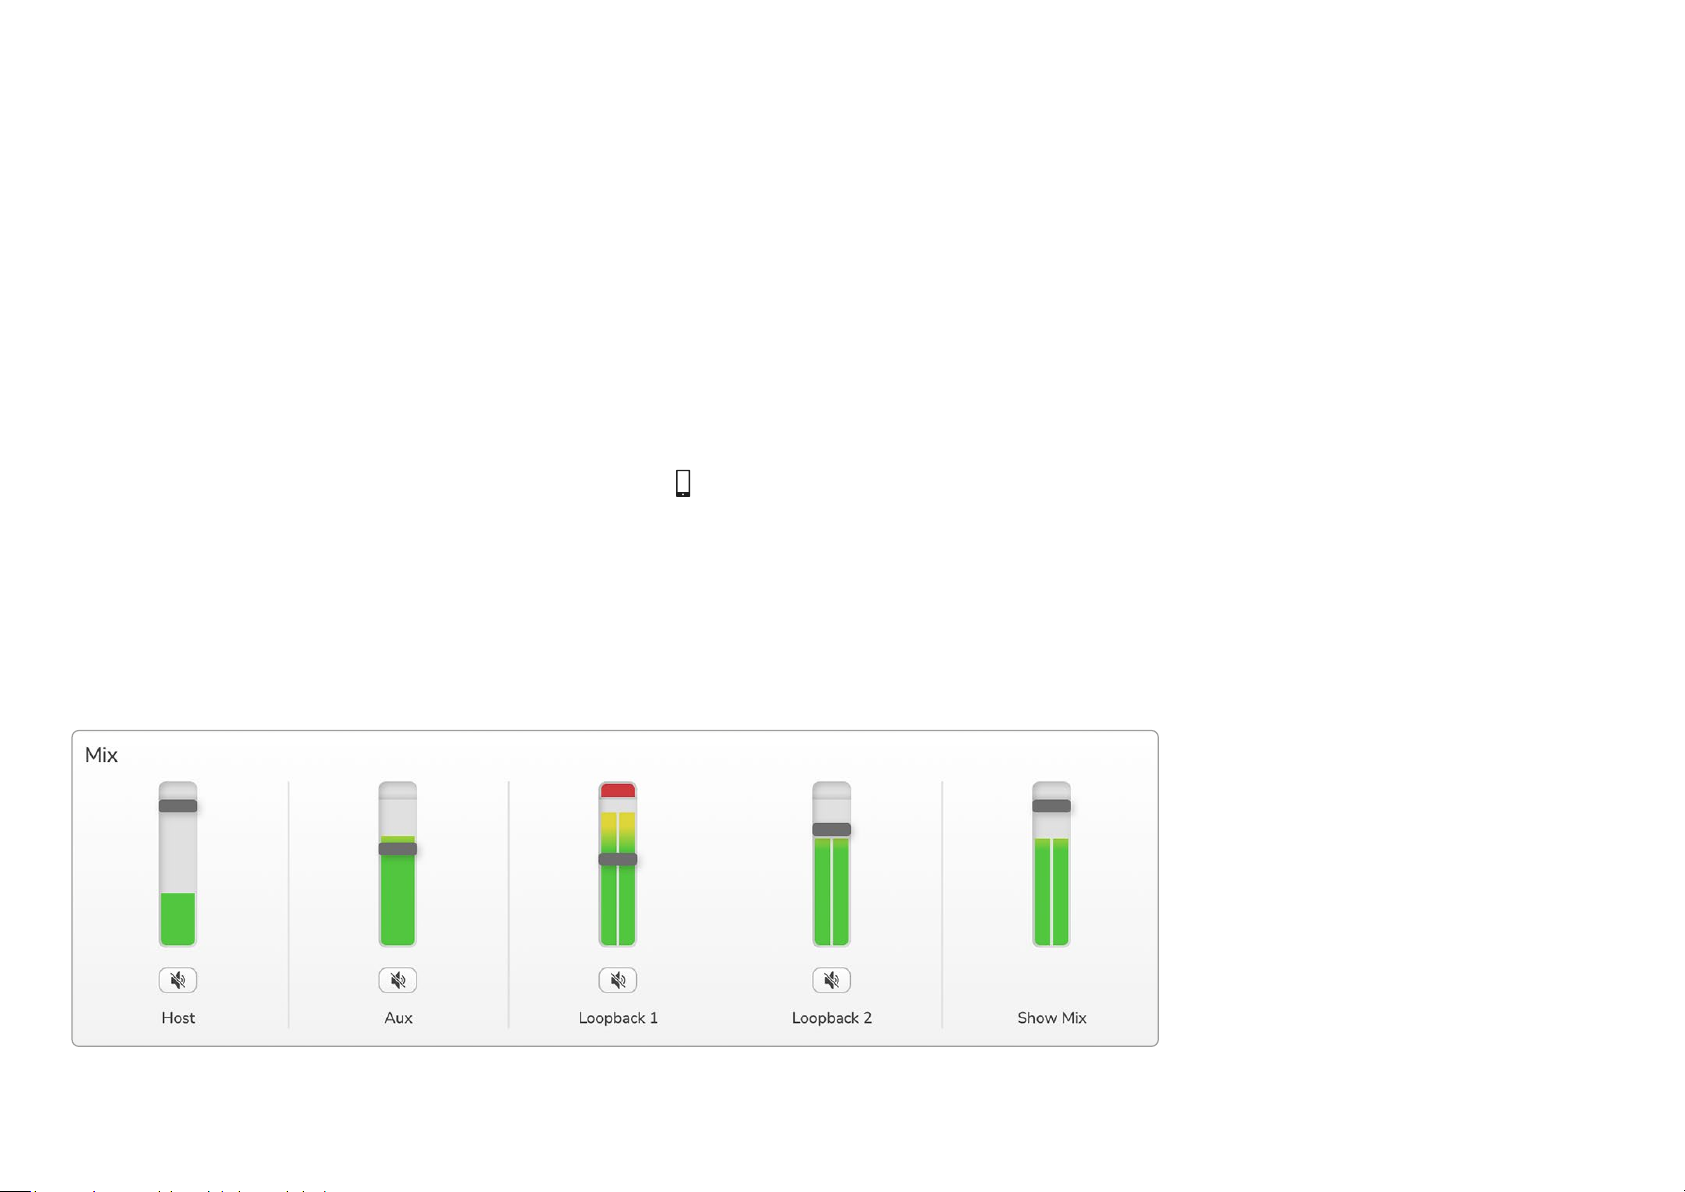
The Mix section of Vocaster Hub allows you to
balance the audio inputs and computer outputs
making up your Show Mix.
Like the Mic Level control, the ‘sliders’ are
both meters and level control. The sliders
affect the headphone/speaker mixes and
Show Mix recording but don’t affect the
level of each channel into your software. The
channels of the mixer are (left to right):
• Host (mono) – this is Vocaster One’s
Host microphone.
• Aux (mono) – use this when you have
connected a phone to the rear panel
connector. It adjusts the audio level
being received from the phone.
• Loopback 1 and Loopback 2 (stereo)–
these control the level of two audio
sources within your computer: these
could be feeds from the internet, pre-
recorded les, or other sources. In the
image below Loopback 1 is ‘clipping’ so
the source level needs turning down to
stop the red clip bar appearing.
• Show Mix (stereo) – this shows and
controls the overall output level of the
mixer.
On the Loopback 1 channel the red part
of the meter is the ‘Clip Indicator’. This
shows you the source is too loud and may
distort in your recording. Loopback is an
exception and may show as clipped often.
Turn down the track’s source, not the
slider in the mixer. If the Show Mix clips,
turn down the tracks in the mixer.
focusrite.com Tell the world 24
Page 25
VOCASTER HUB SOFTWARE
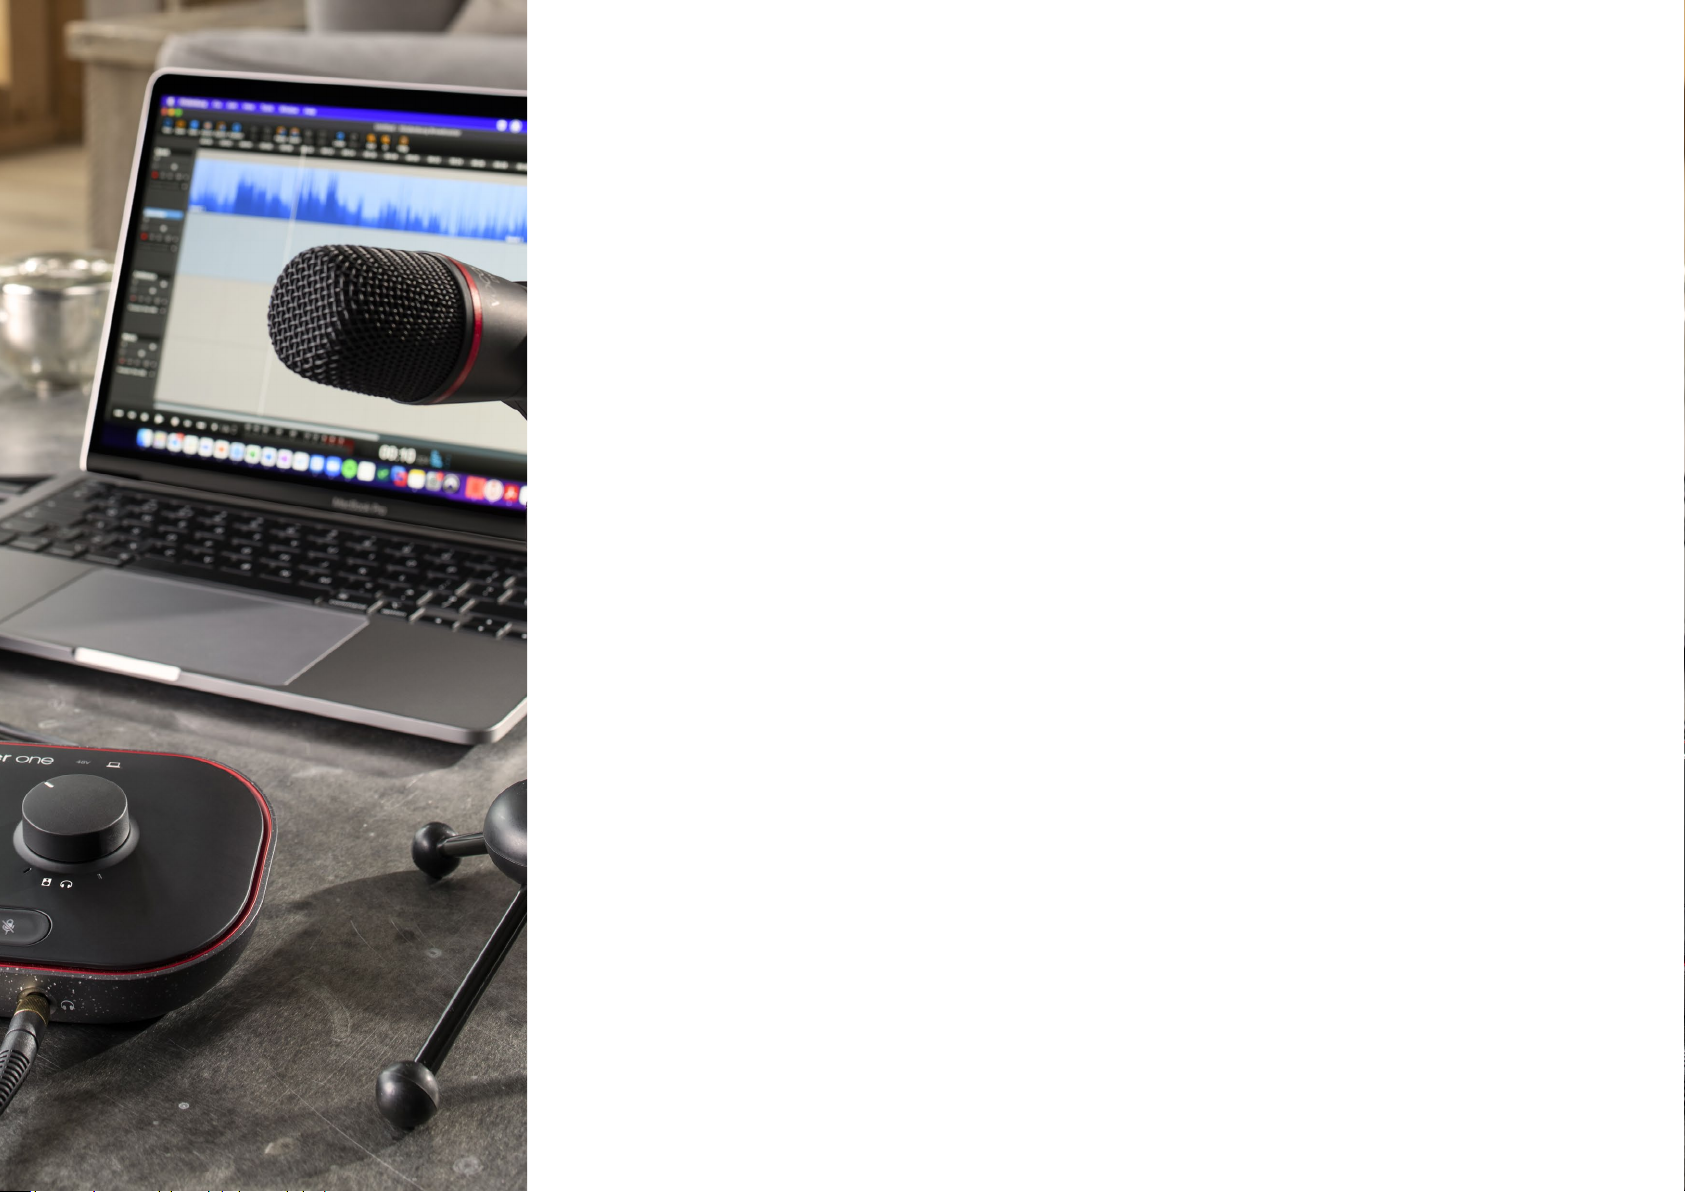
Recording sounds from your computer
Vocaster’s Loopback feature lets you record
audio sources from within your computer
(e.g., the audio output from a web browser).
There are two stereo Loopback sliders
on the mixer; these use Vocaster One’s
‘virtual’ inputs. The virtual inputs don’t have
connectors on the interface, but you can
record them in your DAW in the same way as
any other input.
• Loopback 1 – this input gets its signal
from software with its output set to
Playback 1-2, or software that doesn’t
support output routing. The software
you can use with Loopback 1 includes:
- Internet browsers
- Music playback software such as
Spotify or Apple Music.
- Video call and conference software.
You can feed each Loopback input from
a different software application. Which
application you use with each Loopback
input is congured in the application’s output
settings. If you’re a Mac User and wish to use
both Loopback inputs, we recommend you
read this support article.
Tell the world 25focusrite.com
• Loopback 2 – this input gets its signal
from audio software with its output
routing set to Playback 3-4. You can
congure this in the software’s audio
settings, but not all software allows
output routing selection, so please
check your software’s user guide for this
feature. Software with the ability to feed
audio to Loopback 2 includes:
- Other recording or playback software
you’re using.
- VOIP and video conferencing
applications.
Page 26

VOCASTER HUB SOFTWARE
Example of Loopback usage
You might want to use both Loopback inputs
when you’re recording a show but need
independent recordings of other software
sounds to mix later. For example, in your
show, you want to record your conversation
with a guest in a video call in addition to
including a sound or jingle playback from
another audio playback software.
Your video call software (e.g., Zoom), routes
its output to Playback 1-2 by default. This
appears as Loopback 1 in the mixer. You
can then route the output of your playback
software to Playback 3-4, which becomes
available as Loopback 2.
In your recording software you can now have
separate tracks for recording:
• Loopback 1 appears on your DAW
channels 7 and 8
Recording Tracks into Software
Depending on which recording software you
use, you can pick from up to ten channels to
record from, to separate tracks.
The ten channels you’ll see are:
DAW Input Number Vocaster Input Use
1
2
3
4
5 Host Microphone The Host microphone input.
6 Aux A mono feed from a device connected to the phone input on Vocaster.
7
8
9
10
Video Call L
Video Call R
Show Mix L
Show Mix R
Loopback 1 L
Loopback 1 R
Loopback 2 L
Loopback 2 R
A mix of all inputs excluding Loopback, this is a mix-minus so a video call
guest can hear your whole show without hearing (minus) themselves.
A stereo mix of all the inputs to record your whole show.
Signal from software fed from software playback 1-2.
Signal from software fed from software playback 3-4.
• Loopback 2 appears on your DAW
channels 9 and 10
For all further details, please refer to
the Vocaster Hub User Guide.
focusrite.com Tell the world 26
Page 27
HARDWARE FEATURES
Hardware Features
Top Panel
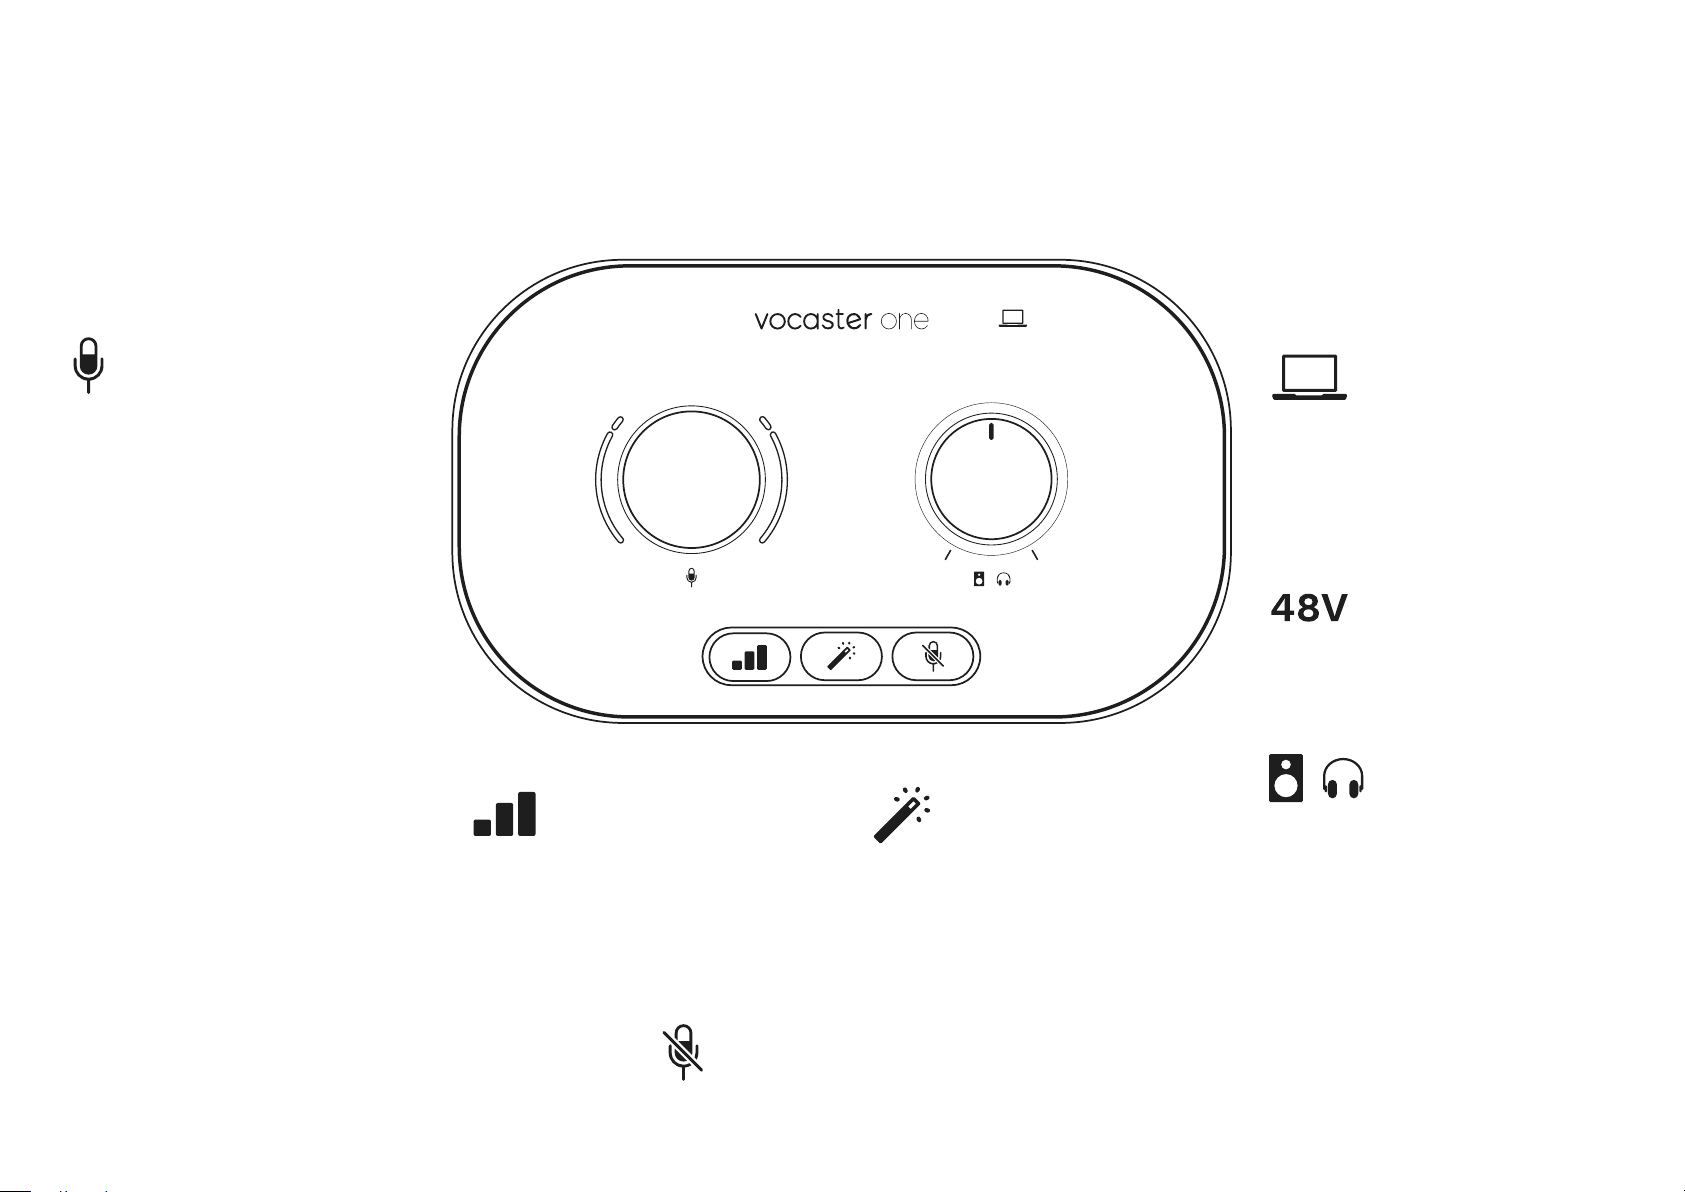
The large rotary control adjusts the gain
for the microphone input.
The gain control has two ‘halo’ LED arcs.
These have several functions.
• In normal operation they conrm
microphone level: green means
normal operation, amber shows the
signal is close to clipping, and red
shows digital clipping, which should
always be avoided.
• Following an Auto Gain calibration,
the arcs illuminate either green or red
to show a successful or unsuccessful
operation (respectively).
• The left-hand arc illuminates white
while microphone gain is being
adjusted, to show the current gain
setting
• Both arcs pulse red when the
microphone is muted
Buttons
Press to start the Auto Gain function:
speak normally into your microphone for
10 seconds to set the microphone gain.
The LED pulses amber during the process.
Microphone mute button. Press to mute
or unmute the microphone channel. LED
illuminates red when muting is active.
48V
Enhance button. Press to activate/
deactivate the Enhance function. LED
illuminates green when Enhance is active.
Indicators
An LED which illuminates white when the
interface has established communication
with the computer it is connected to, and
red if communication fails.
Illuminates red when 48V phantom power
is active.
Monitor output level control - sets the
output level at both the front panel
headphone output and the rear panel
speaker outputs.
focusrite.com Tell the world 27
Page 28
HARDWARE FEATURES
Rear Panel
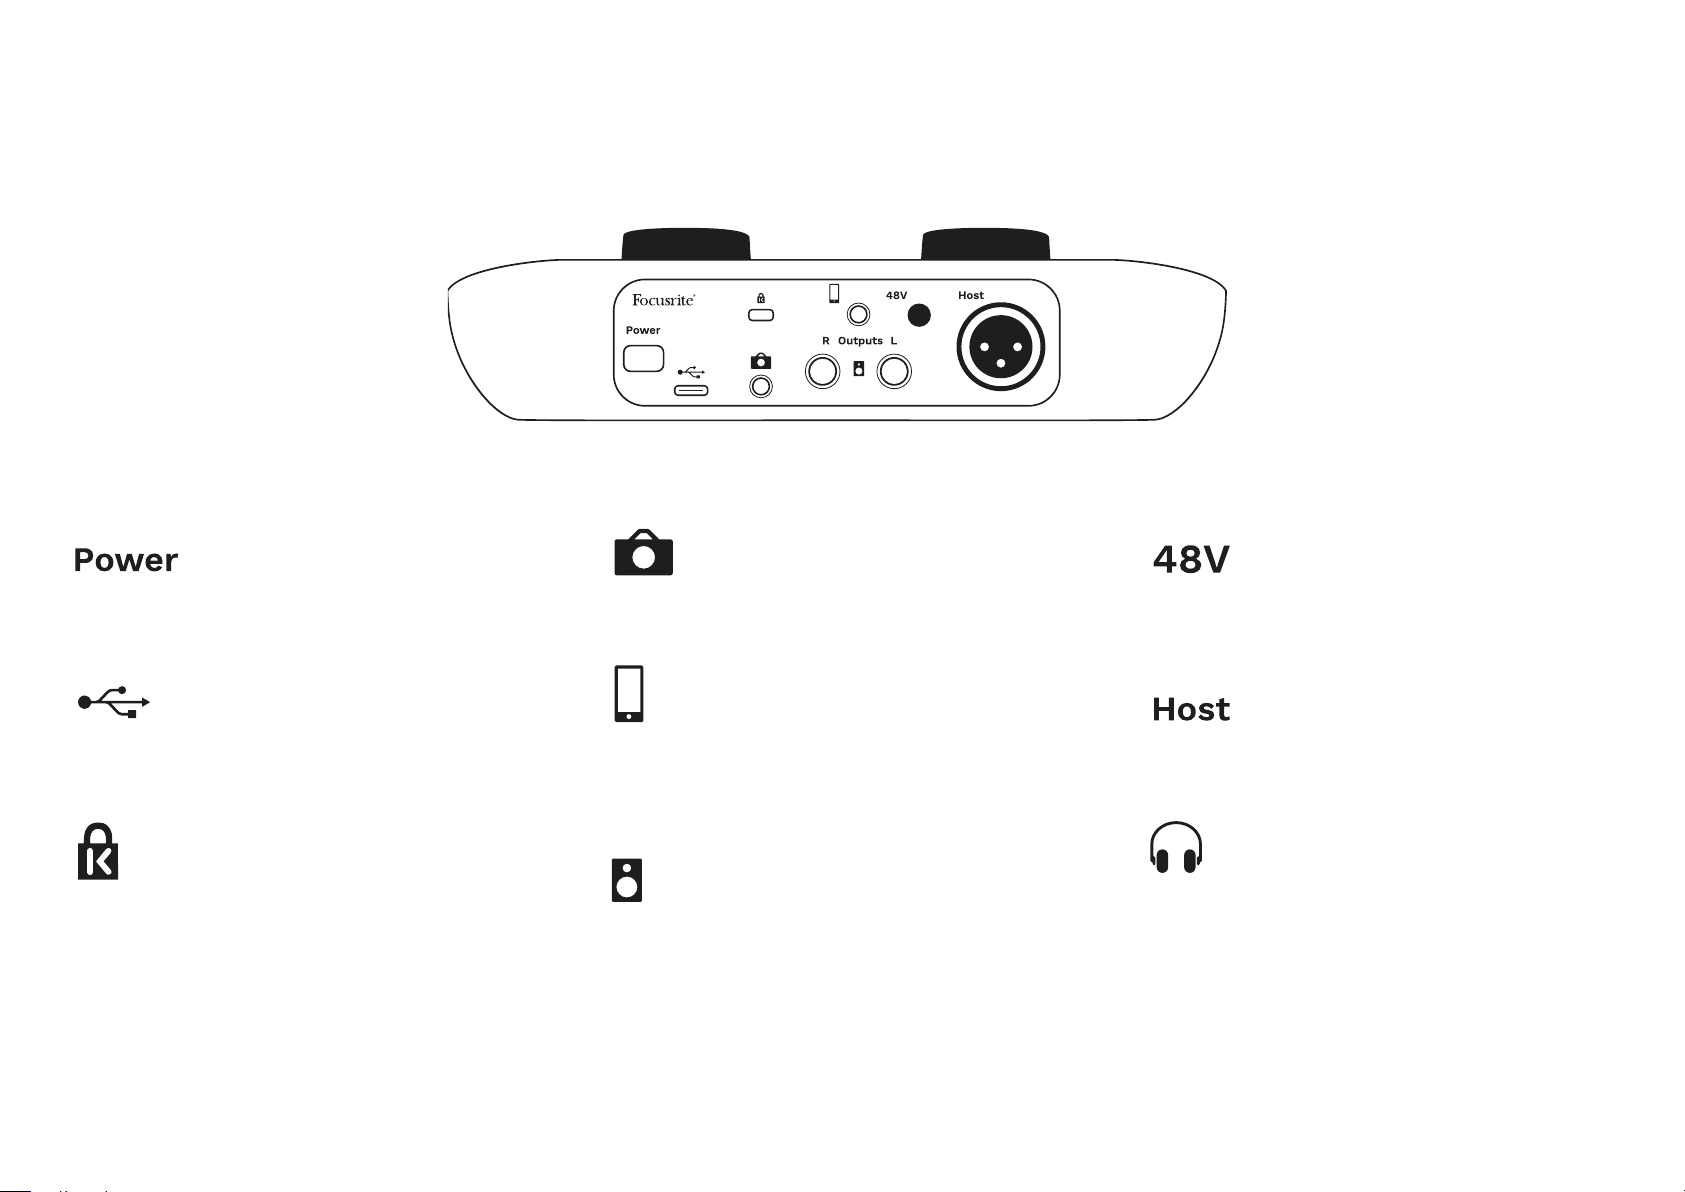
Press to turn Vocaster One on and off.
USB 3.0 port – Type C connector; connect to your
laptop or computer with the USB cable supplied.
3.5 mm TRS jack socket for connecting Vocaster One to
the external audio input of a video camera.
3.5 mm TRRS jack socket for a wired connection to a
compatible phone.
Phantom power switch for microphone input – press to
enable 48V phantom power at the XLR socket.
XLR socket for connecting a microphone
On the front:
Kensington security slot – make your Vocaster One
secure using a Kensington lock.
Outputs L and R – for connecting to monitor
loudspeakers. Two ¼’ TRS jack sockets; electronically
balanced. Either ¼’ TRS (balanced connection) or TS
(unbalanced connection) jack plugs can be used.
focusrite.com Tell the world 28
Headphones output socket. Connect your headphones
here. If your headphones use a 3.5mm jack then you
need to use a 3.5mm to ¼’ jack adaptor.
Page 29

SPECIFICATIONS
Specications
Performance Specications
These specications allow you to compare your Vocaster with other devices and make
sure they’ll work together. If you’re not familiar with these specications, don’t worry you
don’t need to know this information to use your Vocaster with most devices.
Sample Rate
48 kHz
USB
Version USB 3.0
Maximum Current 0.8A
Maximum Voltage 5V
Maximum Power 4W
Microphone Input
Impedance 3KΩ
Maximum Input Level +12.5dBu @ minimum gain
Gain Range 70dB
THD+N (@ -1dBFS)
Frequency Response
(20Hz @ mininum gain)
≤-94dB
20Hz - 20KHz +0, -0.5 dB
Phone Input
Impedance 18KΩ
THD+N (@ -1dBFS) ≤-94dB
Maximum Input Level +1dBu
Frequency Response 20Hz - 20KHz +0, -0.5
Phone Output
Impedance 220Ω
Maximum Output
Level
THD+N -73dB
Frequency Response 20Hz - 20KHz +0dB, -0.5dB
Impedance 440Ω
Maximum Output
Level
-26dBu
Line Outputs
+14dBu
Headphone Output
Impedance 5Ω
Maximum Output Level
@ 0dBFS
Maximum Power (mW)
THD+N
Frequency Response 20Hz - 20KHz ±0.5dB
Camera Output
Impedance 220Ω
Maximum Output Level -24.5dBu
THD+N
(Max Output, -1dBFS,
22Hz - 22kHz)
Frequency Response 20Hz - 20KHz ±0.2dB
+6.5dBu
8.5mW into 270Ω
28mW into 33Ω
-96dB unloaded
-73dB
THD+N ≤-96dB
Frequency Response 20Hz - 2kHz ±0.15dB
focusrite.com Tell the world 29
Page 30
SPECIFICATIONS
Physical And Electrical Characteristics
Other Audio I/O
Camera output 3.5 mm TRS jack on rear panel
Phone input and output 3.5 mm TRRS jack on rear panel
Loopback inputs Two (stereo) via Vocaster Hub
Microphone Input
Connector Balanced, via female XLR on rear panel
Phantom power 48V, rear panel switch
Weight and Dimensions
Weight 348g
Height 50mm
Width 195mm
Depth 113mm
Analogue Outputs
Main outputs Balanced, 2 x ¼’ TRS jacks
Stereo headphone output ¼’ TRS jack on front panel
Output level control
(main and headphone)
On top panel
focusrite.com Tell the world 30
Page 31

SPECIFICATIONS
Vocaster DM1 Microphone Specications Vocaster HP60v Headphones Specications
Capsule
Type Dynamic
Polar Pattern Cardioid
Performance
Sensitivity
(0dB = 1V/Pa at 1kHz)
Frequency Response 50Hz - 14kHz
Impedance (@1kHz) 19Ω ±20%
Mounting Standard 5/8”; 3/8” adaptor supplied
Net Weight
Body Dimensions
-53dB ±3dB
Electrical Characteristics
405g
Diameter
Length
41mm
164mm
Performance
Impedance 32Ω
Sensitivty 98dB ±3dB
Frequency Response 20Hz - 20kHz
Max. power rating 1.2W
Physical and Electrical Characteristics
Type Closed-back
Driver Diameter 50mm
Cable length 3m (approx.)
Connectors
Weight 288g (inc. cable)
3.5mm stereo jack, 6.35mm screw-on
adaptor
focusrite.com Tell the world 3131
Page 32
TROUBLESHOOTING
Troubleshooting
For all troubleshooting queries, please visit
the Focusrite Help Centre at
support.focusrite.com
Copyright and Legal Notices
Focusrite is a registered trademark and
Vocaster is a trademark of Focusrite Audio
Engineering Limited.
All other trademarks and trade names are the
property of their respective owners.
2022 © Focusrite Audio Engineering Limited.
All rights reserved.
Credits
Focusrite would like to thank the following
members of the Vocaster team for their hard
work to bring you this product.
Adrien Fauconnet, Alex Middleton-Dalby,
Alex Wood, Andre Cerqueira,
Anthony Nicholls, Ben Bates, Ben Cook,
Ben Dandy, Bran Searle, Ben Cochrane,
Chris Graves, Dan Weston, Daniel Clarke,
Daniel Hughley, David Marston, Derek Orr,
Ed Fry, Eddie Judd, Emma Davies,
Harry Morley, Ian Hadaway, Jack Cole,
Jake Wignall, James Johnson, James Otter,
James Surgenor, Jason Cheung, Jed Fulwell,
Jessica Chambers, Joe Deller,
Kai Van Dongen, Linus Reitmayr,
Luke Matthews, Martin Dewhirst,
Mary Browning, Michail Fragkiadakis,
Mike Richardson, Mukesh Lavingia,
Orla Haigh, Pete Carss, Rob Stevenson,
Ryan Gray, Seraphin Gnehm, Steve Bush,
Stefan Archer, Stratis Soanos,
Tom Cartwright, Vidur Dahiya,
Vincenzo Di Cosmo and Wade Dawson
Tell the world 32focusrite.com
 Loading...