

Page 1
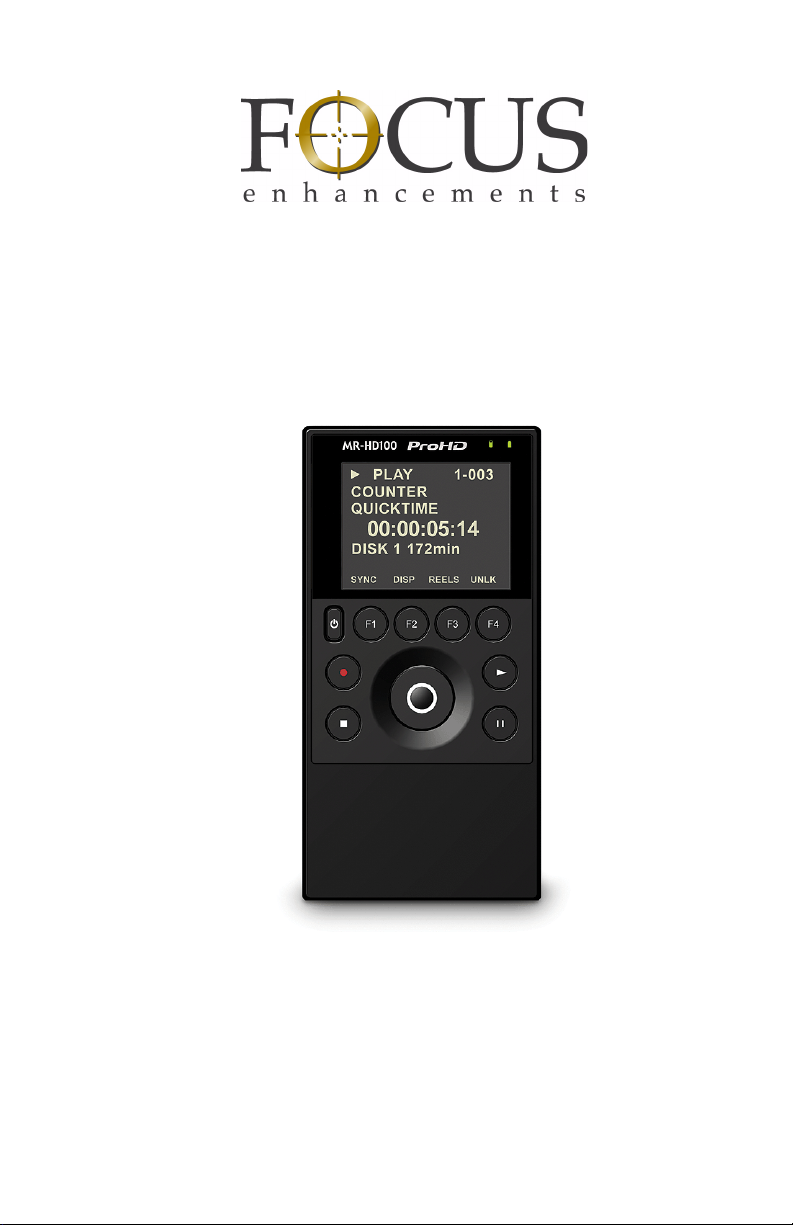
MR-HD100
Media Recorder
User Guide
MANL-1144-02
Page 2

Page 3

LEGAL NOTICES
THIS DOCUMENT CONTAINS CONFIDENTIAL AND TRADE
SECRET INFORMATION OF FOCUS ENHANCEMENTS AND
ITS RECEIPT OR POSSESSION DOES NOT CONVEY ANY
RIGHTS TO REPRODUCE OR DISCLOSE ITS CONTENTS, OR
TO MANUFACTURE, USE, OR SELL ANYTHING THAT IT MAY
DESCRIBE. USE IN WHOLE OR IN PART WITHOUT THE
SPECIFIC WRITTEN AUTHORIZATION OF FOCUS
ENHANCEMENTS IS STRICTLY FORBIDDEN.
EVERY EFFORT HAS BEEN MADE TO ENSURE THAT THE
INFORMATION IN THIS DOCUMENT IS COMPLETE AND
ACCURATE AT THE TIME OF PRINTING; HOWEVER, THE
INFORMATION CONTAINED IN THIS DOCUMENT IS SUBJECT
TO CHANGE.
Copyright 2008 Focus Enhancements
All Rights Reserved
The material contained in this document is also protected by
copyright laws of the United States of America and other
countries. It may not be reproduced or distributed in any form by
any means, altered in any fashion, or stored in a data base or
retrieval system, without express written permission of FOCUS
ENHANCEMENTS.
FOCUS ENHANCEMENTS cannot be responsible for
unauthorized use of equipment and will not make allowance or
credit for unauthorized use or access.
MR-HD100 Media Recorder
i
Page 4

LEGAL NOTICES
Contacting FOCUS ENHANCEMENTS:
USA
Office Hours: Monday through Friday
8:00 AM to 5:00PM (Central Time)
Email: [email protected]
Telephone: +1 763-398-1658
Fax: +1 763-571-7688
Address: Focus Enhancements, Inc.
1370 Dell Avenue
Campbell, CA. 95008
www.focusinfo.com
EMEA (Europe, Middle East, Africa)
Office Hours: Monday through Friday
9:00 AM to 5:00PM
Email: [email protected]
Telephone: +49 4307 - 83 58 58
Fax: +49 4307 - 83 58 99
Address: COMO Computer & Motion GmbH
A Focus Enhancements Company
Lise-Meitner-Str. 15
24223 Schwentinental/ Germany
www.focusinfo.com
Serial Number
The serial number for this equipment is located inside the unit, in
the battery compartment. Please record this serial number and
keep it in a secure area.
MR-HD100 Media Recorder
ii
Page 5

Regulations and Safety
Focus Enhancements, Inc.
1370 Dell Avenue
Campbell, CA. 95008
Model Number: MR-HD100 Media Recorder
Date of Manufacture:
Reference the Serial Number label attached to
the unit.
BATT-0012-01LF
(Accessory Part Number: ASYF-1323-01LF)
Date of Manufacture:
Reference the Serial Number label attached to
the unit.
Batteries
LEGAL NOTICES
FCC Class A
This product satisfies FCC regulations when shielded cables
and connectors are used to connect the unit to other equipment.
To prevent electromagnetic interference with electric appliances
such as radios and televisions, use shielded cables and
connectors.
This equipment has been tested and found to comply within the
limits for a Class A digital device, pursuant to Part 15 of the
FCC Rules. These limits are designed to provide reasonable
protection against harmful interference in a residential
installation. This equipment generates, uses, and can radiate
radio frequency energy and, if not installed and used in
accordance with the instructions, may cause harmful
interference to radio communications. However, there is no
guarantee that interference will not occur in a particular
installation. If this equipment does cause harmful interference to
radio or television reception, which can be determined by
turning the equipment off and on, correct the interference by
one or more of the following actions:
MR-HD100 Media Recorder
iii
Page 6

LEGAL NOTICES
• Reorient or relocate the receiving antenna.
• Increase the separation between the equipment and
receiver.
• Connect the equipment to an outlet on a circuit different
from that used by the receiver.
• Consult the dealer or an experienced radio/TV technician
for help.
Compliance
MR-HD100 is a device marketed for use in industrial or business
environments. The MR-HD100 complies with the regulations the
following testing agencies:
Australia and New Zealand
European Union
MR-HD100 Media Recorder
iv
Page 7
Safety
Symbols
Power Supply Only
This symbol indicates the presence of an un-insulated
Dangerous Voltage within the product’s enclosure that
may constitute a risk of electric shock to persons.
In the MR-HD100 Documentation
Caution Title
This symbol indicates important operating or maintenance (servicing)
information that the user should read and understand.
Note Title
This symbol indicates supplementary information about features, functions, or operations that may be of interest to the user.
LEGAL NOTICES
Documentation
Read, Retain, and Follow Instructions
All the safety and operating instructions should be read before
the product is operated.
• Retain Documentation
Place documentation in a secure place for future reference on
operating and safety instructions.
• Follow All Operating and Safety Instructions
• Pay Attention to All Warnings
Warnings are provided to protect the operator, the equipment,
and content.
MR-HD100 Media Recorder
v
Page 8

LEGAL NOTICES
Electrical Precautions
Do Not Expose to Moisture
Do not use this product near water or in an environment where it
is exposed to dampness or there is the possibility of it getting wet.
Do Not Remove Cover
There are No User Serviceable Parts inside this unit. Servicing
should be done by qualified service personnel.
Power Sources
Use only power sources that match those indicated on the
marking label. If unsure of the type of power supply that is
available, consult your dealer or local power company.
Do Not Overload Power Outlets
Do not overload wall outlets, extension cords, or integral
convenience receptacles as this can result in a risk of fire or
electric shock.
Verify Power Plugs are Fully Inserted
To prevent potential electrical shock to personnel, verify that the
MR-HD100 power cord plug is fully inserted in to a grounded
receptor and that the plug blades are not exposed.
ATTENTI ON
POUR PREVENIR LES CHOCS ELECTRIQUES NE PAS
UTILISER CETTE FICHE POLARISEE AVEC UN
PROLONGATEUR, UNE PRISE DE COURANT OU UNE AUTRE
SORTIE DE COURANT, SAUF SI LES LAMES PEUVENT ETRE
INSEREES A FOND SANS EN LAISSER AUCUNE PARTIE A
DECOUVERT.
Power-Cord Protection
• Routing Power-Cords
Route power supply cords so that they are not likely to be
walked on or pinched by items placed upon or against them.
Avoid sharp angles in the cord, particularly at plugs,
convenience receptacles, and the point where they exit the
product.
MR-HD100 Media Recorder
vi
Page 9

LEGAL NOTICES
• Non-Use Period
During extended periods when the device is not used, unplug
it from the power source and retract the power-cord.
Grounding or Polarization
• Polarized
If this product is equipped with a polarized alternating current
line plug (a plug having one blade wider than the other), it will
fit into the outlet only one way. This is a safety feature. If you
are unable to insert the plug fully into the outlet, try reversing
the plug. If the plug should still fail to fit, contact your
electrician to replace your obsolete outlet. Do not defeat the
safety purpose of the polarized plug.
• Grounded
If this product is equipped with a three-wire grounding type
plug, a plug having a third (grounding) pin, it will only fit into a
grounding type power outlet. This is a safety feature. If you
are unable to insert the plug into the outlet, contact your
electrician to replace your obsolete outlet. Do not defeat the
safety purpose of the grounding type plug.
Ground Loop WARNING:
To avoid earth or ground loops, insure that all equipment
connected to the MR-HD100 share a common ground. Use a
single, grounded outlet strip as opposed to separate outlets with
the possibility of different ground potentials.
Lightning and Power Surges
During electrical storms or when left unattended and unused for
long periods of time, unplug the MR-HD100 from the power
source and disconnect the antenna or cable system.
Power Lines
Do not locate an outside antenna system in the vicinity of
overhead power lines, electric light or power circuits, or where it
can fall onto such lines or circuits.
When installing an outside antenna system, extreme care should
be taken to keep from touching such power lines or circuits as
contact with them might be fatal.
MR-HD100 Media Recorder
vii
Page 10

LEGAL NOTICES
Maintenance and Moving
Cleaning
Unplug this product from the wall outlet before cleaning. The
product should be cleaned only with a polishing cloth or a soft dry
cloth. Never clean with furniture wax, benzine, insecticides or
other volatile liquids since they may corrode the cabinet.
Servicing
Unplug the device from the power outlet and refer servicing to
qualified service personnel under the following conditions:
• When the power-supply cord or plug is damaged.
• If liquid has been spilled, or objects have fallen into the
product.
• If the product has been exposed to rain or water.
• If the product does not operate normally when following the
operating instructions. Adjust only those controls that are
covered by the operating instructions. The incorrect
adjustment of other controls can result in damage and often
requires extensive work by a qualified technician to restore the
product to its normal operation.
• If the product has been dropped or damaged in any way.
• When the product exhibits a distinct change in performance.
Accessories and Replacement Parts
Use only attachments and accessories recommended by Focus
Enhancements.
Use only replacement parts specified by the Focus
Enhancements or of comparable quality and characteristics as
the original parts.
Unauthorized substitution of parts can result in fire, electrical
shock, other hazards, and loss of warranty.
Safety Check
Upon completion of any service or repairs to this product, ask the
service technician to perform safety checks to determine that the
product is in proper operating condition.
MR-HD100 Media Recorder
viii
Page 11

Operating Environment
• Avoid moisture, dust, extreme heat or cold.
LEGAL NOTICES
MR-HD100 Media Recorder
ix
Page 12

MR-HD100 Media Recorder
x
Page 13

Table of Contents
Introduction . . . . . . . . . . . . . . . . . . . . . . . . . . . . . . . . . . . .1
Native File Recording Eliminates Pre-edit Processing . . . . 1
Assign Custom Metadata on the Fly . . . . . . . . . . . . . . . . . . 2
Unpacking . . . . . . . . . . . . . . . . . . . . . . . . . . . . . . . . . . . . . . 2
Features . . . . . . . . . . . . . . . . . . . . . . . . . . . . . . . . . . . . . . . 3
Overview of this Guide . . . . . . . . . . . . . . . . . . . . . . . . . . . . 7
Quick Start . . . . . . . . . . . . . . . . . . . . . . . . . . . . . . . . . . . . . 9
Physical Description and Controls . . . . . . . . . . . . . . . . . . 10
Front View - Controls . . . . . . . . . . . . . . . . . . . . . . . . . 10
Display . . . . . . . . . . . . . . . . . . . . . . . . . . . . . . . . . 10
Power . . . . . . . . . . . . . . . . . . . . . . . . . . . . . . . . . . 10
Record / Play Controls . . . . . . . . . . . . . . . . . . . . . 11
Record . . . . . . . . . . . . . . . . . . . . . . . . . . . . . . 11
Stop . . . . . . . . . . . . . . . . . . . . . . . . . . . . . . . . 11
Play . . . . . . . . . . . . . . . . . . . . . . . . . . . . . . . . 11
Pause . . . . . . . . . . . . . . . . . . . . . . . . . . . . . . 12
Scroll/Select Wheel and Soft Navigation Keys . . . 12
Scroll Wheel and Select key . . . . . . . . . . . . . 13
Right Soft Button . . . . . . . . . . . . . . . . . . . . . . 13
Left Soft Button . . . . . . . . . . . . . . . . . . . . . . . 13
Up Soft Button / Next Video Clip . . . . . . . . . . 13
Function keys . . . . . . . . . . . . . . . . . . . . . . . . . . . . 13
Unit LEDs . . . . . . . . . . . . . . . . . . . . . . . . . . . . . . 14
Disk Activity . . . . . . . . . . . . . . . . . . . . . . . . . 14
Battery Charge . . . . . . . . . . . . . . . . . . . . . . . 14
Top View - Input/Output and Power Connectors . . . . . 15
Power - 11-18V DC . . . . . . . . . . . . . . . . . . . . . . . 15
Video I/O - IEEE1394 Camera FireWire Connector 15
MR-HD100 Media Recorder
xi
Page 14

Table of Contents
DV Audio . . . . . . . . . . . . . . . . . . . . . . . . . . . . 16
Computer I/O - USB 2.0 . . . . . . . . . . . . . . . . . . . . 16
Powering the MR-HD100 . . . . . . . . . . . . . . . . . . . . . . . . . 17
Connecting the MR-HD100 to AC Power . . . . . . . . . . 17
Battery Operations . . . . . . . . . . . . . . . . . . . . . . . . . . . 17
Installing a Battery . . . . . . . . . . . . . . . . . . . . . . . . 17
Removing a Battery . . . . . . . . . . . . . . . . . . . . . . . 18
Charging the Battery . . . . . . . . . . . . . . . . . . . . . . 18
Battery Data . . . . . . . . . . . . . . . . . . . . . . . . . . 19
Low Battery Power During Operation . . . . . . . . . . 20
Power From External DC Battery Devices . . . . . . 20
Power Consumption Tables . . . . . . . . . . . . 20
Operation . . . . . . . . . . . . . . . . . . . . . . . . . . . . 20
Connecting MR-HD100 to DV/HDV Camera . . . . . . . . . . . 22
MR-HD100 User Interface . . . . . . . . . . . . . . . . . . . . . . . . 23
Types of MR-HD100 Displays . . . . . . . . . . . . . . . . . . 28
Record and Playback . . . . . . . . . . . . . . . . . . . . . . . . . . . . 29
Set Up the MR-HD100 . . . . . . . . . . . . . . . . . . . . . . . . 29
Power On MR-HD100 . . . . . . . . . . . . . . . . . . . . . 29
Set Date and Time . . . . . . . . . . . . . . . . . . . . . . . 30
Select Record/Play Mode . . . . . . . . . . . . . . . . . . 33
Select the Control Mode . . . . . . . . . . . . . . . . . . . 33
Select the Recording Format (REC FORMAT) . . 34
Select the NFR Format . . . . . . . . . . . . . . . . . . . . 34
Select the Timecode . . . . . . . . . . . . . . . . . . . . . . 35
Record with the MR-HD100 . . . . . . . . . . . . . . . . . . . . 36
NORMAL Recording . . . . . . . . . . . . . . . . . . . . . . 38
Creating a New File without Dropping Frames 38
EXTERNAL Recording . . . . . . . . . . . . . . . . . . . . . 39
SYNCRO Recording . . . . . . . . . . . . . . . . . . . . . . 40
Recording Timecode in the File . . . . . . . . . . 41
Playback with the MR-HD100 . . . . . . . . . . . . . . . . . . . 42
Metadata . . . . . . . . . . . . . . . . . . . . . . . . . . . . . . . . . . . . . 43
Overview . . . . . . . . . . . . . . . . . . . . . . . . . . . . . . . . . . . . . . 46
Metadata Categories . . . . . . . . . . . . . . . . . . . . . . . . . 46
Descriptive . . . . . . . . . . . . . . . . . . . . . . . . . . . . . . 46
Administrative . . . . . . . . . . . . . . . . . . . . . . . . . . . . 46
Structural . . . . . . . . . . . . . . . . . . . . . . . . . . . . . . . 47
Templates . . . . . . . . . . . . . . . . . . . . . . . . . . . . . . . . . . 47
MR-HD100 Media Recorder
xii
Page 15

Table of Contents
Default Template . . . . . . . . . . . . . . . . . . . . . . . . . 48
Custom Template . . . . . . . . . . . . . . . . . . . . . . . . . 48
Imported Templates . . . . . . . . . . . . . . . . . . . . . . . 48
Video Production . . . . . . . . . . . . . . . . . . . . . . . . . . . . 49
Pre-production . . . . . . . . . . . . . . . . . . . . . . . . . . . 49
Production . . . . . . . . . . . . . . . . . . . . . . . . . . . . . . 49
Post-production . . . . . . . . . . . . . . . . . . . . . . . . . . 50
Logging Onto the MR-HD100 Web Server . . . . . . . . . . . . 52
Metadata Pages and Functions . . . . . . . . . . . . . . . . . . . . . 53
Template . . . . . . . . . . . . . . . . . . . . . . . . . . . . . . . . . . 53
Settings . . . . . . . . . . . . . . . . . . . . . . . . . . . . . . . . . . . 54
Entry . . . . . . . . . . . . . . . . . . . . . . . . . . . . . . . . . . . . . . 55
Export . . . . . . . . . . . . . . . . . . . . . . . . . . . . . . . . . . . . 56
NLE - Final Cut Pro . . . . . . . . . . . . . . . . . . . . . . . 56
ProxSys Media Servers . . . . . . . . . . . . . . . . . . . . 56
Entering Metadata . . . . . . . . . . . . . . . . . . . . . . . . . . . . . . . 57
Saving Metadata . . . . . . . . . . . . . . . . . . . . . . . . . . . . . . . . 58
Reel Matching and Templates . . . . . . . . . . . . . . . . . . . . . 59
Creating A Template . . . . . . . . . . . . . . . . . . . . . . . . . . . . . 60
Creating A New Template . . . . . . . . . . . . . . . . . . . . . 61
TC Depend and Input Style In AXIF and Final Cut Pro 63
Duplicating a Template . . . . . . . . . . . . . . . . . . . . . . . 64
Creating A Custom Template . . . . . . . . . . . . . . . . . . . 66
Importing MR-HD100 Templates . . . . . . . . . . . . . . . . 69
Removing Metadata Fields . . . . . . . . . . . . . . . . . . . . . . . . 70
Making Metadata into XML Files . . . . . . . . . . . . . . . . . . . 71
Export . . . . . . . . . . . . . . . . . . . . . . . . . . . . . . . . . . . . . . . . 72
Final Cut Pro Export . . . . . . . . . . . . . . . . . . . . . . . . . . 72
Export By Track . . . . . . . . . . . . . . . . . . . . . . . . . . 72
Export All . . . . . . . . . . . . . . . . . . . . . . . . . . . . . . . 73
Export Based on Template . . . . . . . . . . . . . . . . . . 73
Generic Export . . . . . . . . . . . . . . . . . . . . . . . . . . . . . . 73
Export By Track . . . . . . . . . . . . . . . . . . . . . . . . . . 73
Export All . . . . . . . . . . . . . . . . . . . . . . . . . . . . . . . 73
Export Based on Template . . . . . . . . . . . . . . . . . . 73
Export Matching . . . . . . . . . . . . . . . . . . . . . . . . . . . . . 74
Exporting a Template . . . . . . . . . . . . . . . . . . . . . . . . . . . . . 76
MR-HD100 Media Recorder
xiii
Page 16

Table of Contents
MR-HD100 Functions . . . . . . . . . . . . . . . . . . . . . . . . . . . 77
General Screen Information . . . . . . . . . . . . . . . . . . . . . . . 78
Welcome . . . . . . . . . . . . . . . . . . . . . . . . . . . . . . . . . . 79
Home . . . . . . . . . . . . . . . . . . . . . . . . . . . . . . . . . . . . . 79
DISP (display) Information Fields . . . . . . . . . . . . . 81
MR-HD100 System Information Screens . . . . . . . . . . 82
OPERATION Screens . . . . . . . . . . . . . . . . . . . . . . . . . . . 83
MODE . . . . . . . . . . . . . . . . . . . . . . . . . . . . . . . . . . . . 84
Exiting HDD . . . . . . . . . . . . . . . . . . . . . . . . . . . . . 84
CONTROL . . . . . . . . . . . . . . . . . . . . . . . . . . . . . . . . . 85
REC MODE . . . . . . . . . . . . . . . . . . . . . . . . . . . . . . . . 86
NORMAL Record . . . . . . . . . . . . . . . . . . . . . . . . . 87
RETRO CACHE . . . . . . . . . . . . . . . . . . . . . . . . . . 87
Setting Length of RETRO CACHE . . . . . . . . 87
RETRO DISK . . . . . . . . . . . . . . . . . . . . . . . . . . . . 88
Setting Length of RETRO DISK . . . . . . . . . . 88
SNAP Record DV modes only . . . . . . . . . . . . . . . 89
TIMELAPSE DV mode only . . . . . . . . . . . . . . . . . 89
Setting Duration of TIMELAPSE . . . . . . . . . . 89
REC FORMAT . . . . . . . . . . . . . . . . . . . . . . . . . . . . . . 90
NFR FORMAT . . . . . . . . . . . . . . . . . . . . . . . . . . . . . . 90
DV Formats . . . . . . . . . . . . . . . . . . . . . . . . . . . . . 91
HDV Formats . . . . . . . . . . . . . . . . . . . . . . . . . . . 91
TIMECODE . . . . . . . . . . . . . . . . . . . . . . . . . . . . . . . . 92
SETUP Screens . . . . . . . . . . . . . . . . . . . . . . . . . . . . . . . . 94
SET DATE . . . . . . . . . . . . . . . . . . . . . . . . . . . . . . . . . 96
SET TIME . . . . . . . . . . . . . . . . . . . . . . . . . . . . . . . . . . 96
LCD . . . . . . . . . . . . . . . . . . . . . . . . . . . . . . . . . . . . . . 97
LCD BRIGHT . . . . . . . . . . . . . . . . . . . . . . . . . . . . . . . 97
KEY BRIGHT . . . . . . . . . . . . . . . . . . . . . . . . . . . . . . . 98
ALARM . . . . . . . . . . . . . . . . . . . . . . . . . . . . . . . . . . . 98
STOP . . . . . . . . . . . . . . . . . . . . . . . . . . . . . . . . . . . . . 99
EXT CTL . . . . . . . . . . . . . . . . . . . . . . . . . . . . . . . . . 100
TC SET . . . . . . . . . . . . . . . . . . . . . . . . . . . . . . . . . . 101
UB SET . . . . . . . . . . . . . . . . . . . . . . . . . . . . . . . . . . . 102
TC MODE
RETRO CACHE . . . . . . . . . . . . . . . . . . . . . . . . . . . 104
RETRO DISK . . . . . . . . . . . . . . . . . . . . . . . . . . . . . . 104
TIMELAPSE . . . . . . . . . . . . . . . . . . . . . . . . . . . . . . 105
Explanation . . . . . . . . . . . . . . . . . . . . . . . . . . . . 105
PLAY MODE . . . . . . . . . . . . . . . . . . . . . . . . . . . . . . 106
NTSC only . . . . . . . . . . . . . . . . . . . . . . . . 103
MR-HD100 Media Recorder
xiv
Page 17

Table of Contents
PLAY FROM . . . . . . . . . . . . . . . . . . . . . . . . . . . . . . . 107
UDF FS PERM . . . . . . . . . . . . . . . . . . . . . . . . . . . . 108
Maximum Recording Times in UDF Mode . . . . . 108
NETWORK . . . . . . . . . . . . . . . . . . . . . . . . . . . . . . . 109
IP ADDR . . . . . . . . . . . . . . . . . . . . . . . . . . . . . . . . . 110
IP MASK . . . . . . . . . . . . . . . . . . . . . . . . . . . . . . . . . 110
BROADCAST . . . . . . . . . . . . . . . . . . . . . . . . . . . . . 111
GATEWAY . . . . . . . . . . . . . . . . . . . . . . . . . . . . . . . . 111
ESSID . . . . . . . . . . . . . . . . . . . . . . . . . . . . . . . . . . . 112
KEY . . . . . . . . . . . . . . . . . . . . . . . . . . . . . . . . . . . . . . 113
WIFI MODE . . . . . . . . . . . . . . . . . . . . . . . . . . . . . . . 114
FTP . . . . . . . . . . . . . . . . . . . . . . . . . . . . . . . . . . . . . 115
FTP PASS . . . . . . . . . . . . . . . . . . . . . . . . . . . . . . . . 115
WEB . . . . . . . . . . . . . . . . . . . . . . . . . . . . . . . . . . . . . 116
AUTO ORG . . . . . . . . . . . . . . . . . . . . . . . . . . . . . . . 117
AUTO MARK . . . . . . . . . . . . . . . . . . . . . . . . . . . . . . 118
REELS PREF . . . . . . . . . . . . . . . . . . . . . . . . . . . . . . 119
FUNCTIONS Screens . . . . . . . . . . . . . . . . . . . . . . . . . . . 120
Functions List . . . . . . . . . . . . . . . . . . . . . . . . . . . . . . 121
Assigning Clips to Reels . . . . . . . . . . . . . . . . . . . . . . 124
Blank . . . . . . . . . . . . . . . . . . . . . . . . . . . . . . . . . 125
UTILITIES Screens . . . . . . . . . . . . . . . . . . . . . . . . . . . 126
FORMAT . . . . . . . . . . . . . . . . . . . . . . . . . . . . . . . . . 127
REPAIR DISK . . . . . . . . . . . . . . . . . . . . . . . . . . . . . 128
REPAIR CLIP . . . . . . . . . . . . . . . . . . . . . . . . . . . . . . 130
FILE NAME . . . . . . . . . . . . . . . . . . . . . . . . . . . . . . . 131
ORGANIZE REEL . . . . . . . . . . . . . . . . . . . . . . . . . . 131
ORGANIZE MXF . . . . . . . . . . . . . . . . . . . . . . . . . . . 132
UPGRADE . . . . . . . . . . . . . . . . . . . . . . . . . . . . . . . . 133
UPGRADE ABORT . . . . . . . . . . . . . . . . . . . . . . 134
DELETE CLIP . . . . . . . . . . . . . . . . . . . . . . . . . . . . . 135
System Reset . . . . . . . . . . . . . . . . . . . . . . . . . . . . 136
Diagnostic . . . . . . . . . . . . . . . . . . . . . . . . . . . . . . . . 136
Status . . . . . . . . . . . . . . . . . . . . . . . . . . . . . . . . . . . . 137
Version . . . . . . . . . . . . . . . . . . . . . . . . . . . . . . . . . . . 137
MR-HD100 with Other Devices . . . . . . . . . . . . . . . . . . .139
Windows and MAC Operating Systems . . . . . . . . . . . . . 141
FAT32 . . . . . . . . . . . . . . . . . . . . . . . . . . . . . . . . . . . . 141
UDF . . . . . . . . . . . . . . . . . . . . . . . . . . . . . . . . . . . . . 142
MR-HD100 Media Recorder
xv
Page 18

Table of Contents
Initial Setup . . . . . . . . . . . . . . . . . . . . . . . . . . . . . . . . . . . 143
MR-HD100 to Computer . . . . . . . . . . . . . . . . . . . . . . 143
MR-HD100 to Wired (Ethernet) Network . . . . . . . . . 144
MR-HD100 and FTP . . . . . . . . . . . . . . . . . . . . . 144
MR-HD100 to a Managed Wireless Network . . . . . . 145
MR-HD100 Web and FTP . . . . . . . . . . . . . . . . . 145
MR-HD100 Peer-to-Peer Networking (Wi-Fi) . . . . . . 146
Example . . . . . . . . . . . . . . . . . . . . . . . . . . . . . . . 146
Setting MR-HD100 . . . . . . . . . . . . . . . . . . . . . . . 146
Setting Up iPod Touch (or iPhone) . . . . . . . . . . 149
Setting Up a Mac . . . . . . . . . . . . . . . . . . . . . . . . 151
Setting Up a PC (XP) . . . . . . . . . . . . . . . . . . . . . 153
Completing Network Setup . . . . . . . . . . . . . . . . 156
Wireless Network Status . . . . . . . . . . . . . . . . . . 157
Mounting to Windows and MAC . . . . . . . . . . . . . . . . . . . 158
Select HDD MODE . . . . . . . . . . . . . . . . . . . . . . . . . . 158
Mounting and Dismounting the MR-HD100 . . . . . . . 159
Windows . . . . . . . . . . . . . . . . . . . . . . . . . . . . . . 159
Close MR-HD100 Directory and Dismount From Win-
dows . . . . . . . . . . . . . . . . . . . . . . . . . . . . . . 160
MAC . . . . . . . . . . . . . . . . . . . . . . . . . . . . . . . . . . 161
Close MR-HD100 Directory and Dismount From MAC
162
iPod Touch and the MR-HD100 . . . . . . . . . . . . . . . . . . . 163
Connect Using Wireless . . . . . . . . . . . . . . . . . . . . . . 163
Logging Metadata While Recording Logging Metadata 164
Content-based Metadata . . . . . . . . . . . . . . . . . . 164
Timecode-based Metadata (In and Out Markers) 166
Video File Types and Name Formats: . . . . . . . . . . . 168
AUTO ORG and REELS . . . . . . . . . . . . . . . . . . . . . . 168
MR-HD100 Accessories . . . . . . . . . . . . . . . . . . . . . . . . . 169
Non-Linear Editors (NLEs) . . . . . . . . . . . . . . . . . . . . . . 171
Final Cut Pro . . . . . . . . . . . . . . . . . . . . . . . . . . . . . . . . . . 172
MR-HD100 NFR Workflow . . . . . . . . . . . . . . . . . . . . 172
Traditional File-Based Workflow . . . . . . . . . . . . 172
MR-HD100 and Content-Based Workflow . . . . . 172
Overview of XML . . . . . . . . . . . . . . . . . . . . . . . . . . . 175
Importing Video Clip and Metadata . . . . . . . . . . . . . 176
Viewing a Clip . . . . . . . . . . . . . . . . . . . . . . . . . . . . . 180
MR-HD100 Media Recorder
xvi
Page 19

Table of Contents
Technical Specifications . . . . . . . . . . . . . . . . . . . . . . . . 183
Physical Description . . . . . . . . . . . . . . . . . . . . . . . . . . . . 183
User Interface . . . . . . . . . . . . . . . . . . . . . . . . . . . . . . . . . 183
Metadata . . . . . . . . . . . . . . . . . . . . . . . . . . . . . . . . . . . . . 183
Compliance . . . . . . . . . . . . . . . . . . . . . . . . . . . . . . . . . . . 184
Connectors . . . . . . . . . . . . . . . . . . . . . . . . . . . . . . . . . . . 184
Inputs/Outputs . . . . . . . . . . . . . . . . . . . . . . . . . . . . . . . . . 184
Video . . . . . . . . . . . . . . . . . . . . . . . . . . . . . . . . . . . . . 184
NFR Video Formats . . . . . . . . . . . . . . . . . . . . . . 185
Audio . . . . . . . . . . . . . . . . . . . . . . . . . . . . . . . . . . . . . 185
Timecode . . . . . . . . . . . . . . . . . . . . . . . . . . . . . . . . . 185
Data I/Os . . . . . . . . . . . . . . . . . . . . . . . . . . . . . . . . . . 185
USB 2.0 . . . . . . . . . . . . . . . . . . . . . . . . . . . . . . . 185
Disk Drive . . . . . . . . . . . . . . . . . . . . . . . . . . . . . . . . . . . . 186
NFR File Formats Supported . . . . . . . . . . . . . . . . . . . . . 186
Error Messages . . . . . . . . . . . . . . . . . . . . . . . . . . . . . . . . 187
Data CRC Errors . . . . . . . . . . . . . . . . . . . . . . . . . . . . 187
Environment . . . . . . . . . . . . . . . . . . . . . . . . . . . . . . . . . . 188
Power . . . . . . . . . . . . . . . . . . . . . . . . . . . . . . . . . . . . . . . 188
Warranty . . . . . . . . . . . . . . . . . . . . . . . . . . . . . . . . . . . . . 189
Index . . . . . . . . . . . . . . . . . . . . . . . . . . . . . . . . . . . index - 1
MR-HD100 Media Recorder
xvii
Page 20

MR-HD100 Media Recorder
xviii
Page 21
Introduction
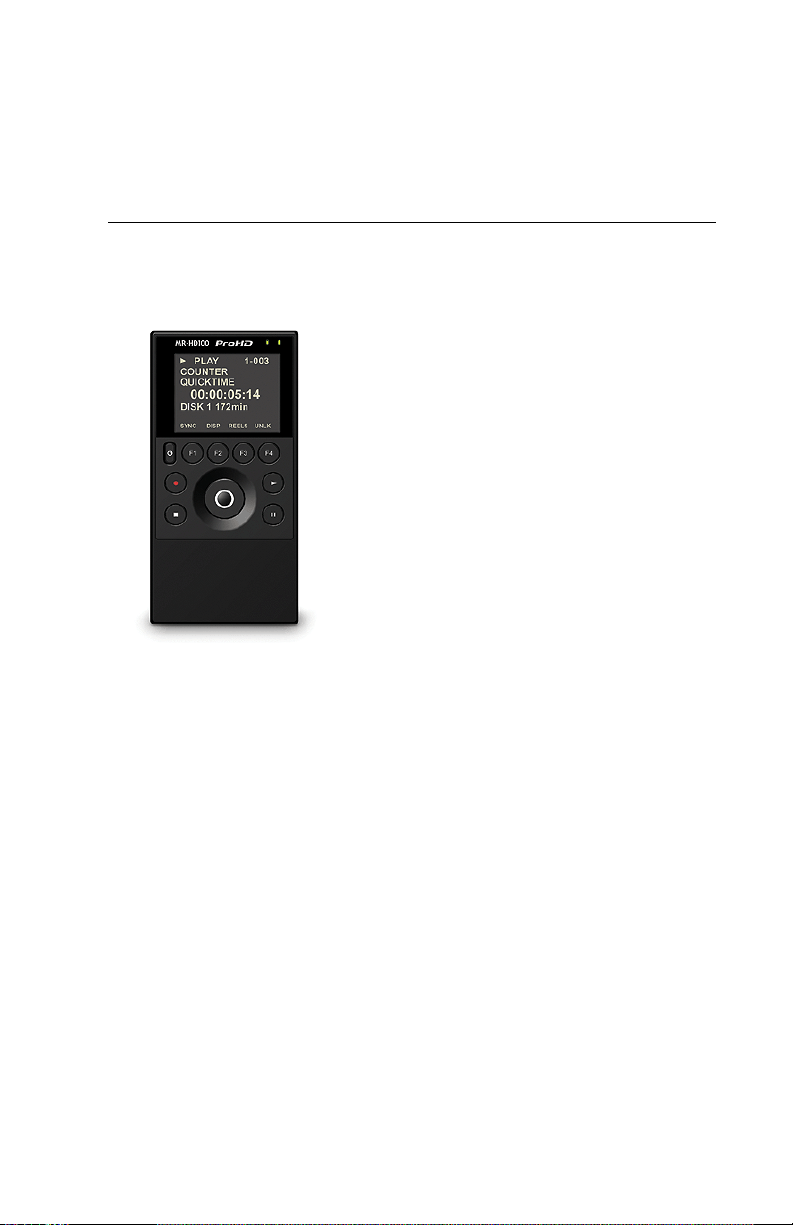
Thank you for purchasing a Focus
Enhancements’ MR-HD100 Media
Recorder. Designed specifically for use
with JVC GY-HD series Pro HD
camcorders, the MR-HD100 combines
powerful, industry leading Native File
Recording with the ability to add metadata
to clips in non-linear editing (NLE) and
media asset management (MAM) native
formats while you shoot. MR-HD100's
small size and powerful feature set make
it ideal for DV and HDV camcorder
owners.
Native File Recording Eliminates Pre-edit Processing
The MR-HD100 Native File Recording eliminates the need to capture,
transfer or convert video clips before editing. The MR-HD100 is a
stand-alone device that records DV25, HD 720p, and HD 1080i video
to its disk drive as a NLE native file. In HD Recorder mode it has the
capability of capturing to disk HD 720p and 1080i video from HDV
camcorders equipped with a 1394 interface. For most DV and many
HDV compatible NLE systems, when the disk drive is connected to a
computer the clips are immediately available for editing.
Shoot, connect, and edit: it is now that easy.
MR-HD100 Media Recorder
1
Page 22

Introduction
Assign Custom Metadata on the Fly
With the MR-HD100, you can personalize and optimize workflow—
while you shoot. With your wireless handheld device or laptop, you
can access the MR-HD100 through a browser, define metadata, and
assign it to video while you're recording, eliminating the need to tag
footage when the shoot is over. During postproduction, simply
transfer clips—complete with metadata—from the MR-HD100 to
your NLE system or PX Media Server. All of the information that you
assigned during the shoot goes with the clips, saving you hours or
even days of logging time.
Unpacking
Verify that the MR-HD100 has the following items:
1. MR-HD100 unit
2. Li-Ion battery pack BATT-0012-01LF
(Accessory Part Number:
ASYF-1323-01LF)
3. Power adapter with connector cable. PWRS-0038-03
4. Cable, power
(If required for included power supply.)
5.
Cable, USB, 2.0, A-A
6. Cable, Firewire, 6-pin to 6-pin CBLA-0165-01LF
7. Cable, Firewire, 6-pin to 4-pin CBLA-0164-01LF
8. WiFi dongle ASYF-1343-01LF or
9. Camera mount cradle ASYF-1342-01LF
10. User Guide MANL-1144
MR-HD100 Media Recorder
2
CBLA-0166-01LF
ASYF-1344-01LF
Page 23
Missing or Damaged Components
If there are missing or damaged items, contact Focus Enhancements
Support for assistance.
USA
Email: [email protected]
Telephone: +1 763-398-1658
EMEA
Email: [email protected]
Phone: +49 4307-8358-58
www.como.com - www.focusinfo.com
Features
The MR-HD100 offers the following features:
• Direct To Disk Acquisition
Especially equipped camcorders permit the use of Native File
Recording (NFR) Technology to record directly from a
camcorder while shooting and without the need of a tape.
• True NFR Technology
When shooting is finished, connect the MR-HD100 to a
computer and instantly be ready to edit in the timeline.
Files are recorded to disk as either:
Introduction
DV25 HD
AVI 1
AVI 2
AVI 2 – 24p (NTSC mode)
Canopus AVI
Matrox AVI
MXF OP Atom
QuickTime
QuickTime 24p (NTSC mode)
RAW DV
M2T
*
MXF
QuickTime **
* 720p30 and 1080i50/60 support only.
** 720p24/25/30/50 and 60 support only.
NFR includes support for HDV camcorders with 720p and
1080i MPEG-2 capabilities and equipped with a FireWire
1394 connection.
MR-HD100 Media Recorder
3
Page 24

Introduction
• Fast and Efficient Editing
When shooting is finished, mount the MR-HD100 to a Mac or PC
editing system like a typical USB hard disk drive. Transfer clips
to your NLE's media drive at up to 480Mb/s or edit instantly in
real-time using the MR-HD100 as your media source. Data
transfer rates vary dpending on type of network and workload.
• Confidence in Recording
Simultaneously record to disk and tape or disk only while you
shoot, providing an immediately available, drop out free, edit
source with an archive and backup on tape.
• Compact, Lightweight, Rugged Design
The MR-HD100 weighs approximately 12 ounces (0.34 kg)
including the battery and is only 1.25" (32mm) thick. You can
mount the MR-HD100 directly to your camcorder using the
optional camera mount kit. The MR-HD100 is designed to
withstand the rigors of field shooting. The electronic shock cache
ensures that video is always recorded even in the roughest of
conditions.
• Disk Utilities
Format, Delete Clip and Repair Disk/Clip.
• Easy to Use, Control and Update
a. The MR-HD100 interfaces with the camcorder via
FireWire.
b. The MR-HD100 uses USB 2.0 to connect to either a
computer or network devices (wired or wireless).
c. When a tape is present in the camera, each press of the
camcorder's record button creates an individual clip on
the MR-HD100 disk.
Some cameras allow the MR-HD100 to be triggered into
record from the camera without the need for a tape.
Check the latest camera / MR-HD100 compatibility chart
on the Focus website.
d. The MR-HD100 features a comprehensive backlit color
display, menu system, scroll wheel and control buttons
allowing for easy control and management of the unit and
its contents.
No Video Playback Through Display
To preview video, place the MR-HD100 in play mode and connect
it through its FireWire DV I/O connector to a camera.
The MR-HD100 does not provide video playback through its color
display.
MR-HD100 Media Recorder
4
Page 25

Introduction
e. In addition, the MR-HD100 is upgradable in the field.
• Flexible Capacities and Power
a. The MR-HD100 hard drive provides hours of recorded
content capacity. See www.focusinfo.com for the
currently available hard drive capacities.
b. Power the MR-HD100 using:
• Removable Li-ion battery pack supplied with the
unit.
• AC adapter supplied with the unit.
• Accepts 11-18 volt DC input.
• FireWire connection between the MR-HD100 and a
computer via an active FireWire port with power.
Using a 6-pin to 6-pin FireWire cable, it is possible to
power the MR-HD100 and charge its battery.
FireWire Connection Is Not A Data Interface
Mounting the MR-HD100 to a computer is done exclusively
through the USB2 interface.
Metadata
•
Fast and flexible metadata generation that includes the ability to
log metadata using a wired or wireless USB 2.0 network adapter
and a device with web browser capabilities (computer, laptop,
PDA, etc.)
• Multiple Control Modes
External, Normal, and Syncro -- coordinate control between
camera and MR-HD100.
• Multiple Timecode Modes
External or Internal Free Run, Rec Run or Regen.
• Never Miss A Shot
MR-HD100's ten second Retro Cache record mode means you
are always recording. When action happens, you know up to ten
seconds prior to the event occurring is saved in your clip.
• HD NFR Formats
QuickTime, MXF (Avid) and M2T HD NFR.
• Retro Cache Mode with 10 Second Cache
This mode insures that action at the beginning of video clip is
not missed. In Retro Cache mode, the MR-HD100 is in a state
similar to Pause, except that it is continuously recording video in
a loop of user-defined length: up to 10 seconds. When active
MR-HD100 Media Recorder
5
Page 26

Introduction
recording starts, the MR-HD100 creates a new clip and
seamlessly appends the Retro Disk session to the beginning of
the new clip.
• Retro Disk Mode
This mode insures that action at the beginning of video clip is
not missed. In Retro Disk mode, the MR-HD100 is in a state
similar to Pause, except that it is continuously recording video in
a loop of user-defined length: from 1 to 392 minutes. The length
of the loop depends on the amount of disk drive space available.
When active recording starts, the MR-HD100 creates a new clip
and seamlessly appends the Retro Disk session to the beginning
of the new clip.
• Scene Marking (Reels)
This allows categorizing video clips into pre-named folders on
the disk during a shoot.
• Snap and Timelapse Record
(DV Only)
• Universal Disk Format (UDF)
a. Large disk storage capacity through use of UDF.
b. Single DV/HDV file recording times of up to 90 minutes.
c. 720p50/60 QuickTime recording time 45 minutes.
d. Automated new file creation at large file boundaries.
e. Read Capability on Windows XP and Read/Write
Capability on Mac OS 10.5 and Windows Vista
f. FAT32 optional.
• Wired or Wireless Networking
Set up and log metadata while shooting, through the MRHD100’s USB 2.0 interface. Mount the MR-HD100 on either
wired or wireless networks using USB 2.0 wired or wireless
(802.11b/g) network adapters provided with the MR-HD100.
In addition, this permits the asynchronous file transfer of clips
from the MR-HD100 to a NLE system or PX Media Server.
MR-HD100 Media Recorder
6
Page 27

Overview of this Guide
This user guide is divided into the following chapters.
Quick Start page 9
This chapter describes how to setup and use the
MR-HD100.
Metadata page 43
This chapter provides a definition of metadata and
how it can be used.
MR-HD100 Functions page 77
This chapter provides detailed information about
each of the MR-HD100 functions.
MR-HD100 with Other Devices page 139
This chapter describes how to connect the MR-HD100 to
Windows and Mac computers.
Non-Linear Editors (NLEs) page 171
This chapter provides information about integrating
the MR-HD100 metadata capabilities with specific Non
Linear Editing (NLE) Systems.
Technical Specifications page 183
Introduction
MR-HD100 Media Recorder
7
Page 28

MR-HD100 Media Recorder
8
Page 29

Quick Start
Quick Start provides the information necessary to start using the MRHD100 as quickly as possible.
This chapter covers the topics:
Physical Description and Controls
Front View - Controls page 10
Top View - Input/Output and Power Connectors page 15
Powering the MR-HD100 page 17
Connecting the MR-HD100 to AC Power page 17
Battery Operations page 17
Connecting MR-HD100 to DV/HDV Camera page 22
MR-HD100 User Interface page 23
Record and Playback page 29
Power On MR-HD100 page 29
Select Record/Play Mode page 33
Select the Recording Format (REC FORMAT) page 34
Set Date and Time page 30
Record with the MR-HD100 page 36
Manual Recording page 27
Syncronized Recording page 27
Playback page 27
MR-HD100 Media Recorder
9
Page 30
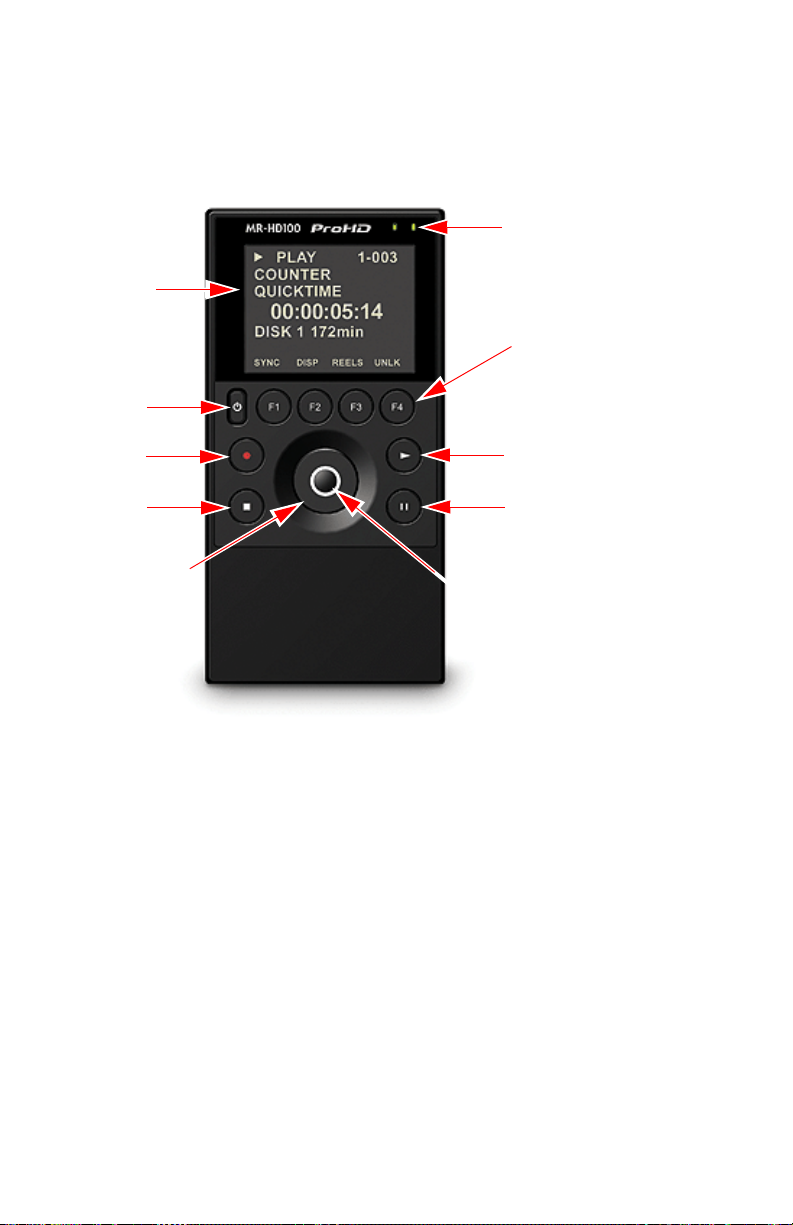
Quick Start
Power
Record
Stop
Pause
Play
Scroll and Select Wheel
Use to:
Navigate menus
Modify values
Display
Function keys
F1 F2 F3 F4
Unit LEDs
Disk Activity (red)
Battery Charge (green)
Soft Nav Keys
Use to:
Navigate menus
Set values
Physical Description and Controls
Front View - Controls
MR-HD100 Media Recorder
10
Display
Active Display that shows menus and recording information,
such as timecode, file format, metadata, and folder assignments.
Power
The Power key provides two functions.
1.
Power ON MR-HD100.
Power OFF.
2.
Press the key to shut down. During power off, the MRHD100 beeps, indicating that it is turning off.
Reset
3.
Is a function of turning off the MR-HD100.
Page 31
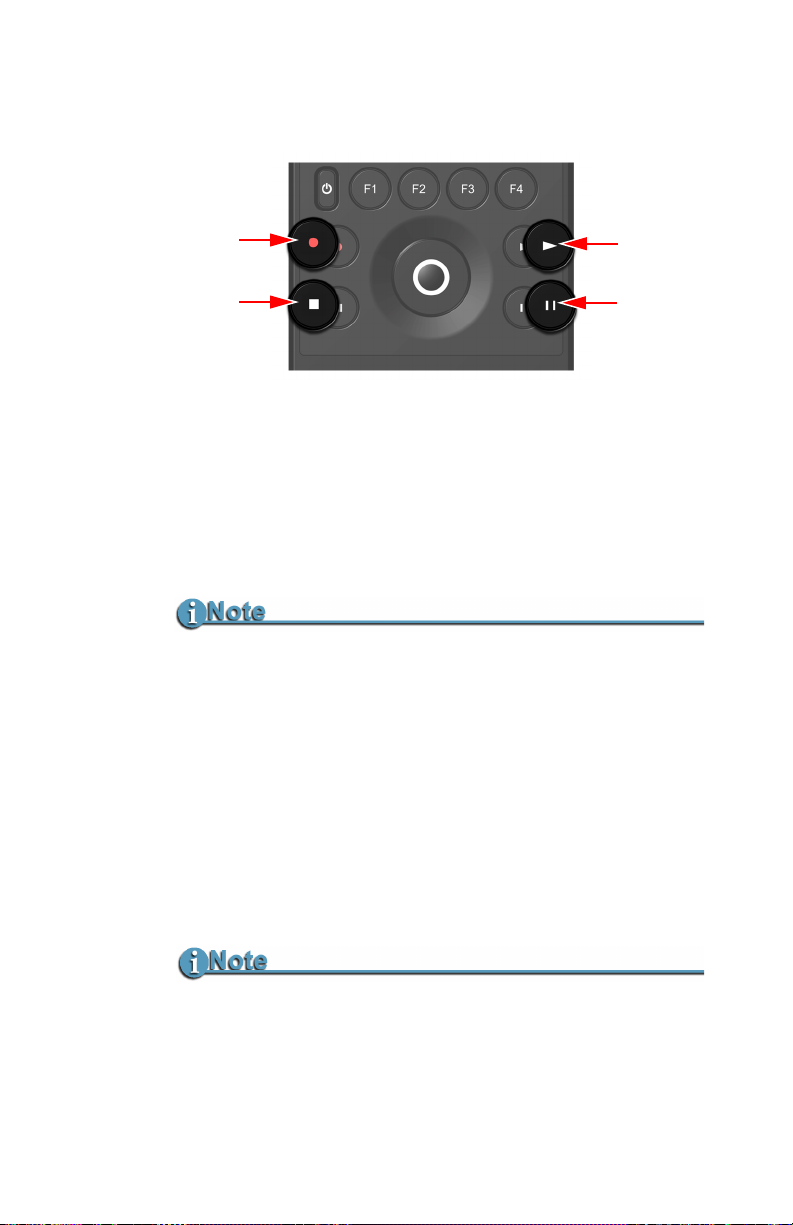
Quick Start
Pause
Record
Play
Stop
Record / Play Controls
Use these keys to control MR-HD100 playback and record
functions. Typically, these functions are used while on the
Screen.
Record
Press Record when the MR-HD100 is in
recording.
Stop mode to start
HOME
Pressing Record Key During Record Mode
In all record modes, pressing the Record key while recording,
causes the current clip to close and a new clip to start without
dropping any frames.
Stop
While in the Home screen, and in any Record and Play modes,
press the
the section,
Stop key to Stop the MR-HD100 function. Refer to
Setup Screens on page 62 for more information.
Play X
Press this key to start playback of the selected clip.
Some HD Camcorders Require a Moment to Synchronize
Some HD camcorders require a moment to synchronize the
video from an external source. Typically during this period, they
display a solid blue or black video until synchronized.
MR-HD100 Media Recorder
11
Page 32
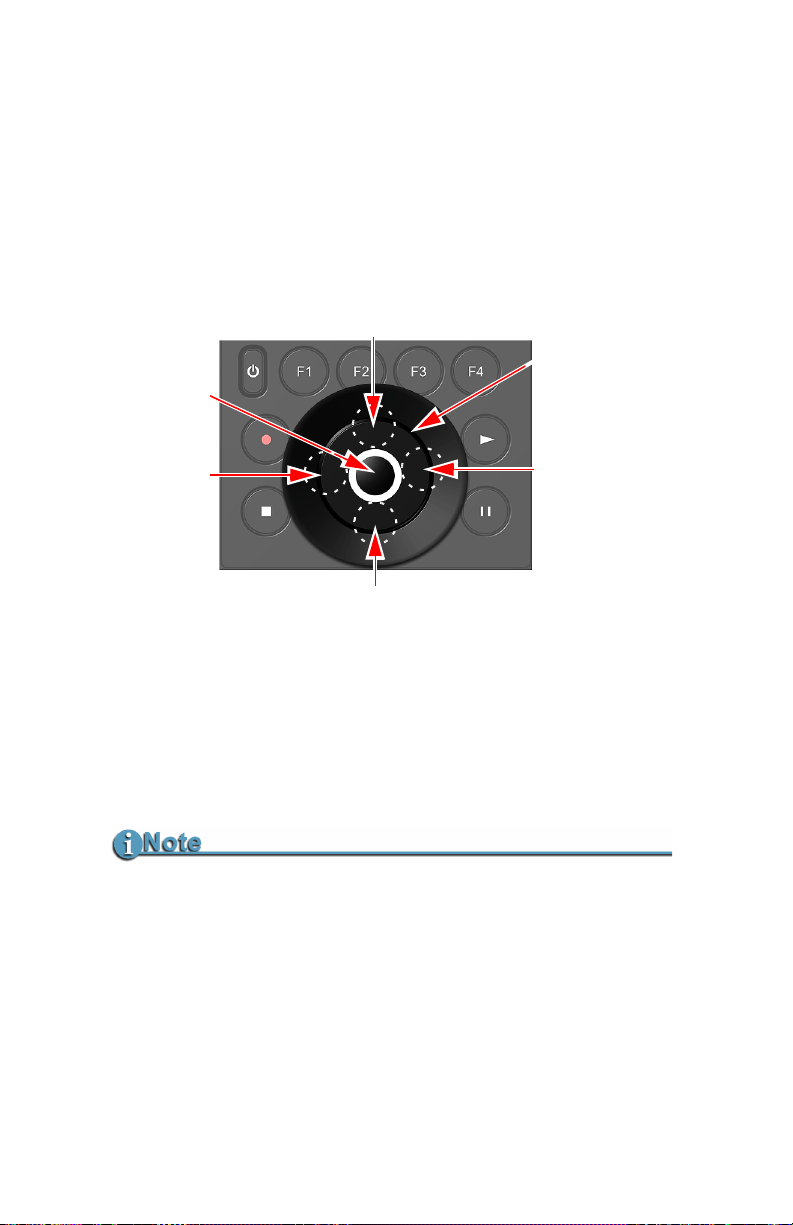
Quick Start
Scroll Wheel
Select Key
Right
Soft Button
Navigate Menu
Left
Soft Button
|Navigate Menu
Down Soft Button
Previous Video Clip
Up Soft Button
Next Video Clip
Pause
While in the Home screen, and in Record or Play mode, press
Pause to temporarily halt the function.
Pressing
Pause a second time resumes the function.
Scroll/Select Wheel and Soft Navigation Keys
MR-HD100 Media Recorder
12
Use the Scroll Wheel, Select and Soft buttons to navigate
through the MR-HD100 menus. The navigation keys are
Left, Right, Up, Down, and Select.
The soft buttons are areas on the Scroll Wheel where, when
pressed, act like a key.
Navigation Tips
When in any of the menus:
• Press the Left soft button to return to the top of the menu.
• Press the Select Key to return directly to the home screen.
Page 33

Quick Start
Scroll Wheel and Select key
The Scroll Wheel has multiple functions.
Menu Navigation
•
Moving through the MR-HD100 menu tree.
Input Values
•
When selecting values for fields, use the
dial to an item in a list of options and the
Scroll Wheel to
Select key to
Exit input mode.
Return to Home Screen
•
When at the top of a menu, pressing the
Select key
returns the display to the Home screen.
Right Soft Button
To enter the menu, use either the Right or Left soft buttons.
Left Soft Button
When in a menu, pressing the Left soft button returns the
display to the top of that menu.
When at the top of a menu, pressing
Home screen.
to the
Left, returns the display
Up Soft Button / Next Video Clip
When in a menu, pressing the Up soft button moves the cursor
upwards in the menu.
When in the Home screen, pressing the
Up soft button
advances to the next clip.
Down Soft Button / Previous Video Clip
When in a menu, pressing the Down soft button moves the
cursor downwards in the menu.
When in the Home screen, pressing the
Down soft button
returns to the previous clip.
Function keys
Below the MR-HD100 LCD display are four user-defined
function keys:
select functions displayed at the bottom of the LCD screen and
to assign metadata. The function of these keys changes,
depending on the options displayed on the LCD.
F1, F2, F3, and F4. Use them as short-cut keys to
MR-HD100 Media Recorder
13
Page 34
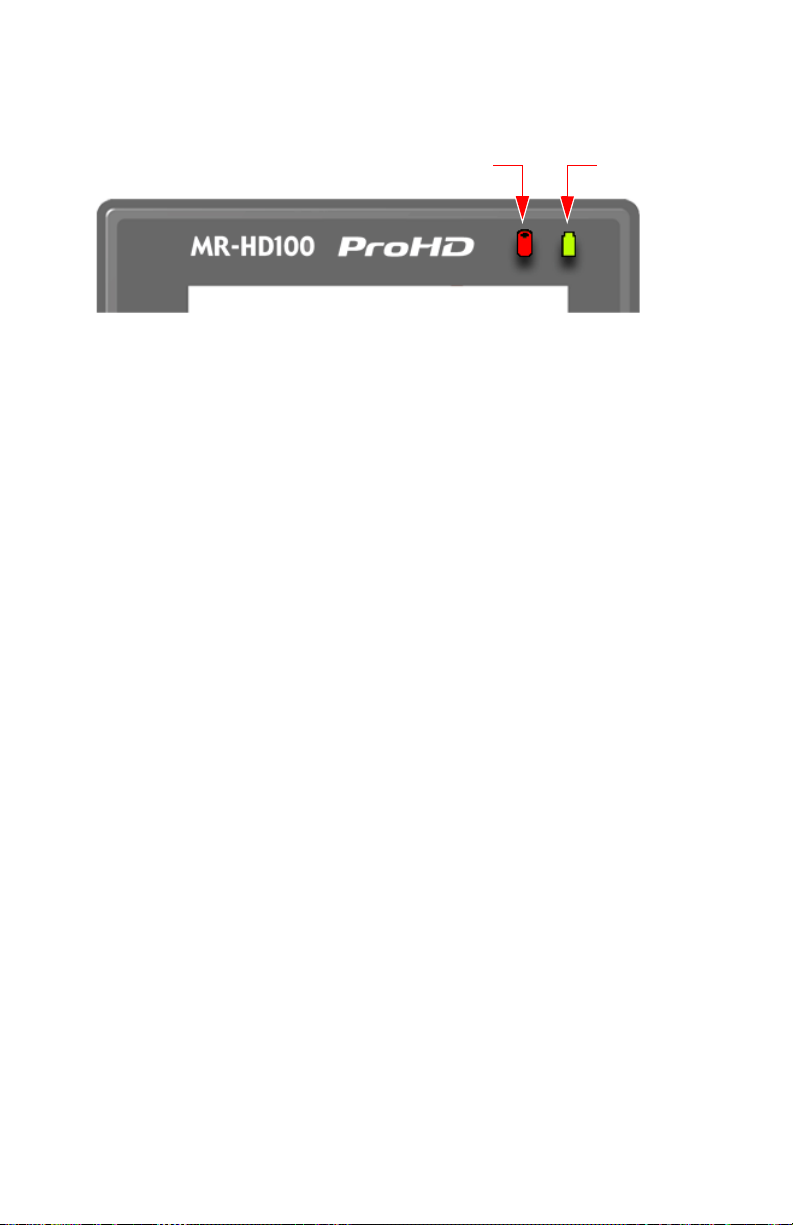
Quick Start
Disk
Battery
Unit LEDs
Disk Activity
Battery Charge
LED State Indicates
Red - Flashing Disk activity.
LED State Indicates
Off Powered Off,
Adapter Connected - No Battery
Green Charging Cycle Completed
Green Slow Flashing Charging (fast charge)
Green Fast Flashing Charging (topping off battery)
Battery charge level is indicated by the color of the battery
symbol in the LCD display:
Green - 100% - 50%
Yellow - 50% - 25%
Red - 25% - 0
Low charge, recharge immediately.
MR-HD100 Media Recorder
14
Page 35
Quick Start
Power
DC 11-18V
IEEE 1394
Video I/0
USB 2.0
Computer I/0
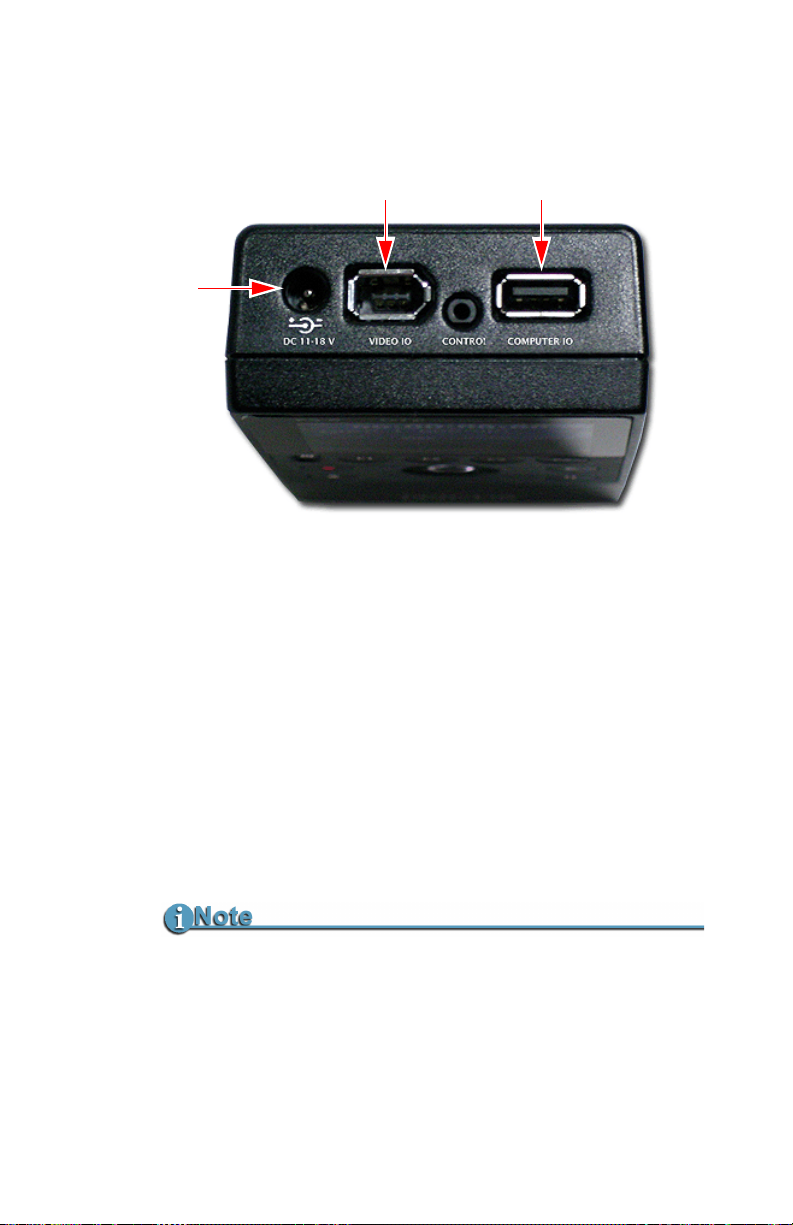
Top View - Input/Output and Power Connectors
Power - 11-18V DC
The primary power input is through the Power connector and
supplied by an external adapter unit. It is possible to plug in DC
power inputs from 11 to 18 volts. This allows powering the MRHD100 with professional battery power systems
Video I/O - IEEE1394 Camera FireWire Connector
• DV/HD Video I/O
• 6-pin IEEE-1394a connector
• Isochronous 19.8/25Mbp/s DV or HDV video I/O
MR-HD100 supports 1080i/720p video I/O when used
with HDV camcorders equipped with a 1394 connection.
Powering the MR-HD100 Via the FireWire Connection
The MR-HD100 can also draw power for recording, playback,
and battery charging operations though the FireWire IEEE 1394
connector. This requires an active Firewire connector with power
and a 6-pin to 6-pin cable.
FireWire Is Not A Data Connection and it is Not Possible to
mount the MR-HD100 to a computer using the FireWire
connection.
MR-HD100 Media Recorder
15
Page 36

Quick Start
DV Audio
Audio is embedded in the FireWire signal.
DV25
•
2-ch (16-bit, 48kHz)
4-ch (12-bit, 32kHz) -- Available in the Raw DV NFR file
format only.
HDV
•
2-ch MPEG 1, Layer 2
Not All Frame Rates Are Supported With All NFR File
Formats.
Check the Focus website for the latest compatibility information:
www.focusinfo.com.
Computer I/O - USB 2.0
The USB 2.0 connector is for all data (asynchronous) I/O:
• Connect with computers at up to 480Mb/s.
Actual performance depends on type of network and
network activity. Best performance is achieved when the
MR-HD100 is connected to the computer’s USB 2.0 port.
• Networks wired or wireless.
Depending on the type of network, it is necessary to use an
USB adapter: USB 2.0 to Ethernet or USB Wireless Network
(802.11b or g) dongle.
Network settings are made in the MR-HD100 System
menu, see
The MR-HD100 auto detects the type of connection being
made provided it is set up correctly or in
Network on page 65.
Setup
HDD mode.
MR-HD100 Media Recorder
16
Page 37
Quick Start
Battery
Powering the MR-HD100
Connecting the MR-HD100 to AC Power
The MR-HD100 can operate with the battery installed or
uninstalled while connected to the MR-HD100 power adapter.
To do this, connect the AC power as follows:
1. Plug the cord from the power supply into the
connector of the MR-HD100.
2. Connect the line cord to the rectangular power supply.
3. Plug the line cord into an electric outlet.
Battery Operations
Before operation with battery power, it is first necessary to fully
charge the battery.
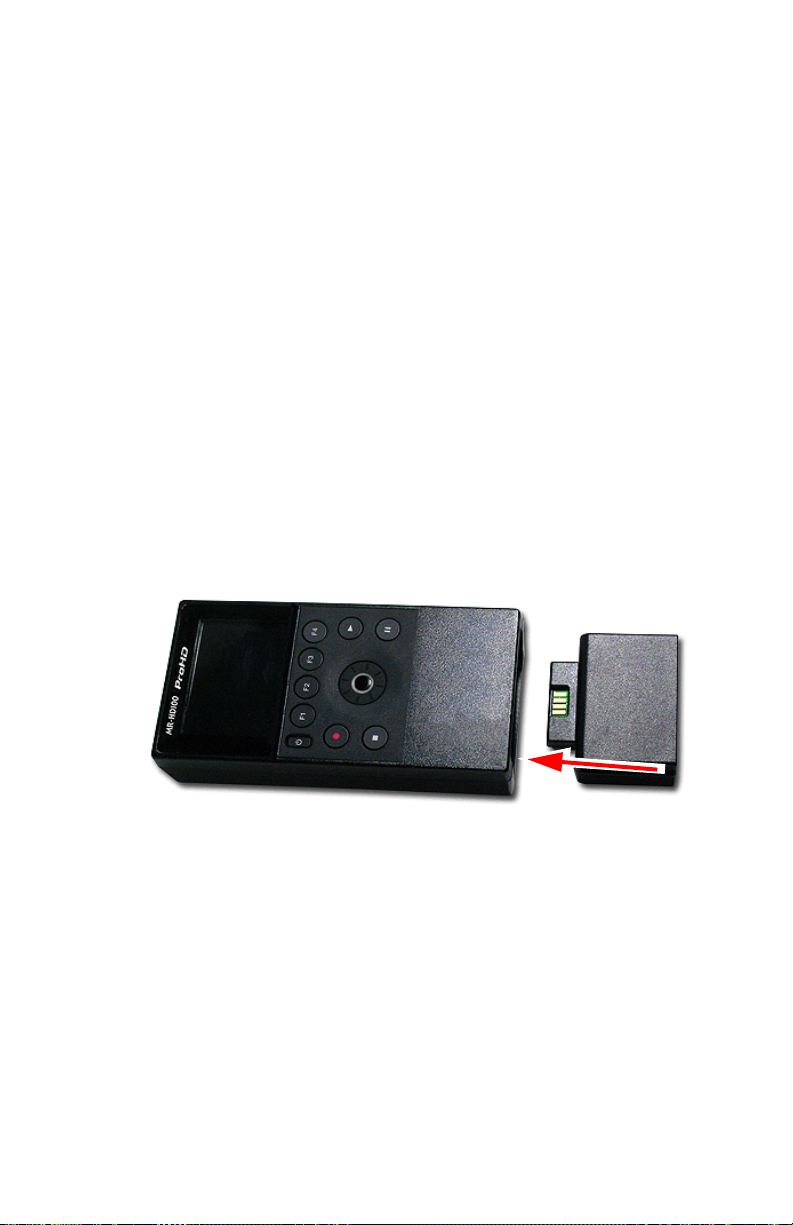
Installing a Battery
Power
1. Place the MR-HD100 so that the unit is face up.
2. Position the battery pack, so that the connector tab is on
the upside.
The connector tab must align with the power tab on the
inside the MR-HD100.
3. Slide the battery forward, into the MR-HD100 until it
latches.
The MR-HD100 uses close tolerances to create a friction fit
that holds the battery firmly in place.
MR-HD100 Media Recorder
17
Page 38
Quick Start
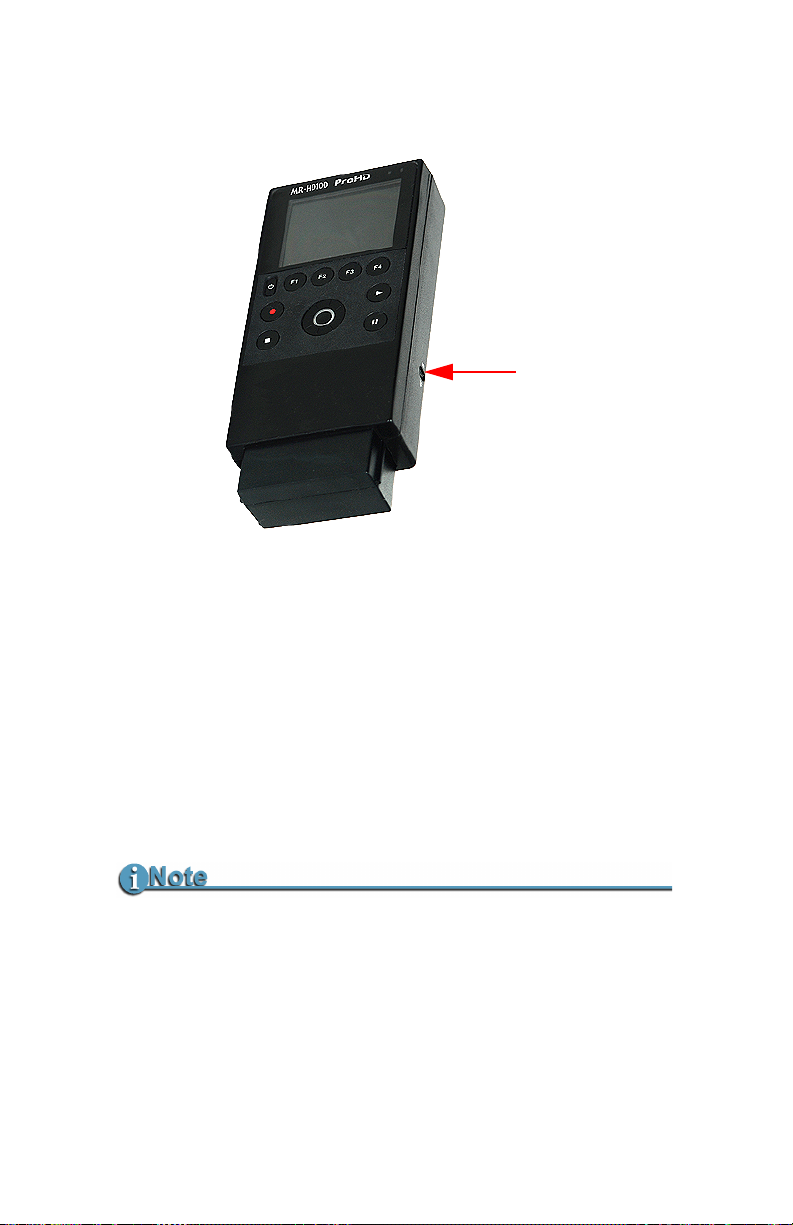
Release Button
Removing a Battery
1. Depress and hold the Release Buton on the MR-HD100’s
right side.
2. Give the MR-HD100 a light straight downward shake: the
battery loosens and slides out.
Charging the Battery
The battery begins charging anytime the MR-HD100 is
connected to the AC power adapter that is supplied with the
MR-HD100.
Charging Battery with FireWire Connection
The FireWire connection can provide power to the MR-HD100 for
operation and battery charging.
The FireWire connection must be with a 6-pin to 6-pin cable to an
active computer port with power.
MR-HD100 Media Recorder
18
Page 39

Quick Start
Battery Data
• The preferred methods for charging the battery, are:
Connect the AC adapter
off. This protects the battery by reducing internal
temperature.
Connect the MR-HD100 to a computer through an active,
powered FireWire port.
• The Battery Charge LED flashes whenever the MR-HD100
has both the battery and AC power installed. This indicates
that the battery is receiving a charge.
• When the battery is charged, the battery charge symbol in
the LCD is solid green.
• An uncharged battery takes 2-3 hours to charge with the
unit powered off.
• The battery provided with the MR-HD100 can supply
power to the unit for a maximum of 3 hours while in
continuous record or play modes. This time depends on
LCD and key brightness and other devices attached to the
unit, such as the wireless dongle.
Battery Use
Misuse can damage unit and/or cause injury such as burns if
a conductive material like jewelry, keys, or beaded chains
touch exposed terminals. Conductive material may complete
an electrical circuit (short circuit) and become very hot. Use
care in handling charged battery, particularly when placing it
inside a pocket, purse, or other container with metal objects.
Warning: Do Not Use Unapproved Battery Chargers
Use of battery chargers not approved by Focus
Enhancements could cause the battery to catch fire or
explode.
with the MR-HD100 unit powered
MR-HD100 Media Recorder
19
Page 40

Quick Start
Low Battery Power During Operation
If during operation, the MR-HD100 senses that the battery
charge is low resulting in a low voltage condition, the unit alerts
the user with warning beeps -- less than 3% charge remaining -and then powers down in an orderly manner, protecting the
stored video clips and metadata.
Power From External DC Battery Devices
The ability to charge the MR-HD100 battery when operating
using an external DC battery device is dependent on the load
placed on the MR-HD100.
Consider the following when using external DC battery devices
to power the MR-HD100. The typical external DC power source
for the video device is 12V or 14.4V.
Power Consumption Tables
No Battery Installed - no charging current
Volt- in No Dongle with Linksys Dongle Notes
14.4 V 0.238A (3.42W) 0.328A (4.72W) idle-LCD/Backlight
at max
12.0V 0.285A (3.42W) 0.398A (4.77W) idle-LCD/Backlight
Battery Installed - partially discharged, full charging current
Volt- in No Dongle with Linksys Dongle Notes
14.4 V NA 0.608A (8.75W) Record Mode-LCD/
14.4 V 0.525A (7.6W) 0.575A (8.25W) record for 1 hr.,
Operation
When operating the MR-HD100 at 12V rather than 14.4V, the
power consumed remains the same, but the current draw
increases by a factor of 1.2 (14.4/12.0).
The Linksys dongle uses approximately 1.35W. This
represents about 30% of the power budget when not charging
the batteries.
MR-HD100 Media Recorder
20
at max
Backlight at max
internal T=56 deg.C
Page 41

Quick Start
When charging the batteries, the MR-HD100 applies as much
power as possible to the battery, up to a limit of about 1A
charging current. However, the overall power system limits
the total amount of current consumed to about 0.6 A
maximum based on the 15V input adapter.
The result is that when a big load is added, such as a
discharged battery and the dongle, the MR-HD100
automatically reduces the amount of the charging current so
that the total current through the adapter never exceeds
approximately 0.6 Amps.
MR-HD100 Media Recorder
21
Page 42
Quick Start
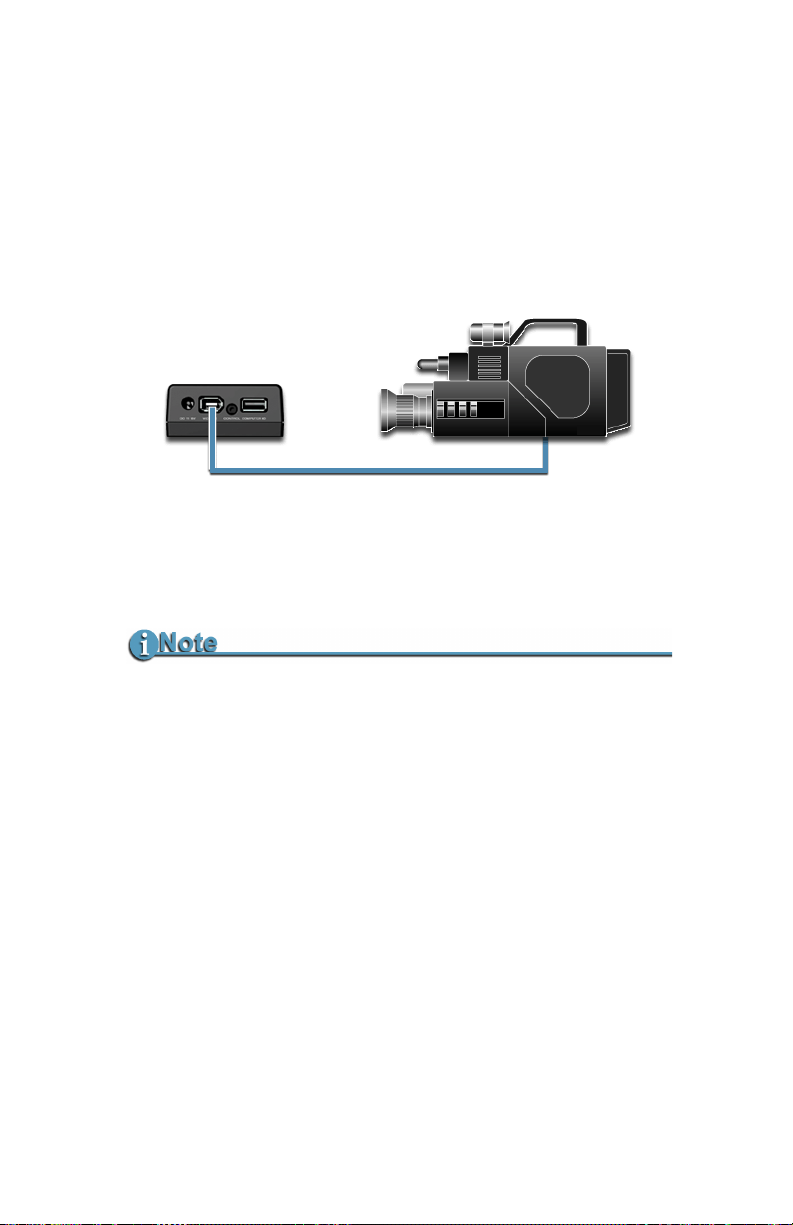
Connecting MR-HD100 to DV/HDV Camera
Before performing this procedure, make sure you have installed and
charged the battery, see
20.
1. Connect the supplied FireWire, 1394, cable to the DV I/O
connector on the top of the MR-HD100.
1. Locate the FireWire/DV/iLink (or similar) connector on your
video camera. It is located in different places depending upon the
brand of camera. If you are unclear of its location, consult your
video camera manual.
Installing / Removing the Battery Pack on page
MR-HD100 Supplied with Two FireWire Cables
The MR-HD100 is provided with both 4-pin to 6-pin and 6-pin to
6-pin FireWire cables.
Check to see which type the camcorder requires.
2. Connect the other end of the FireWire, IEEE 1394, cable to the
video camera.
3. Turn on the camera.
4. Turn on the MR-HD100.
MR-HD100 Media Recorder
22
Page 43
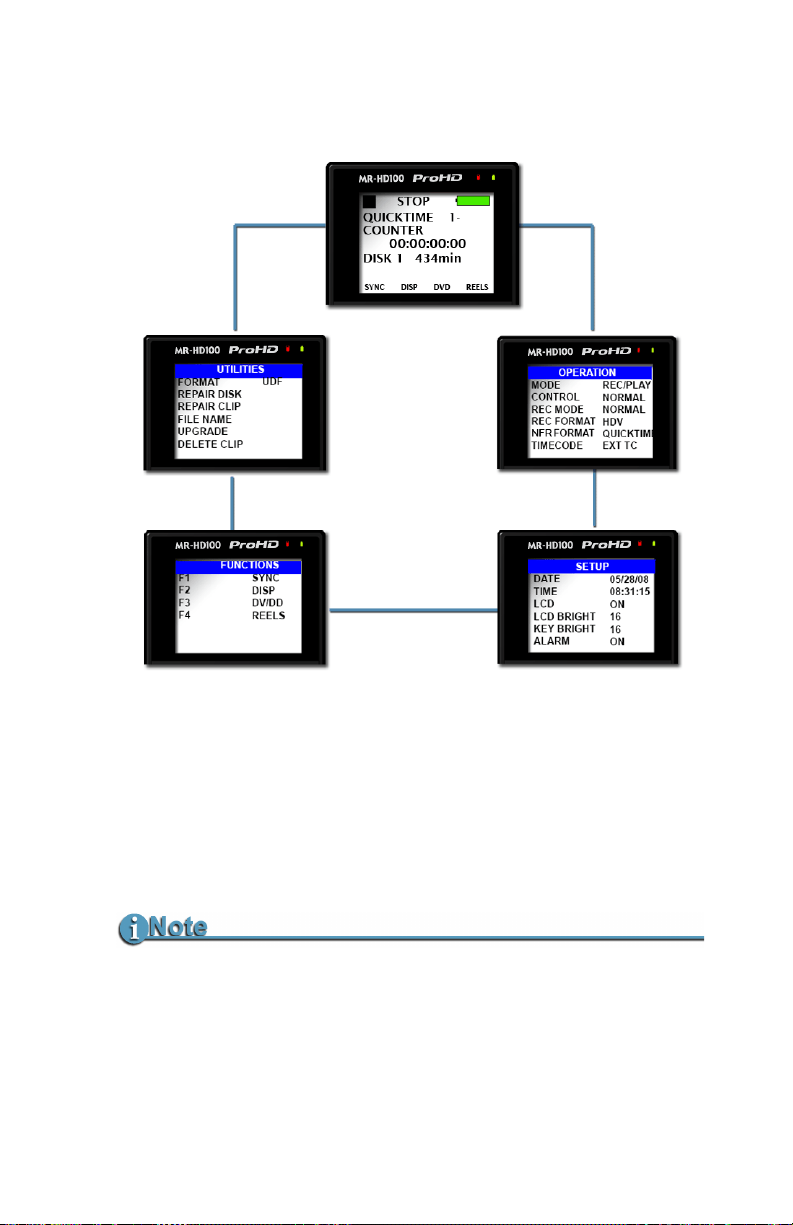
MR-HD100 User Interface
Quick Start
The MR-HD100 menu system provides access to all the functions
available in the unit. Each of the screens below (except the Welcome
and Home screens which come up automatically when the unit
starts) are accessed by pressing the left or right soft buttons on the
Scroll Wheel.
For more information on each function, go to the chapter
Functions
on page 77.
Returning to the Top of the Menu or to Home screen
To get to the top of any menu, press the Left soft button.
To get back to the Home screen:
• Highlight the screen title at the top of the screen.
• Press the Select soft button.
MR-HD100 Media Recorder
MR-HD100
23
Page 44

Quick Start
Main Screen Feature Option Selection
WELCOME
HOME
OPERATION
Only appears for a few seconds on power up.
Gateway screen for all functions, it displays disk and operational
status.
For more information see OPERATION Screens on page 83.
MODE
REC/PLAYER
HDD (mount to computer function)
CONTROL
REC MODE
NORMAL
EXTERNAL
SYNCRO
NORMAL
RETRO CACHE
RETRO DISK
SNAP (DV mode only)
TIMELAPSE (DV mode only)
REC FORMAT
DV
HDV
NFR FORMAT
TIMECODE
Depends on REC FORMAT setting.
DV Raw DV
HDV M2T
TC EXT
TC REC RUN
TC FREE RUN
TC REGEN
AVI Ty pe 1
AVI Ty pe 2
Canopus AVI
Matrox AVI
Quicktime
MXF
QUICKTIME
MXF
MR-HD100 Media Recorder
24
Page 45

Quick Start
Main Screen Feature Option Selection
SYSTEM
For more information see Setup Screens on page 42.
SETUP
DATE
TIME
LCD
LCD BRIGHT
ON
OFF
AUTO
1 through 16
KEY BRIGHT
ALARM
STOP
EXTL CTL
TC SET
UB SET
TC MODE
RETRO CACHE
RETRO DISK
TIMELAPSE
PLAY MODE
PLAY FROM
UDF FS PERM
NETWORK
IP ADDR
1 through 16
(Does not include Scroll Wheel)
ON/OFF
FRAME
GRAY
NO VIDEO
OFF
PAUSE
FRAME
FILE
DROP
NON-DROP
0 to 10 seconds
0 to 392 minutes
(Based on 100GB drive, other models may
vary.)
Set duration between single frame captures.
(DV mode only)
PLAY ALL
PLAY CLIP
LOOP CLIP
LOOP TRACK
PLAY TRACK
PLAY REEL
READ-ONLY
READ-WRITE
DHCP
MANUAL
(When DHCP is set, IP ADDR, IP MASK,
BROADCAST, and GATEWAY are
assigned by the host router.)
Manual or DHCP.
(If MR-HD100 in
EXT TC, TC
Mode has no
effect.)
MR-HD100 Media Recorder
25
Page 46

Quick Start
Main Screen Feature Option Selection
IP MASK
BROADCAST
GATEWAY
ESSID
KEY
Manual or DHCP.
Manual or DHCP.
Manual or DHCP.
Set manually.
Set manually (WEP encryption only.)
FUNCTIONS
WIFI MODE
FTP
FTP PASS
WEB
AUTO ORG
AUTO MARK
REELS PREF
MANAGED
ADHOC (P2P)
DISABLED
ENABLED
(Default ftp://FS:FS@ipaddress)
Sets FTP password for
FTP function.
DISABLED
ENABLED
DISABLED
ENABLED
DISABLED
ENABLED
FOLDER
TEMPLATE
Default is FS.
Contains user definable function key selections. Changing
a setting with a Function key is identical to changing the
setting in its corresponding menu.
Refer to
Functions Screen on page 47 for more
information.
F1
F2
F3
F4
SYNC
EXTERNAL
LCD SET
REELS
R1-1 etc.,
see Reels on page 89.
DISP
ALARM
FILE
REELS
R1-1 etc.,
see Reels on page 89.
DV/DD
REELS
R1-1 etc.,
see Reels on page 89
LOCK
REELS
R1-1 etc.,
see Reels on page 89
MR-HD100 Media Recorder
26
Page 47

Quick Start
Main Screen Feature Option Selection
UTILITIES
For more information see Utilities Screen on page 58.
FORMAT
REPAIR DISK
REPAIR CLIP
FILE NAME
ORGANIZE REEL
ORGANIZE MXF
UPGRADE
SYSTEM RESET
DIAGNOSTIC
STATUS
VERSION
MR-HD100 Media Recorder
27
Page 48

Quick Start
Types of MR-HD100 Displays
The MR-HD100 has three types of screens:
• Informational
These screens provide information only and do not permit
setting values: examples,
137).
• Select an Option
These interactive screens provide a list of items that the User
can select. In some cases, selecting an item leads to a second
screen where settings are selected or values entered.
To do this:
1. Use either the Soft Down or Up keys or the Scroll Wheel
to move about in the menu.
2. Pick an item by pressing on the Select key.
Selecting an item may open other screens with more
options.
•Enter Value
These interactive screens permit the User to enter userdefined values. To do this:
1. Use the Soft right key to advance between data fields.
2. Use the Scroll Wheel to dial in the correct values.
3. Press the Select key to save changes and return to the
SETUP main menu
4. Clicking
UNDO cancels changes and returns to the SETUP
main menu.
WELCOME and VERSION (see page
MR-HD100 Media Recorder
28
Page 49
Quick Start
Record and Playback
Before using the MR-HD100, set up the unit as outlined in the
following sections:
Set Up the MR-HD100 page 29
Power On MR-HD100 page 29
Set Date and Time page 30
Select a DV/HD File Format page 34
Set Time and Date page 34
Record with the MR-HD100 page 36
NORMAL Recording page 38
EXTERNAL Recording page 39
SYNCRO Recording page 40
Playback with the MR-HD100 page 42
The values set in these procedures are fixed and persist through
power cycles. To change them, repeat the steps outlined above.
Set Up the MR-HD100
Power On MR-HD100
1. Press the Power key for more than one second and release
it.
2. The
Welcome screen appears and displays while the
MR-HD100 initializes.
MR-HD100 Media Recorder
29
Page 50
Quick Start
SETUP
DATE
TIME
LCD
LCD BRIGHT
KEY BRIGHT
ALARM
05/28/08
08:31:15
ON
16
16
ON
06/15/08
SETUP
DATE
Set Date and Time
Date and Time Must Be Set
The date and time must be set because they are used in the MRHD100 file naming function.
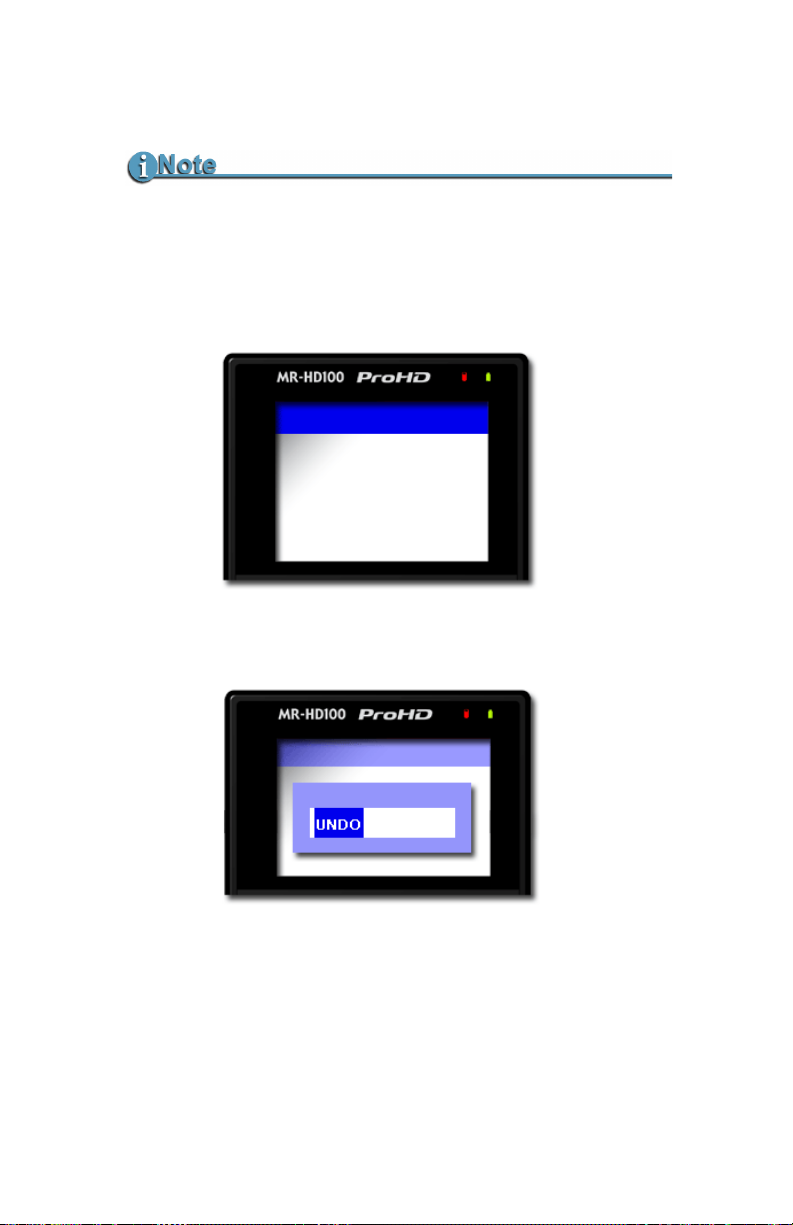
1. Press the Right soft button several times until the SETUP
screen appears.
2. Use the Down soft button to highlight the date and press
the Select key to access the
3. Use the
Right and Left soft buttons to highlight the Month,
Day, and Year. Use the
4. When complete, press the
The display returns to the SETUP menu which displays
the new date.
MR-HD100 Media Recorder
30
Set Date screen.
Scroll Wheel to change the value.
Select key.
Page 51
Quick Start
SETUP
TIME
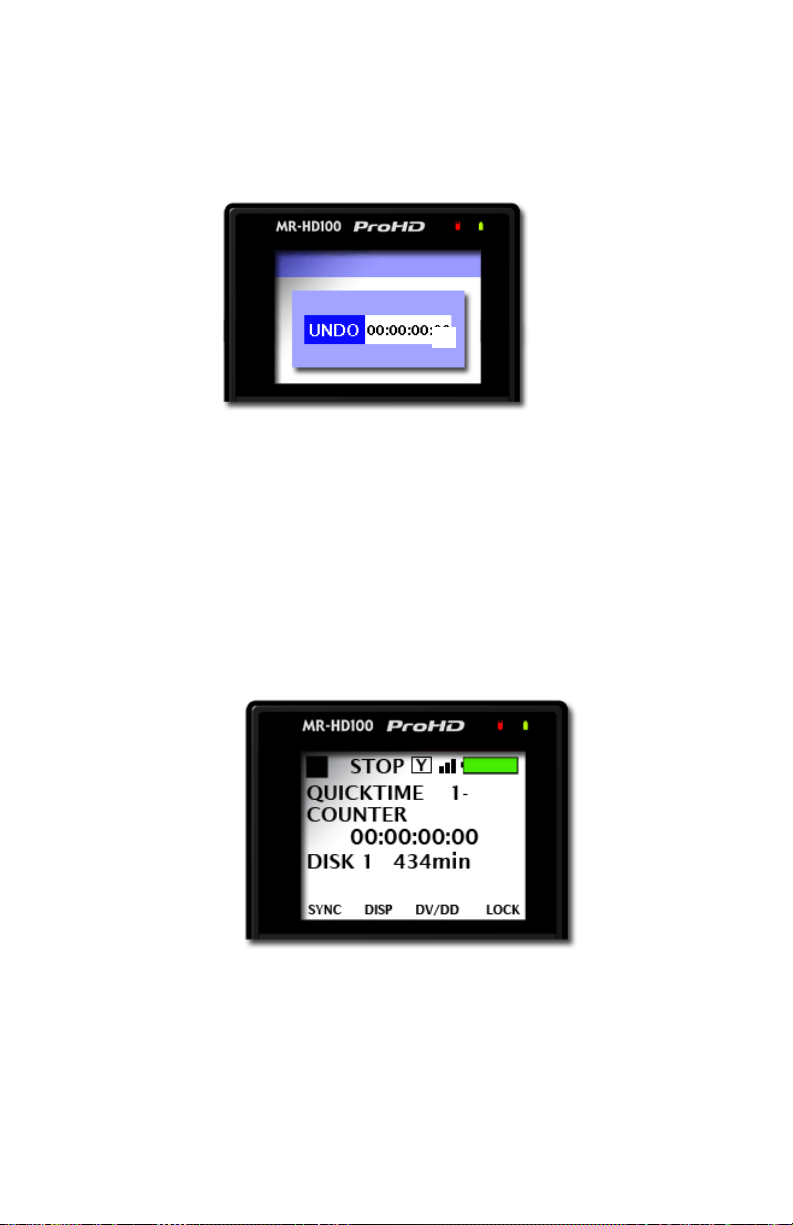
5. Use the Down soft button to select the TIME setup screen
and press the
Right soft button. The following screen
appears:
6. Use the
Right and Left navigation keys to highlight the
Hour, Minute, and Second. (Time is indicated in 24hr.
mode.) Use the
7. Press the
Scroll Wheel to change the value.
Select key.
The display returns to the SETUP menu which displays
the new date.
For more information on the Setup function, refer to the
section,
SETUP Screens on page 94.
8. Return to the Home screen.
For more information see
Home on page 79 for more
details
MR-HD100 Media Recorder
31
Page 52
Quick Start
OPERATION
MODE
CONTROL
REC MODE
REC FORMAT
NFR FORMAT
TIMECODE
REC/PLAY
NORMAL
NORMAL
HDV
QUICKTIME
EXT TC
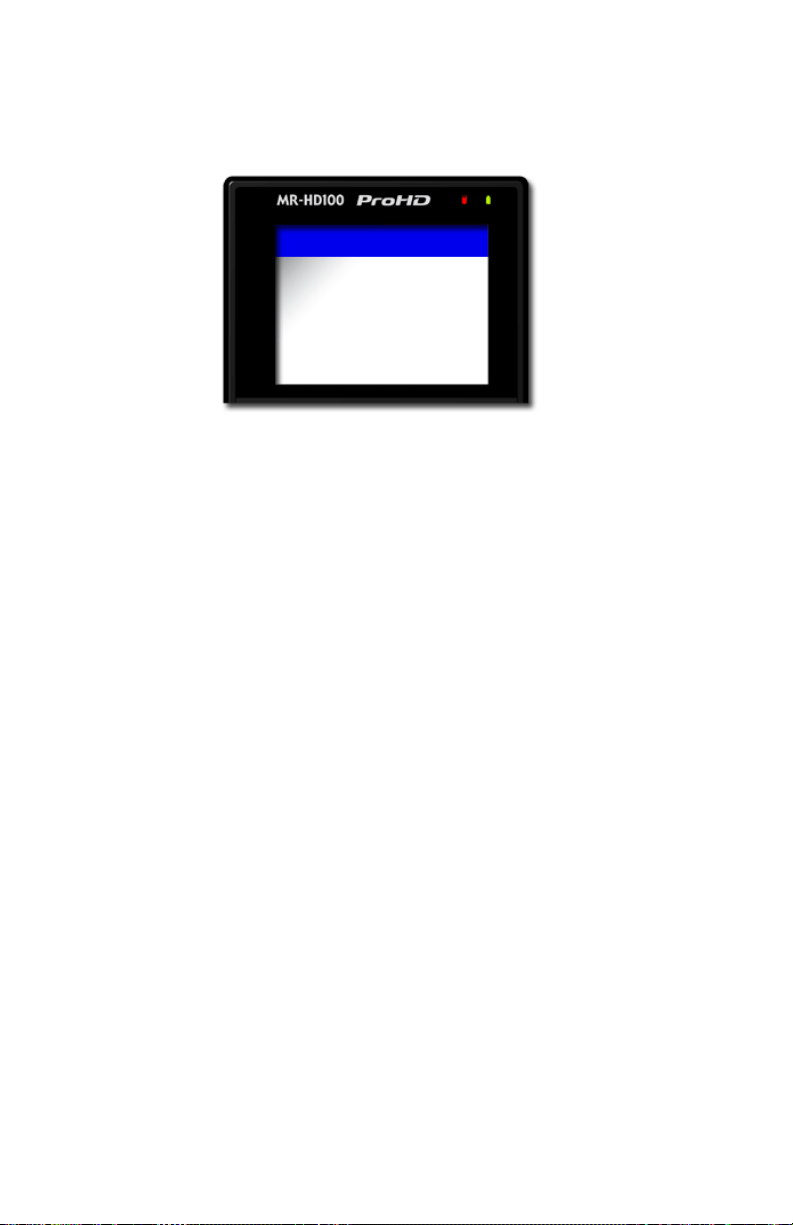
9. Press the Right soft button on the Scroll Wheel once to
display the
OPERATION menu.
By default, the MR-HD100 is setup for the most typical
recording situations. The Operation defaults are:
MODE REC/PLAY See MODE on page 84.
CONTROL NORMAL See CONTROL on page
85.
REC MODE NORMAL See REC MODE on page
86.
REC FORMAT HDV See REC FORMAT on
page 90.
NFR FORMAT QUICKTIME See NFR FORMAT on
page 90.
TIMECODE EXT TC See TIMECODE on page
92.
If it is necessary to change any of these settings, refer to the
following few pages.
MR-HD100 Media Recorder
32
Page 53
Select Record/Play Mode
OPERATION
MODE
REC/PLAY
HDD
OPERATION
CONTROL
NORMAL
EXTERNAL
SYNCRO
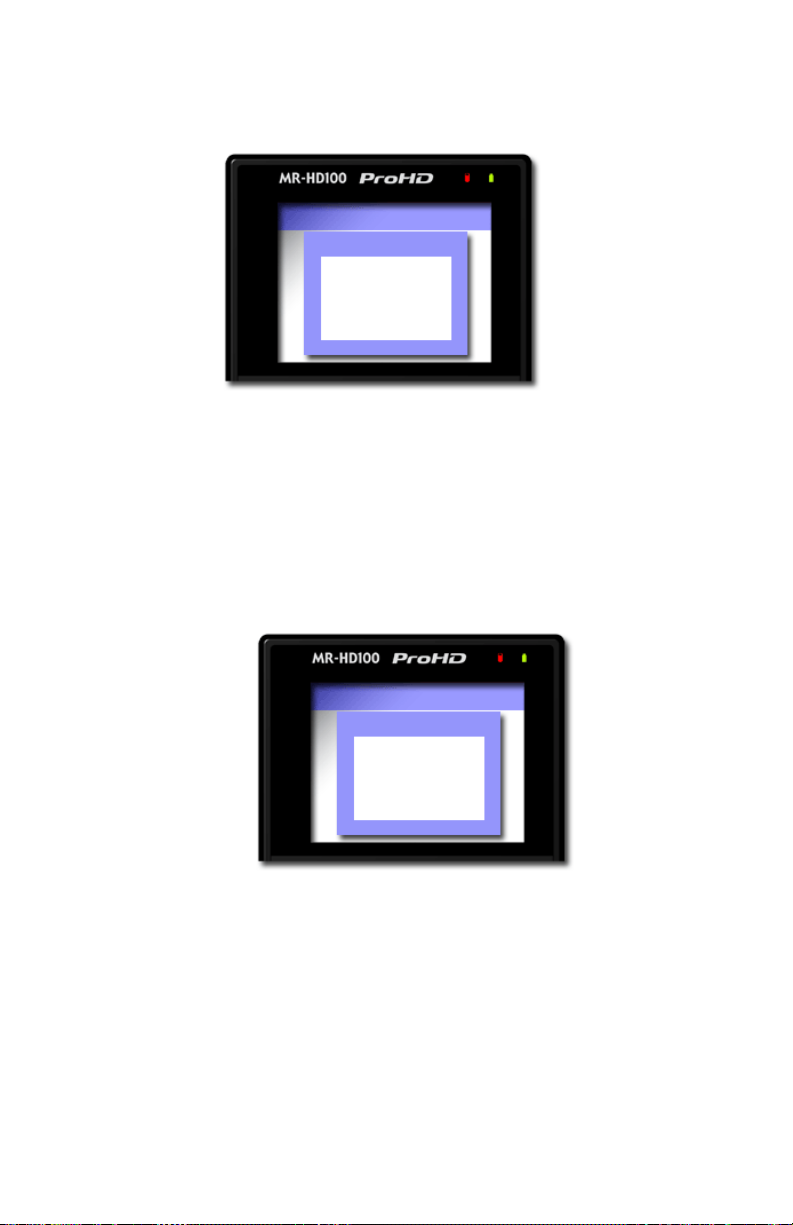
1. Use the Up or Down soft buttons to select MODE.
2. Press the Select key in the center of the Scroll Wheel.
A list of operation modes appears:
3. Pick
REC/PLAY and press the Select key.
The display returns to the
OPERATION menu.
REC/PLAY or HDD.
Select the Control Mode
Quick Start
This determines which controls, the MR-HD100’s or the
camera’s, are used during either recording or playback, see
CONTROL on page 85. Select the mode to use and the display
returns to the
EXTERNAL control mode controls the MR-HD100 from the
camera and is the recommended control mode for all JVC Pro
HD camcorders whether using tape or no tape. Make sure that
the camcorder's DV control port is turned on.
OPERATION menu.
MR-HD100 Media Recorder
33
Page 54
Quick Start
OPERATION
REC FORMAT
DV
HDV
OPERATION
NFR FORMAT
RAW
AVI TYPE1
AVI TYPE2
CANOPUS AVI
Select the Recording Format (REC FORMAT)
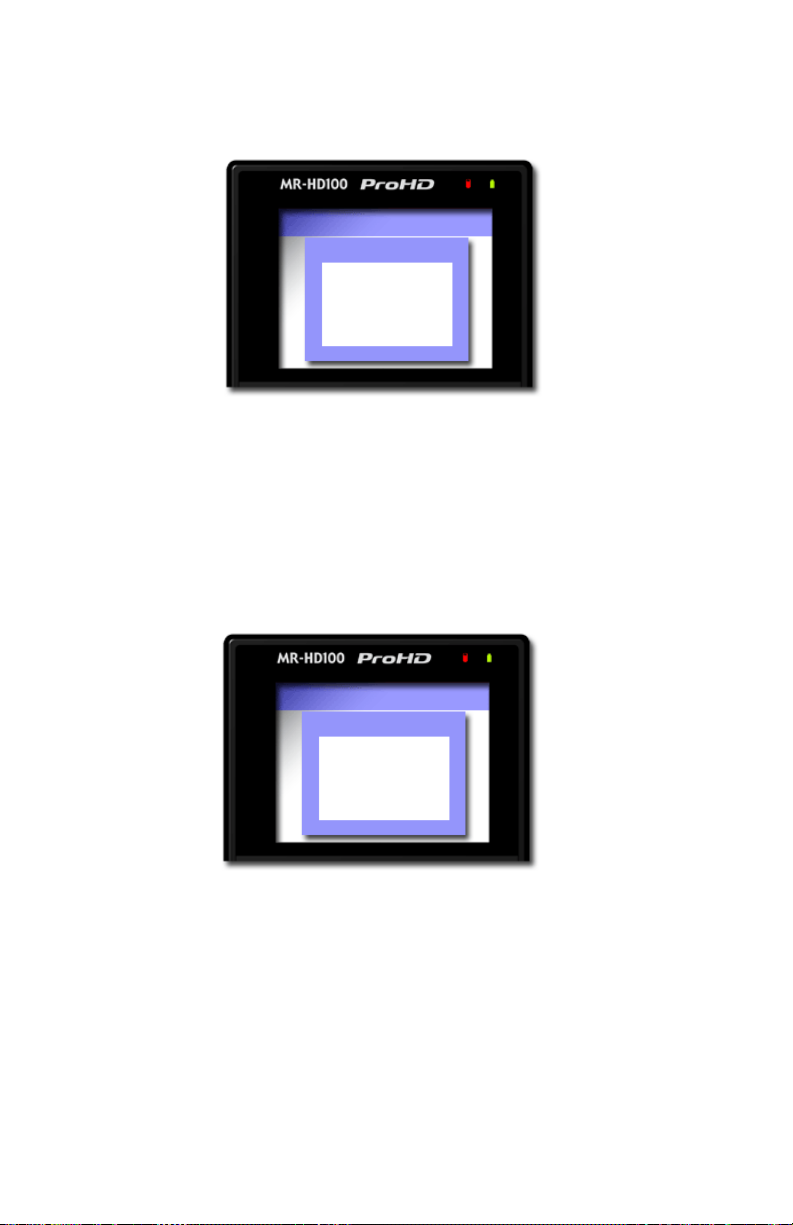
This determines which recording format, DV or HDV, the
MR-HD100 uses. The camera must support the recording format
selected.
Select the format type and the display returns to the
OPERATIONS menu.
Select the NFR Format
This determines which NLE compatible format the MR-HD100
uses when recording. The NFR formats displayed depend on the
REC FORMAT selected in the last step.
MR-HD100 Media Recorder
34
Page 55
OPERATION
TIMECODE
EXT TC
FREE RUN
REC RUN
REGEN
DV24p and PAL 25p Modes
• 24p modes are only for use with camcorder's that are
capable of DV-24p Advanced mode.
• 24p is comparible to DV QuickTime and AVI Type 2.
• PAL 25p camcorders require no special 25p DV format
• There are different MR-HD100 models for NTSC and PAL
recording.
The display returns to the OPERATION menu.
Select the Timecode
Quick Start
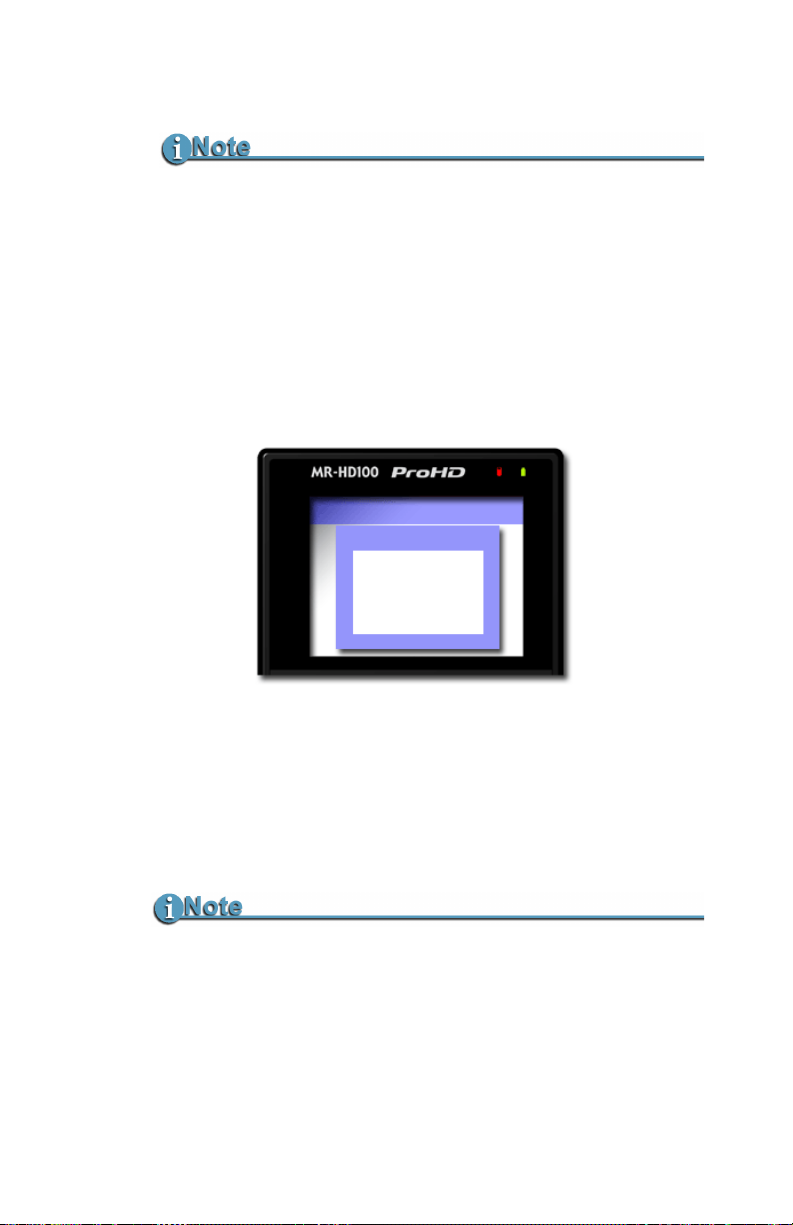
This determines the source of the timecode to be embedded in
the recording.
Selecting the timecode returns the display to the OPERATION
menu.
With the OPERATION menu title highlighted, press the
key once and advance to the
SETUP Menu Overridden by EXT TC Settings
When EXT TC is selected, the MR-HD100 follows the timecode
mode of the camera, Drop Frame or Non Drop Frame,
regardless of the setting in the SETUP menu.
SYSTEM SETUP screen.
MR-HD100 Media Recorder
Right
35
Page 56

Quick Start
Record with the MR-HD100
There are two modes of recording with the MR-HD100.
• NORMAL Recording
Control with the MR-HD100 transport keys.
• EXTERNAL Recording
Control MR-HD100 recording with the video camera controls,
whether using tape or tapeless.
EXTERNAL mode is the recommended control mode for all
JVC Pro HD camcorders whether using tape or no tape. Make
sure that the camcorder's DV control port is turned on.
Check the latest camera compatibility matrix on the Focus
website:
• SYNCRO Recording
SYNCRO is used most often with older camcorders that
require the presence of a tape in the camcorder’s tape deck.
Before beginning recording, verify that:
1. Time and date are set.
2. Recording format is set.
3. NFR Format is set.
4. The MR-HD100 is connected to the video camera according
to the explanation in
Camera
5. Camera and MR-HD100 are powered on.
6. Tape is loaded in the camera, if:
www.focusinfo.com.
Connecting MR-HD100 to DV/HDV
on page 22.
• Camera requires a tape in its transport before it triggers
MR-HD100 record.
• User wants to record to both tape and disk, see the
following note.
MR-HD100 Media Recorder
36
Page 57

Quick Start
.
EXTERNAL Operation
Tape does not need to be loaded if the camera supports external
operation, refer to, CONTROL on page 85.
Troubleshooting: Counter Not Incrementing
If the Counter does not increment while recording the camera, it is
an indication that there is no active connection between the MRHD100 and the camera.
• Verify that the MR-HD100 1394 DV I/O and the camera
connections are secure. It may be necessary to unplug and
then reconnect them.
When a good connection is made, the Counter will increment
and recording will start.
• Verify that MR-HD100 and camera settings are correct.
Verify Record Mode Matches Source Video Content and Format
If in DV Recorder mode, HD content will not record properly. A
NTSC or PAL DV source records only on a matching NTSC or PAL
unit.
Do Not Disconnect Power or FireWire Cable
Never disconnect the power or the FireWire cable during a
recording. This will cause file corruption.
Loss of Power During Recording
If power is lost during recording it is possible to repair the
damaged file or files, refer Repair Disk on page 82 to and
Repair Clip DV mode only on page 83.
MR-HD100 Media Recorder
37
Page 58
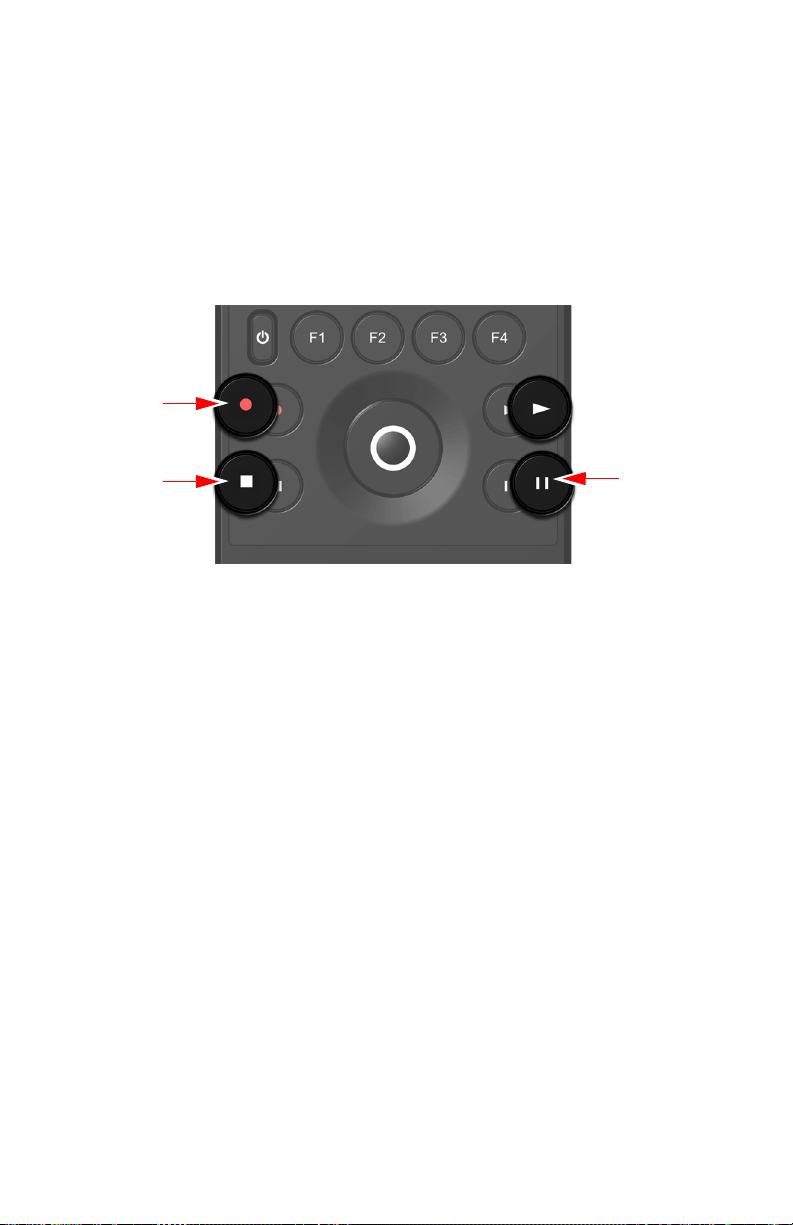
Quick Start
Record
Stop
Pause
NORMAL Recording
1. Set the video camera to Camera or Cam mode.
2. Verify that an image appears in the viewfinder.
3. On the MR-HD100, press
The MR-HD100 begins to record. The timecode value
displays on the screen.
Record .
4. Press
5. Press
6. Press
7. Press
Creating a New File without Dropping Frames
When in record mode, it is possible to break the recording into
a separate, new file without dropping frames.
While recording, press
automatically creates a new clip.
MR-HD100 Media Recorder
38
Pause II once to put the MR-HD100 to Rec-Pause
mode.
Pause II again and the MR-HD100 begins to Record
again in the same clip.
Stop to stop the recording.
Record to begin recording a new clip.
Record again and the MR-HD100
Page 59
EXTERNAL Recording
OPERATION
CONTROL
NORMAL
EXTERNAL
SYNCRO
External control permits the MR-HD100 to control the
camcorder functions during record and playback.
1. Verify that the MR-HD100 is in
2. From the MR-HD100 Home screen, press the
button several times until the
3. Use the Down soft button to select Control.
The default value is
NORMAL
4. Use the Down soft button to select EXTERNAL.
5. Press the Scroll Wheel
Select key.
The Operations screen appears.
6. Press the Left soft button twice to return to the Home
screen.
The screen returns and a
upper left-hand corner. Next to it is an
MR-HD100 is now in external control of the camcorder
record and playback functions.
Proceed with recording.
1. On the MR-HD100, press
The MR-HD100 begins to record. The timecode value
displays on the screen and the image appears in the
camera’s LCD display.
2. Press
3. Press
4. Press
5. Press
Pause II once to put the MR-HD100 in STOP mode.
Pause II again and the MR-HD100 begins to Record
again in the same clip.
Stop to stop the recording.
Record to begin a new clip.
Stop mode.
Right soft
OPERATION screen appears:
STOP indicator appears in the
E indicating that
Record .
MR-HD100 Media Recorder
Quick Start
39
Page 60
Quick Start
OPERATION
CONTROL
NORMAL
EXTERNAL
SYNCRO
SYNCRO Recording
Syncro recording allows the MR-HD100 to mimic camcorder
operations by monitoring the state of the camcorder’s tape
recorder controls.
Syncro: For Camcorders Without External Trigger Control
Syncro mode should only be used with older camcorders that do
not have external trigger controls. Check the latest camera
compatibility matrix on the Focus website.
1. Verify that the MR-HD100 is in
2. From the MR-HD100 Home screen, press the
button several times until the
3. Use the Down soft button to select Control.
The default value is
4. Use the Down soft button to select SYNCRO.
5. Press the Scroll Wheel
The Operations screen appears.
6. Press the Left soft button twice to return to the Home
screen.
The Home screen returns and a
in the upper left-hand corner. Next to it is a
that MR-HD100 is following the state of the camcorder’s
tape controls, i.e. record when the camcorder records and
pause when it pauses.
MR-HD100 Media Recorder
40
Stop mode.
Right soft
OPERATION screen appears:
NORMAL
Select key.
Pause indicator appears
Y indicating
Page 61
Quick Start
OPERATION
TIMECODE
EXT TC
FREE RUN
REC RUN
REGEN
7. Now the MR-HD100 will respond to the camcorder’s tape
controls. The recording signal goes both to the tape in the
camera and to the MR-HD100.
Recording Timecode in the File
1. Press the Right soft button several times until the
Timecode screen appears.
2. Select
EXT TC in the SETUP menu.
This option records the video camera timecode in the
file. For other available timecode options refer to
TIMECODE on page 92.
To view the source timecode (TC) from the camera,
press the
DISP key, F2 default, until the format type
appears, e.g. 1080/60i TC.
EXT TC
When in EXT TC mode the MR-HD100 follows the
camera’s timecode, and the Drop/Non-Drop Frame in
System SETUP menu has no effect on the recorded
video's timecode.
Function keys
The tasks discussed above are available for
programming into the function keys. For information on
setting up function keys, refer to the section,
FUNCTIONS Screens on page 120
MR-HD100 Media Recorder
41
Page 62
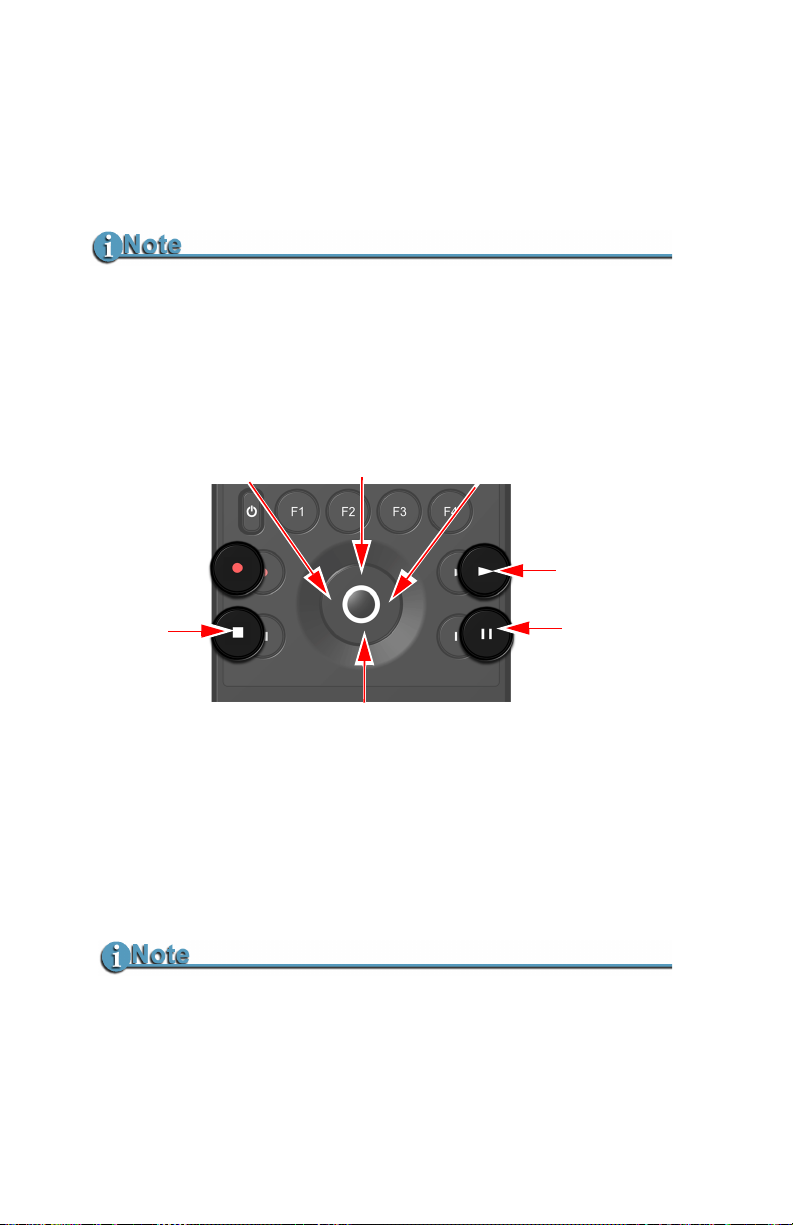
Quick Start
3
7
6
4
Forward Index
5
Backward Index
2
Up
2
Down
Playback with the MR-HD100
Verify that both the video camera and the MR-HD100 are powered
on and that they are connected together with the FireWire cable
from the MR-HD100 DV/IO port to the camcorder 1394 port.
Feature Availability on PAL Cameras
This feature is not available on some PAL cameras.
1. Set the video camera to
VCR or Playback mode.
2. Navigate to the video clip to preview, using the MR-HD100
Down and Up soft buttons.
3. Press the
4. Press
5. Press
Refer to
more information on the function of these controls.
Scroll/Select Wheel and Soft Navigation Keys on page 12 for
Play key.
Pause to pause playback.
Stop to end playback of the clip.
Camcorder Compatibility with External Players
Some HD camcorders are not compatible with the external player
functions Forward/Reverse Search and Pause.
MR-HD100 Media Recorder
42
Page 63

Metadata
Metadata is an important part of modern video production. Metadata
is information that is attached to a content file (video, graphic, audio,
etc.) and describes some characteristic or attribute of the content. In
the case of video, the metadata is either timecode or video clip-based.
The purpose of metadata is to uniquely identify each content item,
creating a data hierarchy that can be used to search for and group
content in as many useful ways as possible.
The advent of tapeless based acquisition devices like the MR-HD100,
which is able to produce files in a variety of video formats, makes the
proper labeling of video content critical. Efficient handling of content
within NLE systems as well as easy content retrieval in asset
management or archive solutions depends on the use of metadata.
Many standards of metadata types and labels have been developed.
The most commonly used is the Apple XML Interchange Format
which is supported by the MR-HD100.
For metadata to be useful, it must reflect the processes and
vocabulary of the organization using it. The easiest and most
recognizable metadata implementation is to use simple descriptions
about the content (e.g. what is the scene, what is the production
name, take number, good shot, etc.) This can be the same type of
descriptive tags that are added to the content when using a NLE’s log
and capture or log and transfer windows.
MR-HD100 Media Recorder
43
Page 64

Metadata
The MR-HD100 Metadata utility is a web-based application that
provides the user the ability to:
• Add video clip-based and timecode-based metadata to video
clips during recording or playback.
• Use a default or custom metadata entry templates.
• Export clip-based and timecode-based templates to ProxSys
Media Servers and NLE applications.
MR-HD100 Web server and Database Provide Metadata Functions
The MR-HD100 has a resident web-based Metadata application that
permits the configuring of metadata templates and metadata logging
using a simple web browser.
Connect to MR-HD100's web server using the USB2 to 802.11 WIFi
dongle provided with the unit or a USB2 to Ethernet adapter. Any
device with networking capabilities and web browser functionality -computer, laptop, PDA, etc. -- can log into MR-HD100's web server.
MR-HD100 Media Recorder
44
Page 65

This chapter contains:
Overview page 46
Metadata Categories page 46
Tem p la t es p ag e 47
Video Production page 49
Logging Onto the MR-HD100 Web Server page 52
Metadata Pages and Functions page 53
Tem p la t e p a ge 53
Settings page 54
Entry page 55
Export page 56
Entering Metadata page 56
Saving Metadata page 58
Reel Matching and Templates page 59
Creating A Template page 60
Creating A New Template page 61
Duplicating a Template page 64
Creating A Custom Template page 66
Importing MR-HD100 Templates page 69
Removing Metadata Fields page 70
Making Metadata into XML Files page 71
Export page 72
Final Cut Pro Export page 72
Generic Export page 73
Export Matching page 74
Exporting a Template page 76
Metadata
MR-HD100 Media Recorder
45
Page 66

Metadata
Overview
MR-HD100 metadata logging is flexible because it can be either
timecode-based or video clip-based.
Metadata Categories
There are three categories of metadata, descriptive, administrative,
and structural. Some metadata, such as Project ID is not limited to
one category.
Descriptive
Descriptive metadata is used to promote rapid search and
recovery of content. Often it is in a form that is familiar to the
greatest number of users, enterprise-wide. Descriptive metadata
can include:
• Name of released project.
• Subject tags -- sports, medicine, history and such.
• Name of videographer.
• Location of recording.
•Project ID.
Often, descriptive metadata values are added during recording
or when transferred to the NLE. Some descriptive metadata may
be added at different stages of production/post-production to
indicate content status.
Administrative
Administrative metadata is video clip based and is used to
manage the content within the content library and backup
repository. This metadata links all content to its parent files and
identifies where it may be archived. Examples of administrative
metadata may include:
• Library archive number.
•Project ID.
MR-HD100 Media Recorder
46
Page 67

Metadata
Structural
Structural metadata is video clip-based and used primarily for
storage of objects in the production library and for presentation.
This metadata assists users during production and post
production steps and can be added or changed according to
where the content is in the workflow.
Structural metadata can include:
• Camera.
•Clip number.
• Name of videographer.
•Project ID.
• Storyboard frame number.
• Sequence start/stop (timecode-based)
• Frame location (timecode-based)
Structural metadata is added during recording and subsequent
editing. Often this metadata is timecode-based, which defines or
describes specific frames within a clip.
Templates
A template is an xml form into which, job specific data is entered.
For example, a news crew will have at least one template available
for each story type covered: accident, fire, interviews, sportsbaseball, sports-football, and weather.
A metadata template can include:
• Fields into which data is entered,
• Lists of predetermined metadata from which values are
selected,
• Setting the type of metadata, timecode based or not,
It is possible to create both metadata templates that conform to the
Apple XML Interchange Format and custom templates.
Metadata entered through the template is stored in a database on
the MR-HD100.
MR-HD100 Media Recorder
47
Page 68

Metadata
Default Template
The MR-HD100's default template is based on the Apple XML
Interchange Format. Metadata that is defined in this template
and later used for logging is later exported to a standard Apple
xml file for direct import into Final Cut Pro or a ProxSys media
asset management system. For more information, see
Pro
on page 172.
Custom Template
The MR-HD100 provides the capability for the User to create
custom templates by modifying the FCP template or entering
unique fields into an empty template.
Imported Templates
The MR-HD100 has the capability of importing templates
created and exported from other MR-HD100 units.
Format Function May Remove Custom and Imported
Tem pla tes
Depending on the Templa tes setting in the Format function,
the Custom and Imported templates may be removed and only
the default template will remain, see FORMAT on page 127.
As a precaution, Export and archive all non-FCP Example
templates. After formatting, it is necessary to re-import them.
Final Cut
MR-HD100 Media Recorder
48
Page 69
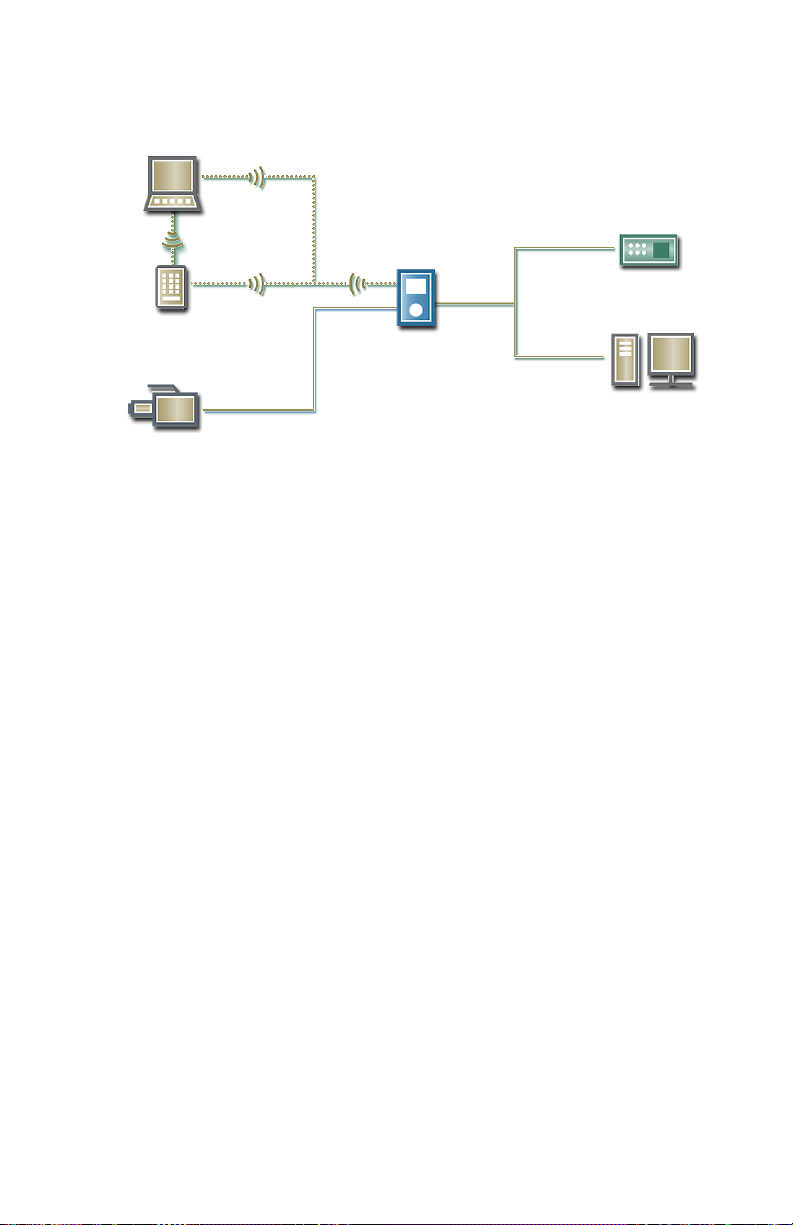
Metadata
1
2
4
4
5
6
Media Server
Non-Linear Editor
Wired or Wireless
network
Video Production
Pre-production
Pre-production includes the setup of equipment for recording
the production, see
page 22, and defining the metadata template(s) used, its
metadata fields and values.
In addition, it is possible to match metadata fields in the file to
specific metadata fields in a different template.
For the MR-HD100 this involves:
1. Set up the xml metadata template.
• Using the MR-HD100 web-based interface, open the
metadata template on a laptop or PDA.
• Setup the metadata template values and settings by
logging into MR-HD100's web server using a computer or laptop.
Template settings and metadata resides on the MR-HD100,
in the MR-HD100 database in the directory:
Production
Production involves the includes recording of video, logging
both clip and timecode metadata based on the templates that
were defined in the pre-production phase. In addition, clips can
be played back and verified -- through the camera -- and
additional metadata can be defined if required.
Connecting MR-HD100 to DV/HDV Camera on
/log/fs_3.db.
MR-HD100 Media Recorder
49
Page 70

Metadata
For the MR-HD100 this involves:
2. Record video.
During recording, use the MR-HD100's web server
interface and template to log predefined or dynamically
input metadata values.
3. Playback video.
4. During playback, use the MR-HD100's web server
interface and template to log predefined or dynamically
input metadata values.
Post-production
The post production phase includes exporting logged metadata
that is stored in the MR-HD100 database into a format that can
be used with an NLE or ProxSys Media Asset Management
system along with the recorded content.
For the MR-HD100 this involves:
5. Export metadata from MR-HD100 database to xml file.
Export metadata from the MR-HD100 database to an xml
file using either the
exports an xml file based on the current templates and
logged metadata -- or the manual metadata export
function in the MR-HD100's web interface. During export,
it is possible to determine the type of export file to create:
compatible with a particular NLE or project on a ProxSys
media server.
6. Import the xml file into a NLE or ProxSys Media Server.
Use the NLE or ProxSys Media Server interface to import
the xml file into the application. In either case, NLE or
ProxSys system, it is only necessary to import the xml file.
During the import process, the application locates and
identifies all video clips associated with the xml file and
imports them too. In addition, the metadata logged
during recording or playback is added to the video clip(s).
The metadata is now viewable and searchable with links
to the video content in the NLE or ProxSys
AUTO ORG function -- automatically
MR-HD100 Media Recorder
50
Page 71

Metadata
Metadata has many uses during post-production.
• Identify individual video clips, clip xml files, cameras --
position and lens, provide for rapid creation and display of
the video dailies from film or digital footage.
Metadata can be used to determine the sequence that the
dailies are shown and create text generator slates before
each shot.
• Merge subtitles with scenes.
• Group and archive all video clips belonging to each project.
• Facilitate rapid search and retrieval of raw footage and
related video clips used in projects.
• Version-tracking of video clips and sequences.
• Find and replace video clips with other clips.
• Track processes applied to video sequences, for example
chromakey effects.
MR-HD100 Media Recorder
51
Page 72
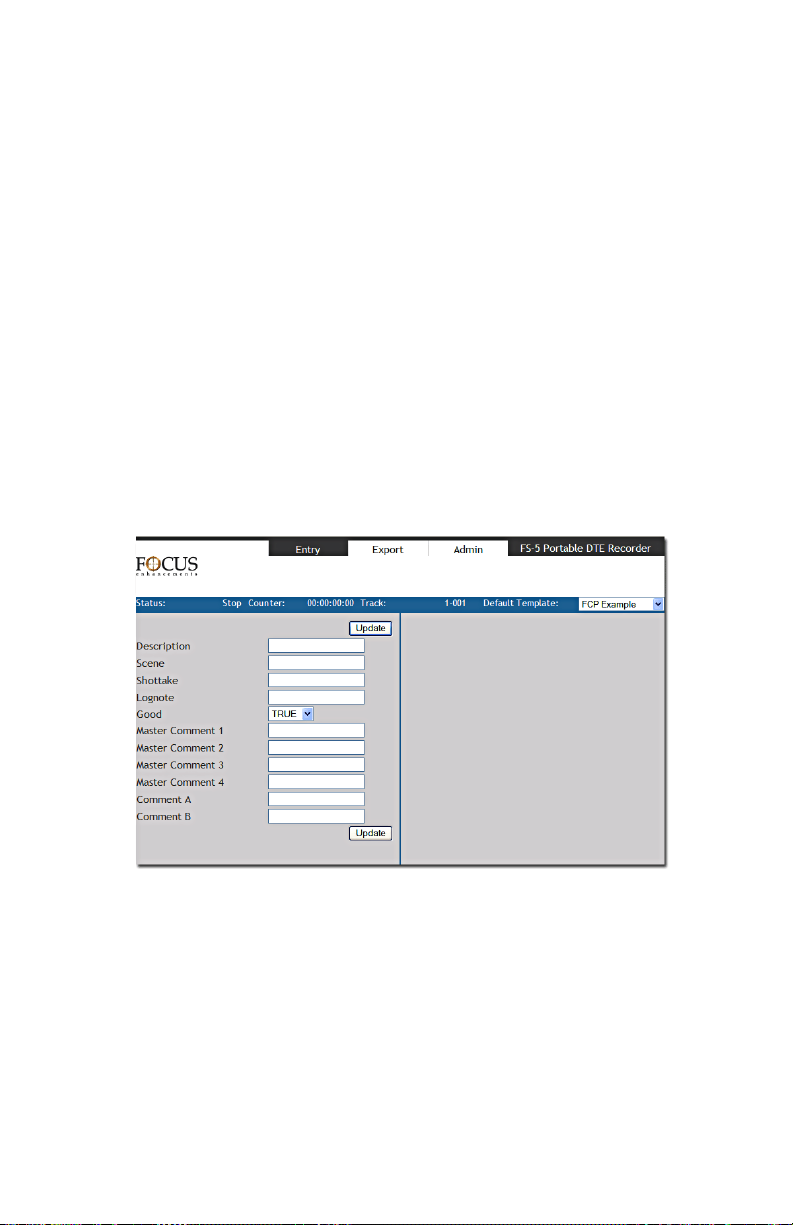
Metadata
Logging Onto the MR-HD100 Web Server
Logging onto the MR-HD100 web server provides access to the
metadata settings and logging functions. The pages and functions
available depend on the type of device accessing the MR-HD100.
1. Connect the MR-HD100 to a wired or wireless network,
through its USB, port using an USB to Ethernet adapter, or the
802.11b/g wireless dongle provided with the MR-HD100.
Depending on the type of connection, refer to the following:
•
MR-HD100 to Wired (Ethernet) Network on page 144.
•
MR-HD100 to a Managed Wireless Network on page 145.
•
MR-HD100 Peer-to-Peer Networking (Wi-Fi) on page 146.
2. Determine the MR-HD100’s IP address, see
110.
3. Open a web browser and enter the MR-HD100’s IP address in
the browser’s Address window.
The
Entry page appears.
IP ADDR on page
This is the first page that a PDA type device displays.
The first time that the Entry page appears it displays the
default template.
MR-HD100 Media Recorder
52
Page 73
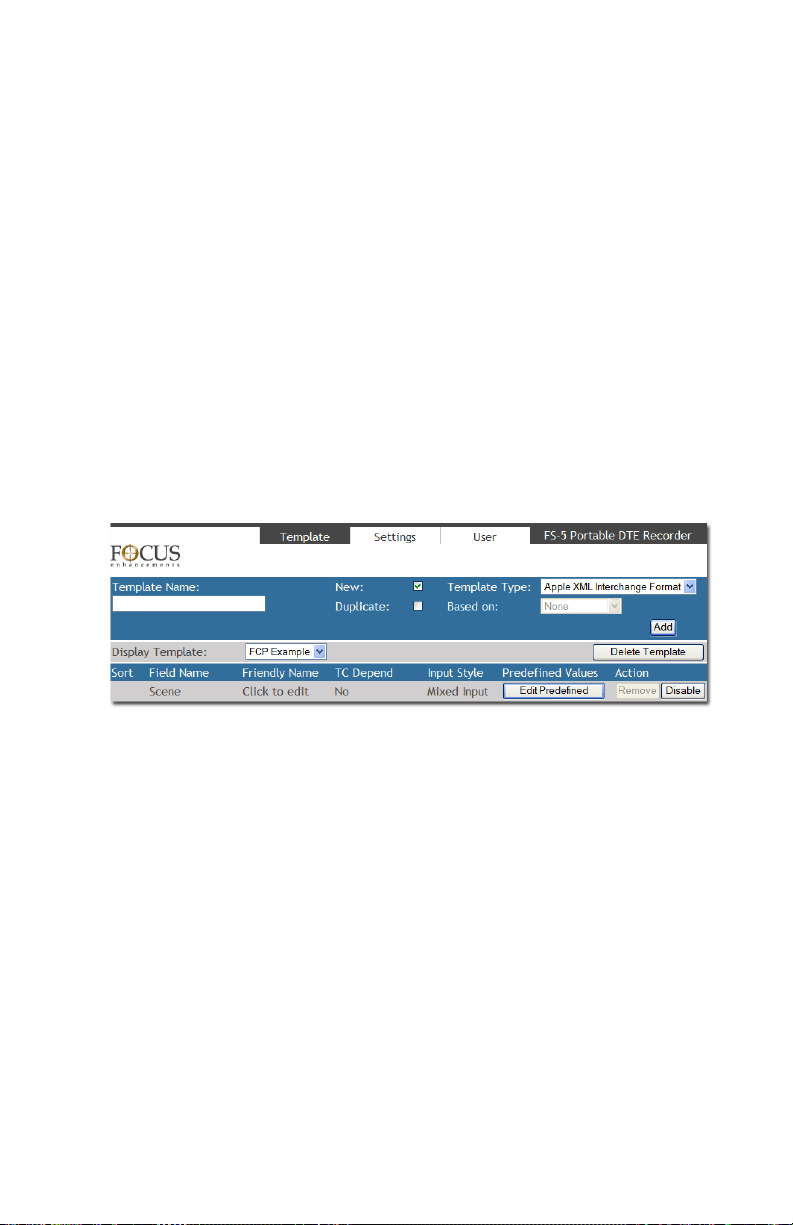
Metadata
Metadata Pages and Functions
MR-HD100 Metadata has four pages representing specific functions
that are divide into two groups:
hidden group, click on the
•
User group includes the pages:
Tem plat e - for creating and managing templates,
Settings - template export/import and reel matching
parameters,
Admin group includes the pages:
•
Entry - for entering and setting metadata values in a template,
Export - for specifiying the export of metadata based on
template type,
Template
User and Admin. To display the
User or Admin tab.
Not accessible with PDA type devices.
Use the
Tem pla te page to create, modify, and manage the metadata
templates stored in the MR-HD100 database:
• Display an existing template.
• Enable or disable specific metadata fields on a template.
• Edit predefined values for specific fields.
• Duplicate an existing template and assign it a new name.
• Create a new template using either the Apple XML
Interchange Format or a Custom format.
MR-HD100 Media Recorder
53
Page 74
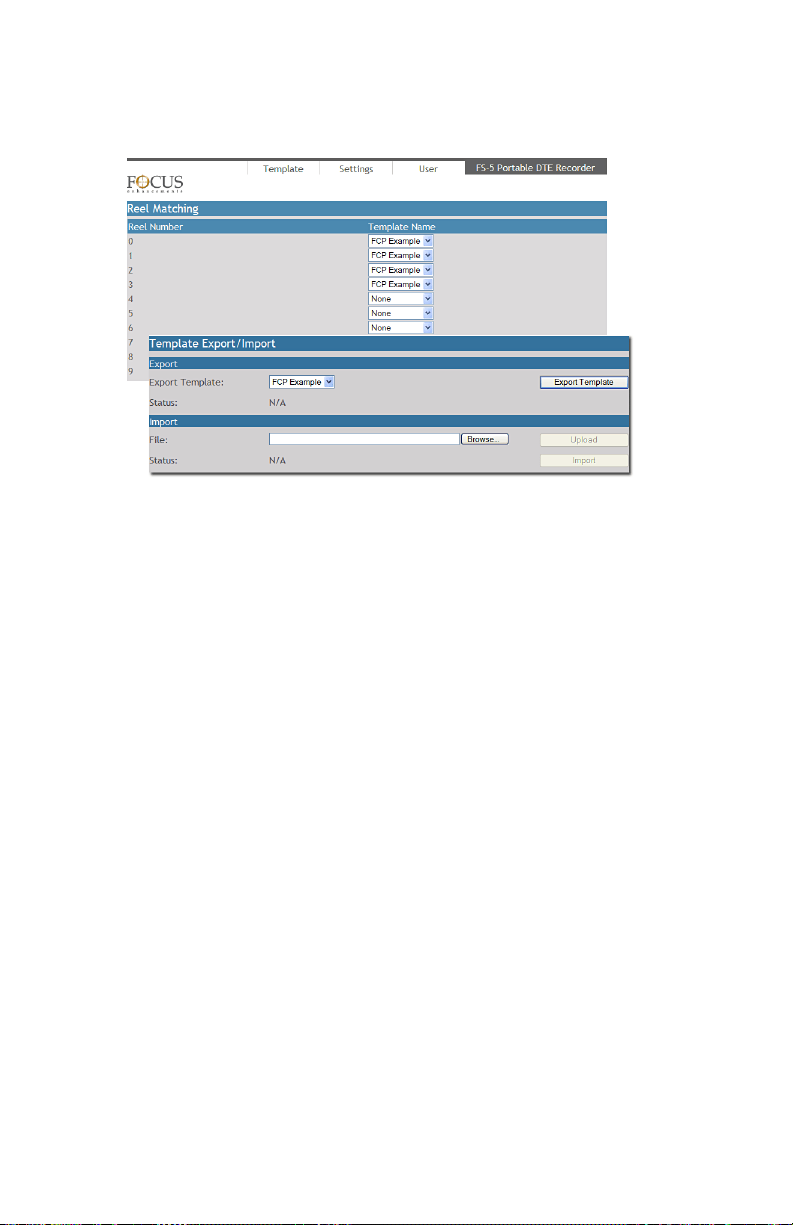
Metadata
Settings
Not accessible with PDA type devices.
Clicking on
• Reel Matching
This function allows the User to assign specific metadata
templates to particular MR-HD100
the template’s name.
The User can, without leaving the Home screen, employ one
of the function keys to quickly select a template by picking a
REEL with the template’s name. The Entry page automatically
changes to the template assigned to the REEL.
This function requires that the
option
• Template Export/Import
This function permits the User to export a template from the
MR-HD100 database to the MR-HD100 drive where it is
available for downloading.
In addition, the User can import from the input device
templates created in other MR-HD100s
• Delete Template
This function allows the User to select and delete templates
from the MR-HD100.
Settings opens a page with the functions:
TEMPLATE be selected, see REELS PREF on page 119.
REELs. The REEL then has
SETUP menu > REELS PREF
MR-HD100 Media Recorder
54
Page 75
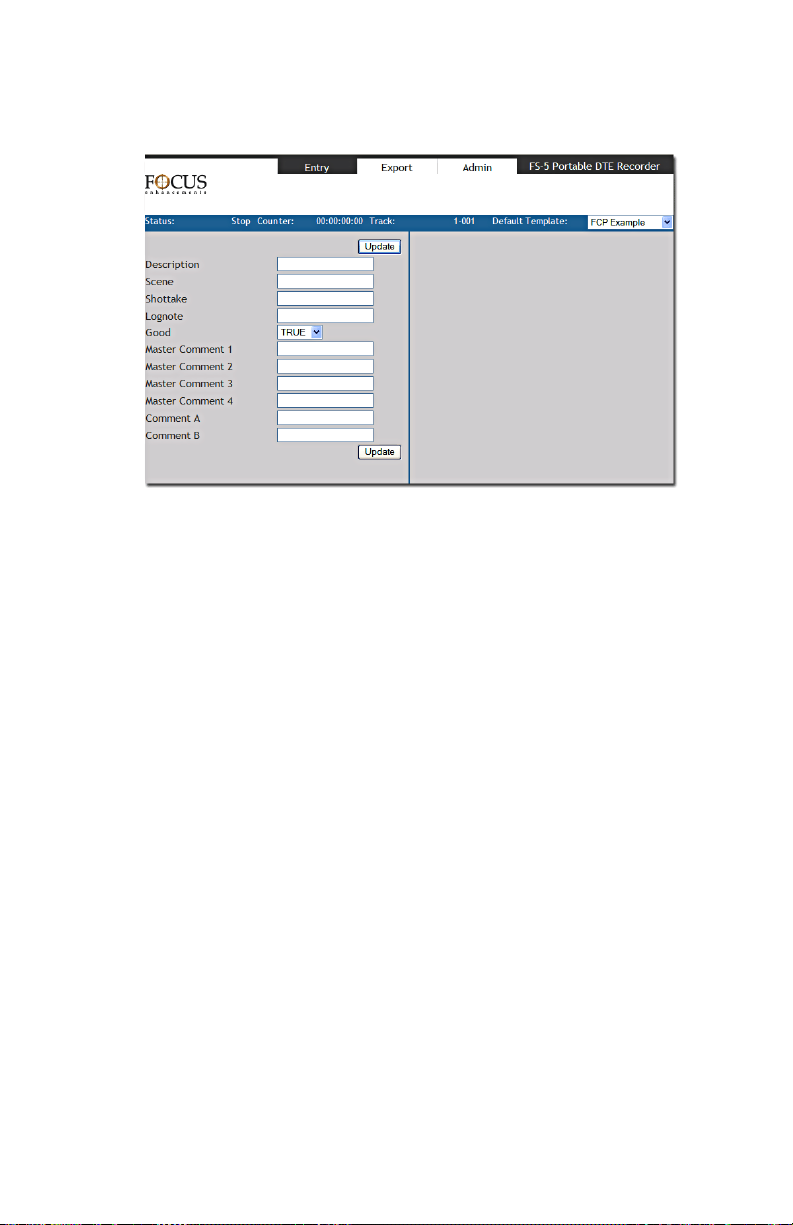
Metadata
Entry
Use the Entry page to enter metadata for a video clip.
Verify that the desired template is selected and appears in the
Default Template field. A template must be selected before
recording or playback begins.
Initially the Entry tab appears blank, however, once the MRHD100 is in Record, Pause or Playback mode, the template’s fields
appear and are active.
It is possible to add metadata to a clip after it is recorded by setting
up the Entry page and then entering Playback mode.
In addition, the Entry provides an information bar where the
current MR-HD100 status (Rec, Play, Pause, Stop), current
timecode, and track number are displayed.
MR-HD100 Media Recorder
55
Page 76
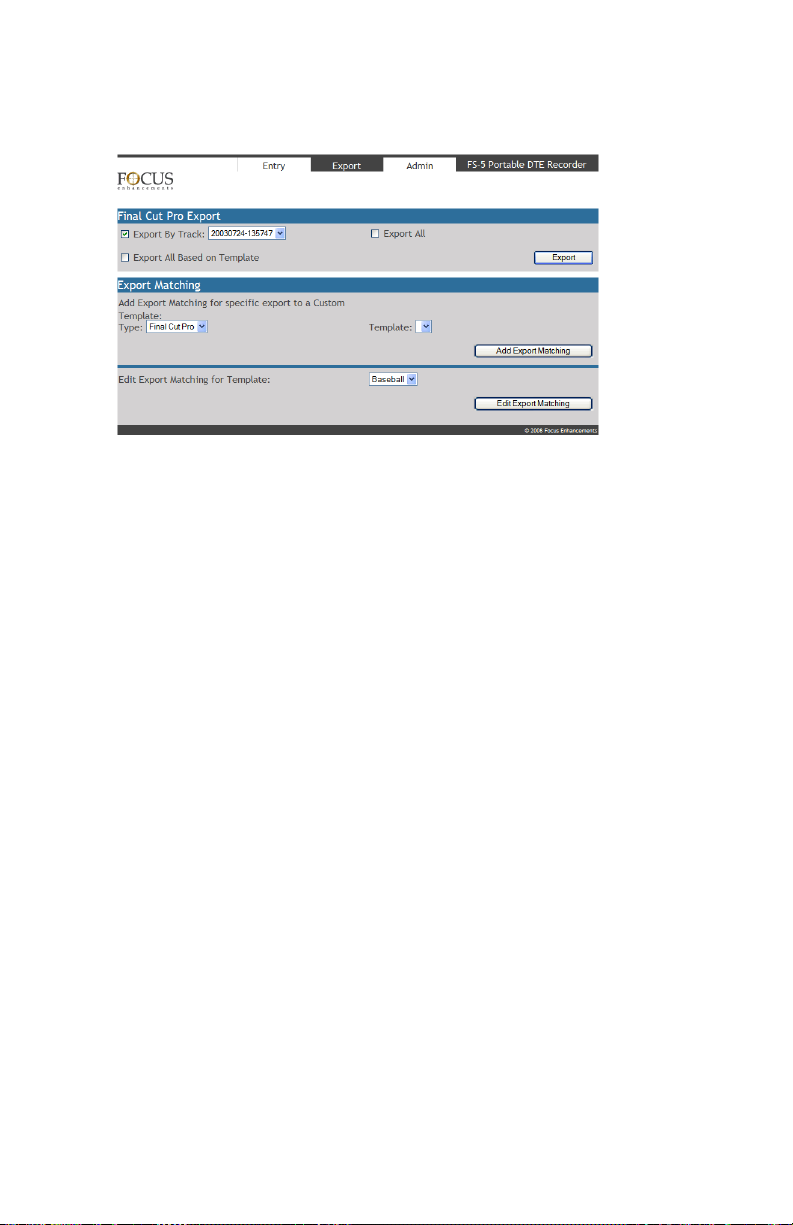
Metadata
Export
Use Export to manually export video clip metadata files from the
MR-HD100 database to User accessible xml files. The file name of
the xml file identifies it as belonging to a specific video clip.
Export creates xml metadata files for specific NLEs, for example
Final Cut Pro, or from a Custom user defined template.
NLE - Final Cut Pro
In Final Cut Pro, the User drags or imports the xml file(s) into
the Final Cut browser, see
Importing Video Clip and Metadata on
page 176. The application automatically locates the associated
video clips and imports them into the editor browser. From
there the User can insert the xml template and video files into
the Final Cut timeline. Using the attached metadata, the User
can review the metadata in the Final Cut browser and use NLE
to search for and through the video clips.
For more information about NLEs refer to
(NLEs)
on page 171.
Non-Linear Editors
ProxSys Media Servers
Using the ProxSys Media Transfer Utility, the User can select the
xml files and import them into ProxSys systems. ProxSys
automatically locates the video clips associated with the xml
file(s) and imports them into the ProxSys system where the
metadata provides search capability. For more information refer
to the ProxSys Media Transfer Utility User Guide.
MR-HD100 Media Recorder
56
Page 77
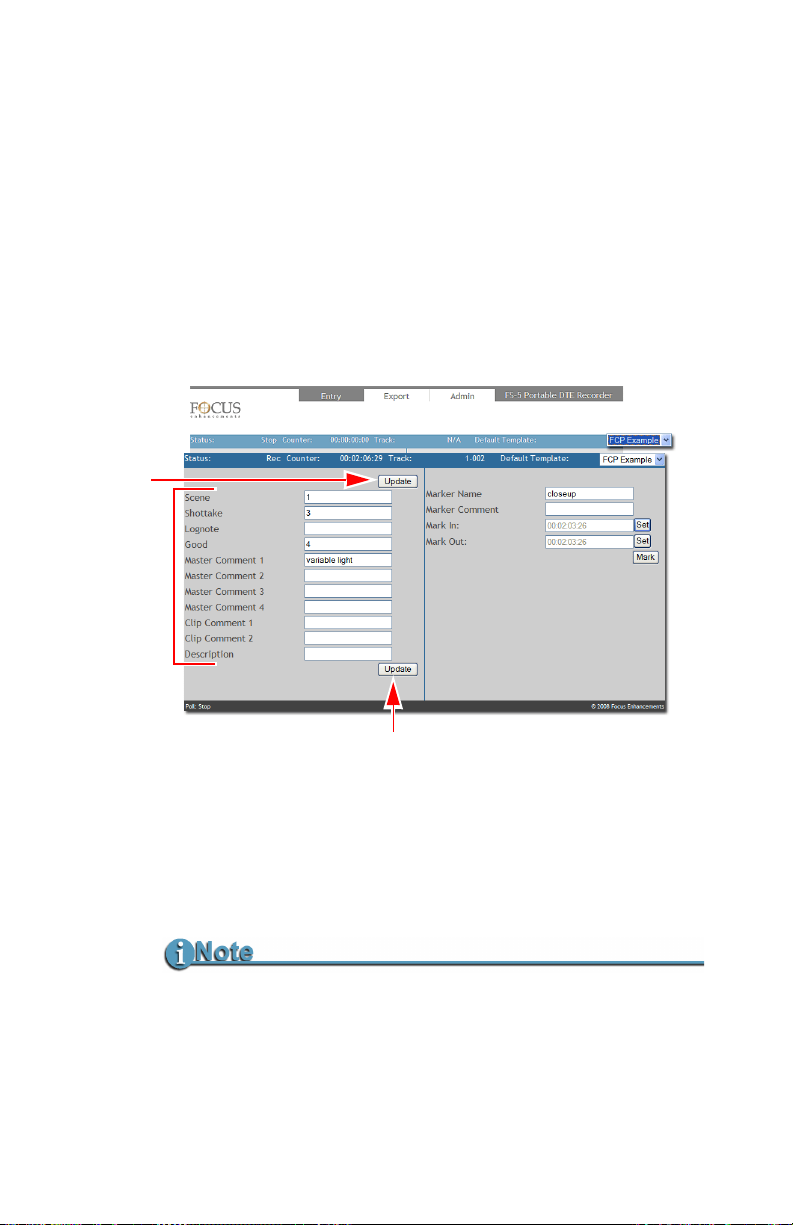
Metadata
2
5
5
6
4
Entering Metadata
This procedure assumes that there is a ready to use template, for
instance the
not necessary to modify it or create a new one.
Use the following steps to enter metadata during Record, Play, and
Stop modes.
1. Open the metadata function using a web browser and the MR-
FCP Example supplied with the MR-HD100, and that it is
HD100 web-based interface.
Initially, the
Entry page is empty.
The style of MR-HD100 user interface displayed, depends on
the type of device used to access it: iPod Touch, iPhone or
other.
2. Select the
This must be done before recording begins.
3. Begin to record or playback or enter Stop.
Entering Metadata During Stop Mode
Metadata entered during Stop mode is assigned to the previous
video clip.
Temp late to use.
The fields of the selected metadata template appear on the
Entry page.
MR-HD100 Media Recorder
57
Page 78

Metadata
4. Enter data into the metadata fields.
This sets the video clip-based metadata.
The type of data entered depends on the type input allowed by
the field: variable, predefined, and mixed. For definitions of
input types see
5. Click
Update.
Creating A Custom Template on page 66.
6. Set timecode markers.
It may be necessary to set markers to indicate the location of a
particular frame or sequence of frames in the video clip. The
names of the markers depends on the template used and the
template type. Generally, there is an In (Start) maker for the
beginning and an Out (Stop) for the end of the marker
selection.
• Clicking on a
Set button places the marker and displays
the timecode location of the marker.
• Clicking on the
Marker button resets the markers to
00:00:00:00.
Continue recording until finished.
Updating Metadata - One Set Per Video Clip
During recording, if different data is entered in the metadata fields
and the Update button clicked, the new data replaces the
previous entry for the video clip.
Repeat the procedure to insert the same or different metadata for
each video clip recorded.
Saving Metadata
There is no distinct Save step.
Clicking on the Update or Mark buttons writes the metadata to the
MR-HD100 database and into a specific record assigned to the video
clip. Changing the metadata in the template changes in real time, the
video clip’s record in the database.
MR-HD100 Media Recorder
58
Page 79
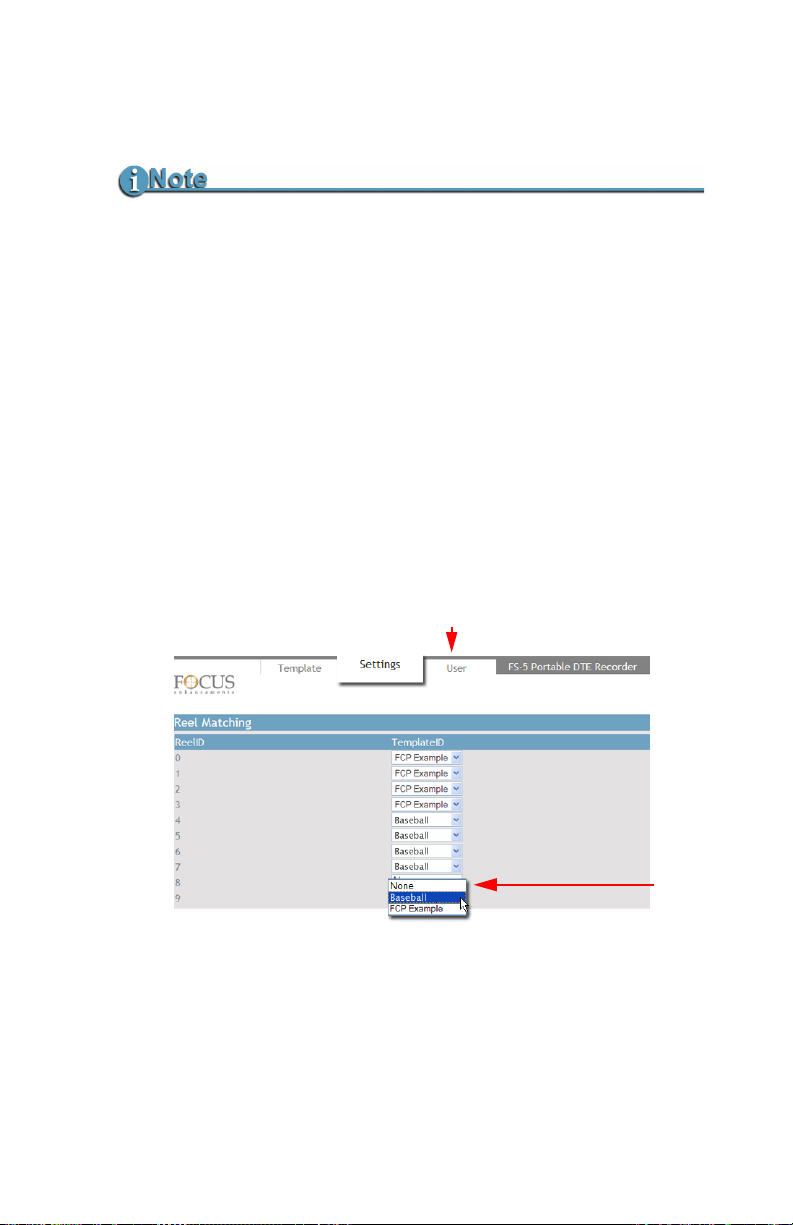
Metadata
5
1
Reel Matching and Templates
PDAs Can Not Access the Settings Page
Because of their limited functionality, PDA type devices can not access
the Settings or Metadata Template pages.
Performing Reel Matching must be done with a computer.
The REELs functions permit the User to group video clips into Reels,
Assigning Clips to Reels on page 124.
see
This function requires that the
TEMPLATE be selected, see REELS PREF on page 119.
Reel Matching is a function that allocates a template to specific reel or
SETUP menu > REELS PREF option
reels. When a Reel is assigned to a video clip the matched template is
applied to the clip and when recording begins, the designated
template automatically appears in the
1. Click on the
Settings tab to display Reel Matching.
Entry window.
The Settings page appears.
2. For each of the Reels, click on its
Template ID dropdown menu
and select a template. From now on, by selecting a clip to a
particular reel, the reel will have the name.
MR-HD100 Media Recorder
59
Page 80

Metadata
Creating A Template
PDAs Can Not Access the Metadata Admin Template Page
Because of their limited functionality, PDA type devices can not
access the Metadata Admin Template or Settings pages.
Creating templates must be done with a computer.
It is possible to create a new template by:
• Duplicating and modifying an existing template.
The duplicate template has the same metadata fields and
settings as the original. The User is restricted to disabling/
enabling the metadata fields or changing their predefined
values.
• Constructing a new template using the Apple XML Interchange
Format.
This method creates a template that conforms to the selected xml
format and with all the metadata fields set to their defaults. The
User is restricted to disabling/enabling the metadata fields or
changing their predefined values.
• Build a new template using an empty custom template.
This procedure permits the User to create a unique template by
adding metadata fields and defining their values and type of
input.
• Import a template created on another MR-HD100
This procedure provides the ability to import templates stored
on the input device -- computer or PDA.
.
TC (timecode) Depend Metadata Fields
TC Depend identifies if whether a metadata field:
• Depends on video timecode: metadata for specific TC markers,
either a single point or a Mark IN and Mark Out point.
• Does Not Depend on video timecode: such as whole clip based
metadata.
These are not editable in a Apple xml template because the format
only supports a default set of metadata values.
MR-HD100 Media Recorder
60
Page 81
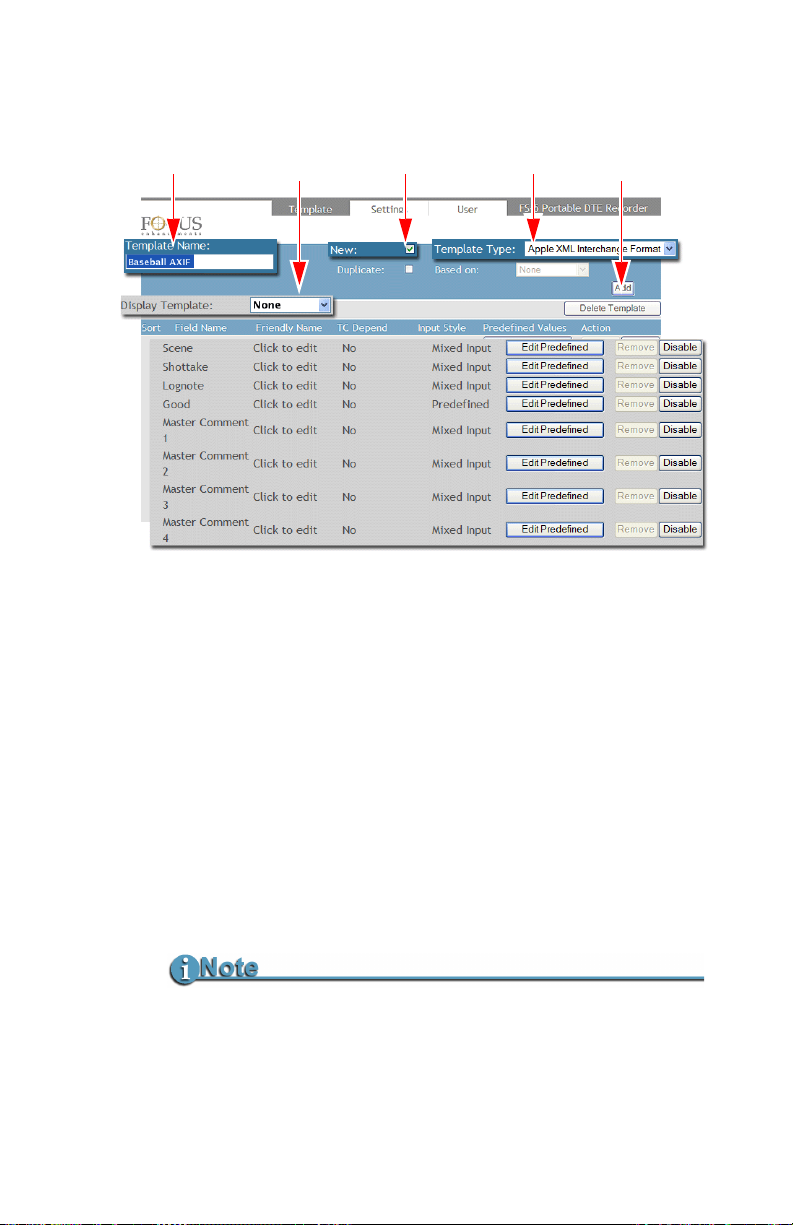
Creating A New Template
1 2 3 4 5
This method uses the Apple XML Interchange Format listed in the
Template Type dropdown menu.
1. Enter a unique name in the
2. Verify that the Display Template field is set to
3. Place a check in the
New check box.
4. Select the metadata template to use from the
dropdown menu.
Apple XML Interchange Format is the default xml document
type.
5. Click
Add.
The template opens displaying all of the metadata fields
available in the xml template. The fields are set to their default
states and values.
Template Name field.
Metadata
None.
Tem p late Type
Final Cut Pro (FCP) Example Template
FCP Example is a generic, Final Cut Pro compatible template
that employs the standard Apple XML Interchange Format. The
information logged into these fields is viewable using the FCP
application browser window, once it is imported into FCP.
MR-HD100 Media Recorder
61
Page 82
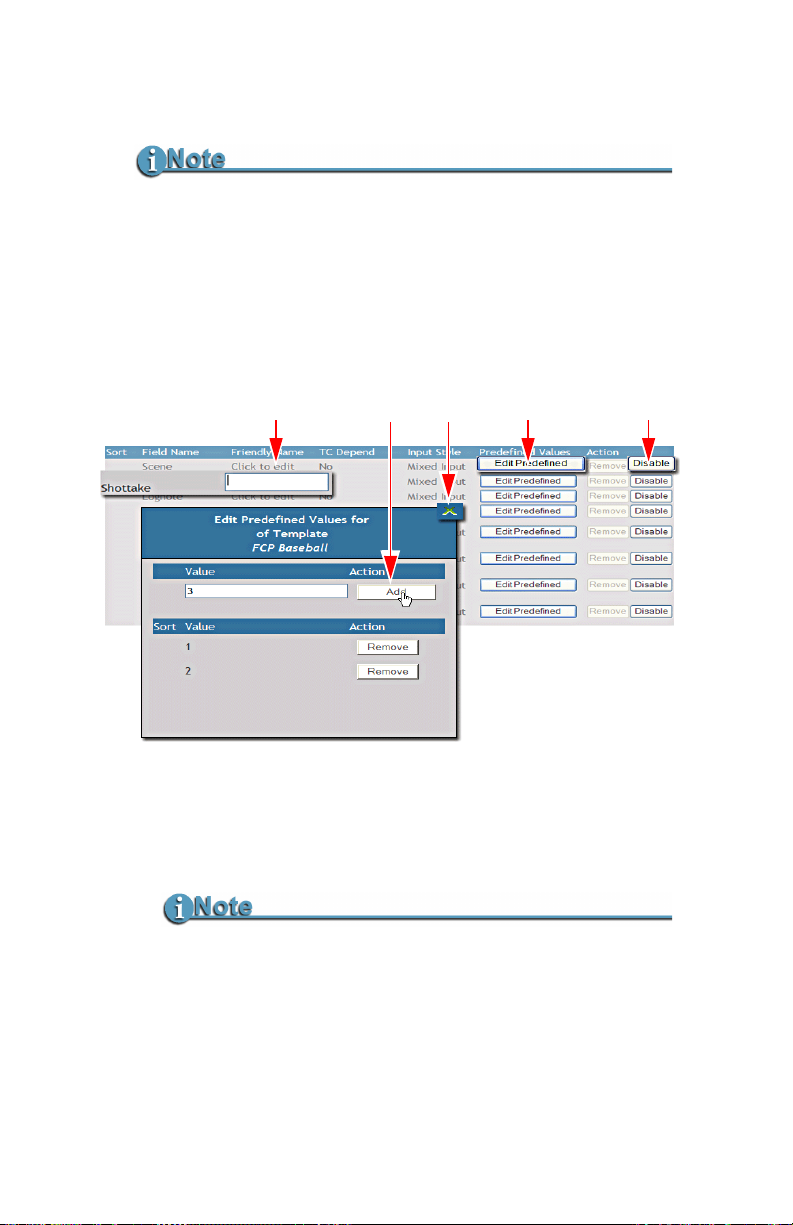
Metadata
7
8 9
610
6. Verify that the necessary metadata fields are enabled.
Enable Only Necessary Fields
When logging metadata in the field, it may be difficult to log more
than a few metadata fields for a given shot (although it is
possible to log as many as you need with MR-HD100). To be
more efficient, disable non-critical fields so that they do not
distract while logging.
Disable/Enable button is a toggle switch. Its label indicates
The
the action that will occur, if it is selected.
7. Define the metadata values for each metadata field.
Click on the
Edit Predefined button to view or edit the
metadata values for specific metadata fields.
Edit Predefined Values dialog box appears.
The
Predefined Values
Predefined values offer the User a list of set items that
makes logging more consistent and quicker.
8.
Add and Remove predefined values.
Enter values, one at a time and click on
Add.
Add values in the order they are to appear.
MR-HD100 Media Recorder
62
Page 83

Metadata
9. Click on X to close the Edit Predefined button.
10. (Optional) Replace the metadata item’s Field Name with a
more meaningful
Click on
Click to Edit in the Friendly Name column.
Friendly Name.
A text field appears where the User can enter a more
meaningful label for the metadata Field Name. The Friendly
Name replaces the Field Name on the Entry page. The
Friendly Name does not change the Field Name in the MRHD100 database.
The template is now ready for use.
TC Depend and Input Style In AXIF and Final Cut Pro
In Apple XML Interchange Format (AXIF) templates the settings
for the TC Depend and Input Style fields are grayed out because
their settings are fixed and can not be changed.
• By default, most but not all of the metatdata fields are set as
not timecode dependent.
• All the metadata fields have their Input Style set as Mixed
Input which permits the use of both predefined and
variable, user entered, values.
Final Cut Pro supports these settings because they are template
defaults.
Creating a Custom Template allows the user to set TC Depend
and Input Style defaults to other values which Final Cut Pro will
then support. For more information, see
Tem plat e
on page 66.
Creating A Custom
MR-HD100 Media Recorder
63
Page 84
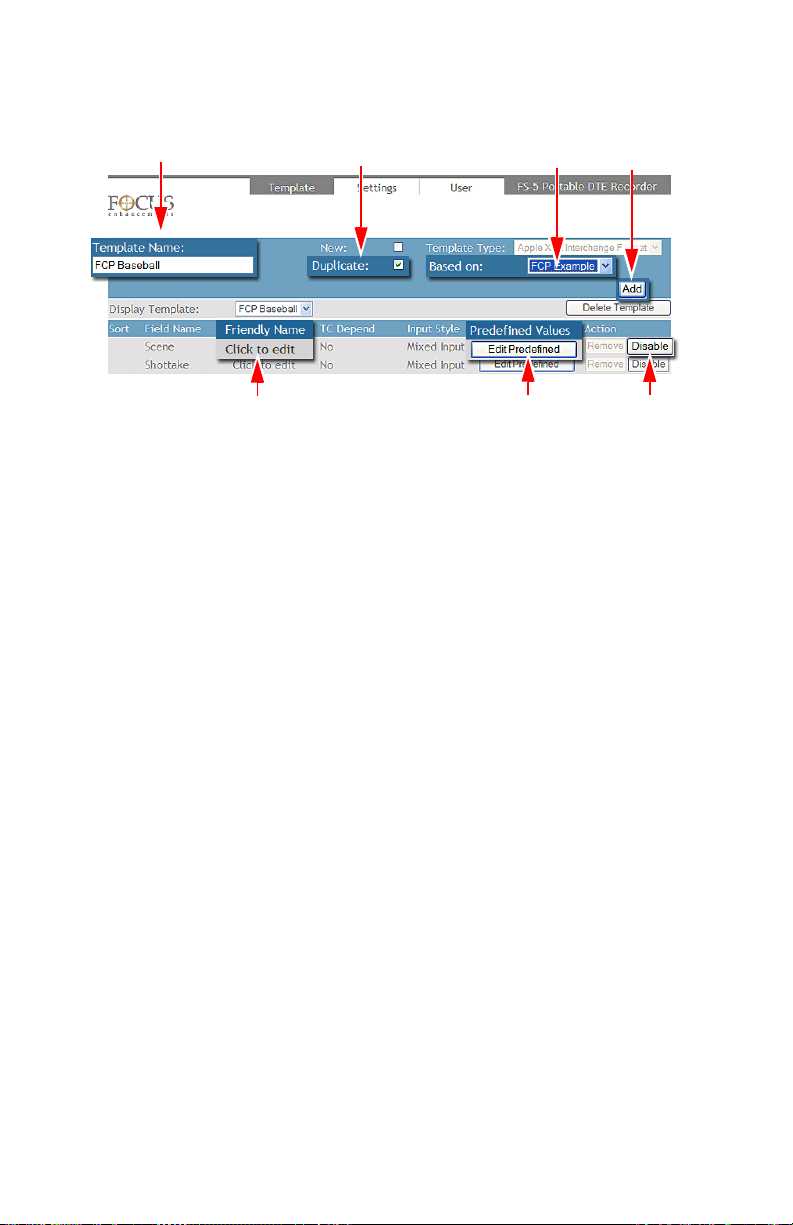
Metadata
1
2
3
4
5
6
9
Duplicating a Template
1. Enter the name of the new template in the Template Name
field.
2. Place a check mark in the
3. Select the template to duplicate from the
dropdown menu.
4. Click
Add.
• The new template appears with all of the metadata
fields found in the parent template.
• The new template’s name appears in the
Temp late
dropdown menu.
5. Determine which fields are active in the template.
It is possible to
Disable/Enable each of the metadata fields in
the template by clicking on its Action button. The button
label indicates the action available. If it is grayed-out it is
inactive.
6. Define the metadata values for each metadata field.
Click on the
Edit Predefined button to view or edit the
metadata values for specific metadata fields.
Duplicate check box.
Based On
Display
MR-HD100 Media Recorder
64
Page 85
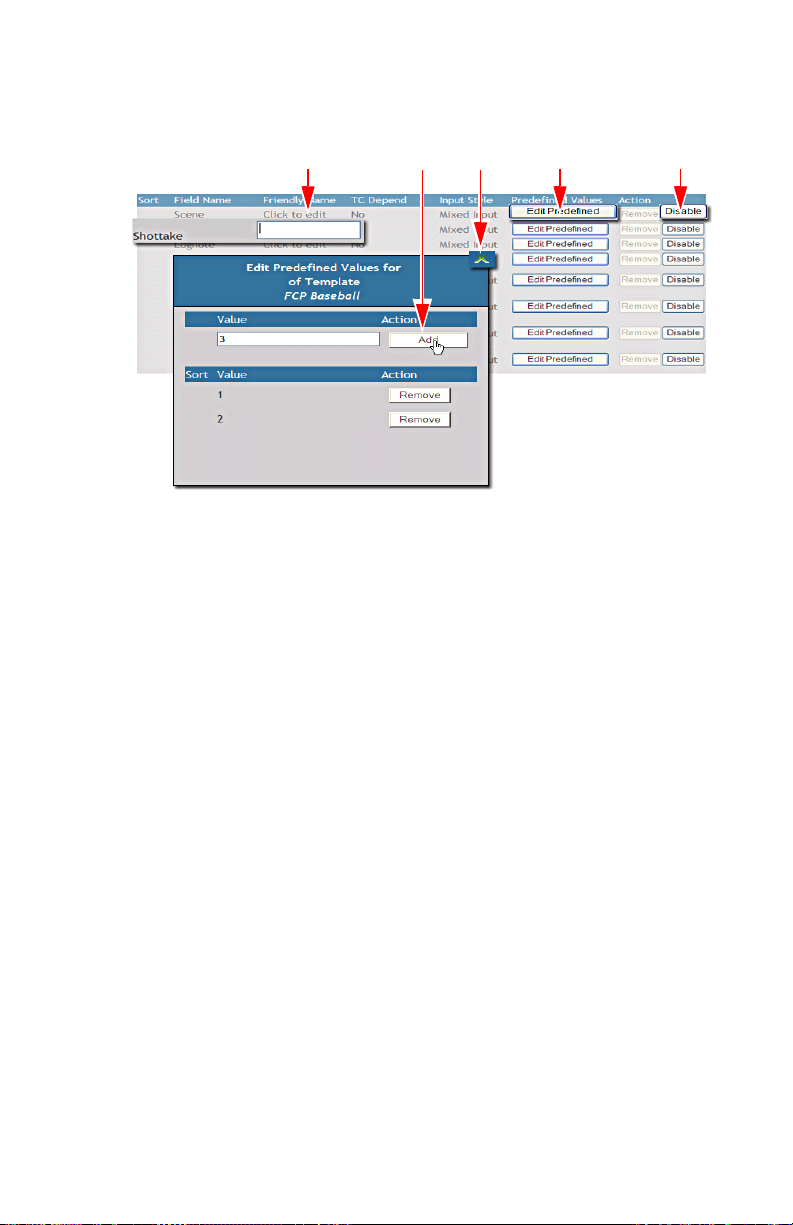
Metadata
6
7 8
59
The Edit Predefined Values dialog box appears.
7.
Add and Remove predefined values.
Enter values, one at a time and click on
Add.
Add values in the order they are to appear.
8. Click on
X to close the Edit Predefined button.
9. (Optional) Replace the metadata item’s Field Name with a
more meaningful
Click on
Click to Edit in the Friendly Name column.
Friendly Name.
A text field appears where the User can enter a more
meaningful label for the metadata Field Name. The Friendly
Name replaces the Field Name on the Entry page. The
Friendly Name does not change the Field Name in the MRHD100 database.
The template is now ready for use.
MR-HD100 Media Recorder
65
Page 86
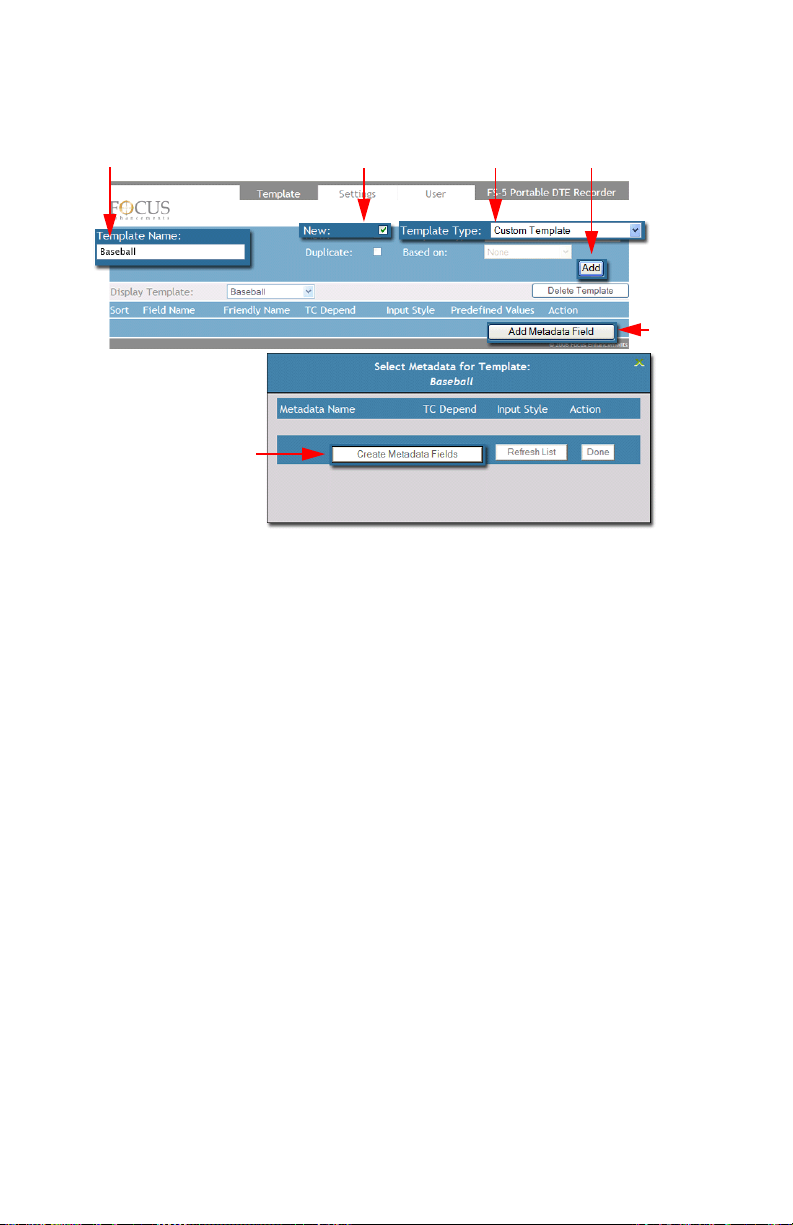
Metadata
1
5
2
3
4
6
Creating A Custom Template
Create custom templates when importing metadata into a NLE
that is not supported by the MR-HD100.
Suppose that it is necessary to create a metadata template for
recording baseball games, that is then used in a proprietary NLE.
To assist the producer and editor the metadata must be specific to
the game of baseball.
To create a new custom template:
1. Enter the name for the custom template, for example
Baseball, in the
2. Change
3. Verify that
4. Click on
The name of the template appears in the Display Template
field along with the template’s column header.
5. Click on the
The Select Metadata for Template dialog box appears. This
box is empty.
6. Click on the
A new window appears with a work space for creating
metadata fields appears.
MR-HD100 Media Recorder
66
Template Name field.
Tem p late Type to Custom.
Display Template is set to None.
Add to create the empty template.
Add Metadata Field button.
Create Metadata Fields button.
Page 87
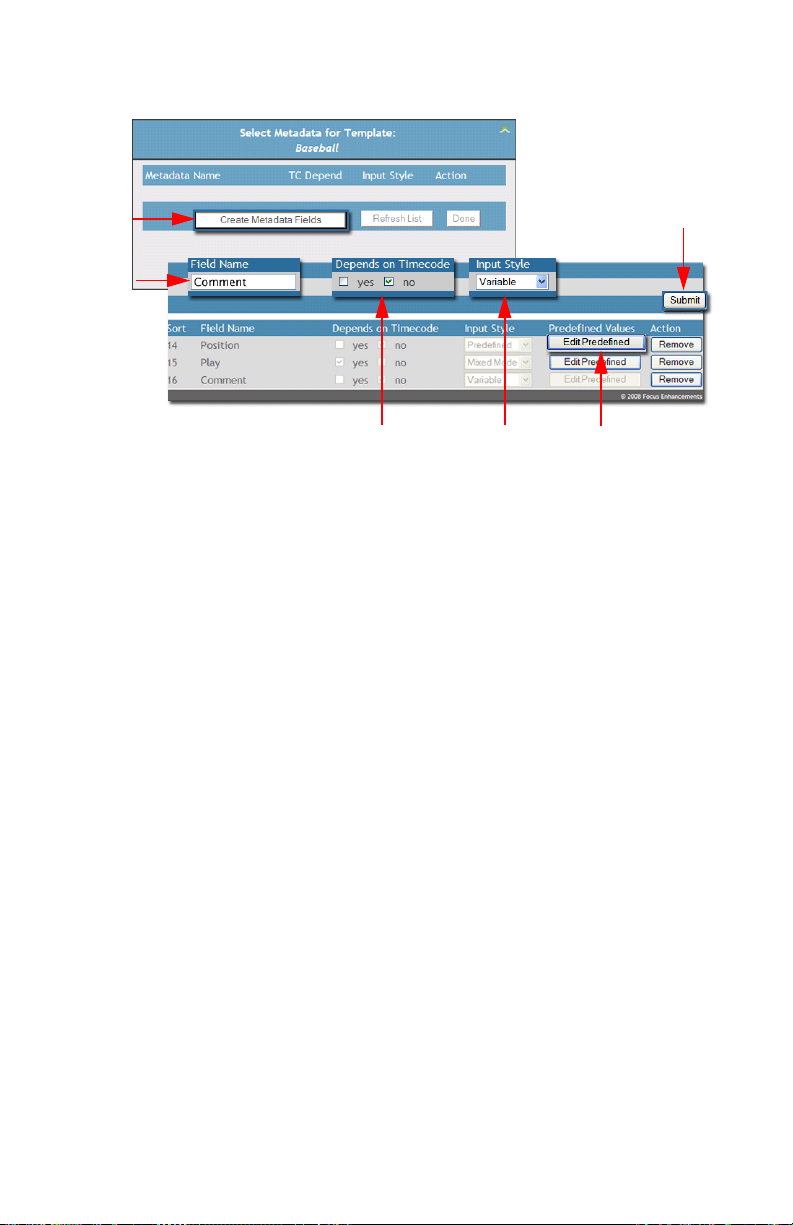
Metadata
8
10
11
6
7
9
7. Enter a name for the metadata field.
8. Set timecode dependence
yes - if metadata relates to timecode.
no - if metadata is independent of time, i.e. notes, remarks,
etc.
9. Set the Input Style, this is required.
This is the type of value input.
Varia ble
The user may enter any character string.
Predefined
This creates a dropdown list of predefined terms that the
user selects from. After the field is submitted and appears in
the list, it is necessary to add the predefined values: refer to
Step 15.
Mixed Mode
This is a combination of
Predefined and Variable inputs. The
User first selects a term from a dropdown list and then can
enter more data as a text string in an open field.
After the field is submitted and appears in the list, it is
necessary to add the predefined values: refer to
10. Click
Submit to post the new fields to the list.
The metadata field appears as a new item in the list below.
11. Click on the
Predefined or Mixed variables.
add
Edit Predefined button for a metadata field to
Step 15.
MR-HD100 Media Recorder
67
Page 88
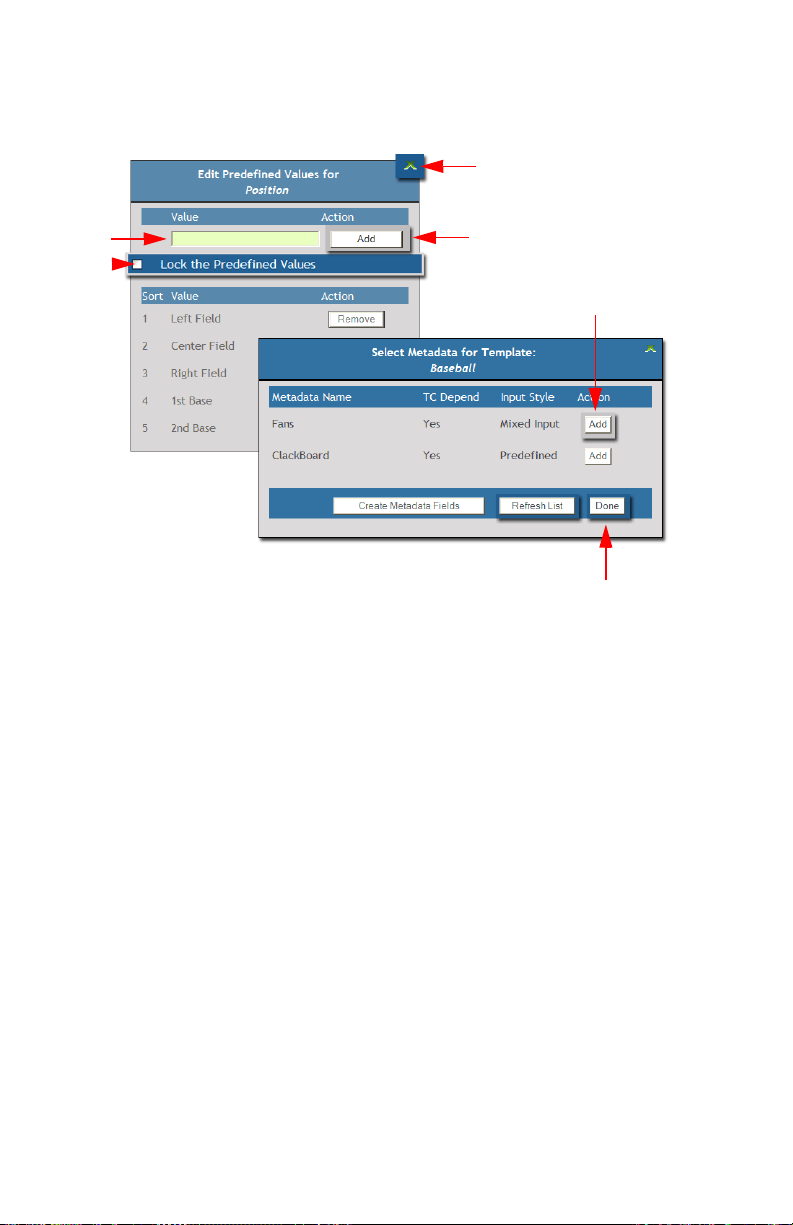
Metadata
17
12
15
13
14
18
The Edit Predefined Values dialog box opens.
12. Enter each value separately.
13. Click
Add to place value in list.
Add the values in the order they should appear.
Click on the
14. Click on
from adding other data to the list during metadata entry.
Remove button to delete a value.
Lock the Predefined Values box to prevent the User
• This restricts the list to only those values already
entered.
• Default is that the User can add other values to the list.
15. Click on the
X in the upper right corner to close the dialog
box.
16. Metadata fields appear in the list of fields from which to
select.
17. Click a field’s
Add button to place it on the template.
When a field is added to the template, it is removed from the
list and, if a field is removed from the template, it reappears
on the select list.
Clicking the
MR-HD100 Media Recorder
68
Refresh button updates the list.
Page 89
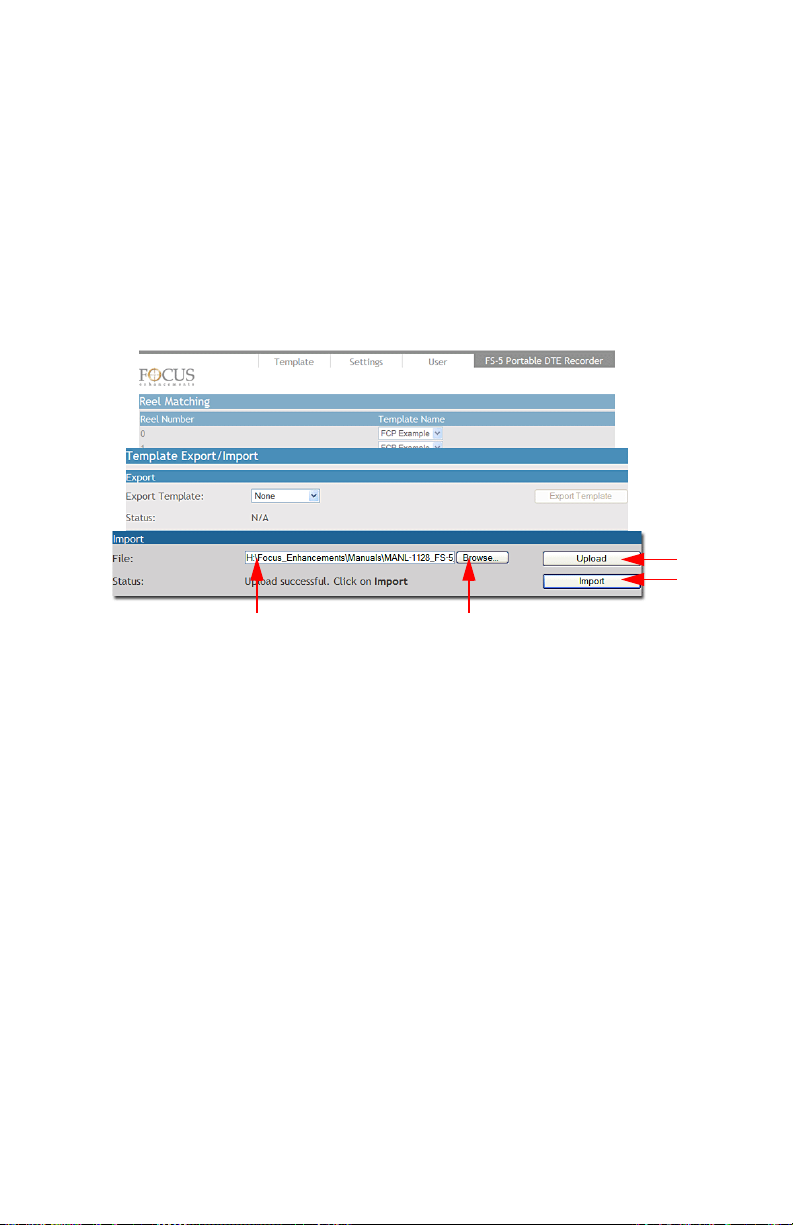
Metadata
5
23
6
18. Click on Done to finalize adding the fields to the template.
The fields now appear in the new template and the Select
Metadata for Template dialog box closes.
19. Close the still open Add Metadata Window.
The template is now ready for use.
Importing MR-HD100 Templates
The MR-HD100 provides the ability to import templates created on
other MR-HD100 units and stored on a local computer or network
drive.
1. Open the
2. Click on the
Settings page.
Browse button in the Import section and locate
the template to import.
A standard file system browser opens.
3. Select the template file.
The file must be a template exported from a MR-HD100
using the
the
4. Click the
The path and filename of the template appear in the
Template Export function. The file is identified by
.fst.xml at the end of the filename.
Open button in the file browser.
Browse
field.
MR-HD100 Media Recorder
69
Page 90

Metadata
5. Click Upload button.
A message appears below the
upload was successful and, if so, to click on
6. Click on the
Import button.
A system message appears below the Browse field,
indicating that the import was successful.
The template
Removing Metadata Fields
Removing A Metadata Field Deletes All Data Stored In Field
In All Records!
Use extreme caution when removing metadata fields.
This applies to metadata fields added by the User and
accompanied by the Remove button.
Browse field, indicating if the
Import.
MR-HD100 Media Recorder
70
Page 91
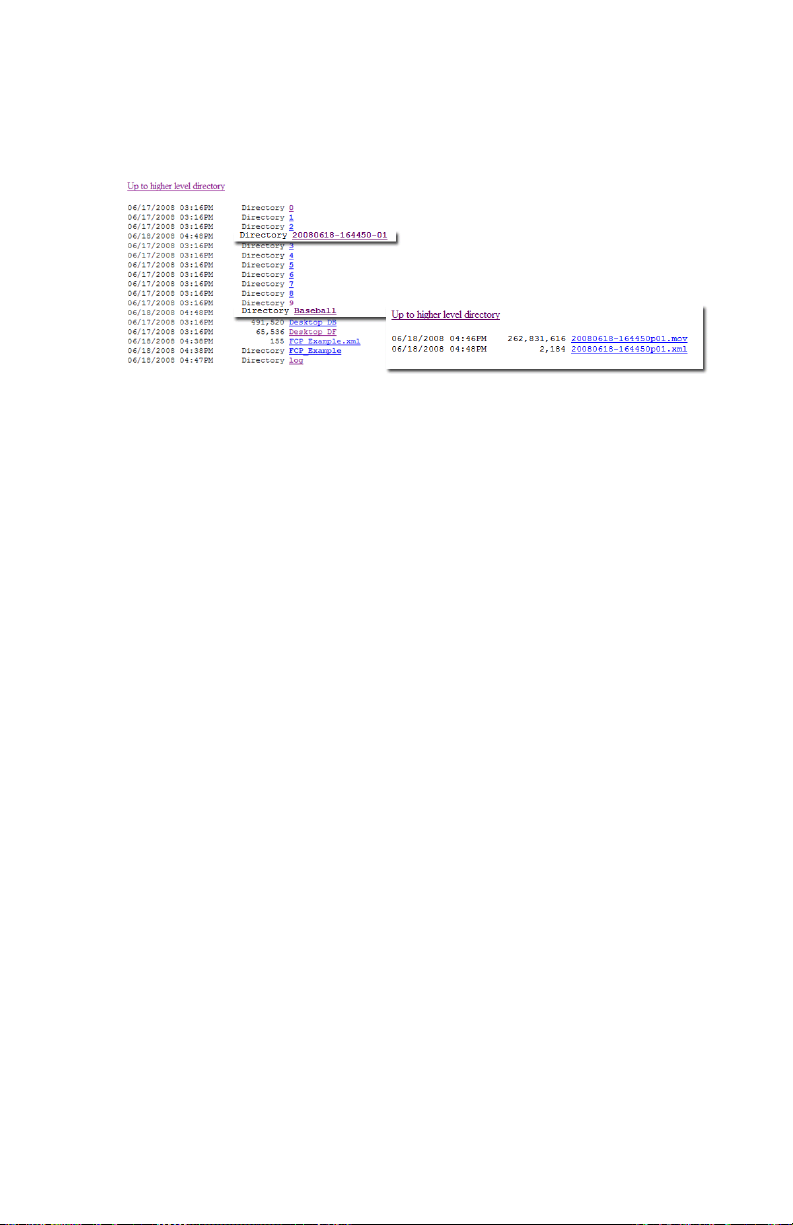
Metadata
Shooting directory for storing video clips.
Directory named for template used.
Video clip and xml file moved to template
directory from shooting directory.
MR-HD100 Drive
Making Metadata into XML Files
During a recording session, video clips are placed in a directory
automatically created by MR-HD100. Metadata is entered into the
MR-HD100 database through the use of xml templates.
To make that data accessible, it is necessary to export it from the
database into a xml file and link it to its video clip. This is done after
the recording and data entry are completed.
There are two methods for doing this.
• AUTO ORG
AUTO ORG is enabled, after video is recorded, run HDD to
If
mount MR-HD100 to a computer, and the video clips and xml
files are placed in the folder with the same name as the template.
In addition, a template xml file is created at the root level of the
drive. This xml files includes links and metadata for all the clips
that were recorded with that particular template loaded.
• Export
Export is a function that allows the User to export the video clips
metadata to either Apple XML Interchange Format or a Custom
formatted xml document.
MR-HD100 Media Recorder
71
Page 92
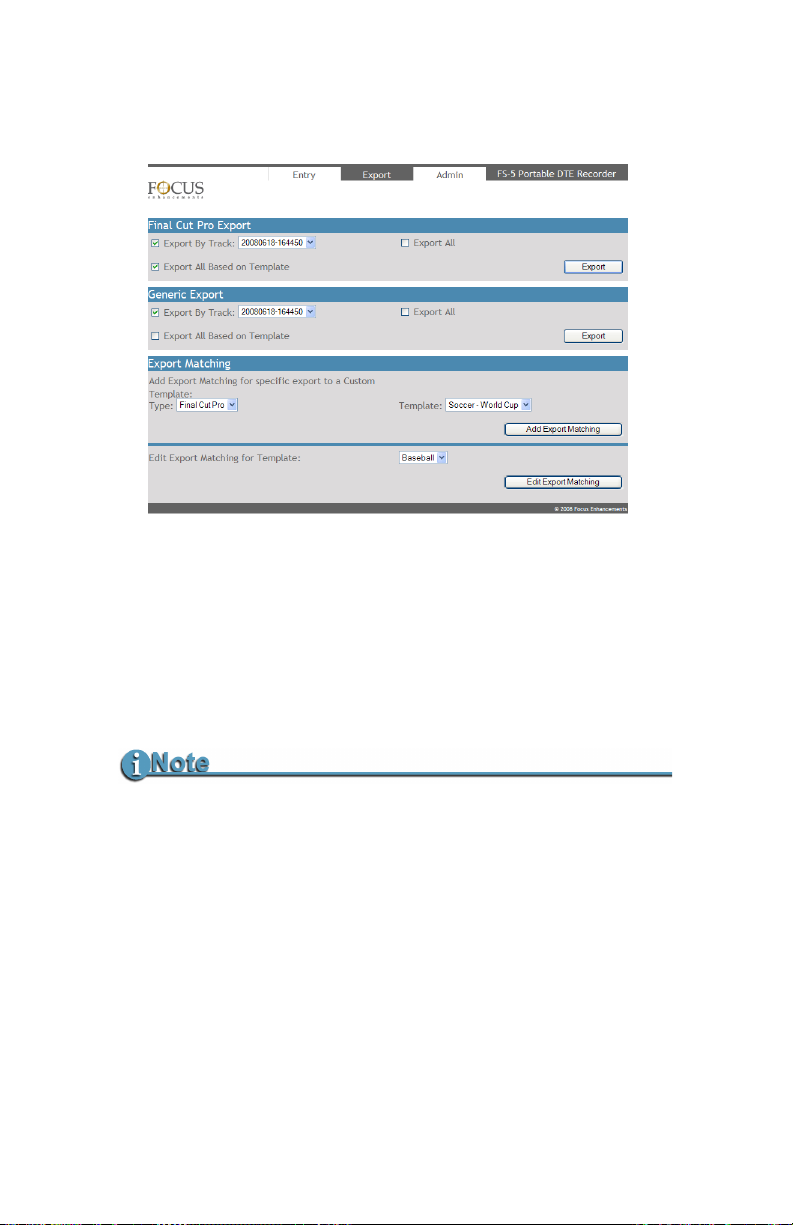
Metadata
Export
Final Cut Pro Export
Use this function to create metadata xml documents for Final Cut
Pro, using the Final Cut Pro XML Interchange Format. There are
three options.
Export By Track
This step is only necessary if AUTO ORG is set to DISABLED
in the SETUP menu.
Use this method to export individual tracks (video clips) with
metadata.
1. Place a check mark in the box
2. Select the
3. Click on
The clip and its metadata document are placed in a directory on
the MR-HD100 with the name of the template used.
MR-HD100 Media Recorder
72
Track (clip) to export.
Export.
Export by Track.
Page 93

Metadata
Export All
Similar to Export By Track, except clicking Export processes all
the waiting video clips.
Export Based on Template
Use this method when a variety of metadata templates were
used during the recording session. This option processes all
video clips that had Final Cut Pro based templates used to enter
metadata.
Generic Export
This option creates a metadata xml document based on the Custom template created.
Use this method to export individual tracks (video clips) with
metadata.
1. Place a check mark in the box
2. Select the
3. Click on
Export.
Export By Track
Export by Track.
Track (clip) to export.
The clip and its metadata document are placed in a directory on
the MR-HD100 with the name of the template used.
Export All
Similar to Export By Track, except clicking Export processes all
the waiting video clips.
Export Based on Template
Use this method when a variety of metadata templates were
used during the recording session. This option processes all
video clips that had the same Custom based templates used to
enter metadata.
MR-HD100 Media Recorder
73
Page 94
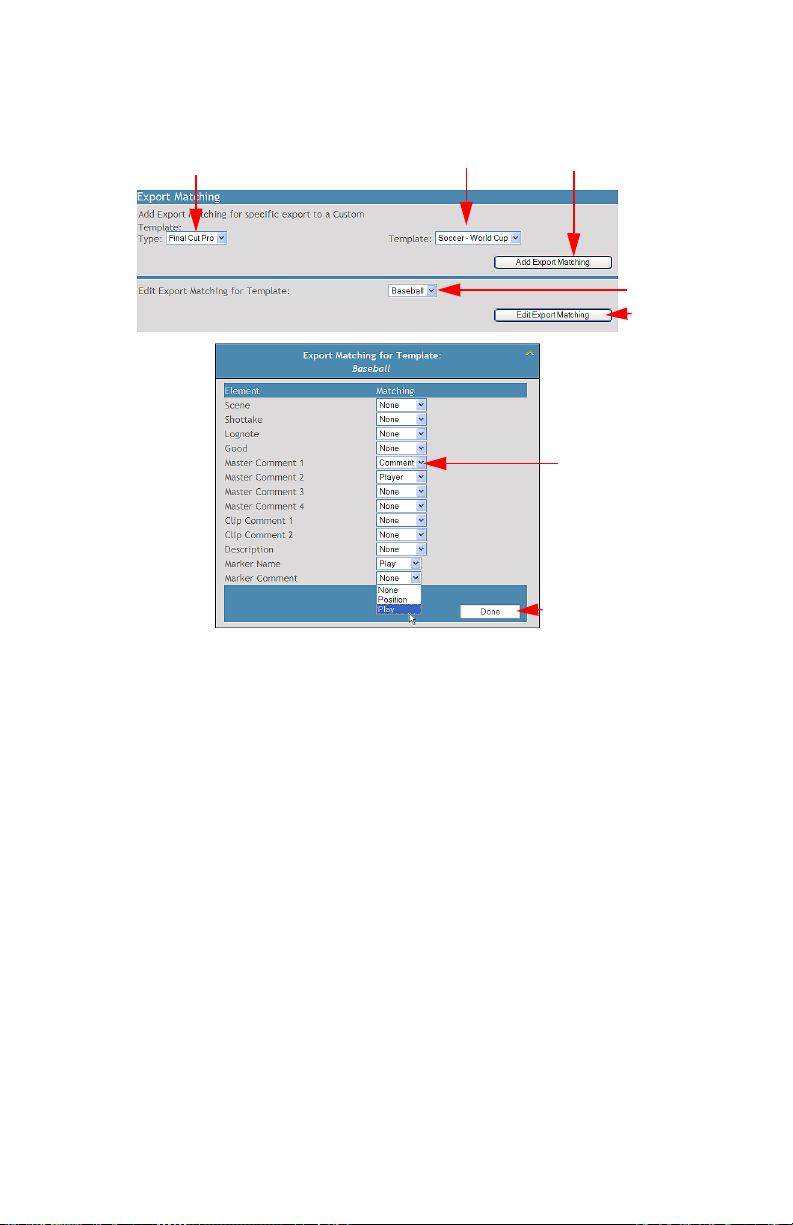
Metadata
1
4
3
2
5
6
7
Export Matching
Export matching allows the User to match similar metadata field
content between Custom and NLE templates even though the
fields may have different names.
1. Select the NLE
Temp l ate Type to match the Custom template
to from the dropdown menu.
2. Select the Custom template from the
Temp late dropdown
menu.
3. Click
Add Export Matching to create database pivot table of
metadata fields. This creates lists from which matches can be
made.
4. Select the Custom template from the Edit Export Matching
Template dropdown menu.
5. Click
Edit Export Matching.
A dialog box opens with the NLE metadata fields listed.
Beside each field is a dropdown menu with a list of the
Custom template fields.
MR-HD100 Media Recorder
74
Page 95

Metadata
6. Select those Custom fields that match to the NLE field. If
there is no match, leave the field at
None.
7. Click Done when all matches are made.
MR-HD100 Media Recorder
75
Page 96
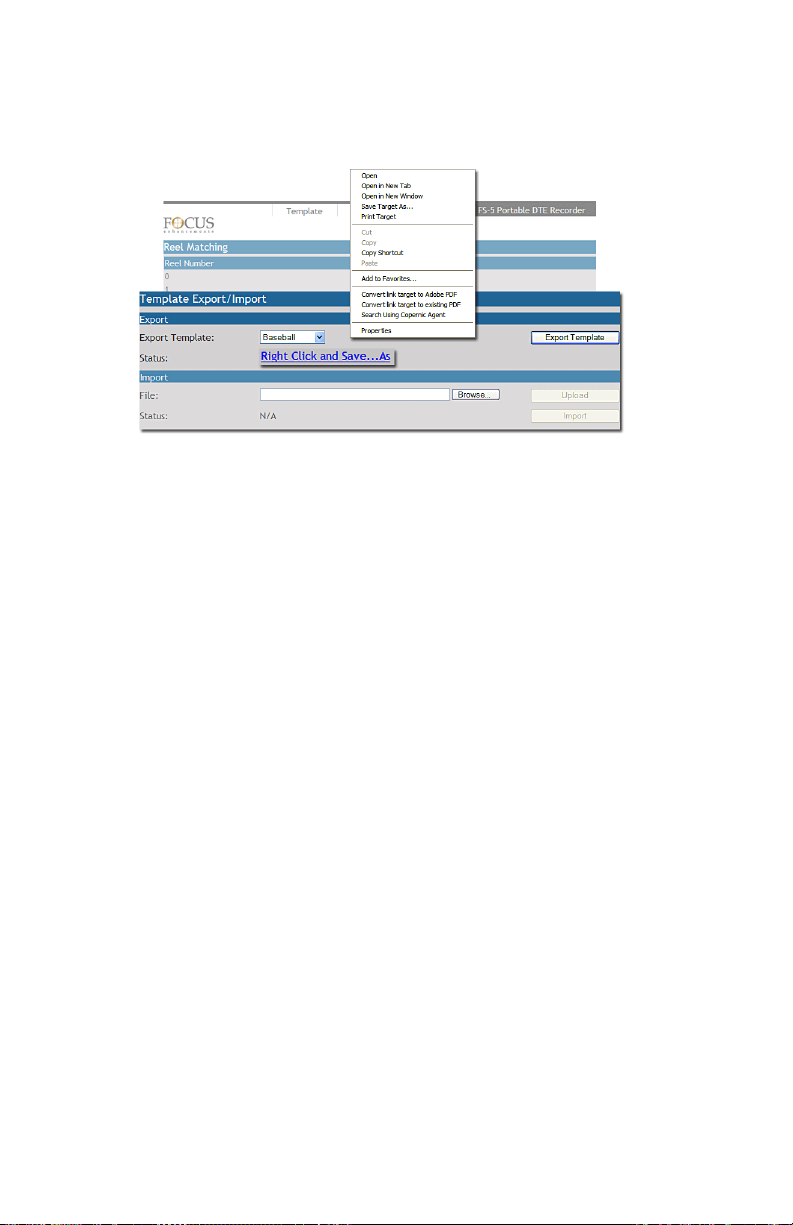
Metadata
Exporting a Template
The MR-HD100 provides the capability of exporting a xml template
to a drive in the input device, computer or PDA, or on the network.
It is first necessary to create the template and then run HDD to mount
the MR-HD100 to the network. The process of running HDD outputs
the template data from the MR-HD100 database as xml template files
to the MR-HD100 directory.
To export the template from the MR-HD100:
1. Go to the
2. Select the template to export from the
dropdown menu in the Template Export/import section.
3. Click on the
A link
dropdown menu.
4. Right-click on the link.
A system file options menu appears.
The menu provides the ability to view, print, and save the xml
file.
5. Click on
A system file browser appears.
6. Locate the destination for the template and
The template now resides on a disk drive. A template exported from
a MR-HD100 can be identified by last 8 characters of its filename:
.fst.xml.
Settings page.
Export Template
Export Template button.
Right Click and Save ... As appears beneath the
Save Target As ... .
Save.
MR-HD100 Media Recorder
76
Page 97

MR-HD100 Functions
This section contains information on the following LCD screens:
General Screen Information 78
OPERATION Screens 83
SETUP Screens 94
FUNCTIONS Screens 120
UTILITIES Screens 126
MR-HD100 screens are organized in a flat hierarchy. Every screen has
a unique name, and it is possible to cycle continuously through the
screens using the
Use the
Scroll Wheel or Up and Down navigation buttons to cycle
through screen items (selections).
Use the Scroll Wheel
Navigation Tip: Jump to Top of Display Using the Left Button
When navigating through the LCD displays and scrolling down into the
menu, press the Left navigation button on the front panel and
immediately return to the top of the display, which allows navigating to
other displays.
Jump to Home display Using Select Button
To return immediately to the Home Screen, navigate to the menu title
at the top of the screen and press the Select button.
Left and Right navigation buttons.
Select button to make a choice.
MR-HD100 Media Recorder
77
Page 98
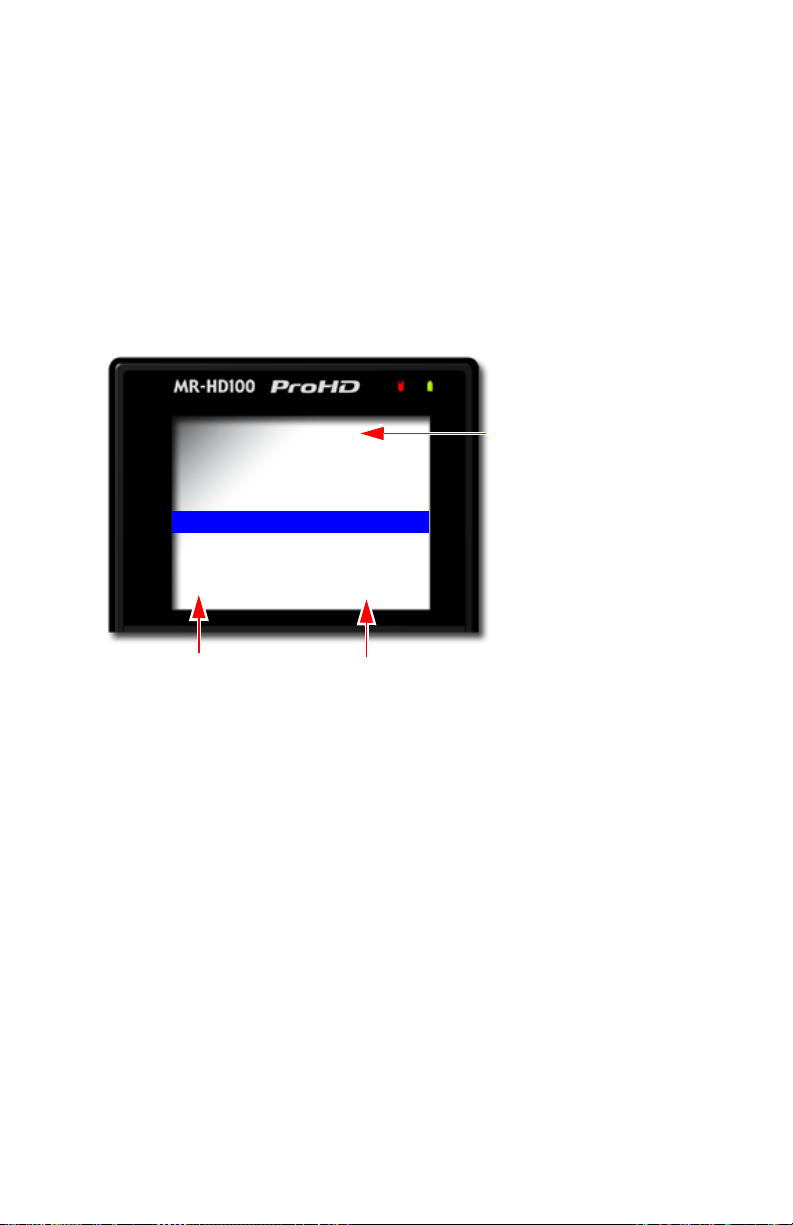
MR-HD100 Functions
Menu Title
Appears at the top of the
display and identifies its
topic or function.
Use the Left or Right soft
navigation buttons to
move between the
previous or next menu.
Menu Items
Use the Up and Down soft
navigation buttons to
move between the items in
the menu.
Pressing Select when an
item is highlighted,
displays its options.
SETUP
DATE
TIME
LCD
LCD BRIGHT
KEY BRIGHT
ALARM
STOP
07/01/08
12:21:30
ON
16
16
ON
FRAME
Current Settings
Opposite the menu item is
its current setting.
General Screen Information
The MR-HD100 LCD menu screens are organized by function with
each menu displaying a list of items. An item can be:
• A value that can be set, such as the date.
• A switch similar to a check box, that can be enabled along with
other options in the display.
• A switch similar to a radio button, that belongs to a family of
options, in which only one can be active at any time.
Selecting a menu item, displays its setting options.
Navigate to the correct option or enter its parameters and press the
Select button to set the option and return to the menu.
MR-HD100 Media Recorder
78
Page 99
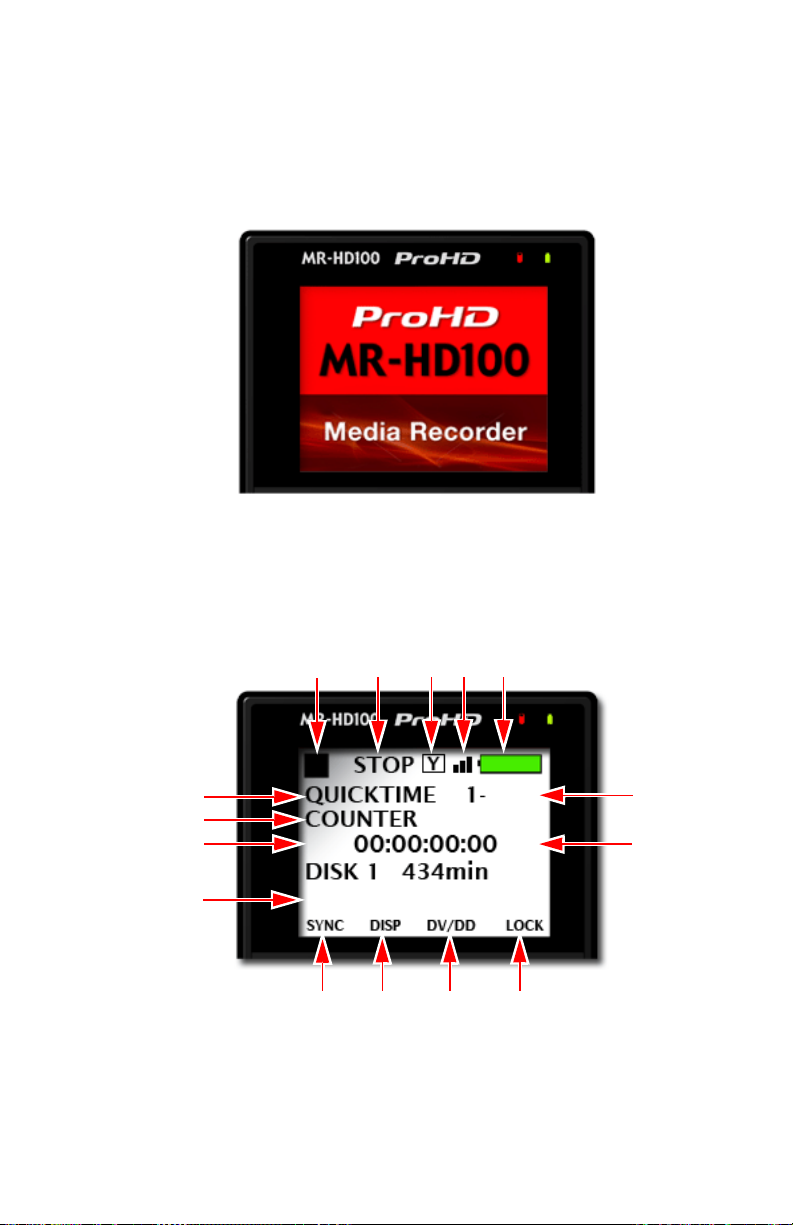
MR-HD100 Functions
12
6
7
1
8
2
3
4 5
14
13
15
11109
Welcome
The Welcome screen appears briefly after boot-up, and
automatically switches to the Home screen when the MR-HD100 is
ready for operation.
Home
The Home screen combines displaying operation information and
providing function controls through the function buttons. To leave
the Home screen use either the
Left or Right Navigation button.
1.
Current Function: symbol and description
Refer to
LCD Display Symbols and Text on page 97.
MR-HD100 Media Recorder
79
Page 100

MR-HD100 Functions
2. Operational Status
This indicates the current record/playback status.
3.
F1 Function Active
Indicates a function assigned to F1 key is active:
Y Syncro
•
•
E External
4.
Wireless Network Connected
Symbol indicates that MR-HD100 is receiving wireless
signals.
Battery Life Gauge
5.
This gauge is accurate only when the unit is powered
exclusively from the battery.
Volume and Clip Number
6.
The volume number is always 1.
Number of the current video clip, i.e. 001 for clip 1.
Time Remaining on the disk.
7.
8.
F1 Functions with EXT as the default, refer to Functions
Screen
on page 52 for more information.
9.
F2 Functions with DISP as the default, refer to Functions
Screen
on page 52 for more information.
10.
F3 Functions with LOCK as the default, refer to Functions
Screen
on page 52 for more information.
11.
F4 Functions
12.
Reel Display
Record or Playback modes, this item displays the
In
particular REEL that a clip is located in or, has been marked
to. If in
PLAY FROM > REEL LIST mode, the REEL appears in
brackets for example, [REEL]. This area is blank if
has been selected.
DISP information field that displays data type.
13.
14.
DISP information field that displays current NFR format.
15.
Recording Format.
NO REEL
MR-HD100 Media Recorder
80
 Loading...