

Page 1
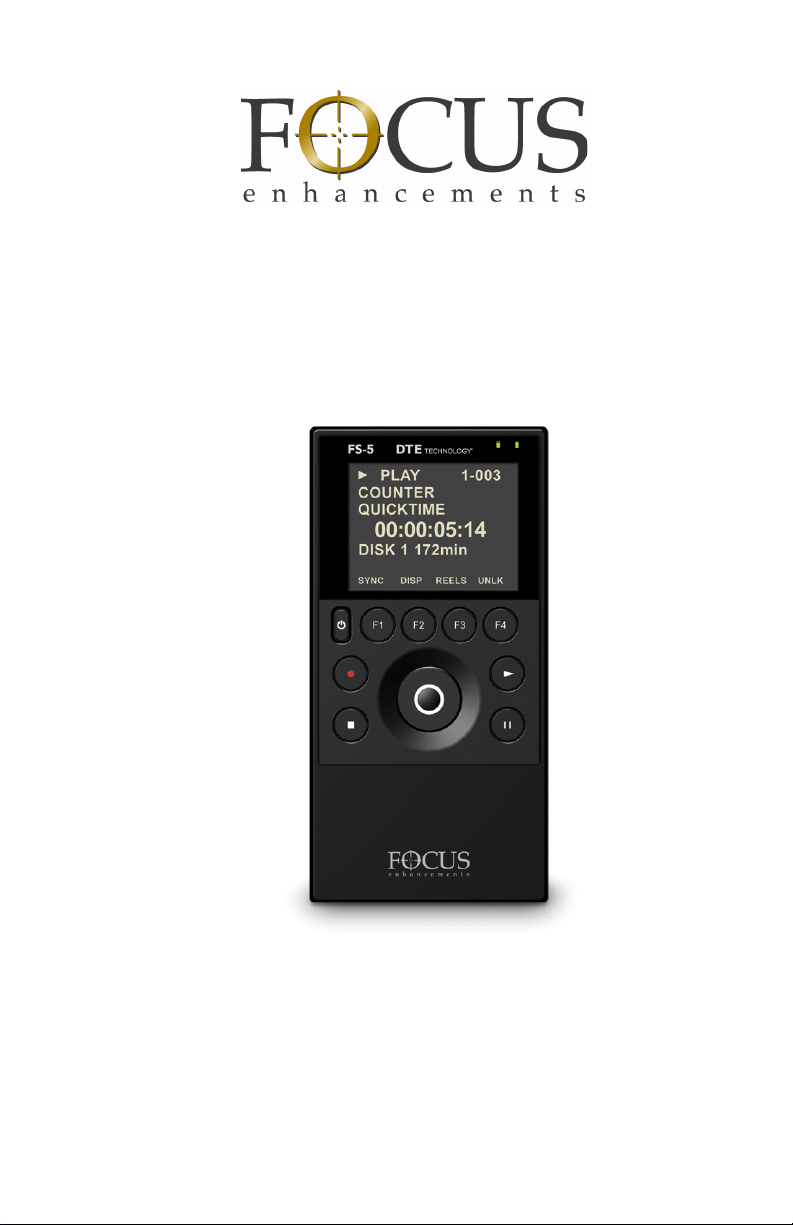
FS-5 2.0
User Guide Addendum
MANL-1160-01
Page 2

Page 3

LEGAL NOTICES
THIS DOCUMENT CONTAINS CONFIDENTIAL AND TRADE
SECRET INFORMATION OF FOCUS ENHANCEMENTS AND
ITS RECEIPT OR POSSESSION DOES NOT CONVEY ANY
RIGHTS TO REPRODUCE OR DISCLOSE ITS CONTENTS, OR
TO MANUFACTURE, USE, OR SELL ANYTHING THAT IT MAY
DESCRIBE. USE IN WHOLE OR IN PART WITHOUT THE
SPECIFIC WRITTEN AUTHORIZATION OF FOCUS
ENHANCEMENTS IS STRICTLY FORBIDDEN.
EVERY EFFORT HAS BEEN MADE TO ENSURE THAT THE
INFORMATION IN THIS DOCUMENT IS COMPLETE AND
ACCURATE AT THE TIME OF PRINTING; HOWEVER, THE
INFORMATION CONTAINED IN THIS DOCUMENT IS SUBJECT
TO CHANGE.
Copyright 2009 Focus Enhancements
All Rights Reserved
The material contained in this document is also protected by
copyright laws of the United States of America and other
countries. It may not be reproduced or distributed in any form by
any means, altered in any fashion, or stored in a data base or
retrieval system, without express written permission of FOCUS
ENHANCEMENTS.
FOCUS ENHANCEMENTS cannot be responsible for
unauthorized use of equipment and will not make allowance or
credit for unauthorized use or access.
FS-5 2.0 User Guide Addendum
i
Page 4

LEGAL NOTICES
Contacting FOCUS ENHANCEMENTS:
USA
Office Hours: Monday through Friday
8:00 AM to 5:00PM (Central Time)
Email: [email protected]
Telephone: +1 763-398-1658
Fax: +1 763-571-7688
Address: Focus Enhancements, Inc.
1370 Dell Avenue
Campbell, CA. 95008
www.focusinfo.com
EMEA (Europe, Middle East, Africa)
Office Hours: Monday through Friday
9:00 AM to 5:00PM
Email: [email protected]
Telephone: +49 4307 - 83 58 58
Fax: +49 4307 - 83 58 99
Address: COMO Computer & Motion GmbH
A Focus Enhancements Company
Lise-Meitner-Str. 15
24223 Schwentinental/ Germany
www.focusinfo.com
FS-5 2.0 User Guide Addendum
ii
Page 5

Symbols
Power Supply Only
This symbol indicates the presence of an un-insulated
Dangerous Voltage within the product’s enclosure that
may constitute a risk of electric shock to persons.
In the FS-5 Documentation
Caution Title
This symbol indicates important operating or maintenance (servicing)
information that the user should read and understand.
Note Title
This symbol indicates supplementary information about features, functions, or operations that may be of interest to the user.
LEGAL NOTICES
Documentation
Read, Retain, and Follow Instructions
All the safety and operating instructions should be read before
the product is operated.
• Retain Documentation
Place documentation in a secure place for future reference on
operating and safety instructions.
• Follow All Operating and Safety Instructions
• Pay Attention to All Warnings
Warnings are provided to protect the operator, the equipment,
and content.
FS-5 2.0 User Guide Addendum
iii
Page 6

LEGAL NOTICES
FS-5 2.0 User Guide Addendum
iv
Page 7

Table of Contents
Introduction . . . . . . . . . . . . . . . . . . . . . . . . . . . . . . . . . . . .1
2.0 Features . . . . . . . . . . . . . . . . . . . . . . . . . . . . . . . . . . . . 1
Overview of this Addendum . . . . . . . . . . . . . . . . . . . . . . . . 2
Quick Start . . . . . . . . . . . . . . . . . . . . . . . . . . . . . . . . . . . . .3
Physical Description and Controls . . . . . . . . . . . . . . . . . . . 4
Front View - Controls . . . . . . . . . . . . . . . . . . . . . . . . . . 4
Play . . . . . . . . . . . . . . . . . . . . . . . . . . . . . . . . . 4
FS-5 2.0 User Interface . . . . . . . . . . . . . . . . . . . . . . . . . . . 5
Record and Playback . . . . . . . . . . . . . . . . . . . . . . . . . . . . 10
Set Up the FS-5 . . . . . . . . . . . . . . . . . . . . . . . . . . . . . 11
Power On FS-5 . . . . . . . . . . . . . . . . . . . . . . . . . . 11
Set Date and Time . . . . . . . . . . . . . . . . . . . . . . . 11
Select Record/Play Mode . . . . . . . . . . . . . . . . . . 14
Select the Control Mode . . . . . . . . . . . . . . . . . . . 15
Select the Recording Format (REC FORMAT) . . 15
Select the DTE Format . . . . . . . . . . . . . . . . . . . . 16
Select the Timecode . . . . . . . . . . . . . . . . . . . . . . 17
Record with the FS-5 . . . . . . . . . . . . . . . . . . . . . . . . 18
NORMAL Recording . . . . . . . . . . . . . . . . . . . . . . 20
Creating a New File without Dropping Frames 20
EXTERNAL Recording . . . . . . . . . . . . . . . . . . . . . 21
SYNCRO Recording . . . . . . . . . . . . . . . . . . . . . . 22
Recording Timecode in the File . . . . . . . . . . 23
Playback on FS-5 2.0 . . . . . . . . . . . . . . . . . . . . . . . . . . . . 24
Thumbnails . . . . . . . . . . . . . . . . . . . . . . . . . . . . . . . . . 25
Viewing Thumbnails on the Web . . . . . . . . . . . . . 25
Proxy Audio Playback . . . . . . . . . . . . . . . . . . . . . . . . . 26
Creating A Proxy File . . . . . . . . . . . . . . . . . . . . . . . . . . . . 27
FS-5 2.0 User Guide Addendum
v
Page 8

Table of Contents
Proxy File Formats . . . . . . . . . . . . . . . . . . . . . . . . . . . 28
Metadata . . . . . . . . . . . . . . . . . . . . . . . . . . . . . . . . . . . . . 29
Overview . . . . . . . . . . . . . . . . . . . . . . . . . . . . . . . . . . . . . . 30
Default Template . . . . . . . . . . . . . . . . . . . . . . . . . . . . . 30
Custom Templates . . . . . . . . . . . . . . . . . . . . . . . . . . . 30
Video Production . . . . . . . . . . . . . . . . . . . . . . . . . . . . 30
Post-production . . . . . . . . . . . . . . . . . . . . . . . . . . 30
Logging Onto the FS-5 Web Server . . . . . . . . . . . . . . . . . 31
Metadata Pages and Functions . . . . . . . . . . . . . . . . . . . . 32
Entry . . . . . . . . . . . . . . . . . . . . . . . . . . . . . . . . . . . . . . 33
Review . . . . . . . . . . . . . . . . . . . . . . . . . . . . . . . . . . . . 35
Marked Segment Thumbnail and Data . . . . . . . . 35
Add or Change Metadata . . . . . . . . . . . . . . . . . . . 35
Export . . . . . . . . . . . . . . . . . . . . . . . . . . . . . . . . . . . . 36
Specific NLE Editors . . . . . . . . . . . . . . . . . . . . . . 36
Avid Media Composer . . . . . . . . . . . . . . . . . . 37
Entering Metadata . . . . . . . . . . . . . . . . . . . . . . . . . . . . . . . 38
Logging Metadata to Multiple 2.0 FS-5s . . . . . . . . . . 38
Saving Metadata . . . . . . . . . . . . . . . . . . . . . . . . . . . . . 39
Creating A Template . . . . . . . . . . . . . . . . . . . . . . . . . . . . . 40
TC Depend and Input Style In AXIF and Final Cut Pro 40
Export . . . . . . . . . . . . . . . . . . . . . . . . . . . . . . . . . . . . . . . . 41
Export to NLE XML Document . . . . . . . . . . . . . . . . . . 41
FS-5 2.0 Functions . . . . . . . . . . . . . . . . . . . . . . . . . . . . . 43
General Menu Information . . . . . . . . . . . . . . . . . . . . . . . . 44
Welcome . . . . . . . . . . . . . . . . . . . . . . . . . . . . . . . . . . 44
OPERATION Menus . . . . . . . . . . . . . . . . . . . . . . . . . . . . 45
PROXY GEN . . . . . . . . . . . . . . . . . . . . . . . . . . . . . . . 46
SETUP Menus . . . . . . . . . . . . . . . . . . . . . . . . . . . . . . . . . 47
SET DATE AND TIME USING NTP . . . . . . . . . . . . . 49
TIME ZONE . . . . . . . . . . . . . . . . . . . . . . . . . . . . . . . . 50
NPT SOURCE . . . . . . . . . . . . . . . . . . . . . . . . . . . . . . 51
DST ADJUST . . . . . . . . . . . . . . . . . . . . . . . . . . . . . . 52
DST MANUAL . . . . . . . . . . . . . . . . . . . . . . . . . . . . . . 53
PLAY PREF . . . . . . . . . . . . . . . . . . . . . . . . . . . . . . . . 54
PROXIES . . . . . . . . . . . . . . . . . . . . . . . . . . . . . . . . . . 54
NETWORK . . . . . . . . . . . . . . . . . . . . . . . . . . . . . . . . 55
FS-5 2.0 User Guide Addendum
vi
Page 9

Table of Contents
IP ADDR . . . . . . . . . . . . . . . . . . . . . . . . . . . . . . . . . . 56
IP MASK . . . . . . . . . . . . . . . . . . . . . . . . . . . . . . . . . . 56
BROADCAST . . . . . . . . . . . . . . . . . . . . . . . . . . . . . . 57
GATEWAY . . . . . . . . . . . . . . . . . . . . . . . . . . . . . . . . . 57
FUNCTIONS Menus . . . . . . . . . . . . . . . . . . . . . . . . . . . . . 58
Functions List . . . . . . . . . . . . . . . . . . . . . . . . . . . . . . . 58
UTILITIES Menus . . . . . . . . . . . . . . . . . . . . . . . . . . . . . . 61
FORMAT . . . . . . . . . . . . . . . . . . . . . . . . . . . . . . . . . . 63
MAKE PROXY . . . . . . . . . . . . . . . . . . . . . . . . . . . . . . 64
Organize MXF . . . . . . . . . . . . . . . . . . . . . . . . . . . . . . 65
CALIBRATE CLOCK . . . . . . . . . . . . . . . . . . . . . . . . . . 66
FS-5 with Other Devices . . . . . . . . . . . . . . . . . . . . . . . . .67
Controlling Multiple FS-5s At Once . . . . . . . . . . . . . . . . . 68
Synchronizing Clocks on Multiple FS-5s . . . . . . . . . . . . . . 70
Greater Accuracy . . . . . . . . . . . . . . . . . . . . . . . . . . . . 70
Calibration Schedule . . . . . . . . . . . . . . . . . . . . . . . . . . 70
Non-Linear Editors (NLEs) . . . . . . . . . . . . . . . . . . . . . . .71
Avid Media Composer . . . . . . . . . . . . . . . . . . . . . . . . . . . . 72
Logging Avid Metadata During Recording . . . . . . . . . 72
Importing Video and Metadata Into Avid . . . . . . . . . . 74
Technical Specifications . . . . . . . . . . . . . . . . . . . . . . . . .75
DTE File Formats Supported . . . . . . . . . . . . . . . . . . . . . . . 75
SD . . . . . . . . . . . . . . . . . . . . . . . . . . . . . . . . . . . . . . . . 75
DV25 . . . . . . . . . . . . . . . . . . . . . . . . . . . . . . . . . . . . . . 75
HDV . . . . . . . . . . . . . . . . . . . . . . . . . . . . . . . . . . . . . . 76
Proxy Videos . . . . . . . . . . . . . . . . . . . . . . . . . . . . . . . . . . . 78
FS-5 2.0 User Guide Addendum
vii
Page 10

Page 11

Introduction
This addendum provides information about the FS-5 2.0 DTE Disk
Recorder’s features.
2.0 Features
• Proxy Video Files
The FS-5 can generate proxy video files from stored original
video files. Proxy files are smaller than their original video clips
and easier to share over the network or internet.
• LCD Video Playback
Playback recorded content on the FS-5 LCD. Original DV/HDV
recordings play back at a reduced frame rate on the FS-5's LCD.
Monitor audio using an USB audio device: headset or speaker
system.
• Single Frame Thumbnails
Single frame thumbnails are created for each recording. These
thumbnails appear on the FS-5 LCD as well as via the web
interface. Clip details are also listed including the clip name and
the file wrapper type. The thumbnail format depends on the
format used during recording.
• Additional NLE Metadata Support
Metadata can now be logged in an AVID compatible format.
This requires Avid Media Composer version 3.5 for use.
• Multi-unit Metadata
Log the same metadata to multiple FS-5 units simultaneously
using a single web interface.
• Multi-unit Control
a. Control multiple units from a single web interface.
b. Sync clocks of multiple units for matching timecode via
WiFi using an optional USB WiFi or wired Ethernet
adapter.
FS-5 2.0 User Guide Addendum
1
Page 12

Introduction
Overview of this Addendum
This addendum is divided into similar chapters as found in the FS-5
User Guide.
Quick Start page 3
This chapter describes how to setup and use the
FS-5 2.0. It includes a description of the new features
LCD Video Playback, Single Frame Thumbnail, and
how to create Proxy Video Files.
Metadata page 29
This chapter covers 2,0 enhancements to metadata
functions and the addition of Avid Media Composer
capability.
FS-5 2.0 Functions page 43
This chapter provides detailed information about
each of the 2.0 FS-5 functions. It also provides
important updates about networking.
FS-5 with Other Devices page 67
2.0 provides the ability use the web server of one
FS-5 2.0 unit to control recording functions of
multiple other FS-5 2.0 units. In addition, it is possible
to synchronize the clocks of multiple FS-5 2.0 units.
Non-Linear Editors (NLEs) page 71
This chapter provides information about integrating
the FS-5 metadata capabilities with Avid Media
Composer 3.5.
Technical Specifications page 75
FS-5 2.0 User Guide Addendum
2
Page 13

Quick Start
Quick Start provides additional information necessary for using the
FS-5 2.0 DTE recorder as quickly as possible. For Information about
FS-5 1.0 functions and features not described in this addendum, refer
to the FS-5 User Guide.
This chapter covers the topics:
Physical Description and Controls
Front View - Controls page 4
FS-5 2.0 User Interface page 5
Record and Playback page 10
Power On FS-5 page 11
Select Record/Play Mode page 14
Select the Recording Format (REC FORMAT) page 15
Set Date and Time page 11
Record with the FS-5 page 18
EXTERNAL Recording page 21
SYNCRO Recording page 22
Playback on FS-5 2.0 page 24
Creating A Proxy File page 27
Proxy Audio Playback page 26
FS-5 2.0 User Guide Addendum
3
Page 14
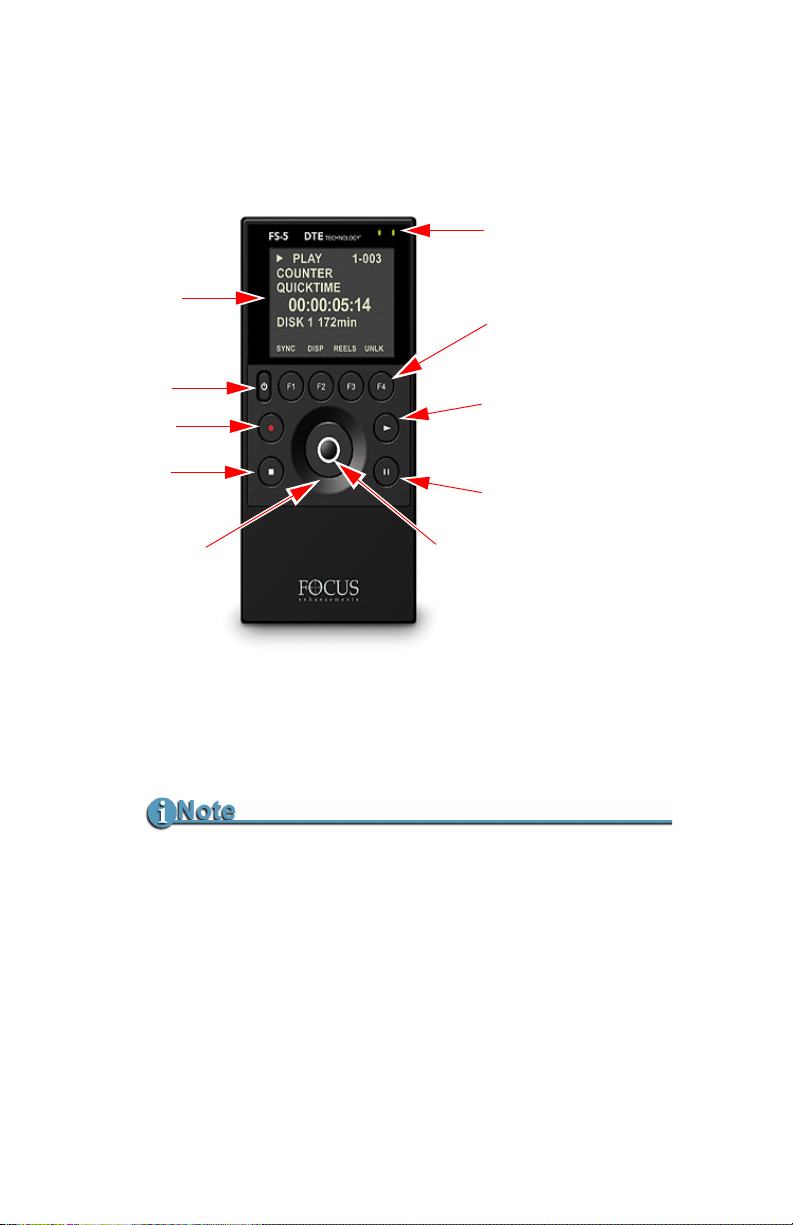
Quick Start
Power
Record
Stop
Pause
Play
Scroll and Select Wheel
Use to:
Navigate menus
Modify values
Display list of video clips
Display
Function keys
F1 F2 F3 F4
Use to play video in
LCD or on camcorder.
Unit LEDs
Disk Activity (red)
Battery Charge (green)
Soft Nav Keys
Use to:
Navigate menus
Set values
Physical Description and Controls
Front View - Controls
Play X
Press this key to start playback of the selected clip.
Some HD Camcorders Require a Moment to Synchronize
Some HD camcorders require a moment to synchronize the
FS-5 2.0 User Guide Addendum
4
video from an external source. Typically during this period, they
display a solid blue or black video until synchronized.
Page 15
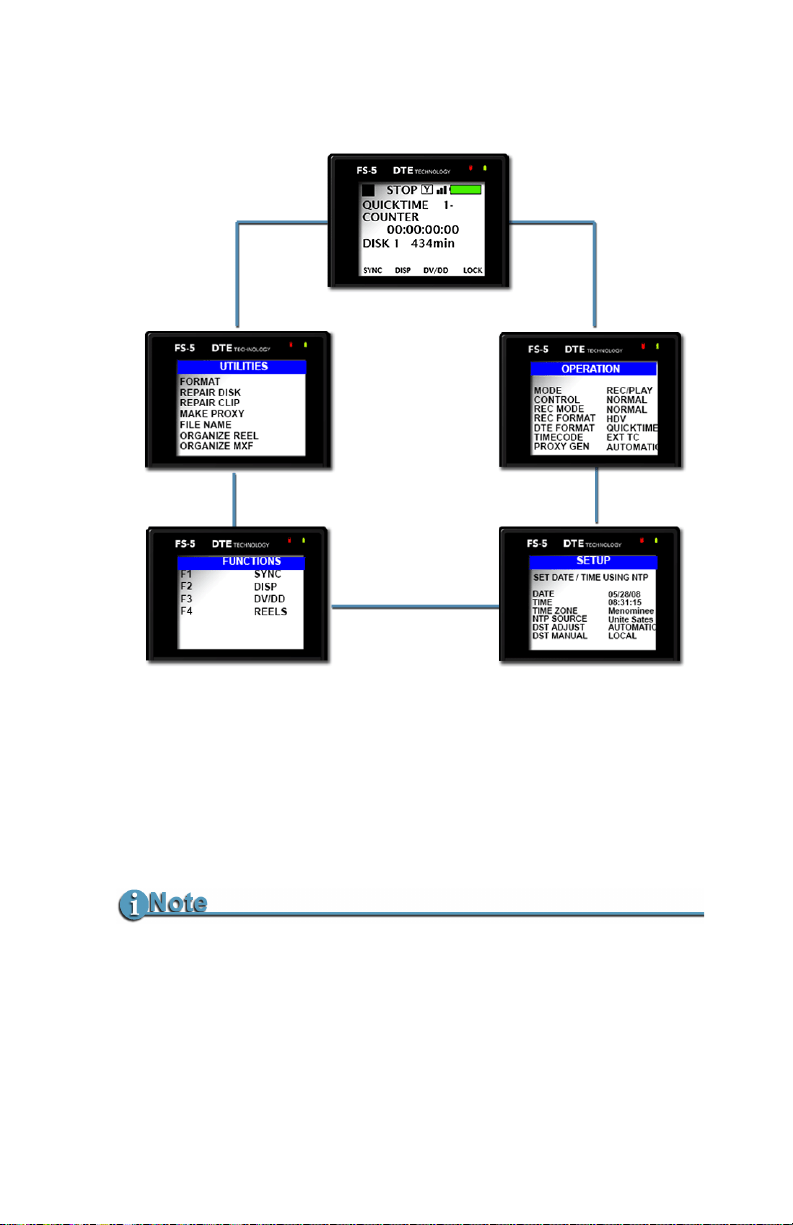
FS-5 2.0 User Interface
Quick Start
The FS-5 menu system provides access to all the functions available
in the unit. Each of the displays below (except the Welcome and
Home menus which come up automatically when the unit starts) are
accessed by pressing the left or right soft buttons on the Scroll Wheel.
For more information on each function, go to the chapter
Functions
.
Returning to the Top of the Menu or to Home menu
To get to the top of any menu, press the Left soft button.
To get back to the Home menu:
• Highlight the menu title at the top of the display.
• Press the Select soft button.
FS-5 2.0 User Guide Addendum
FS-5 2.0
5
Page 16

Quick Start
Main Menu Feature Option Selection
WELCOME
HOME
OPERATION
Only appears for a few seconds on power up.
Gateway menu for all functions, it displays disk and operational
status.
For more information see OPERATION Menus on page 45.
MODE
REC/PLAYER
HDD (mount to computer function)
CONTROL
REC MODE
NORMAL
EXTERNAL
SYNCRO
NORMAL
RETRO CACHE
RETRO DISK
SNAP REC (DV mode only)
TIMELAPSE (DV mode only)
REC FORMAT
DV
HDV
Depends on REC FORMAT setting.
DV Raw DV
HDV M2T
EXT TC
FREE RUN
REC RUN
REGEN
OFF
MANUAL
AUTOMATIC
AVI Ty pe 1
AVI Ty pe 2
Canopus AVI
Matrox AVI
Quicktime
MXF
QUICKTIME
MXF
SETUP
DTE FORMAT
TIMECODE
PROXY GEN
For more information see SETUP Menus on page 47.
SET DATE AND TIME USING NTP
DATE
TIME
TIME ZONE
Select from a list
containing UTC,
continental, and ocean
time zone ranges.
Select a specific
country, state, or
city within the
timecode range.
FS-5 2.0 User Guide Addendum
6
Page 17

Quick Start
Main Menu Feature Option Selection
AUTO TIME
DST ADJUST
DST MANUAL
LCD
LCD BRIGHT
KEY BRIGHT
ALARM
STOP
EXTL CTL
Select a specific global
region.
AUTOMATIC
MANUAL
LOCAL
STANDARD
ON
OFF
AUTO
1 through 16
1 through 16
(Does not include Scroll Wheel)
ON
OFF
FRAME
GRAY
NO VIDEO
OFF
PAUSE
FRAME
FILE
Select a specific
nation within the
region.
TC SET
UB SET
TC MODE
RETRO CACHE
RETRO DISK
TIMELAPSE
PLAY MODE
PLAY FROM
PLAY PREF
UDF FS PERM
NETWORK
IP ADDR
DROP
NON-DROP
0 to 10 seconds
0 to 392 minutes
(Based on 100GB drive, other models may
vary.)
Set duration between single frame captures.
(DV mode only)
PLAY CLIP
LOOP CLIP
PLAY ALL
LOOP ALL
TRACK
REEL
ORIGINAL
PROXY
READ-ONLY
READ-WRITE
DHCP
MANUAL
(When DHCP is set, IP ADDR, IP MASK,
BROADCAST, and GATEWAY are assigned
by the host router.)
Manual or DHCP.
(If FS-5 in EXT TC,
TC Mode has no
effect.)
FS-5 2.0 User Guide Addendum
7
Page 18

Quick Start
Main Menu Feature Option Selection
Manual or DHCP.
Manual or DHCP.
Manual or DHCP.
Set manually.
Set manually (WEP encryption only.)
MANAGED
ADHOC (P2P)
DISABLED
ENABLED
Sets FTP password for
FTP function.
DISABLED
ENABLED
DISABLED
ENABLED
DISABLED
ENABLED
FOLDER
TEMPLATE
SYNC
EXTERNAL
LCD SET
Default ftp://
FS:FS@ipaddress
Default is FS.
FUNCTIONS
IP MASK
BROADCAST
GATEWAY
ESSID
KEY
WIFI MODE
FTP
FTP PASS
WEB
AUTO ORG
AUTO MARK
REELS PREF
Contains user definable function key selections. Changing a
setting with a Function key is identical to changing the
setting in its corresponding menu.
Refer to
FUNCTIONS Menus on page 58 for more
information.
F1
PROXY
REELS
R1-1 etc., see REELS
PREF on page 135.
BLANK
F2
F3
F4
DISP
ALARM
FILE
REELS
R1-1 etc., see REELS
PREF on page 135.
BLANK
DV/DD
REELS
R1-1 etc., see REELS
PREF on page 135
BLANK
LOCK
REELS
R1-1 etc., see REELS
PREF on page 135
BLANK
FS-5 2.0 User Guide Addendum
8
Page 19

Quick Start
Main Menu Feature Option Selection
UTILITIES
For more information see UTILITIES Menus on page 61.
FORMAT
REPAIR DISK
REPAIR CLIP
MAKE PROXY
FILE NAME
ORGANIZE REEL
ORGANIZE MXF
UPGRADE
DELETE CLIP
SYSTEM RESET
DIAGNOSTIC
STATUS
VERSION
CALIBRATE CLOCK
FS-5 2.0 User Guide Addendum
9
Page 20

Quick Start
Record and Playback
Before using the FS-5, set up the unit as outlined in the following
sections:
Set Up the FS-5 page 11
Power On FS-5 page 11
Set Date and Time page 11
Select Record/Play Mode page 14
Select the Control Mode page 15
Select the Recording Format (REC FORMAT) page 15
Select the DTE Format page 16
Select the Timecode page 17
Record with the FS-5 page 18
NORMAL Recording page 20
EXTERNAL Recording page 21
SYNCRO Recording page 22
Playback from FS-5 to Camcorder Viewer page 30
Playback on FS-5 2.0 page 24
Creating A Proxy File page 27
The values set in these procedures are fixed and persist through
power cycles. To change them, repeat the steps outlined above.
FS-5 2.0 User Guide Addendum
10
Page 21
Set Up the FS-5
SETUP
SET DATE AND TIME USING NTP
DATE
TIME
TIME ZONE
AUTO TIME
DST ADJUST
DST MANUAL
04/02/10
19:11:00
UTC
Asia
AUTOMATIC
LOCAL
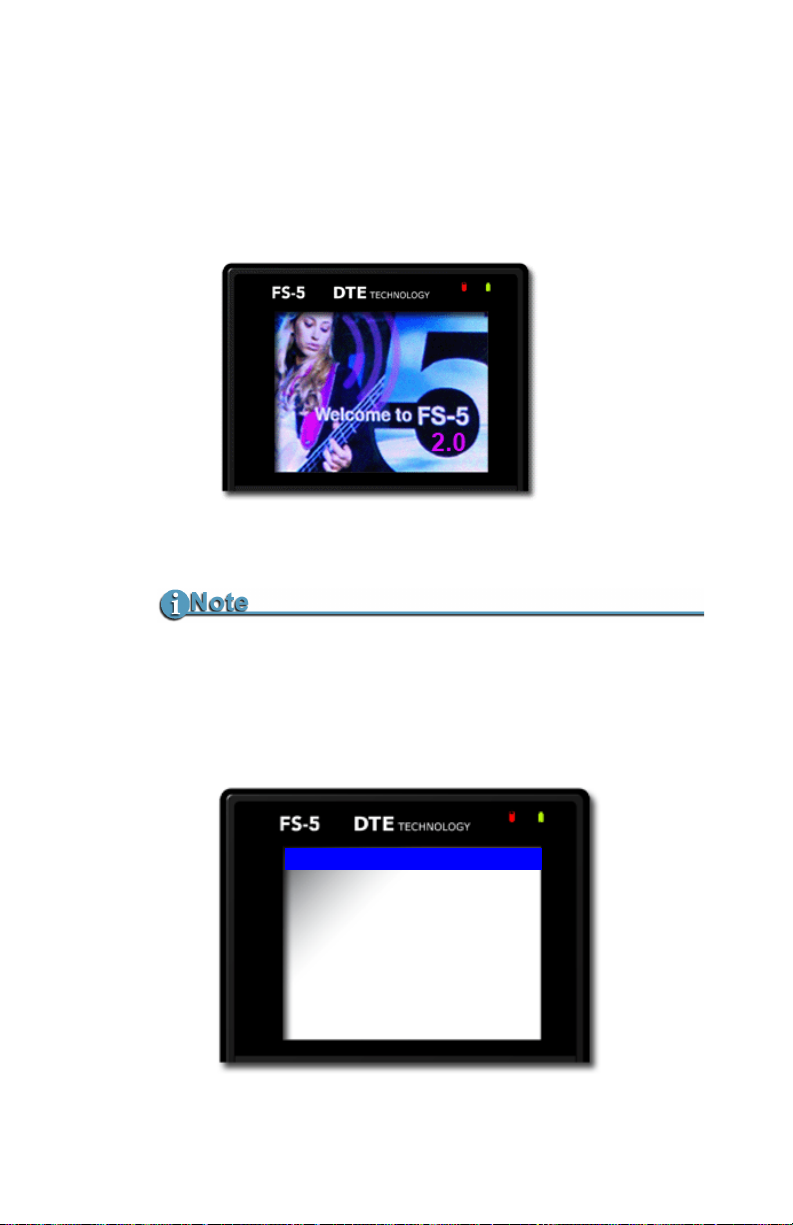
Power On FS-5
1. Press the Power key and release it.
2. The
Set Date and Time
Welcome display appears while the FS-5 initializes.
Quick Start
Date and Time Must Be Set
The date and time must be set because they are used in the FS-5
file naming function.
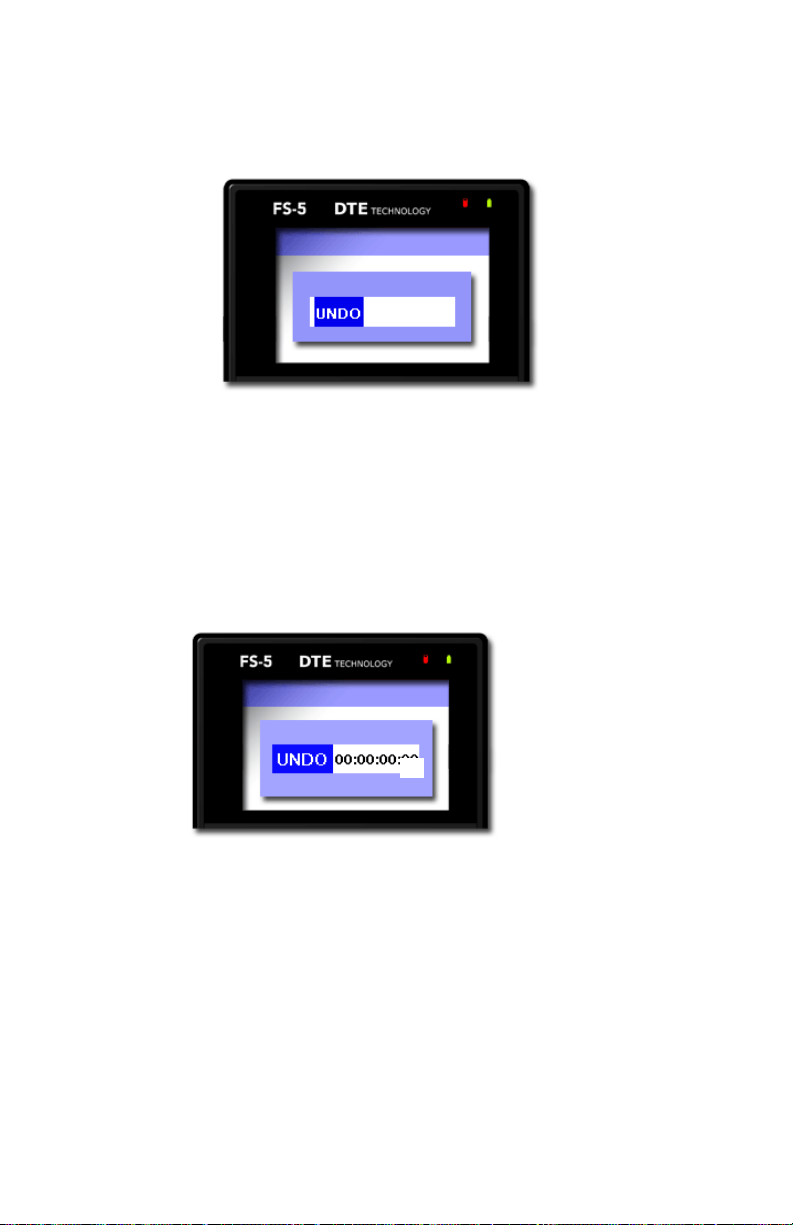
1. Press the Right soft button several times until the SETUP
menu appears.
FS-5 2.0 User Guide Addendum
11
Page 22
Quick Start
06/15/08
SETUP
DATE
SETUP
TIME
2. Use the Down soft button to highlight the date and press
Select key to access the Set Date menu.
the
3. Use the
Right and Left soft buttons to highlight the Month,
Day, and Year. Use the
4. When complete, press the
The display returns to the
the new date.
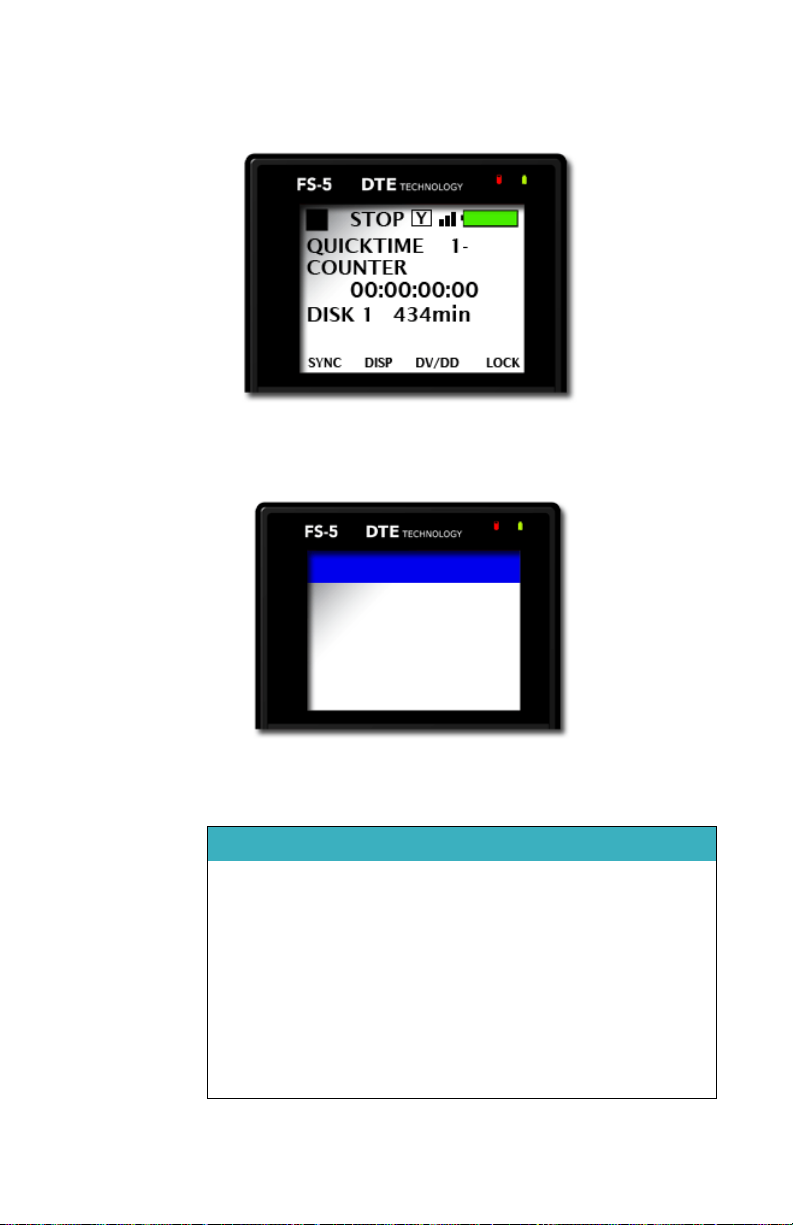
5. Use the
and press the
Down soft button to select the TIME setup menu
Right soft button. The following menu
appears:
6. Use the
Right and Left navigation keys to highlight the
Hour, Minute, and Second. (Time is indicated in 24hr.
mode.) Use the
7. Press the
Scroll Wheel to change the value.
Select key.
The display returns to the
the new date.
FS-5 2.0 User Guide Addendum
12
Scroll Wheel to change the value.
Select key.
SETUP menu which displays
SETUP menu which displays
Page 23
8. Return to the Home menu.
OPERATION
MODE
CONTROL
REC MODE
REC FORMAT
DTE FORMAT
TIMECODE
REC/PLAY
NORMAL
NORMAL
HDV
QUICKTIME
EXT TC
Quick Start
9. Press the
display the
Right soft button on the Scroll Wheel once to
OPERATION menu.
By default, the FS-5 is setup for the most typical recording
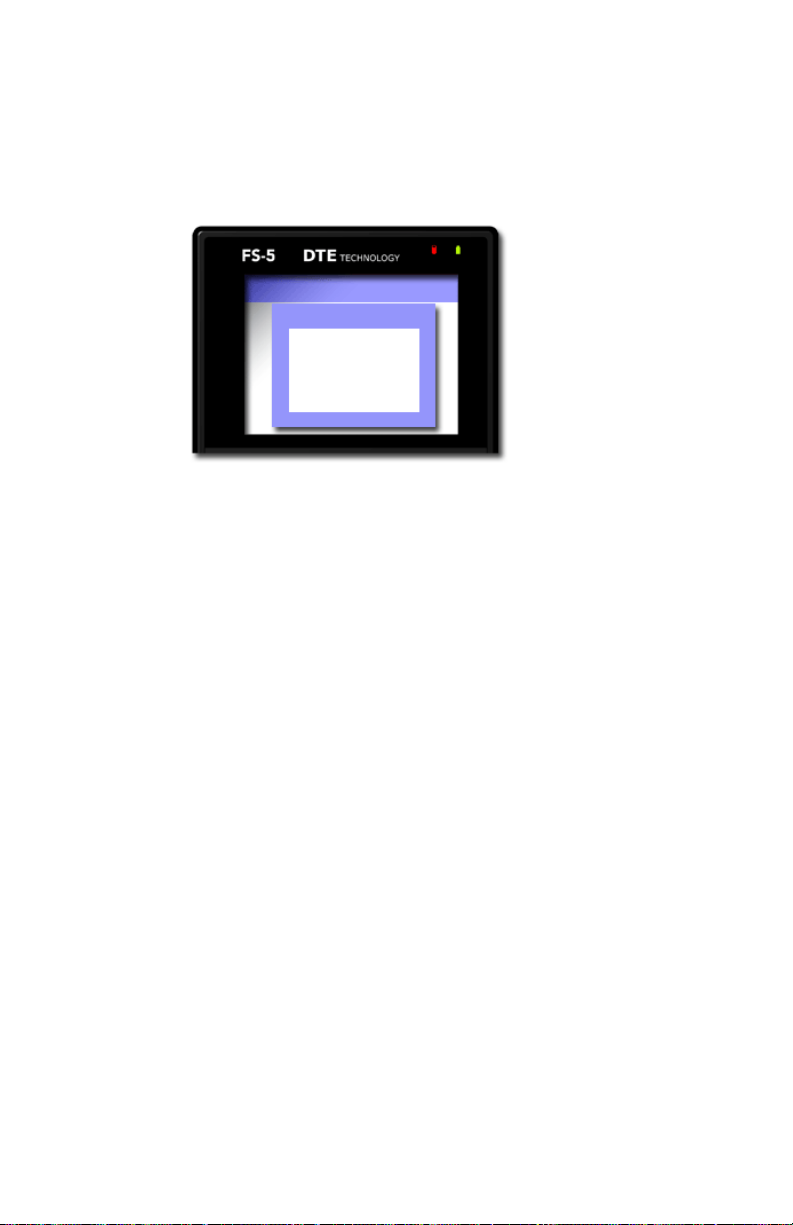
situations. The Operation defaults are:
OPERATION FUNCTION Reference
MODE REC/PLAY
CONTROL NORMAL
REC MODE NORMAL
REC FORMAT HDV
DTE FORMAT QUICKTIME
TIMECODE EXT TC
PROXY GEN AUTOMATIC
See PROXY GEN on page 46.
FS-5 2.0 User Guide Addendum
13
Page 24
Quick Start
OPERATION
MODE
REC/PLAY
HDD
If it is necessary to change any of these settings, refer to the
following few pages.
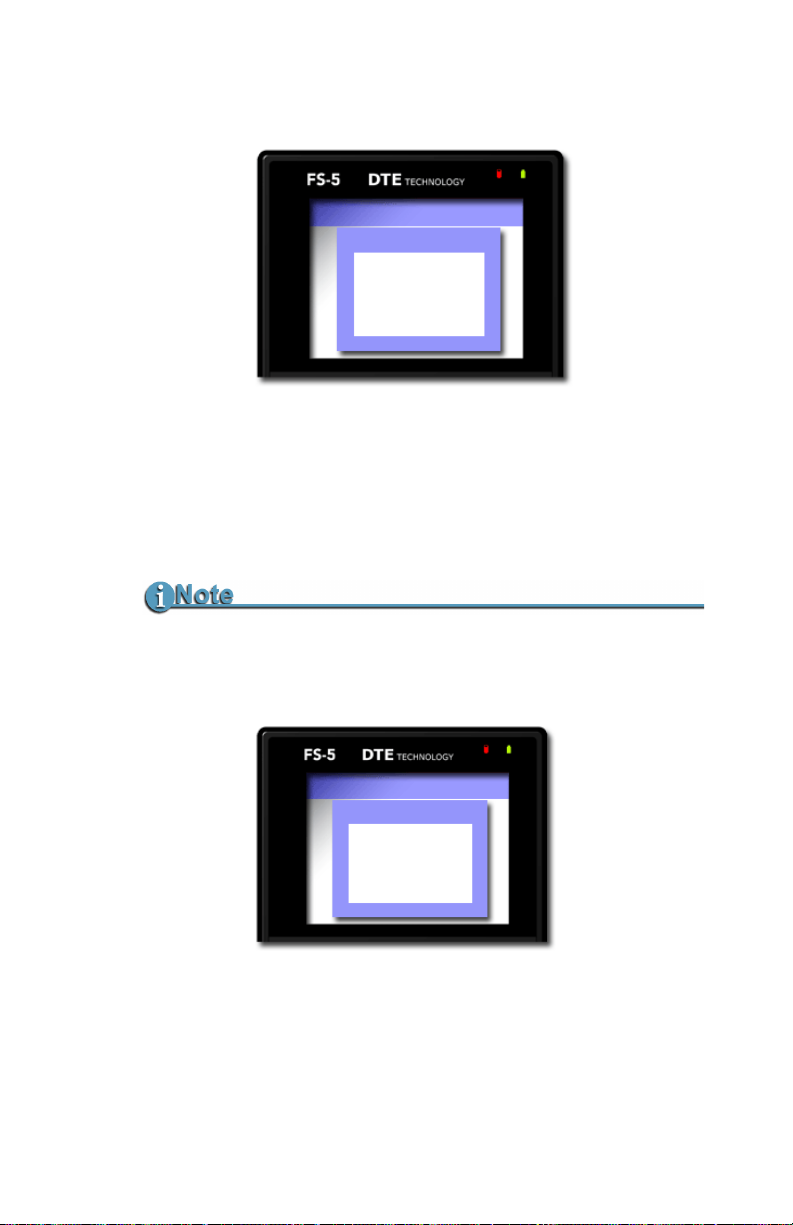
Select Record/Play Mode
1. Use the Up or Down soft buttons to select MODE.
2. Press the Select key in the center of the
A list of operation modes appears:
3. Pick
REC/PLAY and press the Select key.
The display returns to the
OPERATION menu.
Scroll Wheel.
REC/PLAY or HDD.
FS-5 2.0 User Guide Addendum
14
Page 25
Quick Start
OPERATION
CONTROL
NORMAL
EXTERNAL
SYNCRO
OPERATION
REC FORMAT
DV
HDV
Select the Control Mode
This determines which controls, the FS-5’s or the camera’s, are
used during recording, see
mode to use and the display returns to the
EXTERNAL control mode controls the FS-5 from the camera and
works with most modern DV and HDV camcorders, whether
using tape or no tape.
CONTROL on page 95. Select the
OPERATION menu.
Playback of Videos Is Controlled Only by the FS-5
Select the Recording Format (REC FORMAT)
This determines which recording format, DV or HDV, the FS-5
uses. The camera must support the recording format selected.
Select the format type and the display returns to the
OPERATIONS menu.
FS-5 2.0 User Guide Addendum
15
Page 26
Quick Start
OPERATION
DTE FORMAT
RAW
AVI TYPE1
AVI TYPE2
CANOPUS AVI
Select the DTE Format
This determines which NLE compatible format the FS-5 uses
when recording. The DTE formats displayed depend on the
REC FORMAT selected in the last step.
Select the DTE format and the display returns to the
menu.
DTE Formats That Support Recordings Longer than 2GB
DTE formats that support recordings than 2GB in size are:
•M2T (HDV)
• QuickTime (DV and HDV)
• MXF (DV and HDV).
Files larger than 2GB require UDF file system.
OPERATION
DV24p and PAL 25p Modes
• 24p modes are only for use with camcorder's that are capable
of DV-24p Advanced mode.
• 24p is comparable to DV QuickTime and AVI Type 2.
• PAL 25p camcorders require no special 25p DV format
• There are different FS-5 models for NTSC and PAL recording
FS-5 2.0 User Guide Addendum
16
Page 27
Quick Start
OPERATION
TIMECODE
EXT TC
FREE RUN
REC RUN
REGEN
Select the Timecode
This determines the source of the timecode to be embedded in
the recording.
Selecting the timecode returns the display to the
menu.
With the
once and advance to the
OPERATION menu title highlighted, press the Right key
SYSTEM menu.
OPERATION
SETUP Menu Overridden by EXT TC Settings
When EXT TC is selected, the FS-5 follows the timecode mode of
the camera, Drop Frame or Non Drop Frame, regardless of the
setting in the SETUP menu.
FS-5 2.0 User Guide Addendum
17
Page 28

Quick Start
Record with the FS-5
Do Not Disconnect Power or FireWire Cable
Never disconnect the power or the FireWire cable during a
recording. This will cause file corruption.
Loss of Power During Recording
If power is lost during recording it is possible to repair the
damaged file or files, refer to REPAIR DISK and REPAIR CLIP
in the user guide.
There are two modes of recording with the FS-5.
• NORMAL Recording
Control with the FS-5 transport keys.
• EXTERNAL Recording
Control FS-5 recording with the video camera record trigger,
whether using tape or tapeless.
With most modern HDV and DV cameras,
the preferred control method. Check the latest camera
compatibility matrix on the Focus website:
www.focusinfo.com.
• SYNCRO Recording
SYNCRO is used most often with older camcorders that
require the presence of a tape in the camcorder’s tape deck.
Before beginning recording, verify that:
1. Time and date are set.
2. Recording format is set.
3. DTE Format is set.
4. The FS-5 is connected to the video camera according to the
explanation in
Connecting FS-5 to DV/HDV Camcorder on
page 22.
5. Camera and FS-5 are powered on.
6. Tape is loaded in the camera, if:
• Camera requires a tape in its transport before it triggers
FS-5 record.
• User wants to record to both tape and disk, see the
following note.
EXTERNAL mode is
FS-5 2.0 User Guide Addendum
18
Page 29

Quick Start
.
EXTERNAL Operation
Tape does not need to be loaded if the camera supports external
operation, refer to, CONTROL on page 95.
Troubleshooting: Counter Not Incrementing
If the Counter does not increment while recording the camera, it is
an indication that there is no active connection between the FS-5
and the camera.
• Verify that the FS-5 1394 DV I/O and the camera connections
are secure. It may be necessary to unplug and then reconnect
them.
When a good connection is made, the Counter will increment
and recording will start.
• Verify that FS-5 and camera settings are correct.
Verify Record Mode Matches Source Video Content and Format
If in DV Recorder mode, HD content will not record properly. A
NTSC or PAL DV source records only on a matching NTSC or PAL
unit.
FS-5 2.0 User Guide Addendum
19
Page 30
Quick Start
Record
Stop
Pause
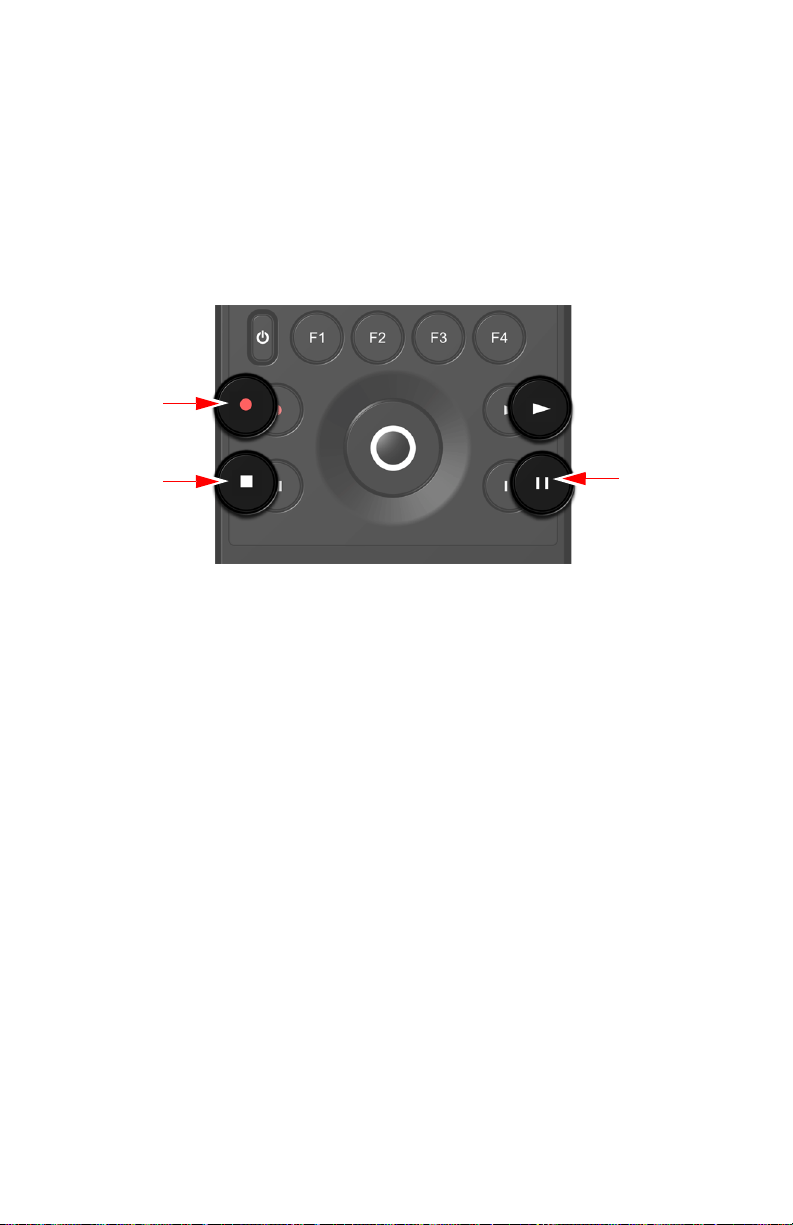
NORMAL Recording
1. Set the video camera to Camera or Cam mode.
2. Verify that an image appears in the viewfinder.
3. On the FS-5, press
The FS-5 begins to record. The timecode value shows on
the display.
Record .
4. Press
5. Press
the same clip.
6. Press
7. Press
Creating a New File without Dropping Frames
When in record mode, it is possible to break the recording into
a separate, new file without dropping frames.
While recording, press
automatically creates a new clip.
FS-5 2.0 User Guide Addendum
20
Pause II once to put the FS-5 to Rec-Pause mode.
Pause II again and the FS-5 begins to Record again in
Stop to stop the recording.
Record to begin recording a new clip.
Record again and the FS-5
Page 31
Quick Start
OPERATION
CONTROL
NORMAL
EXTERNAL
SYNCRO
EXTERNAL Recording
External control allows the camcorder to control the FS-5 record
function via the camcorder trigger.
1. Verify that the FS-5 is in
2. From the FS-5 Home menu, press the
once and the
OPERATION menu appears:
3. Use the Down soft button to select Control.
The default value is
4. Use the Down soft button to select EXTERNAL.
5. Press the Scroll Wheel
The Operations menu appears.
6. Press the Left soft button twice to return to Home menu.
The menu returns and a
upper left-hand corner. Next to it is an
FS-5 record function is now under the external control of
the camcorder.
Proceed with recording using the camcorder trigger.
1. On the camera, press the
The FS-5 begins to record video from camera. The
timecode value appears on the LCD display and the
image appears in the camera’s display.
2. On the camcorder, press
STOP mode.
3. Press
4. On the camcorder, press
5. On the camcorder, press
Pause II again and the FS-5 begins to Record again in
the same clip.
Stop mode.
Right soft button
NORMAL
Select key.
STOP indicator appears in the
E indicating that
Record trigger.
Pause II once to put the FS-5 in
Stop to stop the recording.
Record to begin a new clip.
FS-5 2.0 User Guide Addendum
21
Page 32
Quick Start
OPERATION
CONTROL
NORMAL
EXTERNAL
SYNCRO
SYNCRO Recording
Syncro recording allows the FS-5 to mimic camcorder operations
by monitoring the state of the camcorder’s tape recorder
controls.
Syncro: For Camcorders Without External Trigger Control
Syncro mode should only be used with older camcorders that do
not have external trigger controls. Check the latest camera
compatibility matrix on the Focus website.
1. Verify that the FS-5 is in
2. From the FS-5 Home menu, press the
once and the
OPERATION menu appears:
3. Use the Down soft button to select Control.
The default value is
4. Use the Down soft button to select SYNCRO.
5. Press the Scroll Wheel
The Operations menu appears.
6. Press the Left soft button twice to return to the Home
menu.
The Home menu returns and a
the upper left-hand corner. Next to it is a
FS-5 is following the state of the camcorder’s tape
controls, i.e. record when the camcorder records and
pause when it pauses.
FS-5 2.0 User Guide Addendum
22
Stop mode.
Right soft button
NORMAL
Select key.
Pause indicator appears in
Y indicating that
Page 33
Quick Start
OPERATION
TIMECODE
EXT TC
FREE RUN
REC RUN
REGEN
7. Now the FS-5 will respond to the camcorder’s tape
controls. The recording signal goes both to the tape in the
camera and to the FS-5.
Recording Timecode in the File
1. Press the Right soft button once and OPERATION menu
appears.
2. Press the
TIMECODE option.
3. Select
This option records the video camera timecode in the
file. For other available timecode options refer to
TIMECODE on page 102.
To view the source timecode (TC) from the camera,
press the
appears, e.g. 1080/60i TC.
Down soft button several times to locate the
EXT TC in the SETUP menu.
DISP key, F2 default, until the format type
EXT TC
When in EXT TC mode the FS-5 follows the camera’s
timecode, and the Drop/Non-Drop Frame in SETUP
menu has no effect on the recorded video's timecode.
Function keys
The tasks discussed above are available for
programming into the function keys. For information on
setting up function keys, refer to the section,
FUNCTIONS Menus in the user guide.
FS-5 2.0 User Guide Addendum
23
Page 34
Quick Start
4
2, 6
1
5
3
Playback on FS-5 2.0
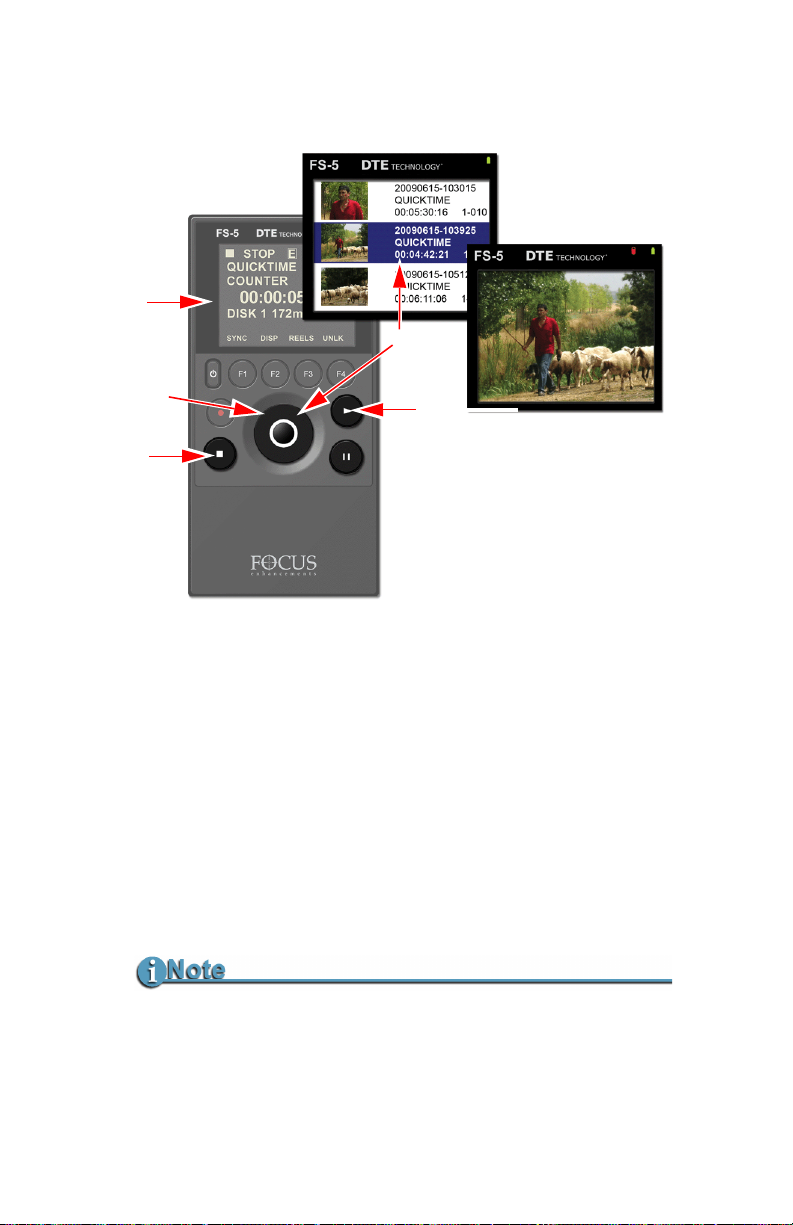
The FS-5 provides the user the ability to playback video clips, DV or
HDV, and proxy files on its color LCD. Each clip has a thumbnail still
image which is displayed along with clip data in list. In addition, the
clip’s proxy video file, clip data, and metadata information are
viewable through the FS-5’s web interface.
To view a video or proxy file on the FS-5:
1. Go to the
2. Press the
Home menu.
Select key.
A list of the video clips with thumbnails and clip information
appears.
If there are no video clips, the viewer will not open and the
Home menu remains displayed.
Setting Playback Preference
The FS-5 offers the ability for the User to determine which file,
the original DTE format or its proxy, displays when Play is
selected. Refer to PLAY PREF on page 54.
FS-5 2.0 User Guide Addendum
24
Page 35

Quick Start
3. Locate the file to view using the Scroll Wheel or the Up and
Down soft buttons.
4. Press the
Play key to start playback.
The original DV or HDV recording plays back at a reduced
frame rate, between 10 and 15 frames per second depending on
the video type, such as HDV or DV, 1080i or 720p, etc.
Use the
5. Press
6. Press the
Play and Pause keys to control playback.
Stop to end playback and return to the video clip list.
Select key to return to the Home menu.
Thumbnails
A single frame thumbnail image is automatically created for each
recording. These thumbnails and accompanying video clip
information are viewable as a list on the FS-5 2.0 LCD. In addition,
the thumbnails, clip information, and clip metadata are available
via the FS-5 2.0 web interface.
The thumbnail screen lists the filename, file type wrapper type
(MXF, QuickTime, etc.), the duration, and track number. To exit
the thumbnail screen, simply press the center button on the scroll
wheel.
Viewing Thumbnails on the Web
1. Log on to the FS-5 web server.
Use the standard procedure to log into FS-5 via WiFi or an
USB to Ethernet adapter: see
Server
, in the Metadata chapter of the user guide.
2. On the
Entry web page, select the Review tab.
Thumbnails for all clips on the FS-5 along with their track
names appears on the web interface.
3. Clicking on a thumbnail image displays a larger
thumbnail image and additional clip information such as
metadata. In addition, metadata can be added or
modified.
For more information, see
Review on page 35 of this addendum.
Logging Onto the FS-5 Web
FS-5 2.0 User Guide Addendum
25
Page 36

Quick Start
Proxy Audio Playback
To listen to proxy file audio, attach an USB headset to the FS-5 and
playback proxy files.
Volume is controlled through the USB headset.
Do Not Unplug USB Headset During Proxy Playback
FS-5 2.0 User Guide Addendum
26
Page 37
Quick Start
UTILITIES
FORMAT
REPAIR DISK
REPAIR CLIP
MAKE PROXY
FILE NAME
ORGANIZE REEL
ORGANIZE MXF
MAKE PROXY
CLIP 003
YES BACK
Creating A Proxy File
The FS-5 provides the videographer the ability to create smaller
proxy files to accompany the native format video clips. These proxy
files are easy to share over networks or the internet and provide
visual records for evaluating the larger native format clips.
This procedure is for generating a proxy file or a selected video clip:
1. From the Home menu, press the
UTILITIES menu.
the
Left soft button once to go to
2. Select
3. Enter the video clip number using the
4. Press
MAKE PROXY.
Scrool Wheel.
F3/YES to start proxy generation.
A status display appears, indicating the file is being generated.
When done the
5. Press
For information about proxy file settings, see
F4/BACK to return to the Utilities menu.
COMPLETED system message appears.
PROXY GEN on page 46.
FS-5 2.0 User Guide Addendum
27
Page 38

Quick Start
Proxy File Formats
The format of the proxy file depends on the format of the parent
video clip.
Original File Format Proxy File Format
QuickTime DV/HDV QuickTime (.mov)
MXF (DV/HDV) AVI (.avi)
M2T (HDV) MP4
AVI (DV Alll variants) AVI (.avi)
RawDV (DV) MP4
For technical information about proxy files, see
page 78.
Proxy Videos on
FS-5 2.0 User Guide Addendum
28
Page 39

Metadata
This chapter covers the 2.0 additions to the FS-5’s metadata
capabilities.
The FS-5 2.0 supports Avid Media Composer 3.5 NLE.
This chapter contains:
Overview page 30
Default Template page 48
Custom Templates page 30
Video Production page 30
Logging Onto the FS-5 Web Server page 31
Metadata Pages and Functions page 32
Entry page 33
Review page 35
Export page 36
Entering Metadata page 38
Logging Metadata to Multiple 2.0 FS-5s page 38
Saving Metadata page 39
Creating A Template page 40
TC Depend and Input Style In AXIF and Final Cut Pro page 40
Export page 41
Export to NLE XML Document page 41
FS-5 2.0 User Guide Addendum
29
Page 40

Metadata
Overview
Default Template
The default AVID MXF template is functionally similar to the other
FS-5 metadata templates. The User can select which metadata tags
to use, determine the type of input they receive, or assign
predefined values. In addition, the User can create Custom
templates that are compatible with AVID MXF.
When the FS-5 prepares video clips using templates based on the
APPLE XML Interchange Format, for importing into a nle like FCP,
the FS-5 records the metadata in xml documents that accompany
the video files. There are two files to export: a video clip and its
companion xml document.
When the FS-5 prepares Avid MXF files for importing into the
Avid Media Composer, it embeds the metadata in the MXF
wrapper. There is only one file to import into the nle.
Custom Templates
The FS-5 provides the capability for the User to create custom
templates by modifying Avid and FCP templates or entering
unique fields into an empty template.
Video Production
Post-production
FS-5 2.0 metadata is viewable and searchable and includes links
to the video content in the NLE or ProxSys media management
system.
FS-5 2.0 User Guide Addendum
30
Page 41
Metadata
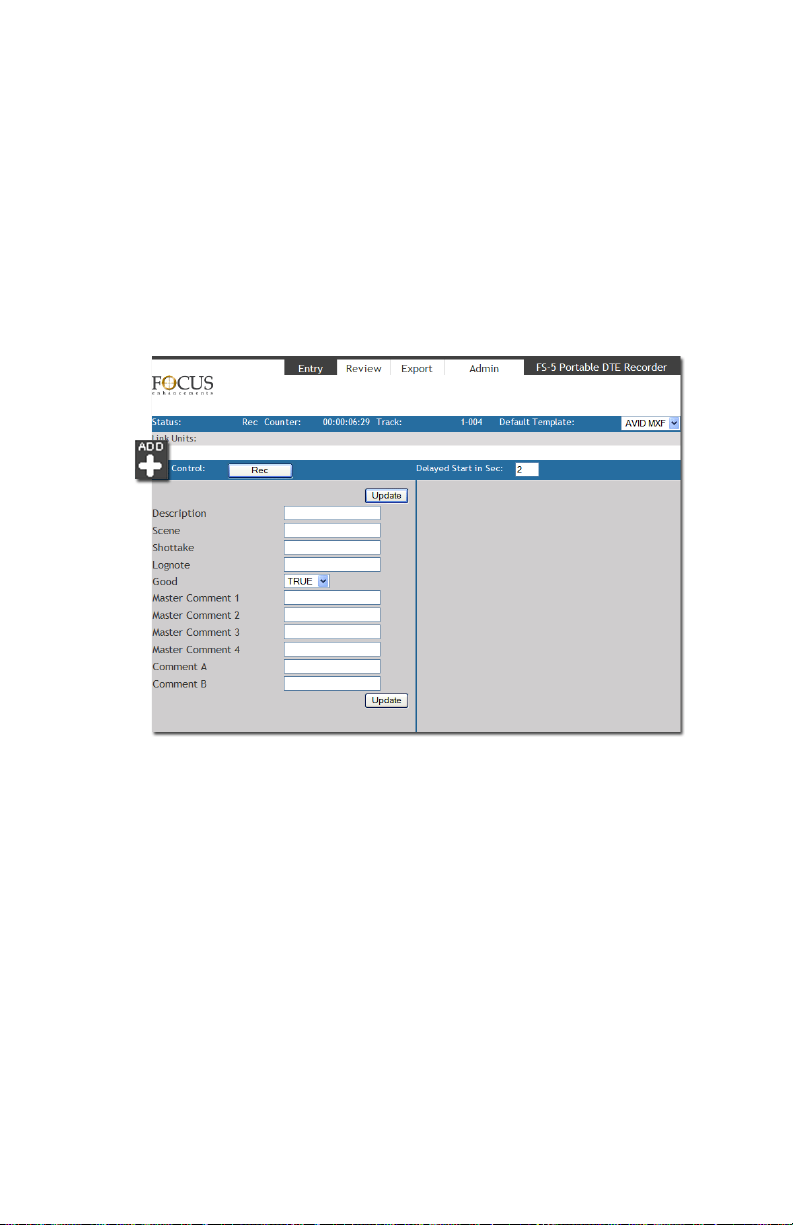
Logging Onto the FS-5 Web Server
Logging onto the FS-5 web server provides access to the metadata
settings and logging functions. The pages and functions available
depend on the type of device accessing the FS-5. Refer to user guide
for more information.
When the FS-5 web server opens, the
time the web server opens the
ENTRY page is empty until a metadata
template is selected.
ENTRY page appears. The first
This is the first page that a PDA displays. The appearance of this
page varies depending on the device used to view it.
The first time that the Entry page appears it displays the default
template.
FS-5 2.0 User Guide Addendum
31
Page 42

Metadata
Metadata Pages and Functions
FS-5 Metadata has five pages representing specific functions that are
divided into two groups:
as a toggle to switch between the two groups. To display the other
group, click on the
•
Admin group includes the pages:
Temp late - for creating and managing templates,
Settings - template export/import and reel matching
parameters, for more information, refer to the user guide.
•
User group includes the pages:
Entry - for entering and setting metadata values in a template,
Review - for reviewing the thumbnails and logged metadata of
recorded video clips.
Export - for specifying the export of metadata based on
template type,
User and Admin. The User/Admin tab acts
User or Admin tab.
FS-5 2.0 User Guide Addendum
32
Page 43
Entry
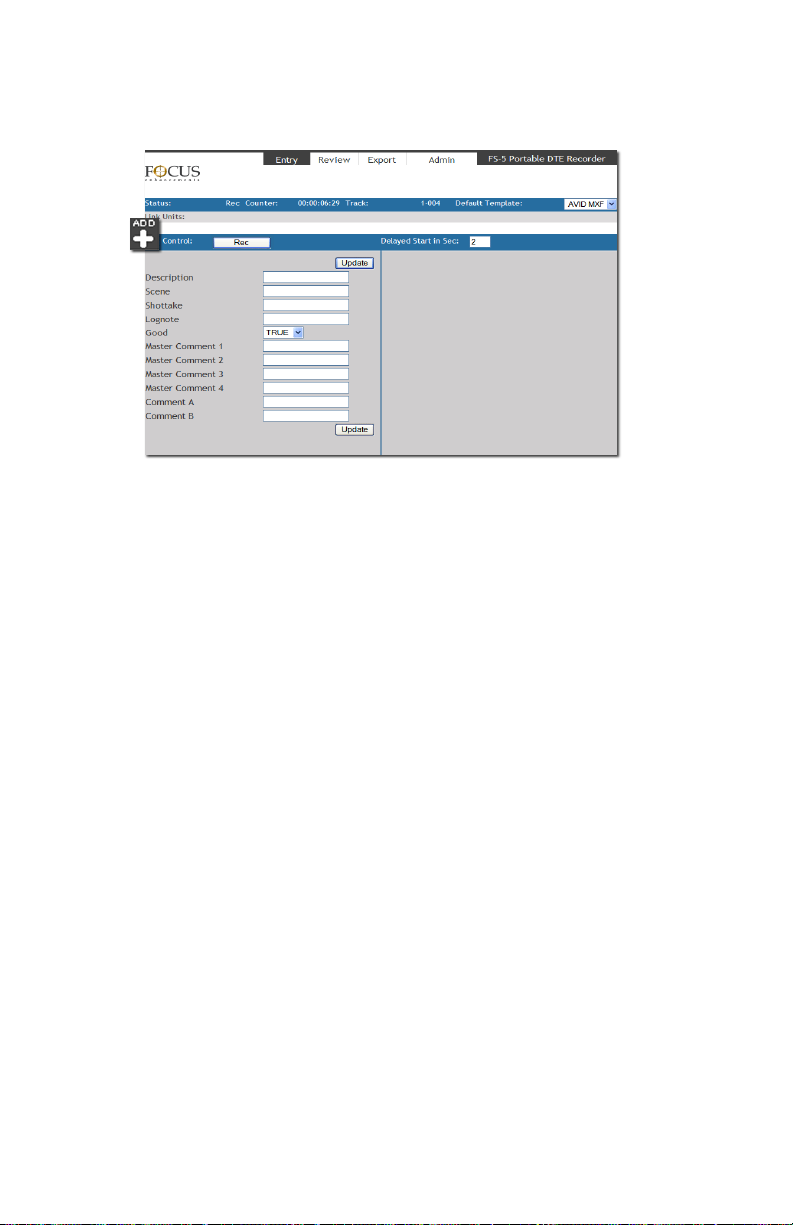
Use the Entry page to enter metadata to video clips.
•STATUS
Indicates the mode the FS-5 is currently in:
• Counter
Displays timecode during recording.
•Track
Displays current track (clip) number.
• Default Template
Initially the Entry page displays the metadata template
selected as the default. Its name appears in the
Tem plat e
field.
To use a different template, select it from the
dropdown menu. The new template appears and is active
once the FS-5 is in Record, Pause or Playback mode.
A template must be selected before recording or playback
begins.
•Control
Use the
Rec/Stop button to start and stop recording from the
Entry page, rather than the FS-5 or the camcorder.
Delayed Start in Sec
This sets the time between when
Rec is pressed and actual
recording begins: range, 0 - 999 seconds.
Rec, Stop.
Default Template
Metadata
Default
FS-5 2.0 User Guide Addendum
33
Page 44

Metadata
• Update Button and Metadata Fields
During record or playback information can be entered in the
metadata fields. Press
Update to log the metadata for the video
clip.
For information about logging metadata, see
Metadata
on page 38.
• ADD
Clicking on ADD displays the
Use Link Units to connect to one or more secondary FS-5s
and:
Copy a metadata template to the secondary FS-5s.
Log metadata on to multiple FS-5s: primary and secondary.
Control synchronized recording operations of multiple FS-
5s using the primary.
For information about logging metadata on multiple FS-5s,
see
Logging Metadata to Multiple 2.0 FS-5s on page 38.
For information about simultaneously controlling recording
on multiple FS-5s, see
Controlling Multiple FS-5s At Once on
page 68.
Entering
Link Units workspace.
FS-5 2.0 User Guide Addendum
34
Page 45
Metadata
Track dropdown list
Show All Thumbnails
Metadata Field
Marked Segment
Track
Review
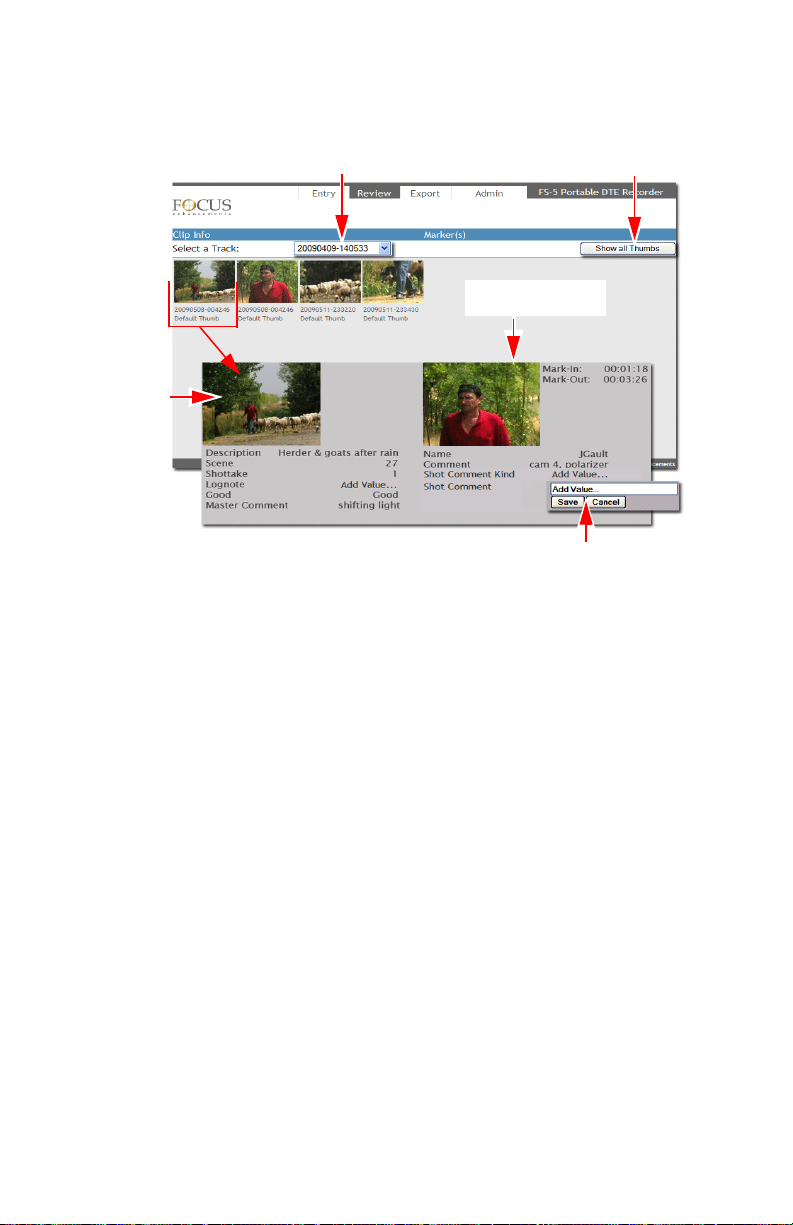
Use Review to examine video clip thumbnails, metadata, timecode,
and in/out markers.
When the Review page first appears, it is empty.
To view information about a video clip the user can either select a
track to view by either:
• Picking a track (clip) from the
•Click on
thumbnails with filenames and video format.
Show All Thumbnails to display a set of video clip
Click on a thumbnail to display a larger thumbnail and all
information about the video clip. If a segment has been
marked, its thumbnail is enlarged too.
Track dropdown list.
Marked Segment Thumbnail and Data
If In/Out Markers have been set in the video clip, an additional
thumbnail appears in the display. It has the same file name as
the parent clip.
Add or Change Metadata
Click on a metadata field to add or change metadata data.
FS-5 2.0 User Guide Addendum
35
Page 46
Metadata
Export
Troubleshooting Tip - Missing Templates Thumbnails
If while working on the Entry, Review, or Temp late pages,
thumbnails or metadata templates are missing it is necessary to
run the
Be certain that the
Save all video clips before formatting.
Format utility, see FORMAT on page 63.
Tem plat es option is set to Clear.
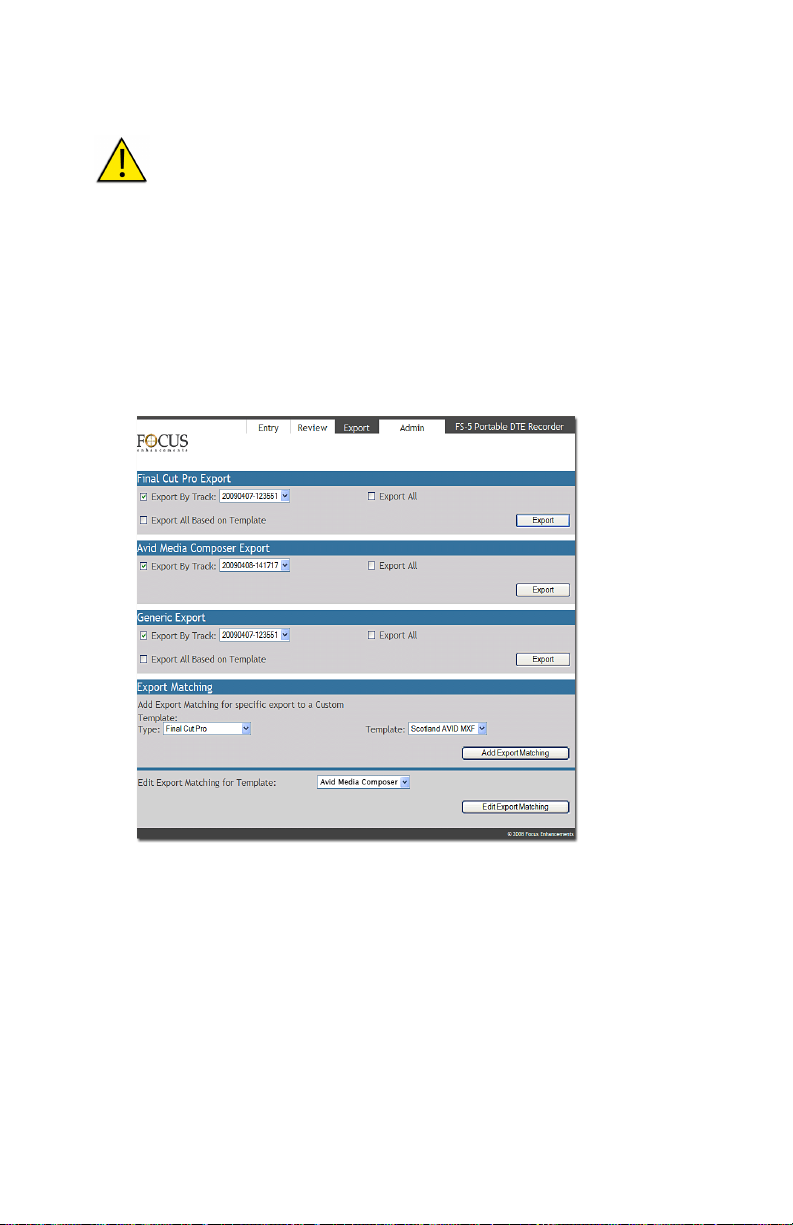
Use Export to manually export video clip metadata files from the
FS-5 database to User accessible xml files. The file name of the xml
file identifies it as belonging to a specific video clip.
Specific NLE Editors
Export provides Final Cut Pro and Avid Media Composer
workspaces for creating xml metadata files specific to those
NLEs.
FS-5 2.0 User Guide Addendum
36
Page 47

Metadata
Avid Media Composer
Before importing MXF files into Avid Media Composer from
the FS-5, it is first necessary to run the FS-5
MXF
. This utility creates the Avid MXF directory structure and
embeds the metadata in the MXF files.
The video files are then ready to import into Avid Media
Composer.
In Avid Media Composer, use the Media Tool to import the
MXF files into a specified bin. Because Avid incorporates
metadata into the MXF wrapper, both the video content and
metadata are imported together.
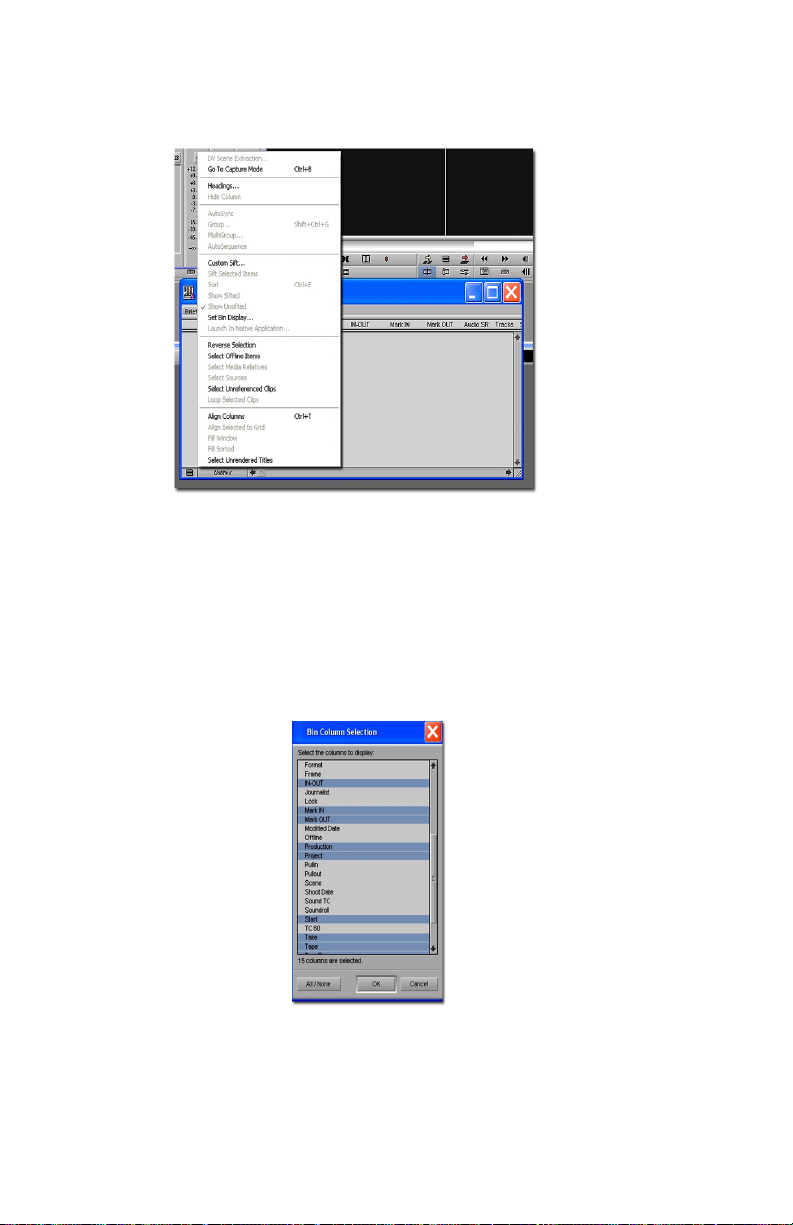
A video clip’s metadata appears in the
window.
For more information see
Avid
on page 74.
Importing Video and Metadata Into
Utility, Organize
bin column selection
FS-5 2.0 User Guide Addendum
37
Page 48
Metadata
4
5
7
8
9
10
6
Entering Metadata
Metadata may be entered into a single FS-5 or simultaneously into
multiple FS-5s.
These procedures assume that there is a ready to use template, such
as the
FCP Example or AVID M X F that are supplied with the FS-5. And
that it is not necessary to modify or create a new template.
Logging Metadata to Multiple 2.0 FS-5s
The FS-5 provides the ability to simultaneously log the same
metadata to multiple FS-5s located on the same network.
To log metadata onto multiple FS-5s:
1. Begin by mounting at least two FS-5 2.0 units on a network.
2. Select one of the FS-5s to be the host.
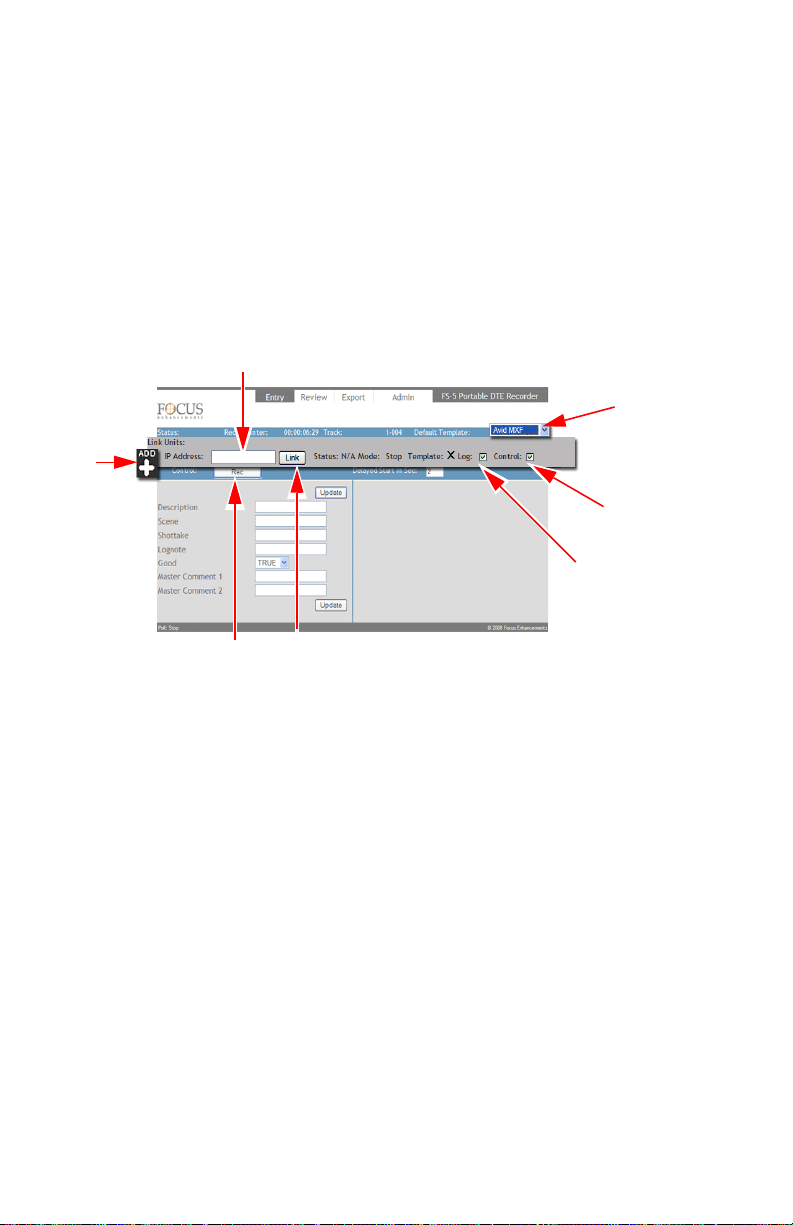
3. Log on to the host and go to its
4. Select the metadata template to use from the
Temp late
5. Click the
dropdown list.
ADD button.
The Link Units workspace expands to show link parameters
for the first client FS-5.
marked. Any time the host FS-5 links to another unit, it
Notice that the
Temp late option is permanently check-
Entry page.
Default
transfers the currently selected template to the client,
regardless if the other link options are selected or not.
6. Enter the
FS-5 2.0 User Guide Addendum
38
IP address for the client FS-5.
Page 49

7. Check-mark Log if the host unit is to log metadata on the
client unit. Then any metadata entered on the host appears
on the client too.
8. Check-mark
Playback, and Pause operations on the client unit.
9. Click
Link to connect to the client unit.
Control if the host unit is to control the Record,
The Status and Mode messages will change indicating that
the connection is made.
Repeat steps 5 through 9 for each client unit.
The linked FS-5s are now ready. Enter metadata as
described in the FS-5 User Guide.
10. To start recording on multiple units, press the
on the
Entry page.
Record button
Saving Metadata
There is no distinct Save step.
Metadata
Clicking on the
Update or Mark buttons writes the metadata to the
FS-5 database and into a specific record assigned to the video clip.
Changing the metadata in the template changes the video clip’s
record in the database in real time.
FS-5 2.0 User Guide Addendum
39
Page 50

Metadata
Creating A Template
TC Depend and Input Style In AXIF and Final Cut Pro
In Apple XML Interchange Format (AXIF) templates the settings
for the TC Depend and Input Style fields are grayed out because
their settings are fixed and can not be changed.
• By default, most but not all of the metadata fields are set as
not timecode dependent.
• All the metadata fields have their Input Style set as Mixed
Input which permits the use of both predefined and
variable, user entered, values.
Avid Media Composer and Final Cut Pro support these settings
because they are template defaults.
Creating a Custom Template allows the user to set TC Depend
and Input Style defaults to other values which Avid and Final
Cut Pro will then support.
FS-5 2.0 User Guide Addendum
40
Page 51
Export
Metadata
Export to NLE XML Document
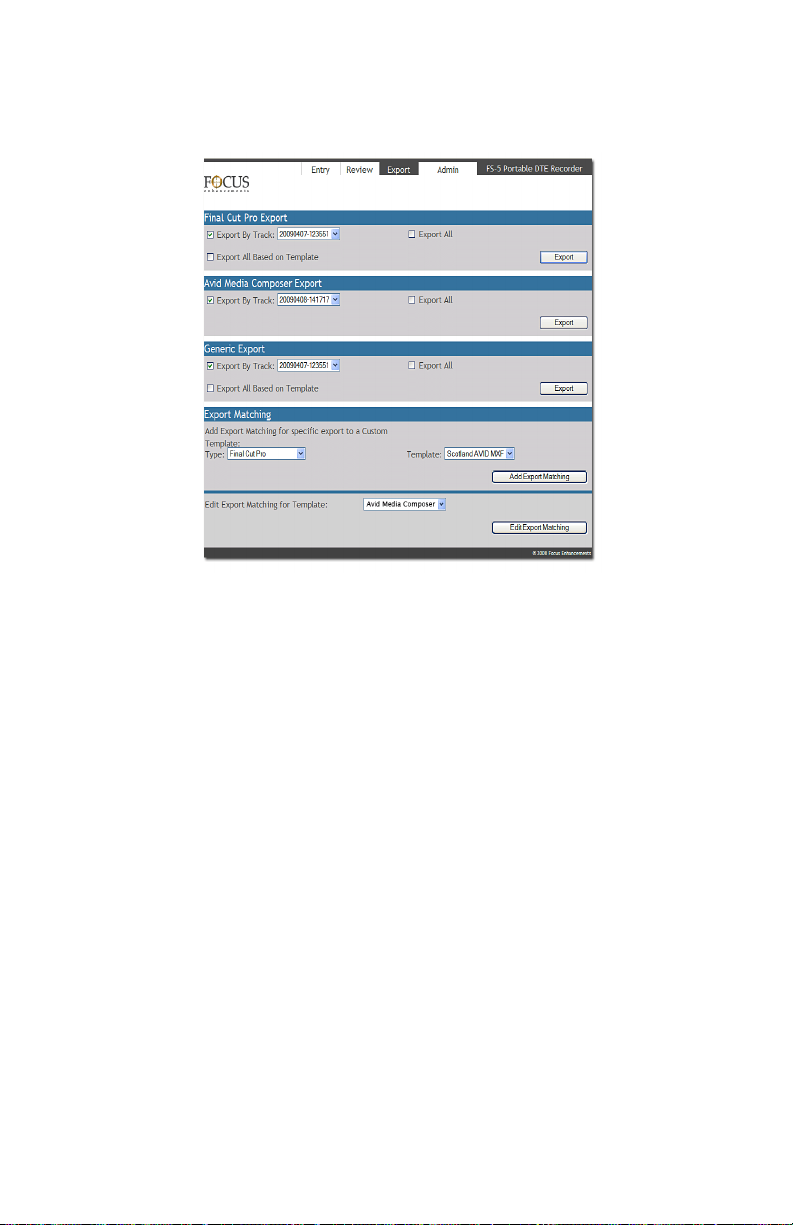
There are three NLE export options:
•
Final Cut Pro Export
Use this function to create metadata xml documents for Final
Cut Pro, using the Final Cut Pro XML Interchange Format.
•
AVID Media Composer
Use this function to create metadata xml documents for Avid
Media Composer.
• Generic Export
This option creates a metadata xml document based on the
Custom template created.
FS-5 2.0 User Guide Addendum
41
Page 52

Metadata
FS-5 2.0 User Guide Addendum
42
Page 53

FS-5 2.0 Functions
This chapter covers the 2.0 additions to FS-5 functions.:
General Menu Information page 44
Welcome page 44
OPERATION Menus page 45
PROXY GEN page 46
SETUP Menus page 47
SET DATE AND TIME USING NTP page 49
TIME ZONE page 50
NPT SOURCE page 51
DST ADJUST page 52
DST MANUAL page 53
PLAY PREF page 54
PROXIES page 54
NETWORK page 55
IP MASK page 56
BROADCAST page 57
GATEWAY page 57
FUNCTIONS Menus page 58
UTILITIES Menus page 61
FORMAT page 63
MAKE PROXY page 64
Organize MXF page 65
CALIBRATE CLOCK page 66
FS-5 2.0 User Guide Addendum
43
Page 54
FS-5 Functions
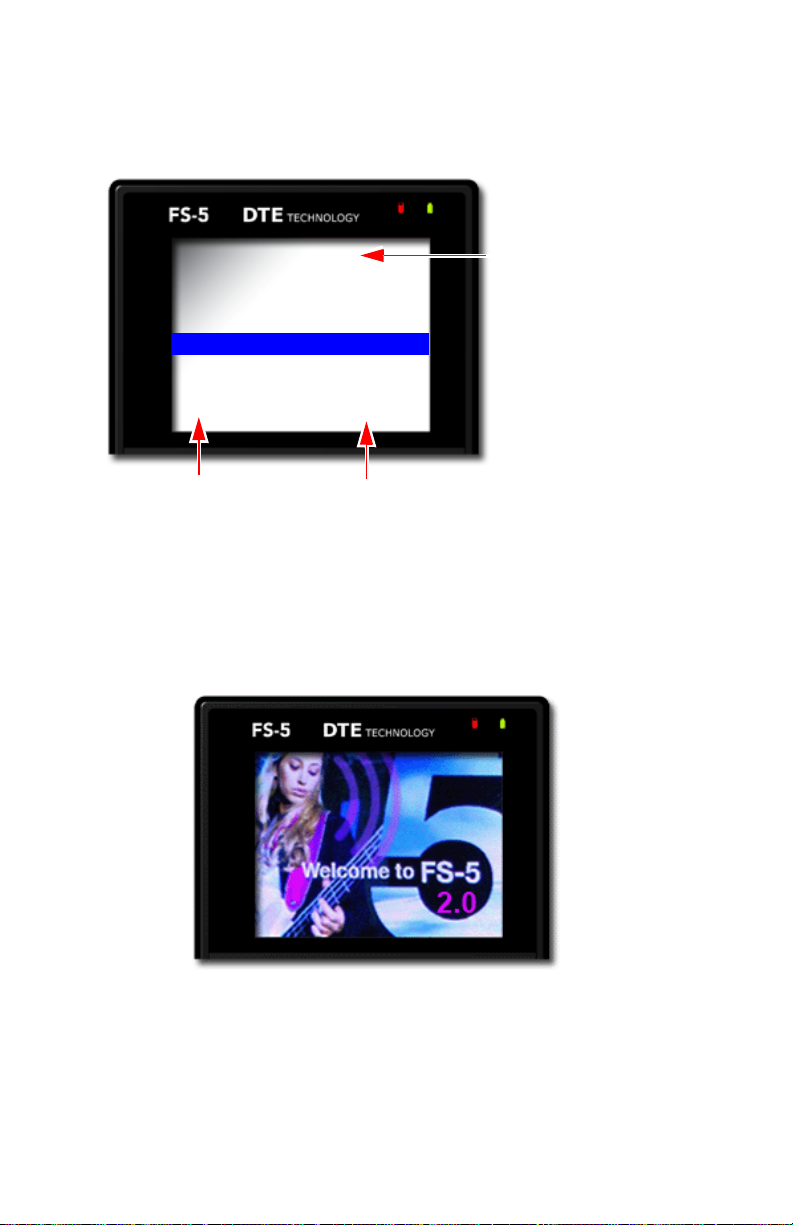
Menu Title
Appears at the top of the
display and identifies its
topic or function.
Use the Left or Right soft
navigation buttons to
move between the
previous or next menu.
Menu Items
Use the Up and Down soft
navigation buttons to
move between the items in
the menu.
Pressing Select when an
item is highlighted,
displays its options.
SETUP
SET DATE AND TIME USING NTP
DATE
TIME
TIME ZONE
AUTO TIME
DST ADJUST
DST MANUAL
04/02/10
19:11:00
UTC
Asia
AUTOMATIC
LOCAL
Current Settings
Opposite the menu item is
its current setting.
General Menu Information
Welcome
.
FS-5 2.0 User Guide Addendum
44
Page 55
FS-5 Functions
OPERATION
MODE
CONTROL
REC MODE
REC FORMAT
DTE FORMAT
TIMECODE
PROXY GEN
REC/PLAY
NORMAL
NORMAL
HDV
QUICKTIME
EXT TC
AUTOMATIC
OPERATION Menus
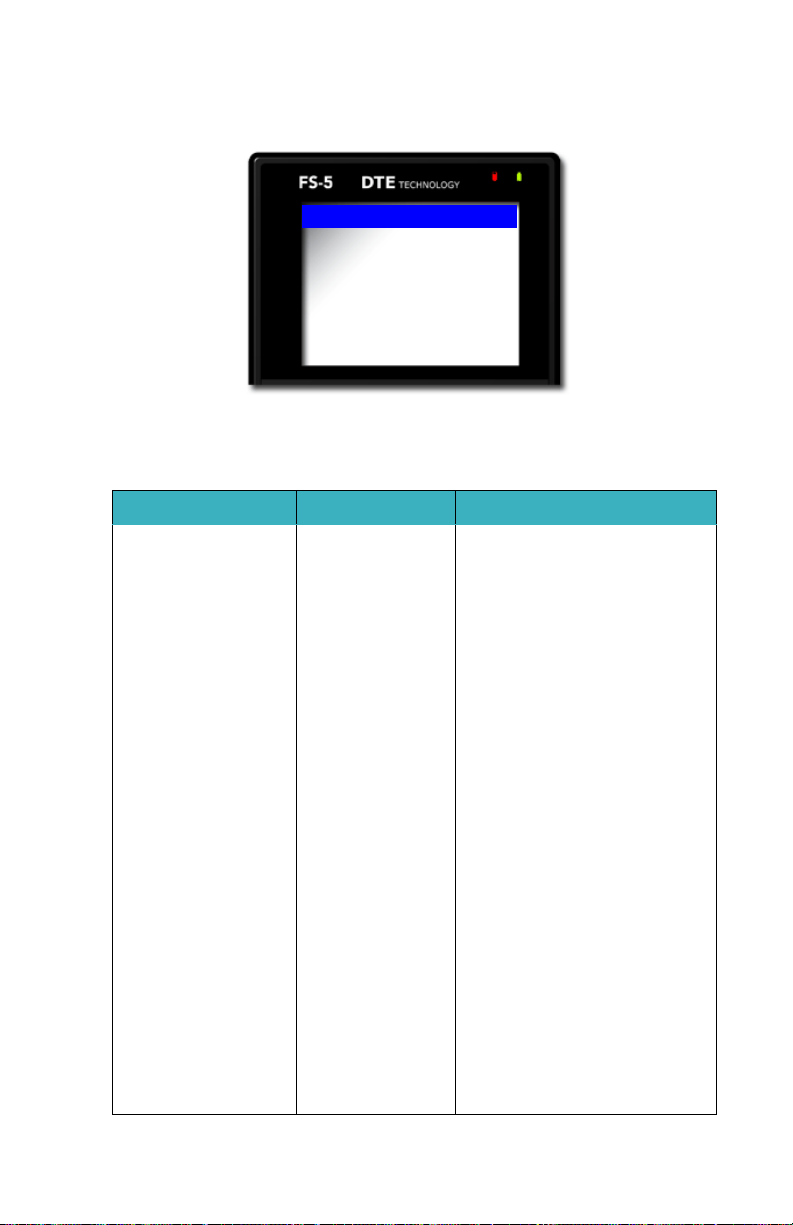
The Operation menu provides access to settings that control various
recording features, functions, and information:
Item Default Options
MODE
CONTROL
REC MODE
REC FORMAT
DTE FORMAT
TIMECODE
PROXY GEN AUTOMATIC OFF
REC /PLAY REC /PLAY
NORMAL NORMAL
NORMAL NORMAL
HDV DV
QUICKTIME DV
EXT TC EXT TC
HDD
EXTERNAL
SYNCRO
RETRO CACHE
RETRO DISK
REC DV REC Mode only
SNAP
TIMELAPSE DV REC Mode only
RAW DV
AVI TYPE 1
AVI TYPE 2
CANOPUS AVI
MATROX AVI
QUICKTIME
MXF
HDV
M2T
QUICKTIME
MXF
FREE RUN
REC RUN
REGEN
MANUAL
AUTOMATIC
FS-5 2.0 User Guide Addendum
45
Page 56
FS-5 Functions
OPERATION
PROXY GEN
OFF
MANUAL
AUTOMATIC
PROXY GEN
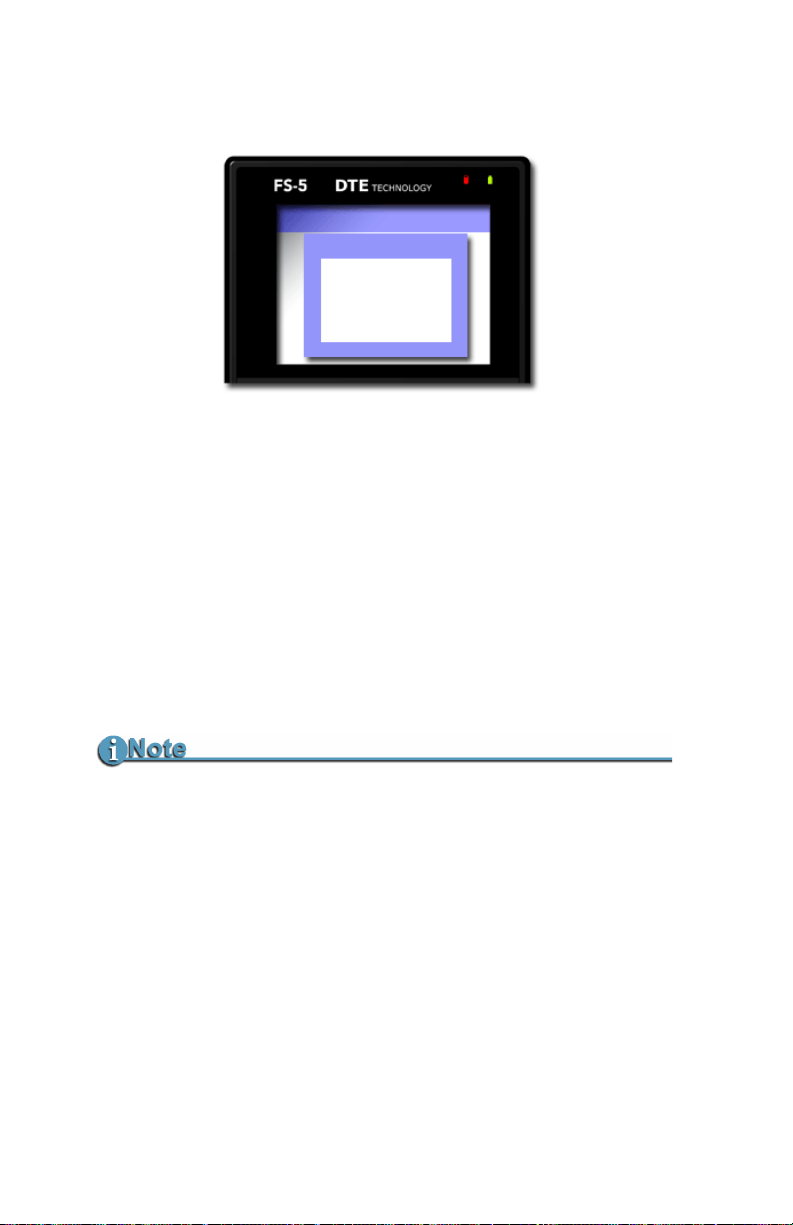
This operation controls how video proxy files are created.
The DTE format of the parent video clip determines the proxy file
wrapper (AVI, MP4, QuickTime) of the proxy file.
• OFF
Disables/enables the
• MANUAL
Allows the videographer to select specific video clips for
proxy files creation.
• AUTOMATIC
Automatically generates proxy files for all video clips during
the recording session.
PROXY GEN function.
Proxy Files
Proxy files are significantly smaller in size than the native format
video files size they are generated from and can be shared quickly via
the internet or network. This provides directors, editors, and others
fast access video rushes.
For more information about proxy file settings, see:
page 54 and
FS-5 2.0 User Guide Addendum
46
PROXIES on page 54.
PLAY PREF on
Page 57
FS-5 Functions
DATE
TIME
TIME ZONE
NTP SOURCE
DST ADJUST
DST MANUAL
05/28/08
08:31:15
Menominee
Unite Sates
AUTOMATIC
LOCAL
SETUP
SET DATE / TIME USING NTP
SETUP Menus
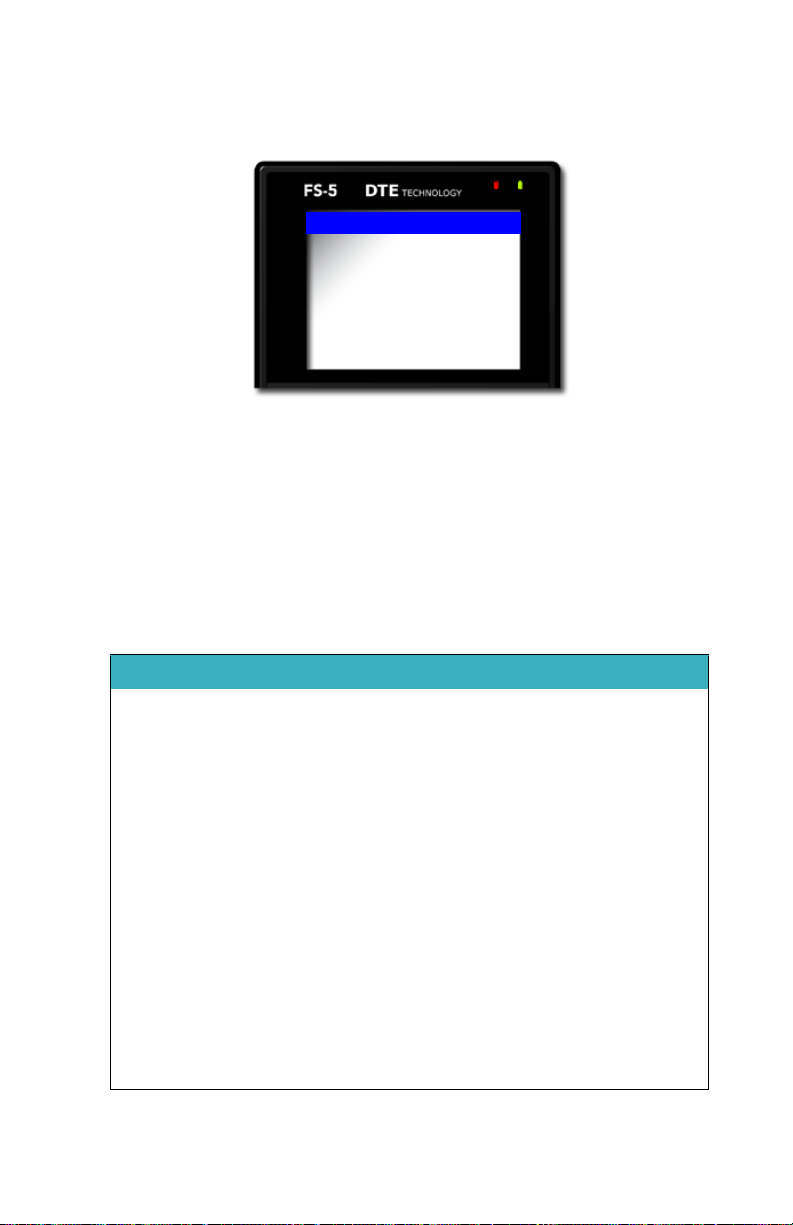
The items in the Setup menu are grouped by function. Within
the function the items act like radio buttons, i.e. when one is
active the others are not.
In some cases, such as the
Date, a new display appears with
parameters to set. To return from a parameters display, use the
BACK function button.
The Setup menu items include:
Item Default Options / Comments
SET DATE AND TIME USING NTP (2.0)
DATE 06/15/08 Displayed in Home menu.
TIME 08:00 Displayed in Home menu.
TIME ZONE (2.0)
NTP SOURCE (2.0)
DST TIME (2.0)
DST MANUAL (2.0)
LCD ON ON
LCD BRIGHT 16 1 -16
KEY BRIGHT 16 1 -16
ALARM ON ON/OFF
UTC Select time for specific time zone by
Global Use this list to locate the NTP pool to
AUTOMATIC Daylight Savings Time
LOCAL Daylight Savings Time
selecting geographical region and city.
sync for date and time info.
OFF
AUTO
FS-5 2.0 User Guide Addendum
47
Page 58

FS-5 Functions
Item Default Options / Comments
STOP NO VIDEO NO VIDEO
EXT CTL OFF OFF
TC SET 00:00:00:00
UB SET 00:00:00:00
TC MODE NON-DROP DROP
RETRO CACHE 5 seconds
RETRO DISK 1 minute
TIMELAPSE 00:00:00:00
PL AY MO DE PLAY CLI P P L AY C LIP
PLAY FROM MODE TRACK TRACK
PLAY PREF (2.0) ORIGINAL ORIGINAL
PROXIES
UDF FS PERM READ-ONLY READ-ONLY
NETWORK DHCP MANUAL
IP ADDR 0.0.0.0 When set to DHCP, 0.0.0.0.
IP MASK 0.0.0.0 When set to DHCP, 0.0.0.0.
BROADCAST 0.0.0.0 When set to DHCP, 0.0.0.0.
GATEWAY 0.0.0.0 When set to DHCP, 0.0.0.0.
ESSID FS5
KEY
WIFI MODE MANAGED MANAGED
FTP DISABLED
SPEED SPEED
PAU SE
FRAME
FILE
NON-DROP
LOOP CLIP
PLAY ALL
LOOP ALL
REEL
PROXY
QUALITY
READ-WRITE
DHCP
When set to MANUAL, 192.168.10.25
When set to MANUAL, 255.255.255.0
When set to MANUAL, 192.168.10.255
When set to MANUAL, 192.168.10.1
ADHOC PEER-TO-PEER (P2P)
FS-5 2.0 User Guide Addendum
48
Page 59
FS-5 Functions
SETTING DATE AND TIME FROM
us.pool.ntp.org
Item Default Options / Comments
FTP PASS FS
WEB ENABLED
AUTO ORG ENABLED
AUTO MARK ENABLED
REELS PREF FOLDER FOLDER
TEMPLATE
SET DATE AND TIME USING NTP
This function uses the Network Time Protocol (NTP) to
synchronize the FS-5 system clock to an internet time server. Before
running this function, it is necessary to first set:
•
TIME ZONE on page 50
•
NPT SOURCE on page 51
The FS-5 must be connected to the internet or an NTP enabled
network for this function to work, see
FS-5 with Other Devices on
page 67.
Selecting the function
SET DATE AND TIME USING NTP
automatically initiates the process.
FS-5 2.0 User Guide Addendum
49
Page 60

FS-5 Functions
SETUP
TIME ZONE
TIME ZONE
UTC
Africa
America
Antarctic
Aortic
Martinique
Mazatlan
Menominee
Merida
Mexico City
Miqueton
TIME ZONE
For FS-5 time features to accurately display local time, it is
necessary to select the time zone where the FS-5 is to operate. This
setting is necessary for the function,
NTP
on page 49 to accurately set the FS-5 clock.
In addition,
Default is
1. Select a
2. Press the
DST ADJUST on page 52 depends on this setting.
UTC, Universal Timecode.
TIME ZONE geographical region.
Left soft button to advance to the TIME ZONE City
list.
3. Use the
Scroll Wheel to locate a city located in the same time
zone as the recording session.
4. Press the
Select key.
The display returns to the
SET DATE AND TIME USING
SETUP menu.
FS-5 2.0 User Guide Addendum
50
Page 61

FS-5 Functions
SETUP
NPT SOURCE
NPT SOURCE
Global
Asia
Europe
North Ame...
Oceania
Europe
Austria
Belarus
Belgium
Bulgaria
Czech Rep...
NPT SOURCE
For FS-5 time features to accurately display local time, it is
necessary to select the NTP source that the function
TIME USING NTP
Default is
1. Select an
2. Press the
3. Use the
employs to set the FS-5 clock.
Global.
NPT SOURCE continent/geographical region.
Left soft button to advance to the country list.
Scroll Wheel to locate a nation located in the same
time zone as the recording session.
4. Press the
The display returns to the
Select key.
SETUP menu.
SET DATE AND
FS-5 2.0 User Guide Addendum
51
Page 62

FS-5 Functions
SETUP
DST ADJUST
AUTOMATIC
MANUAL
DST ADJUST
Use this function to set Daylight Savings Time for the locale where
the FS-5 is operating. There are two setting:
• AUTOMATIC
The FS-5 adjusts to daylight savings time changes.
TIME ZONE must be set to location of operation.
• MANUAL
Selecting MANUAL instructs the FS-5 to check its clock to see
if it must adjust for daylight savings time. It is also necessary
to set
DST MANUAL on page 53.
This function requires that
page 49 be set.
Default
SET DATE AND TIME USING NTP on
FS-5 2.0 User Guide Addendum
52
Page 63

FS-5 Functions
SETUP
DST MANUAL
LOCAL
STANDARD
DST MANUAL
Use this function when manually setting Daylight Savings Time.
If
DST ADJUST is set to MANUAL, verify that this function is set
apriority.
• LOCAL
• STANDARD
Default
FS-5 2.0 User Guide Addendum
53
Page 64
FS-5 Functions
SETUP
PLAY PREF
ORIGINAL
PROXY
SETUP
PROXIES
SPEED
QUALITY
PLAY PREF
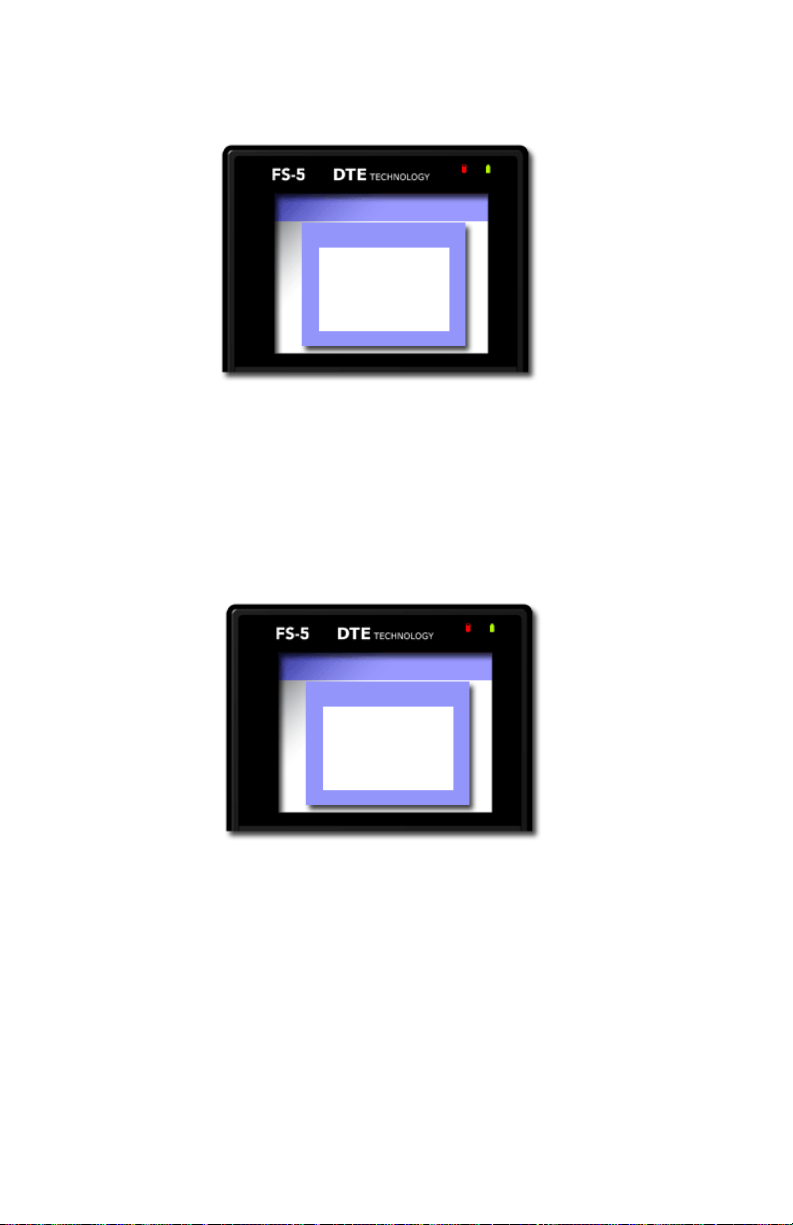
This setting determines which version of the selected video clip
plays back:
• Original
Default
• Proxy
PROXIES
This setting determines the type of proxy file to be created:
• SPEED
Default
This proxy has a lower resolution and smallest file size.
• QUALITY
This proxy is higher resolution and largest proxy file size.
FS-5 2.0 User Guide Addendum
54
Page 65

FS-5 Functions
SETUP
NETWORK
MANUAL
DHCP
NETWORK
Select the method to use to assign a network IP address to the
FS-5.
• MANUAL
When MANUAL IP is selected, the FS-5 automatically fills
in a default value for:
IP ADDR: 192.168.10.251
IP MASK: 255.255.255.0
BROADCAST: 192.168.10.255
GATEWAY: 192.168.10.1
ESSID: FS5
• DHCP
Select, if IP address is automatically assigned by the
network DHCP server.
Default
FS-5 2.0 User Guide Addendum
55
Page 66
FS-5 Functions
SETUP
IP ADDR
SETUP
IP MASK
IP ADDR
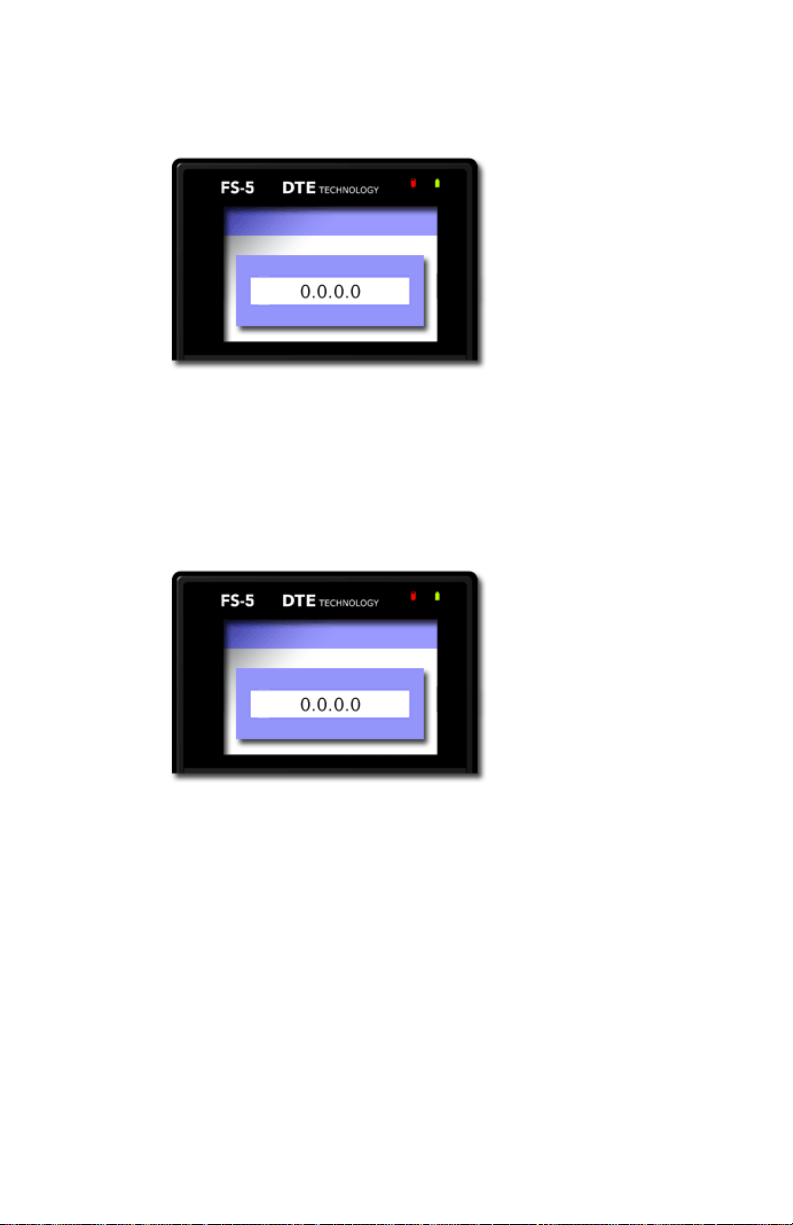
When set to DHCP, the address is 0.0.0.0.
Manual default is 192.168.10.25.
IP MASK
When set to DHCP, the address is 0.0.0.0.
Manual default is 255.255.255.0.
FS-5 2.0 User Guide Addendum
56
Page 67
BROADCAST
SETUP
BROADCAST
SETUP
GATEWAY
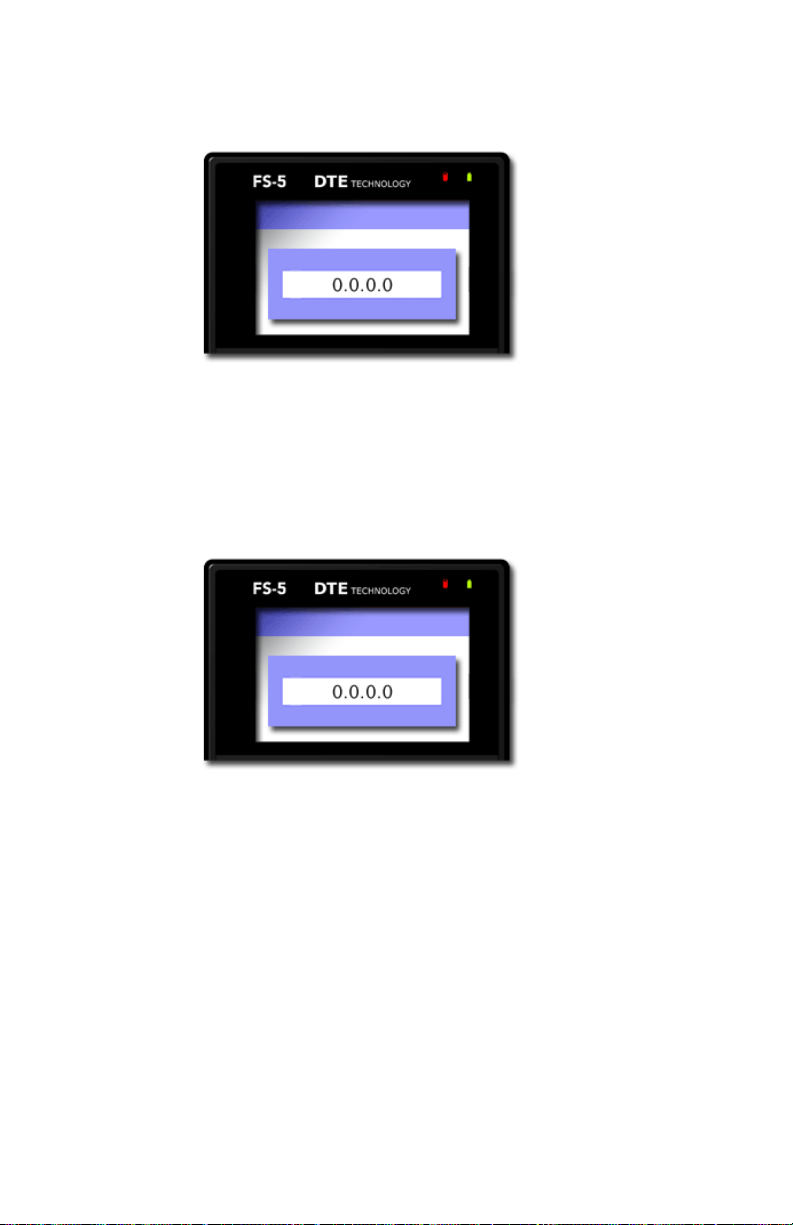
When set to DHCP, the address is 0.0.0.0.
Manual default is 192.168.10.255.
GATEWAY
FS-5 Functions
When set to DHCP, the address is 0.0.0.0.
Manual default is 192.168.10.1.
FS-5 2.0 User Guide Addendum
57
Page 68
FS-5 Functions
FUNCTIONS Menus
Functions List
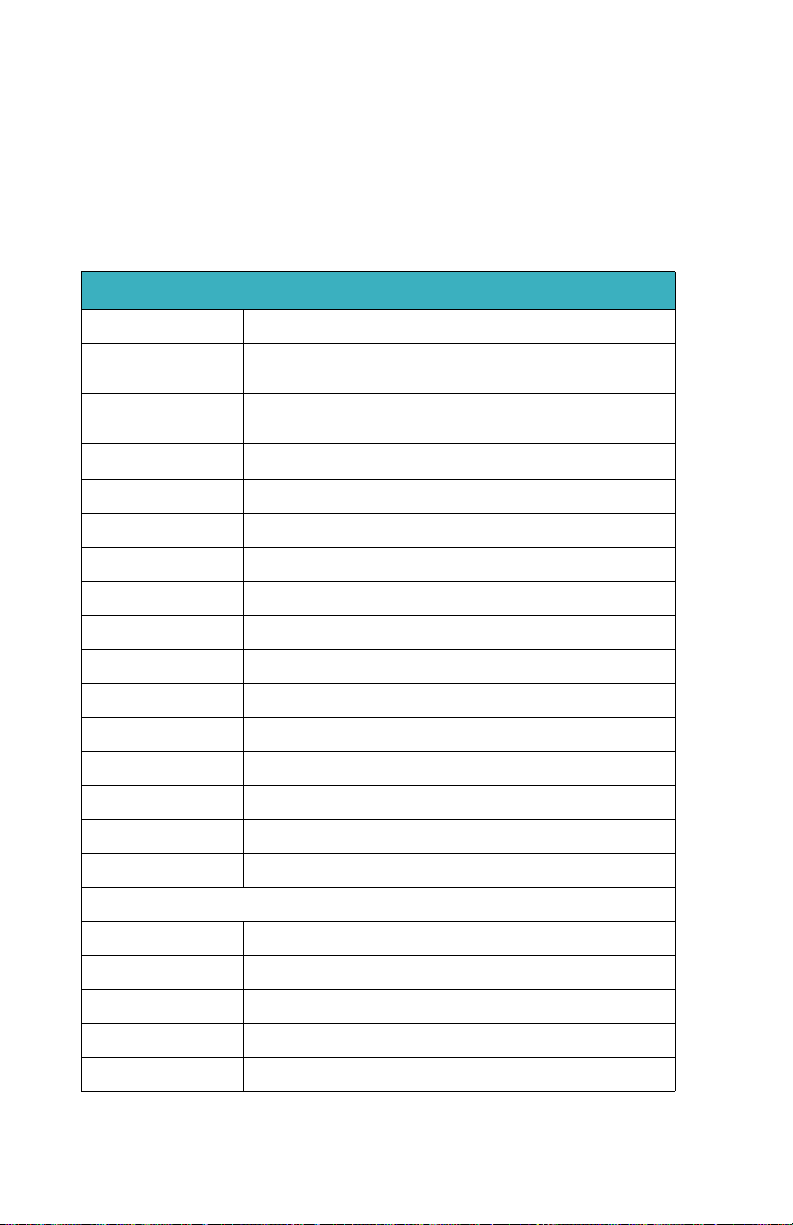
A list of the Function button menu is below. In each group, the
default selection is listed first.
MENU Appears on LCD as…
F1 SYNC SYNC Toggles between SYNCRO and LOCAL record control.
F1 EXTERNAL EXT (Toggles between external TRIGGER and LOCAL control)
LCD SET Sets the LCD display to A = AUTO, 1 = ON, 0 = OFF, see LCD on
PROXY Sets FS-5 to Proxy mode, using current settings.
F1 REELS REEL Increments current reel number,
F1 R0-0 R0 Marks Current Clip to Reel 0,
F1 R1-1 R1 Marks Current Clip to Reel 1,
F1 R2-2 R2 Marks Current Clip to Reel 2,
F1 R3-3 R3 Marks Current Clip to Reel 3,
F1 R4-4 R4 Marks Current Clip to Reel 4,
Default
page 113.
F1 R5-5 R5 Marks Current Clip to Reel 5,
F1 R6-6 R6 Marks Current Clip to Reel 6,
F1 R7-7 R7 Marks Current Clip to Reel 7,
F1 R8-8 R8 Marks Current Clip to Reel 8,
F1 R9-9 R9 Marks Current Clip to Reel 9,
F1 BLANK No Function.
F2 DISP DISP (Toggles the different TC display modes) (Default)
F2 ALARM ALRM/MUTE Turns the FS-C alarm on or off.
F2 FILE FILE (Toggles display between normal and the file name.
F2 REELS REEL Increments current reel number,
F2 R0-0 R0 Marks Current Clip to Reel 0,
FS-5 2.0 User Guide Addendum
58
Page 69
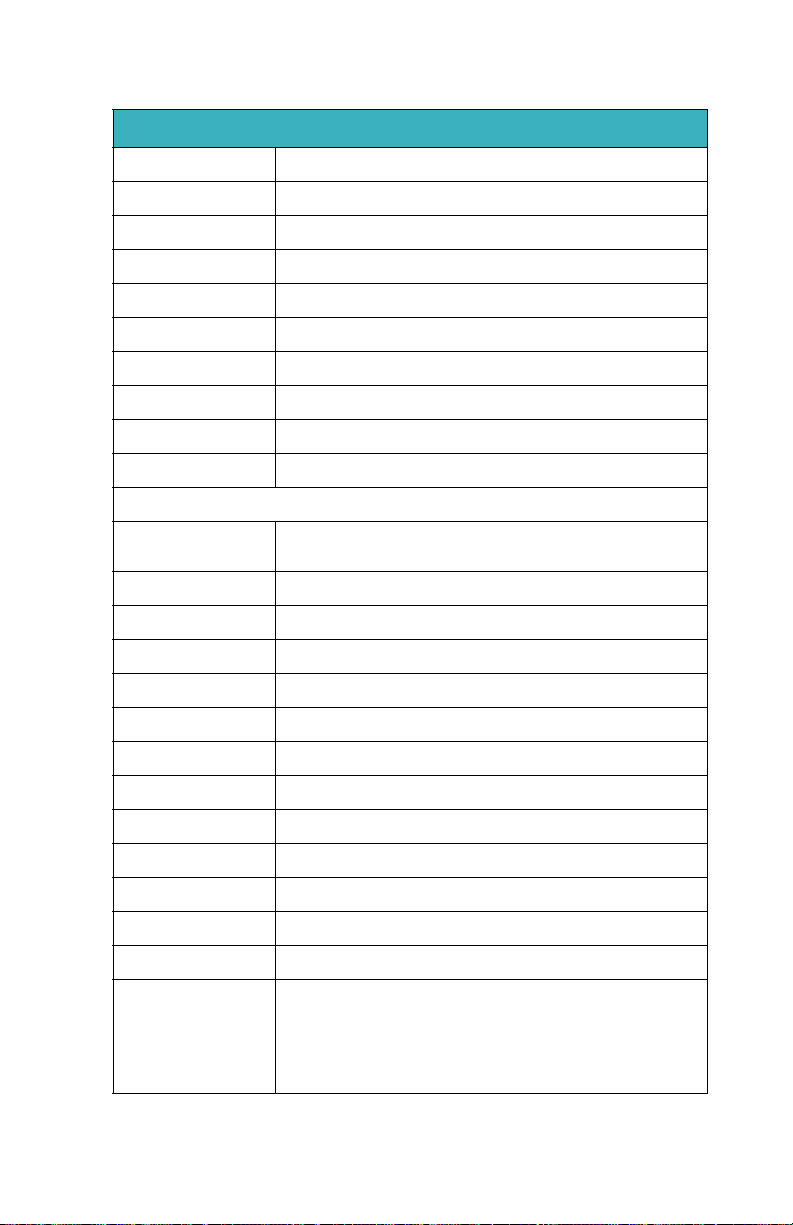
MENU Appears on LCD as…
F2 R1-1 R1 Marks Current Clip to Reel 1,
F2 R2-2 R2 Marks Current Clip to Reel 2,
F2 R3-3 R3 Marks Current Clip to Reel 3,
F2 R4-4 R4 Marks Current Clip to Reel 4,
F2 R5-5 R5 Marks Current Clip to Reel 5,
F2 R6-6 R6 Marks Current Clip to Reel 6,
F2 R7-7 R7 Marks Current Clip to Reel 7,
F2 R8-8 R8 Marks Current Clip to Reel 8,
F2 R9-9 R9 Marks Current Clip to Reel 9,
F2 BLANK No Function.
FS-5 Functions
F3 LOCK LOCK/UNLK Locks the buttonpad (Default) - toggles between
F3 REELS REEL Increments current reel number,
F3 R0-0 R0 Marks Current Clip to Reel 0,
F3 R1-1 R1 Marks Current Clip to Reel 1,
F3 R2-2 R2 Marks Current Clip to Reel 2,
F3R3-3 R3 Marks Current Clip to Reel 3,
F3 R4-4 R4 Marks Current Clip to Reel 4,
F3 R5-5 R5 Marks Current Clip to Reel 5,
F3 R6-6 R6 Marks Current Clip to Reel 6,
F3 R7-7 R7 Marks Current Clip to Reel 7,
F3 R8-8 R8 Marks Current Clip to Reel 8,
F3 R9-9 R9 Marks Current Clip to Reel 9,
F3 BLANK No Function.
F4 LOCK LOCK/UNLK Locks the buttonpad - toggles between LOCK
LOCK and UNLK <Unlock>
(Default) and UNLK <Unlock>
FS-5 2.0 User Guide Addendum
59
Page 70
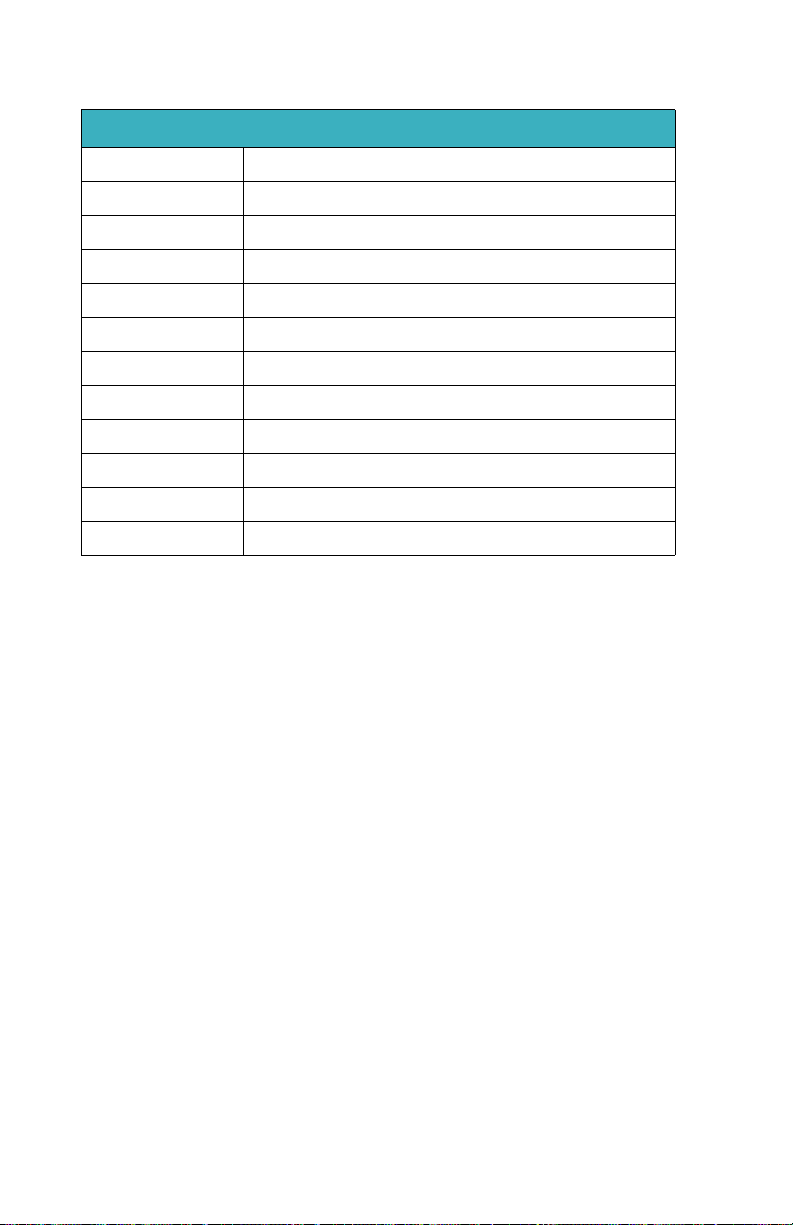
FS-5 Functions
MENU Appears on LCD as…
F4 REELS REEL Increments current reel number,
F4 R0-0 R0 Marks Current Clip to Reel 0,
F4 R1-1 R1 Marks Current Clip to Reel 1,
F4 R2-2 R2 Marks Current Clip to Reel 2,
F4 R3-3 R3 Marks Current Clip to Reel 3,
F4 R4-4 R4 Marks Current Clip to Reel 4,
F4 R5-5 R5 Marks Current Clip to Reel 5,
F4 R6-6 R6 Marks Current Clip to Reel 6,
F4 R7-7 R7 Marks Current Clip to Reel 7,
F4 R8-8 R8 Marks Current Clip to Reel 8,
F4 R9-9 R9 Marks Current Clip to Reel 9,
F4 BLANK No Function.
For information about how to assign clips to reels, see Assigning
Clips to Reels
, in the Functions chapter, of the user guide.
FS-5 2.0 User Guide Addendum
60
Page 71
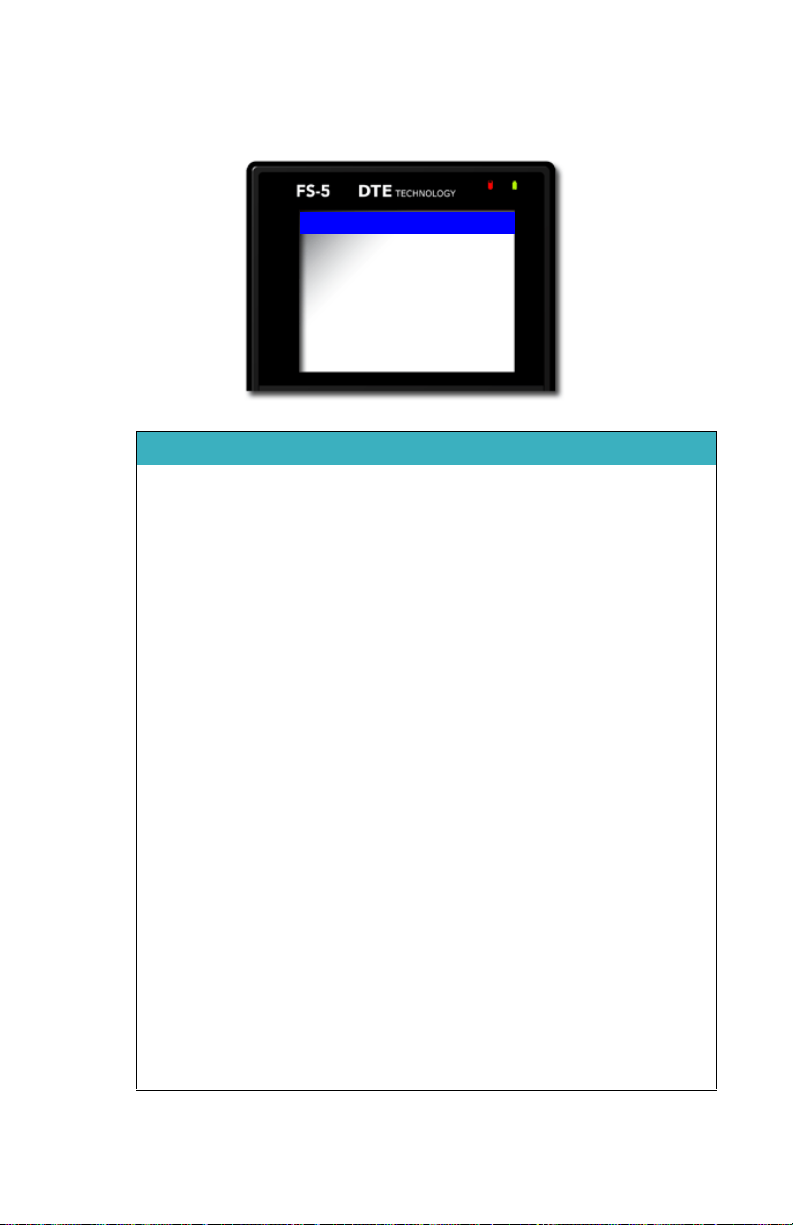
UTILITIES Menus
UTILITIES
FORMAT
REPAIR DISK
REPAIR CLIP
MAKE PROXY
FILE NAME
ORGANIZE REEL
ORGANIZE MXF
Item Default Comment
FS-5 Functions
FORMAT UDF Backup data before using.
REPAIR DISK Not Applicable Use to repair the file structure
REPAIR CLIP Not Applicable Use to repair the end of a
MAKE PROXY
FILE NAME Not Applicable Displays the number assigned
ORGANIZE REEL Not Applicable Places all Assigned To Reels
ORGANIZE MXF Not Applicable
UPGRADE Not Applicable Upgrades the unit software.
DELETE CLIP Not Applicable Deletes and removes selected
SYSTEM RESET Not Applicable Resets unit to factory defaults.
DIAGNOSTIC Not Applicable Use to assist Focus Technical
STATUS Not Applicable Provides details of power state
Not Applicable Creates proxy file for selected
No Undo.
of hard drive.
damaged video clip.
video clip.
to the video clip.
video clips into proper folders.
clip from unit.
Support in diagnosing issues.
and internal temperature of
unit.
No Undo.
FS-5 2.0 User Guide Addendum
61
Page 72

FS-5 Functions
Item Default Comment
VERSION Not Applicable Displays the current software
CALIBRATE CLOCK
Not Applicable Tunes the FS-5 clock’s crystal.
version for the unit.
Important when synchronizing
multiple FS-5s.
FS-5 2.0 User Guide Addendum
62
Page 73
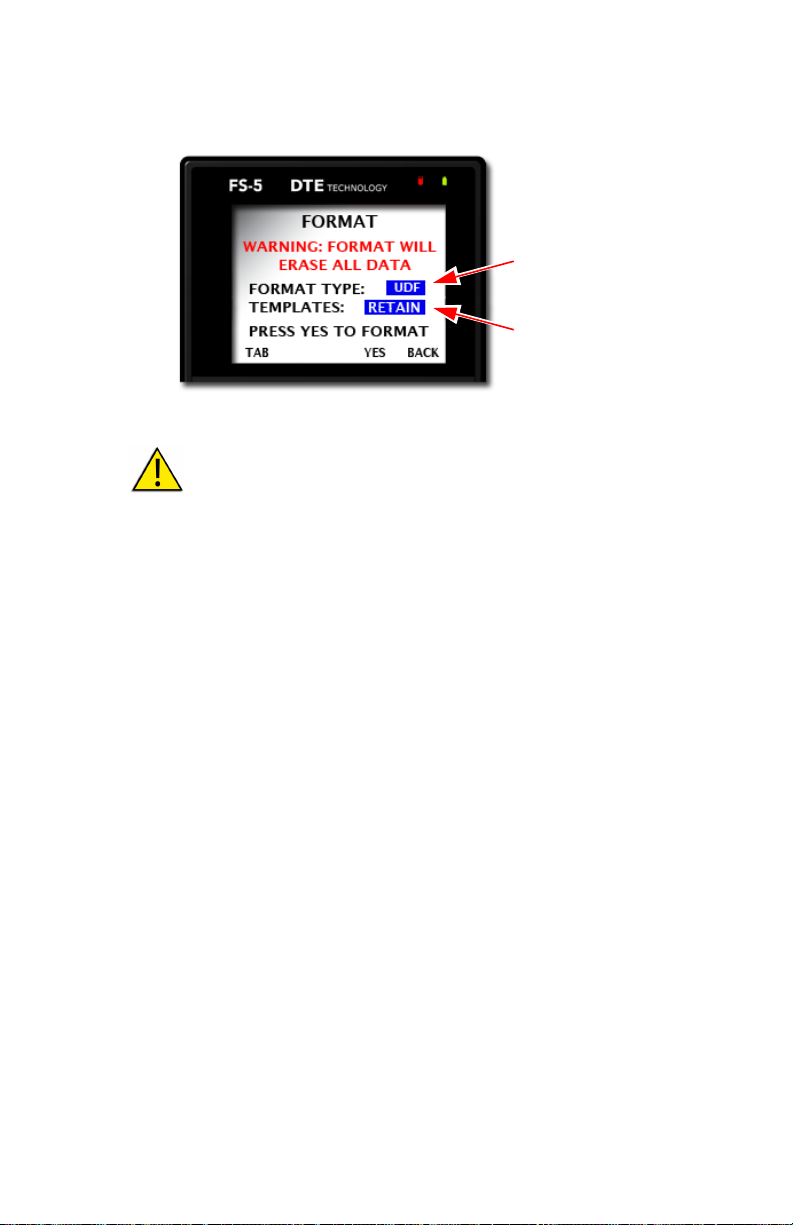
FORMAT
Tem pla tes
CLEAR / RETAIN
Format Type
UDF / FAT
Troubleshooting Tip - Missing Templates Thumbnails
If while working on the Entry, Review, or Te mpla te pages,
thumbnails or metadata templates are missing it is necessary to
run Format.
Be certain that the
FS-5 Functions
Tem plat es option is set to Clear.
FS-5 2.0 User Guide Addendum
63
Page 74
FS-5 Functions
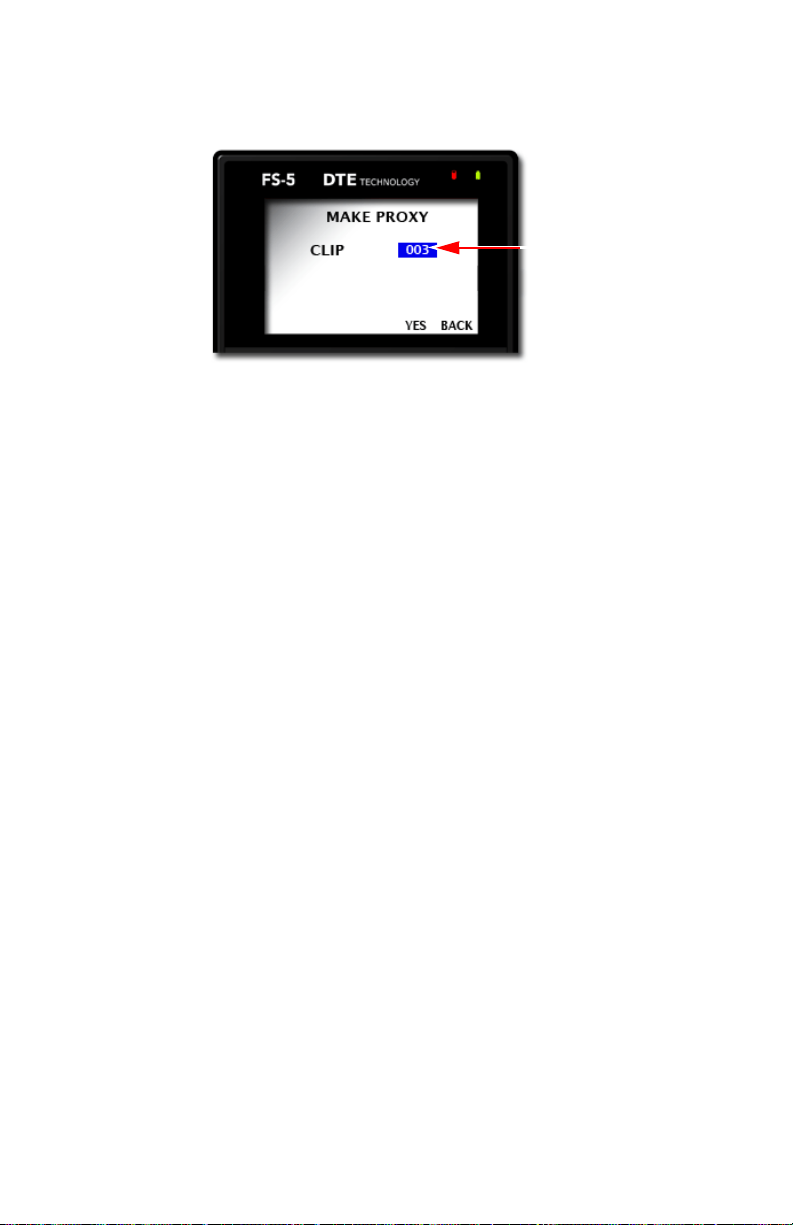
Clip Number
MAKE PROXY
Use this utility to create proxy files from selected original DTE
formatted video clips.
1. From the Utilities menu, go to
2. Enter the video clip number using the
3. Press the
F3/YES to start generating the proxy file.
A progress screen displays while the file is created. When it
is done the
4. Press the
COMPLETE message appears.
F4/BACK, to return to the main Utilities menu.
MAKE POXY.
Scroll Wheel.
FS-5 2.0 User Guide Addendum
64
Page 75
FS-5 Functions
ORGANIZE MXF
COMPLETE
BACK
Organize MXF
When utilizing MXF OPAtom with some NLEs, such as AVID
Xpress Pro, it is necessary to do run
importing the clips.
Disable AUTO ORG Before Recording MXF
After recording MXF clips, run ORGANIZE MXF before mounting FS5 to computer.
ORGANIZE MXF before
The Organize MXF utility:
1. Moves all MXF video files into the /contents/video
directory.
2. Moves all MXF audio files into the /contents/audio
directory.
3. Updates and moves the xml files from the log directory into
the /contents/clip directory.
Metadata Embedded In Avid MXF File Wrapper
In the case of Avid MXF, the metadata is incorporated into the
MXF wrapper and not maintained as a separate xml
document.
4. Generates thumbnails of the clips in /contents/icon
directory.
FS-5 2.0 User Guide Addendum
65
Page 76
FS-5 Functions
CALIBRATE CLOCK
THIS TAKES ABOUT 10 HOURS
PRESS YES TO
CALIBRATE CLOCK
YES BACK
CALIBRATE CLOCK
Use this utility if precise synchronization of multiple FS-5s is
required, see
This utility calibrate’s the FS-5’s internal clock. It requires access to
a NPT network or internet time server.
Synchronizing Clocks on Multiple FS-5s on page 70.
Calibrate Clock Takes 10 Hours
The FS-5 is can not be used while this utility is running.
Plan to calibrate the clock at a time when the FS-5 is not
needed.
FS-5 2.0 User Guide Addendum
66
Page 77

FS-5 with Other Devices
This chapter contains information about FS-5 2.0 as it applies to
operations with other devices. This chapter contains:
Controlling Multiple FS-5s At Once page 68
Synchronizing Clocks on Multiple FS-5s page 70
FS-5 2.0 User Guide Addendum
67
Page 78
FS-5 with Other Devices
4
5
7
8
9
10
6
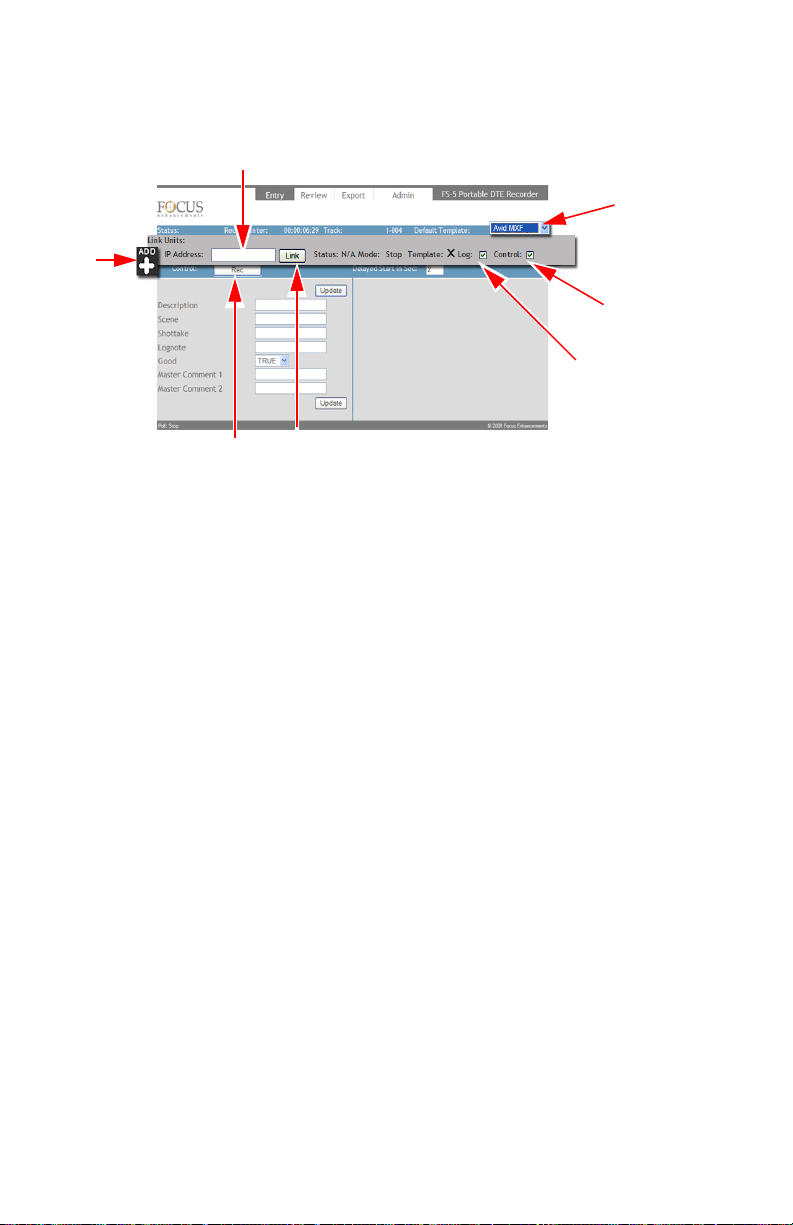
Controlling Multiple FS-5s At Once
The FS-5 provides the ability to simultaneously control the Record
and Stop functions of multiple FS-5s located on the same network.
Begin by linking the host FS-5 to the client units:
1. Begin by mounting at least two FS-5 2.0 units on a network.
2. Select one of the FS-5s to be the host.
3. Log on to the host and go to its
4. Select the metadata template to use from the
dropdown list.
5. Click the
The
ADD button.
Link Units workspace expands to show the link parameters
for the first client FS-5.
Notice that the
Temp late option is permanently check-marked.
Any time the host FS-5 links to another unit, it transfers the
currently selected template to the client, regardless if the other
link options are selected or not.
For information about
Metadata to Multiple 2.0 FS-5s
6. Enter the
7. Check-mark
IP address for the client FS-5.
Log if the host unit is to log metadata on the client
Temp late and Log functions, see Logging
unit. Then any metadata entered on the host appears on the client too.
8. Check-mark
Control.
The host unit can control the
the client unit.
Entry page.
Default Template
on page 38.
Record and Pause operations on
FS-5 2.0 User Guide Addendum
68
Page 79

FS-5 with Other Devices
9. Click Link to connect to the client unit.
The Status and Mode messages change indicating that the
connection is made.
10. Repeat steps 5 through 9 for each client unit.
The linked FS-5s are now ready.
Enter metadata as described in the FS-5 User Guide.
11. Click on the
Record button on the Entry page start recording on
multiple units.
FS-5 2.0 User Guide Addendum
69
Page 80

FS-5 with Other Devices
Synchronizing Clocks on Multiple FS-5s
It is possible to synchronize multiple FS-5s’ system clocks by running
SET DATE AND TIME USING NTP on each unit within a few minutes of
each other. Then the all the FS-5s will have similar timecode stamps.
This feature is useful when using a host FS-5 to control client FS-5s
during a recording session, see
page 68.
Before synchronizing, verify that all the FS-5 have the same setting
for:
TIME ZONE on page 50,
NPT SOURCE on page 51,
DST ADJUST on page 52,
DST MANUAL on page 53,
Once calibrated, the FS-5s stay calibrated through power cycling,
although, over a period of days their timecode stamps will slowly
drift apart.
To determine that the clocks are synchronized, observe the blinking
light on the FS-5’s
Select button. All of the FS-5s’ Select buttons blink
in unison. In addition, go to the FS-5s’
the times in the
TIME row. They will be the same.
Controlling Multiple FS-5s At Once on
SETUP menus and compare
Greater Accuracy
For greater accuracy and a longer synchronization period, multiple
run the
Utility > CALIBRATE CLOCK simultaneously on all FS-5s in
the set.
This takes about 10 hours to complete and the FS-5s are not
available for use until calibration completes.
Calibration Schedule
New units should be calibrated as required to maintain
synchronization within a set of FS-5s. However, after about a year,
calibration should not be necessary more than once a year.
FS-5 2.0 User Guide Addendum
70
Page 81

Non-Linear Editors (NLEs)
This section provides information specific to FS-5, 2.0 features as
they relate to non-linear editors.
In this section:
Avid Media Composer page 72
Logging Avid Metadata During Recording page 72
Importing Video and Metadata Into Avid page 74
The FS-5 2.0 supports Avid Media Composer and Final Cut Pro
metadata capabilities.
FS-5 2.0 User Guide Addendum
71
Page 82
Non-Linear Editors (NLEs)
5
6
7, 9
8
Avid Media Composer
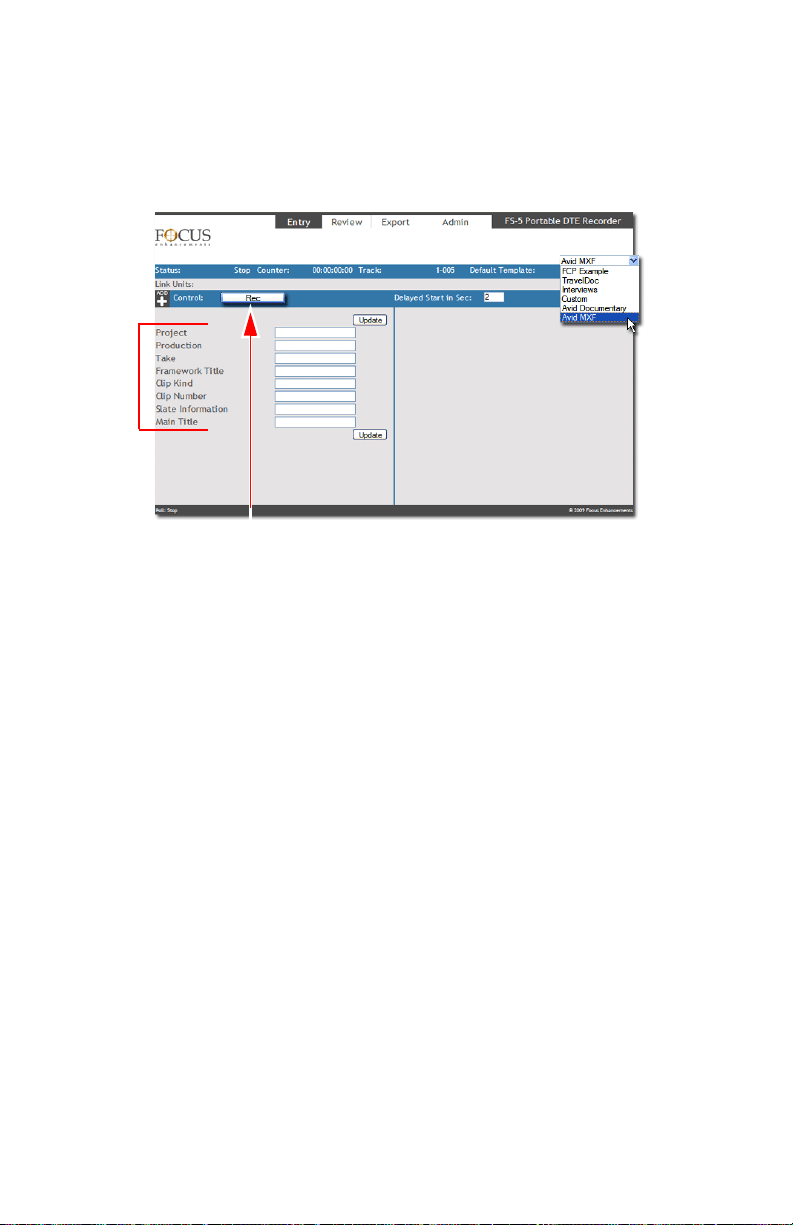
Logging Avid Metadata During Recording
To log Avid metadata during a recording:
1. Open the FS-5’s web server using the standard connection
method.
2. Navigate to the
3. Select
Avid MXF Format from the Templ ate Ty p e menu.
A set of Avid MXF metadata values appears.
Currently, only the first three values (
and
Take (number only)) can be viewed in the Avid bin.
However, all fields are populated in the Avid MXF file.
4. Setup the metadata using the standard procedure described
in the FS-5 user guide.
5. Navigate to the
6. Select the Avid XMF template from the
menu.
7. Begin recording by pressing the Record button on the
page.
The
Record button switches to the Stop button.
8. Log metadata, using the standard procedure described in
the FS-5 user guide.
9. Click on the
Admin > Tem plat e page.
Entry page.
Stop button to cease recording.
Project, Production,
Default Template
Entry
FS-5 2.0 User Guide Addendum
72
Page 83
Non-Linear Editors (NLEs)
UTILITIES
FORMAT
REPAIR DISK
REPAIR CLIP
MAKE PROXY
FILE NAME
ORGANIZE REEL
ORGANIZE MXF
10. Once recording is done, navigate to the Utilities menu.
11. Select Organize MXF.
This is necessary to create the Avid MXF directory structure
and then insert the metadata into the Avid MXF file.
ORGANIZE MXF Embeds Metadata in the MXF File
Unlike the Apple XML Interchange Format used in Final Cut
Pro metadata logging, the metadata for Avid is actually
embedded in the MXF file, not set as a separate XML file.
Disable AUTO ORG Before Recording MXF
After recording MXF clips, run ORGANIZE MXF before
mounting FS-5 to computer.
FS-5 2.0 User Guide Addendum
73
Page 84
Non-Linear Editors (NLEs)
Importing Video and Metadata Into Avid
To import clips into Avid Media Composer, use the standard
Media Tool import method.
1. Select the bin to receive the clips.
2. Left click the bin settings button in the lower left hand
corner of the bin and select
3. From the Headings Menu, make sure that the columns
Project, Production, and Tak e are selected.
Headings.
These columns appear in the Avid bin. Logged metadata for
these fields appears for each clip in the Avid bin.
FS-5 2.0 User Guide Addendum
74
Page 85

Technical Specifications
This chapter contains those specifications that relate to FS-5 2.0
functions.
DTE File Formats Supported
SD
DV25
•Frame Rates
480i @ 30 fps.
480p @ 24 and 30 fps.
576i/p @ 25fps.
• DTE Formats
AVI 2
AVI 2 – 24p
Canopus AVI
Matrox AVI
QuickTime - supports recordings larger than 2GB
QuickTime 24p - supports recordings larger than 2GB
OP Atom
MXF P2 - supports recordings larger than 2GB
FS-5 2.0 User Guide Addendum
75
Page 86

Technical Specifications
HDV
•Frame Rates
720p @ 24
1080i @ 24F
* Supported in the M2T file format only.
•DTE Formats
M2T - supports recordings larger than 2GB
QuickTime - supports recordings larger than 2GB
MXF - supports recordings larger than 2GB
Proxy Videos
•Frame Rates
12fps 1080 hq
20fps 1080 speed
• Codec: MPEG4
Video bit rate: 320kb/s
Audio bit rate: 64kb/s
Frame rate: 12fps (50Hz) or 15fps (60Hz)
• Wrapper Table
*, 25*, 50* and 60* fps
*, 30F*, 25F*, 50 and 60 fps
Original File Format Proxy File Format
QuickTime DV/HDV QuickTime (.mov)
MXF (DV/HDV) AVI (.avi)
M2T (HDV) MP4
AVI (DV Alll variants) AVI (.avi)
RawDV (DV) MP4
FS-5 2.0 User Guide Addendum
76
Page 87

Page 88

FS-5 2.0 User Guide Addendum
MANL-1160-01
 Loading...