

Page 1

FS-2/2E Studio DTE
Disk Recorder
User Guide
MANL-0927-04
Page 2
Symbols
In the FS-2/2E Documentation
On the FS-2/2E Unit
The lightning flash with arrowhead symbol, within an equilateral
triangle, is intended to alert the user to the presence of an
uninsulated Dangerous Voltage within the product’s enclosure that
may be of sufficient magnitude to constitute a risk of electric shock
to persons.
Caution
For continued protection against fire, replace only with fuses of
correct rating, as listed on the rear panel.
Caution
TO PREVENT THE RISK OF ELECTRIC SHOCK, DO NOT REMOVE
COVER (OR BACK). NO USER SERVICEABLE PARTS INSIDE. REFER
SERVICING TO QUALIFIED SERVICE PERSONNEL.
The exclamation point within an equilateral triangle is intended to
alert the user to the presence of important operating and
maintenance (servicing) instructions in the literature
accompanying the device.
Page 3

Notices: Legal, Regulatory, and Safety
LEGAL NOTICES
THIS DOCUMENT CONTAINS CONFIDENTIAL AND TRADE SECRET
INFORMATION OF FOCUS ENHANCEMENTS AND ITS RECEIPT OR
POSSESSION DOES NOT CONVEY ANY RIGHTS TO REPRODUCE OR
DISCLOSE ITS CONTENTS, OR TO MANUFACTURE, USE, OR SELL
ANYTHING THAT IT MAY DESCRIBE. REPRODUCING, DISCLOSING, OR
USING IN WHOLE OR IN PART WITHOUT THE SPECIFIC WRITTEN
AUTHORIZATION OF FOCUS ENHANCEMENTS IS STRICTLY FORBIDDEN.
EVERY EFFORT HAS BEEN MADE TO ENSURE THAT THE INFORMATION IN
THIS DOCUMENT IS COMPLETE AND ACCURATE AT THE TIME OF
PRINTING; HOWEVER, THE INFORMATION CONTAINED IN THIS
DOCUMENT IS SUBJECT TO CHANGE.
Copyright
Copyright 2006 FOCUS ENHANCEMENTS
All Rights Reserved
The material contained in this document is also protected by copyright laws of the
United States of America and other countries. It may not be reproduced or
distributed in any form by any means, altered in any fashion, or stored in a data
base or retrieval system, without express written permission of FOCUS
ENHANCEMENTS.
FOCUS ENHANCEMENTS is responsible for unauthorized use of equipment and
does not make allowance or credit for unauthorized use or access.
FS-2/2E Studio DTE Disk Recorder User Guide
iii
Page 4

Contacting FOCUS ENHANCEMENTS
USA
Office Hours:
Email:
Telephone:
Fax:
Address:
EMEA (Europe, Middle East, Africa)
Office Hours:
Email:
Telephone:
Fax:
Address:
Monday through Friday
8:00 AM to 5:00PM (Central Time)
+1 763-398-1658
+1 763-571-7688
Focus Enhancements, Inc.
1370 Dell Avenue
Campbell, CA. 95008
www.focusinfo.com
Monday through Friday
9:00 AM to 5:00PM
+49 4307 - 83 58 58
+49 4307 - 83 58 99
COMO Computer & Motion GmbHA
A Focus Enhancements Company
Lise-Meitner-Str. 15
24223 Raisdorf / Germany
www.focusinfo.com
Serial Number
The serial number for this equipment is located on the bottom of the unit. Please
write this serial number on the enclosed warranty card and keep it in a secure area.
Registering Products, Technical Support, and Warranty
To register a Focus Enhancements product use the online form at:
http://www.focusinfo.com/rfi/warranty.asp.
For questions about technical support or warranty, contact the seller, distributor, or
contact Focus Enhancements by email: [email protected].
Unauthorized Use
Focus Enhancements is not responsible for the unauthorized use of its
equipment and will not make allowance or credit for unauthorized use or
access.
Unauthorized Alterations and Modifications
Alterations or modifications to Focus Enhancements equipment or software
that is carried out without appropriate authorization may invalidate the
product warranties and the user's right to operate the equipment.
FS-2/2E Studio DTE Disk Recorder User Guide
iv
Page 5
Unauthorized Servicing
Do not attempt to service this product yourself. Opening or removing
covers may expose dangerous voltage or other hazards.
Refer all servicing to qualified service personnel.
Returning Materials
End Users
If the FS-2/2E was not purchased directly from Focus Enhancements, it is
necessary to contact the seller and determine what procedure is needed for
repairing the converter.
Direct Sales
(VARs, Distributors, and Corporate Customers
If the FS-2/2E has problems that cannot be corrected over the telephone by
Focus Enhancements technical support, it may be necessary to return the
converter to Focus Enhancements.
To contact Focus Enhancements:
Office Hours:
Email:
Telephone:
Fax:
Address:
Monday through Friday
8:00 AM to 5:00PM (Central Time)
763-398-1658
763-571-7688
Focus Enhancements, Inc.
1370 Dell Avenue
Campbell, CA. 95008
www.focusinfo.com
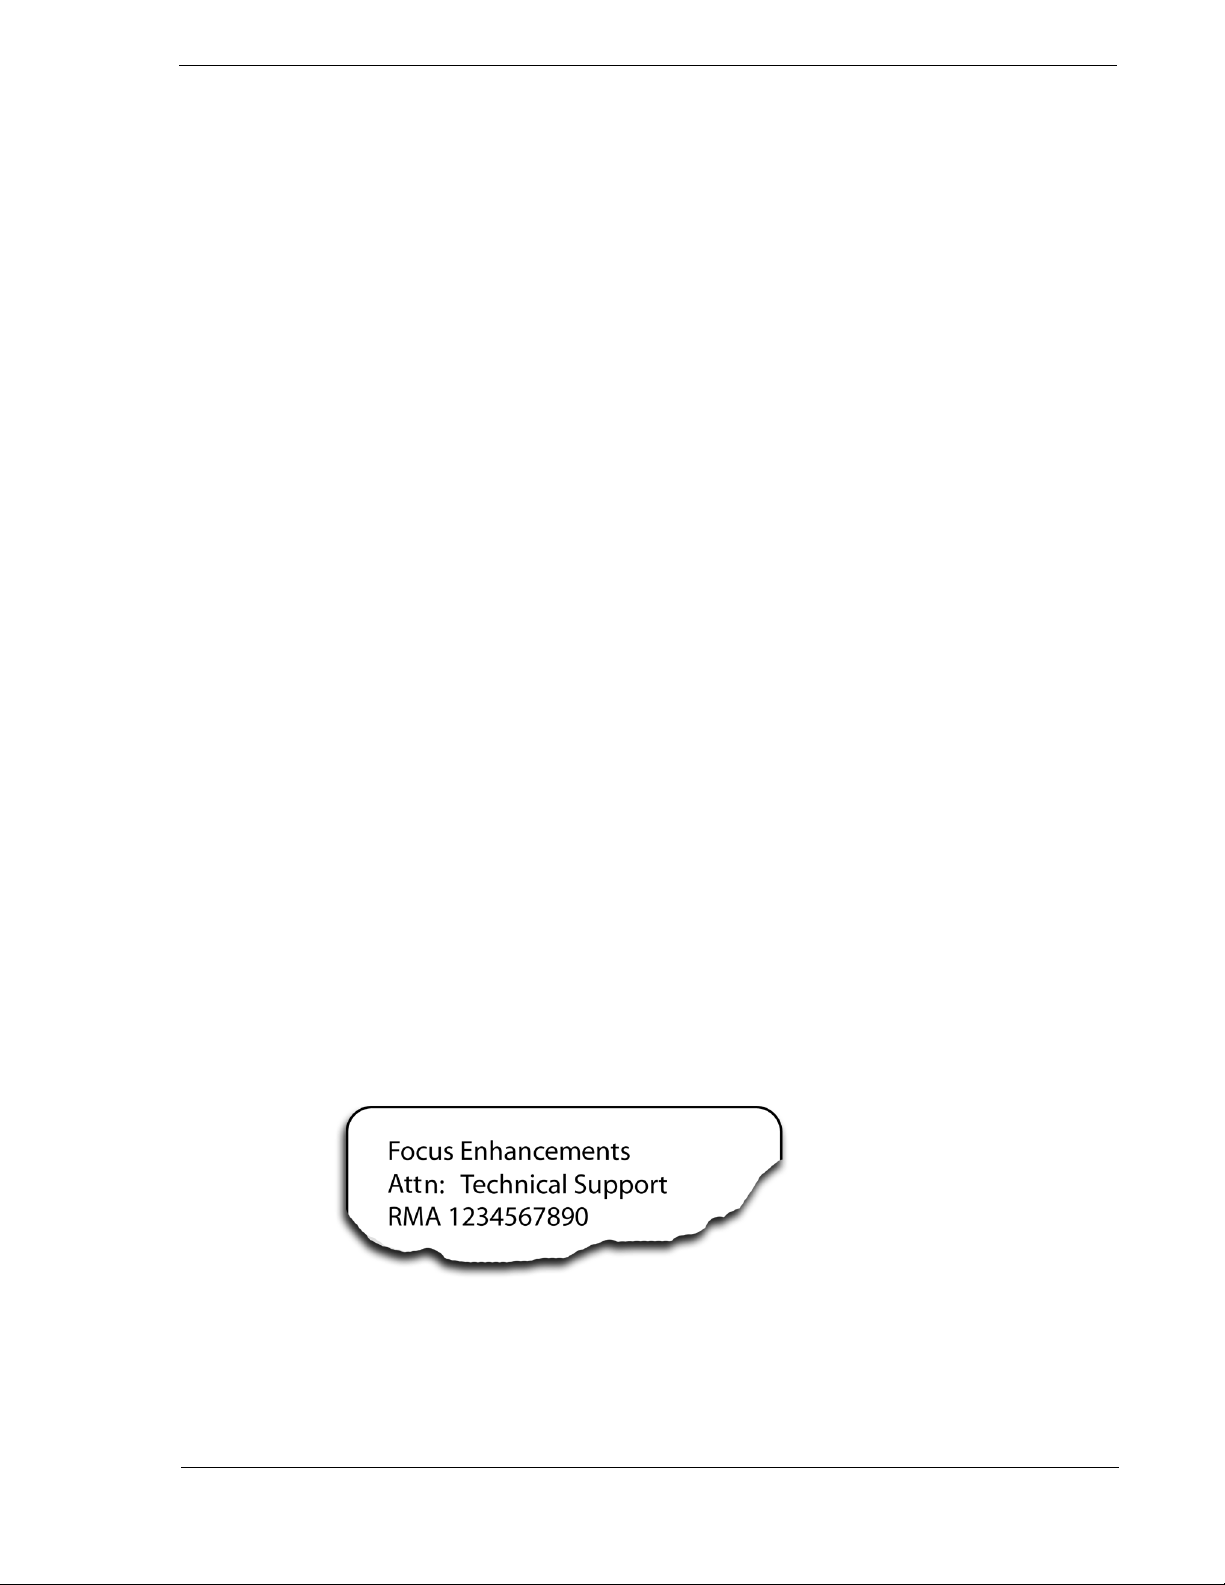
All materials shipped back to Focus Enhancements must be accompanied
by a Return Materials Authorization (RMA) number. Contact Focus
Enhancements Technical Support to receive a RMA number.
Write the RMA number clearly on the shipping label.
FS-2/2E Studio DTE Disk Recorder User Guide
v
Page 6

Regulatory and Safety
Environmental Precaution
Focus Enhancements, Inc.
1370 Dell Avenue
Campbell, CA. 95008
Model Number: FS2-2E
Date of Manufacture:
Reference the Serial Number label attached to the unit.
FCC Class A
This product satisfies FCC regulations when shielded cables and connectors are
used to connect the unit to other equipment. To prevent electromagnetic
interference with electric appliances such as radios and televisions, use shielded
cables and connectors.
This equipment has been tested and found to comply within the limits for a Class
A digital device, pursuant to Part 15 of the FCC Rules. These limits are designed to
provide reasonable protection against harmful interference in a residential
installation. This equipment generates, uses, and can radiate radio frequency
energy and, if not installed and used in accordance with the instructions, may
cause harmful interference to radio communications. However, there is no
guarantee that interference will not occur in a particular installation. If this
equipment does cause harmful interference to radio or television reception, which
can be determined by turning the equipment off and on, correct the interference by
one or more of the following:
• Reorient or relocate the receiving antenna.
• Increase the separation between the equipment and receiver.
• Connect the equipment to an outlet on a circuit different from that used by the
receiver.
• Consult the dealer or an experienced radio/TV technician for help.
FS-2/2E Studio DTE Disk Recorder User Guide
vi
Page 7

Documentation
This manual is written with the assumption that the user is familiar with analog
and digital video/audio signals and hardware.
Read, Retain, and Follow Instructions
All the safety and operating instructions should be read before the product
is operated.
•
Retain Documentation
Place documentation in a secure place for future reference on
operating and safety instructions.
Follow All Operating and Safety Instructions
•
Pay Attention to All Warnings
Warnings are provided to protect the operator, the equipment, and content.
This symbol indicates information about features, functions, operations, that is
of interest to the user.
FS-2/2E Studio DTE Disk Recorder User Guide
vii
Page 8

Electrical Precautions
Do Not Expose to Moisture
Do not use this product near water or in an environment where it is
exposed to dampness or there is the possibility of it getting wet.
Do Not Remove Cover
There are
No User Serviceable Parts inside this unit. Servicing should be done
by qualified service personnel.
ON / OFF Switch in Stand-By Position
The On/Off switch Does Not Separate the Unit From the Main Power when it is
in the stand-by position.
Power Sources
Use only power sources that match those indicated on the marking label. If
unsure of the type of power supply that is available, consult your dealer or
local power company.
Do Not Overload Power Outlets
Do not overload wall outlets, extension cords, or integral convenience
receptacles as this can result in a risk of fire or electric shock.
Verify Power Plugs are Fully Inserted
To prevent potential electrical shock to personnel, verify that the FS-2/2E
power cord plug is fully inserted into a grounded receptor and that the
plug blades are not exposed.
ATTENTION
POUR PREVENIR LES CHOCS ELECTRIQUES NE PAS UTILISER CETTE
FICHE POLARISEE AVEC UN PROLONGATEUR, UNE PRISE DE
COURANT OU UNE AUTRE SORTIE DE COURANT, SAUF SI LES
LAMES PEUVENT ETRE INSEREES A FOND SANS EN LAISSER
AUCUNE PARTIE A DECOUVERT.
Power-Cord Protection
• Routing Power-Cords
Route power supply cords so that they are not likely to be walked on
or pinched by items placed upon or against them. Avoid sharp angles
in the cord, particularly at plugs, convenience receptacles, and the
point where they exit the product.
Non-Use Period
•
During extended periods when the device is not used, unplug it from
the power source and retract the power-cord.
FS-2/2E Studio DTE Disk Recorder User Guide
viii
Page 9
Grounding or Polarization
• Polarized
If this product is equipped with a polarized alternating current line
plug (a plug having one blade wider than the other), it will fit into the
outlet only one way. This is a safety feature. If you are unable to insert
the plug fully into the outlet, try reversing the plug. If the plug should
still fail to fit, contact your electrician to replace your obsolete outlet.
Do not defeat the safety purpose of the polarized plug.
Grounded
•
If this product is equipped with a three-wire grounding type plug, a
plug having a third (grounding) pin, it will only fit into a grounding
type power outlet. This is a safety feature. If you are unable to insert
the plug into the outlet, contact your electrician to replace your
obsolete outlet. Do not defeat the safety purpose of the grounding
type plug.
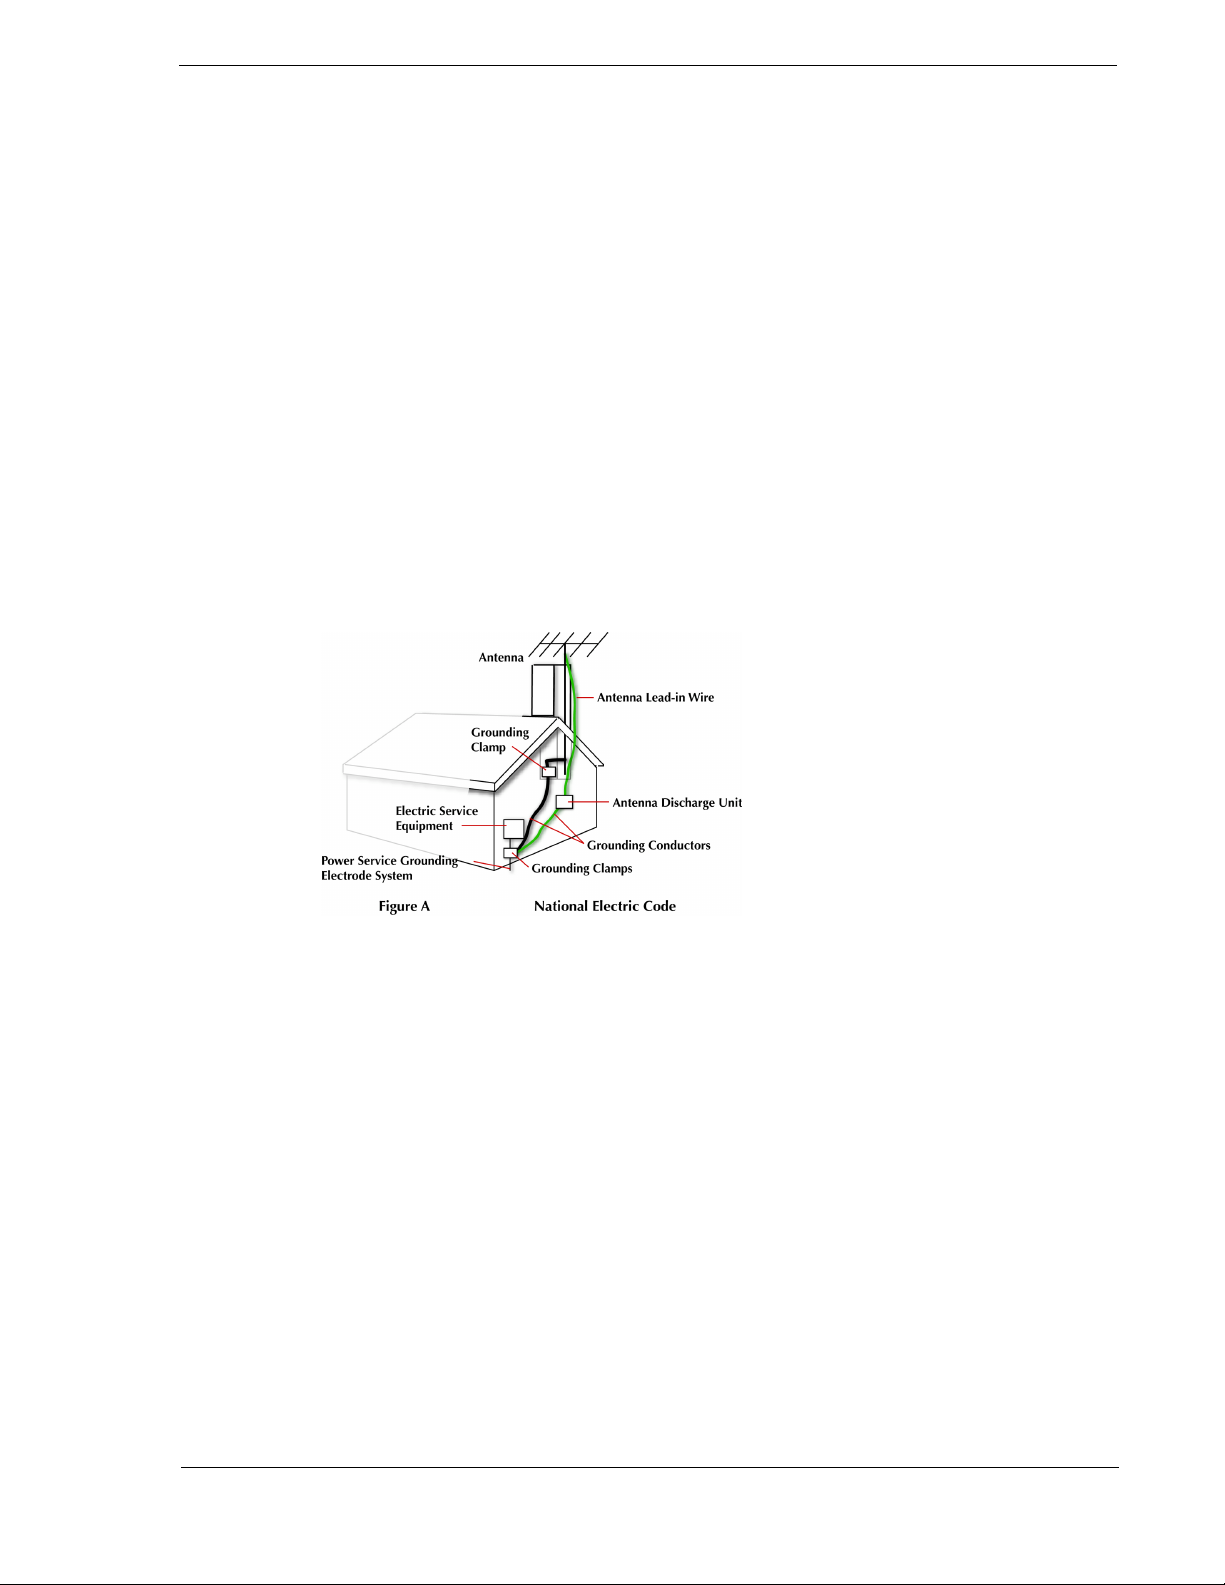
Outdoor Antenna Grounding
If an outside antenna or
cable system is connected to
the FS-2/2E, verify that the
antenna or cable system is
grounded. This provides
some protection against
voltage surges and built-up
static charges.
Refer to Article 810 of the
National Electric Code,
ANSI/NFPA 70, for
information about the
proper grounding of the mast and supporting structure, grounding of the
lead-in wire to an antenna discharge unit, size of grounding connectors,
location of antenna discharge unit, connection to grounding electrodes, and
requirements for the grounding electrode. See Fig. A.
Lightning and Power Surges
During electrical storms or when left unattended and unused for long
periods of time, unplug the FS-2/2E from the power source and disconnect
the antenna or cable system.
Power Lines
Do not locate an outside antenna system in the vicinity of overhead power
lines, electric light or power circuits, or where it can fall onto such lines or
circuits.
FS-2/2E Studio DTE Disk Recorder User Guide
ix
Page 10

When installing an outside antenna system, extreme care should be taken to
keep from touching such power lines or circuits as contact with them might
be fatal.
Optical Precaution
The use of optical instruments with this device will increase hazards to the eyes
hazard.
Maintenance and Moving
Cleaning
Unplug this product from the wall outlet before cleaning. The product
should be cleaned only with a polishing cloth or a soft dry cloth. Never
clean with furniture wax, benzine, insecticides or other volatile liquids
since they may corrode the cabinet.
Servicing
Unplug the device from the power outlet and refer servicing to qualified
service personnel under the following conditions:
• When the power-supply cord or plug is damaged.
• If liquid has been spilled, or objects have fallen into the product.
• If the product has been exposed to rain or water.
• If the product does not operate normally when following the
operating instructions. Adjust only those controls that are covered by
the operating instructions. The incorrect adjustment of other controls
can result in damage and often requires extensive work by a qualified
technician to restore the product to its normal operation.
• If the product has been dropped or damaged in any way.
• When the product exhibits a distinct change in performance.
Accessories and Replacement Parts
Use only attachments and accessories recommended by Focus
Enhancements.
Use only replacement parts specified by the Focus Enhancements or of
comparable quality and characteristics as the original parts.
Unauthorized substitution of parts can result in fire, electrical shock, other
hazards, and loss of warranty.
FS-2/2E Studio DTE Disk Recorder User Guide
x
Page 11

Safety Check
Upon completion of any service or repairs to this product, ask the service
technician to perform safety checks to determine that the product is in
proper operating condition.
Operating Environment
Location
Install this device on a sturdy, level surface, away from moisture and dust.
Heat
•
Locate this device away from heat sources such as radiators, heat
registers, stoves or other electrical devices (including amplifiers) that
generate heat.
Wall or Ceiling Mounts
•
This device should not be mounted to a wall or ceiling.
Any mounting of this device should follow its instructions, and
should use only mounting accessories recommended by Focus
Enhancements.
Moving
• Use appropriate safe lifting practices.
• Do not over load or unbalance carts when moving product.
Ventilation
Do not block the ventilation openings in the FS-2/2E cabinet. Overheating
can occur and damage the device. Do not place this device in a built-in
installation, such as a bookcase or rack, unless proper ventilation is
provided.
FS-2/2E Studio DTE Disk Recorder User Guide
xi
Page 12

WARRANTY
For customers within the USA and Canada, FOCUS ENHANCEMENTS, Inc.
warrants this product against defects in materials or workmanship as follows:
For a period of TWO years from the date of purchase, FOCUS ENHANCEMENTS,
Inc. will repair or replace the unit, at our option, without charge for parts or labor.
After the period of TWO years, you must pay all parts and labor charges.
The limited warranty is extended only to the original purchaser. It does not cover
damage or failure caused by or attributable to Acts of God, abuse, misuse,
improper or abnormal usage, faulty installation, improper maintenance, lightning,
or other incidences of excessive voltage, or any repairs or tampering by other than
the FOCUS ENHANCEMENTS repair facility. It does not cover replacement of
batteries or other consumable parts, transportation costs or damage in transit. This
warranty will become void if the serial number or model number identification has
been wholly or partially removed or erased. Repair or replacement under the terms
of this warranty do not extend the terms of this warranty. Repairs or replacement
performed outside of the warranty period will carry a warranty for 60 days from
return shipment. This warranty can not be modified by an agent of FOCUS
ENHANCEMENTS, Inc. unless in written and signed by an officer of FOCUS
ENHANCEMENTS, Inc.
Should this product prove defective in workmanship or material, the consumer's
sole remedies shall be such repair or replacement provided by the terms of this
warranty. Under no circumstances shall FOCUS ENHANCEMENTS, Inc. be liable
for any loss or damage, direct, consequential, or incidental, arising out of the use of
or inability to use this product. Some states do not allow limitations on how long
an implied warranty lasts or the exclusions or limitations of incidental or
consequential damages, so the above limitations or exclusions may not apply to
you. This warranty gives you specific legal rights. You may also have other rights
which vary from state to state.
FS-2/2E Studio DTE Disk Recorder User Guide
xii
Page 13

FS-2/2E Studio DTE Disk Recorder User Guide
xiii
Page 14

FS-2/2E Studio DTE Disk Recorder User Guide
xiv
Page 15

Table of Contents
Chapter 1 Introduction 1
What is a DTE Disk Recorder? 2
What is the FS-2/2E? 2
Basic Applications 3
Receiving, Unpacking, and Inspecting 3
Package Contents 4
Installation and Site Requirements 5
Mounting in a 19” Electronics Rack 6
Connecting Hard Drives 7
Inserting the Internal 3.5” IDE Drive 7
Using External Disk Drives 7
Physical Features 8
Front Control Panel 8
Rear Connection Panel 10
Setting Up the FS-2/2E 12
Formatting the Drive 13
Setting the Time and Date 14
Replacing the Power Module Fuse 15
Chapter 2FS-2/2E Functions 17
Edit/Utility/Input Buttons 17
Edit Function Keys 18
MARK IN - Mark In Key 18
MARK OUT - Mark Out Key 18
PLAYLIST – Add to Playlist key 18
KEEPER - Keeper Key 18
FOLDER - Folder Key 19
Utility Function Keys 20
OSD - (On Screen Display) 20
HDD – Hard Disk Drive Bypass Key 20
LOCK – Keypad Lock Key 20
REMOTE – Remote Key 20
E-E – Electronic to Electronic Key 20
Input Source Selection Keys 21
CMPST – Composite Video Source Input Key 21
Y/C – S-Video 21
CMPNT – Component Video Source Input Key 21
FS-2/2E Studio DTE Disk Recorder, User Guide
xv
Page 16

SDI Serial Digital Video Source Input Key 21
DV Video Source Input Key 22
LCD Menu Soft Keys 22
Transport Control Keys 23
MENU 23
Back Index 23
Forward Index 24
Stop 24
Play 24
lRecord Key 24
SHIFT 24
Back Search 24
Forward Search 25
LCD Display 26
FS-2/2E Menus and Functions 30
Menu Items 32
Sub-Menu Available 33
Soft Keys 33
Record Menu 33
Normal Record 33
Retro Disk 34
Retro Cache 36
Loop Record 36
Still 37
Time Lapse 37
Control Mode Menu 38
Local 38
Remote 39
AV/C 40
Syncro Slave 41
Play Mode Menu 42
Play Clip 42
Loop Clip 42
Loop All 42
Play All 42
Play From Mode Menu 43
Track List 43
Play List 43
Folder List 43
Playlist Menu 44
Open 45
Save 45
New 46
Edit 46
REMOVE a Clip 47
INSERT a Clip 47
MOVE a Clip 48
View 49
Delete List 49
HDD Bypass 50
Internal HDD 50
Record Format Menu 51
FS-2/2E Studio DTE Disk Recorder, User Guide
xvi
Page 17

Setup Menu 52
Set Date & Time 53
OS Version # 54
OS Upgrade 55
Copy Software to FS-2/2E Internal Drive 55
Load Software from External Drive 56
Restoring the Factory Default Operating System 57
PAL/NTSC 57
RS422 Remote 58
Audio Input 59
Audio In Levels 60
TC Mode 60
TC Set 62
TC Preset 62
UB Preset 63
TC Delay (FS-2E only) 63
Drop/Non Drop 63
On Screen Display 64
FF/RW Hi Res 64
GPI Port 65
Backlight 66
Stop Output 66
Audio Correct 67
Preferences 68
Folder Pref 69
Analog Out 69
Network Setup 70
IP SETTINGS 70
USER/PASSWORD 72
VIEW IP INFO 73
SERVICES 73
GENLOCK 75
Video Out Adj 76
Compnt Level 76
Utilities Menu 77
Organize PINN 77
Organize Clip 79
Organize OMF 79
Delete Clip 80
Format Disk 80
Partition 81
Repair 82
CHECK DISK 82
CURRENT CLIP 83
File Name 83
Factory Reset 83
Diagnostic 83
FS-2/2E Studio DTE Disk Recorder, User Guide
xvii
Page 18

Chapter 3 Using the FS-2/2E85
How to Make a Recording 86
How to Playback 86
How to Put Recorded Clips on a Computer System 87
Mounting FireWire Disk Drives (Windows XP, 2000, 98SE and ME) 88
Using FS-2/2E Recorded Avid OMF Clips on Avid Editing Systems 90
Dismounting FireWire Disk Drives (Windows XP, 2000, 98SE and ME) 92
Mounting FireWire Disk Drives (Macintosh) 92
Dismounting FireWire Disk Drives (Macintosh) 93
How to Create a Playlist 94
How to Mark Scenes 95
Marking Scenes 96
Connecting the FS-2/2E to a Network 98
Chapter 4FS-2E Web Interface 99
Web Interface Home Page 100
The Web Interface 101
Recorder/Player Controls 101
Record 101
Playback 101
Recorder Status 102
Tracklist 103
Adding Tracks to a Playlist 104
Deleting Tracks from the Tracklist 104
Recorder Configuration 105
Playlist 107
System Configuration 108
Updating FS-2E Software via FTP 109
Connecting with the FS-2E 109
Chapter 5Reference 111
Technical Specifications 112
Inputs/Outputs 112
Control 113
Power 113
Physical Specification 113
Audio/Video/Timecode Specification 113
DTE File Formats 114
Disk Information 114
Compatible DV Formats 11 4
FS-2/2E LCD Display Modes 114
Supported RS-422 Commands 11 6
Shuttle Speed Parameters 116
Jog Speed Parameters 117
Custom Commands 117
Index index - 1
FS-2/2E Studio DTE Disk Recorder, User Guide
xviii
Page 19

Page 20

Page 21

Chapter 1
Introduction
Thank you for purchasing the Focus Enhancements FS-2/2E DTE DV Studio Disk
Recorder.
The FS-2/2E is designed for use as a record or playback device in studios, mobile
vans and other installations.
The purpose of this User Guide is to explain the features and operation of the FS-2/
2E. Study the contents of this User Guide before attempting to use your FS-2/2E.
Check the Focus Enhancements website regularly for updates to FS-2/2E software
and documentation:
Alternatively, contact your Focus Enhancements dealer/distributor.
This chapter contains the following sections:
What is a DTE Disk Recorder? page 2
What is the FS-2/2E? page 2
Basic Applications page 3
Receiving, Unpacking, and Inspecting page 3
Package Contents page 4
Installation and Site Requirements page 5
Mounting in a 19 inch Electronics Rack page 6
Inserting the Internal 3.5 inch IDE Drive page 7
Using External Disk Drives page 7
Physical Features page 8
Setting Up the FS-2/2E page 12
Formatting the Drive page 13
Setting the Time and Date page 14
Replacing the Power Module Fuse page 15
www.focusinfo.com/support.
FS-2E Provides Greater Embedded Audio SDI Functionality
The FS-2E provides even more embedded audio SDI functionality. It includes the ability to
selectively record either channels 1 and 2 or 3 and 4 of the embedded audio of the input SDI
stream. It also provides full support of the SDI audio out. The FS-2E inserts the recorded audio
into the SDI output stream. The FS-2 does not possess these capabilities.
FS-2/2E Studio DTE Disk Recorder User Guide
1
Page 22

Introduction
1.1 What is a DTE Disk Recorder?
1.2 What is the FS-2/2E?
A DTE Disk Recorder is a device that allows you to record or playback DV video
directly to/from a removable IDE disk drive or removable FireWire disk drives.
The FS-2/2E features analog and digital inputs and outputs including DV25, SDI,
composite, component, S-Video, AES/EBU digital audio and balanced analog
audio.
Audio and video are recorded to disk as a DV25 data stream in NLE native file
formats.
The FS-2/2E is a DTE Disk Recorder that mounts horizontally in a standard
electronics rack. With the FS-2/2E, it is possible to:
• Input DV25, SDI, composite, component, S-Video, AES/EBU digital audio
and balanced analog audio and record to disk in native DV25 NLE file
formats.
• Playback video from disk or transcode during recordings in DV25, SDI,
composite, component, S-Video, AES/EBU digital audio and balanced analog
audio formats.
• Capture clips to hard disk at the acquisition stage. There is no need to capture
them later.
• Record clips to disk in DTE Technology-based “edit-ready” file formats such
as Raw DV, AVI Type 1, AVI Type 2, Matrox AVI, Canopus AVI, Pinnacle
AVI, QuickTime and Avid DV-OMF. The FS-2E, and the FS-2 (with the
version 2.0 upgrade), also include DTE support for 24P AVI Type 2 (NTSC
only), and 24P Quicktime (NTSC only).This means clips are immediately
available to your NLE system without first having to transfer or convert the
files.
• Connect your FireWire disk directly to your computer or connect it using FS-
2/2E which allows mounting and dismounting of the drives without re-
cabling or computer re-boots.
• Use the FS-2/2E's 10/100BaseT Ethernet port to share files over a network
using FTP. This is not suggested for larger files. The FS-2E, and the FS-2 (with
the version 2.0 upgrade), also include IP control of the FS-2/2E. This means
you can control the FS-2/2E using a standard web browser.
• Jump from clip to clip without spooling through tape when in playback mode.
• As well as video, record and playback embedded DV audio in 2-channel (16-
bit, 48kHz) format.
• Record external timecode, embedded timecode or create your own timecode
using Free Run, Regen or Rec Run time code options. You can also preset
timecode and user-bit values.
• Record, play and navigate using FS-2/2E's VTR-style controls.
• Lock to your facilities Reference Video signal during playback and record.
FS-2/2E Studio DTE Disk Recorder User Guide
2
Page 23

Introduction
• Record and recall a single frame of DV video and record user definable time-
lapse sequences.
• Use trick playback modes up to 30X/-30X fast-forward and rewind speeds,
reverse play, loop clip and loop entire disk.
• Control the FS-2/2E remotely using industry standard RS422 (Sony 9-pin),
FireWire (for starting record/pause or AV/C) from a DV based camcorder
1394 port. You can also control the FS-2/2E using RS-232C (using the optional
wired remote control available as an accessory). The FS-2E, and the FS-2 (with
the 2.0 software upgrade), can be controlled from your web browser using FS-
2/2E IP control. Refer to the section on the FS-2/2E Web Interface,
Interface
• Create and save multiple playlists on the FS-2/2E. These can be shared
between different units.
• Use the internal 120GB, 7200RPM, 3.5" IDE drive or daisy chain up to eight
FireWire (IEEE-1394) hard drives together for extremely long, uninterrupted
record times.
on page 99.
FS-2E Web
1.3 Basic Applications
You can use the FS-2/2E in the acquisition stage of production, the editing/post
production stage, and the presentation stage. The FS-2/2E is most useful in the
following applications:
• Presentation Video Source
•Broadcast Tape Deck Replacement
• Time Lapse Recorder
• Film-to-Disk Transfer
• NLE/Linear Edit Source/Recorder
• Endless Video Program Looping
• Security Recorder/Player
• Medical Recorder/Player
• Industrial Monitoring
• Video DJ and Karaoke Player
• Outside Broadcast
1.4 Receiving, Unpacking, and Inspecting
Upon receipt of the FS-2/2E unit, examine the shipping container. If there is
evidence of damage or rough handling, have an agent of the carrier present when
the equipment is unpacked.
Unpack the equipment carefully. Inspect it for scratches, dents, or cracks. If the
equipment is damaged, save all packing materials and notify both Focus
Enhancements and the carrier immediately.
FS-2/2E Studio DTE Disk Recorder User Guide
3
Page 24
Introduction
1.4.1 Package Contents
1
2
3
7
6
4
5
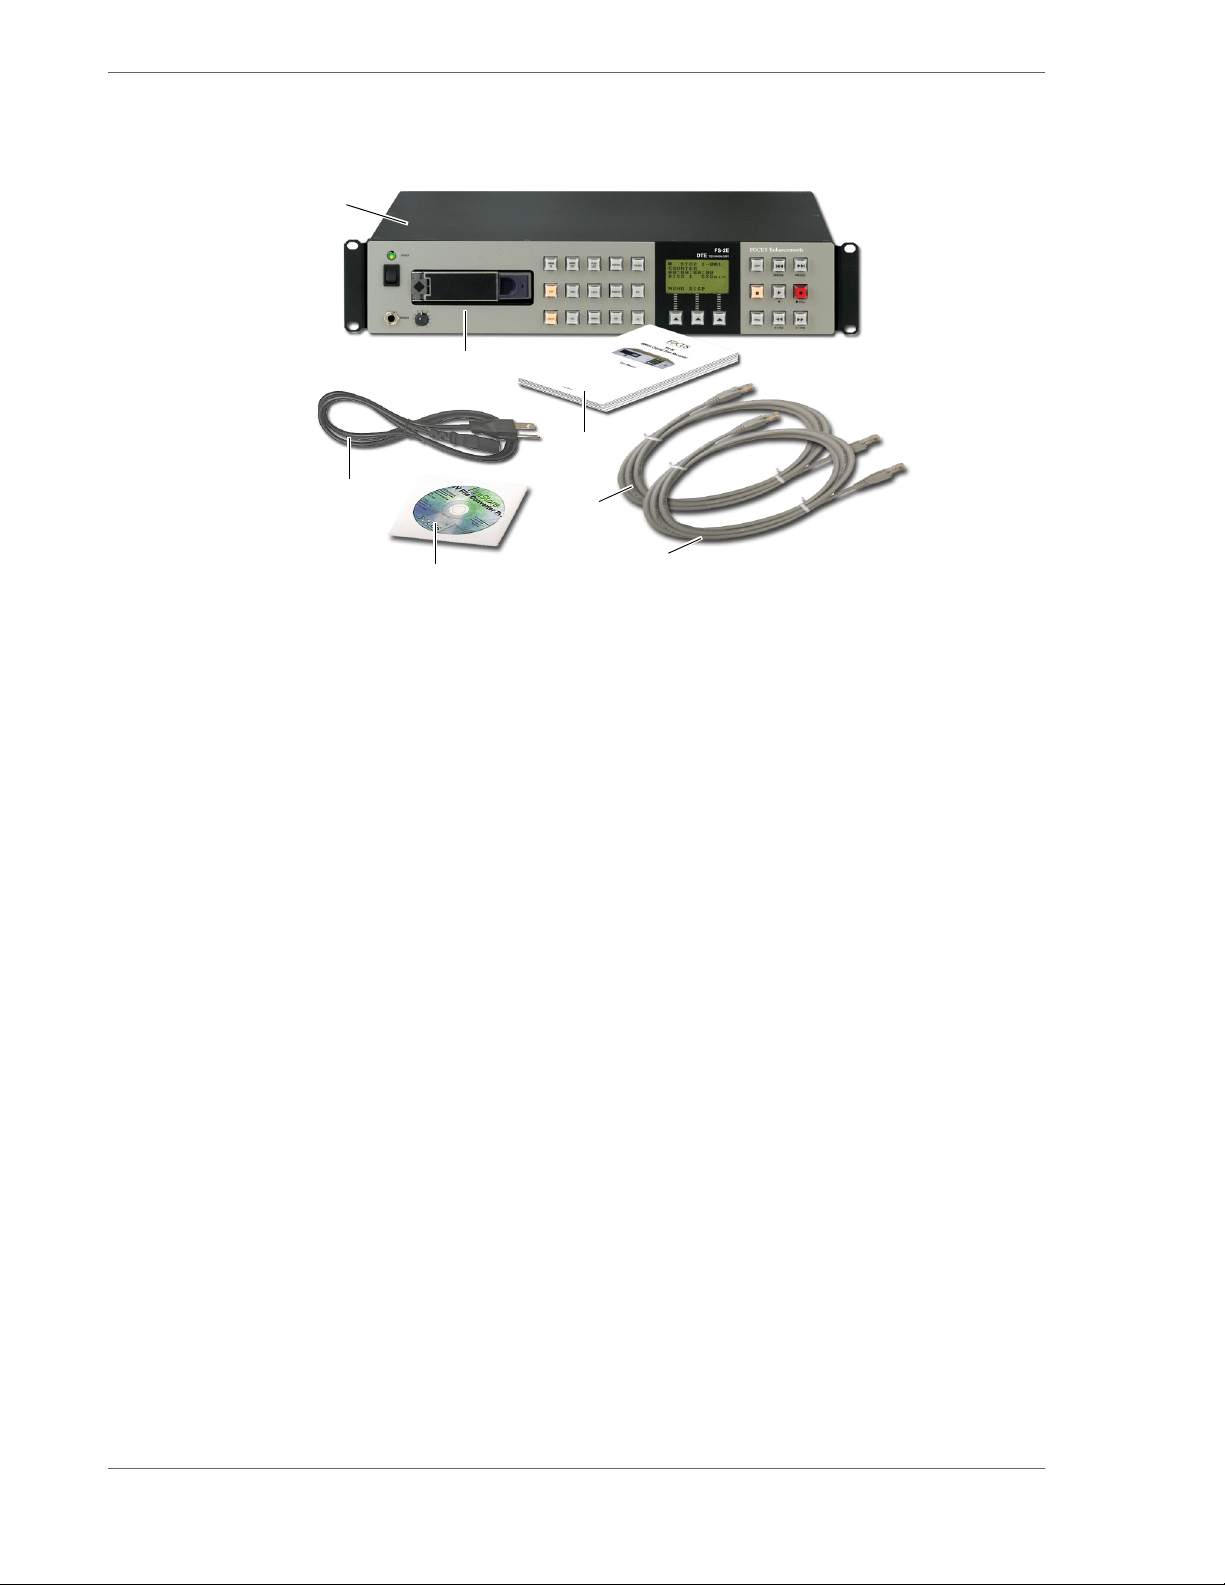
Please take a moment to study the contents of your FS-2/2E package. You
should have the following contents:
1. One (1) FS-2/2E unit with attached rack mounting ears
2. One (1) 120GB IDE disk drive in caddy
3. One (1) User Guide
4. One (1) 6-pin to 6-pin FireWire cable (for External Drive connection)
5. One (1) 6-pin to 6-pin FireWire cable (for front panel port loop)
6. One (1) Focus Enhancement's DV Conversion Suite Demo Disk
7. One Power Cord
8. One (1) Focus Enhancement's Warranty Card and Statement (not
shown)
If any of these items are missing, contact Focus Enhancements or your FS2/2E dealer/distributor immediately.
You may need to purchase cables to connect more than one hard disk drive
to the FS-2/2E at a time. Your Focus Enhancements dealer can help you
identify additional cables you may need.
FS-2/2E Studio DTE Disk Recorder User Guide
4
Page 25

1.5 Installation and Site Requirements
Focus Enhancements recommends that FS-2/2E units be installed in a restricted
access area, such as an equipment room or closet and the installation be performed
by trained installers.
The units are designed and tested to operate reliably between +5 - +40C (41 - 104 F).
To maintain this range, consider the following:
• Air temperature surrounding the equipment must remain within the specified
range.
• Air flow around the equipment must be sufficient to maintain proper
operating temperatures
If in doubt about the site temperature, take measurements to be certain. If
measured temperatures fall outside the defined ambient temperature range, you
must bring the temperature within the defined range.
Storage temperature for the units must remain between -20 - +60C (-4 - 140 F).
Introduction
FS-2/2E Studio DTE Disk Recorder User Guide
5
Page 26
Introduction
1.6 Mounting in a 19 inch Electronics Rack
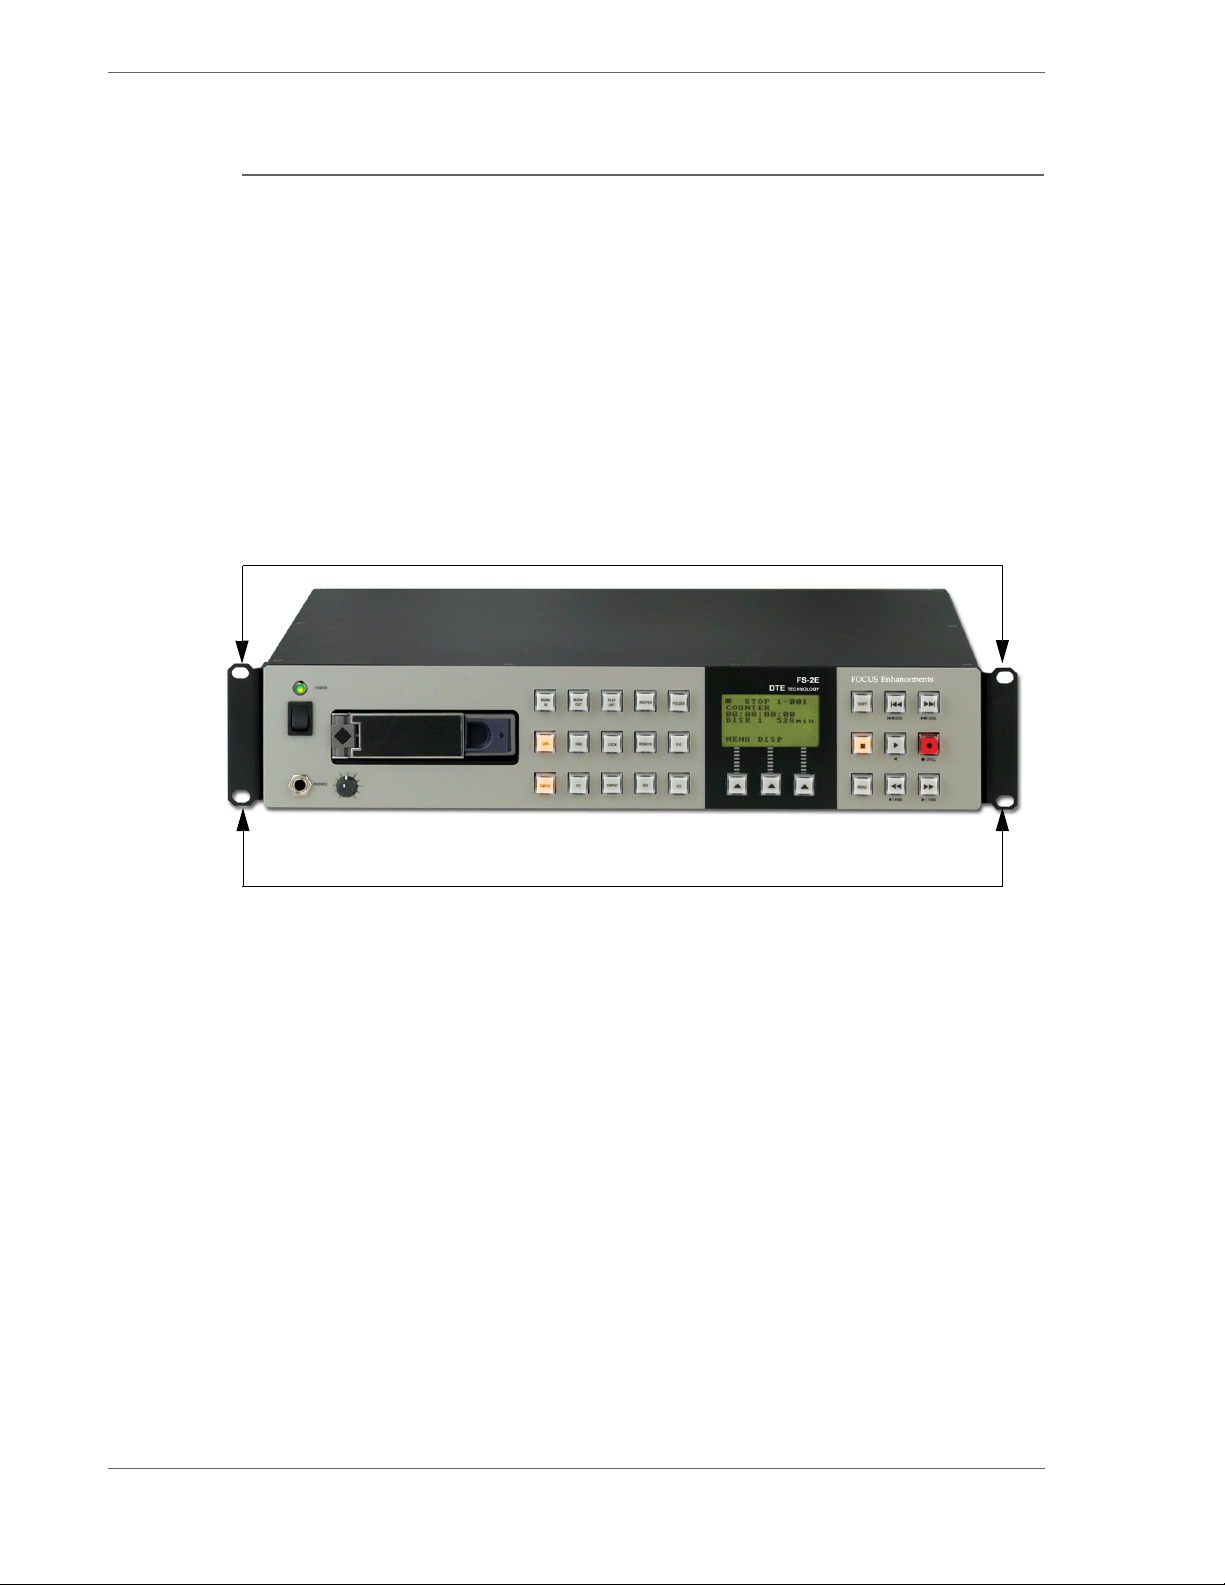
The FS-2/2E measures 15.89” high x 17.36” wide by 3.47” deep. It is an 2RU chassis
featuring front rack mount ears to be installed into a standard 19” audio/visual
rack. There must be room behind the unit for the attachment of cables.
To mount the FS-2/2E in a standard 19” audio/visual rack, do the following:
1. Determine the desired location.
The FS-2/2E requires 3.47 vertical inches of rack space.
To prevent overheating, the FS-2/2E requires a minimum of 1.75 vertical
inches of space above and below the unit.
2. The FS-2/2E includes a pair of universal mounting ears on the front sides of
the unit that support standard 19” audio/visual racks. Using the provided
hardware, mount the FS-2/2E securely in the rack.
Universal Mounting EarsUniversal Mounting Ears
Mounting Screws
(2 per Mounting ear)
3. Connect the FS-2/2E unit to the wall current using the attached power cord.
FS-2/2E Studio DTE Disk Recorder User Guide
6
Page 27
1.7 Connecting Hard Drives
1.7.1 Inserting the Internal 3.5 inch IDE Drive
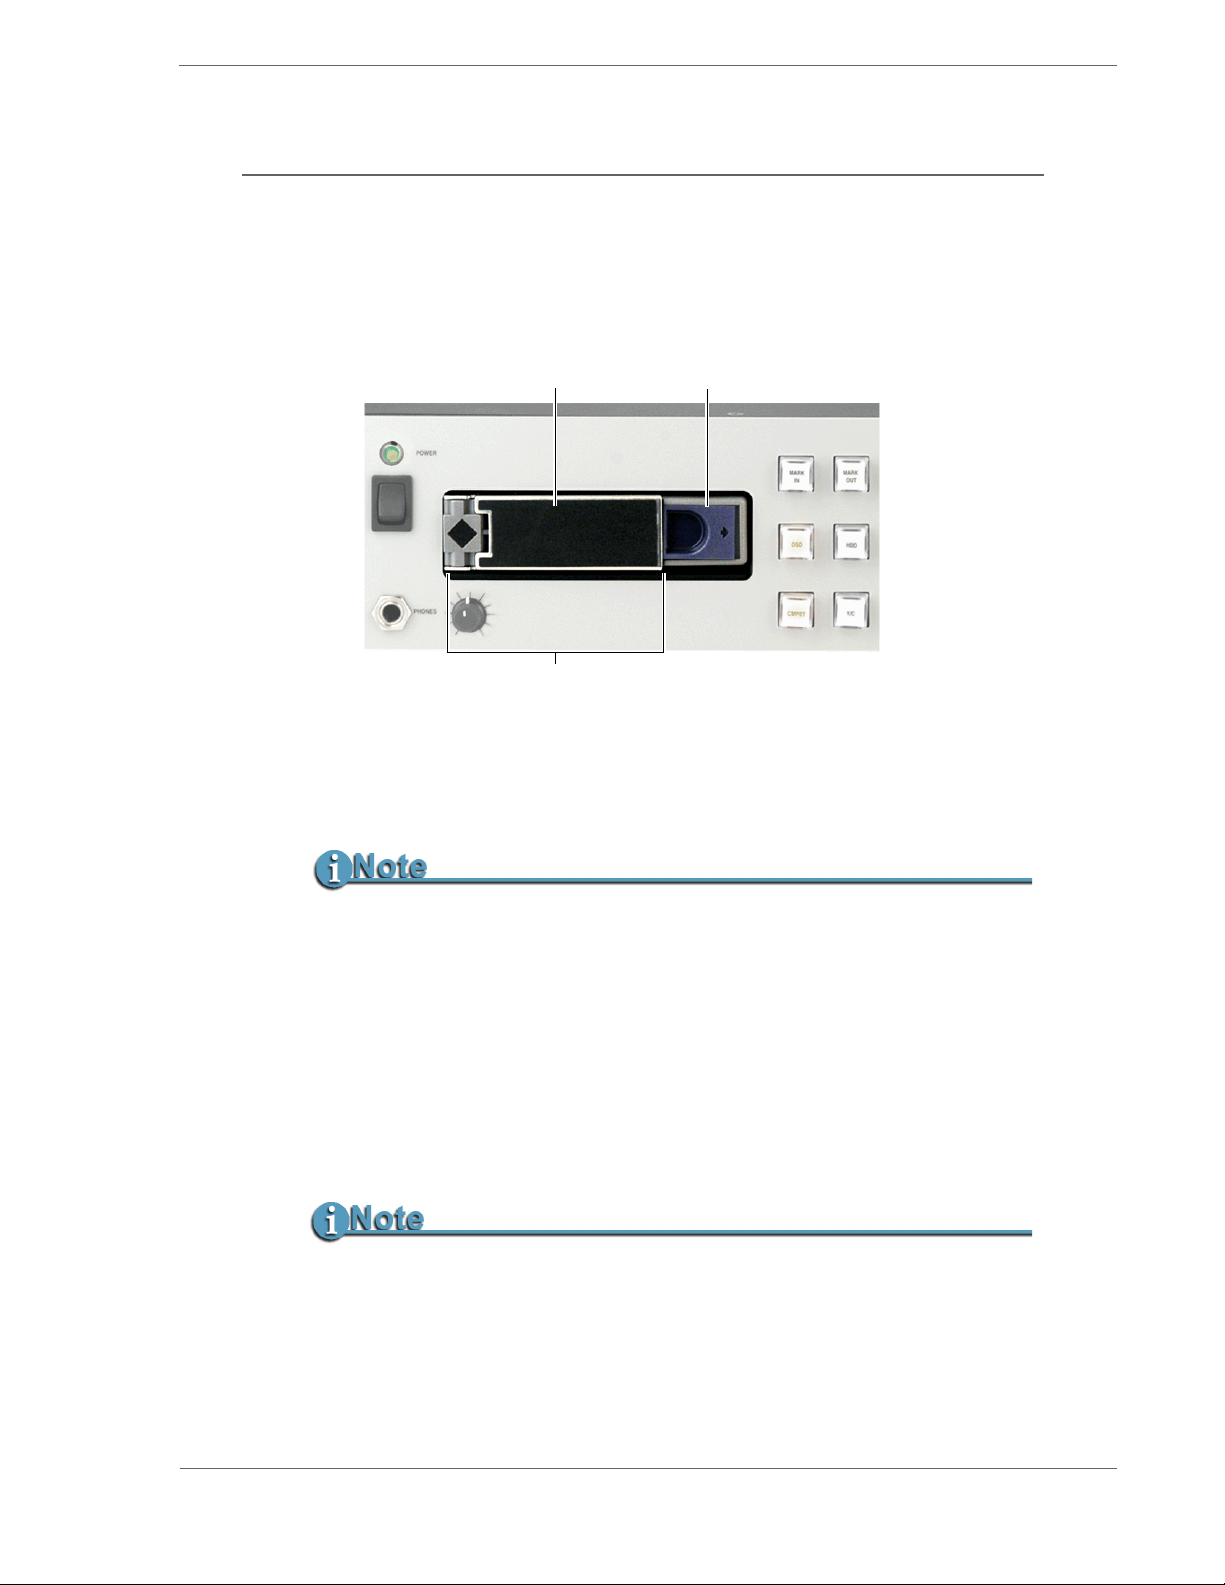
Insert the internal 3.5 inch IDE drive as follows:
1. Remove the drive from its packaging.
2. Slide the drive carefully into the bay until it is seated firmly.
Introduction
Lock Handle
Drive Bay
3. Press the Lock Handle flush with the chassis face to lock the drive in
Release Lever
place.
To remove the drive, slide the
Release Lever to the right. The Lock Handle
disengages. Pull the drive toward you to remove it.
This drive is not intended for hot-swap operation.
1.7.2 Using External Disk Drives
In addition to using a 3.5 inch IDE drive in the internal slot, you can also
connect any FireWire disk drive to the HDD I/O port on the FS-2/2E.
Power a single FireWire disk drive on the FS-2/2E at any given time.
If you are using more than one external FireWire drive, you must provide
external power to them. It may also be necessary to partition and format the
drives before their use with the FS-2/2E. Refer to
page 13 for instructions on preparing drives before use.
Hot-swapping External FireWire Drives
You can hot-swap connected external FireWire HDDs on the FS-2/2E. This means
you can disconnect and connect drives from the system without the need to power
cycle the unit. However, make sure the FS-2/2E is in STOP mode before removing a
disk drive.
Formatting the Drive on
FS-2/2E Studio DTE Disk Recorder User Guide
7
Page 28
Introduction
1.8 Physical Features
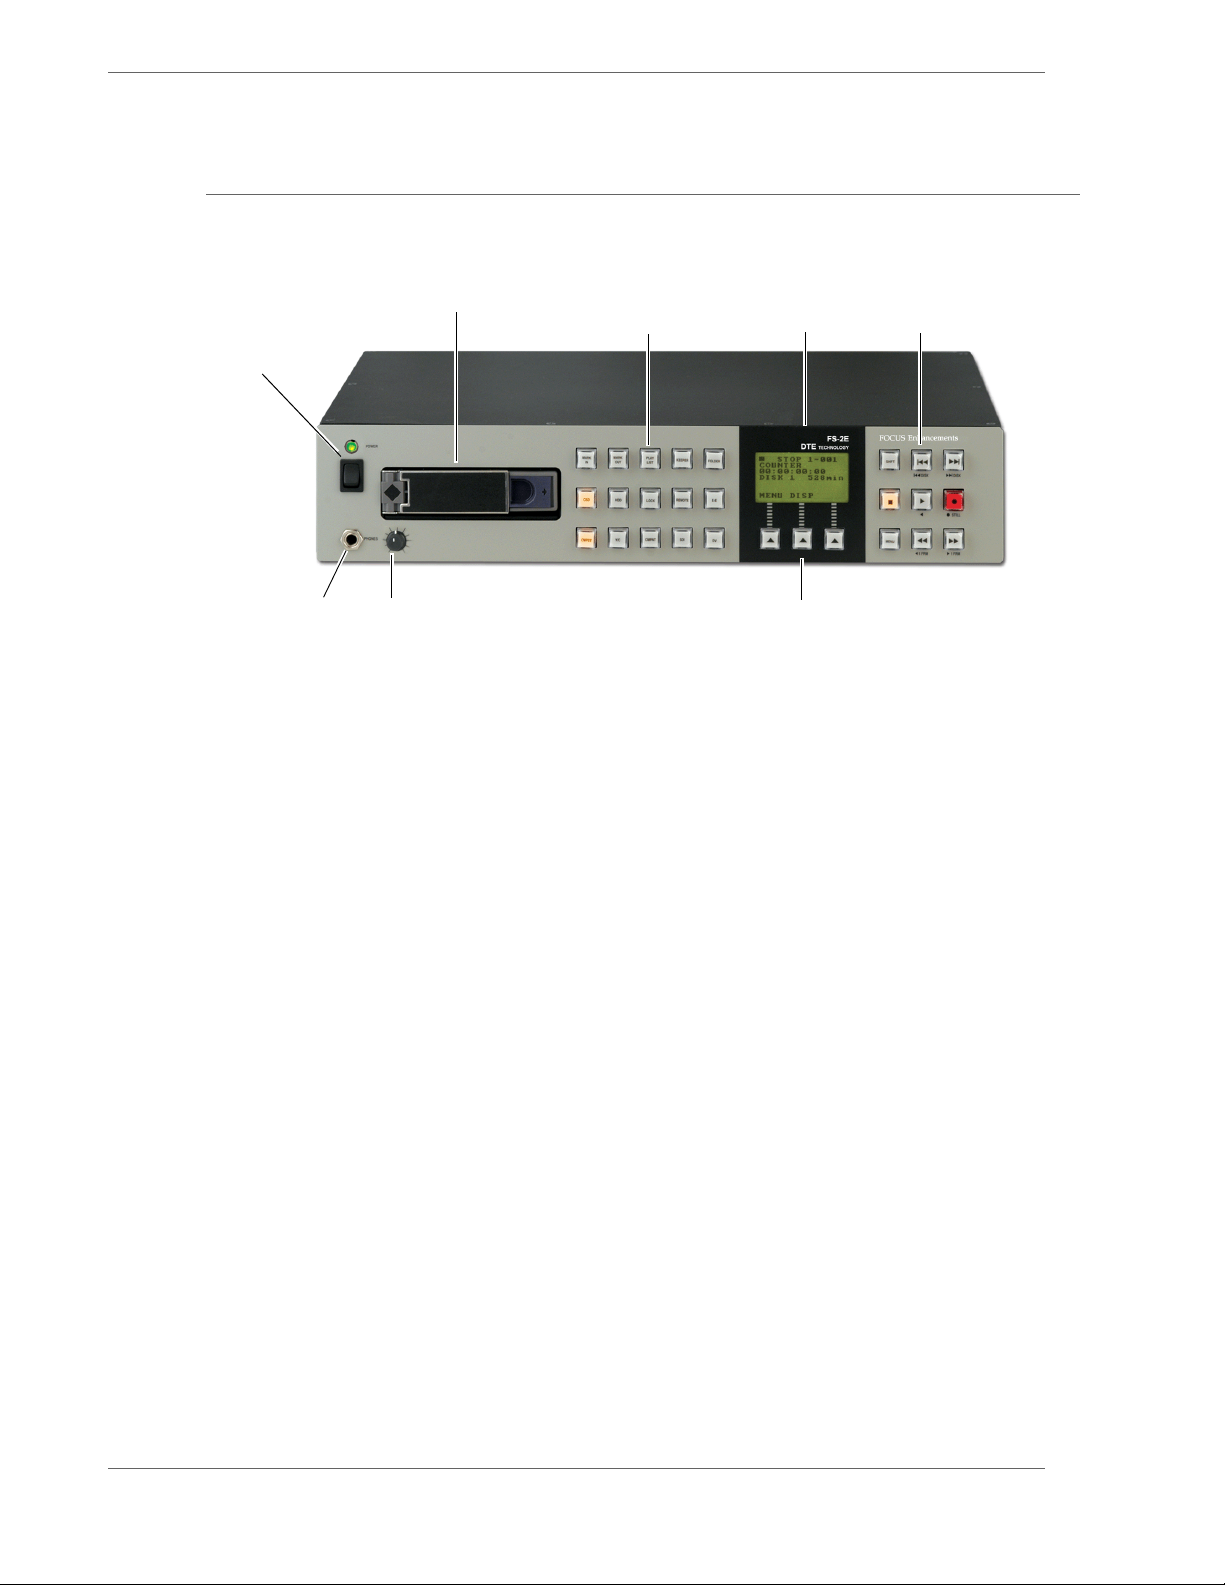
The FS-2/2E features two main surfaces, the front control panel and the rear connector
panel.
Disk Drive Bay
Power Switch
and LED
Jack Volume Control
Jack Volume Control
Headphone
Headphone
1.8.1 Front Control Panel
The front control panel contains the seven control areas, as shown in the illustration
below and described in this section:
•
Power Switch and Power LED
This is the FS-2/2E's main power switch. This switch, although mechanical, is
controlled using software. When the power switch is set to
in most cases the unit takes a moment to power down. During this time, the
FS-2/2E is ensuring that any files that have not been closed properly in a
record session get closed. This prevents errors occurring on particular files.
The green LED above the power switch is
•
Disk Drive Bay
The disk drive bay accepts a standard 3 1/2” removable disk drive in the
supplied sled. Minimum system requirements for this drive are 7200RPM
with a 2MB cache. Drive performance may vary. Focus Enhancements
recommends that you use a FS-2/2E qualified and tested disk drive. Check
the Focus Enhancements website for an updated list. This bay is not intended
for hot swap operation.
Edit / Utility / Input Keys
•
These keys contain the edit, utility and input select functions for the FS-2/2E.
In some cases, these buttons work in conjunction with the FS-2/2E menus on
the display.
Edit / Utility / Input
Keys
LCD
Display
Soft Keys
ON when the unit is powered up.
Transport
Keys
ON and then OFF,
FS-2/2E Studio DTE Disk Recorder User Guide
8
Page 29

Input selections are either Composite, Y/C (S-Video), Component, SDI
or DV. An audio source must be selected for each input using the
SETUP > AUDIO INPUT menu, the Timecode mode in the
SETUP > TC MODE menu, and the reference video source in the
SETUP > GENLOCK > SOURCE menu. For component inputs/outputs
you must select the video standard when used in
Refer to
•
LCD Display
Compnt Level on page 76 for more details.
NTSC mode only.
The FS-2/2E LCD displays the FS-2/2E’s current status including
track number, disk number, timecode, record / playback mode as well
as other information. It also displays the FS-2/2E menu system. The
LCD is a green backlit 128x64 graphical display.
Transport Control Keys
•
This set of keys controls playback and record functions of the FS-2/2E.
These functions include play, reverse play, fast forward, fast rewind,
forward frame, back frame, next track, previous track, stop, record,
and so on.
•
Display Soft Keys
This set of keys enables you to navigate the FS-2/2E menus. The
function of the keys varies depending on what is displayed at the base
of the FS-2/2E LCD. Refer to
LCD Menu Soft Keys on page 22 for more
information.
•
Headphone Jack (3.5mm) and Volume Knob
This jack is for connecting a pair of monitor headphones. You can
monitor audio of the selected input (even if E-E is not selected) when
not in record mode. When in record or playback mode, you can
monitor the current audio. The headphone jack also includes a volume
control.
Introduction
FS-2/2E Studio DTE Disk Recorder User Guide
9
Page 30
Introduction
1.8.2 Rear Connection Panel
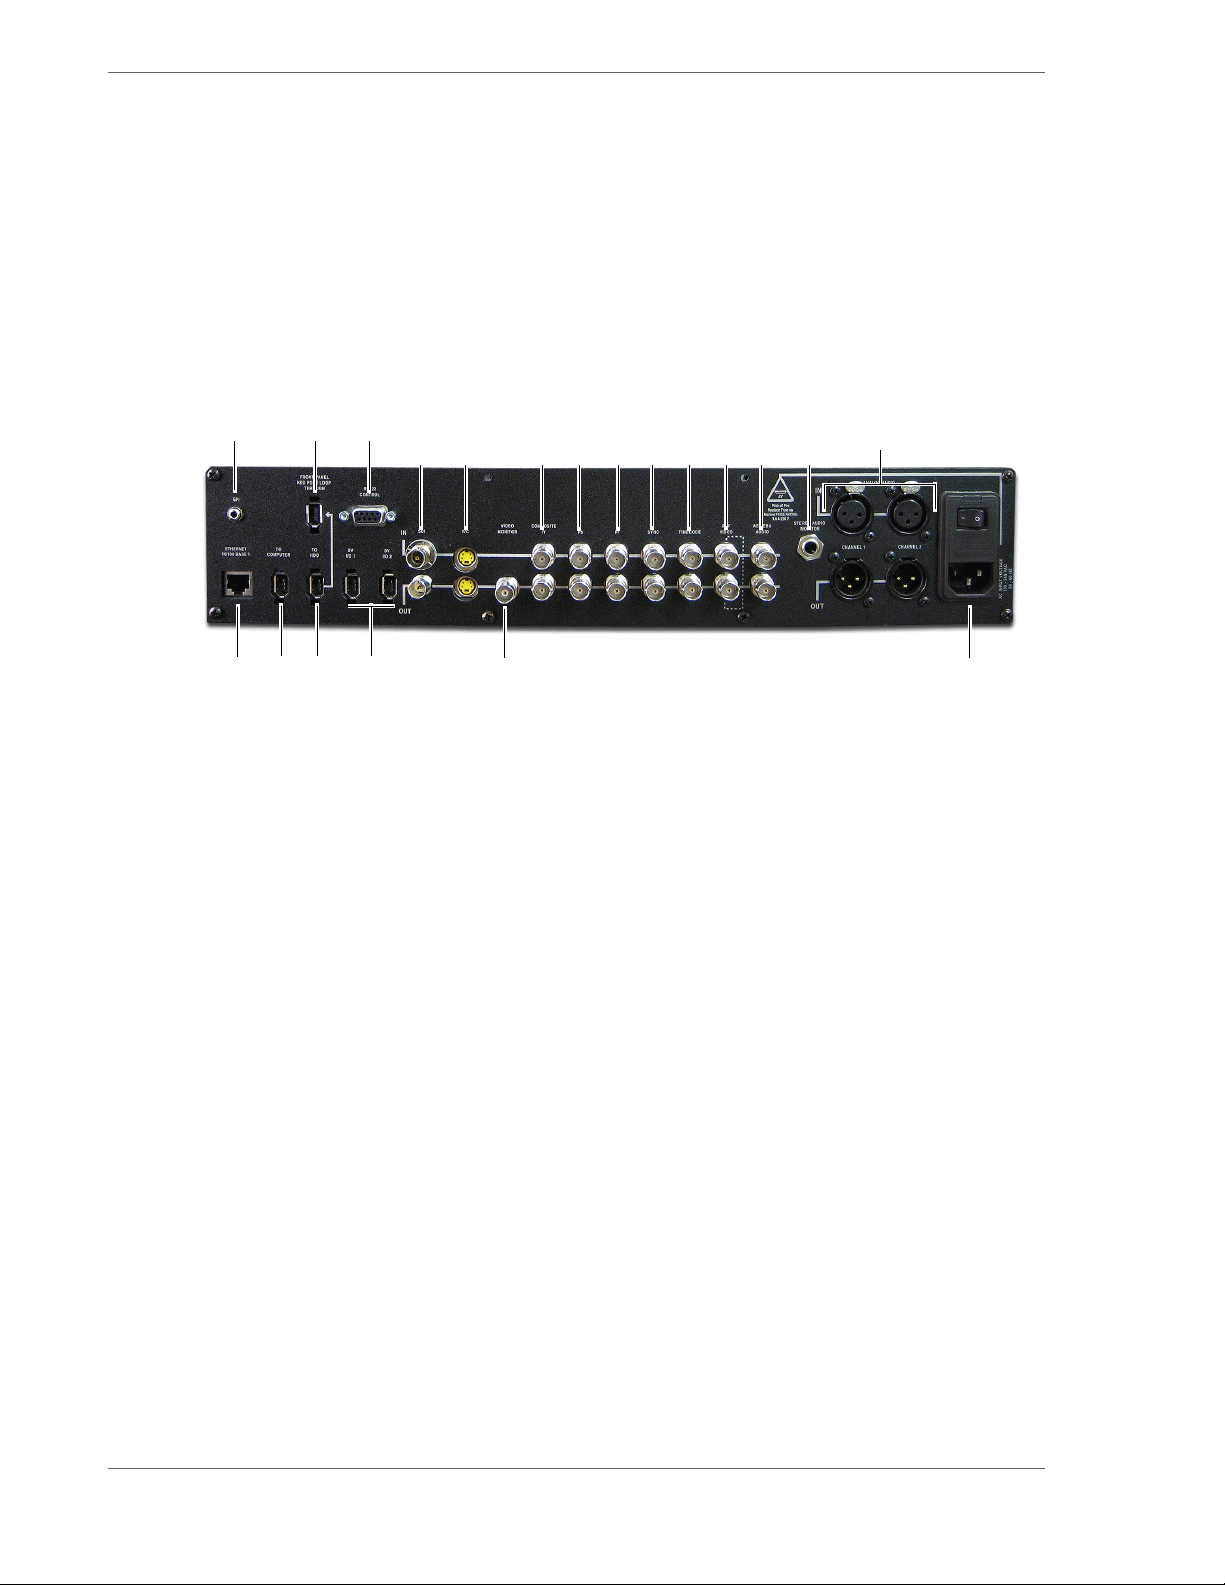
The FS-2/2E rear panel, shown below, contains control and audio/video
input/output areas described in this section.
You can select any of the available inputs as a source. When selected, that
source is what is recorded to disk. If the unit is in E-E mode or recording, all
outputs are live with the incoming signal.
For any particular video input, there is an associated audio input selected as
a default. You can change that default to another input utilizing the
INPUT MENU
2
1
3
under SETUP. Refer to Chapter 2 for more information.
4 5
6
AUDIO
7
9
8
11 12 13 14
10
19 18 17
20
16
1. GPI - For connection of the optional wired remote control (ACSS-0019-
15
01), the optional RS232C cable (CBLA-0113-01) or contact closure
cable. The GPI plug accepts a 3.5mm TRS connector.
2. Front Panel HDD Port Loop Through - When patched to the To HDD
port, this connector activates the front panel FireWire port for
connection of external HDDs.
3. RS422 Control - This is the input connector for external RS422 control
devices.
4. SDI Input - For connecting SDI input sources. The FS-2E provides the
selection of channels 1 and 2 or 3 and 4 of the embedded SDI audio.
Refer to the
Input
on page 59. The FS-2 does not have this capability.
SDI Output - For output to SDI devices. The FS-2E inserts two channels
AUDIO INPUT > SDI > EMBEDDED sub-menu on Audio
of audio into the SDI output stream. Only the FS-2E has this capability.
5. Y/C Input - For connecting Y/C (S-Video) input sources.
Y/C Output - For connecting to Y/C (S-Video) devices.
6. Composite / Y Input - For connecting composite input sources or the Y
signal for component input sources.
Composite / Y Output - For output to composite devices or the Y signal
to component devices (select either composite or component form
ANALOG SETTINGS in the SETUP menu).
7. Pb Input - For connecting the Pb signal from component input sources.
Pb Output - For output of the Pb signal to component devices.
FS-2/2E Studio DTE Disk Recorder User Guide
10
Page 31

Introduction
8. Pr Input - For connecting the Pr signal from component input sources.
Pr Output - For output of the Pr signal to component devices
9. Sync Input - For connecting the Sync signal on non sync on green
component sources.
Sync Output - For connecting the Sync signal to non sync on green
component devices.
10. Timecode Input - For connecting external analog VITC timecode
sources.
Timecode Output - For connection to external analog VITC timecode
devices.
11. Reference Video - For reference video loop through.
To use this Reference Video input, select
SETUP menu. If the loop-through jack is not connected, make sure
the
REF VIDEO from GENLOCK in
the output is terminated using an external 75 ohm terminator.
12. AES/EBU Digital Audio Input and Output - For connecting AES/EBU
input sources or output to AES/EBU devices.
13. Stereo Audio Monitor Output - For connection of audio monitors.
14. Balanced Analog Audio Input Channels 1 and 2 - For connecting
balanced analog audio input sources.
Balanced Analog Audio Output Channels 1 and 2 - For output to
balanced analog audio devices.
15. AC In - Use the power cord supplied to connect to the power outlet.
The power module contains a protective fuse. Refer to
Power Module Fuse
16. Video Monitor Output - For connection to a video monitor (composite).
Use this connection to view the
17. DV I/O 1 and DV I/O 2 - For connection of DV video devices. These two
on page 15 for more information.
On Screen Display.
Replacing the
ports are used to pass through the DV signal. The FS-2/2E does not
support multiple DV inputs.
18. To HDD - For connecting external FireWire 400 disk drives to the FS-2/
2E. Use the FS-2/2E's HDD Bypass function with this port. When a
connection is made with
Front Panel HDD Port Loop Through, it allows
the front panel FireWire connector to be used for connection of
external FireWire HDDs.
19. To Computer - For connecting the FS-2/2E to a computer's FireWire
400 port. It allows any disk drives connected to the FS-2/2E to mount
to the computer.
20. Ethernet 10/100 BaseT - For connecting FS-2/2E to a network or
computers for small file exchange, telnet, or web control. (The web
control functionality is only available for the FS-2E or the FS-2 with the
2.0 upgrade.)
FS-2/2E Studio DTE Disk Recorder User Guide
11
Page 32
Introduction
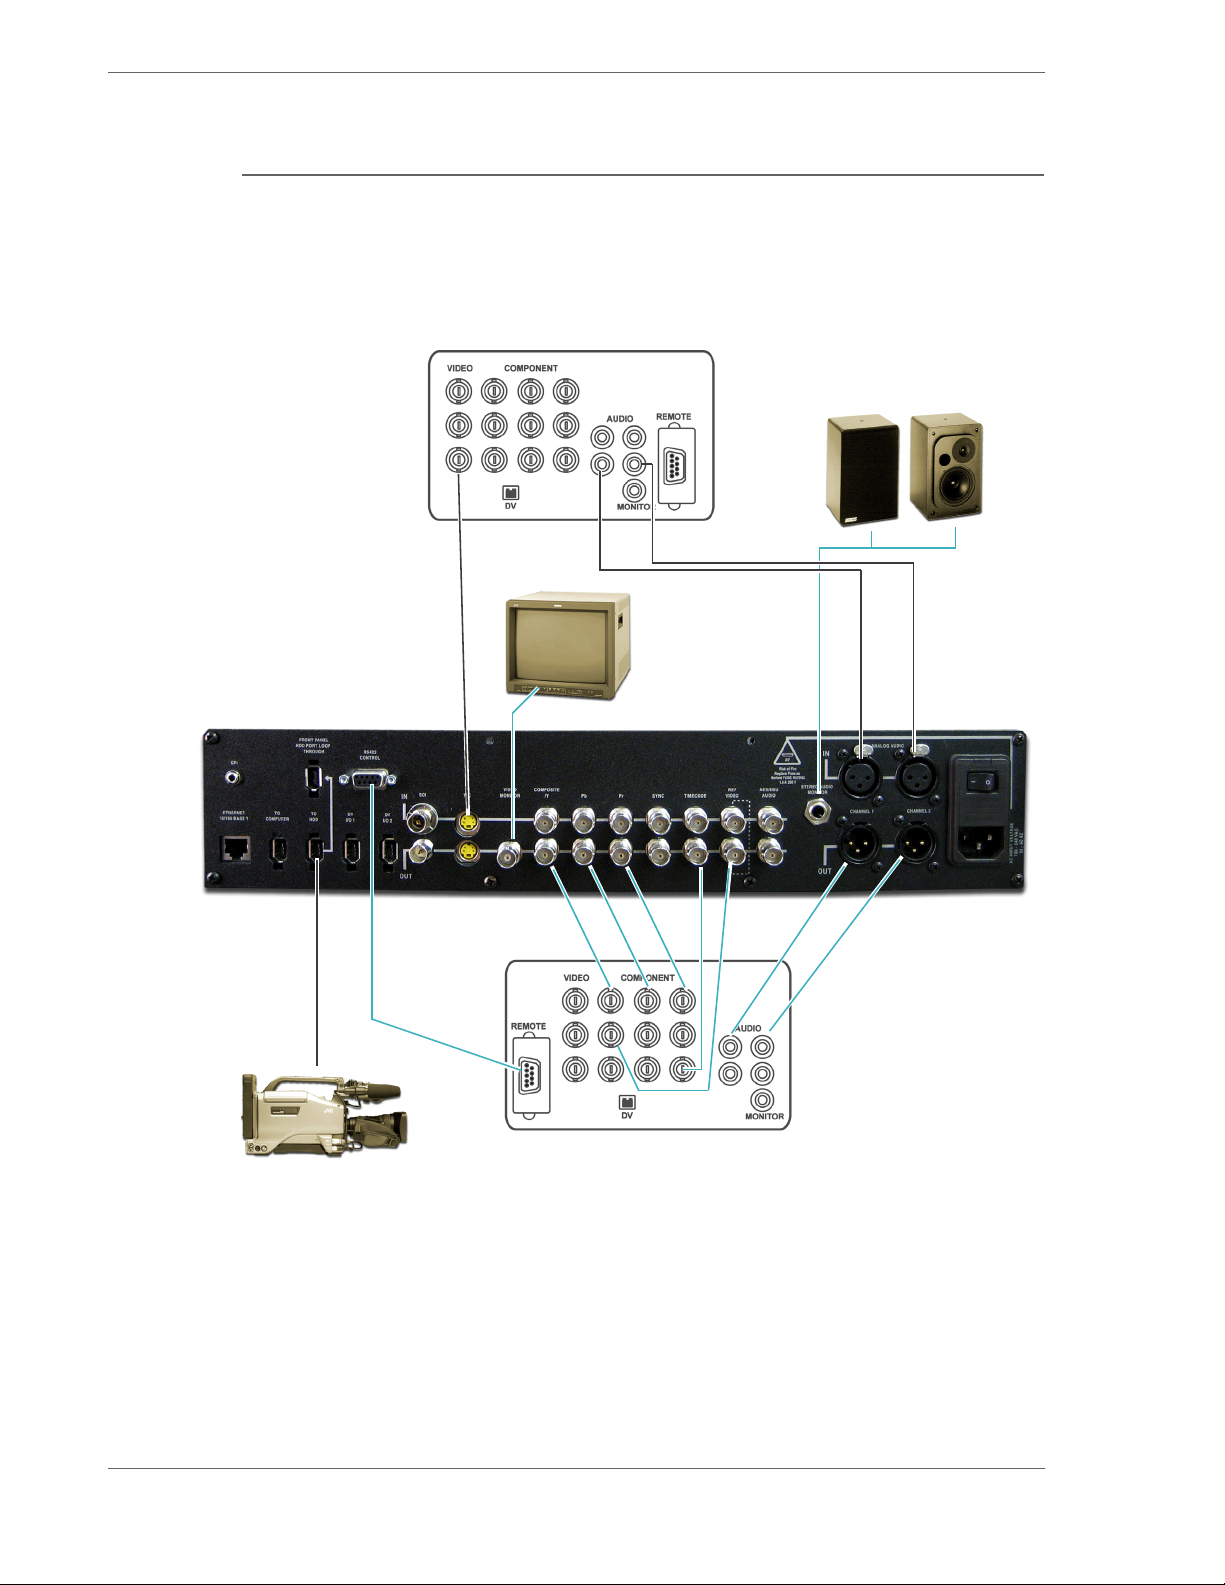
1.9 Setting Up the FS-2/2E
This section explains how to set up the FS-2/2E for use. Refer to the illustration
below and perform the steps on the following page.
Playback VTR
Video Source
Speakers
Audio Output
FS-2/2E Rear Panel
Camcorder
Video Source
Monitor
Display Output
External VTR
Record Output
FS-2/2E Studio DTE Disk Recorder User Guide
12
Page 33
To set up the FS-2/2E, do the following:
1. Plug in the power cord.
2. Connect a Video input device.
3. Connect an Audio source (if desired).
4. Connect a Monitor if desired.
5. Connect Speakers or Headset (to monitor the audio) if desired.
6. Connect a Tape Drive if desired.
7. Connect a Time Code Generator if desired.
8. Connect an External Control Device (RS422) if desired.
9. Connect a Reference Video signal if desired.
1.9.1 Formatting the Drive
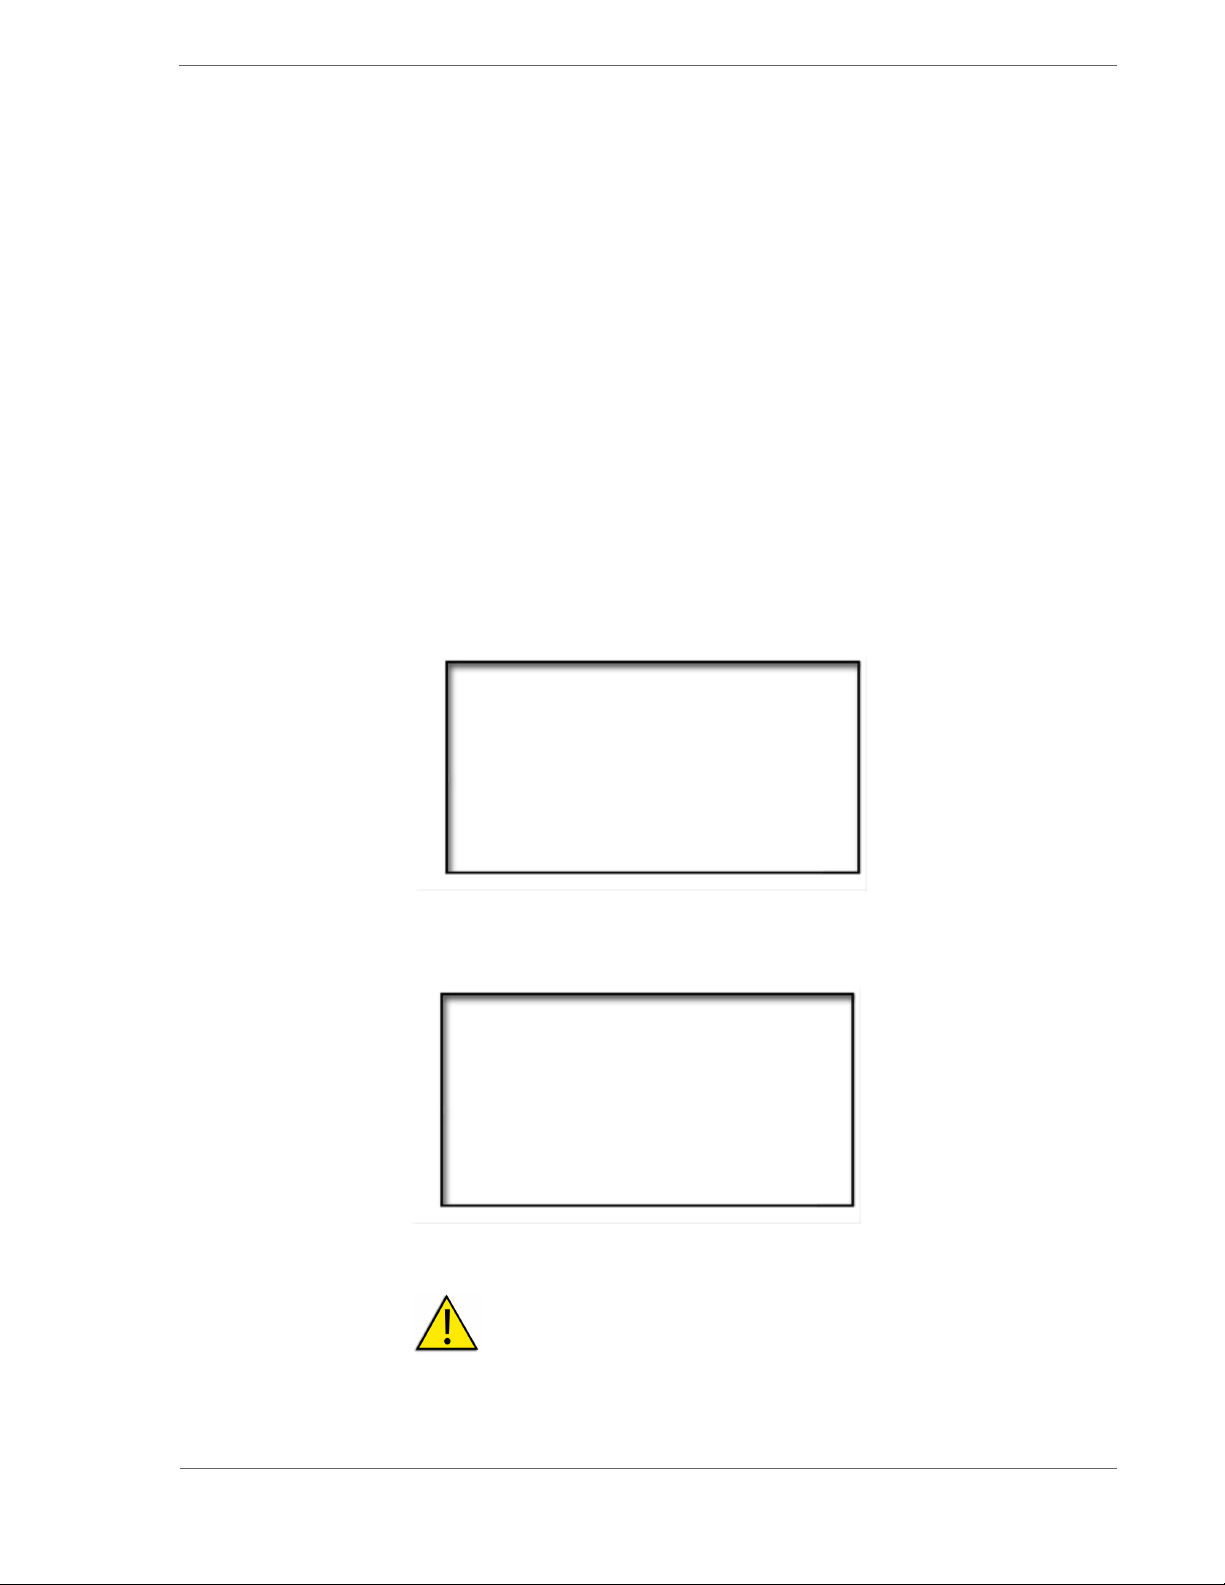
Use this procedure to format the FS-2/2E internal or connected external
disk drives when not yet formatted.
1. From the Utilities menu, select FORMAT DISK as shown below.
When you make this selection, the following screen appears:
Introduction
FORMAT DISK
VOLUME 1?
SIZE 115 Gig
FREE 540 Min
EXIT YES NO
2. Select between volumes by pressing the | and | buttons.
• When you select the volume and press YES, the following screen
appears:
FORMAT WILL
ERASE ALL DATA!!
CONTINUE
FORMAT VOL 1?
EXIT YES NO
• When you select YES, a message indicating that the formatting is
progressing appears.
WARNING: FORMAT ERASES ALL DATA ON THE DISK
DRIVE!
3. Press EXIT to return to the menu screen.
FS-2/2E Studio DTE Disk Recorder User Guide
13
Page 34
Introduction
1.9.2 Setting the Time and Date
Before using the FS-2/2E, use this procedure to set the time and date.
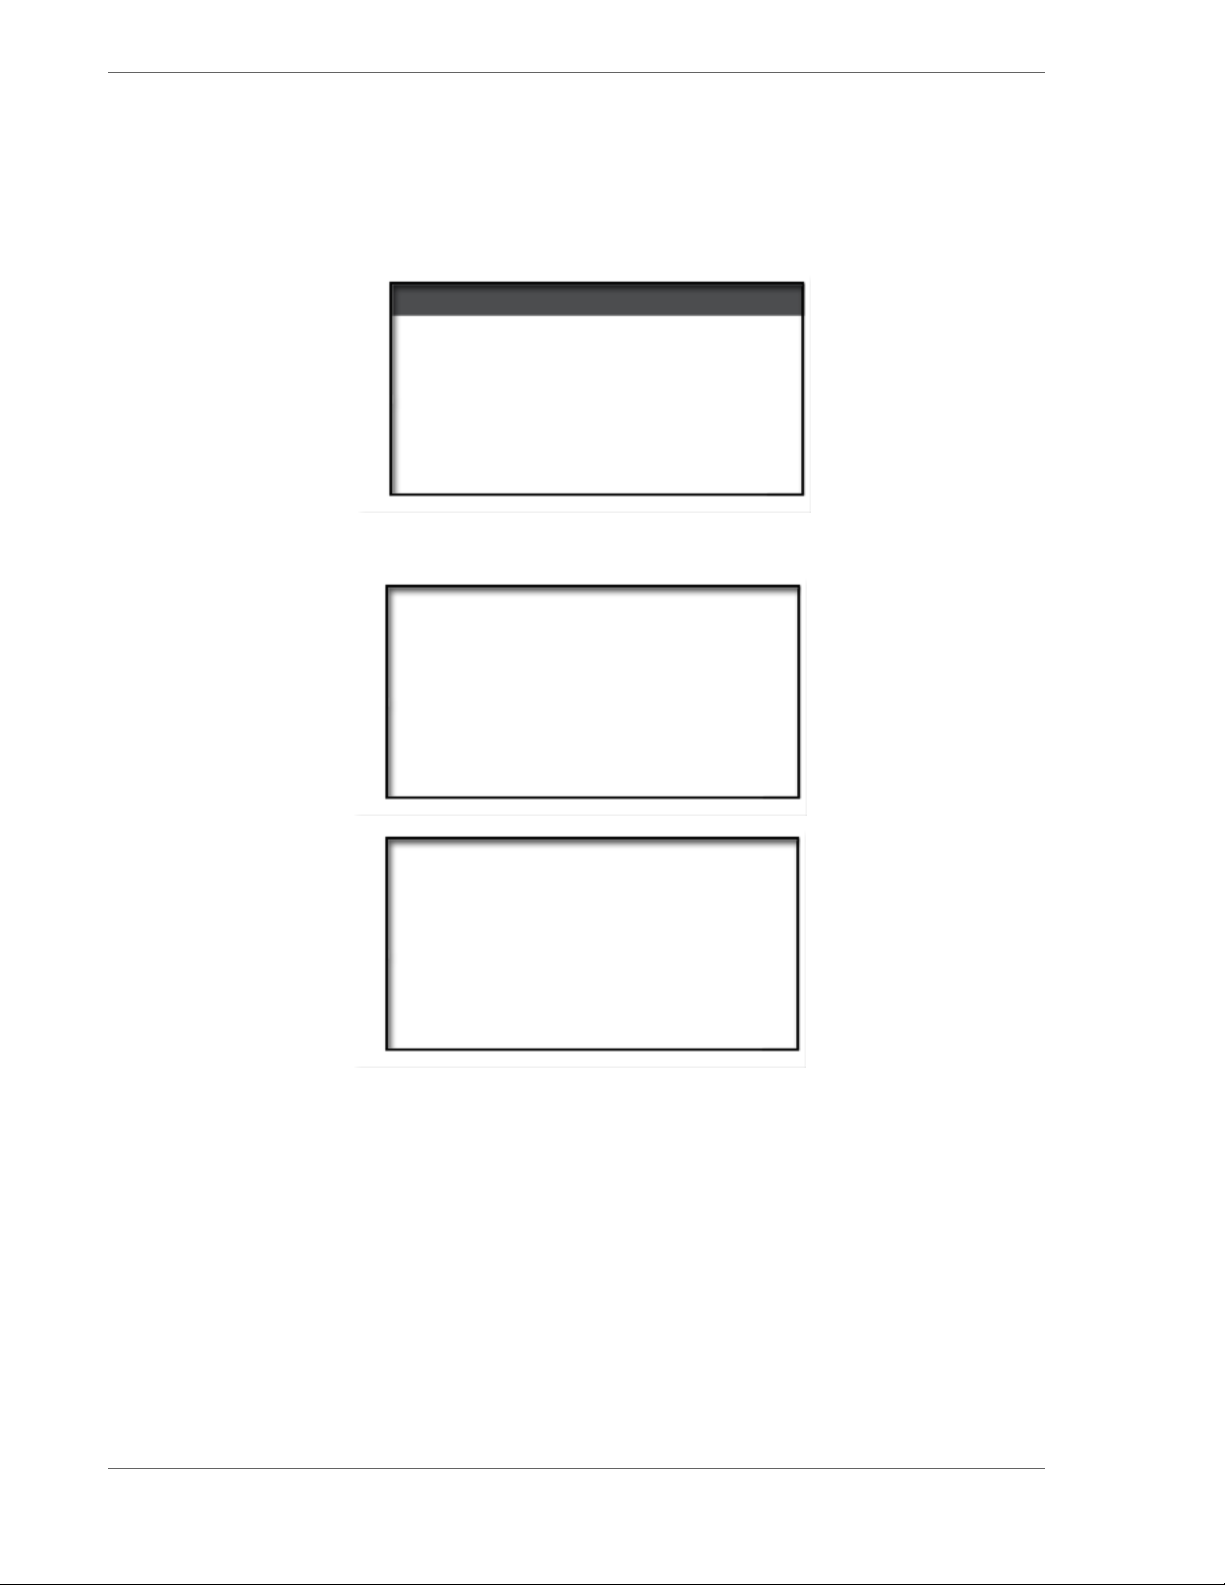
1. Select the Setup Menu.
2. Select SET DATE & TIME. The following screen appears.
SET DATE
SET TIME
EXIT SEL
3. Select SET DATE or SET TIME and press SEL to open the sub menu as
shown below.
SYSTEM DATE
10/01/07
MM/DD/YY
| & |
MOVES CURSOR
EXIT
SYSTEM TIME
16:21:13
Hh:Mm:Ss
| & |
MOVES CURSOR
EXIT
4. Scroll from value to value using the FORWARD and BACK index
buttons.
5. Press and to scroll through digits in the value.
6. Press EXIT to return to the menu screen.
Regardless of the display, the file name always remains
HHMMSS.xxx
FS-2/2E Studio DTE Disk Recorder User Guide
14
(Year-Month-Date-Hour-Minute-Second).
YYYYMMDD-
Page 35

1.10Replacing the Power Module Fuse
The power module of the FS-2/2E contains a protective fuse.
To replace the fuse do the following:
1. Turn off the FS-2/2E.
2. Locate the power module on the rear of the unit. It is indicated as AC In.
3. Detach the power cord from the power module.
4. Locate the small recess on the top of the power module above the power
switch.
5. Use a small tipped standard screwdriver to pop open the fuse door.
6. Once open, slide the white fuse carrier out of the unit.
7. Replace the fuse with a 1.6 amp 250V slow blow fuse.
8. Reassemble the fuse carrier and slide it back into the unit.
9. Replace the fuse box door.
10. Re-attach the power cord.
Introduction
FS-2/2E Studio DTE Disk Recorder User Guide
15
Page 36

FS-2/2E Studio DTE Disk Recorder User Guide
16
Page 37
FS-2/2E Functions
This chapter contains the following sections:
Edit/Utility/Input Buttons page 17
LCD Menu Soft Keys page 22
Transport Control Keys page 23
LCD Display page 26
FS-2/2E Menus and Functions page 30
2.1 Edit/Utility/Input Buttons
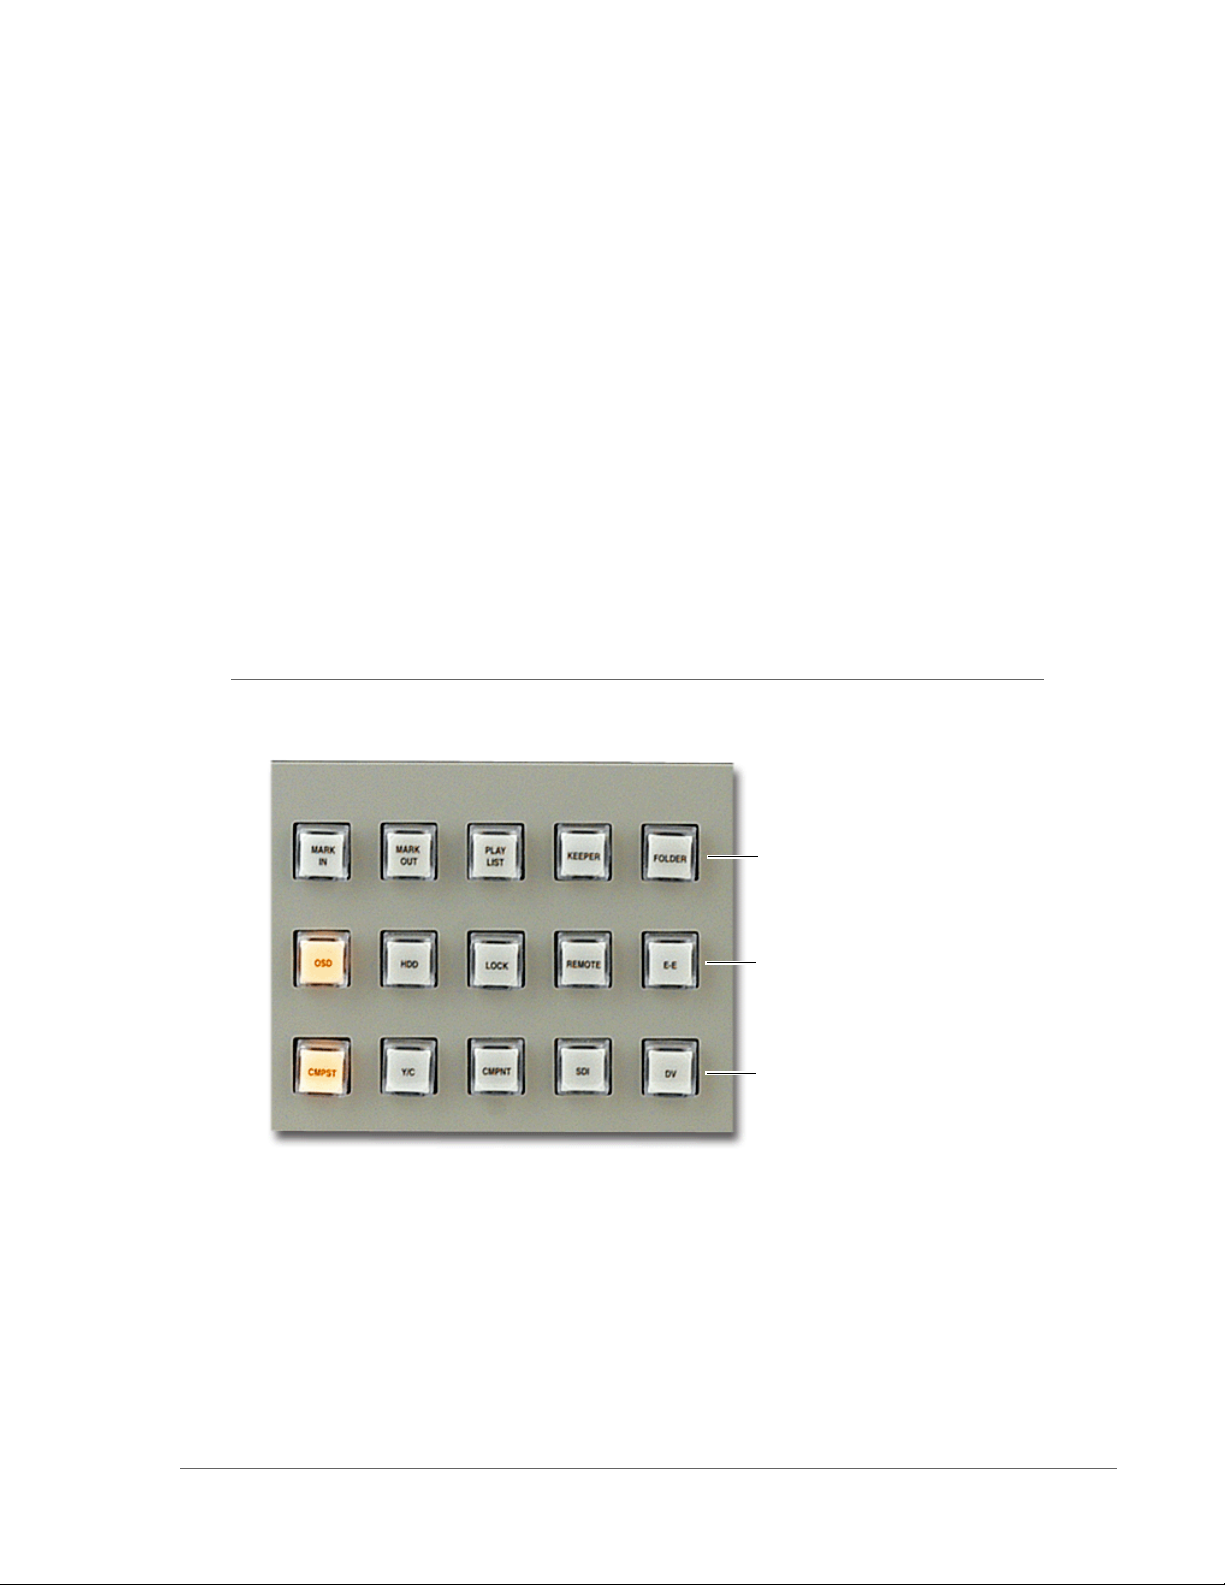
To the right of the hard disk drive is a bank of 15 buttons as shown below.
Chapter 2
Edit Function Keys
Utility Function Keys
Input Source Selection Keys
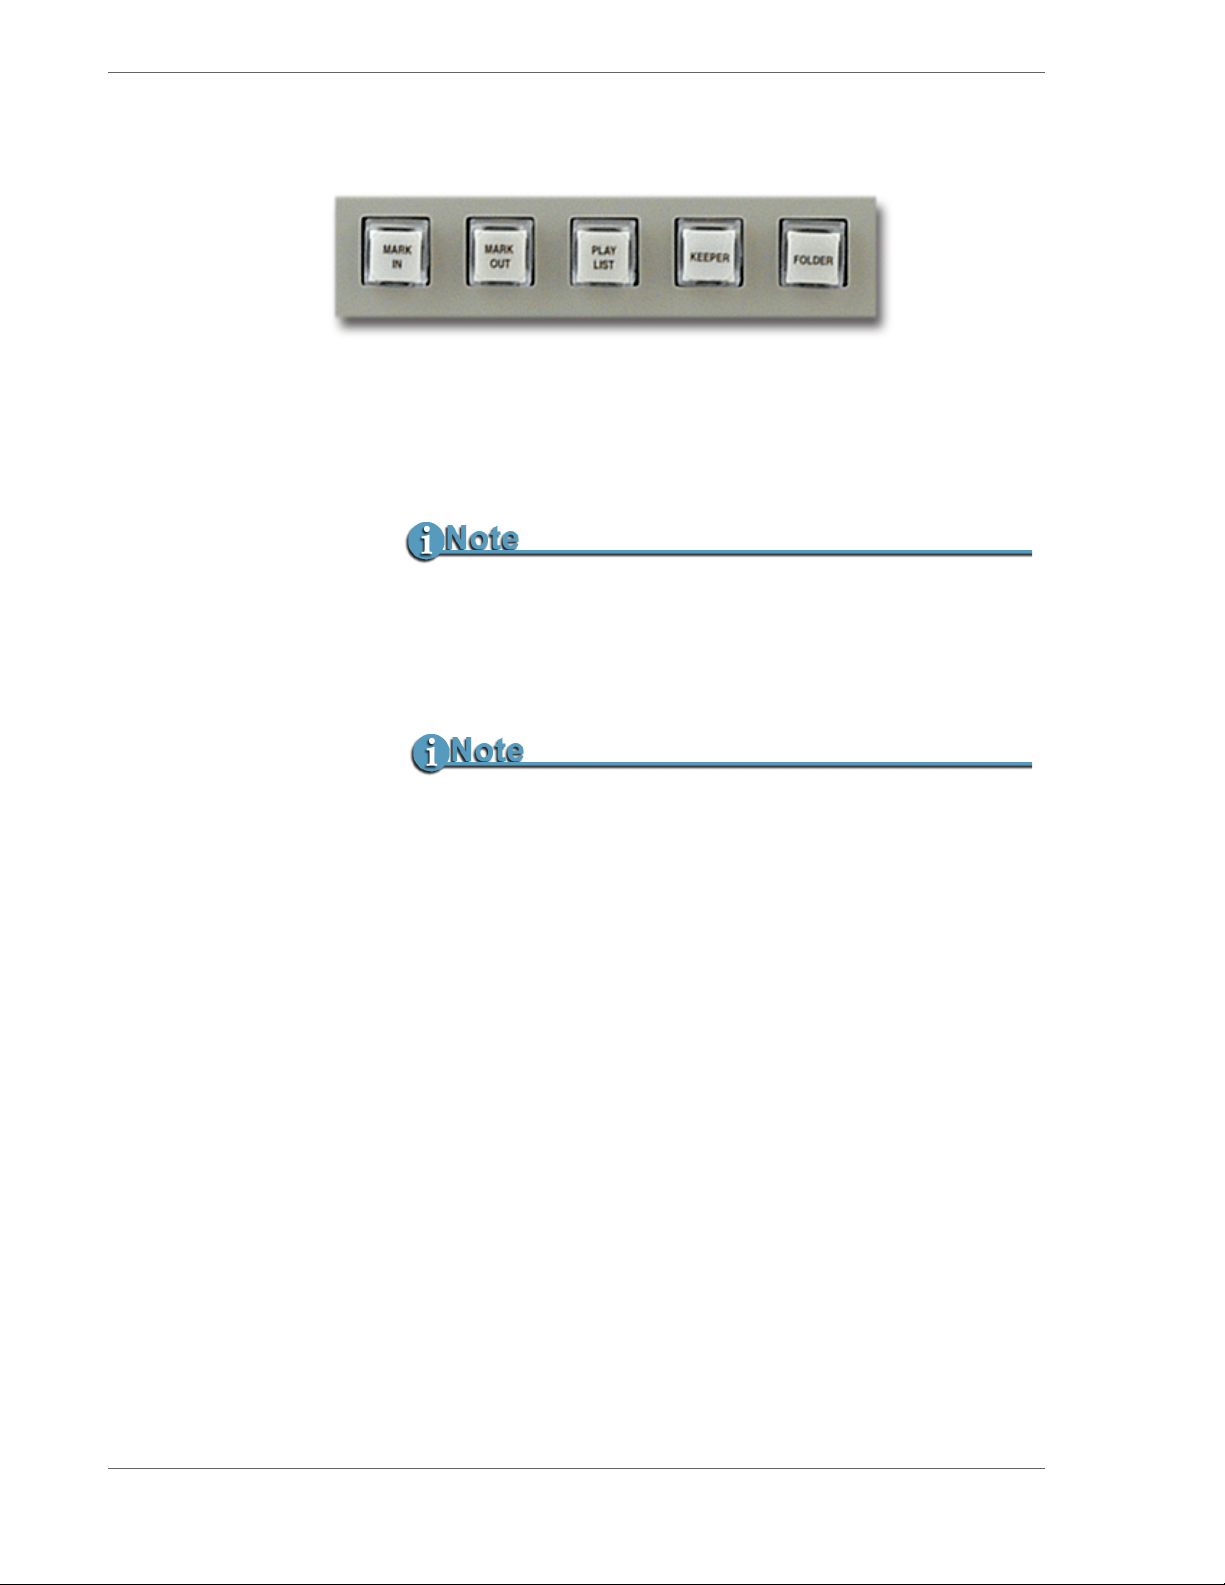
• The first row contains five buttons that are Edit functions keys.
• The second row consists of five buttons that are Utility function keys.
• The third row has five buttons that are Input buttons.
FS-2/2E Studio DTE Disk Recorder User Guide
17
Page 38
FS-2/2E Functions
2.1.1 Edit Function Keys
2.1.1.1 MARK IN - Mark In Key
Use the MARK IN key to mark a particular frame as a starting point
when creating a clip for a playlist. Refer to
44 of this user guide for more information about Playlists.
It is only possible to mark In and Out Points during playback.
Playlist Menu on page
2.1.1.2 MARK OUT - Mark Out Key
Use the MARK OUT key to mark a particular frame as an ending
point when creating a clip for a playlist.
Once the In and Out Points are selected, press the PLAYLIST key.
The In and Out key lights will turn off. You are then free to add more clips
to the playlist by again selecting In and Out points. When finished, go to
the PLAYLIST menu under SETUP.
2.1.1.3 PLAYLIST – Add to Playlist key
Press this key during stop or play to add a current clip to the
playlist.
Once In and Out points have been selected, press this key to add
selected clips to the playlist.
2.1.1.4 KEEPER - Keeper Key
By pressing the KEEPER key during a recording, you can mark
each clip into the
To add all
select
KEEPER clips to the KEEPER folder on the disk drive,
UTILITIES > ORGANIZE CLIP from the FS-2/2E menu.
KEEPER folder on disk.
FS-2/2E Studio DTE Disk Recorder User Guide
18
Page 39

2.1.1.5 FOLDER - Folder Key
By pressing the Folder key during a recording, you can mark each
clip into particular pre-named folders on disk (up to 10 folders can
be prenamed). Default names for the folders are 0 through 9. Refer
How to Mark Scenes on page 95 of this user guide to set up
to
Scene Marking folders).
FS-2/2E Functions
By repeatedly pressing the
FOLDER key, you can scroll though the
available folders. You can also assign clips to folders using the
numeric keypad on the optional remote control units. The current
clip can be marked during recording, playback or in stop mode.
Once selected, the clip is marked for placement into that particular
folder.
To add all marked clips to their respective folders on the disk
drive, select
For more information on scene marking, refer to
Scenes
UTILITIES > ORGANIZE CLIP from the FS-2/2E menu.
How to Mark
on page 95 of this user guide.
If the FOLDER key is lit during playback, the
FS-2/2E
PLAY FROM mode is set to FOLDER.
FS-2/2E Studio DTE Disk Recorder User Guide
19
Page 40

FS-2/2E Functions
2.1.2 Utility Function Keys
2.1.2.1 OSD - (On Screen Display)
Press this key to enable on screen display on the monitor output
(composite). When off, the key will not light.
2.1.2.2 HDD – Hard Disk Drive Bypass Key
Press this key to immediately open the HDD Bypass confirm
screen as described in the HDD Bypass section of the Menu. For
more information, refer to
HDD Bypass on page 50
2.1.2.3 LOCK – Keypad Lock Key
This key turns lock on or off. When the key is lit, the keypad is
locked. When off, it is not locked.
2.1.2.4 REMOTE – Remote Key
When you press this key, the FS-2/2E goes directly to the
REMOTE mode as described under the Control Modes menu. The
key lights in Local mode. When in the FS-2/2E is in remote mode,
you cannot use front panel keys for operation.
Another press exits REMOTE mode and the backlight turns off.
2.1.2.5 E-E – Electronic to Electronic Key
When you press this key, the selected input is passed on to all
outputs on the FS-2/2E. The E-E mode is only active when the
FS-2/2E is in
STOP mode.
FS-2/2E Studio DTE Disk Recorder User Guide
20
Page 41

2.1.3 Input Source Selection Keys
In all cases, when selected, the key lights. When selecting CMPST, Y/C, or
CMPNT and there is no video source available, this light flashes several
times and then the FS-2/2E returns to the original input selection. Switching
is not seamless. You cannot change inputs while in record mode.
2.1.3.1 CMPST – Composite Video Source Input Key
Press this key to select composite video as the input source. If
there is no video source available when this button is pressed, the
light flashes several times and then the FS-2/2E returns to the
original video selection.
FS-2/2E Functions
The default audio link is balanced analog audio. You can also
AES/EBU audio as the input link in the SETUP > AUDIO
select
INPUT
menu.
2.1.3.2 Y/C – S-Video
Press this key to select S-Video (Y/C) as the input source. If there is
no video source available when this button is pressed, the light
flashes several times and then the FS-2/2E returns to the original
video selection.
The default audio link is balanced analog audio. You can also
select
AES/EBU audio as the input link in the SETUP > AUDIO
INPUT
menu.
2.1.3.3 CMPNT – Component Video Source Input Key
Press this key to select Component video (Y, R-Y, B-Y) as the input
source. If there is no video source available when this button is
pressed, the light flashes several times and then the FS-2/2E
returns to the original video selection.
The default audio link is balanced analog audio. You can also
select
AES/EBU audio as the input link in the SETUP > AUDIO
INPUT
menu.
FS-2/2E Studio DTE Disk Recorder User Guide
21
Page 42
FS-2/2E Functions
2.1.3.4 SDI Serial Digital Video Source Input Key
Press this key to select SDI video (SMPTE 259M) as the input
source.
The default audio link is embedded AES/EBU digital audio in the
stream. You can also select either balanced analog audio or
separate
INPUT
AES/EBU audio as the input link in the SETUP > AUDIO
menu.
The FS-2E provides the option to select either channels 1 and 2 or
3 and 4 of the embedded audio of the SDI stream. Refer to the
SETUP > AUDIO INPUT > SDI > EMBEDDED sub-menu on page 59.
2.1.3.5 DV Video Source Input Key
Press this key to select DV video (25Mb/s) as the input source.
The default audio link is embedded 2-channel digital audio in the
stream. You can also select either balanced analog audio or
EBU
audio as the input link in the SETUP > AUDIO INPUT menu.
AES/
2.2 LCD Menu Soft Keys
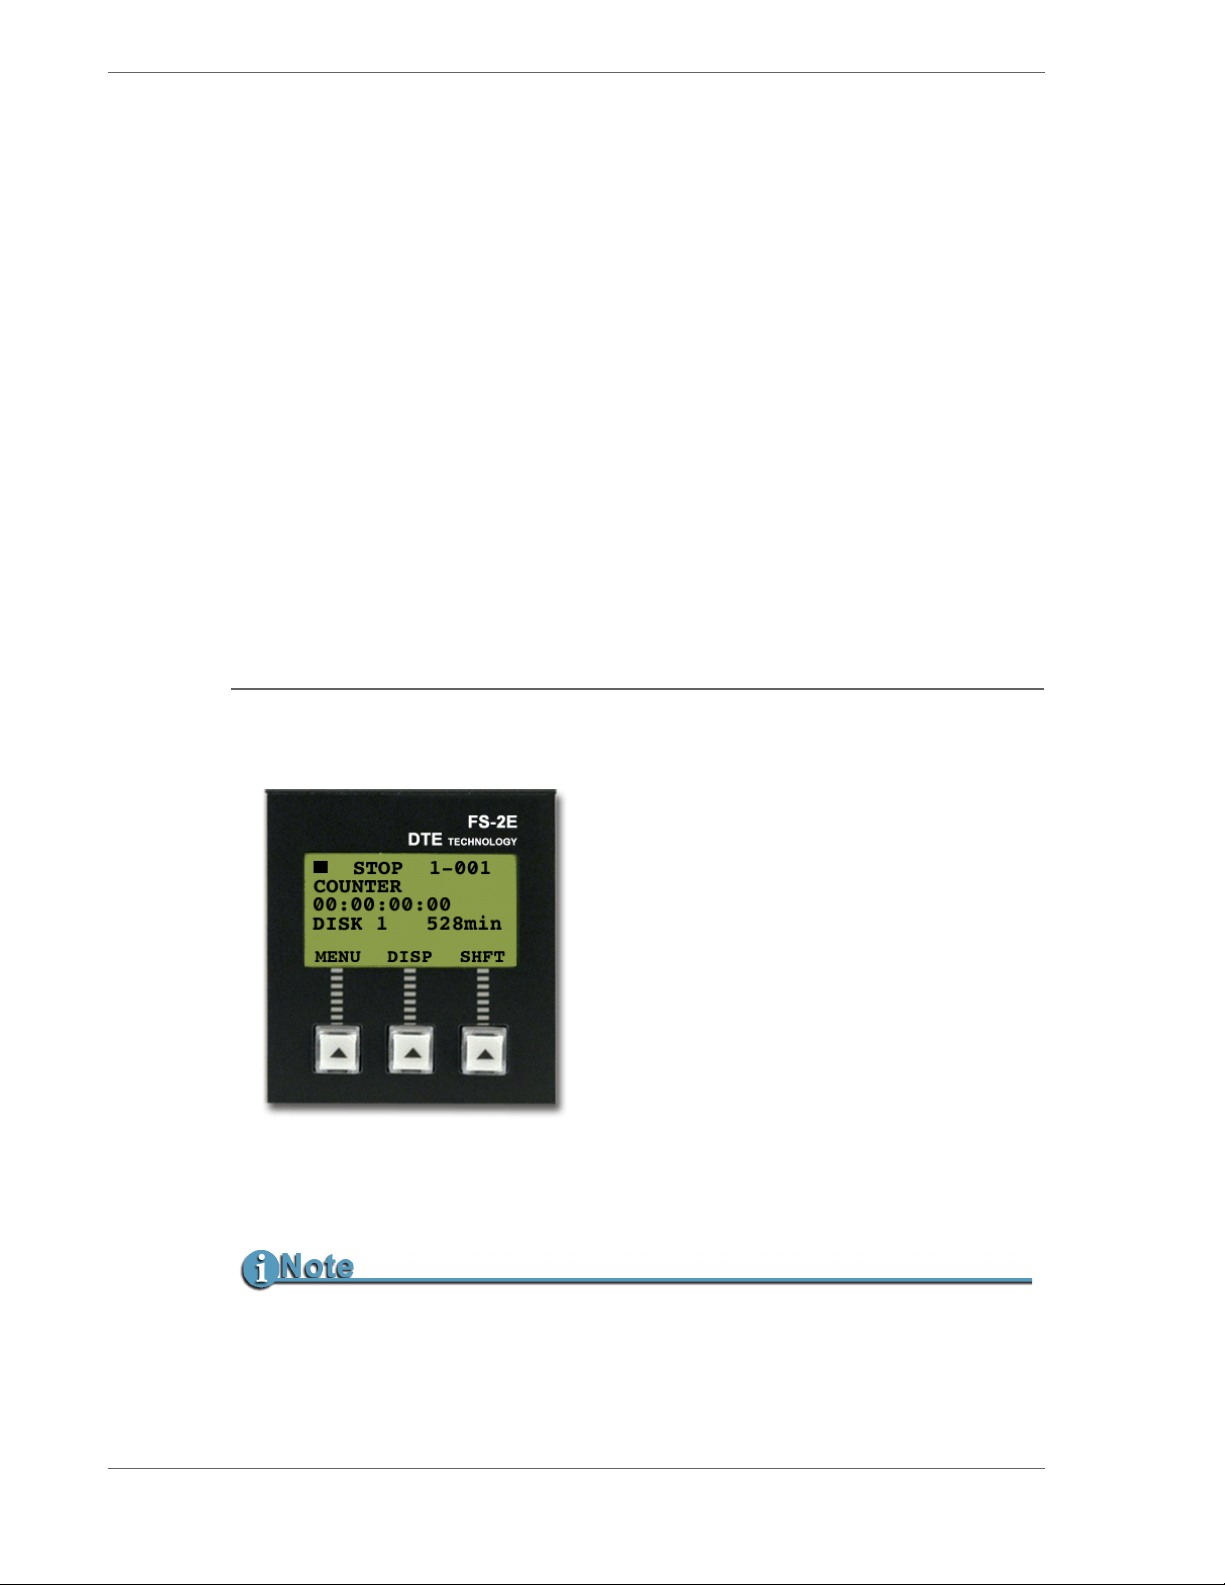
The three keys directly below the FS-2/2E LCD display are soft keys for navigating
and selecting items in the FS-2/2E menu.
These keys are also used for selecting different display modes. They are called soft
because their function changes depending upon what is displayed on the LCD
above the particular key.
Using the Right Soft Key to Scroll
In some cases when navigating the FS-2/2E menus, you can use the right soft key to scroll
down through the menu. To scroll up, just hold down the SHIFT key as well as the right soft
key.
FS-2/2E Studio DTE Disk Recorder User Guide
22
Page 43
2.3 Transport Control Keys
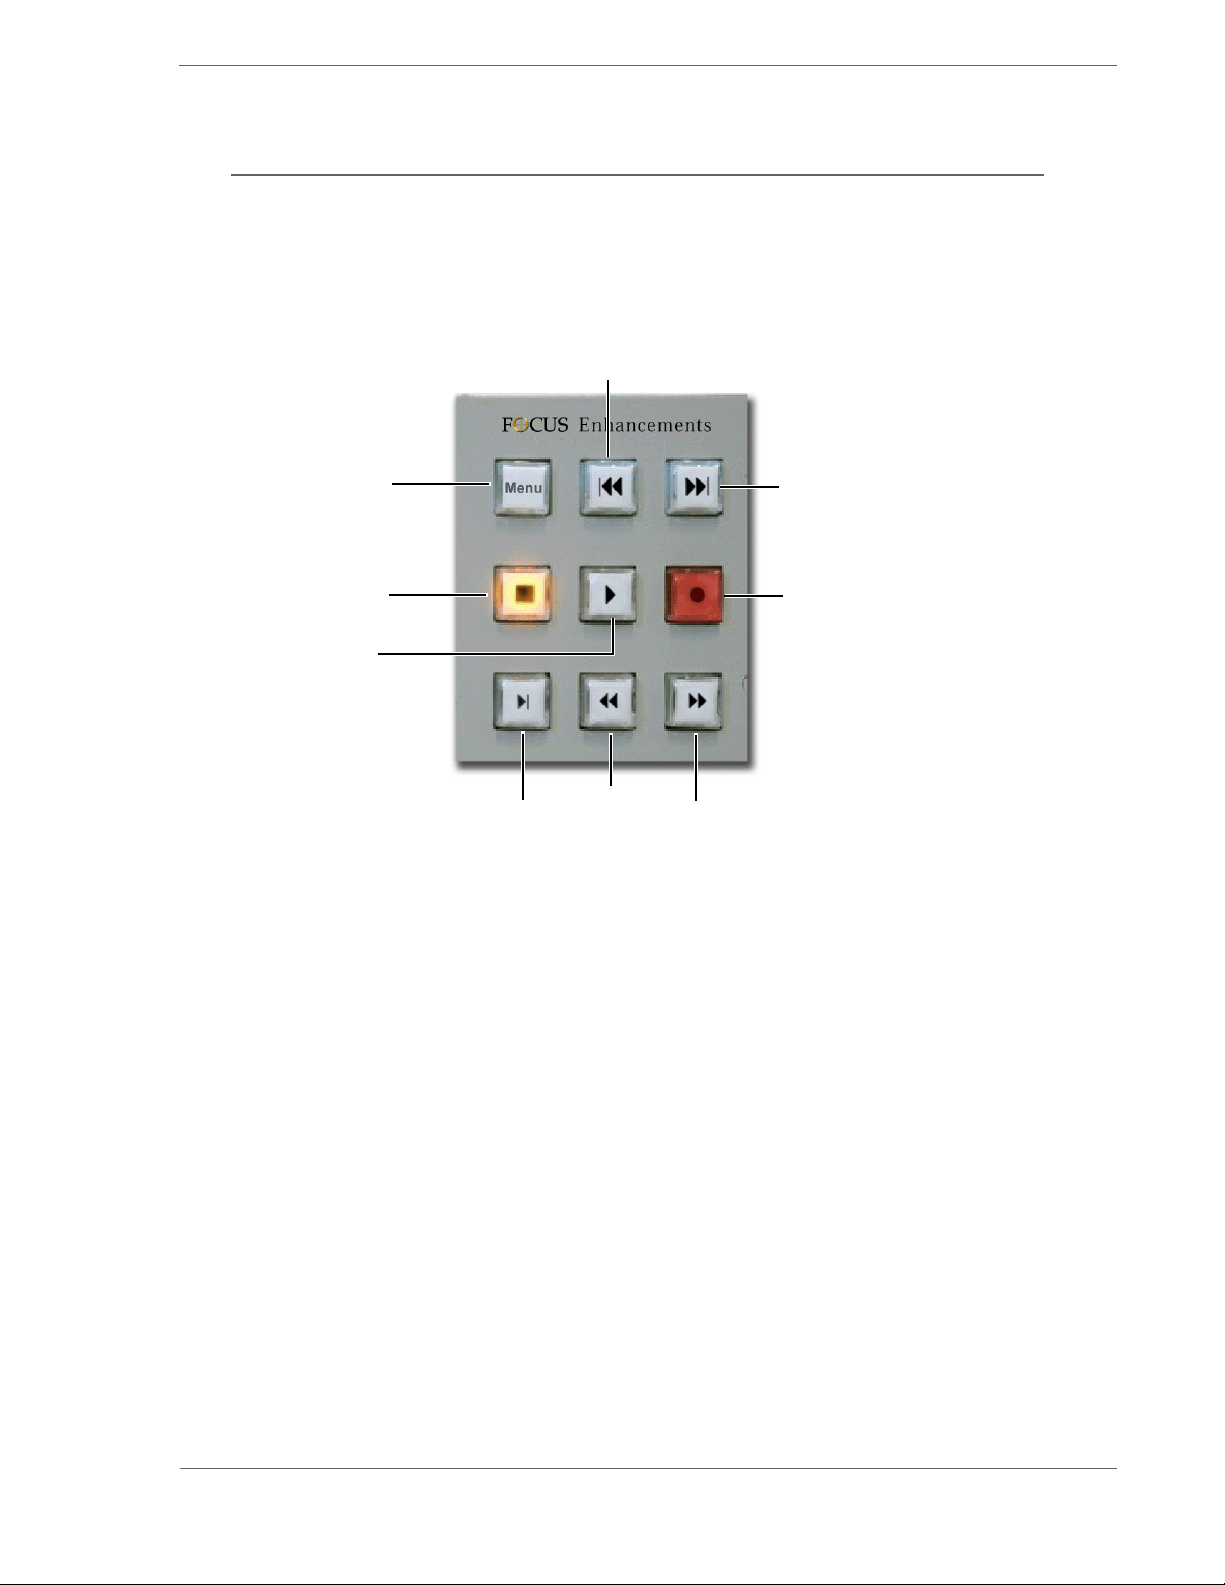
This set of buttons controls playback and record functions of the FS-2/2E. These
functions include play, reverse play, fast forward, fast rewind, forward frame, back
frame, next track, previous track, stop, and record. This area also features hot keys
for changing, controlling, and navigating the FS-2/2E menu system. Each of these
keys is described below as shown in order left to right, top to bottom.
Previous
FS-2/2E Functions
Menu
Stop
Play
2.3.1 MENU
Press this key to launch the FS-2/2E menu system. Once pressed, the Menu
screen appears on the FS-2/2E LCD and the button lights. If you press the
MENU key while in a particular screen in the menu system, that menu is
marked and the MENU key lights. You can then EXIT the menu and
perform other functions. If you press the
return to the marked Menu (except if you are in
Next
Frame
Rewind
Next Tack
Record
Fast
Forward
MENU key at anytime, you will
REC mode).
2.3.2 | Back Index
Press this key to return to the beginning of the current clip if in playback
mode. Press it twice to return to the previous clip during playback. In
mode press it to return to the beginning of the previous clip. If you press
SHIFT and Back Index, the previous disk drive is selected.
Stop
FS-2/2E Studio DTE Disk Recorder User Guide
23
Page 44

FS-2/2E Functions
2.3.3 | Forward Index
Press this key to skip forward to the next sequential clip for playback.
• To skip ahead 10 clips per increment, holding down
• To select the next disk drive, press
2.3.4 Stop
Press this key to Stop the selected mode and return the FS-/2E to Pause.
Press it again to put the FS-2/2E into
The splash screen is the first frame of the selected clip when you select
SETUP > STOP OUTPUT > CLIP PREVIEW. When the FS-2/2E is in Stop
mode, the key lights.
2.3.5 Play
Press this key to start playback of the selected clip. If you press the SHIFT
and
PLAY keys, the FS-2/2E immediately goes into Reverse Play mode.
2.3.6 Record Key
Press this key once when the FS-2/2E is in STOP mode and the FS-2/2E
goes into
recording. If you press
and a new clip is created without dropping any frames. This key is the only
key that is RED on the front panel.
REC-PAUSE. The REC button flashes. Press it again to start
Forward Index.
SHIFT and then Forward Index.
STOP (standby with menu screen).
REC during a recording, the current clip is closed
If you press
REC and SHIFT simultaneously, the FS-2/2E captures a single
frame of video. In a particular session, all single frames of video are saved
as part of the same clip on disk.
2.3.7 SHIFT
Use the SHIFT key to give particular keys a secondary functionality. When
you press it, the SHIFT key lights and remains in
button is released. The SHIFT mode of particular keys is listed below that
key or displayed on the FS-2/2E LCD.
2.3.8 Back Search
Press the Back Search button to allow video to be played at different speeds
(both slower and faster than real-time). Refer to the note under
Search Key
for more information.
SHIFT mode until the
Forward
FS-2/2E Studio DTE Disk Recorder User Guide
24
Page 45

2.3.9 Forward Search
Press the Forward Search key to play video at different speeds (both slower
and faster than real-time).
Change Search Speed with FF Search and Back Search
Pressing the FF Search button multiple times results in increases in the search
speed. This mode is bidirectional in forward X times normal search speed. Press the
Back Search button to cause the FF speed to slow down by one step.
FS-2/2E Functions
For instance, if you are in 10X FF speed and you press the
Back Search
button once, you are in 2X FF mode. This also applies to backward search
speeds. The default speed resolution is as follows (NTSC and PAL have
slightly different multiples for both greater and less than 1X play speed):
• REVERSE: -30X, -10X, -2X, -1X (reverse play), -1/2X(-15fps), Still.
• FORWARD: Still, +1/2X (+15fps), +1X (play), +2X, +10X, +30X
Forward Search and Reverse Search also have a “higher resolution” mode
where more speeds are available as follows:
• REVERSE: -30X, -25X, -18X, -15X, -12X, -10X, -8X, -5X, -4X, -3X, -2X,
-1/30, -1/15, -1/10, -1/6, -1/5, -1/3,-1/2
• FORWARD: +30X, +25X, +18X, +15X, +12X, +10X, +8X, +5X, +4X, +3X,
+2X, +1/30, +1/15, +1/10, +1/6, +1/5, +1/3, +1/2
This mode can be set in the
SETUP > FF / RW HI RES menu in the FS-2/2E
Setup menu. Once set, these speed resolutions become available when you
press
Back Search or Forward Search.
FS-2/2E Studio DTE Disk Recorder User Guide
25
Page 46
FS-2/2E Functions
2.4 LCD Display
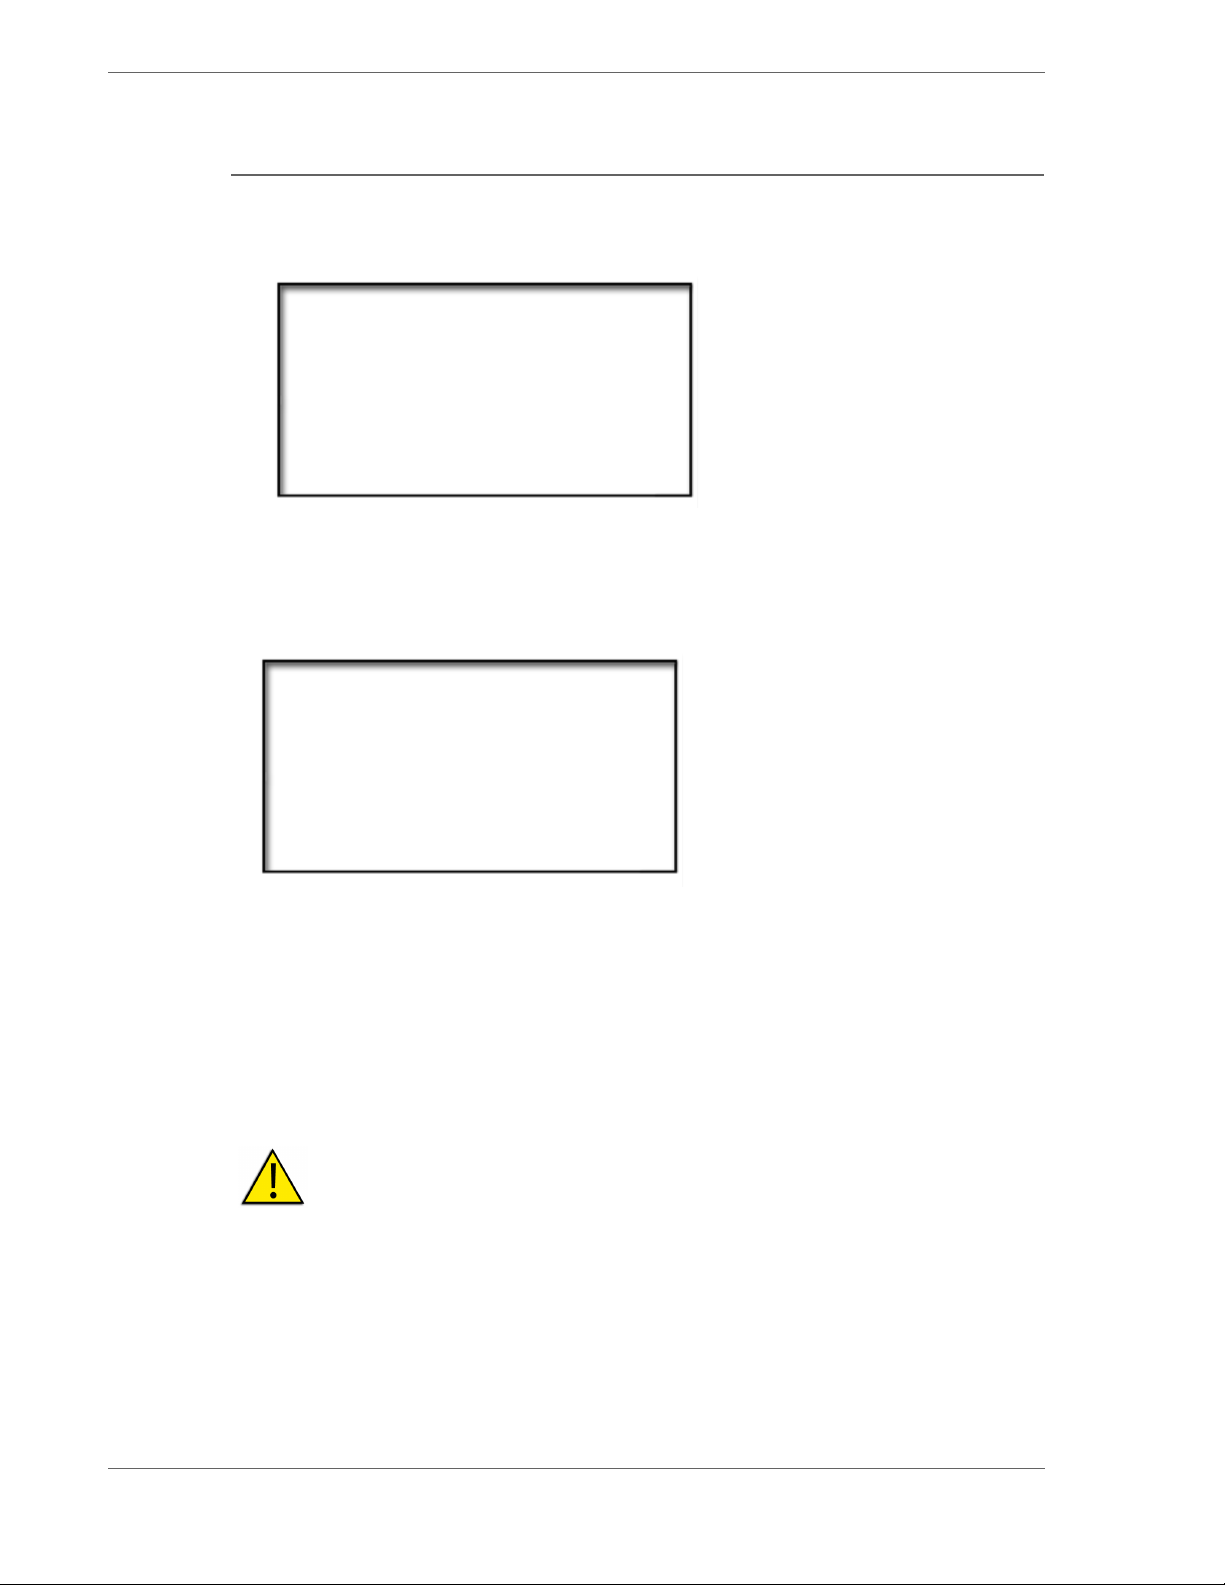
The FS-2/2E LCD screen displays different FS-2/2E modes and states. On boot up,
the FS-2/2E displays the following screen:
Depending on the connected disk drive, the FS-2/2E may or may not display
Please Wait during boot up.
Once booted, if no disk drive is connected to the FS-2/2E (either through the
internal slot or externally using the HDD I/O port), the following screen appears:
WELCOME
TO FS-2E
PLEASE WAIT
NO DISK
DETECTED
MENU
Insert a drive into the front panel drive bay or connect a FireWire disk drive to the
HDD I/O port.
If you received a drive from Focus Enhancements, it should be configured and
ready to use. If the message
No Disk Detected appears, make sure the drive is inserted
properly.
If the message
No Format Detected appears, you must partition and format the
inserted drive before use. The FS-2/2E prompts you through the steps required to
perform a format.
Warning: Formatting and Portioning Erases All Data On the Disk.
FS-2/2E Studio DTE Disk Recorder User Guide
26
Page 47
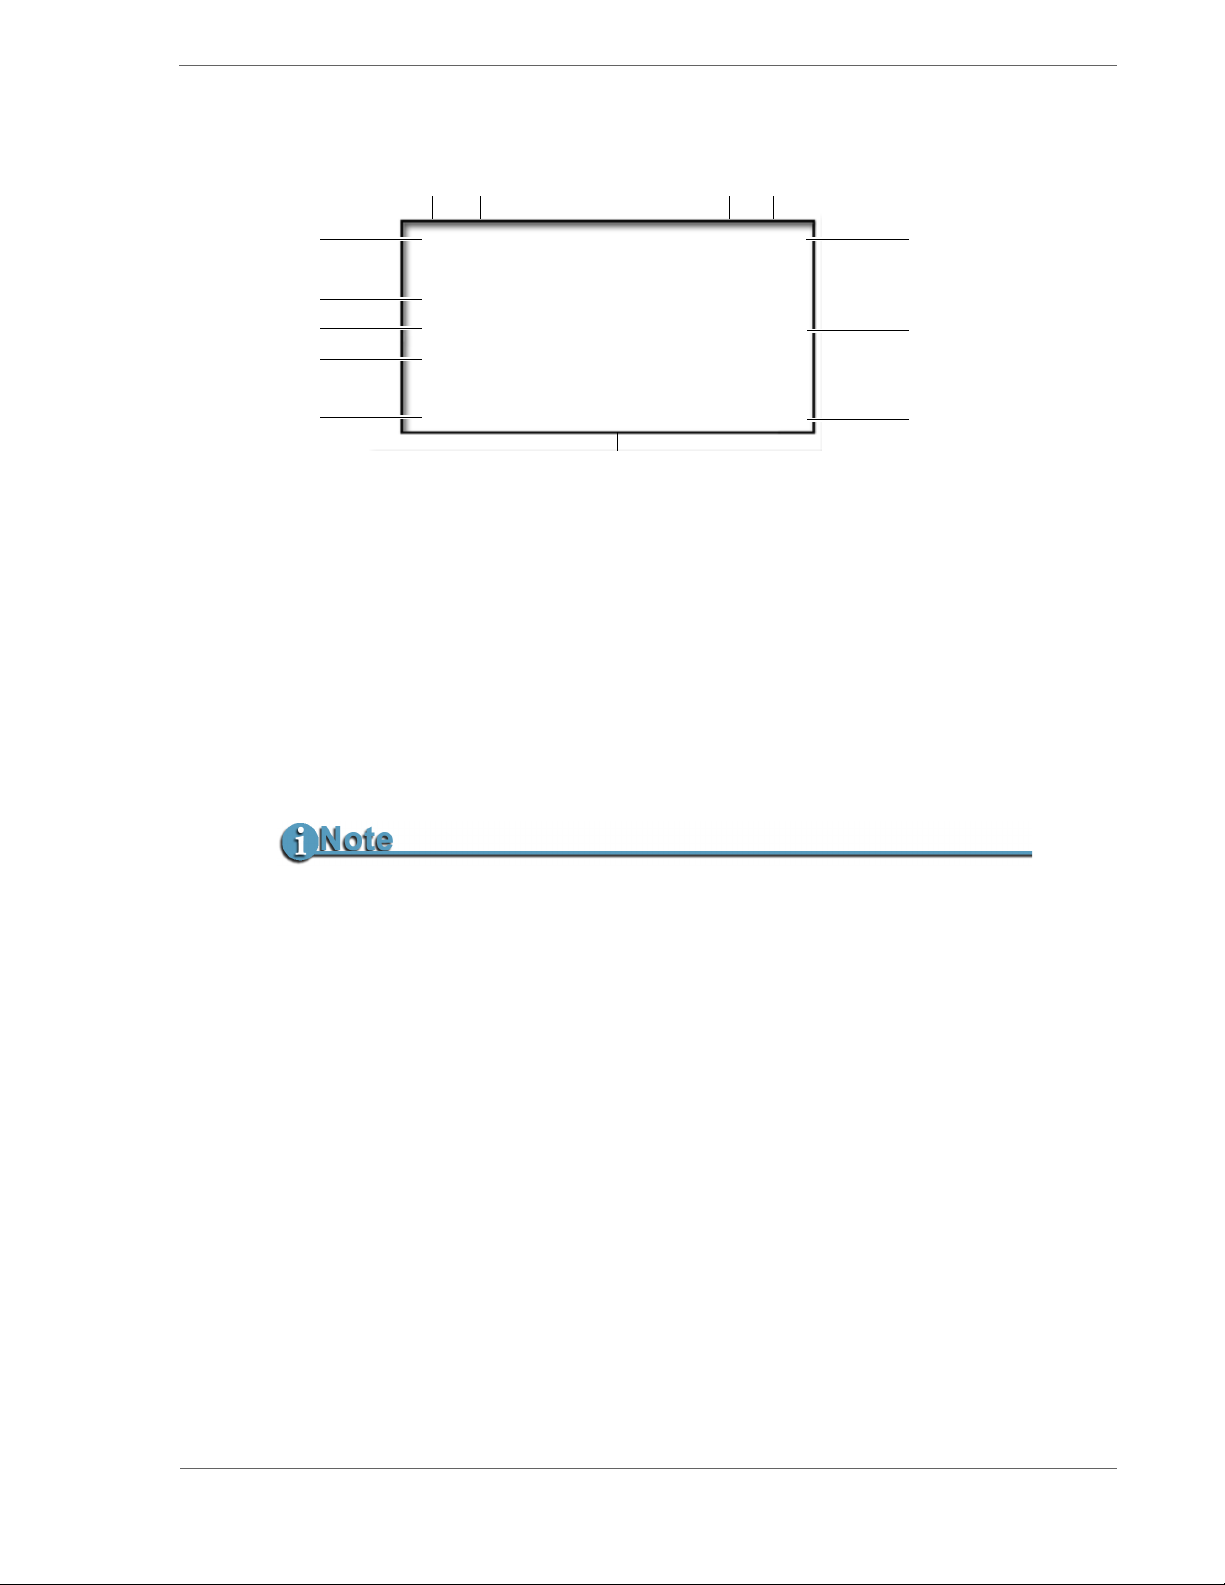
Once ready for use, the FS-2/2E default menu screen appears as follows:
3 4 5
2
FS-2/2E Functions
1
STOP 1-001
6
COUNTER
7
8
10
11
1. Play/Record Status Symbol
00:00:00:00
DISK 1 183 Min
FOLDER
MENU DISP SHFT
12
9
13
This symbol displays a graphical representation of the current FS-2/2E state
as follows:
-
STOP
, - Play or Reverse play
Fast Forward search and speed
-
-
Fast Back search and speed
- Record and Record mode
Pause
|| -
Each symbol has multiple display modes.
For a complete list, refer to FS-2/2E LCD Display Modes on page 26.
2. Record/Play Status Indicator
In this space, the FS-2/2E displays a character that indicates what record or
playback mode it is in. The characters displayed and their respective modes
are listed in
3. Current System Status
FS-2/2E LCD Display Modes on page 114 of this user guide.
The current system status of the FS-2/2E is displayed in the top left corner of
the LCD display. For instance, it displays whether the FS-2/2E is in record,
play, stop, pause, fast search or slow motion modes.
4. Volume Number
The volume or disk number of the current clip recording or playback session
is displayed in the top right corner of the LCD display. For example, a display
value of
2-014 identifies a track as being on volume 2.
FS-2/2E Studio DTE Disk Recorder User Guide
27
Page 48
FS-2/2E Functions
5. Track or Clip Number
6. Timecode/User Bit Display Mode
The track number is displayed in the top right corner of the LCD Display. This
is the current clip or track number being recorded or played back. For
example, a display value of
2-014 identifies a track as being clip 14 on volume
2.
This identifies the display mode for timecode or user bit values. Selections are:
• COUNTER - Counts frames during record or playback of the current clip
only.
• REMAINING - Counts down the number of frames available (time) on a
particular disk during a record session. In a playback session, this display shows the remaining time on the current clip.
• DV NTSC or PAL - Displays the external timecode value being generated
by a camcorder or other device during a record session. Timecode mode
has to be set to EXT TC for this function to operate (refer to
TC Mode on
page 60 of this user guide). In playback mode, this displays the embedded DV timecode value in a particular track.
• USER BIT - Displays the set user bit value in a particular clip. A user bit
value must be added for this to display (refer to
TC Set on page 62 of this
user guide).
• ABSOLUTE - Displays an absolute timecode value for the particular ses-
sion (sum of all COUNTER timecodes on connected volumes). This is
primarily used when you set the FS-2/2E to AV/C mode and are controlling it with an external FireWire device, such as a computer.
The FS-2/2E Does Not Accept NDF TC Values in DF TC Mode.
• AUDIOMETER - Displays left and right levels in db. The scale indicates -
10db, -4db, and 0db. This display mode is only available for the FS-2E, or
the FS-2 (with the 2.0 upgrade). The 2 lines on the menu appear similar to
the following:
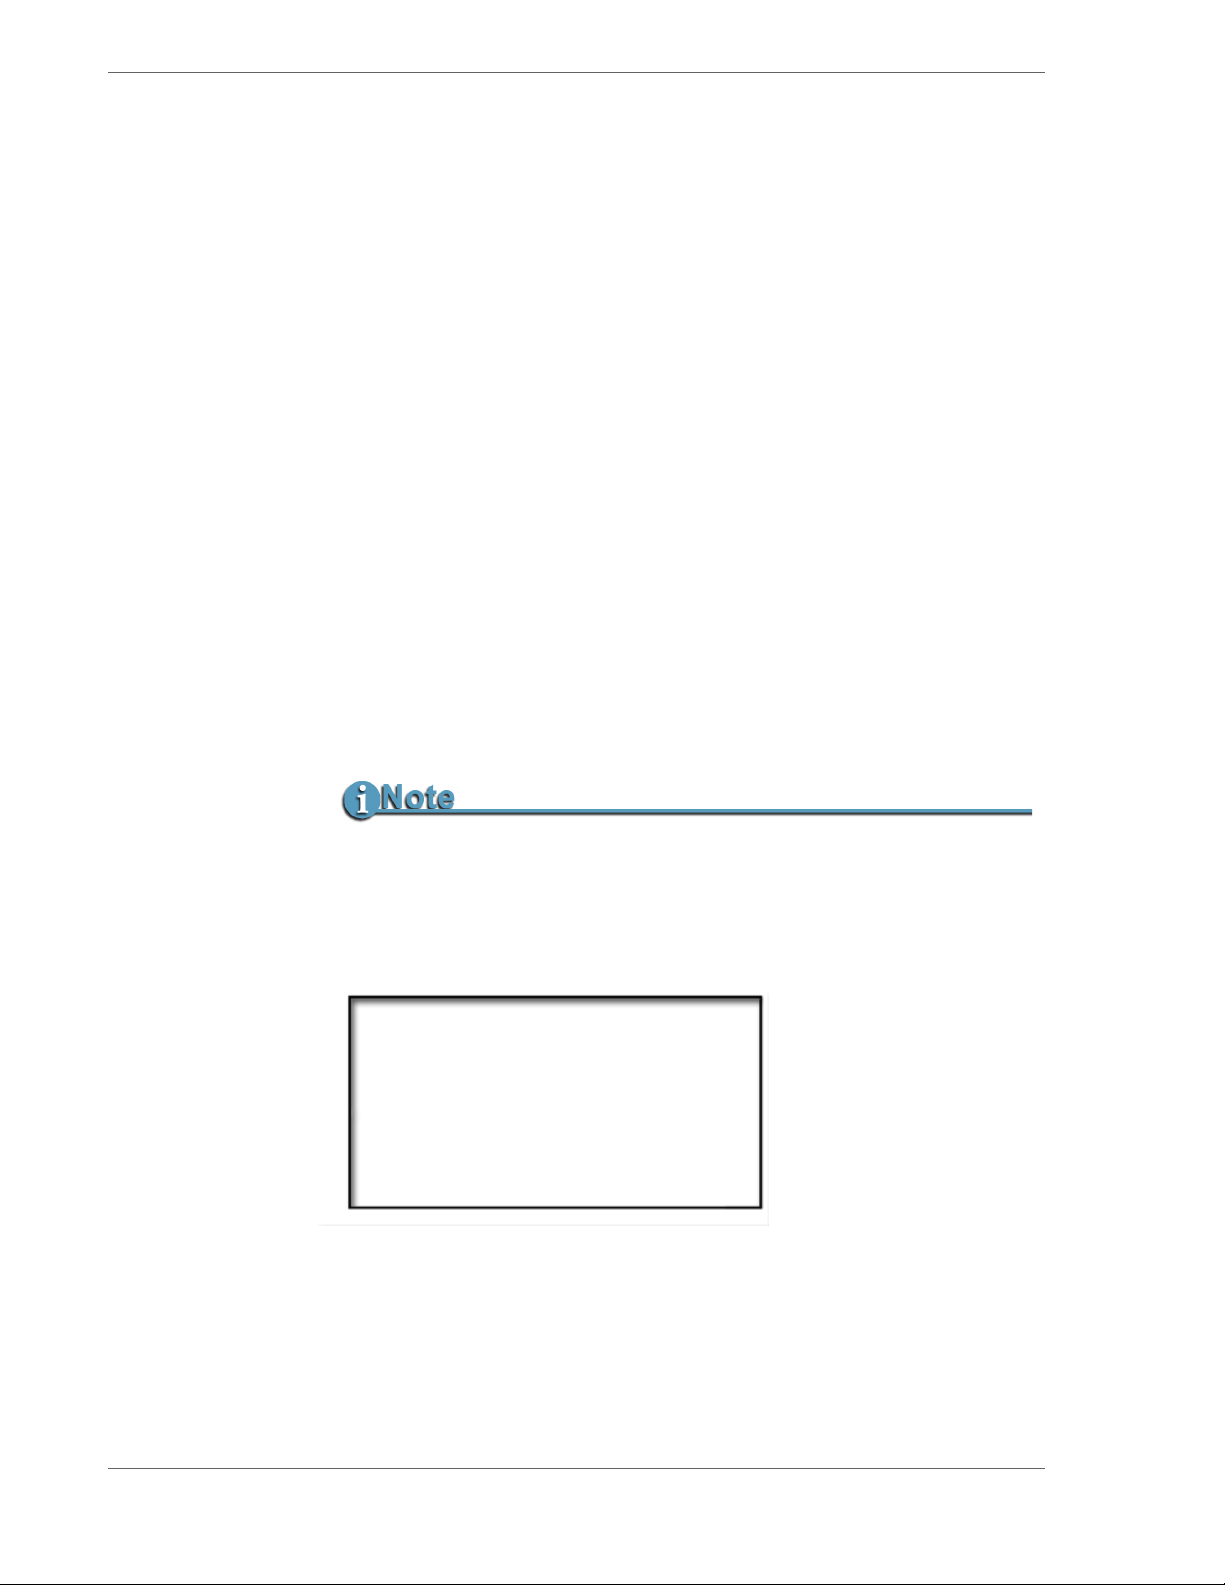
PLAY 1-001
-10 -40
L
R
DISK 1 530min
DISP SHFT
7. Timecode or User Bit Value
Displays the timecode or user bit value of display mode selected as follows:
00:00:00:00 - Drop Frame
00:00:00:00 - Non Drop Frame
FS-2/2E Studio DTE Disk Recorder User Guide
28
Page 49

FS-2/2E Functions
8. Current Disk Volume
Displays the current disk volume in relation to available space.
9. Available Space on Volume
Displays the space in time available on the current volume, for example,
• DISK 1 183min - Current Disk time remaining is 183 minutes
•NO DISK - No attached Disk
10. Folder Display
In record or playback, this displays the particular folder a clip is in (if
applicable). If playing an entire folder (
folder), it displays the folder name as follows:
11. Soft Key One (MENU) Function Display
Displays the current function related to Soft Key
PLAY FROM menu set to particular
[FOLDER].
1 (left key on the top row of
buttons). You can use this key for opening the FS-2/2E Menu and also as a
STOP key during a recording.
12. Soft Key Two (DISP) Function Display
Displays current function of Soft Key
buttons). This changes the TC display between
2 (middle key on the top row of
COUNTER, REMAINING, DV TC
(NTSC or PAL), USER BIT, and ABSOLUTE when in record or playback modes.
For the FS-2E, or the FS-2 with the 2.0 upgrade, there is an additional
AUDIOMETER display mode.
13. Soft Key Three (SHFT) Function Display
Displays current function of Soft Key
3 (right key on the top row of buttons).
FS-2/2E Studio DTE Disk Recorder User Guide
29
Page 50

FS-2/2E Functions
2.5 FS-2/2E Menus and Functions
The FS-2/2E features a comprehensive menu system which allows a number of
features to be initiated and setup. The menu system contains the following
selections:
• RECORD MODE
• CONTROL MODE
•PLAY MODE
• PLAY FROM MODE
•PLAYLIST
• HDD BYPASS
• INTERNAL HDD
•RECORD FORMAT
•NORMAL REC
• RETRO DISK
• RETRO CACHE
• LOOP RECORD
• STILL
• TIME LAPSE
• LOCAL (selections include: NORMAL, INDEX AT TC, INDEX AT SCENE)
•REMOTE
• AV/C (selections include NORMAL, INDEX AT TC, INDEX AT SCENE)
•
SYNCRO SLAVE (selections include NEW FILE [for FS-2E, or FS-2 with
2.0 upgrade only],
SAME FILE [for FS-2E, or FS-2 with 2.0 upgrade
only])
•PLAY CLIP
•LOOP CLIP
•LOOP ALL
•PLAY ALL
• TRACK LIST
• PLAY LIST
• FOLDER LIST (selections include: NONE, KEEPER, 0, 1, 2, 3, 4, 5, 6, 7, 8, 9)
•OPEN
•SAVE
•NEW
• EDIT (selections include REMOVE CLIP, INSERT CLIP, and MOVE CLIP).
•VIEW
• DELETE LIST
•RAW DV
•AVI TYPE 1
•AVI TYPE 2
• CANOPUS AVI
• MATROX AVI
•QUICKTIME
FS-2/2E Studio DTE Disk Recorder User Guide
30
Page 51

•AVID OMF
• PINNACLE
• 24P AVI TYPE 2 (for FS-2E, or FS-2 with 2.0 upgrade only)
•
• SETUP
• SET DATE & TIME (sub-menus include SET DATE, SET TIME)
• OS VERSION NO
• OS UPGRADE
• PAL/NTSC (selections include NTSC, PAL)
•RS422 REMOTE
• AUDIO INPUT
• AUDIO IN LEVELS
• TC MODE
•
•
•
•
•
•
•
•
•
FS-2/2E Functions
24P QUICKTIME (for FS-2E, or FS-2 with 2.0 upgrade only)
• TYPE
• TC SOURCE (selections include ABS, DV, COUNTER)
• COMPOSITE (selections include BALANCED and AES/EBU)
• COMPOSITE
•Y/C (selections include BALANCED and AES/EBU)
•COMPONENT (selections include BALANCED and AES/EBU)
•SDI (selections include EMBEDDED, BALANCED, AES/EBU)
•DV (selection is EMBEDDED)
• EXT TC
• REC RUN
• REGEN
• FREE RUN
• TC SET
• TC PRESET
• UB PRESET
•TC DELAY
• DROP/NON-DROP (sub-menus include DROP, NON-DROP)
ON SCREEN DIS (sub-menus include ABS, TC, MENU, OFF)
FF/RW HI RES (sub-menus include ENABLE, DISABLE)
GPI PORT (sub-menus include DISABLE, PAUSE/UNPAUSE, INDEX/NEW
FILE
, REC SNAPSHOT)
BACKLIGHT (selections include ON, OFF, AUTO OFF)
STOP OUTPUT (selections include GRAY, NO OUTPUT, CLIP PREVIEW,
CUSTOM)
AUDIO CORRECT (selections include OFF, MEDIUM, HIGH)
PREFERENCES (selections include SAVE, RESTORE)
FOLDER PREF (selections include SCENE MARK and AUTO MARK)
ANALOG OUT (selections include COMPOSITE, COMPONENT)
(selections include BVW-75, GENERIC)
(selections include BALANCED and AES/EBU)
(selections include SELECTED INPUT, LTC)
(FS-2E only)
FS-2/2E Studio DTE Disk Recorder User Guide
31
Page 52

FS-2/2E Functions
• UTILITIES
• NETWORK SETUP
• IP SETTINGS (selections include DHCP, CUSTOM IP)
• USER/PASSWORD
• VIEW IP INFO
• SERVICES
[ENABLE/DISABLE]
•
GENLOCK (selections include SOURCE [REF VIDEO/FREERUN], SC PHASE,
H PHASE)
• VIDEO OUT ADJ
• COMPOSITE Y/C
NESS
•COMPONENT (selections include Y, U, V)
•
COMPNT LEVEL
• INPUT (selections include SMPTE, BETA, MII)
•OUTPUT (selections include SMPTE, BETA, MII)
• ORGANIZE PINN
• ORGANIZE CLIP
• ORGANIZE OMF
• DELETE CLIP
•FORMAT
• PARTITION
(selections include FTP [ENABLE/DISABLE], TELNET
, WEB [ENABLE/DISABLE])
(selections include HUE, SATURATION, BRIGHT-
, CONTRAST, BLACKLEVEL, [0/7.5])
• REPAIR (selections include CHECKDISK, CURRENT CLIP)
•FILE NAME
• FACTORY RESET
• DIAGNOSTIC
Each of these selections is explained in this chapter.
To enter the FS-2/2E main menu, press the
in
STOP mode. The following menu screen appears:
MENU key or soft key 1 (MENU) while
RECORD MODE
CONTROL MODE
PLAY MODE
PLAY FROM
EXIT SEL
2.5.1 Menu Items
The four line list indicates the currently highlighted menu item. Push soft
3 (under the symbol) to see more selections. To scroll up through the
key
menu, press
SHIFT + soft key 3.
FS-2/2E Studio DTE Disk Recorder User Guide
32
Page 53

2.5.2 Sub-Menu Available
The symbol at the end of a line indicates a menu item that has a submenu available. Press the
2.5.3 Soft Keys
• EXIT -- Press EXIT to return to the
FS-2/2E main menu screen.
SEL -- Press SEL to select the current menu item. If a sub-menu is
•
available, it will open.
• Scroll Arrow -- The or symbol allows you to scroll up or down
through menu items.
2.5.4 Record Menu
The FS-2/2E RECORD MENU allows you to enable different record
functions.
• Select the mode. by pressing
•Press
EXIT to exit back to the menu screen.
FS-2/2E Functions
SEL soft key, to display the sub-menu.
SEL to open the sub menu.
Once you select a particular mode in the Record Mode menu, the FS-2/2E
remains in that mode until a different mode is selected.
Available items in the
• NORMAL REC
• RETRO DISK
• RETRO CACHE
• LOOP RECORD
• STILL
RECORD MENU are:
• TIME LAPSE
No Space Left Message
When an inserted or attached HDD is nearly full, in some record sessions,
the HDD time remaining may display
RECORD, the FS-2/2E sometimes displays NO SPACE LEFT. Focus
Enhancements advises that when a disk drive is close to being full, you
make sure other disk drives are readily available in order to avoid lost
footage
2.5.4.1 Normal Record
001min remaining. If you press
This is the standard and default record mode. When you press
REC, the FS-2/2E begins standard recording. Press the
to put the FS-2/2E into
FS-2/2E into
RECORD mode.
REC PAUSE mode. Press it again to put the
REC once
FS-2/2E Studio DTE Disk Recorder User Guide
33
Page 54

FS-2/2E Functions
Press STOP once to pause your recording. To stop the recording
session entirely, press
restart the recording.
2.5.4.2 Retro Disk
RETRO DISK
HDD AVAIL:
RETRO TIME:
STOP once again. Use the REC button to
183 Min
15 Min
EXIT
RETRO DISK
Record constantly buffers video in a loop to a
determined amount of space on the hard-disk drive so that when
record is triggered, a retro time period can be added to the
beginning of any clip. You can select the RETRO DISK value to
close the available disk drive space.
1. Set RETRO TIME by pressing the and buttons. Time is
selectable in one minute increments.
2. Hold the button for more than 3 seconds to allow numbers to
increase by 10 times.
3. Press EXIT to return to the RECORD.
Press the
REC key when in RETRO DISK mode to put the FS-2/2E
into a RETRO DISK state (the FS-2/2E's REC button flashes as if in
REC-PAUSE state). The FS-2/2E is actually recording in this state,
but until you press the
REC key a second time, the video records
over itself in a continuous loop. RETRO DISK always keeps at
least the selected amount of time in a series of one minute clips.
For instance, if you set the RETRO DISK value to 3 minutes, the
FS-2 always has 3 minutes (made up of three, one (1) minute clips)
of video saved to disk. As the recording goes past the 3 minute
point, a fourth clip is created. Once that clip reaches one minute,
the oldest of the previous 3 clips is deleted. Another fourth clip is
then created.
If you select a RETRO session that is 60 minutes or greater, instead
of one minute clips, the FS-2/2E creates 9 minute, 13 second clips
(2GB clips on disk). The functionality of RETRO DISK remains the
same. The larger file size prevents the FS-2/2E from reaching its
999 track limitation for very long RETRO records.
FS-2/2E Studio DTE Disk Recorder User Guide
34
Page 55
FS-2/2E Functions
Due to larger files sizes, the maximum amount of drive space
available is decreased to accommodate the last recording in a
session. For instance, if you have 90 minutes of disk space
remaining, after you set RETRO record to less than 60 minutes,
the available space changes to 88 minutes of available disk space.
If you set RETRO time to 88 minutes, the recording will be made
up of about nine and a half 9 minute, 13 second clips. There must
be space available in this situation in order to record the final clip
which eventually will write over clip 1. This ensures that at any
given time, at least 88 minutes of video exists after a complete
RETRO DISK record loop.
Minimum Disk Space Requirements
The FS-2/2E must always have at least one minute of disk space (under
60 minutes) or 9 minutes, 13 seconds of disk space (when the RETRO
DISK value is set to greater than 60 minutes) remaining in addition to the
RETRO DISK value, in order to function correctly. For instance, it is not
possible to set a RETRO DISK value of one minute if only one minute of
disk space remains.
Once RETRO DISK time is set, you can exit the Menus and return
to the Main Screen. An
FS-2/2E's display. Press the
immediately into
L appears next to the record symbol on the
REC key once to put the FS-2/2E
RETRO DISK RECORD. Clips are being recorded
to disk for X number of minutes in one or nine minute increments
(each as a separate track).
The REC button flashes (as when the unit is in pause). When you
press the
REC key, the FS-2/2E leaves RETRO DISK mode and
goes into standard record.
All one minute tracks in the recorded loop sequence appear and
are saved as their own tracks on disk (for example, 1-001, 1-002, 1003, and so on) except for the recording that was in progress,
which takes on the characteristics of a standard track. At this
stage, the FS-2/2E is in standard record mode and the
L on the
display disappears. No frames are lost across tracks during the
record session.
Once paused, the unit returns to RETRO DISK record mode (the
L
reappears in the LCD and viewfinder) for further RETRO
recordings or until it is disabled in the RETRO DISK screen.
RETRO DISK can be used in LOCAL and SYNCRO SLAVE record
control modes.
WARNING: Make certain that the FS-2/2E is in STOP mode
before removing the disk drive from the system.
Do Not Attempt to Remove the drive when the FS-2/2E is in
REC or REC-PAUSE mode.
FS-2/2E Studio DTE Disk Recorder User Guide
35
Page 56
FS-2/2E Functions
2.5.4.3 Retro Cache
RETRO CACHE
CACHE: 10 sec
EXIT
RETRO CACHE Record constantly caches your video in a loop up
to a 10 second data buffer. In this way, when the record is begun, a
retro time period is added to the beginning of any clip.
Pressing the
REC key when in RETRO CACHE mode puts the FS-
2/2E into a RETRO CACHE state (the tally light on the FS-2/2E
flashes as if in PAUSE state). The FS-2/2E is actually recording in
this state, but until you press the
REC key a second time, the video
records over itself in a continuous loop. It is much the same as
RETRO DISK recording, except that it utilizes a data buffer
separate to the disk drive to cache video.
RETRO CACHE is also accurate down to the frame instead of the
1 minute clips used in RETRO DISK. Once a RETRO CACHE
value is set, pressing the
immediately into
RETRO CACHE Record. A C now appears next to
REC key once puts the FS-2/2E
the record symbol on the FS-2/2E's display.
Video is being recorded to the FS-2/2E cache. The REC button
flashes (as if the unit is in pause). When you press the
the FS-2/2E exits the
standard record (the
RETRO CACHE Record mode and goes into
C on the display disappears).
REC key,
Any clip recorded in this mode has the contents of the cache
added to the beginning of the clip.
Once paused, the unit returns to the RETRO CACHE record mode
again (the
C reappears in the LCD) for further RETRO CACHE
recordings or until it is disabled in the RETRO CACHE by setting
the RETRO CACHE time to zero seconds.
RETRO CACHE record can be used in LOCAL and SYNCRO
SLAVE record control modes.
2.5.4.4 Loop Record
When LOOP RECORD is selected after recording has begun,
video is recorded to available disk space. Clips are recorded to
disk continuously in one-minute clips (up to 60 minutes), or 9
minute clips (for loops over 60 minutes, 2GB files).
FS-2/2E Studio DTE Disk Recorder User Guide
36
Page 57
FS-2/2E Functions
When the disk capacity’s record time is reached, an additional
one-minute (or 2GB) segment is created. After this clip is
complete, the oldest one-minute clip (or 2GB segment) is recorded
over, followed by each sequential oldest clip.
When you press
and clips in the current
They are also saved in a single folder.
Loop Record Only Works with One Disk Drive.
2.5.4.5 Still
When you select STILL when REC has begun, a single frame is
grabbed.
You can grab a still quickly by pressing
front panel when you are in any record mode.
Use STILL with LOCAL and SYNCRO SLAVE record control
modes. If STILL is the record mode when power is cut to the unit
or it is turned off, and then rebooted, the FS-2/2E goes to
NORMAL REC mode.
2.5.4.6 Time Lapse
TIME LAPSE
00:00:00:00
STOP during a record session, recording stops
LOOP RECORD session are saved to disk.
SHIFT and REC on the
| & |
MOVES CURSOR
EXIT
You can select an interval of up to twenty-four hours. The interval
is the period of time between the FS-2/2E capture of a single
frame of video (a value of 00:00:00:00 means no frames will be
recorded).
1. Set REC INTERVAL by pressing the TIME and buttons.
Select the time in frames (up to 30 for NTSC or 25 for PAL),
then seconds (up to 59), then minutes up to 59, then hours up
to 23.
2. Use | and | keys to scroll between values.
3. Press EXIT to return to the menu screen.
FS-2/2E Studio DTE Disk Recorder User Guide
37
Page 58
FS-2/2E Functions
2.5.5 Control Mode Menu
LOCAL
REMOTE
AV/C
SYNCRO SLAVE
EXIT
1. Select the Control mode. The highlighted mode is the current mode
SEL
after exit.
2. Press EXIT to return to the menu screen.
Control Mode has the following functions:
•LOCAL
•REMOTE
•AV/C
• SYNCRO SLAVE
2.5.5.1 Local
NORMAL
INDEX AT TC
INDEX AT SCENE
EXIT
Select these options to control the FS-2/2E from the front panel
buttons only. You can also control the FS-2/2E with the optional
wired remote control unit (ACSS-0019-01). This can be purchased
at the Focus Enhancements online store,
https://www.focusinfo.com/webstore/webstore.asp.
This sub-menu contains the following selections:
•
Normal Mode - default - In this mode, recordings are
captured to a single base file until STOP is triggered, or the
nine minute file size limit is reached.
Index at TC - In this mode, recordings are continuous until a
•
break in the incoming timecode stream is detected, or the
nine minute file size limit is reached. At that time, a new file
is automatically created. No frames are lost during the
transition to a new clip.
FS-2/2E Studio DTE Disk Recorder User Guide
38
Page 59

• Index at Scene - In this mode, recordings are continuous
until a scene break is detected in the incoming video stream,
or the nine minute file size limit is reached. At that time, a
new file is automatically created within one second of the
scene change. No frames are lost during the transition to a
new clip..
2.5.5.2 Remote
Select this function to control the FS-2/2E by an external device
through the RS-422 port. The FS-2/2E takes on the characteristics
of a VTR as setup in the
You cannot use the FS-2/2E front panel controls in this mode.
FS-2/2E Functions
The Index at Scene option watches the DV stream for an index
marker that is recorded to tape when a new scene, or record
session starts. It depends upon the camcorder when this index is
recorded to tape. Some camcorders record the index at every
scene, or when the camera is placed in and out of record pause.
Other cameras, only record the index marker at the beginning of
every record session; in other words, the camera needs to be
placed into STOP or powered-off between indices. Refer to your
camcorder's manual for more information.
RS422 menu screen in the SETUP menu.
The FS-2/2E has a menu item that allows the FS-2/2E to appear to
external controllers as a Sony BVW-75 BetaSP VTR when in
Remote RS422 mode. It also has a generic RS422 mode.
In remote, you can also slave an FS-2/2E to another device (such
as a Betacam or other non-DV deck) using the RS422 port.
FS-2/2E Does Not Support All BVW-75 Control Functions
This mode is only for greater compatibility with existing control systems.
Refer to
RS422 supported commands.
Supported RS-422 Commands on page 116 for a listing of
FS-2/2E Studio DTE Disk Recorder User Guide
39
Page 60
FS-2/2E Functions
2.5.5.3 AV/C
NORMAL
INDEX AT TC
INDEX AT SCENE
EXIT
Use these settings in PLAYBACK and other situations where the
FS-2/2E is controlled by an external FireWire device (such as a DV
NLE system).
There three options in this sub-menu:
•
Normal Mode - default - In this mode, recordings are
captured to a single base file until STOP is triggered, or the
nine minute file size limit is reached.
•
Index at TC - In this mode, recordings are continuous until a
break in the incoming timecode stream is detected, or the
nine minute file size limit is reached. At that time, a new file
is automatically created. No frames are lost during the
transition to a new clip.
Index at Scene - In this mode, recordings are continuous
•
until a scene break is detected in the incoming video stream,
or the nine minute file size limit is reached. At that time, a
new file is automatically created within one second of the
scene change. No frames are lost during the transition to a
new clip. Refer to the note under Local mode regarding
index markers.
AV/C does not function completely with all NLE systems.
Contact Focus Enhancements technical support for more information.
FS-2/2E Studio DTE Disk Recorder User Guide
40
Page 61
2.5.5.4 Syncro Slave
NEW FILE
SAME FILE
FS-2/2E Functions
EXIT
The FS-2E and the FS-2 (with the 2.0 upgrade), has two settings in
Syncro Slave:
•
NEW FILE - default - This setting, and the FS-2E is triggered
to stop recording from the camcorder, the current file is
closed and a new file is opened ready for the next recording.
•
SAME FILE - This option appends the new recording onto the
same file. This significantly cuts down on the number of files
created and is ideal for many applications.
In SYNCRO SLAVE mode, a camcorder and the FS-2/2E share the
same record function and the FS-2/2E is slaved to the camcorder.
Once it is set and you exit the
default menu screen. The FS-2/2E also immediately enters
PAUSE
mode and a Y appears next to the record symbol on the FS-
CONTROL menu, they return to the
REC
2/2E interface.
All recording is controlled by the camcorder exclusively. Every
time you press the camcorder’s
the selected
RECORD mode. Each time you start recording on
REC button, the FS-2/2E goes into
your camcorder, a new track is created on disk.
When used with
soon as
SYNCRO SLAVE is set, the camcorder begins filling up the
selected retro record buffer. Press the
RETRO DISK or RETRO CACHE functions, as
REC button on the
camcorder and the contents of the retro buffer are appended to the
start of your clip.
The FS-2/2E buttons (other than MENU) are locked out when in
this mode. It is also not possible to use the optional FS-2/2E
remote control units. You must exit
CONTROL menu by pressing the MENU button when on the
the
SYNCRO SLAVE by entering
FS-2/2E main menu. If the camcorder is set to VTR mode, the FS2/2E’s control panel becomes active in order to allow playback.
If a tape ends while using SYNCRO SLAVE mode, the FS-2/2E
continues to record.
At this point, to stop a recording, push the FS-2/2E
STOP button
twice.
FS-2/2E Studio DTE Disk Recorder User Guide
41
Page 62
FS-2/2E Functions
2.5.6 Play Mode Menu
PLAY CLIP
LOOP CLIP
LOOP ALL
PLAY ALL
EXIT
1. Select the mode. The highlighted mode is the current mode after exit.
2. Press EXIT to return to the menu screen. The default mode is PLAY
CLIP
.
2.5.6.1 Play Clip
For this function, the FS-2/2E plays the selected clip from start to
finish when you press the
PLAY button. At the end of the selected
clip, the FS-2/2E pauses.
2.5.6.2 Loop Clip
For this function, the FS-2/2E plays the selected clip from start to
finish. Immediately after completing the clip, the FS-2/2E begins
playing the clip again without a pause. It plays this clip until
stopped.
2.5.6.3 Loop All
For this function, the FS-2/2E plays the entire contents of the disk
(all clips) in order from start to finish. At the end of the last clip,
the FS-2/2E begins to play from the beginning of the first clip
again without a pause. It plays these clips until stopped.
2.5.6.4 Play All
For this function, the FS-2/2E plays the entire contents of the disk
(all clips) in order from start to finish. At the end of the last clip,
the FS-2/2E pauses.
FS-2/2E Studio DTE Disk Recorder User Guide
42
Page 63
2.5.7 Play From Mode Menu
TRACK LIST
PLAY LIST
FOLDER LIST
FS-2/2E Functions
EXIT
This selection allows you to select the playback list used in play mode.
There are three options available.
1. Select the mode. The highlighted mode is the current mode after exit.
2. Press SEL for the highlighted menu item to open the sub-menu. When
you exit the menu, the last menu item is the current mode.
3. Scroll from value to value using the FORWARD and BACK INDEX
buttons.
4. Press and to scroll through digits in the value.
5. Press EXIT to return to the menu screen.
2.5.7.1 Track List
When you select this setting, all clips on attached disk drives are
played back sequentially based on the order of their base file
name regardless of whether they have been marked in the
KEEPER or SCENE MARKING folders. If Track List is selected, all
PLAY MODES relate to all clips on the connected disk drives.
2.5.7.2 Play List
This selection plays the items in the current playlist.
2.5.7.3 Folder List
When you select this setting, you can play back clips only from a
selected folder. The highlighted folder is the selected folder after
exiting. When selecting
clips in the selected folder.
When the FS-2/2E
the current folder appears without brackets on the LCD display
(for example,
When the
current folder appears in brackets on the LCD display (for
example,
FOLDER, all PLAY modes relate only to
PLAY menu is set to TRACKLIST the name of
2 SCENE 2).
PLAY FROM menu is set to FOLDERS, the name of the
2 <SCENE 2>).
FS-2/2E Studio DTE Disk Recorder User Guide
43
Page 64
FS-2/2E Functions
2.5.8 Playlist Menu
OPEN
SAVE
NEW
EDIT
EXIT
SEL
The Playlist menu options are:
OPEN
•
•
SAVE
•
NEW
•EDIT
• VIEW
•
DELETE
The FS-2/2E playlist feature allows you to playback clips in a custom, userdefined order.
Playlists are created using the FS-2/2E front panel. You can mark in and out
play points on clips. Multiple playlists can be opened, saved and edited at
any time. Use the
PLAYLIST menu selection to modify, open or save playlists.
the
PLAY FROM menu to select the playlist to playback. Use
Playlists can be named with an 8 character/number name (such as 04-05-04
or PROMO2).
A playlist can consist of multiple sequences with whole or portions of
recorded clips. Each sequence gets a number in the playlist starting with
001. The corresponding track number of the clip sequence is also displayed
(for example, 1-005 is a sequence from track five on volume 1).
Select the mode from the list.
1. Press SEL when highlighting a menu item to open the sub-menu.
When you exit the menu, the last menu item is the current mode.
2. Press EXIT to return to the menu screen. These settings are saved on
power down.
FS-2/2E Studio DTE Disk Recorder User Guide
44
Page 65
2.5.8.1 Open
Open allows you to open a playlist on disk. Do this as follows:
1. In the PLAYLIST menu, select the OPEN option.
FS-2/2E Functions
A display similar to the following appears.
03-20-20
06-20-20
03-25-20
03-30-20
EXIT
2. Once the sub menu is opened, select the desired playlist
SEL
from the list. A screen similar to the following appears.
PLAY LIST
OPENED
03-20-20
EXIT
3. Once selected, you can VIEW or PLAY the playlist.
VIEW
If you select the PLAY option,
press
PLAY. The PLAYLIST button lights and playback will
PLAY
EXIT to the main display and
be from the selected Playlist only.
You can also play from a playlist using the
PLAYLIST menu.
PLAY FROM >
Only one playlist can be opened at a time.
Save Changes Before Opening Another Playlist
If you open a playlist without saving changes to a playlist using the SAVE
menu option, the changes are lost.
FS-2/2E Studio DTE Disk Recorder User Guide
45
Page 66

FS-2/2E Functions
2.5.8.2 Save
When a playlist has been created or modified, use the SAVE
option to write it to disk.
If you modify a playlist, upon exiting, the SAVE function
automatically appears.
If you have made modifications and wish to save them as a new
playlist, modify the file name prior to saving it.
SAVE PLAYLIST?
02-20-20
NEXT
Select
CONTINUE SAVE?
02-20-20
BACK
Select
2.5.8.3 New
Even if a playlist is open, you can begin creating a new one. If you
create a new playlist without saving changes using the SAVE
menu option, the changes are lost.
2.5.8.4 Edit
The edit menu allows you to modify an existing playlist.
NEXT and a display similar to the following appears.
YES
YES or NO.
NO
The selected playlist must be opened in order to edit. EDIT allows
you to
FS-2/2E Studio DTE Disk Recorder User Guide
46
REMOVE, INSERT or MOVE clips within a playlist.
Page 67
2.5.8.4.1 REMOVE a Clip
To remove a clip, use the following steps:
1. Select EDIT from the PLAYLIST menu and then
REMOVE CLIP. You are given a list of clips in the
open playlist. (If no clips are in the playlist, the
message
PLAYLIST EMPTY appears.)
FS-2/2E Functions
0001
0002
0003
0004
2. Select the clip you wish to remove and then press
NEXT.
1-001
1-004
1-001
1-003
NEXT
DELETE ITEM?
HDD:
CLIP:
00:00:01:23
01
0001
1-003
00:00:02:00
EXIT
3. You will be asked again if you are sure you want
YES
NO
to delete the item from the playlist.
2.5.8.4.2 INSERT a Clip
The INSERT CLIP option allows you to insert a clip in
an existing playlist. A playlist must be opened and
you must have marked in and out points for the clip
you would like to insert before continuing.
1. From the PLAYLIST menu, select EDIT > INSERT
CLIP
. The selected clip number and its details will
be listed.
2. Press NEXT.
FS-2/2E Studio DTE Disk Recorder User Guide
47
Page 68
FS-2/2E Functions
3. Select between inserting at the BEGIN, END or
CUSTOM (user-specified) part of playlist. Once
you have selected your choice, the updated
playlist is displayed.
INSERT ITEM
IN CLIP 1-001
OUT CLIP 1-001
1 00:00:01:23
0 00:00:02:00
EXIT
2.5.8.4.3 MOVE a Clip
The MOVE CLIP option allows you to move a clip
within an existing playlist. To move a clip, use the
following steps:
1. Select MOVE CLIP from the PLAYLIST > EDIT
menu.
2. Once selected, scroll to the clip you wish to move.
0001
0002
0003
0004
EXIT
3. Press NEXT. The clip information displays.
HDD:
CLIP:
00:00:01:23
00:00:02:00
NEXT
1-001
1-004
1-001
1-003
NEXT
CLIP INFO
01
0001
EXIT
4. Select NEXT. You can move the clip to the BEGIN,
END or CUSTOM (user-specified) part of the
NEXT
BACK
playlist.
5. Press NEXT. The updated playlist is displayed.
FS-2/2E Studio DTE Disk Recorder User Guide
48
Page 69
2.5.8.5 View
The VIEW option allows you to view the track information of an
OPEN playlist. A playlist must be opened in order to view.
1. Select VIEW from the PLAYLIST > EDIT menu.
FS-2/2E Functions
0001
0002
0003
0004
2. Scroll to the desired clip, then select NEXT. The clip
information is displayed.
HDD:
CLIP:
00:00:01:23
00:00:02:00
EXIT
2.5.8.6 Delete List
1-001
1-004
1-001
1-003
NEXT
CLIP INFO
01
0001
NEXT
BACK
The DELETE LIST option allows you to delete an entire playlist.
1. Select DELETE LIST from the PLAYLIST menu. All the
playlists on disk are displayed.
03-20-20
06-20-20
03-25-20
03-30-20
EXIT
2. Select the playlist you wish to delete and press SEL. You are
asked to confirm the request:
3. Press YES to complete the deletion.
SEL
DELETE PLAYLIST XX-XX-XX?
FS-2/2E Studio DTE Disk Recorder User Guide
49
Page 70
FS-2/2E Functions
2.5.9 HDD Bypass
GO TO HDD
BYPASS?
EXIT
HDD Bypass mode allows the connected FireWire hard drives to be
mounted or dismounted to a computer without removing them from the
FS-2E.
Attach FireWire Cable Before Enabling HDD Bypass
Before enabling HDD Bypass, attach a FireWire cable to the computer and HDD
I/O port on the rear panel of the FS-2E. For more details, see Connecting the FS2/2E to a Network on page 98.
In this mode, the computer connects to the “HDD
I/O” port on the FS-2/2E Rear Connector Panel.
1. To Exit this mode, press the EXIT key.
2. Be sure to properly dismount the FireWire drive from the computer
system before exiting HDD Bypass mode on the FS-2/2E.
2.5.10 Internal HDD
The internal HDD function allows you to remove the front mounted IDE
drive from FS-2/2E without first having to power the unit down.
1. Select INTERNAL HDD by pressing the SEL button.
YES
NO
2. Answer YES to question, Remove Internal HDD?
To abort, select
3. Remove the disk drive from the FS-2/2E when prompted. To remove
EXIT.
the hard drive, push the latch on the front right of the drive to the
right. The drive handle pops out from the face of the drive. Then
carefully pull the drive out from the drive bay. Press
EXIT to complete
the process.
To reinsert the drive, slide it back into the drive bay and press the handle
back into place until you hear a click. The drive will be recognized by the
FS-2/2E after about a minute.
FS-2/2E Studio DTE Disk Recorder User Guide
50
Page 71
2.5.11 Record Format Menu
RAW DV
AVI TYPE1
AVI TYPE2
CANOPUS AVI
MATROX AVI
QUICKTIME
EXIT
The RECORD FORMAT menu allows selection of particular DTE
Technology native NLE file formats prior to recording. All files are in the
DV25 standard.
• The FS-2E supports the RAW DV formats:
•
AVI TYPE1
•
AVI TYPE2
•
CANOPUS AVI
•
MATROX AVI
•
QUICKTIME
•AVID OMF
• PINNACLE
• 24P AVI TYPE2*
• 24P QUICKTIME*
* NTSC only.
1. Select a format to activate it. The highlighted format is the current
format after exit.
FS-2/2E Functions
2. Use to scroll through the selections.
3. Press EXIT to return to the menu screen.
When recording in AVID OMF or PINNACLE AVI format, you must first do an
Organize PINN or Organize OMF before using clips in an NLE. Refer to
Utilities Menu on page 77 for more details.
FS-2/2E Studio DTE Disk Recorder User Guide
51
Page 72
FS-2/2E Functions
2.5.12 Setup Menu
SET DATE&TIME
OS VERSION #
OS UPGRADE
PAL/NTSC
EXIT
SEL
The SETUP menu allows you to set various functions of the FS-2/2E.
• Select the menu item.
•Press
SEL to open the sub menu (where applicable).
•Use to scroll through the selections.
•Press
EXIT to return to the menu screen.
The SETUP menu contains the following selections:
• SET DATE&TIME
• OS VERSION #
• OS UPGRADE
•PAL/NTSC
•RS422 REMOTE
• AUDIO INPUT
• AUDIO IN LEVEL
• TC MODE
• TC SET
• ON SCREEN DIS
•FF/RW HI RES
•GPI PORT
• BACKLIGHT
•STOP OUTPUT
• AUDIO CORRECT
• PREFERENCES
• FOLDER PREF
• ANALOG OUT
• NETWORK SETUP
•GENLOCK
• VIDEO OUT ADJ
FS-2/2E Studio DTE Disk Recorder User Guide
52
Page 73
2.5.12.1 Set Date & Time
This selection provides a way to set date and time for file naming
purposes. Date and Time are set in different menus.
1. Select the menu item.
FS-2/2E Functions
SET DATE
SET TIME
EXIT
2. Press SEL to open one of the following sub menus.
SEL
SYSTEM DATE
10/01/07
MM/DD/YY
| & |
MOVES CURSOR
EXIT
SYSTEM TIME
17:20:12
Hh:Mm:Ss
| & |
MOVES CURSOR
EXIT
3. Move from field to field using the FORWARD and BACK
INDEX
4. Press and to scroll through digits in the value.
5. Press EXIT to return to the menu screen. Regardless of the
Buttons.
display, the file name always remains as follows:
YYYYMMDD-HHMMSS.xxx
(Year-Month-Date-Hour-Minute-Second).
The date and time form the basis of the FS-2/2E file naming
structure for use of clips on a computer.
On the FS-2/2E, files are identified by TRACK and VOLUME
(disk drive) number on the LCD. For instance, a file on the FS-2/
2E LCD identified as 1-043 is clip number 43 on Volume (disk) 1.
FS-2/2E Studio DTE Disk Recorder User Guide
53
Page 74

FS-2/2E Functions
On a computer, files are identified by their base file name made
up of DATE and TIME. For instance, a clip named 20050615210943-01.mov is a clip that began recording at 9:09:43PM on June
15th. 2005.
DATE/TIME is used when creating file names only. The FS-2/2E does
not record this information into the stream. The FS-2/2E records the date
and time which is in the DV stream sent from the input source.
2.5.12.2 OS Version #
OS VERSION
2.0.2.01100606
EXIT
This selection displays the current FS-2/2E Operating System
(OS) Firmware version.
FS-2/2E Studio DTE Disk Recorder User Guide
54
Page 75

2.5.12.3 OS Upgrade
To upgrade operating system (OS) software, you must download
a new .bin file to a FireWire drive on your computer. The latest
version of FS-2/2E software can be downloaded from http://
www.focusinfo.com/support.
There are three methods for installing new FS-2/2E software:
FS-2/2E Functions
• Via the Web Interface, see
Updating FS-2E Software via FTP
on page 109.
• Directly onto the FS-2/2E internal drive, see the following
procedure.
• From an external FireWire drive, see the following
procedure.
To begin:
1. Download software from the Focus Website to your local
computer.
2. Unzip file using WinZip (Windows) or Stuffit (Macintosh)
on a computer system with a FireWire (IEEE-1394)
connection.
3. Rename the unzipped file, XXXX.bin, to fs2.bin.
2.5.12.3.1 Copy Software to FS-2/2E Internal Drive
To install new OS software onto the internal drive of
the FS-2/2E, do the following:
1. Using a FireWire cable, connect the computer and
FS-2/2E through the FS-2/2E port labeled,
HDD
.
2. Copy the fs2.bin file to the internal drive of the
FS-2/2E.
3. Enter the FS-2/2E menu and select SETUP.
4. From the SETUP menu, select OS UPGRADE.
The following screen appears:
To
UPGRADE
SYSTEM
FIRMWARE?
EXIT
FS-2/2E Studio DTE Disk Recorder User Guide
YES
NO
55
Page 76
FS-2/2E Functions
5. Select YES.
The following warning appears:
UPGRADE WILL
ERASE CURRENT
OS!!
CONTINUE?
EXIT
6. Select YES to begin the OS upgrade.
7. A message appears indicating the upgrade has
YES
begun.
8. After upgrade is complete, power cycle the FS-2/
2E, to reboot the system. The new software is now
loaded and ready to use.
OS UPGRADE ERROR
If the FS-2/2E cannot find the .bin the LCD screen
displays the message OS UPGRADE ERROR.
Check the connections between the computer and
the FS-2/2E and the upgrade file’s file name.
2.5.12.3.2 Load Software from External Drive
Use this procedure to load new OS software into the
FS-2/2E without copying it to the internal drive.
1. Power OFF the FS-2/2E.
2. Remove the drive from the FS-2/2E.
3. Connect the external FireWire drive with the new
OS software to the FS-2/2E via its
connector.
4. Power ON the FS-2/2E.
5. Follow steps 3 through 7 from the previous
instruction,
Drive
.
6. Power OFF the FS-2/2E, disconnect the external
Copy Software to FS-2/2E Internal
FireWire drive and re-install the FS-2/2E internal
drive.
7. Power ON the FS-2/2E.
This reboots the system and loads the software. It
is now ready for use.
NO
To HDD 1394
FS-2/2E Studio DTE Disk Recorder User Guide
56
Page 77
2.5.12.4 Restoring the Factory Default Operating System
To restore the factory default Operating System hold down the
Left and Middle soft keys located under the LCD during boot up.
2.5.12.5 PAL/NTSC
NTSC
PAL
FS-2/2E Functions
EXIT
Use this screen to select the record standard as either PAL or
NTSC. The highlighted selection is the current one after exit. The
FS-2/2E uses this video standard for both playback and record.
Do Not Combine PAL and NTSC Clips on the Same Drive.
FS-2/2E Studio DTE Disk Recorder User Guide
57
Page 78
FS-2/2E Functions
2.5.12.6 RS422 Remote
This submenu allows you to setup the FS-2/2E for remote
operation using the RS422 control port.
For easy integration with existing control systems, you can make
the FS-2/2E look like either a Sony BVW-75 Betacam SP deck or a
generic recorder. Using the TC SOURCE submenu, you can also
select the timecode source for FS-2/2E control. Options are ABS,
DV and COUNTER.
TYPE
TC SOURCE
EXIT
SEL
You can set the FS-2/2E to two different remote modes:
•
BVW-75 – The FS-2/2E appears as and is identified as a Sony
BVW-75 BetaSP deck to the remote control device.
FS-2/2E Does Not Support All BVW-75 Control Functions
Some BVW-75 control functions are not available on the FS-2/2E.
The FS-2/2E mainly responds to commands such as PLAY, STOP,
REWIND, REC, FF, and so on. Commands such as Insert, Edit,
and other specialty commands are not possible.
Refer to Supported RS-422 Commands on page 116 for more
information on supported commands.
•
Generic - The FS-2/2E appears as and is identified as a
generic device to the remote controller.
After setting up the FS-2/2E’s RS422 to control using an external
RS422 device:
•Press the
REMOTE from the Control Mode menu.
FS-2/2E Studio DTE Disk Recorder User Guide
58
REMOTE button on the front panel or select
Page 79
2.5.12.7 Audio Input
FS-2/2E Functions
COMPOSITE
Y/C
COMPONENT
SDI
EXIT
SEL
In this submenu, you can change the default audio input linked to
a particular video input.
Select the mode to activate it.
1. Press SEL for the highlighted menu item to open the sub-
menu. In the sub-menu, the currently highlighted mode is
the current mode after exit.
2. Press EXIT to return to the menu screen. These settings are
saved on power down.
Each video input and its available audio inputs are listed below:
• Composite
•
Analog Balanced Audio (default)
• AES/EBU Digital Audio
• Y/C (S-Video)
•
Analog Balanced Audio (default)
• AES/EBU Digital Audio
Component
•
• Analog Balanced Audio (default)
• AES/EBU Digital Audio
•SDI
•
Embedded (default)
• Analog Balanced Audio
• AES/EBU Digital Audio
•DV
•
Embedded (default)
The FS-2E provides the option to select channels 1 and 2 or
3 and 4 of the embedded audio of the SDI input stream. This
is an FS-2E feature only.
There is a
SETUP > AUDIO INPUT > SDI > EMBEDDED
submenu that provides the following options:
• CHAN 1 and 2
• CHAN 3 and 4
FS-2/2E Studio DTE Disk Recorder User Guide
59
Page 80
FS-2/2E Functions
2.5.12.8 Audio In Levels
0.0dB
|--------------X------------|
EXIT
This menu item allows you to set the audio input levels for FS-2/
2E.
Adjust the audio level between -34.5dB and +4.5dB in 1.5dB
increments.
2.5.12.9 TC Mode
EXT TC
REC RUN
REGEN
FREE RUN
EXIT
This submenu allows you to select different timecode options for
use when the FS-2/2E is recording.
Select the mode.
SEL
1. Press SEL to open the sub-menu. When you exit the menu,
the highlighted menu item is the current mode.
2. Press EXIT to return to the menu screen. These settings are
saved on power down.
FS-2/2E Studio DTE Disk Recorder User Guide
60
Page 81
FS-2/2E Functions
This submenu contains the following selections:
•
EXT TC - Whatever the incoming timecode, the FS-2/2E
records it. You can select between
SELECTED INPUT and LTC .
Select the desired TC source:
Selected Input TC Source
Composite, Component, & Y/C VITC
SDI LTC
DV Embedded DV TC
• Choosing EXT TC mode will clear any stored timecode
value.
If the FS-2/2E is set to EXT TC when in SYNCRO SLAVE mode,
EXT TC stops once the tape in the camcorder ends. Focus
Enhancements suggests that you use a different TC mode when
using SYNCRO SLAVE. NOTE: TC Preset cannot be changed
while in the EXT TC mode.
REC RUN - In this mode, the FS-2/2E does the following:
•
•1 Uses the last timecode number recorded + 1 as the
timecode number for the first frame of the next recording.
•2 Uses the number entered by a setting in the TC PRE-
SET menu for the first frame of the next recording.
• The last number used is stored in the memory, so this
mode persists across recording sessions.
•
REGEN - After a disk is mounted (at startup, upon manual
connect) and after the track list has been constructed, the FS2/2E looks at the last track and looks at the timecode number
of the last frame in that track. The FS-2/2E stores that
number for use as the TC value (+ 1) for the first frame of the
next recording. If the drive is empty, the FS-2/2E uses the TC
PRESET(+ 1).
FREE RUN - When you enable FREE RUN mode, the FS-2/2E
•
begins counting from the value stored. If you use the TC
PRESET function, when the number is entered and the TC
PRESET menu is exited, the FS-2/2E begins counting from
that value.
Once a timecode value is set and the FS-2/2E is set to REC RUN or
FREE RUN timecode settings, the TC preset value becomes the
starting point for timecode.
FS-2/2E Studio DTE Disk Recorder User Guide
61
Page 82
FS-2/2E Functions
2.5.12.10 TC Set
TC PRESET
UB PRESET
TC DELAY
DROP/NON DROP
EXIT
SEL
This menu allows you to set Timecode values for various modes.
It also allows the selection of drop or non-drop frame (NTSC only)
settings.
The FS-2E, or FS-2 (with the 2.0 upgrade), has the added ability to delay
the recorded timecode relative to the content.
Once a timecode value is set and the FS-2/2E is set to REC RUN or
FREE RUN timecode settings, the TC preset value becomes the
starting point for timecode. Use this menu as follows:
1. Display this menu item by selecting it.
2. Press SEL to open the sub menu of choice.
3. Press EXIT to return to the menu screen.
4. For TC PRESET, scroll from field to field using the
FORWARD and BACK INDEX buttons.
5. Press and to scroll through digits in the value.
6. Press EXIT to return to the menu screen.
2.5.12.10.1 TC Preset
This selection allows you to set the starting timecode
value for future recordings.
TC PRESET
00:00:00:00
| & |
MOVES CURSOR
EXIT
1. For UB Preset, scroll from field to field using the
FORWARD and BACK INDEX buttons.
2. Press and to scroll through the hex digits in
the value.
FS-2/2E Studio DTE Disk Recorder User Guide
62
Page 83
3. Press EXIT to return to the menu screen.
2.5.12.10.2 UB Preset
UB PRESET
00:00:00:00
| & |
MOVES CURSOR
FS-2/2E Functions
EXIT
You cannot set UB values after selecting EXT TC mode in
the TC MODE menu.
2.5.12.10.3 TC Delay (FS-2E only)
The TC DELAY menu is only available for the FS-2E,
or FS-2 (with the 2.0 upgrade). This menu allows you
to delay the recorded timecode up to 29 frames.
TC DELAY: 00
1. Use (middle soft key) and (right soft key) to
adjust the delay value.
2. Press EXIT when done.
2.5.12.10.4 Drop/Non Drop
DROP
NON-DROP
EXIT
For DROP and NON-DROP, select the mode. The
highlighted mode is the current mode after exit.
This selection is not applicable for PAL use. On the
FS-2/2E display, DROP is identified by a semicolon (
and NON-DROP by a colon (
1. Press EXIT to return to the menu screen.
FS-2/2E Studio DTE Disk Recorder User Guide
:).
;)
63
Page 84
FS-2/2E Functions
2.5.12.11 On Screen Display
ABS
TC
MENU
OFF
EXIT
This selection allows you to turn on or off the on-screen display
on FS-2/2E's Monitor Output. The highlighted item is saved after
exit.
When you select ABS, the absolute timecode value, or amount of
time recorded to the disk, appears on the bottom center of the
monitor output.
When you select
the bottom center of the monitor output.
When you select
corner of the monitor output.
1. Press and to scroll though the selections.
2. Press EXIT to return to the menu screen.
By repeatedly pressing the front panel OSD key, you can cycle between
these modes.
2.5.12.12 FF/RW Hi Res
TC, the TC (Counter) timecode value appears on
MENU, the FS-2/2E Menu appears in the top left
ENABLE
DISABLE
EXIT
This screen enables or disables the FS-2/2E forward and reverse
search high resolution mode. When enabled the following search
speeds are available:
REVERSE: -30X, -25X, -18X, -15X, -12X, -10X, -8X, -5X, -4X, -
•
3X, -2X, -1/30, -1/15, -1/10, -1/6, -1/5, -1/3,-1/2
FORWARD: +30X, +25X, +18X, +15X, +12X, +10X, +8X, +5X,
•
+4X, +3X, +2X, +1/30, +1/15, +1/10, +1/6, +1/5, +1/3, +1/2
FS-2/2E Studio DTE Disk Recorder User Guide
64
Page 85

• The highlighted mode is the current mode after exit.
•Press
2.5.12.13 GPI Port
DISABLE
PAUSE/UNPAUSE
INDEX / NEW FILE)
REC SNAPSHOT
FS-2/2E Functions
EXIT to return to the menu screen.
EXIT
This menu allows you to change the setting of the GPI port.
• The highlighted function is the current setting after exit.
•Press
•
EXIT to return to the menu screen.
DISABLE - This selection allows you to connect a 3.5mm to
DB9 cable to the GPI port (CBLA-0113-01) and control the
FS-2/2E using RS232C from an external device. You can also
use the FS-2/2E with the optional wired remote control unit
(ACSS-0019-01). Purchase this item at the Focus
Enhancements online store:
https://www.focusinfo.com/webstore/webstore.asp.
The remaining three selections allow functions to occur from a
simple contact closure as follows:.
•
PAUSE/UNPAUSE -This selection allows control of pause and
unpause during a record or playback session.
INDEX (NEW FILE) - This setting creates a new file during a
•
record session without losing any frames.
•
REC SNAPSHOT - This setting records a single frame of video
to a file. Each sequential use of this function captures another
frame to the same file until stopped.
FS-2/2E Studio DTE Disk Recorder User Guide
65
Page 86
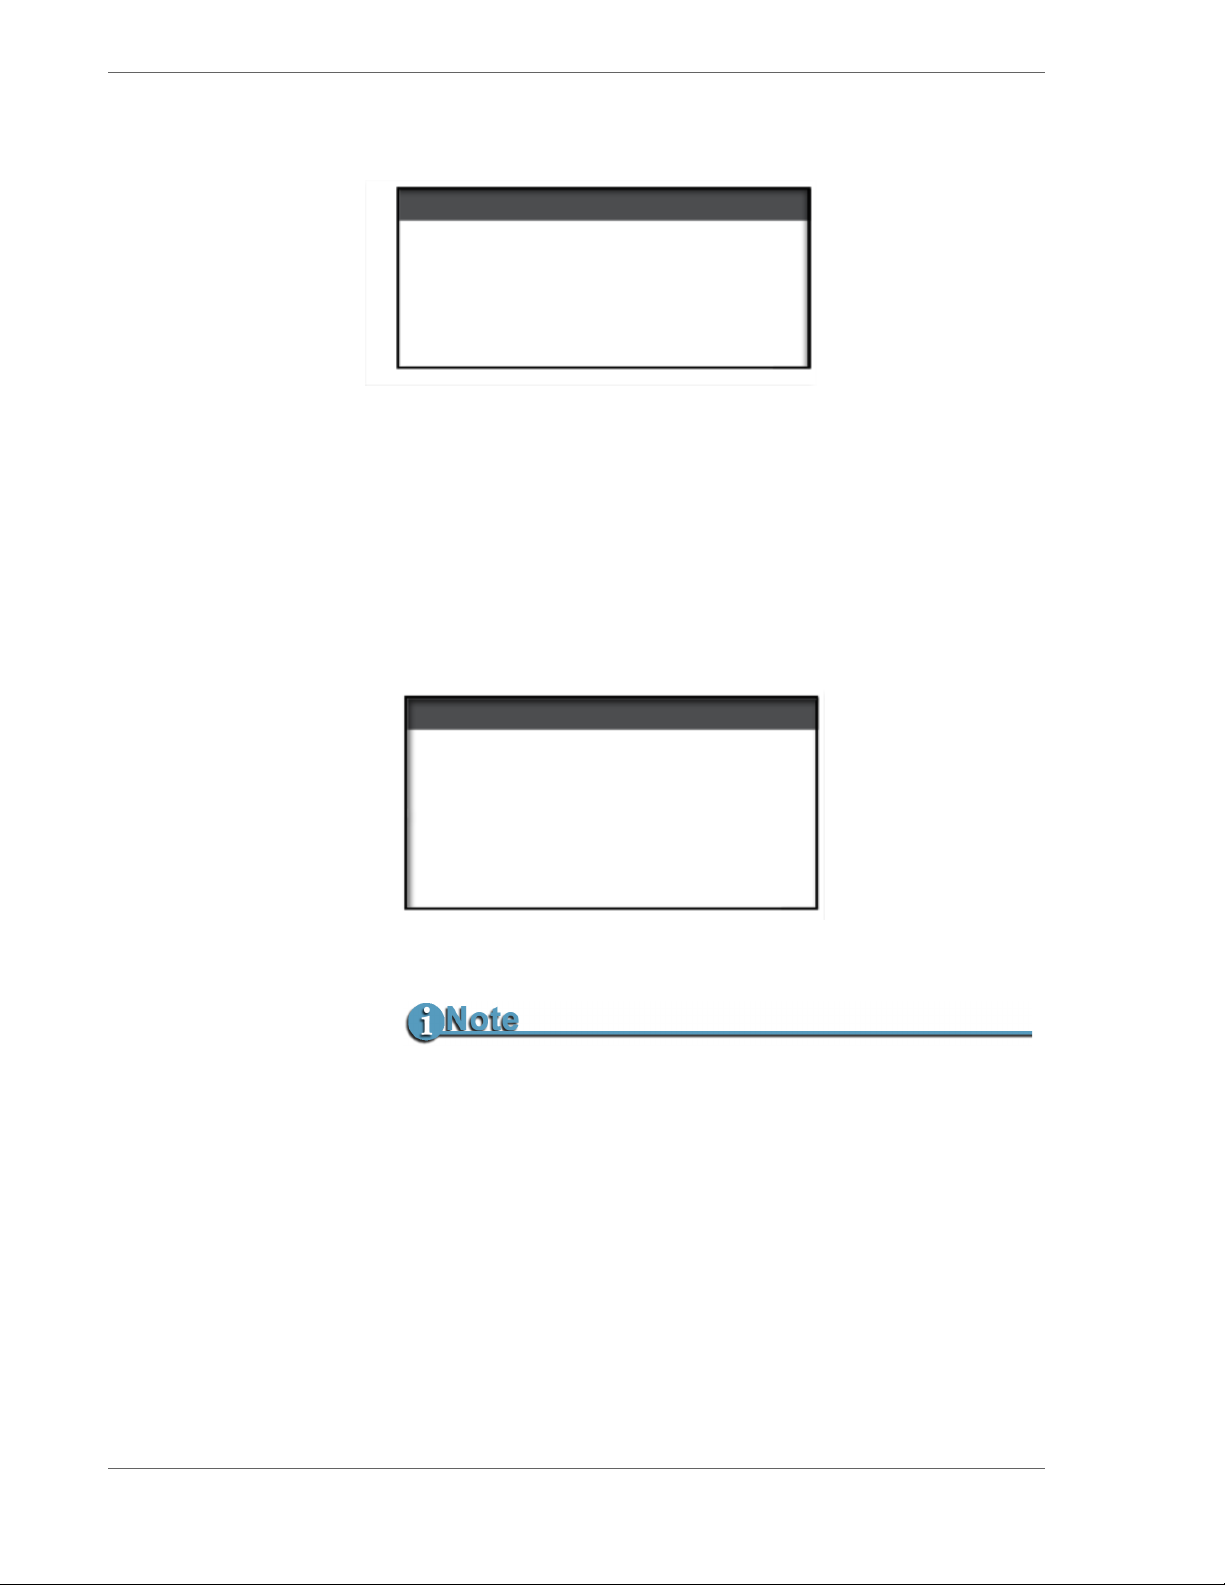
FS-2/2E Functions
2.5.12.14 Backlight
ON
OFF
AUTO OFF
EXIT
This selection enables or disables the FS-2/2E LCD backlight.
• The highlighted state is saved after exit.
•Press
The ON setting leaves the LCD backlight on continuously and
OFF setting turns it off.
AUTO OFF turns off the backlight after one minute. Press any
keypad button on the FS-2/2E to turn the LCD backlight back.
2.5.12.15 Stop Output
GRAY
NO OUTPUT
CLIP PREVIEW
CUSTOM
EXIT
EXIT to return to the menu screen.
Use this option to select the video displayed while the FS-2/2E is
in
STOP mode. The selected mode is the current state after exit.
This setting does not effect E-E mode.
GRAY - A black screen appears.
•
•
NO OUTPUT - A blank screen appears; the DV output is
turned off during STOP.
•
CLIP PREVIEW - The first frame of each clip is generated and
shows on all outputs after 1 second if you pause on that clip.
After pressing the Stop button twice, the screen appears
black. Use either the
Forward Index or Reverse Index to show
the clip preview.
FS-2/2E Studio DTE Disk Recorder User Guide
66
Page 87
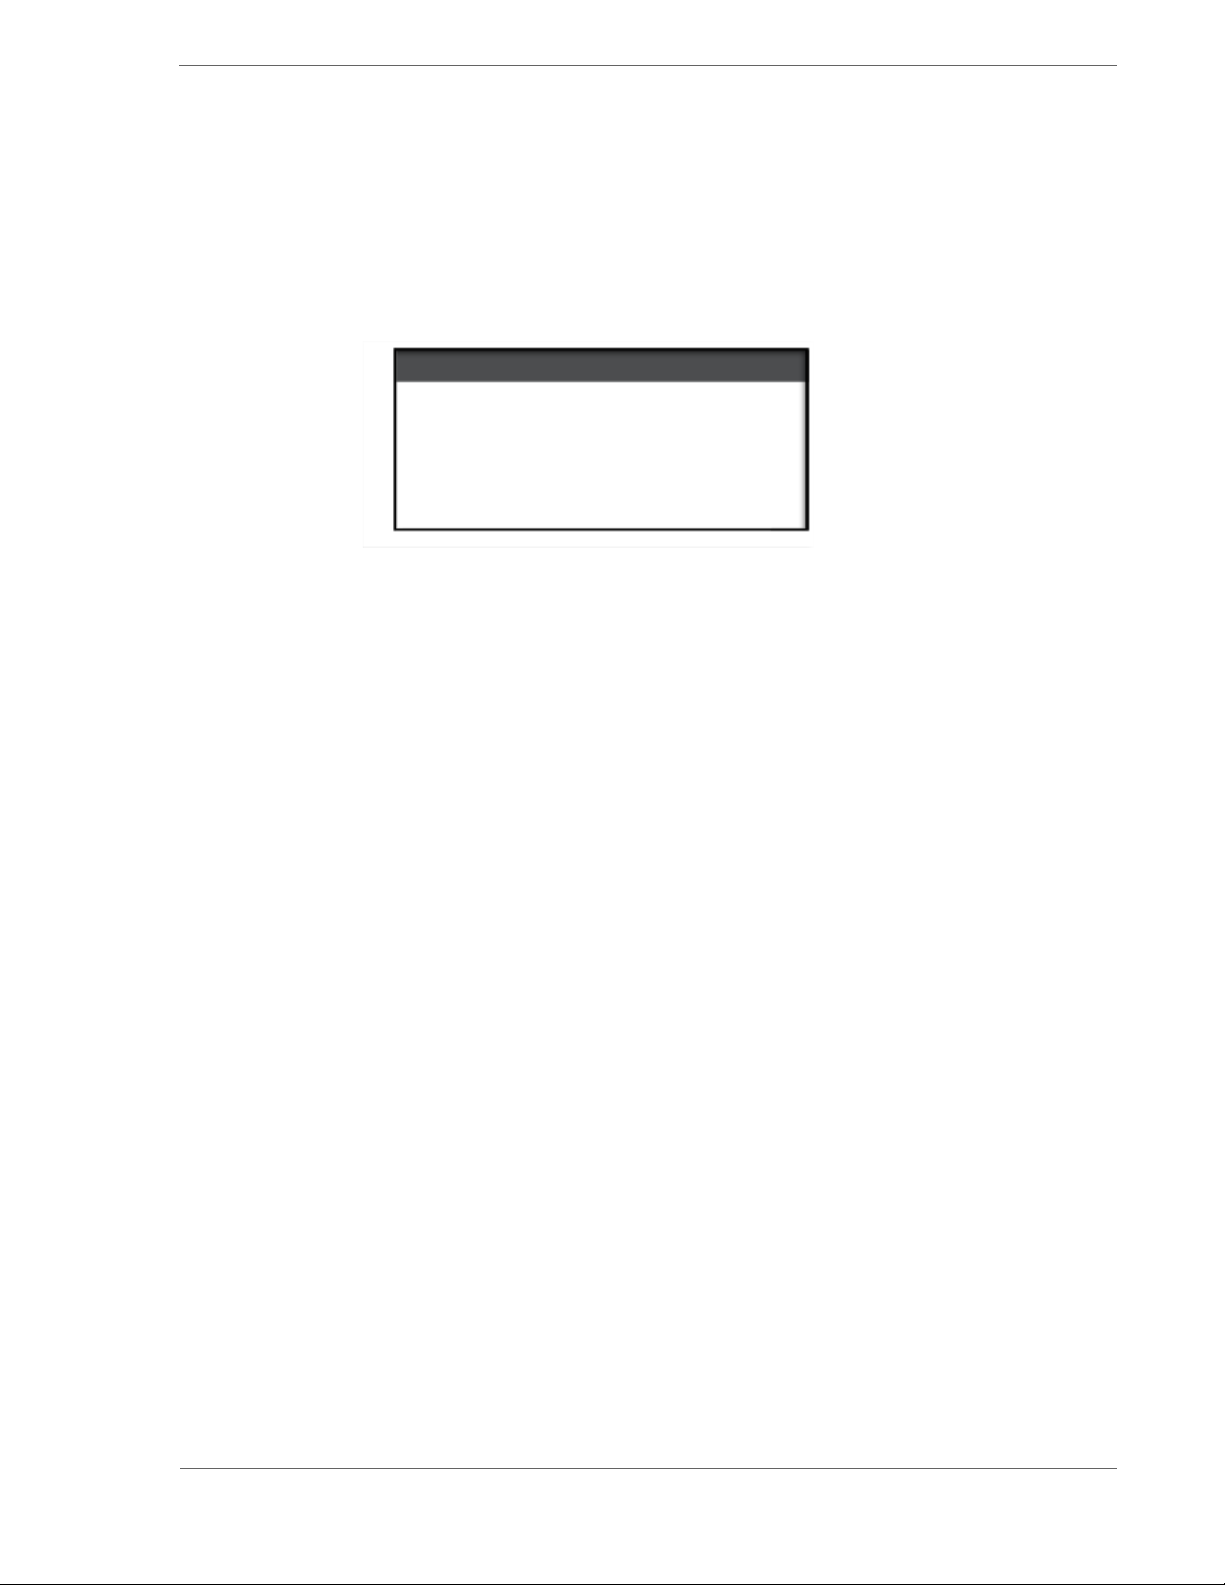
• CUSTOM - The FS-2/2E looks on disk drive volume 1 for any
clip named
that clip. You can name any RawDV clip Splash.dv and the
first frame from that clip appears as the default output in
STOP mode.
2.5.12.16 Audio Correct
OFF
MEDIUM
HIGH
FS-2/2E Functions
SPLASH.dv and always displays the first frame of
EXIT
This sub-menu allows you to change the AUDIO CORRECTION
setting on the FS-2/2E.
• The highlighted state is saved after exiting.
•Press
EXIT to return to the menu screen.
The AUDIO CORRECTION selection is an advanced feature of
the FS-2/2E. You should use the factory default settings for most
operations (Factory default is MEDIUM).
Audio Correction mode allows you to alter the performance of the
audio error corrector while recording. It is useful when recording
to the FS-2/2E from tapes containing dropouts. Error correction
only effects AVI 2, Canopus AVI, Matrox AVI, QuickTime, AVID
OMF, Pinnacle, 24p QuickTime, and 24p AVI Type 2. It does not
effect RawDV or AVI 1. The selections are:
OFF - No audio correction.
•
•
MEDIUM - (default) “Normal” clean tapes played back on a
camcorder or other VTR with clean heads. When error
correction occurs, the audio can be muted for brief periods of
time.
•
HIGH - For cases where there are visible picture disturbances
and likely long audio dropouts (1/2 sec and up).
FS-2/2E Studio DTE Disk Recorder User Guide
67
Page 88
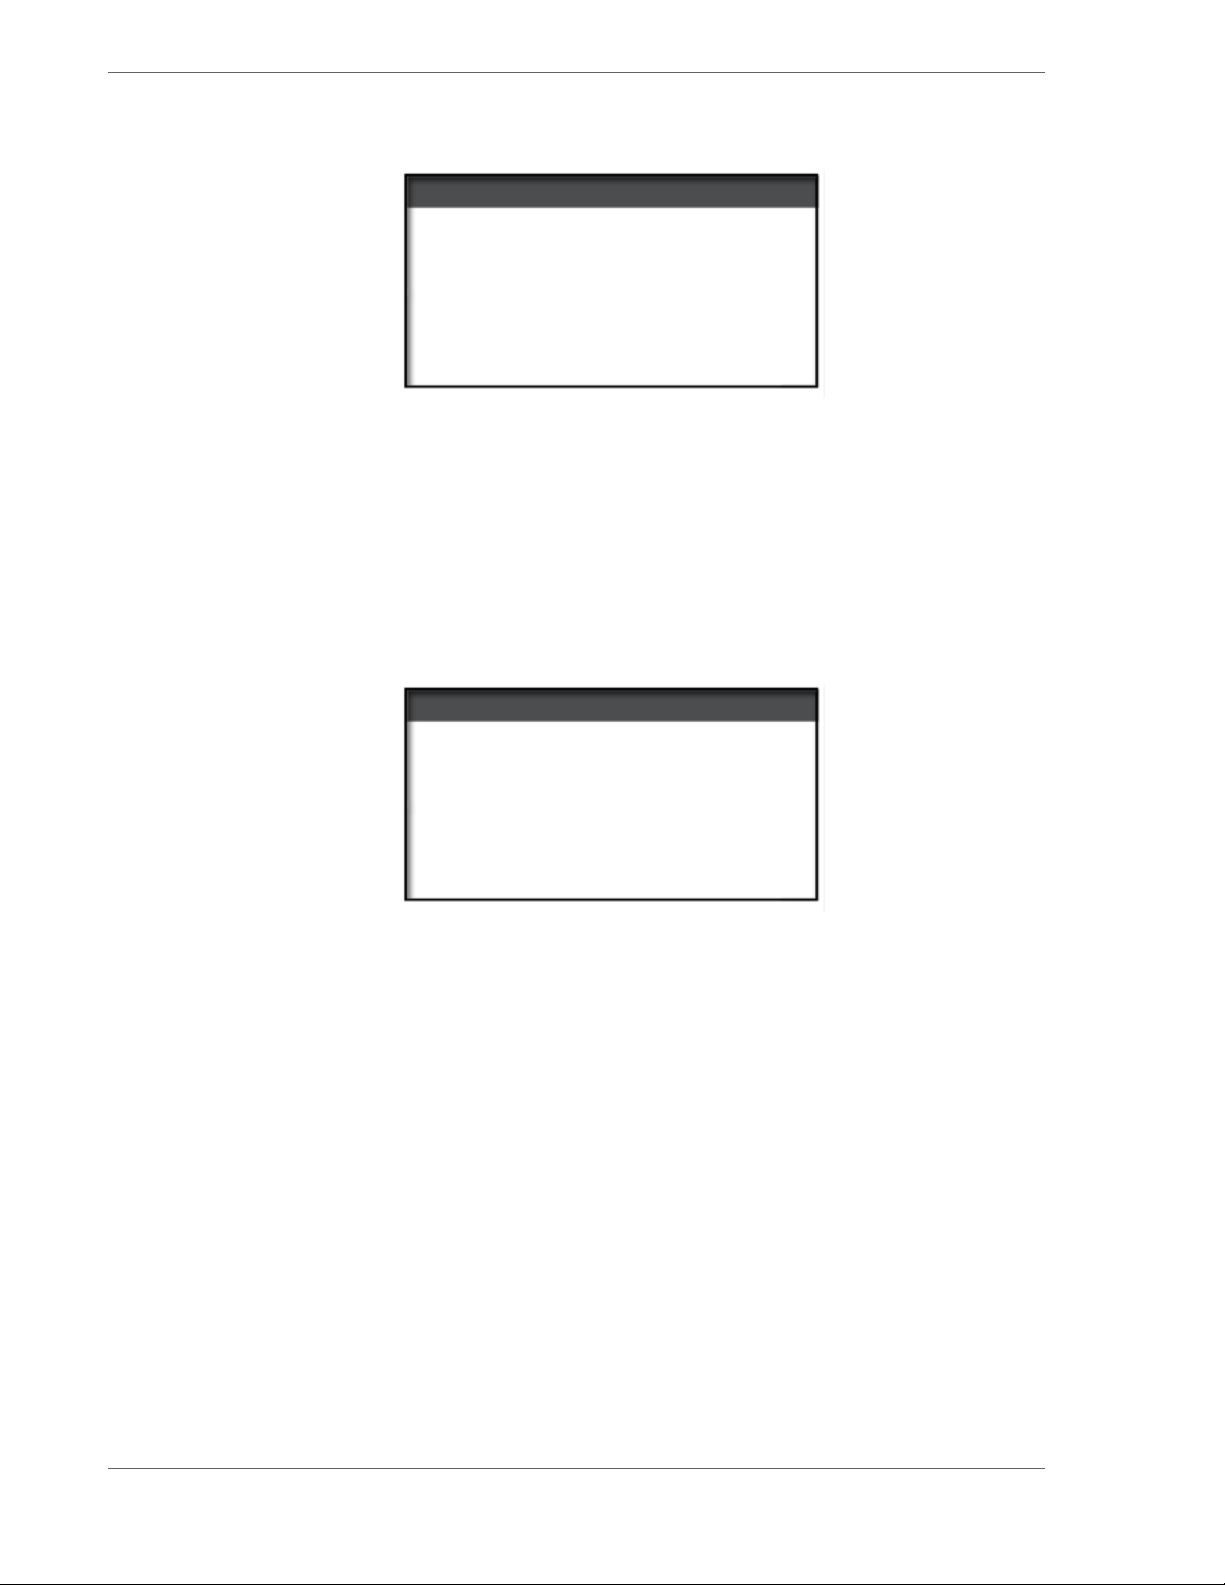
FS-2/2E Functions
2.5.12.17 Preferences
PREFERENCES
SAVE
RESTORE
EXIT
SEL
This menu allows you to save and restore system preferences.
When you select
CURRENT PREFERENCES?
SAVE, you are prompted with the message SAVE
. Press YES and a file is written to the disk
drive saving the current user settings.
When you select
RESTORE the FS-2/2E searches for a saved user
preference on the disk and if found, restores your preferences.
Preferences are a snapshot of all settings that can be saved on the
FS-2/2E.
The following screen appears when the
RESTORE completes.
PREFERENCES
RESTORED
PLEASE RESTART
It is now time to restart the FS-2E.
The restart requires that the FS-2E to be powered off and then on.
FS-2/2E Studio DTE Disk Recorder User Guide
68
Page 89
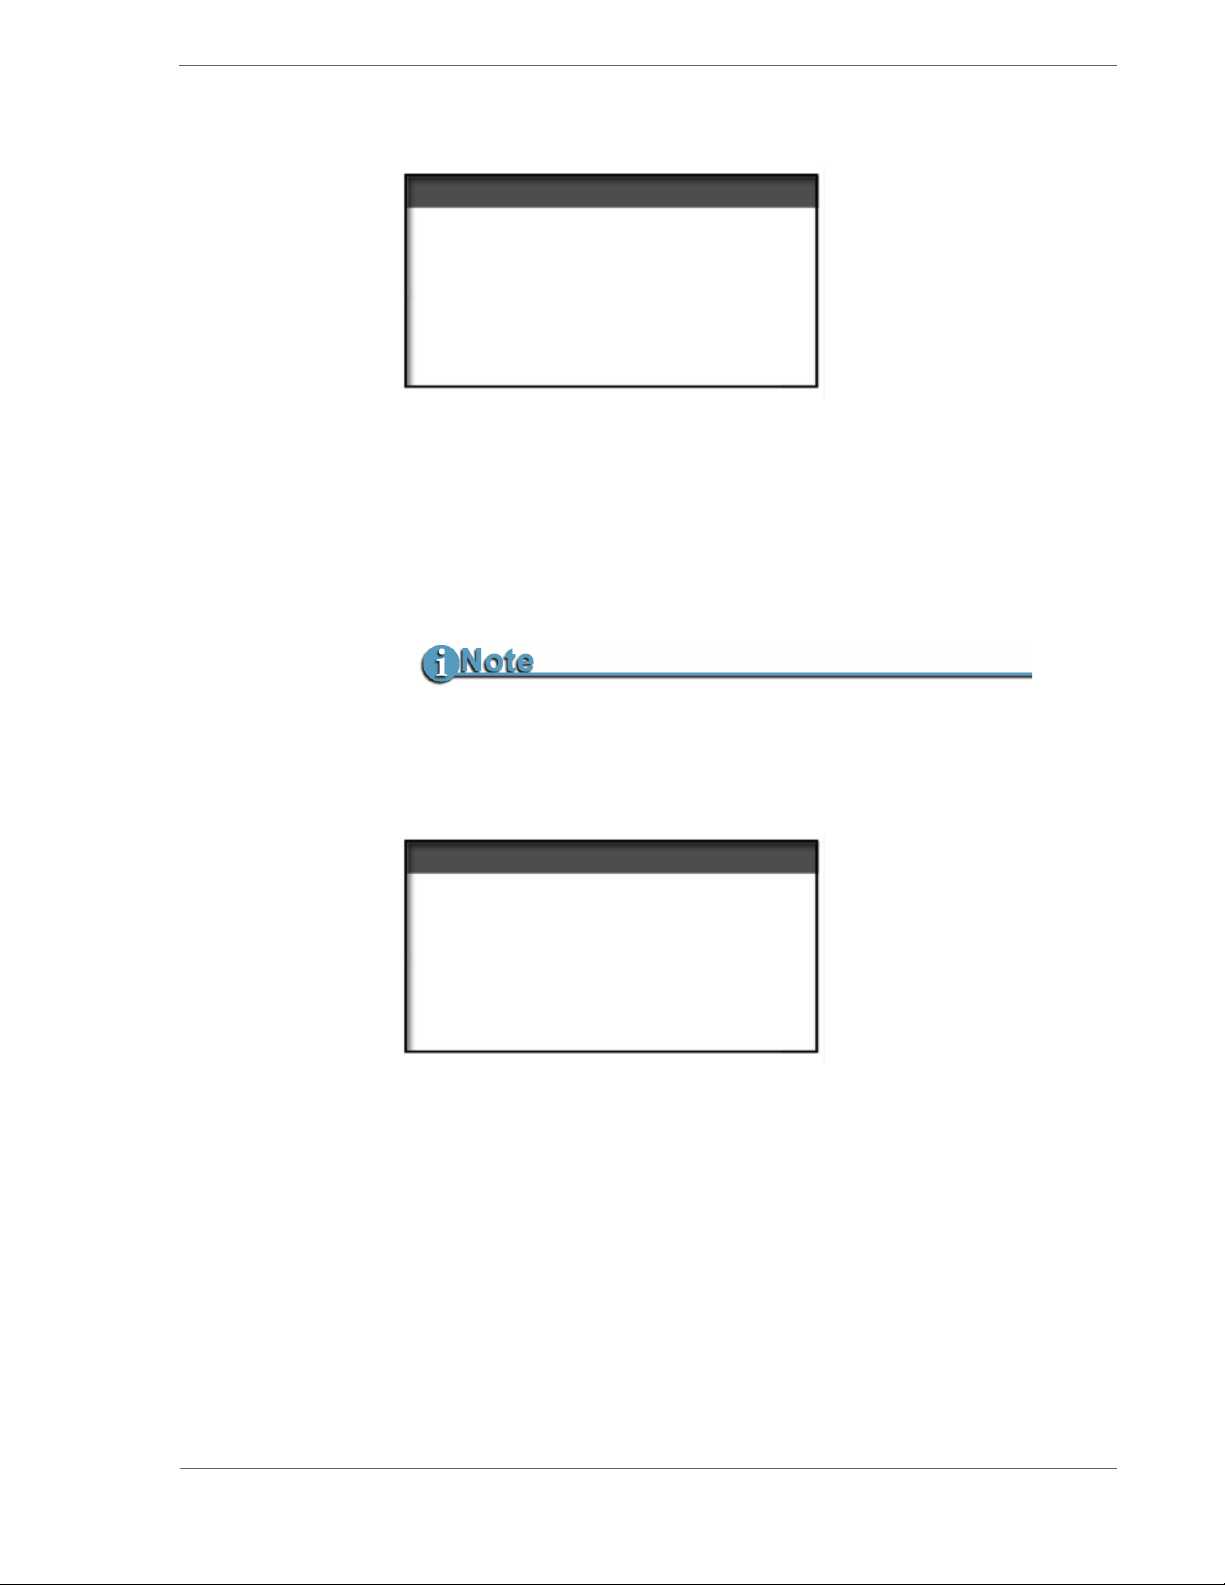
2.5.12.18 Folder Pref
SCENE MARK
AUTO MARK
EXIT
The FOLDER PREF menu allows you to determine the folders to
which your clips are moved when you choose to do a ORGANIZE
CLIPS from the UTILITIES menu. This menu contains the
following sections:
•
SCENE MARK - default - only marks those clips you explicitly
mark during record or playback.
•
AUTO MARK - marks all recorded clips with the last selected
FOLDER.
SEL
FS-2/2E Functions
These features are most easily used in conjunction with the optional
wired remote control. This can be ordered at the Focus Enhancements
on-line store: https://www.focusinfo.com/webstore/webstore.asp.
The part number is ACSS-0019-01.
2.5.12.19 Analog Out
COMPOSITE
COMPONENT
EXIT
This screen provides two selections: Composite or Component.
Composite - Use to select the Y output on the rear panel
•
providing a composite signal.
Component - When you select component out, you can also
•
select either SMPTE, BETACAM, or MII output levels.
The selected mode becomes highlighted after you select
SEL
Exit.
FS-2/2E Studio DTE Disk Recorder User Guide
69
Page 90
FS-2/2E Functions
2.5.12.20 Network Setup
IP SETTINGS
USER/PASSWORD
VIEW IP INFO
SERVICES
EXIT
With NETWORK SETUP, you can connect the
FS-2/2E to a network. When this is done, you can do FTP file
transfers to or from the FS-2/2E or control the FS-2/2E using
Telnet. The FS-2E, or FS-2, with the 2.0 software upgrade also
allows you to control the FS-2 using your internet browser.
FOCUS Enhancements is in no way liable for device security
(Telnet and FTP). Contact your system administrator regarding
the best security practices.
SEL
2.5.12.20.1 IP SETTINGS
DHCP
CUSTOM IP
EXIT
With the IP settings menu item, you can select either
DHCP (the network provides the IP address) or a
CUSTOM IP.
DHCP - If you select DHCP and then EXIT, the FS-
•
2/2E attempts to log onto the network.
• When DHCP is the default,
• When
Custom IP is selected, SEL is displayed.
SEL
SEL is not shown.
FS-2/2E Studio DTE Disk Recorder User Guide
70
Page 91
FS-2/2E Functions
• CustomIP - If you select CUSTOM IP, a submenu
opens to ask you to enter an
, and Gateway.
Mask
IP number, Sub Net
IP
000.000.
000.000
MSK
255.255.
255.000
GWY
EXIT
NEXT
000.000.
000.000
SEL
If you do not have these values, contact your system
administrator. The default values for the IP address
are 000.000.000.000, Sub Net Mask 255.255.255.000 and
Gateway 000.000.000.000.
To modify the custom IP values use the following
steps:
1. Select the item to modify.
2. Press to select the field to change.
3. Use the to increase the value (HINT: press the
SHIFT key on the FS-2/2E front panel plus to
decrease a value).
4. Values wrap back to zero once the maximum
value has been entered.
5. To modify the next item or set of values, press the
NEXT key on the FS-2/2E front panel.
6. Once complete, press the SEL key when EXIT is
highlighted to exit or the
NEXT key to continue to
modify items.
Once you exit the menu, the FS-2/2E attempts to
log into the network and one of two things happen:
If the FS-2/2E successfully logs onto a network, it
displays
NETWORK CONNECT SUCCEEDED.
If the FS-2/2E is unable to log onto a network, it
displays
CABLE
7. Press the VERIFY button on the FS-2/2E to take
NET CONNECT FAILED. CHECK NETWORK
.
you back to the IP Settings menu to verify your
values.
8. Press the EXIT button to take you back to the
SETUP menu.
FS-2/2E Studio DTE Disk Recorder User Guide
71
Page 92
FS-2/2E Functions
2.5.12.20.2 USER/PASSWORD
USER:
PASWD:
fs2
focus
EXIT
SAVE
NEXT
This screen allows you to set a username and
password for the FS-2/2E. If you are unsure what
username and password to use, contact your system
administrator.
• Username may have up to 4 characters.
• Password may have up to 6 characters.
To modify the username and password, use the
following steps:
1. Select the item to modify and then press the right
arrow key to select the field.
2. Use to increase the value (HINT: press the
SHIFT key on the FS-2/2E front panel plus to
decrease a value).
3. Values loop back to zero once the maximum
value has been entered.
4. To modify the next item, press the NEXT key on
the FS-2/2E front panel. It is only possible to have
one username and password per unit. The
maximum number of characters for each is seven.
FS-2/2E Studio DTE Disk Recorder User Guide
72
Page 93
2.5.12.20.3 VIEW IP INFO
IP 000.000
MSK 255.255
GW 000.000
000.000
NEXT
In cases where DHCP is being used, by selecting VIEW
IP INFO
, you can see the IP address that the network
has provided the FS-2/2E.
If the FS-2/2E is not connected to a network or was
not able to successfully log on, this screen displays
DHCP DISABLED NOT CONNECTED. Check your
settings or contact your system administrator for
further assistance.
FS-2/2E Functions
000.00
255.000
2.5.12.20.4 SERVICES
FTP
TELNET
WEB
EXIT
The SERVICES menu allows you to enable or disable
any of these services:
connection. With each, it is necessary to enable or
disable the function within the submenu.
Once
FTP is enabled you can use your web browser or
ftp utility to transfer files to and from the FS-2/2E.
With
TELNET enabled, you can send commands to
control the FS-2/2E with a telnet utility.
With
WEB enabled, you can control the FS-2/2E from
your web browser. Type in the FS-2/2E IP address
into the address bar of your browser to start using the
web interface. Only an FS-2E or FS-2 (with the 2.0
firmware upgrade) has this option available.
SEL
FTP, TELNET, or WEB
FS-2/2E Studio DTE Disk Recorder User Guide
73
Page 94
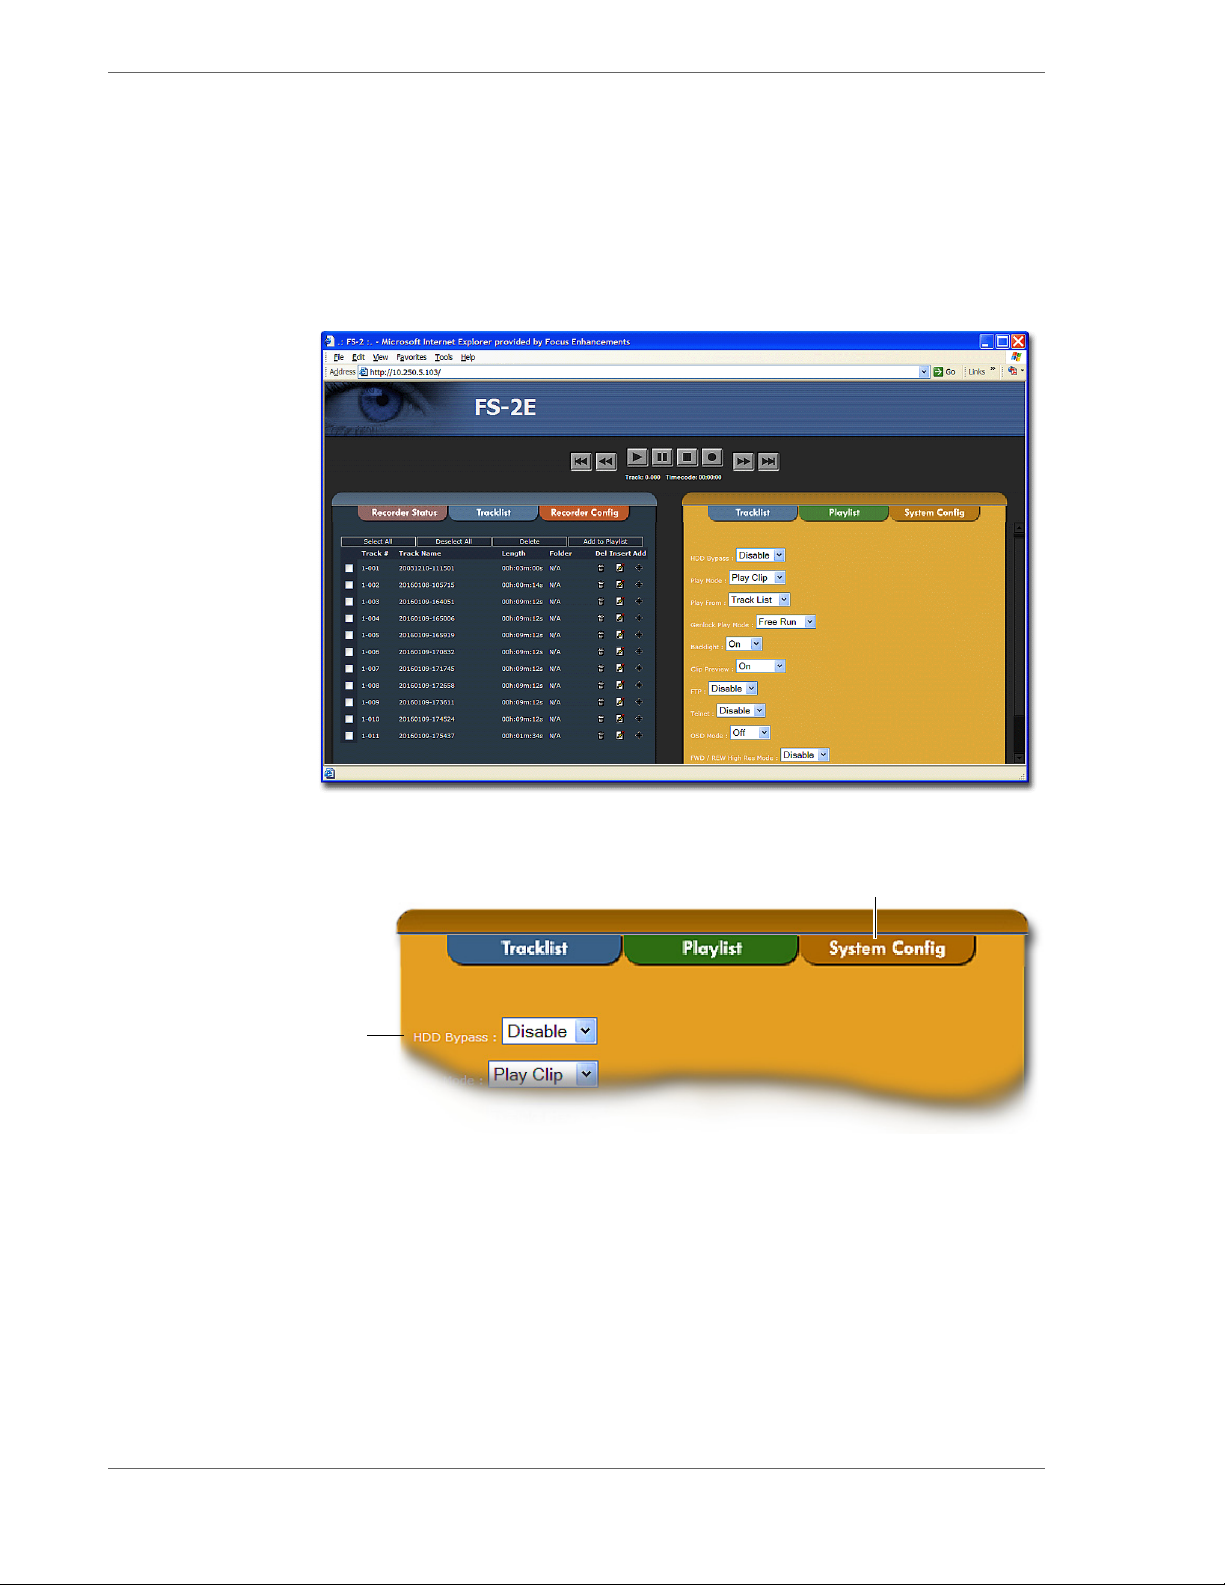
FS-2/2E Functions
Web Interface
Use the web interface to control, change settings, edit
playlists, and even delete tracks on the FS-2/2E.
Below is an example of the web interface. For more
information about the web interface, see
Interface
on page 99.
FS-2E Web
HDD Bypass
Remote Use of HDD Bypass
System Config Tab
HDD Bypass
allows you to make your content files
available on the host computer. This permits more
efficient and flexible transfer of files using your
available network. Consult your Operating System’s
instructions on how to network a FireWire drive.
To set up the FS-2E for
1. Enable HDD Bypass from the System Config tab.
HDD Bypass:
FS-2/2E Studio DTE Disk Recorder User Guide
74
Page 95
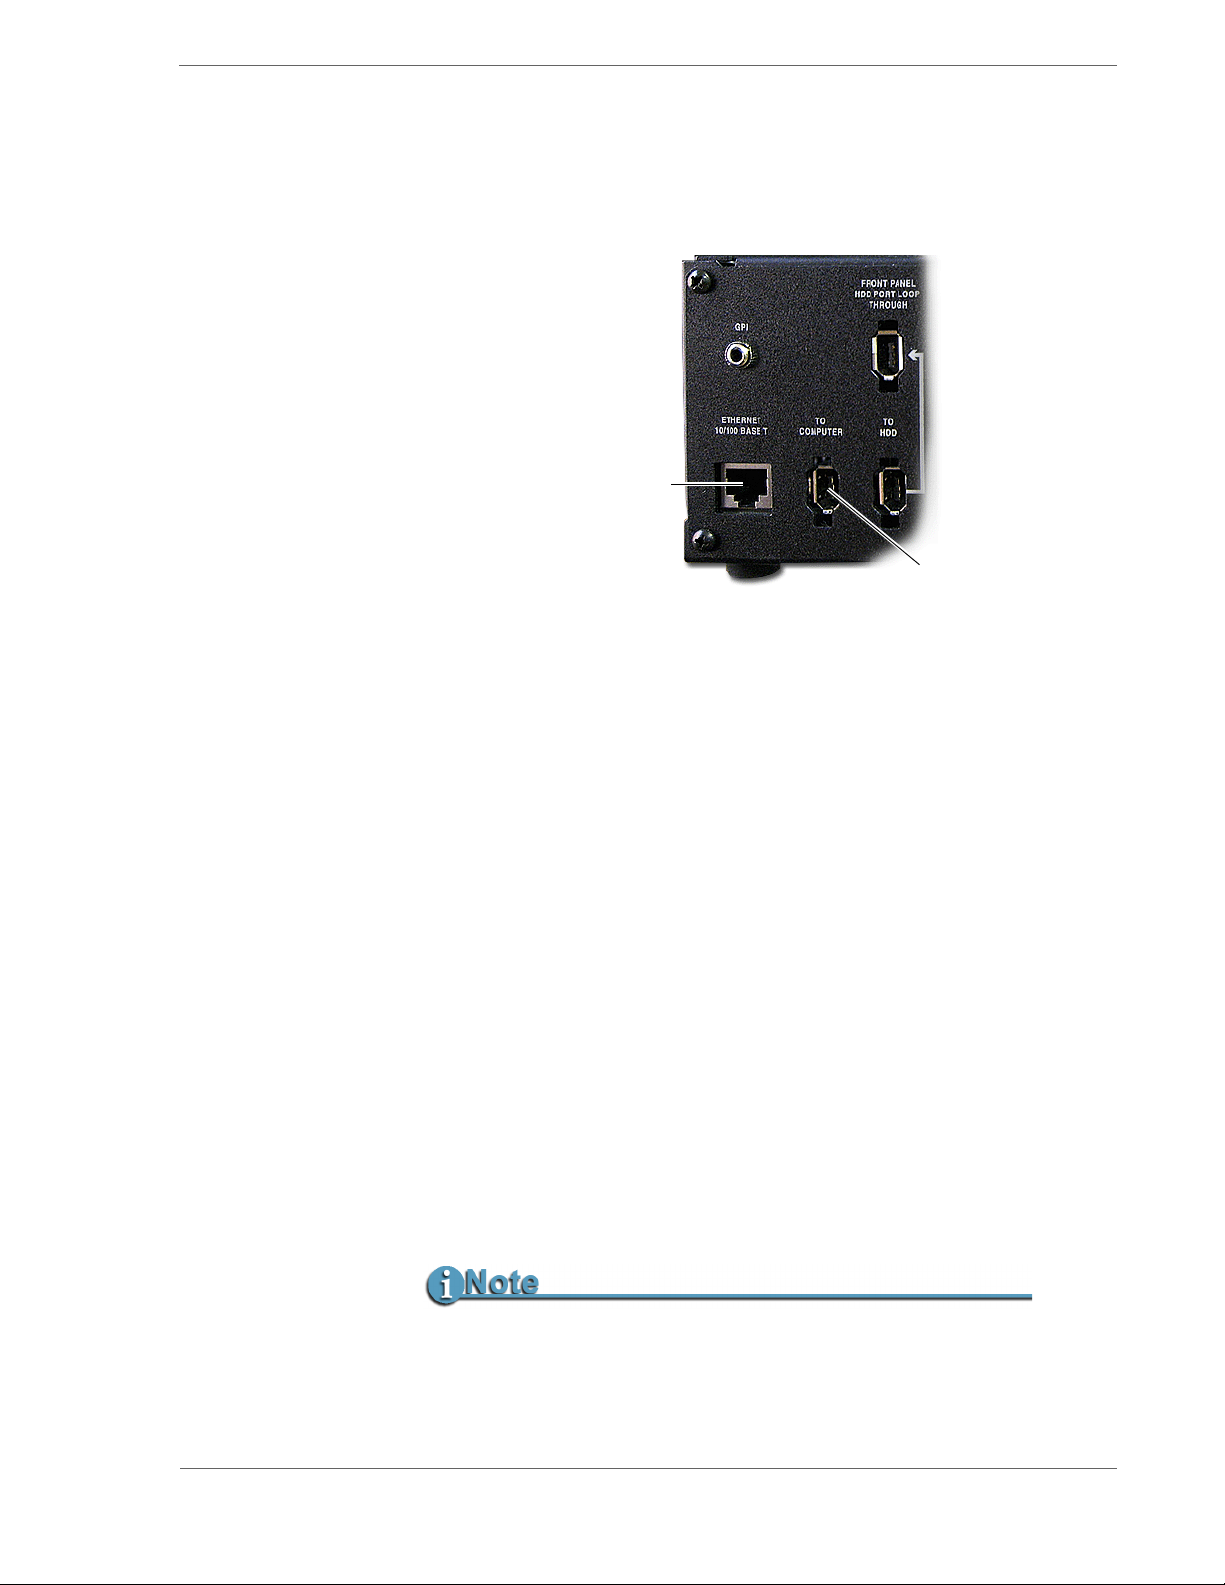
FS-2/2E Functions
2. Connect a host computer to the TO COMPUTER
port on the back of the FS-2E next to the EtherNet
port.
FS-2E Backpanel
Ethernet
10/100 Base T
To Computer
2.5.12.21 GENLOCK
The GENLOCK menu allows you to select and adjust the reference
video source and whether the video out will be locked to the
reference video input in playback modes.
SOURCE - Selects the source of the sync pulses used to time
•
the output video during playback. Choices are:
•REF VIDEO - the reference video port on FS-2/2E's rear
• FREE RUN - reference video is generated internally on
•
SC PHASE - Allows the subcarrier phase to be adjusted
between +127 and -128. The default value is set at 0.
Press and hold either
change the value by increments of ten.
•
H PHASE - Allows the horizontal phase to be adjusted
between +127 and -128. The default value is set at 0.
Press and hold either
change the value by increments of ten.
panel,
the FS-2/2E. When this option is selected the menu is
simplified and only the above selections are in the
GENLOCK menu.
or for more than 3 seconds to
or for more than 3 seconds to
Loop-Through or Terminated Output
If the loop-through jack is not connected, make sure the output is
terminated using an external 75 ohm terminator.
FS-2/2E Studio DTE Disk Recorder User Guide
75
Page 96

FS-2/2E Functions
2.5.12.22 Video Out Adj
The VIDEO OUT ADJ menu options allow you to make
adjustments to FS-2/2E analog output sources.
•
HUE (NTSC composite only) - adjustable between -179 and
+180
•
SATURATION (composite out only)- adjustable between -255
and +256
BRIGHTNESS (composite out only) - adjustable between -127
•
and +128
Y (component only) - adjustable between -128 and 128
•
•
U (component only) - adjustable between -255 and 255
•
V (component only) - adjustable between -255 and 255
•
CONTRAST (composite out only) - adjustable between -127
and +128
BLACK LEVEL (NTSC composite only) - Allows the output
•
black level to be set to either 0 IRE or 7.5 IRE. 0 IRE is the
default setting. This menu item is only present when the FS2/2E is set to NTSC mode.
2.5.12.23 Compnt Level
This is option is only available in NTSC mode and is not available
in PAL mode.
Both the
component inputs and outputs offer three video signal
level standards:
•SMPTE
•BETA
• MII
FS-2/2E Studio DTE Disk Recorder User Guide
76
Page 97
2.5.13 Utilities Menu
ORGANIZE PINN
ORGANIZE CLIP
ORGANIZE OMF
DELETE CLIP
FS-2/2E Functions
EXIT
SEL
This menu allows you to access various utilities.
• Select the menu item. Press
SEL to open the sub menu (where
applicable).
•Press
EXIT to return to the menu screen.
This menu contains the following selections:
• ORGANIZE PINN
• ORGANIZE CLIP
• ORGANIZE OMF
• DELETE CLIP
•FORMAT
• PARTITION
•REPAIR
•FILE NAME
• FACTORY RESET
• DIAGNOSTIC
2.5.13.1 Organize PINN
Once you have finished a Pinnacle recording session, do the
following:
1. From the SETUP menu, select ORGANIZE PINN.
2. When prompted ORGANIZE PINNACLE CLIPS? Select YES.
3. You can now remove the disk drive from to begin editing.
Products such as the Pinnacle AVI file format were created for use
with products such as Pinnacle Liquid Edition. The Pinnacle AVI
file format creates three files simultaneously during a recording;
an AVI video file and two separate WAV audio files labeled as left
and right. An additional
Edition.ale file per recording session is
also created which contains timecode data. This file must be kept
with the media. This is shown in the following illustration.
FS-2/2E Studio DTE Disk Recorder User Guide
77
Page 98
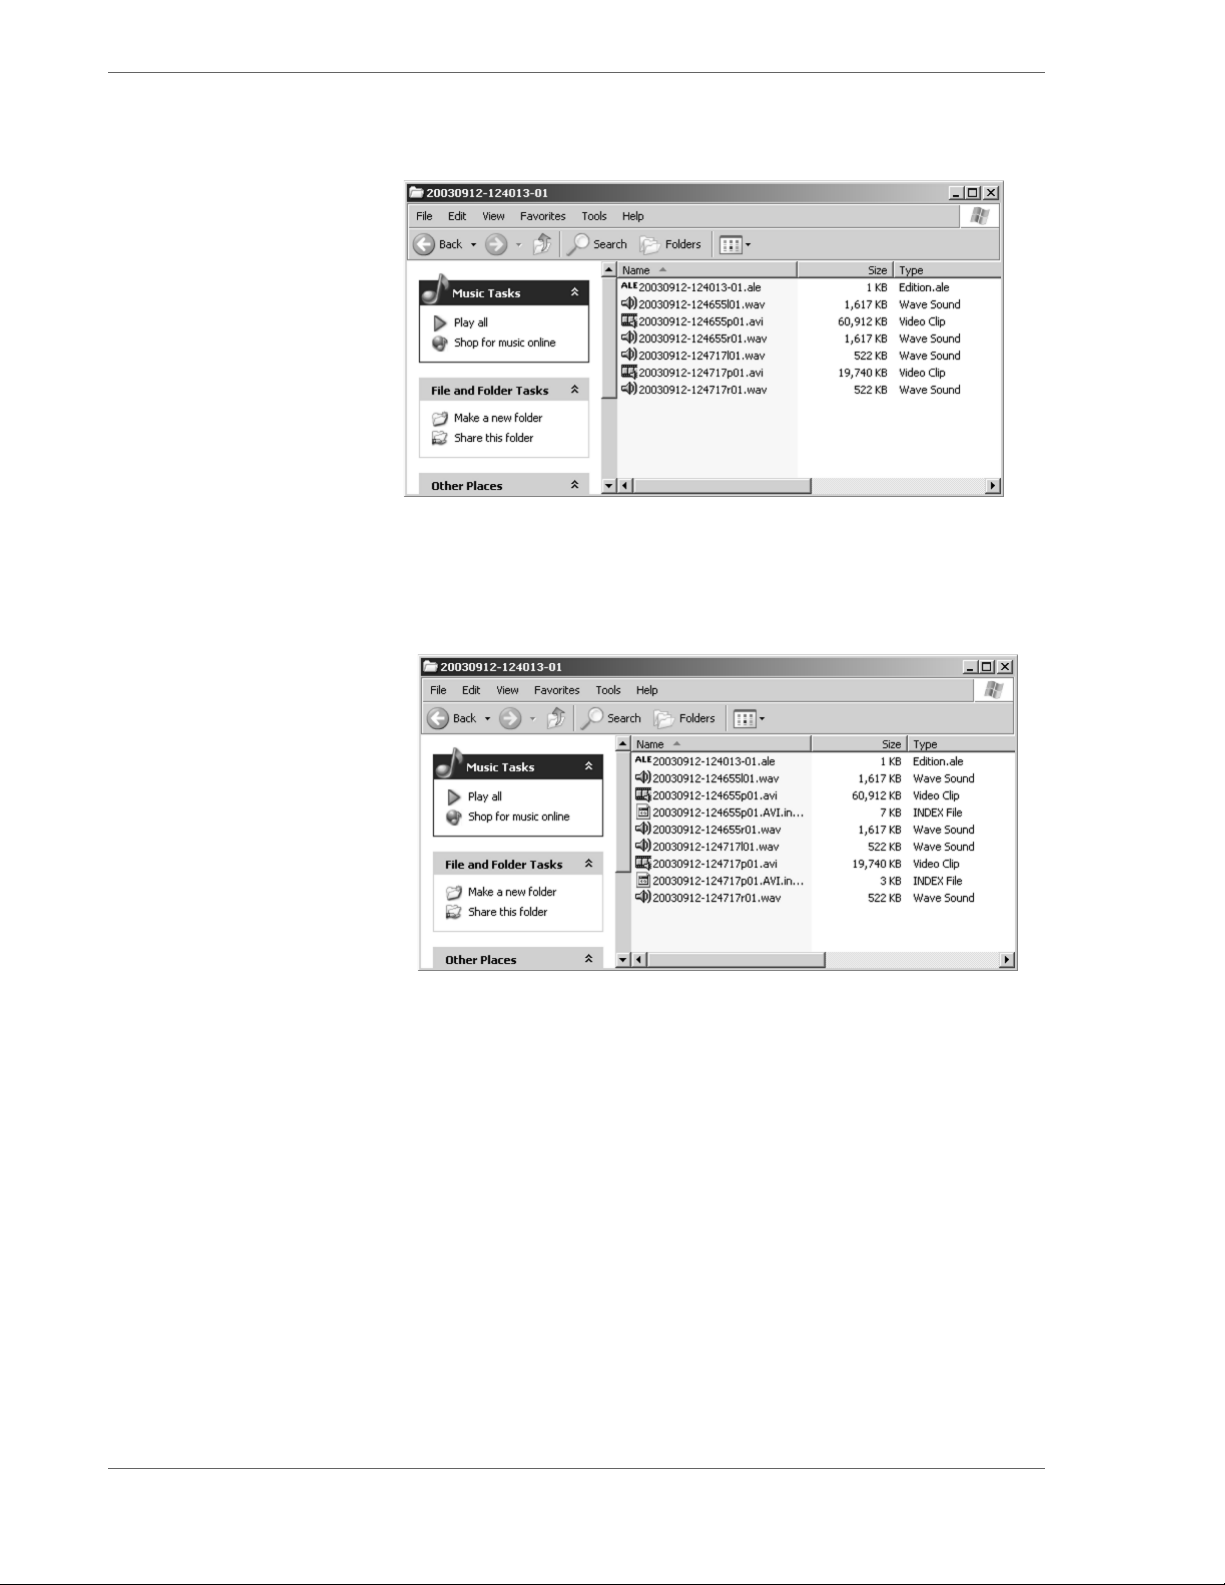
FS-2/2E Functions
Once clips have been imported into Liquid Edition, an Index file is
created on the disk drive per clip. Do not delete this file since it is
required to continue work in the particular project. The
illustration below shows this.
FS-2/2E Studio DTE Disk Recorder User Guide
78
Page 99
2.5.13.2 Organize Clip
ORGANIZE
KEEP CLIPS?
FS-2/2E Functions
EXIT
This selection places all files that were identified as a KEEPER or
were SCENE MARKED during recording into a folder marked
KEEPER or the prenamed SCENE MARKING folders on the disk
drive. These folders can be imported directly into most DV NLE
bins.
2.5.13.3 Organize OMF
ORGANIZE
AVID OMF CLIP?
EXIT
When files are recorded in the AVID OMF file format, this
command automatically takes all the OMF and AIF audio files at
the end of a recording session and places them into a folder on the
disk drive named “OMFI MediaFiles”. When the disk is
connected to a computer, this folder is recognized by Avid’s
Media Tool feature enabling direct import of files into the Avid
timeline.
YES
NO
S
YES
NO
If you have selected files as a KEEPER or they have been SCENE
MARKED, you cannot use this feature and keep files in their selected
folders. If you would like to use clips in KEEPER or SCENE MARKED
folders in Avid, manually create the “OMFI MediaFiles” folder when your
disk drive is on your computer and drag the desired clips into this folder.
For more information on using FS-2/2E clips in Avid, refer to
Using FS-2/2E Recorded Avid OMF Clips on Avid Editing Systems
on page 90.
FS-2/2E Studio DTE Disk Recorder User Guide
79
Page 100
FS-2/2E Functions
2.5.13.4 Delete Clip
DELETE
CLIP 1-001?
BASE:
210612-165423
EXIT
• In the DELETE CLIP X-XXX screen, select between clips by
pressing the and buttons.
•If you select
selected clip is being deleted.
•Press
Once a clip has been deleted, the FS-2/2E display re-organizes the
clip number sequence. For instance, if there are three clips on disk
(1-001, 1-002, 1-003) and you delete clip 1-002, after delete is
complete, clip 1-003 becomes clip 1-002. Base file names are not
affected however.
It is generally not recommended to delete clips, since fragmentation may
occur.
2.5.13.5 Format Disk
FORMAT DISK
VOLUME 1?
SIZE 115 Gig
FREE 540 Min
YES
YES, a message appears indicating that the
EXIT to return to the menu screen.
EXIT YES NO
Select between volumes by pressing the l and l
1.
buttons.
FS-2/2E Studio DTE Disk Recorder User Guide
80
 Loading...