

Page 1

Firefly SC and MZ
Media Players
Version 3.2
User Manual
Page 2

Trademarks
The Focus Enhancements, Visual Circuits, and Firefly logos are
registered trademarks in the United States and other countries. All
other products, services or company names mentioned herein are
claimed as trademarks and trade names by their respective
companies.
© Focus Enhancements (formerly Visual Circuits), 1999-2004.
All rights reserved. No portion of this manual may be copied by
any means without the prior consent of Visual Circuits.
Focus Enhancements
5155 East River Road, Suite 401
Minneapolis, MN 55421 USA
http://www.visualcircuits.com
Publication Number: 813-0049c
All specifications, notices and warnings are subject to change
without notice.
Page 3

Firefly Safety Requirements
IMPORTANT SAFETY INSTRUCTIONS:
The following safety instructions apply to the
Visual Circuits Firefly:
1. Read and follow all warning notices and instructions marked on the
product or included in this manual. Opening or removing covers and/or
components may expose you to dangerous high voltage points or other
risks. Qualified personnel should perform all servicing.
2. The maximum ambient temperature for the Firefly is 114 degrees
Fahrenheit (45 degrees Celsius). Care should be given to allow sufficient
air circulation or space between units when Firefly is installed in a closed
or multi-unit rack assembly because the operating ambient temperature
of the rack environment must be greater than room ambient temperature.
3. Slots and openings in the cabinet (chassis) are provided for ventilation.
To ensure reliable operation of the product and to protect it from
overheating, maintain a minimum of 1-inch (2.5-cm) clearance on the top
and sides.
4. Installation of the Firefly in a rack without sufficient airflow can be
unsafe.
5. If installed in a rack, the rack should safely support the combined weight
of all equipment it supports. A fully loaded Firefly weighs 4 pounds (1.5
kg).
6. The connections and equipment of the Firefly should be capable of
operating safely with the maximum power requirements of the Firefly. In
the event of a power overload, the supply circuits and supply wiring
should not become hazardous.
7. External power supply AC power inputs are intended to be used with the
three-wire grounding type plug (a plug that has a grounding pin). This is
a safety feature. Equipment grounding is vital to ensure safe operation.
Do not defeat the purpose of grounding type plugs by modifying the plug
or using an adapter.
8. If a three-wire grounding type power source is not available, consult a
qualified electrician to determine another method of grounding the
equipment.
9. Install only in restricted areas in accordance with Articles 110-16, 100-17
and 110-18 of the National Electrical Code, ANSI/NFPA 70.
10. Do not allow anything to rest on the power cord and do not locate the
product where persons will walk on or come in contact with the power
cord.
i
Page 4

POWER AND GROUND REQUIREMENTS:
Determine that the cumulative power requirements of the Firefly
plus other equipment in the rack do not overload the supply circuits
and/or wiring.
CAUTION
If using a power strip or similar supply, make sure
the power requirements of the chassis, plus the
cumulative power draw of any other equipment in
the rack, do not overload the supply circuit.
WARNING
For safe operation, this equipment must be properly
grounded.
The chassis should be reliably earth grounded to the
rack equipment. This earth ground connection must be
maintained when supply connection is other than direct
connection to the branch circuit.
ii
Page 5

User Manual Regulatory Documentation
CAUTION
There is danger of explosion if the battery is
incorrectly replaced.
A lithium battery on the product provides backup power
for the device’s timekeeping capability. The battery has
an estimated life expectancy of ten years. When the
battery starts to weaken, the date and time may become
incorrect. If the battery fails, the unit must be sent back
to Visual Circuits for battery replacement.
WARNING
An improperly grounded power supply can result in
electrical shock.
The AC power cord provided with your system has a
grounded plug. Always use a grounded power cord with
a properly grounded wall outlet.
Class A Statement
FCC Part 15 (EN 61 00 0- 3 - 2 )
This equipment has been tested and found to comply with the
limits for a Class A digital device, pursuant to Part 15 (EN61000-3-
2) of the FCC Rules. These limits are designed to provide
reasonable protection against harmful interference when the
equipment is operated in a commercial environment. This
equipment generates, uses, and can radiate radio frequency
energy and, if not installed and used in accordance with this
instruction manual, may cause harmful interference to radio
communications. Operation of this equipment in a residential area
is likely to cause harmful interference in which case the user will
be required to correct the interference at his or her own expense.
The Firefly complies with Part 15 (EN61000-3-2) of the FCC rules.
iii
Page 6

Operation is subject to the following two conditions:
1. This device may not cause harmful interference.
2. This device must accept any interference that may cause undesired
operation.
WARNING
Changes or modifications to this unit not expressly
approved by the party responsible for compliance
could void the user’s authority to operate the
equipment.
Industry Canada
This Class A digital apparatus meets all requirements of the
Canadian Interference-Causing Equipment Regulations.
Cet appareil numerique de la classe A respecte toutes les
exigences du Regulement sur le materiel brouilleur du Canada.
EMC and Safety Directive
Compliance
The CE mark is affixed to this Visual Circuits
Corporation product to confirm compliance with the following
European Community Directives:
Council Directive 89/336/EEC of 3 May 1989 on the approximation
of the laws of Member States relating to electromagnetic
compatibility.
And
Council Directive 73/23/EEC of 19 February 1973 on the
harmonization of the laws of Member States relating to electrical
equipment designed for use within certain voltage limits:
Each amended by Council Directive 93/68/EEC of 22 July 1993 on
the harmonization of CE marking requirements.
iv
Page 7

Class A Warning (EN55024, EN55022)
In a domestic environment this product may cause radio
interference in which case the user may be required to take
adequate measures.
WARNING
Failure to provide adequate surge protection may
cause damage to the Firefly.
Visual Circuits does not warranty damage caused by
electrical surges to the system. Surge protection should
be provided when connecting any peripheral device and
power to the system.
v
Page 8

vi
Page 9

CONTENTS
Welcome to Firefly SC™ and MZ . . . . . . . . . . . . . . . . . . . . 1
Quick Start Plug and Play . . . . . . . . . . . . . . . . . . . . . . . . . 3
Before You Start, You Will Need. . . . . . . . . . . . . . . . . . . . . . . . . 3
Installation Sequence . . . . . . . . . . . . . . . . . . . . . . . . . . . . . . . . . 4
Install the Firefly . . . . . . . . . . . . . . . . . . . . . . . . . . . . . . . . . . . . . . . . 5
Configure for Network . . . . . . . . . . . . . . . . . . . . . . . . . . . . . . . . . . . . 7
Attaching a Laptop or PC . . . . . . . . . . . . . . . . . . . . . . . . . . . . . . 7
Ethernet . . . . . . . . . . . . . . . . . . . . . . . . . . . . . . . . . . . . . . . . 7
Serial . . . . . . . . . . . . . . . . . . . . . . . . . . . . . . . . . . . . . . . . . . 7
Changing TCP/IP Settings . . . . . . . . . . . . . . . . . . . . . . . . . . 8
WebView via Ethernet Port . . . . . . . . . . . . . . . . . . . . . . . . . 8
External Control Commands . . . . . . . . . . . . . . . . . . . . . . . . 9
Install Media Messenger . . . . . . . . . . . . . . . . . . . . . . . . . . . . . . . . . 10
Configure FTP . . . . . . . . . . . . . . . . . . . . . . . . . . . . . . . . . . . . . . . . . 11
Setup on-board Firefly FTP Server . . . . . . . . . . . . . . . . . . . . . . 11
Configure Firefly Properties . . . . . . . . . . . . . . . . . . . . . . . . . . . 11
Configuring the Firefly FTP Server . . . . . . . . . . . . . . . . . . . . . . 12
How To Create a Basic Playlist . . . . . . . . . . . . . . . . . . . . . . . . . . . . 13
Publish . . . . . . . . . . . . . . . . . . . . . . . . . . . . . . . . . . . . . . . . . . . . . . . 14
Via FTP . . . . . . . . . . . . . . . . . . . . . . . . . . . . . . . . . . . . . . . . . . 14
Via CD/DVD . . . . . . . . . . . . . . . . . . . . . . . . . . . . . . . . . . . . . . . 16
Software Updating . . . . . . . . . . . . . . . . . . . . . . . . . . . . . . . . . . . . . . 17
Encoding Requirements and Recommendations . . . . . 19
Encoding Requirements. . . . . . . . . . . . . . . . . . . . . . . . . . . . . . . . . . 19
Encoding Recommendations . . . . . . . . . . . . . . . . . . . . . . . . . . . . . . 20
WEBVIEW . . . . . . . . . . . . . . . . . . . . . . . . . . . . . . . . . . . . . . . 23
Accessing the WebView Interface . . . . . . . . . . . . . . . . . . . . . . . . . . 23
Setup Procedures: . . . . . . . . . . . . . . . . . . . . . . . . . . . . . . . . . . 23
Step 1: Connect to the Network. . . . . . . . . . . . . . . . . . . . . 23
Step 2: Determine the Address of the Firefly. . . . . . . . . . . 24
Step 3: Establishing Communication with the Firefly . . . . . 24
Step 4: Enter Your User Name and Password . . . . . . . . . 25
Forgot Name, Password, IP...???. . . . . . . . . . . . . . . . . . . . . . . 25
Using the WebView Interface. . . . . . . . . . . . . . . . . . . . . . . . . . . . . . 26
Transferring Media . . . . . . . . . . . . . . . . . . . . . . . . . . . . . . . . . . 27
Webview Software Update . . . . . . . . . . . . . . . . . . . . . . . . . . . . 30
vii
Page 10

Contents
Reviewing, Previewing and Deleting Firefly Media . . . . . . . . . . 31
Reviewing Media and Storage Usage on the Firefly . . . . . 31
Previewing Videos and Graphic Overlays
on the Firefly . . . . . . . . . . . . . . . . . . . . . . . . . . . 32
Deleting Media from the Firefly . . . . . . . . . . . . . . . . . . . . . 33
Using the Playlist Editor . . . . . . . . . . . . . . . . . . . . . . . . . . . . . . 35
Creating a New Playlist . . . . . . . . . . . . . . . . . . . . . . . . . . . 36
Adding Videos to a Playlist . . . . . . . . . . . . . . . . . . . . . . . . 36
Removing Videos from a Playlist . . . . . . . . . . . . . . . . . . . . 36
Moving Videos Within a Playlist. . . . . . . . . . . . . . . . . . . . . 37
Shuffling Video Playback on a Channel. . . . . . . . . . . . . . . 37
Adding Graphic Overlays to a Playlist . . . . . . . . . . . . . . . . 37
Working With Graphic Overlays in a Playlist . . . . . . . . . . . 39
Adding Scrolling Text to a Playlist . . . . . . . . . . . . . . . . . . . 42
Working With Scrolling Text in a Playlist . . . . . . . . . . . . . . 43
Transparency Level . . . . . . . . . . . . . . . . . . . . . . . . . . . . . . 43
Saving a Playlist. . . . . . . . . . . . . . . . . . . . . . . . . . . . . . . . . 44
Playing a Playlist Quickly . . . . . . . . . . . . . . . . . . . . . . . . . . 45
Using the Schedule Editor. . . . . . . . . . . . . . . . . . . . . . . . . . . . . 46
Creating a New Schedule . . . . . . . . . . . . . . . . . . . . . . . . . 47
Adding an Event to a Schedule . . . . . . . . . . . . . . . . . . . . . 48
Deleting an Event from a Schedule . . . . . . . . . . . . . . . . . . 50
Editing an Event within a Schedule . . . . . . . . . . . . . . . . . . 50
Saving a Schedule. . . . . . . . . . . . . . . . . . . . . . . . . . . . . . . 52
Additional Saving and Loading Methods . . . . . . . . . . . . . . 53
Assigning Dates for Video Playback . . . . . . . . . . . . . . . . . 56
Exiting the Schedule Editor . . . . . . . . . . . . . . . . . . . . . . . . 58
Using the Player Control Panel. . . . . . . . . . . . . . . . . . . . . . . . . 59
Diagnostics . . . . . . . . . . . . . . . . . . . . . . . . . . . . . . . . . . . . . . . . 60
Diagnostics - General . . . . . . . . . . . . . . . . . . . . . . . . . . . . 61
Diagnostics - Video . . . . . . . . . . . . . . . . . . . . . . . . . . . . . . 62
Diagnostics - Playback. . . . . . . . . . . . . . . . . . . . . . . . . . . . 64
Diagnostics - Logging . . . . . . . . . . . . . . . . . . . . . . . . . . . . 65
System Settings . . . . . . . . . . . . . . . . . . . . . . . . . . . . . . . . . . . . 69
General Settings . . . . . . . . . . . . . . . . . . . . . . . . . . . . . . . . 69
Video Settings . . . . . . . . . . . . . . . . . . . . . . . . . . . . . . . . . . 71
Audio Settings . . . . . . . . . . . . . . . . . . . . . . . . . . . . . . . . . . 73
Control Settings . . . . . . . . . . . . . . . . . . . . . . . . . . . . . . . . 75
Network Settings . . . . . . . . . . . . . . . . . . . . . . . . . . . . . . . . 77
Logging Settings . . . . . . . . . . . . . . . . . . . . . . . . . . . . . . . . 82
WebView Settings . . . . . . . . . . . . . . . . . . . . . . . . . . . . . . . 85
FTP Auto-Update Settings. . . . . . . . . . . . . . . . . . . . . . . . . 87
HTTP Auto-Update Settings . . . . . . . . . . . . . . . . . . . . . . . 89
USB Devices . . . . . . . . . . . . . . . . . . . . . . . . . . . . . . . . . . . 91
viii
Page 11

Contents
USB Devices Settings . . . . . . . . . . . . . . . . . . . . . . . . . . . . 92
USB Network Settings . . . . . . . . . . . . . . . . . . . . . . . . . . . . 94
Multicast. . . . . . . . . . . . . . . . . . . . . . . . . . . . . . . . . . . . . . . 96
Advanced Settings. . . . . . . . . . . . . . . . . . . . . . . . . . . . . . . 99
Networking. . . . . . . . . . . . . . . . . . . . . . . . . . . . . . . . . . . . 101
Overview . . . . . . . . . . . . . . . . . . . . . . . . . . . . . . . . . . . . . . . . . . . . 101
Getting Started . . . . . . . . . . . . . . . . . . . . . . . . . . . . . . . . . . . . . . . . 101
Media Messenger™ Software . . . . . . . . . . . . . . . . . . . . . . . . . . . . 102
Product Features: . . . . . . . . . . . . . . . . . . . . . . . . . . . . . . . . . . 102
Benefits: . . . . . . . . . . . . . . . . . . . . . . . . . . . . . . . . . . . . . . . . . 102
Updating Video Playback . . . . . . . . . . . . . . . . . . . . . . . . 103
Automatic Updating:. . . . . . . . . . . . . . . . . . . . . . . . . . . . . . . . . . . . 103
Manual Updating: . . . . . . . . . . . . . . . . . . . . . . . . . . . . . . . . . . . . . . 103
FTP UPDATING . . . . . . . . . . . . . . . . . . . . . . . . . . . . . . . . . . . . . 103
FTP Server. . . . . . . . . . . . . . . . . . . . . . . . . . . . . . . . . . . . 104
Player Management. . . . . . . . . . . . . . . . . . . . . . . . . . . . . 104
Creating a Firefly FTP Update Account . . . . . . . . . . . . . . 105
/ . . . . . . . . . . . . . . . . . . . . . . . . . . . . . . . . . . . . . . . . . . . . 105
/scripts . . . . . . . . . . . . . . . . . . . . . . . . . . . . . . . . . . . . . . . 105
/updates . . . . . . . . . . . . . . . . . . . . . . . . . . . . . . . . . . . . . . 105
FTP Update Process . . . . . . . . . . . . . . . . . . . . . . . . . . . . 106
FTP Updating Order. . . . . . . . . . . . . . . . . . . . . . . . . . . . . 107
FTP Font Files (.ttf) . . . . . . . . . . . . . . . . . . . . . . . . . . . . . 107
Playlist Parsing Routine. . . . . . . . . . . . . . . . . . . . . . . . . . 107
System Update Check . . . . . . . . . . . . . . . . . . . . . . . . . . . 108
Firefly Storage Cleanup Routine . . . . . . . . . . . . . . . . . . . 108
MULTICAST UPDATING. . . . . . . . . . . . . . . . . . . . . . . . . . . . . . . . 108
Overview . . . . . . . . . . . . . . . . . . . . . . . . . . . . . . . . . . . . . 109
Software Update Check. . . . . . . . . . . . . . . . . . . . . . . . . . 110
System Settings for Multicasting . . . . . . . . . . . . . . . . . . . 111
Manual Updating . . . . . . . . . . . . . . . . . . . . . . . . . . . . . . . . . . . . . . 112
WebView Updating . . . . . . . . . . . . . . . . . . . . . . . . . . . . . . . . . 112
Forgot Name, Password, IP...???. . . . . . . . . . . . . . . . . . . . . . 112
Direct File Access Updating . . . . . . . . . . . . . . . . . . . . . . . . . . 113
Log File Reporting . . . . . . . . . . . . . . . . . . . . . . . . . . . . . 115
Overview . . . . . . . . . . . . . . . . . . . . . . . . . . . . . . . . . . . . . . . . . . . . 115
Run Logs . . . . . . . . . . . . . . . . . . . . . . . . . . . . . . . . . . . . . . . . . . . . 116
Diagnostic Logs . . . . . . . . . . . . . . . . . . . . . . . . . . . . . . . . . . . . . . . 116
Log Format . . . . . . . . . . . . . . . . . . . . . . . . . . . . . . . . . . . . . . . 117
Run Logs . . . . . . . . . . . . . . . . . . . . . . . . . . . . . . . . . . . . . 117
ix
Page 12

Contents
Diagnostic Logs . . . . . . . . . . . . . . . . . . . . . . . . . . . . . . . . 117
DTDs (Document Type Definition) . . . . . . . . . . . . . . . . . . 117
Log Default Playlist . . . . . . . . . . . . . . . . . . . . . . . . . . . . . . . . . 117
Maximum Log File Sizes. . . . . . . . . . . . . . . . . . . . . . . . . . . . . 117
Uploading Log Files . . . . . . . . . . . . . . . . . . . . . . . . . . . . . . . . 118
External Control Commands . . . . . . . . . . . . . . . . . . . . . 119
Connecting via RS232 . . . . . . . . . . . . . . . . . . . . . . . . . . . 119
Connecting via TCP/IP. . . . . . . . . . . . . . . . . . . . . . . . . . . 119
Basic Hyper Terminal Setup . . . . . . . . . . . . . . . . . . . . . . . . . . 120
VCC Control Commands:. . . . . . . . . . . . . . . . . . . . . . . . . . . . . . . . 121
Playlist Playback Commands . . . . . . . . . . . . . . . . . . . . . . . . . 121
Playing Individual Files . . . . . . . . . . . . . . . . . . . . . . . . . . . . . . 123
Using Serial Commands To Create Playlists . . . . . . . . . . . . . 130
. . . . . . . . . . . . . . . . . . . . . . . . . . . . . . . . . . . . . . . . . . . . . . . . 130
Firefly System Commands . . . . . . . . . . . . . . . . . . . . . . . . . . . 131
Callback Commands. . . . . . . . . . . . . . . . . . . . . . . . . . . . . . . . 132
Audio and Video Setting Changes . . . . . . . . . . . . . . . . . . . . . 133
Networking Commands. . . . . . . . . . . . . . . . . . . . . . . . . . . . . . 134
LDV Control Commands . . . . . . . . . . . . . . . . . . . . . . . . . . . . . . . . 141
Introduction . . . . . . . . . . . . . . . . . . . . . . . . . . . . . . . . . . . . . . . 141
COM Port Settings . . . . . . . . . . . . . . . . . . . . . . . . . . . . . . . . . 141
Error Codes. . . . . . . . . . . . . . . . . . . . . . . . . . . . . . . . . . . . . . . 142
Command Syntax . . . . . . . . . . . . . . . . . . . . . . . . . . . . . . . . . . 143
Address Arguments. . . . . . . . . . . . . . . . . . . . . . . . . . . . . . . . . 143
Command Summary . . . . . . . . . . . . . . . . . . . . . . . . . . . . . . . . 144
Playback Commands . . . . . . . . . . . . . . . . . . . . . . . . . . . . . . . 145
External Control Commands
Quick Reference Guide: . . . . . . . . . . . . . . . . . . . . . . . . . . . . . 159
VCC Commands:. . . . . . . . . . . . . . . . . . . . . . . . . . . . . . . 159
LDV Commands: . . . . . . . . . . . . . . . . . . . . . . . . . . . . . . . 159
Troubleshooting . . . . . . . . . . . . . . . . . . . . . . . . . . . . . . .161
General Issues . . . . . . . . . . . . . . . . . . . . . . . . . . . . . . . . . . . . . . . . 161
No Power to Firefly . . . . . . . . . . . . . . . . . . . . . . . . . . . . . . . . . 161
No Video Playback . . . . . . . . . . . . . . . . . . . . . . . . . . . . . . . . . 161
"Latent Images" or "Flashing" During Playback . . . . . . . . . . . 162
Stuttering Files During Playback. . . . . . . . . . . . . . . . . . . . . . . 162
Some files in the playlist do not play. . . . . . . . . . . . . . . . . . . . 163
Smooth Transitions . . . . . . . . . . . . . . . . . . . . . . . . . . . . . . . . . 164
SMPTE time codes are not recognized properly. . . . . . . . . . . 164
Filename Already Exists . . . . . . . . . . . . . . . . . . . . . . . . . . . . . 164
FTPing Font Files (.ttf) . . . . . . . . . . . . . . . . . . . . . . . . . . . . . . 164
x
Page 13

Contents
Insufficient Disk Space . . . . . . . . . . . . . . . . . . . . . . . . . . . . . . 164
Forgot Name, Password, IP...???. . . . . . . . . . . . . . . . . . . . . . 165
Preventing Cabling and Connection Problems. . . . . . . . . . . . . . . . 166
Firefly Multi-Zone™ (MZ) . . . . . . . . . . . . . . . . . . . . . . . . 167
Installing the MZ . . . . . . . . . . . . . . . . . . . . . . . . . . . . . . . . . . . . . . 167
Video Output . . . . . . . . . . . . . . . . . . . . . . . . . . . . . . . . . . . . . . 167
Functionality . . . . . . . . . . . . . . . . . . . . . . . . . . . . . . . . . . . . . . . . . . 168
Software Update. . . . . . . . . . . . . . . . . . . . . . . . . . . . . . . . . . . . . . . 169
Status LED . . . . . . . . . . . . . . . . . . . . . . . . . . . . . . . . . . . . . . . 169
Using Firefly MZ to
Create a Layout and Playlist . . . . . . . . . . . . . . . . . . . . . . . . . . 170
Creating the Layout. . . . . . . . . . . . . . . . . . . . . . . . . . . . . . . . . 170
Setting Display Parameters . . . . . . . . . . . . . . . . . . . . . . . 170
Creating a MZ (multi-zone) Layout . . . . . . . . . . . . . . . . . 171
Position Zones in Layout Workspace. . . . . . . . . . . . . . . . 172
Creating the Playlist . . . . . . . . . . . . . . . . . . . . . . . . . . . . . . . . 173
Link the Playlist to the Firefly . . . . . . . . . . . . . . . . . . . . . . . . . 175
Firefly MZ Tips . . . . . . . . . . . . . . . . . . . . . . . . . . . . . . . . . . . . . . . . 177
Technical Specifications . . . . . . . . . . . . . . . . . . . . . . . . 181
Index. . . . . . . . . . . . . . . . . . . . . . . . . . . . . . . . . . . . . . . . . 183
xi
Page 14

xii
Page 15

WELCOME TO FIREFLY SC™ AND MZ
Thank you for purchasing the Firefly SC™ or the Firefly MZ™.
The Firefly SC and MZ are the media players developed
specifically for A/V professionals; combining the ease and
familiarity, flexibility and control of a disk-based, MPEG-2
decoder. These players provide for playlist creation, time/date
scheduling, graphic overlay capability, remote content updating,
network compatibility and a web-based “control and monitor”
interface.
In addition, the Firefly MZ when teamed with Media Messenger
software permits the creation of compelling multi-zone
presentations.
The Firefly SC and MZ belong to a new-generation of commercial
media players that fit into a wide variety of stand alone or network
attached applications, from trade shows and exhibitions to retail
merchandising, education and training, corporation
communications and digital signage.
The Firefly family continues to develop and evolve to meet the
evolving demands of A/V contractors.
Keep up with our latest product offerings by checking our web site
at www.visualcircuits.com.
1
Page 16

Welcome to Firefly SC™ and MZ
Documentation Conventions
The Firefly SC and MZ are single-channel devices that share many
features and capabilities. Because of these similarities, this manual,
in general, does not differentiate between these two players and
simply calls them either the Firefly or the player. Thus, unless
specifically identified as belong to a particular player, the
information in this manual applies to both.
Information specific only to the MZ is found in the section, Firefly
Multi-Zone™ (MZ) on page 167.
Notes
An exclamation point indicates information found in a Note.
2
Page 17
QUICK START PLUG AND PLAY
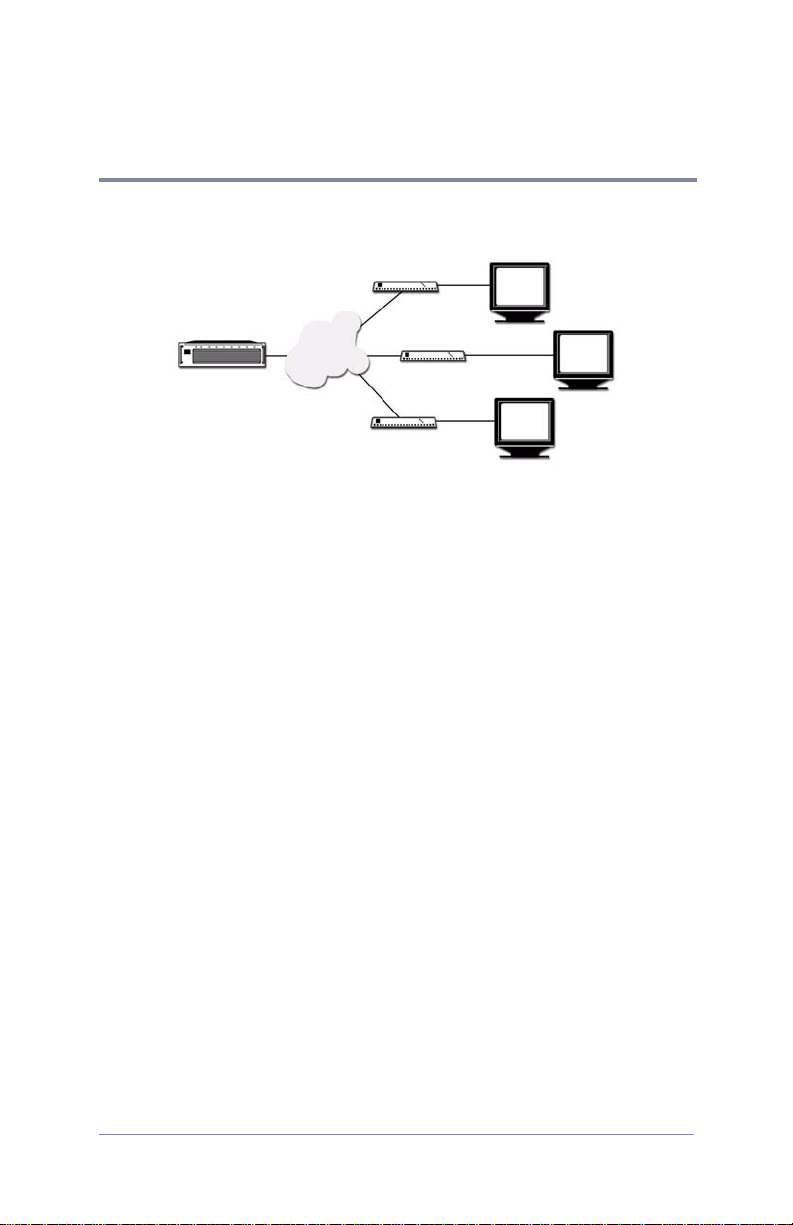
The Firefly is a single-channel output device that is simple to configure and can reside on a network or stand alone.
LAN
Content Server
Firefly Players
Display Devices
Before You Start, You Will Need
Have the following items ready before installing the Firefly MZ
Media Player.
• BNC Video cables
• IP and FTP Information
IP Addressing Mode (Static or DHCP)
IP Address
Hostname
FTP Proxy IP Address and Port
FTP Username and Password
3
Page 18

Quick Start Plug and Play
Installation Sequence
1. Install Firefly on network.
a. Connect your video and audio cables to the back of the
Firefly.
b. Connect the video and audio cables from the Firefly to the
inputs on the monitor and audio component.
c. Connect the power cable to the back of the Firefly and plug
it in to your power source.
d. At start up, the Firefly runs through a a short series of self-
diagnostics before beginning automated playback.
The Firefly comes loaded with sample videos that are useful
as you become familiar with Firefly’s features and for
diagnostic purposes. Video playback is typically controlled
through a “playlist” that defines which videos are played
and in what order. Only one playlist can be active at any
time, though any number of playlists can be stored on
Firefly for later use. Whenever Firefly is turned on, the
playlist that was last used is reloaded and playback begins
automatically.
The default active playlist for a new Firefly is called
“factory.fpl”. The fastest way to test Firefly is to simply
plug it in, connect the cables and turn it on.
The Firefly’s default factory setting plays component,
1080i, and line-level audio. If your application requires the
Firefly to employ a different video standard and/or video
output type, use Webview to change the system settings
as needed. See the section on Video Settings on page 71
for more information.
2. Configure Firefly for network, see page 7.
3. Install Media Messenger application, refer to Media Messenger
User Manual for details.
4. Configure FTP.
5. Creating a Layout and Playlist.
6. Publishing via FTP or CD/DVD.
4
Page 19
Install the Firefly
Quick Start Plug and Play
10/100
DVI-I
Network
Component
Pb Pr Y
S-Video
Y C
Composite
Power
12 VDC
1 2 3 4 5 6
-
+
Unbalanced
(Left Right)
+
USB
-
+
Serial
-
Digital
S / PDIF
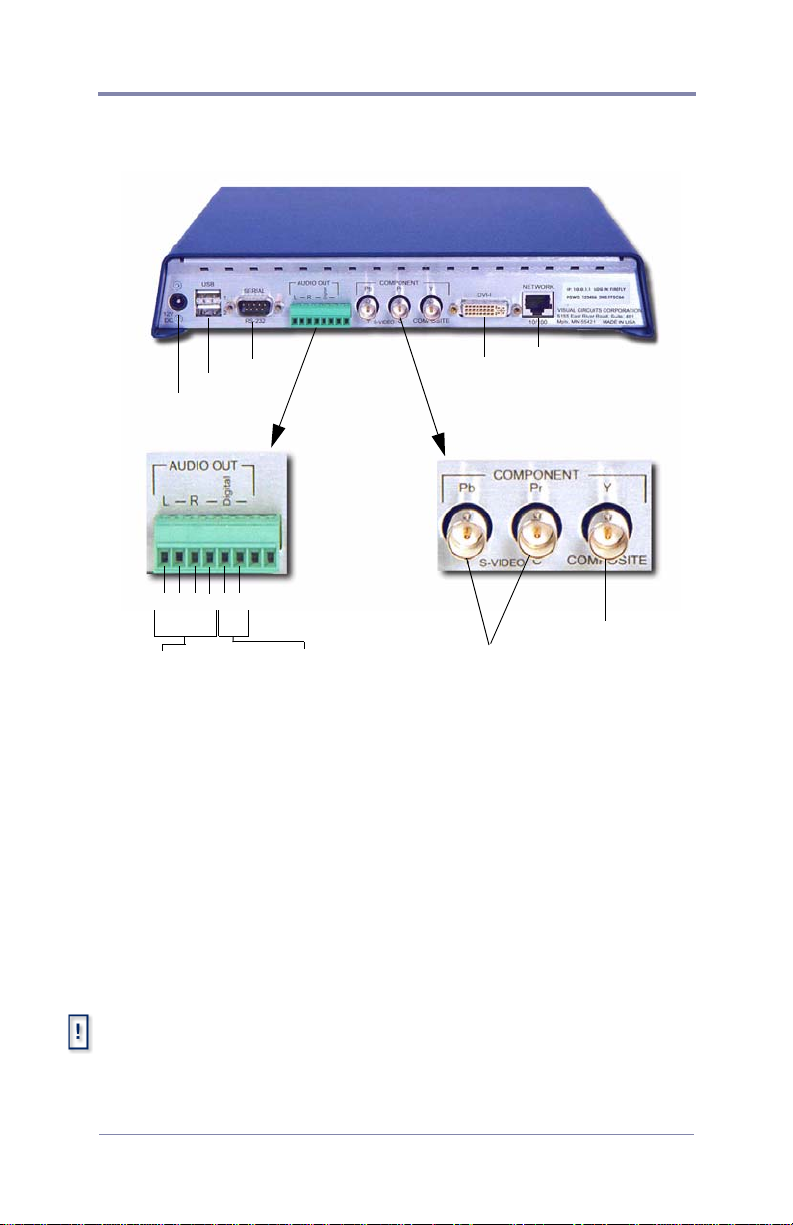
1. Attach the video cables to the Firefly.
❏ For Composite monitors: Connect a BNC-ended
composite cable (not included) to the composite connector
on the back of the Firefly.
❏ For S-Video monitors: Connect a BNC-ended Y s-video
cable (not included) to the corresponding chroma (C) and
luma (Y) connectors on the back of the Firefly.
❏ For Component monitors: Connect BNC-ended
component cables (not included) to the corresponding Pr, Y
and Pb connectors on the back of the Firefly.
MZ RGB and Component Output
For best quality video or to putput to an anology display device, it is
necessary to use the MZ’s DVI output anlog with a DVI to VGA adapter,
see for more details.
5
Page 20

Quick Start Plug and Play
2. Attach the audio cables to the Firefly.
❏ For an unbalanced audio connection use audio cables with
stranded wire ends and connect to terminal 1 (Left +),
terminal 4 (Right +), and terminals 2 and 4 (designated
grounds).
❏ If unbalanced audio cable lengths exceed 10 meters, use an
Audio Line Amp/Balancer such as the Radio Design Labs,
Stick On.
❏ For a S/PDIF digital audio, use a stranded audio cables and
connect to terminal 5 Digital Audio (+) and terminal 6 (-).
3. Attach video and audio cables to the video and audio inputs on
the video monitor and audio component.
4. Cable the Firefly to the network.
5. Plug in the power supply and attach the power cable to the
Firefly. The Firefly powers up and performs a short series of
self-diagnostics and then begins automated playback
6
Page 21
Quick Start Plug and Play
Configure for Network
Often, the Firefly TCP/IP defaults must change to accommodate
the network where it will reside. The best method is to attach a
computer to the media player.
Contact the Network Administrator for the correct network configuration
information,
Attaching a Laptop or PC
Before beginning, verify that the computer and/or the Firefly are powered
off. When connections are completed, power on the devices.
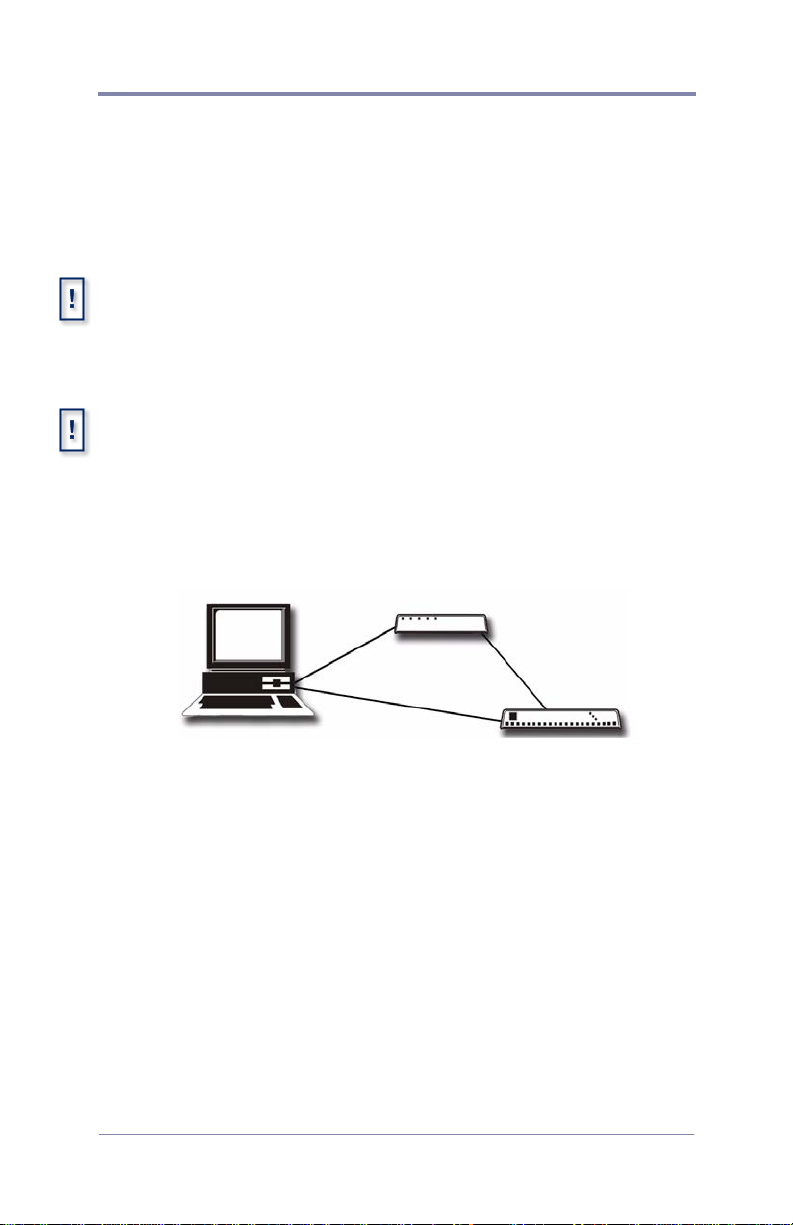
Ethernet
❏ Connect the computer directly to the Firefly using an
Ethernet crossover cable.
or
Ethernet via Hub or Switch.
Ethernet via Cross-over Cable.
❏ Connect using standard Ethernet cables and a hub or switch.
Serial
Use a null modem cable, female DB-9 to female DB-9, RS232
cable, when connecting to the Firefly via the serial port.
7
Page 22

Quick Start Plug and Play
Changing TCP/IP Settings
Firefly default TCP/IP settings:
Static IP Address: 10.0.1.1
Login (case sensitive): firefly
Password: 123456
There are two methods for initially changing the Firefly TCP/IP
settings: WebView and serial commands.
WebView via Ethernet Port
WebView is a browser-based, administration tool-kit that resides
on the Firefly.
1. Set your PC’s IP address to a number in the same range as the
Firefly, such as 10.0.1.2.
2. Open a browser and enter the default IP address 10.0.1.1 in the
address field.
3. Access WebView using the default Firefly login and password,
shown above.
4. Set the IP address and other TCP/IP parameters as required.
5. Click on Update Settings to save.
6. Click on Player Control.
7. Click on Restart Player.
This initializes the new settings.
8
Page 23

Quick Start Plug and Play
Restarting the Firefly is only necessary when updating the network
settings in a DHCP environment, i.e. going from Static to DHCP mode,
changing the Host Name, and so on. .
External Control Commands
External control commands require that the computer has an ASCII
generating control program, such as Hyper Terminal. The
parameters are:
• Serial port 1
• 9600 Bps
• Echo typed letters locally
Use the following Visual Circuits commands to configure the
Firefly.
FireflySetIpAddress
Syntax
fireflysetipaddr IP Address
FireflySetNetmask
Syntax
fireflysetnetmask netmask
FireflySetGateway
Syntax
fireflysetgateway gateway
FireflySetNetworkType
Syntax
fireflysetnetworktype 1 (DHCP) or 2 (Static)
Filenames and External Commands
When using external commands to handle files, it is necessary for those
files to have names without, i.e. sales_video.mpg not sales video.mpg.
One convention is to use underscores in place of spaces.
For more information about External Control Commands see,
External Control Commands on page 119, and for network
configuration, see Network Settings on page 77.
9
Page 24

Quick Start Plug and Play
Install Media Messenger
Install Visual Circuit’s Media Messenger software from the Media
Messenger CD by following the online screens and prompts. Refer
to the Media Messenger User Manual for details.
Whenever the installation sequence requests the Company Name or
Registration Key, enter the name and key precisely as Visual Circuits
provided it.
10
Page 25
Quick Start Plug and Play
Configure FTP
Setup on-board Firefly FTP Server
• Configure Firefly properties.
• Configure Firefly FTP server.
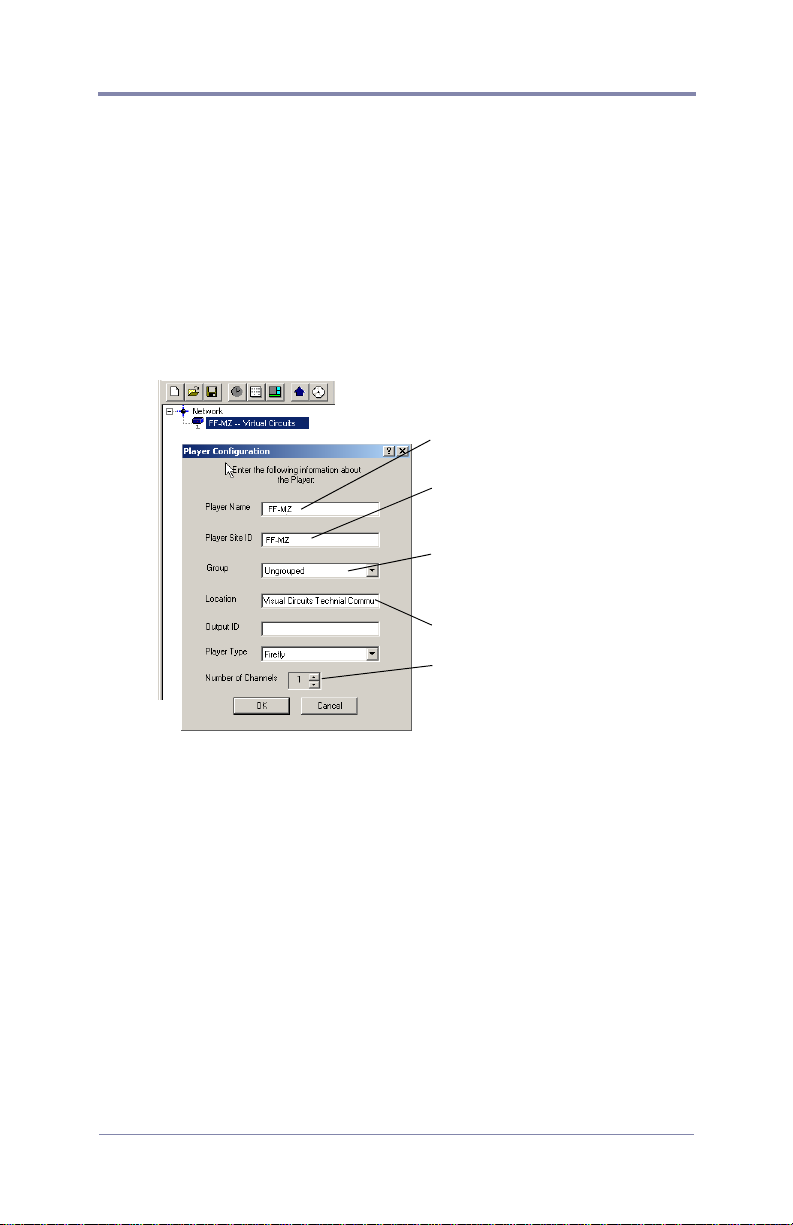
Configure Firefly Properties
Unique name to identify player
(Host Name)
Unique ID set in player before
installation, Media Messenger
uses it to identify the player.
If player belongs to a group,
select the group name fromlist.
Physical location of the player.
Set to one for Firefly.
1. Open the Main window of Media Messenger.
2. Right-click in the Firefly object in the Network Pane and
display Player drop down menu.
3. Click on Properties to display Player Configuration.
4. Fill in the Player Configuration fields.
11
Page 26
Quick Start Plug and Play
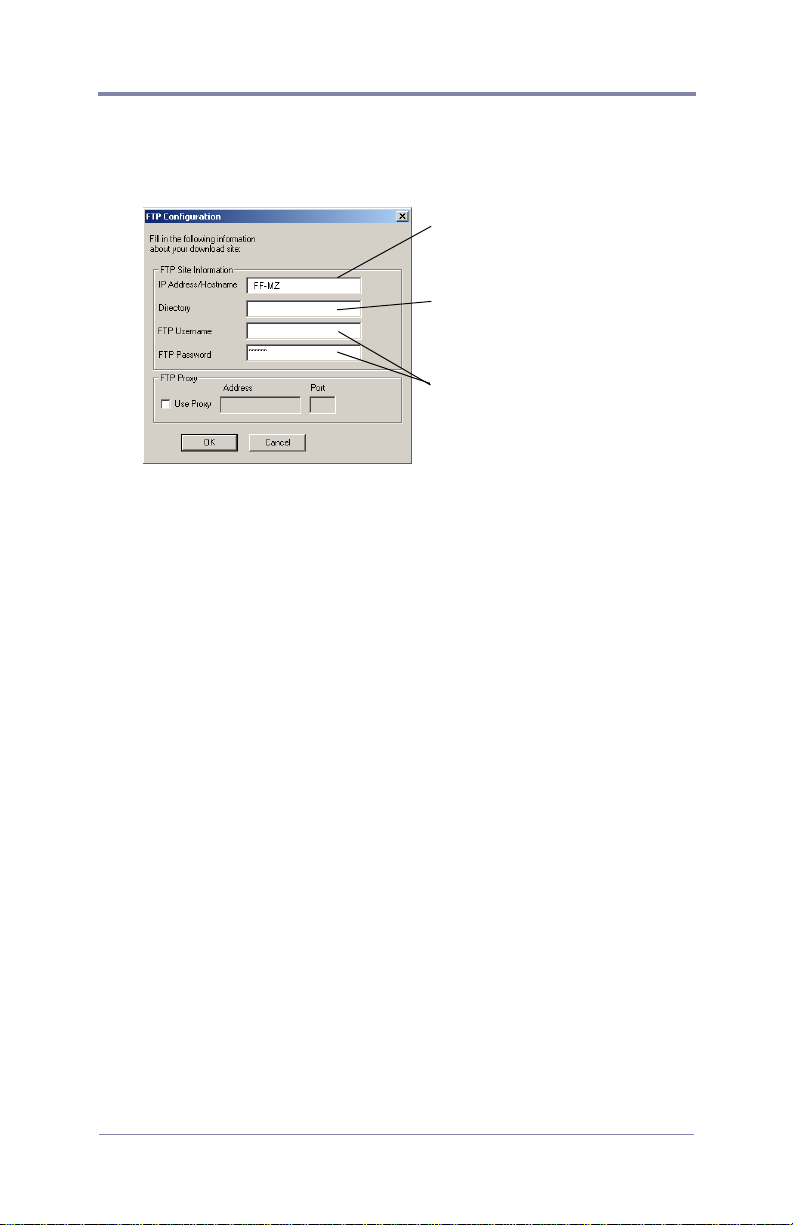
Configuring the Firefly FTP Server
Network Administrator provides FTP configuration information.
This may be the Firefly or an
FTP server used for storing
presentation content.
When loading directly to Firefly, leave the Directory field
blank and place files in FTP
root directory.
Security settings provided by
Network Administrator.
1. Click on Settings in the Main Menu list and select FTP Server
Setup.
2. Fill in the FTP Site Information Fields.
a. IP Address/Hostname.
Network Administrator provides the IP Address and
Hostname of the FTP server.
b. Directory
Name of the directory where the files go.
c. FTP UserName
d. FTP Password
3. FTP Proxy
Check this box if using a FTP Proxy server, then add its IP
address and port.
For additional information, see Updating Video Playback on
page 103.
12
Page 27

Quick Start Plug and Play
How To Create a Basic Playlist
Playing media on Firefly requires
1. That the MPEG videos reside on the Firefly.
2. That a valid playlist resides on the Firefly.
There are several methods for creating a layout and playlist for the
Firefly.
1. WebView interface program (see Using the Playlist Editor on
page 35).
2. Media Messenger, refer to its user manual.
3. Firefly MZ, which is an optional enhancement that works with
Media Messenger, see
and Playlist on page 170.
Using Firefly MZ to Create a Layout
13
Page 28
Quick Start Plug and Play
Publish
Via FTP
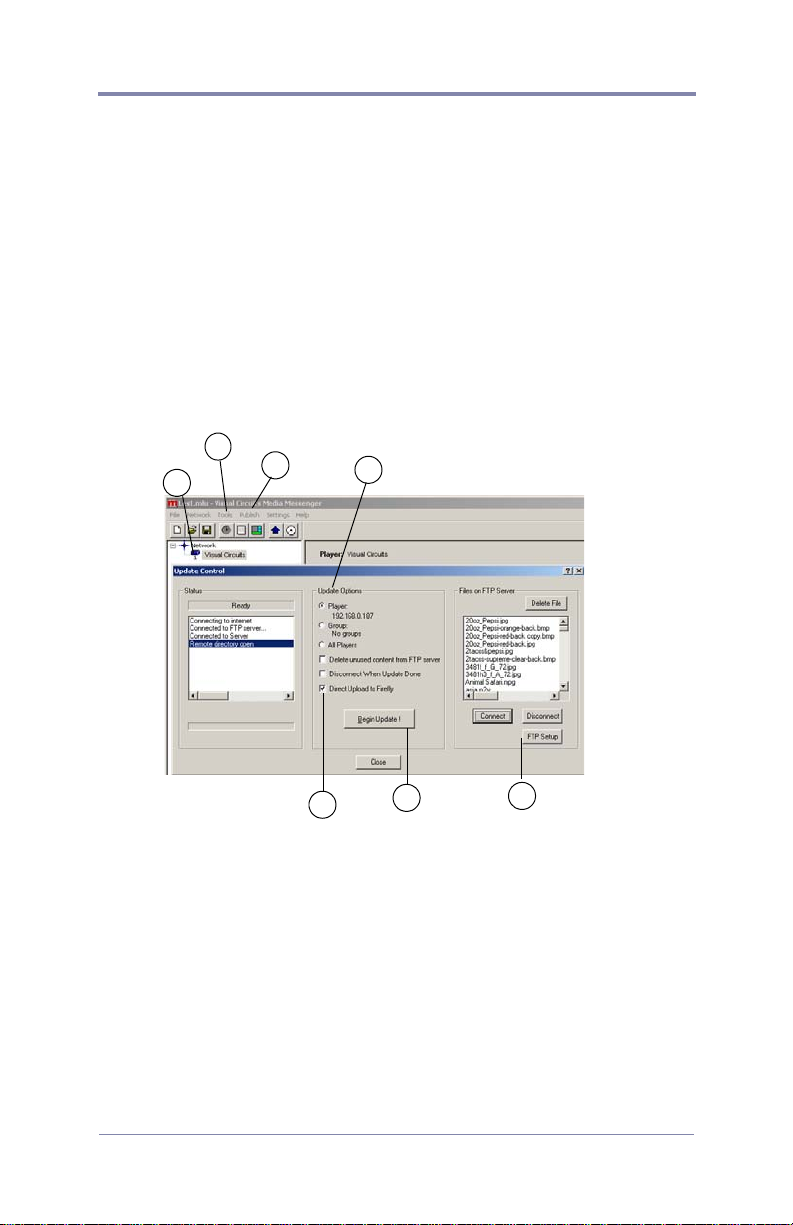
1. Open WebView, click on System Settings, and select Network.
Confirm that the network and security settings are correct.
2. Return to the Media Messenger main workspace.
3. Select the target player or player group in the Network Pane.
4. Click on Publish in the Media Messenger, Main Menu List and
then select Publish to FTP.
2
3
4
6
6A
7
5
5. Confirm that the Media Messenger FTP configuration is
correct for the player: click on the FTP Setup button and
review setup data.
14
Page 29

Quick Start Plug and Play
6. Select the Upload Option:
a. a specific player,
b. a group of players,
c. all players,
6A If uploading to one specific Firefly, select the Direct
Upload to Firefly option, otherwise leave unchecked.
7. Click Begin Update button.
When the upload completes, close the Update Control window.
The Firefly MZ loads immediately and begins playing back the
playlist. If using a schedule, the playback begins at the appropriate
time.
15
Page 30
Quick Start Plug and Play
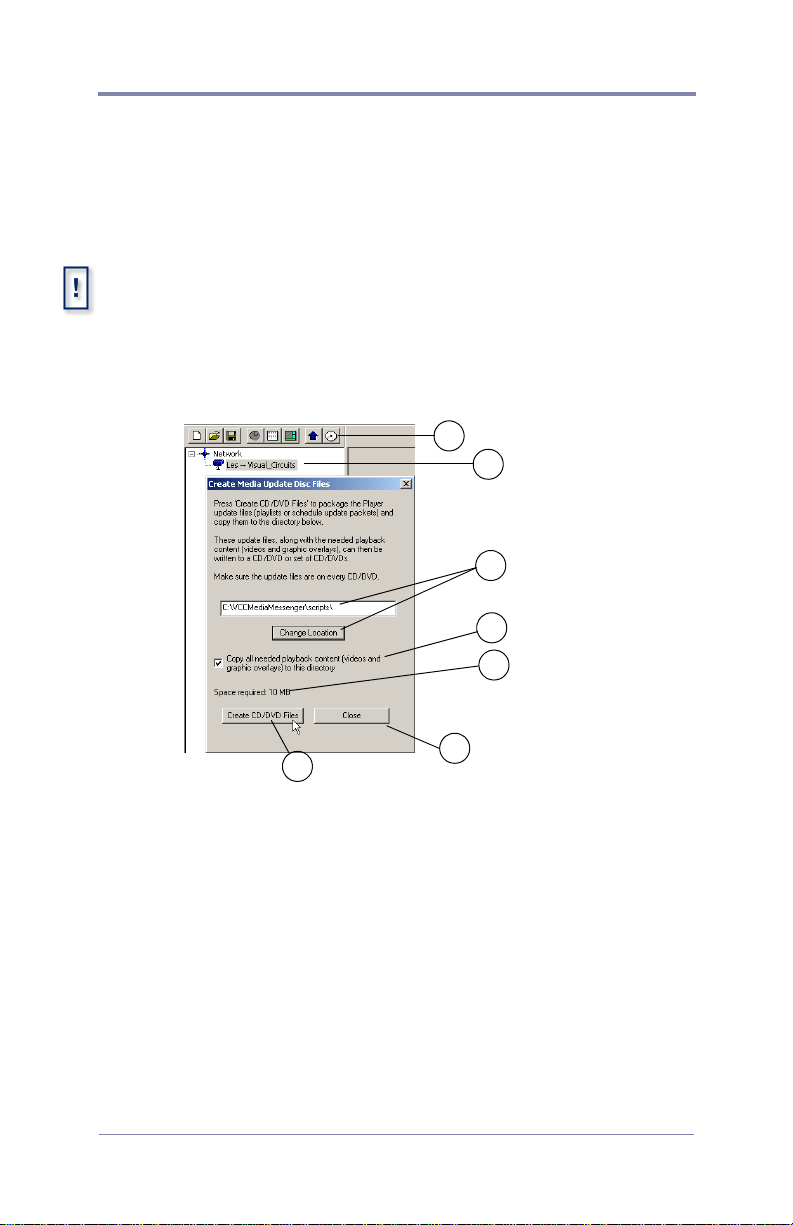
Via CD/DVD
Another method of transporting playlists, schedules, and media
files is to create a media update disc.This process creates the
content image of an autorun disc (CD/DVD).
Media Messenger does not burn a CD or DVD. It prepares the
necessary files so that when they are burned on to a disc, an
autorun application is created.
1. Go to the Media Messenger main workspace and select the
player or group that is to receive the update.
2
1
3
4
5
6
7
2. Select the Publish to CD/DVD icon.
3. Verify that the correct destination for the files is shown in the
destination field: change if necessary.
4. Check the Copy All Needed ... box.
5. Verify that the total space required does not exceed the
capacity of the CD or DVD disc.
6. Click on Create CD/DVD Files.
7. Click on Close.
8. Use CD/DVD creation application to burn files on a disc.
16
Page 31

Quick Start Plug and Play
Software Updating
Visual Circuits is continuously looking for ways to improve and
expand its features and product performance. We provide a variety
of simple methods to keep your Firefly updated with the latest
software for your application.
Software updates are available from www.visualcircuits.com or by
requesting a CD/DVD FROM a Visual Circuits representative.
Software updates and upgrades are processed with the following
methods.
1. Multicast (optional) updating: An active update that finds a
.upd file will automatically update and restart the system. See
Multicast Updating on page 108
2. HTTP/FTP updating: An active update that finds a .upd file in
the /updates folder will automatically update & restart the
system. See
3. Webview Firefly Update: Used to manually select the .upd file
from your PC through the Webview interface. System
automatically updates and restarts. See
Update on page 30
Automatic Updating: on page 103.
Webview Software
WARNING
Whenever performing a software update it is important to allow the
update to complete before rebooting the Firefly.
17
Page 32

18
Page 33

ENCODING REQUIREMENTS
AND RECOMMENDATIONS
In order to ensure proper playback on the Firefly, the MPEG
content must be encoded following a particular set of encoding
requirements. The Encoding Requirements, as well as the
Encoding Recommendations, listed below provide a brief set of
criteria to create MPEG files that will be compatible with the
Firefly playback system.
Encoding Requirements
1. Files must be program stream MPEG2 or system stream
MPEG1 of audio/video, or elementary stream MPEG2 or
MPEG1 of video only or audio only.
2. Use 4:2:0, not 4:2:2 encoding.
3. In MPEG-2, both audio and video fields should be encoded.
This is the normal default.
4. Audio only (Dolby Digital or MPEG Layer 2) files cannot be
mixed with files containing videos (MPEG, MPEG2 program
stream, video only).
5. Firefly – Standard IDE Hard Drive): The total bit rate of a
Firefly player must not exceed 40 mbps.
6. The presentation time stamp (PTS) values contained in the
audio and video streams in a file must be continuous and
increasing. In particular, the PTS values should not reset to 0 at
any point in the file. The time between the first and last time
stamps in a file should reflect the actual duration of the file.
7. Files should be no less than 4 megabytes in size. If some of
your files are smaller than 4 megabytes, use an editor to
combine the files to create a single file at least 4 megabytes in
size.
8. Files should be no larger than 2 gigabytes in size.
19
Page 34

Encoding Requirements and Recommendations
Encoding Recommendations
1. Resolution: 720 X 480 or 704 X 480 in NTSC; 704 X 576 in
PAL.
2. Closed GOP (Group of Pictures) with an “I-frame” every 15
frames is recommended.
3. The recommended audio bit rate is 384kbps and a sampling
rate of 48khz. It is recommended to play back test files using
the original source tapes to confirm audio levels prior to
encoding an entire project. This will allow for calibration of
the encoding system to obtain a standard audio level.
4. Program stream files should have one end code (00 00 01 b9)
at the very end of the file. The Firefly can handle files without
end codes, but it is still a good idea to include one.
5. The bit rate can affect the size and transferability of the files.
The recommended bit rates for various types of video content
are as follows:
Bit Rate Video Content
4 mbps Good quality with low motion
6 mbps Good quality with typical motion
8 mbps Good quality with high motion
10 mbps High quality with demanding content
Tab le 1 . Bit Rate Encoding Recommendations for Firefly
6. Although Firefly can transcode NTSC and PAL, it is
recommended to encode to the video standard (NTSC or PAL)
that you will be setting your Firefly to display.
20
Page 35

Encoding Requirements and Recommendations
7. When encoding files, annotate and store notes on the audio
levels of both the source tape and input settings of the encoder.
It will then be possible to verify audio levels of later encoding
sessions. It is desirable to maintain a baseline audio level
across all files of a presentation whether at single or multiple
locations. If no encoding notes or data is available from
previously encoded files, compare the files. When possible,
measure audio levels of the source tapes and of the encoded
files. At a minimum, listen to and compare files. Even if
encoding is done at the same production facility, variances
between sessions may occur. Once MPEGs are encoded, the
audio level of a file cannot be changed unless the file is reencoded or a new audio track is mixed.
8. MPEG files are constructed from intertwined (i.e. multiplexed)
audio and video streams. The length of video and audio stream
segments within MPEG files should be identical if possible.
Ending the audio segment at a .5 second interval (i.e., at an “Iframe”) will ensure identical stream lengths, providing smooth
and seamless looping playback.
9. When encoding SMPTE tracks it is recommended to encode
these tracks "hot"--at approximately +6db. This adjustment
can compensate for some SMPTE information that may be lost
during compression. Not all encoders will respond in the same
way. Sample testing should be done with all SMPTE tracks.
10. Standard color bars and audio test tones: MPEG files may be
encoded along with the content or source files for reference
and calibration. These encoded display test/tuning files should
be separate files--not headers or footers of the presentation.
11. To play back still images or computer-based graphics, we
recommend software encoders such as DVMPEG
(www.darvision.com). Yet, whenever possible, hardware-based
encoding systems are preferred.
Multiplexing a blank audio track on all video only MPEG files is
highly recommended.
21
Page 36

22
Page 37

WEBVIEW
The WebView interface allows you to access a Firefly over a
network using only a conventional web browser. No special
software is required. WebView is compatible with Microsoft
Internet Explorer
with other web browsers, Visual Circuits cannot guarantee full
compatibility.
Accessing the WebView Interface
Firefly-SC comes factory default with a static IP of 10.0.1.1 and can be
modified to a different IP or changed to DHCP.
Login = firefly
Password = 123456
Setup Procedures:
Step 1: Connect to the Network
™
5.5 and higher. While WebView may work
To begin, both the Firefly and the computer you will be using to
access the Firefly must be on a common network. If you need help
setting up these connections you should contact your IS
department.
WARNING
While it is possible to use WebView over the Internet, all security
provisions must be provided by the user's network. Firefly does not
include any special security measures and because the user name
and password can be displayed as clear text through the on-screen
menu system, it is possible for anyone with physical access to the
unit to obtain this information.
23
Page 38
WEBVIEW
Step 2: Determine the Address of the Firefly
Once proper network connections are confirmed on both the
Firefly and the web browser computer, you will need to know the
IP address or DNS name (if your network has a DNS server) of the
Firefly.
Using DHCP, you should also be able to use the address “http://
hostname” or “http://hostname.yourdomain” to access the Firefly without
knowing the exact IP address.
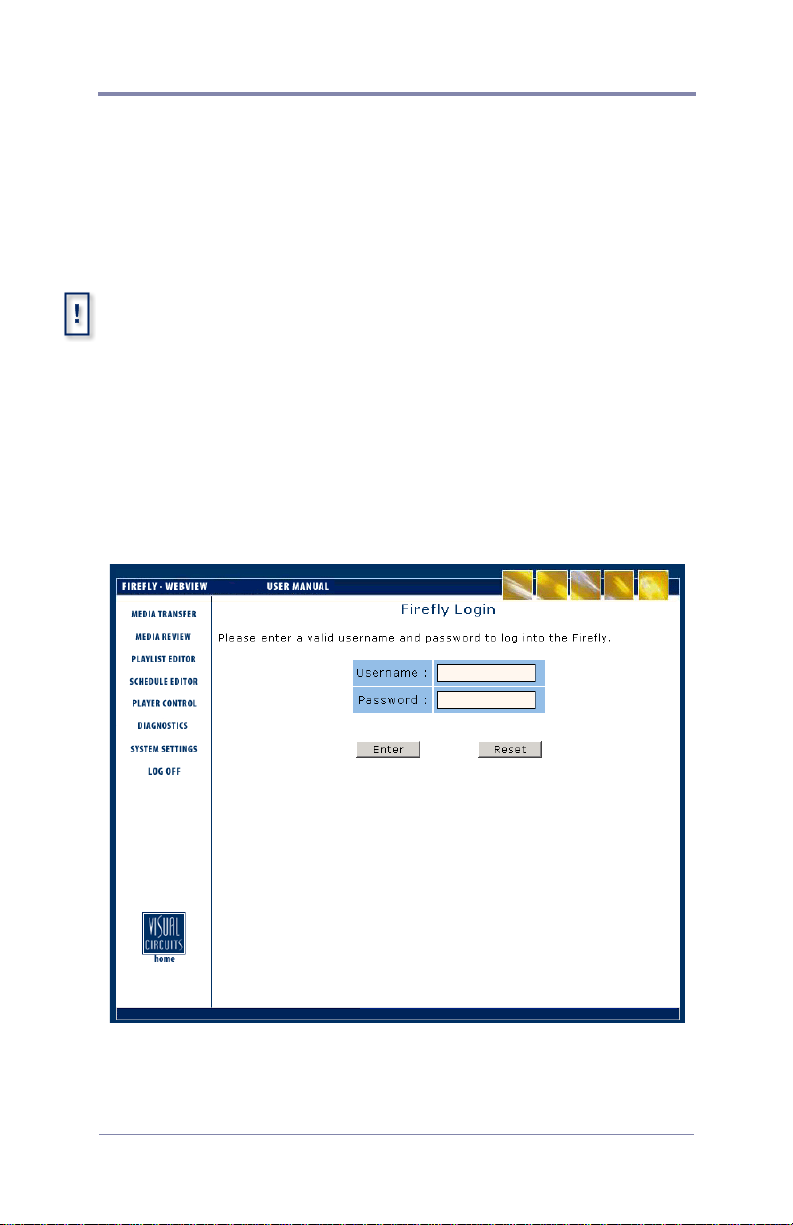
Step 3: Establishing Communication with the Firefly
To begin working with the Firefly you should launch your Internet
browser program and enter the IP address (or DNS name if
appropriate) in the address field. If you have successfully
established communication with the Firefly, you will see a screen
like the one displayed here.
Figure 1. Login Page
24
Page 39

WEBVIEW
Step 4: Enter Your User Name and Password
All Firefly’s ship from the factory with a default user name of
“firefly” and default password “123456”. If you have not yet
changed those defaults, you should enter them at this time.
Otherwise, if you have already created a new user name and
password, enter them now.
Keep in mind that both the user name and password are case
sensitive and require a minimum of 6, but no more than 30,
characters.
Forgot Name, Password, IP...???
If you’re in a situation where you cannot get into the Webview
interface because of a misplaced “User Name, Password, IP
address, DNS Name, etc. Or perhaps the system was inadvertently
set to DHCP when you don’t even have a DHCP server. There’s
still hope. See
Networking Commands on page 134.
Basic Hyper Terminal Setup on page 120 &
WARNING
Default user names and passwords are a favorite tool of hackers.
Since many people never bother to change the defaults, once
hackers learn them they will try them on every like product they
find. Your first layer of security should always be to change the
default settings immediately.
25
Page 40

WEBVIEW
Using the WebView Interface
Once you have logged onto the WebView Interface, your browser
will go to the “Media Transfer” page as the default starting point
page 27). Along the left side of the page are the navigation buttons
(
used to access different pages in the WebView interface. At the top
is a link to download the Firefly User Manual in PDF format.
There is a link to the Visual Circuits web site in the lower left
corner of the page.
The Visual Circuits web site link will actually take you out of the WebView
interface to Visual Circuits Internet web site. If you are not connected to
the Internet through your network, this link will not work. The user manual
download, however, comes directly off of the Firefly and therefore will
work even without an Internet connection.
26
Page 41
WEBVIEW
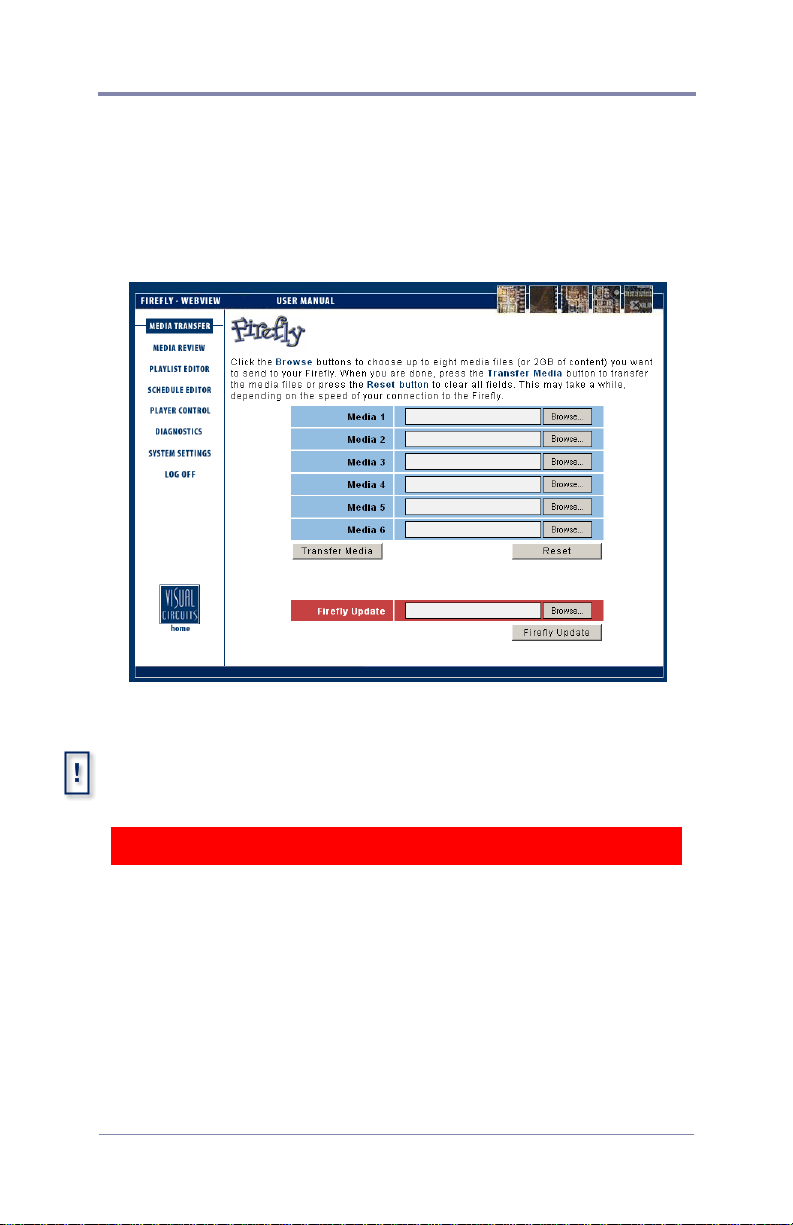
Transferring Media
From this page you can transfer media from your computer or
network to the Firefly. Up to six media files can be transferred at
once by simply specifying the files to be transferred in each of the
Media 1 through Media 6 boxes.
Figure 2. Media Transfer Page
If you close or select another web page during a media transfer, the
transfer will terminate. If you would like to multi-task during a transfer, you
may open a new web browser and log in.
WARNING
Do not use the Internet Explorer “History” function within WebView.
Because the WebView interface needs to query the Firefly player to
refresh, pulling the history out of the Internet Explorer cache file will
cause inconsistent results. For the same reason, do not use the
Internet Explorer backward or forward navigation buttons. Use the
WebView navigation buttons instead.
27
Page 42
WEBVIEW
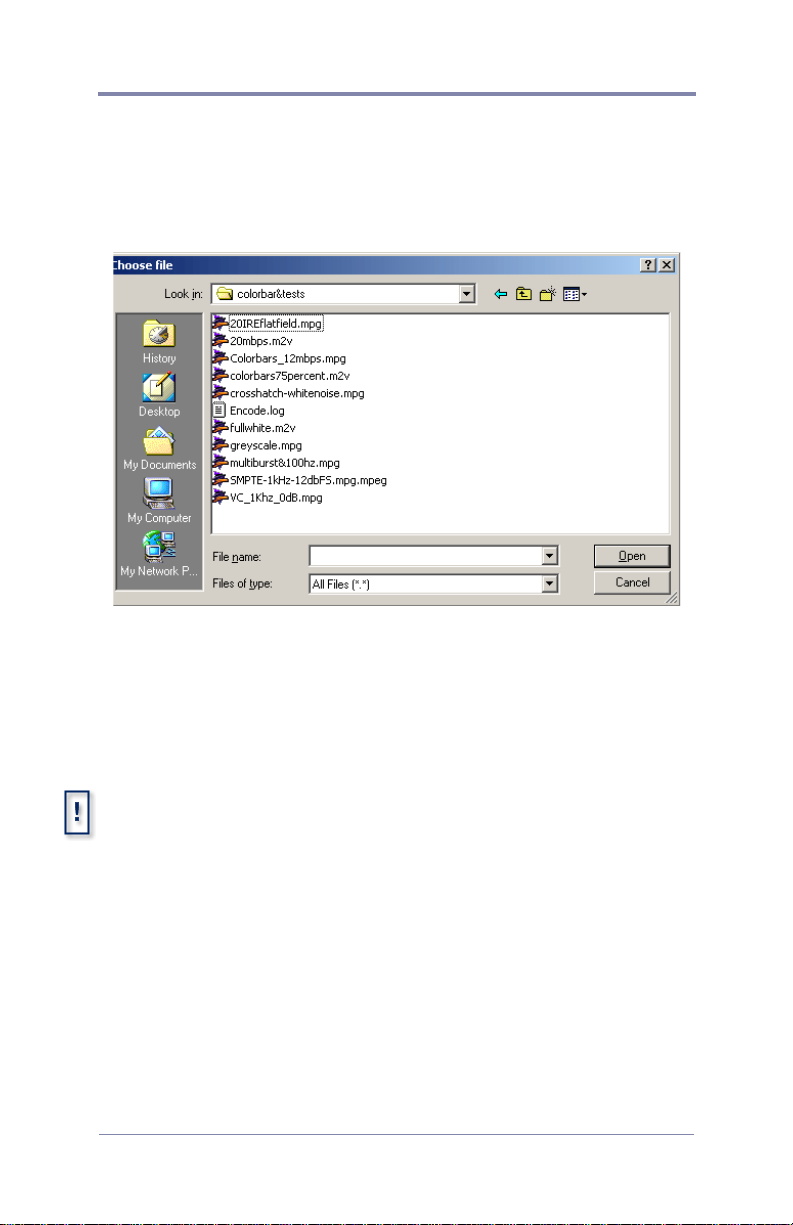
If you cannot remember the names and locations of the files you
wish to transfer, simply click the Browse button to the right of the
box you wish to fill in. This will bring up a window that allows
you to search your hard drive(s) and network for the desired file.
Figure 3. Browse for Files Window
After you have selected all the media files you wish to transfer to
the Firefly, clicking the Transfer Media button will initiate the
transfer. If you wish to change your selections before the transfer
begins, you can click the Reset button to clear all selections.
While copying .jpg, .gif, .tga, .png or non 256-color .bmp image files,
Firefly converts those files to a standard 8-bit, 256-color bitmap format
and reduces the image sizes, if necessary, to the system maximum of
720 x 480 for NTSC. As a result, all image files listed on the system have
the file extension .bmp. The conversion to .bmp format ensures that all
graphic overlays are consistent in appearance and functionality.
An alternative to the auto-formatting performed by the Firefly is to create
the images and convert them to the 8-bit standard mentioned above
before importing them.
28
Page 43
WEBVIEW
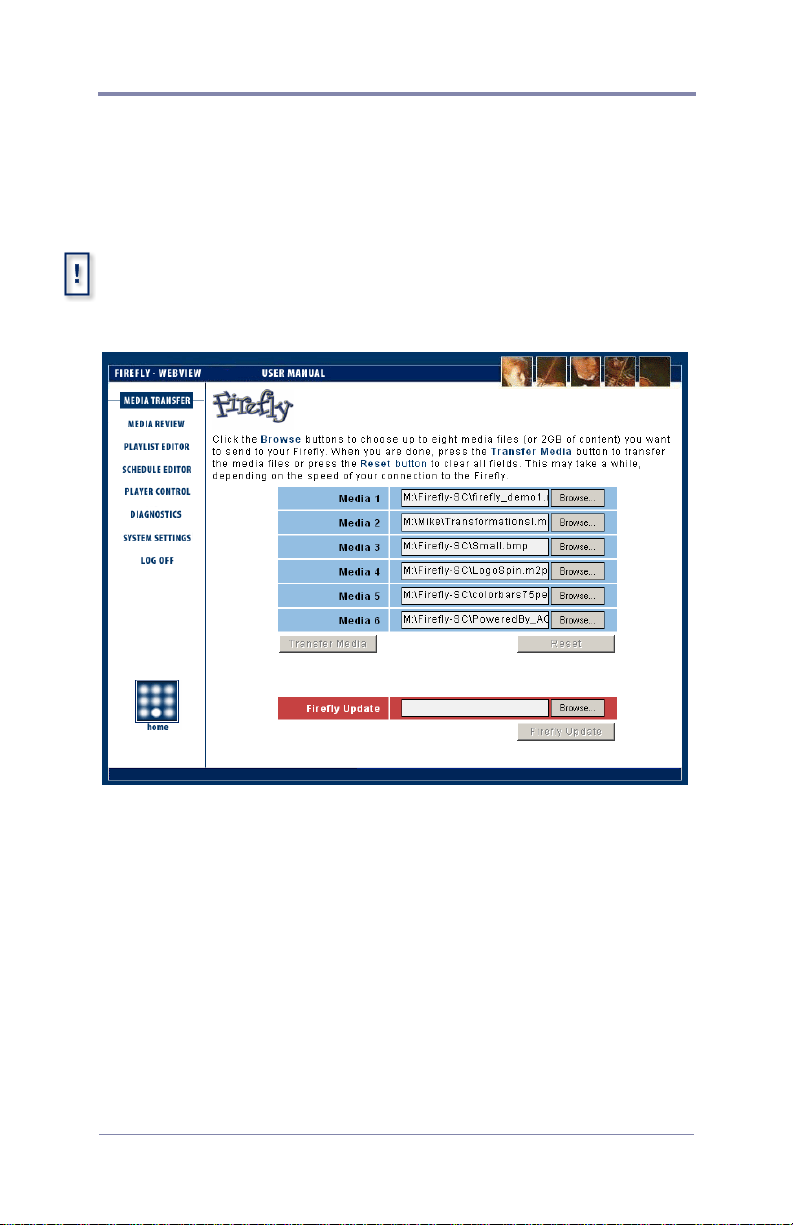
When WebView begins transferring the selected files, an animated
sequence of flashing circles will appear over the Visual Circuits
logo in the lower left portion of the page to let you know that the
transfer is in progress.
Because media files can be quite large, the transfer process can take
several minutes depending on the size of files you have selected and the
speed of your network connection.
Figure 4. WebView Media Transfer In Progress
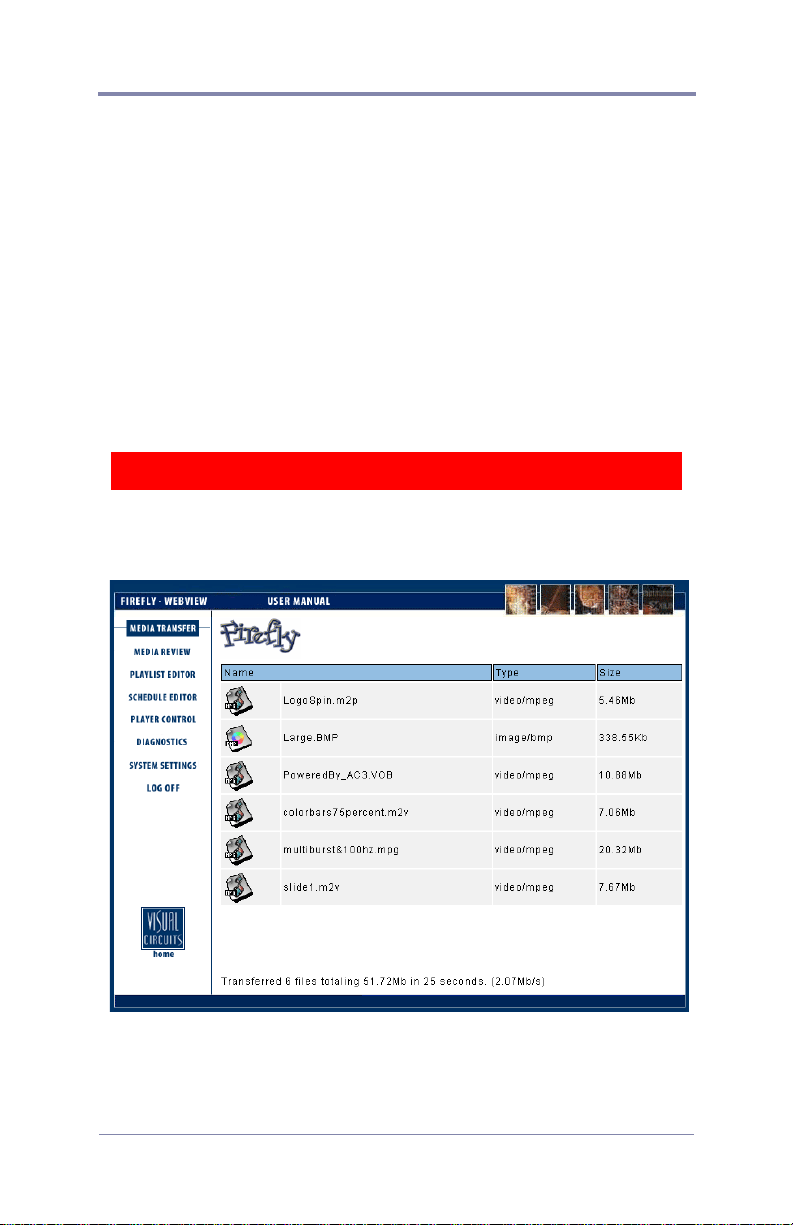
After WebView has successfully transferred all of the selected files
to the Firefly, a summary page will be displayed showing what was
uploaded. If you wish to transfer more files to the Firefly, you may
return to the Media Transfer page by clicking the Media Transfer
navigation button on the left side of the screen.
29
Page 44
WEBVIEW
Webview Software Update
To update your Firefly using the Media Transfer-Firefly Update
method, simply browse your PC for the .upd file you may have
obtained from the Visual Circuits web site or CD ROM. Now
select “Firefly Update”. After the file has been transferred, the
system will immediately begin to process the update for approx. 60
seconds and then restart the player.
You may notice some video stuttering during the update, but this is
completely normal as the update requires a significant amount of
processing bandwidth. After the player has restarted, verify that the
system version has changed, indicating a successful update.
WARNING
Do Not Reboot the Firefly while the update is going on.
Figure 5. Media Transfer Summary Page
30
Page 45
WEBVIEW
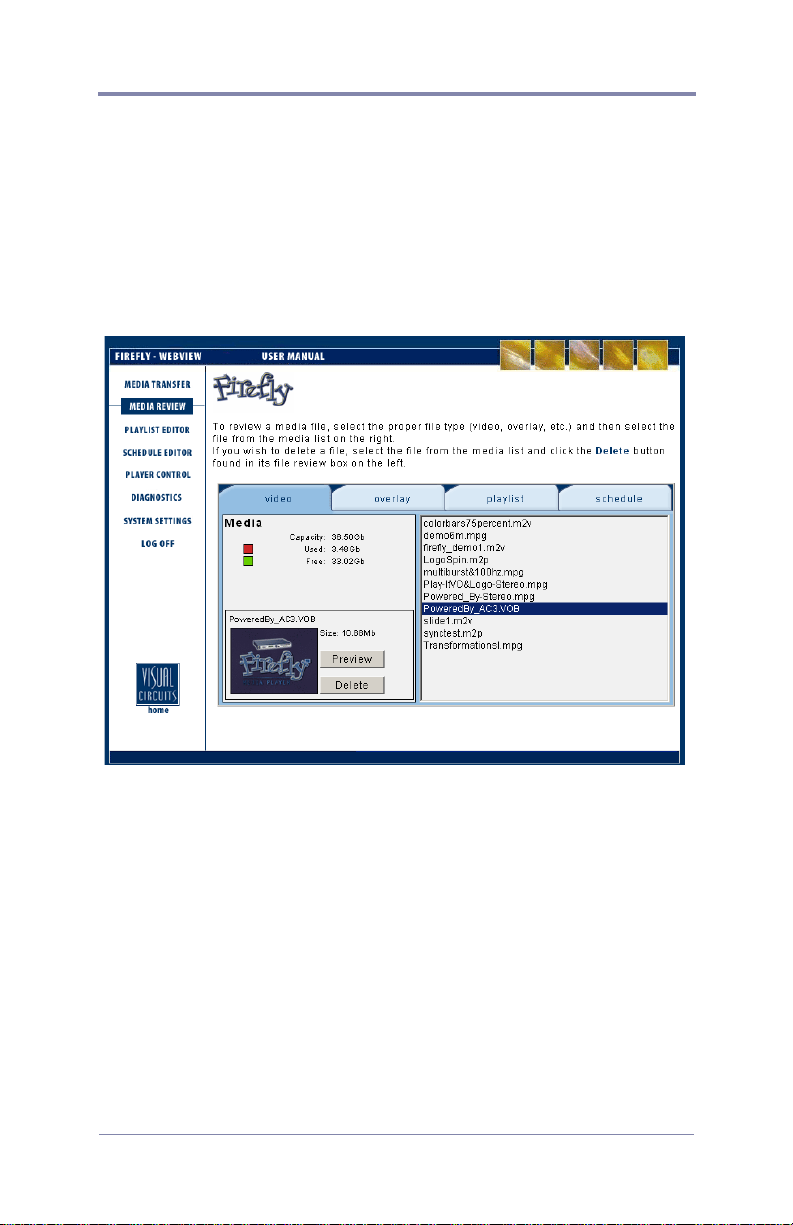
Reviewing, Previewing and Deleting Firefly Media
Within the WebView Media Review page, you will be able to
review media and storage usage on the Firefly, preview video and
graphic overlay media on the Firefly and delete media from the
Firefly.
Figure 6. Media Review Page (Video)
Reviewing Media and Storage Usage on the Firefly
The Media Review page allows you to review the video and
graphics overlay files that are currently on the Firefly.
To review a video or graphic overlay:
1. Select the proper file type tab (video or overlay) at the top.
2. Select the file from the media list on the right.
The media review box on the left will display the name of the file
and its size (in MBs).
31
Page 46

WEBVIEW
In addition, you will be able review the current storage status of the
Firefly by observing the current “Used” space and “Free” space
displayed in the upper left portion of the Media Review window.
Previewing Videos and Graphic Overlays on the Firefly
Within the Media Review page, you will be able to view basic
previews (thumbnail images) of videos and graphic overlays on the
Firefly.
To preview a video on the Firefly:
1. Select the video tab at the top.
2. Select the file from the media list on the right.
The media review box on the left will display the name of the
file and its size (in MBs).
3. Click the “Preview” button.
A short series of still, thumbnail images from the video will be
displayed in an animated sequence. This is a useful feature for you
to see what is in the video, especially when a file name is not
descriptive.
After you have previewed a particular video on the Firefly once,
the thumbnail images will be stored on the Firefly allowing the
preview to load automatically in successive review attempts.
In some cases, certain video files will be unavailable for preview.
To preview a graphic overlay on the Firefly:
1. Select the overlay tab at the top.
2. Select the file from the media list on the right.
The media review box on the left will display the name of the file,
its size (in MBs) and a thumbnail preview of the graphic overlay
image.
32
Page 47
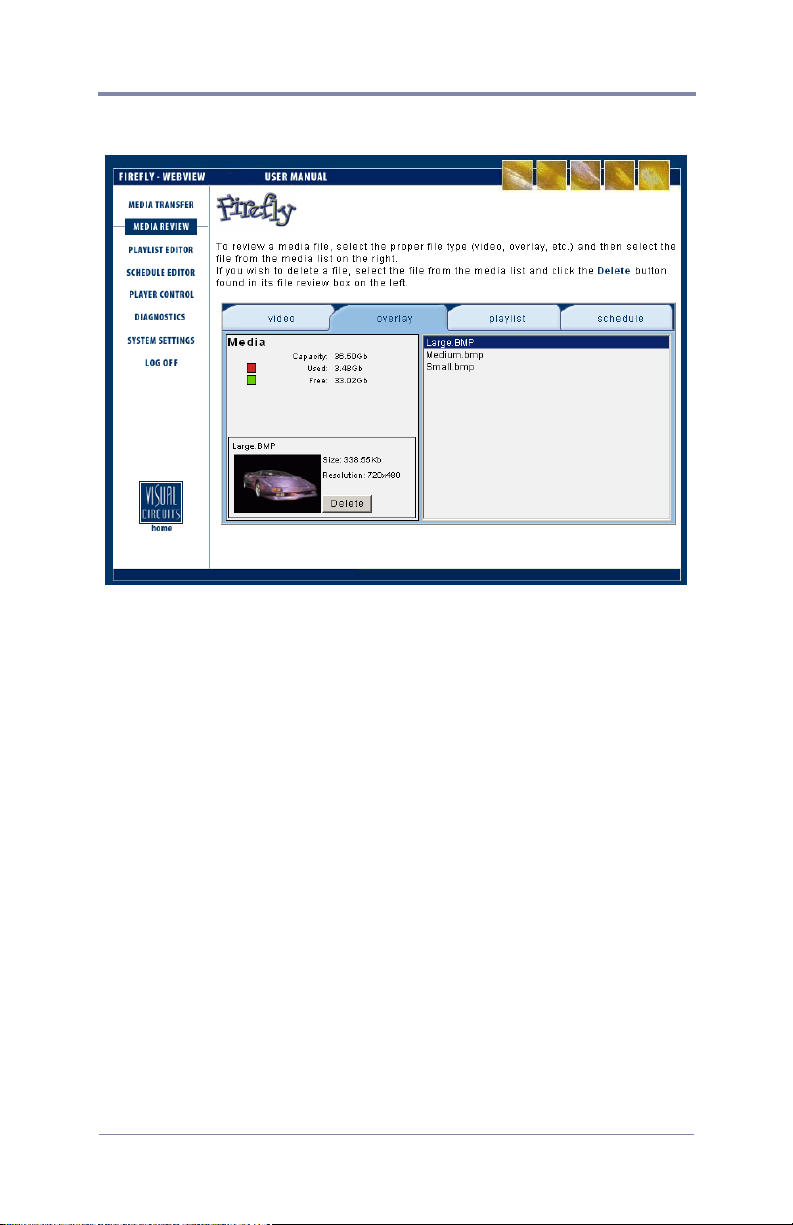
Figure 7. Media Review Page (Graphic Overlay)
WEBVIEW
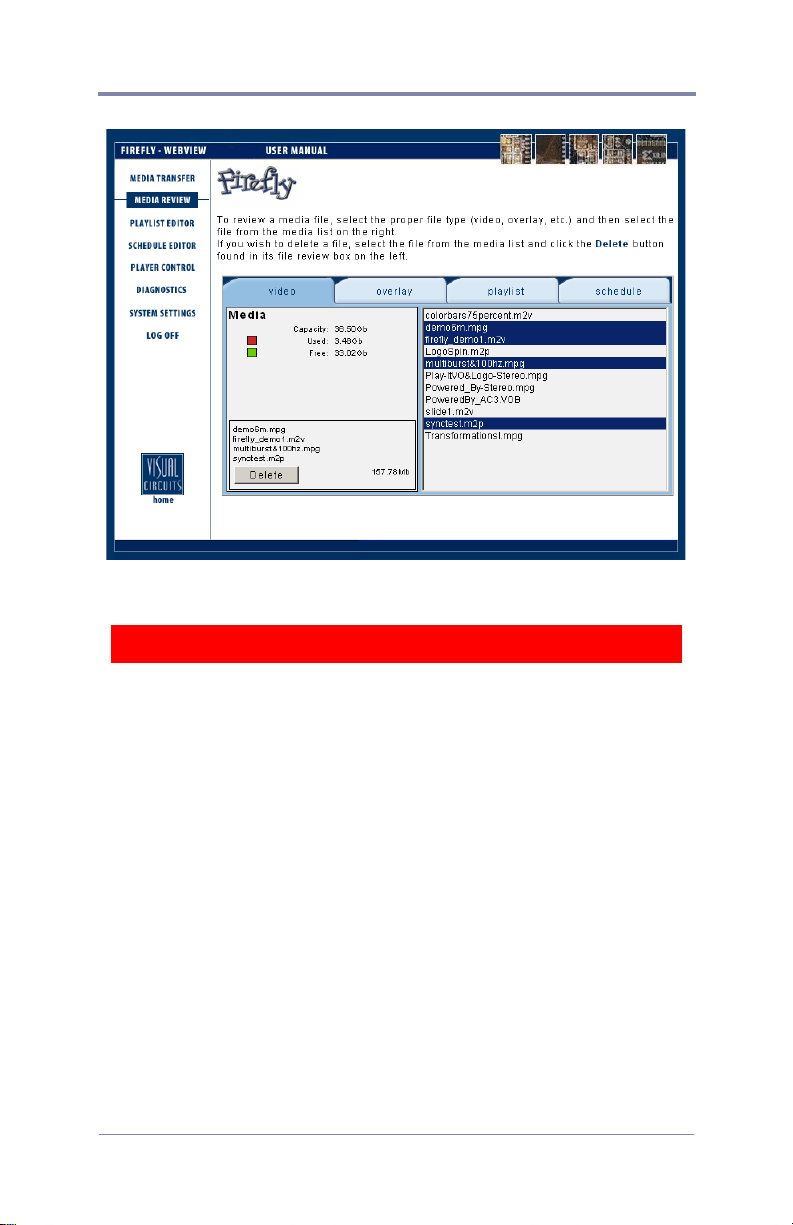
Deleting Media from the Firefly
1. Select the proper file type tab (video, overlay, playlist or
schedule) at the top.
2. Select the file(s) from the media list on the right. If you would
like to select multiple files at the same time, you can use the
standard Windows ‘Shift/Control’ methods.
The media review box on the left will display the name of the
file and its size (in MBs). In cases where you have selected
more than one file, all of the file names will be listed along
with a total combined size (in MBs) for the group of files.
3. Click the “Delete” button.
The media file(s) will be deleted from the Firefly storage.
33
Page 48
WEBVIEW
Figure 8. Media Review Page (Deleting Multiple Files)
WARNING
You may delete any or all media files from the Firefly in this fashion.
This includes files that may be in use by the current playlist. If you
delete a file that is currently playing, it will be allowed to finish
playing before the file is actually removed. The next time it is called
by the playlist it will be skipped.
There is no way to recover files after they have been deleted.
34
Page 49
WEBVIEW
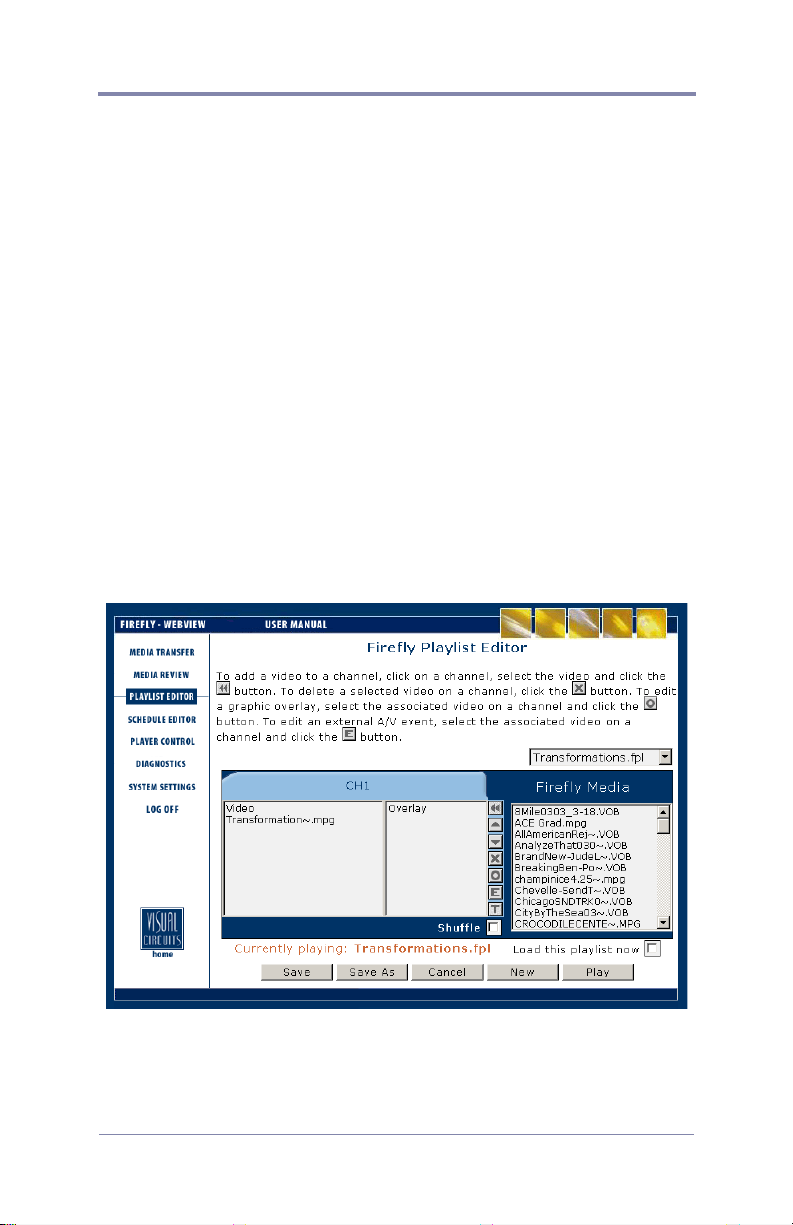
Using the Playlist Editor
Within the Playlist Editor, you will be able to arrange videos on the
Firefly into a playlist. A playlist is essentially a group of videos
arranged in a particular playback sequence. A playlist can be used
for immediate playback or saved on the Firefly for future playback.
In addition, within the Playlist Editor, you will be able to utilize
graphic overlays. A graphic overlay is a static image (.bmp, .jpg,
.gif, .tif, .tga or .png) placed over an associated video. You can
assign individual graphic overlays to specific videos within a
playlist or to all videos within a playlist if desired. The graphic
overlay feature provides an effective way to display a company
logo, sale sign or any other image over your regular video
playback.
To access the Playlist Editor, click on the Playlist Editor navigation
button on the left side of the WebView interface.
Figure 9. Playlist Editor Page
35
Page 50

WEBVIEW
Creating a New Playlist
The process for creating a new playlist may be started in one of
two ways; by choosing “New Playlist” from the “Playlist” drop
down menu or by clicking on the “New” button in the lower right
corner.
Adding Videos to a Playlist
To add a video to a playlist:
1. Browse the Firefly Media list to locate the video you wish to
add.
2. Once you have found the video you wish to add, select it and
then click on the
panel.
Additional videos you wish to add must be selected and added one
at a time.
1. The chosen video file will always be added to the end of the list and
2. All MPEG files used in a given layout need to be of the same
can be used multiple times.
resolution and size. This provides for a smoother transition between
the videos.
button located on the center buttons
Removing Videos from a Playlist
To remove a video from the playlist:
1. Select the video in the Video listbox.
2. Click on the button located on the center buttons panel.
This will remove the video from that specific playlist (not from
the Firefly entirely).
Additional videos you wish to be deleted must be selected and
deleted one at a time.
36
Page 51

WEBVIEW
Moving Videos Within a Playlist
While you are creating or modifying a playlist, you may find
yourself wanting to modify the order of the videos.
To move a video up (towards the beginning) in a playlist:
1. Select the video (from the Video list) you would like to move.
2. Press the button until the video is where you want it within
the playlist.
To move a video down (towards the end) in a playlist:
1. Select the video (from the Video list) you would like to move.
2. Press the button until the video is where you want it within
the playlist.
Continue using the method outlined above to move other videos in
order to create your desired playlist.
Shuffling Video Playback on a Channel
Occasionally, you may want to vary the playback order of your
videos for a given playlist. The Shuffle playback feature within the
Playlist Editor allows you to do just that. By activating Shuffle
playback, videos within the playlist you are working with will be
played back in random order.
To turn Shuffle playback “On” or “Off” for a playlist, simply
check (for On) or uncheck (for Off) the Shuffle checkbox located
at the bottom right of the applicable playlist.
Adding Graphic Overlays to a Playlist
The process for adding graphic overlay files to a playlist is
basically the same as the process of adding video files. The one
significant difference, however, is that a graphic overlay is always
linked to a particular video. Where adding a video creates a new
line at the end of the playlist, adding a graphic overlay attaches the
overlay to the currently selected video entry in the Video listbox.
Therefore, at least one video must be in the Video listbox before
you can add any type of graphic overlay.
37
Page 52

WEBVIEW
There are two ways you can add a graphic overlay to a video.
The first method is as follows:
1. Click on the video within the playlist that you would like the
overlay to associate with.
2. Locate and then click on your desired graphic overlay from the
Firefly Media list.
3. Click on the button to add the graphic overlay.
The graphic overlay you selected will appear across from its
associated video in the Overlay listbox. The properties of the
overlay will be set to the default settings. If you wish to modify the
graphic overlay properties at this point, select either the video or
the graphic overlay and then click on the
button to display the
Graphic Overlay Properties page. You may make your desired
changes in this screen (see
Working With Graphic Overlays in a
Playlist on page 39 for details).
If a graphic overlay is added while a video that already has an associated
graphic overlay is selected on the playlist, the new selection will replace
the original contents.
The second method, which allows you to review and/or adjust the
graphic overlay properties before saving, is as follows:
1. Click on the video within the playlist that you would like the
overlay to associate with.
2. Click on button to display the Graphic Overlay Properties
window.
3. Click on the Overlay Filename drop down menu to locate and
select your desired graphic overlay from the Firefly Media list.
4. Review and/or adjust the overlay properties (see Working With
Graphic Overlays in a Playlist on page 39 for details on this).
5. Click the OK button.
The graphic overlay you selected will appear across from its
associated video in the Overlay listbox.
38
Page 53
WEBVIEW
Working With Graphic Overlays in a Playlist
As previously noted, graphic overlays exist in a playlist as
attributes of specific video entries. The only image types that are
compatible with Firefly are .bmp, .jpg, .gif, .tga or .png.
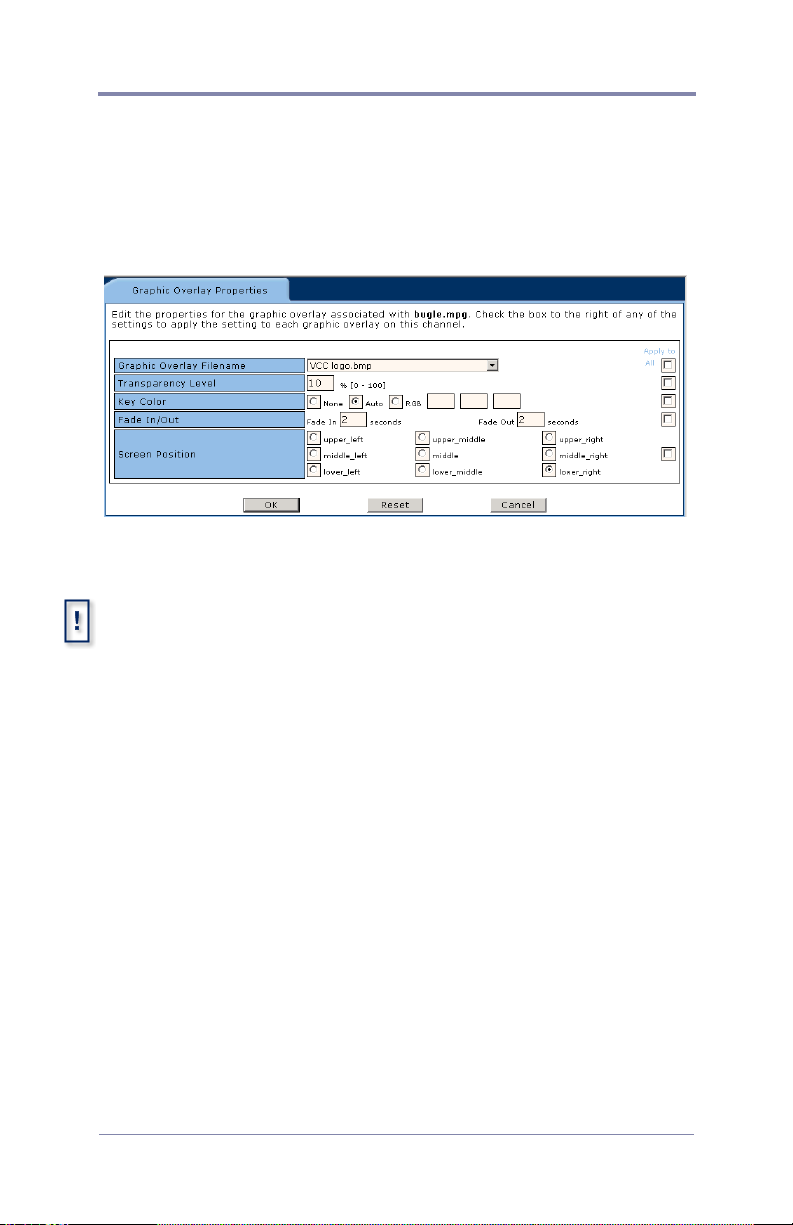
Figure 10. Graphic Overlay Properties Page
While copying .jpg, .gif, .tga, .png or non 256-color .bmp image files,
Firefly converts those files to a standard 8-bit, 256-color bitmap format
and reduces the image sizes, if necessary, to the system maximum of
720 x 480 for NTSC. As a result, all image files listed on the system have
the file extension .bmp. The conversion to .bmp format ensures that all
graphic overlays are consistent in appearance and functionality.
An alternative to the auto-formatting performed by the Firefly is to create
the images and convert them to the 8-bit standard mentioned above
before importing them.
39
Page 54

WEBVIEW
The process for altering the characteristics of a specific graphic
overlay is as follows:
(Skip steps 1 and 2 if you have already selected a graphic overlay
and are within the Graphic Overlay Properties page).
1. Select the video you would like the graphic overlay to be
associated with and then click on the
button to display the
Graphic Overlay Properties page.
2. Click on the Overlay Filename drop down menu to locate and
select your desired graphic overlay from the Firefly Media list.
3. If desired, select a level of transparency between 0 and 100%.
This value will adjust to what extent the graphic overlay covers
the video below. If you want the graphic overlay to blend in
with the video, you may select a higher transparency level.
Conversely, if you would like the graphic overlay to stand out,
you may select a lower or zero-value transparency level.
4. If desired, adjust the key color. The key color property deals
with blocking out or cropping specified colors within the
graphic overlays. For example, if the image you are using is
your company logo (in color) and is placed on top of a white
rectangular background, you may only want to display the
company logo, instead of the logo on top of the white
background.
Within the key color property, there are three options: None,
Auto Key or RGB. You can choose None to not use the key
color option at all. You can choose Auto Key have the system
automatically make transparent the background color. The
system selects the color in the upper left most corner of the
image to determine which color to remove. In most instances,
Auto Key will be the easiest to use and most effective “make
transparent” method. Or you can choose to manually set the
RGB (Red, Green and Blue) key color level. The RGB option
requires you to know the specific RGB value of the color you
would like to “make transparent”
40
Page 55

WEBVIEW
Use a solid background (one color) in your graphic overlays
for the Auto key feature to work properly.
Entering your own RGB values for the key color feature only
works with 8 bit bitmap graphics less than or equal to
720x480 resolution.
5. If desired, adjust the rate (in seconds) at which you would like
the graphic overlay to fade in and/or out on the screen.
6. If desired, select the position on the screen where you would
like to have the graphic overlay located (example: left bottom).
7. If desired, use the check boxes on the right side of the screen.
The check boxes correspond to each of the graphic overlay
properties. These check boxes can be used to copy the
properties in their associated frames to all of the existing
graphic overlays across all channels in a playlist. For example,
if you would like ensure that all existing graphic overlays for a
given playlist always appear in the lower right corner, then you
would set the screen position attribute to right bottom and
would check the “Apply to All” box to the right of that frame.
If, for example, you would like to have the same graphic
overlay with all of the same properties applied to all of the
videos in a given playlist, you would check each of the “Apply
to All” boxes to the right of the option frames (Overlay
Filename, Transparency, Key Color, Fade In/Out and Position
on Screen).
8. Click the OK button to save your changes and to return to the
Playlist Editor screen.
41
Page 56

WEBVIEW
Adding Scrolling Text to a Playlist
The process for adding scrolling text to a playlist is basically the
same as the process of adding video files. The one significant
difference, however, is that scrolling text is always linked to a
particular video. Where adding a video creates a new line at the
end of the playlist, adding scrolling text attaches the text to the
currently selected video entry in the Video listbox. Therefore, at
least one video must be in the Video listbox before you can add
any text.
The Graphic Overlay & Scrolling Text features cannot be used
simultaneously on a single video file.
Adding Scrolling Text:
1. In the Playlist Editor page, select the video file which you want
to associate the scrolling text with and then select the
2. The Scrolling Text properties page will appear as seen in
Figure 11 on page 43.
3. You can type or paste text from another file into the “Scrolling
Text String” window. A maximum of 500 character spaces is
allowed.
4. Select OK, then Play to preview. Once you are satisfied, make
sure to Save your work.
5. Once you are satisfied with the results, select ‘Save’ or ‘Save
As’ another Playlist.
The properties of the scrolling text will be set to the default
settings. If you wish to modify the properties at this point, select
either the video or the scrolling text file and then click on the
button to display the Scrolling Text Properties page. You may
make your desired changes in this screen (See
Working With
Scrolling Text in a Playlist on page 43 for more details).
icon.
Characters & symbols, other than what is currently displayed on most
keyboard key caps, are not supported. Be aware of Word Processing
programs that have the “AutoCorrect” feature enabled.
42
Page 57
WEBVIEW
Working With Scrolling Text in a Playlist
As previously noted, scrolling text exist in a playlist as attributes of
specific video entries.
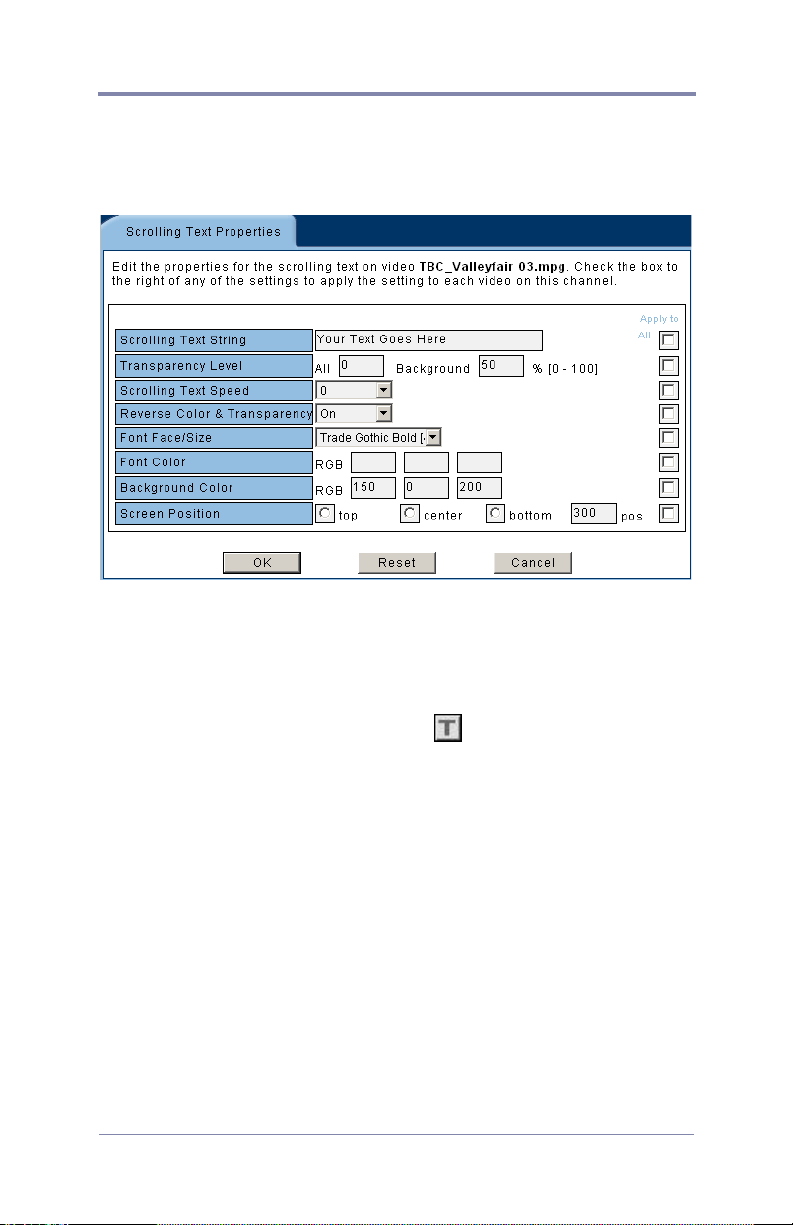
Figure 11. Scrolling Text Properties Page
The process for altering the characteristics of a specific text file is
as follows. Select the video you would like the scrolling text to be
associated with and then click on the
Scrolling Text Properties page:
button to display the
Transparency Level
1. All - If desired, select a level of transparency between 0 and
100%. This value will adjust to what extent both background
and text will “overlay” the video. If you want the background
& text to blend in with the video, you may select a higher
transparency level. Conversely, if you would like them both to
stand out, you may select a lower or zero-value transparency
level.
2. Background - The same rules apply here as “All” except only
the background is affected.
43
Page 58
WEBVIEW
3. Reverse - When Reverse is selected to the on position, the Text
assumes the position of Background & visa versa.
Entering your own RGB values for the background feature only works
with 8 bit bitmap graphics less than or equal to 720x480 resolution.
Saving a Playlist
Once you have finished editing a playlist, you may save changes
by clicking either the “Save” or “Save As” buttons at the bottom of
the screen.
❏ Clicking the “Save” button will overwrite the original
playlist file using the same file name.
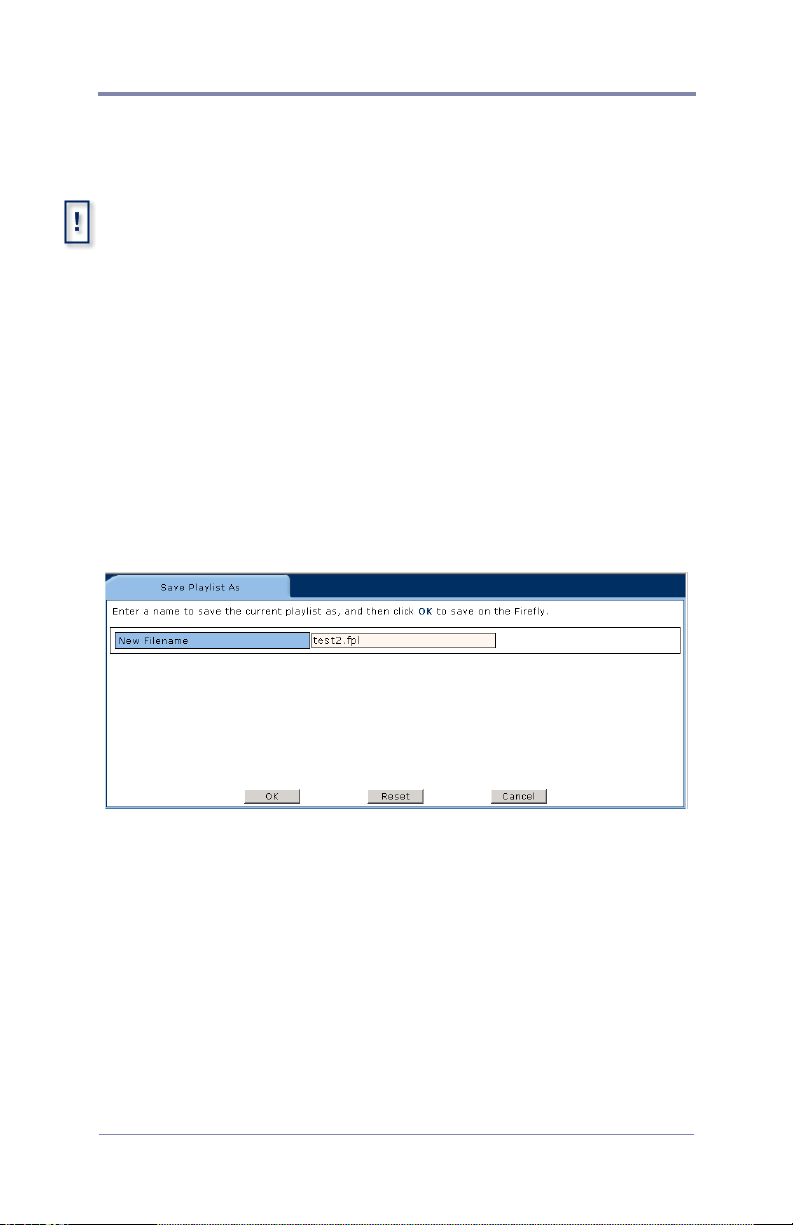
❏ Clicking the “Save As” button will bring you to a screen
where you will need to enter a new file name (maximum of
14 characters).
Figure 12. Save Playlist Dialog Box
After entering the new file name, click the OK button to save the
modified playlist and to return to the Playlist Editor main page.
❏ If you check the “Load this playlist now” check box (found
below the Firefly Media list), the modified playlist will
begin playing on the Firefly as soon as you save it. If you do
not check this box, the playlist will be saved, but playback
will not be started until the playlist is later selected for
playback.
44
Page 59

WEBVIEW
Playing a Playlist Quickly
If you are browsing through your playlists and find one you would
like to play right away, simply click the “Play” button, which is
located in the lower right portion of the Playlist Editor screen.
Clicking the “Play” button will overwrite the original playlist file
using the same file name and will begin designated playback on the
Firefly immediately.
45
Page 60
WEBVIEW
Using the Schedule Editor
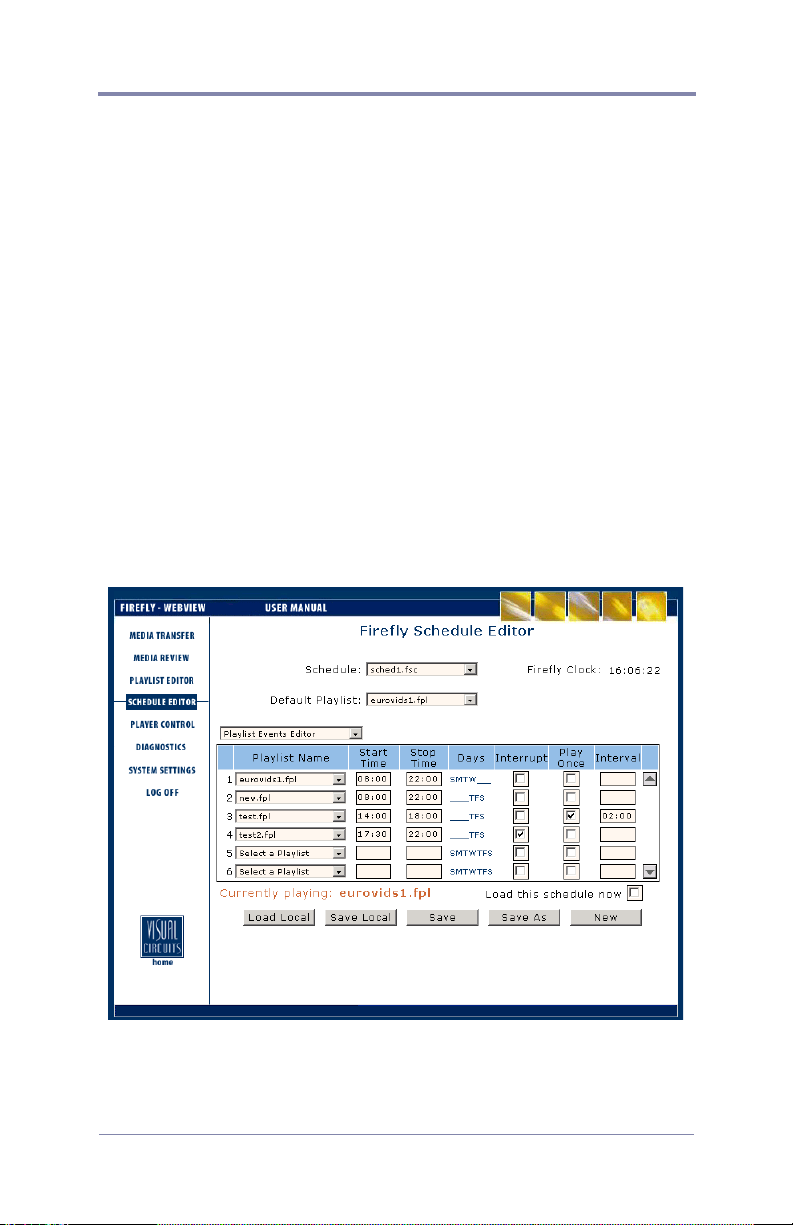
Within the Schedule Editor, there are two separate pages: the
Playlist Events Editor and the Video Dates Editor.
Within the Playlist Events Editor you will be able to work with
playback schedules. A schedule is a group of one or more playlist
events. An event is composed of a single playlist with adjustable
playback properties. Beyond simple start and stop times, events
can be set to play on certain days of the week, interrupt other
events, play just once or at certain repeating intervals.
The Video Dates Editor allows you to assign a specific start date,
end date or both a start and an end date for an individual video.
This is especially useful when you have time sensitive media that
you cannot have played before a certain date, after a certain date or
outside a certain date range.
To access the Schedule Editor, click on the Schedule Editor
navigation button on the left side of the WebView interface. By
default, the Playlist Events Editor will open.
Figure 13. Schedule Editor - Playlist Events Editor Page
46
Page 61

WEBVIEW
Creating a New Schedule
The process for creating a new schedule may be started in one of
two ways; by choosing “New Schedule” from the Schedule drop
down menu or by clicking on the “New” button in the lower right
corner.
Within the Playlist Events Editor page, you will have to option to:
add an event to a schedule, delete an event from a schedule, or edit
an event within a schedule. In addition, (using the Video Dates
Editor) you will be able to assign date rules to individual videos if
desired.
Each of the major tasks in the Playlist Events Editor involve
adjusting the event property fields. The following table provides
basic overviews and examples for each of the event property fields:
Property Description
Playlist
Name
Start Time
Stop Time
Days
Interrupt
Designates which playlist to play.
Example: “I’d like to have my product
demonstration playlist selected to play”.
Designates time to start playing playlist.
Example: “I’d like to have my playlist start playing
at 9:00”.
Designates time to stop playing playlist.
Example: “I’d like to have my playlist stop playing
at 18:00”.
Designates days of week to play playlist.
Example: “I’d like to have my playlist play only on
Thursdays, Fridays and Saturdays”.
Option to cut off video playing in previous playlist
instead of waiting for video to finish playing.
Example: “I’d like to have the video in my sales
promotion playlist interrupt the video in my product
demonstration playlist”.
47
Page 62

WEBVIEW
Property Description
Option to play playlist exactly once and then
return to previously scheduled playlist.
Play Once
Interval
Tab le 1 . Event Property Field Examples
Example: “I’d like to play my one hour specials
playlist just once during the business day”.
Option to repeat a “play once” event
periodically at a specified interval.
Example: “I’d like to play my one hour specials
playlist once every 2 hours throughout the
business day”.
Adding an Event to a Schedule
To add an event to a schedule:
1. Edit the event properties as described below.
a. Playlist Name: Choose a playlist from the “Select a
Playlist” drop down menu.
b. Start Time: Set the specific start time for the playlist using
the number keys on your keyboard.
c. Stop Time: Set the specific stop time for the playlist using
the number keys on your keyboard.
d. Days: Click on any of the days to display the “Days of the
Week” dialog box.
48
Page 63

WEBVIEW
Figure 14. Days of the Week Dialog Box
Click on which days of the week you would like the playlist to play
on. A “checked” box indicates the day is selected and an
“unchecked” box indicates the day is not selected. If you would
like to clear all of the day selections, click the Reset button. When
you are done making any desired changes, click the OK button to
return to the Schedule Editor screen.
e. Interrupt: Click on the Interrupt check box to have the first
video in a scheduled playlist start playing precisely at its
schedule time (interrupting or “cutting off” the video
playing in the previously scheduled playlist). This is useful
if you have a time sensitive playlist. A “checked” box
indicates that Interrupt is selected, interrupting the previous
video and an “unchecked” box indicates that Interrupt is not
selected, allowing the video to finish playing before the new
playlist begins playing.
f. Play Once: Click on the Play Once check box to choose to
have the playlist played back only once (regardless of its
time allotment). A “checked” box indicates that Play Once
is selected and an “unchecked” box indicates that Play Once
is not selected.
g. Interval: Click on the Interval check box to choose to have
a Play Once event played back once at a designated time
interval. Set the interval time using the number keys on your
keyboard.
49
Page 64

WEBVIEW
2. Once you have finished editing the schedule, you may save
your changes by following the instructions found in
Schedule on page 52.
Saving a
Deleting an Event from a Schedule
To delete an event from a schedule, use the following steps:
1. Locate the event (under playlist name) you would like to
delete.
2. Change the playlist to “Select a Playlist” from the playlist
name drop down menu. When done, this will delete the
playback event and its associated properties from the schedule.
3. Once you have finished editing the schedule, you may save
your changes by following the instructions found in
Schedule on page 52.
Saving a
Editing an Event within a Schedule
To edit an event within a schedule, use the following steps:
1. Edit the event properties as described below.
a. Playlist Name: Choose a playlist from the “Select a
Playlist” drop down menu.
b. Start Time: Set the specific start time for the playlist using
the number keys on your keyboard.
c. Stop Time: Set the specific stop time for the playlist using
the number keys on your keyboard.
d. Days: Click on any of the days to display the “Days of the
Week” dialog box.
50
Page 65

WEBVIEW
Figure 15. Days of the Week Dialog Box
Click on which days of the week you would like the playlist to play
on. A “checked” box indicates the day is selected and an
“unchecked” box indicates the day is not selected. If you would
like to clear all of the day selections, click the Reset button. When
you done making any desired changes, click the OK button to
return to the Schedule Editor screen.
e. Interrupt: Click on the Interrupt check box to have the first
video in a scheduled playlist start playing precisely at its
schedule time (interrupting or “cutting off” the video
playing in the previously scheduled playlist). This is useful
if you have a time sensitive playlist. A “checked” box
indicates that Interrupt is selected, interrupting the previous
video and an “unchecked” box indicates that Interrupt is not
selected, allowing the video to finish playing before the new
playlist begins playing.
f. Play Once: Click on the Play Once check box to choose to
have the playlist played back only once (regardless of its
time allotment). A “checked” box indicates that Play Once
is selected and an “unchecked” box indicates that Play Once
is not selected.
g. Interval: Click on the Interval check box to choose to have
a Play Once event played back once at a designated time
interval. Set the interval time using the number keys on your
keyboard.
51
Page 66
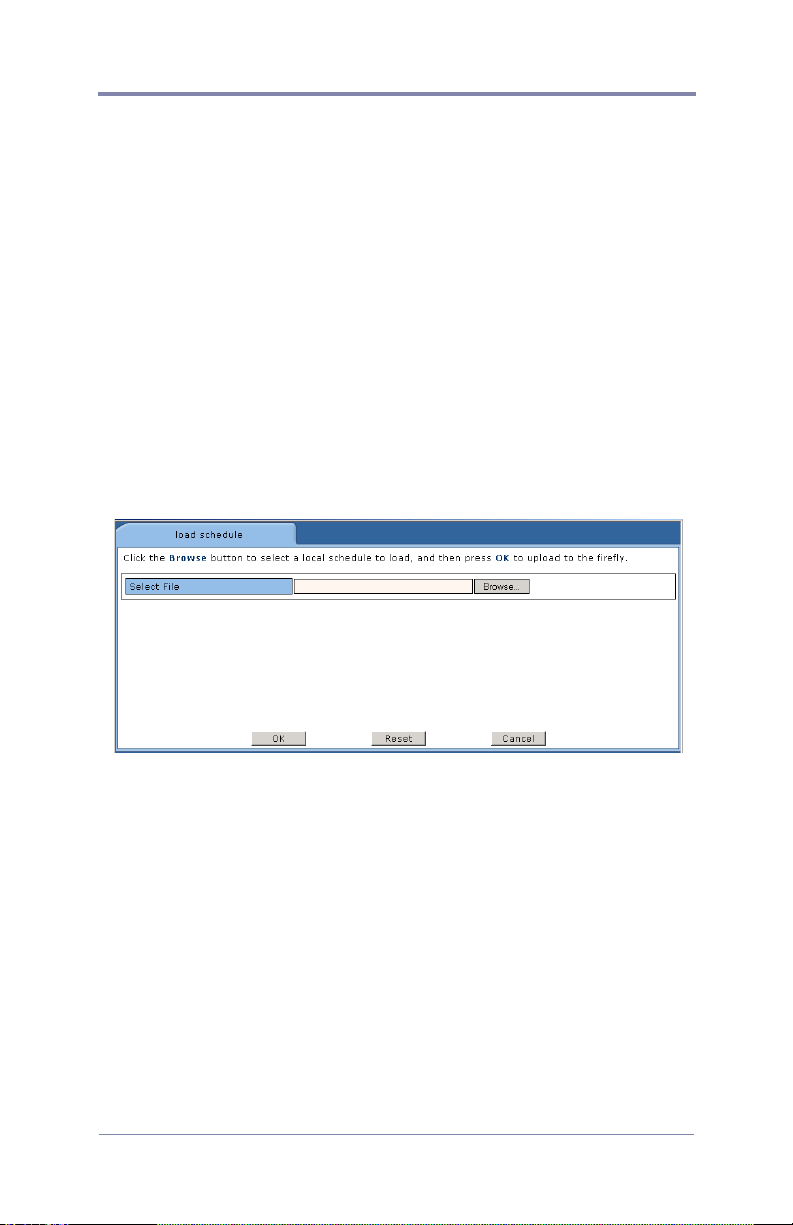
WEBVIEW
2. Once you have finished editing the schedule, you may save
your changes by following the Saving a Schedule instructions
found below.
Saving a Schedule
Once you have finished editing a schedule, you may save changes
on the Firefly by clicking either the “Save” or “Save As” buttons at
the bottom of the screen.
❏ Clicking the “Save” button will overwrite the original
schedule file using the same file name.
❏ Clicking the “Save As” button will bring you to a screen
where you will need to enter a new file name (maximum of
14 characters).
Figure 16. Save Schedule Dialog Box
After entering the new file name, click the OK button to save the
modified schedule and to return to the Schedule Editor main page.
❏ If you check the “Load this schedule now” check box
(found above the New button), the modified schedule will
begin playing on the Firefly as soon as you save it (if the
active schedule coincides with the current day and time). If
you do not check this box, the schedule will be saved, but
playback will not be started until the schedule is later
selected and scheduled for playback.
52
Page 67
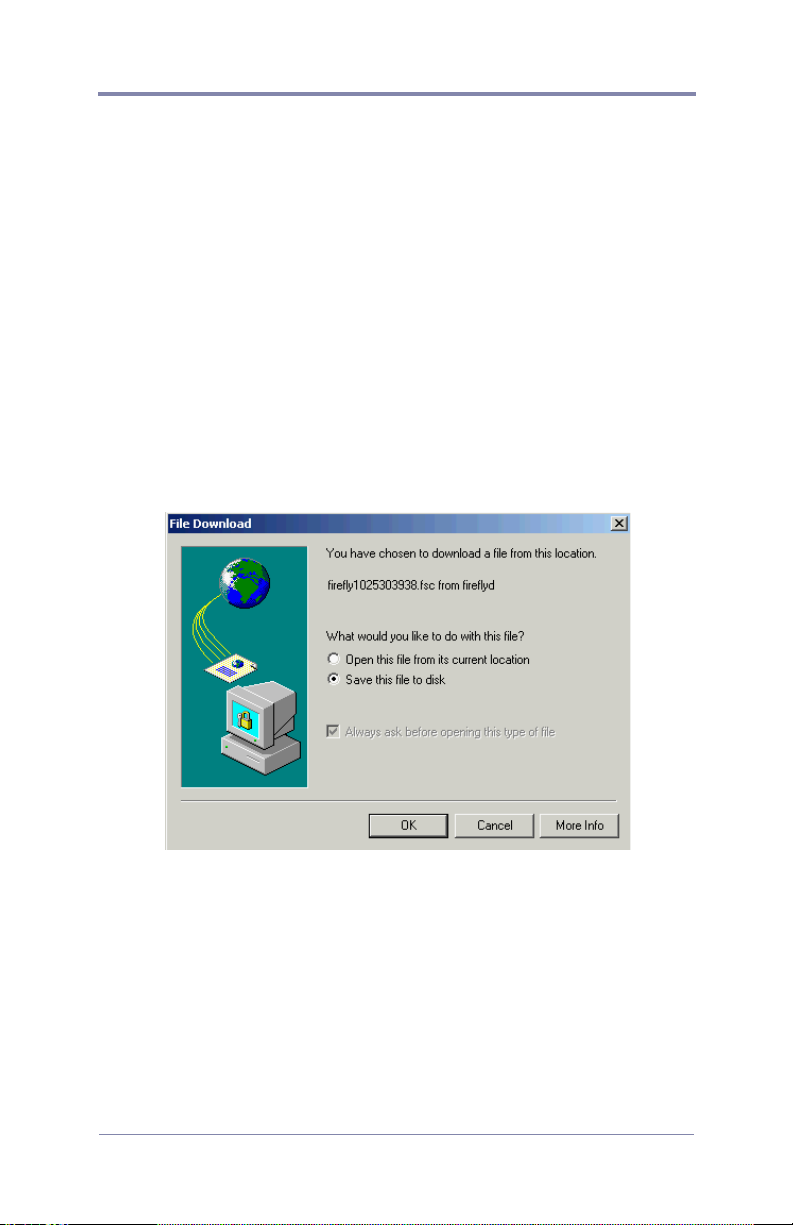
WEBVIEW
Additional Saving and Loading Methods
Beyond the standard saving and loading methods directly to and
from the Firefly, there are two local options available to you.
Save Local:
The Save Local option allows you to save a copy of the schedule
file currently being edited to your local computer or network
(examples: hard drive, floppy drive). This is a useful feature for
transferring files to other Firefly’s or for backing up important
data.
To perform a local save:
1. Click on the “Save Local” button at the bottom of the Schedule
Editor screen. The following dialog box will appear:
Figure 17. Save Local File Download Dialog Box
2. Select “Save this file to disk” and click the “OK” button.
The following Save As dialog box will appear:
53
Page 68
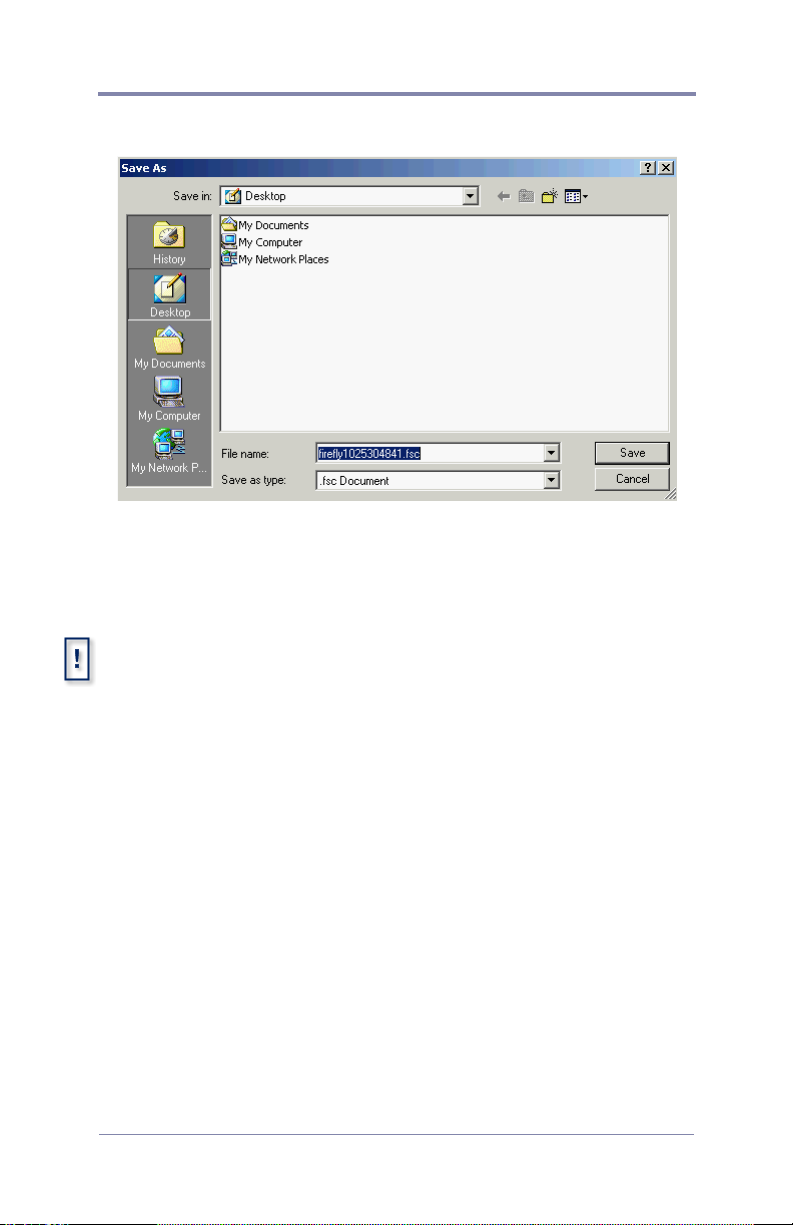
WEBVIEW
Figure 18. Save As Local Dialog Box
3. Type in your desired name for the schedule file and click the
“Save” button.
When saving a schedule locally, you must add the schedule file
extension “.fsc” to the end of all file names.
Once saved, you will be returned to the Schedule Editor main
screen.
Load Local:
The Load Local button allows you to load a schedule file from
your local computer or network as opposed to directly from the
Firefly. This is a useful feature because your schedule file(s) may
only be available on another computer or removable media.
To perform a local load:
1. Click on the “Load Local” button at the bottom of the Schedule
Editor screen. The following dialog box will appear:
54
Page 69
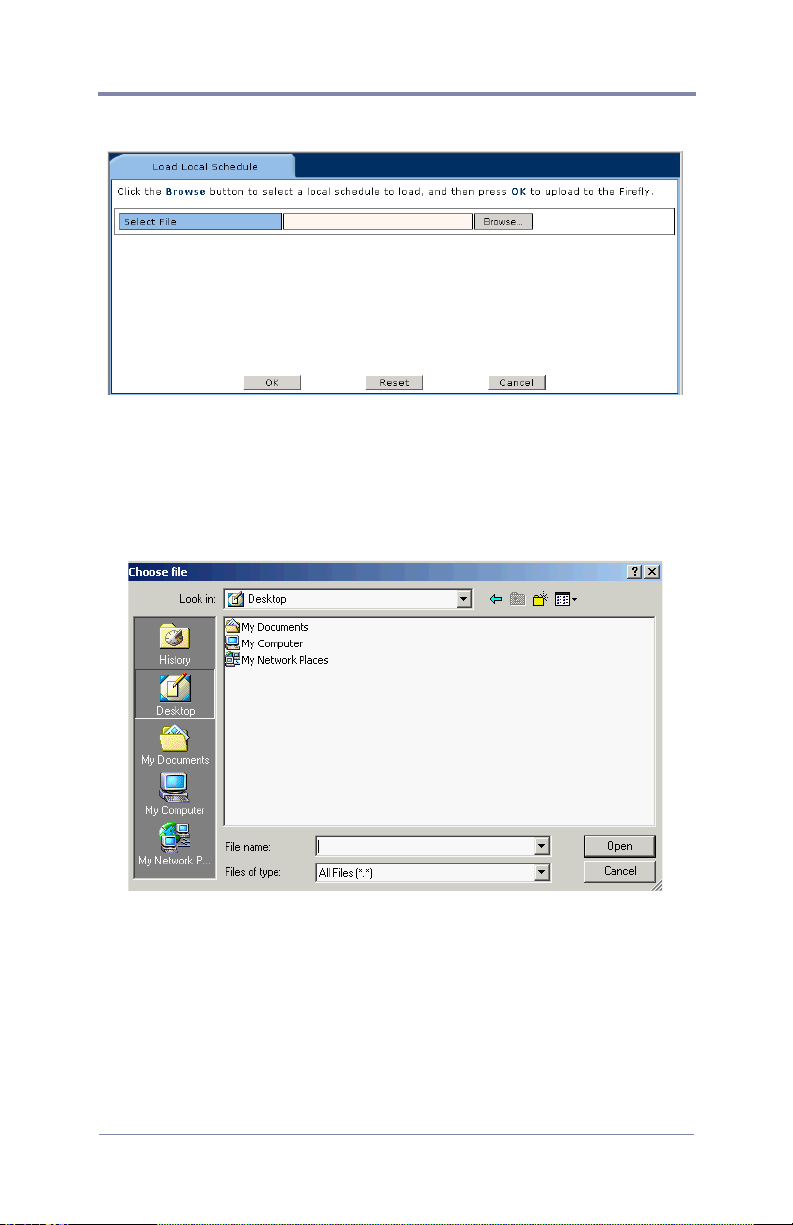
Figure 19. Load Local Browse Dialog Box
2. Click the “Browse” button.
The following Choose File dialog box will appear:
WEBVIEW
Figure 20. Load Local Save As Dialog Box
3. Locate your desired schedule file (.fsc). Once found, highlight
it and click the “Open” button.
4. The field will be populated with your desired schedule file
name. If the file appears correct, click the “OK” button.
55
Page 70
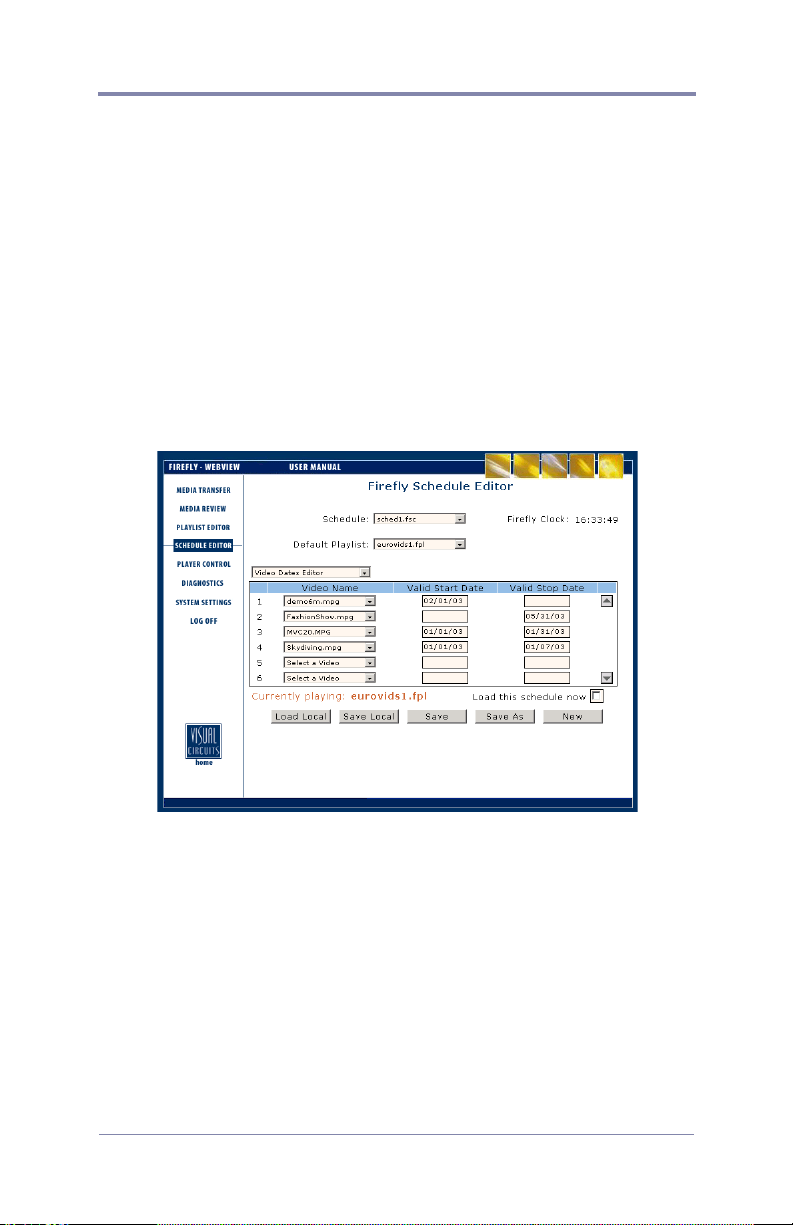
WEBVIEW
You will be returned to the Schedule Editor main screen. The
schedule you just loaded will be open on your screen, ready for
modifications if desired.
Assigning Dates for Video Playback
The Video Dates Editor allows you to designate the actual date(s) a
particular video is allowed to play. By selecting a start date, an end
date or both a start and an end date you can establish a “date rule”
for the playback of a particular video.
Figure 21. Schedule Editor - Video Dates Editor Page
56
Page 71

WEBVIEW
Depending on your application, you may have a need for using any
or all of the three previously mentioned date rules. The table below
provides some “real world” examples for using the Video Dates
Editor.
Start
Date
02/01/03 - -/- -/- - Start date with no stop date.
- -/- -/- - 05/31/03 No start date with stop date.
01/01/03 01/31/03 Both start date and stop date.
Stop
Date
Description
Example: “I want my product demonstration video
available to playlists the day the product is
released, but no sooner than that”.
Example: “I want my new marketing campaign
video available to playlists from now until the end
of the spring months”.
Example: “I’ want my January promotions video
available to playlists only during the month of
January”.
Tab le 2 . Video Date Rule Examples
To add a date rule for a video, use the following steps:
1. (From the Schedule Editor main screen) Select the Video Dates
Editor from the drop down menu. The Video Dates Editor
screen will be displayed.
2. From the “Select a video” drop down menu, select the video
you would like to assign a date rule to.
3. If desired, set the specific start date for the video using the
number keys on your keyboard.
4. If desired, set the specific stop date for the video using the
number keys on your keyboard.
5. Repeat steps 2 through 4 to add date rules to additional videos
if desired.
6. Once you have finished adding date rules, you may save your
changes by following the instructions found in
Saving a
Schedule on page 52.
57
Page 72

WEBVIEW
To delete a date rule for a video, use the following steps:
1. (From the Schedule Editor main screen) Select the Video Dates
Editor from the drop down menu. The Video Dates Editor
screen will be displayed.
2. Locate the video (under Video Name) you would like to delete
the date rule for.
3. Change the video to “Select a Video” from the Video Name
drop down menu. When done, it will delete any previous video
date rule.
4. Repeat steps 2 and 3 to delete date rules for additional videos if
desired.
5. Once you have finished deleting date rules, you may save your
changes by following the instructions found in
Saving a
Schedule on page 52.
To edit a date rule for a video, use the following steps:
1. (From the Schedule Editor main screen) Select the Video Dates
Editor from the drop down menu. The Video Dates Editor
screen will be displayed.
2. From the “Select a video” drop down menu, select the video
you would like to assign or modify a date rule to.
3. If desired, set or modify the specific start date for the video
using the number keys on your keyboard.
4. If desired, set or modify the specific stop date for the video
using the number keys on your keyboard.
5. Repeat steps 2 through 4 to edit date rules for additional videos
if desired.
6. Once you have finished editing date rules, you may save your
changes by following the instructions found in
Saving a
Schedule on page 52.
Exiting the Schedule Editor
At any point while you are working within the Schedule Editor you
may exit by clicking on any of the menu navigation buttons on the
left side of the screen. Any unsaved changes you have made will
be lost.
58
Page 73
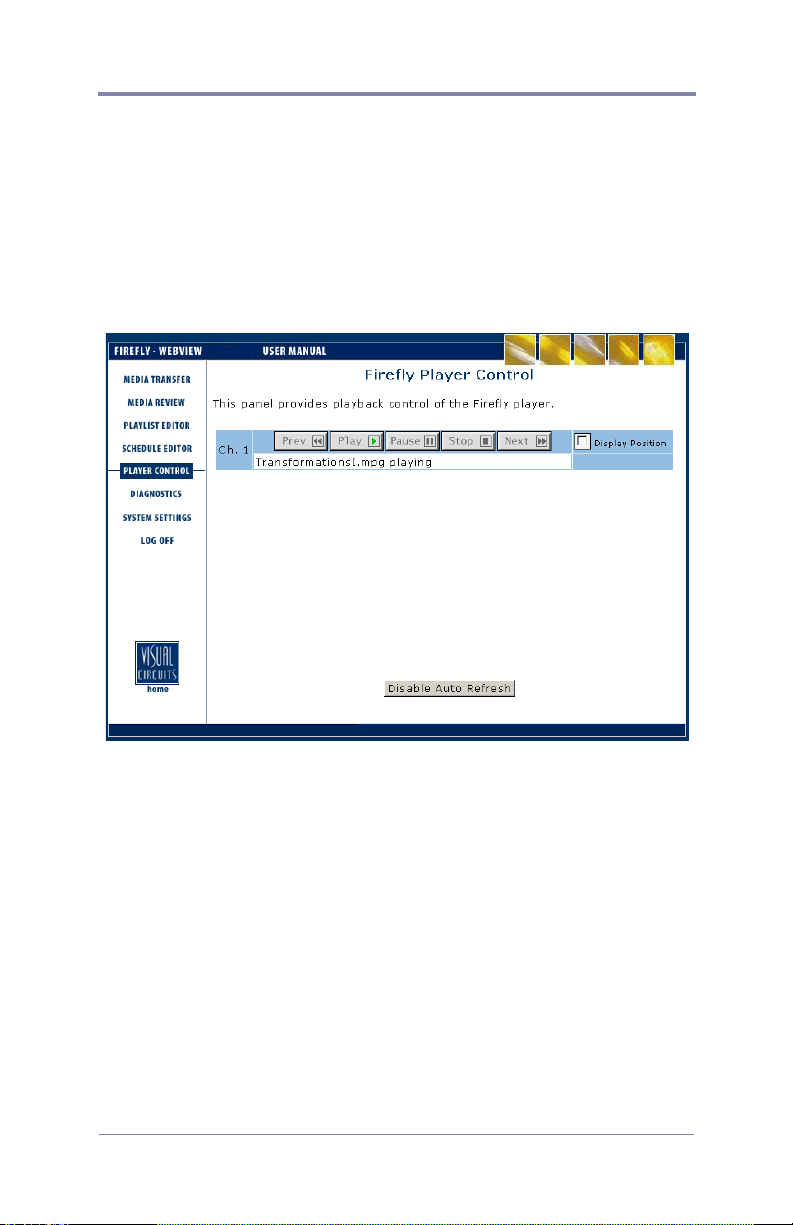
WEBVIEW
Using the Player Control Panel
The Player Control panel mirrors the basic functionality of the
Firefly remote control. You will be able to Play, Pause and Stop
the currently playing file (displayed on the output window). In
addition, you will be able to skip to the Previous and Next video in
a playlist using the respective Previous and Next buttons.
Figure 22. Player Control Panel
In addition to using the standard player controls, the Display
Position checkboxes allow you to display the position bar. The
Display Position indicator shows the current playback position
within the file.
59
Page 74

WEBVIEW
Diagnostics
The Diagnostics pages display a number of statistics about what
the Firefly is doing at a fairly technical level. The information
found within these pages can serve as a tool to help the Visual
Circuits technical support team work with you over the phone in
the event that you are experiencing problems.
The Diagnostics pages provide a snapshot of the system status at the
time the pages were entered. The pages do not automatically update the
information unless you click on the “Enable Auto Refresh” button.
The Diagnostics pages contains four types of information: General,
Video, Playback and Advanced.
By default, when you click on the Diagnostics navigation button
you will be routed to the Firefly Diagnostics - General page.
Within this page you will find basic information about the Firefly
and the media being played on it.
60
Page 75
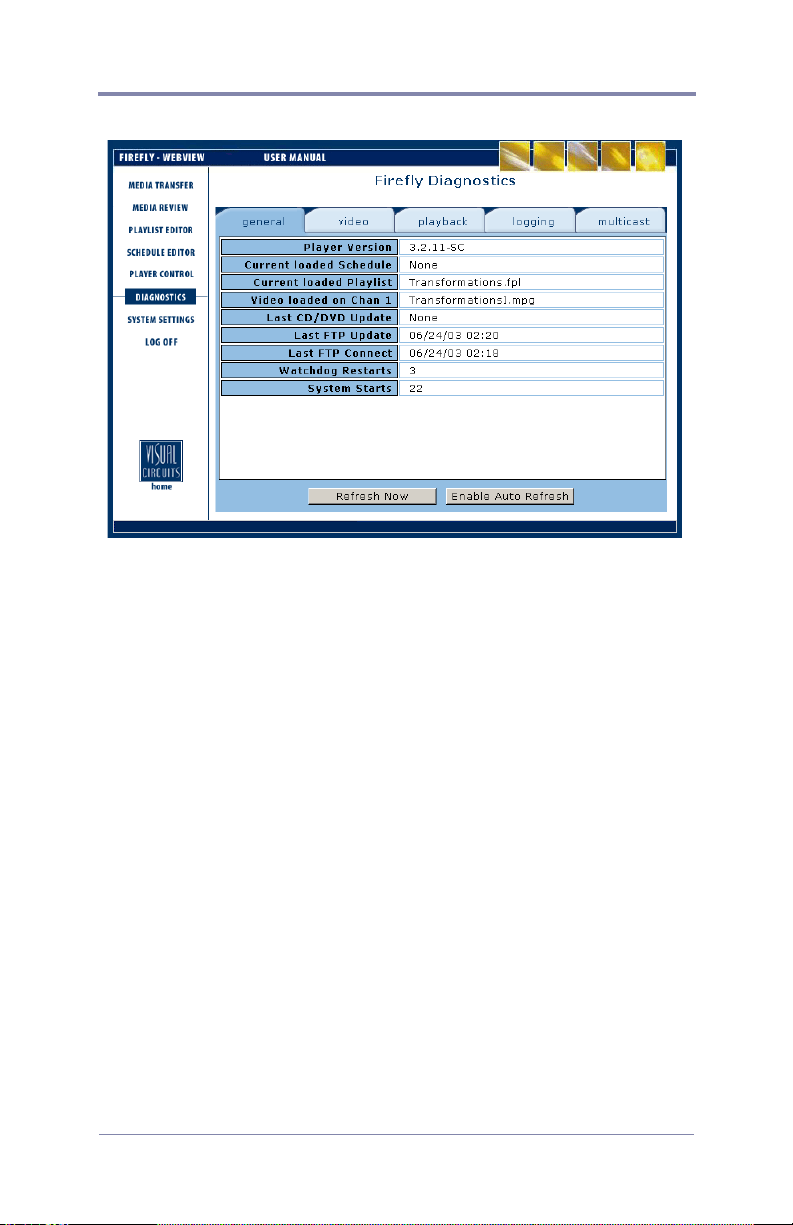
Figure 23. Diagnostics - General Page
Diagnostics - General
WEBVIEW
Player version:Displays the version of the Firefly (incorporating
both hardware and software).
Currently loaded schedule:Displays the file name of the currently
loaded schedule (if applicable) on the system.
Currently loaded playlist:Displays the file name of the currently
loaded playlist on the system.
Video loaded:Displays the file name of the currently loaded video.
Last FTP Update:Displays the date and time of the last FTP
update.
Last FTP Connect:Displays the date and time of the last FTP
connect.
Watchdog Restarts:Displays the number of times the Watchdog
system has restarted the Firefly.
System Starts:Displays the number of times the Firefly has been
started.
61
Page 76
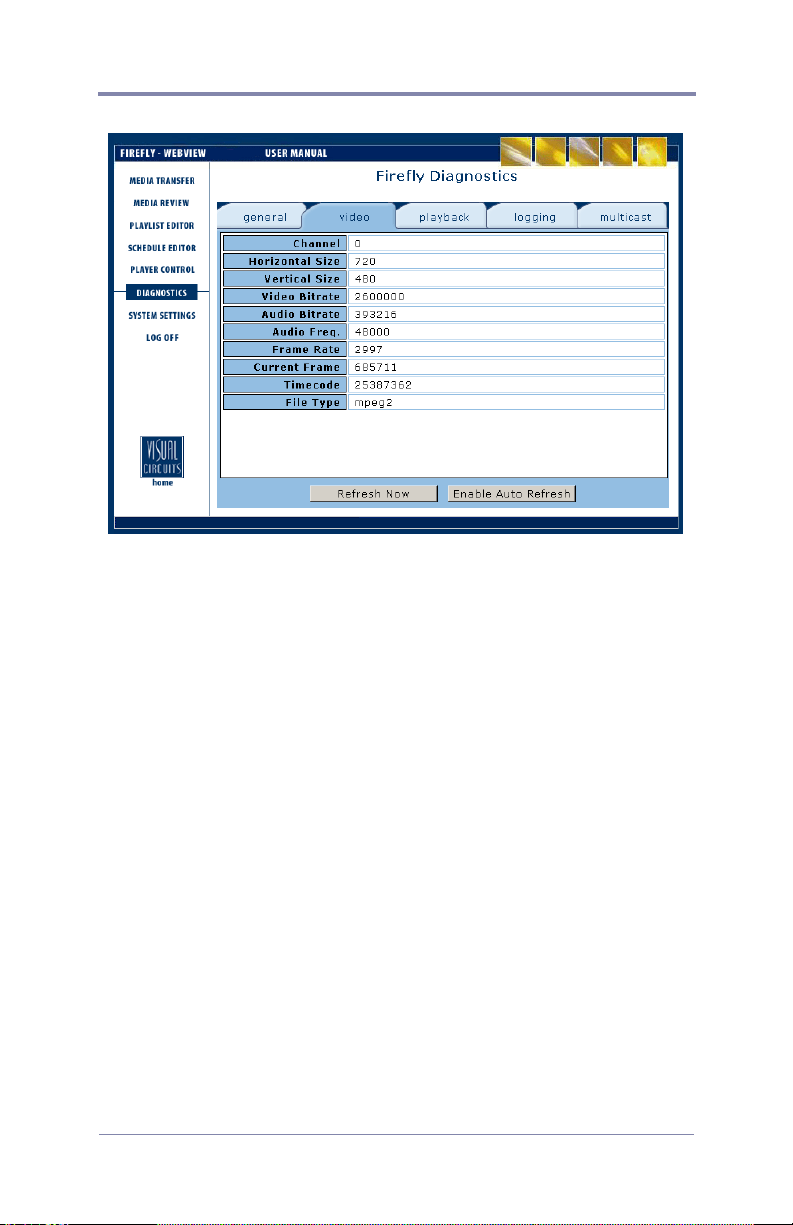
WEBVIEW
Figure 24. Diagnostics - Video Page
Diagnostics - Video
Horizontal Size:Defines the horizontal resolution of the currently
playing MPEG file in pixels.
Vertical Size:Defines the vertical resolution of the currently
playing MPEG file in pixels.
Video Bitrate:Defines the Video Bitrate or data rate of the
currently playing MPEG file.
Audio Bitrate:Defines the Audio Bitrate or data rate of the
currently playing MPEG file.
Audio Frequency:Defines the frequency of the Audio stream.
Frame Rate:Defines the frame rate of the currently playing MPEG
file. The standard NTSC frame rate of 29.97 fps is shown as 2997.
Current Frame:Displays the current frame number playing within
the MPEG file (analogous to the timecode field but with a greater
level of accuracy).
62
Page 77

WEBVIEW
Timecode:Displays the current timecode within the playing MPEG
file offset so that all files start at 00:00:00.
File Type:Displays the type of MPEG file being played on the
channel. The possible types are: mpeg1 - mpeg1 system stream,
mpeg2 - program stream, mpg1v - mpeg1 video only, mpg2v mpeg2 video only, mpg1a - audio only, ac3 - ac3 audio only, ??? unknown type or no file loaded.
63
Page 78
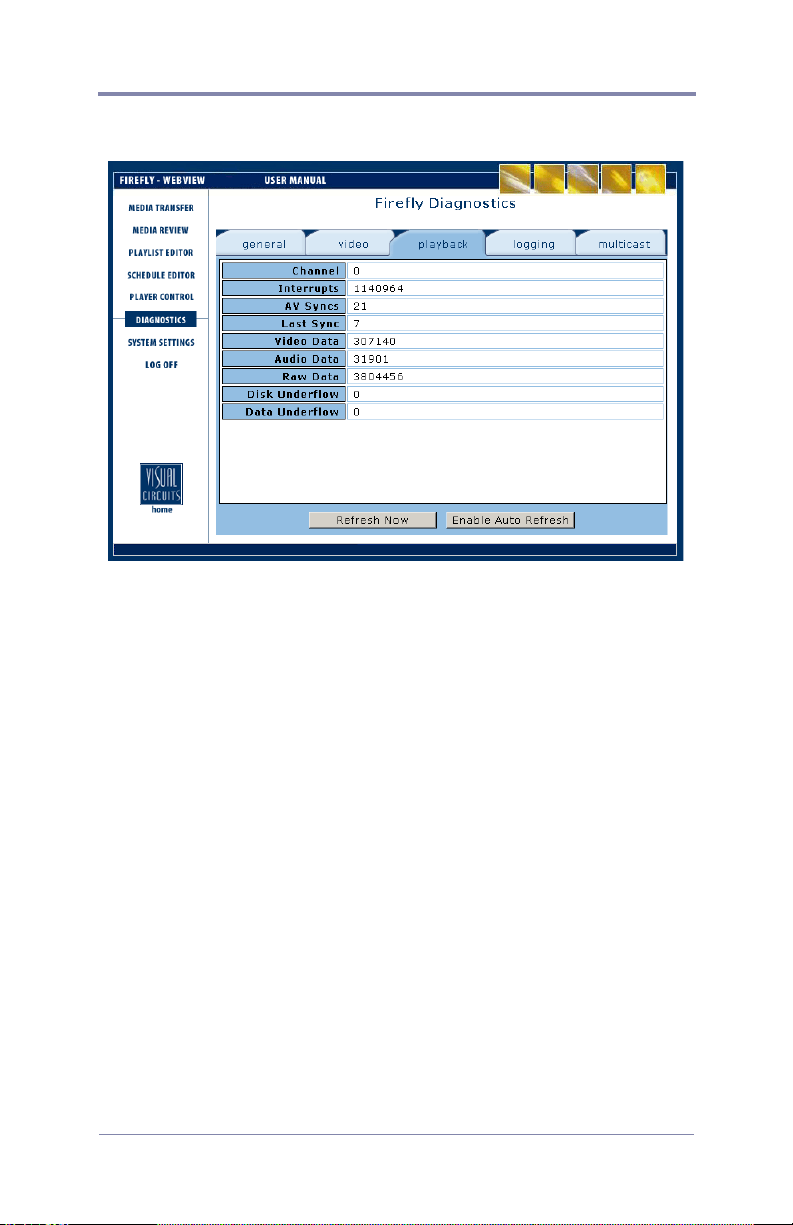
WEBVIEW
Figure 25. Diagnostics - Playback Page
Diagnostics - Playback
Interrupts:Displays the number of interrupts that have been
received from the MPEG decoder.
AV Syncs:Displays the number of times the audio or video streams
had to be adjusted to maintain proper synchronization. (It is not
uncommon for this to be a high number as this is a running total.
Many functions such as fast forward, rewind and seek can cause
large numbers of av syncs. It is only of concern if you see this
number growing quickly during routine playback).
Last Sync:Displays the number of frames that had to be skipped or
repeated during the last av sync to bring the audio and video back
into proper synchronization.
Video Data:Displays the amount of data currently in the MPEG
decoder’s video data buffer.
64
Page 79

WEBVIEW
Audio Data:Displays the amount of data currently in the MPEG
decoder’s audio data buffer.
Raw Data: Bytes of MPEG data in RAM.
Disk Underflow:Displays the number of disk underflows that have
occurred. A disk underflow occurs when the Firefly is unable to
get the data off the disk fast enough to keep the disk buffers from
becoming empty.
Data Underflow:Displays the number of data underflows that
have occurred. A data underflow occurs when the Firefly is unable
to transfer data into the MPEG decoder buffers fast enough to keep
them from becoming empty. Note that during regular playback
conditions it is normal to have a small number of Data Underflows
in this field
Diagnostics - Logging
At the top of the Logging page, from the “Select Logfile” drop
down menu, you can select the log file you would like to view.
The two buttons located at the bottom of the Logging page,
“Refresh” and “Auto Refresh”, allow you to manually refresh or
have the system automatically refresh the logfile data as you view
it.
Refer to Log File Reporting on page 115 for information on setting
up how your Firefly works with logfiles.
Run Logs
Run logs provide a record of which videos played (with which
graphic overlays, if applicable), on which channels, starting at
what dates/times, playing back what percentage of the video and
for how long.
65
Page 80
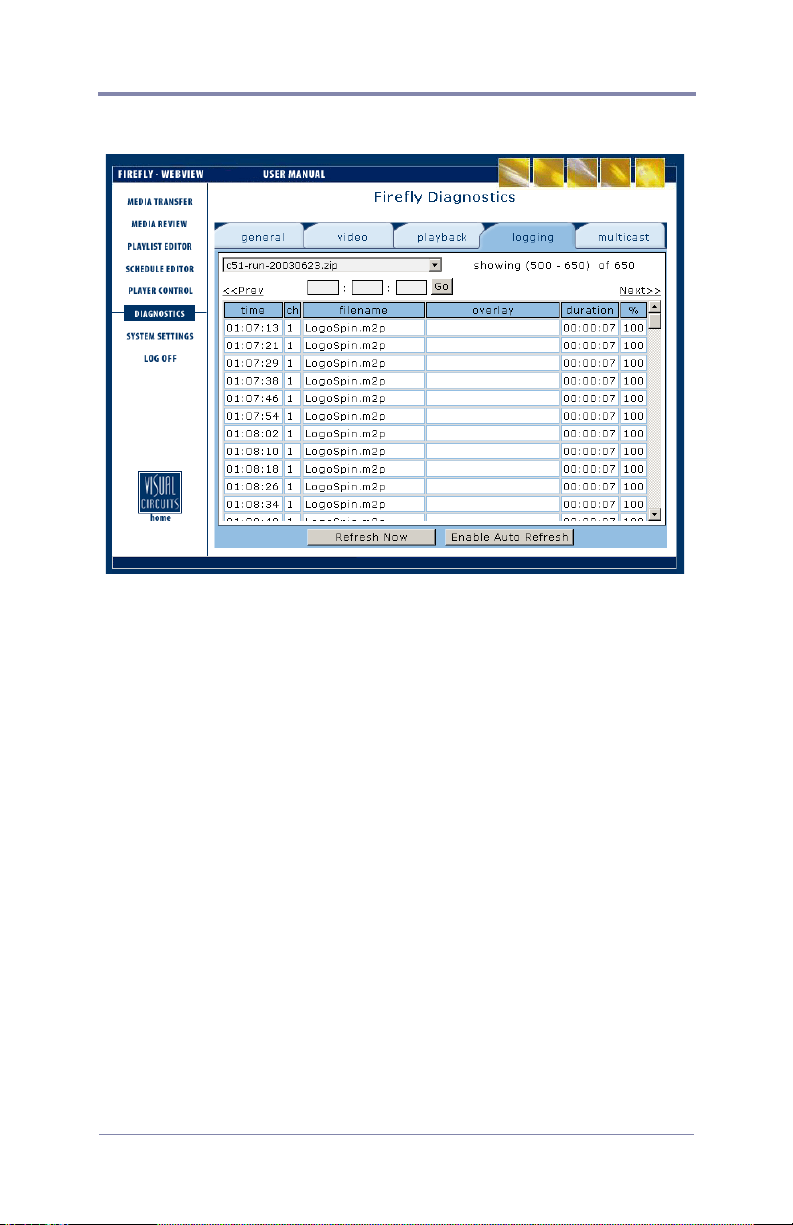
WEBVIEW
Figure 26. Diagnostics - Logging Page (Run log)
Once in the Run logfile viewer, the video playback data will be
listed with one video per line and will be sorted by playback time
(using Firefly’s internal 24-hour clock). You may move to the
previous or next pages by clicking on the respective <<Prev or
Next>> links. You can also move to view the playback data for a
certain time of day by entering either hours, minutes and/or
seconds in the time boxes and then clicking the “Go” button.
Time:Displays the time of day the event was logged based on
Firefly’s internal 24-hour clock.
Filename:Displays the filename of the video.
Overlay:Displays the filename of the graphic overlay that was
associated with the video (if present).
Duration:Displays the total amount of time (HH: MM: SS) that a
video played.
%:Displays the percentage played of the video.
66
Page 81

WEBVIEW
Diagnostic Logs
Diagnostic logs can be used to view a record of all media update
transactions and any system errors on a Firefly.
Information contained in the diagnostic log include:
❏ FTP/DVD Updating data: Tracks date, time of connection/
disconnection, errors- yes/no, files, sizes, percent
transferred and FTP permission errors.
❏ Storage Cleanup data: Records what media have been
deleted by the automatic storage cleanup routine, including
file names, sizes and dates.
❏ Missing Elements Log: Records all missing media
referenced by an active playlist or schedule, including date,
time and file element.
❏ Error Summary data: Records important user player
diagnostic information, including the number of system
restarts, number of watchdog restarts, the player version,
etc.
❏ Serial Commands: Records most incoming and outgoing
external control commands.
67
Page 82
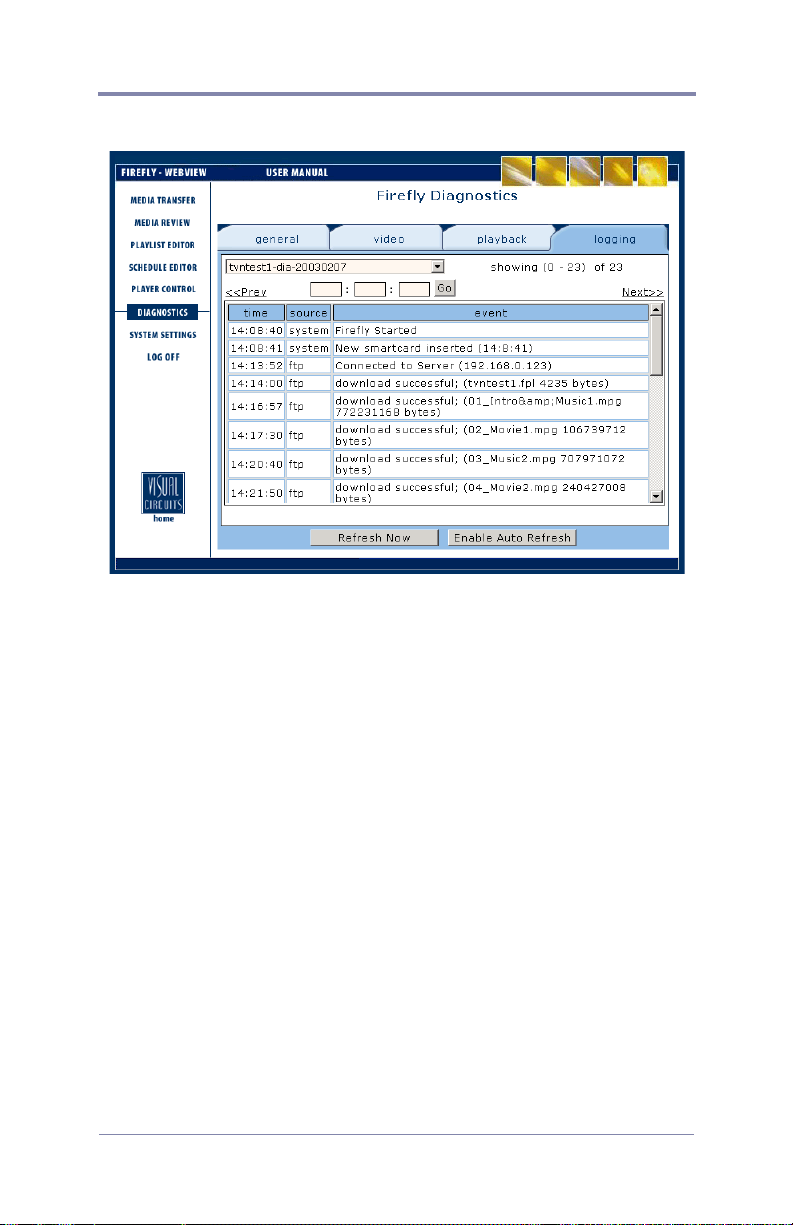
WEBVIEW
Figure 27. Diagnostics - Logging Page (Diagnostic log)
Once in the Diagnostic logfile viewer, the data will be listed with
one diagnostic event per line and will be sorted by playback time
(using Firefly’s internal 24-hour clock). You may move to the
previous or next pages by clicking on the respective <<Prev or
Next>> links. You can also move to view the diagnostic data for a
certain time of day by entering either hours, minutes and/or
seconds in the time boxes and then clicking the “Go” button.
Time:Displays the time of day the event was logged based on
Firefly’s internal 24-hour clock.
Source:Displays the source of the diagnostic event (playback,
multicast, system, etc.).
Event:Displays the diagnostic event.
68
Page 83
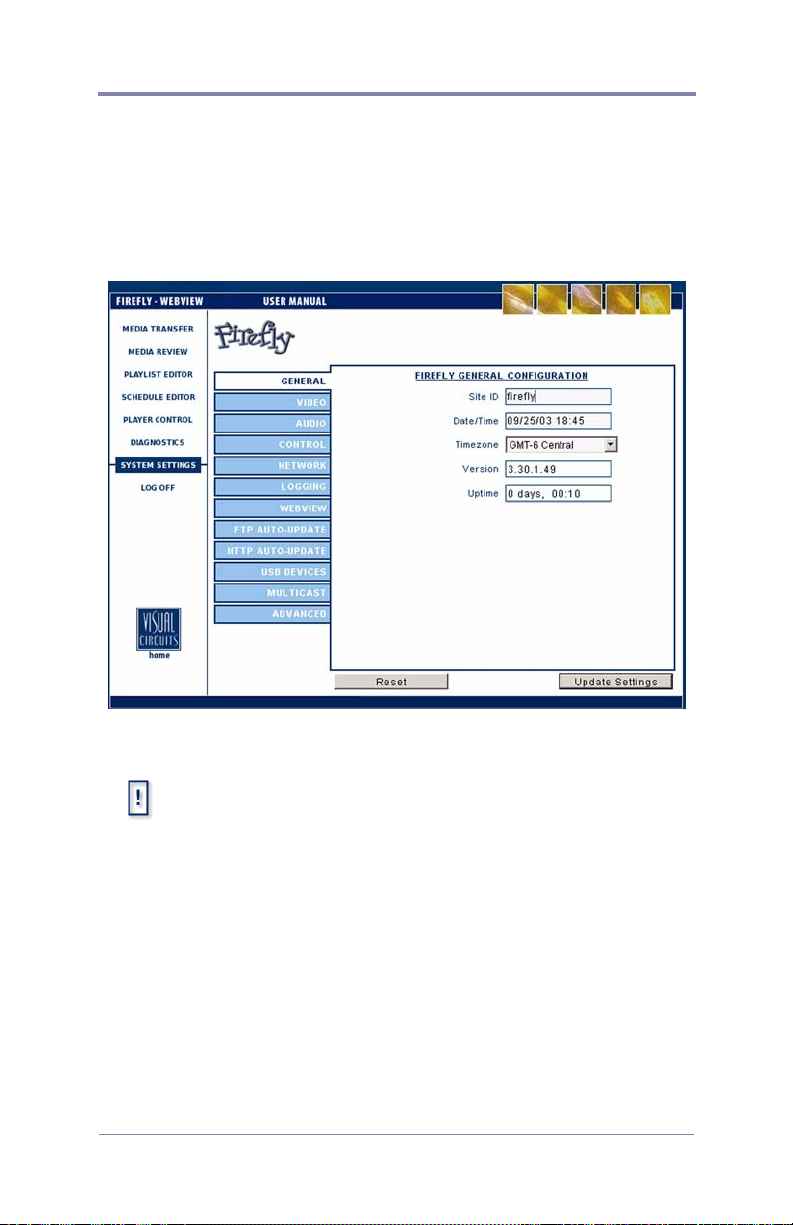
System Settings
Within the System Settings menu, the following options are
available:
General Settings
WEBVIEW
Figure 28. Settings-General
When a field is edited in any one of the following Settings
Categories, the text for that category will turn red until you update
the settings.
Site ID
The Site ID uniquely identifies the Firefly as it updates via FTP. It
is also used for Media Messenger software to enable automated
management of content, playlists & schedule updates.
Date/Time
Sets the Firefly internal clock for date and time.
69
Page 84

WEBVIEW
Time Zone
Allows you to select the appropriate time zone (measured in hours
and minutes plus or minus Greenwich Mean Time) for where the
Firefly is being used.
Version
This is where to reference the software version for technical
support purposes or verifying version change following a
“software update”.
Uptime
This value indicates how long the unit has been in operation since
the last power cycle.
70
Page 85
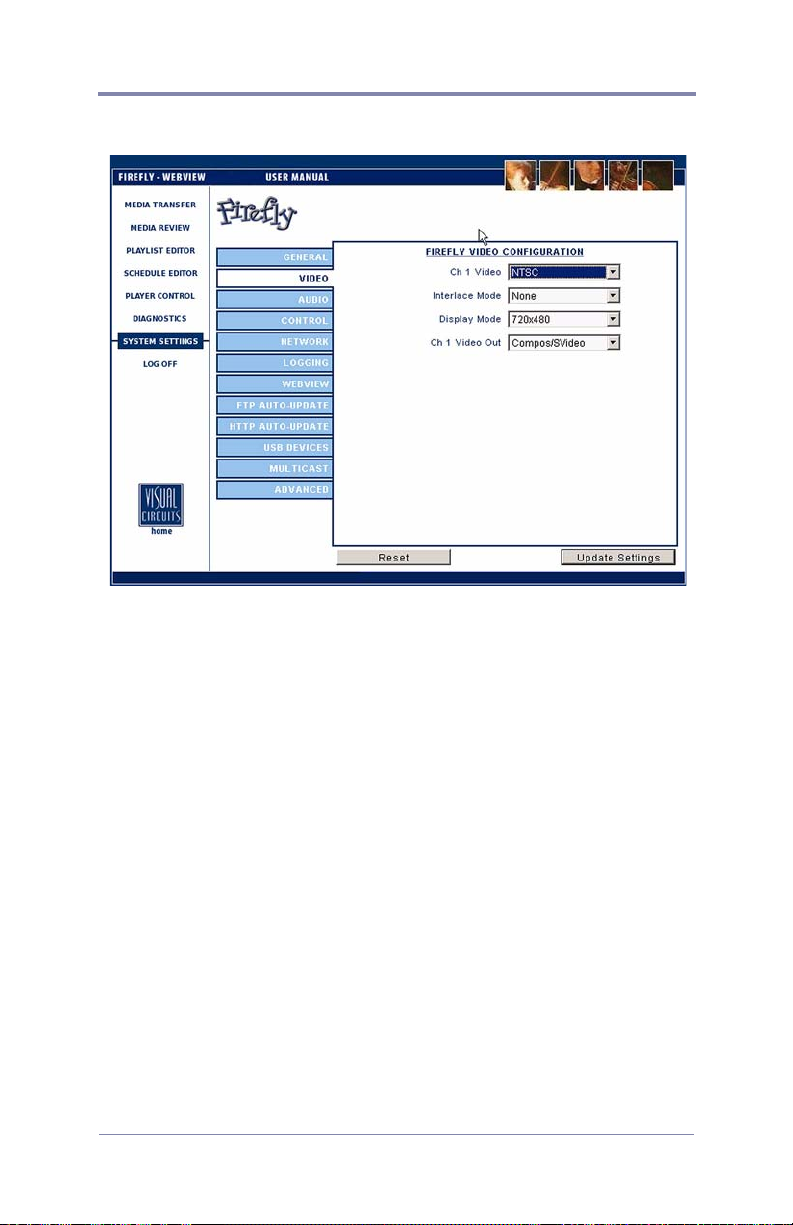
Video Settings
Figure 29. Settings-Video
WEBVIEW
Channel 1 Video
Selects the standard for video output:
❏ NTSC (USA)
❏ PAL (European)
❏ 480p
❏ 576p
❏ 720p
❏ 1080i
❏ NTSC Cropped
❏ PAL Cropped
Interleave Mode
When change frame size, select whether to use interleaving or not
and the type.
❏ None
❏ Interleave
71
Page 86

WEBVIEW
❏ Bob (Bob and Weave)
Display Mode
❏ 720 x 480
❏ 720 x 560
❏ 640 x 480
❏ 800 x 600
❏ 840 x 480
❏ 1024 x 768
❏ 1024 x 852
Channel 1 Video Out
Selects the type of video output: Composite/S-video or
Component. Composite and S-Video signals can be used
simultaneously.
72
Page 87
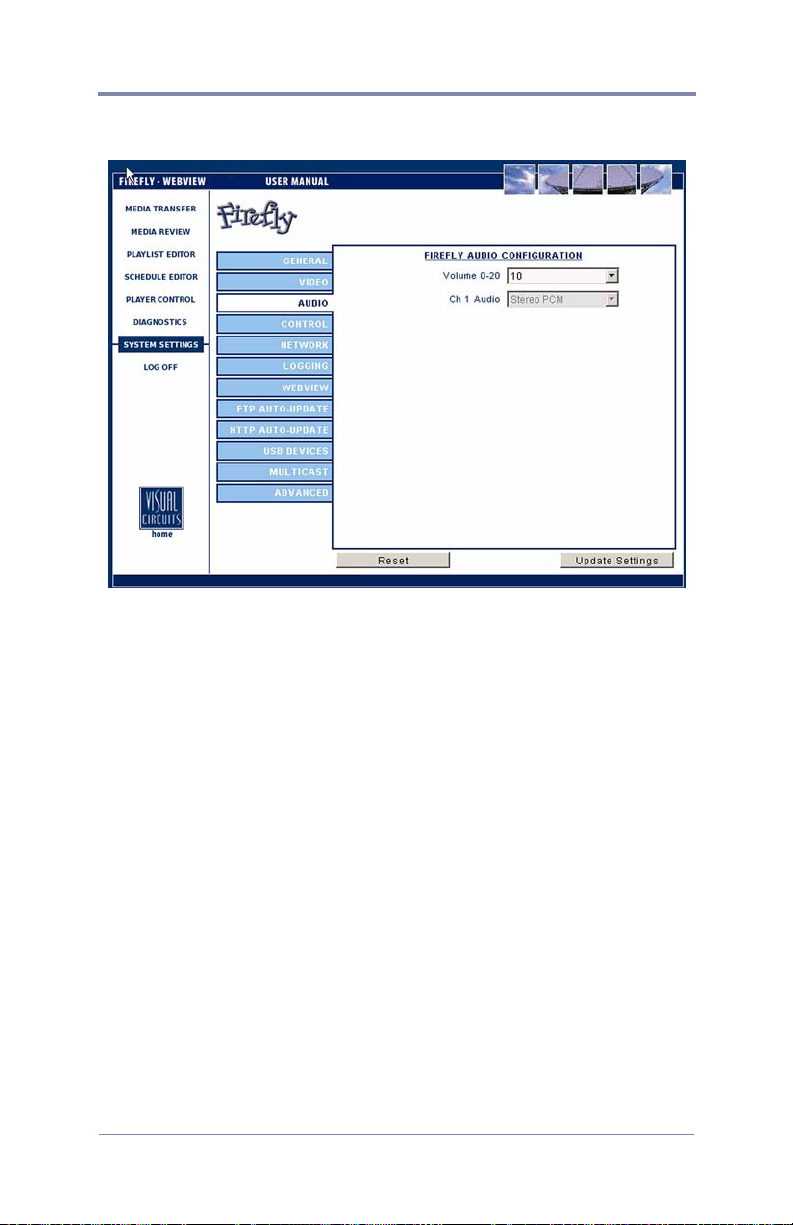
Audio Settings
Figure 30. Settings-Audio
WEBVIEW
Volume
This setting allows you to set the volume level for audio played
back on the Firefly. The default volume setting is 10 on the 0-20
scale.
Audio Output
Firefly gives you several audio output options depending on the
configuration you use (see
Table 3 on page 74). Standard MPEG
layer-2 files will output from both the digital and stereo analog
outputs. Dolby Digital (AC3) files will output from the digital
outputs only. However, by upgrading your unit/s. you can “mix
down” AC3 files to the stereo analog outputs. If your application
requires a 2-channel (stereo) mix of AC3, please contact a Visual
Circuits representative for more information.
73
Page 88

WEBVIEW
g
Firefly Audio Configurations
Config MPEG Audio Type
MPEG Layer 2
1
2
3
4
Stereo Audio
MPEG Layer 2
Stereo Audio
Dolby Digital Audio
(AC3)
Dolby Digital Audio
(AC3)
Firefly Audio
:
Settin
Dolby Digital S/PDIF Yes
Stereo PCM S/PDIF Yes
Dolby Digital
Stereo PCM (w/opt
Upgrade)
Digital
Output
S/PDIF (Dolby
Digital)
S/PDIF Stereo Yes (Decoded)
Tab le 3 . Firefly Audio Configurations
Firefly Dolby Digital D/A decoding is only available when using the
optional Dolby Digital Software Upgrade (config #4).
Stereo Analog
Output?
No
74
Page 89
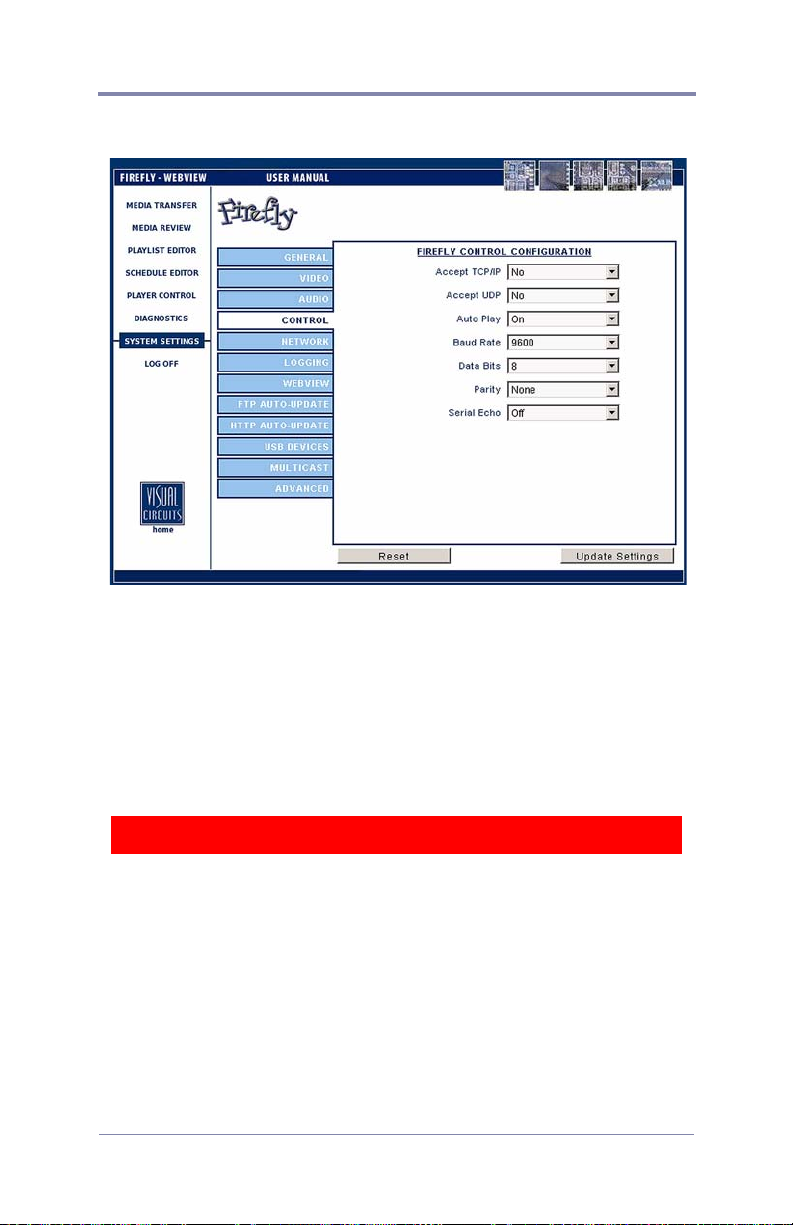
Control Settings
Figure 31. Settings-Control
WEBVIEW
Accept TCP/IP
In conjunction with RS232 serial communication, TCP/IP allows
the user to remotely operate the Firefly by sending operation
commands through a network or locally using an external PC or
show controller (see
External Control Commands on page 119).
WARNING
For security reasons, “Accept TCP/IP” is factory defaulted to “No”.
Be aware that if you decide to use this feature over a large network
(namely the Internet), the potential for outside intervention
(hacking) is greatly increased because there is literally no security
(protection) on this port. Enabling this option will open port 2180.
Accept UDP
Select to use User Datagram Protocol (UDP).
75
Page 90

WEBVIEW
Auto Play
Upon initial start up, Firefly will begin playing the latest loaded
playlist/schedule automatically. Following start up, if you choose
to begin playback manually via External commands, you can
default this option to “Off” to deactivate automatic playback.
Baud Rate
Select an identical value to your external controller. The following
options are available: 1200, 4800, 9600, 38400 & 115200. It is
recommended starting with a Baud Rate of 9600 for your Hyper
Terminal connection.
Data Bits
Select an identical value to your external controller. The following
options are available: 5, 6, 7, & 8.
Parity
Select an identical value to your external controller. The following
options are available: None, Odd & Even.
76
Page 91
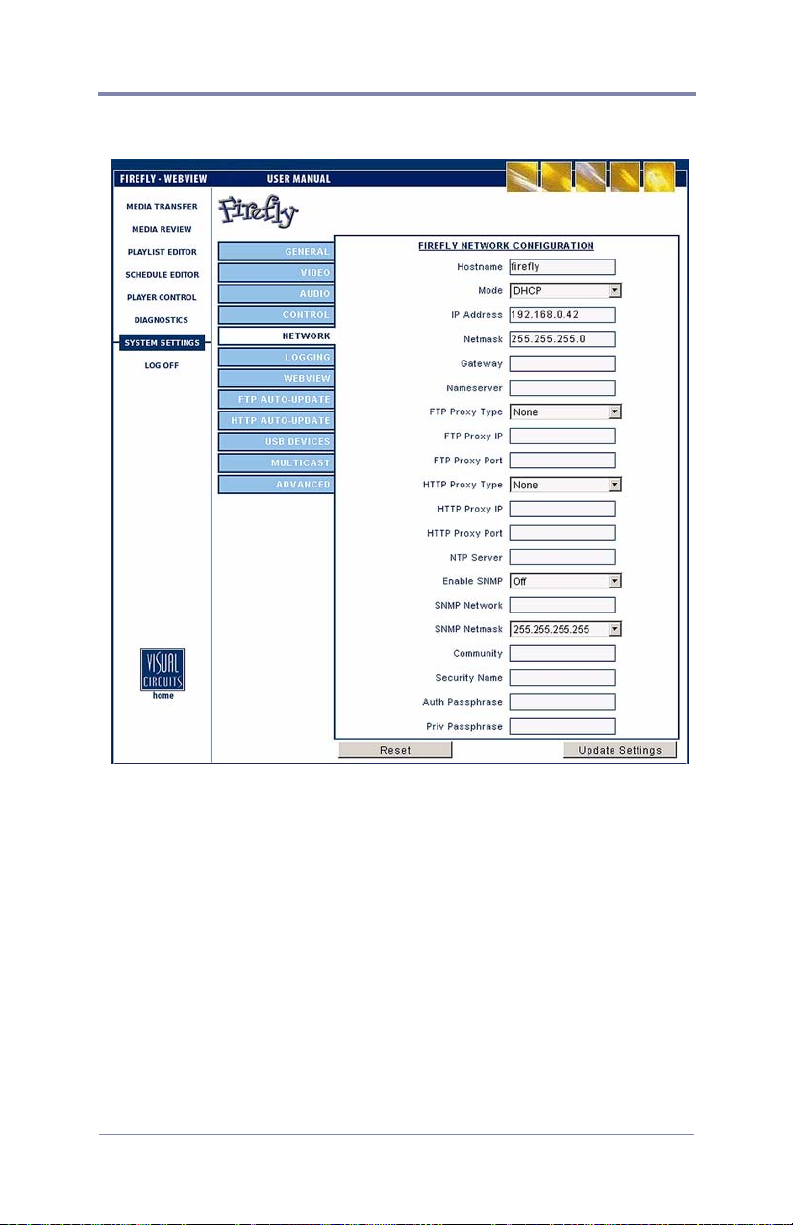
Network Settings
WEBVIEW
Figure 32. Settings-Network
Host Name
Choose a unique name that identifies each Firefly unit on the
network.
77
Page 92

WEBVIEW
Mode
DHCP (Dynamic Host Configuration Protocol) - A TCP/IP service
protocol that offers dynamic leased configuration of host IP
addresses and distributes other configuration parameters to eligible
network clients. DHCP provides safe, reliable, and simple TCP/IP
network configuration, prevents address conflicts, and helps
conserve the use of client IP addresses on the network. DHCP uses
a client/server model where the DHCP server maintains centralized
management of IP addresses that are used on the network. DHCPsupporting clients can then request and obtain lease of an IP
address from a DHCP server as part of their network start up
process. See your Network Administrator for further information.
STATIC -For a local area connection (LAN), in IP address, Subnet
mask, and Default gateway, type the IP address, subnet mask, and
default gateway addresses. For all other connections, in IP address,
type the IP address. See your Network Administrator for further
information.
IP Address
A 32-bit address used to identify a node on an IP internetwork.
Each node on the IP internetwork must be assigned a unique IP
address, which is made up of a network identifier and a host
identifier. This address is typically represented in dotted-decimal
notation, with the decimal value of each octet separated by a
period, for example, 192.168.7.27.
You can configure the IP address statically or dynamically through
DHCP. See your Network Administrator for further information.
78
Page 93

WEBVIEW
Netmask
Specify a range that falls on subnet boundaries.
Most TCP/IP networks use subnets in order to manage routed IP
addresses. For the range specified in From and To, Windows 2000
calculates the closest matching subnet. The range of addresses in
the closest matching subnet may exceed the range specified.
Unless the addresses specified in From and To are subnet
boundaries, the range based on the calculated subnet will be larger
than the range specified. To avoid this, specify a range that falls on
subnet boundaries, For example, if you are using the 10.0.0.0
private network ID for your intranet, a range that falls on subnet
boundaries is 10.0.1.168 to 10.0.1.175. Or, if you are using the
192.168.0.0 private network ID for your intranet, a range that falls
on subnet boundaries is 192.168.1.0 to 192.168.1.255. See your
Network Administrator for further information.
Gateway
A service that allows Firefly to connect to other servers. Creating a
gateway also allows client computers running only Microsoft client
software to access server resources through the gateway. See your
Network Administrator for further information.
Nameserver
The IP address for the server, local or ISP, that handles URL name
resolution for the network. Contact you system administrator for
this information.
FTP Proxy Type
Select the type of FTP proxy best suited for application, i.e. None,
Socks4, Socks5, USER usr@hst p, USER usr@hst:p, SITE
usr@hst p, SITE usr@hst:p, NetCache or NAT Firewall.
Note: The NAT Firewall setting will put the FTP client in passive
mode.
79
Page 94

WEBVIEW
FTP Proxy IP
Enter the address for the proxy, in IP format.
FTP Proxy Port
The number of the port to be used to access the FTP proxy server.
Contact you system administrator for this information.
HTTP Proxy Type
Select the type of HTTP proxy best suited for application.
HTTP Proxy IP
Enter the address for the proxy, in IP format.
HTTP Proxy Port
The number of the port to be used to access the HTTP proxy
server. Contact you system administrator for this information.
NTP Server
The IP address of the NTP server the Firefly will time-sync with
on the network.
Enable SNMP (Simple Network Management Protocol)
Allows you to enable or disable the SNMP feature. SNMP can be
used to monitor the Firefly on your network. You can also retrieve
and change settings on the Firefly in addition to monitoring the
unit by using the Firefly MIB file.
SNMP Network
Designates the IP address of the system(s) you wish to be able to
monitor and change settings on the Firefly. Notation must be
dotted-decimal as with all IP settings on the Firefly. To allow an
individual machine to control the Firefly, set to a specific IP
address, (Ex. 1- 192.168.0.100). To allow a group of machines to
control the Firefly, set the IP to a range, (Ex. 2 - 192.168.0.0).
80
Page 95

WEBVIEW
SNMP Netmask
Designates the Netmask information for the system(s) that will be
able to monitor and control the Firefly. So for the individual
example above you would set, (Ex. 1- 255.255.255.255) and for
the range example above (Ex. 2- 255.255.255.0).
Community
The SNMP Community name defines the relationship between an
SNMP server system (your Firefly) and the client systems. This
acts like a password to control the clients’ access to the Firefly.
Security Name
SNMPv3 feature: Defines the security name for the authentication
and encryption for SNMP transmissions.
Auth Passphrase
SNMPv3 feature: Provides authentication but no encryption on
SNMP information.
Priv Passphrase
SNMPv3 feature: Provides authentication and encryption on
SNMP information.
81
Page 96
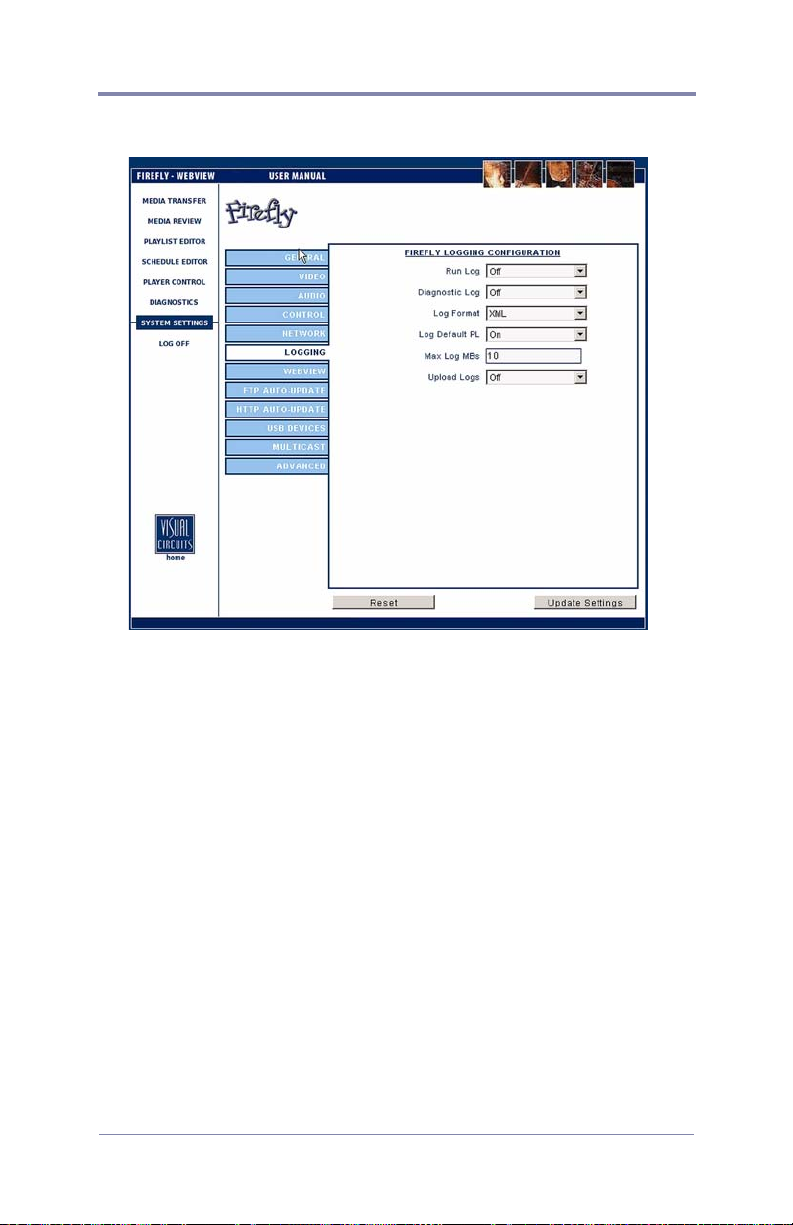
WEBVIEW
Logging Settings
Figure 33. Settings-Logging
Run Log
Allows you turn to “On” or “Off” the run log. The run log provides
a record of which videos played (with which graphic overlays, if
applicable), starting at what dates/times, playing back what
percentage of the video and for how long.
Diagnostic Log
Allows you to turn “On” or “Off” the diagnostic log. The
diagnostic log can be used to view a record of all media update
transactions and any system errors on a Firefly.
Information contained in the diagnostic log include:
❏ FTP/DVD Updating data: Tracks date, time of connection/
disconnection, errors- yes/no, files, sizes, percent
transferred and FTP permission errors.
82
Page 97

WEBVIEW
❏ Storage Cleanup data: Records what media have been
deleted by the automatic storage cleanup routine, including
file names, sizes and dates.
❏ Missing Elements Log: Records all missing media
referenced by an active playlist or schedule, including date,
time and file element.
❏ Error Summary data: Records important user player
diagnostic information, including the number of system
restarts, number of watchdog restarts, the player version,
etc.
❏ Serial Commands: Records most incoming and outgoing
external control commands.
Log Format
Allows you to set the output format of the run log file to
either.CSV or.XML.
Sample from a .CSV format run log:
12-07-02 20:30:07,1,05saturn.mpg,3_ser220.BMP,1,00:01:01,100
Sample from a .XML format run log:
<mpeg datetime=”12-07-02 20:32:57” chan=”1”
filename=”05saturn.mpg” overlay=”3_ser220.BMP” loop=”1”
duration=”00:01:01” percent=”100” />
The format of the diagnostic log is in a simple “time - event” per
line format.
Log Default Playlist
Allows you to designate whether or not the default playlist
playback is included in the playback log file data. Choosing “Yes”
includes the default playlist in the playback data. Conversely,
choosing “No” excludes the default playlist from the log file data.
If you are not using the scheduling feature (single playlist mode),
note that the playlist will not be logged.
83
Page 98

WEBVIEW
Max Log MBs
Allows you to set a value (in megabytes) for the maximum size a
log file is able to reach. The default value is 10 MB. You may want
to keep this value relatively small if you wish to maintain a large
amount of free space for videos and graphic overlays. However, if
you do not reserve enough space, Firefly will delete the oldest
residing logs in order to make room for the new ones.
When the log files exceed the maximum amount of defined storage
space, an automatic cleanup process will delete the oldest file as
required to contain the total log file space under the set limits. In
addition, files will be deleted (cut) after they are transferred to the
FTP server or downloaded from the Firefly player.
Upload Logs
Allows “Yes” or “No” choice for uploading log files to the
“logfiles” directory on your FTP server.
If you choose “Yes” to have the log files uploaded, you may
download the log files to your choice of storage options, such as a
database you have designated for Firefly media playback data,
from your FTP server.
After log files have been successfully uploaded to your FTP server, they
will be deleted from the Firefly.
84
Page 99
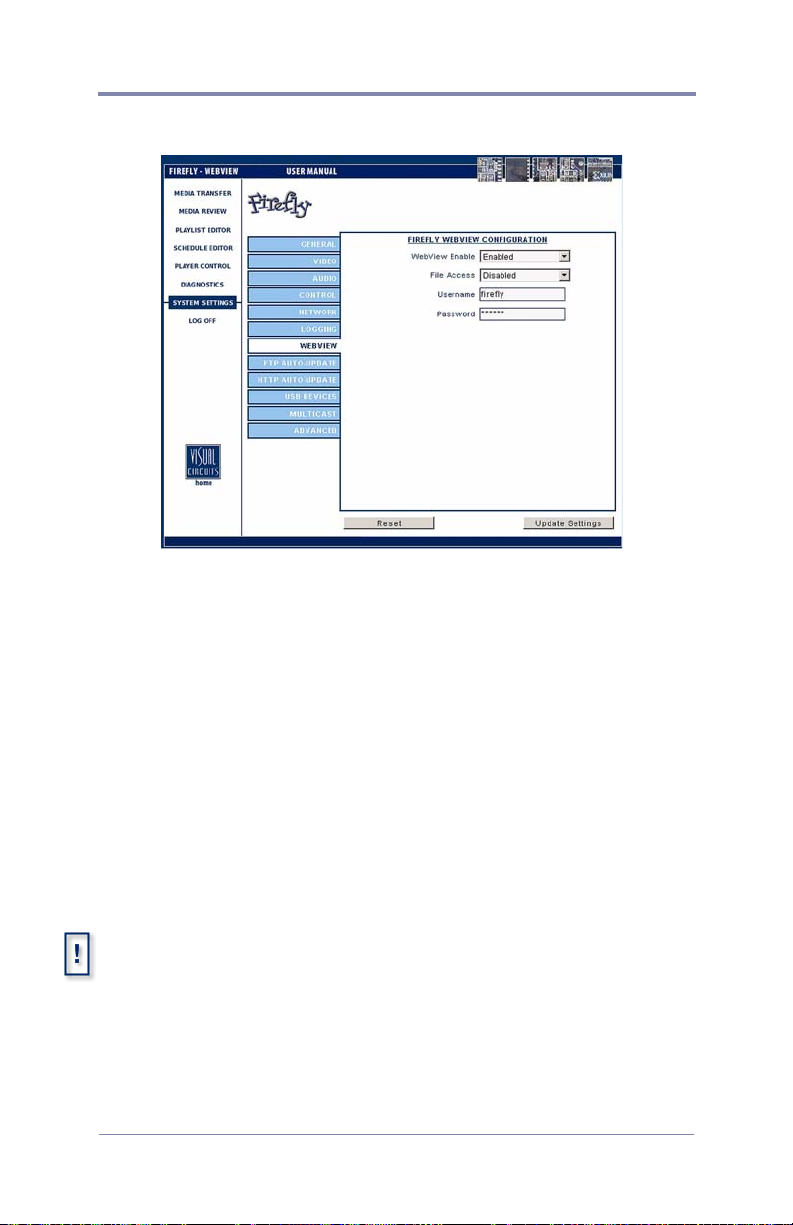
WebView Settings
Figure 34. Settings-Logging
WebView Enable
WEBVIEW
This feature gives the user access to Firefly over a network using a
conventional web browser (see
File Access
WebView on page 23).
Enable/Disable - Accesses the Firefly directly with an FTP client.
Username
Enter at least 6 (but no more than 15) alphanumeric characters
here. This field is case sensitive.
The user name and password are used for both WebView and the FTP
server.
85
Page 100

WEBVIEW
Password
Enter at least 6 (but no more than 15) alphanumeric characters.
This field is case sensitive.
WARNING
It is strongly recommended to change the user name and password
from their original default values for system security.
86
 Loading...