

Page 1
K2 POWER 130 KF - 165 KF
User Manual
Congratulations on purchasing a product from the K2 Power range. We are happy you
share our passion for the “the Spirit of Sound”. Designed using the latest techno-logies,
these speakers continue Focals perfectionist beliefs, developing products with high power
handling, and unrivalled sound quality. To obtain the best results from this product, we
recommend that you follow carefully all the information contained in this user’s manual.
If not followed correctly any fault observed, may not be covered by the guarantee.
Warning
Continued listening at high volume levels above 110dB, are regarded not ideal for your listening
pleasure. Listening above 130dB can damage your hearing permanently.
The Focal guarantee only applies if the enclosed guarantee card is returned to
us within 10 days of purchase.
Features
K2 Power cone : new CKMV sandwich composite, including (Kevlar, foam, and structural glass
fibre). Three individual materials, each with their own advantages, allow the cone to be extremely
rigid, with continued low mass value, and increased damping characteristics, even when played loud.
This ensures improved power handling, with detailed sound quality, low distortion even at high
volume levels.
Chassis made from Zamak : inherently rigid and non magnetic.
Voice coil wound on Kapton former : light-weight and powerful material ensures no deformation
of voice coil.
Butyl moulded rubber surround suspension : excellent reliability even in the most extreme climates.
TN 47 with inverted dome tweeter : inverted dome formed from titanium treated Tioxid 5
material. Producing detailed high frequencies, acoustically rich and dynamic.
High precision crossover : precise level adjustment of tweeter available. High audiophile quality
components used throughout.
Français page 7
Focal® is a trademark of Focal-JMlab® - BP 374 - 108, rue de l'Avenir - 42353 La Talaudière
cedex - France - Tel. (+33) 04 77 43 57 00 - Fax (+33) 04 77 43 57 04 - www.focal-fr.com
Due to constant technological advances, Focal reserves its right to modify specifications without notice. Images may not conform exactly to specific product.
Page 2
K2 POWER 130 KF - 165 KF
User Manual
A B
2
C
E F
D
Page 3

INSTALLATION AND POSITIONING
User Manual
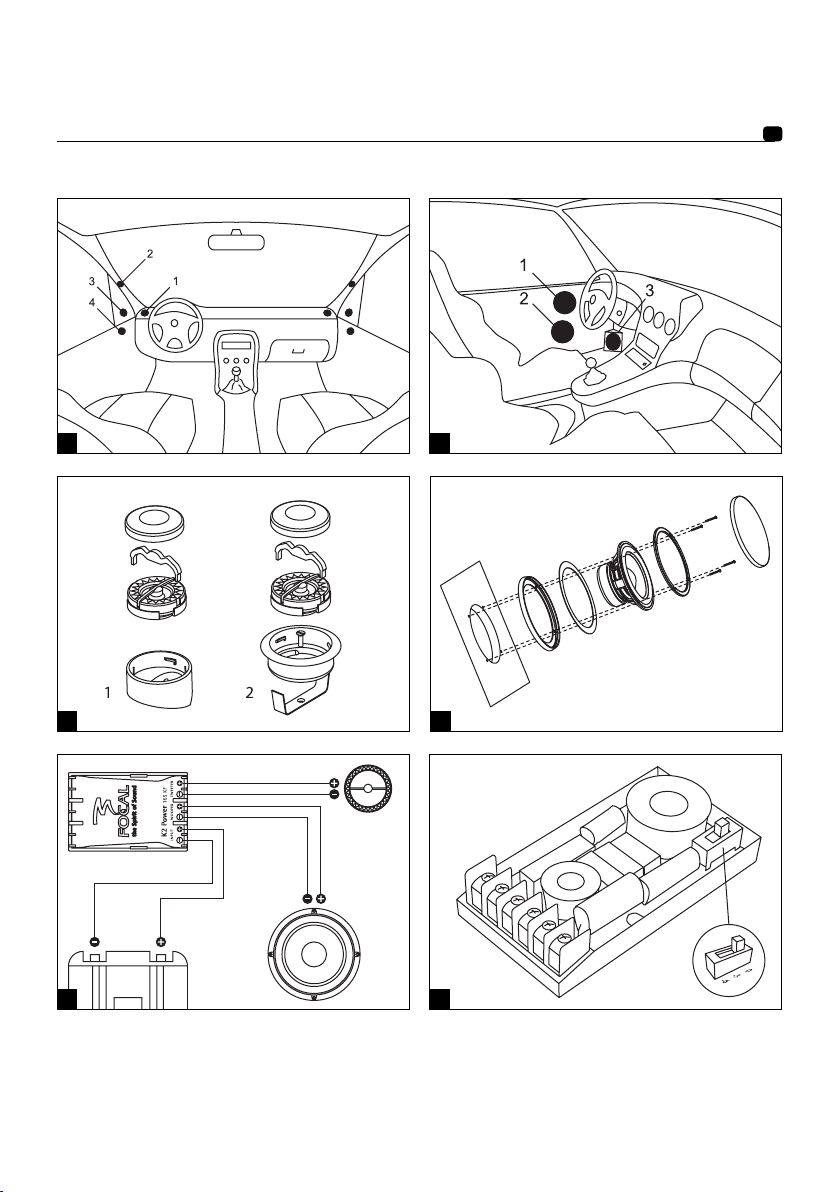
Tweeter installation
The TN 47 tweeter has been designed for flush mounting or surface mounting positioning, using
the two fixing kits provided. The choice of install position is extremely important to deliver the best
performance and to maintain integration into the system. This is a major factor for high frequency
SPL, and stability of the acoustics, stereophonic imaging, and overall staging. Please check the
drawing to understand this further.
The standard recommendation for an ideal stereo system is to ensure the tweeters “left” and “right”
are installed in the same positions. Also they are approximately at equal distance to the driver
(vice-versa for the passenger). The various positions advised should be verified and comparisons
made, for ideal positioning.
The tweeter should always be positioned ahead of the normal listening position. The main
preferences are the ends of the dashboard (fig. A, 1), close to the windshield (fig. A, 2). Normally
easy for installation. The location close to the door mirror (fig. A, 3) is also regarded as a good
position, and normally only a light installation is required. Last, another position, high in the doors
(fig. A, 4) is also acceptable even if it is not considered as the best for optimised staging. It is
imperative to check before any installation is attempted, that enough space is available (especially
for flush-mounting applications). Also make sure that there will be no interference with security
devices air-bags, door latches etc.
Tweeter installation
• Surface-mounting
The flush-mounting fixing kit supplied offers two possibilities for installing the TN47 in an angle of
10°/30°. This allows more flexibility for the installation (fig. C, 1).
Fix the assembly using the two screws provided. Thread the cable from the tweeter, through the back.
Then decide the defined angle and lock in place on the support.
3
• Flush-mounting (highly recommended)
Cut a perfectly round hole of 45mm (1.77“). Push in the support and ensure it remains flat on the
surface. Ensure it is locked in place with the screws supplied. Thread the cable from the tweeter,
through the back. Then decide the defined angle and lock the tweeter in place on the support. To
lock in place, insert the key provided, and turn until locked securely (fig. C, 2).
Woofer installation
• Recommendations
K2 Power woofers have been designed for a multitude of vehicles installations. It is worth
understanding the basic requirements for installing such products. These woofers are capable of
delivering enormous amounts of energy, during their positive / negative movement.
Therefore, it is imperative that they are fixed securely to the desired location. The fixing location
should also be strengthened where necessary.
Panels should be strengthened to eliminate any unwanted vibrations. Such vibrations will drastically
reduce the overall performance. These drive units should be fixed and sealed to the baffle or
location panel. The use of the foam gasket is advisable for correct air sealing.
Page 4

INSTALLATION AND POSITIONING
User Manual
For added performance and to better reduce such unwanted vibrations and any other acoustical
losses, we recommend the use of “Plain Chant”. Easily positioned behind the woofer, on the metal
work of the vehicle, “Plain Chant” soaks up vibrations as well as acoustic reflections.
Beforehand always ensure that enough space is available for the magnet assembly so that it
doesn’t interfere with safety mechanisms or any other parts.
In the case of not using the grilles supplied, it is important to ensure the speakers fit correctly.
Ensuring there is enough depth behind the speaker has already been explained, but thought must
also be given for the forward movement of the cone and surround assembly.
K2 Power woofer, positioned ideally high in the doors (fig. B, 1), produce optimal midrange
frequencies, thus integrating better into the rest of the system.
The woofers from the K2 Power range can also be placed low in the “kick-panels” (fig. B, 3) of the
vehicle. This is to further optimize the stereophonic staging.
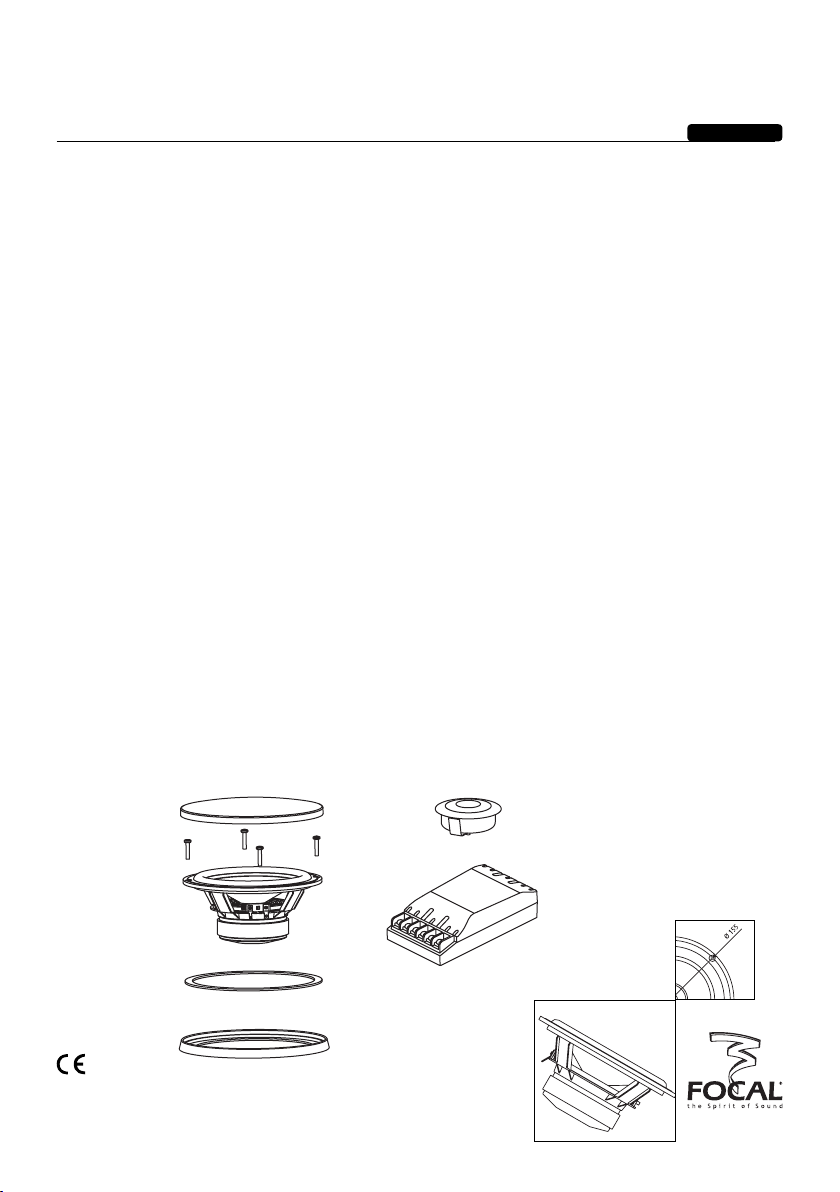
Woofer fixing
Either cut the required hole or use the pre-fitted space. Make sure the diameter is correct.
Where necessary, carefully push in the four fixing clips to fit together with the fixing screws.
Carefully place the fixing ring, ensuring it lines up with the holes or fixing clip positions (fig. D).
Fix the foam gasket to the back of the drive unit chassis. Add a small amount of glue where
necessary so it remains in the correct position (lined up with the holes).
Lower the drive unit above the fixing ring, so it remains in the correct position (lined up with the holes).
Don’t forget to connect the cable to the connectors.
Now lower the drive unit and screw in place with the four screws provided.
Add the grille and push in place. Ensure the logo is straight.
4
Crossover installation
Before you start, it is necessary to remove the clear plastic lid. Doing so enables access for
adjustment, and fixing the unit in place.
Remove it, by pushing gently on the two shortest sides of the clear plastic lid. Then pull off.
Never use a screwdriver to prise off the lid, otherwise damage might occur and will not be covered
by the warranty.
Once removed, fix in place with the 2 screws supplied. Ensure the length of screw is suitable for the
desired location. Always ensure the crossover is installed in a dry, vented and not damp area.
2-Way kits connecting up
Connect the output from the amplifier into the input of the crossover “INPUT”.
Connect the woofer to the output of the crossover “WOOFER”.
Connect the tweeter to the output of the crossover “TWEETER” (fig. E).
Finally always ensure the tweeter and woofer are connected in phase correctly and the polarities
are respected “+” to “+”, and “-” to “-”. If not done correctly a “hole” or “peak” may result due
to a shift in phase. This will dramatically impair the overall performance.
Page 5

INSTALLATION AND POSITIONING
User Manual
Level adjustment of tweeter
The toggle switch found inside the crossover allows the user to adjust the tweeter level. This userfriendly option allows adjustments to be made, to your own personal listening pleasure, plus
optimising the infinite amount of the speaker’s locations available. This allows the system to be
“tailor made” to your vehicle, effectively ensuring the best acoustics available. Remember, with
too much treble your system may sound aggressive, suffer a loss of dynamics, and end up in poor
definition.
Depending on the level of high frequency required for perfect integration with the woofer, adjust
from 0 to -3 and -6dB. Normally if the tweeter is positioned close or on axis with the listening
position slight reductions of -3 and -6dB are advised.
Information of other K2 Power products
Focal-JMlab offer a range of sub-woofers from the 27 KX (270mm/10.6”) to the impressive
46 KX4 (460mm/18”). Consult your dealer for further information.
5
Page 6

SPECIFICATIONS
User Manual
Kit 130 KF 165 KF
Maximum power 140W 160W
Nominal power 70W 80W
Sensitivity 90dB 91dB
Frequency response 70 to 20,000Hz 60 to 20,000Hz
Crossover 3.5kHz to 12/18dB/oct 3.5kHz to 12/18dB/oct
Nominal impedance 4 ohms 4 ohms
Tweeter TN 47 TN 47
Cone Inverted Tioxid 5 Inverted Tioxid 5
Magnet Neodyme Neodyme
Woofer 5KP 6KP
Cone 5" K2 sandwich 130mm 6" K2 sandwich 165mm
Voice coil 1" - 25mm 1" - 25mm
Magnet 3.4" - 85mm 3.4" - 85mm
Surround Butyl Butyl
Resonant frequency (Fs) 89Hz 73Hz
DC resistance (Re) 3.2 ohms 3.0 ohms
Vas 0.17Ft
Qes 0.74 0.81
Qms 8.06 9.01
Qts 0.68 0.74
Sd 13.42in2 - 86.6cm
Bl 4.27N/A 5.09N/A
Xmax 0.1" - 2.5mm 0.2" - 5mm
Cut -out diameter 4.50" - 115mm 5.60" - 142mm
Mounting depth 2.40" - 61mm 2.80" - 71mm
3
- 4.93 litres 0.27Ft3 - 7.71 litres
2
20.57in2 - 132.7cm
2
6
K2 Power drive units use the very latest components. To ensure such complex mechanical
elements work in harmony with each other, they must be allowed to function correctly in the
right environment. Changes in temperature and humidity are regarded as very hostile. K2 Power
speakers benefit from a running-in period. We recommend that once the system is ready for
listening the drive units should be run-in with medium volume setting, with music that has the full
bandwidth of frequencies (sub-bass through to treble). This running-in period should be used for
a few weeks, to gain the full potential. After which, the excellent performance of your K2 Power
products will be fully appreciated.
Conditions of guarantee
All Focal loudspeakers are covered by guarantee drawn up by the official Focal distributor in your
country. Your distributor can provide all details concerning the conditions of guarantee. Guarantee
cover extends at least to that granted by the legal guarantee in force in the country where the
original purchase invoice was issued.
Page 7

K2 POWER 130 KF - 165 KF
Manuel Utilisateur
Nous vous remercions d’avoir choisi les kits K2 Power et de partager avec nous notre
philosophie "the Spirit of Sound". Ces haut-parleurs de haute technicité intègrent les
ultimes perfectionnements Focal en matière de conception pour l’obtention d’un son
puissant et de très haute qualité. Afin d’exploiter toutes leurs performances, nous vous
conseillons de lire ce livret, puis de le conserver avec précaution pour pouvoir vous y
référer ultérieurement. Tout problème dû au non-respect des règles d’utilisation peut
entraîner l’invalidation de la garantie.
Avertissement
L’écoute prolongée à fort niveau au-delà de 110 dB peut détériorer durablement l’audition.
Des écoutes même brèves à plus de 130 dB peuvent provoquer des lésions auditives irrémédiables.
Pour validation de la garantie Focal, merci de nous retourner la garantie jointe
dans les 10 jours.
Caractéristiques
Membrane K2 Power : nouveau sandwich CKMV composite Kevlar / mousse structurale / verre,
alliant très haute rigidité, légèreté extrême et amortissement maximal pour un son puissant et très
détaillé, sans distorsion même à fort niveau.
Châssis Zamak : châssis rigide et amagnétique.
Bobine sur support Kapton : très haute tenue en puissance sans déformation de la bobine.
Suspension en butyle : excellente fiabilité dans le temps.
Tweeter à dôme inversé TN 47 :dôme inversé en titane traité Tioxid 5 pour un son fin, doux,
mais détaillé et dynamique.
Filtre haute précision : réglage du niveau du tweeter, composants de haute qualité.
7
ø165
ø155
Focal® est une marque de Focal-JMlab® - BP 374 - 108, rue de l'Avenir - 42353 La Talaudière
cedex - France - Tel. (+33) 04 77 43 57 00 - Fax (+33) 04 77 37 65 87 - www.focal-fr.com
Dans un but d'évolution, Focal-JMlab se réserve le droit de modifier les spécifications techniques de ses produits sans préavis. Images non contractuelles.
Page 8

K2 POWER 130 KF - 165 KF
Manuel Utilisateur
A B
8
C
E F
D
Page 9

MONTAGE
Manuel Utilisateur
Installation tweeter
• Placement tweeter
Le tweeter TN 47 est conçu pour être monté en surface ou encastré en affleurement, grâce aux
deux kits de fixation fournis. Le choix de l’implantation du tweeter, de la méthode de montage
encastré ou en surface, ont une influence considérable sur le rendu des hautes fréquences, la
stabilité de l’image stéréophonique et le "staging".
La règle, incontournable en stéréo-phonie, est de chercher le meilleur emplacement possible de
manière à ce que les tweeters droit et gauche soient placés approximativement à égale distance
du conducteur. L’emplacement idéal du tweeter exigera de multiples écoutes comparatives.
Le tweeter devra impérativement être placé en avant du point d’écoute, de préférence aux
extrémités du tableau de bord (fig. A, 1), ou mieux encore, sur les montants de pare-brise
(fig. A, 2) moyennant transformation. Le carter des rétroviseurs (fig. A, 3) accepte généralement
l’implantation d’un tweeter moyennant une petite transformation.
Un positionnement en haut des portières (fig. A, 4) est acceptable, même si il n’est pas optimal
en termes de "staging".
Il est impératif de vérifier la profondeur d’encastrement du tweeter avant perçage, notamment
en encastrement.
• Montage en surface
Le kit de fixation pour le montage en surface du TN 47 offre deux pans pour choisir une inclinaison
de 10° ou 30° et optimiser l’installation (fig. C, 1). Fixez le support au moyen de la vis fournie,
faire passer les fils du tweeter au travers du support, mettre en place le tweeter puis le faire pivoter
à l'aide de la clef fournie pour le bloquer sur le support. Remettre la grille en place.
Montage encastré
(recommandé)
9
Les meilleurs résultats sonores seront obtenus pour un montage des tweeters en encastrement.
Découper une ouverture de 45 mm de diamètre. Insérez le support de montage en affleurement
avec sa barrette de fixation maintenue par le boulon (fourni). Bloquez la vis afin que la barrette
vienne pincer le support et le maintienne fermement en haut de porte ou sur la planche de bord.
Faire passer les fils du tweeter au travers du support, mettre en place le tweeter puis le faire pivoter
pour le bloquer sur le support à l'aide de la clef fournie (fig. C, 2).
Attention : il ne faut en aucun cas utiliser l’arceau central pour faire pivoter le tweeter. Utilisez
uniquement la clef fournie.
Installation woofer
• Recommandations importantes
Les hauts-parleurs de la ligne K2 Power sont conçus, grâce à des réglages adaptés et optimisés,
pour fonctionner au mieux de leurs pos- sibilités dans la plupart des empla-cements habituels.
Il convient cependant de ne pas perdre à l’esprit que ces haut-parleurs délivrent une énergie
considérable qui ne doit pas être diluée dans la structure du véhicule, la faute à un support de
haut-parleur insuffisamment rigide.
Page 10

MONTAGE
Manuel Utilisateur
Nous vous suggérons de fixer les haut-parleurs K2 Power sur un support très rigide, éventuellement
renforcé par du bois ou de la résine.
Les haut-parleurs devront y être ensuite solidement fixés pour éviter les vibrations parasites.
L’étanchéité du support doit être parfaite pour éviter les fuites entre l’avant et l’arrière du woofer,
sous peine d’occasionner un dysfonctionnement important.
Pour des écoutes optimales, nous vous conseillons de coller un matériau absorbant type Plain
Chant direc-tement sur la tôle intérieure de la portière, juste derrière le haut-parleur, pour amortir
les vibrations.
Vérifier également que l’aimant du woofer ne gênera pas certains organes mécaniques
du véhicule.
Si vous n’utilisez pas les grilles fournies avec les kits K2 Power mais celles d’origine par exemple,
veillez à ce que l’espace entre le haut-parleur et la grille soit suffisant pour que la membrane ne
vienne pas percuter la grille à fort volume.
Installation woofer
• Placement woofer
Les haut-parleurs K2 Power pourront être placés en haut des portières pour une perception
optimale des fréquences médium (fig. B, 1).
Ils pourront être placés plus bas dans les portes sans dégradation sensible des performances (fig. B, 2).
Les woofers K2 Power pourront également être placés en "kicks panels" (fig. B, 3) dans le but
d’optimiser la perception stéréophonique (staging).
Fixation woofer
Placez si nécessaire les 4 pattes de fixation de vis fournies.
Mettre en place la couronne de fixation de la grille (fig. D).
Fixez le joint circulaire sur la face arrière du châssis du haut-parleur.
Mettre en place le woofer sur le support de grille.
Fixez solidement l’ensemble au moyen des 4 vis fournies.
Mettre la grille de protection en place.
10
Installation filtre
Pour accéder aux trous de fixation du filtre mais aussi aux différents réglages, retirez le capot
translucide en appuyant fermement sur les deux extrémités de celui-ci et en le soulevant. Ne pas
utiliser d’outils pour retirer le capot au risque de le détériorer.
Fixez solidement le filtre au moyen des 2 vis fournies sur un support adapté dans le véhicule.
Les filtres doivent être montés dans un endroit sec et aéré (de préférence exempt de vibration).
Câblage
Branchez la sortie de l’amplificateur sur les entrées "INPUT" du filtre.
Connectez le woofer sur l’entrée "WOOFER" et le tweeter sur "TWEETER" (fig. E).
Attention : il est primordial de respecter les polarités "+" et "-" pour l’obtention d’un recoupement
optimal entre le woofer et le tweeter, sans sensation de "trou" ou de "bosse" à l’écoute.
Page 11

MONTAGE
Manuel Utilisateur
Réglage du tweeter
Le réglage du niveau du tweeter s’effectue à l’intérieur du filtre, par l’intermédiaire d'un inverseur
qui commande une atténuation de -3 et -6 dB (fig. F).
Période de rodage
Les haut-parleurs utilisés sur K2 Power sont des éléments mécaniques complexes qui exigent une
période d’adaptation pour fonctionner au mieux de leurs possibilités et s’adapter aux conditions
de température et d’humidité de votre environnement. Cette période de rodage varie selon les
conditions rencontrées et peut se prolonger sur quelques semaines. Pour accélérer cette opération,
nous vous conseillons de faire fonctionner vos haut-parleurs une vingtaine d’heures à niveau
moyen, sur des programmes musicaux riches en grave. Une fois les caractéristiques des hautparleurs totalement stabilisées, vous pourrez profiter intégralement des performances de vos kits
K2 Power.
Configuration
La ligne K2 Power compte une gamme de 4 subwoofers de 27 cm (27 KX), 33 cm (33 KX),
40 cm (40 KX) et 46 cm (46 KX 4) dont les caractéristiques sont idéalement complémentaires avec
celles des kits K2 Power. Consulter votre revendeur.
11
Page 12

CARACTÉRISTIQUES
Manuel Utilisateur
Kit 130 KF 165 KF
Puissance maximale 140 W 160 W
Puissance nominale 70 W 80 W
Sensibilité 90 dB 91 dB
Réponse en fréquence 70 à 20 000 Hz 60 à 20 000 Hz
Fréquences de filtrage 3,5 kHz à 12/18 dB/oct 3,5 kHz à 12/18 dB/oct
Impédance nominale 4 ohms 4 ohms
Tweeter TN 47 TN 47
Dôme Inversé Tioxid 5 Inversé Tioxid 5
Aimant Néodyme Néodyme
Woofer 5 KP 6 KP
Membrane Sandwich K2 130 mm Sandwich K2 165 mm
Bobine mobile 25 mm 25 mm
Aimant 85 mm 85 mm
Suspension Butyle Butyle
Fréquence de résonance (Fs) 89 Hz 73 Hz
Résistance continue (Re) 3,2 ohms 3,0 ohms
Vas 4,93 litres 7,71 litres
Qes 0,74 0,81
Qms 8,06 9,01
Qts 0,68 0,74
Sd 86,6 cm2 132,7 cm2
Bl 4,27 N/A 5,09 N/A
Xmax 2,5 mm 5 mm
Diamètre d'encastrement 115 mm 142 mm
Profondeur d'encastrement 61 mm 71 mm
12
Conditions de garantie
En cas de problème, adressez-vous à votre revendeur Focal.
La garantie pour la France sur tout matériel Focal est de 1 an. En cas de matériel défectueux,
celui-ci doit être expédié à vos frais, dans son emballage d’origine auprès du revendeur, lequel
analysera le matériel et déterminera la nature de la panne. Si celui-ci est sous garantie, le matériel
vous sera rendu ou remplacé en "franco de port". Dans le cas contraire, un devis de réparation
vous sera proposé.
La garantie ne couvre pas les dommages résultant d’une mauvaise utilisation ou d’un branchement
incorrect (bobines mobiles brûlées par exemple...).
En dehors de la France, le matériel Focal est couvert par une garantie dont les conditions sont
fixées localement par le distributeur officiel Focal de chaque pays, en accord avec les lois en
vigueur sur le territoire concerné.
Page 13

K2 POWER 130 KF - 165 KF
International Guarantee
The Focal guarantee only applies if this page is returned to us within 10 days of
purchase, to the following address:
Focal-JMlab - BP 374 - 108, rue de l’Avenir - 42353 La Talaudière cedex - FRANCE
Model: Serial number:
Name of dealer: Town:
Date of purchase: Purchase price:
Your name: Age: Occupation:
Your complete address:
Your email address:
Details of your installation (brand, model):
Tape: CD:
Navigation:
DVD:
CD-change: Other elements:
Multimedia center:
Amplifier:
13
Your decision for purchasing this Focal model was made according to:
Dealer’s advice Friend’s advice
Visit to an exhibition, show Press article
Listening in auditorium Already own Focal products
Reliability / Quality Documentation
Reputation French produce
Guarantee Quality / Price ratio
Design / Finishes Other:
Sound
In case of purchase of new equipment, what were your former speakers ?
Explain in a few words why you choose Focal...
Further comments:
The information given on this page will remain confidential.
Page 14

Page 15

K2 POWER 130 KF - 165 KF
Garantie France
Pour validation de la garantie Focal, merci de nous retourner cette page dans
les 10 jours, à l’adresse suivante :
Focal-JMlab - BP 374 - 108, rue de l’Avenir - 42353 La Talaudière cedex - FRANCE
Modèle : N° de série :
Nom du revendeur : Ville :
Date de l’achat : Prix de l’achat :
Votre nom : Âge : Profession :
Votre adresse complète :
Votre adresse email :
Composition de votre installation (marque, modèle) :
Cassette : CD :
Système de navigation :
DVD : Amplificateur :
Chargeur CD : Autres éléments :
Système multimédia :
15
Votre choix pour l’achat de ce modèle Focal s’est fait en fonction de :
Conseil du revendeur Conseil d’amis, relation
Visite d’exposition, salon Article de presse
Ecoute en auditorium
Fiabilité / Qualité Catalogues
Réputation
Garantie Rapport qualité / prix
Esthétique / Finition Autre :
Son
En cas de renouvellement, quels étaient vos précédents haut-parleurs ?
Dîtes en quelques mots pourquoi vous avez choisi Focal...
Vos annotations éventuelles :
Nous garantissons la confidentialité de ces informations.
Possède déjà Focal
Matériel Français
Page 16

®
Focal
is a registered trademark of Focal-JMlab® - www.focal-fr.com
Focal-JMlab® - BP 374 - 108, rue de l'Avenir - 42353 La Talaudière cedex - France
Tel. (+33) 04 77 43 57 00 - Fax (+33) 04 77 43 57 04 - SCEB-050107/3
 Loading...