

Flyer E-Bike Operating Instructions Manual

Operating instructions
E-Bike according to EN 15194 · translation of the original operating instructions
I. Safety instructions
These original operating instructions contain the most important information required to familiarise yourself with your new FLYER, to get to
know its technology, to attend to safety aspects and prevent damage to
persons, goods and the environment. Please retain these operating instructions, keep them at hand and take note of the information. Forward
these instructions along with your FLYER if you lend it to other people. You
will repeatedly encounter the following symbols:
The specific fastening torque is either printed on the component
or provided in the Chapter "Fastening torques".
These symbols will from here on be used without any further explanations,
but in each case will represent the contents and risk listed above. The area
belonging to the respective symbol is framed as shown above.
Danger: This sign represents increased risk of falling,
the possibility of injuries and harm to others. Your FLYER
is equipped with modern, complex technology. It has to be
handled with knowledge, experience and special tools. Leave any
work on it to your FLYER dealer. We can only describe the most
important points in these instructions. Further information and
instructions are provided by the component manufacturers. They
are attached to these instructions and must be adhered to as well.
Please note: You should definitely talk to your FLYER dealer if any-
thing is unclear to you.
Note: Here you can find IMPORTANT SPECIFICATIONS and
information about the best use of your FLYER
Attention: This is a WARNING about possible damage to
goods or environmental damage
Adhere to the fastening torques: The exact fastening
torque must be adhered to at each screw connection. This
requires a special tool called a torque spanner. Leave this
work to your specialist dealer when you do not have the required
tool. Parts that have been fastened with the wrong fastening
torque may break or come loose and cause severe falls.
Please read the chapters entitled "Before the first
ride" and "Before each ride" in these instructions.
It is essential that you perform the tests described
in this text. Protect yourself and others by behaving
safely and responsibly and always consider the risks
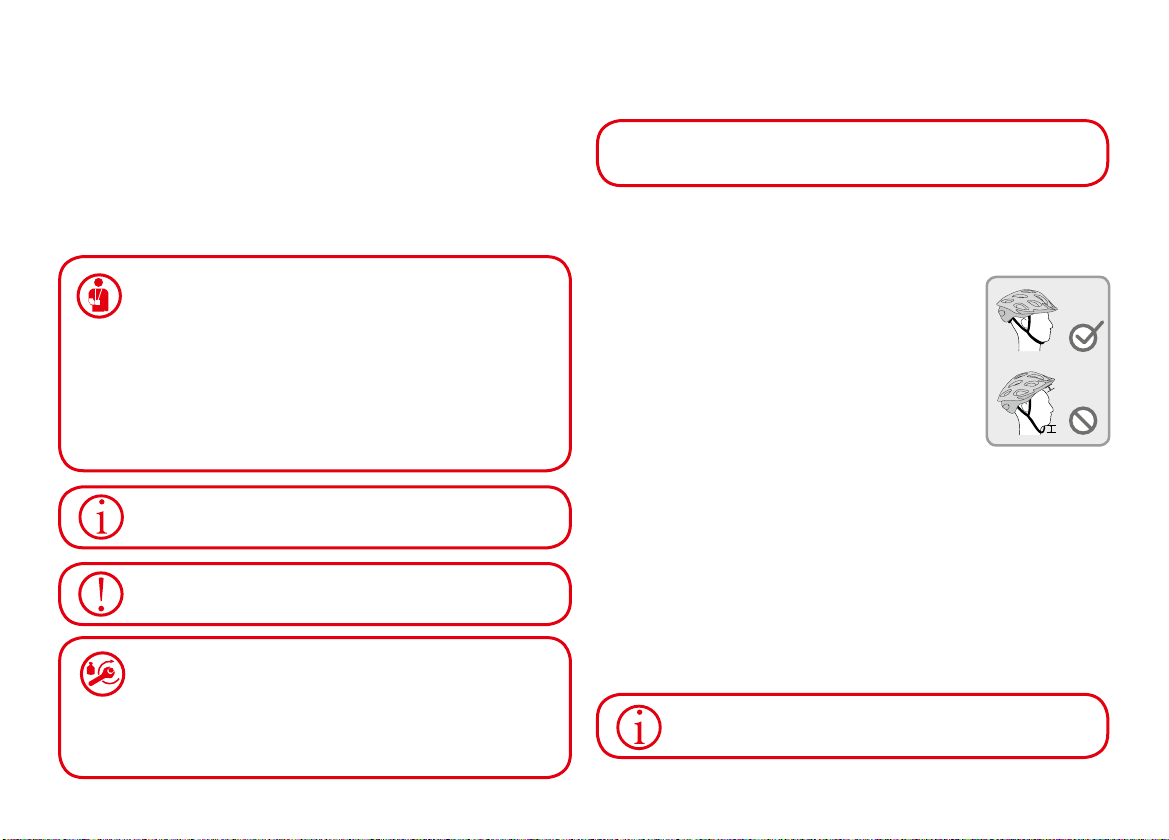
that other road users on bicycles are exposed to. Always wear a well-fitting and suitable helmet. Get information on how to make a helmet fit correctly.
Seeing and being seen is important. Wear light-coloured clothing or
clothing with reflective elements when riding. You might have to use trouser clamps. And: The soles of your shoes should be rigid and slip-proof.
Never ride with your hands off the handle bars.
Note for all parents and guardians:
Your responsibility as a guardian includes responsibility for the actions
and the safety of your child - including responsibility for the technical
state of his bicycle and its suitability for the rider.
Ensure that your child has learned to use his or her E-bike safely and
responsibly – preferably in the environment where he or she will ride the
E-Bike.
Children may only ride with an E-Bike when they have
reached the required age and have the required licence!
C2
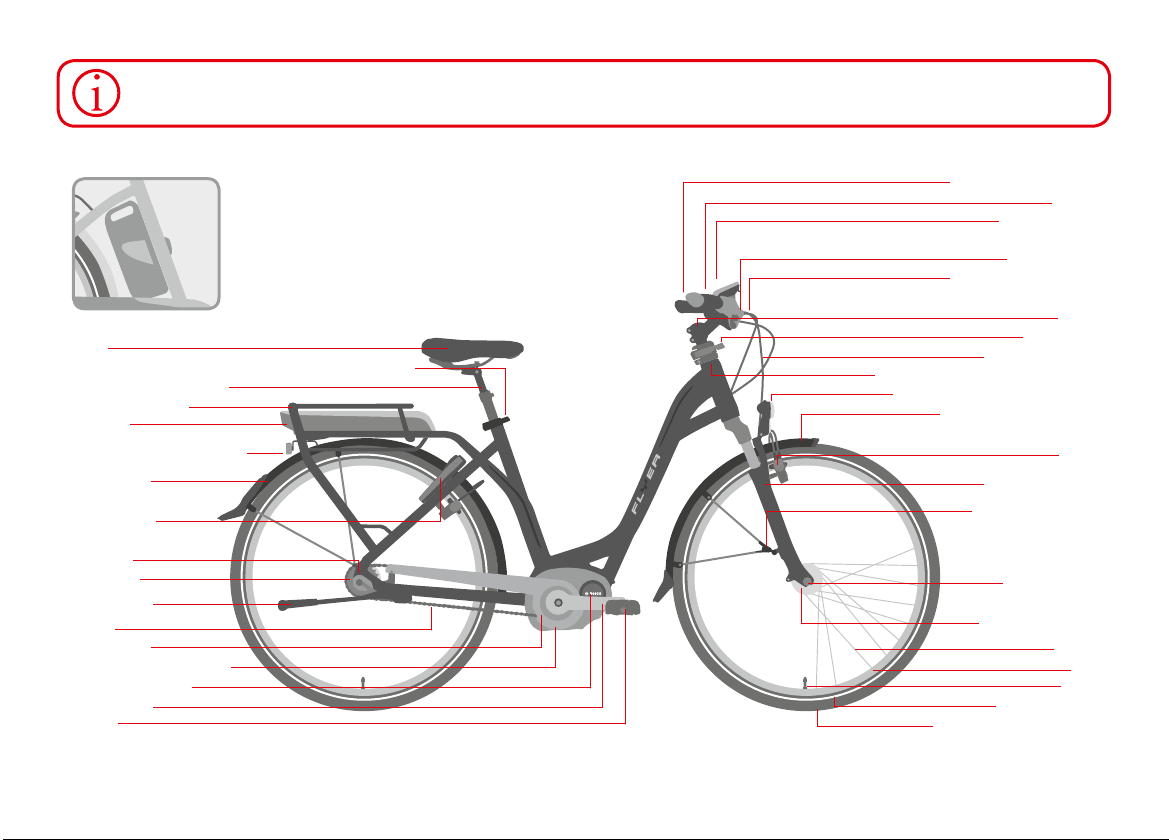
If you leave this page folded out, you can easily locate the component you are currently reading about.
II. The E-Bike and its components
The battery may also
be positioned at the
seat tube, depending
on the mechanical aid
installed.
Seat
Seat support clamp with quick-release fastener
Suspension seat post
Luggage carrier
Battery
Rear light with
integrated rear reflector
Mudguard
Frame lock
Dropout
Sprocket
Prop stand
Chain
Chain ring
Chain wheel protector
Electrical motor
Crank arm
Pedal
Handlebar with grip
Shifter
Operating unit
Brake lever
Gear-switching cable
Stem
Speedlifter
Brake cable/line
Headset
Front headlight with reflector
Front wheel mudguard
Brake
Suspension fork
Safety attachment
Mudguard
Wheel:
Quick-release
fastener front
Front wheel hub
with hub dynamo
Spoke
Rim
Valve
Reflecting ring
Tire with puncture protection
C3
Preamble
III. Brief introduction
Dear FLYER customer, It is essential that you
carefully read these original operating instructions to get to know your new FLYER before you
use it. These instructions include a brief introduction. You will be able to ride your FLYER
after reading this brief introduction if you are
already an experienced E-Bike rider. Please
read all of the instructions to ensure safe use.
These instructions are based on the assumption that you and all users of this FLYER
have a basic knowledge of bicycles and EBikes. Please contact your FLYER specialist
dealer if you are not certain and for important
maintenance tasks.
All persons using, cleaning, maintaining,
repairing and disposing of the FLYER must
know and understand the content of these instructions.
Ignoring this information may have considerable consequences for your own safety.
Ignoring these instructions may lead to severe
accidents as well as financial repercussions.
You must know the specific instructions for
this FLYER as well as the rules and laws applicable to road traffic, which may differ between
countries.
1. It is important to read the safety instructions
about the technical uses of your bicycle first.
Carefully read the quick-start instructions before your first ride.
Reading the quick-start instructions is no a
substitute for reading all the operating instructions. They are intended as a support for
experienced riders. Only they may go ahead
and ride. It is explicitly required that you read
all operating instructions carefully before your
first ride.
Practise using and riding your
E-Bike in a quiet and safe place
before you ride it in public road
traffic!
You may ride at significantly
higher speed than you are used
to on your normal bicycle due
to the additional power of the motor.
Please take this into account when familiarising yourself with the fast E-Bike!
2. Fasten at least one hand brake before placing a foot onto a pedal. The motor starts as
soon as you step onto a pedal. This can be
helpful when starting up and riding uphill, but
it may cause the rider some difficulties and
even severe falls, particularly if you are not
used to it.
3. Take the battery out of the E-Bike before performing any work (e.g. assembly, maintenance,
work on chain, etc.) on the E-Bike, transporting
it by car or plane or storing it. There is a risk
of injury when the electrical system is unintentionally activated.
C4

1. Table of contents
1
I. Safety instructions - C2
II. The E-Bike and its components - C3
Preamble - C4
III. Brief introduction - C4
1. Table of contents – 1
2. Brief introduction to the FLYER with
Panasonic drive unit – 2
2.1 Operation and indicators for the Pana-
sonic drive unit with central operating
element – 2
2.2 Operation and indicators for the Pa-
nasonic drive unit / laterally mounted
display – 3
2.3 Battery – 4
2.4 The pushing aid – 6
2.5 The start-up aid – 6
3. Brief introduction to the FLYER with
Bosch drive unit – 6
3.1 Charging the battery – 8
3.2 Inserting and removing the battery – 9
4. Safety instructions for all electrical
systems – 9
5. Legal stipulations – 10
5.1 Switzerland – 10
5.2 Germany – 10
5.3 Austria – 11
6. Appropriate use – 11
7. Before the first ride – 11
8. Before any ride – 12
9. Rider-specific adjustments – 12
9.1 Setting the seating position – 12
9.2 Operation of quick-release fasteners
and axles – 13
9.3 Seat height – 14
9.4 Seat position – 15
9.5 Handlebar height – 15
10. Suspension elements – 15
11. Wheels and tires – 16
11.1 Checking the rims – 16
12. Tires and tubes – 17
12.1 Fixing a flat tire – 17
13. Bicycle gear systems – 17
14. Bicycle chain – 18
15. Brake, brake lever and braking systems – 18
16. Lighting system – 19
17. Riding with additional load – 20
17.1 Luggage carrier / riding with lug-
gage – 20
18. Mudguards – 20
19. Accessories and equipment – 20
19.1 Transporting children / child seats – 20
19.2 Bicycle trailers and child trailers – 21
19.3 Bicycle basket – 22
19.4 Car roof- and rear-mounted racks – 22
20. Electrical system – 23
21. Maintenance – 23
22. Wearing parts – 24
23. Regular inspections – 24
23.1 Inspection plan – 25
24. Exchanging the components of the
"fast FLYER" – 26
24.1 Components that do not have to be
exachanced using an original component – 26
25. Technical data – 27
25.1 Batteries for the next-generation
FLYER models (36V) – 27
25.2 Fastening torques for screw connections – 27
26. Stipulations regarding warranty and
guarantee – 28
27. Inspections – 30
28. Declaration of conformity & imprint – 32
IV. Handover protocol - U5
V. E-Bike passport - U6
The current operating instructions are provided at
www.flyer.ch/bedienungsanlei-
tungen
2
Brief introduction to the FLYER with Panasonic drive unit
2. Brief introduction to the FLYER with Panasonic drive unit
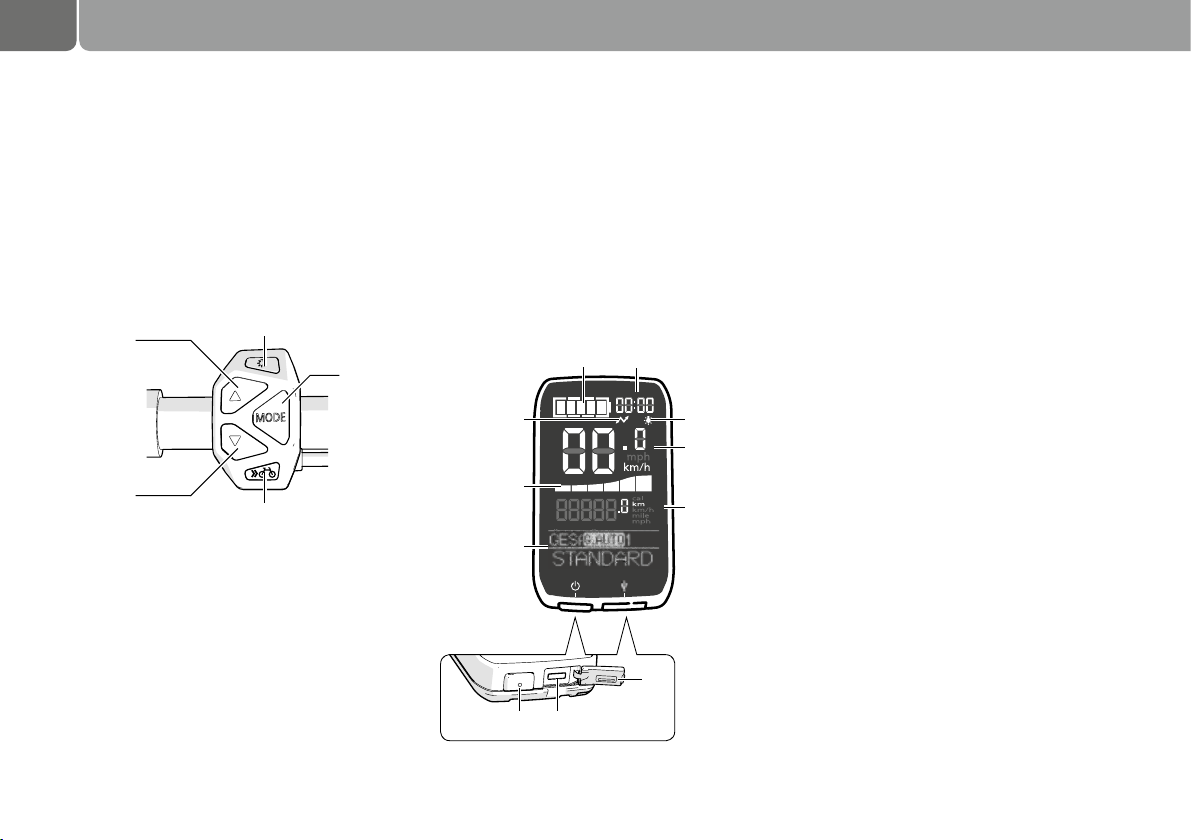
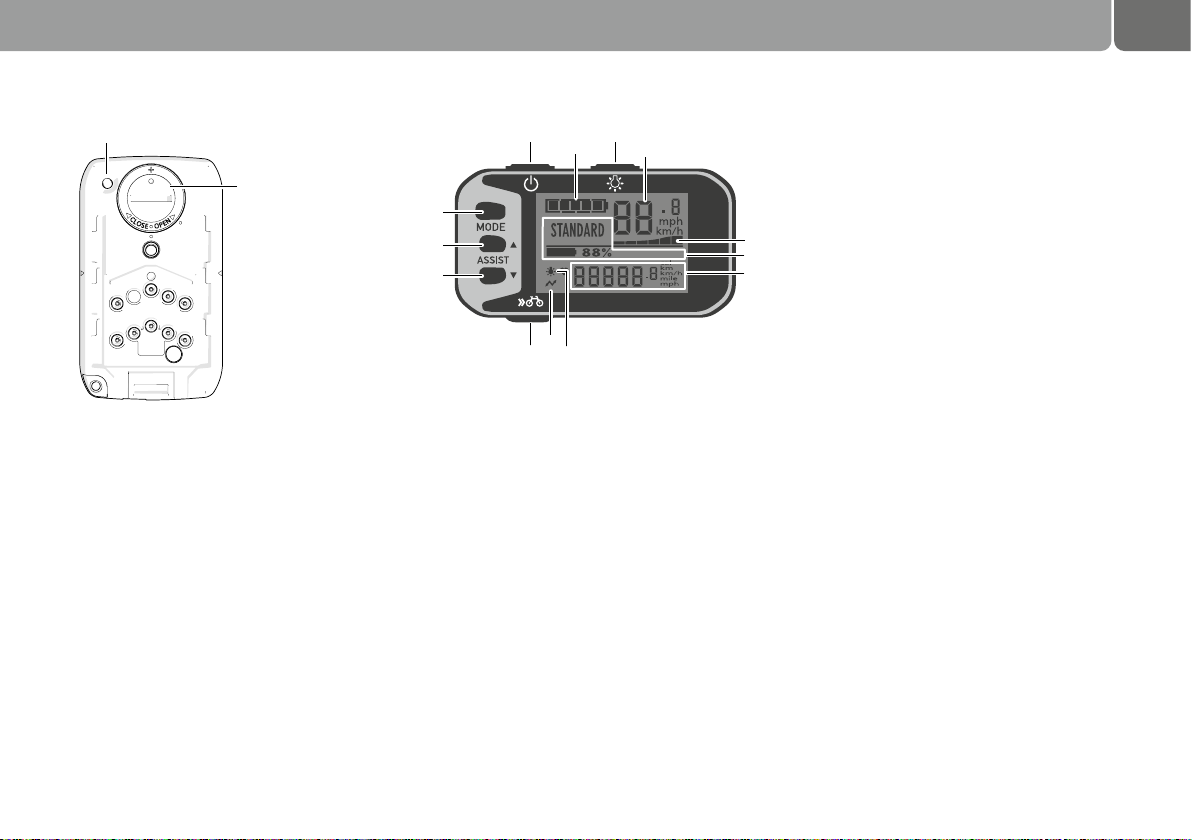
2.1 Operation and indicators for the
Panasonic drive unit with central
operating element
Press the on/off button 13 on the display to
activate the assistance function or the various
indicators.
The assistance function of the motor is au-
tomatically activated when you start pedalling.
1
1
1 Assistance mode selection buttons
Switch between the assistance mode options
[HIGH], [STANDARD] and [ECO]. Select [NO
ASSIST] to deactivate the assistance function.
2 Lighting button
Switches the lighting of the display unit on
or off. The headlight or rear lights are also
switched on or off when they are supplied by
the battery of the E-Bike.
2
3
4
3 MODE button
Scrolls through the secondary information,
e.g. distance ridden.
4 Bicycle button
This button’s functions may change according
to the type of E-Bike. When the E-Bike has a
heavy load, the pushing aid works at speeds of
up to 6 km/h. Fast FLYER E-Bikes for the EU
market can ride up to 20 km/h without pedalling when this button is pressed.
5
9
6
7
8
13 14
10
11
12
15
5 Charging status indicator
Shows the remaining charge of the E-Bike battery.
6 USB connection symbol
Indicates when an external device (e.g. mobile
phone) is connected to the display unit.
7 Operating indicator
Graphic display showing the level of electrical support the rider is using. The more bars
shown, the greater the electrical support the
rider is getting.
8 Text indicator
Shows the current assistance mode.
9 Time indicator
Shows the current time of day.
10 Light symbol
Shows that the lighting is switched on
11 Speed indicator
Shows the current riding speed.
12 Display field for secondary information
This field shows secondary information such
as the distance ridden, the total distance ridden, the highest speed, etc.
13 On/off button
Switches the electrical support on and off.
14 Micro-USB connection
This connection is used to charge an external
device (e.g. mobile phone).
15 Protective cap
Protects the Micro-USB connector.
3
16
17
16 Reset button
This button sets the total distance ridden to "0".
17 Button cell compartment
This compartment contains a button cell for
the timer part of the display unit.
2.2 Operation and indicators for
the Panasonic drive unit / laterally
mounted display
Press the on/off button 12 on the display to
activate the assistance function or the various
indicators. The assistance function of the motor is automatically activated when you start
pedalling.
12
3
1
1
5710
1 Assistance mode selection buttons
Switch between the assistance mode options
[HIGH], [STANDARD] and [ECO]. Select [NO
ASSIST] to deactivate the assistance function.
2 Lighting button
Switches the lighting of the display unit on or
off. The headlight and the rear light of the EBike will also be switched on or off
when they are supplied with power from
the E-Bike battery.
3 MODE button
Scrolls through the secondary information,
e.g. distance ridden.
4 Display field for secondary information
This field shows secondary information such
as distance ridden, average riding speed, maximum speed, total distance ridden and remaining range that can still be ridden with electrical
support.
2
6
11
8
9
4
5 Bicycle button
This button’s functions may change according
to the type of E-Bike. When the E-Bike has a
heavy load, the pushing aid works at speeds of
up to 6 km/h. Fast FLYER E-Bikes for the EU
market can ride up to 20 km/h without pedalling when this button is pressed.
6 Charging status display
Shows the remaining charge of the E-Bike battery.
7 USB connection symbol
Indicates when an external device (e.g.
mobile phone) is connected to the display unit.
8 Operating indicator
Graphic display showing the level of electrical support the rider is getting. The more bars
shown, the greater the electrical support the
rider is getting.
9 Text indicator
Shows the current assistance mode, the remaining battery capacity, warning and fault
indicators.
10 Light symbol
Shows that the lighting is switched on
11 Speed indicator
Shows the current riding speed.
12 On/off button
Switches the electrical support on and off.
Reset button (at the rear side)
This button sets the total distance ridden to "0".
4
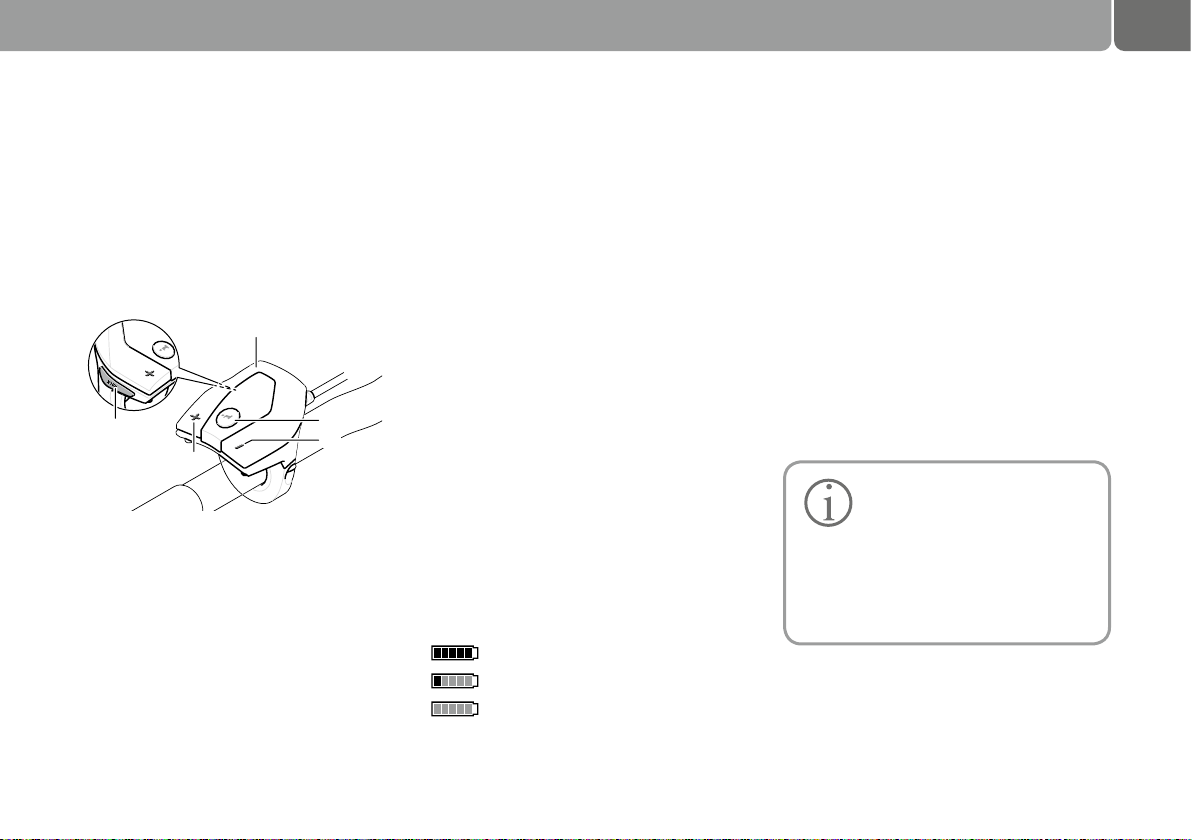
LEDs Charge status
5 lit up ***** 81-100%
4 lit up **** 61-80%
3 lit up **** 41-60%
2 lit up **** 21-40%
1 lit up * 11-20%
1 flashes 1-10%
Brief introduction to the FLYER with Panasonic drive unit
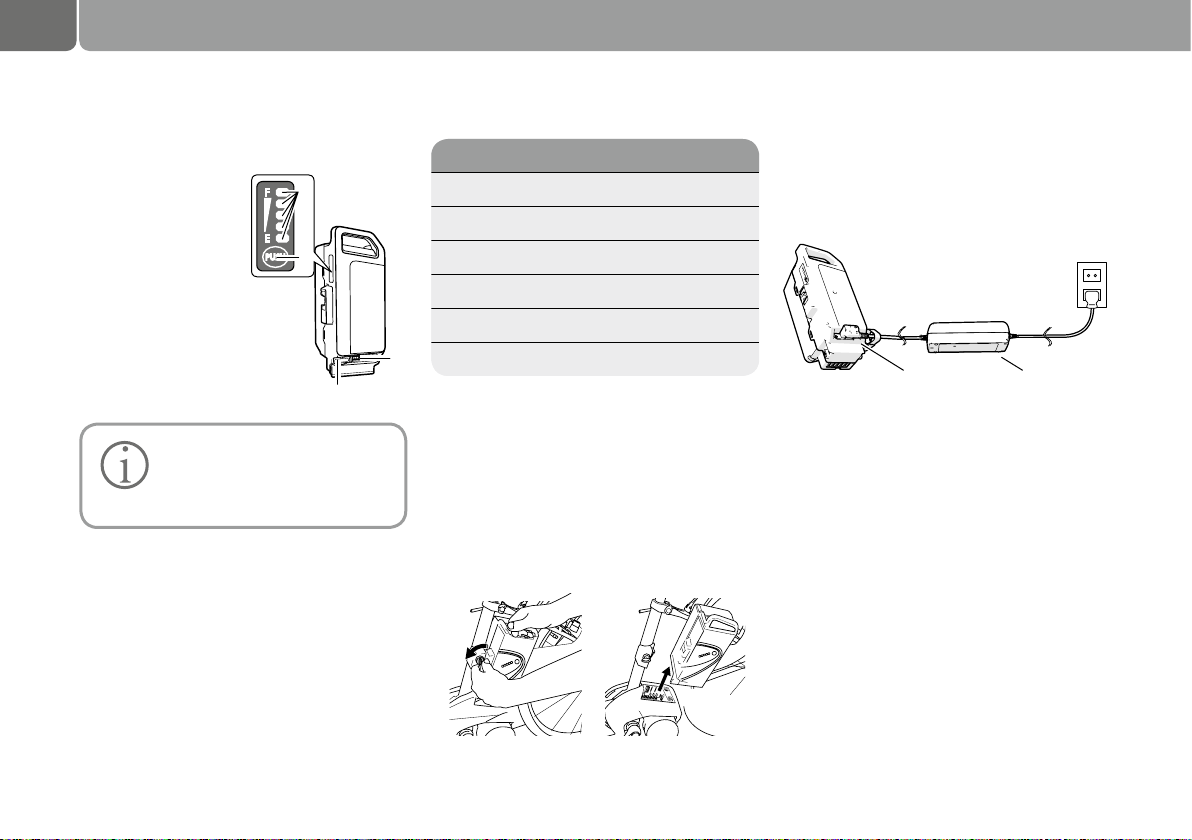
2.3 Battery
1 Charge status LEDs
Shows the battery’s
remaining charge.
2 Charge status
button
3 Connection for
charger
4 Protective cap
Protects the connectors for the charger
when the battery is
not being charged.
Check whether the battery is
fully charged after you have
purchased it and before using it
for the first time.
Press the charge status button on the battery
to check the battery charge.
Charge the battery when the five LEDs do not
all light up. Only use the original charger for
this purpose.
Charging status indicator
The charging status of the battery is indicated
by five LEDs.
Charging the battery
1
2
3
4
A fast-flashing LED indicates that the battery
has been completely discharged.
Removing the battery
1) Switch off the electrical system first.
Press the on/off button for this purpose.
2) Unlock the battery with the battery key and
remove it from the holder. Hold the battery
firmly, it is heavy!
The battery can be charged while it is installed
in the E-Bike or once it has been removed.
Protective cap
1) Remove the protective cap from the battery.
Connect the mains plug to a mains socket (220
V - 240 V AC) and connect the charger to the
battery.
Do not connect the charger to the mains
socket immediately after a sudden temperature change from cold to warm. It is possible
that condensed water has collected on the
contacts and this will lead to a short circuit.
Do not connect the charger until it has reached
room temperature.
2) Check whether the charge status LED is lit up.
The LED lights up according to the charge status. The charge status LED switches off when
the charging process has been completed.
Charger
5
The charging time increases
when the battery temperature
is very low.
Batteries cannot be charged any further once
they are fully charged.
The battery may not be recharged when it indicates a
fault. The battery might be
damaged having been dropped or due
to mechanical impact, even when there
is no external damage visible. Such batteries must therefore be inspected by a
specialist dealer.
3) Separate the mains plug from the mains
socket after disconnecting the battery from
the charger.
It is important that the protective cap is firmly
attached before using the battery.
Safety warning regarding the battery charger
The name plate refers to warning notes and
other safety information in connection with
handling the charger. It is important to read
them before using the charger.
Do not connect the charger to the mains socket immediately after a sudden temperature
change from cold to warm. It is possible that
condensed water has collected on the contacts and this will lead to a short circuit. Do not
connect the charger until it has reached room
temperature.
Only use the charger included
in the delivery of your E-Bike
or an an original Panasonic
charger of the same type.
Only this charger is suitable for the Liion battery in your E-Bike.
The battery is supplied with
a partial charge. Completely
charge the battery using the
charger before the first ride to ensure
full battery performance. Read and adhere to the operating instructions of the
charger when loading the battery.
The battery can at any time be charged outside
or installed in the bicycle without reducing its
life span. Interrupting the charging process
does not damage the battery.
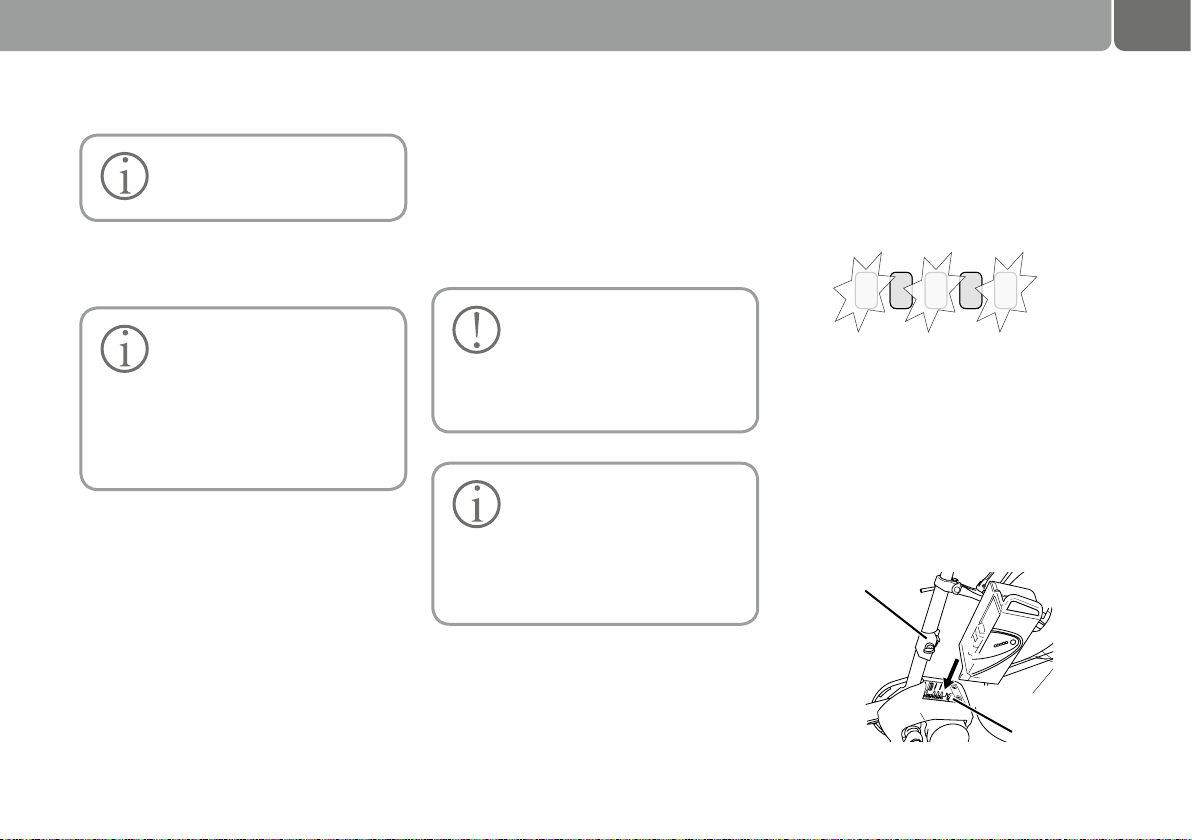
The battery is equipped with a temperature
monitor that permits charging only within a
temperature range of 0°C to 40°C. Three LEDs
of the charging status indicator will flash when
the battery is outside the charging temperature range 1.
Separate the battery from the charger and
wait until it has reached operating temperature. Only reconnect the charger when it has
reached the permitted operating temperature.
Inserting the battery
1) Insert the battery into the E-Bike’s lower
holder.
Ensure that the battery is correctly positioned
in the holder.
Top holder
Lower holder
6
Brief introduction to the FLYER with Panasonic drive unit
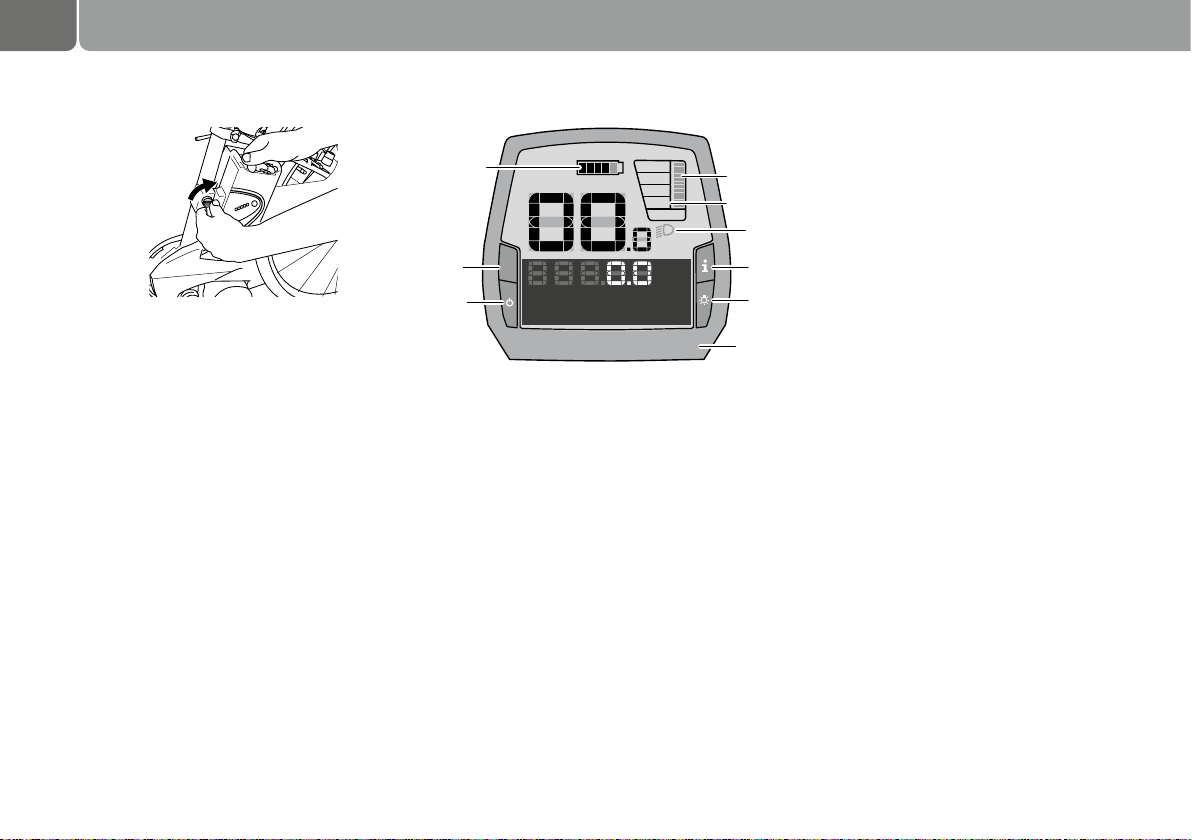
3. Brief introduction to the FLYER with Bosch drive unit
Switching the controls on/off
Briefly press the on/off button 5 to switch on
a
the controls. The controls can also be switched
on when they have not yet been inserted
b
into the holder (if the battery is sufficiently
c
charged).
Press the on/off button 5 to switch off the controls.
2
Setting the electrical support level
You can use the controls to determine how
3
much the E-Bike electrical support will assist you when pedalling. The electrical support
level can be changed at any time, even while
riding.
The following electrical support levels are
available:
• "OFF": The electrical support is switched
off and the E-Bike can be moved by pedalling only, like a normal bicycle.
• "ECO": Effective electrical support with
maximum efficiency to achieve maximum
range
• "TOUR": Continuous electrical support for
trips with a large range
• "SPORT": Powerful electrical support for
athletic riding on mountainous routes as
well as in city traffic
• "TURBO": Maximum electrical support up to
high pedalling frequencies for athletic riding
2) Lock the battery with the key.
The battery may drop out of the holder when it
is not safely locked. Remove the key after locking the battery to prevent theft of the battery.
2.4 The pushing aid
Some models have a pushing aid installed. It is
able to slowly move your E-Bike at up to max.
6 km/h without pedalling. It helps you, for example, to handle ramps when you have to push
your bicycle out of a pedestrian passage or an
underground parking garage.
2.5 The start-up aid
Some fast FLYERs have a start-up aid. It allows riding with motor power only. This can be
done without pedalling. A maximum speed of
20 km/h may be reached.
g
RESET
6 1
5
Rest riding distance
TURBO
SPORT
TOUR
ECO
OFF
MPH
KM/H
AMM
PMWH
MIN
MPH
KM/H
You have the following options for switching on
the E-Bike system:
• The E-bike system is automatically
switched on if the controls are on and inside
their holder.
• Briefly press the controls’ on/off button 5
once the controls and the battery have been
inserted.
• Press the battery on/off button once the
controls have been inserted.
You have the following options for switching off
the E-Bike system:
• Press the controls’ on/off button 5.
• Switch off the battery using its on/off switch
(see operating instructions of the battery).
• Remove the controls from their holder.
7
Increase the electrical support level by pressing the "+" 13 button on the operating unit until
the desired electrical support level is shown at
Indicator b or lower the value by pressing the
"–" 12 button. The motor power requested is
shown on the display a. The maximum motor
performance depends on the electrical support level chosen.
10
14
13
Switching the pushing aid on/off
The pushing aid makes pushing the E-Bike
easier. The speed achieved with this function
depends on the gear selected and can reach
a maximum of 6 km/h. The smaller the gear
selected, the lower the speed for the pushing
aid function (with full power).
11
12
The pushing aid is switched on by pressing the
"WALK" 14 button on the operating unit and
holding it down. The E-Bike electrical support
function is switched on.
The pushing aid is switched off as soon as
one of the following events occurs:
• You release the "WALK" 14 button,
• The wheels of the E-Bike are blocked (e.g.
by breaking or bumping against an obstacle)
• The speed exceeds 6 km/h
Switch lighting on/off
The headlight and the rear light can be
switched on and off at the same time by pressing the 2 button on the controls when the respective bicycle version supplies the riding
lights from the E-Bike system.
Battery charge status indicator
The battery charge status indicator g shows
the charge status of the E-Bike battery and not
that of the internal controls’ battery.
The charge status of the E-Bike battery can
be read on the battery itself.
Each bar on the battery symbol g corre-
sponds to approx. 20% capacity:
The battery is fully charged.
The battery should be topped up.
The charge status indicator LEDs on
the battery switch off.
The charge for electrical support is used up
and the electrical support function will gently
switch off. The remaining capacity is provided
for the lighting and the controls, the display
flashes. The battery will still provide approx. 2
hours of lighting.
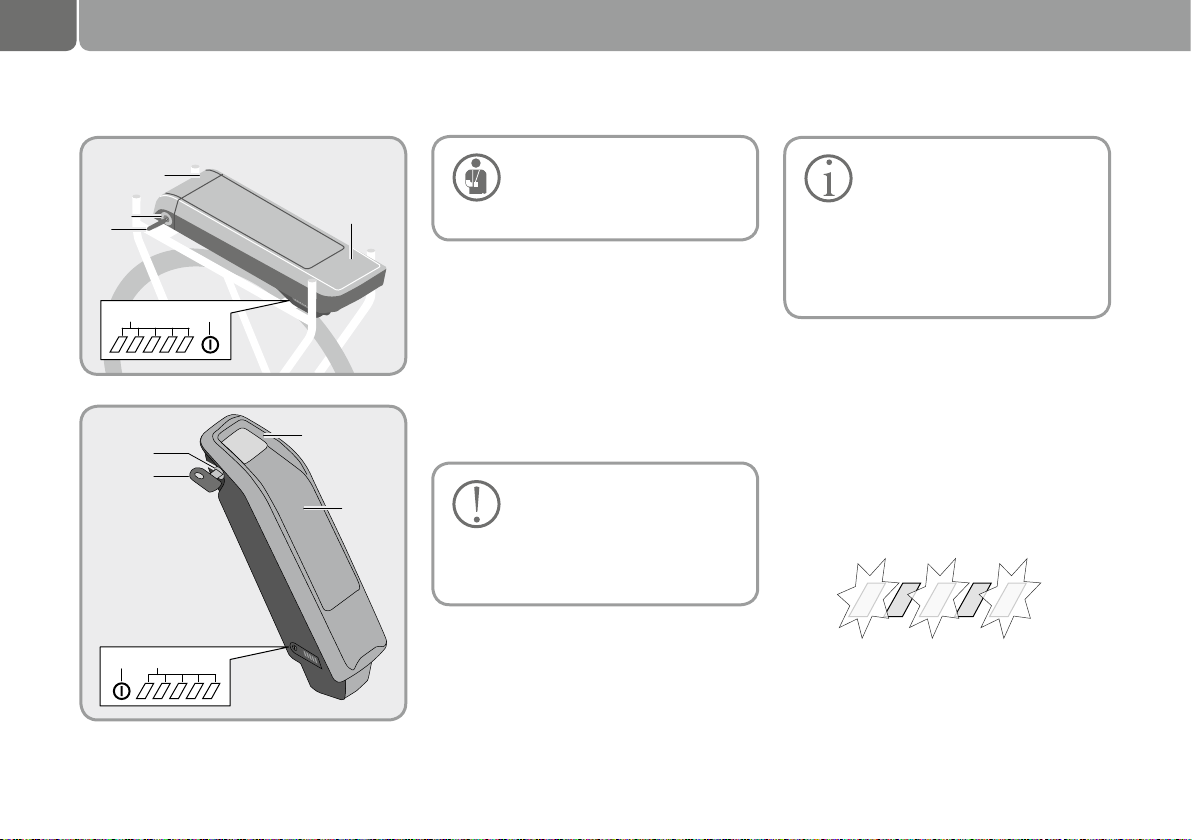
Checking the battery before its first use
Check the battery before you charge it or use it
with your E-Bike for the first time.
Press the A4 on/off button to switch on the
battery. The battery may be damaged when no
LED on the charge status indicator A3 lights
up. Fully charge the battery before its first use
when one but not all LEDs of the charge status
indicator A3 light up.
The battery may not be recharged when it indicates a
fault. The battery might be
damaged having been dropped or due
to mechanical impact, even when there
is no external damage visible. Such batteries must therefore be inspected by a
specialist dealer.
8
Brief introduction to the FLYER with Bosch drive unit
A6
A5
A3 A4
A6
A5
A1
Do not charge a damaged battery and do not use it.
A2
Contact an authorised bicycle
dealer.
3.1 Charging the battery
Do not connect the charger to the mains socket immediately after a sudden temperature
change from cold to warm. It is possible that
condensed water has collected on the contacts and this will lead to a short circuit. Do not
connect the charger until it has reached room
A7
A8
A3A4
temperature.
Only use the charger included
in the delivery of your E-Bike
or an an original Bosch charger
of the same type.
Only this charger is suitable for the Liion battery in your E-Bike.
The battery can at any time be charged outside
or installed in the bicycle without reducing its
life span. Interrupting the charging process
does not damage the battery.
monitor that permits charging only within a
temperature range of 0°C to 40°C. Three LEDs
on the charge status indicator flash when the
battery is outside the charging temperature
range A3.
Separate the battery from the charger and
wait until it has reached operating temperature. Only reconnect the charger when it has
reached the permitted operating temperature.
The battery is supplied with
a partial charge. Completely
charge the battery using the
charger before the first ride to ensure
full battery performance.
Read and adhere to the operating instructions of the charger when loading
the battery.
The battery is equipped with a temperature
 Loading...