

Page 1
KN09-00041A (Rev.1.0)
◈ Information
This installation guide contains quick information required for the product installation.
Refer to the User’s Manual in the CD that comes with the product for detailed
installation instructions. The CD contains the following information.
1. Manual: User’s, Windows CE Module Program, Code pages, Commands,
Bluetooth & Wireless
2. Driver: Windows driver
3. Utility: VMSM (Virtual Memory Swit ch Manager),
We at BIXOLON maintain ongoing efforts to enhance and upgrade the functions and
quality of all our products. In following, product specifi cations and/or user manual
content may be changed without prior notice.
◈ Battery Safety Precautions
1. If you observe any abnormal symptom, such as strange smell and overheating, on
2. Charge the battery only with the exclusive charger specified (optionally provided)
3. Do not use or leave the battery in a location exposed to high temperature s or intense
4. Do not allow water, seawater or moisture to enter or leak into the battery. If the
5. Do not throw the battery or subject it to strong shock. If the safety mechanism in the
6. Do not use the battery if it is damaged or the exte rior is deformed due to external
◈ Content Confirmation
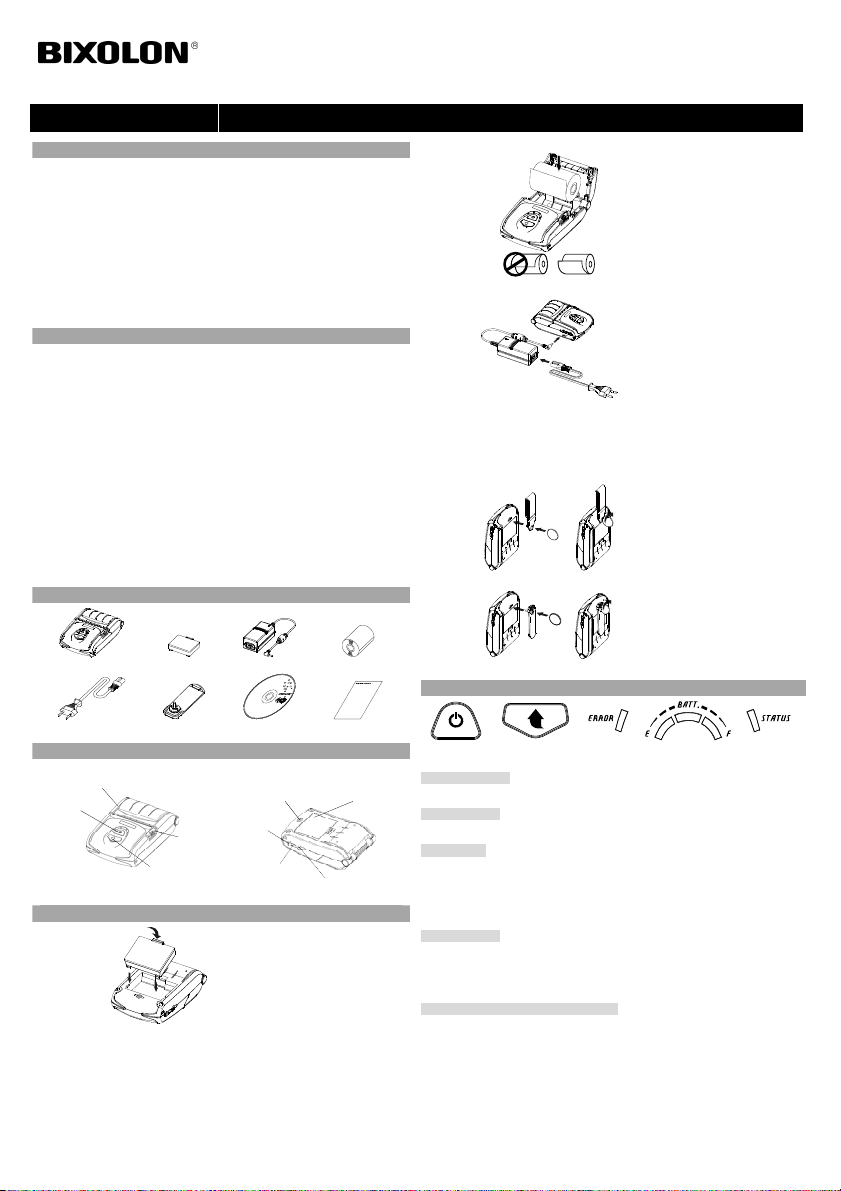
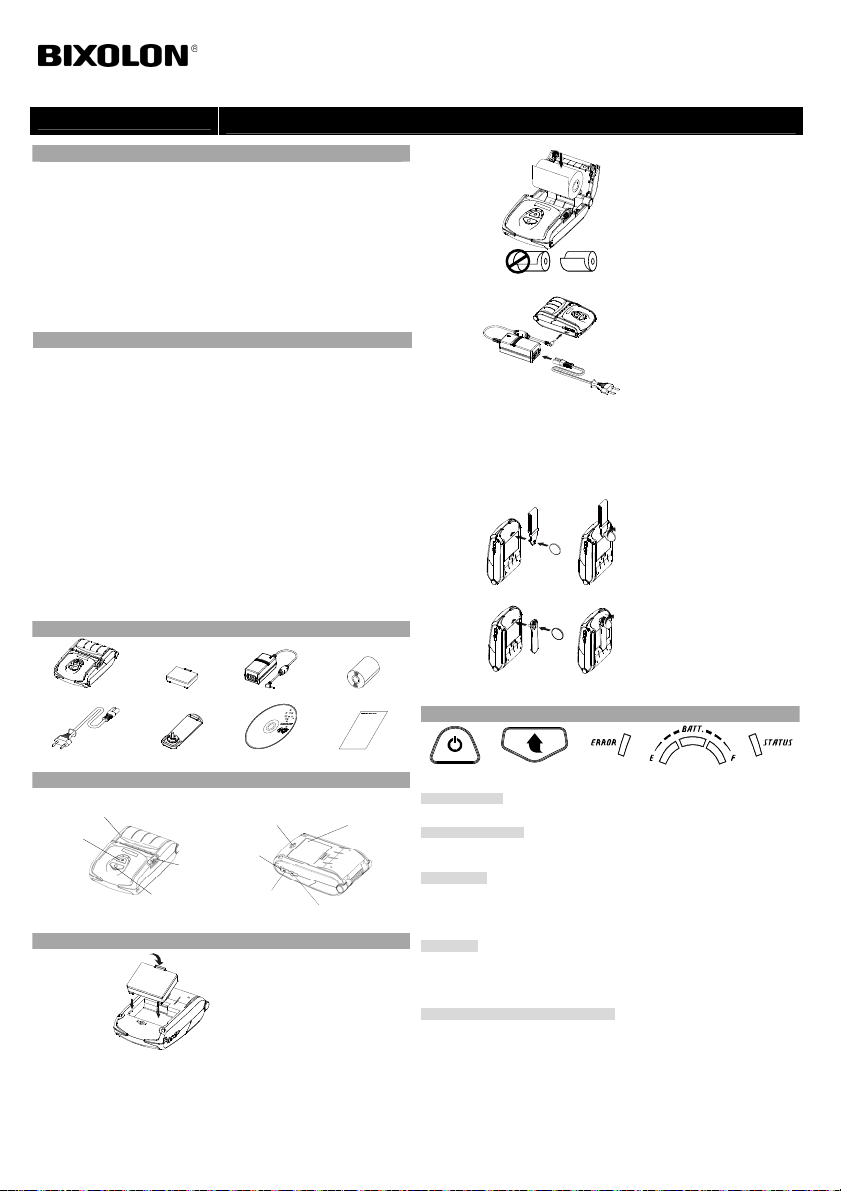
◈ Product Part Names
◈ Installation and Charging
Battery
Installation
NV Image Download Ma nager, Firmware Download Manager
first use after purchasing the product, contact your local dealer immedia tely.
by BIXOLON. The use of an incorrect charger may result in overheating,
combustion and/or explosion of the battery.
direct sunlight, such as within an automobile. Doing so c an cause battery
overheating and/or combustion. In addition, battery performan ce and product life
may be reduced.
safety mechanism within the battery becomes oxidized, the battery may overcharge
with abnormal electrical current and/or voltage so t hat it may overheat, ignite and/or
explode.
battery is damaged, the battery may be overcharged and, consequent ly, an adverse
chemical reac tion may be generated in the battery.
There is a potential risk of battery overheating, combustion, and/or explos ion.
shock or if it is swollen.
SPP-R200III
Power Cord
Paper Cover
Power Button
※ Note
As the battery is not charged at the time of purchase, charge the batter y
prior to product use. (Use the battery charger)
Battery Battery Charger
Belt Clip
Hole for mounting belt strap / belt clip
Open button
Paper Feed Button
Interface Cap
Cable Connection
1. Insert the battery on the rear side of
the printer, aligning the battery hook
properly.
2. Push the battery into the slot until a
snapping sound is heard.
CD
Installation Guide
Power Connection
Paper Roll
Battery
Printer Installation Guide
Mobile Receipt Printer SPP-R200III
1. Press the open button to open the
paper cover.
2. Insert the paper as shown in the
image.
(Remove any remaining core of a
Paper
Installation
Battery
Charging
※ Note
The printer may incur serious damage If the battery charge r provided
by BIXOLON is not used. BIXOLON is not legally liable for any such
damage. (The voltage and electrical current specifications of the pr inter
and battery charger must match.)
Belt Strap
Installation
Belt Clip
Installation
◈ Control Panel Usage
POWER BUTTON FEED BUTTON
• POWER BUTTON
This button is used to turn the printer on and off.
• FEED BUT TON
This button is used to feed paper manually, take the self-test and du mp hexadecimals.
• ERROR LED
If the red led is lit, the paper cover is open.
If the red led is blinking, either the paper has been fully used or the print head is
overheated.
If the red led continues to blink, it may indicate a more serious problem with the
product, and thus an authorized service dealer should be consulted.
• BATTERY LED
If Three blue led are lit, the battery is fully charged.
If two blue led are lit, the battery is half charged.
If one blue led is lit, the battery is at the lowest charge level.
If the red led is lit, the battery must be charged or replaced.
• STATUS LED (Bluetooth or Wireless LAN)
1) When using Bluetooth
If the printer is ready for wireless communication with any Bluetooth, the green led
as well as the battery status led is turned on.
2) When using wireless LAN
The right indicator shows the signal strength from wireless LAN.
The green led is solid for acceptable signal strength while t he green led blinks for
weak signal s trength.
※ Note
In power save mode, only the Status led is lit.
fully used paper roll.)
3. Take care to align the paper
correctly.
4. Pull the paper out and close the
paper cover.
5. Tear off any excess paper in the
direction of the side of the printer.
1. Turn off the printer power.
2. Connect the power cord to the
battery charger, and the connect AC
power.
3. Open the external interface cap in
the direction of arrow.
4. Connect the battery charger to the
power connector.
1. Insert the belt strap screw into the
belt strap hole.
2. Use a coin to tighten the belt strap
screw as shown in the image.
1. Insert the screw of the belt clip to
the belt clip mounting hole.
2. Fasten the screw of the belt clip with
an object like a coin as shown in the
picture.
(be careful to fasten in the correct
direction.)
ERROR LED BATTERY LED
STATUS LED
Page 2
r
◈ Self-test
Run the self-test when first setting the printer or when encountering a problem, and check the
following.
• Control Circuit, Mec hanisms, Print Quality, ROM Version, and Memory Switch Settings
If no issue is found with the printer after running the self-test, examine the other devices or
peripherals and software. This function is independent of such other devices and softwar e.
• Self-Test Instruction s
1) Turn the printer power off and close the printer paper cover.
2) Pressing the paper feed button and power button simultaneously turns the printer on.
3) After printing begins, please release the two buttons.
4) To add a printout of the ASCII pattern, press the paper feed button once more.
5) After the ASCII pattern is printed out, the self-test is automatically terminated.
◈ Product Specifications
Item Description
Printing Method Thermal printing
Printing Speed
Resolution 203 DPI
Paper Supply Mode Easy paper loading
Character Size
Characters Per Line Font A: 32 Font B/C: 42
Character Set
Printing
Barcode
Emulation BXL/POS
Driver
SDK
Sensor Paper End, Paper Cover Open
Cutter Type Tear-Bar
Language User language supported
Paper Form Receipt Linerless
Paper Type Thermal paper Thermal paper
Diameter Max. ø40 mm (1.57”) Max. ø39 mm (1.54”)
Paper
Width
Thickness 0.07 ± 0.003 mm 0.08 ± 0.008mm
※ Note
1) This equipment is indooruse and all the communication hiring are limited to inside of the
building.
2) The switch is the disconnecting device. Turn off switch from any hazard.
◈ Label Printing Function
1. Label Function Setting
Label paper and black mark paper available at the label mode.
• Setting Operations
1) Turn on the printer power.
2) Open the paper cover and press and hold down the paper feed button for longer than two
seconds.
3) After the buzzer tone is emitted, inser t paper and close the cover.
4) Repeat the steps above to return to recei pt mode.
• Setting Via Memory Sw itch
1) Please refer to the memory switch changing section of the Commands Manual.
2. Auto Calibration Function
The label printing function requires the recognition of label paper gaps and black mark
paper black bar in order to print.
If label paper gaps are not properly recognized, use the auto calibration funct ion.
• Auto Calibration Instructions
1) Turn the printer power off while in label print mode.
2) Press and hold down the paper feed button and then press the power button.
3) After the following printout is outputted, press the power button to perform auto
calibration.
4) Three pages of label paper ar e outputted when performing auto calibration.
100 mm/sec (Receipt Paper)
80 mm/sec (Linerless Paper)
Font A: 12 × 24
Font B: 9 × 17
Font C: 9 × 24
English: 95
Expanded Graphics: 128 × 33 pages
International: 32
1 Dimension: UPC A, UPC E, CODE 39, CODE 93,
Code 128, EAN 8, EAN 13, ITF, Codabar
2 Dimension: PDF417, DATAMATRIX, MAXI,
QR Code, GS1 DataBar, Aztec
Windows XP(32/64bit) / WEPOS /
2003 Server(32/64bit) / VISTA(32/64bit) /
2008 Server(32/64bit) / 7(32/64bit) / 8(32/64bit)
Windows XP / WEPOS / 2003 Server /
VISTA / 2008 Server / 7 / 8 / CE 3.0 and later
57.5 ± 0.5 mm
(2.26” ± 0.2”)
Select the mode
Auto Calibration: P ower Button
Self Test: Feed Butto n
57.5 ± 0.5 mm
(2.26” ± 0.2”)
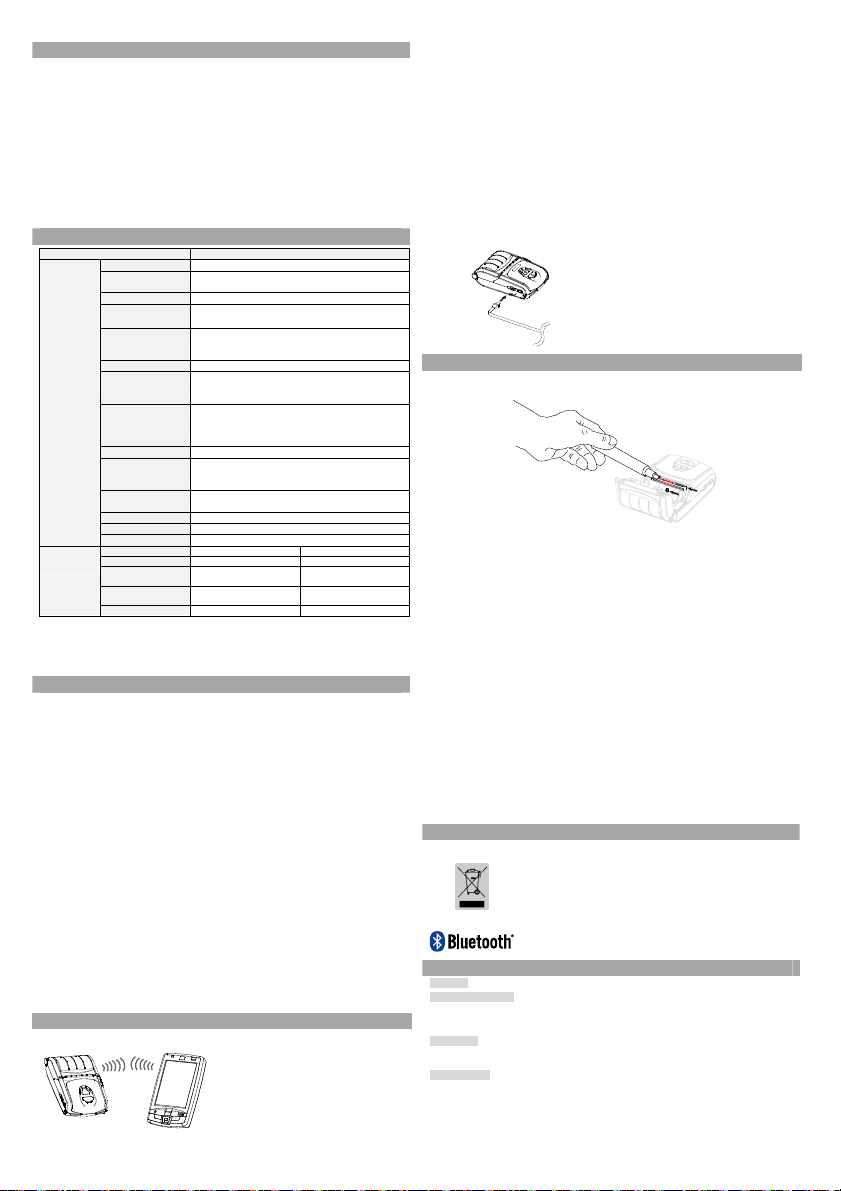
◈ Peripherals Connection
※ Note
Refer to the Bluetooth Wireless LAN Manual for detailed information on its connection.
You can check the Bluetooth environment (authentication, encryption, connection mode) and
the wireless LAN environment (IP, SSID, aut hentication, encryption) via the self-test page.
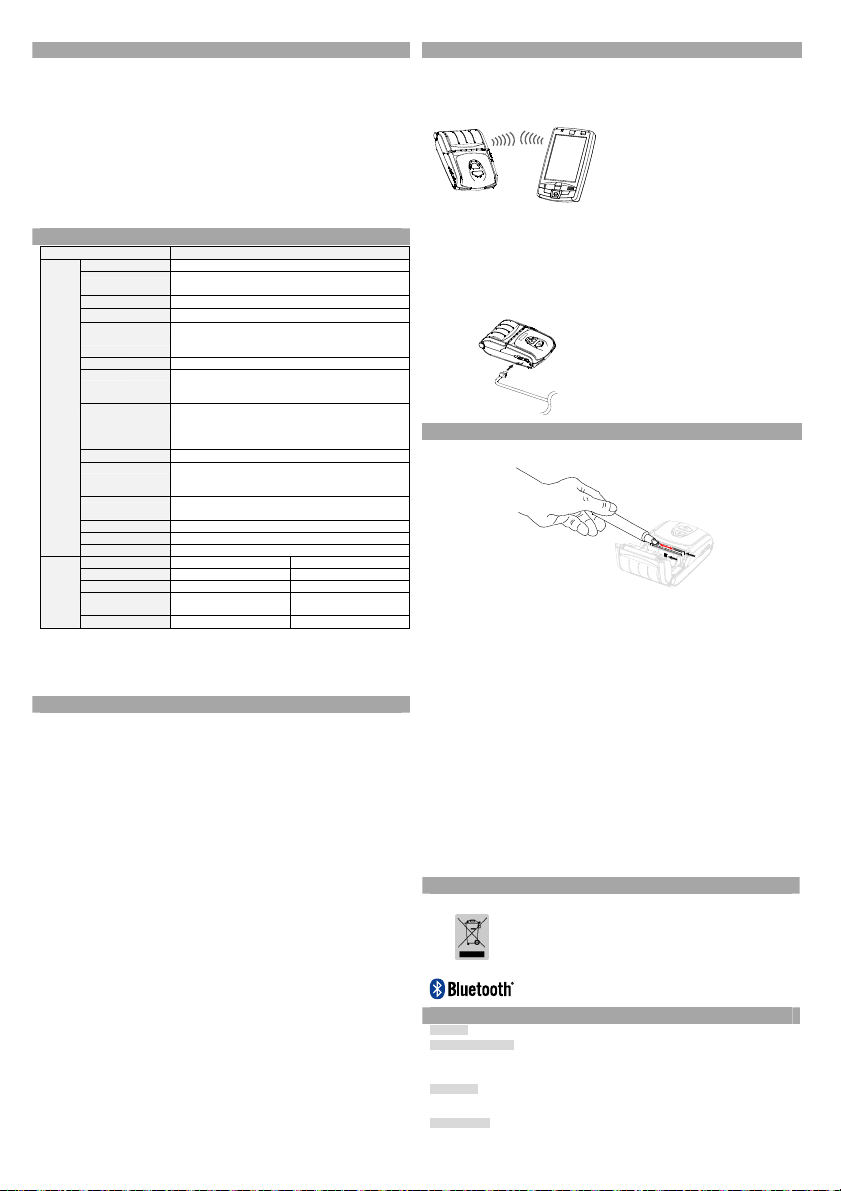
◈ Printer Cleaning
If the interior of the printer is dusty, print quality can decline.
In such a case, follow the instructions below to clean the printer.
1) Open the paper cover and remove the paper if there is any.
Apply the cleaning pen from the center to the ed ge over the printer head for cleaning.
2) Clean the printer head using the cleaning pen.
3) Remove paper dust from the paper detection sensor using the cleaning pen.
4) Do not use the printer for one to two minutes after cleaning the printer head until
the cleaning agent of the cl eaning pen has completely evaporated and dried.
5) Mount the paper and clo se the printer cover.
• Caution
1) Make sure the printer power is turned off before cleaning.
2) Wait for two to three minutes after power-off before head cleaning because the head
part may become very hot during printer operation.
3) Take care not to touch the heating region of the head with your hand while cleaning
the head part.
→ The printer head may be damaged by static electricity.
4) Take care to avoid scratching the head.
5) Clean the printer head periodically if linerless paper is used. Recommended cleaning
period is after consuming ten rolls of linerless paper (100 meters), or more than once
a week. Printing quality may be degraded or printer life may be shortened if the head is
not cleaned periodically.
• Warning
1) Use only the linerless paper that is provided by BIXOLON. Use of other paper voids
product warranty.
2) Use only the cleaning pen (PCP-R200II) provided by BIXOLON for cleaning.
◈ Certification
☎ BIXOLON Co., Ltd.
● Website http://www.bixolon.com
● Korea Headquarters
(Add) 7~8F, (Sampyeong-dong), 20, Pangyoyeok-ro241beon-gil,
(Tel.) +82-31-218-5500
● U.S. Office
(Add) BIXOLON America Inc., 3171 Fujita St, Torrance, CA 90505
(Tel.) +1-858 764 4580
● Europe Office
(Add) BIXOLON Europe GmbH, Tiefenbroicher Weg 35 40472 Düsseldorf
(Tel.) +49 (0)211 68 78 54 0
This marking shown on the product or its literature, indicates that it should not be disposed
of with other household wastes at the end of its working life. To prevent possible harm to
the environment or people from unc ontrolled waste disposal, please separate this from othe
types of wastes and recycle it responsibly to promote the sustainable reuse of material
resources. Household users should contact either the retailer where they purchased this
product, or their local government office, for details of where and how they can take this
item for environmentally safe recycling. Business users should contact their supplier and
check the terms and conditions of th e purchase contract. This product should not be mixed
with other commercial wastes for disposal.
The following Bluetooth mark and ID D022644 is only applicable to models with the
Bluetooth SIG qualification.
Bundang-gu, Seongnam-si, Gyeonggi-do, 13494, Korea (R OK)
1. Bluetooth & Wireless LAN Connection
1) The printer can be connec ted to devices
equipped with Bluetooth communication
capacity (PDAs, PCs, etc.).
2) Use the Bluetooth connection function
supported by the device to connect to the
printer. The NFC tag built into the printer
enables automatic pairing with devices.
※ Note
The device must support NFC Auto Pairing.
It may display a message that the device cannot
be connecteREVd as NFC Auto Pairing is
supported upto the B/T pairing and the devices
must connected manually, but this is normal.
3) The printer can be connected to other
stations, such as PDAs and PCs supporting
wireless LAN communication in Ad-hoc
mode and AP in Infrastructure mode.
2. Interface Cable Connection
1) Open the Interface Cap
2) Connect the interface cable (optional) to the
cable connector of the print er.
Page 3
◈ Information
Diese Installationsanweisung enthält Kurzinformationen zur Produktinstallation.
Detaillierte Installationsanweisungen finden Sie im Benutzer handbuch auf der im
Lieferumfang enthaltenen CD. Die CD enthält die folgenden Informationen.
1. Handbuch: Benutzerhandbuch, Modulprogramm für Windows CE, Code-Seiten,
Befehle, Bluetooth und Wireless
2. Treiber: Windows-Treiber
3. Dienstprogramm: VMSM (Virtual Memory Switch Manager),
Wir von BIXOLON arbeiten ständig an Verbesserungen und Aktualisierungen der
Funktionen und der Qualität aller unserer Produkte. Die Produktspezifikationen und/oder der
Inhalt des Benutzerhandbuchs können sich in der Zukunft ohne vorherige Ankündigung
ändern.
◈ Sicherheitsmaßnahmen in Bezug auf den Akku
1. Sind bei der ersten Verwendung nach dem Kauf des Produkts ungewöhnliche Symptome,
wie beispielsweise ein ungewöhnlicher Geruch oder ein Überhitzen, wahrnehmbar,
wenden Sie sich bitte umgehend an den Händler.
2. Der Akku darf nur mit dem angegebenen Ladegerät (optional erhältlich) von BIXOLON
geladen werden. Die Verwendung eines falschen Ladegeräts kann zu Überhitzen,
Entzünden und/oder Explosion des Akkus führen.
3. Der Akku darf nicht an einem Ort, der hohen Temperaturen oder direkter
Sonneneinstrahlung ausgesetzt ist (z. B. im Innenraum eines Fahrzeuges), verwendet oder
gelagert werden.
Anderenfalls kann es zu einem Überhitzen und/oder Entzünden kommen.
Darüber hinaus können sich die Akkuleistung und -lebensdauer verschlechtern.
4. Das Eindringen von Wasser oder Feuchtigkeit in den Akku muss unter allen Umständen
vermieden werden.
Oxidiert der Sicherheitsmechanismus im Akku, kann es zu einem Überladen des Akkus
kommen und damit zu Überhitzung, Entzündung und/oder Explosion.
5. Der Akku darf nicht fallengelassen oder starken Stößen ausgesetz t werden. Wird der
Sicherheitsmechanismus des Akkus beschädigt, kann es zu einem Überladen des Akkus
und damit zu einer ungewollten chemischen Reaktion kommen.
Es besteht potentiell das Risiko von Überhitzung, Entzündung und/oder Explosion des
Akkus.
6. Der Akku darf nicht mehr eingesetzt werden, wenn er beschädigt wurde oder
angeschwollen ist oder das Äußere aufgrund von Stoßeinwirkungen Beschädigungen
aufweist.
◈ Prüfen des Inhalts
SPP-R200III
Netzanschlusskabel Gürtelclip
◈ Bezeichnungen der Geräteteile
Netztaste
◈ Installation und Laden
Einlegen
des Akkus
NV Image Download Manager, Firmware Download Manager
Papierabdechung
※ Hinweis
Da der Akku werkseitig nicht geladen ist, muss dieser vor der Inbetriebnahme
geladen werden. (Verwenden Sie hierzu das Lad egerät.)
Akku
Tast e f ür
Papierzufuhr
Batterieladegerät Papierrolle
CD
Loch für Montage von Gürtelschlaufe
/ Gürtelclip
Schnittstellenabdec
kung
Tasten zum
Öffnen
Kabelanschluss
1. Legen Sie den Akku auf der Rückseite
des Druckers ein. Achten Sie darauf,
dass der Akkuhaken richtig ausgerichtet
ist.
2. Drücken Sie den Akku in das Fach, bis
dieser hörbar einrastet.
Installationsanweisung
Netzanschluss
Akku
Installationsanweisung
Mobiler Quittungsdrucker SPP-R200III
1. Drücken Sie auf die Taste, um die
Papierabdeckung zu öffnen.
2. Legen Sie das Papier wie dargestellt
ein.
Papier
Installation
Laden des
Akkus
※ Hinweis
Der Drucker kann schwer beschädigt werden, wenn ein anderes
Ladegerät als das von BIXOLON genehmigte verwendet wird.
BIXOLON übernimmt keine Haftung für derartige Schäden.
(Die Spannungs- und Stromspezifikationen von Drucker und
Akkuladegerät müssen übereinstimmen.)
Tragegurt
Installation
Gürtelclip-
Installation
◈ Bedienung des Bedienfelds
EIN-/AUS-TASTE ZUFÜHRUNGSTASTE
• EIN-/AUS-TASTE
Über diese Taste wird der Druck ein-/ausgeschaltet.
• ZUFÜHRUNGSTASTE
Über diese Taste erfolgt die manuelle Zuführung des Papiers, die Durchführung des
Selbsttests und der Hexadezimaldump.
• FEHLER-LED
Leuchtet die rote LED, ist die Papierabd eckung offen.
Blinkt die rote LED, ist entweder das Papier aufgebraucht oder der Druckkop f ist überhitzt.
Blinkt die rote LED weiter, kann dies auf ein schweres Problem hinweisen. Wenden Sie sich
daher in diesem Fall an den Händler.
• AKKU-LED
Leuchten drei blaue LEDs, ist der Akku voll geladen.
Leuchten zwei blaue LEDs, ist der Akku halb geladen.
Leuchtet eine blaue LED, hat der Akku den geringsten Ladezustand.
Leuchtet die rote LED, muss der Akku geladen oder ersetzt werden.
• STATUS-LED (Bluetooth oder Wireless LAN)
1) Bei Verwendung von Bluetooth
Ist der Drucker für die drahtlose Ko mmunikation über Bluetooth bereit, leuchten die grüne
LED und die Akku-Status-LED.
2) Bei Verwendung von Wireless LAN
Die rechte Anzeige zeigt die Signalstärke des Wireless LAN. Die grüne LED leuchtet
durchgehend bei guter Signalstärke. Sie blinkt bei schwacher.
※ Hinweis
Im Energiesparmodus leuchtet nur die Status-LED.
(Entnehmen Sie einen eventuell
vorhandenen Papierkern.)
3. Richten Sie das Papier richtig aus.
4. Ziehen Sie das Papier heraus und
schließen Sie die Papierabdeckung.
5. Reißen Sie überschüssiges Papier zur
Seite des Druckers hin ab.
1. Schalten Sie den Drucker aus.
2. Schließen Sie das Ladegerätkabel an
das Ladegerät an und schließen Sie
das Netzkabel.
3. Öffnen Sie die Abdeckung der
externen Schnittstelle in Richtung des
Pfeils.
4. Schließen Sie das Ladegerät an den
Netzanschluss an.
1. Setzen Sie die Schraube für den
Gürtelriemen in das Montageloch für
den Gürtelriemen ein.
2. Ziehen Sie die Schraube für den
Gürtelriemen wie im Bild dargestellt
mit einer Münze an.
1. Setzen Sie die Schraube für den
Gürtelclip in das Loch für den
Gürtelclip ein.
2. Ziehen Sie die Schraube für den
Gürtelclip zum Beispiel mit einer
Münze (siehe Bild) an.
(Achten Sie auf die korrekte
Anzugsrichtung.)
FEHLER-LED AKKU-LED
STATUS-LED
Page 4

t
r
m
◈ Selbsttest
Führen Sie bei der Einrichtung des Druckers oder bei einem Problem einen Selbs ttest durch, um
Folgendes zu prüfen.
• Steuerschaltkreis, Mechanismus, Druckqualität, ROM-Version und Einstellungen der
Speicherschalter
Hat der Selbsttest kein Problem mit dem Drucker erkannt, müssen die anderen (Peripherie-)Geräte
und die Software geprüft werden. Diese Funktion ist unabhängig von ande ren Geräten und der
Software.
• Anweisungen zum Selbsttest
1) Schalten Sie den Drucker aus und schließen Sie die Papierabdeckung.
2) Drücken Sie die Taste für die Papierzuführung und die Ein-/Aus-Taste am Drucker glei chzeitig,
um den Drucker einzuschalten.
3) Nachdem der Druck begonnen hat, lassen Sie die beiden Tasten los.
4) Drücken Sie die Taste für die Papierzuführung erneut, um einen Ausdruck des ASCII- Musters
zu erhalten.
5) Nach dem Druck des ASCII-Musters wird der Selbsttest automatisch beendet.
◈ Produktspezifikationen
Posten Beschreibung
Druckmethode Thermodruck
Druckgeschwindigkeit
Auflösung 203 dpi
Modus apierzuführung Einfacher Papierlademechanismus
Zeichengröße Schrif tart A: 12 x 24, Schriftart B: 9 x 17, Schriftart C: 9 × 24
Zeichen pro Zeile Schriftart A: 32, Schriftart B/C: 42
Zeichensatz
Strichcode
Drucken
Emulation BXL/POS
Treiber
Kit für Softwareen
twickler (SDK)
Sensor
Typ der
Schneidvorrichtung
Sprache Benutzersprache unterstützt
Papierform Quittung Trennfolienfrei
Papiertyp Thermopapier Thermopapier
Außendurchmesser der
Papierrolle
Papier
Breite
Stärke 0.07 ± 0.003 mm 0.08 ± 0.008 mm
※ Hinweis
1) Dieses Gerät ist für den Gebrauch in Innenräumen gedacht und alle Kommunikations verkabelung
ist auf den Einsatz im Innenraum ausgelegt.
2) Der Schalter dient zum Trennen von der Stromversorgung. Gefahrenausschalter.
◈ Etikettendruckfunktion
1. Einstellung der Etikettenfunktion
Etikettenpapier und Schwarzmarkierungspapier im Betriebszustand Etikettendru ck verfügbar.
• Schritte bei der Einstellung
1) Schalten Sie den Stromschalter des Druckers ein.
2) Öffnen Sie die Papierabdeckung und halten Sie die Taste für die Papierzufuhr mindestens zwei
Sekunden lang gedrückt.
3) Wenn Sie den Summton hören, legen Sie Papier ein und schließen Si e die Abdeckung.
4) Wiederholen Sie die obigen Schritte, um zum Empfangsbetriebszustand zurückzukehren.
• Einstellung über den Speicherschalter
1) Siehe im Befehlehandbuch den Abschnitt „Umschalten des Speicherschalters“.
2. Automatische Kalibrierfunktion
Zum Drucken von Etiketten mit der Etikettendruckfunktion müssen Lücken im Etikettenpapier
und Schwarzmarkierungen erkannt werden.
Werden Lücken im Etikettenpapier nicht ordnungsgemäß erkannt, so verwenden Sie die
automatische Kalibrierfunktion.
• Anweisungen für die automatische Ka librierung
1) Schalten Sie den Stromschalter des Druckers aus, während sich dieser im Betriebszustand
Etikettendruck befindet.
2) Halten Sie die Taste für die Papierzufuhr gedrückt und drücken Sie anschließ end auf die Ein-
/Aus-Taste.
3) Drücken Sie nach Ausgabe des folgenden Ausdrucks auf die Ein-/Aus-Taste, um die
automatische Kalibrierung durchzuführen.
4) Während der automatischen Kalibrierung werden drei Seiten Etikettenpapier ausgegeben.
◈ Anschließen der Peripheriegeräte
100 mm/Sekunde (Quittungspapier)
80 mm/Sekunde (trennfolienfreies Papier)
Englisch: 95
Erweiterte Grafiken: 128 × 33 Seiten
International: 32
1 Maß: UPC A, UPC E, CODE 39, CODE 93, Code 128, EAN 8,
EAN 13, ITF, Codabar
2 Maß: PDF417, DATAMATRIX, MAXI, QR-Code
Aztec
Windows XP (32/64 Bit) / WEPOS / 2003 Server(32/64 Bit) /
VISTA (32/64 Bit) / 2008 Server (32/64 Bit) / 7 (32/64 Bit) /
8 (32/64 Bit)
Windows XP / WEPOS / 2003 Server / VISTA /
2008 Server / 7 / 8 / CE 3.0 oder höher
Papierendesensor, Sensor zur Erkennung ein er offenen
Papierfachabdeckung
Abreißleiste
Max. ø40 mm (1.57 Zoll) Max. ø39 mm (1.54 Zoll)
57.5 ± 0.5 mm
(2.26 Zoll ± 0.2 Zoll)
Wählen Sie folgenden Betriebszus tand:
Automatische Kalibrierung: Power -Taste (Ein/Aus)
Selbsttest: Zuführungstaste
1. Bluetooth- und Wireless-LAN-Anschluss
1) Der Drucker kann an Geräte angeschlossen
werden, die über Bluetooth-Funktion verfügen
(PDAs, PCs, usw.).
2) Verwenden Sie die Vom Gerät unterstützte
Bluetooth-Funktion, ueine Verbindung mit dem
Drucker herzustellen. Der integrierte NFC-Tag
ermöglicht eine automatische Kopplung mit
anderen Geräten.
※ Hinweis
Das Gerät muss die automatische NFC-Kopplung
unterstützen.
, GS1 DataBar,
57.5 ± 0.5 mm
(2.26 Zoll ± 0.2 Zoll)
Es kann sein, dass eine Meldung angezeigt wird, die
besagt, dass eine Verbindung nicht möglich ist, da
eine automatische NFC-Kopplung bis hin zur B/TKopplung unterstützt wird, und die Verbindung des
Gerätes manuell vorgenommen werden muss. Dies ist
normal.
3) Der Drucker kann an andere Stationen , wie
PDAs und PCs, die Wireless-LANKommunikation im Ad-Hoc-Modus und AP im
Infrastrukturmodus unterstützen, angeschlossen
werden.
※ Hinweis
Informationen zum Anschluss finden Sie im Handbuch zu Bluetooth und
Wireless LAN. Über die Selbsttestseite können die Bluetooth-Umgebung (Authentif izierung,
Verschlüsselung, Anschlussmodus( und die Wireless-LAN-Umgebung(IP, SSID, Authentifizierung,
Verschlüsselung) geprüft werden.
◈ Reinigen des Druckers
Die Druckqualität kann sich verschlechtern, wenn sich im Innern des Drucke rs Schmutz ablagert.
Reinigen Sie in diesem Fall den Drucker gemäß den unten angegebenen Anweisungen.
1) Öffnen Sie die Papierabdeckung und entnehmen Sie eventuell vorhandenes Papier.
Wenden Sie den Reinigungsstift am Druckerkopf von der Mitte ausgehend zu den
Kanten hin, um den Druckerkopf zu reinigen.
2) Reinigen Sie den Druckerkopf mit dem Reinigungsstift.
3) Entfernen Sie mittels Reinigungsstift Papierstaub vom Papiererfassungssensor.
4) Der Drucker sollte ein bis zwei Minuten nach Reinigung des Druckerkopfes mit dem
Reinigungsstift nicht verwendet werden, damit zunächst das vom Reinigungs stift
hinterlassene Reinigungsmittel verdampfen kann.
5) Legen Sie das Papier ein und schließen Sie die Druckerabdeckung.
• Achtung
1) Stellen Sie sicher, dass der Drucker vor dem Reinigen ausgeschaltet wird.
2) Warten Sie zwei bis drei Minuten nach dem Ausschalten und bevor Sie die Reinigung
be ginnen, da der Druckerkopf während des Druckbetriebs heiß ge worden sein kann.
3) Berühren Sie während der Reinigung keine heißen Oberflächen des Druckerkopfes mit
den Händen.
→ Der Druckerkopf kann durch statische Elektrizität beschädigt werden.
4) Achten Sie darauf, nicht den Druckerkopf zu zerkratzen.
5) Reinigen Sie den Druckerkopf regelmäßig, wenn trennfolienfreies Papier verwendet
wird. Es wird.empfohlen, den Druckerkopf nach zehn Rollen trennfolienfreiem Papier
(100 Meter) oder mehr als einmal pro Woche zu reinigen. Die Druckqualität kann
abnehmen oder die Druckerlebensdauer kann verkürzt werden, wenn der Kopf nicht
regelmäßig gereinigt wird.
• Warnung
1) Verwenden Sie ausschließlich trennfolienfreies Papier von BIXOLON.
Eine Verwendung von anderem Papier hat das Erlöschen der Gewährleistung zu r Folge.
2) Verwenden Sie ausschließlich den Reinigungsstift (PCP-R200II) von B IXOLON zur
Reinigung.
◈ Zertifizierung
☎ BIXOLON Co., Ltd.
● Website http://www.bixolon.com
● Korea Headquarters
(Add) 7~8F, (Sampyeong-dong), 20, Pangyoyeok-ro241beon-gil,
(Tel.) +82-31-218-5500
● U.S. Office
(Add) BIXOLON America Inc., 3171 Fujita St, Torrance, CA 90505
(Tel.) +1-858 764 4580
● Europe Office
(Add) BIXOLON Europe GmbH, Tiefenbroicher Weg 35 40472 Düsseldorf
(Tel.) +49 (0)211 68 78 54 0
Diese Kennzeichnung auf dem Gerät oder in der Produktdokumentation zeigt an, dass das
Gerät am Ende der Nutzungsdauer nicht über den Hausmüll entsorgt werden sollte. Bitte
trennen Sie zur Vermeidung möglicher U mwelt- oder Gesundheitsschäden durch
unkontrollierte Abfallentsorgung dieses Gerät von anderen Abfällen und recyceln Sie es,
um den nachhaltigen Gebrauch der Materialressourcen zu unterstützen. Wenn Sie das Gerä
in Ihrem Haushalt benutzen, wenden Sie sich bitte an Ihren Fachhändler, bei dem Sie das
Gerät gekauft haben, oder an die Stadtverwaltung. Dort können Sie Einzelheiten dazu
erfragen, wie und wo Sie dieses Gerät abgeben können, damit es umweltsicher recycelt
wird. Wenn Sie das Gerät in der Firma benutzen, sollten Sie sich an Ihren Zuliefere
wenden und die entsprechenden Bedingungen über die Rücknahme oder Entsorgung i
Kaufvertrag nach lesen. Dieses Gerät sollte nicht zusa mmen mit anderen gewer blichen
Abfällen entsorgt werden.
Die folgende Bluetooth-Kennzeichnung und ID D022644 gelten nur für die Modelle mit
Bluetooth-SIG-Genehmigung.
Bundang-gu, Seongnam-si, Gyeonggi-do, 13494, Korea (R OK)
2. Interface-Kabel-Anschluss
1) Öffnen Sie die Schnittstellenabdeckung
2) Schließen Sie das Schnittstellenkabel (optional
erhältlich) an den Kabelanschluss des Druckersan.
Page 5
p
Guide d'installation de l'imprimante
◈ Informations
Ce guide d'installation contient des informations brèves néce ssaires à l'installation du
produit.
Reportez-vous au manuel d'utilisation du CD, fourni avec le produit pour pl us de
détails concernant les instructions d'installation. Le CD contient les informations
suivantes :
1. Manuel : Utilisateur, Programme du module Windows CE, Pages de codes,
Commandes, Bluetooth et sans fil
2. Pilote : Windows driver
3. Utilitaire : VMSM (Virtual Memor y Switch Manager),
NV Image Download Manager,
BIXOLON s'engage à poursuivre ses efforts pour améliorer les fonctions et la qualité
de ses produits. Par conséquent, les caractéristiques du produit et/ou le contenu du
manuel d'utilisation peuvent être modifiés sans avis préalable.
◈ Mesures de sécurité concernant la batterie
1. Si vous observez quelque chose d'anormale comme une odeur étrange ou une
surchauffe lors de la première utilisation, contactez immédiatement votre
fournisseur local.
2. Rechargez la batterie uniquement à l'aide du chargeur indiqué (et fourni en option)
par BIXOLON L'utilisation d'un mauvais chargeur peut se traduire par une
surchauffe, une combustion et/ou une exposition de la batterie.
3. N'utilisez pas ou ne laissez pas la batterie dans un endroit exposé à de fo rtes
température ou à la lumière directe du soleil, dans un véhicule pa r exemple. Cela
risque d'entraîner une surchauffe et/ou une combustion de la batterie. P ar ailleurs, la
performance de la batterie et la durée de vie du produit peuvent s'amoindrir.
4. Ne laisser pas d'eau, d'eau de mer ou d'humidité entrer ou fuir dans l a batterie Si le
mécanisme de sécurité de la batterie venait à s'oxyder, la batterie pourrait être en
sur-tension avec un courant électrique et/ou un voltage anormal pouvant entraîner
une surchauffe, des étincelles et/ou une explosion.
5. Ne jetez pas la batterie et ne la soumettez pas à un ch oc violent. Si le mécanisme de
sécurité de la batterie est endommagée, la batterie risque d'être en s ur-tension et, par
conséquent, une réaction chimique négative peut être générée dans la batte rie.
Il existe un éventuel risque de surchauffe, de combustion et/ou d'explosion de la
batterie.
6. N'utilisez pas la batterie si elle est endommagée ou si l'extérieur est déformé en
raison d'un choc externe ou si elle fuit.
◈ Confirmation du contenu
Gestionnaire de téléchargement de Firmware
Imprimante de reçus mobile SPP-R200III
Installation
du papier
Chargeur
de batterie
※ Note
L'imprimante peut être sérieusement endommager si un chargeur d e
batterie non fourni par BIXOLON est utilisé. BIXOLON ne sera pas
tenue responsable de tout dommage résultant d'une telle uti lisation.
(La tension et le courant électrique de la batterie et ceux du chargeur de
la batterie doivent correspondre.)
Sangle de
ceinture
du papier
Installation
du clip
ceinture
◈ Utilisation du panneau de commandes
1. Appuyez sur le bouton Ouvrir pour
ouvrir le capot du papier.
2. Insérez le rouleau, comme illustré.
(Retirez le moyeu du rouleau de
papier en place.)
3. Veillez à bien aligner le papier
4. Sortez le papier et fermez le capot du
papier.
5. Tirez l'excé dent de papier vers le côté
de l'imprimante.
1. Eteignez l'imprimante.
2. Connectez le câble d'alimentation au
chargeur de la batterie
l'alimentation CA.
3. Ouvrez le cache de l'interface externe
dans le sens de la flèche.
4. Connectez le chargeur de batterie au
connecteur d'alimentation.
1. Insérez la vis de la sangle de ceinture
dans le trou de la sangle de ceinture.
2. Utilisez une pièce pour serrer la vis
de la sangle de ceinture, tel
qu'illustré.
1. Insérez la vis du clip ceinture dans le
trou de fixation du clip ceinture.
2. Serrez la vis du clip ceinture avec un
objet tel une pièce, tel qu'illustré.
(Veillez à la serrer dans le bon sens)
uis connectez
SPP-R200III
Câble d'alimentation Clip ceinture
◈ Nom des pièces du produit
Couvercle papier
Bouton d’alimentation
◈ Installation et charge
Installation
de la
batterie
※ Note
La batterie n'étant pas chargée au moment de l'achat, chargez-la avant de
l'utiliser. (Utilisez le chargeur de batterie)
Batterie Chargeur de batterie Rouleau du papier
CD
Trou de fixation de la passant ceinture
/ du clip ceinture
Bouchon
D’interface
Bouton Ouvrir
Bouton alimentation papier
Connecteur de câble
1. Insérez la batterie à l'arrière de
l'imprimante, en veillant à bien
aligner le crochet de la batterie.
2. Poussez la batterie dans la fente
jusqu'au clic.
Guide d'installation
Connecteur alimentatio n
Batterie
BOUTON
ALIMENTATION
• BOUTON ALIMENTATION (POWER)
Ce bouton sert à allumer et éteindre l'imprimante.
• BOUTON ALIMENTATION (FEED)
Ce bouton permet d'alimenter le papier manuellement, les hexadécimales programmées
et transférées à l'imprimante.
• LED ERREUR
Si le voyant est rouge, le capot du papier est ouvert.
Si le voyant clignote rouge, soit le papier est épuisé, soit la tête d'impression est en
surchauffe.
Si le voyant continue à clignoter rouge, cela peut indiquer un problème grave avec le
produit ; consultez un réparateur agréé.
• LED BATTERIE
Si les trois voyants sont bleus, la batterie est enti èrement chargée.
Si deux voyants sont bleus, la batterie est partiellement chargée.
Si un voyant est bleu, la batterie est faiblement chargé e.
Si le voyant est rouge, la batterie doit être rechargée ou rempl acée.
• LED STATUT (Bluetooth ou LAN sans fil)
1) Lors de l'utilisation du Bluetooth
Si l'imprimante est prête pour une communication sans fil avec le B luetooth, le
voyant vert ainsi que le voyant du statut de la batterie sont allumés.
2) Lors de l'utilisation du LAN sans fil.
Le voyant de droite indique la force du signal du LAN sans fil. Le vo yant vert
s'allume lorsque la force du signal est correct tandis que le voyant clignote vert quand
la force du signal est faible.
※ Note
En mode Veille, seul le voyant du Statut s'allume
BOUTON
ALIMENTATION
LED
ERREUR
LED BATTERIE
.
LED
STATUT
Page 6
(
)
(
)Ep
j
p
t
b
m
◈ Auto-test
Exécutez l'auto-test lors de la première installation de l'imprimante ou lorsque l'imprimante à
rencontrer un problème. Vérifiez ce qui suit :
• Circuit de commande, mécanismes, qualité d'impression, version RAM, et paramétrage de Memory
Switch
Si l'imprimante ne présente aucun problème lors de cet auto-test, vérifiez les autres disp ositifs,
périphériques ou logiciels. Cette fonction est indépendante de celle des autres dispositifs et logiciels.
• Instructions de l'auto-test
1) Éteignez l'imprimante et fermez le capot du papier de l'imprimante.
2) Appuyez simultanément sur le bouton d'alimentation du papier et le bouton d'alimentation pour
allumer l'imprimante.
3) Une fois l'impression commencée, relâchez les deux boutons.
4) Pour ajouter une impression d'un motif ASCII, appuyez une nouvelle fois sur le bouton
d'alimentation de papier.
5) Une fois le motif ASCII imprimé, l'auto-test s'arrête automatiquement.
◈ Caractéristiques du produit
※ Note
1) Cet équipement est destiné pour une utilisation en intérieur, uniquement, et toutes les
2) L'interrupteur permet de déco nnecter l'appareil. En cas de danger, éteignez tout.
◈ Fonction de l'impression d'étiquettes
1. Paramétrage de la fonction Étiquette
• Paramétrage des opérations
• Paramétrage Via Memory Switch
2. Fonction Calibrage automatique
• Instructions du calibrage automatique
◈ Connexion des périphériques
Article Description
Mode d'impression Impression thermique
Vitesse d'impression
Résolution 203 DPI
Mode d'alimentation
du papier
Taille des caractères
Caractères par ligne Police A : 32 Police B/C: 42
Jeu de caractères
Impresssion
Code barres
Emulation BXL/POS
Pilote :
SDK
Capteur Fin de papier, ouverture du capot de papier
Type de découpe Barre de séparation
Langue Langue Utilisateur supportée
Découpe de papier Reçu Monocouche
Type de papier Papier thermique Papier thermique
Diamètre extérieur du
rouleau de papier
Papier
du papier
aisseur 0.07 ± 0.003 mm 0.08 ± 0.008mm
100 mm/sec (Reçu papier)
80 mm/sec (Papier monocouche)
Chargement du papier facile
Police A : 12 × 24
Police B : 9 × 17
Police C : 9 × 24
Anglais 95
Graphiques étendus : 128 × 33 pages
International : 32
1 Dimensions : UPC A, UPC E, CODE 39, CODE 93,
Code 128, EAN 8, EAN 13, ITF,Codabar
2 Dimensions : PDF417, DATAMATRIX, MAXI, QR
Code, GS1 DataBar, Aztec
Windows XP(32/64bit) / WEPOS / 2003
Server(32/64bit) / VISTA(32/64bit) / 2008
Server(32/64bit) / 7(32/64bit) / 8 (32/64bit)
Windows XP / WEPOS / 2003 Server /
VISTA / 2008 Server / 7 / 8 / CE 3.0 et ultérieur
Max. ø40 mm (1.57”) Max. Ø39 mm (1.54”)
57.5 ± 0.5 mm
2.26” ± 0.2”
57.5 ± 0.5 mm
2.26” ± 0.2”
communications sont limitées au même bâtiment.
Le papier étiquette et le papier à marque noire sont disponibles en mode étiquette.
1) Allumez l'imprimante
2) Ouvrez le capot du papier, appuyez sur le bouton d'alimentation du papier et maintenez-l e vers
le bas au moins 2 secondes.
3) Après le bip, insérez le papier et fermez le capot.
4) Répétez les étapes ci-dessus pour revenir en mode Reçu.
1) Reportez-vous à la section de modification de Memory Switch du manuel de commandes.
La fonction de l'impression d'étiquettes exige une reconnaissance des écarts de papier à étiquette
et de la barre noire du papier à marque noire pour qu'une impression soit possible.
Si les écarts de papier à étiquette ne sont pas correctement reconnus, utilisez la fonction de
calibrage automatique.
1) Éteignez l'imprimante lorsqu'elle est en mode Impression d'étiquettes.
2) Appuyez sur le bouton d'alimentation du papier, maintenez-le vers le bas, pui s appuyez sur le
bouton Alimentation (Power).
3) Une fois l'impression terminée, appuyez sur le bouton Alimentation (P ower) pour exécuter le
calibrage automatique.
Calibrage automatique : Bouton alimentation (power)
4) Trois pages du papier à étiquette sortent lors de l'exécution du calibrage automatique.
Sélectionnez le mode
Auto-test : Bouton Alimentation (Feed)
1. Connexion Bluetooth et LAN san s fil
1) L'imprimante peut être connectée aux
dispositifs équipés de la technologie
Bluetooth (PDA, PC, etc.).
2) Utilisez la fonction de connexion Bluetooth
supportée par le dispositif pour connecter
l'imprimante. L'étiquette RFID intégrée à
l'imprimante permet à l'imprimante de se
coupler automatiquement aux périp hériques.
※ Note
Le périphérique doit être co mpatible avec le
couplage automatique RFID.
Un message indiquant que le périphérique ne
peut pas se connecter tant que le couplage
automatique RFID est pris en charge par un
couplage B/T et que les périphériq ues doivent
être connectés manuellement. Cela est normal.
3) L'imprimante peut être connec tée à d'autres
dispositifs comme des PDA et des PC
supportant des communications LAN sans
fil, en mode ad-hoc et AP en mode
※ Note
Reportez-vous au manuel LAN sans fil Bluetooth pour plus de détails concernant la
connexion. Vous pouvez vérifier l'environnement Bluetooth (authentification, encryptage,
mode connexion) et l'environnement LAN(IP , SSID, authentification, encryptage) via la
page d'auto-test.
◈ Nettoyage de l'imprimante
S’il y a de la poussière à l’intérieur de l’imprimante, la qualité d’impression peut être
altérée. Dans ce cas, suivez les consignes ci-dessous afin de nettoyer l’imprimante.
1) Ouvrez le capot du papier et sortez le papier. Appliquez le stylo nettoyant en partant
du centre et en allant vers les extrémités de la tête d'impression pour la nettoyer.
2) Nettoyez la tête d'impression à l'aide du stylo nettoyant.
3) Retirez la poussière du papier du capteur de papier à l'aide du stylo d'impression.
4) Attendez une ou deux minutes avant de réutiliser l'imprimante après avoir nettoyé la
tête d'impression , le temps que l'agent nettoyant du stylo nettoyant se soit bien
évaporé et ait bien séché.
5) Insérez le papier puis fermez le capot de l'imprimante.
• Attention
1) Assurez-vous d'avoir éteint l'imprimante avant de la nettoyer.
2) Attendez deux ou trois minutes après avoir éteint l'imprimante avant de nettoyer la tête
d'impression ; cette dernière peut être très chaude pendant l'impression.
3) Veillez à ne pas toucher la partie chauffante de la tête d'impression lors du nettoyage.
→ La tête d'impression est susceptible d'être endommagée par de l'électricité statique.
4) Veillez à ne pas rayer la tête d'impression.
5) Nettoyez régulièrement la tête d'impression, si vous utilisez du papier monoc ouche.
Il est recommandé de nettoyer la tête d'impression après 10 rouleaux de papier
monocouche (100 mètres) ou plus d'une fois par semaine. Si elle n'est pas nettoyé e
régulièrement, la qualité d'impression peut être amoindrie et la durée de vie de
l'imprimante raccourcie.
• Attention
1) Utilisez le papier monocouche fourni par BIXOLON, unique ment. L'utilisation d'autres
papiers peut entraîner l'annulation de la garantie.
2) Utilisez le stylo nettoyant (PCP-R200II) fourni par BIXOLON, uniquement, p our le
nettoyage.
◈ Certification
☎ BIXOLON Co., Ltd.
● Website http://www.
● Korea Headquarters
(Add) 7~8F, (Sampyeong-dong), 20, Pangyoyeok-ro241beon-gil,
(Tel.) +82-31-218-5500
● U.S. Office
(Add) BIXOLON America Inc., 3171 Fujita St, Torrance, CA 90505
(Tel.) +1-858 764 4580
● Europe Office
(Add) BIXOLON Europe GmbH, Tiefenbroicher Weg 35 40472 Düsseldorf
(Tel.) +49 (0)211 68 78 54 0
Ce symbole indiqué sur le produit et sa documentation indique qu'ils ne doivent pas être
etés avec les autres déchets ménagers. Par mesure de prévention pour l'environnement et
our la santé humaine, veuillez séparer ces composants des autres types de déchets et les
recycler conformément au principe de réutilisation des ressources. Les particuliers son
invités à contacter le distributeur leu r ayant vendu le produit ou à se renseigner auprès de
leur mairie pour savoir où et comment ils peu vent se débarrasser de ce produit afin qu'il soit
recyclé en respect avec la nature. Les entreprises sont invitées à contacter leurs fournisseurs
et à consulter les conditions de leur contrat de vente. Ce produit ne doit pas être mêlé aux
autres déchets commerciaux.
La marque Bluetooth suivante et ID D022644 sont compatibles, uniquement, avec les
modèles qualifiés Bluetooth SIG.
ixolon.co
Bundang-gu, Seongnam-si, Gyeonggi-do, 13494, Korea (R OK)
Infrastructure.
2. Connexion du câble d'interface
1) Ouvrez le cache de l'interface
2) Connectez le câb le d'interface (en option) au
connecteur du câble de l'imprimante.
Page 7

Guía de instalación de la impresora
◈ Información
Esta guía de instalación contiene información breve necesaria para la instalación del producto.
Consulte el Manual del Usuario en el CD que se suministra con el producto para obtener
instrucciones de instalación detalladas. El CD contiene la siguiente información.
1. Manual: Para el usuario, del Programa de Módulo de Windows CE,
páginas de código, comandos, Bluetooth y conexión inalámbrica
2. Controladores: Controlador de Windows
3. Utilidad: VMSM (Administrador del interruptor de mem oria virtual),
Administrador de descarga de la imagen NV,
Administrador de descarga de firmware
En BIXOLON, mantenemos esfuerzos continuos para mejorar y actualizar las funciones y la calidad
de todos nuestros productos. En lo sucesivo, las especificaciones del producto y/o el contenido del
manual del usuario pueden modificarse sin previo aviso.
◈ Medidas de seguridad de la batería
1. Si observa un síntoma anormal, como olores extraños o recalentamiento, en su primer uso luego
de adquirir del producto, comuníquese con su distribuidor local de inmediat o.
2. Cargue la batería solo con el cargador exclusivo especificado (provisto de manera opcional) por
BIXOLON. El uso de un cargador inadecuado puede resultar en el recalentamiento, combustión
y/o explosión de la batería.
3. No utilice ni deje la batería en lugares expuestos a altas temperaturas o a la luz directa e intensa
del sol, tales como en el interior de un automóvil. Esto puede provocar el recalentamiento y/o la
combustión de la batería. Además, puede disminuir el rendimiento de la batería y la vida del
producto.
4. Evite que ingrese o se filtre agua, agua salada o humedad en la batería. Si el mecanismo de
seguridad de la batería se oxida, la batería se puede recalentar con flujo de energía eléctrica y/o
tensión anormales de modo que se puede recalentar, inflamar y/o explotar.
5. No arroje la batería ni la someta a golpes fuertes. Si se daña el mecanismo de seguridad de la
batería, ésta puede sobrecalentarse y, por consiguiente, se puede generar una reacción química
adversa en ella.
Existe un riesgo potencial de recalentamiento, combustión y/o explosión de la batería.
6. No utilice la batería si se encuentra dañada, deformada en el exterior debido a golpes e xternos, o
hinchada.
◈ Confirmación del contenido
SPP-R200III
Cable de energía Broche para cinturón CD
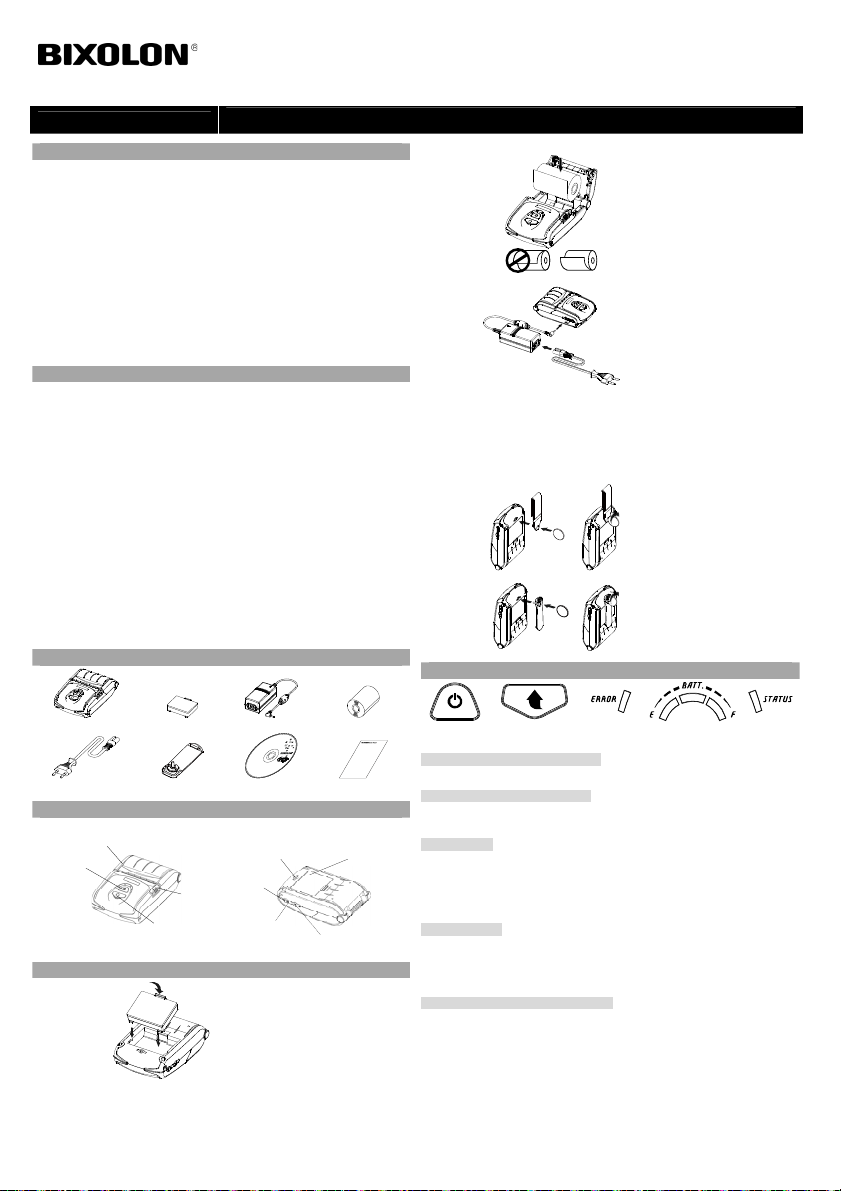
◈ Nombres de las partes del producto
Botón de encendido
◈ Instalación y carga
Instalación de
la batería
Colocación
del papel
Cubierta del papel
※ Nota
Ya que la batería no está cargada al momento de la compra, cárguela antes de usar el
producto. (Use el cargador de batería)
Batería Cargador de la batería Rollo de papel
Orificio para montaje de correa para
cinturón / broche para cinturón
cubierta de interfaz
Botón Abrir
Botón de alimentación del papel
Conector para el cable
1. Inserte la batería en la parte trasera de la
impresora, alineando el enganche de la
misma adecuadamente.
2. Empuje la batería dentro de la ranura hasta
que se escuche un chasquido.
1. Presione el botón Open (Abrir) para abrir la
cubierta del papel.
2. Inserte el papel como se muestra en la
imagen.
(Extraiga el centro del rollo de papel que
que se haya terminado).
3. Sea cuidadoso para alinear el papel
correctamente.
4. Tire del papel y cierre la cubierta del papel.
5. Arranque el exceso de papel hacia el lado
lateral de la impresora.
Conector de energía
Guía de instalación
Batería
Impresora de recibos portátil SPP-R200III
Carga de la
batería
※ Nota
La impresora puede producir daños graves si no se utiliza el cargador de la batería
proporcionado por BIXOLON. BIXOLON no es responsable de ninguno de estos
daños. (Deben coincidir las especificaciones del voltaje y de la corriente eléctrica de
la impresora y de la batería).
Colocación
de la correa
para cinturón
Colocación
del broche
para cinturón
◈ Uso del panel de control
BOTÓN POWER
• BOTÓN POWER (ENCENDIDO)
Este botón se utiliza para encender y apagar la impresora.
• BOTÓN FEED (ALIMENTACIÓN)
Este botón se utiliza para suministrar el papel de manera manual, realizar la
autoevaluación y descargar hexadecimales.
• LED DE ERROR
Si el led rojo está encendido, la cubierta del papel está abierta.
Si el led rojo parpad ea, el papel se ha terminado o el cabe zal de impresión se ha
recalentado.
Si el led rojo continúa parpadeando, pu ede indicar un problema más grave del producto y,
por lo tanto, debe consultar a un distribuidor de servicio técnico autorizado.
• LED DE BATERÍA
Si hay encendidos tres led azules, la batería está totalmente cargada.
Si hay encendidos dos led azules, la baterí a tiene media carga.
Si hay encendido un led azul, la batería se encuentra en su nivel de carga mínimo.
Si se enciende un led rojo, la batería debe cargarse o reemplazarse.
• LED DE ESTADO (Bluetooth o LAN inalámbrica)
1) Al utilizar el Bluetooth
Si la impresora está lista para una comunicación inalámbrica con cualquier Blueto oth,
el led verde y el led de estado de la batería están encendidos.
2) Al utilizar una red inalámbrica LAN
El indicador derecho muestra la fuerza de la señal de la inalámbrica LAN. El led verde
se enciende de manera ininterrumpida po r una señal de fuerza aceptable mientras que el
led verde parpadea por una señal de fuerza débil.
※ Nota
En el modo de ahorro de energía, sólo se enciende el led de estado.
◈ Autoevaluación
Realice la autoevaluación cuando co nfigure la impresora por primera vez o cuando detecte
un problema y verifique lo siguiente.
• El circuito de control, los meca nismos, la calidad de impresión, la versión de ROM y la
configuración de los interruptores de memoria
Si no se detecta ningún problema luego de realizar la autoevaluación, examine los otros
dispositivos o los periféricos y el software. Esta función es independiente de los otros
dispositivos y del software.
• Instrucciones para la autoevalua ción
1) Apague la impresora y cierre la cubierta del papel de la misma.
2) La impresora se enciende al presionar el botón de alimentación del papel y el de
encendido simultáneamente.
3) Después de que haya comenzado la impresión, suelte los dos botones.
4) Para agregar una impresión del patrón ASCII, presione nuevamente el botón de
alimentación del papel.
5) Una vez impreso el patrón ASCII, la autoevaluación finaliza automáticamente.
BOTÓN FEED LED DE ERROR LED DE BATERÍA
1. Apague la impresora.
2. Conecte el cable de energía al cargador de la
batería y luego conecte la energía CA.
3. Abra la cubierta de interfaz externa en la
dirección de la flecha.
4. Conecte el cargador de la batería al conector
de alimentación.
1. Inserte la correa para cinturón en el agujero
de la misma.
2. Utilice una moneda para ajustar la rosca de la
correa para cinturón como se muestra en la
imagen.
1. Inserte el tornillo del broche de correa a su
orificio de montaje.
2. Ajuste el tornillo del broche de correa con un
lueobjeto que asemeje una moneda, como se
muestra en la imagen.
(evite ajustarlo en la dirección incorrecta).
LED DE ESTADO
Page 8

m
(
p
b
m
◈ Especificaciones del producto
Artículo Descripción
Método de
impresión
Velocidad de
impresión
Resolución 203 PPP
Modo de suministro
de papel
Tamaño de caracter
Caracteres Por línea Fuente A: 32 Fuentes B/C: 42
Conjunto de
caracteres
Impresión
Código de barras
Emulación BXL / POS
Controlador
SDK
Sensor Papel terminado, tapa abierta
Tipo de cortador Barra de corte
Idioma Admite el idioma del usuario
Forma del papel Recibo Linerless
Tipo de papel Papel térmico Papel térmico
Diámetro exterior
del rollo de papel
Papel
Ancho
Espesor 0.07 ± 0.003 m
※ Nota
1) Este equipo es para uso doméstico y todos los servicios de comunicación están limitados
al interior del edificio.
2) El interruptor es el dispositivo de desconexión. Apague el interruptor para no correr
peligro.
◈ Función de impresión de etiquetas
1. Configuración de la función de etiquetas
Papel de etiquetas y papel de marcas negras disponibles en el modo de etiquetas.
• Funcionamiento de la configuración
1) Encienda la impresora.
2) Abra la cubierta del papel y mantenga presionado el botón de alimentación del papel
durante más de dos segundos.
3) Luego de que se emita el tono de la alarma, inserte el papel y cierr e la cubierta.
4) Repita los pasos anteriores para volver al modo de recepción.
• Configuración mediante el interruptor de memoria
1) Consulte la sección de cambio del interr uptor de memoria del Manual de comandos.
2. Función de calibración automática
La función de impresión de etiquetas exige para imprimir el reconocimiento de la
separación del papel de etiquetas y de la barra negra del papel de marcas negras. Si la
separación del papel de etiquetas no se reconoce de forma adecuada, utilice la función de
calibración automática.
• Instrucciones para la calibra ción automática
1) Apague la impresora mientras permanece en el modo de impresión de etiquetas.
2) Mantenga presionado el botón de alimentación del p apel y luego presione el botón de
encendido.
3) Una vez hecha la siguiente impresión, presione el botón de encendido para realizar la
calibración automática.
4) Se imprimen tres hojas de papel de etiquet as cuando se realiza la calibración automática.
◈ Conexión de los periféricos
Impresión térmica
100 mm/seg (papel de recibo)
80 mm/seg (papel linerless)
Carga fácil de papel
Fuente A: 12 × 24
Fuente B: 9 × 17
Fuente C: 9 × 24
Inglés: 95
Gráficos ampliados: 128 × 33 páginas
Internacional: 32
1 Dimensión: UPC A, UPC E, CÓDIGO 39,
CÓDIGO 93, Código 128, EAN 8,
EAN 13, ITF, Código de barras
2 Dimensión: PDF417, MATRIZ DE DATOS, MAXI,
Código QR, GS1 DataBar, Aztec
Windows XP(32/64bit) / WEPOS /
2003 Servidor(32/64bit) / VISTA(32/64bit) /
2008 Servidor(32/64bit) / 7(32/64bit) / 8(32/64bit)
Windows XP / WEPOS / Servidor 2003 /
VISTA / Servidor 200 8 / 7 / 8 / CE 3.0 y más recientes
Max. ø40 mm (1.57”) Max. ø39 mm (1.54”)
57.5 ± 0.5 mm
(2.26” ± 0.2”)
Seleccione el modo
Calibración automát ica: Botón de encendido
Autoevaluación: Botón de alimentación
1. Conexión Bluetooth y LAN inalámbrica
1) La impresora se puede conectar a
dispositivos equipados con la capacidad de
comunicación por Bluetooth (PDA, PC, etc .).
2) Utilice la función de conexión Bluetooth que
admite el dispositivo que será conectado a l a
impresora.
La etiqueta NFC integrada a la i mpresora
permite el emparejamiento automático con
los dispositivos.
※
Nota
El dispositivo debe admitir NFC Auto Pairing
Emparejamiento Automático NFC.)
Puede mostrar un mensaje de que el dispositivo
no
puede conectarse puesto que NFC Auto
Pairing se admite
los dispositivos deben conectarse manualmente,
pero esto es normal.
hasta el emparejamiento B/T y
57.5 ± 0.5 mm
(2.26” ± 0.2”)
0.08 ± 0.008mm
3) La impresora se puede conectar a otras
estaciones, a los asistentes digitales
personales y a las computadoras portátiles
que admitan la comunicación inalámbri ca
LAN en el modo Ad-hoc y AP en el modo
Infraestructura.
※ Nota
Consulte el Manual de Bluetooth y de red inalámbrica LAN para obtener más detalles sobre
la conexión. Puede revisar el entorno de bluetooth (autenticación, codificación, modo de
conexión) y el entorno de LAN inalámbr ica (IP, SSID, autenticación, encriptación) a través
de la página de autoevaluación.
◈ Limpieza de la impresora
Si hay polvo en el interior de la impresora, puede haber una menor calidad de impresión.En
tal caso, siga las instrucciones a continuación para limpiar la impresora.
1) Abra la cubierta del papel y quite el p apel si es que lo hay. Apply the cleaning
pen from the center to the edge over the printer head for cleaning.Aplique el
lápiz limpiador desde el centro hacia los bordes del cabezal de la impresora
para la limpieza.
2) Limpie el cabezal de la impre sora con un lápiz limpiador.
3) Quite el polvo del papel del sensor de detección de papel con el lápiz limpiador.
4) No utilice la impresora durante uno a dos minutos después de limpiar el
cabezal de la impr esora hasta que el agente de limpieza del l ápiz limpiador se
haya evaporado y secado completamente.
5) Coloque el papel y cierre la cubierta de la impresora.
• Precaución
1) Asegúrese de que la impresora no esté enc endida antes de la limpieza.
2) Espere dos a tres minutos después de apagar la impresora antes de limpiar el
cabezal dado que el cabezal puede estar muy caliente durante el
funcionamiento de la impresora.
3) Tenga cuidado de tocar la zona de calor de la impresora con las manos mientras limpia
el cabezal.
→ El cabezal puede dañarse con la electricidad estática.
4) Tenga cuidado de no rayar el cabezal.
5) Limpie el cabezal de la impresora periódicamente si utiliza papel linerless.
Recommended cleaning period is after consuming ten rolls of linerless paper
(100 meters), or more than once a week. El período de limp ieza recomendado es
después de consumir diez rollos de papel linerless (100 metros), o más de una
vez por semana. Printing quality may be degraded or printer life may be
shortened if the head is not cleaned periodical ly.Si no limpia periódicamente el
cabezal de la impresora se puede degradar la calidad de la impresión o la vida
útil de la impresora puede reducirse.
• Warning
1) Utilice únicamente papel linerless suministrado por BIXOLON.
Use of other paper voids product warranty.
El uso de otro papel anula la garantía del producto.
2) Utilice el lápiz limpiador (PCP-R200II) suministrado por BIXOLON para la limpieza.
◈ Certificación
☎ BIXOLON Co., Ltd.
● Website http://www.
● Korea Headquarters
(Add) 7~8F, (Sampyeong-dong), 20, Pangyoyeok-ro241beon-gil,
(Tel.) +82-31-218-5500
● U.S. Office
(Add) BIXOLON America Inc., 3171 Fujita St, Torrance, CA 90505
(Tel.) +1-858 764 4580
● Europe Office
(Add) BIXOLON Europe GmbH, Tiefenbroicher Weg 35 40472 Düsseldorf
(Tel.) +49 (0)211 68 78 54 0
Si esta marca aparece en el producto o su literatura, significa que no debería desecharse con
otros residuos del hogar una vez que llegue el final de su vida útil Para evitar posibles
daños al medio ambiente o a las personas a causa de la eliminación incontrolada de
desechos, por favor separe este product o de otros tipos de desechos y recíclelo de manera
responsable para promover la reutilización sostenible de los recursos materiales. Los
usuarios particulares deberían contactarse con el minorista del lugar donde compraron este
roducto, o su oficina de gobierno local, par a obtener detalles sobre adónde y cómo pueden
llevar este artículo para que sea reciclado de manera segura para el medioambiente. Los
usuarios empresariales deberían contactarse con su proveedor y comprobar los términos y
condiciones del contrato de compra. Este producto no debe mezclarse con otros desechos
comerciales para su eliminación.
La siguiente marca Bluetooth y IDD 022644 solo se apli ca en los modelos con la
calificación de Bluetooth SIG.
ixolon.co
Bundang-gu, Seongnam-si, Gyeonggi-do, 13494, Korea (R OK)
2. Conexión del cable de interfaz
1) Abra la cubierta de interfaz.
2) Conecte el cable de interfaz (opcional) al
conector para el cable de la impresora.
Page 9

Guia de Instalação de Impressora
◈ Informação
Este guia de instalação contém informações rápidas necessár ias para a instalação do
produto.
Consulte o manual de utilizador no CD que é enviado com o produto para instru ções
detalhadas da instalação. O CD contém as seguintes informações.
1. Manual: Utilizadores, Programa do Módulo CE do Windows,
Páginas de código, Comandos, Bluetooth & Wireless
2. Driver: Driver Windows
3. Utilitário: VMSM (Gestor de Alternância de Memória Virtual), Gestor de
Na BIXOLON fazemos esforços contínuos para melhorar e actual izar as funções e a
qualidade dos nossos produtos. Desta forma, as especificações do produto e/ou o
conteúdo do manual de utilizador podem ser alterados sem aviso pré vio.
◈ Precauções de Segurança da Bateria
1. Se observar algum sintoma anormal, tal como cheiro estranho e sobreaquecimento,
na primeira utilização após a compra do produto, entre em contacto com o
revendedor local imediatamente.
2. Carregue a bateria apenas com o carregador exclusivo especificado (forneci do
opcionalmente) pela BIXOLON. A utilização de um carregador incorrecto pode
resultar em sobreaquecimento, combustão e/ou explosão da bateria.
3. Não utilize ou deixe a bateria num local exposto a temperaturas elevadas ou luz
solar directa intensa, tal como dentro de um automóvel. Se o fi zer, pode provocar o
sobreaquecimento e/ou combustão da bateria. Além disso, o desempenho da bateria
e a vida do produto podem ser reduzidos.
4. Não permita que água, água do mar ou humidade entre ou derrame dentro da bateria.
Se o mecanismo de segurança dentro da bateria se tornar oxidado, a bateria pod e
sobrecarregar com corrente eléctrica anormal e/ou tensão de modo que pode
sobreaquecer, inflamar e/ou explodir.
5. Não atire a bateria nem a submeta a choques fortes. Se o mecanismo de segurança
na bateria estiver danificado, a bateria poderá ter carga a mais e, con sequentemente,
poderá ser gerada uma reacção química adversa na bateria.
Há o risco potencial de sobreaquecimento, combustão, e/ou explosão da bateria.
6. Não utilize a bateria se estiver danificada ou o exterior deformado devido a choque
externo ou se estiver inchada.
◈ Confirmação de Conteúdo
◈ Nomes de Partes do Produto
Botão de alimentação
◈ Instalação e Carregamento
Instalação da
Bateria
Download de Imagem NV, Gestor de Descarga de Firmware
SPP-R200III
Cabo eléctrico
Tampa do papel
※ Nota
Uma vez que a bateria não vem carregada à altura da compra, carregue
a bateria antes da utilização do produto. (Utilizar o carregad or da
bateria)
Bateria Carregador da Bateria Rolo de Papel
Clip do cinto
Botão de
abertura
Botão de alimentação do
papel
Cap do interface
Conector do cabo
CD
Orifício para montar alça do cinto
/ clip do cinto
1. Insira a bateria na parte traseira da
impressora, alinhando o gancho da
bateria adequadamente.
2. Empurre a bateria para a ranhura até
que oiça um clique.
Guia de Instalação
Bateria
Conector de alimentação
Impressora de Recibos Móvel SPP-R200III
Instalação de
Papel
Carregamento
da Bateria
※ Nota
A impressora poderá ficar seriamente danificada se o carregador da
bateria fornecido pela BIXOLON não for utilizado. A BIXOLON não
é legalmente responsável por quaisquer danos. (As especificações de
voltagem e de corrente eléctrica da impressora e do carregador da
bateria devem coincidir).
Alça do Cinto
Papel
Clipe do
Cinto
Papel
◈ Utilização do Painel de Controlo
BOTÃO DE
ALIMENTAÇÃO
• BOTÃO DE ALIMENTAÇÃO
Este botão utiliza-se para ligar e desligar a impressora.
• BOTÃO ALIMENTAÇÃO
Este botão é utilizado para alimentar papel manualmente, realizar o auto-teste e descarregar
hexadecimais.
• LED DE ERRO
Se o LED vermelho estiver aceso, a tampa do papel está aberta.
Se o LED vermelho estiver a piscar, significa que o papel foi todo utilizado ou a cabeça de
impressão está sobreaquecida.
Se o LED vermelho continuar a piscar, poderá indicar um problema mais grave com o produto
e, assim, deverá ser consultado um técnico de vendas autorizado.
• LED DA BATERIA
Se três LEDs azuis estiverem acesos, a bateria está totalmente carregada.
Se dois LEDs azuis estiverem acesos, a bater ia está meio carregada.
Se um LED azul estiver aceso, a bateria está no nível mai s baixo de carga.
Se o LED vermelho estiver aceso, a bateria deve ser carregada ou substituída.
• LED DE ESTADO (Bluetooth ou Wireless LAN)
1) Quando utiliza Bluetooth
Se a impressora estiver pronta para comunicação sem fios com qualquer Bluetooth, o led
verde e o led de estado da bateria é ligado.
2) Quando utiliza LAN sem fios
O indicador direito mostra a intensid ade do sinal de LAN sem fios. O led verde está aceso
para intensidade de sinal aceitável enqu anto a lâmpada verde pisca para intensidade de sinal
fraca.
※ Nota
No modo de poupança de energia, apenas a lâ mpada de Estado está acesa.
ALIMENTAÇÃO
BOTÃO
1. Prima o botão abrir para abrir a
tampa de papel.
2. Insira o papel tal como indicado na
imagem. (Retire qualquer resto de
um rolo de papel utilizado).
3. Tome cuidado para alinhar o papel
correctamente.
4. Puxe o papel para fora E feche a
tampa de papel.
5. Retire qualquer excesso de papel na
direcção da lateral da impressora.
1. Desligue a energia da impressora.
2. Ligue o cabo eléctrico ao carregador
da bateria e ligue a potência de CA.
3. Abra a tampa do interface externo
na direcção da seta.
4. Ligue o carregador da bateria 매
conector de energia.
1. Insira o parafuso da alça do cinto no
furo da alça do cinto.
2. Utilize uma moeda para apertar o
parafuso da alça do cinto Tal como
indicado na imagem.
1. Insira o parafuso da alça do cinto no
orifício de montagem da alça do
cinto.
2. Aperte o parafuso da alça do cinto
com um objecto como uma moeda
tal como indicado na imagem.
(Tenha o cuidado de apertar o
parafuso na direcção correcta.)
LED DE ERRO LED DA BATERIA
LED DE
ESTADO
Page 10

p
m
m
p
◈ Auto-teste
Execute o auto-teste quando configurar a impressora ou quando encontrar um problema, e verifique
o seguinte.
• Circuito de Controlo, Mecanismos, Qualidade de Impressão, Versão ROM, e Definições de
Interrupto r da Memória
Se não encontrar nenhum problema na impressora após executar o auto-teste, examine os outros
dispositivos ou periféricos e software. Esta função é independente de outros disp ositivos e software.
• Instruções de Auto-Tes te
1) Desligue a alimentação e feche a tampa do papel da impressora.
2) Prima o botão de alimentação de papel e os botões de ligação em simultâneo para ligar a
impressora.
3) Após começar a impressão, solte os dois botões.
4) Para visualizar uma cópia impressa do padrão ASCII, pressione o botão de alimentação do
papel mais uma vez.
5) Após estar a cópia impressa do padrão ASCII, o auto-teste está automaticamente concluído.
◈ Especificações do Produto
※ Nota
1) Este equipamento destina-se a uso i nterior e toda a cablagem de comunicação limita-se ao
2) O interruptor é o dispositivo de desconexão. Desligue o interruptor de qualquer perigo.
◈ Função de Impressão de Etiquetas
1. Configuração da Função de Etiq ueta
• Operações de Definição
• Definição Via Chave de Memória
2. Instruções de Cali bração Automática
• Instruções de Calibração Automática
◈ Ligação de Periféricos
Item Descrição
Método de Impressão Impressão Térmica
Velocidade de
Impressão
Resolução 203 DPI
Modo de Alimentação
do Papel
Tamanho do Caractere Fonte A: 12 × 24 Fonte B: 9 × 17 Fonte C: 9 × 24
Caracteres
Por Linha
Conjunto de
Caracteres
Impressão
Código de barras
Emulação BXL/POS
Driver:
SDK
Sensor Fim do Papel, Abertura da T ampa do Papel
Tipo de Cortador Barra de Corte
Linguagem Linguagem do utilizador suportada
Forma do
Tipo de papel Papel térmico Papel térmico
Diâmetro exterior do
Instalação
rolo de papel
de
Largura
Espessura 0.07 ± 0.003 mm 0.08 ± 0.008mm
100 mm/seg (Papel de Recibos)
80 mm/seg (Papel em Kit)
Carregamento fácil de papel
Fonte A: 32 Fonte B/C: 42
Inglês: 95
Gráficos Expandidos: 128 × 33 páginas
Internacional: 32
1 Dimensão: UPC A, UPC E, CÓDIGO 39, CÓDIGO 93,
Código 128, EAN 8, EAN 13, ITF, Barra de
códigos
2 Dimensão: PDF417, DATAMATRIX, MAXI,
Código QR, GS1 DataBar, Aztec
Windows XP(32/64bit) / WEPOS / 2003 Server(32/64bit) /
VISTA(32/64bit) / 2008 Server(32/64bit) / 7(32/64bit) /
8(32/64bit)
Windows XP / WEPOS / 2003 Server /
VISTA / 2008 Server / 7 / 8 / CE 3.0 e superior
apel Recibo Revestido
Máx. ø40 mm (1.57”) Máx. ø39 mm (1.54”)
57.5 ± 0.5 mm
(2.26” ± 0.2”)
57.5 ± 0.5 mm
(2.26” ± 0.2”)
interior do edifício.
O papel de marca preta e o papel de etiqueta estão disponíveis no modo de etiqueta.
1) Ligue a energia da impressora.
2) Abra a tampa do papel e pressione e mantenha o botão de alimentação do papel dura nte
mais de dois segundos.
3) Após soar o tom da campainha, insira o papel e feche a tampa.
4) Repita os passos acima para voltar ao modo de receb imento.
1) Por favor consulte a secção de mudança de chave de memó ria do Manual de Comandos.
A função de impressão de etiquetas necessita do reconhecimento das falhas d e papel de
etiqueta ea barra preta do papel de marca preta de modo a imprimir.
Se as falhas de papel de etiqueta não forem ad equadamente reconhecidos, utilize a função
de calibração automática.
1) Desligue a energia da impressora enquanto estiver no modo de impressão de etiquetas.
2) Pressione e mantenha o botão de alimentação de papel e em seguida pressione o botão de
alimentação.
3) Após ser emitida a seguinte impressão, pressione o botão de alimentação para realizar a
calibração automática.
4) São emitidas três paginas de papel de etiqueta ao realizar a calibração automática.
Seleccione o modo
Calibração Automática: Botão de Alimentação
Auto-Teste: Botão de Alimentação
1. Conexão LAN Wireless & Bluetooth
1) A impressora pode conectar-se a dispositivos
equipados com comunicação Bluetooth (PDAs,
PCs, etc.).
2) Utilize a função de conexão Bluetooth suportada
pelo dispositivo para se conectar à impressora.
O marcador NFC embutido na
impressora permite o emparelhamento
automático com dispositivos.
※ Nota
O dispositivo deve suportar o Auto
Emparelhamento NFC.
Poderá exibir uma mensagem indicando que o
dispositivo não foi conectado como Auto
Emparelhamento NFC e é suportado para o
emparelhamento B/T e os dispositivos devem
ser conectados manualmente, mas isto é
normal.
3) A impressora pode conectar-se a outras
estações, como por exemplo PDAs e PCs que
suportem comunicação LAN wireless em modo
※ Nota
Consulte o Manual LAN Wireless Bluetooth para informações detalhadas sobre a sua conexão.
Poderá verificar o ambiente Bluetooth (autenticação, encriptação, modo de conexão) e o ambiente
LAN wireless(IP, SSID, autenticação, encriptação) através da página de auto-teste.
◈ Limpeza da Impressora
Se o interior da impressora estiver sujo, a qual idade da impressão pode diminuir.
Se tal for o caso, sigas as instruções abaixo para limpar a impressora .
1) Abra a tampa de papel e retire o papel se exis tir algum. Aplique a caneta de limpeza a
partir do centro até à ex tremidade sobre a cabeça da impressora par a limpeza.
2) Limpe a cabeça da impressora utilizando a caneta de limpeza.
3) Remova o pó do papel do sensor de detecção de papel utilizando a caneta de limpeza.
4) Não utilize a impressora durante um ou dois minutos após a limpeza da
cabeça da impressora até que o agente de limp eza da caneta de limpeza se
tenha completamente evaporado e secado.
5) Monte o papel e feche a tampa da impressor a.
• Cuidado
1) Certifique-se que a potência da impressora está desligada ante s da limpeza.
2) Aguarde dois ou três minutos após a desconexão da bateria antes da limpeza
da cabeça uma vez que a cabeça poderá ficar muito quente durante a operação
de impressão.
3) Tome cuidado para não tocar na região de aquecimento da cabeça com a mão
enquanto limpa a cabeça.
→ A cabeça da impressora poderá ficar danificad a devido à electricidade estática.
4) Tome cuidado para evitar riscar a cabeça.
5) Limpe a cabeça da impressora periodicamente se for utilizado papel revestido.
O período de li mpeza recomendado é a seguir ao consumo de dez ro los de
papel (100 metros) ou mais do que uma vez por semana. A qualidade de
impressão poderá decair ou a vida útil da impressora poderá diminuir se a
cabeça não for limpa periodicamente.
• Aviso
1) Utilize apenas papel revestido que seja fornecido pela BIXOLON. A utilização
de outro papel anula a garantia.
2) Utilize apenas a caneta de li mpeza (PCP-R200II) fornecid a pela BIXOLON
para limpeza.
◈ Certificação
☎ BIXOLON Co., Ltd.
● Website http://www.bixolon.com
● Korea Headquarters
(Add) 7~8F, (Sampyeong-dong), 20, Pangyoyeok-ro241beon-gil,
(Tel.) +82-31-218-5500
● U.S. Office
(Add) BIXOLON America Inc., 3171 Fujita St, Torrance, CA 90505
(Tel.) +1-858 764 4580
● Europe Office
(Add) BIXOLON Europe GmbH, Tiefenbroicher Weg 35 40472 Düsseldorf
(Tel.) +49 (0)211 68 78 54 0
Esta marca indicada no produto ou a sua literatura, indicam que não pode ser eliminado
com outros resíduos domésticos no final do seu período de utilização. Para evitar u
possível dano ao ambiente ou à saúde humana provocado por uma eliminação sem controlo
do lixo, separe este lixo de outros tipos de lixo e recicle-o para promover a reutilização
sustentada de recursos do material. Os utilizadores domésticos devem contactar o
revendedor onde o produto foi adquirido ou o departa mento governamental local, para
obter informações sobre onde e como este produto pode ser levado para uma reciclage
ambiental em segurança. Os utilizadores comerciais devem contactar o seu fornecedor e
verificar os termos e condições do contrato de aquisição. Este
combinado com outro lixo comercial para se r eliminado.
A seguinte marca Bluetooth é ID D022644 aplica-se apenas a modelos com a qualificação
Bluetooth SG.
Bundang-gu, Seongnam-si, Gyeonggi-do, 13494, Korea (R OK)
Ad-hoc e AP em modo Infraestruturas.
2. Conexão de Cabo de Interface
1) Abra a Tampa de Interface
2) Ligue o cabo do interface (opcional) ao conector
do cabo da impressora.
roduto não deverá ser
Page 11

◈ 안내
본 설치 안내서는 제품 설치에 필요한 간단한 정보만 기록하고 있습니다. 자세한
설치 안내는 첨부된 CD 의 사용 설명서를 참고하십시오. CD 에 포함되어있는
내용은 아래와 같습니다.
1. 매뉴얼: 사용자, Windows CE 모듈 프로그램, 코드 페이지, 제어 명령어,
블루투스 & 무선랜
2. 드라이버: Windows 드라이버
3. 유틸리티: VMSM(Virtual Memory Switch M anager), NV Image
Download Manager, Firmware Download Manager
저희 (주)빅솔론은 제품의 기능과 품질 향상을 위하여 지속적인 개선을 하고
. 이로 인하여 제품의 사양과 매뉴얼의 내용은 사전 통보 없이 변경될
있습니다
수 있습니다.
◈ 배터리 안전 주의사항
1. 제품 구매 후 처음 사용 시 이상한 냄새 또는 과열과 같은 이상 증상을
발견하면 즉시 구입 판매점에 문의하십시오.
2. 배터리를 충전할 때 ㈜빅솔론이 지정하는(옵션으로 제공) 전용 충전기만
사용해서 충전하십시오. 잘못된 충전기를 사용할 경우 배터리 과열, 연소 및
폭발이 발생할 수 있습니다.
3. 차량 내부와 같이 고온 또는 강력한 직사광선에 노출되는
사용하거나 보관하지 마십시오. 이 경우 배터리 과열 및 연소가 일어날 수
있습니다. 또한 배터리 성능 및 수명이 감소할 수 있습니다.
4. 배터리에 물, 바닷물 또는 수분이 들어가거나 새어 들어가지 않도록 하십시오.
배터리 내 구동회로 및 보호장치가 산화되면 배터리가 비정상적인 전류 및
전압으로 인해 과충전 되어 배터리가 과열되거나 배터리에 불이
폭발할 수 있습니다.
5. 배터리를 던지거나 강한 충격이 가해지지 않도록 하십시오. 배터리 내
보호장치가 손상되면 배터리가 과열되고 그에 따라 유해한 화학 반응이
배터리 내에서 생성될 수 있습니다. 배터리 과열, 연소 및 폭발이 일어날
가능성이 있습니다.
6. 배터리가 손상되었거나 외부 충격으로 인해 외관이 변형된 경우 또는 부풀어
오른 경우 사용하지 마십시오.
◈ 구성품 확인
SPP-R200III
배터리 배터리 충전기 용지 롤
장소에서 배터리를
붙거나
프린터 설치 안내서
모바일 영수증 프린터 SPP-R200III
1. 열림 버튼을 눌러 용지커버를
여십시오.
2. 그림과 같이 용지를 넣으십시오.
(다 쓴 용지의 지관이 있을 경우
용지 설치
배터리
충전
※ 참고
㈜빅솔론에서 제공한 배터리 충전기를 사용하지 않을 경우
프린터에 심각한 손상이 발생할 수 있습니다. ㈜빅솔론은 그러한
손상에 대해 어떠한 법적 책임을 지지 않습니다. (프린터와
충전기의 전압 및 전류 사양이 일치해야 합니다).
벨트
스트랩
설치
벨트 클립
설치
◈ 조작부 사용법
제거하십시오.)
3. 용지 방향에 주의하십시오.
4. 용지를 앞으로 당긴 다음
용지커버를 닫으십시오.
5. 여분의 용지는 프린터 앞면으로
잡아 당겨 찢어내십시오.
1. 프린터 전원을 꺼 주십시오.
2. 전원 코드를 배터리 충전기에
연결한 다음 AC 전원에
연결하십시오.
3. 화살표 방향으로 외부 인터페이스
캡을 여십시오.
4. 배터리 충전기를 전원 커넥터에
연결하십시오.
1. 벨트 스트랩 고정홀에 벨트
스트랩의 스크류를 삽입하십시오.
2. 그림과 같이 동전 등으로 벨트
스트랩 스크류를 체결하십시오.
1. 벨트 클립 고정홀에 벨트 클립의
스크류를 삽입하십시오.
2. 그림과 같이 동전 등으로 벨트
클립의 스크류를 체결하십시오.
(조립되는 방향에 주의하여
조립하십시오.)
배터리
전원 코드
◈ 제품의 주요 명칭
용지커버
전원 버튼
용지 이송버튼
◈ 설치 및 충전
배터리
설치
※참고
배터리는 구입 시 완전히 충전된 상태가 아니기 때문에 제품 사용
전 배터리를 충전해야 합니다. (배터리 충전기)
벨트 클립
열림 버튼
CD
벨트 스트랩 /벨트 클립 고정 홀
인터페이스 캡
케이블커넥터
1. 프린터 밑면에 배터리를 삽입하고
배터리 훅(hook)을 결합하십시오.
2. 딸깍하는 소리가 날 때까지
프린터에 배터리를 밀어
넣으십시오.
전원 커넥터
설치 안내서
배터리
용지 이송 버튼 오류 LED 배터리 LED
전원 버튼
• 전원 버튼
이 버튼은 프린터 전원을 켜거나 끌 때 사용됩니다.
• 용지 이송 버튼
이 버튼은 용지를 인위적으로 이송 시키거나 셀프 테스트 와 16 진수를 출력할 때
사용됩니다.
• 오류 LED
빨간색 LED 가 켜지면 용지 커버가 열린 상태입니다.
빨간색 LED 가 깜박이면 용지가 없거나 헤드가 가열된 상태입니다.
빨간색 LED 가 계속 깜박이면 제품에 이상이 발생한 경우일 수 있으므로 서비스
대리점에 문의하십시오.
• 배터리 LED
파란색 LED 가 3개 켜지면 배터리가 완전 충전 상태입니다.
파란색 LED 가 2 개 켜지면 배터리의 50%가 충전 상태입니다.
파란색 LED 가 1 개 켜지면 배터리는 최저 충전 상태입니다.
빨간색 LED 가 켜지면 배터리 충전 또는 교체가 필요한 상태입니다.
• 상태 LED (블루투스 또는 무선랜)
1) 블루투스 사용시
녹색 LED 가 배터리 상태 LED 와 켜지면 프린터는 블루투스 무선통신이 가능한
상태입니다.
2) 무선랜 사용시
무선랜의 신호세기를 나타냅니다. 신호세기가 양호하면 녹색 LED 가 켜지고,
신호세기가 약하면 녹색 LED 가 깜빡입니다.
※참고
파워 세이브 모드는 상태 LED 만 켜집니다.
상태 LED
Page 12

N
◈ 셀프 테스트
프린터를 처음 설정할 때 또는 문제가 발생한 경우 셀프 테스트를 실행하여 다음
상태를 확인할 수 있습니다.
• 제어 회로, 메커니즘, 인쇄 품질, ROM 버전 및 메모리스위치 설정
셀프 테스트에서 프린터에 대한 어떠한 문제점도 발견하지 못하면 다른 장치 또는
소프트웨어를 검사하십시오. 이 기능은 다른 장치 및 소프트웨어와 독립적으로 동작
합니다.
• 셀프 테스트 방법
1) 프린터의 전원을 끄고 프린터 용지 커버를 닫으십시오.
2) 용지 이송 버튼과 전원 버튼을 동시에 누르면 프린터가 켜집니다.
3) 인쇄가 시작되면 두 버튼을 놓으십시오.
4) ASCII 패턴을 추가로 인쇄하려면 용지 이송 버튼을 한번 더 누르십시오.
5) ASCII 패턴이 인쇄되면 셀프 테스트가 자동으로 종료됩니다.
◈ 제품 사양서
항목 설명
인쇄 방식 열전사 방식
인쇄 속도
해상도
용지 공급 방식 용이한 용지 교체(Easy paper loading)
문자 크기 폰트 A: 12 × 24 폰트 B: 9 × 17 폰트 C: 9 × 24
라인당 문자 수 폰트 A: 32 폰트 B/C: 42
문자 집합
인쇄
바코드
에뮬레이션
드라이버
SDK
센서 용지 종료, 용지 커버 열림 스위치
커터 유형 절단 바(Tear-Bar)
언어 고객 언어 지원
용지 형태 영수증 라이너리스
용지 종류 감열지 감열지
용지 외경
용지
폭
두께
◈ 라벨 인쇄 기능
1. 라벨 기능 설정
라벨 모드에서는 라벨 용지와 블랙 마크 용지를 사용할 수 있습니다.
• 조작에 의한 설정
1) 프린터 전원을 켜십시오.
2) 용지 커버를 열고 용지 이송 버튼을 2 초 이상 누르십시오.
3) 버저음이 들리면 용지를 삽입하고 커버를 닫으십시오.
4) 영수증 모드로 돌아가려면 위 절차를 반복하십시오.
• 메모리 스위치에 의한 설정
1) 명령 매뉴얼의 메모리스위치 변경 부분을 참조하십시오.
2. Auto calibratio n 기능
라벨 인쇄 기능은 라벨 용지 갭과 블랙 마크 용지의 검정색 바를 인식할 수 있어야
합니다.
라벨 용지 갭을 정상적으로 인식하지 못할 경우 Auto calibration 기능을
사용하십시오.
• Auto calibration 방법
1) 라벨 인쇄 모드에서 프린터 전원을 끄십시오.
2) 용지 이송 버튼을 누른 상태에서 전원 버튼을 누르십시오.
3) 다음 인쇄물이 출력되면 전원 버튼을 눌러 Auto calibration 을 실행합니다.
4) Auto calibration 을 실행하면 프린터는 라벨 용지 3 장을 출력합니다.
◈ 외부 장치 연결
100 mm/sec (영수증 용지)
80 mm/sec (라이너리스 용지)
203 DPI
영문 숫자: 95
확장 그래픽: 128 × 33 페이지
국제문자: 32
1 차원: UPC A, UPC E, CODE 39, CODE 93, Code 128,
EAN 8, EAN 13, ITF, Codabar
2 차원: PDF417, DATAMATRIX, MAXI, QR 코드,
GS1 DataBar, Aztec
BXL/POS
Windows XP(32/64 비트) / WEPOS / 2003
Server(32/64 비트) / VISTA(32/64 비트) / 2008
Server(32/64 비트) / 7(32/64 비트) / 8(32/64 비트)
Windows XP / WEPOS / 2003 Server / VISTA /
2008 Server / 7 / 8 / CE 3.0 이상
Max. ø40 mm (1.57”) Max. ø39 mm (1.54”)
57.5 ± 0.5 mm
(2.26” ± 0.2”)
0.07 ± 0.003 mm 0.08 ± 0.008mm
Select the mode
Autocalibration: Power button
Self test: Feed button
1. 블루투스 및 무선랜 연결
1) 프린터는 블루투스 통신이 가능한 단말기
(PDA, PC 등)과 연결할 수 있습니다.
2) 단말기에서 지원하는 블루투스 연결
기능을 사용하여 프린터에 연결합니다.
프린터에 내장된 NFC tag 를 이용하여
단말기와 프린터간 자동 페어링이
가능합니다.
57.5 ± 0.5 mm
(2.26” ± 0.2”)
※ 참고
단말기에서 NFC Auto pairing 기능을
지원해야 합니다.
FC Auto pairing 기능은 B/T pairing
단계까지만 지원하고 기기간 통신을 위한
연결은 추가로 진행해야 하기 때문에 단말기
별로 연결할 수 없다는 알림 문구가 발생
하기도 하지만 이는 정상적인 동작입니다.
3) 프린터는 Ad-hoc 모드를 통해 무선랜
통신이 가능한 단말기(PDA, PC 등)와
연결이 가능하며, Infrastructure 모드를
※ 참고
더 상세한 연결 방법에 대해서는 블루투스&무선랜 매뉴얼을
셀프 테스트 페이지를 통해 블루투스 환경(인증, 암호화, 연결 모드) 및 무선 LAN
환경(IP, SSID, 인증, 암호화)를 확인할 수 있습니다.
◈ 프린터 청소
프린터 내부에 먼지 등이 끼었을 경우에는 인쇄 품질이 저하될 수 있습니다.
이 경우에는 아래와 같은 방법으로 프린터를 청소하십시오.
1) 용지 커버를 열고 용지가 끼워져 있다면 이를 제거하십시오. 프린터 헤드를
깨끗이 하기 위해 클리닝 펜을 중앙에서 바깥방향으로 프린터 헤드에 사용합니다.
2) 클리닝 펜으로 프린터의 헤드부분을 닦으십시오.
3) 클리닝 펜으로 용지 감지 센서의 지분 (용지 가루)을 제거하십시오.
4) 헤드를 청소한 후 클리닝 펜 청소액이 완전히 증발 및 건조(1~2 분)되기 전까지
프린터를 사용하지 마십시오.
5) 프린터에 용지를 넣고 프린터 커버를 닫으십시오.
• 주의
1) 청소하기 전에 프린터 전원을 반드시 꺼주십시오.
2) 프린터가 동작하는 동안 헤드부분은 매우 뜨거워져 있으므로, 헤드 청소 작업을
하려면 전원을 끄고 약 2~3 분 후에 작업을 진행하십시오.
3) 헤드 청소 시 손으로 헤드의 가열부를 만지지 않도록 주의하십시오.
→ 헤드가 정전기 등에 의해 손상을 입을 수 있습니다.
4) 헤드에 흠집 등이 발생되지
5) 라이너리스 용지 사용 시 주기적으로 헤드를 청소하십시오. 청소 주기는
라이너리스 용지 10 롤(100 미터) 사용 후 또는 일주일에 1 회 이상입니다.
주기적으로 청소를 하지 않을 경우 인쇄품질 불량 및 프린터 수명이 급격히
단축될 수 있습니다.
• 경고
1) 라이너리스 용지는 ㈜빅솔론에서 제공하는 용지만을 사용하십시오.
다른 용지를 사용한 경우 A/S 를 받을 수 없습니다.
2) 청소도구는 반드시 ㈜빅솔론에서 제공하는 클리닝 펜 (PCP-R200II)을
사용하십시오.
◈ 인증
☎ BIXOLON Co., Ltd.
● 웹사이트 http://www.bixolon.com
● 한국 본사
(주소) 경기도 성남시 분당구 판교역로 241 번길 20 (삼평동) 7~8 층 13494
(전화) +82-31-218-5500
● 미주 지사
(주소) BIXOLON America Inc., 3171 Fujita St, Torrance, CA 90505
(전화) +1-858 764 4580
● 유럽 지사
(주소) BIXOLON Europe GmbH, Tiefenbroicher Weg 35 40472 Düsseldorf
(전화) +49 (0)211 68 78 54 0
제품 또는 함께 제공된 인쇄물에 표시되어 있는 이 마크는 이 제품의 사용 수명 종료
시 이 제품을 다른 가정 폐기물과 함께 폐기하지 말아야 함을 나타냅니다. 무단
폐기물 처리로 인해 발생 할 수 있는 환경 또는 인체에 대한 위해를 방지하려면 이
마크가 있는 제품을 다른 유형의 폐기물과 분리하고 재활용하여 물적 자원의 지속적
재사용을 촉진해야 합니다
방법과 장소에 대한 세부사항은 이 제품을 판매한 소매업자 또는 해당 지역
공공기관에 문의해야 합니다. 기업 사용자는 공급자에게 문의하고 구매 계약서의
계약 조건을 확인해야 합니다. 이 제품은 폐기를 목적으로 다른 상업 폐기물과
혼합할 수 없습니다.
다음 블루투스 마크 및 ID D022644 는 블루투스 SIG 인증이 있는
모델에만 적용할 수 있습니다.
통해 AP 와 연결이 가능합니다.
참조하십시오.
2. 인터페이스 케이블 연결
1) 인터페이스 캡을 여십시오.
2) 인터페이스 케이블(별매품)을 프린터의
케이블 커넥터에 연결하십시오.
않도록 주의하십시오.
. 이러한 제품을 환경적으로 안전하게 재활용할 수 있는
Page 13

◈ 指南
本安装手册仅收录有安装产品所需的简单信息。详情请参考随附光盘内的使用
说明书。光盘内含如下内容。
1. 手册:用户、Windows CE 模块程序、代码表、控制命令、
蓝色牙&无线网
2. 驱动器:Windows 驱动器
3. 实用程序: VMSM(Virtual Memory Switch M anager)、NV Image Download
Manager、Firmware Download Manager
(株)BIXOLON 不断改善产品的功能和质量。因此,产品的参数和手册内容可能
在不提前通告的情况下变动。
◈ 电池安全注意事项
1. 购买产品首次使用时如发现有异味或过热等异常状态,请立即咨询购买经销店。
2. 请只使用(株)BIXOLON 指定的(选项提供)专用充电器充电。误用充电器可能导致
电池过热、燃烧或爆炸。
3. 请勿在车辆内部等高温或暴露于强烈直射光线处使用或保管电池。此时可能发生电
池过热或燃烧。还能减少电池的性能及寿命。
4. 请避免水、海水或水分进入或漏入电池。电池内部的驱动电路及保护装置被氧化将
引发电池异常电流或电压异常的过度充电,进而导致电池被过度加热或者电池着火
或爆炸。
5. 请勿投掷电池或者施加以强力冲击。电池内部保护装置损坏将导致电池过度加热,
进而在电池内部产生有害化学反应。还可能导致电池过热、燃烧或爆炸。
6. 电池受损或随外部冲击变形或鼓起时请勿继续使用。
◈ 确认内容物
打印机安装指南书
电池充电
安装皮带吊环带
安装皮带固定夹
◈ 操作部分使用方法
移动发票打印机 SPP-R200III
※ 参考
未使用(株)BIXOLON 提供的电池充电器可能导致打印机严重损
坏。(株)BIXOLON 对于相应损坏不承担任何法律责任。
(打印机和电池充电器的电压及电流参数必须相符)。
1. 请关闭打印机电源。
2. 请将电源线连接至电池充电器,
然后接入 AC 电源。
3. 请沿箭头符号方向打开外部接口
盖。
4. 请将电池充电器连接至电源接
口。
1. 请在皮带吊环带固定孔内插入皮
带吊环带的螺栓。
2. 请如图所示用硬币等上紧皮带吊
环带的螺栓。
1. 请在皮带固定夹固定孔内插入皮
带固定夹的螺栓。
2. 请如图所示用硬币等上紧皮带固
定夹的螺栓。
(请注意能组装的方向。)
电池
皮带扣夹
开启按钮
SPP-R200III
◈ 产品主要部位名称
电源按钮
◈ 安装和充电
安装电池
电源线
纸卷盖
送纸键
※参考
购买当时电池未完全充电,使用产品前请给电池充电。
(电池充电器)
安装纸卷
电池充电器
光盘
皮带吊环带/皮带固定夹固定孔
接口盖
电缆接头
电源连接器
1. 将电池插入打印机背面,
与电池夹(hook)连接。
2. 将电池推入插槽,
直到听见啪哒声。
1. 按下开启按钮打开纸卷盖。
请如图所示放入纸卷。
(如有纸管请予以清除。)
2. 请注意纸张方向。
3. 将纸张略微拉出一些后
关闭纸卷盖。
4. 请沿打印机前面方向握住多
余的纸,拉动撕下。
纸卷
安装指南书
电池
电源按钮
• 电源按钮
用于开启或关闭打印机电源。
• 送纸按钮
送纸按钮用于人为送纸、自检或者 16 进制打印。
• 错误 LED
红色 LED 亮起指纸卷盖打开的状态。
红色 LED 闪烁指缺纸或打印头加热的状态。
红色 LED 持续闪烁可能是产品异常,请咨询售服代理店。
• 电池 LED
3 个 蓝色 LED 亮起指电池完全充电状态。
2 个蓝色 LED 亮起指电池充电 50%的状态。
1 个蓝色 LED 亮起指电池最低充电状态。
红色 LED 亮起指电池需要充电或更换的状态。
• 状态 LED( 蓝牙或无线 LAN)
1) 使用蓝牙时
绿色 LE D与电池状态 LED 亮起指打印机可以蓝牙无线通讯的状态。
2) 使用无线 LAN 时
显示无线 LAN 的信号强度。信号强时绿色 LED 亮起,信号弱时绿色 LED 闪烁。
※参考
节电模式下仅状态 LE D亮起。
◈ 自检
初次设置打印机或遇到问题时可以运行自检,检查以下项目。
• 控制电路、机制、打印质量、只读存储器版本和设置存储器开关。
运行自检后未发现打印机存在问题时请检查其它设备或外围设备和软件。
此项功能与其它装置和软件无关。
• 自检方法
1) 关闭打印机电源,然后关上打印机纸卷盖。
2) 同时按下送纸按钮和电源按钮,开启打印机。
3) 开始打印后请松开两个按钮。
4) 如需添加 ASCII 模式的打印输出,请再次按下送纸按钮。
5) 在打印输出 ASCII 模式后自动结束自检。
送纸按钮 错误 LED 电池 LED
状态 LED
Page 14

N
◈ 产品规格
项目 说明
打印方法 热敏方式
打印速度
分辨率 203 DPI
供纸方式 简便更换纸张(Easy paper loading)
字符大小 字体 A:1 2 × 24 字体 B:9 × 17 字体 C:9 × 24
各行字符数 字体 A: 32 字体 B/C: 42
字符集
打印
代码
模拟程序
驱动器
SDK
传感器 纸张结束、纸盖开启开关
切割器类型 切割条(Tear-Bar)
语种 支持顾客语种
纸张类型 发票 无背衬纸
纸张种类 热敏纸 热敏纸
纸张外径
纸张
宽幅
厚度 0.07 ± 0.003 mm 0.08 ± 0.008mm
◈ 标签打印功能
1. 设定标签功能
标签模式下可以使用标签纸和黑标纸。
• 操作设定
1) 请开启打印机电源。
2) 请打开纸卷盖,然后按住送纸按钮 2 秒以上。
3) 听见蜂鸣音时请插纸,然后关闭纸卷盖。
4) 如需返回发票模式,请反复上述程序。
• 存储器开关设定
1) 请参考手册的存储器开关变更部分。
2. Auto calibration 功能
标签打印功能应可以识别标签纸张间隙和黑标纸张的黑条。
无法正常识别标签纸张间隙时,请使用 Auto calibration 功能。
• Auto calibration 方法
1) 请在标签打印模式下关闭打印机电源。
2) 请在按下送纸按钮的状态按电源按钮。
3) 输出下一打印物时按电源按钮执行 Auto calibration。
4) 执行 Auto calibration 后打印机输出 3 张标签纸。
◈ 连接外部装置
100 mm/sec (发票用纸)
80 mm/sec (无背衬纸)
英文、数字: 95
扩展图像: 128 × 33 页
国际字符: 32
1 元: UPC A、UPC E、CODE 39、CODE 93、
Code 128、EAN 8、EAN 13、ITF、Codabar
2 元: PDF417、DATAMATRIX、MAXI、QR 代码、
GS1 DataBar、Aztec
BXL/POS
Windows XP(32/64 比特)/WEPOS/
2003 Server(32/64 比特)/VISTA(32/64比特 )/2008
Server(32/64 比特)/7(32/64比特)/8(32/64 比特)
Windows XP/WEPOS/2 003 Server/
VISTA/2008 Server/7/8/CE 3.0 以上
Max. ø40 mm (1.57”) Max. ø39 mm (1.54”)
57.5 ± 0.5 mm
(2.26” ± 0.2”)
Select the mode
Autocalibration: Power button
Self test: Feed button
1. 连接蓝牙及无线 LAN
1) 打印机可与拥有蓝牙通信功能的终端
(PDA、PC 等)连接。
2) 选择终端支持的蓝牙连接功能,
将其连接至打印机。
使用打印机内置的 NFC tag,
终端与打印机之间可以自动 Pairing。
※ 参考
终端应支持 NFC Auto pairing 功能。
FC Auto pairing 功能只支持至 B/T pairing
步驟,用於設備間通信的連接需追加進
行,因此可能出現無法按終端連接的字
句,實際上正常運行。
3) 打印机可以通过 Ad-hoc 模式与拥有无
线 LA N 通信功能的终端(PDA、PC 等)
连接;可以通过 Infrastructure 模式与
AP 连接。
57.5 ± 0.5 mm
(2.26” ± 0.2”)
※ 参考
更加详细的连接方法请参考蓝牙&无线 LA N 手册。
通过自检页面可以确认蓝牙环境(认证、加密、连接模式)和无线 LA N环境
(IP、SSID、认证、加密)。
◈ 打印机清洁
如果打印经的内部积灰,打印质量可能会降低。
在这种情况下,按照以下说明清洁打印机。
1) 打开纸盖,如有夹纸请予清除。请用清洁笔从中央至四周清洁打印头,
保持打印头清洁。
2) 请用清洁笔擦拭打印机头部分。
3) 请用清洁笔清除纸张感测传感器的纸粉(纸张粉)。
4) 清洁打印头后,请勿在清洁笔完全蒸发及干燥(1~2 分)前使用打印机。
5) 请将纸装入打印机后关闭打印机盖罩。
• 注意
1) 清洁前请务必关闭打印机电源。
2) 打印机运行时打印头极烫,请在关闭电源 2~3 分钟后清洁打印头。
3) 清洁打印头时请勿用手触摸打印头的加热部分。
→ 打印头受静电等影响可能损坏。
4) 请注意避免打印头产生伤痕。
5) 使用无离型纸(linerless)打印时应定期清洁打印头。清洁周期为每使用 10 卷
(100 米)无离型纸或者每周至少清洁一次。不定期清洁可能造成打印质量不
良及打印机寿命严重缩短。
• 警告
1) (株)BIXOLON 提供的无离型纸,使用其他纸张时不予提供售后服务。
2) 清扫工具请务必使用(株)BIXOLON提供的清洁笔(P CP-R200II)。
◈ 认证
☎ BIXOLON Co., Ltd.
● Website http://www.bixolon.com
● Korea Headquarters
(Add) 7~8F, (Sampyeong-dong), 20, Pangyoyeok-ro241beon-gil,
(Tel.) +82-31-218-5500
● U.S. Office
(Add) BIXOLON America Inc., 3171 Fujita St, Torrance, CA 90505
(Tel.) +1-858 764 4580
● Europe Office
(Add) BIXOLON Europe GmbH, Tiefenbroicher Weg 35 40472 Düsseldorf
(Tel.) +49 (0)211 68 78 54 0
本产品上所示的该标记及文字表明:相应物品在使用完后不应与其它家
庭垃圾一起丢弃。如果不对废物处理进行控制可能会对环境或人类健康
造成伤害,为了防止这种现象发生,请将带有标记的物品与其它种类的
废物分开,认真负责地将其回收,从而促进物质资源的持续再利用。关
于在何地以及如何才能以环保方式回收这些物品的详细步骤,家庭用户
应当联系出售该产品的零售商或者当地政府。商业用户应当联系供应
商,并核对采购合同中的条款和条件。本产品不应与其它商业垃圾一起
处理。
如下蓝牙标志及 ID D022644
Bundang-gu, Seongnam-si, Gyeonggi-do, 13494, Korea (R OK)
2. 连接接口电缆
1) 请打开接口盖。
2) 请将接口电缆(另售品)
与打印机的电缆接口连接。
仅适用于拥有蓝牙 SIG 认证的型号。
Page 15

у
Р
ководство по установке принтера
◈ Общие сведения
В данном руководстве содержатся сведения по установке продукта.
См. порядок установки в руководстве пользователя на компакт-диске, входящем
в комплект поставки. На компакт-диске содержится следующая информация:
1. Руководства: пользователя, по программированию модулей под Windows CE,
по использованию кодовых страниц, по использованию команд, по
подключению устройства по протоколу Bluetooth и протоколам
беспроводной связи.
2. Драйвера: драйвера для ОС Windows.
3. Утилиты: VMSM (Virtual Memory Switch Manager — диспетчер
переключения параметров виртуальной памяти), NV Image Download
Manager — диспетчер загрузок графических изображений, Firmware
Download Manager ― диспетчер загрузки прошивки
Компания «BIXOLON» постоянно совершенствует качество своей продукци и и
расширяет спектр его функциональности. Компания оставляет за собой право
вносить впоследствии изменения в характеристики и/или руководства
пользователя без предварительного о том уведомлени я.
◈ Правила техники безопасности при обращении с аккумулятором
1. При обнаружении настораживающих признаков, в частности, нехарактерного запаха
или перегрева, при первом посл е покупки испо льзовании продукта, необходимо
немедленно обратиться к местному дилеру.
2. Для подзарядки акк умулятора допускается использовать исключительно
специальное зарядное устройство (поставляемое дополнит ельно) марки BIXOLON.
Использовани е нештатного зарядного устройства способно привести к перегреву,
возгоранию и/или взрыву аккумулятора.
3. Не допускается
действию повыш енных температур или ин тенсивному действию пр ямых солнечных
лучей, например, в автомоб иле. Несоблюдение данного условия способно привести
к перегреву и/или взрыву аккумулятора. Это также способно сказаться на
показателях производительности и сроке службы аккумулятора.
4. Не допускать попадания пресной или морской воды, влаги и
батарейного отсека. В случае окисления предохранительного механизма внутри
аккумулятора любая попытка подзар ядить его способна прив ести к превышению
предельно до пустимой силы тока и/или напряжения, которые могут вызвать
перегрев, возгора ние и/или взрыв аккумулятора.
5. Не допускается бросать аккумулятор и подверга ть его механическому воздействию.
Повреждение предохранителя способно привест и к превышению
допустимой силы тока и/или напряжения аккумуля тора и, как следствие, вызвать
ненормальную химическую реакцию.
При этом существует риск его перегрева, возгорания и/или взрыва.
6. Запрещается использовать поврежденн ые аккумуляторы или аккумуляторы с
признаками деформации корпуса, вздутые аккумуляторы.
◈ Комплектност ь поставки
использовать или оставлять аккумулятор в месте, подверженном
жидкостей внутрь
предельно
Мобильный принтер чеков SPP-R200III
Установка
бумажного
аккумулятор
◈ Панель управления
рулона
Зарядка
ов
※ Примечание
Подзаряжать аккумулятор допускается только с использованием
оригинального зарядного адаптера компанией «BIXOLON».
Несоблюдение данного требования может привести к серьезным
повреждениям. Компания «BIXOLON» снимает с себя всякую
ответственность за такие повреждения. (Убедит есь, что
характеристики, указанные на аккумуляторе и принтере
совпадают.)
Монтаж
поясной
скобы
Монтаж
поясной
клипсы
1. Откройте крышку отсека бумажного
рулона, нажав на кнопку открытия.
2. Заправьт е бумагу, как показано на
рисунке (предварительно
извлеките оставшуюся гильзу от
закончившегося рулона).
3. Проследите, чтобы порядок и
направление бумаги совпали с
инструкциями.
4. Извлеките небольшой «язычок»
бумаги и закройте крышку.
5. Оторвите излишек бумаги по
направлению к боку принтера.
1. Выключите принтер.
2. Подсоедините сетевой шнур к , а
затем подсоедините сетевую вилку.
3. Извлеките заглушку внешнего
интерфейсного разъема в
направлении стрелки.
4. Вставьте вилку адаптера в розетку.
1. Вставьте винт для фиксации
поясной скобы в отверстие в скобе.
2. При помощи монеты затяните винт
для фиксации поясной скобы, как
показано на рисунке.
1. Вставьте винт поясной клипсы в
отверстие для крепления поясной
клипсы.
2. Зафиксир уйте поясную клипсу при
помощи предмета, например,
монеты, как показано на рисунке
(соблюдайте направление).
SPP-R200III Элемент питания Зарядный адаптер Бумажный рулон
Сетевой шнур поясная липса Компакт-диск
◈ Общий вид устройства
◈ Монтаж и зарядка
Монтаж
элемента
питания
Крышка отсека бумаги
Кнопка Сеть (Power)
Кнопка открытия
Кнопка Протяжка
бумаги (Paper Feed)
※ Примечание
Аккумулятор при поставке с завода изгото вителя не заряжен. Прежде
чем приступать к эксплуатации, зарядите аккумулятор. (Используйте
зарядный адаптер)
Отверстие для поясной скобы
или поясной клипсы
крышку
разъема
Разъем
для кабеля
Сетевой разъем
1. Вставьте аккумулятор в отсек в задней
части принтера. Проследите, чтобы
защелка попала точно
предназначенное место.
2. Надавите на аккумулятор так, чтобы
он вошел в отсек, и щелкнула
защелка.
Руководство по
установке
Аккумулятор
КНОПКА
«СЕТЬ»
• КНОПКА «СЕТЬ» (POWER)
Данная кнопка позволяет включать и выключать принтер.
• КНОПКА «ПОДАЧА» (FEED)
Данная кнопка используется для ручной протяжки бумаги, автотестирования и вывода
данных в шестнадцатеричном представлении.
• СВЕТОДИОД «ОШИБКА»
Если горит красный диод, крышк а отсека бу
маги не закрыта.
Если красный диод мигает, то это означает либо конец бумаги, либо перегрев
печатающей головки.
Если красный диод продолжает мигать, это может означать более серьезный сбой в
работе принтера. Обратитесь в авторизованный сервисный центр.
• СВЕТОДИОД АККУМУЛЯТОРА
Если горят три синих диода, аккумулятор заряжен полность ю.
Если горят два синих диода, аккумулятор наполовину разряжен.
Если горит один синий диод, аккумулятор разряжен почти полностью.
Если горит красный диод, аккумулятор нуждается в подзарядке или замене.
• СВЕТОДИОД СТАТУСА (Bluetooth или Wireless LAN)
1) Работа по протоколу Bluetooth
Если принтер гото в к обмену данными по протоколу беспроводной связи Bluetooth с
каким-либо из устройство с таким же интерфейсом, загорится зеленый светодиод на
принтере и диод статуса аккумулятора.
2) Работа по протоколу WLAN
На правом индикато ре отображается мощность сигнала беспроводной сети WLAN.
Если зеленый светодиод горит
приемлемой, если же зеленый светодиод мигает, мощность сигнала считается
недостаточ ной.
※ Примечание
В режиме энергосберегающем режиме горит только светодиод статуса.
КНОПКА
«ПОДАЧА»
СВЕТОДИОД
«ОШИБКА»
немигающим светом, мощность сигнала считается
СВЕТОДИОД
АККУМУЛЯТОРА
СВЕТОДИОД
СТАТУСА
Page 16

у
Ч
к
◈ Автотестирование
Автотестирование производится при начальной загрузке настроек в принтер и при появлении
сбоев. При этом происходит пр оверка:
• целостности управляющей цепи, механизмов, качества печати, версии ПЗУ и настроек
переключателей с памятью.
Если автотестирование не выявило сбоев в работе принтера, протестируйте периферийные и
другие устрой ства и ПО. Функция автотестирования автономна и не сп особна выявить
конфликты в другом аппаратном или программном обеспечении.
• Порядок осуществления автотестирования
1) Выключите принтер и закройте крышку бумажного отсека.
2) Одновременным нажатием на кнопки протяжки бумаги и питания включите принтер.
3) После того как начнется печать, отпустит е две кнопки.
4) Для вывода на печать также таблицы ASCII нажмите кнопку протяжки еще раз.
5) После того как текущая таблица кодировки ASCII будет распечатана, автотестирование
закончится.
◈ Технические характеристики
Настройка Описание
Метод печати Термопечать
Скорость печати
Разрешение 203 DPI
Режим подачи бумаги Простая загрузка бумаги
Размер шрифта Шрифт A: 12 × 24 Шрифт B: 9 × 17 Шрифт C: 9 × 24
Символов в строке Шрифт A: 32 Шрифт В/С: 42
Комплект шрифта
Печать
Штрихкод
Эмуляция BXL/POS
Драйвер
Инструментальные
средства разработки ПО
Датчик
Обрезчик бумаги Планка для отрыва
Язык Поддерживается язык по выбору пользователя
Вид бумаги
Тип бумаги Термобумага Т ермобумага
Наружный диаметр
Бумага
бумажного рулона
Ширина 57.5 ± 0.5 мм (2.26” ± 0.2”) 57.5 ± 0.5 мм (2.26” ± 0.2”)
※ Примечание
1) Данный прибор предназначен для эксплуатации в помещениях.
2) Реле служит для отключения электроприбора. Реле следует отключать во избежание
рисков.
◈ Функция печати этикеток
1. Настройка функции печати этикеток
Запечатывание этикеточной бумаги и бумаги с приводными метками доступно в
режиме печати этикеток.
• Последовательность операций при настройке
1) Включите принтер.
2) Откройте крышку отсека, где расположен бумажный рулон. Нажмите и удержите
3) После того, как прозвуч ит характер ный сигнал, вставьте рулон бумаги и закройте
4) Чтобы вернуться в режим печати чеков, повторите вышеописанные действия.
• Настройка путем переключения переключателя памяти
1) См. сведения об установке пере ключателя памяти в руководстве по
2. Функция автокалибровки
Функция печати этикеток срабатывает в том случае, если принтер распознает
характерные пропуски между фрагментами бумаги и приводные метки черного
цвета на кромках.
Если пропуски не распознаются, рекомендуется примен ить функцию
автокалибровки.
• Руководство по автокалибровке
1) Выключите принтер. Учтите, до этого принтер должен был находиться в режиме
2) Нажмите и удержите кнопку протяжки бумаги, а затем нажмите кнопку питания.
3) После того, как будет выполнена нижеприведенная распечатка, нажмите кнопку
4)
◈ Подключение периферийных устройств
Толщина 0.07 ± 0.003 мм 0.08 ± 0. 008 мм
кнопку протяжки бумаги FEED не менее 2 секунд.
крышку.
использованию команд.
печати этикеток.
сети и выполните автокалибровку.
Автотестирование: Кнопка «Feed» (Протяжка)
В ходе процесса автокалибровки принтер отпечатывает три тестовые этикетки.
100 мм/сек (чековая лента)
80 мм/сек (бумага без подложки)
Английский: 95
Расширенная граф ика: 128 × 33 стр
Международная символика: 32
1 плоскость: UPC A, UPC E, CODE 39, CODE 93, Code
128, EAN 8, EAN 13, ITF, Codabar
2 плоскости: PDF417, DATAMATRIX, MAXI,
QR Code, GS1 DataBar, Aztec
Windows XP(32/64 бита)/WEPOS/
2003 Server (32/64 бита)/VISTA(32/64 бита)/
2008 Server(32/64 бита)/7(32/64 бита)/8(32/64 бита)
Windows XP / WEPOS / 2003 Server /
VISTA / 2008 Server / 7 / 8 / CE 3.0 и последующие
Датчика конца бумаги, датчик открытой крышки
отсека б
маги
ек Без подложки
Макс. Ø40 мм (1.57") Макс. Ø39 мм (1.54 ")
Выберите режим.
Автокалибровка: Кнопка «Сеть» (Power)
1. Подключение устройства по протоколу
Bluetooth и протокол у беспроводной связи
1) Принтер допускает подключение к
устройства м, оборудова нным Bluetoothадаптерами (например, КПК, ПК и пр.).
2) Для подключения по протоколу Bluetooth
воспользуйт есь функцией подключения,
поддерживаемой с устройства. Метка
стандарта ближней радиосвязи NFC,
встроенная в принтер, позволяет
осуществлять автоматическое сопряжение
устройств.
※ Примечание
Устройство должно поддерживать стандарт
целях автоматического сопряжения устройств.
На экране может отобразиться сообщение, что
устройств о не может быть подключено в рамках
автоматического сопряжения NFC, так как
поддерживается на уровне сопряжения в рамках
стандарта Bluetooth, и устройства требуют
подключения вручную, что является, тем не
менее, нормой.
3) Принтер допускается подключать к другим
устройствам , таким как КПК и
поддерживающим беспроводную связь
(WLAN) и режим Ad Hoc, а также AP режим
※ Примечание
Подробно о подключении см в руководстве по подключению по протоколу Bluetooth и
Wireless LAN. Параметры окружения Bluetooth (аутентификация, шифрование, режим
соединения) и окружения для wireless LAN (IP, SSID, аутентификация, шифрование) можно
посмотреть, если вывести на печать страницу автотестирования.
◈ Чистка принтера
Накопление пыли внутри принтера может послужить причиной ухудшения качества печати.В
таком случае рекомендуется чистка принтера согласно инструкций, приведенных ниже.
1) Откройте крышку от сека бумажного рулона и извлеките бумагу. При помощи
приспособления для чистки очистите печатную головку в направлении от
центра головки к ее краям.
2) При помощи приспособления для чистки очистите печатную головку.
3) Удалите бумажную пыль с датчика наличия бумаги при помощи приспособления
для чистки.
4) Не рекомендуется пользоваться принтером
очистки печатной головки с использованием средства для чистки,
использующимся в приспособлении, пока оно полностью не испарится и не высохнет.
5) Установите бумажный рулон и закройте крышку бумажного отсека.
• ОСТОРОЖНО!
1) Прежде чем приступать к очистке печатной головки, убедитес ь, что принтер
обесточен.
2) Прежде чем приступать к очистке печатной головки рекомендуется подождать
две-три минуты после выключения принтера, т.к. во время эксплуатации головка
сильно нагревается.
3) Не касайтесь руками нагреваемого участка печатной головки во время очистки
последней.
→ Печатная
головка может быть повреждена в результате воздействия
статического электричества.
4) Чрезвычайно важно не оцарапать головку.
5) Рекомендуется периодически очищать печатную головку, если используется
бумага без подложки. Рекомендуемая периодичность очистки — каждые 10
рулонов бумаги без подложки (100 метров) или не реже чем раз в неделю.
Недостаточно регулярная очистка печатной головки спос обна привести
ухудшению качества печати или сокращению срока эксплуатации принтера.
• ВНИМАНИЕ!
1) Настоятельно рекомендуется использовать специальную бумагу без подложки
для «BIXOL ON». В случае использования других видов бумаги гарантия на
продукцию аннулируется.
2) Для чистки настоятельно рекомендуется использовать приспособление для
чистки (PCP-R200II), предоставляемое «BIXOLON».
◈ Сертификация
☎ BIXOLON Co., Ltd.
● Website http://www.bixolon.com
● Korea Headquarters
(Add) 7~8F, (Sampyeong-dong), 20, Pangyoyeok-ro241beon-gil,
(Tel.) +82-31-218-5500
● U.S. Office
(Add) BIXOLON America Inc., 3171 Fujita St, Torrance, CA 90505
(Tel.) +1-858 764 4580
● Europe Office
(Add) BIXOLON Europe GmbH, Tiefenbroicher Weg 35 40472 Düsseldorf
(Tel.) +49 (0)211 68 78 54 0
При наличии данного символа на устройстве или литературе к нему означ ает, что
данное устройс тво след ует утилизировать отдельно от бытовых отходов по
истечении его срока службы. С целью ненанесения вреда окружающей среде и
здоровью человека ввиду беск онтрольной утилизации, разделяйте отходы с целью
должной их вторичной переработки. Физическим лицам, использующим устройство
для собственных
устройство, либо в соответствующее учреж дение с целью получения све дений о
безопасной утилизации/переработке. Юридическим лицам следует обра титься
поставщику и свериться с усл овиям и договора купли-продажи. Данное уст ройст во
не следует утилизировать вместе с другими промышленными отходами.
Следующая маркировка Bluetooth и номер ID D022644 применимы только к
моделям, отвеч ающим квалификационным требованиям специальной группы по
вопросам Bluetooth.
Bundang-gu, Seongnam-si, Gyeonggi-do, 13494, Korea (R OK)
инфраструктуры.
2. Подключение интерфейсного кабеля
1) Откройте крышку интерфейсного разъема.
2) Подсоедините интерфейсный кабель
(поставляется отдельно) к разъему принтера.
в течение двух-трех минут после
к
нужд, следует обратиться ли бо в пункт, где было приобретено
NFC в
ПК,
Page 17

◈ 案内
この装着案内書は、製品の装着に必要な簡単な情報のみ記載しています。詳
しい説明は、 添付された CD の使用説明書をご参照ください。CD に含まれて
いる内容は、下記のとおりです。
1. マニュアル:ユーザー、Windows CE モジュールプログラム、
2. ドライバ:Windows ドライバ
3. ユーティリティ:VMSM(Virtual Memory Switch Manager)、NV Image
Download Manager、Firmware Download Manager
(株)BIXOLON は製品の機能と品質向上のために、持続的な改善を しています
。このため、製品の仕様とマニュアルの内容は、事前通告なしに変更する場
合があります。
◈ バッテリーの安全注意事項
1. 製品の購入後、初めて使用する際に悪臭または過熱のような異常症状を発
見した場合、すぐに購入販売店にお問い合わせください。
2. バッテリーを充電する場合、(株)BIXOLONが指定する(オプション提供)専
用充電器を必ず使用して充電してください。それ以外の充電器を使用した
場合、バッテリーの過熱、燃焼および/または爆発するおそれがあります。
3. 車両内部のような高温または強力な直射日光が当たる場所でバッテリーを
使用したり、保管したりしないでください。この場合、バッテリーが過熱
および/または燃焼するおそれがあります。また、バッテリーの性能および
寿命が低下するおそれがあります。
4. バッテリーに水、海水または水分が入ったり、水の中に落としたりしない
ようにしてください。バッテリー内の駆動回路および保護装置が酸化する
と、バッテリーが正常ではない電流および/または電圧により過充電にな
り、バッテリーが過熱したり、バッテリーに水がついたり、爆発したりす
るおそれがあります。
5. バッテリーを投げたり、強い衝撃を与えたりしないようにしてください。
バッテリー内の保護装置が損傷すると、バッテリーが過熱し、それにより
有害な化学反応がバッテリー内で起こるおそれがあります。バッテリーの
過熱、燃焼および/または爆発が起こるおそれがあります。
6. バッテリーが損傷したり、外部の衝撃により外観が変形した場合、または
膨張した場合、使用しないでください。
◈ 構成品の確認
SPP-R200III
電源コード ベルトクリップ
◈ 製品の主要名称
電源ボタン
用紙送りボタン
◈ 装着および充電
バッテリ
ー装着
コードページ、制御コマンド 、Bluetooth & 無線 LAN
バッテリー バッテリー充電器 用紙ロール
用紙カバー
フタ開口ボタン
※参考
バッテリーを購入した時点では完全に充電された状態ではないた
め、製品の使用前にバッテリーを充電してください。
(バッテリー充電器)
CD
ベルトストラップ/ベルトクリップ固定ホール
インターフェ
ースの
キャップ
ケーブルコネクター
電源コネクター
1. プリンターの底面にバッテリーを
挿入し、バッテリーフック(hook)
を結合してください。
2. 「カチッ」という音がするまでプ
リンターにバッテリーを押し付け
てください。
モバイルレシートプリンター SPP-R200III
装着案内書
バッテリー
プリンター装着案内書
用紙の装着
バッテリ
ーの充電
※参考
(株)BIXOLON が提供したバッテリー充電器を使用しない場合、プ
リンターに深刻な損傷が発生するおそれがあります。(株)BIXOLO
N は、そのような損傷に関して、いかなる法的責任も負いませ
ん。(プリンターとバッテリー充電器の電圧および電流の仕様は一
致していなければなりません。)
ベルトストラ
ップの装着
ベルトクリッ
プの装着
◈ 操作部の使用法
電源ボタン
• 電源ボタン
このボタンは、プリンターの電源のオン/オフに使用します。
• 用紙送りボタン
このボタンは、用紙を人為的に移送させたり、セルフテストと 16 進数を出力したり
するときに使用します。
• エラー LED
用紙カバーが開いている場合、赤色 LED が点灯します。
用紙が切れていたり、ヘッドが過熱したりした場合、赤色 LED が点滅します。
赤色 LED が点滅し続ける場合、製品に以上が発生したおそれ があるため、サービス
代理店までお問い合わせください。
• バッテリーLED
バッテリーが完全に充電された場合、青色 LED が 3 個点灯します。
バッテリーが 50%充電された場合、青色 LED が 2 個点灯します。
バッテリーの充電が最低レベルの場合、青色 LED が 1 個点灯します。
バッテリーの充電または交換が必要な場合、赤色 LED が点灯します。
• 状態 LED(Blueto othまたは無線 LAN)
1) Bluetooth 使用時
プリンターが Blueto oth/無線LAN 可能な場合、緑色 LED とバッテリー状態 LED が
点灯します。
2) 無線 LAN 使用時
無線 LAN の信号感度を表します。信号感度が良 好な場合は緑色 LED が点灯し、
信号感度が弱い場合は緑色 LE Dが点滅します。
※参考
パワーセーブモードは状態 LED のみ点灯します。
用紙送りボタン エラー LED バッテリーLED
1. 開閉ボタンを押し、用紙カバーを開
けてください。
2. 図のように用紙を入れてください。
(使い切った用紙の芯がある場合、取
り除いてください。)
3. 用紙の向きに注意してください。
4. 用紙を前に引っ張り、用紙カバーを
閉じてください。
5. はみ出した用紙はプリンターの前面
に引っ張り出して切ってください。
1. プリンターの電源を切ってくださ
い。
2. 電源コードをバッテリー充電器に接
続し、AC 電源に接続してください。
3. 矢印の方向に外部インターフェイス
キャップを開いてください。
4. バッテリー充電器を電源コネクタに
接続してください。
1. ベルトストラップ固定ホールにベル
トストラップのスクリューを挿入し
てください。
2. 図のように、コインなどでベルトス
トラップのスクリューを締めてくだ
さい。
1. ベルトクリップ固定ホールにベルト
クリップのスクリューを挿入してく
ださい。
2. 図のように、コインなどでベルトク
リップのスクリューを締めてくださ
い。(向きに注意して組み立ててくだ
さい。)
状態 LED
Page 18

N
b
m
◈ セルフテスト
プリンターを初めて設定する場合や、問題が発生した場合は、セルフテストを実行
し、次の状態を確認することができます。
• 制御回路、メカニズム、印刷の品質、ROM バージョンおよびメモリースイッチの
設定
セルフテストでプリンターの問題点を何も発見できなかった場合、他のデバイスま
たはソフトウェアを検査してください。この機能は、他のデバイスおよびソフトウ
ェアとは独立的に動作します。
• セルフテストの方法
1) プリンターの電源を消し、プリンターの用紙カバーを閉じてください。
2) 用紙移送ボタンと電源ボタンを同時に押すと、プリンターがオンになります。
3) 印刷が始まったら 2 つのボタンから指を放してください。
4) ASCIIパターンを追加で印刷するには、用紙移送ボタンをもう 1 回押してください。
5) ASCIIパターンが印刷され ると、セルフテストが自動で終了します。
◈ 製品仕様書
◈ ラベル印刷機能
1. ラベル機能設定
• 操作による設定
• メモリースイッチによる設定
2. Auto calibratio n機能
• Auto calibration の方法
◈ 外部デバイスの接続
項目 説明
印刷方式 熱転写方式
印刷速度
解像度
用紙供給方式 容易な用紙交換(Easy paper loading)
文字サイズ
文字数/1 ライン フォント A:32 フォント B/C: 42
文字集合
印刷
バーコード
エミュレーション
ドライバ
SDK
センサー 用紙終了、用紙カバー開放スイッチ
カッタータイプ 切断バー(Tear-Bar)
言語 顧客言語をサポート
用紙の形態 レシート ライナーレス
用紙の種類 感熱紙 感熱紙
用紙ロールの外径
用紙
幅
厚さ
100 mm/sec (レシート用紙)
80 mm/sec (ライナーレス用紙)
203 DPI
フォント A:12 × 24
フォント B:9 × 17
フォント C: 9 × 24
英数文字: 95
拡張グラフィック:128 × 33ページ
国際文字: 32
1 次元:UPC A、UPC E、CODE 39、CODE 93、Code 128、
EAN 8、EAN 13、ITF、Codabar
2 次元:PDF417、DATAMATRIX、MAXI、QR コード、
GS1 DataBar、Aztec
BXL/POS
Windows XP(32/64 ビット) / WEPOS /
2003 Server(32/64 ビット) / VISTA(32/64 ビット) /
2008 Server(32/64 ビット) / 7(32/64 ビット) /
8(32/64ビット)
Windows XP / WEPOS / 2003 Server /
VISTA / 2008 Server / 7 / 8 / CE 3.0 以上
Max. ø40 mm (1.57”) M ax. ø39 mm (1.54”)
57.5 ± 0.5 mm
(2.26” ± 0.2”)
0.07 ± 0.003 mm 0.08 ± 0.008mm
57.5 ± 0.5 mm
(2.26” ± 0.2”)
ラベルモードでは、ラベル用紙とブラックマーク用紙を使用することができます。
1) プリンターの電源を入れてください。
2) 用紙カバーを開け、用紙移送ボタンを 2 秒以上押してください。
3) ブザー音が聞こえたら、用紙を挿入してカバーを閉じてください。
4) レシートモードに変わったら、上記のプロセスを繰り返してください。
1) コマンドマニュアルのメモリースイッチ変更部分を参照してください。
ラベル印刷機能は、ラベル用紙ギャップとブラックマーク用紙の黒いバーを認識
できなければなりません。
ラベル用紙ギャップを正常に認識できない場合、Auto calibr ation機能を使 用して
ください。
1) ラベル印刷モードでプリンターの電源を切ってください。
2) 用紙移送ボタンを押した状態で電源ボタンを押してください。
3) 次の印刷物が出力されたら、電源ボタンを押して A uto calibration を実行します。
4) Auto calibration を実行すると、プリンターはラベル用紙 3 枚を出力します。
Select the mode
Autocalibration: Power but ton
Self test: Feed button
1. Bluetooth および無線 LAN の接続
1) プリンターは Blueto oth通信が可能な端
末機(PDA、PC など)に接続することがで
きます。
2) 端末機でサポートする B luetooth接続機
能を使用し、プリンターに接続します。
プリンターに内蔵されている NFC tag を
利用して端末機とプリンター間の自動ペ
アリングが可能です。
※ 参考
端末機が NFC Auto pairing 機能をサポートし
ていなければなりません。
FC Auto pairing 機能は B/T pairing 段階まで
だけをサポートし、機器間通信のための接続
は追加で行わなければならないため、端末機
別に接続できないというメッセージが表示さ
れたりしますが、これは正常な動作です。
3) プリンターは Ad-hoc モードで無線 LAN
通信が可能な端末機(PDA、PC など)と接
続可能で、Infrastructureモードで AP と
※参考
より詳しい接続方法に関しては、Bluetoo th&無線 LAN マニュアルを参照してくださ
い。 セルフテストページで Bluetooth 環境(認証、暗号化、接続モード)および無線 L
AN 環境(IP、SSID、認証、暗号化)を確認することができます。
◈ プリンターのクリーニング
プリンターの内部に埃が溜まると、印刷の品質が劣化します。
このような場合は、下の手順に従ってプリンターを掃除します。
1) 用紙カバーを開き用紙が挟まっている時は、取り除いてください。プリンタヘ
ッドをきれいにするためにクリーニングペンを中央から外側に向かってプリン
タヘッドに使います。
2) クリーニングペンでプリンターのヘッド部分を拭いてください。
3) クリーニングペンで用紙感知センサーの紙粉(用紙粉)を取り除いてください。
4) ヘッドのお手入れ後は、クリーニングペンのクリーナー液が完全に蒸発または
乾燥(1~2 分)するまでプリンタを使わないでください。
5) プリンターに用紙を入れ、プリンターケースを閉じてください。
• 注意
1) お手入れ前にプリンターの電源を必ず切って下さい。
2) プリンター作動中はヘッド部分が過熱するため、ヘッドのお手入れをする時
は電源を切って約 2~3 分後に行って下さい。
3) ヘッドをお手入れする時は、手でヘッドの加熱部に触れないように注意し
て下さい。
→ ヘッドが静電気などで損傷することがあります。
4) ヘッドに傷がつかないように注意して下さい。
5) ライナーレス用紙を使用する場合は周期的にヘッドを清掃して下さい。
お手入れ周期はライナー レス用紙 10 ロール(100 メートル)使用後、
又は一週間に 1 回以上です。周期的 にお手入れをしない場合、
印刷の品質不良及びプリンターの寿命が急に短くなることがあります。
• 警告
1) ライナーレス用紙は(株)ビクソロンが提供する用紙のみをお使い下さい。
他の用紙を使用なさった場合はアフターサービスを受けることができません。
2) お手入れの時は必ず(株)ビクソロンで提供するクリーニングペン
(PCP-R200II)を使ってください。
◈ 認証
☎ BIXOLON Co., Ltd.
● Website http://www.
● Korea Headquarters
(Add) 7~8F, (Sampyeong-dong), 20, Pangyoyeok-ro241beon-gil,
(Tel.) +82-31-218-5500
● U.S. Office
(Add) BIXOLON America Inc., 3171 Fujita St, Torrance, CA 90505
(Tel.) +1-858 764 4580
● Europe Office
(Add) BIXOLON Europe GmbH, Tiefenbroicher Weg 35 40472 Düsseldorf
(Tel.) +49 (0)211 68 78 54 0
製品や共に提供された印刷物に表示されているこのマークは、この製品の使用寿
命終了時にこの製品を他の家庭ゴミと一緒に捨ててはならないことを表していま
す。無断の廃棄物処理により発生する環境または人体に対する危害を防止するた
め、このマークがある製品を他の種類の廃棄物と分離し、リサイクルして物的資
源の持続的な再利用を促進しなければなりません。このような製品を環境に対し
て安全にリサイクルできる方法や、場所に関する詳細事項は、この製品を販売し
た小売業者または該当地域の公共機関にお問い合わせください。企業使用者は供
給者に問い合わせ、購入契約書の契約条件を確認しなければなりません。この製
品は、廃棄を目的に他の商業廃棄物と混合することはできません。
この Bluetooth マークおよび ID D022644 は、Bluetooth SIG 認証があるモデルにの
み適用することができます。
ixolon.co
Bundang-gu, Seongnam-si, Gyeonggi-do, 13494, Korea (R OK)
接続可能です。
2. インターフェイスケーブルの接続
1) インターフェイスキャップを開けてくだ
さい。
2) インターフェイスケーブル(別売り)をプ
リンターのケーブルコネクタに接続して
ください。
Page 19

◈ Information
This installation guide contains quick information required for the product installation.
Refer to the User’s Manual in the CD that comes with the product for detailed
installation instructions. The CD contains the following information.
1. Manual: User’s, Windows CE Module Program, Code pages, Commands,
Bluetooth & Wireless
2. Driver: Windows driver
3. Utility: VMSM (Virtual Memory Swit ch Manager),
We at BIXOLON maintain ongoing efforts to enhance and upgrade the functions and
quality of all our products. In following, product specifi cations and/or user manual
content may be changed without prior notice.
◈ Battery Safety Precautions
1. If you observe any abnormal symptom, such as strange smell and overheating, on
2. Charge the battery only with the exclusive charger specified (optionally provided)
3. Do not use or leave the battery in a location exposed to high temperature s or intense
4. Do not allow water, seawater or moisture to enter or leak into the battery. If the
5. Do not throw the battery or subject it to strong shock. If the safety mechanism in the
6. Do not use the battery if it is damaged or the exte rior is deformed due to external
◈ Content Confirmation
◈ Product Part Names
◈ Installation and Charging
Battery
Installation
NV Image Download Ma nager, Firmware Download Manager
first use after purchasing the product, contact your local dealer immediatel y.
by BIXOLON. The use of an incorrect charger may result in overheating,
combustion and/or explosion of the battery.
direct sunlight, such as within an automobile. Doing so can cause battery
overheating and/or combustion. In addition, battery performan ce and product life
may be reduced.
safety mechanism within the battery becomes oxidi zed, the battery may overcharge
with abnormal electrical current and/or voltage so t hat it may overheat, ignite and/or
explode.
battery is damaged, the battery may be overcharged and, consequent ly, an adverse
chemical reac tion may be generated in the battery.
There is a potential risk of battery overheating, combustion, and/or explos ion.
shock or if it is swollen.
SPP-R200III
Power Cord
Paper Cover
Power Button
※ Note
As the battery is not charged at the time of purchase, charge the batter y
prior to product use. (Use the battery charger)
Battery Battery Charger Paper Roll
Belt Clip
Open button
Paper Feed Button
1. Insert the battery on the rear side of
2. Push the battery into the slot until a
CD
Installation Guide
Hole for mounting belt strap / belt clip
Interface Cap
Cable Connection
the printer, aligning the battery hook
properly.
Power Connection
snapping sound is heard.
Battery
Printer Installation Guide
Mobile Receipt Printer SPP-R200III
Paper
Installation
Battery
Charging
※ Note
The printer may incur serious damage If the battery charger provided
by BIXOLON is not used. BIXOLON is not legally liable for any such
damage. (The voltage and electrical current specifications of the pr inter
and battery charger must match.)
Belt Strap
Installation
Belt Clip
Installation
◈ Control Panel Usage
POWER BUTTON FEED BUTTON
• POWER BUTTON
This button is used to turn the printer on and off.
• FEED BUT TON
This button is used to feed paper manually, take the self-test and du mp hexadecimals.
• ERROR LED
If the red led is lit, the paper cover is open.
If the red led is blinking, either the paper has been fully used or the print head is
overheated.
If the red led continues to blink, it may indicate a more serious problem with the
product, and thus an authorized service dealer should be consulted.
• BATTERY LED
If Three blue led are lit, the battery is fully charged.
If two blue led are lit, the battery is half charged.
If one blue led is lit, the battery is at the lowest charge level.
If the red led is lit, the battery must be charged or replaced.
• STATUS LED (Bluetooth or Wireless LAN)
1) When using Bluetooth
If the printer is ready for wireless communication with any Bluetooth, the green led
as well as the battery status led is turned on.
2) When using wireless LAN
The right indicator shows the signal strength from wireless LAN.
The green led is solid for acceptable signal strength while t he green led blinks for
weak signal s trength.
※ Note
In power save mode, only the Status led is lit.
1. Press the open button to open the
paper cover.
2. Insert the paper as shown in the
image.
(Remove any remaining core of a
fully used paper roll.)
3. Take care to align the paper
correctly.
4. Pull the paper out and close the
paper cover.
5. Tear off any excess paper in the
direction of the side of the printer.
1. Turn off the printer power.
2. Connect the power cord to the
battery charger, and the connect AC
power.
3. Open the external interface cap in
the direction of arrow.
4. Connect the battery charger to the
power connector.
1. Insert the belt strap screw into the
belt strap hole.
2. Use a coin to tighten the belt strap
screw as shown in the image.
1. Insert the screw of the belt clip to
the belt clip mounting hole.
2. Fasten the screw of the belt clip with
an object like a coin as shown in the
picture.
(be careful to fasten in the correct
direction.)
ERROR LED BATTERY LED
STATUS LED
Page 20

r
◈ Self-test
Run the self-test when first setting the printer or when encountering a problem, and check the
following.
• Control Circuit, Mec hanisms, Print Quality, ROM Version, and Memory Switch Settings
If no issue is found with the printer after running the self-test, examine the other devices or
peripherals and software. This function is independent of such other devices and so ftware.
• Self-Test Instruction s
1) Turn the printer power off and close the printer paper cover.
2) Pressing the paper feed button and power button simultaneously turns the printer on.
3) After printing begins, please release t he two buttons.
4) To add a printout of the ASCII pattern, press the paper feed button once more.
5) After the ASCII pattern is printed out, the self-test is automatically terminated.
◈ Product Specifications
Item Description
Printing Method Thermal printing
Printing Speed
Resolution 203 DPI
Paper Supply Mode Easy paper loading
Character Size
Characters Per Line Font A: 32 Font B/C: 42
Character Set
Printing
Barcode
Emulation BXL/POS
Driver
SDK
Sensor Paper End, Paper Cover Open
Cutter Type Tear-Bar
Language User language supported
Paper Form Receipt Linerless
Paper Type Thermal paper Thermal paper
Diameter Max. ø40 mm (1.57”) Max. ø39 mm (1.54”)
Paper
Width
Thickness 0.07 ± 0.003 mm 0.08 ± 0.008mm
※ Note
1) This equipment is indooruse and all the communication hiring are limited to inside of the
building.
2) The switch is the disconnecting device. Turn off switch from any hazard.
◈ Label Printing Function
1. Label Function Setting
Label paper and black mark paper available at the label mode.
• Setting Operations
1) Turn on the printer power.
2) Open the paper cover and press and hold down the paper feed button for longer than two
seconds.
3) After the buzzer tone is emitted, inser t paper and close the cover.
4) Repeat the steps above to return to recei pt mode.
• Setting Via Memory Sw itch
1) Please refer to the memory switch changing section of the Commands Manual.
2. Auto Calibration Function
The label printing function requires the recognition of label paper gaps and black mark
paper black bar in order to print.
If label paper gaps are not properly recognized, use the auto calibration funct ion.
• Auto Calibration Instructions
1) Turn the printer power off while in label print mode.
2) Press and hold down the paper feed button and then press the power button.
3) After the following printout is outputted, press the power button to perform auto
calibration.
4) Three pages of label paper ar e outputted when performing auto calibration.
100 mm/sec (Receipt Paper)
80 mm/sec (Linerless Paper)
Font A: 12 × 24
Font B: 9 × 17
Font C: 9 × 24
English: 95
Expanded Graphics: 128 × 33 pages
International: 32
1 Dimension: UPC A, UPC E, CODE 39, CODE 93,
Code 128, EAN 8, EAN 13, ITF, Codabar
2 Dimension: PDF417, DATAMATRIX, MAXI,
QR Code, GS1 DataBar, Aztec
Windows XP(32/64bit) / WEPOS /
2003 Server(32/64bit) / VISTA(32/64bit) /
2008 Server(32/64bit) / 7(32/64bit) / 8(32/64bit)
Windows XP / WEPOS / 2003 Server /
VISTA / 2008 Server / 7 / 8 / CE 3.0 and later
57.5 ± 0.5 mm
(2.26” ± 0.2”)
Select the mode
Auto Calibration: P ower Button
Self Test: Feed Butto n
57.5 ± 0.5 mm
(2.26” ± 0.2”)
◈ Peripherals Connection
※ Note
Refer to the Bluetooth Wireless LAN Manual for detailed information on its connection.
You can check the Bluetooth environment (authentication, encryption, connection mode) and
the wireless LAN environment (IP, SSID, aut hentication, encryption) via the self-test page.
◈ Printer Cleaning
If the interior of the printer is dusty, print quality can decline.
In such a case, follow the instructions below to clean the printer.
1) Open the paper cover and remove the paper if there is any.
Apply the cleaning pen from the center to the ed ge over the printer head for cleaning.
2) Clean the printer head using the cleaning pen.
3) Remove paper dust from the paper detection sensor using the cleaning pen.
4) Do not use the printer for one to two minutes after cleaning the printer head until
the cleaning agent of the cl eaning pen has completely evaporated and dried.
5) Mount the paper and clo se the printer cover.
• Caution
1) Make sure the printer power is turned off before cleaning.
2) Wait for two to three minutes after power-off before head cleaning because the head
part may become very hot during printer operation.
3) Take care not to touch the heating region of the head with your hand while cleaning
the head part.
→ The printer head may be damaged by static electricity.
4) Take care to avoid scratching the head.
5) Clean the printer head periodically if linerless paper is used. Recommended cleaning
period is after consuming ten rolls of linerless paper (100 meters), or more than once
a week. Printing quality may be degraded or printer life may be shortened if the head is
not cleaned periodically.
• Warning
1) Use only the linerless paper that is provided by BIXOLON. Use of other paper voids
product warranty.
2) Use only the cleaning pen (PCP-R200II) provided by BIXOLON for cleaning.
◈ Certification
☎ BIXOLON Co., Ltd.
● Website http://www.bixolon.com
● Korea Headquarters
(Add) 7~8F, (Sampyeong-dong), 20, Pangyoyeok-ro241beon-gil,
(Tel.) +82-31-218-5500
● U.S. Office
(Add) BIXOLON America Inc., 3171 Fujita St, Torrance, CA 90505
(Tel.) +1-858 764 4580
● Europe Office
(Add) BIXOLON Europe GmbH, Tiefenbroicher Weg 35 40472 Düsseldorf
(Tel.) +49 (0)211 68 78 54 0
This marking shown on the product or its literature, indicates that it should not be disposed
of with other household wastes at the end of its working life. To prevent possible harm to
the environment or people from unc ontrolled waste disposal, please separate this from othe
types of wastes and recycle it responsibly to promote the sustainable reuse of material
resources. Household users should contact either the retailer where they purchased this
product, or their local government office, for details of where and how they can take this
item for environmentally safe recycling. Business users should contact their supplier and
check the terms and conditions of th e purchase contract. This product should not be mixed
with other commercial wastes for disposal.
The following Bluetooth mark and ID D022644 is only applicable to models with the
Bluetooth SIG qualification.
Bundang-gu, Seongnam-si, Gyeonggi-do, 13494, Korea (R OK)
1. Bluetooth & Wireless LAN Connection
1) The printer can be connec ted to devices
equipped with Bluetooth communication
capacity (PDAs, PCs, etc.).
2) Use the Bluetooth connection function
supported by the device to connect to the
printer. The NFC tag built into the printer
enables automatic pairing with devices.
※ Note
The device must support NFC Auto Pairing.
It may display a message that the device cannot
be connecteREVd as NFC Auto Pairing is
supported upto the B/T pairing and the devices
must connected manually, but this is normal.
3) The printer can be connected to other
stations, such as PDAs and PCs supporting
wireless LAN communication in Ad-hoc
mode and AP in Infrastructure mode.
2. Interface Cable Connection
1) Open the Interface Cap
2) Connect the interface cable (optional) to the
cable connector of the print er.
 Loading...