

Page 1

DALE601/601E
Electrical Safety Analyzer
Operators Manual
PN 2243573
May 2008, Rev. 1
© 2008 Fluke Corporation, All rights reserved. Printed in USA. Specifications subject to change without notice.
All product names are trademarks of their respective companies.
Page 2

Warranty and Product Support
Fluke Biomedical warrants this instrument against defects in materials and
workmanship for one year from the date of original purchase. During the warranty period, we will repair or at our option replace, at no charge, a product
that proves to be defective, provided you return the product, shipping prepaid,
to Fluke Biomedical. This warranty covers the original purchaser only and is
not transferable. The warranty does not apply if the product has been damaged
by accident or misuse or has been serviced or modified by anyone other than
an authorized Fluke Biomedical service facility. NO OTHER WARRANTIES,
SUCH AS FITNESS FOR A PARTICULAR PURPOSE, ARE EXPRESSED
OR IMPLIED. FLUKE SHALL NOT BE LIABLE FOR ANY SPECIAL, INDIRECT, INCIDENTAL OR CONSEQUENTIAL DAMAGES OR LOSSES,
INCLUDING LOSS OF DATA, ARISING FROM ANY CAUSE OR THEORY.
This warranty covers only serialized products and their accessory items that
bear a distinct serial number tag. Recalibration of instruments is not covered
under the warranty
This warranty gives you specific legal rights and you may also have other
rights that vary in different jurisdictions. Since some jurisdictions do not allow
the exclusion or limitation of an implied warranty or of incidental or consequential damages, this limitation of liability may not apply to you. If any provision of this warranty is held invalid or unenforceable by a court or other decision-maker of competent jurisdiction, such holding will not affect the validity
or enforceability of any other provision.
07/07
Page 3

Notices
All Rights Reserved
© Copyright 2007, Fluke Biomedical. No part of this publication may be reproduced, transmitted, transcribed, stored in a retrieval system, or translated into any language without the written
permission of Fluke Biomedical.
Copyright Release
Fluke Biomedical agrees to a limited copyright release that allows you to reproduce manuals and
other printed materials for use in service training programs and other technical publications. If
you would like other reproductions or distributions, submit a written request to Fluke Biomedical.
Unpacking and Inspection
Follow standard receiving practices upon receipt of the instrument. Check the shipping carton for
damage. If damage is found, stop unpacking the instrument. Notify the carrier and ask for an
agent to be present while the instrument is unpacked. There are no special unpacking instructions,
but be careful not to damage the instrument when unpacking it. Inspect the instrument for physical damage such as bent or broken parts, dents, or scratches.
Technical Support
For application support or answers to technical questions, either email
techservices@flukebiomedical.com
1-425-446-6945.
Claims
Our routine method of shipment is via common carrier, FOB origin. Upon delivery, if physical
damage is found, retain all packing materials in their original condition and contact the carrier
immediately to file a claim. If the instrument is delivered in good physical condition but does not
operate within specifications, or if there are any other problems not caused by shipping damage,
please contact Fluke Biomedical or your local sales representative.
or call 1-800- 648-7952 or
Standard Terms and Conditions
Refunds and Credits
Please note that only serialized products and their accessory items (i.e., products and
items bearing a distinct serial number tag) are eligible for partial refund and/or credit.
Nonserialized parts and accessory items (e.g., cables, carrying cases, auxiliary modules,
etc.) are not eligible for return or refund. Only products returned within 90 days from the date
of original purchase are eligible for refund/credit. In order to receive a partial refund/credit of a
product purchase price on a serialized product, the product must not have been damaged by the
customer or by the carrier chosen by the customer to return the goods, and the product must be
returned complete (meaning with all manuals, cables, accessories, etc.) and in “as new” and resalable condition. Products not returned within 90 days of purchase, or products which are not in
“as new” and resalable condition, are not eligible for credit return and will be returned to the customer. The Return Procedure (see below) must be followed to assure prompt refund/credit.
Restocking Charges
Products returned within 30 days of original purchase are subject to a minimum restocking fee of
15 %. Products returned in excess of 30 days after purchase, but prior to 90 days, are subject to a
minimum restocking fee of 20 %. Additional charges for damage and/or missing parts and accessories will be applied to all returns.
Page 4

Return Procedure
All items being returned (including all warranty-claim shipments) must be sent freight-prepaid to
our factory location. When you return an instrument to Fluke Biomedical, we recommend using
United Parcel Service, Federal Express, or Air Parcel Post. We also recommend that you insure
your shipment for its actual replacement cost. Fluke Biomedical will not be responsible for lost
shipments or instruments that are received in damaged condition due to improper packaging or
handling.
Use the original carton and packaging material for shipment. If they are not available, we recommend the following guide for repackaging:
Use a double-walled carton of sufficient strength for the weight being shipped.
Use heavy paper or cardboard to protect all instrument surfaces. Use nonabrasive
material around all projecting parts.
Use at least four inches of tightly packed, industry-approved, shock-absorbent
Returns for partial refund/credit:
Every product returned for refund/credit must be accompanied by a Return Material Authorization (RMA) number, obtained from our Order Entry Group at 1-800-648-7952 or 1-425-446-
6945.
Repair and calibration:
To find the nearest service center, go to www.flukebiomedical.com/service
In the U.S.A.:
Cleveland Calibration Lab
Tel: 1-800-850-4606
Email: globalcal@flukebiomedical.com
Everett Calibration Lab
Tel: 1-888-993-5853
Email: service.status@fluke.com
In Europe, Middle East, and Africa:
Eindhoven Calibration Lab
Tel: +31-402-675300
Email: ServiceDesk@fluke.com
In Asia:
Everett Calibration Lab
Tel: +425-446-6945
Email: service.international@fluke.com
material around the instrument.
, or
Certification
This instrument was thoroughly tested and inspected. It was found to meet Fluke Biomedical’s
manufacturing specifications when it was shipped from the factory. Calibration measurements
are traceable to the National Institute of Standards and Technology (NIST). Devices for which
there are no NIST calibration standards are measured against in-house performance standards using accepted test procedures.
WARNING
Unauthorized user modifications or application beyond the published specifications may
result in electrical shock hazards or improper operation. Fluke Biomedical will not be responsible for any injuries sustained due to unauthorized equipment modifications.
Page 5

Restrictions and Liabilities
Information in this document is subject to change and does not represent a commitment
by Fluke Biomedical. Changes made to the information in this document will be incorporated in new editions of the publication. No responsibility is assumed by Fluke Biomedical for the use or reliability of software or equipment that is not supplied by Fluke Biomedical, or by its affiliated dealers.
Manufacturing Location
The DALE 601/601E Electrical Safety Analyzer is manufactured in Everett, Washington
by Fluke Biomedical, 6920 Seaway Blvd., Everett, WA, U.S.A.
Page 6

Page 7

Table of Contents
Chapter Title Page
1 Introduction and Specifications.............................................. 1-1
Introduction .......................................................................................... 1-3
Simplicity.......................................................................................... 1-3
Versatility ......................................................................................... 1-4
General Safety Considerations.............................................................. 1-4
Symbols ............................................................................................ 1-4
Warnings and Cautions..................................................................... 1-5
Key Features......................................................................................... 1-6
Instrument Familiarity .......................................................................... 1-7
Specifications........................................................................................ 1-10
Accessories ........................................................................................... 1-12
2 Operation .................................................................................. 2-1
Preliminary Steps.................................................................................. 2-3
Preparing the Analyzer for Use......................................................... 2-4
Verifying the Power Outlet Connections .......................................... 2-5
Measuring Line (Mains) Voltage.......................................................... 2-6
Measuring Device Current.................................................................... 2-7
Measuring Earth Resistance.................................................................. 2-8
Measuring Leakage Current.................................................................. 2-10
Earth Leakage Current...................................................................... 2-10
Enclosure (Chassis) Leakage Current............................................... 2-11
Patient Lead Leakage Current........................................................... 2-12
Measuring Patient Auxiliary Current.................................................... 2-15
Measuring MAP (Patient Lead Isolation) Current................................ 2-16
External Measurements......................................................................... 2-18
Leakage Current................................................................................ 2-19
Electrical Isolation............................................................................ 2-20
Resistance ......................................................................................... 2-21
3 Maintenance and Service ........................................................ 3-1
Maintenance.......................................................................................... 3-3
Avoiding Damage............................................................................. 3-3
Cleaning............................................................................................ 3-3
Verifying Analyzer Performance.......................................................... 3-4
i
Page 8

DALE601/601E
Operators Manual
Service and Calibration ........................................................................ 3-6
ii
Page 9

List of Tables
Table Title Page
1-1. Symbols ................................................................................................ 1-4
1-2. Components and Controls of the Analyzer ........................................... 1-8
1-3. Standard Accessories ............................................................................ 1-12
1-4. Optional Accessories ............................................................................ 1-12
1-5. Optional Probe Adapter Cables............................................................. 1-13
2-1. Ground Resistance of a Ten-foot Power Cable ..................................... 2-8
3-1. Performance Verification Parameters ................................................... 3-4
3-2. Current Verification Parameters ........................................................... 3-5
List of Figures
Figure Title Page
1-1. Analyzer Front Panel Components and Controls .................................. 1-7
1-2. Analyzer Top Panel Components and Controls .................................... 1-8
2-1. Block Diagram of a Line-operated Instrument...................................... 2-3
iii
Page 10

DALE601/601E
Operators Manual
iv
Page 11

Chapter 1
Introduction and Specifications
Contents Page
Introduction ................................................................................. 1-3
Simplicity................................................................................. 1-3
Versatility................................................................................. 1-4
General Safety Considerations..................................................... 1-4
Symbols.................................................................................... 1-4
Warnings and Cautions ............................................................ 1-5
Key Features ................................................................................ 1-6
Instrument Familiarity ................................................................. 1-7
Specifications............................................................................... 1-10
Accessories .................................................................................. 1-12
1-1
Page 12

DALE601/601E
Operators Manual
1-2
Page 13

Introduction and Specifications
Introduction
1
Introduction
The DALE601/601E Electrical Safety Analyzer, hereafter referred to singly as
the Analyzer, is a simple, highly versatile, and portable instrument. The
Analyzer is used to evaluate the basic electrical safety of electrical systems,
medical devices, and physiological instrumentation, and a broad range of
external measurements, as listed under Key Features.
Its compact handheld size makes it an ideal addition to a toolbox, as well as
serving as a bench top instrument for the laboratory. The Analyzer does not
sacrifice functions or accuracy, and its low cost permits putting one on each
bench.
Simplicity
The Analyzer is simple to use, incorporating the following:
• A single, labeled master function switch that leads the user through a
complete specific measurement procedure
• A single range meter for each measurement that minimizes the chance of
erroneous readings
• Heavy-duty switches that change polarity, open and close the neutral, and
select chassis or earth leakage current measurements
• A single slide switch that gives the user a choice of AAMI or IEC test
load
• Five universal EKG lead connectors that allow for any type of lead
connection
• Green and amber lights that indicate five power line conditions
The Analyzer uses sophisticated electronics for true rms measurement of
current and voltage. Input impedance uses the manually selectable AAMI ES11993 or IEC601-1 test load to compensate for high frequency components in
the measurement. Resistance measurements are made with a four-wire Kelvin
bridge to eliminate errors resulting from cable length and connector resistance.
1-3
Page 14

DALE601/601E
Operators Manual
Versatility
The Analyzer has an additional unique capability to make a broad range of
external measurements, including leakage current and/or voltage gradients and
the resistance between two points. Providing the voltage and measuring
function, the Analyzer can independently measure the isolation current of a
device. Thus, the Analyzer can evaluate the electrical system; system
installation; and, separately, the isolation of probes and transducers, in addition
to conventional leakage current measurement.
General Safety Considerations
The Analyzer should be inspected and its related documentation reviewed for
familiarization with safety markings and instructions before operation.
Symbols
Table 1-1 describes the symbols used in association with the Analyzer.
Table 1-1. Symbols
Symbol Description
X Hazardous voltage
W Important information; refer to manual.
P Conforms to European Union directives
~
CAT I
Do not dispose of this product as unsorted municipal waste. Go
to Fluke’s website for recycling information.
IEC Measurement Category I – CAT I equipment designed to
protect against transients in equipment on circuits not directly
connected to MAINS. Under no circumstances should the
terminals of the Analyzer be connected to any MAINS voltage.
1-4
Page 15

Introduction and Specifications
General Safety Considerations
Warnings and Cautions
A Warning identifies hazardous conditions and actions that could cause
bodily harm or death.
A Caution identifies conditions and actions that could damage the Analyzer,
the equipment under test, or cause permanent loss of data.
XW Warning
To avoid possible electrical shock or personal injury,
follow these guidelines:
• Disconnect all patient connections before connecting
the device to be tested to the Analyzer. Continued
connection may jeopardize patient safety by possible
application of measurement currents.
• Maintain care when making connections. Isolation test
uses 120 or 230 V ac applied to patient leads or to
external connections that are accessible to the tester.
Although the voltage is current limited to 1 mA is safe
for healthy intact skin contact, it can be felt and can
result in a startle reaction.
1
• Ensure the mains installation current rating is
adequate for the DUT (device under test). If the DUT
requires 20 A, the Analyzer must be powered by a 20 A
service to avoid overloading the mains installation.
W Caution
To avoid possible damage to the Analyzer, follow these
guidelines:
• Ensure that the DUT power requirements are within the
capabilities of the Analyzer, labeled as 15 A or 20 A at
120 V ac (depending on model purchased) and 10 A at
230 V ac. While the analyzers are equipped with
receptacles limiting access to devices of higher
ratings, the replacement cord set may have been
installed incorrectly.
1-5
Page 16

DALE601/601E
Operators Manual
• This device is sensitive to electromagnetic fields. If
interference is encountered in measurements,
reconfigure the test setup or contact the manufacturer.
• Do not leave the DUT connected and drawing high load
current for extended periods. The Analyzer is not
designed for continuous measurements and may
overheat.
• Always pause in the OFF (middle) position when
switching polarity from normal to reverse. Inductive
loads of the DUT may create high voltage transients
when trying to reverse the direction of current flow
instantaneously.
Key Features
• Small, lightweight, self-contained, portable, hand-held instrument
• 120 V and 230 V operation (DALE601 and DALE601E, respectively)
• Easy to use controls with master range meter for each test
• Five (5) universal EKG lead connectors
• True rms measurement of current and voltage
• Accurate resistance measurements with 4-wire Kelvin bridge
• Manually selectable ANSI/AAMI ES1-1993 or IEC601-1 test loads
• Measures the following:
• Line (Mains) Voltage
• Device Current
• Earth Resistance
• Leakage Current: Earth, Enclosure (Chassis), Patient Lead (Leakage
Currents can be measured in Open/Closed Neutral, Normal/Reversed
Polarity and Open/Closed Ground and are displayed directly in µA.)
• Patient Auxiliary Current
• M.A.P. (Patient Lead Isolation) Current
• External Measurements: Leakage Current, Electrical Isolation,
Resistance
1-6
Page 17
Introduction and Specifications
Instrument Familiarity
1
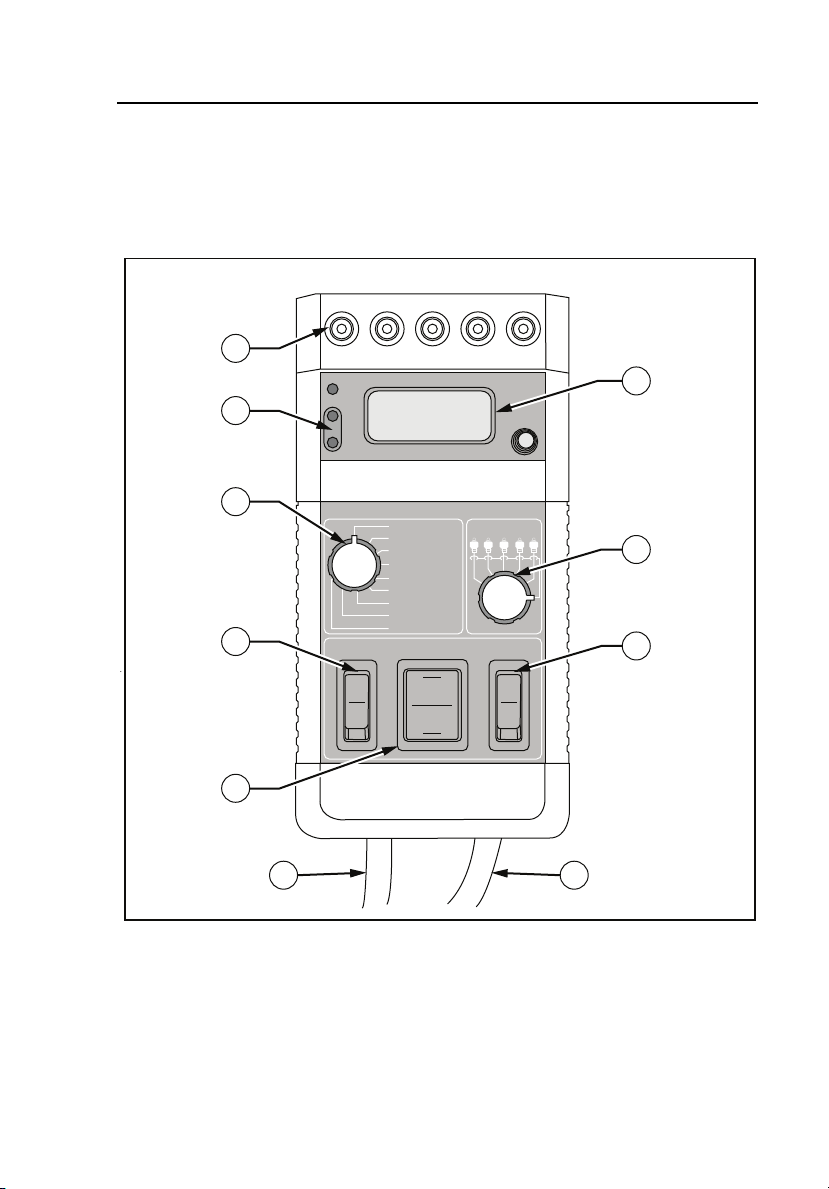
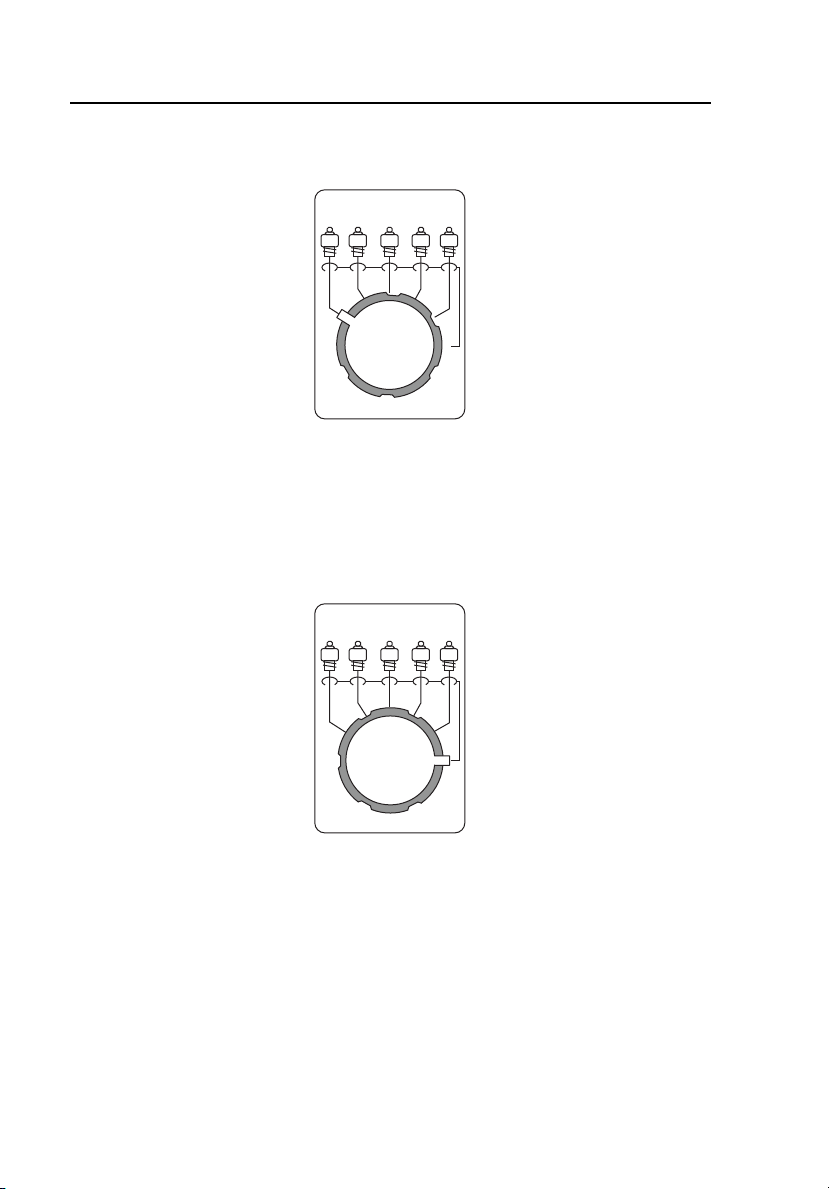
Instrument Familiarity
The Analyzer is shown in Figures 1-1 and 1-2, and Table 1-2 describes its
labeled components.
10
9
3
OUTLET
D
7
5
DALE601
CLOSED
OPEN REVERSED
SAFETY ANALYZER
MAINS VOLTAGE
CURRENT AMPS
EARTH RESISTANCE
EARTH LEAKAGE
ENCLOSURE LEAKAGE
PATIENT LEAD LEAKAGE
PATIENT AUX CURRENT
M.A.P.
EXTERNAL
OUTLETL2
NORMAL
OFF OFF
LEADS
M.A.P.
LIFT GND
8
6
4
1
2
Figure 1-1. Analyzer Front Panel Components and Controls
fcu01.eps
1-7
Page 18

DALE601/601E
Operators Manual
CHASSIS
13
14
EXTERNAL
601
TEST POINTS
AAMI
12
11
Figure 1-2. Analyzer Top Panel Components and Controls
Table 1-2. Components and Controls of the Analyzer
Label Name Function
A Power Cord Supplies power to the Analyzer and to the DUT.
The measurement circuits are energized when
the power cord is plugged into an outlet. There is
no on/off switch.
B Test Receptacle Supplies power to the DUT: DALE601, 15 A at
125 V or DALE601, 20A at 125V; and
DALE601E, 10 A at 230 V.
C Outlet
Indicators
(DALE601 only)
Verifies the polarity and wiring of the outlet to
which the Analyzer is connected. Only correctly
wired outlets should be used. Not applicable to
isolated systems.
fcu02.eps
D Outlet Switch With the center OFF position, permits testing
with both the NORMAL (forward) and
REVERSED polarity of the line. It is
recommended that the switch is paused in the
center OFF position before changing polarity.
1-8
Page 19

Introduction and Specifications
Instrument Familiarity
Table 1-2. Components and Controls of the Analyzer (cont.)
Label Name Function
1
E L2 (Neutral)
Switch
F Lift Ground /
M.A.P. Switch
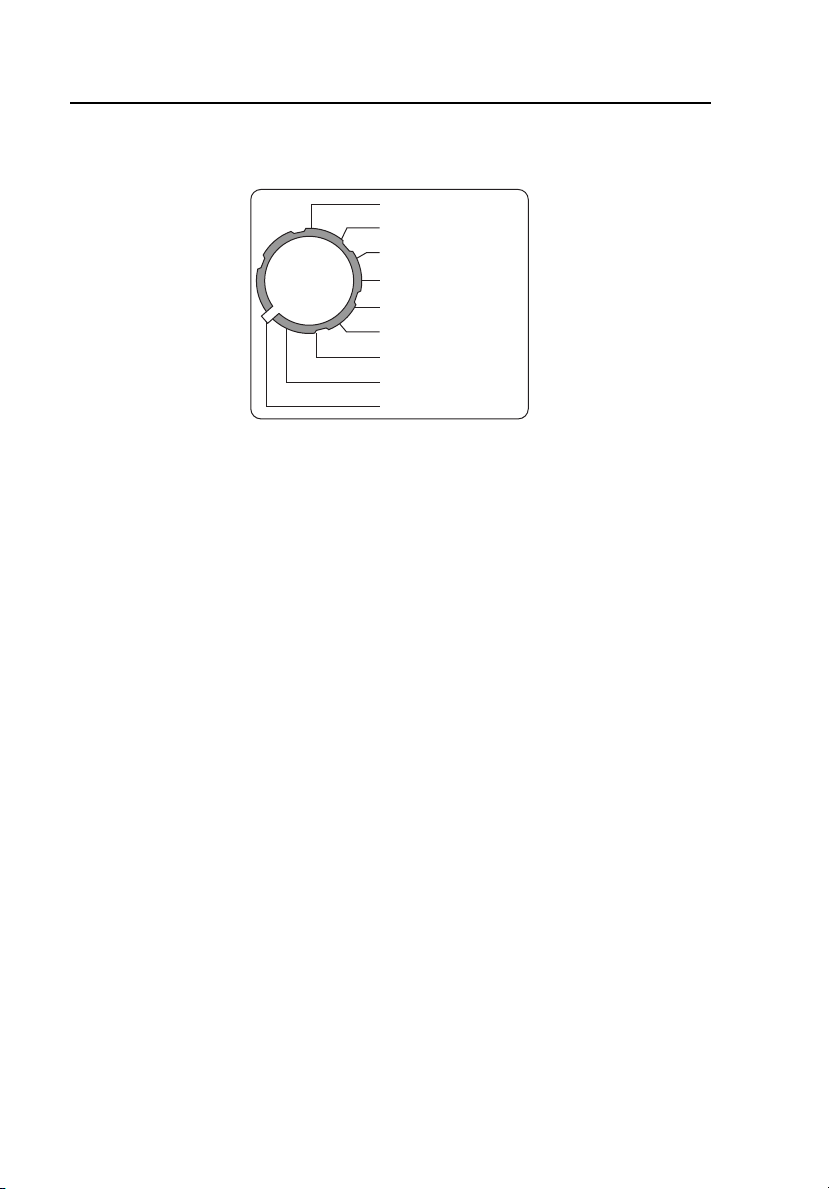
G Function Switch Provides direct one-step selection of the
Permits making leakage current measurements
under the OPEN neutral (L2) condition as
required by UL and IEC.
A dual function switch. The LIFT GROUND
position will open ground to the device for
leakage current measurements. The MAP test
position will energize the selected patient lead at
mains voltage, current limited, to measure the
isolation current when the function switch is in
the M.A.P. position. With the function switch in
the EXTERNAL position, the isolation test
voltage is supplied to the EXTERNAL connector
for measuring the isolation current of a probe or
transducer.
measurement to be made. The functions are:
Mains voltage, instrument current, grounding
(earth) resistance, earth and leakage currents
and the patient lead currents. These include lead
leakage, auxiliary current and mains on applied
parts (M.A.P.) for isolation (sink) current. An
external position is provided to measure leakage
current between two points, or isolation current
of probes and transducers, independent of their
instruments.
H Lead Switch Directs the selected measurement to the desired
patient lead. When testing a 10 lead device, a
second pass is required for the C leads. The
setting to the far right is the ALL lead position.
I Meter (Display) A large, ½ inch, high contrast 3½-digit display of
the measured parameter. This can display 1999
with decimal points added where required
J Universal
Patient Leads
Provide means for the connection of the patient
leads for leakage current measurement.
1-9
Page 20

DALE601/601E
Operators Manual
Table 1-2. Components and Controls of the Analyzer (cont.)
Label Name Function
K Test Points
L Chassis
Connector
M External
Connector
N Test Load Selector switch between IEC601.1 and AAMI
Chassis Cable
(not shown)
0.15 Ω and 100 µA; provided to check the
Analyzer by clipping onto with the chassis cable
and selecting appropriately, RESISTANCE or
ENCLOSURE LEAKAGE, via the function switch.
Provides means for inputting the chassis cable
with its clip for connection to the DUT chassis or
enclosure. With the FUNCTION switch in the
resistance position, the earth resistance is
measured, and on the enclosure position, the
enclosure leakage current is measured.
Provided for making external measurement of
resistance, voltage gradient, leakage current or
isolation current of probes and transducers,
when used in conjunction with the chassis cable
for the other reference point.
A black coil cord with a clamp with black
insulation for measurement of enclosure leakage
and earth resistance. One is supplied with each
Analyzer.
Specifications
The following are specifications for the Analyzer. Please contact your Fluke
Biomedical service representative for more information regarding the device
specifications.
Controls
Function Switch.............................................9 position rotary
Lead Switch.........................................................6 position rotary
Neutral Switch .....................................................2 position rocker (Open/Closed)
Polarity Switch.....................................................3 position rocker
Leakage Switch ...................................................2 position rocker (Chassis/Earth)
(Normal/Off/Reversed)
1-10
Page 21

Introduction and Specifications
Specifications
1
MAP / Ground Switch ......................................... 2 position rocker (Open Ground /
DUT Power............................................................. 15 A @ 120 V, 20 A @ 120 V,
Physical Size ......................................................... 4.0 x 7.8 x 1.6 in
Mains Voltage
Range ................................................................. Line Voltage
Accuracy ............................................................. ±2 % of reading, ±1 digit
Current Consumption
Range ................................................................. 0 – 14.99 A (Dale601-1515)
Accuracy ............................................................. ±5 % of reading, ±1 digit
Earth Resistance
Range ................................................................. 0 – 19.99 Ω
Accuracy ............................................................. ±1 % of reading, ±1 digit
Current Source...................................................... 10 mA DC (four-wire bridge)
Leakage Current
Range ................................................................. 0 – 1999 µA
Accuracy
DC and 25 HZ to 1 KHz ................................. ±1 % of reading, ±3 LSD
1.0 KHz to 100 KHz ........................................ ±2.5 % of reading, ±3 LSD
100 KHz to 1 MHz .......................................... ±5 % of reading, ±3 LSD
Type Measurement......................................... True rms
Test Load........................................................ AAMI or IEC601 – 1 (selectable)
Isolation Test (Mains on Applied Parts)
Voltage................................................................ Mains voltage
Current................................................................ Limited @ 1 mA
Current Capacity
DALE601-1515 ................................................... 15 A
DALE601E .......................................................... 10 A
DALE601-1520/2020 .......................................... 20 A, 20 % duty cycle
Environmental
Operating Temperature ...................................... 15 – 40 ºC
Storage Temperature.......................................... - 20 – 65 ºC
Relative Humidity................................................ 90 % max
Apply Mains on Applied Part test
voltage)
10 A @ 230 V
(102 x 196 x 41 mm)
0 – 19.99 A (Dale601-1520/2020)
0 – 9.99 A (Dale601E)
(0 – 1.99 Ω)
±2 % of reading, ±1 digit
(2 – 19.99 Ω)
(2 minutes on, 8 minutes off)
1-11
Page 22

DALE601/601E
Operators Manual
Accessories
Standard accessories and part numbers are listed in Table 1-3. Optional
accessories and part numbers are listed in Tables 1-4 and 1-5.
Table 1-3. Standard Accessories
Name Description Part Number
Chassis Cable: black
coil cord, 8 ft extended
length with clamp with
black insulation
Soft Carrying Case
Operators Manual This book 2243573
For measurement of
earth resistance and
enclosure leakage
current. Also used as
reference lead for
external measurement.
Case to carry
accessories and to
protect the Analyzer
when placed in a
toolbox.
Table 1-4. Optional Accessories
2392409
2392584
Name Description Part Number
Chassis cable: 8-foot
black cable- with large
clamp with black
insulation
Chassis Cable: black
coil cord, 16 ft extended
with clamp with black
insulation
Chassis Ground Probe:
black coil cord with
copper needle probe for
testing receptacles and
for tight spaces, 8 ft long
extended
1-12
Used for dual lead
leakage
For measurement of
earth resistance and
enclosure leakage
current. Also used as
reference lead for
external measurement.
For measurement of
earth resistance and
enclosure leakage
current. Also used for
grounding saline baths
for isolation testing of
probes and transducers.
2392409
2231563
2392427
Page 23

Introduction and Specifications
Accessories
Table 1-4. Optional Accessories (cont.)
Name Description Part Number
External Leakage Cable:
coiled cord is 8 ft,
extended with a clamp
with red insulation
External Leakage Cable:
coiled cord is 16 ft
extended with a clamp
with red insulation
Hard Carrying Case Case for carrying the
Standard auxiliary cable
for external
measurements of
leakage current and
voltage gradient
between two conductive
surfaces.
Standard auxiliary cable
for external
measurements of
leakage current and
voltage gradient
between two conductive
surfaces.
Analyzer and
accessories.
2392448
2331563
2231830
1
Table 1-5 lists optional probe adaptor cables needed for isolation testing.
These make electrical contact with all terminals of an ultrasound probe
connector.
Table 1-5. Optional Probe Adapter Cables
Description Part Number
GEYMS probe (for GE product) 2392453
LOGIQ series probe (for GE product) 2392466
For Model 21369A probe (for HP/Agilent product) 2392482
For Model 21364A probe (for HP/Agilent product) 2392494
UNIVERSAL Ultrasound Transducer Probe 2231616
1-13
Page 24

DALE601/601E
Operators Manual
1-14 2-1
Page 25

Chapter 2
Operation
Contents Page
Preliminary Steps......................................................................... 2-3
Preparing the Analyzer for Use................................................ 2-4
Verifying the Power Outlet Connections ................................. 2-5
Measuring Line (Mains) Voltage................................................. 2-6
Measuring Device Current........................................................... 2-7
Measuring Earth Resistance......................................................... 2-8
Measuring Leakage Current......................................................... 2-10
Earth Leakage Current ............................................................. 2-10
Enclosure (Chassis) Leakage Current ...................................... 2-11
Patient Lead Leakage Current.................................................. 2-12
Measuring Patient Auxiliary Current........................................... 2-15
Measuring MAP (Patient Lead Isolation) Current....................... 2-16
External Measurements................................................................ 2-18
Leakage Current....................................................................... 2-19
Electrical Isolation ................................................................... 2-20
Resistance................................................................................. 2-21
Page 26

DALE601/601E
Operators Manual
2-2
Page 27

Operation
Preliminary Steps
2
Preliminary Steps
The Analyzer measures electrical parameters, as described below. These
voltages and currents are a natural phenomenon, and their presence within
reasonable limits does not constitute a hazard. However, it is necessary to
measure their values to determine if there is a significant change from previous
measurements or from the device specifications.
Figure 2-1 is a block diagram of a typical line-operated instrument with patient
connections. Measured parameters are labeled, and the discussions that follow
are keyed to the labels in the diagram.
I
L
L1 (Hot)
V
L
C
L
Z
I
L2 (Neutral)
Ground
I
E
I
C
Earth
Z
L
C
R
L
R
G
L
ENCLOSURE
Grounded
Data and
Control
Circuits
CHASSIS
Isolated
Patient
Circuit
Figure 2-1. Block Diagram of a Line-operated Instrument
I
A
I
I
120/220 Vac
I
P
fcu20.eps
2-3
Page 28

DALE601/601E
Operators Manual
Preparing the Analyzer for Use
XW Warning
To avoid possible electrical shock or personal injury to the
patient, disconnect all patient connections to the device to
be tested before starting.
To prepare the Analyzer for use:
1. Place the Analyzer’s switches in the following initial positions:
FUNCTION switch Mains Voltage
NEUTRAL switch CLOSED
OUTLET switch OFF (center)
2. Plug the Analyzer into a properly-rated outlet.
XW Warning
To avoid possible electrical shock or personal injury to the
patient, plug the Analyzer only into a grounded, “Hospital
Grade” power receptacle. Do not circumvent this
precaution for any reason.
The Analyzer is equipped with a hospital-grade power plug. Grounding
reliability can be achieved only when the Analyzer is connected to an
equivalent power receptacle marked "Hospital Grade." Grounding is
important for personnel safety and to make some of the tests offered by
the Analyzer.
Note
This device is sensitive to electromagnetic fields. If interference is
encountered in measurements, reconfigure the test setup or contact
the manufacturer.
2-4
Page 29

Operation
Preliminary Steps
2
Verifying the Power Outlet Connections
Note
This section is not applicable to isolated power systems or to the
601E (230 V version).
Three neon lamps provide indication of the polarity and condition of the outlet
used, as determined by the following chart.
REV
● ● ● ○ ○
OK ● ○ ○ ○ ●
○ ● ○ ○ ●
Correct
wiring
Reverse
polarity
Open
ground
Open hot
Hot /
ground
reversed
Note
Lamps do not check open neutral or neutral/ground reversal.
If the line is found faulty, correct the problem before proceeding. If the line
checks OK, plug the device to be tested into the Analyzer's line receptacle.
XW Warning
To avoid possible electrical shock or personal injury due
to faulty device under test, follow these guidelines:
• Do not touch the metal chassis, any accessible
conductive part, or terminal of the DUT with mains
power applied until all applicable tests have been
completed and the product is verified as compliant.
• Keep fingers behind guards on supplied test
accessories and/or if necessary remove power from
the DUT before making necessary connections.
2-5
Page 30

DALE601/601E
Operators Manual
Measuring Line (Mains) Voltage
Line Voltage (VL) is the mains power supplied by the electrical distribution
system of the hospital. It is shown as a three-wire system of HOT, NEUTRAL
(L2) and GROUND with NEUTRAL, like GROUND, returned to true earth at
entry into the building.
Measurement is made between the HOT and NEUTRAL wires via transformer
coupling to isolate the measuring circuits from the line.
To measure line voltage:
1. Set the FUNCTION switch to MAINS VOLTAGE (the recommended
starting position).
MAINS VOLTAGE
CURRENT AMPS
EARTH RESISTANCE
EARTH LEAKAGE
ENCLOSURE LEAKAGE
PATI E NT LEAD LEAKAGE
PATI E NT AUX CURRENT
M.A.P.
EXTERNAL
fcu03.eps
The Analyzer displays the mains voltage with a resolution of 1 V.
2. Set the OUTLET switch to the NORMAL position and POWER ON the
DUT.
3. The Analyzer displays mains voltage, but under the load of the device
being tested. Depending on the DUT operating current and the electrical
supply wiring, the voltage differential may be significant.
Note
The difference between the line voltages with the DUT powered off
and powered on indicates whether the line is adequate for the device.
A large drop may suggest that a dedicated, higher ampacity line
should be run in for the device.
2-6
Page 31

Operation
Measuring Device Current
2
4. Check the value under load against the DUT ratings to be sure that the
actual value remains within prescribed limits.
Measuring Device Current
Device Current (IL) (instrument current) is that used by the DUT. When
powered on, the DUT should be operated in its various modes to determine the
worst condition to track. Verify that the DUT current is within the current
rating of the Analyzer being used.
Measurement is made in the HOT wire via transformer coupling to ensure that
the total current is measured, because it is possible that the NEUTRAL and
GROUND wires share the return path
To measure device current.
1. Set the FUNCTION switch to CURRENT AMPS.
MAINS VOLTAGE
CURRENT AMPS
EARTH RESISTANCE
EARTH LEAKAGE
ENCLOSURE LEAKAGE
PATI E NT LEAD LEAKAGE
PATI E NT AUX CURRENT
M.A.P.
EXTERNAL
fcu04.eps
The Analyzer displays the DUT current to 19.99 A.
2. Set the OUTLET switch to NORMAL and L2 to CLOSED.
3. POWER ON the DUT and place it in its maximum load condition to
obtain the proper reading.
4. Log this data and note changes in values to help detect problems early.
2-7
Page 32

DALE601/601E
Operators Manual
Measuring Earth Resistance
Earth Resistance (RG) (grounding resistance) is the resistance from the DUT
conductive "grounded" chassis to the grounding terminal on the receptacle into
which it is plugged. Maintaining a low resistance is important to protect the
chassis from becoming "hot" with current as a result of an internal fault. The
resulting voltage drop across the ground wire raises the potential of the chassis
with respect to the local ground, creating a potential hazard.
The ground wire in the power cable is responsible for most of the resistance,
which is proportional to the cable length. See Table 2-1 for typical values for a
10-foot cable. The resistance measurement also includes the junction
resistance in connecting the wire at both ends and the bulk resistance of the
chassis from the grounding point to the point of measurement.
Low resistance values are being measured between the clip on the black
chassis cable and the grounding pin receptacle of the Analyzer. Therefore, the
Analyzer uses a four wire Kelvin bridge to make the measurement, avoiding
errors caused by the contact resistance of the cable connectors and the length
of the test cable.
Table 2-1. Ground Resistance of a Ten-foot Power Cable
Wire Size (AWG) Resistance (milliohms)
18 64
16 41
14 25
Note
Underwriters Laboratory (UL) limits the ground resistance for new
products to 100 m
Association (NFPA) limits ground resistance to 150 m
products and 500 m
Ω
(0.1 Ω), and the National Fire Protection
Ω
for new
Ω
for devices in the field.
To measure earth resistance:
Note
This test is applicable only to devices using three-wire (grounded)
power cords.
2-8
Page 33

Operation
Measuring Earth Resistance
2
1. Set the OUTLET switch to the OFF position.
2. Connect the standard cable (supplied with unit) that has a black coil cord
cable with the clamp with black insulation to the CHASSIS connector on
the top panel of the Analyzer.
3. Clamp the cable clip to the exposed chassis of the DUT or to the
enclosure, if conductive.
Note
Ensure that bare metal is reached and that both jaws of the clip are in
contact with the chassis. Do not use metal labels or incidental
conductive hardware for this test.
4. Once connection is made, set the FUNCTION switch to EARTH
RESISTANCE.
MAINS VOLTAGE
CURRENT AMPS
EARTH RESISTANCE
EARTH LEAKAGE
ENCLOSURE LEAKAGE
PATIENT LEAD LEAKAGE
PATIENT AUX CURRENT
M.A.P.
EXTERNAL
fcu05.eps
The earth resistance value is displayed to 19.99 Ω.
2-9
Page 34

DALE601/601E
Operators Manual
Measuring Leakage Current
Leakage current is the flow of current through or over the surface of an
insulating material or insulator. Leakage current is caused by the proximity of
the hot wire or line potential components to the chassis. In Figure 2-1, this
relationship is represented by Z
resistance (R
) components. For example, if a person comes in contact with an
L
operational device, leakage current flows from the contact point, through the
person’s body, and back to ground. Measurement of leakage current is required
on all mains power products.
Earth Leakage Current
Earth Leakage Current (IE) (internal chassis current) flows in the ground wire
of the power cable to return the chassis leakage current to true earth ground.
This current is not a hazard if the ground wire remains intact and the current
does not become excessive. This leakage can occur if a major fault results in
the ground wire sharing the load current with the neutral wire or in supplying
the total return. The measurement is made using the 1000 Ω AAMI load
placed directly in series with the ground wire. Open neutral usually represents
the worst case.
, a combination of capacitance (CL) and
L
To measure earth leakage current:
Note
Earth leakage current flows normally in the ground wire of the
device. This test is applicable only to devices using three-wire
(grounded) power cords.
1. Set the FUNCTION switch to EARTH LEAKAGE.
2-10
Page 35

Operation
Measuring Leakage Current
MAINS VOLTAGE
CURRENT AMPS
EARTH RESISTANCE
EARTH LEAKAGE
ENCLOSURE LEAKAGE
PATIENT LEAD LEAKAGE
PATIENT AUX CURRENT
M.A.P.
EXTERNAL
2
fcu06.eps
The leakage current displays to 1999 µA.
2. Take measurements under all combinations of the OUTLET switch in
NORMAL and REVERSE, the L2 NEUTRAL switch in CLOSED and
OPEN, and the device power turned ON and OFF.
Note
Be sure to pause in the OFF (middle) position when switching from
NORMAL to REVERSE.
Enclosure (Chassis) Leakage Current
Enclosure Leakage Current (IC) flows between the accessible conductive
chassis or enclosure and earth ground, as measured through a 1000 Ω
impedance. Under the condition of an open ground, this current is the same as
the earth current. With ground intact, the current should be very low, reflecting
the mΩ impedance of the ground wire paralleling the 1000 Ω AAMI load.
Note
Differentiation is made between earth and chassis currents because
the wide use of insulated enclosures makes a conductive chassis
inaccessible. Under this condition, earth current represents total
leakage.
To measure enclosure leakage current:
1. Connect the standard cable (supplied with unit) that has a black coil cord
cable with the clamp with black insulation to the CHASSIS connector on
the top panel of the Analyzer.
2-11
Page 36

DALE601/601E
Operators Manual
2. Clamp the cable clip to accessible conductive sections of the chassis and
the enclosure.
Note
Ensure that bare metal is reached and that both jaws of the clip are in
contact with the chassis. Do not use metal labels or incidental
conductive hardware for this test.
3. Set the FUNCTION switch to ENCLOSURE LEAKAGE.
MAINS VOLTAGE
CURRENT AMPS
EARTH RESISTANCE
EARTH LEAKAGE
ENCLOSURE LEAKAGE
PATI E NT LEAD LEAKAGE
PATI E NT AUX CURRENT
M.A.P.
EXTERNAL
fcu07.eps
The enclosure leakage displays in µA.
4. Take measurements under all combinations of the OUTLET switch in
NORMAL and REVERSE, the GROUND switch CLOSED and
OPEN, the L2 NEUTRAL switch in CLOSED and OPEN, and the
device power turned ON and OFF.
Note
Be sure to pause in the OFF (middle) position when switching from
NORMAL to REVERSE.
Patient Lead Leakage Current
Patient Lead Leakage Current (IP) (source current) would flow through
individual patient leads and all of the patient leads connected together, if the
patient were to come into contact with earth ground. This test was originally
required only for devices incorporating intra-cardiac electrodes or conductive
2-12
Page 37

Operation
Measuring Leakage Current
2
pathways directly to the heart, but it has become standard for all devices
having any patient-applied parts.
This test simulates the condition of a patient with leads attached touching
ground such as an electric bed. If the patient connections are not isolated, this
current reflects the earth current when tested under the open ground condition,
as this is its only path back to true earth. For devices incorporating isolated
patient connections, this current is reduced by the patient isolating impedance
Z
, a combination of resistive and capacitive leakage.
I
Measurement is made to the lead selected by the lead selector switch, with the
other side of the AAMI load connected to system ground.
To measure patient lead leakage:
1. Connect the patient leads to the corresponding universal connectors on the
front of the Analyzer.
2. Set the FUNCTION switch to PATIENT LEAD LEAKAGE.
MAINS VOLTAGE
CURRENT AMPS
EARTH RESISTANCE
EARTH LEAKAGE
ENCLOSURE LEAKAGE
PATI E NT LEAD LEAKAGE
PATI E NT AUX CURRENT
M.A.P.
EXTERNAL
fcu08.eps
The leakage current displays in µA.
2-13
Page 38
DALE601/601E
Operators Manual
3. Select the lead to be tested by the LEADS switch.
LEADS
4. Take measurements for any combination of the OUTLET switch, the
ground intact or lifted, and the DUT power ON or OFF.
5. Rotate the LEADS switch to test each lead individually, including the
ALL position for testing all leads connected together.
LEADS
Current measured should be the same for all leads, including the ALL
position, as the current represents the isolation impedance to the patient
circuit.
fcu12.eps
fcu17.eps
2-14
Page 39

Operation
Measuring Patient Auxiliary Current
2
Measuring Patient Auxiliary Current
Patient Auxiliary Current (IA) (lead-to-lead current) flows from any patient
lead to any other patient lead and to all other leads connected together,
including:
• Bias current of the input amplifier
• Reverse leakage current of input protection diodes
• Lead-off sensing current
• Impedance measurement current such as for respiration
The currents can be dc or ac or a combination of both. They are measured
using a true rms to provide the common base necessary for accurate readout
with a variety of common waveforms.
Measurement is made with a completely floating circuit to avoid extraneous
leakage currents to ground introducing errors. Measurement is made from the
selected lead to all other leads connected together, thus reducing the
permutations required to cover all possibilities.
To measure patient auxiliary current:
1. Connect the patient leads to the universal connectors on the front of the
analyzer.
2. Set the FUNCTION switch to PATIENT AUX CURRENT.
MAINS VOLTAGE
CURRENT AMPS
EARTH RESISTANCE
EARTH LEAKAGE
ENCLOSURE LEAKAGE
PATI E NT LEAD LEAKAGE
PATI E NT AUX CURRENT
M.A.P.
EXTERNAL
fcu09.eps
2-15
Page 40

DALE601/601E
Operators Manual
3. Select by the LEADS switch to test individual leads.
LEADS
fcu12.eps
4. Make measurements under all combinations of the OUTLET switch,
NORMAL and REVERSE; the NEUTRAL switch CLOSED and
OPEN; GROUND CLOSED and the LIFT GROUND switch OPEN;
and the device power turned ON and OFF.
Under normal conditions, the current is primarily input bias current,
measuring current or leadoff sensing current. The worst case condition is
measured from the individual lead to all other leads connected together.
The single lead carrying the most current is generally considered the
reference lead (RL) because it acts as the return for the other leads.
Therefore, the leads can be taken in groups of four with the common
reference lead (RL) and then summed.
Measuring MAP (Patient Lead Isolation) Current
MAP (Mains on Applied Parts) Current (II) (patient lead isolation current) is
that which would flow into the DUT if the patient were to come into contact
with full line voltage. An example is an electric patient bed that has become
ungrounded and has a short to the frame.
Measurement is made in each individual leads, but a common value is found
for all leads, as well as for the ALL position, as this is the measurement for the
isolation of the patient circuit. To assure proper reading, the test should be run
with ground intact. For additional safety, the current is applied to the patient
leads only when the ISO TEST switch is pressed.
2-16
Page 41

Operation
Measuring MAP (Patient Lead Isolation) Current
2
For this test, the Analyzer provides a specially shielded line voltage secondary
on its power transformer that minimizes internal leakage currents from the
measuring circuit. This avoids the necessity of measuring the current and
subtracting it from all readings. The current is limited with a 120 KΩ resistor
for user protection.
XW Warning
To avoid possible electrical shock or personal injury to the
patient, take care when handling the patient leads. High
voltage, 120/230 volts with respect to earth ground, is
accessible at the patient connections during part of this
test.
To measure lead isolation sink current:
1. Connect the patient leads to the universal lead connectors on the front of
the analyzer.
2. Set the FUNCTION switch to M.A.P.
MAINS VOLTAGE
CURRENT AMPS
EARTH RESISTANCE
EARTH LEAKAGE
ENCLOSURE LEAKAGE
PATI E NT LEAD LEAKAGE
PATI E NT AUX CURRENT
M.A.P.
EXTERNAL
fcu10.eps
3. Select the individual lead to be tested by the LEADS switch.
2-17
Page 42

DALE601/601E
Operators Manual
LEADS
fcu12.eps
4. Press the ISO TEST switch to safely apply the high voltage to the leads.
5. While the ISO TEST is energized, read the isolation current in µA.
6. Take measurements for all combinations of the OUTLET in both
NORMAL and REVERSE and L2 switch CLOSED and with the DUT
ON and OFF.
External Measurements
The Analyzer provides the extended capability of making leakage current and
isolation current measurements between selected points, performing as
follows:
• An ohmmeter capable of measuring resistance in the mΩ range for chassis
bonding measurements.
• A low impedance (1000 Ω) voltmeter as specified by the NFPA, with a
range to 1999 mV.
• A 1000 µA ammeter to measure the leakage current between two devices
or between the DUT and a local ground reference. Range is to 1999 µA.
• An isolation tester for testing ultrasound probes and other transducers
independently from the device in which it is used.
Note
Additional optional accessory cables must be purchased to perform
these tests.
2-18
Page 43

Operation
External Measurements
2
Leakage Current
Leakage Current and Voltage Gradients between two points are also measured
for permanently installed equipment as additional verification of the integrity
of the installation. These measurements are equivalent, because the
relationship between volts and current across 1000 Ω is one mV per µA.
To measure leakage current and voltage gradient between two points:
1. Connect the black coil cord cable with the clamp with black insulation to
the CHASSIS connector and the black cable with the clamp with red
insulation to the EXTERNAL connector on the top panel of the Analyzer.
Note
Do not plug a device into the Analyzer. The measurement circuit must
remain isolated from ground.
2-19
Page 44
DALE601/601E
Operators Manual
2. Set the FUNCTION switch to EXTERNAL.
MAINS VOLTAGE
CURRENT AMPS
EARTH RESISTANCE
EARTH LEAKAGE
ENCLOSURE LEAKAGE
PATI E NT LEAD LEAKAGE
PATI E NT AUX CURRENT
M.A.P.
EXTERNAL
3. Clip the cables to the two points for which leakage current is to be
measured.
The Analyzer displays the leakage current between the two points to 1999
µA. The number displayed is also the voltage gradient in mV between the
two points, based on a voltmeter with an input impedance of 1000 Ω.
fcu11.eps
Electrical Isolation
Isolation testing of probes and transducers that make internal contact to a
patient is provided to assure the reliability of the isolation barrier. Such devices
incorporate electrical circuits that can introduce or sink hazardous currents to a
patient who comes into contact with line potential or who becomes grounded.
Note
For devices that require sterilization before use, testing before
sterilization is recommended.
To measure electrical isolation of a probe or transducer:
1. Connect the black coil cord cable with the clamp with black insulation to
the CHASSIS connector and the black cable with the clamp with red
insulation to the EXTERNAL connector on the top panel of the Analyzer.
2-20
Page 45

Operation
External Measurements
2
2. Set the FUNCTION switch to EXTERNAL.
MAINS VOLTAGE
CURRENT AMPS
EARTH RESISTANCE
EARTH LEAKAGE
ENCLOSURE LEAKAGE
PATI E NT LEAD LEAKAGE
PATI E NT AUX CURRENT
M.A.P.
EXTERNAL
fcu11.eps
3. Press the ISO TEST switch.
This action applies isolated line voltage between the two sides. The
Analyzer displays the isolation current that flows.
Note
The method for making connection to either side of the isolation
barrier varies with the device to be tested.
XW Warning
To avoid possible electrical shock or personal injury take
care when handling the cables. High voltage, 110 percent
of line volts, will be accessible between the two cables
when the LIFT GROUND/ISO TEST switch is in the ISO
TEST position.
Resistance
Resistance measurements between two points are made to verify the integrity
of permanently installed equipment whose ground cannot be broken to
measure the chassis leakage current. These are usually high power devices,
which can have high leakage currents and depend on the bonding of all chassis
to a common point for safety. It is recommended that these devices be powered
off for testing.
2-21
Page 46

DALE601/601E
Operators Manual
Measurement is made with a 10 mA dc current and is highly resistant to ac
currents flowing between the measurement points as a result of chassis leakage
current from either or both devices. However, such leakage current may have a
dc component from rectification within the instrument. This dc current adds
and subtracts from the measurement current, resulting in some error that can be
corrected for by reversing the connections, remeasuring, and averaging the two
readings.
To measure resistance between two points:
1. Connect the two black chassis cables with clamps with black insulation to
the CHASSIS and EXTERNAL connectors on the top panel of the
Analyzer.
2. Clip the cables onto the two points to be measured.
Note
Do not plug a device into the Analyzer. Ensure that ground
connections do not provide parallel measurement circuits causing
erroneous results.
3. Set the FUNCTION switch to EARTH RESISTANCE.
MAINS VOLTAGE
CURRENT AMPS
EARTH RESISTANCE
EARTH LEAKAGE
ENCLOSURE LEAKAGE
PATIENT LEAD LEAKAGE
PATIENT AUX CURRENT
M.A.P.
EXTERNAL
The display shows the resistance between the two points.
2-22
fcu05.eps
Page 47

Chapter 3
Maintenance and Service
Contents Page
Maintenance................................................................................. 3-3
Avoiding Damage .................................................................... 3-3
Cleaning ................................................................................... 3-3
Verifying Analyzer Performance................................................. 3-4
Service and Calibration................................................................ 3-6
3-1
Page 48

DALE601/601E
Operators Manual
3-2
Page 49

Maintenance and Service
Maintenance
3
Maintenance
The Analyzer requires little maintenance or special care; however, it is a
calibrated measuring instrument and should be treated as such. Store the
Analyzer in its optional carry case, and ensure that the storage environment is
free from vibration.
Avoiding Damage
Do not drop the instrument or subject it to any mechanical abuse that could
cause a shift in the calibrated settings.
W Caution
To avoid damage to the Analyzer or adverse affects on its
performance, do not expose the system to temperature
extremes. Ambient temperatures should remain between
15 °C and 40 °C, with a relative humidity less than 90 %.
Cleaning
Clean the exterior of the Analyzer occasionally with a cloth dampened with a
mild detergent solution.
W Caution
To avoid damage to the Analyzer or adverse affects on its
performance, do not spray liquid directly on or immerse
the unit.
Carefully wipe down the cables and inspect them for damage and deterioration
of the insulation. Check the cable connections for integrity of the cable clamp
and strain relief.
3-3
Page 50

DALE601/601E
Operators Manual
Verifying Analyzer Performance
The general performance of the Analyzer can be verified, using the procedures
summarized in Table 3-1 and the parameters in Table 3-2. If the Analyzer does
not perform correctly, contact the Fluke Biomedical Service Center
immediately.
Table 3-1. Performance Verification Parameters
Parameter Procedure Desired Reading
Mains Voltage Use a multimeter. Volts
Current
Resistance
Enclosure
Leakage
Patient Lead
Leakage
Patient Aux.
Leakage
Connect a lamp with a
standard incandescent
bulb to the DUT receptacle
and set the OUTLET
switch to NORMAL.
Connect the black chassis
cable with black insulation
to the CHASSIS connector
and clip it to the 0.15 Ω
test point.
Connect the black chassis
cable with a clamp with
black insulation to the
CHASSIS connector and
clip it to the 100 µA test
point.
Attach a clip lead to the
100 µA test point and the
other end to the LEAD
snap selected.
Attach a clip lead to the
100 µA test point and the
other end to the LEAD
snap selected.
Amps, approximately as
shown in Table 3-2
0.15 ±0.02 Ω
100 ±2 µA
100 ±2 µA
100 ±2 µA
3-4
Page 51

Maintenance and Service
Verifying Analyzer Performance
Table 3-1 Performance Verification Parameters (cont.)
Parameter Procedure Desired Reading
3
M.A.P. (lead
isolation current)
External; for
leakage current
measurement
Isolation Clip the black external
Calibration Do not attempt. Not Applicable
Connect the black chassis
cable with a clamp with
black insulation to the
EXTERNAL connector and
the clip to the lead
selected. Press ISO
TEST.
Connect the black external
cable with a clamp with
red insulation to the
EXTERNAL connector and
the clip to the 100 µA test
point.
cable with a clamp with
red insulation to the black
chassis cable and press
the ISO TEST switch.
1000 ±15 %, depending on
line voltage
100 ±2 µA
1000 ±15 %, depending on
the line voltage
Table 3-2. Current Verification Parameters
Bulb (Watts)
120 V Line 230 V line
60 0.50 0.30
75 0.63 0.35
100 0.83 0.45
150 1.25 0.70
Current (Amps)
3-5
Page 52

DALE601/601E
Operators Manual
Service and Calibration
If the new Analyzer fails to operate properly or if it needs a recommended
yearly calibration, please contact the Fluke Biomedical Service Center
immediately, as indicated under Warranty and Product Support.
W Caution
To avoid damage to the Analyzer or adverse affects on its
performance, allow only qualified technical personnel to
service the Analyzer.
Packing
If repairs or calibration are required, return the Analyzer to the factory or the
nearest service center.
1. Before returning the Analyzer for factory service, contact Fluke
Biomedical Service Center for a required Return Authorization Number.
2. Provide the following information:
• The Analyzer serial number
• The specific steps that reproduce your problem
• A daytime phone number
• Your name / company
• A fax number (if available)
3. Pack the instrument carefully, using the original shipping container and
packing materials supplied by Fluke Biomedical. If the original packing
materials are not available, refer to Return Procedures for a list of
preferred materials or contact Fluke Biomedical for replacement packing.
Note
Failure to pack the instrument properly could void your warranty.
3-6
Page 53

Maintenance and Service
Service and Calibration
3
Shipping
1. Place the Return Authorization Number in a prominent place on the
outside of the packing box, and refer to the number in any correspondence
with Fluke Biomedical Service.
2. Enclose your return address and Return Authorization Number.
3. Insure the unit for full retail value and ship to the nearest Fluke
Biomedical service center.
3-7
Page 54

DALE601/601E
Operators Manual
3-8
 Loading...