

Page 1

CNX 3000
Wireless Multimeter
Users Manual
August 2012
© 2012 Fluke Corporation. All rights reserved. Specifications are subject to change without notice.
All product names are trademarks of their respective companies.
Page 2

LIMITED WARRANTY AND LIMITATION OF LIABILITY
This Fluke product will be free from defects in material and workmanship for three years from the date of purchase. This
warranty does not cover fuses, disposable batteries, or damage from accident, neglect, misuse, alteration, contamination, or
abnormal conditions of operation or handling. Resellers are not authorized to extend any other warranty on Fluke’s behalf.
To obtain service during the warranty period, contact your nearest Fluke authorized service center to obtain return
authorization information, then send the product to that Service Center with a description of the problem.
THIS WARRANTY IS YOUR ONLY REMEDY. NO OTHER WARRANTIES, SUCH AS FITNESS FOR A PARTICULAR
PURPOSE, ARE EXPRESSED OR IMPLIED. FLUKE IS NOT LIABLE FOR ANY SPECIAL, INDIRECT, INCIDENTAL OR
CONSEQUENTIAL DAMAGES OR LOSSES, ARISING FROM ANY CAUSE OR THEORY. Since some states or countries
do not allow the exclusion or limitation of an implied warranty or of incidental or consequential damages, this limitation of
liability may not apply to you.
Fluke Corporation
P.O. Box 9090
Everett, WA 98206-9090
U.S.A.
11/99
Fluke Europe B.V.
P.O. Box 1186
5602 BD Eindhoven
The Netherlands
Page 3

Table of Contents
Title Page
Introduction .................................................................................................................... 1
How to Contact Fluke ..................................................................................................... 1
Safety Information .......................................................................................................... 1
Hazardous Voltage ......................................................................................................... 5
Test Lead Alert ............................................................................................................... 5
Battery Saver ................................................................................................................. 5
MIN MAX AVG Record Mode ......................................................................................... 6
Display Hold ................................................................................................................... 7
Yellow Button ................................................................................................................. 7
Display Backlight ............................................................................................................ 7
Manual and Auto Range ................................................................................................. 7
Power-Up Options .......................................................................................................... 8
Features ......................................................................................................................... 9
AC Zero Input Behavior of True-rms Meters .................................................................. 13
Basic Measurements ...................................................................................................... 13
i
Page 4

CNX 3000
Users Manual
AC and DC Voltage Measurements .......................................................................... 13
Volts/Hertz Ratio ....................................................................................................... 15
Resistance Measurements ....................................................................................... 16
Capacitance Measurements ..................................................................................... 17
Continuity Test .......................................................................................................... 18
AC or DC Current Measurements ............................................................................. 19
Diode Test ................................................................................................................ 21
Frequency Measurement .......................................................................................... 23
Remote Operation ......................................................................................................... 25
Radio Frequency Data .............................................................................................. 25
Discovery of Modules ................................................................................................ 26
How to Unbind a Module from the Product ............................................................... 29
How to Set the Product to Module Mode .................................................................. 29
Maintenance ............................................................................................................. 30
General Maintenance ................................................................................................ 30
Fuse Test ....................................................................................................................... 31
Battery and Fuse Replacement ..................................................................................... 32
Service and Parts .......................................................................................................... 34
Specifications ................................................................................................................ 36
Detailed Specifications .............................................................................................. 38
AC Voltage ................................................................................................................ 38
DC Voltage, Continuity, Resistance, Diode Test, and Capacitance .......................... 39
AC and DC Current ................................................................................................... 40
Frequency ................................................................................................................. 40
Frequency Counter Sensitivity .................................................................................. 41
Input Characteristics ................................................................................................. 42
MIN MAX Recording ................................................................................................. 42
ii
Page 5

List of Tables
Table Title Page
1. Symbols ................................................................................................................................. 4
2. Power-Up Options ................................................................................................................. 8
3. Inputs .................................................................................................................................... 9
4. Rotary Switch Positions ......................................................................................................... 10
5. Pushbuttons .......................................................................................................................... 11
6. Replaceable Parts ................................................................................................................. 34
7. Accessories ........................................................................................................................... 36
iii
Page 6

CNX 3000
Users Manual
iv
Page 7

List of Figures
Figure Title Page
1. AC and DC Voltage Measurements ...................................................................................... 14
2. Volt/Hertz Ratio ..................................................................................................................... 15
3. Resistance Measurements .................................................................................................... 16
4. Capacitance Measurements .................................................................................................. 17
5. Continuity Tests ..................................................................................................................... 18
6. AC and DC Current Measurements ....................................................................................... 20
7. Diode Test ............................................................................................................................. 22
8. Frequency Measurement....................................................................................................... 24
9. Module Binding Procedure .................................................................................................... 28
10. Fuse Test .............................................................................................................................. 31
11. Battery and Fuse Replacement ............................................................................................. 33
12. Replacement Parts ................................................................................................................ 35
v
Page 8

CNX 3000
Users Manual
vi
Page 9

Introduction
Warning
To prevent possible electrical shock, fire, or
personal injury, read all safety information
before you use the Product.
The CNX 3000 Wireless Multimeter (the Product) is a
True-rms Digital Multimeter.
How to Contact Fluke
To contact Fluke, call one of the following telephone
numbers:
• Technical Support USA: 1-800-44-FLUKE (1-800-
443-5853)
• Calibration/Repair USA: 1-888-99-FLUKE (1-888-
993-5853)
• Canada: 1-800-36-FLUKE (1-800-363-5853)
• Europe: +31 402-675-200
• Japan: +81-3-6714-3114
• Singapore: +65-6799-5566
• Anywhere in the world: +1-425-446-5500
Or, visit Fluke's website at www.fluke.com.
To register your product, visit http://register.fluke.com.
To view, print, or download the latest manual supplement,
visit http://us.fluke.com/usen/support/manuals.
Safety Information
The Product complies with:
• ANSI/ISA-82.02.01
• CAN/CSA-C22.2 No. 61010-1-12: 3rd Edition
• UL 61010-1: 3rd Edition
• IEC/EN 61010-1:2010
• FCC Part 15 Subpart C Section 15.207, 15.209,
15.249 FCCID: T68-FWCS
• IC:6627A-FWCS
• Measurement Category III, 1000V, Pollution
Degree 2
• Measurement Category IV, 600V, Pollution Degree 2
1
Page 10

CNX 3000
Users Manual
A Warning identifies conditions and procedures that are
dangerous to the user. A Caution identifies conditions
and procedures that can cause damage to the Product or
the equipment under test.
A list of symbols used on the Product and in this manual
is in Table 1.
Warning
To prevent possible electrical shock, fire, or
personal injury:
• Carefully read all instructions.
• Use the Product only as specified, or the
protection supplied by the Product can
be compromised.
• Limit operation to the specified
measurement category, voltage, or
amperage ratings.
• Do not use the Product around explosive
gas, vapor, or in damp or wet
environments.
• Do not touch voltages > 30 V ac rms,
42 V ac peak, or 60 V dc.
• Do not exceed the Measurement
Category (CAT) rating of the lowest rated
individual component of a Product,
probe, or accessory.
• Measure a known voltage first to make
sure that the Product operates correctly.
• Do not use, and disable the Product if it
is damaged.
• Do not work alone.
• Comply with local and national safety
codes. Use personal protective
equipment (approved rubber gloves, face
protection, and flame-resistant clothes)
to prevent shock and arc blast injury
where hazardous live conductors are
exposed.
• Replace the batteries when the low
battery indicator shows to prevent
incorrect measurements.
• The battery door must be closed and
locked before you operate the Product.
2
Page 11

Wireless Multimeter
Safety Information
• Do not use the Product if it operates
incorrectly.
• Examine the case before you use the
Product. Look for cracks or missing
plastic. Carefully look at the insulation
around the terminals.
• Use only correct measurement category
(CAT), voltage, and amperage rated
probes, test leads, and adapters for the
measurement.
• Do not use test leads if they are
damaged. Examine the test leads for
damaged insulation, exposed metal, or if
the wear indicator shows. Check test
lead continuity.
• Keep fingers behind the finger guards on
the probes.
• Do not touch the probes to a voltage
source when the test leads are
connected to the current terminals.
• Connect the common test lead before
the live test lead and remove the live test
lead before the common test lead.
• Remove all probes, test leads, and
accessories that are not necessary for
the measurement.
3
Page 12
CNX 3000
Users Manual
Table 1. Symbols
Symbol Description Symbol Description
Risk of Danger. Important information. See
Manual.
Hazardous voltage.
Conforms to European Union directives. Conforms to relevant Australian EMC requirements.
Battery Double insulation.
CAT III
CAT II
4
Conforms to relevant North American Safety
Standards.
Measurement Category III is applicable to test
and measuring circuits connected to the
distribution part of the building’s low-voltage
MAINS installation.
Measurement Category II is applicable to test and measuring circuits connected directly to utilization points
(socket outlets and similar points) of the low-voltage MAINS installation.
Fuse
Measurement Category IV is applicable to test and
CAT IV
measuring circuits connected at the source of the
building’s low-voltage MAINS installation.
Page 13
Wireless Multimeter
Hazardous Voltage
Table 1. Symbols (cont.)
Symbol Description
This product complies with the WEEE Directive (2002/96/EC) marking requirements. The affixed label indicates
that you must not discard this electrical/electronic product in domestic household waste. Product Category: With
reference to the equipment types in the WEEE Directive Annex I, this product is classed as category 9
"Monitoring and Control Instrumentation" product. Do not dispose of this product as unsorted municipal waste. Go
to Fluke’s website for recycling information.
Hazardous Voltage
The display shows and the hazardous voltage indicator
illuminates red when a hazardous voltage (≥30 V) is
present on the input of the Product
Test Lead Alert
The display shows LEAD for a second when you turn the
function switch to or from the mA position to remind you
to make sure the test leads are in the correct terminals.
Battery Saver
The Product goes into “Sleep mode” and turns off the
display if there is no function change or button pushed for
20 minutes. To turn off the sleep mode, push
you turn on the Product. The sleep mode is always turned
off for a MIN MAX AVG record session and when remote
modules are shown in the display.
while
5
Page 14

CNX 3000
Users Manual
MIN MAX AVG Record Mode
The MIN MAX AVG record mode records the minimum
and maximum input values, and calculates a running
average of all measurements. The Product beeps when a
new high or low is sensed.
Note
For dc functions, accuracy is the specified
accuracy of the measurement function,
±
12 counts for changes longer than 250 ms in
duration.
For ac functions, accuracy is the specified
accuracy of the measurement function
±
40 counts for changes longer than 900 ms in
duration.
To start a MIN MAX AVG record session:
1. Make sure the Product is set to the correct
measurement function and on the correct range.
Autorange is disabled while in a MIN MAX AVG
record session.
2. Push . and Max show at the top of
the display. The measurement in the display is the
maximum value measured. It will change only when
a new maximum value is sensed.
3. To pause MIN MAX AVG record, push .
shows in the display while record is paused.
Recorded values are not deleted. To continue record
session, push .
4. To exit and erase the MIN, MAX, and AVG values,
push for 1 second or turn the rotary switch.
5. To see the other recorded values (minimum and
average), push . Each push of the button
shows a different recorded value. The value shown in
the display is identified with Max, Min, or Avg to the
right of the MIN MAX icon.
Note
Battery save or sleep mode is turned off in MIN
MAX AVG record mode.
6
Page 15

Wireless Multimeter
Display Hold
Display Hold
Warning
To prevent possible electrical shock, fire, or
personal injury, do not use the HOLD
function to measure unknown potentials.
When HOLD is turned on, the display does
not change when a different potential is
measured.
In the display hold mode, the Product holds the DMM
measurement in the display. All wireless module
measurements continue to update. To hold a
measurement in the display, push . The display
shows when display hold is turned on.
Push again to stop hold mode and show
measurements in the display.
Yellow Button
Push the YELLOW button ( ) to set the Product to a
different measurement function. The different functions
are shown in yellow around the rotary switch. Frequency,
mV ac, capacitance, diode test, and mA dc are functions
of the Product set with the yellow button.
Display Backlight
Push to turn on and turn off the backlight. The
backlight automatically turns off after 2 minutes.
Manual and Auto Range
The Product can be set to manual or auto range. In
autorange, the Product sets the range so the input is
shown with the best resolution. Manual range lets you set
the range.
When you turn on the Product, it is set to autorange and
Auto shows in the display. To set the Product to manual
range, push .
Note
You cannot change range when the Product is in
the MIN MAX AVG record mode or in display
hold mode. If you push in one of these
modes, the Product will beep twice to alert you
to an invalid operation.
7
Page 16

CNX 3000
Users Manual
Power-Up Options
To set a power-up option, hold down the button shown in
Table 2 while you turn on the Product.
Table 2. Power-Up Options
Button Power-Up Option
Turns off the beeper.
Turns off battery save (“Sleep mode”).
(YELLOW)
POFF shows in the display for a second.
8
Turns off 2 minute backlight timeout. LOFF
shows in the display for a second.
Sets the Product to the module mode. See
the “How to Set the Product to Module
Mode.”
Page 17

Wireless Multimeter
Features
Features
Tables 3 through 5 are lists of Product features with descriptions.
Table 3. Inputs
31
2
gxr001.eps
Terminal Description
mA - Input for 3.00 mA to 400.0 mA current measurements and current frequency.
COM - Return terminal for all measurements.
- Input for voltage, resistance, diode, capacitance, and voltage frequency.
9
Page 18

CNX 3000
Users Manual
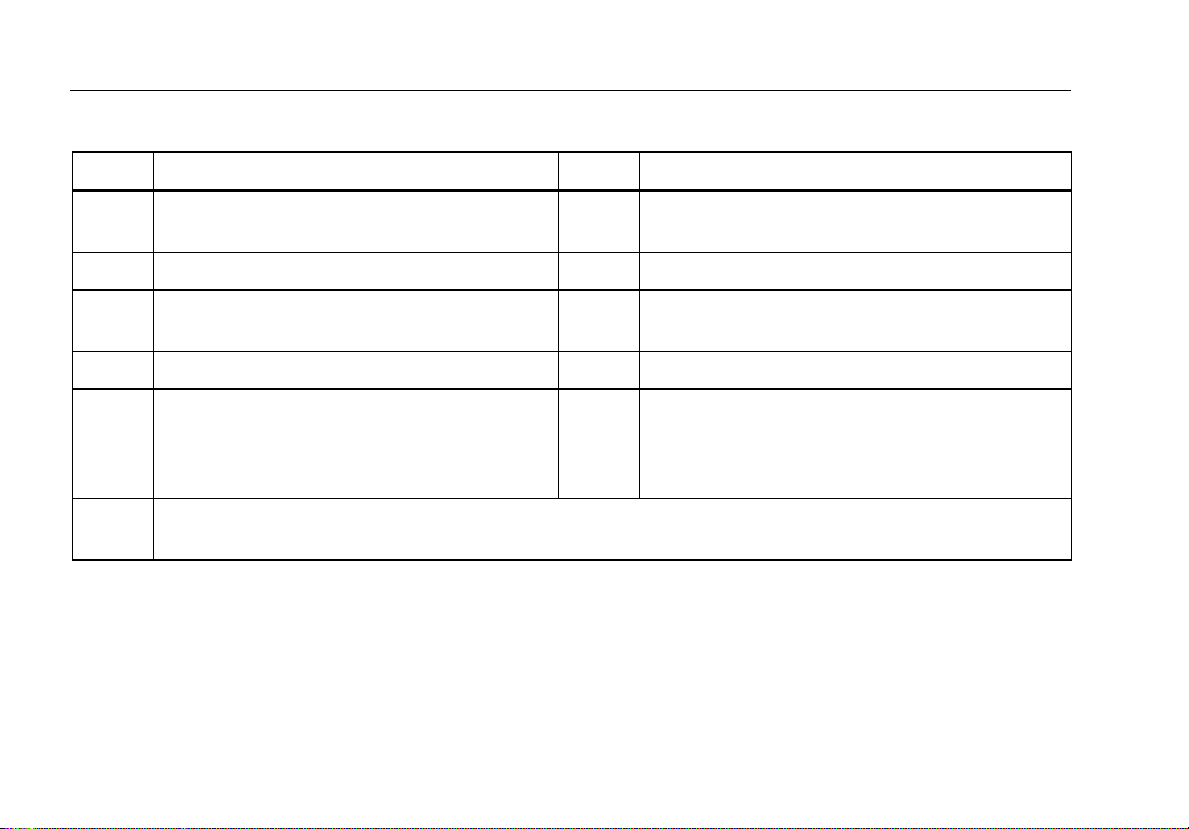
Table 4. Rotary Switch Positions
Switch
Position
Function
DC voltage from 1 mV to 1000 V.
Push
to measure frequency from 2 Hz to 99.99 kHz
AC voltage measurement from 60.0 mV to 1000 V.
Push to measure frequency from 2 Hz to 99.99 kHz.
Push
again to measure Volts/Hertz.
DC voltage measurements from 1 mV to 600 mV.
Push to measure ac voltage from 6 mV to 600 mV.
[1]
Resistance measurements from 0.1 Ω to 50 MΩ.
Push
to measure capacitance from 1 nF to 9999 μF.
Continuity. Beeper turns on at <25 Ω and turns off at >250 Ω.
Push
for diode test. Shows OL above 2.0 V.
AC current measurements from 3.00 mA to 400 mA.
Push to measure dc current from 3.00 mA to 400 mA.
Push
[1] This function will stay in ac or dc when the function switch is moved to another position and back to this function. Even when turned to off and back to
this function.
again to measure frequency from 2 Hz to 9.99 kHz.
[1]
10
Page 19

Wireless Multimeter
Features
Table 5. Pushbuttons
Button
Switch
Position
Selects frequency.
Selects frequency.
Selects ac millivolts.
Selects capacitance.
Selects diode test.
Push once to select dc milliamps. Push twice to select ac frequency.
All positions
All positions Freezes the display
Sets the Product to manual range and scrolls through each range. Push for 1 second to set
the Product to autorange.
Function
[1]
[1]
11
Page 20

CNX 3000
Users Manual
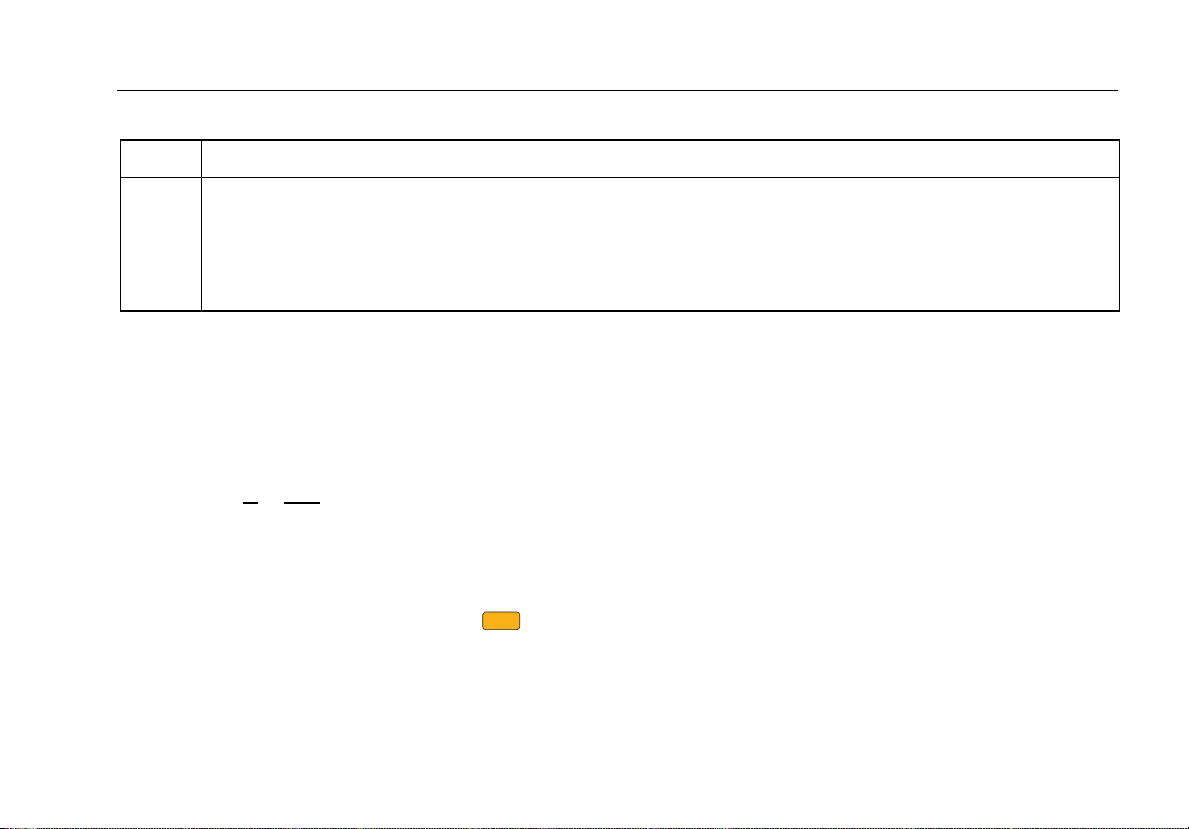
Table 5. Pushbuttons (cont.)
Button
[1] This function will stay in ac or dc when the function switch is moved to another position and back to this function. Even when turned to off and back to
this function.
[2] This button is used when the Product connects with a wireless module. See the “Discovery of Modules” section to learn more.
Switch
Position
Not related to
switch position
All positions
Not related to
switch position
Not related to
switch position
Not related to
switch position
Push once to turn on the backlight and push again to turn off the backlight. The backlight
turns off automatically after 2 minutes.
Starts the MIN MAX record function. Steps the display through MAX, MIN, AVG (average),
and input signal measurement. Push for 1 second to stop MIN MAX record.
Selects/deselects the highlighted wireless module in the display. Hold for 1 second to bind
all selected modules to the Product and stop the discovery procedure.
Moves the highlight in the display to the next wireless module shown in the display.
Turns on the radio and starts the module discovery procedure. shows in the display
when the radio is on. Turns off the radio when the radio is on.
Function
[2]
[2]
[2]
12
Page 21

Wireless Multimeter
AC Zero Input Behavior of True-rms Meters
AC Zero Input Behavior of True-rms Meters
Average responding meters can accurately measure only
pure sinewaves. A True-rms meter can accurately
measure distorted waveform signals. A minimum input
voltage is necessary for Calculating True-rms converters
to make a measurement. Because of this minimum input,
true-rms meter specifications are only good for 1 % to
100 % of range. Non-zero digits that are shown on a
true-rms meter when the test leads are open or are
shorted are possible. This has no effect on the ac
measurement accuracy of signals that are more than 1 %
of range.
Unspecified input levels on the lowest ranges are:
AC voltage less than 1 % of 600 mV ac or 6 mV ac.
AC current less than 5 % of 60 mA ac or 3 mA ac.
Basic Measurements
Warning
To prevent possible electrical shock, fire, or
personal injury, disconnect power and
discharge all high-voltage capacitors before
you measure resistance, continuity,
capacitance, or a diode junction.
The figures that follow show how to make basic
measurements with the Product.
When you connect the test leads to the circuit or device,
connect the common (COM) test lead before the live lead.
When you remove the test leads, remove the live lead
before the common test lead.
AC and DC Voltage Measurements
The voltage ranges are 600.0 mV, 6.000 V, 60.00 V,
600.0 V, and 1000 V. To set the 600.0 mV dc or ac range,
turn the function switch to
Product between millivolts dc and millivolts ac. Refer to
Figure 1 to measure ac or dc voltage.
. Push to toggle the
13
Page 22

CNX 3000
Users Manual
Volts AC
Volts DC
Figure 1. AC and DC Voltage Measurements
Millivolts DC
gxr002.eps
14
Page 23

Wireless Multimeter
Basic Measurements
Volts/Hertz Ratio
The Product can show the ratio of volts to frequency of an
ac signal. Set the Product as shown in Figure 2 to show
Volts/Hertz ratio.
When the Product is set to the Volts/Hz function, the
voltage range is set to manual. If the voltage increases to
a value larger than the range, the Product shows OL in
the display. If the voltage drops to less than 5 % of the
range, the value shown in the display can be invalid. Set
the Product as shown in Figure 2 to measure volts/Hz.
Volts/Hz
Figure 2. Volt/Hertz Ratio
Volt/Hzx 2
gxr011.eps
15
Page 24

CNX 3000
Users Manual
Resistance Measurements
Warning
To prevent possible electrical shock, fire, or
personal injury, disconnect power and
discharge all high-voltage capacitors before
you measure resistance, continuity,
capacitance, or a diode junction.
The Product sends a small current through the circuit for
resistance measurements. Because the current flows
through all possible paths between the probes, the
resistance measured is the total resistance of all paths
between the probes.
The resistance ranges are 600.0 Ω, 6.000 kΩ, 60.00 kΩ,
600.0 kΩ, 6.000 MΩ, and 50.00 MΩ. Set the Product as
show in Figure 3 to measure resistance.
16
Figure 3. Resistance Measurements
gxr003.eps
Page 25

Wireless Multimeter
Basic Measurements
Capacitance Measurements
Warning
To prevent possible electrical shock, fire, or
personal injury, disconnect power and
discharge all high-voltage capacitors before
you measure resistance, continuity,
capacitance, or a diode junction.
Capacitance ranges are 1,000 nF, 10.00 μF, 100.0 μF,
and 9999 μF. To measure capacitance, set up the
Product as shown in Figure 4.
Figure 4. Capacitance Measurements
gxr004.eps
17
Page 26

CNX 3000
Users Manual
Continuity Test
Warning
To prevent possible electrical shock, fire, or
personal injury, disconnect power and
discharge all high-voltage capacitors before
you measure resistance, continuity,
capacitance, or a diode junction.
The continuity test uses a beeper that sounds when a
closed circuit is sensed. The beeper lets you do continuity
tests without the necessity to look at the display. To do a
continuity test, set up the Product as shown in Figure 5.
18
Figure 5. Continuity Tests
gxr005.eps
Page 27

Wireless Multimeter
Basic Measurements
AC or DC Current Measurements
Warning
To prevent possible electrical shock, fire, or
personal injury:
• Remove circuit power before you
connect the Product in the circuit when
you measure current. Connect the
Product in series with the circuit.
• Limit operation to the specified
measurement category, voltage, or
amperage ratings.
Caution
To prevent possible damage to the Product
or the equipment under test:
• Do a fuse test before current
measurements. See “Fuse Test”.
• Use the correct terminals, function, and
range for all measurements.
• Do not put the probes across (in parallel
with) a circuit or component when the
test leads are connected to the current
terminals.
Turn off circuit power, break the circuit, put the Product in
series, and then turn on circuit power.
The current ranges are 60.00 mA and 400.0 mA. Set the
Product as shown in Figure 6 to measure ac and dc
current. Push
milliamps ac and milliamps dc.
to toggle the Product between
19
Page 28

CNX 3000
Users Manual
DC
20
Figure 6. AC and DC Current Measurements
gxr007.eps
Page 29

Wireless Multimeter
Basic Measurements
Diode Test
Warning
To prevent possible electrical shock, fire, or
personal injury, disconnect power and
discharge all high-voltage capacitors before
you measure resistance, continuity,
capacitance, or a diode junction
Do a diode test on diodes, transistors, silicon controlled
rectifiers (SCRs), and other semiconductor devices. The
function sends a current through the semiconductor
junction and then measures the voltage drop across the
junction. A good silicon junction drops between 0.5 V and
0.8 V.
To do a diode test on a diode out of circuit, set up the
Product as shown in Figure 7. For forward-bias
measurements on a semiconductor component, put the
red test lead on the positive terminal of the component
and put the black test lead on the negative terminal of the
component.
In a circuit, a good diode has a forward-bias
measurement of 0.5 V to 0.8 V. A reverse-bias
measurement includes the resistance of other pathways
between the probes.
A short beep sounds if the diode is good (<0.85 V). A
continuous beep sounds if the measurement is ≤0.100 V
or short circuit. The display shows “OL” if the diode is
open.
21
Page 30

CNX 3000
Users Manual
Good Diode
Reverse Bias
Good Diode
22
Bad Diode
Bad Diode
OPEN
BEEP
1
and Shorted
gxr006.eps
Figure 7. Diode Test
Page 31

Wireless Multimeter
Basic Measurements
Frequency Measurement
A frequency measurement is a count of the number of
times an ac voltage or current signal passes through a
threshold point each second.
The Product autoranges to one of four frequency ranges:
99.99 Hz, 999.9 Hz, 9.999 kHz, and 99.99 kHz.
Below are some hints for frequency measurements:
• If a measurement shows 0 Hz or is not stable, the
input signal can be below or near a trigger level. A
lower range increases the sensitivity of the Product
and can usually repair these problems.
• An input signal with distortion can cause a frequency
measurement to be higher than usual. The distortion
can cause the frequency counter to sense multiple
triggers. A higher voltage range decreases the input
sensitivity and can correct this problem. In general,
the lowest frequency is the correct one.
Set up the Product as shown in Figure 8 to measure
frequency.
23
Page 32

CNX 3000
Users Manual
AC/DC Voltage Frequency
Figure 8. Frequency Measurement
AC Current Frequency
Hzx 2Hz
gxr008.eps
24
Page 33

Wireless Multimeter
Remote Operation
Remote Operation
The Product uses low-power 802.15.4 wireless
technology to show measurements from a maximum of
three CNX 3000 Series Wireless Modules. One of the
wireless modules can be a CNX 3000 Wireless
Multimeter. The Product cannot control other DMMs or
modules. The wireless radio does not cause interference
with meter measurements.
Radio Frequency Data
Note
Changes or modifications to the wireless
2.4 GHz radio not expressly approved by Fluke
Corporation could void the user’s authority to
operate the equipment.
This Product complies with Part 15 of the FCC Rules.
Operation is subject to the two conditions that follow: (1)
this device can not cause interference, and (2) this device
must accept any interference, including interference that
can cause undesired operation of the device.
Class B digital device: A digital device that is marketed for
operation in a residential environment notwithstanding
use in commercial, business and industrial environments.
Examples of such devices include, but are not limited to,
personal computers, calculators, and equivalent
electronic devices that are marketed for operation by the
general public.
The Meter was tested and found to comply with the limits
for a Class B digital device, pursuant to Part 15 of the
FCC Rules. These limits are designed to provide
reasonable protection against harmful interference in a
residential installation. This equipment generates, uses,
and can radiate radio frequency energy and, if not
installed and used in accordance with the instructions,
can cause harmful interference to radio communications.
However, there is no guarantee that interference will not
occur in a particular installation. If this equipment does
cause harmful interference to radio or television
reception, which can be determined by turning the
equipment off and on, the user is encouraged to try to
correct the interference by one or more of the measures
that follow:
• Reorient or relocate the receiving antenna.
• Increase the separation between the equipment
and receiver.
• Consult the dealer or an experienced radio/TV
technician for help.
The term “IC:” before the radio certification number only
signifies the device meets Industry’s Canada technical
specifications.
25
Page 34

CNX 3000
Users Manual
Discovery of Modules
The term “discovery” in this manual refers to a procedure
the Product does to look for compatible radio signals
emitted by CNX 3000 Series Wireless Modules. The term
bind or bound means the Product has made a wireless
connection to a module.
Before you start the discovery procedure, make sure the
radio in each module to bind to is turned on. must
show in the display of each module.
When you first turn on the Product, the radio is off. Push
to turn on the radio and start the discovery procedure.
shows in the display when the radio is turned on.
flashes in the display while the Product searches for the
radio signal of other modules.
When a module is discovered by the Product, that module
is given an ID number. The Product starts with 1 and sets
wireless module ID numbers in sequence to ten. The ID
number and the module model number are shown in the
display of the Product. The ID number is also shown in
the module display.
When the Product completes the discovery procedure,
stops flashing in the display.
Note
If modules are not discovered after 2 minutes,
the radio turns off.
At the end of the discovery procedure, all discovered
modules shown in the display have a black number on a
grey background. See Figure 9. This shows the modules
to which the Product is bound. Although the display can
only show three modules, the Product can discover and
temporarily bind to a maximum of 10 modules.
Note
To bind a module to the Product after the
discovery procedure has completed, you must
turn off the radio. Turn on the radio again to start
the discovery procedure.
26
Page 35

Wireless Multimeter
Remote Operation
The number of the module at the top of the list flashes to
show it is highlighted. Push to move the highlight to
the next module in the list.
The Product stays in the module selection mode for
approximately 2 minutes. To select a module to bind to
the Product:
1. Push until you highlight the module to bind.
Note
The radio button () on the module highlighted
in the list flashes at a faster rate. This helps
identify the highlighted module.
2. Push . The number of the selected module will
change to a grey number on a black background.
See Figure 9.
3. Do steps 1 and 2 again for each module to bind to
the Product. The Product can bind to a maximum of
three modules.
4. You can wait for the module selection time to
complete or push and hold for 2 seconds to end
the module selection mode.
Auto
V AC
120.0
1
T3000
2
V3000
Auto
V AC
120.0
1
T3000
2
V3000
Hold 2 Seconds
Auto
V AC
120.0
1
21
Figure 9. Module Binding Procedure
°C
gxr013.eps
27
Page 36

CNX 3000
Users Manual
When the module selection mode ends, all modules that
were set to bind, show in the display. All modules not
selected go out of view.
Note
If you do not select modules, all modules shown
in the display are bound to the Product when the
module selection mode ends.
The model number of each bound module is replaced
with the module measurement. The radio button on the
Product and each module bound to the Product, flashes
one time in a 5 second interval. The radio button on each
non-bound module does not flash.
You can identify which measurement in the display of the
Product belongs to which module with the ID number set
when the module bound with the Product. Look for the
module with the same ID number in its display. To help
identify which module is shown in the Product display
when the module display cannot be seen, push to
select a module in the list. The radio button () on the
module the measurement in the Product display
represents flashes at a faster rate.
28
Page 37

Wireless Multimeter
Remote Operation
How to Unbind a Module from the Product
You can use one of three different procedures to unbind a
module from the Product.
• Turn off the module.
• Push on the module to turn off the radio in the
module. The module stays on to continue
measurements.
• Push on the Product to select the module you
want to unbind and then push . All other
modules stay bound to the Product.
How to Set the Product to Module Mode
You can set the Product to operate as a module so its
measurements can be shown on different DMM setup as
a master. To set the Product to the module mode:
1. Push and hold .
2. Turn on the Product.
3. Release after MOD shows in the display.
Note
The radio is always turned on when the Product
is in the module mode.
When the radio on a different DMM is turned on and the
discovery procedure starts, the Product is discovered and
a number shows in the display of the Product.
29
Page 38

CNX 3000
Users Manual
Maintenance
Warning
To prevent a possible electrical shock or
personal injury:
• Have an approved technician repair the
Meter.
• Do not operate the Product with covers
removed or the case open. Hazardous
voltage exposure is possible.
• Use only specified replacement parts.
• Remove the input signals before you
clean the Product.
General Maintenance
Clean the case with a damp cloth and weak detergent. Do
not use a solvent or cleaners with abrasives.
Dirt or moisture in the terminals can cause incorrect
measurements. To clean the terminals:
1. Turn off the Meter and remove all test leads.
2. Shake out dirt that can possibly be in the terminals.
3. Soak a clean swab with weak detergent and water.
4. Move the swab around in each terminal.
5. Dry each terminal with canned air to push the water
and detergent out of the terminals.
Warning
To prevent electrical shock or personal
injury, remove the test leads and all input
signals before you replace the batteries or
fuses. To prevent damage or injury, install
ONLY specified replacement parts shown in
Table 6.
30
Page 39

Wireless Multimeter
Fuse Test
Fuse Test
To do a fuse test:
1. Set the function switch to .
2. Connect a test lead to the jack as shown in
Figure 10.
3. Touch the other end of the test lead to the mA jack.
A good fuse will show a resistance of 12 Ω or less.
Replace the fuse if the resistance is higher or OL is
shown.
<12
440 mA
OK
OK
Figure 10. Fuse Test
gxr009.eps
31
Page 40

CNX 3000
Users Manual
Battery and Fuse Replacement
Warning
To prevent possible electrical shock, fire, or
personal injury:
• Replace a blown fuse with exact
replacement only for continued
protection against arc flash.
• Use only specified replacement fuses.
• Remove the batteries if the Product is
not used for an extended period of time,
or if stored in temperatures above 50 °C.
If the batteries are not removed, battery
leakage can damage the Product.
• Repair the Product before use if the
battery leaks.
• Be sure that the battery polarity is
correct to prevent battery leakage.
• Batteries contain hazardous chemicals
that can cause burns or explode. If
exposure to chemicals occurs, clean
with water and get medical aid.
To replace the batteries:
1. Turn off the Product and remove all test leads.
2. Lift the tilt stand up as shown in Figure 11.
3. Turn the battery-door latch until the unlock symbol
() aligns with the arrow.
4. Lift off the battery door.
5. Remove the three AA batteries and replace them
with new ones. Use the correct battery orientation.
6. Install the battery door.
7. Turn the battery-door latch until the locked symbol
() aligns with the arrow.
To replace the fuse:
1. Turn off the Product and remove all test leads.
2. As shown in Figure 11, remove six screws from the
case bottom.
3. Pull the case bottom from the case top.
4. Remove the fuse from its holder and replace it with a
440 mA, 1000 V FAST fuse with a minimum interrupt
rating of 10,000 A. Use only Fluke PN 943121.
To reassemble the Product, do the steps in the opposite
sequence.
32
Page 41

Wireless Multimeter
Battery and Fuse Replacement
Figure 11. Battery and Fuse Replacement
gxr010.eps
33
Page 42

CNX 3000
Users Manual
Service and Parts
If the Product fails, replace the batteries and do a fuse
test. Read this manual to make sure the Product is
applied correctly.
Table 6. Replaceable Parts
Description Qty.
Fuse, 440 mA, 1000 V 1 943121
Battery, AA 1.5 V 3 376756
Battery Door Assembly (includes tilt stand) 1 4207624
Gasket, Battery Door 1 4137532
Test Lead Set 1 TL175
Alligator Clip, Black 1
Alligator Clip, Red 1
CNX 3000 DMM Quick Reference Guide 1 4231002
CNX 3000 DMM Safety Information 1 4231677
To ensure safety, use exact replacement only.
Replacement parts and accessories are shown in Table 6
and Figure 12.
To get parts and accessories, refer to the “How to
Contact Fluke” section.
Fluke Part or Model
Number
AC175
34
Page 43

Wireless Multimeter
Service and Parts
Battery
Door
Fuse 440 mA
1000 V, Fast
Battery
AA x 1.5 V
Test Lead Set
Figure 12. Replacement Parts
Quick Reference Guide
TL175
AC175
Threaded
Alligator Clips
CNX 3000 DMM
CNX 3000 DMM
Safety Information
gxr012.eps
35
Page 44

CNX 3000
Users Manual
Table 7. Accessories
Item Description
TPAK ToolPak Magnetic Hanger
FLK-CNX A3000 CNX a3000 Clamp Module – Measure ac current to 400 amps,
FLK-CNX I3000 CNX i3000 Flex Current – Measures ac current to 2500 amps.
FLK-CNX T3000 CNX t3000 Temperature Module – Measures temperature with a k-type thermocouple from -200 °C to
1372 °C
FLK-CNX V3000 CNX v3000 Voltage Module – Measures ac voltage to 1000 V ac.
FLK-CNX PC3000 CNX pc3000 Wireless PC Adapter
FLK-CNX C3000 Deluxe tool bag with shoulder strap.
FLK-CNX C3001 Modular module case.
FLK-CNX C3002 Modular DMM Case
FLK-CNX C3003 Modular 3-compartment case.
36
Page 45

Wireless Multimeter
Specifications
Specifications
Maximum voltage between any Terminal and Earth Ground: 1000 V dc or ac rms
Fuse Protection for mA inputs ....................... 0.44 A (44/100 A, 440 mA), 1000 V FAST Fuse, Fluke specified part only
Display (LCD)
Update rate ......................................................... 4/sec
Votls, amps, ohms, .............................................. 6000 counts
Frequency ........................................................... 10,000 counts
Capacitance ........................................................ 1,000 counts
Battery Type ........................................................... Three AA Alkaline batteries, NEDA 15A IEC LR6
Battery Life ............................................................. 250 hours minimum
Temperature
Operating ............................................................ -10 °C to 50 °C
Storage ................................................................ -40 °C to 60 °C
Relative Humidity .................................................. 0 % to 90 % (0 °C to 35 °C), 0 % to 75 % (35 °C to 40 °C), 0 % to 45 % (40 °C to 50 °C)
Altitude
Operating ............................................................ 2,000 m
Storage ................................................................ 12,000 m
Temperature Coefficient ....................................... 0.1 X (specified accuracy) /°C (<18 °C or >28 °C)
Safety Standards
US ANSI .............................................................. ANSI/ISA 61010-1 / (82.02.01): 3
CSA ..................................................................... CAN/CSA-C22.2 No 61010-1-12: 3
UL ........................................................................ UL 61010-1: 3
CE European ....................................................... IEC/EN 61010-1:2010
rd
edition
rd
edition
rd
edition
37
Page 46

CNX 3000
Users Manual
Wireless Frequency .............................................. 2.4 GHz ISM Band 20 meter range
Size (HxWxL) ......................................................... 1.87 in x 3.68 in x 8.14 in (4.75 cm x 9.3 cm x 20.7 cm)
Weight .................................................................... 17.2 oz (487.5 g)
EMI, RFI, EMC, RF ................................................. EN 61326-1:2006, EN 61326-2-2:2006. ETSI EN 300 328 V1.7.1:2006, ETSI EN 300 489
V1.8.1:2008, FCC Part 15 Subpart C Sections 15.207, 15.209, 15.249, FCCID : T68FWCS IC:6627A-FWCS
Detailed Specifications
For all specifications:
Accuracy is specified for 1 year after calibration, at operating temperatures of 18 °C to 28 °C, with relative humidity at 0 % to
90 %. Accuracy specifications take the form of ±([ % of Reading ] + [ Number of least significant digits ]).
AC Voltage
[2][3][4]
[1]
Range
600.0 mV 0.1 mV
6.000 V 0.001 V
60.00 V 0.01 V
600.0 V 0.1 V
1000 V 1 V
[1] All ac voltage ranges are specified from 1 % of range to 100 % of range.
[2] Crest factor of ≤3 at 4000 counts, decreasing linearly to 1.5 at full scale.
[3] For non-sinusoidal waveforms, add –(2 % of reading + 2 % full scale) typical, for crest factor up to 3.
[4] Do not exceed 10
7
V-Hz
Resolution
45 Hz to 500 Hz 500 Hz to 1 kHz
1.0 % + 3 2.0 % + 3
Accuracy
38
Page 47

Wireless Multimeter
Specifications
DC Voltage, Continuity, Resistance, Diode Test, and Capacitance
Function Range Resolution Accuracy
Ω
Diode Test 2.000 V 0.001 V 1 % + 2
[1] In the 9999 μF range for measurements to 1000 μF, the measurement accuracy is 1.2 % + 2.
600.0 mV 0.1 mV
6.000 V 0.001 V
60.00 V 0.01 V
600.0 V 0.1 V
1000 V 1 V 0.15 % + 2
600 Ω 1 Ω Meter beeps at <25 Ω, beeper detects opens or shorts of 250 μs or longer.
600.0 Ω 0.1 Ω 0.5 % + 2
6.000 kΩ 0.001 kΩ
60.00 kΩ 0.01 kΩ
60.00 kΩ 0.1 kΩ
600.0 kΩ 0.001 MΩ
50.00 MΩ 0.01 MΩ 1.5 % + 3
1000 nF 1 nF
10.00 μF 0.01 μF
100.0 μF 0.1 μF
9999 μF
[1]
1 μF
0.09 % + 2
0.09 % + 2
0.5 % + 1
1.2 % + 2
10 % typical
39
Page 48

CNX 3000
Users Manual
AC and DC Current
Function
(45 Hz to 1 kHZ)
[2]
[1] All ac current ranges are specified from 5 % of range to 100 % of range.
[2] Input burden voltage (typical): 400 mA input 2 mV/mA.
[3] 400.0 mA accuracy specified up to 600 mA overload.
60.00 mA 0.01 mA
400.0 mA
60.00 mA 0.01 mA
400.0 mA
Range
[1]
[3]
[3]
Resolution
0.1 mA
0.1 mA
Frequency
Range Resolution
99.99 Hz 0.01 Hz
999.9 Hz 0.1 Hz
9.999 kHz 0.001 kHz
99.99 kHz 0.01 kHz
[1] Frequency is specified up to 99.99 kHz in volts and up to 10 kHz in amps.
Accuracy
1.5 % + 3
0.5 % + 3
Accuracy
0.1 % + 1
[1]
40
Page 49

Wireless Multimeter
Specifications
Frequency Counter Sensitivity
Input Range
[1] Maximum input for specified accuracy = 10X Range or 1000 V.
[2] Noise at low frequency and amplitude may exceed the frequency accuracy specification.
[3] Unspecified but usable depending on quality and amplitude of signal.
[4] In mA and A ranges, frequency measurement is specified to 10 kHz.
[1] [2]
6 V 0.5 V 0.6 V 1.0 V 2.8 V Unspecified
60 V 5 V 3.8 V 4.1 V 5.6 V 9.6 V
600 V 50 V 36 V 39 V 50 V 58 V
1000 V 500 V 300 V 320 V 380 V NA
6 V 0.5 V 0.75 V 1.4 V 4.0 V Unspecified
60 V 4 V 3.8 V 4.3 V 6.6 V 13 V
600 V 40 V 36 V 39 V 45 V 58 V
1000 V 500 V 300 V 320 V 380 V NA
60.00 mA 5 mA 4 mA NA NA NA
400.0 mA 5 mA 4 mA NA NA NA
2 Hz to 45 Hz 45 Hz to 10 kHz 10 kHz to 20 kHz 20 kHz to 50 kHz 50 kHz to 100 kHz
Typical Sensitivity (RMS Sine Wave)
[3]
[3]
41
Page 50

CNX 3000
Users Manual
Input Characteristics
Function
Overload
Protection
Input Impedance
(nominal)
Common Mode
Rejection Ratio
(1 kΩ unbalance)
Normal Mode Rejection
Ω /
/
Function Overload Protection
mA Fused, 44/100 A, 1000 V FAST Fuse 600 mA overload for 2 minutes maximum, 10 minutes rest minimum
1100 V rms >10 MΩ <100 pF > 120 dB at dc, 50 Hz or 60 Hz > 60 dB at 50 Hz or 60 Hz
1100 V rms >10 MΩ < 100 pF > 60 dB, dc to 60 Hz
1100 V rms >10 MΩ <100 pF > 120 dB at dc, 50 Hz or 60 Hz > 60 dB at 50 Hz or 60 Hz
To 6 MΩ 50 MΩ
1100 V rms <2.7 V dc <0.7 V dc <0.9 V dc <350 μA
1100 V rms <2.7 V dc 2.000 V dc <1.1 mA
Open Circuit Test
Voltage
Full Scale Voltage
Typical Short Circuit Current
Overload
MIN MAX Recording
Function Accuracy
DC Functions The specified accuracy of the measurement function ±12 counts for changes >350 ms in duration.
AC Functions The specified accuracy of the measurement function ±40 counts for changes >900 ms in duration.
42
 Loading...