

Page 1

712B/714B
RTD/Thermocouple Calibrator
March 2015
© 2015 Fluke Corporation. All rights reserved. Specifications are subject to change without notice.
All product names are trademarks of their respective companies.
Calibration Manual
Page 2

LIMITED WARRANTY AND LIMITATION OF LIABILITY
Each Fluke product is warranted to be free from defects in material and workmanship under normal use and
service. The warranty period is three years and begins on the date of shipment. Parts, product repairs, and
services are warranted for 90 days. This warranty extends only to the original buyer or end-user customer of
a Fluke authorized reseller, and does not apply to fuses, disposable batteries, or to any product which, in
Fluke's opinion, has been misused, altered, neglected, contaminated, or damaged by accident or abnormal
conditions of operation or handling. Fluke warrants that software will operate substantially in accordance
with its functional specifications for 90 days and that it has been properly recorded on non-defective media.
Fluke does not warrant that software will be error free or operate without interruption.
Fluke authorized resellers shall extend this warranty on new and unused products to end-user customers
only but have no authority to extend a greater or different warranty on behalf of Fluke. Warranty support is
available only if product is purchased through a Fluke authorized sales outlet or Buyer has paid the
applicable international price. Fluke reserves the right to invoice Buyer for importation costs of
repair/replacement parts when product purchased in one country is submitted for repair in another country.
Fluke's warranty obligation is limited, at Fluke's option, to refund of the purchase price, free of charge repair,
or replacement of a defective product which is returned to a Fluke authorized service center within the
warranty period.
To obtain warranty service, contact your nearest Fluke authorized service center to obtain return
authorization information, then send the product to that service center, with a description of the difficulty,
postage and insurance prepaid (FOB Destination). Fluke assumes no risk for damage in transit. Following
warranty repair, the product will be returned to Buyer, transportation prepaid (FOB Destination). If Fluke
determines that failure was caused by neglect, misuse, contamination, alteration, accident, or abnormal
condition of operation or handling, including overvoltage failures caused by use outside the product’s
specified rating, or normal wear and tear of mechanical components, Fluke will provide an estimate of repair
costs and obtain authorization before commencing the work. Following repair, the product will be returned to
the Buyer transportation prepaid and the Buyer will be billed for the repair and return transportation charges
(FOB Shipping Point).
THIS WARRANTY IS BUYER'S SOLE AND EXCLUSIVE REMEDY AND IS IN LIEU OF ALL OTHER
WARRANTIES, EXPRESS OR IMPLIED, INCLUDING BUT NOT LIMITED TO ANY IMPLIED WARRANTY
OF MERCHANTABILITY OR FITNESS FOR A PARTICULAR PURPOSE. FLUKE SHALL NOT BE LIABLE
FOR ANY SPECIAL, INDIRECT, INCIDENTAL OR CONSEQUENTIAL DAMAGES OR LOSSES,
INCLUDING LOSS OF DATA, ARISING FROM ANY CAUSE OR THEORY.
Since some countries or states do not allow limitation of the term of an implied warranty, or exclusion or
limitation of incidental or consequential damages, the limitations and exclusions of this warranty may not
apply to every buyer. If any provision of this Warranty is held invalid or unenforceable by a court or other
decision-maker of competent jurisdiction, such holding will not affect the validity or enforceability of any other
provision.
Fluke Corporation
P.O. Box 9090
Everett, WA 98206-9090
U.S.A.
Fluke Europe B.V.
P.O. Box 1186
5602 BD Eindhoven
The Netherlands
11/99
Page 3

Table of Contents
Title Page
Introduction ............................................................................................ 1
Contact Fluke ........................................................................................ 1
Safety Information ................................................................................. 1
Symbols ................................................................................................. 2
712B Specifications ............................................................................... 3
DC mA Measurement ........................................................................ 3
Ohms Measurement .......................................................................... 3
Ohms Source ..................................................................................... 3
RTD Input and Output ....................................................................... 4
General Specifications ....................................................................... 5
714B Specifications ............................................................................... 6
Thermocouple mV Input .................................................................... 6
Thermocouple mV Output ................................................................. 6
Thermocouple mA Input .................................................................... 6
Thermocouple Input and Output ........................................................ 6
General Specifications ....................................................................... 8
Maintenance .......................................................................................... 9
Replace the Batteries ........................................................................ 9
Clean the Product .............................................................................. 9
Required Equipment .............................................................................. 10
712B Performance Verification .............................................................. 11
Verify Ohms Source .......................................................................... 11
Verify 4-Wire Ohms Measure ............................................................ 12
Verify 3-Wire Ohms Measure ........................................................... 13
Verify mA Measure ............................................................................ 14
714B Performance Verification .............................................................. 16
Verify mV Source ............................................................................... 16
Verify mV Measure ............................................................................ 17
Verify TC Measure (Type K) .............................................................. 18
Verify TC K Source ............................................................................ 18
Verify mA Measure ............................................................................ 19
712B Calibration Adjustment ................................................................. 21
Enter Manual Calibration Mode ......................................................... 21
Adjust Ohms Source .......................................................................... 21
Adjust 50 Ω Source ........................................................................ 22
Adjust 350 Ω Source ...................................................................... 22
i
Page 4

712B/714B
Calibration Manual
Adjust 500 Ω Source ...................................................................... 23
Adjust 3500 Ω Source .................................................................... 23
Adjust Trigger Current for Ohms Measure ........................................ 24
Adjust 0.1 mA Trigger Current ....................................................... 24
Adjust 0.25 mA Trigger Current ..................................................... 25
Adjust 0.5 mA Trigger Current ....................................................... 25
Adjust 1 mA Trigger Current .......................................................... 26
Adjust Ohms Measure ....................................................................... 26
Adjust 50 Ω Input ........................................................................... 27
Adjust 350 Ω Input ......................................................................... 27
Adjust 500 Ω Input ......................................................................... 28
Adjust 3500 Ω Input ....................................................................... 28
Adjust mA Measure ........................................................................... 29
Adjust 0.1 mA Input ....................................................................... 29
Adjust 24 mA Input ........................................................................ 30
Adjust External Trigger for Ohms Source .......................................... 30
Adjust 0.1 mA External Trigger ...................................................... 31
Adjust 1 mA External Trigger ......................................................... 31
Save Data and Reset the 712B System ............................................ 32
714B Calibration Adjustment ................................................................. 32
Enter Calibration Mode ...................................................................... 32
Use 8508A to Adjust the 5522A Output ............................................. 33
Adjust mV Source .............................................................................. 33
Adjust mV Measure ........................................................................... 34
Adjust Internal Cold Junction Temperature ....................................... 35
Use the Fluke 9101-256 ................................................................ 35
Use a Lag Bath .............................................................................. 37
Adjust mA Measure ........................................................................... 38
Save Data and Reset the 714B System ............................................ 39
User-Replaceable Parts and Accessories ............................................. 40
ii
Page 5

List of Tables
Table Title Page
1. Symbols ..................................................................................................... 2
2. Required Equipment for 712B Verification and Calibration Adjustment .... 10
3. Required Equipment for 714B Verification and Calibration Adjustment .... 10
4. 712B Ohms Source Limits ......................................................................... 12
5. 712B 4-Wire Ohms Measure Limits .......................................................... 13
6. 712B 3-Wire Ohms Measure Limits .......................................................... 14
7. 712B mA Measure Limits .......................................................................... 15
8. 714B mV Source Limits ............................................................................. 17
9. 714B mV Measure Limits .......................................................................... 17
10. 714B Type K Measure Limits .................................................................... 18
11. 714B TC K Source Limits .......................................................................... 19
12. 714B mA Measure Limits .......................................................................... 20
13. User-Replaceable Parts and Accessories for 712B .................................. 40
14. User-Replaceable Parts and Accessories for 714B .................................. 42
iii
Page 6

712B/714B
Calibration Manual
iv
Page 7

List of Figures
Figure Title Page
1. Replace the Batteries ................................................................................
2.
Verify 712B Ohms Source ......................................................................... 11
3.
Verify 712B 4-Wire Ohms Measure ........................................................... 12
Verify 712B 3-Wire Ohms Measure ........................................................... 13
4.
Verify 712B mA Measure .......................................................................... 15
5.
Verify 714B mV Source ............................................................................. 16
6.
Verify 714B mV Measure .......................................................................... 17
7.
Verify Type K Measure .............................................................................. 18
8.
9.
Verify mA Measure .................................................................................... 20
10.
Adjust 712B Ohms Source ........................................................................ 21
11.
Adjust 712B Trigger Current ...................................................................... 24
12.
Adjust for 712B Ohms Measure ................................................................ 26
13.
Adjust 712B mA Measure .......................................................................... 29
Adjust External Trigger for Ohms Source .................................................. 30
14.
Connect the 714B to the 8508A ................................................................ 33
15.
Adjust 714B mV Measure .......................................................................... 34
16.
Connect the 714B to the Fluke 9101-256 .................................................. 36
17.
Use Lag Bath to Adjust Cold Junction Temperature ................................. 37
18.
19.
714B and 5522A mA Channel Connections .............................................. 38
20.
User-Replaceable Parts and Accessories for 712B .................................. 41
21.
User-Replaceable Parts and Accessories for 714B .................................. 43
9
v
Page 8

712B/714B
Calibration Manual
vi 1
Page 9

Introduction
The Fluke 712B/714B RTD/Thermocouple Calibrator (the Product) is a handheld,
battery-operated instrument that measures and sources a variety of
RTDs/thermocouples. It also has an isolated channel to measure 4-20 mA.
Contact Fluke
To contact Fluke, call one of the following telephone numbers:
• Technical Support USA: 1-800-44-FLUKE (1-800-443-5853)
• Calibration/Repair USA: 1-888-99-FLUKE (1-888-993-5853)
• Canada: 1-800-36-FLUKE (1-800-363-5853)
• Europe: +31 402-675-200
• Japan: +81-3-6714-3114
• Singapore: +65-6799-5566
• Anywhere in the world: +1-425-446-5500
Or, visit Fluke's website at www.fluke.com.
To register your product, visit http://register.fluke.com.
To download manuals, or to view, print, or download the latest manual
supplement, visit http://us.fluke.com/usen/support/manuals.
Safety Information
A Warning identifies conditions and procedures that are dangerous to the user.
A Caution identifies conditions and procedures that can cause damage to the
Product or the equipment under test.
To prevent possible electrical shock, fire, or personal injury:
• Carefully read all instructions.
• Read all safety information before you use the Product.
• Use the Product only as specified, or the protection
supplied by the Product can be compromised.
• Do not use the Product around explosive gas, vapor, or in
damp or wet environments.
• Never apply more than 30 V between any two terminals, or
between any terminal and earth ground.
• Do not use the Product if it is damaged.
• The battery door must be closed and locked before you
operate the Product.
Warning
Page 10

712B/714B
Calibration Manual
Symbols
• Remove all probes, test leads, and accessories before the
battery door is opened.
• Remove the input signals before you clean the Product.
• Have an approved technician repair the Product.
• Replace the batteries when the low battery indicator shows
to prevent incorrect measurements.
For safe operation and maintenance of the Product:
• Repair the Product before use if the batteries leak.
• Remove the batteries if the Product is not used for an
extended period of time, or if stored in temperatures that
exceed the specification of the battery manufacturer. If the
batteries are not removed, battery leakage can damage the
Product.
Symbols used on the Product or in this manual are shown in Table 1.
Table 1. Symbols
Symbol Description
Earth Ground
Battery
CAT II
CAT III
CAT IV
Conforms to relevant Australian Standards.
Risk of danger. Important information. See Manual.
Inspected and licensed by TÜV Product Services.
Conforms to European Union directives.
MEASUREMENT CATEGORY II is applicable to test and measuring circuits
connected directly to utilization points (socket outlets and similar points) of the low
voltage MAINS installation.
MEASUREMENT CATEGORY III is applicable to test and measuring circuits
connected to the distribution part of the building’s low-voltage MAINS installation.
MEASUREMENT CATEGORY IV is applicable to test and measuring circuits
connected at the source of the building’s low voltage MAINS installation.
Conforms to relevant North American Safety Standards.
Conforms to relevant South Korean EMC Standards.
This Product complies with the WEEE Directive (2002/96/EC) marking requirements.
The affixed label indicates that you must not discard this electrical/electronic product
in domestic household waste. Product Category: With reference to the equipment
types in the WEEE Directive Annex I, this product is classed as category 9 "Monitoring
and Control Instrumentation" product. Do not dispose of this product as unsorted
municipal waste. Go to Fluke’s website for recycling information.
2
Page 11
RTD/Thermocouple Calibrator
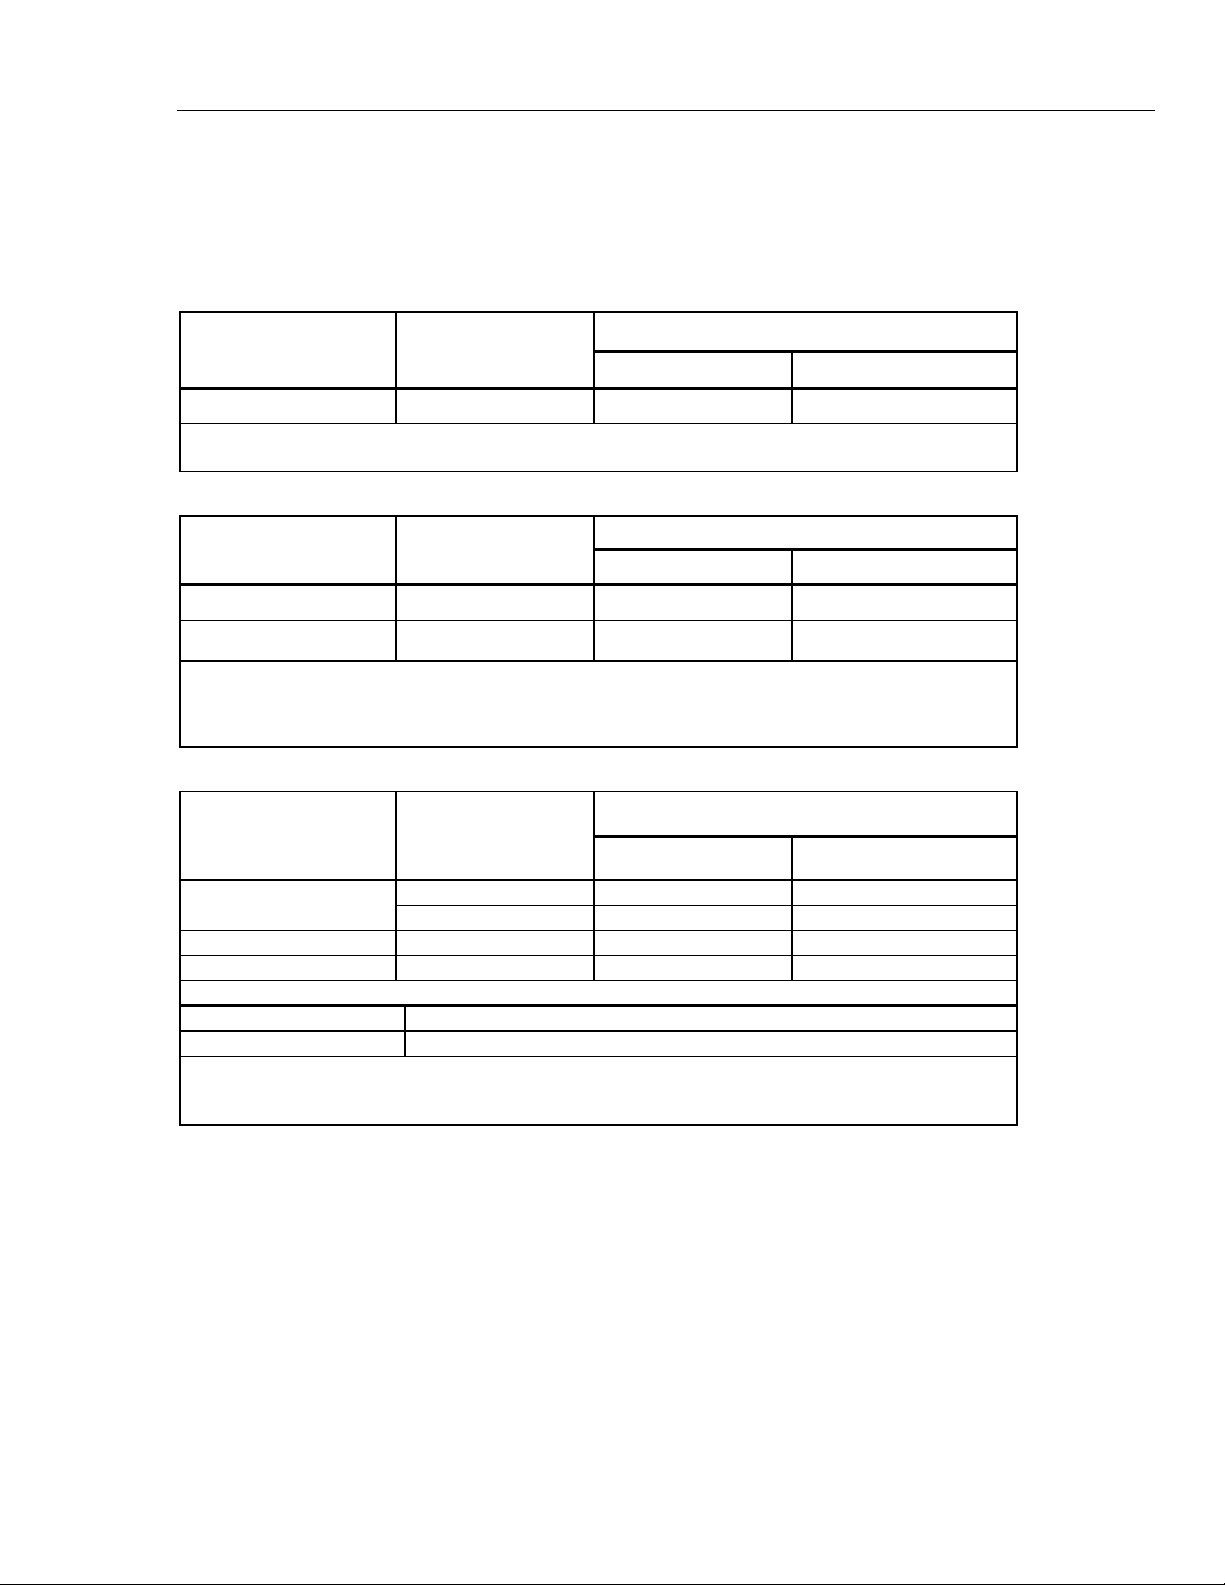
712B Specifications
712B Specifications
Specifications are based on a one year calibration cycle and apply from +18 °C
to +28 °C unless stated otherwise. All specifications assume a 5 minute warmup
period.
DC mA Measurement
Range Resolution
0-24 mA 0.001 mA
• Notes:
• Temperature coefficient: ±(0.002 % of reading + 0.002 % of range) /°C ( <18 °C or >28 °C)
Accuracy (% of Reading + Floor)
1 Year 2 Year
0.01 % + 2 μA 0.02 % + 4 μA
Ohms Measurement
Range Resolution
0.00 Ω to 400.00 Ω 0.01 Ω 0.015 % + 0.05 Ω 0.03 %+ 0.08 Ω
400.0 Ω to 4000.0 Ω 0.1 Ω 0.015 % + 0.5 Ω 0.03 %+ 0.8 Ω
• Notes:
• Reading accuracy is based on 4-wire input. For 3-wire ohm measurements, assuming all three leads are matched, add
0.05 Ω (0.00 Ω~400.00 Ω), 0.2 Ω (400.0 Ω~4000.0 Ω) to the specifications.
• Temperature Coefficient: ± (0.002 % of reading + 0.002 % of range) /°C (<18 °C or >28 °C)
Accuracy (% of Reading + Floor)
1 Year 2 Year
Ohms Source
Accuracy
Ohms Range
1.00 Ω to 400.00 Ω
400.0 Ω to 1500.0 Ω
1500.0 Ω to 4000.0 Ω
1.00 Ω to 400.00 Ω 0.01 Ω
400.0 Ω to 4000.0 Ω 0.1 Ω
• Notes:
• Supports pulsed transmitters and PLCs with pulse times as short as 5 ms.
• Temperature coefficient: ± (0.002 % of output + 0.002 % of range) /°C ( <18 °C or >28 °C)
Excitation Current from
Measurement Device
0.1 mA to 0.5 mA
0.5 mA to 3 mA
0.05 mA to 0.8 mA
0.05 mA to 0.4 mA
0.015 % + 0.1 Ω 0.03 % + 0.2 Ω
0.015 % + 0.05 Ω 0.03 % + 0.08 Ω
0.015 % + 0.5 Ω 0.03 % + 0.8 Ω
0.015 % + 0.5 Ω 0.03 % + 0.8 Ω
Resolution
(% of Output + Floor)
1 Year 2 Year
3
Page 12
712B/714B
Calibration Manual
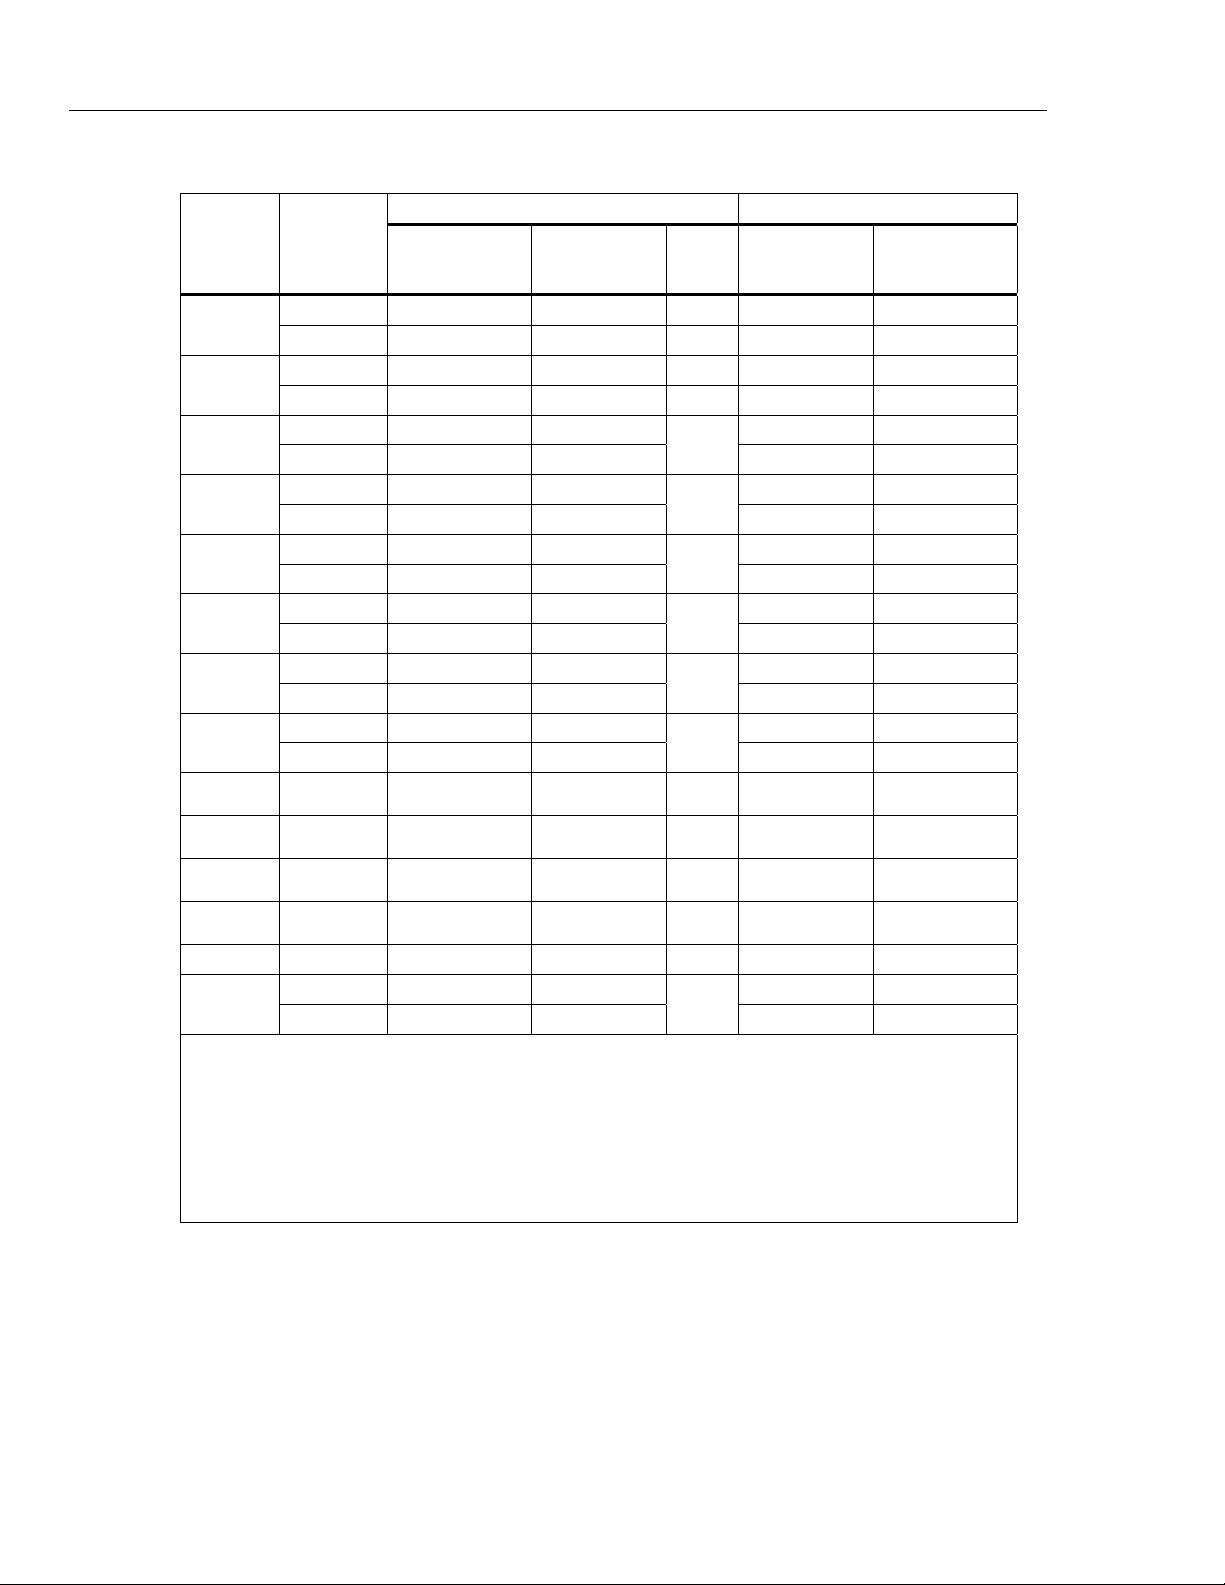
RTD Input and Output
RTD Type
(α)
Range (°C)
Measure (°C) Source (°C)
1 Year 2 Year
Source
Current
1 Year 2 Year
10 Ω
Pt(385)
50 Ω
Pt(385)
100 Ω
Pt(385)
200 Ω
Pt(385)
500 Ω
Pt(385)
1000 Ω
Pt(385)
100 Ω
Pt(3916)
100 Ω
Pt(3926)
10 Ω
Cu(427)
120 Ω
Ni(672)
50 Ω
Cu(427)
100 Ω
Cu(427)
-200 to 100 1.5 3 1 mA 1.5 3
100 to 800 1.8 3.6 1 mA 1.8 3.6
-200 to 100 0.4 0.7 1 mA 0.4 0.7
100 to 800 0.5 0.8 1 mA 0.5 0.8
-200 to 100
100 to 800
-200 to 100
100 to 630
-200 to 100
100 to 630
-200 to 100
100 to 630
-200 to 100
100 to 630
-200 to 100
100 to 630
0.2 °C 0.4 °C
0.015 %+0.18 °C 0.03 %+0.36 °C 0.015 %+0.18 °C 0.03 %+0.36 °C
0.2 °C 0.4 °C
0.015 %+0.18 °C 0.03 %+0.36 °C 0.015 %+0.18 °C 0.03 %+0.36 °C
0.3 °C 0.6 °C
0.015 %+0.28 °C 0.03 %+0.56 °C 0.015 %+0.28 °C 0.03 %+0.56 °C
0.2 °C 0.4 °C
0.015 %+0.18 °C 0.03 %+0.36 °C 0.015 %+0.18 °C 0.03 %+0.36 °C
0.2 °C 0.4 °C
0.015 %+0.18 °C 0.03 %+0.36 °C 0.015 %+0.18 °C 0.03 %+0.36 °C
0.2 °C 0.4 °C
0.015 %+0.18 °C 0.03 %+0.36 °C 0.015 %+0.18 °C 0.03 %+0.36 °C
1 mA
500 μA
250 μA
250 μA
1 mA
1 mA
0.2
°C
0.4 °C
0.2 °C 0.4 °C
0.3 °C 0.6 °C
0.2 °C 0.4 °C
0.2 °C 0.4 °C
0.2 °C 0.4 °C
-100 to 260 1.5 3 1 mA 1.5 3
-80 to 260 0.15 0.3 1 mA 0.15 0.3
-180 to 200 0.4 0.7 1 mA 0.4 0.7
-180 to 200 0.2 0.4 1 mA 0.2 0.4
YSI400 15 to 50 0.2 0.4 250 μA 0.2 0.4
100 Ω
Pt(3902)
-200 to 100
100 to 500 0.015 %+0.18 °C
• Notes:
• Sensor inaccuracies not included.
• Resolution: 0.1 °C.
• Read accuracy is based on 4-wire input. For 3-wire RTD measurements, assuming all three RTD leads are
matched, add 1.0 °C (Pt10 and Cu10), 0.6 °C (Pt50 and Cu50), 0.4 °C (Other RTD types) to the specifications.
• Source Accuracy in source mode is based on 0.5 mA~3 mA (1.00 Ω~400.00 Ω), 0.05 mA~0.8 mA
(400.0 Ω~1500.0 Ω), 0.05 mA~0.4 mA (1500.0 Ω ~4000.0 Ω), excitation current (0.25 mA for Pt1000 range).
• Temperature Coefficient: ±0.05 °C /°C (<18 °C or >28 °C) for both measure and source.
• Supports pulsed transmitters and PLCs with pulse times as short as 5 ms.
0.2 °C 0.4 °C
0.03 %+0.36 °C 0.015 %+0.18 °C 0.03 %+0.36 °C
1 mA
0.2 °C 0.4 °C
4
Page 13
RTD/Thermocouple Calibrator
General Specifications
Maximum voltage applied between any
terminal and earth ground or between any
two terminals:
Operating temperature
Storage temperature
Operating altitude 2,000 meters
Storage altitude 12,000 meters
Relative Humidity (% RH operating without
condensation)
Vibration Requirements MIL-T-28800E, Class 2
Drop Test Requirements 1 meter
IP Rating IEC 60529: IP52
Electromagnetic Environment
Safety IEC 61010-1, Max 30 V to earth, Pollution Degree 2
Electromagnetic Compatibility
Power Supply 4 AA alkaline batteries/NEDA code: 15A, IEC code: LR6
Size (H x W x L) 52.5 x 84 x 188.5 mm
Weight 524 g
30 V
-10 °C to 50 °C
-20 °C to 60 °C
Non condensing
90 % (10 °C to 30 °C)
75 % (30 °C to 40 °C)
45 % (40 °C to 50 °C)
(Without condensation)
IEC 61326-1, Portable
FCC: CFR Title 47, Part 15, Subpart B
Applies to use in Korea only. Class A Equipment (Industrial
Broadcasting & Communication Equipment)
This product meets requirements for industrial (Class A)
electromagnetic wave equipment and the seller or user should
take notice of it. This equipment is intended for use in business
environments and is not to be used in homes.
5
Page 14
712B/714B
Calibration Manual
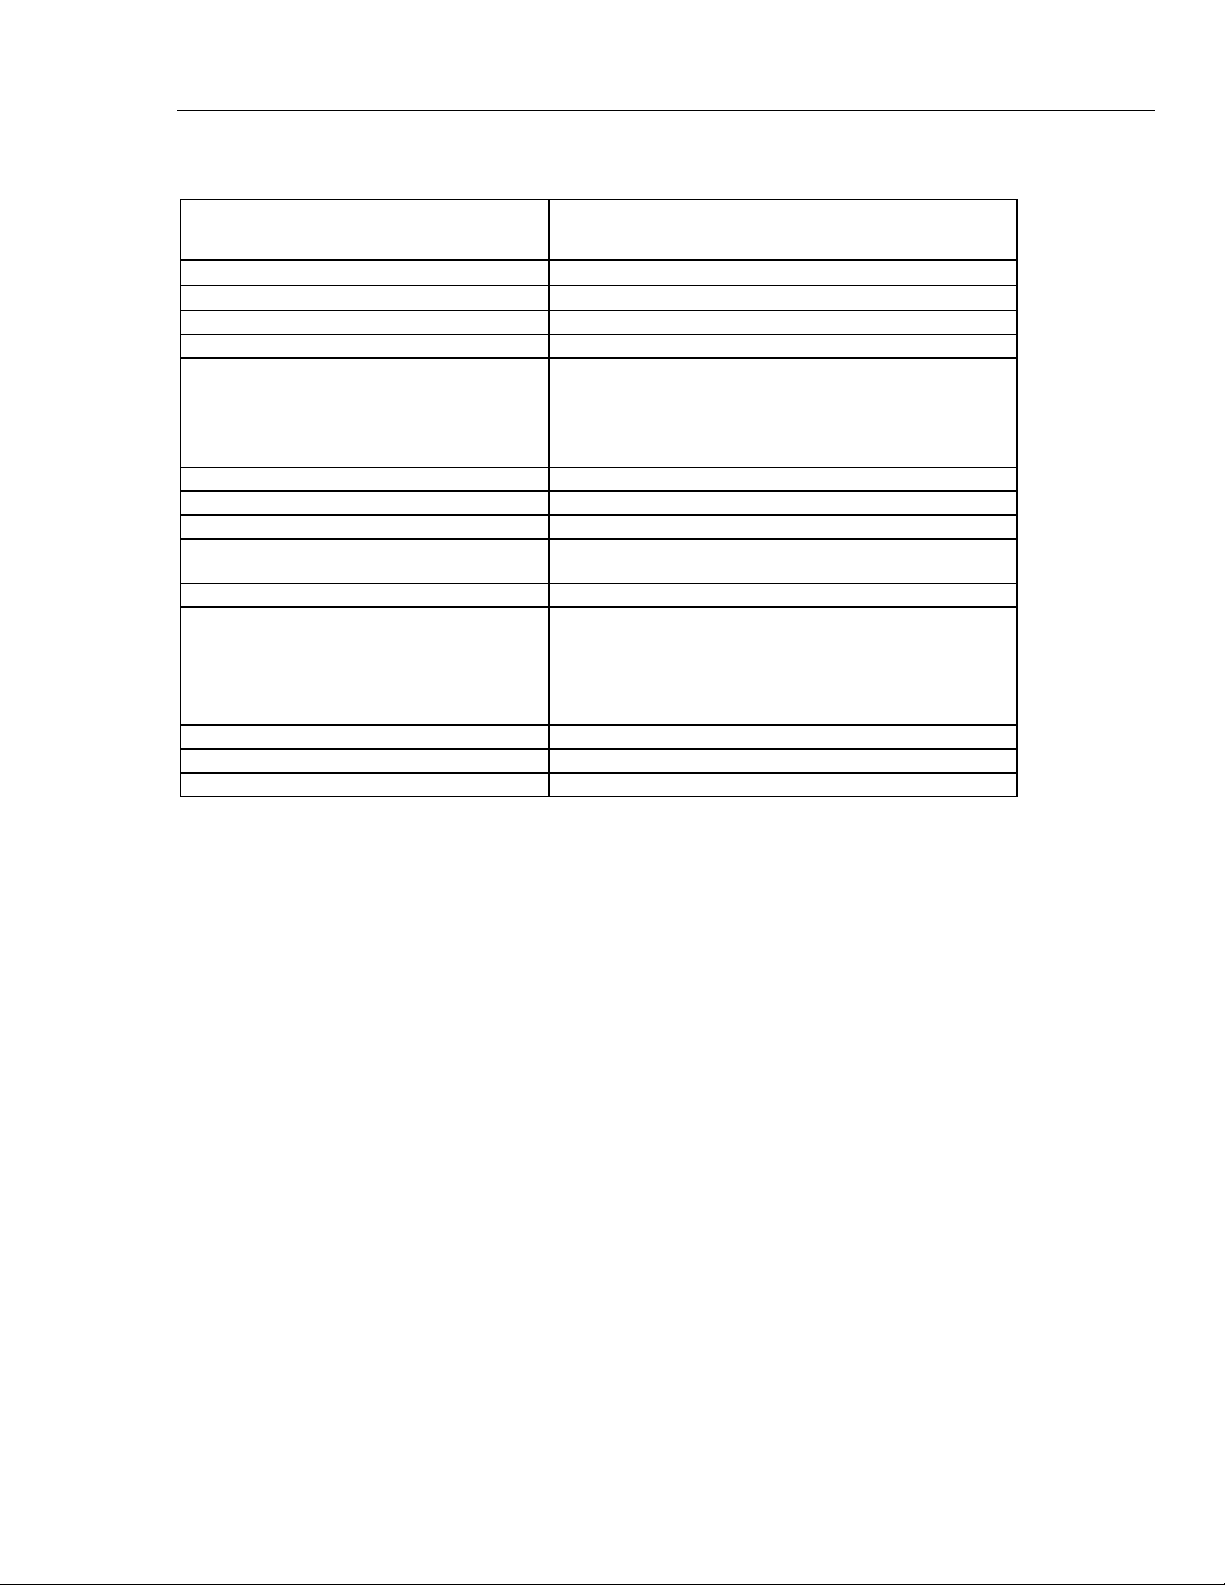
714B Specifications
Thermocouple mV Input
-10 mV to 75 mV 0.001 mV 0.015 % + 10 µV
Thermocouple mV Output
-10 mV to 75 mV 0.01 mV 0.015 % + 10 µV 0.02 % + 15 µV
Thermocouple mA Input
0 mA to 24 mA 0.001 mA 0.01 % + 2 µA 0.02 % + 4 µA
Specifications are based on a one year calibration cycle and apply from +18 °C
to +28 °C unless stated otherwise. All specifications assume a 5 minute warmup
period.
Range Resolution
Temperature coefficient: ±(0.002 % of reading + 0.002 % of range) /°C ( <18 °C or >28 °C)
Range Resolution
Temperature Coefficient: ± (0.002 % of output + 0.002 % of range) /°C ( <18 °C or >28 °C)
Range Resolution
Temperature Coefficient: ± (0.002 % of output + 0.002 % of range) /°C ( <18 °C or >28 °C)
Accuracy (% of Reading + Floor)
1 Year 2 Year
0.02 % + 15 µV
Accuracy (% of Output + Floor)
1 Year 2 Year
Accuracy (% of Reading + Floor)
1 Year 2 Year
Thermocouple Input and Output
TC Type Range
-250 to 200 1.3 2.0 0.6 0.9
E
N
J
K
T
B
R
-200 to -100 0.5 0.8 0.3 0.4
-100 to 600 0.3 0.4 0.3 0.4
600 to 1000 0.4 0.6 0.2 0.3
-200 to -100 1.0 1.5 0.6 0.9
-100 to 900 0.5 0.8 0.5 0.8
900 to 1300 0.6 0.9 0.3 0.4
-210 to -100 0.6 0.9 0.3 0.4
-100 to 800 0.3 0.4 0.2 0.3
800 to 1200 0.5 0.8 0.3 0.3
-200 to -100 0.7 1.0 0.4 0.6
-100 to 400 0.3 0.4 0.3 0.4
400 to 1200 0.5 0.8 0.3 0.4
1200 to 1372 0.7 1.0 0.3 0.4
-250 to -200 1.7 2.5 0.9 1.4
-200 to 0 0.6 0.9 0.4 0.6
0 to 400 0.3 0.4 0.3 0.4
600 to 800 1.3 2.0 1.0 1.5
800 to 1000 1.0 1.5 0.8 1.2
1000 to 1820 0.9 1.3 0.8 1.2
-20 to 0 2.3 2.8 1.2 1.8
0 to 100 1.5 2.2 1.1 1.7
100 to 1767 1.0 1.5 0.9 1.4
Measure (°C) Source (°C)
1 Year 2 Year 1 Year 2 Year
6
Page 15
RTD/Thermocouple Calibrator
714B Specifications
-20 to 0 2.3 2.8 1.2 1.8
S
C
L
U
BP
XK
G
D
P
M
Notes:
• Sensor inaccuracies not included.
• Accuracy with external cold junction; for internal junction add 0.2 °C
• Temperature scale: ITS-90
• Compensation: NIST Monograph 175 for B, R, S, E, J, K, N, T. DIN 43710 for L, U. GOST P 8.585-2001 (Russia) for
BP and XK. ASTM E988-96 for C. ASTM E1751/E1751M − 09ԑ1 for G, D, P, M
• Resolution: 0.1 °C
• Temperature Coefficient: 0.05 °C/°C ( <18 °C or >28 °C )
0 to 200 1.5 2.1 1.1 1.7
200 to 1400 0.9 1.4 0.9 1.4
1400 to 1767 1.1 1.7 1.0 1.5
0 to 800 0.6 0.9 0.6 0.9
800 to 1200 0.8 1.2 0.7 1.0
1200 to 1800 1.1 1.6 0.9 1.4
1800 to 2316 2.0 3.0 1.3 2.0
-200 to -100 0.6 0.9 0.3 0.4
-100 to 800 0.3 0.4 0.2 0.3
800 to 900 0.5 0.8 0.2 0.3
-200 to 0 0.6 0.9. 0.4 0.6
0 to 600 0.3 0.4 0.3 0.4
0 to 1000 1.0 1.5 0.4 0.6
1000 to 2000 1.6 2.4 0.6 0.9
2000 to 2500 2.0 3.0 0.8 1.2
-200 to 300 0.2 0.3 0.2 0.5
300 to 800 0.4 0.6 0.3 0.6
100 to 300 1.6 2.4 1.2 1.8
300 to 1500 1.0 1.5 1.0 1.5
1500 to 2315 2.0 3.0 1.6 2.4
0 to 300 1.6 2.4 1.2 1.8
300 to 1500 1.0 1.5 1.0 1.5
1500 to 2315 2.0 3.0 1.6 2.4
0 to 1000 1.6 2.4 0.6 0.9
1000 to 1395 2.0 3.0 0.8 1.2
-50 to 100 1.0 1.5 0.4 0.6
100 to 1000 1.6 2.4 0.6 0.9
1000 to 1410 2.0 3.0 0.8 1.2
0.07 °C/°C for C type >1800 °C and for BP type >2000 °C
7
Page 16

712B/714B
Calibration Manual
General Specifications
Maximum voltage applied between
any terminal and earth ground or
between any two terminals:
Operating temperature
Storage temperature
Operating altitude 2,000 meters
Storage altitude 12,000 meters
Relative Humidity (% RH operating
without condensation)
Vibration Requirements MIL-T-28800E, Class 2
Drop Test Requirements 1 meter
IP Rating IEC 60529: IP52 (with TC cap)
Electromagnetic Environment
Safety IEC 61010-1, Max 30 V to earth, Pollution Degree 2
Electromagnetic Compatibility
Power Supply 4 AA alkaline batteries/NEDA code: 15A, IEC code: LR6
Size (H x W x L) 52.5 x 84 x 188.5 mm
Weight 515 g
30 V
-10 °C to 50 °C
-20 °C to 60 °C
Non condensing
90 % (10 °C to 30 °C)
75 % (30 °C to 40 °C)
45 % (40 °C to 50 °C)
(Without condensation)
IEC 61326-1, Portable
FCC: CFR Title 47, Part 15, Subpart B
Applies to use in Korea only. Class A Equipment (Industrial Broadcasting &
Communication Equipment)
This product meets requirements for industrial (Class A) electromagnetic
wave equipment and the seller or user should take notice of it. This
equipment is intended for use in business environments and is not to be
used in homes.
8
Page 17

RTD/Thermocouple Calibrator
Maintenance
Maintenance
Replace the Batteries
Warning
To prevent false readings, which could lead to possible electric
shock or personal injury, replace the batteries as soon as the
low battery indicator appears.
Figure 1 shows how to replace the batteries.
Clean the Product
To prevent personal injury or damage to the Product, use only
the specified replacement parts and do not allow water into the
case.
To avoid damaging the plastic lens and case, do not use
solvents or abrasive cleansers.
Clean the Product with a soft cloth dampened with water or water and mild soap.
Figure 1. Replace the Batteries
Warning
Caution
hnh38.eps
9
Page 18

712B/714B
Calibration Manual
Required Equipment
The equipment listed in Table 2 is necessary to do the calibration and test for the
712B. The equipment listed in Table 3 is necessary to do the calibration and test
for the 714B.
Note
Fluke 5522A and Fluke 8508A need an 8-hour warmup period
before the calibration starts. The 5522A needs to zero all the
functions weekly and zero Ohms output function every day. The
8508A needs to zero the dc V measurement function, the 4-Wire
Ohms measurement function and the DCI measurement function.
Table 2. Required Equipment for 712B Verification and Calibration Adjustment
Item Equipment QTY Comment
Fluke 5522A 1 ——
Can be replaced with other
Fluke 8508A 1
reference or equivalent
DMMs
B-36-2,BANANA PLUG
PATCH CORD (Part
number:1894785, RED, Part
Item Equipment QTY Comment
Fluke 5522A 1 The mV output should be calibrated by 8508A
Fluke 8508A 1
Fluke 9101-256 1
Fluke-75X-8014 1 Fluke Item No: 3669716
Fluke 7526A 1 -
[1] Before using the mV output function of 5522A, record the 5522A output setting by the reading of the
8508A.
[2] The absolute uncertainties of the DMM’s dc voltage need to be better than 10 ppm+0.2 μV in the range of
0 mV and 100 mV.
[3] The accuracy (MAX) of standard sensors should be better than 0.05 °C.
[4] The accuracy (MAX) of the TC sensor should be better than 0.05 °C.
number: 1894724, BLACK)
Or
Fluke-75X-8014,
STACKABLE LEAD SET
(Part number: 3669716)
Table 3. Required Equipment for 714B Verification and Calibration Adjustment
Pure copper cables
with the mini plug
J TYPE and K TYPE
TC Sensor
[4]
1
1
2 sets
Can be replaced with other reference or
equivalent DMMs
Can be replaced with a lag bath and standard
sensors
Used for the calibration of the mV input function
and mV source function
Used for verification and calibration adjustment
of the temperature function
[3]
Used for all the function
calibration and verification
test
[2]
.
[1]
.
10
Page 19

RTD/Thermocouple Calibrator
712B Performance Verification
712B Performance Verification
Verify that the 712B performance is within the 1 or 2 year specifications as
desired.
Turn the 712B on and let it warm up for 5 minutes.
Verify Ohms Source
1. Make connections between the 712B and the 8508A, as shown in Figure 2.
Fluke 8508A
Fluke 712B
Figure 2. Verify 712B Ohms Source
hwp011.eps
2. Set the 8508A to 4-wire ohms measurement mode. Set the resolution of
Ohms measurement mode to 7 1/2-digits or above. Set the range of Ohms
measurement mode as shown in Table 4.
3. Set the 712B to Ohms Source mode.
a. Push .
b. Push until Ohms is highlighted.
c. Push again.
d. Push as necessary to enter Source mode.
4. Set the 712B to output the resistance values at the first column in Table 4.
5. Wait approximately 10 seconds until the 8508A shows a stable reading, and
verify that the 8508A readings are within the appropriate limits in Table 4.
Note
The 8508A must be set to 4-Wire measurement and in the requested
range to maintain currents that are within 712B’s limits.
6. Disconnect the 712B from the 8508A.
11
Page 20

712B/714B
5522A
CALIBRATOR
Calibration Manual
Table 4. 712B Ohms Source Limits
Source (Ω)
1 0.950 1.050 0.920 1.080 2k range, 4W
10 9.949 10.052 9.917 10.083 2k range, 4W
100 99.935 100.065 99.890 100.110 2k range, 4W
390 389.892 390.109 389.803 390.197 2k range, 4W
1000 999.35 1000.65 998.90 1001.10 20k range, 4W
4000 3998.90 4001.10 3998.00 4002.00 20k range, 4W
1 Yr. Lower
Limit (Ω)
1 Yr. Upper
Limit (Ω)
2 Yr. Lower
Limit (Ω)
2 Yr. Upper
Limit (Ω)
8508A Range
Verify 4-Wire Ohms Measure
1. Push to set the 712B to Ohms Measure mode.
2. Push until 4W shows on the screen.
3. Make the connections between the 712B and the 5522A, as shown in
Figure 3.
4. Set the 5522A to output the Ohms value at the second column in Table 5.
5. Wait approximately 10 seconds for a stable output of the 5522A, and verify
that the 712B readings are within
the limits shown.
Fluke 712B
Figure 3. Verify 712B 4-Wire Ohms Measure
Fluke 5522A
hwp003.eps
12
Page 21

RTD/Thermocouple Calibrator
5522A
CALIBRATOR
712B Performance Verification
Table 5. 712B 4-Wire Ohms Measure Limits
Range (Ω) Applied Ω from
5522A (Ω)
400 1 0.95 1.05 0.92 1.08
400 10 9.95 10.05 9.92 10.08
400 100 99.94 100.06 99.89 100.11
400 390 389.89 390.11 389.80 390.20
4000 1000 999.4 1000.6 998.9 1001.1
4000 4000 3998.9 4001.1 3998.0 4002.0
1 Yr. Lower
Limit (Ω)
1 Yr. Upper
Limit (Ω)
2 Yr. Lower
Limit (Ω)
2 Yr. Upper
Limit (Ω)
Verify 3-Wire Ohms Measure
1.
Push
2.
Push
3.
Make the connections between the 712B and the 5522A, as shown in
Figure
4.
Set the 5522A to
Table 6.
5.
Wait approximately 10 seconds for a stable output of the 5522A, and verify
that the 712B readings are within
to set the 712B to Ohms Measure mode.
until 3W shows on the screen.
4
.
output the Ohms value at the second column
the limits shown.
in
Fluke 712B
Figure 4. Verify 712B 3-Wire Ohms Measure
Fluke 5522A
hwp018.eps
13
Page 22

712B/714B
Calibration Manual
Table 6. 712B 3-Wire Ohms Measure Limits
Range (Ω)
400 1 0.90 1.10 0.87 1.13
400 100 99.89 100.11 99.84 100.16
4000 1000 999.2 1000.8 998.7 1001.3
Applied Ω
from 5522A (Ω)
1 Yr. Lower
Limit (Ω)
1 Yr Upper
Limit (Ω)
2 Yr. Lower
Limit (Ω)
2 Yr Upper
Limit (Ω)
Verify mA Measure
1.
Make the connections between the 712B, 8508A, and 5522A, as
shown in Figure 5.
2.
Set the 8508A to DCI measurement mode, set the range of the DCI
measurement mode to 20 mA and the resolution of DCI measurement
mode to 7 1/2-digits.
3.
Adjust the mA source output of 5522A and make that 8508A shows
as the first column in the Table 7, and verify that the 712B readings
are within the limits shown.
14
Page 23

RTD/Thermocouple Calibrator
5522A
CALIBRATOR
712B Performance Verification
Fluke 8508A
Fluke 5522A
Fluke 712B
Figure 5. Verify 712B mA Measure
hwp004.eps
Table 7. 712B mA Measure Limits
DC Current
Display from
8508A (mA)
1 Yr. Lower Limit
(mA)
1 Yr Upper Limit
(mA)
2 Yr. Lower Limit
(mA)
2 Yr Upper Limit
(mA)
0.100 0.098 0.102 0.096 0.104
19.000 18.996 19.004 18.992 19.008
15
Page 24

712B/714B
Calibration Manual
714B Performance Verification
Verify mV Source
Verify that the 714B performance is within the 1 or 2 year specifications as
desired.
Turn the 714B on and let it warm up for 5 minutes.
1. Make connections between the 714B and the 8508A with copper wire, as
shown in Figure 6.
Fluke 8508A
Fluke 714B
Pure Copper Cables
Pure Copper TC Miniplug
Figure 6. Verify 714B mV Source
hwp006.eps
2. Set the 714B to Source mV mode.
a. Push .
b. Push until mV is highlighted.
c. Push again.
d. Push as necessary to enter Source mode.
3. Set the 714B to output the mV values in Table 8.
4. Check that the 8508A readings are within the appropriate limits in Table 8.
Table 8. 714B mV Source Limits
Range (mV) Sourced (mV)
-10 to 75 -9.5 -9.511 -9.489 -9.517 -9.483
-10 to 75 10 9.989 10.012 9.983 10.017
-10 to 75 40 39.984 40.016 39.977 40.023
-10 to 75 70 69.980 70.020 69.971 70.029
1 Yr. Lower
Limit (mV)
1 Yr Upper
Limit (mV)
2 Yr. Lower
Limit (mV)
2 Yr Upper
Limit (mV)
16
Page 25

RTD/Thermocouple Calibrator
5522A
CALIBRATOR
714B Performance Verification
Verify mV Measure
1. Make connections between the 714B and the 5522A with copper wire, as
shown in Figure 7.
Fluke 5522A
Fluke 714B
Pure Copper Cables
Pure Copper TC Miniplug
Figure 7. Verify 714B mV Measure
hwp007.eps
2. Push to set the 714B to mV Measure mode.
3. Set the 5522A to the first value in Table 9.
4. Output the mV values in Table 9 and verify that the 714B readings are within
the limits shown.
Table 9. 714B mV Measure Limits
Sourced (mV)
-9.5 -9.511 -9.489 -9.517 -9.483
10 9.989 10.012 9.983 10.017
40 39.984 40.016 39.977 40.023
70 69.980 70.020 69.971 70.029
1 Yr. Lower Limit
(mV)
1 Yr Upper Limit
(mV)
2 Yr. Lower Limit
(mV)
2 Yr Upper Limit
(mV)
Verify TC Measure (Type K)
1. Set the 714B to Type K Measure mode.
2. Set the 7526A to TC Out Type K.
3. Use K type TC sensor to connect the 7526A and the 714B, as shown in
Figure 8.
17
Page 26

712B/714B
Calibration Manual
Fluke 714B
K Type
OUTPUT
100V MAX
20V PK
MAX
CURRENT
20V PK
MAX
7526A
VOLTS
4
7526A
PRECISION PROCESS CALIBRATOR
mA
100mA MAX
HI
LO
W RTD/
INPUT
HI
LO
HI
LO
SENSE
RTD/
OUTPUT
TC
INPUT/OUTPUT
20V PK
MAX
TC Miniplug
Figure 8. Verify Type K Measure
hwp015.eps
4. Set the 7526A to the values in Table 10 and verify that the 714B readings are
within the limits shown.
Table 10. 714B Type K Measure Limits
5522A Sourced
(°C)
1 Yr. Lower Limit
(°C)
1 Yr Upper Limit
(°C)
2 Yr. Lower Limit
(°C)
2 Yr Upper Limit
(°C)
-180 -180.9 -179.1 -181.2 -178.8
0 -0.5 0.5 -0.6 0.6
1300 1299.1 1300.9 1298.8 1301.2
Verify TC K Source
1. Set the 714B to type K Source mode.
2. Set the 7526A to TC IN Type K
3. Maintain the connections in Figure 8.
4. Set the 714B to the values in Table 11 and verify that the 7526A readings are
within the limits shown.
Table 11. 714B TC K Source Limits
714B Sourced
(°C)
-100 -100.5 -99.5 -100.6 -99.4
0 -0.5 0.5 -0.6 0.6
800 799.5 800.5 799.4 800.6
1 Yr. Lower Limit
(°C)
1 Yr Upper Limit
(°C)
2 Yr. Lower Limit
(°C)
2 Yr Upper Limit
(°C)
18
Page 27

RTD/Thermocouple Calibrator
5522A
CALIBRATOR
714B Performance Verification
Verify mA Measure
1. Connect the 5522A, 8508A, and 714B, as shown in Figure 9.
2. Set the 8508A to DCI measurement mode, set the range of the DCI
measurement mode to 20 mA and the resolution of DCI measurement mode
to 7 1/2-digits.
3. Set the 5522A to source and make sure that 8508A shows the first dc current
in Table 12.
4. Output the dc current values in Table 12 and verify that the 714B readings
are within the limits shown.
Fluke 8508A
Fluke 714B
Figure 9. Verify mA Measure
Table 12. 714B mA Measure Limits
Fluke 5522A
hwp010.eps
DC current display from
8508A (mA)
0.100 0.098 – 0.102 0.096 – 0.104
19.000 18.996 – 19.004 18.992 – 19.008
1 Yr. Limit (mA) 2 Yr. Limit (mA)
19
Page 28

712B/714B
Calibration Manual
712B Calibration Adjustment
Enter Manual Calibration Mode
This section describes how to adjust for the 712B.
To enter manual calibration mode:
1. Power off the Product.
2. Push and hold down and at the same time.
3. Push and then release .
4. Release and .
The Welcome screen shows.
5. After a warmup period of approximately 5 minutes, start the calibration
adjustment.
Adjust Ohms Source
Before the calibration adjustment, set the 8508A to 4-Wire Ohms measurement
mode, set the resolution of Ohms measurement mode to 7 1/2-digits or above,
and use two sets of banana plug patch cords to connect the 712B and the 8508A,
as shown in Figure 10.
Fluke 712B
Figure 10. Adjust 712B Ohms Source
Fluke 8508A
hwp01.jpg
hwp011.eps
20
Page 29

RTD/Thermocouple Calibrator
712B Calibration Adjustment
Adjust 50 Ω Source
1. Set the range of 8508A 4-Wire measurement to 2 kΩ.
2. Push on the 712B to enter the 50 Ω Source calibration mode.
3. Wait approximately 10 seconds until the 8508A shows a stable reading.
4. Use the arrow keys to input the reading into the 712B.
5. Confirm the input.
Adjust 350 Ω Source
1. Push to enter 350 Ω Source calibration mode.
2. Wait approximately 10 seconds until the 8508A shows a stable reading.
3. Input the reading into the 712B.
4. Confirm the input.
hwp02.jpg
hwp03.jpg
21
Page 30

712B/714B
Calibration Manual
Adjust 500 Ω Source
1. Set the range of 8508A 4-Wire measurement to 20 kΩ.
2. Push to enter 500 Ω Source calibration mode.
3. Wait approximately 10 seconds until the 8508A shows a stable reading.
4. Input the reading into the 712B.
5. Confirm the input.
Adjust 3500 Ω Source
1. Push to enter 500 Ω Source calibration mode.
2. Wait approximately 10 seconds until the 8508A shows a stable reading.
3. Input the reading into the 712B.
4. Confirm the input.
hwp04.jpg
hwp05.jpg
22
Page 31

RTD/Thermocouple Calibrator
712B Calibration Adjustment
Adjust Trigger Current for Ohms Measure
Before the calibration adjustment, set the 8508A to DCI measurement mode,
set the resolution of DCI measurement mode to 7 1/2-digits, and use one set
of banana plug patch cords to connect the 712B and the 8508A, as shown in
Figure 11.
Fluke 8508A
Fluke 712B
Figure 11. Adjust 712B Trigger Current
Adjust 0.1 mA Trigger Current
1. Set the range of the 8508A dc mA measurement to 2 mA.
2. Push on the 712B to enter 0.1 mA trigger current calibration mode.
3. Wait approximately 15 seconds until the 8508A shows a stable reading.
4. Input the reading into the 712B.
5. Confirm the input.
hwp002.eps
hwp06.jpg
23
Page 32

712B/714B
Calibration Manual
Adjust 0.25 mA Trigger Current
1. Push on the 712B to enter 0.25 mA trigger current calibration mode.
2. Wait approximately 15 seconds until the 8508A shows a stable reading.
3. Input the reading into the 712B.
4. Confirm the input.
Adjust 0.5 mA Trigger Current
1. Push on the 712B to enter 0.5 mA trigger current calibration mode.
2. Wait approximately 15 seconds until the 8508A shows a stable reading.
3. Input the reading into the 712B.
4. Confirm the input.
hwp07.jpg
hwp08.jpg
24
Page 33

RTD/Thermocouple Calibrator
5522A
CALIBRATOR
712B Calibration Adjustment
Adjust 1 mA Trigger Current
1. Push on the 712B to enter 1 mA trigger current calibration mode.
2. Wait approximately 15 seconds until the 8508A shows a stable reading.
3. Input the reading into the 712B.
4. Confirm the input.
Adjust Ohms Measure
Before the calibration adjustment, set the 5522A to Ohms source output mode,
and use two sets of banana plug patch cords to connect the 712B and the 5522A,
as shown in Figure 12.
Fluke 712B
Fluke 5522A
hwp09.jpg
Figure 12. Adjust 712B Ohms Measure
hwp003.eps
25
Page 34

712B/714B
Calibration Manual
Adjust 50 Ω Input
1. Set the 5522A to output 50 Ω.
2. Wait approximately 10 seconds for a stable output of the 5522A.
3. Confirm the reading on the 712B.
Adjust 350 Ω Input
1. Push on the 712B to enter 350 Ω input calibration mode.
2. Set the 5522A to output 350 Ω.
Wait approximately 10 seconds for a stable output of the 5522A.
3. Confirm the reading on the 712B.
hwp10.jpg
hwp11.jpg
26
Page 35

RTD/Thermocouple Calibrator
712B Calibration Adjustment
Adjust 500 Ω Input
1. Push on the 712B to enter 500 Ω input calibration mode.
2. Set the 5522A to output 500 Ω.
Wait approximately 10 seconds for a stable output of the 5522A.
3. Confirm the reading on the 712B.
Adjust 3500 Ω Input
1. Push on the 712B to enter the 3500 Ω input calibration mode.
2. Set the 5522A to output 3500 Ω.
Wait approximately 10 seconds for a stable output of the 5522A.
3. Confirm the reading on the 712B.
hwp12.jpg
hwp13.jpg
27
Page 36

712B/714B
5522A
CALIBRATOR
Calibration Manual
Adjust mA Measure
Before the calibration adjustment, set the 5522A to mA (dc) source output mode,
and use one set of banana plug patch cords to connect the 712B and the 5522A,
as shown in Figure 13.
Fluke 5522A
Fluke 712B
Adjust 0.1 mA Input
1. Set the 5522A to output 0.1 mA.
2. Push on the 712B to enter 0.1 mA input calibration mode.
Wait approximately 10 seconds for a stable output of the 5522A.
3. Confirm the reading on the 712B.
Figure 13. Adjust 712B mA Measure
hwp022.eps
hwp14.jpg
28
Page 37

RTD/Thermocouple Calibrator
5522A
CALIBRATOR
712B Calibration Adjustment
Adjust 24 mA Input
1. Set the 5522A to output 24 mA.
2. Push on the 712B to enter 24 mA input calibration mode.
Wait approximately 10 seconds for a stable output of the 5522A.
3. Confirm the reading on the 712B.
Adjust External Trigger for Ohms Source
Before the calibration, set the 5522A to mA (dc) source output mode, and use
one set of banana plug patch cords to connect the 712B and the 5522A, as
shown in Figure 14.
Fluke 712B
Fluke 5522A
hwp15.jpg
Figure 14. Adjust External Trigger for Ohms Source
hwp005.eps
29
Page 38

712B/714B
Calibration Manual
Adjust 0.1 mA External Trigger
1. Set the 5522A to output 0.1 mA.
2. Push on the 712B to enter 0.1 mA external trigger calibration mode.
3. Wait approximately 10 seconds for a stable output of the 5522A.
4. Confirm the reading on the 712B.
Adjust 1 mA External Trigger
1. Set the 5522A to output 1 mA.
2. Push on the 712B to enter 1 mA external trigger calibration mode.
3. Wait approximately 10 seconds for a stable output of the 5522A.
4. Confirm the reading on the 712B.
hwp16.jpg
hwp17.jpg
30
Page 39

RTD/Thermocouple Calibrator
714B Calibration Adjustment
Save Data and Reset the 712B System
After the calibration procedure described above is done, push to confirm and
store the calibration data. The 712B system is automatically reset.
hwp18.jpg
714B Calibration Adjustment
Enter Calibration Mode
To enter manual calibration mode:
1. Power off the Product.
2. Push and hold down and at the same time.
3. Push and then release .
4. Release and .
The Welcome screen shows.
5. After a warmup period of approximately 5 minutes, start the calibration
adjustment.
hwp19.jpg
hwp20.jpg
31
Page 40

712B/714B
Calibration Manual
Use 8508A to Adjust the 5522A Output
Adjust mV Source
To use the 8508A to calibrate the 5522A output:
1. Connect the voltage output terminals of the 5522A with the voltage input
connectors of the 8508A via the pure copper cables.
2. Set the resolution of DCV measurement mode to 7 1/2-digits or above.
3. Adjust the output of the 5522A until the reading of the 8508A is -10 mV
±0.2 μV, and record the voltage setting of the 5522A (=Voltage
-10mV
Setting).
4. Adjust the output of the 5522A until the reading of the 8508A is 75 mV
±0.2 μV, and record the voltage setting of the 5522A (=Voltage
Setting).
75mV
Note
The two voltage setting records are used to calibrate the UUT.
To calibrate the 714B mV Source function:
1. Connect the 714B TC mini plug and the 8508A with pure copper cables, as
shown in Figure 15.
Fluke 8508A
Fluke 714B
Pure Copper Cables
Pure Copper TC Miniplug
Figure 15. Connect the 714B to the 8508A
2. Push to enter -10 mV Source calibration mode.
3. Input the reading on the 8508A to the 714B.
hwp006.eps
32
hwp21.jpg
Page 41

RTD/Thermocouple Calibrator
5522A
CALIBRATOR
714B Calibration Adjustment
4. Push to enter the 75 mV source calibration mode.
5. Input the new reading on the 8508A to the 714B.
6. Push to confirm.
Adjust mV Measure
1. Connect the 714B TC mini plug to the 5522A with pure copper cables, as
shown in Figure 16.
Fluke 714B
Pure Copper Cables
hwp22.jpg
Fluke 5522A
Pure Copper TC Miniplug
Figure 16. Adjust 714B mV Measure
The 5522A outputs the value (Voltage
-10mV
Setting).
hwp007.eps
33
Page 42

712B/714B
Calibration Manual
The 5522A outputs the value (Voltage
2. After approximately 10 seconds, push to calibrate the value.
Adjust Internal Cold Junction Temperature
Use the Fluke 9101-256 or a lag bath to calibrate the internal cold junction
temperature.
Use the Fluke 9101-256
To use the Fluke 9101-256 to calibrate the internal cold junction temperature:
Setting).
75mV
hwp23.jpg
hwp24.jpg
34
1. Connect the Fluke 9101-256 and the 714B via the J type thermocouple
sensor, as shown in Figure 17.
Page 43

RTD/Thermocouple Calibrator
714B Calibration Adjustment
Fluke 714B
J TYPE TC Sensor
Fluke 9101-256
hwp008.eps
Figure 17. Connect the 714B to the Fluke 9101-256
2. After the J type thermocouple is inserted, wait approximately 5 minutes for
the temperature reading to stabilize.
3. Push to calibrate the cold junction temperature.
hwp25.jpg
35
Page 44

712B/714B
Calibration Manual
Use a Lag Bath
To use a lag bath to calibrate the internal cold junction temperature:
1. Connect the lag bath and the 714B via the J type thermocouple sensor, and
immerse the thermocouple and a precision mercury thermometer in the
mineral oil lag bath, as shown in Figure 18.
2. After the thermocouple is inserted, wait approximately 5 minutes for the
temperature reading to stabilize.
3. Record the reading on the standard sensor, and input the reading to the
714B.
4. Push to calibrate the cold junction temperature.
Fluke 714B
J Type
TC Sensor
Figure 18. Use Lag Bath to Adjust Cold Junction Temperature
Fluke 1551A Ex
Thermometer
Note
The mercury thermometer can be replaced with other standard
temperature sensors. The temperature of the lag bath should be
within
±2°
C of ambient temperature.
hwp009.eps
36
Page 45

RTD/Thermocouple Calibrator
5522A
CALIBRATOR
714B Calibration Adjustment
Adjust mA Measure
1. Connect the 5522A and the 714B via the Fluke-75X-8014 cable, as shown in
Figure 19.
The 5522A outputs 0.1 mA.
Fluke 714B
Figure 19.714B and 5522A mA Channel Connections
Fluke 5522A
hwp26.jpg
hwp023.eps
37
Page 46

712B/714B
Calibration Manual
2. Push . The 5522A outputs 24mA.
3. Push to adjust.
Save Data and Reset the 714B System
After the calibration procedure described above is done, push to confirm and
store the calibration data. The 714B system is automatically reset.
hwp28.jpg
hwp27.jpg
hwp29.jpg
38
Page 47

RTD/Thermocouple Calibrator
User-Replaceable Parts and Accessories
User-Replaceable Parts and Accessories
Warning
To prevent possible electrical shock, fire, or personal injury,
use only specified replacement parts.
User-replaceable parts for the 712B are listed in Table 13 and shown in
Figure 20. User-replaceable parts for the 714B are listed in Table 14 and shown
in Figure 21. For more information about these items, contact a Fluke
representative. See the “Contact Fluke” section of this manual.
Table 13. User-Replaceable Parts and Accessories for 712B
Item Description Part Number
Case top 4307068
Decal 4307164
Keypad 4307147
Keypad support 4307112
Screw, M2.2 x 0.8, 5 MM, PAN, PHILLIPS 2032777
LCD mask 4307101
LCD protect rubber 4307208
LCD 4313462
Support LCD gasket 4307213
Screw, M3 x 0.5,5MM, PAN, PHILLIPS 2032811
Case seal rubber 4307186
Case bottom assembly 4307079
Screw, M3, 13.5 mm, PAN, PHILLIPS 2388382
Battery door seal rubber 4307199
AA battery 376756
Not Shown
Not Shown
Not Shown
Not Shown
[1] See www.fluke.com for more information about the test leads and alligator clips available for your
region.
Pad, battery door 4417921
Battery door assembly 4376901
Bail stand 4307093
Quick Reference Guide 4285042
754-8016 alligator clip set 4253535
Stackable test lead set 3669716
Test Leads variable
Alligator Clips variable
[1]
[1]
39
Page 48

712B/714B
Calibration Manual
1
10
2
6
3
4
5
8
9
7
11
12
13
14
15
16
17
19
18
hqu46.eps
Figure 20.User-Replaceable Parts and Accessories for 712B
40
Page 49

RTD/Thermocouple Calibrator
User-Replaceable Parts and Accessories
Table 14. User-Replaceable Parts and Accessories for 714B
Item Description Part Number
Not Shown
Not Shown
[1] See www.fluke.com for more information about the test leads and alligator clips available for your region.
Case top 4307120
Decal on case top 4307173
TC cap 4369726
Keypad 4307158
Keypad support 4307112
Screw, M2.2 x 0.8, 5 mm, PAN, Philips 2032777
TC plate 4307381
Screw, M3-0.5 x 5 mm, Philips 2032811
LCD mask 4307135
LCD protect rubber 4307208
LCD 4313462
Support LCD gasket 4307213
Case seal rubber 4307186
Case bottom assembly 4307079
Screw, M3, 13.5 mm, PAN, Philips 2388382
Battery door seal rubber 4307199
AA battery 376756
Pad, battery door 4417921
Battery door assembly 4376901
Bail stand 4307093
Quick Reference Guide 4285039
TC plugkit, K type 773135
Test Leads, not shown variable
Alligator Clips
[1]
41
Page 50

712B/714B
Calibration Manual
2
3
4
5
6
7
1
9
10
11
8
12
13
14
15
16
17
18
19
20
21
22
hrk46.eps
Figure 21. User-Replaceable Parts and Accessories for 714B
42
 Loading...