

Page 1
Fluance Ai40 User Manual 1
User Manual
Ai40 - Active Bookshelf Speakers
Serious Performance™ Fluance.com
Page 2

Fluance Ai40 User Manual 2
Introduction
Fluance believes everyone should experience audio in its truest form, recreating the
performance the way the artist intended. Utilizing only superior components and expert
audio engineering, their products are a testament to the performance that can be achieved
when a passion for music takes center stage. The perfect complement to any audiophile’s
lifestyle, you’ll be enjoying live performances in your home for years to come.
Break-in Period
Our speakers have a Butyl rubber ring surrounding the cone. The break-in
period allows the rubber to loosen and stretch, allowing the cone a larger range of
movement, which gives a better sound reproduction. We recommend 10-12 hours of
play at moderate volume to achieve this.
Page 3

Table Of Contents
Introduction 2
Break-in Period 2
What’s Included 4
Front & Back Panel Layout 5
Remote Control Layout 6
Product Setup 7
Turning On/Off Unit 8
Source Selection 8
RCA Input 9
®
Bluetooth
Pairing 10
Volume Adjustment 11
EQ Adjustment 11
Adjusting Source LED Brightness 11
Frequently Asked Questions 12
Troubleshooting 13
Specications 14
Warranty 15
Important Safety Instructions 16
FCC & IC Information 17
Page 4
Fluance Ai40 User Manual 4
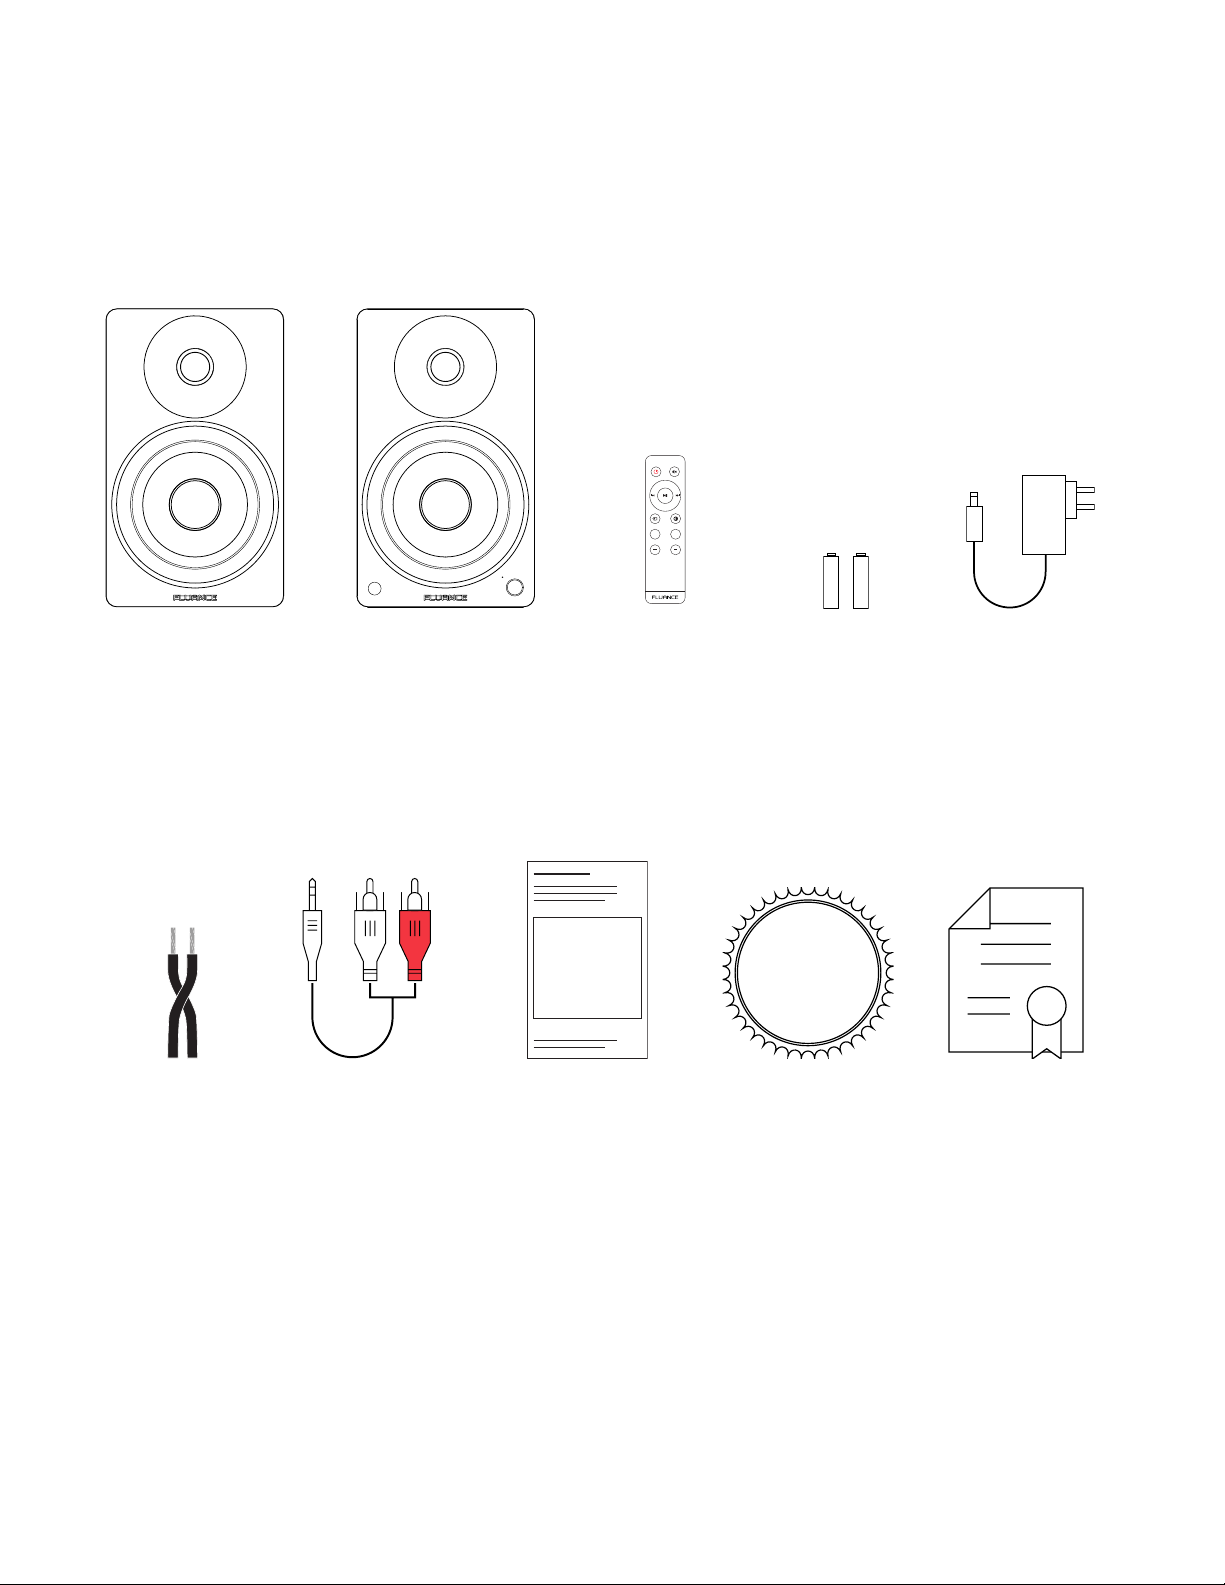
What’s Included
VOL +
VOL -
++
TREBLE BASS
Ai40 Passive
Speaker
(Left Channel)
Speaker
Wire
Ai40 Active
Speaker
(Right Channel)
AUX-to-RCA
Cable
Remote
Control
Quick Start
Guide
2 ‘AAA’
Batteries
LIFETIME
Customer Support
Lifetime
Customer
Support
Power
Adapter
2 Year
Warranty
Page 5
Fluance Ai40 User Manual 5
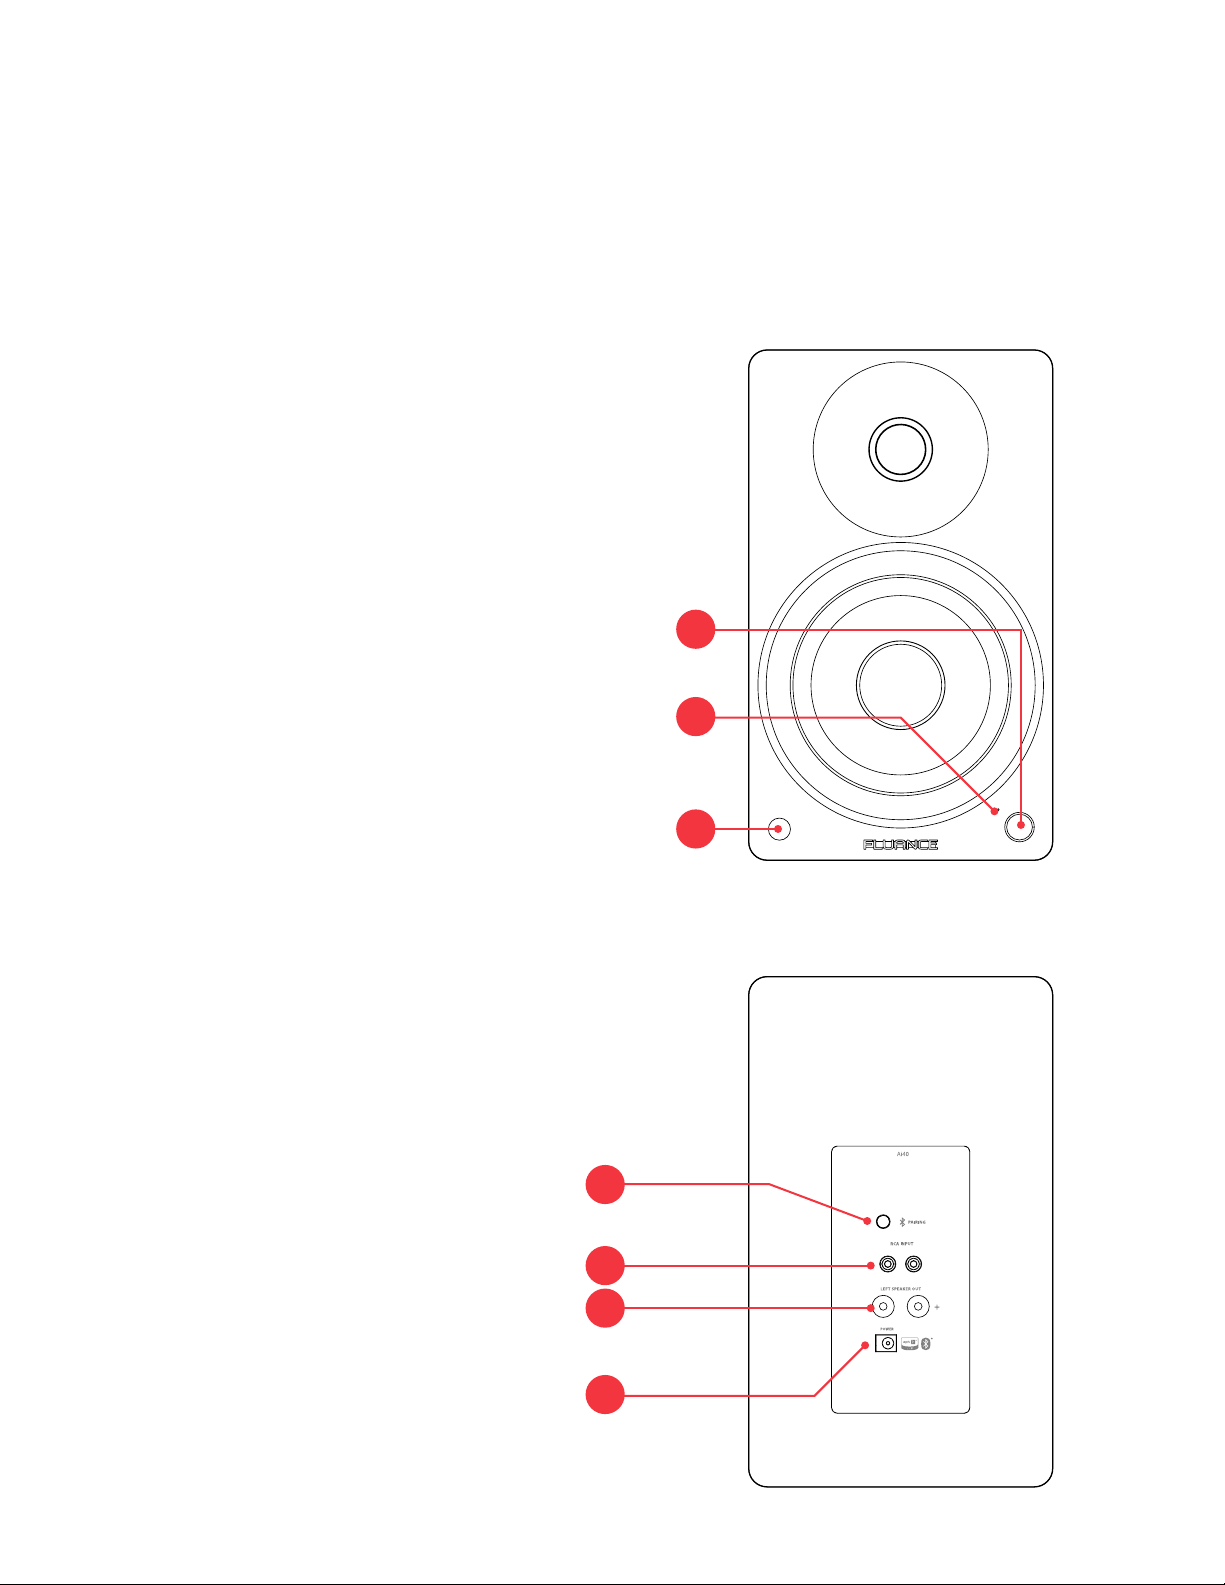
Front & Back Panel Layout
Active Speaker - Front
1. Control Knob
• Volume
• Input Selection
• Power ON/OFF
2. Source LED
• Blue (Solid) - Bluetooth® Paired
• Blue (Flashing) - Bluetooth® Pairing
• Yellow (Solid) - RCA
• Red (Solid) - Standby Mode
• Red (Flashing) - Mute
• Red (Flash x2) - Bass/Treb Set to -5 or +5
• Blue/Yellow (Flash x2) - Bass/Treb Set to 0
3. IR Sensor
1
2
Active Speaker - Back
4. Bluetooth® Reset Pairing
5. RCA Input
6. Left Speaker Output
7. DC Input
3
4
5
6
7
Page 6
Fluance Ai40 User Manual 6
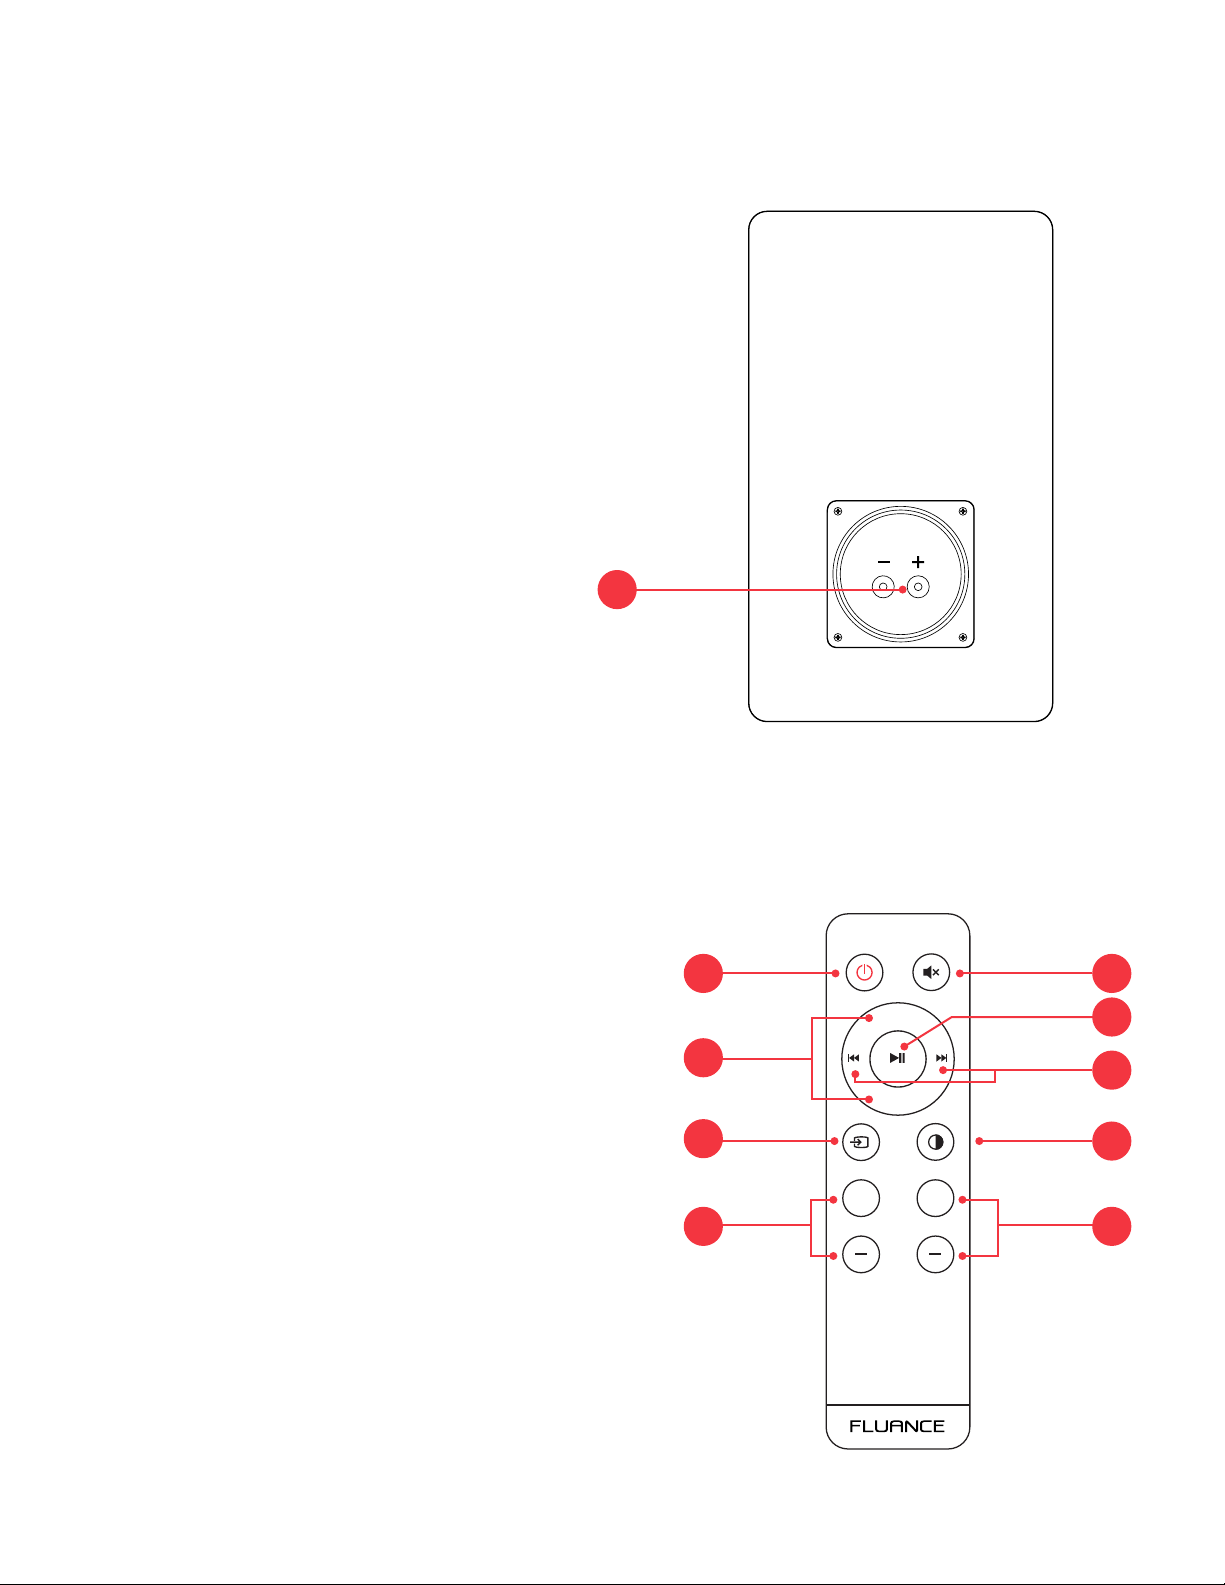
Passive Speaker - Back
8. Speaker Input
8
Remote Control Layout
1. Power ON/OFF
2. Volume UP/DOWN
3. Source
4. Treble UP/DOWN
5. Mute
6. Play/Pause & Bluetooth Pairing Reset*
*To enable Bluetooth Pairing Reset, press + hold
for 3 seconds.
7. Forward/Back
8. LED Brightness - (100% > 25% > OFF)
9. Bass UP/DOWN
1 5
VOL +
2
VOL -
3
++
4 9
TREBLE BASS
6
7
8
Page 7
Fluance Ai40 User Manual 7
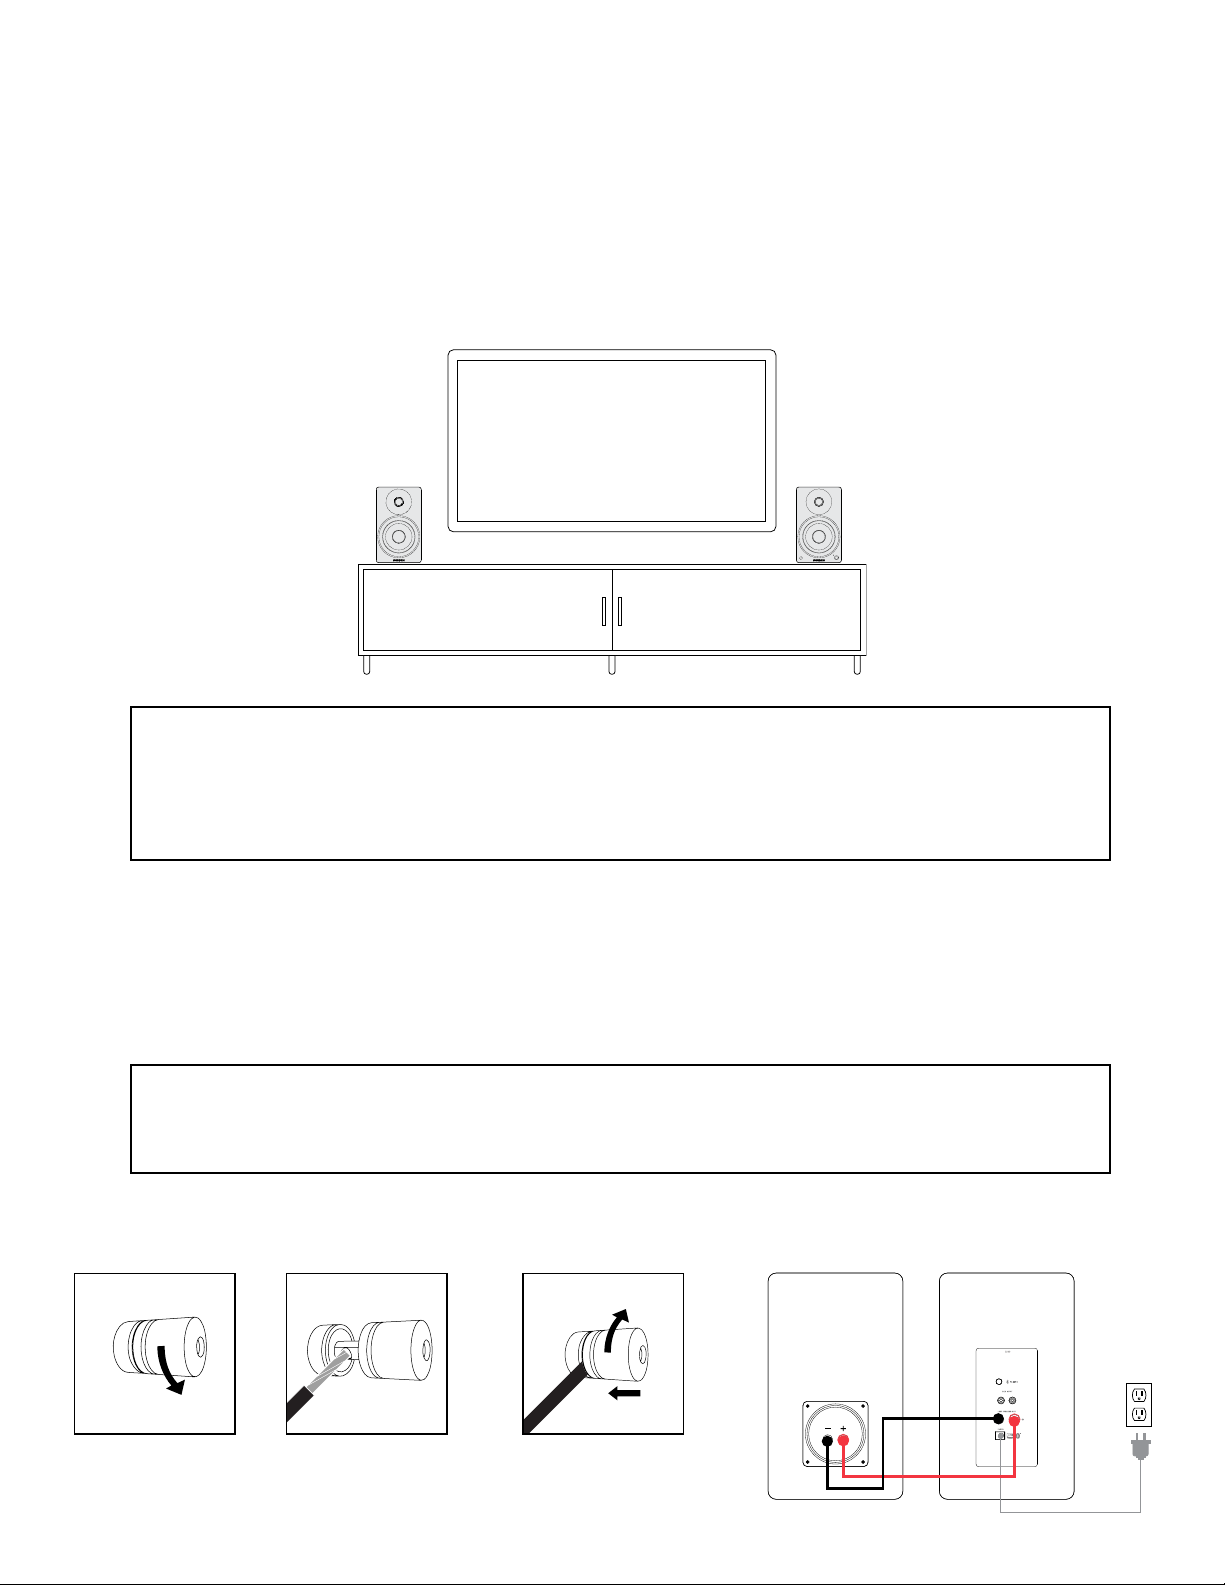
Product Setup
1. Position the speakers with the Active Speaker on the right and the Passive Speaker
on the left.
Passive Speaker Active Speaker
NOTE: If placing the speakers in a cabinet or on a shelf, position the front of the
speakers as close as possible to the front edge of the shelf for optimum audio
performance.
2. Connect one end of the speaker wire to the binding posts on the back of the
Active Speaker and connect the other end of speaker wire to the binding posts on the
back of the Passive Speaker.
IMPORTANT: Ensure the same color wire is connected to the same color binding posts
on each speaker.
NOTE: The included speaker wire is 8ft. If placing your speakers further than 8ft apart
it is recommended to use standard 18 gauge speaker wire to connect the speakers
over the longer distance.
3. Connect the power adapter to the back of the Active Speaker.
Passive
Speaker
Active
Speaker
Loosen the
binding post
Insert speaker
wire through hole
Tighten the
binding post
Page 8
Fluance Ai40 User Manual 8
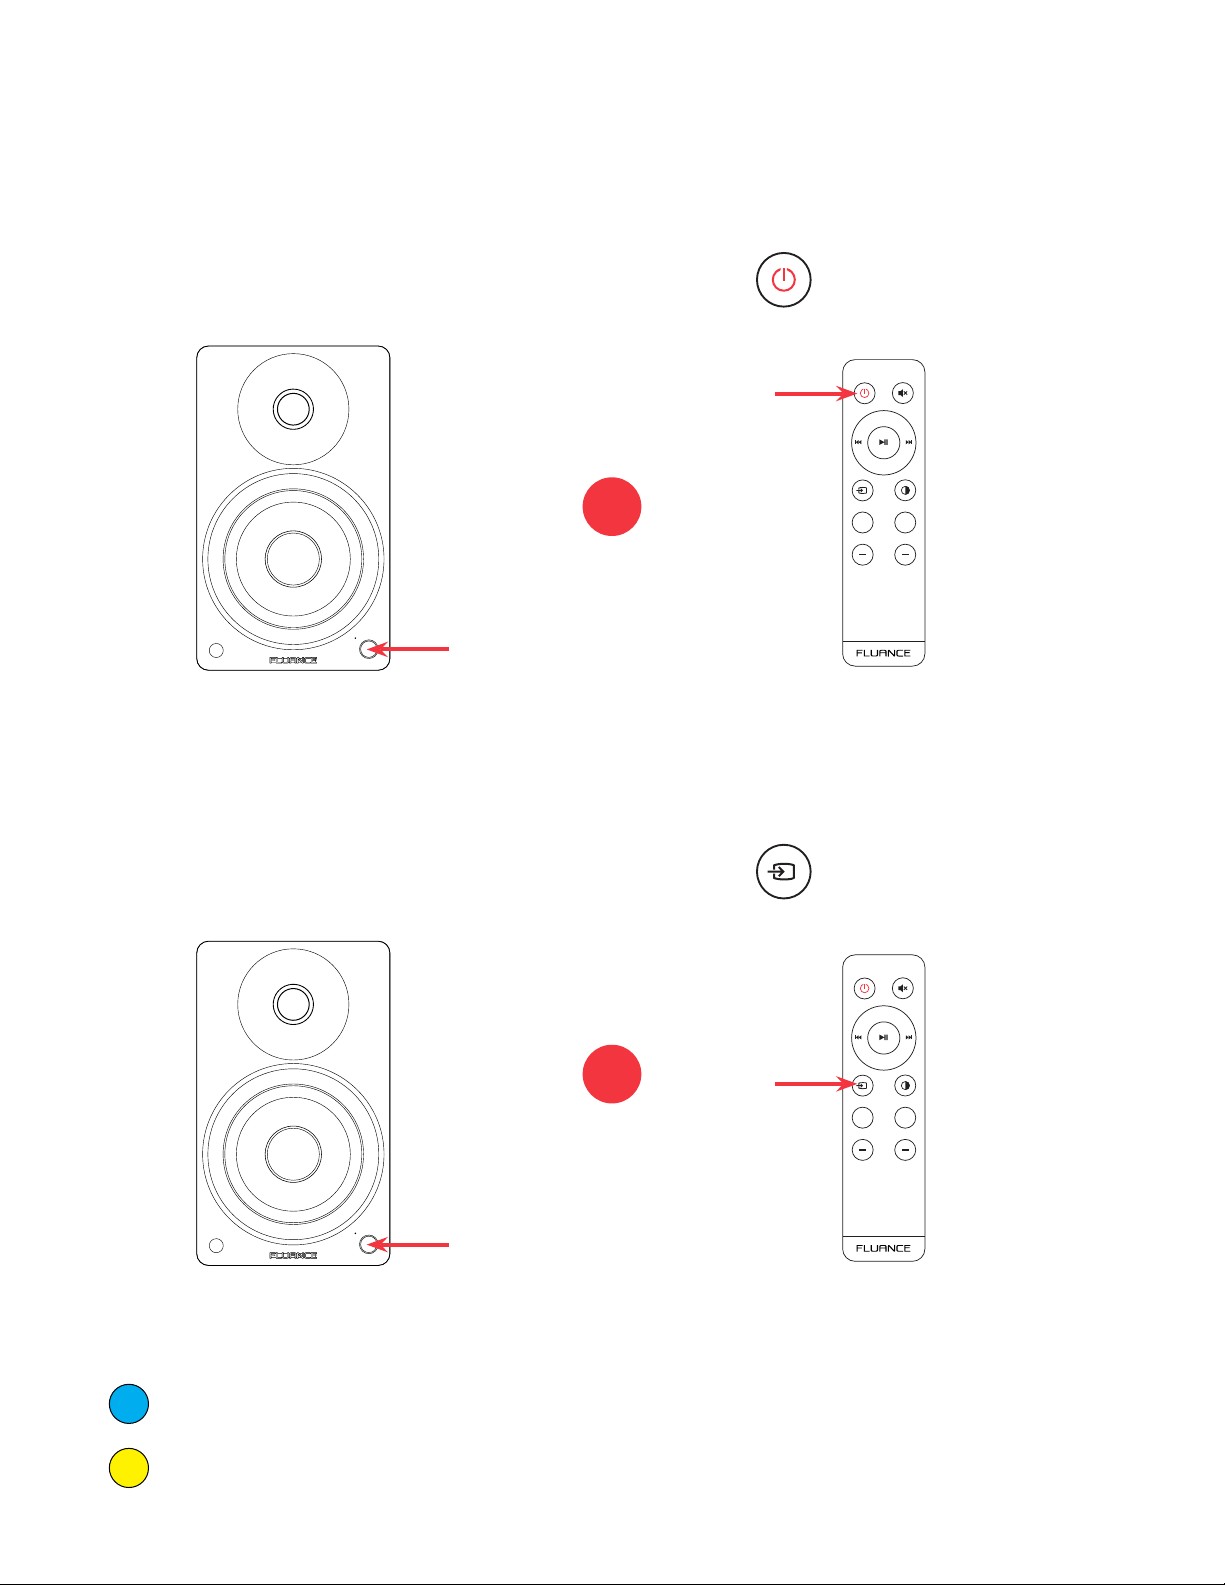
Turning On/Off Unit
Press the Control Knob to turn on
the unit. Hold to turn off the unit.
Source Selection
OR
Press on the Remote to turn the
unit on/off.
VOL +
VOL -
++
TREBLE BASS
Press the Control Knob to cycle through
the audio inputs.
Press
through the audio inputs.
OR
The Source LED will show the below color for each source:
(Blue) Bluetooth
on the remote to cycle
VOL +
VOL -
++
TREBLE BASS
(Yellow) RCA
Page 9
Fluance Ai40 User Manual 9
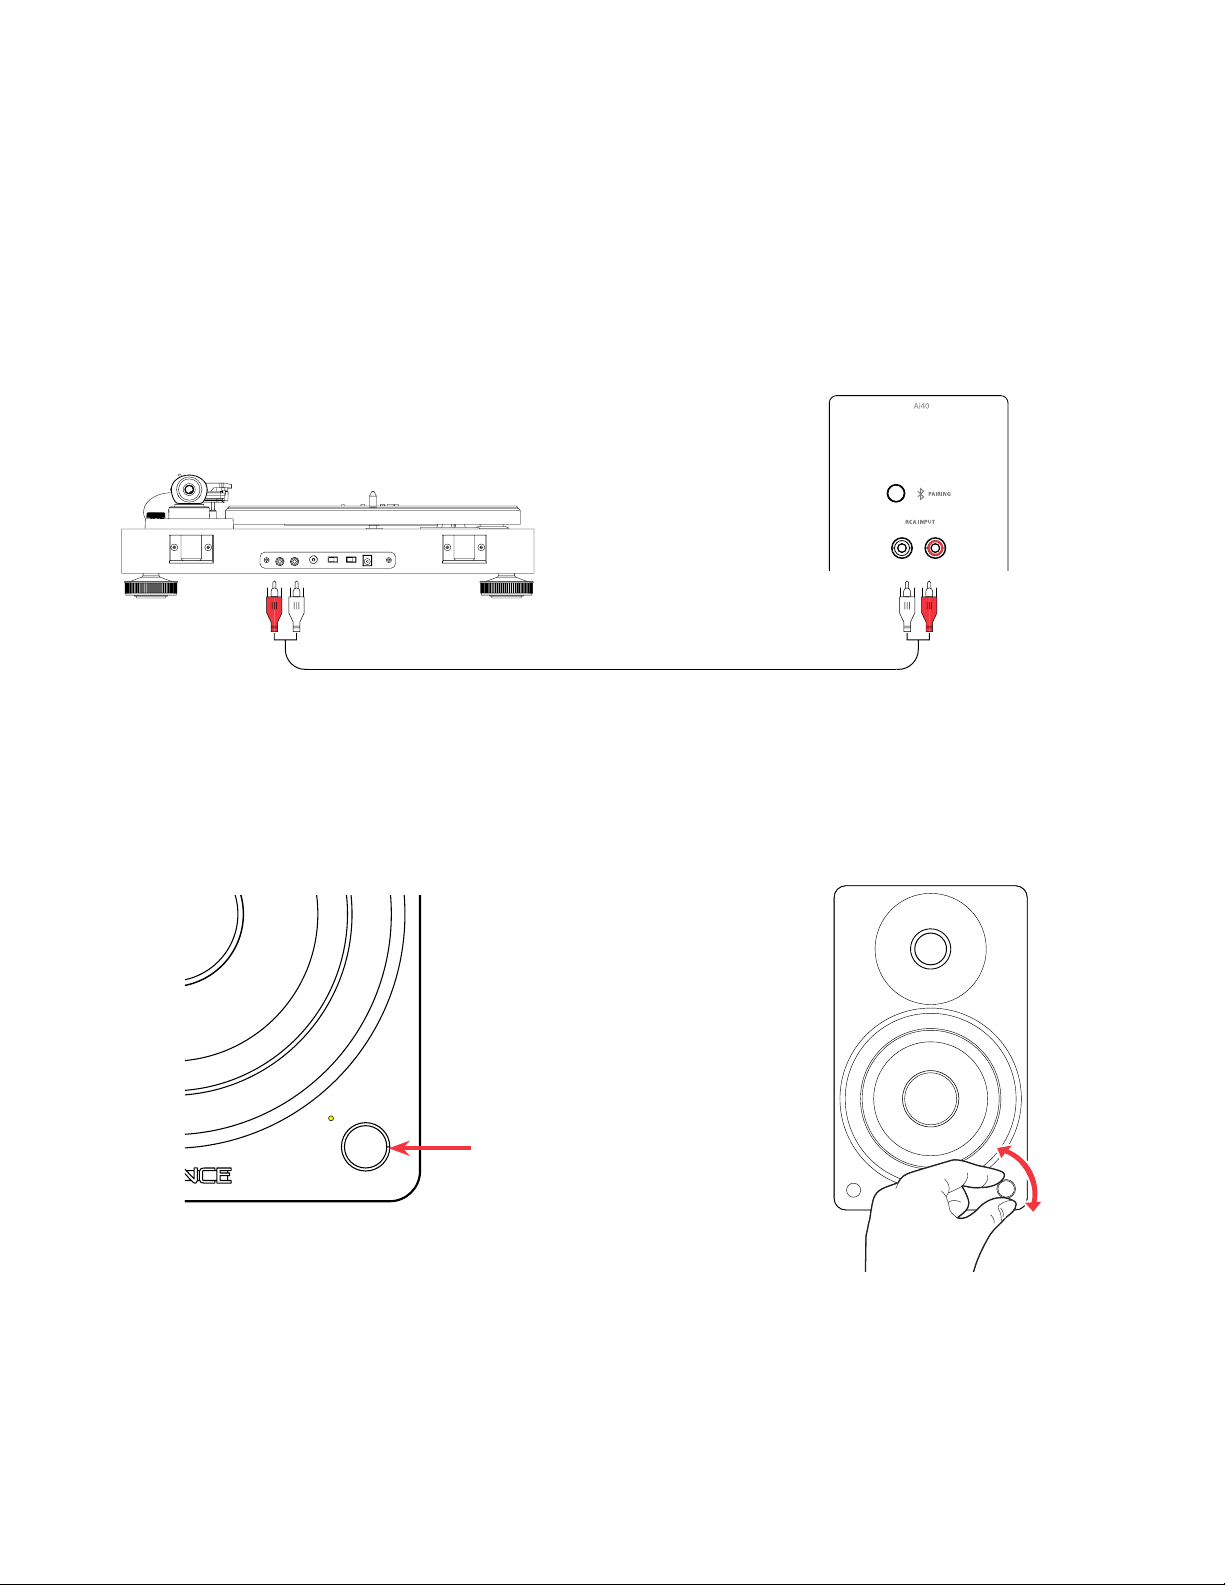
RCA Input
1. Connect the RCA cable to your
source device (Turntable, Smartphone, Computer…).
*RCA to RCA cable not included
3. Press the Control Knob to select
the RCA input (Yellow LED).
2. Connect the other end of the
RCA cable to back of the Active
Speaker.
4. Adjust volume on Ai40 as well as
source device.
Page 10
Fluance Ai40 User Manual 10
VOL +
VOL -
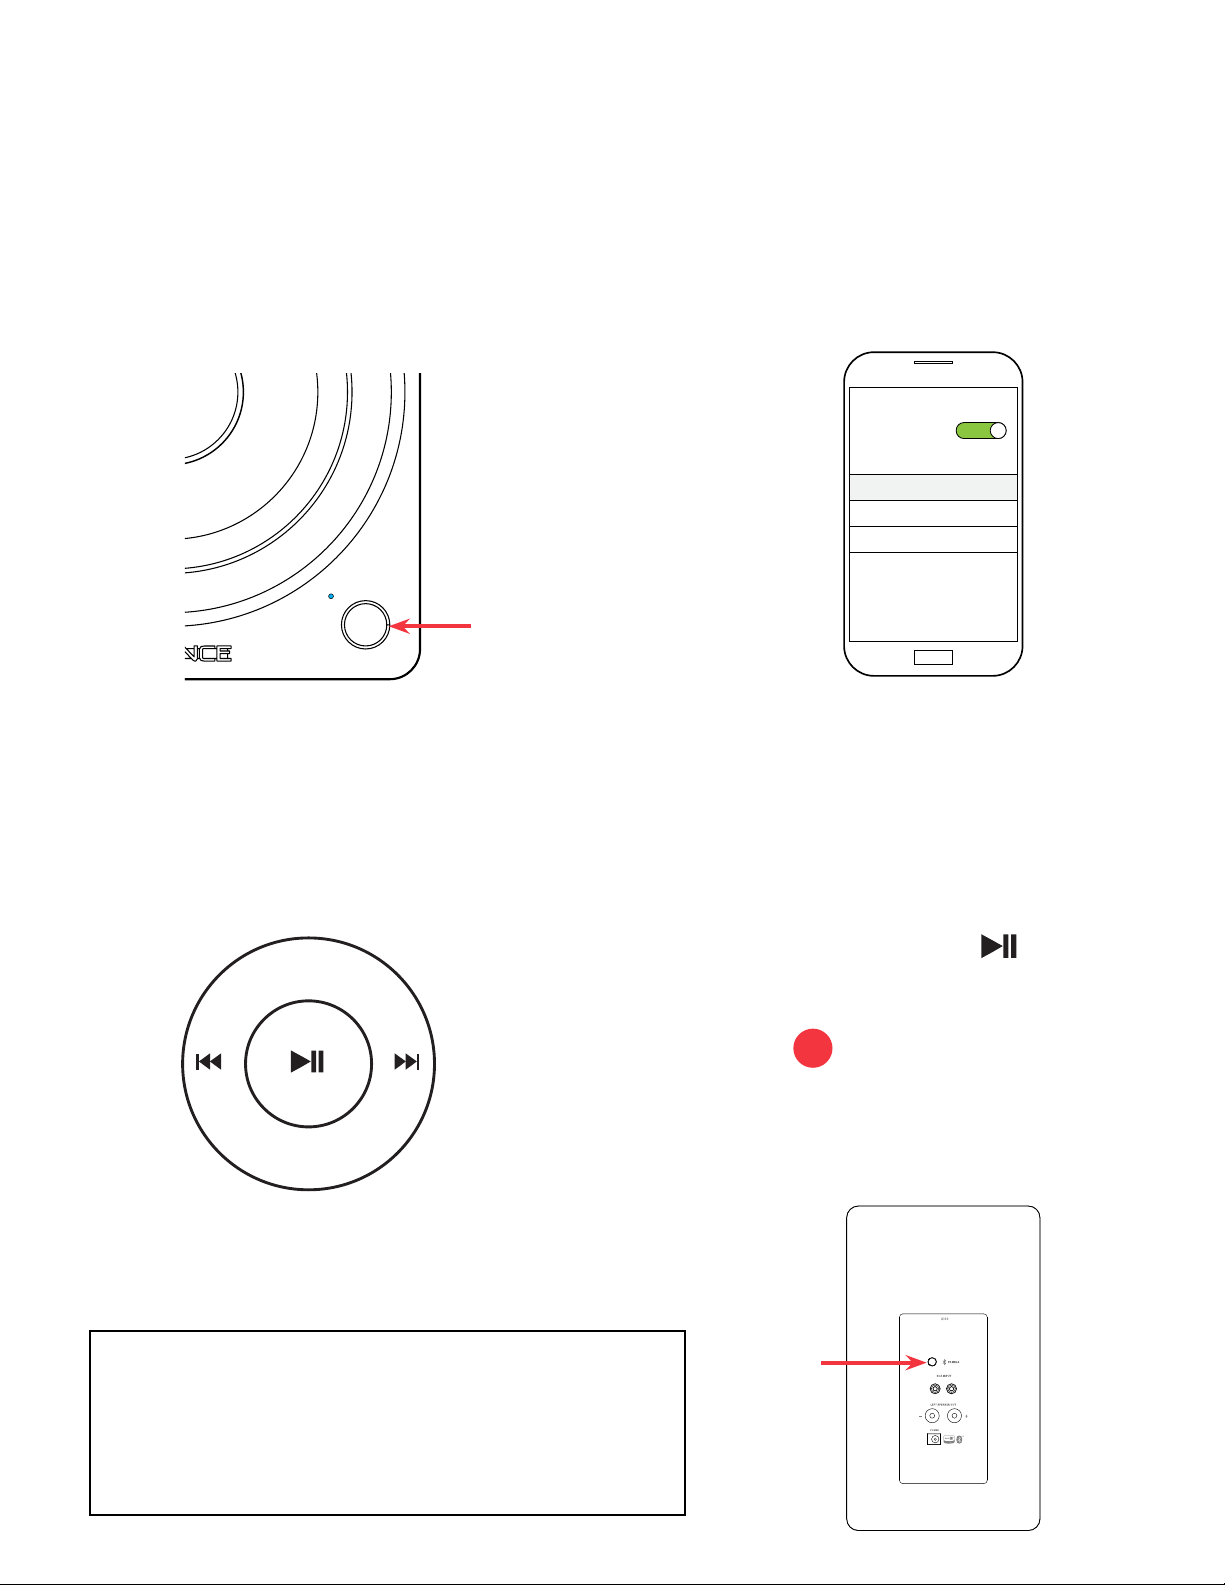
Bluetooth® Pairing
1. Press the Control Knob to select
the Bluetooth input (Blue LED).
3. Use the Remote to control playback on your source device.
2. Pair to “Fluance Ai40” on your
source device.
Settings
Bluetooth
MY DEVICES
Fluance Ai40
Note: Unit will attempt to auto-pair to
the last paired device.
4. Ifyourdevicecannotnd
"Fluance Ai40", you can reset
Bluetooth pairing:
Note: How you access your device’s Bluetooth
settings may vary from one manufacturer to
another. Maximum line of sight for Bluetooth
range is 33ft. Obstacles may decrease
transmission distance.
• Press and hold
for 3
seconds to reset Bluetooth
pairing.
OR
• Press and hold the Bluetooth
Pairing Reset Button on the
back of the unit.
Page 11
Fluance Ai40 User Manual 11
Volume Adjustment
Turn the Control Knob or use the Remote to increase or decrease volume.
EQ Adjustment
Use the Bass/Treble buttons on the Remote to adjust each from -5 to +5.
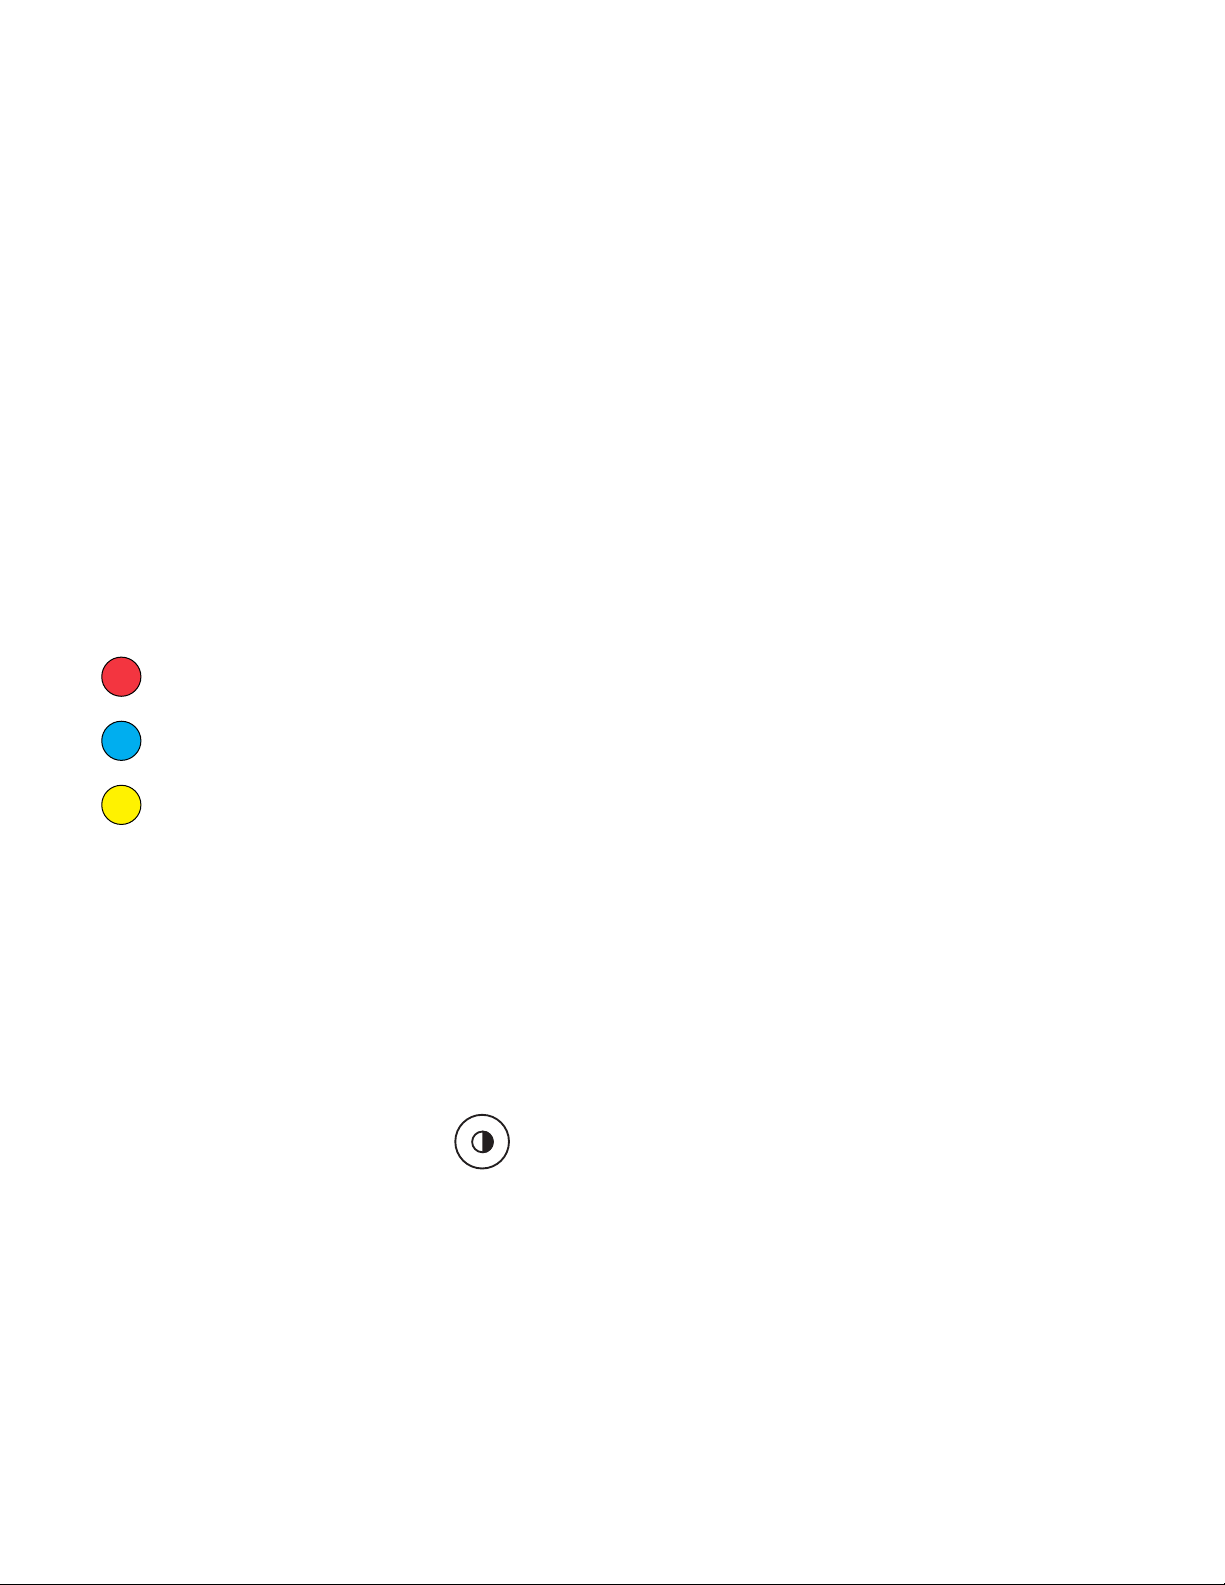
LED Behavior:
Red (Flash 2x) - Bass/Treble Set to -5 or +5
Bluetooth: Blue (Flash 2x) - Bass/Treble Set to 0*
RCA: Yellow (Flash 2x) - Bass/Treble Set to 0*
*Note: The Status LED will ash the input color when Bass/Treble is set to 0.
Adjusting Source LED Brightness
Use the LED Brightness Button on the Remote to cycle between 100%, 25%, and
OFF brightness levels.
Note: When set to OFF, the LED will turn on for 5 seconds when power is turned on or new Source
is selected, before turning off again.
Page 12

Fluance Ai40 User Manual 12
Frequently Asked Questions
What is ˝auto-pairing˝ and how does it work?
Auto-pairing is a convenient connection feature included in all Fluance Bluetooth Speakers.
If the connected Bluetooth-enabled device leaves the connection range of the Ai40 and
returns at a later time, the device will automatically connect. If the device’s Bluetooth
function is disabled and then enabled at a later time, the device will automatically connect
as well.
*Note: The Fluance Ai40 will only auto-pair to the last device that it was connected to.
How do I change the source on my Fluance Ai40?
See page 8
How do I adjust the Volume on my Fluance Ai40?
See page 11
How do I adjust the Bass and Treble on my Fluance Ai40?
See page 11
Another device is connected to my Fluance Ai40 and I want to connect my device.
You can reset any Bluetooth connection by pressing and holding the Bluetooth Pairing
Reset button on the back of the Active Speaker for 1 second. You can also press and hold
“Play/Pause” on the Remote for 3 seconds.
What is the range of my Bluetooth Connection?
The Fluance Ai40 operates with Power Class 2 Bluetooth devices, which have a range of
approximately 33 feet (line of sight).
What is the break-in period for Fluance speakers?
The break-in period for your Fluance Ai40 speakers is about 10 hours of playing time at
normal listening volumes. After this period, the drivers will have had enough movement to
perform at their peak level.
Page 13

Fluance Ai40 User Manual 13
Troubleshooting
No Power
• Ensure the LED Brightness is not set to OFF
• Check all connections on power adapter and ensure fully inserted
No Audio
• Check volume on Ai40 and ensure it is above 0
• Check volume on source device and ensure it is above 0
• ConrmAi40issettocorrectsource
• Ensure all cables are connected properly and fully inserted
No Audio from Passive Speaker
• Check speaker wire connections between speakers and ensure securely connected
to binding posts
Poor Audio
• Ensure the colored wires are connected to the corresponding colored binding posts
on each speaker
• Test with another audio source device to determine source of issue
Page 14

Fluance Ai40 User Manual 14
Specifications
SpeakerConguration
Bluetooth Yes; aptX Codec
Input RCA L/R
Tweeter 1inchSilkSoftDomeFerrouidCooled
Woofer
AmplierPower 70 Watts Continuous Average Output
Frequency Response 40Hz – 20KHz
2 Way – 4 Driver Bluetooth Music System
withIntegratedAmplier
5 inch Woven Glass Fiber Composite
Drivers with Butyl Rubber Surrounds
Internal Lead Wire
Power Input: 100-240V; Output: 19V 3.15A
Enclosure
Dimensions 10.9 x 6.5 x 7.6 inch
Speaker Weight 15.1 lbs
18 gauge Internal Lead Wire to Reduce
Signal Degradation
Sealed Enclosure with Passive Bass
Extension
Page 15

Fluance Ai40 User Manual 15
Warranty
Fluance gives the following warranty to the original customer of each new Fluance product purchased from
a dealer authorized by Fluance. Fluance warrants that each new product, under normal use, is free from
defects, subject to the terms and conditions set forth. If a defect should occur within the warranty period,
repairs will be made free of charge for parts and labor when such defects are determined by us to be attributable to faulty materials or workmanship at time of manufacture.
Warranty Period
The Fluance products listed below are warranted for parts and labor for the stated period from the date of
original purchase and are subject to the terms and conditions of the warranty.
Home Audio Passive Speakers: Lifetime Warranty
Active/Powered Speakers: 2 Year Warranty
HiFi Turntables: 2 Year Warranty
Warranty Exclusions
• Products purchased from a dealer not authorized by Fluance.
• Products with the serial number defaced, altered or missing.
• Defects resulting from disaster, accident, abuse, misuse, lightning, power surges, neglect, unauthorized
modicationorwaterdamage.
• Defects or damage as a result of repairs performed by a person or party not authorized by Fluance.
• Defects or damage occurring during shipping (claims should be made with the shipping company).
To Obtain Warranty Service
Should your Fluance product require warranty service, please contact your Fluance Authorized Dealer and
send your product fully insured and freight prepaid to the nearest Fluance authorized service center. Before
sending to Fluance, you will be required to get a Return Authorization Number from your dealer.
Products shipped without a valid Return Authorization Number will be refused. To avoid possible shipping
damage, make sure the product is properly packaged and well protected. Include a copy of your original
bill of sale as proof of warranty along with your name, home and/or work telephone number(s), a complete
return address and a detailed description of the faults.
Products repaired within warranty will be returned freight prepaid. This warranty in itself is not considered a
valid proof of purchase. When applying for warranty repairs, you must present the original copy of your bill
of sale as proof of warranty.
Page 16
Fluance Ai40 User Manual 16
Important Safety Instructions
WARNING:
TO REDUCE THE RISK OF FIRE OR ELECTRIC SHOCK, DO NOT
EXPOSE THIS APPARATUS TO RAIN OR MOISTURE
CAUTION:
TO REDUCE THE RISK OF ELECTRIC SHOCK,
DO NOT REMOVE COVER (OR BACK). NO USER SERVICEABLE
PARTS INSIDE. REFER SERVICING TO QUALIFIED SERVICE
PERSONNEL.
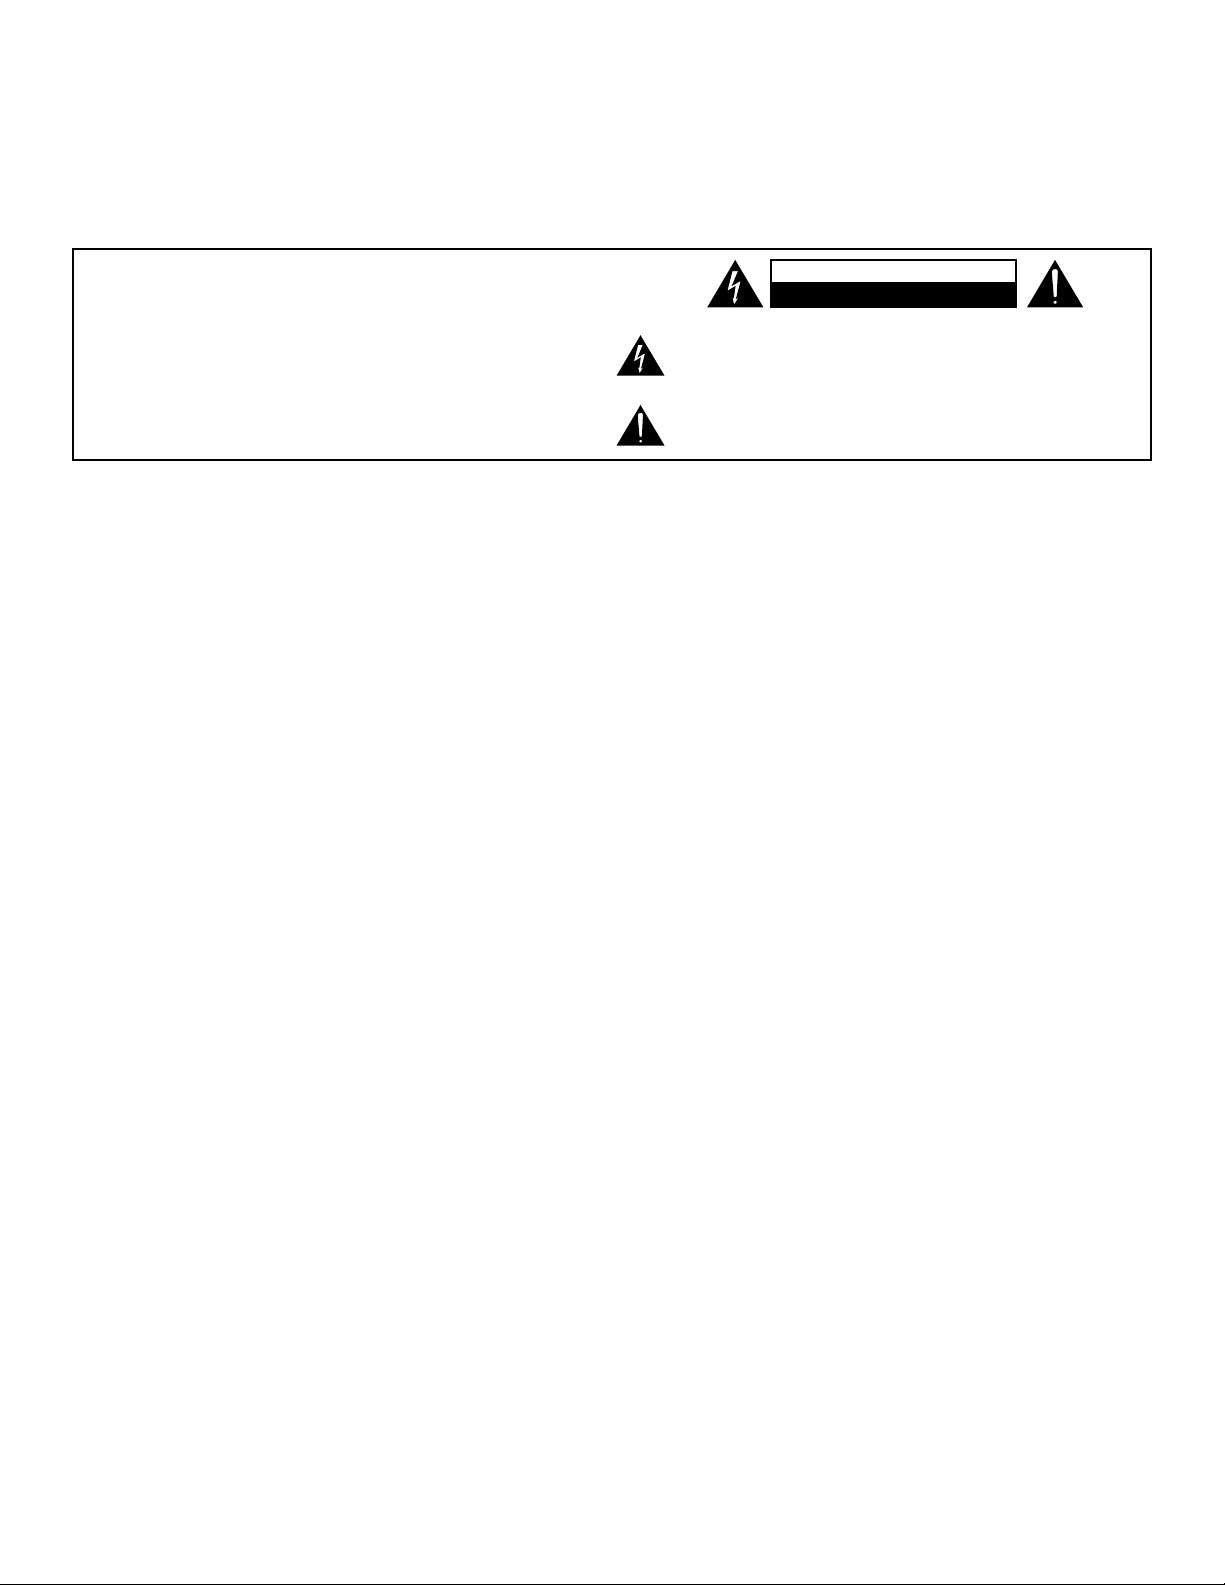
The lightning ash with arrowhead symbol within an equilateral
triangle is intended to alert the user to the presence of uninsulated dangerous voltage within the product’s enclosure that
may be of sufcient magnitude to constitute a risk of electric
shock to persons.
The exclamation point within an equilateral triangle is intended
to alert the user to the presence of important operating and
maintenance (servicing) instructions in the literature accompanying the appliance.
WARNING
RISK OF ELECTRIC SHOCK
DO NOT OPEN
Topreventreorshockhazard,donotusethisplugwithanextensioncord,receptacleorotheroutletunless
thebladescanbefullyinsertedtopreventbladeexposure.Topreventreorshockhazard,donotexpose
this appliance to rain or moisture.
1. Read these instructions.
2. Keep these instructions.
3. Heed all warnings.
4. Follow all instructions.
5. Do not use this apparatus near water.
6. Clean only with dry cloth.
7. Do not block any ventilation openings. Install in
accordance with the manufacturer’s instructions.
8. Do not install near any heat sources such as radiators, heat registers, stoves, or other apparatus
(including amplifiers) that produce heat.
9. Do not defeat the safety purpose of the polarized
or grounding type plug. A polarized plug has two
blades with one wider than the other.
10. A grounding type plug has two blades and a
third grounding prong. The wide blade or the
third prong is provided for your safety. If the provided plug does not fit into you outlet, consult an
electrician for replacement of the obsolete outlet.
11. Protect the power cord from being walked on or
pinched particularly at plugs, convenience receptacles, and point where they exit from the apparatus.
12. Only use attachments / accessories specified by
the manufacturer.
13. Unplug this apparatus during lightning storms or
when unused for long periods of time.
14. Refer all servicing to qualified service personnel.
Servicing is required when the apparatus has
15. This appliance shall not be exposed to dripping
or splashing water and no object filled with liquids such as vases shall be placed on the apparatus.
16. Do not overload wall outlet. Use only power
source as indicated.
17. Use replacement parts as specified by the manuf a cturer.
18. The product may be mounted to a wall only if
recommended by the manufacturer.
19. Upon completion of any service or repairs to
this product, ask the service technician to perform safety checks.
20. Avoid installing this unit in places exposed to
direct sunlight or close to heat radiating appliances such as electric heaters, on top of other
stereo equipment that radiates too much
heat, places lacking ventilation or dusty areas,
places subject to constant vibration and/or humid or moist areas.
21. Do not attempt to clean this unit with chemical
solvents as this might damage the finish. Use a
clean dry cloth.
22. Operate controls and switches as described in
the manual. Before turning on the power, make
certain that power cord is properly installed.
23. When moving the apparatus, be sure to first
disconnect the power cord.
24. Use caution when wearing loose clothing or articles near the spinning turntable.
been damaged in any way, such as power-supply
cord or plug is damaged, liquid has been spilled
or objects have fallen into the apparatus, the
apparatus has been exposed to rain or moisture,
does not operate normally, or has been dropped.
Page 17

Fluance Ai40 User Manual 17
FCC & IC Information
This equipment has been tested and found to comply with the limits for a Class B digital
device, pursuant to Part 15 of the FCC Rules. This digital apparatus does not exceed the
Class B limits for radio noise emissions from digital apparatus as set out in the Radio Interference Regulations of Industry Canada.
These limits are designed to provide reasonable protection against harmful
interference in a residential installation. This equipment generates, uses and can radiate
radio frequency energy and, if not installed and used in accordance with the instructions,
may cause harmful interference to radio communications. However, there is no guarantee that interference will not occur in a particular installation. If this equipment does cause
harmful interference to radio or television reception, which can be determined by turning
the equipment off and on, the user is encouraged to try to correct the interference by one
or more of the following measures:
• Re-orient or relocate the receiving antenna.
• Increase the separation between the equipment and receiver.
• Connect the equipment into an outlet on a circuit different from that to which the receiver is connected.
• Consult the dealer or an experienced radio/TV technician for help.
This device complies with Part 15 of the FCC Rules. Operation is subject to the following
two conditions:
(1) This device may not cause harmful interference, and (2) This device must accept any
interference received, including interference that may cause undesired operation.
IMPORTANT!
Since digital circuitry may cause interference to other radio or television tuners nearby, switch this unit off when not in
use or move it away from the affected radio/television tuner.
Page 18

Fluance Ai40 User Manual 18
Fluance.com
 Loading...