

Page 1

-
1
Debug and Print
catalogue
Debug and Print............................................................................................................................................. - 1 -
catalogue...................................................................................................................................................... - 1 -
1 Connect and Software............................................................................................................................ - 4 -
1 Software Introduction.......................................................................................................................... - 4 -
2 Connect printer to PC.......................................................................................................................... - 4 -
3 Repetier and control printer................................................................................................................. - 5 -
1 Software Installation.................................................................................................................. - 5 -
2 Language Settings.....................................................................................................................- 6 -
3 Printer settings.............................................................................................................................. - 7 -
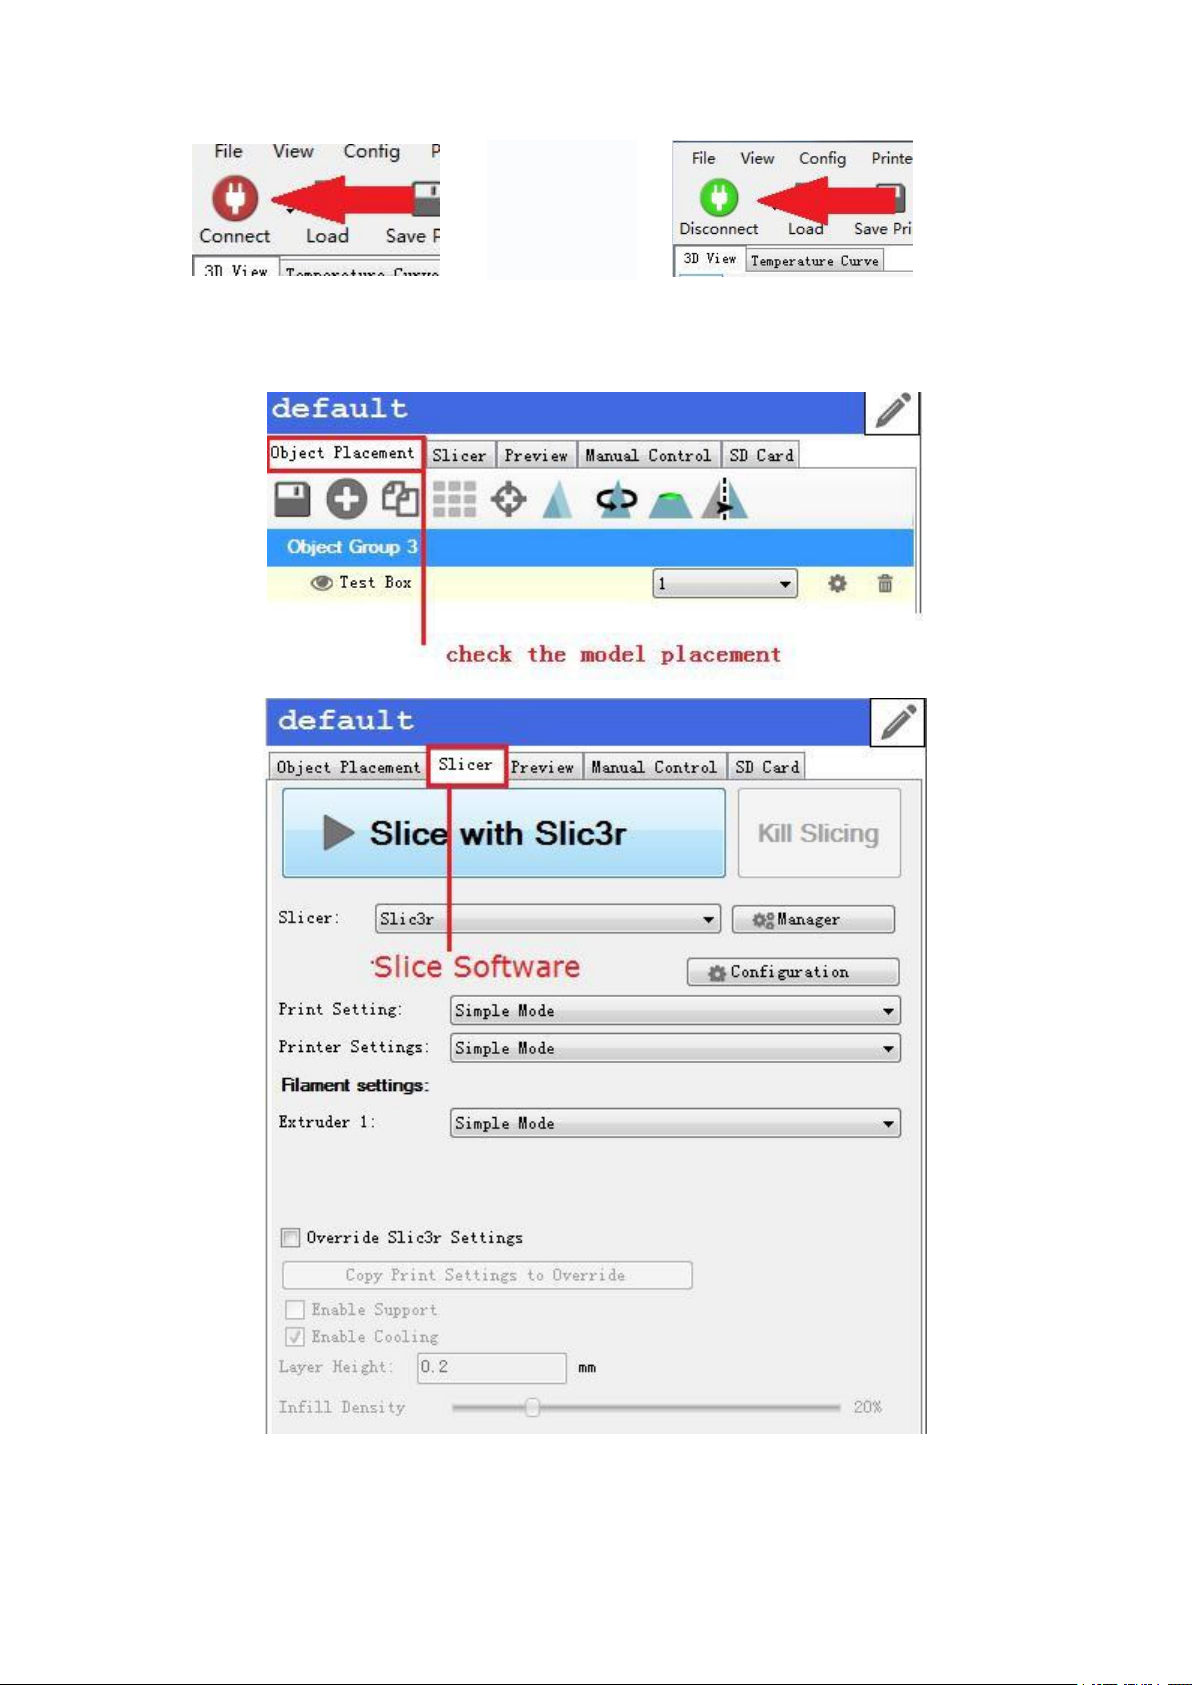
4 Connect the printer....................................................................................................................... - 8 -
5 Panel Introduction.........................................................................................................................- 8 -
6 some important command......................................................................................................- 12 -
2 Leveling and printing............................................................................................................................. - 19 -
1,Calibration......................................................................................................................................... - 19 -
2,Start printing...................................................................................................................................... - 31 -
1 Feeder filament........................................................................................................................... - 31 -
2 Slice............................................................................................................................................ - 37 -
3 slice setting................................................................................................................................. - 39 -
4 printing........................................................................................................................................- 43 -
3 Marlin....................................................................................................................................................... - 45 -
1 Arduino.............................................................................................................................................. - 45 -
2 Marlin................................................................................................................................................ - 45 -
1 Open marlin.............................................................................................................................. - 45 -
2 settings........................................................................................................................................ - 46 -
3 Upload Firmware..................................................................................................................... - 47 -
4 Offline printing........................................................................................................................................ - 49 -
1 load the model....................................................................................................................................- 49 -
2 slice.................................................................................................................................................... - 50 -
3 Export Gcode file...............................................................................................................................- 51 -
4 Copy...................................................................................................................................................- 52 -
5 Printing.............................................................................................................................................. - 52 -
5 Heated bed............................................................................................................................................. - 53 -
6 Problem and advice...............................................................................................................................- 55 -
Page 2

-
2
thank you for your kind support to choose our product!
when you use the printer,meet some problems, pls contact us.
Amazon aftersale email 1:[email protected]
Other email:[email protected]
Technical Support skype
1:wangbo5111 Technical Support
skype 2:oldjiawei Yin
whatsapp :008613183017642
1,If you are satisfied with kossel 3d printer kits,please leave a positive feedback to
us,thank you so much for your kindness.
2,If you are not satisfied for any reason,please contact us before leaving a negative
feedback(any negative review no longer
be changed again),we will work together with you to help you solve any problem until
you are satisfied.
Page 3

-
3
Important Note
A,when use switch power supply,If your country AC voltage is
220V,pls choose 220V;if it’s110V,pls choose 110V,there is one adjust
button on the switch power supply.
B, when heating the nozzle or printing,for the fan which cooling heat
sink,guarantee it working,if not,pls stop heating and printing.
C,the temperature is a important parameter, for PLA filament, the
working temperature is 200℃-210℃, you could adjust it,and the
temperature should not too high.too high temperature maybe lead to
Nozzle clogging.
D,Before printing, please paste high temperature tape on the hot bed
E,If you have installed the touch screen ,pls choose PC or touch
screen to make a Single control
F,If you need to upload marlin ,when you upload ,pls disconnect the
touch screen with the motherboard
Page 4
-
4
1 Connect and Software
1
Software Introduction
2
Connect printer to PC
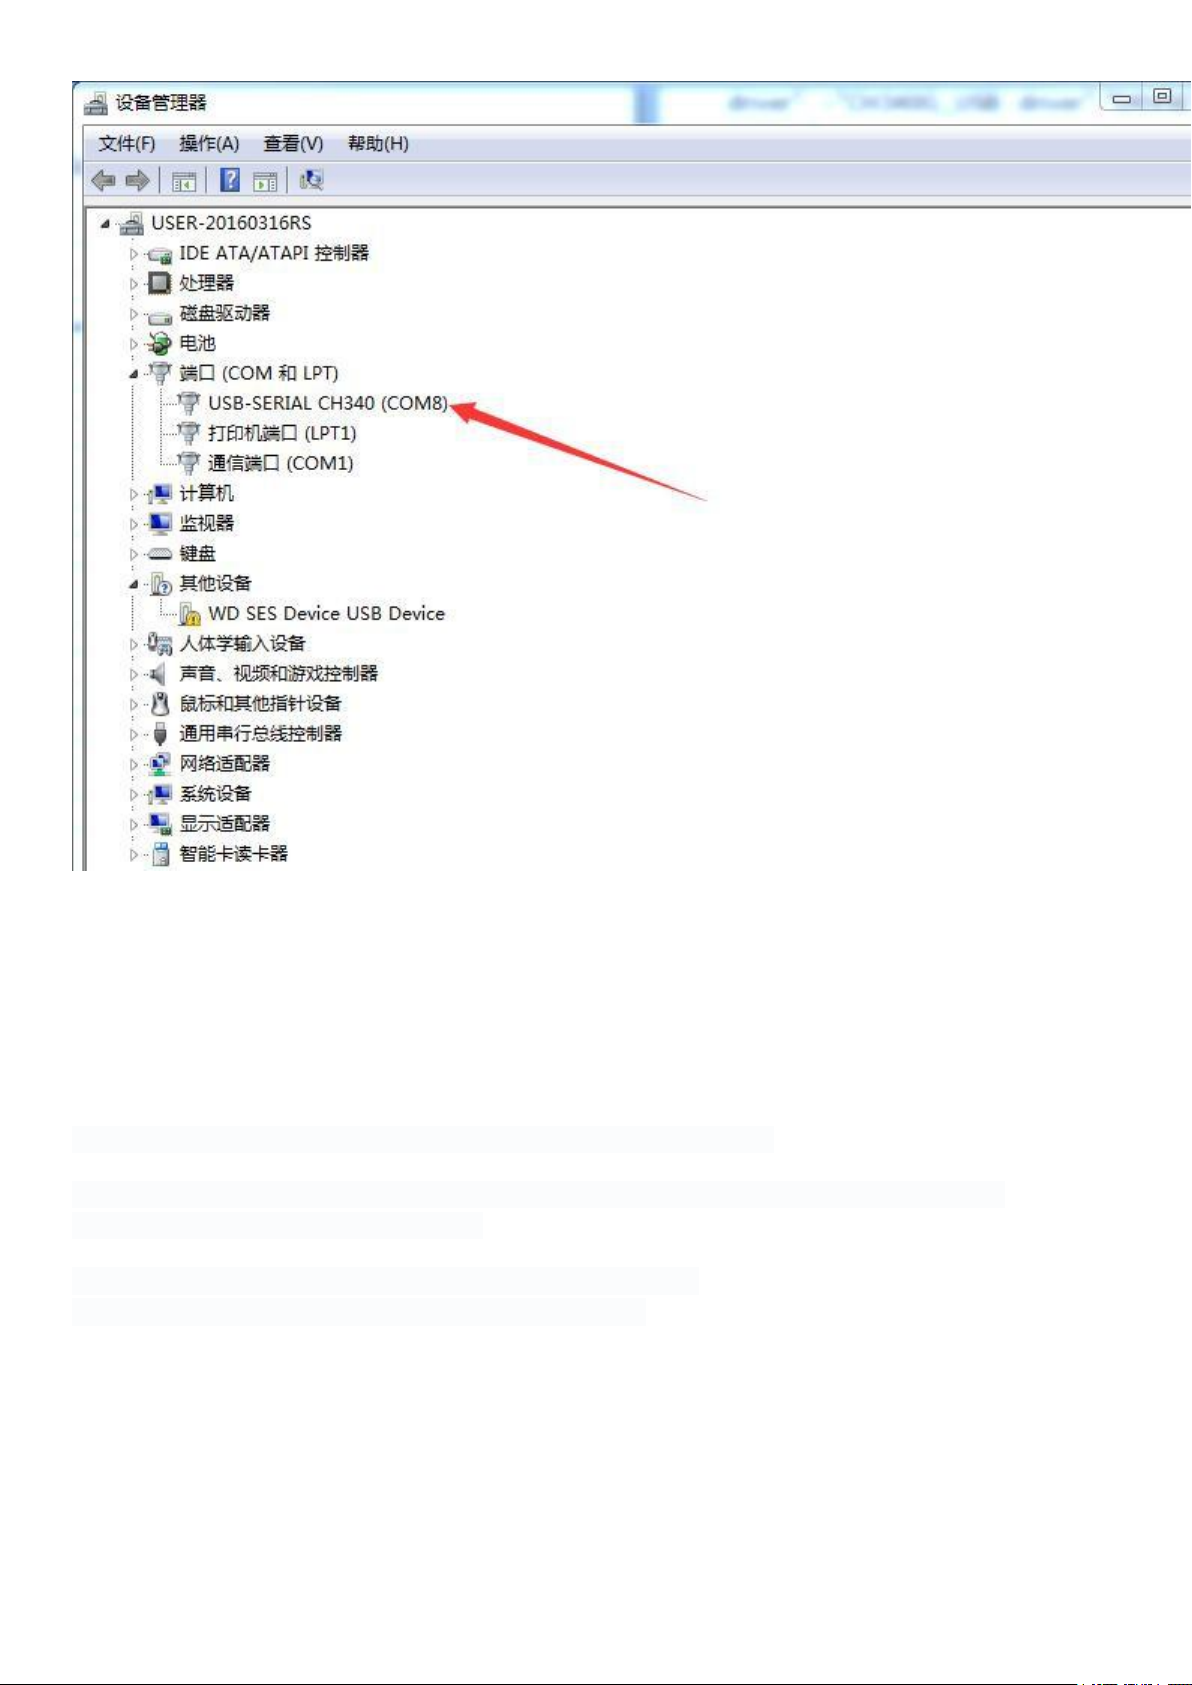
Check Device Manager, will find the hardware
Need software as follows:
A:arduino,it’s the firmware working environment.
B:Marlin,it’s the firmware,it’s program to run printer working,need flash firmware to motherboard.
C:RepetierHost,it’s also PC software,can control the printer,can slice the model, when printing,it’s
good to use.
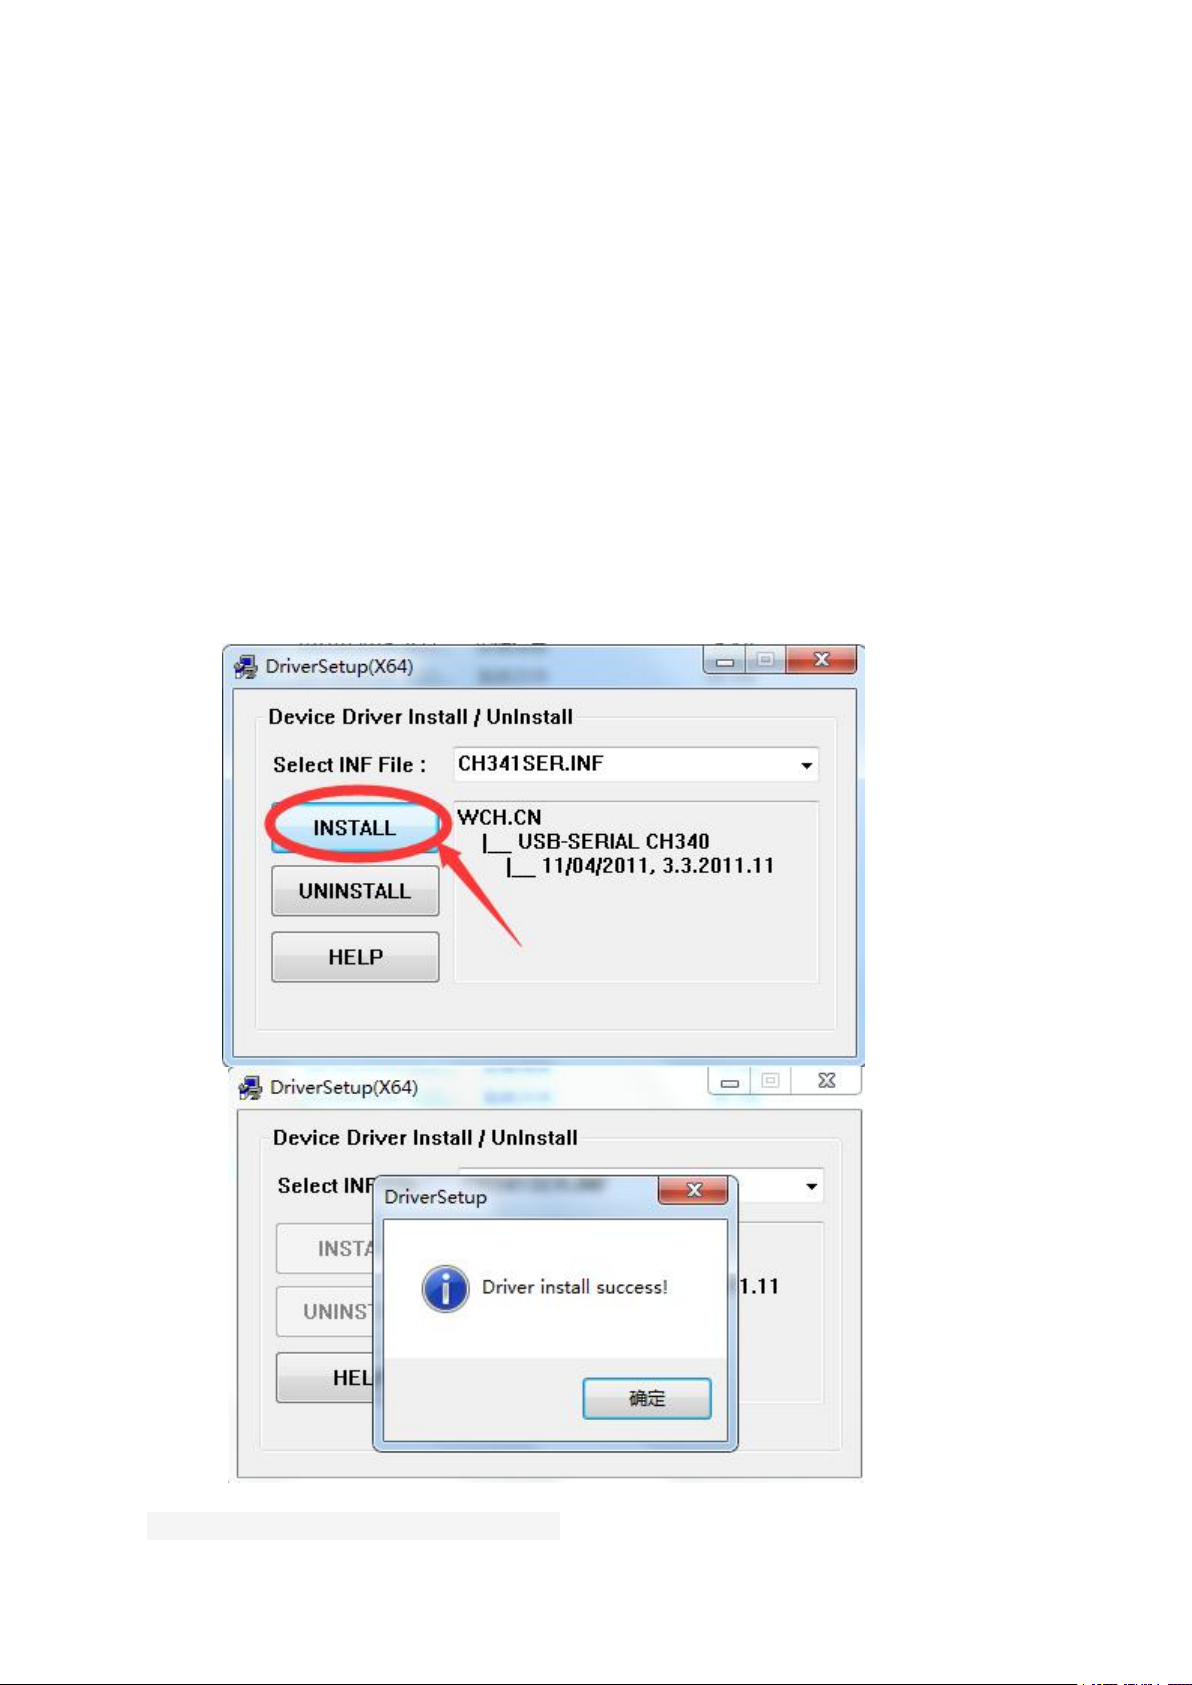
Install the driver. copy the file in the sd card to PC. open the file ” CH340G_USB toTTL
driver”–“CH340G_USB driver”-“DRVSETUP64”(64-bit system) or “SETUP”*(64-bit system).
Page 5
-
5
If the PC can not find the hardware.pls check out the file “Solve streamline Version Windows 7,Can
3
Repetier and control printer
1 Software Installation
http://www.repetier.com/documentation/repetier-host/
About the more info about the Repetire, pls go the the link :
not install d river issue”.do as the file show.
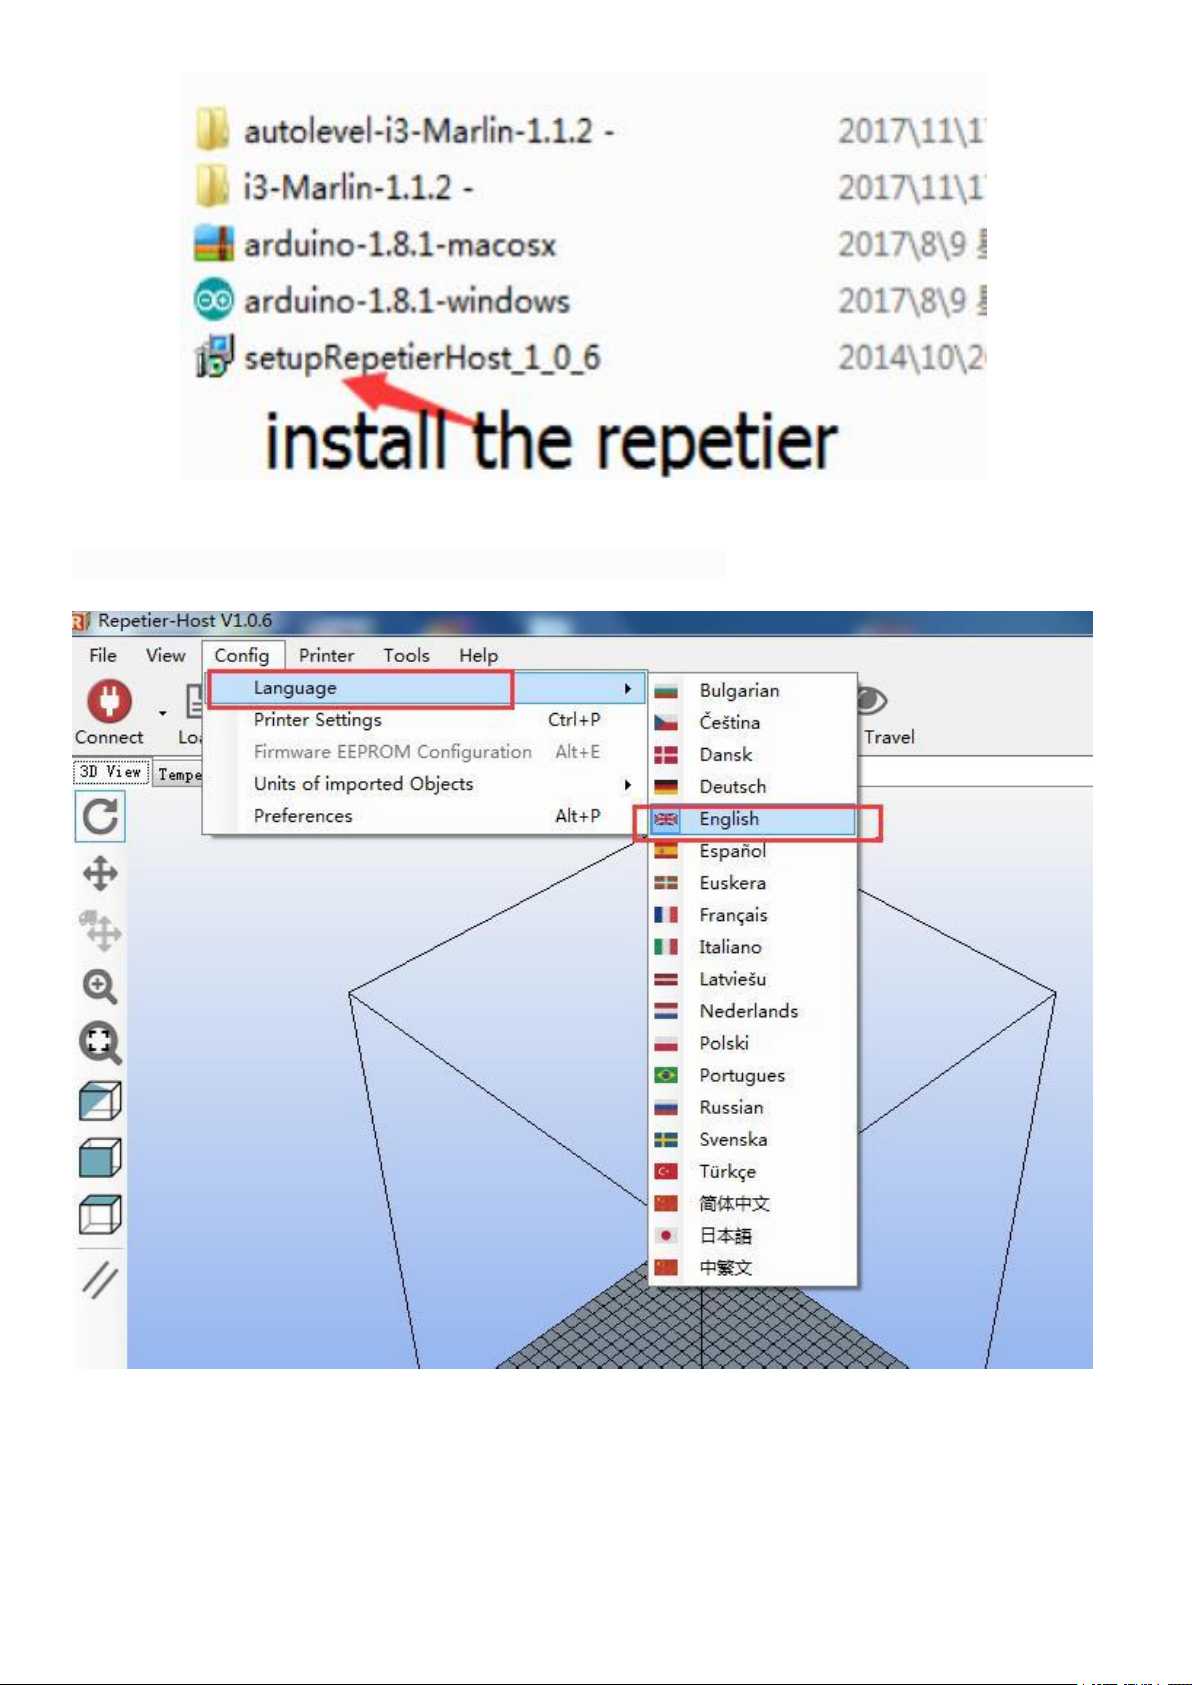
The repetier is software to control the printer,so need install it first.
Install the “software,setupRepetierHost_1_0_6”, the software could be download on the
link:http://www.repetier.com/download/
Page 6
-
6
2 Language Settings
Set the language,Config-Language-choose the suit language.
Page 7
-
7
3 Printer settings
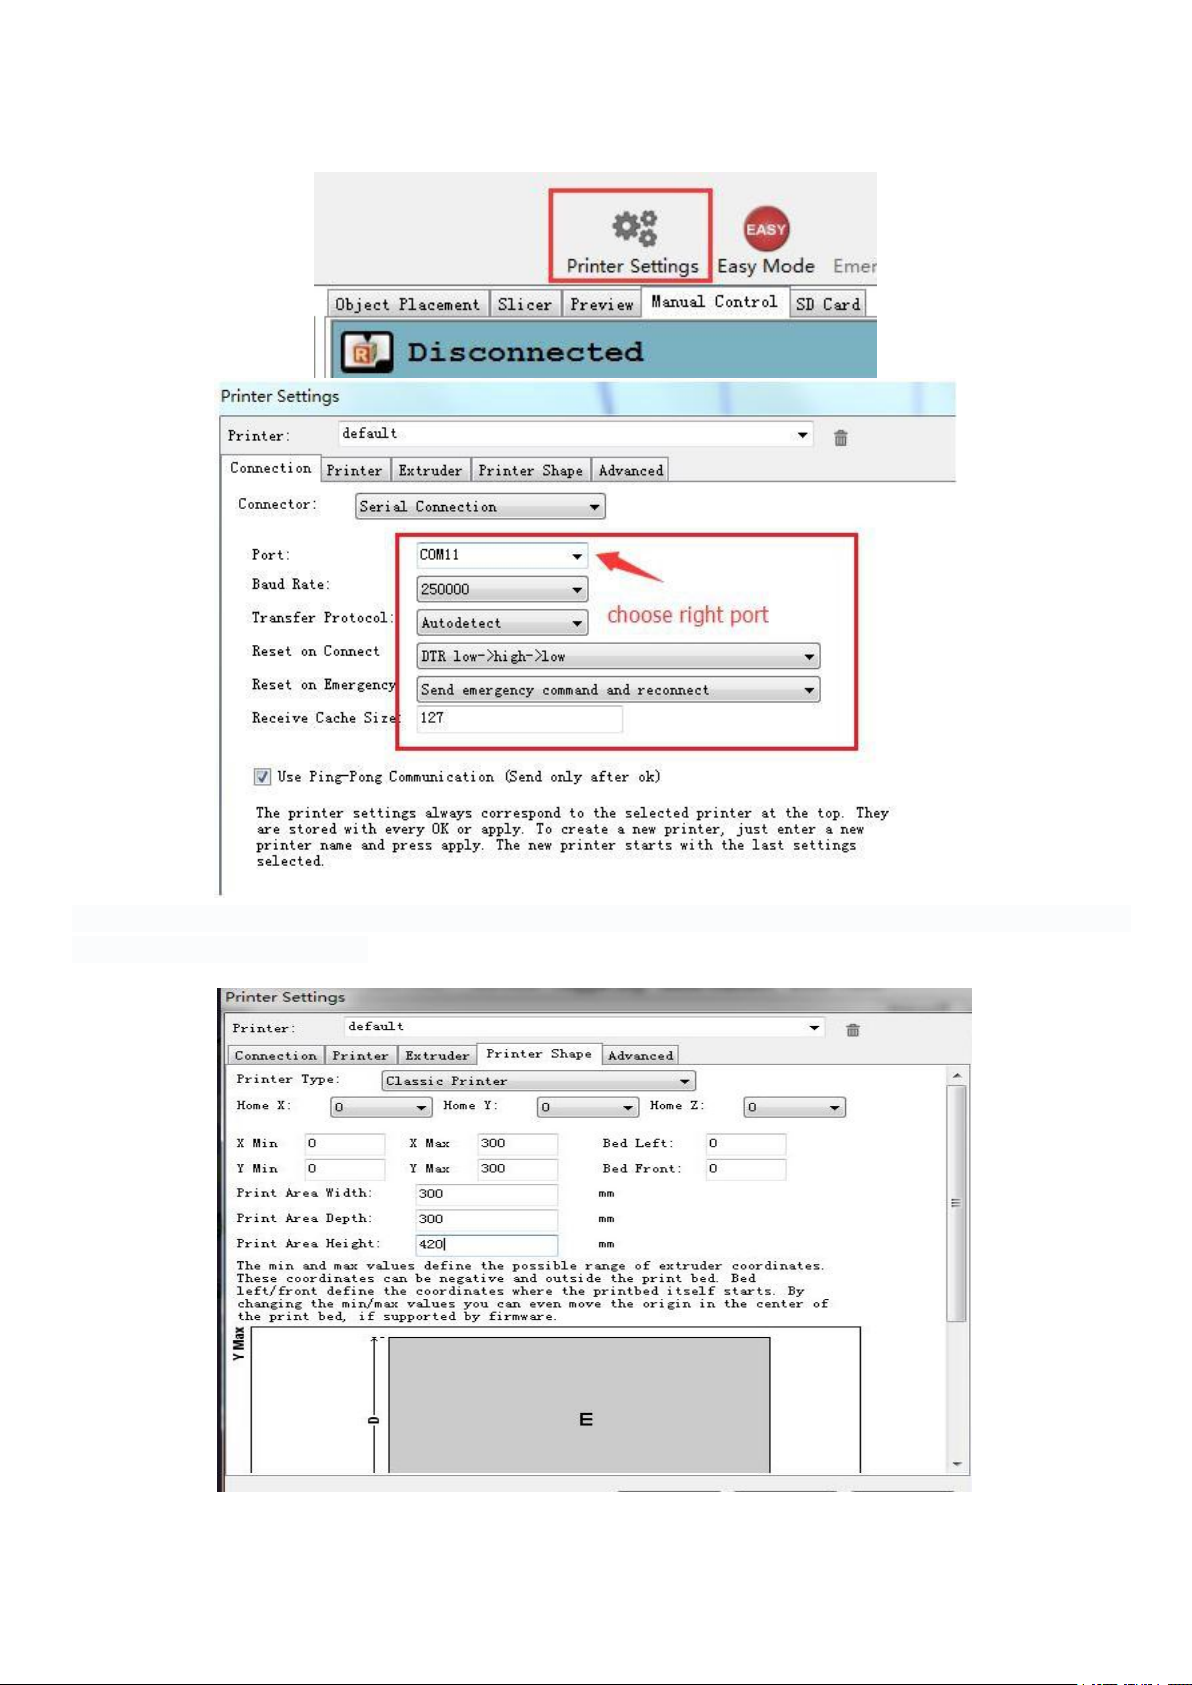
IN the printer shape,choose the Classic printer,the home X is 0,the home Y is 0,the home Z is 0.the
setting as the follow pictrue.
Page 8
-
8
4 Connect the printer
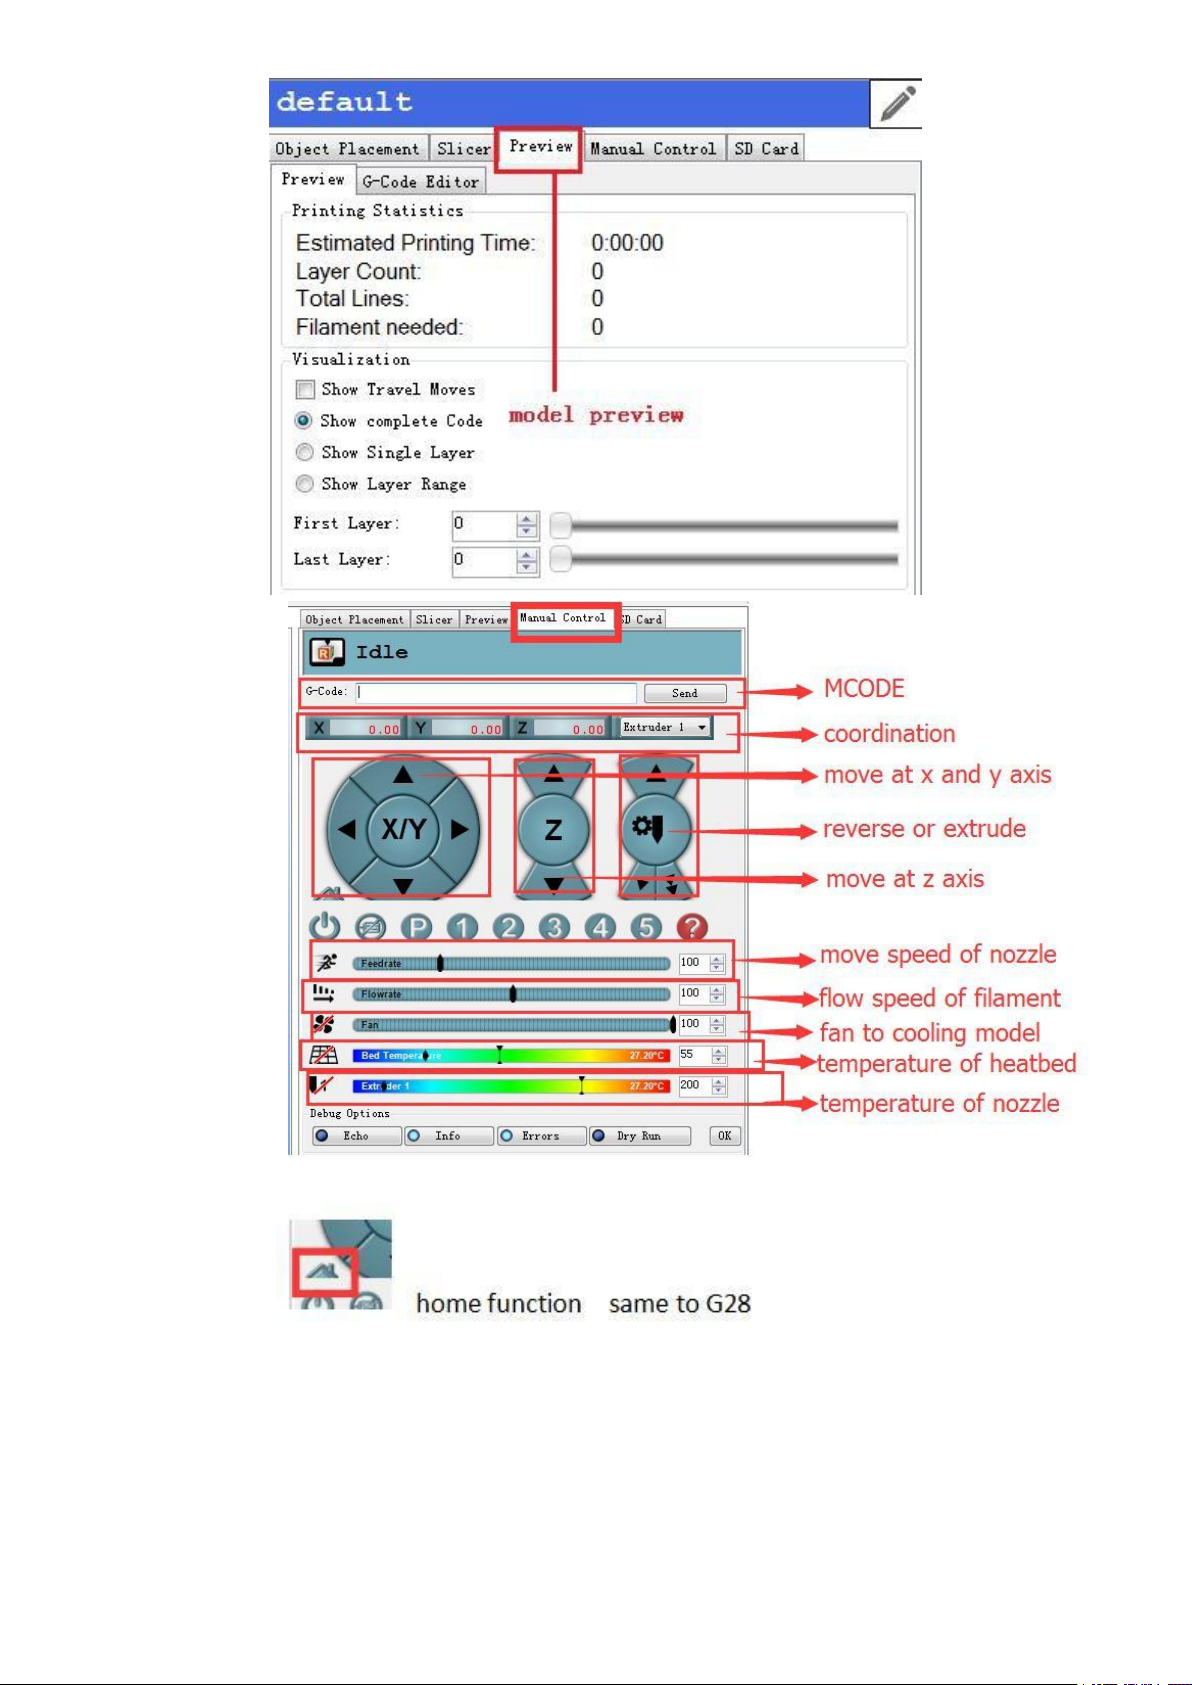
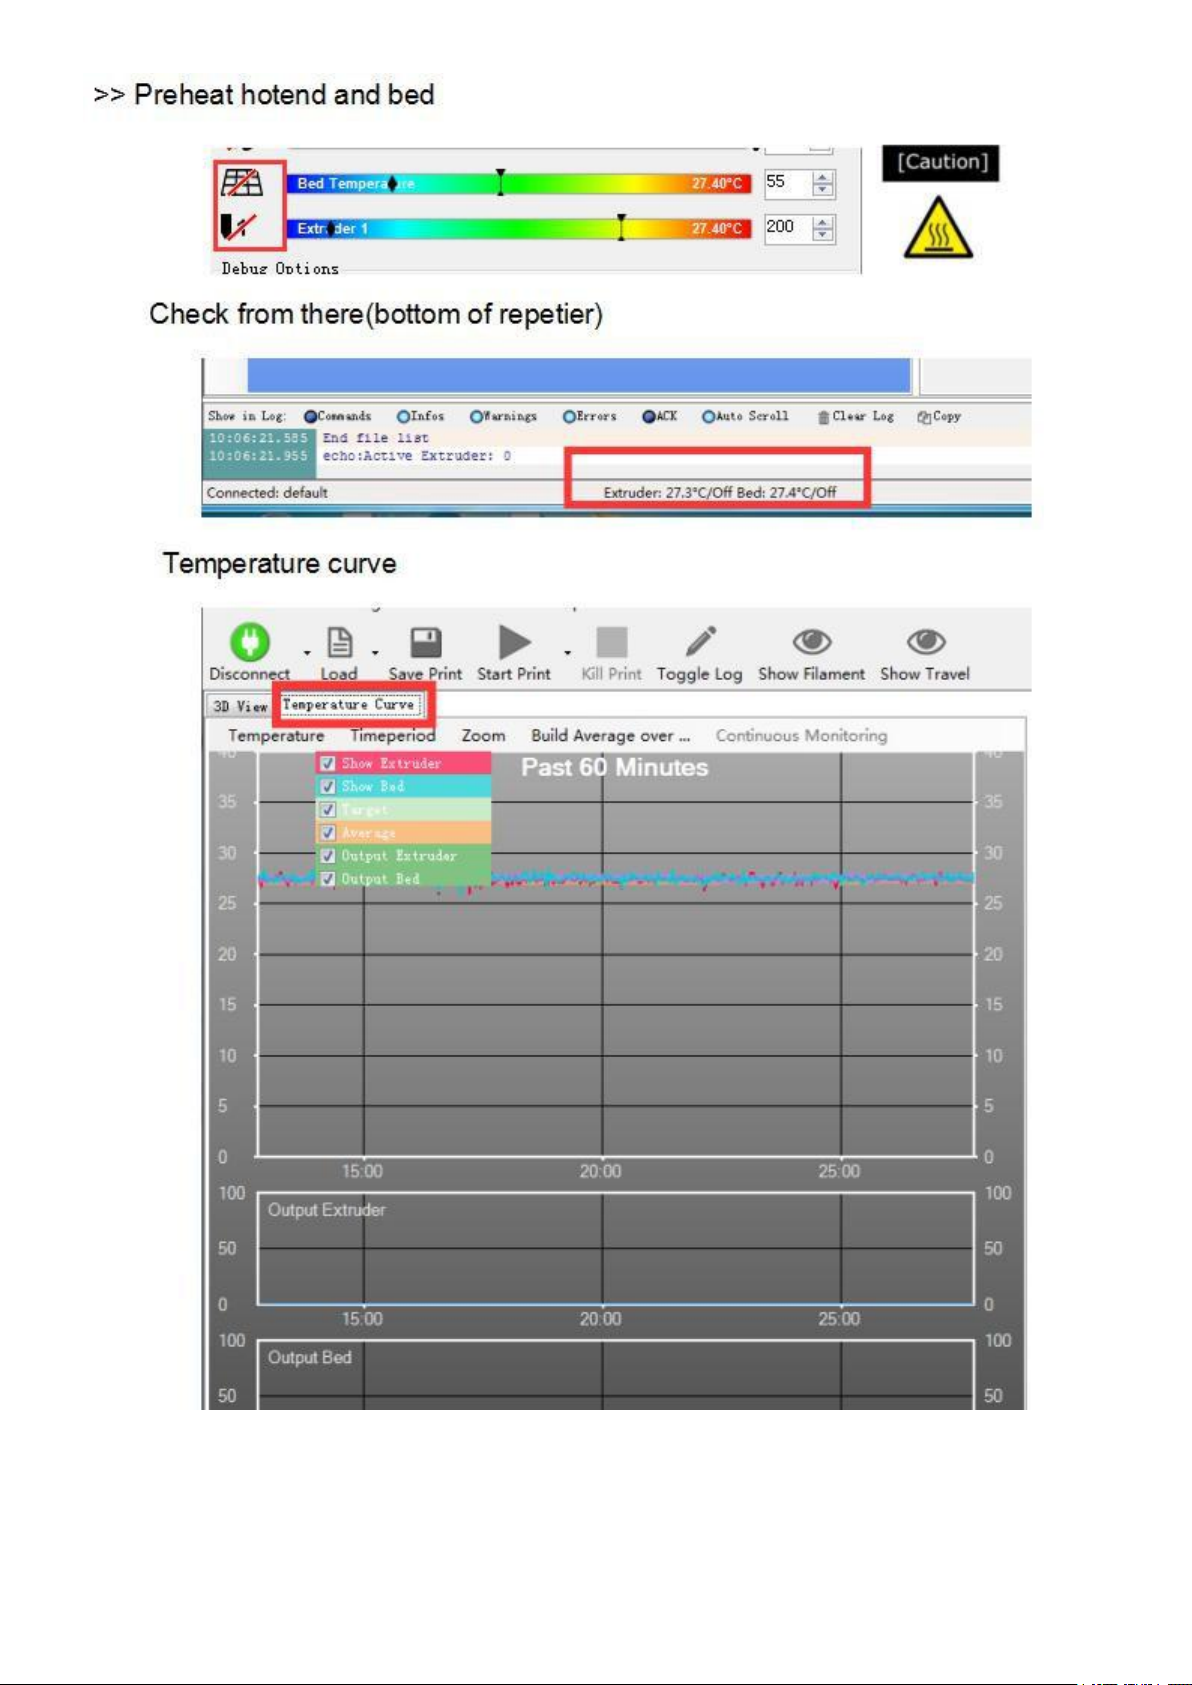
5 Panel Introduction
afer connect
Page 9
-9-10-
Page 10
Page 11
11
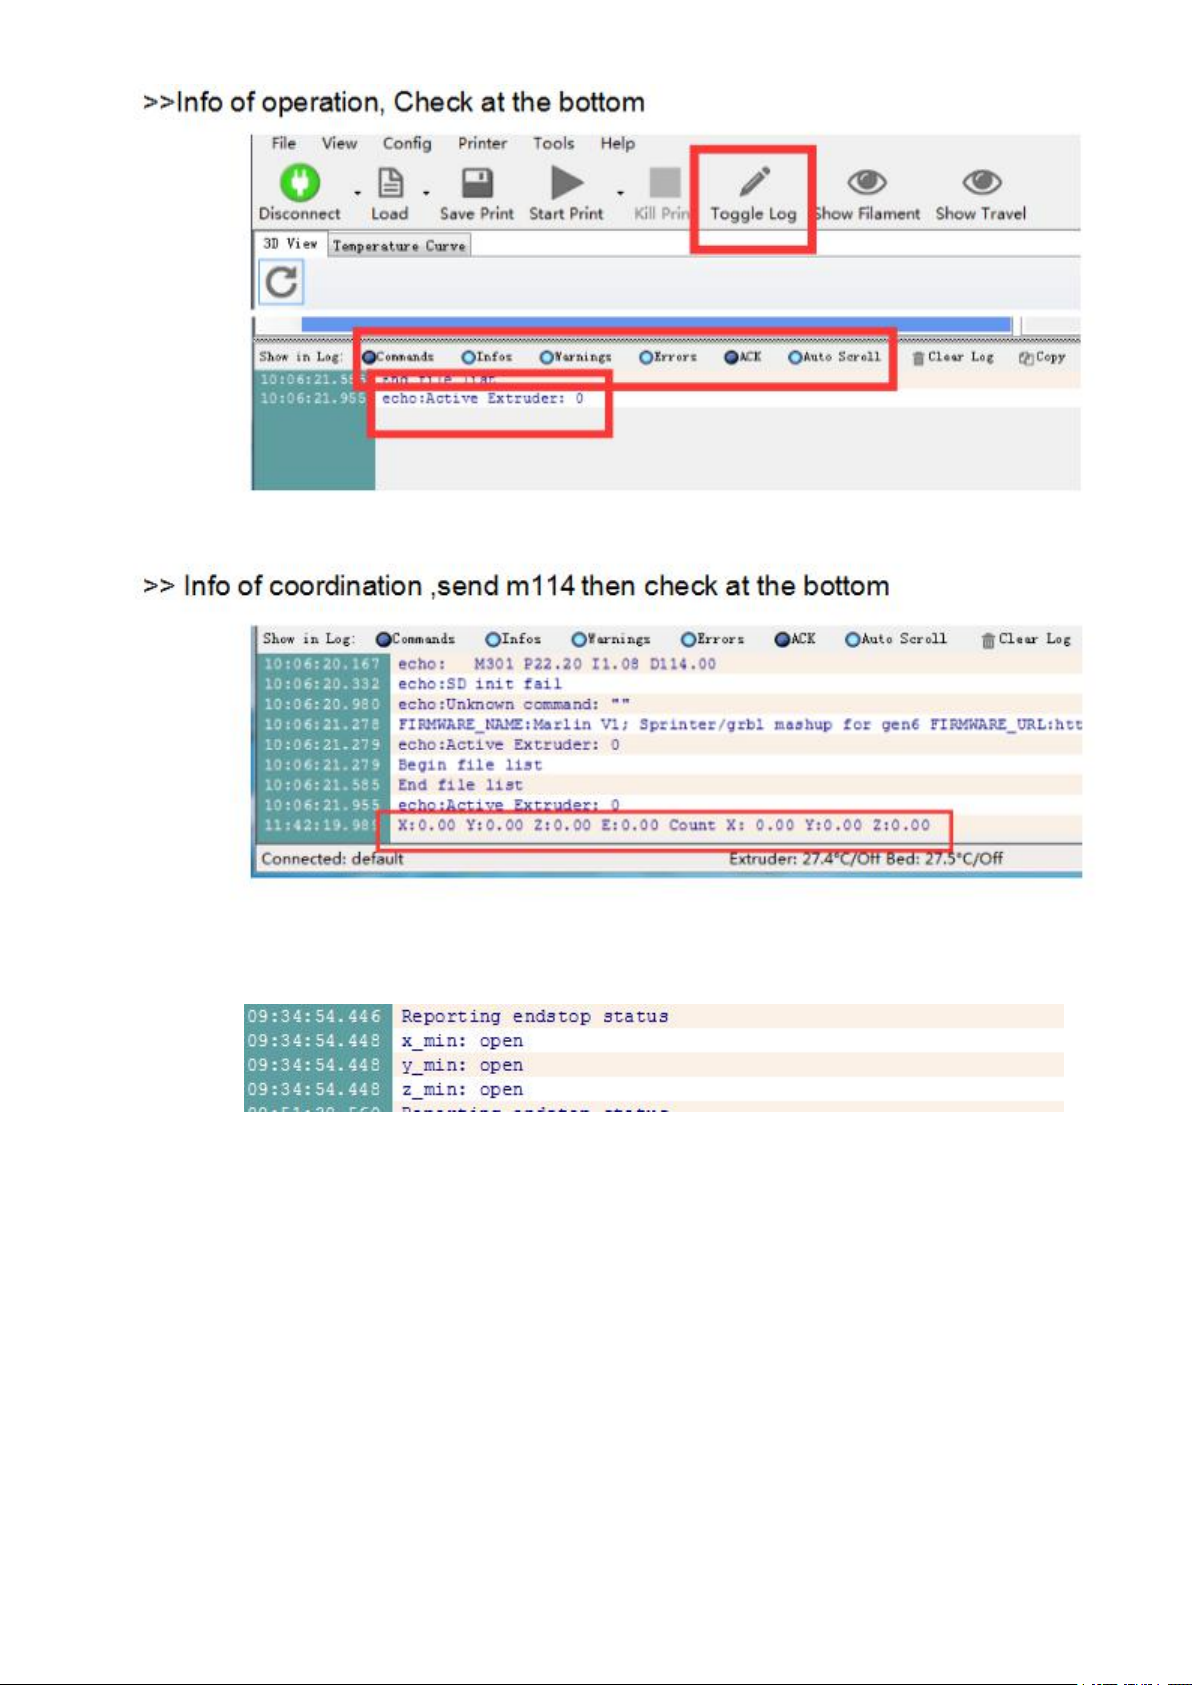
>>Info of limit switch, send m119 then check at the bottom
Page 12
-
12
6 some important command
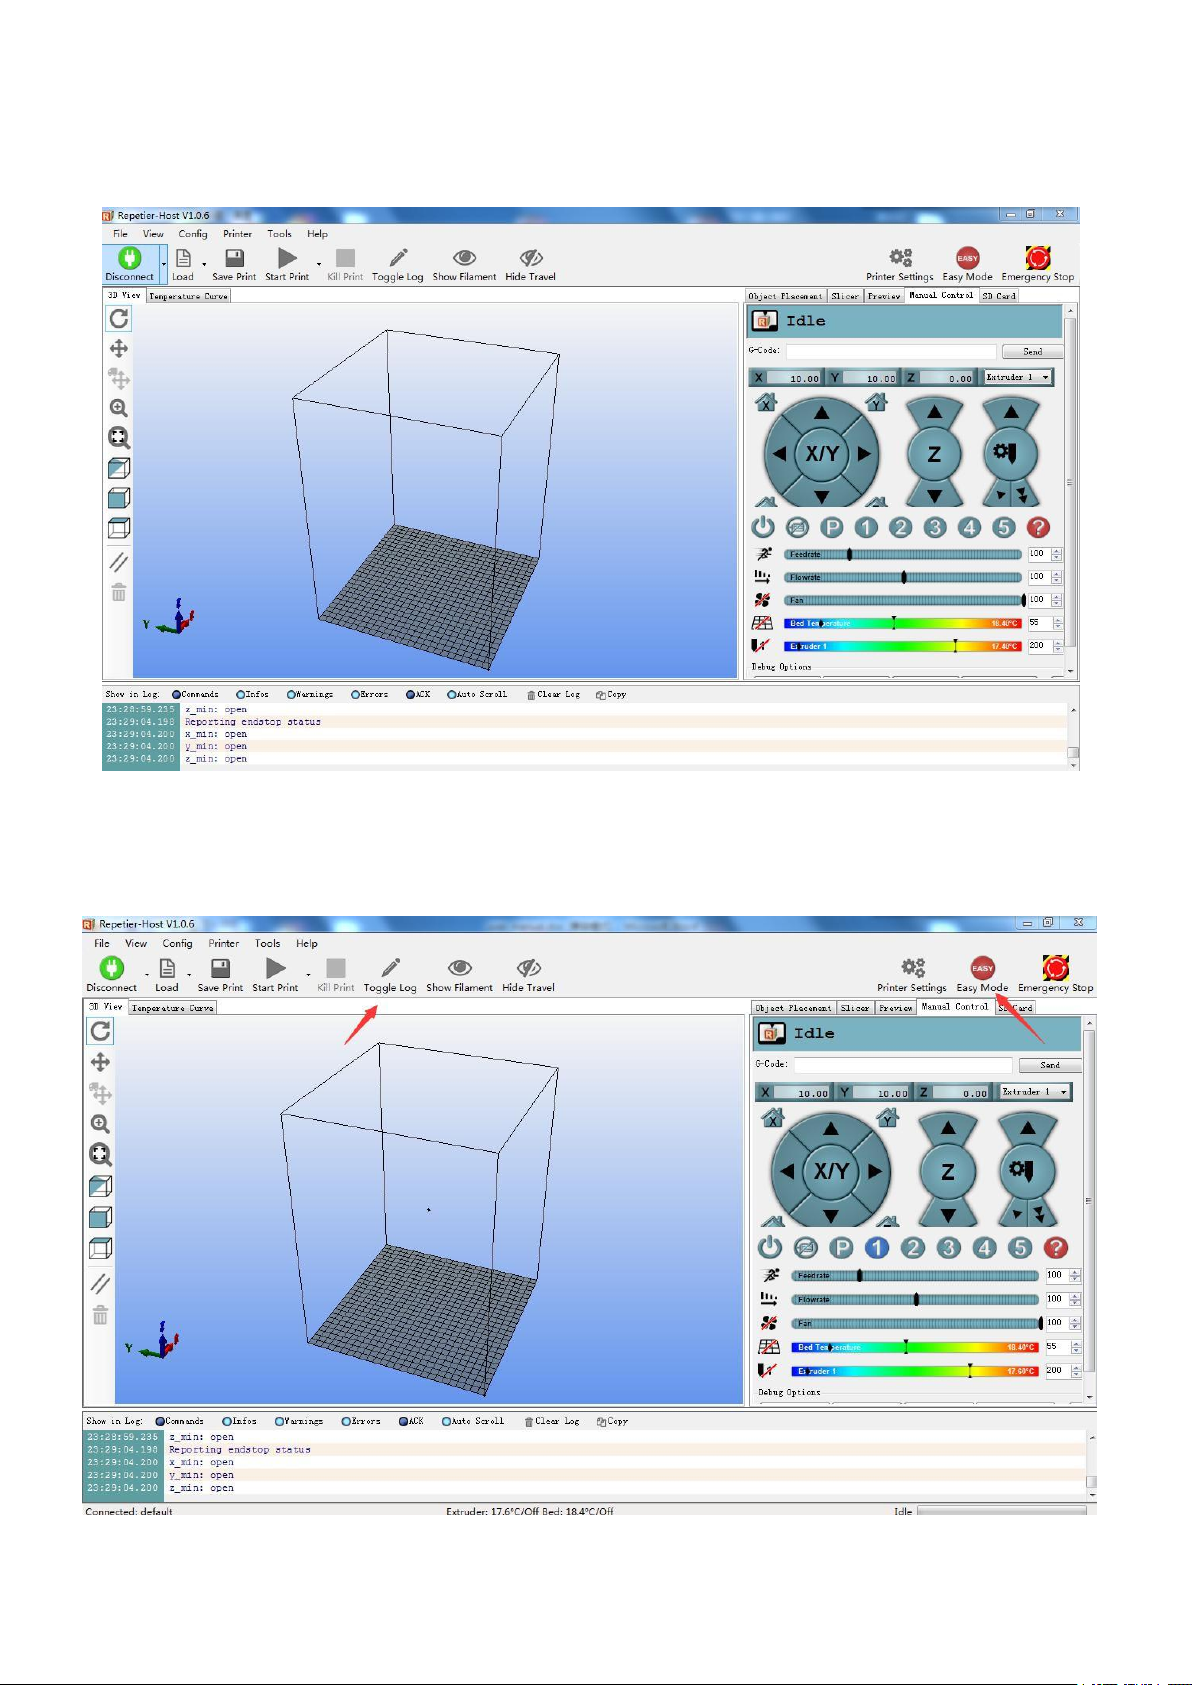
Controling the printer by repetier,after opening repetier,choose right port and click connect. The
repetier interface is like this
open “command bar”where we can input command.Click Easy Mode open command bar,can
input command in command bar.
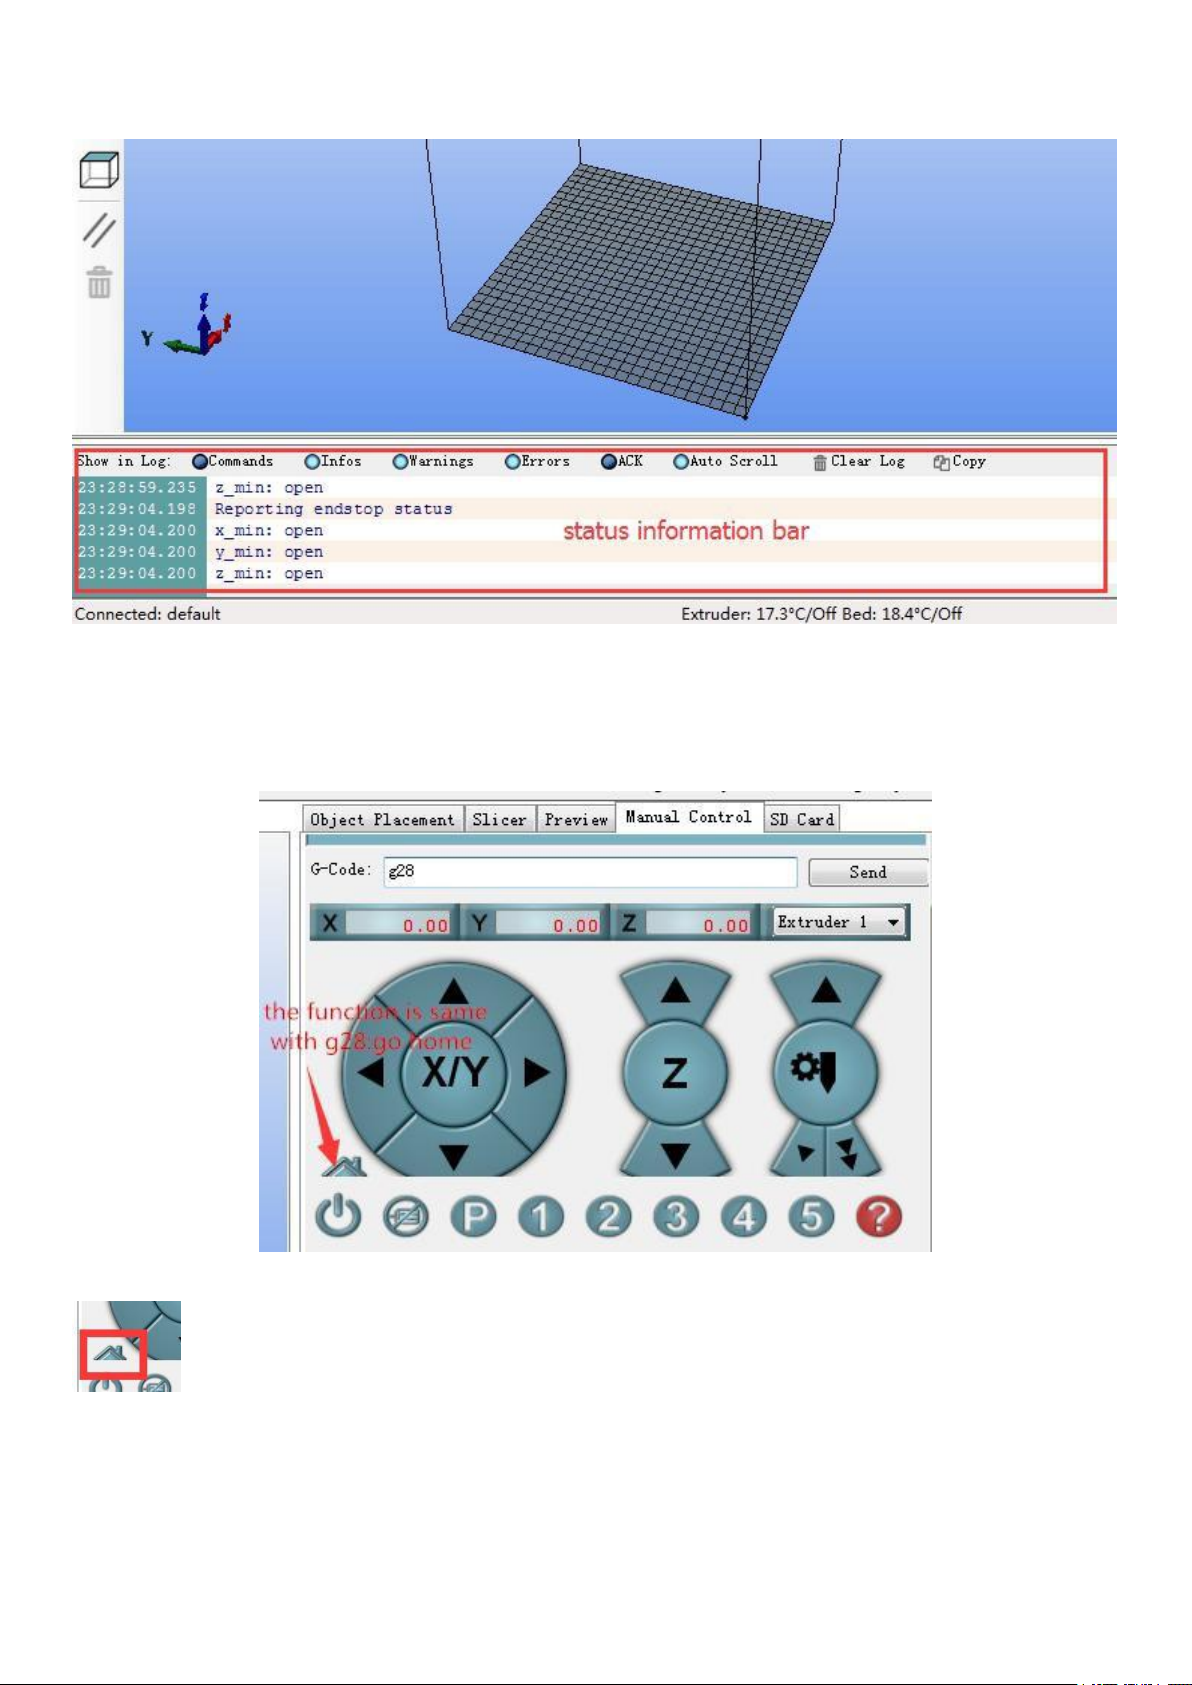
Then click Toggle Log,The information bar appears below the repetier interface.can read info
about printer in information bar.
Page 13
-
13
(1)
g28----all axis go home
In the repetier letters are case-insensitive,G28 also can be used.but in simplify3D,only can use
(2)
m114----check the current coordinates of the nozzle
capital letters .The other command is the same
Send g28,in delta 3D printer all axis rise and hit limit switch ,G28 is same to this icon
input m114 and send ,can see the current coordinates of the nozzle in information bar.
Page 14
-
14
(3)
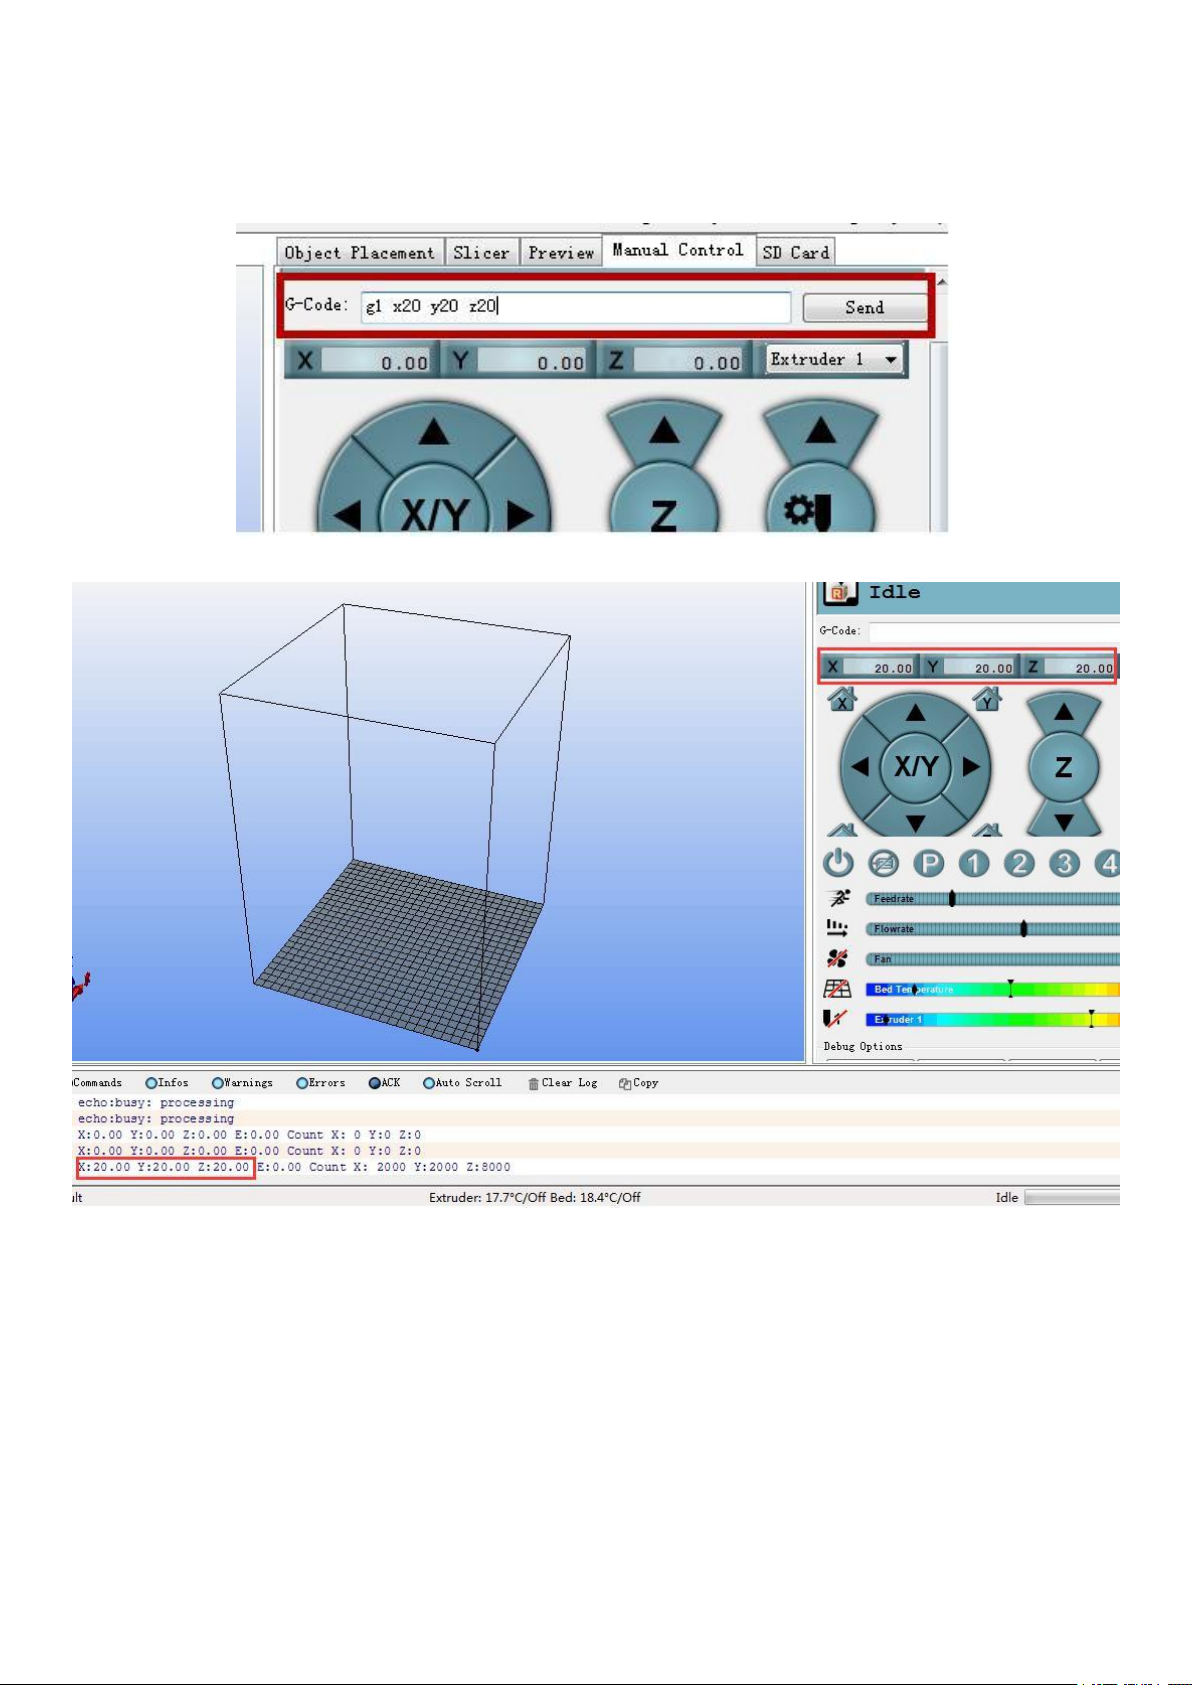
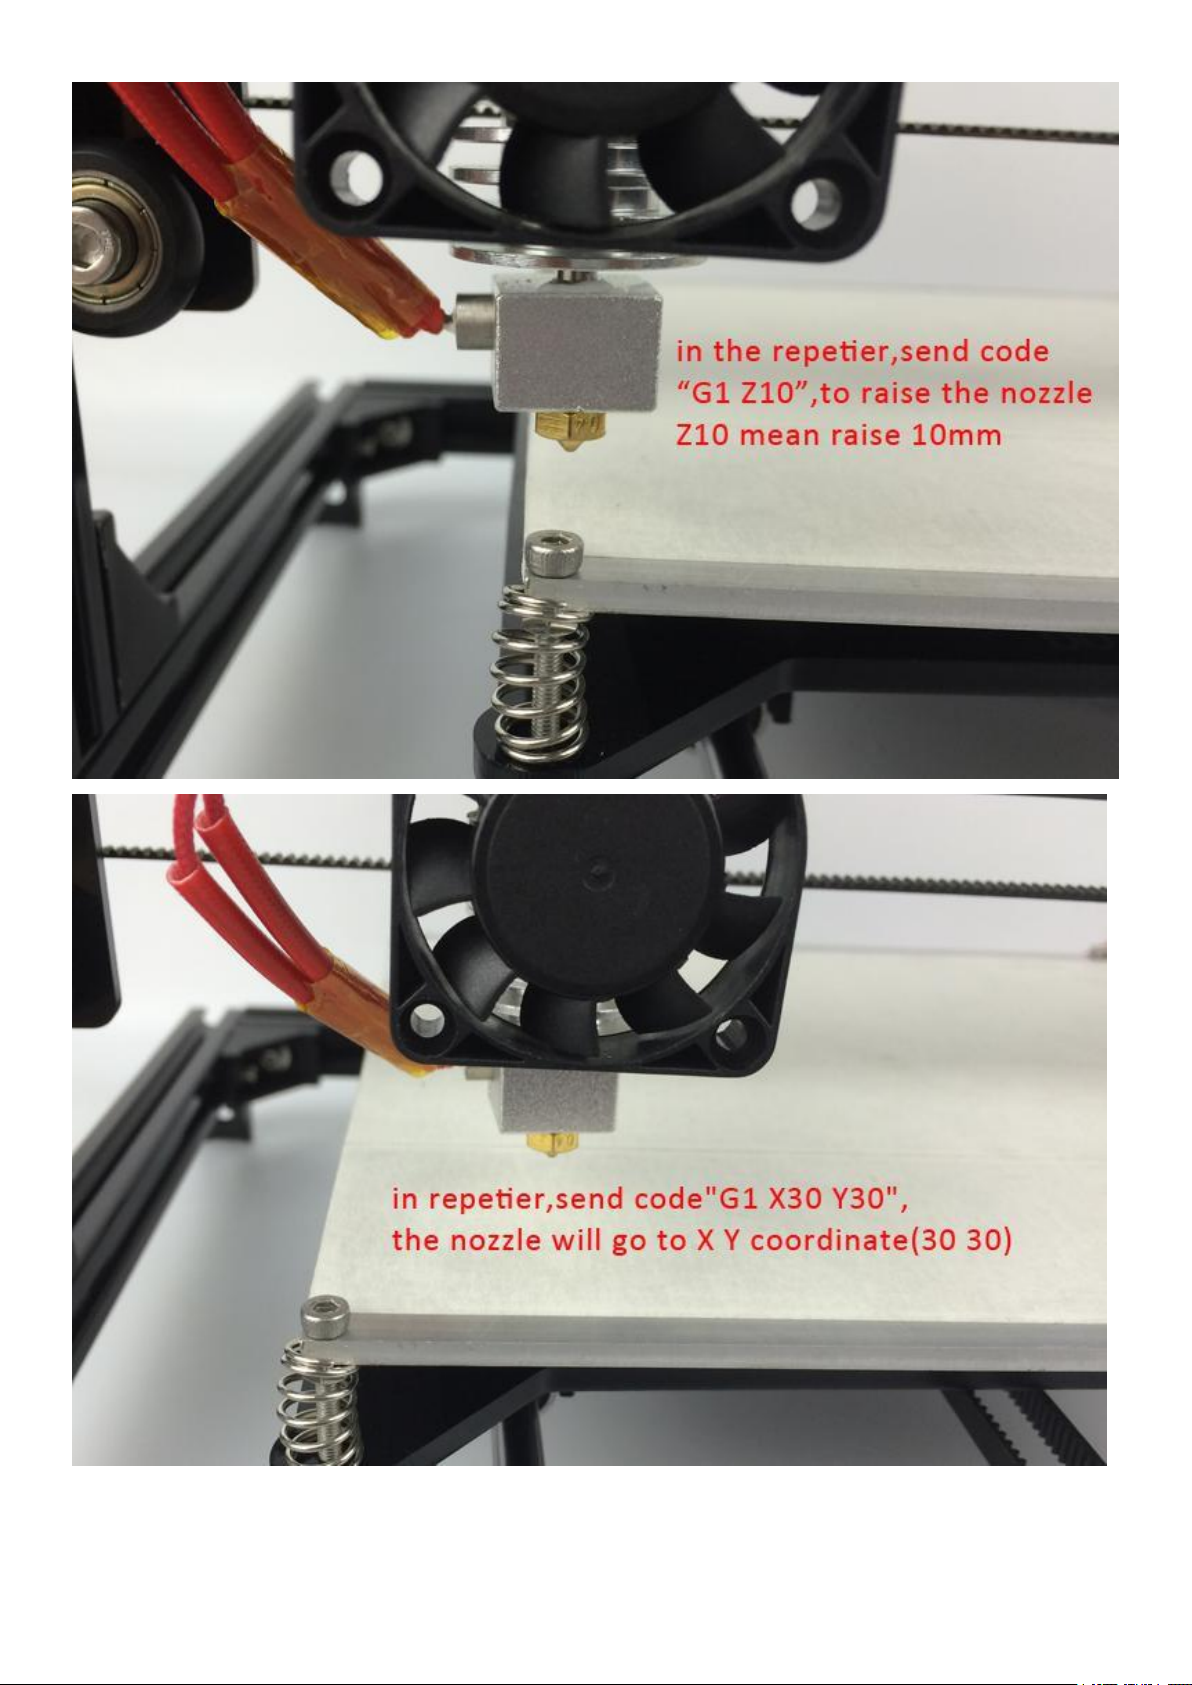
g1 x_ y_ z_----move nozzle to targeted coordinate
For example ,input g1 x20 y20 z20,the nozzle will go to coordinate x y z(20 20 20)
g1 z0—x and y keep previous coordinate,z coordinate arrive to x 0,this arrive the lowest bottom;
g1 x20—y and z keep previous coordinate,x coordinate will arrive to x 20;
g1 x20 y10—z keeps previous coordinate,x coordinate arrive to x 20;y coordinate arrive to y
10; g1 y15 z30—x keeps previous coordinate,y coordinate arrive to y15; z coordinate arrive to
y 30.
(4)
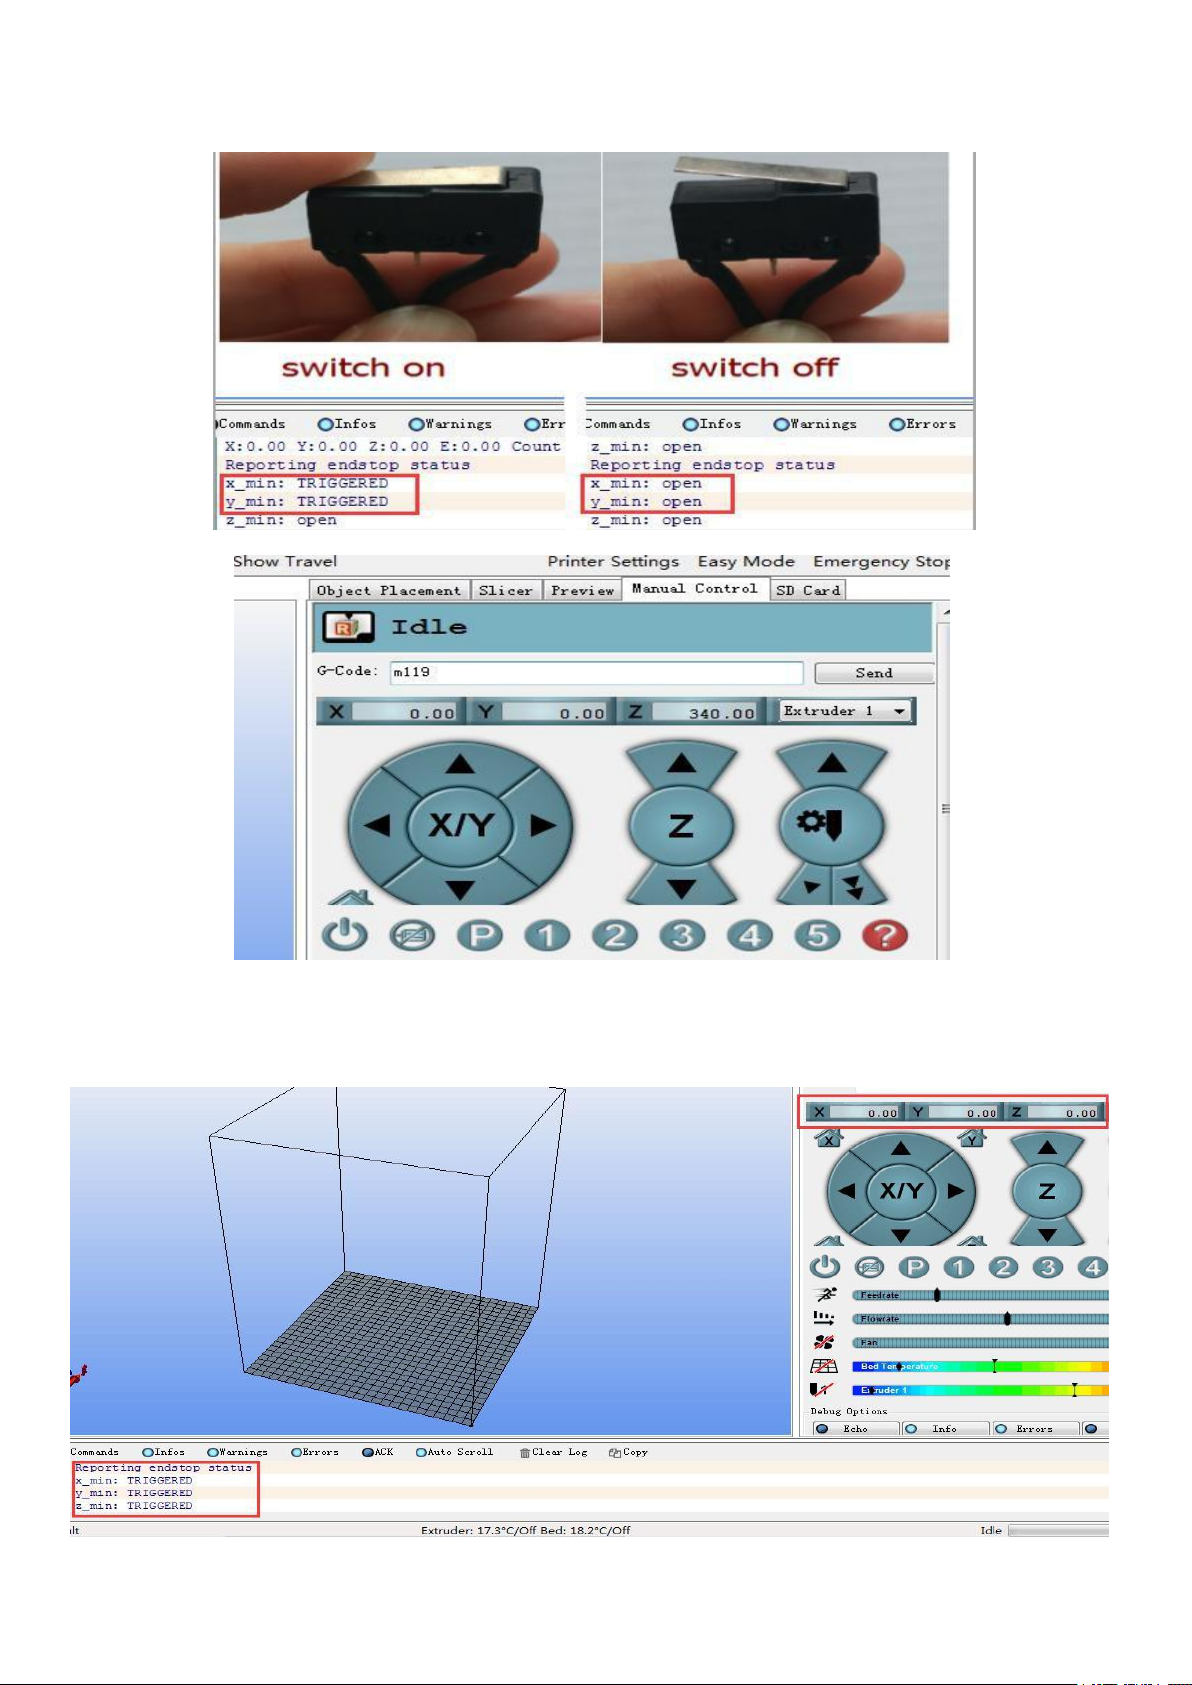
M119----check the status of the switch.
After we send this command ,we can view coordinate of nozzle now.
It’s ok to move only one or two axis
Eg:
The switch status is important directive,when meeting the motor moving problem,can check
the switch status to search problem.
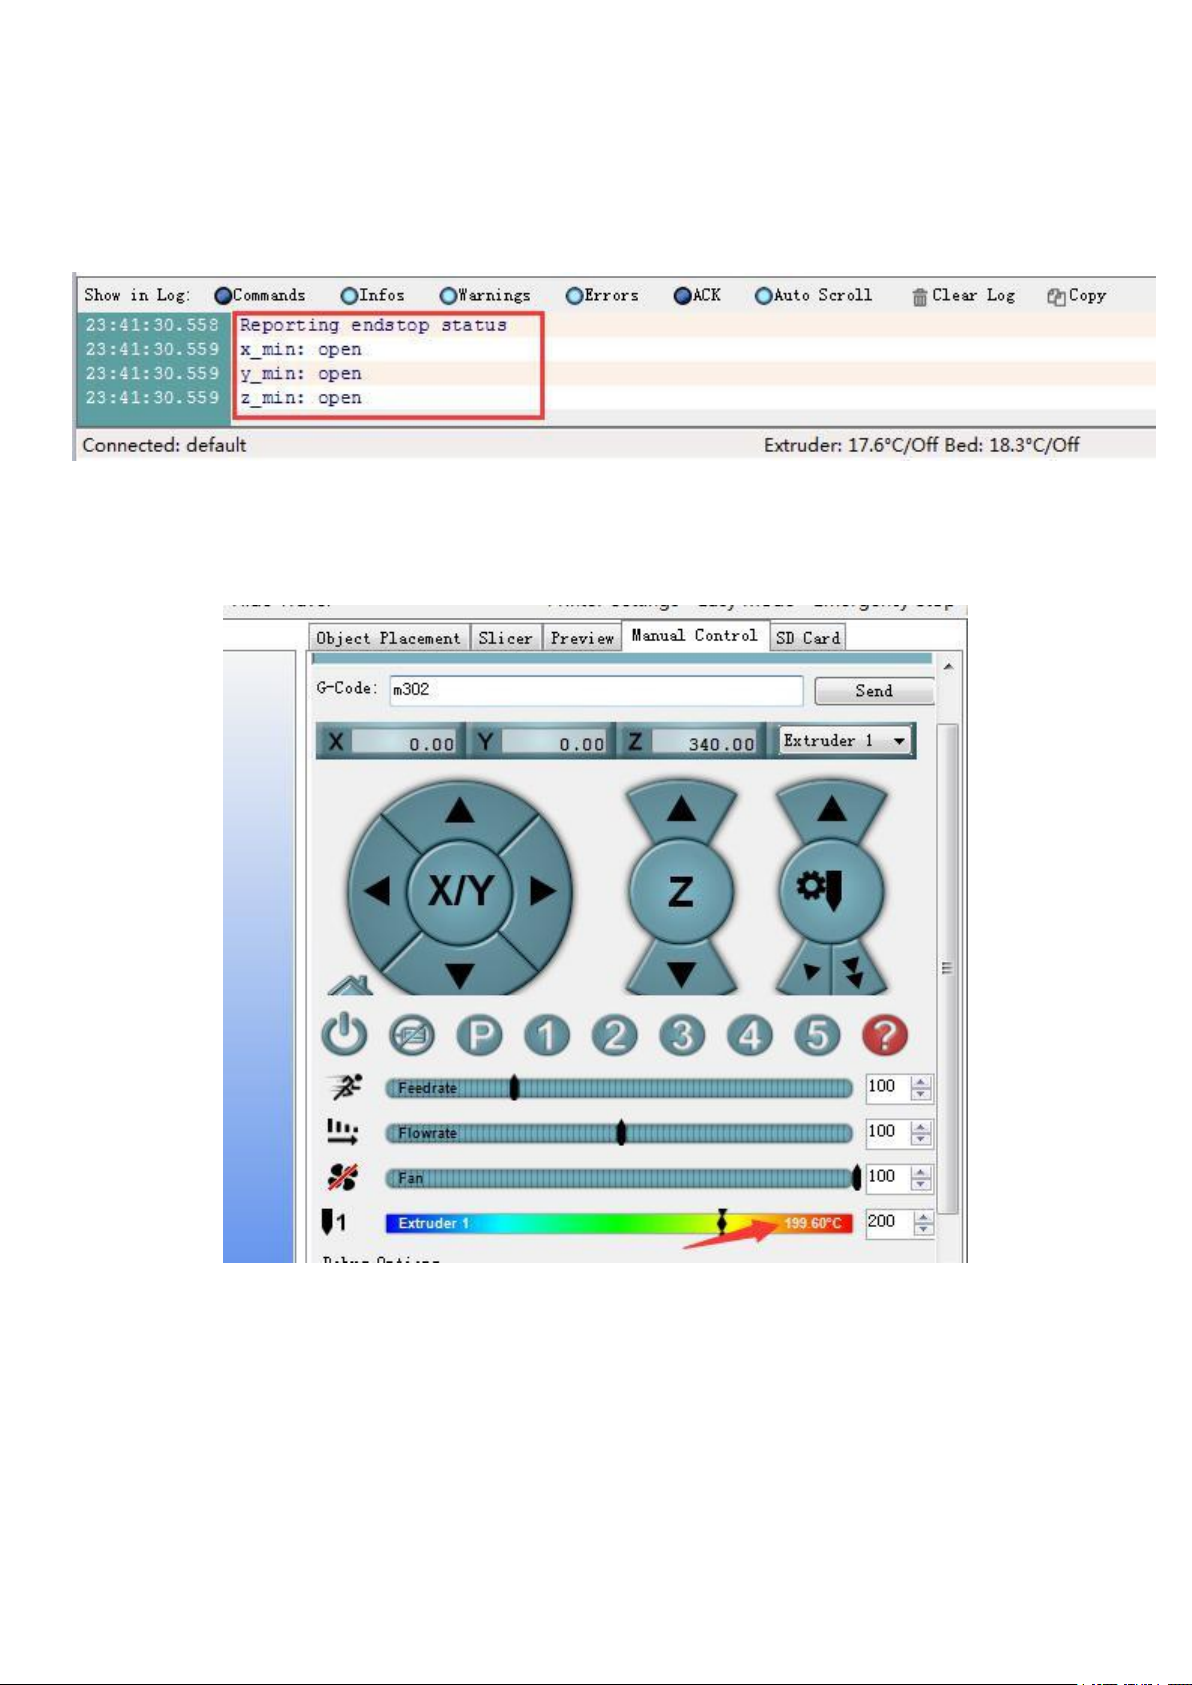
When hit the switch,it shows TRIGGERED;if not touch, it shows open.
Page 15
-
15
When send g28,the nozzle will go home,then send m119 It show:
x_min TRIGGERED
y_min TRIGGERED
z_min TRIGGERED
Page 16
-
16
If the nozzle is at the middle air,not hit any limit switch,all four switch show open.
(5)
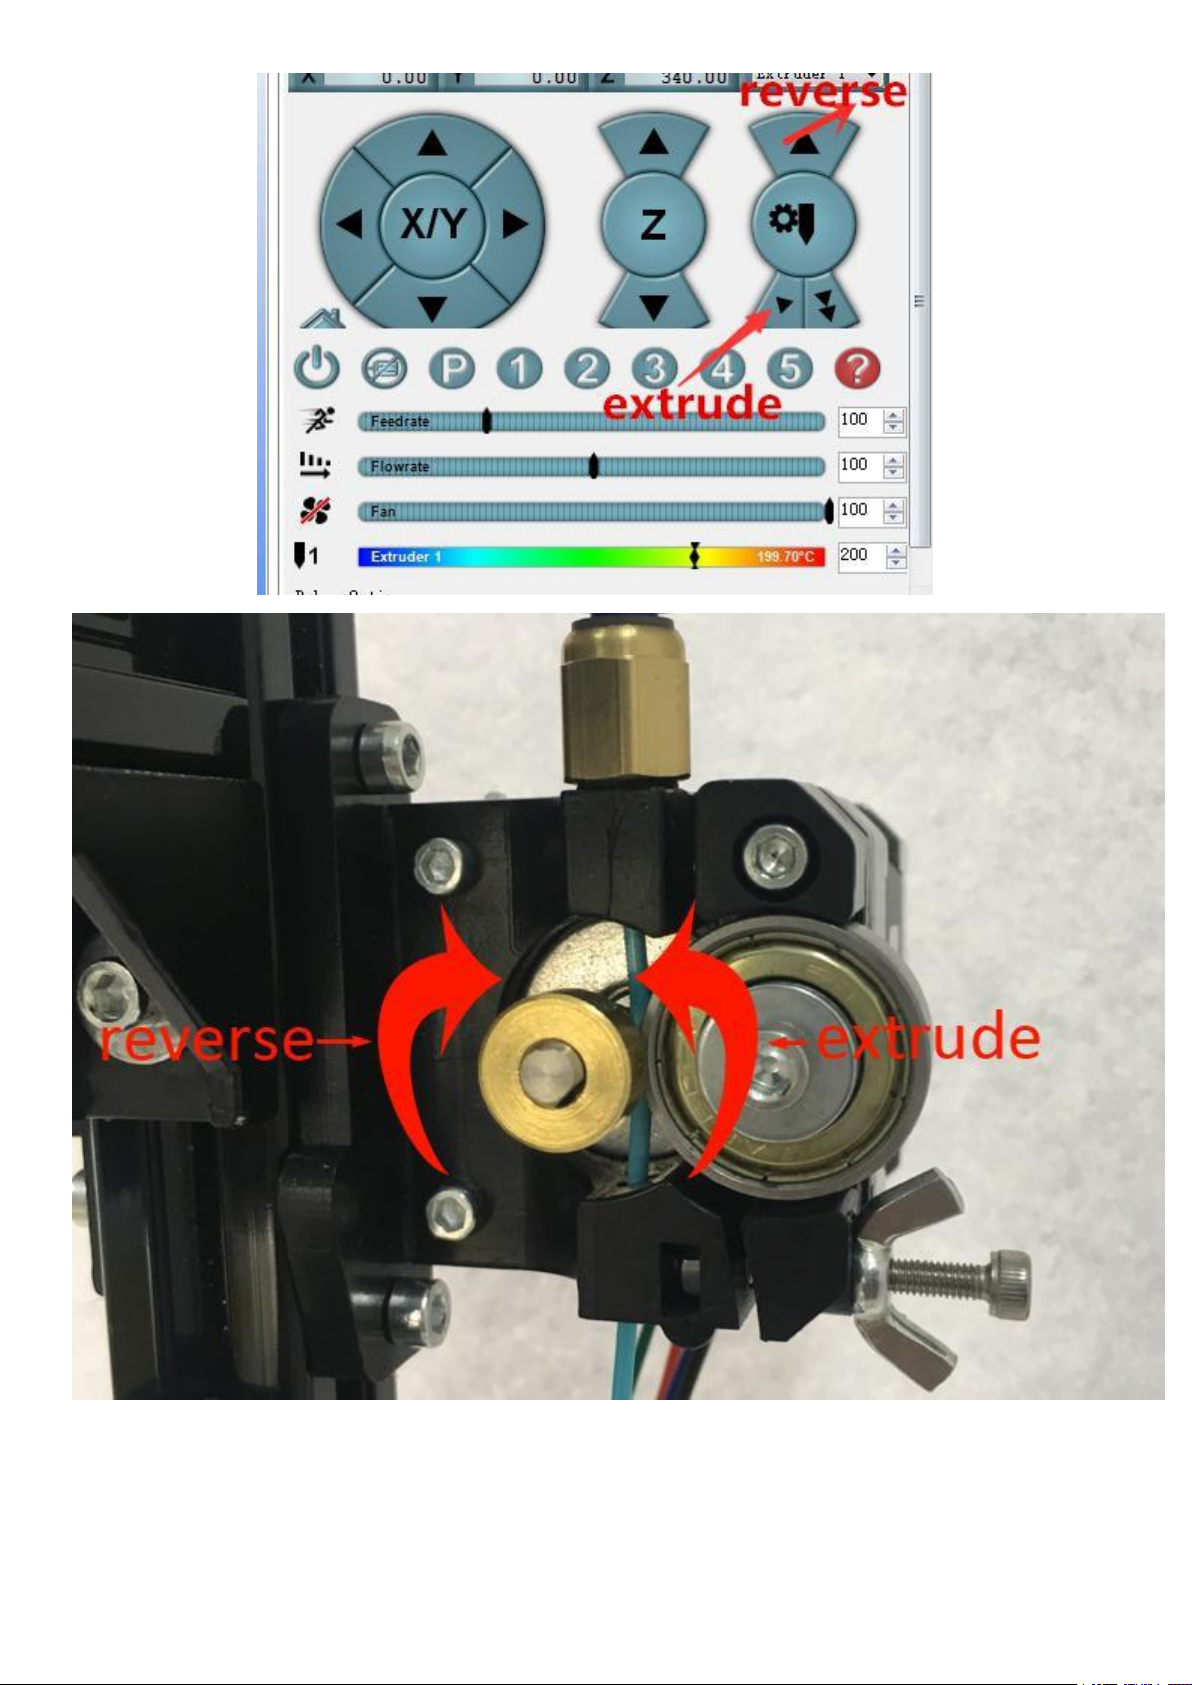
m302----manual control extruder motor
Important note:if use M302 code, must guarantee the nozzle temp reaach 175
℃。
If can not reach 175
℃,
the extruder can not run. !!!
It show:
x_min open
y_min open
z_min open
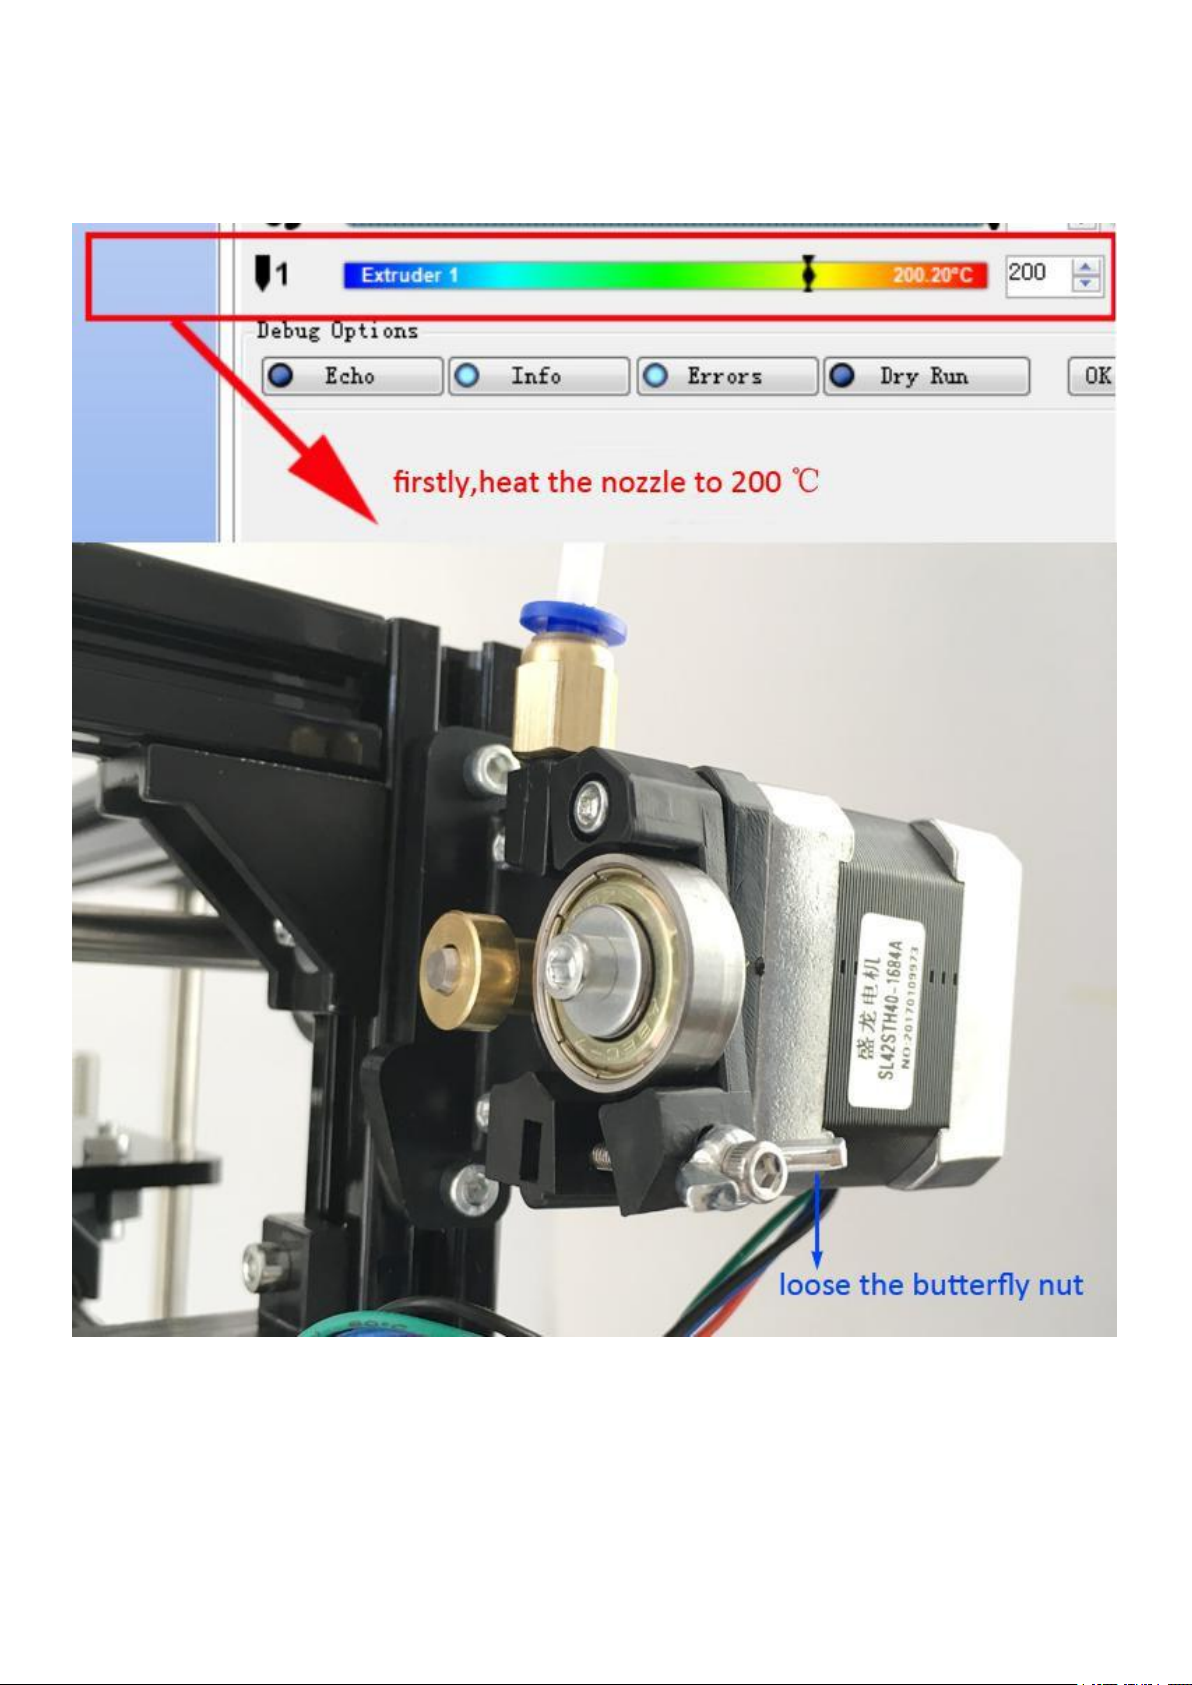
Before manual control extruder motor ,need heat nozzle to targeted temperature and can melt
filament.this step is to prevent the extruder run at cold status, then input 302.
Page 17
-
17
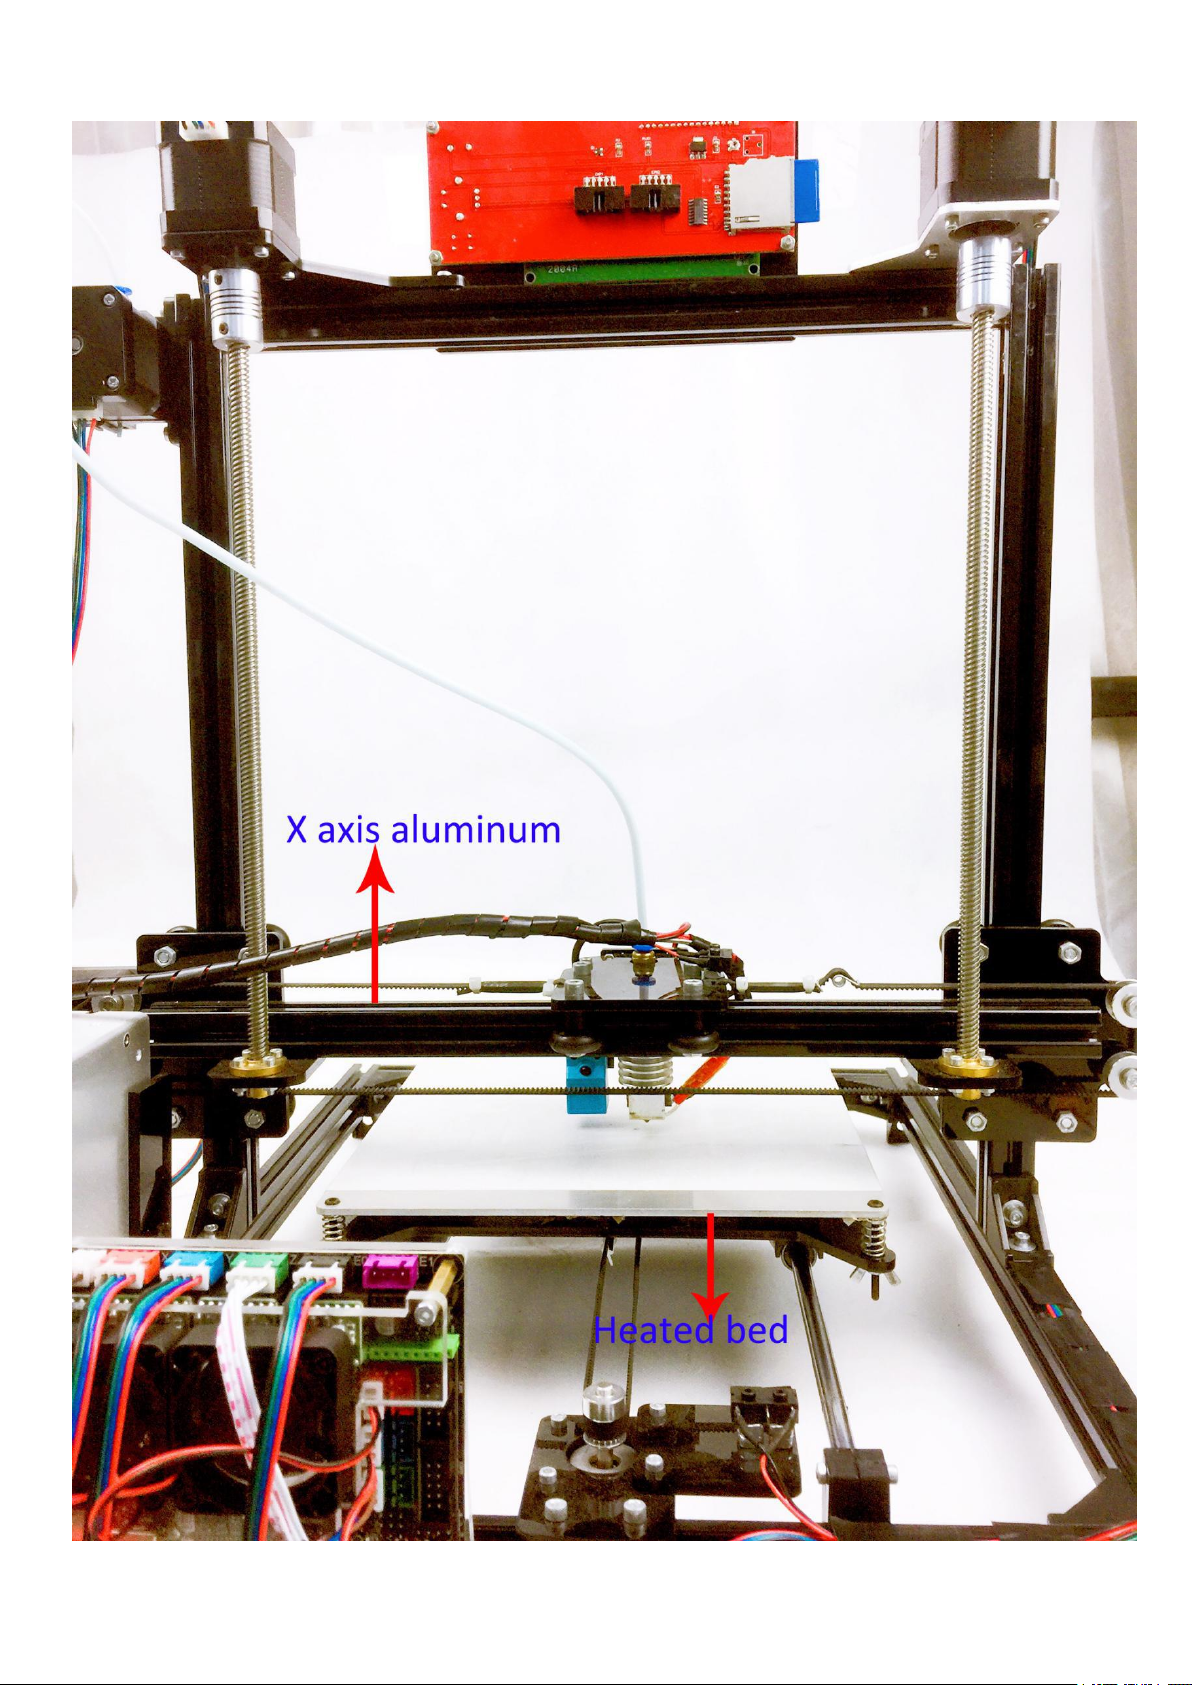
When heating the nozzle ,first input m302 and send ,and then click extrude,we can see extrude
motor run ,and filament come out from nozzle(if you have installed filament)
Page 18
-
18
2 preparation before leveling and automatic leveling
Page 19
-
19
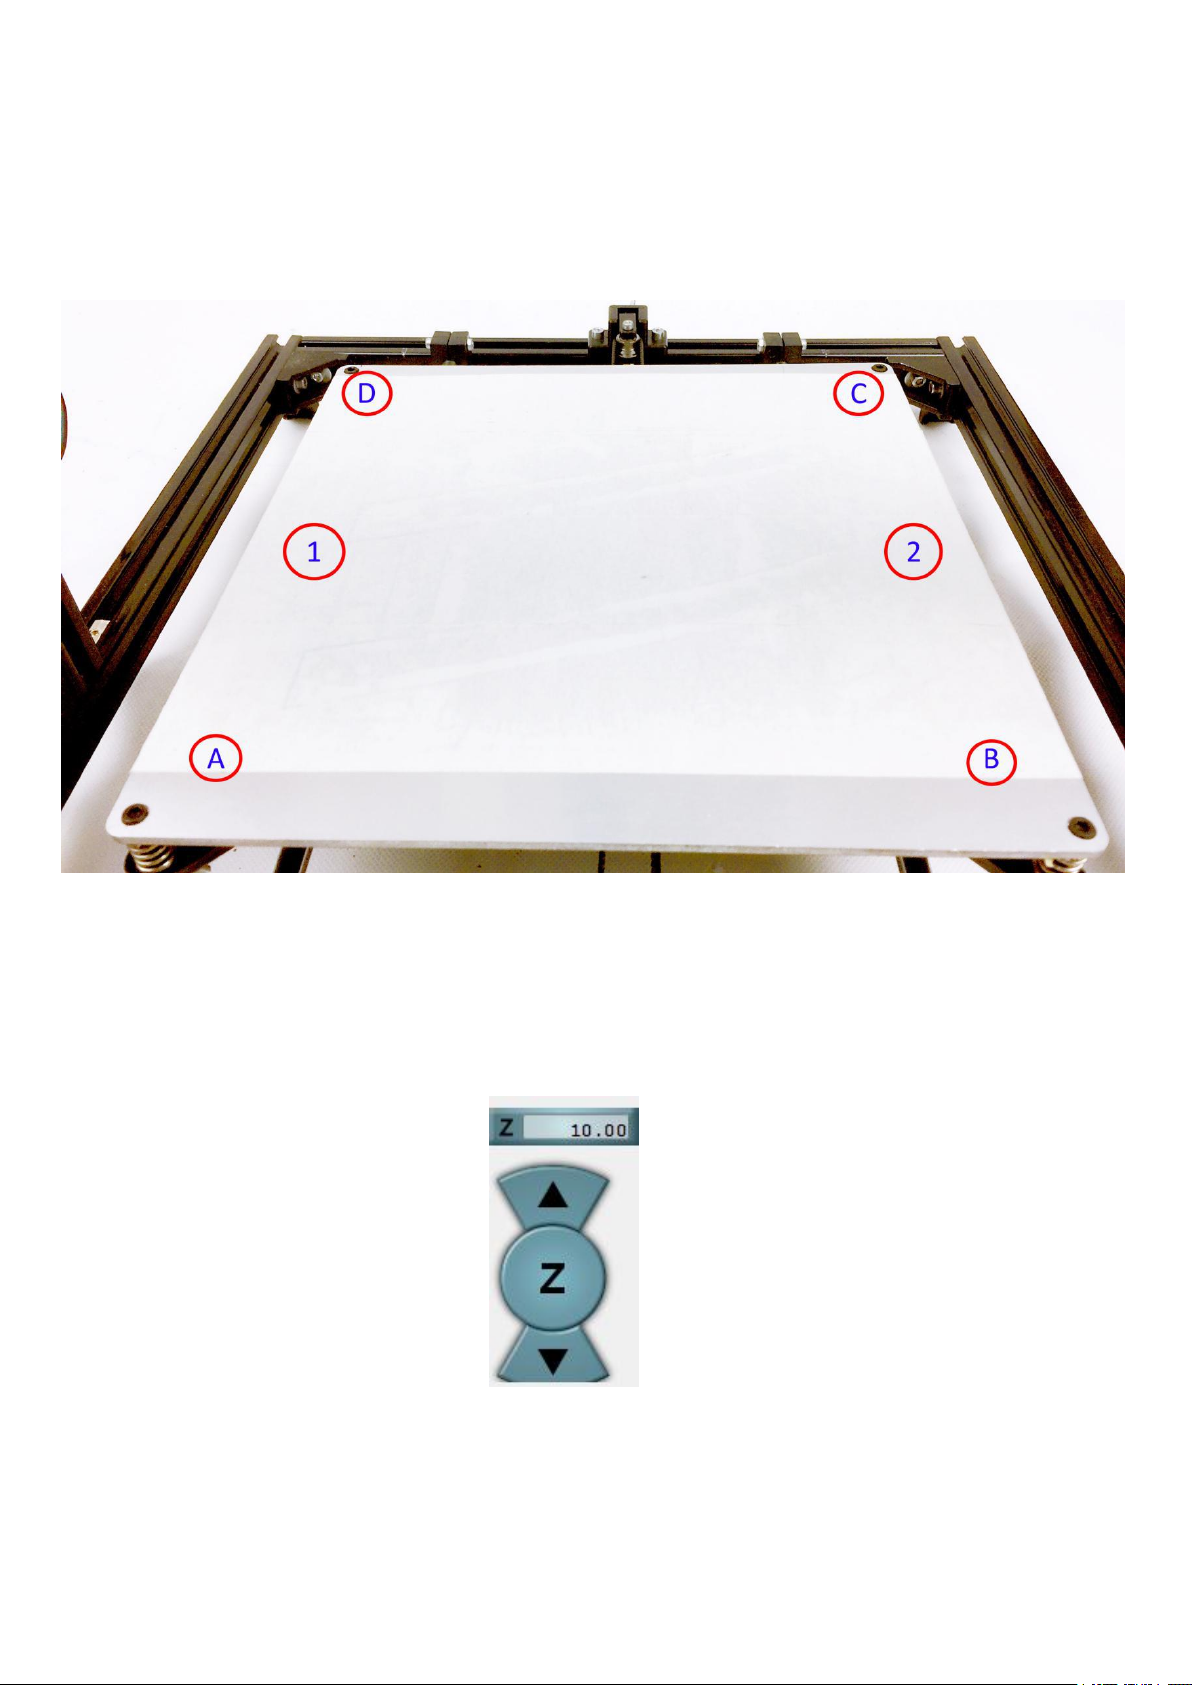
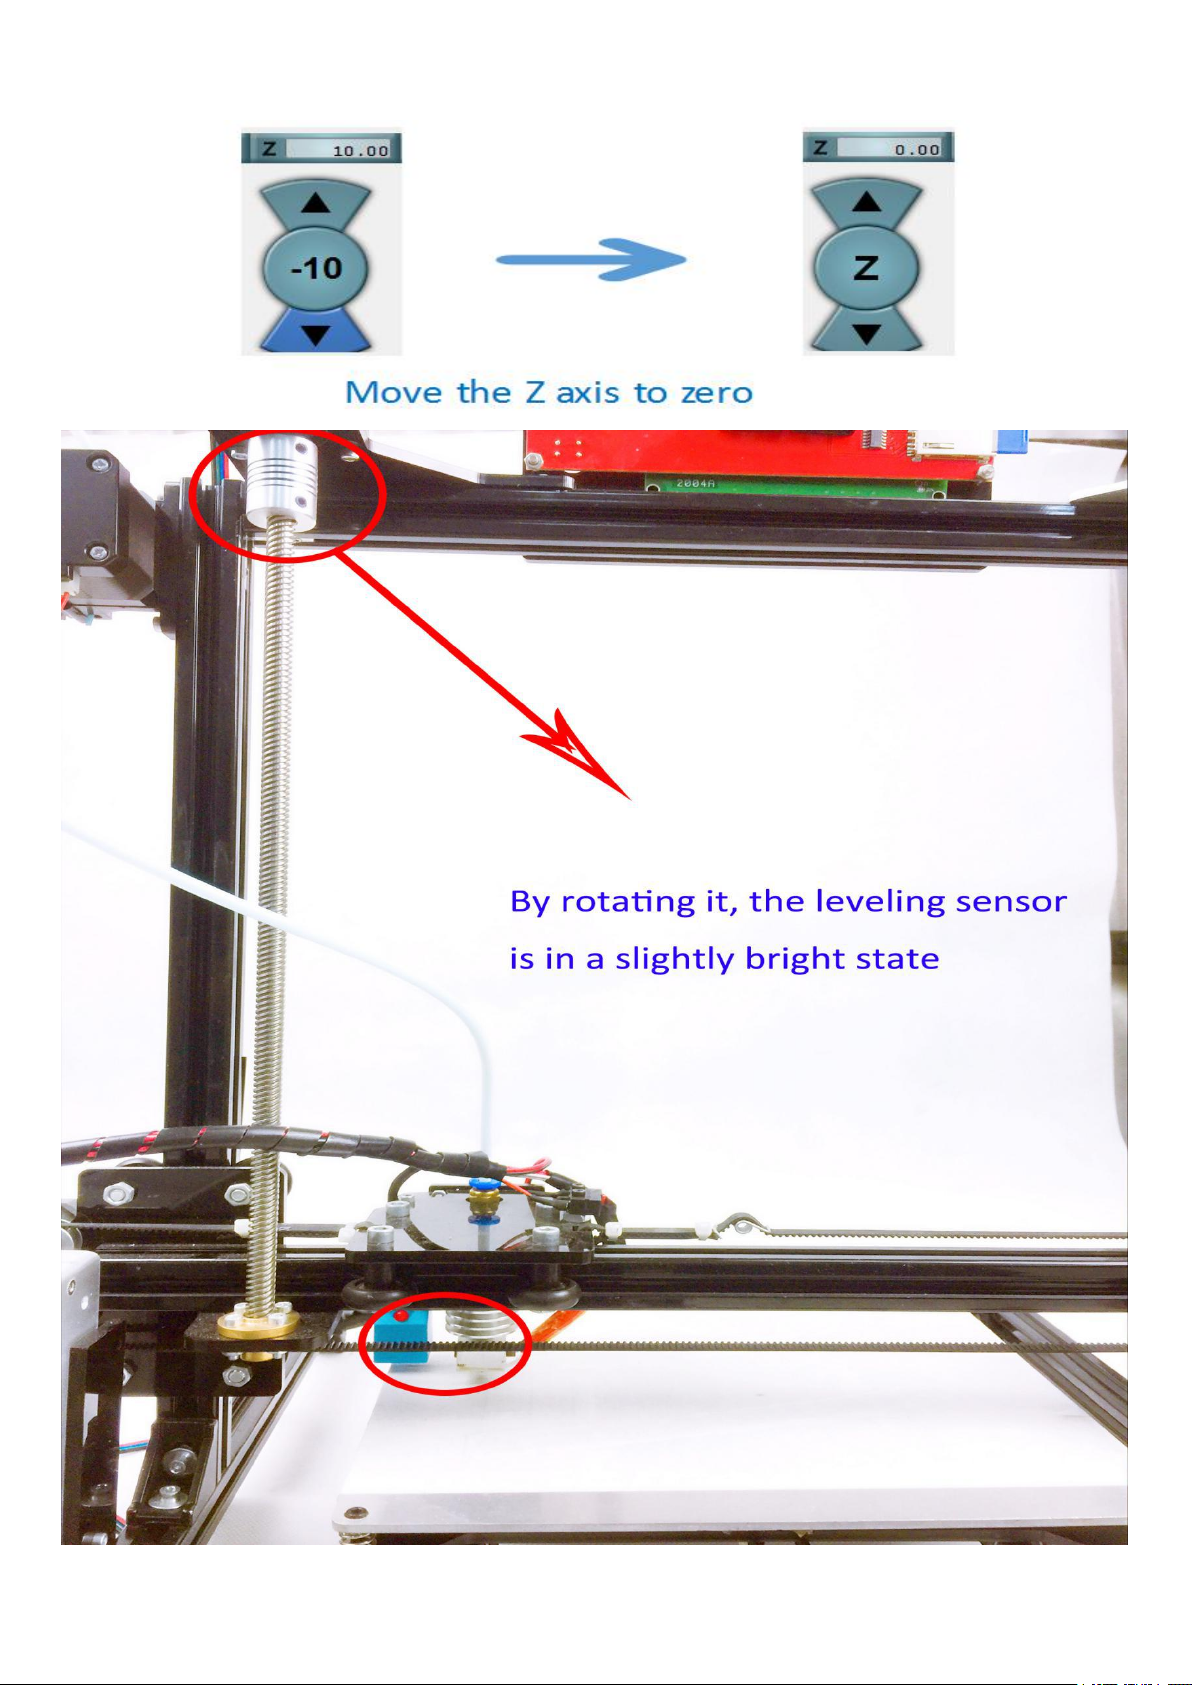
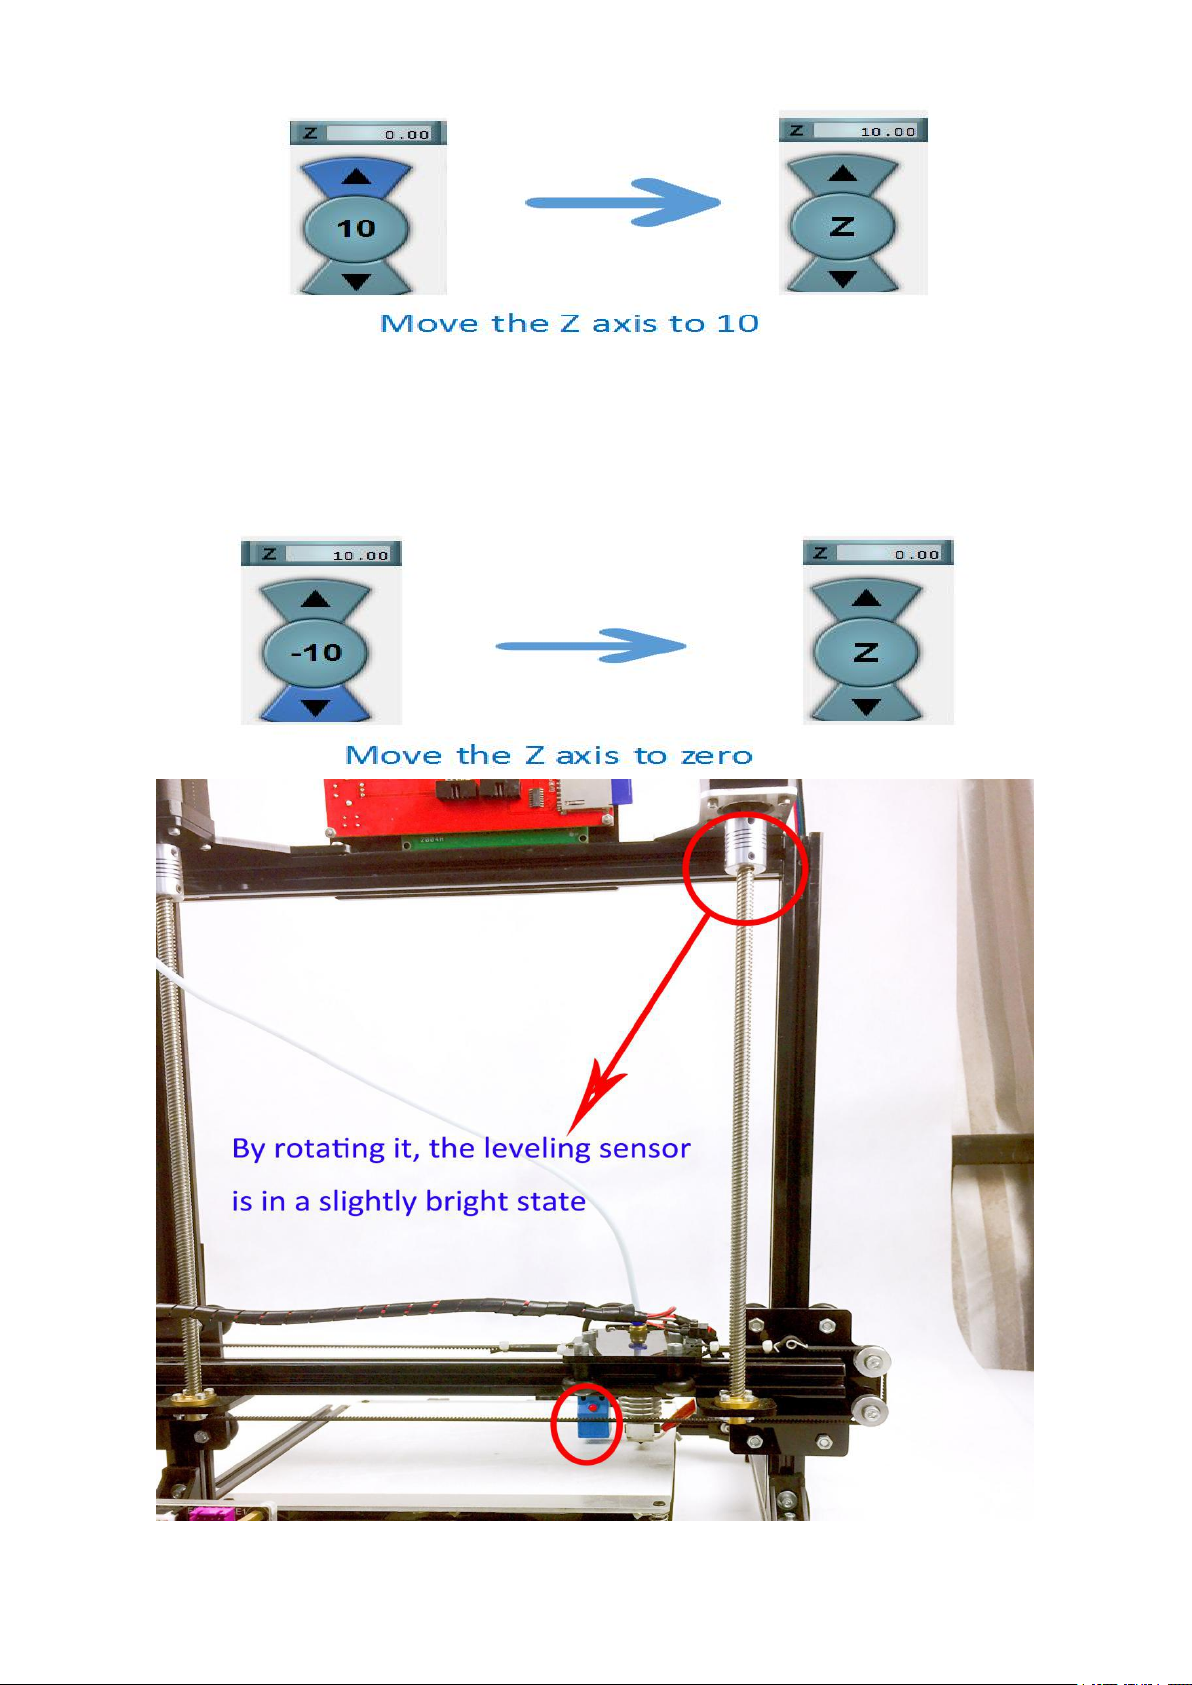
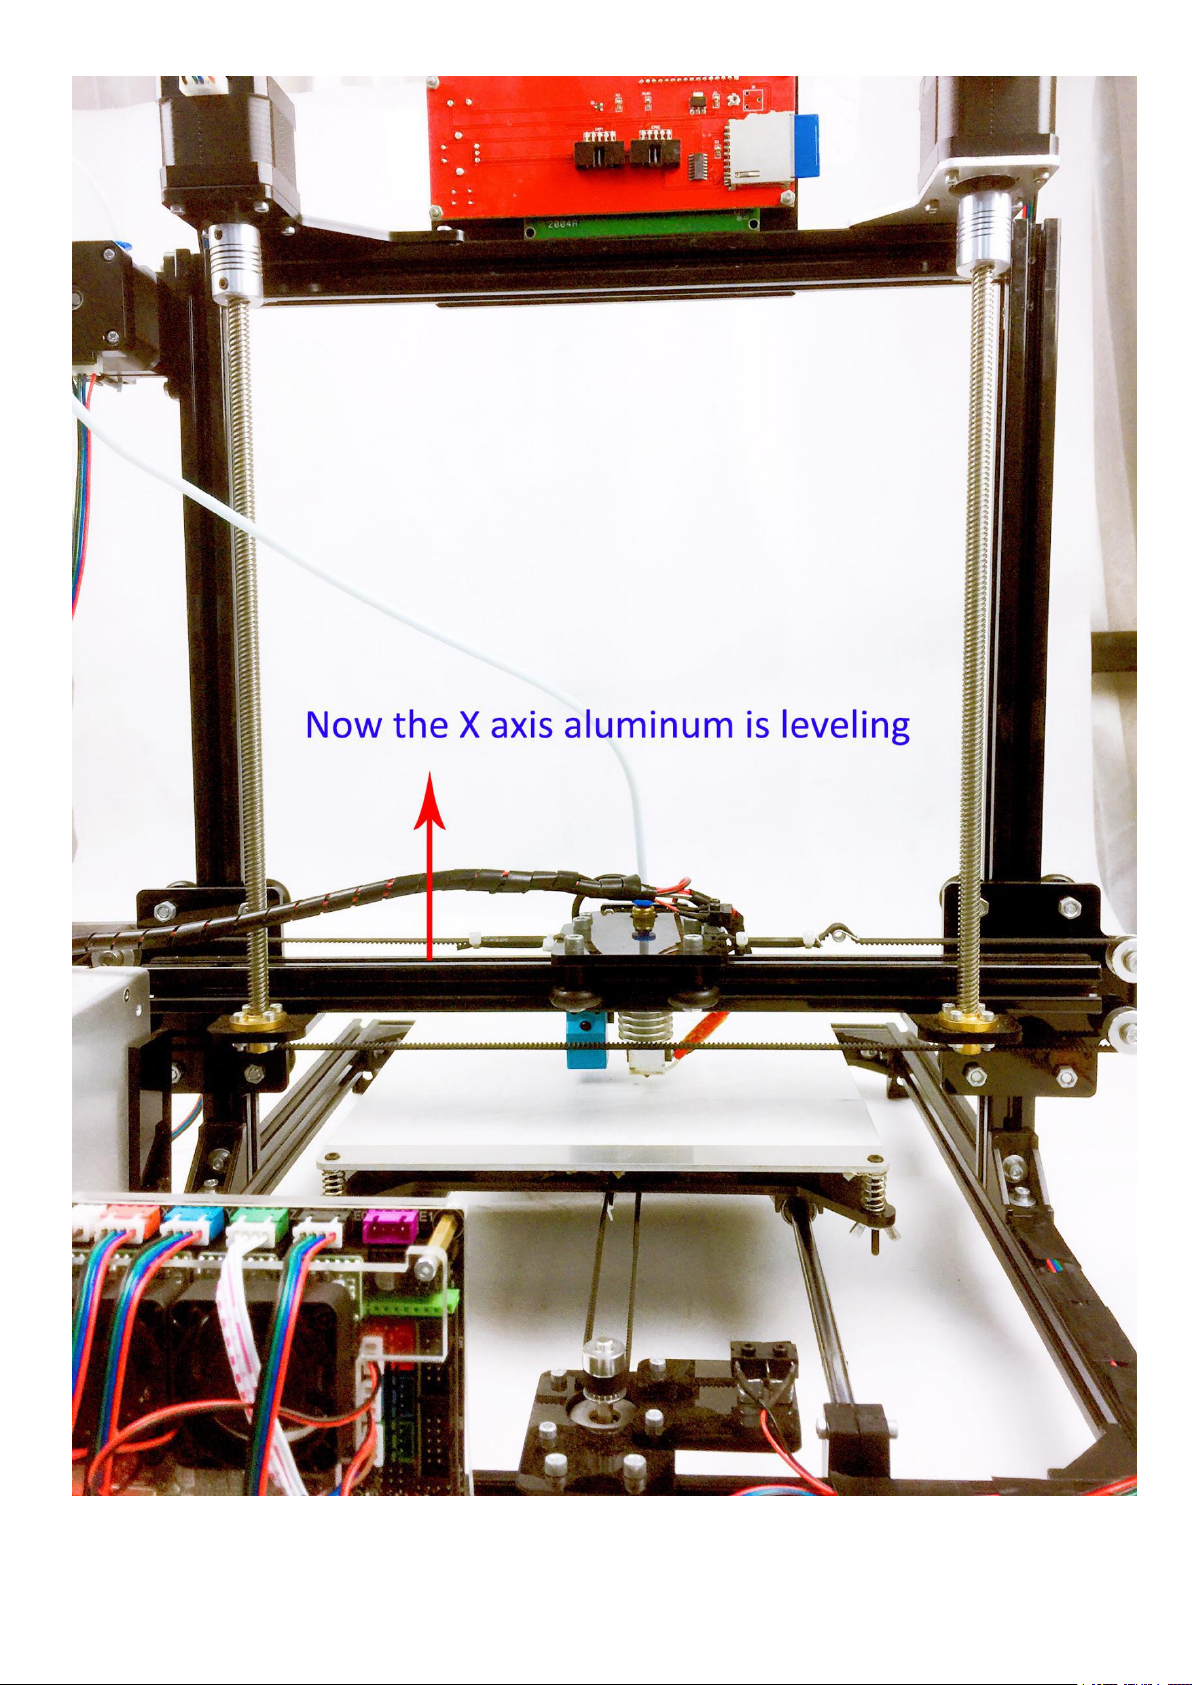
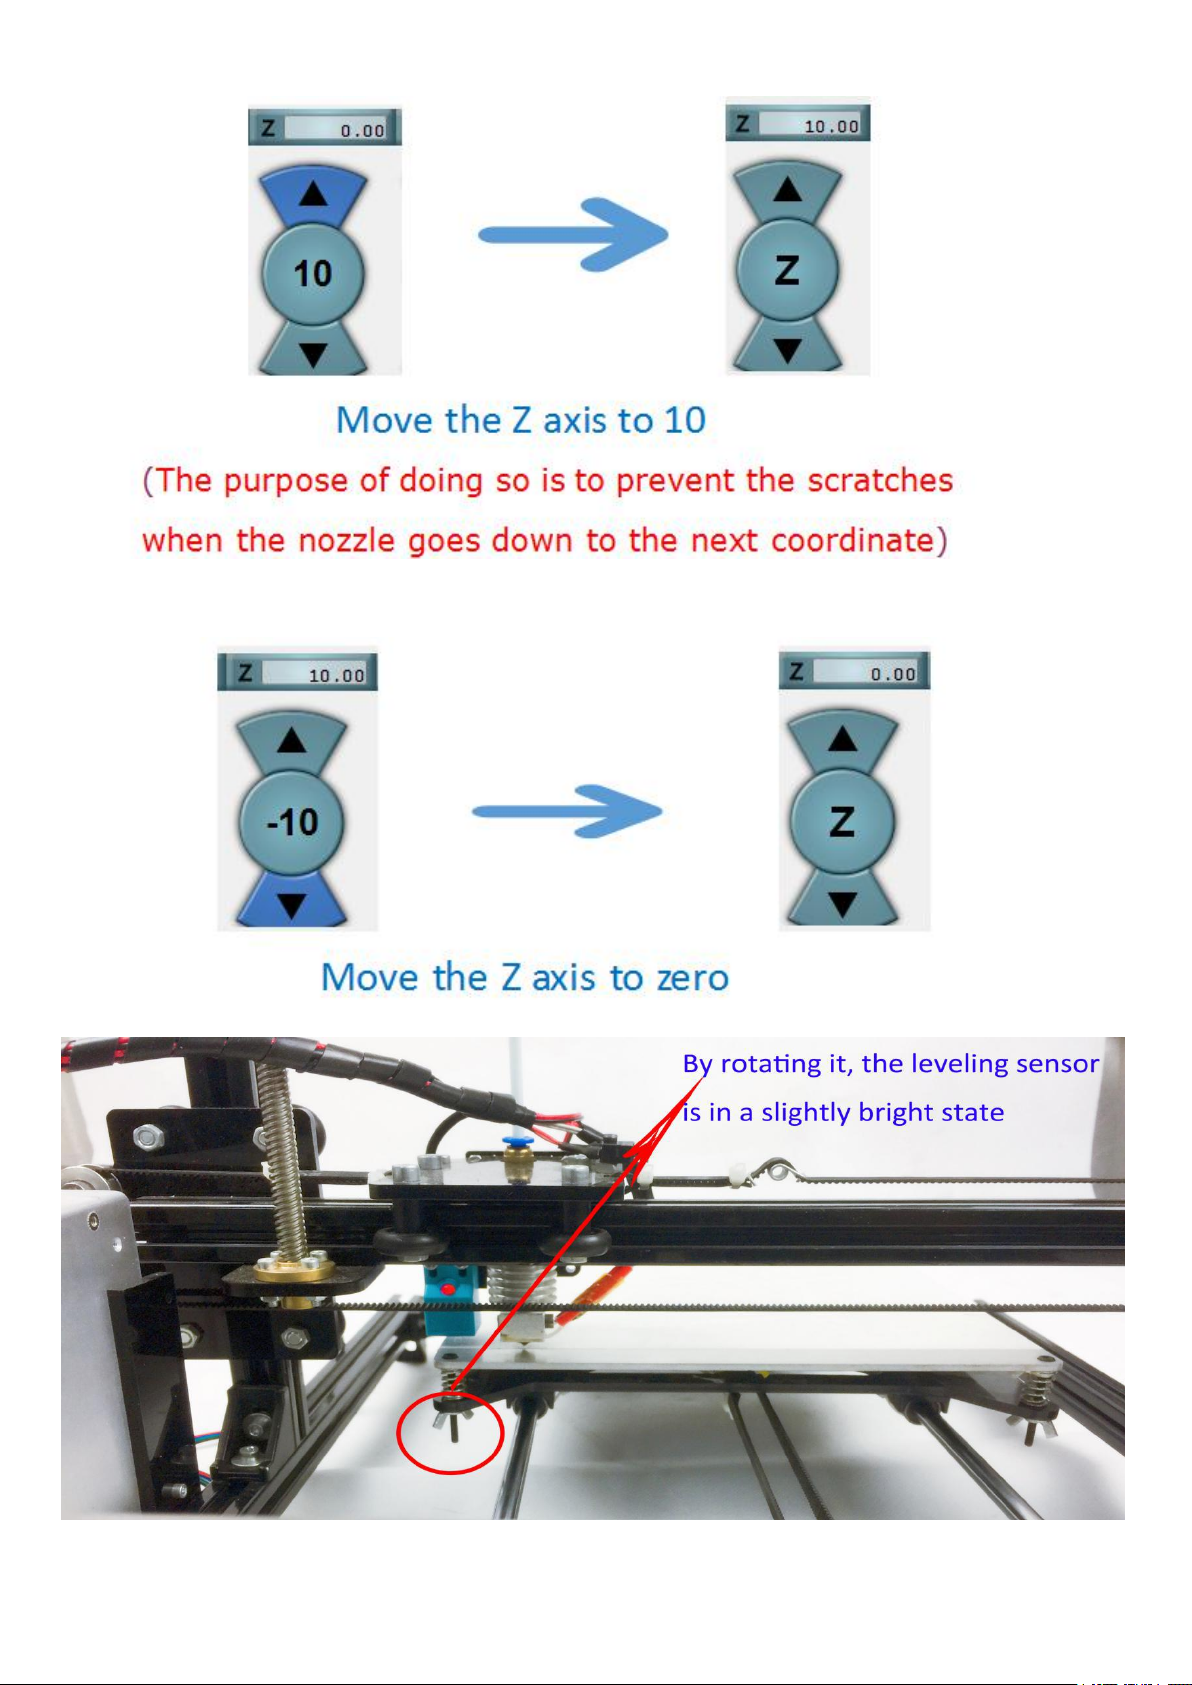
Before automatic leveling, the heated bed and the X axis aluminum should be
leveling
We can through①② two points, adjust the aluminum , through the A B C D four
points, adjust the hot bed
First enter the G28 command, so that the machine is in the
middle position.
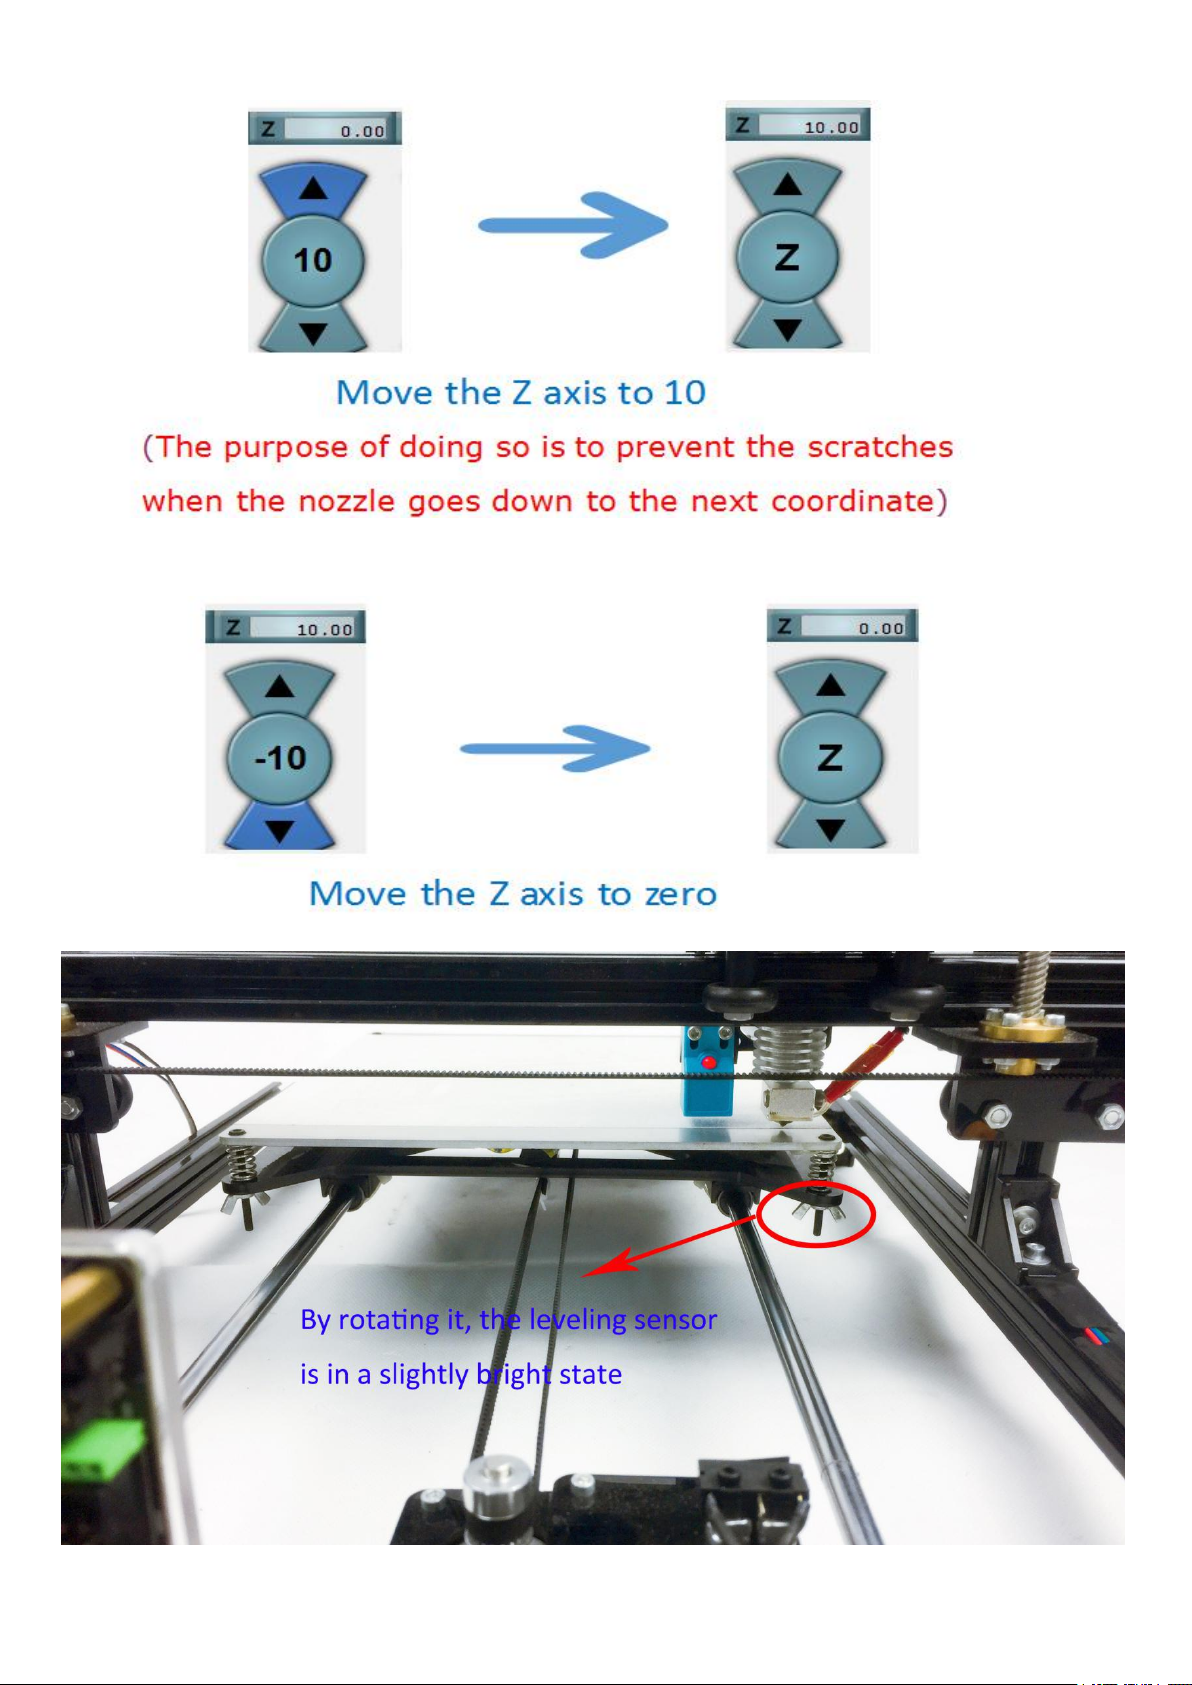
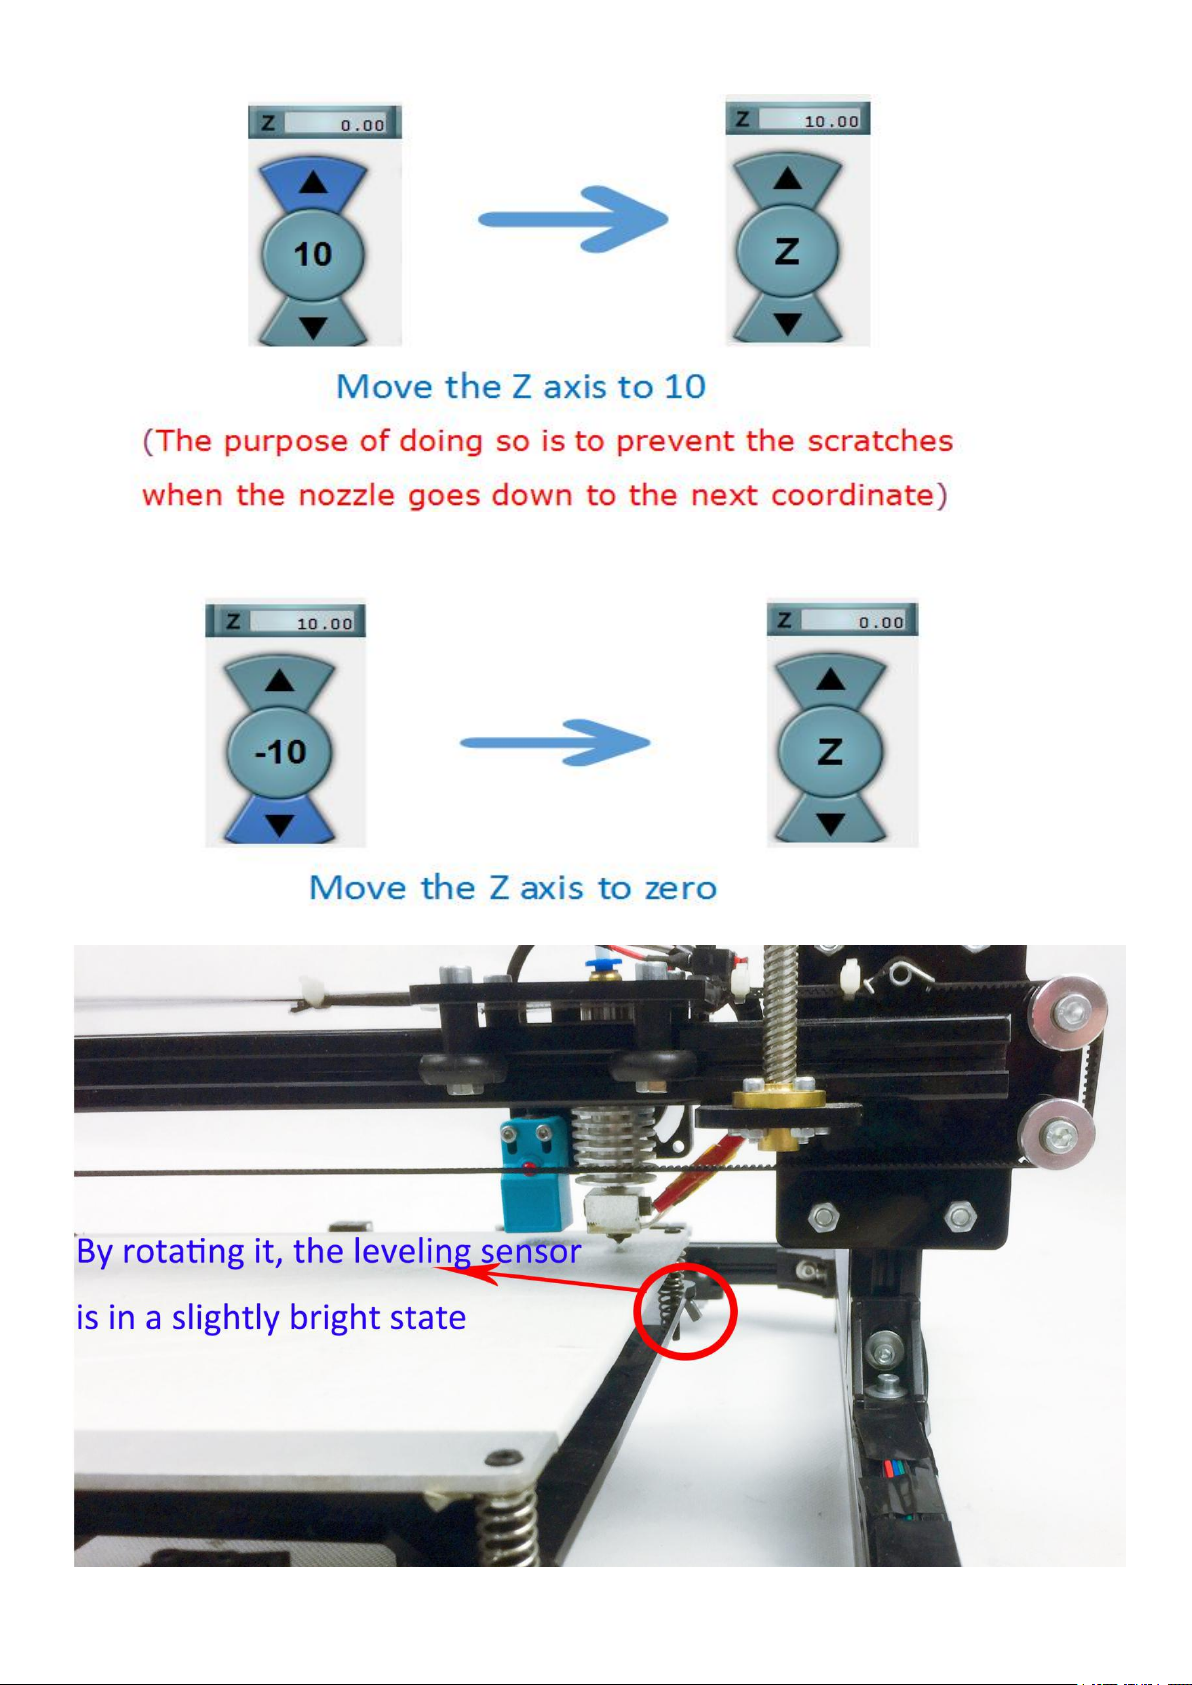
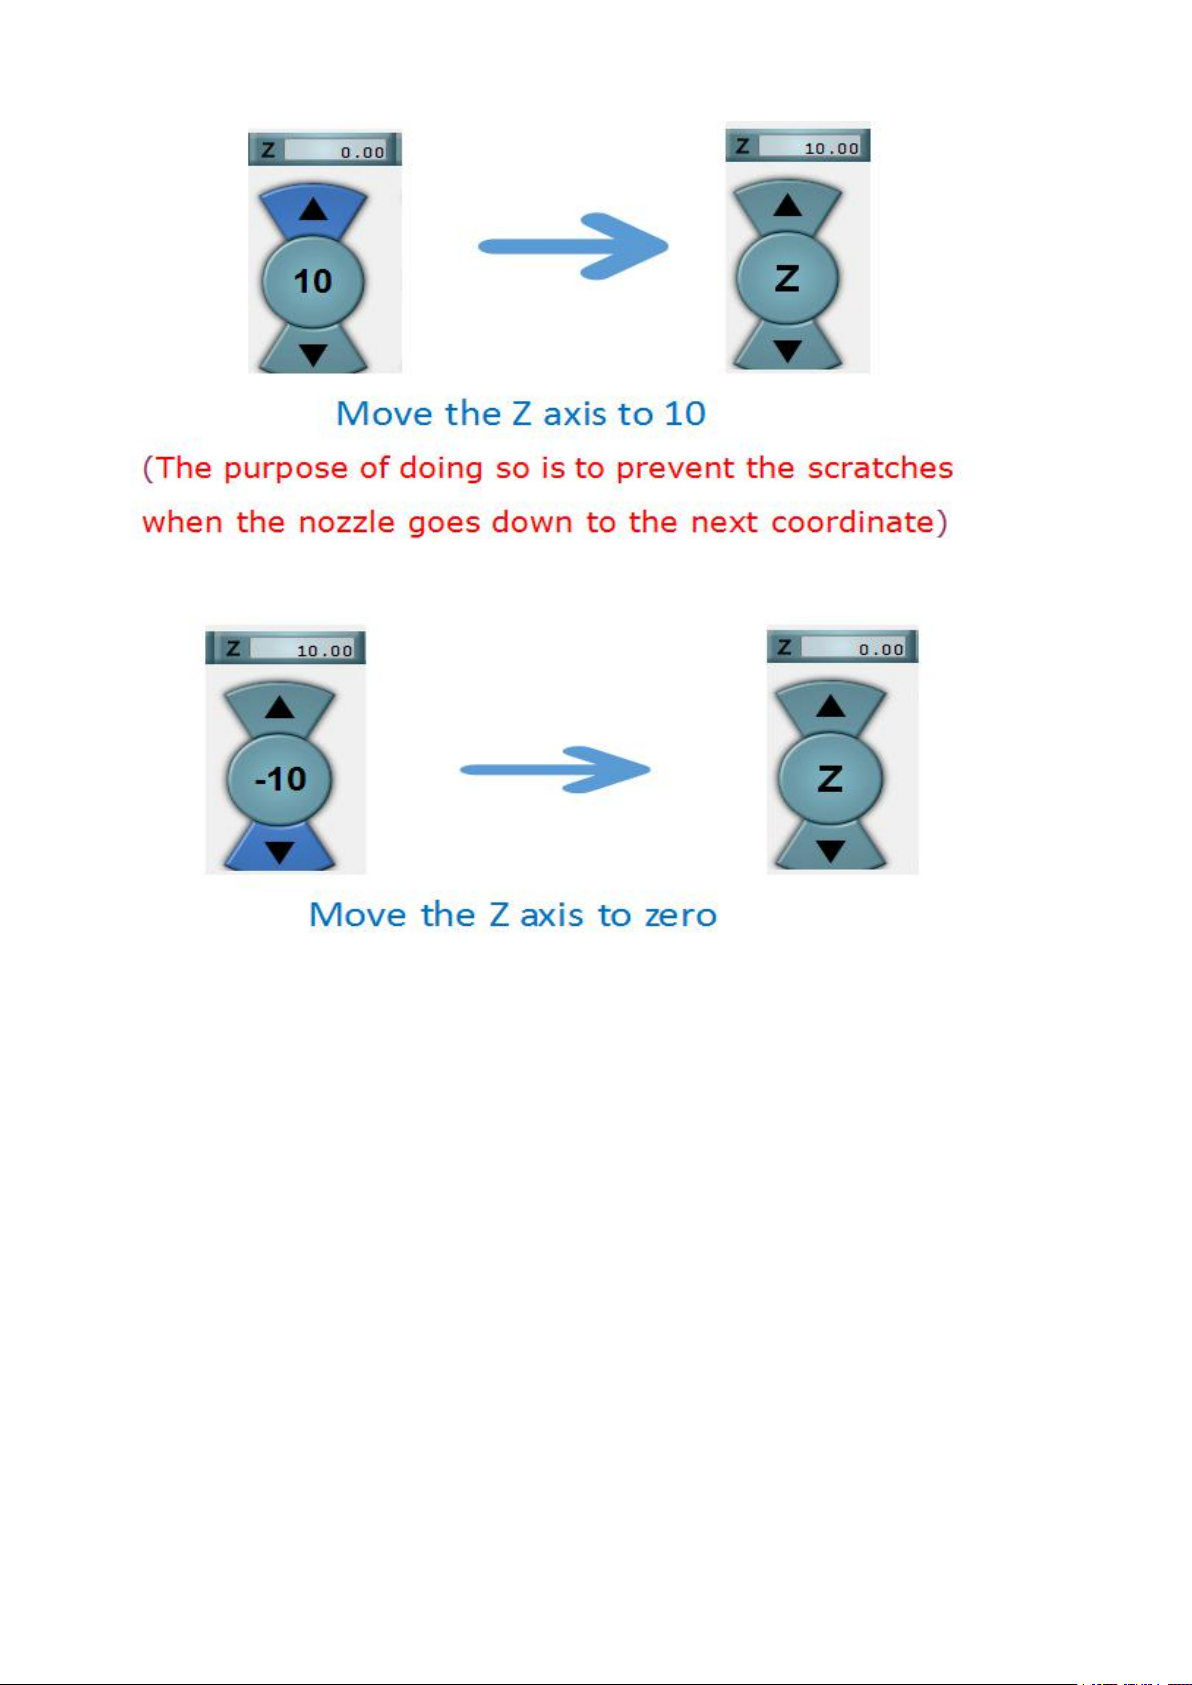
Second in the command bar enter: g1 z10 (The purpose of
doing so is to prevent the scratches when the nozzle goes down
to the next coordinate)
Then enter: g1 x180 y90 ,The nozzle will go to ① coordinate
Page 20
-
20
Then
Page 21
-
21
(The purpose of doing so is to prevent the scratches when the
nozzle goes down to the next coordinate)
Then enter: g1 x10 y90 ,The nozzle will go to
Then
②
coordinate
Page 22
-22-
Page 23
23
Then enter: g1 x180 y180 ,The nozzle will go to A coordinate
Page 24
-
24
Then enter: g1 x10 y180 ,The nozzle will go to B coordinate
Page 25
-
25
Then enter: g1 x10 y10 ,The nozzle will go to C coordinate
Page 26
-
30
Then enter: g1 x180 y10 ,The nozzle will go to D coordinate
Repeat two to three times to ensure that the results are more
accurate.
Now the heated bed is leveling ,preparation before leveling is
complete.
G29 is autolevel command,after you load model and slice it ,the
regular succession is g28 go home,g29 autolevel ,then you can
click start print
Page 27
-
31
2,Start printing
1
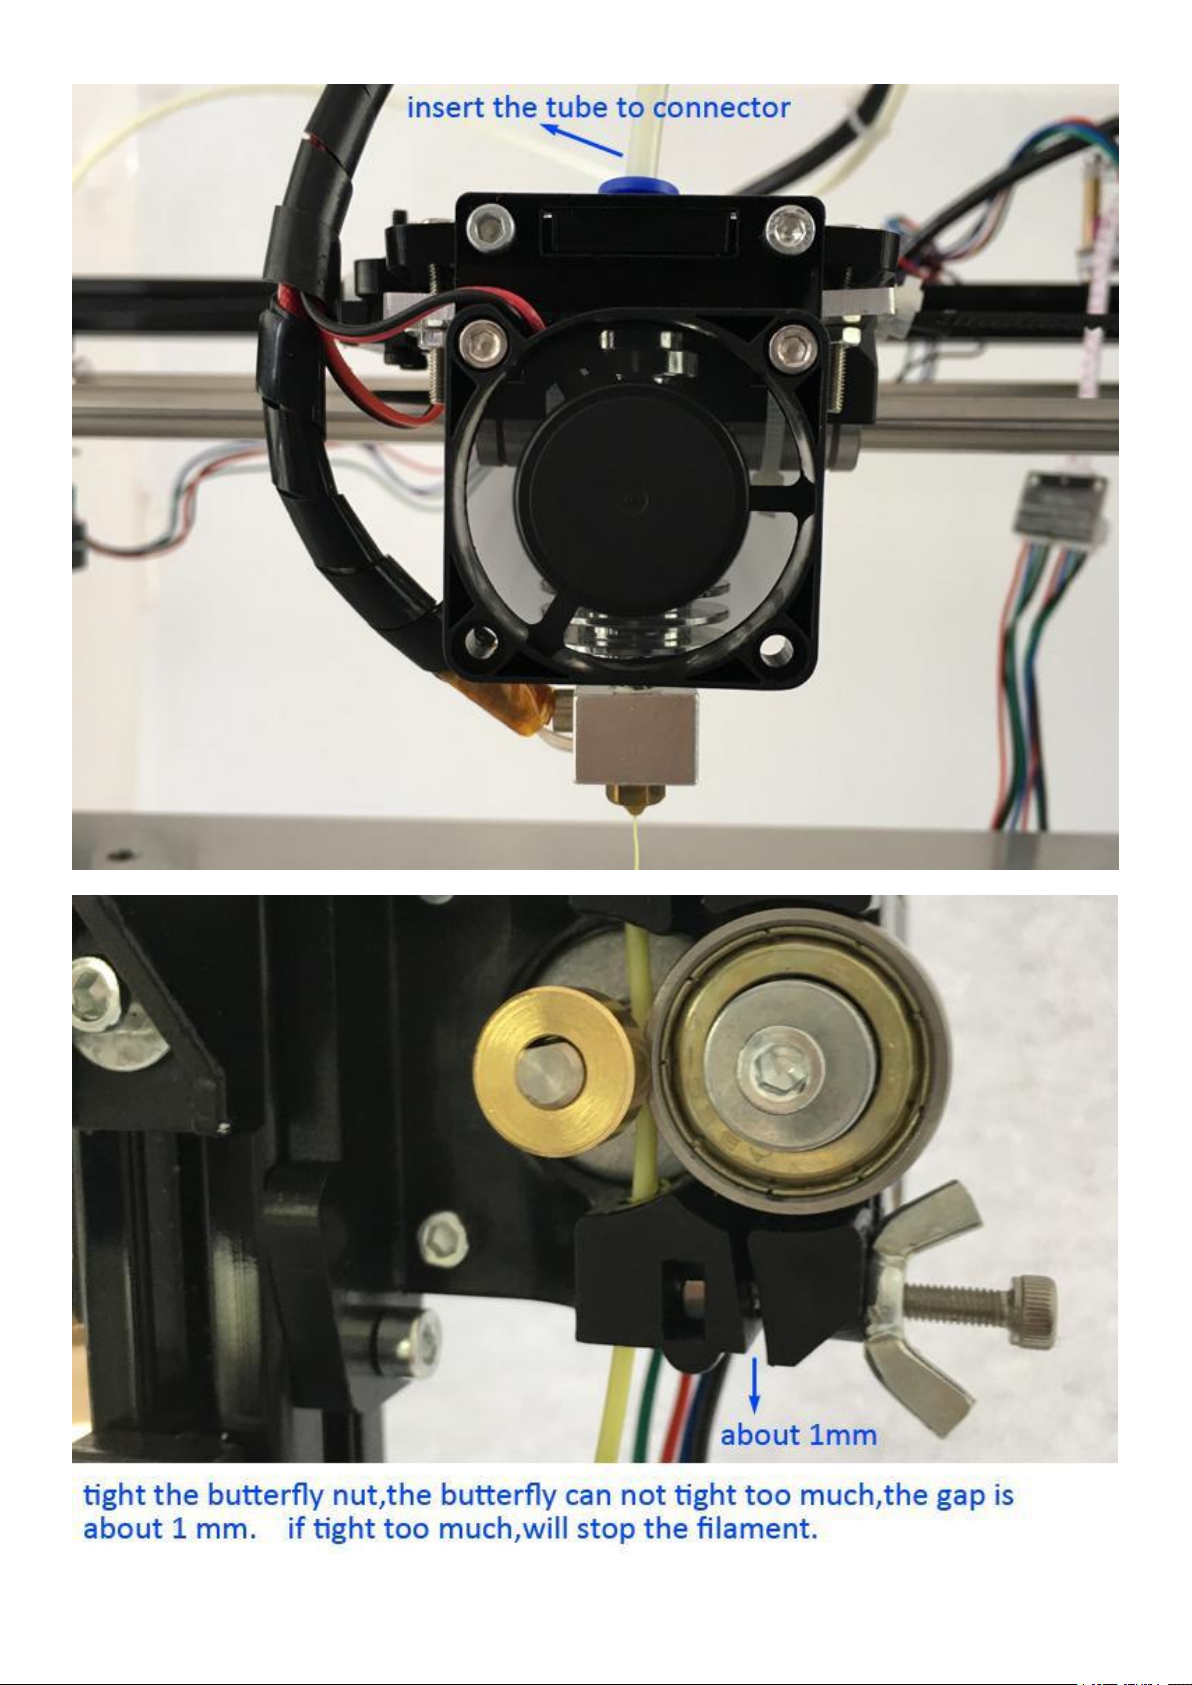
Feeder filament
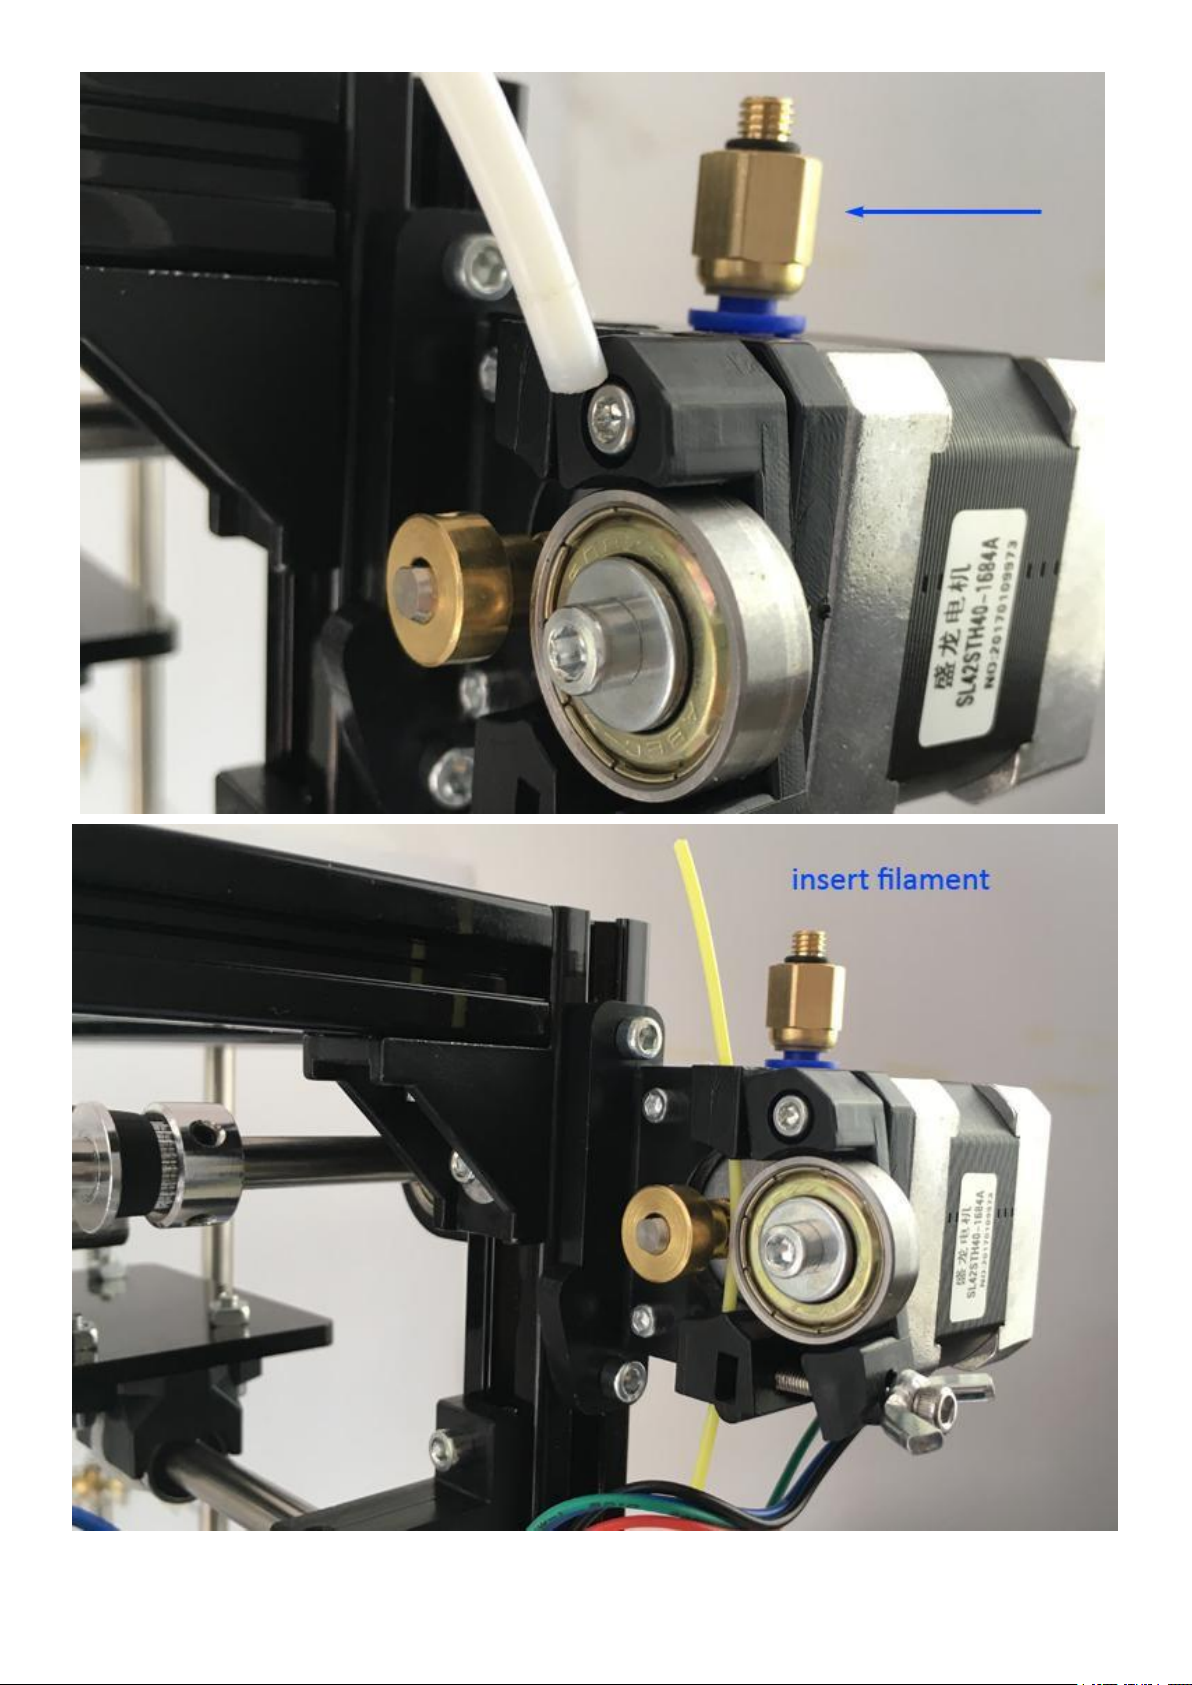
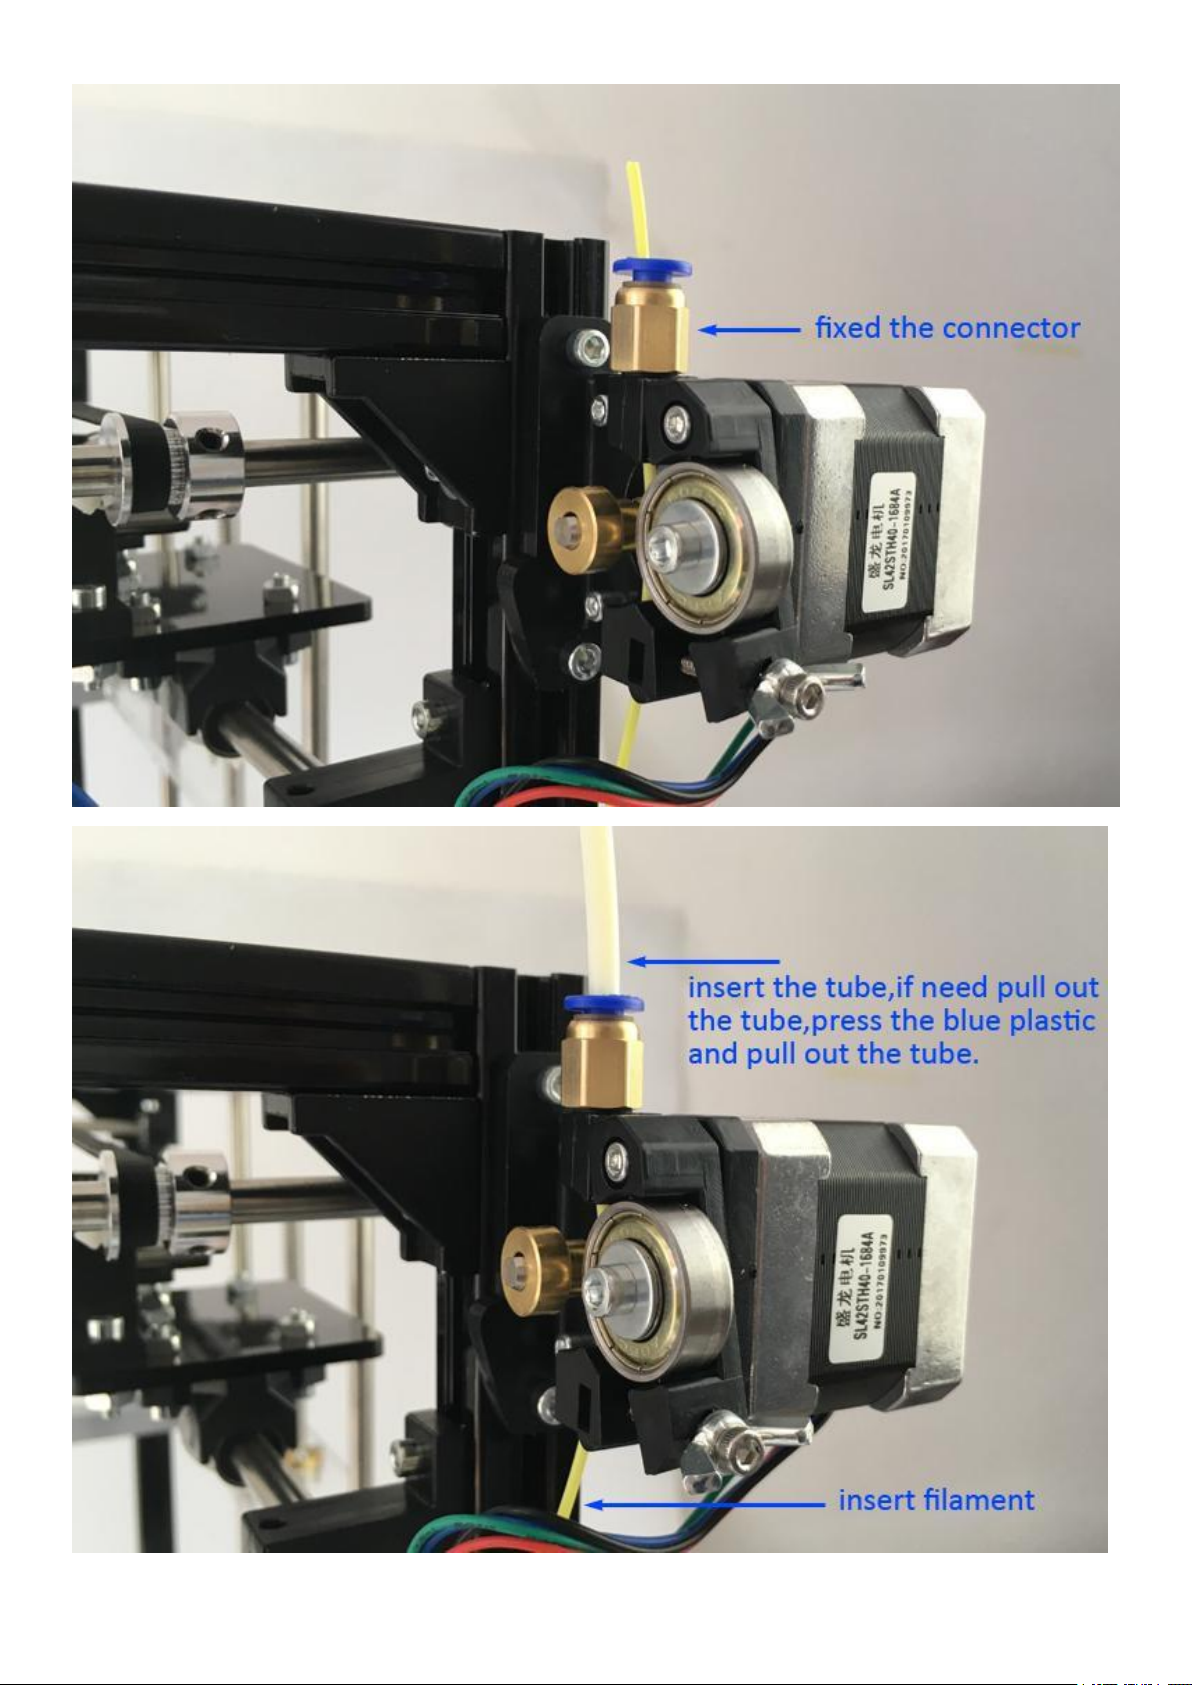
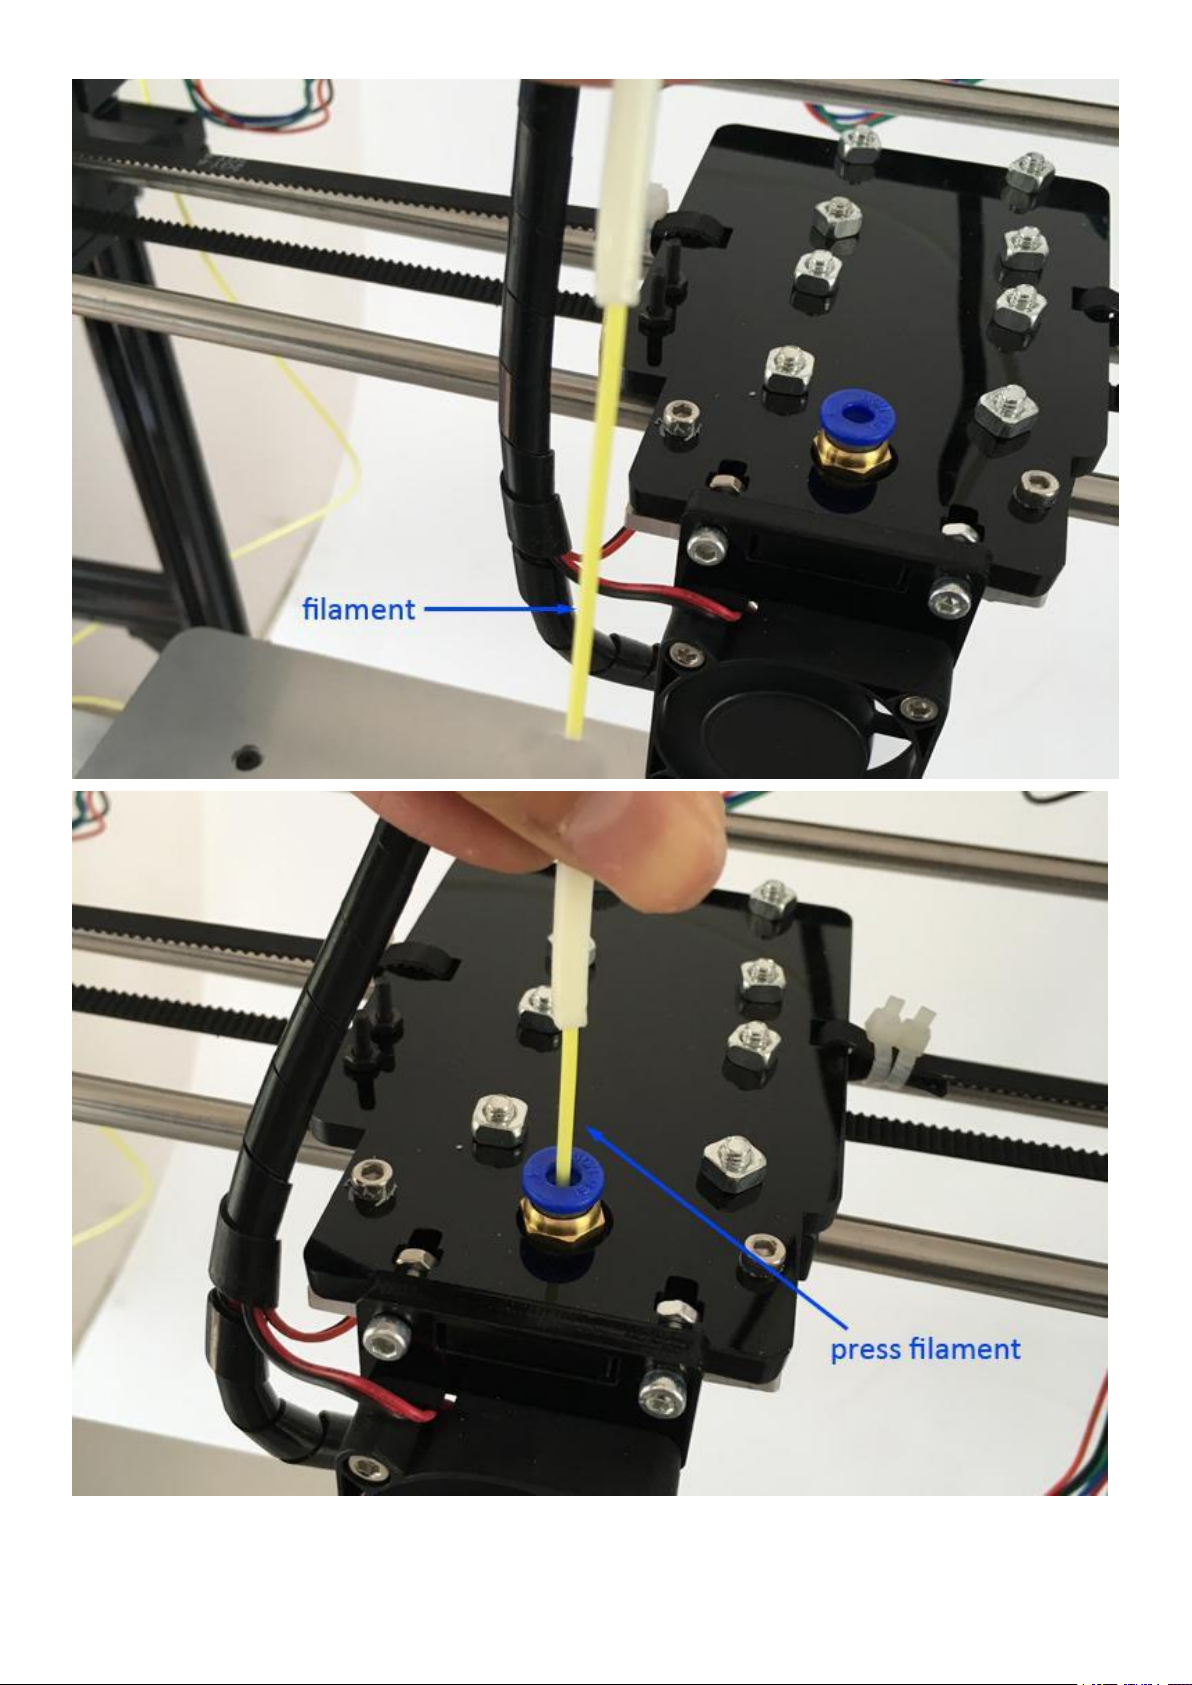
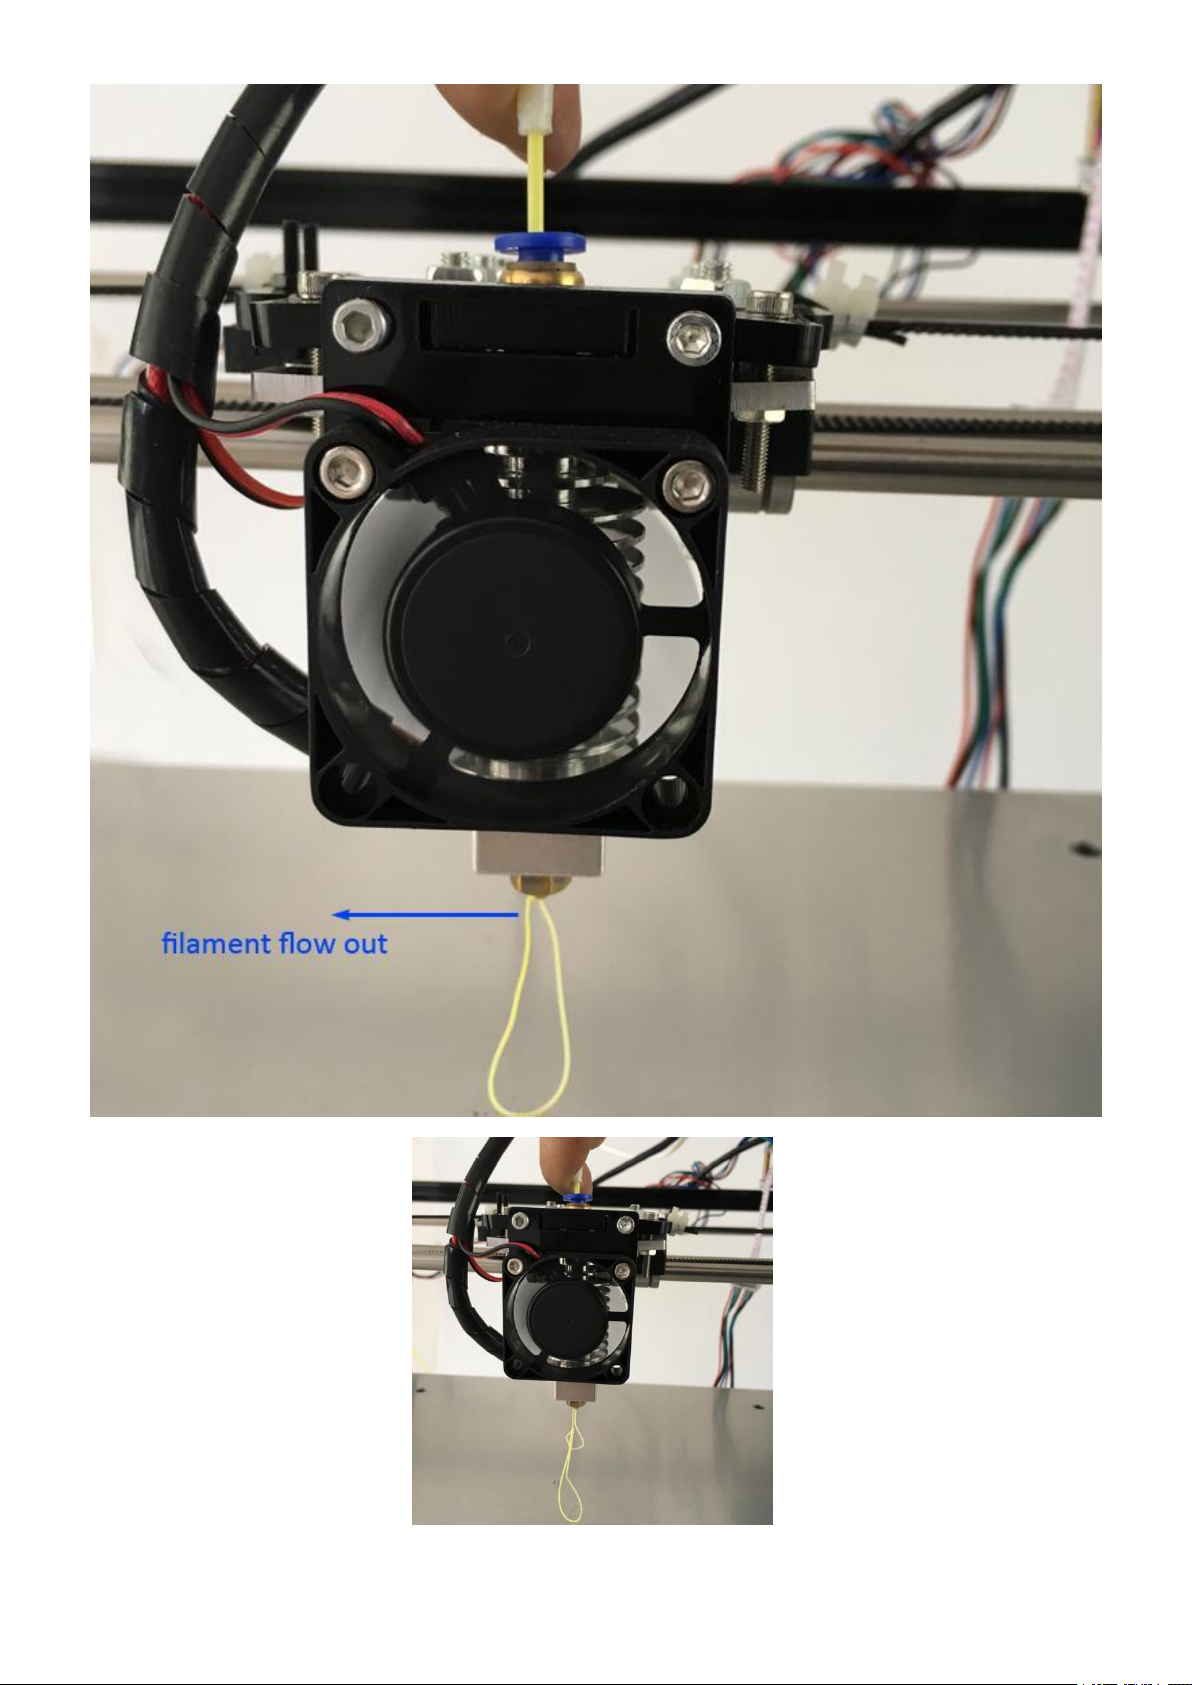
Before printing,connect USB and power supply,then feeder filament.
Page 28
-32-33-34-35-36-
Page 29
Page 30
Page 31
Page 32
Page 33
37
2
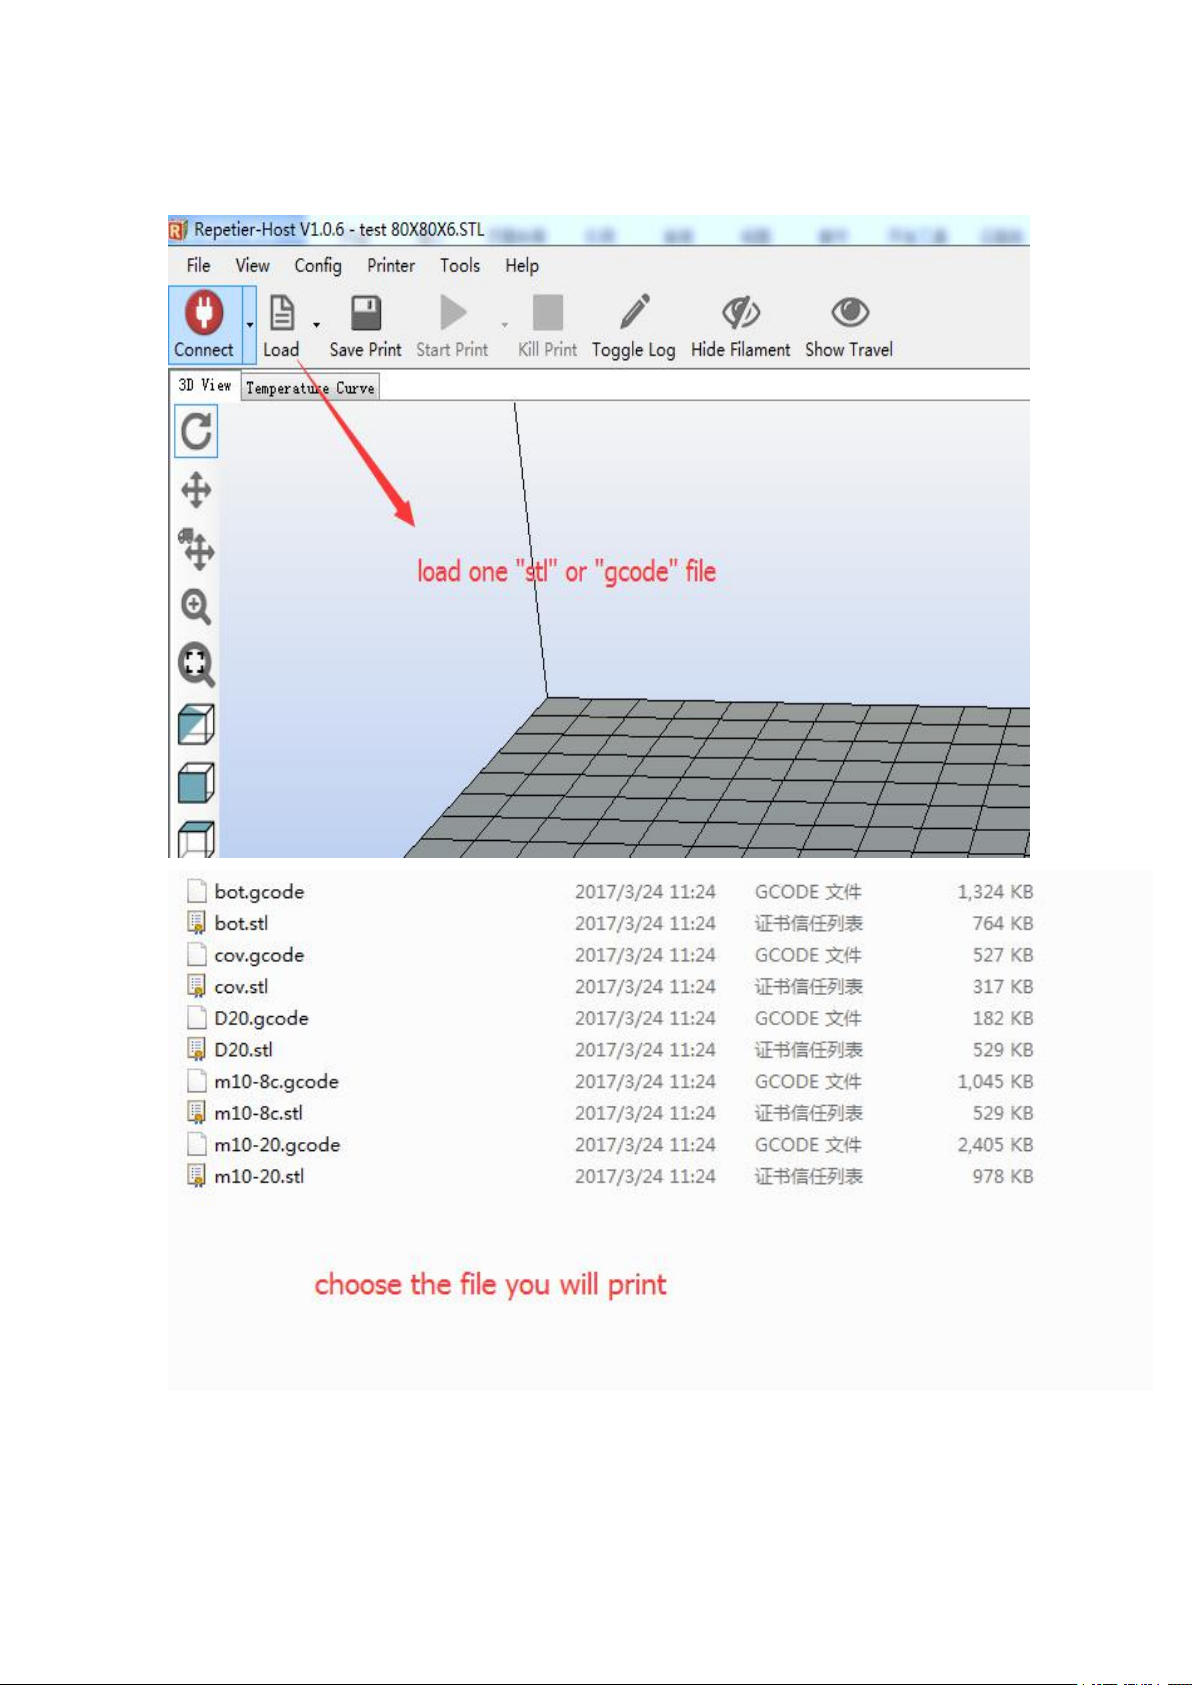
Slice
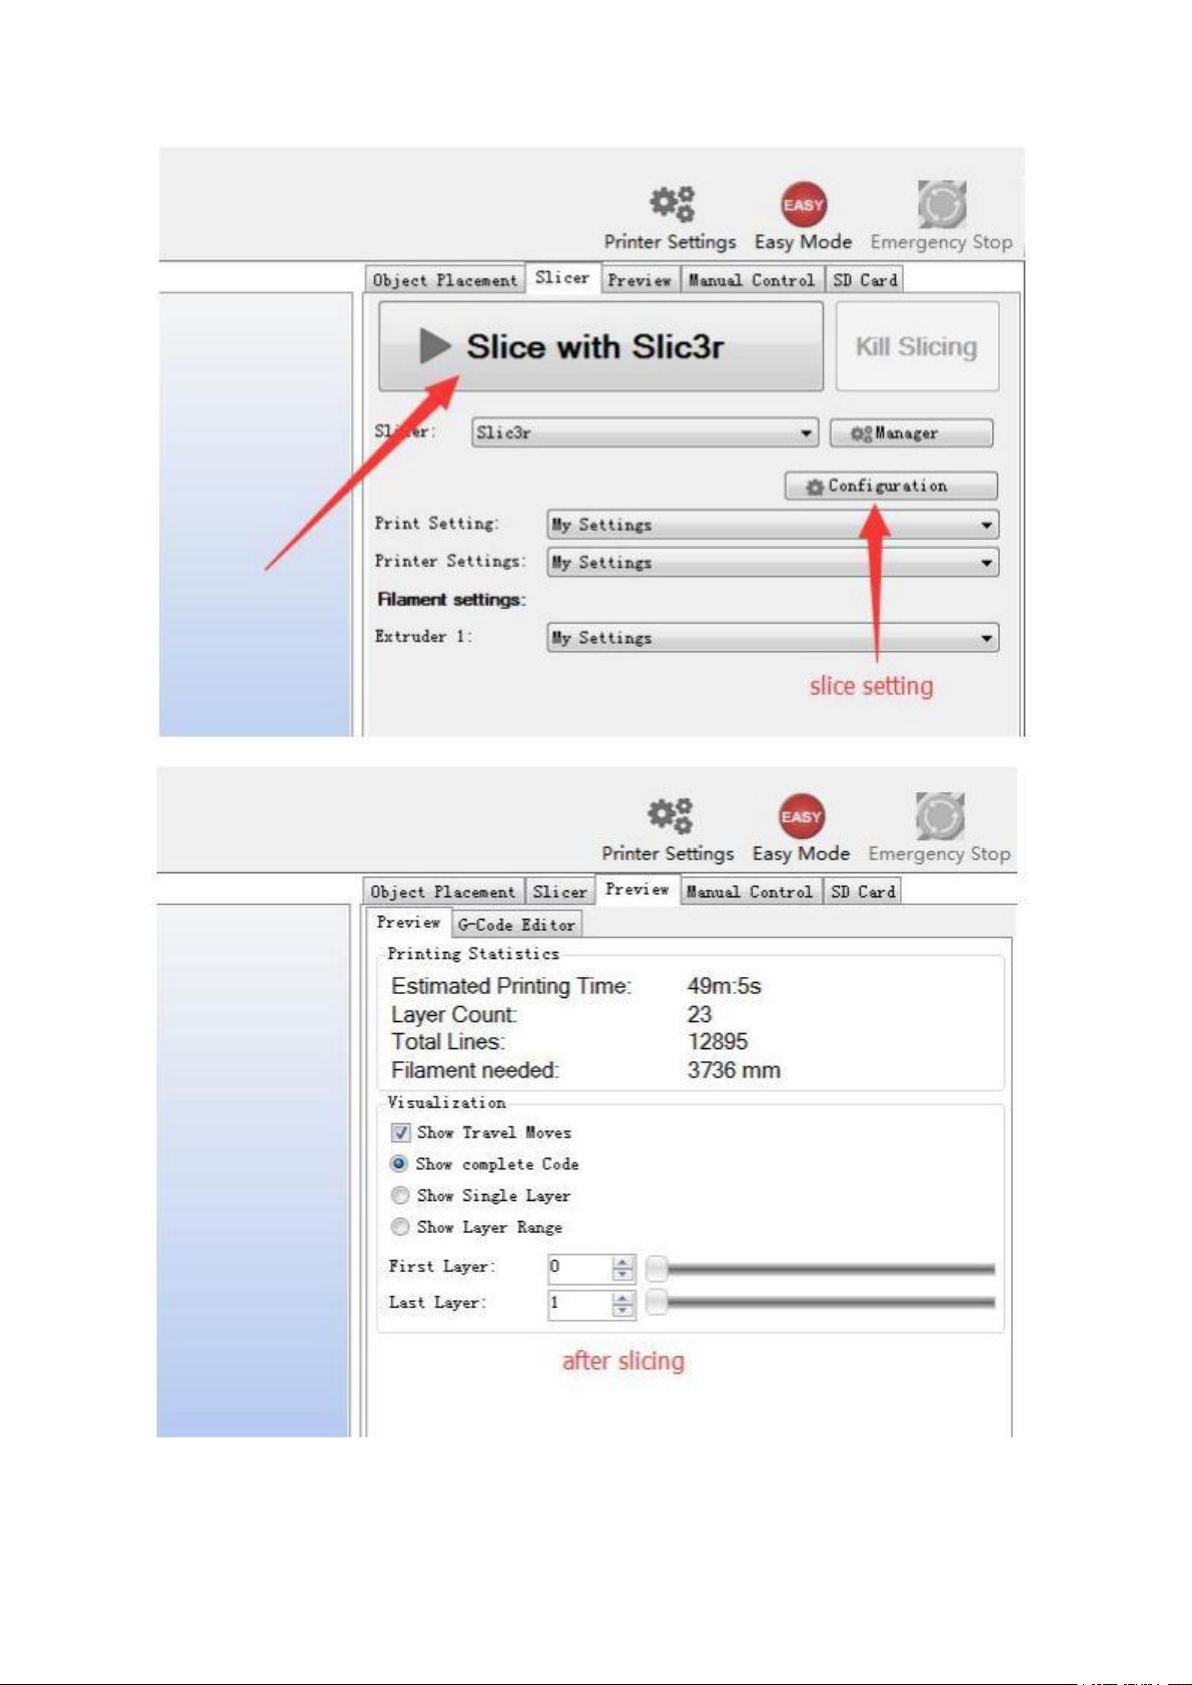
The 3d printer only can Identify g-code files,so need slice first,transfer the stl
file to g-code file.
Page 34
-
38
3
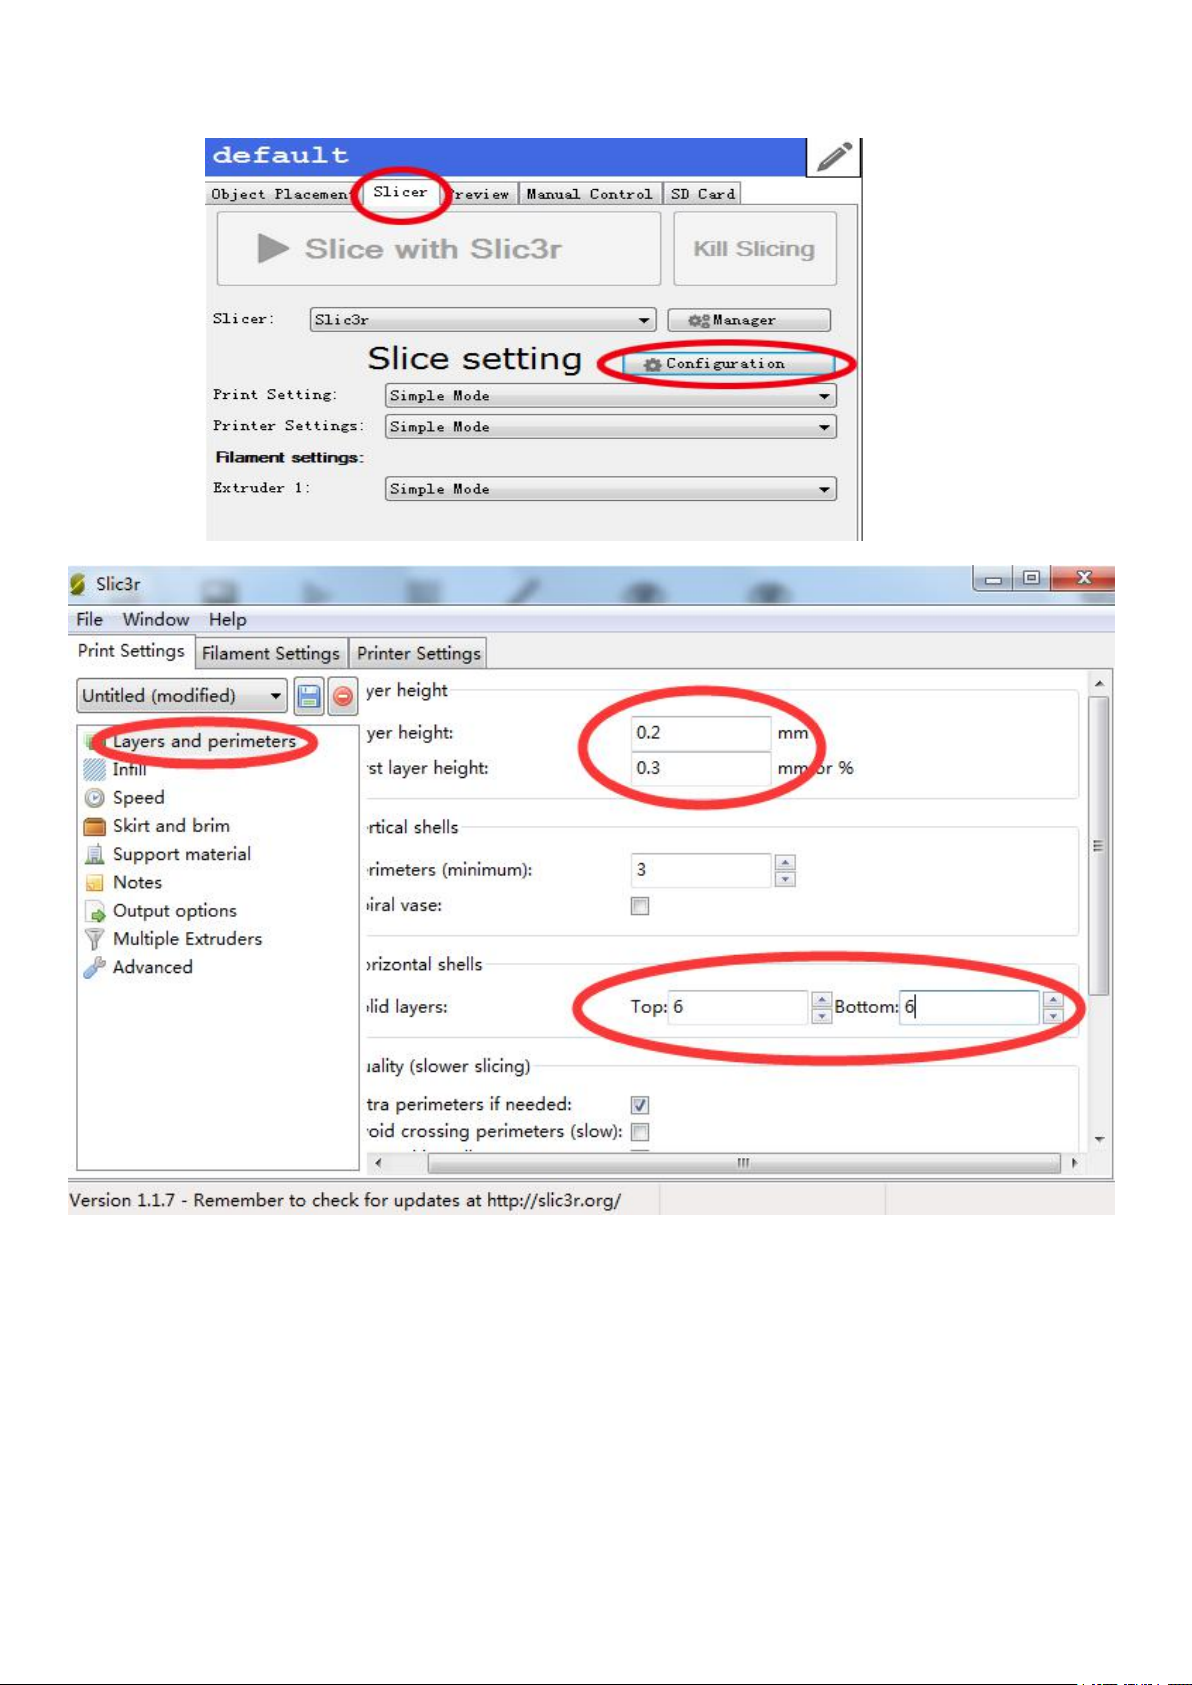
slice setting
Page 35
-40-41-
Page 36
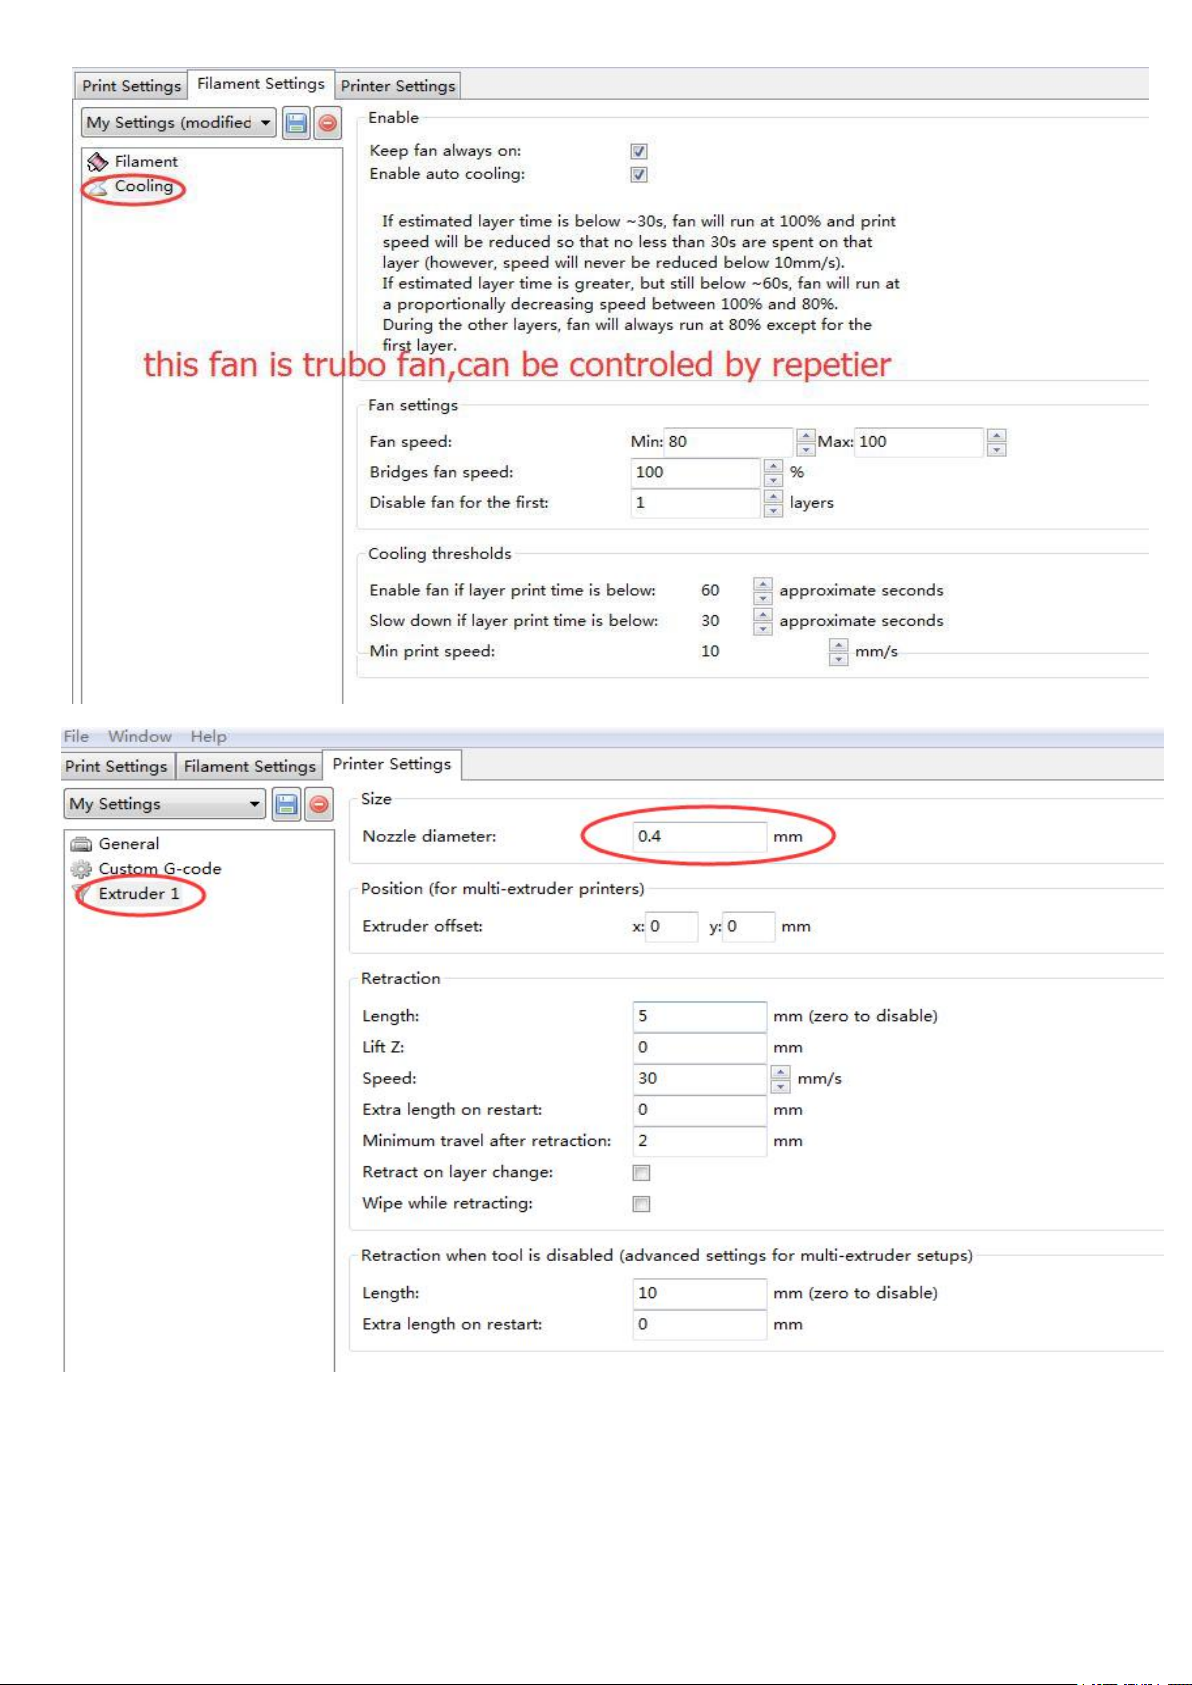
Page 37
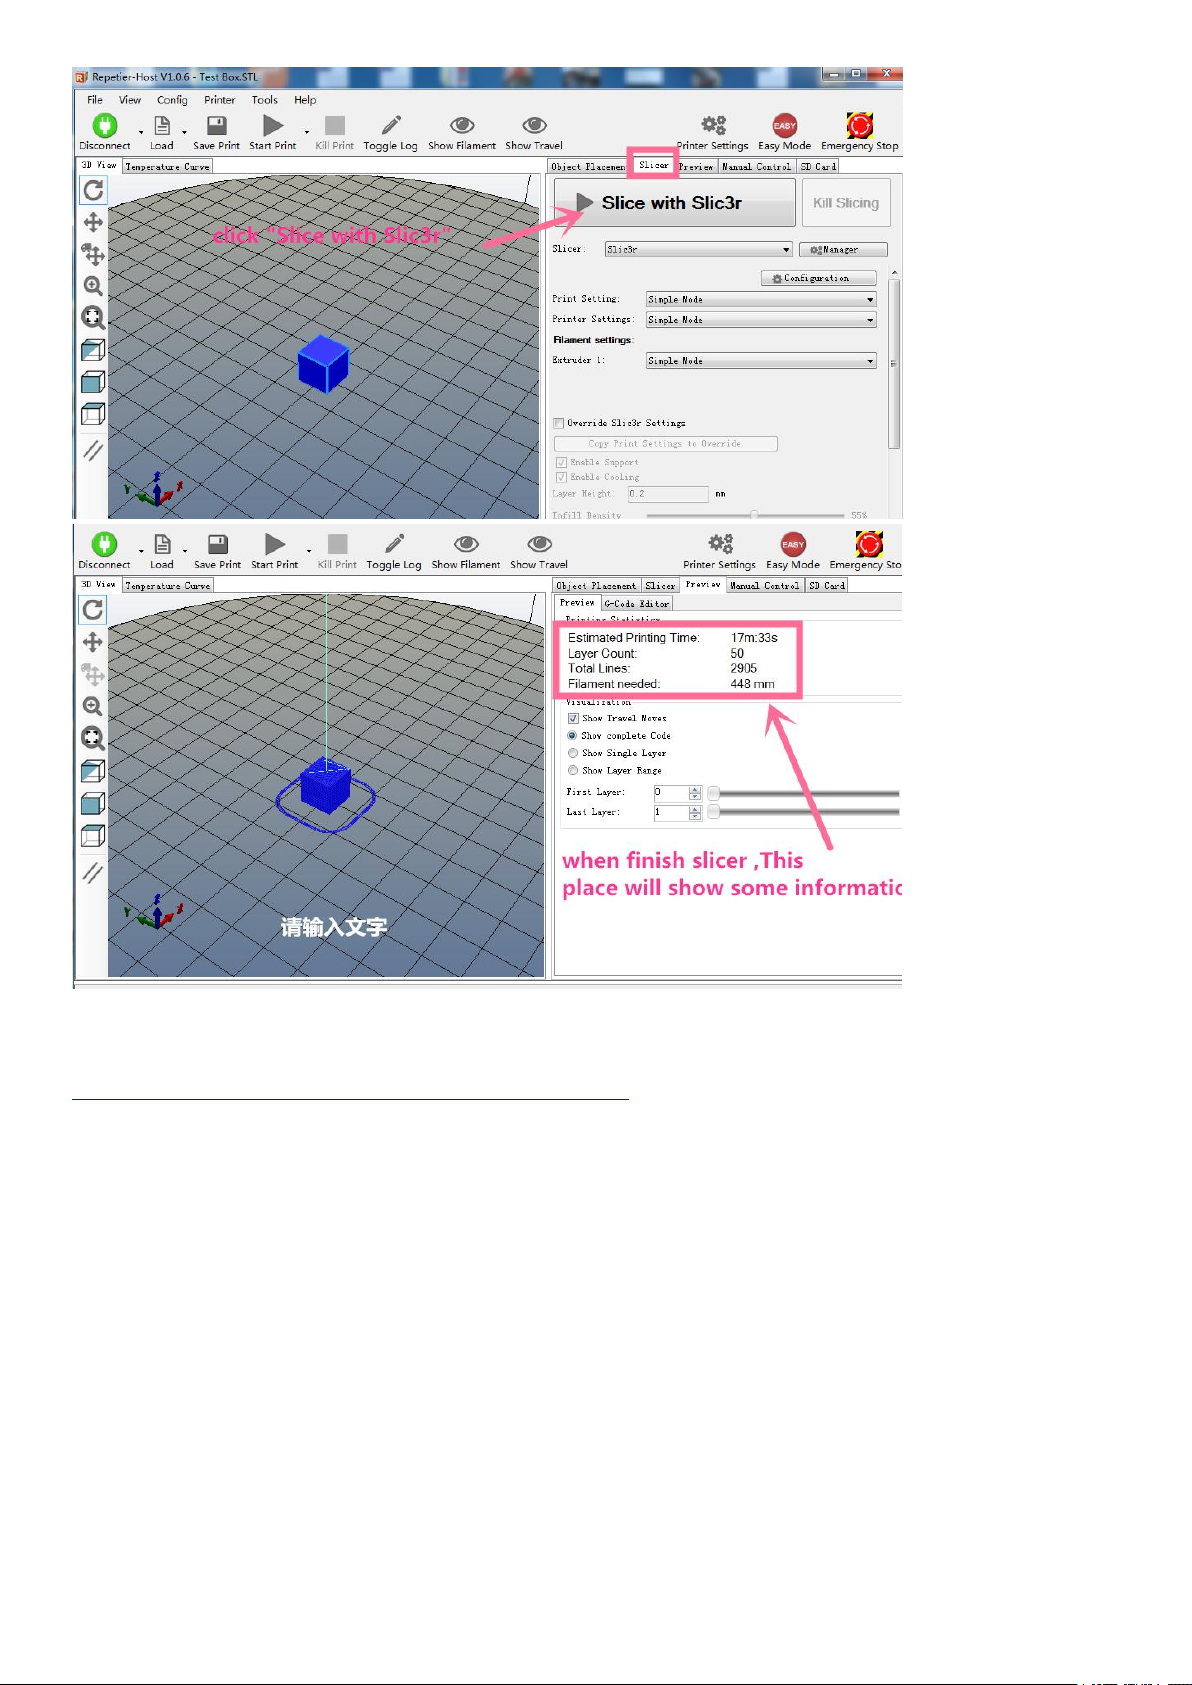
42
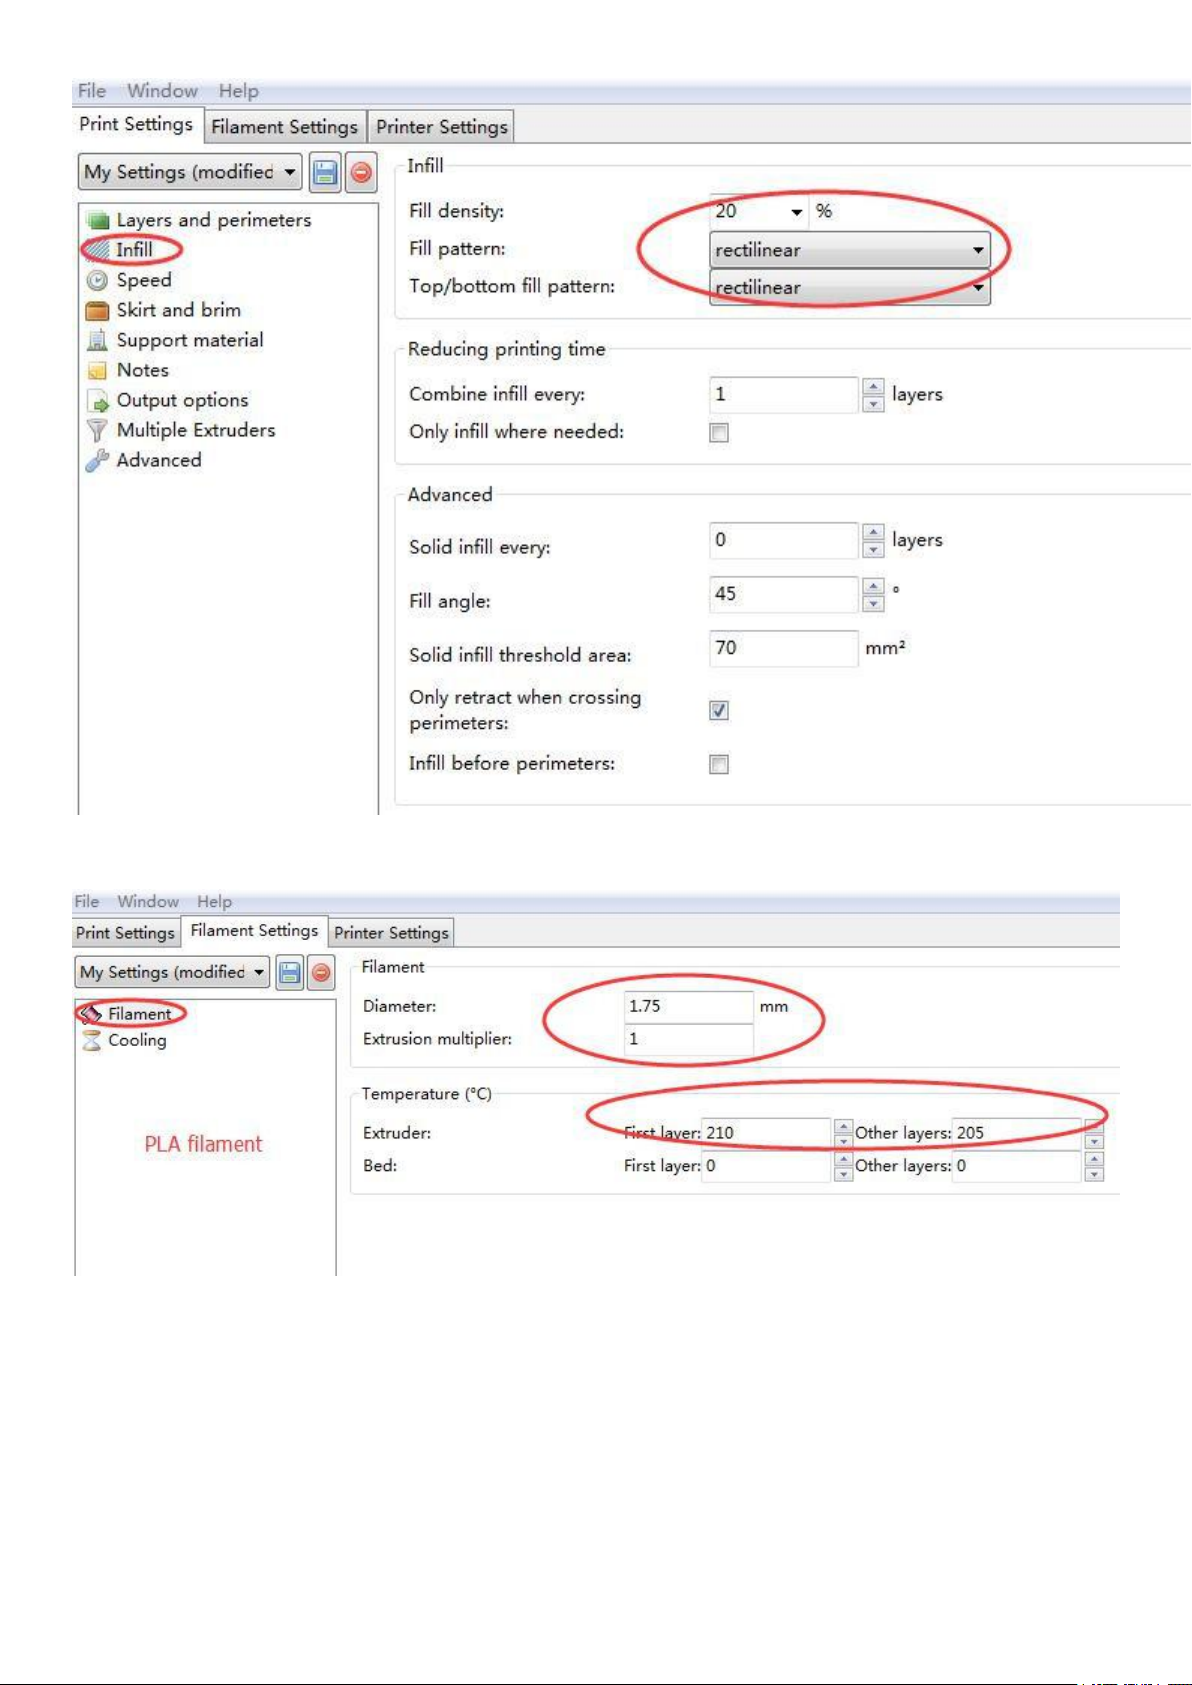
The above pictures only show some key parameters setting when slice, about more info about the
slic3d software,pls go to the link as follow.
http://manual.slic3r.org/intro/overview
Page 38
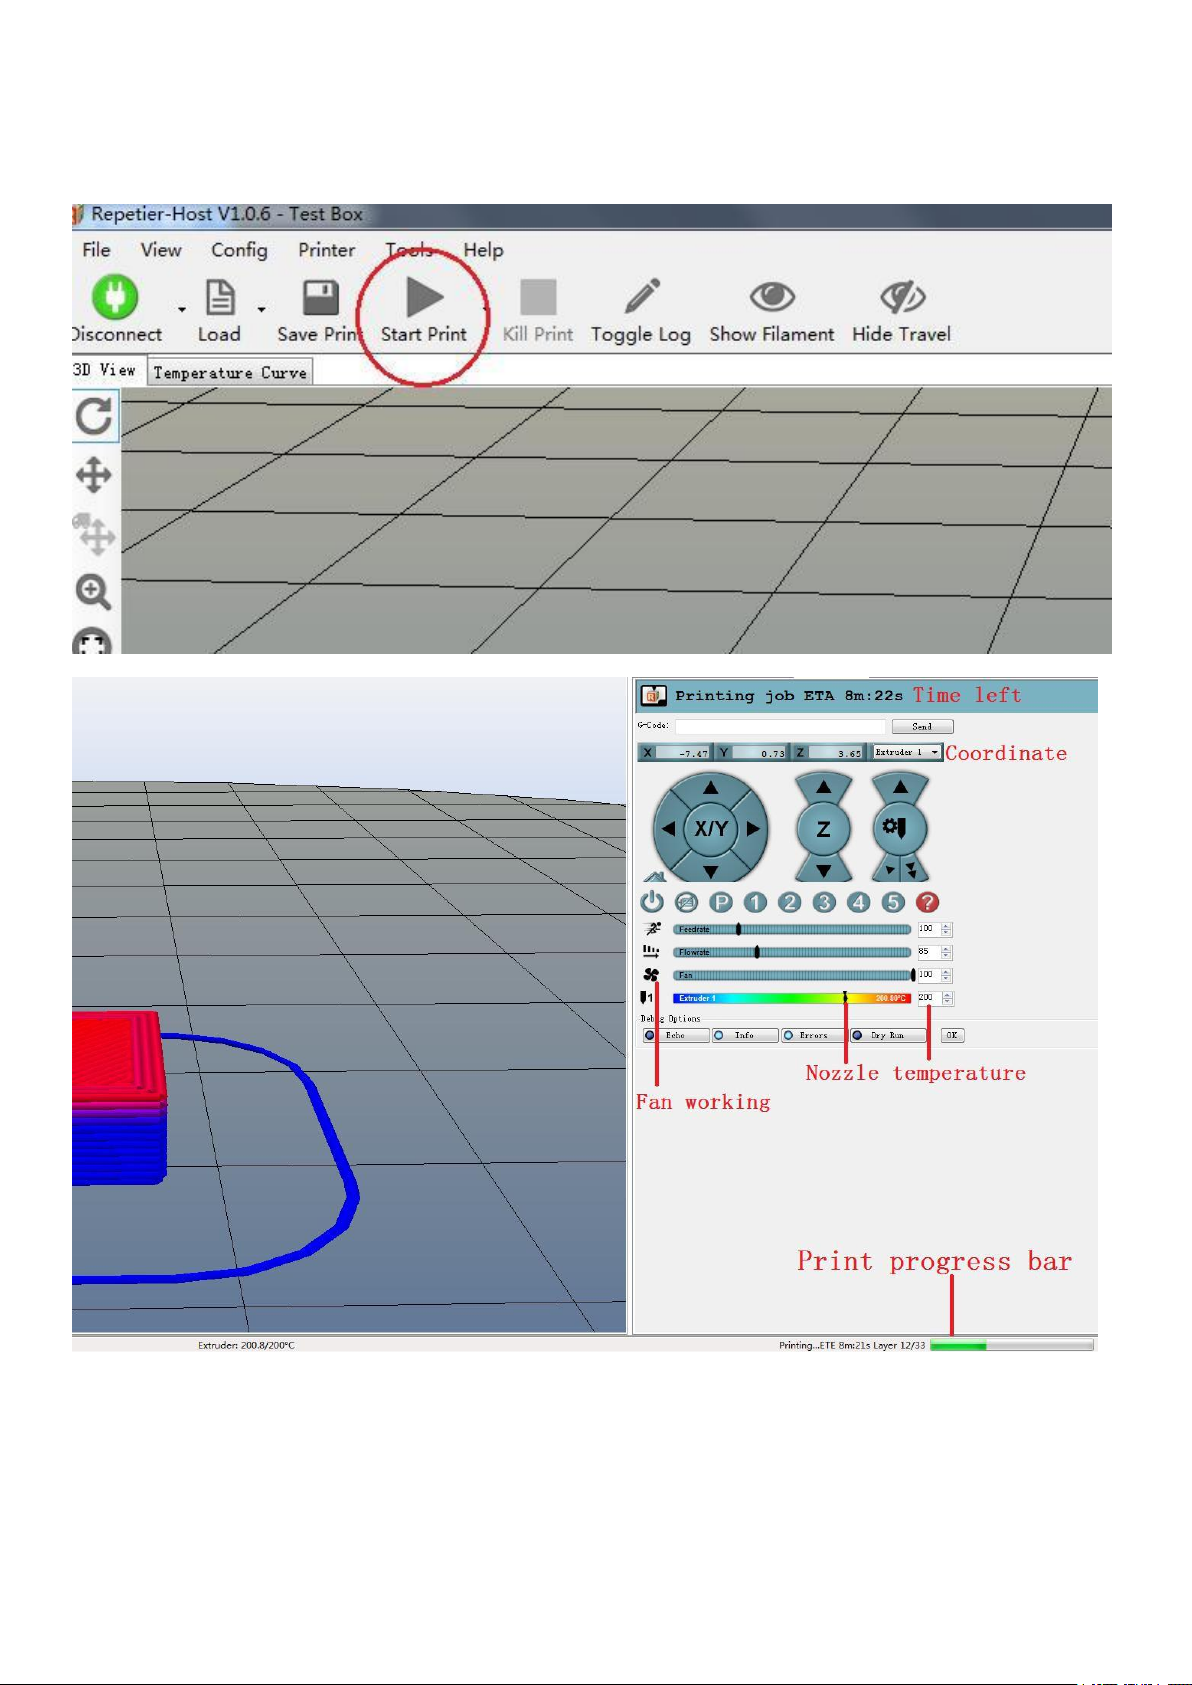
-
43
4
printing
Complete sliced,could start printing,click the “Start print”,will print the model, the panel display
printing progress.
Page 39
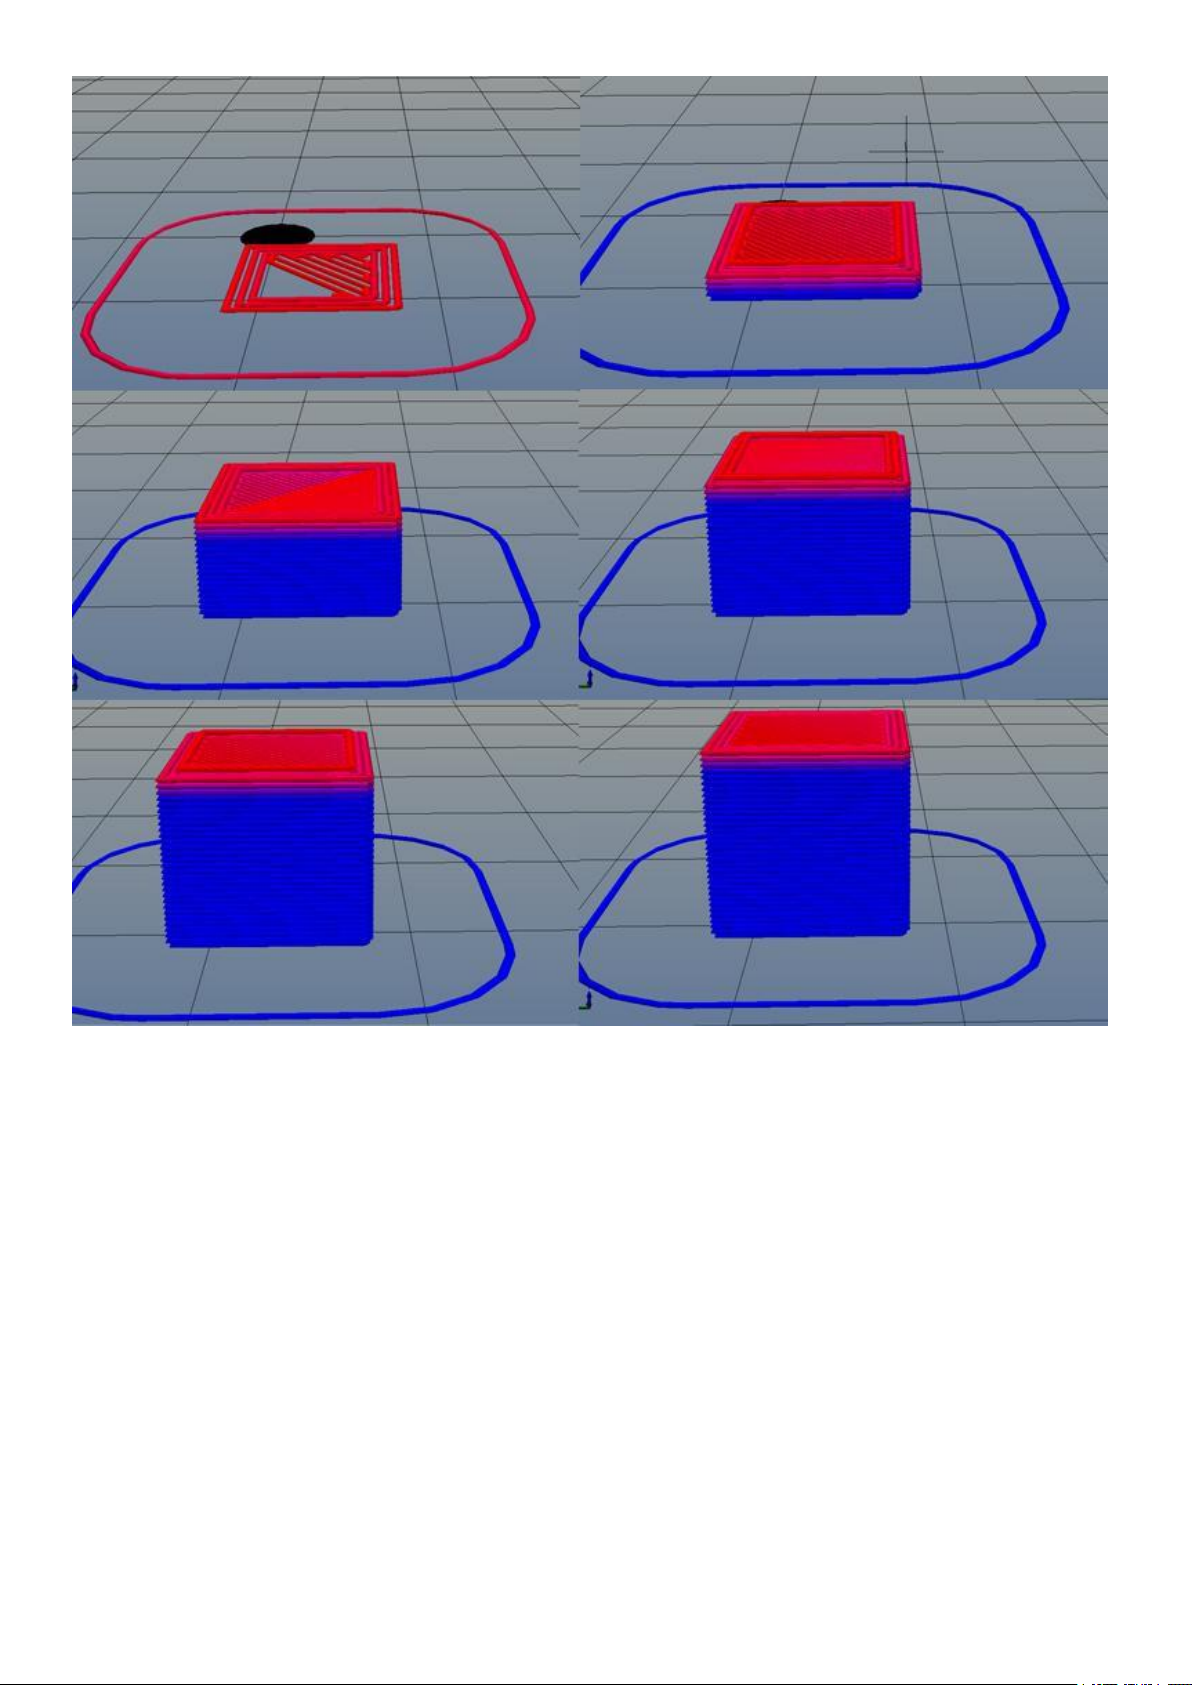
-
44
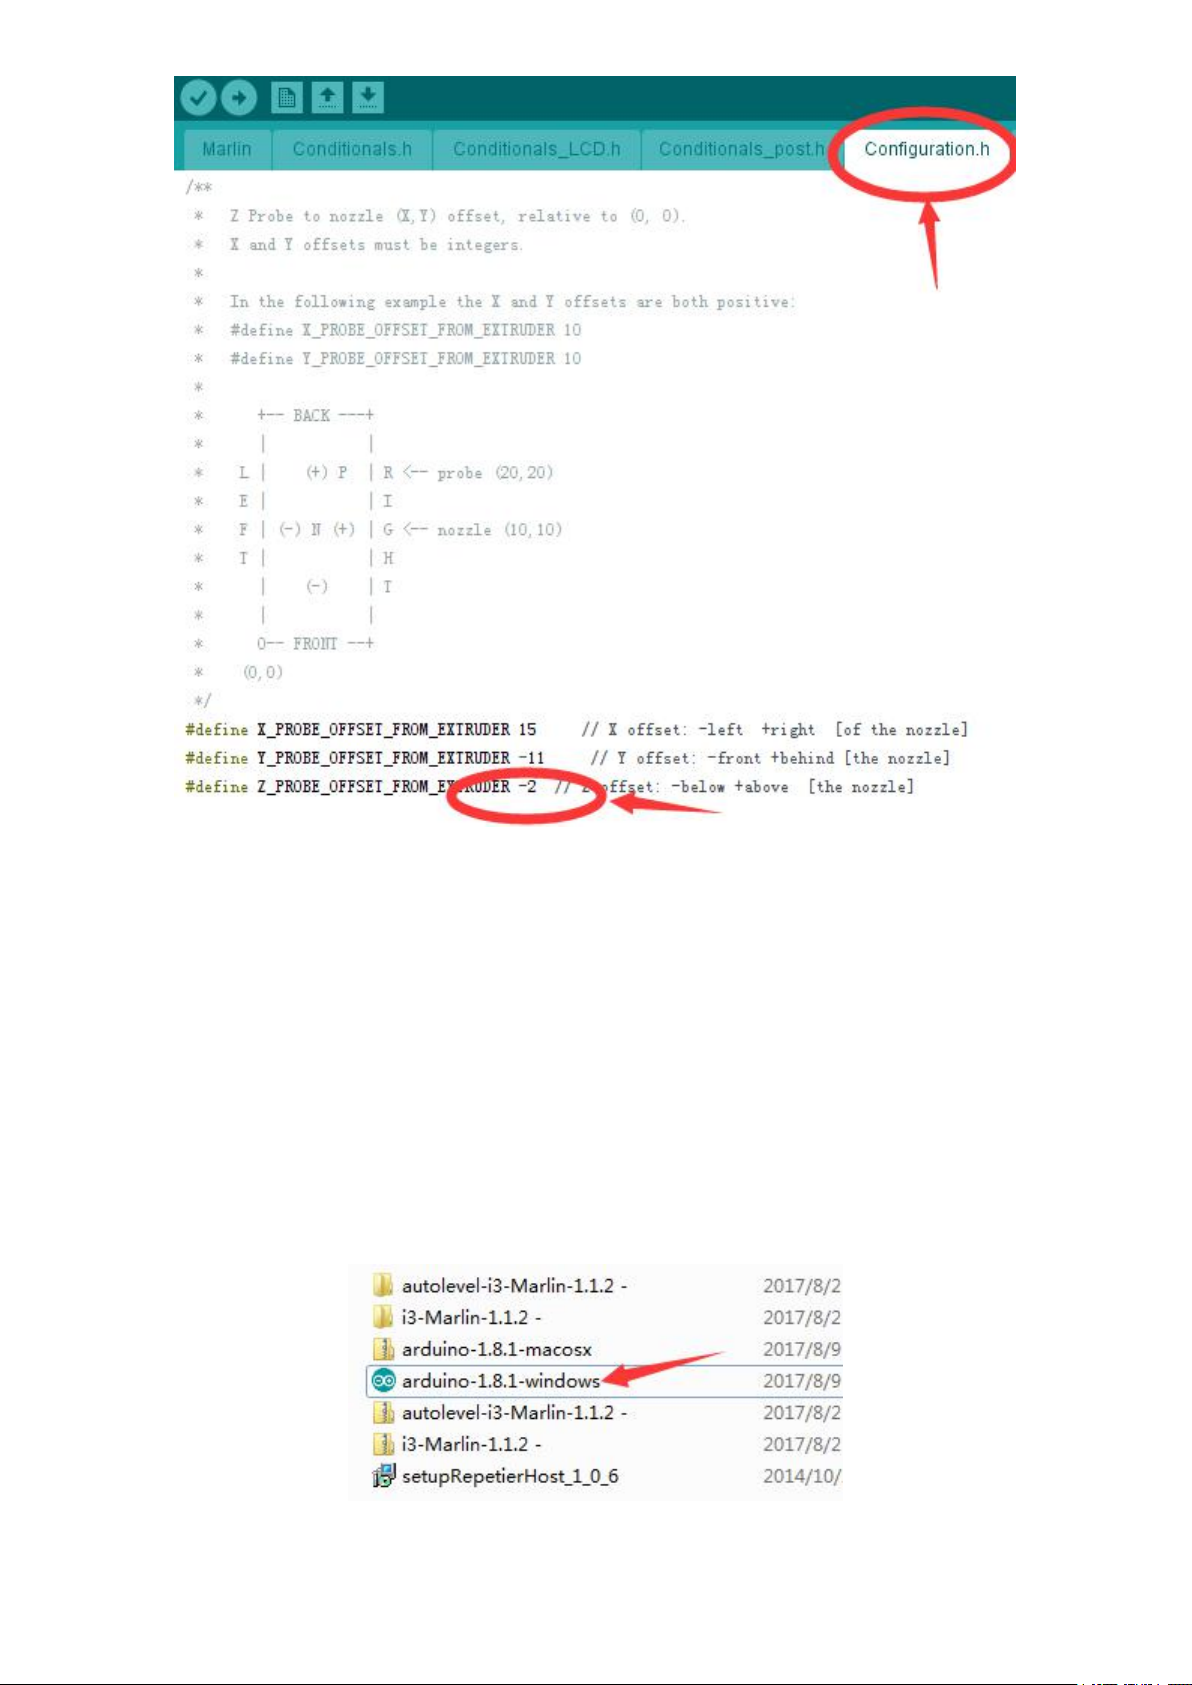
If when print ,the distance between nozzle and bed
is big (filament can’t stick at bed),you can reduce
the offset ,E.g:change -1.4 to -1.5,-1.8,-2.0.
If when print ,the distance between nozzle and bed
is too small(nozzle hit bed),you can add the offset
in marlin ,eg:change -1.4 to -1.2,-1.0,-0.8.
Page 40
-
45
The value is at configuration.h ,481line.
3 Marlin
Sometimes we will encounter some problems that
need to be changed and uploaded marlin
1 Arduino
The marlin is the printer program which run the printer,it’s also named firmware.
Arduino is an working environment for firmware, only installing the arduino on PC,then can
open marlin and flash program to board, if you are not familiar with the software,pls don’t change
any parameters,thank you.
2 Marlin
Page 41
-
46
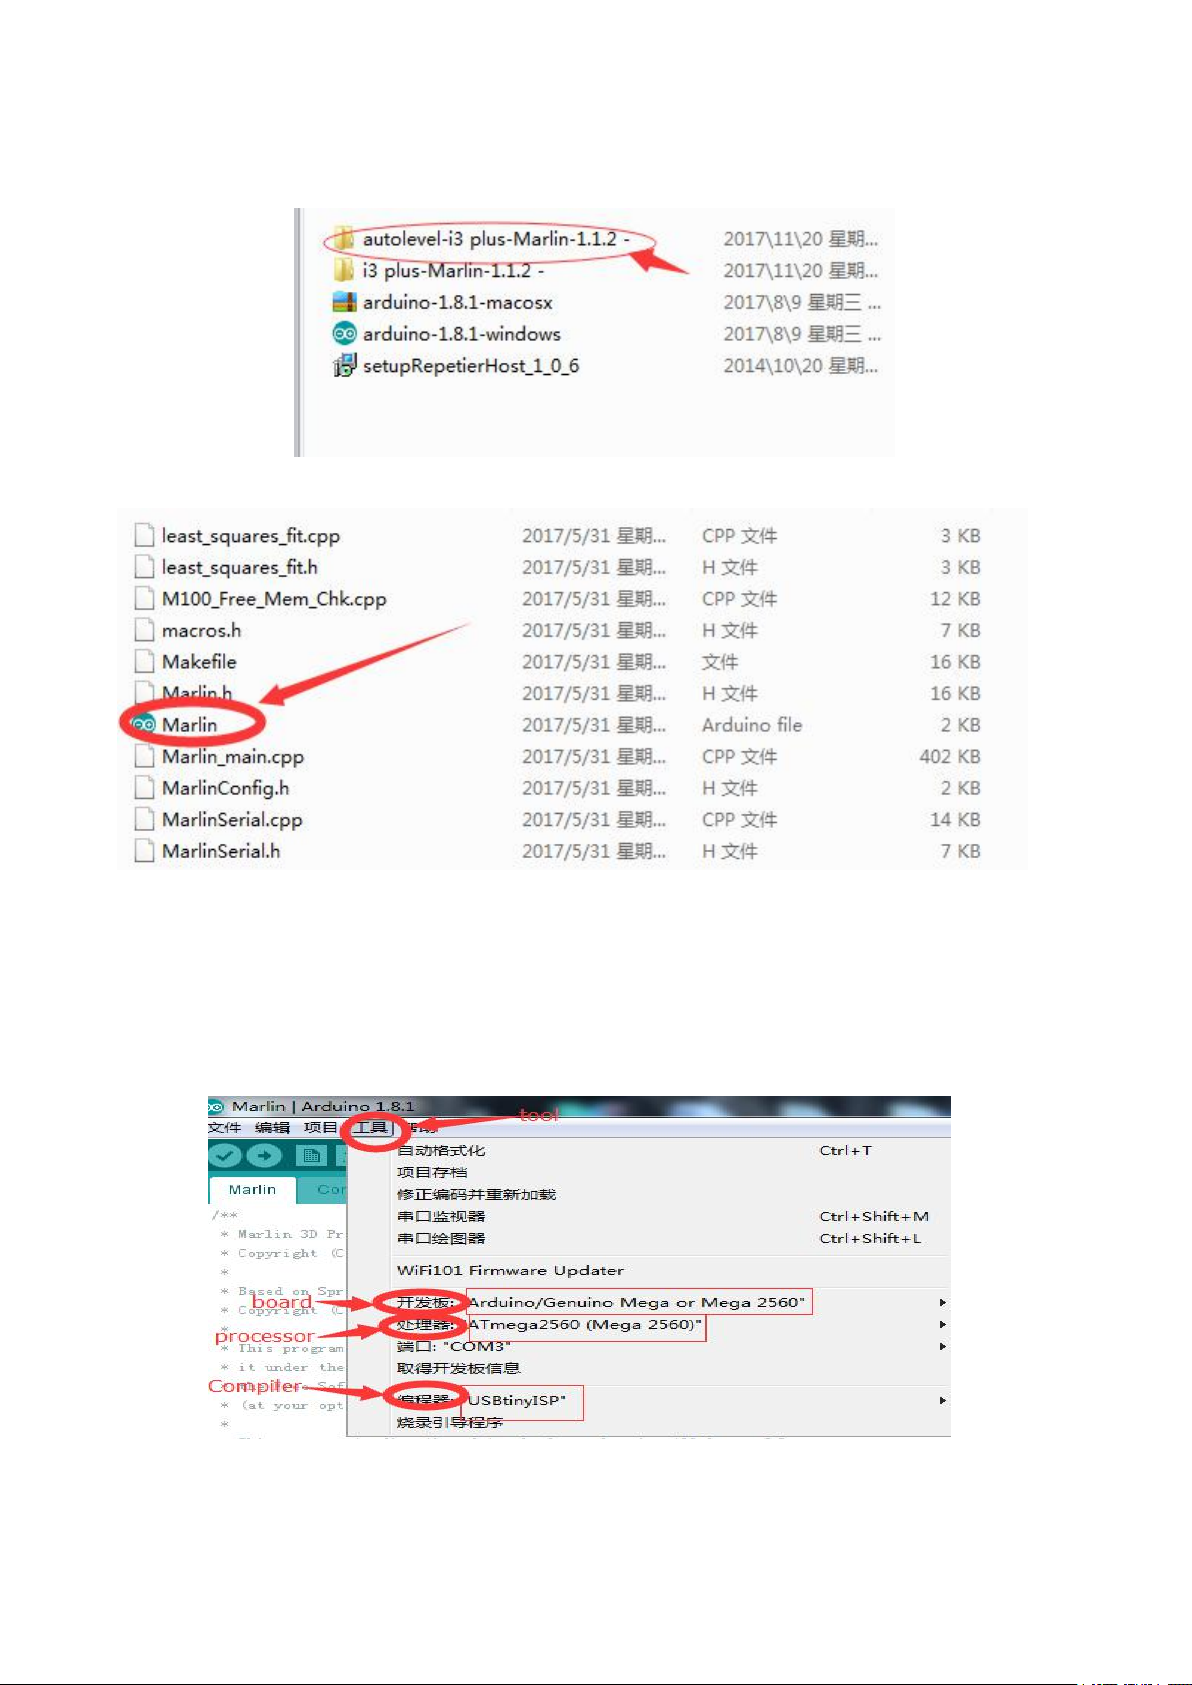
1 Open marlin
open marlin, if it’s compressed file,must unzip it.
2 Upload Firmware
find the icon green color,this format is “ino”, click and open it in arduino.
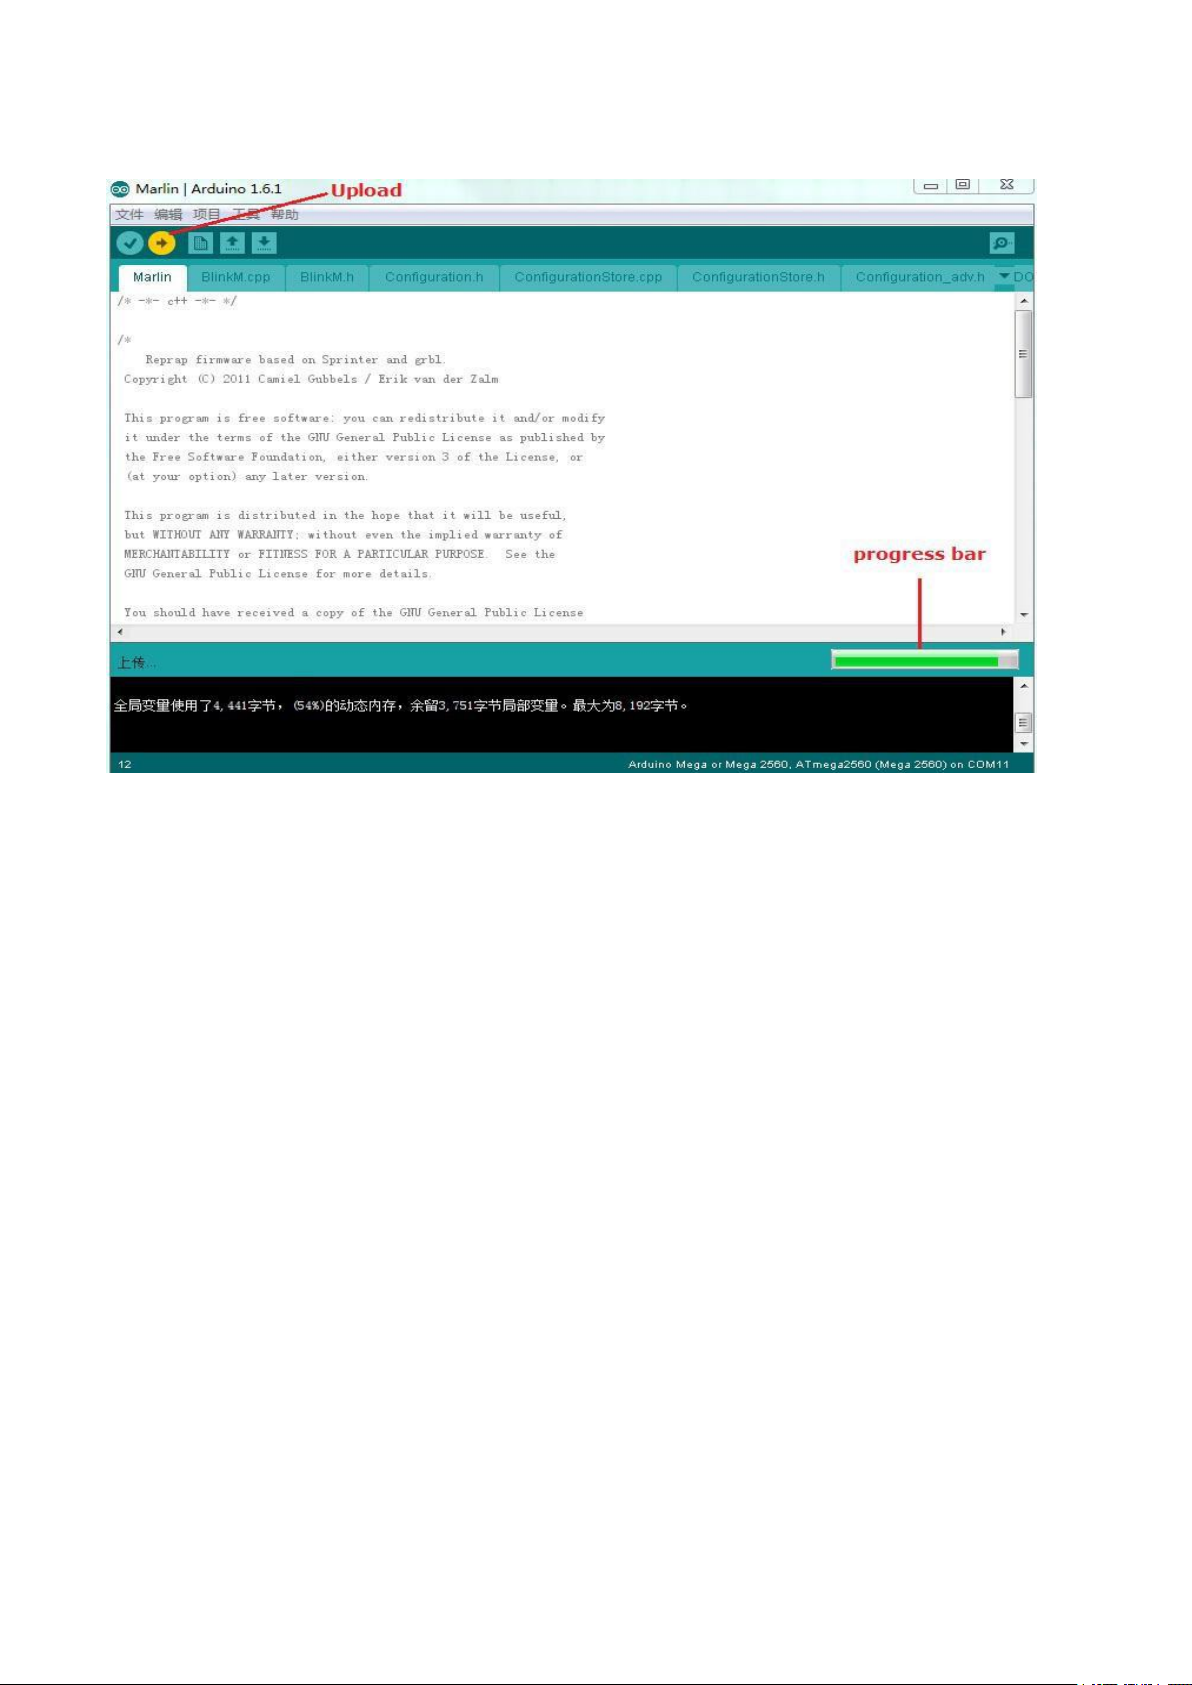
2.settings
Firmware could only be upload succeed when the settings like the above Go to
tools > board >arduino mega 2560
Go to tools > port, select the COM port Go to tools
> programmers > USBtinyISP
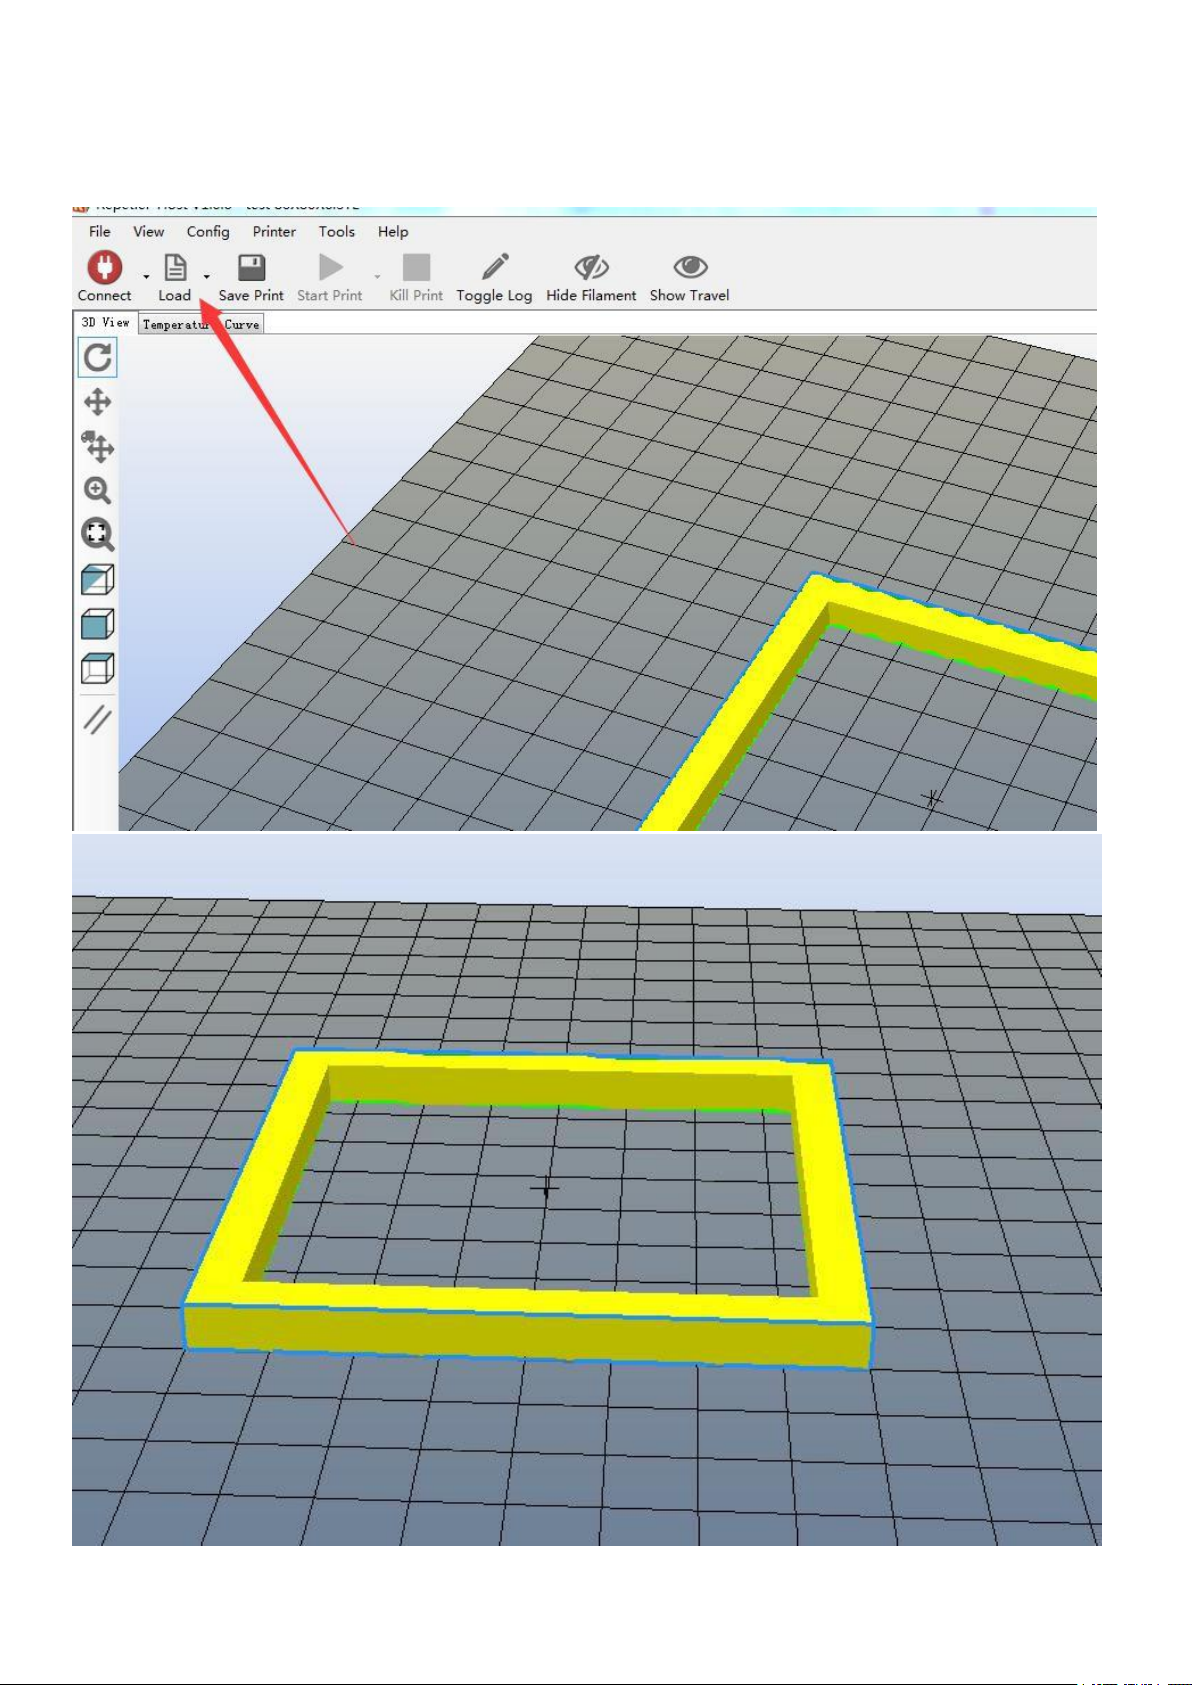
Click the 上传(Upload) button to upload the Marlin Firmware Sketch to MKS Controller Board.
Once upload successful, message “Done”.
Page 42
-
47
pls disconnect repetier when flash firmaware !!!
Page 43
-
48
4 Offline printing
1 load the model
Page 44
-
50
2 slice
Page 45
-
51
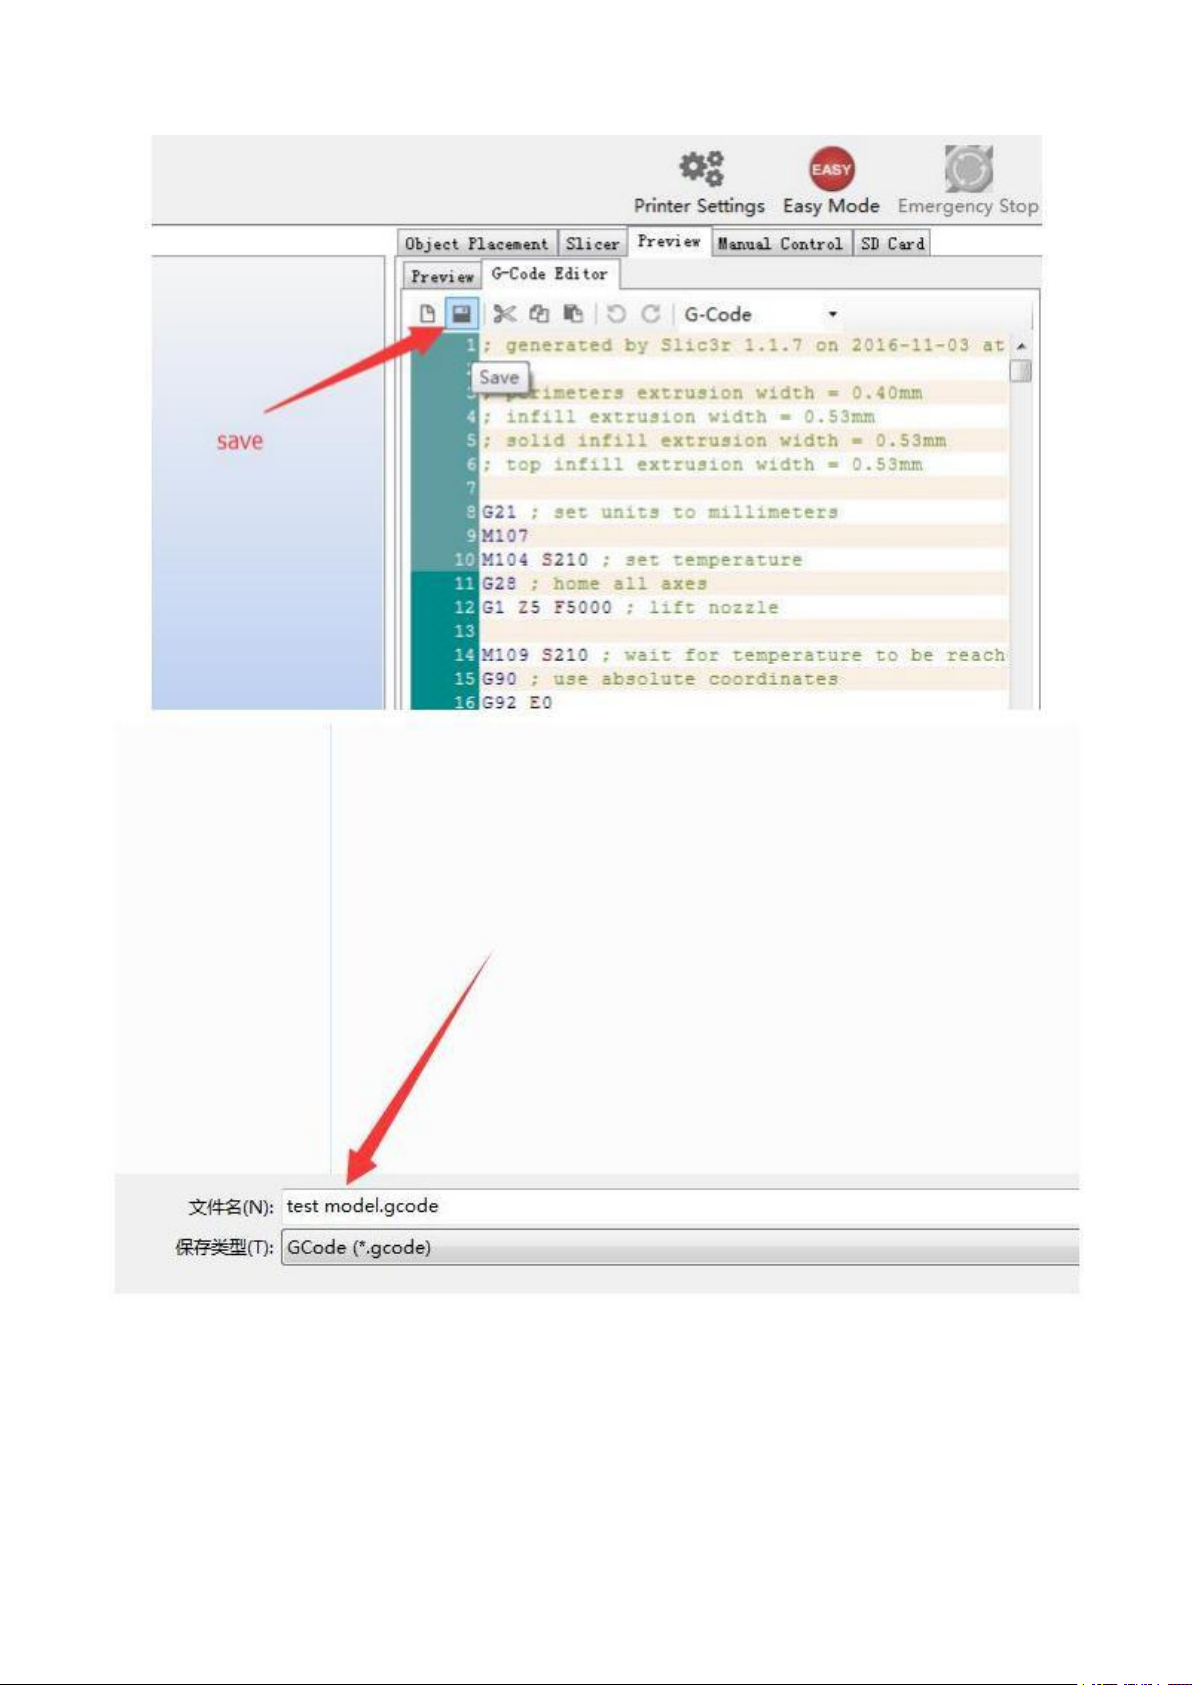
3 Export Gcode file
Page 46
-
52
4 Copy
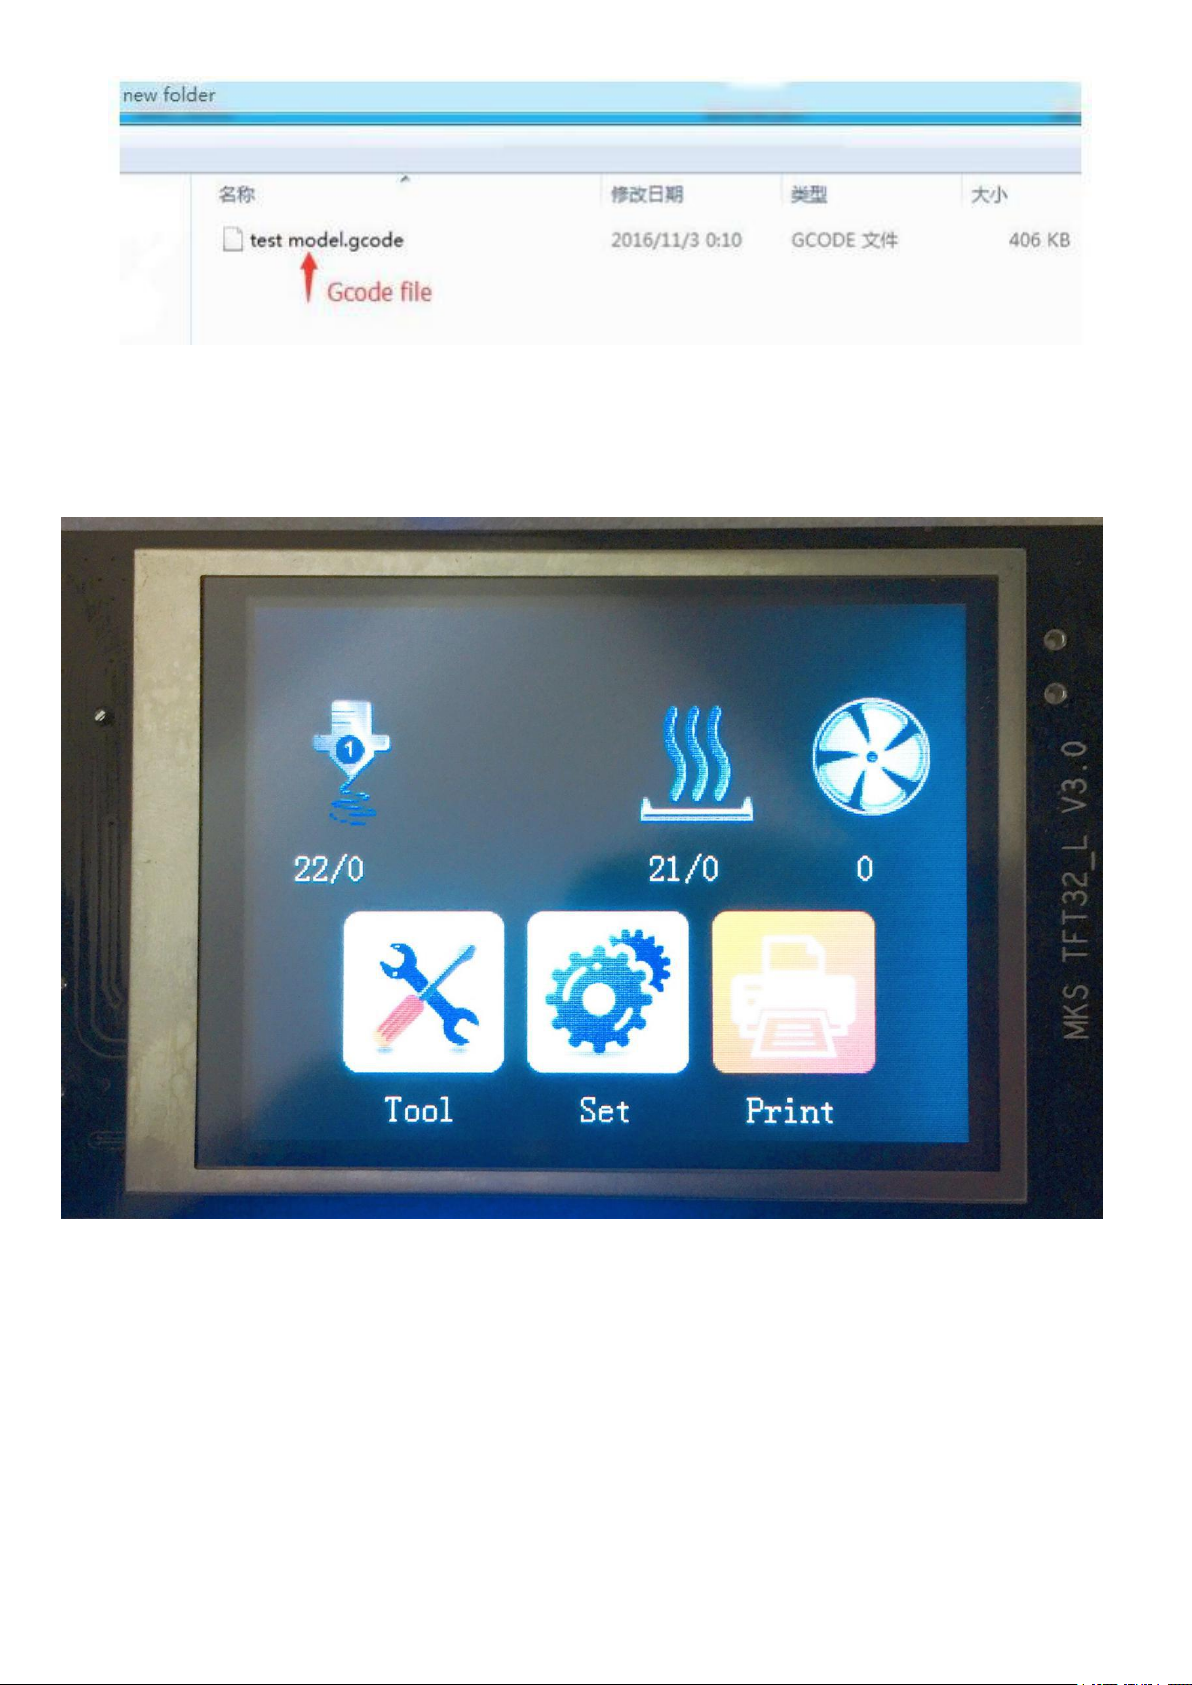
Copy the Gcode file to SD card and insert the SD card into LCD
5 Printing
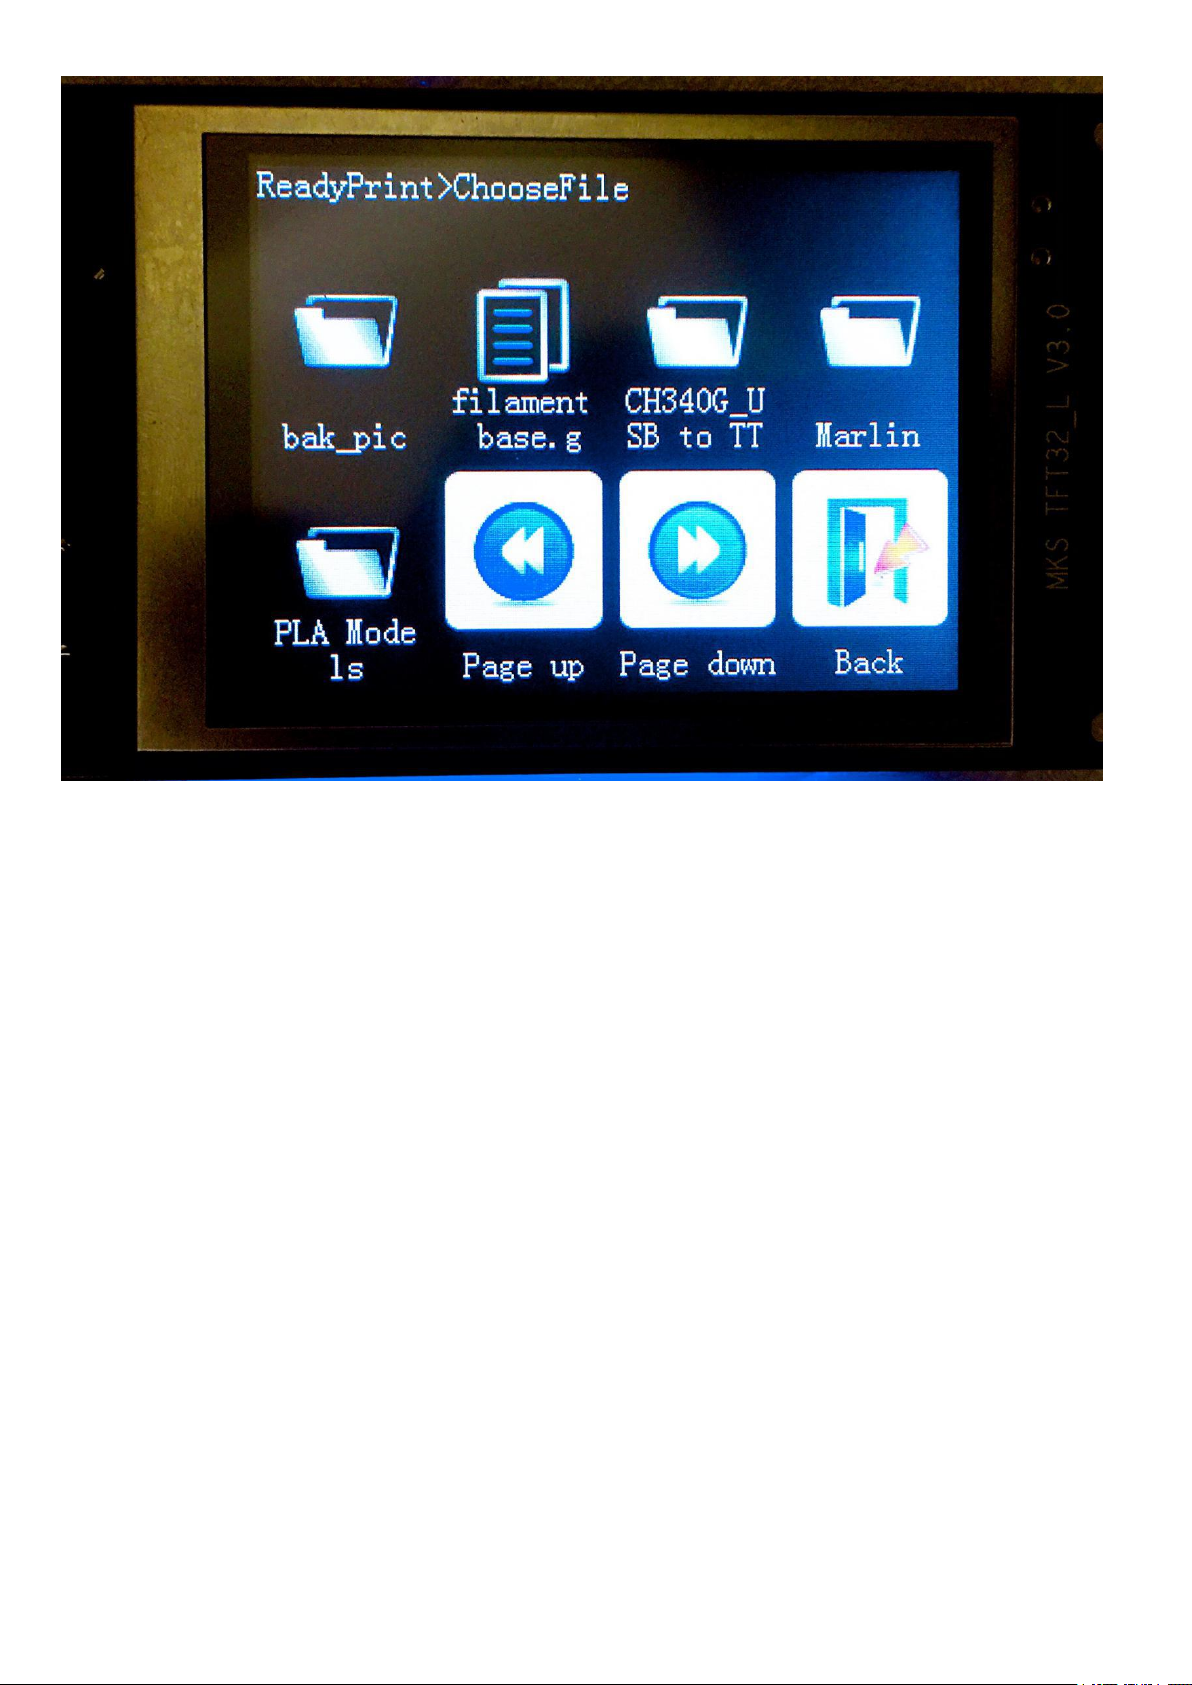
Click on Print
Then choose the Gcode which you have copyed
Page 47
-53-
Page 48
54
5
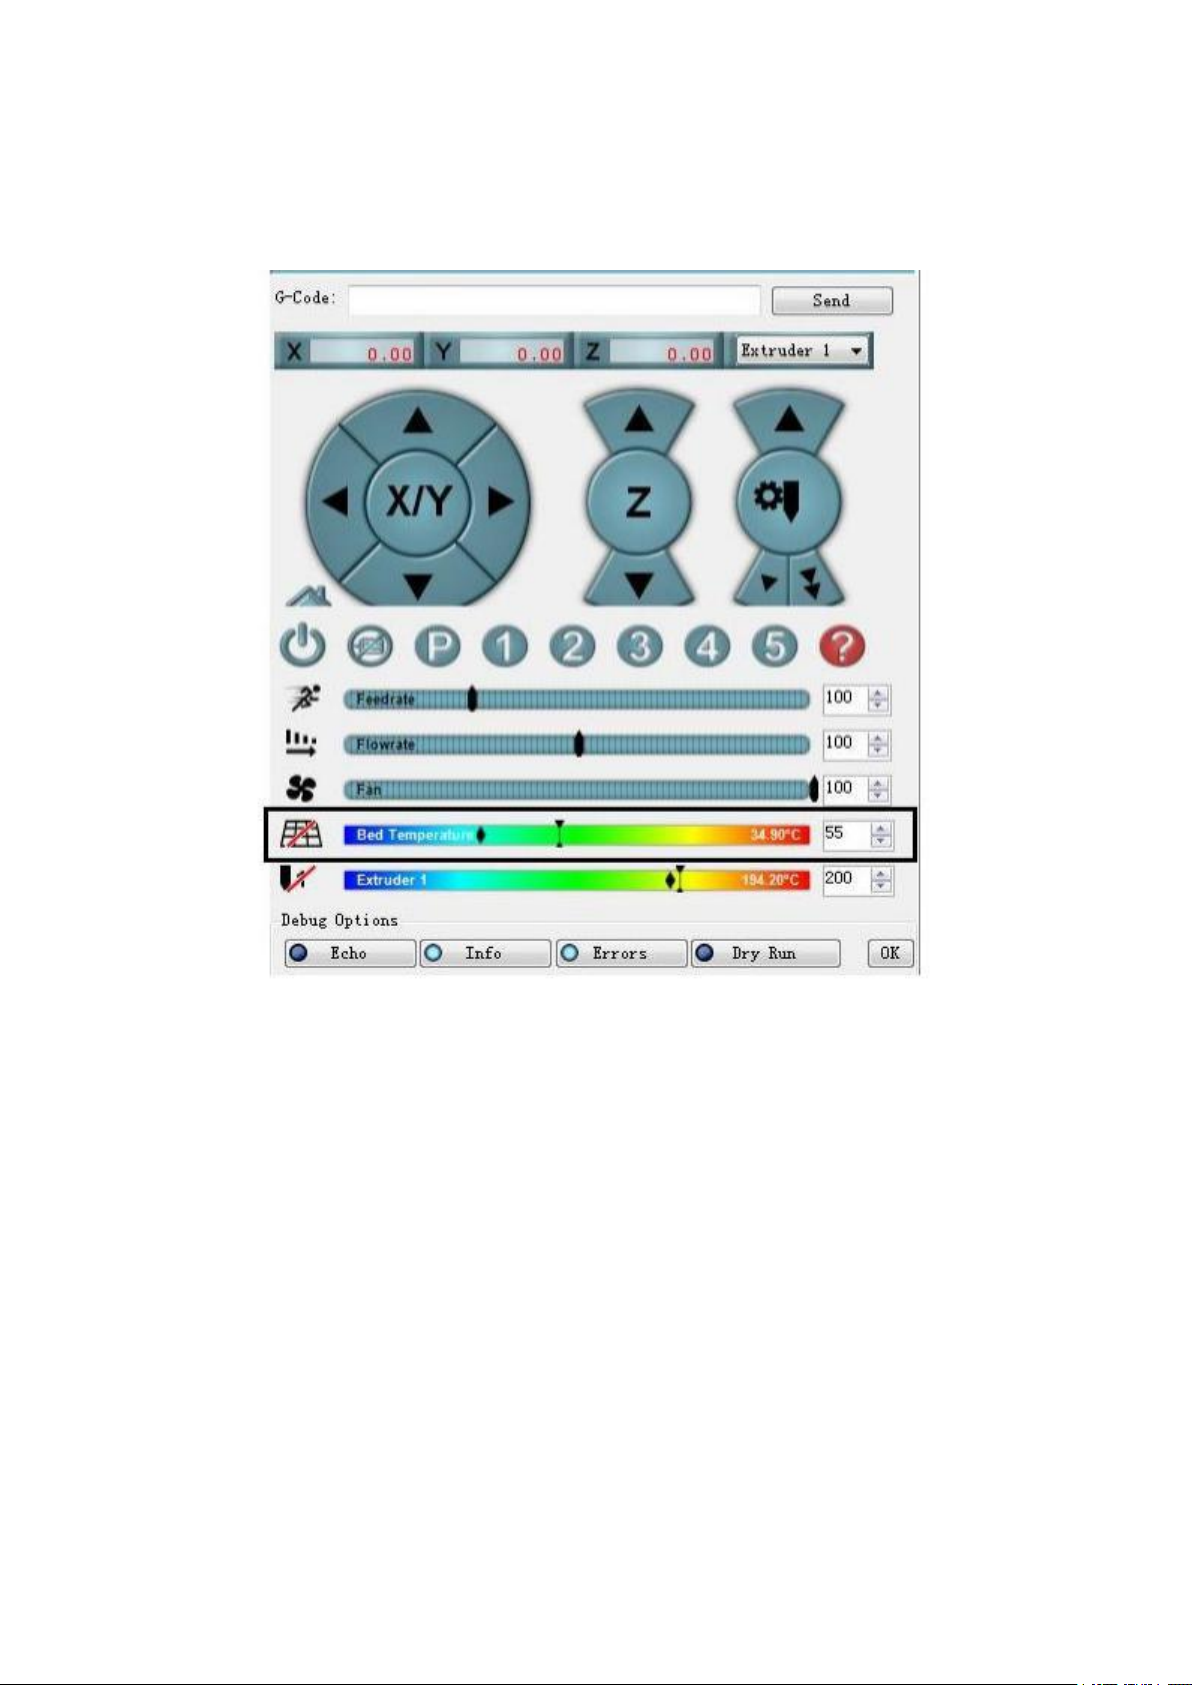
Heated bed
if use PLA filament,no need open heated bed.
If use ABS filament,need open heated bed, set the heated bed temp 85-100℃Must
6
Problem and advice
connect heat bed line to board heated bed sensor to board.
If use repetier to control the printer, can see heated bed choose,can set heated bed temp.
1. The computer can not install arduino and other software
this situation often occur in the windows10, you can download Arduino1.8.1 online, pay attention to
the correct version.
2. The computer cann’t installed the drive
first enter the device manager to find the port item, double-click the unknown device port (unplug
the motherboard, the port disappears, connect the motherboard, the port appears, the port is the
printer port), click the 'update driver' button, then click find the driver software the computer ', and
then in the' Browse 'to find your driver address, the next step, that’s ok.
If you connect the motherboard and computer, in the device manager port, nothing did appear,
there may be a problem with the motherboard, please contact us
3.marlin upload failed
Marlin toolbar configuration may be wrong, the board (2560), processor (2560), port (2560),
Page 49
-
55
programmer (USBtinyISP) need to select the right
Repetier connection is not disconnected
Arduino don’t be installed on right location ,don’t be installed in C drive
arduino version wrong, the correct version is 1.6.1
4.repetier interface nozzle temperature is 0, the display shows "MINTEMP"
Nozzle temperature sensor / white line in the motherboard slot inside the loose, another direction
to tighten
may be the nozzle temperature line / white line is broken, measured with a multimeter,the
resistance is 100K, you can also insert the hot bed temperature Sensor into the nozzle temperature
sensor slot to check.
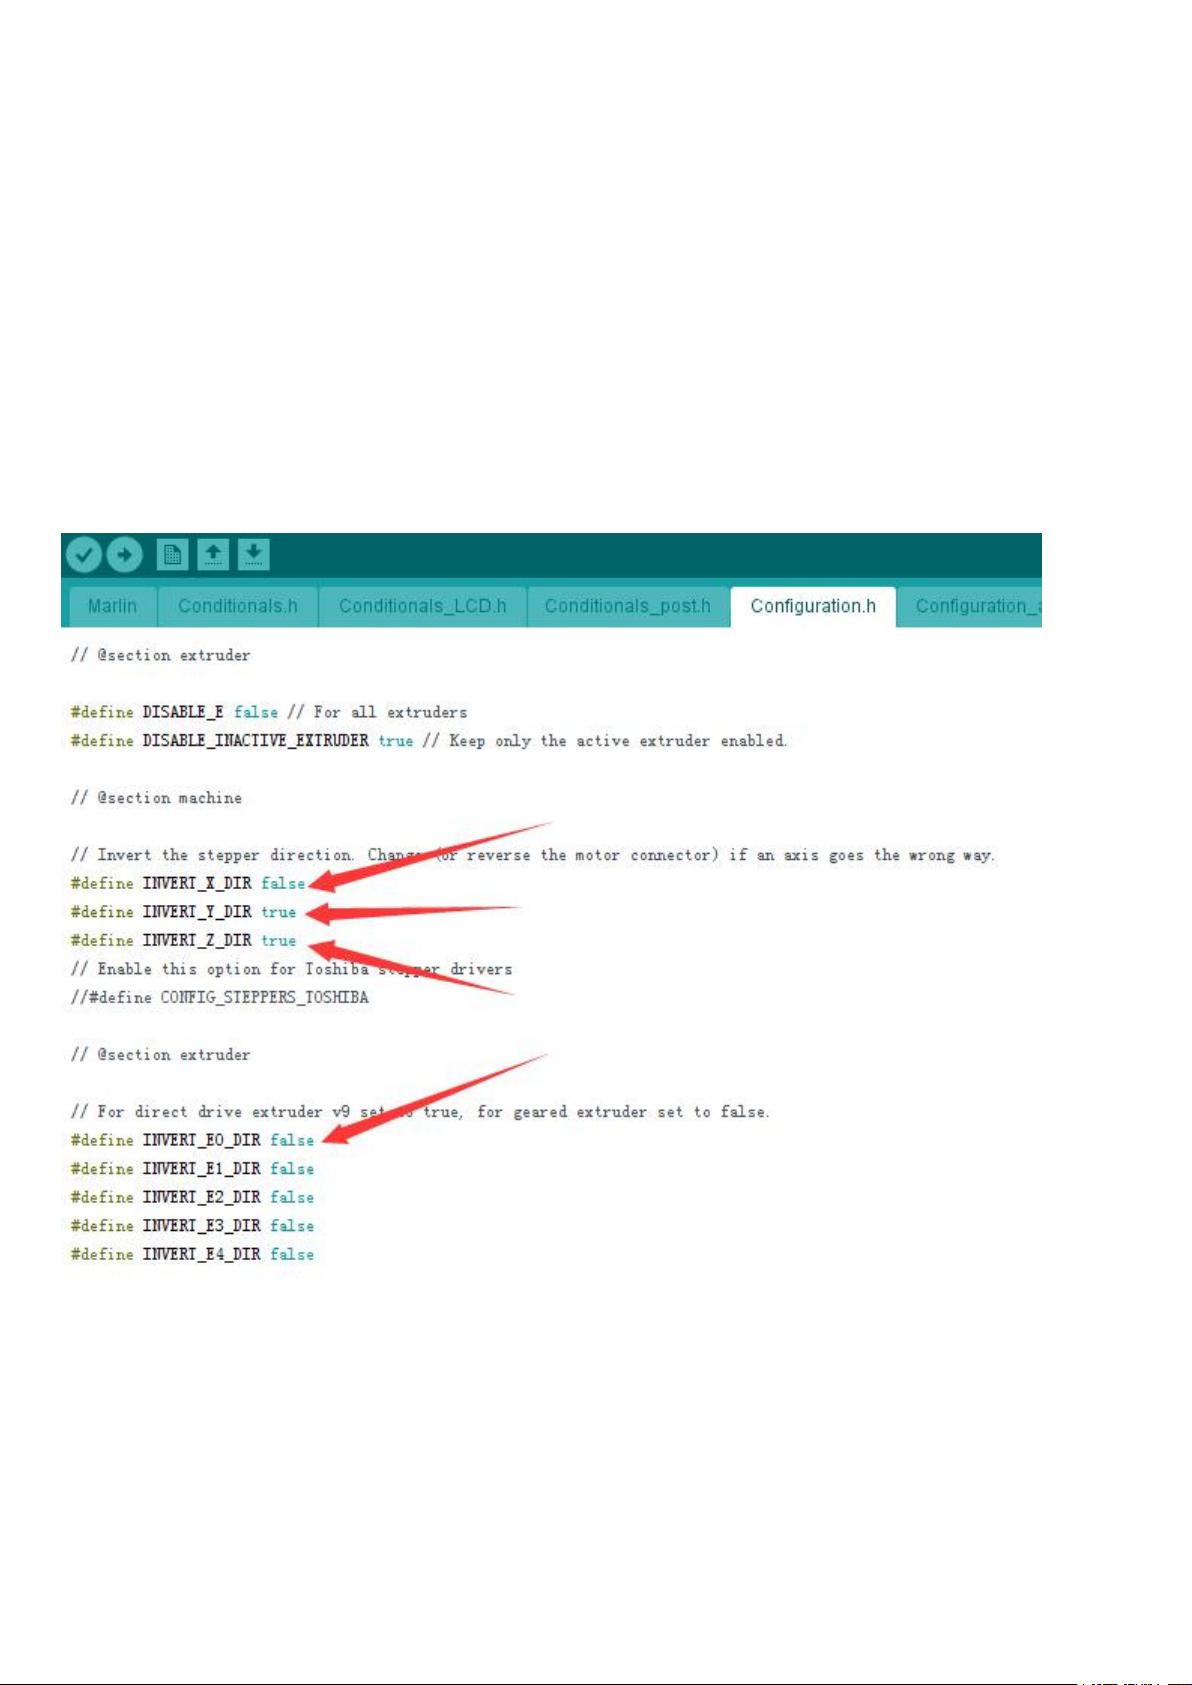
5 if the motor steering is wrong(For example ,control it rises, it drops)
This is the standard motor steering setting, here you can change the
motor steering according to your need
7 if your auto-level senor is bad or not
working ,you can use the manual leveling
Page 50
-
56
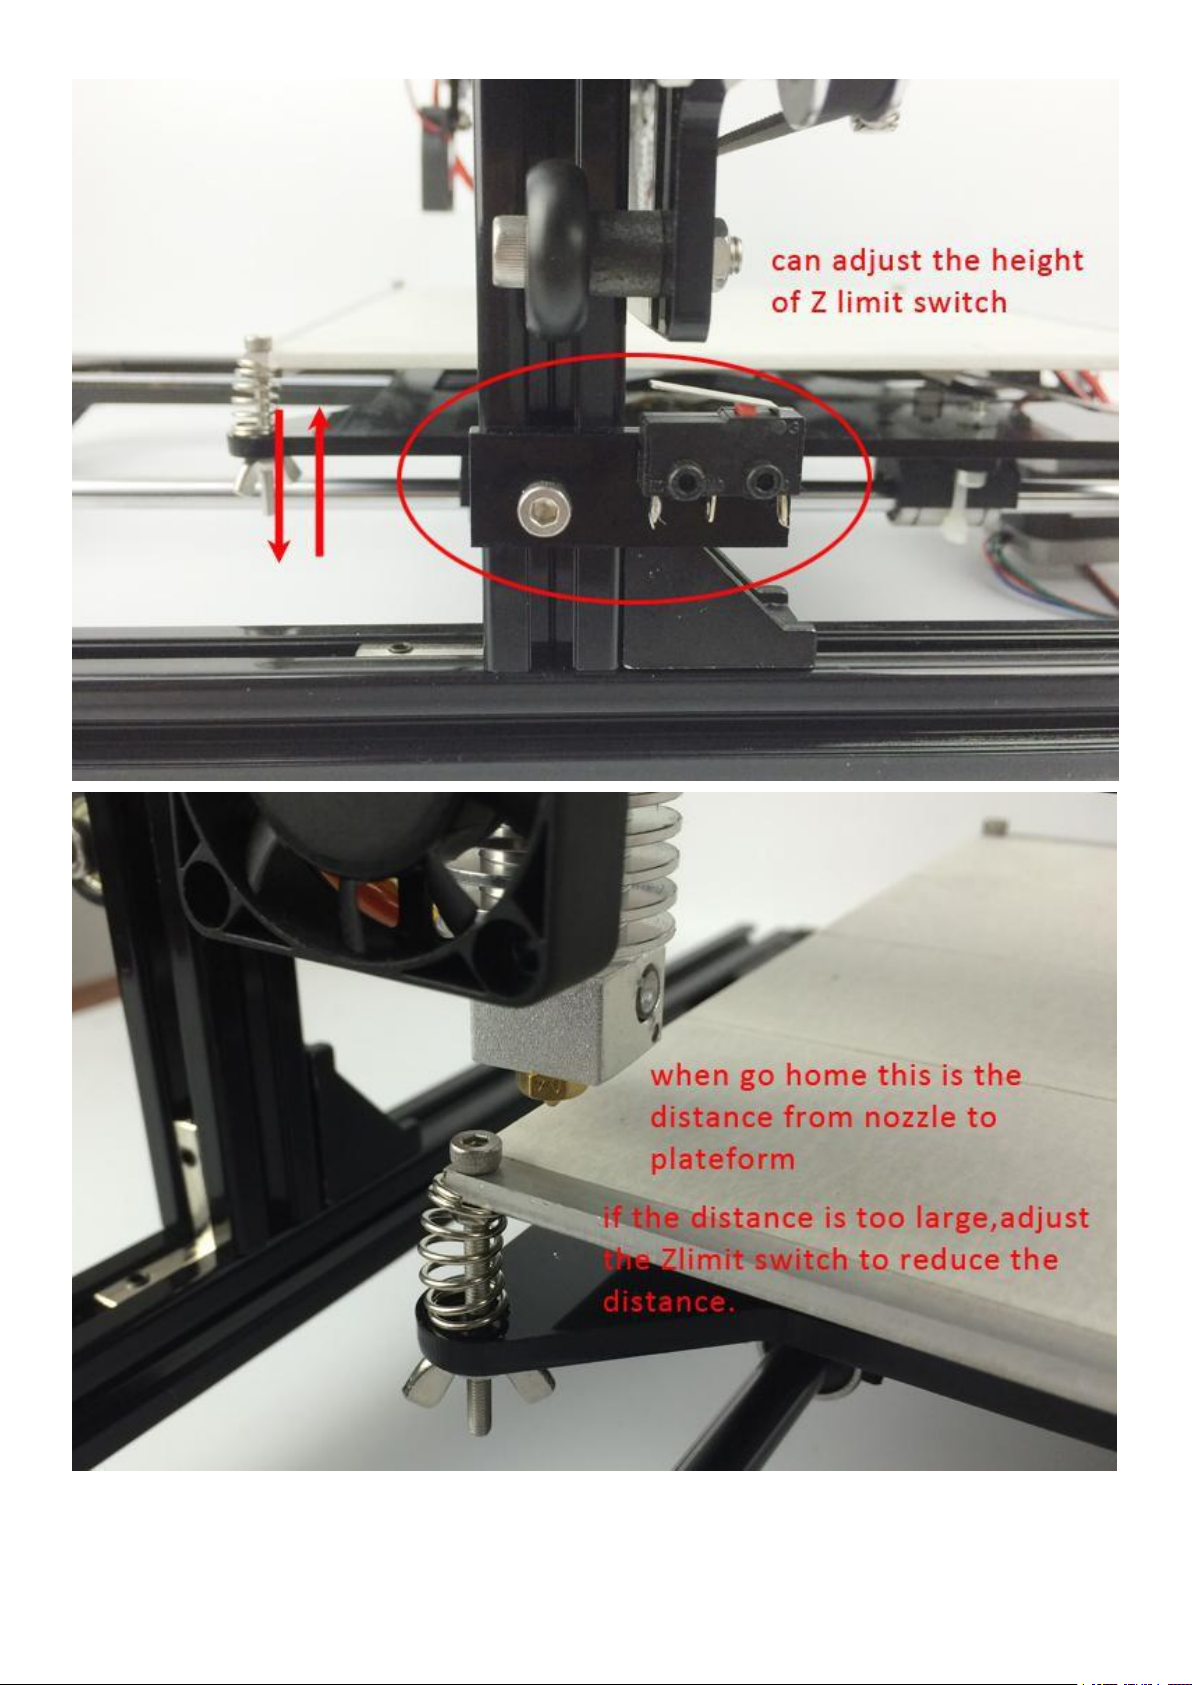
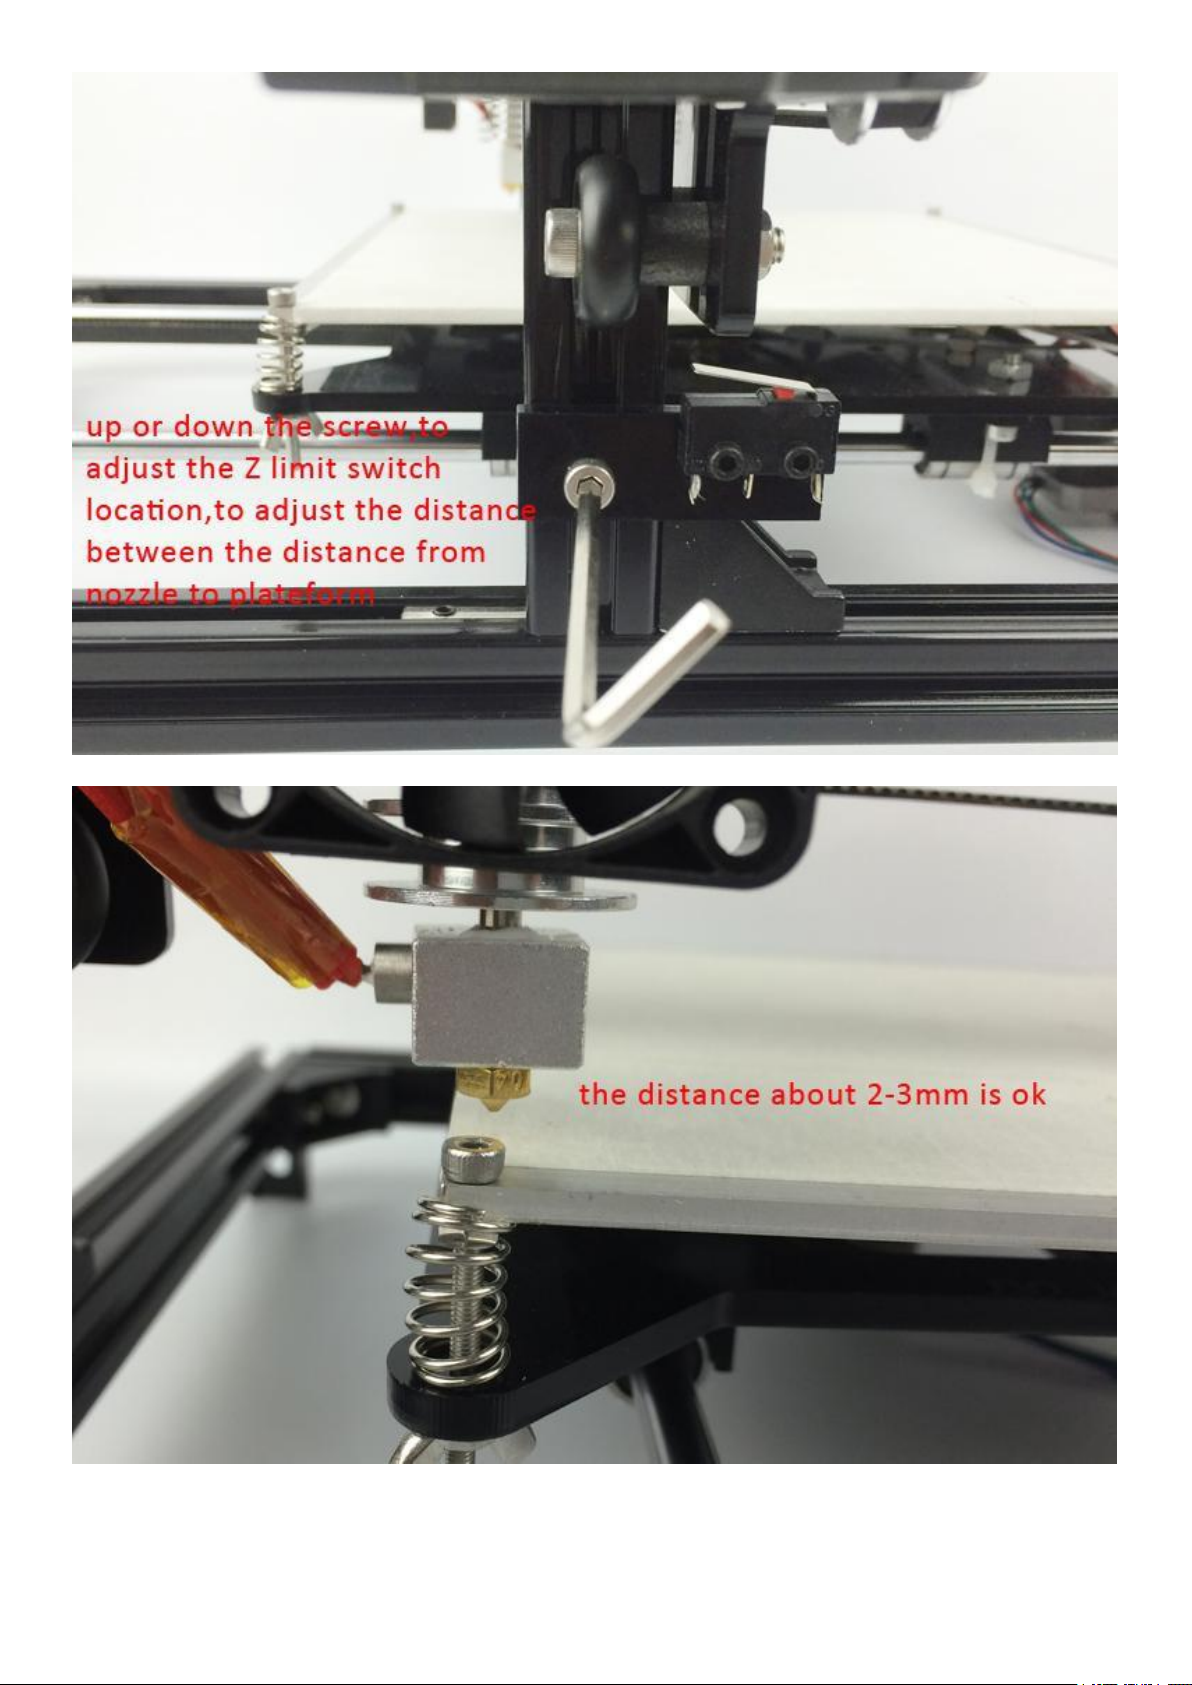
First you should installed the Z limit switch instead of the
Auto-level senor(refer to the the Assembly instructions from
page 89 to page91)
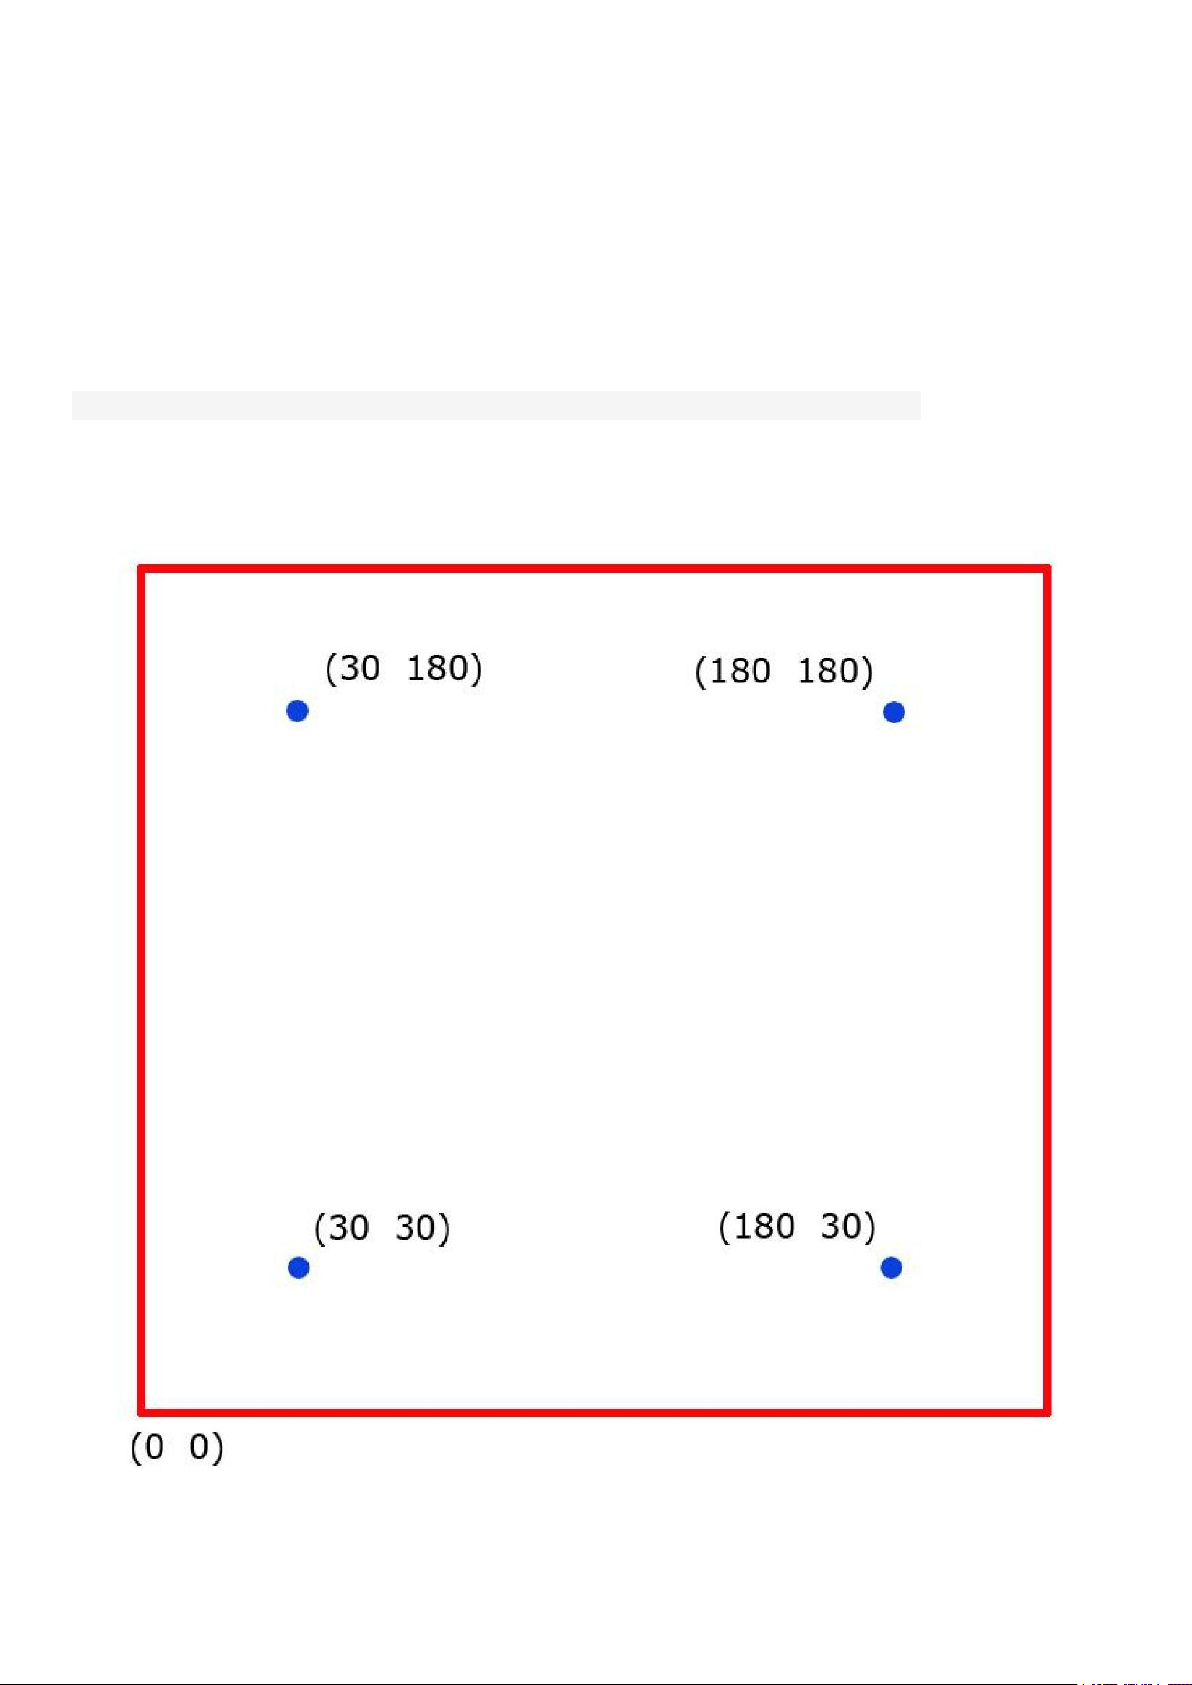
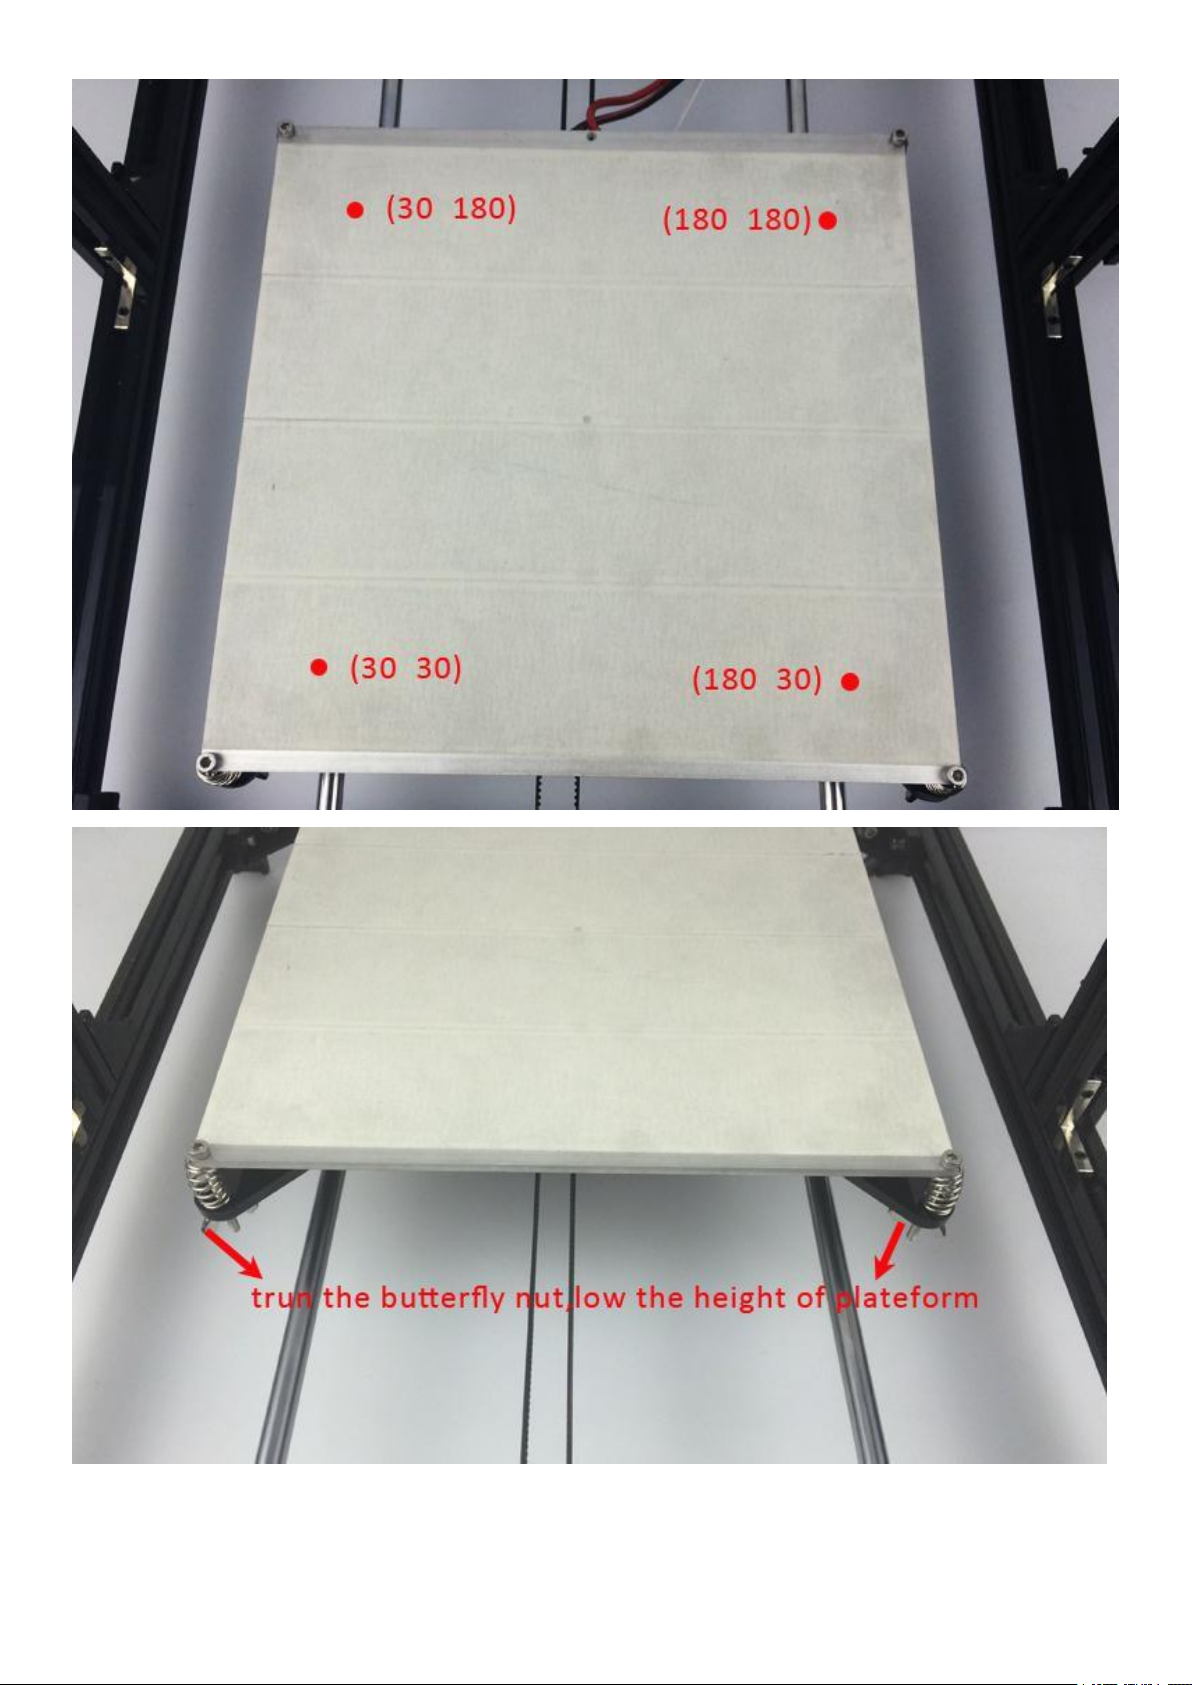
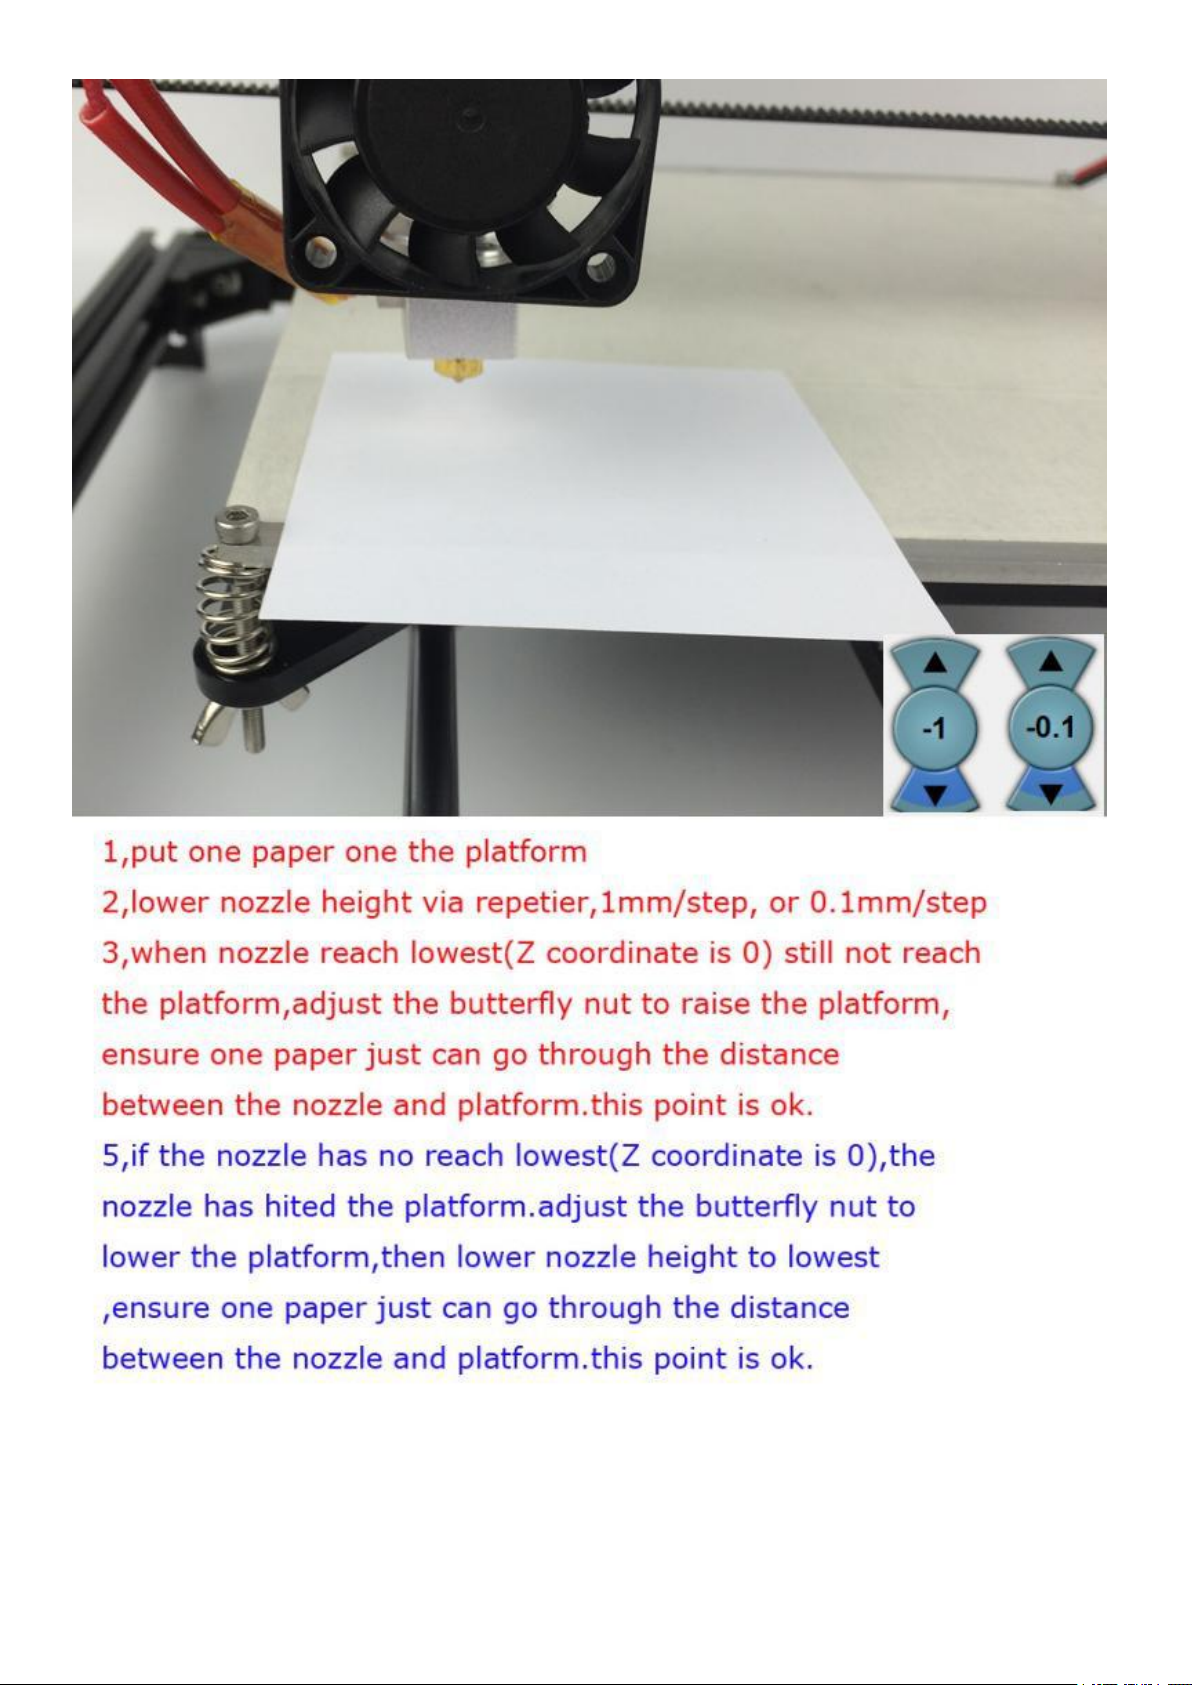
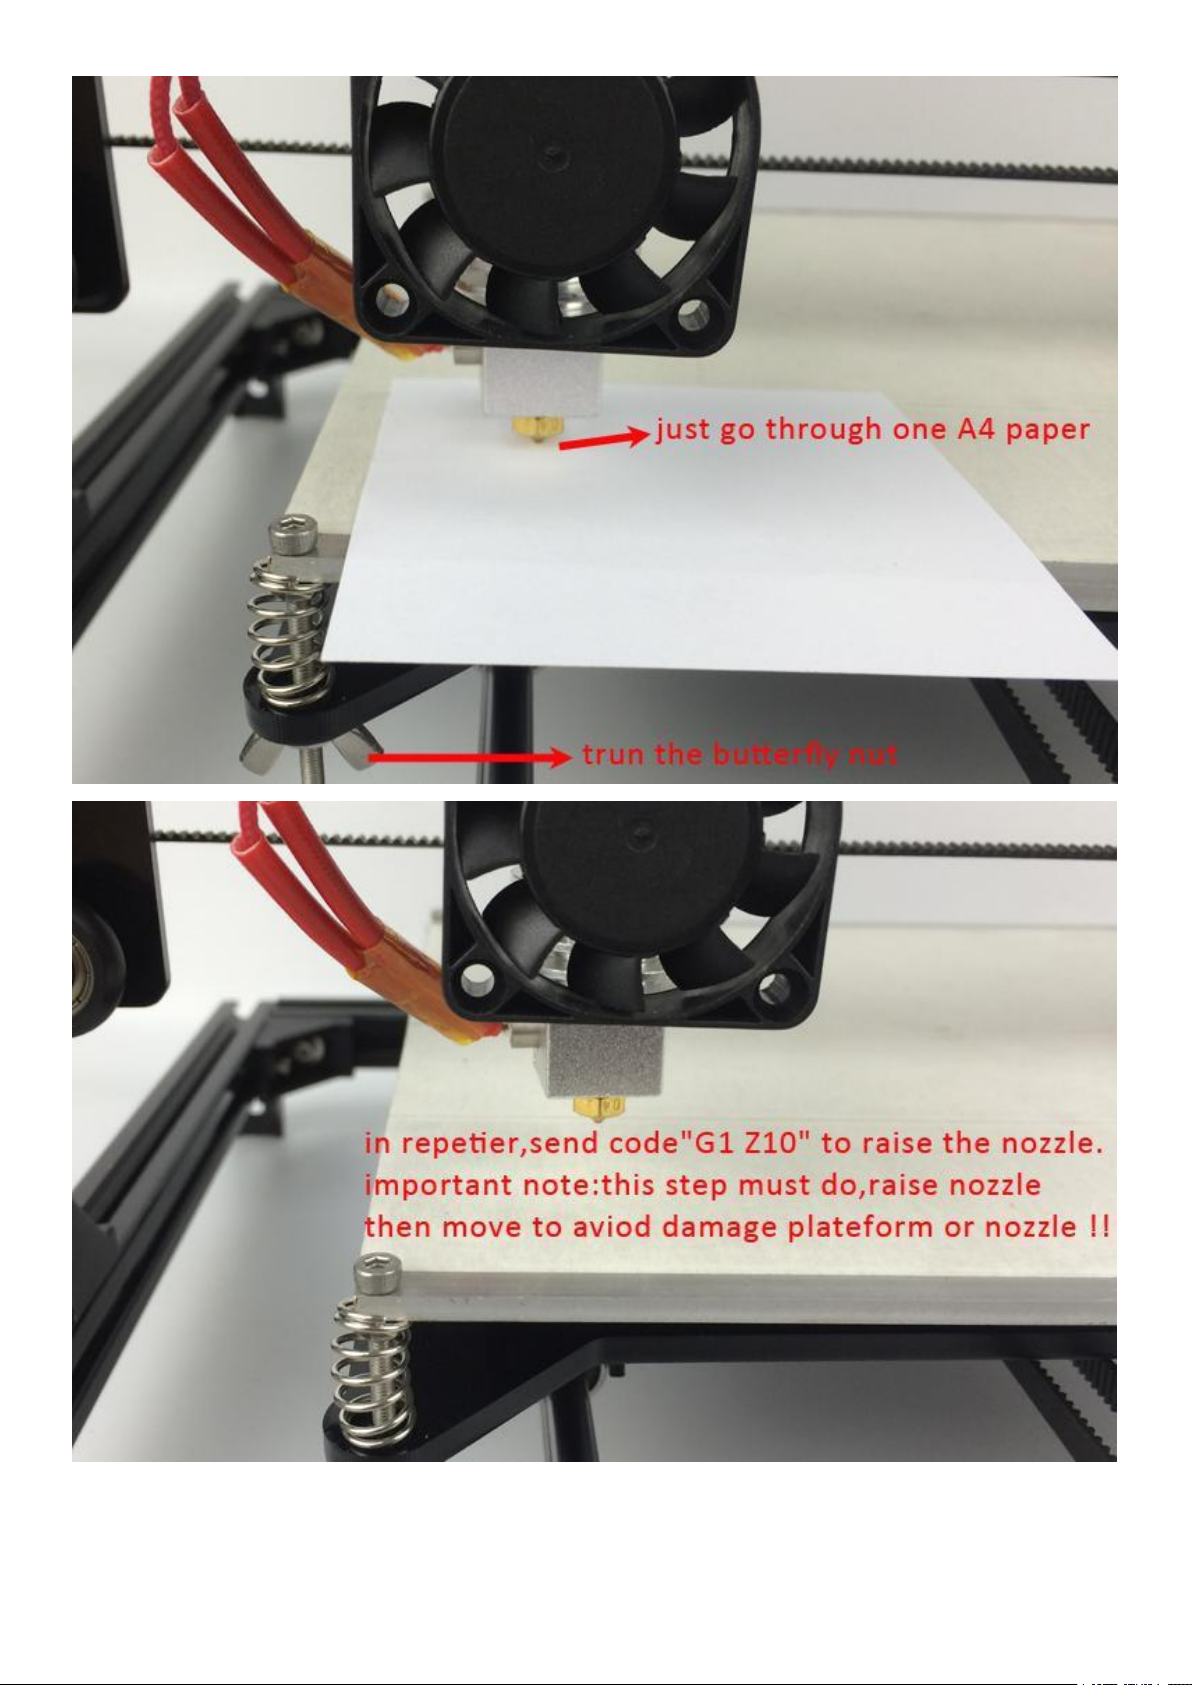
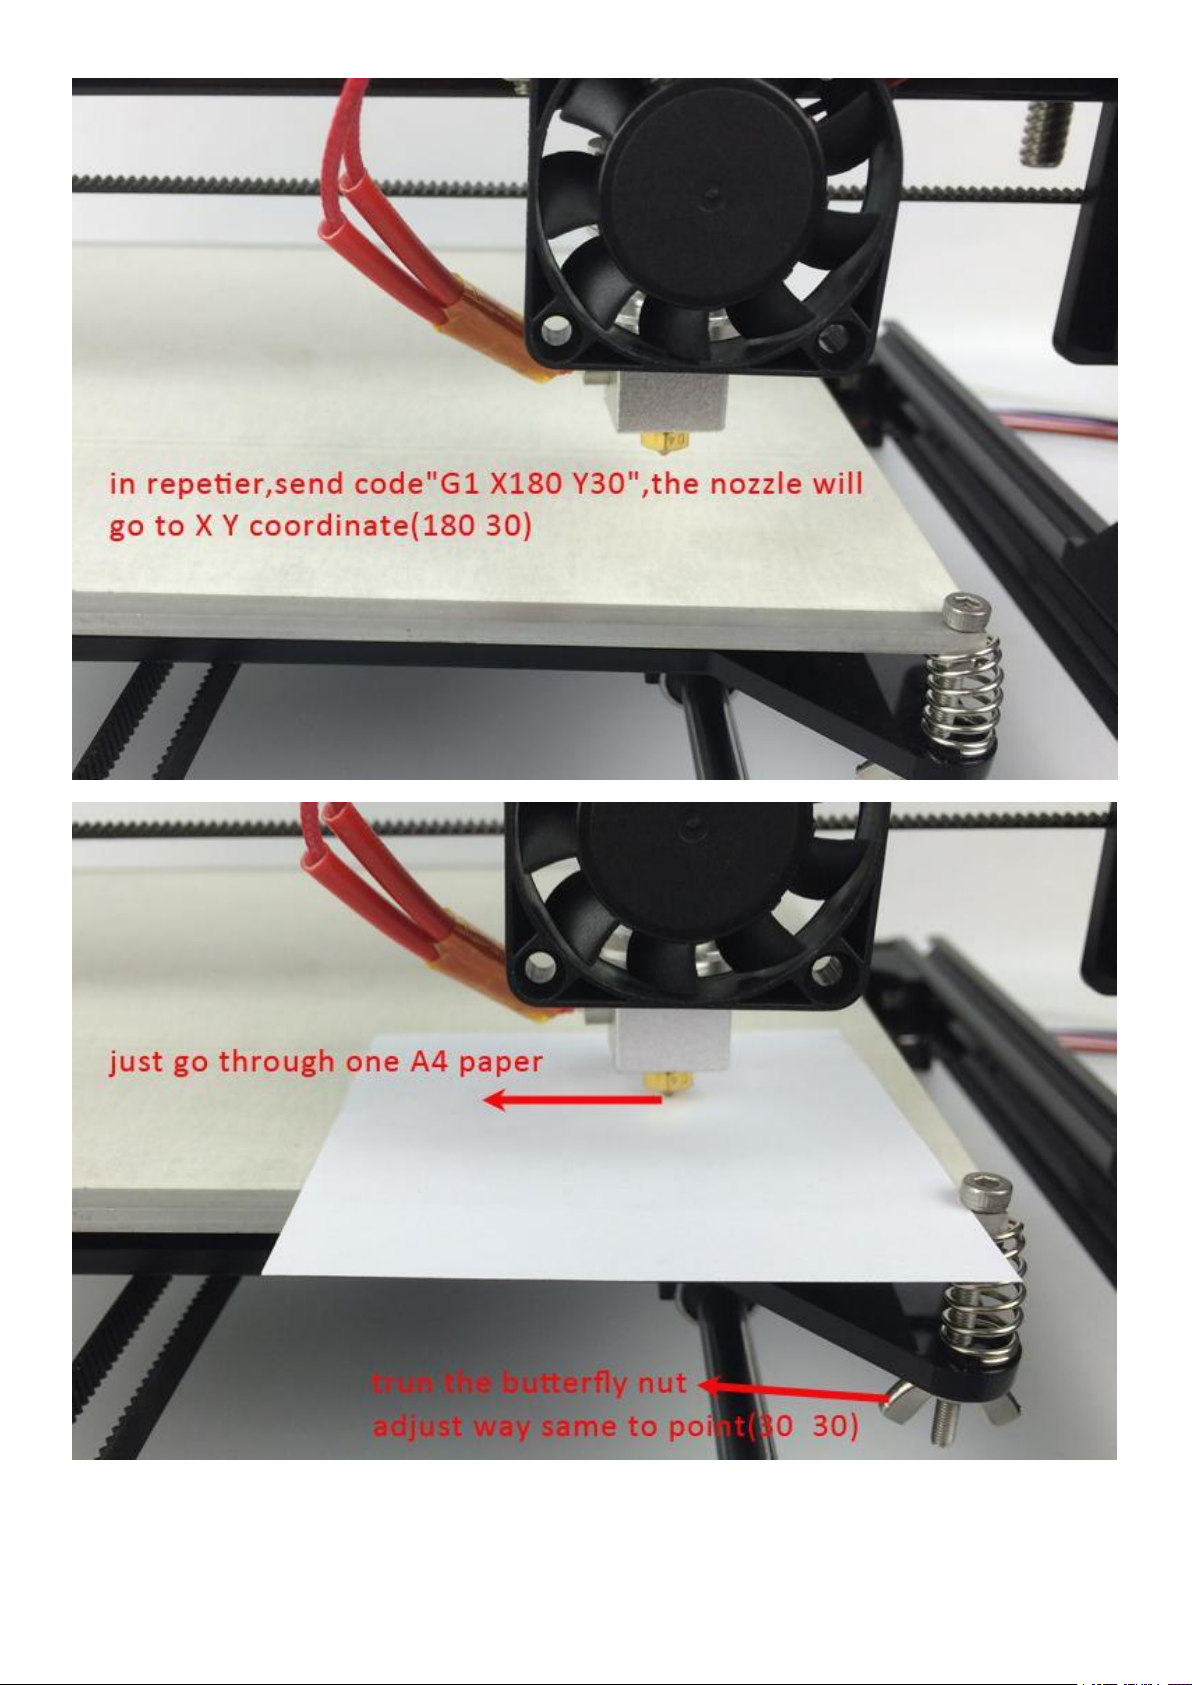
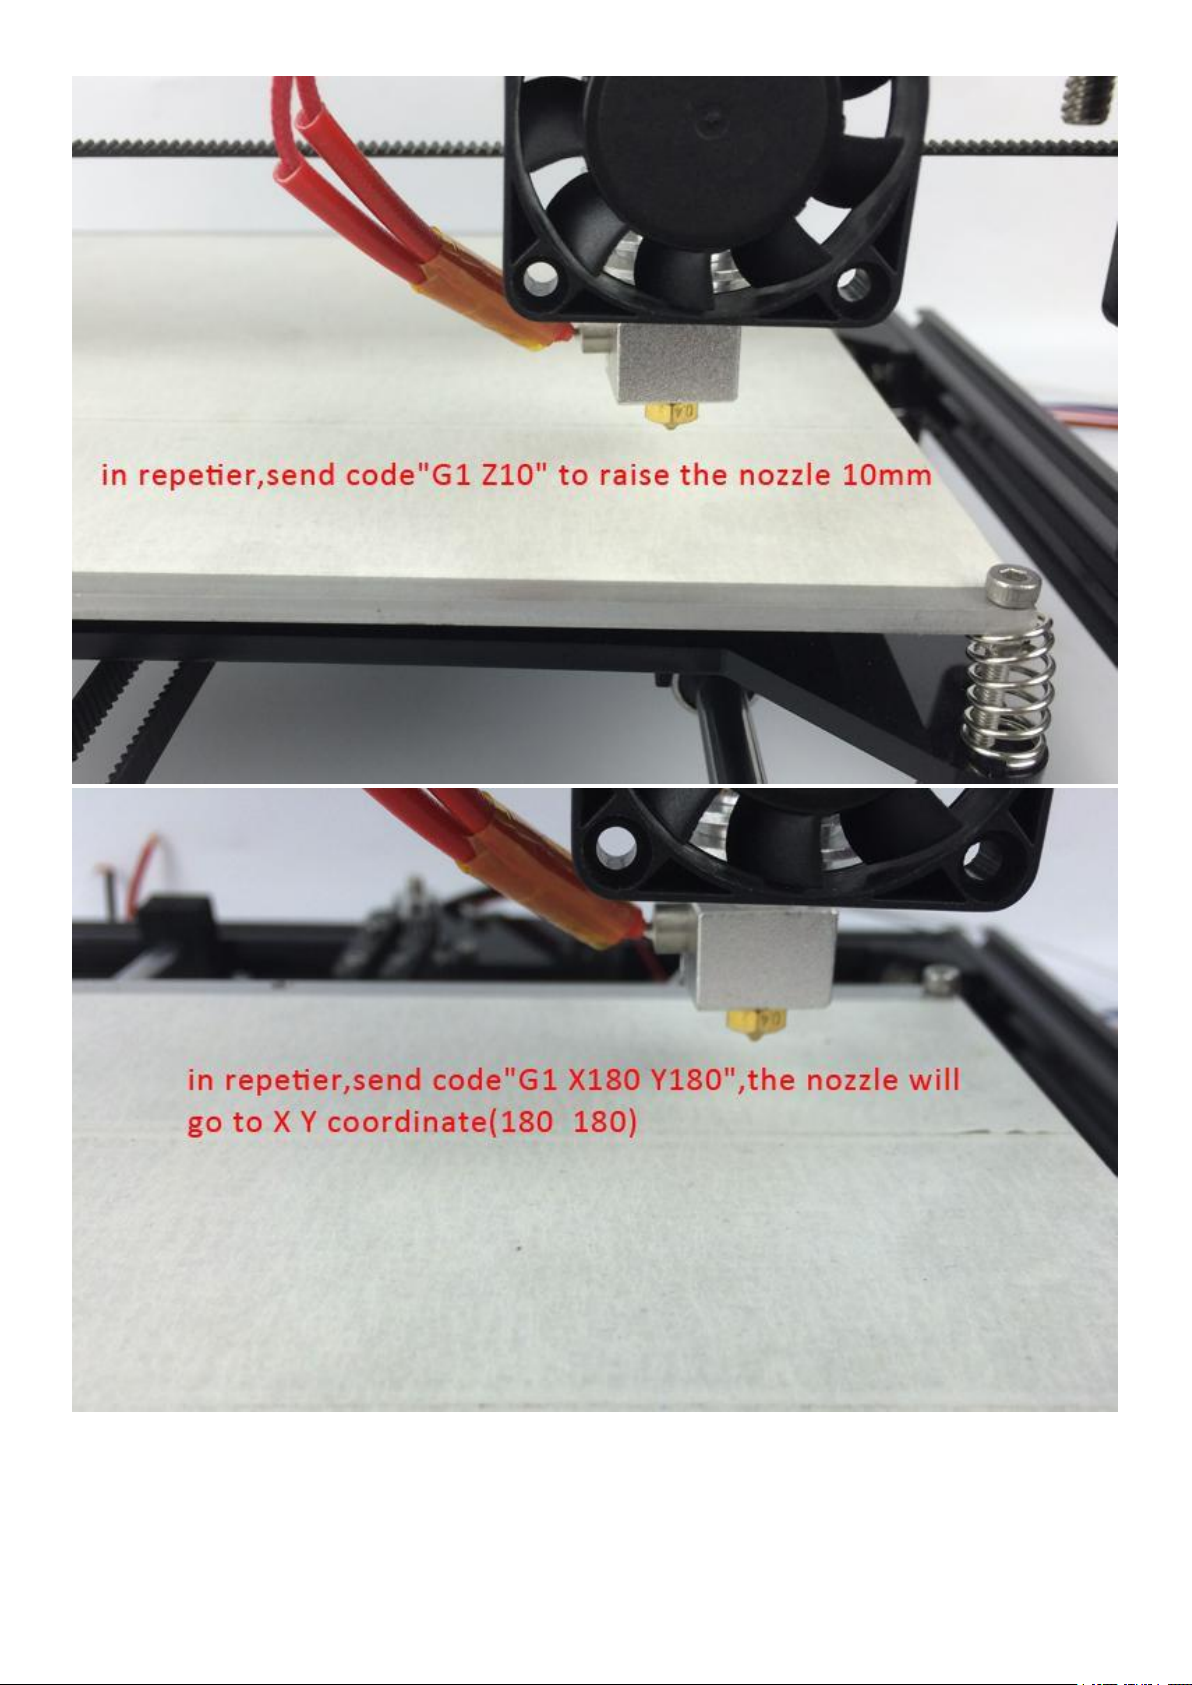
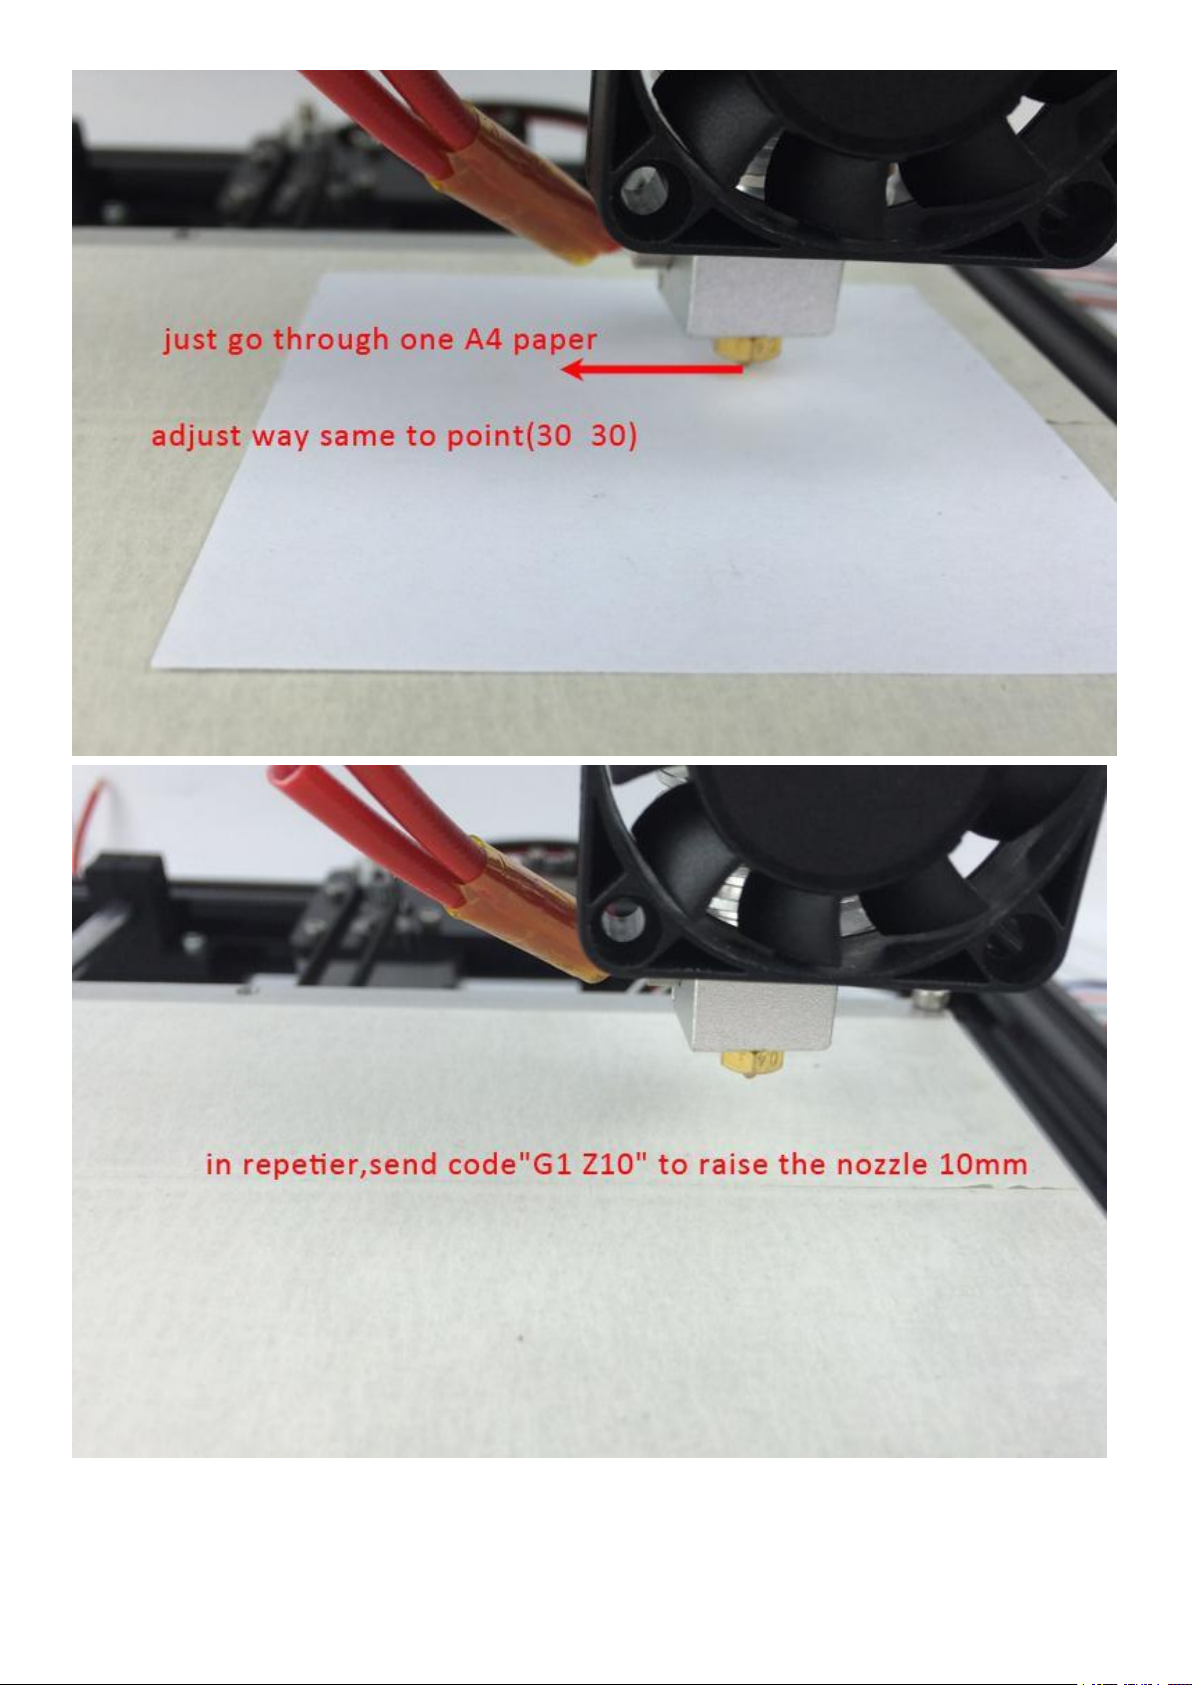
1,Calibration
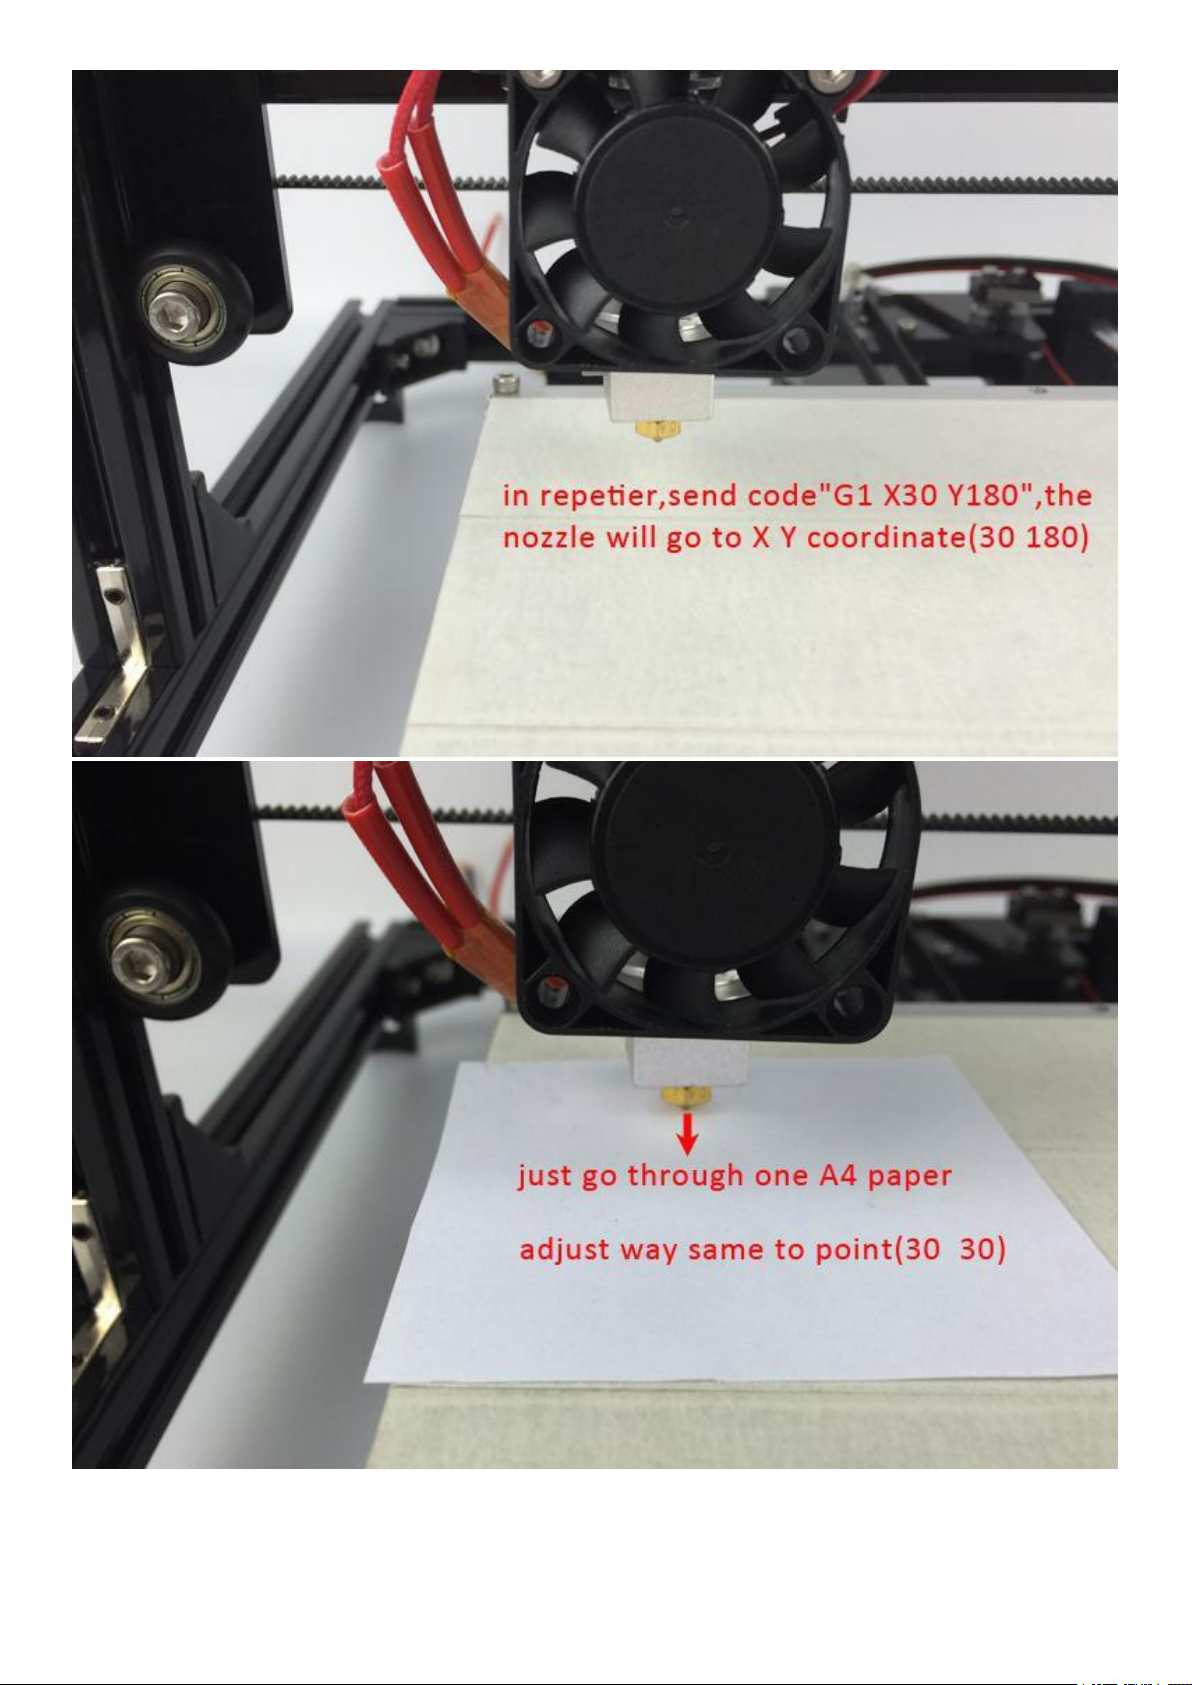
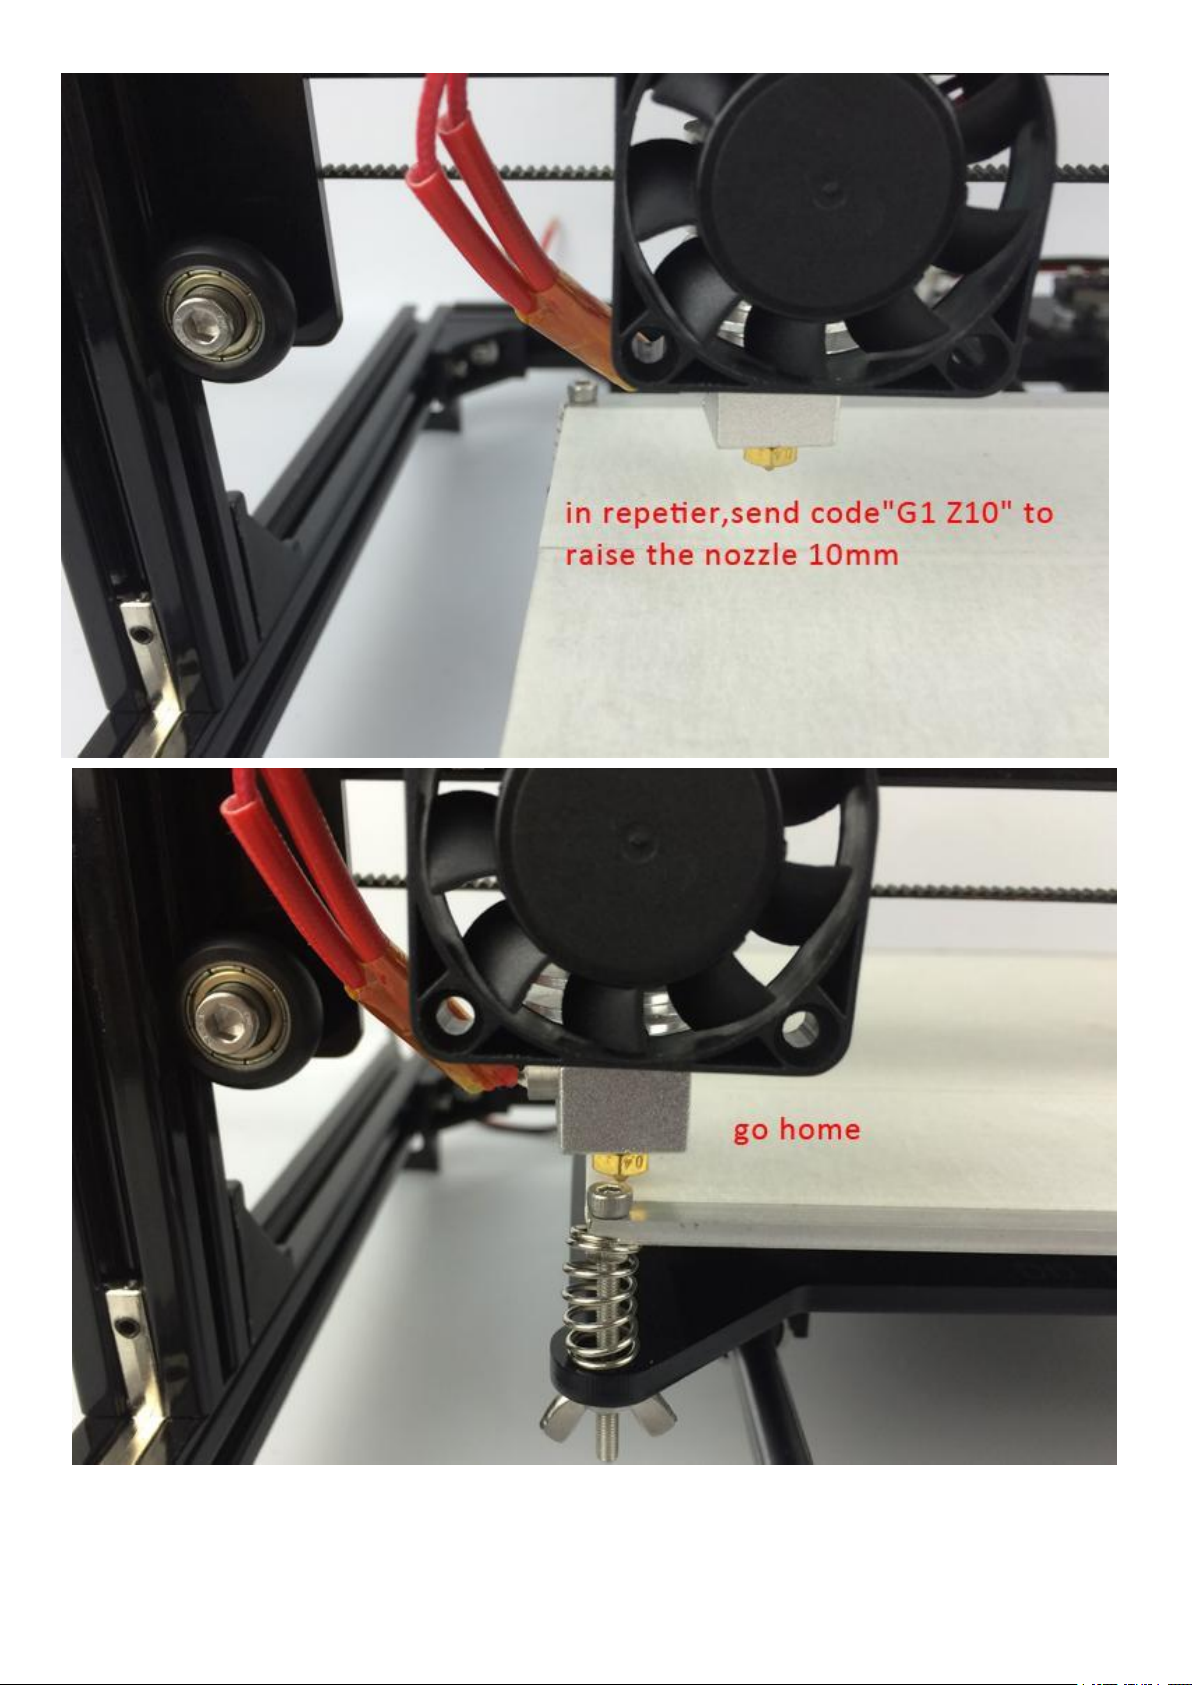
Select 4 points, the 4 points coordinate is (30 30) , (180 30),(180 180),(30 180). Ensure the
nozzle to bed distance,this distance could go through one paper.as the pic show.
Page 51
-20-21-22-23-24-25-26-27-28-29-
Page 52
Page 53
Page 54
Page 55
Page 56
Page 57
Page 58
Page 59
Page 60
Page 61
30
 Loading...