

FLORABEST 282463, 296225 Operation And Safety Notes
®
PROGRAMMABLE WATER TIMER
PROGRAMMABLE WATER TIMER
Operation and Safety Notes
NAPRAVA ZA AVTOMATSKO
ZALIVANJE
Navodila za upravljanje in varnostna opozorila
ZAVLAŽOV ACÍ POČÍTAČ
Pokyny pre obsluhu a bezpečnostné pokyny
IAN 282463
ÖNTÖZÉSIDŐZÍTŐ
Kezelési és biztonsági utalások
ZAVLAŽOV ACÍ POČÍTAČ
Pokyny pro obsluhu a bezpečnostní pokyny
BEWÄSSERUNGSCOMPUTER
Bedienungs- und Sicherheitshinweise

GB Operation and Safety Notes Page 5
HU Kezelési és biztonsági utalások Oldal 14
SI Navodila za upravljanje in varnostna opozorila Stran 24
CZ Pokyny pro obsluhu a bezpečnostní pokyny Strana 34
SK Pokyny pre obsluhu a bezpečnostné pokyny Strana 43
DE / AT / CH Bedienungs- und Sicherheitshinweise Seite 53
A
13
11
B C
14 15
1
2
3
4
5
67891012
4 5 6 7
321
17
18
19
20
16
21
22
23
1 2
1
2
4 5 6 7
321
1 2
3
4 5 6 7
321
1 2
.keS 2 .ac.keS 2 .ac
4
4 5 6 7
321
1 2
7
4 5 6 7
321
1
2
5
4 5 6 7
321
1 2
8
4 5 6 7
321
1
2
6
4 5 6 7
321
1 2
9
4 5 6 7321
21
ca. 2 Sek.

Introduction ......................................................................................................................................Page 6
Intended Use ..........................................................................................................................................Page 6
Scope of delivery ...................................................................................................................................Page 6
Technical Data .......................................................................................................................................Page 6
Parts description .....................................................................................................................................Page 6
Display indicators ...................................................................................................................................Page 7
Safety ....................................................................................................................................................Page 7
Safety instructions ...................................................................................................................................Page 7
Safety instructions for batteries / rechargeable batteries ....................................................................Page 8
Inserting / replacing batteries ...........................................................................................Page 9
Initial use ............................................................................................................................................Page 9
Operation ..........................................................................................................................................Page 10
Switching the product on / off ...............................................................................................................Page 10
Adjusting the time ...................................................................................................................................Page 10
Programme irrigation 1 and 2, interval ................................................................................................Page 10
Manual irrigation ...................................................................................................................................Page 11
Battery status display..............................................................................................................Page 11
Troubleshooting ...........................................................................................................................Page 12
Cleaning and Care ......................................................................................................................Page 12
Cleaning the filter ...................................................................................................................................Page 12
Storage ................................................................................................................................................Page 12
Disposal ...............................................................................................................................................Page 13
Warranty ............................................................................................................................................Page 13
5 GB
Programmable Water Timer
Introduction
We congratulate you on the purchase of your new
product. You have chosen a high quality product.
The instructions for use are part of the product. They
contain important information concerning safety,
use and disposal. Before using the product, please
familiarise yourself with all of the safety information
and instructions for use. Only use the product as described and for the specified applications. If you
pass the product on to anyone else, please ensure
that you also pass on all the documentation with it.
Intended Use
This product is designed to control sprinklers and
sprinkler and irrigation systems. It facilitates the automatic irrigation of outdoor areas at a programmed
time and for a programmed duration. The product
may save up to 2 programmes for automatic irrigation. The product may only be used outdoors. Any
other use or modification to the product constitutes
improper use. The manufacturer assumes no liability
for damages due to improper use. This product is
not intended for commercial use.
Scope of delivery
1 Irrigation controller
1 Coupling
1 Adapter 33.3 mm to 26.5 mm (G1“ to G¾”)
1 Filter
2 Batteries 1.5 V Type AA
1 Instructions for use
Technical Data
Model No.: HG00549
Operating pressure: 34.5–827 kPa
(0.34–8.27 bar)
Max. water temperature: 40°C
Power supply: 2 x 1.5 V
(direct cur-
rent) Batteries Type AA
Flow rate: approx. 28 l / min
Programmable
Irrigation time : 1 min–1439 min
Manual
Irrigation time : 1 min–1439 min
Water connection: G ¾” (26.5 mm) or
G 1” (33.3 mm)
Protection class: IP X4 (splash-proof)
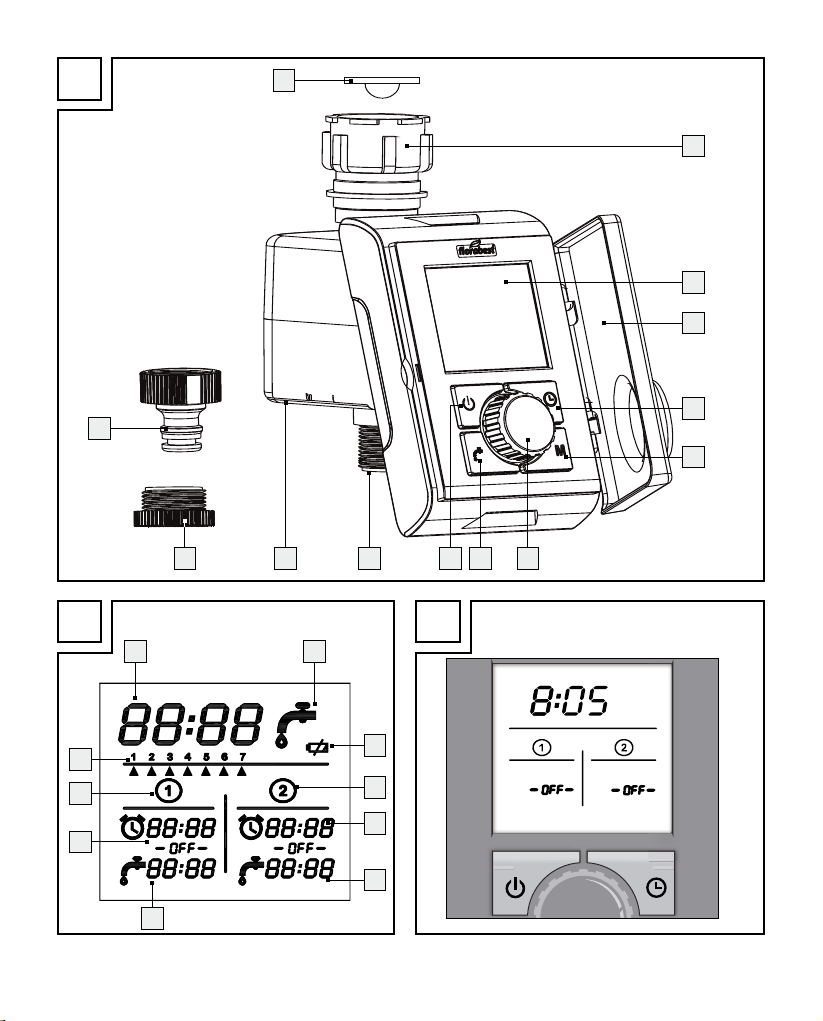
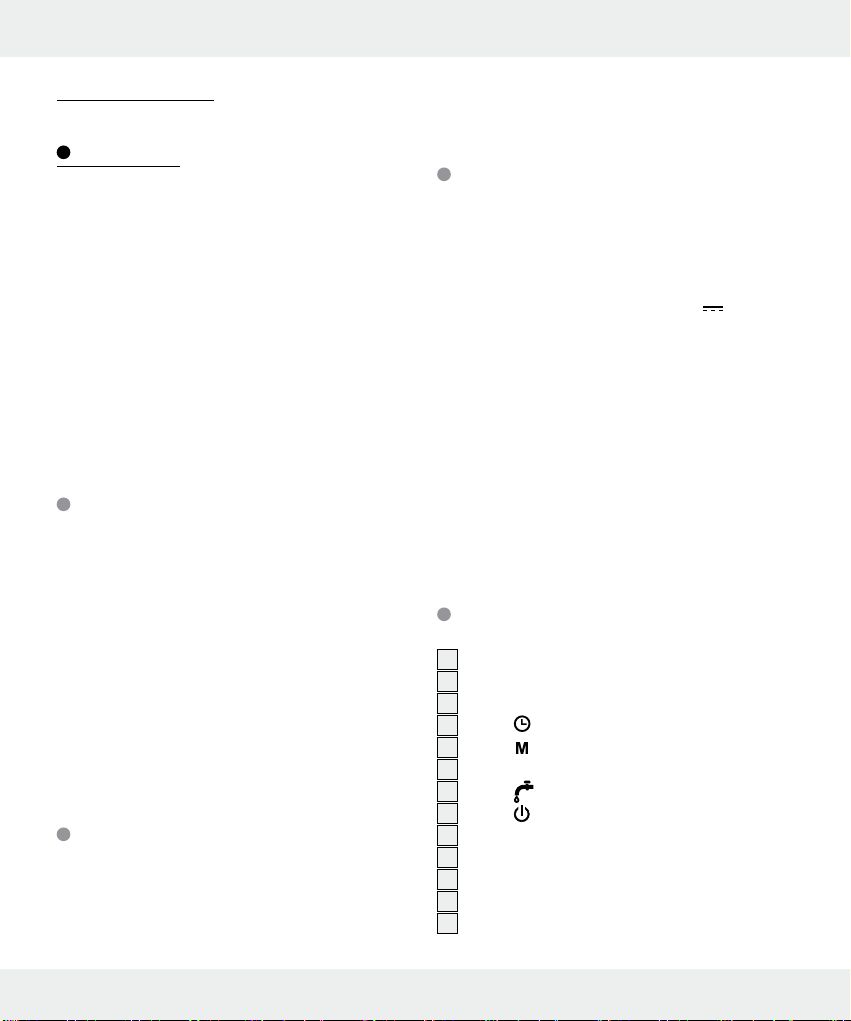
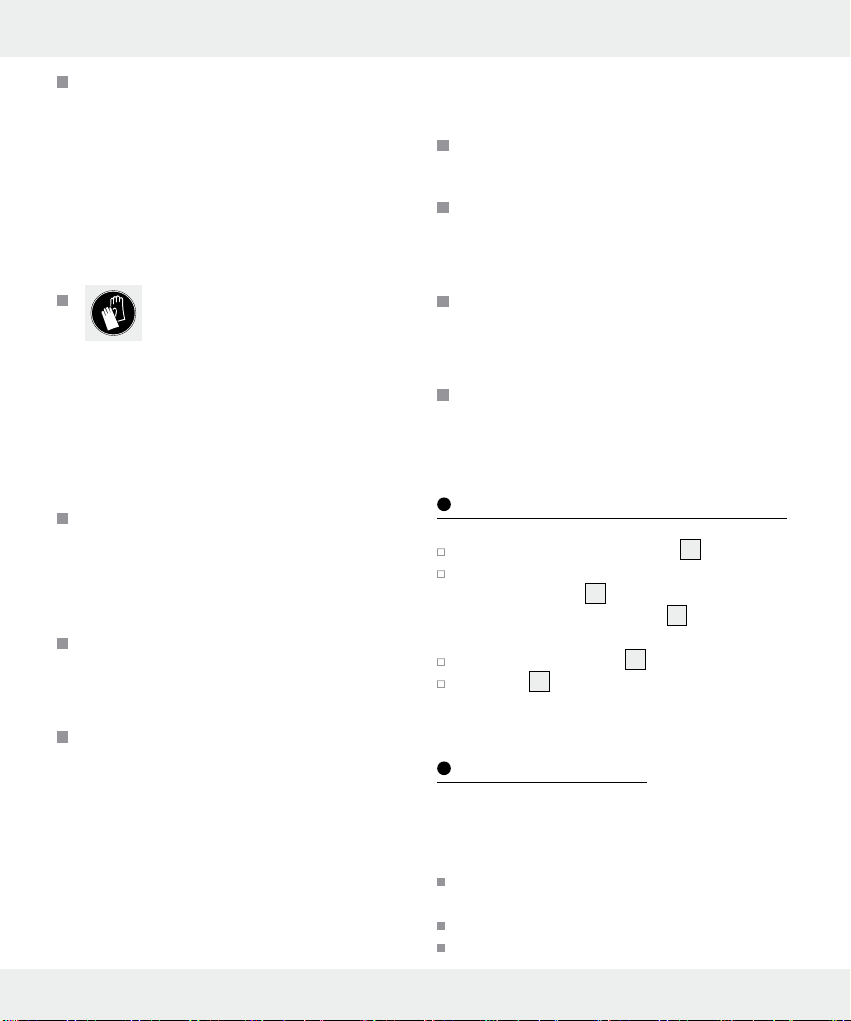
Parts description (Fig. A)
1
Union nut (for tap connector)
2
Display
3
Protective cover
4
Button
5
Button
6
Rotary control
7
Button
8
Button (ON / OFF)
9
Hose connection
10
Battery compartment
11
Filter
12
Adapter 33.3 mm to 26.5 mm (G1” to G¾”)
13
Coupling
6 GB
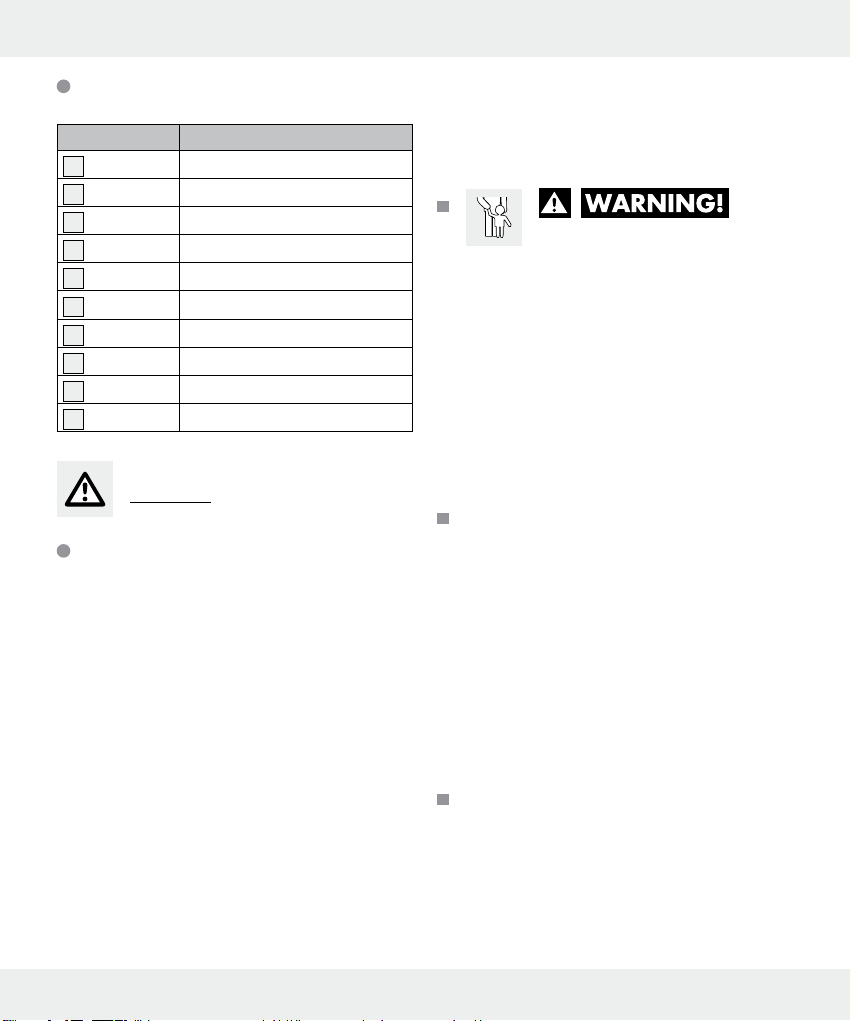
Display indicators (Fig. B)
Display Meaning
14
15
16
17
18
19
20
21
22
23
System time
Irrigation / manual irrigation
Battery status
Irrigation interval
Irrigation 1
Start time irrigation 1
Duration irrigation 1
Irrigation 2
Start time irrigation 2
Duration irrigation 2
Safety
Safety instructions
Damage due to failure to comply
with these operating instructions will
void the warranty! We assume no
liability for consequential damages!
We assume no liability for property
damage or personal injury due to
improper handling or failure to observe the safety instructions!
KEEP ALL THE SAFETY ADVICE
AND INSTRUCTIONS IN A SAFE
PLACE FOR FUTURE REFERENCE!
DANGER TO LIFE AND
RISK OF ACCIDENT FOR
INFANTS AND CHILDREN!
Never leave children unsupervised
with the packaging materials. The
packaging material poses a suffocation hazard. Keep this product
well away from children. This
product is not a toy.
This product may be used by chil-
dren age 8 years and up, as well
as by persons with reduced physical, sensory or mental capacities,
or lack ing experience and / or
knowl edge, so long as they are
supervised or instructed in the
safe use of the product and understand the associated risks.
Children should not be allowed to
play with the product. Clean ing
and user maintenance should not
be performed by children without
supervision.
7 GB

Any repairs during the warranty
period must be performed by a
manufacturer authorised service
centre, or the warranty will be
void if subsequent damages
occur.
Always replace defective parts
with genuine spare parts. Only
by using these parts will you ensure that the safety requirements
are met.
Avoid direct sunlight.
Always shut off the tap if you no
longer use the product
Do not operate the product near
open flames.
Check the product and its supply
lines at regular intervals to ensure
that they are impermeable and
that they function perfectly.
Do not aim the water jet at elec-
trical equipment!
Do not aim the water jet at per-
sons or animals!
The product is not suitable for
supplying drinking water.
Safety instructions for
batteries / rechargeable
batteries
DANGER TO LIFE! Keep bat-
teries / rechargeable batteries out
of reach of children. If accidentally swallowed seek immediate
medical attention.
DANGER OF EXPLO-
SION! Never recharge
non-rechargeable batteries. Do
not short-circuit batteries / rechargeable batteries and / or open
them. Overheating, fire or bursting
can be the result.
Never throw batteries / recharge-
able batteries into fire or water.
Do not exert mechanical loads to
batteries / rechargeable batteries.
Risk of battery leakage
Avoid extreme environmental
conditions and temperatures, which
could affect batteries / rechargeable batteries, e.g. radiators /
direct sunlight.
8 GB

Avoid contact with the skin, eyes
and mucous membranes. In the
event of contact with battery acid,
thoroughly flush the affected area
with plenty of clean water and
seek immediate medical attention.
WEAR PROTECTIVE
GLOVES! Leaked or
damaged batteries / rechargeable
batteries can cause burns on cont-
act with the skin. Wear suitable
protective gloves at all times if
such an event occurs.
In the event of a battery leak,
immediately remove it from the
product to prevent damage.
Only use the same type of batter-
ies / rechargeable batteries. Do
not mix used and new batteries /
rechargeable batteries.
Remove the batteries / recharge-
able batteries if the product will
not be used for a longer period.
Risk of damage of the
product.
Only use the specified type of
battery / rechargeable battery!
When inserting ensure the correct
polarity! This is shown inside the
battery compartment!
Clean the contacts on the battery
and in the battery compartment
before inserting!
Inserting / replacing batteries
Open the battery compartment 10.
Insert 2 AA batteries (LR06 / Mignon) into the
battery compartment
attention to the polarity markings on the batteries
and in the battery compartment
Close the battery compartment 10.
The display 2 will switch on automatically and
the system time will begin at 0:00.
Initial use
The site where the product will be installed must
meet the following requirements for safe and trouble-free operation:
The maximum temperature of the flowing water
is 40 °C.
The minimum operating temperature is +5 °C.
Only use clear freshwater.
Only connect the product vertically with the
hose connection
vent water from entering the battery compart-
10
ment
.
Attention! The irrigation controller may only
be connected to a drinking water abstraction
point with a safety device which corresponds to
TYPE HD at the very least according to EN
1717 (backflow preventer with tube ventilation).
10
. When doing so, pay
10
.
9
pointed downwards to pre-
9 GB
Note: Such mains adapters are available from
speciality retailers.
Check the water connection type available. The
product is fitted with a union nut
1
for a tap
with a 33.3 mm thread (G 1”). For a tap with a
26.5 mm thread (G ¾”) use the adapter sup-
12
plied
.
Insert the filter 11 into the union nut 1 as
depicted in Figure A..
For a 26.5 mm thread (G ¾”): Screw the
adapter
12
onto the tap. Do not use any tools
for this purpose.
Screw the union nut 1 onto the thread of the
tap or the adapter. Do not use any tools for this
purpose.
Screw the coupling 13 onto the hose connec-
9
tion
. You can then connect a hose to the
coupling
13
.
Open the tap.
Attention! If defects / leaks arise when using
the adapter
12
, the thread of the tap must be
wrapped using sealing tape.
Open the protective cover to service the pro-
3
duct
. Close the protective cover 3 fully
afterwards.
Programme irrigation as described in the
chapter „Operation“.
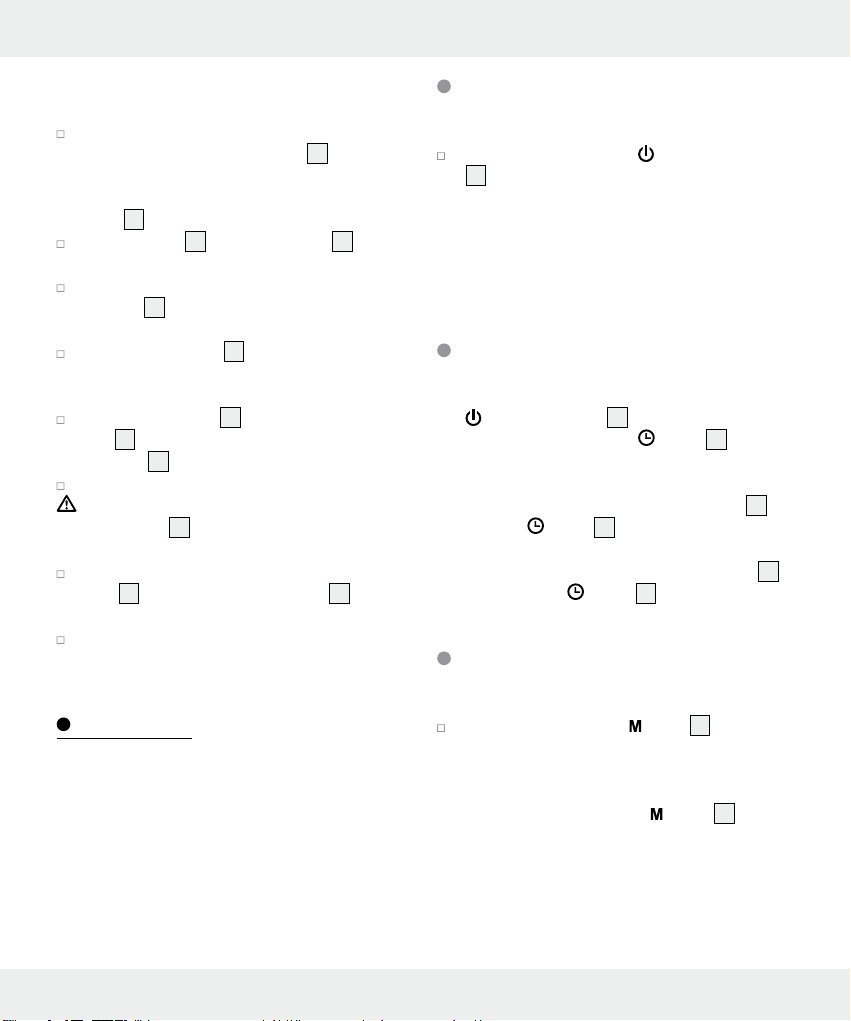
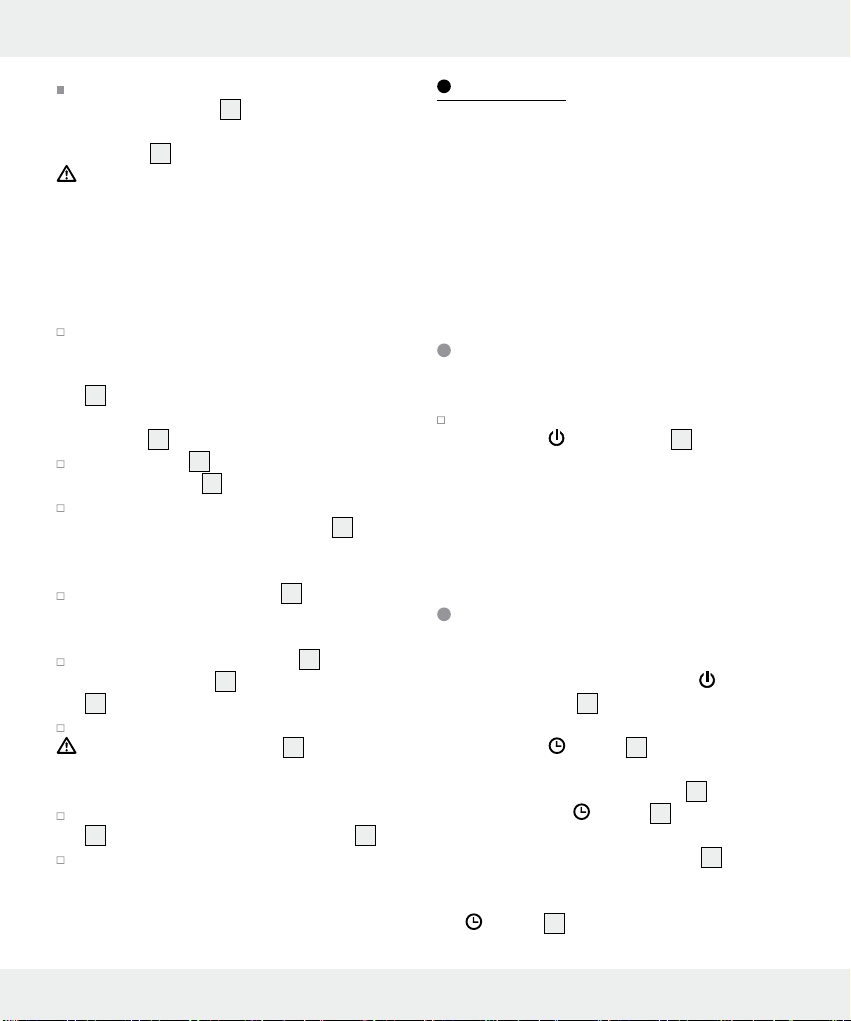
Switching the product on / off
(Fig. 1)
Press and hold down the ON / OFF button
8
for approx. 2 seconds to switch it on or off.
Note: Automatic irrigation does not occur if
the product is switched off (see Fig. C). In a
switched-off state, however, irrigation may
occur manually (as described in the chapter
„Manual irrigation.“).
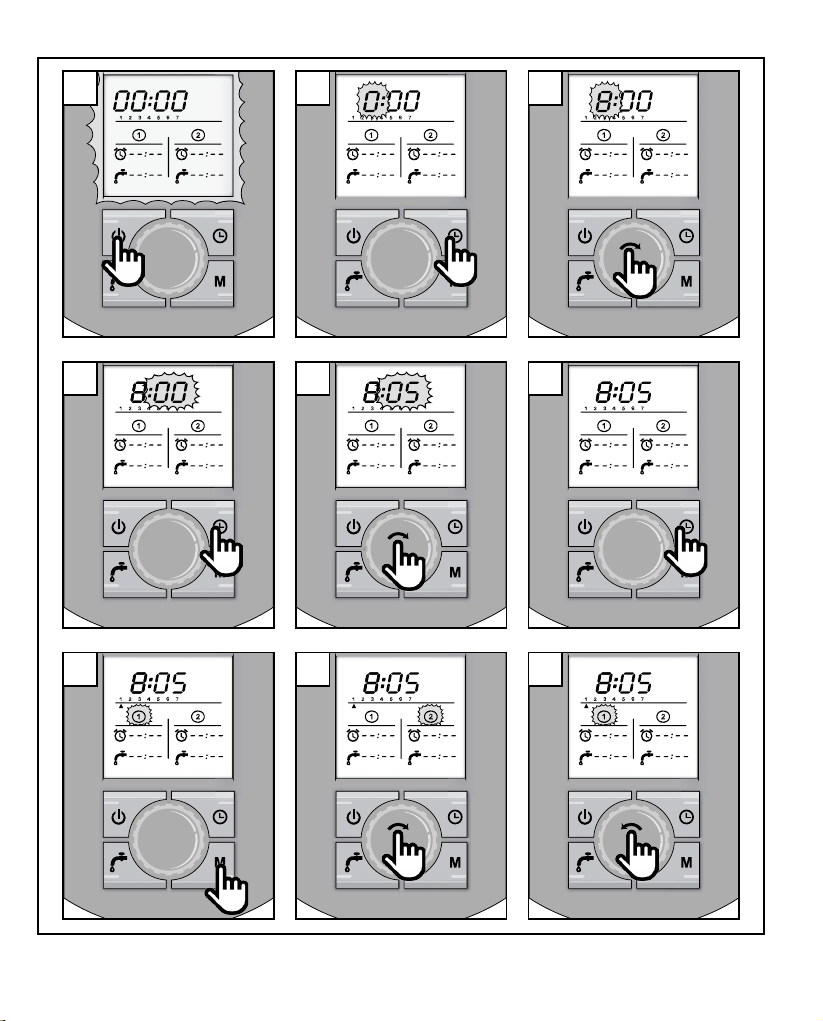
Adjusting the time (Fig. 2–6)
1. Switch on the product. Press and hold down the
ON / OFF button 8 for approx. 2 seconds.
2. Press and hold down the
button 4 for
approx. 2 seconds. The system time‘s hour
display will flash.
3. Set the hour by turning the rotary control
4. Press the
button 4. The system time‘s minute
6
.
display will flash.
5. Set the minutes by turning the rotary control
6. Then press the
button 4 again to save.
6
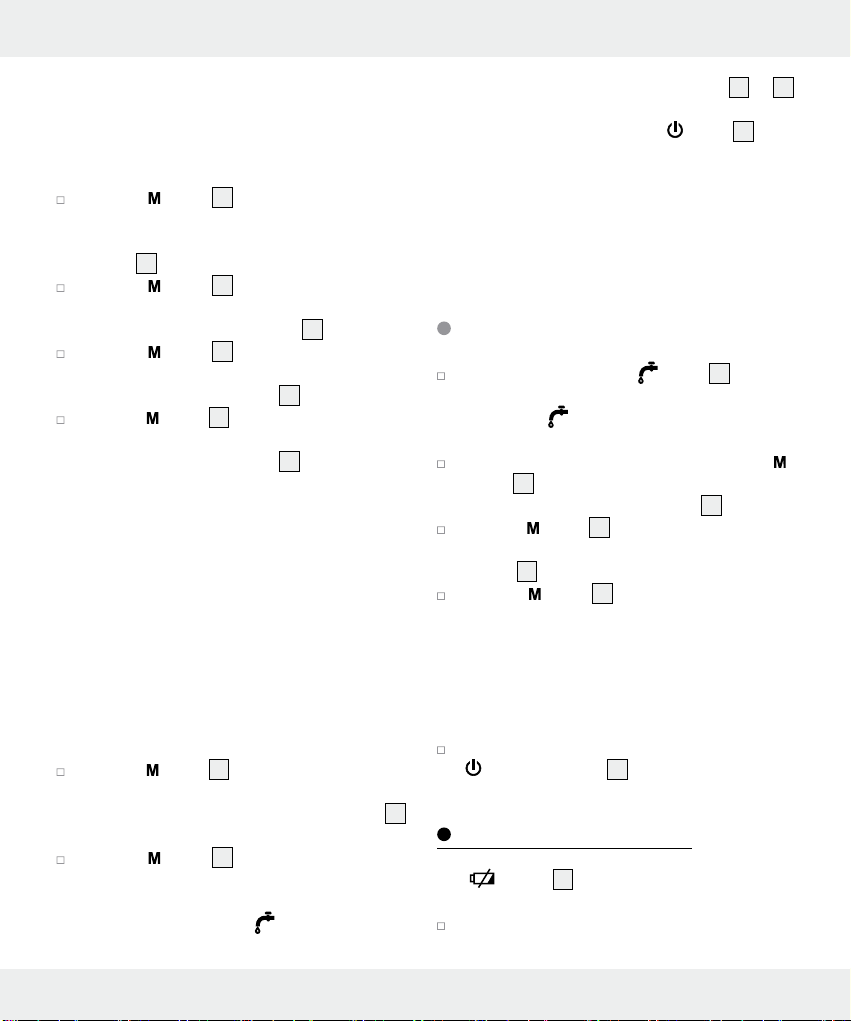
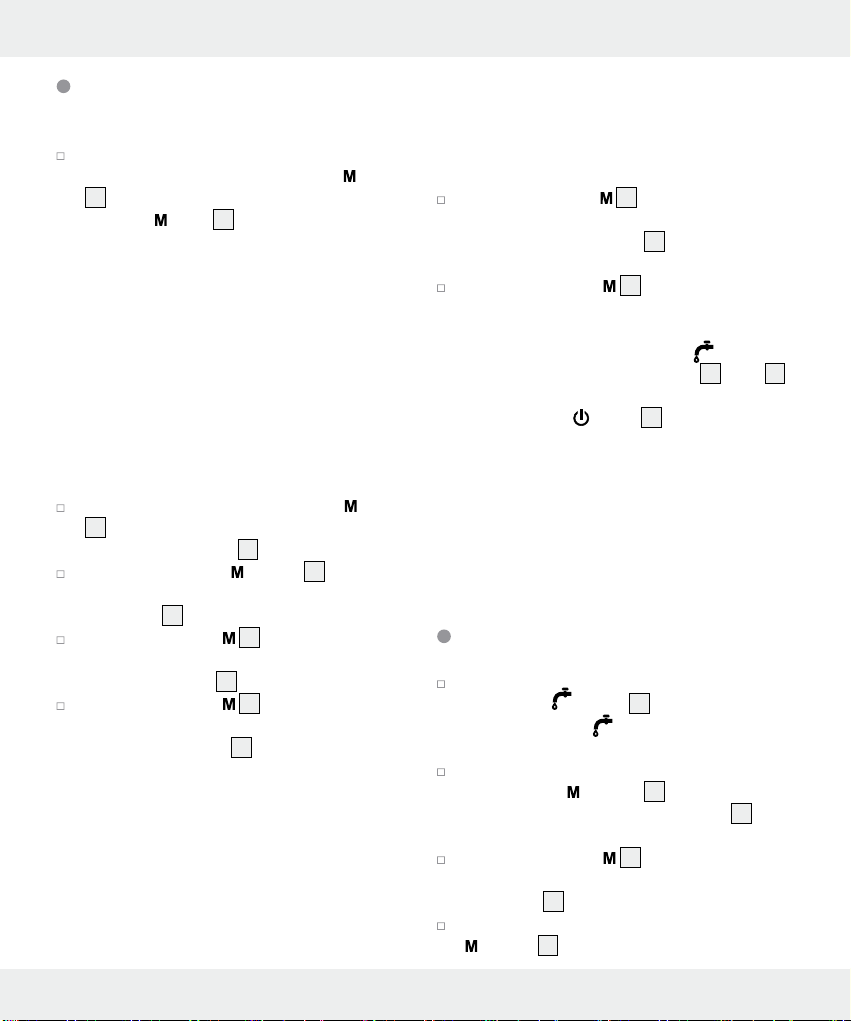
Programme irrigation 1 and 2,
interval (Fig. 7–29)
.
Operation
Irrigation can be fully automated at any time of the
day using the irrigation controller. A sprinkler, sprinkler
system or drip irrigation system may be connected.
The irrigation controller automatically carries out
irrigation at the respective programmed start time
and for the programmed duration. Take the season
and time of the day into consideration when programming. Evaporation and water consumption is
lowest early in the morning or late in the evening.
10 GB
Press and hold down the button 5 for approx.
2 seconds to activate programming mode. You
can either apply all settings one after the other,
or switch between the following setting options
by repeatedly pressing the
button 5:
Start time irrigation 1
Duration irrigation 1
Start time irrigation 2
Duration irrigation 2
Irrigation interval (1 = every day, 2 = every 2nd
day, etc.)
Standby (programming mode ended and automatic
irrigation activated)
Press the button 5 again in programming
mode. The hour display for start time irrigation
1 will flash. Set the hours by turning the rotary
6
control
.
Press the button 5 again. The minute display
for start time irrigation 1 will flash. Set the minutes by turning the rotary control
6
.
Press the button 5 again. The hour display
for irrigation duration 2 will flash. Set the hours
by turning the rotary control
6
.
Press the button 5 again. The minute display
duration for irrigation 2 will flash. Set the minutes
by turning the rotary control
6
.
Note: Please note that you programme the
duration of irrigation, not the end time!
Here are some examples for possible settings /
duration of irrigation:
0:05 = 5 minutes
00:45 = 45 minutes
2:15 = 2 hours and 15 minutes
system time and duration of irrigation (20 or
) will flash.
Note: By briefly pressing the
button 8 you
can jump back a step in programming mode to
change the programmed values.
Note: After approx. 1 minute without an entry,
the product will return to standby mode. All
values which have already been programmed
will be retained.
Manual irrigation (Fig. 30–36)
Press and hold down the button 7 for
approx. 2 seconds. Manual irrigation begins as
soon as the
tem time.
To adjust the manual irrigation time press the
button
hours by turning the rotary control
Press the button 5 again. The minute display
will flash. Set the minutes by turning the rotary
control
Press the button 5 again to confirm your
entry.
display flashes behind the sys-
5
. The hour display will flash. Set the
6
.
6
.
23
Avoid overlapping irrigation times.
The minimum irrigation duration amounts to 1 minute.
The maximum irrigation duration amounts to 23 hours
and 59 minutes.
Press the button 5 again. The arrow display
for the irrigation interval will flash.
Set the interval by turning the rotary control
6
(1 = every day, 2 = every 2nd day etc.).
Press the button 5 again. The product will
switch to standby mode. Irrigation will start automatically at the programmed time. During the
duration of irrigation the
display behind the
The set duration for manual irrigation is saved and
will be automatically adopted for the next manual
irrigation.
To prematurely end manual irrigation, press the
ON / OFF button 8.
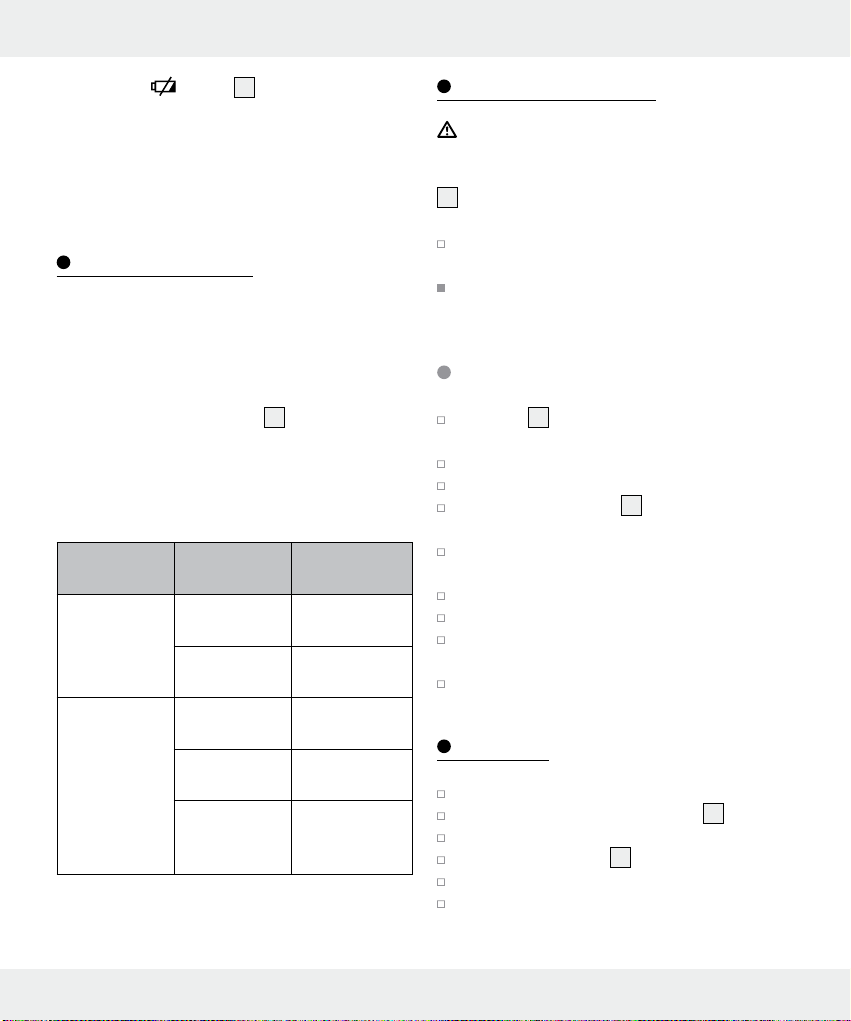
Battery status display
The
empty. All other displays are deactivated.
Change the batteries as described in the chapter
“Inserting / changing the batteries“.
display
16
flashes if the battery is weak or
11 GB
Note: If the
not possible. Irrigation which may be occurring will
be interrupted.
Programming will be saved for 2 minutes. If changing the batteries takes longer, all settings must be
selected again.
display
16
flashes, irrigation is
Troubleshooting
This product contains delicate electronic components.
For this reason, it may be disrupted by transmissions
from transmitters in the direct vicinity.
Note: Electrostatic discharge can cause malfunctions. If this happens, briefly remove the batteries
from the battery compartment
again after 10 minutes. The product will be fully reset. The product will then be ready for use again.
Note: Please note that all settings will be deleted if
the product is reset.
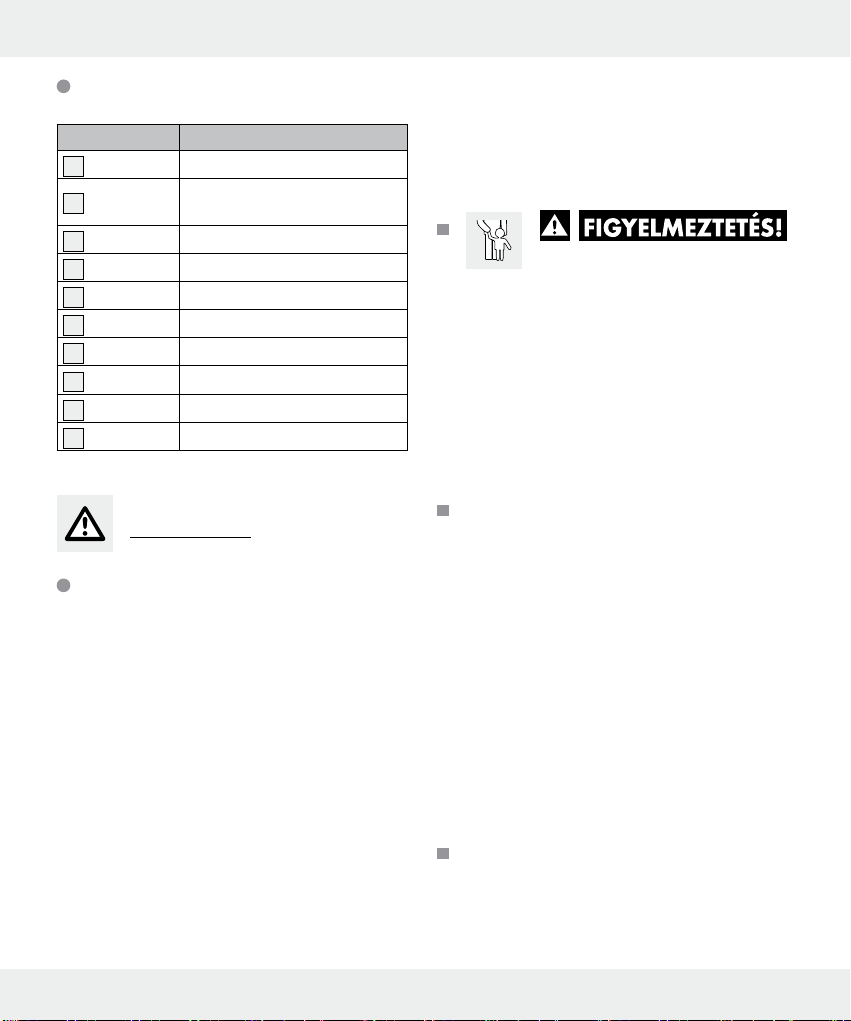
Error Possible
Cause
No notifications on the
display
Irrigation will
not start
No batteries
inserted
The batteries
are dead
The tap is
closed
Wrong programming
No batteries
or dead
batteries
10
and reinsert them
Solution
Insert batteries
Replace the
batteries
Open the tap
Check the
programming
Insert batteries
or replace the
batteries
Cleaning and Care
Attention! Potential damage to the product.
Moisture entering the product may result in damage.
Ensure no moisture enters the battery compartment
10
during cleaning to prevent damaging the product
beyond repair.
Only clean the housing with a slightly damp
cloth and mild washing-up liquid.
Never use petrol, alcohol or other aggressive
cleaning agents to clean the housing.
Cleaning the filter
The filter 11 must be regularly checked and
cleaned if necessary.
Close the tap.
Allow the product to run dry by manual irrigation.
Unscrew the union nut 1 from the tap or
adapter thread.
Remove the conical filter from the water inlet
in the union nut.
Clean the filter.
Reinsert the filter.
Screw the union nut onto the thread of the tap
or adapter.
Open the tap.
Storage
Close the tap.
Loosen the hose from the coupling 13.
Allow the product to run dry.
Loosen the union nut 1.
Remove the batteries.
Store the product in a dry and frost-free environ-
ment.
12 GB
Disposal
The packaging is made entirely of recyclable materials, which you may dispose
of at local recycling facilities. The Green
Dot is not valid for Germany.
Observe the marking of the packaging
b
materials for waste separation, which are
a
marked with abbreviations (a) and numbers (b) with following meaning: 1–7:
plastics / 20–22: paper and fibreboard /
80–98: composite materials.
The product and packaging materials are
recyclable, dispose of it separately for
better waste treatment. The Triman logo
is valid in France only.
Contact your local refuse disposal authority for more details of how to dispose of
your worn-out product.
To help protect the environment, please
dispose of the product properly when it
has reached the end of its useful life and
not in the household waste. Information
on collection points and their opening
hours can be obtained from your local
authority.
Faulty or used batteries must be recycled in accordance with Directive 2006 / 66 / EC and its amendments. Please return the batteries and / or the product
to the available collection points.
Environmental damage through
incorrect disposal of the batteries!
Batteries must not be disposed off with domestic
waste. They may contain toxic heavy metals and
are subject to hazardous waste treatment rules and
regulations. The chemical symbols of the heavy metals are as follows: Cd = cadmium, Hg = mercury,
Pb = lead. That is why you should dispose of used
batteries at a local collection point.
Warranty
The product has been manufactured to strict quality
guidelines and meticulously examined before delivery. In the event of product defects you have legal
rights against the retailer of this product. Your legal
rights are not limited in any way by our warranty
detailed below.
The warranty for this product is 3 years from the
date of purchase. Should this product show any fault
in materials or manufacture within 3 years from the
date of purchase, we will repair or replace it – at
our choice – free of charge to you.
The warranty period begins on the date of purchase.
Please keep the original sales receipt in a safe location.
This document is required as your proof of purchase.
This warranty becomes void if the product has been
damaged, or used or maintained improperly.
The warranty applies to defects in material or manufacture. This warranty does not cover product parts
subject to normal wear, thus possibly considered
consumables (e.g. batteries) or for damage to fragile parts, e.g. switches, rechargeable batteries or
glass parts.
13 GB

Bevezető ........................................................................................................................................... Oldal 15
Rendeltetésszerű használat ................................................................................................................. Oldal 15
A csomag tartalma ............................................................................................................................... Oldal 15
Műszaki adatok ................................................................................................................................... Oldal 15
Tartozékok leírása ................................................................................................................................ Oldal 15
Képernyőkijelzések .............................................................................................................................. Oldal 16
Biztonság .......................................................................................................................................... Oldal 16
Biztonsági tudnivalók ........................................................................................................................... Oldal 16
Az elemekre / akkukra vonatkozó biztonsági tudnivalók .................................................................. Oldal 17
Elemek behelyezése / cserélése .................................................................................... Oldal 18
Üzembe helyezés ...................................................................................................................... Oldal 18
Üzemelés .......................................................................................................................................... Oldal 19
A termék be- / kikapcsolása ................................................................................................................ Oldal 19
Idő beállítása........................................................................................................................................ Oldal 19
Öntözés 1 és 2, Tartam programozása ............................................................................................. Oldal 20
Kézi öntözés ......................................................................................................................................... Oldal 20
Az elem állapotának kijelzése ...................................................................................... Oldal 21
Hibák elhárítása ........................................................................................................................ Oldal 21
Tisztítás és ápolás
A szűrő tisztítása .................................................................................................................................. Oldal 21
Tárolás ................................................................................................................................................ Oldal 22
Megsemmisítés ............................................................................................................................ Oldal 22
Garancia ........................................................................................................................................... Oldal 22
14 HU
Öntözésidőzítő
Bevezető
Gratulálunk új termékének vásárlása alkalmából.
Ezzel a döntésével vállalatunk értékes terméke
mellett döntött. A használati utasítás ezen termék
része. A biztonságra, a használatára és a
megsemmisítésre vonatkozó fontos tudnivalókat
tartalmazza. A termék használata előtt ismerje meg
az összes használati és biztonsági tudnivalót. A
terméket csak a leírtak szerint és a megadott
felhasználási területeken alkalmazza. A termék
harmadik személy számára való továbbadása
esetén kézbesítse vele annak a teljes
dokumentációját is.
Rendeltetésszerű használat
Ez a termék vízfúvó- és fecskendező, valamint
öntözőrendszerek vezérlésére szolgál. Lehetővé
teszi külterek előre programozott időben
történő automatikus öntözését. A termék legfeljebb
2 automatikus öntözőprogramot
képes tárolni. A terméket kizárólag kültéren szabad
használni. Az ettől eltérő alkalmazás, vagy a
termék megváltoztatása nem rendeltetésszerűnek
minősül. A rendeletetésétől eltérő használatból
eredő károkért a gyártó nem felel. A terméket nem
közületi felhasználásra szánták.
A csomag tartalma
1 öntöző-computer
1 kuplungkapcsoló
1 adapter 33,3 mm 26,5 mm-re (G1” G¾”-re)
1 szűrő
2 elem1,5 V AA-típus
1 Használati útmutató
Műszaki adatok
Modell-sz.: HG00549
Üzemi nyomás: 34,5–827 kPa
(0,34–8,27 bar)
Max. vízhőmérséklet: 40°C
Feszültségellátás: 2 db 1,5 V
-os
(egyenáram), AA-típusú
elem
Átfolyási mennyiség: kb. 28 l / perc
Programozható
öntözési idő: 1 perc–1439 perc
Kézi
öntözési idő: 1 perc–1439 perc
Vízcsatlakozás: G ¾” (26,5 mm) vagy
G 1” (33,3 mm)
Védelmi jelleg: IP X4 (fröccsenő víztől
védett)
Tartozékok leírása (A - ábra)
1
Hollandi anya (a vízcs csatlakozáshoz)
2
Kijelző
3
Védőfedél
4
Gomb
5
Gomb
6
Szabályozó gomb
7
Gomb
8
Gomb (BE/KI)
9
Tömlő-csatlakozó
10
Elemrekesz
11
Szűrő
12
Adapter 33,3 mm 26,5 mm-re (G1” G¾”-re)
13
Kuplungkapcsoló
15 HU
Képernyőkijelzések (B-ábra)
kijelzés Jelentés
14
15
16
17
18
19
20
21
22
23
Rendszeridő
Öntözés/kézi
öntözés
Elem állapota
Öntözési időtartam
Öntözés 1
Öntözés 1 kezdő időpontja
Öntözés 1 tartama
Öntözés 2
Öntözés 2 kezdő időpontja
Öntözés 2 tartama
Biztonság
Biztonsági tudnivalók
Olyan károk esetén, amelyek ennek
a kezelési útmutatónak a figyelmen
kívül hagyásából erednek, a garancia
érvényét veszti! A következményekből
eredő károkért a gyártó nem vállal
felelősséget! Azokért a tárgyi-, vagy
személyi sérülésekért, amelyek a
szakszerűtlen kezelésből, vagy a
biztonsági tudnivalók figyelmen
kívül hagyásából erednek, a gyártó
nem vállal felelősséget!
ŐRIZZEN MEG MINDEN
BIZTONSÁGI TUDNIVALÓT ÉS
UTASÍTÁST A JÖVŐBENI
FELHASZNÁLÁS CÉLJÁBÓL!
Élet- és balesetves-
zély kisgyermekek és
gyermekek számára! Soha
ne hagyja a gyerekeket felügyelet
nélkül a csomagolóanyaggal.
Fulladás veszélye áll fenn. Tartsa
távol a terméket a gyerekektől.
A termék nem játékszer.
A terméket 8 éves kor feletti gyer-
mekek, valamint korlátozott fizikai,
érzékszervi vagy szellemi képességgel élő vagy nem megfelelő
tapasztalattal és tudással
rendelkező személyek csak felügyelet mellett, illetve a termék
biztonságos használatára vonatkozó felvilágosítás és a lehetséges
veszélyek megértése után használhatják.
A gyermekek nem játszhatnak a
termékkel. A tisztítást és az ápolást
gyermekek felügyelet nélkül nem
végezhetik.
16 HU
A terméket a garancia időtartama
alatt csak egy a gyártó által
jóváhagyott ügyfélszolgálat
végezhet, különben a következő
károkra már nem lehet garanciális
igénnyel élni.
A hibás alkatrészeket csak ereseti
cserealkatrésszel szabad
helyettesíteni. Csak ezen
alkatrészek felelnek meg a
biztonsági követelményeknek.
Kerülje el a közvetlen napsugárzást.
Mindig zárja el a vízcsapot, ha
már nem használja a terméket
Ne üzemeltesse a terméket nyílt
láng közelében.
Ellenőrizze a terméket és a
vezetékeit rendszeresen a
tömítettség és a kifogástalan
működés szempontjából.
A vízsugarat ne irányítsa
elektromos berendezésekre!
Ne irányítsa a vízsugarat
személyekre vagy állatokra!
A termék nem alkalmas ivóvíz
vételezésére.
Az elemekre / akkukra
vonatkozó biztonsági
tudnivalók
ÉLETVESZÉLY! Tartsa távol az
elemeket / akkumulátorokat a
gyermekektől. Lenyelés esetén
azonnal forduljon orvoshoz!
ROBBANÁSVESZÉLY!
Soha ne töltse a nem
feltölthető elemeket. Az elemeket /
akkukat tilos rövidre zárni és /
vagy felnyitni. Annak
következménye túlhevülés,
tűzveszély vagy a kihasadásuk
lehet.
Soha ne dobja az elemeket /
akkukat tűzbe vagy vízbe.
Ne tegye ki az elemeket / akkukat
mechanikai terhelésnek!
Az elemek kifolyásának
kockázata
Kerülje a szélsőséges
körülményeket és hőmérsékleteket,
mint pl. fűtőtestek / közvetlen
napsugárzás, amelyek hatással
lehetnek az elemekre / akkukra.
17 HU
Kerülje el a bőrrel, a szemmel és
a nyálkahártyákkal való
érintkezését! Elemsavval való
érintkezés esetén azonnal mossa
le az érintett helyet bő tiszta
vízzel és haladéktalanul
forduljon orvoshoz!
VISELJEN
VÉDŐKESZTYŰT! A
kifutott, vagy sérült elemek /
akkuk a bőrrel érintkezve
felmarhatják azt. Ezért
ilyen
esetben mindenképpen húzzon
megfelelő védőkesztyűt!
Kifolyás esetén azonnal távolítsa
el az elemeket a termékből a
károsodások elkerülése
érdekében!
Csak azonos típusú elemeket /
akkukat használjon! Ne használjon
együtt régi és új elemeket / akkukat!
Távolítsa el az elemeket / akkukat,
ha hosszabb ideig nem
használja a terméket.
A termék sérülésének
veszélye
Kizárólag a megadott típusú
elemeket / akkukat használja.
A behelyezésnél ügyeljen a
helyes polarításra! Ez az
elemrekeszen van feltüntetve!
Szükség esetén a behelyezés
előtt tisztítsa meg az elemek és
az elemrekesz érintkezőit!
A lemerült elemeket / akkukat
haladéktalanul távolítsa el a
készülékből.
Elemek behelyezése / cserélése
Nyissa fel az elemtartó rekeszt 10.
Tegyen 2 db AA- méretű elemet (LR06 / Mignon)
az elemrekeszbe
elemen és az elemrekeszben
polaritás-jelzésekre.
Zárja le az elemrekesz 10.
A kijelző 2 automatikusan bekapcsol és a
rendszeridő 0:00 óránál elindul.
Üzembe helyezés
A termék biztonságos és hibamentes üzemeléséhez
a felállítás helyének az alábbi követelményeknek
kell megfelelnie:
Az átfolyó víz hőmérséklete legfeljebb
40 °C lehet.
A minimális üzemi hőmérséklet +5 °C.
Csak tiszta édesvizet használjon.
10
. Ennek során ügyeljen az
10
található
18 HU
A terméket csak függőlegesen, a
tömlőcsatlakozóval
9
lefelé csatlakoztassa,
hogy elkerülje a víz bejutását az elemtartó
rekeszbe
10
.
FIGYELEM! Az öntöző-computer csak olyan
biztosítóberendezéssel ellátott ivóvízvételi helyre
köthető, amely leglább az EN 1717 szerinti
HD-típusnak (visszafolyásgátló csőszellőzéssel)
megfelel.
Tudnivaló: A megfelelő adapter
szakkereskedésekben kapható.
Ellenőrizze a rendelkezésre álló vízcsatlakozás
jellegét. A termék 33,3 mm-es menettel rendelkező
vízvezetékekhez (G 1”) való hollandi anyával
1
van ellátva. 26,5 mm-es menettel (G ¾”)
rendelkező vízvezetékekhez használja a mellékelt
adaptert
12
.
Tegye a szűrőt 11 az A-ábrán látható módon a
hollandi anyába
1
.
26,5 mm-es menettel (G ¾”) rendelkező
vízvezetékekhez: tegye az adaptert
12
a
vízvezetékre. Ehhez ne használjon semmilyen
segédeszközt.
ScCsavarja a hollandi anyát 1 a vízcsap, vagy
az adapter menetére. Ehhez ne használjon
semmilyen segédeszközt.
Csavarja az összekötődarabot 13 a
tömlőcsatlakozóra
13
azután cstlakoztathatja a tömlőt.
9
. Az összekötődarabra
Nyissa meg a vízcsapot.
FIGYELEM! Ha az adapter 12 használata
során tömítettlenséget tapasztal, akkor a vízcsap
menetét tekerje körbe szigetelőszalaggal.
A termék kezeléséhez nyissa fel a védőfedelet
3
. Zárja vissza teljesen a védőfedelet 3.
Programozza be az öntözést az „Üzemelés“
fejezetben leírtak szerint.
Üzemelés
Az öntöző-computerrel bármilyen tetszőleges
időpontban öntözhet. Az locsolóhoz csatlakoztathat
esőztetőt, vízspricelő, vagy csepegtetőrendszert.
Az öntöző-computer teljesen automatizálja a
locsolást a beprogramozott kezdőidővel és tartammal.
A programozás során vegye figyelembe az évszakot
és az adott nap időszakait. Kora reggel és késő
este a legkisebb a párolgás és ezáltal a fogyasztás.
A t ermék be- / kikapcsolása
(1. ábra)
Nyomja le és kb. 2 másodpercig tartsa
lenyomva a
BE-/KI -gombot 8.
Tudnivaló: Kikapcsolt termék esetén
(lásd C-ábra) nincsen automatikus locsolás.
Kikapcsolt állapotban ugyanakkor kézzel
öntözhetünk (a „Kézi öntözés“ fejezetben
leírtak szerint).
Idő beállítása (2–6. ábra)
1. Kapcsolja e a terméket. Nyomja le és kb.
2 másodpercig tartsa lenyomva a
BE- / KI -gombot
8
.
2. Nyomja le és kb. 2 másodpercig tartsa
lenyomva a
-gombot 4. A rendszeridő
óra-jelzése villog.
3. Állítsa be az órát az állítógomb
4. Nyomja meg a
-gombot 4. A rendszeridő
perc- kijelzése villog.
5. Állítsa be az percet az állítógomb
tekerésével.
6. Végezetül a mentéshez nyomja meg újra a
gombot 4.
6
tekerésével.
6
19 HU
Öntözés 1 és 2, Tartam
programozása (7–29. ábra)
A programozó-mód aktiválásához nyomja le és
kb. 2 másodpercig tartsa lenyomva a
5
. Vagy minden beállítást egymás után végez
el, vagy a
-gomb 5 többszöri megnyomásával
kapcsolgathat a következő beállítási
lehetőségek közül:
Öntözés 1 kezdő időpontja
Öntözés 1 tartama
Öntözés 2 kezdő időpontja
Öntözés 2 tartama
Öntözési időtartam (1 = minden nap, 2 = minden
2. nap, stb.)
Készenlét (a programozó-mód vége és az
öntözőautomatika aktiválása)
Programozó-módbannyomja meg újra a - gombot
5
. Az öntözés 1 óra-jelzése villog. Állítsa be
az órát az állítógomb
6
tekerésével.
Nyomja meg ismét a -gombot 5. Az öntözés
1 perc-jelzése villog. Állítsa be a percet az
állítógomb
6
tekerésével.
Nyomja meg újra a 5 gombot. Az öntözés
2 tartamának óra-jelzése villog. Állítsa be az
órát az állítógomb
6
tekerésével.
Nyomja meg újra a 5 gombot. Az öntözés
2 tartamának perc-jelzése villog. Állítsa be a
percet az állítógomb
6
tekerésével.
Tudnivaló: Tartsa szem előtt, hogy az
öntözés tartamát programozza és nem a
befejezés időpontját!
Íme néhány példa a lehetséges beállításokra /
az öntözés tartamára:
0:05 = 5 perc
0:45 = 45 perc
2:15 = 2 óra és 15 perc
-gombot
Kerülje el az öntözési idők közötti átfedést.
Az öntözés legrövidebb lehetséges tartama 1 perc.
Az öntözés leghosszabb lehetséges tartama 23 óra
és 59 perc.
Nyomja meg újra a 5 gombot. Az öntözések
közötti időközök nyíl-jele villog. Állítsa be az
időközöket az állítógomb
6
tekerésével
(1 = minden nap, 2 = minden 2. nap, stb.).
Nyomja meg újra a 5 gombot. A termék
készenlét-módba vált. Az öntözés
automatikusan elindul a programozott időben.
Az öntözés tartama alatt villog a
rendszeridő és az öntözés tartama (
–kijelző a
20
, vagy 23)
mögött.
Tudnivaló: A
-gomb 8 gyors
megnyomásával minig egy lépéssel visszaléphet
programozó-módban, hogy változtasson a már
beprogramozott értéken.
Tudnivaló: Kb. 1 perc elteltével ha nem
történik programozás, akkor a termék készenlétmódba lép vissza. Minden már beprogramozott
érték megmarad.
Kézi öntözés (30–36. ábra)
Nyomja le és kb. 2 másodpercig tartsa
lenyomva a azonnal elindul, a
rendszeridő mögött.
A kézi öntözés tartamának beállításához
nyomja meg a
villog. Állítsa be az órát az állítógomb
tekerésével.
Nyomja meg újra a 5 gombot. A percek
kijelzése villog. Állítsa be a percet az
állítógomb
A bevitel megerősítéséhez nyomja meg ismét a
-gombot 5.
gombot 7. A kézi öntözés
–kijelző villog a
-gombot 5. Az órák kijelzése
6
tekerésével.
6
20 HU
 Loading...