

FLORABEST FBK 4 B2, 273489 Original Instructions Manual

IAN 273489
4-IN-1 PETROL MULTI-TOOL FBK 4 B2
BENZIN-KOMBIGERÄT 4 IN 1
Originalbetriebsanleitung
Vor dem Gebrauch der Maschine sorgfältig lesen!
4-IN-1 PETROL MULTI-TOOL
Translation of the original instructions
Read carefully before using machine!
BENCINSKA KOMBINIRANA NAPRAVA 4 V 1
Prevod originalnega navodila za uporabo
Pred uporabo stroja pozorno preberite!
BENZÍNOVÉ KOMBINOVANÉ NÁRADIE 4 V 1
Preklad originálneho návodu na obsluhu
Pred použitím stroja si dôkladne prečítajte!
BENZÍNOVÝ KOMBINOVANÝ PŘÍSTROJ 4 V 1
Překlad originálního provozního návodu
Před použitím stroje pečlivě přečtěte!
BENZINES 4 AZ 1-BEN KOMBINÁLT KÉSZÜLÉK
Az originál használati utasítás fordítása
Kérjük, olvassa el figyelmesen a készülék használata előtt!

GB Translation of original operation manual Page 1
HU Az originál használati utasítás fordítása Oldal 19
SI Prevod originalnega navodila za uporabo Stran 37
CZ Překlad originálního provozního návodu Strana 55
SK Preklad originálneho návodu na obsluhu Strana 73
DE / AT / CH Originalbetriebsanleitung Seite 91
Before reading, unfold both pages containing illustrations and familiarise yourself with all functions of the
device.
Olvasás előtt kattintson az ábrákat tartalmazó mindkét oldalra és végezetül ismerje meg a készülék mindegyik
funkcióját.
Pred branjem obe strani s slikami odprite navzven in se nato seznanite z vsemi funkcijami naprave.
Před čtením si odklopte obě dvě strany s obrázky a potom se seznamte se všemi funkcemi přístroje.
Pred čítaním si odklopte obidve strany s obrázkami a potom sa oboznámte so všetkými funkciami prístroja.
Klappen Sie vor dem Lesen die beiden Seiten mit den Abbildungen aus und machen Sie sich anschließend
mit allen Funktionen des Gerätes vertraut.
5@
5#
5a
5b

5$
3d3a 3b 3c
1f
2a
2b 2c
5%
5^
5&
5*
5(
6) 6! 6@
6$6#6% 6^ 6&
6*
6(
7) 7! 7@
6&
6%
7@
6%
6(
7)
7!
7@
7#
1d 1e
1a 1b 1c
7@
7!
7)
6(

3h
3e
3f
3g
3i
6a 6b
6c 6d 6e
4
5a 5b
5c
5d 5e 5f
H1
H2
A

1
FBK 4 B2
GB
Contents
Introduction .................................2
Intended use ........................................2
Features............................................2
Package contents.....................................3
Technical data.......................................3
Safety information ...........................6
Operational safety instructions for hedge trimmers ...........6
Complementary safety instructions for hedge trimmers ........7
Operational safety instructions for the pole pruner ...........7
Precautions against kickback............................8
Operational safety instructions for the strimmer .............8
Operational safety instructions for the cutting blade..........9
Safety equipment ....................................9
Before use ..................................9
Attaching the round handle.............................9
Fitting the quick release mechanism ......................9
Fixing/attaching the carrying harness.....................9
Fitting the hedge trimmer..............................10
Removing the hedge trimmer...........................10
Swivelling the hedge trimmer...........................10
Mounting the saw chain and blade .....................10
Removing the saw chain ..............................10
Tightening and checking the saw chain ..................10
Lubricating the chain .................................10
Sharpening the saw chain.............................10
Attaching the extension attachment......................10
Fitting/removing the protective guard ....................11
Installing/replacing the cutting blade ....................11
Installing/replacing the strimmer ........................11
Putting on the carrying harness .........................11
Setting the cutting height ..............................11
Fuel and oil ........................................11
Before use .................................12
Starting when the engine is cold ........................12
Starting when the engine is hot .........................12
Working with the hedge trimmer........................13
Cutting techniques ...................................13
Working with the pole pruner ..........................13
Sawing techniques ..................................13
Working safely .....................................13
Transport ..................................13
Cleaning ...................................13
Maintenance ...............................14
Storage and transportation ...................14
Troubleshooting.............................15
Motor unit .........................................15
Pole pruner ........................................15
Hedge trimmer......................................15
Maintenance interval ........................15
Pole pruner ........................................15
Hedge trimmer......................................15
Spare part orders ...........................15
Disposal ...................................16
Appendix ..................................16
Warranty..........................................16
Service............................................16
Importer...........................................16
Translation of the original Conformity Declaration ..........17

2
FBK 4 B2
GB
4-IN-1 PETROL MULTI-TOOL FBK 4 B2
Introduction
Congratulations on the purchase of your new appliance. You have selected
a high-quality product. The operating instructions are a part of this product.
They contain important information on safety, usage and disposal.
Before using the product, familiarise yourself with all handling and safety
guidelines. Use the product only as described and for the range of applications specified. Please also pass these operating instructions on to any
future owner(s).
Intended use
Long-handled hedge trimmer
This appliance is intended for the cutting and trimming of hedges, bushes
and flowering shrubs in the home environment. This is a hand-held appliance with an integrated motor unit with linear reciprocating cutting blades.
WARNING!
► Hedge trimmers are not suitable for use by children.
Pole pruner
This appliance is intended for trimming branches in trees.
3-section cutting blade/strimmer
Use with 3-section cutting blade: for cutting high grass, undergrowth and
light scrub.
Use with strimmer: for cutting grass and small weeds.
Extension attachment
CAUTION!
■ Do not use the extension attachment/boom
5$
in combination with
the 3-section cutting blade/strimmer attachment!
Any other use which is not expressly permitted in these operating instructions may damage the appliance and represents a serious risk for the user.
Please make sure that you pay attention to the restrictions in the safety
instructions Pay attention to the national regulations which may restrict the
use of the machine. Any other uses of or modifications to the appliance are
deemed to be improper usage and may result in serious physical injury.
Not intended for commercial use.
PROHIBITED APPLICATIONS!
Due to the physical risk posed to the user, the appliance may not be used
to perform the following activities: cleaning footpaths and as a shredder
for shredding tree and hedge sections. Furthermore, the appliance may not
be used to level ground elevations such as molehills. For safety reasons,
the appliance may not be used as a drive unit for any other devices. The
user, not the manufacturer, is liable for any resulting damage or injuries of
any kind.
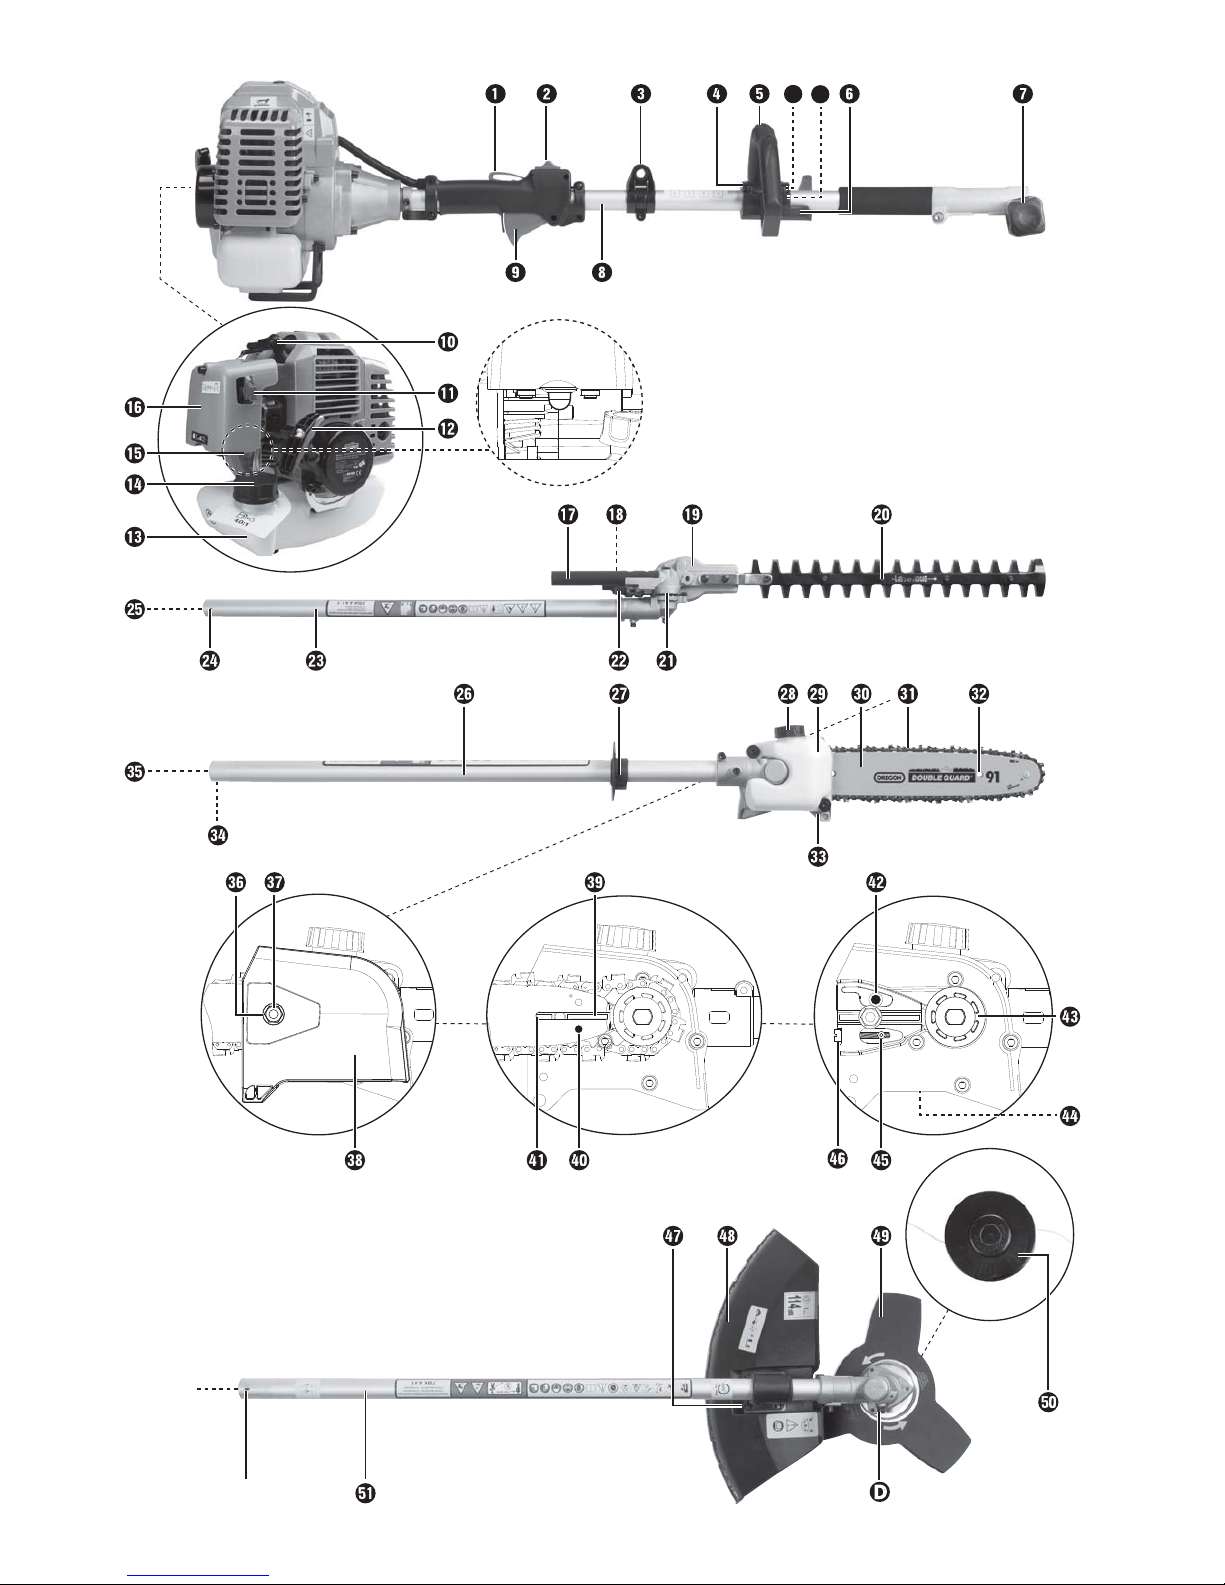
Features
Motor unit FBK 4 B2-1
Safety lock-out
On/Off switch
Carrying lug
4 x fixing bolts (with snap ring, washer and nut)
Round handle
5a
Rubber ring
5b
Pin
Barrier bar
Screw grip
Boom
Throttle control
Spark plug connector
Choke lever
Starter pull cord
Fuel tank
Filler cap
Fuel pump (primer)
Air filter housing cover
Hedge trimmer attachment FBK 4 B2-3
Handle
Lock/release
Transmission case
Cutter bar
Base plate (hedge shears)
Control lever
Front boom (hedge trimmer)
Locking pin
Drive shaft
Pole pruner attachment FBK 4 B2-4
Front boom (pole pruner)
Safety ring
Oil filler cap
Oil tank
Blade
Saw chain
Grinder support
Stop
Locking pin
Drive shaft
Nut
Thread
Sprocket cover
Blade guide
Blade hole
Guide rail
Oil dispenser
Chain sprocket
Oil adjusting screw
Chain tensioner pin
Chain-tensioner screw

3
FBK 4 B2
GB
Strimmer/cutting blade attachment FBK 4 B2-2
4 x bolts (with snap ring, washer and nut)
Blade guard
3-section cutting blade
Strimmer with cutting Strimmer cord
Front boom (strimmer/3-section cutting blade)
5@
Locking pin
5#
Drive shaft
Extension attachment
5$
Boom
5%
Screw grip
5^
Locking pin
5&
Drive shaft
Accessories
5*
Carr ying harness
5(
Blade guard
6)
Chain guard
6!
Organic chain oil
6@
Oil/petrol mixing canister
6#
Safet y goggles
6$
M4 Allen key
6%
M5 Allen key
6^
SW 8/10 open-ended spanner
6&
Spark plug wrench/flat-blade screwdriver
6*
Tool bag
6(
M10 x 1,0 nut (left-hand thread)
7)
Pressure plate cover
7!
Pressure plate
7@
Drive plate
7#
Strimmer cord
Package contents
1 Motor unit
1 Hedge trimmer attachment FBK 4 B2-3 (hereinafter hedge trimmer)
1 Pole pruner attachment FBK 4 B2-4 (hereinafter pole pruner)
1 Strimmer/cutting blade attachment FBK 4 B2-2
1 Extension attachment
1 Handle with barrier bar
1 Strimmer with cutting Strimmer cord
1 Strimmer cord (Strimmer cord Ø: 2.4 mm / Strimmer cord length: 6 m)
1 3-section cutting blade
1 Carrying harness
1 Protective cover for chain
1 Protective cover for blade
1 Oil/petrol mixing canister
1 100 ml organic chain oil
1 Tool bag
1 M4 Allen key
1 M5 Allen key
1 Spark plug wrench/flat-blade screwdriver
1 SW 8/10 open-ended spanner
1 Safety goggles
1 Operating manual
Technical data
Motor unit FBK 4 B2-1
Engine type: 2-stroke engine, air-cooled,
chrome cylinder
Engine output (max.): 1.35 kW/1.85 hp
Cylinder capacity: 42.7 cm³
Engine idle speed: 3000 min
-1
Max. engine speed
with 3-section cutting blade: 9200 min
-1
with strimmer: 8700 min
-1
with chainsaw: 9200 min
-1
with hedge trimmer: 9200 min
-1
Max. cutting speed
with 3-section cutting blade: 6900 min
-1
with strimmer: 6525 min
-1
with chainsaw: 20 m/s
with hedge trimmer: 1550 min
-1
Ignition: Electronic
Drive Centrifugal clutch
Weight:
(empty tank): approx. 5.6 kg
Tank size: 1200 cm
3
Spark plug: CDK L8RTC
Fuel consumption at
max. engine performance: 0.6 kg/h
Specific
fuel consumption
at max. engine performance: 446 g/kWh
Hedge trimmer FBK 4 B2-3
Cut length: 425 mm
Cutting capacity: 20 mm
Weight
(ready for use): approx. 2.24 kg
Pole pruner: FBK 4 B2-4
Weight (ready for use): approx. 1.6 kg
Recommended fill level (oil tank): 140 cm
3
Cut length: approx. 260 mm
Blade: Oregon Type 100SDEA318
Saw chain Oregon 91P040X
Oregon 91P040E
Strimmer/
cutting blade attachment: FBK 4 B2-2
Strimmer with cutting Strimmer cord (IAN 273489)
Strimmer cord cutting circle Ø: 43 cm
Strimmer cord length: 6.0 m
Strimmer cord Ø: 2.4 mm
3-section cutting blade (IAN 273489):
Cutting blade cutting diameter Ø: 25.5 cm

4
FBK 4 B2
GB
Noise and vibration data:
Noise measurement value determined in accordance with ISO 22868,
EN ISO 10517. The A-rated noise level is typically as follows:
Hedge trimmer
Sound pressure level L
pA
: 98.79 dB(A)
Uncertainty K
WA
: 2.5 dB
Sound power level L
WA
: 109.53 dB(A)
Guaranteed sound power level L
WA
: 114 dB(A)
Uncertainty K
WA
: 2.5 dB
Pole pruner:
Sound pressure level L
pA
: 97.06 dB(A)
Uncertainty K
WA
: 2.5 dB
Sound power level: 110.87 dB(A)
Uncertainty K
WA
: 2.5 dB
3-section cutting blade:
Sound pressure level L
pA
: 97.64 dB(A)
Uncertainty K
pA
: 2.5 dB
Sound power level L
WA
: 111.27 dB(A)
Uncertainty K
WA
: 2.5 dB
Strimmer:
Sound pressure level L
pA
: 99.08 dB(A)
Uncertainty K
pA
: 2.5 dB
Sound power level L
WA
: 108.18 dB(A)
Uncertainty K
WA
: 2.5 dB
Wear ear protection to prevent hearing damage!
Vibration values (vector total of three directions) determined in
accordance with EN ISO 11806-1, EN ISO 10517, EN ISO 11680-1 :
Hedge trimmer
Vibration at the front handle: Vibration emission value
a
h,D
= 4.182 m/s
2
Uncertainty K = 1.5 m/s
2
Vibration at the rear handle: Vibration emission value
a
h,D
= 9.695 m/s
2
Uncertainty K = 1.5 m/s
2
Pole pruner:
Vibration on the front handle: Vibration emission value
a
h,D
= 3.855 m/s
2
Uncertainty K = 1.5 m/s
2
Vibration on the rear handle: Vibration emission value
a
h,D
= 7.590 m/s
2
Uncertainty K = 1.5 m/s
2
Strimmer:
Vibration on the front handle: Vibration emission value
a
h,D
= 4.700 m/s
2
Uncertainty K = 1.5 m/s
2
Vibration on the rear handle: Vibration emission value
a
h,D
= 7.547 m/s
2
Uncertainty K = 1.5 m/s
2
3-section cutting blade:
Vibration on the front handle: Vibration emission value
a
h,D
= 4.622 m/s
2
Uncertainty K = 1.5 m/s
2
Vibration on the rear handle: Vibration emission value
a
h,D
= 7.708 m/s
2
Uncertainty K = 1.5 m/s
2
NOTE
► The vibration level specified in these instructions has been measured
in accordance with the standardised measuring procedure specified
in EN ISO 11806-1, EN ISO 10517, EN ISO 11680-1 and can be
used to make equipment comparisons. The specified vibration emission value can also be used to make an initial exposure estimate.
WARNING!
► The vibration level varies in accordance with use and may be higher
than the value specified in these instructions in some cases. There is
a risk of underestimation of the vibration load if the appliance is used
regularly in this manner. For an accurate estimate of the vibration
load during a specific working period, the periods during which the
appliance is switched off or is running but not actually being used
must also be taken into consideration. This can significantly reduce
the vibration load over the total working period.
WARNING!
■ You can reduce the vibration risk, for example, the risk of Raynaud's
phenomenon, by taking regular breaks during which you rub your
hands together.
Explanation of the symbols on the motor unit:
Warning! Read the operating instructions before use!
Wear protective gloves!
Wear safety shoes!
Wear ear protection!
Wear a hard hat!
Wear safety goggles!
Important, hot parts. Keep a safe distance away!
1
ON
o
I
1. Switch on device
FULL
2
2. Fill fuel pump (primer)
3
PULL
3. Pull choke lever
4
PULL
4. Pull starter pull cord
CHOKE
Pull choke lever

5
FBK 4 B2
GB
Push the primer 6 times
Mixing ratio: 40 parts petrol to 1 part oil
Petrol: ROZ 95 / ROZ 98
2-stroke engine oil: ISO - L - EGD / JASO FD
Explanation of the symbols on the hedge trimmer:
Risk of fatal electrical shock! Keep at least 10m away from
overhead power lines!
Caution! Falling objects.
Especially when cutting above head height.
Caution! Risk of injury due to running blades!
Keep a safe distance away!
General warning!
1. Slide the tab on the front boom all the way into the
groove of the boom of the motor unit.
2. Must properly inserted the red line be flush with the
boom of the motor unit.
3. If this is not possible, pull the starter pull cord to adjust
the shaft.
Caution! Switch the on/off switch
to “0”.
Explanation of the symbols on the pole pruner!
Risk of fatal electrical shock! Keep at least 10m away from
overhead power lines!
Protect the appliance from rain and moisture!
Caution! Falling objects.
Especially when cutting above head height.
Caution! Risk of injury due to running blades!
General warning!
1. Slide the tab on the front boom all the way into the
groove of the boom of the motor unit.
2. Must properly inserted the red line be flush with the
boom of the motor unit.
3. If this is not possible, pull the starter pull cord to adjust
the shaft.
Caution! Switch the on/off switch
to “0”.
Explanation of the symbols on the strimmer/cutting blade
attachment!
Caution! Left-hand thread.
Protect the appliance from rain and moisture!
Beware of flung objects!
Beware of recoil!
Attention! Risk of injury from rotating cutting blade!
Keep hands and feet away!
Attention – petrol is highly flammable!
Risk of explosion! Do not spill fuel!
Turn the appliance off and disconnect the spark plug before
performing any maintenance work!
Caution! Risk of suffocation!
Attention! Poisonous CO vapours (carbon monoxide vapours)!
Do not use the appliance in closed rooms!
Warning! Do not use circular saw blades for the cutting
blade function.
20 h
Add a little grease after every 20 hours of operation
(gear grease)
A distance of 15 metres must be maintained between the
machine and third parties!
The cutting tool continues running after it is turned off
(cutting blade/cutting Strimmer cord)!
Important, hot parts. Keep a safe distance away!
Sound power level LWA data in dB.
Fire, naked flames and smoking are prohibited!
1. Slide the tab on the front boom all the way into the
groove of the boom of the motor unit.
2. Must properly inserted the red line be flush with the
boom of the motor unit.
3. If this is not possible, pull the starter pull cord to adjust
the shaft.
Caution! Switch the on/off switch
to “0”.

6
FBK 4 B2
GB
Safety information
IMPORTANT! READ CAREFULLY BEFORE USE! KEEP FOR YOUR
RECORDS.
Operational safety instructions for hedge trimmers
NOTE
► The hedge trimmer is supplied completely assembled.
► Instructions and pictorial representations regarding the settings and use
of the hedge trimmer and/or its controls, maintenance, lubrication by
the user can be found in these instructions and on the fold-out page.
► Notes on the working position (see fold-out page)
► Notes on the operating controls (see fold-out page)
► Note on the safe handling of fuel (see section "Preparation", point f).
► Notes on the recommended replacement or repair of parts or the
Customer Service and specification of spare parts to be used,
inasmuch as these affect the health and safety of the user, can be
found in these instructions.
► The explanation of all graphical symbols, information, features and
technical data as well as the procedure in the event of accidents and
faults can be found in these instructions.
► Blocked tool: remove any blockages from the cutter bar
.
WARNING!
■ Children may never use the hedge trimmer.
■ Stay alert, watch what you are doing and use common sense
when operating the appliance. Do not use the appliance while
you are ill, tired or under the influence of drugs, alcohol or med-
ication. A moment of inattention while operating the appliance may
result in serious personal injury.
■ Avoid improper use. Use the machine only as described under
"Intended use".
Familiarise yourself with the operating instructions before you
operate the appliance.
Preparation
a) THE HEDGE TRIMMER CAN CAUSE SERIOUS INJURIES! Read the
instructions on correct handling, preparation, maintenance, starting and
stopping the hedge trimmer very carefully. Familiarise yourself with all
manual controls and the proper use of the hedge trimmer.
b) Children may never use the hedge trimmer.
c) Beware of overhead power lines.
d) Do not use the hedge trimmer while anyone, especially children, is in
the vicinity.
e) Wear appropriate clothing! Do not wear loose clothing or jewellery
which could get caught in moving parts. We recommend wearing
heavy-duty gloves, non-slip footwear and goggles.
f) Handle fuel carefully. It is highly flammable and the vapours are
explosive. The following points should be followed:
– Use only specially-designed containers.
– Never open the tank filler cap or top up the petrol tank while the motor
is running or hot. Allow the motor and the exhaust components to cool
down before refuelling.
– Do not smoke.
– Refuel outside only.
– Never store the hedge trimmer or the fuel tank in a room where there is
an open flame, for example in a hot water boiler.
– If the petrol has overflowed, do not attempt to start the engine. Remove
the machine from the fuel-contaminated area before restarting.
– Always replace the filler cap after refuelling and close it securely.
– If the tank is empty, this should be done in the open.
g) If the cutting unit comes in contact with a foreign object or if the operating
noise increases or the hedge trimmer starts to vibrate abnormally, stop
the engine and allow the hedge trimmer to come to a standstill. Pull the
spark plug connector off the spark plug and take the following action:
– check for damage;
– check for loose parts and secure all the loose parts;
– replace damaged parts with equivalent parts or have them repaired.
Wear ear protection!
Wear safety goggles!
■ Familiarise yourself with the operation of the hedge trimmer so that you
know how to stop immediately in an emergency.
Operation
a) The engine is to be immobilised before:
– cleaning or removal of a blockage;
– inspection, maintenance or work on the hedge trimmer;
– setting the working position of the cutting unit;
– if the hedge trimmer is to be left unattended.
b) Always make sure that the hedge trimmer is in the proper working posi-
tion before the engine is started.
c) During operation of the hedge trimmer, always ensure that you have firm
footing, especially when using a ladder.
d) Do not use the hedge trimmer if it has a defective or badly worn cutting
unit.
e) To minimise the risk of fire, ensure that the engine and the silencer are
free of residues, leaves or leaked lubricant.
f) Ensure that all supplied handles and safety guards are mounted when
operating the hedge trimmer. Never attempt to operate an incompletely
assembled hedge trimmer or a hedge trimmer with non-approved modifications.
g) Always use both hands if the hedge trimmer is equipped with two
handles.
h) Always familiarise yourself with your environment and be aware of potential
dangers that you may not be able to hear because of the noise of the
hedge trimmer.
Maintenance and storage
a) If the hedge trimmer is shut down for maintenance, inspection or storage,
switch off the engine, pull the spark plug connector off the spark plug
and ensure that all rotating parts have come to a standstill. Allow the
machine to cool down before carrying out an inspection, settings, etc.
b) Store the hedge trimmer where the petrol vapours cannot come into
contact with flames or sparks. Always allow the hedge trimmer to cool
down before storage.
c) When transporting or storing the hedge trimmer, cover the cutting unit
with the protective cover for the cutting unit.

7
FBK 4 B2
GB
Complementary safety instructions for hedge
trimmers
Environmental safety
■ Only operate the hedge trimmer in daylight or good artificial light.
■ While trimming, ensure that you do not come into contact with objects
such as fence wire or plant supports. They could cause damage to the
cutter bar
. Inspect the hedge to be cut carefully and remove any
wires or other foreign bodies.
■ Be aware of your environment and all possible hazards that you may
be unable to hear while cutting the hedge.
DANGER!
► In the event of imminent danger or an emergency, switch off the
engine immediately.
Electrical safety
■ Hold the power tool only by the insulated grips as the cutting blades
could come into contact with hidden power lines. Contact between
the blades and a live wire may make exposed metal parts of the power
tool live and could give the operator an electric shock.
Personal safety
■ During operation, no other person or animal may be within a radius
of 15 metres. The operator is responsible for third parties within the
working area.
■ During operation, ensure that you have proper footing and balance at
all times, especially when used on steps or ladders.
■ Never grasp the hedge trimmer by the cutter bar
.
■ Keep your hands away from the cutting blades. Do not attempt to
clear cuttings or hold onto the material to be cut while the blades
are still in motion. Remove any jammed clippings only when the
appliance has been switched off. A moment of inattention while oper-
ating the hedge trimmer may result in serious personal injury.
■ Wait until the tool has come to a standstill before putting it down.
Use and handling
CAUTION!
► Between tasks or after completion of a task, do not set the cutter bar
down on its tip as this could cause damage to the cutter bar
.
■ Before use, always check that the blades, the blade screws and other
parts of the cutting tool are not worn or damaged. Never work with a
damaged or heavily worn blade.
■ After making settings to the working angle, check whether both setting
levers are clicked firmly into place. If one of the setting levers remains
open, the second could be unintentionally be released by a branch
and the cutter bar
could swing down.
■ Never use the hedge trimmer with defective or missing safety guards.
■ Never grasp the hedge trimmer by the safety guards.
■ Carry the hedge trimmer by the front handle when switched off, and
with the cutter bar facing away from your body. When transporting
or storing the trimmer, always put on the protective cover. Careful
handling of the appliance reduces the likelihood of accidental contact
with the moving blades.
■ Store the hedge trimmer in a dry, high or closed space out of the reach
of children.
■ Do not attempt to repair the equipment unless you have received the
necessary training.
■ For safety's sake, change worn or damaged parts.
DANGER!
► In the event of imminent danger or an emergency, switch off the
engine immediately.
Operational safety instructions for the pole pruner
CAUTION! RISK OF INJURY!
► To prevent injuries, never touch the appliance above the safety ring
while it is running.
Preparation
■ Always wear a hard hat, hearing protection and safety gloves. Also
wear eye protection to prevent splashes of oil or sawdust from falling
into your eyes. Wear a dust mask to protect yourself from dust.
■ Wear sturdy, non-slip boots.
■ Do not use the appliance in the rain.
■ Before use, check the appliance's safety condition, especially the blade
and the saw chain.
■ Do not use the appliance near overhead power lines. Maintain a
minimum distance of 10 m to overhead power lines.
Electrical safety
■ Do not use the appliance in a potentially explosive environment con-
taining flammable liquids, gases or dusts. The sparks generated by the
machine could ignite the vapours or gases.
■ Appliances with defective switches must be repaired immediately to
avoid damage or injuries.
Personal safety
■ Never use the appliance while standing on a ladder.
■ Do not lean too far forwards while using the appliance. Ensure you are
standing firmly and keep your balance at all times. Use the supplied
carrying harness to spread the weight evenly on the body.
■ To avoid injuries due to falling branches, do not stand under the branches
that you want to cut off. Be aware of branches that may spring back
and cause injuries. Work at an angle of approximately 60°.
■ Be aware that the appliance can kick back.
■ Keep an eye not only on the branches being cut, but also on falling
material, to avoid tripping.
■ Cover the guide rail and the chain during transport during transport
and storage using the cover.
■ Avoid unintentional starting of the appliance.
■ Store the appliance outside the reach of children. Only those who are
fully acquainted with the operating instructions and the appliance itself
may operate the appliance.
Use and handling
■ Never start the appliance before the blade, saw chain and sprocket
covers have been fitted correctly.
■ Do not cut any wood that is lying on the ground and do not attempt to
saw roots that are protruding from the soil. Avoid immersing the saw
chain in the soil at all costs, as this could blunt the saw chain.
■ If the appliance accidentally comes into contact with a solid object, turn
off the engine immediately and inspect the appliance for damage.
■ After 30 minutes' work, take a break of at least one hour.
■ If the pole pruner is shut down for maintenance, inspection or storage,
switch off the engine, pull the spark plug connector off the spark plug
and ensure that all rotating parts have come to a standstill. Allow the
machine to cool down before carrying out an inspection, settings, etc.
■ Service the appliance carefully. Check for misalignment or binding
of moving parts, breakage of parts and any other damage that may
impair the tool’s operation. If damaged, have the power tool repaired
before use. Many accidents are caused by poorly-maintained tools.
■ Keep cutting tools sharp and clean. Properly maintained cutting tools
with sharp cutting edges are less likely to jam and are easier to control.
■ Therefore, have the appliance checked by qualified specialists. Use
only the replacement parts recommended by the manufacturer.
8
FBK 4 B2
GB
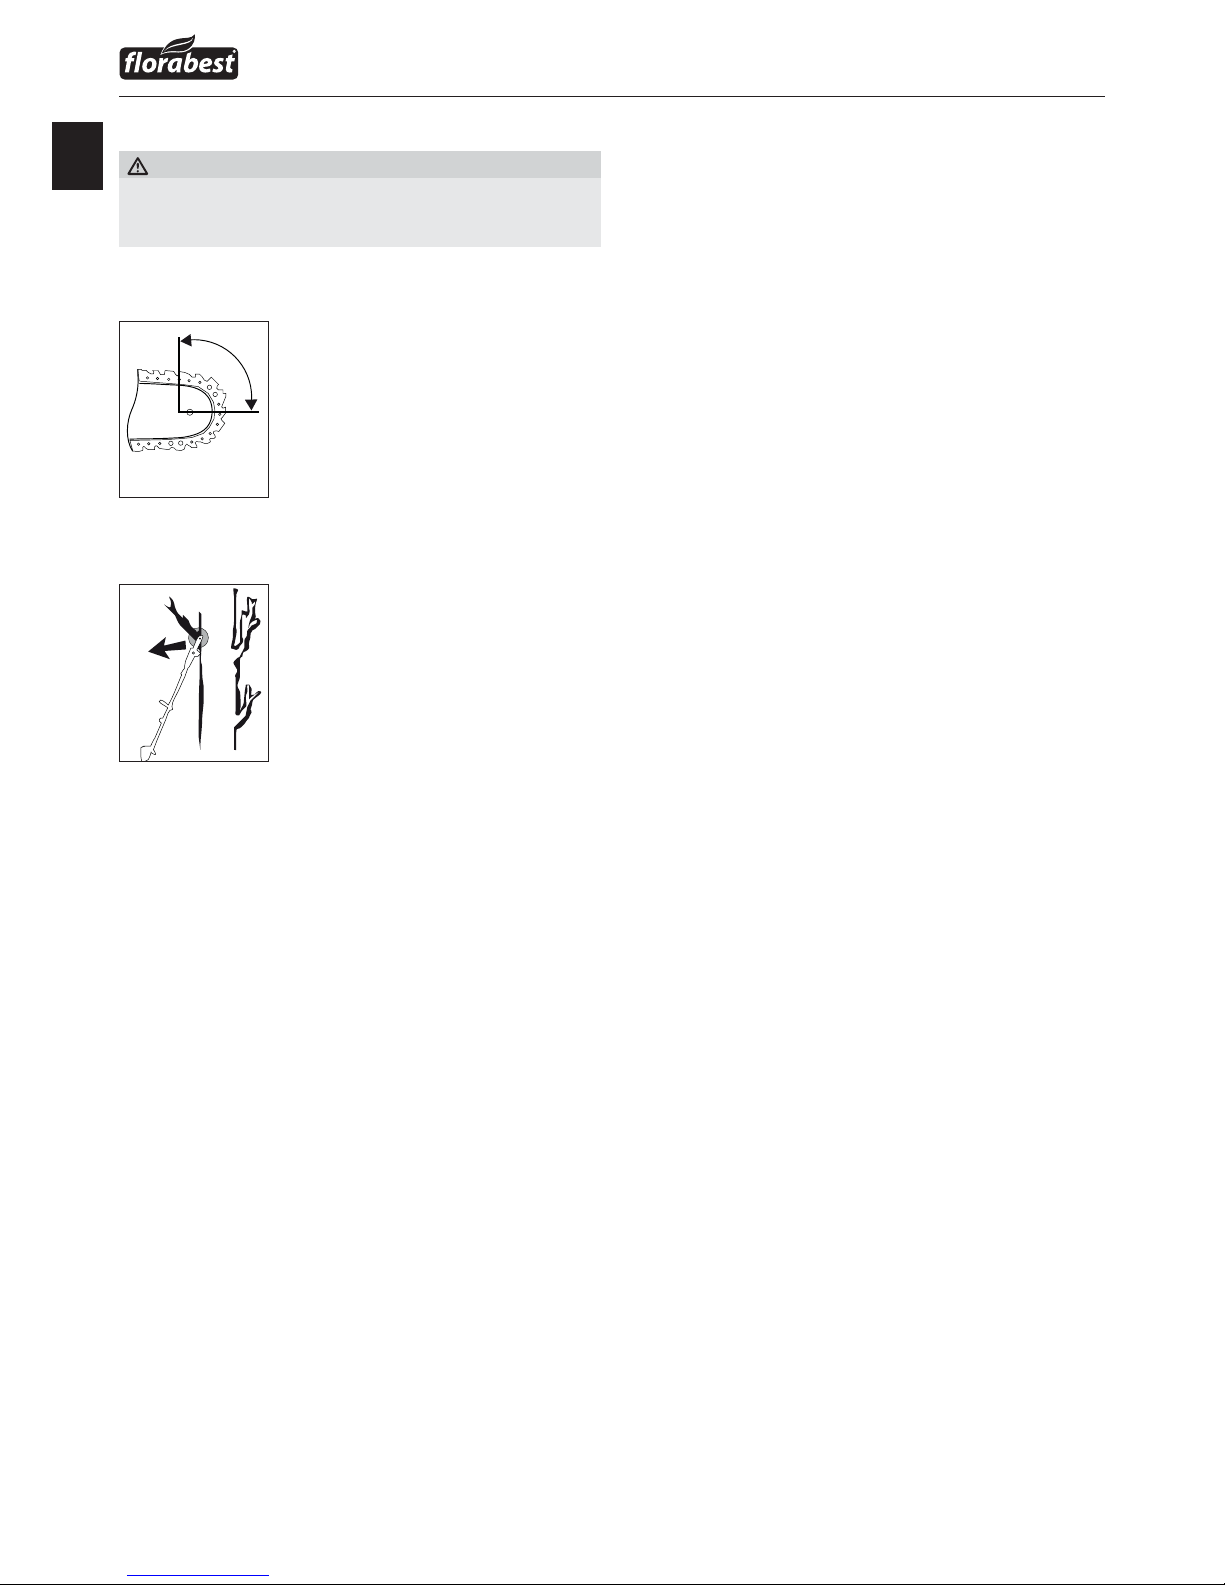
Precautions against kickback
CAUTION KICKBACK!
► Be aware of the danger of kickback when working with the appliance.
There is a risk of personal injury. You can avoid kickbacks by being
careful and using the correct sawing technique.
■ Contact with the tip of the rail can, in some cases, lead to an unexpected
rearwards reaction resulting in the guide rail flying upwards towards
the operator (see Fig. A).
Fig. A
■ Kickbacks can occur if the tip of the guide rail touches an object or if
the wood bends and the saw chain gets caught in the cut (see Fig. B).
Fig. B
■ If the saw chain jams in the upper edge of the guide rail, the rail can
kick back violently towards the operator.
■ Any such reaction can lead to you losing control over the saw and
possibly injuring yourself. Do not rely solely on the chainsaw's built-in
safety devices. As the user of a chainsaw, you can take a number
of measures to avoid accidents and injury. A kickback is caused by
incorrect use or misuse. It can be avoided by taking proper precautions
as given below.
■ Hold the saw firmly with both hands, with your thumb and fingers
around the handles of the chainsaw. Hold your body and arms in
a position in which you can withstand kickback forces. If suitable
measures are taken, the operator can control the recoil forces. Never
let go of the chainsaw.
■ Avoid an abnormal posture and do not saw above shoulder height.
This will prevent inadvertent contact with the tip of the rail and allows a
better control of the chainsaw in unexpected situations.
■ Always use the replacement rails and saw chains specified by the
manufacturer. Incorrect replacement rails and saw chains can lead to
a tearing of the saw chain and/or kickback.
■ Follow the manufacturer's instructions for sharpening and mainten-
ance of the saw chain. Setting the depth stop too low can increase the
risk of kickback.
■ Do not saw with the tip of the blade. This can lead to kickback.
■ Ensure that there are no objects on the ground that you can trip
over.
Operational safety instructions for the strimmer
Preparation
■ Wear close-fitting clothes that offer good protection, such as long
trousers, sturdy work shoes, heavy-duty protective gloves, a hard hat,
a protective mask for your face or safety goggles to protect your eyes
and good ear plugs or some other hearing protection against noise.
■ Always use the enclosed shoulder strap.
■ Always ensure that the handles are dry and clean and that no petrol
mixture is present.
■ Before working, check the area for objects such as pieces of metal,
bottles, stones, etc, which could get thrown up and cause injuries to the
user.
■ Before starting the engine, make sure that the strimmer is not in contact
with any obstacles.
■ Do not use the appliance until you have familiarised yourself with its
use.
Electrical safety
■ Never use the appliance near highly flammable liquids or gases, either in
closed rooms or in the open. This may result in explosions and/or fire.
■ Do not work with a damaged or incomplete appliance or an appli-
ance that has been modified without the consent of the manufacturer.
Never use the unit with defective protective equipment. Do not use the
appliance if it has a defective on/off switch. If the appliance has been
dropped, check for significant damage or defects.
Personal safety
■ This appliance may only be operated, adjusted and maintained by
appropriately trained individuals and adults.
■ If you are not familiar with the appliance, practice handling the appliance
while the engine is off.
■ Do not touch the exhaust.
■ Do not operate the appliance under the influence of alcohol or drugs.
■ Always hold the appliance with both hands. Your thumbs and fingers
should encircle the handles.
■ Work posture: Do not operate the appliance in an uncomfortable
position, when you are unbalanced, with arms fully stretched or with
only one hand.
■ Always ensure that you have a solid and firm stance.
■ Do not use the appliance if spectators or animals are in the direct vicin-
ity. Maintain a minimum distance of 15 metres between the operator
and other people or animals when trimming. Maintain a minimum distance of 30 metres between the operator and other persons or animals
when mowing down to the ground.
■ When mowing on a slope, always stand at a lower level than the
cutting tool. Never cut or trim on an icy, slippery hill or slope.
■ Any modifications to the product may risk personal safety and void the
manufacturer's warranty.
■ Children should be supervised to ensure that they do not play with the
appliance.
■ Do not use the appliance if it is damaged or if there are visible defects.
Use and handling
■ Use the appliance only for its intended purpose: cutting grass, mowing,
pruning branches, cutting and trimming hedges and bushes.
■ Do not use the appliance for extended periods; take regular breaks.
■ Ensure that screws and connecting elements are firmly tightened. Never
operate the appliance if it is not correctly adjusted, incomplete or if it is
not properly assembled.
■ Open the fuel tank slowly in order to allow any pressure which may have
built up in the tank to dissipate. To prevent the risk of fire, move at least 3
metres away from the refuelling area before starting the appliance.
■ Guide the strimmer to the desired height. Avoid contact with small
objects (e.g. stones) when using the strimmer.
■ Always hold the strimmer on the ground when the appliance is in
operation.
■ Do not use the appliance unless the appropriate protective guard has
been installed and is in good condition.
■ Do not use any other cutting tools. For your safety, only use the
accessories and additional devices that are indicated in the operating
instructions. The use of parts other than those recommended in the
operating instructions, or other accessories, can put you at risk of injury.
Bild 1

9
FBK 4 B2
GB
■ Always trim and cut using the high speed range. Do not let the engine
run at a low speed when starting to mow or trim.
■ When starting and operating the appliance, ensure that it does not
come into contact with the ground, stones, wire or other foreign material. Switch off the appliance before you put it down.
■ Switch off the appliance before you put it away.
■ Always turn the engine off before working on the cutting tool.
Operational safety instructions for the cutting
blade
Preparation
■ The cutting blade flings objects and soil with great force. These can
blind or cause other injuries. Wear eye, face and leg protection. Always
remove objects from the work area before using the cutting blade.
■ The cutting blade continues running after the throttle lever has been
released. A running-down cutting blade can inflict cuts to yourself or
other people standing nearby. Turn the engine off and make sure that
the cutting blade has come to a complete stop before performing any
work on the cutting blade.
Personal safety
■ The appliance can blind and cause injuries to bystanders. Maintain a
minimum distance of 15 metres in all directions between the appliance
and other people or animals.
Use and handling
■ Do not use the appliance if any of the cutting blade accessories have
not been properly installed.
■ The cutting blade can kick back from objects with force. This can cause
injuries to your arms and legs. If the appliance comes into contact with
a foreign body, immediately shut down the engine and wait until the
cutting blade has come to a complete stop. Check the cutting blade for
damage. Always replace the cutting blade if it is bent or cracked.
Safety equipment
The relevant plastic protective guard for the cutting blade or line operation
must be installed when working with the appliance in order to prevent
objects from being thrown.
WARNING!
■ Never mow/trim while other individuals, especially children or animals,
are in the vicinity.
■ Maintain a safety distance of 15 m. Turn off the appliance immedi-
ately if this distance is not maintained.
CAUTION! RISK OF POISONING!
■ Exhaust gases, fuels and lubricants are toxic. Exhaust gases must
never be inhaled.
WARNING!
■ Petrol is highly flammable. Store petrol only in the containers
provided.
■ Refuel only outdoors and do not smoke.
■ The filler cap must not be opened and refuelling must not take place
while the engine is running or when the appliance is hot.
■ Do not attempt to start the engine if the petrol has overflowed. In-
stead, remove the appliance from the area polluted by petrol. Do not
attempt to restart the appliance until the petrol fumes have dissipated.
■ For safety reasons, the petrol tank and filler cap must be replaced if
they are damaged.
Limit the noise development and vibrations to a minimum!
■ Only use appliances that are in good condition.
■ Maintain and clean the appliance on a regular basis.
■ Adapt your working method to the appliance.
■ Do not overload the appliance.
■ Have the appliance inspected if necessary.
■ Switch the appliance off when not in use.
■ Wear protective gloves!
Before use
CAUTION!
■ Always wear non-slip footwear and appropriate safety clothing
such as protective gloves, a hard hat, a protective mask and safety
goggles as well as hearing protection.
■ Check the area in which the appliance is to be used and remove any
objects that may be caught and thrown upwards by the blade.
■ Before use and after dropping or other impacts, always visually in-
spect the appliance to check whether the cutting tool, mounting bolts
and the entire cutting unit are damaged. Worn or damaged cutting
tools and mounting bolts must be replaced.
■ Always carry out a visual inspection before use to check whether the
cutting tools are worn or damaged. To prevent imbalance, worn or
damaged cutting tools and mounting bolts should be replaced only
as complete sets.
Attaching the round handle
♦ Start by fitting the rubber ring 5a on the boom .
♦ Attach the barrier bar
onto the rubber ring 5a from below.
♦ The pin
5b
on the barrier bar must be pushed into one of the two
holes on the boom
to lock it into place.
♦ Push the round handle
onto the rubber ring 5a provided on the
boom
.
♦ Insert the 4 mounting bolts
from above through the round handle
and secure them with the 4 nuts in the barrier bar
.
♦ Tighten the bolts
.
Fitting the quick release mechanism
♦ Hook in the carabiner and secure it with the red strap on the quick
release mechanism (see figures). Pull on the red strap if you have to
release the appliance quickly.
Fixing/attaching the carrying harness
♦ Hook the carrying harness 5* into the carrying lug .
♦ Adjust the length of the carrying harness
5*
to your size so that the
carrying lug
is at hip height when hooked in place.

10
FBK 4 B2
GB
Fitting the hedge trimmer
♦ Start by undoing the screw grip on the boom of the motor unit.
♦
Slide the tab on the front boom of the
hedge trimmer onto the boom
of the
motor unit. Must properly inserted the red
line be flush with the boom of the motor unit.
♦ If this is not possible, pull the starter pull cord to adjust the shaft.
Caution! Switch the on/off switch
to “0”.
♦ Tighten the screw grip
.
NOTE
►
The assembly of the pole pruner/strimmer/3-section cutting blade/
extension attachment is carried out in the same order.
Removing the hedge trimmer
♦ Undo the screw grip and pull the front boom on the hedge
trimmer out of the boom
on the motor unit.
NOTE
► Disassembly of the pole pruner/strimmer/3-section cutting blade/
extension attachment is carried out in the same order.
Swivelling the hedge trimmer
♦ Release the lock/release .
♦ Press the control lever
and swivel the hedge trimmer into the
desired position.
♦ Allow the control lever
to click into the recess in the base plate
(hedge trimmer)
.
Mounting the saw chain and blade
WARNING!
► Wear protective gloves! There is a danger of injury from the sharp
cutting teeth.
NOTE
► Pay close attention to the running direction of the saw chain
on
the blade
and at the base plate (pole pruner) .
► Depending on wear, the blade
can be turned.
♦ Undo the nut
using the open-ended spanner 6^.
♦ Remove the sprocket cover
.
♦ Lay the saw chain
over the blade starting at the tip.
♦ Now fit the blade
and saw chain .
♦ Lay the guide rail
over the blade guide while inserting the chain
tensioner pin
in the blade hole . At the same time, lay the saw
chain
over the chain sprocket .
♦ Now you can tighten the saw chain
(see section "Tightening and
checking the saw chain").
♦ Replace the sprocket cover
and tighten the nut gently.
Removing the saw chain
♦ You may have to loosen the saw chain to remove the blade
and the saw chain
(see section "Tightening and checking the saw
chain"). Follow these instructions in reverse order.
Tightening and checking the saw chain
WARNING!
► Wear protective gloves! There is a danger of injury from the sharp
cutting teeth.
♦ Turn the chain-tensioner screw
in a clockwise direction using the
flat-blade screwdriver
6&
to increase the tension.
♦ The saw chain
must lie against the underside of the blade. Check
whether the saw chain
can be drawn by hand over the blade .
NOTE
►
A new saw chain
stretches and must be tightened more regularly.
Lubricating the chain
♦ Remove the oil filler cap .
♦ Fill the oil tank
with approx. 100ml of organic chain oil 6!.
♦ The chain lubrication can be increased or decreased using the oil
adjusting screw
.
♦ Press and then turn the oil adjusting screw
clockwise to decrease
the chain lubrication.
♦ Press and then turn the oil adjusting screw
anticlockwise to increase
the chain lubrication.
WARNING!
► Never work without chain lubrication!
If the saw chain runs dry, the cutting equipment may become irreparably damaged in a short time. Always check chain lubrication and
oil level in the tank before starting work.
NOTE
► Use only saw chain oil. Preferably biodegradable. Do not use waste
oil, motor oil, etc.
► While working, check whether the chain lubrication is working correctly.
Sharpening the saw chain
NOTE
► A grinder can be attached to the grinder support
for a secure grip
during grinding.
► You will find detailed information on sharpening in the sharpening
set, e.g. from Oregon.
► Alternatively, you can use an electrical saw chain sharpening device
and follow the manufacturer's instructions .
► If you have any doubts about carrying out the work, the saw chain
should be replaced.
Attaching the extension attachment
CAUTION!
■ Do not use the extension attachment/boom
5$
in combination with
the 3-section cutting blade/strimmer attachment!
NOTE
► Use the extension attachment/boom
5$
for working at greater
heights.
♦ Fit the extension attachment/boom
5$
between the motor unit and the
hedge trimmer/pole pruner. The assembly is carried out in the same
manner as for the attachments described previously.

11
FBK 4 B2
GB
Fitting/removing the protective guard
WARNING!
■ When working with the 3-section cutting blade, the protective guard
must be fitted. Fold the metal sheet of the front boom down
slightly. The protective cover
is positioned between the metal sheet
and the boom
mounting arm. The protective guard
is now
attached to the front boom with 4 screws . Use the supplied
Allen key
6$
and the open-ended spanner 6^.
Cutting equipment Protective equipment
3-section cutting blade Protective cover
Strimmer with cutting Strim-
mer cord
Protective cover + cutting Strimmer
cord protective guard
C
WARNING!
■ Do not use any other cutting equipment apart from that which is
supplied with the product. The use of any other cutting equipment
or protective equipment is deemed to be improper and carries a
significant risk of accidents.
Installing/replacing the cutting blade
■ Fit/remove the 3-section cutting blade as shown in Figures 1a–1f.
■ Find the hole in the drive plate
7@
, align it with the opposite hole and
block it with the supplied Allen key
6%
.
■ Place the 3-section cutting blade
on the drive plate 7@ (see Fig. 1b).
The label must be visible in working position from above (see fold out
page).
■ Fit the pressure plate
7!
over the thread on the splined shaft (see Fig. 1c).
■ Fit the pressure plate cover
7)
(see Fig. 1d).
■ Now tighten the nut
6(
with the spark plug wrench 6& anti clockwise
CAUTION! Left-hand thread! (see Fig. 1f).
■ The 3-section cutting blade
is fitted with a plastic cover on delivery. This
must be removed before use and refitted during periods when not in use.
■ The plastic cover can now be removed.
CAUTION! SHARP EDGES, WEAR PROTECTIVE GLOVES
■ Fit the cutting Strimmer cord protective guard
C
on the protective
guard
.
■ The cutting Strimmer cord protective guard
C
must be fitted when working with the cutting Strimmer cord. The cutting Strimmer cord protective
guard C (pre-fitted on delivery) is fitted as shown in Figure 2a.
■ Ensure that the cutting Strimmer cord protective guard
C
is correctly
clicked into place. There is a blade A on the inside of the cutting
Strimmer cord protective guard C. This is covered with a safety cover
B
(see Fig. 2a.).
■ Remove the safety cover
B
before starting work and replace it after
finishing work.
CAUTION! SHARP EDGES, WEAR PROTECTIVE GLOVES
■ To remove the cutting Strimmer cord protective guard
C
from the
protective guard
, take a tool, such as a screwdriver, to carefully
remove the three mounting pins. CAUTION! RISK OF INJURY!
Installing/replacing the strimmer
■ Fit/remove the strimmer as shown in Figure 2c.
■ Find the hole in the drive plate
7@
, align it with the opposite hole and
block it with the supplied Allen key
6%
.
■ Screw the strimmer
anticlockwise onto the thread.
CAUTION! Left-hand thread!
Putting on the carrying harness
NOTE
■
The following adjustments can be made to make sure that you can
work without becoming fatigued. The settings may vary depending
on your body size.
■ Before starting work, adjust the carrying harness
5*
to suit your body
size.
■ Balance the appliance with the fitted cutting tool so that the cutting
tool swings just over the ground without the need to move the appliance with your hands.
1.) Put on the carrying harness
5*
and close the clasps so that they click
into place (see Fig. 3a).
2.) As shown in Figure 3b, pull on the belt
5*
to position the carrying
harness
5*
centrally on your body and adjust the upper body size.
3.) To tighten the two shoulder straps, pull on the two shoulder straps as
shown in Figure 3c.
4.) To ensure to the correct position of the appliance on the carrying
harness, pull the belt as shown in Figure 3d.
5.) Hook in the carabiner
and secure it with the red strap on the
quick release mechanism (see Figures 3e–3g).
6.) Now take the appliance and hang it, as shown in Figure 3h, so that the
carrying lug
clicks into the carabiner . The carrying lug can
also be moved by loosening the screw
and sliding it to achieve the
optimum orientation of the appliance.
Setting the cutting height
■ Put on the carrying harness 5* and hook in the appliance (see section
"Putting on the carrying harness").
■ Use the various belt straps on the carrying harness
5*
to adjust the
optimum working and cutting position (see section "Putting on the
carrying harness").
■ Perform a few circular movements without starting the engine in order to
find the ideal shoulder strap length (see fig. 6a).
■ The carrying harness
5*
is equipped with a quick-release locking mech-
anism. Pull on the red strap
if you have to release the appliance
quickly (see Fig. 3i).
CAUTION!
■ Always use the carrying harness
5*
when you are working with
the appliance. Put on the carrying harness
5*
as soon as you have
started the engine and it is ticking over. Switch off the engine before
removing the carrying harness
5*
.
Fuel and oil
■ Only use a mixture of unleaded petrol (min. ROZ 95) and special
2-stroke engine oil. mix (JASO FD/ISO - L - EGD) the fuel mixture in
accordance with the fuel mix table.
■ Add the respective correct amounts of unleaded petrol and 2-stroke
oil to the supplied oil/petrol mixing canister
6@
(see "Fuel mix table").
Then shake the canister well.
Fuel mix table
Mixing process: 40 parts petrol to 1 part oil
Petrol 2-stroke oil
0.5 litre 12.5 ml

12
FBK 4 B2
GB
Before use
CAUTION!
■ Please pay attention to the statutory provisions in the relevant noise
protection regulations.
Before starting the appliance, always check that:
■ The fuel system is not leaking.
■ The protective equipment and cutting equipment is complete and in
perfect working order.
■ All screw connections are firmly tightened.
■ All moving parts can move smoothly and freely.
Starting when the engine is cold
CAUTION!
■ Never allow the starter pull cord to whip back This could cause
damage.
1.) Fill the fuel tank
(see also the section "Fuel and oil").
2.) Press the primer
6 times.
3.) Switch the on/off switch
to "I".
4.) Pull the choke lever
into position " ".
5.) Hold the appliance firmly and pull out the starter pull cord
to the
point of first resistance. Now pull hard on the starter pull cord
.
The appliance starts.
6.) If the engine does not start, repeat steps 4–5.
7.) As soon as the engine is running, press the safety lock-out
and then
press the throttle
to activate the automatic choke.
If the engine does not start after several attempts, read the "Troubleshooting guide" section.
CAUTION!
■ Always pull the starter pull cord
straight out. Hold the handle of
the starter pull cord
firmly when the starter pull cord retracts.
Do not allow the starter pull cord
to whip back.
NOTE
■
At very high ambient temperatures it is possible that even a cold
engine has to be started without using the choke!
Starting when the engine is hot
(The appliance has been turned off for less than 15–20
minutes)
1.) Switch the on/off switch
to "I".
2.) The choke lever
does not need to be pulled out to start a warm motor.
3.) Hold the appliance firmly and pull out the starter pull cord
to the
point of first resistance. Now pull hard on the starter pull cord
.
The appliance should start after 1–2 pulls. If the appliance still hasn't
started after 6 pulls, repeat steps 1–7 under "Starting when the engine
is cold".
Turning the engine off
Emergency stop sequence
If you need to stop the appliance immediately, switch the on/off switch
to "0".
Normal sequence
■ Release the throttle lever
and wait until the engine has slowed down
to its idling speed. Then switch the on/off switch to "0".
CAUTION!
■ The 3-section cutting blade must be stationary when the engine is
idling. If the 3-section cutting blade is rotating adjust the carburettor!
Optimal working procedures
Before using the appliance, practice all working techniques (see Figs.
6a–6c) with the engine stopped.
Extending the cutting Strimmer cord
To lengthen the cutting Strimmer cord, rev the engine to full throttle and tap
the strimmer
on the ground. The Strimmer cord extends automatically.
The knife
A
on the cutting Strimmer cord protective guard C cuts the
thread to the permissible length (see Fig. 6d).
CAUTION!
Grass/weed residues can get caught under the protective guard
.
■ Remove the remains using a scraper or similar item when the engine
is switched off.
Various cutting methods
Trimming/mowing (3-section cutting blade or strimmer)
■ Swing the appliance in a scything motion (see Fig. 6a).
■ Hold the cutting tool parallel to the ground and set the desired cutting
height.
Low trimming (with strimmer)
■ Hold the appliance with a slight incline to the ground (see Fig. 6b). Al-
ways cut away from your body. Never pull the appliance towards you.
Short mowing (with strimmer)
■ Short mowing removes all the vegetation right down to the ground.
Angle the strimmer 30° to the right. Set the handle to the desired
position (see Fig. 6c).
Cutting against trees/fences/foundations (with strimmer)
NOTE
■
The Strimmer cord will wear or fray quickly if it comes into contact
with trees, rocks, walls or foundations. The Strimmer cord will break
off if it strikes fence mesh.
CAUTION!
■ Do not use the appliance to remove any objects from footpaths, etc.!
The appliance is powerful and can fling small stones or other objects
15 metres or more and may cause injuries or damage to cars,
houses and windows.
Wear safety goggles!
Jamming
Immediately turn off the engine if the cutting tool becomes blocked.
Remove all grass and scrub from the appliance before restarting the
appliance.
Preventing kickback
When working with the cutting blade there is a risk of kickback if the blade
strikes against solid obstacles (tree trunks, branches, tree stumps, rocks or
similar). This will result in the cutting tool being catapulted back against the
direction of rotation. This can lead to the loss of control of the appliance.
Do not use the cutting blade near fences, metal posts, boundary stones or
foundations. To cut weak shrubs, position the appliance as shown in Fig.
6e to avoid kickbacks.

13
FBK 4 B2
GB
Working with the hedge trimmer
Cutting techniques
■ The double-sided cutter bar allows cutting in both directions or by using
swinging movements from one side to the other.
■ For a vertical cut, move the hedge trimmer evenly forwards or up and
down in an arc.
■ For a horizontal cut, move the hedge trimmer in a scything motion
along the edge of the hedge so that cut branches fall to the ground.
■ See fold-out page (Figure A).
NOTE
►
Remove thicker branches with a branch cutter.
Working with the pole pruner
Sawing techniques
WARNING!
► Pay attention to falling clippings.
► Be aware of the danger of branches flying back.
NOTE
►
Place the stop
on the branch. This will help you work more safely
and quietly.
► Now you can begin sawing.
Sawing off small branches
♦ Saw small branches (Ø 0–8 cm) from the top down (see figure).
Sawing off larger branches
♦ When sawing larger branches (Ø 8–25 cm), first make a relief cut
A
(see figure). A relief cut also prevents peeling of the bark on the main
trunk.
♦ Saw from the top
B
to the bottom A.
2
1
Saw in sections.
Trim long or thick branches before you make the final cut (see figure).
cb a
Working safely
■ Keep the appliance, the cutting mechanism and the chain guard 6) in
good condition to prevent injury.
■ If the appliance has been dropped, check for significant damage or
defects.
■ Observe the specified working angle max. 60°±10° to ensure safe
working (see figure).
■ Do not use the appliance while standing on a ladder or with unsteady
footing.
■ Do not be tempted into making a poorly considered cut.
You could endanger yourself and others.
■ Children should be supervised to ensure that they do not play with the
appliance.
■ Change your working position regularly. Using the appliance for a long
time can lead to vibration-related circulation disorders of the hands.
You can extend the usage duration by means of appropriate gloves or
by taking regular breaks. Note that any personal predisposition to poor
blood circulation, low external temperatures or large prehensile forces
can reduce the usage period.
Transport
■ Use the protective guards 5( 6) when transporting the appliance.
■ Ensure that the appliance cannot switch on during transport to avoid
injury (see figure).
Cleaning
Cleaning the engine unit
NOTE
■
Clean the appliance thoroughly after every use.
■ Always switch off the appliance before cleaning and then disconnect
the spark plug connector .
■ Clean the appliance regularly with a damp cloth and a mild detergent.
Make sure that no water can penetrate into the interior of the appliance.
Cleaning the pole pruner
■ The pole pruner must be cleaned of sawdust at regular intervals.
♦ Remove the sprocket cover
.
♦ Remove the saw chain
from the blade and clean the guide rail .
♦ Keep the saw chain
sharp and check the tension; check the oil level
and the oil supply.
A
B
C A B
max. 60°±10°

14
FBK 4 B2
GB
Cleaning the hedge trimmer
♦ Check the hedge trimmer for loose screws on the cutter bar
and
tighten these if necessary.
♦ Remove stuck cuttings.
♦ Maintain the cutter bar
using an oil spray or an oil can.
Cleaning the strimmer/3-section cutting blade attachment
♦ Remove stuck cuttings.
♦ Keep the 3-section cutting blade
sharp to facilitate your work.
Maintenance
Replacing the strimmer/cutting Strimmer cord
1.) The strimmer
is removed as described in the section Installing/
replacing the strimmer. Press the marking (see Fig. 5a), turn the cover
and remove one half of the casing (see Fig. 5b).
2.) Remove the spool bobbin
from the strimmer housing (see Fig. 5c).
3.) Remove any remaining cutting Strimmer cord.
4.) Double the new cutting Strimmer cord in the middle and hook the loop
that you have made into the recess on the spool bobbin (see Fig. 5d).
5.) Wind the Strimmer cord tightly in an anticlockwise direction. The spool
bobbin
separates the two halves of the cutting Strimmer cord (see
Fig. 5d).
6.) Hook the last 15cm of the two ends of the Strimmer cord into the
opposite Strimmer cord holders
(see Fig. 5e).
7.) Guide the two ends of the Strimmer cord through the metal lugs in the
strimmer housing (see Fig. 5e).
8.) Press the spool bobbin
into the strimmer housing (see Fig. 5e).
9.) Reconnect the two halves of the housing.
10.) Pull hard on the two ends of the Strimmer cord to free them from the
Strimmer cord holders (see Fig. 5f).
11.) Cut any excess Strimmer cord back to about 13 cm. This reduces the
load on the engine when starting and warming up.
12.) Refit the strimmer (see section "Installing/replacing the strimmer").
Skip points 3–6 if you are replacing the entire strimmer.
Air filter maintenance
Contaminated air filters reduce the engine performance due to low air
supply to the carburettor.
Regular inspection is essential. The air filter
must be inspected after
every 25 hours of operation and cleaned if necessary.
The air filter must be checked more frequently if the air is dusty.
1.) Remove the cover of the air filter housing
.
2.) Remove the air filter
.
3.) Clean the air filter
by tapping or blowing it out (with compressed
air).
4.) Assembly takes place in the reverse order.
CAUTION!
■ Never clean the air filter with petrol or flammable solvents.
Spark plug maintenance
1.) Pull off the spark plug connector
.
2.) Unscrew the spark plug using the spark plug wrench
6&
supplied.
3.) Assembly takes place in the reverse order.
Electrode gap = 0.6 mm (distance between the electrodes between which
the ignition spark is generated). Check the spark plug for contamination
after the first 10 hours of operation and clean it with a copper wire brush
if required.
Afterwards, service the spark plug after every 50 hours of operation.
Grinding the protective guard blade
The blade
A
(see Fig. 2a) can become blunt over time. If you find this
to be the case, undo the 2 screws that hold the blade
A
onto the cutting
Strimmer cord protective guard
C
. Clamp the blade A in a vice. Grind
the blade
A
with a sharpening stone and make sure you maintain the
angle of the cutting edge.
Adjusting the carburettor
Remove the cover of the air filter housing
.
Adjusting the throttle cable
If the appliance no longer reaches maximum speed after a while and all
other causes as described in the "Troubleshooting" section have been ruled
out, this may mean that the throttle cable needs to be adjusted. To adjust
the throttle cable, screw in the screw
or the adjusting screw H1 as well
as the lock nut H2 correctly (see Fig. 4).
Lubricating the gears
■ Add liquid gear grease after every 20 hours of operation (approx. 10 g)
to lubricate the angle gear.
♦ To do this, undo the screw (see foldout page) to press the gear
grease into the gear housing.
♦ After filling the gearbox, close the lubrication hole with the screw
.
Storage and transportation
■ Store the appliance in a safe location.
■ Store the appliance and accessories in a safe location which is
protected against naked flames and sources of heat/sparks, such as
gas-powered water heaters, dryers, oil stoves or mobile heaters, etc.
■ Ensure that the protective guard
, the strimmer and the engine are
free of cutting residue when storing.
■ The plastic cover for the 3-section cutting blade
must be refitted for
transport and storage.
■ Always turn the appliance off before performing any maintenance work
and remove the spark plug connector
.
Storing the appliance
The appliance must be prepared for storage if it is to be stored for longer
than 30 days. Otherwise the residual fuel in the carburettor will evaporate
and leave a gooey sediment. This may make starting the appliance more
difficult and result in expensive repair work.
1.) Remove the filler cap
to relieve any pressure in the fuel tank .
Carefully empty the fuel tank
.
2.) To remove all fuel from the carburettor, start the engine and leave it to
run until it stops.
3.) Allow the engine to cool for about 10 minutes.
4.) Remove the spark plug (see section "Spark plug maintenance").

15
FBK 4 B2
GB
5.) Add 1 teaspoon of 2-stroke oil to the combustion chamber. Pull the
starter pull cord
several times in order to wet all mechanical parts
with oil. Replace the spark plug.
NOTE
■ Store the appliance in a dry place and away from possible ignition
sources.
Start-up after storage
1.) Remove the spark plug (see section "Spark plug maintenance").
2.) Pull the starter pull cord
quickly in order to remove any excess oil
from the combustion chamber.
3.) Clean the spark plug and observe the correct electrode gap on the
spark plug.
4.) Fill the fuel tank
. See the section "Fuel and oil".
Transporting
■ If you are planning to transport the appliance, empty the fuel tank
as explained in the section "Storage".
Troubleshooting
Motor unit
Problem Possible cause Remedy
The engine does
not start.
Incorrect start-up process. Follow the instructions
regarding starting.
The engine starts
but does not run
at full power.
Incorrect adjustment of the
choke lever
.
Set the choke lever
to "
".
Contaminated air filter. Clean air filter.
The engine does
not run smoothly.
Incorrect spark plug gap. Clean the spark plug
and adjust the spark
plug gap or replace
the spark plug.
Soot deposits or
wetness on the
spark plug.
Incorrect carburettor adjustment.
Clean spark plug or
replace it with a new
spark plug.
Pole pruner
Problem Possible cause Remedy
Motor is running,
saw chain
does not move.
Hedge trimmer attachment
or pole pruner attachment
is not connected properly
to the motor unit.
Check assembly.
No work progress.
Saw chain
dry/over-
heating or is sagging.
Top up the oil or
regrind, replace or tight-
en the saw chain
.
Hedge trimmer
Problem Possible cause Remedy
Motor is running,
blades do not
move.
Hedge trimmer attachment
or pole pruner attachment
is not connected properly
to the motor unit.
Check assembly.
Maintenance interval
Pole pruner
The figures given here are based on normal operating conditions. In the
event of more difficult conditions, such as strong dust generation and
longer daily working hours, the given intervals are to be reduced correspondingly.
Appliance part
Action Before
starting
work
Weekly In the
event
of
faults
In the
event
of damage
As required
Lubricating the
chain
check
X
Saw
chain
check and
note sharpness
X
check
chain
tension
X
sharpen
X
Guide
rail
check
(wear,
damage)
X
clean and
turn
XX
deburr
X
replace
XX
Sprocket check
X
replace
X
Hedge trimmer
The figures given here are based on normal operating conditions. In the
event of more difficult conditions, such as strong dust generation and longer
daily working hours, the given intervals are to be reduced correspondingly.
Appliance part
Action Before
starting
work
After
completion
of work
As required
Cutting
blades
visual inspection
X
clean
XX
Spare part orders
Ordering spare parts
The following information should be provided when ordering spare parts:
■ Type of appliance
■ Item number of the appliance
■ Device ID number
Current prices and information are available at
www.kompernass.com
NOTE
■ Replacement parts not listed (such as strimmer, strimmer cord) can be
ordered via our service hotline.

16
FBK 4 B2
GB
Disposal
The packaging is made from environmentally friendly material and
can be disposed of at your local recycling plant. The appliance
and its accessories are made from various materials, such as
metal and plastic.
Your local community or municipal authorities can provide information on
how to dispose of the worn-out appliance.
Environmental protection
■ Carefully empty the petrol and oil tank and dispose of your appliance
at a recycling plant. The plastic and metal parts used can be separated
and recycled.
■ Dispose of waste oil and petrol at a waste collection centre, do not
dump these into the sewerage or drainage system.
■ Dispose of contaminated maintenance material and working materials
at a collection point provided for this purpose.
Appendix
Warranty
You are provided a 3-year warranty on this appliance, valid from the
date of purchase. This appliance has been manufactured with care
and inspected meticulously prior to delivery. Please retain your receipt
as proof of purchase. In the event of a warranty claim, please contact
your Customer Service unit by telephone. This is the only way to guarantee free return of your goods.
The warranty only covers claims for material and manufacturing defects,
not for damage sustained during carriage, components subject to wear
and tear or damage to fragile components such as switches or batteries.
This appliance is intended solely for domestic, not commercial, use.
The warranty shall be deemed void in cases of misuse or improper handling,
use of force and modifications/repairs which have not been carried out
by one of our authorised Service centres. Your statutory rights are not
restricted by this warranty.
The warranty period is not prolonged by repairs effected under the warranty.
This also applies to replaced and repaired components. Any damage and
defects present at the time of purchase must be reported immediately after
unpacking, but no later than two days after the date of purchase. Repairs
carried out after expiry of the warranty period shall be subject to charge.
Service
WARNING!
■ Have your appliance repaired by qualified specialists only. Always
use genuine spare parts. This will ensure the ongoing safety of the
appliance.
Service Great Britain
Tel.: 0871 5000 720 (£ 0.10/Min.)
E-Mail: kompernass@lidl.co.uk
IAN 273489
Hotline availability:
Monday to Friday from 8:00 a.m. to 8:00 p.m. (CET)
Importer
KOMPERNASS HANDELS GMBH
BURGSTRASSE 21
44867 BOCHUM
GERMANY
www.kompernass.com

17
FBK 4 B2
GB
Translation of the original Conformity
Declaration
We, KOMPERNASS HANDELS GMBH, Custodian of Documents:
Mr. Semi Uguzlu, BURGSTR. 21, 44867 BOCHUM, GERMANY,
hereby declare that this appliance complies with the following standards,
normative documents and EC directives:
Machinery Directive
(2006/42/EC)
Outdoor directive
(2005/88/EC)
Emissions directive
(2012/46/EU)
Applied harmonised standards:
EN ISO 11806-1: 2011
EN ISO 10517: 2009+A1
EN ISO 11680-1: 2011
Type/appliance designation:
4-in-1 petrol multi-tool FBK 4 B2
Year of manufacture: 09 - 2015
Serial number: IAN 273489
Bochum, 22/09/2015
Semi Uguzlu
- Quality Manager -
The right to effect technical changes in the context of further development
is reserved.

18
FBK 4 B2

19
FBK 4 B2
HU
Tartalomjegyzék
Bevezető ..................................20
Rendeltetésszerű használat ............................20
Felszereltség .......................................20
A csomag tartalma ..................................21
Műszaki adatok.....................................21
Biztonsági utasítások ........................24
A sövényvágóra vonatkozó munkavédelmi utasítások........24
Kiegészítő biztonsági utasítások a sövényvágóhoz..........25
Munkavédelmi utasítások a teleszkópos ágvágóhoz ........25
Óvintézkedések visszaütéssel szemben...................26
Munkavédelmi utasítások damilfejekhez..................26
Munkavédelmi utasítások vágókésekhez..................27
Biztonsági berendezések . . . . . . . . . . . . . . . . . . . . . . . . . . . . . 27
Üzembe helyezés előtt .......................28
Kerek fogantyú felszerelése............................28
A gyorskioldó mechanizmus felszerelése .................28
Vállheveder rögzítése / felszerelése .....................28
Sövényvágó felszerelése ..............................28
Sövényvágó leszerelése ..............................28
Sövényvágó döntése.................................28
Fűrészlánc és láncvezető lap felszerelése.................28
A fűrészlánc leszerelése ..............................28
Fűrészlánc megfeszítése és ellenőrzése ..................28
Lánckenés .........................................29
Fűrészlánc élezése ..................................29
A hosszabbító előtét felszerelése .......................29
Védőburkolat felszerelése/ leszerelése ...................29
Vágókés felszerelése / cseréje .........................29
Damilfej felszerelése / cseréje..........................30
Vállheveder felvétele .................................30
Vágási magasság beállítása ...........................30
Üzemanyag és olaj ..................................30
Üzembe helyezés ...........................30
Hidegindítás .......................................30
Melegindítás .......................................30
Munkavégzés a sövényvágóval ........................31
Vágási technikák:....................................31
A teleszkópos ágvágóval végzett munka .................31
Fűrészelési technikák.................................31
Biztonságos munkavégzés.............................32
Szállítás ...................................32
Tisztítás....................................32
Karbantartás ...............................32
Tárolás és szállítás ..........................33
Hibakeresés................................34
Motoregység.......................................34
Teleszkópos ágvágó .................................34
Sövényvágó........................................34
Karbantartási időközök......................34
Teleszkópos ágvágó .................................34
Sövényvágó........................................34
Alkatrészek rendelése .......................34
Ártalmatlanítás .............................35
Függelék ..................................35
Garancia..........................................35
Szerviz............................................35
Gyártja ...........................................35
Az eredeti megfelelőségi nyilatkozat fordítása .............36

20
FBK 4 B2
HU
BENZINES 4 AZ 1-BEN KOMBINÁLT
KÉSZÜLÉK FBK 4 B2
Bevezető
Gratulálunk új készüléke megvásárlásához. Vásárlásával kiváló minőségű
termék mellett döntött. A használati utasítás a termék része. Fontos tudnivalókat tartalmaz a biztonságra, használatra és ártalmatlanításra vonatkozóan.
A termék használata előtt ismerkedjen meg valamennyi használati útmutatóval és biztonsági figyelmeztetéssel. Csak a leírtak szerint és a megadott
célokra használja a készüléket. A készülék harmadik személynek történő
továbbadása esetén adja át a készülékhez tartozó valamennyi leírást is.
Rendeltetésszerű használat
Teleszkópos sövényvágó
Ez a készülék a ház körüli sövény, bokrok és díszcserjék vágására és
nyesésére szolgál. Olyan beépített meghajtással rendelkező kézi készülék,
amelynél a lineárisan elrendezett élek ide-oda mozognak.
FIGYELMEZTETÉS!
► A sövényvágót nem használhatják gyerekek.
Teleszkópos ágvágó
Ez a készülék gallyazásához használható.
3 ágú vágókés / damilfej
Használat 3 ágú vágókéssel: Magas fű, bozót és gyenge fás növényzet
vágásához.
Használat damilfejjel: Gyep és egyszerűbb gyomok nyírásához.
Hosszabbító előtét
FIGYELEM!
■ Ne használja a hosszabbító előtétet / szárat
5$
a 3 ágú vágókés /
damilfej előtéttel együtt!
Bármely egyéb felhasználás, amelyet a jelen használati útmutató kifejezetten nem engedélyez, kárt okozhat a készülékben és komoly veszélyt
jelenthet a felhasználó számára. Mindenképpen vegye figyelembe a
biztonsági utasítások korlátozásait. Ügyeljen azokra a nemzeti előírásokra,
amelyek korlátozhatják a készülék használatát. Minden egyéb felhasználási mód vagy a gép módosítása rendeltetésellenesnek minősül és jelentős
balesetveszélyt rejt magában.
Nem ipari használatra készült.
TILOS HASZNÁLATI MÓDOK
A sérülések elkerülése érdekében a készülék nem használható a következő
munkákra: járdák tisztítása, illetve fa- és sövénynyesedék aprítása aprítógépként. Továbbá nem használható a készülék talajegyengetésre, pl.
vakondtúrás elsimítására. Biztonsági okokból a készülék nem használható
meghajtó egységként bármilyen más készülékhez. Az így okozott bármilyen kárért vagy sérülésért a felhasználó / üzemeltető és nem a gyártó
felel.
Felszereltség
Motoregység FBK 4 B2-1
kapcsolózár
be-/ kikapcsoló
tartószem
4 x rögzítőcsavar (rögzítő gyűrűvel, alátéttel és anyával)
kerek fogantyú
5a
gumigyűrű
5b
csap
megállító kengyel
csavaros markolat
szár
gázkar
gyertyapipa
szívató kar
berántó zsinór
üzemanyagtartály
tanksapka
üzemanyagpumpa „Primer“
levegőszűrő ház fedele
Sövényvágó előtét FBK 4 B2-3
markolat
be-/kireteszelő
hajtóműház
késrúd
alaplemez (sövényvágó)
állítókar
elülső szár (sövényvágó)
reteszelőcsap
hajtótengely
Teleszkópos ágvágó előtét FBK 4 B2-4
elülső szár (teleszkópos ágvágó)
védőgyűrű
olajtartály-fedél
olajtartály
láncvezető lap
fűrészlánc
élezőgép-támaszték
ütköző
reteszelőcsap
hajtótengely
anya
csavarmenet
lánckerék védőburkolat
láncvezető
láncvezető lap furat
vezetősín
cseppolajozó
lánckerék
olajszabályozó csavar
láncfeszítő csap
láncfeszítő csavar

21
FBK 4 B2
HU
Damilfej / vágókés előtét FBK 4 B2-2
4 x csavar (rögzítő gyűrűvel, alátéttel és anyával)
védőburkolat
3 ágú vágókés
damilfej fűnyíró damillal
elülső szár (damilfej / 3 ágú vágókés)
5@
reteszelőcsap
5#
hajtótengely
Hosszabbító előtét
5$
szár
5%
csavaros markolat
5^
reteszelőcsap
5&
hajtótengely
Tartozékok
5*
vállheveder
5(
láncvezető lap védőtok
6)
láncvédő tok
6!
bio-láncolaj
6@
olaj / benzin keverő flakon
6#
védőszemüveg
6$
imbuszkulcs M4
6%
imbuszkulcs M5
6^
villáskulcs SW 8/10
6&
gyertyakulcs /lapos csavarhúzó
6*
szerszámtáska
6(
anya M10 x 1,0 (balmenetes)
7)
nyomó alátét fedél
7!
nyomó alátét
7@
menesztő tárcsa
7#
damil
A csomag tartalma
1 motoregység
1 sövényvágó előtét FBK 4 B2-3 (a továbbiakban sövényvágó)
1 teleszkópos ágvágó előtét FBK 4 B2-4 (továbbiakban teleszkópos
ágvágó)
1 damilfej-/ vágókés-előtét FBK 4 B2-2
1 hosszabbító előtét
1 markolat megállító kengyellel
1 damilfej damillal
1 damil (damil-Ø: 2,4 mm / damilhossz: 6 m)
1 3 ágú vágókés
1 vállheveder
1 láncvédő tok
1 láncvezető lap védőtok
1 olaj / benzin keverő flakon
1 100 ml bio-láncolaj
1 szerszámtáska
1 imbuszkulcs M4
1 imbuszkulcs M5
1 gyertyakulcs /lapos csavarhúzó
1 villáskulcs SW 8/10
1 védőszemüveg
1 használati útmutató
Műszaki adatok
Motoregység: FBK 4 B2-1
Motor típus: 2 ütemű, léghűtéses,
krómozott henger
Motor teljesítmény (max.): 1,35 kW / 1,85 LE
Hengerűrtartalom: 42,7 cm³
Motor üresjárati fordulatszám: 3000 perc
-1
Motor max. fordulatszáma
3 ágú vágókéssel: 9200 min
-1
damilfejjel: 8700 min
-1
láncfűrésszel: 9200 min
-1
sövényvágóval: 9200 min
-1
Max. vágósebesség 3 ágú vágókéssel: 6900 min
-1
damilfejjel: 6525 min
-1
láncfűrésszel: 20 m/s
sövényvágóval: 1550 min
-1
Gyújtás: elektronikus
Meghajtás: centrifugális kuplung
Súly:
(üres üzemanyagtartály esetén): kb. 5,6 kg
Üzemanyagtartály kapacitása: 1200 cm
3
Gyújtógyertya: CDK L8RTC
Üzemanyag-fogyasztás,
max. motorteljesítmény esetén: 0,6 kg / h
Fajlagos
üzemanyag-fogyasztás
max. motorteljesítmény esetén: 446 g / kWh
Sövényvágó: FBK 4 B2-3
Vágáshossz: 425 mm
Fogtávolság: 20 mm
Tömeg
(üzemkészen): kb. 2,24 kg
Teleszkópos ágvágó: FBK 4 B2-4
Súly (üzemkészen): kb. 1,6 kg
Olajtartályba töltött, ajánlott olajmennyiség: 140 cm
3
Vágáshossz: kb. 260 mm
Láncvezető lap: Oregon Typ 100SDEA318
Fűrészlánc: Oregon 91P040X
Oregon 91P040E
Damilfej/vágókés előtét: FBK 4 B2-2
Damilfej damillal (IAN 273489):
Damil-vágási kör Ø: 43 cm
Damil hossza: 6,0 m
Damil Ø: 2,4 mm
3 ágú vágókés (IAN 273489):
Vágókés-vágási kör Ø: 25,5 cm

22
FBK 4 B2
HU
Zaj- és rezgésinformációk:
A zaj mérési értéke az ISO 22868, EN ISO 10517 alapján került meghatározásra. Az A-súlyozott zajszintjének jellemző értéke:
Sövényvágó:
Hangnyomásszint L
pA
: 98,79 dB(A)
Bizonytalansági érték K
WA
: 2,5 dB
Hangerőszint L
WA
: 109,53 dB(A)
Garantált hangerőszint L
WA
: 114 dB(A)
Bizonytalansági érték K
WA
: 2,5 dB
Teleszkópos ágvágó:
Hangnyomásszint L
pA
: 97,06 dB(A)
Bizonytalansági érték K
WA
: 2,5 dB
Hangteljesítményszint: 110,87 dB(A)
Bizonytalansági érték K
WA
: 2,5 dB
3 ágú vágókés:
Hangnyomásszint L
pA
: 97,64 dB(A)
Bizonytalansági érték K
pA
: 2,5 dB
Hangerőszint L
WA
: 111,27 dB(A)
Bizonytalansági érték K
WA
: 2,5 dB
Damilfej:
Hangnyomásszint L
pA
: 99,08 dB(A)
Bizonytalansági érték K
pA
: 2,5 dB
Hangerőszint L
WA
: 108,18 dB(A)
Bizonytalansági érték K
WA
: 2,5 dB
A halláskárosodás elkerülése érdekében viseljen
hallásvédőt!
Rezgésértékek (a három irány vektorösszege) az EN ISO 11806-
1, EN ISO 10517, EN ISO 11680-1 alapján meghatározva:
Sövényvágó:
Vibráció az elülső markolatnál: Rezgés kibocsátási érték
a
h,D
= 4,182 m/s2
Bizonytalansági érték K = 1,5 m/s
2
Vibráció a hátsó markolatnál: Rezgés kibocsátási érték
a
h,D
= 9,695 m/s2
Bizonytalansági érték K = 1,5 m/s
2
Teleszkópos ágvágó:
Vibráció az elülső markolatnál: Rezgés kibocsátási érték
a
h,D
= 3,855 m/s2
Bizonytalansági érték K = 1,5 m/s
2
Vibráció a hátsó markolatnál: Rezgés kibocsátási érték
a
h,D
= 7,590 m/s2
Bizonytalansági érték K = 1,5 m/s
2
Damilfej:
Vibráció az elülső markolatnál: Rezgés kibocsátási érték
a
h,D
= 4,700 m/s2
Bizonytalansági érték K = 1,5 m/s
2
Vibráció a hátsó markolatnál: Rezgés kibocsátási érték
a
h,D
= 7,547 m/s2
Bizonytalansági érték K = 1,5 m/s
2
3 ágú vágókés
Vibráció az elülső markolatnál: Rezgés kibocsátási érték
a
h,D
= 4,622 m/s2
Bizonytalansági érték K = 1,5 m/s
2
Vibráció a hátsó markolatnál: Rezgés kibocsátási érték
a
h,D
= 7,708 m/s2
Bizonytalansági érték K = 1,5 m/s
2
TUDNIVALÓ
► A jelen használati útmutatóban megadott rezgésszint az EN ISO
11806-1, EN ISO 10517, EN ISO 11680-1 szabvány szerinti,
szabványos mérési eljárással került meghatározásra és készülékek
összehasonlítására használható. A megadott rezgés kibocsátási
érték a kitettség előzetes megbecsüléséhez is felhasználható.
FIGYELMEZTETÉS!
► A rezgésszint alkalmazástól függően változik és egyes esetekben
a jelen útmutatókban megadott érték felett lehet. A rezgésterhelés
alulbecsült lehet, ha a készüléket rendszeresen így használják. A
rezgésterhelés adott munkaidőszakon belüli pontos becsléséhez azokat
az időszakokat is figyelembe kell venni, amikor a készülék ki van kapcsolva, vagy bár működik, de ténylegesen nincs használatban. Ez a teljes munkaidőtartamra nézve jelentősen csökkentheti a rezgésterhelést.
FIGYELMEZTETÉS!
■ Csökkentse a vibráció okozta károsodások, mint például a fehér ujj
betegség kockázatát gyakori szünetek beiktatásával, amelyek során
pl. dörzsölje össze a tenyerét!
A motoregységen látható tájékoztató jelzések magyarázata:
Figyelmeztetés! Üzembe vétel előtt olvassa el a használati
útmutatót!
Viseljen védőkesztyűt!
Viseljen biztonsági lábbelit!
Viseljen hallásvédőt!
Viseljen védősisakot!
Viseljen védőszemüveget!
Vigyázat, forró alkatrészek. Tartson távolságot!
1
ON
o
I
1. Kapcsolja be a készüléket
FULL
2
2. Töltse meg az üzemanyagpumpát (Primer)
3
PULL
3. Húzza meg a szívató kart
4
PULL
4. Húzza meg a berántó zsinórt
CHOKE
Húzza meg a szívató kart
Nyomja meg 6x az üzemanyagpumpát (Primer)

23
FBK 4 B2
HU
Keverési arány: 40 rész üzemanyaghoz 1 rész olaj
Benzin: ROZ 95 / ROZ 98
Kétütemű motorolaj: ISO - L - EGD / JASO FD
A sövényvágón látható tájékoztató jelzések magyarázata:
Áramütés okozta életveszély! Tartson legalább 10m távolságot
a földfelszín feletti vezetékektől.
Figyelem! Lehulló tárgyak.
Különösen fejmagasság feletti vágásnál.
Figyelem! Működő kés miatti sérülésveszély.
Tartson távolságot!
Általános figyelmeztetés!
1. Csúsztassa az elülső száron lévő csapot ütközésig a
motoregység szárának hornyába.
2. Ha helyesen van becsúsztatva, akkor a piros vonalnak
egy vonalban kell lennie a motoregység szárával.
3. Amennyiben ez nem lehetséges, akkor a tengely beállításához húzza meg a berántó zsinórt.
FIGYELEM! A be-/kikapcsolónak
„0“ állásban kell
lennie.
A teleszkópos ágvágón látható tájékoztató jelzések
magyarázata:
Áramütés okozta életveszély! Tartson legalább 10m távolságot
a földfelszín feletti vezetékektől.
Védje a készüléket esőtől és nedvességtől!
Figyelem! Lehulló tárgyak.
Különösen fejmagasság feletti vágásnál.
Figyelem! Működő kés miatti sérülésveszély.
Általános figyelmeztetés!
1. Csúsztassa az elülső száron lévő csapot ütközésig a
motoregység szárának hornyába.
2. Ha helyesen van becsúsztatva, akkor a piros vonalnak
egy vonalban kell lennie a motoregység szárával.
3. Amennyiben ez nem lehetséges, akkor a tengely beállításához húzza meg a berántó zsinórt.
FIGYELEM! A be-/kikapcsolónak
„0“ állásban kell
lennie.
A damilfej / vágókés előtéten látható tájékoztató jelzések
magyarázata:
Figyelem! Balmenetes.
Védje a készüléket esőtől és nedvességtől!
Ügyeljen a kirepülő tárgyakra!
Vigyázzon a visszaütésre!
Vigyázat! Forgó vágókés okozta balesetveszély!
Kezeit és lábait tartsa távol a készüléktől!
Vigyázat - a benzin fokozottan tűzveszélyes!
Robbanásveszély! Ügyeljen arra, hogy ne ömöljön ki az
üzemanyag!
Karbantartás előtt állítsa le a készüléket és húzza le a
gyertyapipát!
Figyelem! Fulladásveszély!
Vigyázat! Mérges CO-gázok (szénmonoxid-gázok)!
Ne használja a készüléket zárt helyiségben!
Figyelmeztetés! Soha ne használjon körfűrészlapot vágókésként.
20 h
Minden 20 üzemóra után pótoljon kevés zsírt (hajtóműzsírt).
A gép és harmadik személy közötti távolságnak legalább
15 méternek kell lennie!
A vágószerszámok (vágókés / fűnyíró damil) tovább futnak!
Vigyázat, forró alkatrészek. Tartson távolságot!
LWA zajszint-információ dB-ben.
Tűz, nyílt láng használata és a dohányzás tilos!
1. Csúsztassa az elülső száron lévő csapot ütközésig a
motoregység szárának hornyába.
2. Ha helyesen van becsúsztatva, akkor a piros vonalnak
egy vonalban kell lennie a motoregység szárával.
3. Amennyiben ez nem lehetséges, akkor a tengely beállításához húzza meg a berántó zsinórt.
FIGYELEM! A be-/kikapcsolónak
„0“ állásban kell
lennie.

24
FBK 4 B2
HU
Biztonsági utasítások
FONTOS! HASZNÁLAT ELŐTT FIGYELMESEN OLVASSA EL.
ŐRIZZE MEG DOKUMENTUMAI KÖZÖTT.
A sövényvágóra vonatkozó munkavédelmi
utasítások
TUDNIVALÓ
► A sövényvágó teljesen összeszerelve kerül kiszállításra.
► A sövényvágó beállítására, használatára, illetve a sövényvágó
állítható részeire, a felhasználó által végzendő karbantartásra,
kenésre vonatkozó tudnivalók és képi ábrázolások ebben a
használati útmutatóban és a kihajtható oldalon találhatók.
► Útmutató a munkavégzési helyzetre vonatkozóan (lásd a kihajtható
oldalt).
► Útmutató az állítható részekre vonatkozóan (lásd a kihajtható oldalt).
► Útmutató az üzemanyag biztonságos használatára vonatkozóan
(lásd az „Előkészítés“ fejezet f pontját).
► Az alkatrészek ajánlott cseréjére vagy javítására, valamint az
ügyfélszolgálatra és az alkalmazandó alkatrészek műszaki adataira
vonatkozó, a felhasználók egészségét és biztonságát érintő
információk ebben a használati útmutatóban találhatók.
► A sövényvágó esetében használt összes grafikai jelölés, információ,
jellemző és műszaki adat magyarázata, valamint baleset és hiba
esetén végrehajtandó teendők ebben a használati útmutatóban
találhatók.
► Elakadt szerszám: Távolítsa el a beakadt anyagot a késrúdból
.
FIGYELMEZTETÉS!
■ Gyermekek soha nem használhatják a sövényvágót.
■ Legyen mindig figyelmes, figyeljen arra, amit tesz és hozzáértéssel
végezze a munkát a készülékkel. Ne használja a készüléket, ha
beteg, fáradt, vagy ha kábítószer, alkohol vagy gyógyszer hatá-
sa alatt áll. A készülék használatakor már egy pillanatnyi figyelmet-
lenség is komoly sérüléseket okozhat.
■ Kerülje a helytelen alkalmazást, a gépet csak a „Rendeltetésszerű
használat“ fejezetben leírtak szerint használja.
A készülék használata előtt tanulmányozza annak használati
útmutatóját.
Előkészítés
a) EZ A SÖVÉNYVÁGÓ SÚLYOS SÉRÜLÉSEKET OKOZHAT! Olvassa el
figyelmesen a sövényvágó megfelelő kezelésére, előkészítésére, karbantartására, elindítására és leállítására vonatkozó utasításokat. Ismerje
meg a sövényvágó valamennyi állítható részét és helyes használatát.
b) Gyermekek soha nem használhatják a sövényvágót.
c) Legyen óvatos a föld felett húzódó áramvezetékekkel.
d) Kerülje a sövényvágó használatát, ha személyek, különösen gyermekek
tartózkodnak a közelben.
e) Viseljen megfelelő ruházatot! Ne viseljen bő ruházatot vagy ékszert,
amelyek beakadhatnak a mozgó alkatrészekbe. Javasoljuk, hogy használjon ellenálló védőkesztyűt, csúszásmentes cipőt és védőszemüveget.
f) Legyen óvatos az üzemanyag használata során: az üzemanyag
gyúlékony és a benzingőz robbanásveszélyes. Be kell tartani az alábbi
pontokat:
– Csak kifejezetten erre a célra tervezett tartályt használjon.
– Működő vagy forró motor esetén soha ne távolítsa el a tanksapkát
vagy töltsön be benzint. Utántöltés előtt hagyja lehűlni a motort és a
kipufogó elemeket.
– Ne dohányozzon.
– Csak a szabadban tankoljon.
– Soha ne tárolja a sövényvágót vagy az üzemanyagtartályt olyan helyi-
ségben, ahol nyílt láng, például vízmelegítő van.
– A benzin túlcsordulása esetén, ne próbálja meg beindítani a motort,
hanem a beindítás előtt távolítsa el a gépet a benzinnel szennyezett
területről.
– Az üzemanyag betöltése után mindig helyezze vissza a tanksapkát és
gondosan zárja le.
– Az üzemanyagtartály kiürítése csak a szabadban végezhető.
g) Ha a vágóberendezés idegen testbe ütközik vagy a működési zaj han-
gosabb vagy a sövényvágó szokatlanul erősen vibrál, állítsa le a motort
és hagyja leállni a sövényvágót. Húzza le a gyertyapipát a gyújtógyertyáról és tegye a következőt:
– ellenőrizze, hogy nincs-e megsérülve;
– ellenőrizze, hogy nincsenek-e alkatrészek kilazulva és a kilazult alkatré-
szeket húzza meg;
– a sérült alkatrészeket cserélje kis azonos alkatrészekre vagy javíttassa
meg.
Viseljen hallásvédőt!
Viseljen védőszemüveget!
■ Ismerje meg a sövényvágó kezelését, hogy vészhelyzetben azonnal le
tudja állítani.
Működés
a) Állítsa le a motort:
– tisztítás vagy blokkoló idegen testek eltávolítása előtt;
– a sövényvágó ellenőrzése, karbantartása vagy rajta végzett munka előtt;
– a vágóberendezés munkavégzési helyzetének beállítása előtt;
– ha a sövényvágót felügyelet nélkül hagyja.
b) A motor beindítása előtt mindig győződjön meg arról, hogy a sövényvá-
gó az előírásnak megfelelően egy megadott munkahelyzetben van.
c) A sövényvágó működtetése során mindig gondoskodjon a stabil
állóhelyzetről, különösen létra használata esetén.
d) Ne használja a sövényvágót hibás vagy túlságosan kopott vágóeszközzel.
e) A tűzveszély kockázatának csökkentése érdekében, győződjön meg
arról, hogy a motorban és a kipufogóban nincs-e lerakódás, levél vagy
szivárgó kenőanyag.
f) Győződjön meg arról, hogy a sövényvágó használata során az összes
markolat és biztonsági berendezés fel van szerelve. Soha ne próbáljon
meg hiányos vagy engedély nélkül módosított sövényvágót használni.
g) Ha a sövényvágó két markolattal van felszerelve, akkor minden esetben
két kézzel tartsa.
h) Mindig figyeljen a környezetére és ügyeljen a lehetséges veszélyekre,
ezeket ugyanis adott esetben a sövényvágó zaja miatt esetleg nem
hallja.

25
FBK 4 B2
HU
Karbantartás és tárolás
a) Ha a sövényvágó karbantartás, ellenőrzés vagy tárolás miatt leállításra
kerül, akkor kapcsolja ki a motort, húzza le a gyertyapipát a gyújtógyertyáról és győződjön meg arról, hogy minden forgó alkatrész leállt-e.
A gép ellenőrzése, beállítása, stb. előtt hagyja lehűlni a gépet.
b) Olyan helyen tárolja a sövényvágót, ahol a benzingőz nem érintkez-
het nyílt lánggal vagy szikrával. Tárolás előtt mindig hagyja lehűlni a
sövényvágót.
c) A sövényvágó szállítása vagy tárolása során mindig fedje le a vágóbe-
rendezést a vágóberendezés védőtokjával.
Kiegészítő biztonsági utasítások a sövényvágóhoz
Környezeti biztonság
■ Csak nappal vagy megfelelő világítás esetén vágjon sövényt.
■ A vágás során ügyeljen arra, hogy ne érjen hozzá tárgyakhoz, például
drótkerítéshez vagy növénytámaszokhoz. Ez kárt okozhat a késrúdban
.
Alaposan nézze át a vágni kívánt sövényt és távolítson el minden vezetéket és egyéb idegen tárgyat.
■ Legyen tisztában a környezetével és legyen felkészülve azokra a lehet-
séges veszélyekre, amiket a sövény vágása közben esetleg nem hall.
VESZÉLY!
► Fenyegető veszély vagy vészhelyzet esetén azonnal állítsa le a motort.
Villamos biztonság
■ A szerszámot kizárólag a szigetelt markolatánál fogva tartsa, mivel
a vágókés rejtett áramvezetékekkel érintkezhet. A vágókés feszültség
alatt álló vezetékkel történő érintkezése a készülék fém részeit is feszültség alá helyezheti és áramütést okozhat.
Személyi biztonság
■ A készülék használata közben más ember vagy állat nem tartózkodhat
a 15 méteres körön belül. A készülék kezelője a munkaterületen felelősséggel tartozik harmadik féllel szemben.
■ A sövényvágó használatakor mindig ügyeljen a stabil állóhelyzetre és
tartsa meg folyamatosan az egyensúlyát, különösen lépcső vagy létra
használata esetén.
■ A sövényvágót soha ne a késrúdnál
fogja meg.
■ Minden testrészét tartsa távol a vágókéstől. Működő kések esetén,
ne próbáljon meg eltávolítani levágott hulladékanyagot vagy
megtartani a vágandó anyagot. Beszorult hulladékanyagokat csak
kikapcsolt készülék esetén szabad eltávolítani. A sövényvágó hasz-
nálatakor már egy pillanatnyi figyelmetlenség is komoly sérüléseket
okozhat.
■ Mielőtt leteszi a szerszámot, várja meg, hogy hogy teljesen leálljon.
Használat és kezelés
FIGYELEM!
► A késrúd
sérülésének elkerülése érdekében az egyes munkafolyamatok közben vagy az adott munkafolyamat befejezése után nem
szabad a késrudat
a késrúd hegyére állítani.
■ Használat előtt mindig ellenőrizze, hogy a kés, a pengecsavarok és a
vágóegység más részei nem kopottak vagy sérültek. Soha ne dolgozzon sérült vagy túlságosan kopott vágóegységgel.
■ A munkavégzés szögének beállítása után ellenőrizze, hogy mindkét
beállítókar stabilan be van-e kattanva. Ha a beállítókar nyitva marad,
akkor a munkavégzés során a második reteszt egy ág akaratlanul
kioldhatja és a késrúd
lebillenhet.
■ Soha ne használja a sövényvágót hibás biztonsági berendezésekkel
vagy biztonsági berendezések nélkül.
■ A sövényvágót soha ne a biztonsági berendezésnél fogva tartsa meg.
■ A sövényvágót az elülső fogantyúnál fogva, a késrudat a testétől el-
fordítva, kikapcsolt állapotban vigye. A sövényvágó szállítása vagy
tárolása esetén minden esetben használja a védőtokot. A készülék
gondos kezelése csökkenti a mozgó késekkel való véletlen érintkezés
valószínűségét.
■ A sövényvágót száraz, magasan fekvő vagy zárható, gyermekek
számára el nem érhető helyen tárolja.
■ Ne próbálja megjavítani a készüléket, kivéve ha rendelkezik a szükséges
képzettséggel.
■ A biztonság kedvéért cserélje kis a kopott vagy sérült alkatrészeket.
VESZÉLY!
► Fenyegető veszély vagy vészhelyzet esetén azonnal állítsa le a motort.
Munkavédelmi utasítások a teleszkópos ágvágóhoz
VIGYÁZAT! SÉRÜLÉSVESZÉLY!
► A sérülések elkerülése érdekében, soha ne fogja meg a készüléket
működés közben a védőgyűrű
felett!
Előkészítés
■ Viseljen védősisakot, hallásvédőt és biztonsági védőkesztyűt. Viseljen
szemvédőt, hogy ne kerüljön olaj vagy fűrészpor a szemébe. A por
ellen viseljen pormaszkot.
■ Viseljen robusztus, csúszásbiztos csizmát.
■ Ne használja a készüléket eső vagy nedvesség esetén.
■ Használat előtt ellenőrizze a készülék biztonsági állapotát, különös
tekintettel a láncvezető lapra és a fűrészláncra.
■ Ne üzemeltesse a készüléket áramvezeték közelében. Tartson 10 m
távolságot a föld feletti áramvezetékektől.
Villamos biztonság
■ Ne használja a készüléket robbanásveszélyes környezetben, például
gyúlékony folyadékok, gázok vagy gőzök közelében. A gép által
keltett szikrák meggyújthatják a gázokat és gőzöket.
■ A hibás kapcsolóval rendelkező készülékeket haladéktalanul meg kell
javítani a sérülések és károk megelőzése érdekében.
Személyi biztonság
■ Soha ne használja a készüléket létrán állva.
■ A készülék használata során ne hajoljon túlságosan előre. Minden
esetben ügyeljen a biztonságos álló helyzetre és tartsa meg folyamatosan az egyensúlyát. A súly testén történő egyenletes elosztásához
használja a mellékelt vállhevedert.
■ A lezuhanó ágak miatti sérülések elkerülése érdekében ne álljon a
levágni kívánt ágak alá. A sérülések elkerülése érdekében ügyeljen a
visszacsapó ágakra. Kb. 60° alatti szögben dolgozzon.
■ Ügyeljen arra, hogy a készülék ne tudjon visszaütni.
■ Ne csak a megmunkálandó ágakra, hanem a leeső anyagra is ügyel-
jen, hogy elkerülje a botlásveszélyes helyzeteket.
■ Szállítás és tárolás során takarja le a vezetősínt és a láncot a védőbur-
kolattal.
■ Kerülje a készülék akaratlan beindítását.
■ Tárolja a készüléket gyermekektől elzárva. A készüléket csak olyan
személy kezelheti, aki ismeri a használati útmutatót és a készüléket.
Használat és kezelés
■ Soha ne indítsa el a készüléket addig, amíg a láncvezető lap, a fűrész-
lánc és a lánckerék védőburkolat nincs megfelelően felszerelve.
■ Ne fűrészeljen földön fekvő fát, illetve ne próbáljon a földből kiálló
gyökereket fűrészelni. Mindenképpen úgy dolgozzon, hogy a fűrészlánc
ne hatoljon a talajba, mivel ez azonnal életlenné teszi a fűrészláncot.
■ Ha a készülékkel véletlenül szilárd tárgyba ütközik, azonnal állítsa le a
motort és ellenőrizze a készüléket, hogy nem sérült-e meg.
 Loading...