

Page 1
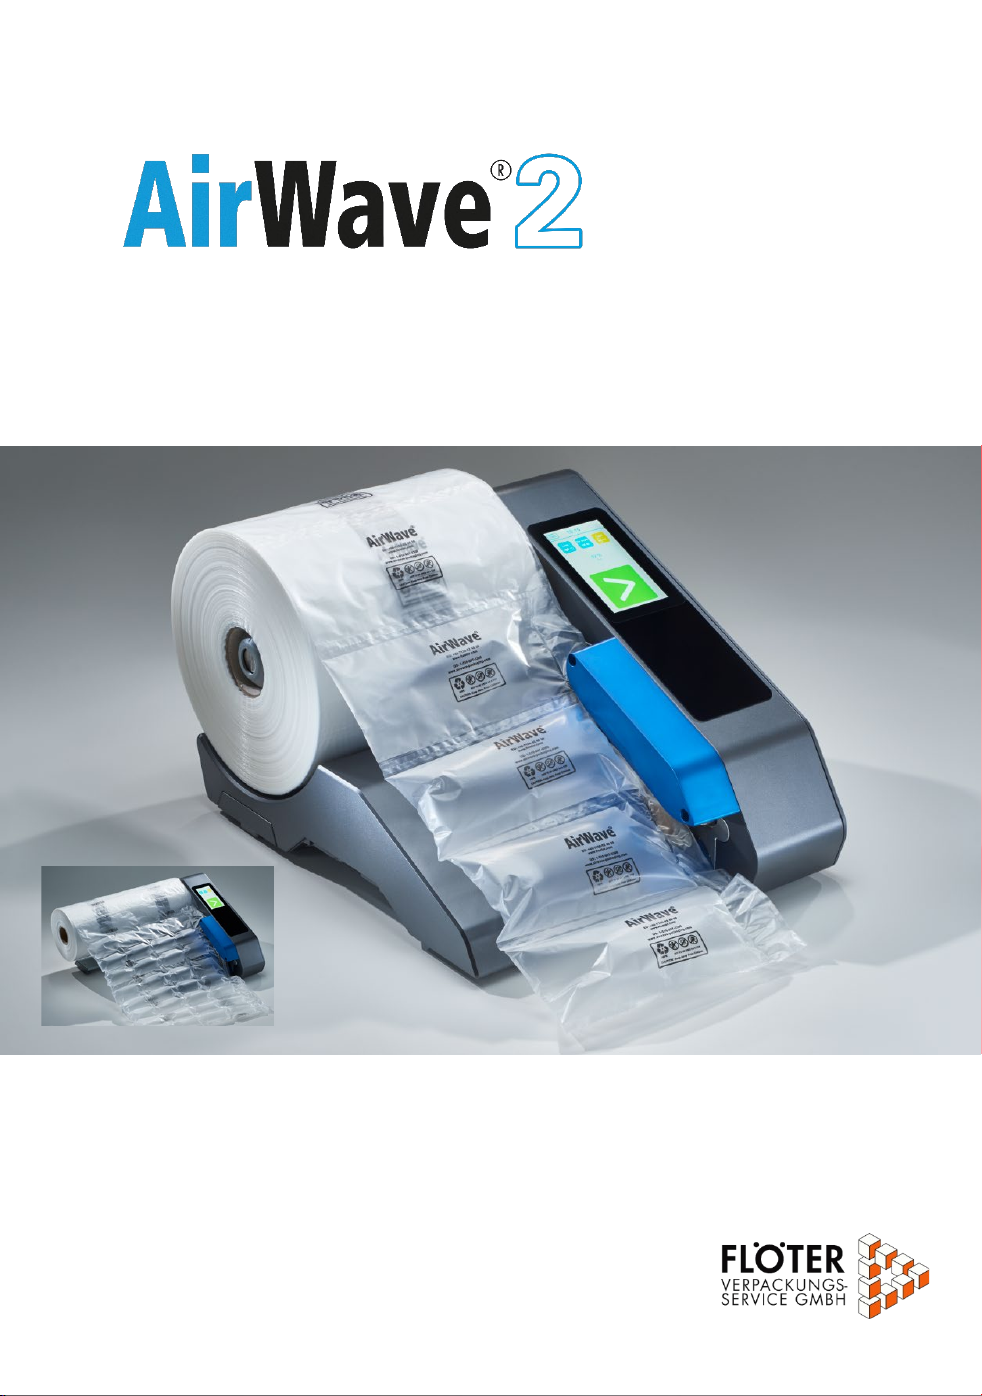
OPERATING INSTRUCTIONS
Page 2

OPERATING INSTRUCTIONS
Contents
Safety guidelines 2
Air cushion types – Type 7 filler 3
Air cushion types – Type 8 wrapper 4
Machine overview 5
Technical data 5
Recommended settings 6
Accessories and spare parts 8
Initial operation 9
Operating instruction 11
Preset function – quick selection 13
Lock function 14
Change the knife 15
Change the Teflon belt 18
Change the transport belt 21
Film guide pins 24
Error codes 25
Options and expandability 26
Advanced settings 28
To change advanced settings touch at start screen. 28
Enter code “1-3-5”, continue with and choose desired submenu. 28
Maintenance & Cleaning 29
Warranty 30
Declaration of Conformity 30
Support and Service 31
Document version 25.04.2019
1
Page 3
OPERATING INSTRUCTIONS
Safety guidelines
Please read the safety guidelines and operating instruction closely before using the
machine.
- Turn off the machine and disconnect power before opening the machine or performing
any repair or maintenance work on the machine.
- Switch off the machine if it will not be used for an extended period of time.
- Do not insert any objects into the machine when it is connected to power.
- To prevent the risk of electric shock, ensure that the machine does not come into contact
with liquids.
- Do not operate the machine without the covers for the machine components.
- Keep hair and loose clothing away from the film feed mechanism.
- Place the machine only on surfaces that are adequately large, stable, flat, and horizontal.
This machine is designed for safe operation in compliance with the use, instructions, and
guidelines specified in these operating instruction.
All persons who use this machine must be familiar with the content of these operating instructions and must carefully follow the safety guidelines.
FLOETER shall not be responsible for damage resulting from improper use of the machine
or non-observance of the safety guidelines.
2
Page 4
OPERATING INSTRUCTIONS
Air cushion types – Type 7 filler
Our standard version – Polyethylene 20 µm
7.1-7.3 with 700 m; 7.4-7.5 with 600 m
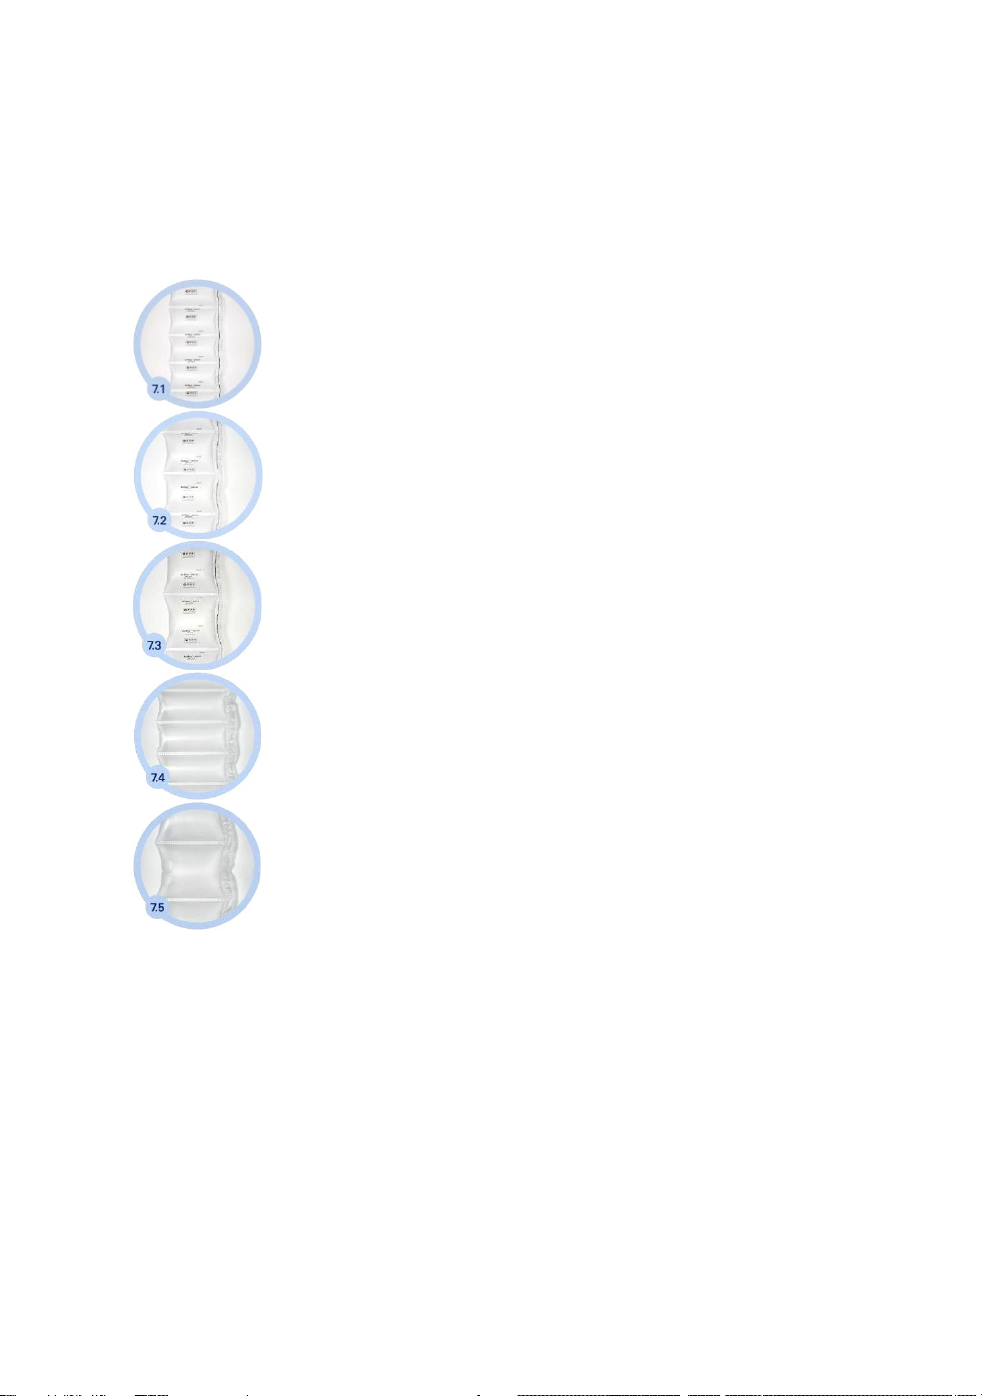
Type 7.1 AirWave air cushion filler 100 x 210 mm
Ideal for filling small voids and for use as an intermediate layer
Type 7.2 AirWave air cushion filler 150 x 210 mm
Ideal for filling medium-sized voids and for use as an air cushion ring
Type 7.3 AirWave air cushion filler 200 x 210 mm
Ideal for filling large voids
Type 7.4 AirWave air cushion filler 130 x 300 mm
Ideal for filling large voids
Type 7.5 AirWave air cushion filler 240 x 300 mm
Ideal for filling large voids
All type 7.x are also available as Jumbo rolls with more running meters per roll,
and also in 15µm or 12µm, in pink antistatic version, in our „Heavy Duty“ version made of laminated
material, or as 100% biodegradable material.
Get in touch with us.
3
Page 5
OPERATING INSTRUCTIONS
Air cushion types – Type 8 wrapper
Our standard version – Polyethylene 20µm
8.1-8.6 with 450 m; 8.3 600 with 300 m
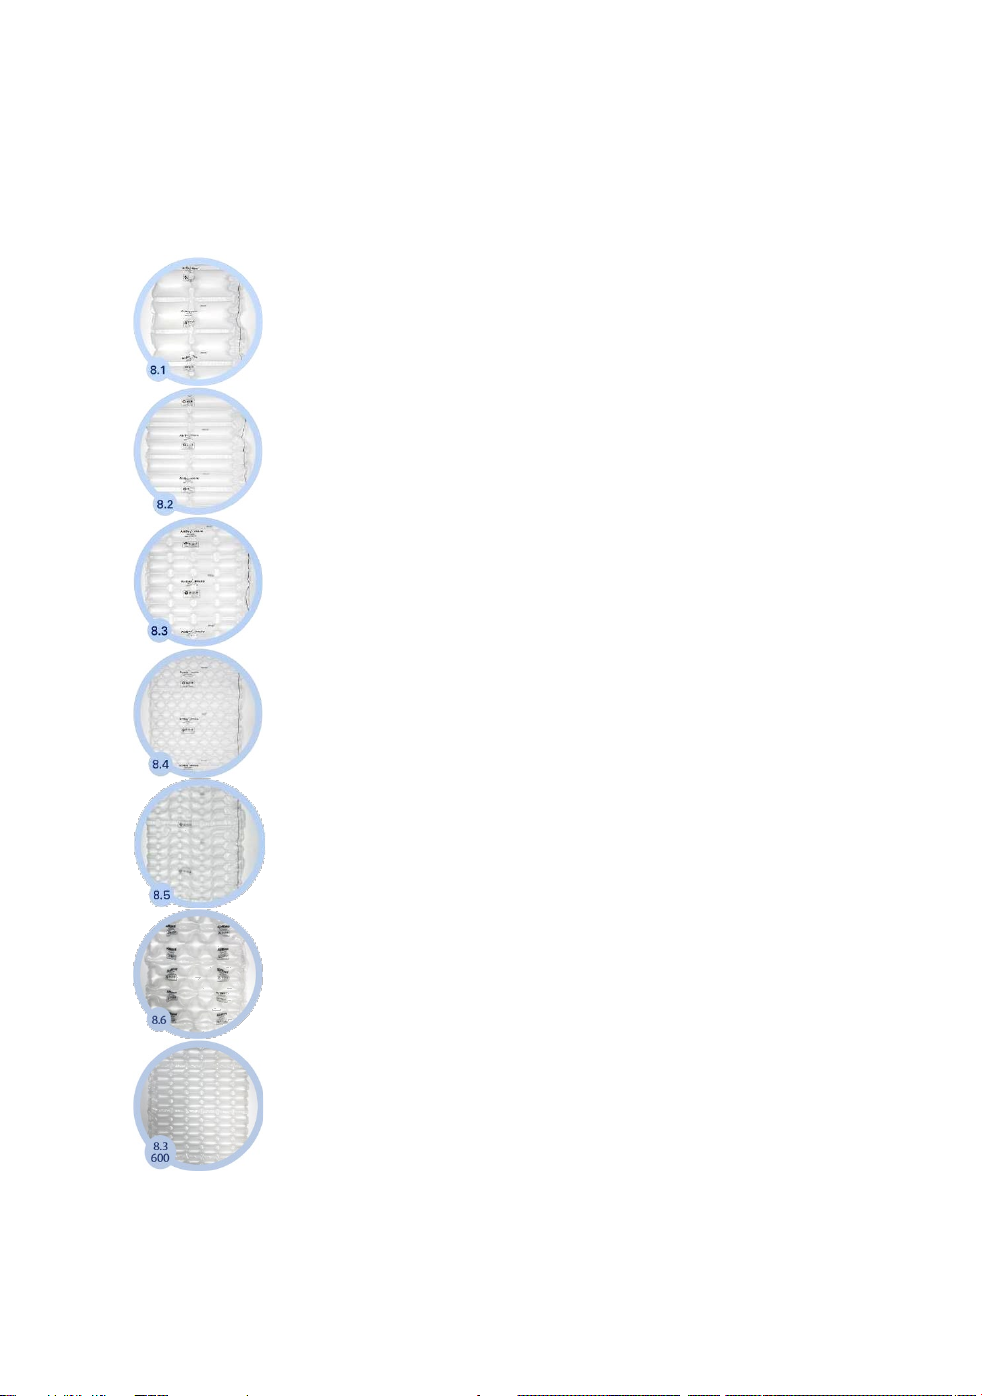
Type 8.1 AirWave wrapper 420mm 2 large chambers
2 large chambers for large volumes and for use as a top layer
Type 8.2 AirWave wrapper 420mm 2 small chambers
2 chambers for moulded components, edge protection, and
wrapping
Type 8.3 AirWave wrapper 420mm 4 chambers
4 chambers for use as an intermediate layer, wrapping, and
envelope
Type 8.4 AirWave wrapper 420mm 8 chambers
8 chambers for use as an envelope and intermediate layer
Type 8.5 AirWave wrapper 420mm 7 wavy chambers
7 chambers for use as an envelope and intermediate layer
Type 8.6 AirWave wrapper 420mm cloud type chambers
4 chambers for use as an envelope and intermediate layer
Type 8.3-600 AirWave wrapper 600mm 6 chambers
6 chambers for use as an envelope and intermediate layer
All type 8.x are also available as Jumbo rolls with more running meters per roll,
and also in 15 µm or 12 µm, in pink antistatic version, in our „Heavy Duty“ version made of laminated
material, or as 100% biodegradable material.
Get in touch with us.
4
Page 6
OPERATING INSTRUCTIONS
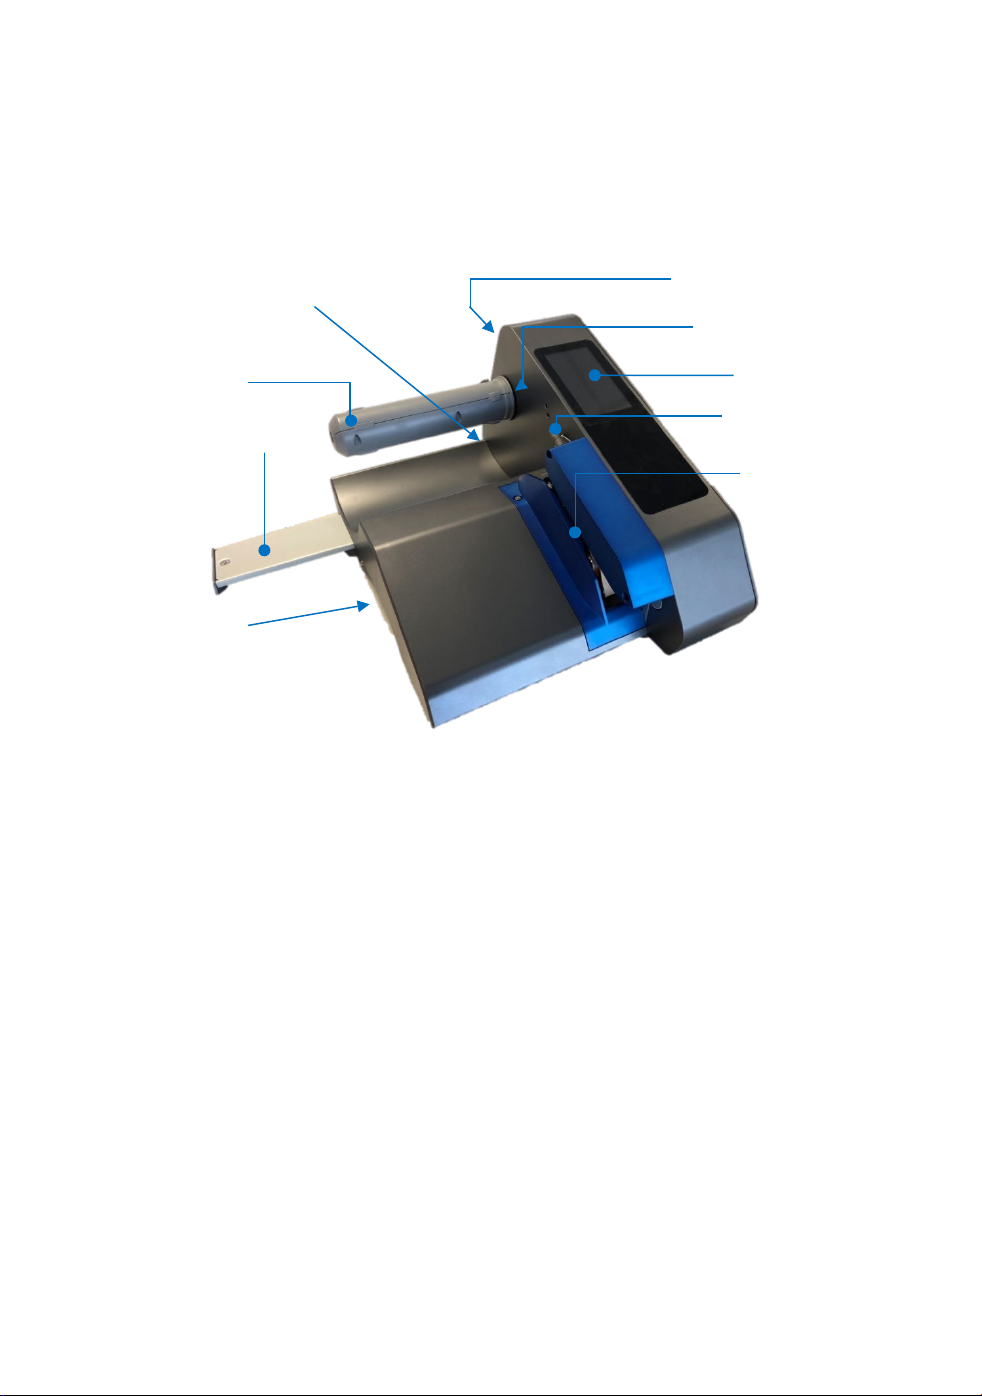
Control panel
Filling pipe for
air supply
Sensor end of film
Film channel
Film roll shaft
Power cord, power switch
Interface for external
control (optional)
Extendable base
Connection jumbo roll
(optional)
Spare part
compartment
Machine overview
holder
Technical data
Power supply: 115-240 V; 50-60 Hz
Power consumption: 200 W
Production speed: 20 m / min resp. 10 m / min
Weight: 6,25 kg
Color: Standard: anthracite / blue (individual on request)
AirWave2 dimensions (l / w / h): 413 / 316 / 232 mm
(extendible base 150mm)
5
Page 7
OPERATING INSTRUCTIONS
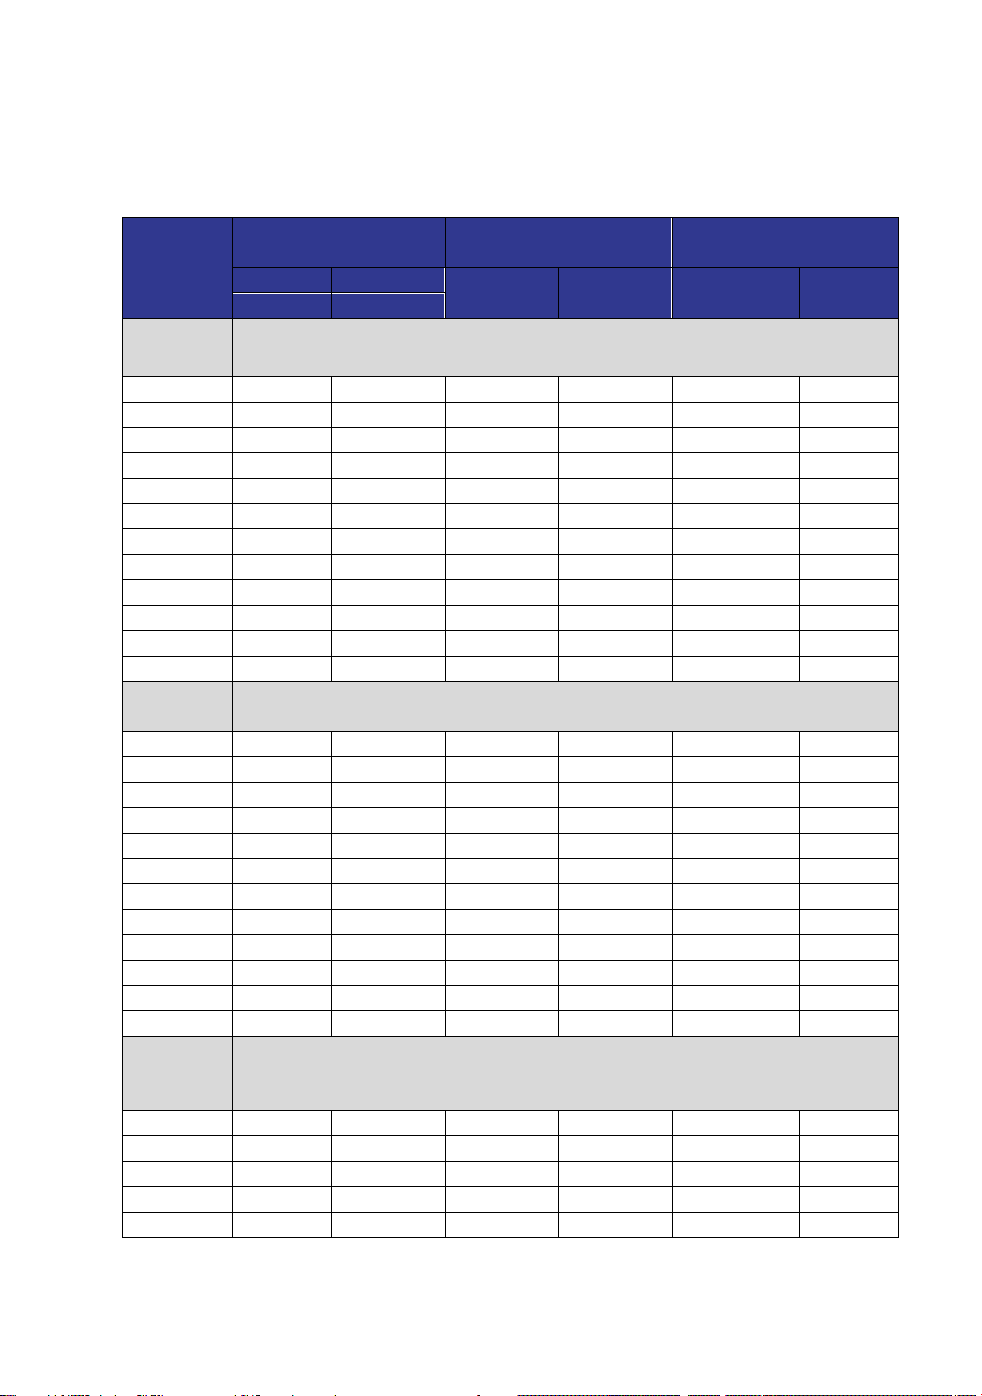
Recommended
Temperature [°C]
Recommended Air
Volume
12m/min
20m/min
°C
°C
7.1
235-250
250-270
30-45
30-50 0 0
7.2
235-250
250-270
30-45
35-50 0 0
7.3
235-250
250-270
35-50
35-50
+0,1
+0,3
7.4
235-250
250-270
35-50
35-50
+0,1
+0,3
7.5
235-250
250-270
40-60
45-65
+0,1
+0,3
*8.1
235-250
-
60-80 - 0 - *8.2
235-250
-
60-80 - 0
-
**8.3
235-250
250-270
70-90
80-95
-0,1
0
**8.4
235-250
250-270
70-90
80-95
-0,1
-0,3
8.5
235-250
250-270
75-95
90-100
-0,1
-0,3
8.6
235-250
250-270
75-95
90-100
-0,3
-0,3
*8.3-600
235-250
-
90-100
-
-0,3
-0,3
ECO
(15µm):
7.1
210-230
230-250
30-45
30-50 0 0
7.2
210-230
230-250
30-45
35-50 0 0
7.3
210-230
230-250
35-50
35-50
+0,1
+0,3
7.4
210-230
230-250
35-50
35-50
+0,1
+0,3
7.5
210-230
230-250
40-60
45-65
+0,1
+0,3
*8.1
210-230
-
60-80 - 0 - *8.2
210-230
-
60-80 - 0
-
**8.3
210-230
230-250
70-90
80-95
-0,1
0
**8.4
210-230
230-250
70-90
80-95
-0,1
-0,3
8.5
210-230
230-250
75-95
90-100
-0,1
-0,3
8.6
210-230
230-250
75-95
90-100
-0,3
-0,3
*8.3-600
210-230
-
90-100
-
-0,3
-0,3
Super
(12µm):
7.1
200-220
220-240
30-45
30-50 0 0
7.2
200-220
220-240
30-45
35-50 0 0
7.3
200-220
220-240
35-50
35-50
+0,1
+0,3
7.4
200-220
220-240
35-50
35-50
+0,1
+0,3
7.5
200-220
220-240
40-60
45-65
+0,1
+0,3
Recommended settings
Cushion
Type
PE
(20µm):
Blowing Time
12m/min 20m/min 12m/min 20m/min
*Recommended speed: 12m/min **Guiding pins recommended
ECO
6
Page 8
OPERATING INSTRUCTIONS
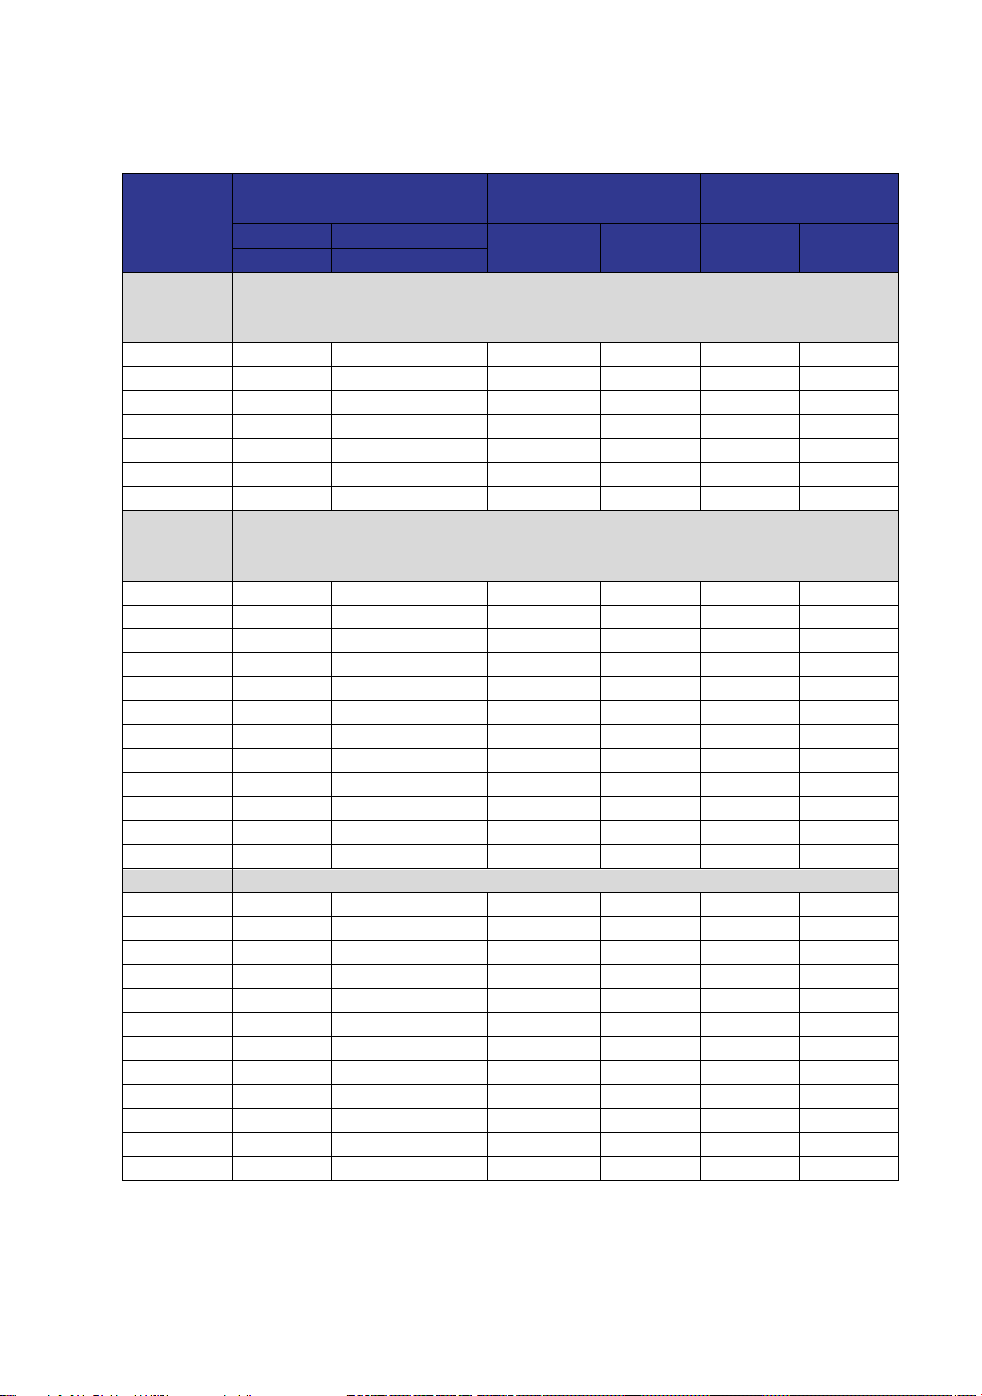
Recommended
Temperature [°C]
Recommended Air
Volume
12m/min
20m/min
°C
°C
Super
(12µm):
*8.1
200-220
-
60-80
- 0 -
*8.2
200-220
-
60-80
- 0 -
**8.3
200-220
220-240
70-90
80-95
-0,1 0 **8.4
200-220
220-240
70-90
80-95
-0,1
-0,3
8.5
200-220
220-240
75-95
90-100
-0,1
-0,3
8.6
200-220
220-240
75-95
90-100
-0,3
-0,3
*8.3-600
200-220
-
90-100
-
-0,3
-0,3
Heavy
(26µm)
7.1
235-250
250-280
30-45
30-50 0 0
7.2
235-250
250-280
30-45
35-50 0 0
7.3
235-250
250-280
35-50
35-50
+0,1
+0,3
7.4
235-250
250-280
35-50
35-50
+0,1
+0,3
7.5
235-250
250-280
40-60
45-65
+0,1
+0,3
*8.1
235-250
-
60-80
- 0 -
*8.2
235-250
-
60-80
- 0 -
**8.3
235-250
250-280
70-90
80-95
-0,1 0 **8.4
235-250
250-280
70-90
80-95
-0,1
-0,3
8.5
235-250
250-280
75-95
90-100
-0,1
-0,3
8.6
235-250
250-280
75-95
90-100
-0,3
-0,3
*8.3-600
235-250
250-280
90-100
-
-0,3
-0,3
Bio:
7.1
170-180
180-200
30-45
30-50 0 0
7.2
170-180
180-200
30-45
35-50 0 0
7.3
170-180
180-200
35-50
35-50
+0,1
+0,3
7.4
170-180
180-200
35-50
35-50
+0,1
+0,3
7.5
170-180
180-200
40-60
45-65
+0,1
+0,3
*8.1
170-180
-
60-80
- 0 -
*8.2
170-180
-
60-80
- 0 -
**8.3
170-180
180-200
70-90
80-95
-0,1 0 **8.4
170-180
180-200
70-90
80-95
-0,1
-0,3
8.5
170-180
180-200
75-95
90-100
-0,1
-0,3
8.6
170-180
180-200
75-95
90-100
-0,3
-0,3
*8.3-600
170-180
-
90-100
-
-0,3
-0,3
Cushion
Type
ECO
Duty
Blowing Time
12m/min 20m/min 12m/min 20m/min
*Recommended speed: 12m/min **Guiding pins recommended
Listed values are recommendations to warrant durability of machine at good results. These values
should not be exceeded. But temperature and air volume can slightly vary dependent on ambient
conditions or application.
7
Page 9
OPERATING INSTRUCTIONS
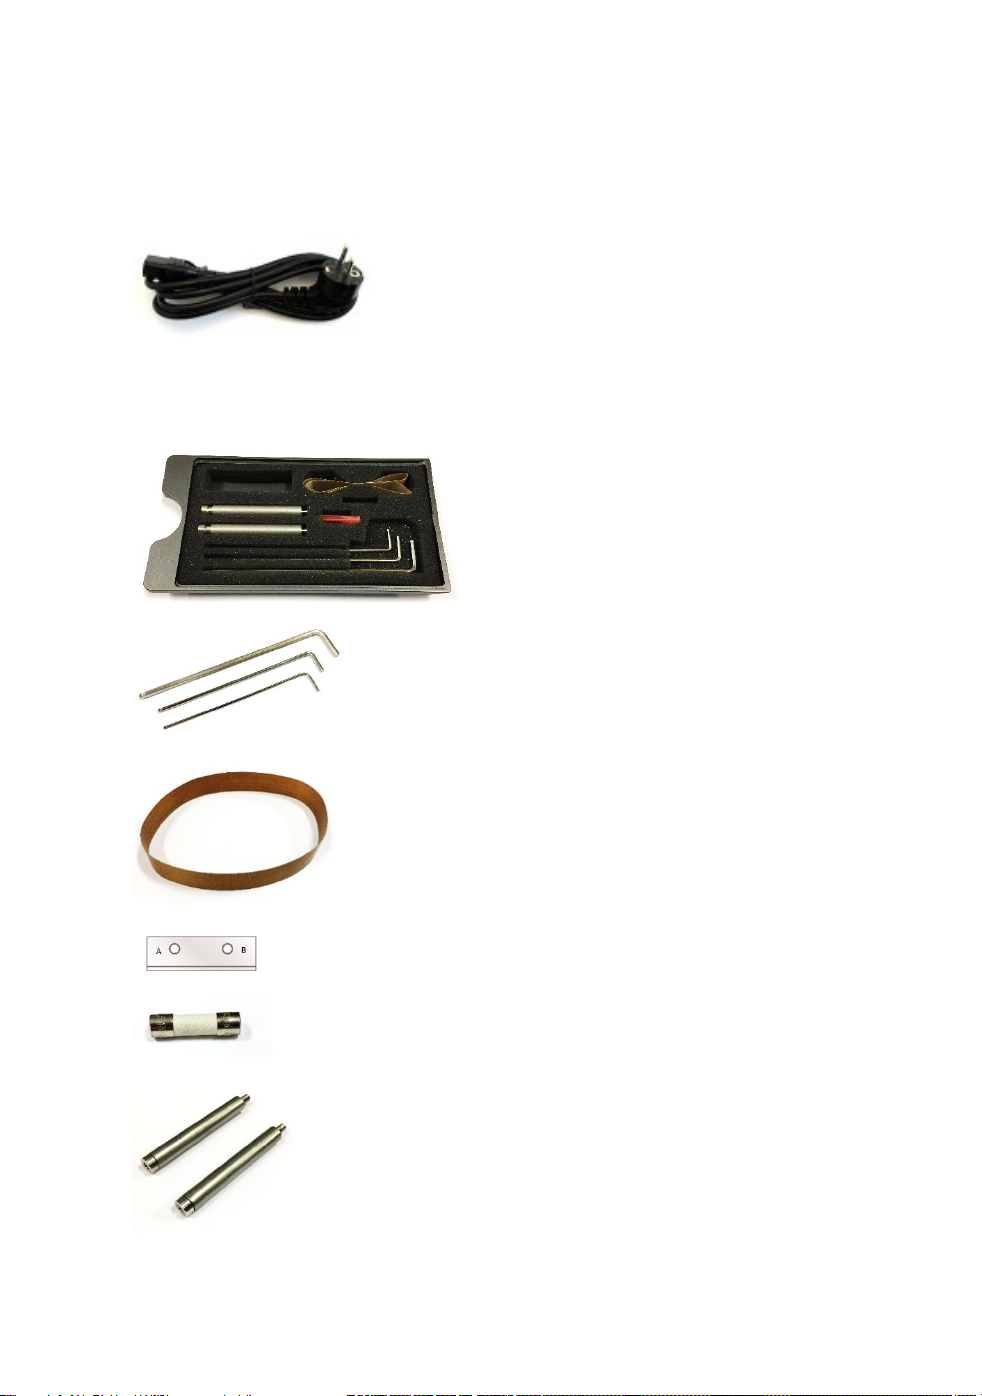
Accessories and spare parts
Power cord (1 pcs)
Hex key (3 pcs)
Teflon belt (1 pcs)
Knife (1 pcs)
Fuse (1 pcs)
Film guide pins (2 pcs)
8
Page 10
OPERATING INSTRUCTIONS
Initial operation
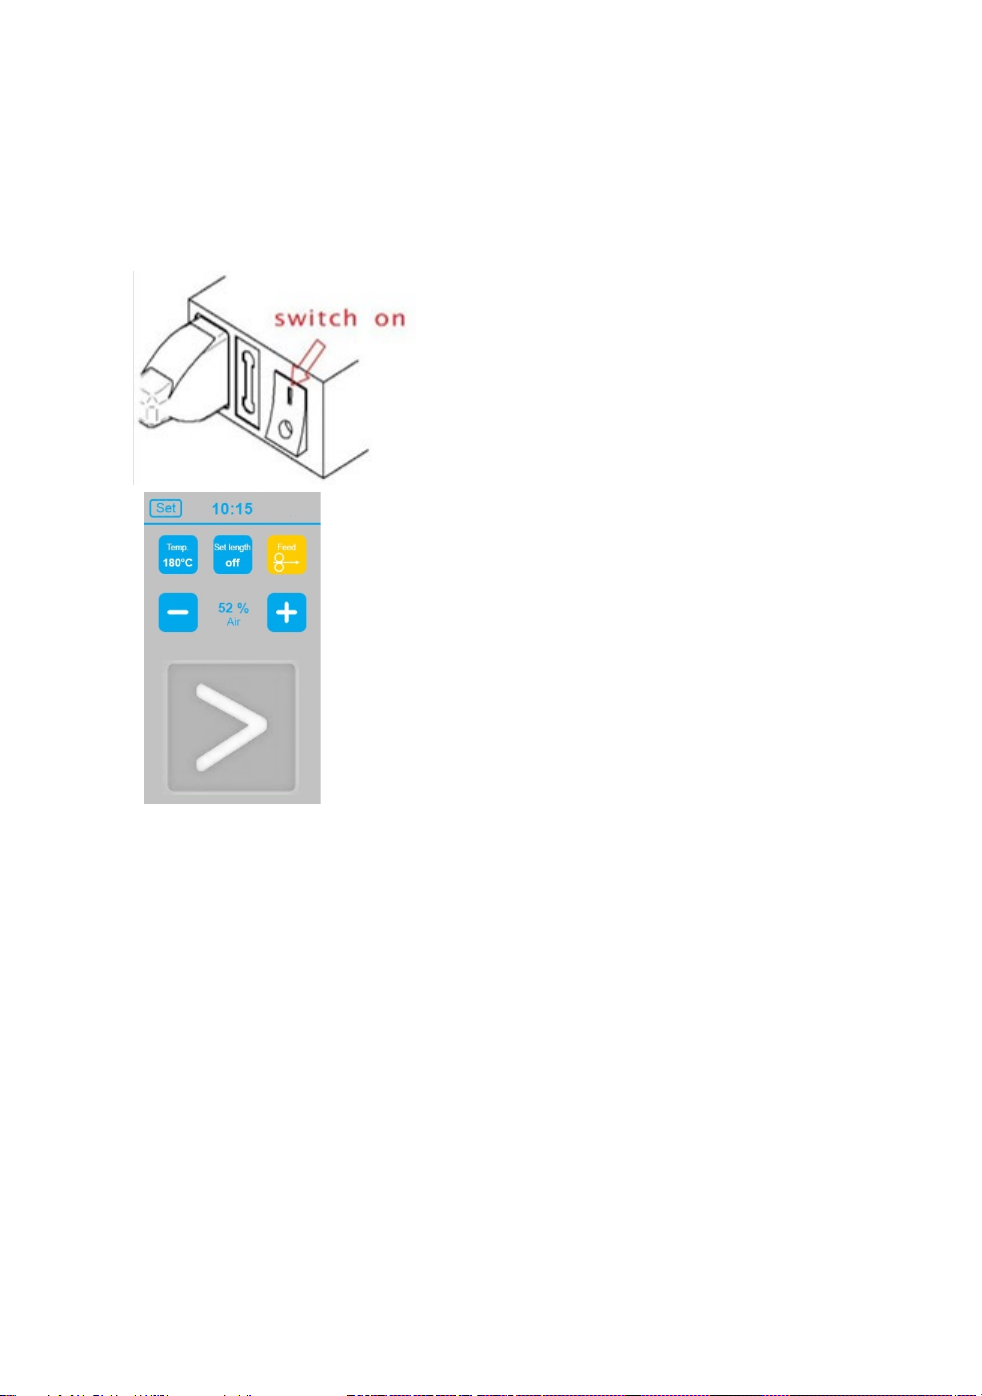
Switch on machine
Connect power to the machine and switch on the
machine.
The start screen will appear automatically after
approximately 3 seconds on the display.
9
Page 11
OPERATING INSTRUCTIONS
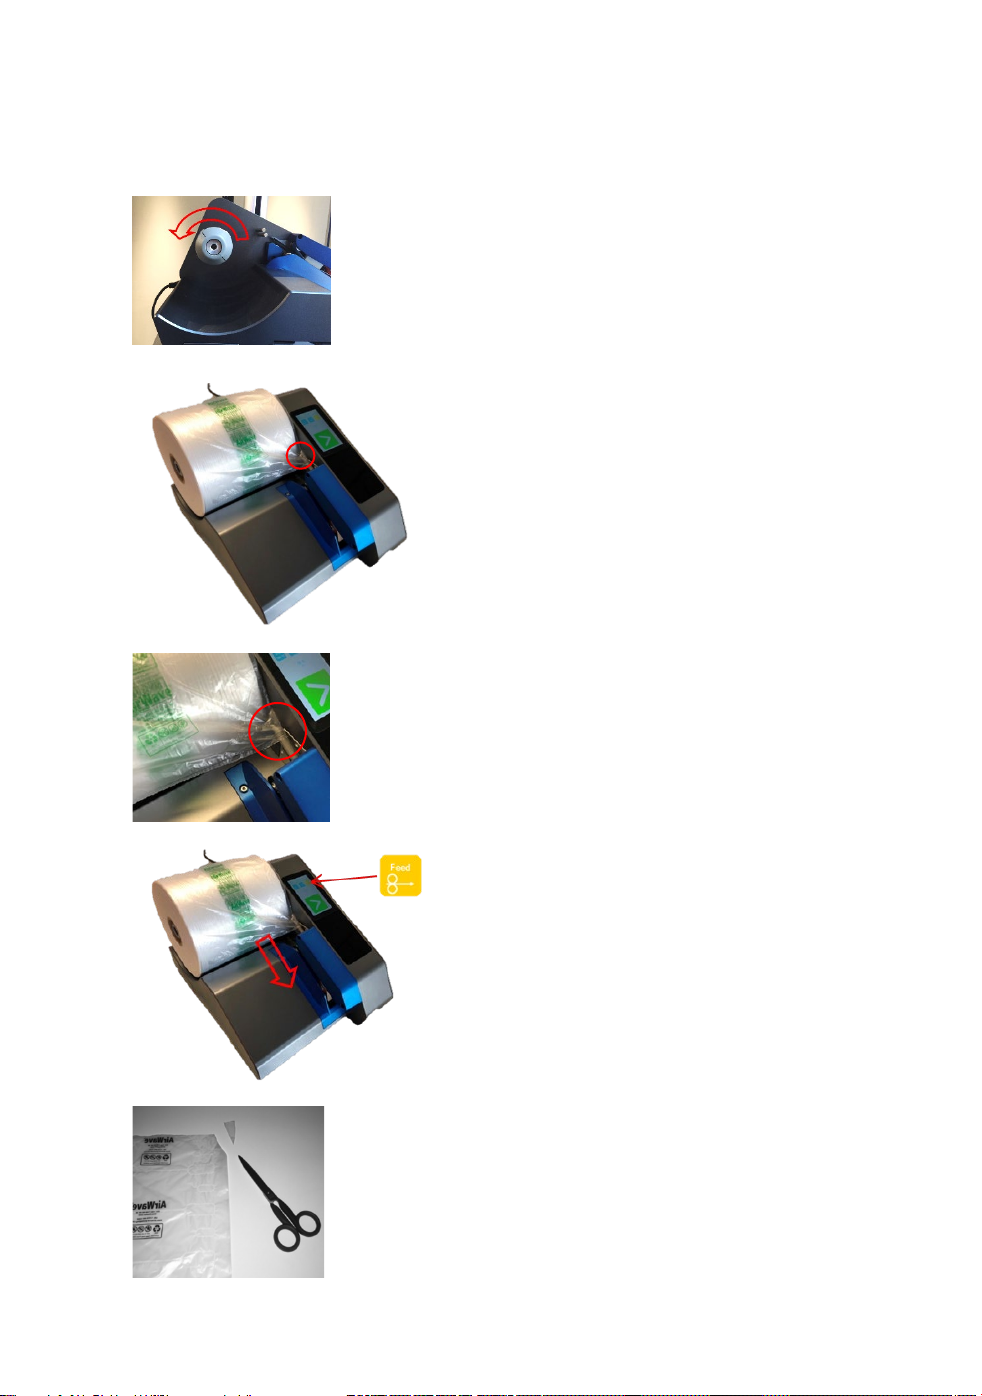
Please rotate the spindle anti-clockwise
the spindle.
Insert film roll
(about 1/2 turn) to unlock the core holder.
To load and also to unload a film roll.
Turn clockwise to lock.
Please note that the roll sits all the way on
Load the roll of film onto the film roll shaft.
Please note the side of air fill channel of the film.
The channel must be on the side closest to the
machine.
Guide the air fill channel of the film onto the air
nozzle. Slide the film on the air nozzle a few more
cm forward in direction of sealing unit.
That will simplify the next step.
Pull the film above the air nozzle and through the
film channel and press the “IN/OUT button”
while pulling the film all the way through.
The corner of the film can be cut at an angle to
make it easier to fit the film over the air nozzle.
10
Page 12
OPERATING INSTRUCTIONS
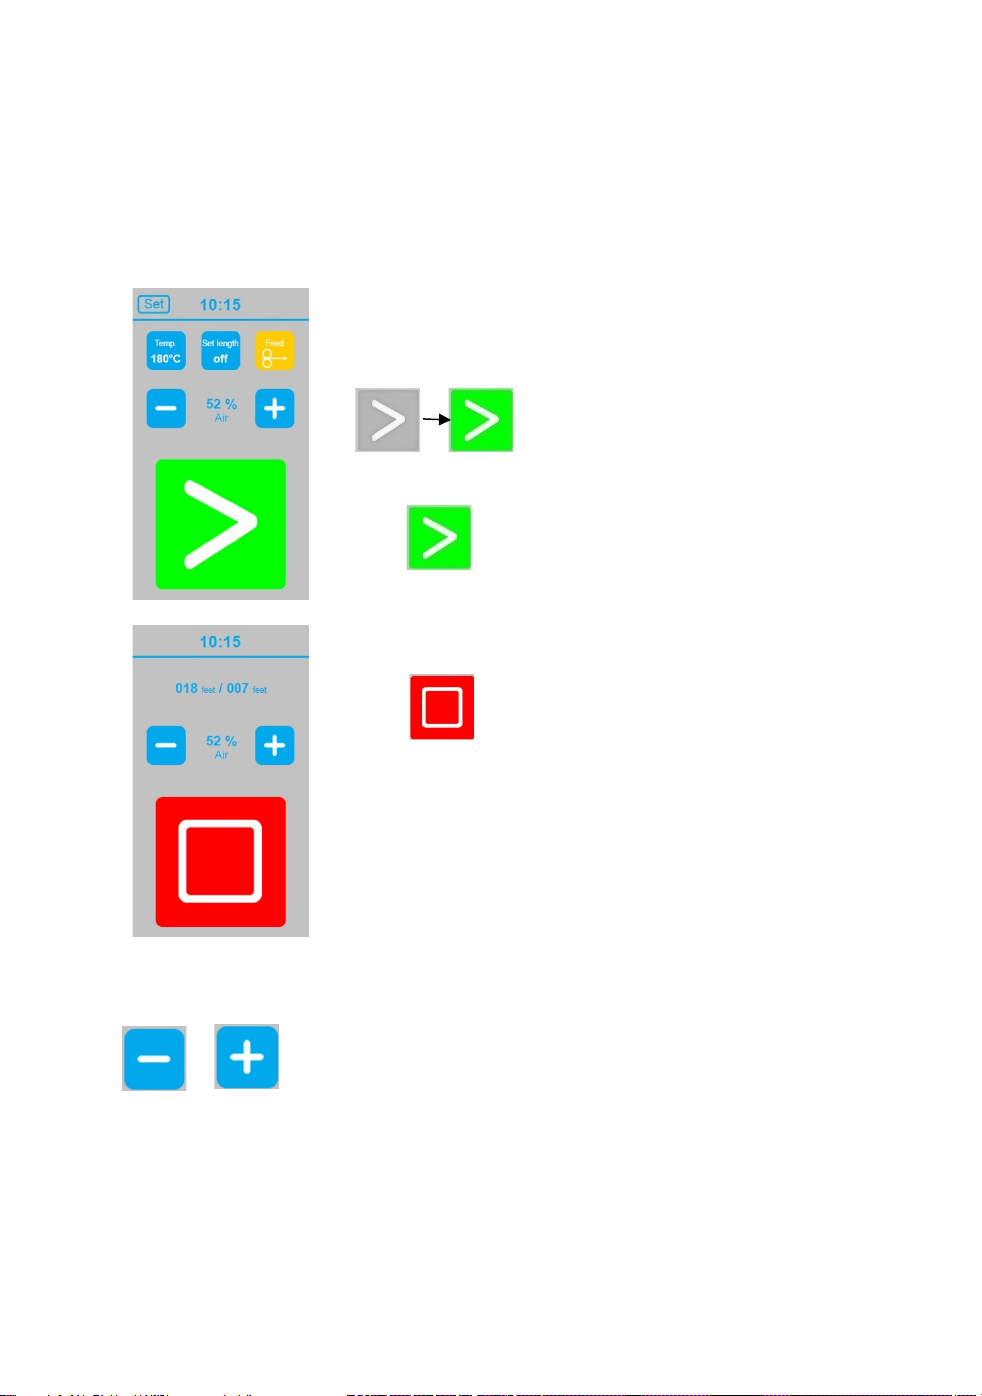
During production of air cushions display show Stop panel.
Operating instruction
Use the touch display to set the sealing temperature, film length, and air volume.
Start, Stop function
Once machine is powered on the sealing unit starts heating
up. When set target temperature is achieved „Start panel“
change color.
and machine is ready to use.
When a roll of film is loaded and all settings are correct,
touch to start the production of air cushions.
Touch to stop production of air cushions
Adjust air volume
Adjust air volume of the air cushions between 0 and 100, by touching
The air volume can be adjusted before production of air cushions at start screen and also
during air cushion production at stop screen.
Please see recommended settings for adequate air volume for the different cushion types.
or at touch display.
11
Page 13
OPERATING INSTRUCTIONS
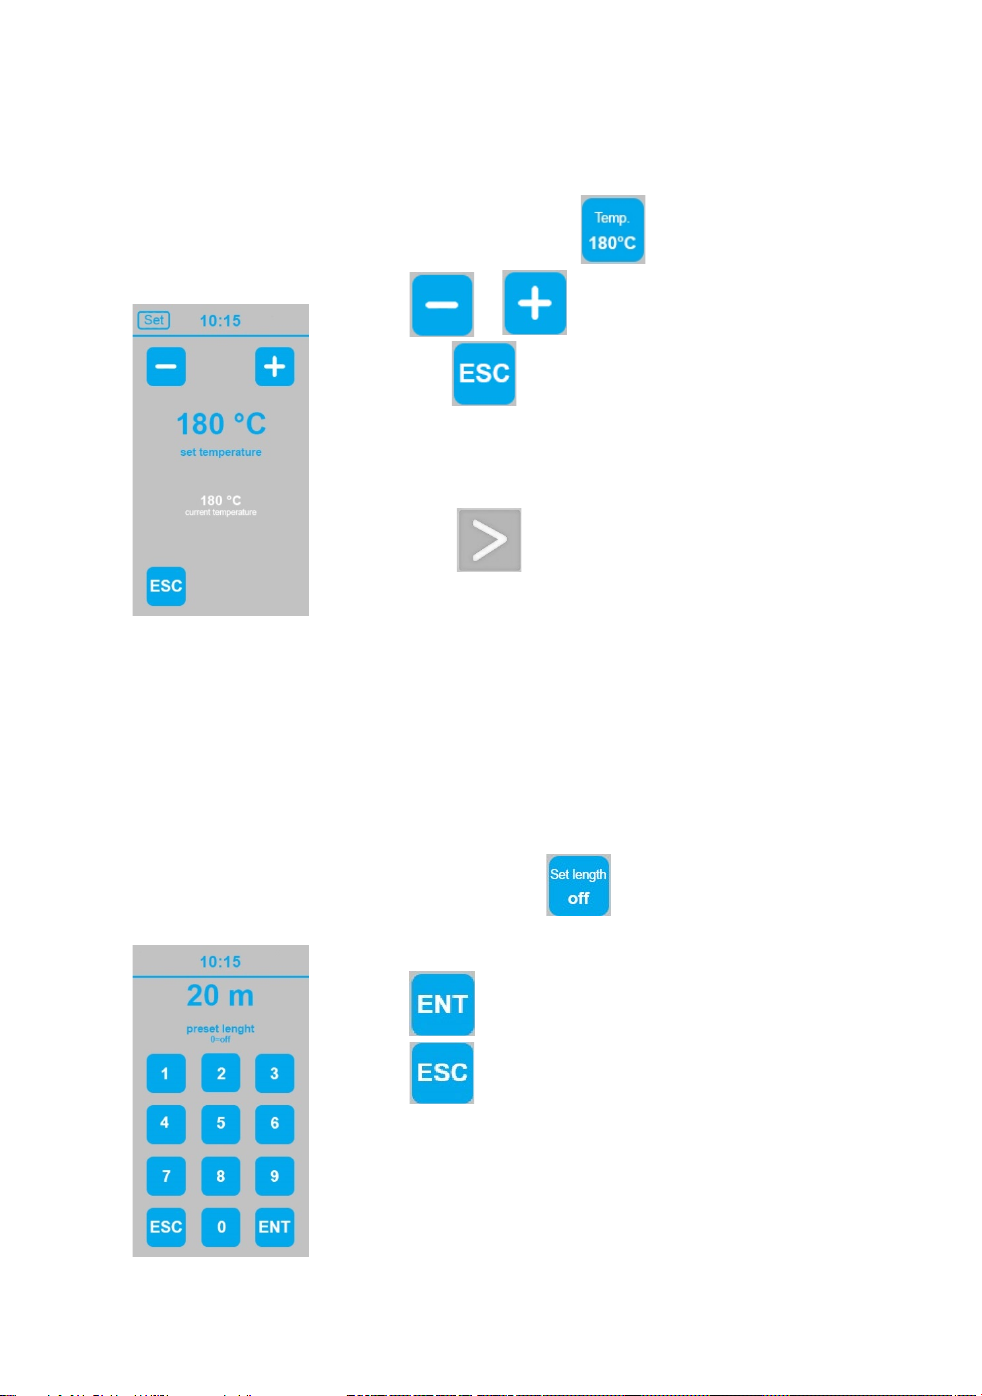
temperature is achieved.
Enter the requested length
Adjust seal temperature
Adjust seal temperature by touching temperature panel
Touch or to adjust target temperature.
Then touch to close setting page and return to start
screen. The machine starts heating or cool down until set
temperature.
Please have a little patience. Air cushion production can
only start when target temperature is achieved.
If you touch during heating up or cooling down
process the machine will get in waiting position and will
start air cushion production by itself once target
Please see recommended settings for the different cushion types.
To change displayed unit, please see “advanced settings”.
Preset film length
The length of the air cushion film you want to produce can be preset in meters, as needed.
This value is set to 0 by default, which tells the machine to produce air cushions
continuously.
To set requested length of air cushion strand, touch at start screen.
Touch to confirm and return to start screen
Touch to discontinue and return to start screen
without changed setting.
Please note that preset length will be kept until delete or
new adjustment.
To change displayed unit, please see “advanced settings”.
12
Page 14
OPERATING INSTRUCTIONS
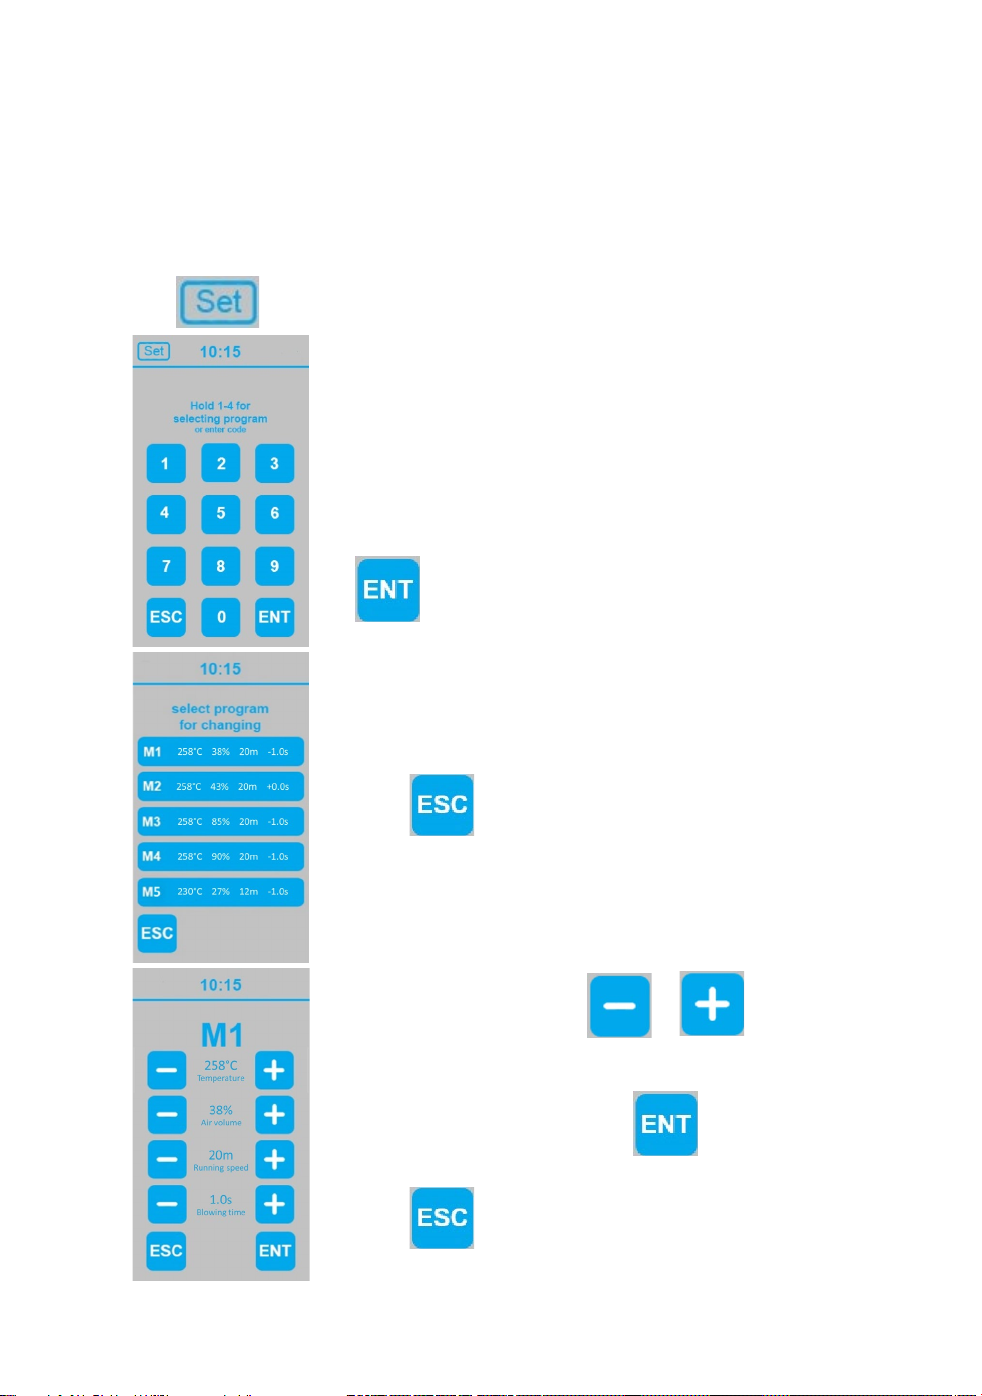
Preset function – quick selection
Five presets with temperature, air volume, running speed and Blowing time are possible
for a quick selection. Programming can be done at programming level.
Touch at start screen to get to the screen for selecting program
For quick selection of a preset touch assigned number (1, 2,
3, 4, or 5) and keep in touch until return to start screen.
Settings will automatically be transferred in start screen
Factory-adjusted: M1 for type 7.1 PE-Film 20µm; M2 for
type 8.3 PE-Film 20µm
To program or change a preset enter “4-5-6” and touch
Select one program by touching M1, M2, M3, M4 or M5 to
get to the corresponding programming level.
Touch to return to start screen with without any
changes.
To change displayed unit, please see “advanced settings”.
At programming level touch or to adjust
temperature, air volum, running speed or blowing time.
When all settings are done, touch to continue
changes and get back to program quick selection page.
Touch to return to program quick selection page
without any changes.
13
Page 15
OPERATING INSTRUCTIONS
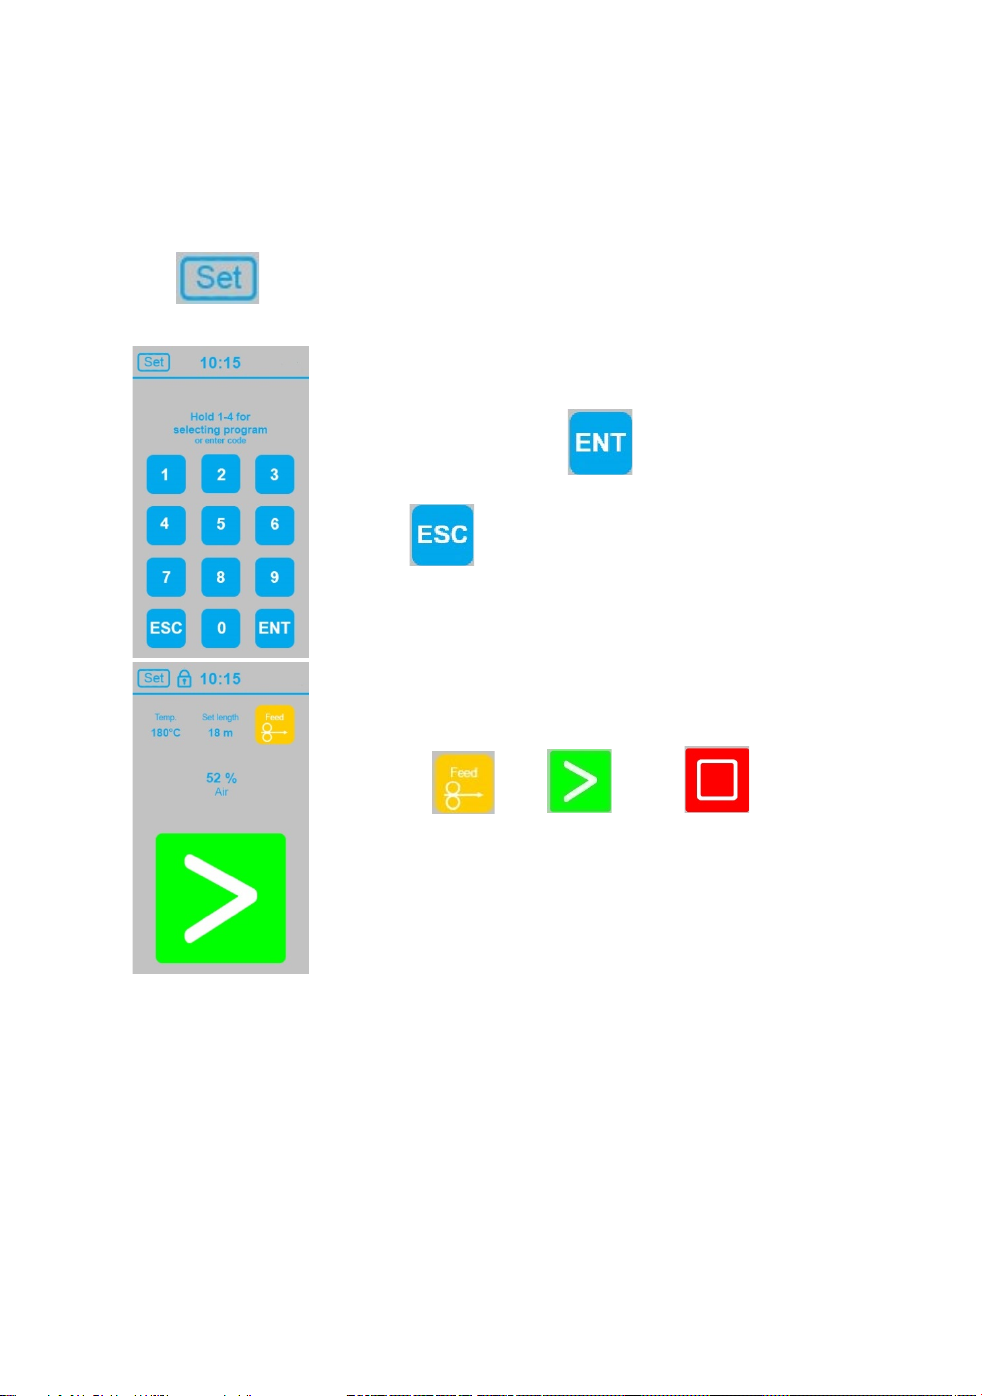
Lock function
Control panel can be locked, to prevent setting changes by unauthorized person.
Touch at start screen to get to the screen for entering code.
Enter code “1-2-3”, touch to confirm and return to
start screen
Touch to return to start screen without lock
function.
A little padlock symbol show that touch display is locked.
If so, it is only possible to
feed film , start , or stop air cushion
production.
Temperature, air volume or production length is not
possible to change. Therefore display needs to be unlocked.
Touch “SET” enter code and touch “ENT” to confirm and
return to start screen.
14
Page 16
OPERATING INSTRUCTIONS
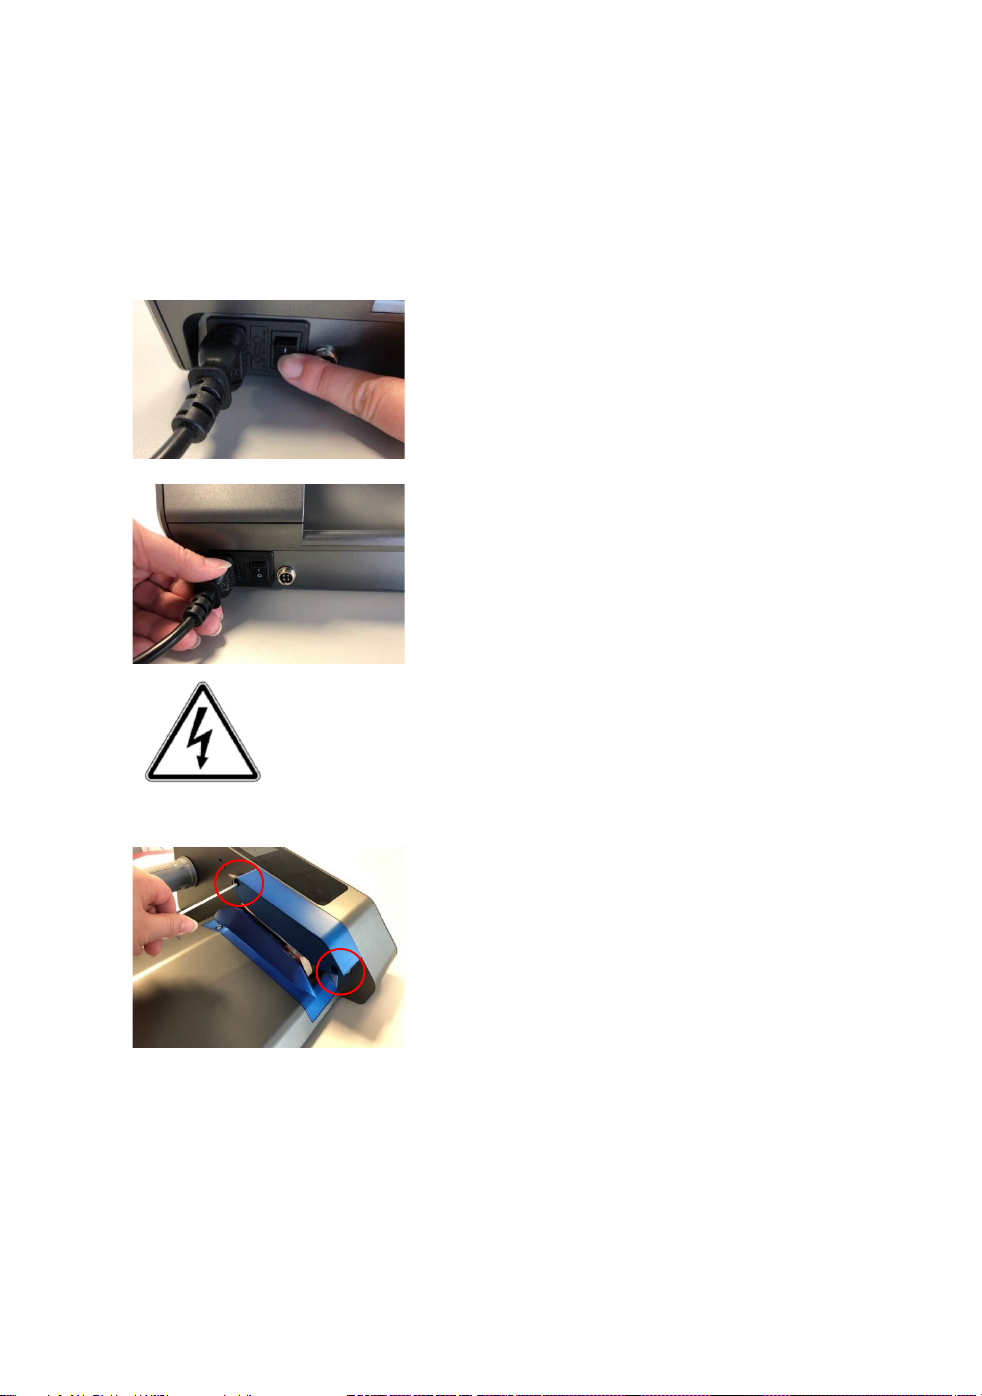
Change the knife
You can easily change the knife for AirWave2 yourself.
Step 1: Switch off the machine and disconnect power
Always switch off the machine before opening it.
Disconnect power to the machine by removing
the power cord completely from the machine.
Allow the machine to cool down!
Step 2: Remove cover
You must follow this step. It is for your safety.
Undo both screws of upper cover with appropriate
hex key and remove cover
15
Page 17
OPERATING INSTRUCTIONS
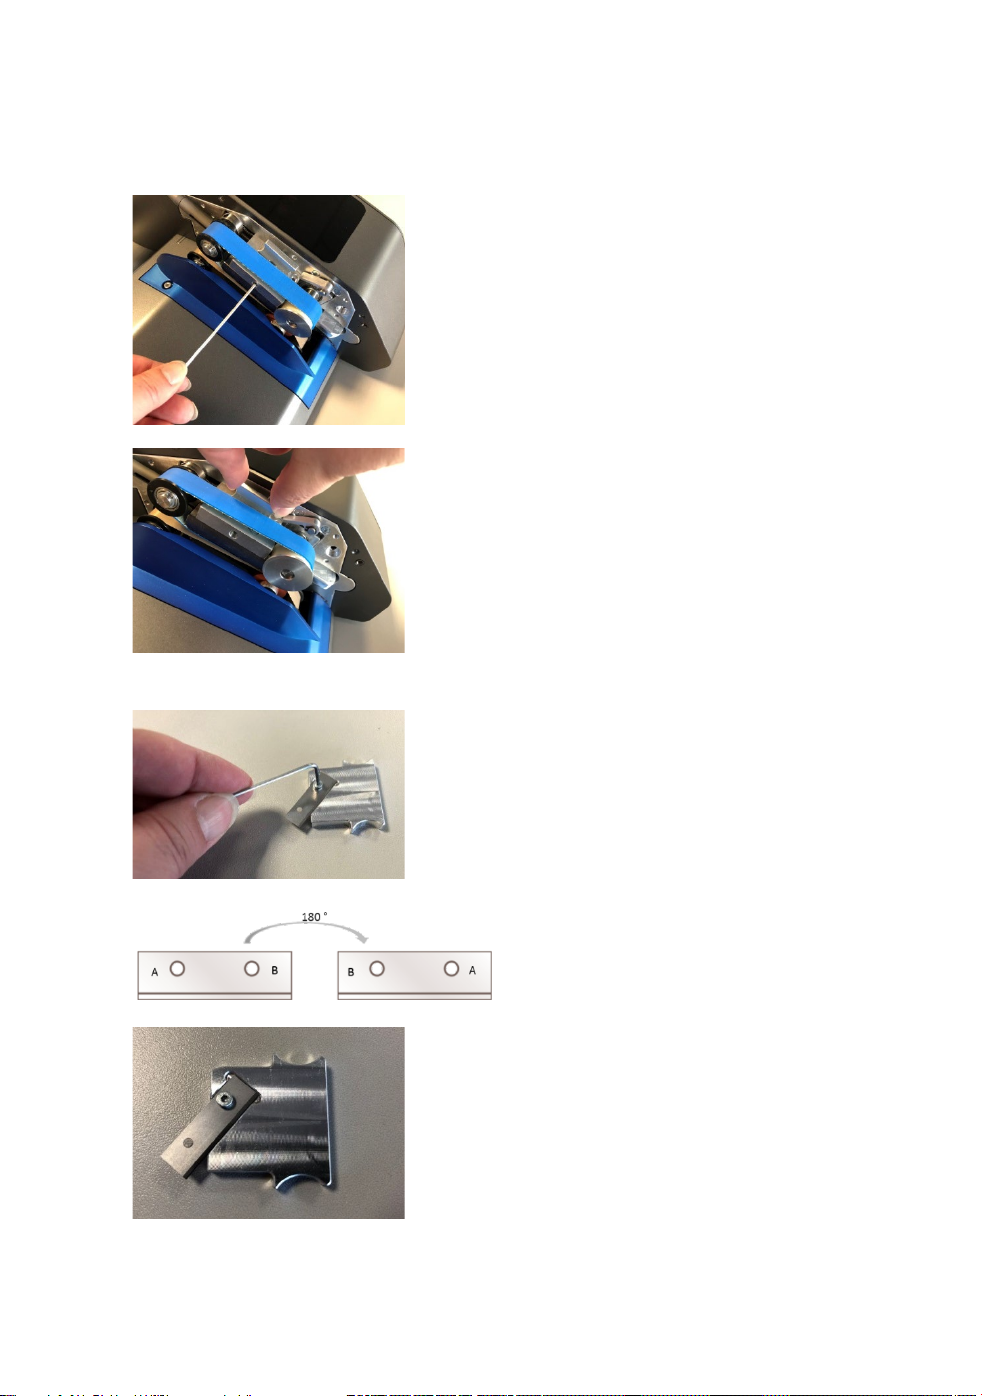
Turn around the blade one time 180° or
used.
Step 3: Remove the knife
Step 4: Change blade
Undo the locating screw with the provided hex key.
Remove the blade bracket.
Caution!!
Even used blades are extremely sharp!
Undo the little screw which fixes the blade with
the provided hex key.
apply a new one if both sides were already
Fix the blade with the corresponding screw.
16
Page 18
OPERATING INSTRUCTIONS
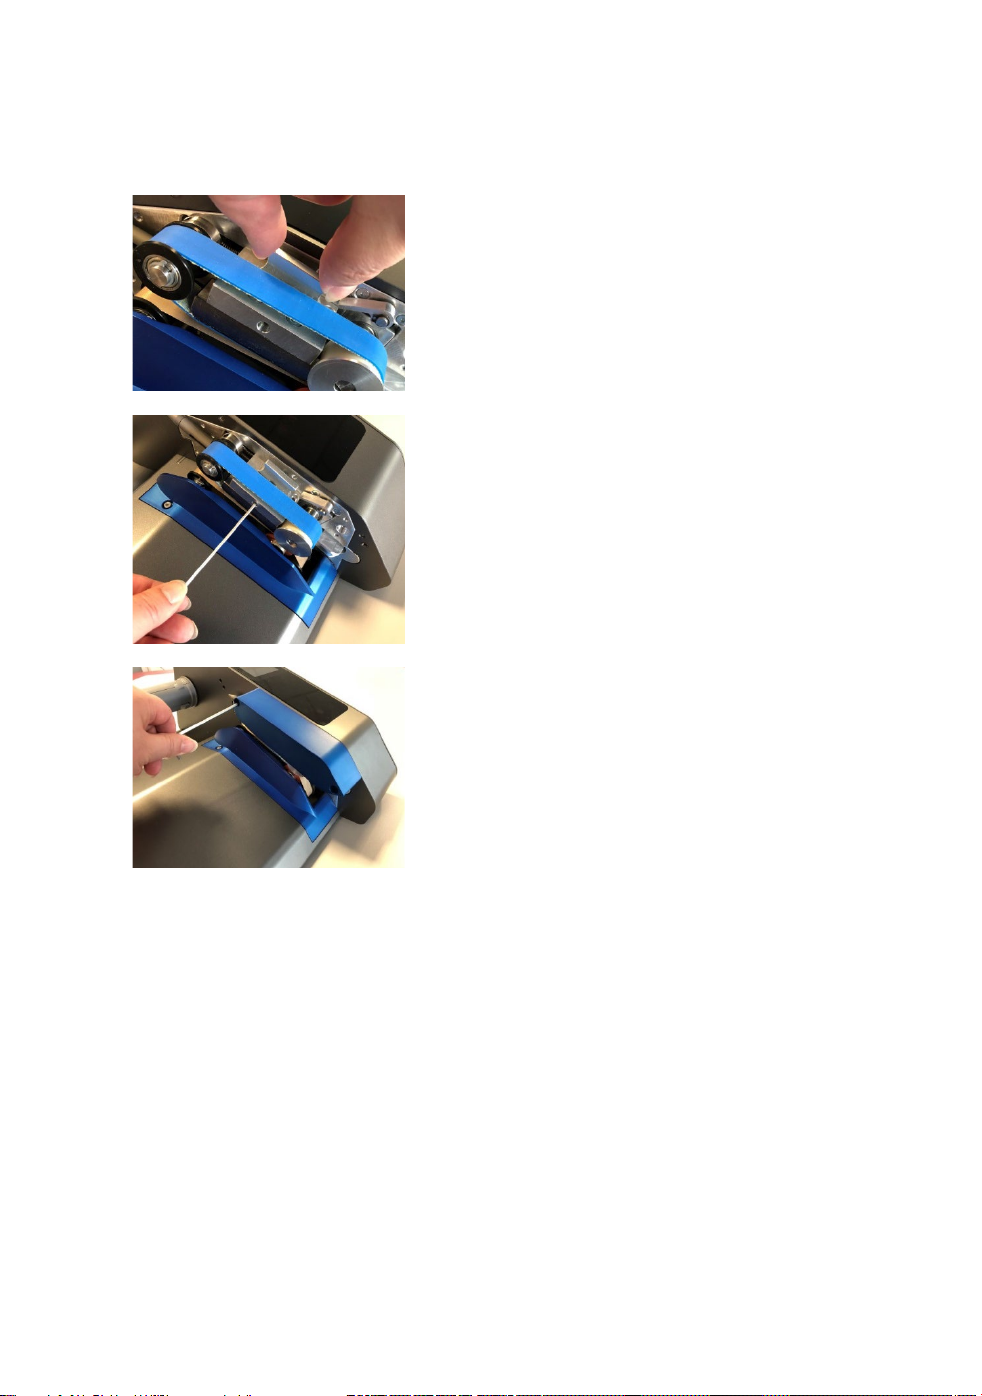
Step 5: Insert the knife
Insert the knife into the slot at the machine
and fix it with the screw.
17
Remount the upper cover and fix it with the
screws with provided hex key.
Page 19
OPERATING INSTRUCTIONS
Change the Teflon belt
You can easily change the Teflon belts at AirWave2 yourself.
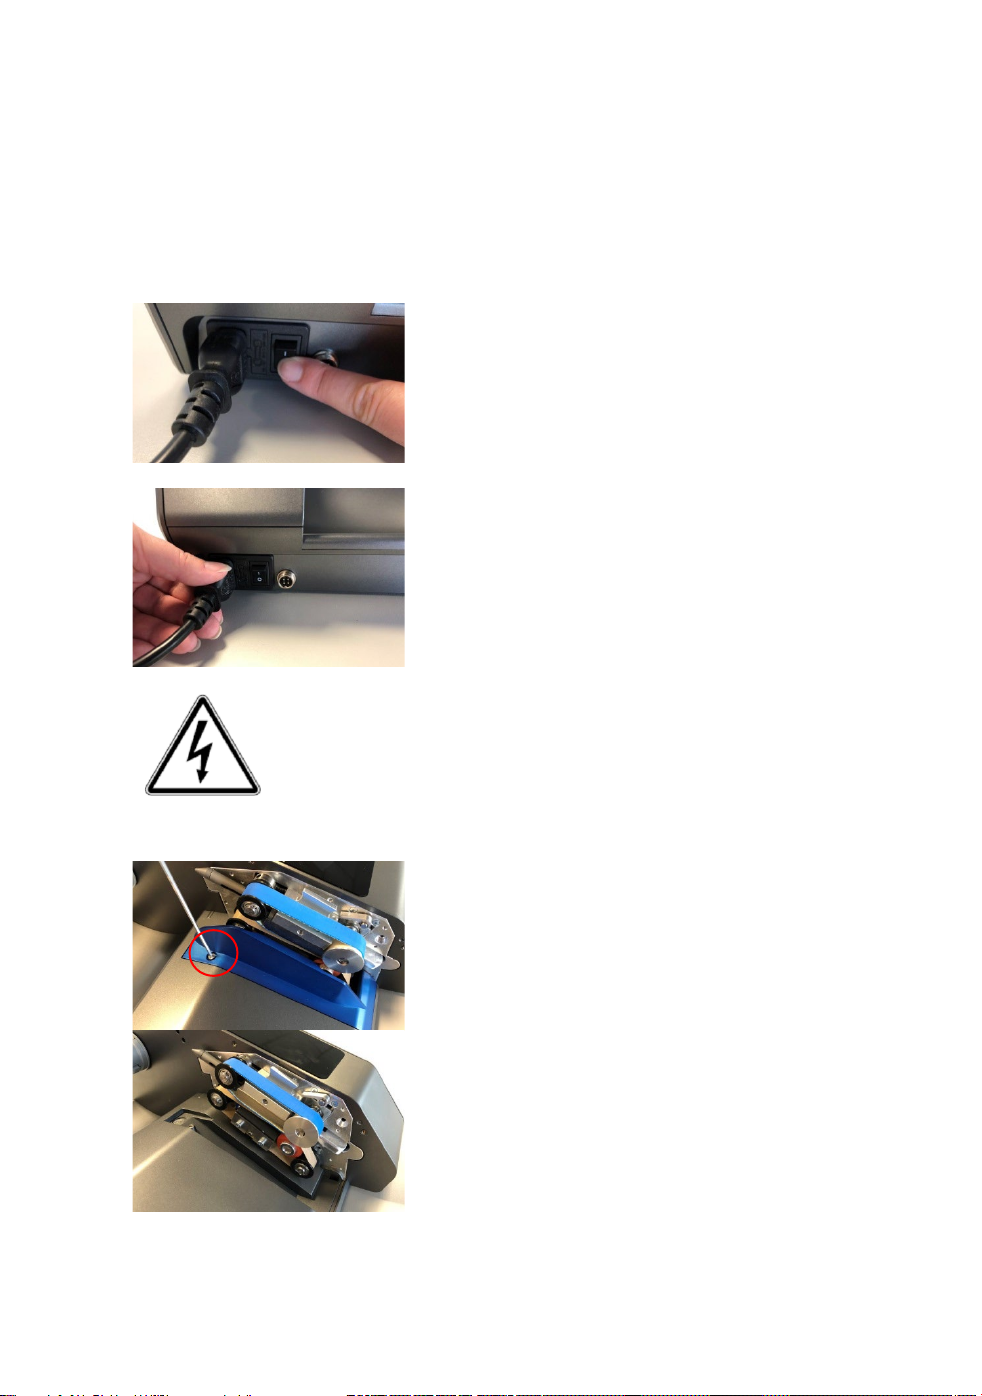
Step 1: Switch off the machine and disconnect power
Always switch off the machine before opening it.
Disconnect power to the machine by removing
the power cord completely from the machine.
Allow the machine to cool down!
Step 2: Remove covers
You must follow this step. It is for your safety.
Undo both screws of upper cover with appropriate
hex key and unscrew lower cover with provided
hex key and remove it.
18
Page 20
OPERATING INSTRUCTIONS
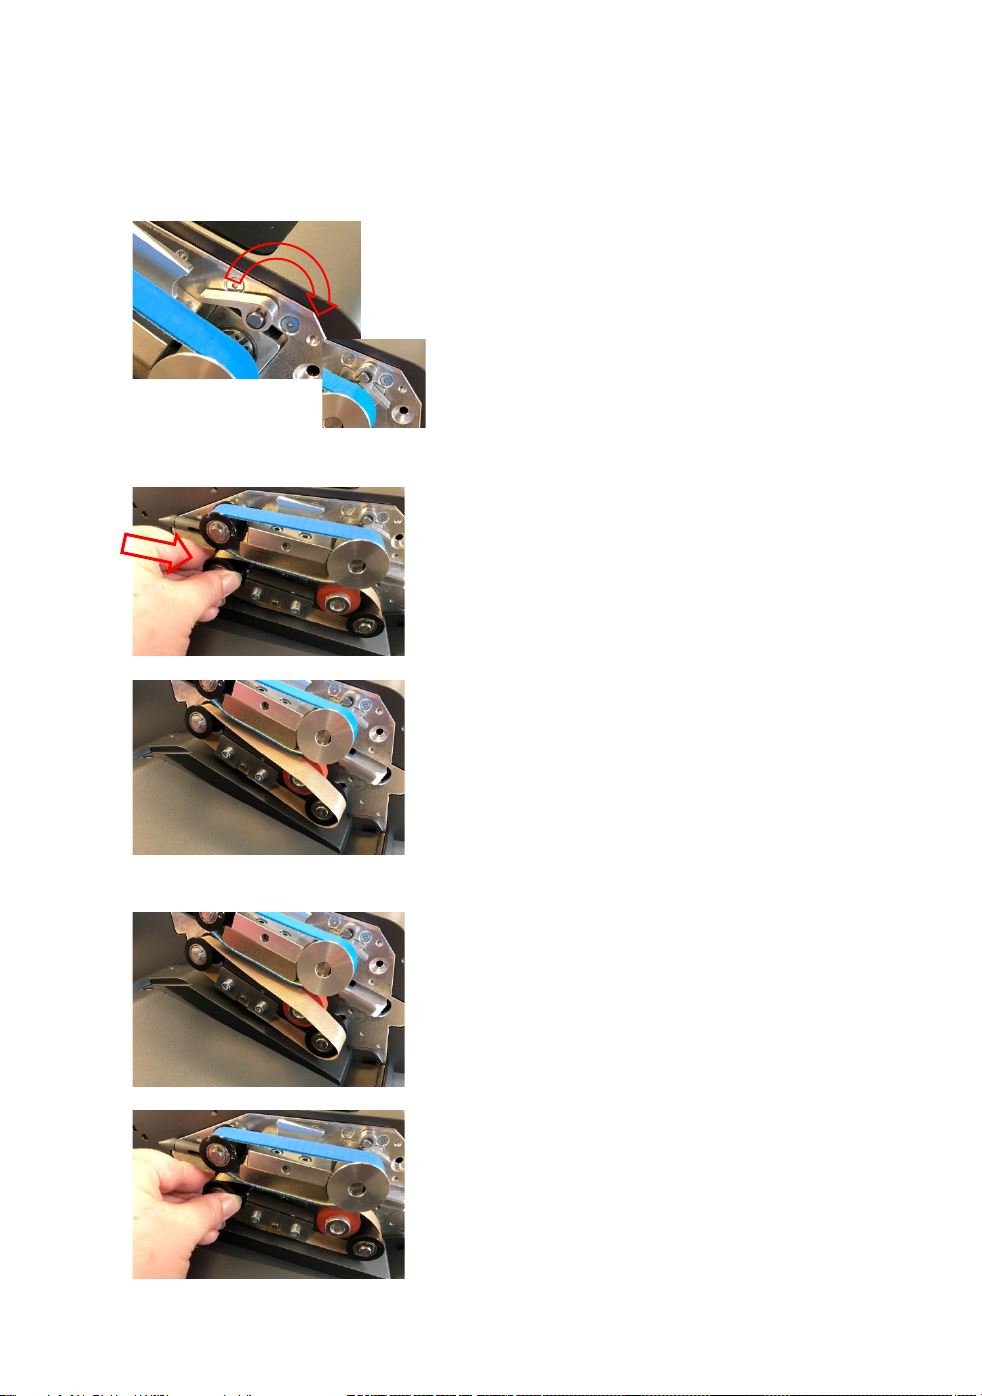
Step 3: Loosen transport rolls
Turn the tension lever to move the transport rolls
apart.
Step 4: Release Teflon belts
Step 5: Insert new Teflon belts.
Push the lower of the two guiding rollers to the
right against the spring to release the tension
for the lower Teflon belt.
Remove the slackened Teflon belt from the rollers.
Place the new Teflon belt over the left transport
rollers
And press the roll again to the right against the
spring until the Teflon belt can be placed on the
right roll.
19
Page 21
OPERATING INSTRUCTIONS
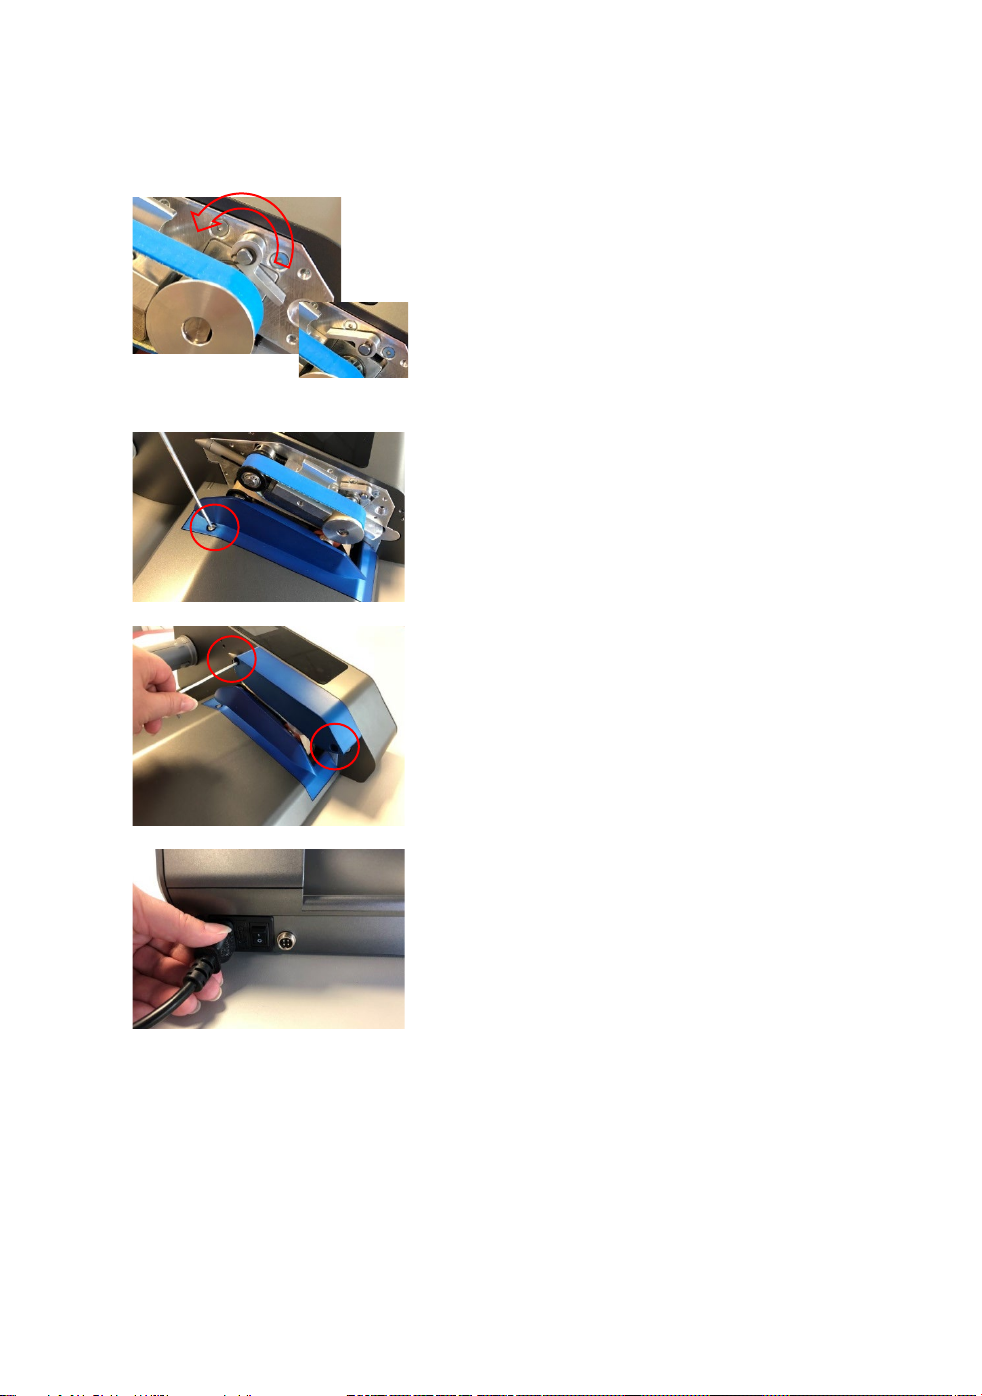
Step 6: Tension the belts
Step 7: Close the machine covers
Turn the tension lever back to the left to
press the transport rolls against each
other.
Fit the covers of the Teflon belts and
screw it with the prepared hex key.
Lower cover first and then the upper one.
Now you can reconnect the power cord and
switch on the machine.
20
Page 22
OPERATING INSTRUCTIONS
Change the transport belt
You can easily change the transport belt at AirWave2 yourself.
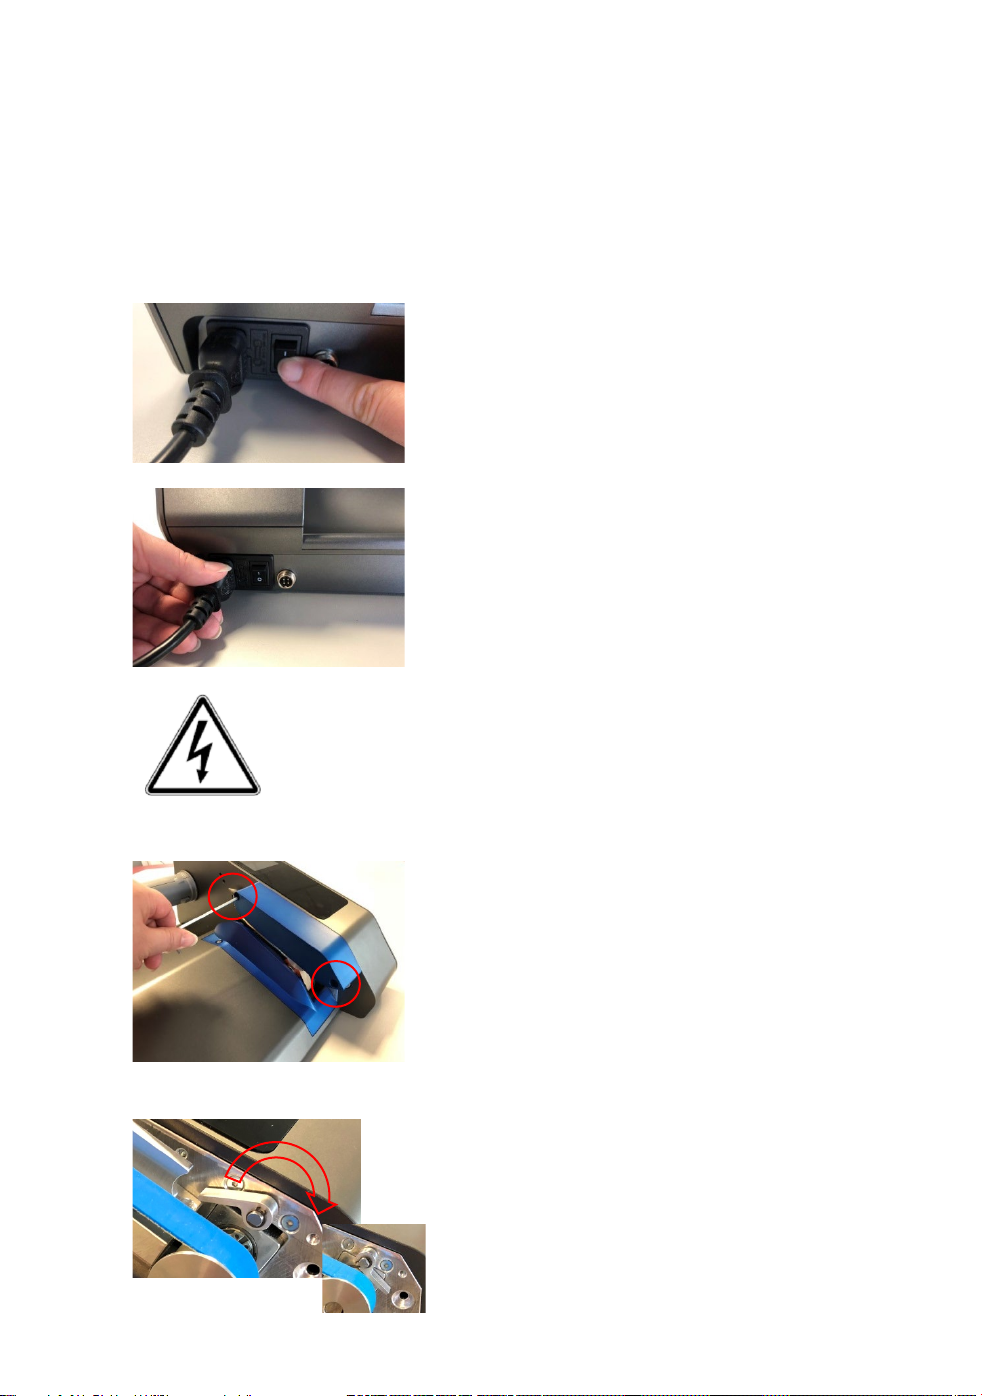
Step 1: Switch off the machine and disconnect power
Always switch off the machine before opening it.
Disconnect power to the machine by removing
the power cord completely from the machine.
Allow the machine to cool down!
Step 2: Remove upper cover
Step 3: Loosen transport rolls
21
You must follow this step. It is for your safety.
Undo both screws of upper cover with appropriate
hex key and remove cover
Turn the tension lever to move the transport rolls
apart.
Page 23
OPERATING INSTRUCTIONS
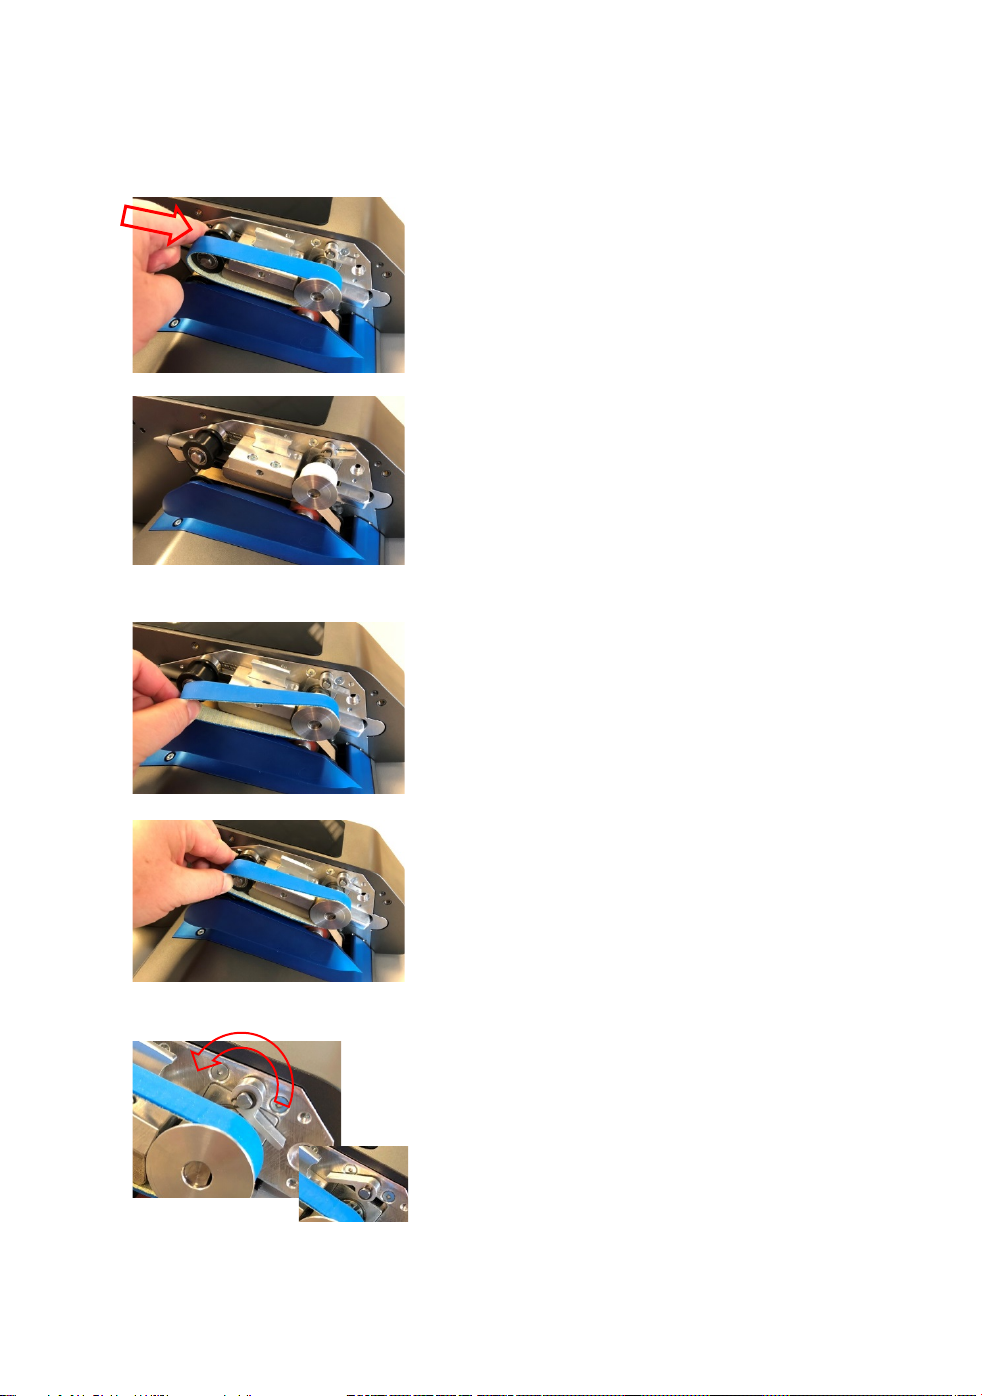
Step 4: Release transport belt
Push the upper left guiding rollers to the right
against the spring to release the tension for the
transport belt.
Remove the slackened transport belt from the
rollers.
Step 5: Insert new transport belt
Place the new transport belt over the right transport
rollers
now press the left roll to the right against the spring
until it is possible to place the transport belt on the
left roll.
Step 6: Tension the belts
Turn the tension lever back to the left to
press the transport rolls against each
other.
22
Page 24
OPERATING INSTRUCTIONS
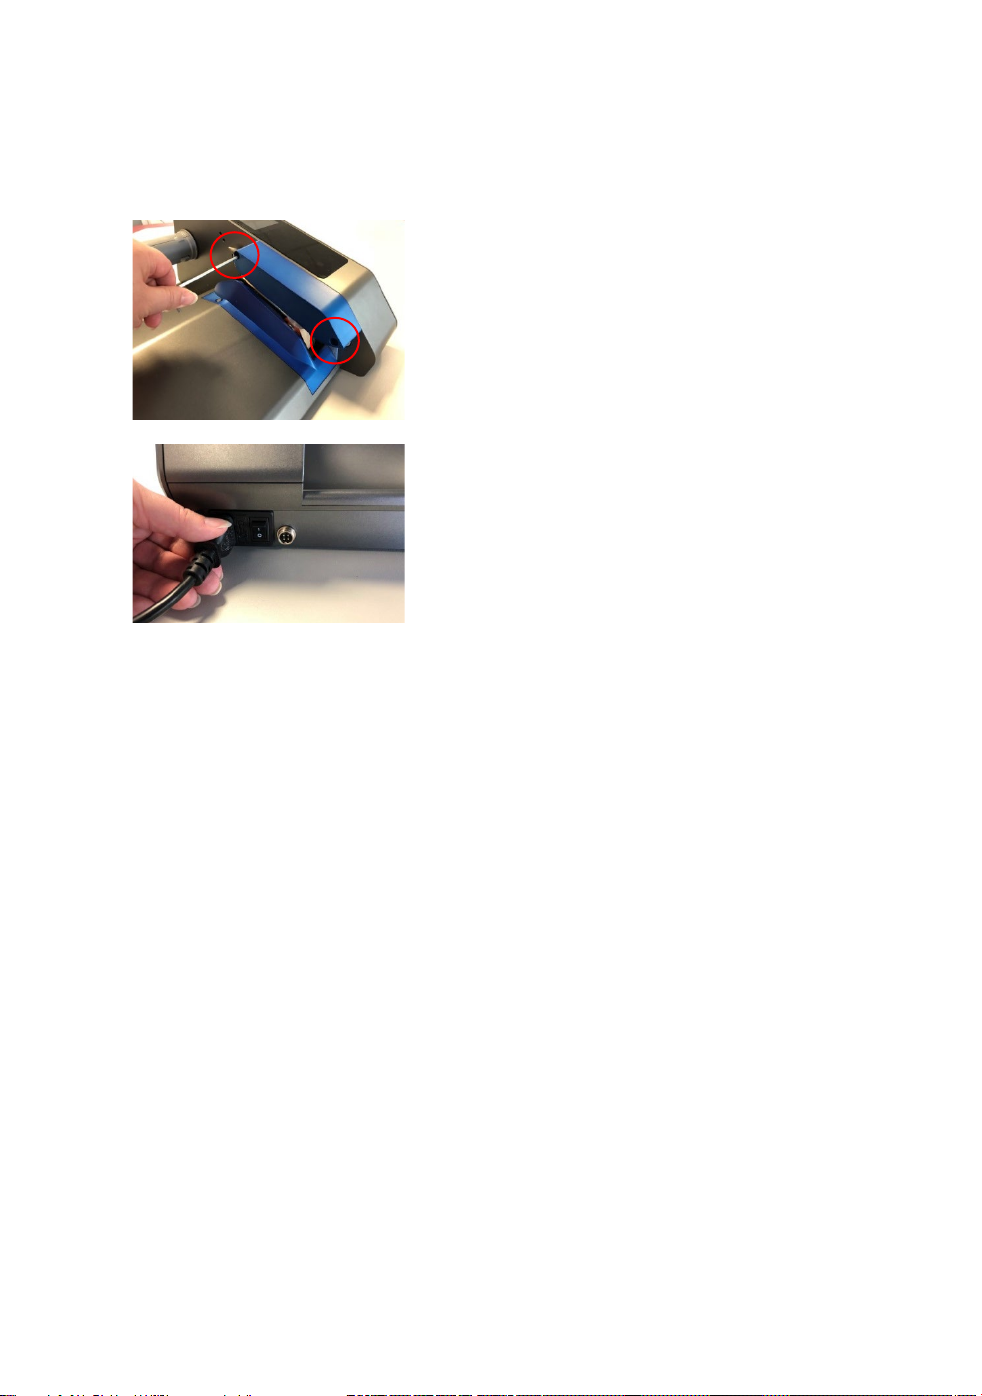
Step 7: Close the machine covers
Fit the upper cover and screw it with the
prepared hex key.
Now you can reconnect the power cord and
switch on the machine.
23
Page 25
OPERATING INSTRUCTIONS
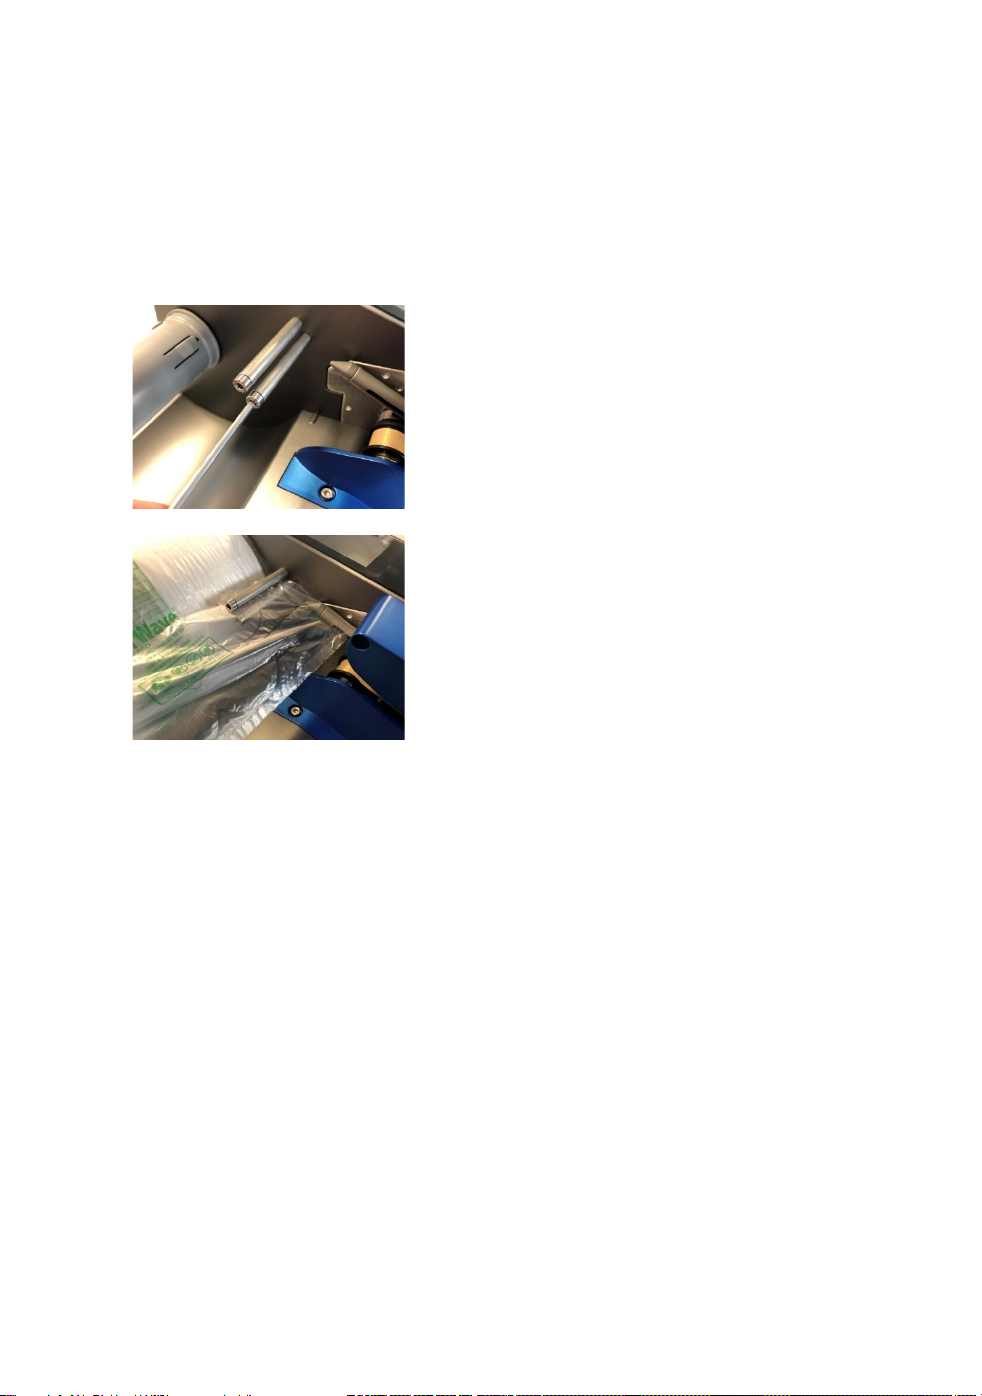
Film guide pins
For a more effective air volume or better film guide for the film Types
8.3 - 8.5 use the two guiding pins.
Screw the pins at the machine casing with
the prepared hex key
Thread the film through the pins and over
the airpipe.
Start production.
24
Page 26
OPERATING INSTRUCTIONS
Error codes
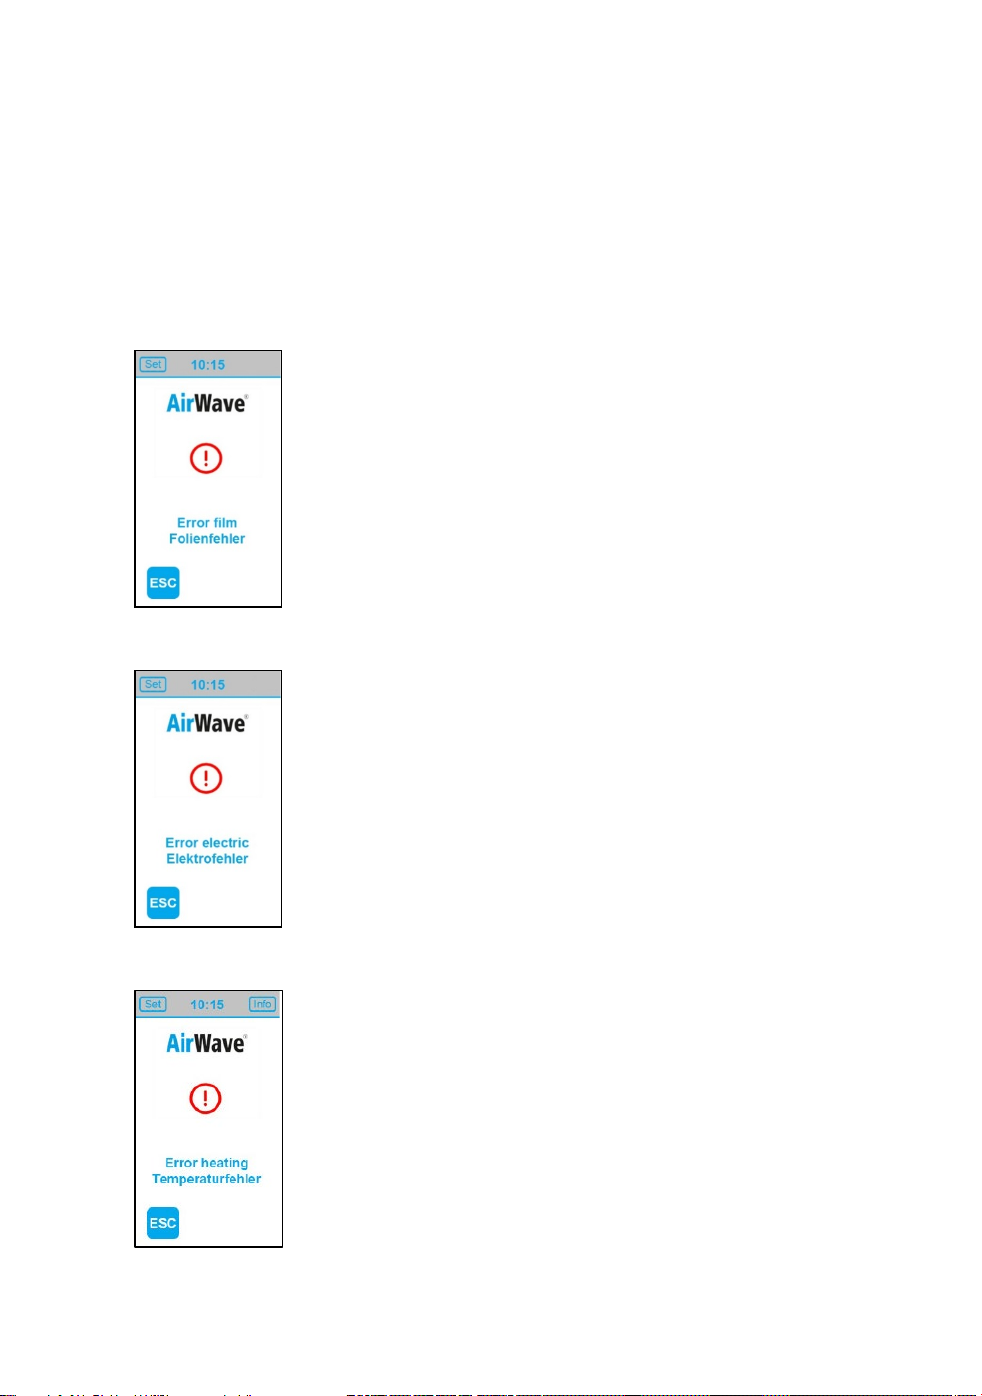
The AirWave2 has an integrated diagnostic program. In the event of an error, an
error description will appear on the display and indicate the cause of error. This
information will help you to correct the error:
Error film
Roll of film is empty or film is misthreaded
Error electric
Error heating
25
Please contact our Floeter Service if this Error occurs
repeatedly or if it would not be possible to reset.
Please contact our Floeter Service if this Error occurs
repeatedly or if it would not be possible to reset.
Page 27
OPERATING INSTRUCTIONS
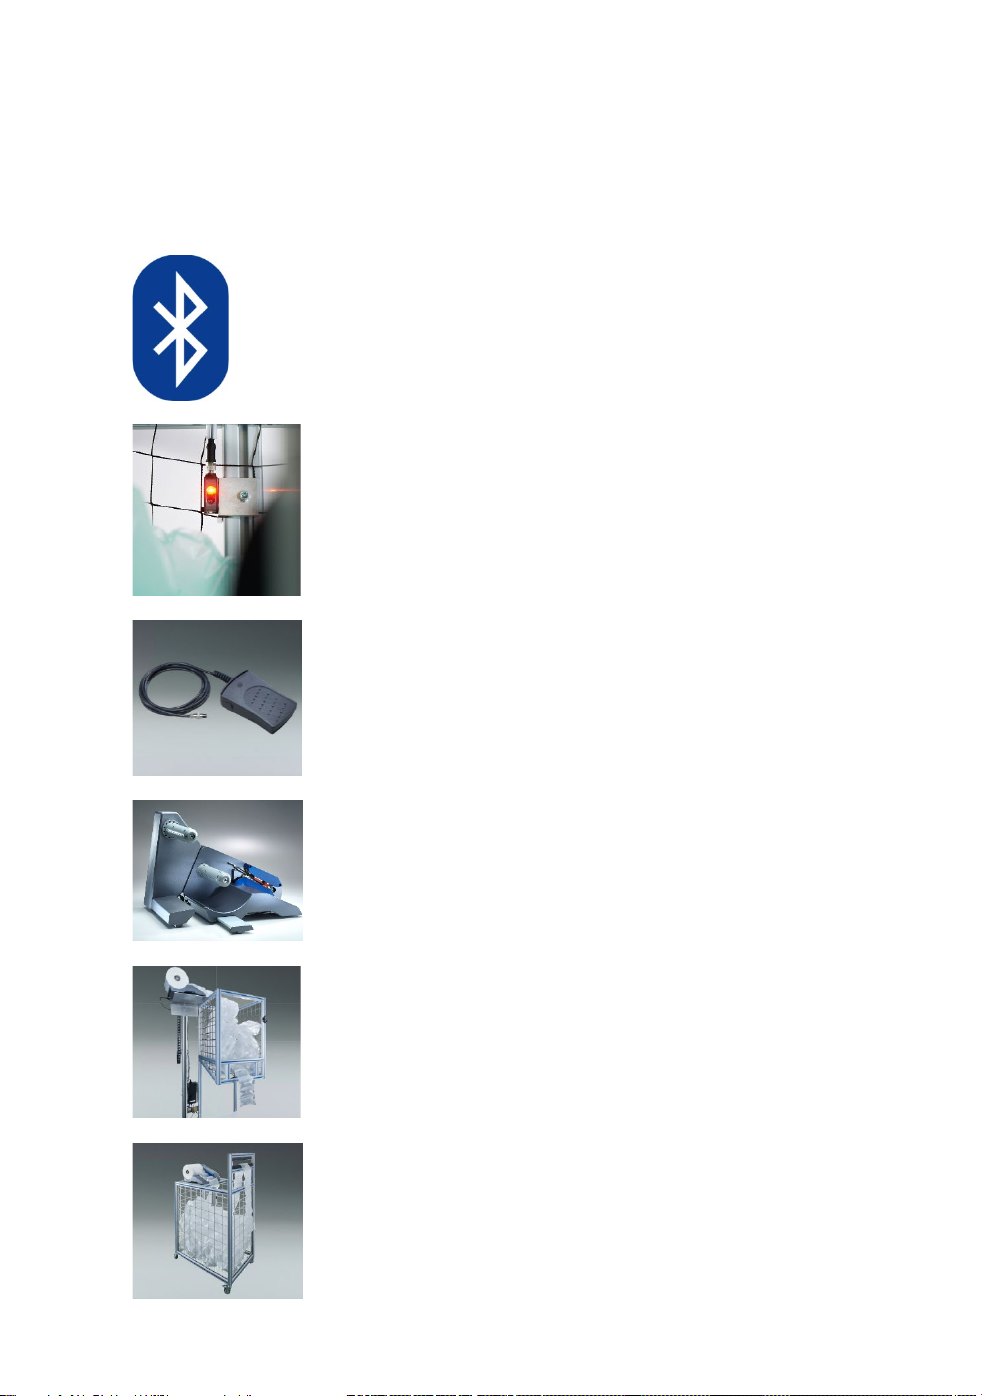
Options and expandability
Please contact your sales advisor for further information.
Distance controlled production by Bluetooth connection.
With tablet or smartphone
Fully automated control by the installation of a filling level
sensor.
Optimal for overhead compartment or mobile air cushion
storage.
Start-/Stop function with foot pedal.
For a production on demand. Even if you have no free hand
or if machine is inaccessible.
Jumbo roll holder
for bigger rolls
Overhead Solution
For an automated air cushion stockage in ideal working
height
Rolling container
always brings your air cushions to the ergonomically correct
working height. Locally flexible.
26
Page 28
OPERATING INSTRUCTIONS
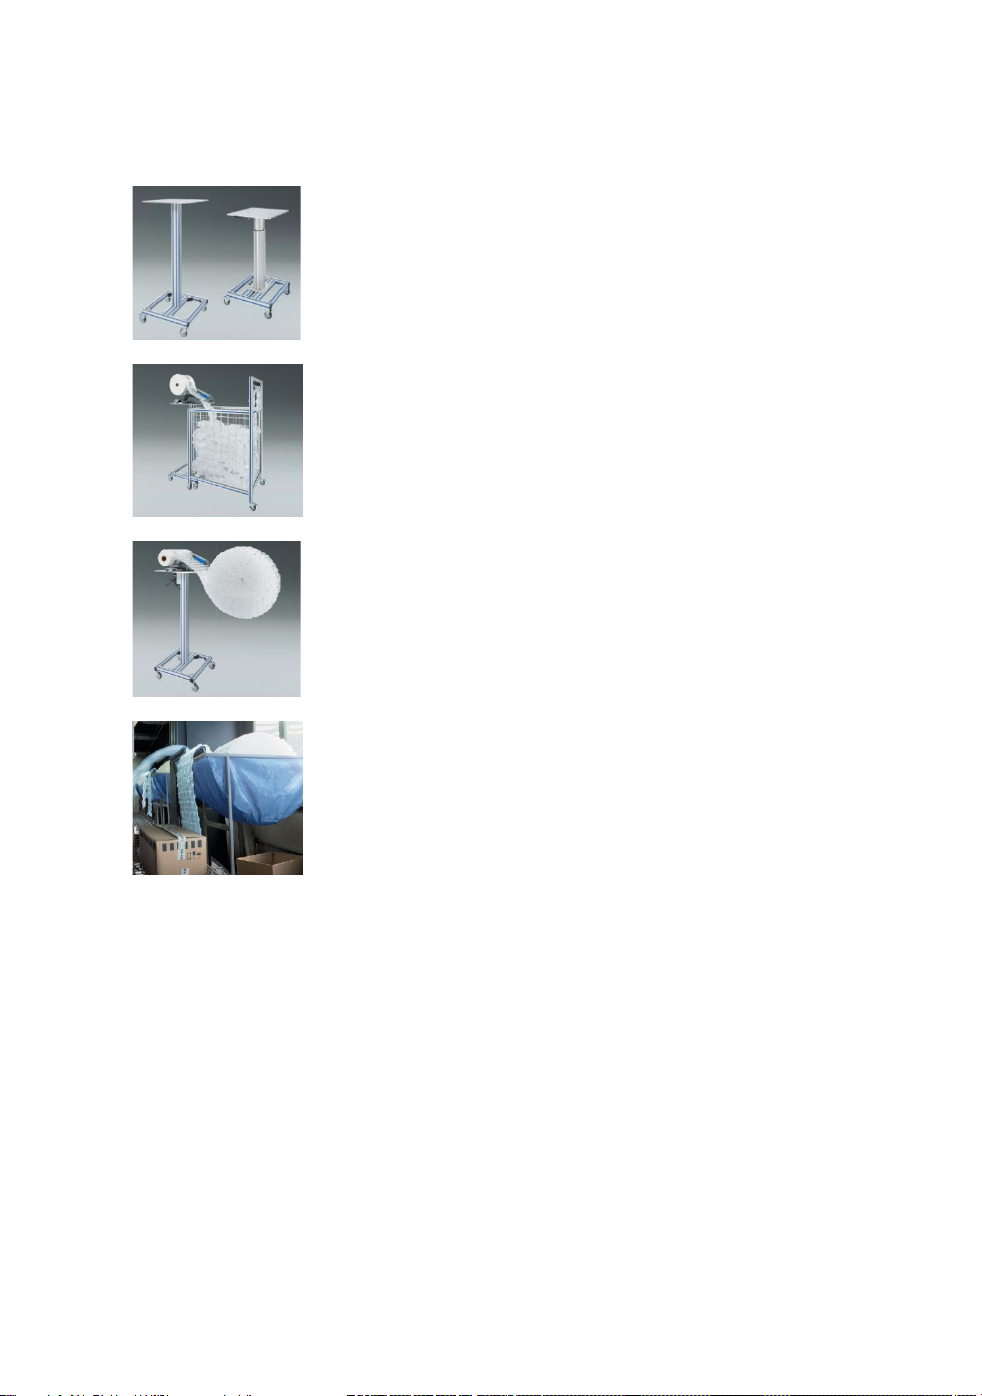
Mobile table solution
Bring your machine to the ideal working height.
(compatible with Docking station)
Docking station
For a decentralized consumption with mobile rolling
container completely independent of machine position.
The large roll coiler
For the production of endless rolled sheets of the cushion
mats
27
Roll trough
For an easy storage of endless rolled sheets in optimum
height
Page 29
OPERATING INSTRUCTIONS
Factory
setting
- 12 m/min
- 20JR m/min
- External sensor
- Deactivated
Delay time
sensor reaction
- Roll holder
- All deactivated
Resting time
starts cooling
- °C
- Feet
- am/pm
hh : mm
- mmdd
- ddmm
-
Delay “Start” via
display
0 : Motor & blower
(0.1 - 1.5 sec)
Running speed
External control
Delay time ext. sens.
Foil detection sensor
Standby time
Units
Time
Date
Communication
Start delay time
Blowing time
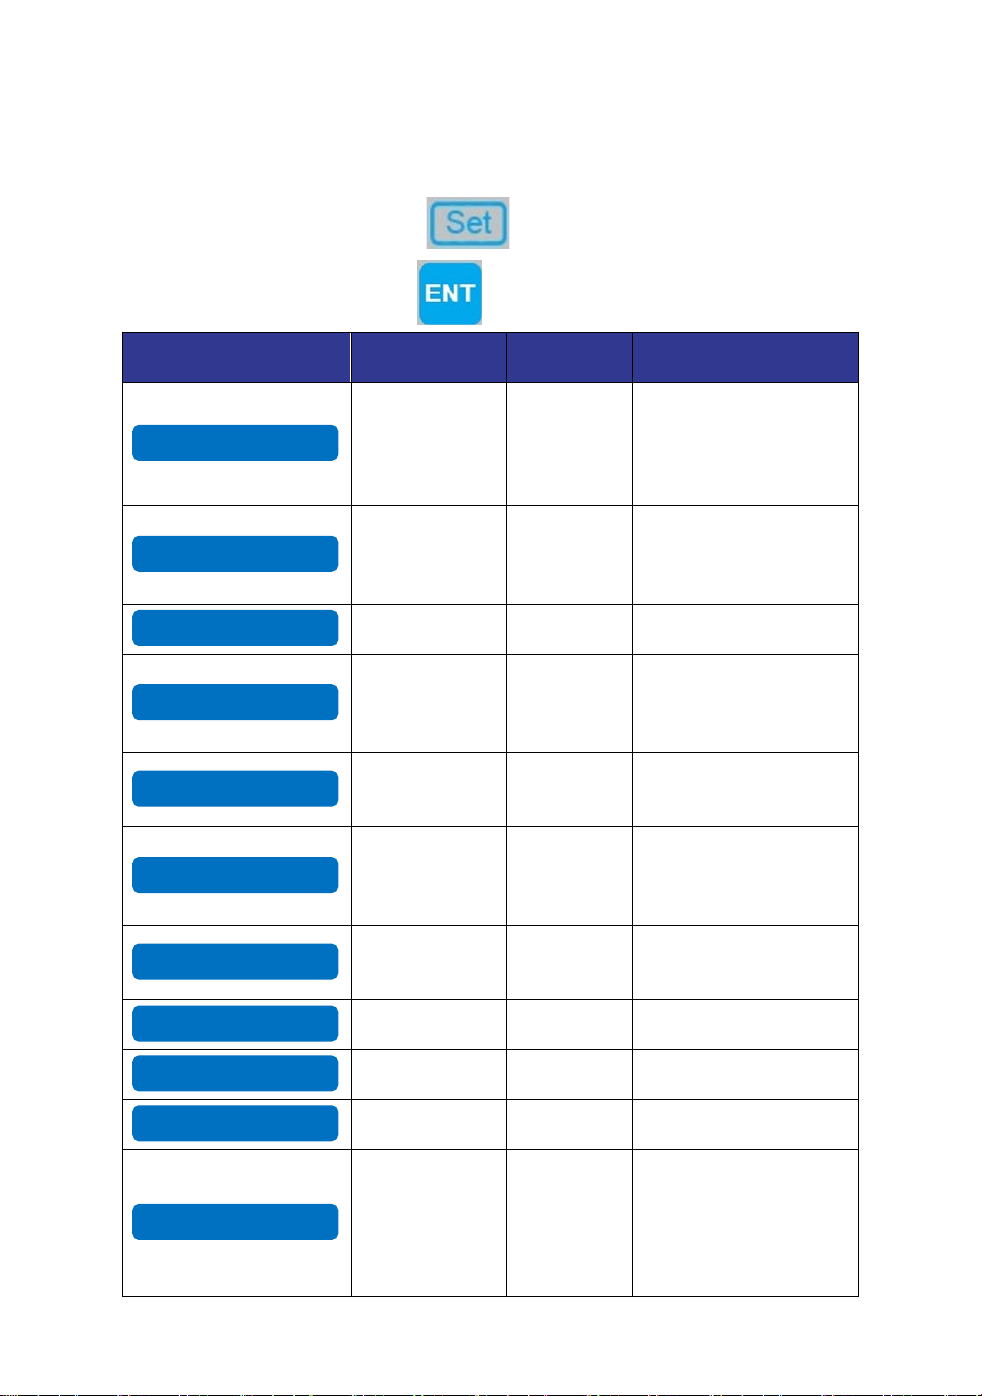
Advanced settings
To change advanced settings touch at start screen.
Enter code “1-3-5”, continue with and choose desired submenu.
Submenu in Level 135 meaning
Production
speed
Start/Stop with
connected ext.
tool
Foil detection
sensor
Choices
- 20 m/min
12 m/min
Deactivated
0 Off/0 - 99 sec
Roll holder
With Jumbo roll holder:
- 12JR m/min
- Foot pedal
- Large roll coiler
- Jumbo roll holder
- Airpipe
until machine
Imperial or
metric units
Time of day 24 h
Date mmdd
Internal section -
Blower starts
before/after
film transport
20 min Off/0 – 99 min
°C & Meter
0 0 – 99 sec
0.0
- °F
- Meter
- 24 h
same time
– : Blower before motor
(0,1 - 1,0 sec)
+ : Blower after motor
28
Page 30

OPERATING INSTRUCTIONS
Maintenance & Cleaning
The AirWave2 is a low maintenance machine.
Mechanically claimed parts can show traces of abrasion after certain operating time.
Furthermore there can occur contamination or residues at the AirWave2.
Our recommendation at regular intervals:
1) Check Teflon belts and replace as the circumstances require
2) Check blue transport belt and replace as the circumstances require
3) Check red and white transport rolls regarding contamination and grip clean or
replace if necessary
4) The gear wheels always need to be sufficiently greased
5) Check knife, see the cutting of the film, if necessary turn 180° or replace
6) If necessary clear the machine of contamination and residue of film. Consider also
knife slot at air pipe, sealing block and other areas of the machine.
29
Page 31

OPERATING INSTRUCTIONS
Warranty
AirWave2 has a 12-month manufacturer’s warranty that covers all electronic and
mechanical components. The warranty period starts automatically when you purchase
the machine.
In the event of damage, please contact our back office (please see contact below).
If the machine needs to be send back to us, please follow the steps discussed with our
service team.
Your machine will be returned to you immediately once the repair is finished.
If you need a replacement machine, the warranty period will continue from the receipt
date of the first machine. The warranty will not be extended.
The scope of the warranty does not include the following:
- Damage resulting from improper use of AirWave2:
- This includes, in particular, damage caused by using unsuitable films or inserting
foreign objects into the machine’s transport belts.
- Wear and tear caused by regular use
- Wearing parts, in particular, Teflon transport belts, knifes, and transport rollers
- Damage caused by machine downtimes
Contact:
FLOETER Verpackungs-Service GmbH
Robert-Bosch-Str. 17
71701 Schwieberdingen
Germany
Declaration of Conformity
The machine AirWave2 and it´s equipment is compliant with the relevant harmonized
standards listed according to EG-Regulations 2006/42/EG, the European EMC Directive
2014/30/EU and LVD Directive 2014/35/EU. The compliance was verified by an
independent specialized certifying company.
Technical records available on request.
30
Page 32

OPERATING INSTRUCTIONS
Support and Service
If you need support, advice or do you have any questions?
We are here for you: www.floeter.com/en/support
FLOETER Verpackungs-Service GmbH
Robert-Bosch-Straße 17
71701 Schwieberdingen
Germany
tel.: +49 (0) 7150 / 92396 - 0
[email protected]
www.floeter.com
31
 Loading...