

Page 1
FLUID COIL
INSTALLATION
OPERATION
AND
MAINTENANCE
Commercial Products
PO Box 1457 / 1000 Heatcraft Drive, Grenada, MS 38902-1457
Tel: 800-225-4328 / 662-229-4000 Fax: 662-229-4212
Email: coils@heatcraft.com
Web Site: www.heatcraft.com
Page 2

Page 3

FLUID IOM
Guidelines for the installation, operation and maintenance of Heatcraft’s cooling and heating coils
have been provided to help insure the proper performance of the coils and their longevity . These are
general guidelines that may have to be tailored to meet the specific requirements of any one job. As
always, the installation and maintenance of any coil should be performed by a qualified party or
individual. Protective equipment such as safety glasses, steel toe boots and gloves are recommended
during the installation and routine maintenance of the coil.
Receiving Instructions
1. All Heatcraft coils are factory tested, inspected and carefully packaged.
2. Damage to the coils can occur after they have left the factory. Therefore, the coils
should be inspected for shipping damage upon receipt. The freight bill should also be
checked against items received for complete delivery .
3. Damaged and/or missing items should be noted on the carrier’s freight bill and signed by
the driver.
4. For additional assistance, contact your local Heatcraft representative.
Nomenclature
Tube O.D. Finned Length (inches)
4=1/2”
5=5/8” Fin Height (inches)
Coil Type Fin Design
W Standard Water A - flat (Al, Cu)
M Splayed Headers B - corrugated (Al, Cu)
B Booster C - sine wave (Al, Cu)
K Cleanable Both Ends F - flat (SS, CS, Al, Cu)
P Cleanable Supply End G - corrugated (SS, CS, Al, Cu)
Q Cleanable Opp. Supply End H - sine wave (SS, CS, Al, Cu)
Circuiting Rows Deep
Q - 1/4 serp M - 1 1/2 serp
H - 1/2 serp D - 2 serp
L - 3/4 serp T - 3 serp Fins Per Inch
S - 1 serp B - skip tube
Booster
S - 1 circuit B - skip tube
D - 2 circuits
5 W S 14 06 C 24.00 x 144.00
1
Page 4
FLUID IOM
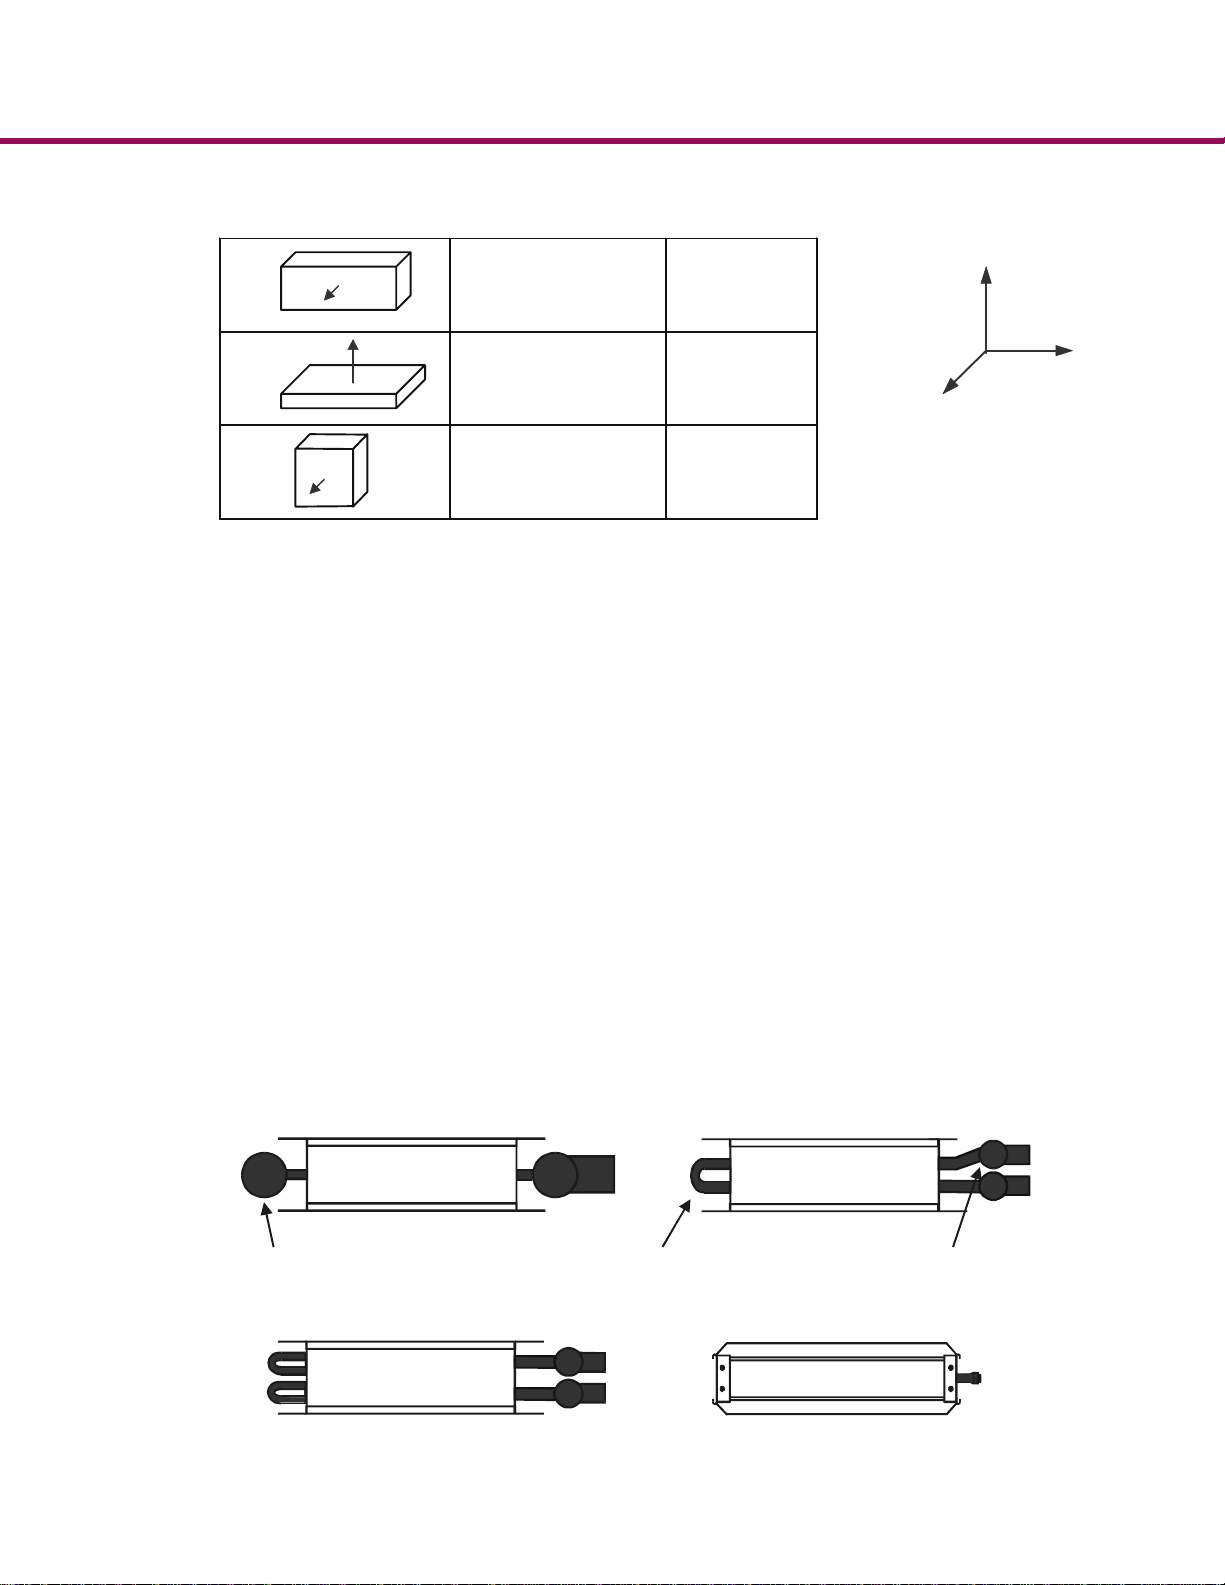
Mounting
Horizontal Air Flow
Horizontal Tubes
Level with the
y-axis and
x-axis.
Y
1. All Heatcraft water and glycol coils are designed to be fully drainable when properly
mounted.
2. Vertical air-flow is not recommended for dehumidifying coils.
Coil Types
Standard Fluid Coils
HEA TCRAFT’ s fluid coils are specifically designed for your particular application. Flexibility is built into our manufacturing processes, offering variations in fin type, fin density ,
circuitry arrangement, coil casing and materials of construction. Standard fluid type
“W” coils utilize a collection header for one and two row applications and return bends
for applications that require three or more rows. Type “M” coils are used for one and
two row applications that require same end connections. For type “M” coils the supply
and return headers are offset or “splayed”. This orientation allows for the supply and
return headers to be placed side by side. Booster coils, type “B”, are also available for
one and two row applications.
Vertical Air Flow
Horizontal Tubes
Horizontal Air Flow
Vertical Tubes
2
Level with the
z-axis and
x-axis.
Level with the
y-axis and
x-axis.
X
Z
W Type
1 or 2 Row
Collection Header Return Bends
W Type
> 2 Row
2
M Type
Splayed Header
Booster
Page 5

FLUID IOM
Cleanable Fluid Coils
Heatcraft also offers cleanable fluid coils for applications where mechanical cleaning of
the internal surface of the tubes are required. Our cleanable coils utilize a box-style head
in lieu of cylindrical headers. The head contains baffles for circuiting and is removable
for easy access to coil tubes. T ype “P” coils are cleanable from the supply end of the coil.
Type “Q” coils are cleanable from the end opposite the supply. Type “K” coils are
cleanable from both ends of the coil.
Installation
1. Carefully remove the coil from the shipping package to avoid damage to the finned
surface area. Damaged fins can be straightened using an appropriate fin comb.
2. For coils with removable heads, check the torque on the nuts before installing. Refer to
Maintenance on Page 6 for recommended torque values.
3. Heatcraft recommends cleaning the coil with a commercially available coil cleaner prior
to installation. Refer to Maintenance on Page 6 for cleaning recommendations.
K Removable Heads
(Both Ends)
Q Removable Heads
(Opposite Connection End)
P Removable Head
(Connection End)
4. Check the coil hand designation to insure that it matches the system. Water and glycol
coils are generally plumbed with the supply connection located on the bottom of the
leaving air-side of the coil and the return connection at the top of the entering air-side of
the coil (Figure 2 - Connection Diagram). This arrangement provides counter flow heat
exchange and positive coil drainage. If a universal coil is supplied, cap off the two
unused connections.
5. Standard coils must be mounted level to insure drainability . Refer to Mounting on page
2 for leveling requirements. Coils with intermediate headers and coils with removable
box style headers can be pitched 1/8” per foot of coil finned length towards the coil’s
header/connection end.
3
Page 6

FLUID IOM
A
6. Proper clearance should be maintained between the coil and other structures such as the
7. Once installed, the coil should be pressurized to 100 psig with dry nitrogen or other
8. All field brazing and welding should be performed using high quality materials and an
9. All field piping must be self supporting. System piping should be flexible enough to
10. General piping diagrams can be found in Figure 1 - Horizontal Airflow and Figure 3 -
fan, filter racks, transition areas, etc..
suitable gas. The coil should be left pressurized for a minimum of 10 minutes. If the coil
holds the pressure, the hook-up can be considered leak free. If the pressure drops by 5
psig or less re-pressurize the coil and wait another 10 minutes. If the pressure drops
again, there is more than likely one or more small leaks which should be located and
repaired. Pressure losses greater than 5 psig would indicate a larger leak that should be
isolated and repaired. If the coil itself is found to be leaking, contact your local Heatcraft
representative. Unauthorized repair to the coil may void the coil’s warranty (see
Heatcraft’s warranty policy on back cover).
inert gas purge (such as nitrogen) to reduce oxidation of the internal surface of the coil.
allow for thermal expansion and contraction of the coil.
V ertical Airflow .
Air Vent
Gate Valve
Figure 1 - Horizontal Airflow Diagram
Tee
Supply
Dirt Leg
Cap
e
R
n
r
u
t
Vent Plug
i
r
F
l
o
Union
w
Drain Plug
4
Page 7

Figure 2 - Coil Diagram
S
u
p
p
l
y
Air Vent
Gate
Valve
FLUID IOM
Return
Air Air
Supply
Side Vent
Plug
R
e
t
u
r
n
Tee
Dirt Leg
Cap
Figure 3 - Vertical Airflow Diagram
Operation
Initial Start-Up
1. Open all air vents so that air is eliminated from within the coil circuitry and headers.
Verify that all vents and drains are not obstructed and do discharge a stream of water.
2. Fill the coil with water then close all vents.
3. Perform an initial hydrostatic leak test of all brazed, threaded or flanged joints, valves
and interconnecting piping. Recheck the coil level and correct if necessary . When the
setup is found to be leak free, discharge and discard initial water charge. It is important
that all grease, oil, flux and sealing compounds present from the installation be removed.
Air Flow
Side Drain Plug
Union
Drain Valve
5
Page 8

FLUID IOM
General
1. Proper air distribution is vital to coil performance. Air flow anywhere on the coil face
2. The drain pan and associated piping (drain line and trap) should be installed so that there
3. Fluid and air velocities should be maintained within Heatcraft’ s recommended values.
should not vary by more than 20%.
is no standing water in the drain pan and that no blow-through occurs.
Table 2a Table 2b
retaWspf8ot1
locylGspf6ot1
Maintenance
General
1. Filters should be inspected on a regular basis and changed as needed. Maintaining clean
filters is a cost effective way to help maintain maximum coil performance and service life.
2. Periodic inspection of the coil for signs of corrosion and/or leaks is recommended. Repair and replacement of the coil and the connecting piping, valves, etc., should be performed as needed by a qualified individual(s).
3. Should the coil surface need cleaning, caution should be exercised in selecting the cleaning solution as well as the cleaning equipment. Improper selection can result in damage
to the coil and/or health hazards. Clean the coil from the leaving air-side so that foreign
material will be washed out of the coil rather than pushed further in. Be sure to carefully
read and follow the manufacturer’s recommendations before using any cleaning fluid.
yticoleVdiulF
slioCgnilooC
yticoleVriA
mpf008-002:ecafruSyrD
mpf055-002:ecafruSteW
slioCgnitaeHmpf0051-002
4. Maintain the circulated fluid free of sediment, corrosive products and biological contaminants. Periodic testing of the fluid followed by any necessary corrective measures
along with maintaining adequate fluid velocities and proper filtering of the fluid will help
to satisfy this goal.
5. If automatic air vents are not utilized, periodic venting of the coil is recommended to
remove accumulated air. Caution should be exercised to avoid injury. High pressure
and/or high temperature fluids can cause serious personal injury .
6. Heatcraft’s cleanable coils with removable box headers should be cleaned using a suitable brush or its equivalent. Dislodged debris should be flushed from the coil and drain
pan. Be sure that debris does not clog the drain. After the coil has been cleaned, the old
gaskets should be discarded and replaced with new ones (contact your local Heatcraft
representative for replacement gaskets). The box header should then be reinstalled. The
recommended installation procedure is as follows.
6
Page 9

FLUID IOM
a. Nuts and weld studs should be coated with thread lubricant.
b. Tighten all nuts per Figure 4 - Torque Pattern, to 35 ft-lb torque. After the initial torque
has been applied retorque them to 50 ft-lb, again using the pattern shown in Figure 4.
The permissible range of final torque values are as follows:
maximum torque: 53 ft-lb
design torque: 50 ft-lb
minimum torque: 47 ft-lb
c. Pressure test coils per the installation instructions.
d. After the coil has been leak tested and found to be free from leaks, let it sit for 24 hours.
Retorque to 50 ft-lb per Figure 4 - Torque Pattern.
e. Refill the coil per the operation instructions.
Figure 4 - Torque Pattern
Freeze Protection
During the winter, chilled water coils need to be protected against freezing. The two
predominant protective measures are covered below .
Blowing-Out Coils
1. Isolate the coil from the rest of the system by closing the valves on both the supply and
return lines (gate valves in Figure 1 - Horizontal Airflow and Figure 3 - Vertical Airflow).
2. Drain the coil by opening all drain valves and/or the drain plug. Remove the vent plug to
aid the draining process.
3. Once the coil has been fully drained, the blower can be hooked-up. Caps installed in the
piping on straight runs going to the supply and return connections are ideal points to
hook-up the blower . The air vent and drain plug are not suitable locations for hookingup the blower. Caution should be exercised when installing the blower. The blower
operator must take precautions to insur e that water does not come into contact with any
7
Page 10

FLUID IOM
4. Close the vent or drain plug on the header which the blower is connected and open the
5. Operate the blower for 45 minutes and then check the coil to see if it is dry. A mirror
6. Let the coil stand for several minutes then blow it out again. If water comes out, repeat
7. Leave all plugs out and drains open until the threat of freezing has passed.
Flushing Coils
1. Heatcraft recommends the use of inhibited glycol designed for HVAC applications for
of the electrical components of the blower. Failure to do so may result in damage to the
equipment and serious injury.
drain valve or cap on the other header.
placed in the discharge will become fogged if moisture is present. Repeat this procedure
until the coil is dry .
the blowing operation.
corrosion protection. The use of uninhibited glycol has produced formicary corrosion in
copper tubing. The complete filling of water coils with an inhibited glycol solution for
freeze protection can be expensive. In some instances, it is more cost effective to flush
the coils with an appropriate concentration of inhibited glycol solution. Residual fluid
can be left in the coil without the threat of freeze damage provided the correct concentration of inhibited glycol was used. The recovered fluid can then be used to flush other
coils. Select an inhibited glycol solution that will protect the coil from the lowest possible temperatures that can occur at the particular coil’s locality. The following tables
have been provided for your convenience.
yBlocylGenelyhtE%
emuloV
0F°23 0F°23
01F°52
02F°61
03F°3
04F°3105F°4306F°55-
1
ezeerF
1
tniop
01F°62
02F°91
03F°8
04F°705F°8206F°06-
Freeze points may vary from product to product.
yBlocylGenelyporP%
emuloV
ezeerF
1
tniop
2. Estimate the volume of the coil in gallons.
For 5/8” tubes (1.5” face tube spacing)
(finned height in inches)x(finned length in inches)x(# of rows)x 0.0011 = gallons
For ½” tubes (1.25” face tube spacing)
(finned height in inches)x(finned length in inches)x(# of rows)x 0.00083 = gallons
3. Isolate the coil from the rest of the system by closing the valves on both the supply and
return lines (gate valves in Figure 1 - Horizontal Airflow and Figure 3 - Vertical Airflow).
8
Page 11

FLUID IOM
4. Drain the coil by opening all drain valves and/or the drain plug. Remove the vent plug to
aid the draining process.
5. Close the drain valve(s) and drain plug.
6. Connect the flushing system to the coil. A typical system is shown in Figure 5 - Flushing
System Diagram.
7. With the throttling valve closed, start the pump and operate until the air is vented from
the coil. Next, close the air vent.
8. Open the throttling valve about half-way and circulate the fluid through the coil for 15
minutes. Check the strength of the fluid. A hydrometer or test kit from the fluid manufacturer is suitable for this application.
9. Adjust the solution strength as needed and circulate the fluid for another 15 minutes.
10. Repeat steps 8 and 9 until the desired concentration is reached.
11. Shut the pump down and drain the inhibited glycol from the coil.
12. The recaptured fluid can be used to flush other coils.
Note: Be sure to follow the manufactur es’ recommendations befor e utilizing any glycol based anti-
freeze solution. Additional fluid will be required for the pump, connected piping and fluid
reservoir. Formulae are for estimation purposes only.
Vent
Shut-off Valve
w/Hose Connection
Throttling
Valve
Vent
Hole
Inhibited
Glycol
Reservoir
Drain
Shut-off Valve
w/Hose Connection
Pump
Figure 5 - Flushing System Diagram
9
Page 12

Commercial Products
WARRANTY
The Heat Transfer Division of Heatcraft Inc., hereinafter referred to as the “Company”, warrants that it will provide
free suitable repair or replacement of coils in the event any coil of its manufacture used in the United States proves
defective in material or workmanship within twelve (12) months from the date shipped by the Company.
THIS WARRANTY CONSTITUTES THE BUYER’S SOLE REMEDY. IT IS GIVEN IN LIEU OF ALL OTHER
WARRANTIES. THERE IS NO IMPLIED WARRANTY OF MERCHANT ABILITY OR FITNESS FOR A
P AR TICULAR PURPOSE. IN NO EVENT AND UNDER NO CIRCUMSTANCE SHALL THE COMPANY BE
LIABLE FOR INCIDENTAL OR CONSEQUENTIAL DAMAGES, WHETHER THE THEORY BE BREACH
OF THIS OR ANY OTHER WARRANTY, NEGLIGENCE, OR STRICT TORT.
This warranty extends only to the original purchaser. Of course, abuse, misuse, or alteration of the product
in any manner voids the Company’s warranty obligation.
This warranty does not obligate the Company to pay any labor or service costs for removing or replacing
parts, or any shipping charges.
No person (including any agent or salesman) has authority to expand the Company’s obligation beyond the
terms of this express warranty , or to state that the performance of the coil is other than that published by the
Heat Transfer Division of Heatcraft Inc.
PO Box 1457 / 1000 Heatcraft Drive, Grenada, MS 38902-1457
Tel: 800-225-4328 / 662-229-4000 Fax: 662-229-4212
Email: coils@heatcraft.com
Web Site: www.heatcraft.com
Printed in U.S.A.
December 1999
 Loading...