

Page 1
Tau Camera
User’s Manual
®
FLIR Commercial Systems, Inc.
70 Castilian Drive
Goleta, CA 93117
Phone: 888.747.FLIR (888.747.3547)
International: +1.805.964.9797
www.flir.com
www.corebyindigo.com
Document Number: TAU-0035-00-10
Version: 150
Issue Date: June 2011
This document is controlled to FLIR Technology Level EAR 1. The information contained in this document is proprietary and/or restricted and pertains
to a dual use product controlled for export by the Export Administration Regulations (EAR). This document and data disclosed herein or herewith is
not to be reproduced, used, or disclosed in whole or in part to anyone without the written permission of FLIR Systems, Inc. Diversion contrary to US
law is prohibited. US Department of Commerce authorization is not required prior to export or transfer to foreign persons, parties, or uses otherwise
prohibited.
Page 2

Tau User’s Manual
© FLIR Commercial Systems, Inc., 2011. All rights reserved worldwide. No parts of this manual, in whole
or in part, may be copied, photocopied, translated, or transmitted to any electronic medium or machine
readable form without the prior written permission of FLIR Commercial Systems, Inc.
Names and marks appearing on the products herein are either registered trademarks or trademarks of
FLIR Commercial Systems, Inc. and/or its subsidiaries. All other trademarks, trade names, or company
names referenced herein are used for identification only and are the property of their respective owners.
Liberation fonts are copyright 2009 by RedHat and are used under authority of the GNU public license.
Information about these fonts and the GNU public license can be found at:
https://www.redhat.com/promo/fonts/.
This product is protected by patents, design patents, patents pending, or design patents pending.
If you have questions that are not covered in this manual, or need service, contact FLIR CVS Customer
Support at 805.964.9797 for additional information prior to returning a camera.
This documentation is subject to change without notice.
This equipment must be disposed of as electronic waste.
Contact your nearest FLIR Commercial Vision Systems, Inc. representative for instructions on
how to return the product to FLIR for proper disposal.
FCC Notice. This device is a subassembly designed for incorporation into other products in order to
provide an infrared camera function. It is not an end-product fit for consumer use. When incorporated
into a host device, the end-product will generate, use, and radiate radio frequency energy that may cause
radio interference. As such, the end-product incorporating this subassembly must be tested and
approved under the rules of the Federal Communications Commission (FCC) before the end-product may
be offered for sale or lease, advertised, imported, sold, or leased in the United States. The FCC
regulations are designed to provide reasonable protection against interference to radio
communications. See 47 C.F.R. §§ 2.803 and 15.1 et seq.
Industry Canada Notice. This device is a subassembly designed for incorporation into other products in
order to provide an infrared camera function. It is not an end-product fit for consumer use. When
incorporated into a host device, the end-product will generate, use, and radiate radio frequency energy
that may cause radio interference. As such, the end-product incorporating this subassembly must be
tested for compliance with the Interference-Causing Equipment Standard, Digital Apparatus, ICES-003, of
Industry Canada before the product incorporating this device may be: manufactured or offered for sale or
lease, imported, distributed, sold, or leased in Canada.
Avis d’Industrie Canada. Cet appareil est un sous-ensemble conçu pour être intégré à un autre produit
afin de fournir une fonction de caméra infrarouge. Ce n’est pas un produit final destiné aux
consommateurs. Une fois intégré à un dispositif hôte, le produit final va générer, utiliser et émettre de
l’énergie radiofréquence qui pourrait provoquer de l’interférence radio. En tant que tel, le produit final
intégrant ce sous-ensemble doit être testé pour en vérifier la conformité avec la Norme sur le matériel
brouilleur pour les appareils numériques (NMB-003) d’Industrie Canada avant que le produit intégrant ce
dispositif puisse être fabriqué, mis en vente ou en location, importé, distribué, vendu ou loué au Canada.
EU Notice. This device is a subassembly or component intended only for product evaluation, development
or incorporation into other products in order to provide an infrared camera function. It is not a finished
end-product fit for general consumer use. Persons handling this device must have appropriate electronics
training and observe good engineering practice standards. As such, this product does not fall within the
scope of the European Union (EU) directives regarding electromagnetic compatibility (EMC). Any endproduct intended for general consumer use that incorporates this device must be tested in accordance
and comply with all applicable EU EMC and other relevant directives.
-ii June 2011 TAU-0035-00-10, version 150
Page 3

Table of Contents
1 Introduction
1.1 Available Tau Configurations ................................................................. 1-2
1.2 Tau Specifications ............................................................................... 1-4
1.3 Unpacking Your Tau Camera ................................................................ 1-5
2 Optional Tau Camera Accessories
2.1 Tau VPC Module Accessory .................................................................. 2-1
2.2 Tau Camera Link Module ..................................................................... 2-2
2.3 Tau WFOV Locking Ring and Tool .......................................................... 2-3
2.4 Tripod Mount for Tau Camera .............................................................. 2-3
2.5 Photon Replicator Board ...................................................................... 2-3
2.6 Photon Replicator Kit .......................................................................... 2-4
2.7 Software Accessory Alternate Lens Calibration Software .......................... 2-4
2.8 Software Accessory SDK for Windows & Embedded ................................ 2-5
3 Basic Operation of the Tau and GUI
3.1 Operation of the Tau Camera using the USB Interface .............................. 3-1
3.2 Remote control of the Tau Camera ....................................................... 3-3
3.3 Installing the FLIR Camera Controller GUI ............................................... 3-4
3.4 Connecting the Tau to a PC via USB ...................................................... 3-7
3.5 Troubleshooting the FLIR Camera Controller GUI ................................... 3-10
3.6 Operation of the FLIR Camera Controller GUI ........................................ 3-11
3.7 Setup Tab ........................................................................................ 3-12
3.8 Analog Video Tab .............................................................................. 3-16
3.9 Digital Video Tab ............................................................................... 3-20
3.10 Image Capture Tab ......................................................................... 3-22
3.11 AGC Tab ....................................................................................... 3-23
3.12 ROI Tab ......................................................................................... 3-26
TAU-0035-00-10, version 150 iii
Page 4

Table of Contents Tau User’s Manual
3.13 Thermal Tab .................................................................................. 3-28
4 Tau Digital Data Channel
4.1 XP Bus Setting—BT.656 Digital Interface ............................................... 4-1
4.2 XP Bus Setting—CMOS Digital Interface ................................................. 4-3
4.3 Discrete I/O ...................................................................................... 4-5
4.4 Photon Camera Legacy LVDS Output ..................................................... 4-6
4.5 Legacy LVDS Digital Data Channels ....................................................... 4-8
5 Overview of the Electrical Interface
5.1 Input Power ....................................................................................... 5-1
5.2 Hirose 50-Pin Connector ..................................................................... 5-1
5.3 Analog Video Output ........................................................................... 5-3
5.4 Command and Control Channel ............................................................ 5-3
5.5 LVDS Digital Data Channel ................................................................... 5-3
5.6 Parallel Digital Data Channel ................................................................ 5-4
Appendix A Pin-out Definitions
A.1 I/O Module 333-0018-00 ................................................................... A-1
Appendix B Serial Communication Technical Details
B.1 Serial Communications Primary Interface ............................................... B-1
B.2 Serial Communications Protocol ........................................................... B-1
B.3 Status Byte ....................................................................................... B-2
B.4 Function Byte ..................................................................................... B-3
B.5 Example of the format of a serial message ........................................... B-11
B.6 Description of Serial Commands ......................................................... B-12
Appendix C Tau with Photon Accessories
C.1 Operation of the Tau camera using the Photon Accessory Kit .....................C-1
C.2 Remote control of the Tau camera .........................................................C-2
C.3 Connecting the serial communications interface using the development kit ...C-2
Appendix D Mechanical IDD Reference
Sheet 1 Tau Camera Mechanical Interface Control Document WFOV ............ D-3
Sheet 1 Tau Camera Core Interface Description Document 5mm - 19mm, .... D-4
Sheet 1 Tau Camera Core Interface Description Document 25mm ............... D-5
Sheet 1 Tau Camera Core Interface Description Document 35mm ............... D-6
Sheet 1 Tau Camera Core Interface Description Document 60mm ............... D-7
iv TAU-0035-00-10, version 150
Page 5
1 Introduction
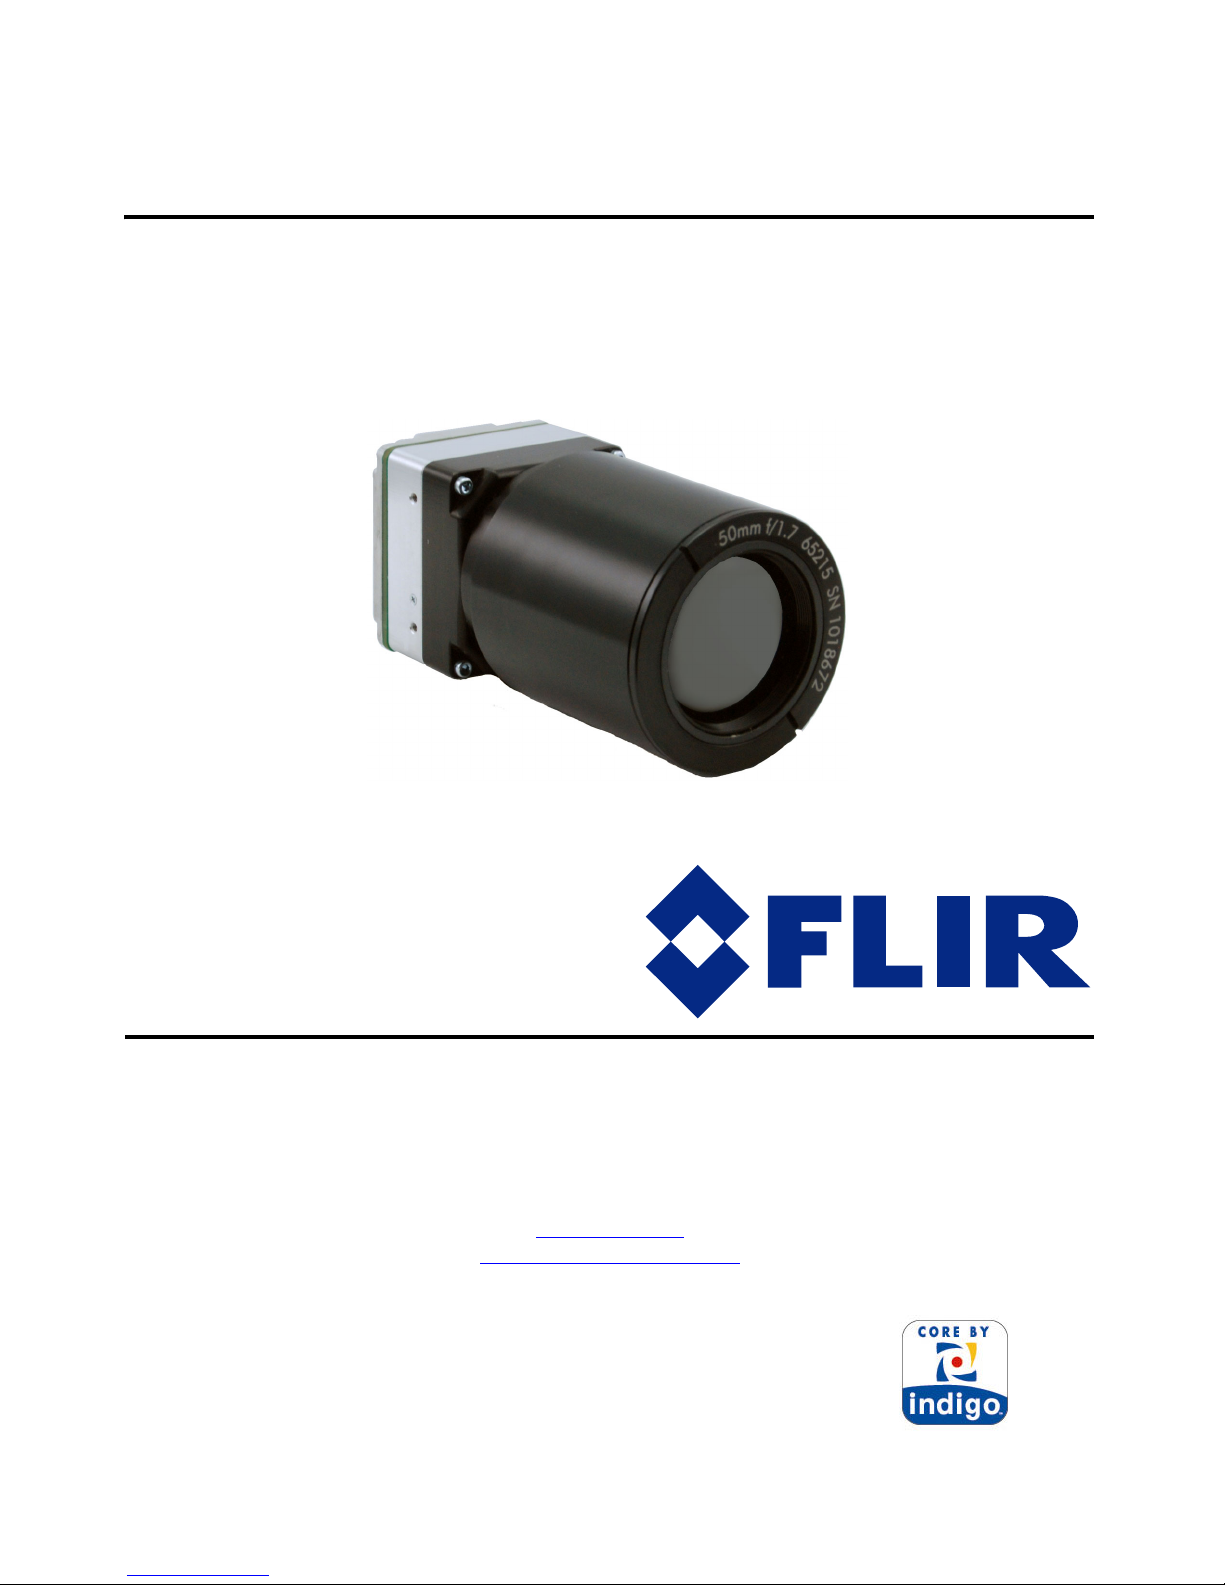
The Tau camera is a long-wavelength (8 – 14 microns) uncooled microbolometer camera
designed for infrared imaging applications that demand absolute minimum size, weight, and
power consumption. It is available with multiple different lens focal length options, as well as
lens-less (not shown) and narrow-field-of-view (NFOV) options. The Tau Software Developer’s Kit
(SDK) enables camera control using one of several programming languages including VB6,
VB.net, C#, and C++ (MFC). The FLIR Camera Controller GUI is an example of an application
created using the SDK—See “Software Accessory SDK for Windows & Embedded” on page 2-
5.
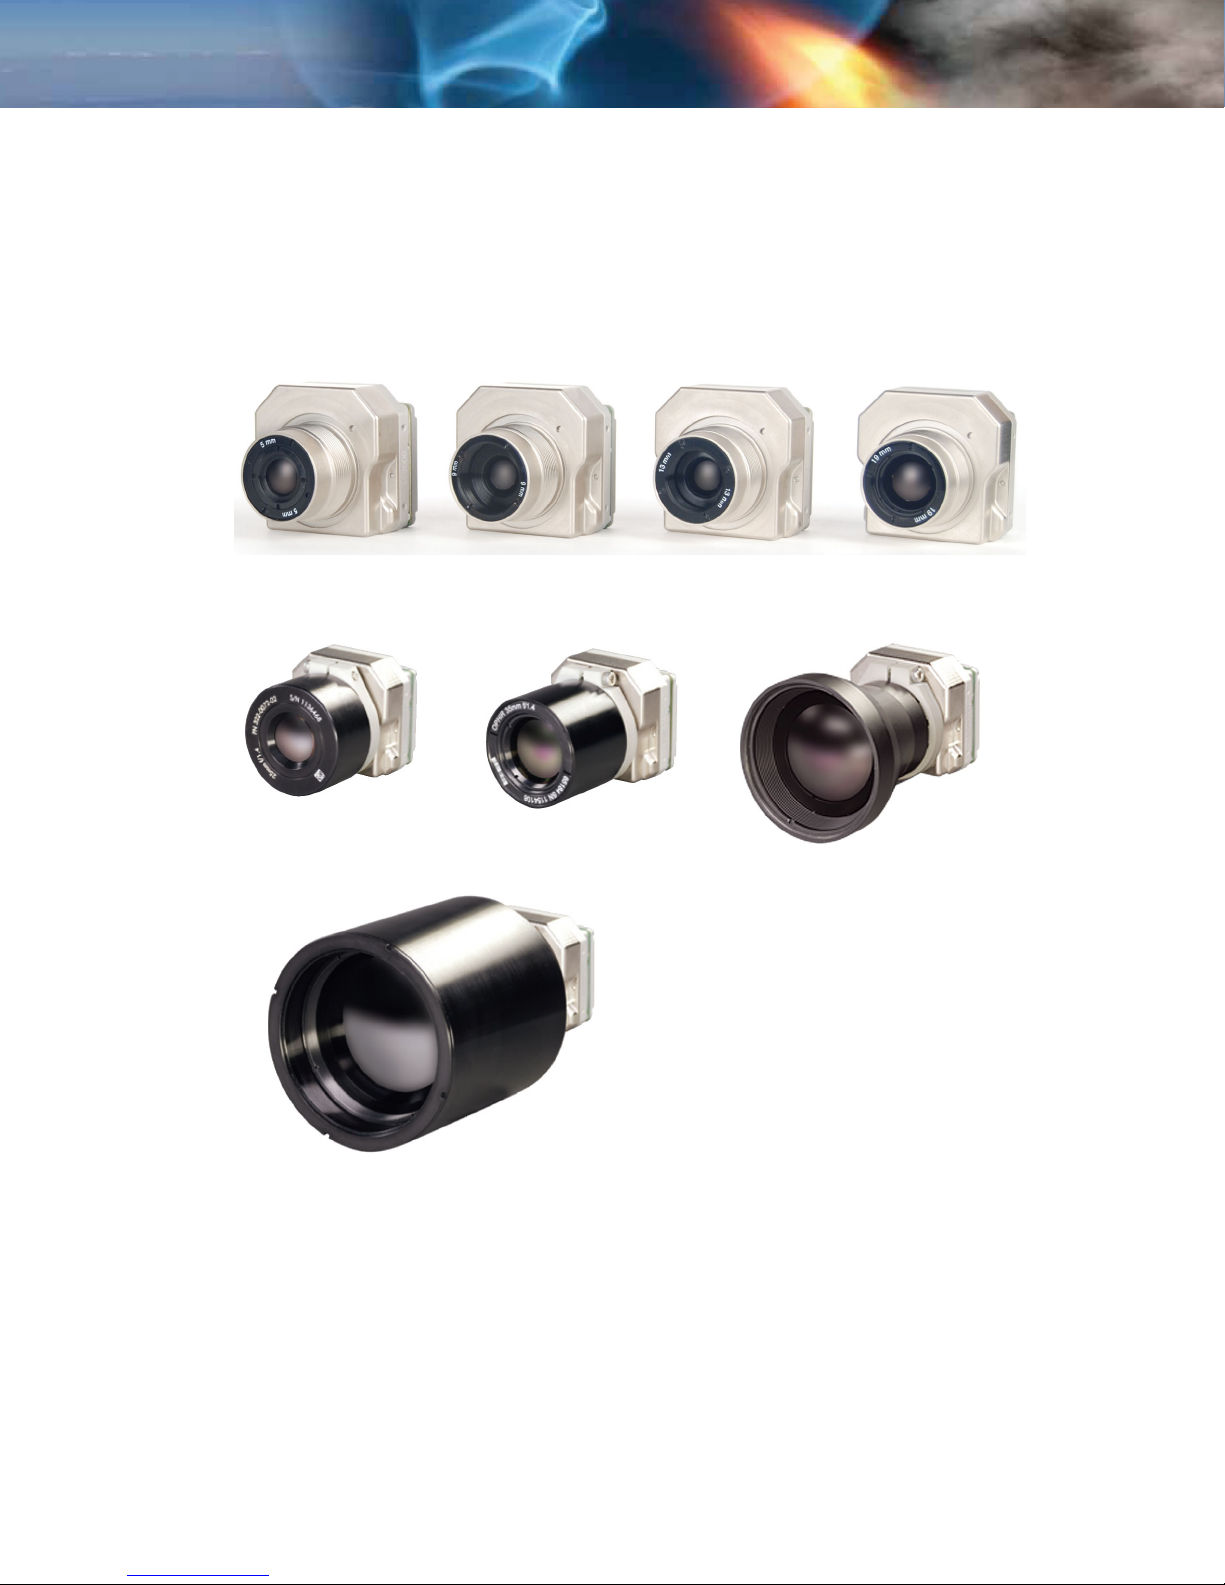
5mm 13mm
(43° HFOV)
25mm
(18° HFOV)
9mm
(48° HFOV) (34° HFOV)
35mm
(13° HFOV)
100mm
(4.6° HFOV)
19mm
(24° HFOV)
60mm
(8° HFOV)
The camera provides “power-in, video-out” capability, which means that one need only apply input
voltage to receive analog video. For those applications requiring serial control, the Tau camera
includes a serial interface (RS-232) for transmitting camera commands and receiving status.
The Tau camera also provides 8-bit and 14-bit digital data options, including CMOS, BT.656,
and the Legacy Photon LVDS—See “Tau Digital Data Channel” on page 4-1.
TAU-0035-00-10, version 150 June 2011 1-1
Figure 1-1: Tau Cameras
Page 6

1—Introduction Tau User’s Manual
1.1 Available Tau Configurations
The Tau camera is available with different lenses providing different fields of view, the ‘Slow
Video’ or ‘9 Hz’ option for license-free exportability, and also a 160
reduced price.
× 120 resolution at a
Resolution f/# FOV (H × V)
5 mm 160 × 120 1.25 43° × 35°
9 mm
13 mm
19 mm
25 mm 320 × 240 1.4 18° × 14° 135 g
35 mm 320 × 240 1.4 13° × 10° 129 g
60 mm 320 × 240 1.1 7.6° × 5.7° 200 g
100 mm 320 × 240 1.6 4.6° × 3.7° 503 g
160 × 120
320 × 240 48° × 37°
160 × 120
320 × 240 34° × 26°
160 × 120
320 × 240 24° × 18°
1.25
1.25
1.25
25° × 20°
17° × 14°
12° × 10°
Weight with
lens
72 g
Note
The Tau camera lenses are sealed to IP67 (1 meter). The camera back is not sealed.
Boresight features are available on Tau WFOV cameras. See “Mechanical IDD Reference” on
page D-1.
Contact FLIR CVS Customer Support or your local FLIR sales representative for information
on available Tau camera configurations, part numbers, and ordering information.
1-2 June 2011 TAU-0035-00-10, version 150
Page 7
Tau User’s Manual 1—Introduction
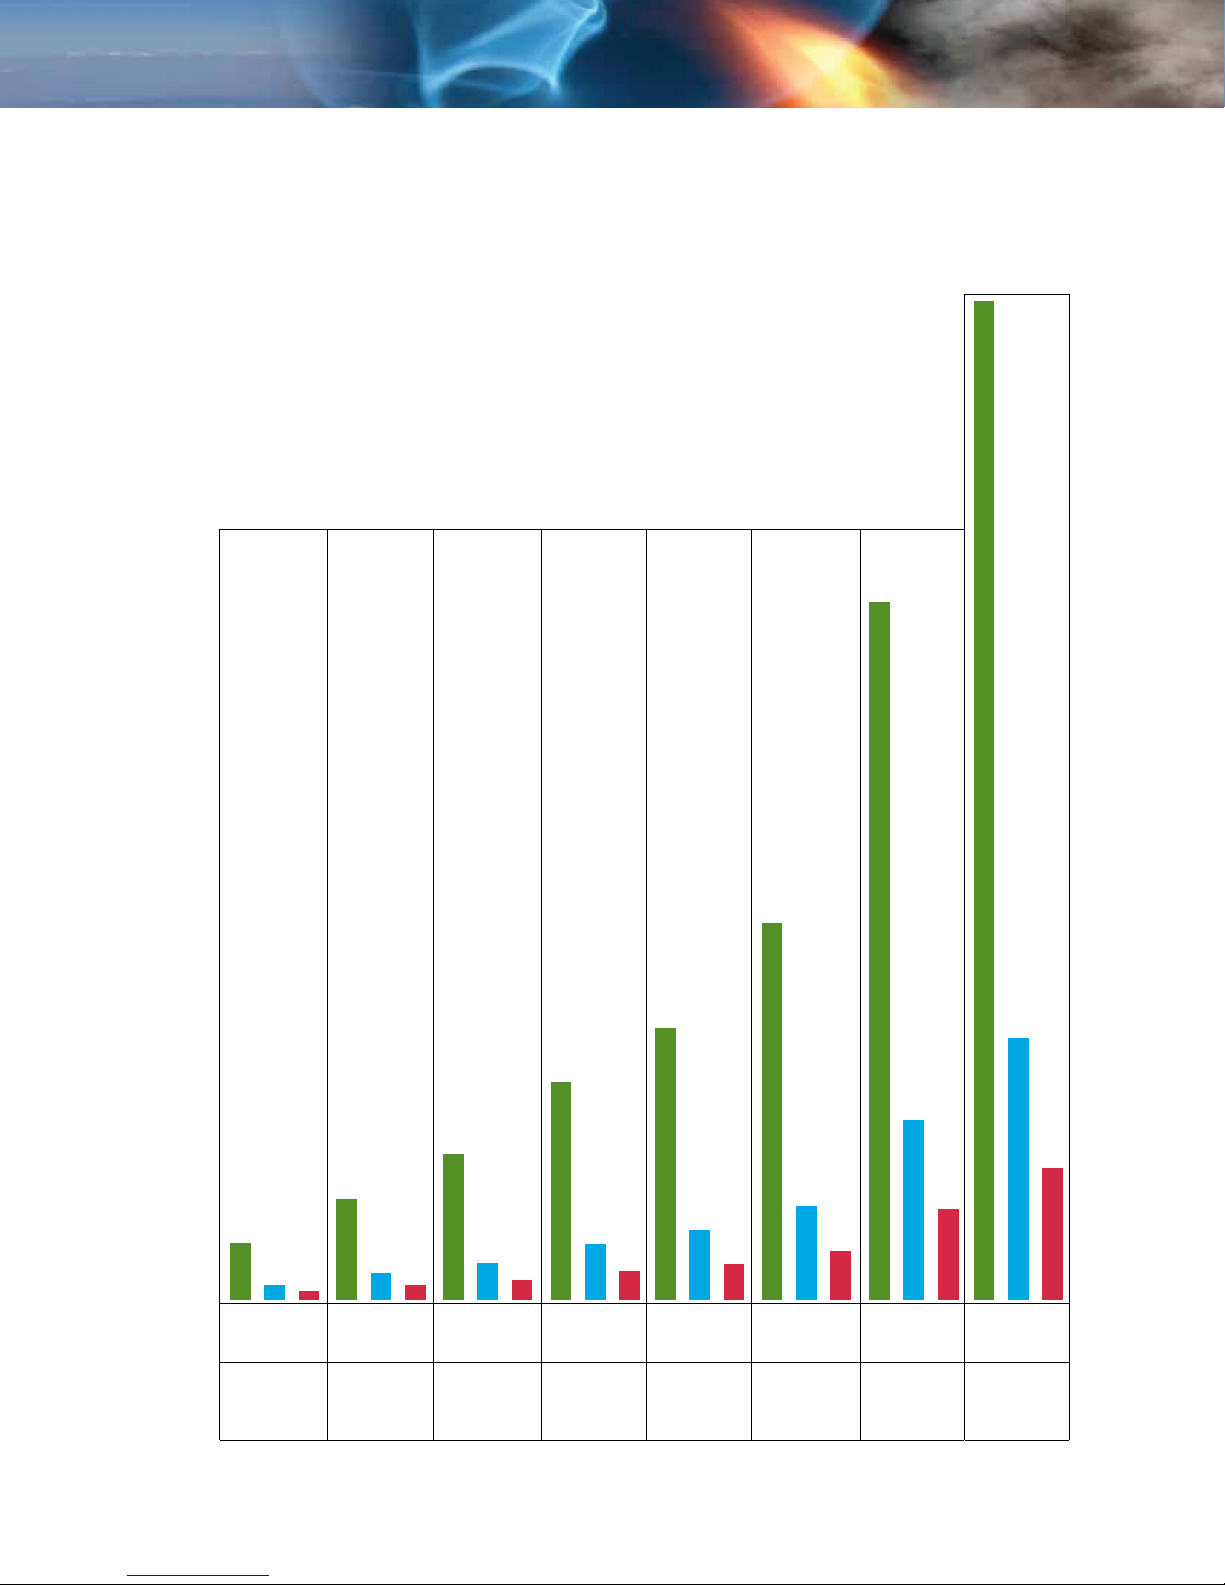
2075 meters—
Detection
115 meters—Detection
27 meters—Recognition
1320 meters—
Detection
780 meters—Detection
560 meters—Detection
540 meters—Recognition
450 meters—Detection
300 meters—Detection
205 meters—Detection
190 meters—Recognition
112 meters—Recognition
52 meters—Recognition
14 meters—Identification
26 meters—Identification
74 meters—Recognition
37 meters—Identification
56 meters—Identification
140 meters—Recognition
70 meters—Identification
97 meters—Identification
340 meters—Recognition
270 meters—Identification
172 meters—Identification
Table 1-1: Tau Camera Lens Range Performance (Standing Man—1.5m by 0.5m)
43°
5mm
HFOV
Lens
48°
9mm
HFOV
Lens
TAU-0035-00-10, version 150 June 2011 1-3
34°
13mm
HFOV
Lens
24°
19mm
HFOV
Lens
18°
25mm
HFOV
Lens
13°
35mm
HFOV
Lens
8°
60mm
HFOV
Lens
4.6°
100mm
HFOV
Lens
Page 8

1—Introduction Tau User’s Manual
1.2 Tau Specifications
• 320 (H) × 256 (V) or 160 (H) × 128 (V) uncooled microbolometer sensor array,
25 × 25 micron pixels
• Spectral band: 7.5 - 13.5μm
• NEdT Performance: < 50mK at f/1.0
• Input voltage range: 4.0 – 6.0 VDC
• Power Consumption: < 1.0 Watts (nominal at room temperature using 5V input)
• Time to image: < 3 seconds
• Operating Temperature Range: -40°C to +80°C
•Weight: ≤ 72 grams with either the 5mm, 9mm, 13mm, or 19mm lens option
1
2
Note
The Tau camera is an export controlled item. In order to increase the Camera’s
exportability, a ‘Slow Video’ version of Tau is available. The frame rate is reduced to
approximately 9 Hz. This change allows Tau to be exported without US export license to
most countries. Please contact FLIR for additional information.
• Analog video output:
NTSC (320 × 240) 30Hz (‘Slow Video’ rate (7.5Hz) is available for exportability)
or
PAL (320 × 256) 25Hz (‘Slow Video’ rate (8.3Hz) is available for exportability)
Note
The NTSC analog video format is default for cameras with analog video. The FLIR Camera
Controller GUI software (free download) allows you to select between NTSC or PAL video
output formats and save this configuration.
• Digital video output: 8- or 14-bit serial LVDS, CMOS, or BT 656
• Remote camera control RS-232 interface: FLIR Camera Controller GUI software
available for free download at http://www.corebyindigo.com/
• The VPC accessory used for USB connectivity requires that the driver is installed
before using. This driver is installed as part of the FLIR Camera Controller GUI
installation.
•2× and 4× Digital Zoom with electronic pan/tilt (analog video)
• Dynamic Digital Detail Enhancement (DDE)
The latest information concerning specifications, accessories, camera configurations, and
other information can be found in the Tau Thermal Imaging Camera Core Data Sheet at:
http://www.corebyindigo.com/
Tau /.
Tau
1. NEdT at the camera output measured with FLIR's proprietary noise reduction applied in the asshipped configuration. Typical performance is approximately 35mK with f/1.0 optics.
2. Some early WFOV Tau lens options (5mm, 9mm, 13mm, and 19mm) were shipped with a nickelplated magnesium lens flange which is not rated for salt/fog. All Tau cameras now ship with black
ecoated lens flanges with a secondary undercoating. This allows the Tau lens flange to survive hundreds of hours in a salt fog environment.
1-4 June 2011 TAU-0035-00-10, version 150
Page 9

Tau User’s Manual 1—Introduction
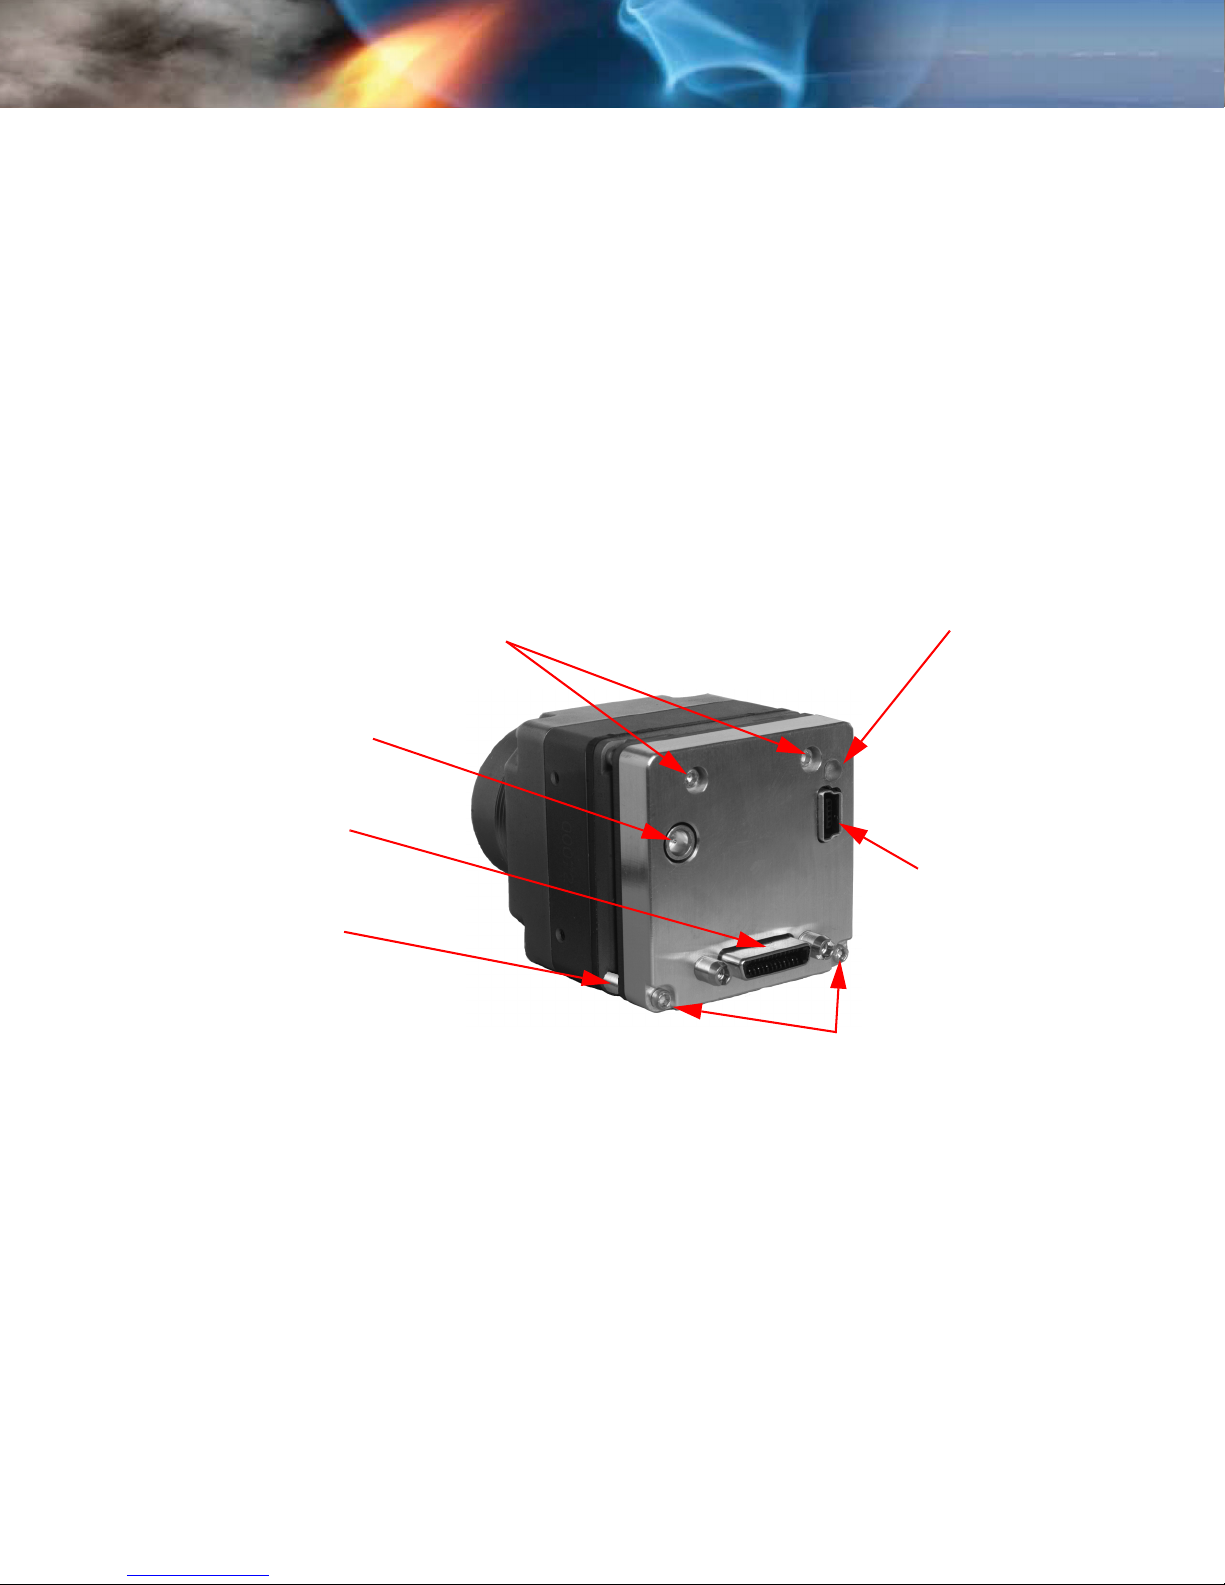
1.3 Unpacking Your Tau Camera
The Tau camera is typically delivered as a component part for incorporation into an original
equipment manufacturer’s (OEM) product; no documentation is included. Documentation and
utilities such as the latest version of this User’s Manual, the FLIR Camera Controller GUI, and
Mechanical Interface Description Documents are available for download from the
www.corebyindigo.com
Please unpack the camera heeding customary Electrostatic Sensitive Device (ESD) precautions
including static safe work station and proper grounding. The Tau camera is packaged in foam to
prevent damage during shipping. It is also placed in a conductive anti-static bag to protect from
electrostatic discharge damage.
website.
Caution!
Disassembling the camera can cause permanent damage and will void the warranty.
Operating the camera outside of the specified input voltage range or the specified operating
temperature range can cause permanent damage.
The camera back is not sealed. Avoid exposure to dust and moisture.
This camera contains electrostatic discharge sensitive electronics and should be handled
appropriately.
TAU-0035-00-10, version 150 June 2011 1-5
Page 10

1—Introduction Tau User’s Manual
1-6 June 2011 TAU-0035-00-10, version 150
Page 11
2 Optional Tau Camera Accessories
Accessories for your Tau camera can be purchased from the online FLIR Camera Accessory
Store located at www.flirshop.com
.
2.1 Tau VPC Module Accessory
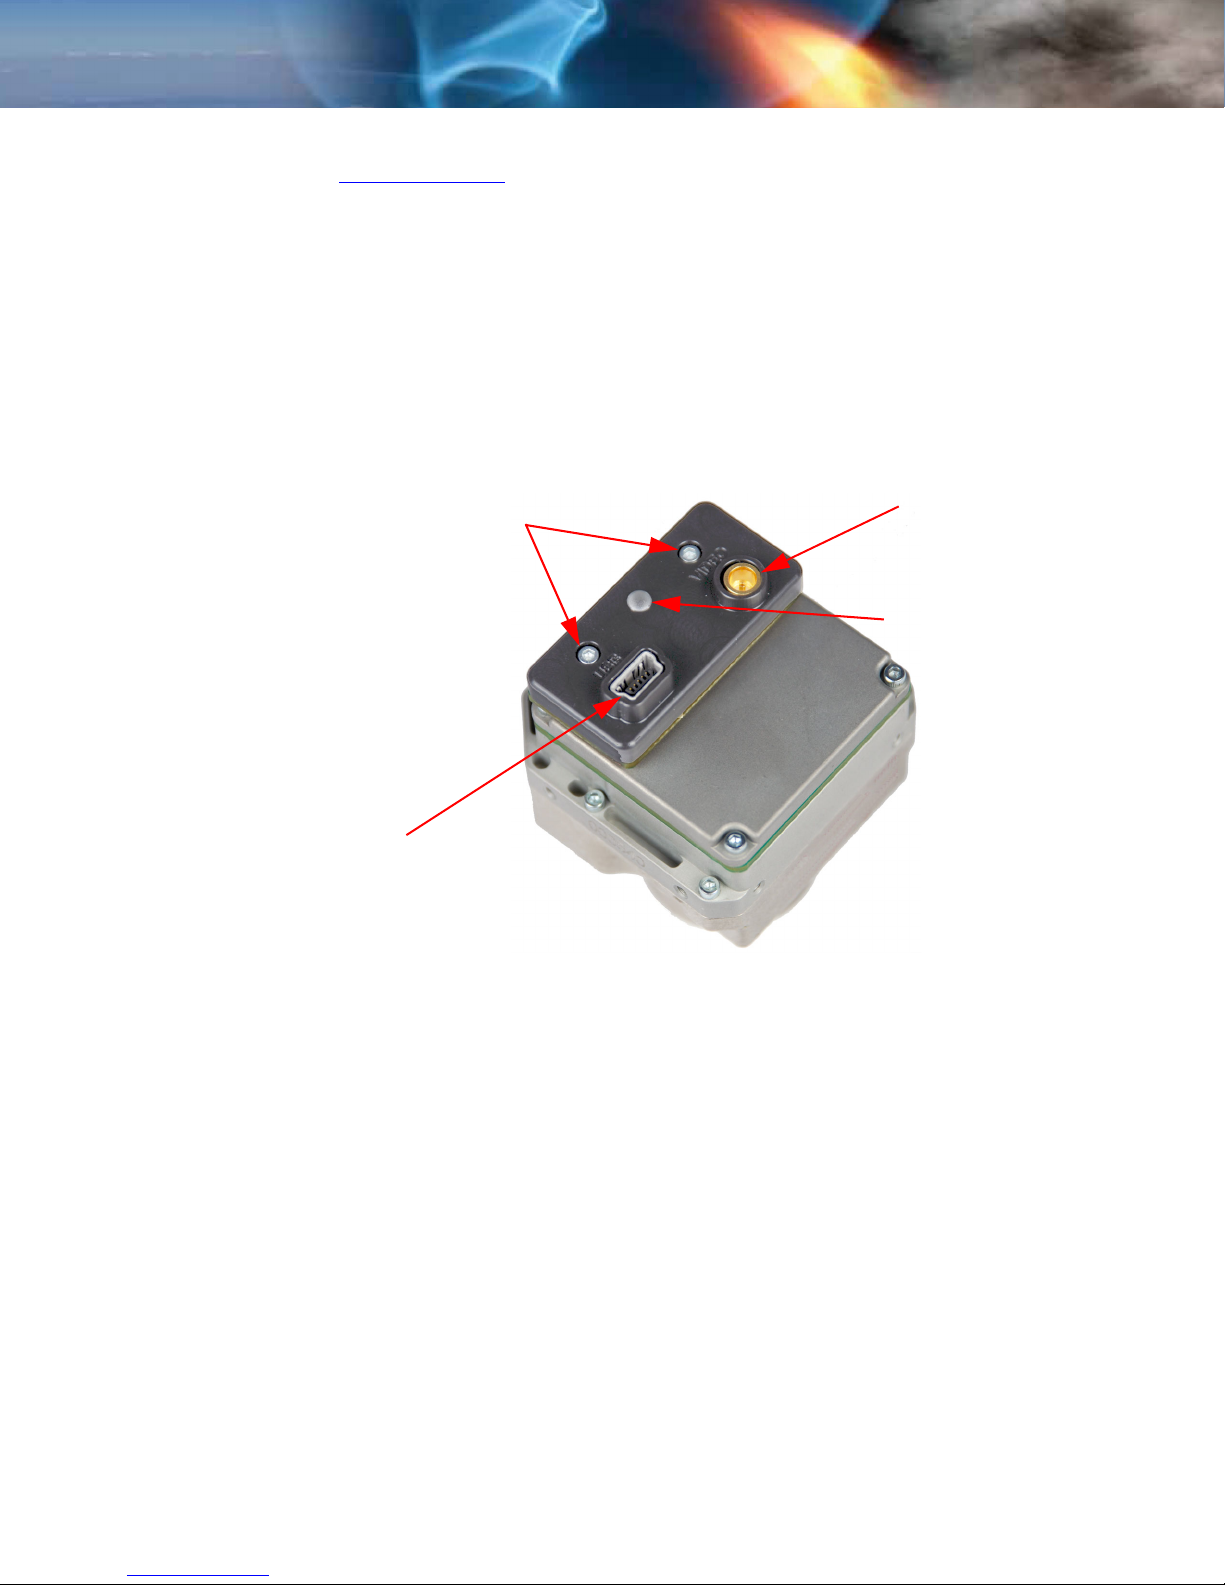
The VPC (video, power, communications) module is an expansion board for the Tau camera that
provides a convenient way for customers to power and communicate with the camera via USB.
The VPC module also incorporates an MCX connector that outputs analog video. The VPC
module includes a USB-A to USB-mini B cable for power and communications, as well as an
MCX-to-BNC cable for analog video.
For instructions on installing the VPC Module refer to paragraph 3.1 “Operation of the Tau
Camera using the USB Interface” on page 3-1.
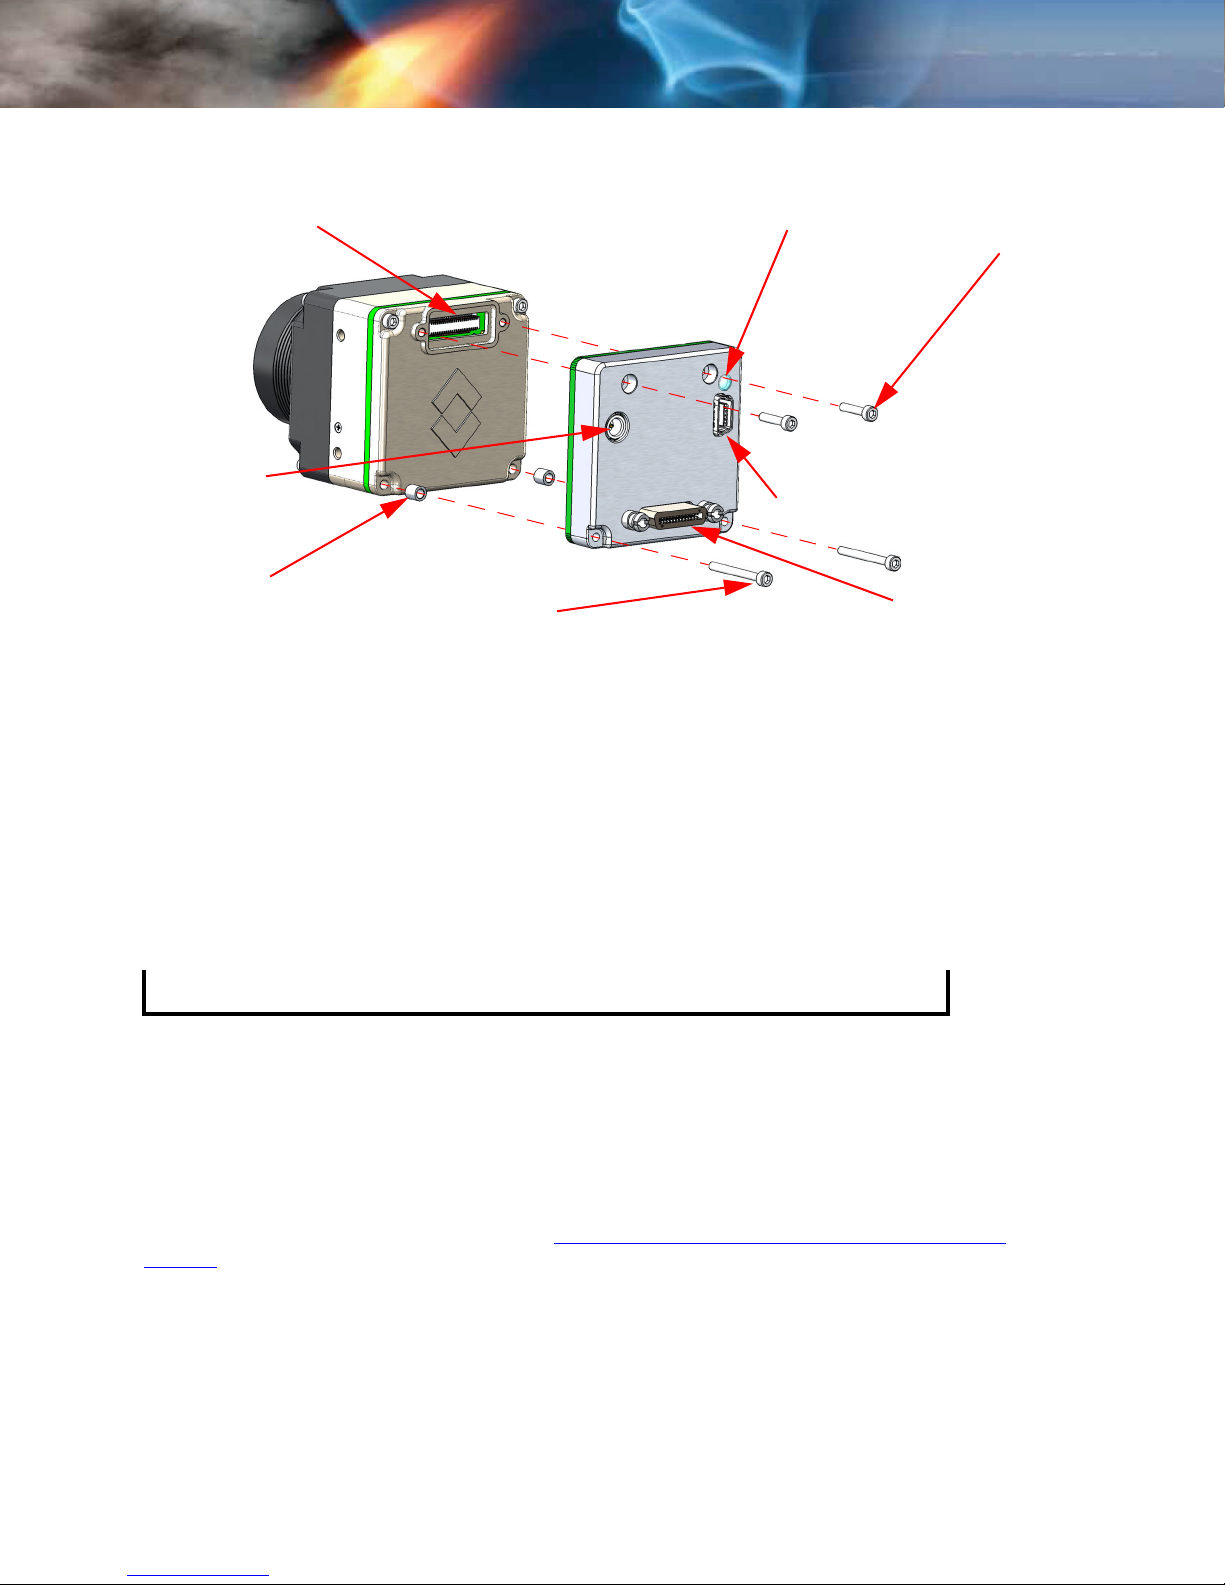
Mounting screws
M1.6 × 0.35 × 6 mm SHCS
Mini USB
Figure 2-1: Tau VPC Module Installed on a Tau camera
MCX coaxial
Power status light
The Tau camera is powered using the USB connector with a nominal draw of 180 mA at 5VDC
and a peak startup draw of 500 mA. The camera uses serial communication at either 57600
or 921600 Baud by creating a virtual COM Port on your computer for USB communications.
The Baud Rate is selected using auto-Baud and the camera will communicate at the first Baud
Rate in which it receives a valid command until it is powered off.
TAU-0035-00-10, version 150 June 2011 2-1
Page 12
2—Optional Tau Camera Accessories Tau User’s Manual
2.2 Tau Camera Link Module
The Camera Link module is an expansion board for the Tau camera that provides a convenient
way for customers to power and communicate with the camera via USB and access LVDS
digital video with a high-speed Camera Link channel. The Camera Link module also incorporates
an MCX connector that outputs analog video.
The Camera Link Module takes CMOS-type digital data from the Tau camera and converts it to
Camera Link. In order to use a Camera Link module for acquisition of data, you will need to first
enable the CMOS XP Bus Output using the FLIR Camera Controller GUI. See “Digital Video Tab”
on page 3-20. On this same page, you can select either 8-bit or 14-bit digital output. Once you
make these changes, it is a good idea to save settings to make them power cycle consistent.
See “Save Settings” on page 3-14.
The Camera Link module accessory comes with the spacers and mounting screws shown in
Figure 2-2. Note that Camera Link cable, frame grabber, or capture software are not included.
For instructions on installing the Camera Link Accessory refer to paragraph 3.1.2 “Installing
the Camera Link Module” on page 3-2.
Mounting screws
M1.6 × 0.35 × 8 mm SHCS
MCX coaxial
(analog video)
Mini Camera Link
(digital video)
Spacer
Ø3 mm × 3.1 mm
M1.6 × 0.35 × 16 mm SHCS
Figure 2-2: Tau Camera Link Module Installed on a Tau camera
Power status light
Mini USB
Mounting screws
The Tau camera is powered using the USB connector with a nominal draw of 230 mA at 5VDC
and a peak startup draw of 550 mA. The camera uses serial communication at either 57600
or 921600 Baud by creating a virtual COM Port on your computer for USB communications.
The Baud Rate is selected using auto-Baud and the camera will communicate at the first Baud
Rate in which it receives a valid command until it is powered off.
The digital data complies with Base Camera Link standards and should be compatible with any
brand Camera Link Frame Grabber and software. The FLIR Camera Controller allows for control
of the Tau camera, but does not support Camera Link frame capture and third-party software
must be used.
External sync is not possible with the Camera Link module.
2-2 June 2011 TAU-0035-00-10, version 150
Page 13
Tau User’s Manual 2—Optional Tau Camera Accessories
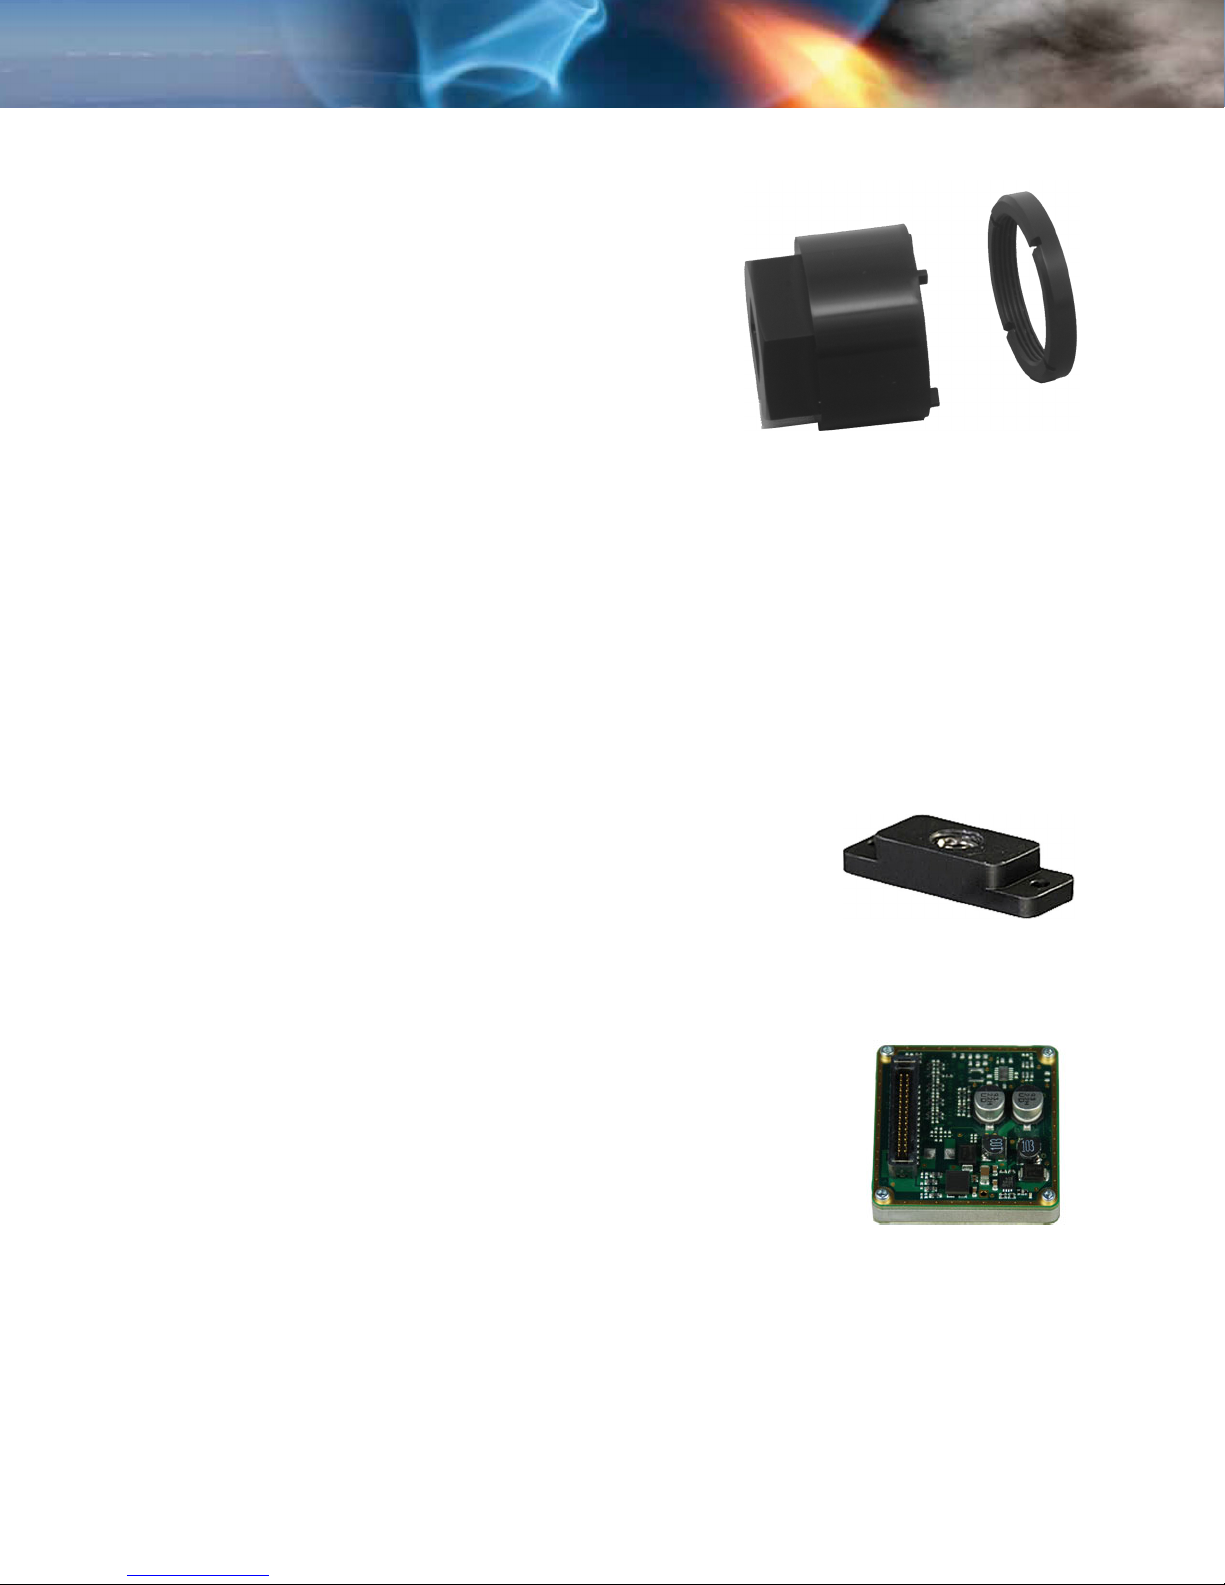
2.3 Tau WFOV Locking Ring and Tool
Tau Locking Ring Accessory,
421-0041-00
Lock Nut Tool,
421-0042-00
Type 2 - 025 O-ring
(not included)
The locking ring is designed to mount a Tau WFOV
camera into a bulkhead. The M29 x 1.0 thread on the
outside of the lens mount flange is placed through the
clearance hole in the bulkhead and the o-ring seals the
camera to the face.
The Type 2-025 O-ring is not for sale through FLIR. This is
a standard o-ring available from many suppliers.
The locking ring accessory is made of Delrin so as not to
scratch the Tau camera lens flange. Scratching the
external plating can compromise the coating and make
the Tau camera more susceptible to corrosion. The lock
nut tool will attach to a torque wrench for proper
tightening. Torque the locking ring to 4.0 in-lbs.
2.4 Tripod Mount for Tau Camera
Tripod mount,
261-2071-00
This accessory adapts two of the mounting points on the
Tau camera to a standard 1/4
plate. The tripod adapter mounts to the bottom of Tau
camera using two furnished socket head screws.
” x 20 tripod mounting
2.5 Photon Replicator Board
Photon Replicator Board,
421-0040-00
This expansion board adapts the Tau camera's native
50-pin Hirose connector to the 30-pin SAMTEC
connector used on FLIR's Photon cameras. The
replicator board makes the Tau camera electrically pincompatible to a Photon camera, including the provision
for operating the Tau camera over a similar input
voltage range as the Photon camera: 6.5-27 VDC.
A cast magnesium spacer and 4 socket-head machine
screws are included (not shown).
TAU-0035-00-10, version 150 June 2011 2-3
Page 14
2—Optional Tau Camera Accessories Tau User’s Manual
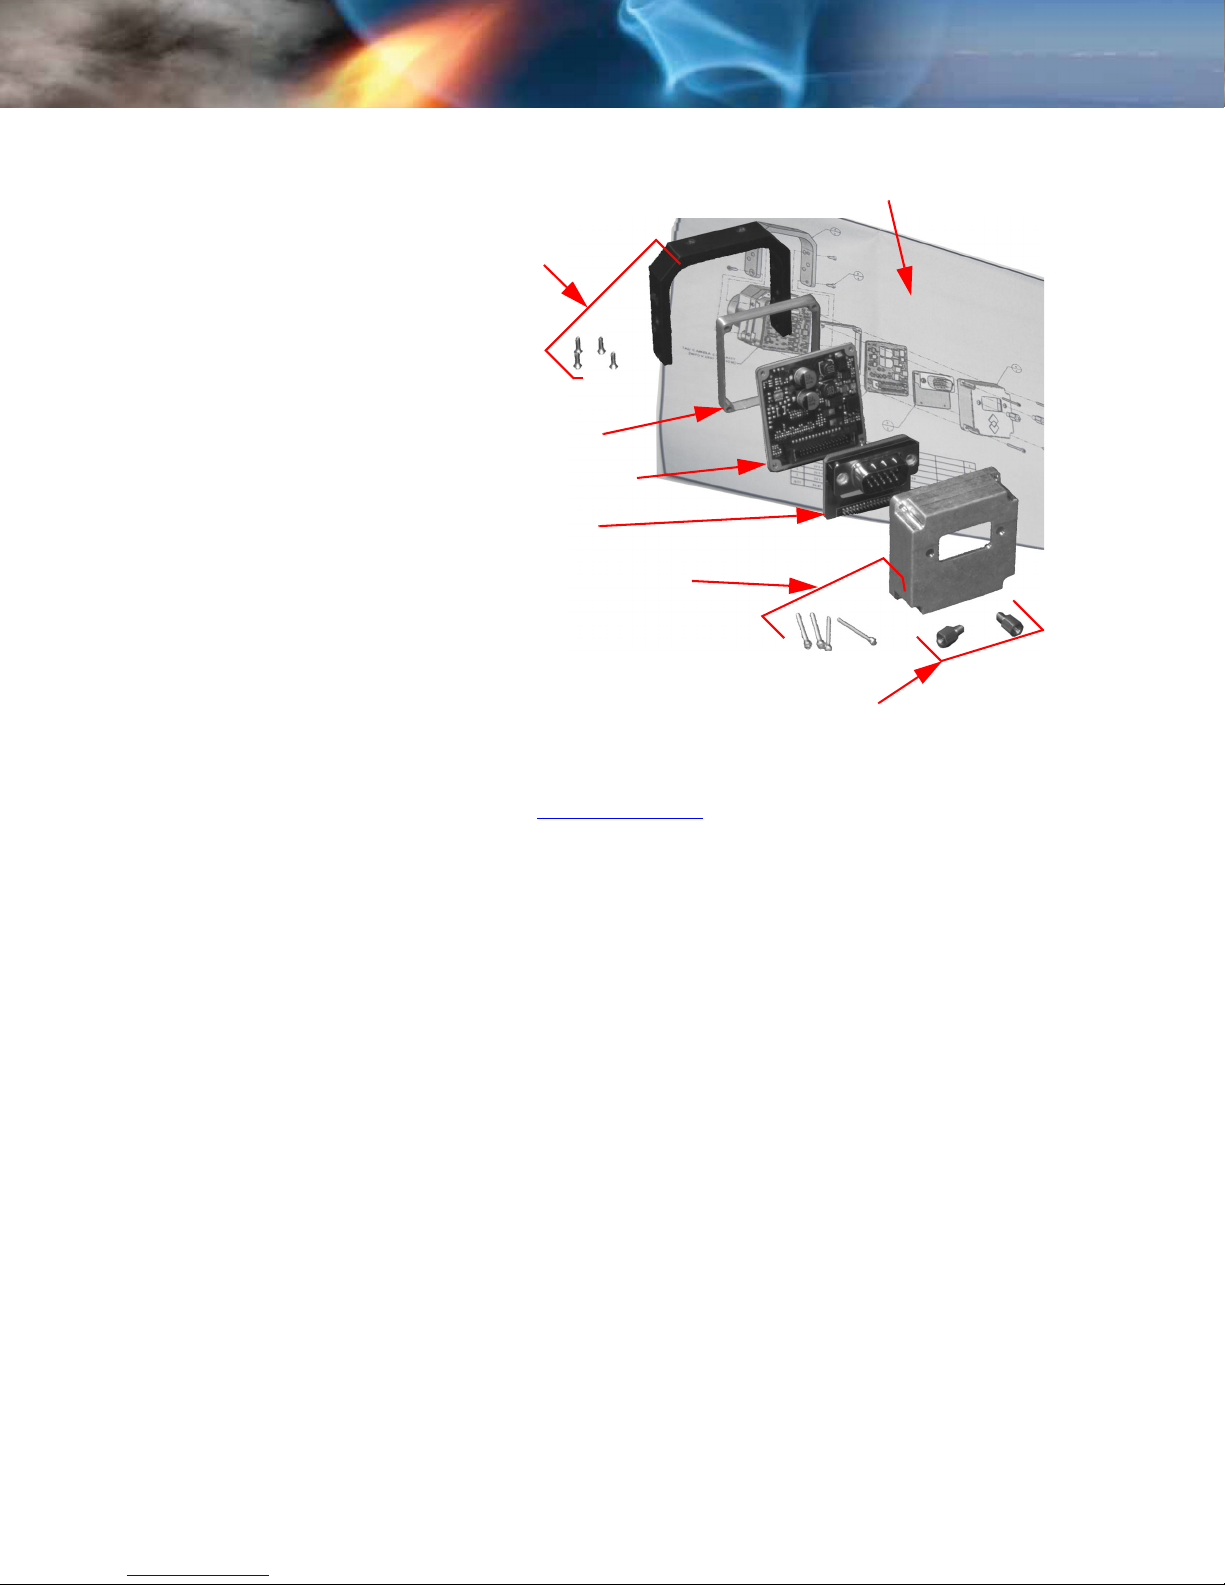
2.6 Photon Replicator Kit
The Photon Replicator kit,
421-0045-00)
Photon adapter
The Photon Replicator Kit
and M2 screws
includes a Photon Replicator
Board, as well as a wearsaver,
and rear cover, that emulates the
15-pin D-sub electrical interface
to Photon 320. A “horseshoe”
shaped bracket is also included
that, when attached to the Tau
Board spacer
camera, exactly mimics the
mounting scheme of the Photon
320 camera.
With this accessory kit, the user
will need a standard BNC cable
for analog video output and a
Replicator board
Adapter
board
Rear cover
and M1.6 screws
standard RS-232 serial COM
cable for advanced configuration
using the free downloadable FLIR
Camera Controller. The Photon
Replicator Board adapts the 50pin Tau connector to a 30-pin
Samtec connector that allows the
use of existing Photon cables and accessories. Purchase accessories for your camera from the
FLIR Camera Accessory Store located at www.flirshop.com
.
Assembly instructions
Connector
standoffs
2.7 Software Accessory Alternate Lens Calibration Software
110-0133-72
For customers that furnish their own optics for use with Tau cores, FLIR sells a Windows
application program called Alt Lens Cal. This software enables users to perform a
supplementary calibration of the camera with a lens. This field-calibration process requires the
use of at least one blackbody source (a uniform, controllable temperature reference) that has
an area greater than the diameter of the front of the lens.
The Alt Lens Cal software also requires a customer-furnished PC, which should be dedicated to
this task. The calibration routine calculates gain terms on a per-pixel basis with the customersupplied lens attached to the Tau core, and stores the customer-performed calibration in nonvolatile camera memory. The original factory calibration coefficients are first uploaded from the
camera and stored into a file on the PC, then the new calibration data is downloaded and
stored directly into the camera. Multiple calibration files can be stored on the host computer.
The original factory calibration file can be restored if necessary, and the customer can actually
build a library of lens calibration files for a Tau camera.
Alternately, customers can contact FLIR to purchase a Lens Calibration feature that works with
the FLIR Camera Controller GUI software.
2-4 June 2011 TAU-0035-00-10, version 150
Page 15

Tau User’s Manual 2—Optional Tau Camera Accessories
2.8 Software Accessory SDK for Windows & Embedded
110-0133-16
The Tau Software Developer’s Kit enables camera control using one of several programming
languages including VB6, VB.net, C#, and C++ (MFC). Code examples are included to help
illustrate how some of the camera control functions can be used. The FLIR Camera Controller
GUI is an example of an application created using the Tau SDK.
Refer to http://www.corebyindigo.com/
.
TAU-0035-00-10, version 150 June 2011 2-5
Page 16

2—Optional Tau Camera Accessories Tau User’s Manual
2-6 June 2011 TAU-0035-00-10, version 150
Page 17
3 Basic Operation of the Tau and GUI
3.1 Operation of the Tau Camera using the USB Interface
The Tau VPC Module and Camera Link Module are USB interfaces for the camera to provide
power and serial communication for more advanced camera command and control via the free
downloadable FLIR Camera Controller GUI. Both modules provide an analog video output, while
the Camera Link Module also provides a digital video output in the Camera Link format. Camera
Link command and control functions are not supported, only the camera link digital video output
is provided.
Connector Type: USB mini 5-pin
Power over USB VPC: nominal draw 180 mA at 5V
(peak load at startup 500 mA at 5V)
Power over USB Camera Link: nominal draw 230 mA at 5V
(peak load at startup 500 mA at 5V)
Serial communications baud rate: 57600 Baud or 921600 Baud
Hot swap protected
Windows Service for automatic detection supported through SDK
Table 3-1: Miniplug / Microplug
Pin Name Color Description
1VCC Red+5 V
2 D- White Data -
3D+GreenData +
4
5 GND Black Signal Ground
1. Pin 4 of mini-USB connector may be not connected, connected to GND, or used as attachment identification
at some portable devices.
1
ID
none
permits distinction of Micro-A- and Micro-B-Plug
Type A: connected to Ground, Type B: not connected
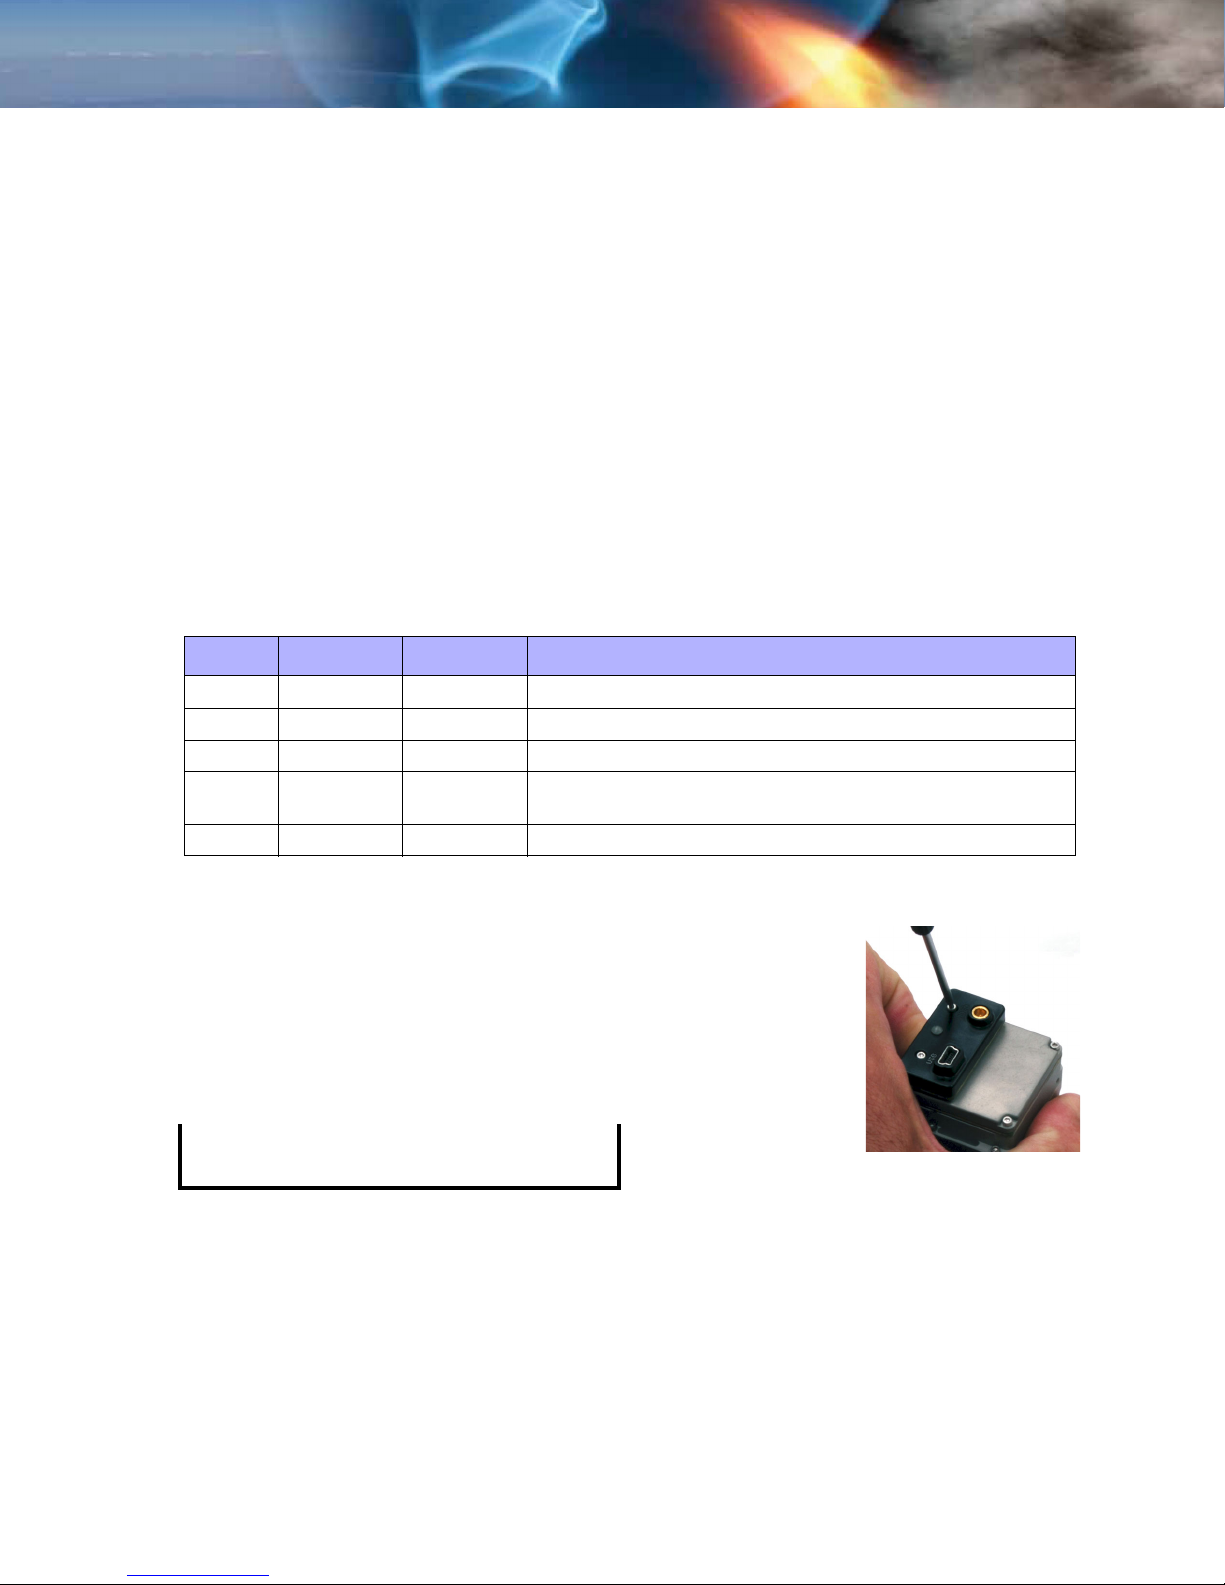
3.1.1 Installing the VPC Module
Step 1 Plug the VPC Module into the mating 50-pin
Hirose Connector on the back of the Tau camera.
Step 2 Install the two socket head cap screws to secure
the VPC Module.
Note
Use only M1.6 × 0.35 × 6 mm screws.
Longer screws will damage the camera.
TAU-0035-00-10, version 150 June 2011 3-1
Page 18
3—Basic Operation of the Tau and GUI Tau User’s Manual
3.1.2 Installing the Camera Link Module
Hirose Connector
MCX coaxial
(analog video)
Spacer (2)
Ø3 mm × 3.1 mm
Power status light
Mini USB
Mounting screw (2)
M1.6 × 0.35 × 16 mm SHCS
Mounting screw (2)
M1.6 × 0.35 × 8 mm SHCS
Mini Camera Link
(digital video)
Step 1 Using a 1.5 mm socket driver, remove the two case screws at the bottom of the
camera (opposite connector).
Step 2 Insert the two M1.6 × 0.35 × 16 mm socket head cap screws through the corner
holes of the Camera Link module, install the spacers on the screws, and thread the
screws into the camera to replace the case screws removed earlier.
Step 3 Plug the module connector into the mating 50-pin Hirose Connector on the back of
the Tau camera.
Step 4 Install the two M1.6 × 0.35 × 8 mm socket head cap screws to secure the module at
the connector.
Note
Use only M1.6 × 0.35 × 8 mm screws. Longer screws will damage the camera.
Step 5 Finish tightening the two M1.6 × 0.35 × 16 mm socket head cap screws at the
corners of the case.
The digital data complies with the Base Camera Link standard and should be compatible with
any brand Camera Link Frame Grabber and software.
The FLIR Camera Controller allows you to control the Tau Camera, but does not support
Camera Link frame capture so that a third-party software must be used. FLIR has tested the
ImperX FrameLink Express frame grabber (http://imperx.com/frame-grabbers/framelink-
express).The ImperX frame grabber comes with FrameLink Express software that allows for
recording single or multiple images (BMP, JPG, TIF, and RAW) as well as standard AVI clips.
Configuration requires selecting 1 TAP, L->R for the tap reconstruction, selecting the
appropriate bit depth that you chose in the FLIR Camera Controller, and clicking “Learn” to
discover the number of digital pixels available.
3-2 June 2011 TAU-0035-00-10, version 150
Page 19
Tau User’s Manual 3—Basic Operation of the Tau and GUI
t
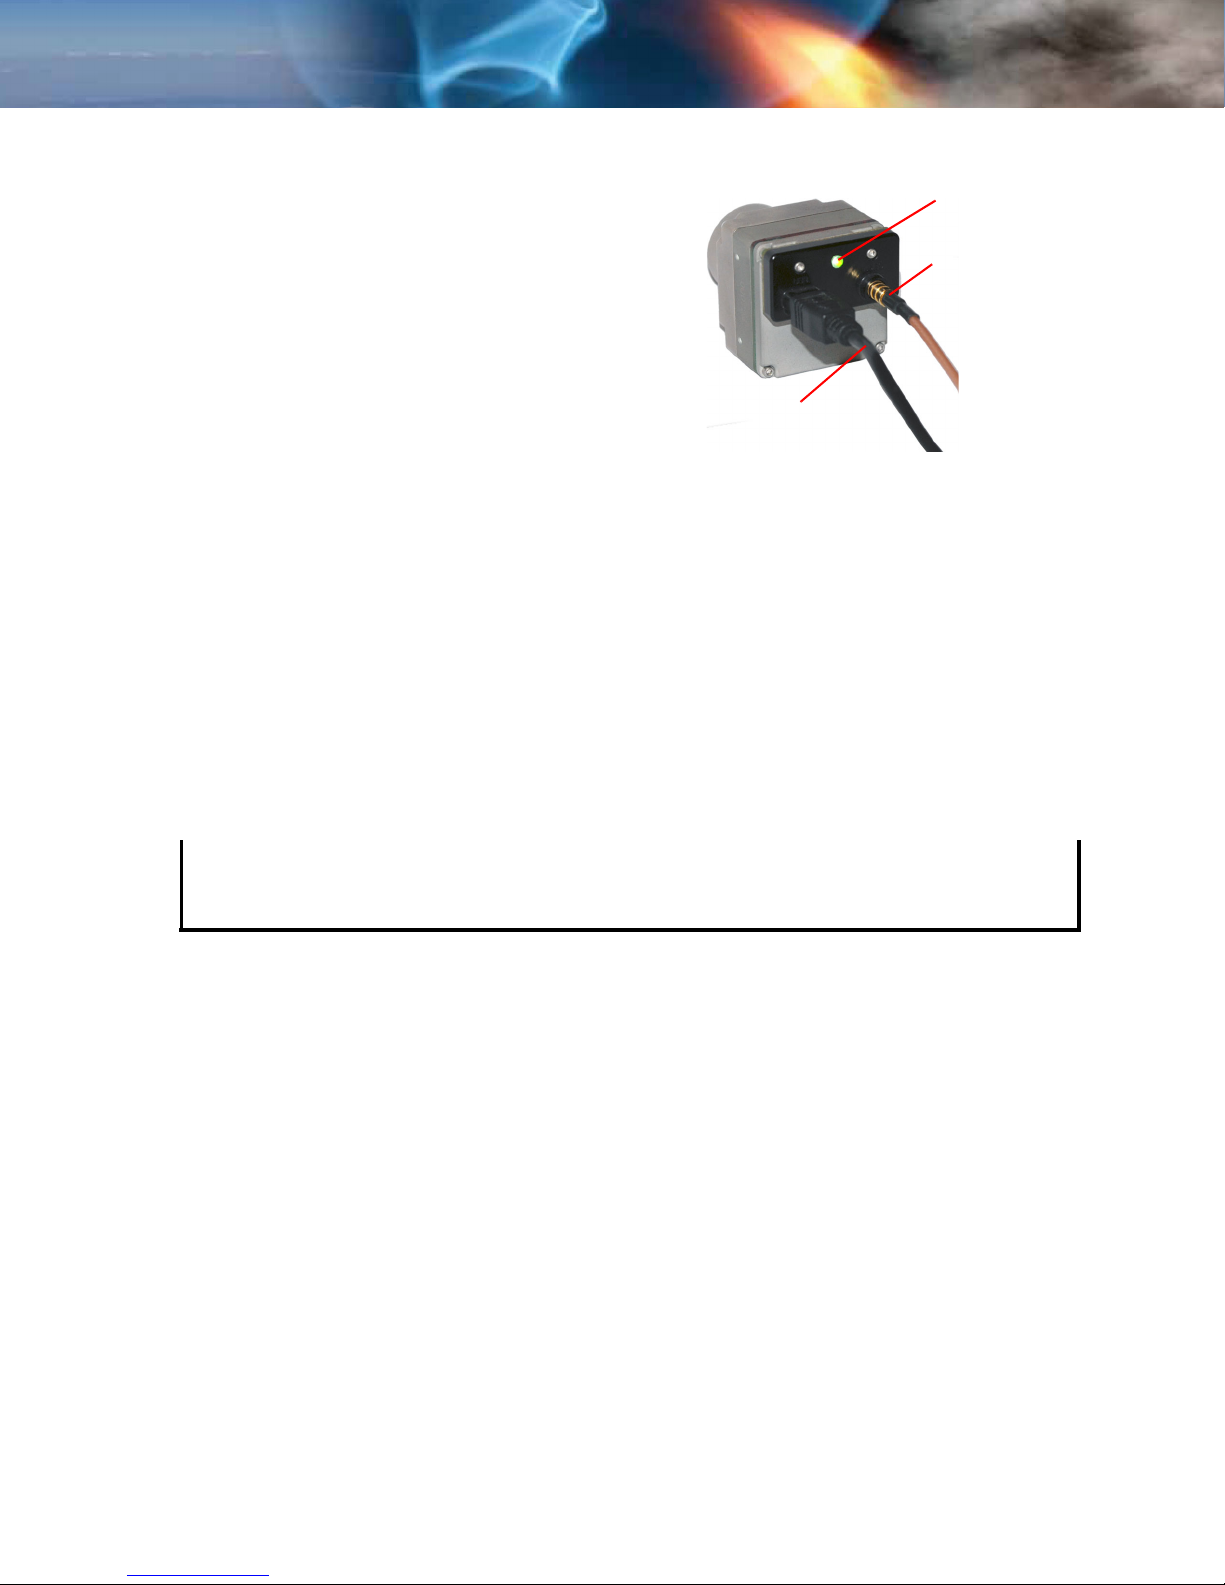
3.1.3 Connecting the Tau Camera for Analog Video
Plug the Video cable into the mating connector
on the back of the camera. Attach the other end
to a compatible video monitor’s composite video
input. If your monitor has an RCA input
connector, a BNC to RCA adapter can be used.
Plug the mini USB plug into the mating
connector on the back of the camera. Connect
the other end of the cable to a USB port on the
computer. At this point, you are only using the
power from the USB port.
USB cable
to computer
Power light
Analog video ou
3.2 Remote control of the Tau Camera
The Tau camera with the a Universal Serial Bus (USB) interface accommodates advanced
camera control through the FLIR Camera Controller GUI. A user can control the camera
through this interface using their own software and hardware by following the Serial
Communication Protocol and command structure defined in Appendix B. This requires
programming skills and a strong technical background. The user can also use the FLIR Camera
Controller GUI offered as a free download from FLIR using a Windows based PC with a
standard USB port. This software provides remote control of various camera features and
modes.
The FLIR Camera Controller GUI software is compatible with Windows XP with .Net Framework
version 2.0 or later. The GUI will prompt the user to update to the latest .Net Framework.
Note
We recommend that Windows Update is turned on, keeping the operating system current;
and that you use the latest version of the FLIR Camera Controller GUI
(available on our website).
If your embedded or specialty applications require custom control software, a Software
Developer’s Kit (SDK) is available. Those intending to generate their own custom software are
encouraged to read the remainder of this section regarding the FLIR Camera Controller GUI to
better understand the camera modes and parameters.
TAU-0035-00-10, version 150 June 2011 3-3
Page 20
3—Basic Operation of the Tau and GUI Tau User’s Manual
3.3 Installing the FLIR Camera Controller GUI
Step 1 If you have another version of the FLIR Camera Controller GUI loaded on your PC, you
should uninstall it using the Windows Uninstall utility via the Windows Control Panel
before proceeding with this installation. This is an important step as camera
malfunction is possible if you do not remove any older versions of Tau (or Omega/
Micron/A10) software.
Step 2 Using your favorite WWW browser, navigate to the following URL:
http://www.corebyindigo.com/
Step 3 Click the Download Tau GUI (Zip file) link.
Step 4 When the File Download prompt appears, choose Save. It is recommended that you
create a new empty directory such as “FLIR Camera Controller GUI Installable Files”
on your desktop, for download.
Step 5 Extract the Installable files using WinZip or other available software.
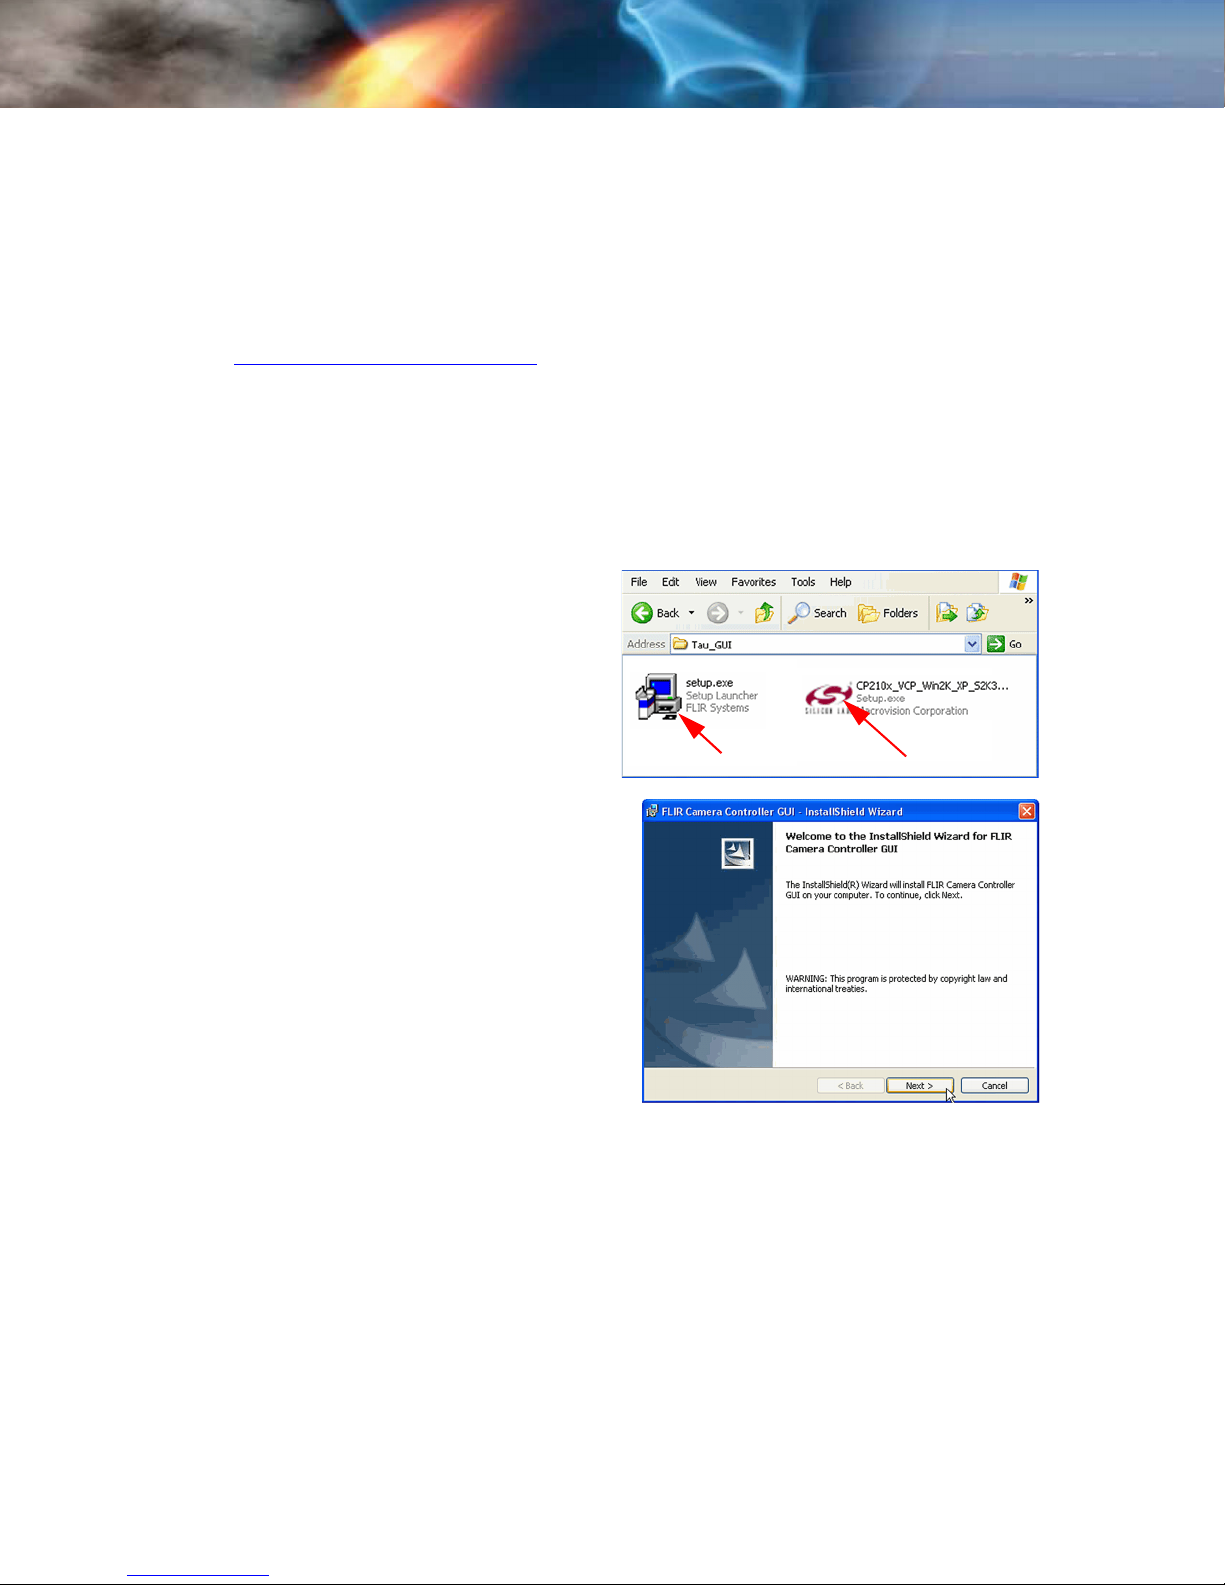
Step 6 Open the directory where you saved
the Installable files. Double-click the
setup.exe file to begin installation.
Tau.
Step 7 Click Next> at the Setup Welcome
screen.
When the installer finishes loading. Follow
the prompts.
Camera Controller GUI USB driver
3-4 June 2011 TAU-0035-00-10, version 150
Page 21
Tau User’s Manual 3—Basic Operation of the Tau and GUI
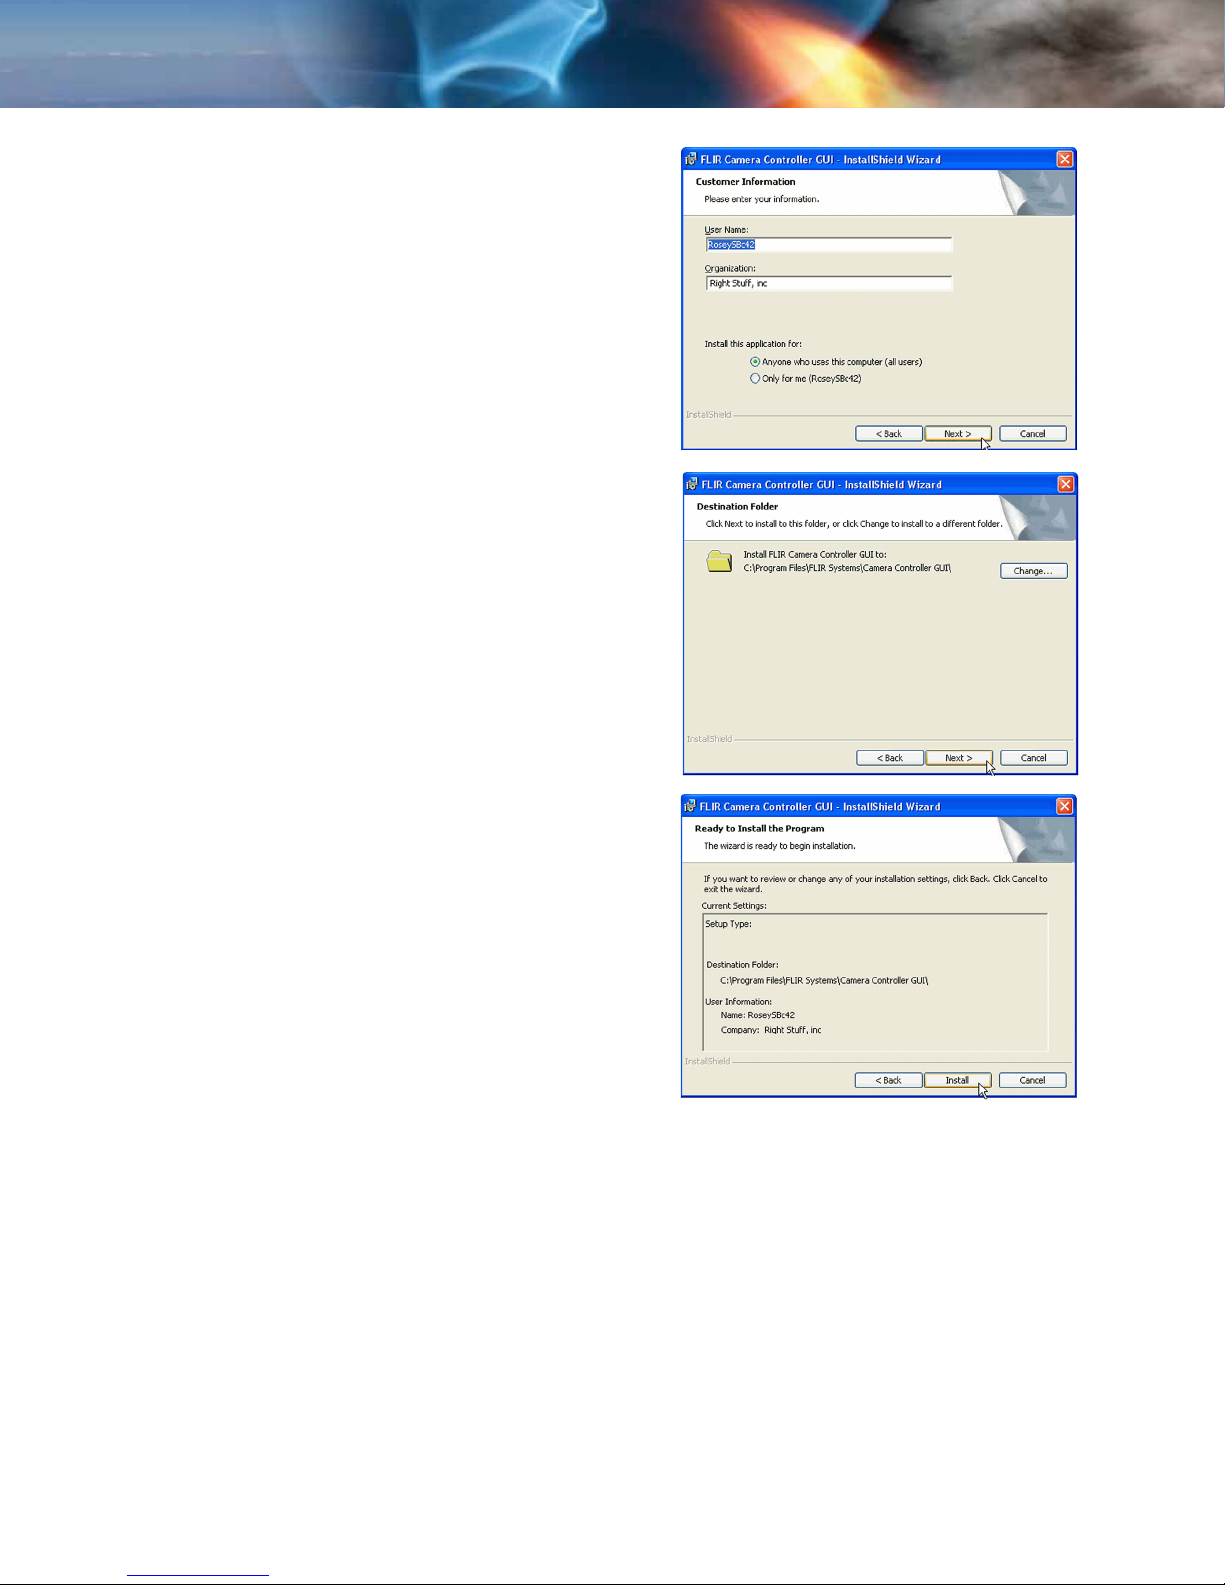
Step 8 Enter your User Name, Organization, and
select your access security.
Click Next>
Step 9 Select a Destination Folder if different
than the default.
Then, click Next>>.
Step 10 Review the settings you have entered for
this installation.
Then, click Install
TAU-0035-00-10, version 150 June 2011 3-5
Page 22
3—Basic Operation of the Tau and GUI Tau User’s Manual
Step 11 Once installation is complete, click Finish.
Step 12 The CP210x_VCP...setup.exe USB driver
installer will start at this point.
Click Next> at the Setup Welcome
screen.
When the installer finishes loading. Follow
the prompts to finish the installation.
Step 13 Installation is complete. You can start the application or create a shortcut to the
application via the
Start→ All Programs→ FLIR Systems→ Camera Controller GUI path.
3-6 June 2011 TAU-0035-00-10, version 150
Page 23

Tau User’s Manual 3—Basic Operation of the Tau and GUI
3.4 Connecting the Tau to a PC via USB
The following steps assume that you have installed the FLIR Camera Controller GUI software
and the USB driver on your PC as described in the proceeding paragraphs 3.3.
Step 1 Follow the steps in paragraph 3.1.3 “Connecting the Tau Camera for Analog Video” on
page 3-3.
About two seconds after the USB cable from the camera is connected to your PC, you
should see video on your monitor. Verify that the camera is producing an image.
Step 2 Launch the FLIR Camera Controller GUI software by selecting Start→ Programs→ FLIR
Systems→ Camera Controller GUI.
Note
The FLIR Camera Controller GUI remembers the last COM port that successfully
communicated with a Tau camera and will use that port as the default when the application
starts. If the connected camera is no longer on that port, the port setting pop-up window will
appear asking for you to select the proper port setting.
TAU-0035-00-10, version 150 June 2011 3-7
Page 24
3—Basic Operation of the Tau and GUI Tau User’s Manual
When the FLIR Camera Controller GUI is started, the Status tab of the utility should
return data similar to the following.
Figure 3-1: FLIR Camera Controller GUI Status Tab
3-8 June 2011 TAU-0035-00-10, version 150
Page 25

Tau User’s Manual 3—Basic Operation of the Tau and GUI
Step 3 Connect to your camera by selecting Connect from the
Camera menu.
Step 4 If you want the FLIR Camera Controller GUI
to automatically connect when it is started,
select Settings from the Tools menu, then
check the Automatically connect on
startup box in the Settings Framework tab.
Additional settings include camera
connection polling, status logging,
and FLIR Veneer style.
TAU-0035-00-10, version 150 June 2011 3-9
Page 26

3—Basic Operation of the Tau and GUI Tau User’s Manual
3.5 Troubleshooting the FLIR Camera Controller GUI
If the FLIR Camera Controller GUI does not link
with the camera, you may see the popup shown at
the right which indicates that the GUI has not
been able to communicate with the Tau camera.
Verify the items in the following checklist:
Is the camera properly cabled to the
host PC?:
Verify that you selected the proper port if it was
not detected automatically. Select Advanced, then
Next> in the Tools→ Connection... dialog box. Also,
try disconnecting and then re-connecting the cable
to the PC. If the GUI was launched before the
cable was connected, close the GUI, connect the
cable, then re-launch the GUI.
Is the Baud rate set correctly? Baud
rate must be set in the Tools→ Connection...
dialog box. The Tau camera supports Baud rates
of 57600 and 921600.
Is the port already in use by another
application?:
Shut down any other applications that may be
using the port. Also, multiple instances of the FLIR
Camera Controller GUI Program can be
instantiated using different ports so be sure the
camera you are interested in controlling is actually
connected to the physical port.
Is the Tau camera power on? Veri fy that
the camera is producing an image on a separate
monitor. On cameras with a shutter installed, at
camera power up, you can hear two sets of a
click-click sound, separated by about 5 seconds,
as the shutter performs its on-power-up
calibration.
If you cannot initiate serial communication with the camera after verifying these items, refer to
the frequently asked questions (FAQ) at http://www.corebyindigo.com/
or contact FLIR Customer Support at (805) 964-9797.
Tau
3-10 June 2011 TAU-0035-00-10, version 150
Page 27

Tau User’s Manual 3—Basic Operation of the Tau and GUI
3.6 Operation of the FLIR Camera Controller GUI
When the FLIR Camera Controller GUI successfully links to the camera, you will see the window
shown below. At the bottom of the application window, you should see Camera and FPA status.
The GUI provides five tabs allowing for camera control as described below.
Figure 3-2: FLIR Camera Controller GUI Status Tab
Camera Part #: indicates the specific camera configuration connected.
Camera Serial #: This is the serial number of the camera currently connected to the FLIR
Camera Controller GUI.
FPA Temperature: The camera’s Focal Plane Array (FPA) temperature.
The connection status, Camera status, Camera Part #, FPA Temp, and FPA Size are displayed
at the bottom of all tabs.
TAU-0035-00-10, version 150 June 2011 3-11
Page 28

3—Basic Operation of the Tau and GUI Tau User’s Manual
3.7 Setup Tab
The Setup tab, shown below, provides the ability to do the following:
Modify the Flat Field Correction (FFC)
Set the External Sync mode
Freeze the video via the Operating Mode section
Populate the Scratch Pad with text
Set the camera to generate a Test Pattern
Save the settings to the camera’s non volatile memory
Restore the Factory Defaults
Reset the Camera
Figure 3-3: FLIR Camera Controller GUI Setup Tab
3-12 June 2011 TAU-0035-00-10, version 150
Page 29

Tau User’s Manual 3—Basic Operation of the Tau and GUI
Flat-Field-Correction Mode: Tau cameras include
internal mechanisms for periodically improving image quality via
a process called flat-field correction (FFC). During FFC, a
shutter briefly blocks the detector array, presenting a uniform
temperature (a flat field) to every detector element. While
imaging the flat field, the camera updates correction
coefficients, resulting in a more uniform array output. The
analog video image is frozen during the entire process, which
takes less than a half second, and resumes automatically
thereafter. Repeating the FFC operation often prevents the
imagery from appearing “grainy”. This is especially important
when the camera temperature is fluctuating, such as
immediately after turn-on or when ambient temperature is
drifting. FFC can be controlled manually at any time using the
Do FFC command button.
Tau provides three FFC modes:
Auto: In the Automatic FFC mode, the camera performs FFC whenever its
temperature changes by a specified amount or at the end of a specified period of time
(whichever comes first). When this mode is selected, input windows are available in
the FLIR Camera Controller GUI for specifying the temperature change and the
number of frames that trigger automatic FFC. The temperature change is specified in
degrees, with valid values in the range 0 to 100 in 0.1 degree increments. The time
period is specified in analog video frames (33ms NTSC, 40ms PAL), with valid values
in the range 0 to 30,000 frames. A setting of 0 frames for the FFC Interval will allow
the Tau camera to only perform an FFC based on the values in Temp change. The
second set of Auto FCC parameters labeled Low Gain apply to Tau-P Cameras with
the auto gain switch enabled.
Note
FLIR recommends using the factory default values for the two automatic-FFC parameters if
possible. These values were selected to maintain a high degree of image quality over all
camera operating conditions.
Manual: In Manual FFC mode, the camera does not perform FFC automatically based
on specified values of temperature change or expired time. The FFC will be performed
once upon startup then again using the internal shutter when the “Do FFC” button is
clicked.
Note
Large camera temperature excursions cause the camera to perform the FFC operation (even
with Manual FFC mode selected), typically at temperature crossings near 0°C and 40 °C.
External: In External FFC mode a uniform source (blackbody) must be placed in front
of the camera. The image of this uniform source will be subtracted from all
subsequent images. This feature is useful if there are lens or lens mount nonuniformities that are not corrected by an internal FFC. The camera will not perform an
FFC process on startup if the saved state of the camera is External mode FFC.
Many customers have found that the palm of their hand or a table is an adequate
uniform source to perform an External FCC.
TAU-0035-00-10, version 150 June 2011 3-13
Page 30

3—Basic Operation of the Tau and GUI Tau User’s Manual
The Tau camera displays an on-screen
symbol called the Flat Field Imminent
Symbol prior to performing an automatic
FFC operation. As shown in Figure 3-4, it
is the square in the upper right of the
video output and is displayed nominally 2
seconds prior to the FFC operation. The
duration of the FFC Imminent Symbol
can be set using the FFC Warn Time
setting in the Analog Video tab. Setting
the Warn Time to less than 15 turns off
the warning (see paragraph 3.8).
Figure 3-4: Flat Field Imminent Symbol
External Sync Mode: The Tau
camera provides the ability to either accept or output a
frame synchronization signal on pin 21 of the 50-pin
Hirose connector or pin 26 of the Photon Replicator
board. This functionality can also be disabled. The designed
signal levels are 0V and 3.3V.
Disabled: The camera will turn off frame synchronization.
Slave: The camera will accept a frame synchronization signal on the interface
connector. The camera output will be frozen if the camera is in slave mode and no
external synchronization signal is received.
The focal plane array readout cycle starts when the external synchronization signal is
received and the camera will continue the output cycle until the frame is complete.
The frame sync signal embedded in the respective digital output should be used to
acquire digital data, not the external sync I/O.
Maximum external sync input rates are up to 29.980 Hz for NTSC and 27.25 Hz for
PAL. The ‘Slow Video’ versions of the Tau camera will have the same external sync
frame rates, but the image data output will be at 1/4 the rate (NTSC) or 1/3 the
rate (PAL).
Master: The camera will output a frame synchronization signal on the interface
connector when configured as a master. The output pulse width will be 100 ns at the
standard frame rates (27.970 Hz for NTSC; 25.000 for PAL).
Operating Mode: The Tau camera will freeze the
analog frame imaged when Frozen is selected. Live video
will cease and the frozen frame will persist. To return the
camera to live video, select Real-Time video mode.
Save Settings: After using the FLIR Camera Controller GUI to change
camera modes and settings to your desired values, use the Save Settings
button to store your current selections as new power-up defaults. The next
time the camera is powered, the Tau camera will remember these saved
settings. If you do not click Save Settings, the changes you make via the FLIR Camera
Controller GUI will be valid only for the current session. Cycling power to the camera will revert
to the previously saved settings.
3-14 June 2011 TAU-0035-00-10, version 150
Page 31

Tau User’s Manual 3—Basic Operation of the Tau and GUI
Factory Defaults: The Factory Defaults button restores the camera’s
settings to the initial values specified by the manufacturer.
If you want the factory default settings to become the power up defaults, first
click the Factory Defaults button, then click the Save Settings button.
Reset Camera: The Reset Camera button restarts the camera
software.
Test-Pattern: A Test-Pattern m o d e i s p r o v id e d to v e r if y
camera electronics. The Test-Pattern mode will not persist
over a power cycle.
Off: No test-pattern is provided in this mode.
This is the normal mode for viewing thermal
imagery.
Ramp: In this ramp mode, the test pattern shown
below and in the Color/LUT section that follows is
provided at the analog and digital data channels.
pix(0,0) = 0 pix(639,0)
pix(25,408) = 16383
pix(25,409) = 0
Figure 3-5: Ramp test pattern example for Top Portion of Tau Ramp Image
(Digital values shown apply to the optional 14-bit digital data stream.)
The above ramp pattern repeats 19 times in the complete 320 × 256 image.
Note
The ramp test pattern is intended primarily for verifying the output of the digital data channel.
The pattern will not necessarily look as shown above when displayed on an analog video
monitor, particularly if an Automatic Gain Control (AGC) mode other than Automatic is
selected. The above image is a horizontal slice of the full displayed image.
Gain Mode: The Tau camera has two gain ranges:
High gain mode is designed to maximize contrast for imaging applications.
Low gain mode has lower contrast but a higher dynamic range and is designed for
viewing hot targets.
Auto gain mode allows the Tau camera to switch between Low and High gain mode
based on the scene being viewed, Auto mode is controlled by the Gain Switch Values
in the Thermal tab. See “Thermal Tab” on page 3-28.
TAU-0035-00-10, version 150 June 2011 3-15
Page 32

3—Basic Operation of the Tau and GUI Tau User’s Manual
3.8 Analog Video Tab
The Analog Video tab on the FLIR Camera Controller GUI, shown below, provides the ability to
modify Tau camera modes:
Image Orientation Dynamic Digital Detail Enhancement (DDE)
Pan & Zoom Video On/Off
Polarity/LUT (Video Color) Video Standard NTSC/PAL
FFC Warn Time
1. Select Video
2. Select Analog Video
Figure 3-6: FLIR Camera Controller GUI Analog Video Tab
3-16 June 2011 TAU-0035-00-10, version 150
Page 33

Tau User’s Manual 3—Basic Operation of the Tau and GUI
Image-Orientation Mode: Two Image-Orientation mode selections are provided. Select
one or both to change the orientation of the video image.
Invert: The normal image is flipped vertically. The
pixel on the upper-left corner of the detector array
is displayed on the lower-left corner of the video
display in Invert mode. Invert is used when
mounting the camera upside-down. Invert applies
to analog, BT.656, CMOS, and LVDS video.
Revert: The normal image is flipped horizontally. The pixel on the upper-right corner of
the detector array is displayed on the upper-left corner of the video display in Revert
mode. Revert mode produces a mirror-image of Normal mode; use for applications
where the camera is imaged through a fold-mirror. Revert applies to analog and
BT.656 video only.
Note
Any time the image orientation mode is inverted, a flat-field correction automatically takes
place. Adjusting image orientation should be followed by a flat-field correction in all modes.
Pan & Zoom, Zoom: The Tau 320
camera has a built-in 2× and 4× digital zoom
Select to
enter offsets
capability. The Tau 160 camera has a built-in
2× digital zoom. The Zoom check boxes are
used to turn on/off the camera zoom. With
the Unzoom box checked, the Tau camera
Click to
center
displays the full sensor array image (NTSC:
320 × 240 pixels or PAL 320 × 256 pixels).
When the Zoom 2x box is checked, a smaller
central region of the sensor array is mapped
to the video output creating the zoom effect.
For NTSC and PAL video formats in 2× zoom
mode, 160 × 120 and 160 × 128 pixels,
respectively, are mapped to the analog video
Tilt
slider
Pan
slider
output. When the Zoom 4x box is checked,
80 × 60 (NTSC) and 80 × 64 (PAL) pixels,
respectively, are mapped to the analog video output. This reduced region of the array is called
the zoomed array region. The BT.656 video also has the zoom feature, but the CMOS and
LVDS do not.
Pan & Zoom, Pan: When in either zoomed mode, you can move the zoomed array region
within the full array area. This digitally simulates panning and tilting. Panning and tilting are
defined as moving the camera image in the horizontal and vertical axes, respectively.
The Pan/Tilt limits for 320 cameras are the same in both 2× and 4× mode.
The Pan/Tilt limits for 160 cameras are ±40/±30; or the same as the Fine range.
You can adjust the vertical and horizontal sliders to move the zoomed array region.
When the fine box is not checked the slider controls move the zoomed image from edge to
edge of the full sized array. Checking the fine box increases the sensitivity of the slide control so
that the zoomed array moves one half the total range but all step values are achievable. Simple
TAU-0035-00-10, version 150 June 2011 3-17
Page 34

3—Basic Operation of the Tau and GUI Tau User’s Manual
experimentation while viewing the displayed image will quickly give you familiarity with this
feature.
Note
The Spot Meter function always reports values from the center of the full array. Pan/Tilt
moves the image but not the location of the Spot Meter. If Pan/Tilt is being used, the Spot
Meter readings will not be correct.
Flat-Field Correction (FFC): The Tau
automatically performs flat-field corrections (see
paragraph “Flat-Field-Correction Mode:” on page 3-
13). A square is displayed on your video monitor as a
warning that the FFC is going to take place. Use this
function to set the number of analog video frames
(33ms NTSC, 40ms PAL) during which the warning will be displayed. The time period, specified
in frames, can range from 0 to 30,000 frames.
The factory setting of 60 frames equates to a two second warning. Setting the FFC Warning to
less than 15 frames turns off the warning. A setting of 0 frames for the FFC Warning will allow
the camera to only perform FFC based on the temperature change values if in Auto FFC mode.
Dynamic Digital Detail Enhancement (DDE) filter:
The DDE algorithm sets edge enhancement dynamically
proportional to the number of bins occupied in the
image histogram.
In a high dynamic range scene the gain will be higher
than in a low dynamic range scene. This allows faint
details to be visible in high dynamic range scenes
without increasing temporal and fixed pattern noise in
low dynamic range scenes.
The DDE filter operates independently from the AGC and will enhance edges without effecting
brightness or contrast. The valid range of Dynamic DDE setting is from 1 to 63 with 17 being
the neutral setting where the filter has no effect. Settings below 17 will smooth the image
reducing the appearance of sharp edges. Higher DDE settings will enhance all image nonuniformities resulting in a very detailed but grainy picture especially in high dynamic range
scenes. Typical factory settings are between 25 and 30. Settings from 18 to 39 are normal
imaging modes where the edge enhancement can be tuned for the scene. Use the slider to
adjust the setting, or select the text field and type in the desired setting.
Note
In 14-bit Raw mode, selecting the DDE mode will not affect the digital data output.
Video On/Off: This feature allows you to turn off
the analog video output which will result in some power
savings (approximately 55mW).
Video Standard: Choose the video standard for
your system.
3-18 June 2011 TAU-0035-00-10, version 150
Page 35

Tau User’s Manual 3—Basic Operation of the Tau and GUI
Polarity/LUT: The Tau camera detects and
images the temperatures in a given scene. Within the
camera, these temperatures are mapped (as
determined by the AGC algorithm selected) to a range
of 0 to 255 values. In a black and white display mode,
this range is converted to shades of grey with, for
example, 0 being totally black and 255 being totally
white. The 0 to 255 grayshades range sensed is
referenced to a Look-Up Table (LUT) permanently
stored in the camera to convert the scene to a video
image. Different LUTs are available to change the
appearance of the displayed image. The most common
selection is either White Hot (hotter objects appear
brighter than cooler objects in the video display) or
Black Hot (hotter objects appear darker than cooler objects). Since the difference between
these two modes simply reverses the choice of darker or lighter for temperature extremes, this
is sometimes referred to as Polarity. Other color LUTs are available as shown below.
Figure 3-7 shows each of the LUTs as displayed in Test Pattern Ramp Mode starting with the
upper left: White Hot, Black Hot, Fusion, Rainbow, Globow, Ironbow1, Ironbow2, Sepia, Color1,
Color2, Ice Fire and Rain. Select one of these LUTs from the pull-down menu to view your image
displayed using the LUT you choose.
Cold
Cold
White Hot
Cold
Globow
Cold
Color1
Hot
Hot
Hot
Hot
Cold
Black Hot Fusion Rainbow
Cold
Ironbow1 Ironbow2 Sepia
Cold
Color2 Ice Fire Rain
Figure 3-7: Look-Up Table Options
Cold
Hot
Cold
Hot
Cold
Hot
Hot
Hot
Hot
Cold
Hot
Cold
Hot
Cold
Hot
Simple experimentation with this feature while viewing the video image will give you familiarity.
Remember that you must click the Save Settings button on the Setup tab to save the LUT
settings as default at power-up.
Note
The setting of the Polarity/LUT mode will not affect the digital data output.
TAU-0035-00-10, version 150 June 2011 3-19
Page 36

3—Basic Operation of the Tau and GUI Tau User’s Manual
3.9 Digital Video Tab
Tau offers a LVDS interface digital output that can be configured in four modes. Changing these
modes will have no effect on the analog (NTSC or PAL) signal. In order to access the digital
output, you must use an advanced interface as described in Chapter 4, Tau Digital Data
Channel. See the Tau Electrical Interface Control Document (102-PS220-41) for information on
how to access digital video for LVDS, BT.656, and CMOS.
1. Select Video
2. Select Digital Video
Figure 3-8: FLIR Camera Controller GUI Digital VIdeo Tab
Camera Digital Output
Note
The Revert feature is not available in digital video.
Note
AGC mode will only affect the digital data output if Camera Digital Output mode is set to 8-bit
data.
Off: The digital data stream coming from the Tau camera is turned off.
3-20 June 2011 TAU-0035-00-10, version 150
Page 37

Tau User’s Manual 3—Basic Operation of the Tau and GUI
8-bit: Data from the 320 × 240 (NTSC) or 320 × 256 (PAL) video pixels is provided
after application of the current Automatic Gain Control (AGC) and Dynamic Detail
Enhancement (DDE). The 8-bit data is essentially a digital version of the same data
provided on the analog video channel.
14-bit Filtered: Data from 324 × 256 pixels is provided prior to video processing
modes in the 8-bit data described above. The 14-bit data is the filtered data to include
the Dynamic Detail Enhancement (DDE) and will appear gray when saving 16-bit TIFF
files. See “Tau Digital Data Channel” on page 4-1.
14-bit Raw: Data from 324 × 256 pixels is provided prior to all video processing and
does not include the Dynamic Detail Enhancement (DDE). The 14-bit data is the ‘raw’
data and will also appear gray when saving 16-bit TIFF files. See “Tau Digital Data
Channel” on page 4-1.
XP Mode Select
The Tau camera has 18 XP pins on the 50-pin Hirose connector. The XP mode uses a
number of these pins to output parallel digital image data.
BT656: The BT.656 parallel output is a common interface which will drive many LCD
displays. The data is digitally encoded NTSC/PAL video and will have AGC, DDE,
symbols, and color included.
CMOS: The CMOS interface is a parallel output that allows the user to access 8-bit
AGC corrected data or 14-bit data. The signal levels are 0 - 3.3 V CMOS logic and are
intended to drive boards mounted directly to the Tau camera. CMOS is not intended to
drive a cable. An XP-board reference design is available upon request.
TAU-0035-00-10, version 150 June 2011 3-21
Page 38

3—Basic Operation of the Tau and GUI Tau User’s Manual
3.10 Image Capture Tab
The Image Capture tab on the FLIR Camera Controller GUI, shown below, allows you to capture
two 8-bit AGC corrected images to camera memory for retrieval to a host computer. The
images will be 8-bit grayscale only, without symbols. (The camera actually captures and
stores14-bit images and the FLIR Camera Controller GUI displays them as 8-bit images with
linear AGC applied.)
1. Select Video 2. Image Capture
Figure 3-9: FLIR Camera Controller GUI Analog Video Tab
Save Currently Displayed Image...: Saves an 8-bit .bmp file as described above.
Take Snapshot: Take two snapshots sequentially. Snapshot memory must be erased
before taking new snapshots; snapshots will not overwrite memory.
Retrieve Snapshot: Snapshot # is retrieved and displayed one at a time.
Erase Snapshot: Snapshots will stay in the camera until erased. This button will erase
all the snapshots from the camera, allowing new snapshots to be taken.
3-22 June 2011 TAU-0035-00-10, version 150
Page 39

Tau User’s Manual 3—Basic Operation of the Tau and GUI
3.11 AGC Tab
The AGC tab, shown in Figure 3-10, controls the Automatic Gain Control (AGC) mode or
algorithm along with selectable parameters. Only one mode can operate at a time and is
selected by clicking one of the Algorithm buttons in the upper left portion of the window.
Parameters for a given mode are contextually made available depending on which mode is
selected. The Region of Interest (ROI) for the AGC mode is adjustable as well (see
paragraph 3.12).
1. Select AGC tab
2. Select AGC
Figure 3-10: FLIR Camera Controller GUI AGC Tab
Note
FLIR has invested heavily in designing high quality AGC algorithms. The default mode
(Automatic) along with the default parameter settings for the Automatic AGC mode have been
proven to offer the best image quality for generalized scene imaging. Also, be aware that you
can make AGC adjustments that will configure the Tau camera to produce no image (all black
or all white). Restoring the Factory Defaults on the Setup Tab will return the camera to its
factory default state and likely restore normal camera operation.
TAU-0035-00-10, version 150 June 2011 3-23
Page 40

3—Basic Operation of the Tau and GUI Tau User’s Manual
AGC Modes: The Tau provides five AGC algorithms for Image-Optimization:
Automatic: This is the most sophisticated algorithm
and for most imaging situations, the best all-around
choice. This factory default along with the default
parameter settings should be used in general imaging
situations. In Automatic, image contrast and
brightness are optimized automatically as the scene
varies. This mode provides an AGC which is based on
a histogram-equalization algorithm. Controls for the
ITT Mean (gray scale mid-point), Max Gain (AGC gain)
and Plateau Value are enabled.
The histogram equalization used in the automatic mode scales the 14-bit to 8-bit
transfer function based on the number of pixels in a bin. The more pixels in a bin, the
higher the gain. But the Plateau value is the pixels/bin limit when the transfer function
is maximized. Normally 250 is the plateau value for imaging cameras when more
contrast is desired.
This algorithm analyzes the scene content in real time and redistributes the dynamic
range of the scene. The goal of this redistribution is that every one of the 255 bins of
display dynamic range has an equal number of pixels in it. This method tends to give
better scene contrast under conditions where the scene statistics are bimodal (for
example, a hot object imaged in a cold background. It should be noted that the heat
range in a given scene is not divided evenly across the grey levels sent to be displayed.
Instead, the AGC algorithm analyzes the scene and distributes the dynamic range to
best preserve statistical scene content (populated regions of the histogram) and
display a redistributed scene representation.
Once Bright: In this mode, the brightness will be set once when the mode is selected.
The brightness (level) is calculated as the mean of the current scene when the Once
Bright button is selected. The scene is mapped to the analog video using a linear
transfer function. Image contrast can be adjusted by the Contrast slider. This is the
only user adjustable parameter. Upon entry into the once bright mode, the currentlystored value of contrast is applied (i.e. the power-on defaults or the last saved values).
Auto-Bright: In this mode, the brightness (level) is calculated as the mean of the
current scene just as in Once Bright mode. The difference with Auto-Bright is that
the values selected for the start and end of the linear transfer function are
automatically updated in real-time, not only at the start of AGC mode selection. The
Brightness Bias offsets the displayed image in intensity. Upon entry into the auto
bright mode, the currently-stored values of Contrast and Brightness Bias are applied
(i.e. the power-on defaults or the last saved values).
Manual: In this mode, image Contrast (gain) and Brightness (level) are entered
completely manually via the sliders. The scene is mapped using a linear transfer
function. Upon entry into the manual mode, currently-stored values of brightness and
contrast are applied (i.e. the power-on defaults or the last saved values).
3-24 June 2011 TAU-0035-00-10, version 150
Page 41

Tau User’s Manual 3—Basic Operation of the Tau and GUI
Linear Histogram: Image contrast and brightness (gain and level) optimized
automatically based upon scene statistics using a linear transfer function. Controls for
the ITT Mean (sets grey scale midpoint) and Max Gain (AGC gain) are adjustable by
entering the value in the Automatic Parameters section. The Linear Histogram
algorithm uses scene statistics to set a global gain and offset (contrast and
brightness) for the image. Upon entry into the linear histogram mode, the currentlystored values are applied (i.e. the power-on defaults or the last saved values).
Note
In Manual mode and Once Bright mode, the brightness setting must be updated as the
camera temperature changes. To avoid this issue, it is recommended to use Automatic or
Auto Bright right modes when possible. Also, AGC mode will only affect the digital data output
if the Digital Video output mode is set to 8-bit data. The 14-bit digital data bypasses the AGC
sections of digital processing.
Linear Parameters: Used for fine tuning the Auto Bright, Once
Bright, and Manual modes, these settings are contextually active
depending on which Algorithm is selected. Each of their settings is
described above.
Once Bright – Only the Contrast control is active.
Auto Bright – The Brightness Bias and Contrast controls
are active.
Manual – The Brightness and Contrast controls are active.
Automatic Parameters: Used for fine tuning the
Automatic and Linear Histogram modes, these settings are
contextually active depending on which AGC algorithm is
selected. Each of their settings is described above as they
pertain to the particular Algorithm.
Automatic – The Plateau Value, ITT Mean, and Max
Gain controls are active.
Manual – The ITT Mean and Max Gain controls are
active.
TAU-0035-00-10, version 150 June 2011 3-25
Page 42

3—Basic Operation of the Tau and GUI Tau User’s Manual
3.12 ROI Tab
The Tau camera allows the user to set a Region of Interest (ROI) or a rectangle of pixels on the
sensor array that the AGC algorithm will use for its calculations. The ROI can be set for either
the entire frame size (0,0 : 320,256) or some smaller portion as shown below. The ROI tab,
shown in Figure 3-11, provides both a Window Editor and text entry coordinates to control the
size and location of the Region of Interest (ROI).
1. Select AGC tab
2. Select ROI Window editor
Figure 3-11: FLIR Camera Controller GUI ROI Tab
3-26 June 2011 TAU-0035-00-10, version 150
Page 43

Tau User’s Manual 3—Basic Operation of the Tau and GUI
Window Editor: Use the mouse to drag the
green ROI rectangle to any location on the FPA. The
size of the ROI rectangle (in pixels) is displayed. To
change the size of the ROI rectangle, drag one of the
corner or side bubbles.
AGC ROI Coordinate Values: The settings use
an X-Y coordinate system with (0,0) being at the
center of the sensor array. The upper two numbers
marked (left,top) are the pixel coordinates of the upper
left corner of the ROI rectangle. The lower two
numbers marked (right,bottom) define the lower right
corner of the ROI rectangle. In the example at the
right, the ROI is specified as a ROI rectangle 66 × 65
pixels located 20 pixels to the left and 10 pixels down
from the center of the FPA.
The new AGC ROI size setting is not active until the Set
button is pressed.
The AGC ROI may be set independently for Unzoom,
Zoom 2×, and Zoom 4×. The AGC ROI may be set anywhere in the full array size, even outside
the zoom window. The Pan and Tilt function will attempt to move the Zoom AGC ROI to remain
centered on the zoom window. If the camera is being used in zoom mode, it is recommended
that the zoom AGC ROI be set to the same size as the zoom window.
TAU-0035-00-10, version 150 June 2011 3-27
Page 44

3—Basic Operation of the Tau and GUI Tau User’s Manual
3.13 Thermal Tab
The Tau cameras (except the Tau-D) have a rough thermal measurement capability. The Spot
Meter reports the temperature viewed by the four pixels in the center of the image. The
Isotherm mode enables special colorization of objects in the scene that are above a specified
threshold.
1. Select Thermal tab
2. Select Mode
Figure 3-12: FLIR Camera Controller GUI Thermal Tab
Spot Meter: The Spot Meter must be on before either the thermal Digital readout or
Thermometer can be displayed.
Select either Fahrenheit or Celsius to enable the Spot Meter.
Select Digital and/or Thermometer to display the symbols on the analog display.
Gain Switch Values are used to control the High Gain/Low Gain switch points. The
table switch is enabled using the Gain Mode switch on the Setup tab.
Note
The factory settings have hysteresis in the table switch settings. Changing these settings can
result in oscillatory behavior or the camera may get stuck in either high or low Gain Mode.
3-28 June 2011 TAU-0035-00-10, version 150
Page 45

4 Tau Digital Data Channel
The Tau camera provides three digital data channels. The BT.656 channel output is a digitally
encoded analog format which contains image, symbol, and color information. The CMOS
channel is a parallel image data output. The Legacy LVDS channel is common with the FLIR
Photon camera.
4.1 XP Bus Setting—BT.656 Digital Interface
The BT.656 parallel output is a common interface which will drive many LCD displays. The data
is digitally encoded NTSC/PAL video and will have AGC, DDE, symbols, and color included. The
signal levels are 0 - 3.3 V CMOS logic and are intended to drive boards mounted directly to the
Tau camera. Table 4-1 shows the connector pin definitions with BT.656 enabled. Also shown in
the table are the optional discrete input pins. Figure 4-1 details BT.656 format and timing.
Table 4-1: 50-pin Hirose connector interface with BT.656 output enabled
Pin # Signal Name Pin # Signal Name
1 RS232_TX 2 RS232_RX
3 DISCRETE6 4 DISCRETE7
5DGND 6 DGND
7 unused 8 unused
9 LVDS_CLK_P 10 LVDS_CLK_N
11 LVDS_SYNC_P 12 LVDS_SYNC_N
13 LVDS_DATA_P 14 LVDS_DATA_N
15 unused 16 unused
17 DGND 18 DGND
19 DISCRETE0 20 DISCRETE1
21 EXT_SYNC 22 unused
23 DISCRETE2 24 DISCRETE3
25 DISCRETE4 26 DISCRETE5
27 DGND 28 DGND
29 BT656_DATA7 30 BT656_DATA6
31 BT656_DATA5 32 BT656_DATA4
33 BT656_DATA3 34 BT656_DATA2
35 BT656_DATA1 36 BT656_DATA0
37 DGND 38 DGND
39 BT656_CLK 40 unused
41 DGND 42 DGND
43 VID_OUT_H 44 VID_OUT_L
45 DGND 46 3V3
47, 49 MAIN_PWR_RTN 48, 50 MAIN_PWR
TAU-0035-00-10, version 150 June 2011 4-1
Page 46

4—Tau Digital Data Channel Tau User’s Manual
H Control Sign al
Start of digital line Start of digital active line
FF0000XY8010801
0
8010FF0000XYC
C
Y
b
r
4 clocks 268 clocks 4 clocks
1716 clocks
D7 D6 D5 D4 D3 D2 D1 D0
1 1 1 1 1 1 1 1
0 0 0 0 0 0 0 0
0 0 0 0 0 0 0 0
1 F V H P3 P2 P1 P0
Blanking
(V = 1)
(V = 0)
Blanking
(V = 1)
(V = 0)
Fram e Line 1
Fram e Line 20
Fram e Line 21, Field1 Line 0
Fram e Line 263 , Field1 Li ne 242
Fram e Line 264
Fram e Line 282
Fram e Line 283 , Field2 Line 0
Fram e Line 525 , Field2 Li ne 242
LINE 4
Field 1
(F = 0)
Odd
LINE 266
Field 2
(F = 1)
Even
LINE 3
Preamble
Status Word
Field 1 Active
Field 2 Active
H=1
H=0
EAV
SAV
1716 clocks @ 27MHz = 63.55us/line
63.55us/line x 525 lines = 29.97 ms/frame
slexiP detisoCedoC VASgniknalBedoC VAE
C
Y
C
Y
b
Y
r
C
b
1440 clocks
F = 0 for field 1, F = 1 for field 2
V = 1 during vertical blanking
H = 0 at SAV, H = 1 at EAV
P3 - P0 = protection bits
P3 = V XOR H
P2 = F XOR H
P1 = F XOR V
P0 = F XOR V XOR H
Line
Number
4 - 20
21 - 263
264 - 265
266 - 282
283 - 525
F V
0
0
0
1
1
1
0
1
1
0
C
Y
Y
r
H
EAVVSAV
01111 - 3
01
01
01
01
01
C
Y
b
243 acti ve lines
243 acti ve lines
EAV Code
C
FF0000X
Y
r
20 blank lines
19 blank lines
Y
Cb, Y, Cr, Y
Any Clock Ena ble
Any Clock
50.625MHz * 8/15
27MHz
YCbCr
NOTES:
This FIFO is outside the
BT.656 Formatter
8
we re
PixelsPerLine
1111
rwcwwc
8
0 = 640
1 = 720
BT.656 Formatter
27MHz
Registers forced
8 8
'0' D
'1'
BT.656 Clock
The FI FO Wri te Clock can be any value as lon g as it is der ived from and locked to 50.626MHz.
The FIFO must store at least 1440 bytes and must be filled at a mini mum rate of 1 byte per
27MHz c lock period (faster is OK ).
A full line must be made available every 1,716 27MHz clock periods.
Sinc e the BT.6 56 Formatt er has no knowl edge of upstream video tim ing, no data shall be
writ ten into t he FIFO unt il the fir st active l ine (line 1 , field 1) of v ideo is available after reset.
Incoming vi deo must conform to the active/blank tim es specified i n the Timing section of this
document.
Figure 4-1: BT.656 Video Formatter Timing and Block Diagram
into IOBs
DQ
r
Q
D
f
C
r
C
f
27MHz
BT.656 Data
BT.656 Data
BT.656 Clock
4-2 June 2011 TAU-0035-00-10, version 150
Page 47

Tau User’s Manual 4—Tau Digital Data Channel
4.2 XP Bus Setting—CMOS Digital Interface
The CMOS interface is a parallel output that allows the user to access 8-bit AGC corrected data
or 14-bit data. The signal levels are 0 - 3.3 V CMOS logic and are intended to drive boards
mounted directly to the Tau camera. CMOS is not intended to drive a cable. An XP-board
reference design is available upon request.
Table 4-2 shows the connector pin definitions with CMOS enabled.
Note
The optional discrete input pins should be unloaded when using the CMOS output.
Table 4-2:
Pin # Signal Name Pin # Signal Name
47, 49 MAIN_PWR_RTN 48, 50 MAIN_PWR
50-pin Hirose connector interface with CMOS output enabled
1 RS232_TX 2 RS232_RX
3CMOS_LINE_VALID 4CMOS_FRAME_VALID
5DGND 6 DGND
7 unused 8 unused
9 LVDS_CLK_P 10 LVDS_CLK_N
11 LVDS_SYNC_P 12 LVDS_SYNC_N
13 LVDS_DATA_P 14 LVDS_DATA_N
15 unused 16 unused
17 DGND 18 DGND
19 DISCRETE0 20 CMOS_DATA13
21 EXTERNAL_SYNC 22 CMOS_DATA12
23 CMOS_DATA11 24 CMOS_DATA 10
25 CMOS_DATA9 26 CMOS_DATA8
27 DGND 28 DGND
29 CMOS_DATA7 30 CMOS_DATA6
31 CMOS_DATA5 32 CMOS_DATA4
33 CMOS_DATA3 34 CMOS_DATA2
35 CMOS_DATA1 36 CMOS_DATA0
37 DGND 38 DGND
39 CMOS_CLK 40 unused
41 DGND 42 DGND
43 VID_OUT_H 44 VID_OUT_L
45 DGND 46 3V3
TAU-0035-00-10, version 150 June 2011 4-3
Page 48

4—Tau Digital Data Channel Tau User’s Manual
Note: Figure is not to scale. CLK duty cycle is 4/7.
Data may be latched on the rising or falling edge of CLK
95.062 nsec
(10.519 MHz)
t
s_R E
t
s_FE
t
= 6/ 7thclock
s_RE
t
= 3/ 7thclock
s_FE
CLK
LINE _ VALID
CMOS_DATA13 –
CMOS_DATA0
Figure 4-2: CMOS Line Timing (normal clock configuration)
Note: Figure is not to scale.
FRAME_VALID
LINE _ VALID
DATA13 – DATA0
1 clock
Pix 0
(13: 0)
Pix 1
(13: 0)
1 / (frame rate)
Lin e 1 Lin e 2 Line mLin e 0
Pix 2
(13: 0)
Pix n
(13: 0)
n = 7 9, 15 9, 319, or 6 39
(idle time)
(idle time)
var iable
4-4 June 2011 TAU-0035-00-10, version 150
Figure 4-3: CMOS Frame Timing
m = 59, 119, 239, or 479 (NTSC)
or 63, 127, 255, or 511 (PAL)
Page 49

Tau User’s Manual 4—Tau Digital Data Channel
4.3 Discrete I/O
By default the Tau camera does not have discrete input functions loaded. The eight discrete
input/output pins with functions are defined by the discrete control file which is available for
download and installation. These functions are not intended to be compatible with Tau cameras
using CMOS output. The signal levels are 0 - 3.3 V CMOS logic and are intended to drive
boards mounted directly to the Tau camera. The discrete control file is defined in Table 4-3.
Table 4-3: Discrete Control Functions
30-pin
50-pin
Connector
19 Pin 29/DIS 1 Discrete 0 White hot/Black hot
20 Pin 27/DIS 2 Discrete 1 Zoom 1×/2×
23 Discrete 2 Do FFC
24 Discrete 3 FCC imminent
25 Discrete 4 FFC mode
26 Discrete 5 Not defined
3 Discrete 6 Not defined
4 Discrete 7 Not defined
Connector/
Photon Replicator
Name
Tau N a m e Function Note
1
2
3
4
5
6
6
6
1. This function is a backward compatible function with Photon. The voltage level of this
pin controls the look-up-table (LUT) applied to the analog image. The pin has a pull-up
so that the open state is High (3.3 V). When this pin is High, the analog image will use
the White hot LUT. When this pin is Low, the analog image will use the Black hot LUT.
The camera will power up in the saved default state and switch to the discrete input
defined state when the pin state is changed.
2. This function is a backward compatible function with Photon. The voltage level of this
pin controls the zoom state applied to the analog image. The pin has a pull-up so that
the open state is High (3.3 V). When this pin is High, the analog image will use the
Zoom 1× state. When this pin is Low, the analog image will use the Zoom 2× state.
The camera will power up in the saved default state and switch to the discrete input
defined state when the pin state is changed.
3. This function is required for effective use of shutterless Tau cameras. A positive going
edge pulse to this pin will direct the camera to perform the Do FFC function (0x12).
4. This pin is normally at 0 V and changes to 3.3 V when the FCC imminent icon is present on the analog image. The FFC_Warn_time command (0x3C) controls both the analog icon and the state of this pin.
5. This pin is used to enable additional control of the camera. The default state is automatic FFC mode with this pin held at 3.3 V by an internal pull-up. When this pin is
pulled low, the camera will change to Manual FFC mode issuing the FFC_Mode_Select
command (0x11 0=manual, 1=Automatic). The camera will power up in the saved default state and switch to the discrete input defined state when the pin state is changed.
6. Not defined. Connection of either 3.3 V or 0 V to this pin will not have an effect on
camera operation.
TAU-0035-00-10, version 150 June 2011 4-5
Page 50

4—Tau Digital Data Channel Tau User’s Manual
4.4 Photon Camera Legacy LVDS Output
The Tau camera provides a digital data channel that outputs the camera’s data in a digital
format compatible with FLIR Photon camera tools and accessories. This channel can be used in
conjunction with commercially-available digital frame grabbers, digital displays, or custom
receive electronics. For Tau users with embedded or specialty applications that require custom
control software, a Software Developer’s Kit (SDK) is available to support your development
efforts. The SDK accessory is described in the Accessories portion of this User’s Manual.
Using the Digital Data Channel is an advanced regime that should only be attempted by qualified
customers.
The digital data channel can be configured to output 14-bit data after application of calibration
(Non Uniformity Correction or NUC) terms. This mode is most useful for external signalprocessing and/or analysis of the camera output. The digital channel can also be configured to
provide 8-bit data after application of video processing algorithms—Automatic AGC mode,
white-hot/black-hot polarity, image orientation (Invert, but not Revert), and DDE filtered. The 8-
bit data is essentially a digital version of the video stream provided on the analog video channel
and is therefore more appropriate than the 14-bit data for interfacing to a digital display.
The digital data channel employs serial low-voltage differential signaling (LVDS). The channel
consists of three signal lines—a clock, a composite sync (frame sync and data valid), and serial
data. This is a modern high speed interface employing a twisted pair current loop architecture.
National Semiconductor offers a good introduction and overview in the following document:
http://www.national.com/appinfo/lvds/files/lvds_ch1.pdf
.
Table 4-4: Discrete Control Functions
50-pin
Connector
19 Pin 29/DIS 1 Discrete 0 White hot/Black hot
20 Pin 27/DIS 2 Discrete 1 Zoom 1×/2×
23 Discrete 2 Do FFC
24 Discrete 3 FCC imminent
25 Discrete 4 FFC mode
26 Discrete 5 Not defined
3 Discrete 6 Not defined
4 Discrete 7 Not defined
30-pin Connector/Photon
Replicator Name
Tau N a m e Function Note
A serial-in-parallel-out (SIPO) module is available from FLIR for converting the serial data to 14bit parallel LVDS output (plus frame sync, line sync, and pixel clock). The parallel data can be
captured using a frame-grabber board installed in a PC.
One frame grabber possibility is the National Instruments IMAQ PCI-1422 board using digital
interface cable part number 308-0013-00. Another frame grabber option is the Bit Flow
RoadRunner Model 14-M board using digital interface cable part number 308-0016-00-03.
Both of these computer-based frame grabber boards require third-party software not offered
or supported by FLIR.
FLIR supplies camera setup files for both the IMAQ and Bit Flow frame grabber boards, but
FLIR does not formally support their use, nor do we claim or guarantee that these setup files
will be suitable for any particular use or application.
Refer to http://www.corebyindigo.com/service/softwareupdates.cfm
4-6 June 2011 TAU-0035-00-10, version 150
Page 51

Tau User’s Manual 4—Tau Digital Data Channel
4.4.1 Using the Legacy LVDS Digital Data Channel
Note
The following instructions assume that you have purchased the optional Tau Photon
Replicator Kit; and have the Photon Legacy serial-to-parallel-out (SIPO) accessory module with
parallel data cable and the appropriate Photon Accessory Kit (including the I/O Module and
cables shown below. If you are using custom cabling and/or interface electronics, contact
FLIR Customer Support at (805) 964-9797 if you need additional assistance.
Follow the steps in paragraph 3.1 “Operation of the Tau Camera using the USB Interface” on
page 3-1 for basic operation of the Tau camera. After verifying that the camera is operating
properly, disconnect power from the Tau camera.
Step 1 Connect the SIPO accessory module directly to the three-row DB-15 connector on the
Interface Module labeled DIGITAL DATA as shown below. A cable is NOT required.
I/O Module
To Photon
Replicator Board
T o frame grabber board
SIPO Module
Step 2 Connect the parallel data cable to the mating connector on the SIPO module. Connect
the other end to the frame-grabber board installed in your PC.
Note
The parallel data cable is specific to a particular frame grabber. Contact the manufacturer of
the frame grabber to make sure you have the correct cable.
Step 3 Follow instructions included with the frame grabber for selecting the camera
configuration file included with the SIPO module.
Step 4 Reapply power to the Interface Module. This will power-up both the Tau camera and
the SIPO module, and digital data will begin streaming.
Step 5 If desired, change the digital data mode using the FLIR Camera Controller GUI
software in the Digital Video tab.
TAU-0035-00-10, version 150 June 2011 4-7
Page 52

4—Tau Digital Data Channel Tau User’s Manual
4.5 Legacy LVDS Digital Data Channels
The camera provides two LVDS digital ports.
• Port 1 consists of the signals DATA_CLK+, DATA_SYNC+, and DATA1_OUT+.
•Port 2 (DATA2_OUT+ and DATA2_OUT-) is currently undefined—do not connect to
these signals.
Note
14-bit and 8-bit timing and format are identical except only 8 bits (LSBs) are available in 8-bit
mode.
DATA2_OUT+ and DATA2_OUT- are currently undefined—do not connect to these signals
All signals in the digital data interface employ low-voltage differential signaling (LVDS).
The clock rate of DATA_CLK+
is 73.636 MHz.
The timing of the digital data interface is shown in Figure 4-4 and Figure 4-6.
The format of the digital output shall be is in Figure 4-5.
F = frame sync; logic high on the first four words starting the frame, logic low otherwise
L = line sync; logic high during valid pixel data, logic low otherwise
Figure 4-4: Digital Data Timing
4-8 June 2011 TAU-0035-00-10, version 150
Page 53

Tau User’s Manual 4—Tau Digital Data Channel
Figure 4-5: Digital Data Format
Figure 4-6: Legacy LVDS Detailed Digital Data Timing
TAU-0035-00-10, version 150 June 2011 4-9
Page 54

4—Tau Digital Data Channel Tau User’s Manual
4-10 June 2011 TAU-0035-00-10, version 150
Page 55

5 Overview of the Electrical Interface
5.1 Input Power
The Tau camera operates from DC power per the specifications given below. It is common in
simple operational scenarios to use an inexpensive wall-powered adapter. The Tau VPC
accessory makes this easy by providing a USB connection.
The camera operating in a steady-state condition consumes around 1W of power. During start
up or when the shutter is operating for the camera’s periodic calibration, peak power levels of
5W (sustained for less than one second) are typical. Typically, start-up times are between three
and four seconds.
Caution!
Reversing the polarity of the input power will damage the camera’s internal power supply.
This damage will not be covered under the camera warranty.
Table 5-1: Input Power Requirements
Parameter
Minimum voltage 4.0 V
Maximum voltage 6.0 V
Nominal Load Power ≤ 1.0 W
Baseline
Value
Comment
Absolute minimum is 4 V
Absolute maximum is 6 V
Typical at room temperature.
The Tau core is tested per EN55022 Class B for radiated emission with and without the rear
cover. The emissions are below the Class B limit with the back cover off; and below the Class A
limit with the back cover on. It is the responsibility of the systems integrator to verify EMI/EMC
compliance at the system level.
5.2 Hirose 50-Pin Connector
In the Tau camera’s simplest form (no accessories attached), one connector provides the
electrical interface. This connector is a 50-pin Hirose board-to-board style connector, per
Hirose Part Number: DF12-50DS-0.5V(86). Hirose offers a variety of mating connectors
including their SFM(L), SMT, and SFSD style products. The primary Tau connector at the rear of
the camera is identified in the figure below:
Hirose connector
See Figure 5-2.
Figure 5-1: 50-Pin Hirose Connector Interface (DF12-50DS-0.5V(86))
TAU-0035-00-10, version 150 June 2011 5-1
Page 56

5—Overview of the Electrical Interface Tau User’s Manual
Table 5-2 below identifies the function of each pin on the standard surface mount mating
connector, Hirose DF12-50DS-0.5V(86).
Table 5-2: 50-pin Hirose Connector Interface of the Tau Camera
Pin # Signal Name Signal Definition Pin # Signal Name Signal Definition
1 RS232_TX
3SPARE0
5, 17,
27, 37,
DGND
41, 45
7LVDS_RX0_P
9LVDS_TX0_P
11 LVDS_TX1_P
13 LVDS_TX2_P
15 LVDS_TX3_P
19 XP15
21 XP13
23 XP11
25 XP9
29 XP7
31 XP5
33 XP3
35 XP1
39 XP_CLK_OUT
43 VID_OUT_H
47,49 MAIN_PWR_RTN
Primary serial communication
transmit, data output 57600
baud
Not Used
Ground
Not Used
Digital Port1, clock, positive
output
Digital Port1, Sync, Positive
output
Digital Port1, Output data 1,
Positive output
Not Used
Not Used
Not Used
Not Used
Not Used
Not Used
Not Used
Not Used
Not Used
Not Used
Analog Video +
Input voltage ground
2 RS232_RX
4SPARE1
6, 18,
28, 38, 42DGND
8LVDS_RX0_N
10 LVDS_TX0_N
12 LVDS_TX1_N
14 LVDS_TX2_N
16 LVDS_TX3_N
20 XP14
22 XP12
24 XP10
26 XP8
30 XP6
32 XP4
34 XP2
36 XP0
40 XP_CLK_IN
44 VID_OUT_L
46 3V3
48, 50 MAIN_PWR
Primary serial communication
receive, data input 57600 baud
Not Used
Ground
Not Used
Digital Port1, clock, negative
output
Digital Port1, Sync Negative
Output
Digital Port1, Output data 1,
Negative output
Not Used
Not Used
Not Used
Not Used
Not Used
Not Used
Not Used
Not Used
Not Used
Not Used
Analog Video -
3.3V output
Input Voltage
Pin 1
Pin 2
Figure 5-2: Mechanical Definition for 50-pin Interface Board
5-2 June 2011 TAU-0035-00-10, version 150
Pin 49
Pin 50
Page 57

Tau User’s Manual 5—Overview of the Electrical Interface
5.3 Analog Video Output
The Tau camera can be configured to provide either NTSC or PAL analog video output. These
analog output standards allow direct video connection to common video display or recording
devices such as TV monitors and VCRs. Typically, an analog monitor input signal is provided
over a coaxial cable and uses either an RCA (consumer based electronics) or BNC (generally
associated with professional or scientific equipment) style connector.
Note
The analog video output is compliant with NTSC or PAL standards when terminated with a 75
Ohm resistor. The video output driver is a current mode device which does not produce a
voltage output without proper termination. Some video filters with capacitive coupling are not
suitable for use unless an additional termination resistor is added before the filter.
When the VIDEO_LO signal is tied to ground, the analog video signal meets the timing and
voltage requirements of either NTSC or PAL protocol. (The FLIR Camera Controller GUI
software allows you to select between NTSC or PAL video output formats. The NTSC analog
video format is the default in all cameras.)
If you are creating a custom cable to carry the analog video signal from the Tau camera to your
monitoring or recording device, you should use 75 Ohm characteristic impedance coaxial cable
and terminate into a 75 Ohm monitor. These specifications represent standard video cabling
and I/O and will likely be the default for any generic video receiving hardware you purchase. Per
the pin function table, you will use the VIDEO_LO and VIDEO_HI pins for the analog video output
signal. Specific video characteristics are given in the table below.
Table 5-3: Video parameters
Parameter NTSC PAL
Monochrome equivalent RS-170A CCIR
Frame rate 29.97 Hz 25 Hz
Update rate 30 Hz/7.5 Hz 25 Hz/8.3 Hz
Active video lines 480 510
# displayed detector samples
320 (H)
× 240 (V) 320 (H) × 256 (V)
Note
Analog output is always NTSC/PAL compatible. Changes for reduced frame rate and reduced
size array do not effect analog video format.
5.4 Command and Control Channel
Remote control of the Tau camera is provided via a RS-232 serial interface consisting of signals
named RX, TX and GND using 3.3 volt signal levels. Chapter 3 provides information regarding
remote control using the FLIR Camera Controller GUI. Appendix B describes the serial
communications protocol in detail for the Tau camera.
5.5 LVDS Digital Data Channel
Tau provides a digital channel with real-time serialized digital video. The camera outputs either
8-bit or 14-bit data using the SD_CLK±, SD_FSYNC± and SD_DATA± signals. Conversion of the
digital data to a parallel format for data acquisition requires a serial-to-parallel converter
accessory. Information regarding the digital data interface is provided in Chapter 4.
TAU-0035-00-10, version 150 June 2011 5-3
Page 58

5—Overview of the Electrical Interface Tau User’s Manual
5.6 Parallel Digital Data Channel
The Tau camera provides a digital parallel channel with real-time parallel digital video. The XPBus may be configured for either CMOS or BT.656 format. Information regarding the digital
data interface is provided in Chapter 4.
5-4 June 2011 TAU-0035-00-10, version 150
Page 59

Appendix A Pin-out Definitions
A.1 I/O Module 333-0018-00
• Camera Connector: See Chapter 5.
• Power Connector
•Video Connector
• Serial Connector
• Digital Data Connector
: Mates to Switchcraft S760 Miniature Power Plug.
: Mates to 75Ω BNC twist-on plug.
: Mates to DB9 Male.
: Mates to Three-Row DB-15 Female.
Table A-1: I/O Module Power Connector Pin-Out
Pin # Signal Name Signal Definition
Pin PWR
Sleeve PWR_RTN
input power
input power return
Table A-2: I/O Module Video Connector Pin-Out
Pin # Signal Name Signal Definition
Pin VIDEO
Sleeve VIDEO_RTN
analog video output
analog video return
Table A-3: I/O Module Serial Connector Pin-Out
Pin # Signal Name Signal Definition
2 RX_232
3 TX_232
5DGND
1,4, 6-9 NC
RS232 Receive channel
RS232 Transmit channel
Digital Ground
Spare (do not connect)
TAU-0035-00-10, version 150 June 2011 A-1
Page 60

Appendix A—Pin-out Definitions Tau User’s Manual
Table A-4: I/O Module Digital Data Connector Pin-Out
Pin # Signal Name Signal Definition
1DATA_SYNC+
2DATA1_OUT+
3DATA2_OUT+
4DATA_CLK+
6DATA_SYNC-
7DATA1_OUT-
8DATA2_OUT-
9DATA_CLK-
10 DGND
11 PWR
12 PWR_RTN
13 NC
5,14,15 NC
Digital data sync (LVDS high)
Digital data 1 output channel (LVDS high)
Digital data 2 output channel (LVDS high)
Digital output channel clock (LVDS high)
Digital data sync (LVDS low)
Digital data 1 output channel (LVDS low)
Digital data 2 output channel (LVDS low)
Digital output channel clock (LVDS low)
Digital ground
input power (connected to power connector pin)
input power return (connected to power connector sleeve)
Spare (do not connect)
Spare (do not connect)
A-2 June 2011 TAU-0035-00-10, version 150
Page 61

Appendix B Serial Communication Technical Details
B.1 Serial Communications Primary Interface
The camera is capable of being controlled remotely through an asynchronous serial interface
consisting of the signals named RX, TX, and GND using 3.3 volt signal levels.
Note
The camera is compatible with most RS232 drivers/receivers but does not implement
signaling levels compliant with the RS232 standard voltage levels.
B.2 Serial Communications Protocol
• The required serial port settings are shown in Table B-1.
• The camera does not generate an outgoing message except in reply to an incoming
message.
• The camera generates an outgoing reply to each incoming message.
• All messages, both incoming and outgoing, adhere to the packet protocol defined in
Table B-2 and the subparagraphs that follow. The first byte i.e., the Process byte is
transmitted first followed by the rest of the bytes in the order specified.
• All multi-byte arguments defined herein uses big-endian ordering (MSB first).
• The serial inter-byte timeout is factory set to 100ms
• Only use the function commands listed in Table B-4. Unsupported commands may
corrupt the camera's software.
• For reference only, a sample command and response is shown in Table B-5.
Table B-1: Serial Port Settings
Parameter Value
Baud rate: 57600
Data bits: 8
Parity: None
Stop bits: 1
Flow control: None
TAU-0035-00-10, version 150 June 2011 B-1
Page 62

Appendix B—Serial Communication Technical Details Tau User’s Manual
Table B-2: Serial Packet Protocol
Byte # Upper Byte Comments
1Process Code
2Status
Set to 0x6E on all valid incoming messages
Set to 0x6E on all outgoing replies
See Table B-3
3Reserved
4Function
See Table B-4
5 Byte Count (MSB)
6 Byte Count (LSB)
7CRC1 (MSB)
8CRC1 (LSB)
(Data)
See argument data bytes in Table B-4
…(Data)
N(Data)
N+1 CRC2 (MSB)
N+2 CRC2 (LSB)
B.3 Status Byte
For all reply messages, the camera sets the Status Byte as shown in Table B-3 to indicate the
receipt of the previous incoming message.
Table B-3: Status Byte Definition
Status Byte
Value (hex)
0x00 CAM_OK
0x01 CAM _BUSY
0x02 CAM _NOT_READY
0x03 CAM _RANGE_ERROR
0x04 CAM _CHECKSUM_ERROR
0x05 CAM _UNDEFINED_PROCESS_ERROR
0x06 CAM _UNDEFINED_FUNCTION_ERROR
0x07 CAM _TIMEOUT_ERROR
0x09 CAM _BYTE_COUNT_ERROR
0x0A CAM _FEATURE_NOT_ENABLED
Definition Description
Function executed
Camera busy processing serial command
Camera not ready to execute specified serial
command
Data out of range
Header or message-body checksum error
Unknown process code
Unknown function code
Timeout executing serial command
Byte count incorrect for the function code
Function code not enabled in the current
configuration.
B-2 June 2011 TAU-0035-00-10, version 150
Page 63

Tau User’s Manual Appendix B—Serial Communication Technical Details
B.4 Function Byte
The list of valid commands that can be set in the Function Byte is shown in Table B-4.
For all reply messages, the camera will echo back the Function Byte of the previous
incoming message.
For all commands in which the byte count is listed in Table B-4 as either 0 or some
non-zero value, the camera will change the value of the specified parameter according
to the incoming data bytes if there are any (i.e., the camera shall set the parameter)
or it will reply with the current value of the parameter if the incoming message
contains no data bytes (i.e., the camera shall get the parameter).
TAU-0035-00-10, version 150 June 2011 B-3
Page 64

Appendix B—Serial Communication Technical Details Tau User’s Manual
Notes
Argument
(i.e, Data Bytes) (hex)
None
Cmd:0
Resp:0
None
Cmd:0
Resp:0
Cmd:0
None
Resp:0
None
Cmd:0
Resp:0
Get Cmd: 0 None
Bytes 0-1: High word camera S/N
Bytes 2-3: Low word camera S/N
Bytes 4-5: High word sensor S/N
Bytes 6-7: Low word sensor S/N
resp: 8
Bytes 0-1: S/W major version
Bytes 2-3: S/W minor version
Bytes 4-5: F/W major version
Bytes 6-7: F/W minor version
cmd: 0 None
Resp: 8
Get Cmd: 0 None
0x0000 = Automatic
0x0001 = Low Gain Only
0x0002 = High Gain Only
0x0003 = Manual (no switching)
Note: All Tau-P cameras have firefighting
features. Automatic mode is necessary
for firefighting.
Set Cmd:2&Resp: 2
Get Cmd: 0 None
0x0000 = Manual
0x0001 = Automatic
0x0002 = External
Set Cmd:2
&
Resp: 2
Table B-4: RS232 Function Codes
No Operation.
Sets all current settings as power-on defaults
Commands a soft camera reset to the default modes
Resets camera with factory header values
Note: It is necessary to send SET_DEFAULTS afterwards to store
Command Description Byte Count
Function
Code (hex)
0x00 NO-OP
the settings as power-on defaults.
0x01 SET_DEFAULTS
0x02 CAMERA_RESET
0x03 RESET_FACTORY_ DEFAULTS
Gets the serial number of the camera and sensor
0x04 SERIAL_NUMBER
Gets the firmware / software version
0x05 GET_REVISION
Gets and sets the dynamic-range-control mode
0x0A GAIN_MODE
Gets and sets the Flat Field Correction (FFC) Mode
0x0B FFC_MODE _SELECT
B-4 June 2011 TAU-0035-00-10, version 150
Page 65

Tau User’s Manual Appendix B—Serial Communication Technical Details
Notes
Argument
(i.e, Data Bytes) (hex)
None
Bytes 0-1:
0x0000 = short FFC
Cmd:0
Resp:0
0x0001 = long FFC
Cmd: 2&Resp: 2
Get Cmd: 0 None
FFC interval for current gain state.
Set Cmd: 2&Resp: 2
Bytes 0-1: FFC interval, high gain
Bytes 2-3: FFC interval, low gain
Set Cmd: 4&Resp: 4
Get Cmd: 0 None
Temp delta (in steps of 0.1C) for current
gain state
Set Cmd:2
&
Resp: 2
Bytes 0-1: Temp delta, high gain
Bytes 2-3: Temp delta, low gain
Set Cmd:4&Resp: 4
Get Cmd:0 None
0x0000 = Real time
0x0001 = Freeze frame
0x0004= 2X zoom
Set Cmd: 2& Resp: 2
0x0008 = 4X zoom (Tau 320 only)
Get Cmd: 0 None
0x0000 = White hot
0x0001 = Black hot
0x0002 = Fusion
0x0003 = Rainbow
0x0004 = Globow
0x0005 = Ironbow1
0x0006 = Ironbow2
0x0007 = Sepia
0x0008 = Color1
0x0009 = Color2
0x000A = Ice and fire
0x000B = Rain
0x000C= OEM custom #1
Set Cmd: 2& Resp: 2
Table B-4: RS232 Function Codes
A “short” or “long” FFC can be optionally specified. (The core will
only switch NUC tables when in manual FFC mode if a long FFC
command is specified.) If sent with no argument, a shor t FFC is
executed.
Note: Clarification is necessary because shutterless cameras will
Command Description Byte Count
Function
Code (hex)
likely be in Manual mode.
0x0C DO_FFC
Gets and sets the interval (in frames) between automatic FFC
0x0D FFC_PERIOD
Gets and sets the temperature difference used to trigger
0x0E FFC_TEMP_ DELTA
automatic FFC.
Gets and sets the video signal mode. Setting Freeze frame
freezes the image. Setting Zoom zooms the image by 2x.
0x0F VIDEO_MODE
Gets and sets the analog video LUT or intensity transform.
0x10 VIDEO_LUT
TAU-0035-00-10, version 150 June 2011 B-5
Page 66

Appendix B—Serial Communication Technical Details Tau User’s Manual
Notes
Argument
(i.e, Data Bytes) (hex)
0x0000 = Normal
0x0001 = Invert
0x0002 = Revert
0x0003 = Invert + Revert
Byte 1: 0x00
Byte 0: LVDS channel setting:
0x00 = 14-bit data
0x01 = 8-bit data
0x02 = digital off
0x03 = 14-bit unfiltered
0x04 = 8-bit inverted
0x05 = 14-bit inverted
Get Cmd: 0 None
Set Cmd: 2& Resp: 2
Get Cmd: 0 None
0x06 = 14- bit inverted unfiltered
Set Cmd: 2& Resp: 2
Bytes 0-1: XP Mode
0x0000 = Generic Bus/No Digital
0x0001 = BT656
0x0002 = CMOS w/1 Discrete
Byte 1: 0x03
Byte 0:
0x00 = Generic Bus/No Digital
0x01 = BT656
0x02 = CMOS w/1 Discrete
0x0000 = plateau histogram
0x0001 = once bright
0x0002 = auto bright
0x0003 = manual
0x0004 = not defined (returns error)
0x0005 = linear
Get Cmd: 2 Bytes 0-1: 0x0200
Resp: 2
Get Cmd: 0 None
Set Cmd: 2& Resp: 2
Get Cmd: 0 None
Contrast value
(0x0000 to 0x00FF)
Set Cmd: 2& Resp: 2
Table B-4: RS232 Function Codes
Gets and sets the analog video orientation. Invert is valid only for
Command Description Byte Count
Function
Code (hex)
block 2. Digital data is unaffected by the revert setting.
0x11 VIDEO_ ORIENTATION
Gets and sets the digital output channel mode.
XP signals (CMOS or BT.656) and LVDS channel are available
simultaneously.
Get the XP bus mode
0x12 DIGITAL_ OUTPUT_MODE
Set the XP bus mode Set Cmd: 2
Gets and sets the image optimization mode
0x13 AGC_TYPE
Gets and sets the manual contrast value
0x14 CONTRAST
B-6 June 2011 TAU-0035-00-10, version 150
Page 67

Tau User’s Manual Appendix B—Serial Communication Technical Details
Notes
Argument
(i.e, Data Bytes) (hex)
Brightness value
Get Cmd: 0 None
(0x0000 to 0x3FFF)
Set Cmd: 2& Resp: 2
Get Cmd: 0 None
Brightness bias value (2’s complement:
0x0000 to 0x0FFF)
Set Cmd: 2& Resp: 2
0x0000 = disabled (off)
0x0001 = on, Fahrenheit scale
Set Cmd: 2& Resp: 2
0x0002 = on, Centigrade scale
0x0000 = disabled (off)
0x0001 = on, Fahrenheit scale
0x0002 = on, Centigrade scale
0x0000 = temp in C*10
Get Cmd: 0 None
Set Cmd: 2& Resp: 2
0x0001 = temp in raw counts
Set Cmd: 2& Resp: 2
Get Cmd: 0 None
Ext sync mode
0x0000 = disabled
Set Cmd: 2& Resp: 2
0x0001 = slave
0x0002 = master
Get Cmd: 0 None
0x0000 = Disabled
0x0001 = Enabled
Set Cmd: 2& Resp: 2
Get Cmd: 0 None
Bytes 0 -1: lower threshold
Bytes 2 -3: upper threshold
Set Cmd: 4& Resp: 4
Table B-4: RS232 Function Codes
Command Description Byte Count
Function
Code (hex)
Gets and sets the manual brightness value
0x15 BRIGHTNESS
Gets and sets the brightness bias value in the auto bright mode
Valid range is +2048 to -2048 decimal
0x18 BRIGHTNESS_BIAS
MSB is the sign bit
Gets or sets the spot-meter mode.
0x1F SPOT_METER_ MODE
Gets the FPA temp. in Celsius x 10 or raw counts
(e.g. value of 512 decimal represents 51.2C)
0x20 READ_SENSOR
Sign bit is the MSB.
Enables or disables the external sync feature
0x21 EXTERNAL_SYNC
Gets or sets the isotherm mode (on/off). If isotherm option is not
enabled (see CAMERA_OPTIONS), command returns an error.
0x22 ISOTHERM
Gets or sets the isotherm thresholds in percent of full-scale-range
(e.g. 97 decimal = 97% FSR) or in deg C. Bit 15 of the lower
0x23 ISOTHERM_ THRESHOLDS
threshold is used to specify units (1 = deg C, 0 = %).
TAU-0035-00-10, version 150 June 2011 B-7
Page 68

Appendix B—Serial Communication Technical Details Tau User’s Manual
Notes
Argument
(i.e, Data Bytes) (hex)
0x0000 = test pattern off
0x0001 = ascending ramp
0x0003=big vertical
0x0004 = horizontal shade
0x0006 = color bars
Get Cmd: 0 None
Set Cmd: 2& Resp: 2
0x0008 = ramp with steps
Get Cmd: 0 None
Resp: 2 Spot temperature value
Get Cmd: 0 None
0x0000 = display off
0x0001 = numeric only
Set Cmd: 2& Resp: 2
0x0002 = thermometer only
0x0003 = numeric & thermometer
Get Cmd: 0 None
Bytes 0 to 1: Time in frames (Data
Range is 0 to 600 frames)
Set Cmd: 2&Resp: 2
Get Cmd: 0 None
Bytes 0 to 1: ITT filter value
0 = immediate
Set Cmd: 2&Resp: 2
1-255 = Numerator (Denominator =
256)
Get Cmd: 0 None
Data Range is 0 to 1000
Set Cmd: 2&Resp: 2
Get Cmd: 0 None
Spot temperature value (in deg C) or
average pixel value (in counts)
Resp: 2
Table B-4: RS232 Function Codes
Gets and sets the test pattern mode. Before turning on the test
pattern, turn off the correction terms and set the flat field and
Command Description Byte Count
Function
Code (hex)
the gain mode to manual.
0x25 TEST_ PATTERN
Returns the value of the spot meter in degrees Celsius
(regardless of spot meter mode). If the spot meter option is not
enabled (see CAMERA_OPTIONS), returns an error.
0x2A GET_SPOT_METER
Gets or sets the spot meter display mode. If the spot meter
option is not enabled (see CAMERA_OPTIONS), returns an error.
0x2B SPOT_DISPLAY
Time to display th e F FC immin en t i con in nu mb er of frame s b efore
the flat field happens
0x3C FFC_WARN_TIME
Gets and sets the AGC ITT filter value
0x3E AGC_FILTER
Specifies the Plateau level for Plateau AGC
0x3F PLATEAU_LEVEL
Returns the value of the spot meter in degrees Celsius
(regardless of spot meter mode). If the spot meter option is not
enabled (see CAMERA_OPTIONS), returns the average value of
the center four pixels.
0x43 GET_SPOT_METER_DATA
B-8 June 2011 TAU-0035-00-10, version 150
Page 69

Tau User’s Manual Appendix B—Serial Communication Technical Details
Notes
Argument
(i.e, Data Bytes) (hex)
Bytes 0-1: Left
Bytes 2-3: Top
Bytes 4-5: Right
Bytes 6-7: Bottom
Bytes 0-1: Left, normal ROI
Bytes 2-3: Top, normal ROI
Bytes 4-5: Right, normal ROI
Bytes 6-7: Bottom, normal ROI
Bytes 8-9: Left, 2X ROI
Bytes 10-11: Top, 2X ROI
Bytes 12-13: Right, 2X ROI
Bytes 14-15: Bottom, 2X ROI
Bytes 16-17: Left, 4X ROI
Bytes 18-19: Top, 4X ROI
Bytes 20-21: Right, 4X ROI
Bytes 22-23: Bottom, 4X ROI
Resp: 8
Get Cmd: 2 Don’t care
Set Cmd: 24&Resp: 24
Get Cmd: 0 None
Data Range is 0 to 255
Set Cmd: 2&Resp: 2
String(32)
Get cmd: 0 None
Response:
32
Get Cmd: 0 None
Data Range 0 to 2048
Set Cmd: 2&Resp: 2
Get Cmd: 0 None
Bytes 0-1: Tilt position in rows relative to
the center of the array (-68 to +68)
Bytes 2-3: Pan position in columns
Set Cmd: 4&Resp: 4
relative to the center of the array(-82 to
+82)
Get Cmd: 0 None
0x0000 = NTSC
0x0001 = PAL
Set Cmd: 2&Resp: 2
Table B-4: RS232 Function Codes
Gets or sets the Region of Interest (ROI) for AGC in normal and
zoom modes. Assumes signed coordinates relative to center
value of (0,0).
When the byte count of the incoming message is 0, the 8-byte
argument of the reply is the ROI for the current zoom state
(unzoomed, 2X zoom, or 4X zoom).
When byte count of the incoming message is 2 (GET) or 24 (set),
the 24-byte argument of the reply contains the normal ROI, 2X
Command Description Byte Count
Function
Code (hex)
zoom ROI, and 4X zoom ROI
0x4C AGC_ROI
Gets and sets the ITT midpoint offset
0x55 ITT_MIDPOINT
Gets the camera part number
Response contains the part number. If the host system is little
endian the bytes need to be reversed as the camera is big endian
0x66 CAMERA_PART
Gets and sets the max value of video gain
0x6A MAX_AGC_GAIN
Gets and sets the pan position (x axis) and the tilt position (y axis)
when the camera is in zoomed mode
0x70 PAN_AND_TILT
Gets or sets the video standard (affects frame rate).
0x72 VIDEO_STANDARD
TAU-0035-00-10, version 150 June 2011 B-9
Page 70

Appendix B—Serial Communication Technical Details Tau User’s Manual
Notes
Argument
(i.e, Data Bytes) (hex)
Shutter position
0x0000 = open
Get Cmd: 0 None
0x0001 = close
Set Cmd: 2& Resp: 2
Get Cmd: 0 None
Gain value (0x0000 to 0x00FF)
Set Cmd: 2&Resp: 2
Get Cmd: 0 None
Threshold value
(0x0000 to 0x00FF)
Set Cmd: 2&Resp: 2
Get Cmd: 0 None
Byte 0 = Threshold
(0x0000 to 0x000F)
Set Cmd: 2&Resp: 2
Byte 1 = Mode
0x0000 = manual
0x0001 = auto
Get Cmd: 0 None
Bytes 0-1: hiToLoThreshold
Bytes 2-3: hiToLoPopulation
Set Cmd: 8&Resp: 8
Bytes 4-5: loToHiThreshold
Bytes 6-7: loToHiPopulation
Table B-4: RS232 Function Codes
Command Description Byte Count
Function
Code (hex)
Opens or closes the shutter
0x79 SHUTTER_POSITION
Sets the gain of the DDE filter (input only in manual mode. In
automatic mode this is set internally)
0x2C DDE_GAIN
Sets the threshold of the DDE filter (input only in manual mode. In
automatic mode this is set internally)
0xE2 DDE_THRESHOLD
Gets or sets the spatial threshold of the DDE filter and the DDE
mode (auto or manual)
0xE3 SPATIAL_THRESHOLD
Gets or sets the population (as a percentage) and temperature
(in deg C) thresholds for high/low gain switching
0xDB GAIN_SWITCH_PARAMS
B-10 June 2011 TAU-0035-00-10, version 150
Page 71

Tau User’s Manual Appendix B—Serial Communication Technical Details
B.4.1 Byte Count Bytes
• On all incoming and outgoing messages, the Byte-Count Bytes are used to specify
the total number of data bytes in the packet.
Note
The number of data bytes in the packet is not equal to the total number of bytes in the
packet. For example, a No-Op serial command contains zero data bytes.)
• The Byte Count must be an even number from 0 to 0x1F4 (500 decimal).
B.4.2 CRC Bytes
• On all incoming and outgoing messages, two cyclical redundancy checks (CRCs) are
calculated using CCITT-16 initialized to 0.
• CRC1 is calculated using only the first 6 bytes of the packet.
• CRC2 is calculated using all previous bytes in the packet (i.e. bytes 0 through N).
B.5 Example of the format of a serial message
Table B-5 describes the bytes that are transferred when the FFC_MODE_SELECT (0x0B)
command is issued to the camera to set the mode to Auto (0x01) and to get the FFC mode:
Table B-5: Sample FFC_MODE_SELECT (0x0B) Command
Set Message sent to camera:
Process
Code
0x6E 0x00 0x00 0x0B 0x00 0x02 0x0F 0x08 0x00 0x01 0x10 0x21
Response from camera to set message:
Process
Code
0x6E 0x00 0x00 0x0B 0x00 0x02 0x0F 0x08 0x00 0x01 0x10 0x21
Get Message sent to camera:
Process
Code
0x6E 0x00 0x00 0x0B 0x00 0x00 0x2F 0x4A 0x00 0x00
Response from camera to get message:
Process
Code
Status Reserved Function Byte Count CRC Data CRC
Status Reserved Function Byte Count CRC Data CRC
Status Reserved Function Byte Count CRC Data CRC
Status Reserved Function Byte Count CRC Data CRC
0x6E 0x00 0x00 0x0B 0x00 0x02 0x0F 0x08 0x00 0x01 0x10 0x21
TAU-0035-00-10, version 150 June 2011 B-11
Page 72

Appendix B—Serial Communication Technical Details Tau User’s Manual
B.6 Description of Serial Commands
B.6.1 Camera Defaults
The RESET_F ACTORY_DEFAULTS command sets the current settings to the factory default
values. In order to save these values as power up defaults, it is necessary to do a
SET_DEFAULTS command.
B.6.2 AGC algorithms
Use the AGC_TYPE command to select one of the following AGC algorithms:
• Automatic
•Once Bright
• Auto Bright
• Manual
•Linear
B.6.3 Pan and Tilt
The PAN_AND_TILT command controls this feature in the camera when the image is zoomed. It
does not have any effect when the image is not zoomed. The center of the screen is considered
as coordinate (0,0).
A positive number is needed to pan right and negative number to pan left. A pan value of 1
pans to the right by one column and a pan value of -1 pans to the left by one column from the
center of the image.
A positive number is needed to tilt downwards and a negative number to tilt upwards. A tilt
value of 1 tilts downwards by one row and a tilt value of -1 tilts upwards by one row from the
center of the image.
When the image is being panned or tilted the ROI moves along with these coordinates. The
limits for the zoom ROI have been set to one and a half times the number of rows and columns
in the video. This is to enable a user to pan and tilt the zoomed portion of the image without any
change in the AGC if the image being looked at does not change. This also means that the AGC
of the image is also determined by portions of the image that is not being currently viewed.
B.6.4 DDE filter
The commands to control the DDE filter settings are DDE_GAIN to control the gain,
DDE_THRESHOLD to control the DDE filter threshold, and SPATIAL_THRESHOLD to control the
spatial threshold of the DDE filter. The image remains unchanged when the value of the DDE
gain is 0 and 17. The image becomes unfocused/unsharpened when the value is between 1
and 15. The image becomes more sharpened when the value is above 17. Increasing the DDE
threshold will make the edges sharper. For threshold values between 0 and about 50 the effect
on the image is lesser and has a greater effect above approximately 50. Increasing the spatial
threshold value will make the image look smoother.
B-12 June 2011 TAU-0035-00-10, version 150
Page 73

Tau User’s Manual Appendix B—Serial Communication Technical Details
The DDE filter has an automatic mode that when activated controls the DDE Gain using a
combination of the Dynamic DDE setting and the scene dynamic range. The valid range of the
Dynamic DDE setting is from 1 to 63. Dynamic DDE settings between 1 and 16, provide image
smoothing, with a setting of 1 providing the most smoothing. A Dynamic DDE setting of 17
turns off the Dynamic DDE. A Dynamic DDE setting between 18 and 39 sets the imaging mode
DDE Gain between 16 and 40. A Dynamic DDE setting of 40 or greater provides maximum
enhancement but image artifacts may also be enhanced giving an image with some fixed
pattern noise.
B.6.5 Spare Serial Communications Channel
The camera provides a spare serial communications port consisting of the signals: RX2, TX2,
and GND.
Note
This serial communications channel is intended for communication with RS-232 controllable
systems.
B.6.6 Digital data
The DIGITAL_OUTPUT_MODE command allows the users to select one of the following digital
data options
• 14-bit data
•8-bit data
• digital off
• 14-bit unfiltered
• 8-bit inverted
• 14-bit inverted
• 14- bit inverted unfiltered
• XP-channel setting
TAU-0035-00-10, version 150 June 2011 B-13
Page 74

Appendix B—Serial Communication Technical Details Tau User’s Manual
B-14 June 2011 TAU-0035-00-10, version 150
Page 75

Appendix C Tau with Photon Accessories
C.1 Operation of the Tau camera using the Photon Accessory Kit
Backward compatibility with existing Photon equipment allows Photon users to connect to the
Tau camera to provide power and obtain video. It also facilitates serial communication for more
advanced camera command and control via the free downloadable FLIR Camera Controller GUI.
In this first section, we will discuss simply applying power and obtaining video.
Using the Accessory Kit’s Interface Cable and I/O Module, plug one end of the Interface Cable
into the mating connector of the Photon Replicator Board on the back of the camera. Connect
the other end of the Interface Cable to the mating connector on the I/O Module labeled
CAMERA.
I/O Module
To video monitor
To Photon
Replicator Board
To power supply
(206-0001-20)
Attach one end of a standard BNC cable to the video port labeled VIDEO on the I/O Module.
Attach the other end to a compatible video monitor’s composite video input. If your monitor has
an RCA input connector, a BNC to RCA adapter can be used.
Plug the power supply into an electrical outlet. Insert the circular plug at the other end of the
power supply into the power jack labeled POWER on the I/O Module and tighten the locking
screw finger tight. The camera will take ~3 seconds to produce an image after you apply power.
You should see an initial splash screen with the FLIR logo displayed, and then live long-wave
infrared video will follow! Point the camera in different directions and notice the imagery. If the
video image appears low in contrast, point the camera at a target with high thermal contrast
such as at a person.
TAU-0035-00-10, version 150 June 2011 C-1
Page 76

Appendix C—Tau with Photon Accessories Tau User’s Manual
C.2 Remote control of the Tau camera
The Tau camera accommodates advanced camera control through an RS-232 serial interface.
A user can control the camera through this interface using their own software and hardware by
following the Serial Communication Protocol and command structure defined in Appendix B.
This requires programming skills and a strong technical background. The user can also use the
FLIR Camera Controller GUI offered as a free download from FLIR using a Windows based PC
with the standard serial communications and components provided in the Development Kit.
This software provides remote control of various camera features and modes. The FLIR
Camera Controller GUI software is compatible with Windows XP and Windows 7. The PC must
have a spare serial communications port or you must use the Tau VPC module accessory. Highspeed communication (921600 Baud) is possible using the VPC module accessory.
Note
A USB to Serial port adapter is acceptable, but the data communication rate must be set to
57600 BAUD.
If your embedded or specialty applications require custom control software, a Software
Developer’s Kit (SDK) is available.
C.3 Connecting the serial communications interface using the
development kit
You should have successfully operated the camera and obtained live video on a monitor as
described in paragraph C.1 “Operation of the Tau camera using the Photon Accessory Kit” on
page C-1.
The only additional hardware required for serial communication is a serial cable connected as
shown below.
To PC serial COM port
(RS232)
To Photon
Replicator Board
Attach one end of a standard RS-232 serial port (9-pin) PC cable to the communications port
labeled RS-232 on the I/O Module. Attach the other end to the serial port on your PC. This
cable should be a standard RS-232 cable, not a cross-over configured serial cable, or nullmodem cable.
C-2 June 2011 TAU-0035-00-10, version 150
Page 77

Appendix D Mechanical IDD Reference
Due to export restrictions, limited data is available at
www.corebyindigo.com
additional data can be obtained from your local sales representative or application engineer.
Figure D-1 and Figure D-2 provide important mechanical information for lens designers.
,
Shown with lens flange
for shuttered cameras.
Vacuum window 0.026” Silicon
Focal Plane surface
Datum, top of camera frame
M2.0 x 0.4 Alignment holes
0.185”
0.100”
0.55”
0.379”
M24 x 0.5 thread
1.33”
Figure D-1: Focal Plane Dimensions and Relationships
Figure D-2: Spectral Response Curve from a Typical Tau Camera
The following Mechanical Description Documents detail the outline and mounting for the Tau
cameras. These documents are provided for reference only. You should consult your local sales
representative or application engineer to obtain current IDD information. Also, the Tau Thermal
Imaging Camera Core Data Sheet available from the website contains important mechanical
interface data as well.
See:
http://www.corebyindigo.com/
TAU-0035-00-10, version 150 June 2011 D-1
Tau.
Page 78

Appendix D—Mechanical IDD Reference Tau User’s Manual
D-2 June 2011 TAU-0035-00-10, version 150
Page 79

Tau User’s Manual Appendix D—Mechanical IDD Reference
TAU-0035-00-10, version 150 June 2011 D-3
Appendix D Mechanical IDD Reference
9.703
±0.500
BWD
(
.50mm FOR FOCUS)
.3820
±.0197
0.665
SILICON WINDOW
.0262
22.35
.8800
25.121
-
0.050
0
.9890
-
.0020
+
.0000
1.25
.0492
2.44
.0960
12.64
.4976
4.26
.1679
M24x0.5 - 6g
FPA IMAGE PLANE
320x256
6.400
FPA ACTIVE AREA
.2520
8.100
.3189
FPA ACTIVE AREA
REVISIONS
ZONE
REV
DESCRIPTION
DATE
APPROVED
P01
THIS DOCUMENT IS CONTROLLED TO FLIR TECHNOLOGY LEVEL 2.
ICD, TAU WIDE FIELD
OF VIEW OPTICS
064Y2
D
INTERPRET DRAWING
PER ASME Y14.5M-1994
----------------------------------------------
UNLESS OTHERWISE SPECIFIED
SURFACE ROUGHNESS 32
.X =
.1
.XX =
.XXX =
ANGULAR =
.5
DWG NO.
REV
PROJECT NO.
DATE
APPROVALS
DWN
CHK
DSGN
CAGE
SIZE
TITLE
FLIR Systems, Inc.
70 Castilian Drive
Goleta, CA 93117
ENG
UNLESS OTHERWISE SPECIFIED ALL
MEASUREMENTS ARE IN MM.
ALL DIMENSIONS IN [ ] ARE INCHES.
DO NOT SCALE DRAWING.
FINISH
MATERIAL
NOTES: UNLESS OTHERWISE SPECIFIED
COVINGTON
04/30/09
THIRD ANGLE PROJECTION
THE INFORMATION CONTAINED IN THIS DOCUMENT PERTAINS TO A DUAL USE PRODUCT CONTROLLED FOR
EXPORT BY THE EXPORT ADMINISTRATION REGULATIONS (EAR). FLIR TRADE SECRETS CONTAINED HEREIN
ARE SUBJECT TO DISCLOSURE RESTRICTIONS AS A MATTER OF LAW. DIVERSION CONTRARY TO US LAW IS
PROHIBITED. US DEPARTMENT OF COMMERCE AUTHORIZATION IS NOT REQUIRED PRIOR TO EXPORT OR
TRANSFER TO FOREIGN PERSONS OR PARTIES UNLESS OTHERWISE PROHIBITED.
Tau Camera Mechanical Interface Control Document WFOV Sheet 1
Page 80

Tau User’s Manual Appendix D—Mechanical IDD Reference
TAU-0035-00-10, version 150 June 2011 D-4
Appendix D Mechanical IDD Reference
1.75
44.45
1.75
44.45
2X
45°
2X
45°
.750
19.05
MINOR DIAMETER
M29X1.0-6h
1.11
TO FLAT
28.07
.522
13.25
.522
13.25
.536
13.61
.536
13.61
.522
13.25
.522
13.25
.060
-
.000
+
.001
.0601.520+
0.03
.060
-
.000
+
.001
.060
1.52
0
+
0.03
(
.2520
)
FPA ACTIVE
AREA (320x240)
6.401
(
.3189
)
FPA ACTIVE AREA
(320x240)
8.100
1.09
27.69
1.49
37.85
ROW 256
COLUMN 0
ROW 256
COLUMN 324
ROW 0
COLUMN 324
ROW 0
COLUMN 0
AVAILABLE LENSES:
ALL LENSES SEALED TO IP67
HAR (HARD CARBON LIKE COATING)
5mm-f1.25 HAR COATING
(SHOWN)
FoV (HxV) 160x120 = 43
x35
9mm-f1.25 HAR COATING
FoV (HxV) 160x120 = 25
x20
FoV (HxV) 320x240 = 48
x37
13mm-f1.25 HAR COATING
FoV (HxV) 160x120 = 17
x14
FoV (HxV) 320x240 = 34
x26
19mm-f1.
1
FoV (HxV) 160x120 = 12
x10
FoV (HxV) 320x240 = 24
x18
PIN 1
PIN 2
PIN 49
PIN 50
.014A BMC
.014A BMC
.014A BMC
.003A DMC
.003A DMC
B
C
.447
11.37
.945
24
(
.100
)
2.54
1.060
1.058
26.92
26.87
.592
15.04
.74
18.80
1.92
48.89
.303
7.69
.42
MINOR DIAMETER
NEAR AND FAR SIDES
2X M2X0.4
- 6H
.157
.014MA
BMC
.020BA
C
.010
B
A
D
(
.558
)
14.17
.827
21.01
1.50
38
1.50
38
1.308
33.22
1.75
44.45
MINOR DIAMETER
2
X
- 6H
OPTICAL
C
L
.020A BMC
.010
A
C
B
1.181
30
M29x1.0
.06
1.52
.42
10.67
.592
15.04
(
.100
)
2.54
MINOR DIAMETER
2X M2X0.4
- 6H
.157
.020C BMA
.010
C
A
1.
TOLERANCES ALSO APPLY FOR 160x120 ARRAY SIZE.
CONNECTOR INTERFACE: HIROSE 50 PIN
DF12-50DS-0.5V(86). MATING
2.
CONNECTOR P/N DF12(5.0)-50DP-0.5V(86). FOR PIN-OUT DESIGNATIONS
SEE TAU CAMERA USERS MANUAL.
ZONE
REV
DATE
APPROVED
P01
IDD, TAU CAMERA CORE,
5mm, 9mm,13mm & 19mm LENSES
064Y2
D
INTERPRET DRAWING
PER ASME Y14.5M-1994
----------------------------------------------
UNLESS OTHERWISE SPECIFIED
SURFACE ROUGHNESS 32
.X =
.1
.XX =
.XXX =
ANGULAR =
.5
DWG NO.
REV
PROJECT NO.
DATE
APPROVALS
DWN
CHK
DSGN
CAGE
SIZE
TITLE
ENG
UNLESS OTHERWISE SPECIFIED ALL
MEASUREMENTS ARE IN INCHES.
ALL DIMENSIONS IN [ ] ARE MM.
DO NOT SCALE DRAWING.
FINISH
MATERIAL
NOTES: UNLESS OTHERWISE SPECIFIED
COVINGTON
10/02/08
41XXXXXXX
P01
THIS DOCUMENT IS CONTROLLED TO FLIR TECHNOLOGY LEVEL 2.
064Y2
D
INTERPRET DRAWING
PER ASME Y14.5M-1994
----------------------------------------------
UNLESS OTHERWISE SPECIFIED
SURFACE ROUGHNESS 32
.X =
.1
.XX =
.XXX =
ANGULAR =
.5
DWG NO.
REV
PROJECT NO.
DATE
APPROVALS
DWN
CHK
DSGN
CAGE
SIZE
TITLE
FLIR Systems, Inc.
70 Castilian Drive
Goleta, CA 93117
ENG
UNLESS OTHERWISE SPECIFIED ALL
MEASUREMENTS ARE IN INCHES.
ALL DIMENSIONS IN [ ] ARE MM.
DO NOT SCALE DRAWING.
FINISH
MATERIAL
NOTES: UNLESS OTHERWISE SPECIFIED
COVINGTON
10/02/08
THIRD ANGLE PROJECTION
THE INFORMATION CONTAINED IN THIS DOCUMENT PERTAINS TO A DUAL USE PRODUCT CONTROLLED FOR
EXPORT BY THE EXPORT ADMINISTRATION REGULATIONS (EAR). FLIR TRADE SECRETS CONTAINED HEREIN
ARE SUBJECT TO DISCLOSURE RESTRICTIONS AS A MATTER OF LAW. DIVERSION CONTRARY TO US LAW IS
PROHIBITED. US DEPARTMENT OF COMMERCE AUTHORIZATION IS NOT REQUIRED PRIOR TO EXPORT OR
Tau Camera Core Interface Description Document 5mm - 19mm, Sheet 1
Page 81

Tau User’s Manual Appendix D—Mechanical IDD Reference
TAU-0035-00-10, version 150 June 2011 D-5
.750
19.05
2X
45°
2X
45°
1.75
44.45
1.75
44.45
(
.2520
)
FPA ACTIVE
AREA (320x240)
6.401
(
.3189
)
FPA ACTIVE AREA
(320x240)
8.100
1.09
27.69
1.49
37.85
ROW 256
COLUMN 0
ROW 256
COLUMN 324
ROW 0
COLUMN 324
ROW 0
COLUMN 0
PIN 1
PIN 2
PIN 49
PIN 50
.014A BMC
.014A BMC
C
.447
11.37
.945
24
(
.100
)
2.54
.303
7.69
MINOR DIAMETER
NEAR AND FAR SIDES
2X M2X0.4
- 6H
.157
.537
13.64
1.23
±.02
31.1
±0.5
.290
7.37
.637
16.18
2.36
±.02
59.8
±0.5
.096
2.45
1.85
46.90
.70
ENTRANCE
PUPIL
17.78
43.2°
DIAGONAL
F.O.V.
OPTICAL
C
L
3
3
.020BA
C
.010
B
A
(
.558
)
14.17
.827
21.01
1.50
38
1.50
38
1.308
33.22
1.75
44.45
MINOR DIAMETER
2X M1.6X0.35
- 6H
OPTICAL
C
L
.020A BMC
.010
A
C
B
1.181
30
(
.100
)
2.54
MINOR DIAMETER
2X M2X0.4
- 6H
.157
.537
13.64
1.693
.020C BMA
.010
C
A
1. INDICATED DIMENSIONS ARE FOR AN ARRAY SIZE OF 320x256. POSITIONAL
TOLERANCES ALSO APPLY FOR 160x120 ARRAY SIZE.
2. CONNECTOR INTERFACE: HIROSE 50 PIN
DF12-50DS-0.5V(86). MATING
CONNECTOR P/N DF12(5.0)-50DP-0.5V(86). FOR PIN-OUT DESIGNATIONS
SEE TAU CAMERA USERS GUIDE.
3
INDICATED ALLOWABLE TRAVEL FOR FOCUS.
OPTICAL
C
L
REVISIONS
ZONE
REV
DESCRIPTION
DATE
APPROVED
P01
IDD, TAU CAMERA CORE,
25mm-f1.4 LENS
064Y2
D
INTERPRET DRAWING
PER ASME Y14.5M-1994
----------------------------------------------
UNLESS OTHERWISE SPECIFIED
SURFACE ROUGHNESS 32
.X =
.1
.XX =
.XXX =
ANGULAR =
.5
=
DWG NO.
REV
PROJECT NO.
DATE
APPROVALS
DWN
CHK
DSGN
CAGE
SIZE
TITLE
ENG
APP
UNLESS OTHERWISE SPECIFIED ALL
MEASUREMENTS ARE IN INCHES.
ALL DIMENSIONS IN [ ] ARE MM.
DO NOT SCALE DRAWING.
FINISH
MATERIAL
NOTES: UNLESS OTHERWISE SPECIFIED
M.LILLY
COVINGTON
04/07/09
41XXXXXXX
P01
THIS DOCUMENT IS CONTROLLED TO FLIR TECHNOLOGY LEVEL 2.
064Y2
D
INTERPRET DRAWING
PER ASME Y14.5M-1994
----------------------------------------------
UNLESS OTHERWISE SPECIFIED
SURFACE ROUGHNESS 32
.X =
.1
.XX =
.XXX =
ANGULAR =
.5
=
DWG NO.
REV
PROJECT NO.
DATE
APPROVALS
DWN
CHK
DSGN
CAGE
SIZE
TITLE
FLIR Systems, Inc.
70 Castilian Drive
Goleta, CA 93117
ENG
APP
UNLESS OTHERWISE SPECIFIED ALL
MEASUREMENTS ARE IN INCHES.
ALL DIMENSIONS IN [ ] ARE MM.
DO NOT SCALE DRAWING.
FINISH
MATERIAL
NOTES: UNLESS OTHERWISE SPECIFIED
M.LILLY
04/06/09
THIRD ANGLE PROJECTION
THE INFORMATION CONTAINED IN THIS DOCUMENT PERTAINS TO A DUAL USE PRODUCT CONTROLLED FOR
EXPORT BY THE EXPORT ADMINISTRATION REGULATIONS (EAR). FLIR TRADE SECRETS CONTAINED HEREIN
ARE SUBJECT TO DISCLOSURE RESTRICTIONS AS A MATTER OF LAW. DIVERSION CONTRARY TO US LAW IS
PROHIBITED. US DEPARTMENT OF COMMERCE AUTHORIZATION IS NOT REQUIRED PRIOR TO EXPORT OR
TRANSFER TO FOREIGN PERSONS OR PARTIES UNLESS OTHERWISE PROHIBITED.
Tau Camera Core Interface Description Document 25mm Sheet 1
Page 82

Tau User’s Manual Appendix D—Mechanical IDD Reference
TAU-0035-00-10, version 150 June 2011 D-6
.750
19.05
1.75
44.45
2X
45°
2X
45°
1.75
44.45
(
.2520
)
FPA ACTIVE
AREA (320x240)
6.401
(
.3189
)
FPA ACTIVE AREA
(320x240)
8.100
1.09
27.69
1.49
37.85
ROW 256
COLUMN 0
ROW 256
COLUMN 324
ROW 0
COLUMN 324
ROW 0
COLUMN 0
PIN 1
PIN 2
PIN 49
PIN 50
.014A BMC
.014A BMC
C
B
.447
11.37
.945
24
(
.100
)
2.54
.303
7.69
MINOR DIAMETER
NEAR AND FAR SIDES
2X M2X0.4
- 6H
.157
.537
13.64
1.59
±.02
40.39
±0.51
.637
16.18
.290
7.37
2.72
±.02
69.08
±0.51
1.83
46.40
32.6°
DIAGONAL
F.O.V.
.98
ENTRANCE
PUPIL
24.89
OPTICAL
C
L
3
3
.020BA
C
.010
B
A
(
.558
)
14.17
.827
21.01
1.50
38
1.50
38
1.308
33.22
1.75
44.45
MINOR DIAMETER
2X M1.6X0.35
- 6H
OPTICAL
C
L
.020A BMC
.010
A
C
B
1.181
30
(
.100
)
2.54
MINOR DIAMETER
2X M2X0.4
- 6H
.157
.537
13.64
1.65
42
.020C BMA
.010
C
A
1. INDICATED DIMENSIONS ARE FOR AN ARRAY SIZE OF 320x256. POSITIONAL
TOLERANCES ALSO APPLY FOR 160x120 ARRAY SIZE.
2. CONNECTOR INTERFACE: HIROSE 50 PIN
DF12-50DS-0.5V(86
).
MATING
CONNECTOR P/N DF12(5.0)-50DP-0.5V(86). FOR PIN-OUT DESIGNATIONS
SEE TAU CAMERA USERS GUIDE.
3
INDICATED ALLOWABLE TRAVEL FOR FOCUS.
OPTICAL
C
L
REVISIONS
ZONE
REV
DESCRIPTION
DATE
APPROVE
D
P
0
THIS DOCUMENT IS CONTROLLED TO FLIR TECHNOLOGY LEVEL 2.
IDD, TAU CAMERA CORE,
35mm-f1.4 LENS
064Y2
D
INTERPRET DRAWING
PER ASME Y14.5M-1994
----------------------------------------------
UNLESS OTHERWISE SPECIFIED
SURFACE ROUGHNESS 32
.X =
.1
.XX =
.XXX =
ANGULAR =
.5
FILLET RADII = .005 MAX
DWG NO.
RE
V
PROJECT NO.
DATE
APPROVALS
DWN
CHK
DSGN
CAGE
SIZE
TITLE
FLIR Systems, Inc.
70 Castilian Drive
Goleta, CA 93117
ENG
APP
UNLESS OTHERWISE SPECIFIED ALL
MEASUREMENTS ARE IN INCHES.
ALL DIMENSIONS IN [ ] ARE MM.
DO NOT SCALE DRAWING.
FINISH
MATERIAL
NOTES: UNLESS OTHERWISE SPECIFIED
M. LILLY
04/07/09
COVINGTON
04/07/09
THIRD ANGLE PROJECTION
41XXXXXXX
THE INFORMATION CONTAINED IN THIS DOCUMENT PERTAINS TO A DUAL USE PRODUCT CONTROLLED FOR
EXPORT BY THE EXPORT ADMINISTRATION REGULATIONS (EAR). FLIR TRADE SECRETS CONTAINED HEREIN
ARE SUBJECT TO DISCLOSURE RESTRICTIONS AS A MATTER OF LAW. DIVERSION CONTRARY TO US LAW IS
PROHIBITED. US DEPARTMENT OF COMMERCE AUTHORIZATION IS NOT REQUIRED PRIOR TO EXPORT OR
TRANSFER TO FOREIGN PERSONS OR PARTIES UNLESS OTHERWISE PROHIBITED.
Tau Camera Core Interface Description Document 35mm Sheet 1
Page 83

Tau User’s Manual Appendix D—Mechanical IDD Reference
TAU-0035-00-10, version 150 June 2011 D-7
(
.2520
)
FPA ACTIVE
AREA (320x256)
6.401
(
.3189
)
FPA ACTIVE AREA
(320x256)
8.100
ROW 256
COLUMN 0
ROW 256
COLUMN 324
ROW 0
COLUMN 324
ROW 0
COLUMN 0
.014A BMC
.014A BMC
.447
11.37
.945
24
(
.100
)
2.54
.303
7.69
MINOR DIAMETER
NEAR AND FAR SIDES
2X M2X0.4
- 6H
.157
.537
13.64
.637
16.18
.290
7.37
2.40
±.02
60.9
±0.5
3.53
±.02
89.6
±0.5
1.89
ENTRANCE
PUPIL
48.01
OPTICAL
C
L
60mm/f1.25 LENS, HC COATING
FRONT ELEMENT SEALED TO IP67
FoV (HxV) 320x256= 8
x6
DIAGONAL FoV 320x256 = 11
3
3
.020BA
C
.010
B
A
.827
21.01
1.50
38
1.50
38
1.308
33.22
1.75
44.45
MINOR DIAMETER
2X M1.6X0.35
- 6H
2X
45°
1.75
44.45
2X
45°
.558
14.17
OPTICAL
C
L
PIN 2
PIN 1
PIN 49
PIN 50
.020A BMC
.010
A
C
B
1.181
30
(
.100
)
2.54
MINOR DIAMETER
2X M2X0.4
- 6H
.157
.537
13.64
2.417
61.40
.020C BMA
.010
C
A
INDICATED DIMENSIONS ARE FOR AN ARRAY SIZE OF 320x256.
1.
CONNECTOR INTERFACE: HIROSE 50 PIN
DF12-50DS-0.5V(86)
.
MATING
2.
CONNECTOR P/N DF12(5.0)-50DP-0.5V(86). FOR PIN-OUT DESIGNATIONS
SEE TAU CAMERA USERS GUIDE.
3
INDICATED ALLOWABLE TRAVEL FOR FOCUS
OPTICAL
C
L
REVISIONS
ZONE
REV
DESCRIPTION
DATE
APPROVE
D
P01
PRELIMINARY RELEASE
9/30/2009
100
RELEASED PER ECN 108691
12/9/2009
1
0
THIS DOCUMENT IS CONTROLLED TO FLIR TECHNOLOGY LEVEL 1.
IDD, TAU 320x256 CAMERA CORE,
60mm/f1.25 LENS
064Y2
D
INTERPRET DRAWING
PER ASME Y14.5M-1994
----------------------------------------------
UNLESS OTHERWISE SPECIFIED
SURFACE ROUGHNESS 32
.X =
.1
.XX =
.XXX =
ANGULAR =
.5
FILLET RADII = .005 MAX
DWG NO.
REV
PROJECT NO.
DATE
APPROVALS
DWN
CHK
DSGN
CAGE
SIZE
TITLE
FLIR Systems, Inc.
70 Castilian Drive
Goleta, CA 93117
ENG
APP
UNLESS OTHERWISE SPECIFIED ALL
MEASUREMENTS ARE IN INCHES.
ALL DIMENSIONS IN [ ] ARE MM.
DO NOT SCALE DRAWING.
FINISH
MATERIAL
NOTES: UNLESS OTHERWISE SPECIFIED
M. LILLY
9-17-09
COVINGTON
12/14/08
THIRD ANGLE PROJECTION
41-60mm
THE INFORMATION CONTAINED IN THIS DOCUMENT PERTAINS TO A DUAL USE PRODUCT CONTROLLED FOR
EXPORT BY THE EXPORT ADMINISTRATION REGULATIONS (EAR). FLIR TRADE SECRETS CONTAINED HEREIN
ARE SUBJECT TO DISCLOSURE RESTRICTIONS AS A MATTER OF LAW. DIVERSION CONTRARY TO US LAW IS
PROHIBITED. US DEPARTMENT OF COMMERCE AUTHORIZATION IS NOT REQUIRED PRIOR TO EXPORT OR
TRANSFER TO FOREIGN PERSONS OR PARTIES UNLESS OTHERWISE PROHIBITED.
Tau Camera Core Interface Description Document 60mm Sheet 1
 Loading...