

Page 1

Getting Started Guide
User Manual. For accessibility
assistance, please call the Sonoma
County Energy Independence
Program at (707) 521-6200.
FLIR i5
FLIR i7
Extech i5
Publ. no.: T559169
Revision: 003
Last revised: March 18, 2010
Page 2

4
© 2010, FLIRSystems AB. All rights reserved worldwide.
Publ. no. T559169, rev. 003
Page 3
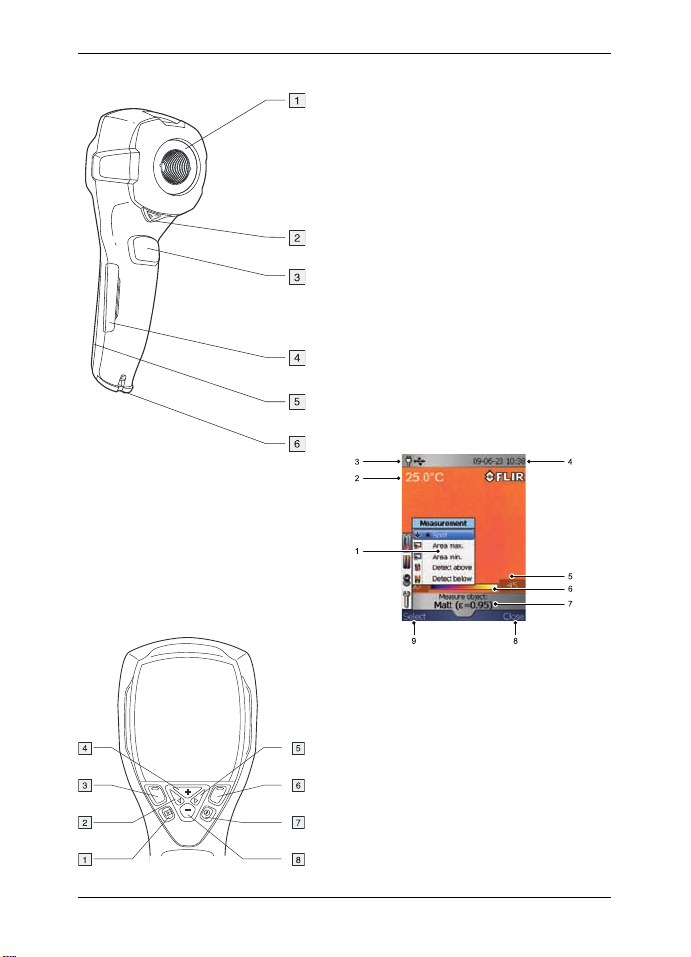
Camera parts
1. Infrared lens
2. Lever to open and close the lens cap
3. Trigger to save images
4. Cover for the connectors and the
miniSD™ memory card slot
5. Cover for the battery compartment
6. Attachment point for the hand strap
Keypad buttons
EN-US English
1. Archive button
2. Left arrow button (on the navigation
pad)
3. Left selection button. This button is
context-sensitive, and the current
function is displayed above the
button on the screen.
4. + button (on the navigation pad)
5. Right arrow button (on navigation
pad)
6. Right selection button. This button is
context-sensitive, and the current
function is displayed above the
button on the screen.
7. On/off button
8. – button (on the navigation pad)
Note: See the User Documentation
CD-ROM for a complete description of
button functionality.
Menu system
© 2010, FLIR Systems AB. All rights reserved worldwide.
Publ. no. T559169, rev. 003
1. Menu system
2. Measurement result
3. Power indicator
4. Date and time
5. Limit value for the temperature scale
6. Temperature scale
7. Currently set emissivity value or
material properties
8. Current function for the right selection
button
9. Current function for the left selection
button
19
Page 4

EN-US English
How to charge the battery
You must charge the battery inside the
camera for four full hours (or until the
battery indicator displays a green light)
before you use the camera for the first
time.
Charge the battery by connecting the
power supply to the power connector on
the camera. Note: The first time you
charge a factory-new battery you must
turn on and then turn off the camera after
you have connected the power supply to
the power connector on the camera.
1. Battery indicator
2. Power supply cable
Quick Start Guide
Follow this procedure to start
immediately:
1. Remove the protective film from the
LCD.
2. Insert a miniSD™ Memory Card into
the card slot.
3. Push the On/Off button to turn on the
camera. Note: If the camera does not
start, push the reset button with a
non-conductive tool. The reset button
is located beside the battery
connector, inside the battery
compartment. Then push the On/Off
button again.
4. Open the lens cap by pushing the
lens cap lever.
5. Aim the camera toward your target of
interest.
6. Pull the save trigger to save the
image.
7. To move the image to a computer, do
one of the following:
20
© 2010, FLIR Systems AB. All rights reserved worldwide.
Publ. no. T559169, rev. 003
Page 5

• (Fig. 1 above) Remove the
miniSD™ Memory Card and insert
it into a card reader connected to
a computer. A miniSD™ card
adapter is included with your
camera.
• (Fig. 2 above) Connect a
computer to the camera using a
USB Mini-B cable.
8. In Windows®Explorer, move the
image from the card or camera using
a drag-and-drop operation.
To keep in mind
• Blank objects may appear warm or
cold to the camera due to reflections of
other objects.
• Avoid direct sunlight on the details that
you are inspecting.
• Different types of faults, such as those
in a building’s construction, may result
in the same type of infrared images.
• Correctly analyzing an infrared image
requires professional knowledge about
the application.
EN-US English
© 2010, FLIR Systems AB. All rights reserved worldwide.
Publ. no. T559169, rev. 003
21
Page 6

ES-ES Español
Componentes de la Botones del teclado
cámara
1. Botón de archivo
2. Botón de flecha izquierda (en el
mando de navegación)
3. Botón de selección izquierdo. La
función de este botón depende del
contexto y la función actual se
muestra sobre el botón en la pantalla.
4. Botón + (en el mando de
1. Lente de infrarrojos
2. Palanca para abrir y cerrar la tapa de
protección de la lente
3. Disparador para guardar imágenes
4. Cubierta de los conectores y la
ranura para la tarjeta de memoria
miniSD™
5. Cubierta del compartimento de la
batería
6. Punto de sujeción de la correa de
mano
navegación)
5. Botón de flecha derecha (en el
mando de navegación)
6. Botón de selección derecho. La
función de este botón depende del
contexto y la función actual se
muestra sobre el botón en la pantalla.
7. Botón de encendido y apagado
8. Botón – (en el mando de navegación)
Nota: consulte el CD-ROM de la
documentación del usuario para obtener
una descripción completa de las
funciones de los botones.
22
© 2010, FLIR Systems AB. All rights reserved worldwide.
Publ. no. T559169, rev. 003
Page 7

Sistema de menús
ES-ES Español
1. Sistema de menús
2. Resultado de la medición
3. Indicador de alimentación
4. Fecha y hora
5. Valor límite de la escala de
temperatura
6. Escala de temperatura
7. Valor de emisividad o propiedades
de material definidos actualmente
8. Función actual del botón de
selección derecho
9. Función actual del botón de
selección izquierdo
Carga de la batería
Antes de usar la cámara por primera vez,
la batería debe cargarse dentro de la
cámara durante cuatro horas completas
(o hasta que el indicador de la batería se
ilumine en verde).
Para cargar la batería, conecte la fuente
de alimentación al conector de
alimentación de la cámara. Nota: la
primera vez que cargue una batería
nueva, deberá encender y apagar la
cámara después de conectar la fuente al
conector de alimentación.
© 2010, FLIR Systems AB. All rights reserved worldwide.
Publ. no. T559169, rev. 003
1. Indicador de batería
2. Cable de alimentación
Guía de inicio rápido
Lleve a cabo este procedimiento para
empezar de inmediato:
1. Retire la película protectora de la
pantalla LCD.
2. Introduzca una tarjeta de memoria
miniSD™ en la ranura para tarjetas.
3. Pulse el botón de encendido y
apagado para encender la cámara.
Nota: si la cámara no se enciende,
pulse el botón de restablecimiento
con ayuda de una herramienta que
no conduzca la electricidad. Este
botón se encuentra en el interior del
compartimento de la batería, junto al
conector. A continuación, pulse de
nuevo el botón de encendido y
apagado.
23
Page 8

ES-ES Español
4. Abra la tapa de protección de la lente • (2 en la figura anterior) Conecte
pulsando la palanca. el equipo informático a la cámara
mediante un cable USB mini B.
8. En el Explorador de Windows
®
mueva la imagen desde la tarjeta o
desde la cámara, mediante una
acción de arrastrar y colocar.
Consideraciones que se deben
tener en cuenta
• Es posible que la cámara interprete los
objetos transparentes como calientes
o fríos debido a reflejos de otros
objetos.
• Evite la luz solar directa en los detalles
5. Apunte con la cámara al objeto de
interés.
6. Accione el disparador para guardar la
imagen.
7. Para enviar la imagen a un equipo
informático, lleve a cabo una de las
siguientes acciones:
que esté inspeccionando.
• Distintos tipos de defectos, como los
de la construcción de un edificio,
pueden generar los mismos tipos de
imágenes de infrarrojos.
• El análisis correcto de una imagen de
infrarrojos requiere conocimientos
profesionales acerca del uso.
• (1 en la figura anterior) Extraiga
la tarjeta de memoria miniSD™ e
introdúzcala en un lector de
tarjetas conectado al equipo
informático. La cámara se
suministra con un adaptador de
tarjetas miniSD.
24
© 2010, FLIR Systems AB. All rights reserved worldwide.
Publ. no. T559169, rev. 003
Page 9

A note on the technical production of this publication
This publication was produced using XML – the eXtensible Markup Language. For more information about XML, please
visit http://www.w3.org/XML/
A note on the typeface used in this publication
This publication was typeset using Linotype Helvetica™ World. Helvetica™ was designed by Max Miedinger
(1910–1980).
LOEF (List Of Effective Files)
$URL: file:///C:/SVNRepository/svn/T638001--T639000/T638207.xml $$Rev: 246 $
$URL: file:///C:/SVNRepository/svn/T638001--T639000/T638352_cs-CZ.xml $$Rev: 344 $
$URL: file:///C:/SVNRepository/svn/T638001--T639000/T638352_da-DK.xml $$Rev: 344 $
$URL: file:///C:/SVNRepository/svn/T638001--T639000/T638352_de-DE.xml $$Rev: 344 $
$URL: file:///C:/SVNRepository/svn/T638001--T639000/T638352_el-GR.xml $$Rev: 344 $
$URL: file:///C:/SVNRepository/svn/T638001--T639000/T638352_en-US.xml $$Rev: 338 $
$URL: file:///C:/SVNRepository/svn/T638001--T639000/T638352_es-ES.xml $$Rev: 344 $
$URL: file:///C:/SVNRepository/svn/T638001--T639000/T638352_fi-FI.xml $$Rev: 344 $
$URL: file:///C:/SVNRepository/svn/T638001--T639000/T638352_fr-FR.xml $$Rev: 344 $
$URL: file:///C:/SVNRepository/svn/T638001--T639000/T638352_hu-HU.xml $$Rev: 344 $
$URL: file:///C:/SVNRepository/svn/T638001--T639000/T638352_it-IT.xml $$Rev: 344 $
$URL: file:///C:/SVNRepository/svn/T638001--T639000/T638352_ja-JP.xml $$Rev: 344 $
$URL: file:///C:/SVNRepository/svn/T638001--T639000/T638352_ko-KR.xml $$Rev: 344 $
$URL: file:///C:/SVNRepository/svn/T638001--T639000/T638352_nb-NO.xml $$Rev: 344 $
$URL: file:///C:/SVNRepository/svn/T638001--T639000/T638352_nl-NL.xml $$Rev: 344 $
$URL: file:///C:/SVNRepository/svn/T638001--T639000/T638352_pl-PL.xml $$Rev: 344 $
$URL: file:///C:/SVNRepository/svn/T638001--T639000/T638352_pt-PT.xml $$Rev: 344 $
$URL: file:///C:/SVNRepository/svn/T638001--T639000/T638352_ru-RU.xml $$Rev: 344 $
$URL: file:///C:/SVNRepository/svn/T638001--T639000/T638352_sv-SE.xml $$Rev: 344 $
$URL: file:///C:/SVNRepository/svn/T638001--T639000/T638352_tr-TR.xml $$Rev: 344 $
$URL: file:///C:/SVNRepository/svn/T638001--T639000/T638352_zh-CN.xml $$Rev: 344 $
$URL: file:///C:/SVNRepository/svn/T638001--T639000/T638352_zh-TW.xml $$Rev: 344 $
$URL: file:///C:/SVNRepository/svn/T638001--T639000/T638208.xml $$Rev: 246 $
Page 10

www.flir.com
 Loading...