

Page 1
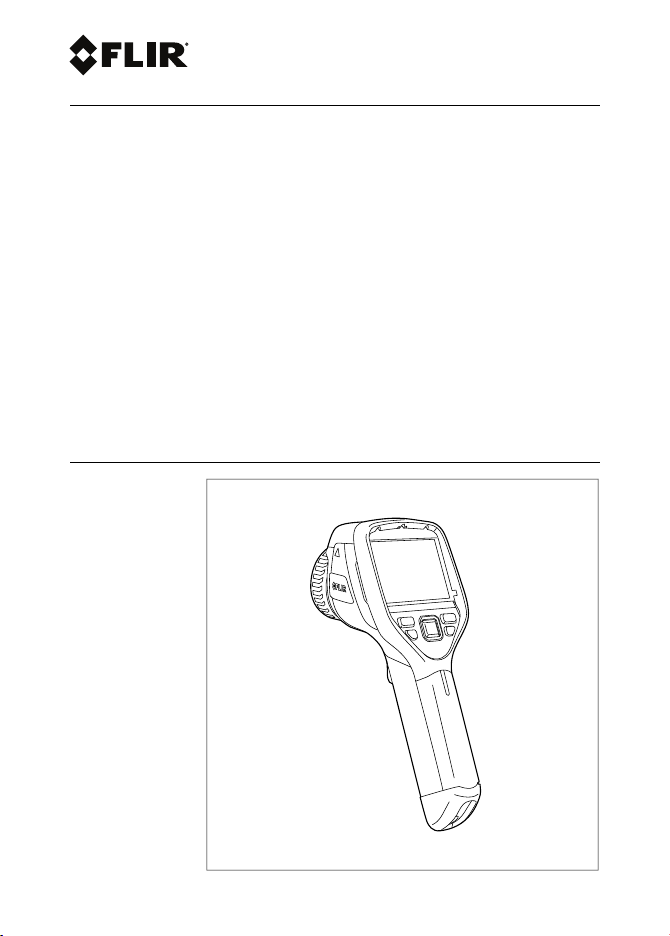
Getting started
FLIR Exx series
Page 2

Page 3

Page 4

Important note
Before operating the device, youmust read, understand, and follow all instructions, warnings, cautions,and legal
disclaimers.
Důležitá poznámka
Před použitím zařízení si přečtěteveškeré pokyny,upozornění, varování a vyvázání se ze záruky, ujistěte se, že jim
rozumíte, a řiďte se jimi.
Vigtig meddelelse
Før du betjener enheden, skal du dulæse, forstå og følge alle anvisninger, advarsler,sikkerhedsforanstaltninger og
ansvarsfraskrivelser.
Wichtiger Hinweis
Bevor Sie das Gerät inBetriebnehmen, lesen, verstehen und befolgen Sie unbedingt alleAnweisungen, Warnungen,
Vorsichtshinweise und Haftungsausschlüsse
Σημαντική σημείωση
Πριν από τη λειτουργία της συσκευής, πρέπει να διαβάσετε, να κατανοήσετε και να ακολουθήσετε όλες τις
οδηγίες, προειδοποιήσεις, προφυλάξεις και νομικές αποποιήσεις.
Nota importante
Antes de usar el dispositivo, debe leer, comprender y seguir toda la información sobre instrucciones, advertencias,
precauciones y renuncias de responsabilidad.
Tärkeä huomautus
Ennen laitteen käyttämistä on luettava ja ymmärrettävä kaikki ohjeet, vakavat varoitukset, varoitukset ja lakitiedotteet
sekä noudatettava niitä.
Remarque importante
Avant d'utiliser l'appareil, vous devez lire, comprendre et suivre l'ensemble des instructions, avertissements, mises
en garde et clauses légales de non-responsabilité.
Fontos megjegyzés
Az eszköz használata előtt figyelmesen olvassa el és tartsa be az összes utasítást, figyelmeztetést, óvintézkedést és
jogi nyilatkozatot.
Nota importante
Prima di utilizzare il dispositivo, è importanteleggere, capire e seguire tutte le istruzioni, avvertenze, precauzioni ed
esclusioni di responsabilità legali.
重要な注意
デバイスをご使用になる前に、あらゆる指示、警告、注意事項、および免責条項をお読み頂き、その内容を理解し
て従ってください。
중요한 참고 사항
장치를 작동하기 전에 반드시 다음의 사용 설명서와 경고, 주의사항, 법적 책임제한을 읽고 이해하며 따라야 합니다.
Viktig
Før du bruker enheten, må du lese, forstå og følge instruksjoner, advarsler og informasjon om ansvarsfraskrivelse.
Belangrijke opmerking
Zorg ervoor dat u, voordat u het apparaat gaatgebruiken, alle instructies, waarschuwingen en juridische informatie
hebt doorgelezen en begrepen, en dat u deze opvolgt en in acht neemt.
Ważna uwaga
Przed rozpoczęciem korzystania z urządzenia należy koniecznie zapoznać się z wszystkimi instrukcjami,
ostrzeżeniami, przestrogami i uwagami prawnymi. Należy zawsze postępować zgodnie z zaleceniami tam zawartymi.
Nota importante
Antes de utilizar o dispositivo, deverá proceder à leitura e compreensão de todos os avisos, precauções, instruções
e isenções de responsabilidade legal e assegurar-se do seu cumprimento.
Важное примечание
До того, как пользоваться устройством, вам необходимо прочитать и понять все предупреждения,
предостережения и юридические ограничения ответственности и следовать им.
Viktig information
Innan du använder enheten måste du läsa, förstå och följa alla anvisningar, varningar, försiktighetsåtgärder och
ansvarsfriskrivningar.
Önemli not
Cihazı çalıştırmadan önce tüm talimatları, uyarıları, ikazları ve yasal açıklamaları okumalı, anlamalı ve bunlara
uymalısınız.
重要注意事项
在操作设备之前,您必须阅读、理解并遵循所有说明、警告、注意事项和法律免责声明。
重要注意事項
操作裝置之前,您務必閱讀、了解並遵循所有說明、警告、注意事項與法律免責聲明。
Page 5

Getting started
FLIR Exx series
#T810135; r. AB/33065/33066; mul
Page 6

Page 7

Table of contents
1 List of contents .. . . . .. . .. . .. . . . .. . .. . .. . . . .. . .. . .. . . . . . . .. . .. . . . . . . .. . .. . . . . . . . 1
2 Illustrations .. . . .. . .. . .. . . . .. . .. . .. . . . .. . .. . .. . . . .. . .. . .. . . . .. . .. . . . .. . .. . .. . . . . 2
3 EN-US English ... . .. . .. .. . .. . .. . . . .. . .. . .. . . . .. . .. . .. . . . .. . .. . .. . . . .. . .. . .. . . . . 5
4 CS-CZ Čeština .. . .. . .. . .. . . . . . . .. . .. . . . . . . .. . .. . . . .. . .. . .. . . . .. . .. . .. . . . .. . .. .10
5 DA-DK Dansk. .. . .. . . . . . . .. . .. . . . . . . .. . .. . . . . . . .. . .. . .. . . . .. . .. . .. . . . .. . .. . . . ..15
6 DE-DE Deutsch .. . . . .. . .. . .. . . . .. . .. . .. . . . .. . .. . .. . . . . . . .. . .. . . . . . . .. . .. . . . .. .20
7 EL-GR Ελληνικά . . .. . . . .. . .. . .. . . . .. . .. . .. . . . .. . .. . . . . . . .. . .. . . . . . . .. . .. . . . . . .26
8 ES-ES Español .. . .. . .. . . . .. . .. . .. . . . .. . .. . .. . . . .. . .. . .. . . . .. . .. . .. . . . .. . .. . .. .32
9 FI-FI Suomi .. . .. . . . . . . .. . .. . .. . . . .. . .. . .. . . . .. . .. . .. . . . .. . .. . .. . . . .. . .. . .. . . . ..38
10 FR-FR Français . .. . . . . . . .. . .. . . . . . . .. . .. . . . . . . .. . .. . .. . . . .. . .. . .. . . . .. . .. . .. . .43
11 HU-HU Magyar .. . .. . .. . . . . . . .. . .. . .. . . . .. . .. . .. . . . .. . .. . .. . . . .. . .. . .. . . . .. . .. .49
12 IT-IT Italiano . . . .. . .. . .. .. . .. . .. . . . .. . .. . .. . . . .. . .. . .. . . . .. . .. . .. . . . .. . .. . .. . . . .54
13 JA-JP 日本語. .. . .. . . . .. . .. . .. . . . .. . .. . .. . . . .. . .. . .. . . . . . . .. . .. . . . . . . .. . .. . . . . . .60
14 KO-KR 한국어. . . . . .. . .. . . . . . . .. . .. . .. . . . .. . .. . .. . . . .. . .. . .. . . . .. . .. . .. . . . .. . .. .65
15 NB-NO Norsk. . . . .. . .. . .. . . . .. . .. . .. . . . .. . .. . .. . . . .. . .. . .. . . . . . . .. . .. . . . . . . .. . .70
16 NL-NL Nederlands. .. . .. . .. . . . .. . .. . .. . . . .. . .. . .. . . . .. . .. . .. . . . .. . .. . .. . . . .. . .75
17 PL-PL Polski. .. . . . .. . .. . .. . . . . . . .. . .. . . . . . . .. . .. . . . . . . .. . .. . .. . . . .. . .. . .. . . . .. .80
18 PT-PT Português. . . . . .. . .. . .. . . . .. . .. . .. . . . .. . .. . .. .. . .. . .. . . . .. . .. . .. . . . .. . ..86
19 RU-RU Русский.. . . . .. . .. . .. . . . .. . .. . .. . . . .. . .. . .. . . . . . . .. . .. . . . . . . .. . .. . . . . . .92
20 SV-SE Svenska. . . .. . .. . . . . . . .. . .. . .. .. . .. . .. . . . .. . .. . .. . . . .. . .. . .. . . . .. . .. . .. .98
21 TR-TR Türkçe ... . .. . . . .. . .. . .. . . . .. . .. . .. . . . .. . .. . .. .. . .. . .. . . . .. . .. . .. . . . .. 103
22 ZH-CN 简体中文 . . . . .. . .. . .. .. . .. . .. . . . .. . .. . .. . . . .. . .. . .. . . . . . . .. . .. . . . . . . .. 108
23 ZH-TW 繁體中文 . .. . .. . .. . . . .. . .. . .. . . . .. . .. . .. . . . .. . .. . .. . . . . . . .. . .. . . . . . . .. 113
#T810135; r. AB/33065/33066; mul vii
Page 8

Page 9

1 List of contents
• Infrared camera
• Battery
• Battery charger
• Camera lens cap
• Extra battery
• FLIR ResearchIR Standard
• FLIR Tools+ (license only)
• Handstrap
• Hard transport case
• IR lens, f = 10 mm, 45°
• Memory card
• Power supply, incl. multi-plugs
• Printed documentation
• Tripod adapter
• USB cable
• Video cable
Note FLIR Systems reserves the right to discontinue models, parts or acces-
sories, and other items, or to change specifications at any time without prior
notice.
1
1
1
1
1
1
1. The inclusion of this item is dependent on model.
#T810135; r. AB/33065/33066; mul 1
Page 10
2 Illustrations
Note Explanations of the illustrations are provided in each language section.
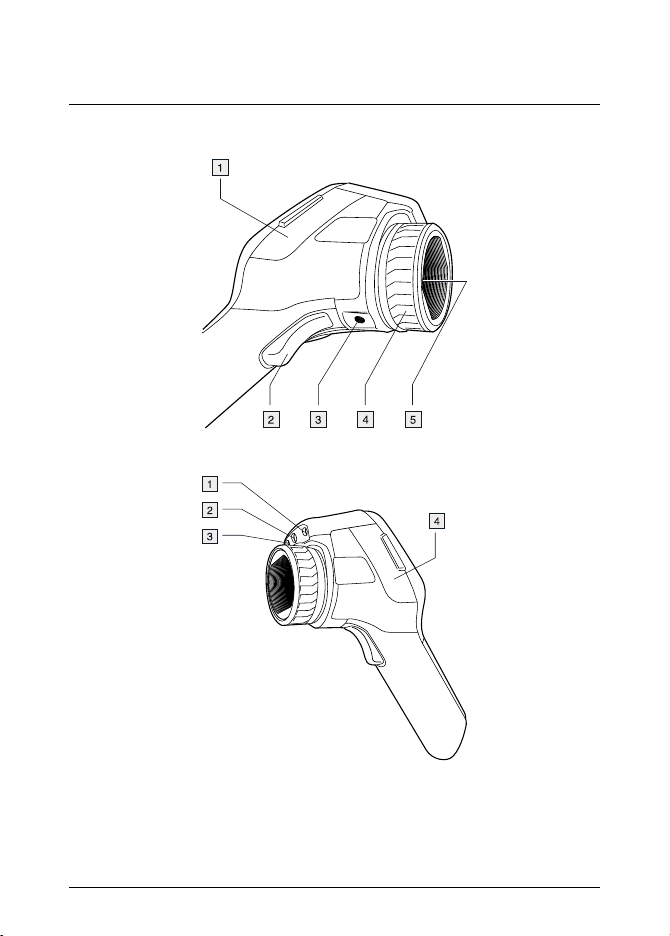
Figure 2.1 View from the right
Figure 2.2 View from the left
#T810135; r. AB/33065/33066; mul 2
Page 11
2 Illustrations
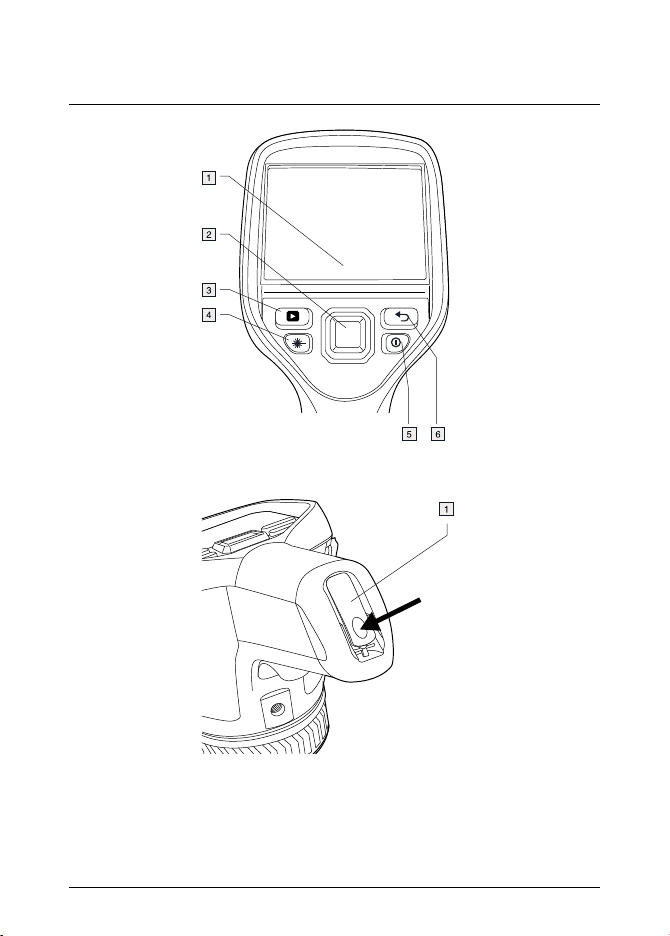
Figure 2.3 LCD and keypad
Figure 2.4 View from the bottom
#T810135; r. AB/33065/33066; mul 3
Page 12
2 Illustrations
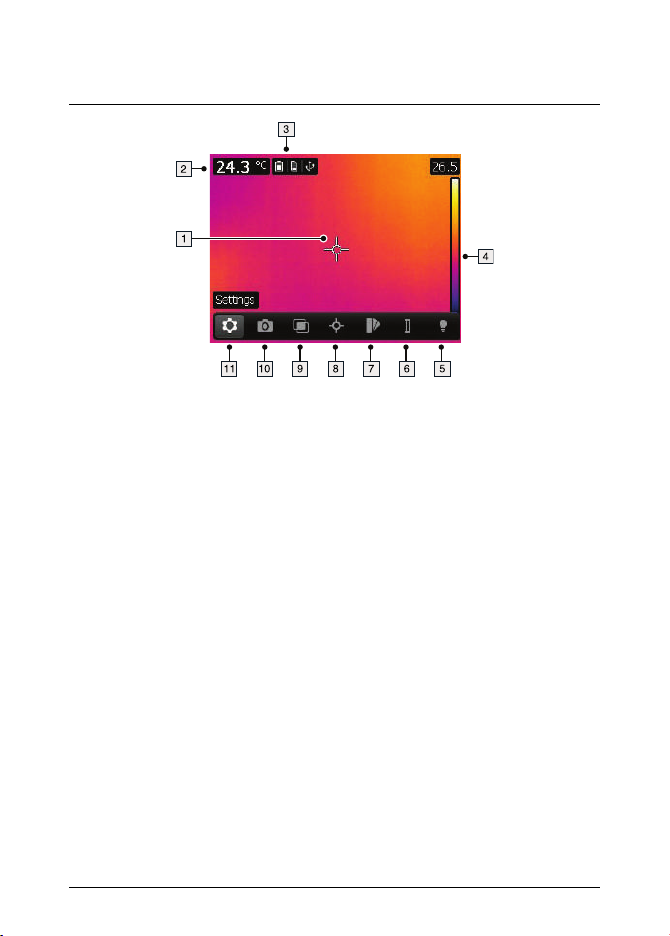
Figure 2.5 Screen elements
#T810135; r. AB/33065/33066; mul 4
Page 13

3 EN-US English
3.1 Thank you!
Thank you for choosing a product from FLIR Systems. We hope that the product
will meet your expectations and that you will consider us again for your future
needs.
3.2 Read the manual before use
Go to the following website to read or download the
manual:
http://support.flir.com/resources/42p5
3.3 Extend your product warranty
Our aim is to provide the best quality and workmanship in the industry. To prove
this, we offer the most generous extended warranty on the market.
Register your camera now to get:
• 2 years camera warranty
• 10 years detector warranty
Go to the following website to activate your extended warranty:
http://www.flir.com/thg/warranty
Note Registration must be completed within 60 days of purchase.
3.4 Download FLIR Tools
FLIR Tools lets you quickly create professional inspection reports that clearly
show decision makers what you’ve found with your IR camera.
#T810135; r. AB/33065/33066; mul 5
Page 14

3 EN-US English
Import, analyze, and fine-tune images easily. Then incorporate them into concise
documents to share findings and justify repairs.
Go to the following website to download FLIR Tools:
http://support.flir.com/tools
3.5 Check out our FLIR apps
Use our apps to analyze your IR images, create reports, and share your reports
using Dropbox, Box.net, FTP, e-mail, etc.
Use your mobile device to go to the following website and download the apps:
http://onelink.to/tools
3.6 Quick start guide
Follow this procedure:
1. Put a battery into the battery compartment.
2. Charge the battery for 4 hours before starting the camera for the first time, or
until the green battery condition LED glows continuously.
3. Insert a memory card into the card slot.
4. Push
to turn on the camera.
5. Aim the camera toward the object of interest.
6. Adjust the focus by rotating the focus ring.
Note It is very important to adjust the focus correctly. Incorrect focus ad-
justment affects how the image modes Thermal MSX, Thermal, and Picture-
in-picture work. It also affects the temperature measurement.
7. Push the Save button (the trigger) to save an image.
8. Install FLIR Tools on your computer.
9. Start FLIR Tools.
10. Connect the camera to the computer using the USB cable.
11. Import the images into FLIR Tools and create a PDF report.
#T810135; r. AB/33065/33066; mul 6
Page 15

3 EN-US English
3.7 View from the right
See Figure 2.1 View from the right, page 2.
1. Cover for the right-hand compartment:
• USB-A connector.
• USB mini-B connector.
• Power connector.
2. Save button.
3. Tripod mount. Requires an adapter (extra accessory).
4. Focus ring.
5. Infrared lens.
3.8 View from the left
See Figure 2.2 View from the left, page 2.
1. Laser pointer.
2. Lamp for the digital camera.
3. Digital camera.
4. Cover for the left-hand compartment:
• Video out connector (composite video).
• Memory card slot.
3.9 LCD and keypad
See Figure 2.3 LCD and keypad, page 3.
1. Touch-screen LCD.
2. Navigation pad with center push.
3. Image archive button.
4. Button to operate the laser pointer.
#T810135; r. AB/33065/33066; mul 7
Page 16
3 EN-US English
5. On/off button.
Function:
• Push the
• Push and hold the
button to turn on the camera.
button for less than 5 seconds to put the camera in standby mode. The camera then automatically turns off after 6
hours.
• Push and hold the
button for more than 10 seconds to turn off the
camera.
6. Back button.
3.10 View from the bottom
See Figure 2.4 View from the bottom, page 3.
1. Latch to open the cover for the battery compartment. Push to open.
3.11 Screen elements
See Figure 2.5 Screen elements, page 4.
1. Measurement tools (e.g., spotmeter).
2. Measurement result table.
3. Status icons and notifications.
4. Temperature scale.
5. Lamp toolbar button.
6. Temperature scale toolbar button.
7. Color toolbar button.
8. Measurement toolbar button.
9. Image modes toolbar button.
10. Recording mode toolbar button.
11. Settings toolbar button.
Note To display the menu system, tap the screen or push the navigation pad.
3.12 To keep in mind
• Adjust the focus first. When the camera is out of focus, the measurement will
be wrong.
#T810135; r. AB/33065/33066; mul 8
Page 17

3 EN-US English
• By default, most cameras adapt the scale automatically. Use this mode first,
but do not hesitate to set the scale manually.
• A thermal camera has a resolution limit. This depends on the size of the detector, the lens, and the distance to the target. Use the center of the spot tool
as a guide to the minimum possible object size, and get closer if necessary.
Make sure to stay away from dangerous areas and live electrical components.
• Be careful when holding the camera perpendicular to the target—you may become the main source of reflection.
• Select a zone of high emissivity, e.g., an area with a matte surface, to perform
a measurement.
• Blank objects, i.e. those with low emissivities, may appear warm or cold in the
camera, as they mainly reflect the environment.
• Avoid direct sunlight on the details that you are inspecting.
• Various types of faults, e.g., those in a building’s construction, may result in
the same type of thermal pattern.
• Correctly analyzing an infrared image requires professional knowledge about
the application.
3.13 Training
Let the Infrared Training Center help you maximize your investment in thermal
imaging:
www.infraredtraining.com info_us@infraredtraining.com
www.irtraining.eu info@irtraining.eu
www.irtraining.com itc@flir.se
3.14 Customer support
Do not hesitate to contact our Customer Support Center at http://support.flir.com
if you experience problems or have any questions about your product.
#T810135; r. AB/33065/33066; mul 9
Page 18

4 CS-CZ Čeština
4.1 Děkujeme!
Děkujeme vám za to, že jste si vybrali výrobek společnosti FLIR Systems. Doufáme, že splní vaše očekávání a že zvážíte zakoupení našich výrobků
i v budoucnosti.
4.2 Před použitím si přečtěte příručku
Uživatelskou příručku si můžete přečíst nebo stáhnout
na následující webové stránce:
http://support.flir.com/resources/42p5
4.3 Prodloužení záruky výrobku
Naším cílem je poskytovat nejlepší kvalitu a zpracování v oboru. Abychom to prokázali, nabízíme nejdelší prodloužení záruky na trhu.
Zaregistrujte svou kameru nyní a získáte:
• záruku na kameru 2 roky
• záruku na detektor 10 let
Prodloužení záruky si můžete aktivovat na následující webové stránce:
http://www.flir.com/thg/warranty
Poznámka Registraci je nutné dokončit do 60 dní od zakoupení.
4.4 Odkaz ke stažení FLIR Tools
Aplikace FLIR Tools vám umožní rychle vytvářet inspekční zprávy z měření, které
řídicím pracovníkům ukáží, co přesně jste s infračervenou kamerou nalezli.
#T810135; r. AB/33065/33066; mul 10
Page 19

4 CS-CZ Čeština
Jednoduše importujte, analyzujte a upravujte snímky a poté je začleňte do výstižných dokumentů, ve kterých se můžete podělit o své poznatky a odůvodnit navržené opravy.
Aplikaci FLIR Tools si můžete stáhnout na následující webové stránce:
http://support.flir.com/tools
4.5 Vyzkoušejte naše aplikace FLIR
Používejte naše aplikace k analýze infračervených snímků, vytváření zpráv a sdílení zpráv pomocí služeb Dropbox a Box.net, serveru FTP, e-mailu apod.
V mobilním zařízení přejděte na následující webovou stránku, kde si aplikace můžete stáhnout:
http://onelink.to/tools
4.6 Stručný návod ke spuštění kamery
Použijte následující postup:
1. Vložte baterii do prostoru pro baterii.
2. Před prvním použitím kamery nabíjejte baterii 4 hodiny nebo do té doby, než
začne zelená LED dioda nepřetržitě svítit.
3. Vložte paměťovou kartu do příslušného slotu pro kartu.
4. Stisknutím tlačítka
kameru zapnete.
5. Namiřte kameru na požadovaný objekt.
6. Otáčením zaostřovacího kroužku kameru zaostřete.
Poznámka Správné zaostření je velmi důležité. Nesprávné zaostření narušuje činnost režimů snímků MSX, Tepelný režim a Obraz v obraze. Ovlivňuje
také měření teploty.
7. Stisknutím tlačítka Uložit (spoušť) uložíte snímek.
8. Nainstalujte aplikaci FLIR Tools do počítače.
9. Spusťte FLIR Tools.
10. Připojte kameru k počítači pomocí kabelu USB.
11. Naimportujte snímky do FLIR Tools a vytvořte zprávu v PDF.
#T810135; r. AB/33065/33066; mul 11
Page 20

4 CS-CZ Čeština
4.7 Pohled z pravé strany
Viz Figure 2.1 View from the right, strana 2.
1. Kryt prostoru na pravé straně:
• Konektor USB-A.
• Konektor USB mini-B.
• Konektor napájení.
2. Tlačítko Uložit.
3. Úchytka na stativ. Vyžaduje adaptér (doplňkové příslušenství).
4. Zaostřovací kroužek.
5. Infračervený objektiv
4.8 Pohled z levé strany
Viz Figure 2.2 View from the left, strana 2.
1. Laserové ukazovátko.
2. Lampa digitální kamery.
3. Digitální kamera.
4. Kryt prostoru na levé straně:
• Konektor video out (kompozitní video).
• Slot pro paměťovou kartu.
4.9 Displej LCD a klávesnice.
Viz Figure 2.3 LCD and keypad, strana 3.
1. Dotykový displej LCD.
2. Navigační ploška se středovým tlačítkem.
3. Tlačítko archivu snímků.
4. Tlačítko pro ovládání laserového ukazovátka.
#T810135; r. AB/33065/33066; mul 12
Page 21
4 CS-CZ Čeština
5. Tlačítko Zap/Vyp.
Funkce:
• Zapněte kameru stisknutím tlačítka
.
• Chcete-li kameru uvést do pohotovostního režimu, stiskněte a podržte
tlačítko
méně než 5 sekund. Poté se kamera automaticky vypne
po 6 hodinách.
• Stisknutím a podržením tlačítka
déle než 10 sekund kameru
vypnete.
6. Tlačítko Zpět.
4.10 Pohled zespodu
Viz Figure 2.4 View from the bottom, strana 3.
1. Západka zajišťující kryt prostoru pro baterii. Pro otevření stiskněte.
4.11 Prvky obrazovky
Viz Figure 2.5 Screen elements, strana 4.
1. Měřicí nástroje (např. měření bodu).
2. Tabulka s výsledky měření.
3. Stavové ikony a indikátory.
4. Teplotní stupnice.
5. Tlačítko lampy na panelu nástrojů.
6. Tlačítko stupnice teploty na panelu nástrojů.
7. Tlačítko barvy na panelu nástrojů.
8. Tlačítko panelu nástrojů pro měření.
9. Tlačítko režimů snímků na panelu nástrojů.
10. Tlačítko režimu nahrávání na panelu nástrojů.
11. Tlačítko Nastavení na panelu nástrojů.
Poznámka Chcete-li zobrazit systém nabídek, klepněte na obrazovku nebo
stiskněte navigační plošku.
4.12 Nezapomeňte
• Nejprve nastavte zaostření. Není-li kamera zaostřená, měření bude chybné.
#T810135; r. AB/33065/33066; mul 13
Page 22

4 CS-CZ Čeština
• Většina kamer ve výchozím nastavení nastavuje stupnici automaticky. Použijte nejprve tento režim, v případě potřeby však neváhejte nastavit stupnici
ručně.
• Termokamera má limit rozlišení, který závisí na rozměrech detektoru, objektivu a na vzdálenosti od cíle. Použijte střed bodového nástroje jako vodítko
pro minimální možnou velikost objektu a v případě potřeby se přibližte. Zachovávejte dostatečnou vzdálenost od nebezpečných oblastí a elektrických součástí pod napětím.
• Dbejte opatrnosti, když kameru držíte kolmo k cíli – můžete se stát hlavním
zdrojem odrazu.
• Pro měření vyberte oblast s vysokou emisivitou (například s matným
povrchem).
• Lesklé objekty, tj. objekty s nízkou emisivitou, se v kameře mohou zobrazovat
jako teplé nebo studené, protože převážně odráží teplo z okolí.
• Při zaměření na detaily se snažte, aby na ně nepadalo přímé sluneční světlo.
• Různé typy chyb a vad, jako jsou například vady v konstrukci budovy, mohou
mít stejné rozložení teplot.
• Správná analýza infračerveného obrazu vyžaduje znalosti oblasti použití na
profesionální úrovni.
4.13 Školení
Infrared Training Center vám pomůže maximálně využít vaši investici do teplotního zobrazování:
www.infraredtraining.com info_us@infraredtraining.com
www.irtraining.eu info@irtraining.eu
www.irtraining.com itc@flir.se
4.14 Zákaznická podpora
Pokud se setkáte s problémy nebo máte nějaké dotazy ohledně výrobku, neváhejte kontaktovat technickou podporu na adrese http://support.flir.com.
#T810135; r. AB/33065/33066; mul 14
Page 23

5 DA-DK Dansk
5.1 Tak!
Tak, fordi du valgte et kamera fra FLIR Systems. Vi håber, at produktet lever op til
dine forventninger, og at du vil handle hos os igen.
5.2 Læs brugervejledningen inden brug
Gå til denne webside for at læse eller downloade
manualen:
http://support.flir.com/resources/42p5
5.3 Forlæng garantien på dit produkt
Vores mål er at levere den bedste kvalitet og forarbejdning i branchen. For at leve
op til dette mål tilbyder vi den bedste udvidede garanti på markedet.
Registrer dit kamera, og få:
• 2 års garanti på kameraet
• 10 års garanti på detektoren
Gå til dette websted for at aktivere din udvidede garanti:
http://www.flir.com/thg/warranty
Bemærk Registrering skal ske inden 60 dage fra købsdatoen.
5.4 Download FLIR Tools
Med FLIR Tools kan du hurtigt oprette professionelle rapporter, der tydeligt viser
beslutningstagerne, hvad du har fundet med dit IR kamera.
Du kan nemt importere, analysere og finjustere billeder. Derefter kan du indarbejde dem i kortfattede dokumenter, så du kan resultater og begrunde reparationer.
#T810135; r. AB/33065/33066; mul 15
Page 24

5 DA-DK Dansk
Gå til denne webside for at downloade FLIR Tools:
http://support.flir.com/tools
5.5 Se vores apps til FLIR
Brug vores apps til at analysere dine IR-billeder, oprette rapporter og dele dine
rapporter via Dropbox, Box.net, FTP, e-mail osv.
Brug din mobile enhed til at gå til denne webside og downloade apps:
http://onelink.to/tools
5.6 Startvejledning
Følg denne fremgangsmåde:
1. Læg et batteri i batterirummet.
2. Oplad batteriet i fire timer, før du tænder kameraet første gang, eller indtil
batteriets grønne LED-indikator lyser konstant.
3. Sæt et hukommelseskort i kortåbningen.
4. Tryk på
for at tænde for kameraet.
5. Ret kameraet mod det ønskede objekt.
6. Tilpas fokus ved at dreje på fokusringen.
Bemærk Det er meget vigtigt at justere fokus korrekt. Forkert fokus påvirker den måde, hvorpå billedtilstandene MSX, Termisk og Billede-i-billede
fungerer. Det påvirker også temperaturmålinger.
7. Tryk på knappen Gem (udløseren) for at gemme et billede.
8. Installer FLIR Tools på computeren.
9. Start FLIR Tools.
10. Slut kameraet til computeren vha. USB-kablet.
11. Importer billederne i FLIR Tools, og opret en PDF-rapport.
5.7 Set fra højre
Se Figure 2.1 View from the right, side 2.
1. Dæksel til højre rum:
• USB-A-stik.
• USB mini-B-stik.
• Strømstik.
#T810135; r. AB/33065/33066; mul 16
Page 25
5 DA-DK Dansk
2. Knappen Gem.
3. Trebensstativ. Kræver en adapter (ekstra tilbehør).
4. Fokusring.
5. Infrarødt objektiv.
5.8 Set fra venstre
Se Figure 2.2 View from the left, side 2.
1. Laserpointer.
2. Lampe til det digitale kamera.
3. Digitalkamera.
4. Dæksel til venstre rum:
• Videoudgangsstik (composite video).
• Hukommelseskortåbning.
5.9 LCD og tastatur
Se Figure 2.3 LCD and keypad, side 3.
1. LCD-berøringsskærm.
2. Navigationstast med tryk i midten.
3. Knappen Billedarkiv.
4. Knap til betjening af laserpointeren.
5. Knap til tænd/sluk.
Funktion:
• Tryk på knappen
• Tryk på knappen
for at tænde kameraet.
i mindre end 5 sekunder for at indstille kameraet
til dvaletilstand. Kameraet slukker automatisk efter 6 timer.
• Tryk på knappen
, og hold den nede i mere end 10 sekunder for at
slukke for kameraet.
6. Knappen Tilbage.
#T810135; r. AB/33065/33066; mul 17
Page 26

5 DA-DK Dansk
5.10 Set fra bunden
Se Figure 2.4 View from the bottom, side 3.
1. Lås til at åbne dækslet til batterirummet. Tryk for at åbne.
5.11 Skærmelementer
Se Figure 2.5 Screen elements, side 4.
1. Måleredskaber (f.eks. spotmeter).
2. Resultatoversigt for målingen.
3. Statusikoner og -meddelelser.
4. Temperaturskala.
5. Knappen Lampe på værktøjslinjen.
6. Knappen Temperaturskala på værktøjslinjen.
7. Knappen Farve på værktøjslinjen.
8. Knappen Måling på værktøjslinjen.
9. Knappen Billedtilstande på værktøjslinjen.
10. Knappen Optagelse på værktøjslinjen.
11. Knappen Indstillinger på værktøjslinjen.
Bemærk Tryk på skærmen eller på navigationstasten for at få vist
menusystemet.
5.12 Vigtigt!
• Juster først fokus. Når kameraet er ude af fokus, bliver målingen forkert.
• Som standard tilpasses skalaen automatisk på de fleste kameraer. Brug først
denne tilstand, men tøv ikke med at indstille skalaen manuelt.
• Et termisk kamera har en opløsningsgrænse. Den afhænger af detektorens
størrelse, objektivet og afstanden til objektet. Brug spotværktøjets centrum
som guide for den mindst mulige objektstørrelse, og gå nærmere, hvis det er
nødvendigt. Hold afstand til farlige områder og elkomponenter med fare for
stød.
• Vær forsigtig, når kameraet holdes vinkelret på objektet – du kan blive den primære reflektionskilde.
• Vælg en zone med høj emissivitet, f.eks. et område med en mat overflade,
når der udføres en måling.
• Blanke objekter, dvs. dem med lav emissivitet, kan i kameraet fremtræde som
varme eller kolde, da de primært reflekterer omgivelserne.
• Undgå direkte sollys på de detaljer, du ønsker at undersøge.
#T810135; r. AB/33065/33066; mul 18
Page 27

5 DA-DK Dansk
• Forskellige fejltyper, f.eks. omkring bygningskonstruktioner, kan resultere i
samme type af termisk mønster.
• Korrekt analyse af et infrarødt billede og anvendelse heraf kræver professionel viden.
5.13 Kurser
Med Infrared Training Center kan du få mest mulig ud af termisk billedteknolog:
www.infraredtraining.com info_us@infraredtraining.com
www.irtraining.eu info@irtraining.eu
www.irtraining.com itc@flir.se
5.14 Kundesupport
Kontakt vores kundesupport på http://support.flir.com, hvis du kommer ud for problemer eller har spørgsmål om dit produkt.
#T810135; r. AB/33065/33066; mul 19
Page 28
6 DE-DE Deutsch
6.1 Vielen Dank!
Vielen Dank, dass Sie sich für ein Produkt von FLIR Systems entschieden haben.
Wir hoffen, dass die Kamera Ihren Erwartungen voll und ganz entspricht und Sie
sich bei Bedarf an weiteren Produkten erneut an uns wenden.
6.2 Lesen Sie vor Gebrauch zunächst die Anleitung
Besuchen Sie die folgende Website, um das Benutzerhandbuch zu lesen bzw. herunterzuladen:
http://support.flir.com/resources/42p5
6.3 Verlängern Sie die Garantie Ihres Produkts
Unser Ziel besteht darin, branchenweit die beste Qualitätsarbeit anzubieten. Beweis dafür ist unsere großzügige Garantieverlängerung, die auf dem Markt ungeschlagen ist.
Registrieren Sie Ihre Kamera jetzt, und Sie erhalten die folgenden Vorteile:
• 2 Jahre Garantie auf die Kamera
• 10 Jahre Garantie auf den Detektor
Besuchen Sie die folgende Website, um Ihre verlängerte Garantie zu aktivieren:
http://www.flir.com/thg/warranty
Hinweis Die Registrierung muss innerhalb von 60 Tagen nach Kauf abge-
schlossen werden.
#T810135; r. AB/33065/33066; mul 20
Page 29

6 DE-DE Deutsch
6.4 FLIR Tools herunterladen
Mit FLIR Tools können Sie schnell professionelle Untersuchungsberichte erstellen, die Entscheidungsträgern klar aufzeigen, was Sie mit Ihrer Infrarotkamera
aufgenommen haben.
Sie können Ihre Bilder einfach importieren und analysieren sowie Feinabstimmungen vornehmen. Anschließend können Sie sie in prägnante Dokumente integrieren und so die Ergebnisse teilen und Reparaturen rechtfertigen.
Besuchen Sie die folgende Website, um FLIR Tools herunterzuladen:
http://support.flir.com/tools
6.5 Sehen Sie sich auch unsere FLIR-Apps an
Nutzen Sie unsere Apps, um Ihre IR-Bilder zu analysieren, Berichte zu erstellen
und um Ihre Berichte per Dropbox, Box.net, FTP, E-Mail usw. zu teilen.
Gehen Sie mit Ihrem Mobilgerät auf die folgende Website, und laden Sie die
Apps herunter:
http://onelink.to/tools
6.6 Schnelleinstieg
Gehen Sie folgendermaßen vor:
1. Setzen Sie einen Akku in das Akkufach ein.
2. Laden Sie vor dem erstmaligen Starten der Kamera den Akku 4 Stunden
lang auf oder bis die LED-Akkuanzeige kontinuierlich grün leuchtet.
3. Setzen Sie eine Speicherkarte in den Kartensteckplatz ein.
4. Drücken Sie
, um die Kamera einzuschalten.
5. Richten Sie die Kamera auf das gewünschte Objekt.
6. Stellen Sie den Fokus der Kamera durch Drehen des Fokusrings ein.
Hinweis Es ist sehr wichtig, dass Sie den Fokus korrekt einstellen. Eine
fehlerhafte Fokuseinstellung wirkt sich auf die Arbeitsweise der Bildmodi
MSX, Infrarot und Bild im Bild aus. Von den Auswirkungen ist auch die Temperaturmessung betroffen.
7. Drücken Sie die Speichern-Taste (den Auslöser) ganz nach unten, um ein
Bild zu speichern.
8. Installieren Sie FLIR Tools auf Ihrem Computer.
#T810135; r. AB/33065/33066; mul 21
Page 30

6 DE-DE Deutsch
9. Starten Sie FLIR Tools.
10. Schließen Sie die Kamera über das USB-Kabel an den Computer an.
11. Importieren Sie die Bilder in FLIR Tools und erstellen Sie einen PDF-Bericht.
6.7 Ansicht von rechts
Siehe Figure 2.1 View from the right, Seite 2.
1. Abdeckung für rechtes Fach:
• USB-A-Anschluss.
• USB-Mini-B-Anschluss.
• Netzanschluss.
2. Schaltfläche Speichern.
3. Stativbefestigung – Adapter erforderlich (Sonderzubehör).
4. Fokusring.
5. Infrarotobjektiv.
6.8 Ansicht von links
Siehe Figure 2.2 View from the left, Seite 2.
1. Laserpointer.
2. Lampe der Digitalkamera.
3. Digitalkamera
4. Abdeckung für linkes Fach:
• Videoausgang (composite video).
• Speicherkarten-Kartensteckplatz.
6.9 LCD und Tastatur.
Siehe Figure 2.3 LCD and keypad, Seite 3.
1. LCD-Display mit Touchscreen.
2. Navigationstastenfeld mit Schaltfläche in der Mitte.
3. Bildarchiv-Taste.
4. Taste zum Einschalten des Laserpointers.
#T810135; r. AB/33065/33066; mul 22
Page 31

6 DE-DE Deutsch
5. Ein/Aus-Taste.
Funktion:
• Drücken Sie die
• Halten Sie die
-Taste, um die Kamera einzuschalten.
-Taste kürzer als 5 Sekunden gedrückt, um die Kamera in den Standby-Modus zu versetzen. Die Kamera schaltet sich automatisch nach 6 Stunden aus.
• Halten Sie die
-Taste länger als 10 Sekunden gedrückt, um die Kamera auszuschalten.
6. Zurück-Taste.
6.10 Ansicht von unten
Siehe Figure 2.4 View from the bottom, Seite 3.
1. Verriegelung der Akkufach-Abdeckung. Zum Öffnen drücken.
6.11 Bildschirmelemente
Siehe Figure 2.5 Screen elements, Seite 4.
1. Messwerkzeuge (z. B. Messpunkt).
2. Tabelle mit Messergebnissen.
3. Statussymbole und Benachrichtigungen.
4. Temperaturskala.
5. Symbolleistenschaltfläche "Lampe".
6. Symbolleistenschaltfläche "Temperatur".
7. Symbolleistenschaltfläche "Farbe".
8. Symbolleistenschaltfläche "Messung"
9. Symbolleistenschaltfläche "Bildmodi".
10. Symbolleistenschaltfläche "Aufnahmemodus".
11. Symbolleistenschaltfläche "Einstellungen".
Hinweis Tippen Sie auf den Bildschirm oder drücken Sie das
Navigationstastenfeld.
#T810135; r. AB/33065/33066; mul 23
Page 32

6 DE-DE Deutsch
6.12 Bitte beachten Sie Folgendes
• Stellen Sie zunächst die Bildschärfe ein. Wenn die Kamera nicht richtig
scharfgestellt ist, führt dies zu falschen Messungen.
• Die meisten Kameras passen die Skala standardmäßig automatisch an. Verwenden Sie zunächst diesen Modus, scheuen Sie sich aber nicht, die Skala
manuell einzustellen.
• Eine Infrarotkamera besitzt eine Auflösungsgrenze. Diese hängt von der Größe des Detektors, dem Objektiv und dem Abstand zum Ziel ab. Verwenden
Sie die Mitte des Punkt-Messwerkzeugs als Anhaltspunkt für die kleinstmögliche Objektgröße, und verringern Sie bei Bedarf den Abstand zum Objekt.
Achten Sie darauf, sich von Gefahrenbereichen und unter Spannung stehenden elektronischen Bauteilen fern zu halten.
• Lassen Sie besondere Sorgfalt walten, wenn Sie die Kamera rechtwinklig
zum Zielobjekt halten – Sie können sonst leicht selbst zur Hauptreflexionsquelle werden.
• Wählen Sie einen Bereich mit hohem Emissionsgrad, z. B. einen Bereich mit
matter Oberfläche, um eine Messung durchzuführen.
• Blanke Objekte, d. h., solche mit geringen Emissionsgraden, können in der
Kamera als warm oder kalt erscheinen, da sie in erster Linie ihre jeweilige
Umgebung reflektieren.
• Die Elemente, die Sie untersuchen möchten, sollten keiner direkten Sonneneinstrahlung ausgesetzt sein.
• Unterschiedliche Mängel, beispielsweise in der Gebäudekonstruktion, können zu gleichen Wärmemustern führen.
• Um ein Infrarotbild korrekt analysieren zu können, müssen Sie über die entsprechenden Fachkenntnisse verfügen.
6.13 Schulung
Lernen Sie im Infrared Training Center den Nutzen aus Ihrer Investition in die
Wärmebildtechnik zu maximieren:
www.infraredtraining.com info_us@infraredtraining.com
www.irtraining.eu info@irtraining.eu
www.irtraining.com itc@flir.se
#T810135; r. AB/33065/33066; mul 24
Page 33

6 DE-DE Deutsch
6.14 Kundendienst
Wenn Probleme auftreten oder Sie Fragen zu unserem Produkt haben, wenden
Sie sich an unser Customer Support Center unter http://support.flir.com.
#T810135; r. AB/33065/33066; mul 25
Page 34

7 EL-GR Ελληνικά
7.1 Ευχαριστούμε!
Ευχαριστούμε που επιλέξατε ένα προϊόν της FLIR Systems. Ελπίζουμε ότι το
προϊόν θα ικανοποιήσει τις προσδοκίες σας και ότι θα εμπιστευτείτε ξανά την
εταιρεία μας για τις μελλοντικές ανάγκες σας.
7.2 Διαβάστε το εγχειρίδιο πριν τη χρήση
Ανατρέξτε στον παρακάτω ιστότοπο για να διαβάσετε
ή να κάνετε λήψη του εγχειριδίου:
http://support.flir.com/resources/42p5
7.3 Επέκταση εγγύησης προϊόντος
Στόχος μας είναι να παρέχουμε τη βέλτιστη ποιότητα υλικών και εργασίας στον
κλάδο. Για να το αποδείξουμε, προσφέρουμε την πιο γενναιόδωρη επέκταση
εγγύησης στην αγορά.
Δηλώστε την κάμερά σας τώρα για να αποκτήσετε:
• εγγύηση κάμερας για 2 χρόνια
• εγγύηση ανιχνευτή για 10 χρόνια
Ανατρέξτε στον παρακάτω ιστότοπο για να ενεργοποιήσετε την επέκταση
εγγύησης:
http://www.flir.com/thg/warranty
Σημειωση Η δήλωση πρέπει να ολοκληρωθεί μέσα σε διάστημα 60 ημερών
από την ημερομηνία αγοράς.
#T810135; r. AB/33065/33066; mul 26
Page 35

7 EL-GR Ελληνικά
7.4 Λήψη του FLIR Tools
Με το FLIR Tools μπορείτε να δημιουργείτε γρήγορα επαγγελματικές εκθέσεις
επιθεώρησης, οι οποίες δείχνουν ξεκάθαρα στους υπεύθυνους λήψης αποφάσεων τι έχετε εντοπίσει με την κάμερα υπερύθρων.
Μπορείτε να εισαγάγετε, να αναλύσετε και να βελτιώσετε εύκολα τις εικόνες,
και έπειτα να τις ενσωματώσετε σε συνοπτικά έγγραφα, μαζί με τα ευρήματά
σας και την αιτιολόγηση των εργασιών αποκατάστασης.
Ανατρέξτε στον παρακάτω ιστότοπο για να κάνετε λήψη του FLIR Tools:
http://support.flir.com/tools
7.5 Ρίξτε μια ματιά στις εφαρμογές της FLIR
Χρησιμοποιήστε τις εφαρμογές μας για να αναλύσετε εικόνες υπερύθρων, να
δημιουργήσετε εκθέσεις και να τις μοιραστείτε μέσω Dropbox, Box.net, FTP,
email κ.λπ.
Χρησιμοποιήστε την κινητή συσκευή σας για να μεταβείτε στον παρακάτω
ιστότοπο και να κάνετε λήψη των εφαρμογών:
http://onelink.to/tools
7.6 Εγχειρίδιο γρήγορης εκκίνησης
Ακολουθήστε την εξής διαδικασία:
1. Τοποθετήστε μία μπαταρία στην υποδοχή της.
2. Φορτίστε τη μπαταρία για 4 ώρες προτού ξεκινήσετε τη λειτουργία της κά-
μερας για πρώτη φορά ή έως ότου η πράσινη ενδεικτική λυχνία LED ανάβει συνεχώς.
3. Εισαγάγετε μια κάρτα μνήμης στην υποδοχή της κάρτας.
4. Πατήστε
για να ενεργοποιήσετε την κάμερα.
5. Στοχεύστε την κάμερα προς το επιθυμητό αντικείμενο.
6. Ρυθμίστε την εστίαση της κάμερας περιστρέφοντας το δακτύλιο εστίασης.
Σημειωση Είναι πολύ σημαντικό να ρυθμίσετε σωστά την εστίαση. Λανθασμένη ρύθμιση της εστίασης θα επηρεάσει τους τρόπους λειτουργίας εικόνας MSX, Θερμική και Φωτογραφία σε φωτογραφία. Επίσης, θα
επηρεάσει τη μέτρηση της θερμοκρασίας.
#T810135; r. AB/33065/33066; mul 27
Page 36

7 EL-GR Ελληνικά
7. Πατήστε το κουμπί Αποθήκευση (τη σκανδάλη) για να αποθηκεύσετε μια
εικόνα.
8. Εγκαταστήστε το FLIR Tools στον υπολογιστή σας.
9. Ανοίξτε το FLIR Tools.
10. Συνδέστε την κάμερα στον υπολογιστή μέσω του καλωδίου USB.
11. Εισαγάγετε τις εικόνες στο FLIR Tools και δημιουργήστε μια έκθεση ως αρ-
χείο PDF.
7.7 Δεξιά όψη
Δείτε Figure 2.1 View from the right, σελίδα 2.
1. Κάλυμμα για το δεξιό χώρο:
• Υποδοχή σύνδεσης USB-A.
• Υποδοχή σύνδεσης USB τύπου mini-B.
• Υποδοχή σύνδεσης ρεύματος.
2. Κουμπί αποθήκευσης.
3. Υποδοχή στερέωσης τρίποδα. Απαιτείται προσαρμογέας (πρόσθετο
εξάρτημα).
4. Δακτύλιος εστίασης.
5. Φακός υπερύθρων.
7.8 Αριστερή όψη
Δείτε Figure 2.2 View from the left, σελίδα 2.
1. Δείκτης λέιζερ.
2. Λυχνία ψηφιακής κάμερας.
3. Ψηφιακή κάμερα.
4. Κάλυμμα για τον αριστερό χώρο:
• Υποδοχή σύνδεσης εξόδου βίντεο (σύνθετο βίντεο).
• Υποδοχή κάρτας μνήμης.
7.9 Οθόνη LCD και πληκτρολόγιο
Δείτε Figure 2.3 LCD and keypad, σελίδα 3.
1. Οθόνη αφής LCD.
2. Κουμπιά κατεύθυνσης με κεντρικό κουμπί.
3. Κουμπί αρχείου εικόνων.
4. Κουμπί για τη λειτουργία του δείκτη λέιζερ.
#T810135; r. AB/33065/33066; mul 28
Page 37

7 EL-GR Ελληνικά
5. Κουμπί On/Off.
Λειτουργία:
• Για να ενεργοποιήσετε την κάμερα, πατήστε το κουμπί
• Πατήστε παρατεταμένα το κουμπί
για λιγότερο από 5 δευτερό-
.
λεπτα, για να θέσετε την κάμερα σε λειτουργία αναμονής. Στη συνέχεια, η κάμερα θα απενεργοποιηθεί μετά από 6 ώρες.
• Για να απενεργοποιήσετε την κάμερα, πατήστε παρατεταμένα το κου-
μπί
για πάνω από 10 δευτερόλεπτα.
6. Κουμπί πίσω.
7.10 Προβολή από το κάτω μέρος
Δείτε Figure 2.4 View from the bottom, σελίδα 3.
1. Ασφάλεια για το άνοιγμα του καλύμματος του χώρου της μπαταρίας. Πιέ-
στε για να ανοίξει.
7.11 Στοιχεία οθόνης
Δείτε Figure 2.5 Screen elements, σελίδα 4.
1. Εργαλεία μέτρησης (π.χ. σημειακός μετρητής).
2. Πίνακας αποτελεσμάτων μέτρησης.
3. Εικονίδια και ειδοποιήσεις κατάστασης.
4. Κλίμακα θερμοκρασίας.
5. Κουμπί "Λυχνία" στη γραμμή εργαλείων.
6. Κουμπί "Κλίμακα θερμοκρασίας" στη γραμμή εργαλείων.
7. Κουμπί "Χρώμα" στη γραμμή εργαλείων.
8. Κουμπί "Μέτρηση" στη γραμμή εργαλείων.
9. Κουμπί "Τρόποι λειτουργίας εικόνων" στη γραμμή εργαλείων.
10. Κουμπί "Τρόπος λειτουργίας εγγραφής" στη γραμμή εργαλείων.
11. Κουμπί "Ρυθμίσεις" στη γραμμή εργαλείων.
Σημειωση Για προβολή του συστήματος μενού, πατήστε την οθόνη ή πατήστε τα κουμπιά κατεύθυνσης.
#T810135; r. AB/33065/33066; mul 29
Page 38

7 EL-GR Ελληνικά
7.12 Να θυμάστε
• Πρώτα ρυθμίστε την εστίαση. Όταν η κάμερα βρίσκεται εκτός πεδίου εστίασης, η μέτρηση θα είναι λανθασμένη.
• Από προεπιλογή, οι περισσότερες κάμερες προσαρμόζουν την κλίμακα αυτόματα. Χρησιμοποιήστε πρώτα αυτή τη λειτουργία, αλλά μη διστάσετε να
ρυθμίσετε την κλίμακα μη αυτόματα.
• Οι θερμικές κάμερες έχουν όριο ανάλυσης. Αυτό εξαρτάται από το μέγεθος
του ανιχνευτή, από το φακό και την απόσταση του στόχου. Χρησιμοποιήστε
το κέντρο του εργαλείου μέτρησης σημείου ως οδηγό για το ελάχιστο δυνατό μέγεθος αντικειμένου και πλησιάστε, αν απαιτείται. Φροντίστε να απομακρυνθείτε από επικίνδυνες περιοχές και ηλεκτρικά εξαρτήματα σε
λειτουργία.
• Να είστε προσεκτικοί όταν κρατάτε την κάμερα κάθετα προς το στόχο.
Μπορεί να γίνετε η κύρια πηγή αντανάκλασης.
• Επιλέξτε μια ζώνη υψηλού συντελεστή εκπομπής, π.χ. μια περιοχή με ματ
επιφάνεια, για την εκτέλεση της μέτρησης.
• Τα κενά αντικείμενα, δηλαδή εκείνα με χαμηλό συντελεστή εκπομπής, μπορεί να εμφανιστούν θερμά ή ψυχρά στην κάμερα, καθώς κυρίως αντανακλούν το περιβάλλον.
• Αποφύγετε την άμεση επαφή του ηλιακού φωτός με τις λεπτομέρειες που
επιθεωρείτε.
• Διάφοροι τύποι σφαλμάτων, όπως αυτά σε μια οικοδομή, μπορεί να έχουν
ως αποτέλεσμα τον ίδιο τύπο θερμικού μοτίβο.
• Η σωστή ανάλυση μιας υπέρυθρης εικόνας απαιτεί επαγγελματική γνώση
του αντικειμένου.
7.13 Εκπαίδευση
Μεγιστοποιήστε την επένδυσή σας στη θερμική απεικόνιση με τη βοήθεια του
Infrared Training Center:
www.infraredtraining.com info_us@infraredtraining.com
www.irtraining.eu info@irtraining.eu
www.irtraining.com itc@flir.se
#T810135; r. AB/33065/33066; mul 30
Page 39

7 EL-GR Ελληνικά
7.14 Υποστήριξη πελατών
Μην διστάσετε να επικοινωνήσετε με το Κέντρο υποστήριξης πελατών μας
στη διεύθυνση http://support.flir.com αν αντιμετωπίσετε προβλήματα ή έχετε
οποιαδήποτε ερώτηση για το προϊόν.
#T810135; r. AB/33065/33066; mul 31
Page 40

8 ES-ES Español
8.1 Gracias.
Gracias por escoger un producto FLIR Systems. Esperamos que cumpla sus expectativas y nos vuelva a considerar para compras futuras.
8.2 Lea el manual antes de usar el producto
Visite el siguiente sitio web para leer o descargar el
manual:
http://support.flir.com/resources/42p5
8.3 Amplíe la garantía de sus productos
Nuestro objetivo es ofrecer la mejor calidad y mano de obra del sector. Para ello,
ofrecemos la mayor garantía del mercado.
Registre su cámara y obtendrá:
• 2 años de garantía en cámaras
• 10 años de garantía en detectores
Visite el siguiente sitio web para activar su garantía ampliada:
http://www.flir.com/thg/warranty
Nota El registro debe completarse dentro de los primeros 60 días de la compra.
8.4 Descargue FLIR Tools
FLIR Tools le permite crear rápidamente informes profesionales de inspección
que muestran con claridad a los responsables de toma de decisiones los resultados que ha detectado con su cámara infrarroja.
#T810135; r. AB/33065/33066; mul 32
Page 41

8 ES-ES Español
Importe, analice y ajuste las imágenes con facilidad para incorporarlas a unos
documentos realmente precisos y comparta la información para justificar las reparaciones necesarias.
Visite el siguiente sitio web para descargar FLIR Tools:
http://support.flir.com/tools
8.5 Pruebe nuestras aplicaciones FLIR
Use nuestras aplicaciones para analizar sus imágenes infrarrojas y comparta
sus informes mediante Dropbox, Box.net, FTP, correo electrónico, etc.
Utilice su dispositivo móvil para acceder al siguiente sitio web y descargar las
aplicaciones:
http://onelink.to/tools
8.6 Guía de inicio rápido
Lleve a cabo el siguiente procedimiento:
1. Ponga una batería en el compartimento.
2. Cargue la batería durante 4 horas antes de encender la cámara por primera
vez, o hasta que el indicador LED de estado de la batería se ilumine de forma continua en verde.
3. Inserte una tarjeta de memoria en la ranura para tarjetas.
4. Pulse
para encender la cámara.
5. Oriente la cámara hacia el objeto de interés.
6. Ajuste el enfoque girando la anilla de enfoque.
Nota Es muy importante ajustar el enfoque correctamente. Un ajuste incorrecto del enfoque afecta al funcionamiento de los modos de imagen MSX,
Térmico y Imagen en imagen. También afecta a la medición de la
temperatura.
7. Pulse el botón de guardar (el disparador) para guardar una imagen.
8. Instale FLIR Tools en el equipo.
9. Inicie FLIR Tools.
10. Conecte la cámara al equipo mediante el cable USB.
11. Importe las imágenes a FLIR Tools y cree un informe en PDF.
#T810135; r. AB/33065/33066; mul 33
Page 42

8 ES-ES Español
8.7 Vista desde la derecha
Consulte Figure 2.1 View from the right, página 2.
1. Cubierta del compartimento de la derecha:
• Conector USB A.
• Conector USB mini B.
• Conector de alimentación.
2. Botón para guardar.
3. Soporte para trípode. Requiere un adaptador (accesorio adicional).
4. Anillo de enfoque.
5. Lente de infrarrojos.
8.8 Vista desde la izquierda
Consulte Figure 2.2 View from the left, página 2.
1. Puntero láser.
2. Lámpara para la cámara digital.
3. Cámara digital.
4. Cubierta del compartimento de la izquierda:
• Conector de salida de vídeo (vídeo compuesto).
• Ranura de tarjeta de memoria.
8.9 Pantalla LCD y teclado
Consulte Figure 2.3 LCD and keypad, página 3.
1. Pantalla táctil LCD.
2. Mando de navegación con pulsador central.
3. Botón de archivo de imágenes.
4. Botón para utilizar el puntero láser.
#T810135; r. AB/33065/33066; mul 34
Page 43

8 ES-ES Español
5. Botón de encendido.
Función:
• Pulse el botón
• Mantenga pulsado el botón
para encender la cámara.
menos de 5 segundos para poner la
cámara en modo de espera. La cámara se apagará automáticamente
después de 6 horas.
• Mantenga pulsado el botón
durante más de 10 segundos para
apagar la cámara.
6. Botón para volver.
8.10 Vista desde la parte inferior
Consulte Figure 2.4 View from the bottom, página 3.
1. Pestaña para abrir la cubierta del compartimento de la batería. Presione para abrir.
8.11 Elementos de la pantalla
Consulte Figure 2.5 Screen elements, página 4.
1. Herramientas de medición (p. ej., puntero de medida).
2. Tabla de resultados de medición.
3. Iconos e indicadores de estado.
4. Escala de temperatura.
5. Botón de iluminación de la barra de herramientas.
6. Botón de escala de temperatura de la barra de herramientas.
7. Botón de color de la barra de herramientas.
8. Botón de medición de la barra de herramientas.
9. Botón de modo de imagen de la barra de herramientas.
10. Botón de modo de grabación de la barra de herramientas.
11. Botón de barra de herramientas de ajustes.
Nota Para ver el sistema de menús, toque la pantalla o pulse el mando de
navegación.
#T810135; r. AB/33065/33066; mul 35
Page 44

8 ES-ES Español
8.12 Consideraciones que se deben tener en cuenta
• Ajuste primero el enfoque. Si la cámara está desenfocada, la medición será
incorrecta.
• Por defecto, la mayoría de las cámaras se adaptan a la escala automática-
mente. Utilice primero este modo, pero no dude en ajustar la escala
manualmente.
• Una cámara térmica cuenta con un límite de resolución. Esto depende del ta-
maño del detector, de la lente y de la distancia a la que se encuentre el objetivo. Utilice el centro de la herramienta de puntero como guía para ver el
tamaño de objeto mínimo posible, y acérquese si es necesario. Asegúrese
de permanecer alejado de zonas peligrosas y de componentes eléctricos
activos.
• Tenga cuidado cuando sostenga la cámara perpendicular al objetivo; usted
podría convertirse en la principal fuente de reflexión.
• Seleccione una zona de alta emisividad; por ejemplo, un área con una super-
ficie mate, para realizar una medición.
• Los objetos blancos, es decir, con baja emisividad, pueden mostrarse calien-
tes o fríos en la cámara, ya que pueden reflejar el entorno.
• Evite la luz directa del sol en los detalles que esté inspeccionando.
• Distintos tipos de fallos, como los de la construcción de un edificio, pueden
generar el mismo tipo de patrón térmico.
• El análisis correcto de una imagen de infrarrojos requiere conocimientos pro-
fesionales acerca de la aplicación.
8.13 Formación
Deje que Infrared Training Center le ayude a maximizar su inversión en un dispositivo termográfico:
www.infraredtraining.com info_us@infraredtraining.com
www.irtraining.eu info@irtraining.eu
www.irtraining.com itc@flir.se
#T810135; r. AB/33065/33066; mul 36
Page 45

8 ES-ES Español
8.14 Atención al cliente
No dude en ponerse en contacto con nuestro centro de soporte técnico en
http://support.flir.com si tiene problemas o alguna pregunta referente a su
producto.
#T810135; r. AB/33065/33066; mul 37
Page 46

9 FI-FI Suomi
9.1 Kiitos!
Kiitos, että valitsit FLIR Systems -tuotteen. Toivottavasti tuote vastaa odotuksiasi
ja hyödynnät tarjontaamme tulevaisuudessakin.
9.2 Lue opas ennen käyttöä
Voit lukea tai ladata oppaan seuraavasta osoitteesta:
http://support.flir.com/resources/42p5
9.3 Tuotteen takuupaketin laajentaminen
Pyrimme tarjoamaan parasta laatua ja työtä tällä alalla. Osoituksena tästä tarjoamme markkinoiden laajimman takuupaketin.
Rekisteröi kamerasi, niin saat takuun:
• 2 vuoden takuu kameralle
• 10 vuoden takuu ilmaisimelle.
Ota laajennettu takuupaketti käyttöön seuraavassa osoitteessa:
http://www.flir.com/thg/warranty
Huom Tuote on rekisteröitävä 60 päivän kuluessa ostohetkestä.
9.4 FLIR Tools -ohjelmiston lataaminen
FLIR Tools -ohjelmistolla voit luoda nopeasti ammattimaisia tarkastusraportteja,
joista käyvät selvästi ilmi lämpökameralla tehdyt löydökset.
Tuo, analysoi ja säädä kuvia helposti. Luo sitten löydöksistä ja korjaustarpeista
ytimekkäitä raportteja.
#T810135; r. AB/33065/33066; mul 38
Page 47

9 FI-FI Suomi
Lataa FLIR Tools seuraavasta osoitteesta:
http://support.flir.com/tools
9.5 FLIR -sovellukset
Käytä sovelluksiamme lämpökuvien analysoimiseen, raporttien luomiseen ja niiden jakamiseen esimerkiksi Dropbox-, Box.net-, FTP- ja sähköpostipalvelun
avulla.
Lataa sovellukset mobiililaitteen avulla seuraavasta osoitteesta:
http://onelink.to/tools
9.6 Pika-aloitusopas
Toimi seuraavasti:
1. Aseta akku akkulokeroon.
2. Lataa akkua neljä tuntia ennen kameran ensimmäistä käynnistyskertaa tai
kunnes akun tilan vihreä merkkivalo palaa jatkuvasti.
3. Aseta muistikortti korttipaikkaan.
4. Käynnistä kamera painamalla
-näppäintä.
5. Suuntaa kamera kuvauskohteeseen.
6. Säädä tarkennus kiertämällä tarkennusrengasta.
Huom Tarkennuksen säätäminen oikein on erittäin tärkeää. Virheelliset tar-
kennussäädöt vaikuttavat siihen, miten kuvatilat MSX, Lämpökuva ja Kuva
kuvassa toimivat. Tarkennusasetukset vaikuttavat myös lämpötilan
mittaamiseen.
7. Tallenna kuva painamalla tallennuspainiketta (laukaisinta).
8. Asenna FLIR Tools tietokoneeseen.
9. Käynnistä FLIR Tools.
10. Kytke kamera tietokoneeseen USB-kaapelilla.
11. Tuo kuvat kohteeseen FLIR Tools ja luo PDF-raportti.
#T810135; r. AB/33065/33066; mul 39
Page 48

9 FI-FI Suomi
9.7 Kuva oikealta
Katso Figure 2.1 View from the right, sivu 2.
1. Oikeanpuoleisen lokeron kansi:
• USB-A-liitin
• USB-mini-B-liitin
• virtaliitin.
2. Tallennuspainike.
3. Jalustan kiinnityskohta. Edellyttää sovitinta (lisävaruste).
4. Tarkennusrengas.
5. Infrapunalinssi.
9.8 Kuva vasemmalta
Katso Figure 2.2 View from the left, sivu 2.
1. Laserosoitin.
2. Digitaalikameran lamppu.
3. Digitaalikamera.
4. Vasemmanpuoleisen lokeron kansi:
• videolähtöliitin (komposiittivideo)
• muistikorttipaikka.
9.9 LCD-näyttö ja painikkeet
Katso Figure 2.3 LCD and keypad, sivu 3.
1. LCD-kosketusnäyttö.
2. Nuolinäppäimet ja keskipainike.
3. Kuvakansiopainike.
4. Laserosoittimen käyttöpainike.
#T810135; r. AB/33065/33066; mul 40
Page 49

9 FI-FI Suomi
5. Virtapainike.
Käyttö:
• Käynnistä kamera painamalla
• Siirrä kamera valmiustilaan pitämällä
-painiketta.
-painiketta painettuna alle 5
sekuntia. Kamera sammuu automaattisesti 6 tunnin kuluttua.
• Sammuta kamera pitämällä
-painiketta painettuna yli 10 sekuntia.
6. Paluupainike.
9.10 Kuva alhaalta
Katso Figure 2.4 View from the bottom, sivu 3.
1. Salpa, jota painamalla avataan akkulokeron kansi.
9.11 Näytön osat
Katso Figure 2.5 Screen elements, sivu 4.
1. Mittaustyökalut (esimerkiksi mittauspiste).
2. Mittaustulos.
3. Tilakuvakkeet ja ilmoitukset.
4. Lämpötila-asteikko.
5. Lampputyökalurivin painike.
6. Lämpötila-asteikkotyökalurivin painike.
7. Värityökalurivin painike.
8. Mittaustyökalurivin painike.
9. Kuvatilatyökalurivin painike.
10. Tallennustilatyökalurivin painike.
11. Asetustyökalurivin painike.
Huom Saat valikon näkyviin napauttamalla näyttöä tai painamalla
nuolinäppäinpainiketta.
9.12 Muistettavaa
• Säädä ensin tarkennus. Jos kamera on väärin tarkennettu, mittaustulos on
virheellinen.
#T810135; r. AB/33065/33066; mul 41
Page 50

9 FI-FI Suomi
• Useimmissa kameroissa asteikko säätyy automaattisesti. Käytä automaatti-
säätöä ensin ja tarvittaessa säädä asteikkoa manuaalisesti.
• Lämpökamerassa on tarkkuusraja, johon vaikuttavat ilmaisimen koko, linssi ja
etäisyys kohteeseen. Mittauspistetyökalun keskikohdan avulla voit tarkistaa,
kuinka suuri kohteen on vähintään oltava. Siirry tarvittaessa lähemmäksi. Pysy kaukana vaarallisilta alueilta ja jännitteellisistä komponenteista.
• Ole tarkkana, kun pidät kameraa pystysuorassa kohteeseen nähden. Muussa
tapauksessa sinusta voi tulla heijastusten pääasiallinen lähde.
• Valitse mittaukseen erittäin emissiivinen alue, kuten himmeäpintainen alue.
• Kiiltävät, vähän emissiiviset kohteet voivat näkyä kamerassa lämpiminä tai
kylminä, sillä ne lähinnä aiheuttavat heijastuksia.
• Vältä suoraa auringonvaloa kuvattavissa kohteissa.
• Erityyppiset viat, kuten rakennuksen rakenneviat, voivat tuottaa samantyyppi-
siä lämpökuvia.
• Lämpökuvien oikea analysointi edellyttää ammattitietoutta käyttökohteesta.
9.13 Koulutus
Infrared Training Center voi auttaa – saat suurimman hyödyn investoinnistasi
lämpökuvaukseen:
www.infraredtraining.com info_us@infraredtraining.com
www.irtraining.eu info@irtraining.eu
www.irtraining.com itc@flir.se
9.14 Asiakastuki
Jos sinulla on kysyttävää tuotteesta tai havaitset siihen liittyviä ongelmia, ota yhteys asiakastukeen osoitteessa http://support.flir.com.
#T810135; r. AB/33065/33066; mul 42
Page 51

10 FR-FR Français
10.1 Merci !
Merci d'avoir choisi un produit FLIR Systems. Nous espérons que ce produit
vous apportera entière satisfaction et que vous choisirez à nouveau notre
marque lors de vos prochains achats.
10.2 Veuillez lire le manuel avant utilisation
Rendez-vous sur le site Web suivant pour consulter ou
télécharger le manuel :
http://support.flir.com/resources/42p5
10.3 Étendez la garantie de votre produit
Notre objectif est de proposer la meilleure qualité et la meilleure main-d'œuvre
du secteur. Dans ce but, nous offrons la meilleure garantie étendue du marché.
Enregistrez votre caméra dès maintenant et profitez des garanties suivantes :
• 2 ans de garantie sur la caméra
• 10 ans de garantie sur le détecteur
Rendez-vous sur le site Web suivant pour activer votre garantie étendue :
http://www.flir.com/thg/warranty
Remarque Vous devez enregistrer votre produit dans les 60 jours suivant son
achat.
10.4 Téléchargez FLIR Tools
FLIR Tools vous permet de créer rapidement des rapports d'inspection professionnels afin que vous puissiez faire part de votre diagnostic aux personnes en
charge, caméra infrarouge à l'appui.
#T810135; r. AB/33065/33066; mul 43
Page 52

10 FR-FR Français
Importez, analysez et ajustez vos images en toute simplicité pour les intégrer
dans des documents concis à partager pour convaincre de la nécessité des réparations à effectuer.
Rendez-vous sur le site Web suivant pour télécharger FLIR Tools :
http://support.flir.com/tools
10.5 Découvrez nos applications FLIR
Utilisez nos applications pour analyser vos images infrarouges et pour générer et
partager vos rapports à l'aide de Dropbox, de Box.net, par FTP, par e-mail, etc.
Utilisez votre appareil mobile pour vous rendre sur le site Web suivant et télécharger les applications :
http://onelink.to/tools
10.6 Guide de démarrage rapide
Procédez comme suit :
1. Placez une batterie dans le compartiment.
2. Chargez la batterie pendant 4 heures avant le tout premier démarrage de la
caméra ou attendez que le voyant DEL vert d'état de la batterie s'allume en
continu.
3. Insérez une carte mémoire dans le logement de la carte.
4. Appuyez sur
pour mettre la caméra sous tension.
5. Orientez la caméra vers l'objet cible.
6. Réglez la mise au point en tournant la bague de mise au point.
Remarque Il est très important de régler la mise au point correctement. Un
mauvais réglage de la mise au point affecte le fonctionnement des modes
d'image Thermal MSX (Thermique MSX), Thermal (Thermique) et Picture-in-
picture (Superposition). La mesure de la température est également affectée.
7. Appuyez sur le bouton Enregistrer (le déclencheur) pour enregistrer une
image.
8. Installez FLIR Tools sur votre ordinateur.
9. Démarrez FLIR Tools.
10. Branchez la caméra à l’ordinateur à l’aide du câble USB.
11. Importez les images dans FLIR Tools et créez un rapport au format PDF.
#T810135; r. AB/33065/33066; mul 44
Page 53

10 FR-FR Français
10.7 Vue de droite
Voir Figure 2.1 View from the right, page 2.
1. Couvercle du compartiment droit :
• Connecteur USB-A.
• Connecteur USB mini-B.
• Prise d'alimentation.
2. Bouton Enregistrer.
3. Montage du trépied. Nécessite un adaptateur (accessoire supplémentaire).
4. Bague de mise au point.
5. Objectif infrarouge.
10.8 Vue de gauche
Voir Figure 2.2 View from the left, page 2.
1. Pointeur laser.
2. Lampe pour la caméra numérique.
3. Caméra numérique.
4. Couvercle du compartiment gauche :
• Connecteur de sortie vidéo (vidéo composite).
• Logement de carte mémoire.
10.9 LCD et pavé de navigation
Voir Figure 2.3 LCD and keypad, page 3.
1. Écran tactile LCD.
2. Pavé de navigation avec bouton central.
3. Bouton Images archivées.
4. Bouton d'actionnement du pointeur laser.
#T810135; r. AB/33065/33066; mul 45
Page 54

10 FR-FR Français
5. Bouton Marche/Arrêt.
Fonction :
• Appuyez sur le bouton
• Maintenez le bouton
pour allumer la caméra.
enfoncé pendant moins de 5 secondes pour
mettre la caméra en veille. La caméra s'éteint automatiquement au bout
de 6 heures.
• Maintenez le bouton
enfoncé pendant plus de 10 secondes pour
éteindre la caméra.
6. Bouton Précédent.
10.10 Vue inférieure
Voir Figure 2.4 View from the bottom, page 3.
1. Poussez le loquet pour ouvrir le couvercle du compartiment réservé à la
batterie.
10.11 Éléments de l'écran
Voir Figure 2.5 Screen elements, page 4.
1. Outils de mesure (par exemple, point de mesure).
2. Tableau de résultats de mesure.
3. Icônes d'état et notifications.
4. Échelle de température.
5. Bouton Lampe de la barre d'outils.
6. Bouton Échelle de température de la barre d'outils.
7. Bouton Couleur de la barre d'outils.
8. Bouton Mesure de la barre d'outils.
9. Bouton Modes d'image de la barre d'outils.
10. Bouton Mode d'enregistrement de la barre d'outils.
11. Bouton Paramètres de la barre d'outils.
Remarque Pour afficher les menus, appuyez sur l'écran ou appuyez sur le
pavé de navigation.
#T810135; r. AB/33065/33066; mul 46
Page 55

10 FR-FR Français
10.12 Rappels
• Procédez tout d'abord à la mise au point, car une mauvaise mise au point en-
traîne une mesure erronée.
• La plupart des caméras adaptent l'échelle automatiquement. Commencez
par utiliser ce mode, mais n'hésitez pas à régler l'échelle manuellement.
• Une caméra thermique dispose d'une limite de résolution qui dépend de la
taille du détecteur, de l'objectif et de la distance de la cible. Utilisez le centre
de l'outil point pour vous aider à obtenir la taille d'objet la plus petite possible
et rapprochez-vous en si nécessaire. Veillez à rester éloigné des zones dangereuses et des composants électriques sous tension.
• Maintenez la caméra perpendiculaire à l'objectif avec précaution, car vous
êtes susceptible de devenir la principale source de réflexion.
• Choisissez une zone à forte émissivité, par exemple une zone à surface mate,
pour effectuer une mesure.
• Les objets vides, c'est-à-dire à faible émissivité, peuvent apparaître chauds
ou froids à la caméra car ils réfléchissent leur environnement.
• Évitez la lumière directe du soleil sur les éléments que vous inspectez.
• Les différents types de défaut, par exemple les défauts de la structure d'un
bâtiment, peuvent entraîner le même type de profils thermiques.
• Pour analyser correctement une image infrarouge, vous devez posséder les
connaissances professionnelles requises pour son application.
10.13 Formation
Le centre de formation Infrared Training Center peut vous aider à optimiser votre
investissement dans l'imagerie thermique :
www.infraredtraining.com info_us@infraredtraining.com
www.irtraining.eu info@irtraining.eu
www.irtraining.com itc@flir.se
#T810135; r. AB/33065/33066; mul 47
Page 56

10 FR-FR Français
10.14 Assistance clientèle
N'hésitez pas à contacter notre centre d'assistance clientèle sur la page
http://support.flir.com si vous rencontrez des problèmes ou avez des questions
concernant votre produit.
#T810135; r. AB/33065/33066; mul 48
Page 57

11 HU-HU Magyar
11.1 Köszönjük!
Köszönjük, hogy a FLIR Systems termékét választotta. Reméljük, hogy a termék
megfelel elvárásainak, és a jövőben is minket választ majd.
11.2 Használat előtt olvassa el a kézikönyvet
Látogasson el az alábbi weboldalra az útmutató megtekintéséhez vagy letöltéséhez:
http://support.flir.com/resources/42p5
11.3 Hosszabbítsa meg a garanciát
Célunk, hogy a legjobb minőséget és kivitelezést nyújtsuk az iparban. Ezen törekvés zálogaként a legtovább tartó meghosszabbított garanciát kínáljuk a
piacon.
Regisztrálja most kameráját, és a következőkben részesülhet:
• 2 év garancia a kamerára
• 10 év garancia a detektorra
Navigáljon az alábbi weboldalra a meghosszabbított garancia aktiválásához:
http://www.flir.com/thg/warranty
Megjegyzés A regisztrációt a vásárlástól számított 60 napon belül el kell
végezni.
11.4 A FLIR Tools letöltése
A FLIR Tools segítségével professzionális felügyeleti jelentéseket hozhat létre,
amelyek képesek egyértelműen prezentálni a hőkamerás mérések eredményeit
a döntéshozók számára.
#T810135; r. AB/33065/33066; mul 49
Page 58

11 HU-HU Magyar
Egyszerűen importálhat, elemezhet, és finomhangolhat képeket. Ezt követően tömör dokumentumokba gyűjtheti azokat az eredmények megosztása, valamint javítások indoklása végett.
A FLIR Tools letöltéséhez látogasson el az alábbi weboldalra:
http://support.flir.com/tools
11.5 Tekintse meg FLIR alkalmazásainkat
Használja alkalmazásainkat az infravörös képek elemzéséhez és jelentések készítéséhez, majd ossza meg azokat a Dropbox, Box.net, FTP, e-mail stb.
használatával.
Használja mobileszközét a következő weboldalak eléréséhez és az alkalmazások letöltéséhez:
http://onelink.to/tools
11.6 Beüzemelési útmutató
Kövesse az alábbi eljárást:
1. Helyezzen akkumulátort az akkumulátortartóba.
2. Mielőtt először bekapcsolná a kamerát, töltse az akkumulátort 4 órán keresztül, vagy amíg az akkumulátor állapotát jelző LED zöld színnel folyamatosan
világítani nem kezd.
3. Helyezzen memóriakártyát a kártyafoglalatba.
4. A
megnyomásával bekapcsolhatja a kamerát.
5. Irányítsa a kamerát a vizsgált tárgy irányába.
6. Állítsa be a fókuszt a fókuszgyűrű elforgatásával.
Megjegyzés A fókusz megfelelő beállítása különösen fontos. A helytelen
fókuszbeállítás befolyásolja a MSX, Termikus és Kép a képben üzemmódok
működését, valamint a hőmérsékleti méréseket.
7. Nyomja meg a Mentés gombot (ravaszkapcsolót) a kép mentéséhez.
8. Telepítse a számítógépen a FLIR Tools programot.
9. Indítsa el a FLIR Tools alkalmazást.
10. Csatlakoztassa a kamerát a számítógéphez az USB-kábellel.
11. Importálja a képeket a FLIR Tools programba, és készítsen PDF-jelentést.
#T810135; r. AB/33065/33066; mul 50
Page 59

11 HU-HU Magyar
11.7 Jobb oldali nézet
Lásd: Figure 2.1 View from the right, oldal 2.
1. A jobb kéz felőli rekesz fedele:
• USB-A csatlakozó
• USB mini-B csatlakozó
• Tápcsatlakozó
2. Mentés gomb
3. Állványrögzítő. Átalakítót igényel (külön megvásárolható kiegészítő).
4. Fókuszgyűrű
5. Infravörös lencse
11.8 Bal oldali nézet
Lásd: Figure 2.2 View from the left, oldal 2.
1. Lézermutató
2. Digitális kamera lámpája
3. Digitális kamera
4. A bal kéz felőli rekesz fedele:
• Videokimenet csatlakozója (kompozit videó)
• Memóriakártya foglalata
11.9 LCD kijelző és billentyűzet
Lásd: Figure 2.3 LCD and keypad, oldal 3.
1. Érintőképernyős LCD kijelző
2. Navigációs gomb középső nyomógombbal
3. Képarchívum gomb
4. A lézermutató kezelőgombja
#T810135; r. AB/33065/33066; mul 51
Page 60

11 HU-HU Magyar
5. Be-/kikapcsoló gomb
Funkció:
• Nyomja meg a
• Tartsa nyomva a
gombot a kamera bekapcsolásához.
gombot 5 másodpercnél kevesebb ideig, hogy
készenléti üzemmódba kapcsolja a kamerát. 6 óra elteltével a kamera automatikusan kikapcsol.
• A kamera kikapcsolásához 10 másodpernél hosszabb ideig tartsa nyom-
va a
gombot.
6. Vissza gomb.
11.10 Alulnézet
Lásd: Figure 2.4 View from the bottom, oldal 3.
1. Az akkumulátortartó fedelének kinyitására szolgáló retesz. Nyomja be a fedél kinyitásához.
11.11 Képernyőelemek
Lásd: Figure 2.5 Screen elements, oldal 4.
1. Mérőeszközök (pl. pontmérő)
2. Mérési eredmények táblázata
3. Állapotikonok és értesítések
4. Hőmérsékleti skála
5. Lámpa eszköztárgomb
6. Hőmérsékleti skála eszköztárgomb
7. Szín eszköztárgomb
8. Mérés eszköztárgomb
9. Képmód eszköztárgomb
10. Rögzítési mód eszköztárgomb
11. Beállítások eszköztárgomb.
Megjegyzés A menürendszer megjelenítéséhez érintse meg a képernyőt vagy
nyomja meg a navigációs gombot.
#T810135; r. AB/33065/33066; mul 52
Page 61

11 HU-HU Magyar
11.12 Fontos tudnivalók
• Először a fókuszt állítsa be. Ha a kamera nincs fókuszban, a mérés rossz lesz.
• Alapértelmezés szerint a legtöbb kamera automatikusan adaptálja a skálát.
Először ezt a módot használja, de szükség esetén manuálisan állítsa be a
skálát.
• A hőkamera felbontása korlátozott. A felbontás a detektor méretétől, a len-
csétől, valamint a céltól való távolságtól függ. A pontmérő eszköz közepét
használva állapítsa meg a lehetséges minimális objektumméretet, és ha szükséges, menjen közelebb. Maradjon távol a veszélyes helyektől és a feszültség
alatt lévő elektromos alkatrészektől.
• Körültekintően járjon el, ha a kamerát a célra merőlegesen tartja – a teste a
reflexió fő forrásává válhat.
• A mérésekhez nagy fajlagos emisszióval rendelkező – pl. matt felületű – zónát
válasszon.
• Az alacsony fajlagos emissziójú, sima tárgyak melegnek vagy hidegnek tűn-
hetnek a kamerában, mivel visszaverik a sugárzást.
• A megvizsgált részeken kerülje a közvetlen napfényt.
• Különböző hibák (pl. épületszerkezeti hibák) ugyanilyen típusú termikus min-
tát eredményezhetnek.
• Az infravörös képek megfelelő elemzéséhez az alkalmazási szakterület ma-
gas szintű ismerete szükséges.
11.13 Képzés
Az Infrared Training Center segítségével a legtöbbet hozhatja ki a
hőképalkotásból:
www.infraredtraining.com info_us@infraredtraining.com
www.irtraining.eu info@irtraining.eu
www.irtraining.com itc@flir.se
11.14 Ügyfélszolgálat
Ha bármilyen problémát észlel vagy kérdése van a termékkel kapcsolatban, forduljon bizalommal Ügyfélszolgálatunkhoz az alábbi címen: http://support.flir.com.
#T810135; r. AB/33065/33066; mul 53
Page 62

12 IT-IT Italiano
12.1 Grazie!
Grazie per aver scelto un prodotto FLIR Systems. Ci auguriamo che il prodotto
sia all'altezza delle aspettative e che vorrà scegliere nuovamente i nostri prodotti
in futuro.
12.2 Leggere il manuale prima dell'utilizzo
Accedere al seguente sito Web per leggere o scaricare il
manuale:
http://support.flir.com/resources/42p5
12.3 Estensione della garanzia del prodotto
Il nostro scopo è quello di fornire la migliore qualità e lavorazione nel settore. Per
dimostrarlo, offriamo la garanzia più estesa presente sul mercato.
Registrando subito la termocamera, si riceverà quanto segue:
• 2 anni di garanzia per la termocamera
• 10 anni di garanzia per il rilevatore
Accedere al seguente sito Web per attivare la garanzia estesa:
http://www.flir.com/thg/warranty
Nota La registrazione deve essere completata entro 60 giorni dall'acquisto.
12.4 Download di FLIR Tools
FLIR Tools consente di creare rapidamente report di ispezione professionali che
mostrano in modo chiaro ai responsabili le rilevazioni effettuate con la termocamera a infrarossi.
#T810135; r. AB/33065/33066; mul 54
Page 63

12 IT-IT Italiano
Consente, inoltre, di importare, analizzare e ottimizzare le immagini con facilità e
di inserirle successivamente in documenti di sintesi per condividere i risultati e
giustificare gli interventi di riparazione.
Accedere al seguente sito Web per scaricare FLIR Tools:
http://support.flir.com/tools
12.5 Le nostre app FLIR
Con le nostre app è possibile analizzare le immagini a infrarossi, creare e condividere report utilizzando Dropbox, Box.net, FTP, e-mail e molto altro.
È possibile accedere al sito Web e scaricare le app direttamente dal proprio dispositivo mobile:
http://onelink.to/tools
12.6 Guida introduttiva
Attenersi alla procedura seguente:
1. Inserire una batteria nel vano batteria.
2. Prima di accendere la termocamera per la prima volta, caricare la batteria
per 4 ore o finché il LED di stato della batteria non rimane acceso fisso sul
verde.
3. Inserire una scheda di memoria nell'apposito slot.
4. Premere
per accendere la termocamera.
5. Puntare la termocamera verso il soggetto desiderato.
6. Regolare la messa a fuoco della termocamera ruotando la ghiera di messa a
fuoco.
Nota È importante regolare correttamente la messa a fuoco poiché una regolazione errata può compromettere il funzionamento delle modalità di immagine MSX, Termica e Picture-in-picture e la misurazione della
temperatura.
7. Per salvare un'immagine, premere il pulsante Salva (grilletto).
8. Installare FLIR Tools nel computer in uso.
9. Avviare FLIR Tools.
10. Collegare la termocamera al computer mediante il cavo USB.
11. Importare le immagini su FLIR Tools e creare un report in formato PDF.
#T810135; r. AB/33065/33066; mul 55
Page 64

12 IT-IT Italiano
12.7 Vista da destra
Vedere Figure 2.1 View from the right, pagina 2.
1. Coperchio per il vano destro:
• Connettore USB-A.
• USB, connettore mini-B.
• Connettore di alimentazione.
2. Pulsante Salva.
3. Punto di fissaggio del treppiede: richiede un adattatore (accessorio extra).
4. Ghiera di messa a fuoco.
5. Obiettivo ad infrarossi.
12.8 Vista da sinistra
Vedere Figure 2.2 View from the left, pagina 2.
1. Puntatore laser.
2. Illuminatore per videocamera digitale.
3. Videocamera digitale.
4. Coperchio per il vano sinistro:
• Connettore Video Out (video composito).
• Slot per scheda di memoria.
12.9 Schermo LCD e tastierina
Vedere Figure 2.3 LCD and keypad, pagina 3.
1. Schermo LCD touchscreen.
2. Tasto di navigazione a pressione centrale.
3. Pulsante di archiviazione immagine.
4. Pulsante per attivare il puntatore laser.
#T810135; r. AB/33065/33066; mul 56
Page 65

12 IT-IT Italiano
5. Pulsante di accensione/spegnimento.
Funzione:
• Per accendere la termocamera, premere il pulsante
.
• Per impostare la modalità standby della termocamera, tenere premuto il
pulsante
per meno di 5 secondi. La termocamera si spegne auto-
maticamente dopo 6 ore.
• Per spegnere la termocamera, tenere premuto il pulsante
per più
di 10 secondi.
6. Pulsante Indietro.
12.10 Vista dal basso
Vedere Figure 2.4 View from the bottom, pagina 3.
1. Leva di apertura del coperchio del vano batteria. Premere per aprire.
12.11 Elementi del display
Vedere Figure 2.5 Screen elements, pagina 4.
1. Strumenti di misurazione (ad esempio, puntatore).
2. Tabella dei risultati di misurazione.
3. Icone di stato e notifiche.
4. Scala temperatura.
5. Pulsante Lampada sulla barra degli strumenti.
6. Pulsante Scala di temperatura sulla barra degli strumenti.
7. Pulsante Colore sulla barra degli strumenti.
8. Pulsante Misurazione sulla barra degli strumenti.
9. Pulsante Modalità immagine sulla barra degli strumenti.
10. Pulsante Modalità di registrazione sulla barra degli strumenti.
11. Pulsante Impostazione barra strumenti.
Nota Per visualizzare il sistema di menu, toccare lo schermo o premere il tasto
di navigazione.
#T810135; r. AB/33065/33066; mul 57
Page 66

12 IT-IT Italiano
12.12 Promemoria
• Innanzitutto regolare la messa a fuoco. Quando la messa a fuoco della termo-
camera non è regolata, la misurazione non sarà corretta.
• Per impostazione predefinita, la maggior parte delle termocamere adattano la
scala automaticamente. Utilizzare prima questa modalità, ma non esitare a
impostare la scala manualmente.
• Una termocamera è dotata di una risoluzione limitata che dipende dalle di-
mensioni del rilevatore, dall'obiettivo e dalla distanza del soggetto. Utilizzare il
centro dello strumento puntatore come guida per determinare le dimensioni
dell'oggetto minime, quindi avvicinarsi se necessario. Assicurarsi di restare
lontano da aree pericolose e da componenti elettrici in funzione.
• Prestare attenzione quando si tiene la termocamera perpendicolare al sog-
getto, poiché chi la utilizza potrebbe diventare la principale sorgente di
riflessione.
• Per effettuare una misurazione, selezionare una zona ad elevata emissività:
ad esempio, un'area con una superficie opaca.
• Gli oggetti apparentemente vuoti, ovvero con basse emissività, potrebbero
apparire caldi o freddi nella termocamera, poiché possono riflettere
l'ambiente.
• Evitare la luce solare diretta sui dettagli che si stanno ispezionando.
• Diversi tipi di difetti, ad esempio quelli nella costruzione di un edificio, posso-
no produrre lo stesso tipo di caratteristica termica.
• L'analisi corretta di un'immagine termica richiede una conoscenza professio-
nale dell'area di applicazione.
12.13 Formazione
Il centro ITC Infrared Training Center offre un notevole supporto nell'ottimizzazione degli investimenti nell'imaging termico:
www.infraredtraining.com info_us@infraredtraining.com
www.irtraining.eu info@irtraining.eu
www.irtraining.com itc@flir.se
#T810135; r. AB/33065/33066; mul 58
Page 67

12 IT-IT Italiano
12.14 Assistenza clienti
In caso di problemi o domande sul prodotto, contattare il Centro di assistenza
clienti all'indirizzo http://support.flir.com.
#T810135; r. AB/33065/33066; mul 59
Page 68

13 JA-JP 日本語
13.1 ご購入ありがとうございます
FLIR Systems の製品をご購入いただきありがとうございます。本製品がお客様
のご期待に沿い、今後も弊社製品をご利用いただけましたら幸いです。
13.2 使用前にマニュアルをお読みください。
以下の Web サイトに移動して、マニュアルを読むかダ
ウンロードしてください。
http://support.flir.com/resources/42p5
13.3 製品保証の延長
弊社では、業界で最高の品質と技術を提供することを目指しています。現に、
最も手厚い延長保証を市場に提供しています。
カメラを今すぐ登録すると、下記の保証が受けられます。
• カメラの 2 年保証
• 検出器の 10 年保証
以下の Web サイトに移動して、延長保証を有効にしてください。
http://www.flir.com/thg/warranty
注 登録は、ご購入から 60 日以内に行ってください。
13.4 FLIR Tools のダウンロード
FLIR Tools を使用すると、プロフェッショナルな検査報告書を素早く作成し、
IR カメラで確認した事を意思決定者に明確に伝えることができます。
#T810135; r. AB/33065/33066; mul 60
Page 69

13 JA-JP 日本語
簡単な操作で画像をインポートして、解析し、微調整を行います。次に調査結
果を共有し、修理の妥当性を証明するために、その情報を簡潔な文書にまとめ
ます。
以下の Web サイトに移動して、FLIR Tools をダウンロードしてください。
http://support.flir.com/tools
13.5 FLIR アプリの利用
このアプリを使用すると、IR 画像の分析、報告書の作成や、Dropbox、Box.net、
FTP、電子メールなどを使用して報告書の共有を行うことができます。
モバイル機器を使用して、以下の Web サイトに移動し、アプリをダウンロー
ドしてください。
http://onelink.to/tools
13.6 クイック スタート ガイド
次の手順に従います。
1. バッテリー ケースにバッテリーを入れます。
2. カメラを初めて起動する前に、バッテリーを 4 時間充電するか、緑色の
バッテリー状態 LED が継続的に点灯するまで充電します。
3. カード スロットにメモリー カードを差し込みます。
4.
を押すと、カメラの電源が入ります。
5. カメラを対象物に向けます。
6. ピント リングを回してカメラのフォーカスを調整します。
注 フォーカスを正確に調整することは非常に重要です。フォーカスの調
整が不正確だと、画像モードMSX、赤外線、およびピクチャー イン ピク
チャー の動作に影響を与えます。温度測定も影響を受けます。
7. 保存ボタン (トリガー) を押して、画像を保存します。
8. コンピュータに FLIR Tools をインストールします。
9. FLIR Tools を起動します。
10. USB ケーブルを使ってカメラをコンピュータに接続します。
11. FLIR Tools に画像をインポートし、 PDF レポートを作成します。
#T810135; r. AB/33065/33066; mul 61
Page 70

13 JA-JP 日本語
13.7 右側からの外観
Figure 2.1 View from the right, ページ 2 を参照してください。
1. 右コネクタ ケース用カバー:
• USB A コネクタ。
• USB miniB コネクタ。
• 電源コネクタ。
2. 保存ボタン。
3. 三脚マウント。アダプター (追加アクセサリ) が必要。
4. フォーカス リング。
5. 赤外線レンズ。
13.8 左側からの外観
Figure 2.2 View from the left, ページ 2 を参照してください。
1. レーザー ポインタ。
2. デジタル カメラ用ライト。
3. デジタル カメラ。
4. 左コネクタ ケース用カバー:
• ビデオ出力コネクタ (コンポジット ビデオ)。
• メモリー カード スロット。
13.9 LCD およびキーパッド
Figure 2.3 LCD and keypad, ページ 3 を参照してください。
1. タッチ スクリーン LCD。
2. 中央押しボタン付きナビゲーション パッド。
3. 画像アーカイブ ボタン。
4. レーザー ポインタの操作ボタン。
#T810135; r. AB/33065/33066; mul 62
Page 71

13 JA-JP 日本語
5. オン/オフ ボタン。
機能:
•
•
ボタンを押して、カメラの電源を入れます。
ボタンを押し続けると (5 秒未満)、カメラはスタンバイ モードに
なります。6 時間経つとカメラの電源が自動的にオフになります。
• カメラの電源を切るには
ボタンを 10 秒以上押し続けます。
6. [戻る] ボタン。
13.10 下側からの外観
Figure 2.4 View from the bottom, ページ 3 を参照してください。
1. バッテリー ケースのカバーを開けるためのラッチ。押して開きます。
13.11 画面要素
Figure 2.5 Screen elements, ページ 4 を参照してください。
1. 測定ツール (スポットメーターなど)。
2. 測定結果テーブル。
3. ステータス アイコンおよび通知。
4. 温度スケール
5. ライト ツールバー ボタン。
6. 温度スケール ツールバー ボタン。
7. 色ツールバー ボタン。
8. 測定ツールバー ボタン。
9. 画像モード ツールバー ボタン。
10. 記録モード ツールバー ボタン。
11. [オプション] ツールバー ボタン。
注 メニュー システムを表示するには、画面をタップするか、ナビゲーション
パッドを押します。
13.12 留意事項
• 最初にフォーカスを調整してください。カメラの焦点が合っていないと、
正確な測定ができません。
#T810135; r. AB/33065/33066; mul 63
Page 72

13 JA-JP 日本語
• ほとんどのカメラでは、デフォルトでスケールが自動的に最適化されます。
最初はこのモードを使用しますが、手動でスケールを自由に設定すること
もできます。
• 赤外線カメラの解像度には限度があります。限度は検出素子のサイズ、レ
ンズ、および対象への距離によって変わります。スポット ツールの中心部
分が、測定可能な対象の最小サイズの目安になります。必要に応じて対象
に近づけてください。危険区域や電気構成部分には近づかないようにして
ください。
• カメラは対象に対して垂直になるように慎重に保持してください。ユー
ザー自身が主な反射源になってしまう可能性があります。
• 光沢のない表面を持つ領域など、放射率の高いゾーンを選択し、測定を実
施してください。
• 主に環境が反映される影響から、放射率の低い空のオブジェクトが温かい
(または冷たい) オブジェクトとしてカメラに表示される場合があります。
• 検査対象に直射日光が当たらないようにしてください。
• 建物の構造などのさまざまな種類の欠陥により、同様の熱性質が生成され
る場合があります。
• 赤外線画像を適切に解析するには、用途に関する専門知識が必要です。
13.13 トレーニング
お客様が熱画像に対する投資を最大限に活用できるよう、Infrared Training
Center がお手伝いします。
www.infraredtraining.com info_us@infraredtraining.com
www.irtraining.eu info@irtraining.eu
www.irtraining.com itc@flir.se
13.14 顧客サポート
問題が発生した場合や製品について質問がある場合には、お客様サポート セン
ター (http://support.flir.com) までお問い合わせください。
#T810135; r. AB/33065/33066; mul 64
Page 73

14 KO-KR 한국어
14.1 감사합니다!
FLIR Systems의 제품을 선택해 주셔서 감사합니다. 저희 제품이 귀하의 기대를
충족하기를 바라면서 향후에 필요할 경우에도 저희 제품을 다시 한 번 찾아주시
면 좋겠습니다.
14.2 사용하기 전에 설명서 읽기
다음 웹 사이트로 이동하여 매뉴얼을 읽거나 다운로드하
십시오.
http://support.flir.com/resources/42p5
14.3 제품 보증 연장
당사의 목표는 업계에서 우수한 품질과 기량을 선보이는 것입니다. 이를 증명하
기 위해 가장 넉넉하게 연장된 보증 서비스를 시중에 내놓았습니다.
다음을 얻으려면 지금 바로 카메라를 등록하십시오.
• 2년 카메라 보증
• 10년 감지기 보증
연장 보증 서비스를 활성화하려면 다음 웹 사이트로 이동하십시오.
http://www.flir.com/thg/warranty
참고 구매일로부터 60일 이내에 등록해야 합니다.
14.4 FLIR Tools 다운로드
FLIR Tools는 적외선 카메라로 발견한 사항을 의사 결정자들에게 보여주는 전문
검사 보고서를 신속하게 생성할 수 있습니다.
#T810135; r. AB/33065/33066; mul 65
Page 74

14 KO-KR 한국어
또한 간편하게 이미지를 불러오고, 분석하고, 세밀하게 조정한 뒤 결과를 공유하
고 수리할 부분을 파악하여 간결한 문서로 통합합니다.
다음 웹 사이트로 이동하여FLIR Tools를 다운로드하십시오.
http://support.flir.com/tools
14.5 FLIR 앱 살펴보기
앱을 사용하여 적외선 이미지를 분석하고, 보고서를 생성하며 Dropbox, Box.net,
FTP, 이메일 등을 사용하여 보고서를 공유하십시오.
모바일 장치를 통해 다음 웹 사이트로 이동하여 앱을 다운로드하십시오.
http://onelink.to/tools
14.6 퀵 스타트 가이드
다음 절차를 따르십시오.
1. 배터리를 배터리함에 넣습니다.
2. 처음 카메라를 시작하기 전에 4시간 동안 또는 녹색 배터리 상태 LED가 계속
켜질 때까지 배터리를 충전합니다.
3. 메모리 카드를 카드 슬롯에 삽입합니다.
4. 카메라를 켜려면
버튼을 누릅니다.
5. 원하는 피사체를 향해 카메라를 조준합니다.
6. 초점 링을 돌려서 초점을 조절합니다.
참고 초점을 맞추는 것은 매우 중요합니다. 부정확한 초점은 MSX, 적외선,
PIP(Picture-in-picture) 이미지 모드의 작동 및 온도 측정에 영향을 미칩니다.
7. 저장 버튼(트리거)을 눌러 이미지를 저장합니다.
8. 컴퓨터에 FLIR Tools를 설치합니다.
9. FLIR Tools를 시작합니다.
10. USB 케이블을 사용하여 컴퓨터에 카메라를 연결합니다.
11. FLIR Tools로 이미지를 가져와 PDF 보고서를 만듭니다.
#T810135; r. AB/33065/33066; mul 66
Page 75

14 KO-KR 한국어
14.7 우측면도
Figure 2.1 View from the right, 페이지 2 참조.
1. 오른쪽 함 덮개:
• USB-A 커넥터
• USB 미니 B 커넥터
• 전원 커넥터
2. 저장 버튼
3. 삼각대 마운트. 어댑터 필요(추가 액세서리)
4. 초점 링
5. 적외선 렌즈
14.8 좌측면도
Figure 2.2 View from the left, 페이지 2 참조.
1. 레이저 포인터.
2. 디지털 카메라용 램프
3. 디지털 카메라.
4. 왼쪽 함 덮개:
• 비디오 출력 커넥터(컴포지트 비디오)
• SD 카드 슬롯
14.9 LCD 및 키패드
Figure 2.3 LCD and keypad, 페이지 3 참조.
1. 터치스크린 LCD
2. 가운데를 누를 수 있는 탐색 패드
3. 이미지 아카이브 버튼
4. 레이저 포인터를 작동하기 위한 버튼
#T810135; r. AB/33065/33066; mul 67
Page 76

14 KO-KR 한국어
5. 켜기/끄기 버튼
기능:
•
• 카메라를 대기 모드로 전환하려면
버튼을 눌러 카메라를 켭니다.
버튼을 5초 이하 길게 누릅니다.
카메라는 6시간 후 자동으로 꺼집니다.
• 카메라를 끄려면
버튼을 10초 이상 길게 누릅니다.
6. 뒤로 버튼
14.10 밑면도
Figure 2.4 View from the bottom, 페이지 3 참조.
1. 배터리함 덮개 오픈용 래치입니다. 누르면 열립니다.
14.11 화면 구성
Figure 2.5 Screen elements, 페이지 4 참조.
1. 측정 도구(예: 스팟미터)
2. 측정 결과표
3. 상태 아이콘 및 표시등
4. 온도 눈금
5. 레이저 도구 모음 버튼
6. 온도 눈금 도구 모음 버튼
7. 색 도구 모음 버튼
8. 측정 도구 모음 버튼
9. 이미지 모드 도구 모음 버튼
10. 기록 모드 도구 모음 버튼
11. 설정 도구 모음 버튼
참고 메뉴 시스템을 표시하려면 화면을 누르거나 탐색 패드를 누르십시오.
14.12 주의할 점
• 초점을 먼저 조절합니다. 카메라의 초점이 맞지 않으면 측정값이 정확하지 않
습니다.
• 기본적으로 대부분의 카메라는 눈금을 자동으로 맞춥니다. 이 모드를 먼저 사
용하지만 눈금을 수동으로 바로 설정할 수도 있습니다.
#T810135; r. AB/33065/33066; mul 68
Page 77

14 KO-KR 한국어
• 열화상 카메라에는 해상도 제한이 있습니다. 해상도는 디텍터, 렌즈 및 대상까
지의 거리에 따라 달라집니다. 스팟 도구의 중앙을 가능한 최소 피사체 크기의
기준으로 이용하고 필요한 경우 더 가깝게 조정합니다. 위험한 영역이나 전기
가 흐르는 부품에는 접근하지 마십시오.
• 카메라를 대상에 대해 수직으로 잡고 있는 경우 촬영자가 적외선 방사 발생원
이 될 수 있습니다.
• 방사열이 높은 구역(무광택 표면)을 선택하여 측정을 수행합니다.
• 빈 피사체(방사율이 낮은 피사체)는 주변을 반사하여 카메라에서 따뜻하거나
차갑게 나타날 수 있습니다.
• 조사 중인 물체에 직사광선이 닿지 않게 합니다.
• 빌딩 구조 내에 있는 것과 같은 다양한 유형의 결함이 열화상 패턴을 동일한
유형으로 인식되게 할 수 있습니다.
• 적외선 이미지를 올바르게 분석하려면 해당 응용 분야에 대한 전문 지식이 필
요합니다.
14.13 교육
Infrared Training Center 에서 열화상 이미지에 대한 투자를 극대화하도록 도와 드
리겠습니다.
www.infraredtraining.com info_us@infraredtraining.com
www.irtraining.eu info@irtraining.eu
www.irtraining.com itc@flir.se
14.14 고객 지원
제품에 문제가 있거나 문의 사항이 있는 경우 고객 서비스 센터(
http://support.flir.com)로 언제든 연락 주시기 바랍니다.
#T810135; r. AB/33065/33066; mul 69
Page 78

15 NB-NO Norsk
15.1 Takk!
Takk for at du valgte et produkt fra FLIR Systems. Vi håper at produktet innfrir forventningene dine og at du vil vurdere å bruke oss igjen ved fremtidige behov.
15.2 Les instruksjonsboken før bruk
Gå til den følgende nettsiden for å lese eller laste ned
brukerhåndboken:
http://support.flir.com/resources/42p5
15.3 Utvid produktgarantien din
Målet vårt er å tilføre industrien den beste kvaliteten og de beste ferdighetene.
For å bevise dette tilbyr vi den mest sjenerøse utvidede garantien på markedet.
Registrer kameraet ditt nå for å få følgende:
• 2 års kameragaranti
• 10 års detektorgaranti
Gå til den følgende nettsiden for å aktivere den utvidede garantien din:
http://www.flir.com/thg/warranty
Obs Registreringen må fullføres innen 60 dager etter kjøp.
15.4 Last ned FLIR Tools
FLIR Tools gjør at du raskt kan opprette profesjonelle inspeksjonsrapporter som
tydelig viser beslutningstakere hva du har funnet med IR-kameraet.
Importer, analyser og finjuster bilder på en enkel måte. Deretter kan du innlemme
dem i konsise dokumenter for å dele funn og gjøre rede for reparasjoner.
#T810135; r. AB/33065/33066; mul 70
Page 79

15 NB-NO Norsk
Gå til den følgende nettsiden for å laste ned FLIR Tools:
http://support.flir.com/tools
15.5 Sjekk ut FLIR-appene
Bruk appene våre til å analysere IR-bildene dine, opprette rapporter og dele rapportene ved bruk av Dropbox, Box.net, FTP, e-post osv.
Bruk den mobile enheten din til å gå til den følgende nettsiden og laste ned
appene:
http://onelink.to/tools
15.6 Hurtigstart
Gå frem på følgende måte:
1. Legg et batteri i batterilommen.
2. Lad batteriet i fire timer før du starter kameraet første gang, eller til det grønne lyset som indikerer batteristatus, lyser kontinuerlig.
3. Sett inn et minnekort i kortsporet.
4. Trykk på
for å slå kameraet på.
5. Rett kameraet mot objektet.
6. Juster fokus ved å vri på fokusringen.
Obs Det er svært viktig å justere fokus riktig. Feil fokusjustering påvirker
hvordan bildemodusene MSX, Termisk og Bilde-i-bilde fungerer. Det påvirker
også temperaturmålingen.
7. Trykk på Lagre-knappen (utløseren) for å lagre et bilde.
8. Installer FLIR Tools på datamaskinen.
9. Start FLIR Tools.
10. Koble kameraet til datamaskinen via en USB-kabel.
11. Importer bildene til FLIR Tools, og opprett en PDF-rapport.
#T810135; r. AB/33065/33066; mul 71
Page 80

15 NB-NO Norsk
15.7 Sett fra høyre
Se Figure 2.1 View from the right, side 2.
1. Deksel for det høyre rommet:
• USB-A-kontakt.
• USB mini-B-kontakt.
• Strømkontakt.
2. Lagre-knapp.
3. Stativfeste. Krever en adapter (ekstrautstyr).
4. Fokusring.
5. Infrarød linse.
15.8 Sett fra venstre
Se Figure 2.2 View from the left, side 2.
1. Laserpeker.
2. Lampe for digitalkamera.
3. Digitalkamera.
4. Deksel for det venstre rommet:
• Video ut-kontakt (sammensatt videosignal).
• Spor til minnekort.
15.9 LCD og tastatur
Se Figure 2.3 LCD and keypad, side 3.
1. LCD-berøringsskjerm.
2. Navigasjonspute med midttrykking.
3. Knapp for bildearkiv.
4. Knapp for å betjene laserpekeren.
#T810135; r. AB/33065/33066; mul 72
Page 81

15 NB-NO Norsk
5. Av/på-knapp.
Funksjon:
• Trykk på
• Trykk på og hold nede knappen
for å slå på kameraet.
i mindre enn 5 sekunder for å sette kameraet i standbymodus. Kameraet slår seg deretter automatisk av
etter 6 timer.
• Trykk og hold nede knappen
lenger enn 10 sekunder for å slå av
kameraet.
6. Tilbake-knapp.
15.10 Sett fra undersiden
Se Figure 2.4 View from the bottom, side 3.
1. Lås for å åpne dekslet til batterirommet. Trykk for å åpne.
15.11 Skjermelementer
Se Figure 2.5 Screen elements, side 4.
1. Måleverktøy (f.eks. punktmåler).
2. Tabell over måleresultater.
3. Statusikoner og meldinger.
4. Temperaturskala.
5. Verktøylinjeknapp for lampe.
6. Verktøylinjeknapp for temperaturskala.
7. Verktøylinjeknapp for farge.
8. Verktøylinjeknapp for måling.
9. Verktøylinjeknapp for bildemoduser.
10. Verktøylinjeknapp for opptaksmodus.
11. Verktøylinjeknapp for innstillinger.
Obs For å vise menysystemet trykker du på skjermen eller navigasjonsputen.
15.12 Ting å huske på
• Still inn fokus først. Hvis kameraet er ute av fokus, vil målingen være feil.
#T810135; r. AB/33065/33066; mul 73
Page 82

15 NB-NO Norsk
• Som standard tilpasser de fleste kameraer seg automatisk til skalaen. Benytt
denne modusen først, men nøl ikke med å stille inn skalaen manuelt.
• Et termokamera har en oppløsningsgrense. Den er avhengig av størrelsen på
detektoren, linsen og avstanden til målet. Bruk sentrum av punktverktøyet
som referanse til den minst mulige objektstørrelsen, og gå nærmere hvis nødvendig. Pass på ikke å komme i nærheten av farlige områder og spenningsførende elektriske komponenter.
• Vær forsiktig når du holder kameraet vinkelrett mot målet – du kan bli hovedkilden til refleksjon.
• Velg en sone med høy emissivitet, f.eks. et område med matt overflate, for å
utføre en måling.
• Blanke gjenstander, dvs. de med lav emissivitet, kan fremstå som varme eller
kalde i kameraet, da de hovedsakelig reflekterer omgivelsene.
• Unngå direkte sollys på detaljene du undersøker.
• Forskjellige typer feil, f.eks. de som kan påvises i en bygningskonstruksjon,
kan føre til samme type termisk mønster.
• Å analysere et infrarødt bilde på riktig måte krever profesjonell kunnskap om
bruksområdet.
15.13 Opplæring
La Infrared Training Center hjelpe deg med å få mest mulig ut av investeringen
din i termografi:
www.infraredtraining.com info_us@infraredtraining.com
www.irtraining.eu info@irtraining.eu
www.irtraining.com itc@flir.se
15.14 Kundestøtte
Ikke nøl med å kontakte kundestøttesenteret vårt på http://support.flir.com hvis
du støter på problemer eller har spørsmål angående produktet.
#T810135; r. AB/33065/33066; mul 74
Page 83

16 NL-NL Nederlands
16.1 Dank u!
Hartelijk dank voor de aanschaf van een product van FLIR Systems. Wij vertrouwen erop dat het product aan uw verwachtingen voldoet en dat u in de toekomst
opnieuw voor een product van FLIR Systems zult kiezen.
16.2 Lees de handleiding vóór gebruik
Ga naar de volgende website om de handleiding te lezen
of te downloaden:
http://support.flir.com/resources/42p5
16.3 Uw productgarantie verlengen
Ons streven is u qua kwaliteit en vakmanschap het beste in de branche te leveren. Daarom bieden wij u de ruimste verlengde garantie op de markt aan.
Registreer uw camera nu en ontvang:
• 2 garantie op de camera
• 10 jaar garantie op de detector
Ga naar de onderstaande website om uw verlengde garantie te activeren:
http://www.flir.com/thg/warranty
Opm. De registratie moet binnen 60 dagen na aankoop zijn voltooid.
16.4 FLIR Tools downloaden
Met FLIR Tools kunt u snel professionele inspectierapporten maken waarin besluitvormers duidelijk kunnen zien wat u met uw infraroodcamera hebt
vastgelegd.
#T810135; r. AB/33065/33066; mul 75
Page 84

16 NL-NL Nederlands
Beelden zijn eenvoudig te importeren, analyseren en aan te passen. Vervolgens
kunt u ze opnemen in beknopte rapporten om bevindingen te delen en reparaties
te verantwoorden.
Ga naar deze website om FLIR Tools te downloaden:
http://support.flir.com/tools
16.5 Gebruikmaken van onze FLIR-apps
Gebruik onze apps om infraroodbeelden te analyseren, rapporten te maken en
deze te delen via Dropbox, Box.net, FTP, e-mail, etc.
Ga met uw mobiele apparaat naar deze website en download de apps:
http://onelink.to/tools
16.6 Snelstartgids
Volg deze procedure:
1. Plaats een batterij in het batterijvak.
2. Laad de batterij vier uur lang op voordat u de camera de eerste keer opstart
of totdat de groene LED-indicator voor de batterij continu brandt.
3. Plaats een geheugenkaart in de kaartsleuf.
4. Druk op
om de camera aan te zetten.
5. Richt de camera op het gewenste object.
6. Stel de camera scherp door de focusring te draaien.
Opm. Juiste scherpstelling is van groot belang. Onjuiste scherpstelling
heeft effect op de werking van de modi MSX, Infrarood en Beeld-in-beeld.
Het heeft tevens effect op de temperatuurmeting.
7. Druk op de knop Opslaan (activeerknop) om een afbeelding op te slaan.
8. Installeer FLIR Tools op uw computer.
9. Start FLIR Tools.
10. Sluit de camera op de computer aan met behulp van de USB-kabel.
11. Importeer de afbeeldingen in FLIR Tools en maak een PDF-rapport.
#T810135; r. AB/33065/33066; mul 76
Page 85

16 NL-NL Nederlands
16.7 Rechteraanzicht
Zie Figure 2.1 View from the right, pagina 2.
1. Klepje voor het rechtervak:
• USB-A-connector.
• USB mini-B-connector.
• Netsnoeraansluiting.
2. Knop voor opslaan.
3. Bevestiging statief. Adapter vereist (extra accessoire).
4. Focusring.
5. Infraroodlens.
16.8 Linkeraanzicht
Zie Figure 2.2 View from the left, pagina 2.
1. Laseraanwijzer.
2. Lamp voor de digitale camera.
3. Digitale camera.
4. Klepje voor het linkervak:
• Video-uitgang (composiet video).
• Sleuf voor geheugenkaart.
16.9 LCD-scherm en toetsenblok
Zie Figure 2.3 LCD and keypad, pagina 3.
1. LCD-aanraakscherm.
2. Navigatietoets met drukknopfunctie in het midden.
3. Beeldarchiefknop.
4. Knop om de laserwijzer te bedienen.
#T810135; r. AB/33065/33066; mul 77
Page 86

16 NL-NL Nederlands
5. Aan/uit-knop.
Functie:
• Druk op de knop
• Houd de knop
om de camera in te schakelen.
korter dan 5 seconden ingedrukt om de camera in
de stand-by-stand te zetten. De camera wordt dan na 6 uren automatisch
uitgeschakeld.
• Druk op de knop
en houd deze knop minimaal 10 seconden inge-
drukt om de camera uit te schakelen.
6. Terug-knop.
16.10 Van onderen weergeven
Zie Figure 2.4 View from the bottom, pagina 3.
1. Vergrendeling voor het openen van het batterijvak. Druk om te openen.
16.11 Schermelementen
Zie Figure 2.5 Screen elements, pagina 4.
1. Meethulpmiddelen (bijv. puntmeter).
2. Tabel met meetresultaten.
3. Statuspictogrammen en -meldingen.
4. Temperatuurschaal.
5. Werkbalkknop Lamp.
6. Werkbalkknop Temperatuurschaal.
7. Werkbalkknop Kleur.
8. Werkbalkknop Meten.
9. Werkbalkknop Beeldmodi.
10. Werkbalkknop Opnamemodus.
11. Werkbalkknop Instellingen.
Opm. Als u het scherm aanraakt of op de navigatietoets drukt, wordt het menu-
systeem weergegeven.
16.12 Onthouden
• Stel de camera eerst scherp. Als u dit niet doet, zal de meting onjuist zijn.
#T810135; r. AB/33065/33066; mul 78
Page 87

16 NL-NL Nederlands
• Standaard wordt de instelling van de meeste camera´s automatisch aangepast. Gebruik eerst deze modus, maar stap bij twijfel over op handmatige
bediening.
• Een warmtebeeldcamera heeft een resolutielimiet. Deze is afhankelijk van de
grootte van de detector, de lens en de afstand tot het onderwerp. Gebruik de
functie voor middelpuntsmeting als hulpmiddel voor het bepalen van de
kleinst mogelijke objectgrootte. Ga indien noodzakelijk dichterbij staan. Zorg
dat u uit de buurt blijft van gevaarlijke plekken en elektrische onderdelen.
• Wees voorzichtig als u de camera verticaal naar het doel richt - u kunt dan via
belangrijkste bron van reflectie worden.
• Selecteer bij het uitvoeren van metingen een zone met een hoge emissiegraad, bijvoorbeeld een gebied met een niet-weerspiegelend oppervlak.
• Lege objecten, met lage emissiewaarden, kunnen in de camera warm of koud
lijken aangezien deze hoofdzakelijk reflecties veroorzaken.
• Vermijd direct zonlicht op de details die u inspecteert.
• Verschillende typen defecten, zoals die in de constructie van gebouwen, kunnen resulteren in hetzelfde type thermische patronen.
• Het correct analyseren van een infraroodopname vereist professionele kennis
van het toepassingsgebied.
16.13 Training
Laat het Infrared Training Center u helpen het maximale uit uw investering in
warmtebeeldtechnologie te halen:
www.infraredtraining.com info_us@infraredtraining.com
www.irtraining.eu info@irtraining.eu
www.irtraining.com itc@flir.se
16.14 Klantenondersteuning
Aarzel niet om contact op te nemen met onze klantenservice op http://support.flir.
com indien u problemen ondervindt of vragen heeft over uw product.
#T810135; r. AB/33065/33066; mul 79
Page 88
17 PL-PL Polski
17.1 Dziękujemy!
Dziękujemy za wybranie produktu firmy FLIR Systems. Mamy nadzieję, że spełni
on oczekiwania i zachęci do zakupu kolejnych produktów z naszej oferty.
17.2 Przed użyciem należy zapoznać się z instrukcją
Odwiedź poniższą stronę internetową, aby przeczytać
lub pobrać instrukcję obsługi:
http://support.flir.com/resources/42p5
17.3 Przedłuż gwarancję na produkt
Naszym celem jest zapewnienie najlepszej jakości oraz doskonałego wykonania
w przemyśle. Aby tego dokonać, oferujemy najdłuższą gwarancję dostępną na
rynku.
Zarejestruj teraz swoją kamerę, aby otrzymać:
• 2-letnią gwarancję na kamerę
• 10-letnią gwarancję na detektor
Wejdź na poniższą stronę internetową, aby aktywować przedłużoną gwarancję:
http://www.flir.com/thg/warranty
Uwaga Rejestracja musi nastąpić w ciągu 60 dni od dokonania zakupu.
17.4 Pobierz FLIR Tools
FLIR Tools pozwoli Ci na szybkie tworzenie profesjonalnych raportów kontrolnych, które w przejrzysty sposób pokażą przełożonym dane zebrane za pomocą
kamery podczerwieni.
#T810135; r. AB/33065/33066; mul 80
Page 89

17 PL-PL Polski
Importuj, analizuj i z łatwością koreluj obrazy. Następnie wprowadzaj je do zwięzłych dokumentów, aby dzielić się odkryciami lub uzasadnić naprawy.
Odwiedź poniższą stronę internetową, aby pobrać FLIR Tools:
http://support.flir.com/tools
17.5 Sprawdź nasze aplikacje FLIR
Korzystaj z naszych aplikacji, aby analizować obrazy termowizyjne, tworzyć raporty i dzielić się nimi za pomocą Dropbox, Box.net, FTP, e-maila, itd.
Skorzystaj z urządzenia mobilnego, aby wejść na poniższą stronę internetową i
pobrać aplikacje:
http://onelink.to/tools
17.6 Skrócona instrukcja obsługi
Wykonaj następujące czynności:
1. Umieść akumulator w komorze akumulatora.
2. Przed użyciem kamery po raz pierwszy ładuj akumulator przez 4 godziny lub
do czasu, aż zielona kontrolka LED stanu akumulatora zaświeci się w sposób ciągły.
3. Włóż kartę pamięci do gniazda karty.
4. Naciśnij przycisk
, aby włączyć kamerę.
5. Nakieruj kamerę na dowolny obiekt.
6. Wyreguluj ostrość, obracając pierścień regulacji ostrości.
Uwaga Poprawna regulacja ostrości jest bardzo ważna. Nieprawidłowa regulacja ostrości wpływa na sposób działania trybów Tryb MSX, Podczerwień
i Obraz w obrazie, a także na pomiar temperatury.
7. Naciśnij przycisk Save (przycisk wyzwalający), aby zapisać obraz.
8. Zainstaluj program FLIR Tools w komputerze.
9. Uruchom program FLIR Tools.
10. Podłącz kamerę do komputera za pomocą kabla USB.
11. Importuj obrazy do programu FLIR Tools i utwórz raport w formacie PDF.
#T810135; r. AB/33065/33066; mul 81
Page 90

17 PL-PL Polski
17.7 Widok od prawej strony
Patrz Figure 2.1 View from the right, strona 2.
1. Pokrywa komory z prawej strony:
• Złącze USB-A.
• Złącze mini-B USB.
• Złącze zasilania.
2. Przycisk Save.
3. Gniazdo mocowania statywu — wymaga adaptera (dodatkowa część).
4. Pierścień regulacji ostrości.
5. Obiektyw na podczerwień.
17.8 Widok od lewej strony
Patrz Figure 2.2 View from the left, strona 2.
1. Wskaźnik laserowy.
2. Lampa kamery cyfrowej.
3. Kamera cyfrowa.
4. Pokrywa komory z lewej strony:
• Złącze wyjścia wideo (sygnał kompozyt wideo).
• Gniazdo karty pamięci.
17.9 Ekran LCD i klawiatura
Patrz Figure 2.3 LCD and keypad, strona 3.
1. Dotykowyekran LCD.
2. Panel nawigacyjny z przyciskiem środkowym.
3. Przycisk archiwizacji obrazu.
4. Przycisk działania wskaźnika laserowego.
#T810135; r. AB/33065/33066; mul 82
Page 91
17 PL-PL Polski
5. Przycisk włączania/wyłączania.
Funkcja:
• Naciśnij przycisk
, aby włączyć kamerę.
• Aby przejść do trybu gotowości kamery, naciśnij i przytrzymaj przycisk
krócej niż 5 sekund. Kamera zostanie automatycznie wyłączona
po 6 godzinach.
• Aby wyłączyć kamerę, naciśnij przycisk
i przytrzymaj go przez po-
nad 10 sekund.
6. Przycisk Wstecz.
17.10 Widok od dołu
Patrz Figure 2.4 View from the bottom, strona 3.
1. Zatrzask pokrywy akumulatora. Naciśnij, aby otworzyć.
17.11 Elementy ekranu
Patrz Figure 2.5 Screen elements, strona 4.
1. Narzędzia pomiarowe (np. miernik punktowy).
2. Tabela wyników pomiarów.
3. Ikony i powiadomienia stanu.
4. Skala temperatury
5. Przycisk lampy dostępny na pasku narzędzi.
6. Przycisk skali temperatury dostępny na pasku narzędzi.
7. Przycisk koloru dostępny na pasku narzędzi.
8. Przycisk pomiarów dostępny na pasku narzędzi.
9. Przycisk trybów obrazu dostępny na pasku narzędzi.
10. Przycisk trybu rejestracji dostępny na pasku narzędzi.
11. Przycisk paska narzędzi ustawień.
Uwaga Aby wyświetlić system menu, dotknij ekranu lub naciśnij przycisk
nawigacyjny.
#T810135; r. AB/33065/33066; mul 83
Page 92

17 PL-PL Polski
17.12 Ważne:
• Najpierw wyreguluj ostrość. Jeśli ostrość kamery nie jest wyregulowana, pomiar jest nieprawidłowy.
• W większości kamer domyślnie skala dostosowywana jest automatycznie.
Najpierw użyj tego trybu, ale zawsze możesz ustawić skalę ręcznie.
• Kamera termiczna ma ograniczoną rozdzielczość. Zależy ona od wielkości
detektora, obiektywu i odległości od celu. Użyj środka narzędzia punktowego
do określenia minimalnego możliwego rozmiaru obiektu i przybliż się w razie
potrzeby. Uważaj, aby nie znaleźć się w obszarze niebezpiecznym ani w pobliżu działających podzespołów elektrycznych.
• Zachowaj ostrożność, trzymając kamerę prostopadle do celu — możesz stać
się głównym źródłem odbicia.
• Do przeprowadzenia pomiaru wybierz obszar o dużej emisyjności (np. o matowej powierzchni).
• Gładkie obiekty (tzn. mające niską emisyjność) mogą być widziane przez kamerę jako ciepłe lub zimne, ponieważ przeważnie odbijają otoczenie.
• Nie należy badać obiektów w czasie, gdy są wystawione na bezpośrednie
światło słoneczne.
• Różne typy usterek, jak np. usterki w konstrukcji budynku, mogą tworzyć ten
sam typ rozkładu temperatury.
• Prawidłowa analiza obrazu termowizyjnego wymaga profesjonalnej wiedzy o
obszarze zastosowania.
17.13 Szkolenia
Infrared Training Center pomoże Ci w maksymalnym wykorzystaniu inwestycji w
obrazowanie termiczne:
www.infraredtraining.com info_us@infraredtraining.com
www.irtraining.eu info@irtraining.eu
www.irtraining.com itc@flir.se
#T810135; r. AB/33065/33066; mul 84
Page 93

17 PL-PL Polski
17.14 Pomoc techniczna
Jeśli masz problemy lub pytania dotyczące produktu, skontaktuj się z naszym
centrum pomocy technicznej pod adresem http://support.flir.com.
#T810135; r. AB/33065/33066; mul 85
Page 94

18 PT-PT Português
18.1 Obrigado!
Obrigado por escolher um produto da FLIR Systems. Esperamos que este produto cumpra as suas expetativas e que nos considere novamente para as suas
necessidades futuras.
18.2 Leia o manual antes da utilização
Aceda ao seguinte website para ler ou transferir o
manual:
http://support.flir.com/resources/42p5
18.3 Aumente a garantia do seu produto
O nosso objetivo é fornecer a melhor qualidade e fabrico da indústria. Desta forma, oferecemos-lhe a garantia alargada mais generosa no mercado.
Registe agora a sua câmara para receber:
• 2 anos de garantia para a câmara
• 10 anos de garantia para o detetor
Aceda ao seguinte website para ativar a sua garantia alargada:
http://www.flir.com/thg/warranty
Nota O registo deve ser concluído nos 60 dias após a data de compra.
18.4 Transferir o FLIR Tools
O FLIR Tools permite-lhe criar rapidamente relatórios de inspeção profissionais,
que mostram claramente aos elementos decisores o que descobriu com a sua
câmara de IV.
#T810135; r. AB/33065/33066; mul 86
Page 95

18 PT-PT Português
Importe, analise e aperfeiçoe imagens facilmente. Depois, incorpore-as em documentos concisos para partilhar descobertas e justificar reparações.
Aceda ao seguinte website para transferir o FLIR Tools:
http://support.flir.com/tools
18.5 Consulte as nossas aplicações FLIR
Utilize as nossas aplicações para analisar imagens de IV, criar relatórios e partilhá-los através dos serviços Dropbox, Box.net, FTP, e-mail, etc.
Utilize o seu dispositivo móvel para aceder ao website e transferir as aplicações:
http://onelink.to/tools
18.6 Manual de iniciação rápida
Siga este procedimento:
1. Coloque uma bateria no respetivo compartimento.
2. Carregue a bateria durante 4 horas antes de ligar pela primeira vez a câmara
ou até o LED verde de estado da bateria ficar permanentemente aceso.
3. Insira um cartão de memória na respetiva ranhura.
4. Prima
para ligar a câmara.
5. Aponte a câmara na direção do objeto de interesse.
6. Ajuste o foco rodando o anel de focagem.
Nota É muito importante ajustar corretamente o foco. Um ajuste incorreto
do foco afeta o funcionamento dos modos de imagem MSX, Térmica (IV), e
Imagem na imagem. Também afeta a medição da temperatura.
7. Prima o botão Guardar (o disparador) para guardar uma imagem.
8. Instale o FLIR Tools no seu computador
9. Iniciar o FLIR Tools.
10. Ligue a câmara ao computador utilizando o cabo USB.
11. Importe as imagens para FLIR Tools e crie um relatório em PDF.
#T810135; r. AB/33065/33066; mul 87
Page 96

18 PT-PT Português
18.7 Perspetiva da direita
Ver Figure 2.1 View from the right, página 2.
1. Tampa do compartimento do lado direito:
• Conector USB-A.
• Conector USB mini-B.
• Conector de alimentação.
2. Botão Guardar.
3. Encaixe para tripé. Requer um adaptador (acessório extra).
4. Anel de focagem.
5. Lente de infravermelhos.
18.8 Perspetiva da esquerda
Ver Figure 2.2 View from the left, página 2.
1. Ponteiro laser.
2. Lâmpada da câmara digital.
3. Câmara digital.
4. Tampa do compartimento do lado esquerdo:
• Conector de saída de vídeo (vídeo composto).
• Ranhura do cartão SD.
18.9 LCD e teclado
Ver Figure 2.3 LCD and keypad, página 3.
1. Ecrã tátil LCD.
2. Tecla de navegação com toque central.
3. Botão de arquivo de imagens.
4. Botão para controlar o ponteiro laser.
#T810135; r. AB/33065/33066; mul 88
Page 97

18 PT-PT Português
5. Botão Ligar/Desligar.
Função:
• Prima o botão
• Mantenha premido o botão
para ligar a câmara.
durante menos de 5 segundos para
colocar a câmara em modo de espera. A câmara desliga automaticamente após 6 horas.
• Mantenha premido o botão
durante mais de 10 segundos para
desligar a câmara.
6. Botão Retroceder.
18.10 Perspetiva inferior
Ver Figure 2.4 View from the bottom, página 3.
1. Fecho para abrir a tampa do compartimento da bateria. Premir para abrir.
18.11 Elementos do ecrã
Ver Figure 2.5 Screen elements, página 4.
1. Ferramentas de medição (por ex., medidor de pontos).
2. Tabela de resultados de medição.
3. Ícones e notificações de estado.
4. Escala de temperatura.
5. Botão da barra de ferramentas da Lâmpada.
6. Botão da barra de ferramentas da Escala de temperatura.
7. Botão da barra de ferramentas de Cor.
8. Botão da barra de ferramentas Medição.
9. Botão da barra de ferramentas Modos de imagem.
10. Botão da barra de ferramentas Modo de gravação.
11. Botão da barra de definições.
Nota Para apresentar o sistema de menus, toque no ecrã ou prima a tecla de
navegação.
#T810135; r. AB/33065/33066; mul 89
Page 98

18 PT-PT Português
18.12 Tenha em atenção o seguinte
• Ajuste primeiro a focagem. Quando a câmara estiver desfocada, a medição
será incorreta.
• Por predefinição, a maioria das câmaras adapta automaticamente a escala.
Utilize primeiro este modo, mas, se necessário, defina a escala manualmente.
• Uma câmara térmica possui um limite de resolução. Este depende do tamanho do detetor, da lente e da distância em relação ao alvo. Utilize o centro da
ferramenta de ponto como guia para o tamanho mínimo de objeto possível e,
se necessário, aproxime-se. Certifique-se de que fica afastado de zonas perigosas ou de componentes elétricos com corrente.
• Tenha cuidado ao segurar a câmara num ângulo perpendicular ao alvo - poderá tornar-se a principal fonte de reflexão.
• Selecione uma zona com alta emissividade, isto é, uma área com uma superfície mate, para efetuar uma medição.
• Os objetos vazios, ou seja, com baixa emissividade, podem aparecer como
quentes ou frios na câmara pelo facto de refletirem principalmente o
ambiente.
• Evite a luz solar direta sobre os detalhes que inspeciona.
• Vários tipos de falhas, como as que se encontram na construção de um edifício, podem ter como resultado o mesmo tipo de padrão térmico.
• A análise correta de uma imagem de infravermelhos requer o conhecimento
profissional da área de aplicação.
18.13 Formação
Deixe que o Infrared Training Center o ajude a maximizar o seu investimento em
imagens térmicas:
www.infraredtraining.com info_us@infraredtraining.com
www.irtraining.eu info@irtraining.eu
www.irtraining.com itc@flir.se
#T810135; r. AB/33065/33066; mul 90
Page 99

18 PT-PT Português
18.14 Apoio ao cliente
Não hesite em contactar o nosso Centro de Apoio ao Cliente em
http://support.flir.com caso encontre algum problema ou tenha alguma dúvida
sobre o seu produto.
#T810135; r. AB/33065/33066; mul 91
Page 100

19 RU-RU Русский
19.1 Спасибо!
Благодарим вас за выбор оборудованияFLIR Systems. Мы надеемся, что наше оборудование оправдает все ваши ожидания, и вы продолжите использовать нашу продукцию в будущем.
19.2 Прочитайте руководство перед началом работы
Перейдите на указанный сайт, чтобы прочитать или
загрузить руководство:
http://support.flir.com/resources/42p5
19.3 Продлите гарантию на продукт
Наша цель - обеспечить наилучшее качество в нашей области промышленности. Поэтому мы предлагаем самую расширенную гарантию на рынке.
Зарегистрируйте вашу камеру сейчас, чтобы получить:
• 2 года гарантии на камеру
• 10 лет гарантии на детектор
Перейдите на указанный сайт, чтобы активировать расширенную
гарантию:
http://www.flir.com/thg/warranty
Примечание Регистрацию необходимо завершить в течение 60 дней с
момента покупки.
#T810135; r. AB/33065/33066; mul 92
 Loading...