

Page 1
Quick Start
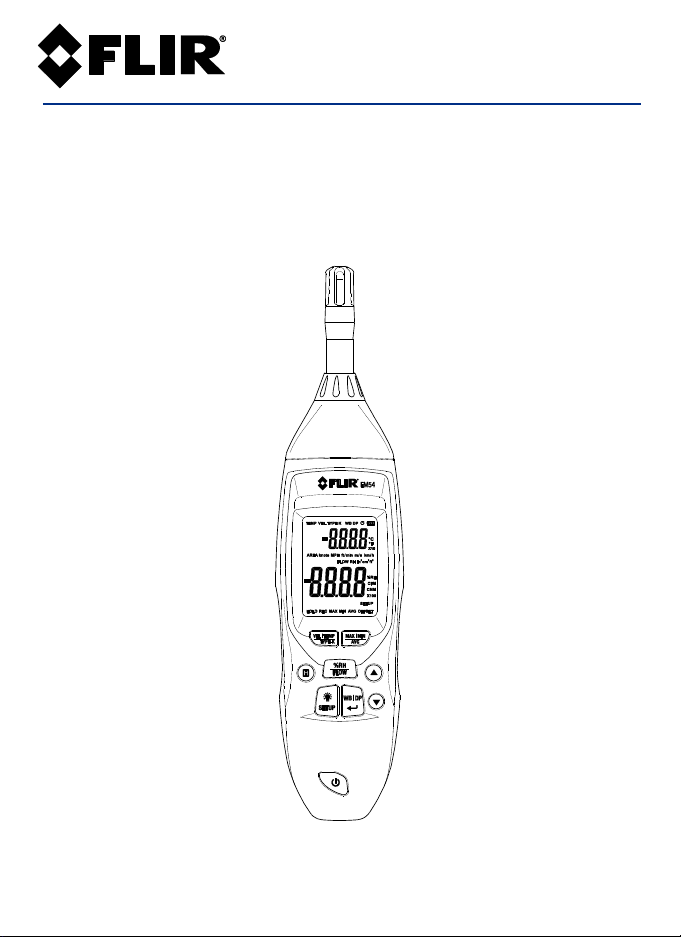
FLIR EM54
Environmental Meter
Page 2
EM54-QS-en-US_AA
EM54 - QUICK START - EN
Air Temperature, RH, Wet Bulb, Dew Point Modes
1. Long press to switch the meter ON/OFF
2. Short press VEL|TEMP|TYPE-K to step to Air Temperature mode (TEMP).
The upper digits show the reading, short press to toggle oC/oF
3. Short press %RH|FLOW to select RH for display on the lower digits
4. Short press WB|DP to toggle Wet Bulb (WB) and Dew Point (DP)
temperature modes. The upper digits show the reading
5. The temperature and RH sensors are located at the tip of the meter
6. For out of range measurements the display shows ‘OL’
Type-K Contact Temperature Measurements
1. Connect a thermocouple to the jack in the right-side compartment
2. Short press VEL|TEMP|TYPE-K to step to the TYPE-K mode
3. Touch the temperature probe to the surface under test, the upper display
digits show the reading. Short press to select oC/oF units
4. With no thermocouple connected the display shows dashes
5. See the Setup Mode section for setting a temperature display offset
Air Velocity Measurements
1. Connect the supplied vane anemometer probe to the USB jack in the right-
side compartment
2. Short press VEL|TEMP|TYPE-K to step to the Air Velocity mode (VEL)
3. Place the vane in the flow of air and view the air velocity readings on the
upper display digits
4. Short press to select the units m/s, ft/min, km/hr, MPH, or knots
Airflow (CFM, CMM) Measurements
1. Measure the area of the air duct under test. See Area Equations section
2. Connect the vane anemometer to the USB jack in the side compartment
3. Short press %RH|FLOW to select FLOW. Press to select CFM (cubic feet
per minute) or CMM (cubic meters per minute) for the volume (airflow)
measurement units
Page 3

EM54-QS-en-US_AA
4. Long press the SETUP button to access the Setup Mode and then press 4
times to step to the AREA screen
5. Press Return ( ) and use the arrows ( ) to select the area units: in
2
,
cm2, or ft2
6. Press Return to access the SIZE screen. Press Return again and use the
arrows to select the decimal placement for the area value (note the x10 and
x100 multipliers on the display)
7. Press Return and use the arrows to adjust the flashing digit for the area
value. Use the H button to select a new digit to edit. Continue in this way
until the area of the duct is accurately entered
8. Press Return to confirm the area value and then long press SETUP to exit
9. Insert the vane sensor in the air duct and read the airflow (volume of air)
value on the lower display digits
Setup Mode
1. Long press the SETUP button*
2. The first screen is the default TEMP UNIT for air temperature. Press Return
to see the setting. Use the arrows to set oC or oF
3. Press Return to see TYPE K OFFSET. Press Return again and use the arrows
to select a temperature offset, if desired
4. Press Return to see VEL UNITS. Press Return again to see the default units.
Use the arrows to select m/s, ft/min, km/hr, MPH, or knots
5. Press Return to see FLOW UNITS. Press Return again to see the default
Airflow units; use the arrows to select CFM or CMM
6. Press Return to see AREA UNIT. Press Return again to see the default area
units and use the arrows to change to in2, cm2, or ft2
7. Press Return to see AREA SIZE, press Return again and use the arrows to
select the decimal position for the area value. Press Return and use the
arrows to adjust the flashing digit. Use the H button to select a new digit to
edit. Continue in this way until the area of the duct is accurately entered
8. Press Return to see SLP (sleep). Press Return to see the default APO time.
Use the arrows to set timer to 5, 10, 15, 20, 25, 30, 40, 60 minutes or OFF
9. Long press the SETUP button to exit the Setup Mode
*Note that you can use the arrow buttons immediately after you access the
Setup Mode to step through the Setup parameters quickly.
Page 4

EM54-QS-en-US_AA
Area Equations
CFM (ft3/min) = Air Velocity (ft/min) x Area (ft2)
CMM (m3/min) = Air Velocity (m/sec) x Area (m2) x 60
Battery Replacement
Switch the meter OFF and remove the screw that secures the rear battery
compartment. Open the compartment and replace the 9V battery, observing
correct polarity. Re-assemble the meter before use.
LCD Backlight
Short press the backlight button to switch the backlight ON/OFF.
Data Hold
Short press H to access/exit the Data Hold mode. Data Hold freezes the
displayed reading. The HOLD icon will appear while in the Data Hold mode.
MAX-MIN-AVG Recording
Short press MAX|MIN|AVG to start recording (REC) and to step through
maximum, minimum, and average readings. Long press MAX|MIN|AVG to exit.
3-Year Limited Warranty
This product is protected by FLIR’s 3-Year Limited Warranty. Visit
www.flir.com/testwarranty to read the 3-Year Limited Warranty document.
Register your product at the website to receive a free 1-year warranty
extension.
User Manual
Visit https://support.flir.com (download tab) to download the User Manual
and Quick Start with translations. The User Manual includes detailed
specifications and instructions.
Page 5

EM54-QS-en-US_AA
Corporate Headquarters
FLIR Systems, Inc.
2770 SW Parkway Avenue
Wilsonville, OR 97070 USA
Customer Support
Repair, Calibration, and Technical Support
https://support.flir.com
Publication Identification No.: EM54-QS
Release version: AA
Release Date: March 2019
Language: en-US
Copyright © 2019 FLIR Systems, Inc.
All rights reserved including the right of reproduction in whole or in part in any form
www.flir.com
 Loading...