

Page 1
User guide
FLIR UVMS
CCTV Keyboard
DVT-KBD-G2
1.0 May 9, 2018
i
Page 2

© 2018 FLIR Systems, Inc. All rights reserved worldwide. No parts of this manual, in whole or in part, may
be copied, photocopied, translated, or transmitted to any electronic medium or machine readable form
without the prior written permission of FLIR Systems, Inc.
Names and marks appearing on the products herein are either registered trademarks or trademarks of
FLIR Systems, Inc. and/or its subsidiaries. All other trademarks, trade names, or company names
referenced herein are used for identification only and are the property of their respective owners.
This product is protected by patents, design patents, patents pending, or design patents pending.
The contents of this document are subject to change.
FLIR Systems, Inc.
6769 Hollister Avenue
Goleta, California 93117
USA
Phone: 888.747.FLIR (888.747.3547)
International: +1.805.964.9797
For technical assistance, please call us at +1.888.388.3577 or visit the Service & Support page at
www.flir.com/security.
Important Instructions and Notices to the User:
Modification of this device without the express authorization of FLIR Commercial Systems, Inc. may void
the user’s authority under FCC rules to operate this device.
ii
DVT-KBD-G2 FLIR UVMS CCTV Keyboard
May 9, 2018
Page 3

Table of Contents
Table of Contents
1. Important Safeguards ................................................................................................... 1
1.1
1.2
1.3
1.4
2. FLIR UVMS Keyboard Features .................................................................................... 5
3. Getting Started ............................................................................................................. 6
4. FLIR UVMS Keyboard Overview ................................................................................... 7
4.1
4.2
4.3
5. Basic Setup ................................................................................................................ 10
5.1
5.2
5.3
6. Keyboard Menu .......................................................................................................... 13
General Precautions ............................................................................................... 1
Installation ............................................................................................................. 1
Service .................................................................................................................. 3
Use ...................................................................................................................... 3
Default Username and Password ............................................................................. 7
Keyboard Ports ...................................................................................................... 7
Front Panel & Buttons ............................................................................................ 7
Keyboard Commands ......................................................................................... 84.3.1
PTZ Controls ..................................................................................................... 94.3.2
Instant Replay Commands .................................................................................. 94.3.3
Start Up .............................................................................................................. 10
Connecting to a client machine using RS232 .......................................................... 10
Finding RS232 Information on UVMS ..................................................................... 10
6.1
6.2
6.3
6.4
6.5
6.6
6.7
7. System Specifications ................................................................................................ 18
7.1
8. Notices ........................................................................................................................ 20
Navigating the Menu ............................................................................................. 13
System ............................................................................................................... 13
Time ............................................................................................................... 136.2.1
AUX ................................................................................................................ 136.2.2
Account .............................................................................................................. 14
Modify PW ...................................................................................................... 146.3.1
Add User ......................................................................................................... 146.3.2
Delete User ..................................................................................................... 156.3.3
Modify Rights ................................................................................................... 156.3.4
Config (Resetting to Factory Defaults) .................................................................... 15
Info ..................................................................................................................... 16
Model .................................................................................................................. 16
Menu Tree Overview .............................................................................................. 17
Dimensions ......................................................................................................... 19
May 9, 2018
DVT-KBD-G2 FLIR UVMS CCTV Keyboard
iii
Page 4

Table of Contents
Table of Contents
8.1
FCC Class A Notice ............................................................................................. 20
iv
DVT-KBD-G2 FLIR UVMS CCTV Keyboard
May 9, 2018
Page 5
Important Safeguards
CAUTION
Maintain electrical safety. Power line operated equipment or accessories connected to this product should
bear the UL listing mark or CSA certification mark on the accessory itself and should not be modified so as to
defeat the safety features. This will help avoid any potential hazard from electrical shock or fire. If in doubt,
contact qualified service personnel.
1 Important Safeguards
In addition to the careful attention devoted to quality standards in the manufacturing
process of your product, safety is a major factor in the design of
every instrument. However, safety is your responsibility too. This sheet lists
important information that will help to ensure your enjoyment and proper use
of the product and accessory equipment. Please read them carefully before
operating and using your product.
1.1 General Precautions
1. All warnings and instructions in this manual should be followed.
2. Remove the plug from the outlet before cleaning. Do not use liquid aerosol detergents. Use a waterdampened cloth for cleaning.
3. Do not use this product in humid or wet places.
4. Keep enough space around the product for ventilation. Slots and openings in the storage cabinet should
not be blocked.
5. It is highly recommended to connect the product to a surge protector to
protect from damage caused by electrical surges. It is also recommended
to connect the product to an uninterruptible power supply (UPS), which
has an internal battery that will keep the product running in the event of a
power outage.
1.2 Installation
1. Read and Follow Instructions - All the safety and operating instructions should be read before the
product is operated. Follow all operating instructions.
2. Retain Instructions - The safety and operating instructions should be retained for future reference.
3. Heed Warnings - Comply with all warnings on the product and in the operating instructions.
4. Polarization - Do not defeat the safety purpose of the polarized or grounding-type plug.
A polarized plug has two blades with one wider than the other.
DVT-KBD-G2 FLIR UVMS CCTV Keyboard
1May 9, 2018
Page 6

Important Safeguards
A grounding type plug has two blades and a third grounding prong.
The wide blade or the third prong are provided for your safety.
If the provided plug does not fit into your outlet, consult an electrician for replacement of the obsolete
outlet.
5. Power Sources - This product should be operated only from the type of power source indicated on the
marking label. If you are not sure of the type of power supplied to your location, consult your video
dealer or local power company. For products intended to operate from battery power, or other sources,
refer to the operating instructions.
6. Overloading - Do not overload wall outlets or extension cords as this can result in the risk of fire or
electric shock. Overloaded AC outlets, extension cords, frayed power cords, damaged or cracked wire
insulation, and broken plugs are dangerous. They may result in a shock or fire hazard. Periodically
examine the cord, and if its appearance indicates damage or deteriorated insulation, have it replaced by
your service technician.
7. Power-Cord Protection - Power supply cords should be routed so that they are not likely to be walked
on or pinched by items placed upon or against them. Pay particular attention to cords at plugs,
convenience receptacles, and the point where they exit from the product.
8. Surge Protectors - It is highly recommended that the product be connected to a surge protector. Doing
so will protect the product from damage caused by power surges. Surge protectors should bear the UL
listing mark or CSA certification mark.
9. Uninterruptible Power Supplies (UPS) - Because this product is designed for continuous, 24/7
operation, it is recommended that you connect the product to an uninterruptible power supply. An
uninterruptible power supply has an internal battery that will keep the product running in the event of a
power outage. Uninterruptible power supplies should bear the UL listing mark or CSA certification mark.
10.Ventilation - Slots and openings in the case are provided for ventilation to ensure reliable operation of
the product and to protect it from overheating. These openings must not be blocked or covered. The
openings should never be blocked by placing the product on a bed, sofa, rug, or other similar surface.
This product should never be placed near or over a radiator or heat register. This product should not be
placed in a built-in installation such as a bookcase or rack unless proper ventilation is provided and the
product manufacturer’s instructions have been followed.
11.Attachments - Do not use attachments unless recommended by the product manufacturer as they
may cause a hazard.
12.Water and Moisture - Do not use this product near water — for example, near a bath tub, wash bowl,
kitchen sink or laundry tub, in a wet basement, near a swimming pool and the like.
13.Heat - The product should be situated away from heat sources such as radiators, heat registers,
stoves, or other products (including amplifiers) that produce heat.
DVT-KBD-G2 FLIR UVMS CCTV Keyboard
May 9, 20182
Page 7

Important Safeguards
14.Accessories - Do not place this product on an unstable cart, stand, tripod, or table. The product may
fall, causing serious damage to the product. Use this product only with a cart, stand, tripod, bracket, or
table recommended by the manufacturer or sold with the product. Any mounting of the product should
follow the manufacturer’s instructions and use a mounting accessory recommended by the
manufacturer.
15.Camera Extension Cables – Check the rating of your extension cable(s) to verify compliance with
your local authority regulations prior to installation.
16.Mounting - The cameras provided with this system should be mounted only as instructed in this guide
or the instructions that came with your cameras, using the provided mounting brackets.
17.Camera Installation - Cameras are not intended for submersion in water. Not all cameras can be
installed outdoors. Check your camera environmental rating to confirm if they can be installed outdoors.
When
1.3 Service
1. Servicing - Do not attempt to service this product yourself, as opening or removing covers may expose
you to dangerous voltage or other hazards.
Refer all servicing to qualified service personnel.
2. Conditions Requiring Service - Unplug this product from the wall outlet and refer servicing to qualified
service personnel under the following conditions:
·
When the power supply cord or plug is damaged.
·
If liquid has been spilled or objects have fallen into the product.
·
If the product has been exposed to rain or water.
·
If the product has been dropped or the cabinet has been damaged
·
If the product does not operate normally by following the operating instructions. Adjust only those
controls that are covered by the operating instructions. Improper adjustment of other controls may
result in damage and will often require extensive work by a qualified technician to restore the product
to its normal operation.
·
When the product exhibits a distinct change in performance. This indicates a need for service.
3. Replacement Parts - When replacement parts are required, have the service technician verify that the
replacements used have the same safety characteristics as the original parts. Use of replacements
specified by the product manufacturer can prevent fire, electric shock, or other hazards.
4. Safety Check - Upon completion of any service or repairs to this product, ask the service technician to
perform safety checks recommended by the manufacturer to determine that the product is in safe
operating condition.
1.4 Use
1. Cleaning - Unplug the product from the wall outlet before cleaning. Do not use liquid cleaners or
aerosol cleaners. Use a damp cloth for cleaning.
2. Product and Cart Combination - When product is installed on a cart, product and cart combination
should be moved with care. Quick stops, excessive force, and uneven surfaces may cause the product
and cart combination to overturn.
DVT-KBD-G2 FLIR UVMS CCTV Keyboard
3May 9, 2018
Page 8

Important Safeguards
3. Object and Liquid Entry - Never push objects of any kind into this product through openings as they
may touch dangerous voltage points or “short-out” parts that could result in a fire or electric shock.
Never spill liquid of any kind on the product.
4. Lightning - For added protection of this product during a lightning storm, or when it is left unattended
and unused for long periods of time, unplug it from the wall outlet and disconnect the antenna or cable
system. This will prevent damage to the product due to lightning and power line surges.
DVT-KBD-G2 FLIR UVMS CCTV Keyboard
May 9, 20184
Page 9

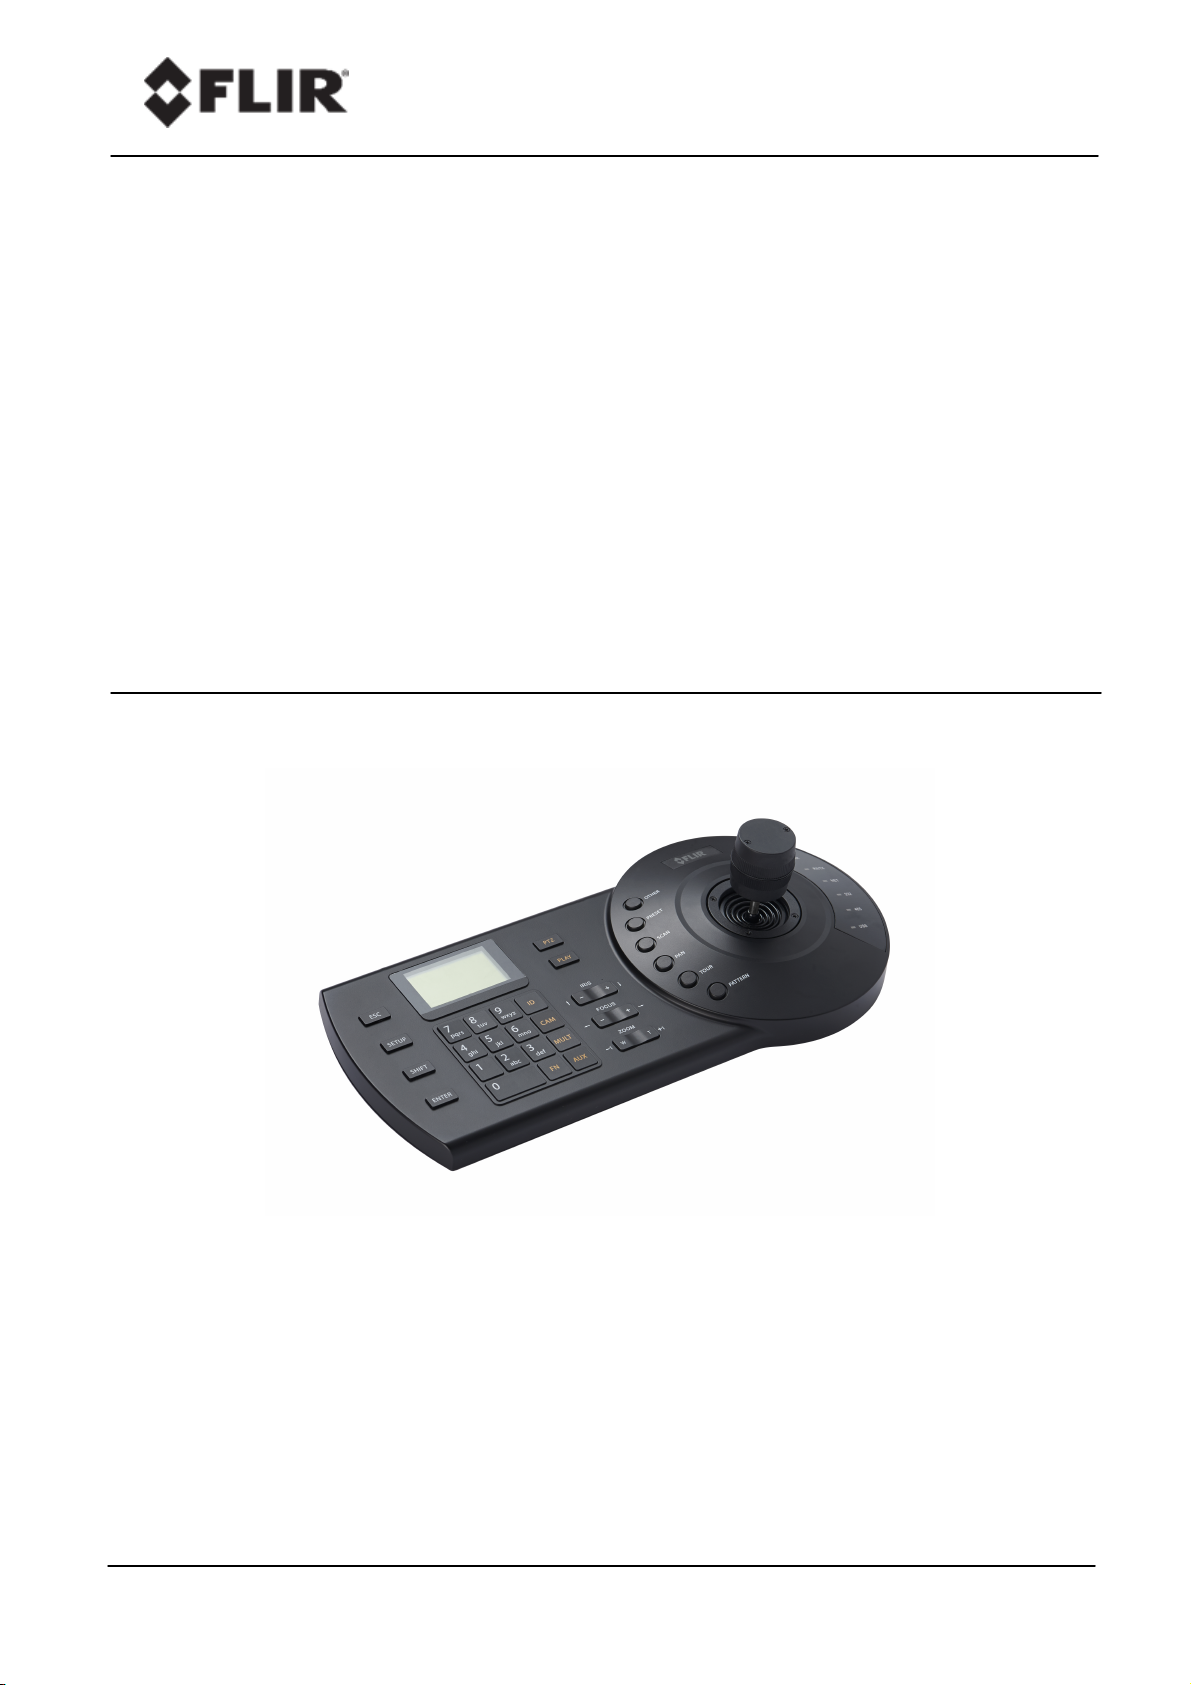
FLIR UVMS Keyboard Features
Note
Please visit http://www.flir.com/security/ for information, firmware, and compatibility updates
2 FLIR UVMS Keyboard Features
·
Manage FLIR UVMS (Latitude, Horizon and Meridian).
·
Access multiple devices using the same keyboard.
·
RS232 supported.
DVT-KBD-G2 FLIR UVMS CCTV Keyboard
5May 9, 2018
Page 10

Getting Started
FLIR UVMS Keyboard
12V Power Adapter
1.5 meter RS-232 cable
3 Getting Started
The System comes with the following components:
DVT-KBD-G2 FLIR UVMS CCTV Keyboard
May 9, 20186
Page 11

FLIR UVMS Keyboard Overview
4 FLIR UVMS Keyboard Overview
The keyboard has the following user account by default:
admin: can access all functions. Default password is 000000.
4.1 Default Username and Password
The keyboard has the following user account by default:
admin: can access all functions. Default password is 000000.
4.2 Keyboard Ports
1. USB: Not supported.
2. RS422: Not supported.
3. RS485: Not supported.
4. Ethernet: Not supported.
5. RS232: Used for RS232 connections
6. DC12V: Connect the power adapter to power the keyboard.
4.3 Front Panel & Buttons
Note: The SHIFT button works as a toggle button for other buttons on the keyboard. When
SHIFT is used to trigger a function, it remains in the SHIFT state until the button is used again to
toggle back to the previous mode.
DVT-KBD-G2 FLIR UVMS CCTV Keyboard
7May 9, 2018
Page 12

FLIR UVMS Keyboard Overview
Function
Keyboard Command
Key
Select a Control Center Monitor
MULT
8
Select a View tile
MULT
8
Display a camera on the selected monitor or tile
CAM
7
Toggle through viewing pane layouts with 4 tiles
SETUP
2
Toggle through viewing pane layouts with 9 tiles
SETUP
2
Toggle through viewing pane layouts with 16 tiles
4 SETUP
2
Expand currently selected tile to fill viewing pane
MULT
8
Clear currently selected tile
SHIFT CAM
3+7
Display a sequence on the selected monitor or
tile
Sequence number TOUR
19
Pause Sequence
TOUR
19
Switch to next camera of a paused sequence
SHIFT FOCUS+
3+13
Switch to previous camera of a paused sequence
SHIFT FOCUS-
3+13
Turn recording of the selected camera's video
stream on/off
SCAN
17
Audio PTT
OTHER15Audio Listen
3+15
Trigger an alarm
PAN
18
Acknowledge alarm in its active tile
SHIFT PAN
3+18
Full Screen
11 FN
11+5
Display CC Help File
1 FN
1+5
4.3.1 Keyboard Commands
DVT-KBD-G2 FLIR UVMS CCTV Keyboard
May 9, 20188
Page 13

FLIR UVMS Keyboard Overview
Function
Keyboard Command
Key
Pan left/right
Joystick left/right
21
Tilt up/down
Joystick up/down
21
Zoom in/out
ZOOM +/-
21
PTZ preset
PRESET
16
PTZ Pattern
PATTERN
20
Send to 'home' position
PTZ
10
Lock/unlock
PTZ
10
Flip position
PTZ
10
Control Iris
IRIS +/-
12
Focus
FOCUS +/-
13
Auxiliary controls ON
AUX Number
9
Auxiliary controls OFF
AUX Number
3+9
Function
Keyboard Command
Key
Display Instant replay on next
available tile
PLAY
11
Play
IRIS +
12
Pause
IRIS -
12
Rewind
FOCUS - or joystick left
13/21
Fast Forward
FOCUS + or joystick right
13/21
Bookmark the selected tile
SHIFT+SCAN
2+17
4.3.2 PTZ Controls
Note: Entering the PTZ menu, by pressing the PTZ Button (10) will display a menu with options
that are listed below under Keyboard commands as PTZ. To learn more about navigating the
menu, see the section titled Navigating the Menu.
4.3.3 Instant Replay Commands
Note: Moving the joystick will pause the video. Once paused, moving the joystick to the left or
right will move the playback needle, in order to jump to time within the time-line. When a desired
spot is determined, press PLAY to continue watching.
DVT-KBD-G2 FLIR UVMS CCTV Keyboard
9May 9, 2018
Page 14

Basic Setup
Note
To find the RS232 connection information in the UVMS, Finding RS232 Conneciton Information
in UVMS United Control Center
5 Basic Setup
5.1 Start Up
1. Connect the included power adapter to the keyboard and to a power outlet or surge
protector.
2. When the keyboard starts up it will show the current date and time on the display. Press ID
to enter the sign in screen.
3. Move the joystick down to highlight PW. Enter the admin password (default:000000). Press
ENTER to log into the keyboard.
4. Request to enter ID will be shown. Default ID '0' will be shows. Press ENTER to complete
login.
5.2 Connecting to a client machine using RS232
You can use the User guide to control the UVMS United Control Center via an RS232 serial
connection.
1. Connect the RS232 cable from the keyboard to the back of the client PC.
2. Plug in the keyboard to power it on.
3. Press ID to open the menu. Select the admin user and enter the password (default: 000000)
under PW.
4. Request to enter ID will be shown. Default ID '0' will be shows. Press ENTER to complete
login.
The keyboard will connect to the device
5.3 Finding RS232 Information on UVMS
When connecting to the UVMS United Control Center, the address settings are pre-defined in
the keyboard and does not require such configuration in the Control Center setting.
The following steps are required to allow the Control Center to recognize the keyboard:
DVT-KBD-G2 FLIR UVMS CCTV Keyboard
May 9, 201810
Page 15

Basic Setup
Open Control Center on the client machine of which you plan to connect the FLIR Keyboard via
RS232
1. At the top of the screen, on the application Menu, click Tools > Options
2. On the left hand side, navigate to Keyboard
3. In the Keyboard Selection section, open the drop-down and select: DVTel Keyboard v0.1
4. In the RS232 Port Selection section, open the drop-down and select the appropriate
computer port associated with the RS232 port of the local client machine
DVT-KBD-G2 FLIR UVMS CCTV Keyboard
11May 9, 2018
Page 16

Basic Setup
5. Click OK
DVT-KBD-G2 FLIR UVMS CCTV Keyboard
May 9, 201812
Page 17

Keyboard Menu
6 Keyboard Menu
You can use the keyboard menu to configure the keyboard.
6.1 Navigating the Menu
·
Move the joystick UP and DOWN to select items.
·
Move the joystick LEFTand RIGHT to change parameters.
·
Press the keyboard buttons to enter characters. Press SHIFT to change input types. Press
FOCUS— to delete characters.
·
Press ENTER to confirm selections or enter sub-menus.
·
Press ESC to exit or go back.
6.2 System
The System menus allow you to configure keyboard settings. System menus are under Menu
Settings>System.
6.2.1 Time
The Time menu lets you set the system time. Set the year, month, day, minute, and second.
You can select 12 or 24 hour time under Mode. Press ENTER to save changes.
6.2.2 AUX
The AUX menu allows you to configure backlight and auto-logout.
·
Backlight: Select ON to enable screen backlight or OFF to disable. Press ENTER to save
changes.
·
AutoLogout: Select OFF to disable auto-logout, or select auto-logout in 10 minutes (10M), 30
minutes (30M), or 60 minutes (60M). Press ENTERto save changes.
DVT-KBD-G2 FLIR UVMS CCTV Keyboard
13May 9, 2018
Page 18

Keyboard Menu
6.3 Account
The Account menus allow you to add, delete, or modify user accounts and passwords on the
keyboard.
Note: You must be logged into the keyboard with the admin account to access this menu.
6.3.1 Modify PW
Modify PW allows you to change the password for a user account.
To change an account password:
1. Highlight User and press left/right on the joystick to select the user account.
2. Highlight PW and enter the new password for the user. It is recommended to enter a six digit
password.
3. Highlight OK and confirm the password. Press ENTER to save the new password.
6.3.2 Add User
You can add additional user accounts to the keyboard
To add additional user accounts:
1. Highlight User and enter user name.
2. Highlight PW and enter account password. It is recommended to enter asix digit password.
3. Highlight OK and confirm the password.
4. Press down to highlight Right and press ENTER to configure user account rights. Press
LEFT/RIGHT to enable/disable rights. Rights are enabled when the icon is filled (•) and
disabled when the icon is empty (?). Press ENTER to confirm the rights and save the user
account.
5. Press ENTER to save the user account.
DVT-KBD-G2 FLIR UVMS CCTV Keyboard
May 9, 201814
Page 19

Keyboard Menu
6.3.3 Delete User
Select a user account and press ENTER to delete the account.
Note: The admin account cannot be deleted
6.3.4 Modify Rights
Modify Rights allows you to change rights assigned to user accounts you have created.
To modify rights:
1. Highlight User and select the user account you want to modify.
2. Press down to highlight Right and press ENTER to configure user account rights. Press
left/right to enable/disable rights. Rights are enabled when the icon is filled (•) and disabled
when the icon is empty (?). Press ENTER to confirm the rights and save the user account.
3. Press ENTER to save changes.
6.4 Config (Resetting to Factory Defaults)
The Config menu allows you to clear all zones or reset the keyboard to factory default settings.
To clear zones:
1. Select Clear Zones and press ENTER.
2. Press ENTER again to confirm or ESC to cancel
To reset the keyboard to factory defaults:
1. Select Default and press ENTER.
2. Press ENTER again to confirm or ESC to cancel.
DVT-KBD-G2 FLIR UVMS CCTV Keyboard
15May 9, 2018
Page 20

Keyboard Menu
6.5 Info
The Version menu shows the current version of the keyboard firmware.
6.6 Model
The Model menu shows the model number of the keyboard.
DVT-KBD-G2 FLIR UVMS CCTV Keyboard
May 9, 201816
Page 21

6.7 Menu Tree Overview
Keyboard Menu
DVT-KBD-G2 FLIR UVMS CCTV Keyboard
17May 9, 2018
Page 22

System Specifications
Compatibility
Latitude NVMS, Horizon/Meridian NVR
Keyboard
Keypanel
Electromechanical
Joystick
3-axis, vector-solving, twisting, return to-center
Connectors
RS232
Display
LCD, 75.2mm x 33.85mm
Max User
Accounts
1 Admin, 10 User
User Account
Type
Admin, User
Power Supply
Input 100V ~240V 50Hz / 60Hz, Output 12V DC 1000mA
Power
Consumption
Max 5W
Operating
Temperature
–14~131°F / –10~55°C
Operating
Humidity
<90%RH
Dimension
13.0” x 5.1” x 4.0” / 330mm x 139mm x 103mm
Weight
5.5lbs / 2.5Kg
7 System Specifications
DVT-KBD-G2 FLIR UVMS CCTV Keyboard
May 9, 201818
Page 23

7.1 Dimensions
System Specifications
As our products are subject to continuous improvement, FLIR Systems, Inc. and its
subsidiaries reserve the right to modify product design, specifications, and prices without notice
and without incurring any obligation. E&OE
DVT-KBD-G2 FLIR UVMS CCTV Keyboard
19May 9, 2018
Page 24

Notices
8 Notices
This equipment has been certified and found to comply with the limits regulated by FCC, EMC,
and LVD. Therefore, it is designated to provide reasonable protection against interference and
will not cause interference with other appliance usage.
However, it is imperative that the user follows the guidelines in this manual to avoid improper
usage which may result in damage to the unit, electrical shock and fire hazard injury.
In order to improve the feature functions and quality of this product, the specifications are
subject to change without notice from time to time.
8.1 FCC Class A Notice
This equipment has been tested and found to comply with the limits for a Class A digital device
pursuant to Part 15 of the FCC Rules. These limits are designed to provide reasonable
protection against harmful interference when the equipment is operated in a commercial
environment. This equipment generates, uses, and can radiate radio frequency energy and, if
not installed and used in accordance with the manufacturer’s instruction manual, may cause
harmful interference with radio communications. Operation of this equipment in a residential
area is likely to cause harmful interference, in which case you will be required to correct the
interference at your own expense.
DVT-KBD-G2 FLIR UVMS CCTV Keyboard
May 9, 201820
Page 25

FLIR Systems, Inc.
6769 Hollister Ave.
Goleta, CA 93117
USA
PH: +1 805.964.9797
PH: +1 877.773.3547 (Sales)
PH: +1 888.747.3547 (Support)
FX: +1 805.685.2711
w w w .flir.com/security
Corporate Headquarters
FLIR Systems, Inc.
27700 SW Parkw ay Ave.
Wilsonville, OR 97070
USA
PH: +1 503.498.3547
FX: +1 503.498.3153
Document:
DVT-KBD-G2 FLIR UVMS CCTV Keyboard
Version: 1.0
Date: May 9, 2018
Language: en-US
 Loading...