

Page 1
Operating Instructions & Parts Manual
5.28
Please read and save these instructions. Read carefully before attempting to assemble, install, operate or maintain the product described.
Protect yourself and others by observing all safety information. Failure to comply with instructions could result in personal injury and/or property damage! Retain instructions for future reference.
Pressure Booster Pumps
Description
Pressure booster pumps increase water pressure from city mains or private water
systems. Applications include providing high water pressure for washing buildings, dairy
walls or floors, hog parlors, poultry houses, rinsing or spray cooling equipment, lawn
sprinkling and insecticide spraying.
Single-phase models are equipped with a capacitor start, thermal protected motor.
Three-phase models require separate overload protection.
2 & 3HP
4.88
TEFC ONLY
3.88
1Ø TEFC ONLY
3.75
6.50
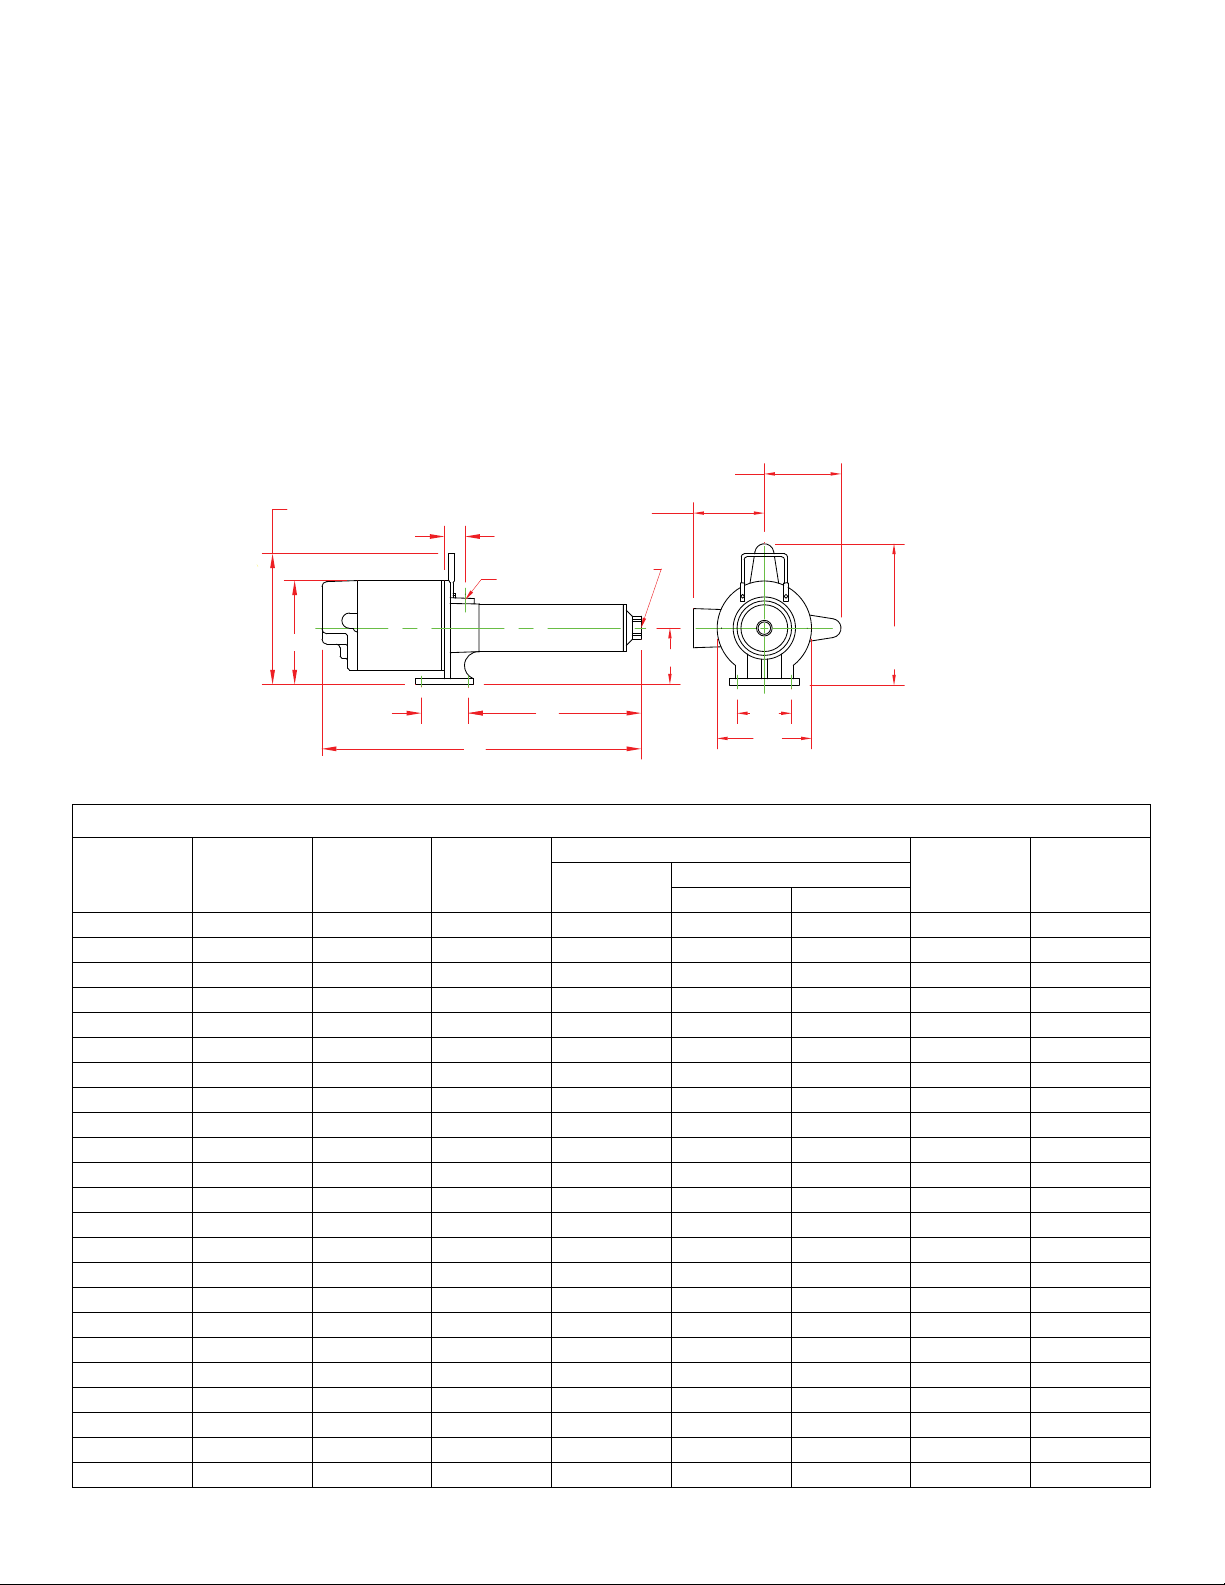
Figure 1
(MODELS WITH HANDLES)
7.15
9.00
1.44
"H" INLET
3.25 "C"
"F"
"J" DISCHARGE
Unpacking
When unpacking the unit, inspect
carefully for any damage that may
have occurred during transit.
NOTE: Use pump with clear water
only.
9.75
1-1/2 & 2HP 1Ø TEFC
ALL 3HP 1Ø
IL0391B
Pump Dimensions 60 Hz Chart A
F
HP GPM Stage “C”
1/3 5 8 10.19 19.81 - - .75 .75
1/3* 5 8 10.19 20.06 22.04 - .75 .75
1/2 5 12 13.38 23.25 23.23 24.10 .75 .75
1/2* 5 14 14.97 25.34 26.82 25.69 .75 .75
3/4 5 16 16.54 26.91 28.77 27.51 .75 .75
3/4 7 12 13.38 23.75 25.61 24.35 .75 .75
3/4* 7 14 14.97 25.84 27.20 25.94 .75 .75
1 10 14 16.31 27.18 29.16 28.02 .75 .75
1-1/2 10 16 18.13 29.62 31.48 30.07 .75 .75
1* 10 20 21.69 33.18 34.54 33.40 .75 .75
1* 10 22 23.50 34.99 36.35 35.21 .75 .75
1* 10 23 24.38 35.87 37.73 36.09 .75 .75
2 19 14 17.89 29.88 32.12 30.87 .75 .75
1-1/2* 19 20 24.06 36.05 37.41 36.00 .75 .75
2* 19 22 26.13 38.12 40.36 39.11 .75 .75
2 27 11 15.38 27.37 29.61 28.36 1.00 1.00
3 27 14 18.50 30.49 33.85 33.35 1.00 1.00
2* 27 17 21.59 33.58 35.82 34.57 1.00 1.00
3 27 17 21.59 33.74 - - 1.00 1.00
2 35 6 13.94 25.93 28.17 26.92 1.00 1.00
3 35 8 17.13 29.12 32.48 31.98 1.00 1.00
1-1/2* 35 8 17.13 29.12 30.48 29.07 1.00 1.00
3* 35 14 26.86 38.85 42.21 41.71 1.00 1.00
F&W
1 Phase 3 Phase
TEFC
H J
Copyright © 2014 FLINT & WALLING, INC. • 95 North Oak St. • Kendallville, IN 46755
1
flintandwalling.com
132934 C
Page 2
PRESSURE ADDED - PSI 10 20 40 60 80 100 120 140 160 180 200 220
Stainless Steel
Fitted
PB0508S031 PB0508C031 PB0508A031‡ 1/3 8 10.2 9.6 8.3 6.5 4.3 96
PB0512S051 PB0512C051 PB0512A051‡ 1/2 12 10.0 9.5 8.3 7.1 6.0 4.0 2.3 132
PB0516S071 PB0516C071 PB0516A071 3/4 16 10.2 9.7 9.1 8.3 7.5 6.6 5.8 4.6 3.3 189
PB0712S071 PB0712C071 PB0712A071 3/4 12 14.0 13.4 12.2 10.9 9.5 8.9 7.0 4.6 158
PB1014S101 PB1014C101 PB1014A101 1 14 * * 14.5 13.4 12.3 11.2 9.8 8.0 6.0 2.3 183
PB1016S151 PB1016C151 PB1016A151 1-1/2 16 * * 15.0 14.1 13.1 12.1 11.0 9.8 8.2 5.2 2.0 212
PB1914S201 PB1914C201 PB1914A201 2 14 27.6 27.0 25.7 24.2 22.6 20.8 18.7 16.2 12.9 7.7 190
PB3506S201 PB3506C201 PB3506A201 2 6 48.0 47.0 42.5 35.2 24.0 85
PB2711S201 PB2711C201 PB2711A201 2 11 * * 31.5 29.5 27.1 24.2 20.3 13.0 147
PB3508S301 PB3508C301 PB3508A301 3 8 48.0 47.5 44.0 40.0 35.2 27.5 118
PB2714S301 PB2714C301 PB2714A301 3 14 * * 33.0 31.5 29.8 27.9 25.6 22.8 18.9 11.1 187
PB2717S303** - - 3 17 * * * 34.1 32.3 30.5 28.3 25.8 23.1 20.0 16.6 11.4 225
- - PB5504A201 2 4 77.6 71.5 52.5 55
- - PB5506A301 3 6 77.8 74.4 65.0 51.1 31.9 83
- - PB8504A201 2 4 105.8 90.0 47.0 49
- - PB8505A301 3 5 108.8 98.8 60.0 25.0 60
‡ Equipped with carrying handle. 132079 handle available as an option for other models.
† Example: If PB0508A031 pump is connected to supply line of sufficient capacity, carrying water at 40 PSI, and the output of the pump is held to 7.3 GPM by a gate
valve, the pump will add 40 PSI to line pressure for a total output pressure of 80 PSI.
* Operation of pump in this range may result in reduced pump life and/or motor damage.
To keep pump and seal lubricated, a minimum flow of 1.5 GPM must always be maintained through the pump.
** Only available in 3 phase
Motor voltage: Open Drip Proof Totally Enclosed Fan Cooled
Powder-
Coated Cast
Iron Fitted
Single Phase 1/3 - 2 HP - 115/230; 3 HP - 230V 60 Hz.
Three Phase 1/2 - 2 HP - 208-230/460, 50/60Hz.
Three Phase 3 HP - 208-230/460, 60 HZ
For three phase models, use suffix “3” on the model no.
Example: PB0512A053
Cast Iron Fitted HP Stage Output - Gallons per Minute
60Hz Models
Single Phase: 1/2 thru 3 HP - 115/230V 60/50Hz
Three Phase: 1/2 thru 3 HP - 208/230/460V 60/50Hz
Max.
Press.
PSI
Suction
Pipe
Tap
NPT
3/4” 3/4”
1” 1”
2” 2”
Disch.
Pipe
Tap
NPT
Single Phase Motor Data 60HZ Chart C
Single Phase† 60 Hz 3450 RPM Capacitor Start
HP
1/3
1/2
3/4
1
1-1/2
2
3
Motor
Voltage
115/230
115/230
115/230
115/230
115/230
115/230
230
Factory
Connected
Motor
Voltage
115V
115V
115V
230V
230V
230V
230V
Service Factor Motor
Amps
Locked Rotor Motor
Amps
115V 230V 115V 230V
8.6
13.0
14.0
18.0
21.0
25.0
-
4.3
6.5
7.0
9.0
10.5
12.5
13.5
26.0
36.0
52.0
78.0
98.0
116.0
-
13.0
18.0
26.0
39.0
49.0
58.0
53.0
Code Letter
K
K
K
L
J
H
D
Single Phase Motor Data 50HZ
Single Phase† 50 Hz 2850 RPM Capacitor Start
1/2
3/4
1
1-1/2
2
†Thermal overload protector - automatic reset
115/230
115/230
115/230
115/230
230
115V
115V
230V
230V
230V
10.0
14.4
16.4
23.6
-
5.0
7.2
8.2
11.8
13.2
48.0
64.0
72.0
104.0
-
24.0
32.0
36.0
52.0
55.0
M
L
K
K
H
Copyright © 2014 FLINT & WALLING, INC. • 95 North Oak St. • Kendallville, IN 46755
flintandwalling.com
2
Page 3

Three Phase Motor Data Chart D
Three Phase† 60/50 Hz 3450/2850 RPM Capacitor Start
HP
3/4
1
1-1/2
2
3
Motor
Voltage
208-230/460
208-230/460
208-230/460
208-230/460
208-230/460
Factory
Connected
Motor
Voltage
230V
230V
230V
230V
230V
Service Factor Motor
Amps
Locked Rotor Motor
Amps
230V 460V 230V 460V
3.5
4.5
5.7
7.4
9.8
1.75
2.25
2.85
3.70
4.90
19.0
26.9
33.5
44.0
48.0
13.5
16.8
22.0
24.0
9.5
Code Letter
K
K
K
K
D
3 HP, 3 Phase motor operable on 60Hz only.
Material Construction Chart E
Component Standard Models* Stainless Steel Models
Motor Rear access - Nema 56J face Rear access - Nema 56J face
Bearings Ball-ball, permanently lubricated Ball-ball, permanently lubricated
Impellers Noryl with 304 stainless steel bearing insert Noryl with 304 stainless steel bearing insert
Diffuser Noryl Noryl
Diffuser plates Delrin Delrin
Pump shaft 416 Stainless steel 304 Stainless steel
Pump shaft coupling 316 Stainless steel 316 Stainless steel
Pump shell 304 Stainless steel 304 Stainless steel
Discharge & inlet casting Cast iron 304 Stainless steel
O-Rings Buna-N Viton
Seal composition Carbon-silicon carbide, stainless steel spring
and Buna-N
*Models with powder coated inlet & discharge also available.
Carbon-silicon carbide, stainless steel spring
and Viton
Minimum Wire Size Chart (Gauge) Chart F
Motor
HP
1/3 115/230 1 14/14 14/14 14/14 12/14 12/14 15/15
1/2 115/230 1 12/14 12/14 12/14 12/14 10/14 15/15
3/4 115/230 1 12/14 12/14 10/14 10/12 8/12 15/15
1 115/230 1 10/14 10/14 10/12 8/12 6/10 20/15
11/2 115/230 1 10/12 8/12 6/12 */10 */10 30/15
2 115/230 1 10/12 8/12 6/12 */10 */10 30/15
3 230 1 10 10 10 10 8 20
3/4 230/460 3 14/14 14/14 14/14 14/14 14/14 15/15
1 230/460 3 14/14 14/14 14/14 14/14 12/14 15/15
11/2 230/460 3 14/14 14/14 14/14 12/14 12/14 15/15
2 230/460 3 14/14 14/14 14/14 12/14 10/12 15/15
3 230/460 3 14/14 14/14 14/14 12/14 10/12 15/15
1. (*) Not economical to run in 115V, use 230V.
Volts Phase
Copyright © 2014 FLINT & WALLING, INC. • 95 North Oak St. • Kendallville, IN 46755
0-50 50-100 100-150 150-200 200-300
Distance In Feet From Motor To Service Panel
Breaker Size
(Amps)
Wire Size
3
flintandwalling.com
Page 4
General Safety Information
!
!
!
!
!
!
Carefully read and follow all safety instructions in this
manual and on pump. Keep safety labels in good condition.
Replace missing or damaged safety labels.
This is a SAFETY ALERT SYMBOL. When you see this
symbol on the pump or in the manual, look for one
of the following signal words and be alert to the
potential for personal injury or property damage.
Warns of hazards that WILL cause serious
personal injury, death or major property
damage if ignored.
Warns of hazards that CAN cause serious
personal injury or death, if ignored.
Warns of hazards that MAY cause minor
personal injury, product or property damage
if ignored.
IMPORTANT: Indicates factors concerned with operation,
installation, assembly or maintenance which could result in
damage to the machine or equipment if ignored.
NOTE: Indicates special instructions which are important but
are not related to hazards.
9. Do not insert finger or any object into pump or motor
openings.
10. Secure the discharge line before starting the pump. An
unsecured discharge line will whip, possibly causing
personal injury and/or property damage or puncture.
Do not touch an operating motor or
engine. They are designed to operate at
high temperatures.
This product contains chemicals known
to the State of California to cause cancer
and birth defects or other reproductive
harm.
Risk of Electric Shock. This pump has not
been investigated for use in swimming
pool areas.
NOTE: Pumps with the “CSA-CUS” mark are tested to UL
standard UL778 and certified to CSA standard C22.2 No. 108.
Pre-Installation
HANDLING
1. Use handle supplied to lift pump.
2. Avoid impact on pump or motor. In particular, avoid
impact on discharge end of pump or rear motor access
cover.
LOCATION
In any installation where property
damage and/or personal injury might
result from an inoperative or leaking
pump due to power outages, discharge line blockage, or any
other reason, a backup system(s) should be used.
1. Locate pump as close to the fluid source as possible,
keeping the inlet pipe short as possible.
2. Place unit where the pump and piping are protected
from the weather and extremes of heat, humidity and
below freezing temperatures.
Hazardous voltage. Can shock,
burn or cause
death. Ground
pump before connecting to power
supply.
Wire motor for correct voltage. See
“Electrical” section and Motor Data Charts
C&D of this manual, and motor nameplate.
Ground motor before connecting to
power supply.
Meet United States National Electrical
Code and local codes for all wiring.
Do not handle a pump or pump motor
with wet hands or when standing on a wet
or damp surface or in water.
3. Mount unit in a dry location that is easily accessible for
Follow wiring instructions in this manual when connecting
to power lines.
Always disconnect power source before
performing any work on or near the motor
or its connected load.
Do not use to pump flammable or explosive fluids such
as gasoline, fuel oil, kerosene, etc. Do not use in flammable and/or explosive atmospheres.
inspection and maintenance. If a dry location is not
available, mount it on a foundation well above the wet
floor.
4. Allow ample clearance around unit for free air
circulation.
SUCTION LIMITATIONS
1. Units are non self-priming.
Hazardous pressure! Install pressure relief valve in
discharge pipe. Release all pressure on system before
working on any component.
2. Pressure booster pumps are not recommended for
suction lift applications.
PIPING
1. Use galvanized piping, rigid plastic or other suitable pipe
1. Make workshop child proof - use padlocks, master switches;
remove starter keys.
2. Wear safety glasses when working with pumps.
3. Wear a face shield and proper apparel when pumping
hazardous chemicals.
4. Keep work area clean, uncluttered and properly lighted;
replace all unused tools and equipment.
5. Provide guarding around moving parts.
6. Keep visitors at a safe distance from the work area.
7. Periodically inspect pump and system components.
8. Protect electrical cord. Replace or repair damaged or worn
cords immediately.
that will not collapse under suction or rupture due to
pressure.
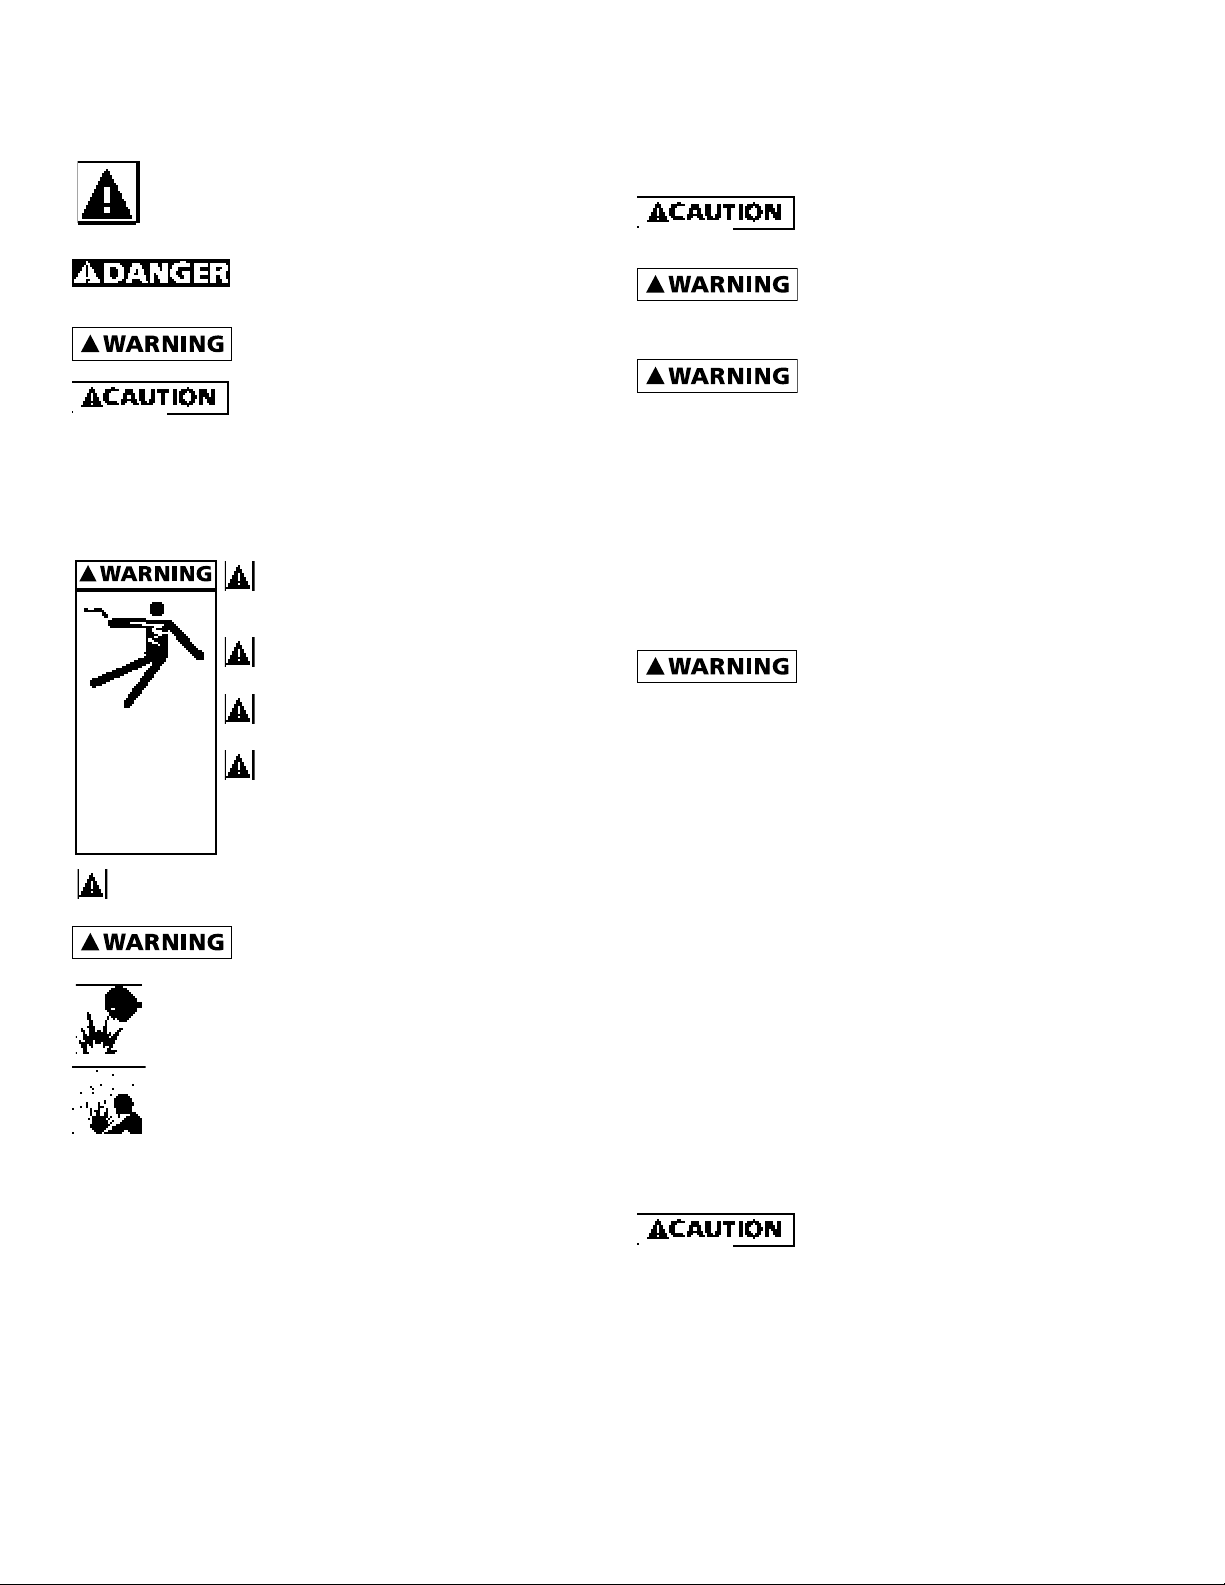
If hose is used, make sure it is the
reinforced industrial type that is rated
higher than the shutoff pressure of the
system. Ordinary garden hose will collapse and starve the
pump of water.
2. The diameter of the inlet and discharge pipe should be
no smaller than the corresponding ports of the pump
(See Figure 1). Smaller pipe will reduce the capacity of
the pump. Increase pipe size on long runs.
3. Avoid air pockets in inlet piping or air will accumulate at
high points, making priming difficult.
4. Use pipe compound on all joints and connections. Use
Teflon tape or plastic joint stik, on plastic pipe. Draw all
pipe up tightly.
Copyright © 2014 FLINT & WALLING, INC. • 95 North Oak St. • Kendallville, IN 46755
flintandwalling.com
4
Page 5
IL0418
IL0420
IL0421
IMPORTANT: The entire system must
!
be air and water tight for efficient/
proper operation.
Installation
PUMP INSTALLATION
IMPORTANT: Pump is built to handle
clear water only; it is not designed to
handle water containing sand, silt or
other abrasives.
1. Refer to Figures 6, 7, and 8 for
typical installations.
Support pump and
piping when assembling and when
installed. Failure to do so may cause
piping to break, pump to fail, motor
bearing failures, etc.
2. If the pump is used as part of a
permanent installation, bolt to a
rigid foundation.
Use only
components that
are rated for
maximum pressure pump can produce
when used in boosting system or any
other system. Do not exceed the total
maximum pressure boost as listed per
model in Performance Charts B.
PRESSURE BOOST SYSTEMS
1. On pressure boost systems, locate
the pump so that there will always
be a positive supply of water to
the pump (See Figures 6, 7 and 8).
2. For service convenience, install a
gate valve and union in the inlet
and discharge line.
Do not use a globe
valve or other
restricting type of
valve that will seriously restrict the
pumps discharge capacity.
3. Install a check valve as shown in
Figure 6. Be sure check valve flow
arrows point in the direction of
water flow.
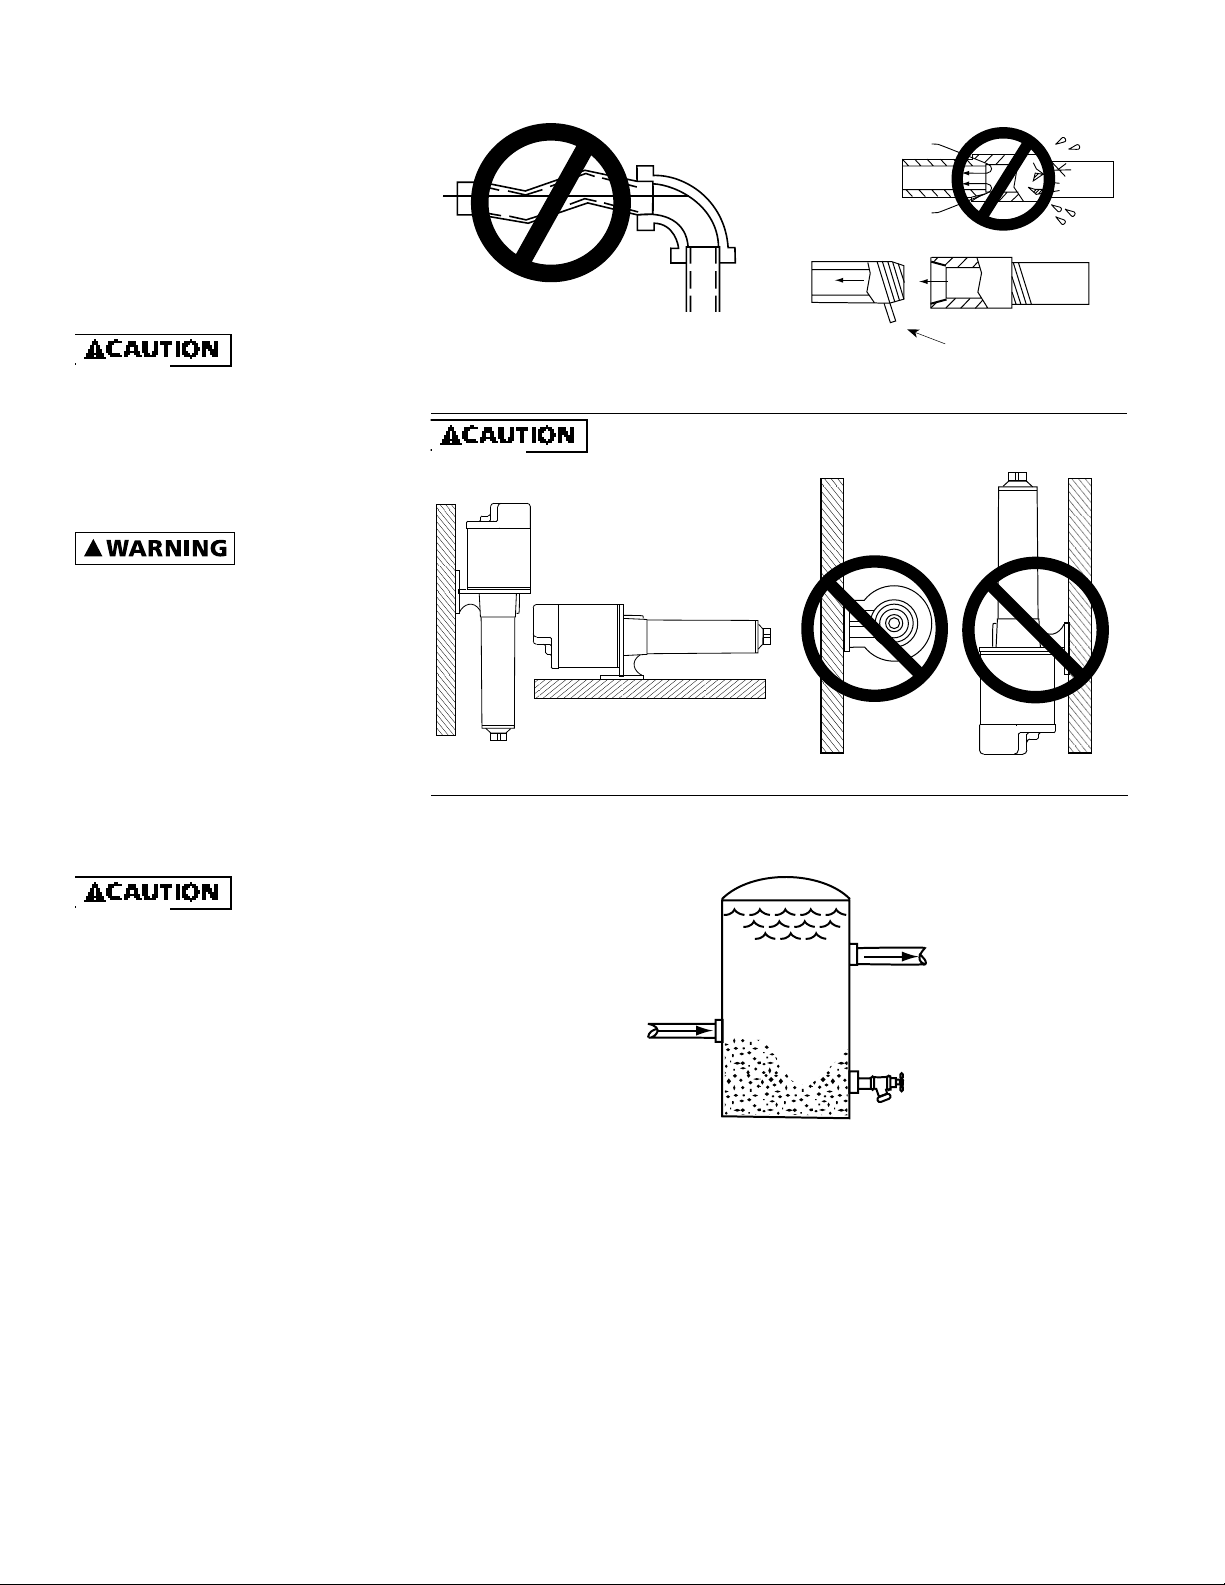
4. Whenever dirt, sand or debris is
present in the supply water, install
a strainer or filter on the inlet side
of the pump (See Figure 7).
NOTE: For heavy amounts of
sediment, install a trap filter on the
inlet side of the pump (See Figure 5).
NOTE: Pressure gauges installed
before and after the filter will show
pressure differential indicating
the need for filter replacement or
cleaning.
No Sags
Sags Allow Air Pockets
No Air Leaks In
Inlet Pipe
Pipe Joint Compound
Will Damage Plastic
If Air Flows
Water
Won’t
If Air Pockets Form,
Water Won’t Flow
Figure 2 - No Air Pockets in Inlet Pipe
Mount pump in correct position or pump failure will result.
Correct
Figure 4A Figure 4B
IL1013
Figure 3 - Inlet Pipe Must Not Leak
Use Teflon Tape
Incorrect
SAND AND SEDIMENT TRAP FILTER
Standard Pressure
Tank - 42 Gallon Or
Larger
Outlet
Inlet
Sand Settles To The Bottom
Figure 5
Clean Out
IMPORTANT: Clean all filters and strainers on a regular schedule.
IL0419
IL1014
Copyright © 2014 FLINT & WALLING, INC. • 95 North Oak St. • Kendallville, IN 46755
flintandwalling.com
5
Page 6

Installation (Continued)
!
IL0423
5. A pressure gauge installed in
the inlet pipe close to the inlet
port, (See Figure 6) will show if
enough water is being supplied
to the pump. See Operation
Section - Priming, Pressure Boost
Installations.
6. On installations that are using
nozzles for mist spraying, install
a filter in the discharge plumbing
to prevent the nozzles from
becoming plugged. Multiple filters
should be plumbed in parallel.
Install a pressure
relief valve on any
installation where
pump pressure can exceed the pressure
tank’s maximum working pressure or
on systems where the discharge line
can be shut off or obstructed. Extreme
over pressure can result in personal
injury or property damage.
This unit is not
waterproof and is
not intended to be
used in showers, saunas or other
potentially wet locations. The motor is
designed to be used in a clean dry
location with access to an adequate
supply of cooling air. Ambient
temperature around the motor should
not exceed 104ºF (40ºC). For outdoor
installations, motor must be protected
by a cover that does not block airflow
to and around the motor. This unit is
not weatherproof nor is it able to be
submersed in water or any other
liquid.
Pump used to boost incoming city pressure (automatic operation).
Street Supply
Check
Valve
Gate/Ball
Valve
(Normally
open)
Figure 6
Union
Union
Pressure
Gauge
Check Valve
Service Tee
Inlet
Outlet
Gate/Ball
Valve
(Normally
open)
To size tank
properly - Match
drawdown of
tank to capacity
of pump
Pressure Switch
Pressure
Switch
Drain
Main Power Box
Fuse
Box or
Switch
Union
Pressure
Gauge
IL0422
Pressure
Relief
Valve
IMPORTANT: A contained air pressure tank and pressure switch is required to
keep the pump from rapid cycling and prevent the motor from over heating.
Install the tank and switch on the house side of system.
Pump used to boost water pressure in mist spray applications (automatic
operation).
Fuse Box
or Switch
Pressure Gauge
Thermostat
Gate/Ball Valve
To avoid dangerous or fatal
electrical shock, turn off power to
motor before working on electrical
connections.
Supply voltage must be within ±
10% of nameplate voltage. Incorrect
voltage can cause fire or seriously
damage motor and voids warranty. If
in doubt, consult a licensed electrician.
Use wire size specified in wiring
Chart F. If possible, connect pump
to a separate branch circuit with no
other appliances on it. If motor wiring
diagram differs from diagram shown
below, follow diagram on motor.
Line Filter
Pressure
Relief
Valve
Figure 7
Solenoid
Valve
To Drain
NOTE: Install solenoid valve on discharge side of pump.
IMPORTANT: Clean all filters and strainers on a regular schedule.
Copyright © 2014 FLINT & WALLING, INC. • 95 North Oak St. • Kendallville, IN 46755
flintandwalling.com
6
From Water Source
Gate/Ball Valve
(Normally open)
To Nozzles
Page 7

Installation (Continued)
IL0424
!
L1
L2A B
L1
L2A B
IL0180
YELLOW
115 VOLT
SINGLE PHASE
LINE
230 VOLT
SINGLE PHASE
LINE
WHITE
GRAY
RED
TAN
YELLOW
WHITE
GRAY
RED
TAN
Ground motor
before connecting
to electrical power
supply.
Failure to
ground motor can
Hazardous
voltage. Can
shock, burn or
cause death.
Ground pump
before connecting
to power supply.
phase motors. See Motor Rotation
under Operation section and Figure 12.
WIRING
1. Install, ground, wire and maintain
this pump in accordance with
your local electrical code and
all other codes and ordinances
that apply. Consult your local
building inspector for local code
information.
2. Ground the pump permanently
using a wire of size and type
specified by local or United States
National Electrical Code. Do not
ground to a gas supply line.
3. Connect ground wire first.
Connect to ground first, then to
green grounding terminal provided
on the motor frame, identified as
GRD. Ground connection MUST
be made to this terminal. Do not
connect motor to electrical power
supply until unit is permanently
grounded; otherwise serious or
fatal electrical shock hazard may
be caused.
4. Connect the other end of the
ground wire to a properly
grounded service panel or to a
control panel ground bar if it is
connected to the power supply
ground.
IMPORTANT: Check local and/or
United States National Electric Codes
for proper grounding information.
electrical specifications of the motor
supplied. See Motor Data Charts.
cause severe or
fatal electrical shock
hazard.
Do not ground
to a gas supply line.
Proper rotation of
pump impeller is
critical on three
Make certain that
the power supply
conforms to the
Pump used to boost incoming pressure from a wall hydrant (manual operation).
Hose Adapter
Wall Hydrant
Pressure Gauge
Pressure
Relief Valve
High Pressure Reinforced Hose
Service Tee
Inlet
Hose Adapter
Outlet
Spray
Nozzle
Figure 8
High Pressure Reinforced Hose
NOTE: Dual voltage motors, change the red and
gray wire to the voltage required.
Figure 9 - Wiring Diagram for Single Phase 1/3 - 2 HP
Motors
230 Volts
Single Phase
LINE
L1 L2
A B
YELLOW
NOTE: Single voltage (230V) motor, and can not
be connected to 115V.
Figure 10 - Wiring Diagram for Single Phase
3 HP Motors
GRAY
IL0181
Copyright © 2014 FLINT & WALLING, INC. • 95 North Oak St. • Kendallville, IN 46755
flintandwalling.com
7
Page 8

Installation (Continued)
IL1229
3 Phase
5
6
9
3
4
8
7
2
1
LINE LINE
3 Phase
HIGH VOLTAGELOW VOLTAGE
5
6
9
3
4
(WHEN REQ)
T7
T1
8
7
2
1
T3
IL1231
T6
T5
T8
T2
T6
T9
T3
T5
T8
LINE
T4
T7
T2
T1
HIGH VOLTAGELOW VOLTAGEGROUND
T6
T9
T3
T5
T8
T2
LINE
T4
T7
T1
Figure 11 - Wiring Diagram for Baldor TEFC 3 Phase
motors
3 Phase
HIGH VOLTAGELOW VOLTAGE
5
5
6
9
3
IL1230
Figure 12 - Wiring Diagram for Franklin Electric TEFC 1
Phase and 3 Phase motors
8
LINE
4
7
2
6
8
9
2
3
1
LINE
BROWN
4
VIOLET
BLACK
YELLOW
BLUE
7
1
BROWN
VIOLET
YELLOW
BLACK
BLUE
1 Phase
HIGH VOLTAGE
(10)
(9)
(2)
(3)
(4)
LOW VOLTAGE
(10)
(9)
(3)
(2)
(4)
LINE
LINE
Figure 13 - Wiring Diagram for Marathon TEFC 3 Phase
motors
LOW VOLTAGE 230V HIGH VOLTAGE 460 V
4 5 6
7 8 9
1 2 3
3-ø
4 5 6
7 8 9
1 2 3
L1 L3L2 L1 L3L2
IL0770
1 - Tan 4 - Yellow 7 - Purple
2 - Red 5 - Black 8 - Gray
3 - Orange 6 - Blue 9 - White
CONNECTION FOR 3 PHASE, 9 LEADS. IF YOUR 3 PHASE
LEADS ARE COLOR CODED, MATCH NUMBER ABOVE TO THE
CORRESPONDING COLOR.
NOTE: To reverse rotation, interchange any two incoming lines
(Power) leads.
Figure 14 - Wiring Diagram for Three Phase Motors
Copyright © 2014 FLINT & WALLING, INC. • 95 North Oak St. • Kendallville, IN 46755
8
flintandwalling.com
Page 9

Installation (Continued)
!
!
5. Specific Wiring Procedure (Refer to Figures 9, 10, 11, 12,
13, 14 and Minimum Wire Size Chart).
a. Select the voltage you are to use, either 115V or 230V
single phase, 230V or 460V three phase.
b. The 1/3, 1/2 and 3/4 HP single phase pumps are factory
connected for 115V at the motor. The 1, 1
HP pumps are factory connected for 230V at the motor.
Three phase models are factory connected for 230V at
the motor.
c. If the motor wiring must be changed to conform to your
specific voltage requirements then the motor, pressure
switch or other controls should be rewired to conform
to one of the wiring diagrams (either 115V or 230V,
single phase; 230V or 460V, three phase). Single phase 3
HP motors are 230V only and cannot be wired for 115V
service.
d. The motor wiring diagrams are Figures 9, 10, 11, 12, 13
& 14, and also are located on the motor label of the
pump.
6. Remove the rear access cover of the motor.
7. Make the wiring change and replace the rear access
cover.
Replace rear access cover before starting
or operating pump. Failure to do so can
result in personal injury.
IMPORTANT: Do not use an extension cord or splice wires.
Joints should be made in an approved junction box. If the
above information or the following wiring diagrams are
confusing, consult a licensed electrician.
8. All units are not supplied with pressure switches, float
devices, on/off switches, or the like (control devices).
Controls should be wired in at this time, utilizing
whatever instructions come with the controls. All
units supplied with cords, will run whenever cord is
plugged into power and will turn off whenever cord is
disconnected from power.
MOTOR PROTECTION
All single phase motors have built in thermal protection
for all voltages. The overload protects the motor against
burnout from overload of low voltage, high voltage and
other causes. The device is automatic and resets itself once
the temperature has dropped to a safe point. Frequent
tripping of the device indicates trouble in the motor or
power lines and immediate attention is needed.
Never examine, make wiring changes or
touch the motor before disconnecting
the main electrical supply switch. The
thermal device may have opened the electrical circuit.
Three phase motors do not have a built in thermal
protection. It is recommended that a properly sized
magnetic or manual starter (both with properly sized
heaters) be used with all three phase motors. Install starters
following instructions of the starter manufacturer. See
Motor Rotation under Operation Section for changing
rotation on three phase motors.
All motors (single and three phase) should be equipped with
a correctly fused disconnect switch to provide protection.
Consult local or United States National Electric Codes for
proper fuse protection based on motor data chart (See
Charts C, D and Wire chart F).
1
/2, 2 and 3
Operation
Unit must be full of fluid before
operating. Do not run dry, or against a
closed discharge. Do not pump dirty
water or abrasive liquids. To do so will cause pump failure
and will void the warranty.
VALVES
The inlet valve should be in the full open position and the
discharge valve should be partially open, permitting some
back pressure to be exerted against the pump when starting
up. Open valve after start up is completed.
PRIMING
NOTE: Before starting the pump it is absolutely necessary
that both the pump and the inlet pipe be completely
filled with water.
PRESSURE BOOST INSTALLATIONS
Priming is automatic when pump is connected to a pressure
source such as a hydrant or city main (See Figures 6, 7 & 8).
1. Open valves or nozzle on inlet and discharge side of
pump.
2. To relieve trapped air, allow water supply to run a
minimum of 30 seconds before starting the pump.
IMPORTANT: An adequate flow of water going into the
pump is required so that the pumps impellers and shaft seal
do not run dry and fail.
3. If you installed a pressure gauge at the pump inlet, a
reading of 2 psi minimum should show whenever the
pump is in operation (See Figures 6, 7 & 8).
This reading insures that there is an ample supply of water
into the pump inlet housing.
MOTOR/PUMP ROTATION
1. Single phase models are one (1) rotation only
(counterclockwise when facing the pump end) and
cannot be reversed.
2. Proper rotation of pump impeller is critical for three
phase pumps. Pump motor should turn counterclockwise
(CCW) when facing pump end. Momentarily “bump”
(apply power for less than a second) the motor to check
for proper rotation. To change rotation on three phase
units, interchange any two (2) incoming line (power)
leads.
Do not go over recommended maximum
operating pressure (see Specifications),
while maintaining minimum flow of 1.5
GPM thru the pump. Do not restrict the inlet line to the
pump.
If driver (electric motor) is overloaded, a valve can be
installed in the discharge line to increase the back pressure
and reduce driver loading.
Copyright © 2014 FLINT & WALLING, INC. • 95 North Oak St. • Kendallville, IN 46755
flintandwalling.com
9
Page 10

Operation (Continued)
START - UP PROCEDURE
Once the preceding instructions have been completed, the
pump can be started.
1. During the first few hours of operation, inspect the
pump, piping and any auxiliary equipment used in
connection with the unit.
2. Check for leaks, excessive vibration or unusual noises.
IL1825
Figure 15 - Correct Motor/Pump Rotation (all units)
NOTE: See rotation arrow on inlet casting.
Maintenance
Disconnect power supply and
depressurize system before servicing
pump or removing any component.
ROUTINE
Pump should be checked routinely for proper operation.
Replace or clean all filters and line strainers on a regular
basis.
DRAINING
This pump cannot be completely drained because of internal
design. Most of the liquid can be drained by tilting the
discharge forward after removing discharge casting; or, the
liquid can be drained through the inlet port. Store in heated
areas.
CLEANING
If used for spraying insecticides, pump should be thoroughly
flushed with clean water after using.
LUBRICATION
The motor has prelubricated bearings. No lubrication is
required.
SERVICING THREE-PHASE UNITS
Loctite (thread sealer) is used on the threads between
the motor shaft and the pump shaft coupling. When
reassembling, reapply thread sealer.
PUMP DISASSEMBLY
To disassemble the pump, refer to the exploded parts view
and Figures 16, 17 & 18
Tools Required:
• Block of wood (2” x 4” x 12”)
Piece of 3/4” pipe (12” to 24” long)
• Pipe wrench
• Strap wrench
• 1/4” Dowel rod (about 24” long)
• 9/16” Open end wrench
• 3/8” Open end wrench
1. To stabilize pump during disassembly, place block of
wood underneath pump barrel.
2. Thread pipe into pump inlet port. This acts as a handle.
3. Using the pipe wrench, remove the discharge head,
turning CCW (counter clockwise).
4. With the strap wrench, loosen the barrel, turning CCW
(counter clockwise). DO NOT use pipe wrench on pump
barrel.
5. Holding the impeller stack in place, position pump in
upright position, standing unit on the motor end cover.
6. Use the 1/4” dowel rod to hold the stages down and in
place on the pump shaft. Remove pump barrel.
7. Slide the stages off the pump shaft onto the 1/4” dowel
rod. Leave stages on rod and carefully set aside.
NOTE: There may be some small .010” shim washers located
next to the pump shaft coupling. Keep these shims for
re-assembly.
8. Through the side opening of the mounting frame, hold
the motor shaft with 9/16” wrench. Remove the shaft
and coupling from the motor using the 3/8” wrench on
the hex shaped pump shaft.
NOTE: If the hex shaft comes free, leaving the coupling
attached to the motor, use vise grips to free the coupling.
MECHANICAL SEAL REPLACEMENT
1. Follow instructions under “Pump Disassembly”.
2. Remove the mechanical seal assembly.
a. The rotary portion of the seal assembly (carbon ring,
Buna-N gasket and spring will slide easily off the end of
shaft).
b. Using two (2) screwdrivers, pry the ceramic seal and rub-
ber gasket from the recess of the mounting ring (See
Figure 16).
The precision lapped faces of the
mechanical seal are easily damaged.
Handle the replacement seal carefully.
Short seal life will result if seal faces (ceramic & carbon) are
nicked, scratched or dirty.
3. Clean the seal cavity of the mounting ring and the
motor thoroughly.
4. Wet outer edge of rubber cup on ceramic seat with
liquid soap solution. Use sparingly (one drop only).
NOTE: Liquid soap solution - one drop of liquid soap
combined with one teaspoonful of water.
5. With thumb pressure, press ceramic seal half firmly and
squarely into seal cavity. Polished face of ceramic seat
is up. If seal will not seat correctly, remove, placing seal
face up on bench. Reclean cavity. Seal should now seat
correctly (See Figure 17).
6. If seal does not seat correctly after recleaning cavity,
place a cardboard washer over polished seal face and
carefully press into place using a piece of standard clean
3/4” pipe as a press (See Figure 18).
Copyright © 2014 FLINT & WALLING, INC. • 95 North Oak St. • Kendallville, IN 46755
flintandwalling.com
10
Page 11

Maintenance (Continued)
IMPORTANT: Do not scratch seal face.
7. Dispose of cardboard washer and recheck seal face to
be sure it is free of dirt, foreign particles, scratches and
grease.
8. Inspect shaft to be sure it is free of nicks and scratches.
9. Apply liquid soap solution sparingly (one drop is
sufficient) to inside diameter of rubber rotating member.
10. Slide rotating seal member (carbon face down toward
ceramic face) and spring over the shaft.
IMPORTANT: Do not nick or scratch carbon face of seal
when handling.
MOTOR REPLACEMENT
The motor can be replaced with any standard Nema 56J jet
pump motor (of proper HP for each pump) by referring to
the following instructions.
1. Follow steps as outlined under Rotary Seal Replacement
and Pump Disassembly.
2. Remove cap screws that connect the motor to the
mounting ring and pull motor away.
3. Replace motor with standard Nema 56J jet pump motor
by positioning motor against the mounting frame and
assembling with four (4) cap screws.
IMPORTANT: Because damage to the shaft seal can occur in
disassembly, a new seal will be necessary.
PUMP REASSEMBLY
Before reassembling the pump, carefully inspect the
component parts of the cartridge (stage) assembly, looking
for damage, wear or heat distortion. Pay careful attention
to spacing direction of components, and location of shims.
Refer to Figure 19 for proper facing and parts arrangement.
If damage to Stage components is evident, a complete
cartridge assembly or individual stage assemblies are
available for replacement (See Replacement Parts List).
1. Reassembly should follow the reverse order of the
disassembly procedure with special care given to
replacement of the rotary seal.
2. Check top and bottom of o-rings for damage. It is recom-
mended that new o-rings be used.
3. Do not use pipe compound of Teflon tape on barrel
threads. The o-rings will prevent pump from leaking.
4. After pump is reassembled, tighten the discharge head to
a torque of 45-50 ft/lbs. If torque wrench is not available,
tighten firmly but avoid distortion or damage to plastic
internal parts.
5. After reassembly, apply power momentarily to unit (15 to
30 seconds). The pump and motor should rotate freely or
with a light rubbing.
Figure 16 - Remove Mechanical Seal
Figure 17 - Press In Seal
3/4” Pipe
Press Carefully
Cardboard
Washer
Protects Seal
Face
Seal Cavity
IL0554
Figure 18 - If Necessary, Press With
Cardboard And Pipe
Seal
Copyright © 2014 FLINT & WALLING, INC. • 95 North Oak St. • Kendallville, IN 46755
flintandwalling.com
11
Page 12

Troubleshooting Chart
Symptom Possible Cause(s) Corrective Action
Pump won’t
start or run
at full speed
Pump
operates,
but delivers
little
or no water
Excessive
noise while
pump in
Pump leaks 1. Worn mechanical seal (leaks at shaft) 1. Replace shaft (rotary) seal
1. Blown fuse or open circuit breaker 1. Replace fuse or close circuit breaker. See wire size chart for
proper break/fuse size
2. Power supply in OFF position 2. Turn power on
3. Incorrect voltage at motor (check volt-
age with motor running)
3. Low voltage
a. Voltage must be within ± 10% of motor rated voltage.
Check incoming voltage. Contact power company
b. Make certain that voltage of motor matches voltage of
power supply. See motor name plate and motor wiring
diagrams
c. Check wire size from main switch to pump. See wire
size chart for correct wire size
4. Loose, broken or incorrect wiring 4. Rewire any incorrect circuits. Tighten connections, replace
defective wires
5. Defective motor 5. Replace motor
6. Pump hydraulic components clogged/
6. Replace worn parts or entire pump. Clean parts if required
worn/damaged
1. Manual or solenoid valves plumbed
into system restricting flow
1. a Check all valves on pump inlet and discharge sides of
system to be sure they are opened properly to allow
flow to and from the pump
b. Bleed trapped air in pump which keeps water from
reaching the pump. (Normally
due to closed valve in discharge plumbing)
2. In-line filter restricting flow 2. Check all in-line filters to be sure they are not plugged or
restricted
3. Low line voltage 3. See low line voltage corrective action (above)
4. Inadequate water supply to booster
pump
4. Check pressure on inlet side of booster to be sure positive
pressure is maintained to the booster pump
5. Undersized piping 5. Replace undersized piping
6. Leak on inlet side of system 6. Make sure connections are tight. Repair leaks as necessary
7. Inadequate, defective or plugged foot
7. Clean, repair or replace as needed
valve and/or strainer
8. Worn or defective pump parts or
8. Replace worn parts or entire plugged impeller Clean parts if
pump.
9. Suction lift too great 9. Pump should be operated under
flooded suction only
10. Pump not primed 10. Prime pump - Make certain inlet pipe is drawn up tight and
pump and pipe are full of water
11. Incorrect rotation, motor running
backwards
11. Reverse motor rotation can occur on three phase units. To
correct, interchange any two incoming power leads.
1. Pump not secured to firm foundation 1. Secure properly
2. Piping not supported 2. Make necessary adjustments
3. Restricted inlet line 3. Clean or correct
4. Cavitation (noise like marbles in pump) 4. a. Reduce speed on direct drive
b. Increase inlet pipe size
c. Too viscous (material being pumped too thick
5. Worn motor bearings 5. Replace bearings or motor
2. Worn o-ring seals 2. Replace o-ring seals, located inside both ends of the stainless
steel shell
Copyright © 2014 FLINT & WALLING, INC. • 95 North Oak St. • Kendallville, IN 46755
flintandwalling.com
12
Page 13

Booster Pump Parts Drawing
IL0308
IL0127
4
10A
10
1B
1A
1
9
8
2
5
7
6A
6E
6D
6A
5
4A
3
6C
6B
4
ITEM NO. DESCRIPTION
1 Motor
1A †Governor
1B †Switch Motor
2 Seal, Rotary
3 Barrel
4 Discharge Head
4A Discharge Bearing
5 O-ring (2)
6A Plate, Diffuser
6B Impeller
6C Diffuser
6D Diffuser Bearing
6E Shim as Required
7 Shaft and Coupling Assembly
8 Mounting Ring
9 Hex Head Bolts (4)
10 †MotorAccess Cover
10A †Screws, Access Cover (2)
*See note below parts included in cartridge assembly.
†ODP Motor Only
Figure 19
Internal Parts Detail
Figure 20 - Cartridge Assembly Includes Discharge Bearing, Shaft & Coupling Assembly, Diffuser Plate, Impellers, Diffuser
Bearings, Diffusers and O-rings
NOTE: Illustration shows only two stages. Pump has multiple stages. Individual parts are not available separately.
Copyright © 2014 FLINT & WALLING, INC. • 95 North Oak St. • Kendallville, IN 46755
flintandwalling.com
13
Page 14

PRESSURE BOOSTER PUMP REPAIR PARTS
(For Pricing Refer To Repair Parts Price List)
Replacement Motors
9
10
IL0565
FORM NO. FW0045
SUPERSEDES 0208
0813
ITEM REPLACEMENT MOTORS QTY CAST IRON
ODP NEMA J 1/3 HP
ODP NEMA J 1/2 HP 98J105 98J105 98S105 98J305 98J305 98S305
ODP NEMA J 3/4 HP 98J107 98J107 98S107 98J307 98J307 98S307
9
ODP NEMA J 1 HP 98J110 98J110 98S110 98J310 98J310 98S310
ODP NEMA J 1-1/2 HP 98J115 98J115 98S115 98J315 98J315 98S315
ODP NEMA J 2 HP 98J120 98J120 98S120 98J320 98J320 98S320
ODP NEMA J 3 HP 98J630 98J630 98S630 023251 023251 023251
10 Motor Cover w/Screws 1 136132R 136132R 136132R 136132R 136132R 136132R
* Screws, Motor Cover 2 136133 136133 136133 136133 136133 136133
ODP NEMA J 1/3 HP
ODP NEMA J 1/2 HP 98J005 98J005 98S005 98J305 98J305 98S305
ODP NEMA J 3/4 HP 98J007 98J007 98S007 98J307 98J307 98S307
9
ODP NEMA J 1 HP 98J010 98J010 98S010 98J310 98J310 98S310
ODP NEMA J 1-1/2 HP 98J015 98J015 98S015 98J315 98J315 98S315
ODP NEMA J 2 HP 98J820 98J820 98S820 98J320 98J320 98S320
10 Motor Cover w/Screws 1 136132R 136132R 136132R 136132R 136132R 136132R
* Screws, Motor Cover 2 136133 136133 136133 136133 136133 136133
TEFC NEMA J 1/2 HP
TEFC NEMA J 3/4 HP 021008 021008 021012 021012
TEFC NEMA J 1 HP 021009 021009 020688 020688
9
TEFC NEMA J 1-1/2 HP 020692 020692 020647 020647
TEFC NEMA J 2 HP 020693 020693 020689 020689
TEFC NEMA J 3 HP 021010 021010 020690 020690
* Not Shown
1
1
1
98J103 98J103 98S103
98J003 98J003 98S003
POWDER
COATED
SINGLE PHASE 60 HZ THREE PHASE 60 HZ
SINGLE PHASE 50 HZ THREE PHASE 60/50 HZ
SINGLE PHASE 60/50 HZ THREE PHASE 60/50 HZ
020691 020691 021011 021011
STAINLESS
STEEL
CAST IRON
POWDER
COATED
STAINLESS
STEEL
Copyright © 2014 FLINT & WALLING, INC. • 95 North Oak St. • Kendallville, IN 46755
14
flintandwalling.com
Page 15

FORM NO. FW0046
0312
SUPERSEDES 0509
PRESSURE BOOSTER PUMP REPAIR PARTS
(For Pricing Refer To Repair Parts Price List)
10
8
9
3
6
7
1
4
2
IL0565
ITEM DESCRIPTION QTY CAST IRON
5 - 7 - 10 - 19 GPM,
60 HZ & 50 HZ
27 - 35 GPM,
60 HZ & 50 HZ
55 - 85 GPM,
60 HZ & 50 HZ
ALL SERIES
60 HZ & 50 HZ
(†) Buna N - Carbon/Silicon Carbide (‡) Viton - Carbon/Silicon Carbide (■) Buna N (▲) Viton (*) Not Shown
(8) 132079 Handle available as an option
MATERIAL
ITEM DESCRIPTION MATERIAL PART NUMBER
5 Cartridge Assembly ‡
6 Shaft & Coupling Assembly
7 Barrel/Shell CI, PC & SS 135162 132003 138448 132003 134997 135815
MATERIAL
ITEM DESCRIPTION MATERIAL PART NUMBER
5 Cartridge Assembly ‡
60 HZ MODELS
6 Shaft & Coupling Assembly
7 Barrel/Shell CI, PC & SS 137223 135628 136630 136627 136633
MATERIAL CAST IRON CI PB5504XX PB5506XX PB8504XX PB8505XX
ITEM DESCRIPTION MATERIAL PART NUMBER
5 Cartridge Assembly ‡ CI 022293 022294 022295 022296
6 Shaft & Coupling Assembly CI 022289 022287 022288 022287
7 Barrel/Shell CI, PC & SS 022291 022292 138151 022290
MATERIAL
ITEM DESCRIPTION MATERIAL PART NUMBER
5 Cartridge Assembly ‡
6 Shaft & Coupling Assembly
7 Barrel CI, PC & SS 135162 138151 138151 135098 020094 135912
MATERIAL
50 HZ MODELS
ITEM DESCRIPTION MATERIAL PART NUMBER
5 Cartridge Assembly ‡
6 Shaft & Coupling Assembly
7 Barrel CI, PC & SS 020094 138947 136633 021016 139436
(‡) Cartridge assembly includes: impellers, diffusers, o-rings and shaft & coupling assembly. Components not available individually. Sold as assembly only.
1 Discharge Head 3/4” NPT 1 132000 136905 136640
2 Mounting Ring 3/4” NPT 1 132002 136904 136639
1 Discharge Head 1” NPT 1 136635 137796 139166
2 Mounting Ring 1” NPT 1 136634 137794 139100
1 Discharge Head 2” NPT 1 021585 - 2 Mounting Ring 2” NPT 1 021584 - -
3 Seal, Rotary w/Spring 1 131100 † 131100 † 136682 ‡
O-Ring 2 131925 ■ 131925 ■ 136607 ▲
4
* Hex Head Cap Screws 3/8” x 3/4” 4 121106 121106 121106
CAST IRON CI PB0508AXXX PB0512AXXX PB0516AXXX PB0712AXXX PB1014AXXX PB1016AXXX
POWDER COATED PC PB0508CXXX PB0512CXXX PB0516CXXX PB0712AXXX PB1014CXXX PB1016CXXX
STAINLESS STEEL SS PB0508SXXX PB0512SXXX PB0516SXXX PB0712SXXX PB1014SXXX PB1016SXXX
CI & PC 135163 132939 138447 134097 134998 135814
SS 136683 138450 136684 136685 136686
CI & PC 135161 133336 138446 133336 134996 135813
SS 138938 136636 138449 136636 136637 136638
CAST IRON CI PB1914AXXX PB2711AXXX PB2714AXXX PB3506AXXX PB3508AXXX
POWDER COATED PC PB1914CXXX PB2711CXXX PB2714CXXX PB3506CXXX PB3508CXXX
STAINLESS STEEL SS PB1914SXXX PB2711SXXX PB2714SXXX PB3506SXXX PB3508SXXX
CI & PC 137222 135627 136629 136626 136632
SS 139162 139163 138946 139164 139165
CI & PC 137221 136624 136628 136625 136631
SS 139159 139157 137535 139156 139158
CAST IRON CI PB0508XXXX PB0514XXXX PB0714XXXX PB1020XXXX PB1022XXXX PB1023XXXX
POWDER COATED PC PB0508ZXXX PB0514ZXXX PB0714ZXXX PB1020ZXXX PB1022ZXXX PB1023ZXXX
STAINLESS STEEL SS PB0508YXXX PB0514YXXX PB0714YXXX PB1020YXXX PB1022YXXX PB1023YXXX
CI & PC 135163 138150 021032 135907 135911
SS 138682 021033 138683 020280 138684
CI & PC 135161 138149 138149 135906 020278 135910
SS 138938 138444 138444 138154 020278 137103
CAST IRON CI PB1920XXXX PB2717XXXX PB3508XXXX PB3514XXXXT
POWDER COATED PC PB1920ZXXX PB2717ZXXX PB3508ZXXX PB3514ZXXXT PB1922ZXXX
STAINLESS STEEL SS PB1920YXXX PB2717YXXX PB3508YXXX PB3514YXXXT
CI & PC 020982 020980 136632 021017 139435
SS 020095 138949 139165 021026 *
CI & PC 020971 020916 136631 021015 139434
SS 020093 138948 139158 021020 021425
4
POWDER
COATED
STAINLESS
STEEL
See
replacement
motors.
ITEMS 9 & 10
Copyright © 2014 FLINT & WALLING, INC. • 95 North Oak St. • Kendallville, IN 46755
15
flintandwalling.com
 Loading...