

FLI Audio FU1000.5 Instruction Manual

UNDERGROUND
INSTRUCTION &
INSTALLATION MANUAL
AMPLIFIER
1000.5
MODEL: FU1000.5

2
BLE F
-
t. FLI equipment is capable o
he sound should be comfortable an
utting any holes, investigate the layout of your vehicle
no moving parts catch on the speaker or grill (e.g. window or d
ealer if yo
ould be co
car chas
e spe
Thank you for purchasing this FLI UNDERGROUND amplifi er. It will provide you
with years of trouble free usage providing you follow a few simple guidelines.
INTRODUCTION
This instruction manual is for your safety and must be adhered to at all times. Please read
and ensure that you fully understand the installation and set up procedures as explained.
If you are unclear on the installation or set up of your FLI UNDERGROUND amplifi er please
contact your nearest authorised FLI UNDERGROUND dealer.
WARNING
DO NOT EXPOSE THIS PRODUCT TO DAMP OR MOISTURE - doing so may result in fi re,
shock or damage to the product.
BEFORE WIRING DISCONNECT THE CABLE FROM THE POSITIVE BATTERY TERMINAL
- failure to do so may result in electric shock or injury.
ENSURE GOOD AND CORRECT CONNECTIONS - failure to make the correct connections
may result in fi re or damage to the product.
KEEP THE VOLUME AT A LEVEL SO YOU CAN STILL HEAR OUTSIDE NOISE - failure to
do this may result in an accident. FLI equipment is capable of producing sound levels that can
permanently damage your hearing. FLI recommends caution when listening at high volume. For
safe and enjoyable listening the sound should be comfortable and clear without distortion.
CAUTION
• Never connect any speaker lead to the car chassis. This can cause severe damage to your
speaker / car radio / amplifi er.
• Before drilling or cutting any holes, investigate the layout of your vehicle thoroughly.
• Use caution when working near the fuel / hydraulic lines and electrical wiring.
• Observe the correct polarity when wiring, improper phasing may cause a loss of bass
response.
• Ensure that no moving parts catch on the speaker or grill (e.g. window or door handles, or
window glass inside the door)
INSTALLATION
• The quality of the installation will affect the system performance and reliability.
• Contact your nearest authorised FLI dealer if you are unsure about the installation of this
product.
• Please mount this unit away from any potential hazards.
• Minimising the length of wires will provide higher audio output from the system.
• The speaker should be securely fastened to the mounting position using the screws
provided.
• Pre drill your mounting holes using a drill and position with the template provided.
• Be sure to investigate your mounting area thoroughly for electrical wires, brake or fuel lines or
fuel tank to prevent causing any damage.

AMplifier Installation
h
an
t
t
0
t
3
t
6
t
9
t
9
t
8
20–35
p
2
p
444
4
65
85
5
125
s
2
50
s
222
A
WG
t
sectiona
WG
be
c
2
5
5
897.35
2
58.54.6
9.83
7
04.19
824.6216.8
162
.
3
4.6610.5
8.26.36
2.91.63
0
2
9
ee
t
Your FLI UNDERGROUND amplifi er is designed with a swift installation routine in
mind. Please mount the amplifi er in a dry location on a solid surface. NEVER mount the
amplifi er upside down, this will cause the amplifi er to over heat and will eventually damage
the amplifi er. Before fi xing the amplifi er in place please ensure that there is suffi cient air
fl ow around the exterior of the casing, at least two inches will be suffi cient.
Power Cable
• At least an 8 gauge cable should be used for both the power and the ground connections to
the amplifi er.
• The power cable should be taken directly from the battery. Rubber grommets should be used
when passing through any bulkheads to prevent the cable from becoming chaffed or cut.
• It is vital that a fuse / circuit breaker (of at least equal value to the one fi tted on the amplifi er) is placed
in line with the power cable and is no further than eighteen inches away from the battery.
• Please ensure that the fuse is not fi tted until the entire installation procedure is complete.
• The two tables below are to help you decide on what cable is correct for you. The fi rst enables you to
select the size of cable depending on the length required. The second will help you convert the cable
size from American Wire Gauge to Metric if you need to.
engt
rrentm
–20
–50am
–
–
5–10
–
125–1
am
mp
6
4 4 4
1
101
1Metre–3.28F
131
161
1
2
4
3
totriconversionhar
l
m
1
n
.32
.2
.2
.22
.2
.1
.
.14
.12
.
.10
4
2.5
.25
.
26.
.
.26
4
ground cable
• The ground cable needs to carry the same current as the power cable. At least an 8
gauge cable should be used.
• The amplifi er ground should be connected directly to the chassis of the vehicle, to bare
metal.
• The cable length should be kept to an absolute minimum. It is not recommended that you
connect the ground cable to the vehicle’s seatbelt anchor point.
Remote Turn On
• A minimum of 18 gauge cable should be used for this connection.
• The cable should be run with exactly the same care and attention as the power cable and taken
back to the source (headunit) and joined to the remote cable provided.
• If the source (headunit) does not have a remote turn on cable then a 12v supply should be used. This
will require a switch to be fi tted inline to enable the amplifi er to be turned on and off. Remember that if
this switch is left on you will fl atten the car battery.
RCA Cables
• Depending on the model number of your amplifi er and the number of speakers you wish to power you will
have to run either one or two RCA cables from the source to the amplifi er.
• Please take extra care when running these cables from the source to the amplifi er. Ensure that they are
placed away from all items that can generate any interference, wiring harnesses etc.
• It is recommended that the RCA cables should be run on the opposite site of the car to the previously
installed power cables, if possible.
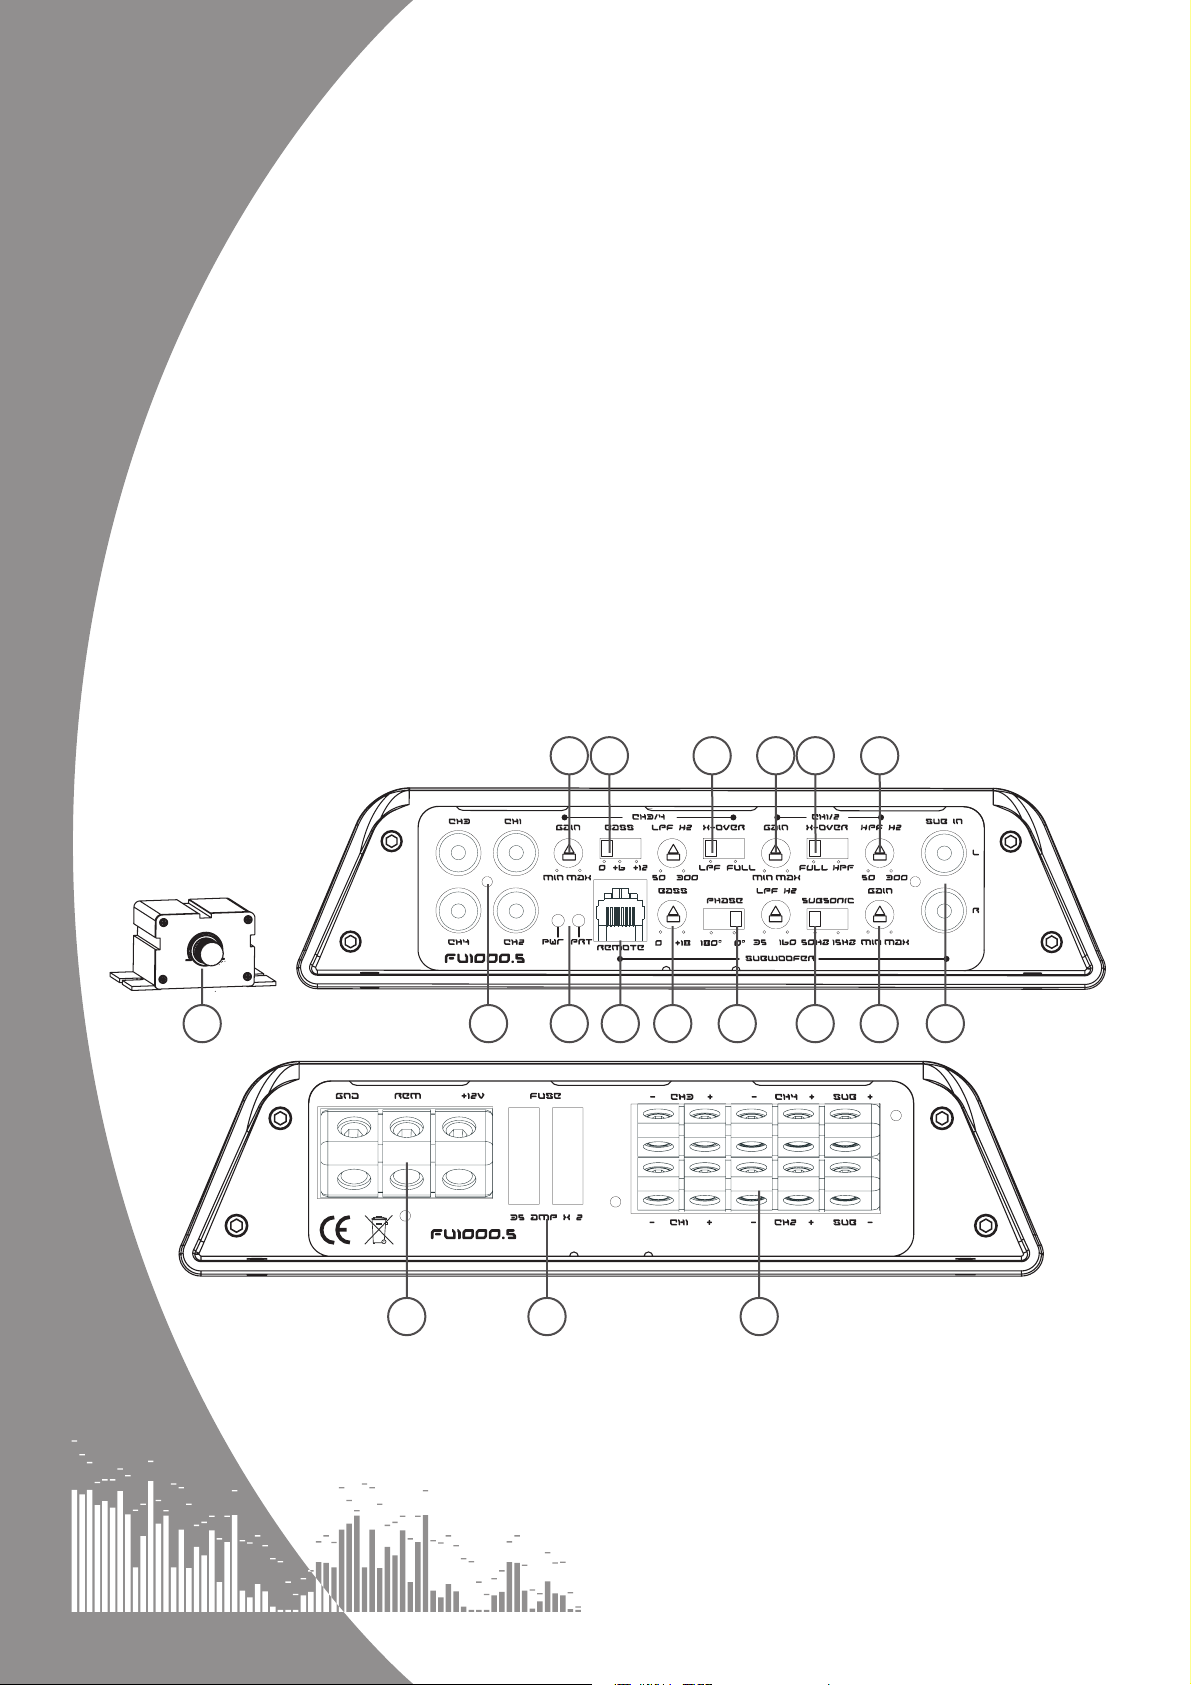
AMPLIFIER CONNECTIONS & CONTROLS
B
J IN
A
G
C CF D
H
B
E
AB
M
A. LOW LEVEL INPUT
Low level input for connection to any source (headunit) with a low level stereo output. This is your
RCA output from the source (headunit).
B. GAIN CONTROL
Used to match the input signal of the source (headunit) to the amplifi er. There are separate
controls for channels (1 & 2), (3 & 4) and subwoofer. See the setup section for more
details.
L K
 Loading...