

Page 1

r
5112204
Elevator
User Manual
eated by EBCCW 00:06
C
Created by EBCCW 96:05Created by EBCCW 00:06Created by EBCCW 96:05Created by EBCCW 00:06
Page 2

Created by EBCCW 96:05Created by EBCCW 00:06
Page 3

© Flexlink Components AB 2010
Elevator
User Manual
All Rights Reserved
No part of this program and manual may be used, reproduced, stored or
transmitted in any form or by any means without the written permission of
FlexLink Components AB. The contents of this manual are for informational
use only. All information and specifications contained in this document
have been carefully checked to the best efforts of FlexLink Components
AB, and are believed to be true and accurate as of time of publishing.
However, due to continued efforts in product development FlexLink
Components AB reserves the right to modify products and its manuals
without notice.
FlexLink Components AB assumes no responsibility or liability on any
errors or inaccuracies in this program or documentation. Any kind of
material damages or other indirect consequences resulting from any
FlexLink Components AB´s product part, documentation discrepancies
and errors or non-anticipated program behavior are limited to the value of
appropriate products purchased from FlexLink Components AB. The
products are delivered to the customer at th e ’as is’ state and revision level
they are on the moment of purchasing, and are declared in detail in the
license agreements between FlexLink Components AB and user. User
accepts and is obliged to follow the guidelines stated in the separate
license agreement needed in using any parts of this product package.
Created by EBCCW 00:06
5112204
Page 4

5112204
Page 5

Preface 1
1 Safety 3
1.1 System information 3
1.2 Important safety conditions 4
1.3 Description of safety provisions 6
1.4 Safety measures to be taken 13
1.5 Explanation of symbols 13
2 Technical specification 15
2.1 Technical data 16
2.2 Ordering information 17
2.3 Operating conditions 19
3 Introduction function and components 20
3.1 Purpose of use 20
3.2 Description of the Elevator 21
3.3 Working principle 33
4 Unload the elevator 34
Created by EBCCW 00:06
5112204
i
Page 6

4.1 Preparation 34
4.2 Unloading instructions 35
5 Installation and adjustment 38
5.1 Provisions to be provided 38
5.2 Mechanical assembly 39
5.3 Electrical installation and controls 41
5.4 Test run 43
5.5 Adjustment 44
5.6 Check / Shadow run 56
6 Instructions for use 58
6.1 Handling 58
6.2 Manual operation 59
7 Technical maintenance 60
7.1 Check and control procedures 60
7.2 Maintenance procedures 61
7.3 Troubleshooting 63
ii
5112204
Page 7

7.4 Maintenance schedule elevator 64
8 Put out of commission 65
8.1 Disconnect the power sources 65
8.2 Disassemble 65
8.3 Transport 66
8.4 Reuse 66
9 Recommended spare parts 67
9.1 Mechanical 67
9.2 Electrical 72
10 Supplier’s information 92
Created by EBCCW 00:06
5112204
iii
Page 8

iv
5112204
Page 9
Preface
Preface
Purpose of this manual
The purpose of this manual is to describe a number of o perations th at a re
intended for the user concerned. Here it becomes clear how the user can
work as well and as safely as possible. By making use of clear illustrations
and texts FlexLink wants to achieve a simple and safe way of working with
the Elevator . This docu ment cont ains rema rks that point o ut a risky or sp ecific situation to the user . In man y ca ses this situation is provided with one
of the symbols given below.
General warning for danger!
.
Warning for electrical voltage!
.
Attention, this is an important notice!
.
Compliance with the operations described in this document is important in
order to prevent dangerous situations and unnecessary damage to the Elevator. Care fully keep this document! It is recommended to keep one copy
near the machine and one copy with your technical documentation.
Structure of the manual
The user’s manual has been composed in such a way, that a number of operations can quickly and easily be found. This manual will not describe operations that are not meant for the user . It does, however , indicate what the
user must do when carrying out a certain operation, for example calling in
technical staff. The user’s manual has been divided into sections. These
sections describe, among other things, the safety and the operation of the
Elevator. FlexLink would like to point out to the user that section Safety is
to be read carefully.
Created by EBCCW 00:06
5112204
1
Page 10
Preface
Requirements of the user
The Elevator may be operated by any adult person who has become acquainted with section Safety. If the user is not technically qualified, he or
she may not carry out any maintenance or repair activities on the elevator.
. Note! Maintenance activities on the elevator may only be carried
out by a technically qualified person.
. NB: Technically qualified employees means: employees that
have followed an adequate training for carrying out the activitie s
involved and have a good ability to read and understand the
English language.
2
5112204
Page 11
Safety
1 Safety
The Elevator has been designed in such a way, that it can be used and
maintained in a safe way . This holds for the application, the circumst ances
and the instructions described in the manual. Any person working with or
on this machine should study the manual and follow the instructions. It is
the responsibility of the employer to make sure that the employee is familiar
with and follows these instructions.
The company or the country in which the machine is used ma y r eq uire extra safety measures. This particularly applies to the working conditions.
This manual does not describe how these are to be complied with. In case
of doubt, consult your government or safety officer!
1.1 System information
The project number and/or general drawing number shall always be specified when communicating with FlexLink with respect to the elevator.
Project number See machine nameplate
Supplier FlexLink Engineering Polska
Sp. z.o.o
ul. Za Motelem 2c
62-080 Sady, Poland
Machine type: Elevator
Date of manufacture See machine nameplate
Gen. drwg. no. See machine nameplate
Created by EBCCW 00:06
5112204
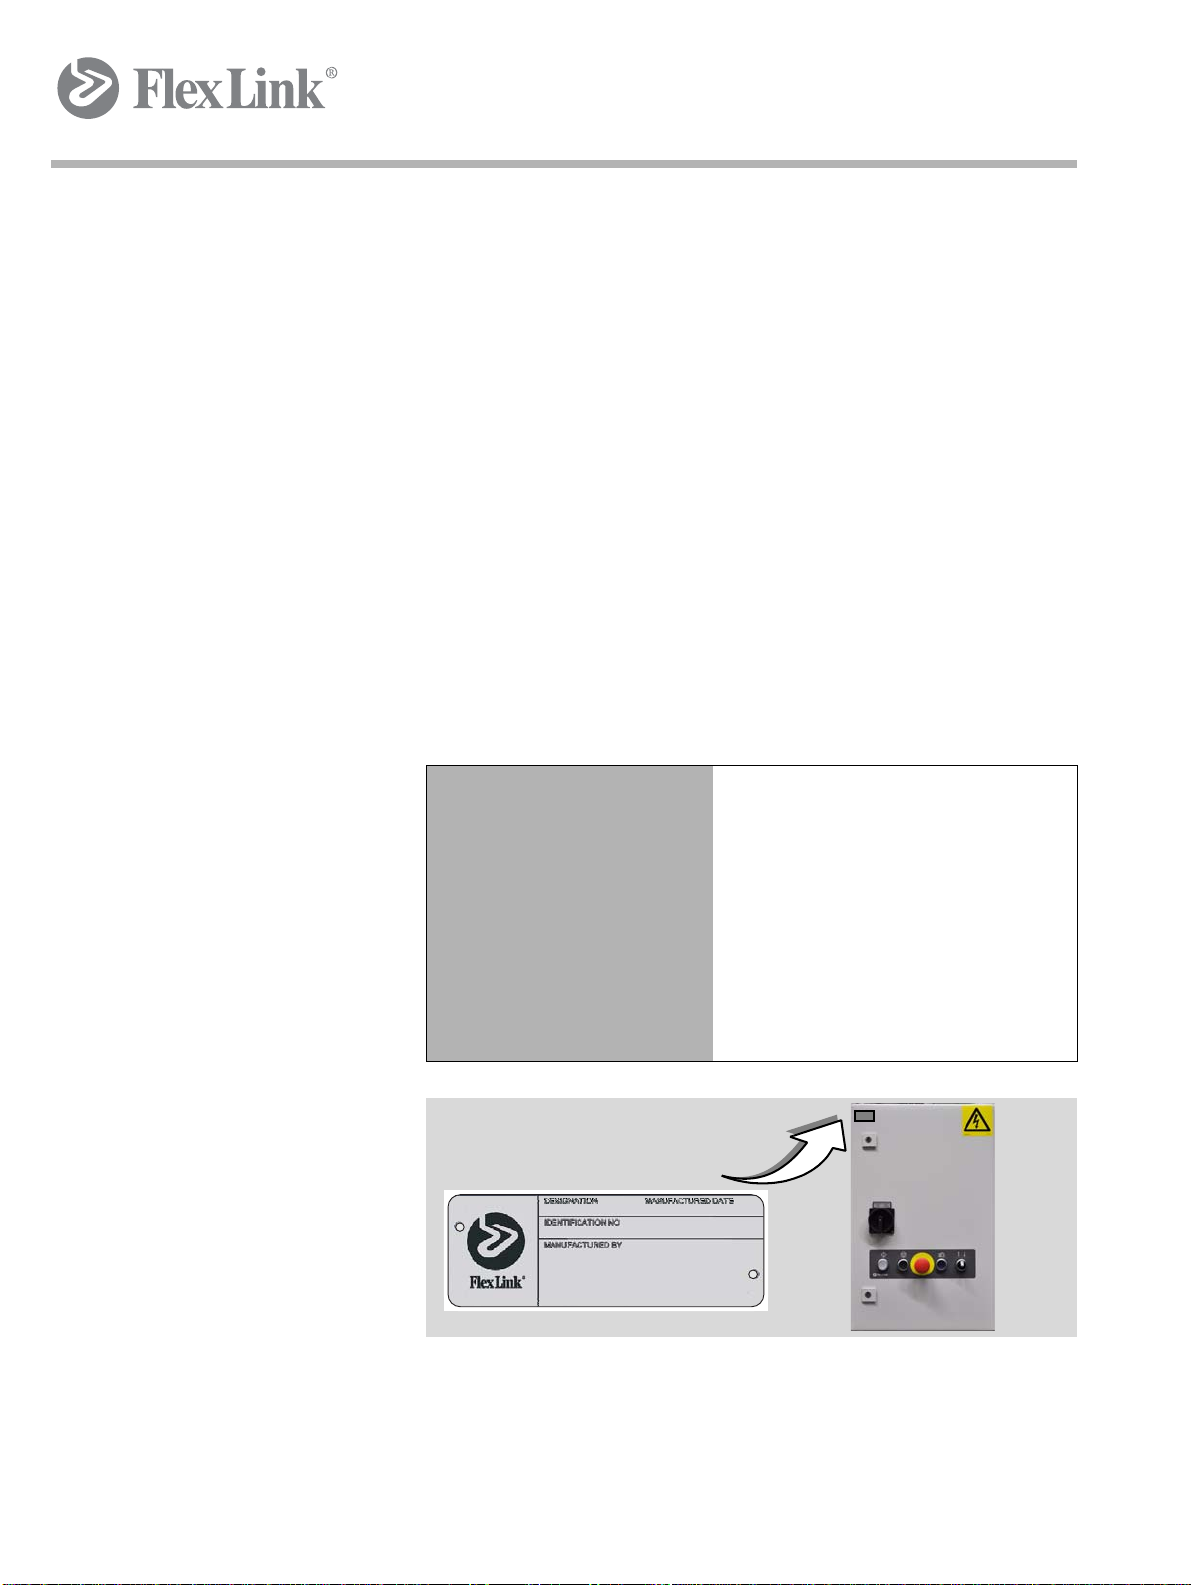
Figure 1 Machine nameplate
The machine nameplate is located on the electrical cabinet a s shown in the
figure above.
3
Page 12
Safety
1.2 Important safety conditions
At the moment that the elevator is going to be operated by a user, the following safety conditions must be met:
• Make sure that children or animals have no access to the machine
and its surrounding area by, for example, screening off the elevator with a fence.
• Only persons who have read and understood the operating instructions are allowed to operate, maintain and clean the machine.
• Do not reach into the machine while it is running or on. Even if the
machine is not running, it can be ‘on’, which means star t operating
automatically.
• Safety provisions, such as side plating, bottom plating, emergency stops and detectors may not be removed or deactivated wh ile
the elevator is running.
• Provide good ambient lighting to enable the opera tor to work well
and orderly with the elevator.
1.2.1 General
. • Incorrect use of the equipment can cau se pe rso n al inju ry.
• Do not stand or climb on the equipment.
• Do not wear clothing or other articles that can fasten in the machine.
• Follow the instructions in this user manual when transporting the
machine. FlexLink Components AB must approve all modifications or changes to this machine.
• Only use recommended spare parts.
• Only authorised personnel may open electrical units.
• FlexLink is not responsible for damage if service on the equipment is not performed in accordance with this user manual.
4
5112204
Page 13
1.2.2 Service technicians
. Service technicians must have:
• Sufficient knowledge for reading technical information
• Ability to comprehend technical drawings
• Basic knowledge of mechanics
• Sufficient knowledge in the use of hand tools
1.2.3 Electricians
. Electricians must have:
• Experience from similar installations
Safety
• Sufficient knowledge to work from drawings and wiring diag ra ms
• Knowledge of local safety regulations for electrical power and automation
To avoid risks, only experienced personnel with technical knowledge and
experience may perform repair work on the machine's electronics components.
1.2.4 Operators
. To correctly use the equipment, operators must have appropriate training
and/or experience.
Created by EBCCW 00:06
5112204
5
Page 14

Safety
1.3 Description of safety provisions
As a standard the Elevator is not provided with control and an y safety pr ovisions. Before putting the Elevator into operation some safety provisions
are to be taken care of. The purpose of these safety p rovisions is to protect
the user, the product and the Elevator against undesired situations (damage). Without these safety provisions FlexLink cannot give a guarantee on
any damage caused in absence of these safety provisions.
The table below gives a general description of the safety provisions required. Here it should be noted that only technically qualified employees
are allowed to work on the settings of the safety provisions!
Control Remark
Emergency stop switch Each Elevator is to be provided with one or more emerge ncy stop switches
that can be operated within reach of the user.
The switch must have the standard red colour.
The emergency stop switch must make sure that the input and output
tracks are switched off simultaneously.
Motor protection The technical specification of the Elevator is, among other things, geared
to the load given in the order confirmation.
Should the Elevator (motor) be overloaded for certain reasons, this should
be detected. Without this protection there is a chance that the Motor or
other components of the Elevator will be damaged.
6
5112204
Page 15
Safety
. Note! If it cannot be made sure that there will be no product on
the machine that exceeds the minimum or maximum dimensions
(see technical specification), the detector described below must
be installed on the Elevator.
Height / width
detector
The product that is put into the Elevator may not get stuck as a result of a too
high / wide or twisted product.
In order to ensure that products fit in the Elevator and will not get stuck, the
input of the Elevator can be checked for height / width.
This detection must take place well before the Elevator prior to putting the
product on the Elevator.
The maximum dimensions of the product are given in the technical
specification.
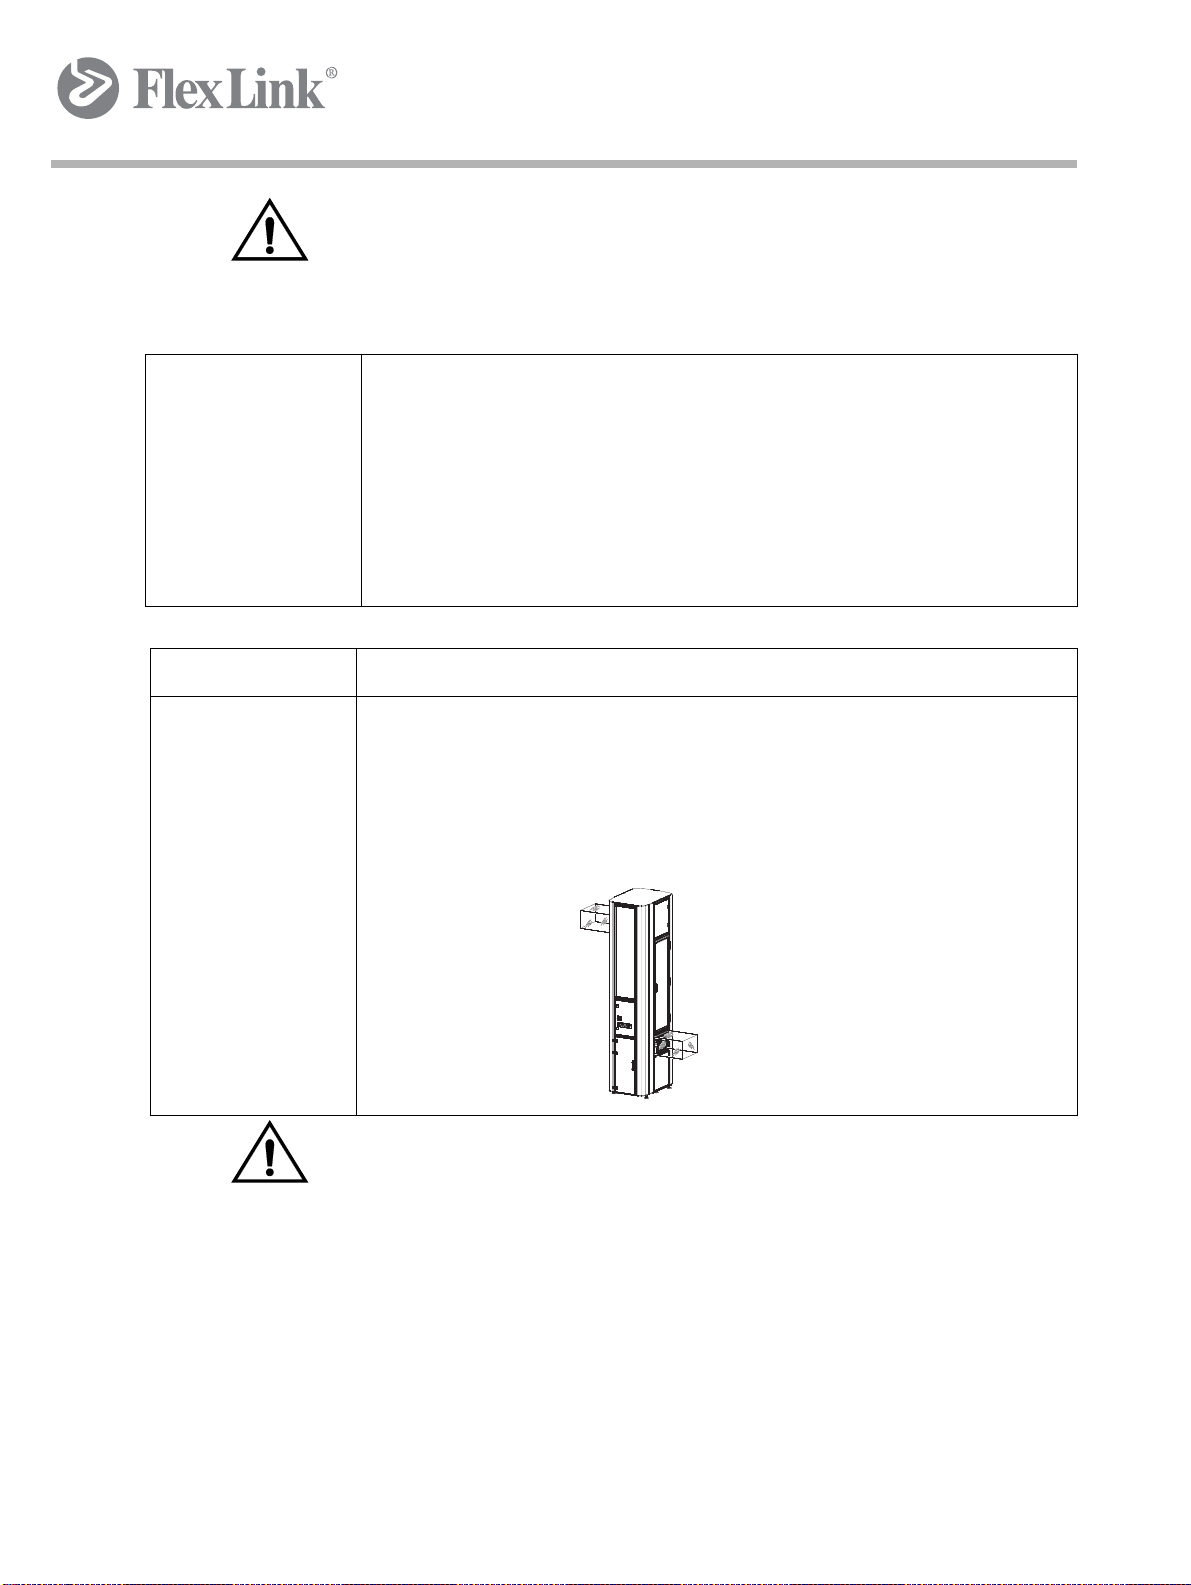
Mechanical Remark
Transition guard At the transition between the Elevator and a connected conveyor a gua rd must
have been placed, so that persons are kept at a reaching distance from the
transition.
Do not use the Elevator as a platform for maintenance work or in the production,
use equipment intended for these purposes.
Created by EBCCW 00:06
. . Note! Only technically qualified employees are allowed to
change the settings of the safety provisions.
5112204
7
Page 16
Safety
Safety
system
Line main cabinet
Safety
system
Door
switch
M
Vertical
motion
ES
M
Horizontal
motion
Motor supply voltage (VAC)
24V
DC
Line global
emergency
switch loop
Elevator
ES
Emergency
switch loop
Comm.
interface
ES
Permanent
I/O
24V
DC
Safe
I/O
Safe motor
supply voltage (V
AC
)
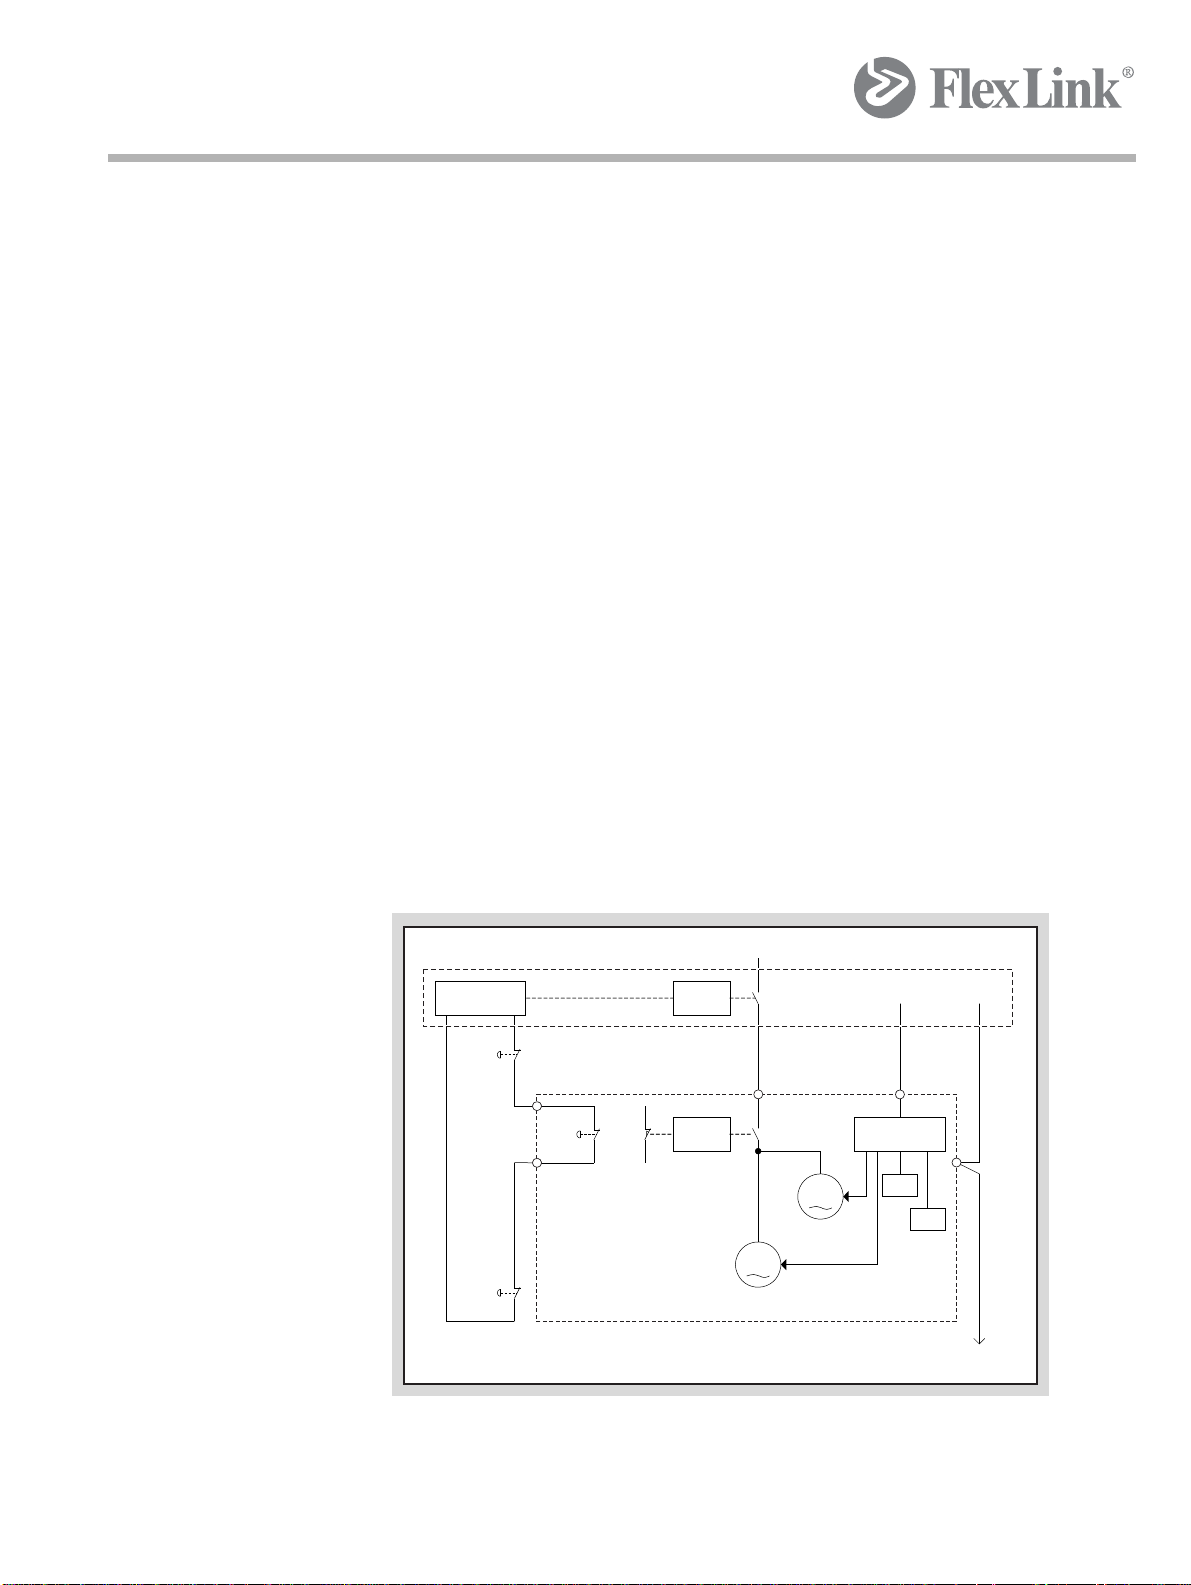
1.3.1 Safety system architecture
The safety system architecture varies depending on elevator version.
Elevators require motor supply voltage and permanen t 24V DC power supply for communication devices. Motor supply voltage depends on version
(50 Hz version: 400 V AC, 60 Hz version: 480 V AC).
Safe 24V DC (disconnected at emergency) is not used although the elevator provides means for passing on the power.
1.3.1.1 Profibus/DeviceNet versions
Emergency switch
The purpose of the safeguard is to be part of the line global emergency
safety system and affect the motor power supply to the elevator.
In case of emergency, the motor power supply to elevator shall be disconnected (stop category 0, EN60204-1).
Door switch
The elevator is equipped with a service door for access inside . Opening the
door results in a elevator internal disconnection to motors (stop category 0,
EN60204-1).
Figure 2 Profibus or DeviceNet version
8
5112204
Page 17
Safety
Line main cabinet
Door
switch
M
Vertical
motion
ES
M
Horizontal
motion
24V
DC
Elevator
Safety comm. interface
Permanent
I/O
24V
DC
Safe
I/O
Motor supply voltage (VAC)
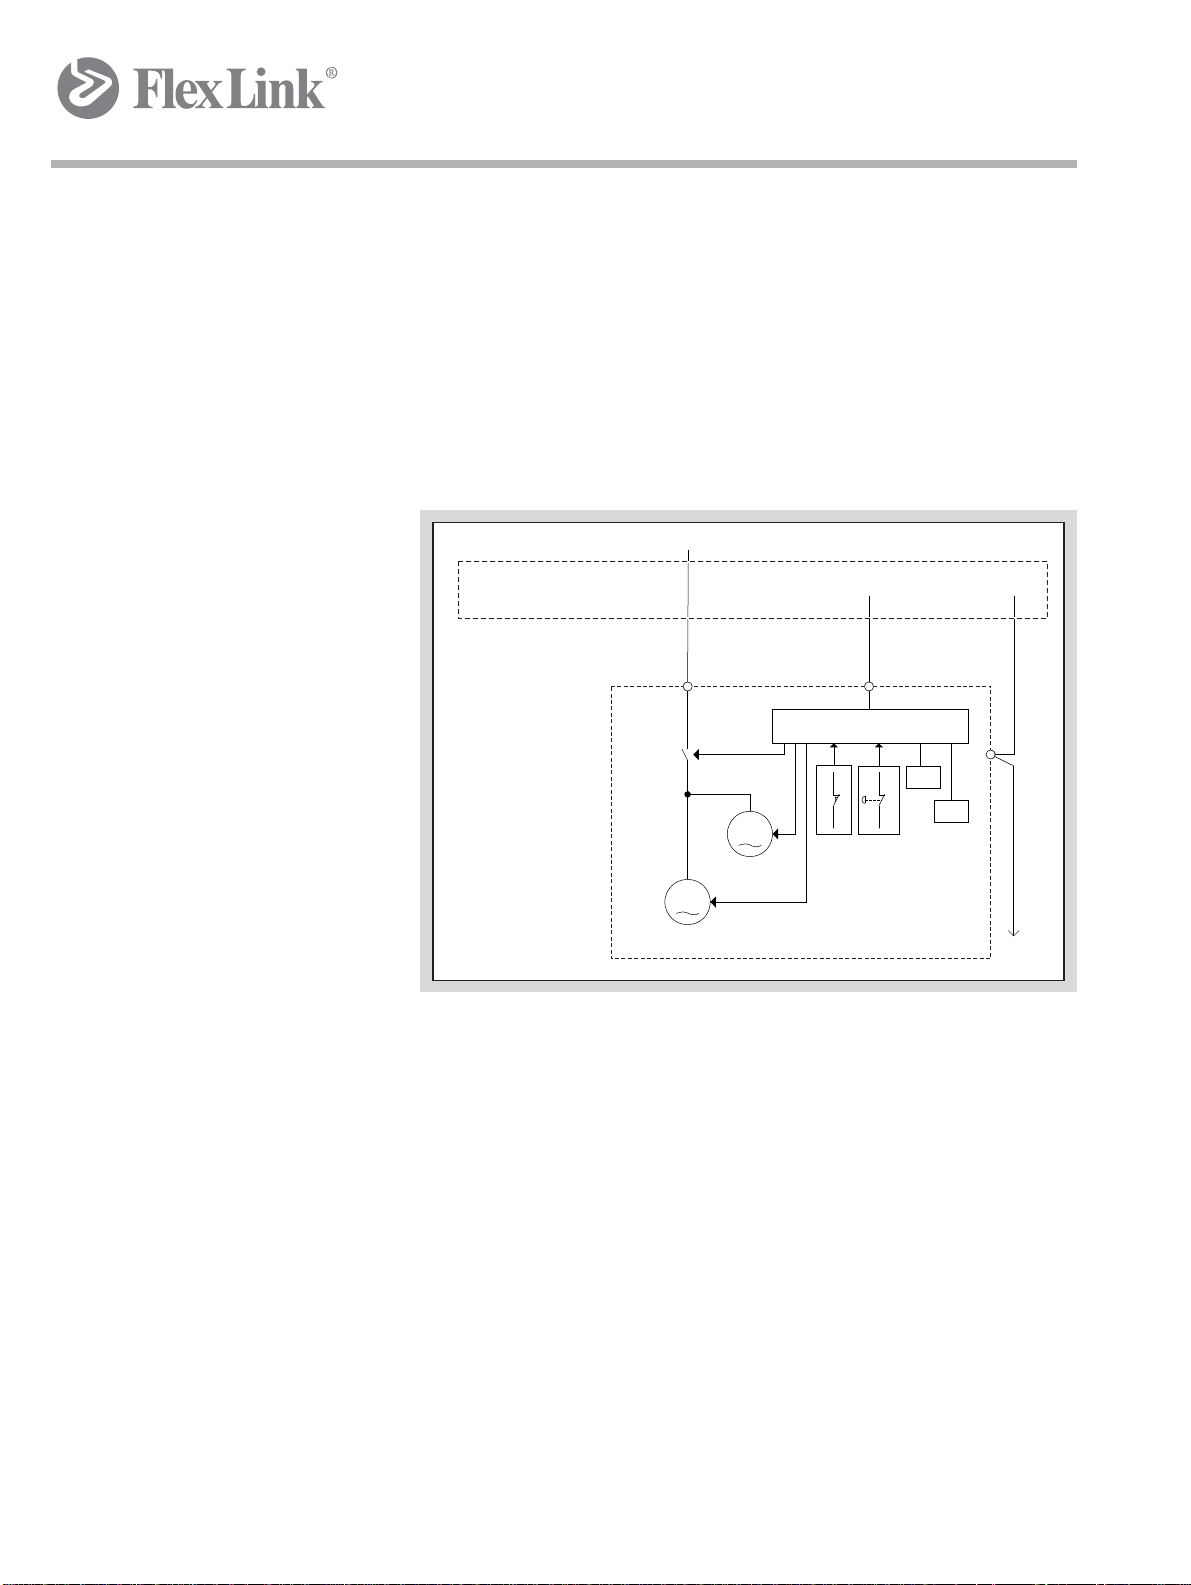
1.3.1.2 Profisafe versions
Emergency switch and door switch
Safety fieldbus protocols provide flexibility in safety architecture.
The emergency switch and door switch are connected to safe inputs of the
communication interface inside the control box of elevator.
Safety outputs of the communication in terface disconnect s the motor power supply internally in the elevator.
Created by EBCCW 00:06
5112204
Figure 3 Profisafe version
9
Page 18
Safety
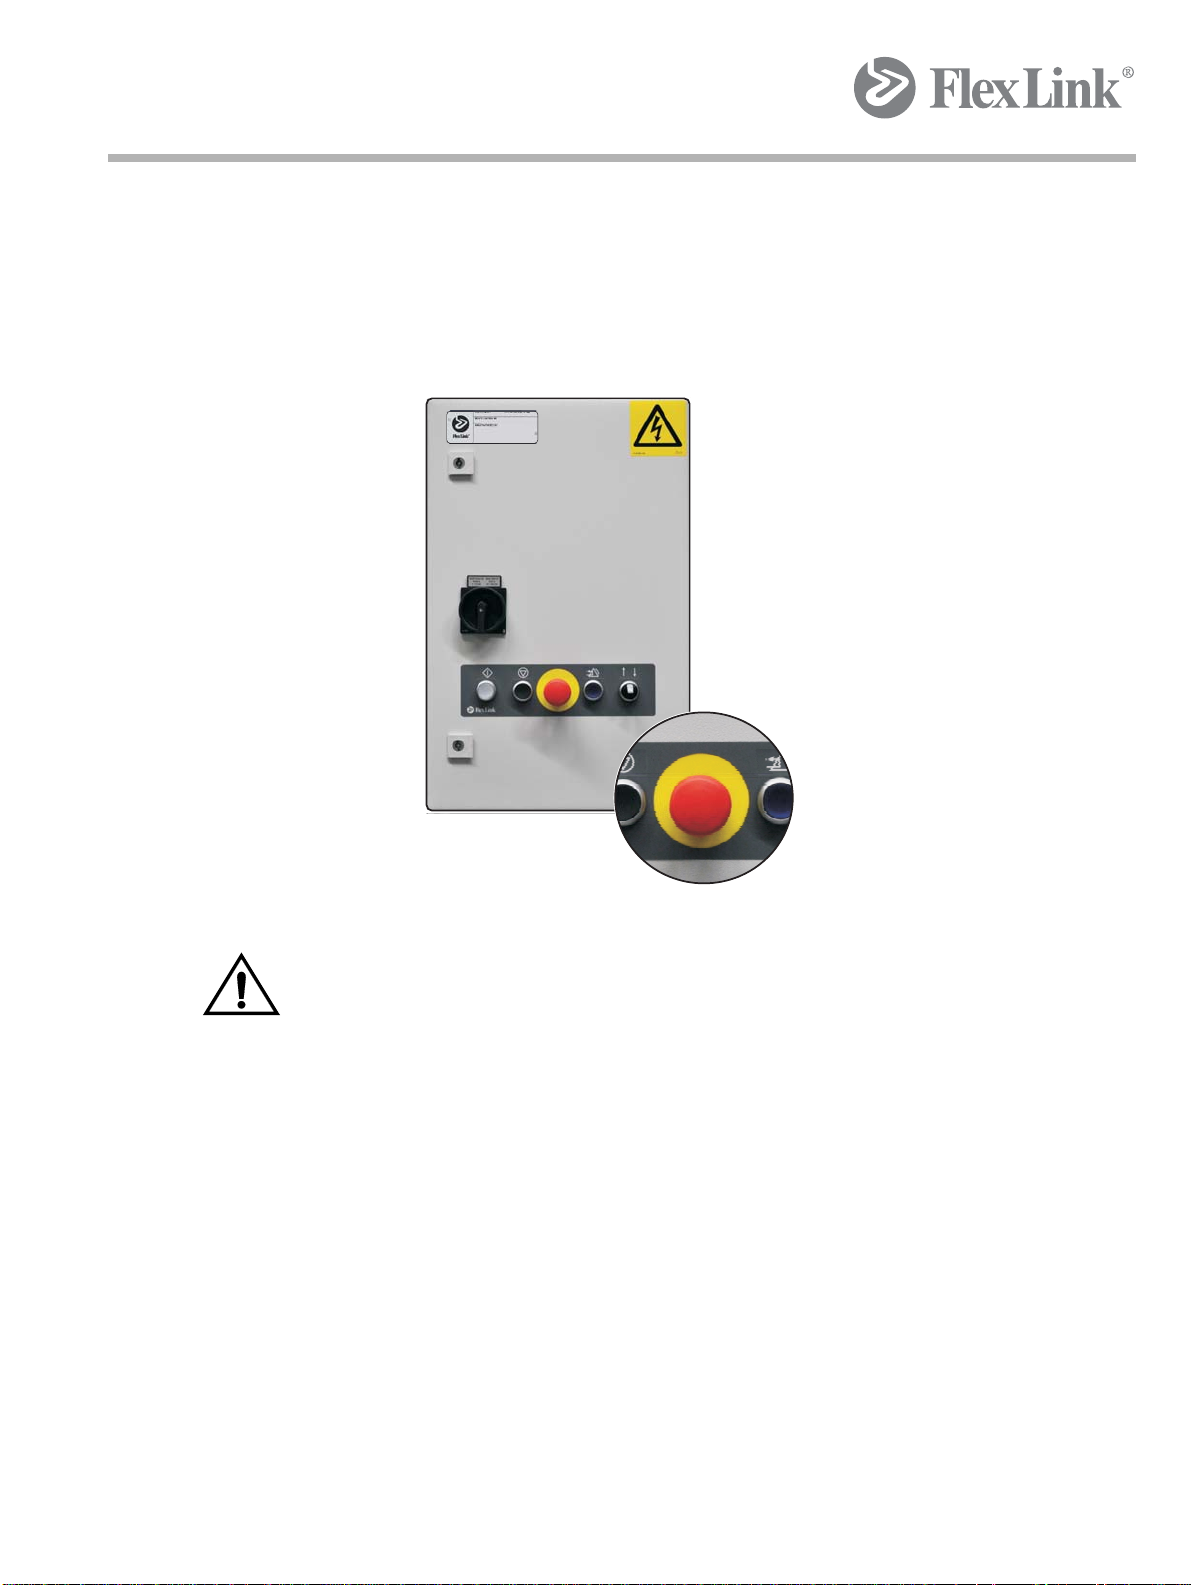
1.3.2 Emergency stops
If personal safety is endangered or if there is a risk for equ ipment damage,
the emergency stop button must be immediately pressed.
An emergency stop button is mounted on the front of the electrical cabinet.
Figure 4 Location of emergency stop button
. The emergency stop device does not disconnect power to the ma-
chine.
For more detailed information about th e emerge ncy stop function, see the
application manual.
10
5112204
Page 19
1.3.3 Guards
. The elevator consists of moving parts that can cause injury.
Feed-in and feed-out areas around the elevator are unprotected; they must
be protected by, for example, the installation of tunnels or similar devices.
The elevator may not be operated if the door switch is inoperable or if a st ationary guard is improperly fitted.
Stationary guards
The elevator is protected by stationary guards of clear PC a nd alu minium.
Openable guard
The elevator is equipped with a service door for accessing the interior . This
door is equipped with a door switch. If the door is opened dur ing operation,
power to elevator motors is disconnected (stop category 0 according to EN
60204-1).
Safety
. Stop the elevator before opening the door. Do not open the door for
the purpose of stopping the elevator.
The door switch does not disconnect power to the machine.
1.3.4 Noise level
. The noise level produced by the elevator is under 70 dB(A).
1.3.5 Electrical cabinet
. The voltage in the electrical cabinet is 400 V or 480 V, depending on ver-
sion. Ensure that the electrical cabinet is closed and locked after working
in the electrical cabinet.
Never bypass the safety system.
The electrical cabinet can only be opened using a tool.
Before working in the electrical cabinet, the main switch to the motor must
be turned off and locked. The key is retained by the service technician until
work is finished.
Created by EBCCW 00:06
5112204
11
Page 20

Safety
Examples of service work include:
• Disconnection of wiring
• Replacement of motors, etc.
• Service work in the electrical cabinet, terminal boxes, etc.
• Service work performed on the machine that cannot be seen from
the electrical cabinet.
For adjustment of photo-electric cells, inductive sensors, etc., power is required:
- Stop the machine and wait until the moving p arts have come
to a complete stop.
- Ensure that "Start" is turned off.
- Open the elevator door.
- Make adjustment.
Verify adjustments using manual operation of the elevator with the door
closed (see Handling
on page 58).
12
5112204
Page 21
Safety
1.4 Safety measures to be taken
For a safe operation of the Elevator a number of safety measures are to be
taken. These include the following measures:
• Clean floor surface - With a clean floor surface the operator will
not be hindered while operating the Elevator. This can prevent
tripping or slipping, so that the operator does not unexpectedly
come into contact with the Elevator.
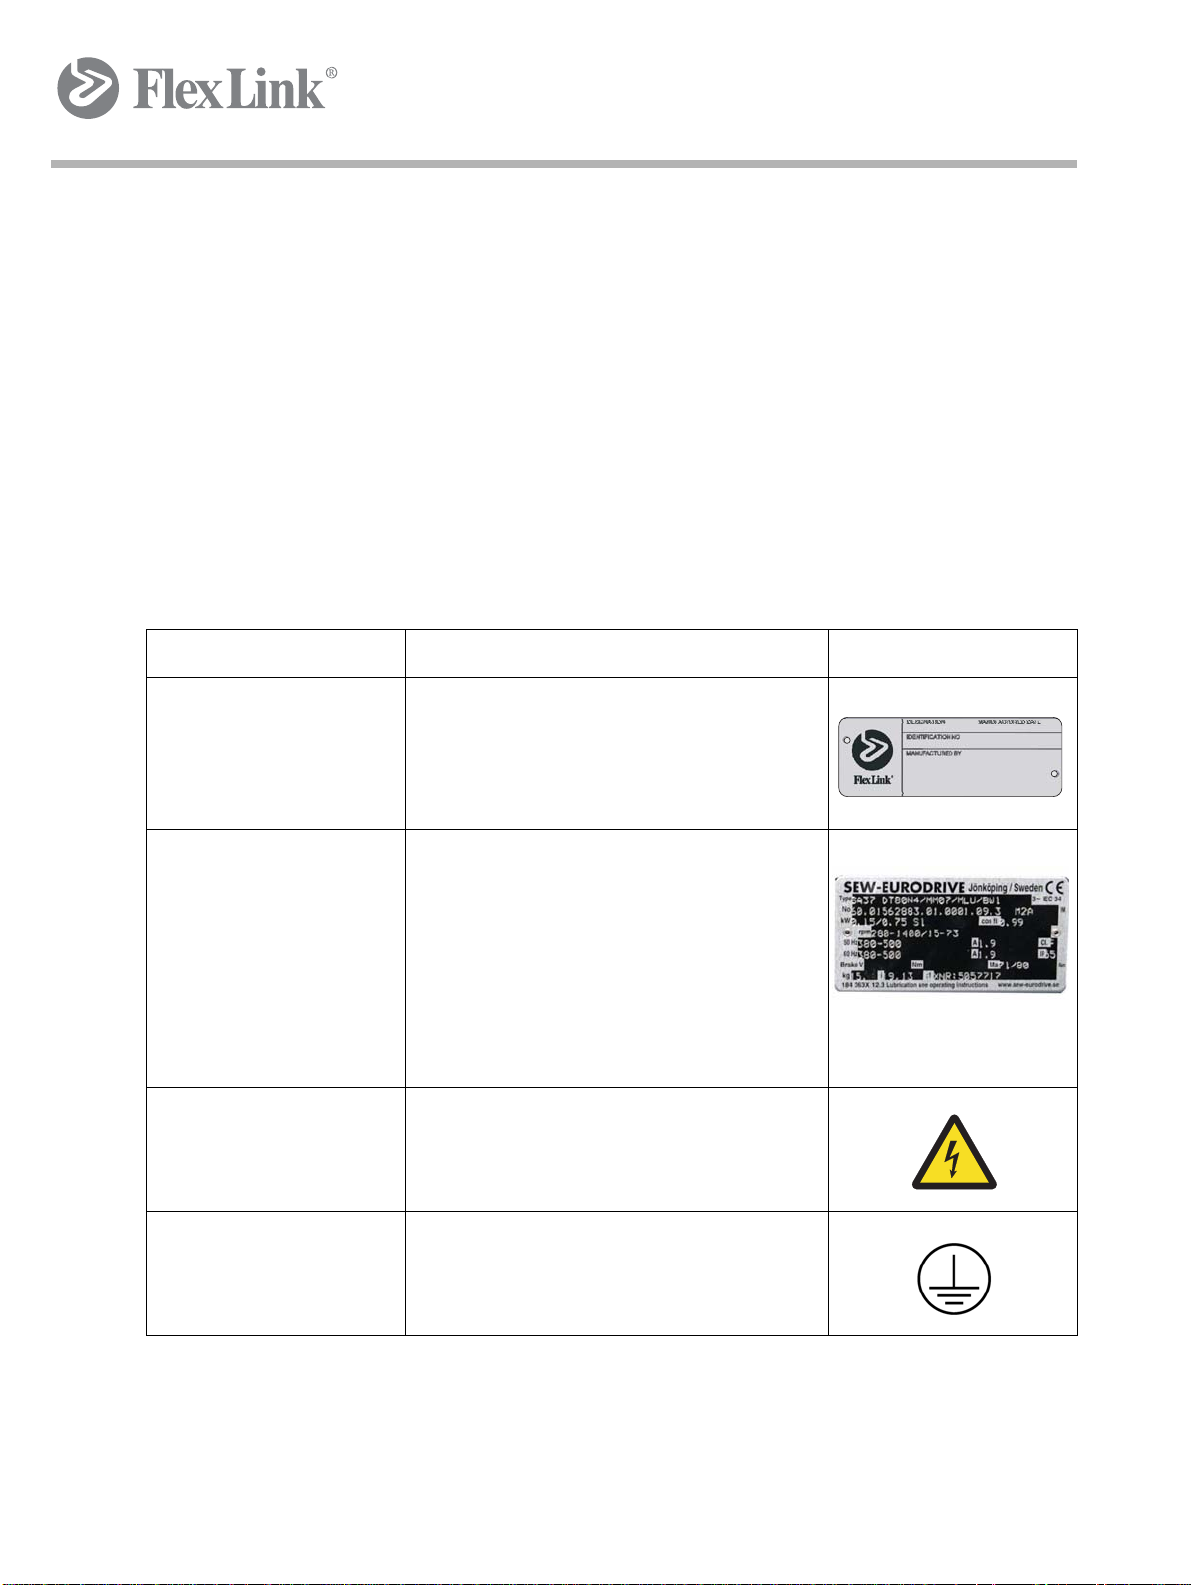
1.5 Explanation of symbols
Just like in the manual, symbols are used that have been placed on the Elevator in order to point the attention of the user to cert ain situations or pr ovide certain information on components of the Elevator.
No. Description Picture
1.Type plate Elevator This contains the name and the address of
the Manufacture. Apart from that the
declaration of incorporation, series or type
indication, serial number and the year of
construction of the Elevator.
2.Type plate motor This contains the name and the address of
the motor supplier. Apart from that the CEmark, kind of motor oil, series or type
indication, serial number and the year of
construction of the motor.
3. Risk for electric shock Placed on control box.
4. Protective earth According to IEC 60417. Placed below
control box. Points out where to connect
equipotential bonding conductors.
Created by EBCCW 00:06
5112204
13
Page 22
Safety
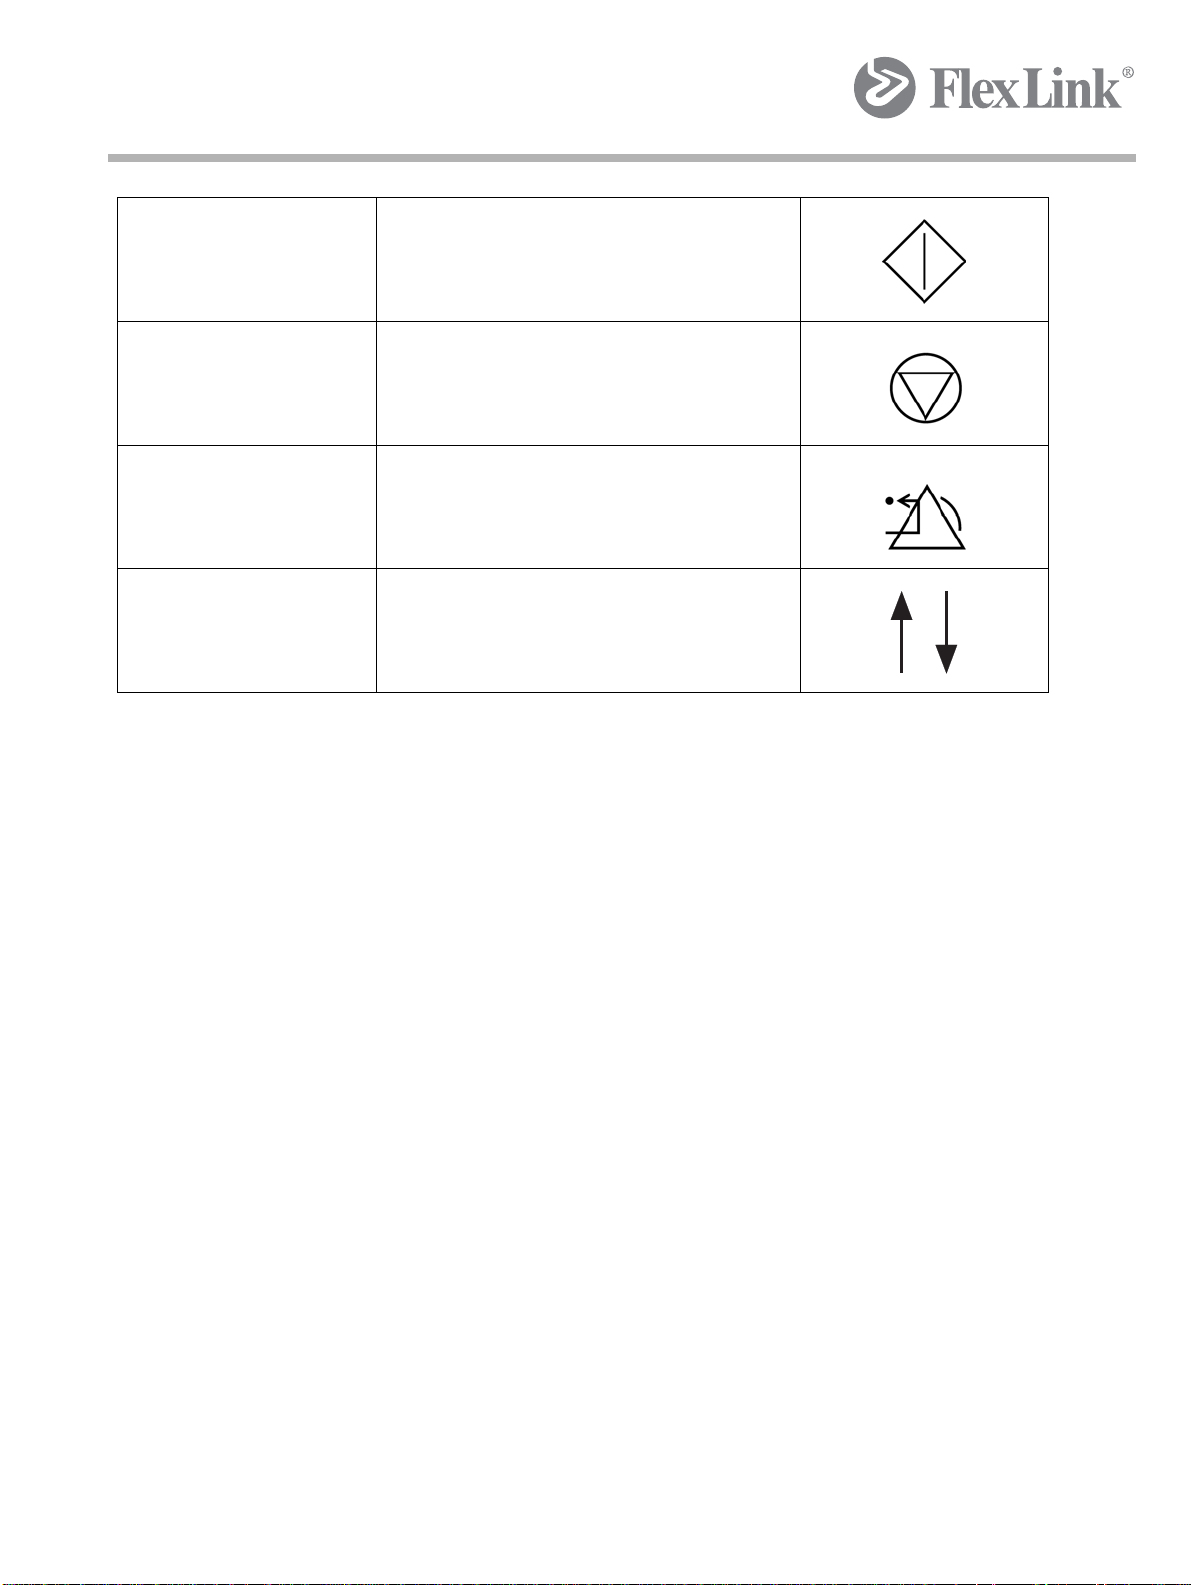
5. Start According to IEC 60417. Pictogram at
pushbutton on control box door.
6. Stop According to IEC 60417. Pictogram at
pushbutton on control box door.
7. Alarm reset According to IEC 60417. Pictogram at
pushbutton on control box door.
8. Up/Down According to IEC 60417. Pictogram at
pushbutton on control box door.
14
5112204
Page 23
Technical specification
2 Technical specification
Complete turn-key version.
In feed and discharge protections are not included.
Cycle time 13- 16 sec (low elevator)
18- 24 sec (high elevator)
Max weight* *
Max product height 400 mm
A number of pallets can be elevated at the same time.
Conveyor length Max. length 550/640 mm
Conveyor speed 15 m/min
Electrical environment 50 Hz: 400 V AC
60 Hz: 480 V AC
ESD version elevators are available.
Cabinet for Profibus, Profisafe or Device Net communication for Line control.
*) Maximum product weights are as follows:
Type Max. load/level Max. total load in elevator
X85/XK/XT 30 Kg 30 Kg
RTI 15 Kg 100 Kg
DAS 80 85 Kg 85 Kg
Dimensions LxBxH: See appendix.
Weight Low elevator: ~ 300 kg (Depending of configuration)
Weight High elevator: ~ 400 kg (Depending of configuration)
Electrical
specifications
Pneumatic
system
Supply: 3 phase + neutral + PE, 400 V AC, 50 Hz, 24 V DC
Max. power: 1 kW N/A
N/A
Created by EBCCW 00:06
5112204
Capacity Products per minute: See application.
Max. speed: See application.
15
Page 24
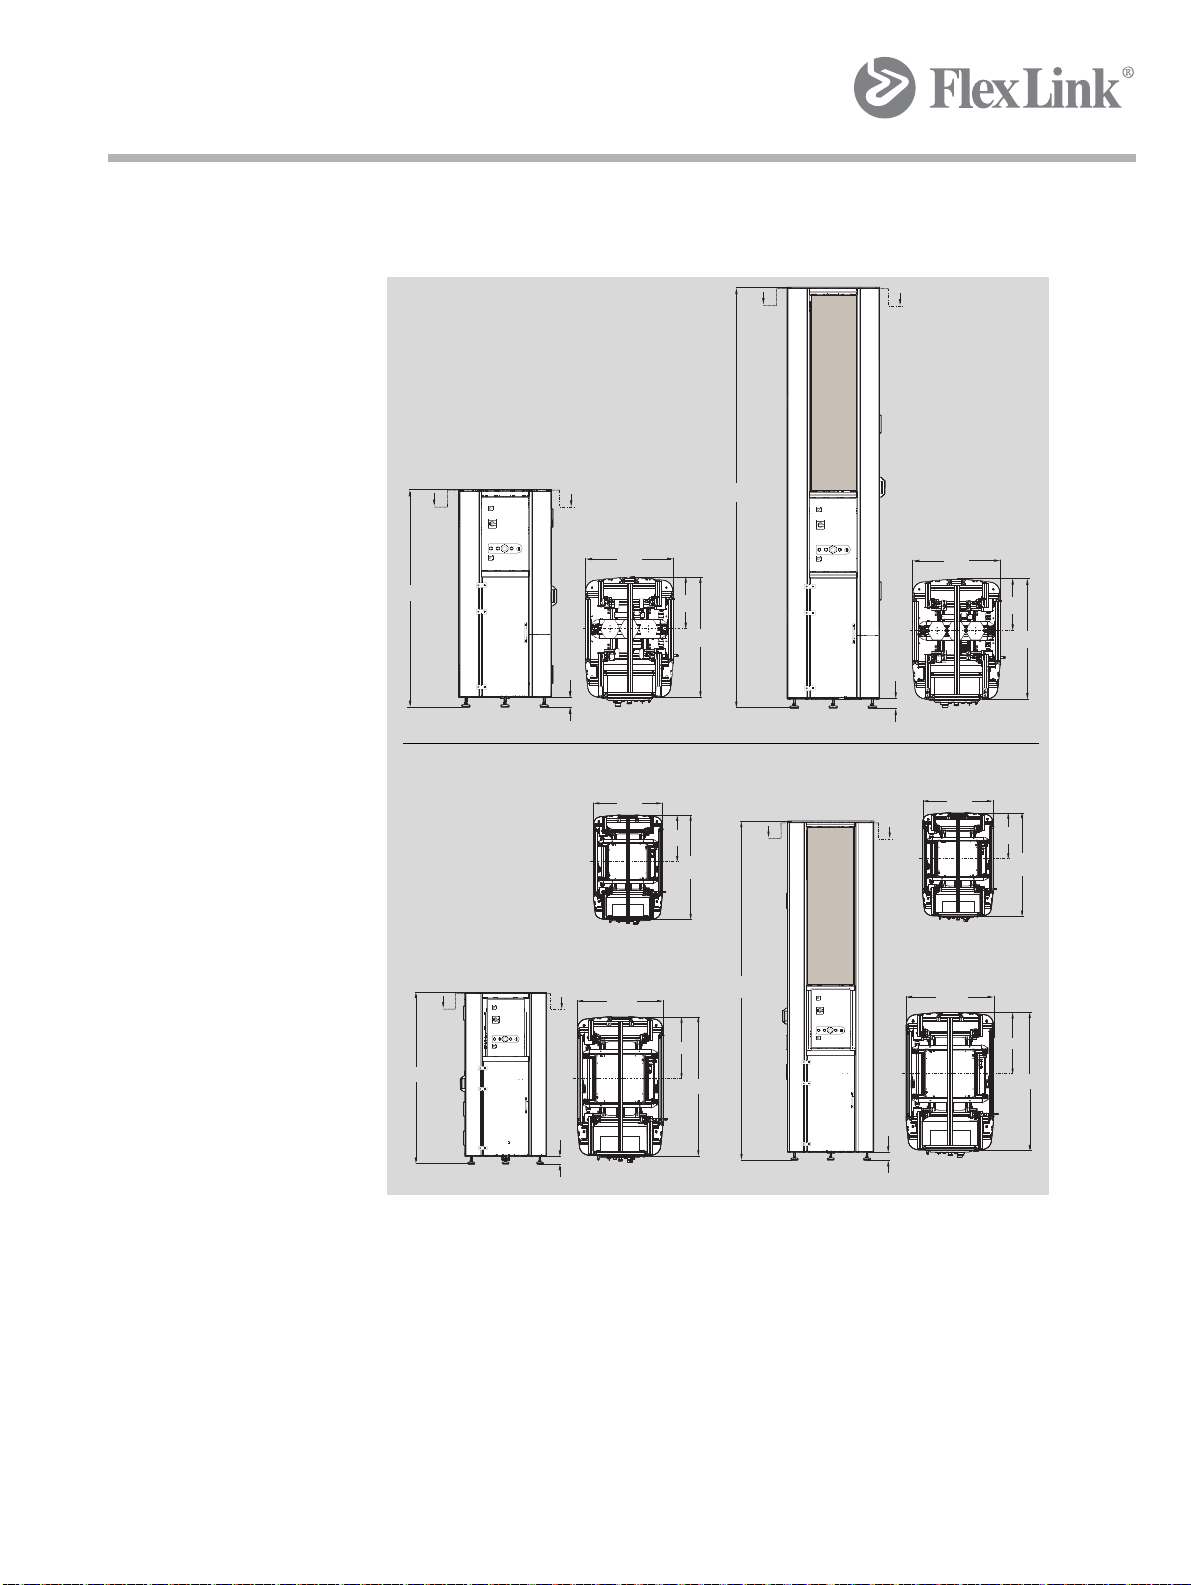
Technical specification
A
A
A-A
745
435
1018
75 30±
1754
75 30±
A-A
745
435
1018
75 30±
A
A
3394
A-A
75 30±
1754
A
A
833
604
1356
A-A
745
435
1018
Pallet width 240-320
Pallet width 400-640
A-A
833
604
1356
A-A
745
435
1018
Pallet width 240-320
Pallet width 400-640
A
A
3394
75 30±
XT
X85/XK
2.1 Technical data
Figure 5 Elevator description
16
5112204
Page 25
Technical specification
2.2 Ordering information
Example of strings obtained from the configurator:
AC D EF GHIJ
X85 - 200 - ABCD - E - 900 - 2800 - 50 - PB - AS0
Table 1: X85 High elevator with Profibus
AB CDE F G H
I J
XT - 400 - 150 - AB - E - 400 - 1200 - 50 - PS - AS2
Table 2: XT low elevator, pallet width 400, Profisafe
AC D EF GHIJ
X85 - 200 - ABCD - E - 900 - 2800 - 50 - DN - AS0
Table 3: X85 High elevator with Device net
Created by EBCCW 00:06
5112204
17
Page 26
Technical specification
E
A
B
D
C
F
E
F
Input Variable
A- Platform: X85
XK
XT
B- Pallet width: 240
320
400
480
640
C- Product height: 1-400 mm
D- In feed and discharge positions: A
B
C
D
E- Door positions: E= Left
F= Right
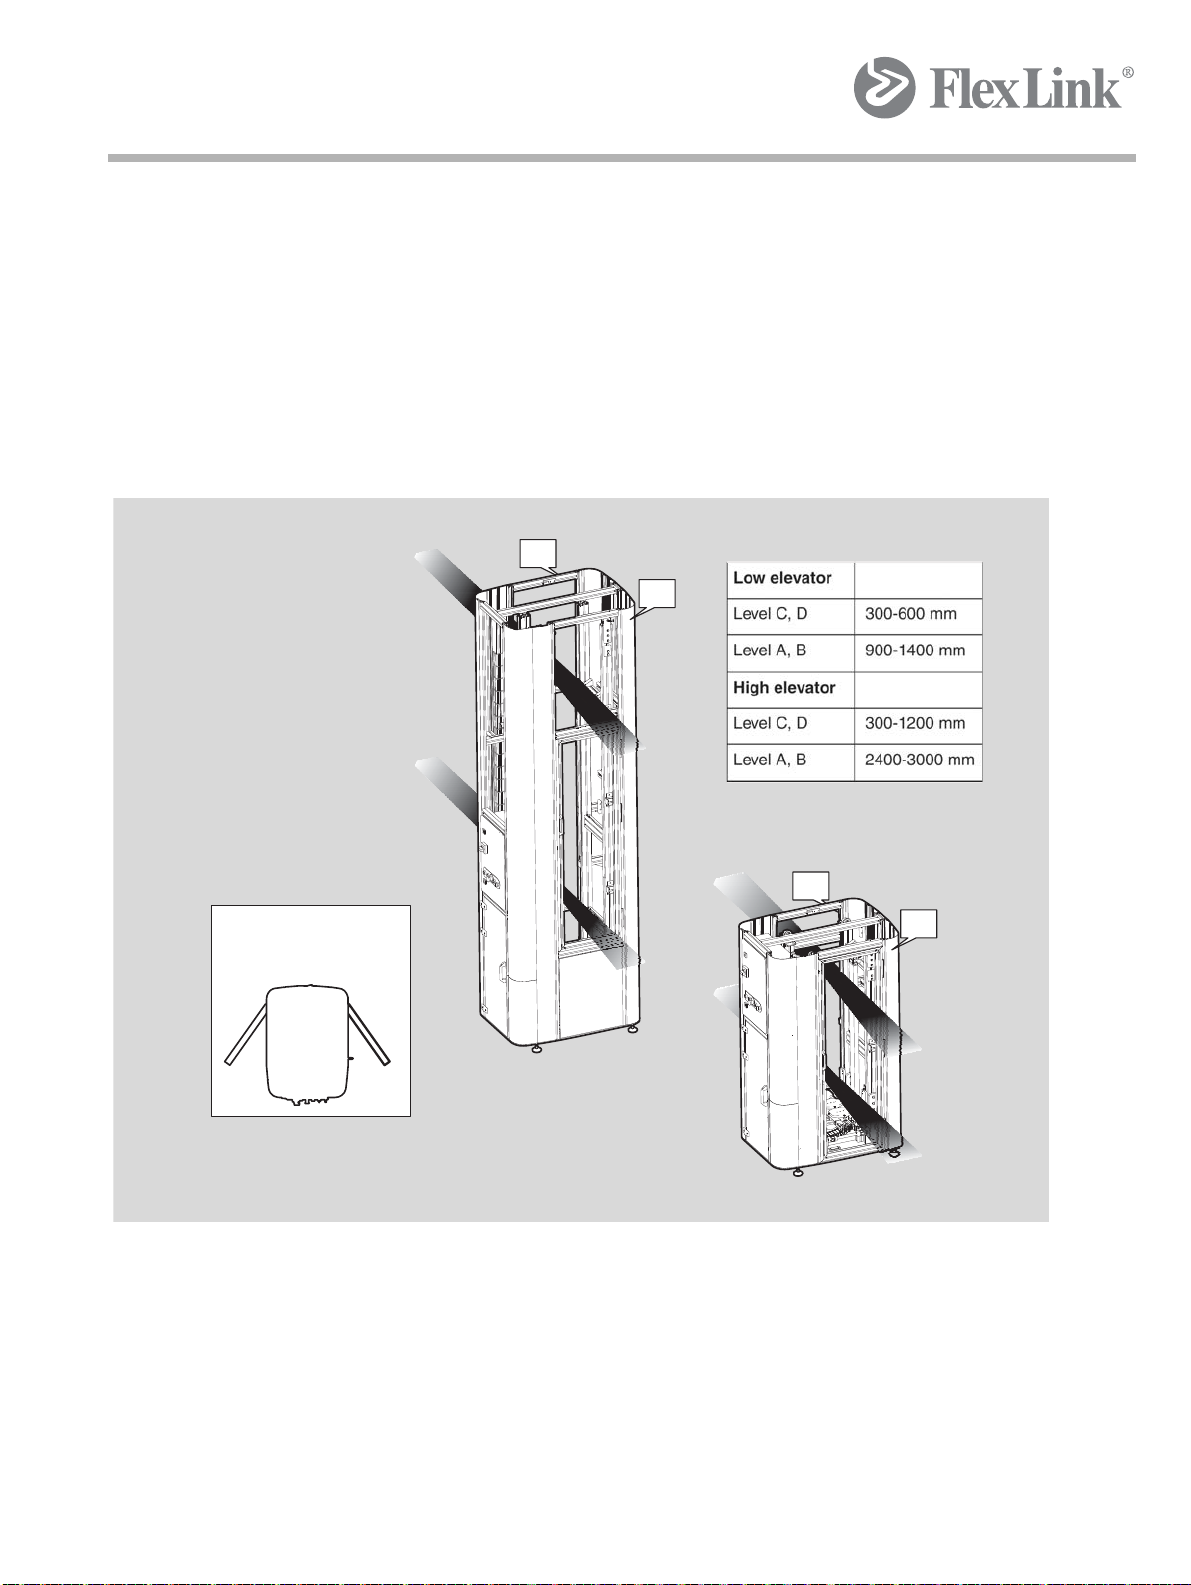
F- Lower height: Low elevator 300-600 mm
High elevator 300-1200 mm
G- Upper height: Low elevator 900-1400 mm
High elevator 2400-3000 mm
H- Drive unit version 50 Hz, European
60 Hz, American
I- Fieldbus: PB: Profibus
PS: Profisafe
DN: Device net
J- ESD version: Standard: AS0
Conductive: AS2
For more information please contact your local FlexLink of fice.
18
5112204
Page 27

Technical specification
2.3 Operating conditions
The circumstances under which the Elevator can be ap plied partly depend
on the materials selected. FlexLink has defined a number of parameters
within which the Elevator would be allowed to function. Should th e Elevator
still be applied beyond these limiting values, FlexLink cannot guarantee the
good functioning of the Elevator.
Ambient temperature (in operation) -20°C to +60°C
Relative air humidity (RH) 30% to 95%, not condensing
Lighting Normal ambient lighting
As a standard no lighting is installed on the Elevator and this can neither
be installed as an option. Normal ambient lighting is sufficient to work safely
with the Elevator. The Elevator is not intended for use in the open air and
besides the Elevator is not suitable for an envir onment with a risk of explo sion.
For use under deviating circumstances you may contact the supplier of the
Elevator.
Created by EBCCW 00:06
5112204
19
Page 28
Introduction function and components
E
A
B
C
D
A
B
D
C
Height
(Top of chain)
F
E
F
E, F
Available door positions
To p
View
Right
Left
3 Introduction function and
components
3.1 Purpose of use
The elevator changes the elevation of products in a flow, such as boxes or
pallets, according to the principle of first in/first out.
20
5112204
Page 29
Introduction function and components
3.2 Description of the Elevator
The elevator primarily consists of two main units:
• Control system
• Mechanical lifting device
Control system
Created by EBCCW 00:06
5112204
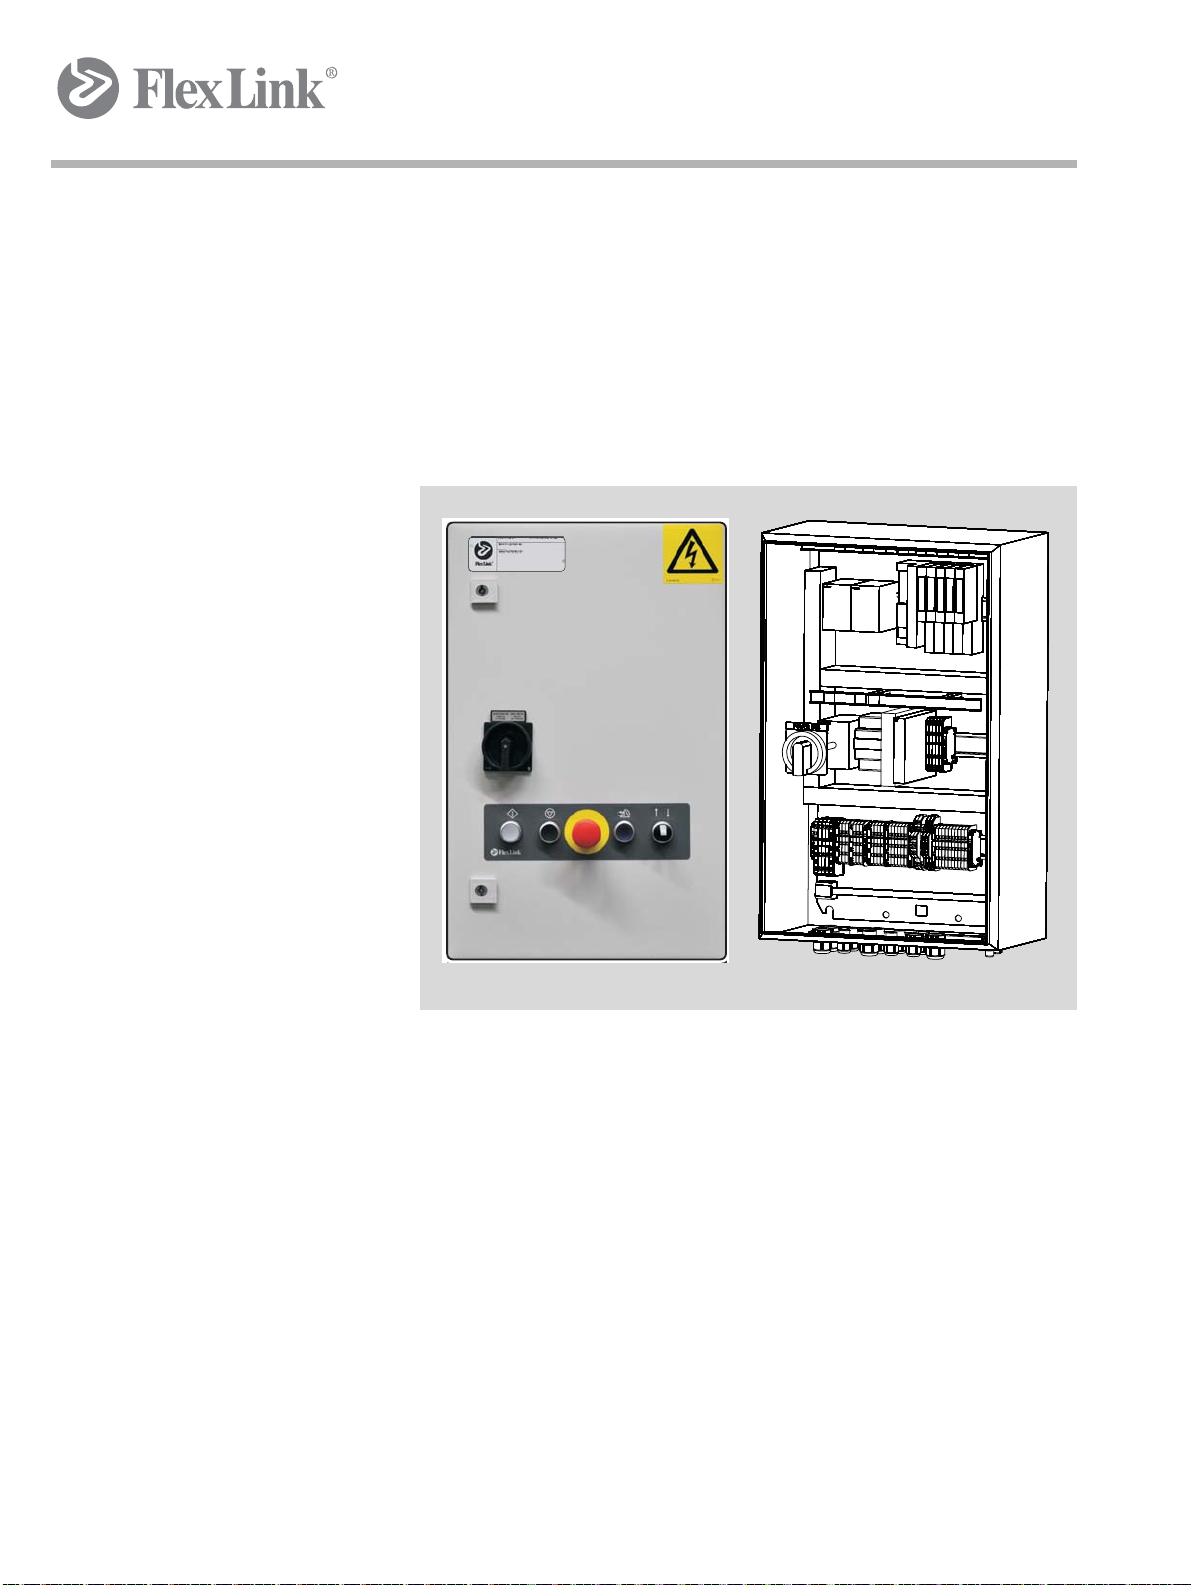
Figure 6 Electrical cabinet
Central intelligence and distributed I/O
The elevator is to be controlled by a Line co ntroller and do not itself contai n
any intelligence such as PLC. The Line controller (PLC/PC/etcetera) controls the elevator through the integrated communication interface in the
control box.
21
Page 30

Introduction function and components
Safety system
Profibus and DeviceNet versions includes an autonomous safety system
for the door switch, disconnecting the power suply to the motors through
the safety relay and main contactors.
For Profisafe versions the door switch and emergency switch are connected to safety inputs of the communication interface. Main contactors are
connected to safety outputs of the communication interface.
For Profibus and DeviceNet versions the conductors of emergency switch
is connected to a terminal group. This terminal group is integrated into the
line global emergency stop safety system by integrator.
The red knob of emergency switch is delivered in pla stic bag a s th e el evator emergency switch functionality is not guaranteed before it is appropriately integrated into the line's safety system by the integrator.
Drives
The horizontal drive is with fixed speed controlled by a device including
contactor and motor protection.
The vertical drive is frequency controlled by a frequency converter placed
on the motor itself.
For standard versions the motor contr ol is discrete: On/Off, Up/Down, High
speed/Low speed. Spee ds are preset in hardware of motor.
For advanced versions a second communication interface provides advanced control of the motor. Speed and ramp times can be controlled by
software in Line controller . Motor current value and error codes can be provided by the motor to the Line controller.
22
5112204
Page 31
Introduction function and components
Mechanical lifting device
For RTI elevators (Paternoster), the lifting device consists of a number of
carriers attached to a roller chain. These ar e powered by a Movimot bra ke
motor mounted in the lower part of the elevator. Feed-in and discharge devices are required for feeding in and feeding out pallets. These are not included with the elevator.
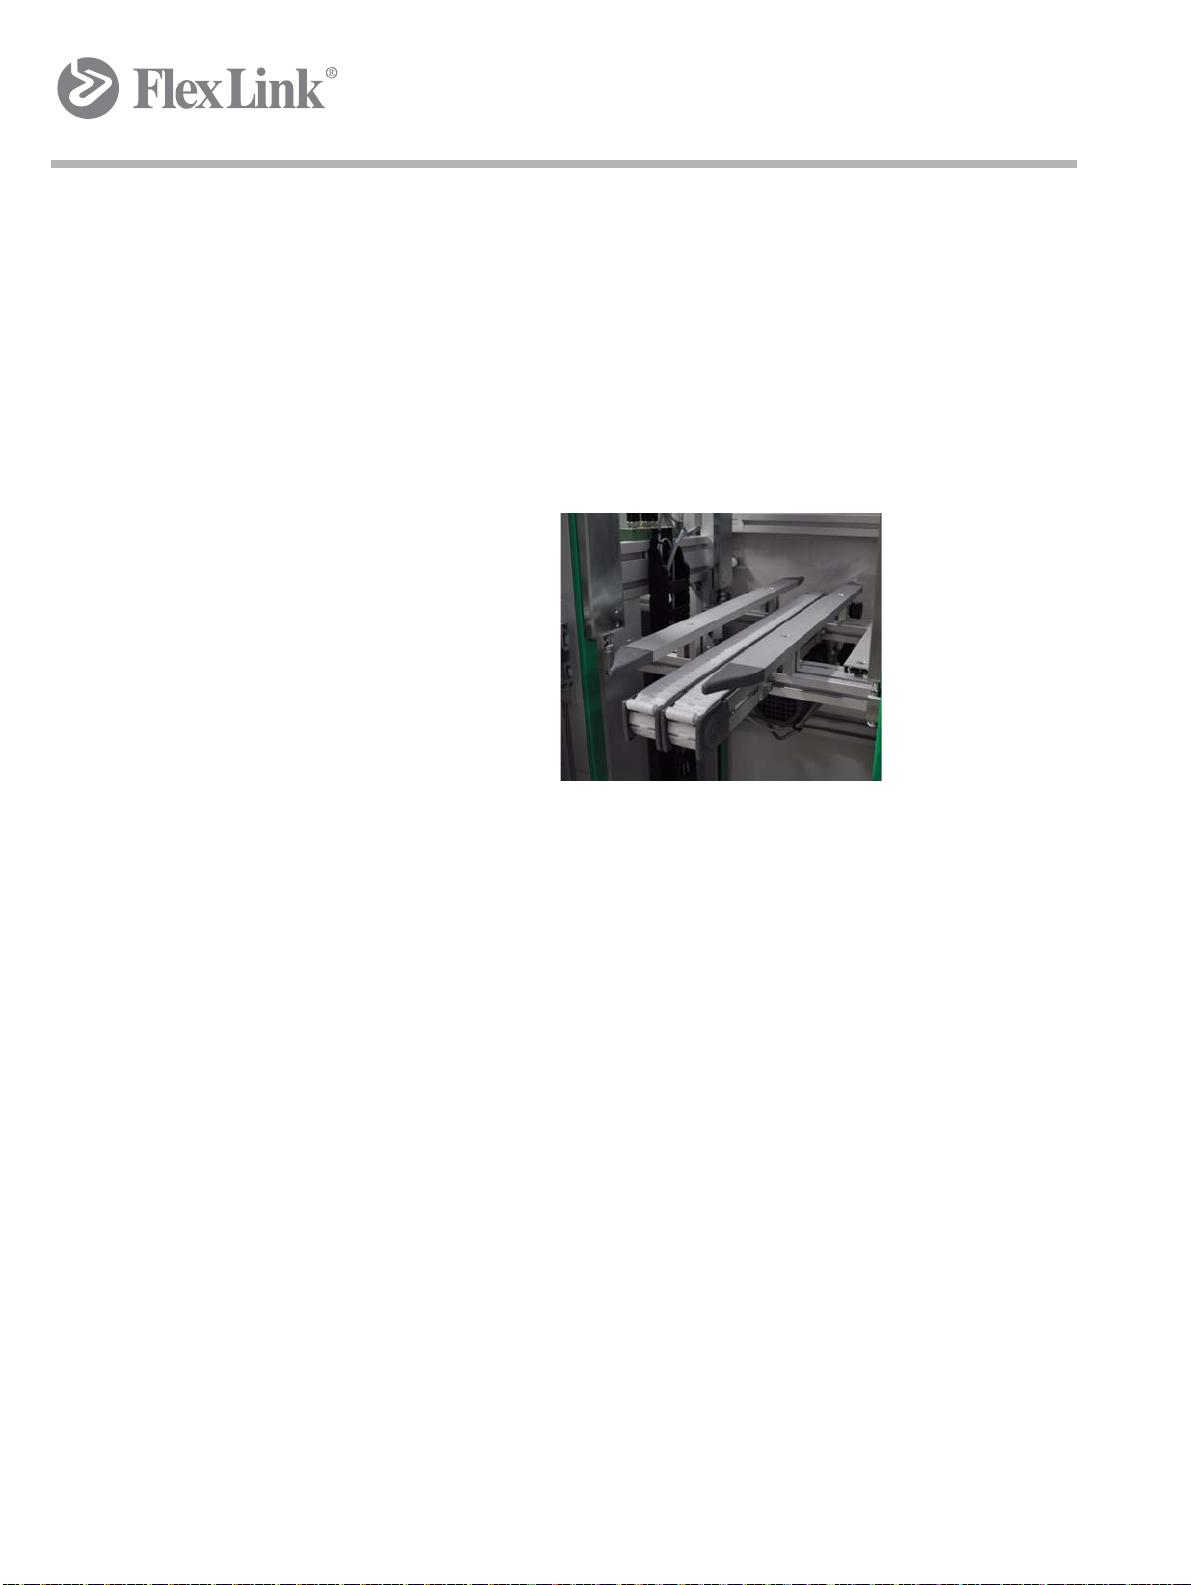
For XT/X85/XK elevators, the lifting device consist of a short conveyer with
separate drives for feeding in and feeding out p allets (see the figure below).
Vertical movement of the lifting device is powered by a drive chain to a Movimot brake motor, mounted in the lower part of the elevator.
Figure 7 Lifting device
Elevator function is controlled by a number of photo-electric cells and inductive
sensors.
The photo-electric cells check that product feed-in is correct and that the
product is correctly positioned for discharge. For XT elevators, this check
is made by inductive sensors.
Inductive sensors control the lowering of the lifting speed and stopping of
the lifting movement.
The machine is of the stand-alone design and can be combined with conveyers. Feed-in and discharge can be single or multiple.
Maximum product size is dependent on product stability and the dimensions of the elevator.
RTI elevators do not include feed-in or discharge devices at the top.
Created by EBCCW 00:06
5112204
23
Page 32

Introduction function and components
3.2.1 Components
3.2.1.1 Electrical cabinet
The electrical cabinet is fitted in the front of elevator. The door is equipped
with the required means of maneuvering (pushbuttons/lamp s) and module
electrical main switch.
The main switch do not disconnect 24 V DC power supply to module.
24
Figure 8 Electrical cabinet
The through-puts in the bottom of box is accord ing to module version, see
electrical drawings. In the bottom is also the fast-connectors for fieldbus
positioned.
Inside the electrical cabinet is the module safety system, fieldbus communication interface, circuit breakers, etcetera.
The safety system design depends on version. Profibus and DeviceNet
versions include a safety relay to which the door is connected. Profisafe
version do not contain any safety relay. Common for all versions is that motor supply voltage is disconnected at emergency stop through main contactors.
In the bottom of cabinet is an earth rail for cables. There is also one earth
terminal for each terminal group.
5112204
Page 33

Introduction function and components
The fieldbus cable is connected by fast connectors as mentioned above,
see electrical documentation. If the module contains several communication interfaces, such as the advanced versions with field distributor, there
is still only one connection point for fieldbus.
Outside and below the electrical cabinet is the connection point for equipotential bonding, see electrical documentation.
. .
Warning: The voltage is 400 V AC (or 480 V AC).
Warning: The voltage in the field distributor is 400 V . There is risk
for serious injury due to electrocution. Immediately seek the care
of a physician if an accident occurs. After the main switch of field
distributor is turned off, voltage is still high in the field distributor.
Warning: Check that the electrical cabine t is closed and locked
after working in the electrical cabinet.
Warning: Never bypass the safety system.
Created by EBCCW 00:06
5112204
25
Page 34

Introduction function and components
3.2.1.2 Field distributor
The field distributor, used in advanced versions, is the communication interface of the adjustable speed drive for the vertical motion.
26
Figure 9 Field distributor
5112204
Page 35

Introduction function and components
3.2.1.3 Motor
Figure 10 Adjustable speed drive (motor with frequency inverter)
An adjustable speed drive powers the elevator 's lif ting motion, ver tical m otion, via roller chain/gears. The drive p ackage is moun ted in the lowe r pa rt
of the elevator.
Created by EBCCW 00:06
5112204
27
Page 36

Introduction function and components
3.2.1.4 Guards
The elevator consists or moving parts that can cause injury. Feed-in and
discharge are covered by stationary and openable guards. The elevator
may not be operated if the door switch is inoperable or if a stationary guard
is improperly fitted.
Stationary guards
The elevator is protected by stationary guards of clear PC and aluminium.
These guards must be correctly fitted when the elevator is in service. The
stationary guards must be in place when the power is on.
Openable guard
The elevator is equipped with a service door for accessing the interior . This
door is equipped with a door switch. If the door is opened during operation,
power to the elevator motors is disconnected (stop category 0 according to
EN 60204-1). The door switch is a p art of the safety system and may under
no circumstances be by passed or in any other way made inoperable. Once
the door is closed, the elevator can be reset and started.
. Warning: Stop the elevator b efore opening the door. Do not o pen
the door for the purpose of stopping the elevator.
Figure 11 Safety switch, door
28
5112204
Page 37

Introduction function and components
Elevator module
Vertical motion
Horizontal
motion
Discharge conveyor
Not part of module
In-feed conveyor
Not part of module
Possible conveyor motors placed inside elevator , not p art of Elevator module, are not affected by the door switch.
Figure 12 Elevator module
. Warning: Stop the elevator before op ening the door. Do not open
the door for the purpose of stopping the elevator.
5112204
Created by EBCCW 00:06
29
Page 38

Introduction function and components
XT
Inductive lift cage
position sensor
X85/XK
Photo-electric lift cage
position sensor
X85/XK
Reflector of photo-electric
lift cage position sensor
3.2.1.5 Sensors
3.2.1.5.1 Lift cage
30
Figure 13 Photo-electric cells
Photo-electric or inductive sensors, depending on version, are used for detecting that product is positioned in the lift cage.
The photo-electric sensor type is retro-reflective, thus the light beam is reflected by a reflector on the opposite side of conveyor back to sensor, making the detection of product less sensitive to colour differences of product.
The stop position of conveyed item, due to sensor position, is such that the
conveyed item does not reach to the end of lift cage convey or.
RTI elevator version
For RTI elevators, photo-electric cells are used, mounted at fixed positions
in the elevator frame.
5112204
Page 39

3.2.1.5.2 Vertical motion
Vertical motion
position sensors
Lifting interlock sensor
Lifting interlock sensor
reflector
Introduction function and components
Figure 14 Inductive sensors
Vertical motion sensors
Inductive sensors are used at stop positions and low-speed stretches of the
vertical motion.
Interlocking sensors
Retro-reflective photo-electric sensors are mounted in the upper part of
frame with reflectors mounted on the bottom plate of elevator. Their purpose is to interlock vertical motion if obstacle is detected.
Created by EBCCW 00:06
5112204
31
Page 40

Introduction function and components
3.2.1.5.3 Limit switches
This does not apply to RTI units. These should be protected by the application.
32
Figure 15 Limit switches
The limit switches are located in the upper and lower parts of the frame and
are activated in the event of excessive lifting device travel.
The upper limit switch interlock the vertical motion upwards electrically and
vice versa for the lower limit switch. Thus, activating the lower limit switch
still allows upward motion.
Mechanical dampers serve as protectio n after the limit switch es .
To assure correct operation of the elevator, ensure that the switches are
correctly positioned and are activated in the intended direction of travel.
5112204
Page 41

Introduction function and components
E
A
B
C
D
A
B
D
C
Height
(Top of chain)
F
E
F
E, F
Available door positions
To p
View
Right
Left
3.3 Working principle
The purpose of the elevator is to transport produ cts / goods ve rtically to
bridge a difference of height or to function as buffer zone.
5112204
Figure 16 Principle sketch elevator
In most cases the Elevator is integrate d in a system. The input / output sid e
of the Elevator is determined by the application.
33
Created by EBCCW 00:06
Page 42

Unload the elevator
4 Unload the elevator
4.1 Preparation
This section describes the steps that are required for unloading the Elevator. It is recommended to make use of the d evices described. When using
this or another device, this device is expected to be provided with a quality
mark.
. Note! The operations concerned are to be carried out calmly in
order to be able to carefully monitor any movement of the
Elevator.
Before starting the unloading a good prep aration is required . The appropriate devices must be available. Apart from that the first transport check is
an important part of the unloading, as in case of damage this shou ld be
mentioned on the delivery note in relation to guarantee and the like.
The first transport check after arrival of the Elevator a transpor t check is to
be carried out. The check can be carried out at the moment the Elevator
has been unloaded from the container o r the truck. The technical specification gives the dimensions to be checked. Is the elevator delivered undamaged and is it the correct Elevator?
Machine serial number type plate
. Note! Any damage is to be mentioned on the delivery note and
should immediately be reported to the supplier . This with respect
to the guarantee of the machine.
34
5112204
Page 43

Unload the elevator
4.2 Unloading instructions
Before starting unloading, all fastening means (securing belts, screws, etc.)
that secure the Elevator unto the means of transport must be removed.
Subsequently check whether the transport supports are still connected well
to the Elevator. After this the unloading procedure may be started.
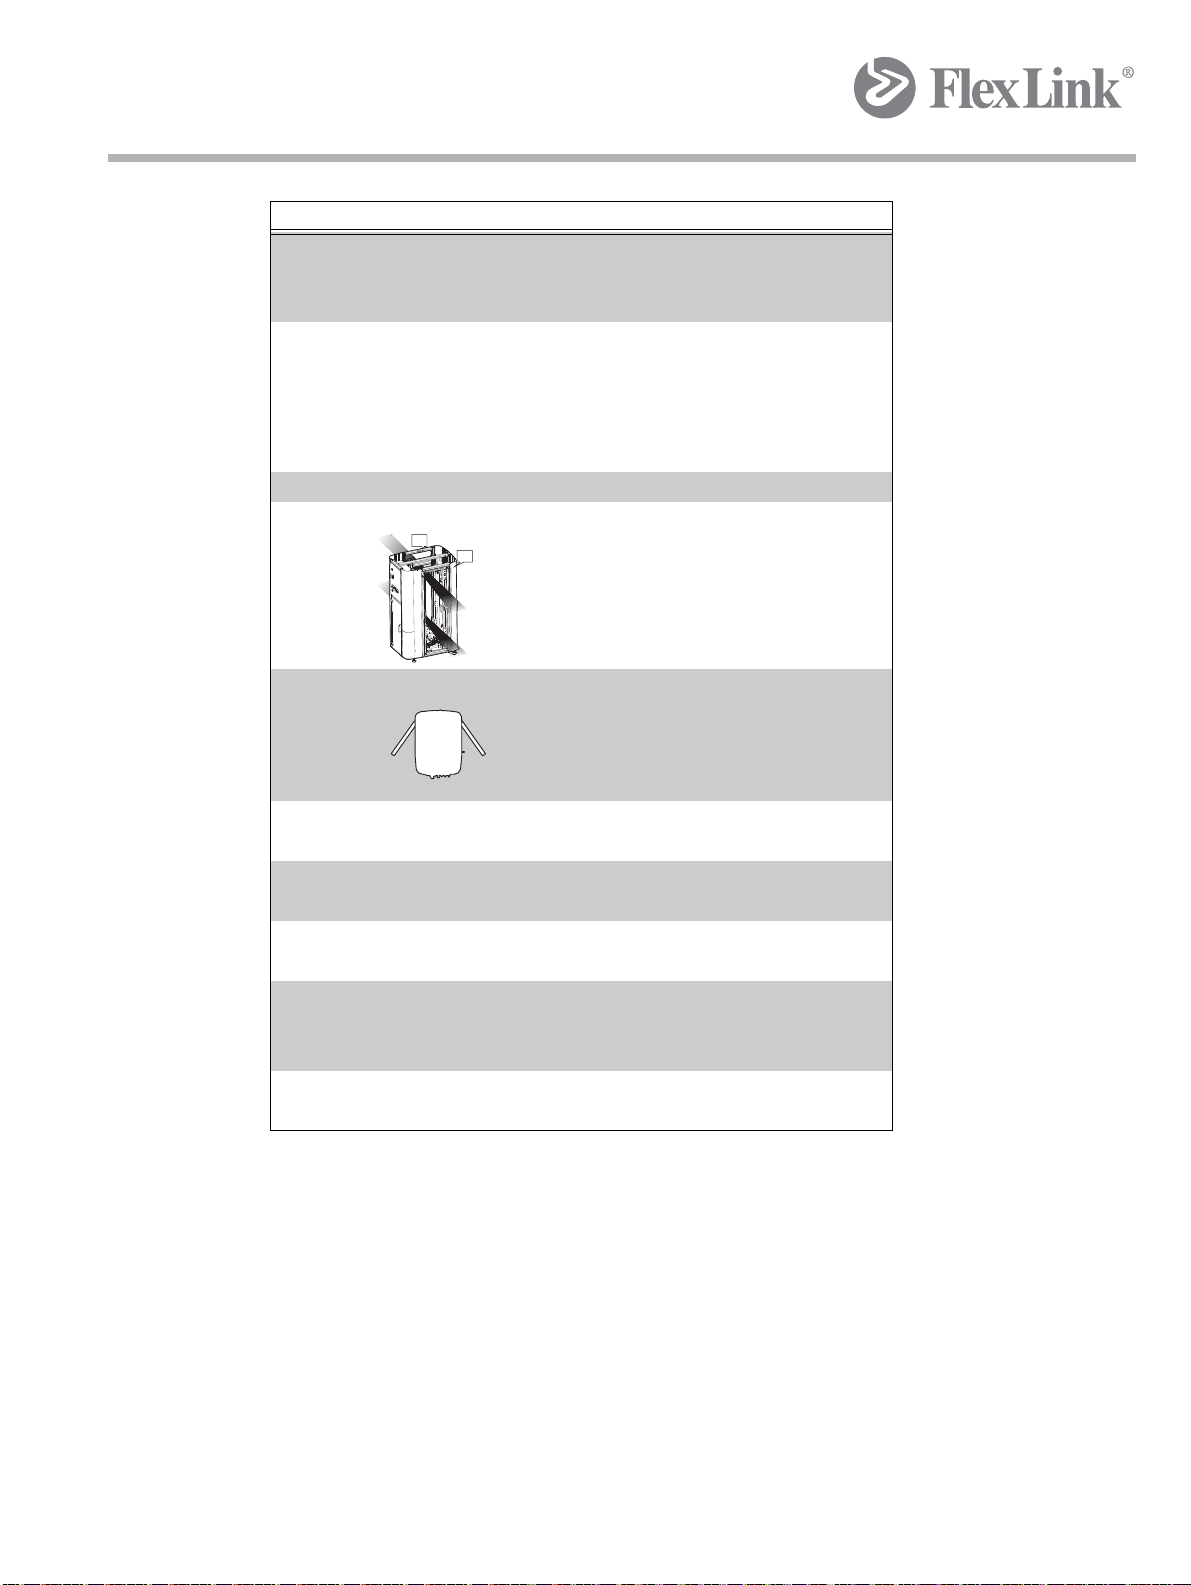
4.2.1 Erecting the Elevator See Erecting the Elevator on page 37
When putting upright, just like when moving the Elevator, make sure that
the floor is level and clean and has sufficient carrying capacity. At the moment the Elevator is on the correct place it can be put upright. Dependent
on the situation the Elevator can be put upright using a hoist, a cran e o r a
forklift truck.
Device(s)
Hoist Crane Open-end spanner
. Note! Make sure when putting upright there is enough space /
height to put the Elevator upright!
Hoist
• The hoisting device is to be fastened to the top of the Elevator .
While hoisting the hoist should be well fixed and may not ride/shif t
away unexpectedly.
• After having mounted the adjusting feet the Elevator can be put
upright. Now the hoisting device can calmly hoist the Elevator in
the upright position.
Created by EBCCW 00:06
5112204
35
Page 44

Unload the elevator
. Note! Be careful that the Elevator does not tip at the moment it
almost has been hoisted in the upright po sition. Make sure there
are no persons near the Elevator!
. Note! Carry out these operations calmly in order to be able to
carefully monitor any movement of the Elevator.
. Note! It is forbidden to walk under the Elevator during putting
upright.
. Note! Make sure that while putting upright there are no
unauthorised persons or people that ar e no t su pp osed to be
there near the Elevator.
36
5112204
Page 45

Unload the elevator
1
2
3
4
Created by EBCCW 00:06
5112204
Figure 17 Erecting the Elevator
37
Page 46

Installation and adjustment
Connecting track
Elevator
Connecting track
Input/output
without
connecting track
5 Installation and adjustment
This section deals with the operations to have the elevator function well
within a (transport) system. First section 1.2 on page 4, in which the provisions to be taken care of are given, should be studied car efully . section 1.3
on page 6 is particularly im portant for the elevators that are deliver ed to the
end user not fully assembled.
5.1 Provisions to be provided
Make sure before integrating that the surround ings are clean and free from
obstacles and the mounting surface is clean and level. Besides, it shou ld
be repeated that the operations are to be carried out in a calm and controlled way!
After having placed the elevator in the correct position, the elevator is to be
fastened to the mounting surface by using the holes in the adjusting feet.
The elevator has an input and output and these a re to be connecte d to the
connecting tracks. Correct adjustment determines the quality of the system.
Figure 18 In feed and discharge
38
5112204
Page 47

Installation and adjustment
Air vents
5.2 Mechanical assembly
5.2.1 Integration in a (transport) system
The elevator is a machine that is integrated in a system of conveyors. This
means that an input and output are to be connected to it. If the elevator is
to be fitted into an existing situation, this usually give s more problems than
in a completely new situation. In both cases one should aim at optimum
functioning.
5.2.2 Floor construction
Below a number of items are given which should be paid attention to during
integrating a elevator as floor construction.
Tools
Opend end spanner Ring spanner Plastic hammer
• Before placing the elevator first make sure that it is placed on the
right place and at the right height. For setting the correct height
the adjusting feet mounted under the elevator can be used.
• Now that the correct height has been established, the connectin g
tracks at the lower and upper ends of the elevator can be adjusted. A special sliding bridge or roller bridge may be needed for a
safe transfer of products.
• After the elevator has been well integrated in the system, the elevator can be attached to the floor surface. This can be don e by anchoring the adjusting feet firmly to the floor or/and connect
through the holes shown in the picture.
• At installation, dismount transport protections and replace them
with air vents.
For more information, see the separate manual from gear box
manufacture.
NB: The quality of integration in the system is coresp on sib l e fo r
the good functioning of the elevator. Therefore make sure this is
done properly!
Created by EBCCW 00:06
5112204
39
Page 48

Installation and adjustment
5.2.3 Validation
No. Component Remark Checked
1. Lower end Has the lower end the correct height. For the cor rect height we
refer to the technical specification.
2. Upper end Has the upper end the correct height. For the correct height we
refer to the technical specification.
3. Elevator Is there enough sp ace aroun d the elevator to allow working on
it.
4. Fastening /
foundation
Has the elevator been fastened well so that the elevator is
standing steadily and does not move to the left or to the right.
Yes / No
Yes / No
Yes / No
Yes / No
40
5112204
Page 49

Installation and adjustment
400 V AC
24 V DC
ES-loop
Fieldbus
Equipotential bonding
Module
A001
5.3 Electrical installation and controls
5.3.1 Electrical installation
During this phase all necessary cabling is connected to elevator and application code software for controlling the elevator is downloaded to the line
controller (IPC/PLC) as well as the fieldbus hardware configuration.
Reference to the electrical documentation for the version in question.
5112204
Created by EBCCW 00:06
Figure 19 Cabling example
Cabling:
• Power supply
• Fieldbus
• Safety
• Equipotential bonding
41
Page 50

Installation and adjustment
Action Remark
Power on - Motor supply
Voltage check Check equipotential bonding.
Safety check Check that safety system is working properly.
5.3.2 Validation
The purpose of the validation phase is to prepare the elevator for test run.
The validation is performed with empty elevator. No products in elevator.
Reference to electrical documentation.
(Version dependent. 50 Hz: 400 V AC, 60 Hz: 480 V AC)
- 24 V DC
Check voltages. Turn elevator control box circuit breakers
on.
- Service door can be opened and cause motor power
supply disconnection. Closing the door enables safety
reset.
- Emergency switch activation cause motor power supply
disconnection. Deactivating the switch enables safety
reset.
Where disconnections are made is version dependent.
Manual sensor I/O-check Important: Service door must be open preventing motions.
Make sure all sensor signals reach the communica tio n
interface in control box. The sensors are activated
manually. (Inductive sensors are activated with metal.)
Limit switches are excluded.
Maneuver interface check Important: Service door must be open preventing motions.
Make sure all push button signals reach the communication
interface in control box.
42
5112204
Page 51

5.4 Test run
The purpose is to check functionality. T esting is performed by running man ually with an empty elevator without products.
Adjustment for making the lift cage stop exactly in horizontal line with connecting tracks is performed in a later stage.
Action Remark
Manual mode check Elevator can be set to manual mode enabling
vertical motion up/down.
Installation and adjustment
Vertical motion and end
positions
Run elevator carefully towards end-position.
Listen for noise and vibrations.
a. Check that elevator is running high-speed
outside the low-speed areas.
b. Check ramp-down to low speed while
inside low-speed areas.
c. Check that when stopped in end position,
the stop and low speed sensors are still
activated.
Limit switch check Disconnect stop position sensors by
unscrewing the sensor cable in the sensor
end.
The elevator will pass the stop sensor. It will
probably loose the low speed sensor which
may cause it to switch to high speed.
Check that limit switch interlocks the
corresponding motion direction.
Re-connect stop position sensors.
Interlocking sensor check Check that if any of these sensors are
activated vertical motion in both directions is
interlocked.
See Adjustment
on
page 53
See Limit switches
on page 54
See Adjustment on
page 53
Created by EBCCW 00:06
5112204
43
Page 52

Installation and adjustment
Reset button
5.5 Adjustment
5.5.1 Electrical cabinet
The electrical cabinet contains several items which needs correct settings
before usage:
• Contactor (for horizontal drive)
• Communication interface
. 5.5.1.1 Adjustment
For designations of contactor and communication interface see electrical
documentation.
Contactor for horizontal drive
The contactor includes motor prote ction which must be ad justed to the rated current of motor.
Before adjustment make sure the device is not activated.
44
Figure 20 Contactor for horizontal drive
5112204
Page 53

Installation and adjustment
Instruction
1 Activate the reset button for more than 6 s to reach the operating
mode "Parameterization" - the green LED PWR flashes once. The
LEDs are switched off at intervals of 2 s for 0.3 s in the operating
mode "Parameterization" to differentiate from other operating
conditions.
2 Set the rated current of the drive with the 240° potentiometer, for
value see below. The four LEDs display the set current.
Current setting = 0.41 A: PWR=0, ERR=0, L=1, R=0.
3 Store the value by pressing the reset button again (retentive area
of the memory).
4 Actuate the Reset key for more than 2 s (and less than 6 s) to
display the set current for 3 s.
Communication interface
Integrator responsibility due to situation.
5.5.2 Field distributor
Apply to advanced elevator versions. Reference to electrical document.
Created by EBCCW 00:06
5112204
Figure 21 Field distributor
45
Page 54

Installation and adjustment
Adress (dip switches)
5.5.2.1 Adjustments
Figure 22 Terminal box cover
• Switch off power supply prior to removing/installing the terminal-
• Ensure before startup that all protective covers have been fitted
Necessary settings:
• Address (dip switches)
For more information see manufacturer manual.
box cover.
correctly.
46
5112204
Page 55

Installation and adjustment
5.5.3 Vertical motion drive
Figure 23 Adjustable speed drive (motor with frequency inverter)
The motor is frequency controlled with the frequency converter integrated
on the motor.
The converter requires settings according to application.
The drive powers the elevator's lifting motion, via roller chain/gears. The
drive package is mounted in the lower part of th e elevator.
5.5.3.1 Adjustments
Reference to electrical documentation.
Reference to manufacturer manual.
Settings are made on the inside of frequency converter top cover.
• Switch off power supply prior to removing/installing the terminalbox cover.
• Ensure before startup that all protective covers have been fitted
correctly.
Created by EBCCW 00:06
5112204
47
Page 56

Installation and adjustment
f1
t1
f2
S1, S2
Figure 24 Frequency controlled
Standard elevator settings
Potentiometers:
• Nominal speed (f1)
• Low speed (f2)
• Acceleration (t1)
• Dip switch (S1, S2)
• Address and PWM frequency
Advanced elevator settings
Potentiometers:
• Nominal speed (f1)
• Acceleration (f2)
• Dip switch (S1, S2)
• Address and PWM frequency
48
For more information, see manufacture manual.
5112204
Page 57

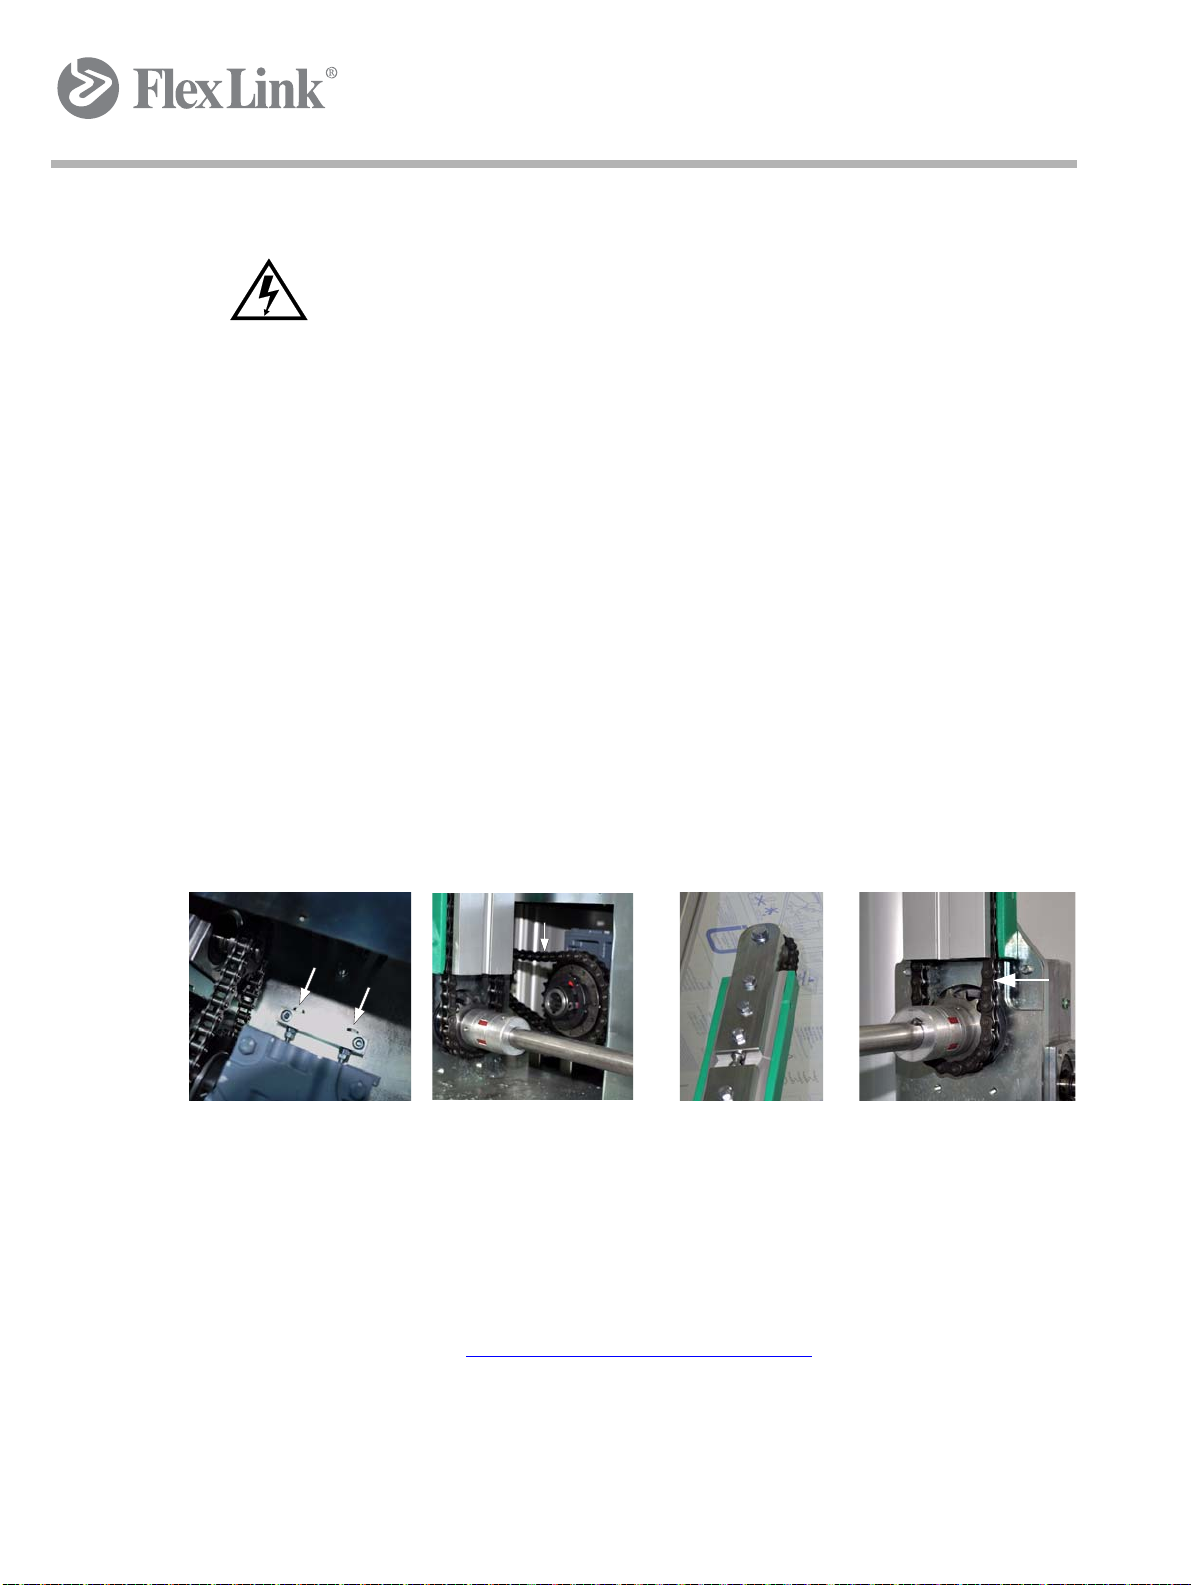
Adjustment procedure, See section 7.2.2 on page 61
Adjustable screws
5-10 mm
2-3 mm
Installation and adjustment
Figure 25 Drive and drift chain adjustment
5.5.4 Connecting tracks
Elevator lift cage conveyor speed see Technical specification on page 15
The optimal speed of the connecting tracks is equal to elevator lift cage
conveyor speed as this prevents product twisting and wear of the high friction conveyor plates.
The speed difference may not exceed 15%.
If speed difference is unavoidable, an increasing speed is preferred.
5.5.5 Guards
The elevator consists or moving parts that can cause injury. Feed-in and
feed-out are covered by stationary and openable guard s. The elevator may
not be operated if the door switch is inoperable or if a stationary guard is
improperly fitted.
Created by EBCCW 00:06
5112204
49
Page 58

Installation and adjustment
5.5.5.1 Stationary guards
The elevator is protected by stationary guards of clear PC and aluminium.
These guards must be correctly fitted when the elevator is in service. The
stationary guards must be in place when the power is on.
5.5.5.2 Openable guard
The elevator is equipped with a service door for accessing the interior . This
door is equipped with a door switch.
5.5.5.3 Adjustment
To be positioned in line according to figure below.
Figure 26 Safety switch, door
. Warning: Stop the elevator b efore opening the door. Do not o pen
the door for the purpose of stopping the elevator.
50
5112204
Page 59

Installation and adjustment
XT
Inductive lift cage
position sensor
X85/XK
Photo-electric lift cage
position sensor
X85/XK
Reflector of photo-electric
lift cage position sensor
5.5.6 Sensors
5.5.6.1 Lift cage
5112204
Figure 27 Photo-electric cells
Photo-electric or inductive sensors, depending on version, are used for detecting that product is positioned in the lift cage.
The photo-electric sensor type is retro-reflective, thus the light beam is reflected by a reflector on the opposite side of conveyor back to sensor, making the detection of product less sensitive to colour differences of product.
The stop position of conveyed item, due to sensor position, is such that the
conveyed item does not reach to the end of lift cage conveyor.
51
Created by EBCCW 00:06
Page 60

Installation and adjustment
Vertical motion
position sensors
Lifting interlock sensor
Lifting interlock sensor
reflector
5.5.6.1.1 Adjustments
Photo-electric sensor
Adjust the sensor angle towards the reflector.
Adjust the reflector angle making the light beam from sensor hit the reflector 90 degrees against reflective surface.
The LED of sensor confirms reflection by reflector with not obstacles between. Any obstacle between should cause the LED to fall.
If anything blocks the signal between the sensor and reflector, the LED indicator shall turn off.
Inductive sensor
Adjust the vertical distance between sensor and sensor flag on pallet.
5.5.6.2 Vertical motion
52
Figure 28 Inductive sensors
Inductive sensors are used at stop positions and low-speed stretches of the
vertical motion.
Retro-reflective photo-electric senso r s are mo un te d in th e up per part of
frame with reflectors mounted on the bottom plate of elevator. Their purpose is to interlock vertical motion if obstacle is detected.
5112204
Page 61

5.5.6.2.1 Adjustment
Reflector
Interlocking
Low speed
area
Low
speed
Up
Reflector
Interlocking
Low speed
area
Low
speed
Down
Vertical motion
Lift cage
sensor flag
Vertical motion sensors
Installation and adjustment
Figure 29 Vertical motion sensors
The low speed and stop sensors for up and down must be adjusted in relation to motion speed and flag length.
The distance between low speed sensor and corresponding stop sensor is
affected by:
• Flag length. Distance between sensors may not exceed flag
length on lift cage. If not fulfilled, the lift cage will loose the low
speed sensor, thus accelerating to high speed the moments before reaching stop sensor.
• Motion speed/ramp time.
1 The combination of high speed, ramp time and distance between
sensors should be such that the lift cage successfully ramps down
to low speed before reaching stop sensor.
2 The combination of low speed and ramp time should be such that
the lift cage successfully ramps down to stop on the stop sensor
when the stop sensor is activated.
Created by EBCCW 00:06
5112204
53
Page 62

Installation and adjustment
Interlocking sensors
The light beam of the photo-electric sensor should hit the reflector. The lift
cage should not act as obstacle at any height.
5.5.6.2.2 Adjustment
The sensor is adjusted so that the XT conveyers stops within the area, limited by the two photo-electric laser cells (WL9L).
5.5.6.3 Limit switches
This does not apply to RTI units. These should be protected by the application.
54
Figure 30 Limit switches
The limit switches are located in the upper and lower parts of the frame and
are activated in the event of excessive lifting device travel.
Mechanical dampers serve as protectio n after the limit switch es .
To assure correct operation of the elevator, ensure that the switches are
correctly positioned and are activated in the intended direction of travel.
5112204
Page 63

Installation and adjustment
5.5.6.3.1 Adjustment
The limit switches are positioned so that they are activated af ter the upp er
and lower feed-in and discharge positions and be fore the dampers (see the
figure 30).
Created by EBCCW 00:06
5112204
55
Page 64

Installation and adjustment
5.6 Check / Shadow run
In this paragraph the elevator will be checked in a semiloaded condition
with all safety provisions activated. If during the shadow run irregular
sounds or other anomalies occur or if the elevator does not meet the specification or if with a test of ALL products some of th ese do not fit on the track
or get stuck or slip, the machine may not be tested further and advice
should be obtained.
Carry out the check
First the elevator is to be put into operation in order to carry out the checks
required. The elevator will run with semiload while the specified products
are transported through the elevator. If no unusual situations occur, the
check of the elevator and the associated safety provisions can be started.
Check elevator
Below a check table is set up with respect to how the elevator can be
checked for a number of items.
Checklist
No. Check Remarks
1. Does excessive noise occur. Yes / No This may occur because the tension of the
chain is not correct, lifting device are loose or a
sprocket wheel is not aligned well (see
Troubleshooting
list’).
2. There is a ticking sound. Yes / No This may occur because the tension of the
chain is not correct, lifting device are loose or a
sprocket wheel is not aligned well (see
Troubleshooting
list’).
3. Are the lifting device strongly
moving at any place in the
elevator.
4. Are lifting de vice touching the
frame, the guide, the guard or
anything else.
Ye s / No This m ay oc cu r as th er e ar e som e loos e lifting
device (see Troubleshooting
‘troubleshooting list’)
Yes / No Adjust the lifting device.
on page 63. ‘troubleshooting
on page 63. ‘troubleshooting
on page 63.
5. Do all products fit on the
track.
56
Y es / No Check in the technical specification whether the
product dimensions are correct.
5112204
Page 65

Installation and adjustment
6. Are there any products that
do not run over the
transitions uninterruptedly.
7. Is the product correctly
supplied / discharged at the
input / output track.
8. Is the product properly
transported through the
elevator.
9. Can any irregularities be
found in the chain guide.
Yes / No Check the setting of the transition distance or
the transition roller. See section 5.2.2 on page
39 ‘integration elevator’.
Yes / No The system designer has determined this and
will have guidelines with respect to this and
know how to adjust an incorrect output.
Yes / No The product may not move on the track. If so,
contact the supplier
Yes / No The lifting device may not get stuck anywhere
or find resistance, otherwise this is to be
reworked or improved
Created by EBCCW 00:06
5112204
57
Page 66

Instructions for use
6 Instructions for use
6.1 Handling
The control box contains pushbuttons and indica tions (lamps ) to star t/stop/
jog/alarm och to reset alarms. Pictograms are used for describing purpose
of pushbuttons and indications; Start, Stop, Reset, Jog up/down.
Pushbutton and lamp overview
"Start" is used for starting the module
" Stop" is used for stopping the module normally. The elevator can be
stopped normally in two ways, quickly or controlled. A quick stop is executed when the stop-button is activated more than one time per second. A
quick stop will cause the elevator to stop immediately (as quick as possible). A controlled stop is executed if the stop-button is activated once per
second and cause the elevator to finish the motions in progress before it
stops.
"Alarm reset" is used for resetting alarms.
"Jog up/down" is used for manually adjusting the lift cage's vertical position.
58
Start procedure
Before the elevator can be started all alarms must be reset. Press "Start"
to start. The "Start"-indication will start flashing slowly (1 Hz) a certain time,
ca 2 seconds, before the flash turns into steady light. At fixed light the elevator is started and in production.
Production
When the elevator is in production it receives products from connecting
tracks, elevates to correct vertical level, sends the product to receiving conveyor and returns to home position.
5112204
Page 67

Instructions for use
Stop procedure
Quick stop instruction: Press several times during one second. The elevator will stop immediately/quickly. It will not finish motions in progress.
Controlled stop instruction: Press once per second. The elevator will finish
ongoing motions before stopping. While stopping, the "Start"-indication
flash quickly (2 Hz). When the elevator is stopped the "Start"-indication is
off.
Emergency stop
Emergency stop must not be used for normal stop. It should be used in
case of emergency. Emergency stopping may cause the whole line to
emergency stop. An emergency stop of the elevator disconnect parts of the
electric power. A certain amount of manual labour may be required to get
the elevator back into normal run.
Opening door as stop
The door must not be used for normal stop. It should be used in case of
emergency or when the elevator already is normally stopped. Opening the
door during production will have the same effect on elevator as an emergency stop. See above.
Alarm
During normal state the "Reset" -indication has steady light. At the occasion of alarm the indication will start flashing until alarm is reset. Press "Re-
set" in order to reset alarm. The flashing turns into steady light if a larms are
reset.
6.2 Manual operation
The elevator's vertical motion can be manually adjusted in stopped state.
Alarms must be reset. Stop the eleva tor, wait until it is stopped and adjust
the lift cage's vertical position up/down using the 3-position switch. The motion is interlocked to avoid running past the up-and down-sensors. If the elevator is run upwards it will stop automatically when the up-sensor is activated, which is an advantage when verifying an adjusted sensor-position,
checking that lift cage and adjacent conveyor are in level thus making the
transition smooth. The motion downwa rds is not affected by the up-se nsor .
Occasionally it is necessary to run past the up-and down-sensors, for example at a crash-situation. In order to realize a run past the up-and downsensors keep "Stop"-button pressed.
Created by EBCCW 00:06
5112204
Manual operation, upward direction: Turn the switch to the left.
Manual operation, downward direction: Turn the switch to the right.
To return to operation in automatic mode: Leave the switch in neutral position and press "Start"-button.
59
Page 68

Technical maintenance
7 Technical maintenance
Technical main te na nc e is an imp o rtant part of this manual. Go od ma int e nance will lead to cost reduction, because defects can be timely recognised
and solved. This section starts with a troubleshooting list, subsequently a
maintenance schedule is set up in section 7.2 on page 61 describes different maintenance activities.
During carrying out any activities on the elevator make sure that the main
switch has been switched off, so that there is no voltage on the machine.
7.1 Check and control procedures
7.1.1 Daily maintenance
• Check for abnormal sound/heat
• Check for dust and particles (especially on sensors)
7.1.2 Monthly maintenance
• Check function of the emergency stop device.
• Check chain tension and lubrication.
• Check the roller chain guides.
• Check drive chain for wear and tension.
• Check the bearings.
7.1.3 Maintenance performed every third month
• Check threaded fasteners.
• Check that the elevator is running smoothly.
• Check attachment of the carriers.
• Check that the chain, cog belt and carriers/lifting device are free
from damage.
60
5112204
Page 69
Technical maintenance
Adjustable screws
5-10 mm
2-3 mm
7.2 Maintenance procedures
. Disconnect the power when performing maintenance on the elevator.
A clearly visible sign must be displayed, indicating that work is underway.
If you have questions related to maintenance, contact FlexLink.
7.2.1 Cleaning
Periodic cleaning keeps the elevator in ser vice and extends its service life.
Do not employ high pressure cleaning on drive ends, chains and electrical
components. Cleaning behind guards is conducted with a damp cloth or
sponge.
7.2.2 Roller chain
Chains/cog belt replaced as necessary.
After replacement, ensure that the cog belt/chain is correctly tensioned.
The drive chain is
correctly tensioned
when it does not
flutter during
operation.
Chain tensioning is
conducted at the top
of the elevator; the
lower sprocket wheel
and drive shaft shall
move freely after
tensioning
Once the chain is
correctly tensioned,
the chain should be
possible to depress
2–3 mm between the
lower sprocket wheel
and the chain guide.
Created by EBCCW 00:06
5112204
See Recommended spare parts
on page 67.
61
Page 70

Technical maintenance
7.2.3 Motor
For standard elevators without field distributor the main switch of the cabinet needs to be switched off and locked prior to motor replacement.
• Turn off electrical main switch of module located on control box
door.
• Check no voltage in motor.
• Replace motor electrically and mechanically.
• Set all DIP switches and thumb wheels in the cover of the motor
according to replaced motor.
• Connect the internal cables on the terminal block acco rd ing to ei ther the electrical documentation or the replaced motor.
The vertical drive for advanced versions is connected to the field distributor
through a fast connector cable to facilitate service.
• Turn off the switch on the field distributor and lock it prior to disconnecting the fast connector to the motor.
• Set all DIP switches and thumb wheels in the cover of the motor
so that they are the same positions
as the one to be replaced.
• Connect the internal cables on the terminal block acco rd ing to ei ther the electrical documentation or the replaced motor.
• Plug in the connector and tighten it before turning on the power
switch.
To assure trouble-free operation, the motor and gears must be maintained
according to manufacturer's user manual.
For more information, see manufacturer manual.
7.2.4 Chain guide profile
The chain guide profile shall be replaced as necessary.
See Recommended spare parts
on page 67.
62
5112204
Page 71

Technical maintenance
7.3 Troubleshooting
If in doubt concerning the troubleshooting procedures below, contact FlexLink.
Troubleshooting guide
Symptom Cause Corrective action
The elevator does
not start
Products fasten/
have fastened
Peripheral equipment is not
connected. Power not on,
emergency stop button pressed,
door not closed, no signal from
peripheral equipment or circuit
breaker tripped.
No products to discharge Wait for products to arrive.
Foreign matter on photo-electric
cells
Photo-electric cell faulty, out of
position or dirty
Only personnel with technical
knowledge or equivalent sufficient
experience may conduct the
following actions.
• Check circuit-breakers.
• Check that peripheral equipment has started.
• Check that the power is on.
• Check that the emergency stop
button is not pressed.
• Check that the door switch is
activated.
• Press "Reset".
• Check that peripheral equipment produces signals.
• Press "Start".
Clean photo-electric cells.
Only personnel with technical
knowledge or equivalent sufficient
experience may perform the
following actions.
1 Clean photo-electric cells.
2 Adjust photo-electric cells.
3 Check photo-electric cells'
position and operation, and
that they are connected.
Created by EBCCW 00:06
5112204
63
Page 72

Technical maintenance
7.4 Maintenance schedule elevator
The elevator requires relatively little maintenance. S till some maintenance
activities are to be carried out. Below there is a maintenance schedule with
an interval that is referred to normal operating conditions in an organisation
with one shift without excessive accumulation of dirt caused by the products or the environment conditions. The user has to apply an appropriate
maintenance schedule dependent on the individual operating conditions.
It is very important for the proper functioning of the elevator that maintenance is done correctly and timely. Improper, insufficient or not documented maintenance will void any warranty.
No. Execution Interval Remark
1. Clean elevator Monthly Regular cleaning depends on product and
environment
2. Check the elevator for broken
or missing parts, replace if
Daily It is the task of the operator to check this daily (see
user’s manual)
necessary
3. Check the chain tension Monthly See section 7.2.2 on page 61
4. Check the sprocket wheel
and alignment. Replace or
align if necessary
5. Check the guide rails for
Monthly Faulty alignment of the gear may cause permanent
wear or make the chain derail and can so cause
serious stoppages
Monthly Replace guides
dents, damages and
connection
6. Check the drive for oil
leakage and annoying noise
7. Check whether the Moto r is
fastened well to the elevator.
Tighten the bolt s if necessary
8. Check the oil level in the gear
Monthly Repair or replace if necessary. See the
troubleshooting list
Monthly Drive vibrations can make the bolts loosen by
vibration, the faulty alignment of the drive can bend
the shaft and the chain may derail.
Monthly
boxes, fill up if necessary
9. Change the oil in the Gear
box
In accordance with the gear boxes specification of
the manufacturer!
. Note! During carrying out any activities on the elevator make
sure that the main switch has been switched off, so that there is
no voltage on the machine.
64
5112204
Page 73

Put out of commission
8 Put out of commission
Place the elevator on a pallet or p allets with specially cu t supports and with
the electrical cabinet upwards. Secure the elevator with straps. The eleva tor must be well protected and strapped during transport.
At the moment a elevator is put out of operation for some reason, a number
of steps are to be taken in order to avoid da ngerous situations. This section
clearly indicates how one should proceed in a number of cases with respect to uncoupling, dismounting, transport and reuse of materials coming
from the elevator
8.1 Disconnect the power sources
Prior to starting the dismounting, the voltage is to be cut of f from the power
source. First the main switch is to be switched off before the power source
can be disconnected.
. Danger: First switch off the main switch before the power source
may be disconnected.
8.2 Disassemble
While dismounting the machine, the regulations for waste processing applicable on the place and at the time of the dismantling are to be complied
with. The machine only contains commonly known materials. At the time of
assembling the elevator there were processing possibilities for this and no
particular risks were known for persons involved in dism antling. The disassembly of the elevator generally requires few operations. The elevator can
be disposed of in the same way as it was delivered.
. Note! At the time of assembling the elevator there were
processing possibilities for this and no particular risks were
known for persons involved in dismantling.
Created by EBCCW 00:06
5112204
65
Page 74

Put out of commission
8.3 Transport
While transporting the elevator a number of safety measur es are to be t aken.
Use the tools / aids indicated in section. If not, it is assumed that the tool /
device used instead is safe and provided with a quality mark.
Carry out the transport operations calmly in order to be able to carefully
monitor any movement of the elevator.
. Note! Vertical or horizontal movement depends on the height of
the elevator. It is recommended to move a elevator higher than
2400 mm in a horizontal position!
8.4 Reuse
No fixed rules have been made up for reuse of the elevator, because the
elevator does not contain any hazardous subst ances. At the time of assembling the elevator there were processing possibilities for this and no particular risks were known for persons involved in the reuse.
. Note! Putting the elevator out of operation with all operations
involved may only be done by technically qualified personnel.
66
5112204
Page 75

Recommended spare parts
2
1
19
9 Recommended spare parts
9.1 Mechanical
Created by EBCCW 00:06
5112204
67
Page 76

Recommended spare parts
17
14
Only XT
15
12
68
5112204
Page 77

8B
10B
11
4B
4A
20
13
16
5, 6, 7
8A, 10A
3
11
10B
9
13
18
Recommended spare parts
Created by EBCCW 00:06
5112204
69
Page 78

Recommended spare parts
Group
Drive unit 1 Motors:
Pos
2 Field distributor 5057737 Z6 PROFIBUS SEW
3 Roller chain 08-B1 LAMDA FlexLink or local
4A
4B
5 Roller chain 5045327 08-B1 FlexLink or local
6 Carrier link 5986156 08-B1 Special
7 Chain lock 5045326 08-B1 FlexLink or local
Part Part no. Designation Comments Supplier
XT 640
XT 480-240
XK/X85
XK/X85
RTI
Gear box 5111425
5111464
5111919
5111545
5111569
5111684
5111424
K37DT80K4MM07BMG
W30DT80K4MM05BMG
W30DT80K4MM05BMG
W30DT80K4MM05BMG
K37DT80N4MM07BMG
BS 50A0U
BS 50 A0O- DP
Contact FlexLink
(All with KPF6 1.5 M)
50 Hz, 54-541 rpm
50 Hz, 27-137 rpm
50 Hz, 43-213 rpm (EU)
60 Hz, 43-259 rpm (US)
50 Hz, 35-176 rpm
SEW
supplier
Benzlers
supplier
FlexLink
supplier
8A
8B
9 Guide profile 5986013 FlexLink
10A
10B
11
Lifting
device
Sensors
Sensors 16 Reflector 5110995 PL 30A SICK
12 (Applies to XT, X85 and XK variants)
13 Inductive sensor 5058574 IQ10 SICK
14 Inductive sensor 5111460 NBN40-L2-E2-V1 Applies only to XT
15 Photo-electric
17 Reflector 5111135 SICK
Bearings 5052978
5058259
Sprocket wheel 5986022
5986183
Coupling element
For spare mechanical parts, see FlexLink catalogue 5147 or www.flexlink.com.
5059929 MHL 15-p3336 (Does not apply to XT) SICK
cell
6202-2 Z/C3
6204- 2 RSH/C3
ROTEX GS 19 98 SH A GS FlexLink or local
Top
Bottom
Top
Bottom
pallets
SKF
FlexLink or local
supplier
supplier
SICK
70
5112204
Page 79

Recommended spare parts
Group
Switches
Pos
Part Part no. Designation Comments Supplier
18 Photo-electric
laser cell
19 Door switch 5112509 PSEN 1.1p-22, 504222 Pilz
20 Limit switch 5059096 XCKP 2118 P16
5111749 WL9L-P430 SICK
TELE-MECANIQUE
Created by EBCCW 00:06
5112204
71
Page 80

Recommended spare parts
9.2 Electrical
Spare parts list Kit 5112499
Des Name Manufacturer Manufacturer item nr Comment
W320 Cable U.I. Lapp 1119 404 4G2.5
W321 Cable U.I. Lapp 1119 107 7G0.75
W322 Cable U.I. Lapp 1119 802 2x0.75
W323 Cable U.I. Lapp 1119 802 2x0.75
W330 Cable U.I. Lapp 1119 304 4G1.5
W360 Cable Murr Electronic 7000-08061-2210150
W430 Cable Murr Electronic 7000-88001-2200300
W431 Cable Murr Electronic 7000-88001-2200300
W432 Cable Murr Electronic 7000-88001-2200300
W433 Cable Murr Electronic 7000-88001-2200300
W434 Cable Murr Electronic 7000-88261-2200300
W435
W436 Cable Murr Electronic 7000-88241-2200300
W437 Cable Murr Electronic 7000-88241-2200300
W438 Cable integrated on unit A438
Item 5113374
Specification 3940639
Split box
72
5112204
Page 81

Recommended spare parts
Spare parts list Control box 5112396
Des Name Manufacturer Manufacturer item nr Comment
K360, K361 Contactor Moeller Electric 276600 DILM7
Q300 Main switch Moeller Electric P1-25/V/SVB-SW
Q320 Miniature circuit breaker Moeller Electric 278873 C16/3
Q320 Auxiliary contact Moeller Electric 286054
K330 Contactor Phoenix Contact 2297031
A360 Safety relay Pilz PNOZ s3
A410 Communication interface Siemens 6ES7151-1AA05-0AB0
T410 Connector Siemens 6ES7193-4CD30-0AA0
Power supply Siemens 6ES7138-4CA50-0AB0
A420, A430, A440 Input module Siemens 6ES7131-4BF00-0AA0
Connector Siemens 6ES7193-4CB30-0AA0
A450 Output module Siemens 6ES7132-4BF00-0AA0
Connector Siemens 6ES7193-4CB30-0AA0
S420 + (H450) Pushbutton Moeller Electric 216922 Illuminated, White
Contact element Moeller Electric 216504 +Fixing adapter, 1NO
Lamp Moeller Electric 216557 White
S421 Pushbutton Moeller Electric 216590 Black
Contact element Moeller Electric 216503 +Fixing adapter, 1NC
S350 Switch Moeller Electric 216515 Emergency
Contact element Moeller Electric 216376 1NO
Contact element Moeller Electric 216378 1NC
S360 + (H452) Pushbutton Moeller Electric 216931 Illuminated, Blue
Contact element Moeller Electric 216504 +Fixing adapter, 1NO
Contact element Moeller Electric 216376 1NO
Lamp Moeller Electric 218057 Blue
S426 + (H451) Switch Moeller Electric 216870 3-pos, Illuminated, Blue
Contact element Moeller Electric 216504 +Fixing adapter, 1NO
Contact element Moeller Electric 216376 1NO
Lamp Moeller Electric 216557 White
Created by EBCCW 00:06
5112204
73
Page 82

Recommended spare parts
Spare parts list Kit 5112226
Des Name Manufacturer Manufacturer item nr Comment
W320 Cable U.I. Lapp 1119 404 4G2.5
W321 Cable U.I. Lapp 1119 107 7G0.75
W322 Cable U.I. Lapp 1119 802 2x0.75
W323 Cable U.I. Lapp 1119 802 2x0.75
W330 Cable U.I. Lapp 1119 304 4G1.5
W360 Cable Murr Electronic 7000-08061-2210150
W430 Cable Murr Electronic 7000-88001-2200300
W431 Cable Murr Electronic 7000-88001-2200300
W432 Cable Murr Electronic 7000-88001-2200300
W433 Cable Murr Electronic 7000-88001-2200300
W434 Cable Murr Electronic 7000-88261-2200300
W435 Cable Murr Electronic 7000-88261-2200300
W436 Cable Murr Electronic 7000-88241-2200300
W437 Cable Murr Electronic 7000-88241-2200300
W438 Cable integrated on unit
A438 Split box
Item 5113375
Specification 3940640
74
5112204
Page 83

Recommended spare parts
Spare parts list Control box 5112396
Des Name Manufacturer Manufacturer item nr Comment
K360, K361 Contactor Moeller Electric 276600 DILM7
Q300 Main switch Moeller Electric P1-25/V/SVB-SW
Q320 Miniature circuit breaker Moeller Electric 278873 C16/3
Q320 Auxiliary contact Moeller Electric 286054
K330 Contactor Phoenix Contact 2297031
A360 Safety relay Pilz PNOZ s3
A410 Communication interface Siemens 6ES7151-1AA05-0AB0
T410 Connector Siemens 6ES7193-4CD30-0AA0
Power supply Siemens 6ES7138-4CA50-0AB0
A420, A430, A440 Input module Siemens 6ES7131-4BF00-0AA0
Connector Siemens 6ES7193-4CB30-0AA0
A450 Output module Siemens 6ES7132-4BF00-0AA0
Connector Siemens 6ES7193-4CB30-0AA0
S420 + (H450) Pushbutton Moeller Electric 216922 Illuminated, White
Contact element Moeller Electric 216504 +Fixing adapter, 1NO
Lamp Moeller Electric 216557 White
S421 Pushbutton Moeller Electric 216590 Black
Contact element Moeller Electric 216503 +Fixing adapter, 1NC
S350 Switch Moeller Electric 216515 Emergency
Contact element Moeller Electric 216376 1NO
Contact element Moeller Electric 216378 1NC
S360 + (H452) Pushbutton Moeller Electric 216931 Illuminated, Blue
Contact element Moeller Electric 216504 +Fixing adapter, 1NO
Contact element Moeller Electric 216376 1NO
Lamp Moeller Electric 218057 Blue
S426 + (H451) Switch Moeller Electric 216870 3-pos, Illuminated, Blue
Contact element Moeller Electric 216504 +Fixing adapter, 1NO
Contact element Moeller Electric 216376 1NO
Lamp Moeller Electric 216557 White
Created by EBCCW 00:06
5112204
75
Page 84

Recommended spare parts
Spare parts list Kit 5112227
Des Name Manufacturer Manufacturer item nr Comment
W320 Cable U.I. Lapp 1119 404 4G2.5
W321 Cable U.I. Lapp 1119 107 7G0.75
W322 Cable U.I. Lapp 1119 802 2x0.75
W323 Cable U.I. Lapp 1119 802 2x0.75
W330 Cable U.I. Lapp 1119 304 4G1.5
W360 Cable Murr Electronic 7000-08061-2210150
W430 Cable Murr Electronic 7000-88001-2200300
W431 Cable Murr Electronic 7000-88001-2200300
W432 Cable Murr Electronic 7000-88001-2200300
W433 Cable Murr Electronic 7000-88001-2200300
W434 Cable Murr Electronic 7000-88261-2200300
W435
W436 Cable Murr Electronic 7000-88241-2200300
W437 Cable Murr Electronic 7000-88241-2200300
W438 Cable integrated on unit A438
Split box
Item 5113376
Specification 3940641
76
5112204
Page 85

Recommended spare parts
Spare parts list Control box 5112234
Des Name Manufacturer Manufacturer item nr Comment
K470, K471 Contactor Moeller Electric 276600 DILM7
Q300 Main switch Moeller Electric P1-25/V/SVB-SW
Q320 Miniature circuit breaker Moeller Electric 278873 C16/3
Q320 Auxiliary contact Moeller Electric 286054
K330 Contactor Phoenix Contact 2297031
A410 Communication interface Siemens 6ES7151-1BA02-0AB0
T410 Connector Siemens 6ES7193-4CD30-0AA0
Power supply Siemens 6ES7138-4CA50-0AB0
A420, A430 Input module Siemens 6ES7131-4BF00-0AA0
Connector Siemens 6ES7193-4CB30-0AA0
A450 Output module Siemens 6ES7132-4BF00-0AA0
Connector Siemens 6ES7193-4CB30-0AA0
T411 Connector Siemens 6ES7193-4CD30-0AA0
Power supply Siemens 6ES7138-4CA50-0AB0
A460 Input module Siemens 6ES7138-4FA04-0AB0
Connector Siemens 6ES7193-4CG30-0AA0
A470 Output module Siemens 6ES7138-4FB03-0AB0
Connector Siemens 6ES7193-4CG30-0AA0
S420 + (H450) Pushbutton Moeller Electric 216922 Illuminated, White
Contact element Moeller Electric 216504 +Fixing adapter, 1NO
Lamp Moeller Electric 216557 White
S421 Pushbutton Moeller Electric 216590 Black
Contact element Moeller Electric 216503 +Fixing adapter, 1NC
S460 Switch Moeller Electric 216515 Emergency
Contact element Moeller Electric 216378 1NC
S462 + (H452) Pushbutton Moeller Electric 216931 Illuminated, Blue
Contact element Moeller Electric 216504 +Fixing adapter, 1NO
Lamp Moeller Electric 218057 Blue
S426 + (H451) Switch Moeller Electric 216870 3-pos, Illuminated,
Contact element Moeller Electric 216504 +Fixing adapter, 1NO
Contact element Moeller Electric 216376 1NO
Lamp Moeller Electric 216557 White
Blue
Created by EBCCW 00:06
5112204
77
Page 86

Recommended spare parts
Spare parts list Kit 5112229
Des Name Manufacturer Manufacturer item nr Comment
W320 Cable U.I. Lapp 1119 404 4G2.5
W321 Cable U.I. Lapp 1119 107 7G0.75
W322 Cable U.I. Lapp 1119 802 2x0.75
W323 Cable U.I. Lapp 1119 802 2x0.75
W330 Cable U.I. Lapp 1119 304 4G1.5
W360 Cable Murr Electronic 7000-08061-2210150
W430 Cable Murr Electronic 7000-88001-2200300
W431 Cable Murr Electronic 7000-88001-2200300
W432 Cable Murr Electronic 7000-88001-2200300
W433 Cable Murr Electronic 7000-88001-2200300
W434 Cable Murr Electronic 7000-88261-2200300
W435 Cable Murr Electronic 7000-88261-2200300
W436 Cable Murr Electronic 7000-88241-2200300
W437 Cable Murr Electronic 7000-88241-2200300
W438 Cable integrated on unit A438
Split box
Item 5113377
Specification 3940642
78
5112204
Page 87

Recommended spare parts
Spare parts list Control box 5112234
Des Name Manufacturer Manufacturer item nr Comment
K470, K471 Contactor Moeller Electric 276600 DILM7
Q300 Main switch Moeller Electric P1-25/V/SVB-SW
Q320 Miniature circuit breaker Moeller Electric 278873 C16/3
Q320 Auxiliary contact Moeller Electric 286054
K330 Contactor Phoenix Contact 2297031
A410 Communication interface Siemens 6ES7151-1BA02-0AB0
T410 Connector Siemens 6ES7193-4CD30-0AA0
Power supply Siemens 6ES7138-4CA50-0AB0
A420, A430 Input module Siemens 6ES7131-4BF00-0AA0
Connector Siemens 6ES7193-4CB30-0AA0
A450 Output module Siemens 6ES7132-4BF00-0AA0
Connector Siemens 6ES7193-4CB30-0AA0
T411 Connector Siemens 6ES7193-4CD30-0AA0
Power supply Siemens 6ES7138-4CA50-0AB0
A460 Input module Siemens 6ES7138-4FA04-0AB0
Connector Siemens 6ES7193-4CG30-0AA0
A470 Output module Siemens 6ES7138-4FB03-0AB0
Connector Siemens 6ES7193-4CG30-0AA0
S420 + (H450) Pushbutton Moeller Electric 216922 Illuminated, White
Contact element Moeller Electric 216504 +Fixing adapter, 1NO
Lamp Moeller Electric 216557 White
S421 Pushbutton Moe ller Electric 216590 Black
Contact element Moeller Electric 216503 +Fixing adapter, 1NC
S460 Switch Moeller Electric 216515 Emergency
Contact element Moeller Electric 216378 1NC
S462 + (H452) Pushbutton Moeller Electric 216931 Illuminated, Blue
Contact element Moeller Electric 216504 +Fixing adapter, 1NO
Lamp Moeller Electric 218057 Blue
S426 + (H451) Switch Moeller Electric 216870 3-pos, Illuminated, Blue
Contact element Moeller Electric 216504 +Fixing adapter, 1NO
Contact element Moeller Electric 216376 1NO
Lamp Moeller Electric 216557 White
Created by EBCCW 00:06
5112204
79
Page 88

Recommended spare parts
Spare parts list Kit 5112230
Des Name Manufacturer Manufacturer item nr Comment
W320 Cable U.I. Lapp 281404 4G2.5, UL
W321 Cable U.I. Lapp 281807 7G1 UL
W322 Cable U.I. Lapp 281602 2x0.75 UL
W323 Cable U.I. Lapp 281602 2x0.75 UL
W324 Cable U.I. Lapp 281805 5G1 UL
W330 Cable U.I. Lapp 281604 4G1.5 UL
W360 Cable Murr Electronic 7000-08061-2210150
W430 Cable Murr Electronic 7000-88001-2200300
W431 Cable Murr Electronic 7000-88001-2200300
W432 Cable Murr Electronic 7000-88001-2200300
W433 Cable Murr Electronic 7000-88001-2200300
W434 Cable Murr Electronic 7000-88261-2200300
W435
W436 Cable Murr Electronic 7000-88241-2200300
W437 Cable Murr Electronic 7000-88241-2200300
W438 Cable integrated on unit A438
Split box
Item 5113378
Specification 3940643
80
5112204
Page 89

Recommended spare parts
Spare parts list Control box 5112235
Des Name Manufacturer Manufacturer item nr Comment
K360, K361 Contactor Moeller Electric 276600 DILM7
Q300 Main switch Moeller Electric P1-25/V/SVB-SW
Q320 Miniature circuit breaker Moeller Electric 1489-A3C160 C16/3
Q320 Auxiliary contact Moeller Electric 1489-AAHS3
K330 Contactor Phoenix Contact 2297031
A360 Safety relay Pilz PNOZ s3
A410 Communication interface Rockwell 1734-ADN
A420, A430, A440 Input module Rockwell 1734-IB8
Connector Rockwell 1734-TBS
A450 Output module Rockwell 1734-OB8
Connector Rockwell 1734-TBS
S420 + (H450) Pushbutton Moeller Electric 216922 Illuminated, White
Contact element Moeller Electric 216504 +Fixing adapter, 1NO
Lamp Moeller Electric 216557 White
S421 Pushbutton Moeller Electric 216590 Black
Contact element Moeller Electric 216503 +Fixing adapter, 1NC
S350 Switch Moeller Electric 216515 Emergency
Contact element Moeller Electric 216378 1NC
Contact element Moeller Electric 216376 1NO
S360 + (H452) Pushbutton Moeller Electric 216931 Illuminated, Blue
Contact element Moeller Electric 216504 +Fixing adapter, 1NO
Contact element Moeller Electric 216376 1NO
Lamp Moeller Electric 218057 Blue
S426 + (H451) Switch Moeller Electric 216870 3-pos, Illuminated, Blue
Contact element Moeller Electric 216504 +Fixing adapter, 1NO
Contact element Moeller Electric 216376 1NO
Lamp Moeller Electric 216557 White
Created by EBCCW 00:06
5112204
81
Page 90

Recommended spare parts
Spare parts list Kit 5112230
Des Name Manufacturer Manufacturer item nr Comment
W320 Cable U.I. Lapp 281404 4G2.5, UL
W321 Cable U.I. Lapp 281807 7G1 UL
W322 Cable U.I. Lapp 281602 2x0.75 UL
W323 Cable U.I. Lapp 281602 2x0.75 UL
W324 Cable U.I. Lapp 281805 5G1 UL
W330 Cable U.I. Lapp 281604 4G1.5 UL
W360 Cable Murr Electronic 7000-08061-2210150
W430 Cable Murr Electronic 7000-88001-2200300
W431 Cable Murr Electronic 7000-88001-2200300
W432 Cable Murr Electronic 7000-88001-2200300
W433 Cable Murr Electronic 7000-88001-2200300
W434 Cable Murr Electronic 7000-88261-2200300
W435 Cable Murr Electronic 7000-88261-2200300
W436 Cable Murr Electronic 7000-88241-2200300
W437 Cable Murr Electronic 7000-88241-2200300
W438 Cable integrated on unit A438
Split box
Item 5113379
Specification 3940644
82
5112204
Page 91

Recommended spare parts
Spare parts list Control box 5112235
Des Name Manufacturer Manufacturer item nr Comment
K360, K361 Contactor Moeller Electric 276600 DILM7
Q300 Main switch Moeller Electric P1-25/V/SVB-SW
Q320 Miniature circuit breaker Moeller Electric 1489-A3C160 C16/3
Q320 Auxiliary contact Moeller Electric 1489-AAHS3
K330 Contactor Phoenix Contact 2297031
A360 Safety relay Pilz PNOZ s3
A410 Communication interface Rockwell 1734-ADN
A420, A430, A440 Input module Rockwell 1734-IB8
Connector Rockwell 1734-TBS
A450 Output module Rockwell 1734-OB8
Connector Rockwell 1734-TBS
S420 + (H450) Pushbutton Moeller Electric 216922 Illuminated, White
Contact element Moeller Electric 216504 +Fixing adapter, 1NO
Lamp Moeller Electric 216557 White
S421 Pushbutton Moeller Electric 216590 Black
Contact element Moeller Electric 216503 +Fixing adapter, 1NC
S350 Switch Moeller Electric 216515 Emergency
Contact element Moeller Electric 216378 1NC
Contact element Moeller Electric 216376 1NO
S360 + (H452) Pushbutton Moeller Electric 216931 Illuminated, Blue
Contact element Moeller Electric 216504 +Fixing adapter, 1NO
Contact element Moeller Electric 216376 1NO
Lamp Moeller Electric 218057 Blue
S426 + (H451) Switch Moeller Electric 216870 3-pos, Illuminated, Blue
Contact element Moeller Electric 216504 +Fixing adapter, 1NO
Contact element Moeller Electric 216376 1NO
Lamp Moeller Electric 216557 White
Created by EBCCW 00:06
5112204
83
Page 92

Recommended spare parts
Spare parts list Kit 5112224
Des Name Manufacturer Manufacturer item nr Comment
W320 Cable U.I. Lapp 1119 404 4G2.5
W321 Cable U.I. Lapp 1119 107 7G0.75
W322 Cable U.I. Lapp 1119 802 2x0.75
W323 Cable U.I. Lapp 1119 802 2x0.75
W325 (+ A001.X410) Connector with cable Phoenix Con tact 1525571 Belongs to A001
W326 Cable U.I. Lapp 2170 220 Profibus
W330 Cable U.I. Lapp 1119 304 4G1.5
W360 Cable Murr Electronic 7000-08061-2210150
W430 Cable Murr Electronic 7000-88001-2200300
W431 Cable Murr Electronic 7000-88001-2200300
W432 Cable Murr Electronic 7000-88001-2200300
W433 Cable Murr Electronic 7000-88001-2200300
W434 Cable Murr Electronic 7000-88261-2200300
W435
W436 Cable Murr Electronic 7000-88241-2200300
W437 Cable Murr Electronic 7000-88241-2200300
W438 Cable integrated on unit A438
Split box
Item 5113380
Specification 3940645
84
5112204
Page 93

Recommended spare parts
Spare parts list Control box 5112233
Des Name Manufacturer Manufacturer item nr Comment
K360, K361 Contactor Moeller Electric 276600 DILM7
Q300 Main switch Moeller Electric P1-25/V/SVB-SW
Q320 Miniature circuit breaker Moeller Electric 278873 C16/3
Q320 Auxiliary contact Moeller Electric 286054
K330 Contactor Phoenix Contact 2297031
A360 Safety relay Pilz PNOZ s3
A410 Communication interface Siemens 6ES7151-1AA05-0AB0
T410 Connector Siemens 6ES7193-4CD30-0AA0
Power supply Siemens 6ES7138-4CA50-0AB0
A420, A430, A440 Input module Siemens 6ES7131-4BF00-0AA0
Connector Siemens 6ES7193-4CB30-0AA0
A450 Output module Siemens 6ES7132-4BF00-0AA0
Connector Siemens 6ES7193-4CB30-0AA0
S420 + (H450) Pushbutton Moeller Electric 216922 Illuminated, White
Contact element Moeller Electric 216504 +Fixing adapter, 1NO
Lamp Moeller Electric 216557 White
S421 Pushbutton Moeller Electric 216590 Black
Contact element Moeller Electric 216503 +Fixing adapter, 1NC
S350 Switch Moeller Electric 216515 Emergency
Contact element Moeller Electric 216376 1NO
Contact element Moeller Electric 216378 1NC
S360 + (H452) Pushbutton Moeller Electric 216931 Illuminated, Blue
Contact element Moeller Electric 216504 +Fixing adapter, 1NO
Contact element Moeller Electric 216376 1NO
Lamp Moeller Electric 218057 Blue
S426 + (H451) Switch Moeller Electric 216870 3-pos, Illuminated, Blue
Contact element Moeller Electric 216504 +Fixing adapter, 1NO
Contact element Moeller Electric 216376 1NO
Lamp Moeller Electric 216557 White
Created by EBCCW 00:06
5112204
85
Page 94
Recommended spare parts
Spare parts list Kit 5112139
Des Name Manufacturer Manufacturer item nr Comment
W320 Cable U.I. Lapp 1119 404 4G2.5
W321 Cable U.I. Lapp 1119 107 7G0.75
W322 Cable U.I. Lapp 1119 802 2x0.75
W323 Cable U.I. Lapp 1119 802 2x0.75
W330 Cable U.I. Lapp 1119 304 4G1.5
W360 Cable Murr Electronic 7000-08061-2210150
W430 Cable Murr Electronic 7000-88001-2200300
W431 Cable Murr Electronic 7000-88001-2200300
W432 Cable Murr Electronic 7000-88001-2200300
W433 Cable Murr Electronic 7000-88001-2200300
W434 Cable Murr Electronic 7000-88261-2200300
W435
W436 Cable Murr Electronic 7000-88241-2200300
W437 Cable Murr Electronic 7000-88241-2200300
W438 Cable integrated on unit A438
Split box
Item 5113381
Specification 3940646
86
5112204
Page 95

Recommended spare parts
Spare parts list Control box 5112233
Des Name Manufacturer Manufacturer item nr Comment
K360, K361 Contactor Moeller Electric 276600 DILM7
Q300 Main switch Moeller Electric P1-25/V/SVB-SW
Q320 Miniature circuit breaker Moeller Electric 278873 C16/3
Q320 Auxiliary contact Moeller Electric 286054
K330 Contactor Phoenix Contact 2297031
A360 Safety relay Pilz PNOZ s3
A410 Communication interface Siemens 6ES7151-1AA05-0AB0
T410 Connector Siemens 6ES7193-4CD30-0AA0
Power supply Siemens 6ES7138-4CA50-0AB0
A420, A430, A440 Input module Siemens 6ES7131-4BF00-0AA0
Connector Siemens 6ES7193-4CB30-0AA0
A450 Output module Siemens 6ES7132-4BF00-0AA0
Connector Siemens 6ES7193-4CB30-0AA0
S420 + (H450) Pushbutton Moeller Electric 216922 Illuminated, White
Contact element Moeller Electric 216504 +Fixing adapter, 1NO
Lamp Moeller Electric 216557 White
S421 Pushbutton Moeller Electric 216590 Black
Contact element Moeller Electric 216503 +Fixing adapter, 1NC
S350 Switch Moeller Electric 216515 Emer gency
Contact element Moeller Electric 216376 1NO
Contact element Moeller Electric 216378 1NC
S360 + (H452) Pushbutton Moeller Electric 216931 Illuminated, Blue
Contact element Moeller Electric 216504 +Fixing adapter, 1NO
Contact element Moeller Electric 216376 1NO
Lamp Moeller Electric 218057 Blue
S426 + (H451) Switch Moeller Electric 216870 3-pos, Illuminated, Blue
Contact element Moeller Electric 216504 +Fixing adapter, 1NO
Contact element Moeller Electric 216376 1NO
Lamp Moeller Electric 216557 White
Created by EBCCW 00:06
5112204
87
Page 96

Recommended spare parts
Spare parts list Kit 5112282
Des Name Manufacturer Manufacturer item nr Comment
W320 Cable U.I. Lapp 1119 404 4G2.5
W321 Cable U.I. Lapp 1119 107 7G0.75
W322 Cable U.I. Lapp 1119 802 2x0.75
W323 Cable U.I. Lapp 1119 802 2x0.75
W325 (+ A001.X410) Cable with connector Phoenix Contact 1525571 Belongs to A001
W326 Cable U.I. Lapp 2170 220 Profibus
W330 Cable U.I. Lapp 1119 304 4G1.5
W360 Cable Murr Electronic 7000-08061-2210150
W430 Cable Murr Electronic 7000-88001-2200300
W431 Cable Murr Electronic 7000-88001-2200300
W432 Cable Murr Electronic 7000-88001-2200300
W433 Cable Murr Electronic 7000-88001-2200300
W434 Cable Murr Electronic 7000-88261-2200300
W435
W436 Cable Murr Electronic 7000-88241-2200300
W437 Cable Murr Electronic 7000-88241-2200300
W438 Cable integrated on unit
A438 Split box
Item 5113382
Specification 3940647
88
5112204
Page 97

Recommended spare parts
Spare parts list Control box 5112133
Des Name Manufacturer Manufacturer item nr Comment
K470, K471 Contactor Moeller Electric 276600 DILM7
Q300 Main switch Moeller Electric P1-25/V/SVB-SW
Q320 Miniature circuit breaker Moeller Electric 278873 C16/3
Q320 Auxiliary contact Moeller Electric 286054
K330 Contactor Phoenix Contact 2297031
A410 Communication interface Siemens 6ES7151-1BA02-0AB0
T410 Connector Siemens 6ES7193-4CD30-0AA0
Power supply Siemens 6ES7138-4CA50-0AB0
A420, A430 Input module Siemens 6ES7131-4BF00-0AA0
Connector Siemens 6ES7193-4CB30-0AA0
A450 Output module Siemens 6ES7132-4BF00-0AA0
Connector Siemens 6ES7193-4CB30-0AA0
T411 Connector Siemens 6ES7193-4CD30-0AA0
Power supply Siemens 6ES7138-4CA50-0AB0
A460 Input module Siemens 6ES7138-4FA04-0AB0
Connector Siemens 6ES7193-4CG30-0AA0
A470 Output module Siemens 6ES7138-4FB03-0AB0
Connector Siemens 6ES7193-4CG30-0AA0
S420 + (H450) Pushbutton Moeller Electric 216922 Illuminated, White
Contact element Moeller Electric 216504 +Fixing adapter, 1NO
Lamp Moeller Electric 216557 White
S421 Pushbutton Moeller Electric 216590 Black
Contact element Moeller Electric 216503 +Fixing adapter, 1NC
S460 Switch Moeller Electric 216515 Emergency
Contact element Moeller Electric 216378 1NC
S462 + (H452) Pushbutton Moeller Electric 216931 Illuminated, Blue
Contact element Moeller Electric 216504 +Fixing adapter, 1NO
Lamp Moeller Electric 218057 Blue
S426 + (H451) Switch Moeller Electric 216870 3-pos, Illuminated, Blue
Contact element Moeller Electric 216504 +Fixing adapter, 1NO
Contact element Moeller Electric 216376 1NO
Lamp Moeller Electric 216557 White
Created by EBCCW 00:06
5112204
89
Page 98

Recommended spare parts
Spare parts list Kit 5112285
Des Name Manufacturer Manufacturer item nr Comment
W320 Cable U.I. Lapp 1119 404 4G2.5
W321 Cable U.I. Lapp 1119 107 7G0.75
W322 Cable U.I. Lapp 1119 802 2x0.75
W323 Cable U.I. Lapp 1119 802 2x0.75
W325 (+ A001.X410) Cable with connector Phoenix Contact 1525571 Belongs to A001
W326 Cable U.I. Lapp 2170 220 Profibus
W330 Cable U.I. Lapp 1119 304 4G1.5
W360 Cable Murr Electronic 7000-08061-2210150
W430 Cable Murr Electronic 7000-88001-2200300
W431 Cable Murr Electronic 7000-88001-2200300
W432 Cable Murr Electronic 7000-88001-2200300
W433 Cable Murr Electronic 7000-88001-2200300
W434 Cable Murr Electronic 7000-88261-2200300
W435 Cable Murr Electronic 7000-88261-2200300
W436 Cable Murr Electronic 7000-88241-2200300
W437 Cable Murr Electronic 7000-88241-2200300
W438 Cable integrated on unit A438
Split box
Item 5113383
Specification 3940648
90
5112204
Page 99

Recommended spare parts
Spare parts list Control box 5112133
Des Name Manufacturer Manufacturer item nr Comment
K470, K471 Contactor Moeller Electric 276600 DILM7
Q300 Main switch Moeller Electric P1-25/V/SVB-SW
Q320 Miniature circuit breaker Moeller Electric 278873 C16/3
Q320 Auxiliary contact Moeller Electric 286054
K330 Contactor Phoenix Contact 2297031
A410 Communication interface Siemens 6ES7151-1BA02-0AB0
T410 Connector Siemens 6ES7193-4CD30-0AA0
Power supply Siemens 6ES7138-4CA50-0AB0
A420, A430 Input module Siemens 6ES7131-4BF00-0AA0
Connector Siemens 6ES7193-4CB30-0AA0
A450 Output module Siemens 6ES7132-4BF00-0AA0
Connector Siemens 6ES7193-4CB30-0AA0
T411 Connector Siemens 6ES7193-4CD30-0AA0
Power supply Siemens 6ES7138-4CA50-0AB0
A460 Input module Siemens 6ES7138-4FA04-0AB0
Connector Siemens 6ES7193-4CG30-0AA0
A470 Output module Siemens 6ES7138-4FB03-0AB0
Connector Siemens 6ES7193-4CG30-0AA0
S420 + (H450) Pushbutton Moeller Electric 216922 Illuminated, White
Contact element Moeller Electric 216504 +Fixing adapter, 1NO
Lamp Moeller Electric 216557 White
S421 Pushbutton Moeller Electric 216590 Black
Contact element Moeller Electric 216503 +Fixing adapter, 1NC
S460 Switch Moeller Electric 216515 Emergency
Contact element Moeller Electric 216378 1NC
S462 + (H452) Pushbutton Moeller Electric 216931 Illuminated, Blue
Contact element Moeller Electric 216504 +Fixing adapter, 1NO
Lamp Moeller Electric 218057 Blue
S426 + (H451) Switch Moeller Electric 216870 3-pos, Illuminated, Blue
Contact element Moeller Electric 216504 +Fixing adapter, 1NO
Contact element Moeller Electric 216376 1NO
Lamp Moeller Electric 216557 White
Created by EBCCW 00:06
5112204
91
Page 100

Supplier’s information
10 Supplier’s information
This manual goes together with the elevator of the type mentioned on the
order and on the title page of this ma nual. This document was drawn up by:
FlexLink Components AB
Date: 2010/03/01
Copyright: FlexLink Sweden, 2010
The machine was produced by:
FlexLink Engineering Polska
Sp. z.o.o
ul. Za Motelem 2c
62-080 Sady
Poland
E-mail: info.pl@flexlink.com
www.flexlink.com
. Note! In case of failures please contact the system integrator.
92
5112204
 Loading...