

Page 1
Operating instruction
FLUXUS WD
UMFLUXUS_WDV1-3EN
Page 2

FLUXUS is a registered trademark of FLEXIM GmbH.
FLEXIM GmbH
Boxberger Straße 4
12681 Berlin
Germany
Tel.: +49 (30) 936 67 660
Fax: +49 (30) 936 67 680
E-mail: [email protected]
www.flexim.com
Operating instruction for
FLUXUS WD
UMFLUXUS_WDV1-3EN, 2018-07-16
Firmware version: V7.18
Article number: 411
Copyright (©) FLEXIM GmbH 2018
Subject to change without prior notice.
Page 3

FLUXUS WD Table of contents
Table of contents
1Introduction . . . . . . . . . . . . . . . . . . . . . . . . . . . . . . . . . . . . . . . . . . . . . . . . . . . . . . . . . . . . . . . . . . . . . . . . . . . . . .7
2 Safety instructions . . . . . . . . . . . . . . . . . . . . . . . . . . . . . . . . . . . . . . . . . . . . . . . . . . . . . . . . . . . . . . . . . . . . . . . .8
2.1 General safety instructions . . . . . . . . . . . . . . . . . . . . . . . . . . . . . . . . . . . . . . . . . . . . . . . . . . . . . . . . . . . . . . . . . . .8
2.2 Intended use . . . . . . . . . . . . . . . . . . . . . . . . . . . . . . . . . . . . . . . . . . . . . . . . . . . . . . . . . . . . . . . . . . . . . . . . . . . . . .8
2.3 Not intended use . . . . . . . . . . . . . . . . . . . . . . . . . . . . . . . . . . . . . . . . . . . . . . . . . . . . . . . . . . . . . . . . . . . . . . . . . .9
2.4 Safety instructions for the user . . . . . . . . . . . . . . . . . . . . . . . . . . . . . . . . . . . . . . . . . . . . . . . . . . . . . . . . . . . . . . . .9
2.5 Safety instructions for the operator . . . . . . . . . . . . . . . . . . . . . . . . . . . . . . . . . . . . . . . . . . . . . . . . . . . . . . . . . . . . .9
2.6 Safety instructions for electrical work . . . . . . . . . . . . . . . . . . . . . . . . . . . . . . . . . . . . . . . . . . . . . . . . . . . . . . . . . . .9
2.7 Safety instructions for transport . . . . . . . . . . . . . . . . . . . . . . . . . . . . . . . . . . . . . . . . . . . . . . . . . . . . . . . . . . . . . .10
2.8 Recommended procedure in hazardous situations . . . . . . . . . . . . . . . . . . . . . . . . . . . . . . . . . . . . . . . . . . . . . . .10
3 General principles . . . . . . . . . . . . . . . . . . . . . . . . . . . . . . . . . . . . . . . . . . . . . . . . . . . . . . . . . . . . . . . . . . . . . . .11
3.1 Measurement principle . . . . . . . . . . . . . . . . . . . . . . . . . . . . . . . . . . . . . . . . . . . . . . . . . . . . . . . . . . . . . . . . . . . . .11
3.2 Measurement arrangements . . . . . . . . . . . . . . . . . . . . . . . . . . . . . . . . . . . . . . . . . . . . . . . . . . . . . . . . . . . . . . . .14
3.3 Acoustic penetration . . . . . . . . . . . . . . . . . . . . . . . . . . . . . . . . . . . . . . . . . . . . . . . . . . . . . . . . . . . . . . . . . . . . . . .16
3.4 Undisturbed flow profile . . . . . . . . . . . . . . . . . . . . . . . . . . . . . . . . . . . . . . . . . . . . . . . . . . . . . . . . . . . . . . . . . . . .17
4 Product description . . . . . . . . . . . . . . . . . . . . . . . . . . . . . . . . . . . . . . . . . . . . . . . . . . . . . . . . . . . . . . . . . . . . . .19
4.1 Measuring system . . . . . . . . . . . . . . . . . . . . . . . . . . . . . . . . . . . . . . . . . . . . . . . . . . . . . . . . . . . . . . . . . . . . . . . .19
4.2 Handling concept . . . . . . . . . . . . . . . . . . . . . . . . . . . . . . . . . . . . . . . . . . . . . . . . . . . . . . . . . . . . . . . . . . . . . . . . .19
4.3 Display . . . . . . . . . . . . . . . . . . . . . . . . . . . . . . . . . . . . . . . . . . . . . . . . . . . . . . . . . . . . . . . . . . . . . . . . . . . . . . . . .21
4.4 Keyboard . . . . . . . . . . . . . . . . . . . . . . . . . . . . . . . . . . . . . . . . . . . . . . . . . . . . . . . . . . . . . . . . . . . . . . . . . . . . . . .22
5 Transport and storage . . . . . . . . . . . . . . . . . . . . . . . . . . . . . . . . . . . . . . . . . . . . . . . . . . . . . . . . . . . . . . . . . . . .23
5.1 Transport . . . . . . . . . . . . . . . . . . . . . . . . . . . . . . . . . . . . . . . . . . . . . . . . . . . . . . . . . . . . . . . . . . . . . . . . . . . . . . .23
5.2 Storage . . . . . . . . . . . . . . . . . . . . . . . . . . . . . . . . . . . . . . . . . . . . . . . . . . . . . . . . . . . . . . . . . . . . . . . . . . . . . . . . .23
6 Installation . . . . . . . . . . . . . . . . . . . . . . . . . . . . . . . . . . . . . . . . . . . . . . . . . . . . . . . . . . . . . . . . . . . . . . . . . . . . . .24
6.1 Transmitter . . . . . . . . . . . . . . . . . . . . . . . . . . . . . . . . . . . . . . . . . . . . . . . . . . . . . . . . . . . . . . . . . . . . . . . . . . . . . .25
6.2 Transducers . . . . . . . . . . . . . . . . . . . . . . . . . . . . . . . . . . . . . . . . . . . . . . . . . . . . . . . . . . . . . . . . . . . . . . . . . . . . .31
7 Connection . . . . . . . . . . . . . . . . . . . . . . . . . . . . . . . . . . . . . . . . . . . . . . . . . . . . . . . . . . . . . . . . . . . . . . . . . . . . .52
7.1 Transducers . . . . . . . . . . . . . . . . . . . . . . . . . . . . . . . . . . . . . . . . . . . . . . . . . . . . . . . . . . . . . . . . . . . . . . . . . . . . .53
7.2 Power supply . . . . . . . . . . . . . . . . . . . . . . . . . . . . . . . . . . . . . . . . . . . . . . . . . . . . . . . . . . . . . . . . . . . . . . . . . . . .61
7.3 Outputs . . . . . . . . . . . . . . . . . . . . . . . . . . . . . . . . . . . . . . . . . . . . . . . . . . . . . . . . . . . . . . . . . . . . . . . . . . . . . . . . .63
7.4 Service interfaces . . . . . . . . . . . . . . . . . . . . . . . . . . . . . . . . . . . . . . . . . . . . . . . . . . . . . . . . . . . . . . . . . . . . . . . . .65
8 Start-up . . . . . . . . . . . . . . . . . . . . . . . . . . . . . . . . . . . . . . . . . . . . . . . . . . . . . . . . . . . . . . . . . . . . . . . . . . . . . . . .68
8.1 Start-up settings . . . . . . . . . . . . . . . . . . . . . . . . . . . . . . . . . . . . . . . . . . . . . . . . . . . . . . . . . . . . . . . . . . . . . . . . . .69
8.2 Switching on . . . . . . . . . . . . . . . . . . . . . . . . . . . . . . . . . . . . . . . . . . . . . . . . . . . . . . . . . . . . . . . . . . . . . . . . . . . . .69
8.3 Status indications . . . . . . . . . . . . . . . . . . . . . . . . . . . . . . . . . . . . . . . . . . . . . . . . . . . . . . . . . . . . . . . . . . . . . . . . .70
8.4 Program branches . . . . . . . . . . . . . . . . . . . . . . . . . . . . . . . . . . . . . . . . . . . . . . . . . . . . . . . . . . . . . . . . . . . . . . . .71
8.5 Language . . . . . . . . . . . . . . . . . . . . . . . . . . . . . . . . . . . . . . . . . . . . . . . . . . . . . . . . . . . . . . . . . . . . . . . . . . . . . . .71
8.6 Initialization . . . . . . . . . . . . . . . . . . . . . . . . . . . . . . . . . . . . . . . . . . . . . . . . . . . . . . . . . . . . . . . . . . . . . . . . . . . . . .71
8.7 Time and date . . . . . . . . . . . . . . . . . . . . . . . . . . . . . . . . . . . . . . . . . . . . . . . . . . . . . . . . . . . . . . . . . . . . . . . . . . . .72
8.8 Information regarding the transmitter . . . . . . . . . . . . . . . . . . . . . . . . . . . . . . . . . . . . . . . . . . . . . . . . . . . . . . . . . .72
UMFLUXUS_WDV1-3EN, 2018-07-16
3
Page 4

Table of contents FLUXUS WD
9 Measurement . . . . . . . . . . . . . . . . . . . . . . . . . . . . . . . . . . . . . . . . . . . . . . . . . . . . . . . . . . . . . . . . . . . . . . . . . . . 73
9.1 Parameter Input . . . . . . . . . . . . . . . . . . . . . . . . . . . . . . . . . . . . . . . . . . . . . . . . . . . . . . . . . . . . . . . . . . . . . . . . . . 73
9.2 Measurement settings . . . . . . . . . . . . . . . . . . . . . . . . . . . . . . . . . . . . . . . . . . . . . . . . . . . . . . . . . . . . . . . . . . . . . 77
9.3 Start of the measurement . . . . . . . . . . . . . . . . . . . . . . . . . . . . . . . . . . . . . . . . . . . . . . . . . . . . . . . . . . . . . . . . . . 87
9.4 Display of measured values . . . . . . . . . . . . . . . . . . . . . . . . . . . . . . . . . . . . . . . . . . . . . . . . . . . . . . . . . . . . . . . . . 89
9.5 Display of parameters . . . . . . . . . . . . . . . . . . . . . . . . . . . . . . . . . . . . . . . . . . . . . . . . . . . . . . . . . . . . . . . . . . . . . 91
9.6 Repeated display of measured values . . . . . . . . . . . . . . . . . . . . . . . . . . . . . . . . . . . . . . . . . . . . . . . . . . . . . . . . . 92
9.7 Execution of special functions . . . . . . . . . . . . . . . . . . . . . . . . . . . . . . . . . . . . . . . . . . . . . . . . . . . . . . . . . . . . . . . 92
9.8 Stop of the measurement . . . . . . . . . . . . . . . . . . . . . . . . . . . . . . . . . . . . . . . . . . . . . . . . . . . . . . . . . . . . . . . . . . 93
10 Troubleshooting . . . . . . . . . . . . . . . . . . . . . . . . . . . . . . . . . . . . . . . . . . . . . . . . . . . . . . . . . . . . . . . . . . . . . . . . 94
10.1 Problems with the measurement . . . . . . . . . . . . . . . . . . . . . . . . . . . . . . . . . . . . . . . . . . . . . . . . . . . . . . . . . . . . . 95
10.2 Measuring point selection . . . . . . . . . . . . . . . . . . . . . . . . . . . . . . . . . . . . . . . . . . . . . . . . . . . . . . . . . . . . . . . . . . 96
10.3 Maximum acoustic contact . . . . . . . . . . . . . . . . . . . . . . . . . . . . . . . . . . . . . . . . . . . . . . . . . . . . . . . . . . . . . . . . . 96
10.4 Application-specific problems . . . . . . . . . . . . . . . . . . . . . . . . . . . . . . . . . . . . . . . . . . . . . . . . . . . . . . . . . . . . . . . 96
10.5 Significant deviations of the measured values . . . . . . . . . . . . . . . . . . . . . . . . . . . . . . . . . . . . . . . . . . . . . . . . . . . 96
10.6 Problems with the totalizers . . . . . . . . . . . . . . . . . . . . . . . . . . . . . . . . . . . . . . . . . . . . . . . . . . . . . . . . . . . . . . . . . 97
11 Maintenance and cleaning . . . . . . . . . . . . . . . . . . . . . . . . . . . . . . . . . . . . . . . . . . . . . . . . . . . . . . . . . . . . . . . .98
11.1 Maintenance . . . . . . . . . . . . . . . . . . . . . . . . . . . . . . . . . . . . . . . . . . . . . . . . . . . . . . . . . . . . . . . . . . . . . . . . . . . . 99
11.2 Cleaning . . . . . . . . . . . . . . . . . . . . . . . . . . . . . . . . . . . . . . . . . . . . . . . . . . . . . . . . . . . . . . . . . . . . . . . . . . . . . . . . 99
12 Dismounting and disposal . . . . . . . . . . . . . . . . . . . . . . . . . . . . . . . . . . . . . . . . . . . . . . . . . . . . . . . . . . . . . . . 100
12.1 Dismounting . . . . . . . . . . . . . . . . . . . . . . . . . . . . . . . . . . . . . . . . . . . . . . . . . . . . . . . . . . . . . . . . . . . . . . . . . . . . 100
12.2 Disposal . . . . . . . . . . . . . . . . . . . . . . . . . . . . . . . . . . . . . . . . . . . . . . . . . . . . . . . . . . . . . . . . . . . . . . . . . . . . . . . 100
13 User modes . . . . . . . . . . . . . . . . . . . . . . . . . . . . . . . . . . . . . . . . . . . . . . . . . . . . . . . . . . . . . . . . . . . . . . . . . . . 101
13.1 StandardUser mode . . . . . . . . . . . . . . . . . . . . . . . . . . . . . . . . . . . . . . . . . . . . . . . . . . . . . . . . . . . . . . . . . . . . . . 102
13.2 ExpertUser mode . . . . . . . . . . . . . . . . . . . . . . . . . . . . . . . . . . . . . . . . . . . . . . . . . . . . . . . . . . . . . . . . . . . . . . . . 106
13.3 SuperUser Mode and SuperUser ext. Mode . . . . . . . . . . . . . . . . . . . . . . . . . . . . . . . . . . . . . . . . . . . . . . . . . . . 109
14 Outputs . . . . . . . . . . . . . . . . . . . . . . . . . . . . . . . . . . . . . . . . . . . . . . . . . . . . . . . . . . . . . . . . . . . . . . . . . . . . . . . 112
14.1 Configuration of a binary output . . . . . . . . . . . . . . . . . . . . . . . . . . . . . . . . . . . . . . . . . . . . . . . . . . . . . . . . . . . . . 112
14.2 Activation of a binary output as pulse output . . . . . . . . . . . . . . . . . . . . . . . . . . . . . . . . . . . . . . . . . . . . . . . . . . . 116
15 Data logger . . . . . . . . . . . . . . . . . . . . . . . . . . . . . . . . . . . . . . . . . . . . . . . . . . . . . . . . . . . . . . . . . . . . . . . . . . . . 117
15.1 Configuration of the data logger . . . . . . . . . . . . . . . . . . . . . . . . . . . . . . . . . . . . . . . . . . . . . . . . . . . . . . . . . . . . 117
15.2 Deletion of the data logger . . . . . . . . . . . . . . . . . . . . . . . . . . . . . . . . . . . . . . . . . . . . . . . . . . . . . . . . . . . . . . . . . 121
15.3 Information relating the data logger . . . . . . . . . . . . . . . . . . . . . . . . . . . . . . . . . . . . . . . . . . . . . . . . . . . . . . . . . . 121
15.4 Print of measured values . . . . . . . . . . . . . . . . . . . . . . . . . . . . . . . . . . . . . . . . . . . . . . . . . . . . . . . . . . . . . . . . . . 121
15.5 Transmission settings . . . . . . . . . . . . . . . . . . . . . . . . . . . . . . . . . . . . . . . . . . . . . . . . . . . . . . . . . . . . . . . . . . . . 122
16 Data transmission . . . . . . . . . . . . . . . . . . . . . . . . . . . . . . . . . . . . . . . . . . . . . . . . . . . . . . . . . . . . . . . . . . . . . . 123
16.1 Service interface . . . . . . . . . . . . . . . . . . . . . . . . . . . . . . . . . . . . . . . . . . . . . . . . . . . . . . . . . . . . . . . . . . . . . . . . 123
16.2 Process interface . . . . . . . . . . . . . . . . . . . . . . . . . . . . . . . . . . . . . . . . . . . . . . . . . . . . . . . . . . . . . . . . . . . . . . . . 124
17 Advanced functions . . . . . . . . . . . . . . . . . . . . . . . . . . . . . . . . . . . . . . . . . . . . . . . . . . . . . . . . . . . . . . . . . . . . 125
17.1 Totalizers . . . . . . . . . . . . . . . . . . . . . . . . . . . . . . . . . . . . . . . . . . . . . . . . . . . . . . . . . . . . . . . . . . . . . . . . . . . . . . 125
17.2 FastFood mode . . . . . . . . . . . . . . . . . . . . . . . . . . . . . . . . . . . . . . . . . . . . . . . . . . . . . . . . . . . . . . . . . . . . . . . . . 127
17.3 Calculation channels . . . . . . . . . . . . . . . . . . . . . . . . . . . . . . . . . . . . . . . . . . . . . . . . . . . . . . . . . . . . . . . . . . . . . 128
17.4 Diagnosis by means of the snap function . . . . . . . . . . . . . . . . . . . . . . . . . . . . . . . . . . . . . . . . . . . . . . . . . . . . . 133
17.5 Modification of the limit for the inner pipe diameter . . . . . . . . . . . . . . . . . . . . . . . . . . . . . . . . . . . . . . . . . . . . . . 134
17.6 Remote functions . . . . . . . . . . . . . . . . . . . . . . . . . . . . . . . . . . . . . . . . . . . . . . . . . . . . . . . . . . . . . . . . . . . . . . . . 135
17.7 Event trigger . . . . . . . . . . . . . . . . . . . . . . . . . . . . . . . . . . . . . . . . . . . . . . . . . . . . . . . . . . . . . . . . . . . . . . . . . . . 137
17.8 Event protocol . . . . . . . . . . . . . . . . . . . . . . . . . . . . . . . . . . . . . . . . . . . . . . . . . . . . . . . . . . . . . . . . . . . . . . . . . . 141
4
2018-07-16, UMFLUXUS_WDV1-3EN
Page 5

FLUXUS WD Table of contents
18 Settings . . . . . . . . . . . . . . . . . . . . . . . . . . . . . . . . . . . . . . . . . . . . . . . . . . . . . . . . . . . . . . . . . . . . . . . . . . . . . . .142
18.1 Dialogs and menus . . . . . . . . . . . . . . . . . . . . . . . . . . . . . . . . . . . . . . . . . . . . . . . . . . . . . . . . . . . . . . . . . . . . . . .142
18.2 Measuring modes . . . . . . . . . . . . . . . . . . . . . . . . . . . . . . . . . . . . . . . . . . . . . . . . . . . . . . . . . . . . . . . . . . . . . . . .144
18.3 Measurement settings . . . . . . . . . . . . . . . . . . . . . . . . . . . . . . . . . . . . . . . . . . . . . . . . . . . . . . . . . . . . . . . . . . . .144
18.4 Units of measurement . . . . . . . . . . . . . . . . . . . . . . . . . . . . . . . . . . . . . . . . . . . . . . . . . . . . . . . . . . . . . . . . . . . .145
18.5 Material scroll list . . . . . . . . . . . . . . . . . . . . . . . . . . . . . . . . . . . . . . . . . . . . . . . . . . . . . . . . . . . . . . . . . . . . . . . .146
18.6 Working with parameter records . . . . . . . . . . . . . . . . . . . . . . . . . . . . . . . . . . . . . . . . . . . . . . . . . . . . . . . . . . . . .146
18.7 Contrast settings . . . . . . . . . . . . . . . . . . . . . . . . . . . . . . . . . . . . . . . . . . . . . . . . . . . . . . . . . . . . . . . . . . . . . . . . .147
18.8 HotCodes . . . . . . . . . . . . . . . . . . . . . . . . . . . . . . . . . . . . . . . . . . . . . . . . . . . . . . . . . . . . . . . . . . . . . . . . . . . . . .148
18.9 Key lock . . . . . . . . . . . . . . . . . . . . . . . . . . . . . . . . . . . . . . . . . . . . . . . . . . . . . . . . . . . . . . . . . . . . . . . . . . . . . . .148
Annex
A Menu structure . . . . . . . . . . . . . . . . . . . . . . . . . . . . . . . . . . . . . . . . . . . . . . . . . . . . . . . . . . . . . . . . . . . . . . . . .151
B Units of measurement . . . . . . . . . . . . . . . . . . . . . . . . . . . . . . . . . . . . . . . . . . . . . . . . . . . . . . . . . . . . . . . . . . .165
C Reference . . . . . . . . . . . . . . . . . . . . . . . . . . . . . . . . . . . . . . . . . . . . . . . . . . . . . . . . . . . . . . . . . . . . . . . . . . . . .168
D Conformity declarations . . . . . . . . . . . . . . . . . . . . . . . . . . . . . . . . . . . . . . . . . . . . . . . . . . . . . . . . . . . . . . . . .171
UMFLUXUS_WDV1-3EN, 2018-07-16
5
Page 6

Table of contents FLUXUS WD
6
2018-07-16, UMFLUXUS_WDV1-3EN
Page 7
1 Introduction
Danger!
Warning!
Caution!
Important!
Notice!
FLUXUS WD
1 Introduction
This operating instruction has been written for users operating the ultrasonic flowmeter FLUXUS. It contains important information about the measuring equipment, how to handle it correctly, and how to avoid damages. Read the safety instructions carefully. Make sure you have read and understood this operating instruction before using the measuring equipment.
Any work on the measuring equipment has to be carried out by authorized and qualified personnel in order to detect and
avoid possible risks and dangers.
Presentation of warnings
This operating instruction contains warnings marked as follows:
Type and source of danger
danger with high level of risk, which if not avoided, can lead to death or serious injuries
measures of prevention
Type and source of danger
danger with medium level of risk, which if not avoided, can lead to death or serious injuries
measures of prevention
Type and source of danger
danger with low level of risk, which if not avoided, can lead to minor or moderate injuries
measures of prevention
This text contains important information which should be observed to avoid material damage.
This text contains important information about the handling of the measuring equipment.
Storage of the operational manual
The operating instruction must permanently be available at the place where the measuring equipment is used. It must
always be available to the user.
User comments
All reasonable effort has been made to ensure the correctness of the content of this operating instruction. If you however
find some erroneous information or miss information, please inform us.
We will be grateful for any suggestions and comments regarding the concept and your experience working with the measuring equipment. If you have any suggestions about improving the documentation and particularly this operating instruction, please let us know so that we can consider your comments for future reprints.
Copyright
The contents of this operating instruction are subject to changes without prior notice. All rights reserved. No part of this
operating instruction may be reproduced in any form without FLEXIM's written permission.
UMFLUXUS_WDV1-3EN, 2018-07-16
7
Page 8
2 Safety instructions
2.1 General safety instructions FLUXUS WD
2 Safety instructions
2.1 General safety instructions
Prior to any work, read the operating instruction carefully and in full.
Failure to comply with the instructions, in particular with the safety instructions, poses a risk to health and can lead to
material damages. For further information, contact FLEXIM.
During installation and operation of the measuring equipment, observe the ambient and installation conditions specified in
the documentation.
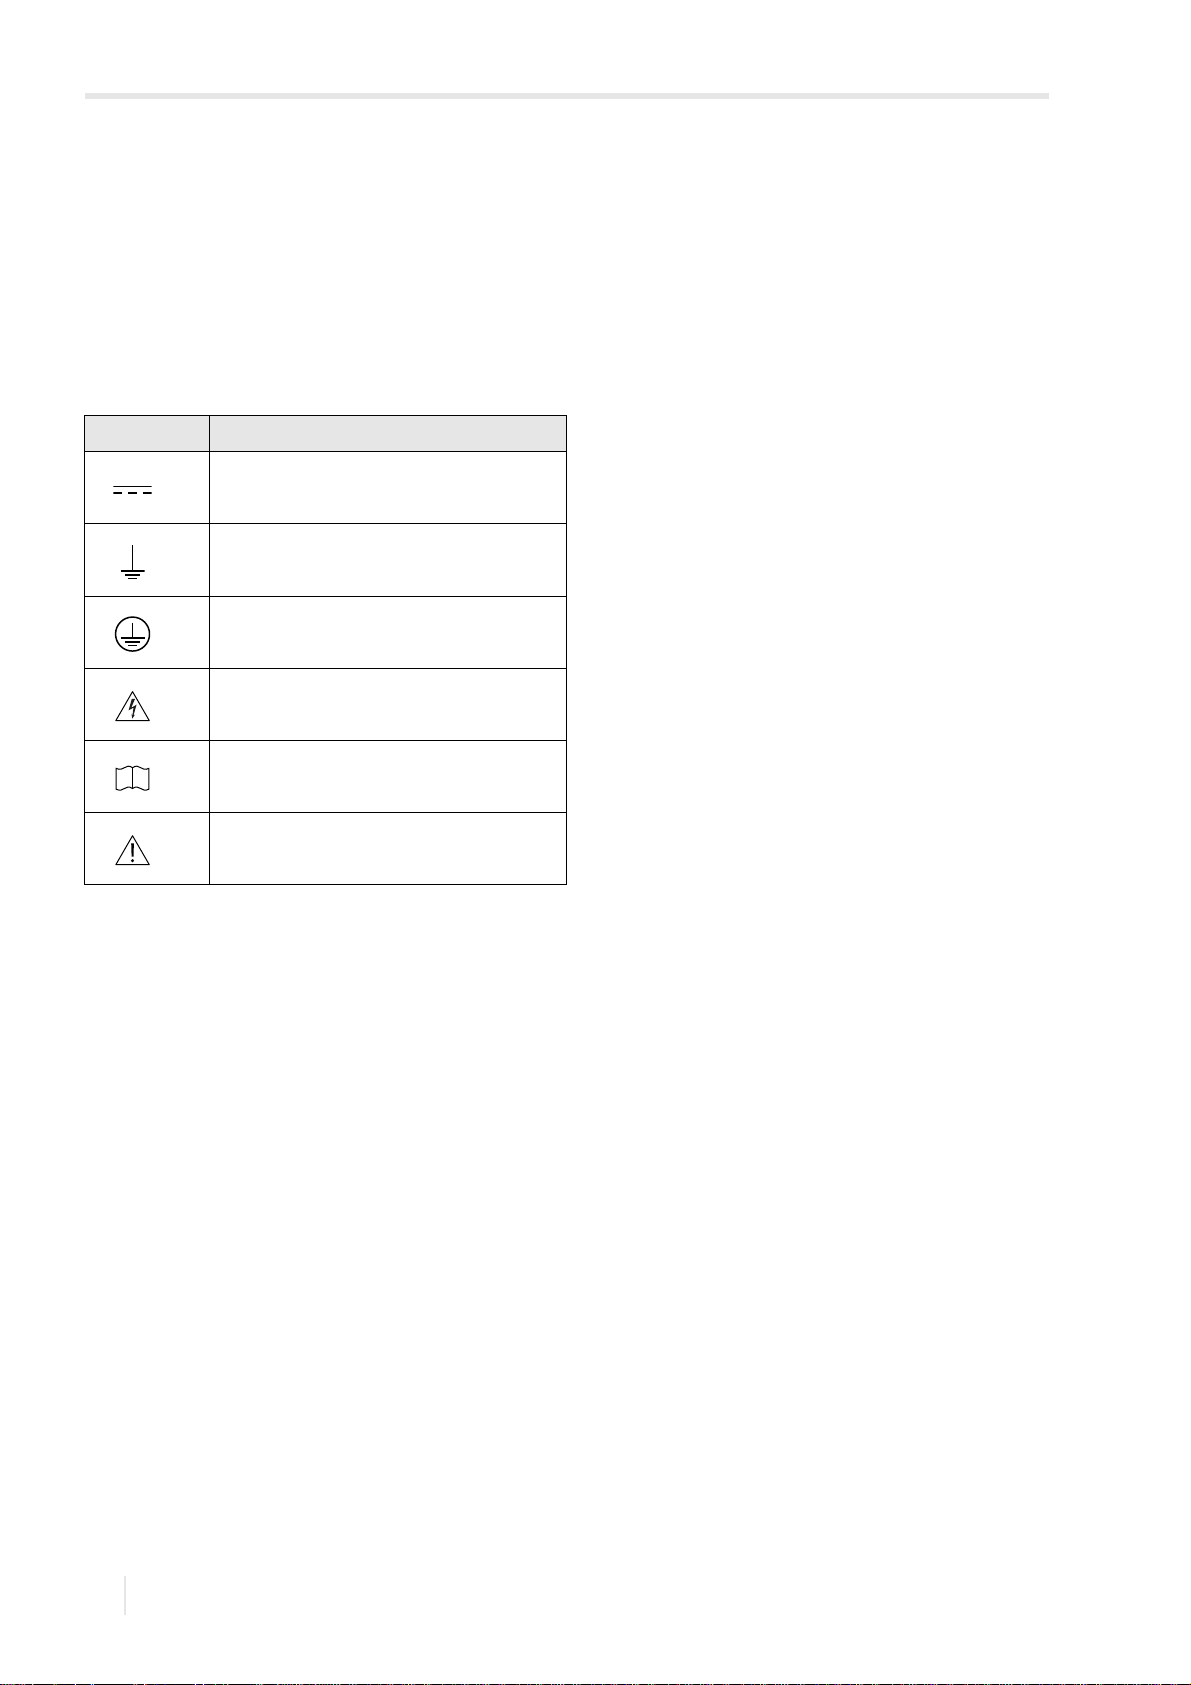
The following symbols are affixed to the measuring equipment:
symbol explanation
direct current
connection to ground
ground conductor terminal
warning of voltage
i
i
observe the operating instruction
Attention!
The measuring equipment has to be checked for proper condition and operational safety before each use. If troubles or
damages have occurred during installation or operation of the measuring equipment, please inform FLEXIM.
It is not allowed to make unauthorized modifications or alterations to the measuring equipment.
If the measuring point is within an explosive atmosphere, the danger zone and present explosive atmosphere have to be
determined. The transmitter, transducers and accessories have to be appropriate and approved for the conditions within
the corresponding zone.
The personnel has to be suitably trained and experienced for the work.
Observe the "Safety instructions for the use in explosive atmospheres", see document SIFLUXUS. Observe the instructions for
hazardous substances and the respective safety data sheets. Observe the regulations for the disposal of electrical equipment.
2.2 Intended use
The measuring equipment is intended for the measurement of fluid properties in closed pipes. By means of connected
transducers, the transit times of the ultrasonic signals in the fluid and the pipe as well as other related properties, such as
temperature and pressure, are measured and evaluated.
The transmitter uses these values to calculate the sought physical quantities, e.g., volumetric flow rate, mass flow rate,
heat quantity, density and concentration. Through comparison with the values stored in the transmitter further physical
quantities can be determined. The physical quantities are provided via configurable outputs and the display.
• All instructions of this operating instruction have to be observed to ensure intended use.
• Any use beyond or other than the intended use is not covered by warranty and can present a danger. Any damage arising from not intended use shall be solely the liability of the operator or user.
• The measurement is carried out without direct contact to the fluid in the pipe. The flow profile is not influenced.
• The transducers are fixed to the pipe using the supplied transducer mounting fixture.
• If an extension cable is required to connect the transducers to the transmitter, a junction box can be used (optional).
Observe the safety instructions in the operating instruction. For the technical data of the junction box, see Technical
specification.
• Observe the operating conditions, e.g., environment, voltage ranges. For the technical data of the transmitter, transducers
and accessories, see Technical specification.
8
2018-07-16, UMFLUXUS_WDV1-3EN
Page 9

2 Safety instructions
FLUXUS WD 2.3 Not intended use
2.3 Not intended use
Not intended use in terms of a misuse means:
• any work on the measuring equipment without observing all instructions in this operating instruction
• use of transmitter, transducer and accessories combinations not intended by FLEXIM
• installation of the transmitter, transducers and accessories in explosive atmospheres they are not approved for
• any work on the measuring equipment (e.g., installation, dismounting, connection, start-up, operation, service and maintenance) carried out by unauthorized and untrained personnel
• storage, installation and operation of the measuring equipment outside the specified ambient conditions, see Technical
specification
2.4 Safety instructions for the user
Any work on the transmitter has to be carried out by authorized and qualified personnel. Observe the safety instructions in
the operating instruction. For the technical data of the transmitter, transducers and accessories, see Technical specification.
• Observe the safety and accident prevention regulations applicable on the site of operation.
• Only use the supplied mounting fixtures and transducers as well as the intended accessories.
• Always wear the required personal protective equipment.
2.5 Safety instructions for the operator
• The operator shall qualify the personnel to perform their assigned tasks. The operator shall provide the required personal
protective equipment and oblige the personnel to wear it. It is recommended to risk assess the workplace.
• Besides the safety instructions in this operating instruction, the health, safety and environment regulations applicable for
the range of application of the transmitter, transducers and accessories have to be observed.
• With the exceptions stated in chapter 10, the measuring equipment is maintenance-free. Any components and spare
parts may only be replaced by FLEXIM. The operator shall carry out periodic checks for changes or damages that can
present a danger. For further information, contact FLEXIM.
• Observe the specifications for the installation and connection of the transmitter, transducers and accessories, see
chapter 6 and 7.
2.6 Safety instructions for electrical work
• Prior to any work on the transmitter (e.g., installation, dismounting, connection, service and maintenance), the transmitter
has to be disconnected from the power supply. It is not sufficient to remove the internal fuse of the instrument, see section
7.2.
• Electrical work may only be carried out if there is enough space.
• Open the transmitter in safe ambient conditions only (e.g., air humidity < 90 %, no conductive pollution, no explosive atmosphere). Otherwise, additional protective measures have to be taken.
• The degree of protection of the transmitter is only ensured if all cables are tightly fitted using cable glands and the housing is firmly screwed.
• The condition and tight fit of the electrical connections have to be checked at regular intervals.
• When connecting the transmitter to the power supply, an appropriate cutoff device according to IEC 60947-1 and IEC
60947-3 has to be installed as disconnector. The cutoff device has to disconnect all live wires. The ground conductor
connection must not be interrupted. The cutoff device has to be easily accessible and clearly marked as a disconnector
for the transmitter. It should be located near the transmitter. If the transmitter is used in an explosive atmosphere, the
cutoff device has to be installed outside the explosive atmosphere. If this is not possible, it has to be installed in the least
hazardous area.
• The connection may only be made to networks up to overvoltage category II. When connecting the inputs and outputs as
well as the power supply, observe the installation instructions, in particular the terminal assignment, see chapter 7.
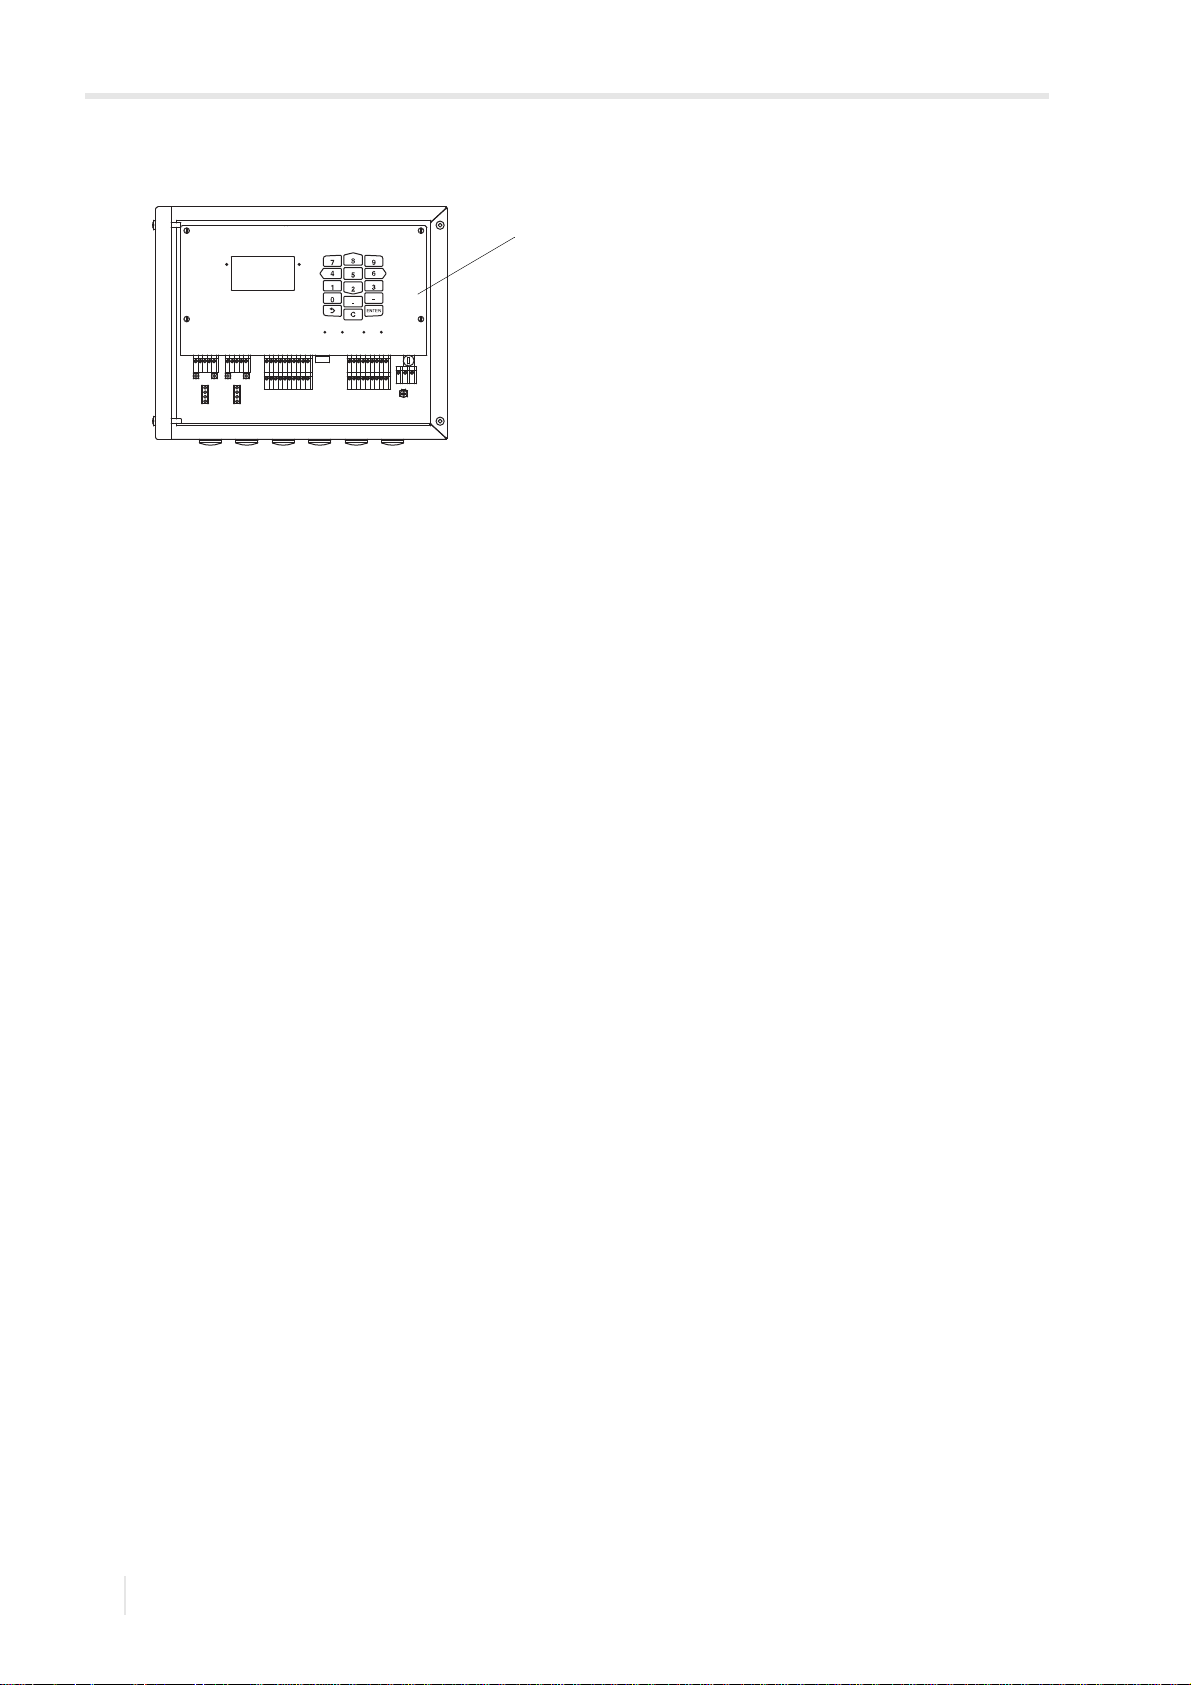
• The front plate must not be removed, see Fig. 2.1. The transmitter does not contain any components to be maintained by
the user. For repair and service work, please contact FLEXIM.
• Observe the safety and accident prevention regulations for electrical systems and equipment.
UMFLUXUS_WDV1-3EN, 2018-07-16
9
Page 10
2 Safety instructions
A
B
SNAP
DISP
DISP
MODEFAST
MUX
NEXT
Q
ON
Q+Q-
3x Q
OFF
LAN
USB
A+B-P1+
P2+
P3+
P4+
P5a
P6a
P7a
SSP1-
P2-
P3-
P4-
P5b
P6b
P7b
X2 X3
X_AV
KL11
KL12
KL7KL8
KL9KL10
KL4
X_AR X_BV X_BR
T1A
T1BS1T2A
T2B
T3A
T3BS3T4B
T4A
T1a
T1bS1T2a
T2b
T3a
T3bS3T4b
T4a
N(-)
PE
L(+)
AV
AVS
AGN
ARSARBV
BVS
BGN
BRS
BR
front plate
2.7 Safety instructions for transport FLUXUS WD
Fig. 2.1: Transmitter FLUXUS WD
2.7 Safety instructions for transport
• If you detect a transport damage when unpacking the delivery, please contact the supplier or FLEXIM immediately.
• The transmitter is a sensitive electronic measuring instrument. Avoid shocks or impacts.
• Handle the transducer cable with care. Avoid sharp bends or kinks. Observe the ambient conditions.
• Select a solid surface to put the transmitter, transducers and accessories on.
• The transmitter, transducers and accessories have to be properly packed for transport:
– Use, if possible, the original packaging by FLEXIM or an equivalent cardboard box.
– Position the transmitter, transducers and accessories in the middle of the cardboard box.
– Fill any voids with appropriate packaging material (e.g., paper, foam, bubble wrap).
– Protect the cardboard box against humidity.
2.8 Recommended procedure in hazardous situations
Fire fighting measures
• If possible, disconnect the transmitter from the power supply.
• Prior to extinguishing, protect any electrical parts that are not affected by the fire (e.g., using a cover).
• Select a suitable extinguishing agent. Avoid, if possible, conductive extinguishing agents.
• Observe the applicable minimum distances. The minimum distances differ depending on the used extinguishing agent.
10
2018-07-16, UMFLUXUS_WDV1-3EN
Page 11

3 General principles
c
sin
------------
c
sin
------------
c
sin
------------
c
sin
-----------
V
·V·
m
·m·
V·V
·
FLUXUS WD 3.1 Measurement principle
3 General principles
In the ultrasonic flow measurement, the flow velocity of the fluid in a pipe is determined. Further physical quantities are
derived from the flow velocity and from additional physical quantities, if necessary.
3.1 Measurement principle
The flow velocity of the fluid is measured in the TransitTime mode using the ultrasonic-transit time difference correlation
principle. When measuring with a high proportion of gas or solid particles, the transmitter can toggle into the NoiseTrek
mode.
3.1.1 Terms
Flow profile
Distribution of flow velocities over the cross-sectional pipe area. For an optimal measurement, the flow profile has to be
fully developed and axisymmetrical. The shape of the flow profile depends on whether the flow is laminar or turbulent and
is influenced by the conditions at the inlet of the measuring point.
Reynolds number Re
Coefficient describing the turbulence behavior of a fluid in the pipe. The Reynolds number Re is calculated from the flow
velocity, the kinematic viscosity of the fluid and the inner pipe diameter.
If the Reynolds number exceeds a critical value (usually approx. 2300, if the fluid flows in a pipe), a transition from a laminar flow to a turbulent flow takes place.
Laminar flow
A flow without any turbulence. There is no mixing between the parallel flowing layers of the fluid.
Turbulent flow
A flow with turbulences (swirling of the fluid). In technical applications, the flow in the pipe is mostly turbulent.
Transition range
The flow is partly laminar and partly turbulent.
Sound speed c
Speed of the propagating sound. The sound speed depends on the mechanical properties of the fluid or the pipe material.
In pipe materials and other solid materials, a distinction is made between the longitudinal and transversal sound speed.
For the sound speed of some fluids and materials, see annex C.
Flow velocity v
Average value of all flow velocities of the fluid over the cross-sectional pipe area.
Acoustic calibration factor k
a
ka =
The acoustic calibration factor k
is a transducer parameter which results from the sound speed c within the transducer
a
and the angle of incidence. According to Snell's law of refraction, the angle of propagation in the adjoining fluid or pipe material is:
= = =
k
a
Fluid mechanics correction factor k
Re
With the fluid mechanics calibration factor kRe, the measured value of the flow velocity in the area of the sound beam is
converted into the value of the flow velocity across the whole cross-sectional pipe area. In case of a fully developed flow
profile, the fluid mechanics calibration factor only depends on the Reynolds number and the roughness of the inner pipe
wall. The fluid mechanics calibration factor is recalculated by the transmitter for each new measurement.
Volumetric flow rate
= v · A
The volume of the fluid that passes through the pipe per unit time. The volumetric flow rate is calculated from the product
of the flow velocity v and the cross-sectional pipe area A.
Mass flow rate
= ·
The mass of the fluid that passes through the pipe per unit time. The mass flow rate is calculated from the product of the
volumetric flow rate and the density .
UMFLUXUS_WDV1-3EN, 2018-07-16
11
Page 12
3 General principles
t
2t
-----------
c
c
3
21
c
c
reduction of the
sound path
flow direction of
the fluid
sound path with flow
sound path
without flow
c
flow direction of
the fluid
sound path with flow
sound path
without flow
c
increase of the
sound path
3
12
c
c
3.1 Measurement principle FLUXUS WD
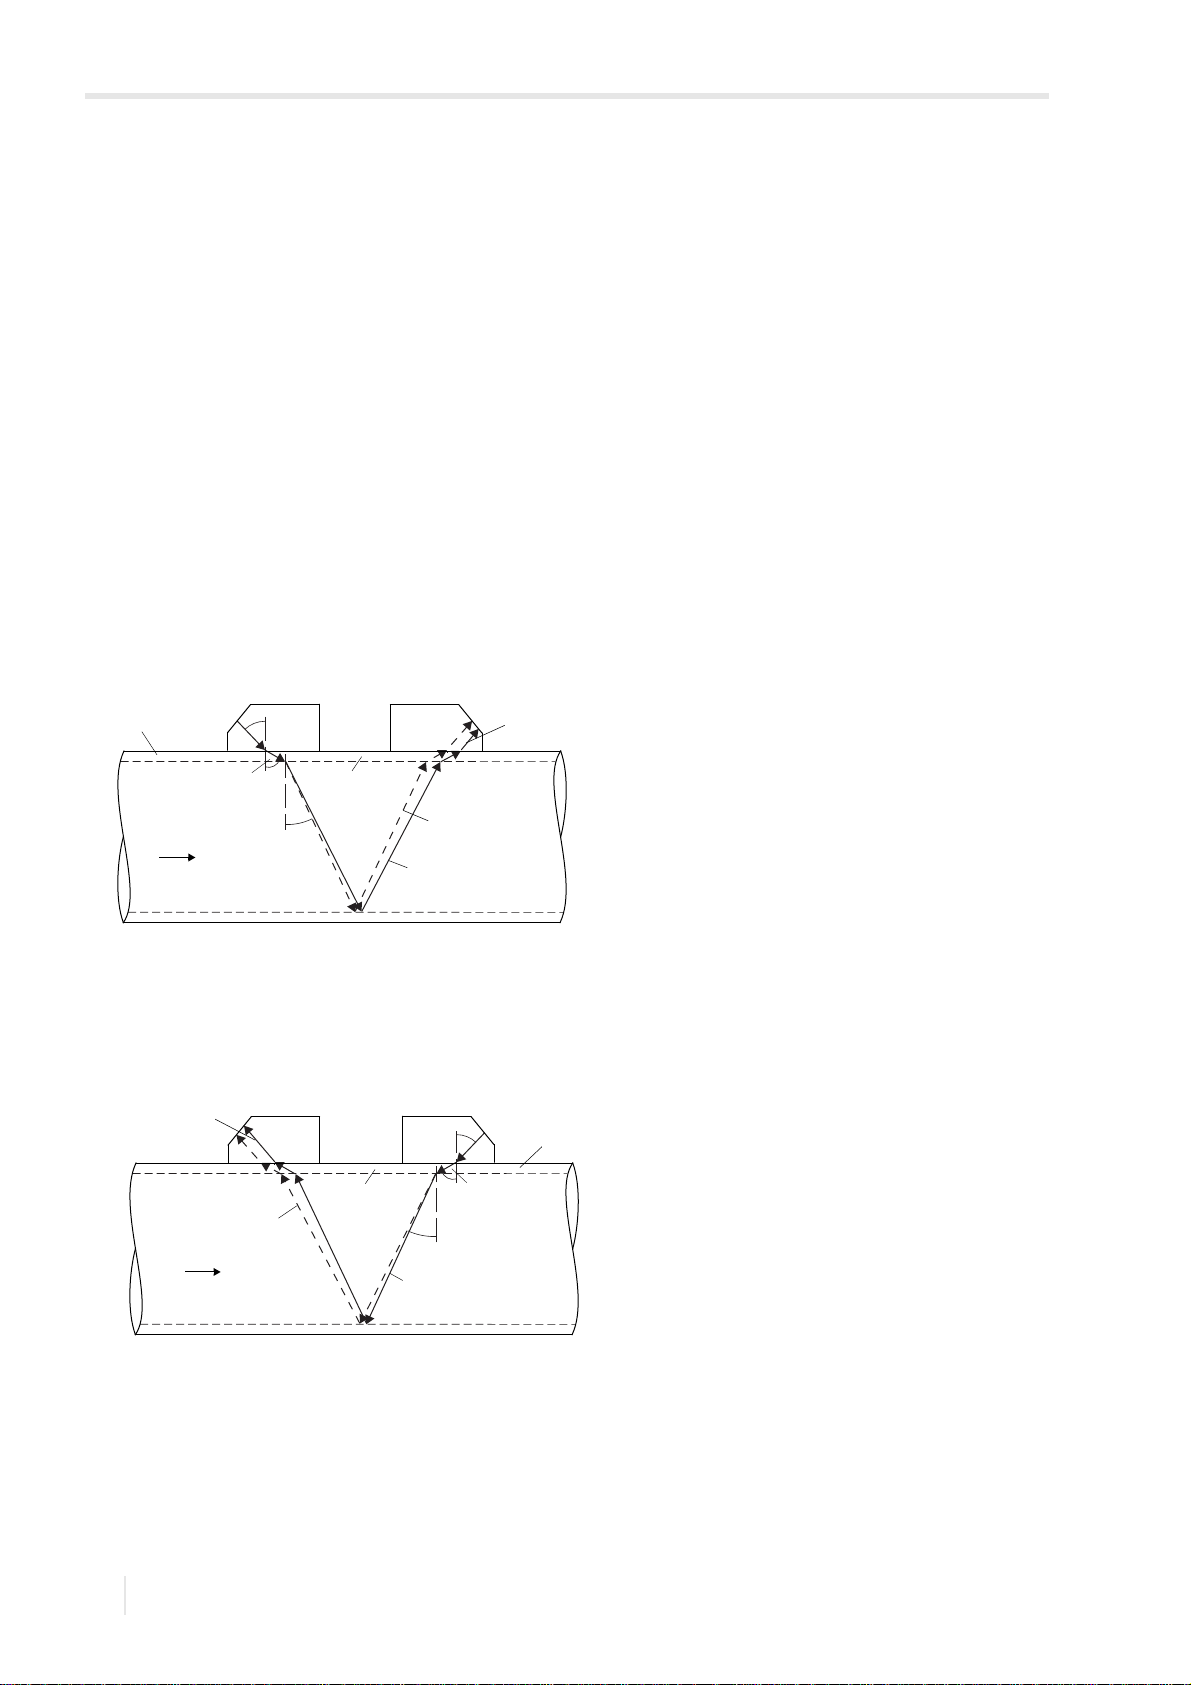
3.1.2 Measurement of the flow velocity in the TransitTime mode
The signals are emitted and received by 2 transducers alternatively in and against the flow direction. If the fluid is flowing,
the signals propagating in the fluid are displaced with the flow.
Caused by this displacement, the sound path of the signal in flow direction is reduced and the signal against the flow direction is increased, see Fig. 3.1 and Fig. 3.2.
This causes a change in the transit times. The transit time of the signal in flow direction is shorter than the transit time
against the flow direction. The transit time difference is proportional to the average flow velocity.
The average flow velocity of the fluid is calculated as follows:
· ka ·
v = k
Re
where
v – average flow velocity of the fluid
– fluid mechanics calibration factor
k
Re
– acoustic calibration factor
k
a
t – transit time difference
– transit time in the fluid
t
Fig. 3.1: Sound path of the signal in the flow direction
c – sound speed
1 – transducer (emitter)
2 – transducer (receiver)
3 – pipe wall
Fig. 3.2: Sound path of the signal against the flow direction
c – sound speed
1 – transducer (emitter)
2 – transducer (receiver)
3 – pipe wall
12
2018-07-16, UMFLUXUS_WDV1-3EN
Page 13
3 General principles
1 2
t
flow direction
transducer 1 transducer 1
flow direction
ultrasonic signal S
1
gas bubble or
solids particle
ultrasonic signal S
2
pulse at time t
gas bubble or
solids particle
pulse at time t + t
p
transit time t
1
transit time t
2
t
2 t
p
----------------
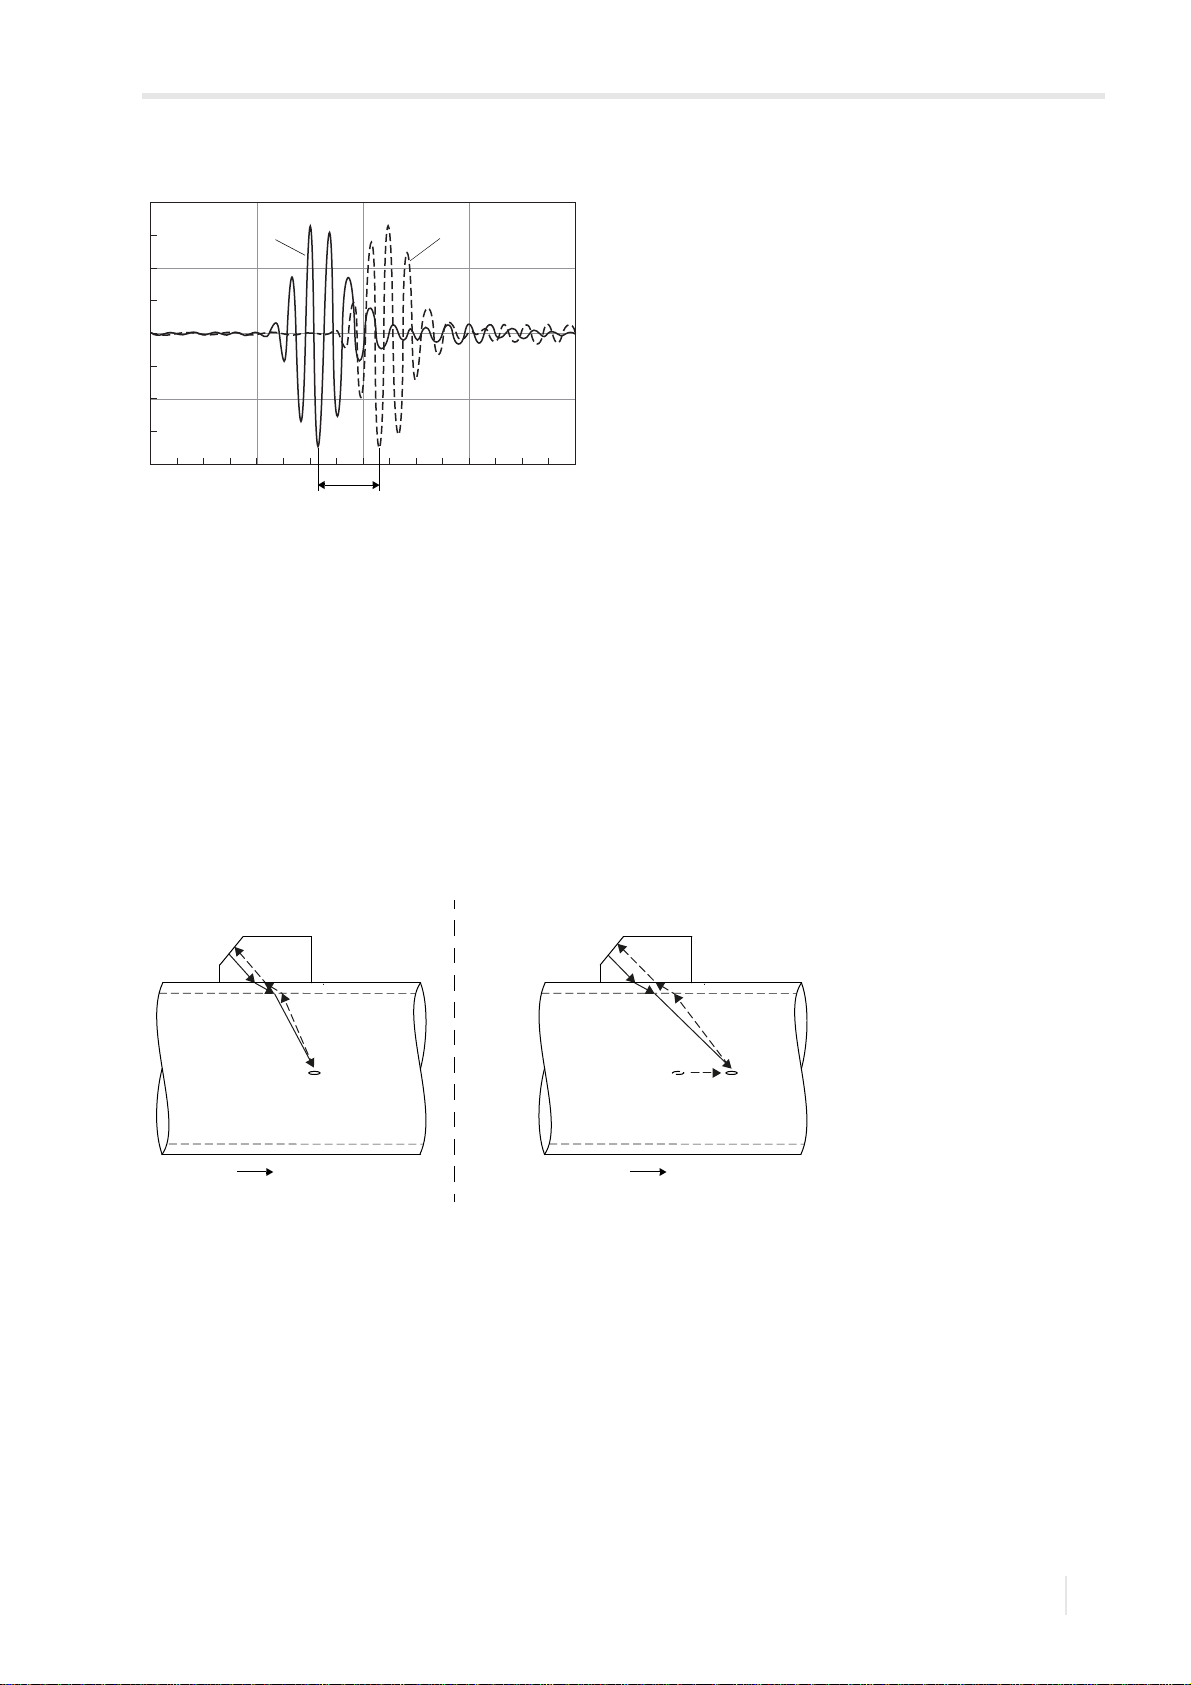
FLUXUS WD 3.1 Measurement principle
Fig. 3.3: Transit time difference t
1 – signal in the flow direction
2 – signal against the flow direction
3.1.3 Measurement of the flow velocity in the NoiseTrek mode
If the proportion of gas or solids in the fluid is high, the damping of the ultrasonic signal can be so high that the complete
propagation of the fluid and therefore a measurement in TransitTime mode is not possible anymore. In this case the
NoiseTrek mode has to be used.
The NoiseTrek mode uses the presence of gas bubbles and/or solid particles in the fluid.
Ultrasonic signals are sent from a transducer into the fluid at short intervals, reflected by the gas bubbles and/or the solids
particles and again received by the same transducer.
The measurement arrangement used in the TransitTime mode does not need to be changed.
The transit time difference t of 2 consecutive ultrasonic signals is determined. It behaves proportionately to the distance
the gas bubble/solid particle is covering between 2 consecutive pulses and thus, to the average flow velocity of the fluid,
see Fig. 3.4.
Fig. 3.4: Measurement of the flow velocity in the NoiseTrek mode
The average flow velocity of the fluid is calculated as follows:
Re·ka
·
v=k
where
v – average flow velocity of the fluid
k
– fluid mechanics calibration factor
Re
– acoustic calibration factor
k
a
– time difference between 2 consecutive pulses
t
p
t – transit time difference of ultrasonic signals S
Depending on the attenuation of the ultrasonic signal, the error of measurement in the NoiseTrek mode can be greater
than in the TransitTime mode.
UMFLUXUS_WDV1-3EN, 2018-07-16
and S2 (t = t2 - t1)
1
13
Page 14
3 General principles
3.2 Measurement arrangements FLUXUS WD
3.1.4 Measurement of the flow velocity in the HybridTrek mode
The HybridTrek mode combines the TransitTime and the NoiseTrek mode. During a measurement in the HybridTrek
mode, the transmitter automatically toggles between the TransitTime and the NoiseTrek mode depending on the gaseous
or solid content.
The measurement arrangement is identical to the one in the TransitTime mode.
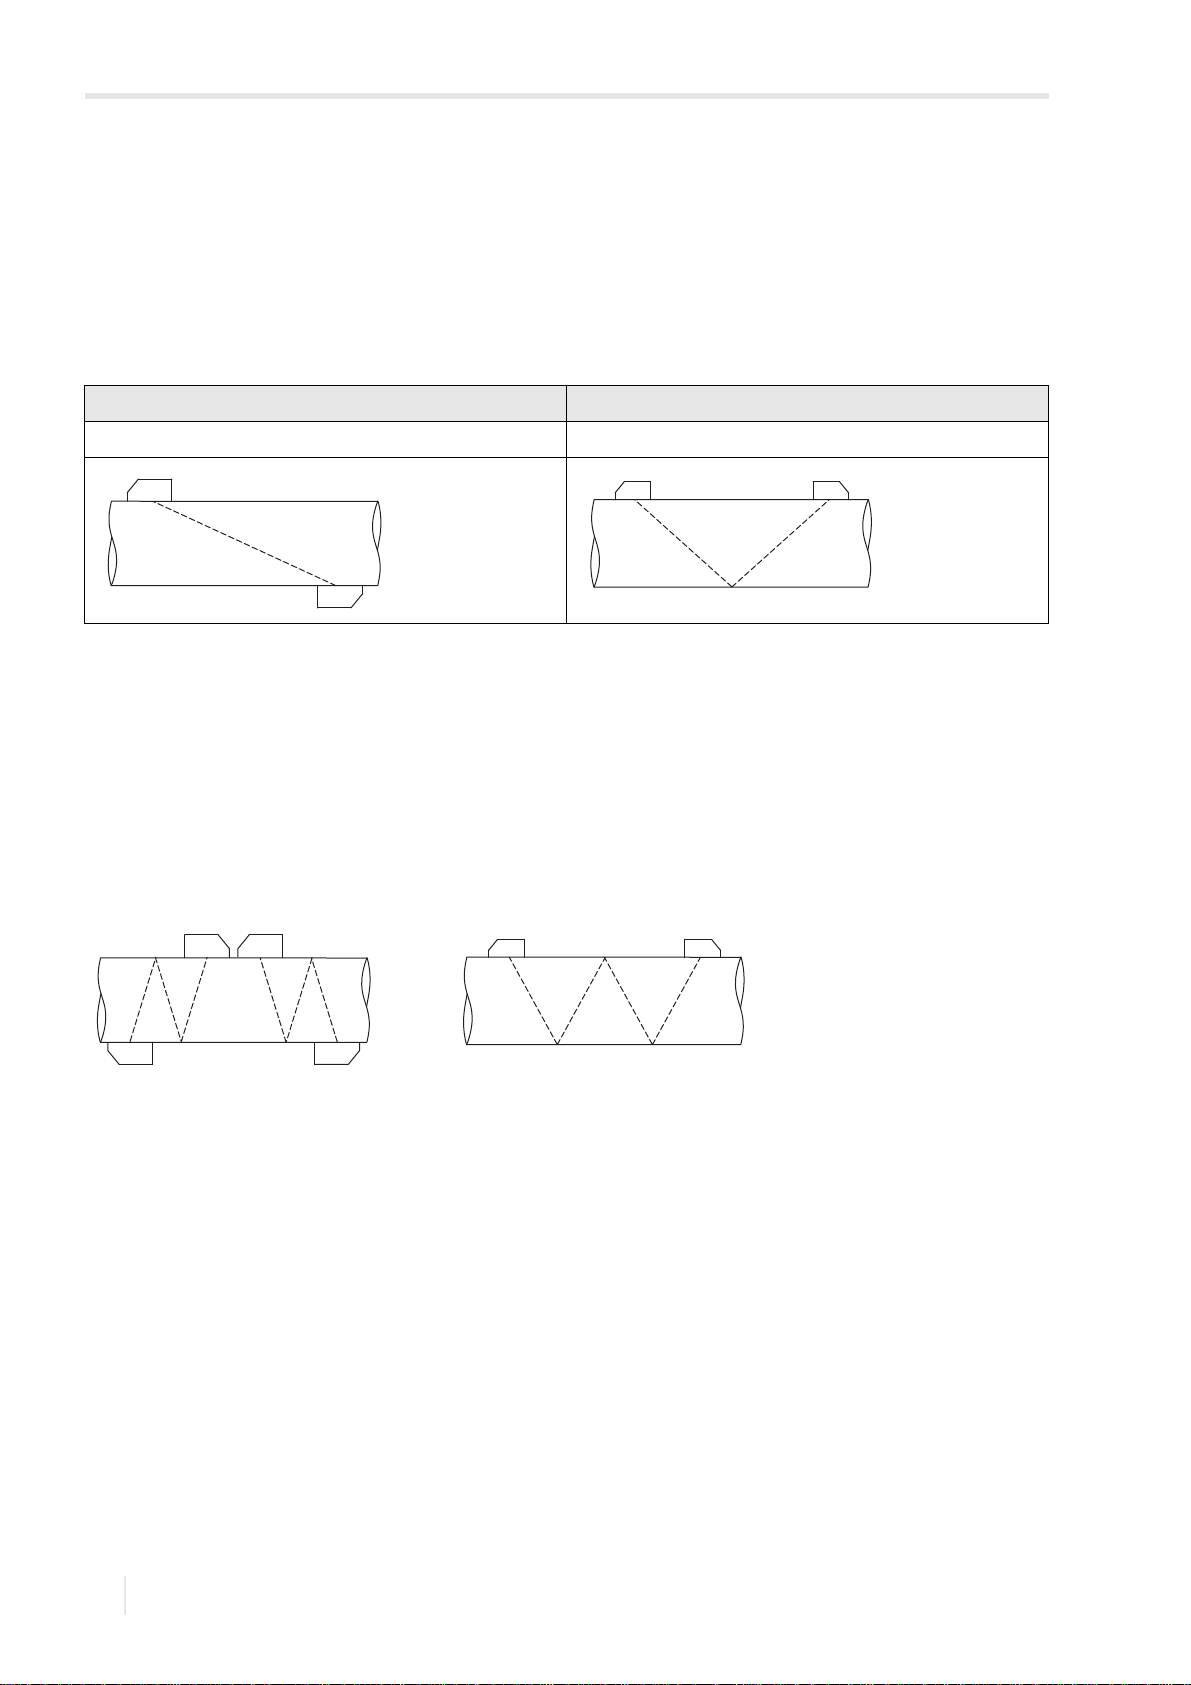
3.2 Measurement arrangements
3.2.1 Terms
Diagonal arrangement Reflection arrangement
The transducers are mounted on opposite sides of the pipe. The transducers are mounted on the same side of the pipe.
Sound path
The distance covered by the ultrasonic signal after crossing the pipe once. The number of the sound paths is:
• odd if the measurement is carried out in diagonal arrangement
• even if the measurement is carried out in reflection arrangement
Beam
The path covered by the ultrasonic signal between the transducers, i.e., the transducer emitting the ultrasonic signal and
the transducer receiving it. One beam consists of 1 or several sound paths.
Fig. 3.5: Diagonal arrangement with 2
beams and 3 sound paths
Fig. 3.6: Reflection arrangement with 1
beam and 4 sound paths
14
2018-07-16, UMFLUXUS_WDV1-3EN
Page 15
3 General principles
a
a
a
FLUXUS WD 3.2 Measurement arrangements
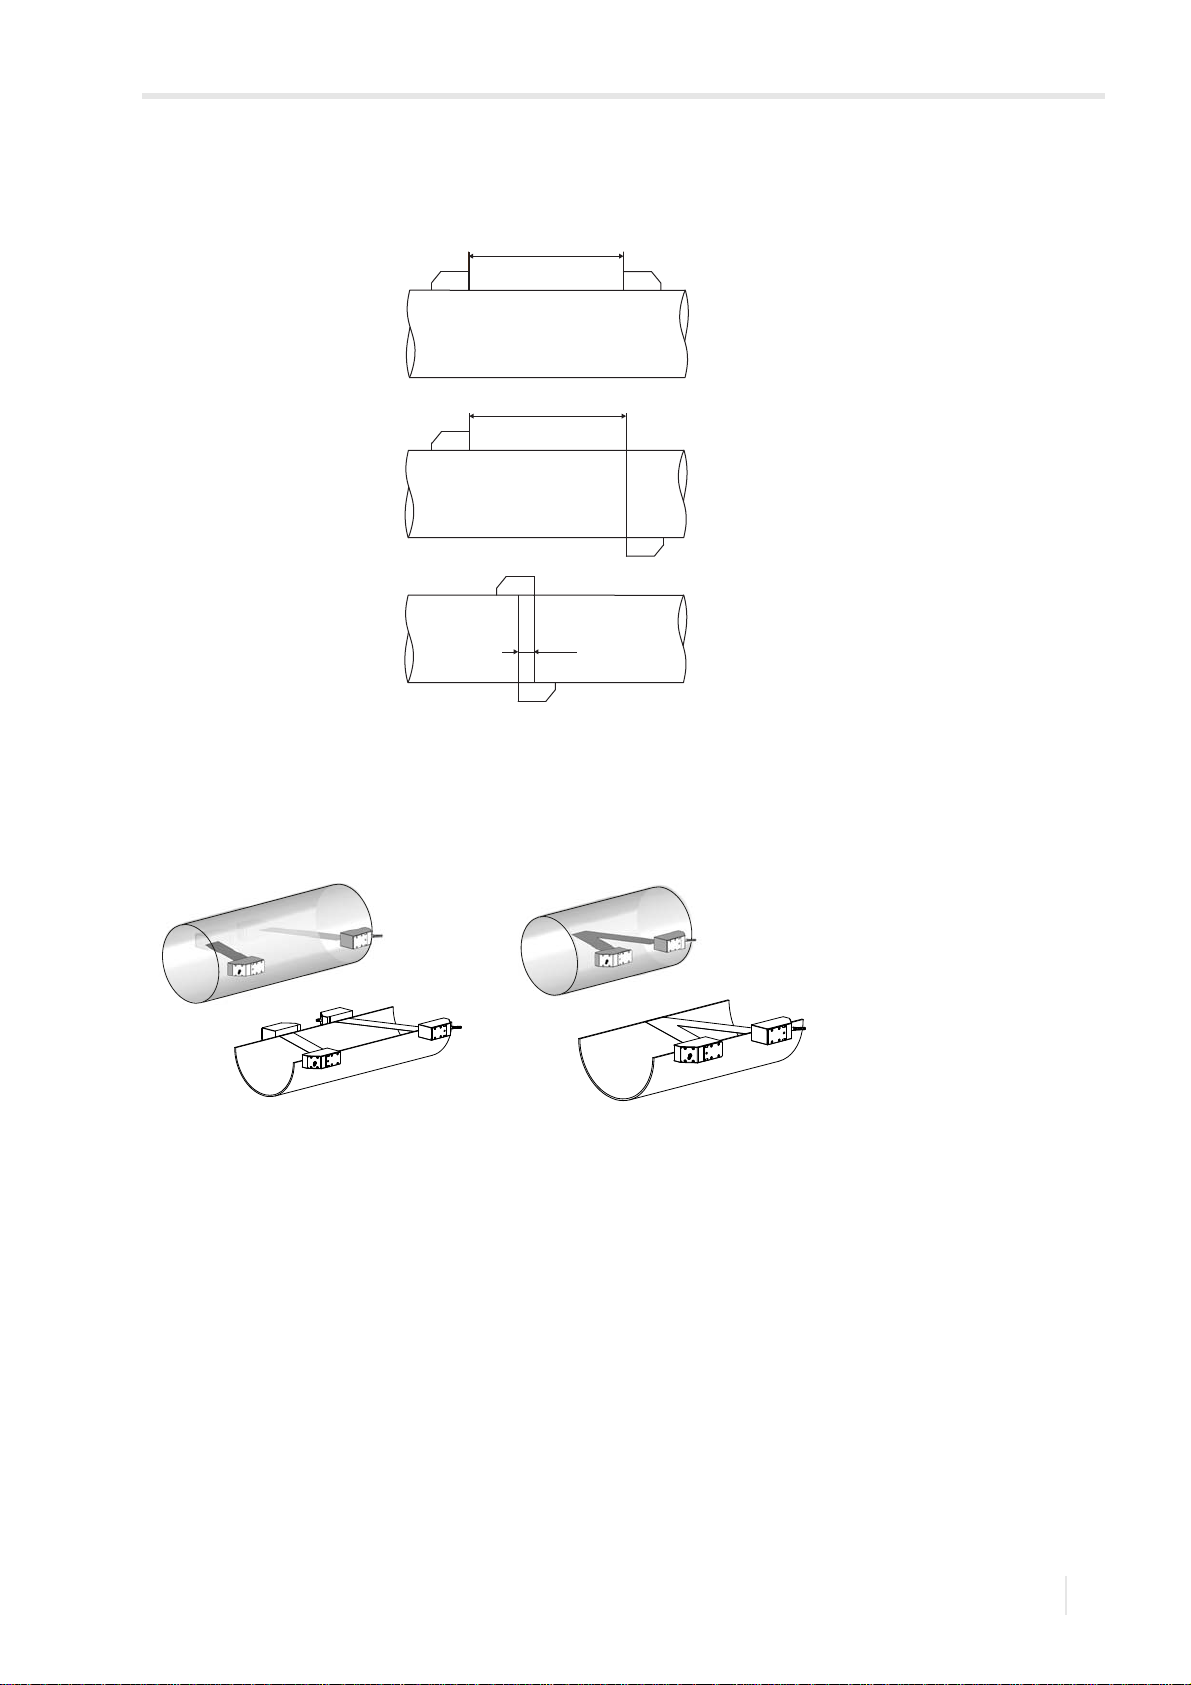
Transducer distance
The transducer distance is measured between the inner edges of the transducers.
reflection arrangement
diagonal arrangement
(positive transducer distance)
diagonal arrangement
(negative transducer distance)
a – transducer distance
Sound beam plane
Plane containing 1 or several sound paths or beams
Fig. 3.7: 2 beams in 1 plane Fig. 3.8: 2 sound paths in 1 plane
UMFLUXUS_WDV1-3EN, 2018-07-16
15
Page 16
3 General principles
Notice!
X arrangement
displaced X arrangement
3.3 Acoustic penetration FLUXUS WD
3.2.2 Examples
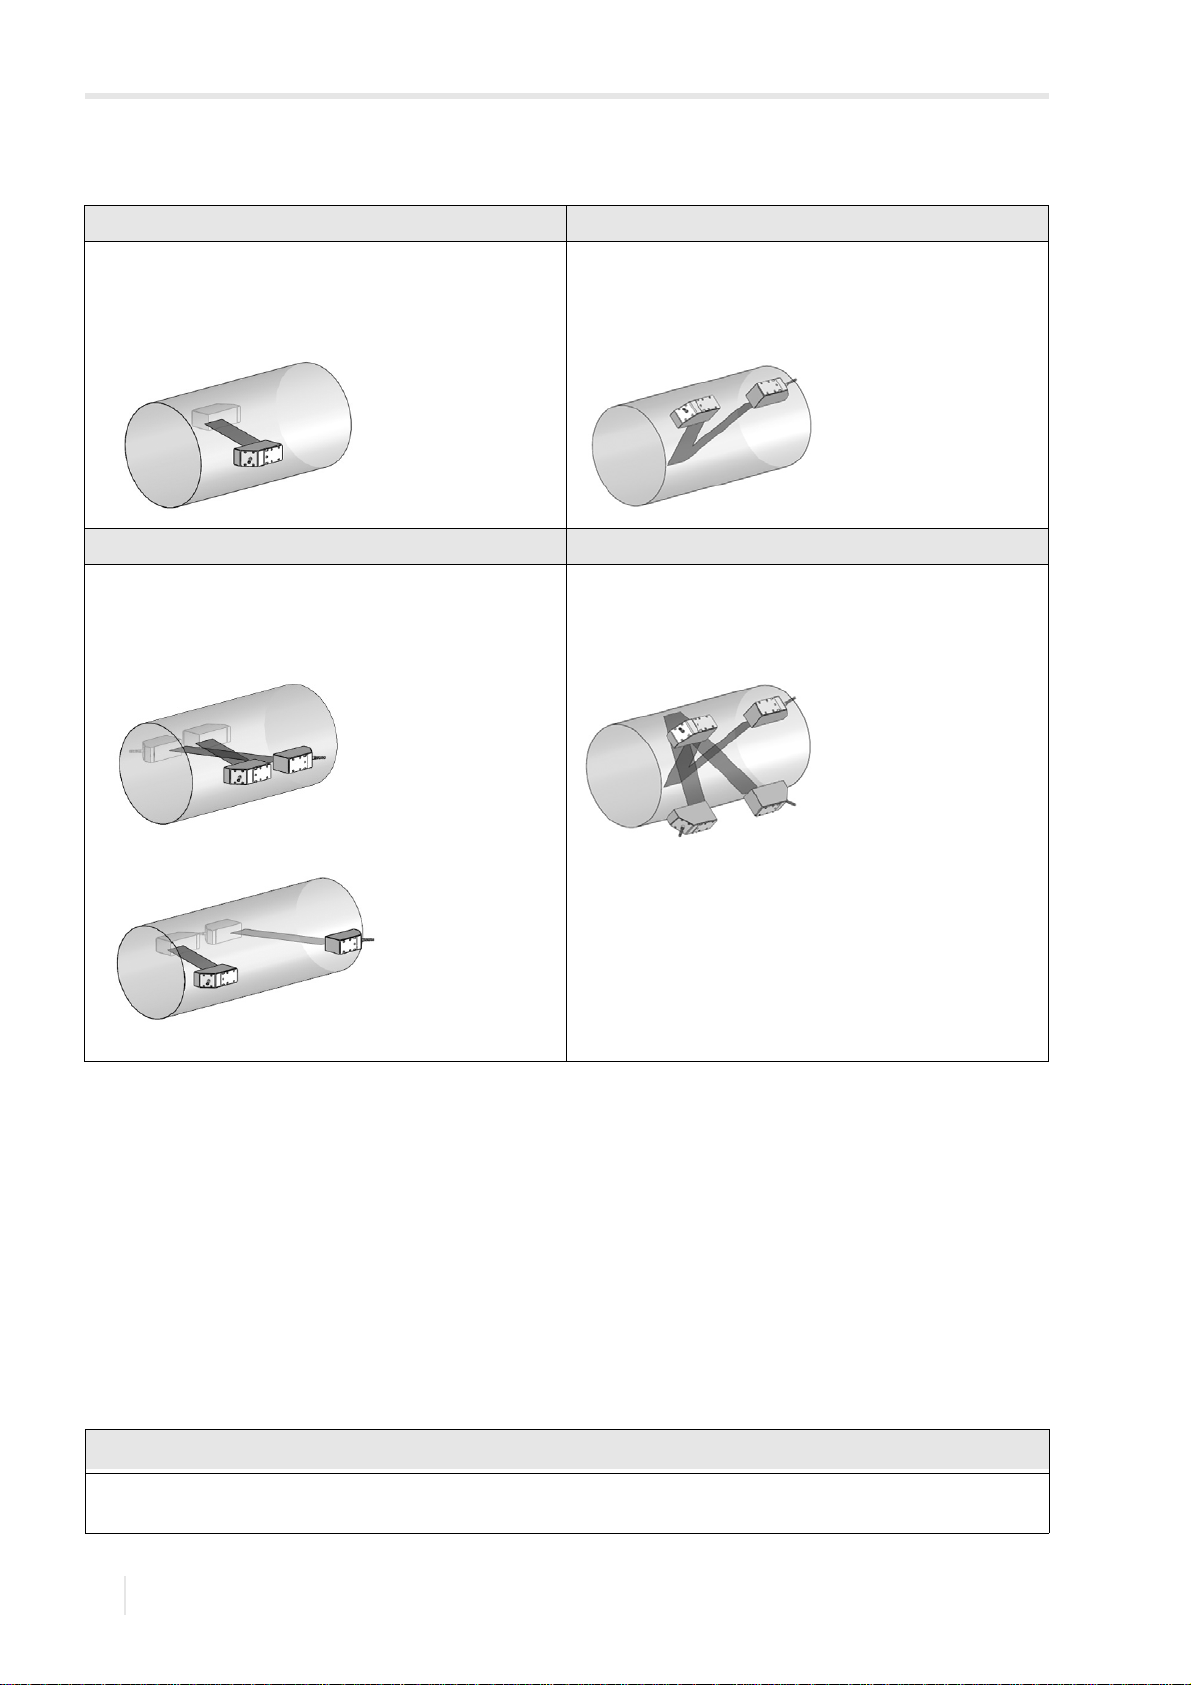
diagonal arrangement with 1 beam reflection arrangement with 1 beam
1 transducer pair
1 sound path
1 beam
1 plane
diagonal arrangement with 2 beams reflection arrangement with 2 beams and 2 planes
2 transducer pairs
2 sound paths
2 beams
1 plane
1 transducer pair
2 sound paths
1 beam
1 plane
2 transducer pairs
4 sound paths
2 beams
2 plane
3.3 Acoustic penetration
The pipe has to be acoustically penetrable at the measuring point. The acoustic penetration is given when pipe and fluid
do not attenuate the sound signal so strongly that it is completely absorbed before reaching the second transducer.
The attenuation caused by the pipe and the fluid depends on:
• kinematic viscosity of the fluid
• proportion of gas bubbles and solids in the fluid
• deposits on the inner pipe wall
• pipe material
The following requirements have to be met at the measuring point:
• the pipe is always completely filled
• no solid deposits in the pipe
• no bubble formation in the pipe
Even bubble-free fluids can form gas bubbles when the fluid expands, e.g., before pumps and after great cross-section
extensions.
2018-07-16, UMFLUXUS_WDV1-3EN
16
Page 17
3 General principles
FLUXUS WD 3.4 Undisturbed flow profile
Observe the following notes on the selection of the measuring point:
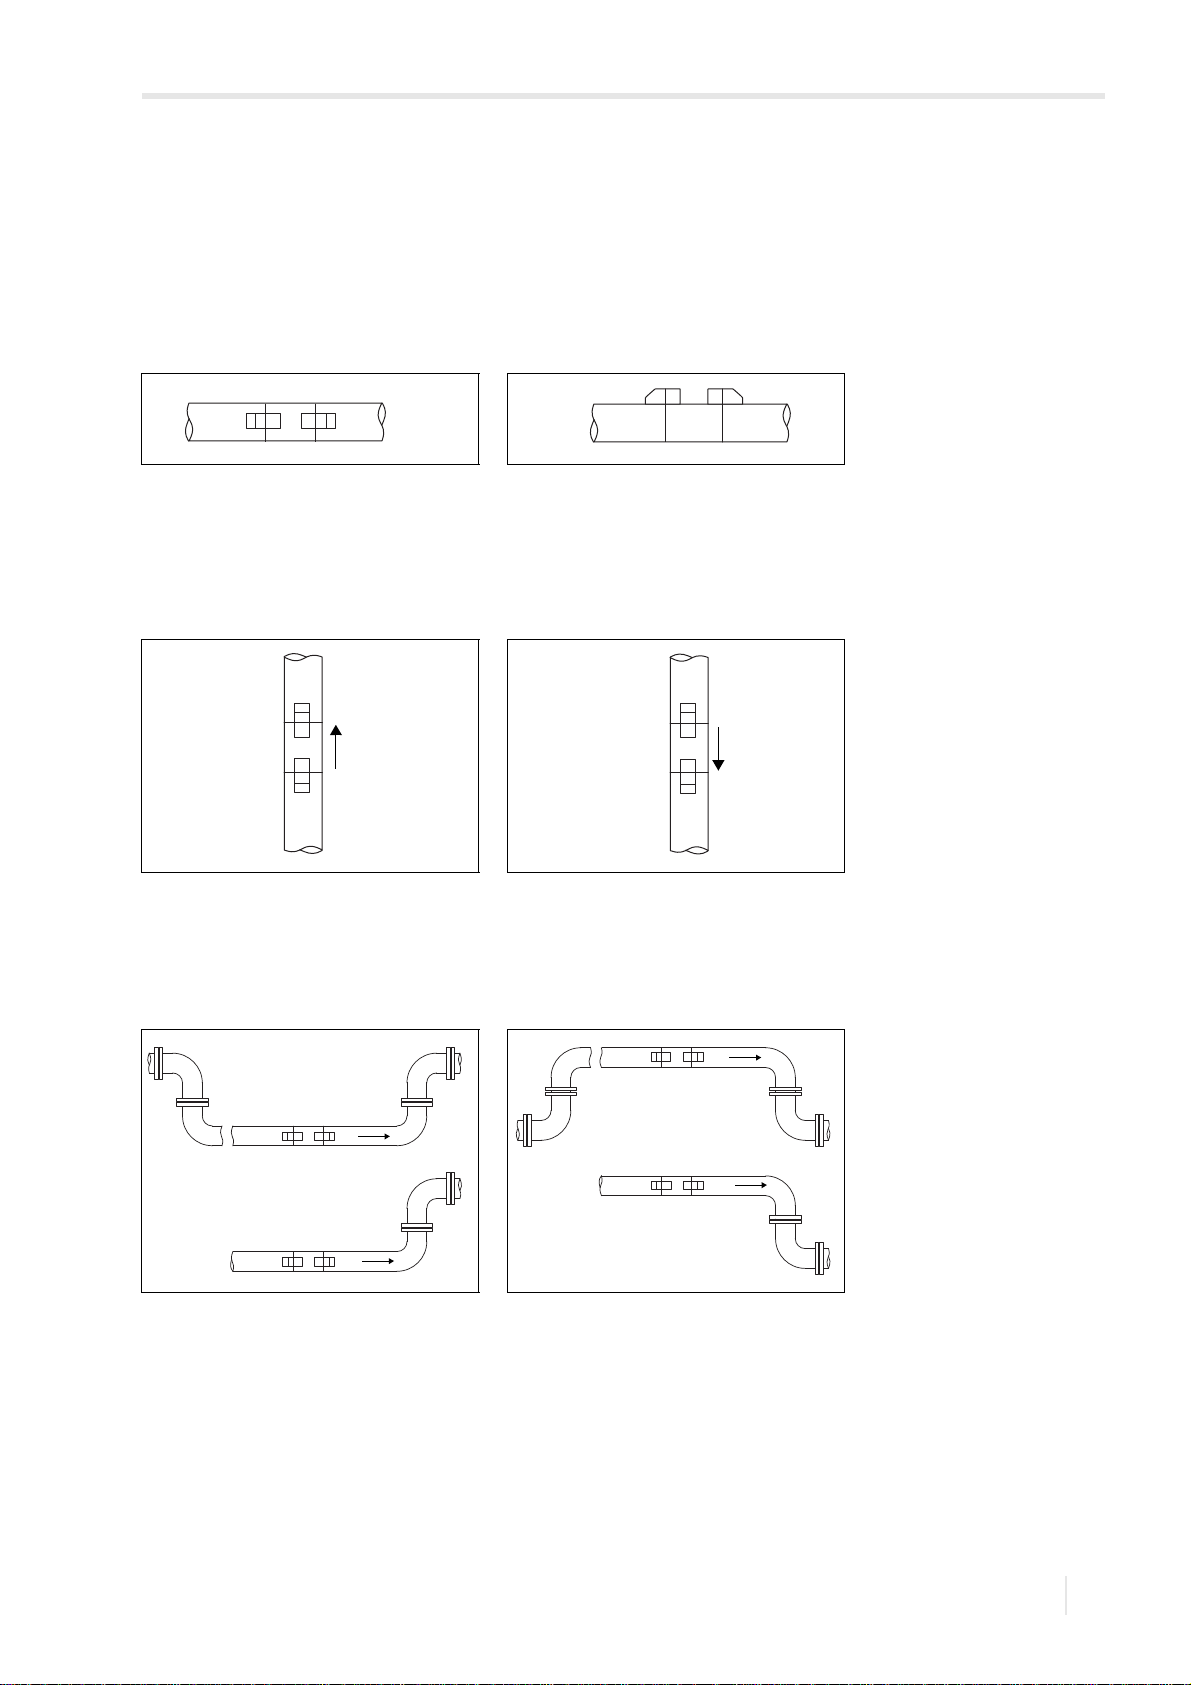
Horizontal pipe
Select a measuring point where the transducers can be mounted laterally on the pipe, allowing the sound waves to propagate horizontally in the pipe. Thus, solids on the bottom of the pipe or gas bubbles in the pipe's upper part are prevented
from influencing the propagation of the signal, see Fig. 3.9 and Fig. 3.10.
Fig. 3.9: Recommended transducer
mounting position
Fig. 3.10: Disadvantageous transducer
mounting position
Vertical pipe
Select the measuring point at a pipe location where the fluid flows upward. The pipe has to be completely filled, see Fig.
3.11 and Fig. 3.12.
Fig. 3.11: Recommended transducer
mounting position
Fig. 3.12: Disadvantageous transducer
mounting position
Free inlet or outlet pipe section
Select the measuring point at a pipe section where the pipe cannot run empty, see Fig. 3.13 and Fig. 3.14.
Fig. 3.13: Recommended transducer
mounting position
Fig. 3.14: Disadvantageous transducer
mounting position
3.4 Undisturbed flow profile
Some flow elements (e.g., elbows, valves, pumps, reducers) distort the flow profile in their vicinity. The axisymmetrical
flow profile in the pipe needed for correct measurement is no longer given. A careful selection of the measuring point helps
to reduce the impact of disturbance sources.
It is most important that the measuring point is chosen at a sufficient distance from any disturbance sources. Only then it
can be assumed that the flow profile in the pipe is fully developed. However, measuring results can be obtained even if the
recommended distance to disturbance sources cannot be met for practical reasons.
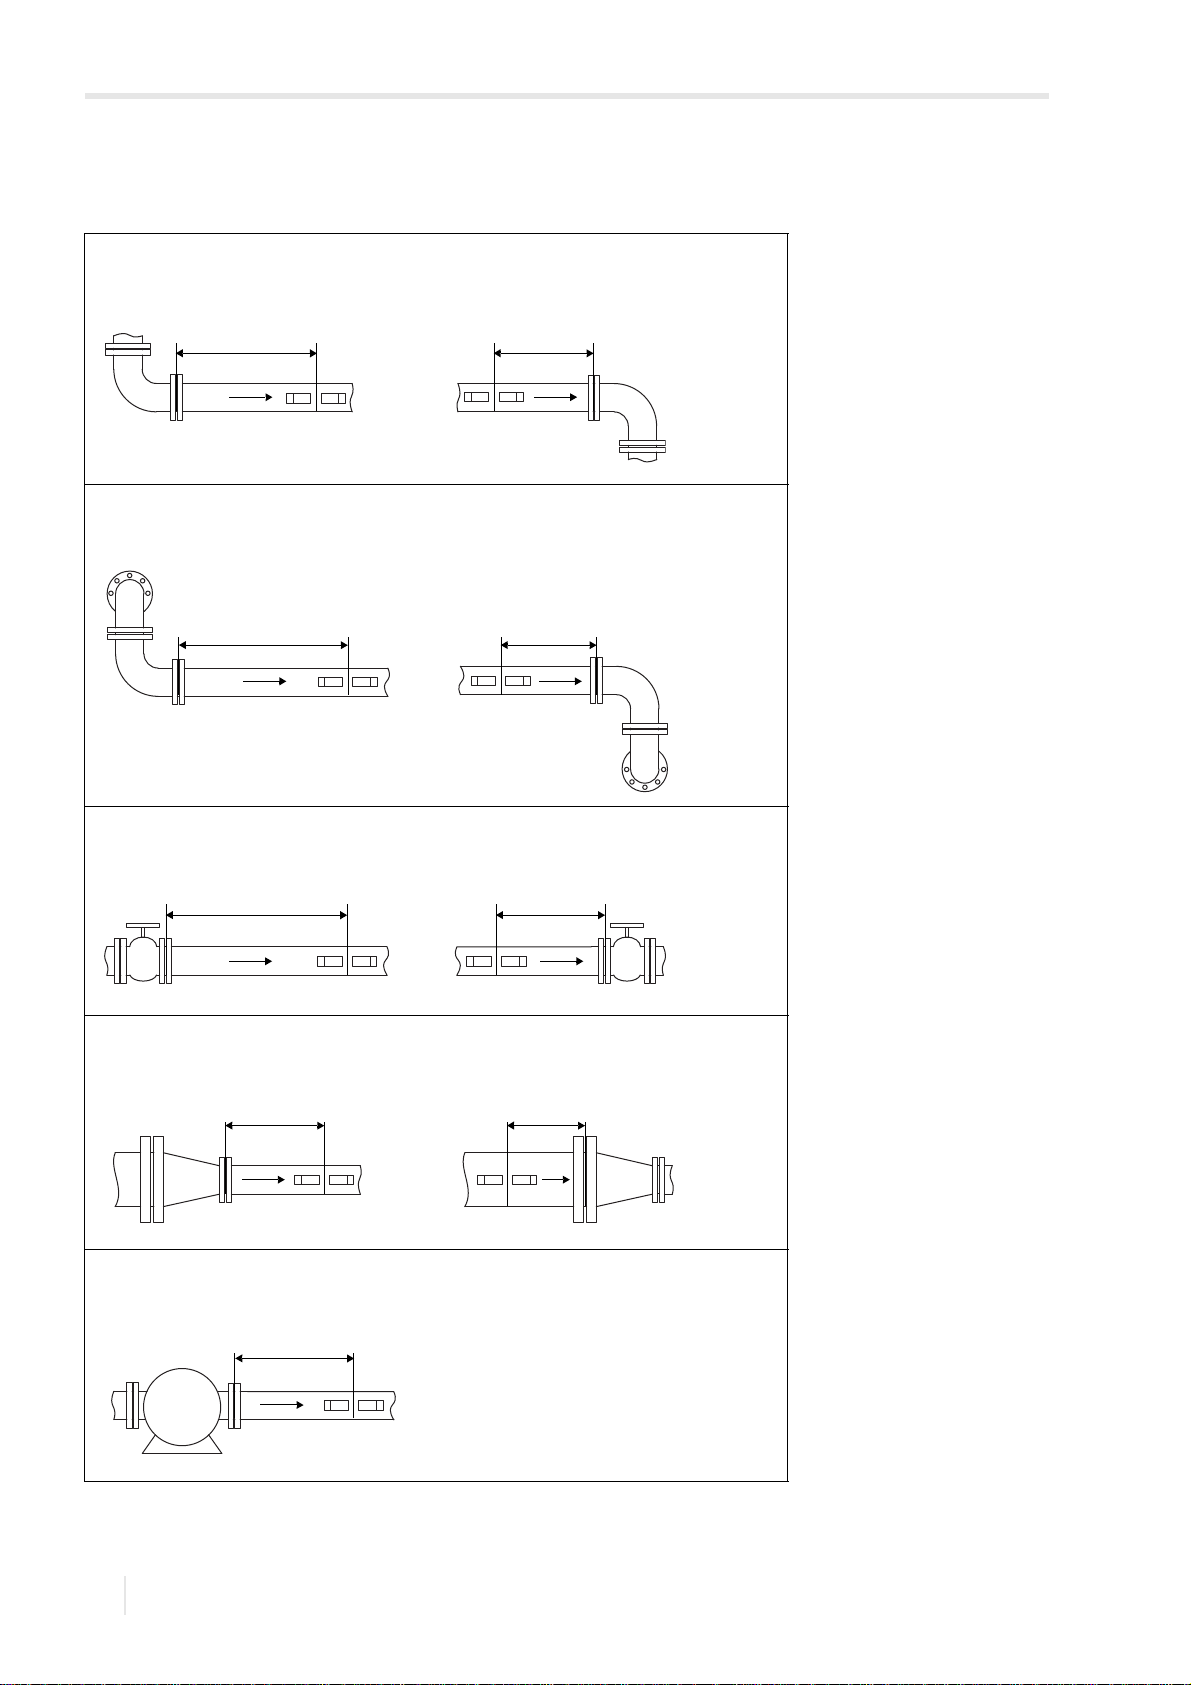
The recommended straight inlet and outlet pipe lengths for different types of flow disturbance sources are shown in the
examples in Tab. 3.1.
UMFLUXUS_WDV1-3EN, 2018-07-16
17
Page 18
3 General principles
l l
l l
l l
l l
l
3.4 Undisturbed flow profile FLUXUS WD
Tab. 3.1: Recommended distance from disturbance sources
D – nominal pipe diameter at the measuring point
l – recommended distance between disturbance source and transducer position
disturbance source: 90° elbow
inlet: l 10 D outlet: l 5D
disturbance source: 2 × 90° elbows on different planes
inlet: l 40 D outlet: l 5D
disturbance source: valve
inlet: l 40 D outlet: l 5D
disturbance source: reducer
inlet: l 10 D outlet: l 5D
disturbance source: pump
inlet: l 20 D
18
2018-07-16, UMFLUXUS_WDV1-3EN
Page 19
4 Product description
1
2
3
A
B
SNAP
DISP
DISP
MODEFAST
MUX
NEXT
Q
ON
Q+Q-
3x Q
OFF
LAN
USB
A+B-P1+
P2+
P3+
P4+
P5a
P6a
P7a
SSP1-
P2-
P3-
P4-
P5b
P6b
P7b
X2 X3
X_AV
KL11
KL12
KL7KL8
KL9KL10
KL4
X_AR X_BV X_BR
T1A
T1BS1T2A
T2B
T3A
T3BS3T4B
T4A
T1a
T1bS1T2a
T2b
T3a
T3bS3T4b
T4a
N(-)
PE
L(+)
AV
AVS
AGN
ARSARBV
BVS
BGN
BRS
BR
1
2
FLUXUS WD 4.1 Measuring system
4 Product description
4.1 Measuring system
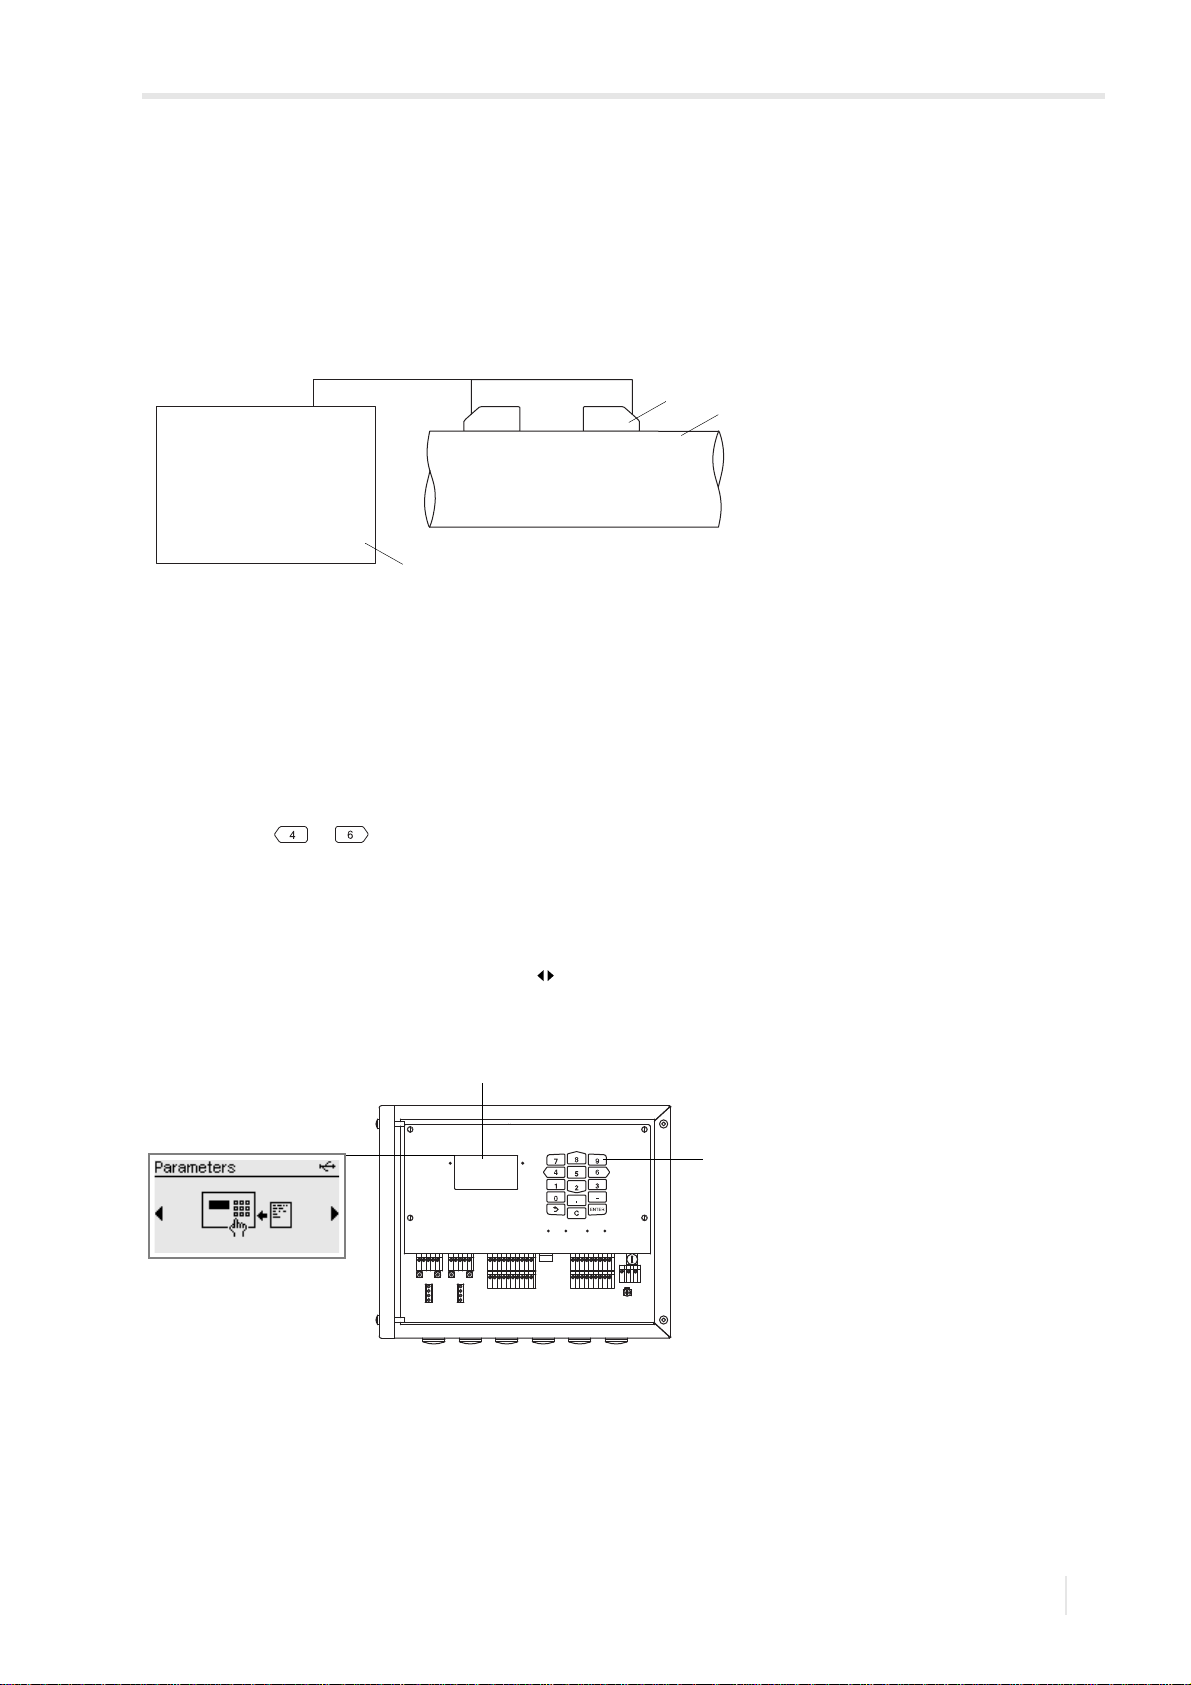
The measurement system consists of a transmitter, the ultrasonic transducers and the pipe on which the measurement is
carried out, see Fig. 4.1.
Fig. 4.1: Example for a measurement arrangement
1 – transducer
2 – pipe
3 – transmitter
The ultrasonic transducers are mounted on the pipe. They send and receive ultrasonic signals through the fluid.
The transmitter controls the measuring cycle, eliminates noise signals and analyzes useful signals. The measured values
can be displayed, used for calculations and transmitted by the transmitter.
4.2 Handling concept
The transmitter is operated via the keyboard.
By pressing key or the following program branches are displayed consecutively:
•Parameters
•Measurement
•Options
•Special functions
A program branch is displayed between 2 arrows , see Fig. 4.2.
Fig. 4.2: Display of the program branch Parameters
1–display
2–keyboard
UMFLUXUS_WDV1-3EN, 2018-07-16
19
Page 20
4 Product description
4.2 Handling concept FLUXUS WD
For a description of the individual program branches, see Tab. 4.1.
Tab. 4.1: Description of the program branches
program branch description
Parameters Before starting a measurement, the transducer, pipe and fluid parameters have to be entered in the
program branch Parameters.
Measurement After activating the measuring channels and the input of the transducer distance, the measurement is
Options Channel-related settings are carried out in the program branch Options as e.g., selection of the
Special functions Global settings, relating the transmitter and all measuring channels, are carried out in the program
started in the program branch Measurement.
physical quantity, selection of the unit of measurement, input of the damping factor, assignation of the
inputs.
branch Special functions, as e.g. system settings (language, key lock), measuring settings,
communication, data logger, snaps, configuration of inputs.
After connecting the transmitter to the power supply and starting up the transmitter for the first time, the following settings
according to language, time, date and units of measurement have to be made, see section 8.1. The program branch
Parameters will be displayed. Any further start-up will display the measured value in case the measurement was not
stopped before the transmitter has been disconnected from the program branch. If the measurement is stopped, the program branch Parameters will be displayed.
After starting the measurement, the parameter settings or configuration of the transmitter outputs can be displayed without
interrupting the measurement. A change is not possible. For this, the measurement has to be stopped.
20
2018-07-16, UMFLUXUS_WDV1-3EN
Page 21
4 Product description
1
2
3
error message
ongoing measurement
activated FastFood mode
full data logger
connection via USB cable
activated key lock
FLUXUS WD 4.3 Display
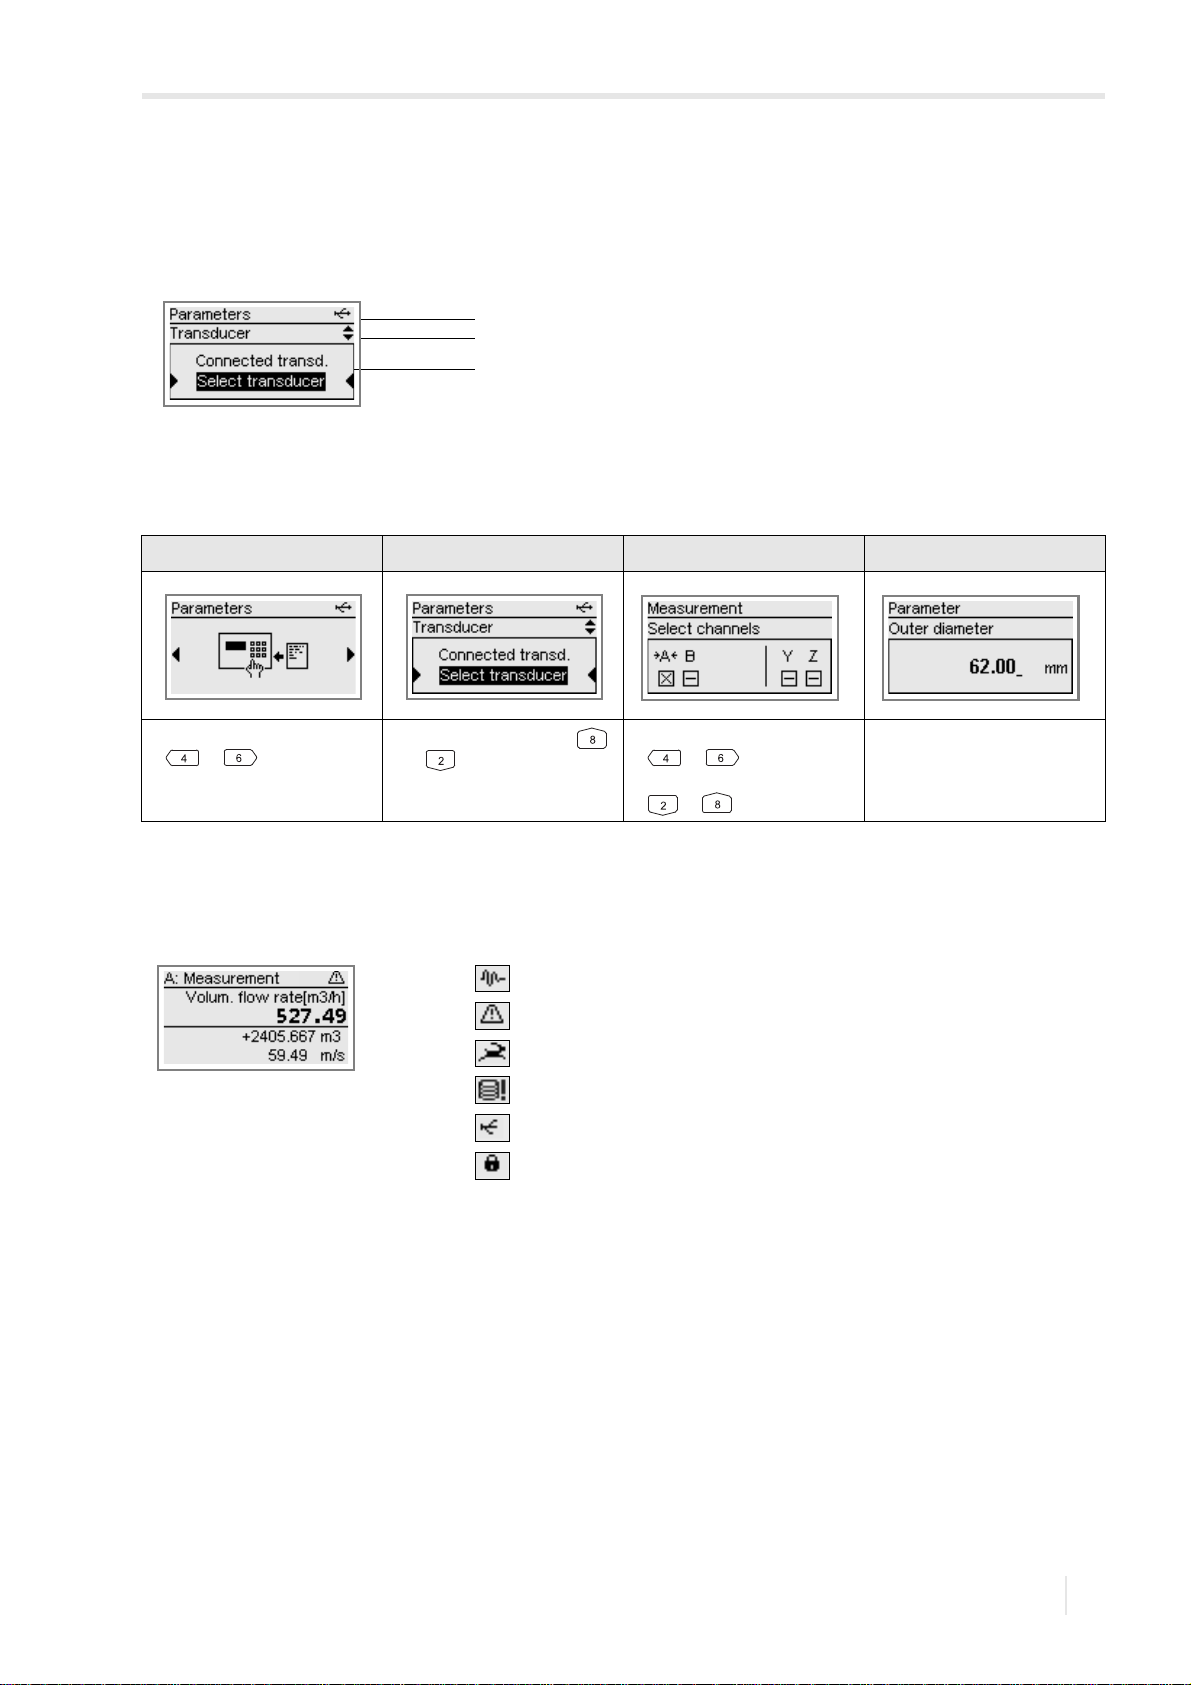
4.3 Display
Structure
Fig. 4.3: Menu item of the program branch Parameters
1 – program branch
2 – menu item currently edited
3 – area for scroll lists, selection fields or input fields
Tab. 4.2: Navigation
horizontal scroll list vertical scroll list selection fields input fields
• scroll horizontally with key
or
• scroll vertically with key
or
Status indications
Several symbols are used for the status indications.
Fig. 4.4: Status indications (line 1)
• scroll horizontally with key
or
• activate/deactivate with key
or
• input via the 10 numerical
keys of the keyboard, see
Tab. 4.5
• delete with key C
UMFLUXUS_WDV1-3EN, 2018-07-16
21
Page 22
4 Product description
4.4 Keyboard FLUXUS WD
4.4 Keyboard
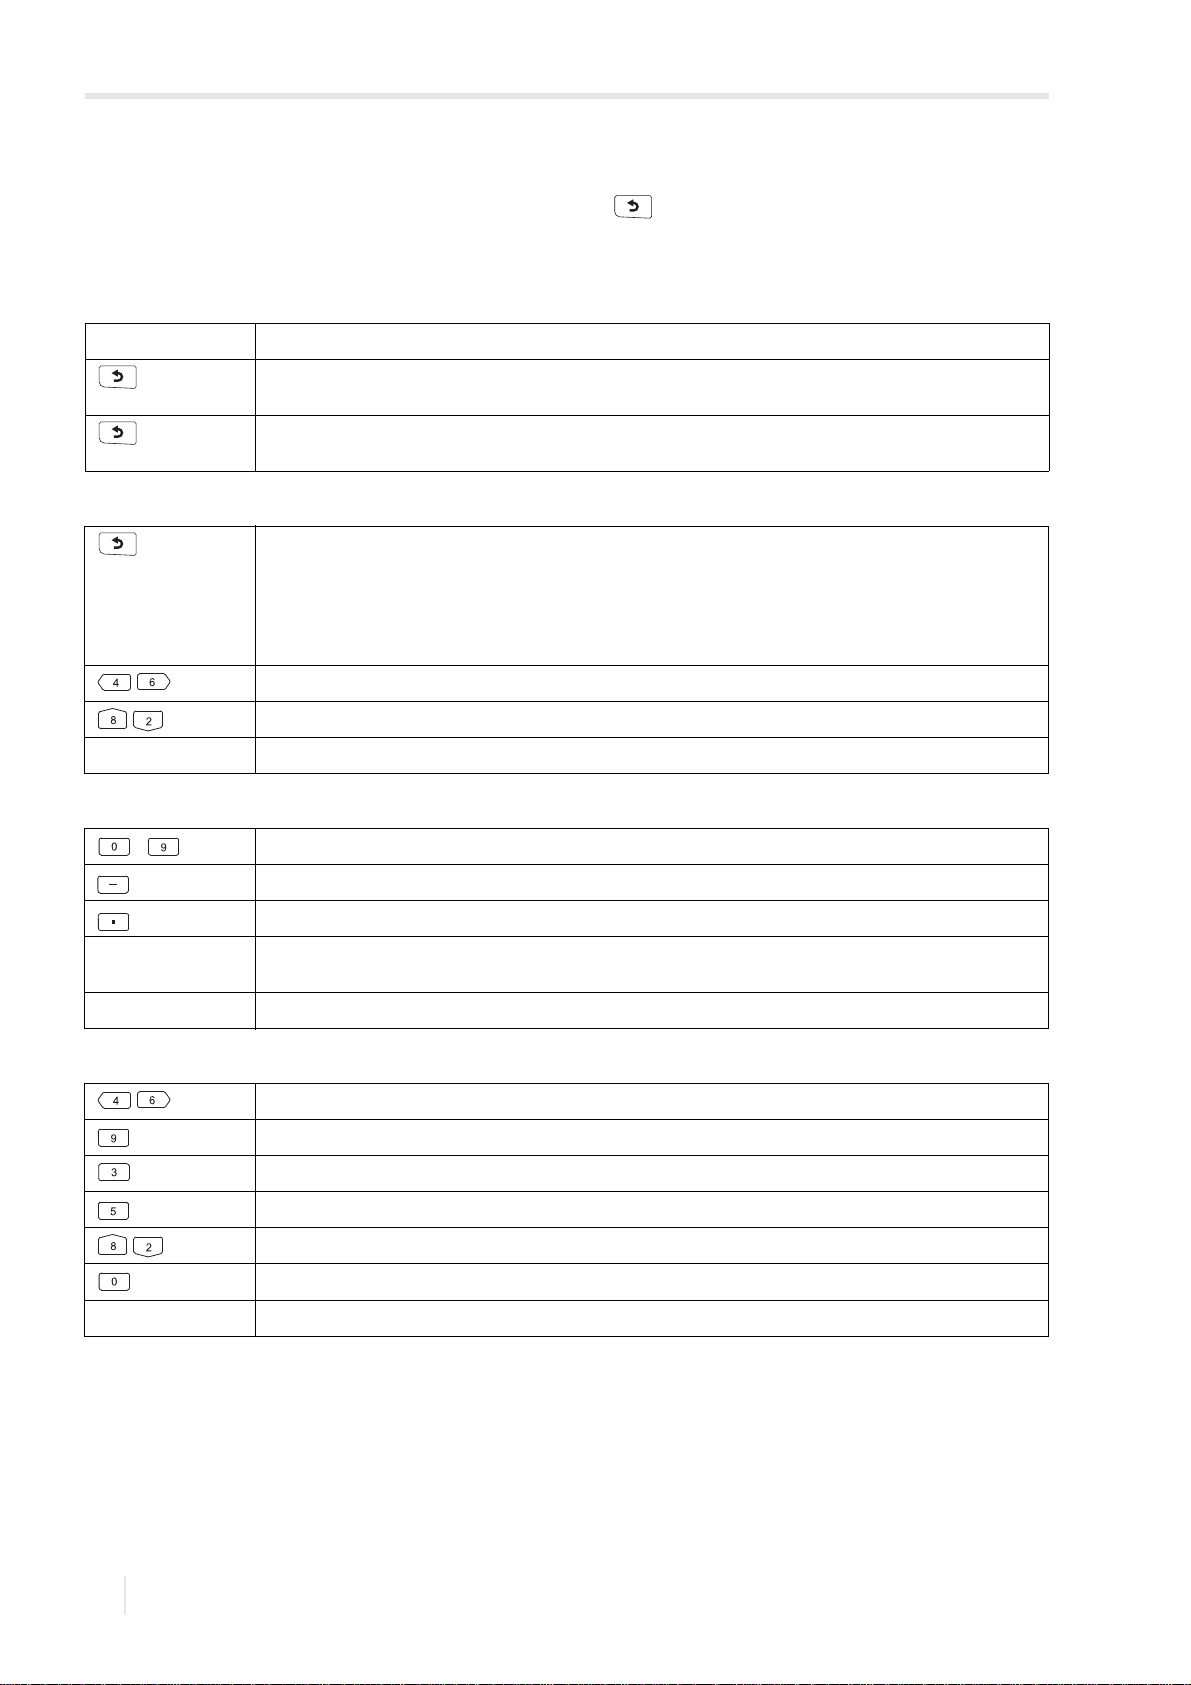
The keyboard has 15 keys, including the 3 function keys: ENTER, and C.
Some key have multiple functions. They can be used to enter data, to navigate through scroll lists as well as to execute
special functions (e.g., reset of totalizers).
Tab. 4.3: General functions
ENTER confirmation of selection or input
+ C + ENTER Reset: press these 3 keys simultaneously to correct a malfunction. The reset has the same effect as a restart
+ C INIT: During an initialization of the transmitter, all settings are reset to the factory default settings (see section
Tab. 4.4: Navigation
scroll to the left/right through a scroll list
scroll upwards/downwards through a scroll list
ENTER confirmation of a menu item of the program branch
Tab. 4.5: Input of numbers
… input of the number pictured on the key
C deletion of values
of the transmitter. Stored data are not affected.
8.6).
when entering parameters:
short press: return to the main menu
long press (several seconds): return to the beginning of the program branch
during the measurement:
display of scroll list: Stop measurement, Enter parameters, Show measurement
sign for the input of negative values
decimal marker
After the value has been deleted, the previous value will be displayed.
ENTER confirmation of the input
Tab. 4.6: Input of text
positioning of the cursor
"A" is displayed and capitalization is activated
"Z" is displayed and capitalization is activated
toggling between upper and lower case
selection of the previous/next character
deletion of a character and insertion of a blank
ENTER confirmation of the input
22
2018-07-16, UMFLUXUS_WDV1-3EN
Page 23
5 Transport and storage
Caution!
Caution!
FLUXUS WD 5.1 Transport
5 Transport and storage
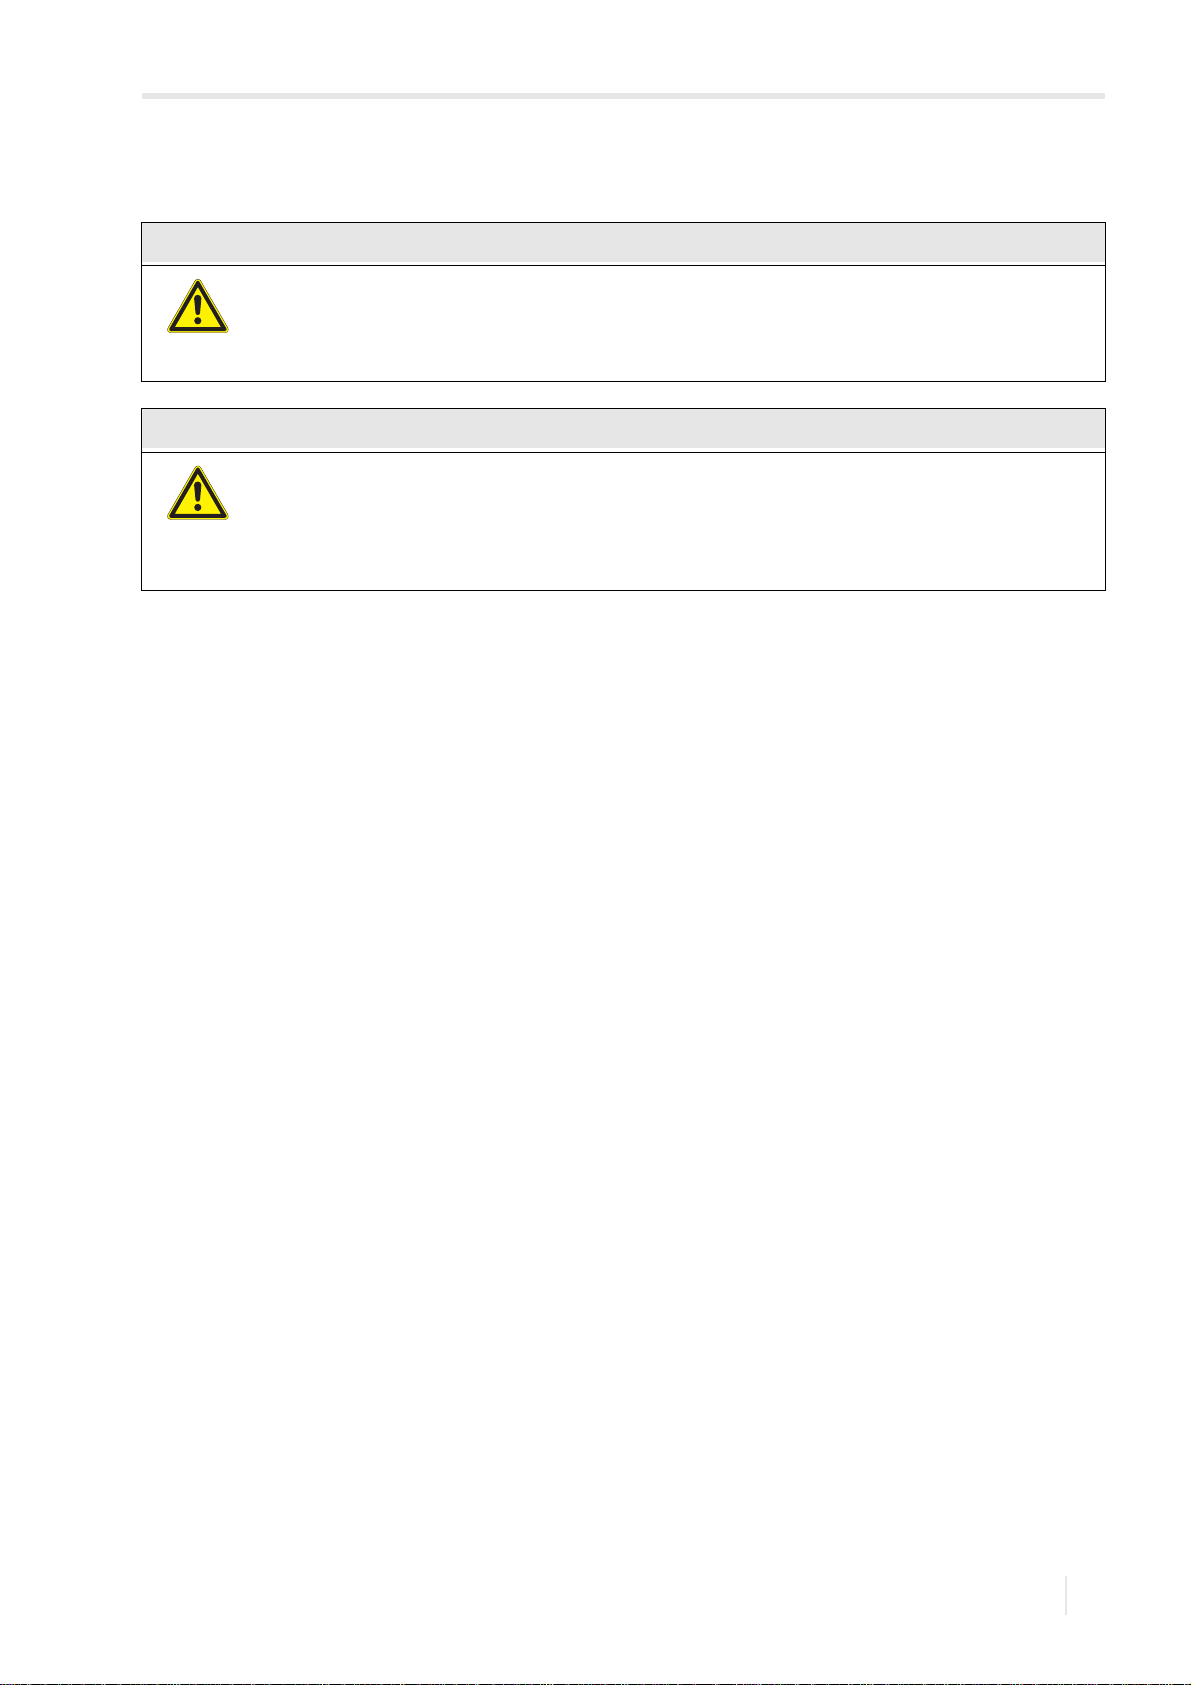
When packaging, the transmitter can fall down.
There is a danger of crushing body parts or damaging the measuring equipment.
Secure the transmitter against falling during packaging. Wear the required personal protective equip-
ment. Observe the applicable rules.
When lifting, the center of gravity of the transmitter can be displaced within the cardboard box. The
transmitter can fall down.
There is a danger of crushing body parts or damaging the measuring equipment.
Secure the transmitter against falling during transport. Wear the required personal protective equip-
ment. Observe the applicable rules.
5.1 Transport
The measuring equipment must be packaged properly for transport, see section 2.7. For weight indications of the transmitter
and the transducers, see Technical specification.
5.2 Storage
The transmitter and the transducers have to be stored in a dry place.
UMFLUXUS_WDV1-3EN, 2018-07-16
23
Page 24
6 Installation
Warning!
Danger!
Caution!
Caution!
FLUXUS WD
6 Installation
Installation, connection and start-up by unauthorized and unqualified personnel
This may result in personal or material damage or other dangerous situations.
Any work on the transmitter has to be carried out by authorized and qualified personnel.
Working in mines or cramped confines
Risk of intoxication and/or asphyxiation because of emerging gases, risk of injuries because of cramped
conditions.
Wear the required personal protective equipment. Observe the applicable rules.
Safety and accident prevention regulations for electrical systems and equipment
Failure to observe these regulations may lead to severe injury or death.
Observe the safety and accident prevention regulations for electrical systems and equipment.
Touching hot or cold surfaces
This may result in injuries (e.g., thermal damages).
Observe the ambient conditions at the measuring point during installation. Wear the required personal
protective equipment. Observe the applicable rules.
24
2018-07-16, UMFLUXUS_WDV1-3EN
Page 25
6 Installation
A
B
SNAP
DISP
DISP
MODEFAST
MUX
NEXT
Q
ON
Q+Q-
3x Q
OFF
LAN
USB
A+B-P1+
P2+
P3+
P4+
P5a
P6a
P7a
SSP1-
P2-
P3-
P4-
P5b
P6b
P7b
X2 X3
X_AV
KL11
KL12
KL7KL8
KL9KL10
KL4
X_AR X_BV X_BR
T1A
T1BS1T2A
T2B
T3A
T3BS3T4B
T4A
T1a
T1bS1T2a
T2b
T3a
T3bS3T4b
T4a
N(-)
PE
L(+)
AV
AVS
AGN
ARSARBV
BVS
BGN
BRS
BR
1
3
9
5
8
4
7
2
6
10
FLUXUS WD 6.1 Transmitter
6.1 Transmitter
6.1.1 Transmitter design
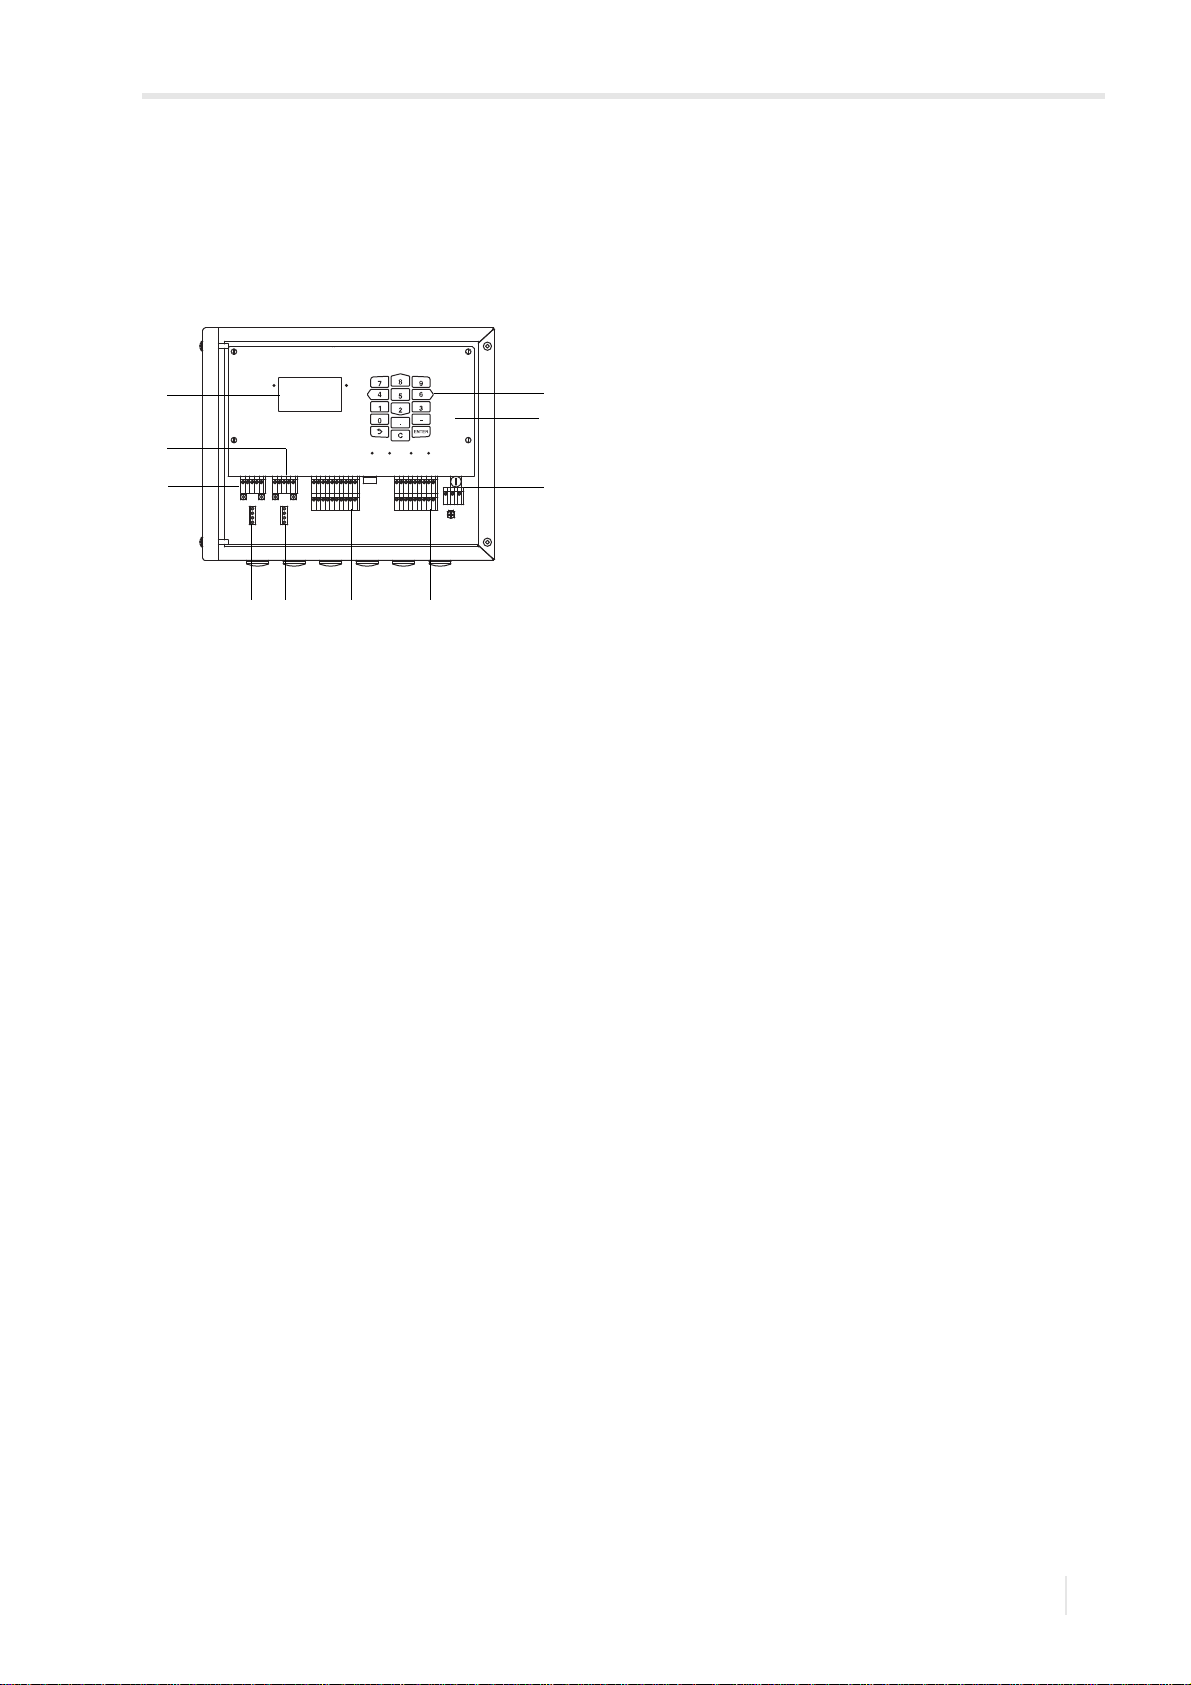
The command panel can be accessed by opening the housing cover.
Fig. 6.1: Command panel of the transmitter
1 – LCD display, backlight
2 – transducers (channel A)
3 – transducers (channel B)
4–keyboard
5 – power supply
6 – sensor module (channel A)
7 – sensor module (channel B)
8 – inputs
9 – outputs
10 – front plate
UMFLUXUS_WDV1-3EN, 2018-07-16
25
Page 26
6 Installation
Important!
1
1
1
240
280
min. 130
6.1 Transmitter FLUXUS WD
6.1.2 Opening and closing the housing
Opening
Do not use objects which may damage the housing gasket to open the cover housing.
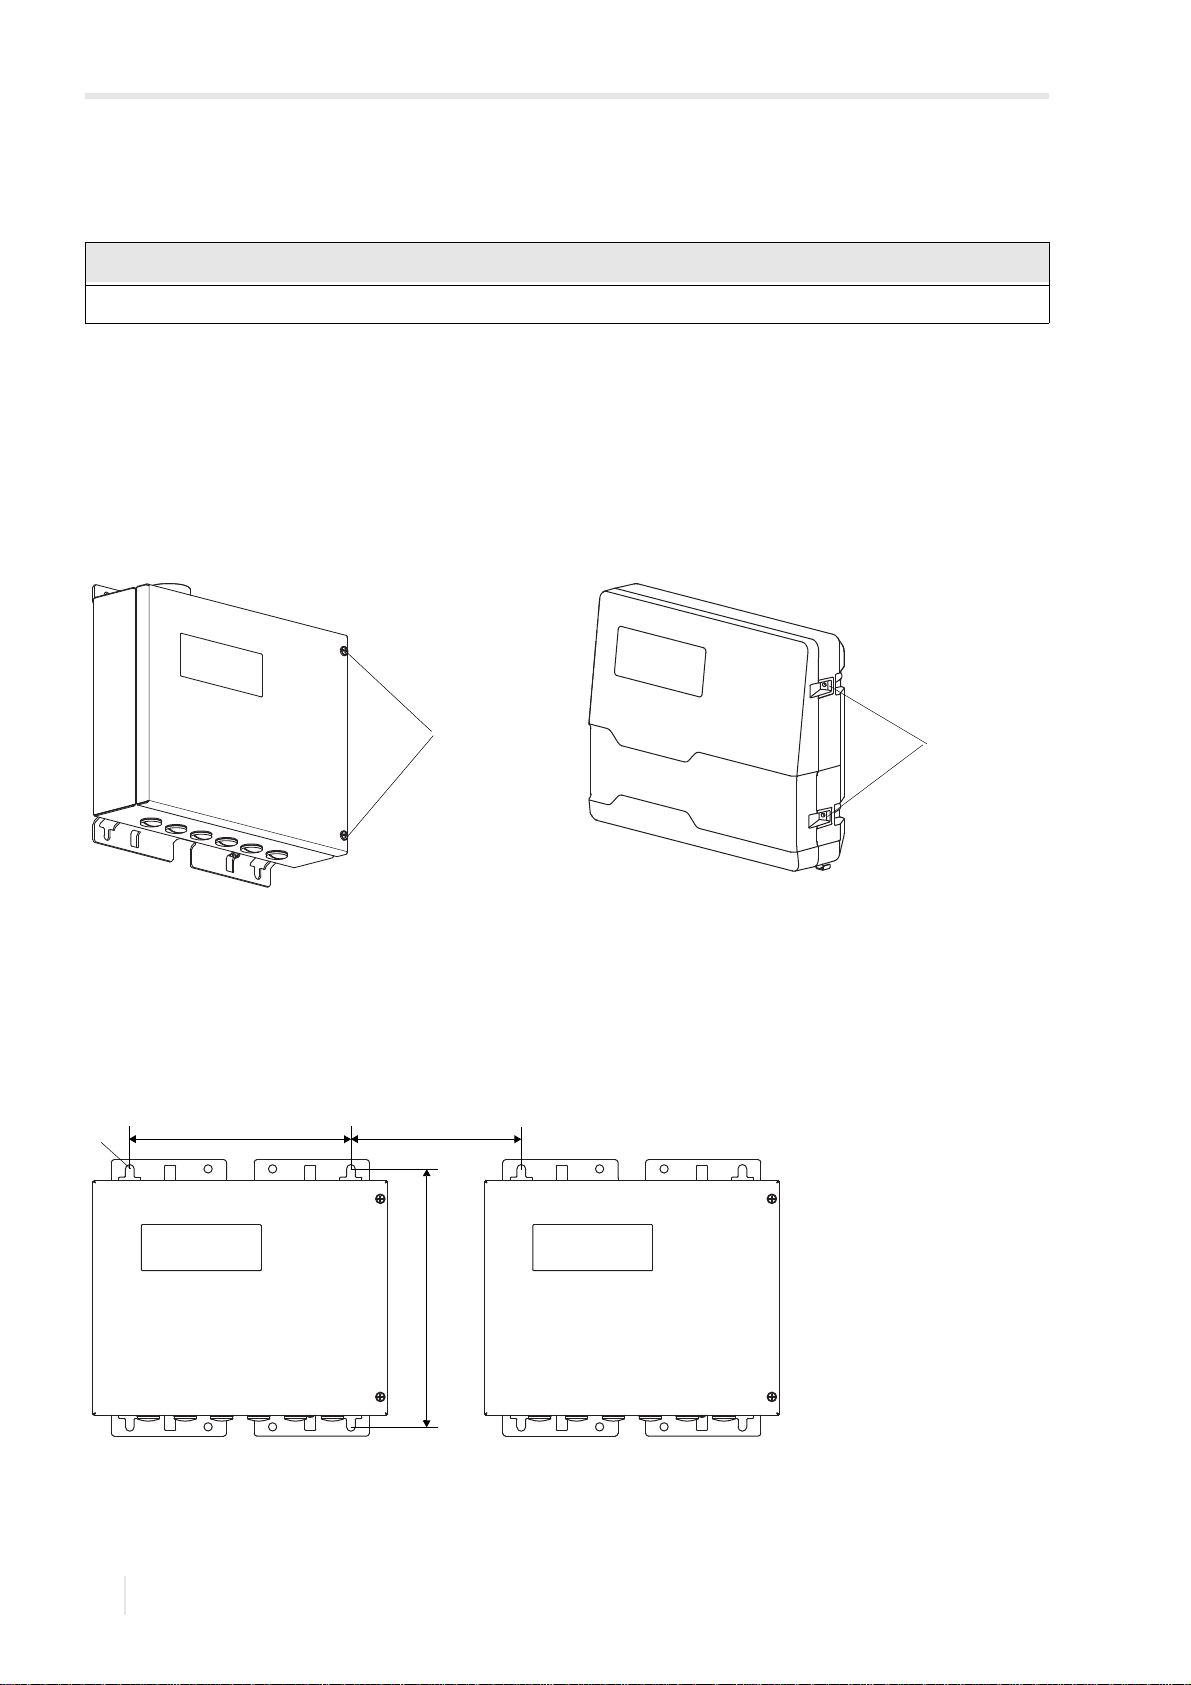
• Loosen the screws of the transmitter housing, see Fig. 6.2 and Fig. 6.3.
• Open the housing cover of the transmitter.
Closing
• Close the housing cover.
• Tighten the screws of the transmitter housing, see Fig. 6.2 and Fig. 6.3.
(transmitter with stainless steel housing: a max. torque of 1 Nm)
Fig. 6.2: Transmitter with stainless steel housing
1–screws
6.1.3 Installation of the transmitter
6.1.3.1 Wall installation
Transmitter with stainless steel housing
• Fix the transmitter with 4 screws to the wall, see Fig. 6.4.
Fig. 6.4: Transmitter with stainless steel housing (dimensions in mm)
Fig. 6.3: Transmitter with aluminum housing
1–screws
1 – fixing hole for wall mounting Ø 9.5
26
2018-07-16, UMFLUXUS_WDV1-3EN
Page 27
6 Installation
165.6
Ø 1
0.4
Ø
8.5
190.2 min. 180
1
2
5
3
5
1
4
FLUXUS WD 6.1 Transmitter
Transmitter with aluminum housing
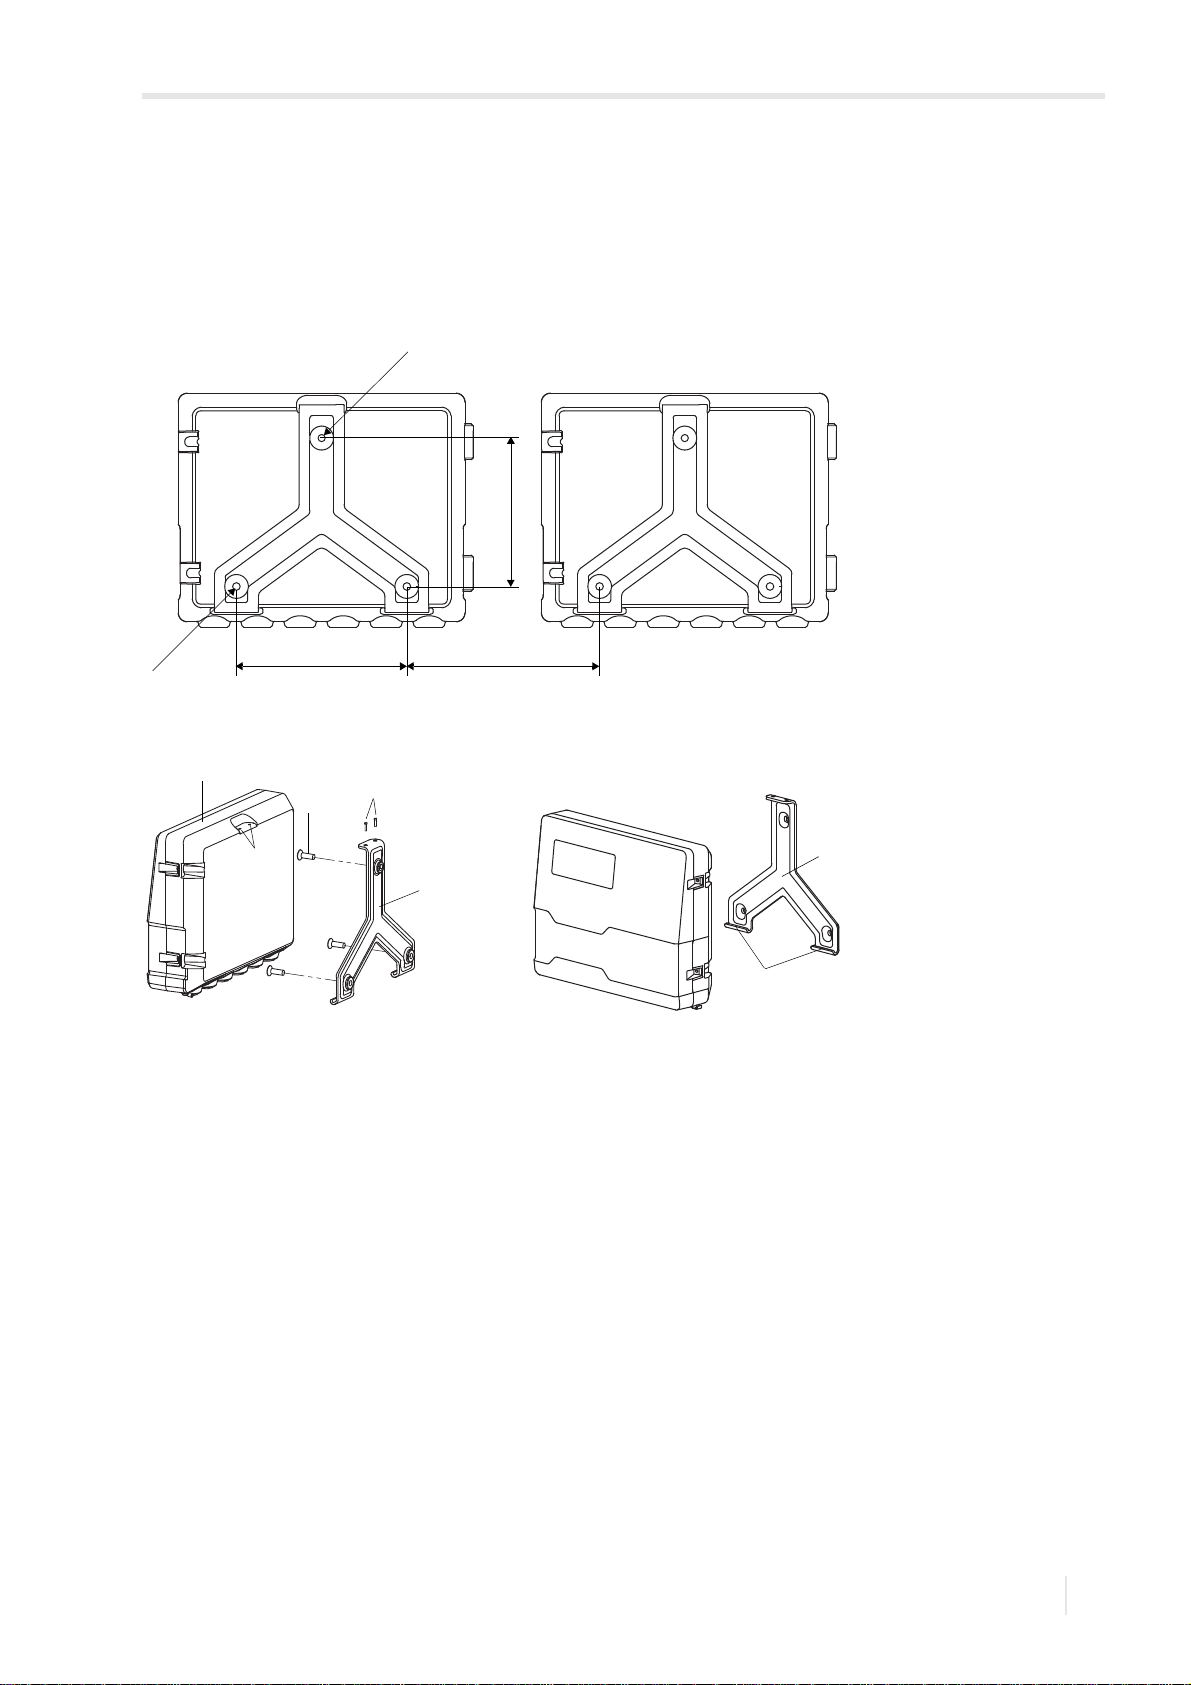
• Fix the wall mount (1) with 3 countersunk-head screws (3) firmly to the wall.
• Use the lower claws (4) to hang the transmitter (2) onto the wall mount.
• Fix the transmitter to wall mount by tightening the 2 screws (5), see Fig. 6.5 and Fig. 6.6.
Fig. 6.5: Transmitter with aluminum housing (dimensions in mm)
Fig. 6.6: Installation view
1 – wall mount
2 – transmitter
3 – countersunk-head screw
4 – hooks
5–screws
UMFLUXUS_WDV1-3EN, 2018-07-16
27
Page 28
6 Installation
Notice!
Caution!
1
2
6.1 Transmitter FLUXUS WD
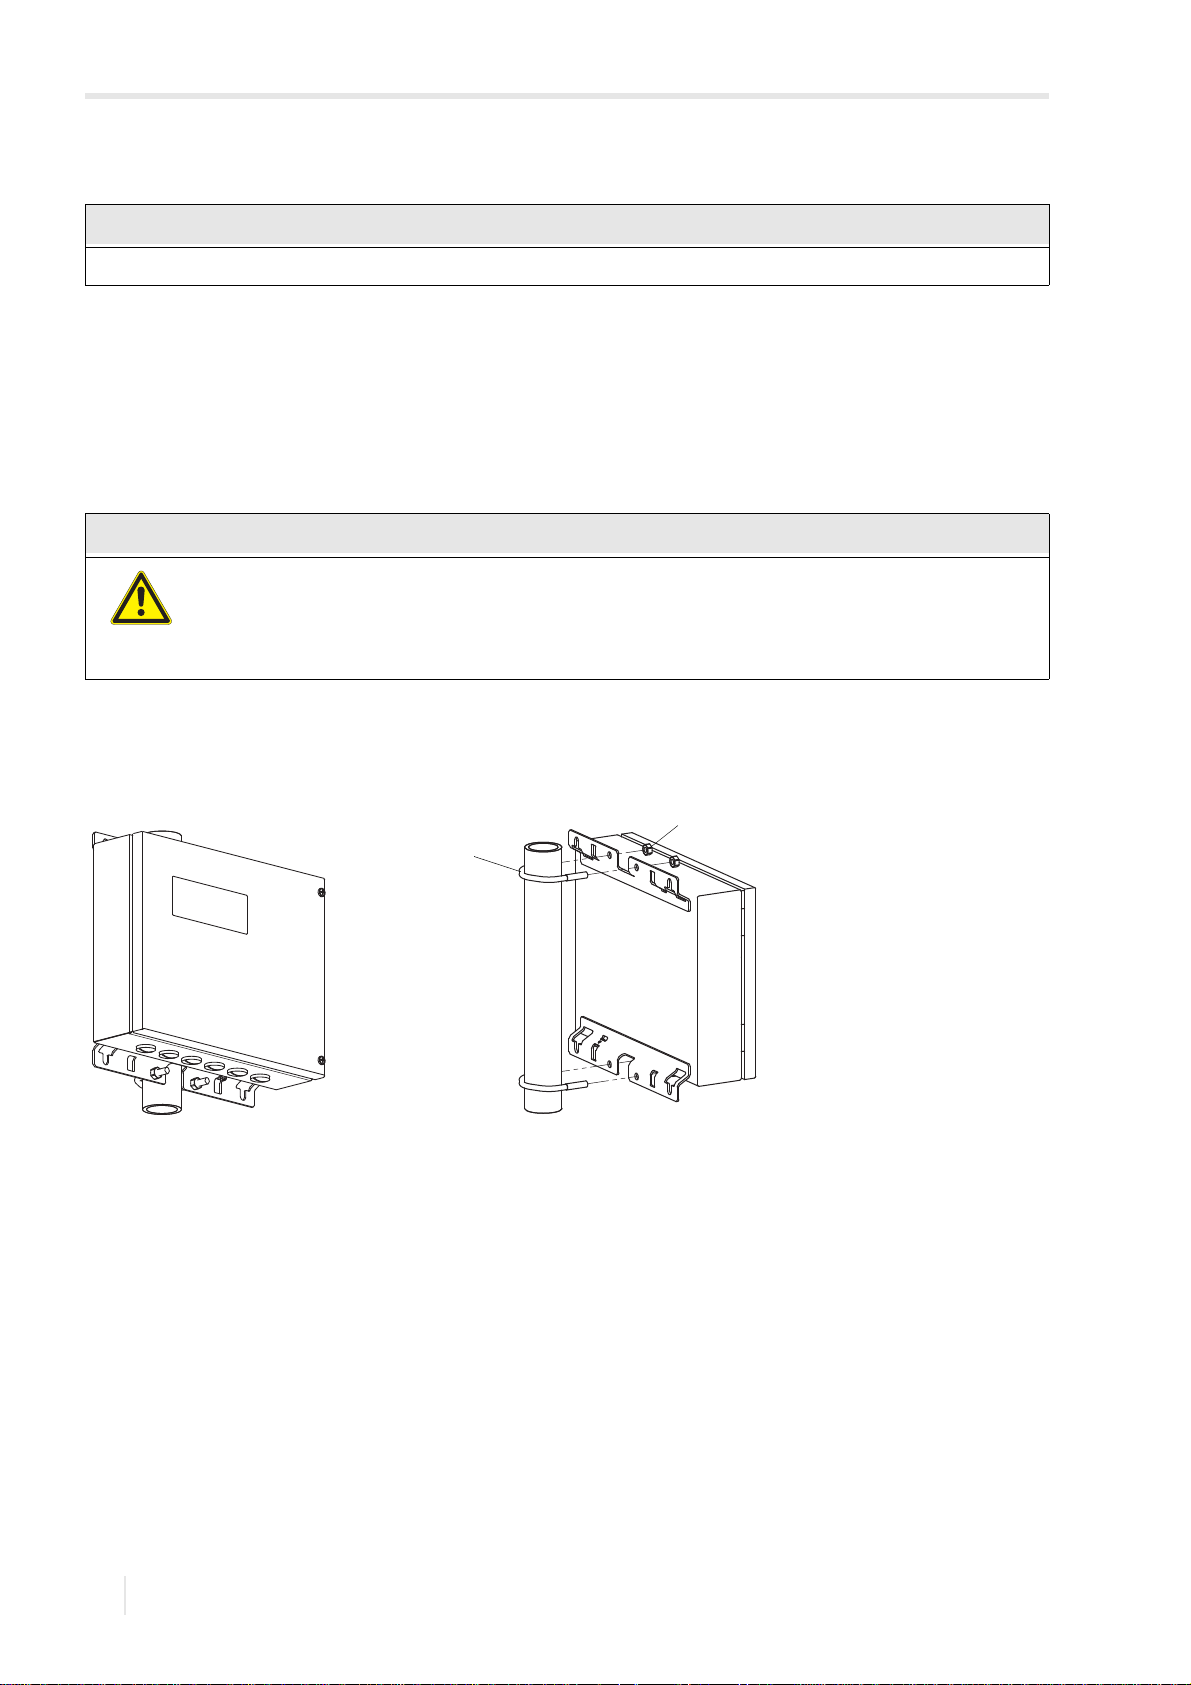
6.1.3.2 Pipe installation
The pipe has to be sufficiently stable to withstand the pressure exerted by the transmitter and the shackles.
Transmitter with stainless steel housing
Installation on a 2'' pipe
• Position the transmitter and the shackle (1) on the pipe, see Fig. 6.7.
• Fix the transmitter with the shackle to the pipe by tightening the nuts (2).
Installation on a pipe > 2''
The pipe mounting kit is fixed to the pipe by using tension straps.
The edge of the tension strap is very sharp.
Risk of injury!
Debur sharp edges.
Wear the required personal protective equipment. Observe the applicable rules.
• Fix the transmitter to the pipe by using tension straps instead of shackles.
Fig. 6.7: Transmitter with stainless steel housing
1 – shackle
2 – nut
28
2018-07-16, UMFLUXUS_WDV1-3EN
Page 29
6 Installation
2
1
5
6
3
4
8
7
8
FLUXUS WD 6.1 Transmitter
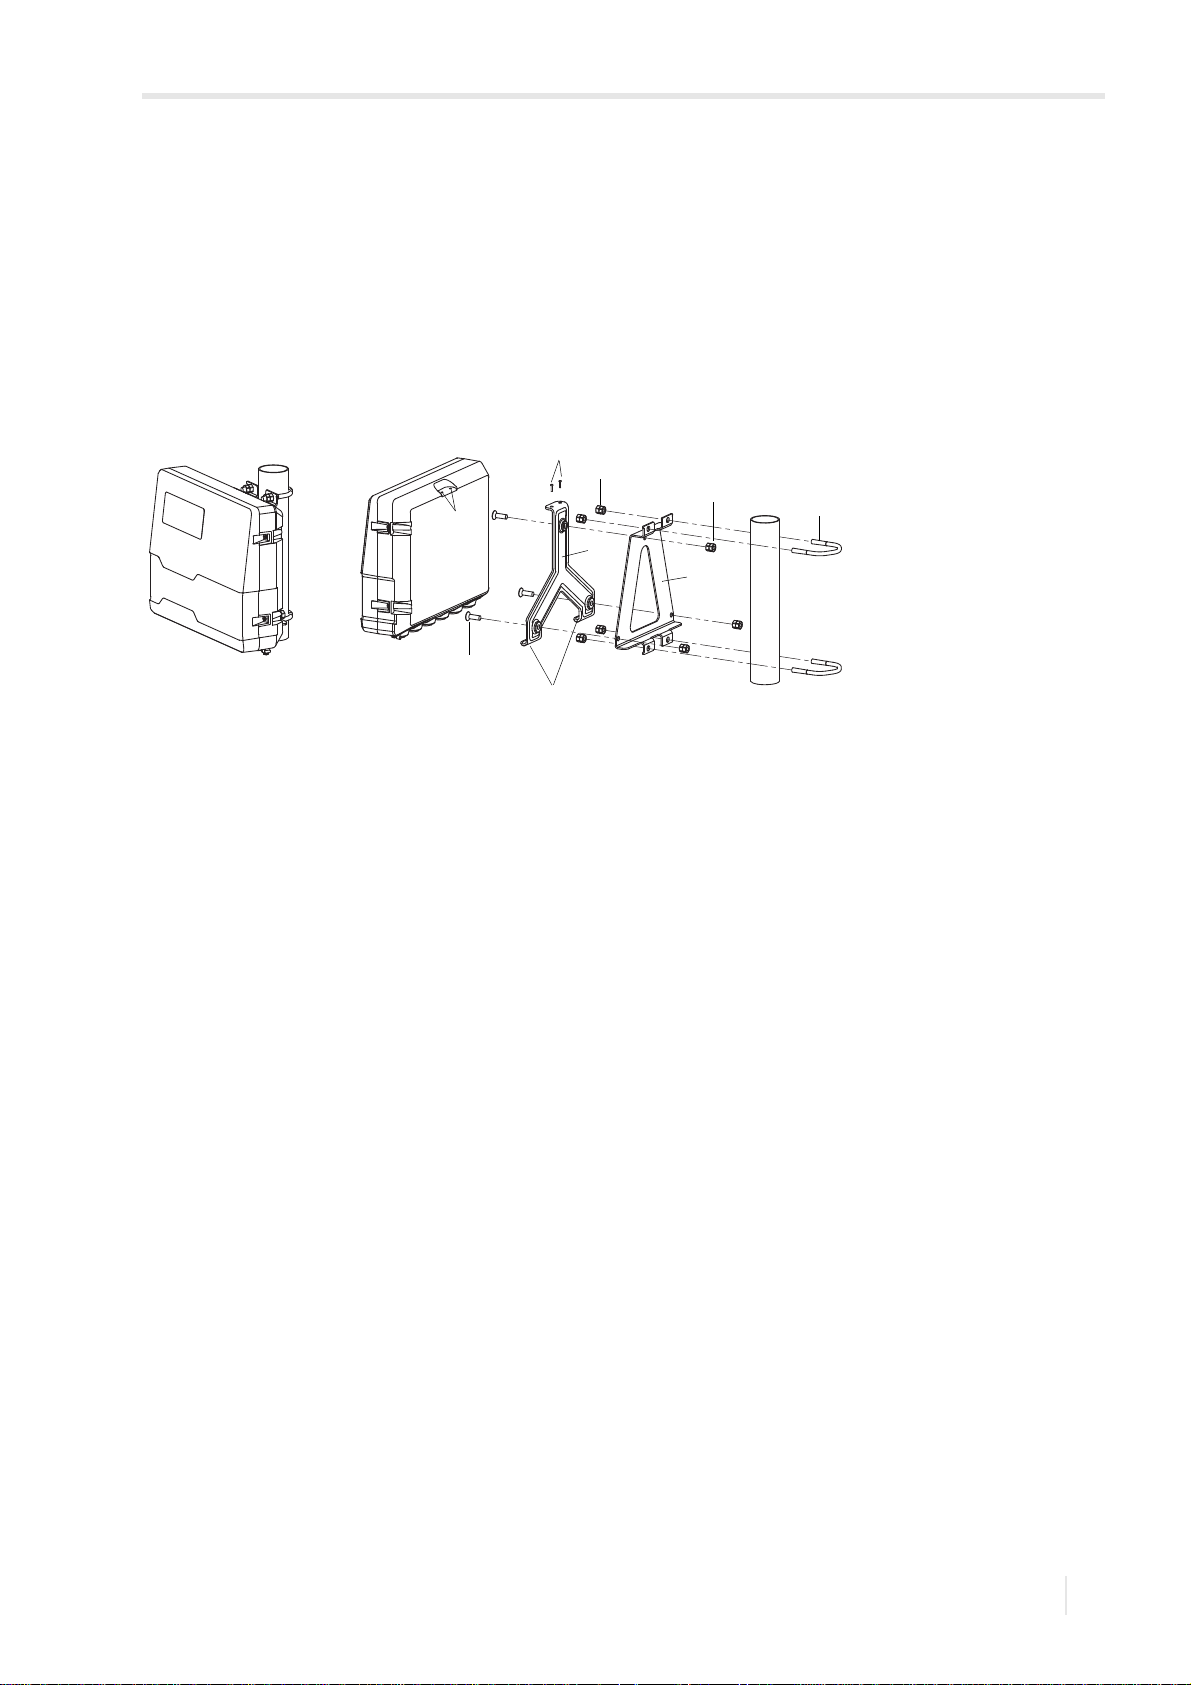
Transmitter with aluminum housing
Installation on a 2'' pipe
• Fix the wall mount (1) with 3 countersunk-screws (2) and nuts (3) firmly to the instrument mounting plate (4), see Fig. 6.8.
• Position the instrument mounting plate (4) and the shackles (5) to the pipe.
• Fix the instrument mounting plate with the shackles to the pipe by tightening the nuts (6).
• Attach the transmitter to the lower hooks (7) of the wall mount, see Fig. 6.6.
• Fix the transmitter to wall mount by tightening the 2 screws (8), see Fig. 6.8.
Fig. 6.8: Transmitter with aluminum housing
1 – wall mount
2 – countersunk-head screw
3 – nut of countersunk-head screw
4 – instrument mounting plate
5 – shackle
6 – nut of shackle
7 – hooks
8–screws
UMFLUXUS_WDV1-3EN, 2018-07-16
29
Page 30
6 Installation
Caution!
2
1
6.1 Transmitter FLUXUS WD
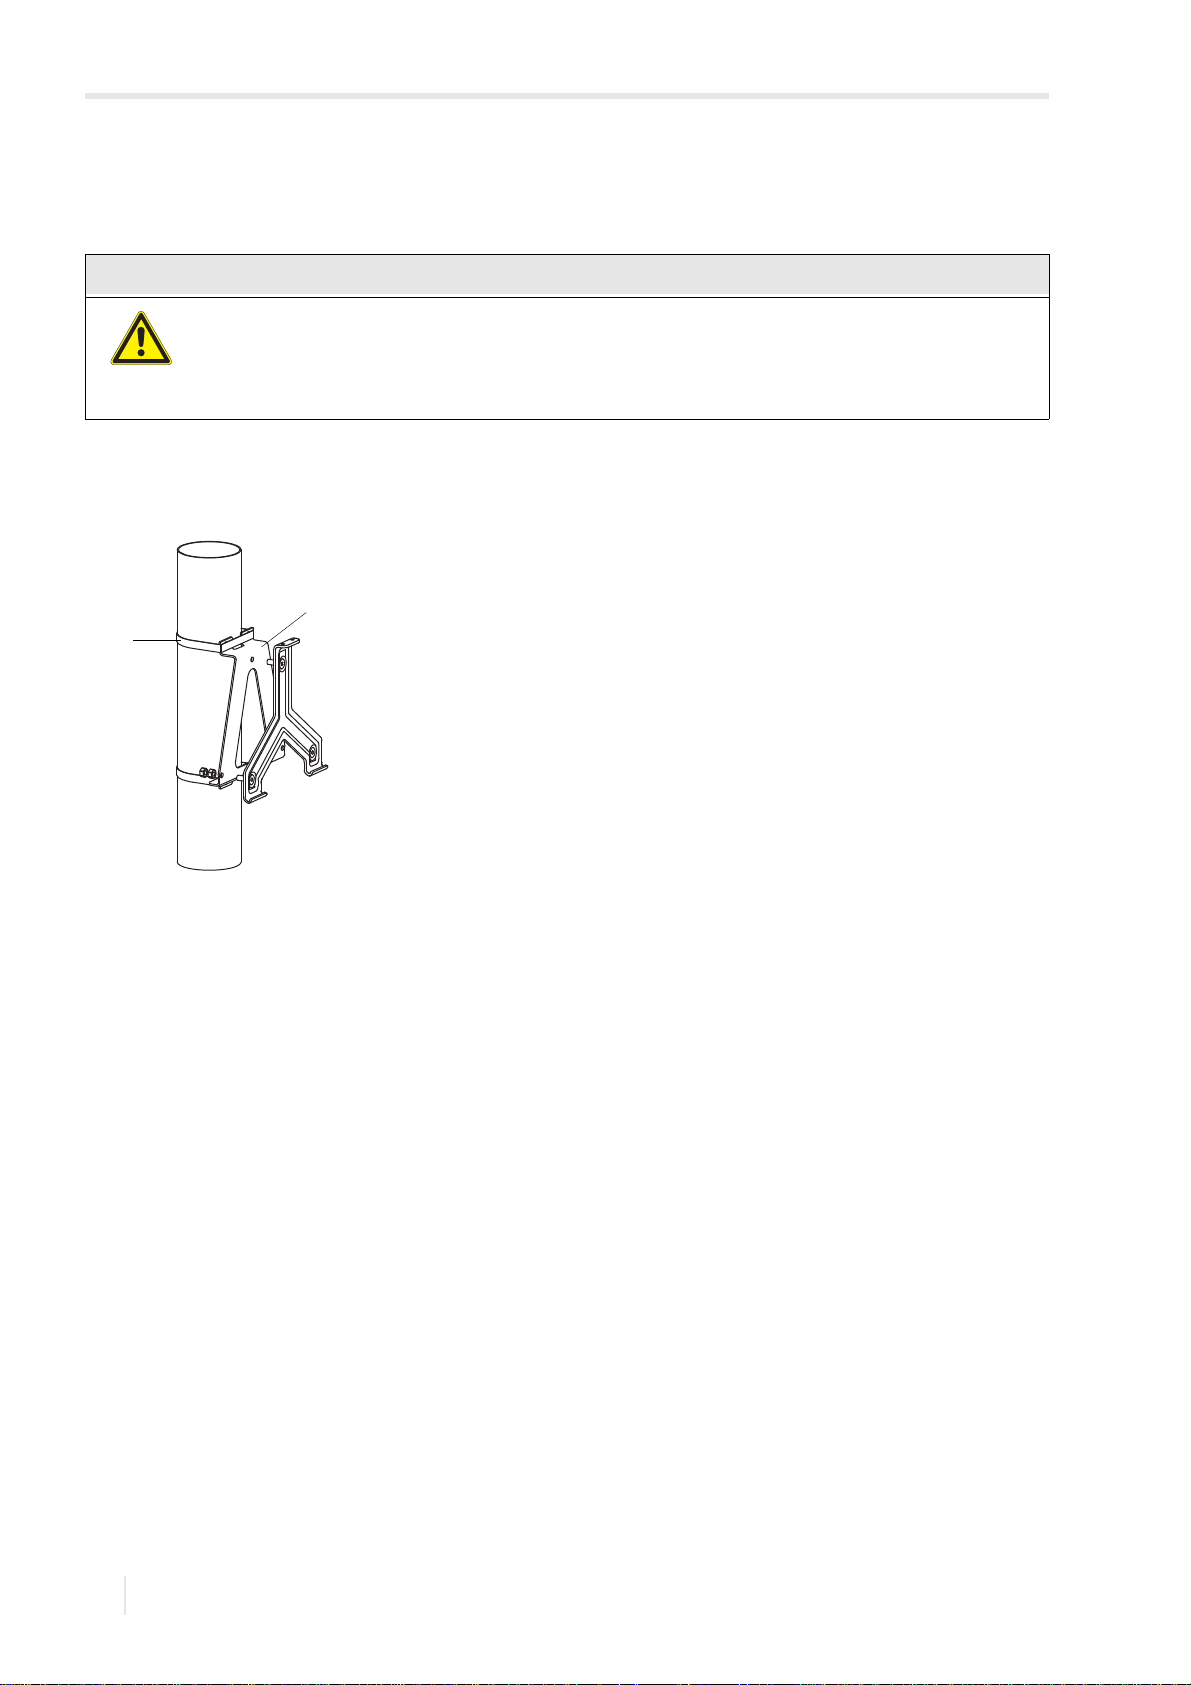
Installation on a pipe > 2''
The pipe mounting kit is fixed to the pipe by using tension straps.
The edge of the tension strap is very sharp.
Risk of injury!
Debur sharp edges.
Wear the required personal protective equipment. Observe the applicable rules.
• Fix the instrument mounting plate (1) to the pipe using tension straps (2) instead of the shackles (see Fig. 6.9).
Fig. 6.9: Pipe installation with tension straps
1 – instrument mounting plate
2 – tension strap
30
2018-07-16, UMFLUXUS_WDV1-3EN
Page 31
6 Installation
Caution!
Important!
Notice!
FLUXUS WD 6.2 Transducers
6 Installation
6.2 Transducers
6.2.1 Preparation
6.2.1.1 Measuring point selection
The correct selection of the measuring point is crucial for achieving reliable measurement results and a high measurement
accuracy.
A measurement on a pipe is possible if:
• the ultrasound propagates with a sufficiently high amplitude
• the flow profile is fully developed
The correct selection of the measuring point and the correct transducer positioning guarantee that the sound signal will be
received under optimum conditions and evaluated correctly.
Because of the variety of applications and the different factors that influence the measurement, there is no standard solution for the transducer positioning.
The measurement is influenced by the following factors:
– diameter, material, lining, wall thickness and shape of the pipe
–fluid
– gas bubbles in the fluid
• Avoid measuring points in the vicinity of distorted or defective areas of the pipe or in the vicinity of welds.
• Avoid measuring points with deposit formation in the pipe.
• Make sure the pipe surface at the selected measuring point is even.
• Select the location of the transmitter within the transducer cable range.
• The ambient temperature at the measuring point has to be within the operating temperature range of the transmitter and
the transducers, see Technical specification.
If the measuring point is within an explosive atmosphere, possibly present danger zones and gases have to be determined. The transducers and the transmitter have to be appropriate for these conditions.
6.2.1.2 Pipe preparation
Contact with grinding dust
This may result in injuries (e.g., breathing difficulties, skin reactions, eye irritations).
Wear the required personal protective equipment. Observe the applicable rules.
The pipe has to be sufficiently stable to withstand the pressure exerted by the transducers and the tension straps.
Observe the selection criteria of pipe and measuring point.
Rust, paint or deposits on the pipe absorb the sound signal. A good acoustic contact between the pipe and the transducers is obtained as follows:
• Clean the pipe at the selected measuring point.
– If present, the paint layer has to be smoothed by grinding. The paint does not need to be removed completely.
– Remove rust or loose paint.
• Use coupling foil or apply a bead of acoustic coupling compound along the center line of the contact surface of the transducers.
• Observe that there must be no air pockets between the transducer contact surface and the pipe wall.
UMFLUXUS_WDV1-3EN, 2018-07-16
31
Page 32
6 Installation
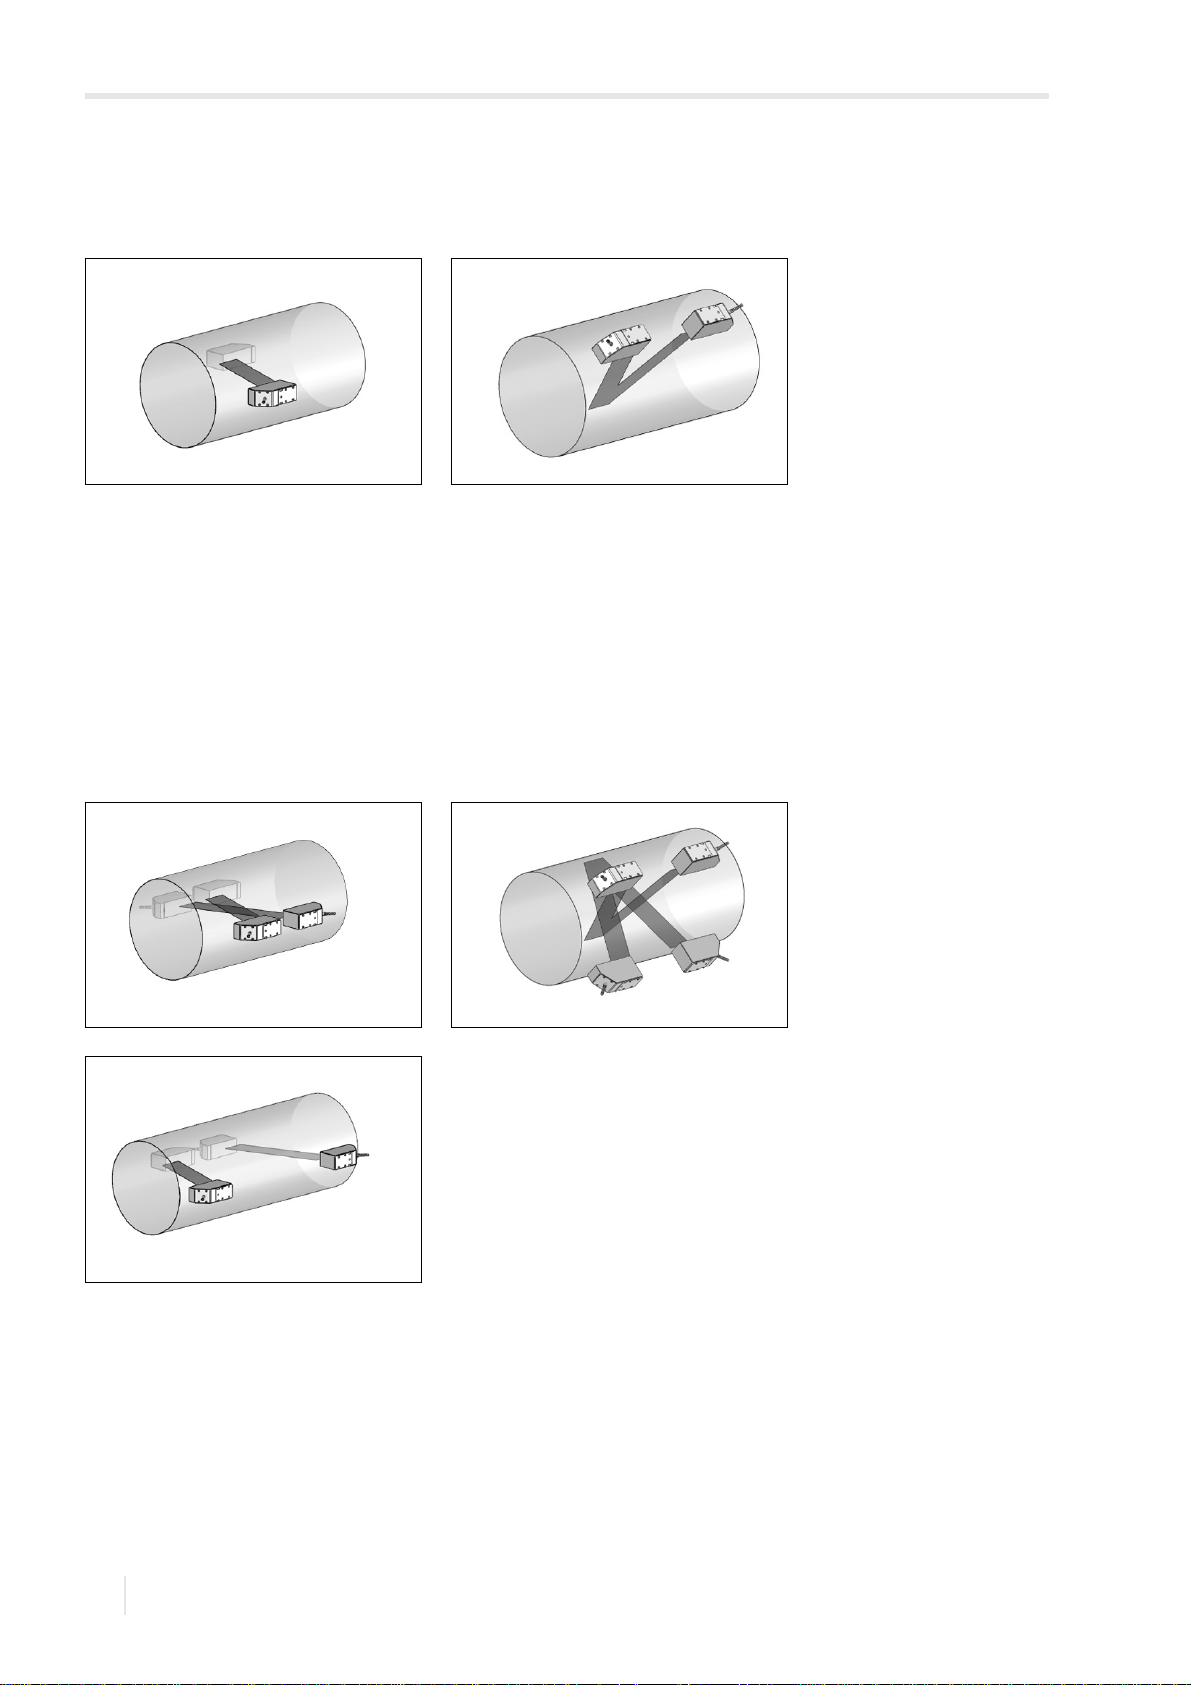
X arrangement
displaced X arrangement
6.2 Transducers FLUXUS WD
6.2.1.3 Selection of the measurement arrangeme nt
Diagonal arrangement with 1 beam Reflection arrangement with 1 beam
• wider flow velocity and sound speed
range compared to the reflection
arrangement
• use in the presence of deposits on the inner pipe wall or with strongly attenuating
gases or liquids (only 1 sound path)
• smaller flow velocity and sound speed
range compared to the diagonal arrangement
• transverse flow effects are compensated
because the beam crosses the pipe in 2
directions
• higher accuracy of measurement because the accuracy increases with the
number of sound paths
Diagonal arrangement with 2 beams Reflection arrangement with 2 beams
and 2 planes
• same characteristics as reflection
arrangement with 2 beams
• additional characteristic:
influences of the flow profile are compensated because the measurement takes
place in 2 planes
• same characteristics as diagonal
arrangement with 1 beam
• additional characteristic:
transverse flow effects are compensated
because the measurement is conducted
with 2 beams
32
2018-07-16, UMFLUXUS_WDV1-3EN
Page 33
6 Installation
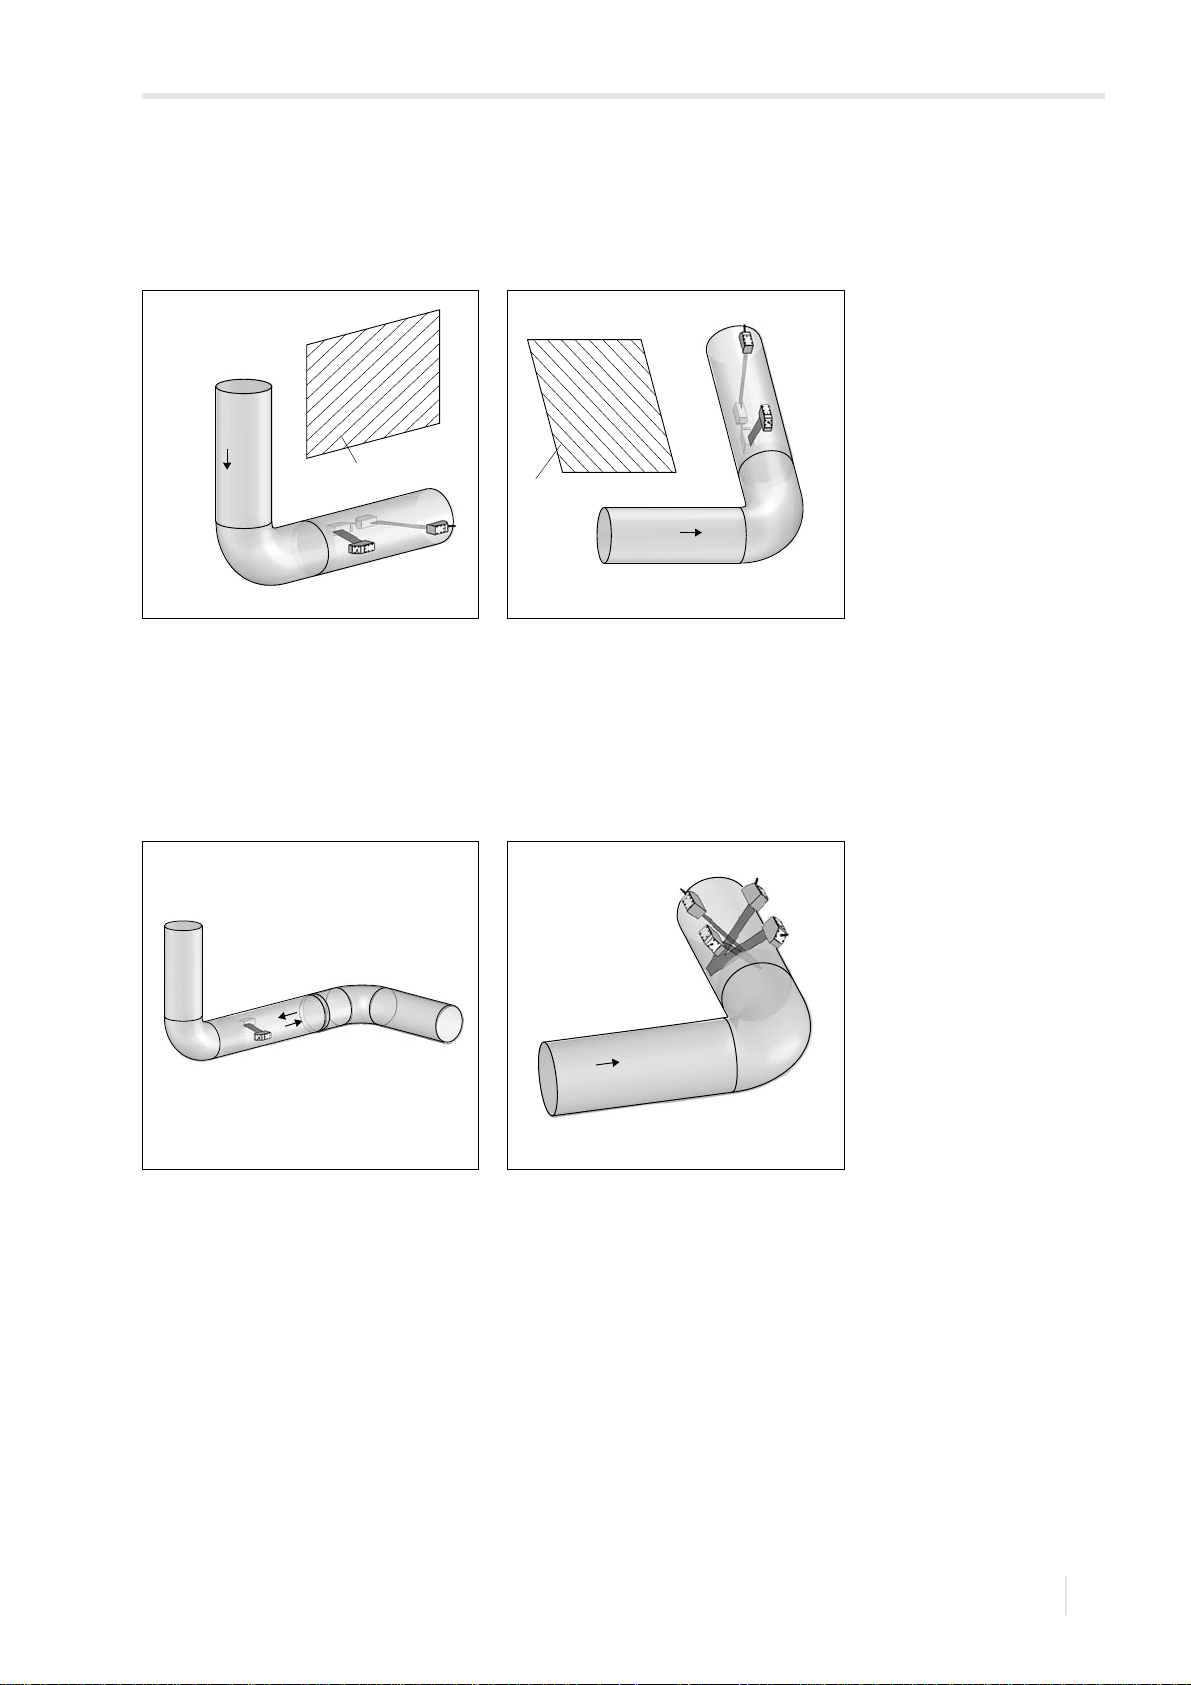
elbow plane
flow di-
rection
flow direction
elbow plane
flow direction
flow direction
FLUXUS WD 6.2 Transducers
If the measuring point is situated near an elbow, the following measurement arrangements are recommended for the
selection of the sound beam plane.
Vertical pipes Horizontal pipes
• The sound beam plan is selected in an
angle of 90° to the elbow plane. The elbow is upstream of the measuring point.
• The sound beam plane is selected in an
angle of 90° ± 45° to the elbow plane.
The elbow is upstream of the measuring
point.
Bidirectional measurements Measurements in reflection
arrangement with 2 beams and 2
planes
• The sound beam plane is selected according to the nearest elbow (horizontal
or vertical, depending on the pipe orientation, see above).
• The 2 sound beam planes are selected
in an angle of 45° to the elbow plane.
The elbow is upstream of the measuring
point.
• On horizontal pipes, the transducers are
mounted on the upper half of the pipe.
UMFLUXUS_WDV1-3EN, 2018-07-16
33
Page 34
6 Installation
a
6.2 Transducers FLUXUS WD
6.2.2 Installation of the transducers
6.2.2.1 Orientation of the transducers and determination of the transducer distance
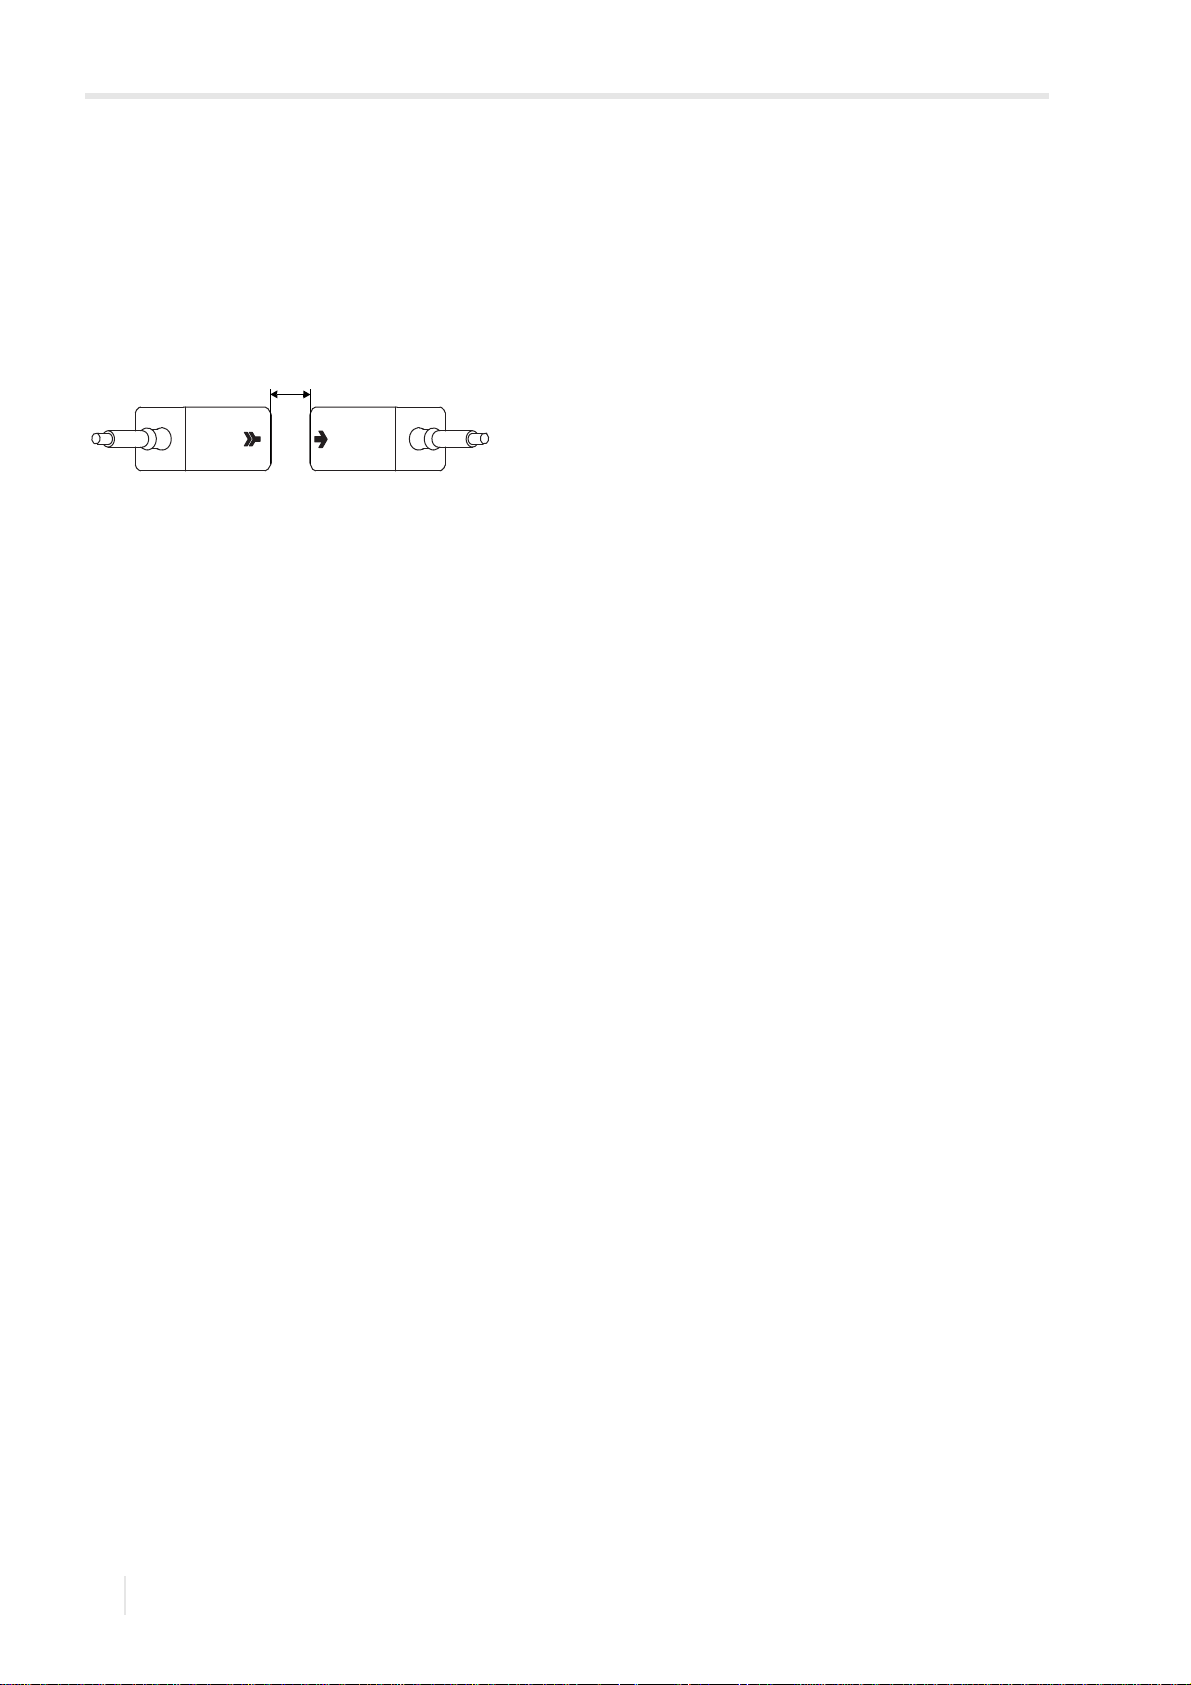
Observe the orientation of the transducers. If the transducers have been mounted properly, the engravings on the transducers form an arrow, see Fig. 6.10. The transducer cables show in opposite directions.
The transducer distance is measured between the inner edges of the transducers.
Fig. 6.10: Orientation of the transducers and transducer distance
a – transducer distance
• Select the installation instructions that correspond to the supplied transducer mounting fixture.
34
2018-07-16, UMFLUXUS_WDV1-3EN
Page 35
6 Installation
FLUXUS WD 6.2 Transducers
6.2.2.2 Mounting with Variofix L (PermaRail)
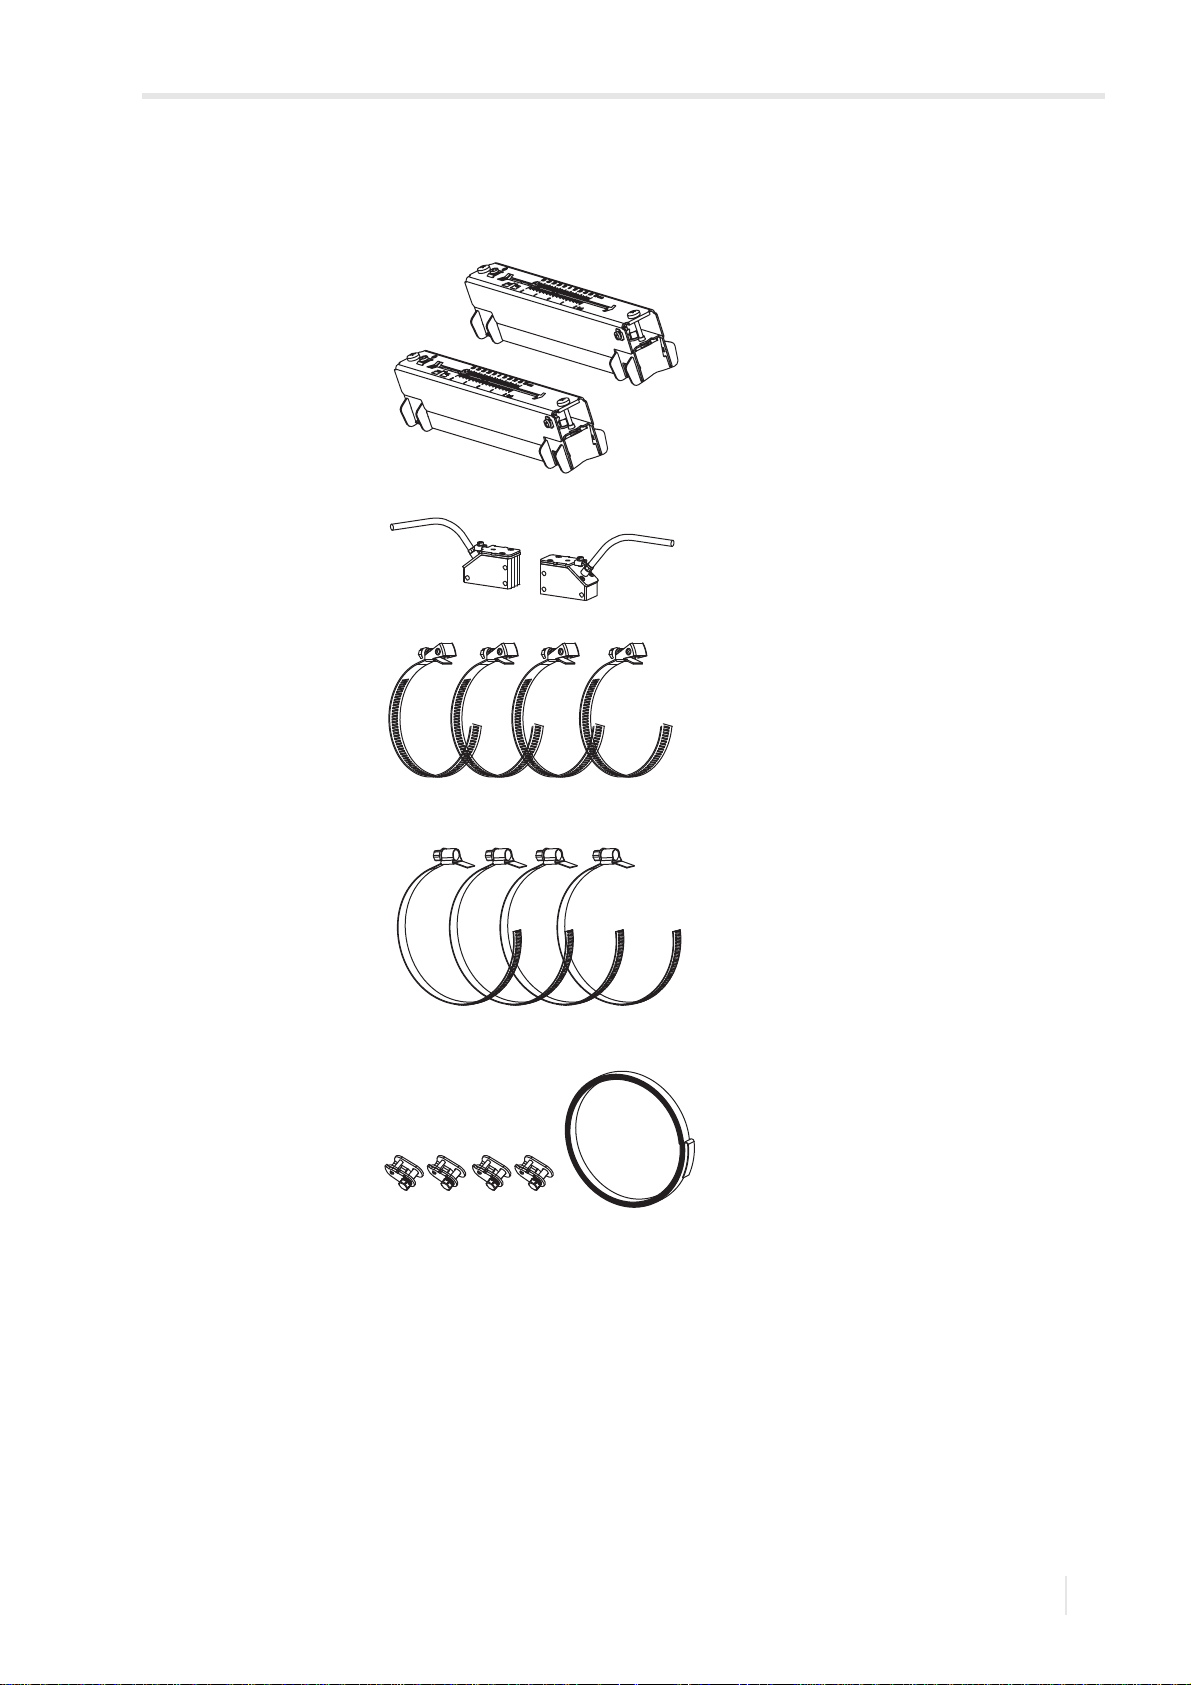
Scope of delivery
2 × Variofix L
1 × transducer pair
4 × quick release clasp with
tension strap
or
4 × band clamp clasp with
tension strap
or
4 × ratchet clasp and tension
strap coil
UMFLUXUS_WDV1-3EN, 2018-07-16
35
Page 36
6 Installation
6.2 Transducers FLUXUS WD
Mounting
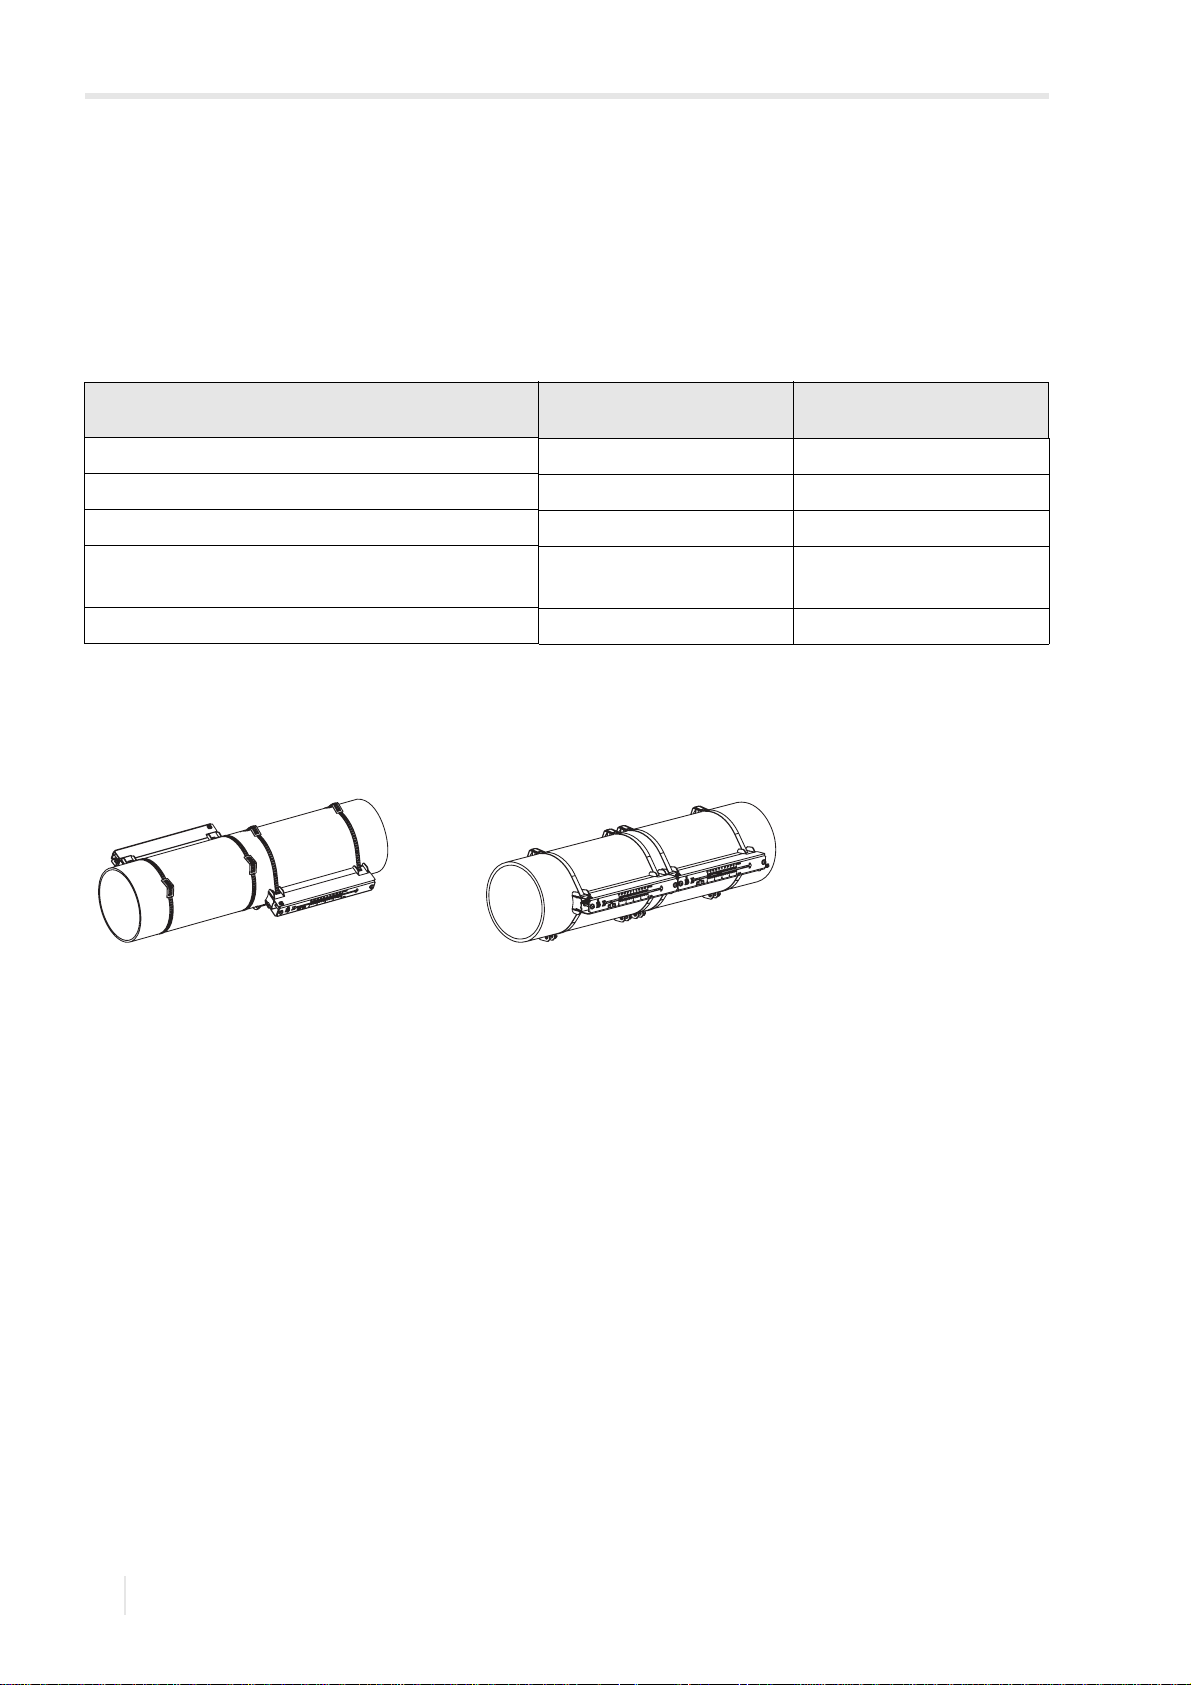
When measuring in diagonal arrangement, the transducer mounting fixtures are mounted on opposite sides of the pipe,
see Fig. 6.11. When measuring in reflection arrangement, the transducer mounting fixtures are mounted on the same side
of the pipe, see Fig. 6.12.
When measuring in diagonal arrangement with 2 beams in displaced X arrangement, 4 transducer mounting fixtures have
to be mounted. When measuring in reflection arrangement and small transducer distance, only 1 transducer mounting fixture has to be mounted, see Tab. 6.1.
Tab. 6.1: Approximate values for the mounting of both transducers in a Variofix L
transducer frequency
(third character of the technical type)
F 368 < 94
G, H, K (****LI*) 368 < 94
G, H, K (except ****LI*) 348 < 89
M, P (Lamb wave transducers)
M, P (shear wave transducers)
Q 176 < 69
length of the rail [mm] transducer distance [mm]
234 < 84
< 100
In the following, the mounting of 2 transducer mounting fixtures in reflection arrangement is described (1 transducer
mounting fixture for each transducer).
Fig. 6.11: Transducer mounting fixture Variofix L
(diagonal arrangement)
Fig. 6.12: Transducer mounting fixture Variofix L
(reflection arrangement)
Overview of the mounting steps
• step 1
dismounting of the transducer mounting fixture Variofix L
• step 2
fixing the clasps to the tension straps
• step 3
fixing the tension strap to the pipe
• step 4
fixing the rail to the pipe
• step 5
installation in the transducer mounting fixture Variofix L
36
2018-07-16, UMFLUXUS_WDV1-3EN
Page 37
6 Installation
Caution!
1
2
3
4
5
5
FLUXUS WD 6.2 Transducers
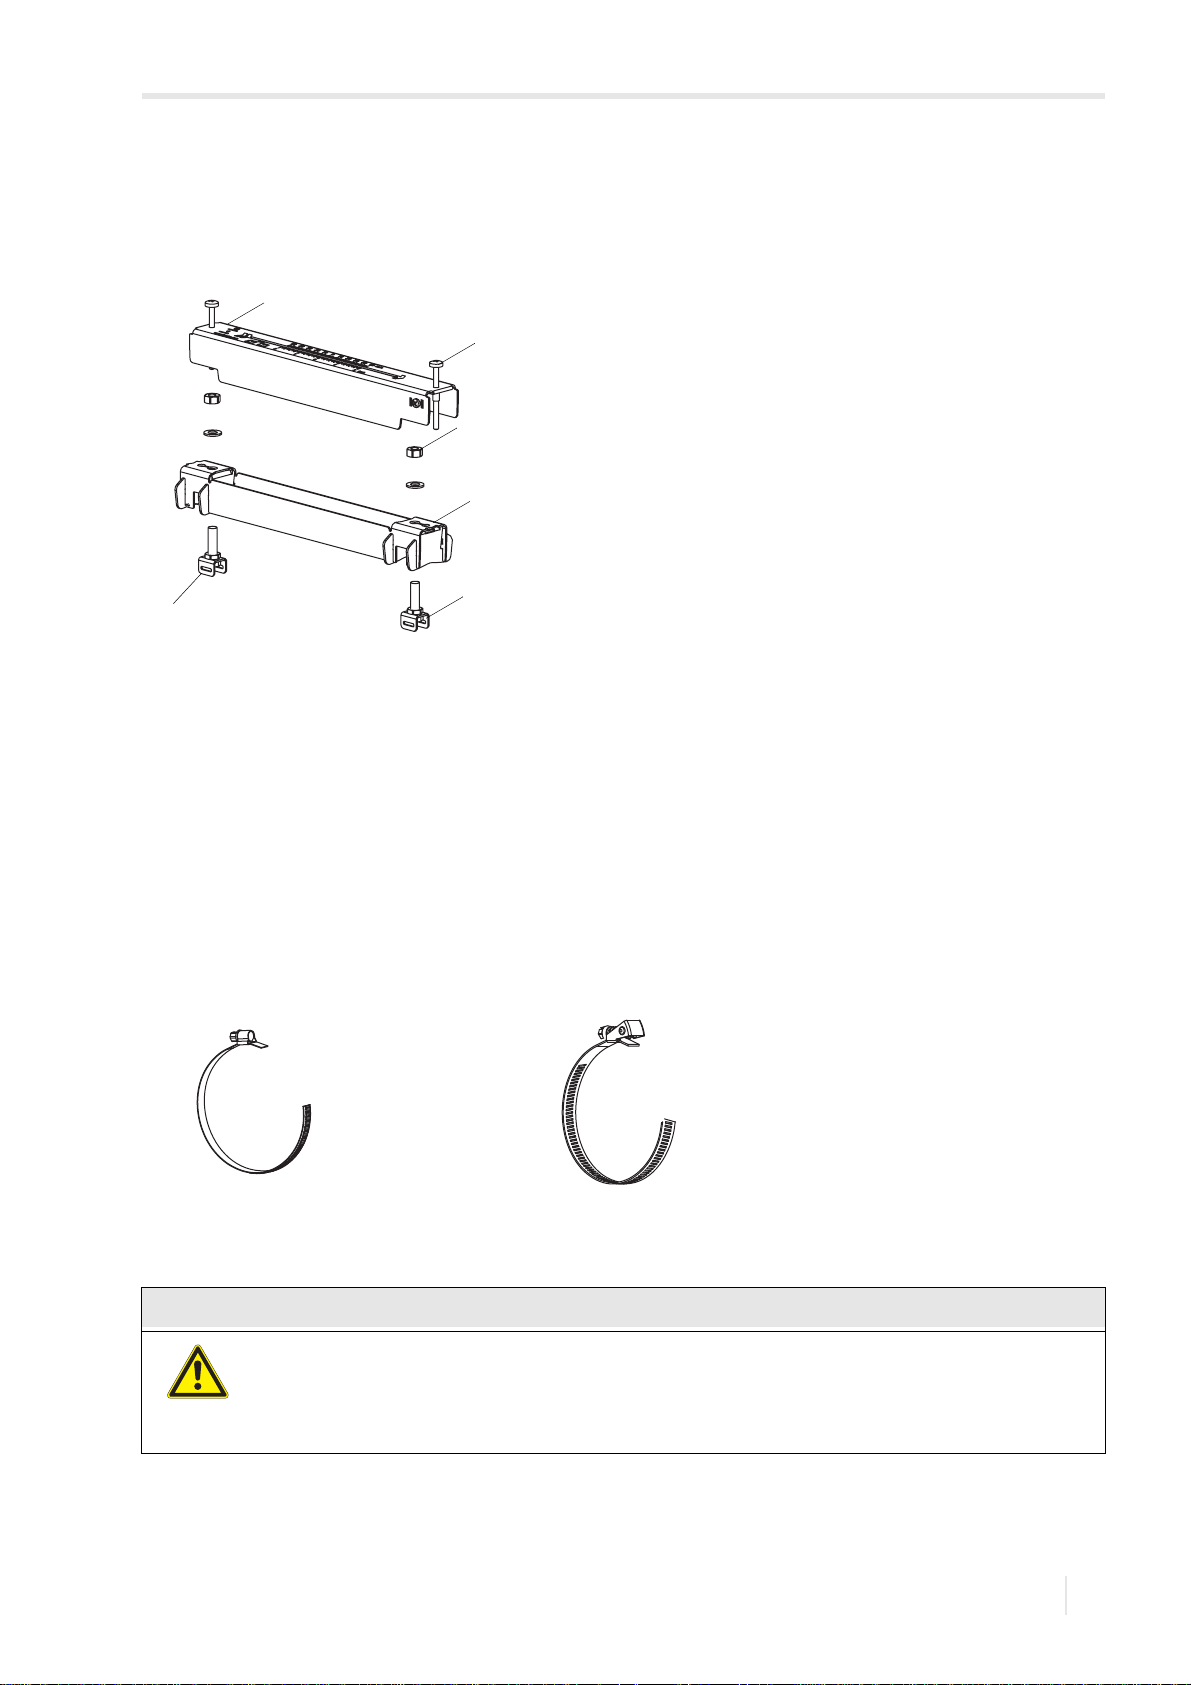
Step 1: Dismounting of the transducer mounting fixture Variofix L
• Disassemble the transducer mounting fixture Variofix L, see Fig. 6.13.
Fig. 6.13: Dismounting of the transducer mounting fixture Variofix L
1–cover
2–screw
3 – nut
4–rail
5 – tension strap clamp
Step 2: Fixing the clasps to the tension straps
• Select the installation instructions according to the supplied clasp:
Band clamp clasp
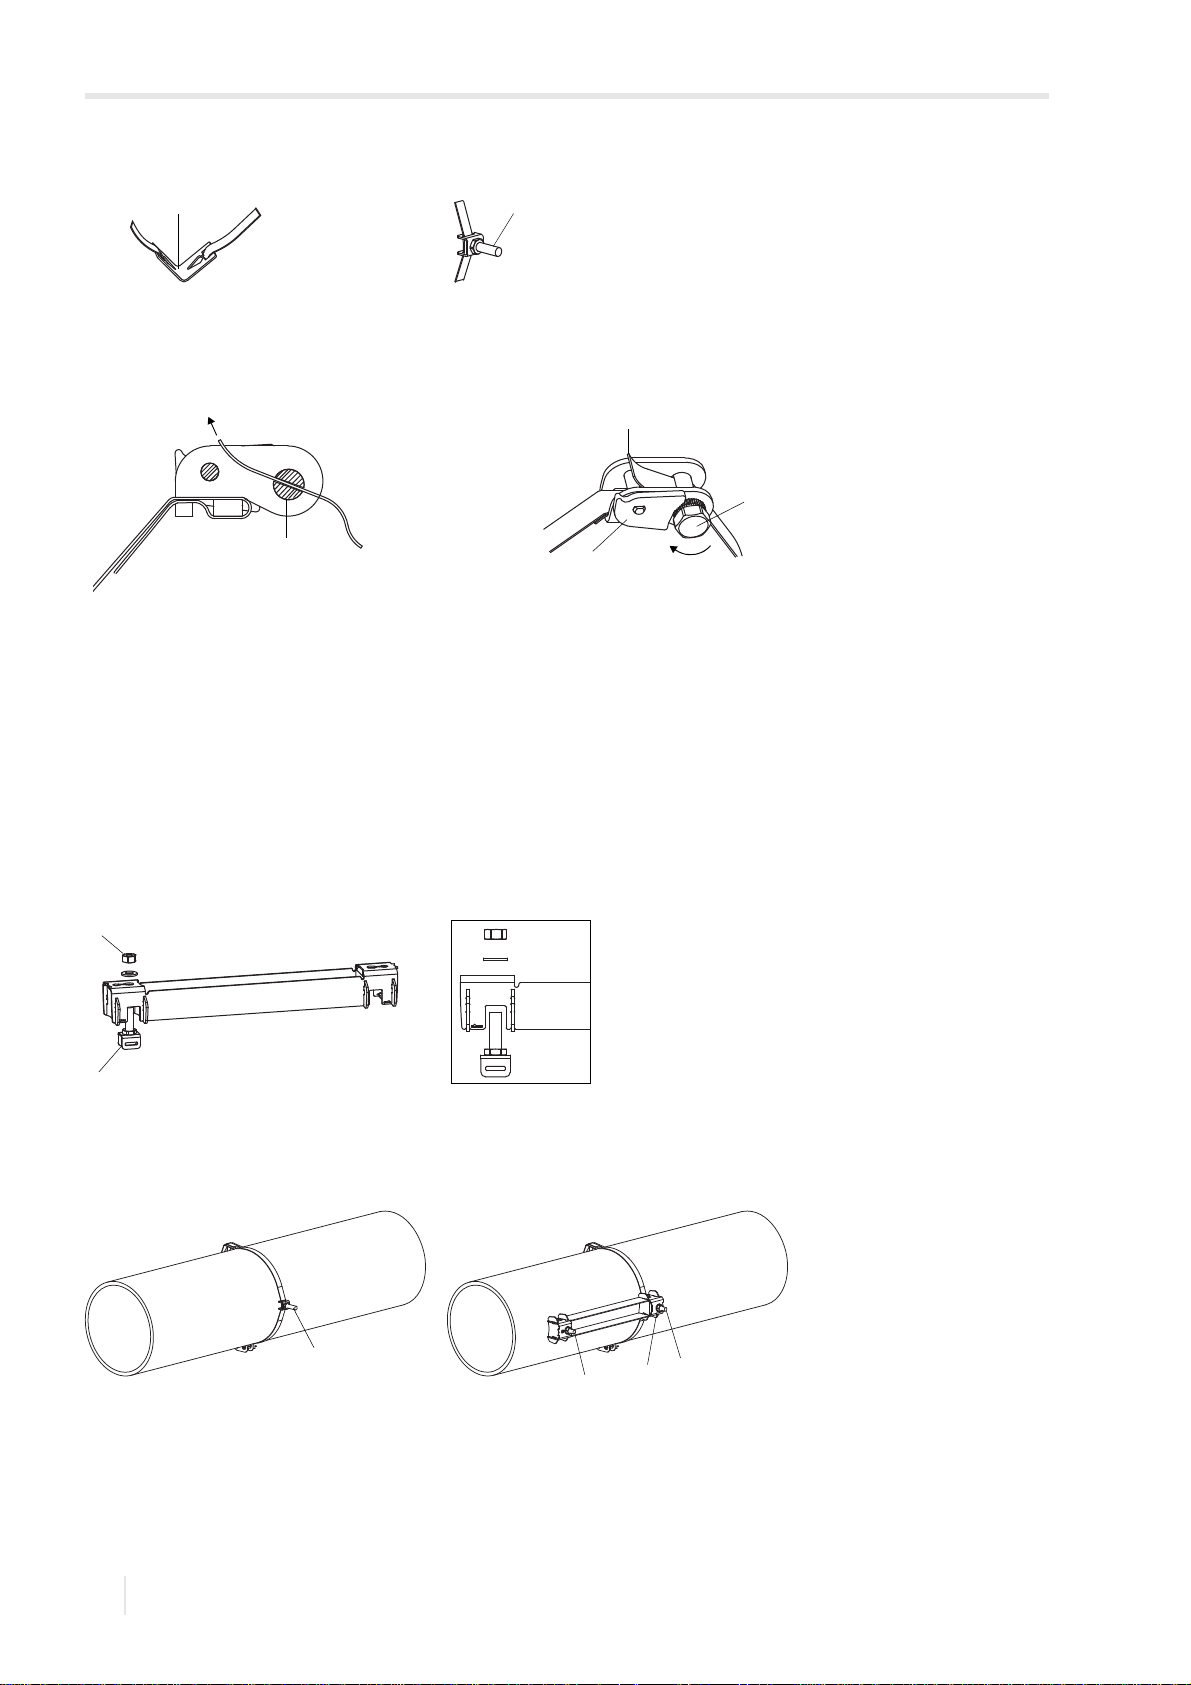
The clasp is fixed to the tension strap, see Fig. 6.14.
Quick release clasp
The clasp is fixed to the tension strap, see Fig. 6.15.
• Cut the tension strap to length (pipe circumference + at least 120 mm).
Fig. 6.14: Band clamp clasp with tension strap Fig. 6.15: Quick release clasp with tension strap
Ratchet clasp
• Cut the tension strap to length (pipe circumference + at least 120 mm).
The edge of the tension strap is very sharp.
Risk of injury!
Debur sharp edges.
Wear the required personal protective equipment. Observe the applicable rules.
UMFLUXUS_WDV1-3EN, 2018-07-16
37
Page 38
6 Installation
ab
12 1
3
1
2
6.2 Transducers FLUXUS WD
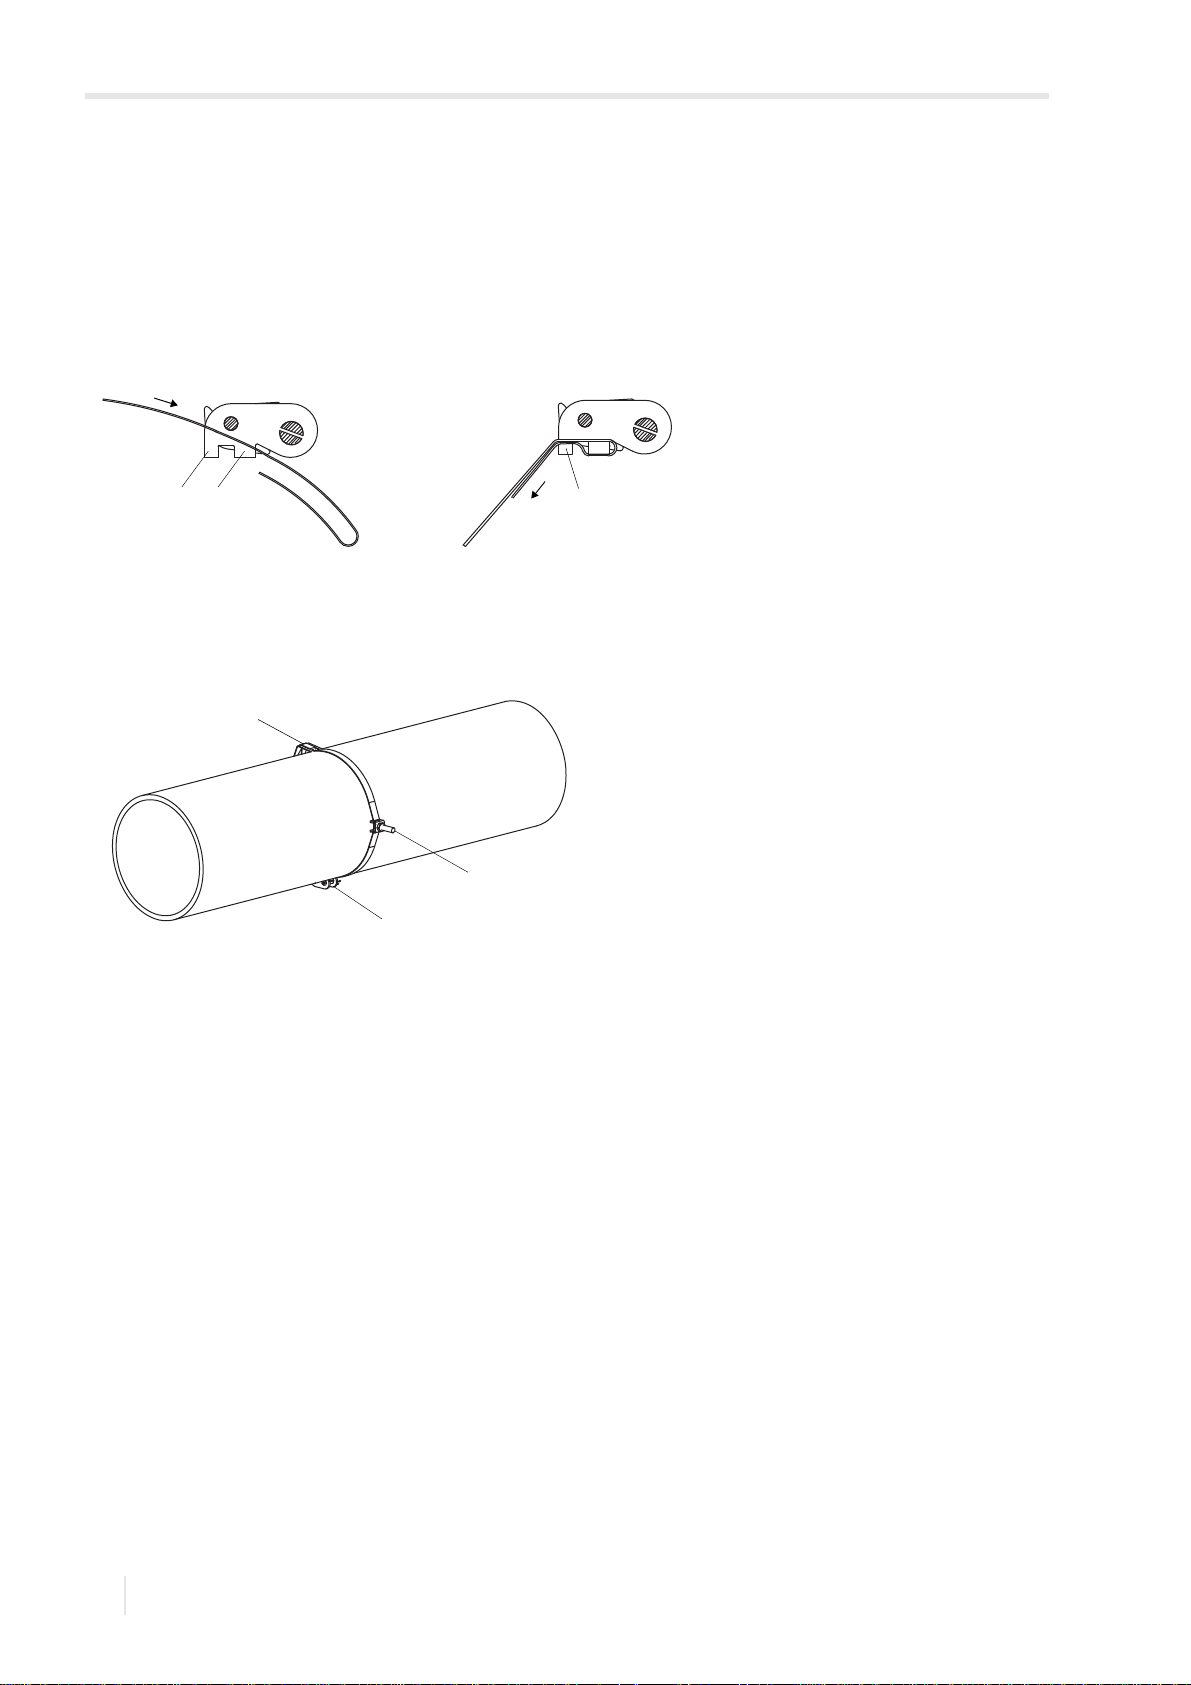
• Insert approx. 100 mm of the tension strap into part (1) and (2) of the ratchet clasp, see Fig. 6.16 a.
• Bend the tension strap.
• Insert the tension strap into part (1) of the ratchet clasp, see Fig. 6.16 b.
• Tighten the tension strap.
• Repeat the steps for the second tension strap.
Fig. 6.16: Ratchet clasp with tension strap
Step 3: Fixing the tensions strap to the pipe
One tension strap is fixed to the pipe, see Fig. 6.17. The second tension strap is mounted later.
Fig. 6.17: Tension strap with tension strap clamp and metal spring on the pipe
1 – tension strap clamp
2–clasp
3–metal spring
Select the installation instructions according to the supplied clasp:
Band clamp clasp
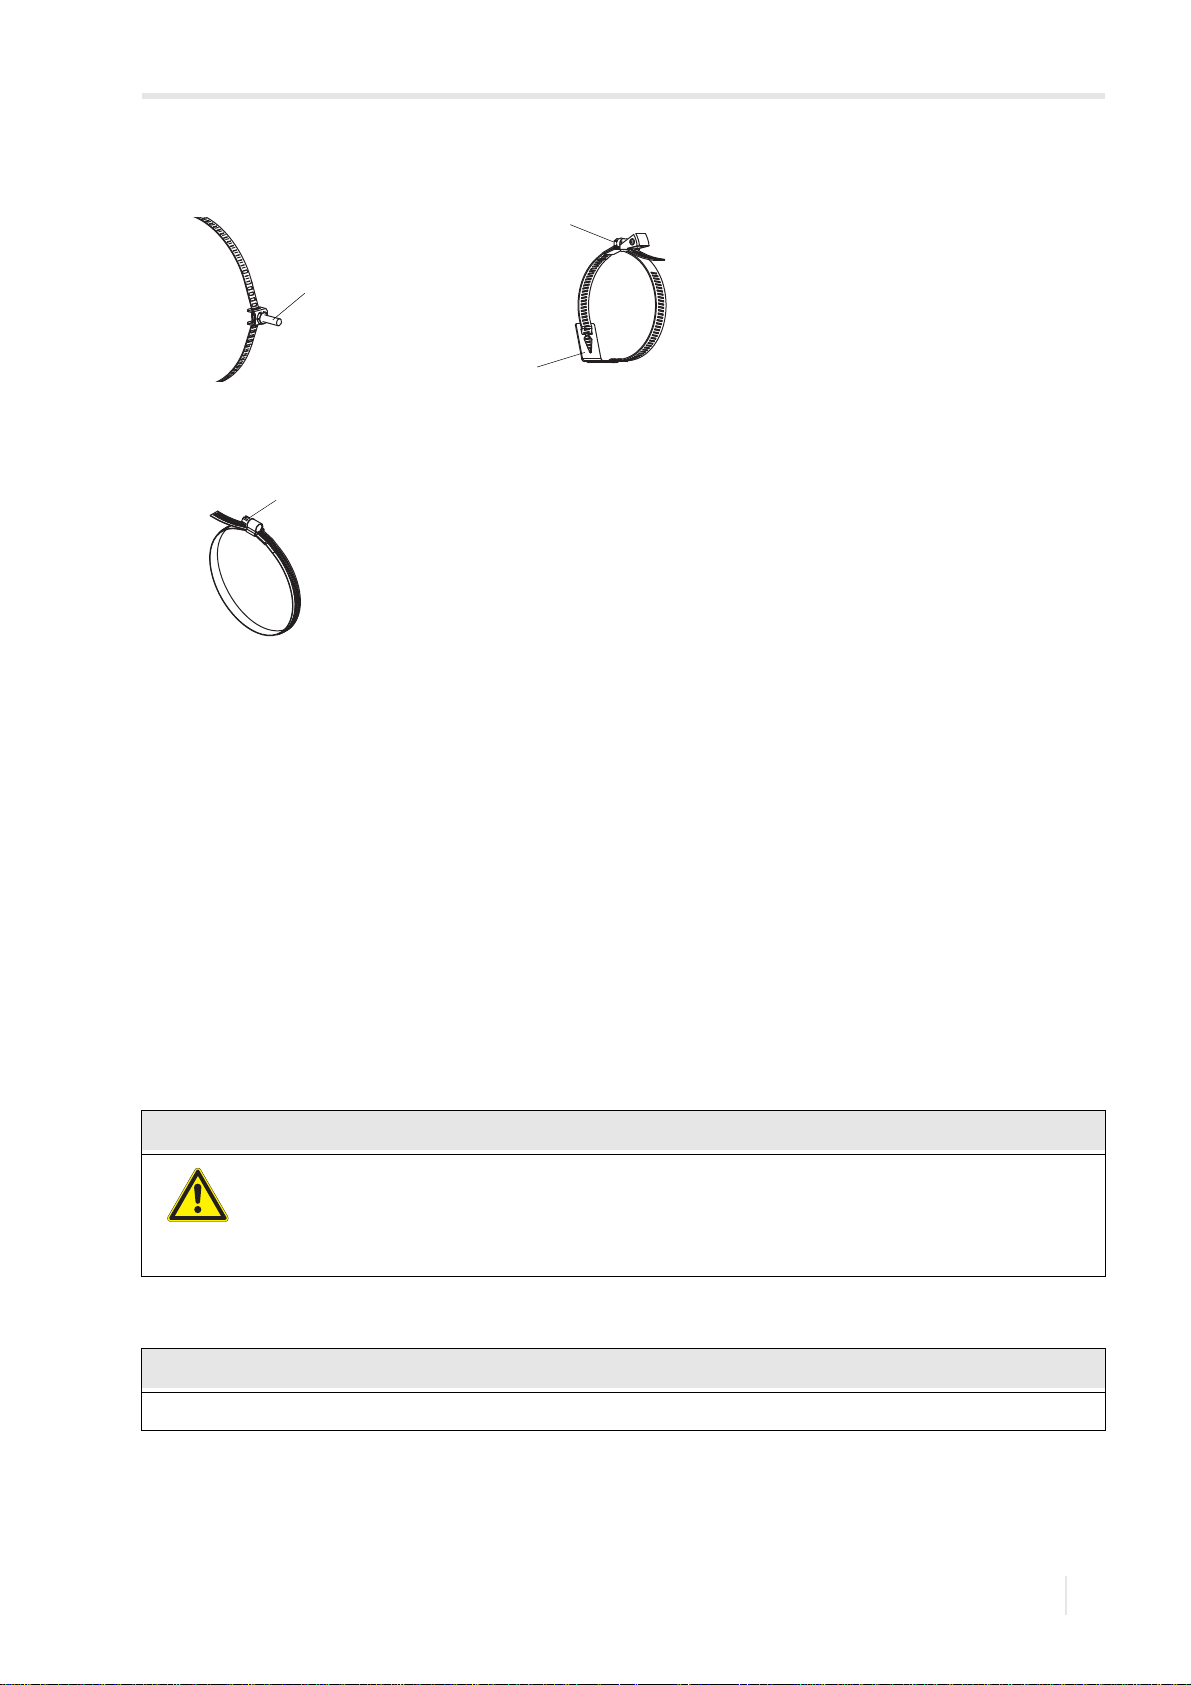
• Insert the tension strap into the tension strap clamp, see Fig. 6.18.
• Position the clasp and the tension strap clamp on the pipe, see Fig. 6.17. On a horizontal pipe, mount the tension strap
clamp on the side of the pipe, if possible.
• Place the tension strap around the pipe and insert it into the clasp, see Fig. 6.20.
• Tighten the tension strap.
• Tighten the clasp screw.
Quick release clasp
• Insert the tension strap into the tension strap clamp and the metal spring, see Fig. 6.18 and Fig. 6.19.
• Position the clasp, the tension strap clamp and the metal spring on the pipe, see Fig. 6.17:
– on a horizontal pipe, mount the tension strap clamp on the side of the pipe, if possible
– mount the metal spring opposite to the tension strap clamp
38
2018-07-16, UMFLUXUS_WDV1-3EN
Page 39
6 Installation
Caution!
Notice!
1
2
1
1
FLUXUS WD 6.2 Transducers
Fig. 6.18: Tension strap with clamp Fig. 6.19: Tension strap with quick release
1 – tension strap clamp 1 – clasp screw
2–metal spring
Fig. 6.20: Tension strap with band clamp clasp
1 – clasp screw
clasp and metal spring
• Place the tension strap around the pipe and insert it into the clasp, see Fig. 6.19.
• Tighten the tension strap.
• Tighten the clasp screw.
Ratchet clasp
Insert the tension strap into the tension strap clamp and the metal spring, see Fig. 6.21.
•
The metal spring does not have to be
mounted on:
– steel pipes
– pipes with an outer pipe diameter < 80 mm
– pipes that are not subjected to significant temperature fluctuations
• Position the ratchet clasp, tension strap clamp and metal spring (if necessary) on the pipe, see Fig. 6.17:
– on a horizontal pipe, mount the tension strap clamp on the side of the pipe, if possible
– mount the metal spring (if necessary) opposite to the tension strap clamp
• Place the tension strap around the pipe and pass it through the slot of the clasp screw, see Fig. 6.22.
• Tighten the tension strap.
• Cut off the protruding tension strap, see Fig. 6.22.
The edge of the tension strap is very sharp.
Risk of injury!
Debur sharp edges.
Wear the required personal protective equipment. Observe the applicable rules.
• Tighten the clasp screw.
In order to release the screw and the tension strap, press the lever down, see Fig. 6.22.
UMFLUXUS_WDV1-3EN, 2018-07-16
39
Page 40
6 Installation
12
1
2
4
3
4
1
2
2
1
3
1
6.2 Transducers FLUXUS WD
Fig. 6.21: Tension strap with metal spring and clamp
1–metal spring
2 – tension strap clamp
Fig. 6.22: Ratchet clasp with tension strap
1 – sense of rotation
2 – edge
3–lever
4 – clasp screw with slot
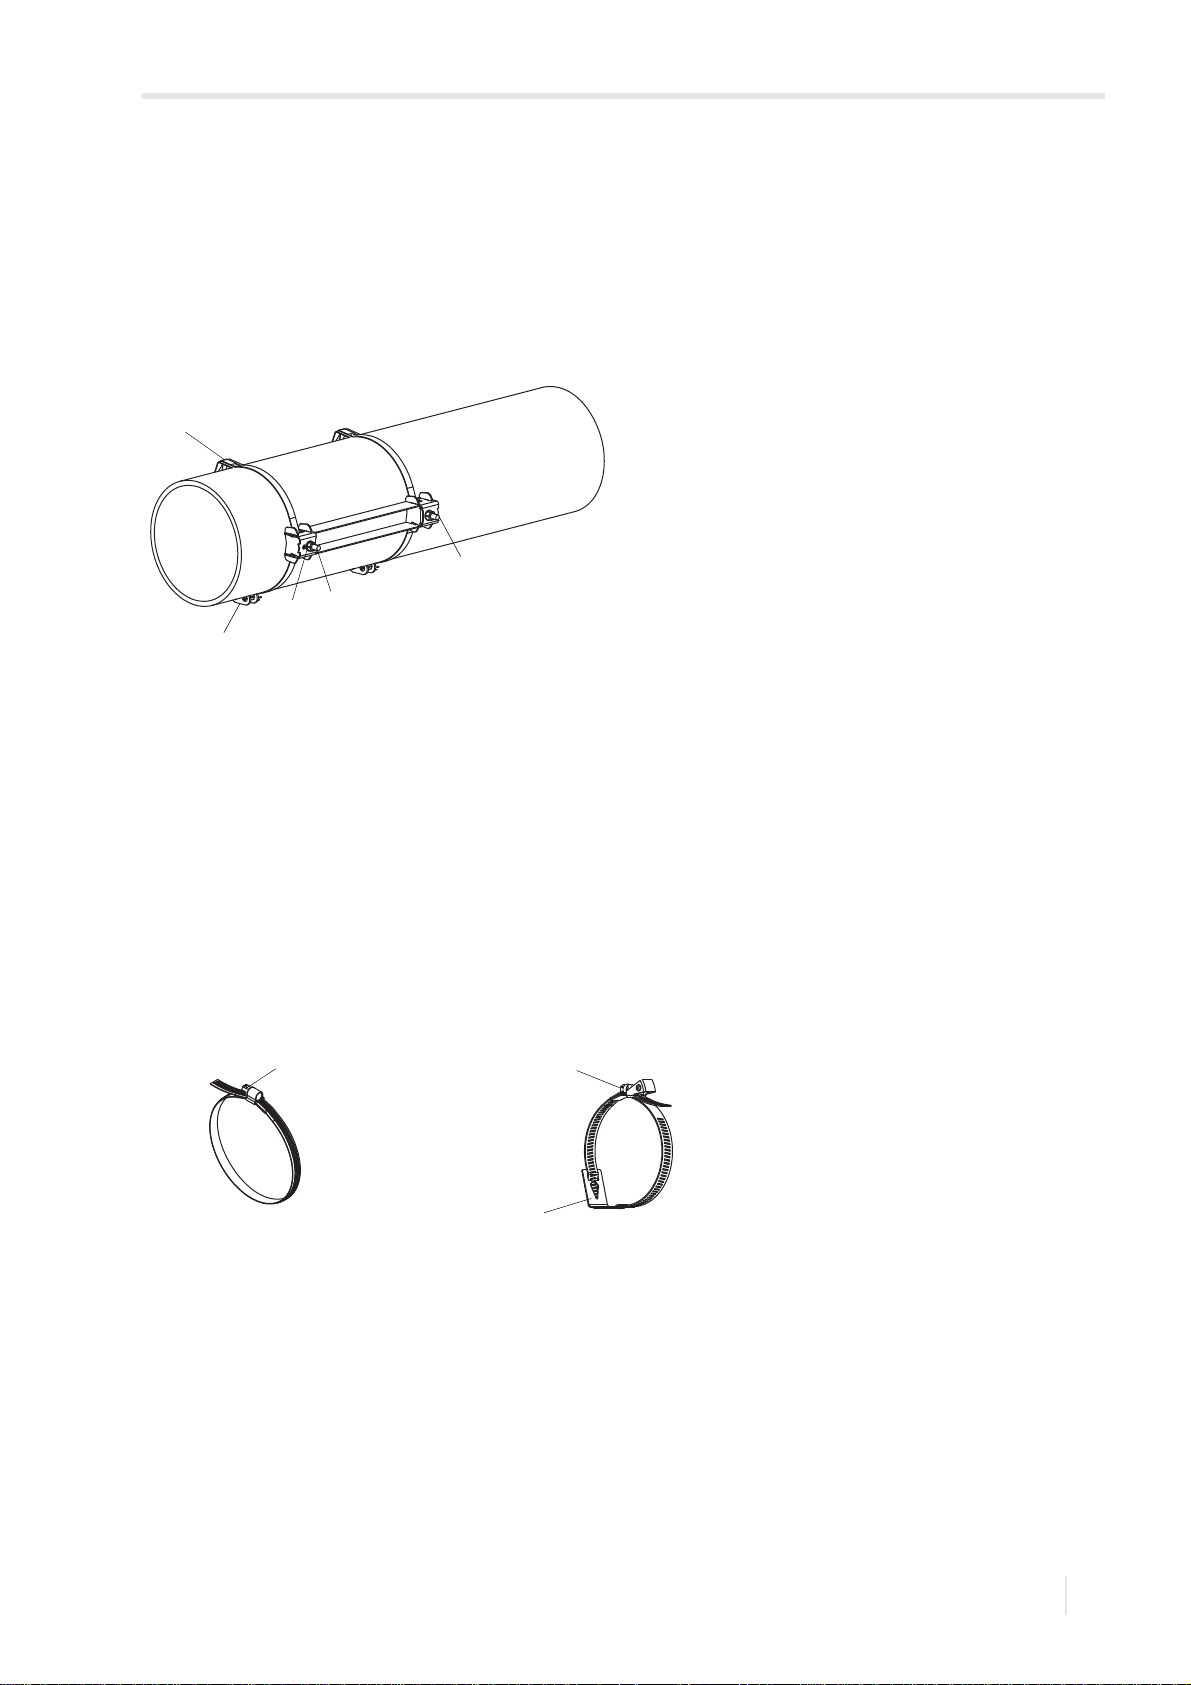
Step 4: Fixing the rail to the pipe
• Place the tension strap clamp (2) in the rail, see Fig. 6.23. Observe the orientation of the tension strap clamp.
• Tighten the nut of the tension strap clamp (2) slightly.
• Screw the rail to tension strap clamp (1), see Fig. 6.24.
• Tighten the nut of tension strap clamp (1), but not too firmly in order not to damage the tension strap.
Fig. 6.23: Rail with tension strap clamp
1 – nut
2 – tension strap clamp
Fig. 6.24: Rail, mounted on one side of the pipe
1 – tension strap clamp
2 – tension strap clamp
3 – nut
• Select the installation instructions according to the supplied clasp:
40
2018-07-16, UMFLUXUS_WDV1-3EN
Page 41
6 Installation
3
4
2
5
1
1
2
1
FLUXUS WD 6.2 Transducers
Band clamp clasp
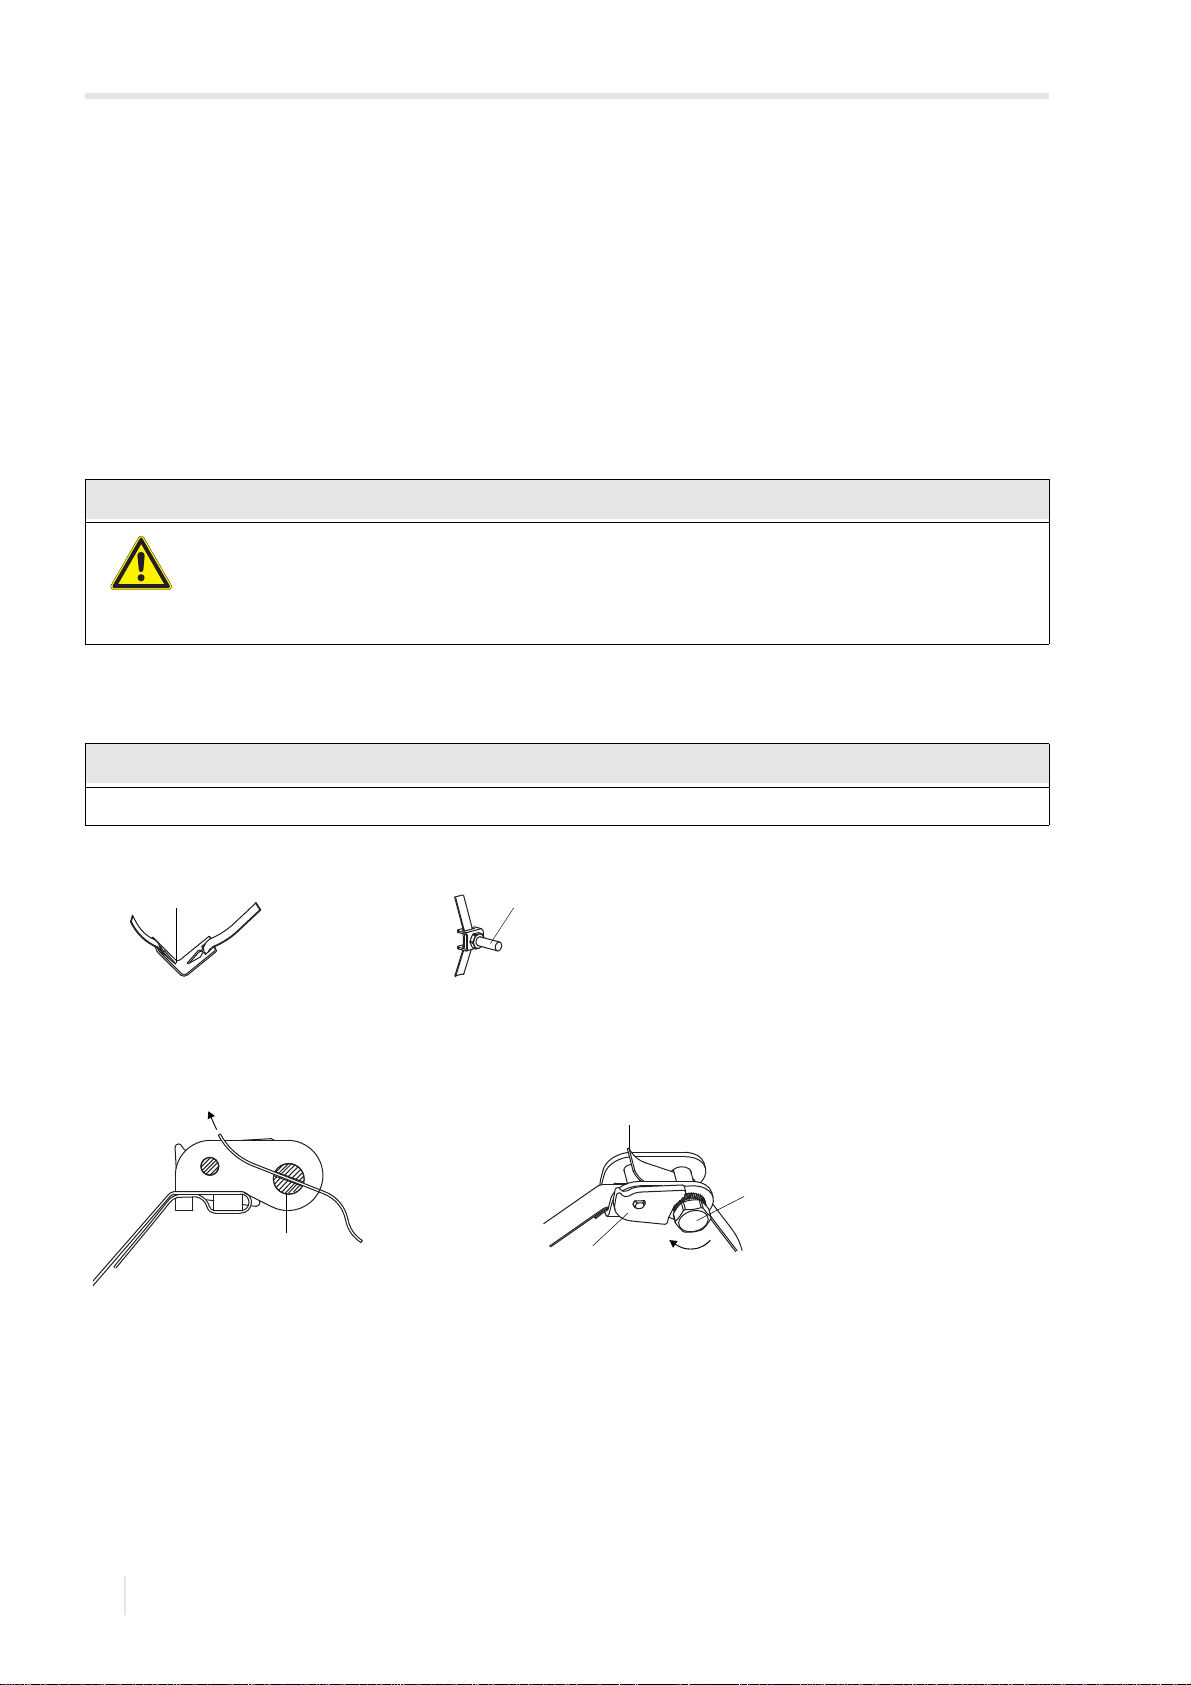
• Insert the tension strap into the tension strap clamp (2), see Fig. 6.25.
• Place the tension strap around the pipe and insert it into the clasp, see Fig. 6.26.
• Tighten the tension strap.
• Tighten the clasp screw.
• Tighten the nut of the tension strap clamp (2), but not too firmly in order not to damage the tension strap, see Fig. 6.25.
Fig. 6.25: Rail on the pipe
1 – tension strap clamp
2 – tension strap clamp
3–metal spring
4 – nut
5–clasp
Quick release clasp
• Insert the tension strap into the tension strap clamp (2) and the metal spring, see Fig. 6.27 and Fig. 6.25.
• Place the tension strap around the pipe and insert it into the clasp.
• Mount the metal spring opposite to the tension strap clamp (2).
• Tighten the tension strap.
• Tighten the clasp screw.
• Tighten the nut of the tension strap clamp (2), but not too firmly in order not to damage the tension strap, see Fig. 6.25.
Fig. 6.26: Tension strap with band clamp clasp Fig. 6.27: Tension strap with quick release
1 – clasp screw 1 – clasp screw
2–metal spring
clasp and metal spring
UMFLUXUS_WDV1-3EN, 2018-07-16
41
Page 42
6 Installation
Caution!
Notice!
12
1
2
4
3
4
6.2 Transducers FLUXUS WD
Ratchet clasp
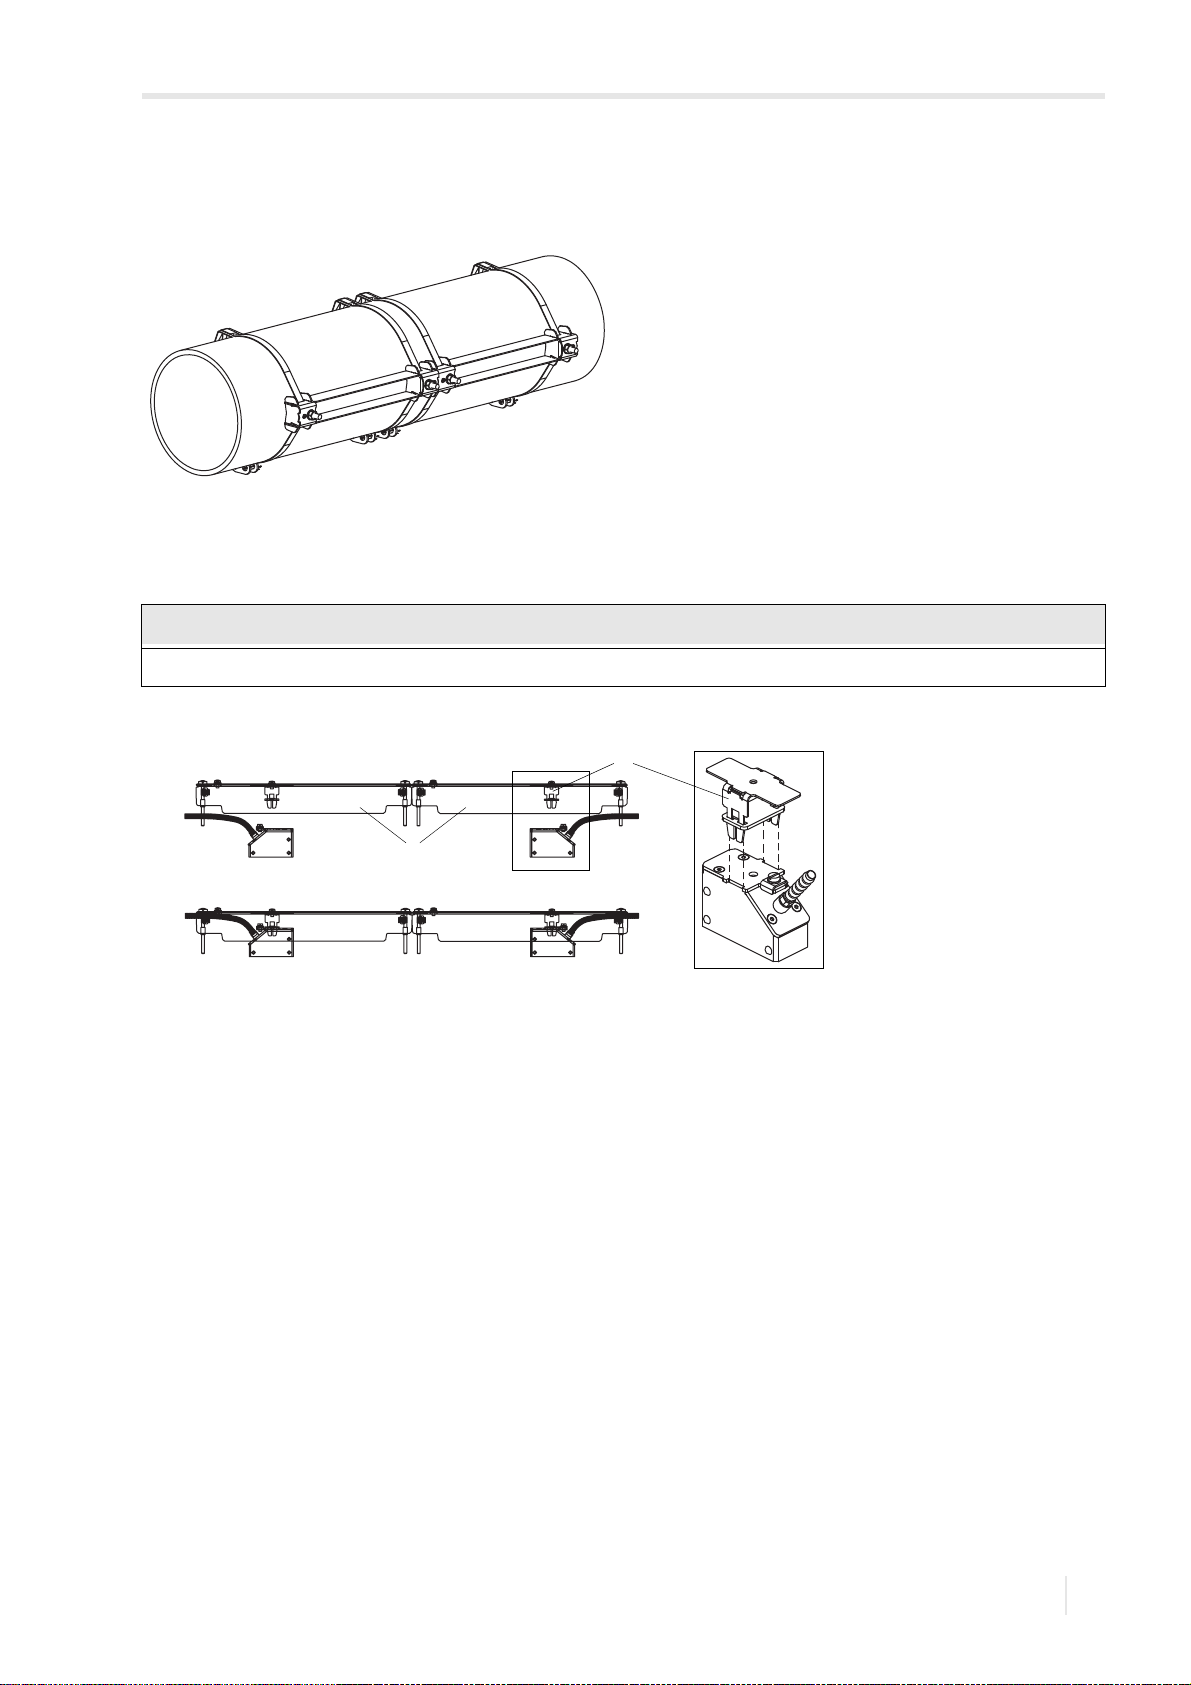
• Insert the tension strap into the tension strap clamp (2) and the metal spring, see Fig. 6.25 and Fig. 6.28. The metal
spring does not have to be mounted on:
– steel pipes
– pipes with an outer pipe diameter < 80 mm
– pipes that are not subjected to significant temperature fluctuations
• Position the ratchet clasp, tension strap clamp (2) and metal spring (if necessary) on the pipe:
• Mount the metal spring opposite to the tension strap clamp.
• Place the tension strap around the pipe and pass it through the slot of the clasp screw, see Fig. 6.29.
• Tighten the tension strap.
• Cut off the protruding tension strap, see Fig. 6.29.
The edge of the tension strap is very sharp.
Risk of injury!
Debur sharp edges.
Wear the required personal protective equipment. Observe the applicable rules.
• Tighten the clasp screw.
• Tighten the nut of the tension strap clamp (2), but not too firmly in order not to damage the tension strap, see Fig. 6.25.
In order to release the screw and the tension strap, press the lever down, see Fig. 6.22.
Fig. 6.28: Tension strap with metal spring and clamp
1–metal spring
2 – tension strap clamp
Fig. 6.29: Ratchet clasp with tension strap
1 – sense of rotation
2 – edge
3–lever
4 – clasp screw with slot
42
2018-07-16, UMFLUXUS_WDV1-3EN
Page 43
6 Installation
Notice!
1
2
FLUXUS WD 6.2 Transducers
• Repeat the steps to fix the second rail, see Fig. 6.30.
Fig. 6.30: Pipe with 2 rails
Step 5: Installation in the transducer mounting fixture Variofix L
• Press the transducers firmly into the transducer mounting fixture in the covers until the transducers are tightly fixed. The
transducer cables show in opposite directions, see Fig. 6.31.
The arrows on the transducers and the covers have to point in the same direction.
Fig. 6.31: Installation of the transducers in the covers
1–cover
2 – transducer clamping fixture
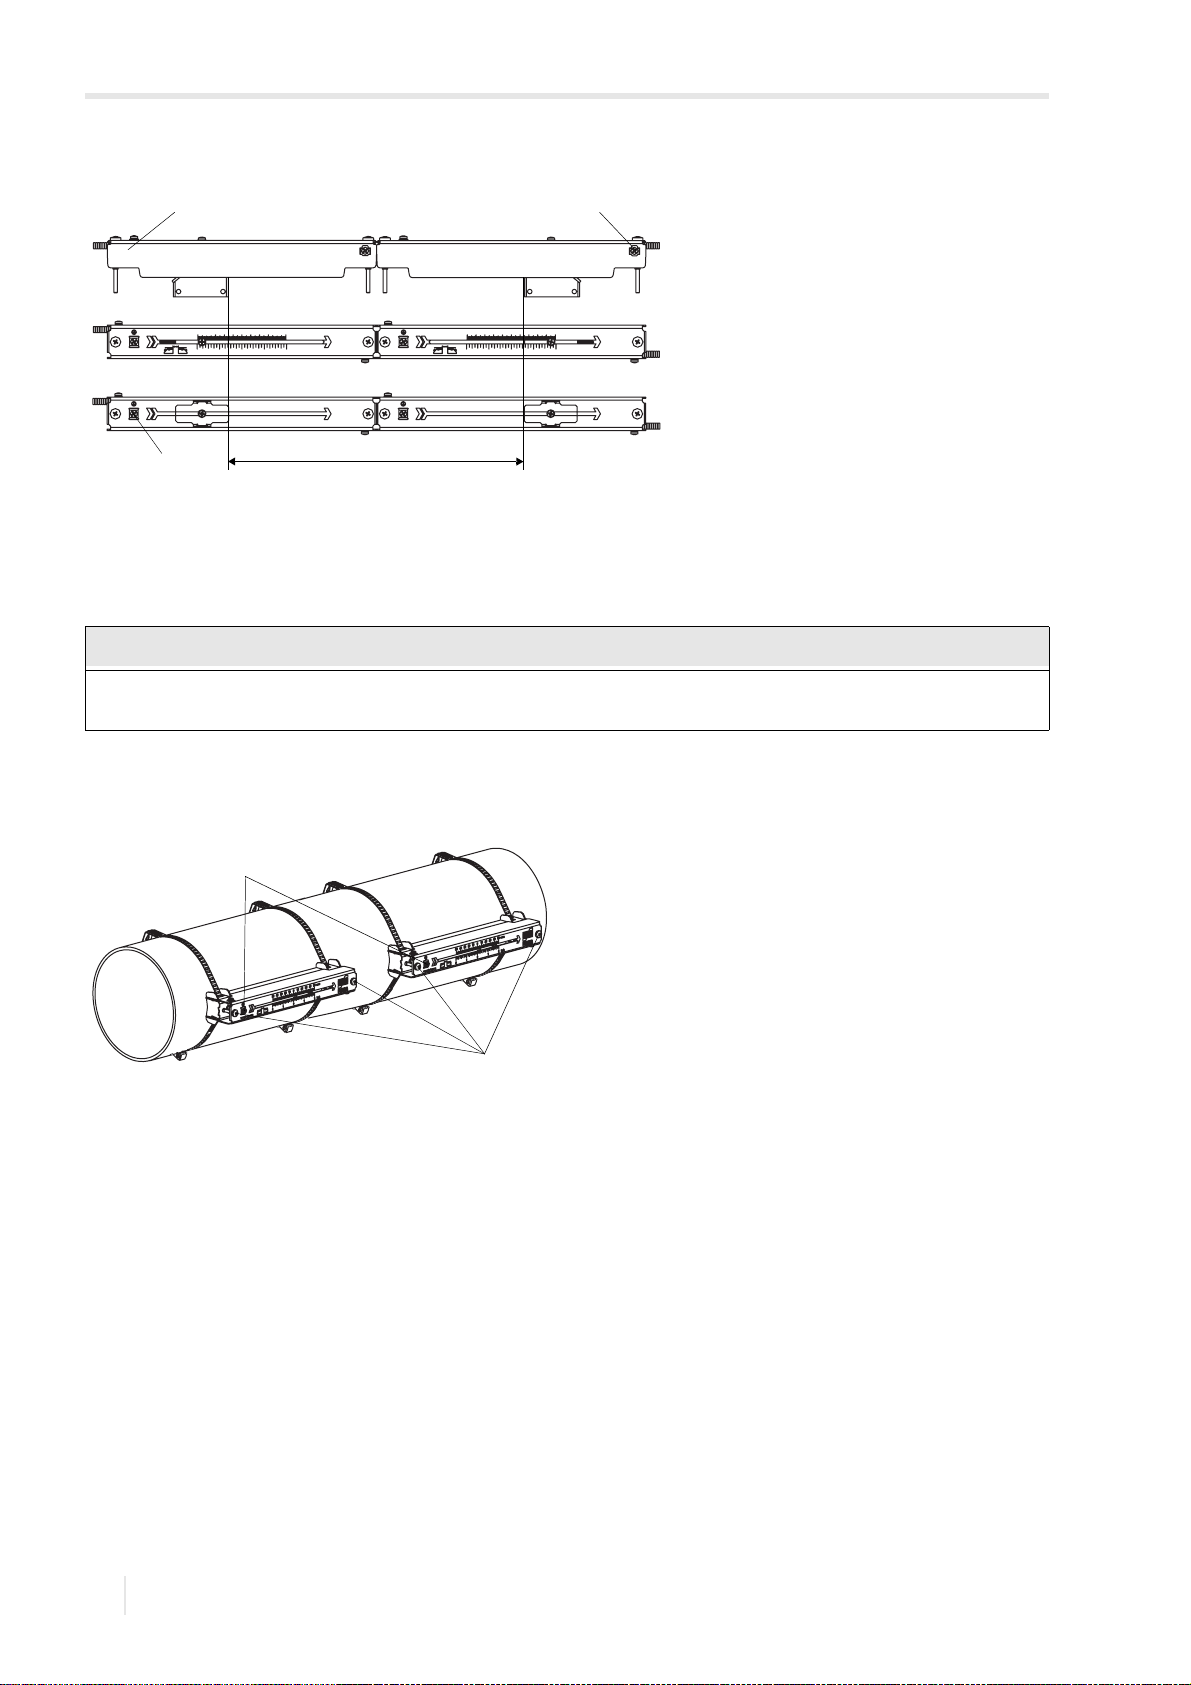
• Adjust the transducer distance displayed by the transmitter, see Fig. 6.32.
• Fix the transducer cables with the strain relief clamp to protect them from mechanical strain, see Fig. 6.32.
• Stick coupling foil (or some coupling compound for a short-term installation) on the contact surface of the transducers.
The coupling foil can be fixed to the contact surface with some coupling compound.
• Put the covers with the transducers on the rail.
• Correct the transducer distance, if necessary.
UMFLUXUS_WDV1-3EN, 2018-07-16
43
Page 44
6 Installation
Notice!
12
a
3
2
1
6.2 Transducers FLUXUS WD
Fig. 6.32: Adjustment of the transducer distance
1–cover
2 – strain relief clamp
3 – equipotential bonding terminal
a – transducer distance
Make sure that the coupling foil remains on the contact surface of the transducers. For information concerning the
coupling foil, see the safety data sheet In case a safety data sheet is required, contact FLEXIM.
• Tighten the cover screws, see Fig. 6.33.
Fig. 6.33: Variofix L with transducers on the pipe
1 – equipotential bonding terminal
2 – cover screws
44
2018-07-16, UMFLUXUS_WDV1-3EN
Page 45
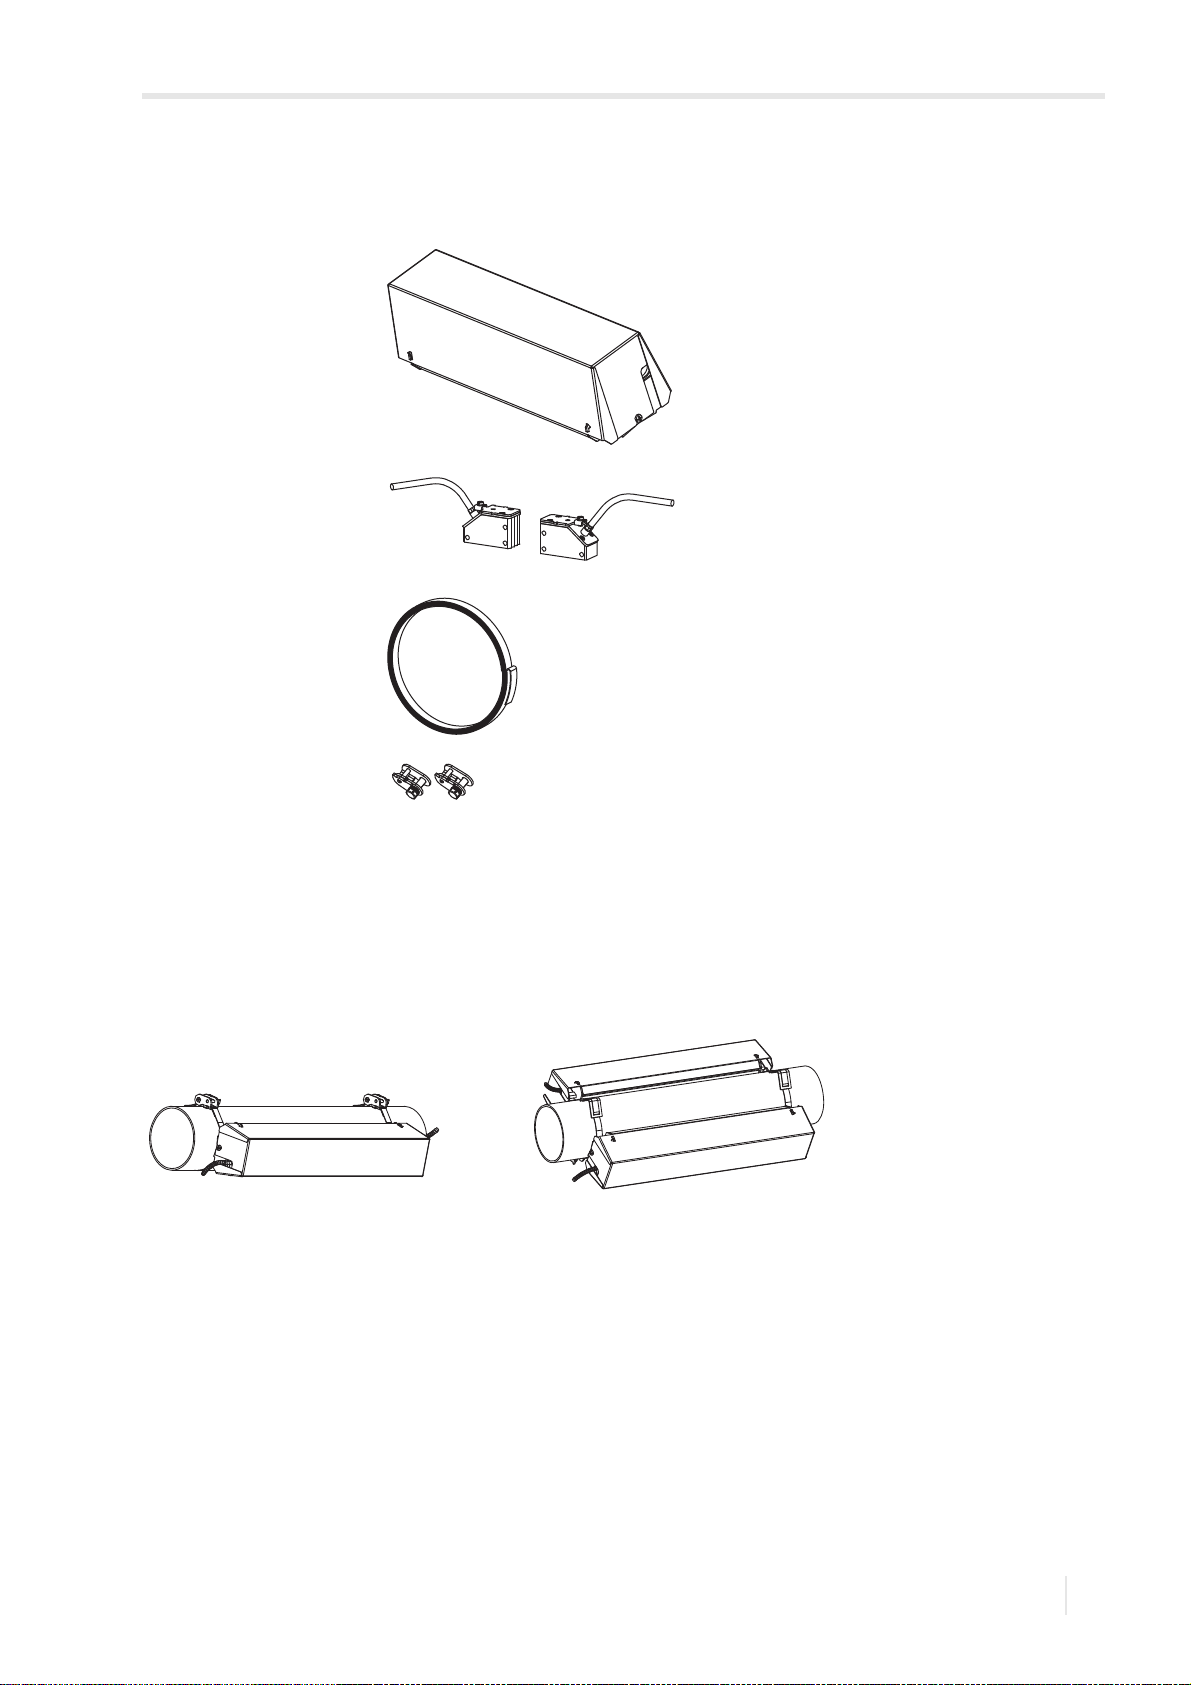
6 Installation
FLUXUS WD 6.2 Transducers
6.2.2.3 Mounting with Variofix C
Scope of delivery
1 × Variofix C
1 × transducer pair
1 × tension strap coil
2 × ratchet clasp
Mounting
When measuring in reflection arrangement, 1 transducer mounting fixture is mounted laterally on the pipe, see Fig. 6.34.
When measuring in diagonal arrangement, 2 transducer mounting fixtures are mounted on opposite sides of the pipe, see
Fig. 6.35.
In the following, the installation of 1 transducer mounting fixture in reflection arrangement is described.
Fig. 6.34: Transducer mounting fixture Variofix C
(reflection arrangement)
Fig. 6.35: Transducer mounting fixture Variofix C
(diagonal arrangement)
Overview of the mounting steps
• step 1
dismounting of the transducer mounting fixture Variofix C
• step 2
mounting the rail
• step 3
installation of the transducers in the transducer mounting fixture Variofix C
UMFLUXUS_WDV1-3EN, 2018-07-16
45
Page 46
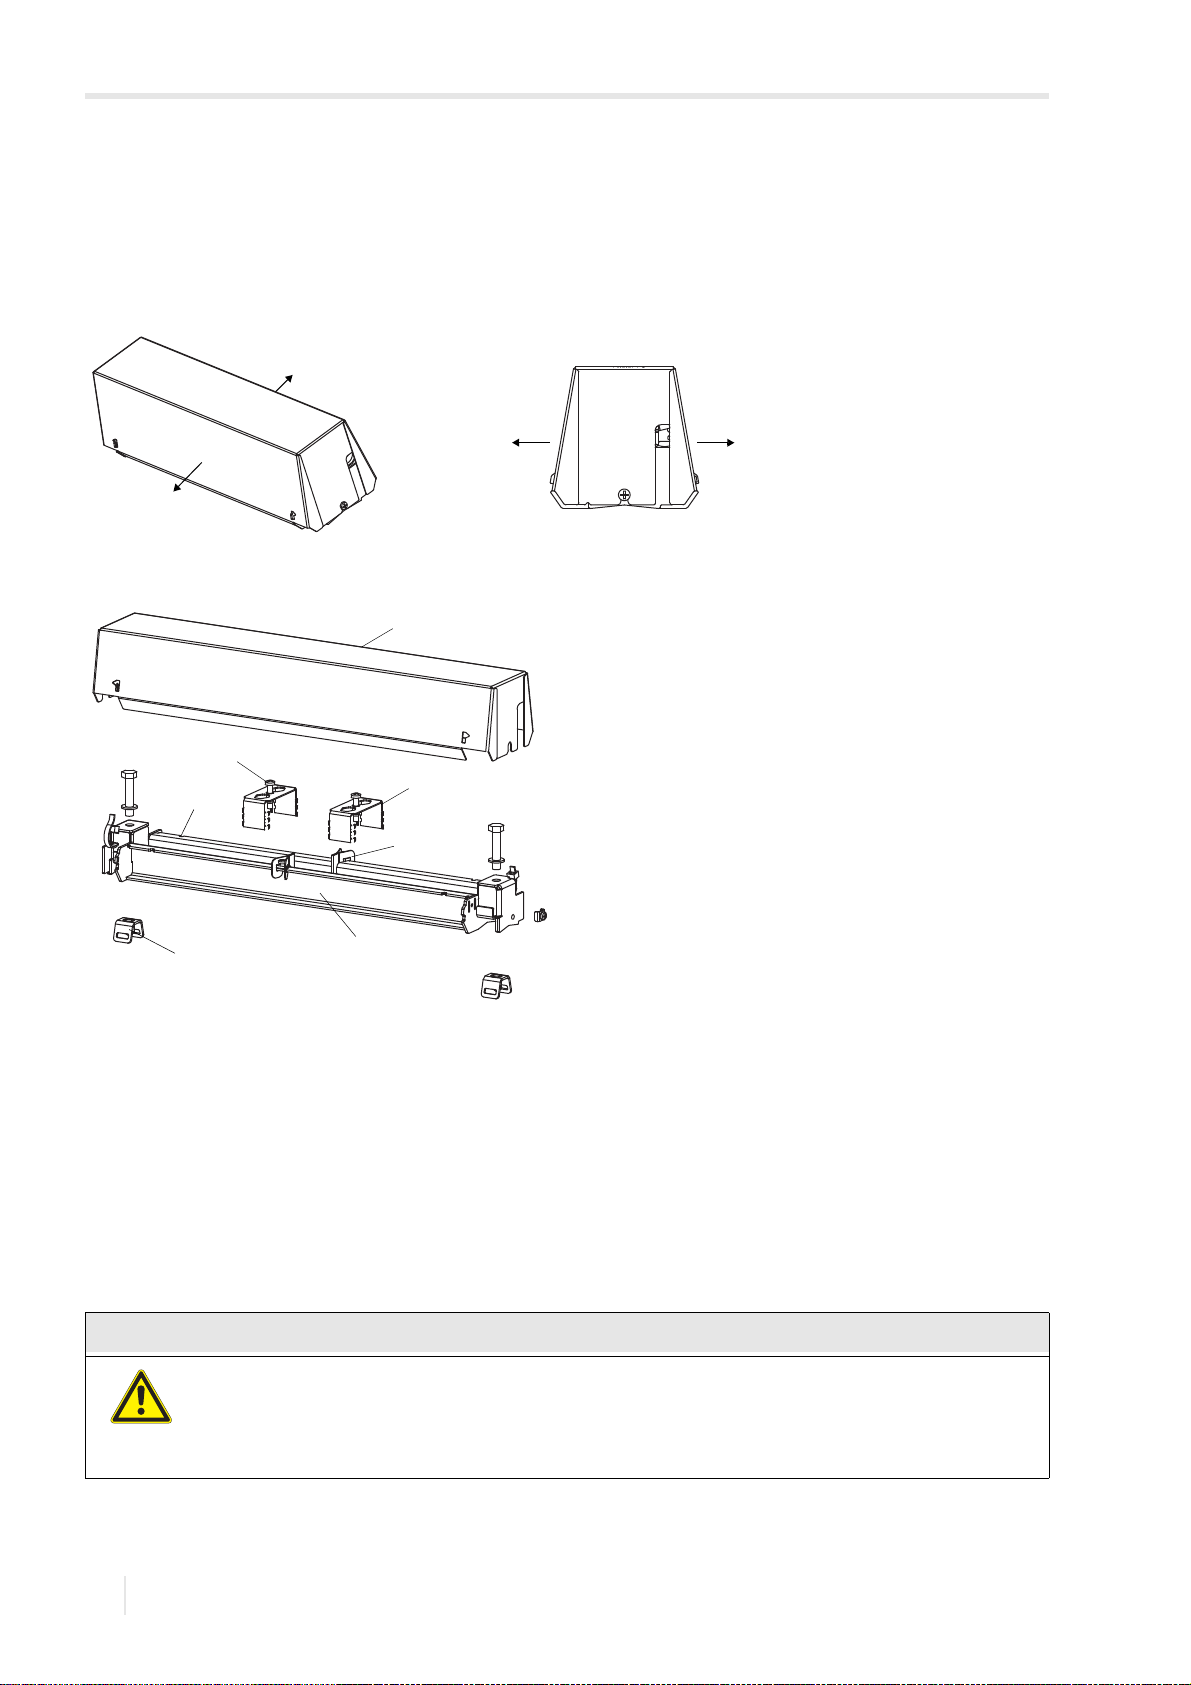
6 Installation
Caution!
1
2
3
4
5
6
7
6.2 Transducers FLUXUS WD
Step 1: Dismounting of the transducer mounting fixture Variofix C
• Disassemble the transducer mounting fixture Variofix C.
In order to remove the cover from the rail, bend the outer sides of the cover outwards, see Fig. 6.36.
In order to remove the spring clip from the rail, slide it over the indentation on the rail and lift it off, see Fig. 6.37.
Fig. 6.36: Removal of the cover
Fig. 6.37: Dismounting of the transducer mounting fixture Variofix C
1–cover
2 – tensioning screw
3 – spring clip
4 – indentation
5 – spacing element
6–rail
7 – tension strap clamp
Step 2: Mounting the rail
• Select the installation instructions according to the supplied clasp:
Mounting of the rail without a clasp
• Cut the tension strap to length (pipe circumference + at least 120 mm).
The edge of the tension strap is very sharp.
Risk of injury!
Debur sharp edges.
46
Wear the required personal protective equipment. Observe the applicable rules.
2018-07-16, UMFLUXUS_WDV1-3EN
Page 47
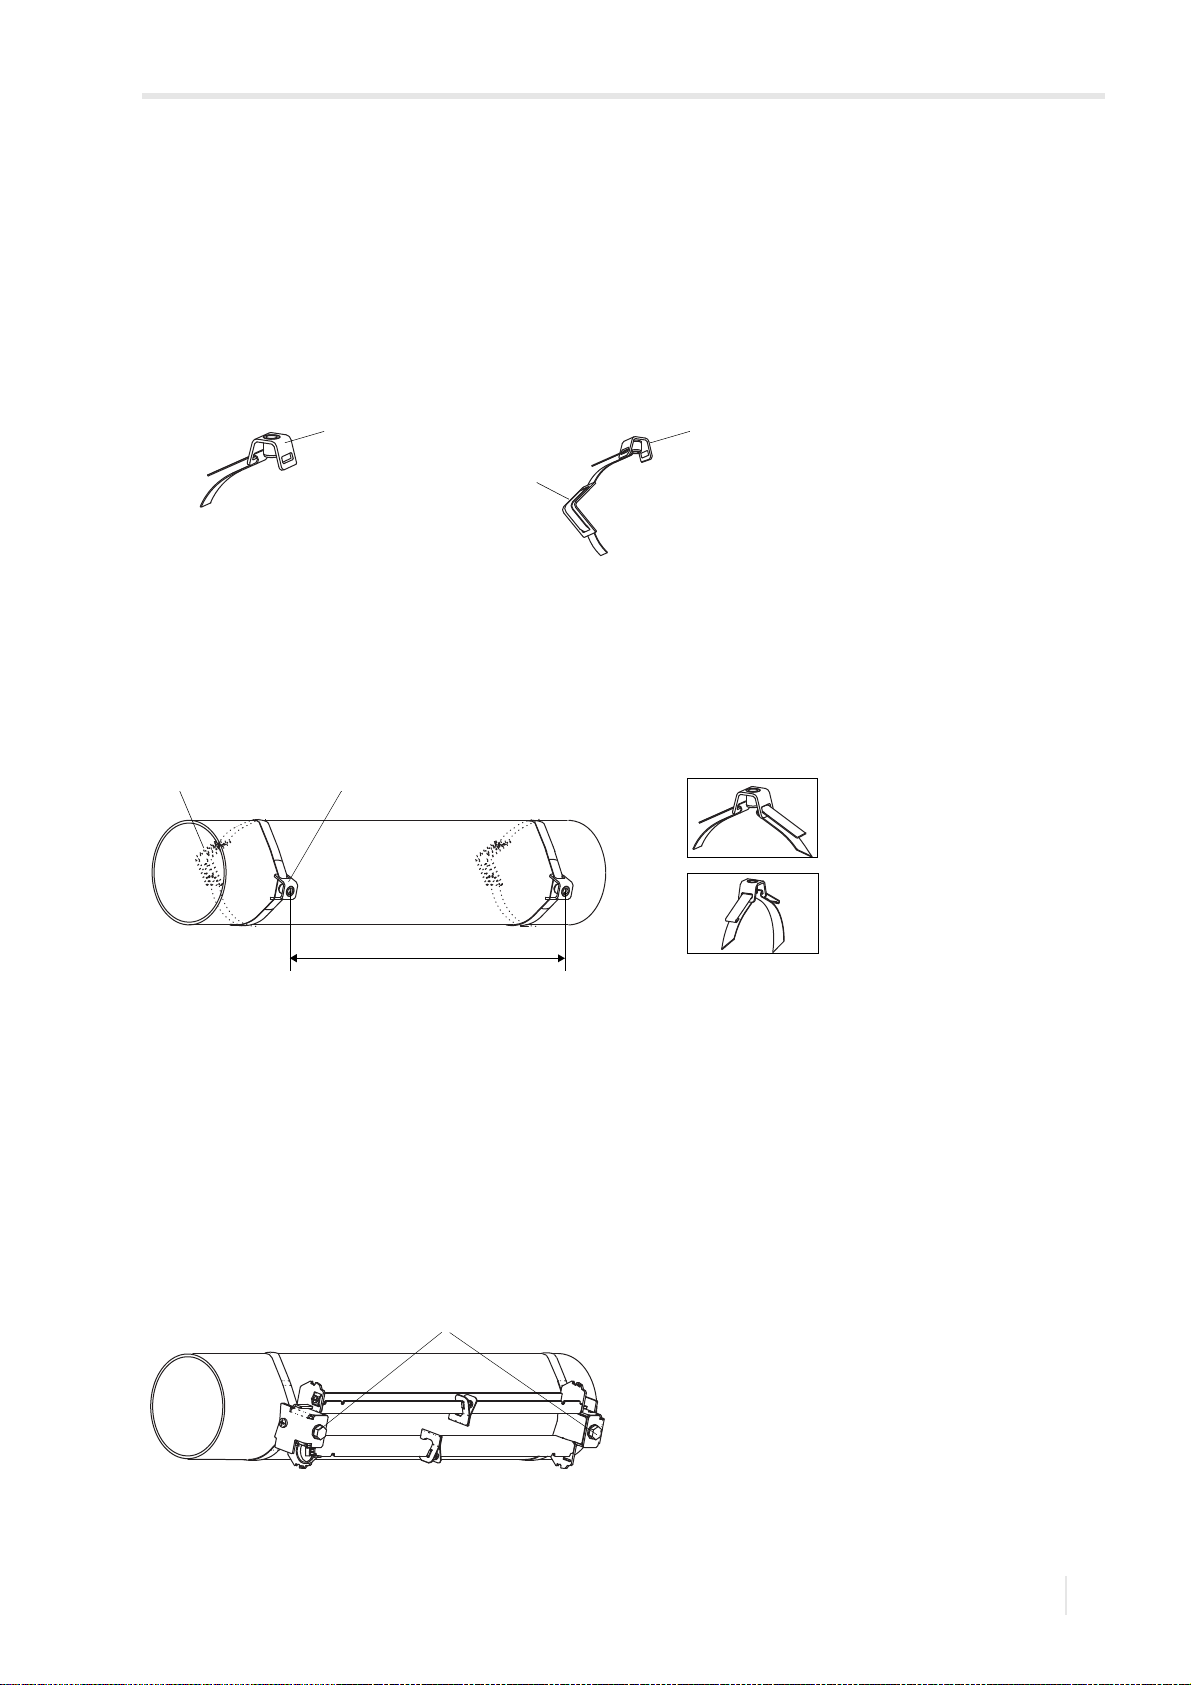
6 Installation
1
1
2
12 a
b
s
1
FLUXUS WD 6.2 Transducers
• Insert approx. 100 mm of the tension strap into one of the slots of the tension strap clamp and bend it, see Fig. 6.38.
• If necessary, insert the long end of the tension strap into the metal spring, see Fig. 6.39. The metal spring does not have
to be mounted on:
– steel pipes
– pipes with an outer pipe diameter < 80 mm
– pipes that are not subjected to significant temperature fluctuations
• Place the tension strap around the pipe, see Fig. 6.40.
Fig. 6.38: Tension strap with clamp Fig. 6.39: Tension strap with metal spring and clamp
1 – tension strap clamp 1 – tension strap clamp
2–metal spring
• Position the tension strap clamp and metal spring (if necessary) on the pipe, see Fig. 6.40:
– on a horizontal pipe, mount the tension strap clamp on the side of the pipe, if possible
– mount the metal spring (if necessary) opposite to the tension strap clamp
Fig. 6.40: Tension strap with metal spring and tension strap clap on the pipe
1–metal spring
2 – tension strap clamp
s = length of the rail - 33 mm
• Insert the long end of the tension strap into the second slot of the tension strap clamp, see Fig. 6.40 a.
• Tighten the tension strap and bend it.
• Bend both ends of the tension strap, see Fig. 6.40 b.
• Repeat the steps for the second tension strap. Position the tension strap at the distance s, see Fig. 6.40.
• Put the rail on the tension strap clamps.
• Use the screws to fix the rail to the tension strap clamps, see Fig. 6.41.
• Tighten the screws.
Fig. 6.41: Rail on the pipe
1–screws
UMFLUXUS_WDV1-3EN, 2018-07-16
47
Page 48
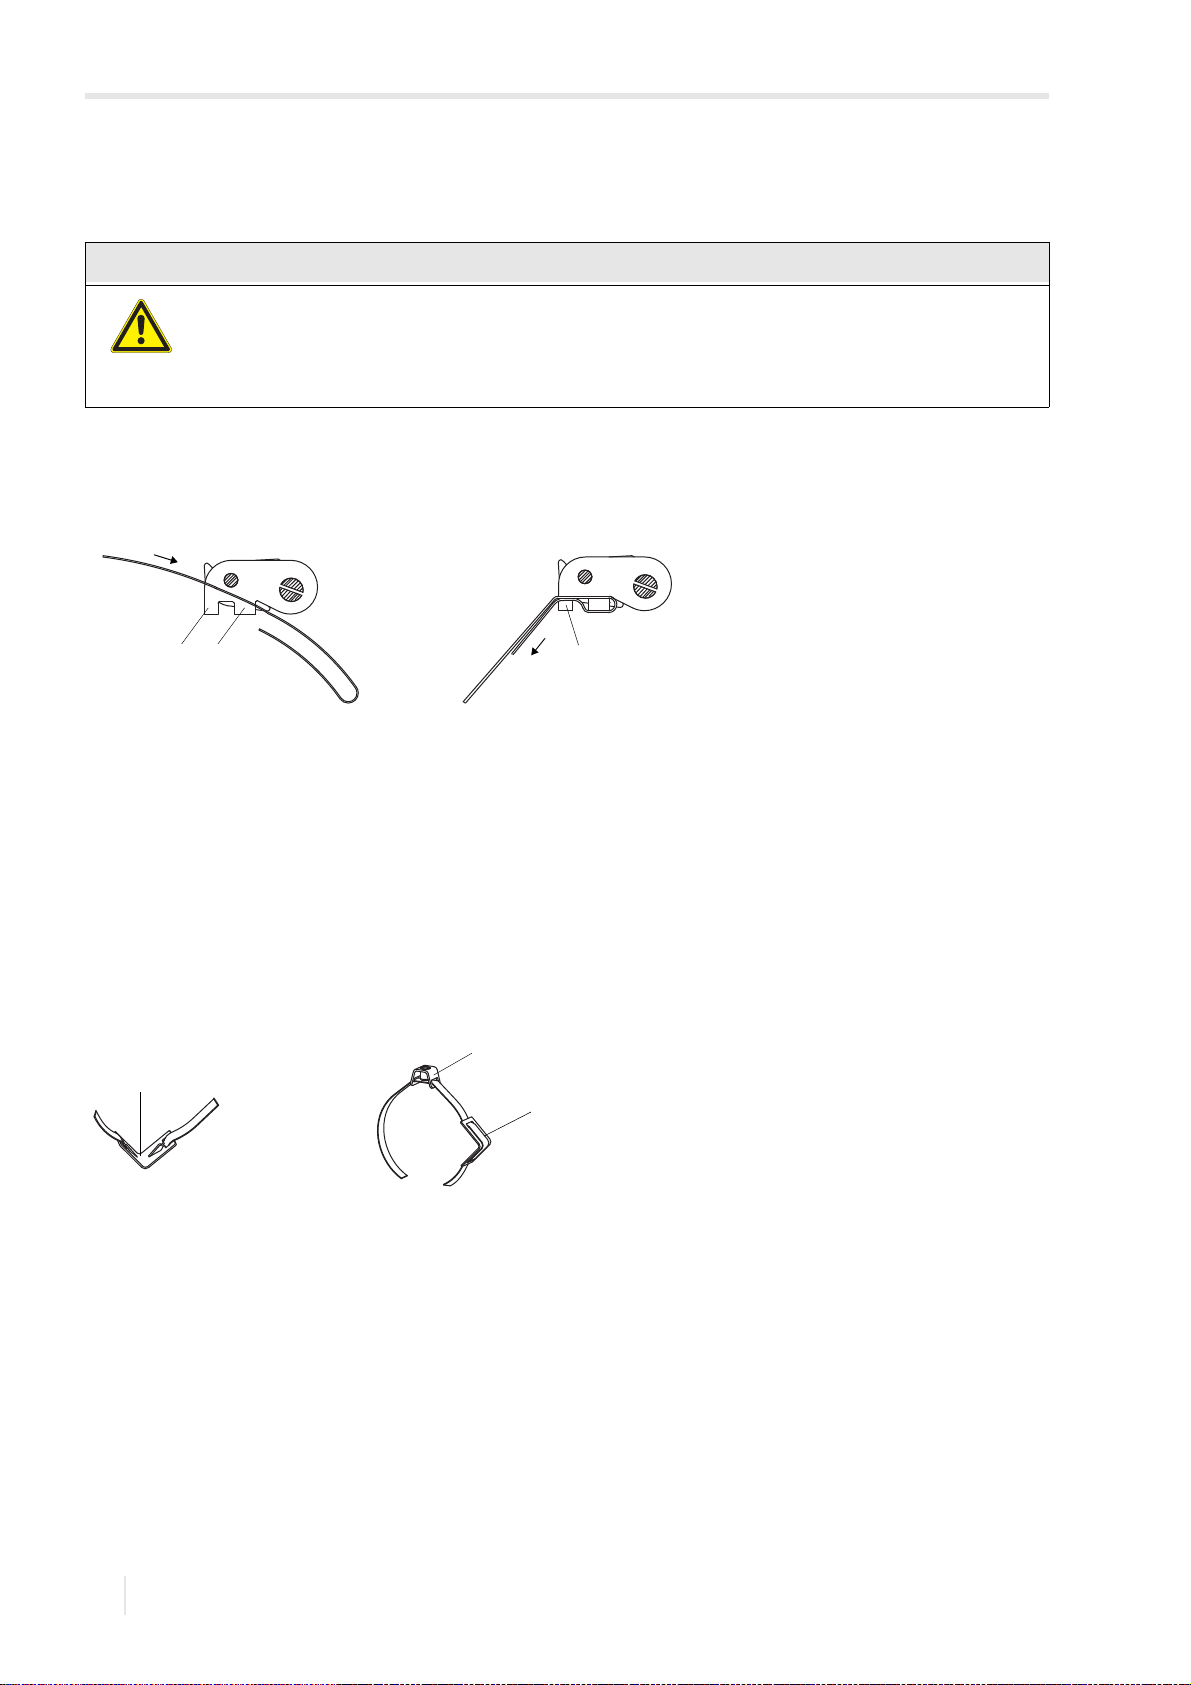
6 Installation
Caution!
ab
12 1
1
1
2
6.2 Transducers FLUXUS WD
Mounting the rail with ratchet clasp
• Cut the tension strap to length (pipe circumference + at least 120 mm).
The edge of the tension strap is very sharp.
Risk of injury!
Debur sharp edges.
Wear the required personal protective equipment. Observe the applicable rules.
• Insert approx. 100 mm of the tension strap into part (1) and (2) of the ratchet clasp, see Fig. 6.42 a.
Fig. 6.42: Ratchet clasp with tension strap
• Bend the tension strap.
• Insert the tension strap into part (1) of the ratchet clasp, see Fig. 6.42 b.
• Tighten the tension strap.
• Insert the long end of the tension strap into the tension strap clamp and the metal spring, see Fig. 6.43. The metal spring
does not have to be mounted on:
– steel pipes
– pipes with an outer pipe diameter < 80 mm
– pipes that are not subjected to significant temperature fluctuations
• Place the tension strap around the pipe, see Fig. 6.44.
Fig. 6.43: Tension strap with metal spring and clamp
1–metal spring
2 – tension strap clamp
• Position the ratchet clasp, tension strap clamp and metal spring (if necessary) on the pipe:
– on a horizontal pipe, mount the tension strap clamp on the side of the pipe, if possible
– mount the metal spring (if necessary) opposite to the tension strap clamp
• Insert the long end of the tension strap into the second slot of the tension strap screw, see Fig. 6.45.
• Tighten the tension strap.
• Cut off the protruding tension strap, see Fig. 6.45.
• Tighten the screw of the ratchet clasp.
• Repeat the steps for the second tension strap.
48
2018-07-16, UMFLUXUS_WDV1-3EN
Page 49
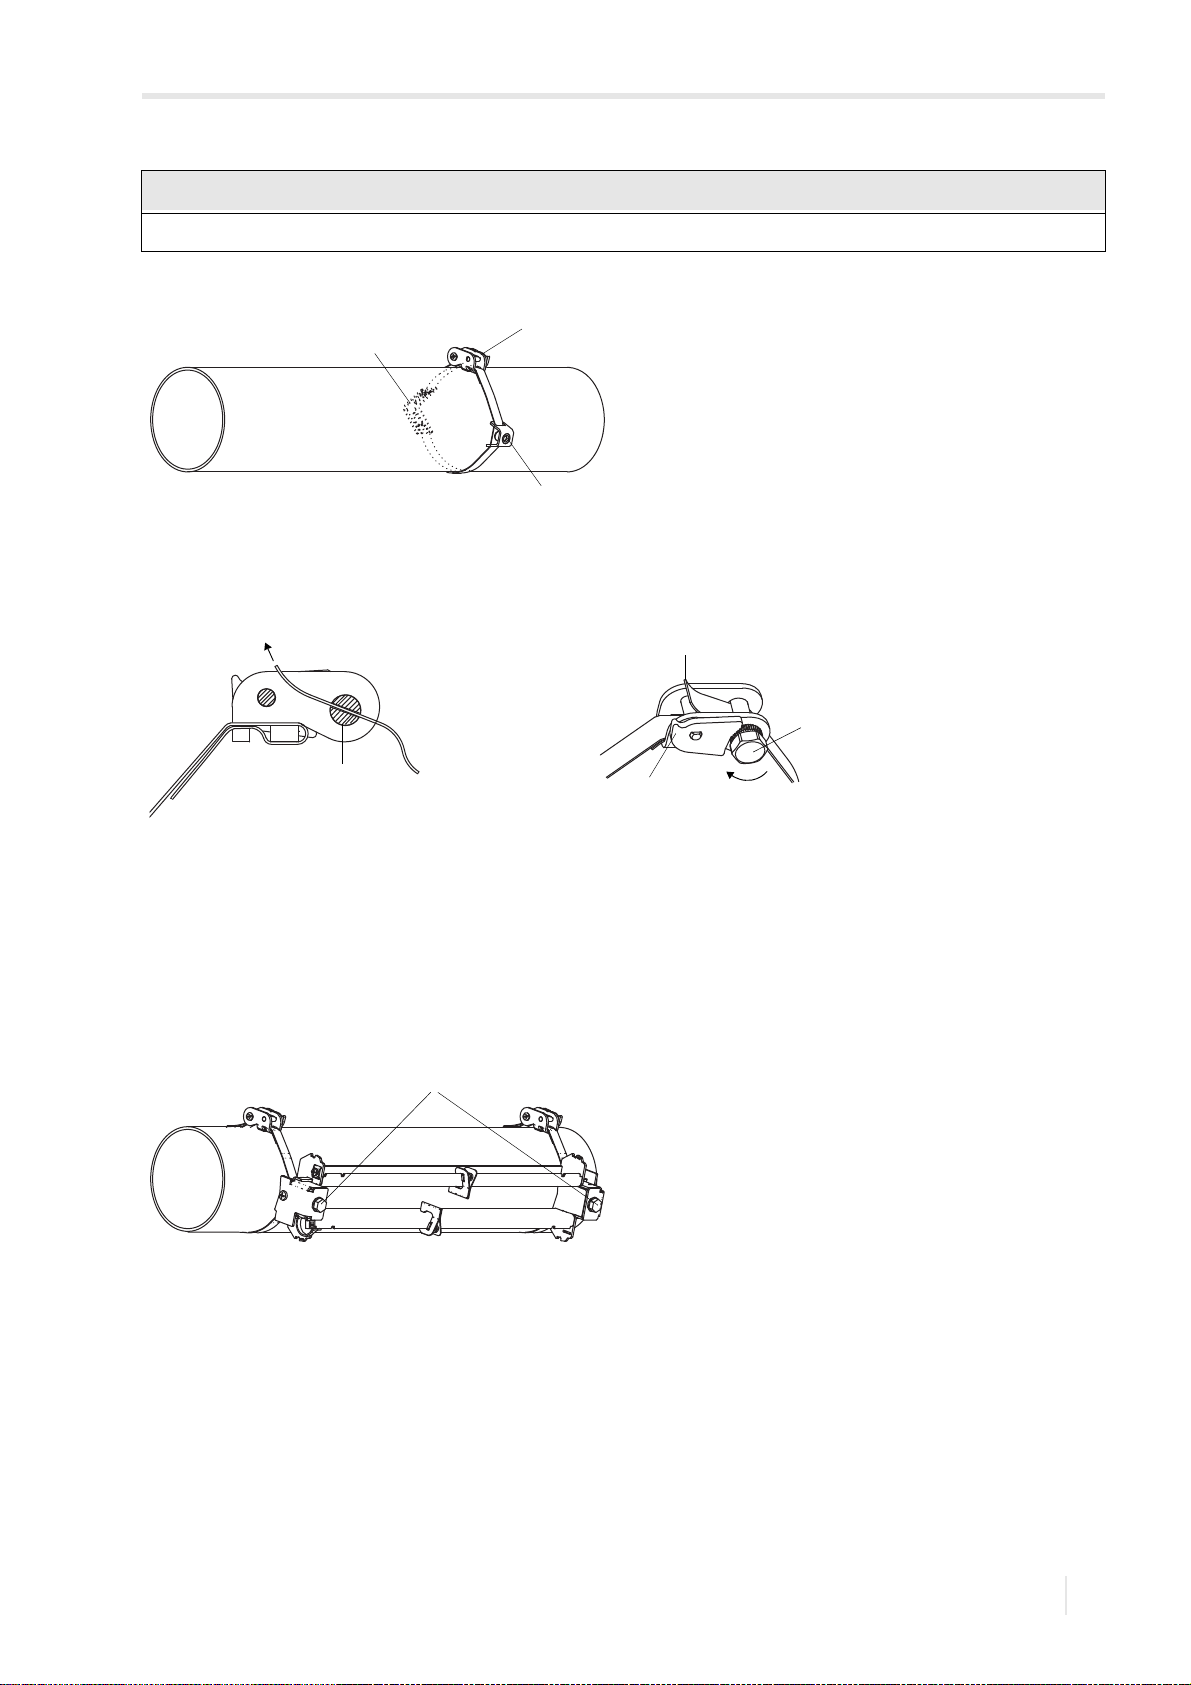
6 Installation
Notice!
2
1
3
1
2
4
3
4
1
FLUXUS WD 6.2 Transducers
In order to release the screw and the tension strap, press the lever down, see Fig. 6.45.
Fig. 6.44: Ratchet clasp with tension strap, tension strap clamp and metal spring
1–metal spring
2 – ratchet clasp
3 – tension strap clamp
Fig. 6.45: Ratchet clasp with tension strap
1 – sense of rotation
2 – edge
3–lever
4 – clasp screw with slot
• Put the rail on the tension strap clamps, see Fig. 6.46.
• Fix the rail to the tension strap clamps with the screws.
• Tighten the screws.
Fig. 6.46: Rail on the pipe
1–screws
UMFLUXUS_WDV1-3EN, 2018-07-16
49
Page 50
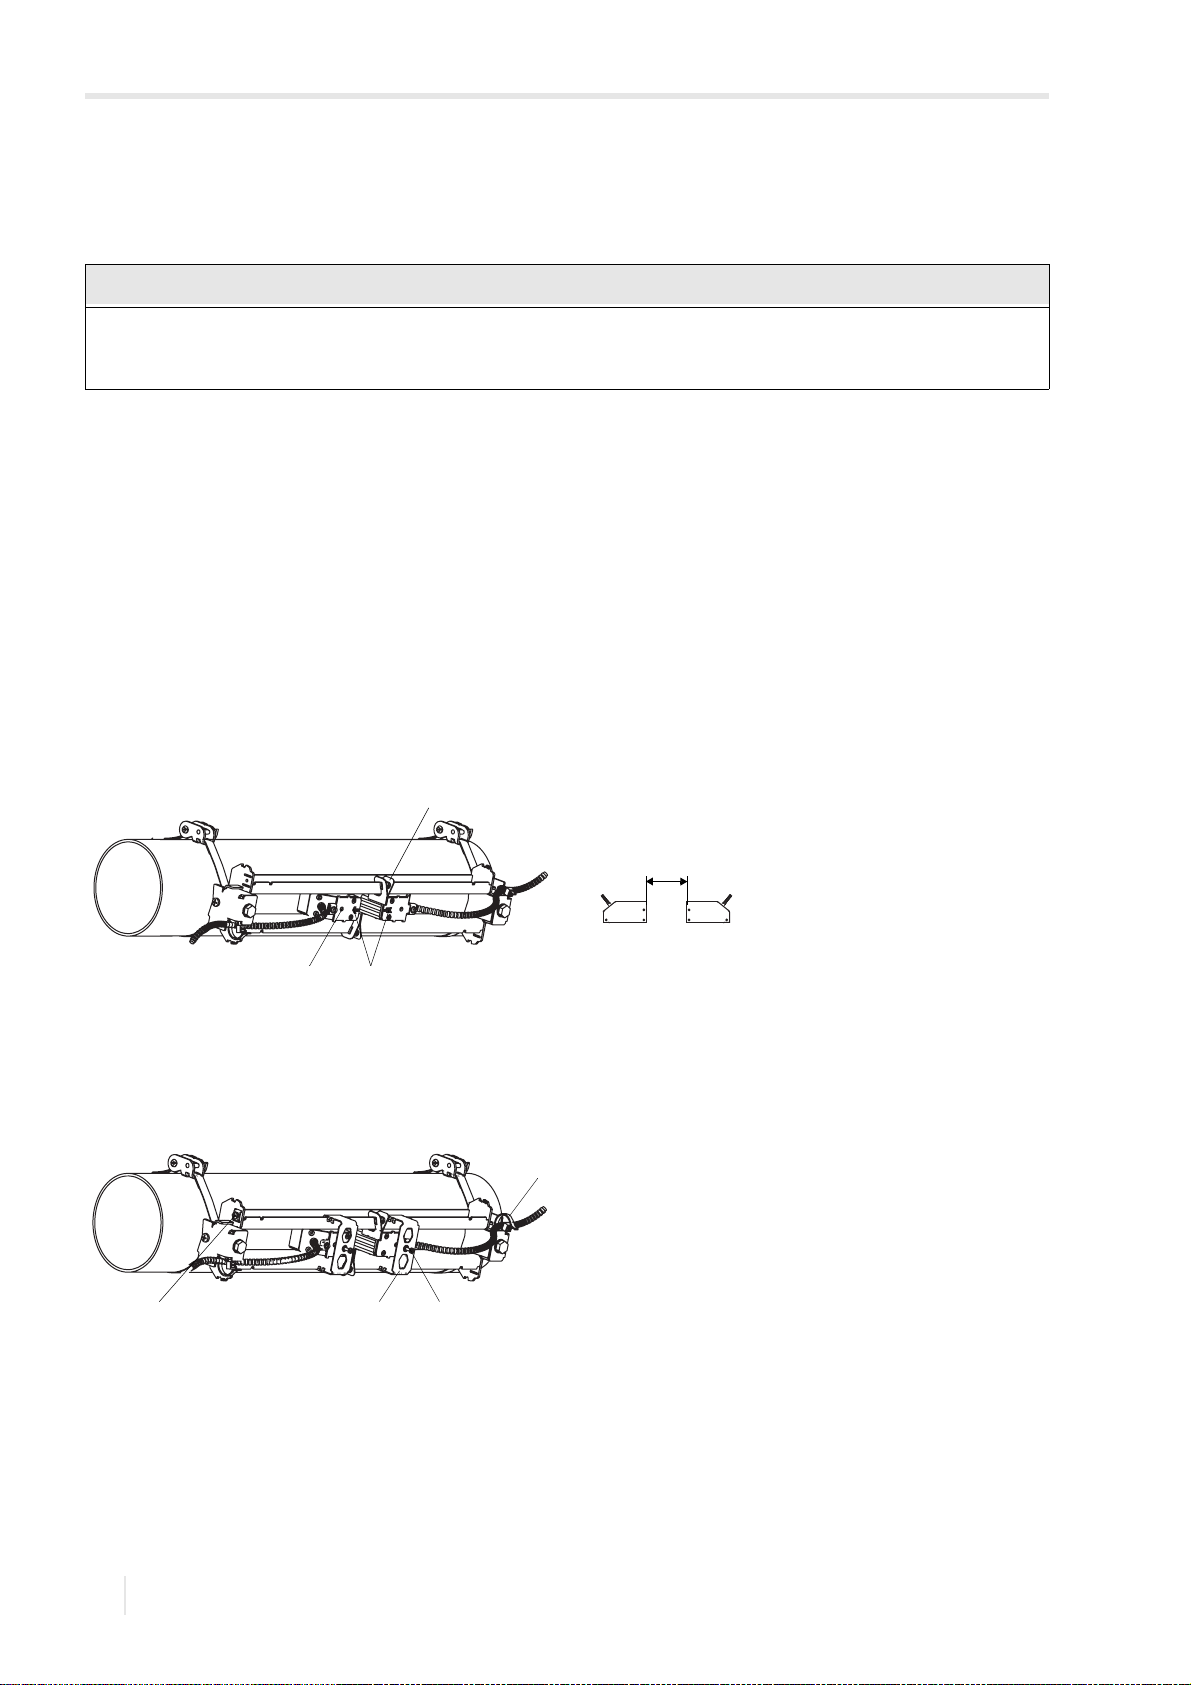
6 Installation
Notice!
1
23
a
2
4
31
6.2 Transducers FLUXUS WD
Step 3: Installation of the transducers in the transducer mounting fixture Variofix C
• Stick coupling foil (or some coupling compound for a short-term installation) on the contact surface of the transducers.
The coupling foil can be fixed to the contact surface with a small amount of coupling compound.
If the signal is not sufficient for the measurement, use coupling compound instead of coupling foil. For information
concerning the coupling foil or coupling compound, see the safety data sheet. In case a safety data sheet is required,
contact FLEXIM.
• Position the transducers on the rail in such way that the engravings on the transducers form an arrow. The transducer
cables show in opposite directions, see Fig. 6.47.
• Adjust the transducer distance displayed by the transmitter, see Fig. 6.47.
• Slide the spring clips on the transducers, see Fig. 6.48.
• Fix the transducers by tightening the tensioning screws slightly. The end of the tensioning screw has to be placed above
the hole in the transducer, see Fig. 6.47 and Fig. 6.48.
• Correct the transducer distance, if necessary.
• Tighten the tensioning screws.
• Fix the spacing element on the rail to mark the transducer position, see Fig. 6.47.
• Use a cable tie to fix the transducer cables in order to protect them from mechanical strain, see Fig. 6.48.
• Put the cover on the rail, see Fig. 6.49.
• Tighten the screws on both sides of the cover.
Fig. 6.47: Transducers in the rail (spring clip not shown)
1 – spacing element
2 – hole
3 – engravings on the transducers
a – transducer distance
Fig. 6.48: Transducers in the rail
1 – equipotential bonding terminal
2 – spring clip
3 – tensioning screw
4 – cable tie
50
2018-07-16, UMFLUXUS_WDV1-3EN
Page 51
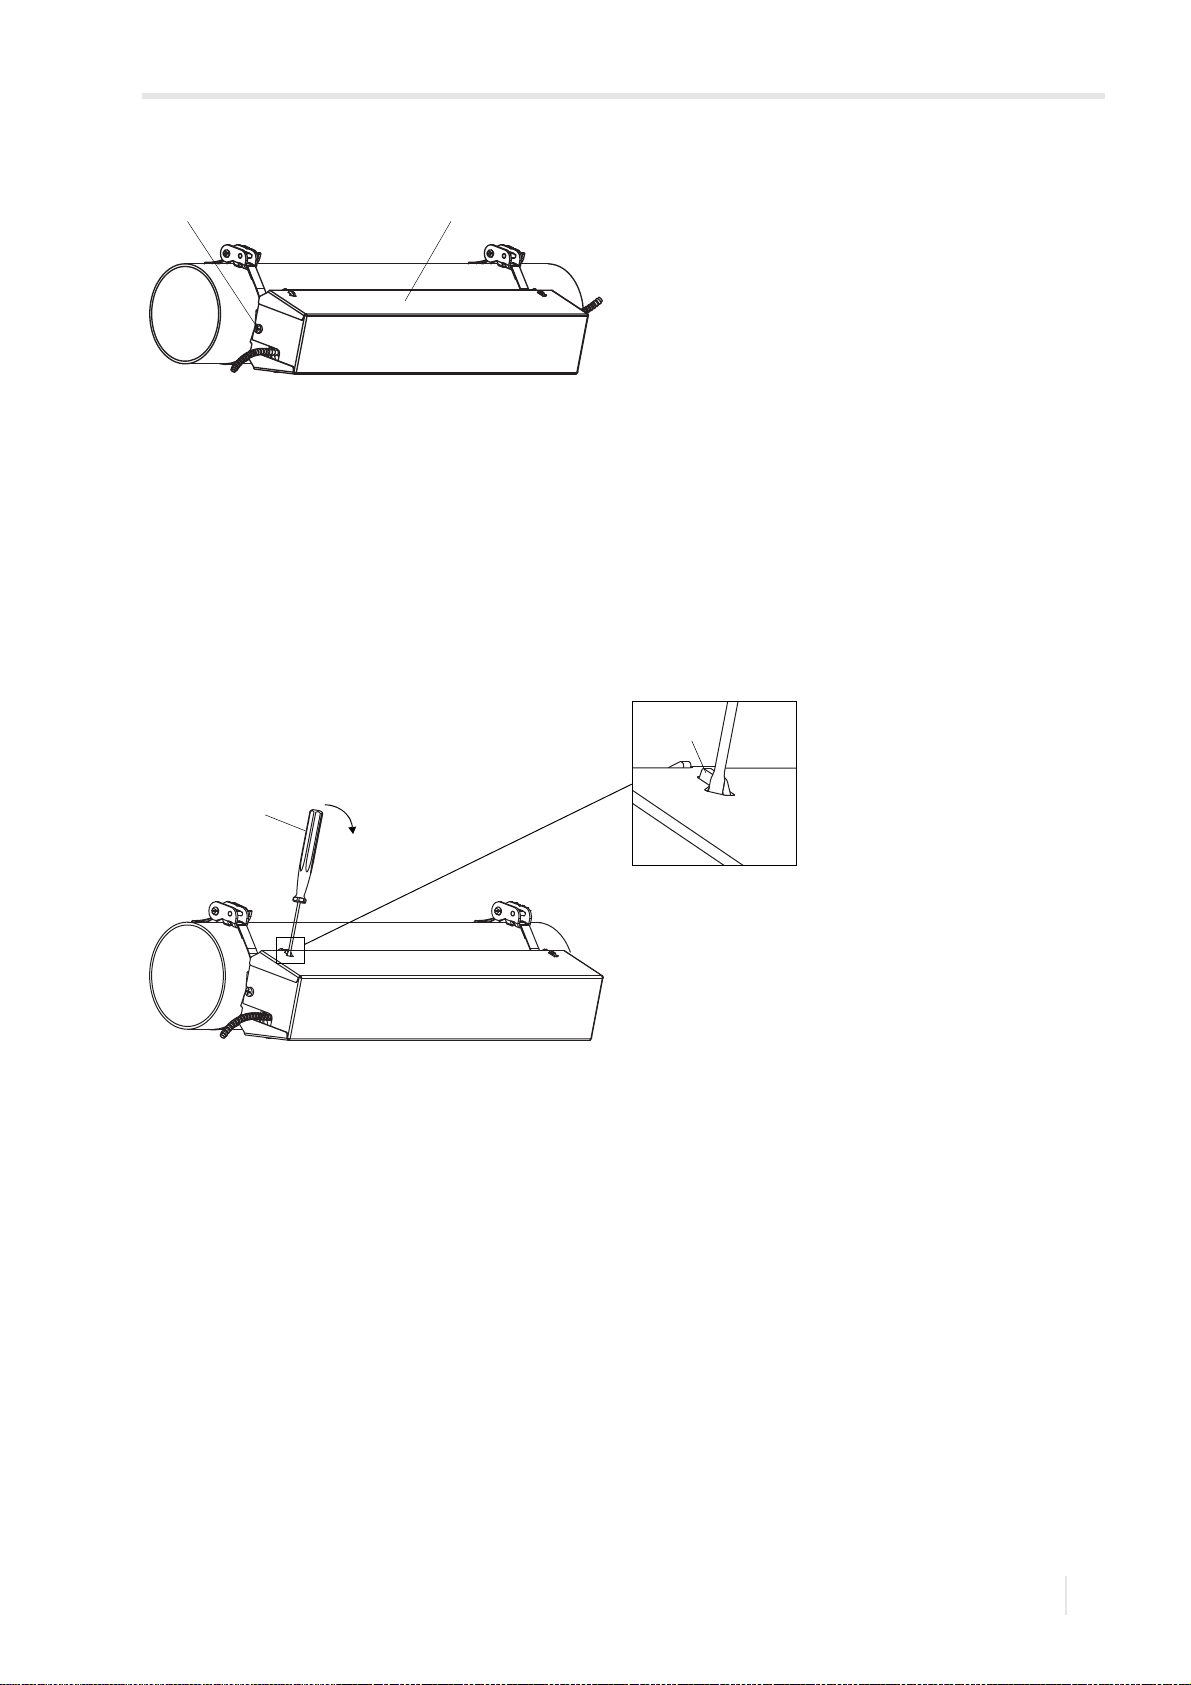
6 Installation
12
2
1
FLUXUS WD 6.2 Transducers
Fig. 6.49: Variofix C with transducers on the pipe
1–screw
2–cover
Remove the cover from the mounted transducer mounting fixture Variofix C as follows:
• Use a lever tool to remove the cover.
• Insert the lever tool in one of the 4 openings of the cover, see Fig. 6.50.
• Press the lever tool against the fixture.
• Bend the cover outwards and release it from the anchoring.
• Repeat the steps for the other 3 openings.
• Remove the cover from the rail.
Fig. 6.50: Removal of the cover
1 – lever tool
2–fixture
UMFLUXUS_WDV1-3EN, 2018-07-16
51
Page 52
7 Connection
Warning!
Danger!
Warning!
Caution!
FLUXUS WD
7 Connection
Installation, connection and start-up by unauthorized and unqualified personnel
This may result in personal or material damage or other dangerous situations.
Any work on the transmitter has to be carried out by authorized and qualified personnel.
Working in mines or cramped confines
Risk of intoxication and/or asphyxiation because of emerging gases, risk of injuries because of cramped
conditions.
Wear the required personal protective equipment. Observe the applicable rules.
Touching live parts
Electric shock or arc faults can led to severe injuries. The measuring equipment can be damaged.
Prior to any work on the transmitter (e.g., installation, dismounting, connection, start-up), the transmit-
ter has to be disconnected from the power supply. It is not sufficient to remove the internal fuse of the
instrument, see section 7.2.
Safety and accident prevention regulations for electrical systems and equipment
Failure to observe these regulations may lead to severe injury or death.
Observe the safety and accident prevention regulations for electrical systems and equipment.
52
2018-07-16, UMFLUXUS_WDV1-3EN
Page 53
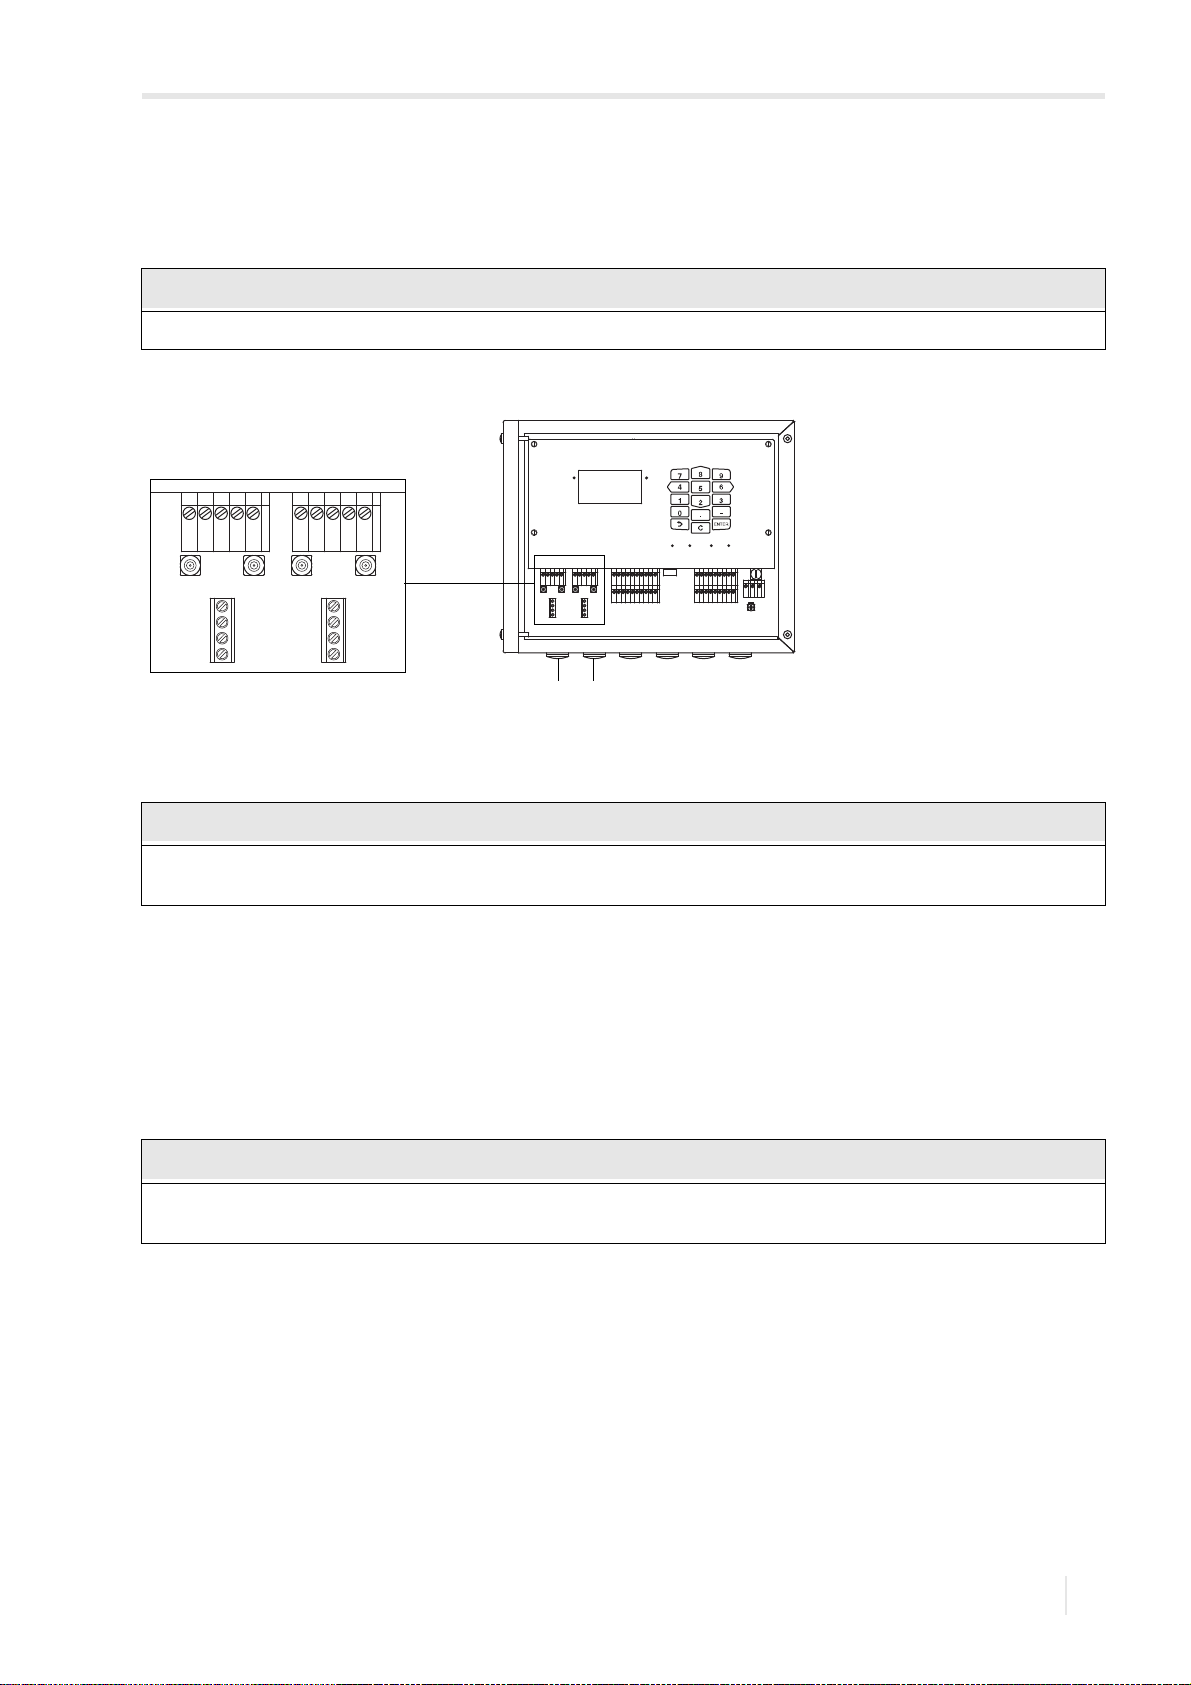
7 Connection
Notice!
Important!
Notice!
A
B
SNAP
DISP
DISP
MODEFAST
MUX
NEXT
Q
ON
Q+Q-
3x Q
OFF
LAN
USB
A+B-P1+
P2+
P3+
P4+
P5a
P6a
P7a
SSP1-
P2-
P3-
P4-
P5b
P6b
P7b
X2 X3
X_AV
KL11
KL12
KL7KL8
KL9KL10
KL4
X_AR X_BV X_BR
T1A
T1BS1T2A
T2B
T3A
T3BS3T4B
T4A
T1a
T1bS1T2a
T2b
T3a
T3bS3T4b
T4a
N(-)
PE
L(+)
AV
AVS
AGN
ARSARBV
BVS
BGN
BRS
BR
X2 X3
X_AV
KL11
KL12
X_AR X_BV X_BR
AV
AVS
AGN
ARS
AR
BV
BVS
BGN
BRS
BR
12
FLUXUS WD 7.1 Transducers
7.1 Transducers
It is recommended to run the cables from the measuring point to the transmitter before connecting the transducers to
avoid load on the connectors.
If transducers are replaced or added, the sensor module also has to be replaced or added, see section 7.1.5.
Fig. 7.1: Connection of the transducers to the transmitter
1 – transducers (measuring channel A)
2 – transducers (measuring channel B)
7.1.1 Connection of the transducer cable to the transmitter
The degree of protection of the transmitter is only ensured if all cables are tightly fitted using cable glands and the
housing is firmly screwed.
• Remove the blind plug for the connection of the transducer cable.
• Open the cable gland of the transducer cable. The compression part remains in the cap nut.
• Push the transducer cable through the cap nut and the compression part.
• Prepare the transducer cable.
• Shorten the external shield and brush it back over the compression part.
• Screw the sealing ring side of the basic part into the transmitter housing.
• Insert the transducer cable into the housing.
For good electromagnetic compatibility (EMC), it is important to ensure good electrical contact between the external
shield and the cap nut (and thus the housing).
• Fix the cable gland by screwing the cap nut onto the basic part.
• Connect the leads of the transducer cable to the terminals of the transmitter, see Fig. 7.2 and Tab. 7.1.
UMFLUXUS_WDV1-3EN, 2018-07-16
53
Page 54
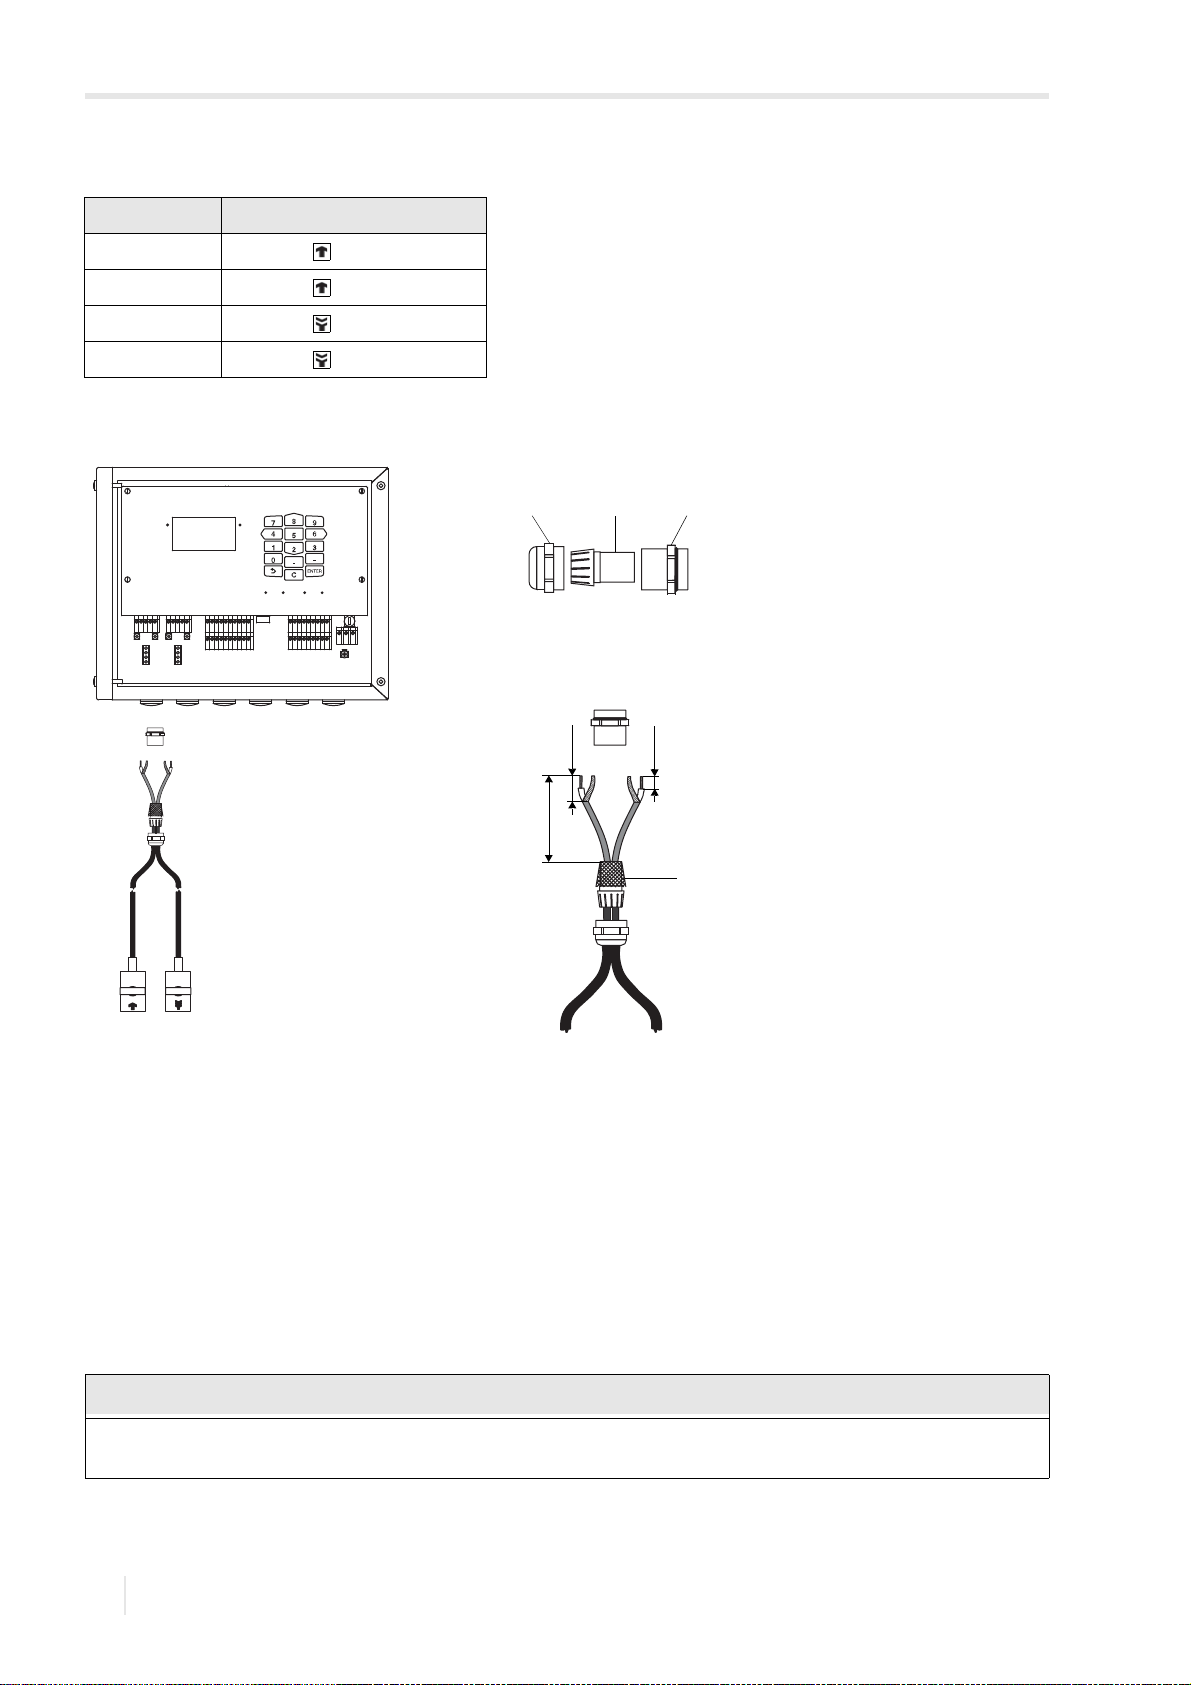
7 Connection
Notice!
A
B
SNAP
DISP
DISP
MODEFAST
MUX
NEXT
Q
ON
Q+Q-
3x Q
OFF
LAN
USB
A+B-P1+
P2+
P3+
P4+
P5a
P6a
P7a
SSP1-
P2-
P3-
P4-
P5b
P6b
P7b
X2 X3
X_AV
KL11
KL12
KL7KL8
KL9KL10
KL4
X_AR X_BV X_BR
T1A
T1BS1T2A
T2B
T3A
T3BS3T4B
T4A
T1a
T1bS1T2a
T2b
T3a
T3bS3T4b
T4a
N(-)
PE
L(+)
AV
AVS
AGN
ARSARBV
BVS
BGN
BRS
BR
70 mm
20 mm
10 mm
4
cable gland
1 23
7.1 Transducers FLUXUS WD
Tab. 7.1: Terminal assignment
terminal connection
AV transducer (core)
AVS transducer (internal shield)
ARS transducer (inner shield)
AR transducer (core)
Fig. 7.2: Connection of the transducer cable with plastic cable jacket and stripped cable ends to
the transmitter
1 – cap nut
2 – compression part
3 – basic part
4 – external shield brushed back
7.1.2 Connection of the extension cable to the transmitter
• Remove the blind plug for the connection of the extension cable.
• Open the cable gland of the extension cable. The compression part remains in the cap nut.
• Push the extension cable through the cap nut and the compression part.
• Prepare the extension cable.
• Shorten the external shield and brush it back over the compression part.
• Screw the sealing ring side of the basic part into the transmitter housing.
• Insert the extension cable into the housing.
For good electromagnetic compatibility (EMC), it is important to ensure good electrical contact between the external
shield and the cap nut (and thus the housing).
• Fix the cable gland by screwing the cap nut onto the basic part.
• Connect the extension cable to the terminals of the transmitter, see Fig. Fig. 7.3 and Tab. 7.2.
54
2018-07-16, UMFLUXUS_WDV1-3EN
Page 55
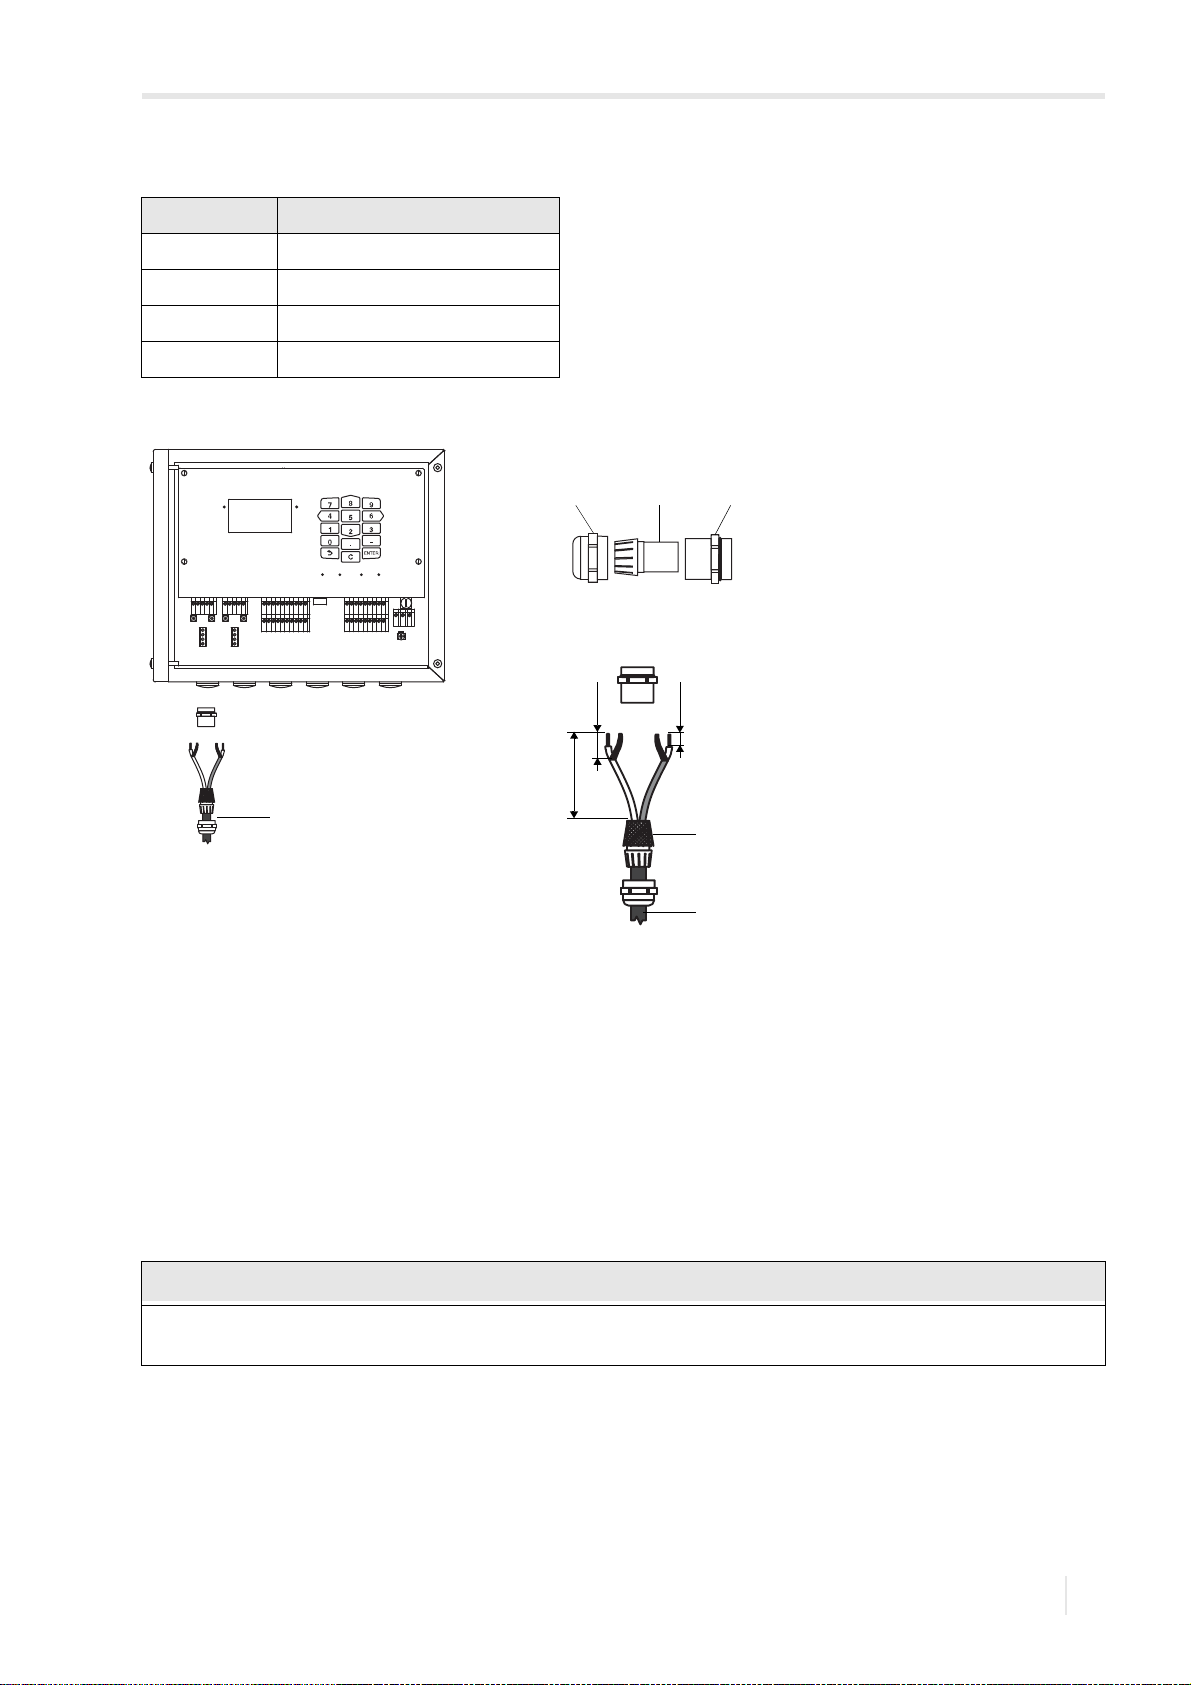
7 Connection
Notice!
A
B
SNAP
DISP
DISP
MODEFAST
MUX
NEXT
Q
ON
Q+Q-
3x Q
OFF
LAN
USB
A+B-P1+
P2+
P3+
P4+
P5a
P6a
P7a
SSP1-
P2-
P3-
P4-
P5b
P6b
P7b
X2 X3
X_AV
KL11
KL12
KL7KL8
KL9KL10
KL4
X_AR X_BV X_BR
T1A
T1BS1T2A
T2B
T3A
T3BS3T4B
T4A
T1a
T1bS1T2a
T2b
T3a
T3bS3T4b
T4a
N(-)
PE
L(+)
AV
AVS
AGN
ARSARBV
BVS
BGN
BRS
BR
cable gland
1 23
70 mm
20 mm
10 mm
4
5
5
FLUXUS WD 7.1 Transducers
Tab. 7.2: Terminal assignment
terminal connection
AV white or marked cable (core)
AVS white or marked cable (shield)
ARS brown cable (shield)
AR brown cable (core)
Fig. 7.3: Connection of the extension cable to the transmitter
1 – cap nut
2 – compression part
3 – basic part
4 – external shield brushed back
5 – extension cable
7.1.3 Connection of the transducer cable to the junction box
• Remove the blind plug for the connection of the transducer cable, see Fig. 7.4.
• Open the cable gland of the transducer cable. The compression part remains in the cap nut.
• Push the transducer cable through the cap nut and the compression part. Prepare the transducer cable.
• Shorten the external shield and brush it back over the compression part.
• Screw the gasket ring side of the basic part into the junction box.
• Insert the transducer cable into the junction box.
For good electromagnetic compatibility (EMC), it is important to ensure good electrical contact between the external
shield and the cap nut (and thus the housing).
• Fix the cable gland by screwing the cap nut onto the basic part.
• Connect the transducer cable to the terminals of the junction box, see Fig. 7.4 and Tab. 7.3.
UMFLUXUS_WDV1-3EN, 2018-07-16
55
Page 56
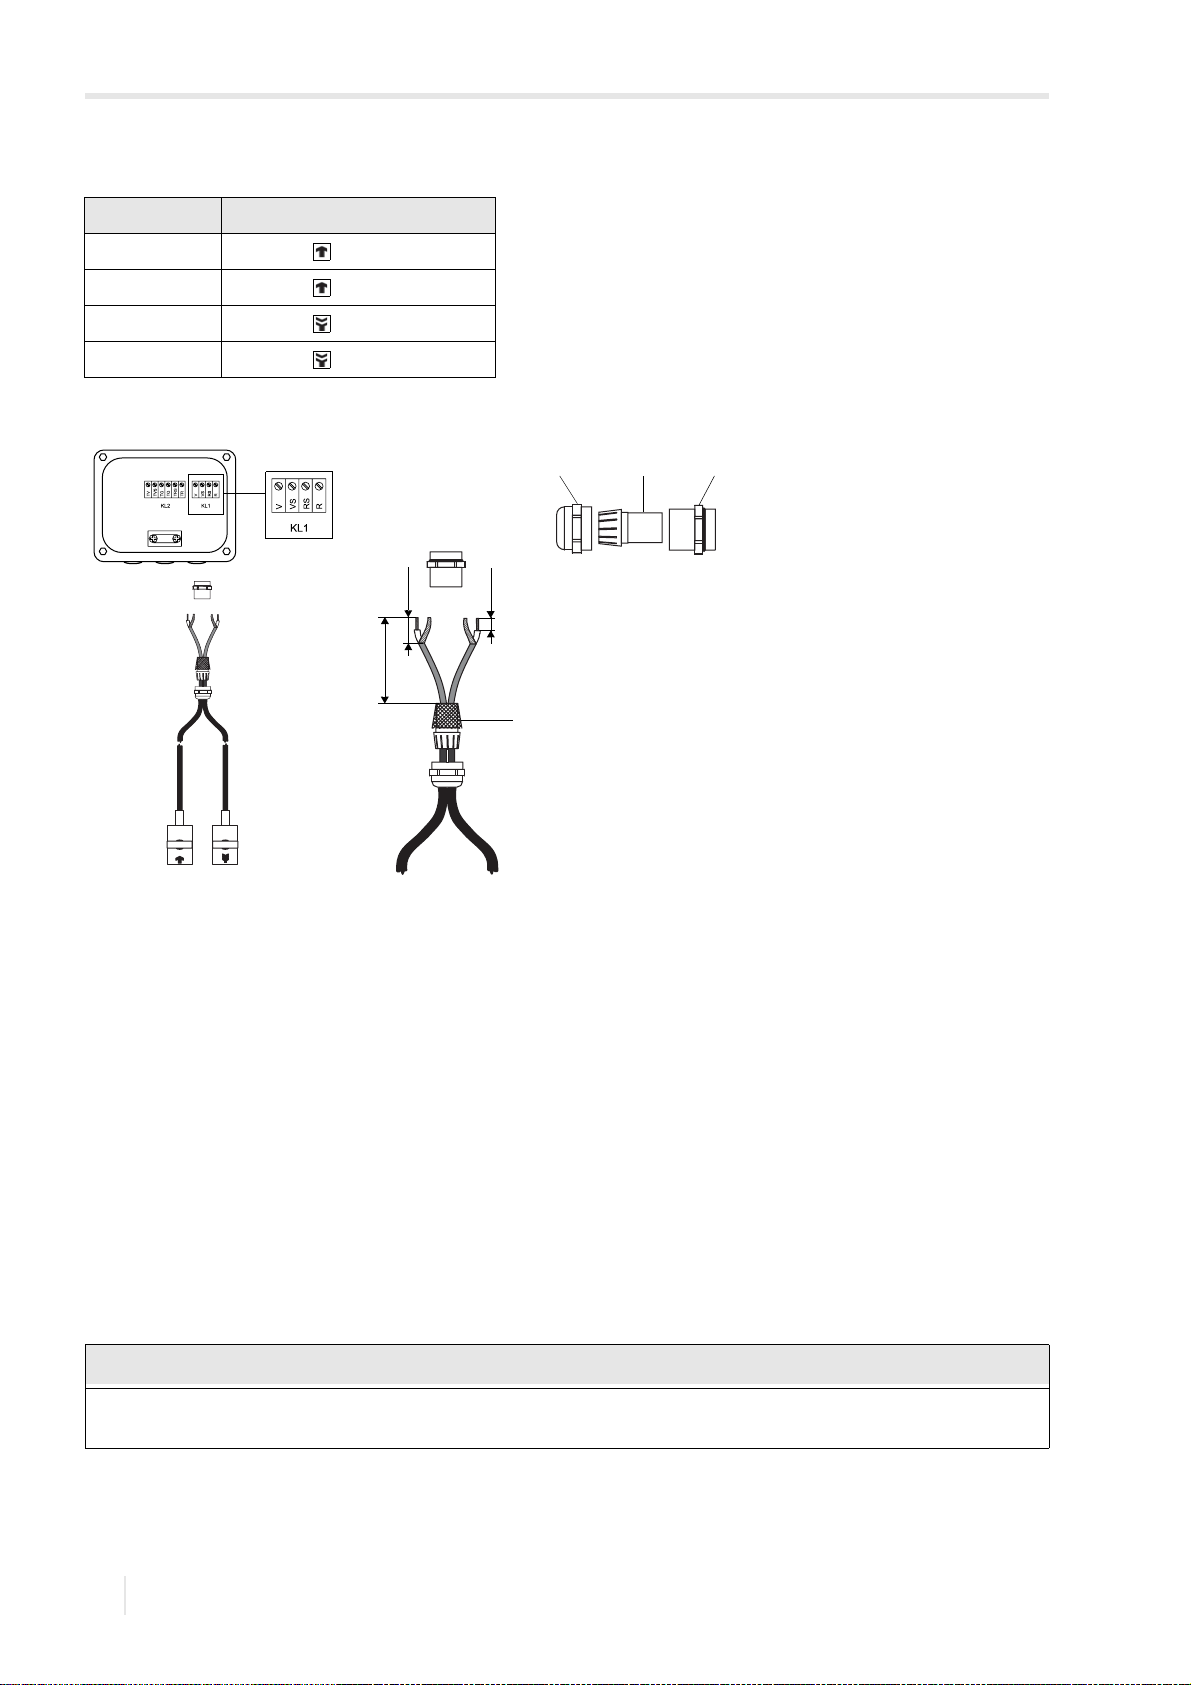
7 Connection
Notice!
100 mm
20 mm
10 mm
4
cable gland
1 23
7.1 Transducers FLUXUS WD
Tab. 7.3: Terminal assignment
terminal connection
V transducer (core)
VS transducer (internal shield)
RS transducer (inner shield)
R transducer (core)
Fig. 7.4: Connection of the transducer cable with plastic cable jacket and stripped cable ends
1 – cap nut
2 – compression part
3 – basic part
4 – external shield brushed back
7.1.4 Connection of the extension cable to the junction box
7.1.4.1 Connection without potential separation (standard)
The connection of the extension cable to the junction box without potential separation ensures that transducer, junction
box and transmitter are on the same potential. The extension cable should always be connected in this manner, especially
if power current cables are nearby the extension cable. If earthing on the same potential cannot be ensured, see section
7.1.4.2.
• Remove the blind plug for the connection of the extension cable.
• Open the cable gland of the extension cable. The compression part remains in the cap nut.
• Push the extension cable through the cap nut and the compression part.
• Prepare the extension cable.
• Shorten the external shield and brush it back over the compression part.
• Screw the gasket ring side of the basic part into the junction box.
• Insert the extension cable into the junction box.
For good electromagnetic compatibility (EMC), it is important to ensure good electrical contact between the external
shield and the cap nut (and thus the housing).
• Fix the cable gland by screwing the cap nut onto the basic part.
• Connect the extension cable to the terminals of the junction box, see Fig. 7.5 and Tab. 7.4.
56
2018-07-16, UMFLUXUS_WDV1-3EN
Page 57
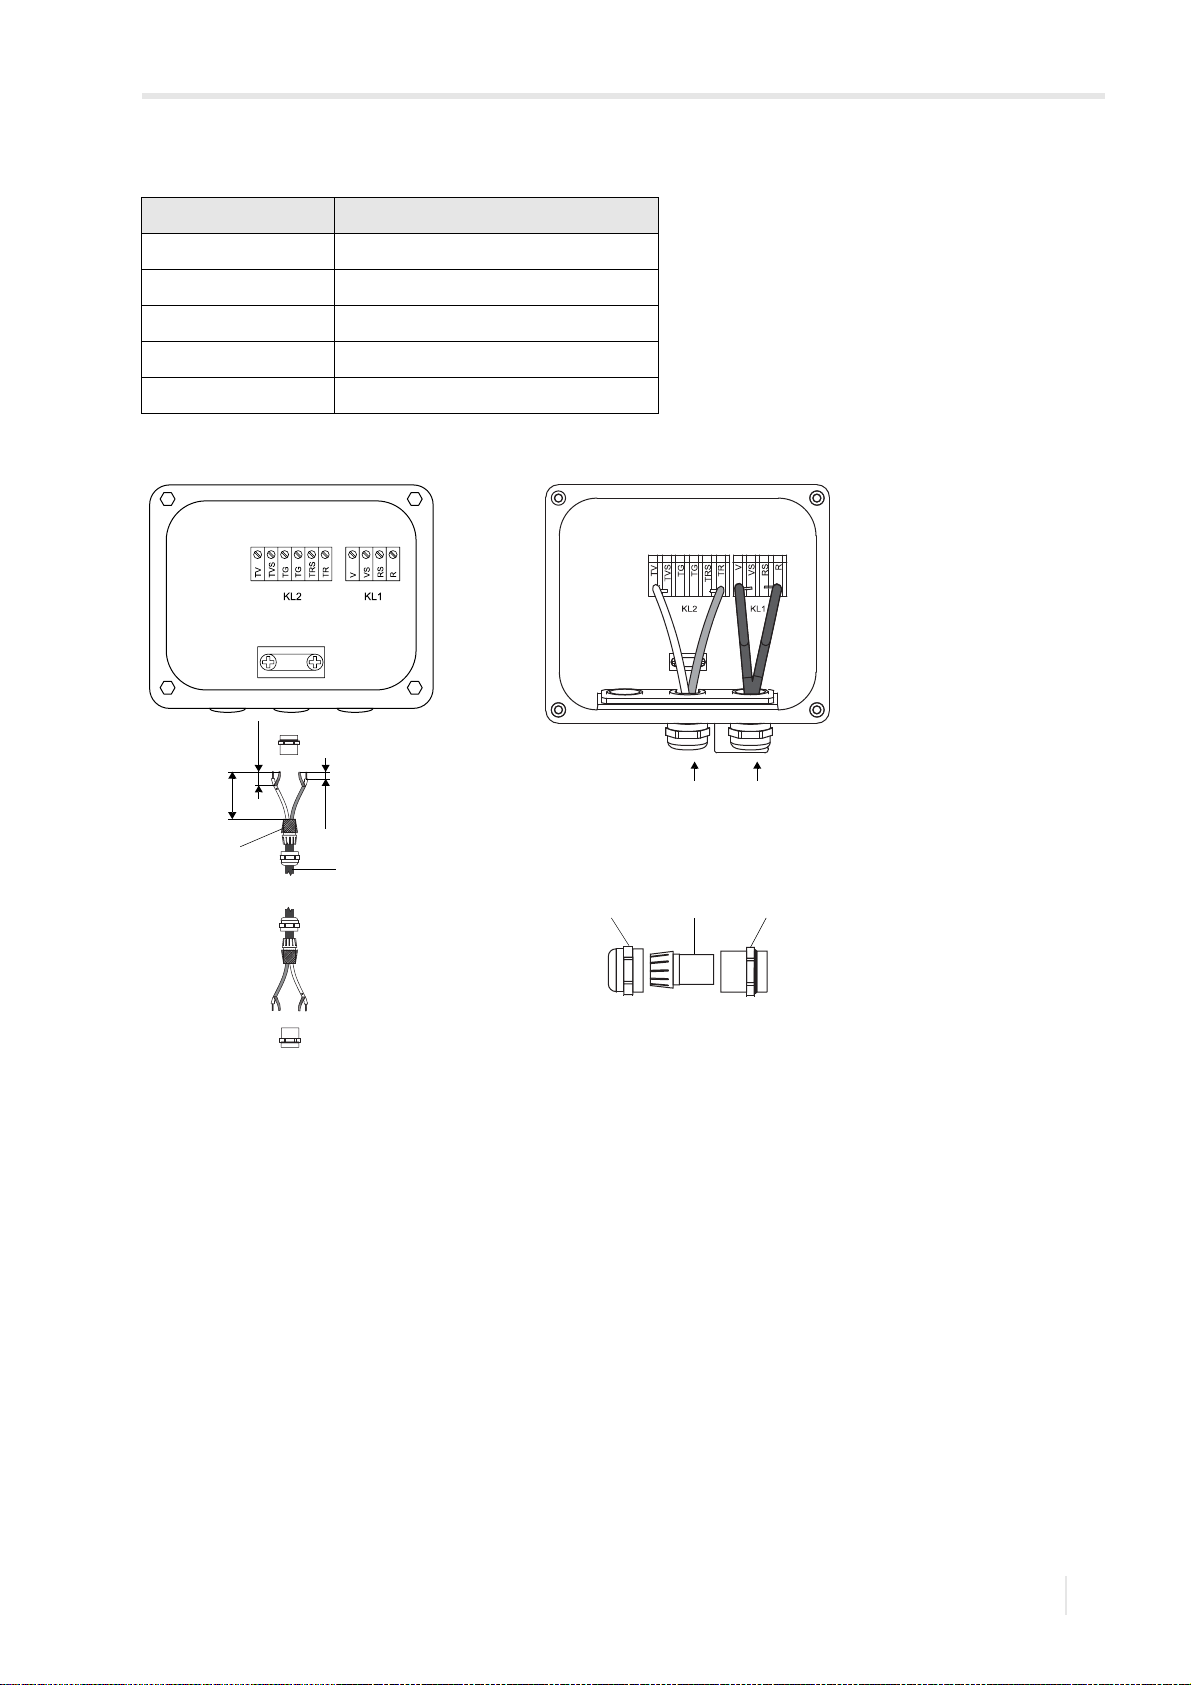
7 Connection
cable gland
3 45
100 mm
20 mm
10 mm
1
2
67
FLUXUS WD 7.1 Transducers
Tab. 7.4: Terminal assignment (junction box, KL2)
terminal connection (extension cable)
TV white or marked cable (core)
TVS white or marked cable (internal shield)
TRS brown cable (internal shield)
TR brown cable (core)
cable gland external shield
Fig. 7.5: Connection of the extension and transducer cable to the junction box
1 – extension cable
2 – external shield brushed back
3 – cap nut
4 – compression part
5 – basic part
6 – connection of the extension cable
7 – connection of the transducer cable
UMFLUXUS_WDV1-3EN, 2018-07-16
57
Page 58
7 Connection
Important!
Important!
7.1 Transducers FLUXUS WD
7.1.4.2 Connection with potential separatio n
If earthing on the same potential cannot be ensured e.g., in measurement arrangements with long extension cables, the
extension cable and the junction box have to be electrically insulated from each other. The junction box and the transducers have to be on the same potential. By doing this, no compensation currents can flow to the transmitter via the extension
cables.
For measurement arrangements where the junction box and the transducers have to be electrically insulated from each
other, see the document TIFLUXUS_GalvSep.
• Remove the blind plug for the connection of the extension cable.
• Open the cable gland of the extension cable. The compression part remains in the cap nut.
• Push the extension cable through the cap nut, the compression part and the basic part.
• Insert the extension cable into the junction box.
• Prepare the extension cable.
• Cut the outer shield and brush it back.
• Pull the extension cable back until the back brushed external shield is below the shield terminal, see Fig. 7.6. The extension cable has to remain completely insulated up to the shield terminal.
• Screw the gasket ring side of the basic part into the junction box.
• Fix the cable gland by screwing the cap nut onto the basic part.
Observe the max. permissible voltage of 60 V DC between the earth potentials.
The external shield of the extension cable must not have electrical contact to the junction box. Therefore, the extension cable has to remain completely insulated up to the shield terminal.
• Fix the extension cable and the external shield to the shield terminal.
• Connect the extension cable to the terminals of the junction box, see Fig. 7.6 and Tab. 7.5.
Tab. 7.5: Terminal assignment (junction box, KL2)
terminal connection (extension cable)
TV white or marked cable (core)
TVS white or marked cable (internal shield)
TRS brown cable (internal shield)
TR brown cable (core)
shield terminal external shield
58
2018-07-16, UMFLUXUS_WDV1-3EN
Page 59
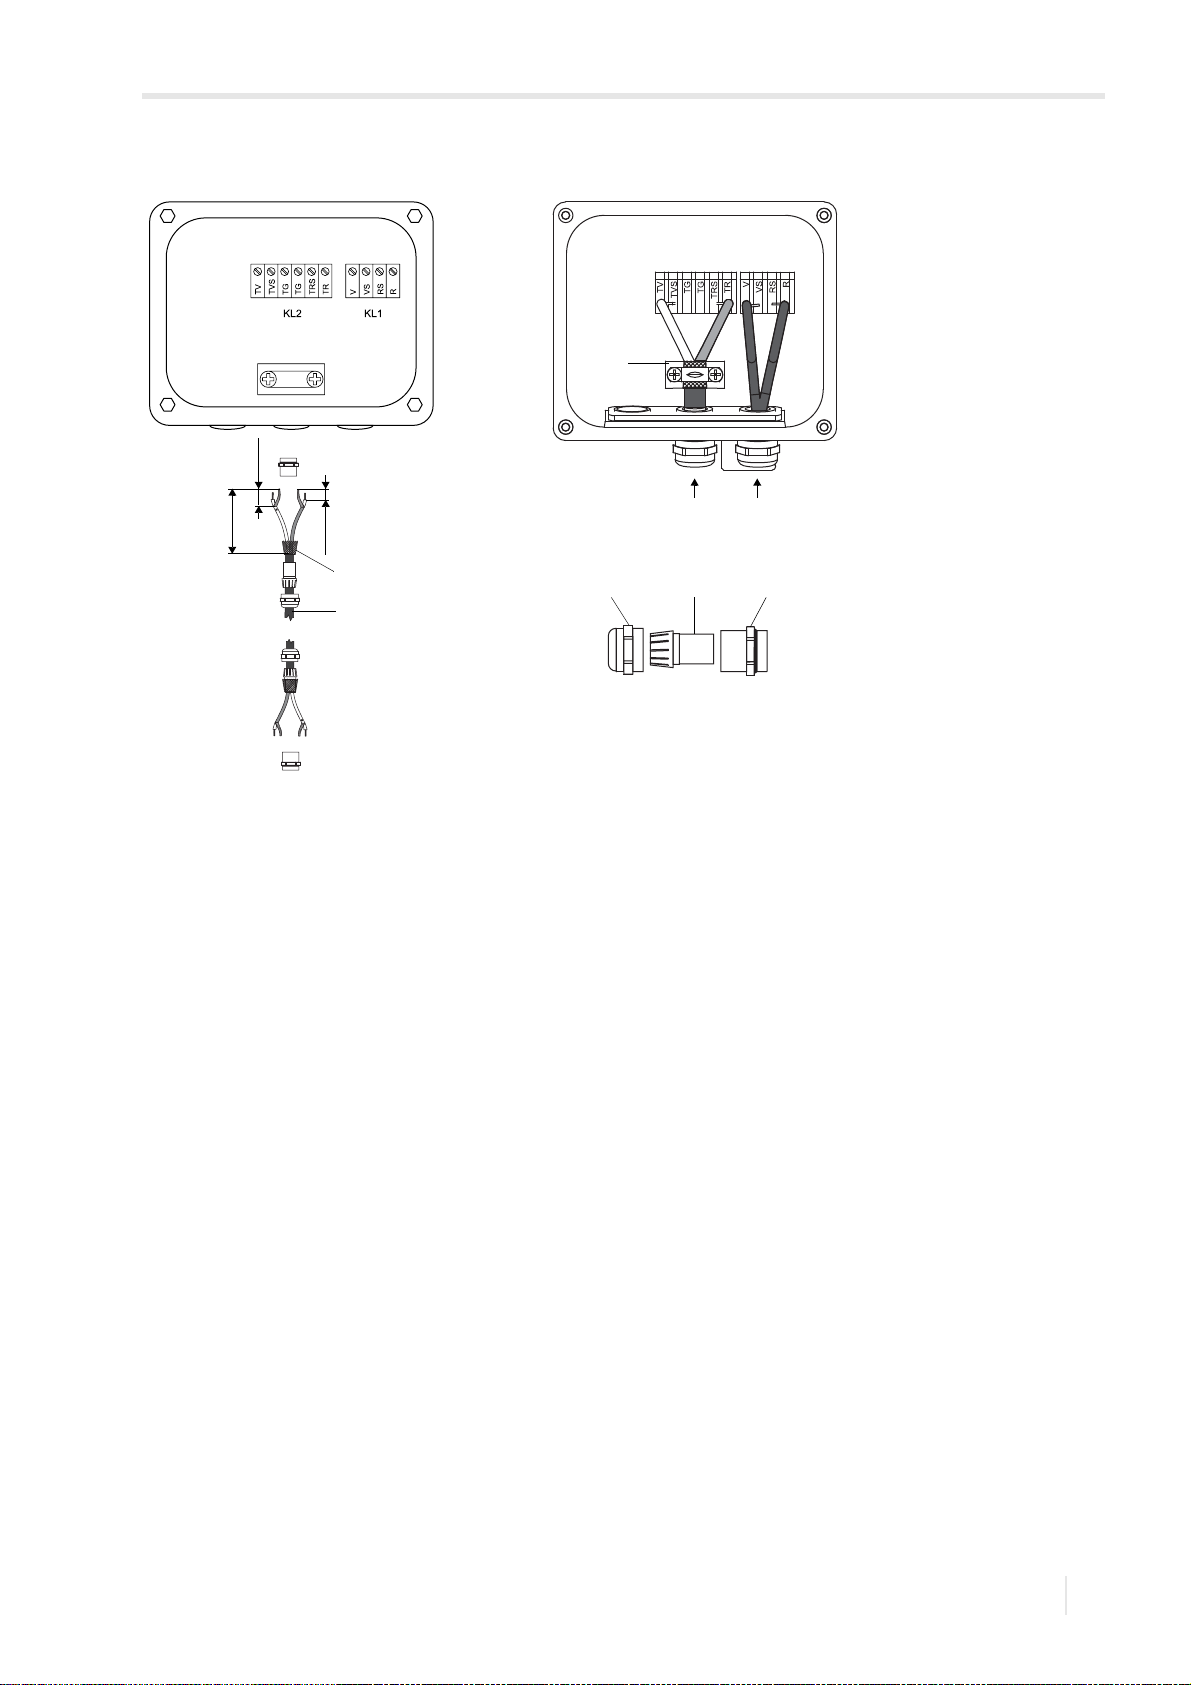
7 Connection
cable gland
4 56
100 mm
20 mm
10 mm
1
2
3
78
FLUXUS WD 7.1 Transducers
Fig. 7.6: Connection of the extension and transducer cable to the junction box
1 – extension cable
2 – external shield
3 – shield terminal
4 – cap nut
5 – compression part
6 – basic part
7 – connection of the extension cable
8 – connection of the transducer cable
UMFLUXUS_WDV1-3EN, 2018-07-16
59
Page 60
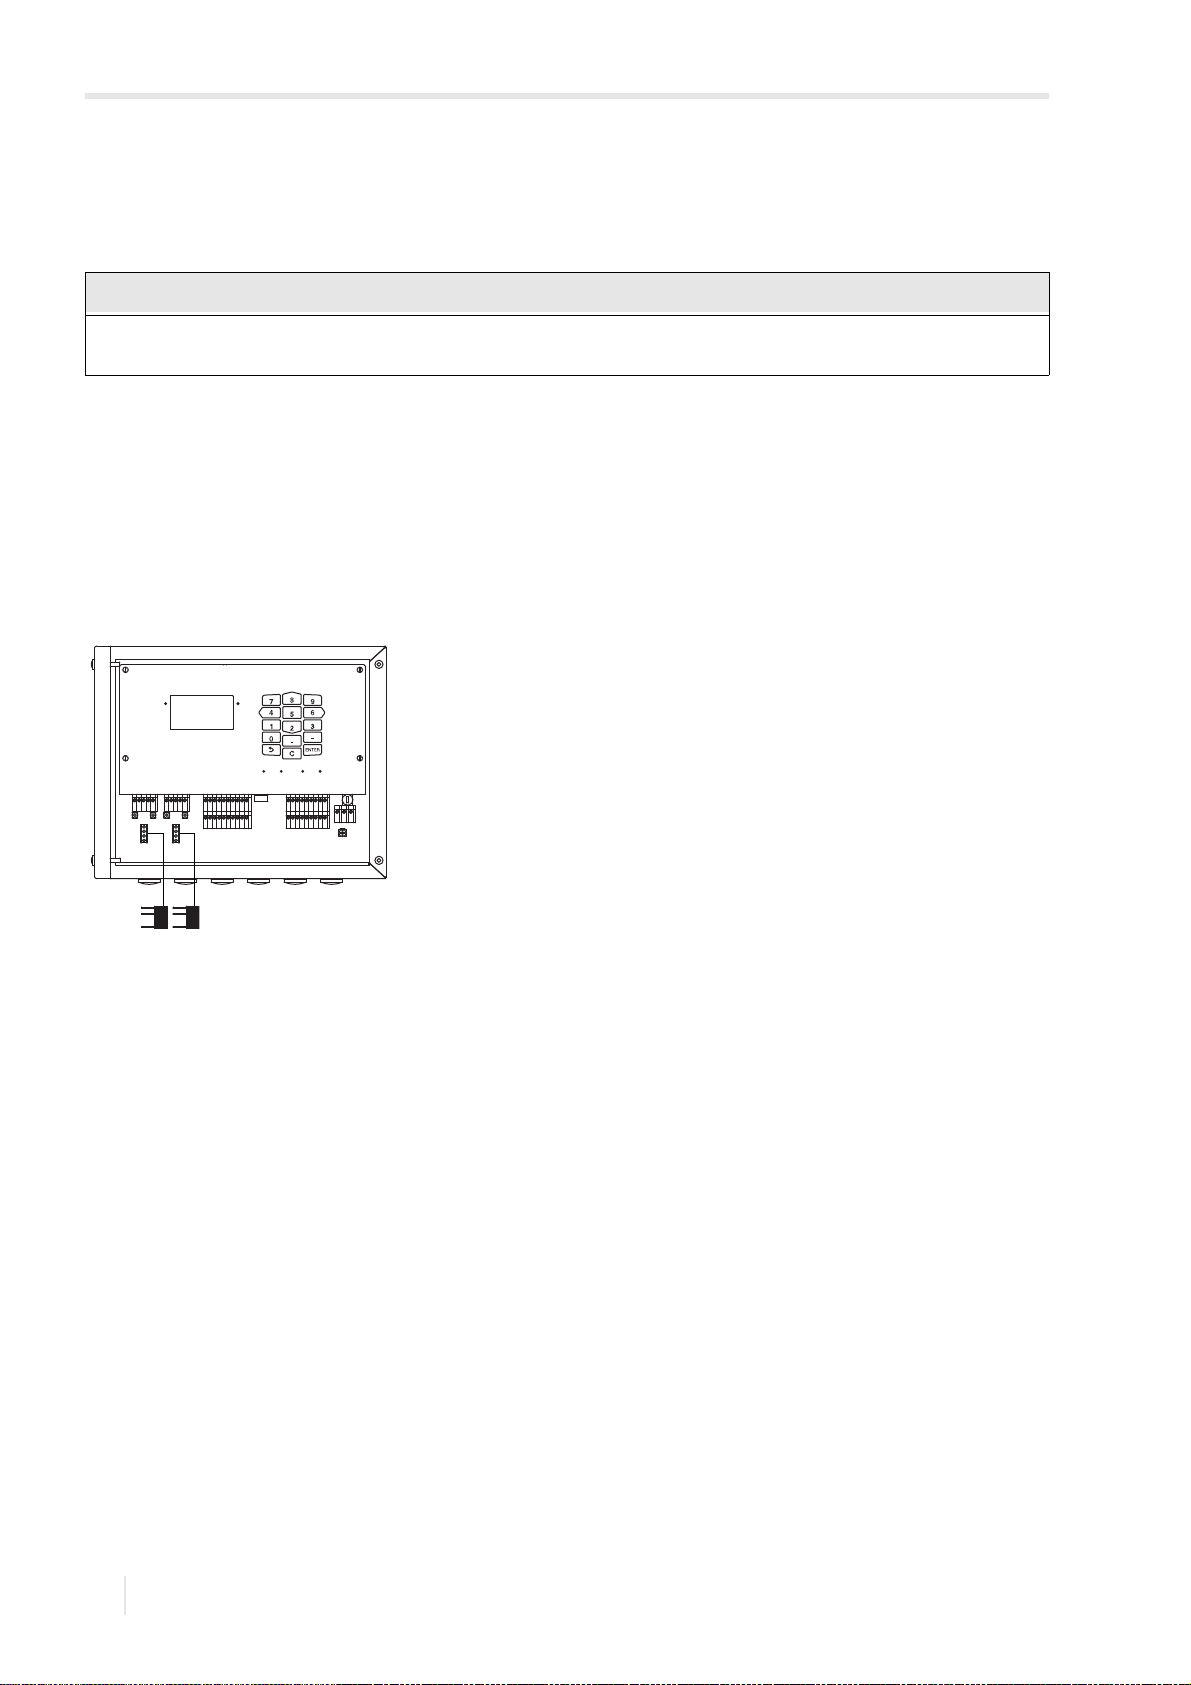
7 Connection
Notice!
A
B
SNAP
DISP
DISP
MODEFAST
MUX
NEXT
Q
ON
Q+Q-
3x Q
OFF
LAN
USB
A+B-P1+
P2+
P3+
P4+
P5a
P6a
P7a
SSP1-
P2-
P3-
P4-
P5b
P6b
P7b
X2 X3
X_AV
KL11
KL12
KL7KL8
KL9KL10
KL4
X_AR X_BV X_BR
T1A
T1BS1T2A
T2B
T3A
T3BS3T4B
T4A
T1a
T1bS1T2a
T2b
T3a
T3bS3T4b
T4a
N(-)
PE
L(+)
AV
AVS
AGN
ARSARBV
BVS
BGN
BRS
BR
1 2
7.1 Transducers FLUXUS WD
7.1.5 Transducer module (SENSPROM)
The transducer module contains important transducer data for the operation of the transmitter with transducers.
If transducers are replaced or added, the sensor module must also be replaced or added.
The serial numbers of the transducer module and the transducer must be identical. A wrong or incorrectly connected
sensor module will lead to incorrect measured values or to a measurement failure.
The sensor module is connected to the terminals of the transmitter, see Fig. 7.7.
• Disconnect the transmitter from the power supply.
• Connect the transducer module to the corresponding terminal, see Fig. 7.7. Terminal X2 is assigned to the transducers
of measuring channel A, terminal X3 to the transducers of measuring channel B.
• Connect the transmitter to the power supply.
• Enter all parameters of the program branch Parameters.
• Start the measurement.
Fig. 7.7: Sensor module
1 – transducer module (measuring channel A)
2 – transducer module (measuring channel B)
60
2018-07-16, UMFLUXUS_WDV1-3EN
Page 61
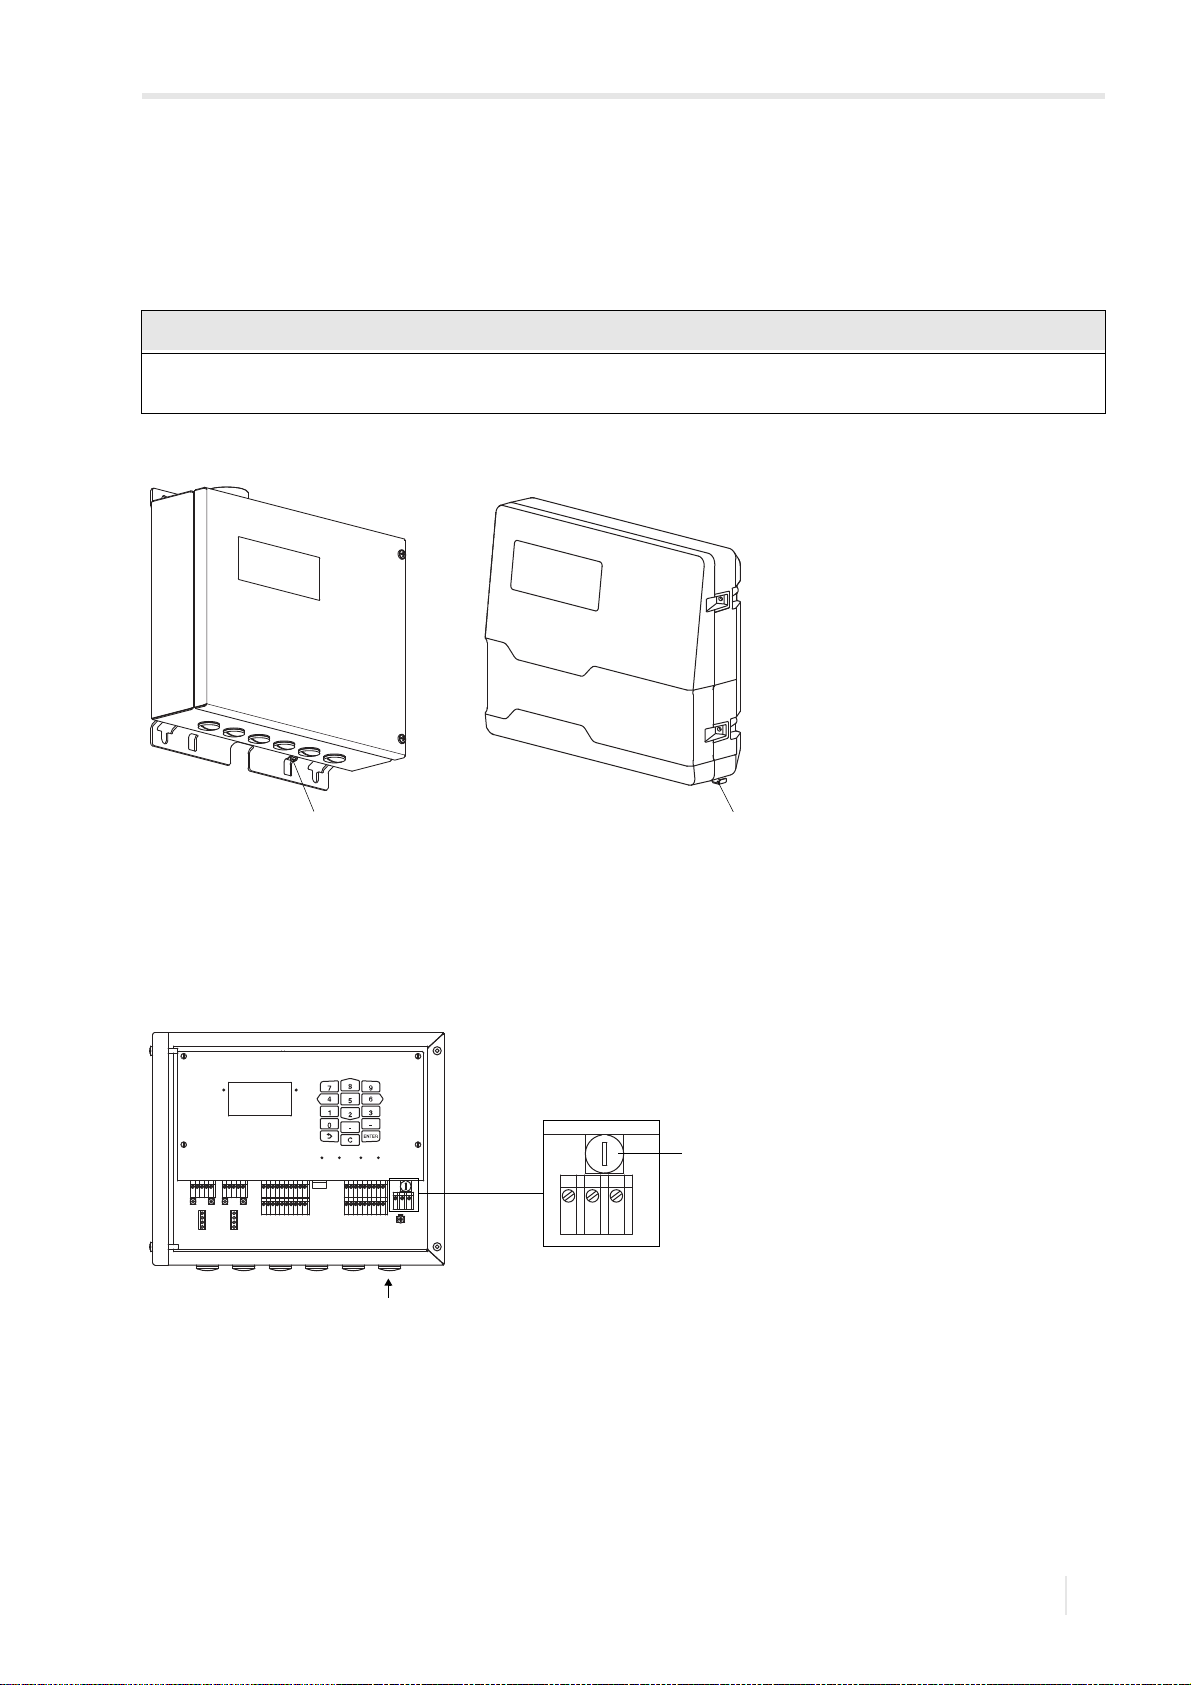
7 Connection
Important!
12
A
B
SNAP
DISP
DISP
MODEFAST
MUX
NEXT
Q
ON
Q+Q-
3x Q
OFF
LAN
USB
A+B-P1+
P2+
P3+
P4+
P5a
P6a
P7a
SSP1-
P2-
P3-
P4-
P5b
P6b
P7b
X2 X3
X_AV
KL11
KL12
KL7KL8
KL9KL10
KL4
X_AR X_BV X_BR
T1A
T1BS1T2A
T2B
T3A
T3BS3T4B
T4A
T1a
T1bS1T2a
T2b
T3a
T3bS3T4b
T4a
N(-)
PE
L(+)
AV
AVS
AGN
ARSARBV
BVS
BGN
BRS
BR
KL4
N(-)
PE
L(+)
1
2
FLUXUS WD 7.2 Power supply
7 Connection
7.2 Power supply
The installation of the power supply is carried out by the operator. The operator has to provide an overcurrent protector
(fuse or similar device) disconnecting all energizing wires in case of an inadmissible high current consumption. The impedance of the protective earth has to be low ohmic in order not to allow touch voltage pass the permissible limit. The equipotential bonding terminal serves as functional earth of the transmitter, see Fig. 7.8.
The degree of protection of the transmitter will only be guaranteed if the power cable fits firmly and tightly in the cable
gland.
Fig. 7.8: Equipotential bonding terminal on the transmitter
1 – equipotential bonding terminal on stainless steel housing
2 – equipotential bonding terminal on aluminum housing
• Connect the power cable to the transmitter.
For the connection of the power supply cable to the transmitter, see section 7.2.1, Fig. 7.9 and Tab. 7.6.
Fig. 7.9: Connection of the power supply to the transmitter
1–fuse
2 – connection of the power supply
UMFLUXUS_WDV1-3EN, 2018-07-16
61
Page 62
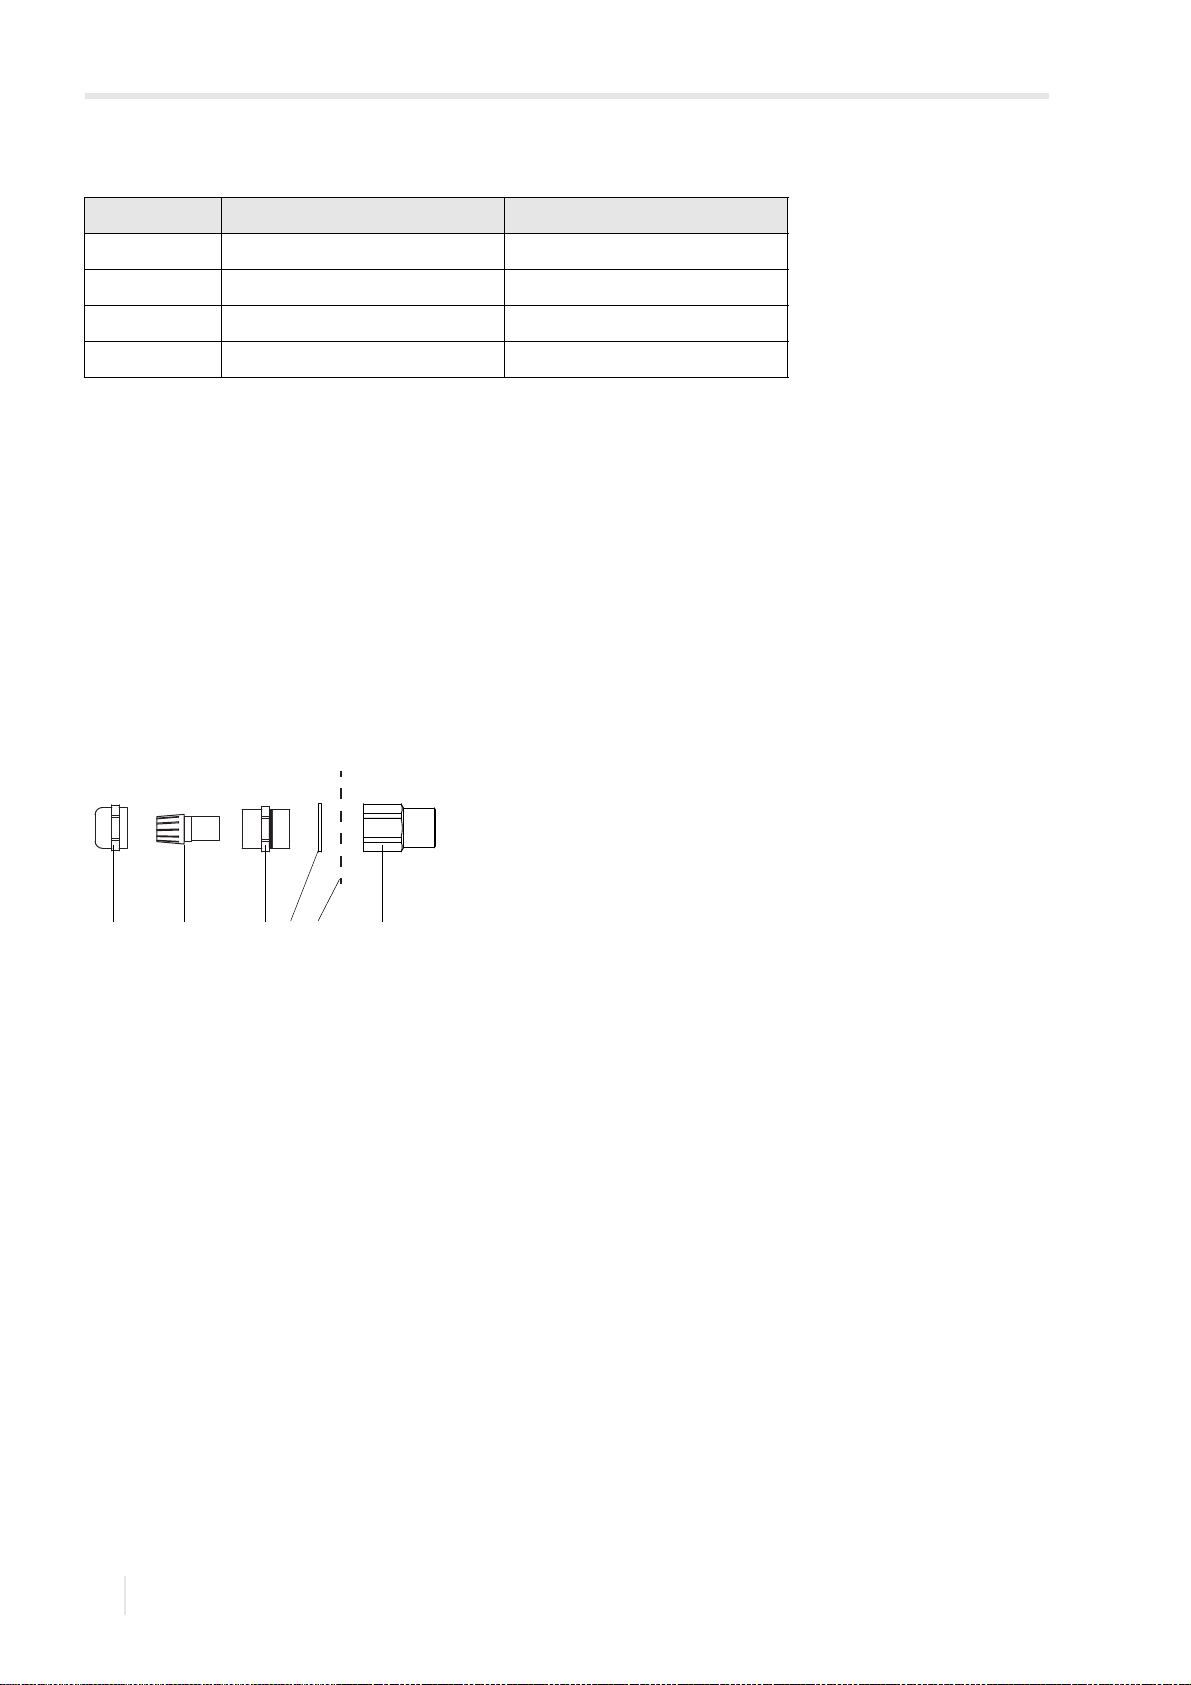
7 Connection
213456
7.2 Power supply FLUXUS WD
Tab. 7.6: Terminal assignment
terminal connection AC connection DC
PE earth earth
N(-) neutral -
L(+) phase 100...230 V AC, 50...60 Hz +
fuse 1 A, time-lag 1.6 A, time-lag
7.2.1 Cable connection
Transmitter with stainless steel housing
• Remove the blind plug to connect the cable to the transmitter.
• Prepare the cable with a cable gland. The used cable has to have a wire cross-section of 0.25…2.5 mm². The outer
diameter of the cable may not exceed 7.6 mm.
• Push the cable through cap nut, compression part, basic part and sealing ring (sealing ring: only for cable gland M20, not
for cable gland 1/2 NPS).
• Insert the cable into the housing of the transmitter.
• Fix the cable gland by screwing the cap nut onto the basic part.
• Fix the transducer cable by tightening the cable gland with the ferrite nut.
• Connect the cable to the terminals of the transmitter.
Fig. 7.10: Cable gland for stainless steel housing
1 – cap nut
2 – compression part
3 – basic part
4 – sealing ring: only for cable gland M20, not for cable gland 1/2 NPS
5 – housing wall
6 – ferrite nut
Transmitter with aluminum housing
• Remove the blind plug to connect the cable to the transmitter.
• Prepare the cable with a cable gland.
• The used cable has to have a wire cross-section of 0.25…2.5 mm².
• Push the cable through the cap nut, compression part and basic part of the cable gland.
• Insert the cable into the housing of the transmitter.
• Screw the sealing ring side of the basic part into the transmitter housing.
• Fix the cable gland by screwing the cap nut onto the basic part.
• Connect the cable to the terminals of the transmitter.
62
2018-07-16, UMFLUXUS_WDV1-3EN
Page 63
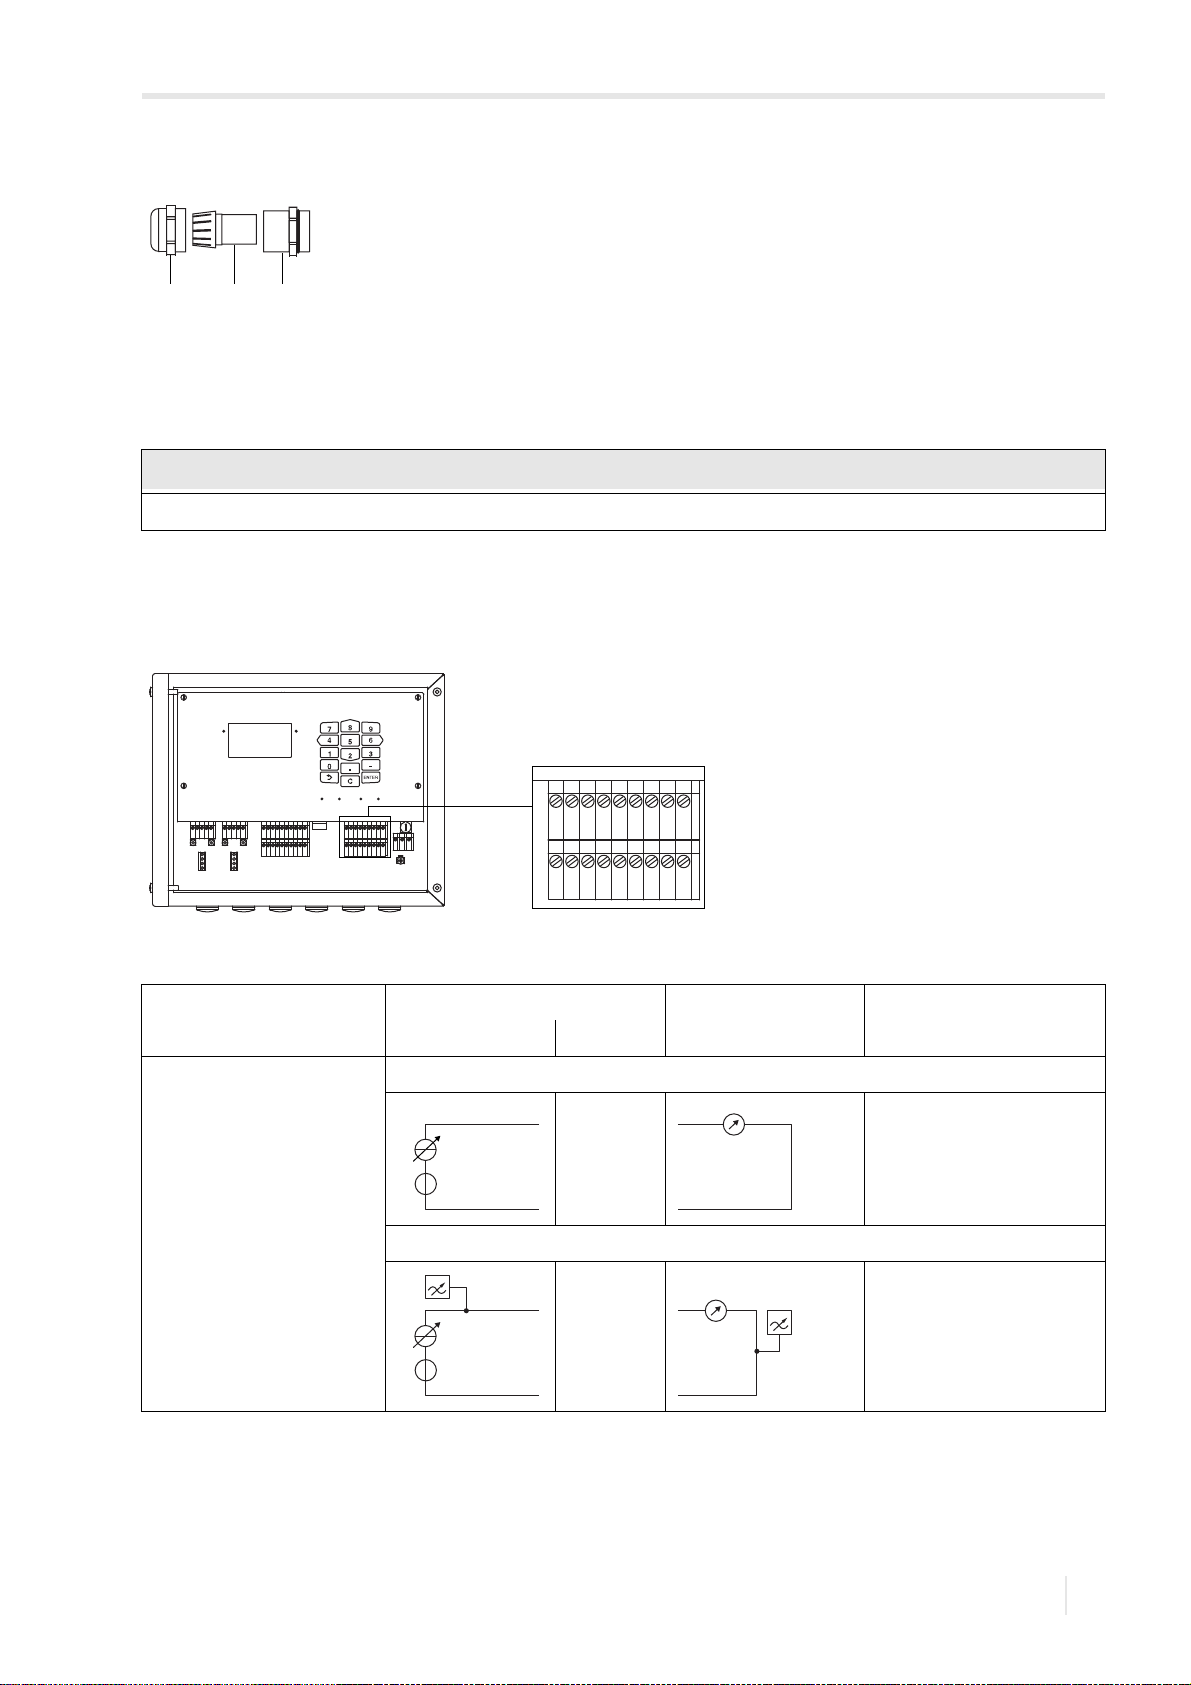
7 Connection
Important!
21 3
A
B
SNAP
DISP
DISP
MODEFAST
MUX
NEXT
Q
ON
Q+Q-
3x Q
OFF
LAN
USB
A+B-P1+
P2+
P3+
P4+
P5a
P6a
P7a
SSP1-
P2-
P3-
P4-
P5b
P6b
P7b
X2 X3
X_AV
KL11
KL12
KL7KL8
KL9KL10
KL4
X_AR X_BV X_BR
T1A
T1BS1T2A
T2B
T3A
T3BS3T4B
T4A
T1a
T1bS1T2a
T2b
T3a
T3bS3T4b
T4a
N(-)
PE
L(+)
AV
AVS
AGN
ARSARBV
BVS
BGN
BRS
BR
A+B-P1+
P2+
P3+
P4+
P5a
P6a
P7a
SSP1-
P2-
P3-
P4-
P5b
P6b
P7b
KL9KL10
+
-
Px+
Px-
+
-
mA
ƒ
G
+
-
U
int
Px+
Px-
ƒ
G
mA
FLUXUS WD 7.3 Outputs
Fig. 7.11: Cable gland for aluminum housing
1 – cap nut
2 – compression part
3 – basic part
7.3 Outputs
The max. permissible voltage between the outputs and against PE is 60 V DC (permanent).
• Connect the output cable to the transmitter.
For the connection of the output cable to the transmitter, see section 7.2.1, Fig. 7.12 and Tab. 7.7.
Fig. 7.12: Connection of the outputs on the transmitter
Tab. 7.7: Circuit of the outputs
output transmitter external circuit remark
internal circuit connection
active current output/HART current output
R
ext
< 500
HART
The number, type and the connections of the outputs depend on the order.
is the sum of all ohmic resistances in the circuit (e.g., resistance of the conductors, resistance of the amperemeter/voltmeter).
R
ext
UMFLUXUS_WDV1-3EN, 2018-07-16
U
= 24 V
int
63
Page 64
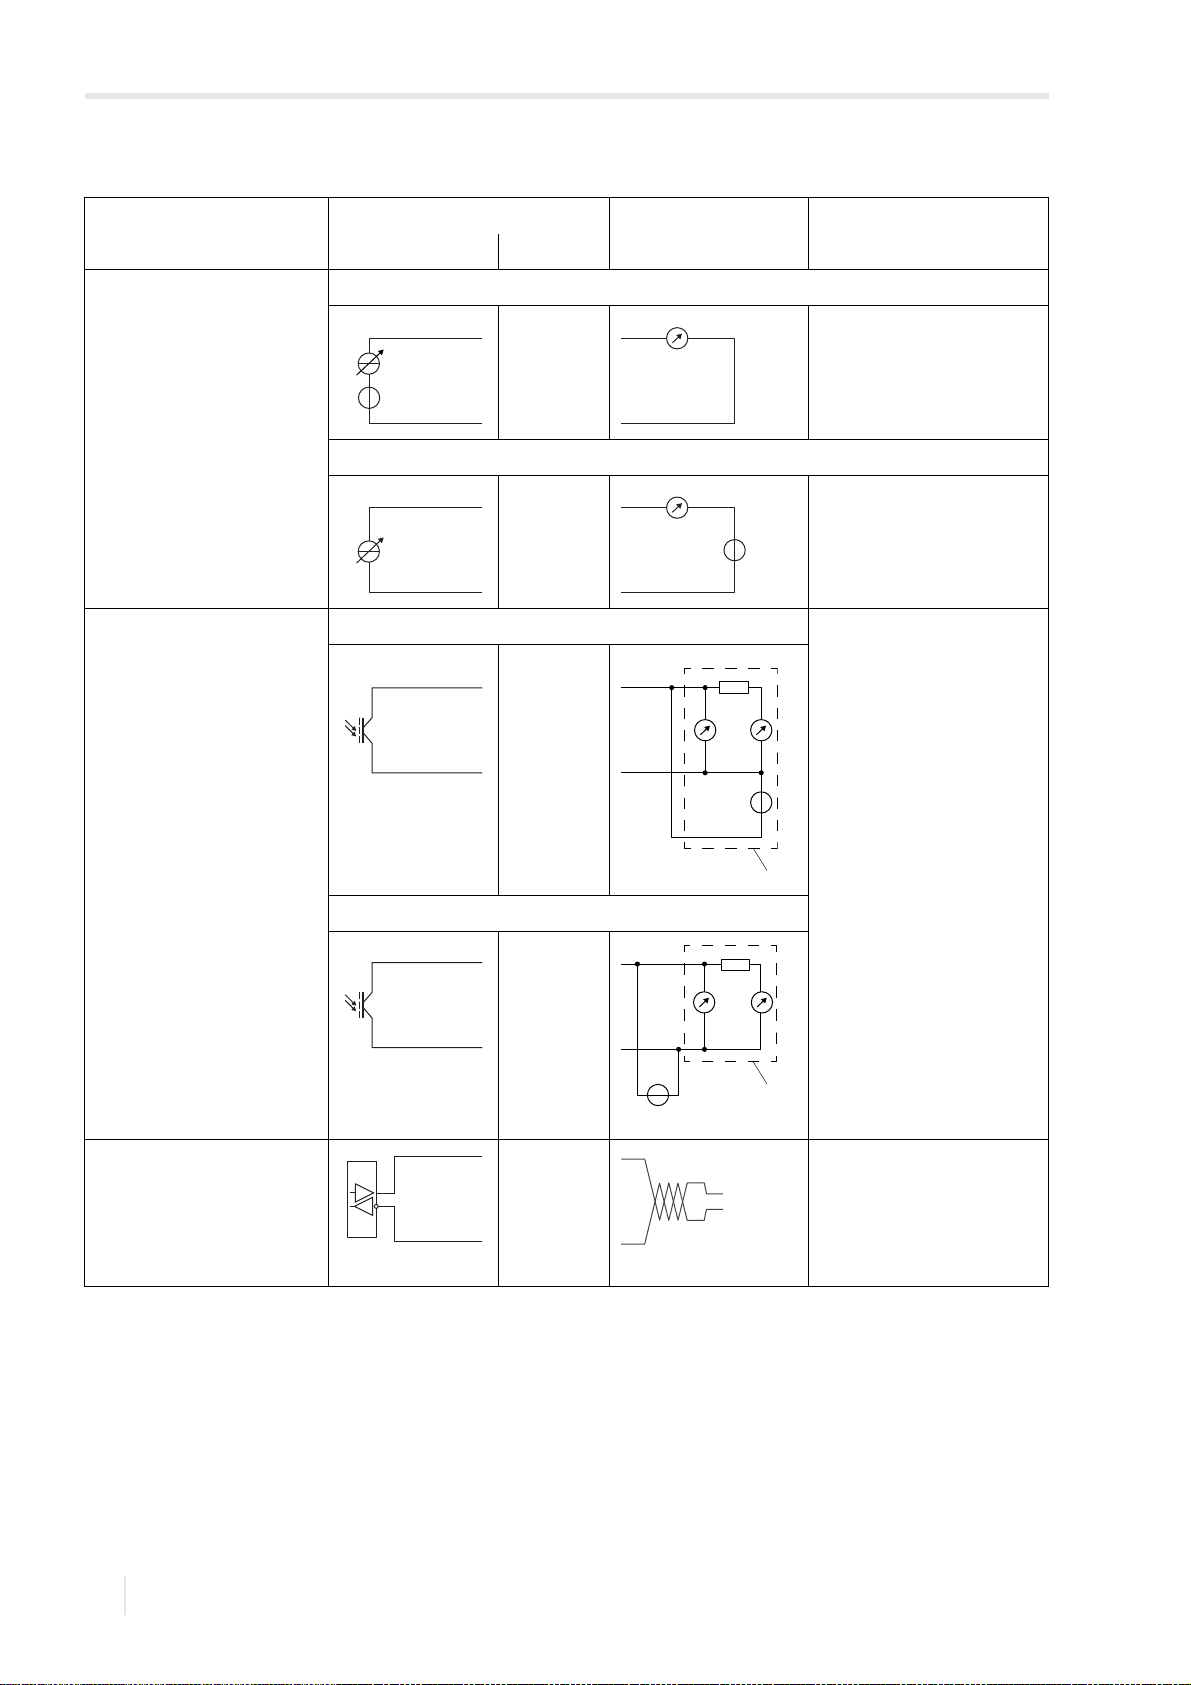
7 Connection
+
-
Px+
Px-
+
-
mA
Px+
Px-
mA
U
ext
+
-
Pxa
Pxb
mA
R
c
V
U
ext
+
-
PLC
Pxa
Pxb
U
ext
mA
R
c
V
- +
PLC
+
-
shield
A+
B-
S
7.3 Outputs FLUXUS WD
Tab. 7.7: Circuit of the outputs
output transmitter external circuit remark
internal circuit connection
switchable current output
active current output
The switchable current output
is switched to active or passive
in the menu item Special
functions\Outputs.
passive current output
binary output (optorelay) circuit 1 U
R
< 350
ext
U
8...30 V
ext =
> 0.021 A . R
U
ext
example:
U
=12V
ext
R
190
ext
26 V
ext
100 mA
I
c
[] + 8 V
ext
circuit 2
RS485 120
termination resistor
The number, type and the connections of the outputs depend on the order.
R
is the sum of all ohmic resistances in the circuit (e.g., resistance of the conductors, resistance of the amperemeter/voltmeter).
ext
64
2018-07-16, UMFLUXUS_WDV1-3EN
Page 65
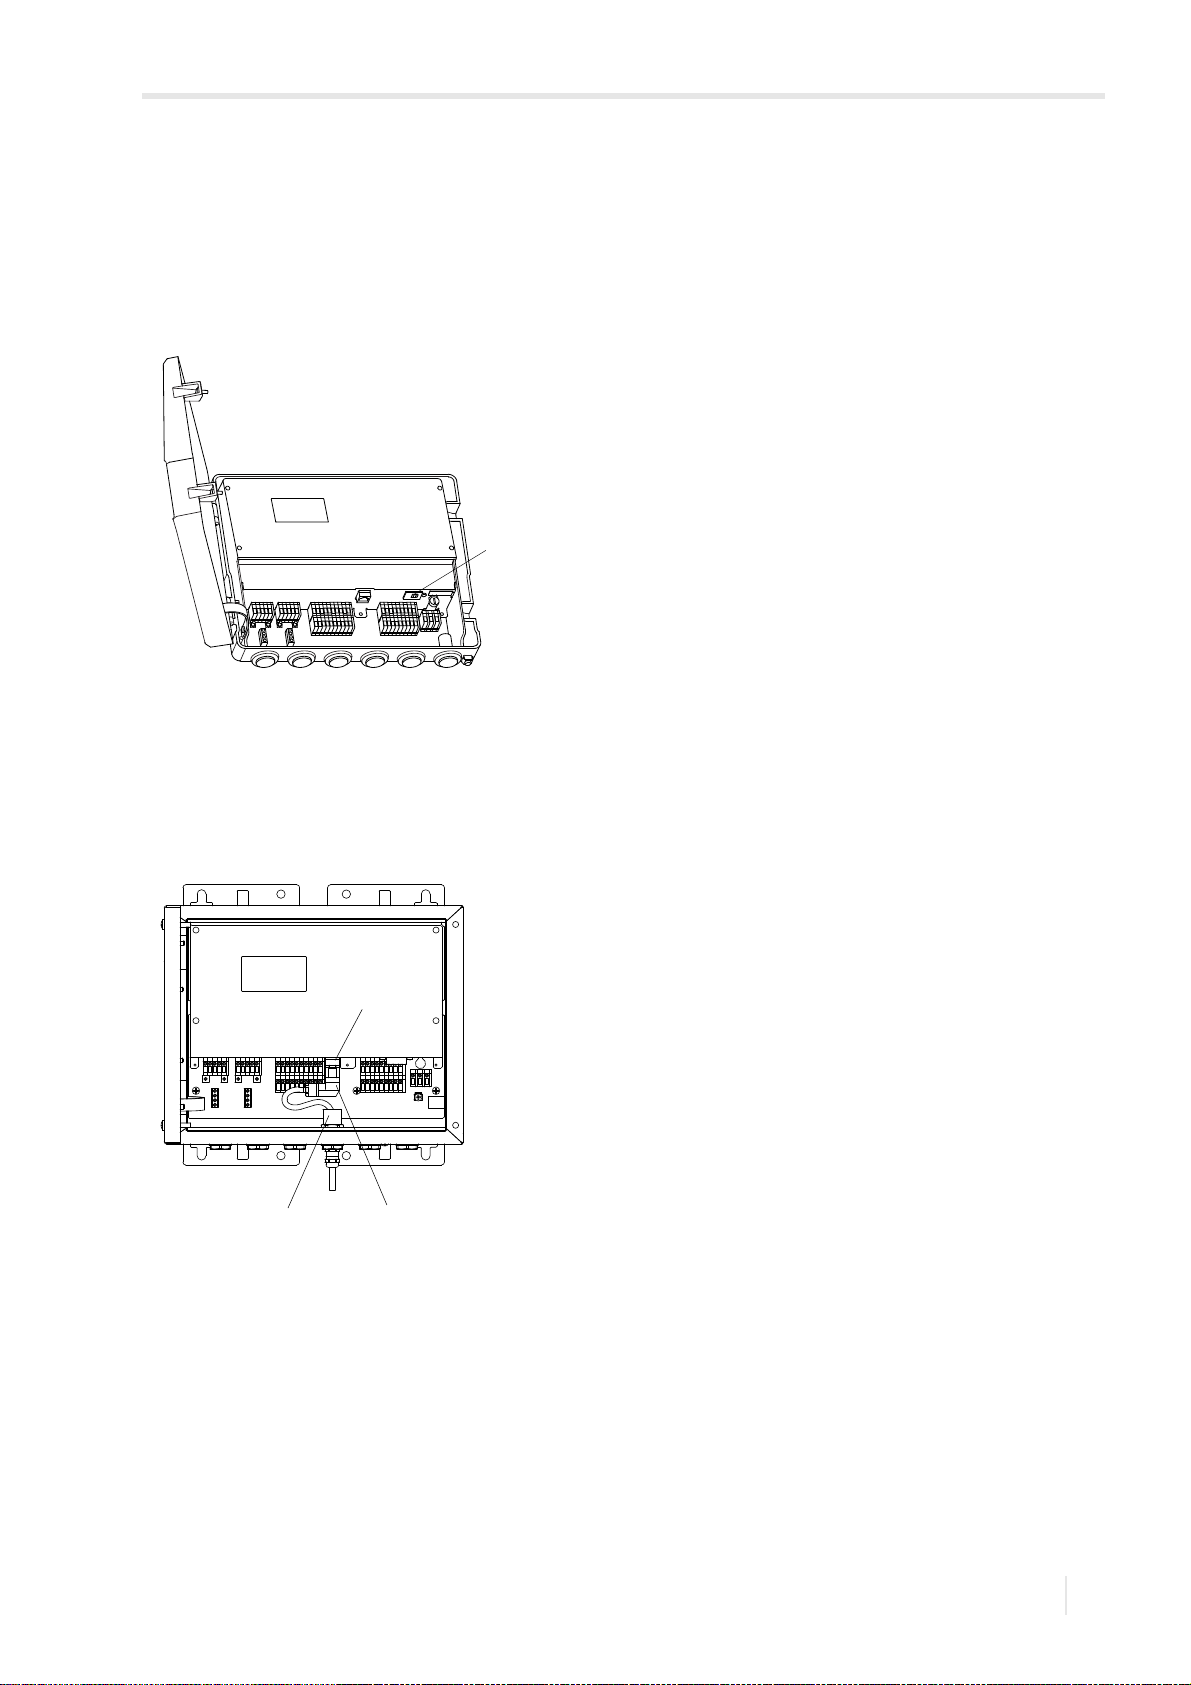
7 Connection
1
2
1
3
FLUXUS WD 7.4 Service interfaces
7 Connection
7.4 Service interfaces
7.4.1 USB interface
The transmitter can be connected directly to the PC via USB interface.
• Connect the USB cable to the USB interface of the transmitter and the PC, see Fig. 7.13.
Fig. 7.13: Connection of the USB cable
1 – USB interface
7.4.2 Ethernet interface
The transmitter can be connected to the PC or LAN network via an Ethernet cable.
Transmitter with stainless steel housing
Fig. 7.14: Connection of the Ethernet cable (transmitter with stainless steel housing)
1 – Ethernet interface
2 – ferrite nut
3 – Ethernet connector
• Remove the blind plug on the transmitter to connect the cable, see
Fig. 7.14
.
• Open the cable gland of the Ethernet cable. The compression part remains in the cap nut, see Fig. 7.15.
UMFLUXUS_WDV1-3EN, 2018-07-16
65
Page 66
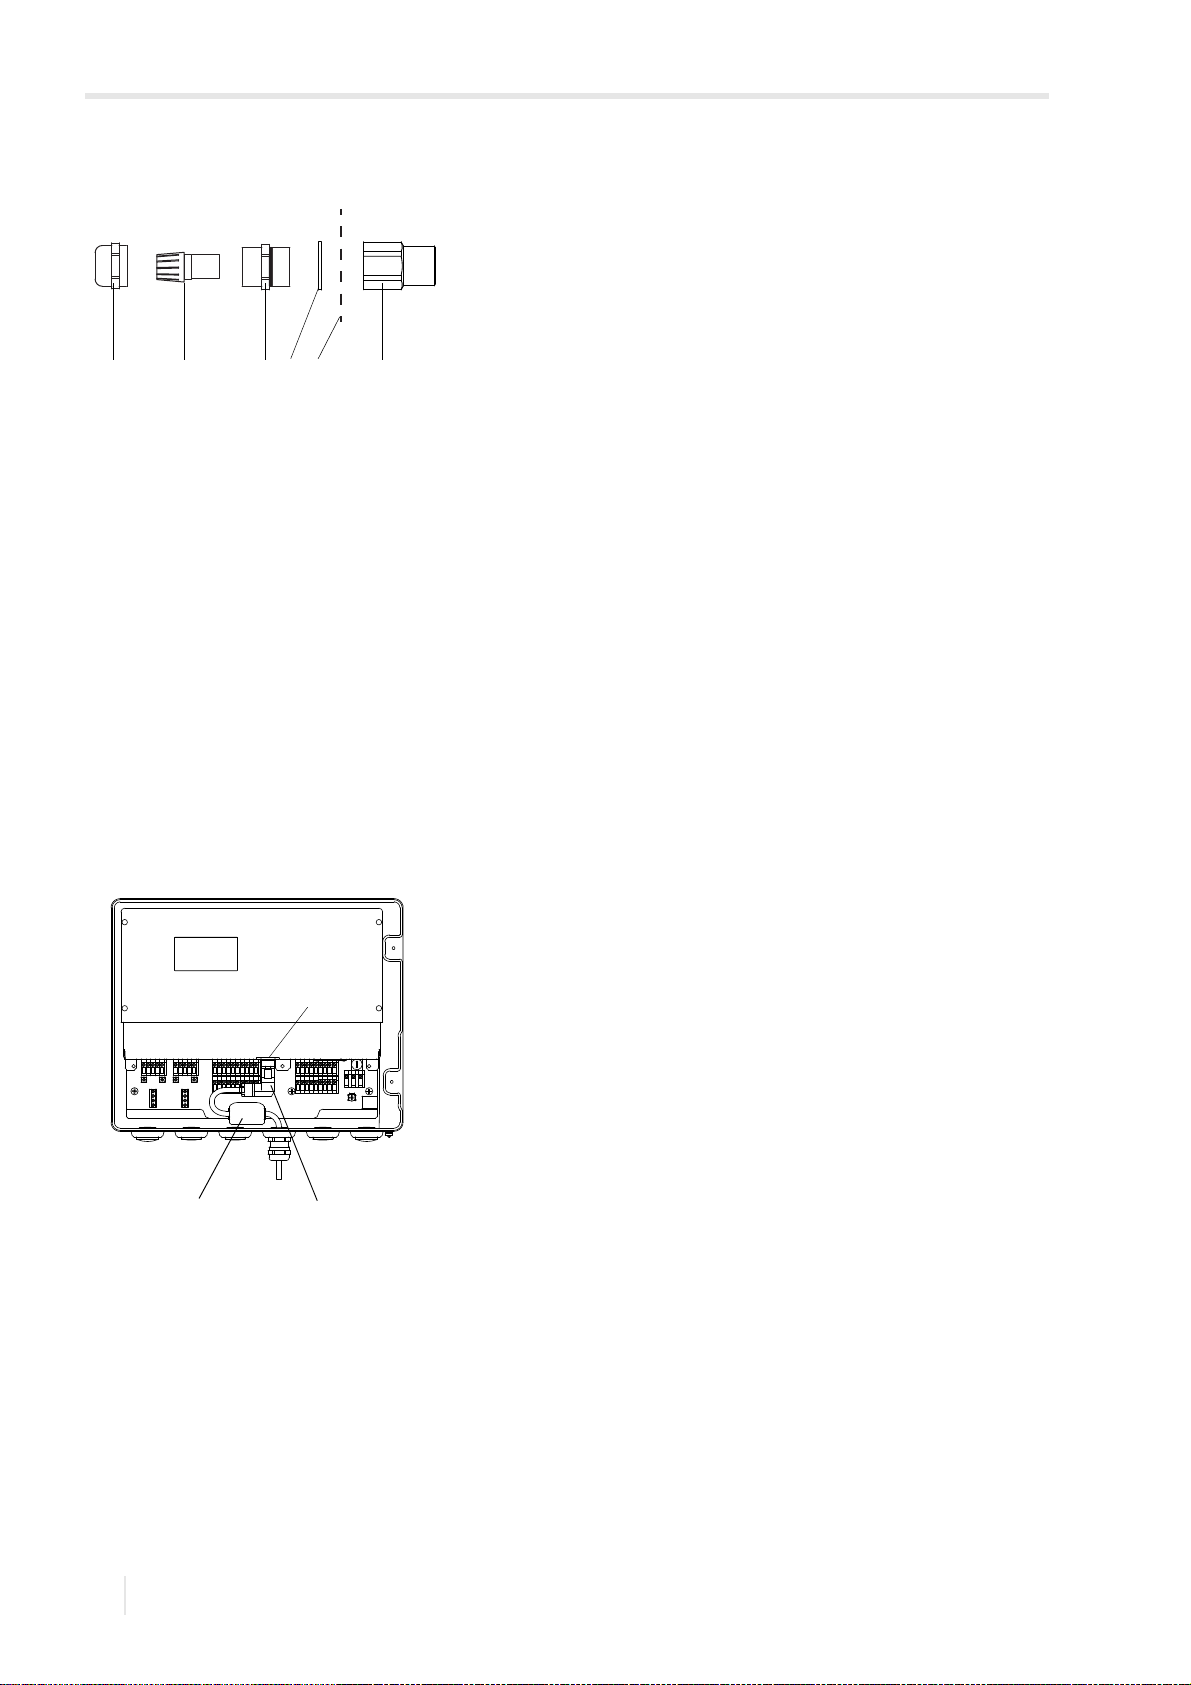
7 Connection
213456
2
1
3
7.4 Service interfaces FLUXUS WD
Fig. 7.15: Cable gland
1 – cap nut
2 – compression part
3 – basic part
4 – sealing ring (only for cable gland M20, not for cable gland 1/2 NPS)
5 – housing wall
6 – ferrite nut
• Push the cable through cap nut, compression part, basic part and sealing ring (sealing ring: only for cable gland M20, not
for cable gland 1/2 NPS).
• Insert the cable into the housing of the transmitter.
• Push the cable through the ferrite nut.
• Prepare the cable. For the preparation of the cable, see the supplied manufacturer's documents.
• Mount the connector. For the mounting of the connector, see the delivered manufacturer's documents.
• Insert the connector into the Ethernet port.
• Position the cable in the housing as shown in Fig. 7.14.
• Fix the cable gland by screwing the cap nut onto the basic part.
• Fix the transducer cable by tightening the cable gland with the ferrite nut, see Fig. 7.14.
Transmitter with aluminum housing
Fig. 7.16: Connection of the Ethernet cable (transmitter with aluminum housing)
1 – Ethernet interface
2 – foldable ferrite core
3 – Ethernet connector
• Remove the blind plug on the transmitter to connect the cable, see
Fig. 7.16
.
• Open the cable gland of the Ethernet cable. The compression part remains in the cap nut, see Fig. 7.17.
66
2018-07-16, UMFLUXUS_WDV1-3EN
Page 67

7 Connection
1
23
FLUXUS WD 7.4 Service interfaces
Fig. 7.17: Cable gland
1 – cap nut
2 – compression part
3 – basic part
• Push the cable through the cap nut, compression part and basic part of the cable gland.
• Insert the cable into the housing of the transmitter.
• Prepare the cable. For the preparation of the cable, see the supplied manufacturer's documents.
• Mount the connector. For the mounting of the connector, see the delivered manufacturer's documents.
• Insert the connector into the Ethernet port, see Fig. 7.16.
• Fix the foldable ferrite core to the cable.
• Position the cable in the housing as shown in Fig. 7.16.
• Screw the sealing ring side of the basic part into the transmitter housing.
• Fix the cable gland by screwing the cap nut onto the basic part, see Fig. 7.16.
UMFLUXUS_WDV1-3EN, 2018-07-16
67
Page 68
8 Start-up
Warning!
Danger!
Caution!
Notice!
FLUXUS WD
8 Start-up
Installation, connection and start-up by unauthorized and unqualified personnel
This may result in personal or material damage or other dangerous situations.
Any work on the transmitter has to be carried out by authorized and qualified personnel.
Working in mines or cramped confines
Risk of intoxication and/or asphyxiation because of emerging gases, risk of injuries because of cramped
conditions.
Wear the required personal protective equipment. Observe the applicable rules.
Safety and accident prevention regulations for electrical systems and equipment
Failure to observe these regulations may lead to severe injury or death.
Observe the safety and accident prevention regulations for electrical systems and equipment.
The transmitter and transducers have to be checked to ensure proper condition and operational safety before each
use. The transmitter housing must always be closed during operation. Observe that maintenance work must be concluded.
68
2018-07-16, UMFLUXUS_WDV1-3EN
Page 69
8 Start-up
Notice!
FLUXUS WD 8.1 Start-up settings
8.1 Start-up settings
When starting up the transmitter for the first time, the following settings are required:
• language
• time/date
• unit of measurement
These displays will only be indicated when the transmitter is switched on for the first time or after an intialization, see
section 8.6.
Language
The available transmitter languages are displayed.
• Select a language.
• Press ENTER.
The menus are displayed in the selected language.
Set time
The current time is displayed.
• Press ENTER to confirm the time or to set the current time via the numeric field.
• Press ENTER.
Set date
The current date is displayed.
• Press ENTER to confirm the date or to set the current date via the numeric field.
• Press ENTER.
Units of measurement
•Select Metric or Imperial.
• Press ENTER.
Region of Canada
•Select Yes if the transmitter is to be used in the region of Canada.
• Press ENTER.
This display will only be indicated if Imperial is selected.
8.2 Switching on
As soon as the transmitter is connected to the power supply, the menu is displayed in the adjusted language. The language can be changed.
The parameters cannot be changed during the measurement. The measurement has to be stopped in order to
change the parameters.
If the transmitter was switched off during the measurement, the message Measurement started will be displayed after
connecting the transmitter to the power supply. The measurement is carried out with the parameters last set.
By pressing key in the program branch Measurement it is possible either to stop the measurement or to display the
current parameter settings.
UMFLUXUS_WDV1-3EN, 2018-07-16
69
Page 70
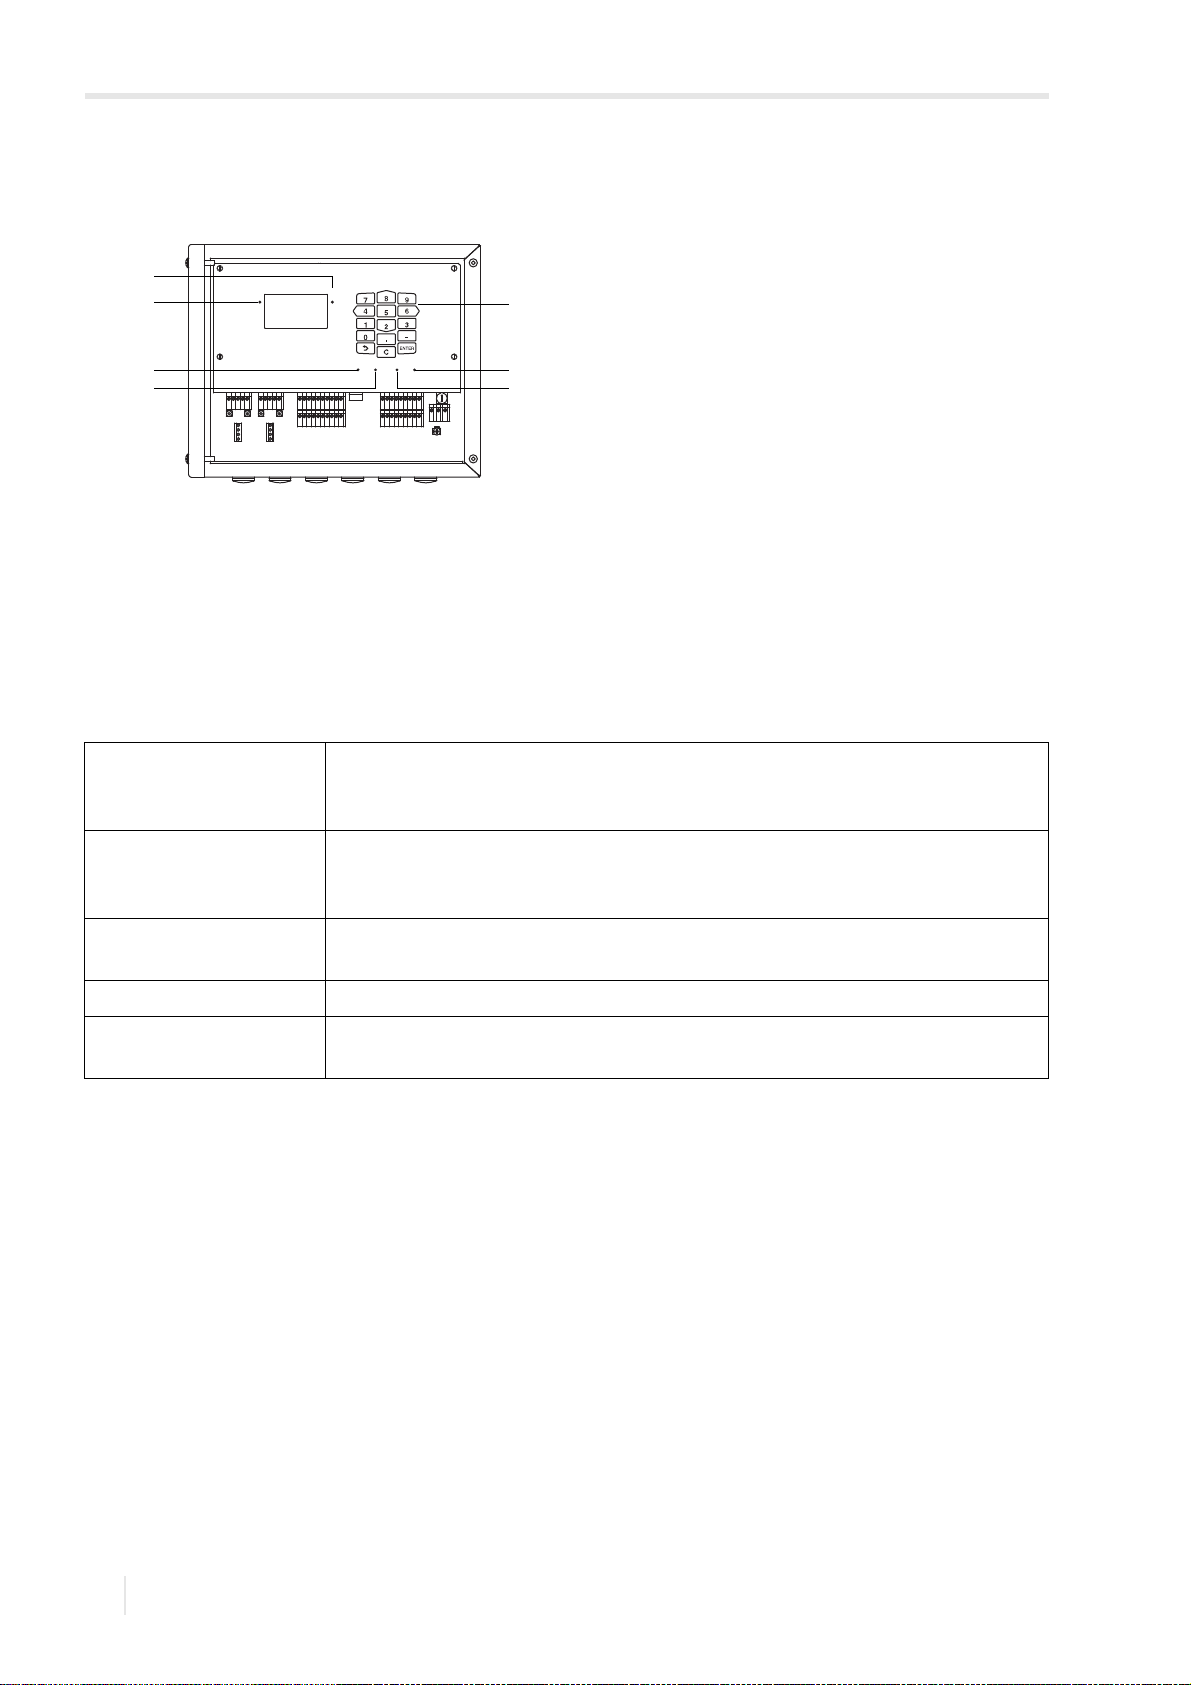
8 Start-up
A
B
SNAP
DISP
DISP
MODEFAST
MUX
NEXT
Q
ON
Q+Q-
3x Q
OFF
LAN
USB
A+B-P1+
P2+
P3+
P4+
P5a
P6a
P7a
SSP1-
P2-
P3-
P4-
P5b
P6b
P7b
X2 X3
X_AV
KL11
KL12
KL7KL8
KL9KL10
KL4
X_AR X_BV X_BR
T1A
T1BS1T2A
T2B
T3A
T3BS3T4B
T4A
T1a
T1bS1T2a
T2b
T3a
T3bS3T4b
T4a
N(-)
PE
L(+)
AV
AVS
AGN
ARSARBV
BVS
BGN
BRS
BR
2
1
3
4
5
6
7
8.3 Status indications FLUXUS WD
8.3 Status indications
Fig. 8.1: Command panel of the transmitter
1 – LED (channel A)
2 – LED (channel B)
3 – keyboard
4 – LED LAN activity
5 – LED LAN mode
6 – LED USB device
7 – LED USB host (not used)
The operation state is indicated by LEDs, see Fig. 8.1.
Tab. 8.1
LED (channel A) Lights if the transmitter is in measuring mode and channel A is activated.
red – invalid measurement
green – valid measurement
LED (channel B) Lights if the transmitter is in measuring mode and channel B is activated.
red – invalid measurement
green – valid measurement
LED LAN activity Lights if the transmitter is connected to a network via USB cable.
Flashes in case of data exchange on the network connection.
LED LAN mode Lights if the data rate is 100 MBit/s otherwise it is 10 MBit/s.
LED USB device Lights if the transmitter is connected to a PC via USB cable.
Flashes in case of data exchange between PC and transmitter.
70
2018-07-16, UMFLUXUS_WDV1-3EN
Page 71
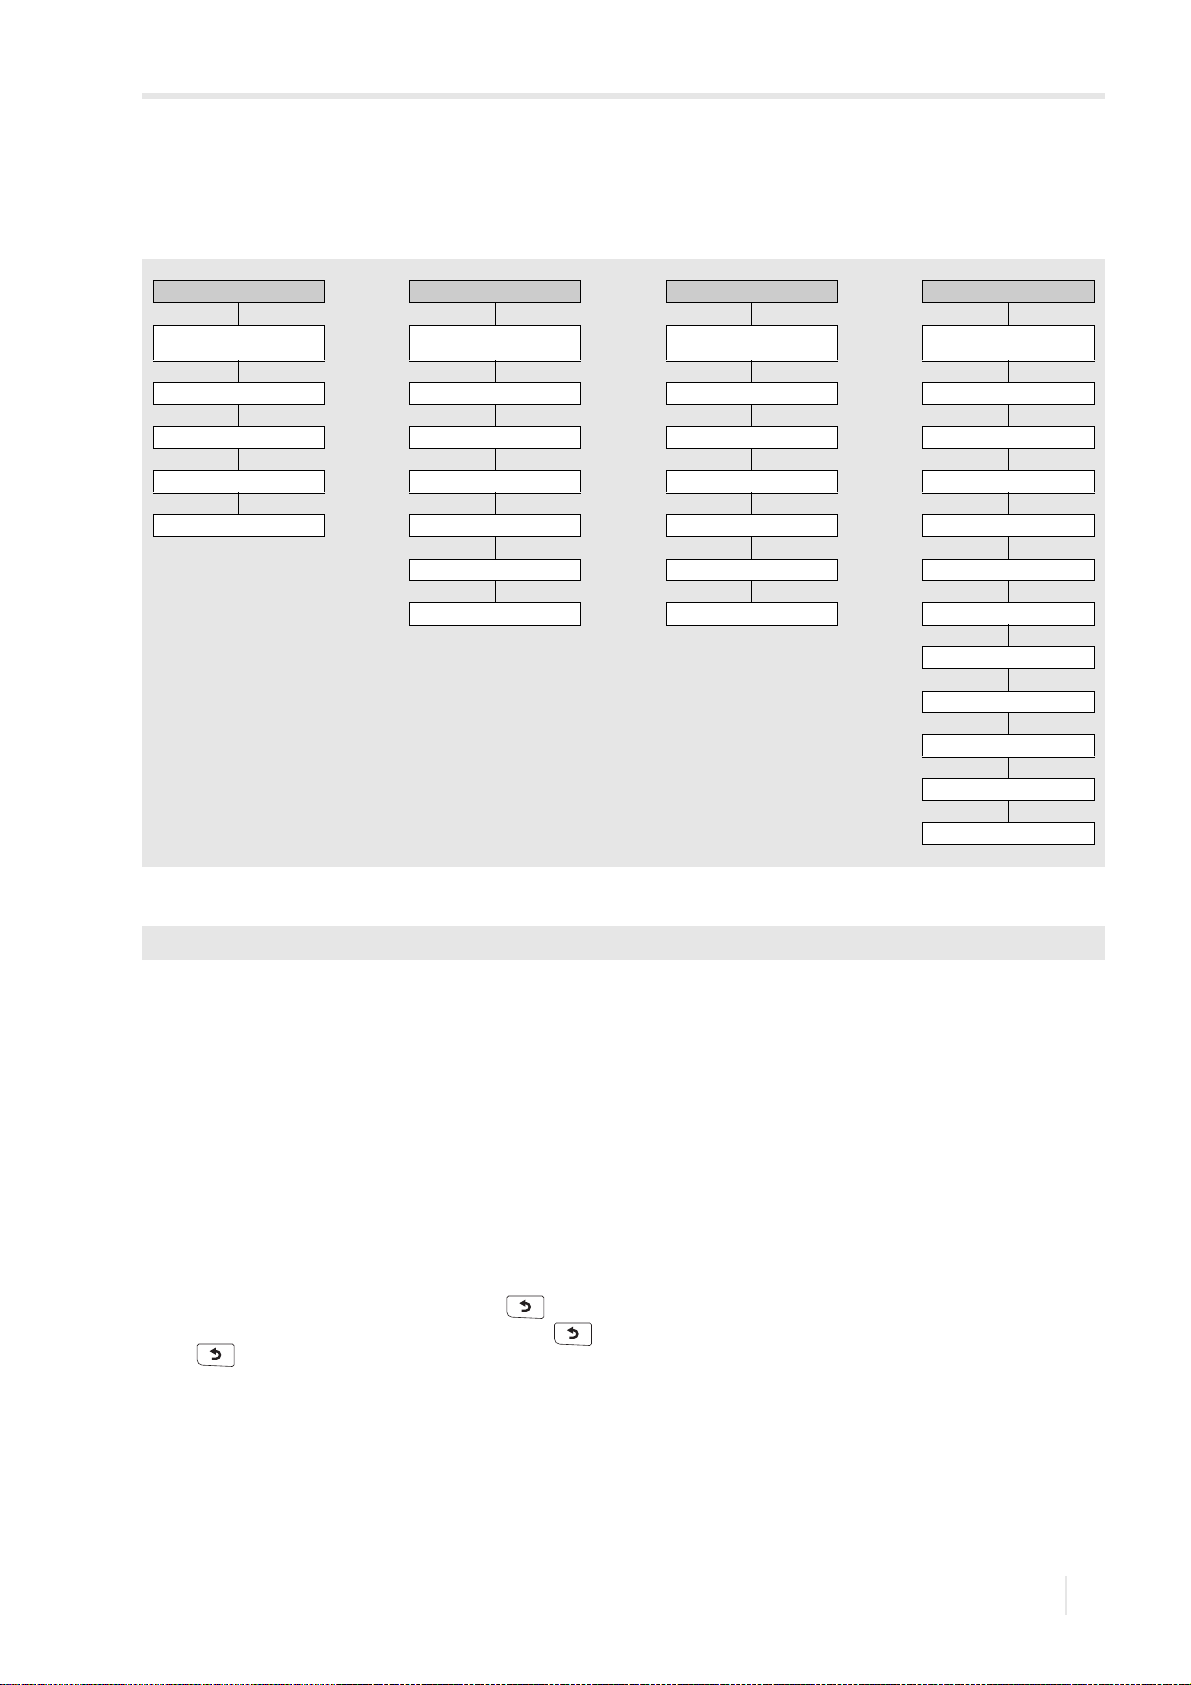
8 Start-up
FLUXUS WD 8.4 Program branches
8.4 Program branches
The following schema shows the program branches. For a detailed overview of the menu structure see annex A.
Parameters Measurement Options Special functions
Selection of a measuring
channel
Transducer parameter Measuring point number Physical quantity Outputs
Pipe parameters Number of sound paths Units of measurement Measurement
Fluid parameter Transducer distance Outputs Data logger
Length of extension cable Diagnostic values Remote functions Snaps
Selection of measuring
channels
Transducer positioning Event trigger Communication
Measurement Special settings Units of measurement
Selection of a measuring
channel
Minimum pipe diameter
8.5 Language
System settings
Totalizers
Dialogs/menus
Parameter record
Libraries
Special functions\System settings\Language
The language of the transmitter can be selected:
• Select the menu item Language in the program branch Special functions\System settings.
• Press ENTER.
• Select the desired language from the scroll list.
• Press ENTER.
Afterwards the menu will be displayed in the selected language. The selected language remains activated when the transmitter is switched off and on again.
The language can also be changed by entering a HotCode.
8.6 Initialization
During an initialization (INIT) of the transmitter, all settings are reset to the factory default settings.
Proceed as follows to execute an initialization:
• When switching on a transmitter: keep keys and C pressed.
• During the operation of the transmitter: press keys , C and ENTER simultaneously. Release only key ENTER. Keep
keys and C pressed.
During an initialization it is tested whether the key lock is activated. If so, it has to be deactivated.
• Enter a 6-digit key lock code.
• Press ENTER.
If a measurement is currently running, it will be stopped.
It will be requested whether the initial settings are to be carried out.
UMFLUXUS_WDV1-3EN, 2018-07-16
71
Page 72
8 Start-up
8.7 Time and date FLUXUS WD
Initial settings
If Yes is selected, the following setting dialogs will be displayed.
•Language
•Time/date
•Units of measurement
•Delete meas. values
•Delete snaps
• Delete user subst. (all user-defined materials and fluids which were stored after delivery will be deleted)
•Reset totalizers
The initialization can also be started with the HotCode 909000.
8.7 Time and date
Special functions\System settings\Time/date
The transmitter has a battery-powered clock. Measured values are automatically stored with time and date.
•Select Time/date.
The adjusted time is displayed.
• Enter the current time via the numeric field.
• Press ENTER.
The adjusted date is displayed.
• Enter the current date via the numeric field.
• Press ENTER.
8.8 Information regarding the transmitter
Special functions\System settings\Transmitter info
•Select Transmitter info.
• Press ENTER.
• Press key or to scroll through the list.
• Press key to return to the menu item System settings.
The following information regarding the transmitter is displayed:
display description
Serial number type and serial number of the transmitter
Firmware version version number of the installed firmware
Firmware date creation date of the installed firmware
Production date manufacturing date of the transmitter
MAC address MAC address of the transmitter
Service TCP Port TCP port of the transmitter
72
2018-07-16, UMFLUXUS_WDV1-3EN
Page 73
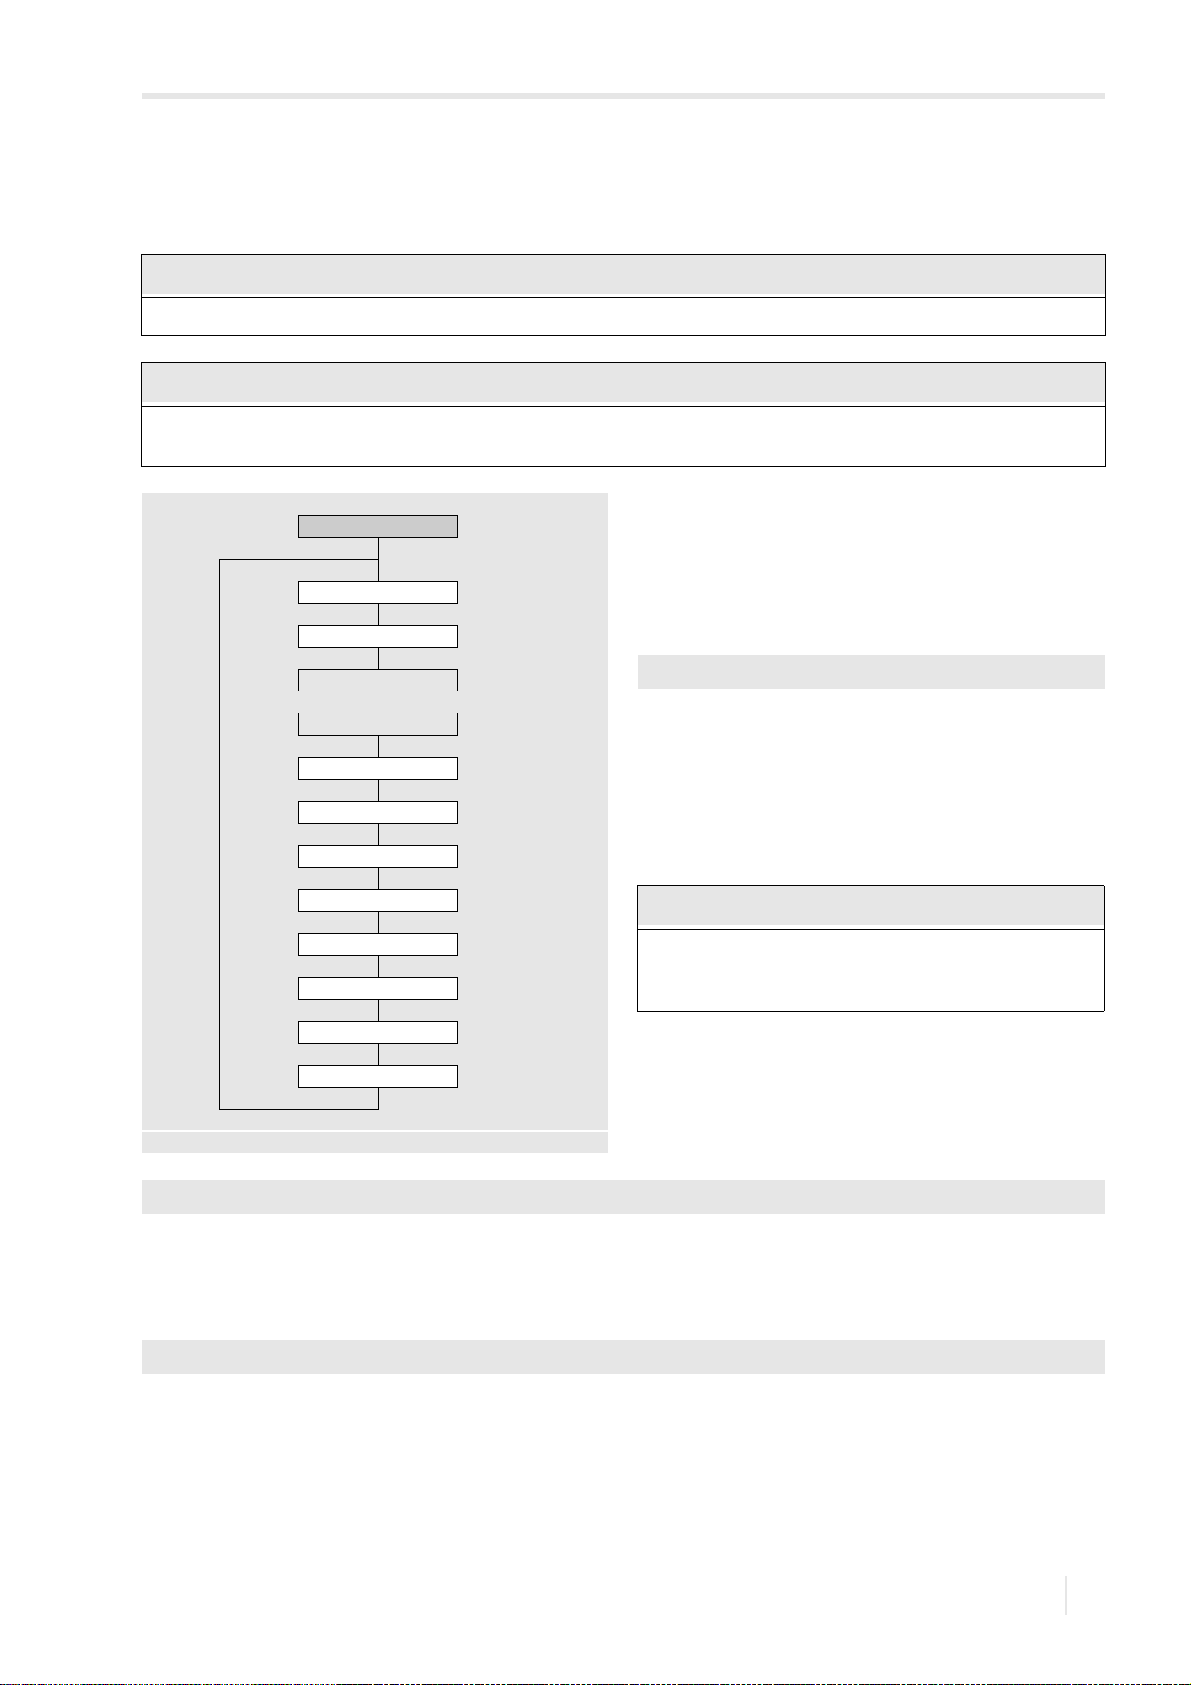
9 Measurement
Notice!
Notice!
Notice!
FLUXUS WD 9.1 Parameter input
9 Measurement
9.1 Parameter input
All settings changed in this program branch will be stored at the beginning of the measurement.
Avoid a simultaneous parameter entry via the keyboard and the USB, Ethernet or process interface. The parameter
records received via these interfaces will overwrite the current transmitter parameterization.
The pipe and fluid parameters are entered for the selected
Parameters
Channel x
Transducer
measuring point. The parameter ranges are limited by the
technical characteristics of the transducers and the transmitter.
• Select the program branch Parameters.
•Press ENTER.
Parameters\Channel A
Connected transducer Select transducer
• Select the channel for which the parameters are to be
entered (here: Channel A).
Outer diameter
Pipe material
Pipe wall thickness
Lining
Roughness
•Press ENTER.
The display will not be indicated if the transmitter has only
one measuring channel.
9.1.1 Transducer selection
The transducer is selected in dependence of the inner
pipe diameter (= outer pipe diameter - 2 × pipe wall
Fluid
Fluid temp.
Extension cable
see annex A, p. 152
thickness), see Technical specification.
Parameters\Clamp-on transducer CDP2E52
• The transducer (here: CDP2E52) connected to the transmitter is displayed.
• Press ENTER.
This display will only be indicated if transducers and sensor module are connected to the transmitter.
Parameters\Connected transd.
The parameter input can also be carried out without connected transducers or sensor module.
•Select Connected transd.
• Press ENTER.
The display Transducer not found will be indicated if neither transducers nor sensor module are connected.
• Press ENTER.
UMFLUXUS_WDV1-3EN, 2018-07-16
73
Page 74
9 Measurement
Notice!
9.1 Parameter input FLUXUS WD
Parameters\Select transducer
•Select Select transducer to use the standard transducer stored in the transmitter.
• Select the transducer.
• Press ENTER.
This display will only be indicated if the transducers and the sensor module are connected to the transmitter.
If a standard transducer is selected, no transducer-specific calibration values are considered. A higher uncertainty
has to be expected.
9.1.2 Input of pipe parameters
Outer pipe diameter
Parameters\Outer diameter
• Enter the outer pipe diameter.
• Press ENTER.
It is possible to enter the pipe circumference instead of the outer pipe diameter.
Pipe circumference
Parameters\Pipe circumference
• Activate the input of the pipe circumference.
• Press key in the menu item Outer diameter. The menu item Pipe circumference will be displayed.
• Enter the pipe circumference.
• Press ENTER.
If the outer pipe diameter is to be entered, press key . The menu item Outer diameter is displayed.
Pipe material
Parameters\Pipe material
The pipe material has to be selected to be able to determine the corresponding sound speed.
The sound speeds for the materials in the scroll list are stored in the transmitter.
• Select the pipe material.
• Press ENTER.
• If the material is not in the scroll list, select Other material.
• Press ENTER.
74
2018-07-16, UMFLUXUS_WDV1-3EN
Page 75
9 Measurement
Notice!
FLUXUS WD 9.1 Parameter input
Sound speed of the pipe material
Parameters\Pipe material\Other material\c material
• Enter the sound speed of the pipe material.
There are 2 sound speeds for pipe materials, the longitudinal and the transversal one. Enter the sound speed which
is nearer to 2500 m/s.
• Press ENTER.
•Select Transverse wave or Longitudinal wave.
• Press ENTER.
These displays will only be indicated if Other material is selected.
For the sound speed of some materials, see annex C.
Roughness of the pipe material
Parameters\Pipe material\Other material\Roughness
The flow profile of the fluid is influenced by the roughness of the inner pipe wall.
The roughness is used for the calculation of the profile correction factor.
In most cases, the pipe roughness cannot be exactly determined and must therefore be estimated.
• Press ENTER if the pipe has a lining. The pipe roughness of the lining is included into the calculation.
• Enter the roughness of the pipe material in case the pipe has no lining. Press ENTER.
This display will only be indicated if Other material is selected.
For the roughness of some materials, see annex C.
Wall thickness
Parameters\Pipe wall thickness
• Enter the pipe wall thickness.
• Press ENTER.
Lining
Parameters\Lining
•Select Yes if the pipe has a lining. Select No if the pipe has no lining.
• Press ENTER.
Lining material
Parameters\Lining material
• Select the lining material.
• Press ENTER.
• If the lining material is not included in the scroll list, select Other material.
• Press ENTER.
This display will only be indicated if Yes is selected in the menu item Lining.
UMFLUXUS_WDV1-3EN, 2018-07-16
75
Page 76
9 Measurement
Notice!
9.1 Parameter input FLUXUS WD
Sound speed of the lining material
Parameters\Lining material\Other material\c material
• Enter the sound speed of the lining material.
For pipe materials there are 2 sound speeds, the longitudinal and the transversal one. Enter the sound speed which
is nearer to 2500 m/s.
• Press ENTER.
•Select Transverse wave or Longitudinal wave.
• Press ENTER.
These displays will only be indicated if Other material is selected.
Roughness of the lining material
Parameters\Lining material\Other material\Roughness
The flow profile of the fluid is influenced by the roughness of the inner pipe wall.
The roughness is used for the calculation of the profile correction factor.
In most cases, the pipe roughness cannot be exactly determined and must therefore be estimated.
• Enter the roughness of the lining material.
• Press ENTER.
This display will only be indicated if Other material is selected.
Lining thickness
Parameters\Lining thickness
• Enter the thickness of the lining.
• Press ENTER.
This display will only be indicated if Yes is selected in the menu item Lining.
Roughness
Parameters\Roughness
The flow profile of the fluid is influenced by the roughness of the inner pipe wall.
The roughness is used for the calculation of the profile correction factor.
In most cases, the pipe roughness cannot be exactly determined and must therefore be estimated.
•If Automatic is selected, the roughness values stored in the transmitter are used.
•If User-defined is selected, a roughness value has to be entered.
• Press ENTER.
This display will not be indicated if Other material is selected in the menu item Pipe material or Lining material.
76
2018-07-16, UMFLUXUS_WDV1-3EN
Page 77
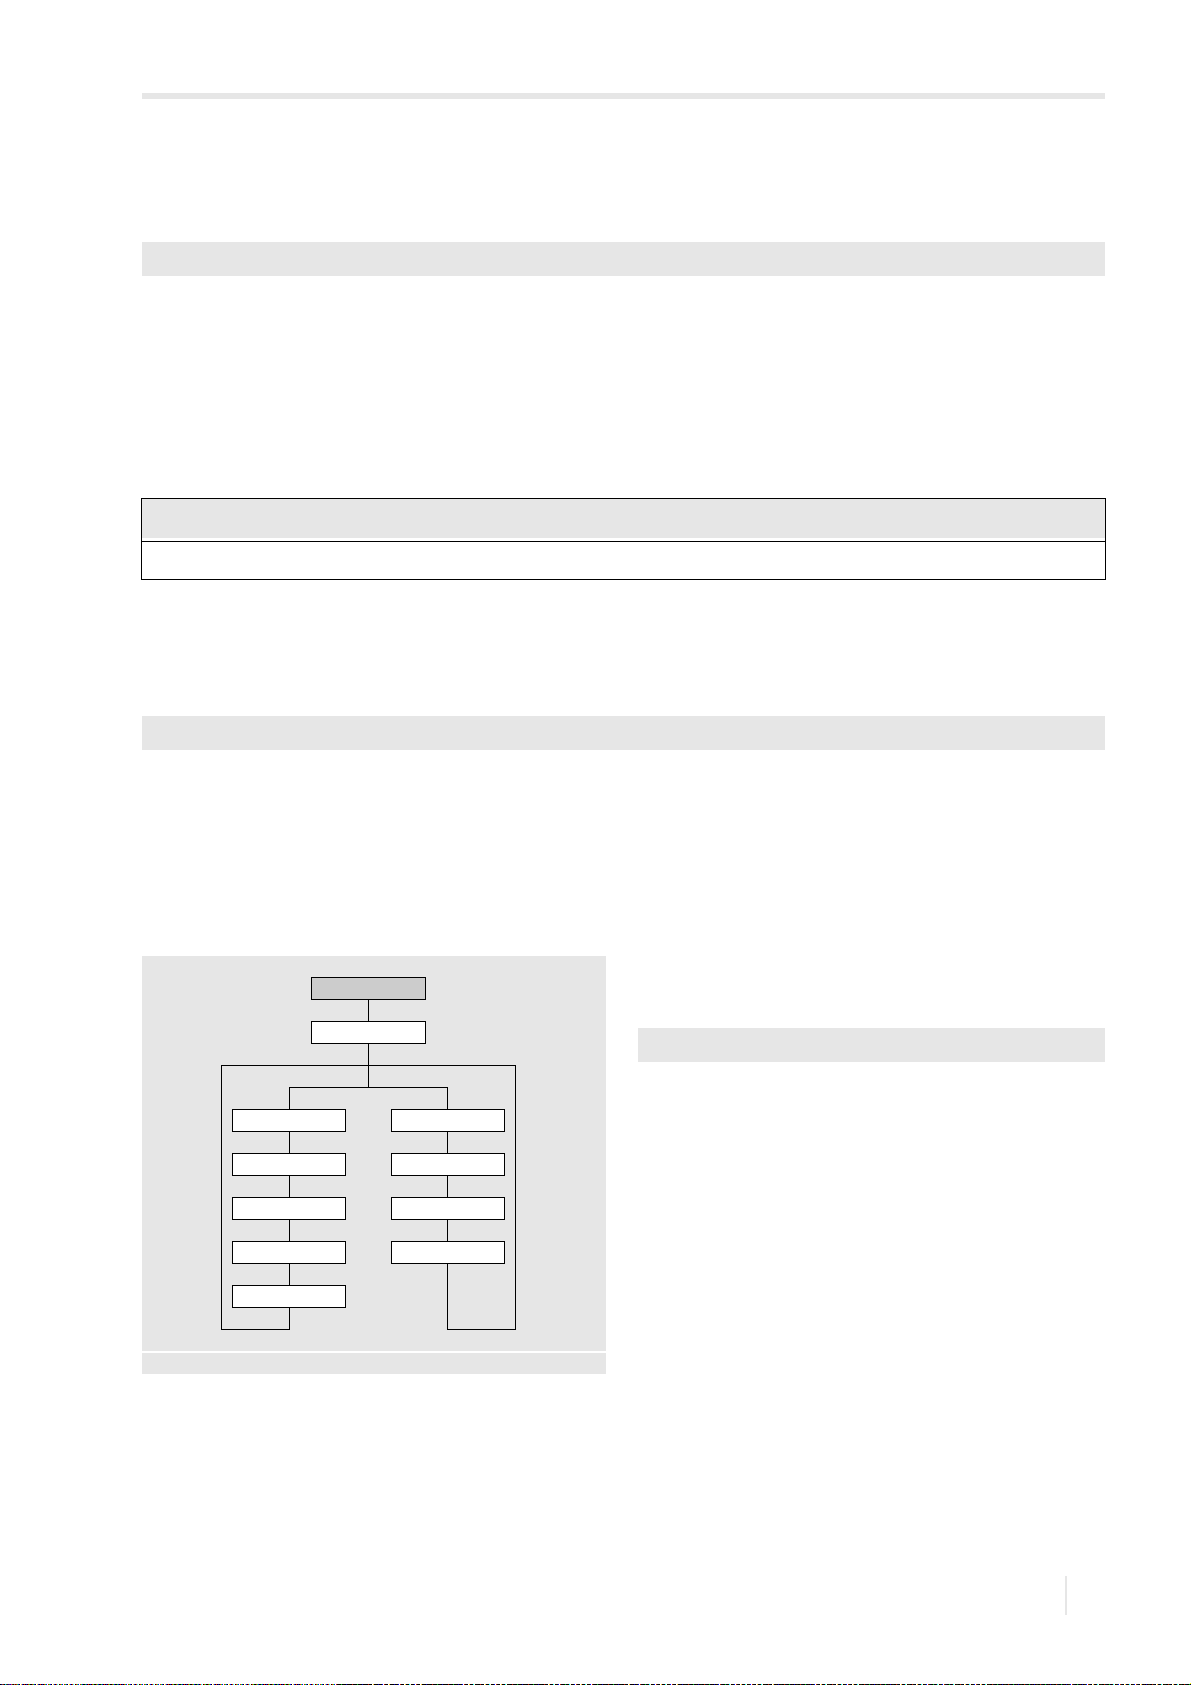
9 Measurement
Notice!
FLUXUS WD 9.2 Measurement settings
9.1.3 Input of fluid parameters
Fluid temperature
Parameters\Fluid temp.
The fluid temperature is used:
– at the beginning of the measurement for the interpolation of the sound speed and therefore for the calculation of the
recommended transducer distance
– during the measurement for the interpolation of the density and the viscosity of the fluid
This value is only used, if the temperature is not measured. The value has to be within the operating temperature of the
transducers.
• Enter the fluid temperature. In case of a temperature range, enter the average fluid temperature.
If the relation between the sound speed and the temperature is not linear, see the sound speed-temperature curve.
• Press ENTER.
9.1.4 Other parameters
Extension cable
Parameters\Extension cable
In case the transducer cable is extended (e.g., between junction box and transmitter), enter the length of the extension cable.
• Select the menu item Extension cable in the program branch Parameters.
• Enter the length of the extension cable.
• Press ENTER.
9.2 Measurement settings
• Select the program branch Options.
Options
Channel x
Measurement
Physical quantity Flow velocity
Unit of measurement
Damping Mass flow rate
Units of measurement
Volumetric flow rate
•Press ENTER.
Options\Channel A
• Select the channel for which a physical quantity has to be
entered (here: Channel A)
•Press ENTER.
This display will not be indicated if the transmitter has only
one measuring channel.
•Select Measurement.
•Press ENTER.
Error value delay
see annex A, p. 153
UMFLUXUS_WDV1-3EN, 2018-07-16
77
Page 78
9 Measurement
Notice!
9.2 Measurement settings FLUXUS WD
9.2.1 Selection of the physical quantity
Options\Channel A\Measurement\Physical quantity
•Select Physical quantity.
• Press ENTER.
9.2.2 Selection of the unit of measurement
Options\Channel A\Physical quantity\Volumetric flow rate
For the selected physical quantity (except sound speed), a scroll list with the available units of measurement is displayed.
The unit of measurement which was selected previously is displayed first.
• Select the unit of measurement of the physical quantity.
• Press ENTER.
If the physical quantity or the unit of measurement is changed, the settings of the outputs have to be checked, see
section 9.2.5.
9.2.3 Input of the damping factor
Options\Channel A\Measurement\Damping
Each displayed measured value is a floating average of the last x seconds, with x being the damping factor. If 0 s is entered as damping factor, no average is calculated.
The value of 10 s is appropriate for normal flow conditions. If the values fluctuate strongly, caused by a higher dynamic
flow, a higher damping factor can be very useful.
• Enter the damping factor.
• Press ENTER.
9.2.4 Input of the error delay
Options\Channel A\Measurement\Error value delay
The error delay is the time interval after which the error value is transmitted to the output, see Tab. 9.3.
This display will only be indicated if the list item Edit is selected in Special functions\Dialogs/Menus\Error
value delay.
If the error delay is not entered, the damping factor will be used.
• Enter a value for the error delay.
• Press ENTER.
• Press key to return to the program branch Options.
78
2018-07-16, UMFLUXUS_WDV1-3EN
Page 79
9 Measurement
FLUXUS WD 9.2 Measurement settings
9.2.5 Configuration of the output
If the transmitter is equipped with outputs, they have to be
Options
Channel x
Outputs
Select the output
configured. In principle, the measured value, the status value or an event value can be transmitted via the different
outputs.
In the following, the configuration of an analog outputs is
described.
• Select the program branch Options.
•Press ENTER.
Enable the output
Source item
see annex A, p. 156
Selection of the measuring channel
Options\Channel A
• Select the channel (here: Channel A).
•Press ENTER.
This display will not be indicated if the transmitter has only
one measuring channel.
Assignment of an output
•Select Outputs.
• Press ENTER.
Options\Channel A\Outputs\Current I1(--)
• Select an output to be assigned to the channel (here: Current I1(--)).
• Press ENTER.
The scroll list contains all available outputs of the transmitter:
– Current Ix (--)
– Binary Bx (--)
If the output has already been assigned to a channel, it is displayed as follows: Current I1 (A).
Options\Channel A\Outputs\Current I1\I1 Enable
•Select Yes to change the settings for an already assigned output or to assign a new output.
•Select No to cancel the assignment and to return to the previous menu item.
• Press ENTER.
Assignment of a source item
One source item has to be assigned to each selected output.
Options\Channel A\Outputs\...\Source item
• Select a source item whose measured value, status value or event value is to be transmitted via the output, see Tab. 9.1.
• Press ENTER.
UMFLUXUS_WDV1-3EN, 2018-07-16
79
Page 80

9 Measurement
9.2 Measurement settings FLUXUS WD
Tab. 9.1: Configuration of the outputs
source item list item output
Flow quantities Flow velocity
Volumetric flow rate
Mass flow rate
Totalizers Volume (+) totalizer for the volumetric flow rate in positive flow direction
Volume (-) totalizer for the volumetric flow rate in negative flow direction
Volume (Δ) difference of the totalizers for the positive and negative flow direction
Mass (+) totalizer for the mass flow rate in positive flow direction
Mass (-) totalizer for the mass flow rate in negative flow direction
Mass (Δ) difference of the totalizers for the positive and negative flow direction
Pulse Pulse |V| pulse without sign consideration of the volume flow rate
Pulse +V pulse for positive measured values of the volumetric flow rate
Pulse -V pulse for negative measured values for the volumetric flow rate
Pulse |m| pulse without sign consideration of the mass flow rate
Pulse +m pulse for the positive measured values of the mass flow rate
Pulse -m pulse for the negative measured values of the mas flow rate
Event trigger R1 limit message (Event trigger R1)
R2 limit message (Event trigger R2)
R3 limit message (Event trigger R3)
R4 limit message (Event trigger R4)
Diagnostic values Amplitude signal amplitude
Quality signal quality
SNR ratio useful signal/noise signal
SCNR ratio useful signal to correlated noise signal
VariAmp amplitude fluctuation
VariTime transit time fluctuation
Amplification amplification, important to receive a useful signal
PIG detection signalizes whether a pig is detected
This display will only be indicated if PIG detection is activated.
Sound speed Sound speed sound speed
Sound speed (Δ) difference of the measured sound speed and the sound speed calculated
from the fluid data
Depending on the selected source item, it is possible to output measured values, status or event values, see Tab. 9.2.
80
2018-07-16, UMFLUXUS_WDV1-3EN
Page 81
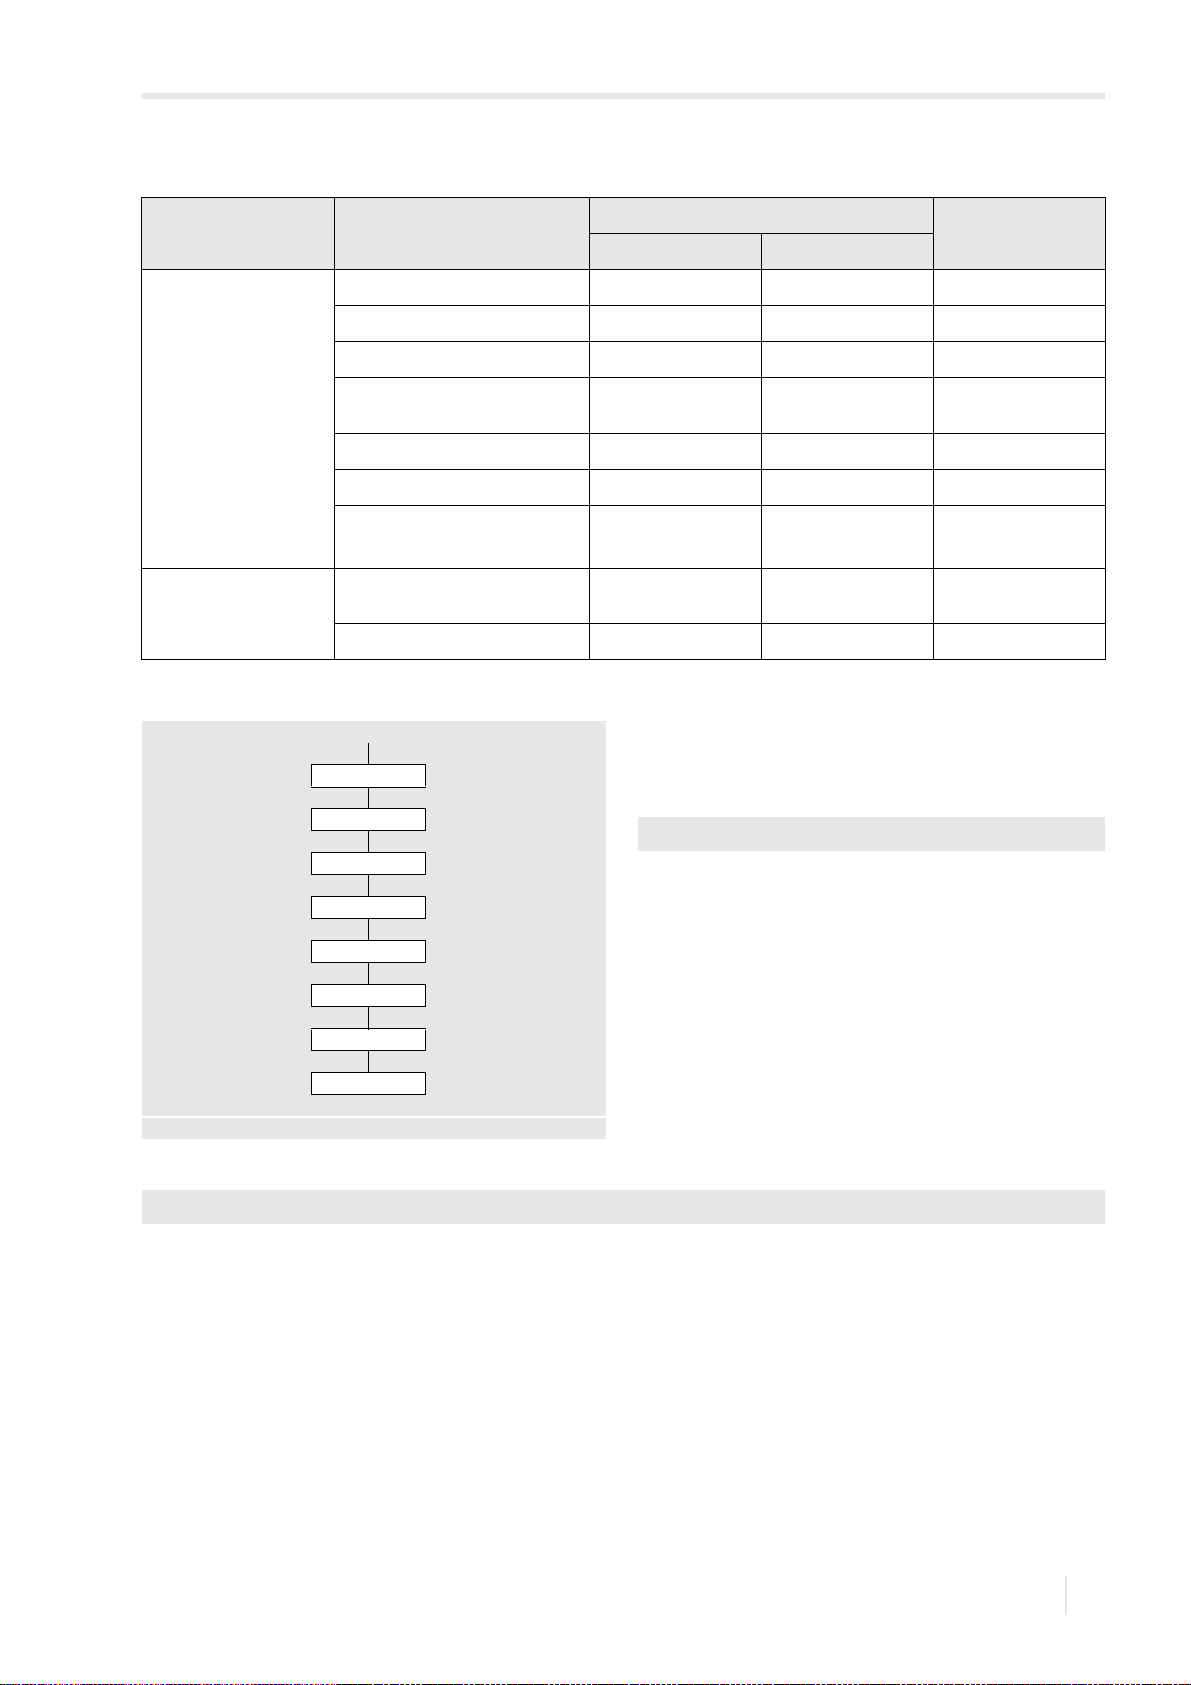
9 Measurement
FLUXUS WD 9.2 Measurement settings
Tab. 9.2: Output of measured values, status values or event values
source item measured value event value
value status
physical quantities Flow quantities xx
Totalizers xx
Fluid properties xx
Miscellaneous
(User-def.input 1...4)
Sound speed xx
Pulse xx
Diagnostic values
(except PIG detection)
results Diagnostic values \
PIG detection
Event trigger x
9.2.5.1 Output of a measured value
Source item
Values
Output range
Error value
Measuring range
Output info
Test signal
Test mea. range
see annex A, p. 156
xx
x
x
• Select the list item Options\Outputs\...\Values.
•Press ENTER.
Output range
Options\Channel A\Outputs\...\Output range
• Select a list item.
– 4...20 mA
– Other range
•Press ENTER.
If Other range is selected, enter the values Output
MIN and Output MAX.
The output range has to have > 10 % of the max. output
value (Output MAX). An error message will be displayed if
the output range is smaller. The next possible value will be
displayed.
Error output
Options\Channel A\Outputs\...\Error value
An error value which is output if the source item cannot be measured, can be defined.
• Select a list item for the error output, see Tab. 9.3.
• Press ENTER.
• If Other value is selected, enter an error value. The value has to be within the output range.
• Press ENTER.
UMFLUXUS_WDV1-3EN, 2018-07-16
81
Page 82
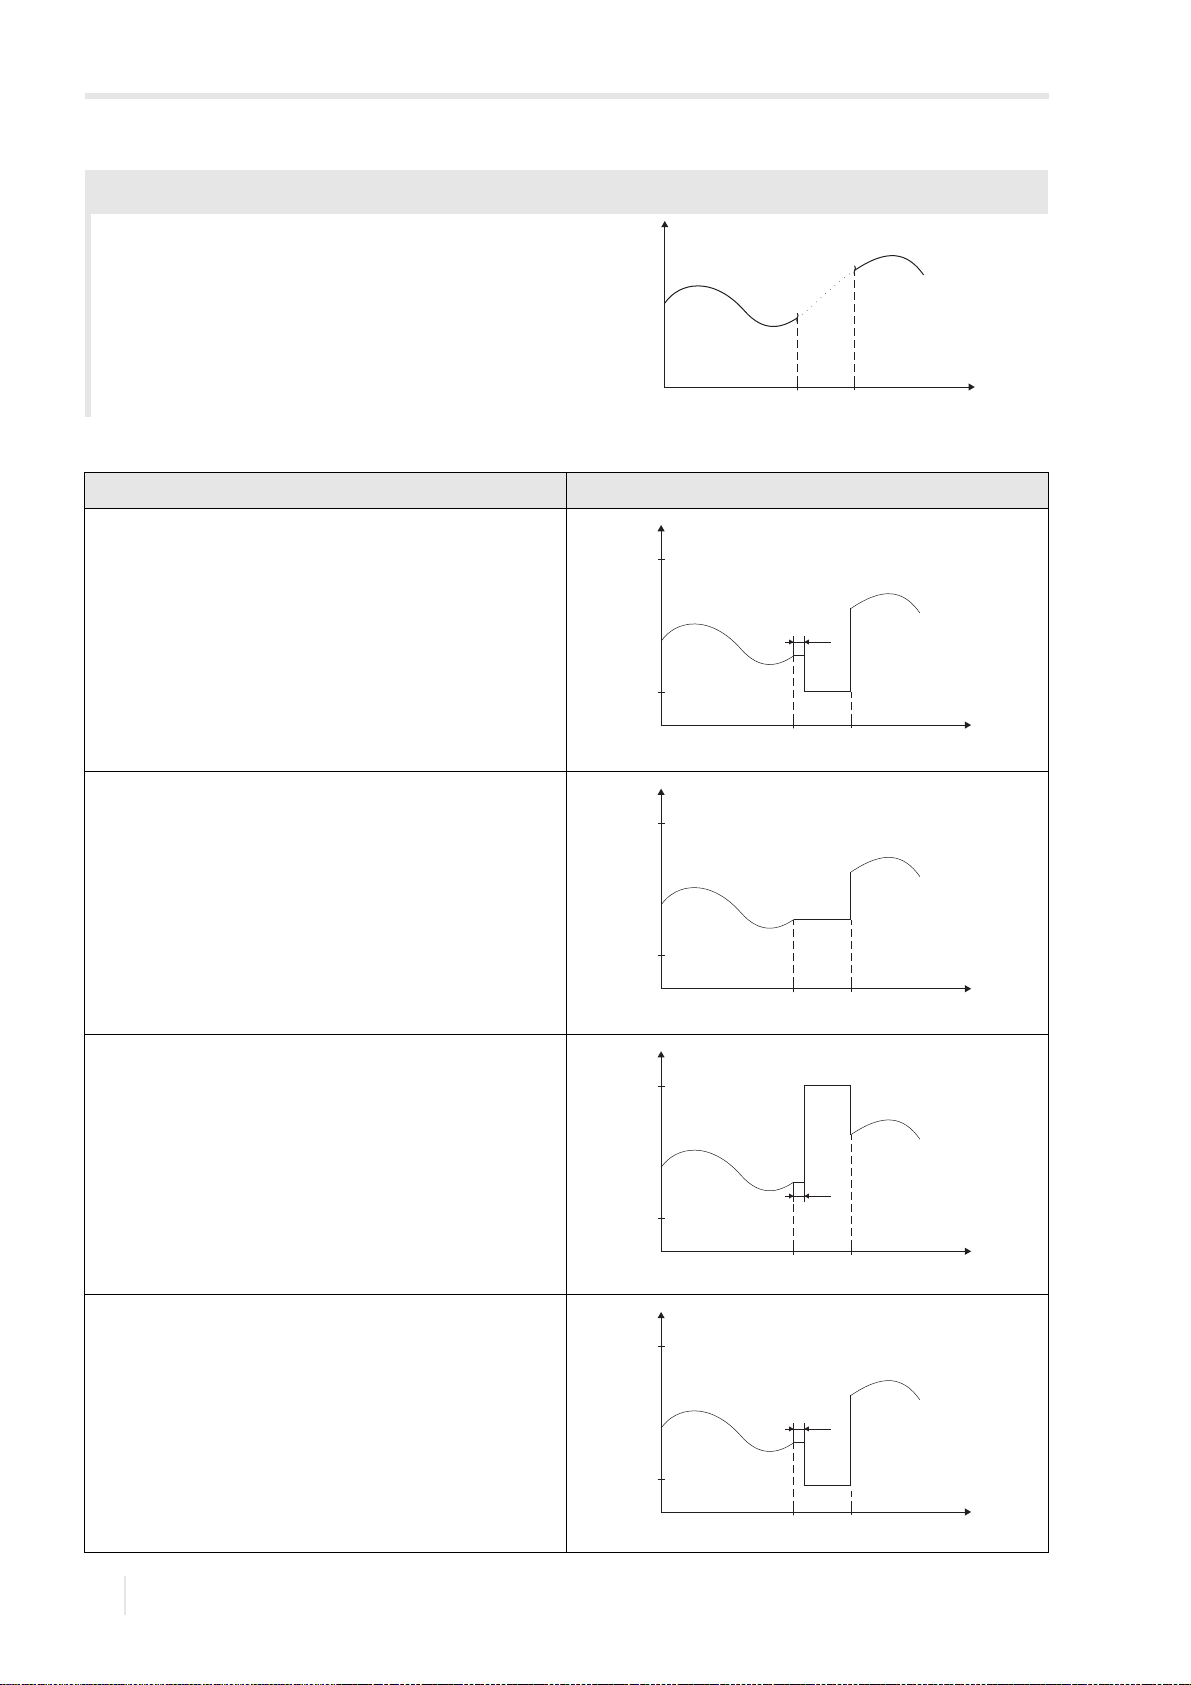
9 Measurement
Example
v [m³/h]
t
0
t
1
t
I [mA]
20
4
t
d
t
0
t
1
t
I [mA]
20
4
t
0
t
1
t
I [mA]
20
4
t
d
t
0
t
1
t
I [mA]
20
4
t
d
t
0
t
1
t
9.2 Measurement settings FLUXUS WD
source item:
output:
output range:
volumetric flow rate
current output
4…20 mA
error delay: td>0
(see section 9.2.4 and Tab. 9.3)
The volumetric flow rate cannot be measured during the
time interval t
Tab. 9.3: Examples for the error output (output range: 4...20 mA)
list item output signal
4.0 mA
Last value
...t1. The error value will be output.
0
20.0 mA
Other value
error value = 3.5 mA
82
2018-07-16, UMFLUXUS_WDV1-3EN
Page 83
9 Measurement
FLUXUS WD 9.2 Measurement settings
Measuring range
The sign of the measured value and the measuring range are determined.
Options\Channel A\Outputs\...\Measured values\Absolute value
•Select Sign if the sign of the measured values is to be considered for the output.
•Select Absolute value if the sign of the measured values is not to be considered for the output.
Options\Channel A\Outputs\...\Start of meas. range
• Enter the lowest expected measured value. The unit of measurement of the source item will be displayed.
Start of meas. range is the value assigned to the value Output MIN of the output range.
Options\Channel A\Outputs\...\End of meas. range
• Enter the highest expected measured value. The unit of measurement of the source item will be displayed.
End of meas. range is the value assigned to the value Output MAX of the output range.
Terminal assignment
Options\Channel A\Outputs\...\Output info
The terminals for the connection of the output are displayed.
By pressing key or further information is displayed.
• Press ENTER.
If the transmitter possesses a switchable current output, it is displayed whether it is active or passive.
Output function test
The function of the output can now be tested.
• Connect an external measuring instrument to the terminals of the output.
Options\Channel A\Outputs\...\Test signal
•Select Yes to test the output. Select No to display the next menu item.
• Press ENTER.
Options\Channel A\Outputs\...\Enter test value
• Enter a test value. It has to be within the output range.
• Press ENTER.
If the external measuring instrument displays the entered value, the output functions correctly.
•Select Repeat to repeat the test, Finish to display the next menu item.
• Press ENTER.
Options\Channel A\Outputs\...\Test mea. range
•Select Yes to test the assignment of the measured value to the output signal. Select No to display the next menu item.
• Press ENTER.
UMFLUXUS_WDV1-3EN, 2018-07-16
83
Page 84
9 Measurement
9.2 Measurement settings FLUXUS WD
Options\Channel A\Outputs\...\Enter test value
• Enter a test value for the selected physical quantity. It has to be within the output range.
• Press ENTER. If the external measuring instrument displays the entered value, the output functions correctly.
•Select Repeat to repeat the test. Select Finish to display the next menu item.
• Press ENTER.
9.2.5.2 Output of a status value
• Select the list item Options\Outputs\...\Status.
• Press ENTER.
Source item
Status
Output range
Output range
Options\Channel A\Outputs\...\Output range
• Select a list item.
Status OK
Output info
Test signal
Test mea. range
see annex A, p. 158
– 4...20 mA
– Other range
• Press ENTER.
If Other range is selected, enter the values Output
MIN and Output MAX.
The output range has to have > 10 % of the max. output
value (Output MAX). An error message will be displayed if
the output range is smaller. The next possible value will be
displayed.
Status OK
The status of the output signal is defined which is to be output when measuring a measured value.
Options\Channel A\Outputs\...\Status OK
• Select in the scroll list the value for Status OK.
• Press ENTER.
Terminal assignment
Options\Channel A\Outputs\...\Output info
The terminals for the connection of the output are displayed.
By pressing key or further information is displayed.
• Press ENTER.
If the transmitter possesses a switchable current output, it is displayed whether it is active or passive.
84
2018-07-16, UMFLUXUS_WDV1-3EN
Page 85

9 Measurement
FLUXUS WD 9.2 Measurement settings
Output function test
The function of the output can now be tested.
• Connect an external measuring instrument to the terminals of the output.
Options\Channel A\Outputs\...\Test signal
•Select Yes to test the output. Select No to display the next menu item.
• Press ENTER.
Options\Channel A\Outputs\...\Enter test value
• Enter a test value. It has to be within the output range.
• Press ENTER.
If the external measuring instrument displays the entered value, the output functions correctly.
•Select Repeat to repeat the test, Finish to display the next menu item.
• Press ENTER.
Options\Channel A\Outputs\...\Test mea. range
•Select Yes to test the status of the output signal. Select No to display the next menu item.
• Press ENTER.
Options\Channel A\Outputs\...\Enter test value
• Select in the scroll list Status OK or Status error.
• Press ENTER.
If the external measuring instrument displays the entered value, the output functions correctly.
•Select Repeat to repeat the test, Finish to display the next menu item.
• Press ENTER.
9.2.5.3 Output of an event value
Output range
Options\Channel A\Outputs\...\Output range
• Select a list item.
– 4...20 mA
– Other range
• Press ENTER.
If Other range is selected, enter the values Output MIN and Output MAX.
The output range has to have > 10 % of the max. output value (Output MAX). An error message will be displayed if the
output range is smaller. The next possible value will be displayed.
Idle state
The status of the output signal which is to be output if no event occurs is defined.
Options\Channel A\Outputs\...\Idle state
• Select the value for the idle state.
• Press ENTER.
UMFLUXUS_WDV1-3EN, 2018-07-16
85
Page 86
9 Measurement
9.2 Measurement settings FLUXUS WD
Terminal assignment
Options\Channel A\Outputs\...\Output info
The terminals for the connection of the output are displayed.
By pressing key or further information is displayed.
• Press ENTER.
If the transmitter possesses a switchable current output, it is displayed whether it is active or passive.
Output function test
The function of the output can now be tested.
• Connect an external measuring instrument to the terminals of the output.
Options\Channel A\Outputs\...\Test signal
•Select Yes to test the output. Select No to display the next menu item.
• Press ENTER.
Options\Channel A\Outputs\...\Enter test value
• Enter a test value. It has to be within the output range.
• Press ENTER.
If the external measuring instrument displays the entered value, the output functions correctly.
•Select Repeat to repeat the test, Finish to display the next menu item.
• Press ENTER.
Options\Channel A\Outputs\...\Test mea. range
•Select Yes to test the status of the output signal. Select No to display the next menu item.
• Press ENTER.
Options\Channel A\Outputs\...\Enter test value
• Select in the scroll list Passive (idle state) or Active.
• Press ENTER.
If the external measuring instrument displays the entered value, the output functions correctly.
•Select Repeat to repeat the test, Finish to display the next menu item.
• Press ENTER.
• Press key to return to the program branch Options.
9.2.5.4 Switchable current output
• Select the menu item Outputs in the program branch
Special functions
Special functions.
• Press ENTER.
86
Outputs
Active Passive
see annex A, p. 158
Special functions\Outputs
•Select Active if the current output is to be switched to
active. Select Passive if the current output is to be
switched to passive.
• Press ENTER.
2018-07-16, UMFLUXUS_WDV1-3EN
Page 87
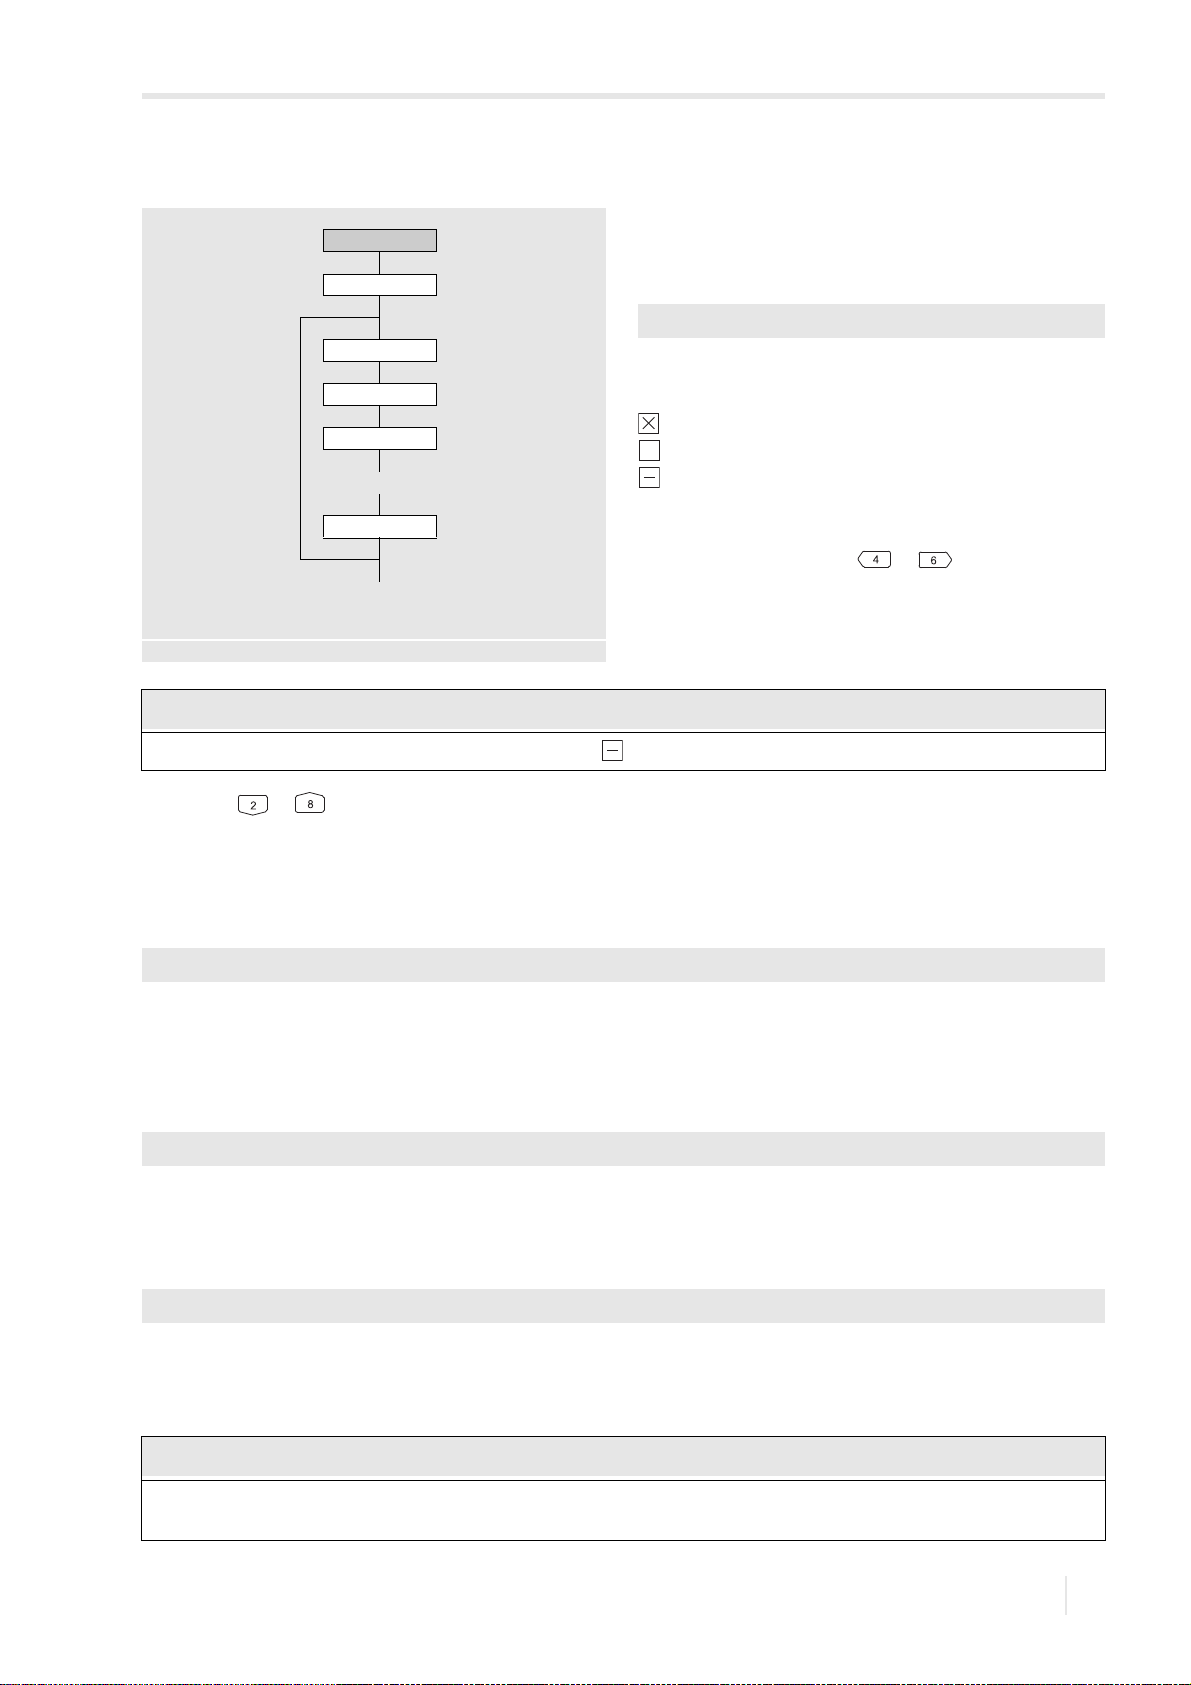
9 Measurement
Notice!
Notice!
FLUXUS WD 9.3 Start of the measurement
9.3 Start of the measurement
• Select the program branch Measurement.
Measurement
•Press ENTER.
Select channels
Activation of the channels
Measurement\Select channels
Measuring point no.
The channels for the measurement can be activated and
for each
activated
measuring
channel
Sound path
Transducer distance
Signal test
Transducer distance
deactivated.
: the channel is activated
: the channel is deactivated
: the channel cannot be activated
This display will not be indicated if the transmitter has only
one measuring channel.
• Select a channel with key or .
Measurement
display
see annex A, p. 155
Pass the program branch
Parameters
in its entirety if is displayed for all channels.
• Press key or to activate or deactivate the channel.
If the parameters in the program branch Parameters are not valid or incomplete, the error message Invalid parameters
will be displayed.
A deactivated channel will be ignored during the measurement.
Input of the measuring point number
Measurement\Measuring point no.
• Enter the number of the measuring point.
• Press ENTER.
For the activation of the text input see Special functions\Dialogs/Menus\Measuring point no.
Input of the sound path number
Measurement\Sound path
• Enter the number of sound paths.
• Press ENTER.
Adjustment of the transducer distance
Measurement\Transducer distance
The recommended transducer distance will be displayed. The transducer distance is measured between the inner edges
of the transducers. In case of a measurement in diagonal mode on very small pipes, a negative transducer distance is
possible.
The accuracy of the recommended transducer distance depends on the accuracy of the entered pipe and fluid
parameters.
UMFLUXUS_WDV1-3EN, 2018-07-16
87
Page 88
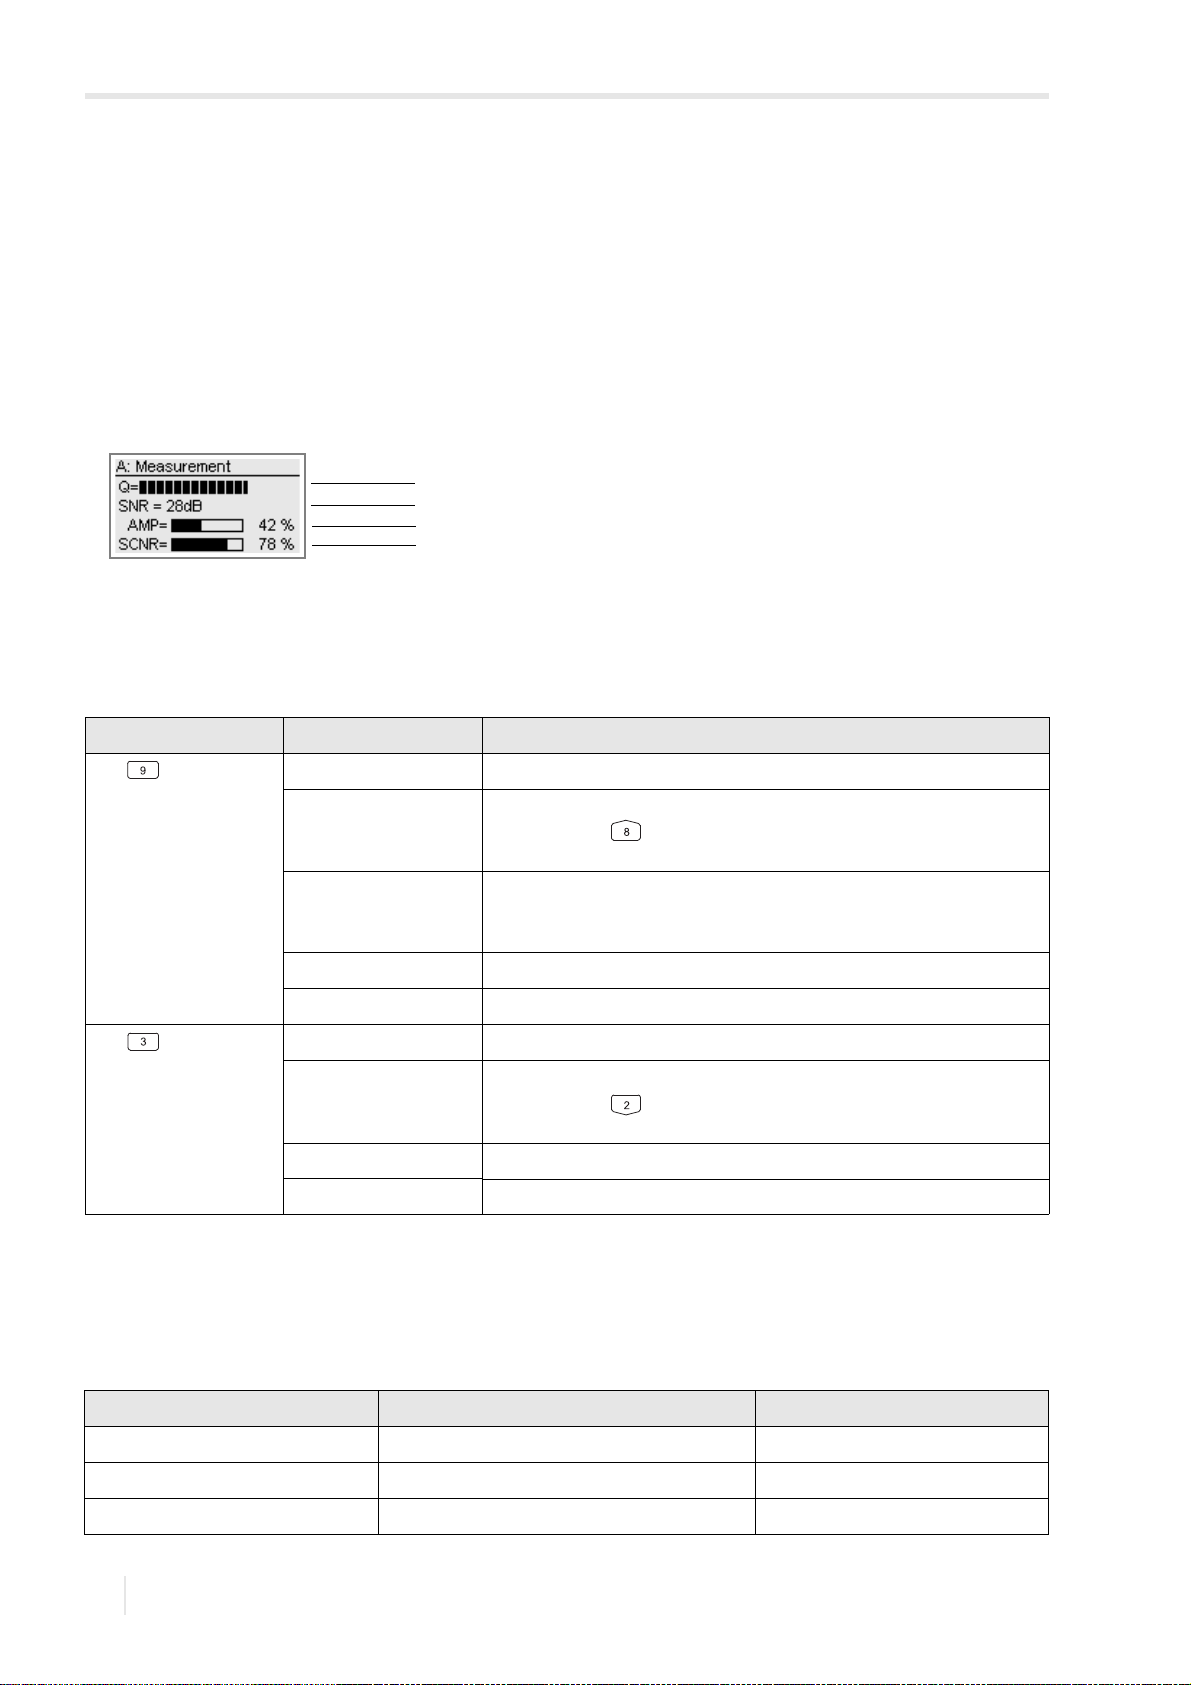
9 Measurement
1
4
2
3
9.3 Start of the measurement FLUXUS WD
• Mount the transducers on the pipe adjusting the transducer distance.
• Press ENTER.
The diagnostics window is displayed, see Fig. 9.1.
Fine adjustment of the transducer distance
The bar graph AMP shows the amplitude of the received signal, see Fig. 9.1.
The bar graph SCNR shows the ratio useful signal to correlated noise signal.
• Shift one of the transducers slightly within the range of the recommended transducer distance until the bar graph reaches the max. length.
Fig. 9.1: Diagnostics window
1 – additional diagnostic
2 – additional diagnostic
3 – amplitude (bar graph)
4 – SCNR value (bar graph)
Tab. 9.4: Diagnostic values
display
key
(1 in Fig. 9.1)
key
(2 in Fig. 9.1)
1
In order to avoid doubling, a value already be displayed in one of these lines will be ignored in the other.
SNR ratio useful signal/noise signal
signal quality Q bar graph has to reach max. length
GAIN= 86 dB signal amplification
AMP= 44% G= 86 dB amplitude and gain
SCNR ratio useful signal to correlated noise signal
SNR ratio useful signal/noise signal
signal quality Q bar graph has to reach max. length
■<>■ transducer distance
SCNR ratio useful signal to correlated noise signal
1
explanation
By pressing key it is possible to display the numeric value instead of the
bar graph.
If the current value of the amplification is higher than the max. amplification,
the current value is displayed with →FAIL!.
By pressing key it is possible to display the numeric value instead of the
bar graph.
• In case of large deviations of the diagnostic values, see Tab. 9.5, check if the entered parameters are correct or repeat
the measurement at a different point on the pipe.
• Press ENTER.
Tab. 9.5: Recommended diagnostic limits
good measurement measurement at limit measurement not possible
SCNR 30 dB (> 50 %) 20 dB SCNR 30 dB (0 % < SCNR 50 %) SCNR 20 dB (= 0 %)
SNR 15 dB 0 dB SNR 15 dB SNR 0dB
GAIN 98 dB 98 dB GAIN 113 dB GAIN 113 dB
88
2018-07-16, UMFLUXUS_WDV1-3EN
Page 89
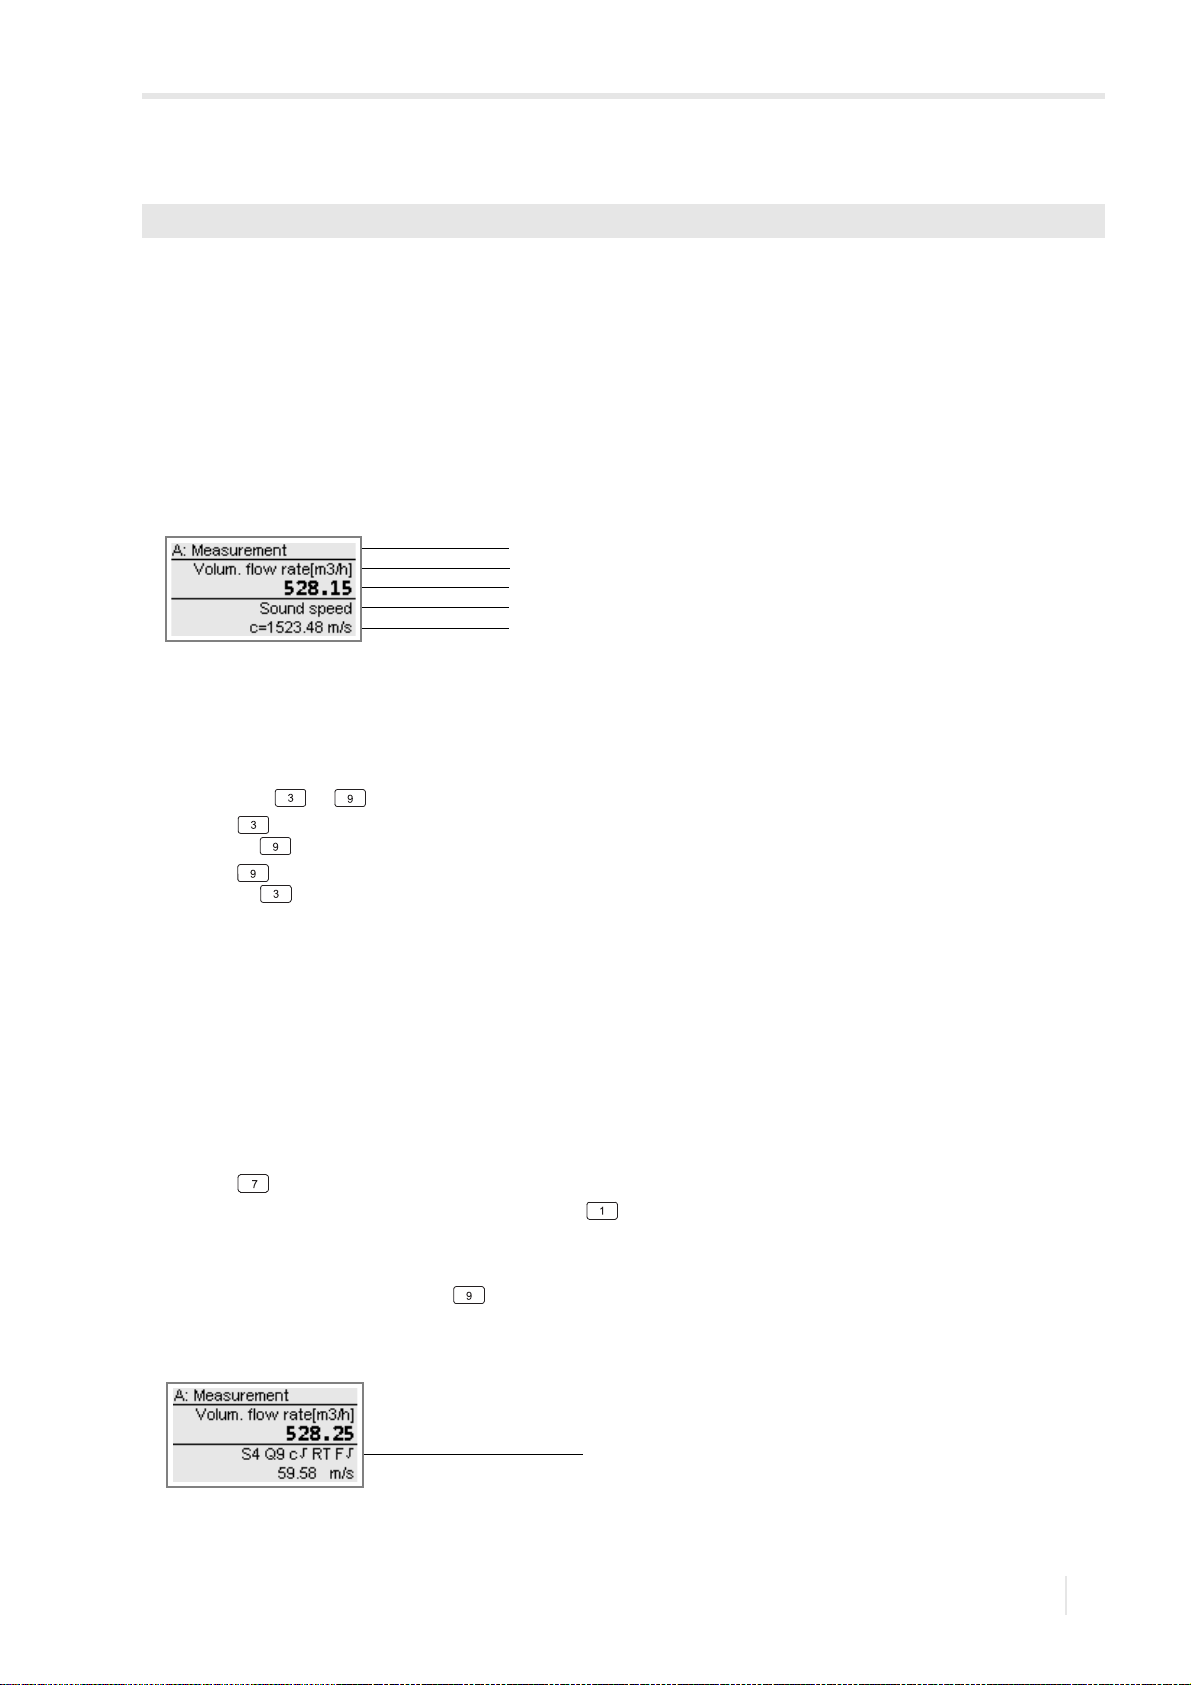
9 Measurement
1
2
3
4
5
1
FLUXUS WD 9.4 Display of measured values
Input of the transducer distance
Measurement\Transducer distance
After precise transducer positioning, the recommended transducer distance is displayed in brackets again.
• Measure the transducer distance.
• Enter the measured transducer distance.
• Press ENTER.
The measurement is started. The measured values are displayed.
9.4 Display of measured values
The measured values are displayed during the measurement as follows:
Fig. 9.2: Display of measured values
1 – channel, program branch, status indicators
2 – measurand and unit of measurement
3 – measured value
4 – display of further measured values
5 – display of further measured values
By pressing key or , additional physical quantities can be displayed during the measurement, see Fig. 9.2.
• Press key to display the measured values in line 5. The designation of the physical quantity is displayed in line 4 by
pressing key for several seconds.
• Press key to display the measured values in line 4. The designation of the physical quantity is displayed in line 5 by
pressing key for several seconds.
Toggling between the channels
If the measurement is started on several channels, the display of the measured values can be adapted during the measurement as follows:
AutoMux mode
If the AutoMux mode is activated, the measured values of all activated channels (measuring and calculation channels) are
displayed consecutively. The next active channel is selected after 3 s. The toggle time can be changed in the menu item
Special functions\Dialogs/Menus\Toggle time.
HumanMux mode
The measured values of one channel are displayed in the HumanMux mode. The measurement on the other channels
continues.
• Press key to display the next activated channel. The measured values for the selected channel are displayed.
Each measurement starts in AutoMux mode. Press key to toggle between the modes.
Status line
Important information of the running measurement is summarized in the status line. The quality and precision of the measurement can be evaluated. Press key during the measurement to scroll to the status line.
Fig. 9.3: Display of the status line
1 – status line
UMFLUXUS_WDV1-3EN, 2018-07-16
89
Page 90
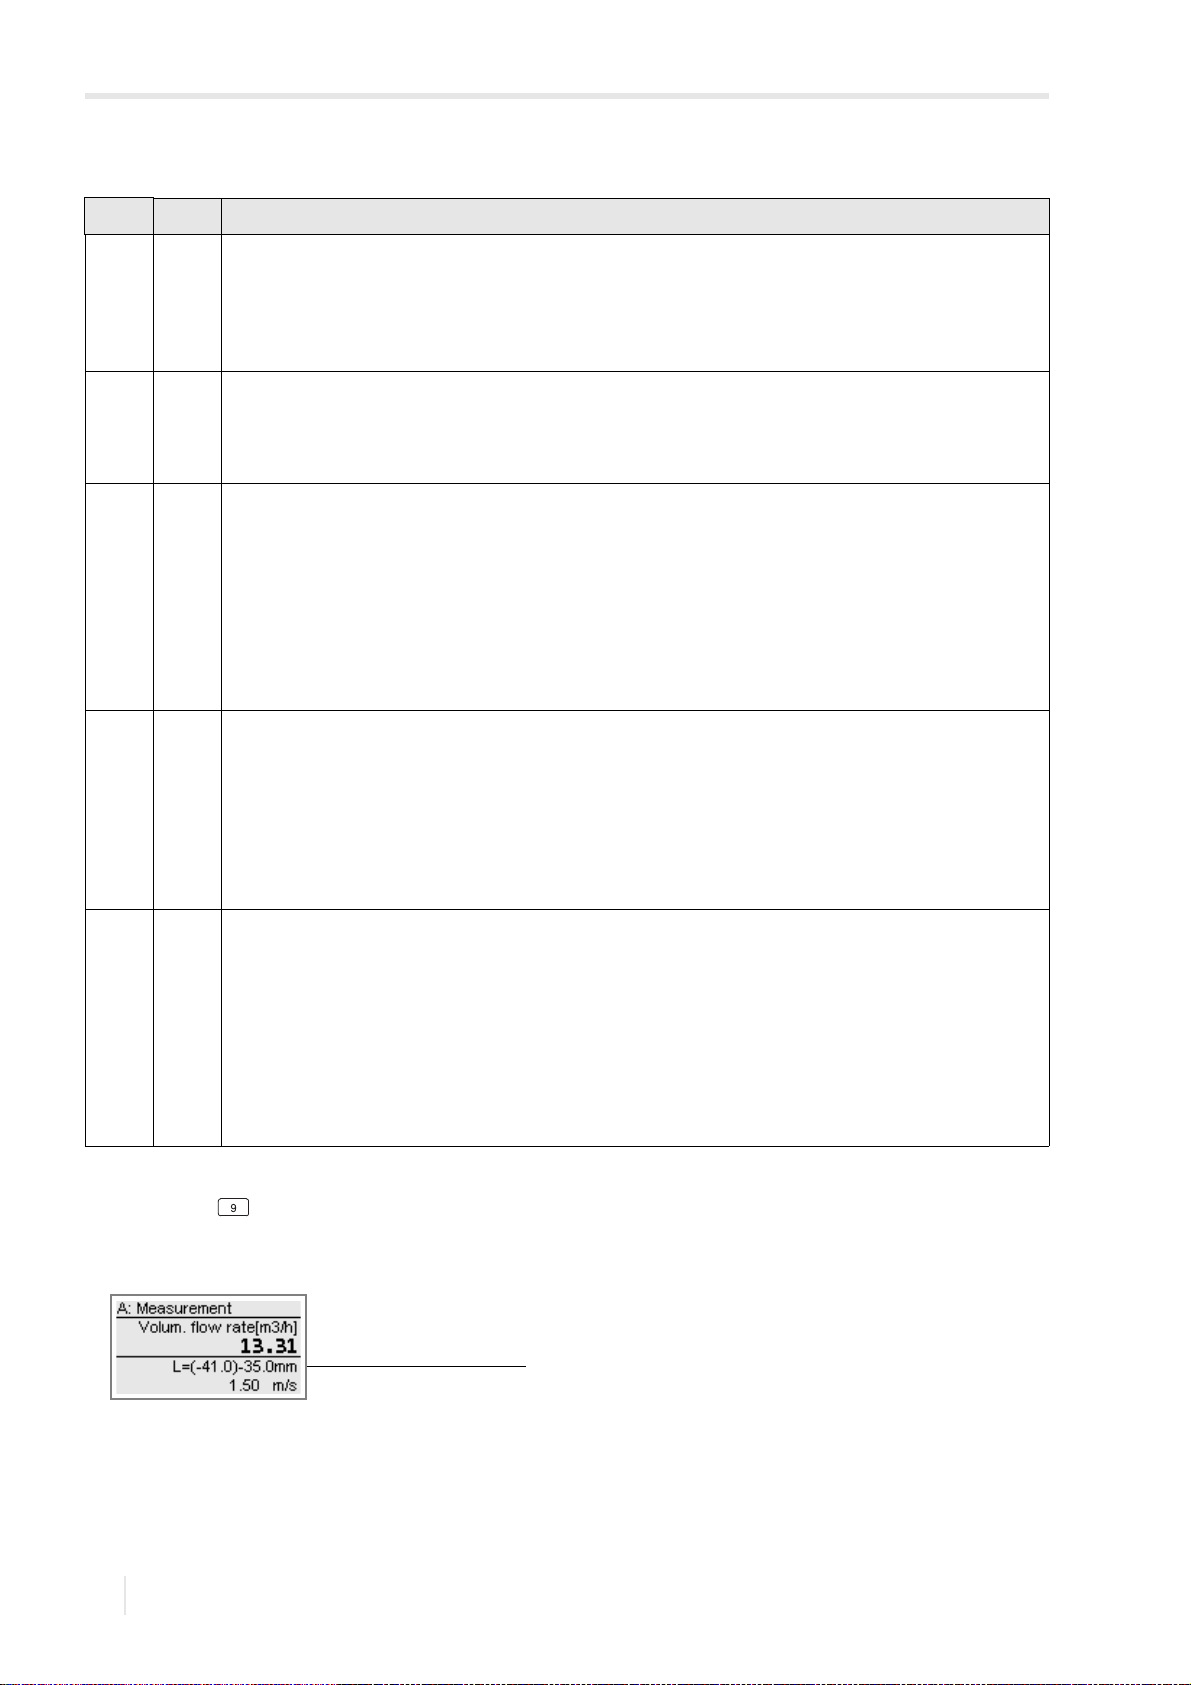
9 Measurement
1
9.4 Display of measured values FLUXUS WD
Tab. 9.6: Description of the status line
value explanation
S signal amplitude
0
…
9
Q signal quality
0
…
9
c sound speed
OK, is equal to the expected value
> 20 % of the expected value
< 20 % of the expected value
? unknown, cannot be measured
R flow profile
T fully turbulent flow profile
L fully laminar flow profile
flow within the transition range between laminar and turbulent flow
< 5 %
…
90 %
values 3 are sufficient for the measurement
< 5 %
…
90 %
comparison of the measured and the expected sound speed of the fluid
The expected sound speed is calculated from the fluid parameters.
information about the flow profile based on the Reynolds number
? unknown, cannot be calculated
F flow velocity
OK, the flow velocity is not within the critical range
the flow velocity is higher than the current limit
the flow velocity is lower than the current cut-off flow
0 the flow velocity is within the limit range of the measuring method
? unknown, cannot be measured
comparison of the measured flow velocity with the flow limits of the system
Transducer distance
By pressing key during the measurement, it is possible to scroll to the display of the transducer distance.
Fig. 9.4: Display of the transducer distance
1 – transducer distance
The recommended transducer distance (here: -41.0 mm) is displayed in brackets. The measured transducer distance
(here: -35.0 mm) is displayed afterwards.
The recommended transducer distance might change during the measurement (e.g., due to temperature fluctuations).
A deviation from the optimum transducer distance (here: 6 mm) will be compensated internally.
90
2018-07-16, UMFLUXUS_WDV1-3EN
Page 91
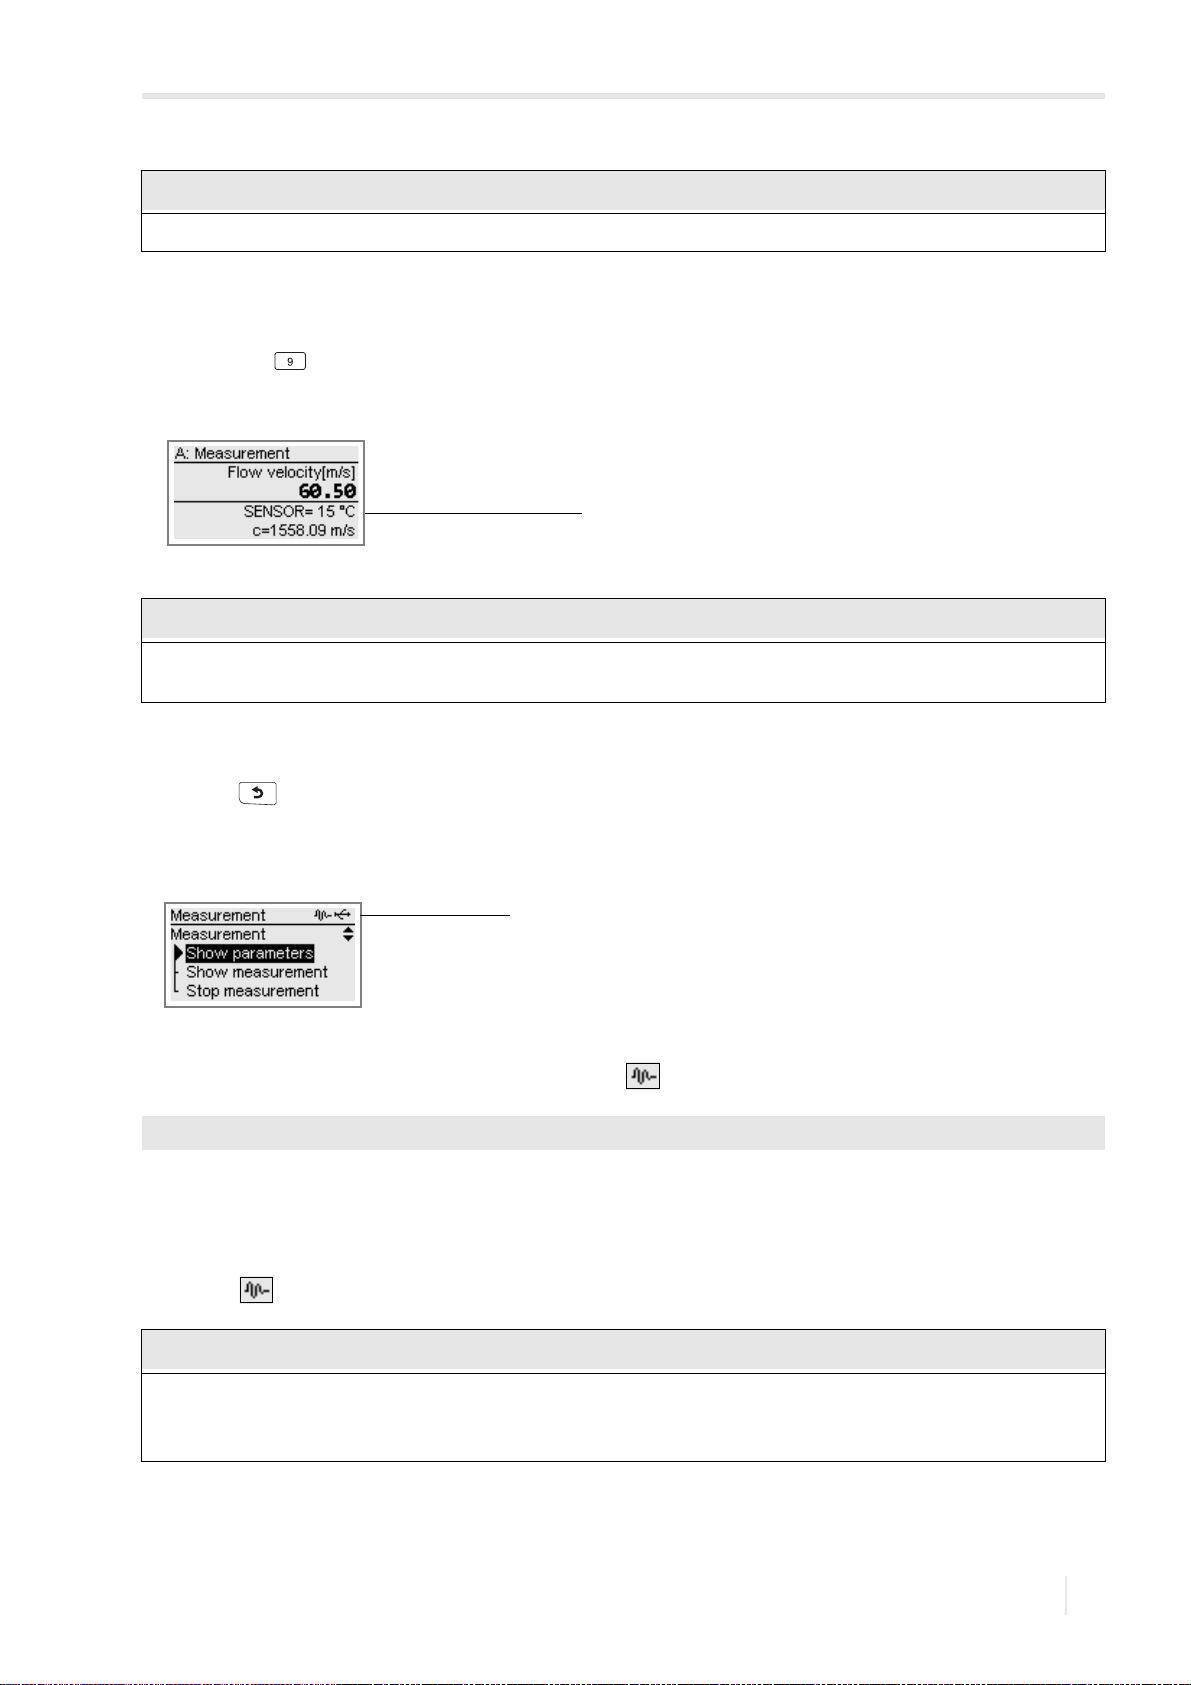
9 Measurement
Notice!
Notice!
Notice!
1
1
FLUXUS WD 9.5 Display of parameters
Never change the transducer distance during the measurement.
Transducer temperature
If the transmitter is operating in the SuperUser or SuperUser ext. mode, the transducer temperature can be displayed
during the measurement.
By pressing key during the measurement, it is possible to scroll to the transducer temperature display.
Fig. 9.5: Display of the transducer temperature
1 – transducer temperature
If the compliance of the specified transducer temperature has to be monitored, an event trigger can be set on the
temperature value.
9.5 Display of parameters
The parameters can be displayed during the measurement.
• Press key during the measurement.
The following display appears:
Fig. 9.6: Scroll list in the program branch Measurement
1 – status indication
The measurement is running in the background. The symbol is displayed in the status indication, see Fig. 9.6.
Measurement\Show parameters
•Select Show parameters in the scroll list.
• Press ENTER.
• The program branch Measurement is displayed.
• Select a program branch to display the parameters.
The symbol remains visible in all menus. All parameters and settings can be displayed.
The parameters cannot be changed during the measurement. When attempting to change the parameters, the message Read-only mode will be displayed.
The measurement has to be stopped in order to change the parameters.
UMFLUXUS_WDV1-3EN, 2018-07-16
91
Page 92
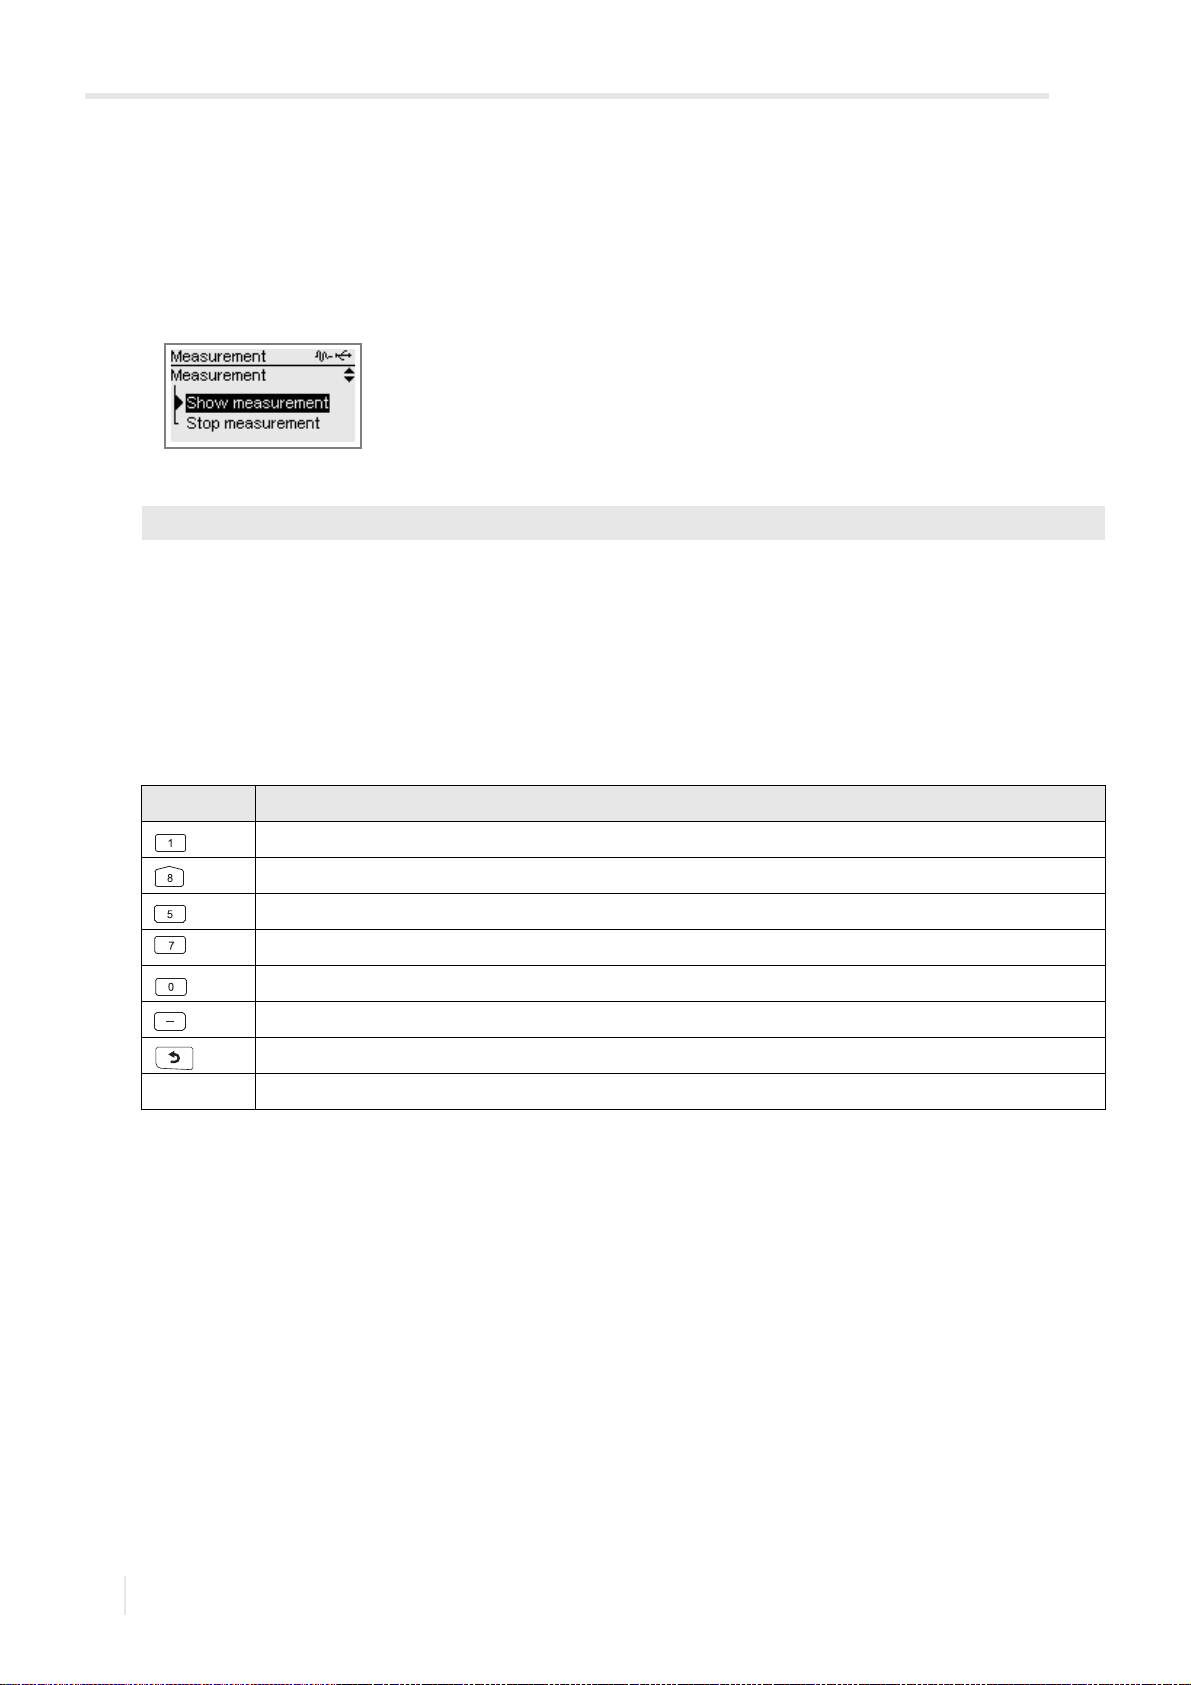
9 Measurement
9.6 Repeated display of measured values FLUXUS WD
9.6 Repeated display of measured values
• Select the program branch Measurement to return to the measured value display.
• Press ENTER.
The following display appears:
Fig. 9.7: Scroll list in the program branch Measurement
Measurement\Show measurement
•Select Show measurement in the scroll list.
• Press ENTER.
The measured values are displayed.
9.7 Execution of special functions
Some key have multiple functions. They can be used to enter data, to navigate through scroll lists and to execute special
functions.
Tab. 9.7: Key functions
key function
toggling between the AutoMux and HumanMux mode
totalizer display
triggering snaps
toggling between the displays of the activated channels
toggling between the TransitTime and the FastFood mode
toggling between the TransitTime and the NoiseTrek mode
display of scroll list in the program branch Measurement, see Fig. 9.6.
ENTER display of diagnostic window
92
2018-07-16, UMFLUXUS_WDV1-3EN
Page 93
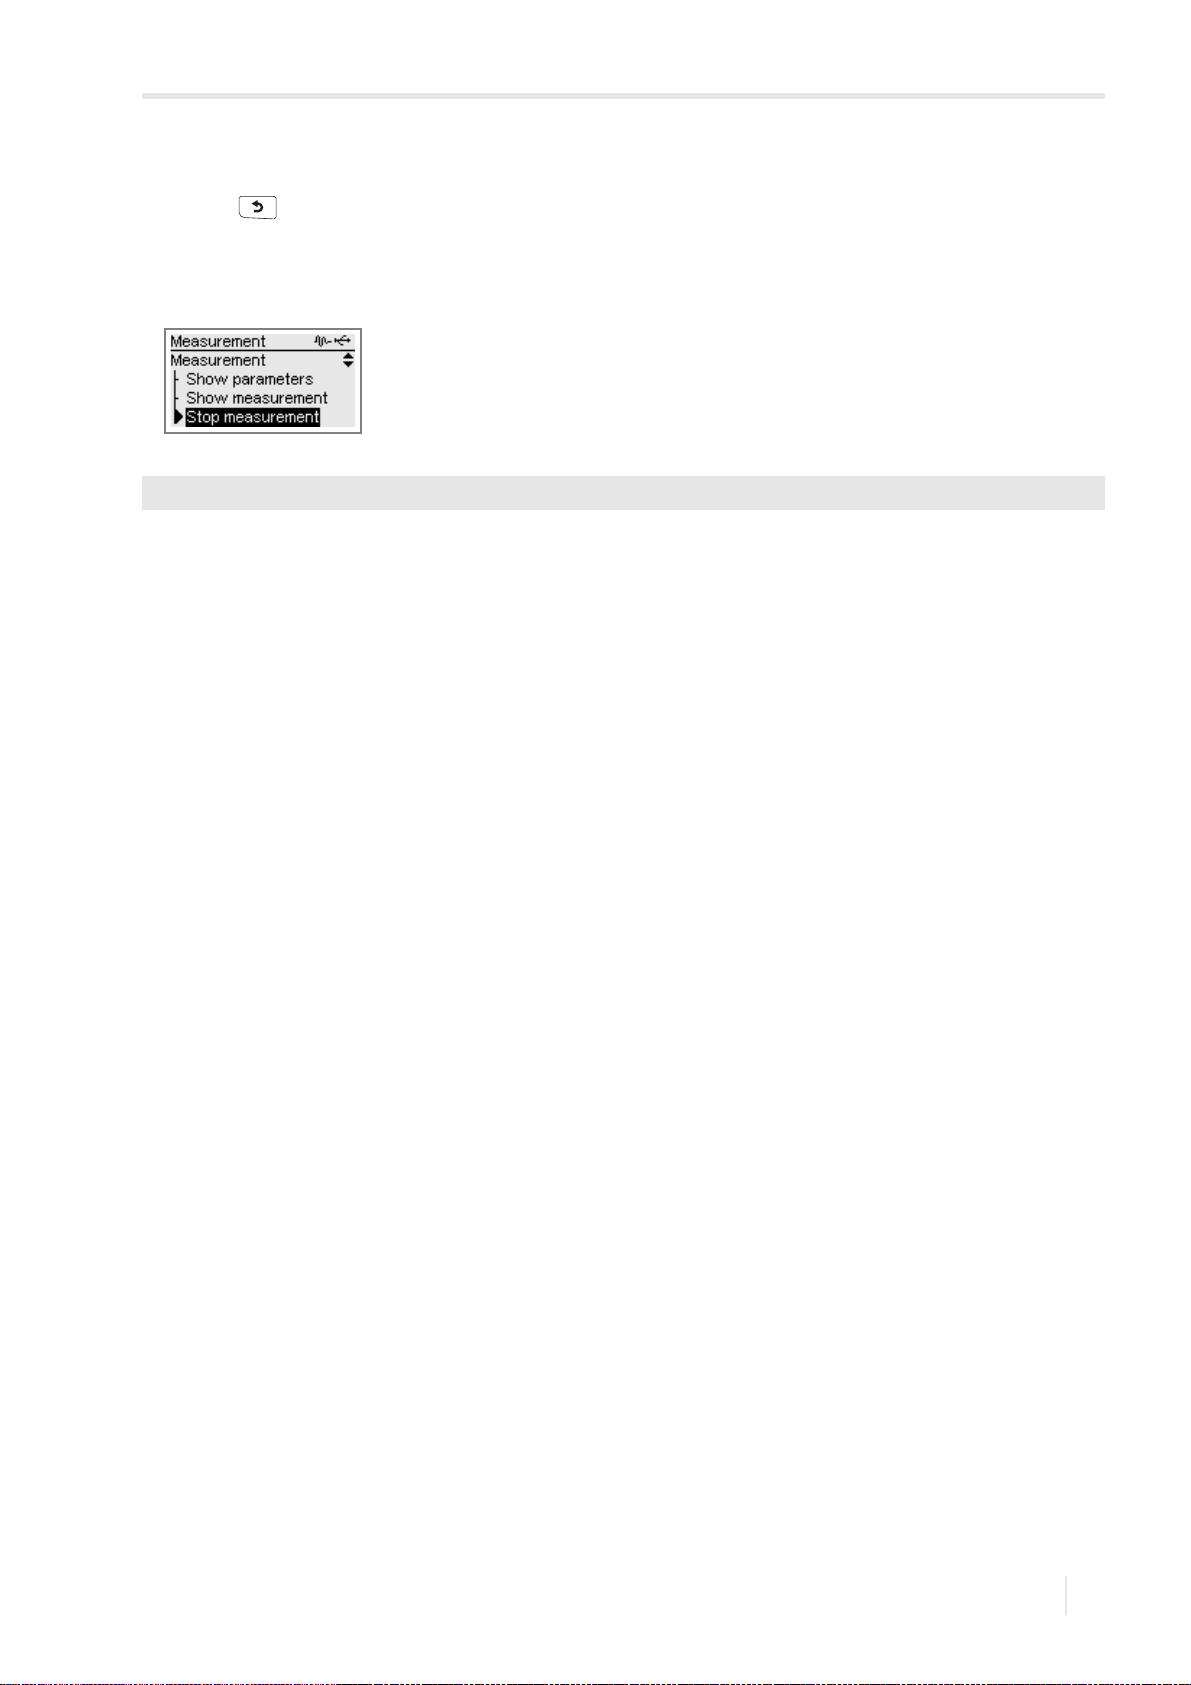
9 Measurement
FLUXUS WD 9.8 Stop of the measurement
9.8 Stop of the measurement
• Press key during the measurement.
The following display appears:
Fig. 9.8: Scroll list in the program branch Measurement
Measurement\Stop measurement
•Select Stop measurement.
• Press ENTER.
The measurement is stopped. The program branch Parameters is displayed.
After disconnecting and reconnecting the power supply, the program branch Parameters appears.
UMFLUXUS_WDV1-3EN, 2018-07-16
93
Page 94
10 Troubleshooting
Warning!
Danger!
Caution!
Warning!
Caution!
FLUXUS WD
10 Troubleshooting
Service works by unauthorized and unqualified personnel
This may result in personal or material damage or other dangerous situations.
Any work on the transmitter has to be carried out by authorized and qualified personnel.
Working in mines or cramped confines
Risk of intoxication and/or asphyxiation because of emerging gases, risk of injuries because of cramped
conditions.
Wear the required personal protective equipment. Observe the applicable rules.
Safety and accident prevention regulations for electrical systems and equipment
Failure to observe these regulations may lead to severe injury or death.
Observe the safety and accident prevention regulations for electrical systems and equipment.
Touching live parts
Electric shock or arc faults can led to severe injuries. The measuring equipment can be damaged.
Prior to any work on the transmitter (e.g., installation, dismounting, connection, start-up), the transmit-
ter has to be disconnected from the power supply. It is not sufficient to remove the internal fuse of the
instrument, see section 7.2.
Touching hot or cold surfaces
This may result in injuries (e.g., thermal damages).
Observe the ambient conditions at the measuring point during installation. Wear the required personal
protective equipment. Observe the applicable rules.
If any problem appears which cannot be solved with the help of this operating instruction, contact our sales office and give
a precise description of the problem. Specify the type, the serial number and the firmware version of the transmitter.
Calibration
If installed as recommended in an appropriate location, used cautiously and serviced conscientiously, no troubles should
appear.
The transmitter has been calibrated at factory and, usually, a re-calibration of the transmitter is not necessary.
A re-calibration is recommended if:
• the contact surface of the transducers show visible wear or
• the transducers were used for a prolonged period at high temperatures (several months > 130 °C for normal transducers
or > 200 °C for high temperature transducers)
In order to realize a recalibration under reference conditions either the transmitter, the transducers or the transmitter with
transducers have to be sent to FLEXIM depending on which part needs to be calibrated.
94
2018-07-16, UMFLUXUS_WDV1-3EN
Page 95

10 Troubleshooting
FLUXUS WD 10.1 Problems with the measurement
The display does not work at all or fails regularly
Check the contrast setting of the transmitter or enter the HotCode 555000 to set the display to medium contrast.
Make sure that the correct voltage is available at the terminals. The destined transmitter voltage is indicated on the nameplate below the outer right terminal.
If the power supply is OK, the transducers or an internal component of the transmitter are defective. The transducers and
the transmitter have to be sent to FLEXIM for repair.
If the transmitter is only connected via the USB interface, the backlight will be switched off.
An error is displayed in the status indication (symbol )
Press key to return to the main menu. Select Special functions\System settings\Event log. Press
ENTER. The error message list will be displayed.
Date and time are wrong, the measured values are deleted when the transmitter is switched off
The data backup battery has to be replaced if the date and the time are reset or wrong or the measured values are deleted
after the transmitter has been switched off and on. Send the transmitter to FLEXIM.
An output does not work
Make sure that the outputs are configured correctly. Check the function of the output. If the output is defective, contact
FLEXIM.
10.1 Problems with the measurement
A measurement is not possible because no signal is received. A question mark is displayed after the physical
quantity. The LED lights red after starting the measurement.
• Check whether the entered parameters are correct, especially the outer pipe diameter, the pipe wall thickness and the
sound speed of the fluid. Typical errors: The circumference or the radius was entered instead of the diameter. The inner
pipe diameter was entered instead of the outer pipe diameter.
• Check the number of sound paths.
• Make sure that the recommended transducer distance was adjusted when mounting the transducers.
• Make sure that an appropriate measuring point is selected and the number of sound paths was entered correctly.
• Try to establish a better acoustic contact between the pipe and the transducers.
• Enter a lower value for the number of sound paths. The signal attenuation might be too high due to a high fluid viscosity
or deposits on the inner pipe wall.
The measuring signal is received but no measured values can be obtained
• If the defined upper or lower limit of the flow velocity is exceeded or below, UNDEF and an exclamation point will be displayed after the physical quantity. The measured values are marked as invalid. The limit has to be adapted to the measuring conditions.
• If no exclamation point is displayed, a measurement at the selected measuring point is impossible.
Signal loss during the measurement
• If there is no measuring signal after the pipe had been run empty and refilled, contact FLEXIM.
• Wait a moment until the acoustic contact is reestablished. The measurement can be interrupted due to a temporarily
higher proportion of gas bubbles and solids in the fluid.
The measured values substantially differ from the expected values
• Wrong measured values are often caused by wrong parameters. Make sure that the entered parameters are correct for
the measuring point.
UMFLUXUS_WDV1-3EN, 2018-07-16
95
Page 96

10 Troubleshooting
10.2 Measuring point selection FLUXUS WD
10.2 Measuring point selection
• Make sure that the recommended min. distance to any disturbance source is observed.
• Avoid measuring points with deposit formation in the pipe.
• Avoid measuring points in the vicinity of deformations and defects on the pipe as well as welds.
• Make sure the pipe surface at the selected measuring point is even.
• Measure the temperature at the measuring point and make sure that the transducers are suitable for this temperature.
• Make sure that the outer pipe diameter is within the measuring range of the transducers.
• When measuring on a horizontal pipe, the transducers have to be mounted laterally on the pipe.
• The measuring point on a vertically mounted pipe has always to be filled. The fluid should flow upward.
• No gas bubbles should form (even bubble-free fluids can form gas bubbles when the fluid expands, e.g., upstream of
pumps and downstream of great cross-section enlargements).
10.3 Maximum acoustic contact
see section 6.2
10.4 Application-specific problems
A fluid with a wrong sound speed was selected
If the selected sound speed in the fluid does not match the actual one, the transducer distance can probably not be determined correctly.
The fluid sound speed is used to calculate the transducer distance and is therefore very important for the transducer positioning. The sound speeds stored in the transmitter only serve as an orientation.
The entered pipe roughness is not appropriate
Check the entered value. The pipe state should be considered.
Measurements on pipes made of porous materials (e.g ., concrete or cast iron) are only conditionally possible
Contact FLEXIM.
The pipe lining may cause problems during the measurement if it is not firmly attached to the inner pipe wall or
consists of acoustically absorbing material
Try to measure on a section of the pipe free from lining.
Highly viscous fluids strongly attenuate the ultrasonic signal
The measurement of fluids with a viscosity of > 1 000 mm²/s is only conditionally possible.
A high concentration of gases or solids in the fluid scatter and absorb the ultrasonic signal and thus attenuate
the measuring signal
A measurement is impossible if the value is 10 %. If the proportion is high, but < 10 %, a measurement is only conditionally possible.
10.5 Significant deviations of the measured values
A fluid with a wrong sound speed was selected
If a fluid was selected whose sound speed does not match the actual one, the measuring signal may be confused with the
pipe wall signal.
The flow calculated on the basis of the wrong signal by the transmitter is very small or fluctuates around zero.
There is gas in the pipe
If there is gas in the pipe, the measured flow will be too high because both, the liquid and gas volume, are measured.
The defined upper limit of the flow velocity is too low
All measured flow velocities that are greater than the upper limit will be ignored and marked as invalid. All quantities deviated from the flow velocity will also be indicated as invalid. If several correct measured values are ignored, the totalizer
values will be too low.
The entered cut-off flow is too high
All flow velocities below the cut-off flow are set to zero. All derived quantities are also set to zero. The cut-off flow has to be
set to a low value to be able to measure at low flow velocities (default: 2.5 cm/s).
96
2018-07-16, UMFLUXUS_WDV1-3EN
Page 97

10 Troubleshooting
FLUXUS WD 10.6 Problems with the totalizers
The entered pipe roughness is not appropriate
The flow velocity of the fluid is outside the measuring range of the transmitter
The measuring point is not appropriate
Check whether a different measuring point provides better results. Because pipes are never rotationally symmetric, the
flow profile is affected.
10.6 Problems with the totalizers
The values of the totalizers are too small
One of the totalizers has reached the upper limit and has to be reset to zero manually.
The sum of the totalizers is not correct
The output sum of both totalizers (throughput Q) transmitted via an output is not valid after one of the totalizers has overflowed for the first time.
A question mark is displayed after the value of the totalizer
The measurement was temporarily impossible, therefore the totalizer value can be wrong.
UMFLUXUS_WDV1-3EN, 2018-07-16
97
Page 98
11 Maintenance and cleaning
Warning!
Danger!
Warning!
Caution!
Caution!
FLUXUS WD
11 Maintenance and cleaning
Service works by unauthorized and unqualified personnel
This may result in personal or material damage or other dangerous situations.
Any work on the transmitter has to be carried out by authorized and qualified personnel.
Working in mines or cramped confines
Risk of intoxication and/or asphyxiation because of emerging gases, risk of injuries because of cramped
conditions.
Wear the required personal protective equipment. Observe the applicable rules.
Touching live parts
Electric shock or arc faults can led to severe injuries. The measuring equipment can be damaged.
Prior to any work on the transmitter (e.g., installation, dismounting, connection, start-up), the transmit-
ter has to be disconnected from the power supply. It is not sufficient to remove the internal fuse of the
instrument, see section 7.2.
Safety and accident prevention regulations for electrical systems and equipment
Failure to observe these regulations may lead to severe injury or death.
Observe the safety and accident prevention regulations for electrical systems and equipment.
Touching hot or cold surfaces
This may result in injuries (e.g., thermal damages).
Observe the ambient conditions at the measuring point during installation. Wear the required personal
protective equipment. Observe the applicable rules.
98
2018-07-16, UMFLUXUS_WDV1-3EN
Page 99
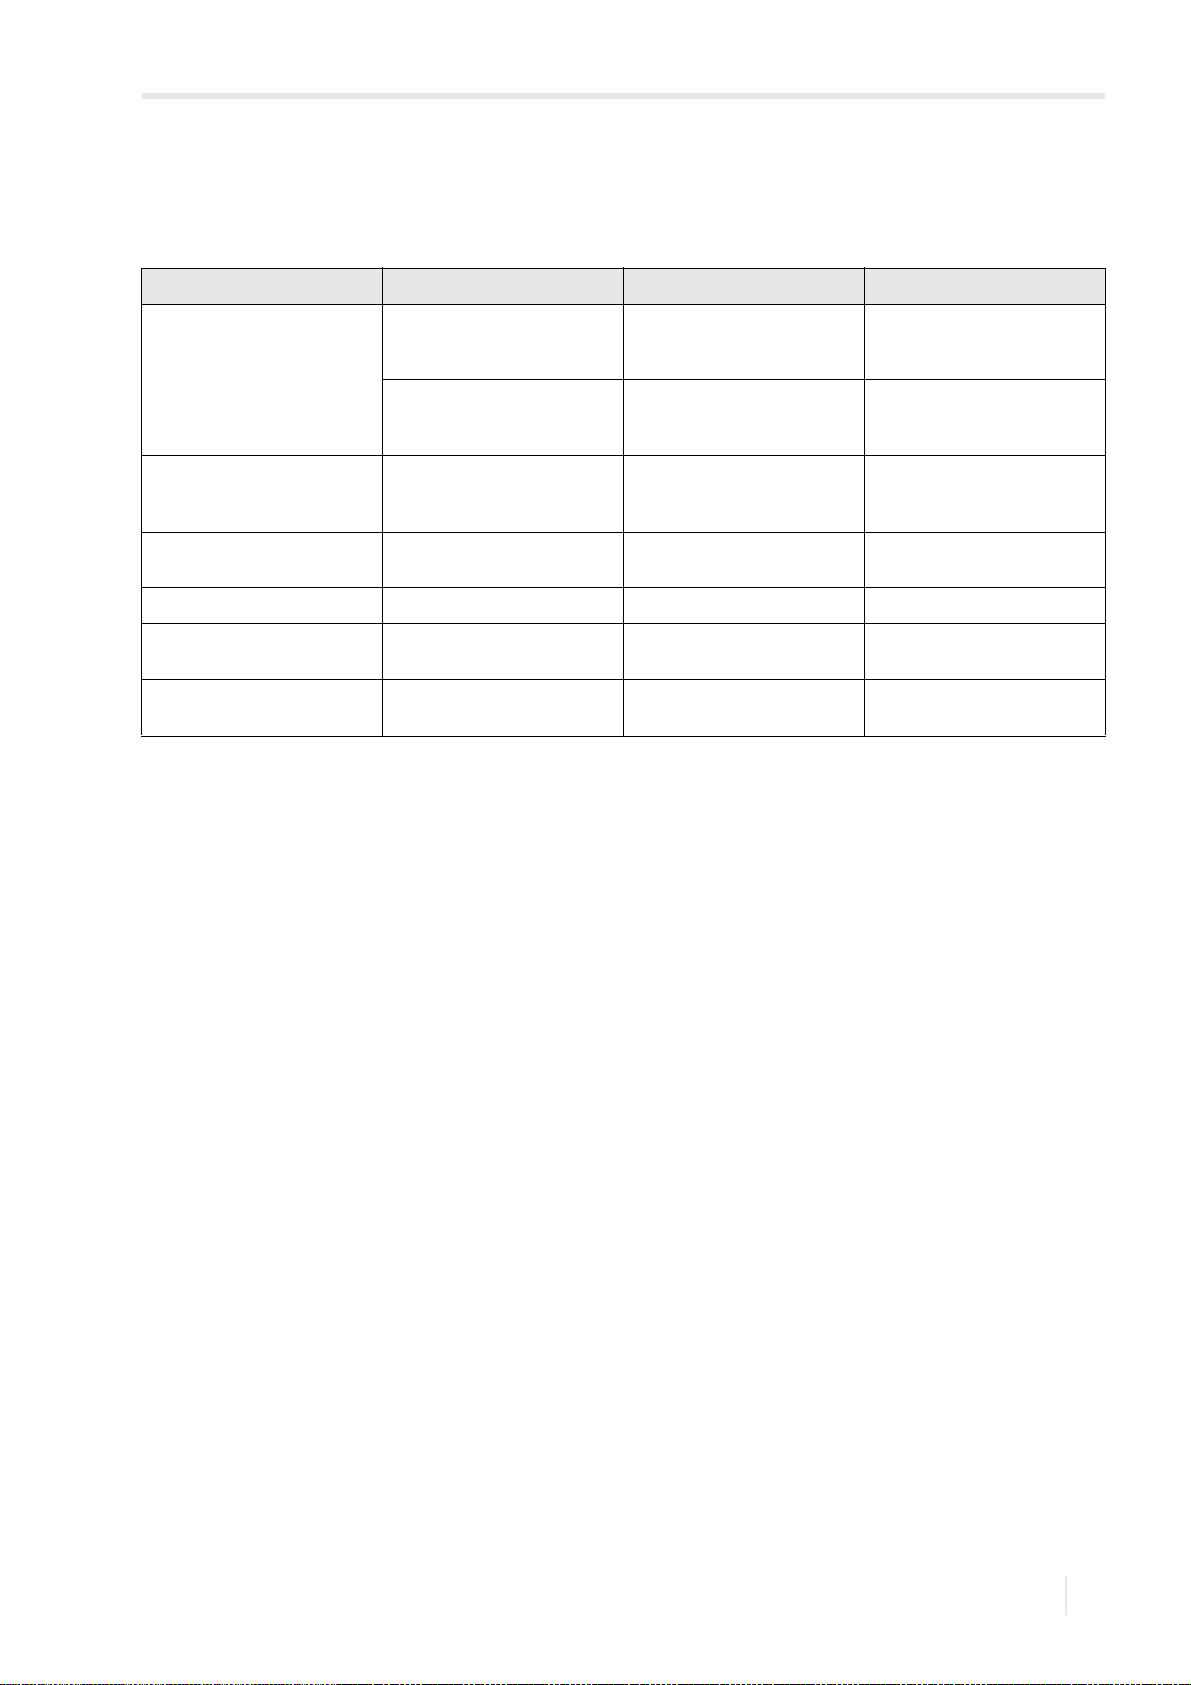
11 Maintenance and cleaning
FLUXUS WD 11.1 Maintenance
11.1 Maintenance
The transmitter and the transducers are practically maintenance-free. In order to ensure security, the following maintenance intervals are recommended:
item maintenance step interval measure
stainless steel housing
• transmitter
• junction box
• transducer mounting fixture
aluminum housing
• transmitter
transducers check of the transducer
transmitter firmware check for updates annually update, if necessary
transmitter functional test annually reading of measured and
transmitter and transducers calibration - see chapter 10, section
visual inspection for corrosion
and damages
visual inspection for
contamination
visual inspection for
contamination
coupling on the tube
annually, depending on the
ambient conditions more
frequently
annually, depending on the
ambient conditions more
frequently
annually, depending on the
ambient conditions more
frequently
annually replace the coupling foil, if
cleaning (see section 11.2)
cleaning (see section 11.2)
cleaning (see section 11.2)
necessary
diagnostic values
"Calibration"
11.2 Cleaning
Stainless steel housing
• Clean the stainless steel housing using a soft cloth and care and cleaning spray for stainless steel.
Aluminum housing
• Clean the aluminum housing with a soft cloth. Do not use detergents.
Transducers
• Remove traces of coupling compound from the transducers with a soft paper towel.
UMFLUXUS_WDV1-3EN, 2018-07-16
99
Page 100
12 Dismounting and disposal
Warning!
Danger!
Warning!
Caution!
12.1 Dismounting FLUXUS WD
12 Dismounting and disposal
Service works by unauthorized and unqualified personnel
This may result in personal or material damage or other dangerous situations.
Any work on the transmitter has to be carried out by authorized and qualified personnel.
Working in mines or cramped confines
Risk of intoxication and/or asphyxiation because of emerging gases, risk of injuries because of cramped
conditions.
Wear the required personal protective equipment. Observe the applicable rules.
Touching live parts
Electric shock or arc faults can led to severe injuries. The measuring equipment can be damaged.
Prior to any work on the transmitter (e.g., installation, dismounting, connection, start-up), the transmit-
ter has to be disconnected from the power supply. It is not sufficient to remove the internal fuse of the
instrument, see section 7.2.
Safety and accident prevention regulations for electrical systems and equipment
Failure to observe these regulations may lead to severe injury or death.
Observe the safety and accident prevention regulations for electrical systems and equipment.
12.1 Dismounting
The dismounting is carried out in reverse order to its installation, see chapter 6.
12.2 Disposal
The measuring equipment has to be disposed in accordance to the applicable regulations.
Depending on the material, the corresponding parts have to be disposed in residual or special waste or recycled. For further
information, contact FLEXIM.
100
2018-07-16, UMFLUXUS_WDV1-3EN
 Loading...