

Page 1
COOLER KIT Jeep Cherokee XJ 1987 - 2001
Part #4116XJ Recommended - Rad. / Fan Kit #67108
& Rad. only Kit #67100 for replacement
“Auxiliary transmission cooler” - Automatic Transmission Only
Note: Always read instructions and verify kit contents prior to installation.
Cooler ........................................ 1 ea.
Brackets, Cooler Mounting ........ 2 ea.
Channel ..................................... 2 ea.
Rubber Hose @ 4ft .................... 2ea.
Instruction Sheet ....................... 1 ea.
Flex-a-lite Decal ......................... 1 ea.
*Hardware Kit ............................ 1 ea.
* Hardware Kit Includes:
bolt hex head 1/4-20 x 1-1/2” ...... (4ea)
nut nylock 1/4-20 ........................ (4ea)
gatorclip 1/2” ...............................(8ea)
worm drive hose clamp ............... (4ea)
nylon tie straps ........................... (4ea)
plastic spacer .............................. (4ea)
screw PH 1/4-20 x 1/2” ............... (4ea)
INSTALLATION INSTRUCTIONS
Note: Special Tools Required: “tubing cutter” & “flaring tool”
Note: To view these instructions, visit www.flex-a-lite.com or call 1-877-767-0554
or FAX: (253) 922-0226 for Technical Assistance. It is HIGHLY recommended to read and
review these instructions prior to installation.
BE SURE THE ENGINE IS OFF AND COOL BEFORE PROCEEDING!
Start installation by laying out all contents of kit and compare to parts list above.1.
Disconnect transmission lines from radiator. Cap the ends of the metal transmission cooling lines to prevent 2.
line leakage. Be mindful of possible leakage from fittings of radiator during removal of radiator from vehicle.
Remove existing cooler (if applicable): 3.
Because the existing cooler is designed to run through the radiator tank for additional cooling, there is no
longer a place to connect the transmission cooler lines. The replacement Flex-a-lite cooler 4118XJ is a
higher capacity direct fit transmission cooler that will better meet your transmissions’ cooling needs and
improve its life expectancy.
Grill removal: 4.
Remove the headlight beauty rings and then the front grill. Removal of the grill allows you to position the
cooler with connected brackets and make adjustments as necessary.
Rev. 02-15-13 99108 Page 1 of 4
Page 2
Installation instructions continued from previous page
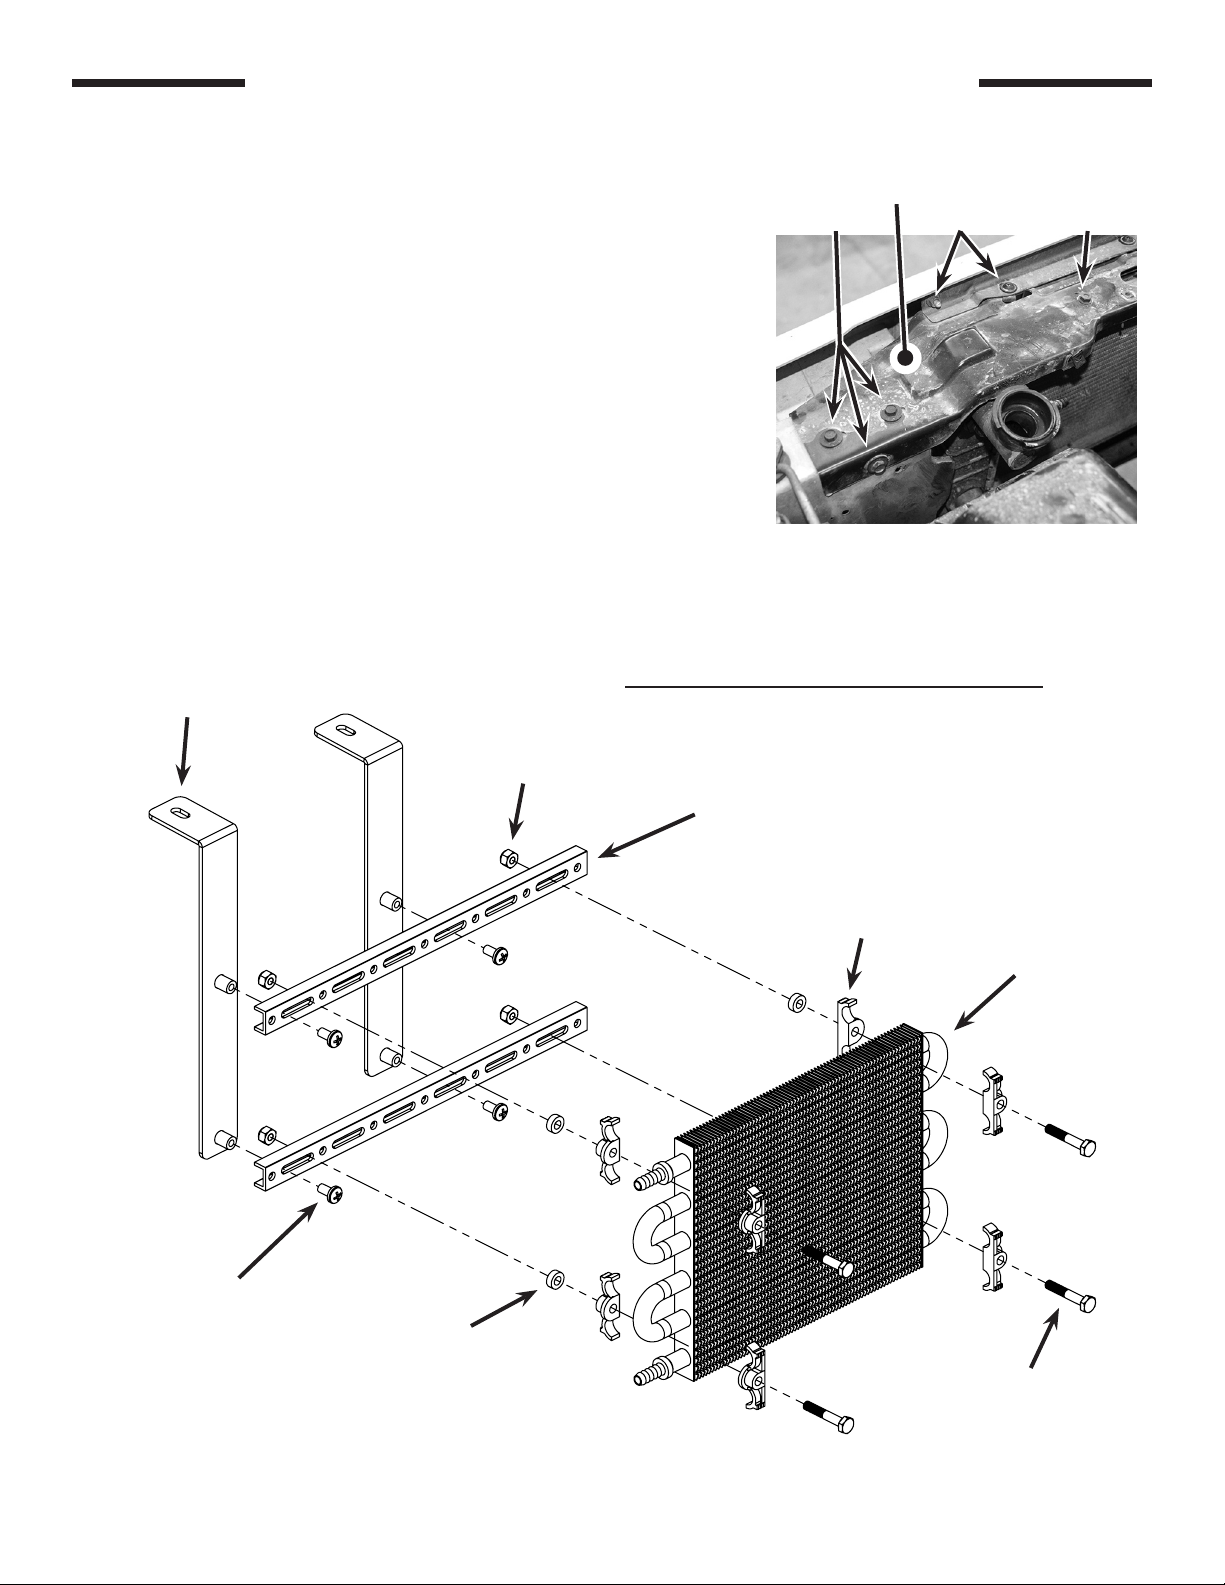
Removal of top radiator support: 5.
The installation of the cooler requires that you sandwich the
cooler’s bent mounting brackets between the long radiator support
and long “L-bracket”. Remove the Torx bolts securing center hood
latch bar on top of radiator support. Remove the Torx bolts and
10MM nuts securing the long “L-bracket” along top of radiator
support (see Detail A-1). Remove 10 MM nuts 2ea. releasing
rubber mounts below radiator support along top of radiator (see
Detail A-2). Along top of radiator remove 10 MM bolts securing
radiator support at right and left sides of support (see Detail A-3).
Lift and remove the long radiator support.
Assemble the cooler / bracket assembly: 6.
Per the “exploded assembly view” shown below. It is suggested
that assembly of the cooler / brackets be made using the hole and
slot locations shown. Vehicle equipment variations may require
shifting placement of the cooler along channels.
Radiator Support, long
“A-1” “A-2”“A-3”
Detail A
Mounting Bracket
(2ea)
“Cooler / Bracket Exploded Assembly”
Nut - nylock
1/4-20 (4ea)
Extruded channel
(2ea)
Gator clip
(8ea)
Transmission
Cooler
(1ea)
Screw - 1/4-20 x 1/2
(4ea)
Plastic Spacer
(4ea)
Bolt - hex HD
1/4-20 x 1-1/2” (4ea)
Rev. 02-15-13 99108 Page 2 of 4
Page 3

Installation instructions continued from previous page
Note: The dimension between center holes on the formed brackets needs to be at 6-1/2”. (see Detail B)
“Complete Cooler / Bracket assembly”
6 -1/2”
Top view of assembly
Side view of assembly
Detail B
Positioning of the cooler assembly: 7.
Hold the cooler assembly roughly in the position shown (see Detail C). Holding the bent bracket section
of the cooler slightly higher than its final mounting height allows room for reinstallation of the long radiator
support under it. Position the long radiator support back into its original position and then lower the cooler
assembly brackets onto it (see Detail D). Align the slots of the cooler brackets with the threaded clips.
(see Detail E)
Cooler brackets held
up out of the way
Long radiator
support bracket
Positioning radiator
support bracket back
into place
Bracket slots aligned
with threaded clips
Detail C Detail D Detail E
Reassembling brackets at top of radiator: 8.
With radiator support and cooler assembly in position, place the long “L-bracket” back into position and
secure with previously removed Torx bolts and 10 MM nuts. Final securing of cooler assembly brackets
takes place when sandwiched between “L-bracket” and radiator support with Torx bolts. Reattach the center
hood latch bar with previously removed Torx bolts to top center of radiator support.
Rev. 02-15-13 99108 Page 3 of 4
Page 4

Installation instructions continued from previous page
Plumbing transmission to cooler: 9.
With cooler installed, attach provided hoses 2ea. to fittings of cooler using provided hose clamps.
Route hoses to metal transmission cooling lines to the point where you plan to attach. Cut and flare the
transmission cooler lines where the rubber hoses are to be attached. Note: “Double flaring” of cooler
line is suggested because the metal tubing edge may cut into the rubber hose if the flare is sharp. Trim
hose length as necessary and route hose path to provide a clean fitment. Slide rubber hoses over flared
transmission lines and secure each with provided hose clamps (see Detail F). Use provided nylon tie
straps to secure routed hose.
Note: BE SURE that all moving parts of the engine, cooling fans and lines / hoses are clear of each
other before proceeding!
Trim and attach hoses to transmission cooling lines.
Detail F
Note: Picture for demonstration purpose only. Not actual vehicle shown
Note: We suggest following the vehicle manufacturer’s recommended transmission fluid level 10.
checking and filling procedure before operating the vehicle on the road.
To Register Cooler Kit #4116XJ:
Visit our website @ www.flex-a-lite.com/warranty-registration
The Flex-a-lite Limited Warranty
Flex-a-lite Consolidated, 7009-45th St. Ct. E. Fife, WA 98424, Telephone No. 253-922-2700, warrants to the original purchasing user, that all Flex-a-lite
products to be free of defects in material and workmanship for a period of 365 days (1 year) from date of purchase. Flex-a-lite products failing within
365 days (1 year) from date of purchase may be returned to the factory through the point of purchase, transportation charges prepaid. If, on inspection,
cause of failure is determined to be defective material or workmanship and not by misuse, accidental or improper installation, Flex-a-lite will replace the
product free of charge, transportation prepaid. Flex-a-lite will not be liable for incidental, progressive or consequential damages. Some states do
not allow the exclusion or limitation of incidental or consequential damages, so the above limitation or exclusion may not apply to you. This warranty gives
you specific legal rights and you may have other rights, which vary from state to state. The Flex-a-lite warranty is in compliance with the Magnuson-Moss
Warranty Act of 1975.
Rev. 02-15-13 99108 Page 4 of 4
 Loading...