

Page 1
ENGLISH
EN USER’S MANUAL pag 2
IT MANUALE UTENTE pag 16
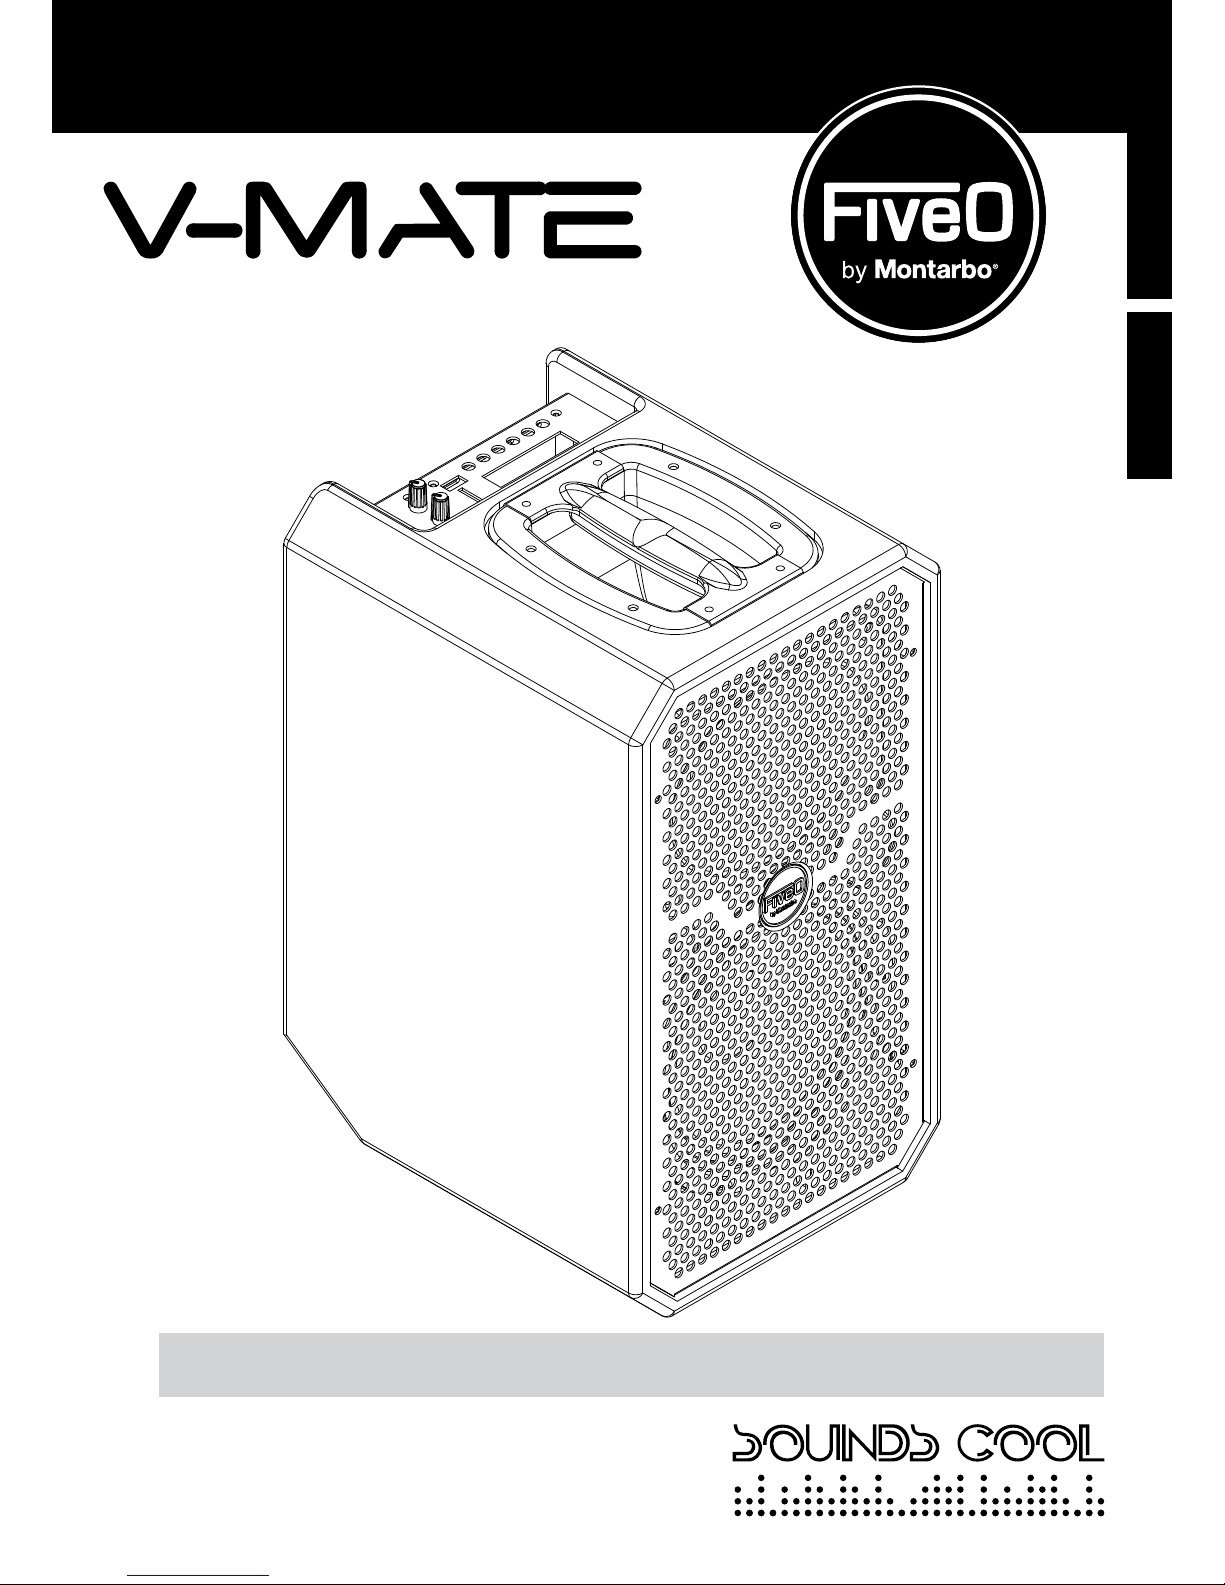
V-MATE 506 · V-MATE 508 · V-MATE 510
ENGLISHITALIANO
FULL RANGE BI-AMPLIFIED LOUDSPEAKERS
DIFFUSORI BI-AMPLIFICATI FULL-RANGE
Page 2
Owner’s manual | V-MATE SERIES Full range bi-amplified Loudspeakers
2
Full range bi-ampliFied loudspeakers
WARNING
In order to protect your own and others’ safety and to avoid
invalidation of the warranty of this product, please read this
section carefully before operating this product.
This product has been designed and manufactured for being operated as active
speaker system in the applications tipical of a sound reinforcement system or of a
sound recording system. Operation for purposes and applications other than these
has not been covered by the manufacturer in the design of the product, and is
therefore to be undertaken at end user’s and/or installer’s sole risk and responsability.
This unit conforms to Class I insulation, and for safe use it is required that the
protective earth contact is connected to a grounded (earthed) outlet.
TO AVOID THE RISK OF FIRE AND/OR ELECTRIC SHOCK:
• Never expose this product to rain or moisture, never use it in proximity of water
or on a wet surface. Avoid dripping water or water sprays, moreover never place
objects full of liquid, such as vases, on top of it. Never let any liquid, as well as any
object, enter the product. In case, immediately disconnect it from the mains supply
and refer to servicing before operating it again. Never place burning candles or
other sources of open flame on top of the device.
• Before connecting this product to the mains supply, always make sure that the
voltage on the mains outlet corresponds to that stated on the product.
• This product must be connected only to a grounded mains outlet complying to
the safety regulations in force via the supplied power cable. In case the power cable
needs to be substituted, use exclusively a cable of the same type and characteristics.
• This device is connected to the power line even when the mains switch is in
the O (off) position and the power indicator is off. As long as it is plugged in
there are potentially dangerous electrical potentials inside the device, so, before
undertaking any sort of maintenance work etc., always make sure it has been
unplugged from the mains socket.
• Never place any object on the power cable. Never lay the power cable on a
walkway where one could trip over it. Never press or pinch it.
• Never install the product without providing adequate airow to cool it.
Never obstruct the air intake openings on it. Leave enough room to get to the
mains power socket and the mains connector on the back panel.
• In case the external fuse needs replacement, substitute it only with one of the
same type and rating, as stated on the product.
• Always make sure the Power switch is in its ’0’ (= off) position before doing any
operation on the connections of the product.
• Before attempting to move the product after it has been installed, remove all
the connections.
• To disconnect the power cable of this product from the mains supply never pull
the cable directly. Hold the body of the plug firmly and pull it gently from the
mains supply outlet.
CAUTION This product does not contain user
serviceable parts. In order to prevent fire and/or electrical
shock, never disassemble it. For maintenance and
servicing always refer to the official FiveO by Montarbo
®
Distributor in your Country or to qualified personnel
specifically authorised by the Distributor.
•
Before placing the product on a surface of any kind, make sure that
its shape and load rating safely match the product size and weight.
When installing the speaker system on a stand, use a stable stand that
will t in the adapter and may carry the loudspeaker weight. When
two loudspeakers are laid one upon the other, make sure that stability
is guaranteed by matching the upper loudspeaker feet to the lower
loudspeaker cavities
.
• To avoid shocks, kicks, or whatever action, always reserve a protected area
with no access to unqualied personnel as installation site of the product.
In case the product is used near children and animals closest supervision
is necessary.
• This product can generate very high acoustic pressures which are dangerous to the hearing system. Always avoid operation at loud levels if anyone
is excessively near to the product.
[!] Never expose children to high sound sources.
WEEE | Waste from Electrical and Electronic Equipment
ATTENTION!
The crossed out wheeled bin symbol that can be found on this
product means that the product is covered by the Waste from
Electrical and Electronic Equipment Directive.
The symbol is intended to indicate that waste from
electrical and electronic equipment must be subject to a selective collection.
For more details on available collection facilities please contact your local
government ofce or the retailer where you purchased this product. The solid
bar underneath indicates that the product has been put on the market after
13
th
August 2005.
INFORMATION ON PROPER DISPOSAL
Information on Disposal for Users (private households)
In the European Union | Attention: If you want to dispose of this
equipment, please do not use the ordinary dust bin! Used electrical and
electronic equipment should not be disposed of via the normal household
waste stream but must be treated separately and in accordance with legi
-
slation that requires proper treatment, recovery and recycling of used elec-
trical and electronic equipment. Following the implementation by member states, private households within the EU states may return their used
electrical and electronic equipment to designated collection facilities free of
charge*. In some countries* your local retailer may also take back your old
product free of charge if you purchase a similar new one. *Please contact
your local authority for further details.
In other Countries outside the EU | If you wish to dispose of this pro
duct, please contact your local authorities and ask for the correct method
of disposal.
In Switzerland | Used electrical or electronic equipment can be returned
free of charge to the dealer, even if you don’t purchase a new product.
Further collection facilities are listed on the homepage of www.swico.ch
or www.sens.ch.
Information on Disposal for Professional Users
In the European Union | If the product is used for business purposes
and you want to discard it: please contact your FiveO by Montarbo
®
dealer
who will inform you about the take-back of the product. You might be
charged for the costs arising from take-back and recycling. Small products
(and small amounts) might be taken back by your local collection facilities.
In Spain | Please contact the established collection system or your local
authority for takeback of your used products.
In other Countries outside the EU | Please contact your local authorities
and ask for the correct method of disposal.
The lighting ash with arrowhead symbol within an equilateral
triangle, is intended to alert the user to the presence of uninsulated
’dangerous voltage’ within the product’s enclosure, that may be of
sufficient magnitude to constitute a risk of electric shock to humans.
The exclamation point within an equilateral triangle, is intended
to alert the user to the presence of important operating and
maintenance (servicing) instructions.
IMPORTANT PRECAUTIONS
Page 3

V-MATE SERIES Full range bi-amplified Loudspeakers | Owner’s manual
3
ENGLISH
PACKAGE CONTENTS
• Active full range loudspeaker
• Power cable (3m)
• EU-UK adapter
• Remote control
• Owner’s manual
• Warranty certificate
CONTENTS
Important precautions 2
Introduction 4
Features 4
DSP section 4
MP3/WMA player 4
Bluetooth
®
5
Installation 5
Operations 5
Tips 5
Description 6
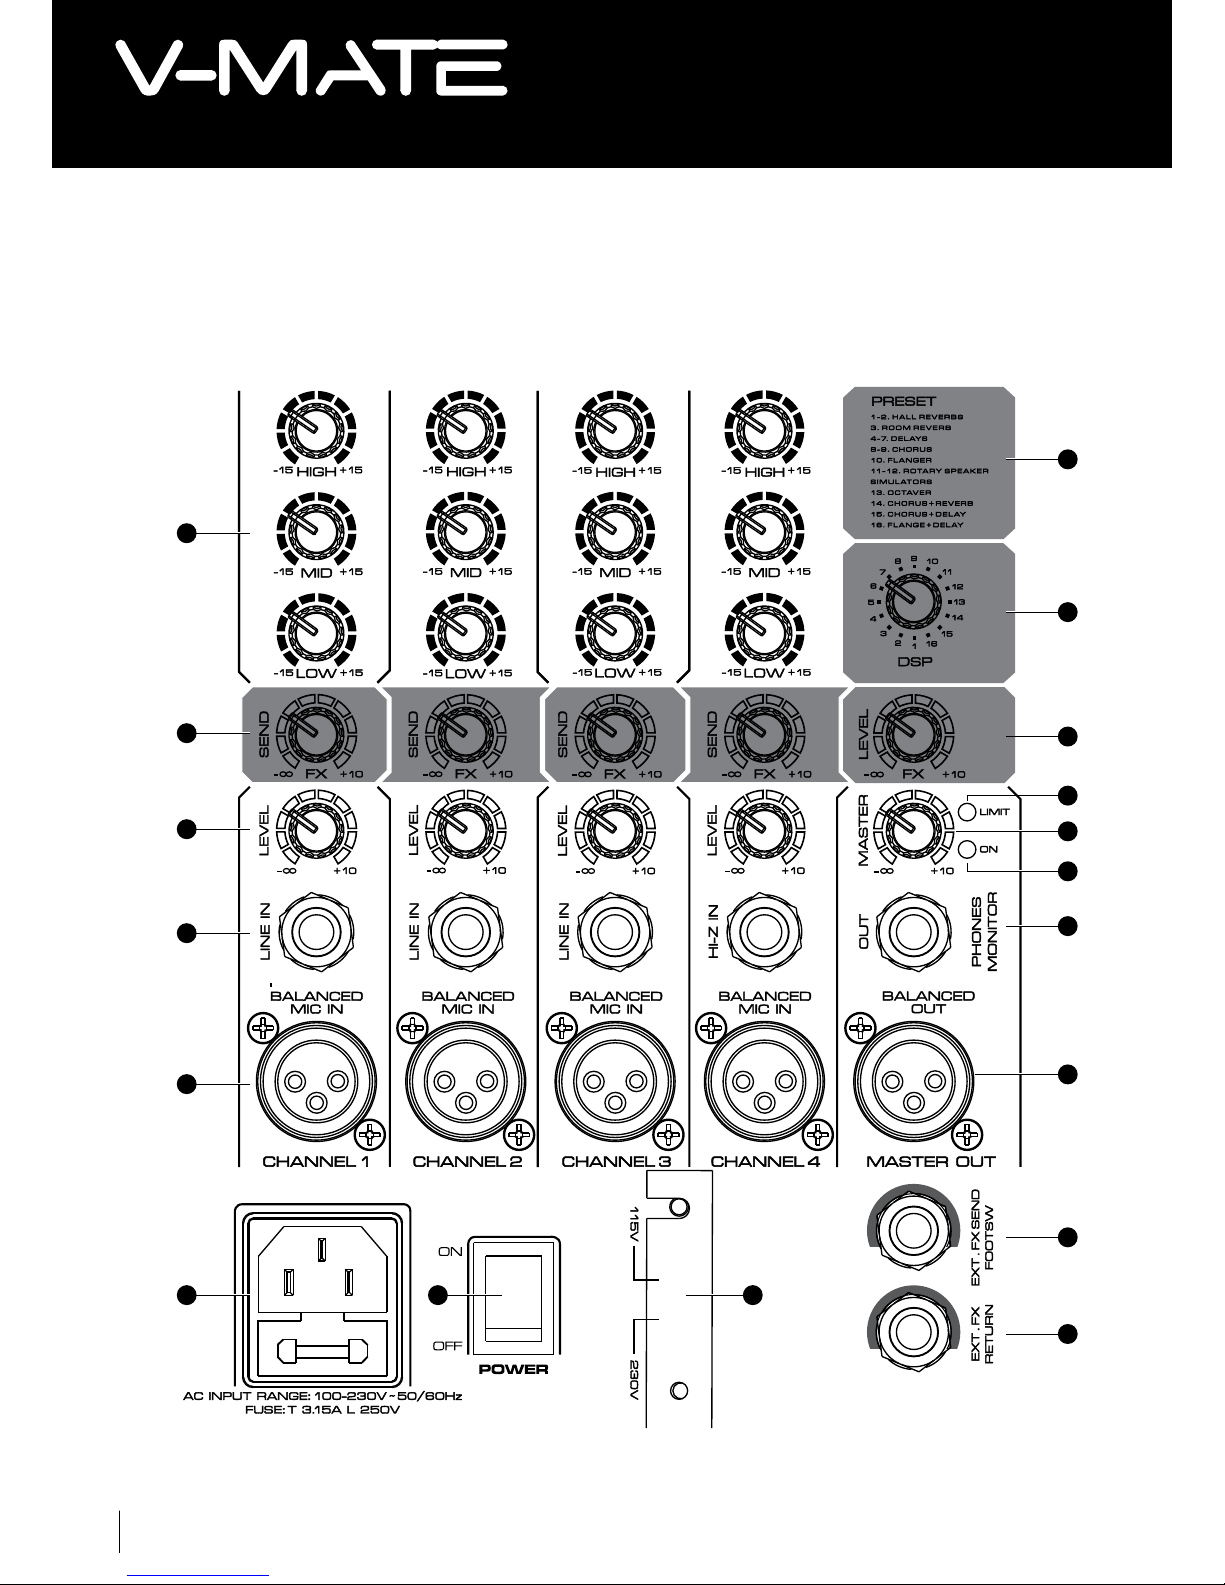
1.1 Control elements and connectors 8
1.2 DSP section 9
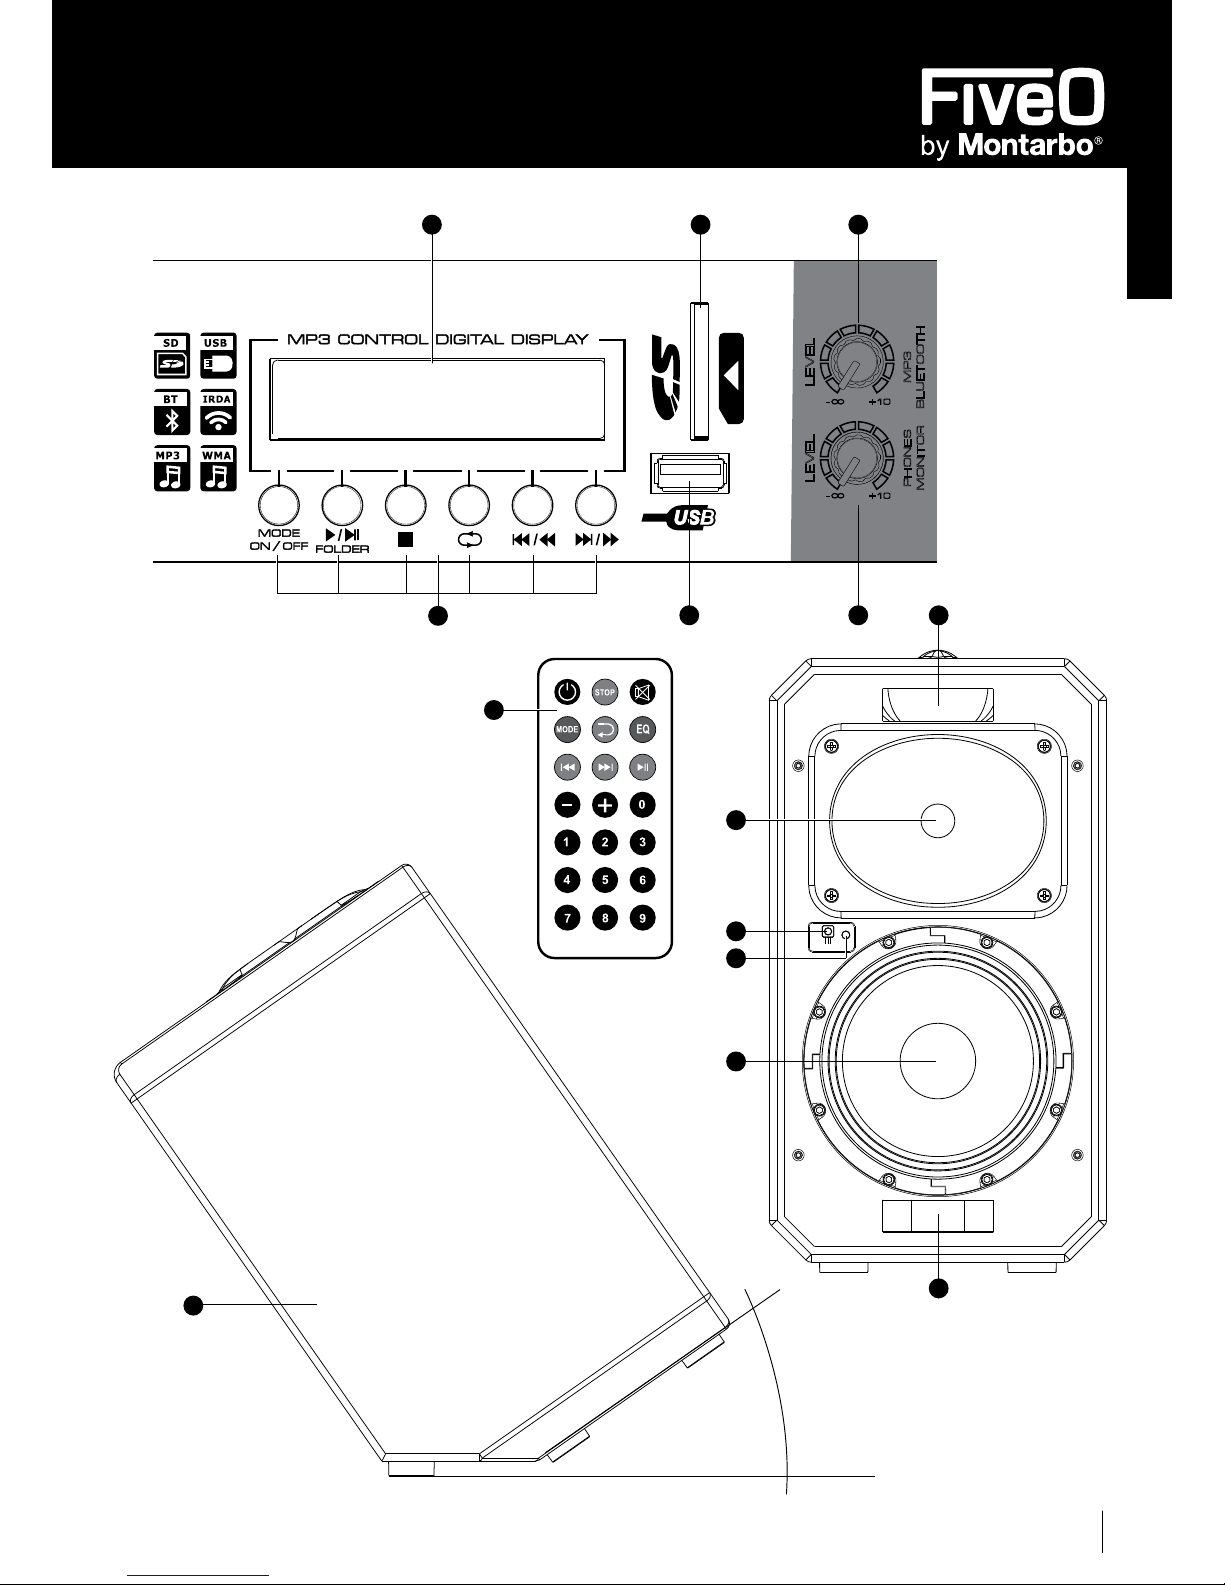
1.3 MP3 player section 9
1.4 iOS Bluetooth
®
procedure 10
1.5 Master section 11
1.6 Mains section 12
1.7 Cabinet 12
Technical specifications
2.1 Common specifications 13
2.2 Models specifications 14
Notes 15
Page 4

Owner’s manual | V-MATE SERIES Full range bi-amplified Loudspeakers
4
Full range bi-ampliFied loudspeakers
INTRODUCTION
First of all, thank you for choosing a product of Montarbo FIVEO series.
V-MATE series is a new generation of bi-amplied active full range loudspeakers characterized by a very high
versatility, allowing the higher versatility for any application.
The range has been designed following most recent market trends: provide a unique and innovative solution,
while ensuring an accurate sonic image in an ultra-compact design.
All the models perfectly suit the needs of bands, piano bar, rehearsal room, dancing halls, small gigs, school
meetings, religious gatherings, business seminars and presentations, local sports events, auctions, fitness centres
and a host of other applications. Please, in order to enjoy each feature of your new PA unit, thus achieving the
best sonic results, take a few moments to carefully read these instructions.
For further information about your portable V-MATE, please check our website www.fiveo.it, or send an
email to: mail@fiveo.it
FEATURES
This series speakers have been expressly designed for a fast and user-friendly use in all applications. They represent
the perfect combination of high portability and good sonic quality.
All models feature a fully featured 4-channel mixer, last generation Class-D power ampliers, and a powerful
DSP with 16 presets. The microphone preampliers have a good signal-to-noise ratio and headroom.
Processing electronics feature a high slope active crossover lter, ensuring phase coherency and a perfect drivers
overlap in the crossover region. The digital player features a display and all the needed keys, allowing to playback
your songs in MP3/WMA formats as well as to synchronize your smart-phone or tablet using the embedded
Bluetooth® technology.
Finally, the design of the entire range is distinguished by ease of use and construction details; in fact, each unit is
manufactured with durable MDF, with internal plywood reinforcements at support and lifting points, anti-scratch
painting with high resistance to mechanical stress and protective steel grille for a professional and distinct look.
For each model power and speakers, please consult the technical specications table.
- MIC balanced XLR inputs on all channels, for connection of dynamic and condenser microphones.
- LINE unbalanced 6,35mm (1/4”) jack inputs on channels 1-3, for connection of any line level device.
- HI-Z unbalanced 6,35mm (1/4”) jack input on channel 4, to directly connect your instrument.
- 16-preset DSP for voice and instruments effects.
- FX send and return 6,35mm (1/4”) jacks, to use external effect units.
- Balanced XLR out for daisy-chain further V-MATE active loudspeakers.
- Stereo Monitor/Phones out, to monitor the sound balance.
- Independent MP3/Bluetooth® level control, to balance the playback volume.
- Large display for MP3 input section, with USB port and SD reader.
- Infra-Red Remote Control allowing comfortable and precise remote control.
- Class D amplifiers and hi-quality custom drivers.
- Pole positioning available thanks to bottom 36 mm. (1.41”) standard hole.
- Bottom panel 35° angle cut allows a very useful sound emission for wedge monitor use.
DSP SECTION
V-MATE 506, 508 and 510 mixer feature a professional DSP effect unit, allowing you to choose the best
effect for every song, among reverb, delay, chorus, flanger, rotary speaker simulator, octaver and combinations.
MP3/WMA PLAYER
In order to add further versatility and to answer to most recent market needs, we provided your systems with
an MP3 player. This section features inputs for SD card and a USB port for generic multi-purpose connections
and a display with full function keys. Moreover V-MATE features a remote control allowing you to comfortably
manage the MP3 player for background music, karaoke nights, etc.
Page 5

V-MATE SERIES Full range bi-amplified Loudspeakers | Owner’s manual
5
ENGLISH
BLUETOOTH
®
The entire range embeds the Bluetooth® wireless technology for playback of signals from any smartphone and
tablet. To do this, the sound source must be tuned to the player digital section Bluetooth® receiver. The units
can properly work with any operating system (Android, Blackberry, Windows 7 & 8). For further information,
see the Bluetooth® iOS procedure.
INSTALLATION
First of all, place your V-MATE in the needed way: on a pole using the bottom 36mm. (1.41”) standard hole,
or on ground.
Since your loudspeaker contains a power amp, please leave enough space around the unit for cooling purposes.
Don’t place your unit close to high-temperature devices such as radiators or exposed to direct sunlight for
several hours.
The loudspeaker is connected to the mains via the supplied cable. First connect the mains cable to the unit,
then connect the cable plug to the mains, finally turn on your system.
Please note that all units must be properly grounded. For your own safety, you should never remove any
ground connector/device from electrical devices or power cables, or make them inactive. Please ensure that
only qualified people install and operate the unit.
OPERATIONS
Before connecting your V-MATE 508 and 510 to a. c. mains, please check the setting of voltage selector,
close to power switch. Using a screwdriver remove the transparent plastic tap, then using a slotted screwdriver
you can change the unit operating a. c. power. Please note that V-MATE 506 has no voltage selector.
During initial setup, all V-MATE LEVEL knobs should be at minimum, “0” position. If a LEVEL is raised please
move it to “0” position, preventing in this way any noise which could damage your speakers. Set EQ knobs
at central position.
With your MASTER LEVEL at “0”, start making connections.
Using an XLR balanced cable, connect your microphone(s) and using unbalanced 6,35mm (1/4”) TS cable
connect your line level device and instrument, to HI-Z channel 4 input only!
NOTE: Do not connect / disconnect the cable with the volumes “up” since a loud noise will
ensue, but you also risk to damage the unit.
Now you can turn on your V-MATE and raise MASTER LEVEL knob to 12 o’clock position. Begin to set all the
levels, a good starting LEVEL settings is with each channel knob at 12 o’clock position. If a channel signal is too
hot, please turn the knob counter-clockwise; if the signal is too weak turn the knob clockwise. USB port and SD
card use the MP3/BLUETOOTH level, close to MP3 player display. DSP section has its overall FX LEVEL control.
The useful front panel IR LED allows you an easy and precise pointing of infrared remote control, the ideal angle
is 15°. Please note that MP3 player section EQ presets can be chosen by IR remote control only.
TIPS
We suggest you to avoid exposition to loud music for prolonged periods, you risk to damage your hearing.
In order to avoid overload or distorted sound, please listen carefully to your mix; hearing even a small saturation,
please turn counter-clockwise the MASTER knob, or the LEVEL knob of the saturated or distorted source.
Avoid using extreme EQ settings, which could overload the channel and its FX send to the internal DSP device
and even the MASTER section. We suggest you to use the EQ to emphasize sound nuances and details, even
cutting EQ on other inputs!
In order to avoid overloading internal DSP, please carefully check each channel FX SEND knob.
In order to prevent speakers switch-on thump, please turn the MASTER LEVEL knob to “0” after every session,
and check the MASTER LEVEL knob “0” position before any new session.
Page 6
Owner’s manual | V-MATE SERIES Full range bi-amplified Loudspeakers
6
Full range bi-ampliFied loudspeakers
1
2
3
4
5
25 24 23
DESCRIPTION
6
7
8
16
17
18
19
20
9
10
Page 7
V-MATE SERIES Full range bi-amplified Loudspeakers | Owner’s manual
7
ENGLISH
26
PHO
NES
MON ITOR
LEV EL
+10
M
P
3
B
L
U
E
T
O
O
TH
LEV EL
+10
12 21
13 11 22
14
15
30
32
33
31
33
33
35° max
Page 8
Owner’s manual | V-MATE SERIES Full range bi-amplified Loudspeakers
8
Full range bi-ampliFied loudspeakers
1.1 CONTROL ELEMENTS AND CONNECTORS
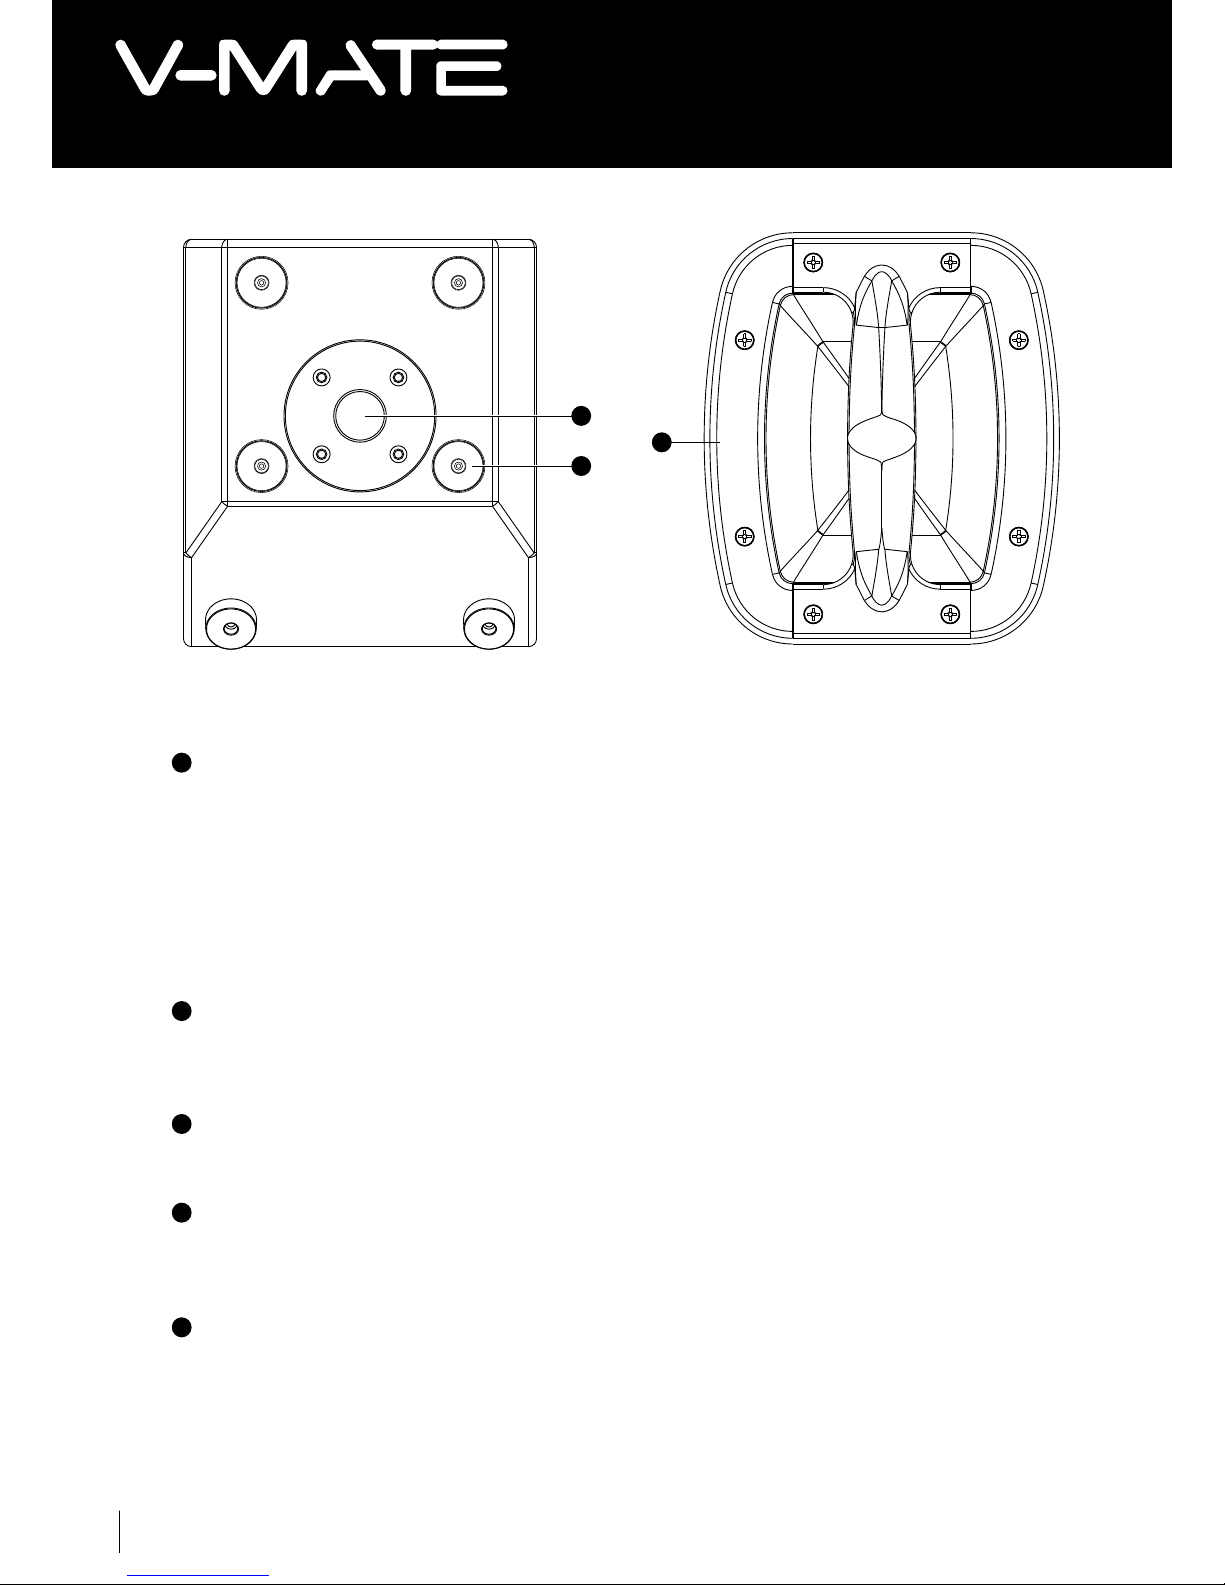
EQ SECTION
Each input channel includes a 3-band equalizer; all bands provide boost or cut of up to 15 dB. In knob central position,
the equalizer is inactive.
HIGH The 12kHz HIGH knob is a “shelving” lter, which operates from 12kHz up, affecting most instruments higher
harmonics.
MID The 2.5kHz MID is a “peaking” control. Peaking means that the lter boosts or cuts shaping an hill around that
frequency. MID eq affects the higher frequencies of most musical instruments and some singers voice. To obtain a good
vocal result try even to cut the mid on the other channel(s).
LOW The 80Hz LOW knob is a “shelving” lter, which operates from from 80Hz down, affecting kick drum, bass guitar
and lower octaves of piano and synths.
FX SEND
The FX SEND knob enables you to feed signals, through each channel knob, to internal DSP bus, or any external effects
unit. FX SEND is configured post-fader, i.e. the amount of each channel send is determined by each channel FX SEND send
as well as by each channel LEVEL knob setting.
LEVEL
The LEVEL control determines the level of the channel signal in the main mix. This control setting affects even this channel
FX SEND.
LINE IN
Each input features an unbalanced TS 6,35mm. (1/4”) line input.
Please note that you can only use either the microphone or the line input of a channel at one time. You should never use
both input connectors simultaneously!
MIC
Each input channel features also an XLR balanced microphone input connector. The XLR connector also carries +48V
phantom power supply.
NOTE: Nearly all microphones can properly work with phantom power active. Anyway, before connecting your microphone
to this input, double check the microphone user manual.
WARNING: Do not connect to this input any unbalanced sources using an adaptor!
1
2
3
4
5
27
28
29
Page 9

V-MATE SERIES Full range bi-amplified Loudspeakers | Owner’s manual
9
ENGLISH
1.2 DSP SECTION
PRESET DESCRIPTION
This silk-screen printing list allows you to immediately chose the needed effect for mixing.
1-2 HALL REVERB – is the reverb typical of a large hall
3 ROOM REVERB – is the reverb typical of a room, with plaster walls
4-7 DELAY – is the delay of the original sound heard some time after
8-9 CHORUS – is a very short delay with slight changes in timbre and pitch of the original sound
10 FLANGER - is a very short delay with modulation of original sound timbre and pitch
11-12 ROTARY SPEAKER SIMULATORS - is the simulation of combined an amplifier and a loudspeaker that modifies
the sound by rotating
13 OCTAVER – is a synthesised signal whose musical tone is an octave lower than the original sound
14 CHORUS + REVERB – is a combination of CHORUS and REVERB
15 CHORUS + DELAY – is a combination of CHORUS and DELAY
16 FLANGE + DELAY – is a combination of FLANGER and DELAY
Generally Reverb, Delay and Combination are better suited for vocal, while Flanger, Rotary and Octaver are better suited
for instruments.
DSP
The mixer features an internal DSP effect processor, providing you 16 presets, including 2 HALL REVERBs, 1 ROOM REVERB,
4 DELAYs, 2 CHORUSes, 1 FLANGER, 2 ROTARY SPEAKER SIMULATORS, 1 OCTAVER, as well 3 MULTI-effects.
Rotate this selector until finding the needed effect for your song or for a part of your song! Detecting some unpleasant
distortion, please decrease input channels FX send.
FX LEVEL
The FX LEVEL knob sets the effect volume in the main mix.
EXT. FX SEND/FOOTSW
This TRS 6,35mm. (1/4”) jack has two different functions.
The Tip of TRS is used as footswitch to turn on/off the internal DSP or the external effects unit.
The Ring of TRS is used to send the FX send signal to an external effect unit.
The Sleeve of TRS is the common ground of footswitch and effect send.
If you use a TS 6,35mm. (1/4”), it works for footswitch only.
EXT FX RETURN
This Stereo 6,35mm. (1/4”) jack can be connected to the outputs of an external effects unit.
Since this stereo input has no level control, you’ve to adjust the output of the external effects device connected. You can
also use this stereo input as input for an external sub-mixer or any other line level device, properly adjusting the external
device output level.
In case your external effect/device is stereo and features two 6,35mm. (1/4”) mono jacks, please use a ”Y”-shaped cable
terminated with one stereo jack.
1.3 MP3 PLAYER SECTION
SD
This slot is for SD card plugging.
USB
This port is for USB device connection.
WARNING: this digital section is sensitive to high temperature, so please do not place your unit
exposed to direct sun-light for extended period.
6
7
8
10
11
12
9
Page 10

Owner’s manual | V-MATE SERIES Full range bi-amplified Loudspeakers
10
Full range bi-ampliFied loudspeakers
CONTROL DIGITAL DISPLAY
The 2 row 16-characters display allows you to carefully check all the content of the SD card input and/or the device
connected to the USB port.
Using the MP3 player remotely controlled by Bluetooth, the display will only show “CONNECTED”.
KEYS
MODE ON/OFF Press this key to select the play mode between USB/SD CARD and BLUETOOTH. Pressing this key for
more than three seconds, you can turn off or turn on the MP3 player.
PLAY/PAUSE It allows you to play and pause the player. Hold this key to select play mode T-ALL.
T-ALL is for reproduction of first ten songs of each folder.
STOP It stops player playback.
REPEAT Press this key to select play mode between ALL - ONE – RANDOM. Pressing more times this key,
playback mode changes as follows: ALL - ONE – RANDOM. ALL is for song reproduction by number,
ONE is for just one song play, RANDOM is for random play. The factory default setting is ALL.
WARNING: Please note that the MP3 player plays all the songs following uploading sequence from computer, so
the 1st uploaded song will be the first to be played by MP3 player, the 2nd uploaded song will be the second
to be played, and so on. So, reproduction play list must be created before uploading the songs, based on your
needs. To change reproduction order, you’ve to upload again all the tracks of that folder or to create a new
folder with right upload play-list.
PREV To play previous song; by holding the key you achieve fast rewind.
NEXT To play next song; by holding the key you achieve fast forward.
REMOTE CONTROL
ON/OFF To turn on and off the MP3 player.
STOP Press this key to stop MP3 playback.
MUTE Press this key to mute the MP3 player.
MODE Press this key to select the play mode between USB/SD CARD and BLUETOOTH.
REPEAT Press this key to select play mode between ALL - ONE – RANDOM. Pressing more times this key,
playback mode changes as follows: ALL - ONE – RANDOM. ALL is for song reproduction by number,
ONE is for just one song play, RANDOM is for random play. The factory default setting is ALL.
EQ Press this key to choose MP3 section presets among JAZZ, ROCK, POP, CLASSIC, USER.
PREV Press this key to play previous song.
NEXT Press this key to play next song.
PLAY/PAUSE Press this key to play and pause the player.
VOL- Press this key to reduce the MP3 volume.
VOL+ Press this key to raise the MP3 volume.
NUMERIC KEYS Press the key combination to play the desired song.
Note: Please, maintain a “straight line of sight without obstacles” between the remote control and V-MATE IR
LED, which is close to your speaker frontal “ON” blue LED.
1.4 iOS BLUETOOTH® PROCEDURE
IPHONE – IPAD PROCEDURE
1) From the Settings menu => activate bluetooth on your Apple device => ‘I’ => Devices => Looking for ...
2) Set the potentiometers and MP3 Master Volume in central position. It’s important to listen the tones issued by MP3/
BLUETOOTH section.
3) Switch on the V-MATE unit.
4) Pressing the MODE button (by default the MP3 player is turned on) the display shows the message “Bluetooth Initializing
...”. A tone (bup) is issued, and the detection procedure starts.
13
14
15
Page 11

V-MATE SERIES Full range bi-amplified Loudspeakers | Owner’s manual
11
ENGLISH
5) When the external device is identied, the V-MATE emits a sequence of two tones (bup - bup) and your iPhone or iPad
“Devices” menu shows BLUETOOTH (in capital letters). It means that the Apple device is synced with the unit. In this
case, proceed to the connection as explained in step 11.
6) If the loudspeaker display shows “Unconnected”, please repeat steps 4) and 5).
7) If after 3 attempts the display still shows “Unconnected” turn off the unit.
8) Before turning on again your loudspeaker, delete or ignore other bluetooth devices already present on the Apple unit.
Menu “Devices” => blue arrow click “Forget this Device”.
9) Wait for 5 seconds, then power on again your loudspeaker.
10) Repeat the steps 4) and 5).
11) To connect both devices press “not connected” in external device. Once connected, the loudspeaker emits a tone
(beep) and its display shows the message “Connected”.
12) Now you can start to send any signal to your unit through the Bluetooth connection.
For further information about bluetooth
®
tuning with different OS, please check our website www.
fiveo.it, or send an email to: mail@fiveo.it
1.5 MASTER SECTION
MASTER
The MASTER knob adjusts the overall volume of main outputs. Use this knob carefully, continuously checking your sound
system output quality.
LIMIT LED
This LED is lit when the the ampliers are pushed over their limits, and a limiter circuit acts to prevent any damage to the
speakers.
POWER ON LED
This LED is lit, together with front panel LED, when the POWER ON switch is pressed to ON .
Before turning ON or OFF the unit, please be sure that MASTER knob is in “-∞” position.
PHONES/MONITOR OUT
This 6.35mm. (1/4”) stereo unbalanced connector can be used to monitor your V-MATE Master signal. Please note that overall
level will be adjusted by PHONES/MONITOR knob (placed close to MP3 player section) in conjunction with MASTER knob.
You can connect this output to an headphones as well as to any external unit, like a recorder or monitoring speakers.
MASTER OUT
This XLR balanced connector can be used to send the Master signal to an external sound device. Please note that overall
level will be adjusted by MASTER LEVEL knob.
You can connect this output also to external units, like a different sound system which will diffuse your mix in different rooms.
WARNING: Despite its XLR connector do not connect this output to a microphone input!
PHONES/MONITOR LEVEL
This knob adjusts, in conjunction with MASTER knob, the overall PHONES/MONITOR OUT level.
Please note that this knob is close to MP3 player section.
MP3 BLUETOOTH
®
LEVEL
This knob adjusts the playback level of the MP3 player or Bluetooth® signal.
Even this knob is located near to the MP3 player.
21
22
20
19
18
17
16
Page 12

Owner’s manual | V-MATE SERIES Full range bi-amplified Loudspeakers
12
Full range bi-ampliFied loudspeakers
1.6 MAINS SECTION
MAINS VOLTAGE SELECTOR
This switch allows you to change the voltage, adapting the unit to your area voltage.
WARNING: Turn off the unit before changing the operating voltage.
NOTE: This switch is not present in V-MATE 506.
POWER ON / OFF SWITCH
Press the top of this switch to turn the unit on. Press the bottom to turn the unit off.
AC LINE IN RECEPTACLE AND FUSE-HOLDER
The AC LINE IN socket complies to IEC standards. Each unit package is supplied with the specic power cord for your area.
For your own safety, never disconnect the grounding plug.
In case you need to replace the fuse, always use one of the same type and value as the original. Refer to technical
specifications table for details of the fuse for each model of V-MATE series.
1.7 CABINET
BOX SHAPE
The bottom of the cabinet features an oblique cut of 35°, allowing to slant the speaker for monitoring and ground listening
applications.
POLE MOUNT
This standard hole of 36mm (1.4”) allows you to mount the speaker on a tripod or dedicated accessory/wall supports.
RUBBER FEET
These rubber feet allow the placement on oor and speakers stacking during storage.
HANDLE
To make the transport easier, we have equipped the cabinet with a practical ABS handle.
Do not use it to hang the speakers!
IR LED
Receiving LED for remote control emissions. Do not cover/obscure this section!
ON
This blue LED is lit when the speaker mains is on.
HF DRIVER AND HORN
The compression driver reproduces the frequencies above the crossover point; the oval horn ensures a wide angle of coverage.
The only model that does not adopt this solution for the higher frequencies is the V-MATE 506, which has a dome
tweeter with a small waveguide.
Refer to the technical specifications table for details of each model.
WOOFER AND REFLEX PORTS
The woofer reproduces frequencies below the crossover point.
The reex ports enhance the efciency of the woofer and improve the reproduction of lower frequencies.
Refer to the technical specifications table for details of each model.
23
24
25
26
27
28
29
30
31
32
33
Page 13

V-MATE SERIES Full range bi-amplified Loudspeakers | Owner’s manual
13
ENGLISH
Inputs 4 analogue inputs + MP3 Player + Bluetooth connection
Outputs Master Output (Mix Direct Out); Monitor/Headphones stereo out
Controls and connectors
6,35mm (¼”) TRS connector with Footswitch input for FX ON/OFF on tip, FX send on ring,
6.35 mm (¼”) TRS connector stereo FX return.
Effect 16-Preset Multi Effects Dsp
USB/MP3 player Master level and IR remote control
Bluetooth
®
function
V-MATEs play back audio tracks virtually from all smart-phones and tablets,
thanks to the embedded Bluetooth technology
MICROPHONE INPUT
Typ e XLR, electronically balanced
Phantom power +48V DC
Max. Input level -53dB
Impedance
1KΩ
Signal-to noise ratio
-50 dB
LINE INPUT (1-3)
Typ e 6.35 mm (¼”) TS connector
Impedance 1MΩ
Max. input level -33 dB
Distortion (THD+ N) 0.1%
EQ
Low 80Hz, +/- 15 dB
Mid 2,5kHz, +/- 15 dB
High 12kHz, +/- 15 dB
MASTER OUT
Typ e XLR
Impedance 47 kΩ
Max. output level 0 dB
PHONES/MONITOR OUT
Typ e 6,35mm (¼”) TRS connector, unbalanced
Impedance 47KΩ
Max. output level 0dB
2.1 COMMON SPECIFICATIONS
Page 14

Owner’s manual | V-MATE SERIES Full range bi-amplified Loudspeakers
14
Full range bi-ampliFied loudspeakers
506 508 510
System type
Active vented enclosure Active vented enclosure Active vented enclosure
Amplifier technology
Class D amp with SMPS Class D amp with SMPS Class D amp with SMPS
Continuous power (LF-HF) 80W + 20W 130W + 20W 200W + 30W
Maximum power (LF-HF)
100W + 20W 130W + 70W 250W + 50W
HF Driver
1” Neodymium tweeter
34mm compression driver with
25,4mm. (1”) exit and horn
34mm compression driver with
25,4mm. (1”) exit and horn
Horn coverage
--- 90° x 60° 90° x 60°
LF Driver
6” custom woofer
with 38mm VC
8” custom woofer
with 38mm VC
10” custom woofer with
50mm VC
Frequency response 80-20kHz 80-20kHz 68-20kHz
CABINET
Construction
12mm reinforced MDF 12mm reinforced MDF 12mm reinforced MDF
Grille
1.5mm perforated steel 1.5mm perforated steel 1.5mm perforated steel
Finishing
Black anti-scratches
water paint
Black anti-scratches
water paint
Black anti-scratches
water paint
Power supply
110~120 / 220~240V AC 50/60Hz
110~120 / 220~240V AC 50/60Hz
110~120 / 220~240V AC 50/60Hz
Power Consumption
100W 180W 270W
Fuse
1.5A L 250V 3.15A L 250V 3,15A L 250V
Dimensions (W x H x D)
240 x 380 x 281mm
(9.4” x 14.6” x 11”)
260 x 465 x 300mm
(10.2 x 18.3” x 11,8”)
300 x 517 x 300mm
(11,8” x 19.7” x 11,8”)
Weight
9Kg (19.8 lbs) 12Kg (26.4 lbs) 15Kg (33 lbs)
2.2 MODELS SPECIFICATIONS
Page 15

V-MATE SERIES Full range bi-amplified Loudspeakers | Owner’s manual
15
ENGLISH
NOTES
Page 16
DIFFUSORI Bi-amplificati full-range
Manuale utente | Serie V-mate Diffusori Bi-amplificati Full-range
16
ATTENZIONE
Nell’interesse della propria e della altrui
sicurezza, e per non invalidare la garanzia,
si raccomanda una attenta lettura di questa
sezione prima di utilizzare il prodotto.
• Leggete tutta la documentazione prima di utilizzare
l’apparecchiatura.
• Conservate tutta la documentazione per ogni ulteriore
consultazione.
• La tensione di rete deve corrispondere all’etichetta posteriore.
• Danni causati da errata connessione a tensione alternata
non sono coperti da garanzia.
• Utilizzate sempre l’unità con il cavo di massa di corrente
collegato alla terra dell’impianto elettrico. Prendete
precauzioni per evitare una messa a terra difettosa, scorretta
o inefficiente.
• Per ridurre il rischio di incendio o scossa elettrica, non usate
l’unità in prossimità dell’acqua e non esporla alla pioggia.
• Dopo il collegamento dell’alimentazione alcuni componenti
all’interno dell’unità sono già accesi.
• Spegnete l’apparecchio prima di estrarre il cavo di
alimentazione e il cavo (o i cavi) di segnale.
• Non ostruite le porte di entrata e di uscita per l’aria di
raffreddamento.
• Per l’assistenza tecnica rivolgetevi esclusivamente a personale
qualificato ed autorizzato.
Questo apparecchio non contiene parti interne
destinate all’intervento diretto da parte
dell’utilizzatore. Per evitare il rischio di incendio
e/o folgorazione, non smontarlo e non rimuovere
eventuali pannelli protettivi.
NOTA BENE
Per qualsiasi intervento di manutenzione
o riparazione, rivolgetevi alla Elettronica
Montarbo srl e/o a personale altamente
qualificato specificamente segnalato da questa.
Direttiva RAEE
ATTENZIONE!
Il prodotto è contrassegnato da questo simbolo che
segnala di non smaltire le apparecchiature elettriche ed
elettroniche tramite la normale procedura di smaltimento
dei riuti domestici. Per questi prodotti è previsto un sistema
di raccolta differenziato in conformità alla legislazione che richiede
il trattamento, il recupero e il riciclaggio adeguato dei suddetti
prodotti. Per maggiori informazioni si prega di contattare l’autorità
locale competente. La barra nera sotto il simbolo indica che il
prodotto è stato immesso sul mercato dopo il 13 agosto 2005.
INFORMAZIONI PER UN CORRETTO SMALTIMENTO
Per gli utenti privati
Nell’Unione europea | Attenzione: Per smaltire il presente
dispositivo, non utilizzare il normale bidone della spazzatura! Le
apparecchiature elettriche ed elettroniche usate devono essere
gestite a parte e in conformità alla legislazione che richiede il
trattamento, il recupero e il riciclaggio adeguato dei suddetti
prodotti. In seguito alle disposizioni attuate dagli Stati membri,
i privati residenti nella UE possono conferire gratuitamente
le apparecchiature elettriche ed elettroniche usate a centri di
raccolta designati*. In alcuni paesi (*), anche il rivenditore locale
può ritirare gratuitamente il vecchio prodotto se l’utente acquista
un altro nuovo di tipologia simile. *Per maggiori informazioni si
prega di contattare l’autorità locale competente.
In paesi che non fanno parte dell’UE | Contattare le autorità
locali e informarsi sul metodo di smaltimento corretto.
In Svizzera | Le apparecchiature elettriche o elettroniche usate
possono essere restituite gratuitamente al rivenditore, anche se
non si acquista un prodotto nuovo. Altri centri di raccolta sono
elencati sulle homepage di www.swico.ch o di www.sens.ch.
Per gli utenti professionali
Nell’Unione europea | Attenzione: Se il prodotto è impiegato
a scopi professionali, procedere come segue per eliminarlo:
contattare il proprio rivenditore FiveO by Montarbo
®
che fornirà
informazioni circa il ritiro del prodotto. Potrebbero essere
addebitate le spese di ritiro e riciclaggio. Prodotti piccoli (e
quantitativi ridotti) potranno essere ritirati anche dai centri di
raccolta locali.
In Spagna | Contattare il sistema di raccolta ufficiale o l’ente
locale preposto al ritiro dei prodotti usati.
In paesi che non fanno parte dell’UE | Contattare le autorità
locali e informarsi sul metodo di smaltimento corretto.
Il lampo con la freccia inserito in un triangolo equilatero avvisa
l’utilizzatore della presenza di tensione pericolosa, senza
isolamento, all’interno dell’apparecchio che potrebbe essere
sufficientemente alta da generare il rischio di scossa elettrica.
Il punto esclamativo inserito in un triangolo equilatero avvisa
l’utilizzatore della presenza di importanti istruzioni per l’utilizzo
e per la manutenzione.
AVVERTENZE
Page 17

ITALIANO
SERIE V-MATE Diffusori Bi-amplificati Full-range | Manuale utente
17
CONTENUTI DELL’IMBALLO
• Diffusore attivo full range
• Cavo di alimentazione (3m)
• Telecomando
• Adattatore EU-UK
• Manuale utente
• Certificato di garanzia
INDICE
Avvertenze 16
Introduzione 18
Caratteristiche 18
Sezione DSP 18
Lettore MP3/WMA 18
Bluetooth
®
19
Installazione 19
Utilizzazione 19
Suggerimenti 19
Descrizione 20
1.1 Elementi di controllo e connettori 22
1.2 Sezione DSP 23
1.3 Sezione MP3 23
1.4 Procedura BLUETOOTH
®
iOS 24
1.5 Sezione Master 25
1.6 Sezione di alimentazione 26
1.7 Cabinet 26
Caratteristiche tecniche
2.1 Caratteristiche comuni 27
2.2 Caratteristiche dei modelli 28
Note 29
Page 18

DIFFUSORI Bi-amplificati full-range
Manuale utente | Serie V-mate Diffusori Bi-amplificati Full-range
18
INTRODUZIONE
Vi ringraziamo per aver scelto un prodotto della linea FIVEO By Montarbo.
La serie V-MATE 506-508-510 rappresenta una nuova generazione di diffusori full-range bi-amplificati con
una versatilità tale da poter avere la massima libertà di utilizzo in qualsiasi situazione.
L’intera gamma è stata progettata seguendo le ultime tendenze di mercato: fornire una soluzione unica e
innovativa, garantendo al contempo un’immagine acustica precisa in un design ultra compatto.
Tutti i modelli si adattano perfettamente alle esigenze di gruppi, piano bar, sale prove e da ballo, piccoli concerti,
assemblee scolastiche, raduni religiosi, seminari di lavoro e presentazioni aziendali, eventi sportivi locali, aste,
centri fitness e molte altre applicazioni.
Al fine di sfruttare al meglio le caratteristiche di questi sistemi raccomandiamo una lettura attenta di queste
istruzioni, anche nell’interesse della propria e dell’altrui sicurezza.
Per ulteriori informazioni consultate il nostro sito web www.fiveo.it, o inviate una mail a: mail@fiveo.it
CARATTERISTICHE
I diffusori di questa linea sono stati progettati appositamente per un utilizzo estremamente immediato e semplice
in diverse applicazioni. Essi rappresentano una combinazione ideale di vera portabilità e buona qualità sonora.
Tutti i modelli della serie 500 incorporano un vero mixer a 4 canali, amplicatori in classe D di ultima generazione
e un potente DSP con 16 effetti disponibili. La circuiteria di preamplicazione presente sugli ingressi microfonici
offre un buon rapporto segnale-rumore e margine dinamico.
L’elettronica di processamento del segnale comprende un crossover attivo ad elevata pendenza che assicura
coerenza di fase e perfetta sovrapposizione dei trasduttori nella zona di incrocio.
Il player digitale dotato di display e comandi di facile utilizzo, vi consentirà di riprodurre i vostri brani in formato
Mp3/WMA e di sincronizzare il vostro smartphone o tablet grazie alla tecnologia Bluetooth® integrata.
Infine, il design dell’intera gamma si distingue per praticità di utilizzo e dettagli costruttivi, infatti, ogni apparecchio
è dotato di un box in MDF compatto e resistente, con rinforzi interni in legno multistrato nei punti di appoggio
e sollevamento, verniciatura anti-graffio con alta resistenza meccanica alle sollecitazioni e griglia frontale di
protezione in acciaio per un aspetto professionale e distinto.
Per i dettagli su potenza ed altoparlanti, consultate la tabella delle caratteristiche tecniche.
- Ingressi MIC bilanciati XLR su tutti i canali per il collegamento di microfoni dinamici e a condensatore.
- Ingressi LINEA sbilanciati con jack da 6,35mm (1/4”) nei canali 1-3, per il collegamento di qualsiasi apparecchio
di livello di linea.
- Ingresso HI-Z sbilanciato con jack da 6,35mm (1/4”) sul canale 4, per collegare direttamente il vostro strumento.
- DSP con 16 effetti per voce e strumenti.
- Jack da 6,35mm (1/4”) per mandata e ritorno FX e poter utilizzare una unità di effetti esterni.
- Uscita bilanciata XLR per collegamento in cascata di ulteriori diffusori attivi V-Mate.
- Uscita Stereo Monitor/cuffia per controllare il bilanciamento del suono.
- Controllo di livello MP3/Bluetooth indipendente per bilanciare il volume di riproduzione.
- Ampio display per la sezione MP3, dotata di porta USB e lettore SD card.
- Telecomando ad infrarossi per un controllo comodo e preciso a distanza.
- Amplificatori di Classe D e altoparlanti custom.
- Posizionamento su palo grazie al foro inferiore da 36 mm. (1.41”).
- Fondo angolato di 35° per consentire un’emissione sonora diretta anche nelle applicazioni di monitoraggio.
SEZIONE DSP
Il mixer delle V-MATE 506, 508 e 510 è dotato di un DSP professionale, che permette di scegliere il migliore
effetto per ogni brano tra riverbero, delay, chorus, flanger, simulatore di leslie, Octaver e varie combinazioni.
LETTORE MP3/WMA
Per aggiungere ulteriore versatilità e rispondere alle più recenti richieste del mercato abbiamo fornito i nostri
sistemi di un lettore MP3. Questa sezione dispone di un ingresso per schede SD, una porta USB per connessioni
generiche, un display e tutti i tasti di comando necessari. Inoltre è incluso un telecomando che permette di gestire
comodamente il lettore o alcuni precisi comandi del player quando quest’ultimo si trova in modalità Bluetooth®.
Page 19

ITALIANO
SERIE V-MATE Diffusori Bi-amplificati Full-range | Manuale utente
19
BLUETOOTH
®
L’intera gamma incorpora la tecnologia wireless Bluetooth® per la riproduzione di segnali provenienti da qualsiasi
smartphone e tablet. Per fare questo, la sorgente sonora deve essere sintonizzata al ricevitore Bluetooth®
presente nella sezione digitale del player. Le unità possono funzionare correttamente con qualsiasi sistema
operativo (Android, Blackberry, Windows 7 & 8). Per ulteriori informazioni, consultate il capitolo Procedura
BLUETOOTH® iOS.
INSTALLAZIONE
Innanzitutto posizionate il diffusore secondo le vostre esigenze: su un treppiede usando il suo foro standard
da 36mm (1.41”) o a pavimento. Dato che l’unità contiene un amplicatore di potenza, lasciate intorno
all’apparecchio uno spazio sufficiente per il raffreddamento. Non collocate il diffusore vicino a dispositivi ad
alta temperatura come radiatori, ne esponetelo alla luce diretta del sole per parecchie ore.
L’unità è collegata alla rete elettrica mediante il cavo in dotazione. Prima collegate il cavo di alimentazione
all’apparecchio, quindi collegate la spina del cavo alla rete elettrica, infine accendete il sistema.
Attenzione: tutte le unità devono avere una messa a terra corretta. Per la vostra sicurezza
non rimuovete né disattivate connettori o strumenti di messa a terra da apparecchi elettrici
o cavi di alimentazione. Assicuratevi che l’installazione e l’utilizzo dell’unità sia effettuata
esclusivamente da personale specializzato.
UTILIZZAZIONE
Prima di collegare le V-MATE 508 e 510 ad una presa di corrente, controllate l’impostazione del selettore di
tensione, vicino al pulsante di accensione. Rimuovete il coperchio di plastica trasparente quindi cambiate la
tensione operativa dell’unità. Durante la configurazione iniziale tutte le manopole di livello devono essere al
minimo, ossia nella posizione “0”. Se un livello è alzato, spostatelo in posizione “0”, evitando in questo modo
qualsiasi rumore che potrebbe danneggiare gli altoparlanti. Regolate anche la manopole EQ in posizione centrale.
Iniziate quindi a fare i collegamenti con il LIVELLO MASTER al minimo, “0”.
Collegate i microfoni tramite cavi bilanciati XLR, usate cavi sbilanciati con jack da 6,35 mm (1/4”) per gli
apparecchi di livello linea e per l’eventuale strumento, all’ingresso HI-Z del canale 4.
NOTA: non collegate/scollegate il cavo con i volumi alzati, oltre il forte rumore che ne
deriverà, rischiate di danneggiare le unità.
Ora potete accendere l’apparecchio e portare la manopola MASTER LEVEL a “ore 12”. Iniziate a regolare tutti i
livelli, partendo con le manopole dei canali ad “ore 12”; se il segnale del canale è troppo forte, ruotate la manopola
in senso antiorario, se il segnale è troppo debole ruotate in senso orario. Gli ingressi USB ed SD utilizzano il livello
MP3/BLUETOOTH, vicino al display del lettore MP3. La sezione DSP ha il controllo generale FX LEVEL.
Il led del pannello frontale consente un puntamento facile e preciso del telecomando ad infrarossi, l’angolo
ideale è di 15°. Tenete presente che i preset di equalizzazione (EQ) del lettore MP3 possono essere scelti
esclusivamente tramite il telecomando.
SUGGERIMENTI
Vi consigliamo di evitare l’esposizione ad elevati volumi per periodi prolungati, rischiate di danneggiare il
vostro udito. Al ne di evitare suono saturo o distorto ascoltate attentamente il vostro mix; sentendo anche
una minima saturazione girate in senso antiorario la manopola MASTER o la manopola LEVEL della sorgente
che satura o distorce. Evitate di utilizzare impostazioni EQ estreme, che potrebbero sovraccaricare il canale e
la relativa mandata FX per il DSP interno e anche la sezione MASTER.
Suggeriamo di usare l’EQ per sottolineare sfumature sonore e dettagli, anche attenuando l’EQ di altri ingressi!
Al ne di evitare il sovraccarico del DSP interno, controllate attentamente la manopola FX SEND di ogni canale.
Per evitare che l’accensione provochi un forte rumore dannoso per gli altoparlanti, dopo ogni sessione ruotate
la manopola MASTER LEVEL su “0” e controllate che la manopola MASTER LEVEL sia nella posizione “0” prima
di ogni nuova sessione.
Page 20
DIFFUSORI Bi-amplificati full-range
Manuale utente | Serie V-mate Diffusori Bi-amplificati Full-range
20
1
2
3
4
5
25 24 23
DESCRIZIONE
6
7
8
16
17
18
19
20
9
10
Page 21
ITALIANO
SERIE V-MATE Diffusori Bi-amplificati Full-range | Manuale utente
21
26
PHO
NES
MON ITOR
LEV EL
+10
M
P
3
B
L
U
E
T
O
O
TH
LEV EL
+10
12 21
13 11 22
14
15
30
32
33
31
33
33
35° max
Page 22
DIFFUSORI Bi-amplificati full-range
Manuale utente | Serie V-mate Diffusori Bi-amplificati Full-range
22
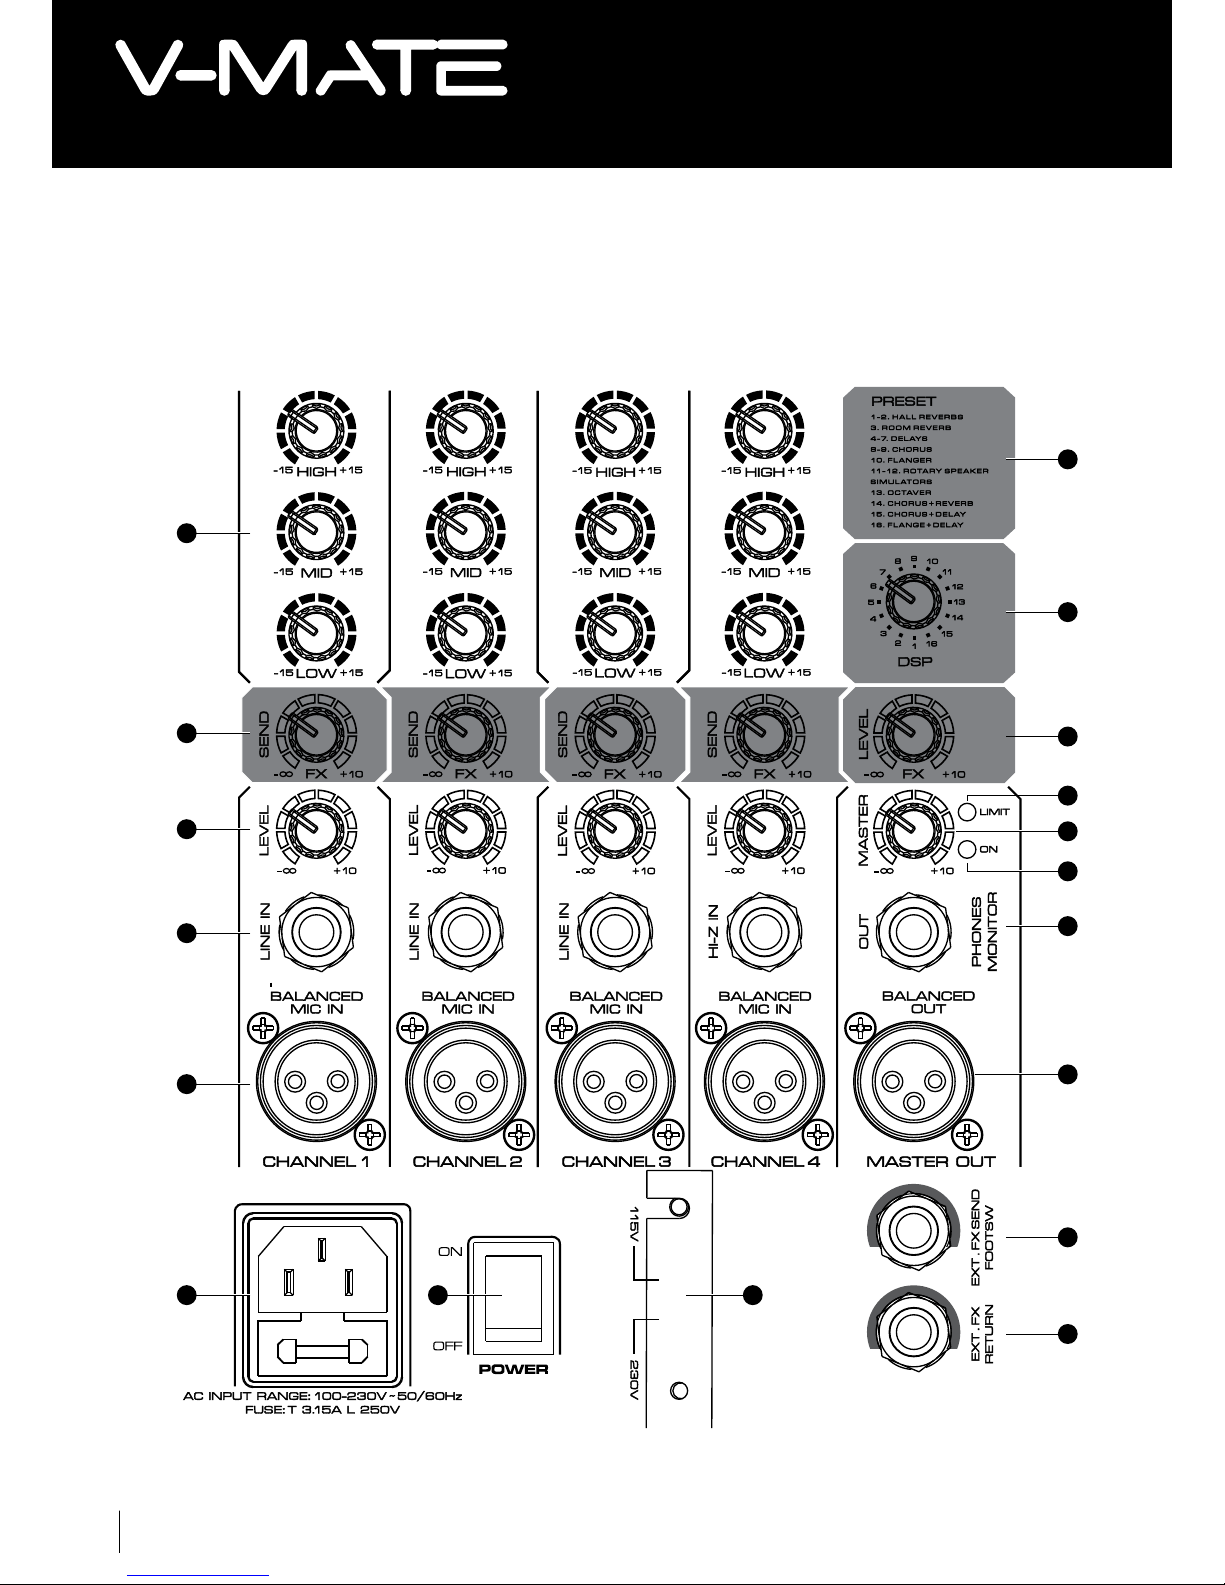
1.1 ELEMENTI DI CONTROLLO E CONNETTORI
SEZIONE EQ
Ogni canale di ingresso è dotato di un equalizzatore a 3 bande; tutte le bande forniscono esaltazione o attenuazione
massima di 15 dB. Con la manopola nella posizione centrale, l’equalizzatore è inattivo.
HIGH La manopola HIGH (alti) è un ltro “shelving”, che opera opera da 12kHz in su, inuenzando le armoniche della
maggior parte degli strumenti più elevati.
MID Il controllo MID (medi) a 2,5kHz è di tipo “peaking”, ossia il circuito esalta o attenua creando una specie di campana
intorno a quella frequenza. L’eq MID influenza le frequenze superiori della maggior parte degli strumenti musicali e delle
voci. Per ottenere una buona presenza della voce, provate anche ad attenuare questo controllo negli altri canali.
LOW La manopola LOW (bassi) è un ltro “shelving”, che opera da 80Hz in giù, inuenzando cassa, basso e le ottave
inferiori di pianoforte e synth.
FX SEND
La manopola FX SEND consente di inviare i segnali al circuito DSP interno o ad un’eventuale unità effetti esterna. FX SEND
è configurato post-fader, ossia la quantità di invio del segnale di ciascun canale è determinata sia dalla regolazione FX
SEND di ciascun canale che dall’impostazione della manopola LEVEL del canale.
LEVEL
Il controllo LEVEL stabilisce la quantità del segnale del canale nel mix principale. La regolazione di questo controllo inuenza
anche EFF SEND.
LINE IN
Ogni ingresso dispone di un connettore sbilanciato jack da 6,35mm (1/4”).
Tenete presente che per ogni canale potete usare ogni volta l’ingresso microfonico o quello linea. Non dovete mai usare
simultaneamente entrambi i connettori di ingresso!
MIC
Ogni canale di ingresso dispone anche di un connettore microfonico bilanciato XLR. Il connettore XLR porta anche
l’alimentazione Phantom a +48 V.
NOTE: Quasi tutti i microfoni possono funzionare correttamente con l’alimentazione Phantom attiva. In ogni caso, prima
di collegare un microfono a questo ingresso, consultate attentamente il suo manuale di istruzioni.
ATTENZIONE: Non collegare a questo ingresso sorgenti sbilanciate utilizzando un adattatore!
1
2
3
4
5
27
28
29
Page 23

ITALIANO
SERIE V-MATE Diffusori Bi-amplificati Full-range | Manuale utente
23
1.2 SEZIONE DSP
ELENCO DEI PRESET
Questa legenda vi permette di scegliere rapidamente l’effetto necessario per il vostro mixing.
1-2 HALL REVERB – riverbero tipico di una grande sala
3 ROOM REVERB – riverbero tipico di una stanza, con pareti in gesso
4-7 DELAY – ritardo del suono originale
8-9 CHORUS – breve ritardo con lievi variazioni di timbro e intonazione del suono originale
10 FLANGER – breve ritardo con modulazione di originale timbro di un suono e intonazione
11-12 ROTARY SPEAKER SIMULATORS – simulazione della combinazione fra un amplificatore ed un altoparlante che
modifica il suono ruotando
13 OCTAVER – segnale sintetizzato il cui tono musicale è dell’ottava inferiore al suono originale
14 CHORUS + REVERB – combinazione di chorus e riverbero
15 CHORUS + DELAY – combinazione di chorus e delay
16 FLANGE + DELAY – combinazione di flanger e linea di ritardo
Generalmente Reverb, Delay e le varie combinazioni sono più adatte per le voci, mentre Flanger, Rotary e Octaver sono in
genere usati per gli strumenti.
DSP
Ogni modello incorpora un processore DSP interno che fornisce 16 preset, di cui 2 HALL REVERBS, 1 ROOM REVERB, 4
DELAY, 2 CHORUS, 1 FLANGER, 2 ROTARY SPEAKER SIMULATORS, 1 OCTAVER nonché tre multi-effetti.
Ruotate il selettore nché trovate l’effetto necessario per il vostro brano o per una parte del vostro brano.
Se sentite il segnale dell’effetto distorto, diminuite la mandata FX dei canali di ingresso.
MANOPOLA LEVEL
La manopola FX LEVEL regola il volume dell’effetto nel mix.
EXT. FX SEND/FOOTSW
Questo jack stereo da 6,35mm. (1/4”) ha due funzioni diverse.
La punta è utilizzata come interruttore da pedale per attivare/disattivare il DSP interno o l’unità di effetti esterna.
L’anello è utilizzato per inviare il segnale della mandata FX a un’unità effetti esterna.
La base del jack è la massa comune del pedale e della mandata effetto.
Se utilizzate un jack sbilanciato da 6,35mm. (1/4”), questa presa funziona solo per il pedale.
EXT FX RETURN
Questo jack stereo da 6,35mm. (1/4”) può essere collegato alle uscite di un’unità effetti esterna.
L’ingresso stereo non ha alcun controllo di livello, quindi dovete regolare il volume dall’uscita dell’unità effetti esterna
collegata. È inoltre possibile utilizzare questo ingresso stereo per un sub-mixer esterno o qualsiasi altro apparecchio di
linea, regolando correttamente il livello di uscita del dispositivo esterno.
Nel caso in cui l’unità effetti/dispositivo esterno sia stereo e dotato di due jack da 6,35mm. (¼”) mono, utilizzate un cavo
ad “Y” che termini con un solo spinotto stereo.
1.3 SEZIONE MP3
SD
Questo ingresso serve per l’inserimento delle schede SD.
USB
Questa porta serve per il collegamento del dispositivo USB.
ATTENZIONE: questa sezione digitale è molto sensibile alle temperature elevate, pertanto vi consigliamo
di non collocare ed esporre l’unità ai raggi diretti del sole per periodi di tempo prolungati.
6
7
8
10
11
12
9
Page 24

DIFFUSORI Bi-amplificati full-range
Manuale utente | Serie V-mate Diffusori Bi-amplificati Full-range
24
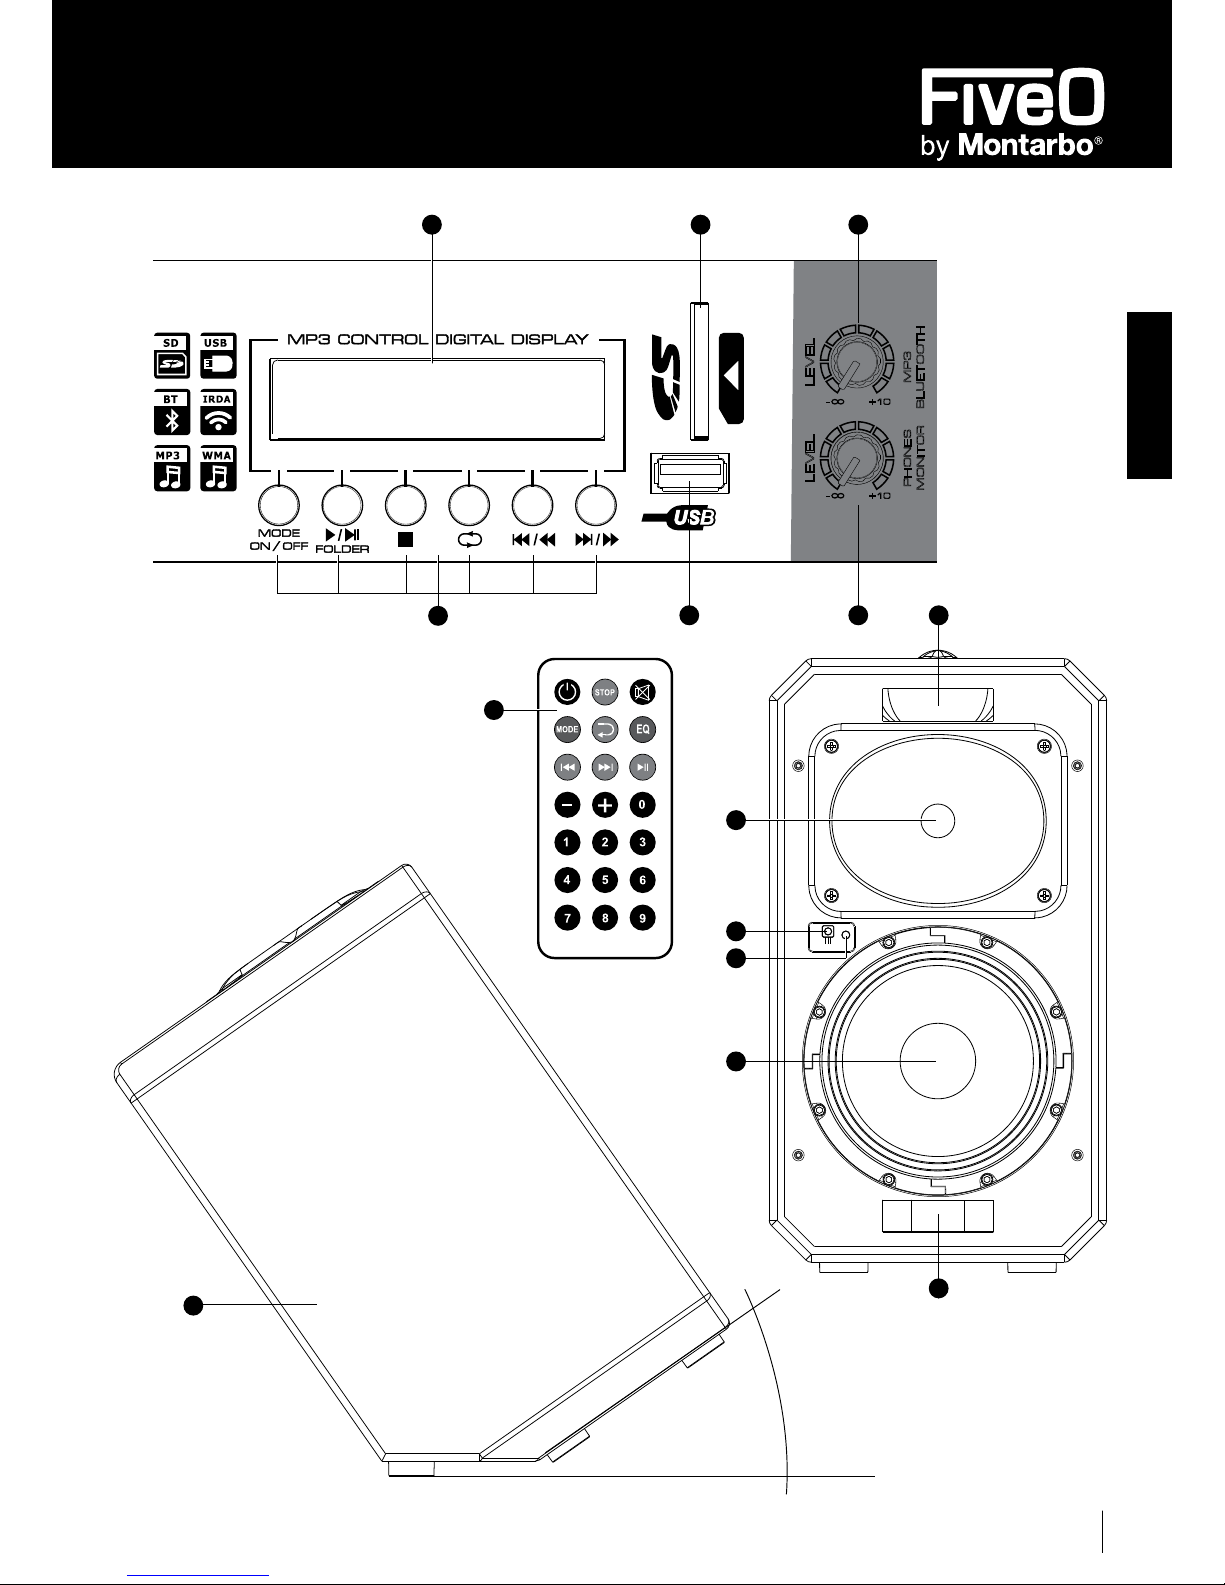
CONTROL DIGITAL DISPLAY
Il display a 2 righe di 16 caratteri permette di controllare con attenzione tutto il contenuto del dispositivo inserito nella
porta SD e/o il dispositivo collegato alla porta USB.
Utilizzando il lettore MP3 controllato a distanza via Bluetooth, il display mostrerà solo “CONNECTED”.
TASTI
MODE ON/OFF Premete questo tasto per selezionare la modalità di riproduzione tra CARD USB/SD e Bluetooth.
Premendo questo tasto per più di tre secondi potete spegnere o riaccendere il lettore.
PLAY/PAUSE Consente di riprodurre e mettere in pausa il lettore. Tenete premuto questo tasto per selezionare la
modalità di riproduzione T-ALL. T-ALL è per la riproduzione dei primi dieci brani di ogni cartella.
STOP Interrompe la riproduzione.
REPEAT Premete questo tasto per selezionare la modalità di riproduzione tra ALL-ONE-RANDOM. Premendo
più volte il tasto REPEAT, il modo di riproduzione cambia come segue: ALL – ONE – RANDOM.
ALL è la riproduzione di tutti i brani in ordine numerico, ONE è la riproduzione di un solo brano,
RANDOM è la riproduzione casuale. L’impostazione di fabbrica della riproduzione è ALL.
ATTENZIONE: il lettore MP3 riproduce i brani in funzione della sequenza di caricamento (ordine di upload da PC)
di conseguenza il primo brano caricato sarà il primo ad essere riprodotto dal lettore, il secondo sarà il successivo
e così via. Pertanto la playlist di riproduzione deve essere creata in anticipo secondo le vostre esigenze. Per
cambiare l’ordine di riproduzione, dovete caricare nuovamente tutti i brani secondo le vostre necessità o creare
opportunamente una nuova cartella contenente la playlist desiderata.
PREV Riproduce il brano precedente; tenendo premuto il tasto si attiva il riavvolgimento veloce.
NEXT Riproduce il brano successivo, tenendo premuto il tasto si attiva l’avanzamento veloce .
TELECOMANDO
ON/OFF Accende o spegne il lettore Mp3.
STOP Premete questo tasto per interrompere la riproduzione.
MUTE Premete questo tasto per silenziare il lettore MP3.
MODE Premete questo tasto per selezionare la modalità di riproduzione tra CARD USB/SD e Bluetooth
®
.
REPEAT Premete questo tasto per selezionare la modalità di riproduzione tra ALL-ONE-RANDOM. Premendo
più volte il tasto REPEAT, il modo di riproduzione cambia come segue: ALL – ONE – RANDOM.
ALL è la riproduzione di tutti i brani in ordine numerico, ONE è la riproduzione di un solo brano,
RANDOM è la riproduzione casuale. L’impostazione di fabbrica della riproduzione è ALL.
EQ
Premere questo tasto per scegliere la sezione il preset di EQ dell’MP3 tra JAZZ, ROCK, POP, CLASSIC, USER.
PREV Premete questo tasto per riprodurre il brano precedente.
NEXT Premete questo tasto per riprodurre il brano successivo.
PLAY/PAUSE Premete questo tasto per la riproduzione o per mettere in pausa il lettore.
VOL- Premete questo tasto per ridurre il volume del brano in riproduzione.
VOL+ Premete questo tasto per aumentare il volume del brano in riproduzione.
TASTI NUMERICI Premete la combinazione di tasti per riprodurre il brano desiderato.
Nota: Mantenete una “linea visuale retta e senza ostacoli” fra il telecomando e il led ricevente posto sul frontale
del diffusore accanto al led blu di accensione.
1.4 PROCEDURA BLUETOOTH® iOS
IPHONE – IPAD
1) Dal menù Impostazioni => attivate bluetooth sul dispositivo Apple => “I” => Dispositivi => Cerco…
2) Portate il potenziometri Master e MP3 Volume al centro. Ciò è importante per sentire i toni di riconoscimento emessi
dalla sezione MP3/BLUETOOTH.
3) Accendete l’unità V-MATE .
13
14
15
Page 25

ITALIANO
SERIE V-MATE Diffusori Bi-amplificati Full-range | Manuale utente
25
4) Premete il tasto MODE (di default l’unità accende l’MP3)=> sul display compare la scritta bluetooth Initializing…
e si sente un tono (bup). Quindi inizia la procedura di riconoscimento
5) L’unità emette due toni in sequenza (bup – bup) quando riconosce il dispositivo esterno. Dal menù “Dispositivi”
dell’Iphone o Ipad è possibile visualizzare la scritta BLUETOOTH (in maiuscolo). Significa che il dispositivo Apple è in
sync con il diffusore. In tal caso procedete alla connessione.
Andate direttamente al punto 11.
6) Nel caso in cui nel display appaia la scritta “Unconnected”, ripetete i passi 4 e 5 della procedura, per fare un nuovo
tentativo.
7) Nel caso in cui dopo 3 tentativi appaia ancora la scritta “Unconnected” spegnete il diffusore mettendo l’interruttore
AC in OFF.
8) Prima di riaccendere la vostra V-MATE cancellate o ignorate gli altri dispositivi bluetooth presenti sui dispositivi Apple.
Menù “Dispositivi “=>freccia blu clic su “Ignora questo dispositivo”.
9) Attendete 5 secondi e riaccendete l’unita. AC “I”.
10) Ripetete i passi 4 e 5 della procedura.
11) Per connettere i dispositivi premete “non connesso” sul device esterno. A connessione avvenuta l’apparecchio emette
un tono (bip) e visualizza la scritta “Connected” sul display.
12) Da questo momento potete inviare qualsiasi sorgente sonora attraverso la connessione Bluetooth.
Per ulteriori informazioni riguardo il sync del bluetooth con altri sistemi operativi, consultate il
nostro sito www.fiveo.it, o inviate un’email a: mail@fiveo.it
1.5 SEZIONE MASTER
MANOPOLA MASTER
La manopola MASTER regola il volume complessivo delle uscite principali. Utilizzate questa manopola con attenzione,
controllando costantemente la qualità di uscita del vostro sistema.
LED LIMIT
Questo LED si accende quando gli amplicatori sono spinti oltre i loro limiti ed un circuito limitatore entra in funzione per
prevenire danni agli altoparlanti.
LED POWER ON
Questo LED si accende, insieme a quello blu frontale, quando l’interruttore di accensione è su ON.
Prima di accendere o spegnere l’apparecchio, assicuratevi che la manopola MASTER sia in posizione “-∞”.
PHONES/MONITOR OUT
Questo connettore sbilanciato stereo da 6,35mm (1/4 “) può essere utilizzato per monitorare il segnale Master del V-MATE.
Il livello generale sarà regolato dalla manopola PHONES/MONITOR (posto vicino alla sezione lettore MP3), in combinazione con
la manopola MASTER. Potete collegare a questa uscita una cufa o una unità esterna, come un registratore o casse per monitor.
MASTER OUT (USCITA NON AMPLIFICATA)
Questo connettore bilanciato XLR di linea può essere usato per inviare il segnale Master a un dispositivo audio esterno.
Il livello generale sarà regolato dalla manopola MASTER.
È possibile collegare questa uscita anche ad unità esterne, come un registratore o un altro impianto audio, per diffondere
il mix in altri ambienti.
ATTENZIONE: non collegate questa uscita a un ingresso microfonico!
PHONES/MONITOR LEVEL
Questa manopola regola, in combinazione con la manopola MASTER, il livello complessivo dell’uscita PHONES/MONITOR.
Tenete presente che questa manopola si trova vicino al lettore MP3.
MP3 BLUETOOTH
®
LEVEL
Questa manopola regola il livello di riproduzione del lettore MP3 o del segnale del Bluetooth
®
.
21
22
20
19
18
17
16
Page 26

DIFFUSORI Bi-amplificati full-range
Manuale utente | Serie V-mate Diffusori Bi-amplificati Full-range
26
1.6 SEZIONE DI ALIMENTAZIONE
SELETTORE DI TENSIONE ALTERNATA
Questo selettore vi permette di cambiare la tensione adeguandola a quella presente nella vostra zona.
AVVERTENZA: spegnete l’apparecchio prima di modificare la tensione di esercizio.
NOTA: Questo selettore non è presente nel modello V-MATE 506.
INTERRUTTORE POWER ON / OFF
Premete la parte superiore di questo interruttore per accendere l’unità. Premete la parte inferiore per spegnere l’unità.
RICETTACOLO AC LINE IN E PORTAFUSIBILE
La presa AC LINE IN è conforme allo standard IEC. Ogni confezione è fornita del cavo di alimentazione necessario per la
vostra zona. Per la vostra sicurezza, non scollegate mai il polo di terra.
Nel caso in cui doveste sostituire il fusibile utilizzate sempre quello dello stesso tipo e valore dell’originale. Consultate le
caratteristiche tecniche per informazioni dettagliate del fusibile per ogni modello della serie V-MATE.
1.7 CABINET
FORMA DEL MOBILE
Il fondo della cassa presenta un taglio obliquo di 35° che consente l’inclinazione del diffusore nelle applicazioni di
monitoraggio e ascolto da terra.
FORO PER PALO
Il foro standard di 36mm (1,4”) consente il montaggio del diffusore su treppiede o sugli accessori/sostegni da parete dedicati.
PIEDINI DI GOMMA
Questi sostegni di gomma consentono il collocamento a pavimento e l’impilamento dei diffusori durante le fasi di
magazzinaggio.
MANIGLIA
Per rendere più agevole il trasporto abbiamo dotato il cabinet di una pratica maniglia in ABS.
Non utilizzatela per appendere le casse!
IR LED
Led ricevitore del telecomando. Non coprite/oscurate questa sezione!
ON
Questo led di colore blu si illumina quando il diffusore è acceso.
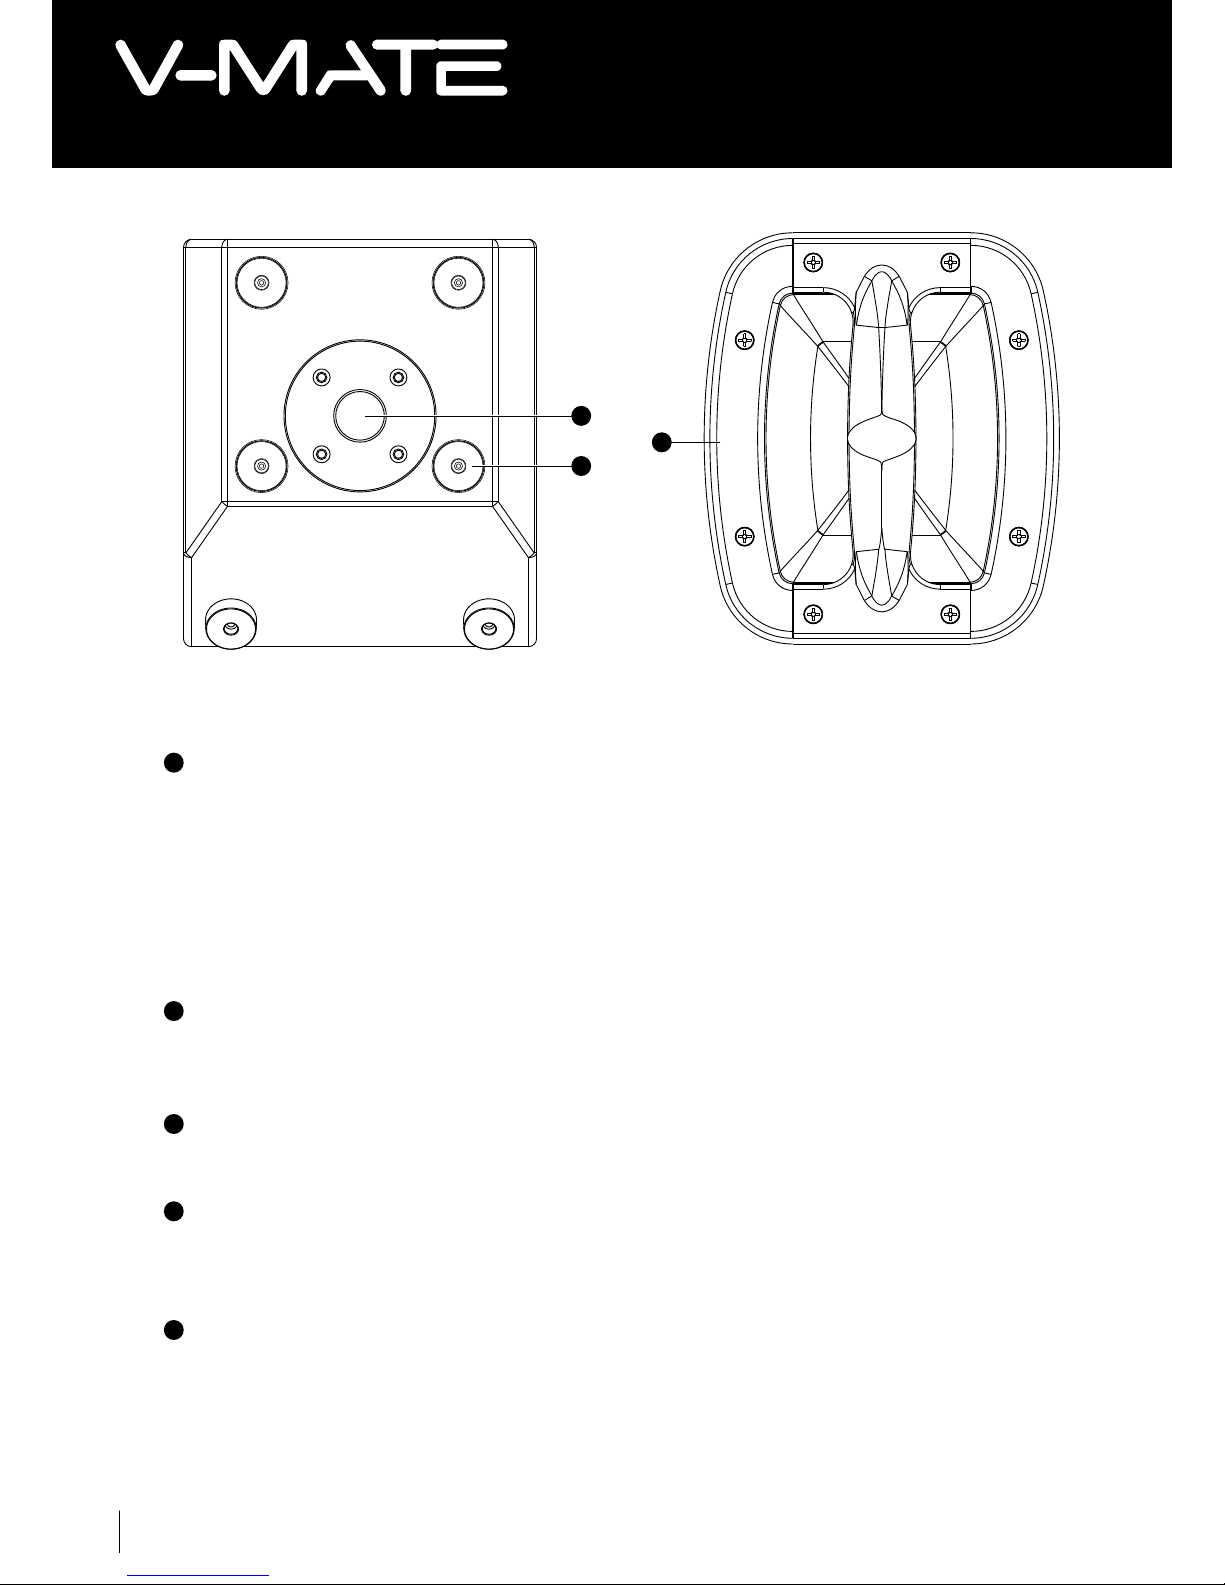
DRIVER E TROMBA
Il driver a compressione riproduce le frequenze superiori al punto di crossover; la tromba ovale garantisce un ampio angolo
di copertura. L’unico modello non dotato del caricamento a tromba è il V-MATE 506 che ha un tweeter a cupola con
un piccola guida d’onda.Consultate la tabella delle caratteristiche tecniche per informazioni dettagliate di ogni modello.
WOOFER E PORTE REFLEX
Il woofer riproduce le frequenze inferiori al punto di crossover.
Le porte reex aumentano l’efcienza del woofer e migliorano la riproduzione delle frequenze più basse.
Consultate la tabella delle caratteristiche tecniche per informazioni dettagliate di ogni modello.
23
24
25
26
27
28
29
30
31
32
33
Page 27

ITALIANO
SERIE V-MATE Diffusori Bi-amplificati Full-range | Manuale utente
27
Ingressi 4 ingressi analogici + lettore MP3 + connessione Bluetooth
Uscite Uscita Master (Mix Direct Out); uscita stereo Monitor/Headphones
Controlli e connettori
Connettore stereo da 6,35mm (¼”). Footswitch FX ON/OFF sulla punta, mandata FX
sull’anello, Connettore stereo da 6,35mm (¼”) per ritorno FX
Unità effetti DSP multieffetti con 16 preset
USB/MP3 player Livello Master e telecomando ad infrarossi
Funzione Bluetooth
V-MATE riproduce tracce audio virtualmente da tutti gli smartphone e tablet,
grazie alla tecnologia Bluetooth incorporata
MICROPHONE INPUT
Tipo XLR, bilanciato elettronicamente
Alimentazione Phantom +48V DC
Max. livello d’ingresso -53dB
Impedenza
1KΩ
Rapporto segnale/rumore
-50 dB
LINE INPUT (1-3)
Tipo Connettore sbilanciato jack da 6,35mm (¼”)
Impedenza 100kΩ
Max. livello d’ingresso -33 dB
Distorsione (THD+ N) 0.1%
EQ
Low 80Hz, +/- 15 dB
Mid 2,5kHz, +/- 15 dB
High 12kHz, +/- 15 dB
MASTER OUT
Tipo XLR
Impedenza 47 kΩ
Max. livello di uscita 0 dB
PHONES/MONITOR OUT
Tipo Connettore stereo sbilanciato da 6,35mm (¼”)
Impedenza 47KΩ
Max. livello di uscita 0dB
2.1 CARATTERISTICHE COMUNI
Page 28

DIFFUSORI Bi-amplificati full-range
Manuale utente | Serie V-mate Diffusori Bi-amplificati Full-range
28
506 508 510
Sistema
Attivo - bass reex Attivo - bass reex Attivo - bass reex
Amplificazione
Classe D con SMPS Classe D con SMPS Classe D con SMPS
Potenza continua (LF-HF) 80W + 20W 130W + 20W 200W + 30W
Potenza massima (LF-HF)
100W + 20W 130W + 70W 250W + 50W
HF Driver
Tweeter da 1” al neodimio
Driver a compressione da
34mm con uscita da 25,4mm.
(1”)
Driver a compressione da
34mm con uscita da 25,4mm.
(1”)
Copertura della tromba
--- 90° x 60° 90° x 60°
LF Driver
6
” custom con bobina mobile
da 38mm
8” custom con bobina mobile
da 38mm
10” custom con bobina mobile
da 38mm
Risposta in frequenza 80-20kHz 80-20kHz 68-20kHz
CABINET
Materiali
MDF da 12mm rinforzato MDF da 12mm rinforzato MDF da 12mm rinforzato
Griglia
Acciaio perforato da 1.5mm Acciaio perforato da 1.5mm Acciaio perforato da 1.5mm
Finitura
Verniciatura anti-graffio con
alta resistenza meccanica alle
sollecitazioni
Verniciatura anti-graffio con
alta resistenza meccanica alle
sollecitazioni
Verniciatura anti-graffio con
alta resistenza meccanica alle
sollecitazioni
Alimentazione
110~120 / 220~240V AC 50/60Hz
110~120 / 220~240V AC 50/60Hz
110~120 / 220~240V AC 50/60Hz
Assorbimento
100W 180W 270W
Fusibile
1.5A L 250V 3.15A L 250V 3,15A L 250V
Dimensioni (L x H x P)
240 x 380 x 281mm 260 x 465 x 300mm 300 x 517 x 300mm
Peso
9Kg 12Kg 15Kg
2.2 CARATTERISTICHE DEI MODELLI
Page 29

ITALIANO
SERIE V-MATE Diffusori Bi-amplificati Full-range | Manuale utente
29
NOTE
Page 30

DIFFUSORI Bi-amplificati full-range
Manuale utente | Serie V-mate Diffusori Bi-amplificati Full-range
30
NOTE
Page 31

ITALIANO
SERIE V-MATE Diffusori Bi-amplificati Full-range | Manuale utente
31
NOTE
Page 32
Full range bi-ampliFied loudspeakers
EN The information contained in this manual have been carefully drawn up and checked. However no responsibility will be assumed for any incorrectness.
This manual cannot cover all the possible contingencies which may arise during the product installation and use. Should further information be desired,
please contact us or our local distributor. Elettronica Montarbo srl can not be considered responsible for damages which may be caused to people and
things when using this product. Specifications and features are subject to change without prior notice.
IT Le informazioni contenute in questo manuale sono state attentamente redatte e controllate. Tuttavia non si assume alcuna responsabilità per eventuali
inesattezze. Questo manuale non può contenere una risposta a tutti i singoli problemi che possono presentarsi durante l’installazione e l’uso dell’apparecchio.
Siamo a vostra disposizione per fornirvi eventuali ulteriori informazioni e consigli. Elettronica Montarbo srl non può essere ritenuta responsabile per danni
o incidenti a cose o persone, causati o connessi all’utilizzazione o malfunzionamento dell’apparecchio.
Elettronica Montarbo srl
via G. di Vittorio 13 | 40057 Cadriano Granarolo Emilia (BO) ITALY
T +39 051 6047711
F +39 051 765226
@ mail@fiveo.it
www.fiveo.it
Company under the control of EKO Music Group SpA
©2014 Elettronica Montarbo srl | Printed in China
EN The product is made in China under license of Elettronica Montarbo srl. The product is compliant with the EU legislation.
IT Prodotto in Cina per conto di Elettronica Montarbo srl. Prodotto conforme alle normative della Comunità Europea.
 Loading...