

Page 1
V-100 Violin / Viola Pickup
Thank you for your purchase of a FISHMAN product. Please read these instructions carefully. If you have any questions or problems, contact our
PPRROODDUUCCTT IINNFFOORRMMAATTIIOONN LLIINNEE
at
997788--998888--99666655
or at
tteecchh@@ffiisshhmmaann..ccoomm
The V-100 Violin / Viola Pickup is a bridge-mounted, piezo-ceramic pickup. It senses
string vibrations via a single piezo element, fastened to the instrument's wing slot with
a patented floating mount. The pickup is terminated with a Switchcraft™ 1/8" jack that
mounts to the tailpiece.
The V-100 installs in minutes, with only minor alterations required. Its low mass minimizes any damping or muting that could affect the instrument's acoustic tone. The V100 provides a natural, acoustic sound for arco or pizz playing styles.
PARTS LIST
• V-100 Violin / Viola Pickup
• 1/8" to 1/4" Instrument Cable
CAUTION
As might be expected of a high performance, vibration-sensing transducer, the FISHMAN V-100 should be handled with care, particularly during installation. However,
once installed as instructed below, this device is well protected from abuse and
should provide years of trouble-free service.
P
RELIMINARY
1. Remove all rosin deposits from the bridge of the instrument.
2. Examine the bridge closely to make sure that the wing slots are free of warps or
irregularities and that the slots present flat parallel faces.
The FISHMAN V-100 VIOLIN / VIOLA PICKUP is warranted to function for a period
of One (1) Year from the date of purchase. If the unit fails to function properly
within the warranty period, free repair and the option of replacement or refund in
the event that FISHMAN is unable to make repair are FISHMAN’s only obligations.
This warranty does not cover any consequential damages or damage to the unit due
to misuse, accident, or neglect. FISHMAN retains the right to make such
determination on the basis of factory inspection. Products returned to FISHMAN for
repair or replacement must be shipped in accordance with the Return Policy, as
follows. This warranty remains valid only if repairs are performed by FISHMAN.
This warranty gives you specific legal rights and you may also have other rights
which may vary from state to state.
Return Policy
To return products to FISHMAN TRANSDUCERS, you must follow these steps...
1. Call FISHMAN TRANSDUCERS at 978-988-9199 for a Return Authorization
Number (“RAN”).
2. Enclose a copy of the original Bill of Sale as evidence of the date of purchase,
with the product in its original packaging and a protective carton or mailer.
3. FISHMAN TRANSDUCERS’ technicians will determine whether the item is
covered by warranty or if it instead has been damaged by improper customer
installation or other causes not related to defects in material or workmanship.
4. Warranty repairs or replacements will be sent automatically free of charge.
5. If FISHMAN TRANSDUCERS determines the item is not covered by warranty, we
will notify you of the repair or replacement cost and wait for your authorization to
proceed.
FISHMAN T RANSDUCERS
340-D Fordham Road Wilmington MA 01887 USA
Phone 978-988-9199 • Fax 978-988-0770
www.fishman.com
009-015-003 12-02
®
®
2
V-100 Violin / Viola Pickup
Page 2
The spring (made of tempered beryllium copper) provides the proper
tension for a snug fit in wing slots ranging from .060 inch to .090 inch (1.2
mm to 2.3 mm).
NOTE: For best performance, the wing slot opening should be exactly
.070" (1.8mm).
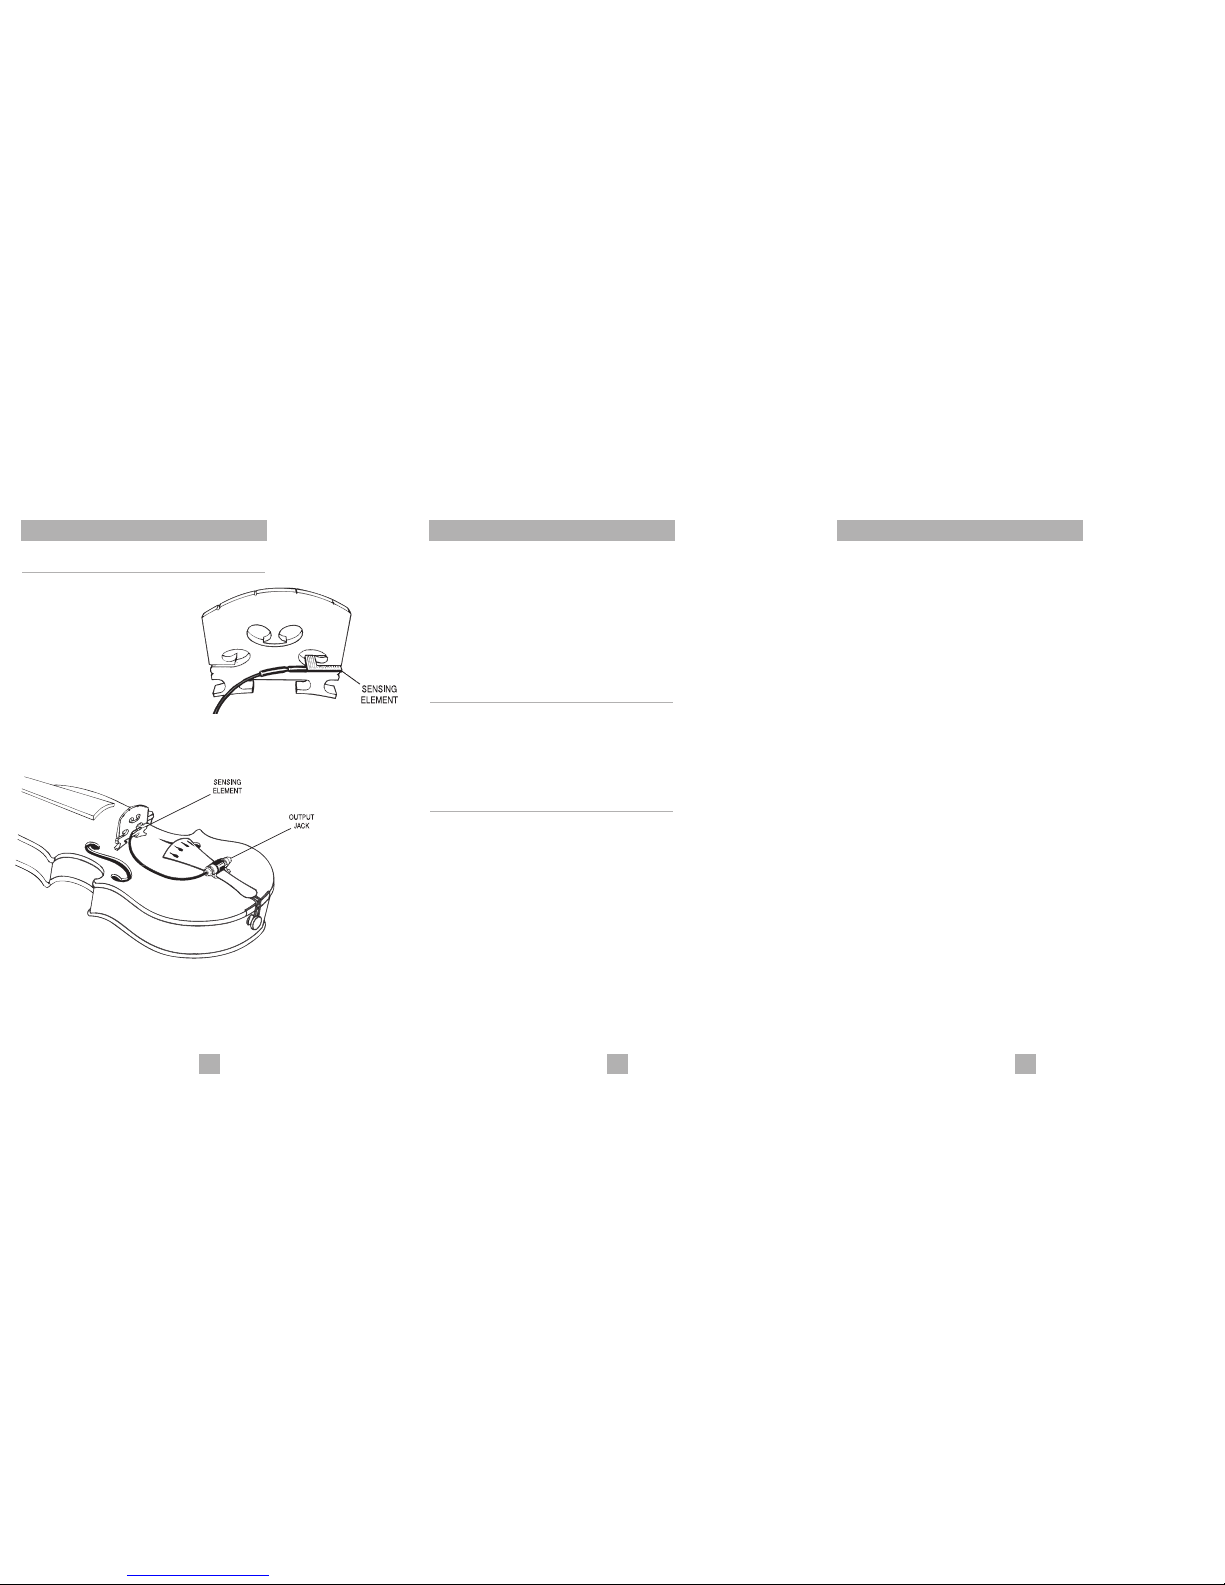
3. Once the transducer is properly installed in the bridge, attach the output
jack to the tailpiece with the black plastic tie wrap.
FINE T UNING
Once the V-100 is properly mounted, plug the instrument into an amplifier and
play at a low volume. Carefully shift the position of the pickup and listen for
the best location.
NOTE: If installation is to be permanent, a small drop of adhesive on the side
(lower face) of the transducer can be used.
PLUGGING I N
Due to the nature of passive pickups, the type of cable you use and the input
you plug into will affect the quality of your sound.
Instrument Cable
Cable lengths over 10 feet (before preamp) will cause audible high frequency
loss. Use a high quality, low capacitance shielded cable. This will ensure
minimal tone coloration and hum. Using fully shielded metal plugs will also
help eliminate hum.
Kinds of Audio Inputs
Because of the lack of standardization for high impedance audio inputs, special
attention should be paid to what you are plugging into:
The V-200 Professional will sound best when plugged directly into an input
with a 10 MΩ impedance; the full frequency response of the instrument is
reproduced.
The V-200 Professional can also be plugged into inputs as low as 1 MΩ with
adequate results; the bass frequencies will be slightly rolled off.
INSTALLATION
1. Measure the opening of the
wing slot on the bridge with a
vernier caliper. The opening
should be between .060-.090"
(1.5-2.3mm) for proper fit.
If the wing slot measures less
than .060" (1.5 mm), employ a
qualified repairman to enlarge
the wing slot.
If the wing slot measures more than .090 inch (2.3 mm) as is the case in
violas, a small wooden shim may be required. If so, use an adhesive to
bond the shim to the "leg" face.
2. Slide the V-100 Transducer into the wing slot of the bridge (See Fig.1).
Make certain that the sensing element is in contact with the wing face and
that the spring is in contact with the corresponding "leg" face of the bridge.
3
V-100 Violin / Viola Pickup
4
V-100 Violin / Viola Pickup
Preamps
We strongly recommend using a 10 MΩ, impedance matching, buffered
preamp in conjunction with the pickup.
A matching preamp will:
1. Realize the full frequency response potential of the pickup.
2. Permit long cable runs (after the preamp) without signal deterioration.
3. Allow precise volume and tone shaping with dedicated EQ.
4. Ensure compatibility with virtually any instrument level audio input
available.
Fishman Transducers manufactures a complete line of compatible preamps,
all with 10 MΩ inputs:
POWERJACK - Miniature Endpin Preamp
MODEL GII - Outboard Acoustic Instrument Preamp
PRO-EQ II - 4 Band Acoustic Instrument Preamp
PRO-EQ PLATINUM - Outboard Acoustic Instrument Preamp / EQ / D.I.
POCKET BLENDER - 2 Channel Pickup / Mic Preamp
Musical Instrument Amplifiers
Most musical instrument amplifiers (at least 1 MΩ input impedance) will yield
useable results. Acoustic instrument amplifiers have a 10 MΩ Piezo input,
ideally matching the pickup.
Direct Boxes
You can plug the V-200 Professional into an "active" direct box (1 MΩ to 10
MΩ input) with very good results. Using a passive direct box will sound weak
and thin.
PA / Recording Consoles
Professional PA and recording consoles have a much lower input impedance
than what is acceptable for the V-200 Professional ; you will need an
impedance matching preamp. Plugging a passive piezo pickup into a mixer
without an impedance matching preamp will sound harsh and thin.
5
V-100 Violin / Viola Pickup
FIG. 1
FIG. 2
 Loading...