

Page 1

www.fishman.com
USER GUIDE
TONEDEQ | AFX
Page 2

2
Important Safety Information
To ensure your personal safety and the safety of others, operate this apparatus only after
completely reading this instruction manual and heeding the warnings listed below.
This equipment has been tested and found to comply with the limits for a Class B digital device, pursuant to Part
15 of the FCC Rules. These limits are designed to provide reasonable protection against harmful interference in a
residential installation. This equipment generates, uses, and can radiate radio frequency energy and, if not installed
and used in accordance with the instructions, may cause harmful interference to radio communications. However,
there is no guarantee that interference will not occur in a particular installation. If this equipment does cause
harmful interference to radio or television reception, which can be determined by turning the equipment off and
on, the user is encouraged to try to correct the interference by one or more of the following measures:
– Reorient or relocate the receiving antenna.
– Increase the separation between the equipment and receiver.
– Connect the equipment into an outlet on a circuit different from that to which the receiver is connected.
– Consult the dealer or an experienced radio/TV technician for help.
Cet appareil a été testé et reconnu conforme aux limites des appareils numériques de classe B, conformément
à l’alinéa 15 des réglementations fédérales américaines. Ces limites sont destinées à assurer une protection
raisonnable contre les interférences dans un environnement résidentiel. Cet appareil produit, utilise et peut
émettre de l’énergie haute-fréquence et, s’il n’est pas installé et utilisé conformément aux instructions, peut
provoquer des interférences dans les communications radio. Cependant, les risques d’interférences ne peuvent
pas être totalement exclus. Si l’appareil cause des interférences lors de la réception d’émissions de radio ou de
télévision (il suffit pour le constater de placer l’appareil successivement hors et sous tension), il est recommandé à
l’utilisateur de prendre l’une ou plusieurs des mesures suivantes :
– Réorientez ou déplacez l’antenne réceptrice.
– Éloignez l’appareil du récepteur.
– Connectez l’appareil à une prise secteur sur une ligne différente de celle du récepteur.
– Consultez le revendeur ou un technicien radio ou télévision expérimenté pour toute assistance.
NOTE: Fishman Transducers, Inc. is not responsible for unauthorized equipment modications that could violate FCC rules, and/ or void product safety certications.
EU Declaration of Conformity CE: Hereby, Fishman declares that this ToneDEQ is in
compliance with the essential requirements and other relevant provisions of Directive
1999/5/EC.
Copyright © 2015 FISHMAN TRANSDUCERS, INC.
All rights reserved. No part of this document may be reproduced in any form without the
written permission of FISHMAN TRANSDUCERS, INC.
Page 3
3
Welcome
Thank you for making Fishman a part of your acoustic experience. We are proud
to offer you the nest acoustic amplication products available; high-quality
professional-grade tools to empower you to sound your very best. We are
condent TONEDEQ | AFX will both enhance and inspire your music making.
Quick Start
Power • Install a fresh 9V battery (not included) or connect a Fishman 910-R
power adapter.
Set the controls • Volume at minimum and all other controls as shown below.
Plug in • Use standard ¼-inch and XLR shielded instrument cables.
Set input trim • Play hard and adjust the input trim (on the right side) so the
level LED lights green and occasionally ashes red.
Turn up • Raise the volume and adjust the low, mid and high controls.
Select effects • Audition effects using their select knobs and foot switches.
Adjust each effect’s intensity using its individual level control.
Page 4
4
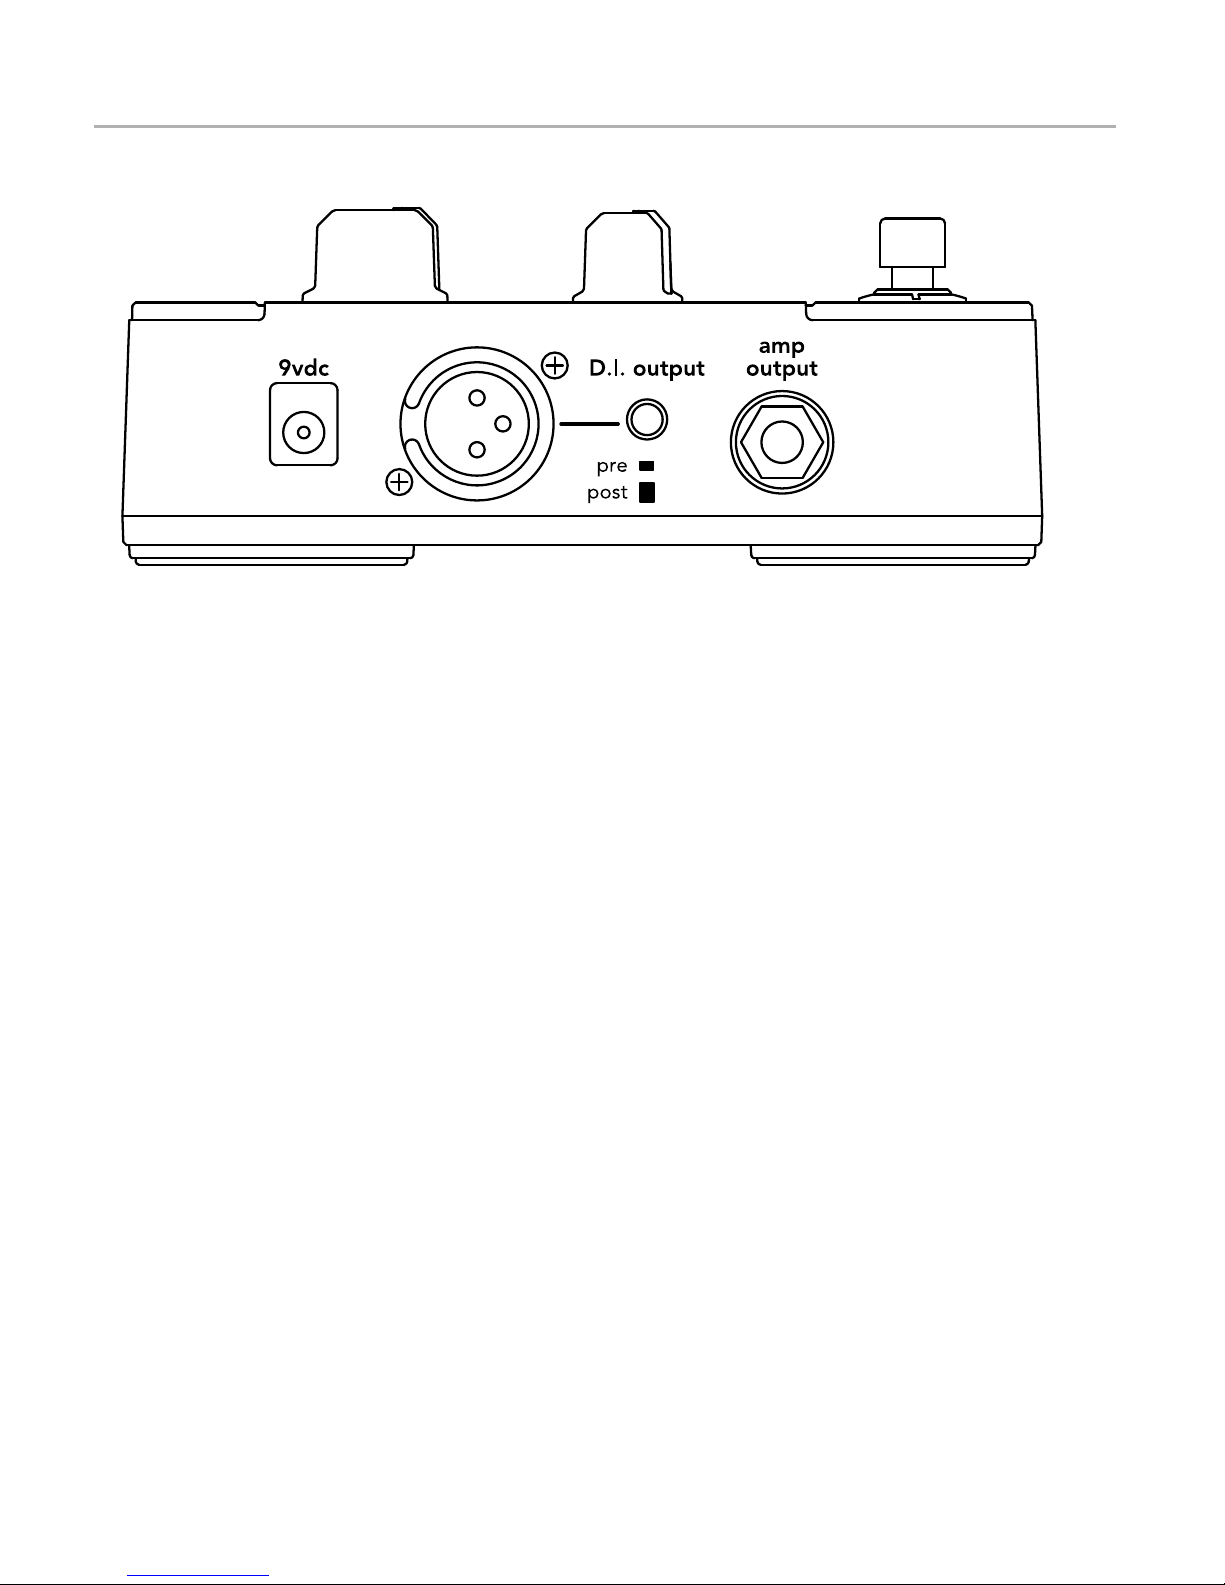
Left Side Panel
9VDC
Power may be supplied by either a 9V battery (battery compartment
underneath the pedal) or the Fishman 910-R power adapter.
XLR D.I. Output
Connect a standard microphone cable here to feed recording equipment or a
sound reinforcement mixing console. When the 1/4” output is also connected,
this D.I. output’s ground is automatically lifted to prevent any unwanted ground
loops. This D.I. provides a xed-level output, unaffected by the volume control.
D.I. Output Pre/Post
Choose between a true D.I. (pre EQ) or an effected XLR output (post EQ).
• Post is useful in live venues (especially if you are mixing from onstage)
where you want your “dialed-in” sound to come through the PA.
• Set this switch to the Pre position when you want a “at” DI signal
going to the board and you wish to leave it to the sound-person or
recording engineer to dial up the instrument tone from their console.
Amp Output
Use a standard ¼-inch instrument cable to connect the amp output to your
amplier, mixer or effects devices. You can also connect the amp output to an
unbalanced input on a recording system.
Page 5

5
Right Side Panel
Input
Plug in your instrument here with a standard ¼-inch instrument cable. If you have
a passive undersaddle pickup (no battery onboard), always plug into this preamp
pedal rst, even if you use a pedal tuner.
Insert a plug into the input jack, and the TONEDEQ | AFX powers up. To
conserve the battery, remove the plug from the input when not in use.
Input Trim
Raise or lower the input trim to optimize the input level for your pickup. Play
hard and adjust input trim so the level LED lights green and occasionally ashes
red. Some pickup systems may not cause the light to ash red at all and other
onboard preamps may require you to turn their output down to achieve an
optimum level.
Boost Level
The amp output and D.I. output level can be boosted using the boost foot
switch. The boost level controls the amount of increased output level from 3dB
to 9dB.
Page 6

6
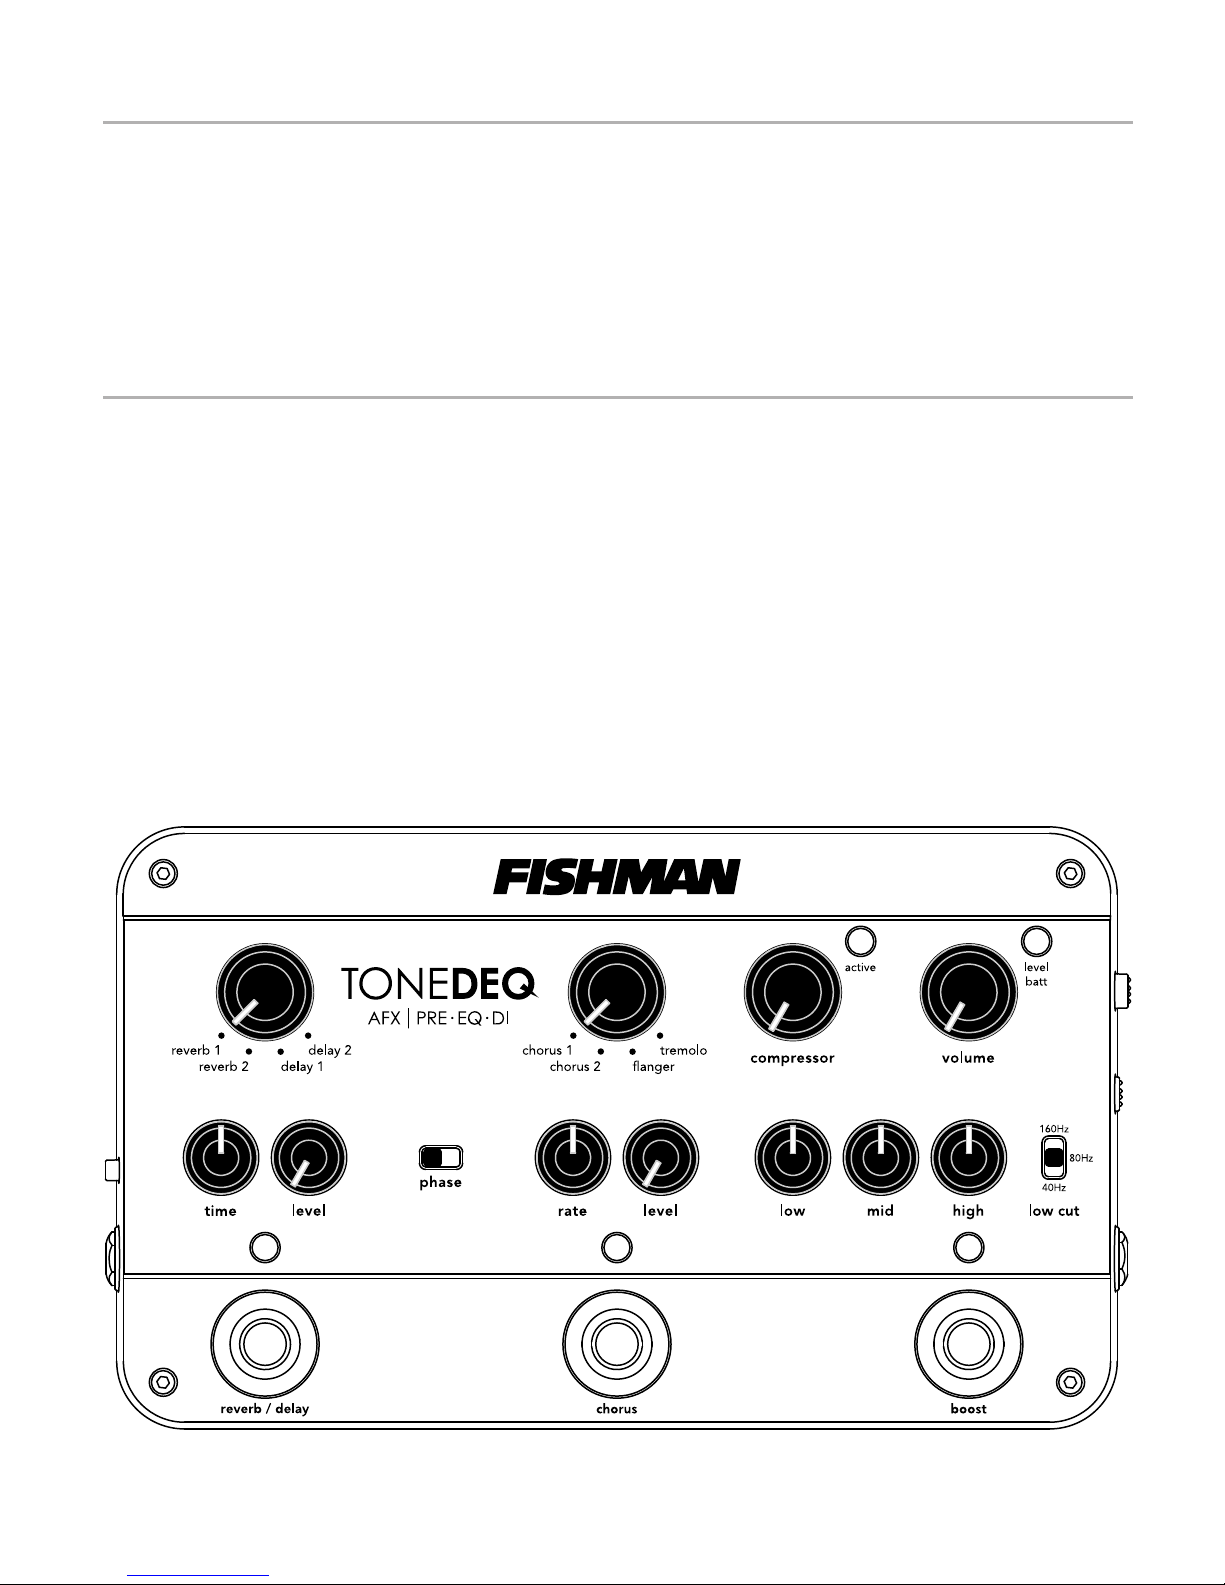
Front Panel
Volume
The volume control affects the 1/4 inch output level only.
For the cleanest signal, set the volume as high as possible
without clipping the next device in the signal chain. If you
hear distortion and the level light is not ashing red,
reduce the volume. For setting proper levels, refer to
input trim on page 5.
Compressor
The compressor uses a sophisticated leveling circuit to automatically reduce the
volume of loud sounds determined by your playing level and the setting of the
compressor control.
As you turn this knob clockwise, your overall playing
dynamics become increasingly limited, making softer
notes louder and controlling loud spikes in your
playing. This can be helpful in performances where
you desire a more even level to your playing. At its
maximum setting, there may be some overall
increase in the output level.
The active LED will light green to indicate that the
compressor is beginning to affect your dynamics. If the signal level continues
to increase to the point where 6dB of compression has occurred, the LED will
change to amber.
Battery Replacement
The batt indicator will light steadily when it is time to change the battery. Open
the battery door underneath the pedal and install a fresh 9V alkaline or lithium
battery. When the batt LED comes on you have approximately one hour of
remaining battery life. Approximate battery life is 12 hours using common
alkaline battery and 18 hours with a lithium battery.
Page 7

7
Front Panel (cont.)
Tone Controls
Low • Boost here to add depth and weight to the sound of the instrument.
Mid • Turn all the way left for a smooth “scooped out” tone at high volumes.
Raise the control to the right of center to add midrange “bite” to the sound.
High • Boost to cut through the mix. Cut to mellow and subdue the sound.
Low Cut • Adjust this control to affect the lowest frequencies that can cause
“rumble” or thumping sounds while you play.
Phase
The phase switch ips the polarity of your instrument signal from
positive to negative, changing its relationship to the sound
coming from the amplier. One phase setting usually provides
better resistance to feedback than the other and will vary
depending on the instrument and playing environment.
Another approach to determining optimal phase is the selection which sounds
or feels most natural when playing. In certain playing environments the phase
switch may not have an audible impact.
The phase switch also affects the signal polarity to the balanced XLR D.I. and 1/4
inch outputs, synchronizing the amp output with other sound systems in use.
Boost
The boost foot switch increases the pedal’s overall output
level at the amp and D.I. output from 3dB to 9dB. When
activated, the LED above the foot switch will light steadily.
The amount of level increase is determined by the boost level
control on the pedal’s right side panel.
Page 8

8
Front Panel (cont.)
TONEDEQ | AFX offers two independent effects processors that run in parallel
with the analog preamp, compressor and EQ circuits to reduce the effect of
coloration on your instrument’s sound.
Reverb & Delay Effects
Time • Sets the overal “length” of the reverb or delay
effect. For reverb effects, increasing this control will make
the reverb “tail” more obvious. For delay effects, increasing this control will add space between each repeat.
Level • The level control mixes the effect in parallel,
adding as much or as little effect into your direct sound.
Effects:
• Reverb 1
• Reverb 2
• Delay 1
• Delay 2
Block Diagram
Page 9

9
Front Panel (cont.)
Chorus Effects
Rate • Sets the speed (rate) or intensity of the selected
effect.
Level • The level control mixes the effect in parallel,
adding as much or as little effect into your direct sound.
Effects:
• Chorus 1
• Chorus 2
• Flanger
• Tremolo
Page 10

10
Technical Specifications
Input impedance: 10M Ohm
Input trim gain range: -6dB to +14dB
Nominal Output impedance: 1k Ohm, Amp Output
600 Ohm, D.I. Output
Maximum Output level: +8dBV (onset of clipping)
Baseline noise: -91dBV (A-weighted
)
Dynamic range: 97dB (A-weighted
)
Typical in-use current consumption: 37mA (62mA max.)
Typical 9V battery life: 12 hours using alkaline battery
18 hours using lithium battery)
9V adapter: Fishman 910-R
or suitable ltered and regulated,
200mA type, tip = negative
Tone Controls:
Low cut:
40Hz, 80Hz, 160Hz
Low control:
±14dB @ 100Hz
Mid control:
±12dB @ 700Hz, Q=1
High control:
±15dB @ 6.5kHz
Compressor:
Threshold:
Variable
Ratio:
2.3:1
Phase switch: Left position = non-inverting
Boost: Variable: +3dB to +9dB
Dimensions: 5.6” D x 9.5” W x 2.2” H
142mm D x 240.8mm W x 55mm H
Weight: 2.2lbs (1.0kg)
We reserve the right to change any of the the specications and information in
this manual without notice.
Page 11

11
Page 12

www.fishman.com
Fishman and Fishman Transducers are trademarks or tradenames of FISHMAN TRANSDUCERS, Inc. 513-300-199 Rev 2 9-15
 Loading...