

Page 1

Installation Guide
®
TM
EQUIPPED!
Installation Guide
SBT-Series
SoundBoard Transducer
Includes Installation Instructions for Models
SBT-C
for classical
SBT-E
with 1/4” endpin jack
SBT-HP
for harp & piano
Page 2

SBT Series - SoundBoard Transducer
SBT Series - SoundBoard Transducer
Thank you for choosing the Fishman SBT. Although it is a very simple and basic passive pickup, the SBT will reproduce the full, natural response of your instrument. Please follow the
installation instructions carefully. Special attention should also be paid to the PLUGGING IN
section to ensure the best sound from your pickup. If you have any questions, please contact
CCuusstt oommee rr SSeerrvvii ccee DDeeppaa rrtt mmeenntt aatt 997788--998888--99666655 oorr tt eecchh@@ff ii sshhmmaann..ccoo mm
our
The SBT Series pickups are economical "stick on" style pickups that can be mounted on any type
of acoustic stringed instrument equipped with a flat soundboard. All three models are crafted to
sense the microvibrations of a soundboard. Each is a practical alternative to more expensive
bridge mounted units that require the services of a repairman for installation.
The Model SBT-C is recommended for easy installation on classical guitars, steel string guitars,
dulcimers and similar stringed instruments. The Model SBT-E features the Fishman
Switchjack™ and is recommended when a permanent installation is desired. The Model SBT-HP
is specifically for harp and piano.
PARTS
•
SBT-C Pickup with 1/8" Shielded Jack
•
(3) Double-sided Adhesive Pads
•
Adhesive-backed Jack Holder
•
Felt-covered Strain Relief Clip
•
10' Instrument Cable
PREPARATION
The model SBT-C may be mounted onto a classical guitar, a steel string guitar, a dulcimer and
similar stringed instruments. The installation may be performed either on the outside of the instrument or inside the soundhole where the transducer will be out of harm's way. In instruments with
small soundholes, dulcimers, for example, internal installation may not be practical.
As a general rule, the transducer should be mounted over a freely vibrating location and not over
a "dead" structural brace. The exact location for best results should be determined by experimentation.
2
2
INSTALLING THE MODEL SBT-C
Page 3
JACK
HOLDER
JACK
STRAIN
RELIEF
CLIP
Installation Guide
1.5 "
1.5 "
Installation Guide
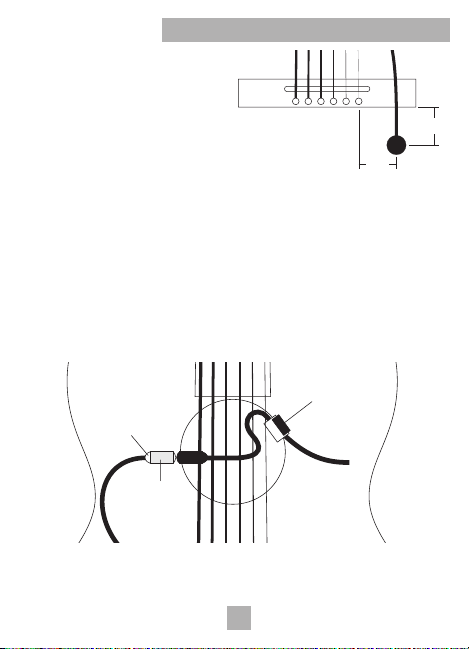
1. Determine the approximate location of
the transducer by measuring about 1.5"
(3.8 cm) below the bridge and a 1.5"
(3.8 cm) below the highest pitched
string and note the position where these
two measurements meet. This will
serve as a test location (Fig.1).
2. Apply an adhesive pad to the shiny brass face of the transducer and mount at the location
indicated in Step 1. The transducer wire should follow the grain of the soundboard and point
toward the soundhole of the instrument.
Check the location by plugging in the pickup and listening. Should the position prove unsatisfactory, move the pickup in 1/4" increments, and re-test, until you find the best position.
Carefully slide a guitar pick or credit card between the transducer and the soundboard to
release the foam adhesive. Residual adhesive should then be removed from the brass surface of the transducer.
CAUTION: TO PREVENT DAMAGE TO THE TRANSDUCER WHEN REMOVING THE
ADHESIVE PAD, DO NOT PULL THE WIRE OR BEND THE TRANSDUCER.
FIG. 1
3. Once you have found the "sweet spot" for the pickup, mount it at the same spot inside the
instrument.
3
3
FIG. 2
Page 4

SBT-C Installation Continued
SBT-C Installation Continued
4. Mount the adhesive backed jack holder to the inside of the instrument adjacent to the sound-
hole (Fig.2).
5. Insert the jack into the jack holder and plug the instrument cable into the jack (Fig.2).
6. Attach the felt-covered strain relief clip to the soundhole (Fig.2).
NOTE: The felt-covered clip can be bent to accommodate different soundhole thicknesses.
OPTION: PERMANENT TRANSDUCER MOUNTING
Although excellent results are obtained by using the adhesive pads, an increase in overall frequency response and output will result when the transducer is bonded to the soundboard with a
"hard" adhesive. We suggest a gap-filling cyanoacrylate such as Loctite "Black Max™". Note that
such a procedure is permanent and irreversible; removal may result in damage to both the transducer and the inner surface of the soundboard.
INSTALLING THE MODEL SBT-E
The Model SBT-E is designed specifically for classical and steel string guitars when a permanent
endpin-style jack is desirable. We strongly recommend the services of a qualified repairman primarily because a hole must be drilled in the instrument.
Follow the same procedure as the Model SBT-C on page 3 to mount the pickup element.
PARTS
•
SBT-E Pickup
•
1/4" Fishman Switchjack™ stereo endpin jack
•
(3) Double-sided Adhesive Pads
Prepare the Endblock
There are two ways to widen the endpin hole to accept the endpin jack:
Slow and Safe
If you have the time, this is the preferred way to enlarge the endpin hole. Remove the endpin and
widen the hole to size with a 15/32'" (11.9mm) reamer, available in the US & Canada through
Stewart MacDonald, 800-848-2273, part #4323.
Quick & Clean
The objective here is to drill out the hole with the endpin or other suitable plug in place. You may
remove a loose endpin and refasten it in the endblock with cyanoacrylate glue before starting the
procedure.
OR
4
4
Page 5

Installation Guide
Installation Guide
Note: We do not recommend this method for instruments with brittle ornamental veneers
(ex: abalone) around the endblock.
1. Apply masking tape around the endblock area to protect the instrument.
2. Locate an X-Acto saw blade 1/16" (1.6mm) away from the body and saw off the endpin.
3. Centerpunch a guide hole in the center of the trimmed endpin.
4. Drill a 1/8" (3.2mm) pilot hole through the endblock.
5. Line up a 15/32" (11.9mm) Spade bit in the pilot hole and begin drilling. Maintain a perpendic-
ular plunge in relation to the instrument. Use steady (but not heavy) pressure, especially as
the drill exits inside the guitar.
6. To avoid damage to the instrument, let the drill come to a complete stop before removing it
from the hole.
Install the Pickup
1. Insert the pickup in the slot and then strip and tin the wire ends.
2. Unscrew the shielding cap on the jack to expose the solder terminals. Thread the pickup wire
through the shielding cap.
Gently bend back the strain relief/sleeve tab to gain better access to the Tip terminal.
3. Solder the pickup "hot" wire to the Tip terminal, which is the shortest of the three tabs.
Solder the pickup shield to the ground tab on the jack. Gently tighten the strain relief.
4. Refasten the shielding cap to the jack.
OPTION: PERMANENT TRANSDUCER MOUNTING
Although excellent results are obtained by using the adhesive pads, an increase in overall frequency response and output will result when the transducer is bonded to the soundboard with a
"hard" adhesive. We suggest a gap-filling cyanoacrylate such as Loctite "Black Max™". Be aware,
however, that such a procedure is permanent and irreversible; removal may result in damage to
both the transducer and the inner surface of the soundboard.
5
5
Page 6

SBT Series - SoundBoard Transducer
TM
Shield
Tip
(Short Terminal)
Ring
TipGuitar Sleeve
1/4" Stereo Plug
Switch
(Long Terminal)
Ring
(Medium Terminal)
SBT Series - SoundBoard Transducer
Wiring Options with the Fishman Switchjack
The Switchjack T-R-S-S (Tip/Ring/Sleeve/Switch) stereo switching endpin jack
allows simultaneous stereo operation and battery switching for active pickups. This
new configuration simplifies stereo wiring with many pickup combinations that were
once incompatible.
To gain better access to the Tip, Ring and Switch terminals, gently bend back the
Strain Relief/Sleeve tab, before you begin to solder.
Pages 7 & 8 illustrate the various wiring options made possible by the Switchjack.
6
6
Page 7

Installation Guide
Pickup Signal
to Tip
Shield to
Sleeve
Installation Guide
Mono Wiring an SBT Series Pickup
Mono Wiring an SBT Series Pickup
Stereo Wiring a Second Pickup to an SBT Series Pickup
Stereo Wiring a Second Pickup to an SBT Series Pickup
2nd Pickup
to Ring
Pickup Signal
Common
Ground
to Tip
7
7
Page 8

SBT Series - SoundBoard Transducer
Negative Battery Wire
to Switch
Pickup Signal
to Tip
2nd Pickup
to Ring
Common
Ground
Common
Ground
Pickup Signal
to Tip
Microphone to Ring
Zener Diode
between Ring & Sleeve
SBT Series - SoundBoard Transducer
Adding a Microphone to an SBT Series Pickup
Adding a Microphone to an SBT Series Pickup
Stereo Wiring with an Active Pickup
Stereo Wiring with an Active Pickup
For use with the Fishman Blender System
*
8
8
*
*
Page 9

Installation Guide
34 5 6 7 82
1
Installation Guide
Fasten the Jack in the Endpin Hole
Follow this sequence when installing the endpin jack:
1 - Shielding Cap
2 - First Large Hex Nut
3 - Large Dress Washer
4 - Star Washer
5 - Guitar Endblock
6 - Small Dress Washer
7 - Small Dress Nut
8 - Strap Button
The jack should protrude at least 5/16" and no more than 11/32" outside of the guitar body for
proper fit. After fitting the small dress washer and nut over the end of the jack, insert the 3/32"
allen wrench through the small hole on the end of the jack. Tighten the nut with the 1/2" open end
wrench while holding the jack in place with the allen wrench. Thread and hand tighten the strap
button.
NOTE: With the strap button in place, the end of the jack
should protrude slightly, so that when a plug is inserted, it
will snap securely in place.
INSTALLING THE MODEL SBT-HP
The Model SBT-HP is designed for harp or piano.
PARTS
•
SBT-HP with 42" Cord and 1/4" Jack
•
(3) Double-sided Adhesive Pads
•
Adhesive-backed Jack Holder
As a general rule, the transducer should be mounted over a freely vibrating location and not over
a "dead" structural brace. The exact location for best results should be determined by experimentation.
9
9
Page 10

SBT-HP Installation Continued
SBT-HP Installation Continued
FOR HARP MOUNTING
1. The approximate pickup position will be between 1/3 and 1/2 the soundboard's length, starting
at the bottom of the soundboard, 1" out from either side of the center brace. The resulting
intersection of the two measurements provides a good test location for the transducer.
2. Apply an adhesive pad to the shiny brass face of the transducer and mount outside the instrument, at the location indicated in Step 1. The transducer wire should follow the grain of the
soundboard and point toward the bottom of the instrument.
3. Plug the pickup into an amplifier and experiment with the vertical location of the transducer. If
you detect boominess or feedback, relocate the transducer higher up on the soundboard. In
no case should it be necessary to mount it higher than 1/2 the distance. Use increments of
about 3 inches.
CAUTION: Removal for relocation should be performed by gently sliding a thin plastic credit
card between the transducer and the soundboard.
4. Once you have found the "sweet spot" for the pickup, mount it at the same spot inside the
instrument.
5. Plug the instrument into an amplifier. If boominess or feedback occurs, relocate the transducer as detailed above.
6. Remove the protective film from the bottom of the jack holder and mount the holder in a convenient location. We recommend a location on the base of the instrument, if possible. We do
not recommend mounting to the soundboard.
FOR PIANO MOUNTING
A single SBT-HP mounted on an acoustic piano soundboard is an effective means of providing
high volume amplified sound reinforcement when used in conjunction with one microphone. The
microphone should sense the bass register of the piano while the transducer’s signal, when mixed
with the microphone signal, will provide punch and clarity to the middle and upper ranges of the
piano.
The SBT-HP should be mounted to the piano soundboard at a location adjacent to the higher
strings. For example, on a grand piano the transducer should be placed directly on the soundboard within the third-largest ranges of the piano.
For additional instructions, see the instructions above for mounting the transducer to a harp.
10
10
Page 11

Installation Guide
PLUGGING IN
Due to the nature of passive pickups such as the SBT, the type of cable you use and the input you plug into
will affect the quality of your sound.
Instrument Cable
Cable lengths over 10 feet (before preamp) will cause audible high frequency loss. Use a high quality, low
capacitance shielded cable. This will ensure minimal tone coloration and hum. Using fully shielded metal plugs
will also help eliminate hum.
Kinds of Audio Inputs
Because of the lack of standardization for high impedance audio inputs, special attention should be paid to
what you are plugging into. The SBT will sound best when plugged directly into an input with a 10 M
impedance; the full frequency response of the instrument is reproduced. The SBT can also be plugged into
inputs as low as 1 M
Preamps
We strongly recommend using a 10 M
pickup. A matching preamp will:
1. Realize the full frequency response potential of the pickup.
2. Permit long cable runs (after the preamp) without signal deterioration.
3. Allow precise volume and tone shaping with dedicated EQ.
4. Ensure compatibility with virtually any instrument level audio input available.
Fishman Transducers manufactures a complete line of compatible preamps, all with 10 M
POWERJACK - Miniature Endpin Preamp
MODEL GII & BII - Outboard Acoustic Instrument Preamp
AGP-2 - Onboard Instrument Preamp
PRO-EQ II - 4 Band Outboard Acoustic Instrument Preamp
PRO-EQ PLATINUM - Outboard Acoustic Instrument Preamp / EQ / D.I.
DUAL PARAMETRIC D.I. - Fully Parametric Two Band Preamp / D.I.
ACOUSTIC / BASS BLENDER - 2 Channel Pickup / Mic Preamp
POCKET BLENDER - 2 Channel Pickup/Mic Preamp
Musical Instrument Amplifiers
Most musical instrument amplifiers (at least 1 M
instrument amplifiers have a 10 M ΩPiezo input, and will match the pickup.
Direct Boxes
You can plug the SBT into an "active" direct box (1 - 10 M
direct box will sound weak and thin.
PA / Recording Consoles
Professional PA and recording consoles have a much lower input impedance than what is acceptable for the
SBT; you will need an impedance matching preamp. Plugging a passive piezo pickup into a mixer without an
impedance matching preamp will sound harsh and thin.
Ω
with adequate results; the bass frequencies will be slightly rolled off.
Ω
, impedance matching, buffered preamp in conjunction with the
Installation Guide
Ω
WW
inputs:
Ω
input impedance) will yield useable results. Many acoustic
Ω
input) with very good results. Using a passive
Page 12

Limited Warranty
®
Limited Warranty
The FISHMAN SBT Series SoundBoard Transducer is warranted to function for a
period of One (1) Year from the date of purchase. If the unit fails to function
properly within the warranty period, free repair and the option of replacement or
refund in the event that FISHMAN is unable to make repair are FISHMAN’s only
obligations. This warranty does not cover any consequential damages or damage to
the unit due to misuse, accident, or neglect. FISHMAN retains the right to make
such determination on the basis of factory inspection. Products returned to
FISHMAN for repair or replacement must be shipped in accordance with the Return
Policy, as follows. This warranty remains valid only if repairs are performed by
FISHMAN. This warranty gives you specific legal rights and you may also have
other rights which may vary from state to state.
Return Policy
To return products to FISHMAN TRANSDUCERS, you must follow these steps...
1. Call FISHMAN TRANSDUCERS at 978-988-9199 for a Return Authorization
Number (“RAN”).
2. Enclose a copy of the original Bill of Sale as evidence of the date of purchase,
with the product in its original packaging and a protective carton or mailer.
3. FISHMAN TRANSDUCERS’ technicians will determine whether the item is
covered by warranty or if it instead has been damaged by improper customer
installation or other causes not related to defects in material or workmanship.
4. Warranty repairs or replacements will be sent automatically free of charge.
5. If FISHMAN TRANSDUCERS determines the item is not covered by warranty, we
will notify you of the repair or replacement cost and wait for your authorization to
proceed.
F
340-D Fordham Road Wilmington MA 01887 USA
Phone 978-988-9199 • Fax 978-988-0770
ISHMAN
T
RANSDUCERS
www.fishman.com
6-00 • 009-030-001
 Loading...