

Page 1

USER GUIDE
LOUDBOX PERFORMER
Page 2

Whenever this symbol appears, it alerts you to the
presence of important operating and maintenance
(servicing) instructions in the user’s manual for this
amplifier.
Wherever this symbol appears, it alerts you to the
presence of uninsulated dangerous voltage inside
the enclosure that may be sufficient to constitute a
risk of shock.
Important Safety Instructions
To ensure your personal safety and the safety of others, operate this apparatus only after reading these instructions
and heeding the warnings listed below.
1. Read these instructions.
2. Keep these instructions.
3. Heed all warnings.
4. Follow all instructions.
5. Do not use this apparatus near water.
6. Clean only with a dry cloth.
7. Do not block the ventilation openings. Install in accordance with the manufacturer's instructions.
8. Do not install near any heat sources such as radiators, heat registers, stoves or other apparatus (including
amplifiers) that produce heat.
9. Do not defeat the safety purpose of the polarized or grounding-type plug. A polarized plug has two blades
with one wider than the other. A grounding-type plug has two blades and a third grounding prong. The
wide blade or the third prong are provided for your safety. If the provided plug does not fit into your outlet,
consult an electrician for replacement of the obsolete outlet.
10. Protect the power cord from being walked on or pinched, particularly at the plugs, convenience receptacles
and the point where they exit from the apparatus.
11. Use only attachments/accessories specified by the manufacturer.
12. Use only with a cart, stand, tripod, bracket or table specified by the manufacturer, or sold with the
apparatus. When a cart is used, use caution when moving the cart/apparatus combination to avoid injury
from tip-over.
13. Unplug this apparatus during lightning storms or when unused for long periods of time.
14. Refer all servicing to qualified service personnel. Servicing is required when the apparatus has been
damaged in any way, such as a power-supply cord or plug is damaged, liquid has been spilled or objects
have fallen into the apparatus, the apparatus has been exposed to rain or moisture, does not operate
normally, or has been dropped.
15. Do not expose the apparatus to dripping or splashing liquids and do not place objects filled with liquids
(such as a beverage container or a vase) on the apparatus.
16. Warning” To reduce the risk of fire or electric shock, do not expose this apparatus to moisture.
17. The apparatus should be connected to mains outlet with a protective earthing connection.
Disconnect device is Mains Plug, which should remain readily operable.
Copyright © 2018 FISHMAN TRANSDUCERS, INC.
All rights reserved. No part of this document may be reproduced in any form without the
written permission of FISHMAN TRANSDUCERS, INC.
2
Page 3
INFORMATIONS IMPORTANTES
DE SECURITE
• Lisez attentivement ces instructions.
• Veuillez conserver ces instructions.
• Observez tous les avertissements.
• Suivez toutes les consignes à la lettre.
• N’utilisez jamais cet appareil dans un endroit humide ni à proximité
d’eau.
• L’appareil alimenté par courant électrique ne peut pas être exposé à
des éclaboussures; évite en outre de placer des récipients
contenant des liquides, comme un vase (ou un verre de bière), sur
l’appareil.
• Nettoyez uniquement l’appareil avec un chiffon doux et sec.
• Ne bloquez jamais les orifices de ventilation de l’appareil et
installez-le toujours conformément aux instructions du fabricant.
• N’installez jamais l’appareil à proximité d’une source de chaleur,
telle que des radiateurs, poêles ou tout autre dispositif (y compris
des amplificateurs) générant de la chaleur.
• N’essayez jamais de contourner le dispositif de sécurité d’une prise
de type polarisée ou d’une prise de terre. Une prise dite polarisée
dispose de deux broches, dont l’une est plus large que l’autre. Une
prise de terre comporte trois broches, dont une de mise à la terre.
Cette broche plus large ou broche de mise à la terre vise à assurer
votre sécurité. Si la fiche du cordon d’alimentation ne correspond
pas au type de prise de courant de votre région, faites remplacer la
prise obsolète par un électricien qualifié (pour les Etats-Unis et le
Canada).
• Placez toujours le cordon d’alimentation de sorte qu’on ne risque
pas de marcher dessus ni de le pincer. Cette précaution vise tout
spécialement la fiche du cordon et sa sortie de l’appareil.
• Utilisez exclusivement les fixations/accessoires préconisés par le
fabricant.
• S’il y a risque d’orage ou que vous ne comptez pas utiliser l’appareil
pendant une période prolongée, débranchez-le du secteur.
• La mise sur OFF de l’interrupteur d’alimentation n’isole pas
totalement ce produit de la ligne secteur; aussi, retirez la fiche de la
prise s’il doit rester inutilisé pendant une période prolongée.
• Installez ce produit près de la prise électrique murale et gardez un
accès facile à la prise électrique et au cordon d’alimentation.
• ATTENTION: Cet appareil doit absolument être connecté à une
prise électrique reliée à la terre.
• Confiez tout travail de réparation uniquement à un S.A.V. qualifié.
Faites appel au S.A.V. si l’appareil a subi tout endommagement,
comme par exemple si sa fiche secteur ou son cordon
d’alimentation sont endommagés, si de l’eau ou des objets ont
pénétré à l’intérieur de l’appareil, si celui-ci a été exposé à la pluie
ou à la moisissure, s’il est tombé ou présente tout signe de
dysfonctionnement.
• N’utilisez jamais d’allonge trop longue avec cet appareil et ne
l’alimentez jamais via les prises secteur équipant d’autres
dispositifs.
• N’installez jamais cet appareil dans un endroit confiné comme une
caisse de transport ou tout autre récipient similaire.
• Des niveaux d’écoute trop importants lors de l’utilisation d’un
casque ou d’écouteurs peuvent entraîner des pertes d’audition.
• Utilisez l’appareil uniquement avec le chariot, stand, trépied, fixation
ou table spécifiés par le fabricant ou fourni avec l’appareil. Si vous
avez placé l’appareil sur un chariot, soyez très prudent quand vous
déplacez le chariot, afin d’éviter une chute et des blessures.
WARNING:
L’éclair dans le triangle est un symbole
destiné à attirer l’attention de
l’utilisateur sur la présence de parties
non isolées et de “tension dangereuse”
à l’intérieur de l’appareil, qui posent des
risques d’électrocution pour l’utilisateur.
Le point d’exclamation dans un triangle
est un symbole destiné à attirer
l’attention de l’utilisateur sur des
sections de ce manuel contenant des
informations importantes, liées à
l’utilisation et à l’entretien de ce produit.
ATTENTION
Le non-respect de la polarité lors du remplacement de
la pile peut poser un risque d’explosion.
Remplacez la pile uniquement avec un modèle
identique ou équivalent.
Note concernant les disposition (Seulement EU)
Quand un symbole avec une poubelle barrée
d’une croix apparait sur le produit, le mode
d’emploi, les piles ou le pack de piles, cela
signifie que ce produit, manuel ou piles doit être
déposé chez un représentant compétent, et non
pas dans une poubelle ou toute autre
déchetterie conventionnelle. Disposer de cette
manière, de prévenir les dommages pour la
santé humaine et les dommages potentiels pour
l'environnement. La bonne méthode d'élimination
dépendra des lois et règlements applicables dans votre
localité, s’il vous plaît, contactez votre organisme
administratif pour plus de détails. Si la pile contient des
métaux lourds au-delà du seuil réglementé, un symbole
chimique est affiché en dessous du symbole de la
poubelle barrée d’une croix sur la pile ou le pack de
piles.
* Tous les noms de produits et de sociétés sont des marques
commerciales ou déposées de leur détenteur respectif.
3
Page 4

Hear This!
The Loudbox Performer amplifier is capable of cleanly reproducing the sound of
your instrument at very high volume levels. Prolonged repeated exposure to high
sound pressure levels (SPLs) without protection can cause permanent hearing
loss. OSHA has set guidelines and specified permissible sound-exposure limits
for those who work in high SPL environments.
Permissible Noise Exposures
Duration per day, hours Sound level dBA slow response
8 90
6 92
4 95
3 97
2 100
1 1/2 102
1 105
1/2 110
1/4 or less 115
To ensure against permanent hearing loss, wear hearing protection when you perform with amplification.
This symbol means the product must not be discarded as household waste, and should be delivered to an
appropriate collection facility for recycling. For more information on disposal and recycling of this product,
contact your local municipality, disposal service, or the shop where you bought this product.
FCC Compliance Notice
This equipment has been tested and found to comply with the limits for a Class B digital device, pursuant to Part
15 of the FCC Rules. These limits are designed to provide reasonable protection against harmful interference in a
residential installation. This equipment generates, uses, and can radiate radio frequency energy and, if not installed
and used in accordance with the instructions, may cause harmful interference to radio communications. However,
there is no guarantee that interference will not occur in a particular installation. If this equipment does cause harmful
interference to radio or television reception, which can be determined by turning the equipment off and on, the user
is encouraged to try to correct the interference by one or more of the following measures:
– Reorient or relocate the receiving antenna.
– Increase the separation between the equipment and receiver.
– Connect the equipment into an outlet on a circuit different from that to which the receiver is connected. – Consult
the dealer or an experienced radio/TV technician for help. Changes and modifications not expressly approved
by FISHMAN TRANSDUCERS can void your authority to operate this equipment under Federal Communications
Commissions rules.
Loudbox Performer
Contains FCC ID: RMU-PROLBX500
Contains IC: 10812A-PROLBX500
4
Page 5

FCC Compliance Statement
The device complies with Part 15 of the FCC Rules. Operation is subject to the following two
conditions:
1. This device may not cause harmful interference, and
2. This device must accept any interference received, including interference that may cause
undesired operation.
EU Declaration of Conformity CE: Hereby, Fishman declares that this Loudbox Performer is in
compliance with the essential requirements and other relevant provisions of Directive 2014/53/EU,
2014/30/EU, 2014/35/EU.
This device complies with Industry Canada license-exempt RSS standard(s): Operation is subject
to the following two conditions: (1) this device may not cause interference, and (2) this device must
accept any interference that may cause undesired operation of the device.
Cet appareil est conforme aux normes Industry Canada exemptes de licence standard RSS(s):
Son fonctionnement est sujet aux deux conditions suivantes: (1) cet appareil ne peut pas provoquer
d’interférences et (2) cet appareil doit accepter toute interférence, y compris les interférences
susceptibles de provoquer un fonctionnement indésirable.
Bluetooth
The Bluetooth® word mark and logos are registered trademarks owned by Bluetooth SIG, Inc. and
any use of such marks by Fishman Transducers is under license. Other trademarks and trade names
are those of their respective owners.
WARNING!
FCC and IC Radiation Exposure Statement:
The device complies with FCC’s and IC’s RF radiation exposure limits set forth for an uncontrolled
environment under the following conditions:
1. This equipment should be installed and operated such that a minimum separation distance of
2. This transmitter must not be co-located or operating in conjunction with any other antenna or
®
20cm is maintained between the radiator (antenna) & user’s/nearby person’s body at all times.
transmitter.
Before using Loudbox Performer, carefully read the following:
Important Safety Instructions (Page 2)
Getting Started (Page 7)
5
Page 6
Welcome
Thank you for making Fishman a part of your acoustic experience. We are proud
to offer the fi nest acoustic amplifi cation products available; high-quality
professional-grade tools which empower you to sound your very best.
6
Page 7

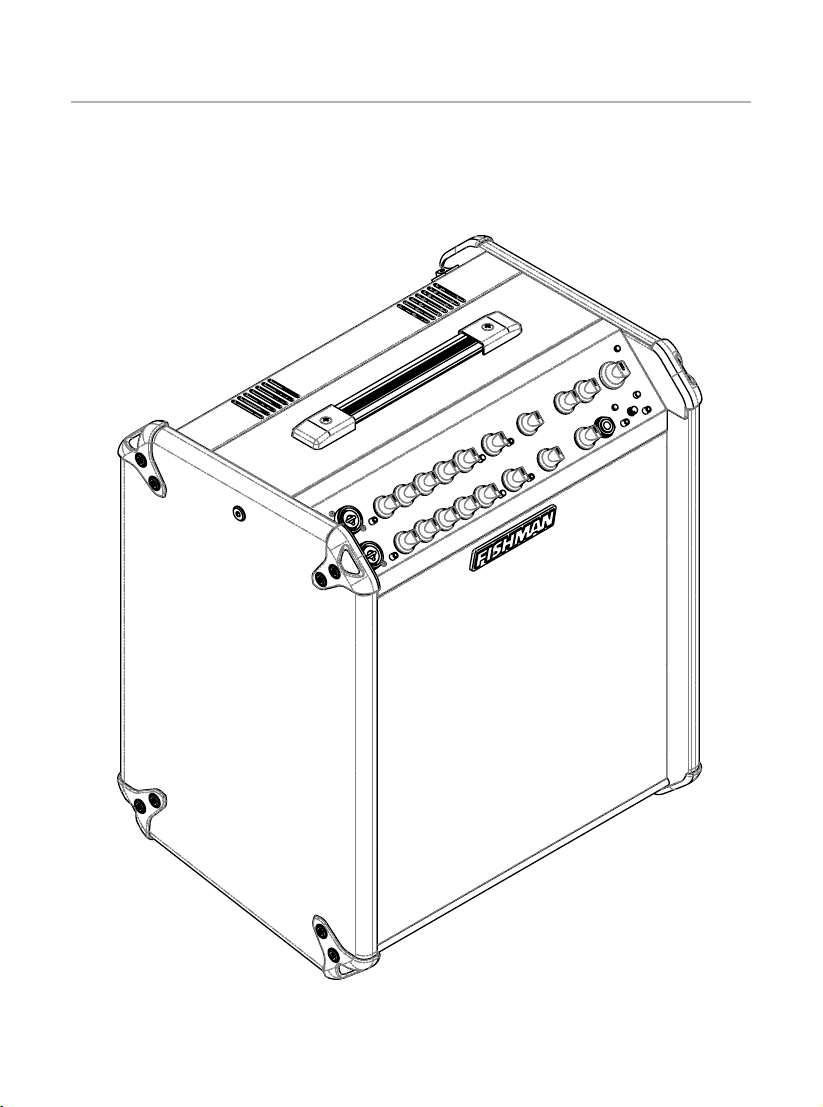
Getting Started
Your new Loudbox Performer is a portable amplifi er designed to faithfully re-
produce the sound of acoustic instruments and a diverse assortment of vocal or
recorded accompaniments.
With the addition of Bluetooth® wireless connectivity, you can now easily add
backing tracks or other accompaniment to your performances.
Here are some basic setup tips to help get you going. To operate the
Loudbox Performer safely, please read the entire manual, especially the Important Safety Instructions on page 2.
Plug the provided AC line cord into the back of the amplifi er.
1. Locate the Power switch (above the rear panel power cord terminal) and switch
it off (down position)
2. Plug the Loudbox Performer into an electrical outlet with the appropriate AC
voltage.
3. Turn down the Master Volume control
4. Connect your instrument to the Channel 1 input with a shielded ¼” cable.
5. Play aggressively and raise Channel 1 Gain until the Clip LED (inside the Pad
button) fl ashes, then back off the Gain until no clipping occurs.
6. Set the tone controls “fl at” as illustrated below.
7. Slowly raise the Master Volume to the desired level.
and turn on the Power switch.
pairing
Tweeter
Channel
Phantom
Mute
24V
7
Page 8

Front Panel
Controls 1 through 10 are identical for both channels.
1. Channel 1 Input
The 1/4” input accepts all types of passive or active acoustic pickups.
Plug a balanced mic into the XLR input for vocal or instrument use.
2. 10dB Pad & Clip LED
If you have a high output pickup and the Clip LED (located in the center of the
Pad button) comes on at low Gain settings, push this switch in to put your pickup
level into a more useable range.
3. Gain
Use the Gain knob to set the level of the signal.
4. Low
Boost here to add weight to the sound. In general, boost bass at low volumes
and fl atten it out (or cut) at higher levels. With the dial set at 12 o’clock, the
control is effectively out of the circuit.
5. Mid
This control affects how well the instrument blends in or stands out in the mix. At
loud volumes a midrange cut will achieve a more natural sound. With the dial set
at 12 o’clock, the control is effectively out of the circuit.
6. High
Boost highs to add “air” to the sound of the instrument. With the knob set at
12 o’clock, the control is effectively out of the circuit.
1 2 4 5
8
6
73 8
Page 9

Front Panel
13 14 22
2120 23
7. Anti-Feedback
If you encounter low-frequency feedback, sweep this control to isolate and
eliminate it. To learn more about acoustic feedback, see page 15.
8. Phase
Use the Phase switch in conjunction with the Anti-Feedback fi lter to eliminate
acoustic feedback. To read more about acoustic feedback, see page 15.
9. Effect A Level
Controls the amount of Effect A in the input channel.
10. Effect B On
When this button is lit, the input channel’s audio is processed by Effect B.
11. Effect A
Use this control to select one of four effects for Effect A.
12. Effect A “Time”
Determines the length of time for the delay or reverb effects.
13. Effect B
Use this control to select one of four effects for Effect B.
14. Effect B “Depth”
Adjusts the intensity of Effect B.
9 10 11 12 15 17 19
9
16 18
Tweeter
Channel
Mute
pairing
Phantom
24V
Page 10

Front Panel (cont.)
15. Aux Level
Use this to control the level of an audio device plugged into the Aux input. Note
that the Aux channel is independent of the Mute switch, so you can play prerecorded music on your breaks.
16. Bluetooth
This green indicator will display a medium fl ash indicating the Bluetooth® mod-
ule is ready for pairing. It will display a slow fl ash indicating the module is ready
for reconnection with a previously paired device. The indicator will be on when
playback is active and display a fast fl ash when playback is paused.
17. Master Volume
Set the overall level of the Loudbox Performer with the Master Volume. In general put the Master Volume as high as possible (2 o’clock to 5 o’clock) to achieve
the cleanest sound.
18. Bluetooth
To pair a Bluetooth® enabled device for the fi rst time, hold the Pairing button
more than 5 seconds. You will hear an ascending tone and the Bluetooth
Indicator will change from a slow fl ash to a fast fl ash indicating it is ready to pair.
Ensure your Bluetooth® enabled device is in pairing mode. Once paired the
indicator will stop fl ashing and will allow you to stream music to the amplifi er.
If the button is pressed during paired playback, the playback will be paused
and the Bluetooth
resume playback and the Bluetooth® Indicator will return to on.
To activate Bluetooth® for a previously paired device, hold the Pairing button for
approximately 1-2 seconds (must be less than 5 seconds). An ascending tone will
play briefl y to indicate the Bluetooth
will slowly fl ash informing it is ready to reconnect and will pair if your device is in
pairing mode.
To turn off the Bluetooth® when already paired, hold the button for 1-2 seconds.
A descending tone will indicate that the connection is powering down and the
Bluetooth
19. Power
Lights up when the amplifi er power is on.
®
Indicator
®
Pairing
®
Indicator will display a fast fl ash. Press the button again to
®
Indicator will turn off.
®
®
is powering on. The Bluetooth® Indicator
10
Page 11

Front Panel (cont.)
20. Headphone Jack
When you plug in stereo headphones here, the speakers shut off. This output
monitors Channels 1 & 2 and the Aux input, so you can play along with
pre-recorded music through the headphones.
21. Channel Mute
The Channel Mute switch shuts off the signals from Channels 1 and 2 to the
speakers and all XLR outputs. The Channel Mute does not affect the Aux Inputs
or the effects sends. When mute is active, its button LED will be lit.
22. Tweeter Level
Turn this control to attenuate the tweeter’s output level to where it sounds best
to you.
23. Phantom Power
Provides 24V to the XLR input on each input channel to power a condenser
microphone. When phantom power is active, its button LED will be lit.
Most condenser and dynamic microphones, as well as some
preamps, can be used safely with phantom power.
However, phantom power can damage some audio devices including some
unbalanced mics, preamps or stompboxes that have been modifi ed for
balanced XLR use. Whenever there is doubt, contact the manufacturer to
confi rm compatibility.
11
Page 12
Rear Panel
1
2
3 5 6 7 8 9
4
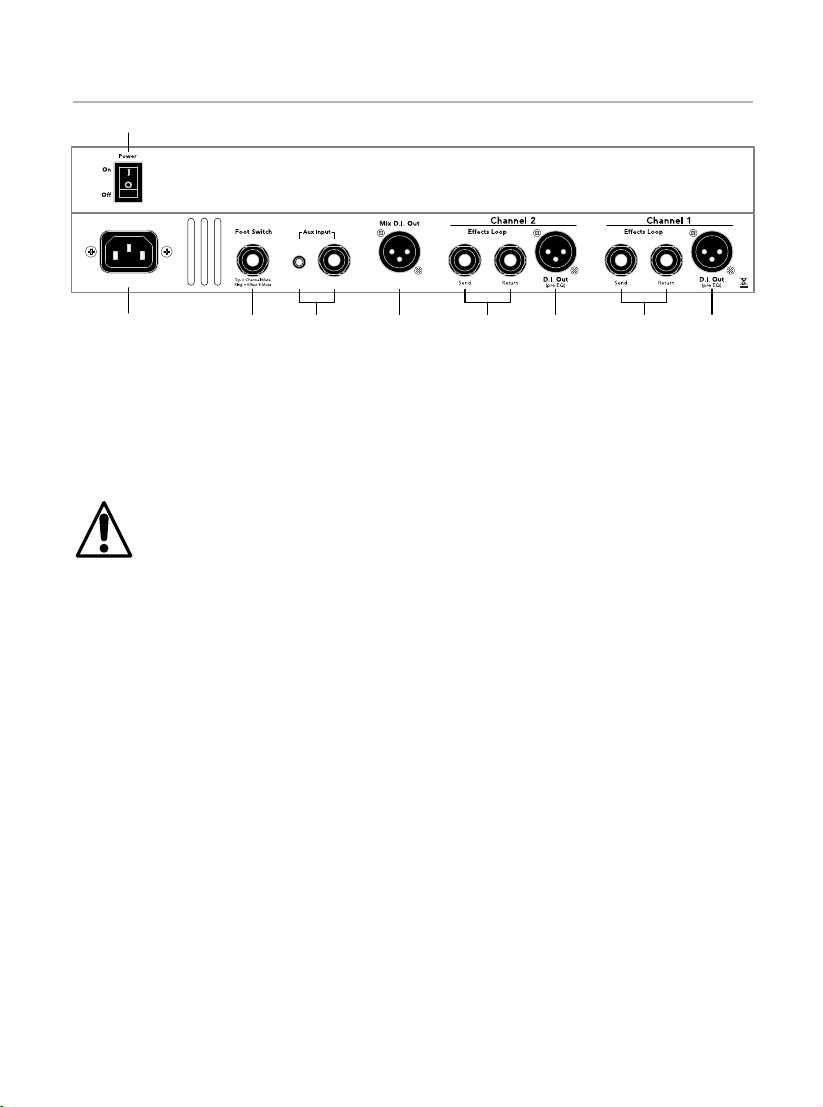
1. Power switch
Lower the Master Volume before you turn on the amp. Flip the power switch to
the up position.
2. AC power
Operate the amplifi er only at the voltage indicated on the rear panel.
Disconnect device is AC inlet or power switch.
3. Mute Foot Switch
Plug a Fishman dual foot switch into this jack for remote access to Channel Mute
and Effect B Mute.
4. Aux Input - 1/4” & 1/8”
Plug in a line level stereo audio source such as a CD or MP3 player in either
input. Both inputs may be used at the same time. They are stereo (TRS) inputs,
however the left and right signals are mixed to mono.
5. Mix D.I. (Post)
Plug in here when you wish to send signals from both Channel 1 and 2 to a
mixing console or a slave amplifi er. This post-EQ output is always ground
isolated to prevent ground loop hum.
12
Page 13

Rear Panel (cont.)
6. Channel 2 Effects Loop (serial)
Patch an external effect through these jacks. Use a standard ¼” shielded
instrument cable to connect the Channel 2 Send to the input of the effect.
Connect the Channel 2 Return jack to the output of the effect. The Channel 2
loop is located post-EQ and is compatible with battery-operated stompboxstyle effects processors.
7. Channel 2 D.I. Out (Pre-EQ)
Use this output when you want a fl at D.I. signal to send to a mixing console. This
pre-EQ output is always ground isolated to prevent ground loop hum.
8. Channel 1 Effects Loop (serial)
Patch an external effect through these jacks. Use a standard ¼” shielded
instrument cable to connect the Channel 1 Send to the input of the effect.
Connect the Channel 1 Return jack to the output of the effect. The Channel 1
loop is located post-EQ and is compatible with battery-operated stompboxstyle effects processors.
9. Channel 1 D.I. Out (Pre-EQ)
Use this output when you want a fl at D.I. signal to send to a mixing console. This
pre-EQ output is always ground isolated to prevent ground loop hum.
13
Page 14

Tone Tips
Set up
For reference, start with the tone controls fl at (straight-up, twelve o’clock). In this
position, there is no equalization applied to your sound. Begin at a very low
volume and work your way up. As you turn up, try adjusting the Loudbox Performer’s tone controls as recommended below.
1. Low volume
At a low volume (just above conversation level) our ears are not very sensitive to
bass and treble, so give the Low and High controls a good boost.
2. Medium volume
At intermediate levels, when you need to raise your voice to be heard over the
music, the human ear is quite sensitive to midrange. Cut the Mid control to
about ten o’clock or to your taste. At this level our perception of bass and treble
starts to catch up to the rest of the tonal spectrum, so you can back off the Low
and High controls slightly for good tonal balance.
3. High volume
At loud levels, when you must shout to be heard over the music, your ears (and
your audience) will benefi t from a deep midrange cut. Set the Mid dial between
nine and seven o’clock. Our perception of bass and treble “fl attens out” at high
volumes, so you won’t need much, if any, Low or High boost. Set the Low and
High knobs to between twelve and one o’clock.
14
Page 15

About Acoustic Feedback
Feedback usually occurs in the lowest octave of your instrument, generally with
two notes about a half step apart. The lower type of feedback (cavity resonance)
starts when the sound pressure coming out of the speakers excites the resonant
air chamber inside your instrument. We have found that it is effective to tune
out an instrument’s cavity resonance feedback with the Anti-Feedback (notch
fi lter) in the Loudbox Performer. For acoustic guitar this occurs at G# on the low
E-string, or at about 100Hz. Turn the Anti-Feedback knob to about 11 o’clock to
dial out this resonance. Note that the circuit can be effectively defeated by moving the dial to the Off (7 o’clock) position.
The higher range of feedback (top resonance) usually starts about a half or whole
step above cavity resonance of the instrument. Top resonance feedback
happens when the sound pressure coming off the speakers excites the resonant
frequency of the soundboard of your instrument. For acoustic guitar, this occurs
at A and above on the low E-string. Push the Phase switch in and out until you
fi nd the position that subdues top resonance feedback.
Anti
Lower
Feedback Range
(E to G#)
Feedback
Upper
Feedback Range
(A and above)
Phase
15
Page 16
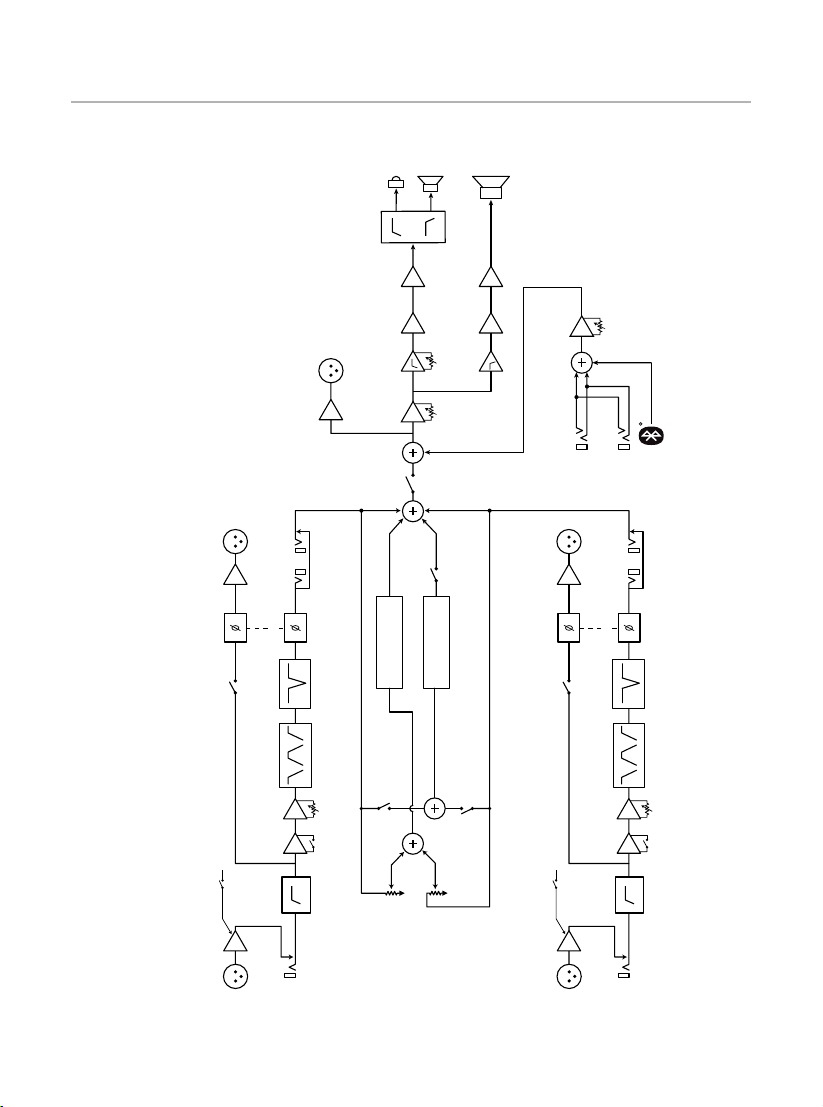
Block Diagram
Passive
Crossover
Tweeter
Midrange
Woofer
(bal., mic level)
Pre-EQ D.I. Output
PhaseChannel Mute
Foot Switch
Channel 1
Power
Phantom
+24V
Effect
Return
Send
Effect
Phase
Notch Filter
Anti-feedback
Tone Controls
Low, Mid, High
Gain
Pad
10dB
HPF
40Hz
(bal., mic level)
Mix D.I. Output
60Watt
Power Amp
Limiter
HPF
Master
Volume
Effect A
Reverb, Delay
Ch 1
Effect B On
Level
Tweeter
Mute
Channel
Effect B
Chorus, Flanger, Slap Echo
120Watt
Power Amp
Limiter
LPF
Foot
Switch
Foot Switch
Effect B Mute
Ch 2
Effect B On
Aux
Level
Inputs
Stereo Aux
(bal., mic level)
Pre-EQ D.I. Output
PhaseChannel Mute
Foot Switch
+24V
Power
Phantom
Tip = Left
Ring = Right
1/4”
Effect
Return
Send
Effect
Phase
Notch Filter
Anti-feedback
Tone Controls
Low, Mid, High
Gain
Pad
10dB
HPF
40Hz
®
1/8”
Bluetooth
Channel 2
Mic
Preamp
Mic
Input
Input
Instrument
Ch 1 Effect A
Level
Ch 2 Effect B
Level
Mic
Preamp
Mic
Input
Input
Instrument
16
Page 17

Technical Specifi cations
Input Impedance:
1/4” Input 5MOhm
XLR Input 2.4kOhm Balanced
Aux Input (stereo) 10kOhm
Phantom Power
XLR Input 24VDC / 1.2kOhm DC source impedance per pin
Tone Controls and Anti-Feedback:
Low ±12.5dB @ 50Hz (resonant)
Mid ±10.5dB @ 750Hz (resonant)
High ±12.5dB @ 10kHz (shelving)
Anti Feedback range -14dB @ 15Hz – 330Hz (Hi-Q resonant notch)
Channel 1 & 2 D.I. Output:
Output Impedance 440Ohm balanced
Phantom power tolerant, ground isolated
Channel 1 & 2 Effects Sends:
Output Impedance 2.2kOhm
Operating Level -10dBV Nominal
Channel 1 & 2 Effects Returns:
Input Impedance 28k Ohm
Input Voltage -10dBV Nominal
(Sends and returns are compatible with battery operated effects processors)
Mix D.I. Output:
Output Impedance 440Ohm balanced
Phantom power tolerant, ground isolated
17
Page 18

Technical Specifi cations (cont.)
Speaker System:
Woofer 8” paper cone, acoustic suspension
Midrange 5” poly cone, acoustic suspension
Tweeter 1” cloth dome,neodymium magnet
Tweeter Level Up to 6dB cut @ 10kHz
Crossover Bi-amplifi ed with active/passive hybrid crossover
500Hz, active; 3.5kHz, passive
Baffl e Angle 10 Degrees
Rated Power:
Cumulative 180Wrms
Woofer Amp 120Wrms continuous
Mid/Tweeter Amp 60Wrms continuous
SPL @ 1 Meter 114dB SPL
Frequency Response 80Hz – 20kHz (-4dB)
Power Consumption: 200W max
Fuse Rating:
100V, 50/60Hz: T2.5AL 250V (2.5A slow-blow)
120V, 50/60Hz: T2.5AL 250V (2.5A slow-blow)
240V, 50/60Hz: T1.25AL 250V (1.25A slow-blow)
Physical:
Dimensions 18.2” H x 15.8” W x 11.5”D (462mm x 401mm x
292mm)
Weight 29.4 (13.3 kg)
Connectivity:
Playback Bluetooth
We reserve the right to change any of the specifi cations and information in this manual without notice.
®
4.0
18
Page 19

19
Page 20

fi shman.com
Fishman and Fishman Transducers are trademarks or tradenames of Fishman Transducers Inc. 513-300-195 rev 3
 Loading...