

Page 1

LOUDBOX MICRO
USER GUIDE
GUIDA UTENTE
BENUTZERHANDBUCH
GUIDE DE L’UTILISATEUR
GUÍA DEL USUARIO
Page 2
Whenever this symbol appears, it alerts you to the presence of
important operating and maintenance (servicing) instructions in
the user’s manual for this amplifier.
Wherever this symbol appears, it alerts you to the presence of
uninsulated dangerous voltage inside the enclosure that may be
sufficient to constitute a risk of shock.
No user serviceable parts inside.
Refer servicing to qualified personnel.
Do not expose to rain or moisture.
CAUTION
Risk of electric shock.
Do not open.
Important Safety Instructions
To ensure your personal safety and the safety of others, operate this apparatus only after reading these instructions
and heeding the warnings listed below.
1. Read these instructions.
2. Keep these instructions.
3. Heed all warnings.
4. Follow all instructions.
5. Do not use this apparatus near water.
6. Clean only with a dry cloth.
7. Do not block the ventilation openings. Install in accordance with the manufacturer's instructions.
8. Do not install near any heat sources such as radiators, heat registers, stoves or other apparatus (including
amplifiers) that produce heat.
9. Do not defeat the safety purpose of the polarized or grounding-type plug. A polarized plug has two blades
with one wider than the other. A grounding-type plug has two blades and a third grounding prong. The
wide blade or the third prong are provided for your safety. If the provided plug does not fit into your outlet,
consult an electrician for replacement of the obsolete outlet.
10. Protect the power cord from being walked on or pinched, particularly at the plugs, convenience receptacles
and the point where they exit from the apparatus.
11. Use only attachments/accessories specified by the manufacturer.
12. Use only with a cart, stand, tripod, bracket or table specified by the manufacturer, or sold with
the apparatus. When a cart is used, use caution when moving the cart/apparatus combination
to avoid injury from tip-over.
13. Unplug this apparatus during lightning storms or when unused for long periods of time.
14. Refer all servicing to qualified service personnel. Servicing is required when the apparatus has been
damaged in any way, such as a power-supply cord or plug is damaged, liquid has been spilled or objects
have fallen into the apparatus, the apparatus has been exposed to rain or moisture, does not operate
normally, or has been dropped.
15. Do not expose the apparatus to dripping or splashing liquids and do not place objects filled with liquids
(such as a beverage container or a vase) on the apparatus.
16. Warning To reduce the risk of fire or electric shock, do not expose this apparatus to moisture.
17. The device is designed and evaluated under the condition of non-tropical climate; and, it can be only used
in locations in non-tropical climate areas. Using the device in tropical climate areas would result in high
safety risk.
18. Normal operating environmental temperature range: 0 °C [32 °F] to 35 °C [95 °F].
19. No naked flame sources, such as lighted candles, should be placed on the apparatus.
20. Do not install this equipment in a confined or build-in space such as a book case or similar unit, and
maintain a well-ventilated condition. Do not cover the ventilation openings with items such as newspaper,
table-cloths, curtains etc.
Warning: The mains plug/appliance coupler is used as disconnect device, the disconnect device shall remain
readily operable.
Copyright © 2023 FISHMAN TRANSDUCERS, INC.
All rights reserved. No part of this document may be reproduced in any form without the written
permission of FISHMAN TRANSDUCERS, INC.
2
Page 3

Hear This!
The Loudbox Micro amplifier is capable of cleanly reproducing the sound of your
instrument at high volume levels. Prolonged repeated exposure to high sound
pressure levels (SPLs) without protection can cause permanent hearing loss.
OSHA has set guidelines and specified permissible sound-exposure limits for
those who work in high SPL environments.
Permissible Noise Exposures
Duration per day, hours Sound level dBA slow response
8 90
6 92
4 95
3 97
2 100
1 1/2 102
1 105
1/2 110
1/4 or less 115
To ensure against permanent hearing loss, wear hearing protection when you perform with amplification.
This symbol means the product must not be discarded as household waste, and should be delivered
to an appropriate collection facility for recycling. For more information on disposal and recycling
of this product, contact your local municipality, disposal service, or the shop where you bought this
product.
FCC Compliance Notice
This equipment has been tested and found to comply with the limits for a Class B digital device, pursuant to Part
15 of the FCC Rules. These limits are designed to provide reasonable protection against harmful interference in a
residential installation. This equipment generates, uses, and can radiate radio frequency energy and, if not installed
and used in accordance with the instructions, may cause harmful interference to radio communications. However,
there is no guarantee that interference will not occur in a particular installation. If this equipment does cause harmful
interference to radio or television reception, which can be determined by turning the equipment off and on, the user
is encouraged to try to correct the interference by one or more of the following measures:
– Reorient or relocate the receiving antenna.
– Increase the separation between the equipment and receiver.
– Connect the equipment into an outlet on a circuit different from that to which the receiver is connected.
– Consult the dealer or an experienced radio/TV technician for help. Changes and modifications not expressly approved
by FISHMAN TRANSDUCERS can void your authority to operate this equipment under Federal Communications
Commissions rules.
Loudbox Micro
3
Page 4

Il simbolo con punto esclamativo all’interno di un triangolo
equilatero serve per informare l’utente sulla presenza di istruzioni
importanti per ilfunzionamento e la manutenzione (assistenza)
nella documentazione che accompagna il dispositivo.
Il simbolo della saetta con punta a freccia all’interno di un
triangolo equilatero serve per informare l’utente sulla presenza
di tensioni pericolose sufficiente per costituire un rischio di
folgorazione per le persone.
Le parti interne non sono sostituibili
dall’utente. Per l’assistenza, rivolgersi
ATTENZIONE
Rischio di scosse elettriche.
Non aprire.
solo a personale qualificato.
Importanti Istruzioni di Sicurezza
Per garantire la vostra e l’altrui sicurezza, utilizzate questo dispositivo solo dopo aver letto queste istruzioni e aver prestato
attenzione alle avvertenze elencate di seguito.
1. Leggere le seguenti istruzioni.
2. Conservare queste istruzioni
3. Prestare attenzione agli avvertimenti.
4. Seguire tutte le istruzioni.
5. Non utilizzare l’apparecchio vicino all’acqua.
6. Pulire solo con un panno asciutto.
7. Non installare vicino a fonti di calore come radiatori, pannelli radianti, fornelli o altre attrezzature (inclusi gli
amplificatori) che producono calore.
8. Le fessure e le aperture presenti sulla struttura servono a garantire la ventilazione e il funzionamento affidable del
pdotto, nonché a proteggerlo dal surriscaldamento. Si prega di non bloccare le aperture di ventilazione. Assicurare
che l’apparecchio abbia a disposizione sufficiente spazio attorno a sé per garantire una ventilazione adeguata.
Oggetti come giornali, tovaglie, tende, ecc. possono ostacolare la ventilazione.
9. Non manomettere la sicurezza della spina polarizzata o con messa a terra. Una spina polarizzata possiede due
contatti, uno leggermente più grande dell’altro. Una spina con messa a terra possiede due contatti più un terzo per
la messa a terra. La presenza del contatto più grande o del contatto di messa a terra è per garantire la tua sicurezza.
Se la spina in dotazione non è adatta alla tua presa, consulta un elettricista per sostituire la presa obsoleta.
10. Proteggi il cavo di alimentazione in modo che non venga calpestato o schiacciato, soprattutto in corrispondenza
delle spine, delle prese a muro e del punto in cui il cavo esce dall’apparecchio.
11. Utilizzare solo attacchi e accessori specificati dal produttore.
12. Tilizzare solamente insieme al carrello, supporto, treppiede, staffa o tavolo specificati dal produttore
oppure venduti con l’apparecchio. Quando si utilizza un carrello, prestare attenzione nello spostare
insieme il carrello e l’apparecchio, per evitare lesioni dovute al ribaltamento.
13. Scollegare l’apparecchio durante i temporali oppure se non viene utilizzato per lunghi periodi di tempo.
14. Per l’assistenza, rivolgersi solo a personale qualificati. L’assistenza è necessaria quando l’apparecchio è rimasto
danneggiato in qualsiasi modo, come, ad esempio. se il cavo di alimentazione o la spina hanno subito danni, se
del liquido è stato versato sull’apparecchio oppure se qualche oggetto vi è caduto sopra, se l’apparecchio è stato
esposto a pioggia o umidità, se il normale funzionamento è compromesso oppure se è stato fatto cadere.
15. Questo apparecchio non deve essere esposto a gocce o schizzi d’acqua. Non disporre sopra l’apparecchio nessun
oggetto riempito d’acqua, come, ad esempio, un vaso di fiori.
16. AVVERTENZA. Per ridurre il rischio di incendio o di folgorazione, non esporre questo apparecchio a pioggia o
umidità.
17. Il dispositivo è stato progettato e verificato in condizioni di clima non tropicale e può essere usato solo in località
con clima non tropicale. L’utilizzo del dispositivo in aree con clima tropicale comporterebbe un rischio elevato per la
sicurezza.
18. Intervallo normale di temperatura ambientale operativa. 0 °C [32 °F] to 35 °C [95 °F].
19. Non posizionare fiamme libere sull’apparecchio, come candele accese.
20. Non installare questo apparecchio in uno spazio ristretto come lo scaf, fale di una libreria o un luogo simile.
Installare l’apparecchio seguendo le istruzioni del produttore.
AVVERTENZA. La spina o il connettore del dispositivo vengono utilizzati come dispositivo di
connessione. Entrambi i dispositivi devono poter essere utilizzabili facilmente quando l’apparecchio
è installato.
Diritto d’autore © 2023 FISHMAN TRANSDUCERS, INC.
Tutti i diritti riservati. Nessuna parte di questo documento può essere riprodotta in qualsiasi forma
senza il consenso scritto di FISHMAN TRANSDUCERS, INC.
4
Page 5

Chaque fois que ce symbole apparaît, il vous avertit de la
présence d’instructions importantes d’utilisation et de
maintenance (entretien) dans le manuel d’utilisation de cet
amplificateur.
Partout où ce symbole apparaît, il vous avertit de la présence
d’une tension dangereuse non isolée à l’intérieur de l’e nceinte
qui peut être suffisante pour constituer un risque de choc.
Aucune pièce réparable par l’utilisateur à l’intérieur.
Confiez l’entretien à du personnel qualifié.
ATTENTION
Risque de choc électrique.
Ne pas ouvrir.
Ne pas exposer à la pluie ou à l’humidité.
Consignes De Sécurité Importantes
Pour assurer votre sécurité personnelle et celle des autres, n’utilisez cet appareil qu’après avoir lu ces instructions
et tenu compte des avertissements énumérés ci-dessous.
1. Lisez attentivement ces consignes de sécurité.
2. Conservez ces consignes de sécurité à portée de main.
3. Tenez compte de tous les avertissements.
4. Respectez toutes les consignes.
5. N’utilisez pas cet appareil à proximité d’un point d’eau.
6. Nettoyez l’appareil uniquement avec un chiffon sec.
7. Les fentes et les ouvertures présentes sur le boîtier sont destinées à l’aération de l’appareil. Elles garantissent
son bon fonctionnement et évitent toute surchauffe. Ne bloquez jamais les ouvertures d’aération. Veillez à laisser
suffisamment d’espace autour de l’appareil pour assurer son aération. Ne couvrez pas l’appareil avec des journaux,
des nappes ou des rideaux, par exemple, car cela empêcherait son aération.
8. N’installez jamais l’appareil près d’une source de chaleur, comme par exemple des radiateurs, des conduits d’air
chaud, des fours, des amplificateurs ou tout autre appareil produisant de la chaleur.
9. Ne modifiez jamais les dispositifs de sécurité des prises électriques polarisées ou de terre. Une prise électrique
polarisée dispose de deux broches, l’une étant plus large que l’autre. Une prise de terre possède deux broches
classiques et soit une troisième broche, soit une borne, soit une barrette servant à la mise à la terre. La barrette, la
troisième broche ou la borne sont prévues pour votre sécurité. Si la prise électrique fournie n’est pas compatible
avec votre prise murale, faites appel à un électricien afin qu’il ou elle remplace la prise murale obsolète.
10. Évitez de marcher ou de pincer le cordon d’alimentation, en particulier les broches, les prises et le point de sortie
de l’appareil.
11. Utilisez uniquement les accessoires spécifiés par le fabricant.
12. Utilisez l’appareil uniquement avec le chariot, le support, le trépied ou la table spécifiés par le fabricant, ou ceux
vendus avec l’appareil. Si vous utilisez un chariot, déplacez celui-ci et l’appareil avec précaution afin d’éviter toute
blessure qui pourrait être causée par leur basculement et leur chute.
13. Débranchez l’appareil en cas d’orage ou si vous ne l’utilisez pas pendant une période prolongée.
14. Confiez les réparations à du personnel qualifié. Tout dommage causé à l’appareil doit faire l’objet d’une
réparation, par exemple si le cordon ou la prise d’alimentation sont détériorés, du liquide a été renversé
ou des objets sont tombés sur l’appareil ; si l’appareil a été exposé à la pluie ou à l’humidité, ne semble
pas fonctionner normalement ou s’il a chuté.
15. Cet appareil ne doit en aucun cas être exposé à des projections de liquides. Ne placez aucun objet contenant du
liquide, comme par exemple des vases, sur l’appareil.
16. Pour réduire tout risque d’incendie ou d’électrocution, n’exposez jamais l’appareil à la pluie ou à l’humidité. Ne
placez jamais d’objets remplis de liquides sur l’appareil.
17. L’appareil est conçu et évalué dans des conditions de climat non tropical ; et, il ne peut être utilisé que dans des
endroits situés dans des zones climatiques non tropicales. L’utilisation de l’appareil dans les zones de climat tropical
entraînerait un risque élevé pour la sécurité.
18. Plage de température ambiante de fonctionnement normale . 0 °C [32 °F] à 35 °C [95 °F].
19. Ne posez pas de flammes nues, telles que des bougies allumées, sur l’appareil
20. Do’installez pas cet équipement dans un espace confiné ou dans un bâtiment tel qu’une bibliothèque ou une unité
similaire, et restent dans des conditions de ventilation de puits sur un site ouvert. La ventilation ne doit pas être
entravée en recouvrant les ouvertures de ventilation avec des articles tels que du journal, des nappes, des rideaux,
etc.
Avertissement. La prise d’alimentation ou le coupleur de l’appareil servent de dispositif de
déconnexion. L’un ou l’autre dispositif doit toujours rester facilement accessible quand l’appareil est
installé.
Droits d’auteur © 2023 FISHMAN TRANSDUCERS, INC.
Tous droits réservés. Aucune partie de ce document ne peut être reproduite sous quelque forme que
ce soit sans l’autorisation écrite de FISHMAN TRANSDUCERS, INC.
5
Page 6

Jedes Mal, wenn dieses Symbol erscheint, weist es Sie auf
wichtige Bedienungs- und Wartungsanweisungen (Service) in der
Bedienungsanleitung dieses Verstärkers hin.
Jedes Mal, wenn dieses Symbol erscheint, macht es Sie auf das
Vorhandensein von unisolierter und gefährlicher Spannung im
Inneren des Gehäuses aufmerksam, welche ausreichen kann, um
ein Stromschlagrisiko zu Verursachen.
Enthält keine vom Benutzer zu wartenden Teile.
Bitte überlassen Sie die Wartung qualifiziertem Personal.
Setzen Sie das Gerät weder Regen noch Feuchtigkeit aus.
VORSICHT
Rischio di scosse elettriche.
Non aprire.
Wichtige Sicherheitshinweise
Um Ihre persönliche Sicherheit und die Sicherheit anderer zu gewährleisten, bedienen Sie dieses Gerät nur,
nachdem Sie diese Anweisungen gelesen und die unten aufgeführten Warnhinweise beachtet haben.
1. Lesen Sie diese Anleitung.
2. Bewahren Sie diese Anleitung auf.
3. Beachten Sie alle Warnhinweise.
4. Befolgen Sie alle Anweisungen.
5. Verwenden Sie dieses Gerät nicht in der Nähe von Wasser.
6. Nur mit einem trockenen Tuch reinigen.
7. Schlitze und Öffnungen im Gehäuse dienen der Belüftung, gewährleisten einen zuverlässigen Betrieb des Produkts
und schützen es vor Überhitzung. Bitte blockieren Sie keine Lüftungsöffnungen. Sorgen Sie für ausreichend Platz um
das Gerät herum, um eine ausreichende Belüftung zu gewährleisten. Die Belüftung sollte nicht durch Abdecken mit
Gegenständen wie Zeitungen, Tischdecken, Vorhängen usw. behindert werden.
8. Installieren Sie das Gerät nicht in der Nähe von Wärmequellen wie Heizkörper, Wärmespeicher, Öfen oder anderen
Geräten (einschließlich Verstärker), die Wärme erzeugen.
9. Umgehen Sie nicht den Sicherheitszweck des polarisierten oder geerdeten Steckers. Ein gepolter Stecker hat zwei
Messerkontakte, von denen einer breiter als der andere ist. Ein geerdeter Stecker hat zwei Messerkontakte und
einen dritten Erdungskontakt. Der breite oder dritte Stift dienen Ihrer Sicherheit. Wenn der mitgelieferte Stecker
nicht in Ihre Steckdose passt, wenden Sie sich an einen Elektriker, um die veraltete Steckdose auszutauschen.
10. Schützen Sie das Netzkabel vor dem Begehen oder Einklemmen, insbesondere an Stecker,
Komfortbuchsen und an deren Ausgängen.
11. Verwenden Sie nur vom Hersteller angegebenes Befestigungen/Zubehör.
12. Verwenden Sie nur Wagen, Ständer, Stative, Halterungen oder Tische, welche vom Hersteller
angegeben oder zusammen mit dem Gerät verkauft werden. Wenn ein Wagen verwendet wird, ist
beim Bewegen des Wagens/der Gerätekonstruktion Vorsicht angebracht, um Verletzungen durch
Umkippen zu vermeiden.
13. Ziehen Sie den Netzstecker dieses Geräts bei Gewitter oder bei längerer Nichtbenutzung aus.
14. Überlassen Sie alle Wartungsarbeiten qualifiziertem Servicepersonal. Eine Wartung ist erforderlich, wenn das
Gerät in irgendeiner Weise beschädigt wurde. Zum Beispiel wenn das Netzkabel oder der Netzstecker beschädigt
wurde, Flüssigkeit verschüttet wurde oder Objekte in das Gerät gefallen sind, das Gerät Regen oder Feuchtigkeit
ausgesetzt war, nicht normal funktioniert oder fallen gelassen wurde.
15. Setzen Sie das Gerät keinen tropfenden oder spritzenden Flüssigkeiten aus und stellen Sie keine mit Flüssigkeiten
gefüllten Gegenstände (wie z.B. Getränkebehälter oder Vasen) auf das Gerät.
16. Warnung” Um das Risiko eines Feuers oder Stromschlags zu verringern, darf das Gerät keiner Feuchtigkeit
ausgesetzt werden.
17. Das Gerät ist unter den Bedingungen eines nicht-tropischen Klimas konstruiert und bewertet worden; es kann nur
an Orten in nicht-tropischen Klimazonen verwendet werden. Die Verwendung des Geräts in tropischen Klimazonen
würde zu einem hohen Sicherheitsrisiko führen.
18. Normaler Betrieb-Umgebungstemperaturbereich. 0 °C [32 °F] bis 35 °C [95 °F].
19. Es dürfen keine offenen Flammenquellen, wie z.B. brennende Kerzen, auf das Gerät gestellt werden.
20. Installieren Sie dieses Gerät nicht in einem engen oder eingebauten Raum wie einem Bücherschrank oder
einem ähnlichen Gerät, und sorgen Sie für eine gute Luftzirkulation am offenen Standort. Die Belüftung sollte
nicht dadurch behindert werden, indem die Lüftungsöffnungen mit Gegenständen wie Zeitungen, Tischtüchern,
Vorhängen usw. abgedeckt werden.
Warnung: Der Netzstecker/Gerätekoppler wird als Trennvorrichtung verwendet, die Trennvorrichtung
muss leicht bedienbar bleiben.
Urheberrechte © 2023 FISHMAN TRANSDUCERS, INC.
Alle Rechte vorbehalten. Kein Teil dieses Dokuments darf ohne schriftliche Genehmigung von
FISHMAN TRANSDUCERS, INC. in irgendeiner Form reproduziert werden.
6
Page 7

Cada vez que aparece este símbolo, le advierte de la presencia de
importantes instrucciones de funcionamiento y mantenimiento
(servicio) en el manual del usuario de este amplificador.
Dondequiera que aparezca este símbolo, le advierte sobre la
presencia de voltaje peligroso no aislado dentro del gabinete
que puede ser suficiente para constituir un riesgo de descarga
eléctrica.
No hay piezas reparables por el usuario en el interior.
Remita el servicio a personal calificado.
No exponer a la lluvia ni a la humedad.
PRECAUCIÓN
Riesgo de shock eléctrico.
No abrir.
Instrucciones de Seguridad Importantes
Para garantizar su seguridad personal y la seguridad de los demás, opere este aparato solo después de leer estas
instrucciones y prestar atención a las advertencias que se enumeran a continuación.
1. Lee estas instrucciones.
2. Conserva estas instrucciones.
3. Presta atención a las advertencias.
4. Sigue todas las instrucciones.
5. No utilices este dispositivo cerca del agua.
6. Limpia el dispositivo solo con un paño seco.
7. Las ranuras y aberturas de la caja sirven como conductos de ventilación y garantizan que el producto funcione
adecuadamente, además de protegerlo de un sobrecalentamiento. No obstruyas las aberturas de ventilación.
Asegúrate de que el dispositivo cuenta con el espacio adecuado a su alrededor para que tenga la ventilación
suficiente. Se debe evitar cubrir el dispositivo con periódicos, manteles, cortinas y otros elementos que impidan la
ventilación.
8. No coloques el dispositivo (incluidos los amplificadores) cerca de fuentes de calor, como radiadores, calefactores,
estufas u otros aparatos que produzcan calor.
9. No te deshagas del dispositivo de seguridad del enchufe con toma a tierra o polarizado. Los enchufes polarizados
disponen de dos clavijas, una de mayor tamaño que la otra. Los enchufes con toma a tierra tienen dos clavijas y
una tercera de toma a tierra. La clavija ancha o la tercera clavija se proporcionan para la seguridad del usuario. Si el
enchufe suministrado no encaja en la toma, ponte en contacto con un electricista para sustituir la toma
antigua.
10. Protege el cable de alimentación para que no se pise o pinche, especialmente en los enchufes,
ladrones y el punto de salida del dispositivo.
11. Utiliza solo los complementos o accesorios especificados por el fabricante.
12. Utiliza el dispositivo solo con el carro, pie, trípode, bastidor o mesa especificados por el fabricante o
vendidos junto al dispositivo. Cuando uses el dispositivo con un carro, muévelo cuidadosamente para evitar que se
dañe a consecuencia de una caída.
13. Desenchufa el dispositivo si hay tormenta eléctrica o si no vas a usarlo durante un período largo.
14. Toda reparación debe ser realizada por personal cualificado. Deben llevarse a cabo reparaciones cuando el
dispositivo se ha dañado de alguna forma, por ejemplo. el enchufe o cable de alimentación se ha dañado, se han
derramado líquidos o se han caído objetos encima del dispositivo, se ha expuesto el dispositivo a lluvia o humedad,
no funciona con normalidad o se ha caído.
15. No se debe exponer este dispositivo a goteos ni salpicaduras. No se deben colocar objetos llenos de líquido, como
jarrones, sobre el dispositivo.
16. Para reducir el riesgo de incendio o descarga eléctrica, no expongas este dispositivo a lluvia o humedad. No
coloques objetos llenos de líquido sobre este dispositivo.
17. El dispositivo está diseñado y evaluado bajo la condición de clima no tropical; y solo se puede usar en ubicaciones
en áreas de clima no tropical. El uso del dispositivo en áreas de clima tropical resultaría en un alto riesgo de
seguridad.
18. Rango de temperatura ambiental de funcionamiento normal. 0 °C [32 °F] a 35 °C [95 °F].
19. No coloques fuentes con llamas descubiertas (como velas encendidas) sobre el dispositivo
20. No instale este equipo en un espacio confinado o en un edificio, como una librería o unidad similar, y mantenga
las condiciones de ventilación de un pozo en un sitio abierto. No se debe impedir la ventilación cubriendo las
aberturas de ventilación con elementos como periódicos, manteles, cortinas, etc
Advertencia: Se utilizan el enchufe de red o el conector del dispositivo para desconectarlo. Ambos
deben poder accionarse de forma sencilla cuando el dispositivo esté preparado para su uso.
Derechos de Autor © 2023 FISHMAN TRANSDUCERS, INC.
Reservados todos los derechos. Ninguna parte de este documento puede reproducirse de ninguna
forma sin el permiso por escrito de FISHMAN TRANSDUCERS, INC.
7
Page 8

EU Declaration of Conformity CE: Hereby, Fishman declares that this Loudbox Micro is in
compliance with the essential requirements and other relevant provisions of Directive 2014/30/EU,
2014/35/EU. You can find the DoC here: www.fishman.com/compliance.
Dichiarazione di conformità UE CE: Con la presente, Fishman dichiara che questo Loudbox Micro è
conforme ai requisiti essenziali e ad altre disposizioni pertinenti della Direttiva 2014/53/UE, 2014/30/
UE, 2014/35/UE. Puoi trovare la DoC qui: www.fishman.com/compliance
EU-Konformitätserklärung CE: EU-Konformitätserklärung CE: Hiermit erklärt Fishman, dass diese
Loudbox Micro mit den grundlegenden Anforderungen und anderen relevanten Bestimmungen der
Richtlinien 2014/53/EU, 2014/30/EU, 2014/35/EU übereinstimmt. Das DoC finden Sie hier:
www.fishman.com/compliance
Déclaration UE de conformité CE: Par la présente, Fishman déclare que ce Loudbox Micro est
conforme aux exigences essentielles et aux autres dispositions pertinentes de la directive 2014/53/
UE, 2014/30/UE, 2014/35/UE. Vous pouvez trouver le DoC ici: www.fishman.com/compliance
Declaración de conformidad de la UE CE: Por la presente, Fishman declara que este Loudbox
Micro cumple con los requisitos esenciales y otras disposiciones relevantes de la Directiva 2014/30/
EU, 2014/35/EU.
This device complies with Industry Canada license-exempt RSS standard(s): Operation is subject
to the following two conditions: (1) this device may not cause interference, and (2) this device must
accept any interference that may cause undesired operation of the device.
Cet appareil est conforme aux normes Industry Canada exemptes de licence standard RSS(s):
Son fonctionnement est sujet aux deux conditions suivantes: (1) cet appareil ne peut pas provoquer
d’interférences et (2) cet appareil doit accepter toute interférence, y compris les interférences
susceptibles de provoquer un fonctionnement indésirable.
Before using Loudbox Micro, carefully read the following:
Important Safety Instructions (Page 2)
8
Page 9

Questo simbolo indica che il prodotto non deve essere smaltito come un normale rifiuto domestico ma
deve essere consegnato a un impianto di raccolta appropriato per il riciclo. Per ulteriori informazioni
sullo smaltimento e il riciclo di questo prodotto, contatta l’autorità locale, il servizio di smaltimento o il
negozio in cui lo hai acquistato.
Dieses Symbol bedeutet, dass das Produkt nicht über den Hausmüll entsorgt werden darf und an eine
geeignete Recycling-Sammelstelle. Weitere Informationen zur Entsorgung und zum Recycling dieses
Produkts, Wenden Sie sich an Ihre örtliche Gemeinde, den Entsorgungsdienst oder das Geschäft, in
dem Sie dieses Produkt gekauft haben.
Ce symbole signifie que le produit ne doit pas être jeté comme ordures ménagères et doit être livré à
une installation de collecte appropriée pour recyclage. Pour plus d’informations sur l’élimination et le
recyclage de ce produit, contactez votre municipalité locale, le service d’élimination ou le magasin où
vous avez acheté ce produit.
Este símbolo significa que el producto no debe desecharse como basura doméstica y debe entregarse
a un centro de recolección adecuado para su reciclaje. Para obtener más información sobre la
eliminación y el reciclaje de este producto, comuníquese con su municipio local, el servicio de
eliminación o la tienda donde compró este producto.
9
Page 10

Welcome
Thank you for making Fishman a part of your acoustic experience. We are proud
to offer the finest acoustic amplification products available; high-quality
professional-grade tools which empower you to sound your very best.
Your new Loudbox Micro is a portable amplifier designed to faithfully reproduce
the sound of acoustic instruments and a diverse assortment of vocal or recorded
accompaniments.
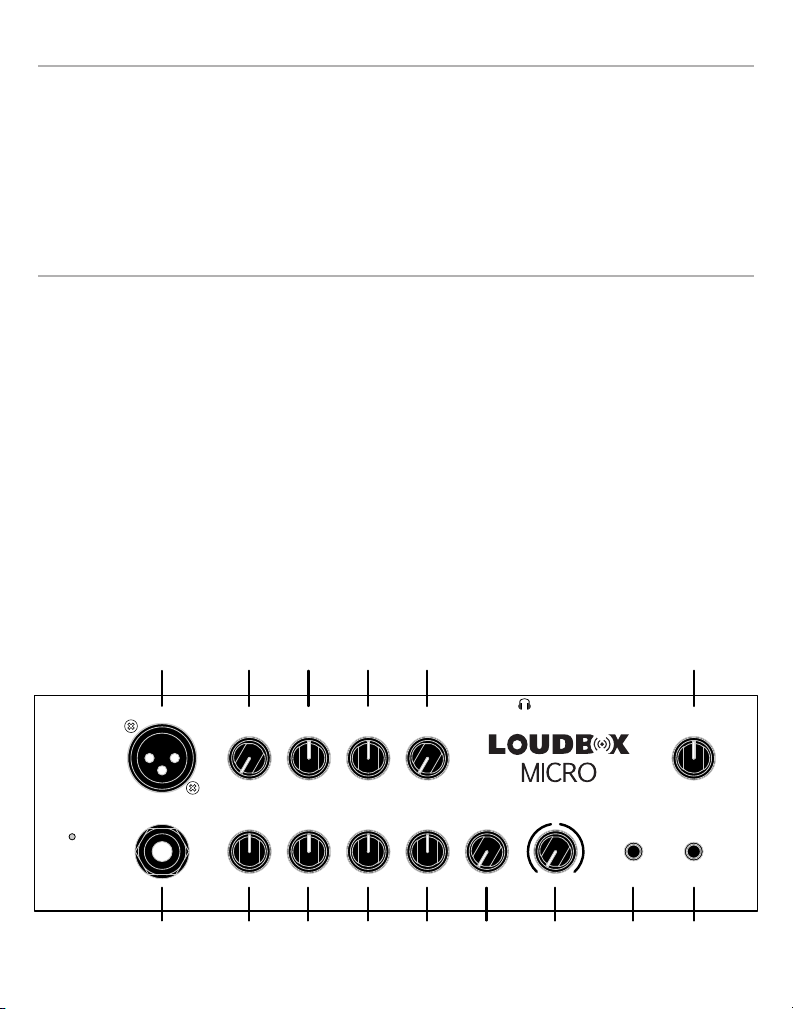
Control Panel
1. Instrument Input
Connect your instrument to the Instrument input with a shielded ¼” cable. This
input accepts all types of passive or active acoustic pickups.
2. Gain
Gradually increase the Instrument channel Gain:
• For instruments featuring active (battery-powered) onboard preamps,
start with the control around 12 o’clock.
• For passive pickups, you may start with the control set much higher.
It is normal to run this control near its maximum with many passive
soundhole pickups.
• A clip light will warn you when the Gain is set too high.
10 11 12 13 14
15
Mic
clip
Instrument
Aux In
Gain
Low
High
Reverb
HighMidLowGain Reverb
mild
Chorus
off
heavy
Phase
1 2 3 4 5 6 7 8
10
Master
Volume
Power
9
Page 11

Control Panel (cont.)
3. Low
Boost here to add weight to the sound.
4. Mid
This control affects how well the instrument blends in or stands out in the mix. At
loud volumes, a midrange cut will achieve a more natural sound.
5. High
Boost highs to add “air” to the sound of the instrument.
6. Reverb
Controls the amount of the reverb effect in the Instrument channel.
7. Chorus
Controls the depth of two separate chorus presets.
8. Phase
Use the Phase switch to improve bass at low volume and suppress feedback at
high volumes.
9. Power
Connect only the included power adapter and press this switch to turn on the
amplifier. The light in the power switch will illuminate.
10. Mic Input
Connect a dynamic microphone into this XLR input for vocal or instrument. You
may also connect an outboard preamp with balanced XLR out to this input.
11. Gain
Use the Gain knob to set the signal level for the Microphone input.
12. Low
Boost here to add weight to the sound.
13. High
Boost highs to add “air” to the sound of the microphone.
14. Reverb
Controls the amount of the reverb effect in the Microphone channel.
15. Master Volume
Sets the overall level of Loudbox Micro. In general, put the Master Volume as
high as possible using less Gain to achieve the cleanest sound.
11
Page 12

Rear Panel
16. DC Power Inlet
Connect only the included power adapter.
17. Aux In
Connect a line level stereo audio source here. This mono-summing input has no
separate volume control and is adjusted by using the master volume.
18. Headphone Output
When you plug in headphones here, the speakers shut off so you can play along
silently with pre-recorded music.
19. Mix D.I. (Post)
Plug in here when you wish to send signals from the mic, instrument, and aux
inputs to a mixing console or a recording device. This post-EQ output is always
ground isolated to prevent ground loop hum.
16 17 18 19
Aux In
Use included
power supply
only
Mix D.I.
Output
12
Page 13

Technical Specifications
Output Rating:
Power rating, combined 40 W
SPL @ 1 meter 100 dB
Frequency Response 80 Hz – 20 kHz
Input Impedance:
Instrument 10 MΩ
Microphone 2 kΩ
Aux Input (stereo) 10 kΩ
Tone Controls:
Low ±12 dB @ 60 Hz (resonant)
Mid ±10.5 dB @ 700 Hz (resonant)
High ±12.5 dB @ 15 kHz (shelving)
Mix D.I. Out (post):
Output Impedance 600 Ω balanced, mic level
Phantom power tolerant
Speaker System:
Woofer 5.25” poly cone
Tweeter 0.8” soft dome
Baffle Angle 10 degrees
Physical:
Dimensions 8.1” D x 10.4” W x 9.5” H
Weight 10 lbs
We reserve the right to change any of the specifications and information in this manual without notice.
13
Page 14

Benvenuto
Grazie per aver reso Fishman parte della tua esperienza acustica. Siamo orgogliosi
di offrire i migliori prodotti di amplificazione acustica disponibili: strumenti profes-
sionali di alta qualità che ti permettono di suonare al meglio.
Il tuo nuovo Loudbox Micro è un amplificatore portatile progettato per riprodurre
fedelmente il suono degli strumenti acustici e un assortimento vario di accompagnamenti vocali o registrati.
Pannello di Controllo
1. Ingresso Instrument
Collega il tuo strumento all’ingresso Instrument con un cavo schermato da
6.35mm. L’ingresso accetta tutti i tipi di pickup acustici passivi o attivi.
2. Gain
Aumentare gradualmente il Gain del canale Instrument:
• Per strumenti con preamplificatori attivi (alimentati a batteria) integrati,
iniziare con il controllo a ore 12.
• Per i pickup passivi, si può iniziare con il controllo impostato a livelli più
elevati. È normale far funzionare questo controllo vicino al massimo con
molti pickup passivi a buca.
• Suona in modo aggressivo e aumentate il Gain fino a quando il LED
Clip lampeggia, poi riduci il Gain finché non si verifica più alcun clipping.
10 11 12 13 14
15
Mic
clip
Instrument
Aux In
Gain
Low
High
Reverb
HighMidLowGain Reverb
mild
Chorus
off
heavy
Phase
1 2 3 4 5 6 7 8
14
Master
Volume
Power
9
Page 15

Pannello di Controllo (continua)
3. Low
Incrementa questo controllo per aggiungere peso al suono.
4. Mid
Questo controllo influisce su quanto bene lo strumento si fonde o si distingue
nel mix. A volumi elevati, un taglio del midrange conferisce un suono più naturale.
5. High
Aumenta gli acuti per aggiungere “aria” al suono dello strumento.
6. Reverb
Regola l’intensità dell’effetti reverb.
7. Chorus
Controlla la profondità di due preset Chorus separati.
8. Phase
Usa l’interruttore Phase per migliorare i bassi a basso volume e sopprimere il
feedback ad alto volume.
9. Power
Collegare il cavo DC in dotazione alla presa di alimentazione “DC In”
dell’amplificatore. Si illumina quando l’amplificatore è acceso.
10. Ingresso Mic
Inserire in questo ingresso XLR un microfono bilanciato per la voce o per lo
strumento. È possibile inoltre collegare a questo ingresso un preamplificatore
esterno con uscita bilanciata XLR.
11. Gain
Utilizza la manopola Gain per impostare il livello del segnale.
12. Low
Incrementa questo controllo per aggiungere peso al suono.
13. High
Aumenta gli acuti per aggiungere “aria” al suono dello microfono.
14. Reverb
Regola l’intensità dell’effetti reverb.
15. Master Volume
Regola il livello generale di Loudbox Micro con il Master Volume. In generale,
imposta il Master Volume il più alto possibile per ottenere il suono più pulito.
15
Page 16

Pannello Posteriore
16. Ingresso alimentazione CC
Collegare solo l’alimentatore incluso.
17. Ingresso Ausiliario
Inserisci in questo ingresso una sorgente audio stereoLine Level, come un lettore
CD o MP3. Sebbene siano ingressi stereo (TRS), i segnali destro e sinistro sono
mixati in mono.
18. Presa Jack Headphone
Quando inserisci le cuffie stereo in questa presa, i diffusori si spengono, in modo
da poter suonare insieme alla musica preregistrata attraverso le cuffie.
19. Mix D.I. (Post)
Collegati qui quando vuoi inviare segnali da entrambi i canali 1 e 2 a un mixer o a
un amplificatore slave. Questa uscita post-EQ è sempre isolata a terra per evitare
il ronzio del ground loop.
16 17 18 19
Aux In
Use included
power supply
only
Mix D.I.
Output
16
Page 17

Specifiche Tecniche
Potenza Nominale:
Cumulativa 40 W
SPL @ 1 meter 100 dB
Risposta in frequenza 80 Hz – 20 kHz
Impedenza di Ingresso:
Instrument 10 MΩ
Microfono 2 kΩ
Ingresso Ausiliario (stereo) 10 kΩ
Controlli di Tono :
Low ±12 dB @ 60 Hz (resonant)
Mid ±10.5 dB @ 700 Hz (resonant)
High ±12.5 dB @ 15 kHz (shelving)
Mix D.I. out:
Impedenza d’uscita 600 Ω bilanciata, mic level
Tollera alimentazione Phantom
Sistema di Speaker:
Woofer poli cone da 133 mm
Tweeter a cupola in tela da 20 mm
Angolo del Baffle 10º
Fisiche:
Dimensioni 206 mm D x 264 mm W x 242 mm H
Peso 4.5 kg
Ci riserviamo il diritto di cambiare qualsiasi specifica e informazione in questo manuale senza preavviso.
17
Page 18

Herzlich Willkommen
Danke, dass Sie Fishman zu einem Teil Ihres akustischen Erlebnisses gemacht
haben. Wir sind stolz darauf, die besten akustischen Verstärkerprodukte die auf
dem Markt erhältlich sind, anbieten zu können; hochwertige Werkzeuge in profes-
sioneller Qualität, die es Ihnen ermöglichen, Ihr bestmögliches Klangerlebnis zu
erzielen.
Ihre neue Loudbox Micro ist ein tragbarer Verstärker, der für die originalgetreue
Wiedergabe des Klangs akustischer Instrumente und einer vielfältigen Auswahl an
Gesangs- oder Begleitaufnahmen entwickelt wurde.
Schalttafel
1. Instrumenten-Eingang (Instrument)
Schließen Sie Ihr Instrument mit einem abgeschirmten 6,35 mm-Kabel (Klinken-
stecker) an den Instrumenteneingang an. Der Eingang erlaubt alle Arten von passiven oder aktiven akustischen Tonabnehmern.
2. Verstärkung (Gain)
Erhöhen Sie allmählich die Verstärkung (Gain) des Instrumentenkanals:
• Stellen Sie , bei Instrumenten mit aktiven (batteriebetriebenen) Vorverstärkern, den Regler auf ungefähr 10 Uhr zu Beginn ein.
• Bei passiven Tonabnehmern können Sie mit einem wesentlich höheren
Regelsatz beginnen. Es ist normal, diesen Regler in der Nähe seines
Maximums mit vielen passiven Schalloch-Tonabnehmer laufen zu lassen.
• Spielen Sie aggressiv und erhöhen Sie die Gain-Werte bis die Clip-LED
blinkt, dann schalten Sie die Gain-Funktion wieder aus, bis kein Clipping
auftritt.
10 11 12 13 14
15
Mic
clip
Instrument
Aux In
Gain
Low
High
Reverb
HighMidLowGain Reverb
mild
Chorus
off
heavy
Phase
1 2 3 4 5 6 7 8
18
Master
Volume
Power
9
Page 19

Schalttafel (forts.)
3. Niedrig (Low)
Verstärken Sie hier, um dem Klang mehr Gewicht zu verleihen.
4. Mitte (Mid)
Diese Einstellung beeinflusst, wie gut sich das Instrument in den Mix einfügt
oder sich darin hervorhebt. Bei hohen Lautstärken wird durch einen Mittelton-
schnitt ein natürlicherer Klang erzielt.
5. Hoch (High)
Verstärken Sie die Höhen, um dem Klang des Instruments “Luft” hinzuzufügen.
6. Reverb
Passt die Intensität von Hall-Effekte.
7. Chor (Chorus)
Steuert die Tiefe von zwei separaten Chorus-Voreinstellungen.
8. Phase
Verwenden Sie den Phasenschalter, um den Bass bei niedriger Lautstärke zu
verbessern und Rückkopplungen bei hoher Lautstärke zu unterdrücken.
9. Power
Stecken Sie das mitgelieferte Gleichstromkabel in die Gleichstromeingangsbuchse am Verstärker. Der An-/Aus-Schalter-Knopf leuchtet, wenn die Stromversorgung des Verstärkers eingeschaltet ist.
10. Mikrofon-Eingang
Schließen Sie ein symmetrisches Mikrofon für Gesang oder für Ihr Instrument
an diesen XLR-Eingang an. Sie können an diesen Eingang auch einen externen
Vorverstärker mit symmetrischem XLR-Ausgang anschließen.
11. Verstärkung (Gain)
Stellen Sie mit dem Gain-Regler den Pegel des Signals ein.
12. Niedrig (Low)
Verstärken Sie hier, um dem Klang mehr Gewicht zu verleihen.
13. Hoch (High)
Verstärken Sie die Höhen, um dem Klang des Mikrofon “Luft” hinzuzufügen
14. Hall (Reverb)
Passt die Intensität von Hall-Effekte.
15. Master-Lautstärke (Master Volume)
Stellen Sie den Gesamtpegel der Loudbox Micro mit dem Master Volume ein.
Stellen Sie die Master-Lautstärke im Allgemeinen so hoch wie möglich ein um
den saubersten Klang zu erzielen.
19
Page 20

Rückseite
16. Gleichstromeingang
Schließen Sie nur das mitgelieferte Netzteil an.
17. Aux-Eingang
Schließen Sie an diesem Eingang eine Line-Pegel-Stereo-Audioquelle wie z.B.
einen CD- oder MP3-Player an. Es handelt sich um Stereo-Eingänge (TRS),
jedoch werden das linke und das rechte Signal zu Monokanälen gemischt.
18. Kopfhöreranschluss
Wenn Sie hier einen Stereokopfhörer anschließen, schalten sich die Lautsprecher
ab, so dass Sie über die Kopfhörer voraufgenommene Musik mitspielen können.
19. D.I. Mischen (Post)
Schließen Sie hier an, wenn Sie Signale sowohl von Kanal 1 als auch von Kanal 2
an ein Mischpult oder einen Slave-Verstärker senden möchten. Dieser Post-EQ-
Ausgang ist immer masseisoliert, um ein Brummen der Erdschleife zu verhindern.
16 17 18 19
Aux In
Use included
power supply
only
Mix D.I.
Output
20
Page 21

Technische Angaben
Nennleistung:
Kumulativ 40 W
SPL @ 1 meter 100 dB
Frequenzgang 80 Hz – 20 kHz
Eingangswiderstand:
Mikrofon 10 MΩ
Instrument 2 kΩ
Aux-Eingang (stereo) 10 kΩ
Tonregler:
Niedrig ±12 dB @ 60 Hz (resonant)
Mitte ±10.5 dB @ 700 Hz (resonant)
Hoch ±12.5 dB @ 15 kHz (shelving)
D.I. Mischen (Post):
Ausgangswiderstand 600 Ω symmetrisch
Phantomspeisung tolerant
Lautsprechersystem:
Tieftöner 133 mm Tuchkegel
Hochtöner-Pegel 20 mm weiche Kuppel
Baffle Angle 10º
Physisch:
Abmessungen 206 mm D x 264 mm W x 242 mm H
Gewicht 4.5 kg
Wir behalten uns das Recht vor, die Spezifikationen und Informationen in diesem Handbuch ohne
Vorankündigung zu ändern.
21
Page 22

Bienvenue
Merci d’avoir fait de Fishman une partie de votre expérience acoustique. Nous
sommes fiers d’offrir les meilleurs produits d’amplification acoustique disponibles;
des outils de haute qualité de qualité professionnelle qui vous permettent de donner le meilleur de vous-même.
Votre nouveau Loudbox Micro est un amplificateur portable conçu pour reproduire
fidèlement le son des instruments acoustiques et un assortiment diversifié
d’accompagnements vocaux ou enregistrés.
Panneau de Commande
1. Entrée de l’instrument
Connectez votre instrument à l’entrée instrument avec un câble blindé de 6.35mm.
L’entrée accepte tous les types de micros acoustiques passifs ou actifs.
2. Gain
Augmentez progressivement le gain du canal de l’instrument:
• Pour les instruments équipés de préamplis embarqués actifs (alimentés
par batterie), commencez par la commande vers 10 heures.
• Pour les micros passifs, vous pouvez commencer avec le jeu de contrôle
beaucoup plus élevé. Il est normal d’exécuter ce contrôle près de son
maximum avec de nombreux micros passifs.
• Jouez de manière intensive et augmenter le gain jusqu’à ce que le clip
LED clignote, puis recule sur le gain jusqu’à ce qu’aucun écrêtage ne se
produise.
10 11 12 13 14
15
Mic
clip
Instrument
Aux In
Gain
Low
High
Reverb
HighMidLowGain Reverb
mild
Chorus
off
heavy
Phase
1 2 3 4 5 6 7 8
22
Master
Volume
Power
9
Page 23

Panneau de Commande (suite)
3. Basse
Boostez ici pour ajouter du poids au son.
4. Milieu
Ce contrôle affecte la façon dont l’instrument se fond ou se démarque dans le
mix. À des volumes élevés, une coupe de milieu de gamme permettra d’obtenir
un son plus naturel.
5. Haute
Boostez les aigus pour ajouter de l’« air » au son de l’instrument.
6. Reverb
Ajuste l’intensité de réverbération.
7. Chœur
Contrôle la profondeur de deux préréglages de chorus distincts.
8. Phase
Utilisez le commutateur de phase pour améliorer les basses à faible volume et
supprimer le larsen à volume élevé.
9. Power
Branchez le câble CC fourni dans la prise d’alimentation CC de l’ampli. S’allume
lorsque l’amplificateur est sous tension.
10. Entrée micro
Branchez un microphone symétrique dans cette entrée XLR pour la voix ou pour
votre instrument. Vous pouvez également connecter un préampli hors-bord avec
une sortie XLR symétrique à cette entrée.
11. Gain
Utilisez le bouton Gain pour régler le niveau du signal.
12. Basse
Boostez ici pour ajouter du poids au son.
13. Haute
Boostez les aigus pour ajouter de l’« air » au son de microphone.
14. Reverb
Ajuste l’intensité de réverbération.
15. Master Volume
Réglez le niveau global de Loudbox Micro avec le volume principal. En général,
placez le volume principal aussi haut que possible pour obtenir le son le plus
propre.
23
Page 24

Panneau Arrière
16. Entrée d’alimentation CC
Connectez uniquement l’adaptateur secteur inclus.
17. Entrée Auxiliaire
Branchez une source audio stéréo au niveau de la ligne telle qu’un lecteur CD
ou MP3 dans cette entrée. Ce sont des entrées stéréo (TRS), mais les signaux
gauche et droit sont mélangés en mono.
18. Prise Casque
Lorsque vous branchez des écouteurs stéréo ici, les haut-parleurs s’éteignent, de
sorte que vous pouvez jouer avec de la musique préenregistrée via le casque.
19. Mix D.I. (Post)
Branchez-vous ici lorsque vous souhaitez envoyer des signaux des canaux 1 et 2
à une console de mixage ou à un amplificateur esclave. Cette sortie post-égalisation est toujours isolée à la terre pour éviter le bourdonnement de la boucle de
terre.
16 17 18 19
Aux In
Use included
power supply
only
Mix D.I.
Output
24
Page 25

Caractéristiques Techniques
Puissance nominale:
Cumulatif 40 W
SPL @ 1 meter 100 dB
Réponse de fréquence 80 Hz – 20 kHz
de translation
Impédance d’entrée:
Instrument 10 MΩ
Microphone 2 kΩ
Entrée Auxiliaire (stereo) 10 kΩ
Contrôles de tonalité:
Basse ±12 dB @ 60 Hz (résonance)
Milieu ±10.5 dB @ 700 Hz (résonance)
Haute ±12.5 dB @ 15 kHz (rayonnages)
Mix D.I. (post):
Impédance de sortie 600 Ω équilibrée
Tolérant à l’alimentation fantôme
Système de haut-parleurs:
Woofer 133 mm poly cône
Tweeter 20 mm dôme en tissu
Angle du déflecteur 10º
Physique:
Dimensions 206 mm D x 264 mm W x 242 mm H
Poids 4.5 kg
Nous nous réservons le droit de modifier les spécifications et les informations contenues dans ce
manuel sans préavis.
25
Page 26
Bienvenido
Gracias por hacer de Fishman parte de su experiencia acústica. Estamos orgullo-
sos de ofrecer los mejores productos de amplificación acústica disponibles; her-
ramientas profesionales de alta calidad que le permitirán sonar lo mejor posible.
Su nuevo Loudbox Micro es un amplificador portátil diseñado para reproducir
fielmente el sonido de instrumentos acústicos, así como una gran variedad de
acompañamientos vocales o grabados.
Panel de Control
1. Entrada Instrumento
Conecta tu instrumento a esta entrada usando un cable apantallado de 6.35mm.
Esta entrada acepta todo tipo de pastillas acústicas, pasivas o activas.
2. Ganancia
Aumenta gradualmente la ganancia de la entrada:
• Para instrumentos con preamplificadores activos (alimentados por
batería), empiece con el nivel de Gain en la posición central.
• Para pastillas pasivas, puede empezar con este control en un punto
más alto. Es normal utilizar este control cerca de su máximo con muchas pastillas pasivas.
• Un indicador luminoso le avisará cuando el nivel de ganancia esté
demasiado alto.
Mic
clip
Instrument
10 11 12 13 14
Aux In
Gain
Low
High
Reverb
HighMidLowGain Reverb
mild
Chorus
off
heavy
1 2 3 4 5 6 7 8
26
Phase
15
Master
Volume
Power
9
Page 27

Panel de Control (cont.)
3. Graves
Incremente este control para añadir cuerpo al sonido.
4. Medios
Este control afecta a la forma en que el instrumento se integra o destaca en la
mezcla. A volúmenes altos, un recorte de medios conseguirá un sonido más
natural.
5. Agudos
Aumenta los agudos para añadir “aire” al sonido del instrumento.
6. Reverberación
Controla la cantidad del efecto de reverberación del canal de Instrumento.
7. Chorus
Controla la profundidad de dos presets de chorus separados.
8. Fase
Utiliza el conmutador Phase para mejorar la reproducción de graves a bajo volumen y/o suprimir la realimentación a volúmenes altos.
9. Encendido
Conecte el adaptador de corriente incluido en el amplificador y pulse este interruptor para encenderlo. La luz del interruptor de encendido se iluminará.
10. Entrada Micrófono
Conecte un micrófono dinámico en esta entrada XLR para voces o instrumentos.
También puede conectar un preamplificador externo con salida XLR balanceada
a esta entrada.
11. Ganancia
Utilice el control de ganancia para ajustar el nivel de señal de la entrada de
micrófono.
12. Graves
Incremente este control para añadir cuerpo al sonido.
13. Agudos
Aumenta los agudos para añadir “aire” al sonido del micrófono.
14. Reverberación
Controla la cantidad del efecto de reverberación en el canal de Micrófono.
15. Volumen Master
Controla el volumen general del Loudbox Micro. Por norma, ponga el Volumen
Master lo más alto posible utilizando así menos ganancia de entrada y conseguir
el sonido más limpio.
27
Page 28

Panel Trasero
16. Entrada de alimentación DC
Conecte aquí el adaptador de corriente incluido.
17. Entrada Aux
Conecte aquí una fuente de audio estéreo de nivel de línea. Esta entrada no
tiene control de volumen separado y se ajusta utilizando el volumen Master.
18. Salida de auriculares
Cuando conectas unos auriculares en esta entrada los altavoces se apagan para
que puedas escuchar música pregrabada en silencio.
19. Mix D.I. (Post)
Conéctese aquí cuando desee enviar señales desde las entradas de micro,
instrumento y auxiliar a una mesa de mezclas o a un dispositivo de grabación.
Esta salida post-EQ está siempre aislada de tierra para evitar interferencias de la
señal.
16 17 18 19
Aux In
Use included
power supply
only
Mix D.I.
Output
28
Page 29

Especificaciones Técnicas
Clasificación de Salida:
Potencia Nominal 40 W
SPL @ 1 meter 100 dB
Respuesta frecuente 80 Hz – 20 kHz
Impedancia de Entrada:
Canal 1 10 MΩ
Canal 2 2 kΩ
Entrada auxiliar (estéreo) 10 kΩ
Controles de tono:
Graves ±12 dB @ 60 Hz (resonante)
Medios ±10.5 dB @ 700 Hz (resonante)
Agudos ±12.5 dB @ 15 kHz (estantería)
Salida Mezcla D-I:
Impedancia de Salida 600 Ω balanceada, nivel de micrófono
Compatible con alimentación Phantom
Sistema de Altavoces:
Woofer 133 mm cono de poli
Tweeter 20 mm cúpula blanda
Ángulo Deflector 10º
Physical:
Dimensiones 206 mm D x 264 mm Wx 242 mm H
Peso 4.5 kg
Nos reservamos el derecho de cambiar cualquiera de las especificaciones e información de este
manual sin previo aviso.
29
Page 30

30
Page 31

31
Page 32

shman.com
Fishman and Fishman Transducers are trademarks or tradenames of Fishman Transducers Inc.
513-300-317 rev 0
 Loading...