

Page 1
Owner’s Manual
Page 2

Loudbox
Tested To Comply
With FCC Standards
FOR HOME OR OFFICE USE
TM
Page 3
CAUTION
Risk of electric shock.
Do not open.
No user serviceable parts inside.
Refer servicing to qualified personnel.
Do not expose to rain or moisture.
Wherever this symbol appears, it alerts you to
the presence of uninsulated dangerous
voltage inside the enclosure that may be
sufficient to constitute a risk of shock.
Whenever this symbol appears, it alerts you
to the presence of important operating and
maintenance (servicing) instructions in the
user’s manual for this amplifier.
Important Safety Instructions
To ensure your personal safety and the safety of others,
operate this apparatus only after reading these
instructions and heeding the warnings listed below.
1. Read these instructions.
2. Keep these instructions.
3. Heed all warnings.
4. Follow all instructions.
5. Do not use this apparatus near water.
6. Clean only with a dry cloth.
7. Do not block the ventilation openings. Install in
accordance with the manufacturer's instructions.
8. Do not install near any heat sources such as
radiators, heat registers, stoves or other apparatus
(including amplifiers) that produce heat.
9. Do not defeat the safety purpose of the polarized or
grounding-type plug. A polarized plug has two
blades with one wider than the other. A groundingtype plug has two blades and a third grounding
prong. The wide blade or the third prong are
provided for your safety. If the provided plug does
not fit into your outlet, consult an electrician for
replacement of the obsolete outlet.
10. Protect the power cord from being walked on or
pinched, particularly at the plugs, convenience
receptacles and the point where they exit from the
apparatus.
11. Use only attachments/accessories specified by the
manufacturer.
12. Use only with a cart, stand, tripod, bracket or table
specified by the manufacturer, or sold with the
apparatus. When a cart is used, use caution when
moving the cart/apparatus combination to avoid
injury from tip-over.
13. Unplug this apparatus during lightning storms or
when unused for long periods of time.
14. Refer all servicing to qualified service personnel.
Servicing is required when the apparatus has been
damaged in any way, such as a power-supply cord
or plug is damaged, liquid has been spilled or
objects have fallen into the apparatus, the apparatus
has been exposed to rain or moisture, does not
operate normally, or has been dropped.
Do not expose the apparatus to dripping or splashing
liquids and do not not place objects filled with liquids (such
as a beverage container or a vase) on the apparatus
Warning
To reduce the risk of fire or electric shock, do not expose
this apparatus to rain or moisture.
Hear This!
The Loudbox amplifier is capable of cleanly reproducing
the sound of your instrument at very high volume levels.
Prolonged repeated exposure to high sound pressure
levels (SPLs) without protection can cause permanent
hearing loss. OSHA has set guidelines and specified
permissible sound exposure limits for those who work in
high SPL environments.
Permissible Noise Exposures
Duration per day, hours Sound level dBA slow response
8 90
692
495
397
2 100
1 1/2 102
1 105
1/2 110
1/4 or less 115
To ensure against permanent hearing loss, wear hearing
protection when you perform with amplification.
Page 4

QUICK START
Please read your Owner’s Manual before powering up your Loudbox. Here’s what you need to do to plug
in and play.
If your amplifier has an operating voltage of 120V, plug the provided AC line cord into the back of the
amplifier. For an amplifier that operates at 240V you must supply your own detachable power cord. The cord
you supply must have an IEC style 320 connector at one end, and a male AC plug appropriate for your area
at the other.
1. Make sure the Loudbox is switched OFF.
2. Plug the Loudbox into an electrical outlet with the appropriate AC voltage.
NOTE: Do not defeat the ground prong on the AC cable; the safe operation of this
amplifier depends on a proper ground connection.
3. Push the Mute switch to the IN position and make sure the Volume is turned down.
4. Connect your acoustic instrument to the Input of the Loudbox with a shielded 1/4”
cable.
Suggested Settings:
TM
5. Turn the Loudbox on.
6. Push the Mute switch to the OUT position and slowly turn the volume knob up to
the desired volume level.
If your pickup system has a volume control, turn it up a high as possible without
causing the amp to distort.
4 9
Page 5

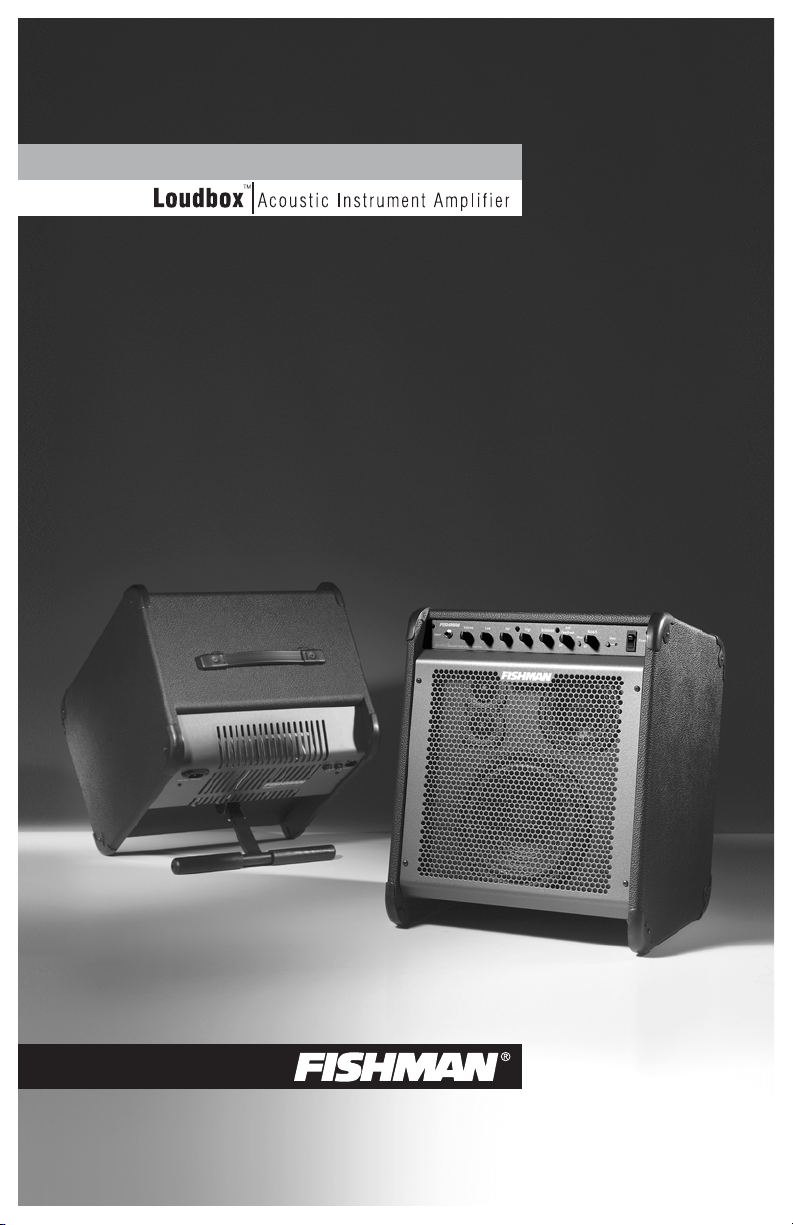
INTRODUCTION
Thank you for choosing the Fishman
Loudbox. This full-range, high powered amp
is designed especially for acoustic stringed
instruments (excluding bass). With
performance that gives new meaning to the
phrase “loud and clear”, this diminutive tri-
amped powerhouse delivers studio-quality
sound at stunning volume levels.
Please read these instructions carefully. If you
have any questions, please email us at
tech@fishman.com
The 250-watt, single-channel Loudbox, features an 8” woofer,
4” polypropylene mid driver and two 1” soft-dome
neodymium tweeters. These speaker components have been
painstakingly designed for high power handling and a smooth,
flat acoustic response. Each component is housed in its own
sealed enclosure and tuned precisely for
acoustic stringed instruments. The
innovative Loudbox enclosure leans back
10 degrees for better dispersion of highs
and tighter lows. When you need even
more angle, an integrated “t-bar” kick
stand allows you to tilt the amp back as
much as 70 degrees, converting the
Loudbox into an effective near-field floor
monitor.
Taking a cue from commercial sound reinforcement systems,
the three power amplifiers that drive the Loudbox deliver
cleaner, less distorted sound through the speakers than any
acoustic amplifier in its class. The high efficiency paper cone
woofer pumps out the bass, the polypropylene midrange
driver handles the crucial midrange frequencies and two softdome neodymium tweeters top off the treble.
The tweeters in the Loudbox are identical to those used in the
best studio mastering monitors; they produce a smooth,
sweet treble that is perfect for acoustic instruments. With two
of these tweeters, you get great dispersion and high SPLs,
without the unpleasant “honk” of a high frequency
compression driver found in many so called “acoustic” amps.
The single-channel Loudbox features an ultra-high impedance
input with an EQ section that includes bass, treble, midrange
and brilliance controls. Like a high-performance sports car, we
decided to keep the layout simple and straightforward. The
Loudbox has a greater than 116dB SPL rating, so the big
thrills with this amp come when you step on the gas and feel
the surge of power. Fighting acoustic feedback is
straightforward with the Loudbox’s notch filter and phase
switch. A sweet-sounding spring reverb, mute switch, effects
loop, and an XLR output round out the features.
Our decision to go with a tri-amped,
three-way speaker system was driven
entirely by our quest for amplified clarity
and sheer volume. To achieve the sound
quality and power we were looking for, a
two-way system just couldn’t cut it; we’d
sacrifice the system’s response or we
would over-burden the drivers. Once we
added the midrange driver to the
equation, all these problems evaporated.
Page 6

Front Panel Features
TM
TM
TM
Input
This input has a very wide operating range and will accept high or
low level signals from most acoustic instruments.
Volume
Sets the overall level of the Loudbox. Since the system can produce
sound pressure levels in excess of 120dB peaks, we strongly
suggest that you wear hearing protection when you use the
Loudbox at higher volumes.
Low
Shelving bass, ±10 dB @ 100Hz. Boost here to add weight to the
sound. In general, boost bass at low volumes and flatten it out (or
cut) at higher levels. With the dial set at 12:00, the control is
effectively out of the circuit.
Mid
A resonance style filter, ±12dB @ 1.2kHz. This control affects how
well the instrument blends in or stands out in the mix. At loud
volumes a midrange cut will achieve a more natural sound. With the
dial set at 12:00, the control is effectively out of the circuit.
High
Shelving treble, ±12dB @ 10kHz. Boost highs to add “air” to the
sound of the instrument. With the knob set at 12:00, the control is
effectively out of the circuit.
Brilliance
A Resonance style tone circuit, ±12dB @ 10kHz. Add presence and
“zing” to high frequencies. With the knob set at 12:00, the control is
effectively out of the circuit.
Anti-Feedback
A Fixed level, variable frequency notch filter -14dB @ 20 - 400Hz. If
you encounter low frequency feedback, sweep this control to isolate
and eliminate it. Many guitars will benefit with the Anti Feedback
knob set at about 11:00. The Anti Feedback filter is off at 7:00
position.
6 7
Page 7

Phase
Use the phase switch in conjunction with the Anti Feedback filter to
eliminate acoustic feedback
About Acoustic Feedback
Feedback usually occurs in the lowest octave of your instrument, generally around two notes
about a half step apart. Like blowing air across a bottle, the lower type of feedback (cavity
resonance) starts when the resonant air chamber inside your instrument is excited by the sound
pressure coming out of the speakers. We have found that it is effective to tune out an
instrument’s cavity resonance feedback with the Anti Feedback (notch filter) in the Loudbox. For
acoustic guitar this occurs at G# on the low E-string, or at about 100Hz. Turn the Anti Feedback
knob to about 11:00 to dial out this resonance. Note that the circuit can be effectively defeated
by moving the dial to the OFF (7:00) position.
The higher range of feedback (top resonance) usually starts about a half or whole step above
cavity resonance of the instrument. Top resonance feedback happens when the resonant
frequency of the soundboard of your instrument is excited by the sound pressure coming off the
speakers. For acoustic guitar this occurs at A and above on the low E-string. Push the Phase
switch in and out until you find the position that subdues top resonance feedback.
Reverb
This is a classic spring style reverb that we have meticulously voiced
for acoustic instruments.
Mute
Silences the speaker and the XLR output for tuning or during breaks.
Engage the mute switch when you change instruments to avoid loud
electronic “pops”. The LED next to the mute switch lights when the
mute is engaged.
Power Switch
Lower the Volume or engage the mute switch before you turn on the
amp to avoid surprise beginnings. Flip the power switch up and it
will light, indicating the amp is on.
Page 8

Rear Panel Features
120V / 240V ~AC
50 / 60Hz
-
300W Max
AC Power
For 120V amplifiers purchased in the USA and Canada, plug in the supplied
detachable AC power cable.
For 240V amplifiers purchased outside the USA and Canada, you must supply
your own detachable AC cable. This cable must have an IEC style 320 connector
at one end, and a male AC plug appropriate for your area at the other.
Fuse Holder
The fuse is located within the AC power receptacle on the back of the amp.
Access the fuse compartment with a small slotted screwdriver.
For 120V amplifiers purchased in the USA and Canada, replace the fuse with:
Littelfuse type 21802.5 or equivalent 5 x 20mm, 2.5A, 250V, time delay fuse
For 240V amplifiers purchased outside the USA and Canada, replace the fuse
with: Littelfuse model 2181.25 or equivalent; 5 x 20mm, 1.25A, 250V, time
delay fuse.
Effects Loop (Serial)
Patch an external effect (delay, reverb, chorus) through these jacks. Use a
standard 1/4” instrument cable to connect the send on the Loudbox to the input
of the effect. Connect the return jack on the Loudbox to the output of the effect.
The effects loop is located “post-EQ”. The effects loop is compatible with battery
operated “stompbox” style effects processors.
You may also connect the send jack on the Loudbox to an external tuner or to
an additional stage amp.
XLR Output
Use this balanced output to route your instrument’s signal to a mixing console,
PA, etc.
This output is “post-fader” and “post-EQ”, which means that all the front panel
controls (excluding the phase switch) will affect the signal that gets to the XLR
output.
Kickstand
To hear yourself better onstage, use the kickstand to angle the
Loudbox back like a wedge style floor monitor. The kickstand
has three click-stops that enable you to tilt the cabinet back
to a 45, 57 or 70 degree angle. Squeeze the buttons on
the side of the kickstand to unlock the pivot mechanism,
then select the angle that you prefer. Gently tilt the
Loudbox back onto the kickstand. The closer you stand to
the amp, the more angle you’ll need to get the Loudbox
pointed at ear level.
8 5
Page 9

Guidelines for selecting the kickstand angle:
45 Degrees
The first click-stop on the kickstand angles the cabinet back 45 degrees,
which is useful when you stand about three to five feet (1 to 1.5 meters)
from the Loudbox.. This angle is also useful when you perform sitting down
next to the amplifier.
57 Degrees
The second click-stop angles the cabinet back 57 degrees. Use this position
when you stand about 1 to 2 feet (30 to 60 cm) from the Loudbox.
70 Degrees
When space is very limited onstage and you must stand directly over the
Loudbox, set the kickstand at the third click-stop to a 70 degree angle.
Warning: Do not pick the amp up by the kickstand!
For safe operation, use the kickstand only on solid, level ground.
Page 10

Performance Specifications
Cumulative Rated Power: 250W
All measurements @ nominal line 120V, 60 Hz
SPL @ 1 Meter: >116dB SPL
Frequency Response: 100Hz - 20kHz ±4dB
Hum and Noise: < -95dB referred to full output
Power Consumption: 270W max @ 120Vrms, 60Hz
Input Impedance: 10MOhm / 68pF
Nominal Input Level: -20dBv
Maximum Recommended Input Level: +6dBv
Fixed High Pass: -3dB @ 55Hz
Bass: ±10dB @ 100Hz (shelving)
Mid: ±12dB @ 1.2kHz (resonant)
Treble: ±12dB @ 10kHz (shelving)
Brilliance: ±12dB @ 10kHz (resonant)
Notch: -14dB @ 20 - 400Hz (Hi Q resonant)
All tone controls ±1dB tolerance, all frequencies 10%
Reverb: Equalized, medium delay, triple spring reverb
Effects Send:
Effects Return:
Effects send and return are designed to be compatible with battery operated effects processors.
Woofer Amp: 160W rms single tone sine wave @ 100Hz
Midrange Amp: 60W rms single tone sine wave @ 1kHz
Tweeter Amp: 30W rms single tone sine wave @ 5kHz
Output Impedance: 2.2K
Output Voltage: ~ +3dBv (1.4Vrms max)
-10dB Nominal
Input Impedance: 20K
Input Voltage: ~ +3dBv (1.4Vrms max )
-10dB Nominal
XLR Out : +3dBv balanced
Crossover Frequency: 450Hz, 3.4kHz (Tri-amplified w/electronic crossover)
Speaker System:
Baffle Angle:
Dimensions: 19.25" H x 15.5" W x 13.75"D
Weight: 55.5 lbs.
Because we continually improve our products, the specifications and information in this manual are subject to change without notice.
Woofer: 8" Treated Paper Cone
Midrange: 4" Polypropylene Cone
Tweeters: 2 x 1" dome, rare earth magnets, Ferro fluid cooled
Upright Position: 10 degrees
With Kickstand: 45 degrees, 57 degrees, 70 degrees
10 3
Page 11

11
Page 12

Limited Warranty
Save your original sales receipt. It is your proof of purchase if you require warranty service.
Fishman Acoustic Instrument Amplifiers (“Products”) are warranted to the original consumer purchaser to be free of defects in
materials and workmanship under normal use and service for a period of one (1) year from the date of purchase, with the exception
of the speaker components which are warranted for a period of ninety (90) days from the date of purchase. If the Product fails to
function properly due to defects in materials or workmanship during the applicable warranty period, Fishman Transducers Inc.
(“Fishman”), at its option, will repair or replace the Product, with no charge for labor or materials. This warranty applies only if the
Product is sold and delivered within the U.S. by an authorized Fishman Dealer.
Warranty service and repairs for Fishman Acoustic Instrument Amplifiers are to be made only at an authorized Fishman Service
Center OR at the factory in Wilmington MA. Unauthorized repairs will void this warranty.
Note: For factory warranty service, the customer must prepay freight to Fishman.
To obtain warranty service from an authorized Fishman Service Center:
1. The Fishman Dealer where you purchased your amplifier may also be authorized to perform warranty service and should be
your first point of contact. If the Fishman Dealer who sold the Product is authorized to service the amplifier, bring the defective
unit to the service center along with your original sales receipt. If you can’t provide the original receipt, the authorized Fishman
Service Center may charge you for repairs.
If your local Fishman Dealer cannot service the amplifier, contact Fishman (tech@fishman.com) and we will recommend an
authorized Fishman Service Center in your area. If there is no service center close to you, return the amplifier to the factory as
described below.
2. Make sure you can duplicate the problem for the Service Center. If you bring in the amplifier for warranty service and the
problem can’t be duplicated by the technician, you may be charged a service fee.
3. Fishman Authorized Service Centers reserve the right to inspect the amplifier before beginning warranty service. Final
determination of warranty coverage lies solely with Fishman Transducers or its Authorized Service Centers.
4. Fishman assumes no responsibility for the quality or timeliness of repairs performed by Fishman Authorized Service Centers.
To obtain factory service:
Amplifiers repaired under warranty at the Fishman factory will be returned to the customer UPS ground freight, prepaid by Fishman
to any location within the continental United States.
Important!
A Product that is returned to Fishman which is not covered by the terms of this warranty will be
repaired and returned C.O.D. with billing for labor, materials, return freight and insurance.
For factory service, you must deliver the amplifier prepaid freight to Fishman.
1. Contact Fishman Transducers Factory Service via email (tech@fishman.com) to obtain a Return Authorization number (RA
number). Products returned without an RA number will be refused.
2. Pack the amplifier in its original shipping carton. If you do not have the carton, request one from us when you get your RA
number. Include your shipping address (no P.O. boxes or route numbers). Also include a copy of your sales receipt and a note
that explains how to duplicate the problem. If we cannot duplicate the problem at the Factory or verify the original purchase
date, we may, at our option, charge for parts/labor and return shipping.
3. Ship the amplifier freight prepaid to:
Fishman Transducers Service Department
340 Fordham Road, Wilmington, MA 01887 USA
EXCEPT AS SPECIFICALLY PROVIDED IN THIS DOCUMENT, THERE ARE NO OTHER WARRANTIES, EXPRESSED OR IMPLIED, INCLUDING, BUT NOT
LIMITED TO, IMPLIED WARRANTIES OF MERCHANTABILITY OR FITNESS FOR A PARTICULAR PURPOSE. IN NO EVENT SHALL FISHMAN BE LIABLE
FOR LOSS OF PROFITS OR INCIDENTAL, INDIRECT, SPECIAL, CONSEQUENTIAL OR OTHER SIMILAR DAMAGES ARISING OUT OF ANY BREACH OF
WARRANTY OR OTHER OBLIGATION CONTAINED IN THIS OWNERS' MANUAL. THE WARRANTY CONTAINED HEREIN SHALL NOT APPLY IF THE
SERIAL NUMBER IS DEFACED OR REMOVED OR THE PRODUCT HAS BEEN DAMAGED BY ALTERATION, MISUSE, ACCIDENT, NEGLECT OR USE WITH
UNAUTHORIZED ATTACHMENTS.
www.fishman.com
513-000-003 • Rev A • 10-7-03
 Loading...