

Page 1
White
Shield
Black
Red
Installation Guide
White
Shield
Black
Red
Installation Guide
Ellipse Blend
™
Add-on soundhole electronics for the Fishman Acoustic Matrix Natural I,
Acoustic Matrix Natural II and Powerjack systems. Compatible with most
standard flat-top guitars. May not fit all instruments*.
Installation
WARNING!
Installation of the Ellipse Blend is to be performed only by a professional repairperson.
The installer assumes responsibility for any damage to the instrument or the Ellipse
Blend that may result from improper installation.
The heat from a soldering iron can easily overheat the circuit board traces and destroy
the surface-mount components on the endpin preamp. Use only a low wattage (30
watts max) soldering iron and do not overheat the components.
Remove the Endpin preamp from the guitar’s endblock and then follow the
instructions that apply to the specific preamp.
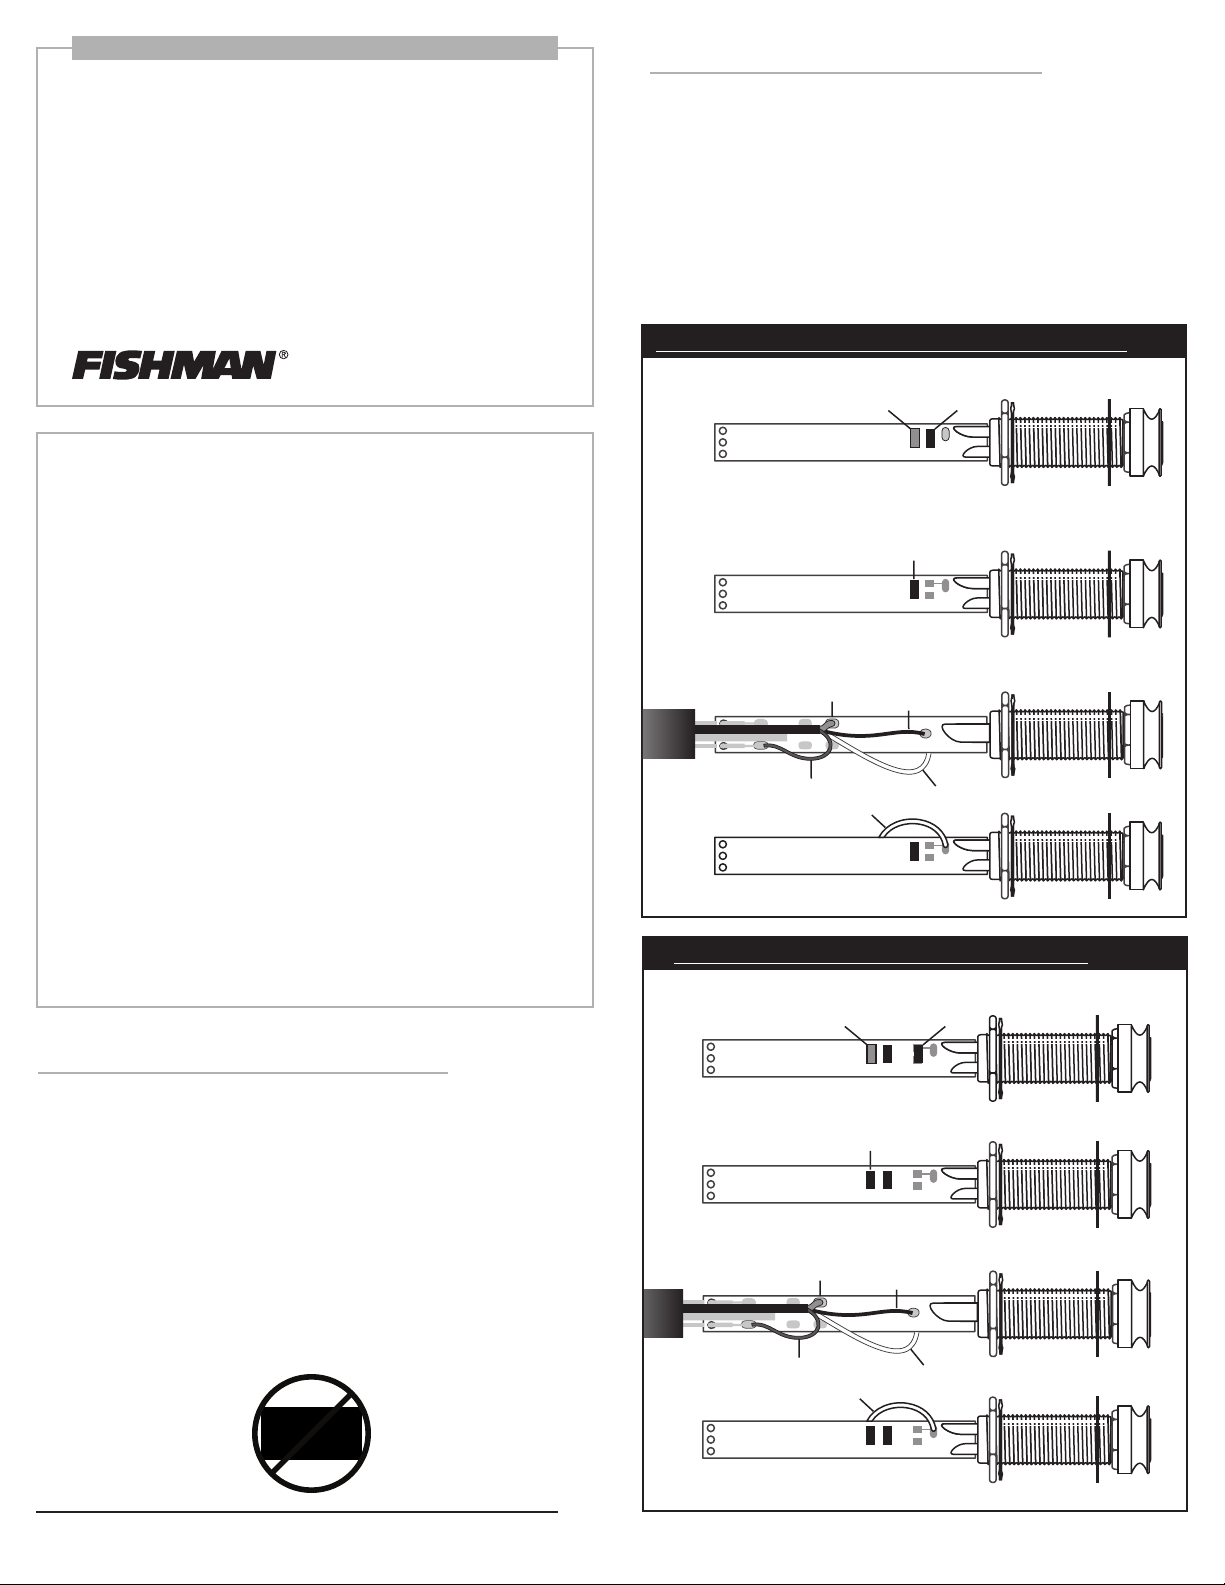
Fishman Acoustic Matrix & Martin Gold Plus - Rev 5.0 and up
1. Remove the components from the endpin preamp as indicated
2. Solder the new 2k resistor (supplied with your Ellipse Blend) to the preamp circuit board in place
of the capacitor
Remove
Capacitor
2k Resistor "202"
Remove
"182" Resistor
182
202
Requirements
The Ellipse Blend is compatible with the following active pickup systems:
• Fishman Acoustic Matrix Natural I & II - Revision 4.0 or higher
• Fishman Powerjack - Revision 2.3 or higher
• Martin Gold Plus- Revision 4.0 or higher
• Martin Active Jack - Revision 2.3 or higher
Note that Revision numbers for each pickup are printed on the
preamp circuit board inside the endpin jack.
Note: Do not use with the discontinued Acoustic Matrix Natural or the
Acoustic Matrix Hot preamps or older revisions of the Martin Gold Plus
systems. These units can be identified by the rectangular metal box that
encases the electronics.
3. Thread the Ellipse Blend cable through the preamp barrel and solder to the preamp circuit board
White
202
Fishman Acoustic Matrix & Martin Gold Plus - Rev 4.0
1. Remove the components from the endpin preamp as indicated
000
000
000
Remove
Resistor "182"
182
Remove
Capacitor
2. Solder the new 2k resistor (supplied with your Ellipse Blend) to the preamp circuit board
2k Resistor "202"
202
3. Thread the Ellipse Blend cable through the preamp barrel and solder to the preamp circuit board
White
202
*
Taylor guitars with NT neck or Larrivee guitars.
Page 2
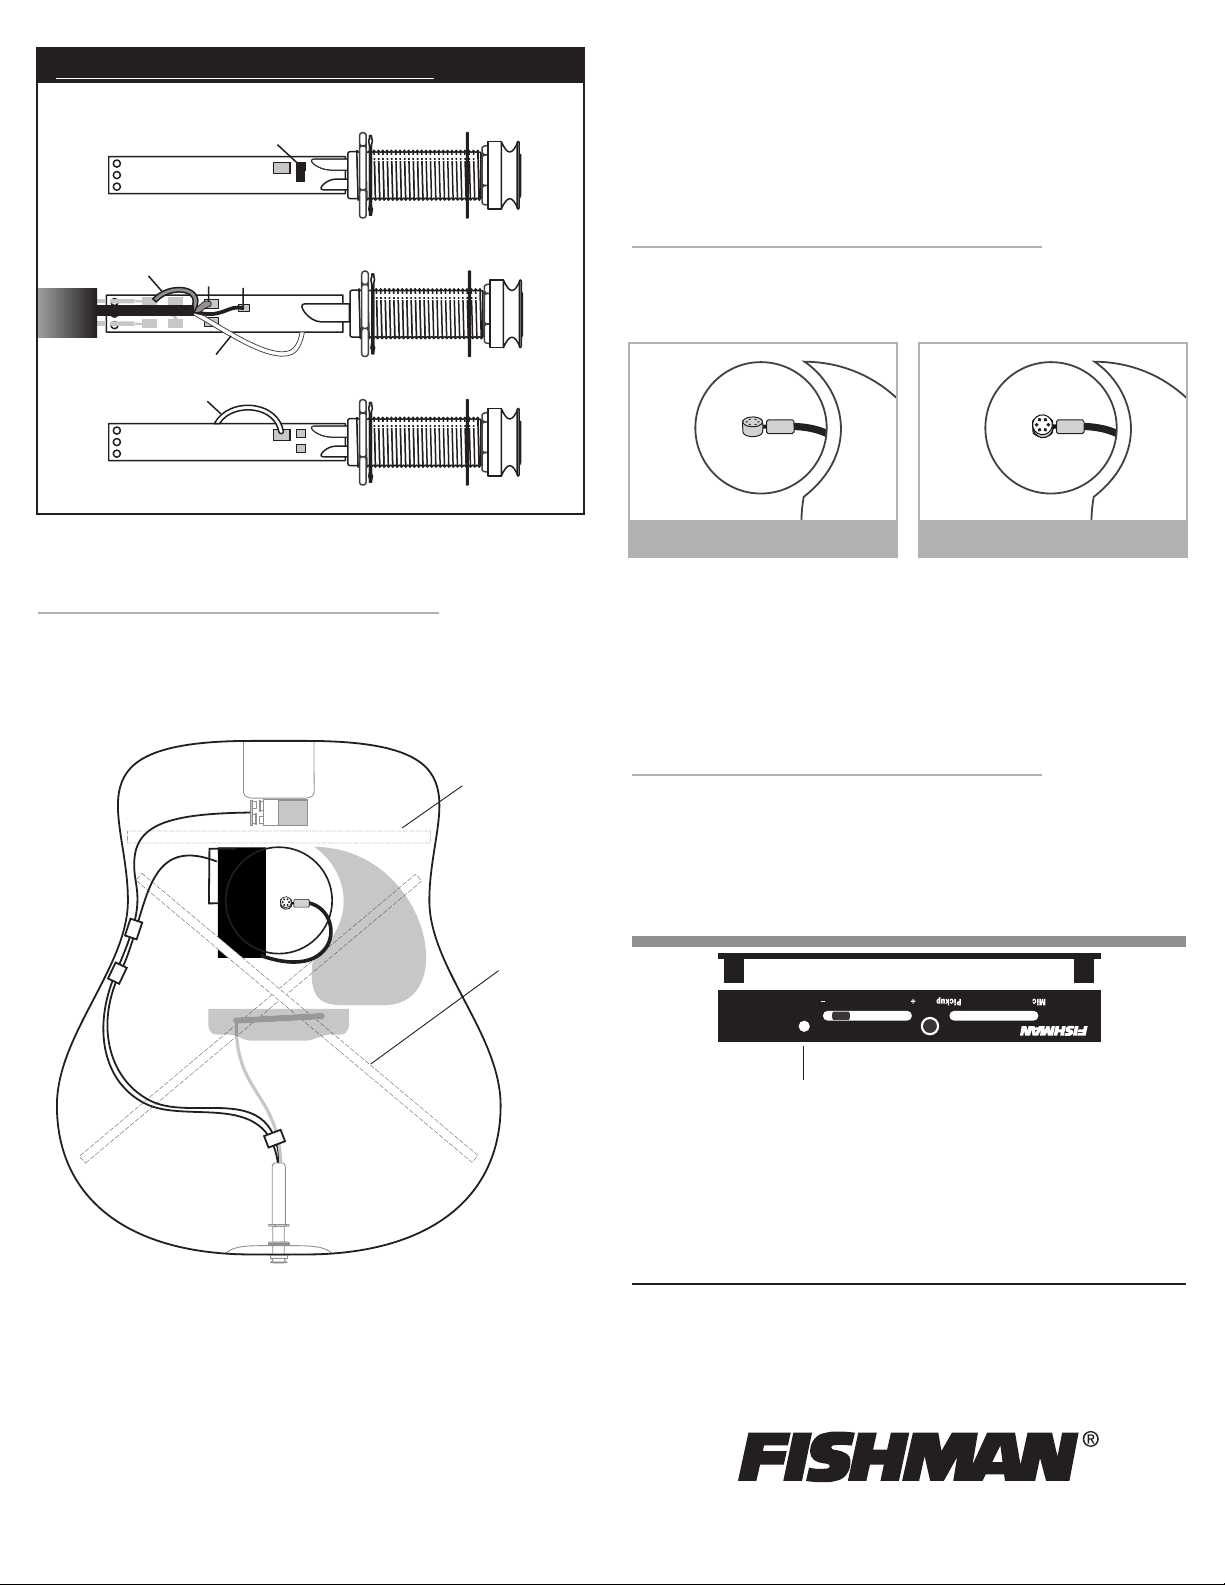
Fishman Powerjack, Martin Active Jack - Rev 2.3
White
Shield
Black
Red
1. Remove the "000" jumper from the endpin preamp.
Remove Jumper
"000"
000
We include two adhesive backed clips to help you secure the wires to the side
of the guitar. A cable tie is also included to bundle the wires together and
provide strain relief where the wires exit the endpin preamp.
Once the wires are secure inside the guitar, the Ellipse Blend will easily snap
in place on top of the magnetic base
2. Thread the Ellipse Blend cable through the preamp barrel and solder to the preamp circuit board
White
Location
Locate the Ellipse Blend flush on the edge of the soundhole below the bass
strings. When properly aligned, the module will be centered between the
transverse brace above the soundhole and the X-brace.
Transverse Brace
Microphone Positioning
You can position the microphone to find the “sweet spot” inside the
instrument. Take the time to experiment with microphone placement until you
find the position that works best in the instrument.
Less Bass More Bass
Plug in the guitar and move the blend slider to the left for mic only. Start with
the mic capsule so that it faces the back of the guitar. Move the mic closer to
the sound hole for more bass. Turn the capsule toward the sides of the
instrument for less bass.
Microphone Trim Control
A small circular potentiometer is recessed below the volume slider and can
be accessed with a small slotted screwdriver. This is a "set it and forget it"
control. Use it to calibrate the microphone balance in relation to the pickup.
Set the Blend slider to the center position and adjust the trim control until both
the microphone and pickup levels are balanced to your liking.
Clips
Tie Wrap
Prepare the bare wood surface on the inside edge of the soundhole with an
alcohol wipe or a cotton ball wetted with rubbing alcohol.
X Brace
Your satisfaction is very important to us. If you have any questions,
please contact Fishman Service and Support at www.fishman.com
Peel back the release film on the bottom of the mount and affix the Ellipse
to the underside of the soundhole. Apply even, steady pressure to the
module to set the adhesive.
For easy access inside the guitar pull the control module down and separate
it from the magnetic base. Re-install the endpin jack.
VolumeBlend
Mic Trim
Phase
Mic Trim
www.fishman.com
514-000-009 • Rev A • 6-15-04
 Loading...