

Page 1

OWNER’S MANUAL
DUAL
PARAMETRIC
D.I.
2-BAND EQ / PREAMP / DIRECT BOX
Page 2

DUAL PARAMETRIC D.I.
Thank you for your purchase of a Fishman Product. Please read these instructions carefully. If you have any questions or problems, feel free to contact our PRODUCT INFOR-
MATION LINE at 978-988-9665.
The Fishman Dual Parametric D.I. is essentially three devices in one. It is a high-quality
electrically balanced D.I. for use on stage. It is a high input impedance instrument preamp
that can be used with piezo input signals as well as other types of input signals such as
microphones and magnetic pickups. And it is a two-band parametric equalizer in a compact enclosure that is both portable and durable.
It may seem questionable that a 9-volt battery-powered device can provide these capabilities. However, the performance of the Dual Parametric D.I. rivals that of more expensive
studio-grade equipment thanks to Fishman’s exclusive 9-volt doubling technology.This
provides the unit with headroom, low distortion, wide bandwidth and high signal-to-noise
ratio equalling professional high-end requirements.
CONTENTS
3) What is a Parametric Equalizer?
5) Operating Instructions
15) Applications
19) Combination EQ using both bands
23) Specifications
Please fill in the following information for future reference:
Model Name: Model Number:
Serial Number: Dealer's Name:
Dealer's Address: Date of Purchase:
PACKING INFORMATION
After you unpack your Fishman Dual Parametric D.I., check it for any damage. We tested
and inspected the unit before we packed and shipped it, but in the unlikely event that
something was damaged before it reached you, contact your dealer to remedy the situation. Do not use it if it appears damaged.
Save the original packing materials and the box that your Dual Parametric D.I. came in.
Should you ever need to ship it, the box will protect it.
NOTE: There are no user-serviceable par ts inside. Always refer servicing to qualified personnel.
2
Page 3
EQ / PREAMP / DIRECT BOX
WWHHAATT IISS AA PPAARRAAMMEETTRRIICC EEQQUUAALLIIZZEERR??
An equalizer is a filter, or tone control, designed to shape soundeither to remove or de-emphasize unwanted frequencies, or to boost
specific frequencies. The most common equalizer (EQ) in everyday
use is a tone control on a radio or TV, which selectively removes
high-frequency content. Bass and treble controls on stereo gear
adjust specific bands of frequencies. Guitar amps commonly have
bass, treble, and midrange controls, usually capable of boosting or
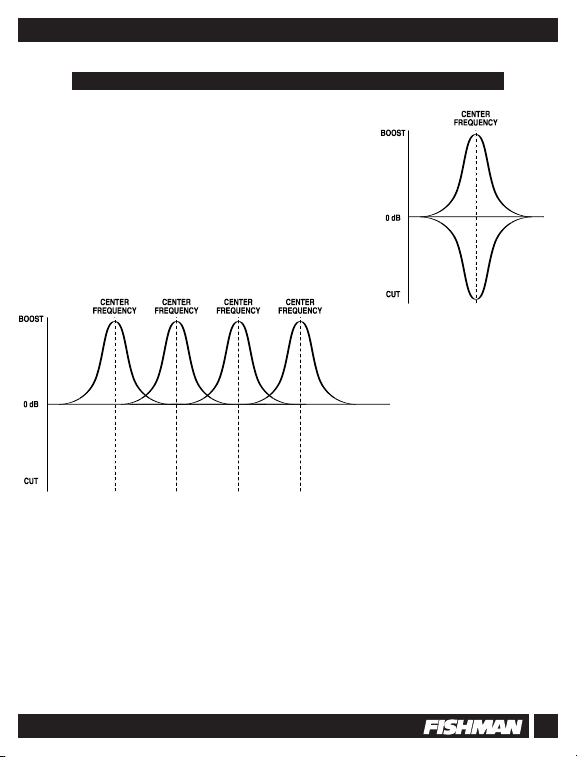
cutting the frequencies in preset bands. More complex is the graphic
equalizer, which may have 3, 5, 7, or even as many as 31 bands,
each representing a frequency center and offering boost and cut at
each of those centers, as this diagram shows.
It's not unusual for a graphic
equalizer's bands to actually
overlap.This makes them
somewhat imprecise for certain applications where precision equalization (such as
feedback control) is desired.
What tone controls and graphic equalizers have in common is that they affect frequencies that are preselected by the manufacturer. In addition, the bandwidth-or spectrum-of frequencies affected by each control is preset. For example, a graphic equalizer may have a band that says 110 Hz (Hz is short for Hertz,
or cycles per second). That is its center frequency, and the slide control indeed boosts or cuts sound at
that frequency. However, it may boost and cut, to varying degrees, frequencies above and below that
center frequency. Therefore, when you adjust the 110 Hz slider, you may also be boosting and cutting
frequencies in a range from, say 80 Hz up to 140 Hz. The center frequency will be boosted or cut by the
greatest amount, and frequencies farther from the center will be affected to lesser degrees, depending
on the design and number of bands in an equalizer.
Another important aspect of graphic equalizers is that as a band is boosted or cut, its bandwidth often
changes-usually, the larger the boost or cut, the greater the bandwidth.
3
Page 4
DUAL PARAMETRIC D.I.
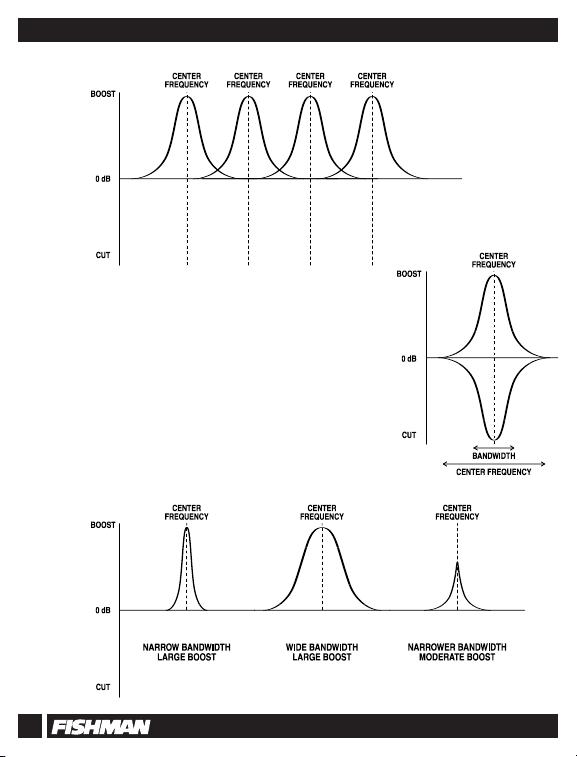
Parametric equalizers are designed to provide you with far greater
control than graphic equalizers or other tone controls (that's why
they're included in professional recording consoles). First, a band of
parametric EQ consists of three controls, instead of a simple cut or
boost/cut knob or slider. There is, of course, a boost/cut knob, joined
by an octave bandwidth knob and a center frequency knob (the
Fishman Dual Parametric D.I. has a switch that works in conjunction
with the frequency knob to select the center frequency). Here are the
parameters you can control with a parametric equalizer such as the
Fishman Dual Parametric D.I. :
This affords you a fantastic range of control. You can independently
set the bandwidth, boost or cut, and center frequency:
4
Page 5

EQ / PREAMP / DIRECT BOX
OOPPEERRAATTIINNGG IINNSSTTRRUUCCTTIIOONNSS
HOOKING UP YOUR FISHMAN DUAL PARAMETRIC D.I.
POWER
The Dual Parametric D.I. is powered at all times when using an AC adapter. Always be sure to use only
the Fishman 910-R or Roland PSA Series AC adapters.
BATTERY OPERATION
The 1/4” Input jack is also the power switch for the Dual Parametric D.I.when using a 9 volt battery and
a mono instrument cable.
To use battery power, install a 9 volt alkaline battery in the compartment located in the bottom of the
unit. Follow the diagram in the battery compartment to make sure the “+” and “-” are aligned properly.
NOTE: Never plug a speaker output from an amplifier into the Dual Parametric D.I.'s Input! The high level
will damage the Dual Parametric D.I.'s circuitry and may also result in damage to the amplifier.
1. Using a high-quality shielded cable, plug your sound source (instrument, preamp, etc.) directly into
the mixer, amp, or other piece of gear you would normally use, and set your levels for minimum distortion and best signal-to-noise ratio (where the desirable sound is loud and any residual hiss is at a
very low level).
2. Set the controls on the Dual Parametric D.I. as follows: Band One and Band Two Out/In switches to
their "OUT" setting, Band One and Band Two boost/cut knobs to their 0dB setting, and the Volume
control in the middle of the face panel to its 3 o'clock (0dB) setting.
3. Turn off your mixer or amp and your sound source. Disconnect the cord between your sound source
(instrument, preamp, etc.) and the other piece of gear that you previously linked.
4. Plug the sound source into the Dual Parametric D.I.'s 1/4" Input.
5. Plug a cord into the Dual Parametric D.I.'s Output (either a cord with an XLR connector or a 1/4" plug
will do-follow the needs of your mixer or other gear).
6. Turn all of your gear on, and set the sound source's and mixer's levels as before.
7. Adjust the Volume knob on the Dual Parametric D.I.so that the level matches the level you set before
you inserted the Dual Parametric D.I. in the chain.
8. Now you may adjust the D.I. controls on the Dual Parametric D.I.
CAUTION: Proceed slowly at first, since the Dual Parametric D.I. can provide up to 15dB of gain at
selected frequencies. If the input signal is "hot" to begin with, increasing the gain to high levels may
overload equipment such as mixers and amplifiers.
5
Page 6
DUAL PARAMETRIC D.I.
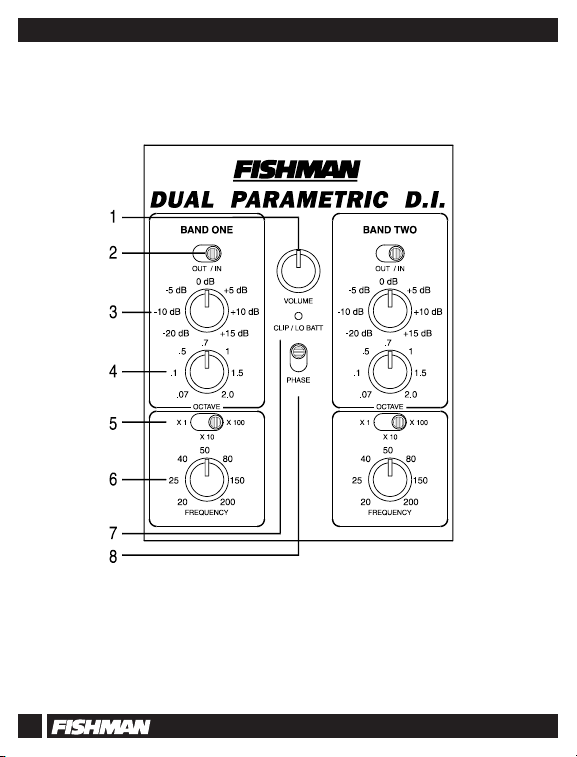
TOP PANEL
The front panel is divided into three sections: Band One, Band Two, and the input stage controls and
indicator. Band One and Band Two operate identically, and the input section sets the level and phase of
the incoming signal.
1) Volume Control
2) Out/In Switch
3) Boost/Cut Control
4) Octave Selector
6
5) Frequency Range Selector
6) Frequency Control
7) Clip/Lo Batt LED
8) Phase Switch
Page 7

EQ / PREAMP / DIRECT BOX
VOLUME
The Volume knob sets the level of the incoming signal. When an instrument is plugged into the Fishman
Dual Parametric D.I., its signal may be too weak or too overpowering. If the signal is too weak, it needs
boosting to overcome any noise inherent in downline equipment. If a signal is too "hot," the result is clipping, a type of distortion that-as its name implies-results from the tops of the waveforms being cut off
because the circuitry can't accommodate such high levels.
Turning the Volume knob clockwise increases the gain, while turning it counterclockwise
reduces it. When the Volume knob is at its 3 o'clock position, it is at its 0dB, or unitygain, position, meaning that it is neither adding nor subtracting level.
Setting an appropriate volume level is easy. Make sure that your instrument is providing
its best signal. If a pickup passes through a preamp with a level or gain control, set its
control close to 0dB, or perhaps a little higher. Electric guitars and electric basses are
often operated with their volume wide open, so that's a good setting to use. For electronic keyboards or
other gear, a little experimenting is in order.
SET YOUR LEVELS:
1. Set the Dual Parametric D.I.'s volume to its 3 o'clock position.
2. Adjust the output from your instr ument to a normal level (check its manual if you're not sure of a prop-
er level).
3. Play as hard or as loud as you normally would, tur ning the Dual Parametric D.I.'s Volume control clockwise until the Clip/Lo Batt LED glows.
4. Continue playing hard, and reduce the Dual Parametric D.I.'s Volume until the Clip/Lo Batt LED only
glows momentarily when you play your absolute hardest. (If you hear distortion, turn the Volume control counterclockwise until it disappears; check that the input level control on the equipment receiving
the Dual Parametric D.I.'s output isn't set too high, as well.)
CLIP / LO BATT LED
This dual-purpose LED tells you when the signal you plug into the Dual Parametric D.I. is too "hot," and
when the battery in the Dual Parametric D.I. is getting low. If an incoming signal has too high of a level
and the Dual Parametric D.I.'s Volume control is set too high, then the Clip/Lo Batt LED will glow, indicating that the signal is so strong that it is distorting. This tells you to (1) lower the output level from the
equipment sending its signal to the Dual Parametric D.I. and (2) turn the Volume control on the Dual
Parametric D.I. counterclockwise to reduce the gain.
The low-battery indicator function operates like this: When a battery's voltage drops below 7 volts, then
the LED turns on. This typically means that the Dual Parametric D.I. will operate normally for at least an
hour before the battery is drained. It's a good idea to change the battery when the LED glows-no point in
waiting until it goes completely drained.
NOTE: If you are using an AC adapter, the Clip/Lo Batt LED only functions as a clipping indicator.
7
Page 8
DUAL PARAMETRIC D.I.
PHASE
When a signal is out of phase with another signal, it can cause cancellation, which (as its name implies)
results in something missing. The opposite is true when two signals are in phase; the combined signals
can be solid or absolutely overpowering, depending on the sounds and how "in phase" they are. Using
the phase relationship between two sounds can be a powerful tool for fighting feedback or making
multiple sound sources (such as a pickup and a built-in microphone) sound better together.
The Phase switch can accomplish a couple of different things. If you are using an acoustic instrument
such as a guitar equipped with only one pickup or internal microphone, it inverts the signal's phase,
which can be a remedy for feedback in some cases. If your instrument has a built-in mic as well as a
pickup, one of the signals may be out of phase with the other, creating a nasal sound or other symptoms
of signal cancellation. Employing the Phase switch when treating one of the signals with the Dual
Parametric D.I. before mixing it with the other signal at a mixer can provide a stronger signal, often with
better tone.
Regardless of what type of signal you are sending through the Dual Parametric D.I., try the Phase switch
in both of its positions, to be sure the best sound is being produced.
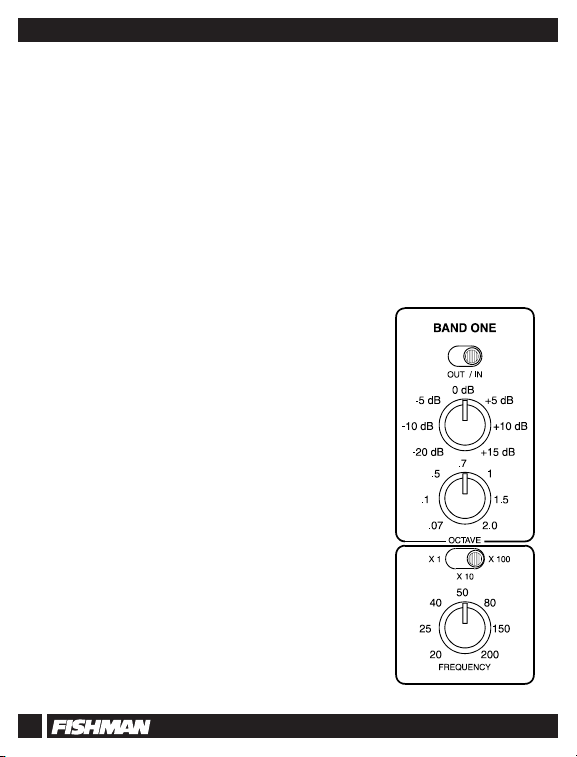
BAND ONE
Band One and Band Two are identically configured. Therefore, all
information pertaining to the controls and functions of Band One
are also applicable to Band Two.
OUT / IN SWITCH
This switch allows you to activate or bypass Band One's
parametric equalizer. Because both Bands are outfitted with an
Out/In switch, you may set up two separate equalization schemes
with the Dual Parametric D.I., and select either, both, or neither.
The switch is also helpful when you want to compare the effect of
the D.I. against the straight (bypassed) sound.
When the Band One and Band Two Out/In switches are both in the
OUT position, then both EQ sections are bypassed. Note, though,
that the Volume control is still active, and the signal is still
buffered-that is, its impedance is isolated from that of anything
connected to the Dual Parametric D.I.'s output. This "doublebypassed" mode, therefore, makes the Dual Parametric D.I. an
impedance-buffered direct box, perfect for studio recording and
interfacing instruments with P.A. mixers, even when you don't need
to alter their tone.
8
Page 9

EQ / PREAMP / DIRECT BOX
BBOOOOSSTT // CCUUTT KKNNOOBB
The tone controls on many amps or
stereos only boost or cut their
assigned frequency band. Fishman's
Dual Parametric D.I. Boost/Cut knob
not only combines boosting and cutting
in a single knob, but offers an extremely wide boost/cut range, from -25dB to
+15dB (most graphic equalizers offer
±12dB or ±15dB ranges). The
Boost/Cut knob has a 0dB setting at its
12 o'clock position, where no boosting
or cutting occurs.
Once you've selected a frequency
range's bandwidth (via the Octave
knob) and frequency (Frequency knob
and multiplier switch), you can
increase or decrease the level in that
band to suit your musical application.
It's a common misconception that the
best way to fix a sound is to boost certain frequencies. ("Too much bass?
Boost the treble!") Actually, cutting
specific frequencies can do as much
as-or more than-any boosting. This is
especially true when you're trying to
eliminate feedback, string squeaks, or
60 Hz hum from lighting systems or
nearby motors.
9
Page 10

DUAL PARAMETRIC D.I.
OCTAVE SELECTOR
Equalizers generally express the range
of their effect in terms of octaves
instead of specific frequencies. An
octave is the distance between one
frequency and another that is twice as
high (100 Hz and 200 Hz, for
example). The A string on a guitar is at
110 Hz, so the A note at the octave
(12th fret) is 220 Hz, and an octave
higher is 440 Hz. Notice that the
relationship is the doubling (2 times),
rather than the frequency, since the
difference between 110 and 220 is
110, and the difference between 220
and 440 is 220. This is why it's easier
to express the bandwidth, the
frequency range affected by the Dual
Parametric D.I.'s Band, in terms of
octaves.
The Dual Parametric D.I.'s bandwidth
is adjustable from .015 octaves to 2
octaves, a huge range. For example, at
1kHz (1,000 Hz), a bandwidth of .015
octaves is 15 Hz. At 100 Hz, that
would be 1.5 Hz. These are extremely
tight settings. Even at 20kHzapproximately the top limit of human
hearing-a bandwidth of .015 octaves
translates to only 300 Hz. Narrow
bandwidths are great for selectively
chopping out feedback frequencies, 60
Hz hum, etc. Wider bandwidths mean
that the equalizer affects a wider range
of frequencies.
10
Page 11

EQ / PREAMP / DIRECT BOX
FREQUENCY RANGE
MULTIPLIER SWITCH
This switch operates in conjunction
with the Frequency knob, selecting the
range that the knob operates in. It
allows the Frequency knob to provide
finer resolution than if the knob had to
cover the entire 20 Hz to 20kHz range
in one revolution.
Here are the multiplier switch's three
settings and the Frequency knob's corresponding ranges:
X 1 20 Hz to 200 Hz
X 10 200 Hz to 2kHz
X 100 2kHz to 20kHz
11
Page 12

DUAL PARAMETRIC D.I.
FREQUENCY KNOB
This knob selects the frequency center
for the Band. The EQ's greatest effect
takes place at this frequency center,
with decreased effect toward the outer
reaches of the bandwidth.
12
Page 13

EQ / PREAMP / DIRECT BOX
BAND TWO
Band Two is configured identically to Band One. All controls operate in the same manner as the corresponding controls of Band One.
SIDE PANEL
Inputs and outputs are conveniently located on the side panel, making them easily accessible, whether
the Dual Parametric D.I. is used with other signal processors, mixers, amplifier effects loops, or as a
direct box.
1) 1/4” Input
2) 1/4” Output
4) XLR Output Jack
5) AC Adapter Jack
3) Ground Lift Switch
1/4” INPUT
This 1/4" unbalanced input jack accepts the signal from guitars, basses, keyboards, acoustic pickups,
microphones, and any other amplifiable instrument. In addition, it accepts signals from other audio gear,
such as the send from an amplifier's effects loop, a compressor/limiter's side-chain output, or a mixer's
effects buss.
1/4” OUTPUT
This 1/4" unbalanced output jack sends the output from the Dual Parametric D.I. to other gear or amplifi cation or further processing. Its signal is identical to that found at the XLR output.
13
Page 14

DUAL PARAMETRIC D.I.
GROUND LIFT SWITCH
When connecting the XLR Output to other gear, it's possible that it can create a secondary path to
ground, introducing hum to the sound. Using the GND LIFT (Ground Lift) switch disconnects the secondary ground path, removing the ground loop and the hum that comes from it.
XXLLRR OOUUTTPPUUTT
This balanced XLR output provides a low-impedance, high-level output that's ideal for sending to a
mixing console or pro-level audio processors. Its signal is identical to that found at the 1/4" output.
9V POWER INPUT
The Dual Parametric D.I. is designed to be powered by a 9-volt alkaline battery or an AC adapter. This
jack accepts an AC adapter such as Fishman's 910-R or Roland's PSA Series.
Note that using an AC adapter does not recharge a battery inside the Dual Parametric D.I.
BATTERY ACCESS
The battery access door, located on the underside of the Dual Parametric D.I., opens with a fingernail,
guitar pick, or screwdriver. The cover lifts off, exposing the battery compartment. Always use a 9-volt
alkaline battery (Duracell MN1604, Eveready No. 522, or equivalent) for best power; carbon batteries do
not provide reliable enough power and can leak, damaging the Dual Parametric D.I.
When installing a battery, make sure the connectors are aligned correctly in reference to the "+" and "-"
indications shown inside the Dual Parametric D.I. After installing the batter y, replace the cover plate.
Never operate the Dual Parametric D.I. without its cover plate in place.
14
Page 15

EQ / PREAMP / DIRECT BOX
APPLICATIONS
ELIMINATING FEEDBACK
Feedback is usually one frequency or a narrow frequency band that recirculates from a microphone (or
pickup) through the P.A. or monitors and then back through the microphone again. The result is a highpitched ringing or squealing sound.
Here's a way to eliminate it, using the Fishman Dual Parametric D.I.:
Plug your pickup-equipped instrument or microphone into the Dual Parametric D.I., and the D.I.into your
mixer. Turn one Band off and set the other's boost/cut to 0dB and its Octave knob to .5. Then raise the
level of the mixer until the speakers squeal. Backing off a little bit, just below the feedback point, turn the
EQ's boost up about halfway and slowly turn the Frequency knob up until the squeal begins. Now,
change the knob from boosting to cutting to cut the feedback. Raise the volume a bit more, and when
you start to hear ringing again, adjust the octave knob to a tighter range, closer to .015 and then cut a
little bit more. That should do the trick.
REDUCING “THUMP” IN ACOUSTIC INSTRUMENTS
Some acoustic instruments, especially large-bodied acoustic guitars, have a lot of "thumpiness" in their
low range, most often caused by bumping the body with your hand.Through an amplifier or P.A. they're
loud and annoying. Here's how to reduce it:
Plug your pickup-equipped instrument or microphone into the Dual Parametric D.I., and the D.I. into your
mixer. Turn one Band off and set the other's boost/cut to its 9 o'clock position and its Octave knob to .5.
Set the Frequency Multiplier Switch to its leftmost position, "X 1." Turn the Frequency knob fully counterclockwise. Now start making thumps with your hand-tapping with the heel of your hand or gently with
your index finger. As you tap, slowly turn the Frequency knob clockwise, listening to the effect that the
Dual Parametric D.I. has on the sound. If you have a hard time hearing where the thump is most prominent, set the Octave knob to .015 and set the boost/cut knob to its 3 o'clock position. Start tapping and
turn the Frequency knob. When you hit the most prominent thump frequency, the thump will sound very
pronounced and perhaps even like a weird drum. Continue tapping and turn the boost/cut knob until the
thump is greatly reduced or disappears altogether. Play some notes and/or chords on the instrument to
make sure that you didn't cut out some of the vital support. You may have to experiment with the amount
of cut to strike a balance between keeping your tone intact and reducing the thump.
15
Page 16

DUAL PARAMETRIC D.I.
SUPPRESSING AC POWER HUM
Sometimes low-frequency hum caused by AC power, poorly grounded pickups, or a multitude of other
reasons creeps into your system. (In the U.S., this is at 60 Hz, but elsewhere in the world it may be at 50
Hz.) If you can't eliminate the hum by using ground lifts, switching polarity, or any of the other means
recommended by the manufacturer of your electrical equipment, then try this:
If your instrument's pickup is introducing low hum, then plug it into the Dual Parametric D.I. and the Dual
Parametric D.I. into your mixer, amp, etc. Turn one Band off and set the other's boost/cut to its 9 o'clock
position and its Octave knob to .015. Set the Frequency Multiplier Switch to its leftmost position, "X 1."
Turn the Frequency knob fully counterclockwise. While listening to your amp, P.A., or monitors, turn the
Frequency knob clockwise until the hum disappears.Turn the boost/cut knob clockwise until you hear the
hum again. Now turn it counterclockwise until it disappears. Don't cut any more signal than necessar y,
since some instruments (particularly basses and cellos) produce useful sound in the same r ange as
electricity-caused hum.
You can also connect the Dual Parametric D.I.in line between signal processors to suppress
AC power hum. Follow the same directions outlined above-and make sure that your levels are
set properly!
“SCOOPING OUT” A BASS GUITAR’S TONE
Some bassists like to slap and pop on their instruments, and to emphasize that tone it's often desirable
to boost the bottom and top end and cut the midrange frequencies a bit. This "scooping out" is easy to
do with the Dual Parametric D.I.:
Use one Band, and set the Frequency knob to its midpoint, its multiplier to "X 10," the Octave knob to 1,
and the boost/cut knob to -25dB. Slap your bass, and turn the Frequency knob back and forth until the
right zone is scooped out. A setting of -25dB may be too deep a cut, so experiment with less severe settings; experiment with different Octave settings, too, since you may want a wider or narrower band affected by the Dual Parametric D.I.If you want to add more "bite" when you snap strings, turn on the second
Band and pump up some highs.
SUPER HONK WAH-WAH FOR ELECTRIC GUITAR
Many guitarists like the nasal sound that a wah-wah pedal gives a guitar, without rocking the wah-wah
back and forth. You can duplicate the sound with the Dual Parametric D.I.by setting Band One's controls
like this: Frequency at about 1.3kHz, the Octave control midway between .5 and 1 at about .75, and
boost at +15. This provides a very nasal tone. For a deeper effect, duplicate the settings on Band Two.If
you want to add brightness rather than deepen the "honk" sound, widen Band Two's Octave setting to 1.5
octaves and select a Frequency center of around 3.5kHz.This adds a bit of an edge, and brings out the
pick's sound.
16
Page 17

EQ / PREAMP / DIRECT BOX
Increasing Intelligibility In Speech And Vocals. Recording or amplifying vocals through a P.A.
system can present a variety of challenges. A common one is rumble from vibrations reaching the microphone through the mic stand. Others include the overbearing booms produced when a person sounds the
letters "B" or "P," or the ear-mauling high-frequency blast from sibilances (sounds like "S" or "T").
To deal with rumble: Use one Band, and set the Frequency knob to its farthest counterclockwise point
(200), its multiplier to "X 1," the Octave knob to .5, and the boost/cut knob to -25dB. Have someone walk
around the stage with the mic turned up a little louder than normal while you turn the Frequency knob
back and forth until the rumble disappears. A setting of -25dB may be too deep a cut, so experiment with
less severe settings; experiment with different Octave settings, too, since you may want a narrower band
affected by the Dual Parametric D.I.
To deal with plosives ("B" and "P" sounds): Use one Band, and set the Frequency knob to its midpoint,
its multiplier to "X 1," the Octave knob to .5, and the boost/cut knob to -25dB. Have the person who will
be using the mic make "buh" and "puh" sounds into the mic while you turn the Frequency knob back and
forth until the boominess is de-emphasized. A setting of -25dB may be too deep a cut, affecting the vocal
quality (especially in deep-voiced singers), so experiment with less severe settings.
You can use this technique to help cut down on wind noise, too. Follow the same directions, but with the
wind blowing across the mic instead of a singer making plosive sounds. (Don't forget to install a microphone wind cover over the mic before you attempt this-it may cut down on the wind rumble, and make
your job easier).
To deal with sibilances ("S" and "T" sounds, usually residing between 2kHz and 10kHz): Use one Band,
and set the Frequency knob to halfway between 300 and 700, its multiplier to "X 100," the Octave knob
to its 10 o'clock position, and the boost/cut knob to -25dB. Have the person who will be using the mic
make "sssss" and "ttttt" sounds into the mic while you turn the Frequency knob back and forth until the
shrillness is subdued. A setting of -25dB may be too deep a cut and may affect the overall tone, so
experiment with less severe settings and compare the sound of "S" and "T" with real, live singing.
USING THE DUAL PARAMETRIC D.I.
WITH A COMPRESSOR/LIMITER FOR DE-ESSING.
Some compressor/limiters have a sidechain, detector loop, or key input that allows you to use an external source to selectively squash certain frequencies. Set up the Dual Parametric D.I. as outlined in the
previous section on controlling sibilances. Then place the Dual Parametric D.I. in the compressor / limiter's detector loop. Set the limiter to react to the incoming sibilances by squashing them. Should you
need more guidance on de-essing (also known as dynamic sibilance control), consult your
compressor/limiter's manual.
17
Page 18

DUAL PARAMETRIC D.I.
SANITIZING AND ALTERING SAMPLES
Use the Dual Parametric D.I. between a sound source and a sampler's input to shape the sound. Remove
hiss, add body to the midrange, or experiment with unusual EQ combinations to create unique sounds of
your own.
USING THE DUAL PARAMETRIC D.I. AS A DIRECT BOX
Because the Fishman Dual Parametric D.I. has an impedance buffer and a Volume control, it can be used
as a direct box between high-impedance signals (such as those from electric basses, electric guitars,
microphones, etc.) and low-impedance inputs such as those found on many mixers. You can switch both
EQ bands to their "out" positions if you don't want to perform any equalization, and if you set the Volume
knob at its 3 o'clock position, the Dual Parametric D.I. will pass the signal through without boosting or
cutting, even though it will serve as a buffer. You can use either the XLR or the 1/4" output jack (or both
outputs simultaneously) for this application. The Ground Lift switch can help remove hum-causing ground
loops.
NOTE: Never plug a speaker output from an amplifier into the Dual Parametric D.I.'s Input!
The high level will damage the Dual Parametric D.I. 's circuitry and may also result in damage
to the amplifier.
18
Page 19

EQ / PREAMP / DIRECT BOX
COMBINATION EQs
COMBINATION EQ
USING BOTH BANDS
USING BOTH BANDS
Sometimes it's necessary to treat a
couple of frequency bands simultaneously. The Dual Parametric D.I. is perfect for this. In some cases, the bands
may be very close together, requiring
fairly narrow bandwidths (setting the
Octave control to less than .5). Here's
the combined response of two bands
boosting frequencies near each other:
Notice that because the bandwidths
can be wide or narrow, they may overlap, creating a less pronounced boost
(or cut) between them.
19
Page 20

DUAL PARAMETRIC D.I.
If you want to boost the low-end
response for a bass drum while deemphasizing any ringing, you can separately boost and cut using Band One
and Band Two as follows (the frequencies are merely examples-experiment
with your own combinations):
20
Page 21

EQ / PREAMP / DIRECT BOX
Similarly, if you want to cut thump out
of the low end and deeply reduce an
offensive, though narrow, band of
highs, you can do so. Note that the
bandwidth of one Band can be razorsharp while the other is wide.
21
Page 22

DUAL PARAMETRIC D.I.
Sometimes you want to boost a broad
range, but at the same time you want
to de-emphasize a band somewhere
within that range. This can be done
by setting each Band separately and
then combining them. Notice how this
combination of overlapping boosting
and cutting creates a broad boost
with a notch cut out of the middle.
Experiment with the Dual Parametric
D.I. as both a single- and doublechannel equalizer. You'll find that it is
indeed a "Swiss Army Knife" for solving a multitude of EQ problems.
22
Page 23

EQ / PREAMP / DIRECT BOX
SPECIFICATIONS
Nominal Input Level -20 dBV
Input Overload (20 Hz to 20 kHz) 8 dBV
Input Stage Impedance 10 MOhm
Output Type Electronically balanced XLR and unbalanced 1/4”
Output Impedance 220 Ohm
Nominal Output Level -20 dBV
Gain Control Range -Infinity to +6dB
Bandwidth Control Range .07 to 2 Octaves
Output Overload (600 Ohm load) 12 dBV
Boost Control Range +15 dB
Cut Control Range -20 dB
Overall THD .03% @ 1 kHz -14 dBV input
Signal-to-noise Ratio 89 dB
(A weighted referred to nominal -20 dBV input)
Dimensions 4.375” x 5.5” x 2.5”
Weight 18 oz.
Power 9 volt regulated, or single 9 volt alkaline battery
(estimated 40 hours continuous use)
All specifications subject to change without notice.
23
Page 24

LIMITED WARRANTY
The FISHMAN DUAL PARAMETRIC D.I. is warranted to function for a period of One (1)
Year from the date of purchase. If the unit fails to function properly within the warranty
period, free repair and the option of replacement or refund in the event that FISHMAN is
unable to make repair are FISHMAN’s only obligations.This warranty does not cover any
consequential damages or damage to the unit due to misuse, accident, or neglect.
FISHMAN retains the right to make such determination on the basis of factory
inspection. Products returned to FISHMAN for repair or replacement must be shipped in
accordance with the Return Policy, as follows. This warranty remains valid only if repairs
are performed by FISHMAN. This warranty gives you specific legal rights and you may
also have other rights which may vary from state to state.
RETURN POLICY
To return products to FISHMAN AUDIO, you must follow these steps...
1. Call FISHMAN AUDIO at 978-988-9199 for a Return Authorization Number (“RAN”).
2. Enclose a copy of the original Bill of Sale as evidence of the date of purchase, with
the product in its original packaging and a protective carton or mailer.
3. FISHMAN AUDIO’s technicians will determine whether the item is covered by warranty or if it instead has been damaged by improper customer installation or other
causes not related to defects in material or workmanship.
4. Warranty repairs or replacements will be sent automatically free of charge.
5. If FISHMAN AUDIO determines the item is not covered by warranty, we will notify
you of the repair or replacement cost and wait for your authorization to proceed.
FISHMAN AUDIO
340-D FORDHAM ROAD WILMINGTON MA 01887 USA
PHONE 978-988-9199 FAX 978-988-0770
www.fishman.com
009-070-004 9-97
®
 Loading...