

Page 1
Instructions
Model Number: 72693
Please save these instructions for future reference.
Adult assembly is required.
Tool needed for assembly: Phillips Screwdriver(not included).
This product requires three “AAA” (LR03) alkaline batteries (not included) for operation.
Fun Sounds Garage
™
Page 2
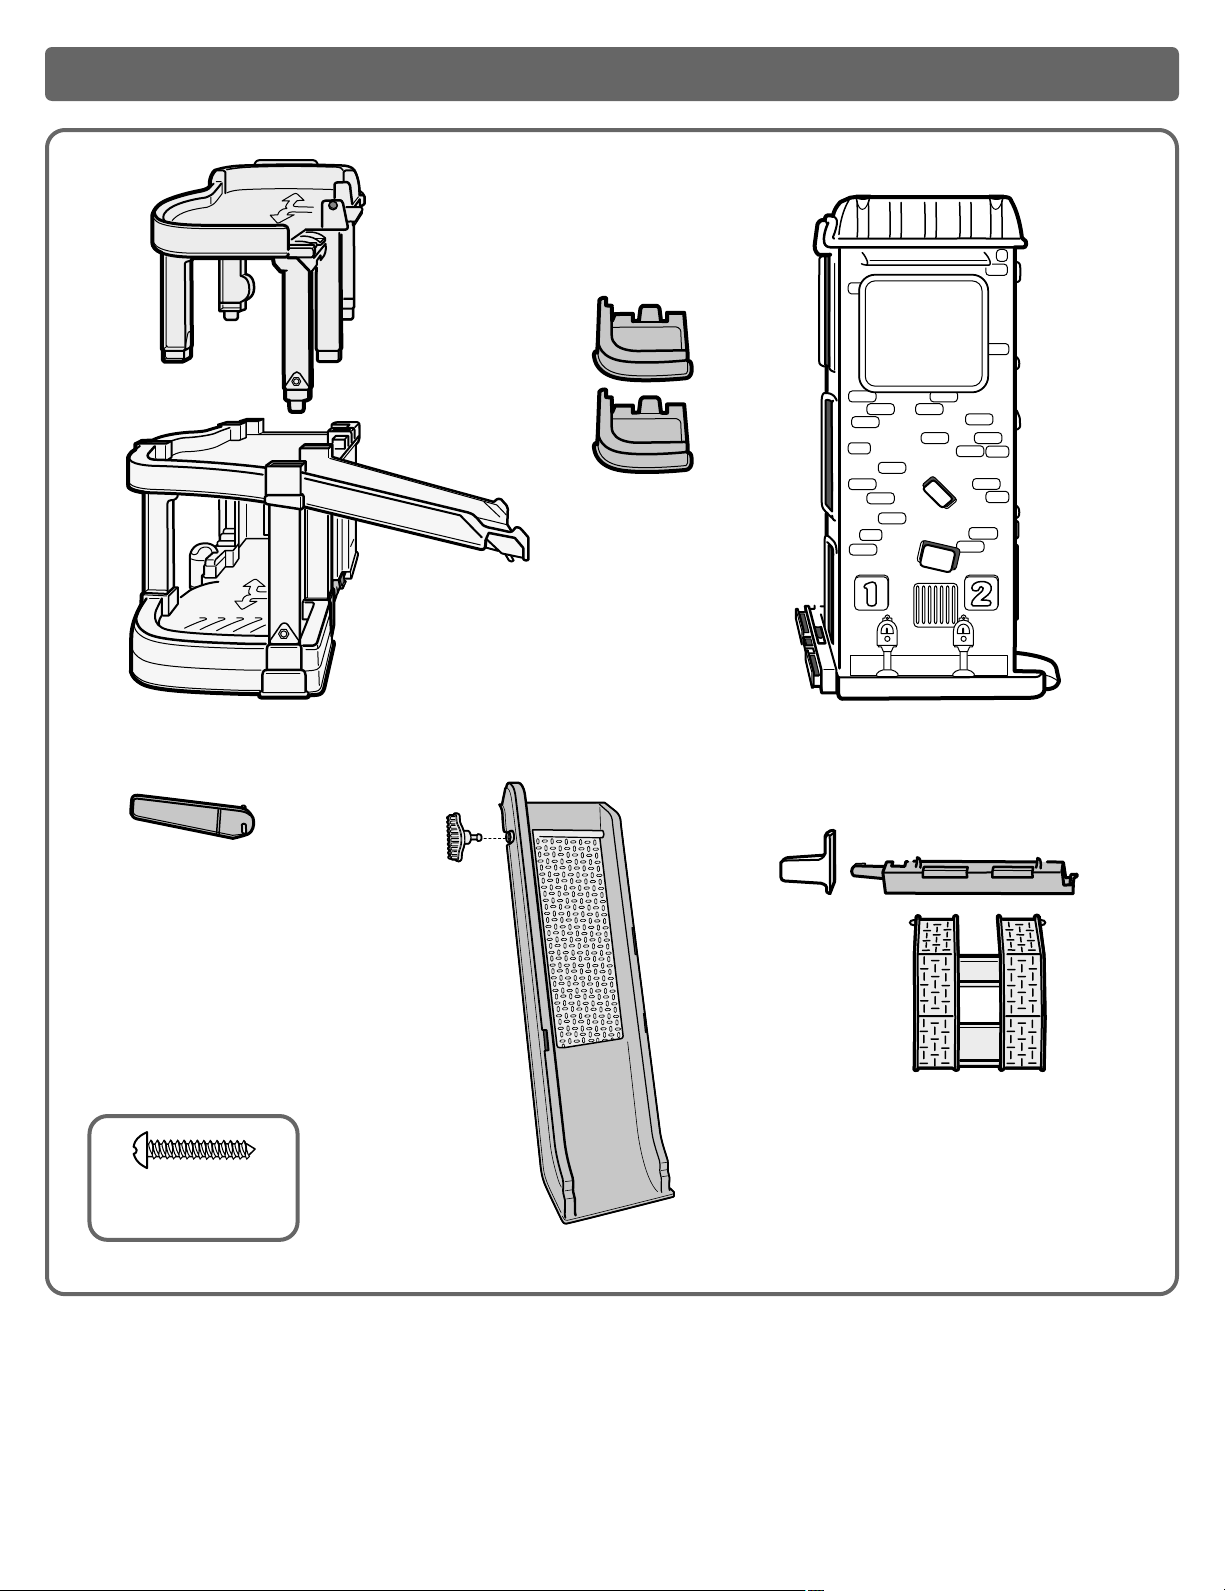
Parts
2
Lift
Car Wash Gate
Secret Door
Knob
Lift Threshold
2 Balconies
Long Ramp
Top Floor
Elevator Shaft
Lift Knob
Base
#6 x 3/4” Screw - 2
SHOWN ACTUAL SIZE
Not Shown: Label Sheet
2 Little People®Figures
Car
Fisher-Price, Inc., a subsidiary of Mattel, Inc.
East Aurora, New York 14052, U.S.A.
©2000 Mattel, Inc. All Rights Reserved. Printed in Mexico
® and ™ designate U.S. trademarks of Mattel, Inc. 72693a-0920
Page 3

Assembly
• Lift and hold the secret door on the long ramp in the
“open” position.
• Insert and snap the secret door knob into the hole in the
side of the secret door.
• Insert a screw through the secret door knob and into the
secret door.Tighten the screw with a Phillips screwdriver.
Do not over-tighten
3
3
• Fit the three tabs on the top floor into the top end of
the ramp.
• Insert and snap the hooked tab on the elevator shaft into
the slot in the side of the long ramp.
• Insert and snap the tabs on base ramp into the slots in the
long ramp.
4
Secret Door Knob
Long Ramp
Secret Door
Elevator
Shaft
Hooked
Tab
Slot
Slot
Elevator Shaft
Long Ramp
Base
Ramp
Top Floor Tabs
Tab
Tab
• Position the elevator shaft on a flat surface.Note the locations of the bottom slots, snap slot and retainer on the
elevator shaft.
• While holding the base at an angle, fit the locator tabs into
the bottom slots in the elevator shaft A.
• While making sure the base lip fits over the elevator shaft
ledge B, inser t and snap the hooked tab on the base into
the slot in the elevator shaft C.
• Insert and snap the tab on the side of the base ramp into
the retainer in the elevator shaft D.
• Insert and snap all five top floor columns into the grooves
in the base. Make sure the top floor lip fits over the elevator
shaft ledge.
1
A
A
B
C
B
C
D
2
Elevator Shaft Ledge
Base
Lip
Base
Tabs
Retainer
Bottom Slots
Elevator Shaft
Elevator
Shaft
Ledge
Top Floor Lip
Base
Groove
Grooves
Top
Floor
Columns
Groove
D
Page 4

Assembly
• At an angle, insert the peg on the lift threshold into the
slot in the base. Lower the lift threshold to fit it into place
in the base.
• Fit the lift knob onto the lift peg. Inser t a screw through
the lift knob and into the lift peg.Tighten the screw with a
Phillips screwdriver. Do not over-tighten.
6
• Insert and snap the tabs on the balconies into the slots in
the elevator shaft.
• Fit the pegs on the car wash gate into the slot in the
car wash opening.
5
Pegs
Car
Wash
Gate
Elevator
Shaft
Slots
Balconies
Tabs
Slot
• Position the lift so that the treads are upright.
• At an angle, insert a peg on the lift into a hole in the
lift threshold.
• Fit the other peg on the lift into the other hole in the
lift threshold.
Assembly is now complete.
7
Lift Knob
Lift Knob
Base
Slot
Lift
Threshold
Peg
Hole
Pegs
Treads
Lift
4
Page 5

Label Decoration
Proper label application will help to keep the labels looking their best!
• Wash your hands before applying the labels.
• Make sure the areas where the labels will be applied are clean and dry.Wipe this product with a clean, soft, dry cloth to
remove any dust or oils.
• For best results, do not attempt to apply a label more than once.
• Apply the labels as shown in the illustrations.
3
8
7
6
2
11
12
4
10
5
1
9
5
Helpful Hint: Move the people elevator
all the way up to apply label 5.
Page 6

Battery Installation
• Locate the battery compar tment on the underside of the
elevator shaft.
• Loosen the screw in the battery compartment door with a
Phillips screwdriver.
• Lift to open the battery compar tment door.
• Insert three, size “AAA” (LR03) alkaline batteries as indicated inside the battery compar tment.
Hint: We recommend the use of alkaline batteries for longer
battery life.
• Replace the battery compar tment door and tighten the
screw with a Phillips screwdriver. Do not over-tighten.
Battery
Compartment
Door
1.5V x 3
“AAA” (LR03)
Shown Actual Size
Bottom View
Battery Tips
• Do not mix old and new batteries.
• Do not mix different types of batteries: alkaline, standard
(carbon-zinc) or rechargeable (nickel-cadmium).
• Remove the batteries during long periods of non-use.
Always remove exhausted batteries from the toy.
Battery leakage and corrosion can damage the toy.
Dispose of batteries properly.
• Never short circuit the battery terminals.
• Non-rechargeable batteries are not to be recharged.
• Only batteries of the same or equivalent type as recommended in the “Battery Installation” instr uctions are to
be used.
• If removable rechargeable batteries are used, they are only
to be charged under adult supervision.
• Rechargeable batteries are to be removed from the toy
before they are charged.
• If you use a battery charger, it should be examined regularly for damage to the cord, plug, enclosure and other
parts. Do not use a damaged batter y charger until it has
been properly repaired.
6
Page 7

Let’s Fix It Up!
7
• Turn the secret door knob to lift the secret trap door on the
long ramp.
• Place the car on the lift. Pull the lift knob up.
• Place a Little People
®
figure or a car into the elevator
and lift.
• Turn the lift knob to raise the car.
• Turn the crank to wash the car.
Fun Sounds Buttons
Press any of the buttons to hear fun sounds!
Gas Pump Button
Telephone Button
“Ring Ring”
“Cha Ching”
“Ding Dong”
“Beep Beep”
“Honk Honk”
Car Wash
Crank
Lift Knob
Secret Door
Knob
Elevator
Page 8

Care
FCC Note (United States Only)
If you have any questions about this product:
In CANADA - Mattel Canada Inc., 6155 Freemont Blvd., Mississauga, Ontario L5R 3W2.Questions? 1-800-567-7724.
In GREA
T BRITAIN - Mattel U.K., Ltd., Helpline: 01628 500303.
In AUSTRALIA - Mattel Australia Pty. Ltd., 658 Church Street, Locked Bag #870, Richmond, Victoria 3121 Australia. Consumer Advisory Service 1-800-800-812 (valid only in Australia).
Questions? We’d like to hear from you!
Call Fisher-Price®Consumer Relations, toll-free at 1-800-432-KIDS, 8 AM - 6 PM EST Monday through Friday.
Hearing-impaired consumers using TTY/TDD equipment, please call 1-800-382-7470.Or, write to:
Fisher-Price
®
Consumer Relations
636 Girard Avenue
East Aurora, New York 14052
8
• Do not immerse any part of this product. Surface wash this toy with a mild detergent and clean, soft cloth.
• If sounds from this toy become faint, or if there is no sound, remove the batteries and dispose of them properly. Replace the
batteries with three, “AAA” (LR03) alkaline batteries.
Note: This equipment has been tested and found to comply with the limits for a Class B digital device, pursuant to Part 15 of the
FCC Rules.These limits are designed to provide reasonable protection against harmful interference in a residential installation.
This equipment generates, uses and can radiate radio frequency energy and, if not installed and used in accordance with the
instructions, may cause harmful interference to radio communications. However, there is no guarantee that interference will not
occur in a particular installation. If this equipment does cause harmful interference to radio or television reception, which can be
determined by turning the equipment off and on, the user is encouraged to try to correct the interference by one or more of the
following measures:
• Reorient or relocate the receiving antenna.
• Increase the separation between the equipment and receiver.
• Consult the dealer or an experienced radio/TV technician for help.
 Loading...