

Page 1

Instructions
Jeep
Push’n Scoot
™
Model Number: 72607
If you experience a problem with this product, or are missing a part,
please call us at 1-800-432-KIDS, rather than return this product to the store.
Please save these instructions for future reference.
Adult assembly is required.
Tools required for assembly: Hammer and Scrap Block of Wood.
Weight Limit: 55 lbs.
Ages: 11/2years - 5 years.
®
’
Page 2
• Adult supervision is required.
•Never use near steps, sloped driveways, hills, roadways, alleys, swimming pool areas or
other bodies of water.
• Always wear shoes or sneakers.
•Never allow more than one rider.
WARNING
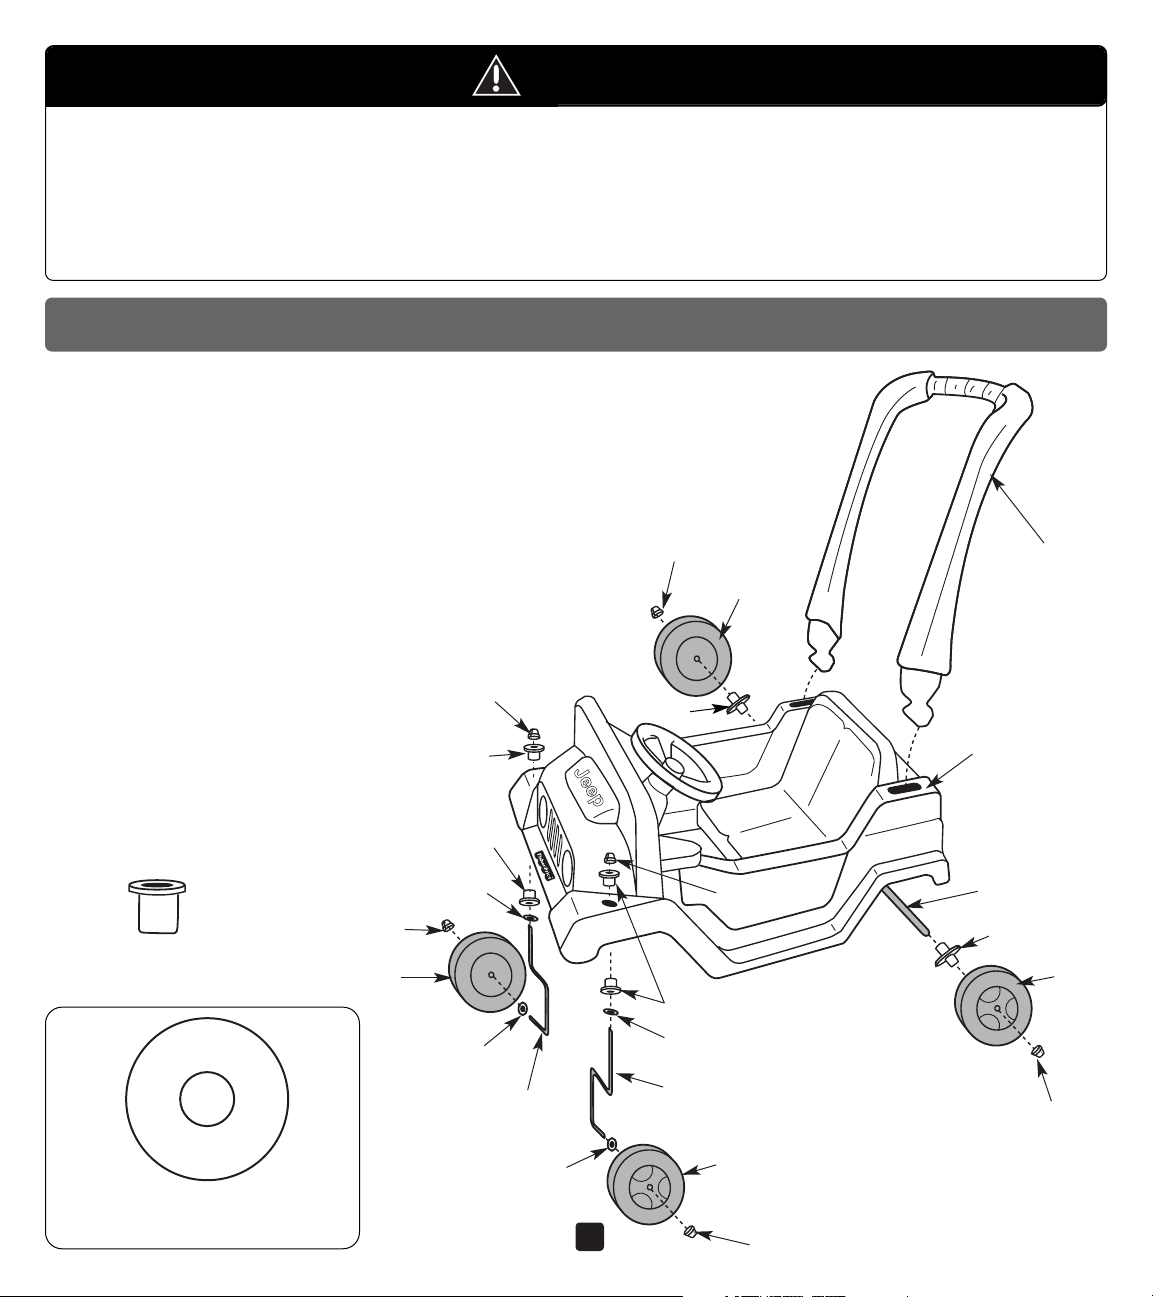
Parts
• If you experience a problem with this product, or are
missing a part, please call us at 1-800-432-KIDS, rather
than return this product to the store.
• Please save all packaging material until assembly is
complete to ensure that no parts are discarded.
•For your convenience, an extra piece of each type of
hardware is included.
• Before assembling the Jeep Push ‘n Scoot™, please
wipe each part with a clean, dry cloth.
• The Jeep Push ‘n Scoot™ comes with cap nut tools to
help you fasten the cap nuts. After one-time assembly is
complete, dispose of the cap nut tools properly.
2
Handle
Spacer
Spacer
Cap Nut Tool - 2
Cap Nut
Cap Nut
Cap Nut
Cap Nut
Cap Nut
Cap Nut
Wheel
Wheel
Wheel
Wheel
“A” Front Axle
“B” Front Axle
Washer
Washer
Washer
Washer
Bushing
Bushing
Bushing
Vehicle Body
Rear Axle
11/8" Washer - 4
SHOWN ACTUAL SIZE
®
®
Page 3
Assembly
CAUTION
Rear Axle
Cap Nut
Scrap Block
of Wood
1
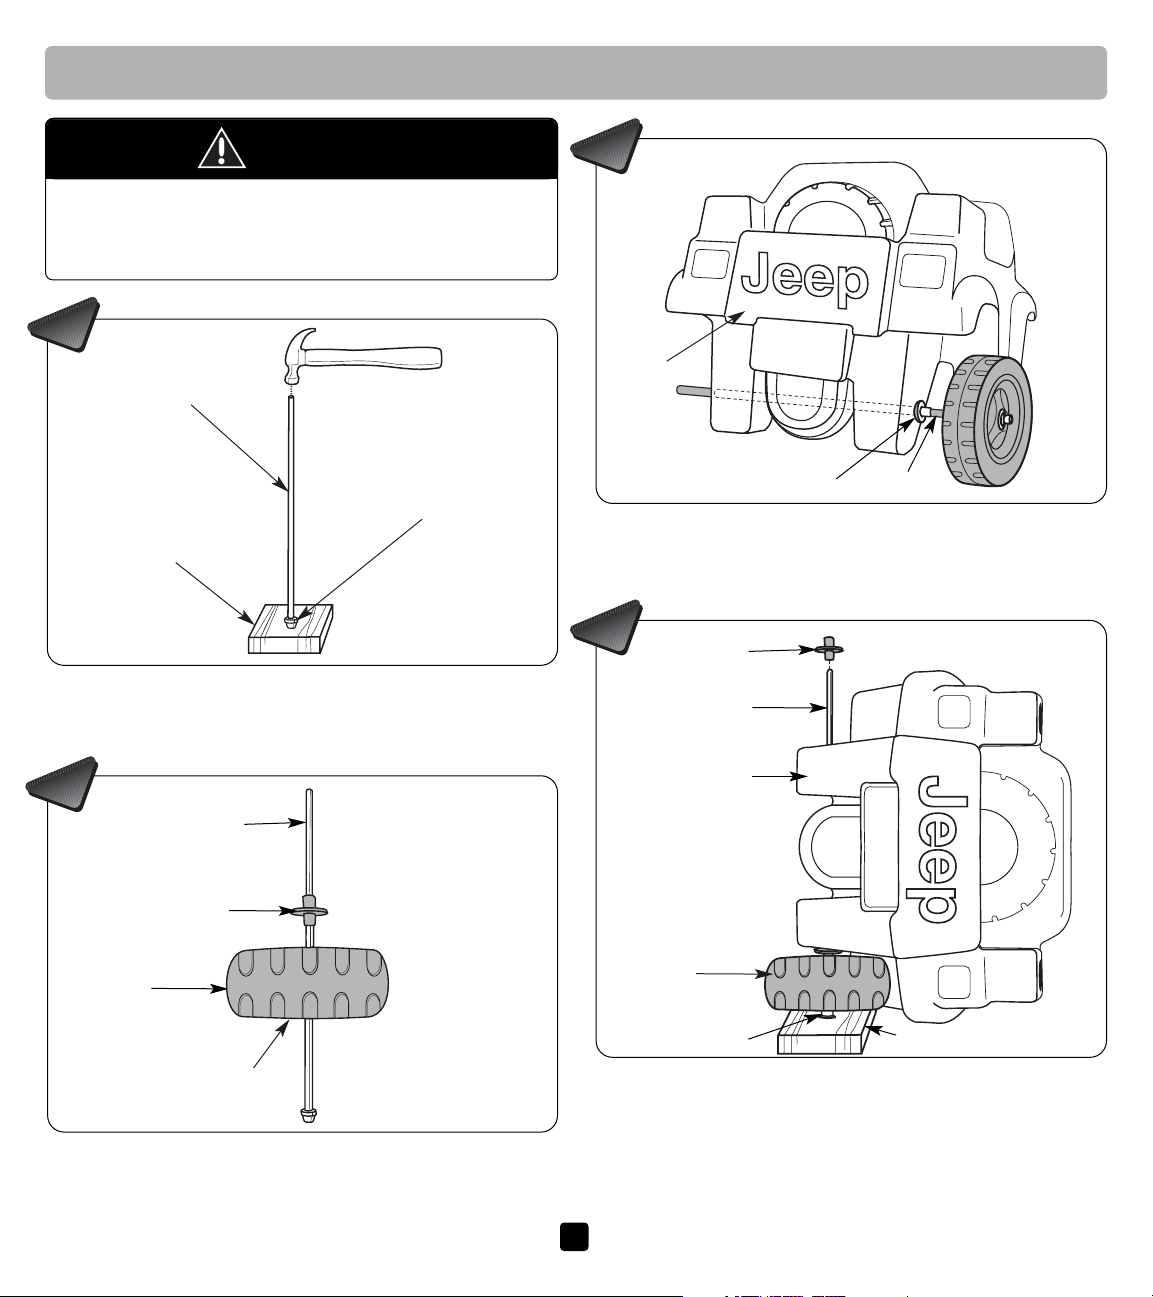
• Place a cap nut on a scrap block of wood.
• Fit the rear axle into the cap nut and tap with a hammer
until secure.
• Slide a wheel, spoke side down, onto the rear axle.
• Slide a spacer onto the rear axle.
Rear Axle
Wheel
Spoke Side Down
Spacer
2
•Insert the rear axle through the holes in the rear of the
vehicle body. Make sure the spacer fits into the hole in
the vehicle body.
Spacer
Rear Axle
3
•Turn the vehicle body on its side with the end of the
rear axle facing up.
• Lift the vehicle body up slightly and fit a cap nut tool on
the cap nut.
• Slide a block of wood under the cap nut tool to support
the rear axle.
• Fit the other spacer onto the rear axle and into the hole
in the vehicle body.
Scrap Block of Wood
Vehicle Body
Cap Nut Tool
Vehicle
Body
Spacer
Rear Axle
4
3
Please keep small parts and plastic
bags out of children’s reach. Dispose of
plastic bags properly.
Wheel
Page 4
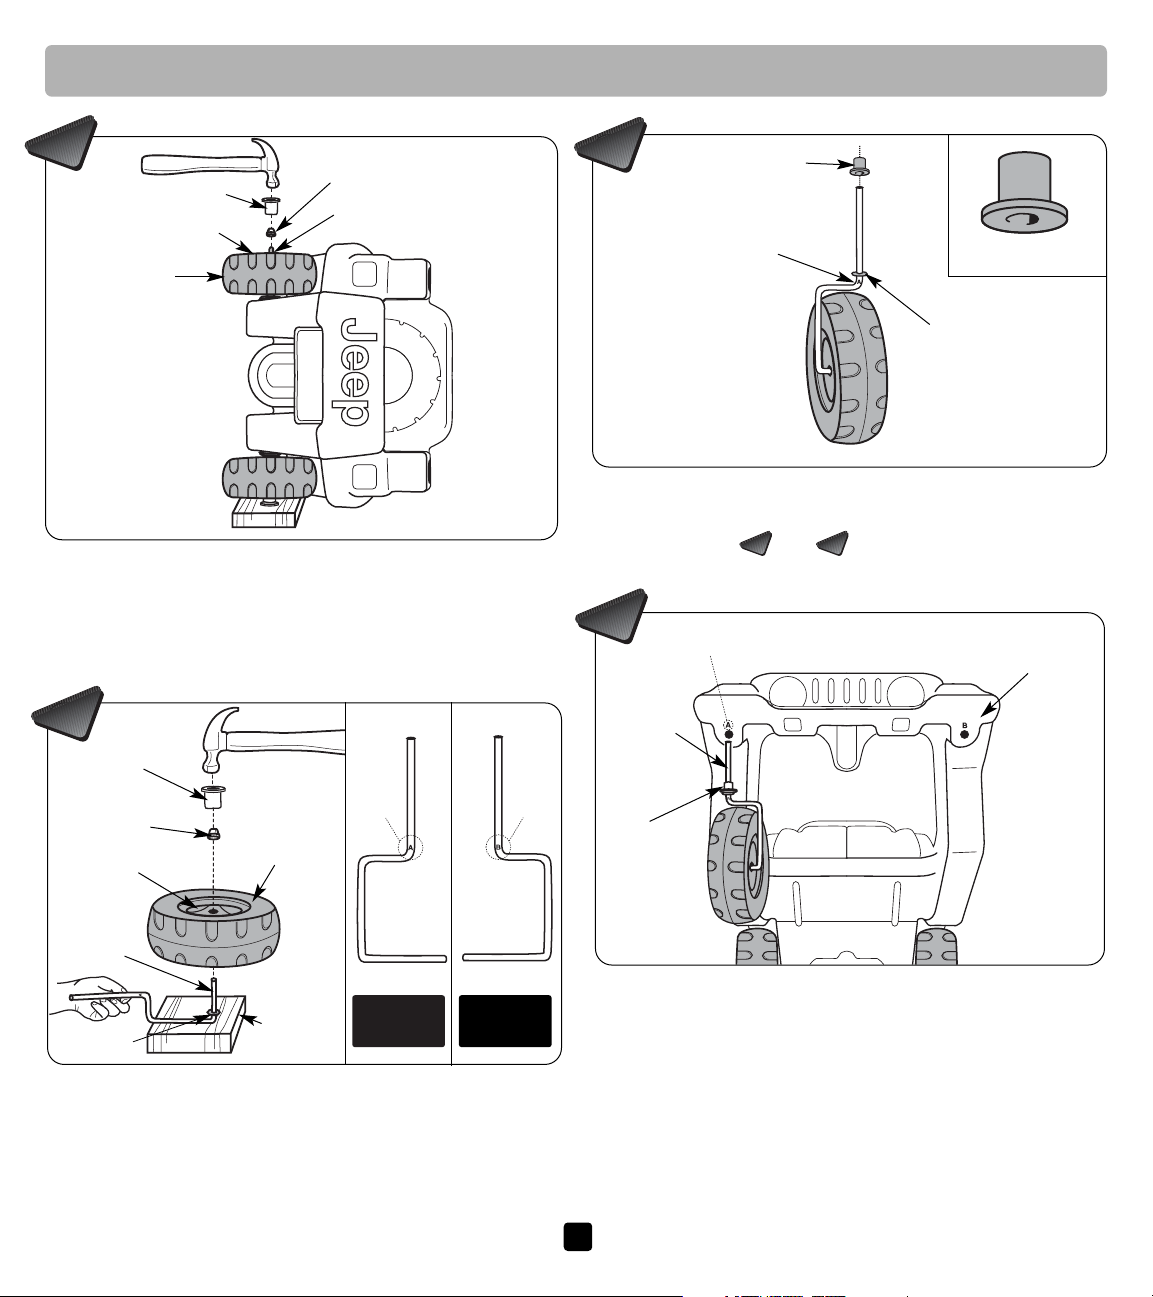
• Slide a washer onto the "A" front axle.
• Slide a bushing, narrow side up, onto the "A" front axle.
• Repeat steps and to assemble the "B" front
axle, washer, wheel, bushing and cap nut.
• Identify and separate the "A" and "B" front axles.
• Place the "A" front axle onto a scrap block of wood.
• Slide a washer onto the "A" front axle.
• Slide one of the wheels, spoke side up, onto the "A"
front axle.
• Fit a cap nut onto the end of the "A" front axle.
• Fit a cap nut tool over the cap nut and tap the center
with a hammer until the cap nut is secure.
6
A
• Slide a wheel, spoke side up, onto the end of the
rear axle.
• Fit a cap nut onto the end of the rear axle.
• Fit a cap nut tool over the cap nut and tap the center
with a hammer until the cap nut is secure.
Cap Nut Tool
Spoke Side Up
Cap Nut
Rear Axle
Wheel
5
Assembly
Cap Nut
Cap Nut
Tool
Wheel
Washer
Spoke Side Up
Scrap
Block of
Wood
Bushing
Bushing
"A" Front Axle
Washer
"A"
Front
Axle
B
"A" Front
Axle
"B" Front
Axle
A
•Turn the vehicle body upright.
• Lift the front end of the vehicle body and locate the
side of the vehicle body marked "A".
IMPORTANT! For proper wheel position, the "A" front
axle assembly must be inserted into the hole in the
vehicle body marked "A".
•Insert the "A" front axle up into the hole underneath
the vehicle body marked "A".
• Make sure the bushing fits into the hole in the vehicle
body.
8
Bushing
"A"
Front
Axle
"A" Marking
Vehicle
Body
4
6
7
7
Page 5
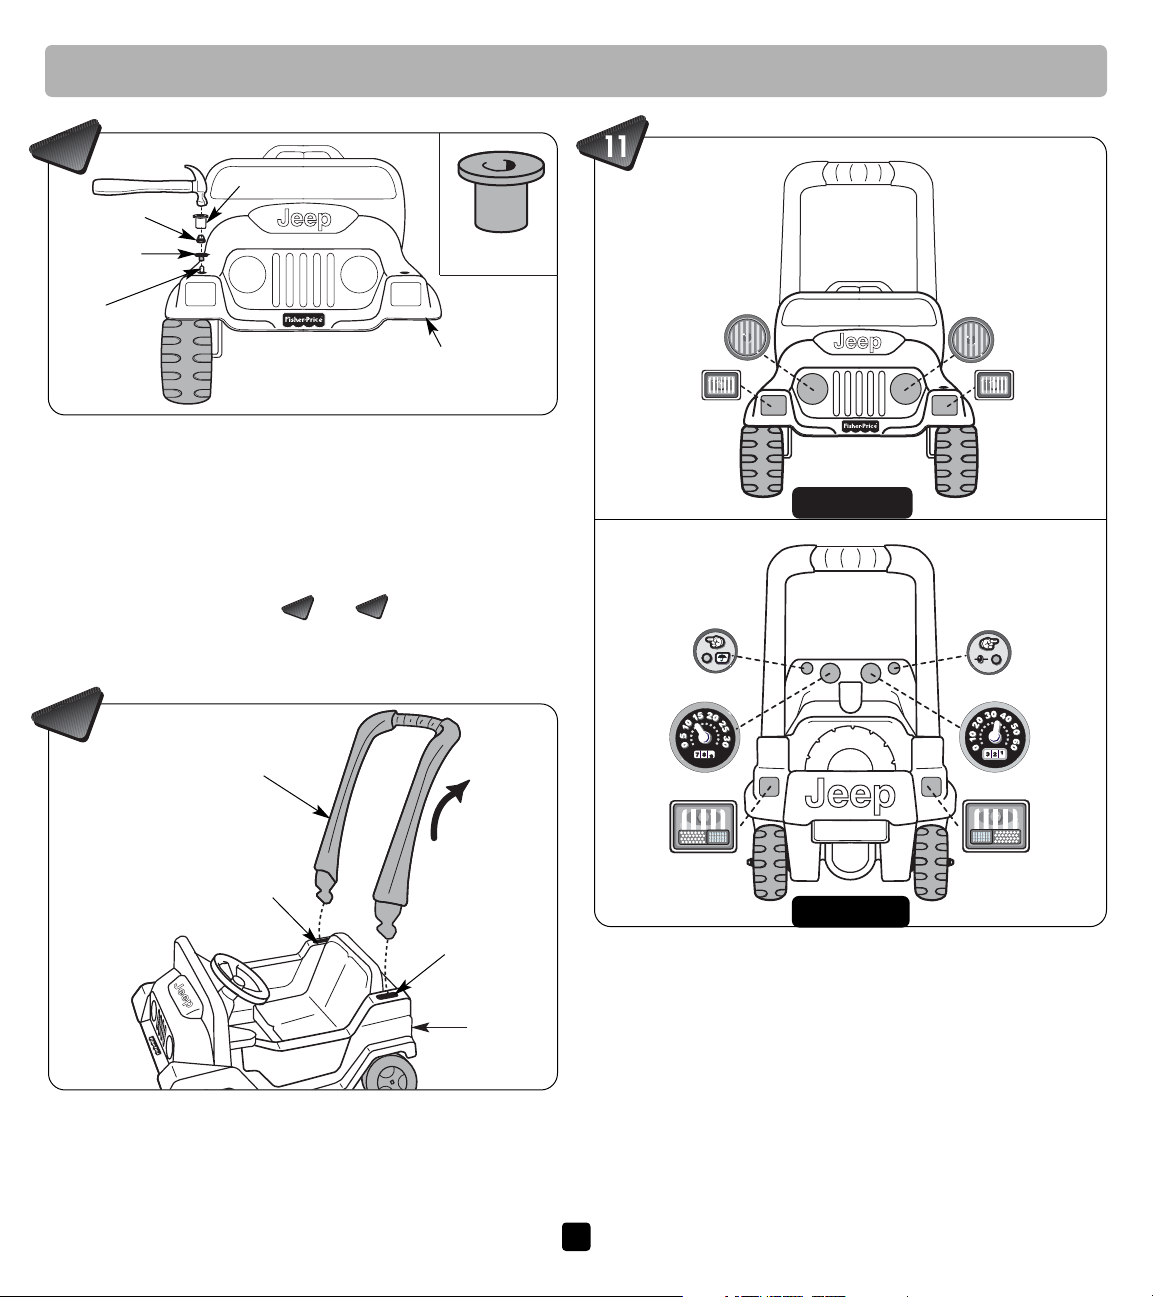
•Lower the vehicle body.
•Fit a bushing, narrow side down, onto the exposed end
of the "A" front axle and into the hole in the vehicle
body.
• Fit a cap nut onto the end of the "A" front axle.
• Fit a cap nut tool over the cap nut and tap the center
with a hammer until the cap nut is secure.
• Repeat assembly steps and to assemble the
"B" front axle to the side of the vehicle body marked "B".
• Dispose of the cap nut tools properly.
8
9
Assembly
9
Cap Nut
Cap Nut Tool
"A"
Front
Axle
Bushing
Vehicle Body
•Position the handle over the rear of the vehicle body so
that it leans away from the vehicle body.
• While keeping the vehicle body stationary, insert and
snap the handle into the two holes in the rear of the
vehicle body.
10
Hole
Rear of
Vehicle
Body
Hole
Handle
5
• Make sure the areas where the labels will be applied
are clean and dry.
• Apply the labels as shown in the illustrations.
•For best adhesion, try to avoid applying a label more
than once.
One-time assembly is now complete.
1
2
10
9
7
8
3
4
65
Front View
Back View
Bushing
Page 6
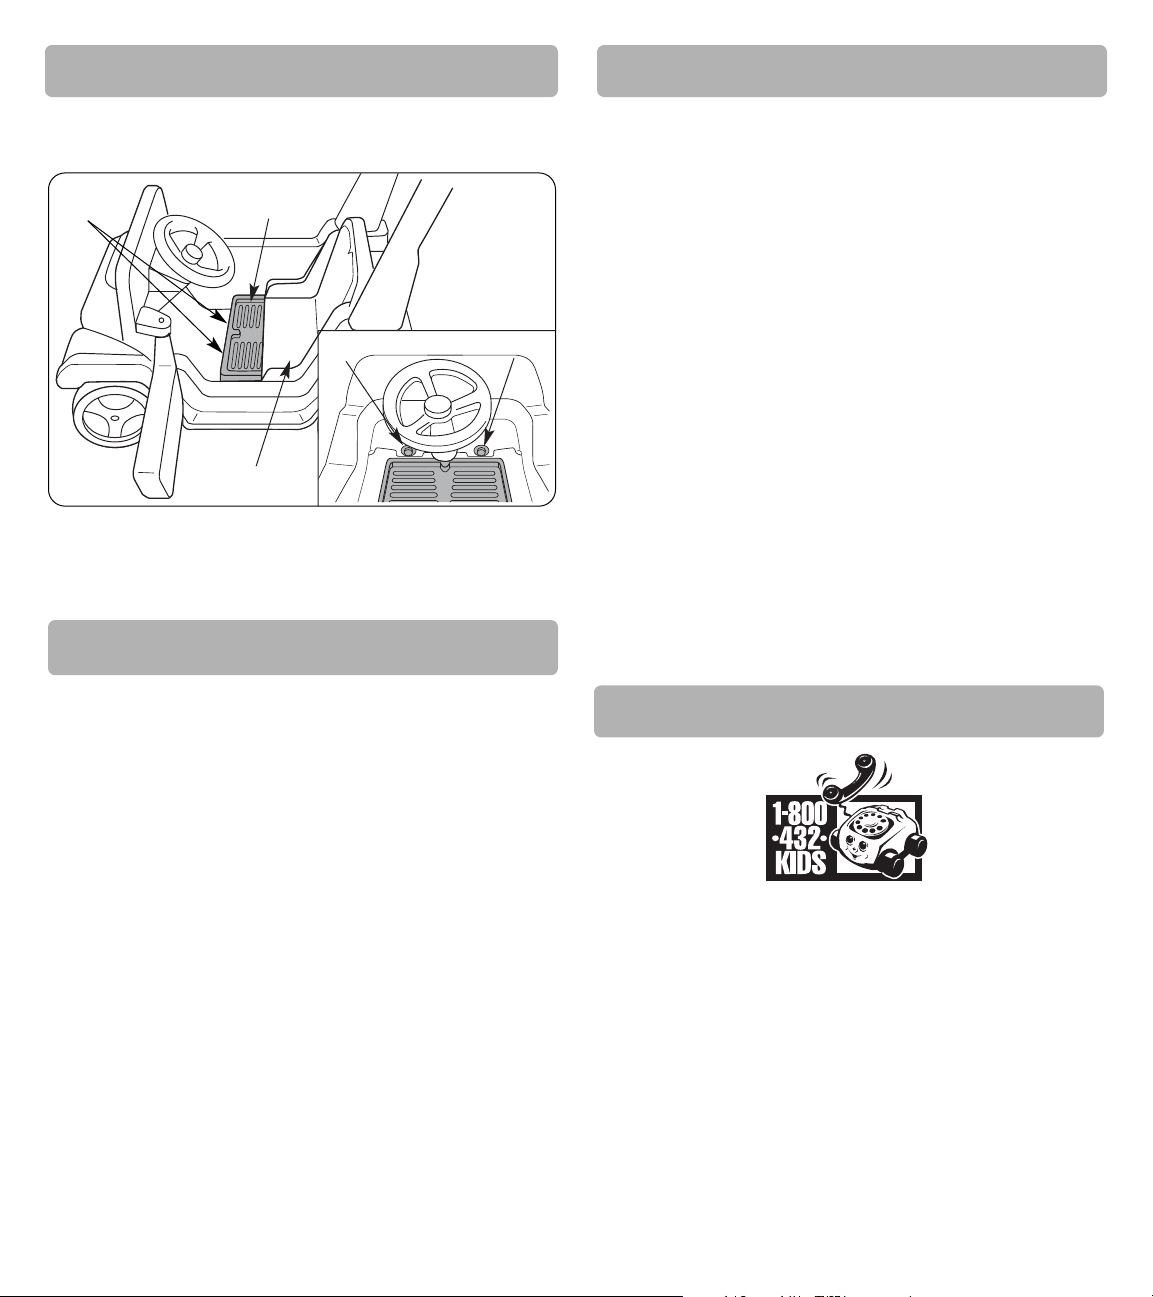
When pushing your child in the Jeep Push 'n Scoot™,
use the pull-out footrest.
Use
• Pull the footrest out from under the seat.
• Hook the notches in the front of the footrest onto the
tabs on the inside front of the Jeep Push 'n Scoot™.
Ta b
Ta b
Seat
Footrest
Notches
Fisher-Price, Inc., 636 Girard Avenue, East Aurora,
New York 14052, warrants to the original owner that the
Jeep Push 'n Scoot™ is free from all defects in material
and workmanship when used under normal conditions for
a period of three (3) years from the date of purchase. This
warranty does not cover color fading of the product or
product parts, or damage from excessive abuse or Acts
of God.
Should the product fail to perform properly, we will repair
or replace it, free of charge. Purchaser is responsible for
shipping the product to the address indicated above and
for all associated freight and/or insurance cost.
Fisher-Price, Inc. will bear the cost of shipping the repaired
or replaced item to you. This warranty is void if the owner
repairs or modifies the product. This warranty excludes any
liability other than the above mentioned, including but not
limited to any incidental or consequential damages.
SOME STATES DO NOT ALLOW THE EXCLUSION OR
LIMITATIONS OF INCIDENTAL OR CONSEQUENTIAL
DAMAGES, SO THE ABOVE LIMITATION OR EXCLUSION MAY NOT APPLY TO YOU.
THIS WARRANTY GIVES YOU SPECIFIC LEGAL
RIGHTS, AND YOU MAY ALSO HAVE OTHER RIGHTS
WHICH MAY VARY FROM STATE TO STATE.
Maintenance
Three (3) Year Limited Warranty
Questions?
•Periodically check the Jeep Push 'n Scoot™ to be sure
all fasteners are secure and re-fasten as needed.
•To clean or remove static electricity, use a mild soap
and water solution and a clean cloth. Rinse clean with
water to remove soap residue.
©1997 Fisher-Price, Inc., East Aurora, New York 14052
Printed in U.S.A. 72607 1 72607-0920
We'd like to hear from you!
Call Fisher-Price®Consumer Affairs, toll-free at
1-800-432-KIDS, 8 AM - 6 PM EST Monday through
Friday. Hearing-impaired consumers using TTY/TDD
equipment, please call 1-800-382-7470. Or, write to:
Fisher-Price®Consumer Affairs, 636 Girard Avenue,
East Aurora, New York 14052.
®
®
®
®
JEEP and Jeep grille design are registered trademarks of Chrysler Corporation U.S.A. Used under license.
© CHRYSLER CORPORATION 1997.
If you have any questions about this product:
In Canada, call 1-800-567-7724, or write to: Mattel/Fisher-Price, 6155 Freemont Blvd., Mississauga, Ontario L5R 3W2.
In Great Britain, telephone 01734 770488.
In Australia, call the Fisher-Price Australian Consumer Advisory Service toll-free at 1-800-800-812, or write to: Fisher-Price, Mattel Pty. Limited, 461 Plummer Street,
Port Melbourne, Victoria 3207.
 Loading...