

Page 1

Importado por : Mattel do Brasil Ltda.CNPJ : 54.558.002/0008-04 - Av.
Tenente Marques, 1246 - Sala 02 - 2º.
Andar - 07770-000 - Polvilho Cajamar - SP – Brasil. Serviço de
Atendimento ao Consumidor (SAC):
0800-550780 - sac@mattel.com.
Informações
ao consumidor
• Com a chave de fenda, empurre para
retirar a chave do veículo.
Dica: Repita os passos 1-3 até remover
completamente a chave.
3
Instruções de Remoção Instruções de Remoção
• Descarte a chave.
4
Instruções de Instalação
• Coloque a nova, chave achatada no
local. Pressione a chave achatada
com a palma da mão para "encaixar"
adequadamente.
Dica: Isso pode exigir um pouco de força.
Chave
Achatada
Fisher Price, Inc., a subsidiary of Mattel, Inc., East Aurora, NY 14052 U.S.A.
©2010 Mattel, Inc. All Rights Reserved. ® and ™ designate U.S. trademarks of Mattel, Inc.
Fisher Price, Inc., une filiale de Mattel, Inc., East Aurora, NY 14052 É.-U.
©2010 Mattel, Inc. Tous droits réservés. ® et ™ désignent des marques de Mattel, Inc. aux É.-U.
PRINTED IN USA/IMPRIMÉ AU É.-U. 00989pr-1036
Instructions
Key Removal and Installation
Trike Model Numbers: 72633, 72639, 72642, 72643, 72644, 72792,
B8775, B8776, K6672, K6673, M5727, N6021, T6209, V4270
SERIOUS INJURY HAZARD
• A child can strike, sit or fall on the
plastic key in the seating area of the
trike and be injured. DO NOT use this
product until you remove and replace
the key.
• DO NOT allow children to remove the
key or install the new, attened key.
WARNING
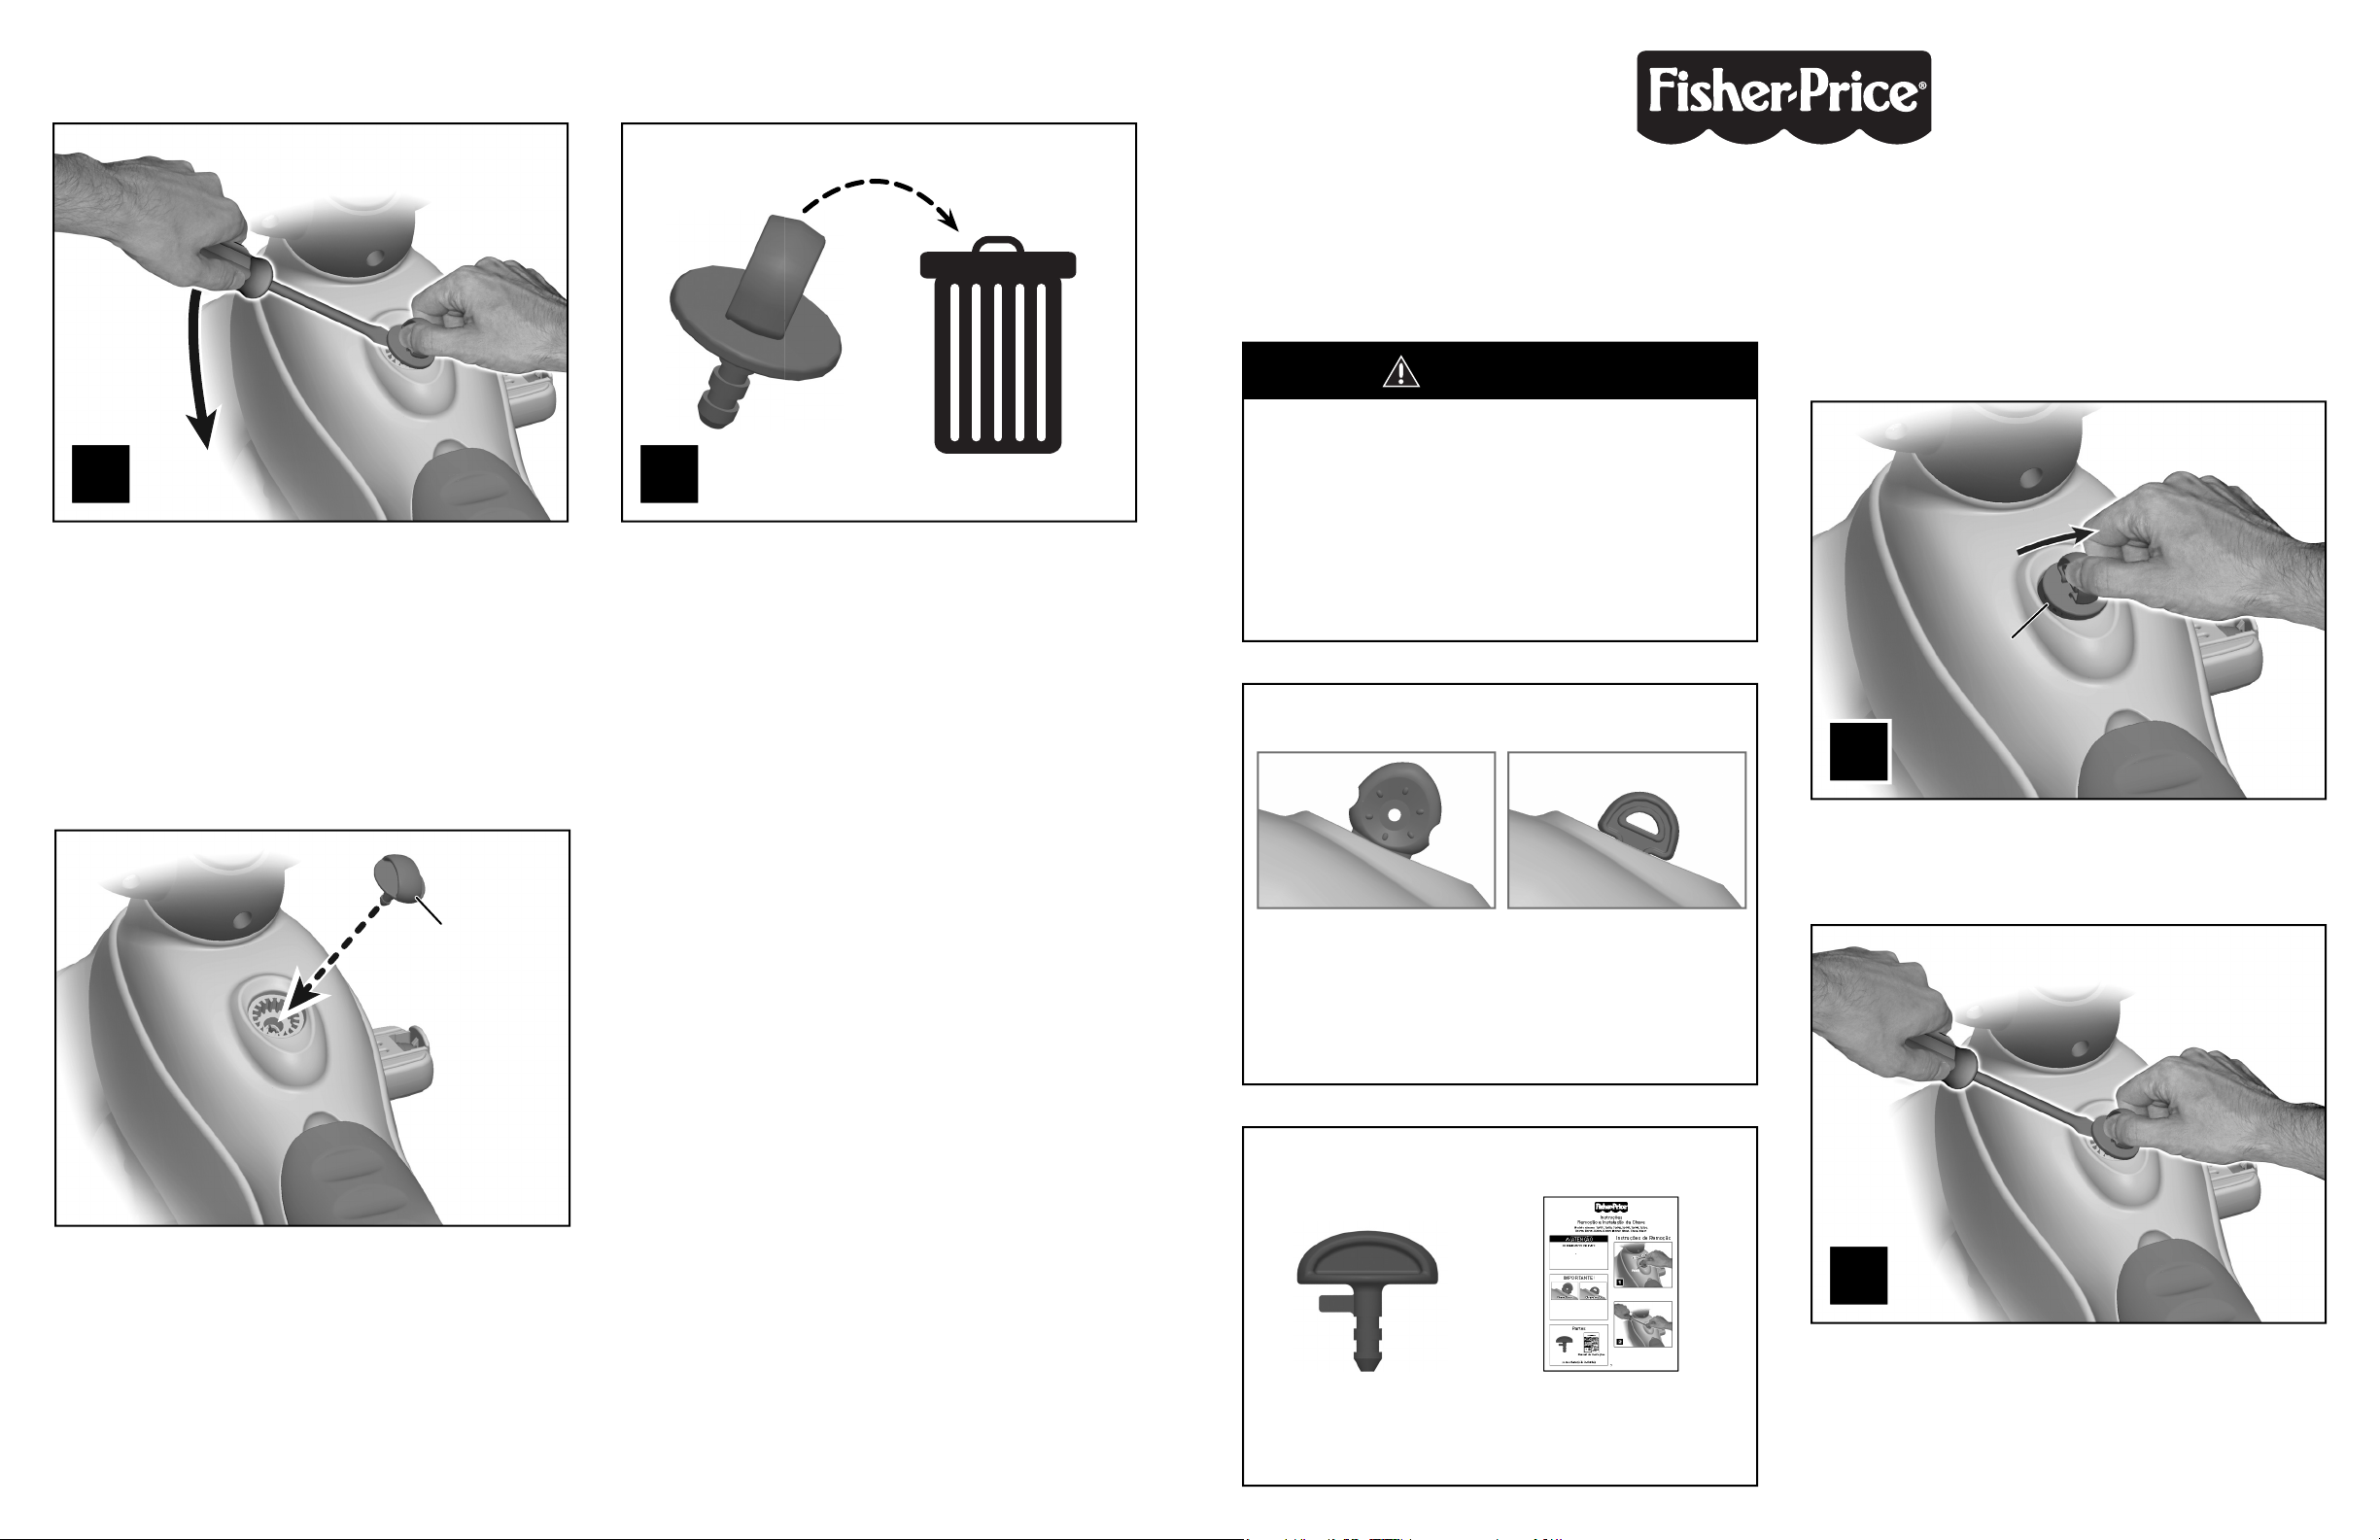
Removal Instructions
• Push the key to the side to create a
gap between the base of the key and
the trike.
• While continuing to push the key, t
the tip of a at blade screwdriver into
the gap.
PUSHPUSH
1
2
GapGap
If your trike includes a key in the
seating area that looks like either of
the keys shown in the illustrations
above, please follow the removal
and installation instructions on this
instruction sheet.
Disc Shaped KeyDisc Shaped Key "D" Shaped Key"D" Shaped Key
IMPORTANT!
Kit Parts
Tool needed for key removal:
Flat Blade Screwdriver (not included).
Flattened Key
Instruction Sheet
Tri
t
t
key or install the new,
g
e.
• While continuing to push the key,
t
the tip of a
Gap
G
a
p
f
t
and
s
Disc Shaped Key
D
i
s
y
Key Removal and Installation
ke Model Numbers: 72633, 72639, 72642, 72643, 72644, 72792,
B8775, B8776, K6672, K6673, M5727, N6021, T6209, V4270
• A child can strike, sit or fall on the
plastic key in the seating area of the
rike and be injured. DO NOT use this
product until you remove and replace
he key.
• DO NOT allow children to remove the
If your trike includes a key in the
seating area that looks like either o
he keys shown in the illustrations
above, please follow the removal
installation instructions on thi
Flattened Ke
Flat Blade Screwdriver (not included).
Removal Instructions
• Push the key to the side to create a
ap between the base of the key and
the trik
at blade screwdriver into
the gap.
Page 2
If you have further questions regarding
the removal of the key and installation of
the new, attened key, please call
Fisher-Price
®
Consumer Relations at
1-800-432-5437, 9 AM – 6 PM EST
Monday through Friday. Hearing-impaired
consumers using TTY/TDD equipment,
please call 1-800-382-7470. In the United
States, write to: Fisher-Price
®
Consumer
Relations, 636 Girard Avenue, East
Aurora, New York 14052. In Canada, write
to: Mattel Canada Inc., 6155 Freemont
Blvd., Mississauga, Ontario L5R 3W2.
Consumer Information
• Lower the at blade screwdriver handle
to pry the key from the trike.
Hint: You may need to repeat steps 1-3 a
few times to completely pry the key from
the trike.
3
Removal Instructions Removal Instructions
• Dispose of the key.
4
Installation Instructions
• Insert the new, attened key into the
socket in the trike. Push down on the
attened key with the palm of your hand
to "snap" it into place.
Hint: This may take some force.
Flattened
Key
2
Instruções
Remoção e Instalação da Chave
Modelo número: 72633, 72639, 72642, 72643, 72644, 72792,
B8775, B8776, K6672, K6673, M5727, N6021, T6209, V4270
FERIMENTOS GRAVES
• Uma criança pode bater, sentar ou
cair na chave plástica do assento e
se machucar. NÃO use o produto até
remover e trocar a chave.
• NÃO permita que a criança remova a
chave ou instale uma nova chave.
ATENÇÃO
Instruções de Remoção
• Vire a chave para criar uma fenda entre
a base da chave e o veículo.
• Enquanto vira a chave, coloque a chave
de fenda ponta chata na fenda.
PRESS
IONE
PRESSIONE
1
2
FendaFenda
Se o seu produto inclui uma chave
na área do assento que seja parecida
com uma das chaves mostradas
aqui, por favor, siga as instruções de
remoção e instalação neste manual.
Chave DiscoChave Disco Chave em DChave em D
IMPORTANTE!
Partes
Ferramenta necessária: Chave de fenda
ponta chata (não incluída).
Chave Achatada
Manual de instruções
7
• U
cair na chave plástica do assento e
se machucar. NÃO use o produto até
p
remover e
ocar a chave
•
chave ou instale uma nova chave
.
.
FendaFenda
S
com uma das chaves mostradas
C
ma criança pode bater, sentar ou
tr
.
NÃO permita que a criança remova a
.
• Vire a chave para criar uma fenda entre
a base da chave e o veículo
• Enquanto vira a chave, coloque a chave
de fenda ponta chata na fenda
e o seu produto inclui uma chave
na área do assento que seja parecida
aqui, por favor, siga as instruções de
remoção e instalação neste manual.
have Achatada
Ferramenta necessária: Chave de fenda
Page 3

Pour toute question concernant le
remplacement de la clé, communiquer
sans frais avec le Service à la clientèle
de Fisher-Price au 1-800-432-5437 du
lundi au vendredi, de 9 h à 18. Les
personnes malentendantes qui utilisent
un ATS peuvent composer le
1-800-382-7470. Ou écrire à :
Fisher-Price, Service à la clientèle,
Mattel Canada Inc., 6155 Freemont Blvd.,
Mississauga, Ontario L5R 3W2.
Renseignements
pour les consommateurs
• Appuyer sur le manche du tournevis
pour enlever la clé du tricycle.
Remarque : Il sera peut-être nécessaire
de répéter quelques fois les étapes 1 à 3
a n d'enlever complètement la clé.
3
Enlèvement de la clé Enlèvement de la clé
• Jeter la clé.
4
Installation
de la nouvelle clé
• Insérer la nouvelle clé plate dans
l'ouverture. Appuyer sur la clé plate
avec la paume de la main pour bien
l'enclencher.
Remarque : Cela peut demander une
certaine force.
Clé plate
6
Instrucciones
Cómo quitar e instalar la llave
Modelos de triciclo: 72633, 72639, 72642, 72643, 72644, 72792,
B8775, B8776, K6672, K6673, M5727, N6021, T6209, V4270
PELIGRO DE LESIONES GRAVES
• Un niño puede golpear, sentarse o
caer sobre la llave de plástico en el
área del asiento del triciclo y salir
lesionado. NO usar este producto hasta
después de quitar y sustituir la llave.
• NO permitir que los niños quiten o
instalen la nueva llave plana.
ADVERTENCIA
Instrucciones
para quitar la llave
• Empujar la llave a un lado para crear un
espacio entre la base de la llave y
el triciclo.
• Mientras sigue presionando la llave,
introducir la punta de un desatornillador
plano en el espacio.
EMPUJ
AR
EMPUJAR
1
2
EspacioEspacio
Si el triciclo incluye una llave en
el área del asiento que se parece
a cualquiera de las llaves en las
ilustraciones, seguir las instrucciones
sobre cómo quitar e instalar las llaves
en estas instrucciones.
Llave en forma Llave en forma
de discode disco
Llave en forma Llave en forma
de "D"de "D"
¡IMPORTANTE!
Piezas del estuche
Herramienta necesaria para quitar la
llave: desatornillador plano (no incluido).
Llave plana
Instrucciones
3
C
e
M
,
B
S
c
á
r
d
.
s
e
• Mi
p
.
S
e
i
L
l
l
ómo quitar e instalar la llav
odelos de triciclo: 72633, 72639, 72642, 72643, 72644, 72792
8775, B8776, K6672, K6673, M5727, N6021, T6209, V4270
nstruccione
PELIGRO DE LESIONES GRAVE
• Un niño puede golpear, sentarse o
aer sobre la llave de plástico en el
rea del asiento del triciclo y sali
lesionado. NO usar este producto hasta
espués de quitar y sustituir la llave.
• NO permitir que los niños quiten o
instalen la nueva llave plana
ara quitar la llav
i el triciclo incluye una llave en
l área del asiento que se parece
a cualquiera de las llaves en las
lustraciones, seguir las instrucciones
sobre cómo quitar e instalar las llaves
Herramienta necesaria para quitar la
lave: desatornillador plano (no incluido).
entras sigue presionando la llave,
introducir la punta de un desatornillador
lano en el espacio
Page 4

Si tiene alguna pregunta sobre cómo quitar la
llave e instalar la nueva llave plana, contactarse
con la o cina Mattel más próxima a su localidad.
Mattel de México, S.A. de C.V., Insurgentes
Sur # 3579, Torre 3, O cina 601, Col. Tlalpan,
Delegación Tlalpan, C.P. 14020, México, D.F.
R.F.C. MME-920701-NB3. Tels.: 59-05-51-00 Ext.
5205 ó 01-800-463-59-89.
Mattel Chile, S.A., Avenida Américo Vespucio
501-B, Quilicura, Santiago.
Mattel de Venezuela, C.A., RIF J301596439, Ave.
Mara, C.C. Macaracuay Plaza, Torre B, Piso 8,
Colinas de la California, Caracas 1071.
Mattel Argentina, S.A., Curupaytí 1186, (1607) Villa Adelina, Buenos Aires.
Mattel Colombia, S.A., calle 123#7-07 P.5, Bogotá.
Mattel Perú, S.A., Av. República de Panamá N°
3531, O cina 1003, San Isidro, Lima, Perú.
• Bajar el mango del desatornillador plano
para quitar la llave del triciclo.
Atención: Quizá sea necesario repetir
unas cuantas veces los pasos 1 a 3 para
quitar la llave del triciclo.
3
Instrucciones
para quitar la llave
Instrucciones
para quitar la llave
• Desechar la llave en la basura.
4
Instrucciones
de instalación
• Introducir la nueva llave plana en el
ori cio en el triciclo. Con la palma de la
mano, empujar hacia abajo la llave plana
para ajustarla en su lugar.
Nota: Esto puede requerir fuerza.
Llave plana
4
Información
al consumidor
Directives
Enlèvement et installation de la clé
Modèles de tricycles : 72633, 72639, 72642, 72643, 72644, 72792,
B8775, B8776, K6672, K6673, M5727, N6021, T6209, V4270
RISQUE DE BLESSURES GRAVES
• Un enfant pourrait s'asseoir ou tomber
sur la clé en plastique située près du
siège du tricycle, ou la frapper, et se
blesser. NE PAS utiliser ce produit tant
que la clé n'a pas été remplacée.
• NE PAS laisser un enfant enlever la
clé ou installer la nouvelle clé plate.
AVERTISSEMENT
Enlèvement de la clé
• Pousser la clé de côté pour créer un
espace entre la base de la clé et
le tricycle.
• Tout en continuant à pousser la clé,
insérer le bout de la lame du tournevis
dans l'espace.
POUSSERPOUSSER
1
2
EspaceEspace
Pièces incluses
Outil requis pour enlever la clé : un
tournevis à tête plate (non fourni).
Clé plate
Directives
5
Si votre tricycle contient une clé
qui ressemble à une des clés
illustrées, veuillez suivre les
présentes directives pour l'enlever
et installer la nouvelle clé.
Clé en formeClé en forme
de disquede disque
Clé en formeClé en forme
de « D »de « D »
IMPORTANT!
S
r
b
q
.
c
.
esp
l
insé
.
Espace
E
space
O
p
Clé en forme
C
ISQUE DE BLESSURES GRAVE
• Un enfant pourrait s'asseoir ou tombe
sur la clé en plastique située près du
siège du tricycle, ou la frapper, et se
lesser. NE PAS utiliser ce produit tant
ue la clé n'a pas été remplacée
• NE PAS laisser un enfant enlever la
lé ou installer la nouvelle clé plate
• Pousser la clé de côté pour créer un
ace entre la base de la clé et
util requis pour enlever la clé : un
e tricycle.
• Tout en continuant à pousser la clé,
rer le bout de la lame du tournevis
dans l'espace
Si votre tricycle contient une clé
résentes directives pour l'enlever
 Loading...