

Page 1
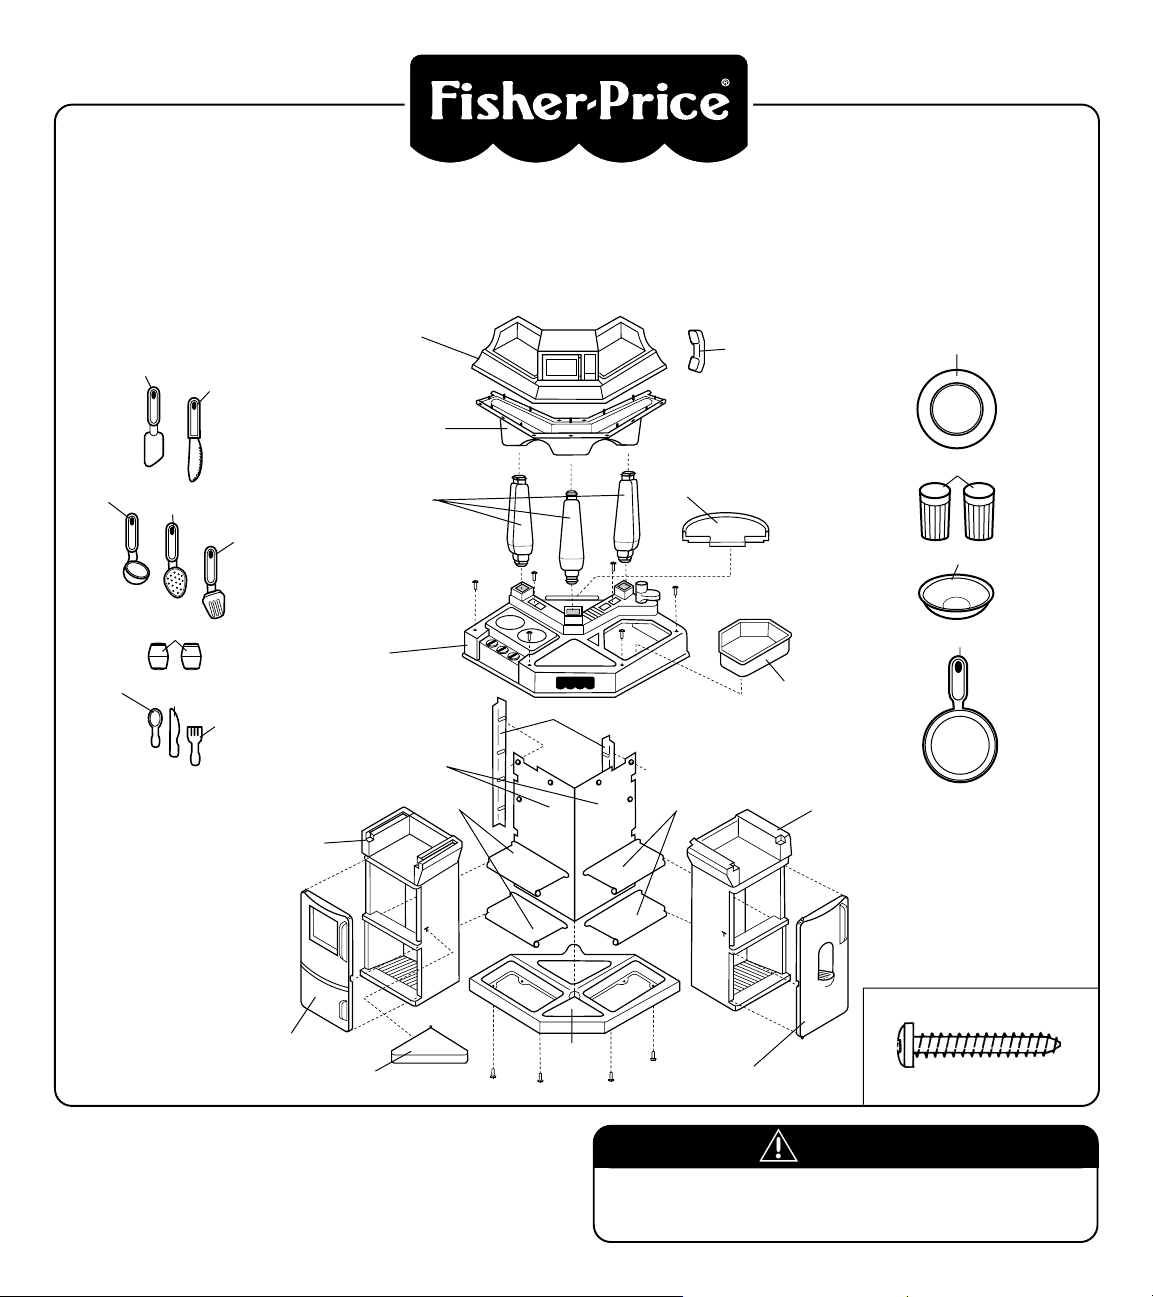
All-In-One
Please keep these instructions for future reference.
Tool needed for assembly: Phillips screwdriver.
Kitchen Center
™
Spatula
Kitchen Knife
®
®
Fisher-Price
Fisher-Price
Slotted
Ladle
Spoon
®
®
Fisher-Price
Fisher-Price
Salt & Pepper Shakers
Spoon - 2
Knife - 2
Fork - 2
Flipper
®
Fisher-Price
Upper Canopy
Lower Canopy
Canopy Support - 3
Top
Backboard
Oven
Shelf - 2
Fisher-Price
Retainer - 2
Telephone
Plate - 2
Cup - 2
Tray
Bowl - 2
Pan
®
Shelf - 2
Sink
Refrigerator
®
Fisher-Price
Oven Door
Label Decoration Sheet
(not shown)
Triangular Shelf
• Before assembly, wipe each plastic part with a damp
cloth to remove any debris.
• Save all packaging material until assembly is complete
to ensure that parts are not discarded.
Base
#6, 1" Screw - 20
Refrigerator Door
SHOWN ACTUAL SIZE
CAUTION
Please keep small parts, hardware and
plastic bags out of children’s reach.
Page 2

Assembly
Triangular Shelf
• Place the base on a flat surface so that the triangular
shelf faces you.
• Take note of the letter (A or B) next to each rectangular
opening.
A
Oven
B
Refrigerator
B
Oven
Tabs
Tab
Refrigerator
Base
Front View
• Insert the refrigerator (B) into the rectangular opening in
the base (B).
• Position the refrigerator and the oven so that the tab on
the refrigerator is flat against the oven and the tabs on
the oven are flat against the refrigerator.
Back View
• Turn the oven and refrigerator around so that the backs
face you.
• Identify the oven (A) and the refrigerator (B).
A
Oven
Base
Front View
• Insert the oven (A) into the rectangular opening in the
base (A).
Base
Bottom View
• Turn the base assembly upside down.
• Insert four screws and tighten with a Phillips screwdriver.
Do not over-tighten.
2
Page 3

Oven
Refrigerator
Notches
Tabs
Tab
Slot
Plug
Triangular Shelf
Slot
Plug
Front View
• Stand the base assembly upright.
• Insert the triangular shelf into the slots in the oven and
refrigerator.
• Make sure the tab on the refrigerator is flat against
the oven and the tabs on the oven are flat against
the refrigerator.
Peg
Backboard
Retainer
• Position the backboard so that the notches are upward.
• Insert the square and round pegs on a retainer into the
corresponding holes in the backboard.
• Repeat this procedure to attach the other retainer to the
backboard.
PLEASE NOTE: If the pegs on the retainer do not line-up
with the holes in the backboard, turn the backboard around,
so that you are looking at the opposite side. Re-crease the
backboard in the middle and attach the retainers.
Pegs
Groove
Thick End
of Shelf
Back View
• Turn the base assembly so that the back faces you.
• Hold a shelf so that the thick end faces away from you.
• Insert the thick end of the shelf into a groove in the oven.
• Repeat this procedure to insert a shelf into the other
groove in the oven, and the remaining two shelves into
the grooves in the refrigerator.
Base
Groove
Backboard
Base
Groove
Back View
• Insert the backboard into the base groove, as shown.
• Insert the four pegs on the back of the oven and
refrigerator into the holes in the backboard.
3
Base
Groove
Page 4

Refrigerator
Oven
Tabs
Doll Seat
Retainer
Back View
• Snap the retainer onto the oven.
• Snap the retainer onto the refrigerator.
Top
®
Fisher-Price
Retainer
Triangular
Counter
Tray
Slots
Back View
• Turn the base assembly so that the back faces you.
• Align the tabs on the tray with the slots on the bar in front of
the doll seat.
• Snap the tray into place on the bar.
Faucet
Sink
Front View
• Turn the assembly so that the front faces you.
• Turn the faucet to the right, completely away from the sink
opening.
• Fit the sink into the opening on top of the refrigerator.
• Center the faucet over the sink.
Canopy Supports
Triangular
Shelf
Front View
• Turn the base assembly so that the front faces you.
• Fit the top onto the base assembly so that the
triangular counter is over the triangular shelf.
• Push the top down firmly.
• Insert six screws and tighten with a Phillips screwdriver.
Do not over-tighten.
Square Base
®
Fisher-Price
• Insert a canopy support, wide end down, into a square base.
• Press down to snap the canopy support into place.
• Repeat this procedure to attach the other two canopy
supports.
4
Page 5

Lower Canopy
Upper Canopy
• Turn the upper canopy upside down.
• Fit the lower canopy onto the upper canopy, as shown.
• Insert the ten screws and tighten with a Phillips screwdriver.
Do not over-tighten.
Upper Canopy
Lower Canopy
Fisher-Price
®
Microwave
Upper Hole
Lower Hole
Lower Peg
Upper Peg
Front View
• Insert the upper peg on the oven door into the upper hole
in the oven.
• Slide the lower peg on the oven door into the lower hole
in the oven.
Front View
Triangular Shelf
• Turn the canopy upright so that the microwave oven
faces you.
• Fit the canopy onto the canopy supports, making sure
the microwave oven is over the triangular shelf.
• Push down on the canopy until it snaps into place.
Upper Peg
Upper Hole
Lower Hole
Lower Peg
Front View
• Insert the upper peg on the refrigerator door into the
upper hole in the refrigerator.
Front View
• Slide the lower peg on the refrigerator door into the lower
hole in the refrigerator.
5
Page 6

Label Decoration
1 23
54 6
879
Adding Accessories
C
0
• Place the telephone on the holder on the canopy.
• Hang the spatula, the slotted spoon, the flipper and the
ladle on the canopy hooks.
• Before using the cooking and eating utensils, hand
wash them in hot, soapy water.
B
Maintenance
• Periodically check the All-In-One Kitchen Center
for loose screws, and tighten as needed.
®
Fisher-Price
A
Questions? We’d like to hear from you!
D
Front View
Call Fisher-Price Consumer Affairs, toll-free at
1-800-432-KIDS, 8 AM - 6 PM EST Monday through
Friday. Hearing-impaired consumers using TTY/TDD
equipment, please call 1-800-382-7470. Or, write to:
Fisher-Price Consumer Affairs, 636 Girard Avenue,
East Aurora, New York 14052.
E
If you have any questions about this product:
In Canada, call 1-800-567-7724, or write to: Mattel/Fisher-Price, 6155
Freemont Blvd., Mississauga, Ontario L5R 3W2.
In Great Britain, telephone 01734 770488.
In Australia, call the Fisher-Price Australian Consumer Advisory
Service toll-free at 1-800-800-812, or write to: Fisher-Price, Mattel Pty.
Limited, 461 Plummer Street, Port Melbourne, Victoria 3207.
Back View
• Note where the label decorations should be applied, as
shown in the illustrations.
• Make sure the areas where the labels will be applied are
clean and dry.
• Apply the top corners of the label first and smooth
downward to remove air bubbles.
• For best adhesion, try to avoid applying the labels more
than once.
© 1996 Fisher-Price, Inc., East Aurora, New York 14052 72108 2 72108-0920
6
 Loading...