

Fisher & Paykel TITAN CG913 Series, JET CG602Q, JET CG602M, JET CG902Q, JET CG902M User Manual
Page 1

User guide
NZ & AU
Gas cooktop
JET: CG602Q, CG602M, CG902Q, CG902M
TITAN: CG913 Series
Page 2

Page 3

Contents
Introducing your cooktop 2
TITAN MODELS (CG913 Series)
Temperature control 3
Flame failure reignition system 4
Accessories 4
JET MODELS (CG602 & CG902 Series)
Temperature control 6
Flame failure safety feature 7
Accessories 8
Hints and tips 10
Troubleshooting 11
Care and cleaning 12
Safety and warnings 14
Warranty 16
Customer Care 17
Important!
SAVE THESE INSTRUCTIONS
1
Page 4

Introducing your cooktop
Now that your new cooktop is installed and ready to use, you will want to know everything
about it to ensure excellent results right from the start.
This booklet will introduce you to the features and special talents of your cooktop.
We recommend you read the whole book before you start using your cooktop, for the sake of
safety as well as success.
First use
Check that the cooktop is plugged in and the electricity switched on for the electronic ignition
to work.
Jet 9
(CG902 series)
1. Semi-rapid burner
2. Rapid burner
3. Fish burner
4. Wok burner
5. Auxiliary burner
6. Cooktop controls
Titan
(CG913 series)
Jet 6
(CG602 series)
1
1
1
5
4
4
3
5
2
2
6
6
1
1
4
5
6
2
Page 5
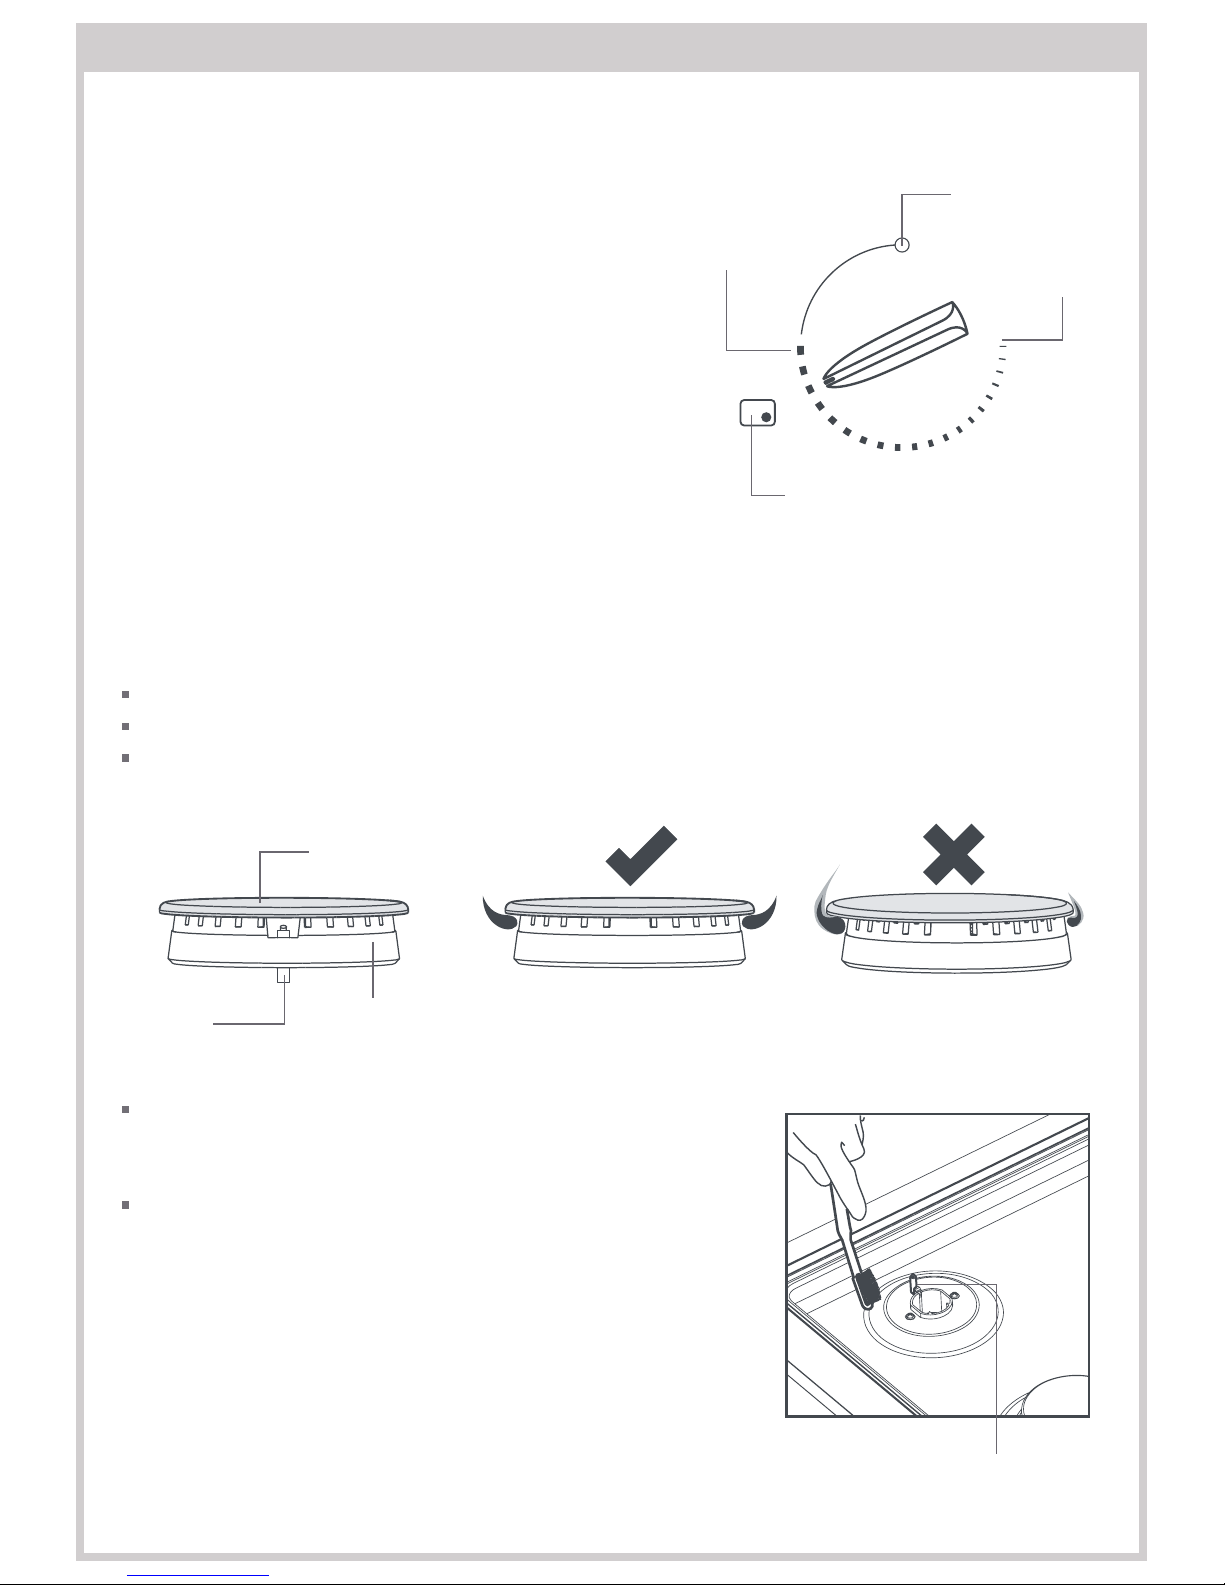
Temperature control
1
Choose the control knob for the burner you want to
use.
2
Press down gently and turn the knob anticlockwise to
the high position. You do not need to hold the knob
down.
3
All electrodes will spark until the selected burner
ignites.
Note: For the first burner selected there is a short
delay before the safety valve allows gas to flow to the
cooktop.
4
Adjust the flame anywhere between the High and
the Low positions. Do not adjust the flame between High and Off.
If the cooktop does not light
Check that the cooktop is plugged in and the power is switched on.
Check that the gas is turned on.
Check that the burner parts, including the burner cap, are positioned correctly.
Allow two seconds for the safety valve to open when igniting
the first burner.
A dirty or wet electrode will prevent the burner lighting
efficiently. Clean electrodes with a toothbrush and methylated
spirits.
TITAN MODELS (CG913 Series)
High
Low
Off
Burner
ON
light
Correct assembly Incorrect assembly
Electrode
Burner ring
Burner cap
Electrode
3
Page 6
Flame failure reignition system
In the event of the flame being accidentally blown out, the flame failure reignition system will
detect this, and the electrode will spark and relight the flame. If no flame is detected after about
five seconds, the gas supply to the appliance will be shut off and the burner ‘ON’ indicator light
will flash slowly. The burner must be turned OFF and restarted to resume cooking.
Power failure
In the event of a power failure, the gas supply will be cut off, even if a burner is in use. When the
power is restored and if the burner control knob is still in the ON position, the burner ‘ON’ light
will flash rapidly. The burner must be turned OFF and restarted to resume cooking.
Accessories
Using a wok
The pan support over the central ‘wok’ burner is shaped to fit a wok. Care should be taken when
using a large wok that other pots are not pushed sideways and become unstable or deflect heat
onto nearby walls.
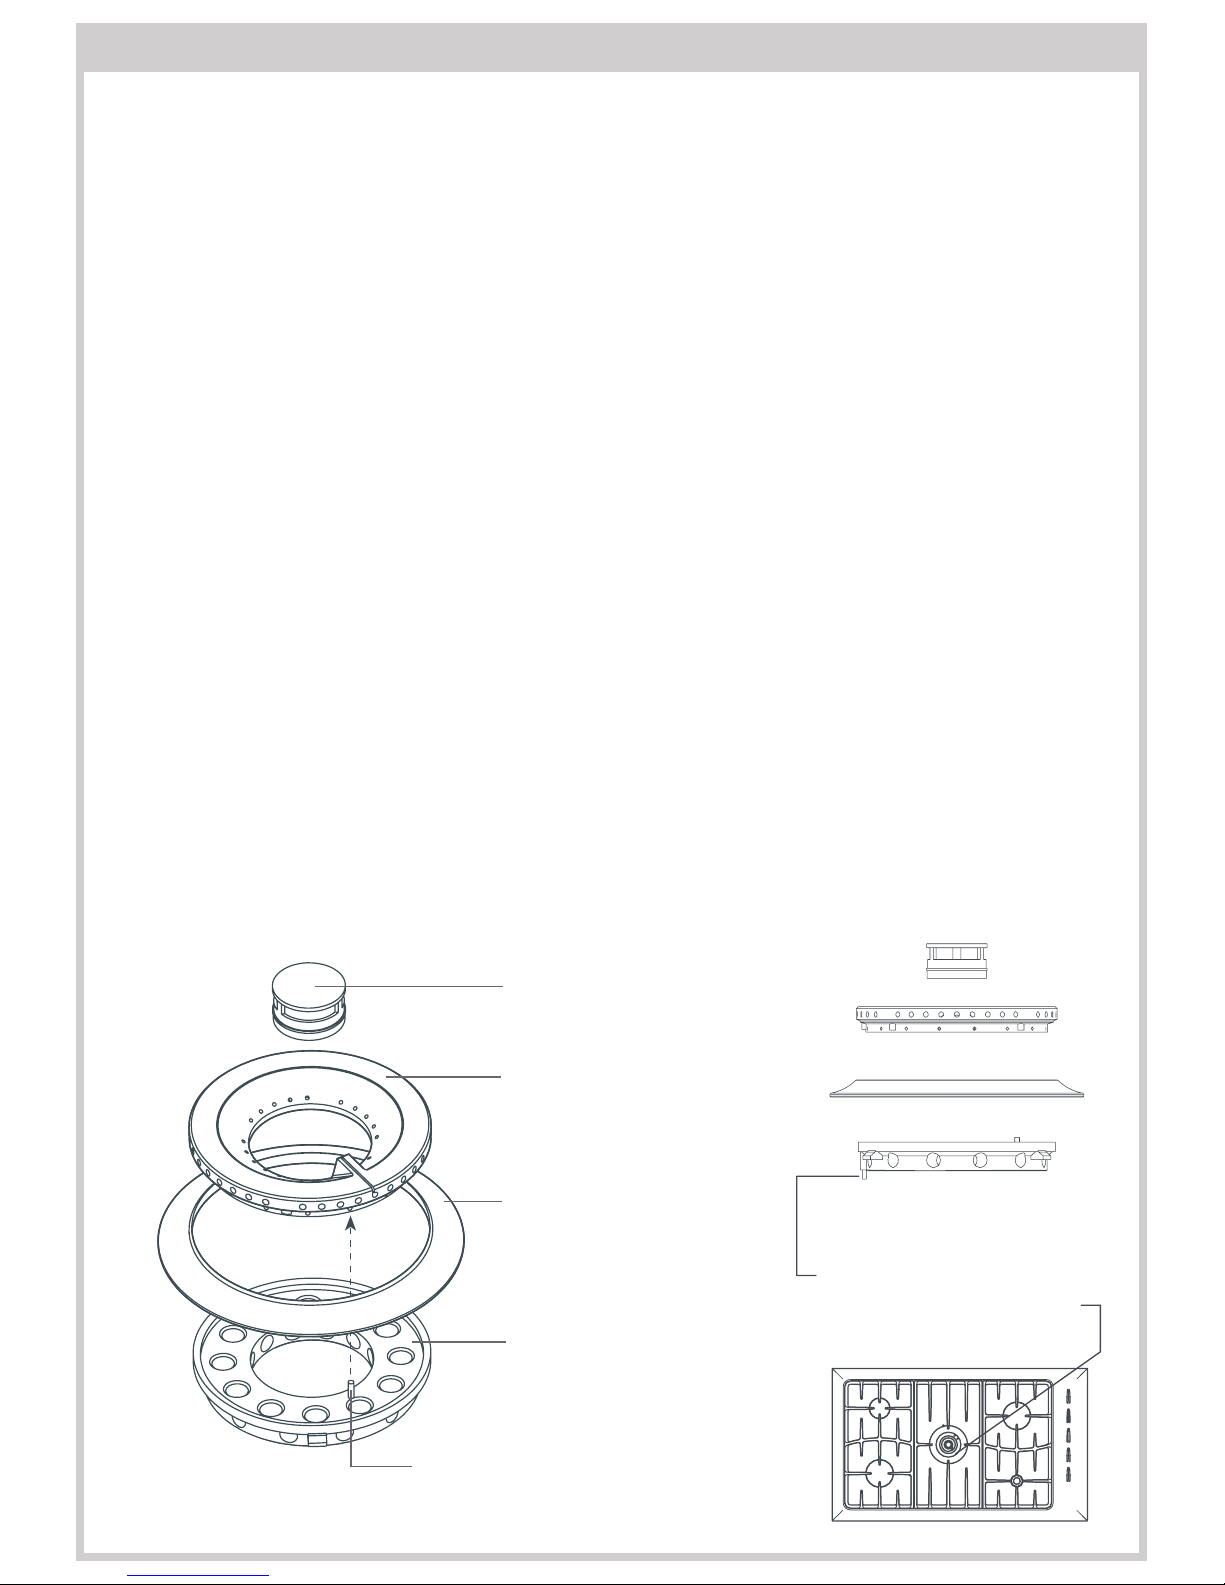
Re-assembling the wok burner (CG913TM Iridium models only)
Parts of your wok burner have locating pins to help you to assemble it correctly after cleaning.
Incorrect assembly can cause irregular flames and ignition problems. Refer to this diagram for
the correct order of assembly. Note: The brass parts of your wok burner will change colour with
use. This is normal and will not affect performance.
Rotate burner ring to align
locator pin with hole in burner
base.
Side view
TITAN MODELS (CG913 Series)
Inner cap
Burner cover (small holes)
Decorative ring
Burner ring with locator pins
(large holes)
Align and insert pin
4
Page 7

Repositioning the pan supports
The wok support goes in the centre over the wok burner. The other two pan supports are
interchangeable but need to be rotated to match the rounded corners of the hob top.
TITAN MODELS (CG913 Series)
Using the Simmermat
The Simmermat helps you control the temperature
of your cooking surface to ensure the long slow
simmering that is needed for successfully cooking
delicate foods. Use at low heat only. Always
remember it is for simmering and exposure to
extreme heat may distort it.
To use the Simmermat
1
First cook the food, or bring to the boil, over high heat.
2
Then reduce the heat and carefully place the Simmermat over the flame with the points facing
upwards. Put your saucepan on top of the points and simmer on the low flame setting.
WARNING!
Hot Surface Hazard
Always turn the burner off before moving
the Simmermat and handle the hot
Simmermat with tongs and/or pot holders
Failure to do so could result in burns and
scalds.
Rounded
corners
Correct pan support orientation
5
Page 8

Temperature control
1
Choose the control knob for the burner you want to
use.
2
Press down gently and turn the knob anticlockwise
to the high position. All electrodes will spark
until you release the knob. Hold down the knob for
approximately five seconds as releasing it too soon may
extinguish the flame.
3
Adjust the flame anywhere between the High and Low
positions. Do not adjust the flame between High and
Off.
If the cooktop does not light
Check that the cooktop is plugged in and the power is switched on.
Check that the gas is turned on.
Check that the burner parts, including the burner cap, are positioned correctly.
If the burner has not lit within 15 seconds, turn the control knob off and wait at least one minute
before trying again.
A dirty or wet electrode will prevent the burner lighting
efficiently. Clean electrodes with a toothbrush and
methylated spirits.
JET MODELS (CG602 & CG902 Series)
High
Low
Off
Correct assembly Incorrect assembly
Burner ring
Burner cap
Electrode
Thermocouple
6
Page 9

Flame failure safety feature
Some cooktops have a flame failure safety thermocouple fitted (see previous diagram).
When lighting the burner on flame failure models, hold the knob down for five seconds after the
burner has lit.
Releasing the burner knob too soon will extinguish the flame.
In the event of the burner flame being accidentally blown out, the flame failure safety device will
cut off the gas supply. Before relighting the burner, turn the knob off and wait one minute.
Power failure
In the event of a power failure, the burners can be lit by holding a match close to the side of the
burner and turning the control knob to the high flame position. Wait until the flame is burning
all the way around the burner cap before adjusting.
JET MODELS (CG602 & CG902 Series)
7
Page 10

JET MODELS (CG602 & CG902 Series)
Accessories
Using the skillet (CG902 series only)
Season your skillet before using for the first time.
See below.
Your skillet will offer you a quick, hot method of
cooking which is ideal for tender cuts of meat,
panini, chargrilled vegetables, pikelets and
pancakes.
Best results are obtained by placing the skillet over
the fish burner (CG902 series only).
Always use medium to high temperatures and heat
the skillet well before cooking on it. Oil the food
prior to cooking, not the skillet, to avoid splattering
and smoking.
Steaks - best turned only once about halfway through the cooking time. The skillet needs to
have reached a high temperature to sear the outside of the steak and prevent the meat stewing
in its own juices. Test if steaks are cooked by pressing with tongs, the less movement there is, the
more cooked the steak is. Don’t cut the steak to see if it is cooked, as this releases the juices and
dries the steak out.
Capsicums, eggplant, tomato halves & zucchini are some of the vegetables ideal for char grilling
on the ridged side of the skillet. Flat breads and polenta are wonderful when cooked on the flat
side.
Seasoning the skillet
Your new skillet comes with a finish which is intended to burn off with seasoning. The seasoning
process will naturally blacken the skillet.
To season - first wash your skillet thoroughly in warm water with detergent. Use a scouring pad
to remove any residue that might be on the skillet. Rinse thoroughly and dry. Drying may be
helped by warming the skillet on a burner.
Coat the skillet, including handles, liberally with vegetable oil and place in an oven at 150 °C for
one hour. Remove from the oven and allow to cool. Wipe excess oil from the skillet with a paper
towel.
Cleaning the skillet
Place in hot water with a small amount of detergent while still warm. If there is food residue
left on the skillet, scrub with a wire barbeque brush to remove it. Make sure that the skillet is
completely dry before storing.
8
Page 11

Using a wok
When using any wok, make sure it does not
push any other pots and pans aside. This
could make them unstable, or deflect heat
onto nearby walls or the benchtop.
Only use the circular wok ring supplied with your
Jet cooktop for wok cooking.
Coffee pot support
For the simmer and semi-rapid burners, pots should be larger than 12 cm in diameter (smaller
pots can be used with the coffee pot support). The coffee pot support allows small items to be
placed on burners. Do not leave the coffee pot
on the pan support when not in use as this may cause
damage to the pan support.
Fish kettle (not supplied)
A fish kettle on the fish burner is useful for poaching
fish and steaming long vegetables like cobs of corn,
Chinese broccoli, long beans and asparagus.
Repositioning the pan supports
The pan support above the wok burner is higher
than those above the other burners. Replace the
pan supports correctly after cleaning.
Correct pan support position
JET MODELS (CG602 & CG902 Series)
Wok ring
Wok on raised
area of pan
support
Coffee pot support
Raised area above wok burner
9
Page 12

Hints and tips
To get the best out of your cooktop follow these simple suggestions.
Do not use an asbestos mat between the flame and the saucepan as this may cause serious
damage to your cooktop.
Never use plastic or aluminium foil dishes on the burners.
Saucepans should have thick flat bottoms. Food in a saucepan with an uneven bottom will take
longer to cook. Very heavy saucepans may bend the pan support or deflect the flame.
Match the bottom of your saucepans with the cooking zone of the burner and always make sure
they are stable. This will give you the most efficient cooking. Do not let large saucepans or frying
pans overlap the bench as this can deflect heat onto the benchtop and damage the surface.
When you need to boil, simmer or fry food, first set the temperature to the high position.
Once the food is boiling, reduce the temperature to maintain a steady heat to cook your food
thoroughly. Doing this will reduce cooking time.
10
Page 13

Troubleshooting
Problem Possible solutions
My cooktop does not
light
Check the cooktop is plugged in and the power is switched
on.
The gas electrodes may be dirty. These can be easily cleaned
with a toothbrush and methylated spirits.
The burner parts may not be located properly. Check the
assembly and make sure the burner cap is sitting flat.
Check the gas supply valve is turned on and the supply to
the house is working. Gas should be heard when you turn a
burner on.
My burner flames are
yellow/slow to start
The burner parts may not be located properly. Check the
assembly and make sure the burner cap is sitting flat.
If you use bottled gas this may indicate you are getting near
the end of the bottle.
Check the burner parts are not blocked with water.
The gas pressure may not be at the correct level. Check with
your service person/installer.
One of my burners
has an uneven flame
Check the burner parts are clean and dry. Check the assembly
and make sure the burner cap is sitting flat.
My cooktop goes
out when I let go of
the knob (Jet models
CG602 & CG902 only)
Your cooktop has a safety feature called ‘flame failure’. When
lighting a burner, you need to hold down the knob for five
seconds.
The flame goes out at
low settings
The gas supply pressure may be low. Check with your service
person/installer.
The low setting may have been adjusted incorrectly. Check
with your service person/installer.
11
Page 14

Care and cleaning
Clean regulary – do not let stains become burnt on.
Use soapy water and a soft sponge or cloth (use the mildest cleaner that will do the job).
Rinse with clean water to ensure no cleaner residue is left (when heated this can stain the cooktop).
Dry thoroughly to avoid leaving water marks.
Clean brushed stainless steel in the direction of the grain.
Soak stubborn stains under a soapy cloth.
Pan supports etc. are dishwasher safe. For stubborn stains, see the following chart.
Do not clean cooktop parts in a self-cleaning oven.
Do not use a steam cleaner.
After cleaning, replace the parts correctly in the cooktop.
Important!
The cleaners in the following table indicate cleaner types only and are not endorsements. Use all
products according to directions on the package.
WARNING!
Hot Surface Hazard
Before cleaning, be certain the burners
are turned off and the whole cooktop
is cool.
Failure to do so could result in burns and
12
Page 15

Cooktop part Cleaning Important
Pan supports,
burner caps &
Simmermat
Enamel finish
Hot soapy water and nylon scourer.
Soaking in a solution of biological
clothes washing detergent eg
Drive®
Mild abrasive cleansers eg Jif®
Fume free oven cleaner eg Mr
Muscle®
Heavy duty oven cleaner eg Mr
Muscle®
Always allow cooktop parts to
cool completely before cleaning
them.
Remove spills as soon as the
burner caps are cool to avoid
the soil becoming burnt on.
Burner parts
Hot soapy water.
To clear the holes use a stiff nylon
brush or wire eg straight ended
paper clip.
Mild abrasive cleansers eg Jif®
Reassemble the burner parts
correctly.
Brass wok burner
(Titan CG913 series
only)
Brass cleaner eg Brasso®, Brass Brite® Brass naturally darkens with
heating. The wok burner parts
can be polished back to their
original bright colour but results
will be temporary.
Control knobs
Hot soapy water and a soft cloth
Mild abrasive cleansers eg Jif®
Always apply minimal pressure
with abrasive cleaners.
Stainless steel
exterior
Brushed and
iridium
Soak stains under a hot soapy cloth,
rinse and dry thoroughly
Hard water spots can be removed
with household white vinegar.
Non abrasive stainless steel cleaner
eg Hillmark steelkleen stainless steel
cleaner & polish. Regular use of a
stainless steel polish will reduce
fingerprints and other marks.
Heavy soiling can be removed with
oven cleaner eg Mr Muscle® fume
free or
Mr Muscle® heavy duty.
Never use harsh/abrasive
cleaning agents as they will
damage the stainless steel
finish.
Chlorine or chlorine compounds
in some cleaners are corrosive to
stainless steel and may damage
the appearance of your cooktop.
Check the label on the cleaner
before using.
The graphics are etched onto
the steel by laser and will not
rub off.
Electrodes
Toothbrush and methylated spirits.
A dirty or wet electrode will
prevent the burner lighting
efficiently.
Care and cleaning
13
Page 16

Safety and warnings
WARNING!
Hot Surface Hazard
This appliance becomes hot during use.
Care should be taken to avoid touching cooktop components, burners, pan
supports and stainless steel base.
WARNING!
Household appliances are not intended to be played with by children. Children, or
persons with a disability which limits their ability to use the appliance, should have a
responsible person to instruct them in its use. The instructor should be satisfied that
they can use the appliance without danger to themselves or their surroundings.
WARNING!
This appliance should be connected to a circuit that incorporates an isolating switch
providing full disconnection from the power supply.
WARNING!
Do not stand or place heavy objects on this appliance.
Do not use an asbestos mat between the flame and the saucepan as this may cause
serious damage to your cooktop.
Do not place aluminium foil or plastic dishes on the cooktop burners.
Do not let large saucepans or frying pans overlap the bench as this can deflect heat
onto your benchtop and damage the surface.
Do not spray aerosols in the vicinity of this cooktop while it is in operation.
Do not place aerosol containers near or on the cooktop.
Do not use a steam cleaner for cleaning this cooktop.
WARNING!
Handles of saucepans may be hot to touch. Ensure saucepans handles do not
overhang other gas burners that are on. Keep handles out of reach of children.
14
Page 17

Electrical supply cord
If the electrical supply cord is damaged, it must only be replaced by an authorised person.
Ensure that the electrical connection plug is accessible after installation.
Marine craft & caravan installation
Where this appliance is installed in marine craft or in a caravan, it shall not be used as a space
heater.
Ventilation
The use of a gas cooking appliance results in the production of heat and moisture in the room in
which it is installed. Ensure the kitchen is well ventilated. Keep natural ventilation holes open or
install a mechanical ventilation device (rangehood).
Prolonged intensive use of the appliance may call for additional ventilation, for example opening
of a window, or more effective ventilation, for example increasing the level of mechanical
ventilation where present.
Abnormal operation
Abnormal operation which requires the appliance to be serviced include such things as:
Very yellow flame tips
Objectionable odours
The burner flames appearing to lift off the burners
15
Page 18

Warranty
When you purchase any new Fisher & Paykel whiteware product you automatically receive a two
year Manufacturer’s Warranty covering parts and labour for servicing.
Fisher & Paykel undertakes to
Repair or, at its option, replace without cost to the owner either for material or labour any part of
the product, the serial number of which appears on the product, which is found to be defective
within TWO YEARS of the date of purchase.
This warranty does not cover
A. Service calls that are not related to any defect in the product. The cost of a service call will be
charged if the problem is not found to be a product fault. For example:
1. Correct the installation of the product.
2. Instruct you how to use the product.
3. Replace house fuses or correct house wiring or plumbing.
4. Correcting fault(s) caused by the user.
B. Defects caused by factors other than:
1. Normal domestic use or
2. Use in accordance with the product’s user guide.
C. Defects to the product caused by accident, neglect, misuse or act of god.
D. The cost of repairs carried out by non-authorised repairers or the cost of correcting such
unauthorised repairs.
E. Normal recommended maintenance as set out in the product’s user guide.
F. Repairs when the appliance has been dismantled, repaired or serviced by other than a
fisher & paykel authorised customer service centre or the selling dealer.
G. Pick up and delivery.
H. Transportation or travelling costs involved in the repair when the product is installed outside
the fisher & paykel authorised customer service centre’s normal service area.
Service under this manufacturer’s warranty must be provided by an authorised service centre.
Please refer to the customer care section for contact details. Such service shall be provided
during normal business hours. This warranty certificate should be shown when making any
claim.
Note: this warranty is an extra benefit and does not affect your legal rights.
Please save these instructions.
Do not return to Fisher & Paykel.
16
Page 19

Customer Care
Check the things you can do yourself. Refer to your
user guide and check:
1
Your appliance is correctly installed
2
You are familiar with its normal operation
If after checking these points you still need assistance please refer to the following:
In New Zealand
If you need assistance...*
Call your Fisher & Paykel retailer who is trained to provide information on your appliance, or if
we can be of any further help, please contact our Customer Care Centre,
Toll Free - 0800 FP CARE or 0800 37 2273 Fax: (09) 273 0656.
Email: customer.care@fp.co.nz Postal address: P.O.Box 58732, Greenmount,
Auckland.
If you need service...*
Fisher & Paykel has a network of independent Fisher & Paykel Authorised Service Centres
whose fully trained technicians can carry out any service necessary on your appliance. Your
dealer or our Customer Care Centre can recommend an Authorised Service Centre in your area.
In Australia
If you need assistance...*
Call the Fisher & Paykel Customer Care Centre and talk to one of our Customer Care
Consultants.
Toll Free - 1300 650 590 Fax: (07) 3826 9298
Email: customer.care@fp.com.au Postal Address: PO Box 798, Cleveland QLD 4163
If you need service...*
Fisher & Paykel Australia Pty Ltd has a network of independent Fisher & Paykel Authorised
Service Centres whose fully trained technicians can carry out any service necessary on your
appliance. Our Customer Care Centre can recommend an Authorised Service Centre in your
area.
*If you call or write, please provide: name, address, model number, serial number, date of
purchase and a description of the problem. This information is needed in order to better
respond to your request for assistance.
Product details
Fisher & Paykel Ltd
Model Serial no.
Date of Purchase Purchaser
Dealer Suburb
Town Country
www.fisherpaykel.com
17
Page 20

Notes
18
Page 21

Page 22

Copyright © Fisher & Paykel 2005. All rights reserved.
The product specifications in this booklet apply to
the specific products and models described at the
date of issue. Under our policy of continuous product
improvement, these specifications may change at any
time. You should therefore check with your Dealer to
ensure this booklet correctly describes the product
currently available.
www.fisherpaykel.com
NZ AU
Gas cooktop user guide
Published: 05/2005
Part No. 599256 B
 Loading...