

Page 1

PROFESSIONAL FREESTANDING COOKER
RIV-915
USER GUIDE
NZ AU
Page 2

Page 3

CONTENTS
Introduction 4
Safety and warnings 5
Before you begin 11
First use 12
Using the oven light 19
Using the kitchen timer 20
Changing the time 22
Locking the control panel 23
Unlocking the control panel 24
Cooking options 25
Delayed Cook 26
Auto Off 27
Food probe 28
Guided cooking 31
Cooking guide 33
Induction cookware 39
Cooktop use 40
Locking the cooktop controls 43
SmartZones 44
PowerBoost 45
Auto RapidHeat 47
Heat settings 49
User preference settings 50
WiFi connection and remote mode 52
Sabbath Mode 54
Care and cleaning 56
Using Self Clean 64
Troubleshooting 67
Alert codes 73
Warranty and service 74
3
Page 4
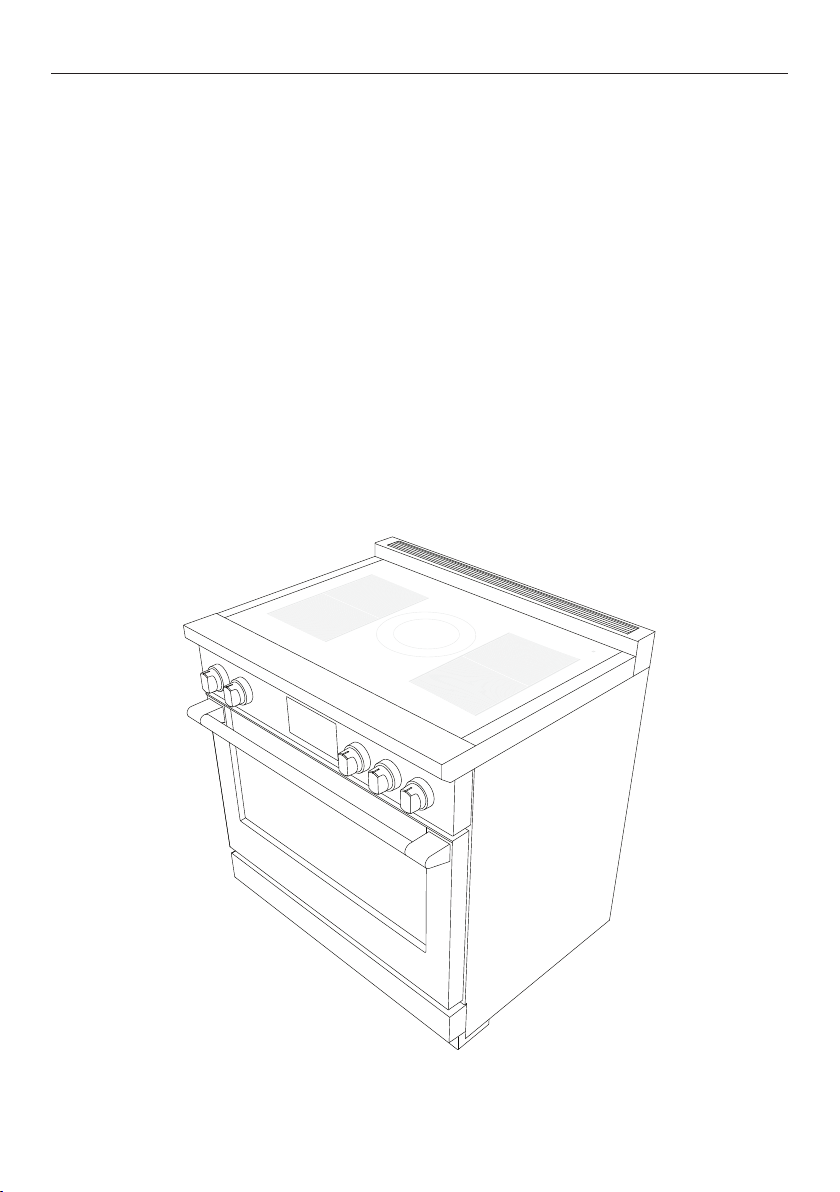
INTRODUCTION
We hope you’re excited to start cooking with your new Fisher & Paykel professional
freestanding cooker. It’s loaded with our latest cooking technology to ensure you perfect
results for every dish, with a number of features designed for your safety and convenience.
COOK WITH CONFIDENCE With its high resolution touchscreen, this oven offers intuitive
guided cooking experiences - from tips on manual cooking to a fully automated journey
through preset recipes - to deliver the best results for chefs at all skill levels.
PYROLYTIC SELF-CLEAN Pyrolytic self-clean breaks down food residue at a very high
temperature, leaving a light ash that’s easily removed with a damp cloth.
Register your product online. It’ll help us give you the best service possible, and we’ll also
let you know when we have special offers or promotions running. Go to fisherpaykel.com/
register now.
4
Page 5
SAFETY AND WARNINGS
!
WARNING !
Electric Shock Hazard
Failure to follow this advice may result in
electric shock or death.
• Turn the oven off at the wall before replacing
the oven lamp.
!
WARNING!
Fire Hazard
Failure to follow this advice may result in
overheating, burning, and injury.
• Carefully follow the instructions for starting a
Self Clean cycle.
• Do not place combustible materials (for
example: wood, fabric, plastic) in the oven
during a self clean cycle.
• Do not place aluminium foil, dishes, trays, water
or ice on the oven floor during cooking, this will
irreversibly damage the enamel. Lining the oven
with aluminium foil may cause fire.
• Never use your appliance for warming or
heating the room. Persons could be burned or
injured or a fire could start.
• Flammable materials should not be stored in an
oven or near its surface.
!
WARNING!
Cut Hazard
Failure to use caution could result in injury.
• Take care: some edges are sharp.
5
Page 6
SAFETY AND WARNINGS
!
WARNING!
Hot Surface Hazard
Failure to follow this advice could result in
burns and scalds.
• To avoid burns and scalds, keep children away
from this appliance.
• Surfaces of the appliance may become hot
enough to cause burns. Examples include the
oven vent, the surface near the oven vent, and
the oven door.
• Do not touch heating elements or interior
surfaces of the oven. Heating elements may be
hot, even when they are dark in colour.
• Use protection when handling hot surfaces, such
as oven shelves or dishes.
• Be careful when opening the oven door. Let
hot air or steam escape before removing or
replacing food.
• During and after use, do not touch or let
clothing or other flammable materials contact
heating elements or interior surfaces of the oven
until they have had sufficient time to cool.
!
WARNING!
Tipping Hazard
Failure to use caution could result in death or
serious burns in adults and children.
• Cooker must be secured by a correctly installed
anti-tip bracket. See installation guide for details.
• Ensure the anti-tip bracket is re-engaged when
the freestanding cooker is moved. Do not use the
appliance until it has been secured.
6
Page 7
SAFETY AND WARNINGS
!
WARNING!
Explosion Hazard
Failure to follow this advice may result in
injury or death.
• If you smell gas, do not use the appliance. Open
a window or door to let the gas escape, then
follow the guidance on the inside front cover of
this manual.
• Do not use water on grease fires. A violent
steam explosion may result.
• Turn all burners off, then smother fire or flame
or use dry chemical or foam-type extinguisher.
• Do not heat unopened food containters such as
cans – Build-up of pressure may cause container
to burst
!
WARNING!
Poisoning Hazard
Failure to follow this advice may result in
carbon monoxide poisoning or overheating.
• Never use material such as aluminium foil to
cover an entire rack or the oven floor. Doing so
block airflow through the oven.
• Clean the appliance with caution. Some
cleaners can produce noxious fumes if applied
to a hot surface. Follow the directions of the
cleaner manufacturer.
• Never use this appliance as a space heater to
heat or warm the room.
7
Page 8

SAFETY AND WARNINGS
WARNING !
To reduce the risk of fire, electrical shock, injury to persons or damage when using the
oven, follow the important safety instructions listed below. Read all the instructions
before using the oven. Use the oven only for its intended purpose as described in
these instructions.
Installation
z
Ensure your appliance is properly installed and earthed by a qualified technician.
z
Ensure this oven is connected to a circuit which incorporates an isolating switch
providing full disconnection from the power supply.
z
Do not install or operate the appliance if it is damaged or not working properly. If you
receive a damaged product, contact your dealer or installer immediately.
z
Verify the anti-tip device has been correctly installed and engaged. see installation
guide for details.
z
Ensure the anti-tip device is re-engaged when the freestanding cooker is moved.
z
Do not operate the freestanding cooker without the anti-tip device engaged.
Servicing
z
Do not repair or replace any part of the appliance unless specifically recommended in
the user guide. All other servicing should be undertaken be a Fisher & Paykel trained
and supported service technician or qualified person.
Fire Hazard
z
Do not use water on grease fires. Smother the fire or flame or use a dry chemical or
foam type extinguisher.
z
Use only dry oven mitts or potholders. Moist or damp potholders on hot surfaces could
result in burns from steam. Do not let potholders touch hot areas or heating elements.
Do not use a towel or a bulky cloth for a potholder. It could catch fire.
z
Do not heat unopened food containers. They can build up pressure that may cause the
container to burst and result in injury.
Food Safety
z
Leave food in the oven for as short a time as possible before and after cooking. This is
to avoid contamination by organisms which may cause food poisoning. Take particular
care during warm weather.
General Use
z
Household appliances are not intended to be played with by children.
z
Children should not be left alone or unattended in the area where the appliance is in
use. They should never be allowed to sit or stand on any part of the appliance.
z
Children of less than 8 years old must be kept away from the appliance unless
continuously supervised.
z
This appliance can be used by children aged from 8 years and above, and persons with
reduced physical, sensory or mental capabilities or lack of experience and knowledge,
if they have been given supervision or instruction concerning the use of the appliance
in a safe way and they understand the hazards involved. Cleaning and user maintenance
shall not be carried out by children without supervision.
z
Caution: do not store items of interest to children in cabinets above the freestanding
cooker or on the backguard of the freestanding cooker. Children climbing to reach
items could be seriously injured.
8
Page 9

SAFETY AND WARNINGS
z
Do not place heavy objects on the oven door.
z
Always keep oven vents unobstructed.
z
This appliance is configurable to allow remote operation at any time, however the
induction hobs are not intended to be operated by means of an external timer or
separate remote-control system. Do not store flammable or temperature sensitive items
inside, on top of, or near the appliance.
z
Do not wear loose fitting or hanging garments when using the appliance. They could
ignite or melt if they touch an element or hot surface and you could be burned.
z
Do not change or modify the wireless communication device in any way. Changes or
modifications not expressly approved by Fisher & Paykel could void the user’s authority
to operate the equipment.
z
Caution: Hot air can blow from the vent at the top of the oven as part of the oven’s
cooling system.
z
Always position shelves in the desired location while the oven is cool (before
preheating). If a shelf must be removed while the oven is hot, do not let the oven mitts
or potholder contact hot heating elements in the oven or the base of the oven.
z
Use only bakeware approved for oven use. Follow the bakeware manufacturer’s guides.
z
Only certain types of glass, glass/ceramic, earthenware or other glazed utensils
are suitable for freestanding cooker-top service without breaking due to sudden
temperature changes.
z
This appliance is equipped with one or more surface units of different size. Select
utensils with flat bases large enough to cover the heating element. The use of
undersized utensils will expose a portion of the heating element to direct contact and
may result in ignition of clothing.
z
Ensure flow of combustion and ventilation is unobstructed.
z
Do not use the oven for storage.
z
Do not cook on broken cooktop - If cooktop should break, cleaning solutions and
spillovers may penetrate the broken cooktop and create a risk of electric shock.
Contact qualified electrician immediately.
z
Do not place metalic objects such as knives, forks, spoons and lids on the cooktop
surface as they can get hot
z
Never leave surface units unattended at a high heat setting. Boilover causes smoking
and greasy spillover that may ignite.
z
Utensil handles should be turned inward and not extend over adjacent surface
z
Use only the temperature food probe supplied with this oven.
z
After use, switch off the element with the control dial. Do not rely on the pan detector
to turn off elements.
9
Page 10

SAFETY AND WARNINGS
Cleaning and maintenance
z
Do not clean the oven seal or use any oven-cleaning products on it. It is essential for a
good seal, which ensures that the oven operates efficiently. Care should be taken not to
rub, damage or move the oven seal.
z
Do not use oven cleaners, harsh/abrasive cleaning agents, waxes, or polishes. No
commercial oven cleaner, oven liner, or protective coating of any kind should be used in
or around any part of the oven.
z
Do not use harsh/abrasive cleaners, scourers or sharp metal scrapers to clean the oven
door glass since they scratch the surface, which may result in the glass shattering.
z
Clean only the parts listed in this manual.
z
Do not use a steam cleaner to clean any part of the oven.
z
Keep appliance area clear and free from combustible materials.
z
Clean cooktop with caution - if wet sponge or cloth is used to wipe spills on a hot
cooking area, be careful to avoid steam burns. Some cleaners may produce noxious
fumes if applied to a hot surface.
Self Cleaning
z
Spillages must be removed before starting a Self Clean cycle.
z
Before starting a Self Clean cycle, remove oven shelves and all other cookware/utensils,
and wipe up large food spills or grease deposits.
z
Before starting a Self Clean cycle, ensure you move any pet birds to another, closed
and well ventilated room. Some pet birds are extremely sensitive to the fumes given off
during Self Clean and may die if left in the same room as the oven during a cycle.
z
During a Self Clean cycle, the oven reaches higher temperatures than it does for
cooking. Under such conditions, the surfaces may get hotter than usual and children
should be kept away.
10
Page 11
BEFORE YOU BEGIN
IMPORTANT!
Do not block the vents of the oven or the oven door with cookware, utensils or towels.
During cleaning, take care not to let any liquids run down these vents.
z
Ensure that the anti-tip bracket at the right rear of the freestanding cooker has been
correctly installed.
z
Read this guide, taking special note of the 'Safety and warnings' section.
z
Remove all packaging from the oven and cooktop. Recycle items that you can.
z
Remove any adhesive residue using dishwashing liquid on a soft cloth — Do not use any
harsh or abrasive cleaners.
z
Condition the oven, using the instructions under ‘First Use’.
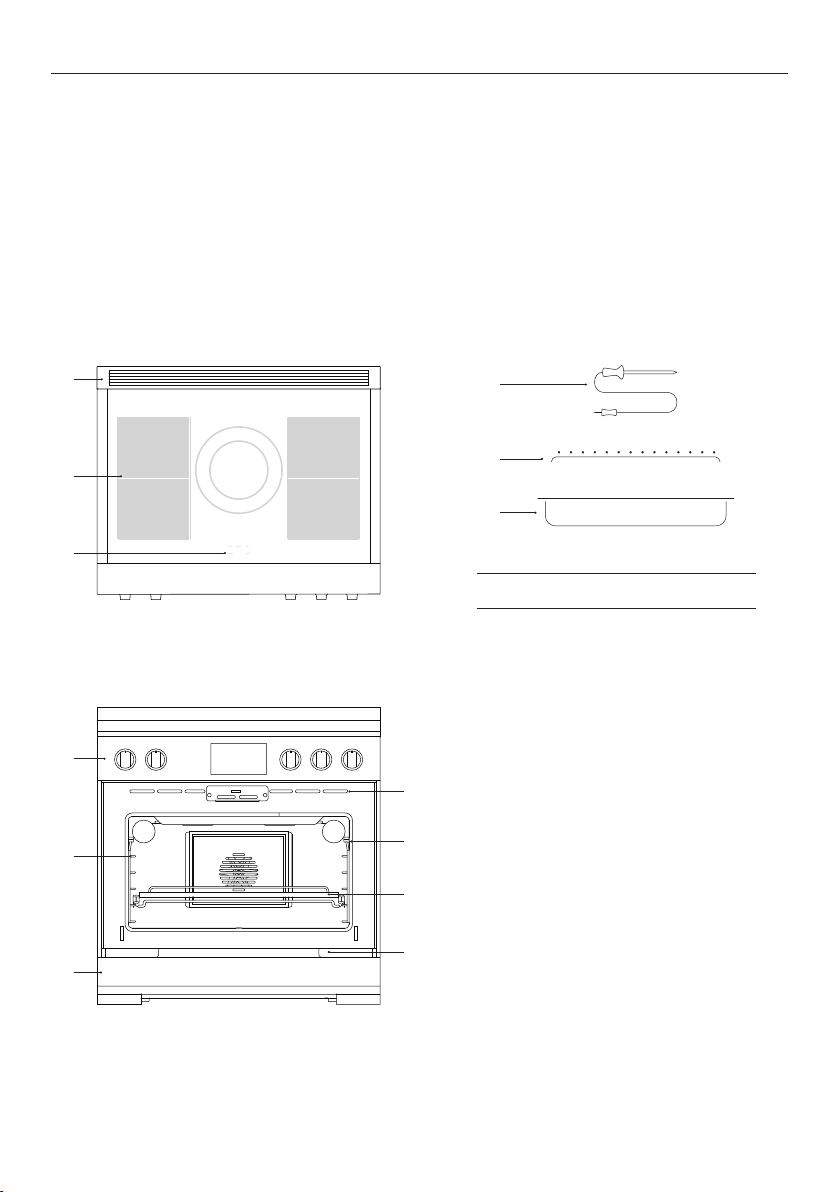
RIV3-915 model illustrated
1
2
3
4
7
!0
5
6
8
9
!1
!2
!3
Oven features and accessories
1 Back trim
2 Induction zones
3 Zone indicators
4 Control panel
5 Oven vent louvres
6 Oven seal
7 Side rack
8 Full extension sliding shelf
9 Serial label
!0 Toe kick
!1 Food probe
!2 Grill rack
!3 Grill pan
11
Page 12
FIRST USE
Replace shelving in your preferred positions
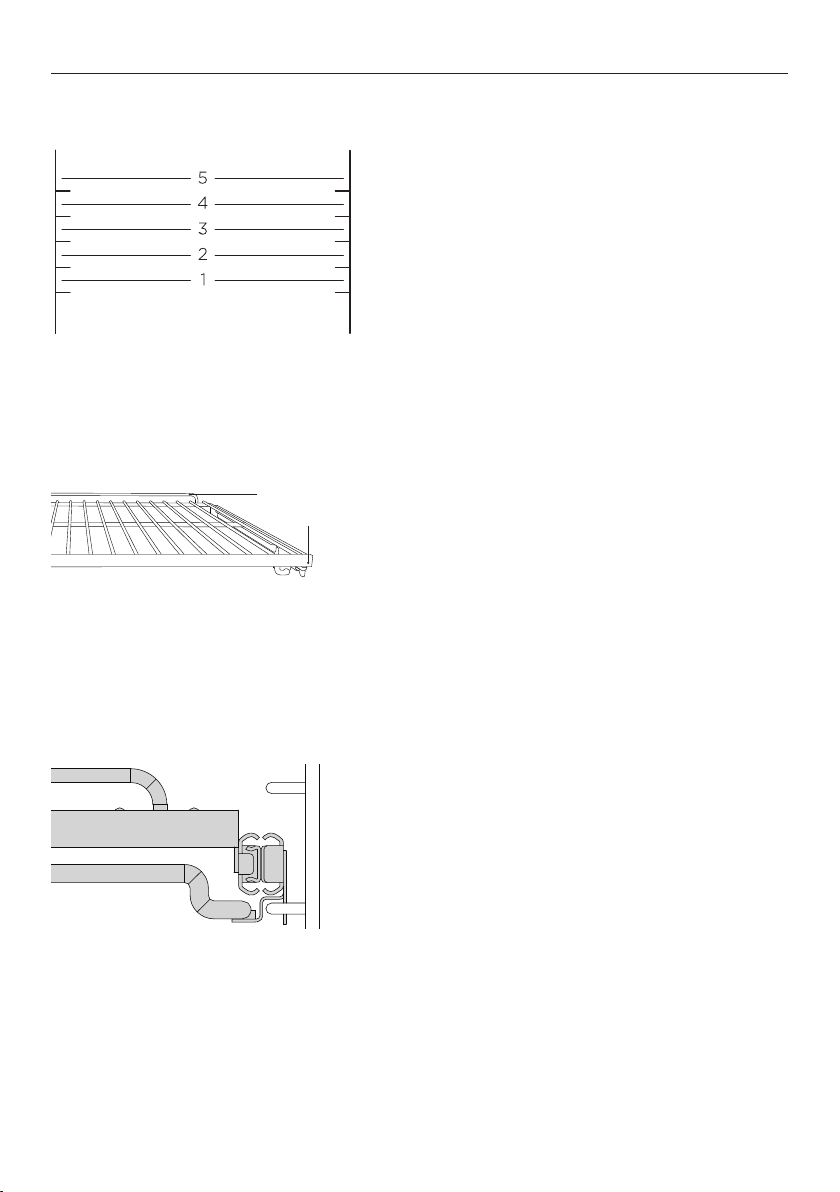
Shelf positions
Always position the oven shelves before
turning the oven on. Remove any unused
shelves and baking utensils from the oven.
For advice on which shelf position to use,
see the 'Cooking guide' on page 33.
Replacing the shelves
1 Grip the shelf at the front (ensuring you
Guard rail
Front bar
2 Ensure the shelf is level and facing the
3 Place the shelf on top of the side racks
4 Push the shelf all the way into the oven,
are holding the wire shelf and the sliding
frame together).
right way with the guard rail at the back.
at the desired height, hooking the rear
tags over the side racks on both sides.
making sure the front tags are also
securely hooked over the side racks.
Ensure sliding shelves are positioned
on top of the side rack wires instead of
between them.
The wire shelves and slides are built together
as one unit. When positioned correctly, the
slides will prevent the wire shelves from
tilting when pulled forward.
12
Page 13
10:45
COOK BY
FUNCTION
COOK BY
FOOD TYPE
COOK BY
RECIPE
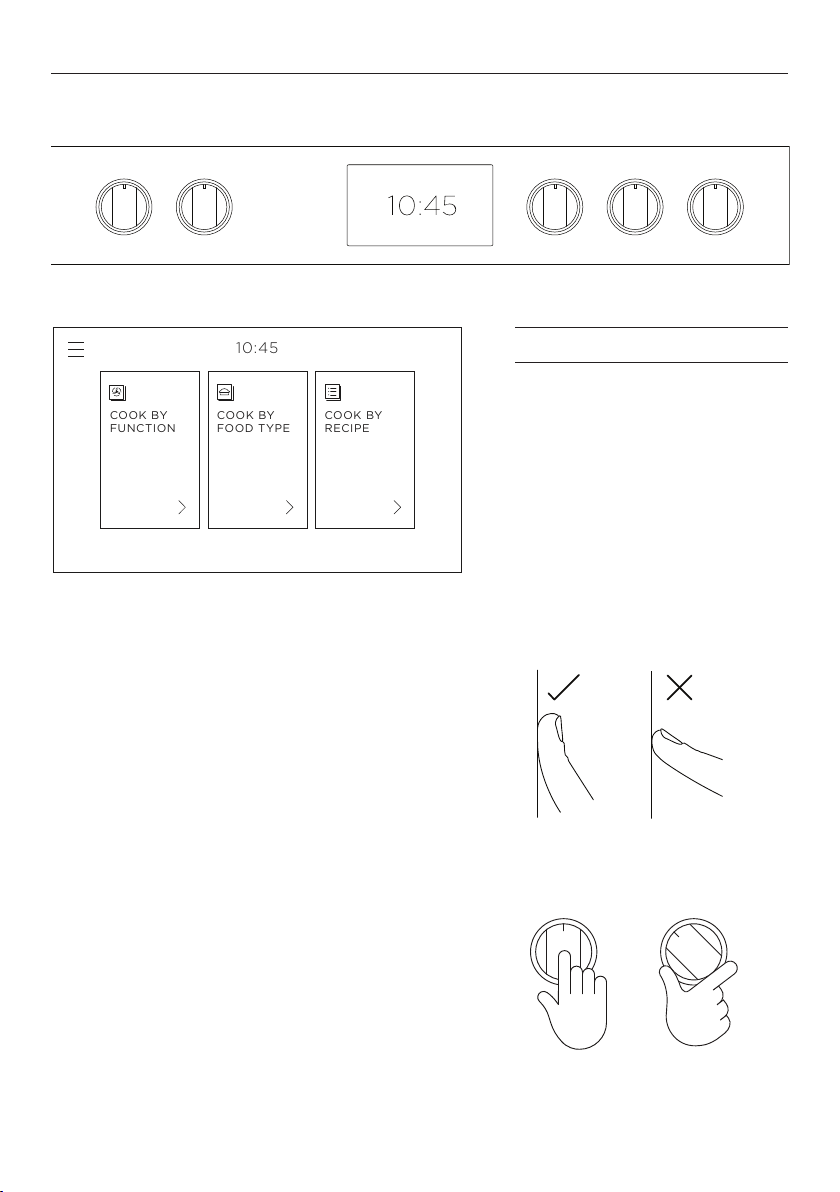
Control panel
FIRST USE
1
2
3
4
5 66
Touch screen display
Your oven is operated using an intuitive touch
screen display. Use the screen to navigate cooking
functions, guided cooking features and settings.
Using the touch controls
Use the ball of your finger, not its tip. The controls
respond to touch, so pressure is not needed.
Using the control dials
To use the control dials, push in and turn clockwise
to the desired heat setting.
Control panel features
1 Touch screen display
2 Control dials
3 Menu
4 Clock
5 Oven functions
6 Guided cooking features
Dial halos
When a dial is in use, a red halo will illuminate. This
halo will change from red to white if the dial is
turned to
OFF but another dial remains active. If all
dials are turned to OFF, all halos will dim.
13
Page 14
FIRST USE
CLOCK FORMAT
24 HOUR
12 HOUR
OFF
CONFIRM
CLOCK FORMAT
24 HOUR
12 HOUR
OFF
CONFIRM
1
11
26
24
:
pm
am
SET CLOCK
CONFIRM
CLOCK FORMAT
24 HOUR
12 HOUR
OFF
CONFIRM
1
11
26
24
:
pm
am
SET CLOCK
CONFIRM
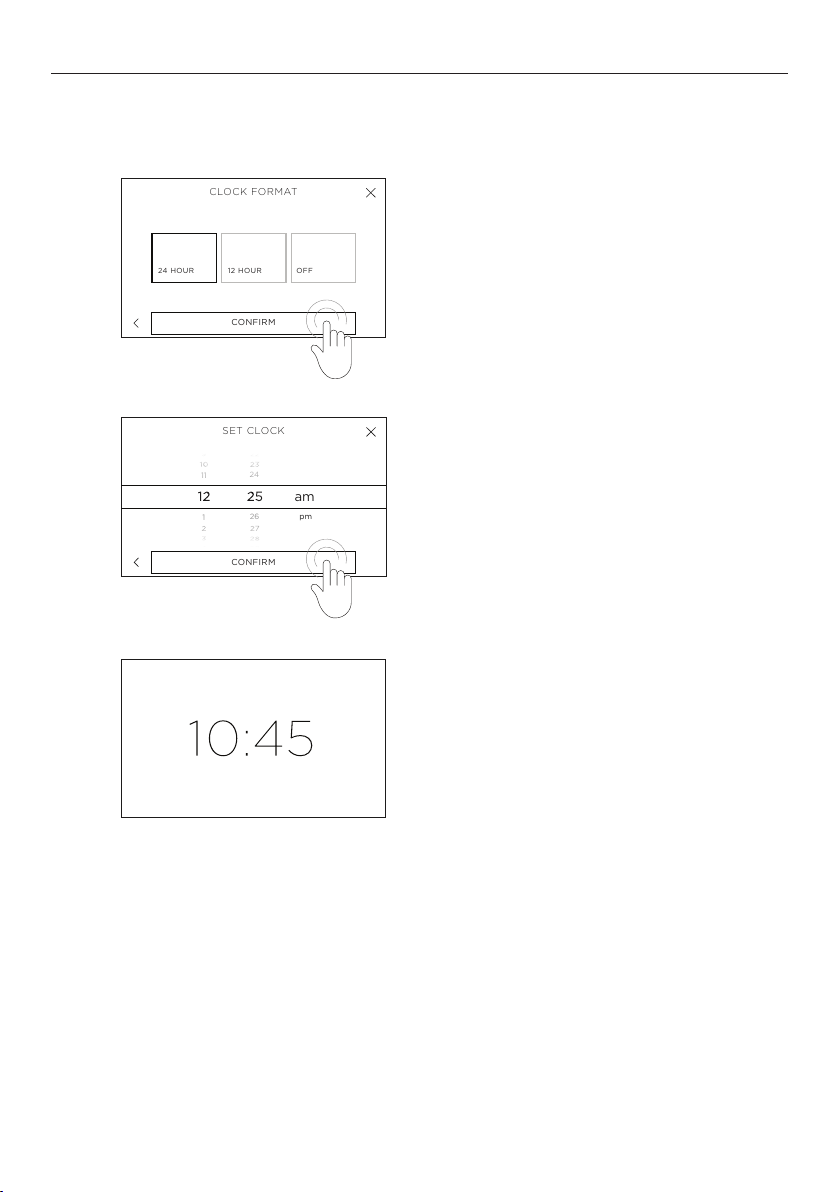
Setting the clock
You’ll need to set the time on your oven when it is first turned on, or after a power cut.
Set the clock format. Choose
1
between 24 HOUR, 12 HOUR or OFF
then select CONFIRM.
2
3
Scroll to set the correct time then
select
CONFIRM.
The time is now set and will show on
the screen.
14
Page 15
FIRST USE
FUNCTIONS
BAKE
TRUE
CONVECTION
MAXI
GRILL
CONVECTION
GRILL
Everyday cooking
Multi-shelf cooking
Crisping and
browning
Reduced moisture
cooking
175
o
C
OPTIONS
STA RT
10:45
BAKE
175
o
C
Heat radiates from the top and bottom of
the oven while natural convection currents
evenly distribute heat. Moisture is retained
to provide light, succulent dishes
For best results bake on only one shelf at a
time
BAKE
Everyday
cooking
FUNCTIONS
FUNCTIONS
BAKE
TRUE
CONVECTION
MAXI
GRILL
CONVECTION
GRILL
Everyday cooking
Multi-shelf cooking
Crisping and
browning
Reduced moisture
cooking
FUNCTIONS
BAKE
TRUE
CONVECTION
MAXI
GRILL
CONVECTION
GRILL
Everyday cooking
Multi-shelf cooking
Crisping and
browning
Reduced moisture
cooking
175
o
C
OPTIONS
STA RT
10:45
BAKE
175
o
C
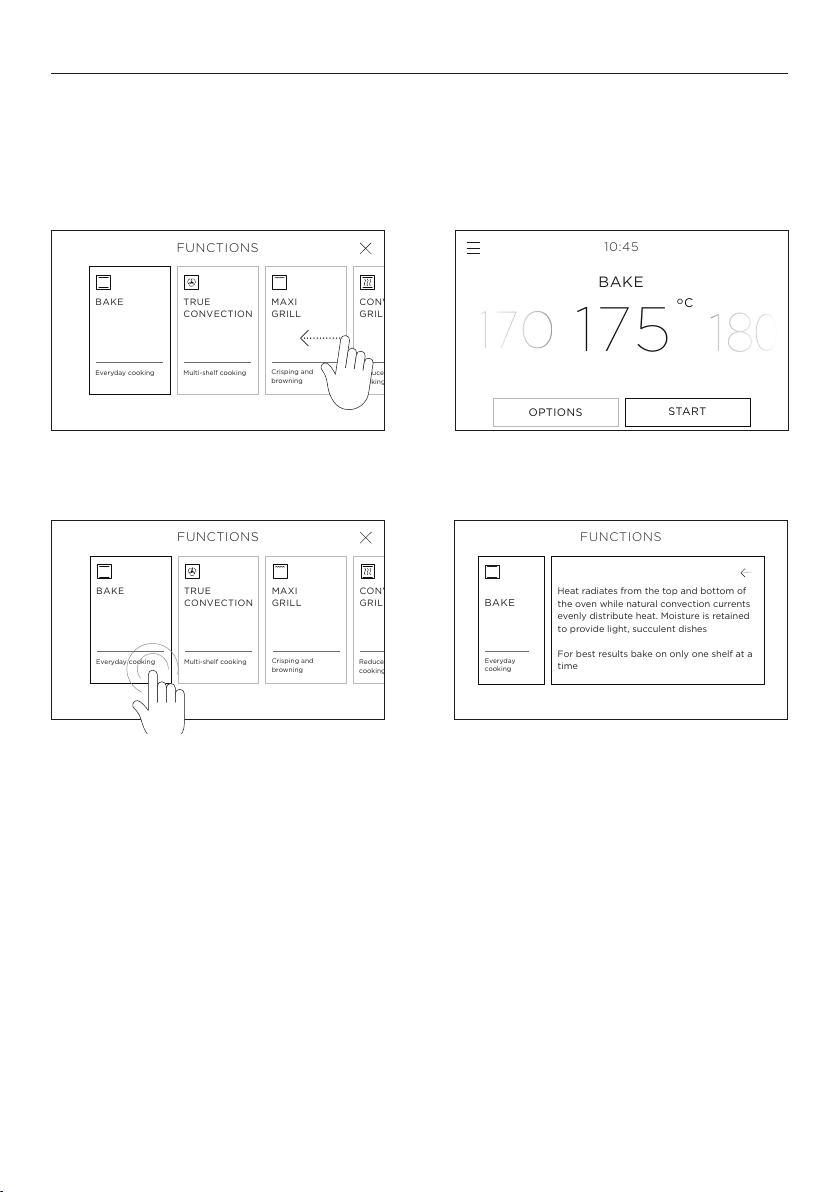
Function menu layout
To select and use a function, touch the function name or icon. For more information
on each function, touch the description underneath each function name.
Select function
Expand description
15
Page 16
FIRST USE
10:45
COOK BY
FUNCTION
COOK BY
FOOD TYPE
COOK BY
RECIPE
10:45
COOK BY
FUNCTION
COOK BY
FOOD TYPE
COOK BY
RECIPE
OPTIONS
STA RT
10:45
CLASSIC BAKE
10:45
COOK BY
FUNCTION
COOK BY
FOOD TYPE
COOK BY
RECIPE
OPTIONS
STA RT
10:45
OPTIONS
CANCEL
CLASSIC BAKE
10:45
CLASSIC BAKE
o
PREHEAT:
90
175
o
C
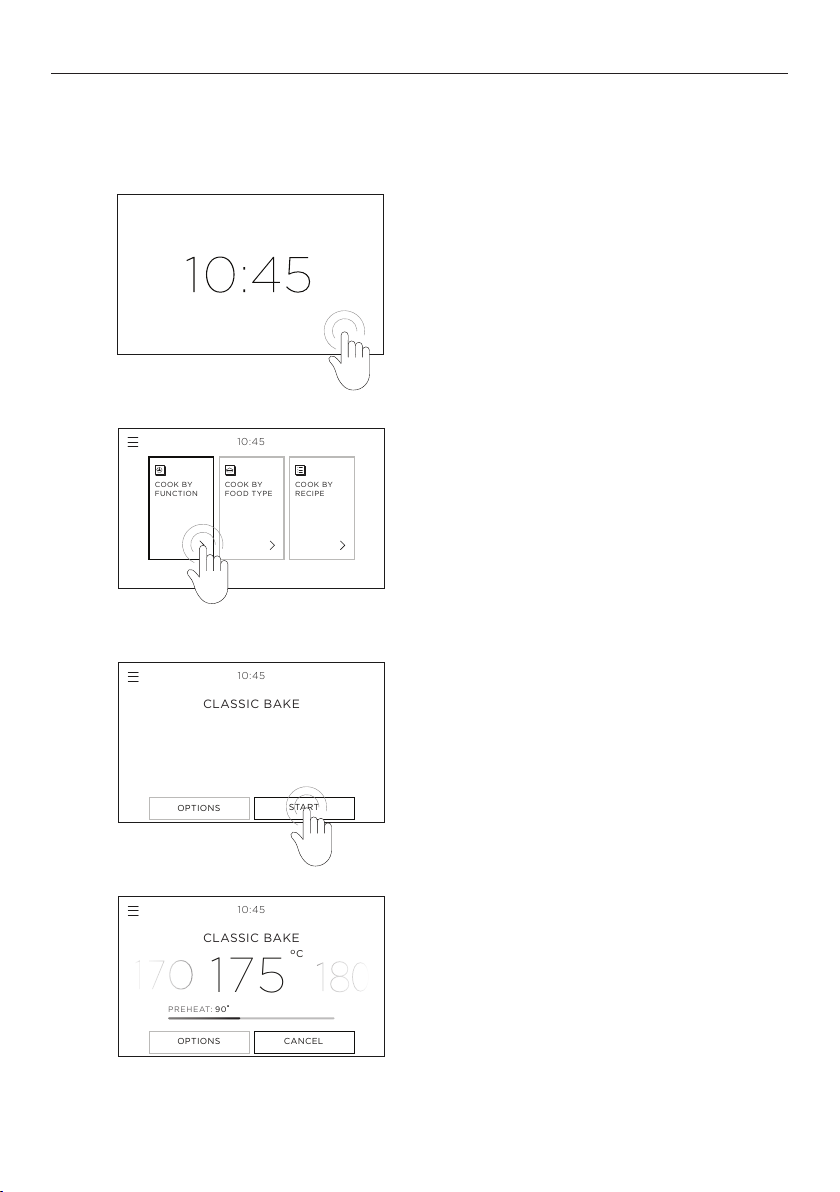
Setting a function and temperature
For more information on the functions, touch the description underneath each
function name or see the 'Cooking guide' section of this book.
1
2
3
Touch the screen or turn the dial* to enter
the menu. Select COOK BY FUNCTION.
Scroll through the functions and select the
one you want to cook with.
To adjust the preset temperature, swipe left
or right. Touch
STA R T to heat the oven and
begin cooking.
A red bar will show on the screen while the
oven is heating.
4
16
When the oven hs reched the set
temperture, tone will sound nd the br
will dispper.
Some functions do not need to preheat. For
those functions the bar won’t show.
Page 17
FIRST USE
OPTIONS
CANCEL
CLASSIC BAKE
10:45
o
HEATING:
90
OPTIONS
CANCEL
10:45
CLASSIC BAKE
175
o
C
175
o
C
OPTIONS
CANCEL
10:45
CLASSIC BAKE
175
o
C
FUNCTIONS
BAKE
TRUE
CONVECTION
MAXI
GRILL
CONVECTION
GRILL
Everyday cooking
Multi-shelf cooking
Crisping and
browning
Reduced moisture
cooking
OPTIONS
CANCEL
CLASSIC BAKE
10:45
o
HEATING:
90
OPTIONS
CANCEL
CLASSIC BAKE
10:45
o
HEATING:
90
OPTIONS
CANCEL
10:45
CLASSIC BAKE
175
o
C
175
o
C
175
o
C
FUNCTIONS
BAKE
TRUE
CONVECTION
MAXI
GRILL
CONVECTION
GRILL
Everyday cooking
Multi-shelf cooking
Crisping and
browning
Reduced moisture
cooking
OPTIONS
CANCEL
10:45
CLASSIC BAKE
175
o
C
FUNCTIONS
BAKE
TRUE
CONVECTION
MAXI
GRILL
CONVECTION
GRILL
Everyday cooking
Multi-shelf cooking
Crisping and
browning
Reduced moisture
cooking
OPTIONS
CANCEL
CLASSIC BAKE
10:45
o
HEATING:
90
OPTIONS
CANCEL
CLASSIC BAKE
10:45
o
HEATING:
90
OPTIONS
CANCEL
10:45
CLASSIC BAKE
OPTIONS
CANCEL
10:45
CLASSIC BAKE
175
o
C
175
o
C
175
o
C
175
o
C
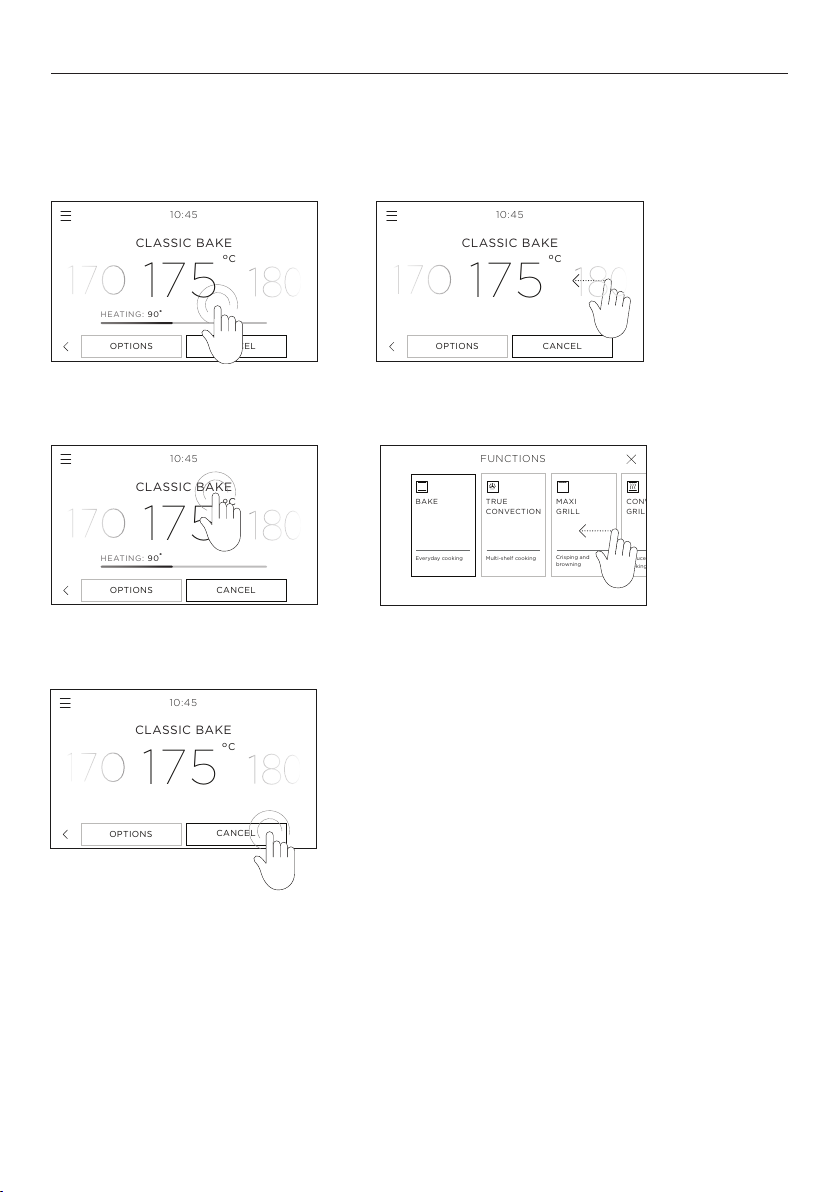
Editing or cancelling cooking
Touch the function name or temperature at any point during cooking to adjust.
Changing the temperature
Changing the function
Turning the oven off
To stop cooking and turn the
oven off, press
CONFIRM at any point.
CANCEL and then
17
Page 18
FIRST USE
OPTIONS
START
10:45
BAKE
175
o
C
OPTIONS
STA RT
10:45
CONVECTION GRILL
OPTIONS
START
10:45
BAKE
o
C
200
175
o
C
OPTIONS
STA RT
10:45
CONVECTION GRILL
OPTIONS
STA RT
10:45
TRUE CONVECTION
OPTIONS
START
10:45
BAKE
o
C
200
o
C
200
175
o
C
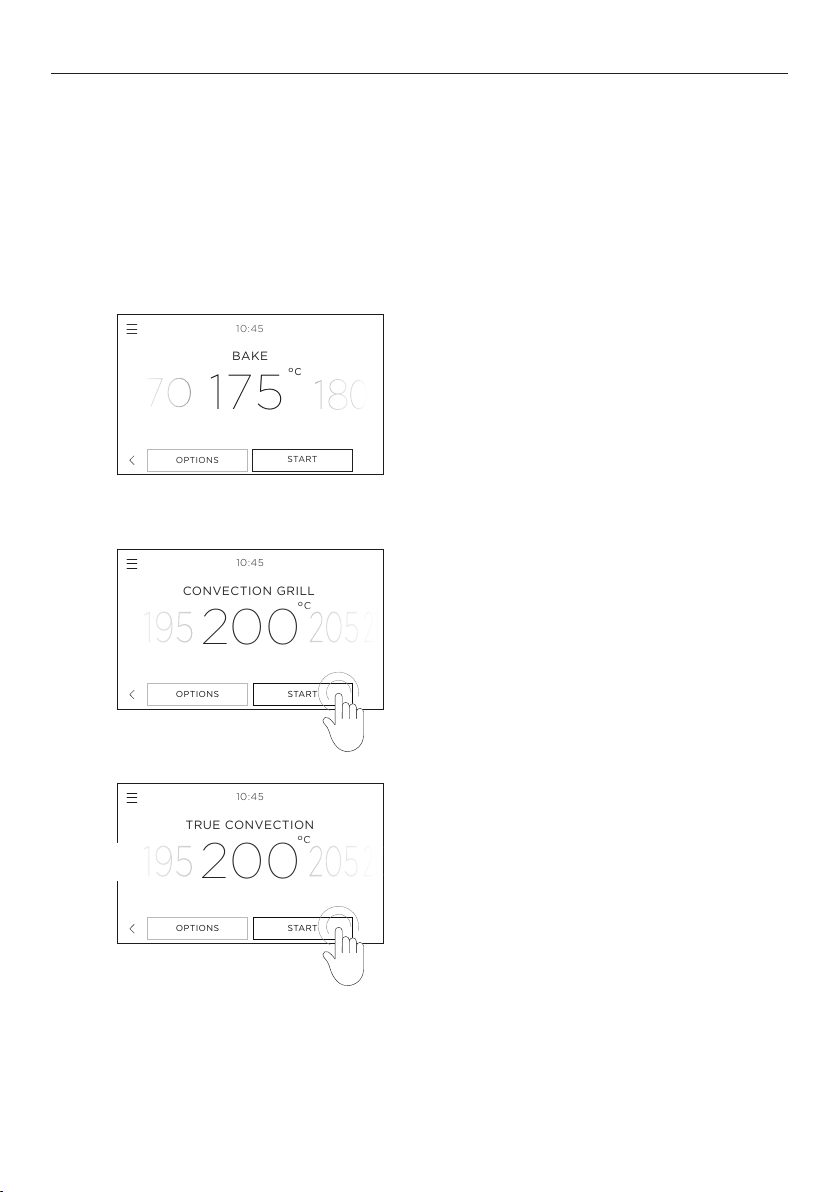
Conditioning the oven
It is important to condition your oven before using it for cooking. This will burn off any
manufacturing residues and ensure that you get the best results right from the start. It
will take appproximately 1 hour.
Before you start:
Make sure you have removed all packaging and any cable ties used to secure the
shelving during transit. Make sure all shelves are fitted in the oven. Make sure the
kitchen is well ventilated during conditioning.
Select
1
COOK BY FUNCTION and set the oven
to BAKE at 200oC (400oF ) and heat for
30 minutes.
2
3
After conditioning:
There will be a distinctive smell and a small amount of smoke during the conditioning
process as manufacturing residue is burnt off. This is normal, but make sure the kitchen is
well ventilated. Once cooled, wipe out the oven with a damp cloth and mild detergent, and
dry thoroughly.
18
After 30 minutes change the function to
CONVECTION GRILL and heat for 5 minutes.
After 5 minutes, change the function to
TRUE CONVECTION and heat for a further 20
minutes. When you have finished, turn the
oven off.
Page 19
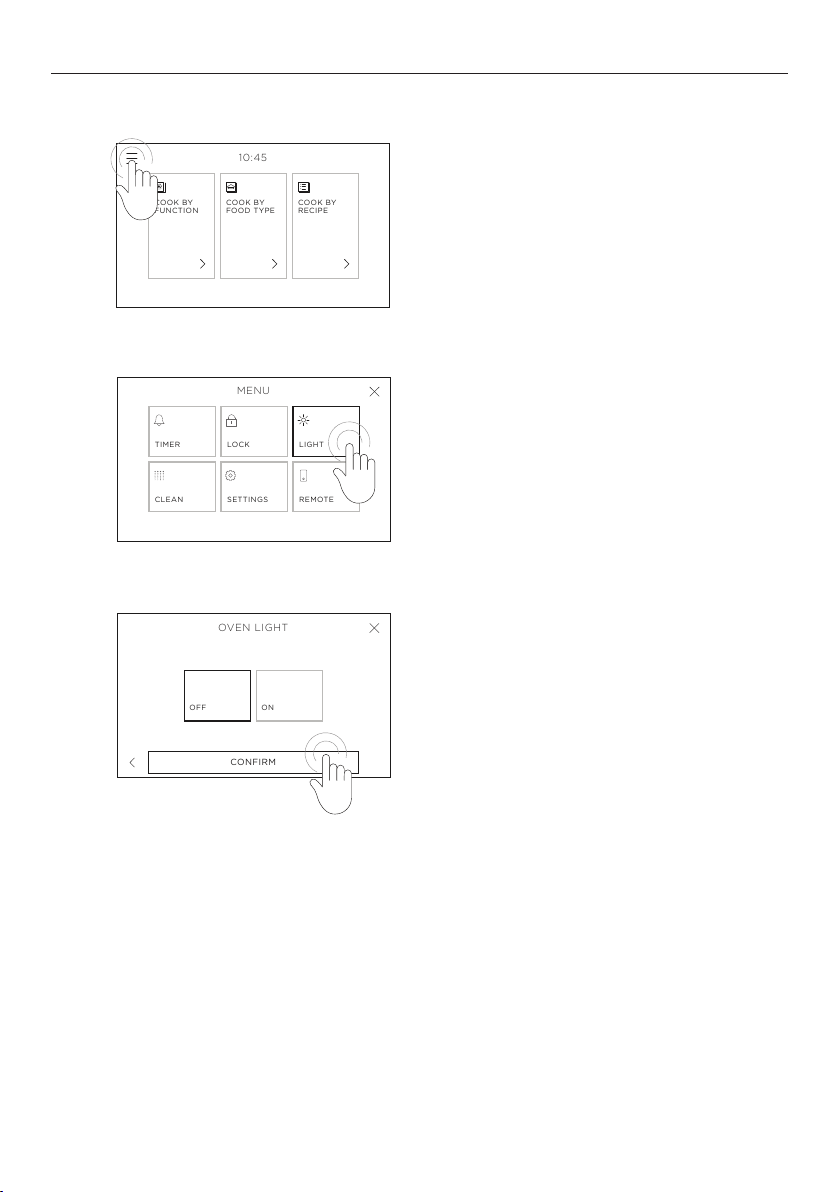
USING THE OVEN LIGHT
10:45
COOK BY
FUNCTION
COOK BY
FOOD TYPE
COOK BY
RECIPE
10:45
COOK BY
FUNCTION
COOK BY
FOOD TYPE
COOK BY
RECIPE
MENU
TIMER
LOCK
LIGHT
CLEAN
SETTINGS
REMOTE
10:45
COOK BY
FUNCTION
COOK BY
FOOD TYPE
COOK BY
RECIPE
MENU
TIMER
LOCK
LIGHT
CLEAN
SETTINGS
REMOTE
OVEN LIGHT
CONFIRM
OFF
ON
Turning the oven light ON or OFF
1
2
3
Touch the menu icon in the top left corner
of the display.
LIGHT.
Select
Select ON or OFF as required and then
select CONFIRM.
19
Page 20
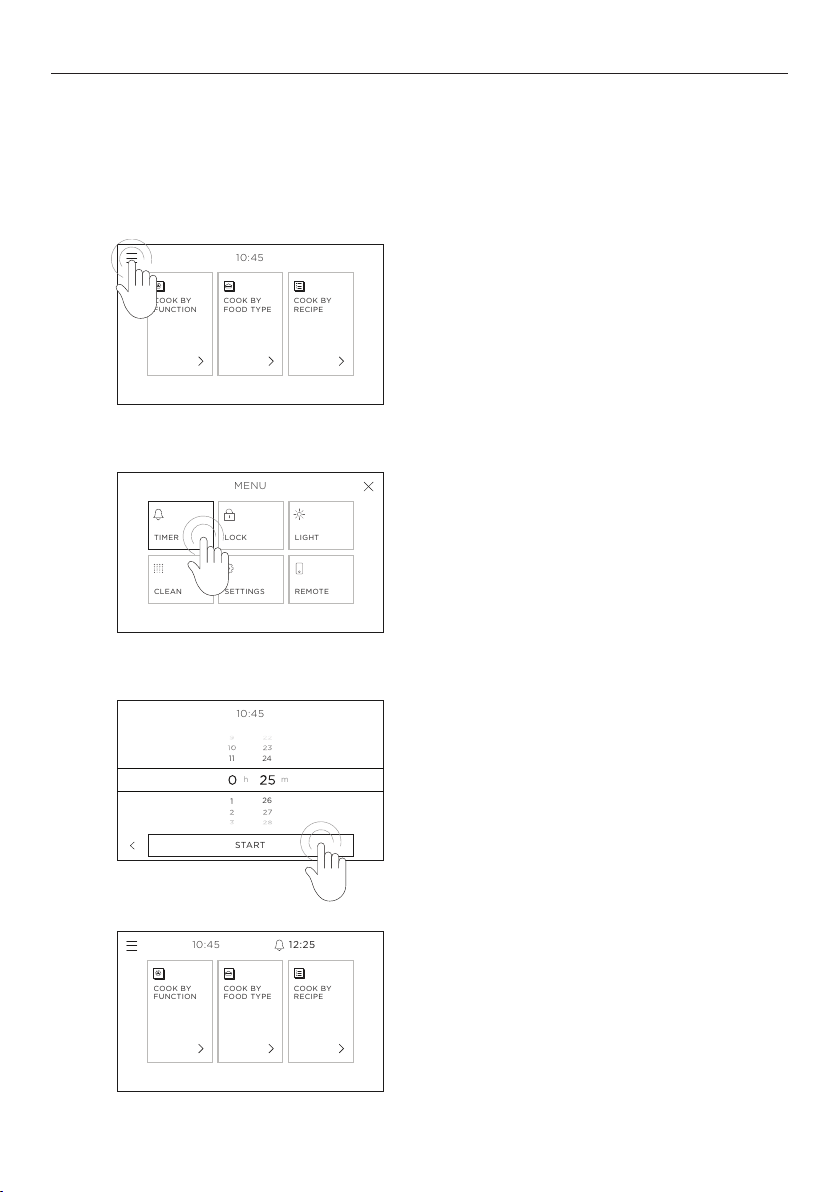
USING THE KITCHEN TIMER
10:45
COOK BY
FUNCTION
COOK BY
FOOD TYPE
COOK BY
RECIPE
10:45
COOK BY
FUNCTION
COOK BY
FOOD TYPE
COOK BY
RECIPE
MENU
TIMER
LOCK
LIGHT
CLEAN
SETTINGS
REMOTE
10:45
COOK BY
FUNCTION
COOK BY
FOOD TYPE
COOK BY
RECIPE
MENU
TIMER
LOCK
LIGHT
CLEAN
SETTINGS
REMOTE
10:45
1
26
11
24
h
m
STA RT
10:45
COOK BY
FUNCTION
COOK BY
FOOD TYPE
COOK BY
RECIPE
COOK BY
FUNCTION
COOK BY
FOOD TYPE
COOK BY
RECIPE
MENU
TIMER
LOCK
LIGHT
CLEAN
SETTINGS
REMOTE
10:45
1
26
11
24
h
m
STA RT
12:25
10:45
z
Use the kitchen timer to keep track of cooking times. You can use it at any time, even
if you are not using the oven.
z
The kitchen timer does not turn the oven off. See 'Cooking options' for how to set
the AUTO OFF timer or DELAYED COOK.
Setting the timer
1
2
3
Touch the menu icon in the top left corner
of the screen.
TIMER.
Select
Scroll to set timer length then select
STA R T .
You can set the timer for up to
11 hours 59 minutes.
20
4
The timer countdown will show on the screen.
Page 21
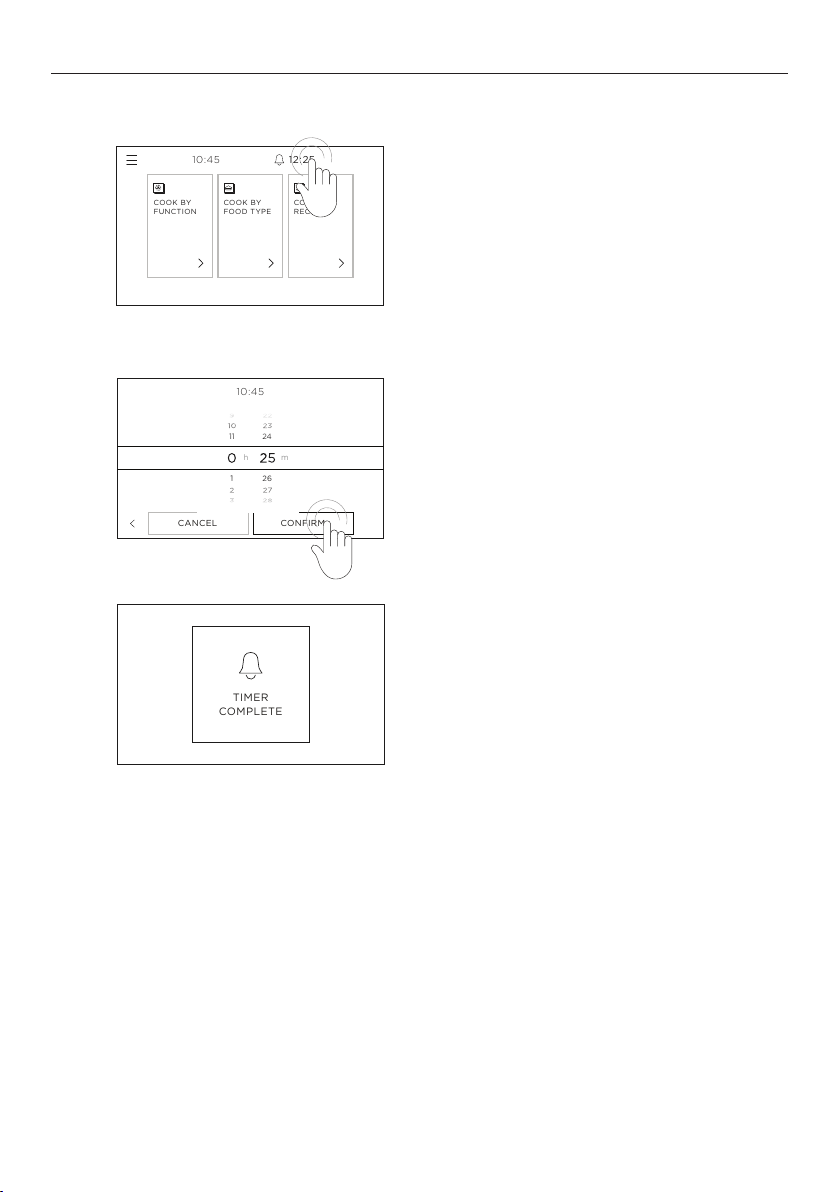
USING THE KITCHEN TIMER
COOK BY
FUNCTION
COOK BY
FOOD TYPE
COOK BY:
RECIPE
12:25
10:45
COOK BY
FUNCTION
COOK BY
FOOD TYPE
COOK BY:
RECIPE
12:25
10:45
CANCEL
CONFIRM
10:45
1
26
11
24
h
m
COOK BY
FUNCTION
COOK BY
FOOD TYPE
COOK BY:
RECIPE
12:25
10:45
TIMER
COMPLETE
CANCEL
CONFIRM
10:45
1
26
11
24
h
m
Editing or cancelling the timer
1
2
3
Touch the timer countdown in the upper
right of the screen.
Adjust the timer as needed and select
CONFIRM, or touch CANCEL to cancel the
timer completely.
At the end of the timer a tone will sound
every few seconds. Touch the screen
anywhere to stop it.
21
Page 22
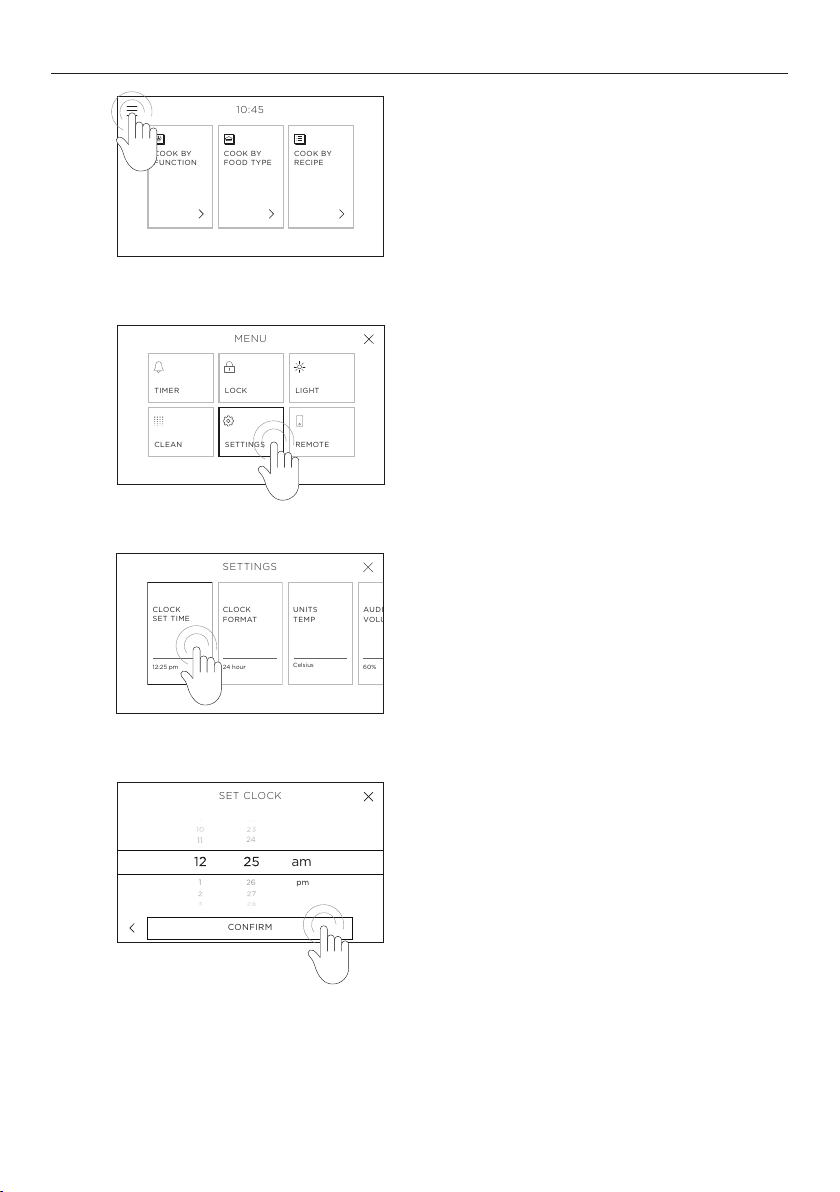
CHANGING THE TIME
10:45
COOK BY
FUNCTION
COOK BY
FOOD TYPE
COOK BY
RECIPE
10:45
COOK BY
FUNCTION
COOK BY
FOOD TYPE
COOK BY
RECIPE
MENU
TIMER
LOCK
LIGHT
CLEAN
SETTINGS
REMOTE
10:45
COOK BY
FUNCTION
COOK BY
FOOD TYPE
COOK BY
RECIPE
MENU
TIMER
LOCK
LIGHT
CLEAN
SETTINGS
REMOTE
SETTINGS
CLOCK
SET TIME
CLOCK
FORMAT
UNITS
TEMP
AUDIO
VOLUME
12:25 pm
24 hour
Celsius
60%
10:45
COOK BY
FUNCTION
COOK BY
FOOD TYPE
COOK BY
RECIPE
MENU
TIMER
LOCK
LIGHT
CLEAN
SETTINGS
REMOTE
SETTINGS
1
11
26
24
:
pm
am
SET CLOCK
CONFIRM
CLOCK
SET TIME
CLOCK
FORMAT
UNITS
TEMP
AUDIO
VOLUME
12:25 pm
24 hour
Celsius
60%
1
2
3
Touch the menu icon in the top left corner.
Select
SETTINGS.
Select
CLOCK SET TIME.
22
4
Scroll to change the time then
select CONFIRM.
Page 23
LOCKING THE CONTROL PANEL
10:45
COOK BY
FUNCTION
COOK BY
FOOD TYPE
COOK BY
RECIPE
10:45
COOK BY
FUNCTION
COOK BY
FOOD TYPE
COOK BY
RECIPE
MENU
TIMER
LOCK
LIGHT
CLEAN
SETTINGS
REMOTE
10:45
COOK BY
FUNCTION
COOK BY
FOOD TYPE
COOK BY
RECIPE
MENU
TIMER
LOCK
LIGHT
CLEAN
SETTINGS
REMOTE
CONFIRM
This will lock the oven controls.
Press and hold the screen
at any point to unlock.
BACK
10:45
COOK BY
FUNCTION
COOK BY
FOOD TYPE
COOK BY
RECIPE
MENU
TIMER
LOCK
LIGHT
CLEAN
SETTINGS
REMOTE
OVEN
LOCKED
CONFIRM
This will lock the oven controls.
Press and hold the screen
at any point to unlock.
BACK
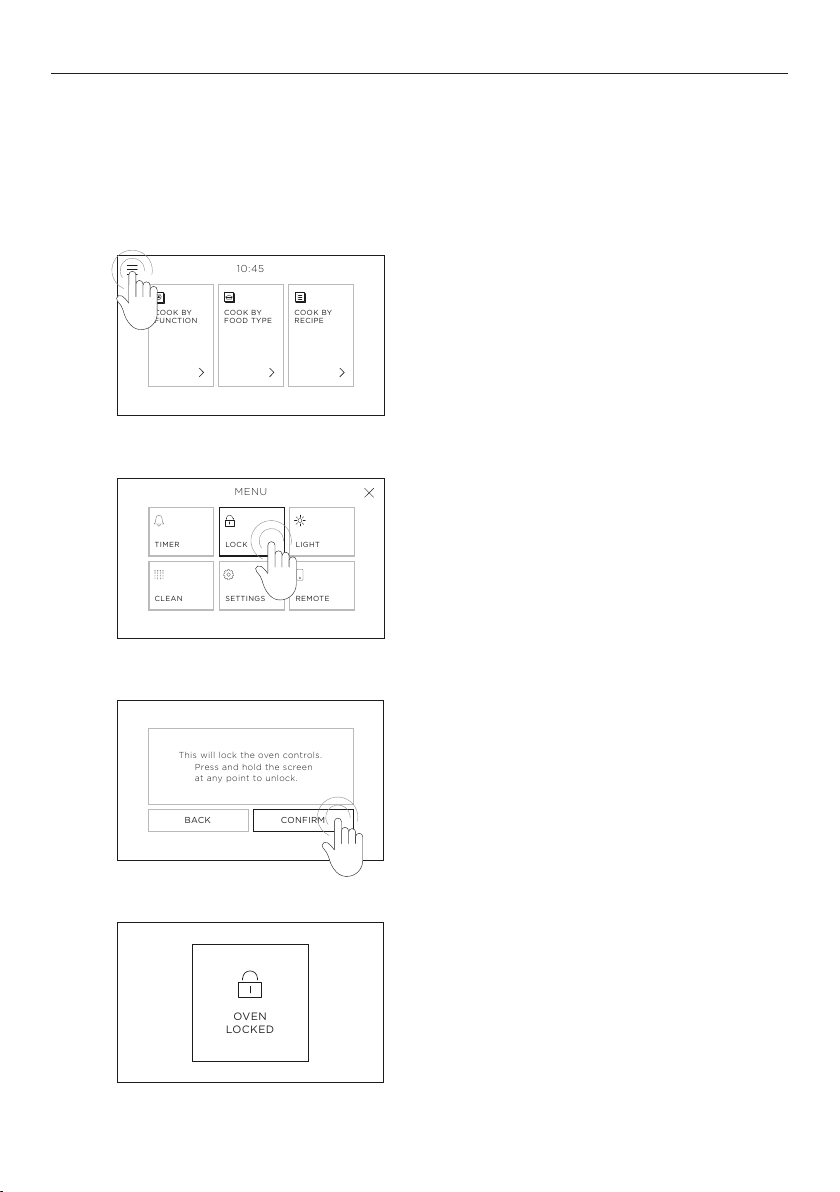
Lock the oven controls to prevent accidental use of the oven by children or when
cleaning. When locked, the controls are unresponsive and the oven will not turn on.
For safety reasons you cannot lock the oven controls while the oven is in use or if
automatic cooking options have been set.
1
2
3
Touch the menu icon in the top left corner
of the screen.
LOCK.
Select
CONFIRM.
Select
4
The control panel is now locked. The controls
will remain unresponsive until it is unlocked.
23
Page 24

UNLOCKING THE CONTROL PANEL
Press and hold to unlock
1
Press and hold anywhere on the screen
until the bar fills and the oven unlocks.
24
Page 25
10:45
COOK BY
FUNCTION
COOK BY
FOOD TYPE
COOK BY
RECIPE
COOKING OPTIONS
10:45
COOK BY
FUNCTION
COOK BY
FOOD TYPE
COOK BY
RECIPE
OPTIONS
CANCEL
BAKE
10:45
o
HEATING:
90
VENT
BAKE
Vents moisture
from oven…
BAKE
TRUE
AERO
GRILL
FUNCTIONS
For everyday
cooking…
Great for multi-
shelf cooking…
For browning and
crisping…
175
o
C
10:45
COOK BY
FUNCTION
COOK BY
FOOD TYPE
COOK BY
RECIPE
FUNCTIONS
BAKE
TRUE
CONVECTION
MAXI
GRILL
CONVECTION
GRILL
Everyday cooking
Multi-shelf cooking
Crisping and
browning
Reduced moisture
cooking
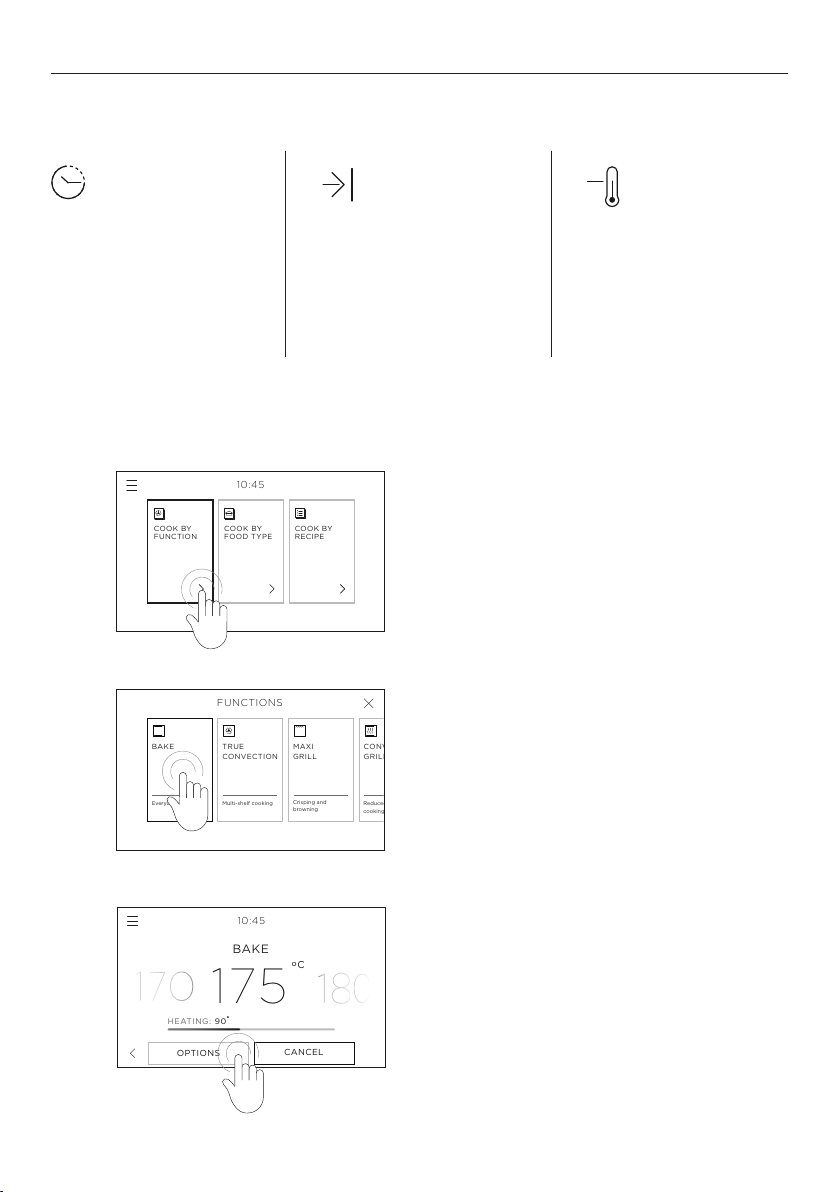
Your oven comes with a number of automatic cooking options to help you get the
best results:
DELAYED COOK
Set the oven to turn on
later in the day, cook for
a set length of time and
turn off automatically.
AUTO OFF
Set the oven to turn off
after a set length of time.
FOOD PROBE
Use the food probe to
automatically turn your
oven off when your food
reaches a set internal
temperature.
You can set these options either before you start cooking, or at any point once your oven is
already running.
1
2
Select COOK BY FUNCTION.
Select the function you want to cook with.
3
Touch
OPTIONS at the bottom of the
screen and select the option you want
to use.
25
Page 26
DELAYED
COOK
AUTO
OFF
FOOD
PROBE
OPTIONS
COOKING OPTIONS | DELAYED COOK
DELAYED
COOK
AUTO
OFF
FOOD
PROBE
OPTIONS
10:45
STA RT
1
26
11
24
m
Cook:
h
1
26
11
24
:
End:
pm
am
DELAYED
COOK
AUTO
OFF
FOOD
PROBE
OPTIONS
10:45
STA RT
1
26
11
24
m
Cook:
h
1
26
11
24
:
End:
pm
am
OPTIONS
CANCEL
BAKE
10:45
COOK:
2 h 25 m
END:
12:25 pm
175
o
C
DELAYED
COOK
AUTO
OFF
FOOD
PROBE
OPTIONS
10:45
STA RT
1
26
11
24
m
Cook:
h
1
26
11
24
:
End:
pm
am
OPTIONS
CANCEL
BAKE
10:45
COOK:
2 h 25 m
END:
12:25 pm
OPTIONS
CANCEL
BAKE
10:45
COOK:
2 h 25 m
END:
12:25 pm
175
o
C
175
o
C
The grill element may come on while the oven is heating up. Position food on a lower
shelf or cover to prevent burning as the oven heats up.
Safe food handling: leave food in the oven for as short a time as possible before and
after cooking or defrosting, to avoid contamination by organisms which may cause food
poisoning. Take particular care during warmer weather.
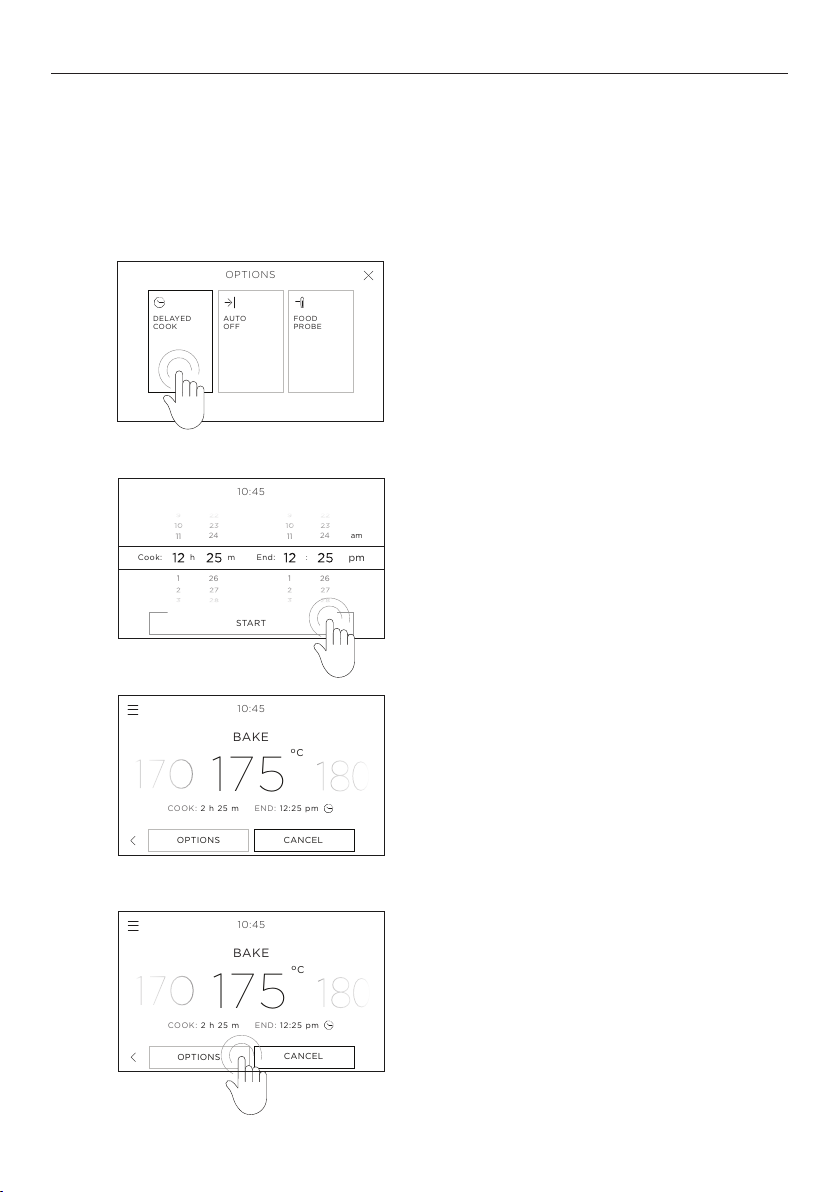
DELAYED COOK from the
1
Select
OPTIONS menu.
2
3
4
Scroll to set a cook time and an end time,
then select
DELAYED COOK is now set.
STA R T .
Your oven will automatically calculate when
it needs to turn on based on what cook time
and end times are set.
To edit or cancel
Touch
OPTIONS and select DELAYED COOK at
any point to edit or cancel.
When the end time is reached
The oven will automatically turn off and a
long tone will sound.
26
Page 27
COOKING OPTIONS | AUTO OFF
DELAYED
COOK
AUTO
OFF
FOOD
PROBE
OPTIONS
DELAYED
COOK
AUTO
OFF
FOOD
PROBE
OPTIONS
10:45
STA RT
1
26
11
24
m
Cook:
h
:
End:
pm
DELAYED
COOK
AUTO
OFF
FOOD
PROBE
OPTIONS
10:45
STA RT
1
26
11
24
m
Cook:
h
:
End:
pm
OPTIONS
CANCEL
BAKE
10:45
COOK:
2 h 25 m
END:
12:25 pm
175
o
C
DELAYED
COOK
AUTO
OFF
FOOD
PROBE
OPTIONS
10:45
STA RT
1
26
11
24
m
Cook:
h
:
End:
pm
OPTIONS
CANCEL
BAKE
10:45
COOK:
2 h 25 m
END:
12:25 pm
OPTIONS
CANCEL
BAKE
10:45
COOK:
2 h 25 m
END:
12:25 pm
175
o
C
175
o
C
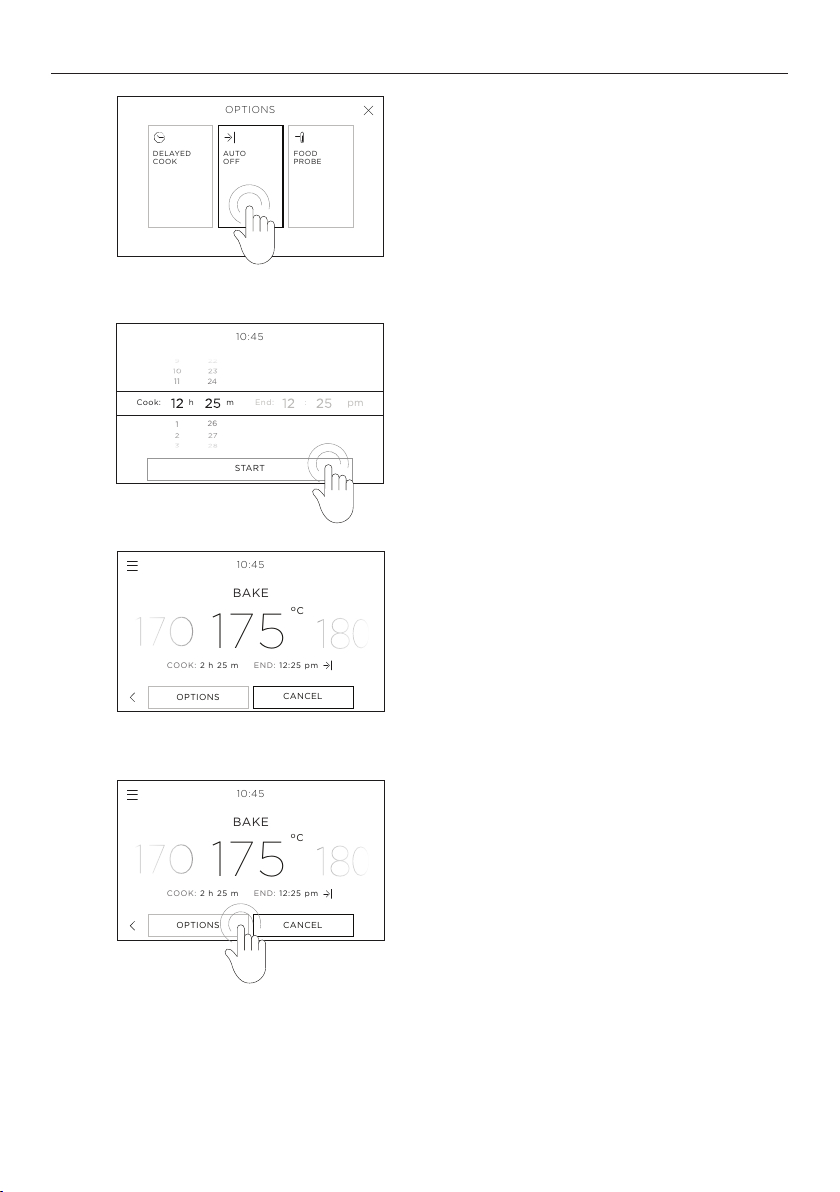
1
2
3
Select AUTO OFF from the OPTIONS menu.
Scroll to set a cook time and select
STA R T .
Your oven will automatically calculate the
end time based on what cook time is set.
AUTO OFF is now set.
Your oven will cook for the set length of time
and then turn off automatically.
4
To edit or cancel
Touch
OPTIONS and select AUTO OFF at any
point to edit or cancel.
When the end time is reached
The oven will automatically turn off and a
long tone will sound.
27
Page 28

COOKING OPTIONS | FOOD PROBE
Tips for using the food probe
z
Use only the food probe supplied.
z
You can still use the kitchen timer when the probe is in use.
z
You cannot use the meat probe with DELAYED COOK or AUTO OFF.
z
The internal temperature of meat will continue to rise by a few degrees after you have
removed it from the oven, so allow for this in your calculations. After cooking, cover and
let the meat rest for 15 to 20 minutes.
z
If you wish to remove food from the oven (eg basting), unplug the meat probe from
the oven but do not remove it from the meat. When you are ready to resume cooking,
ensure you plug the probe plug back into the oven.
z
When cooking meat, insert the probe horizontally into the centre of the thickest part.
The thicker the meat, the longer it will take to cook, so it is important that the tip of the
probe is measuring the temperature of the meat at its thickest point. Make sure the tip of
the probe is not protruding out of the meat, and does not touch bone, fat or gristle, as
these will heat up more quickly than the lean meat.
Internal temperatures and food safety
z
Ensure meat is fully defrosted before cooking. The temperatures given onscreen and
in the Cooking Guides are recommendations. Results will depend on the quality and
composition of the food.
z
Rest meat after cooking to allow the internal temperature to continue to rise.
z
For food safety, high risk foods such as fish should reach a minimum internal
temperature of 63 - 70oC (145 - 160oF) and poultry and minced meat should reach 75 85oC (165 - 185oF).
28
Page 29
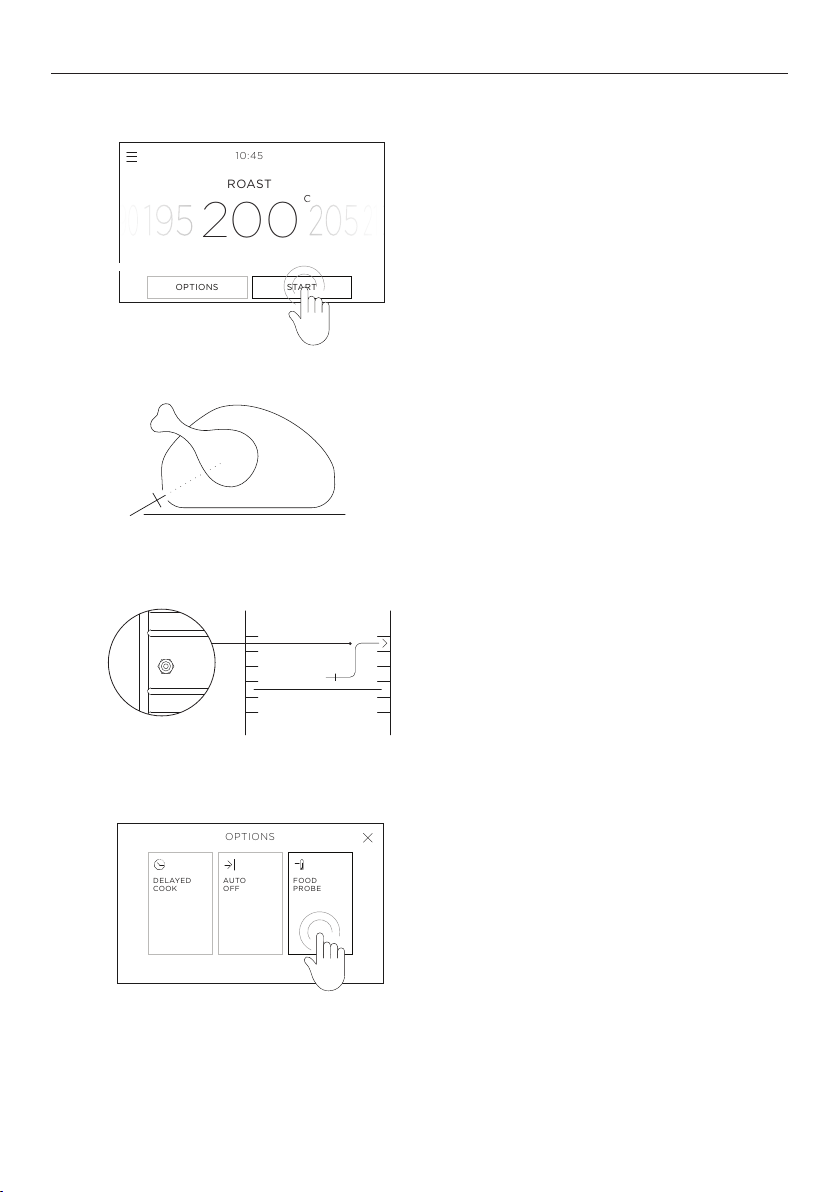
OPTIONS
STA RT
10:45
ROAST
C
200
Setting FOOD PROBE
DELAYED
COOK
AUTO
OFF
FOOD
PROBE
OPTIONS
OPTIONS
STA RT
10:45
ROAST
C
200
COOKING OPTIONS | FOOD PROBE
1
2
3
Select your function and temperature and
preheat the oven if needed.
Insert the probe into your food.
Always position the tip of the probe in the
thickest part of the dish, avoiding fat and
bone in meat.
Ensure the tip of the probe doesn’t
protrude out the other side of food or
touch cookware.
Place food in the oven and plug the probe
into the socket inside the oven, on the
right hand side.
4
Go to the
FOOD PROBE.
OPTIONS menu and select
29
Page 30
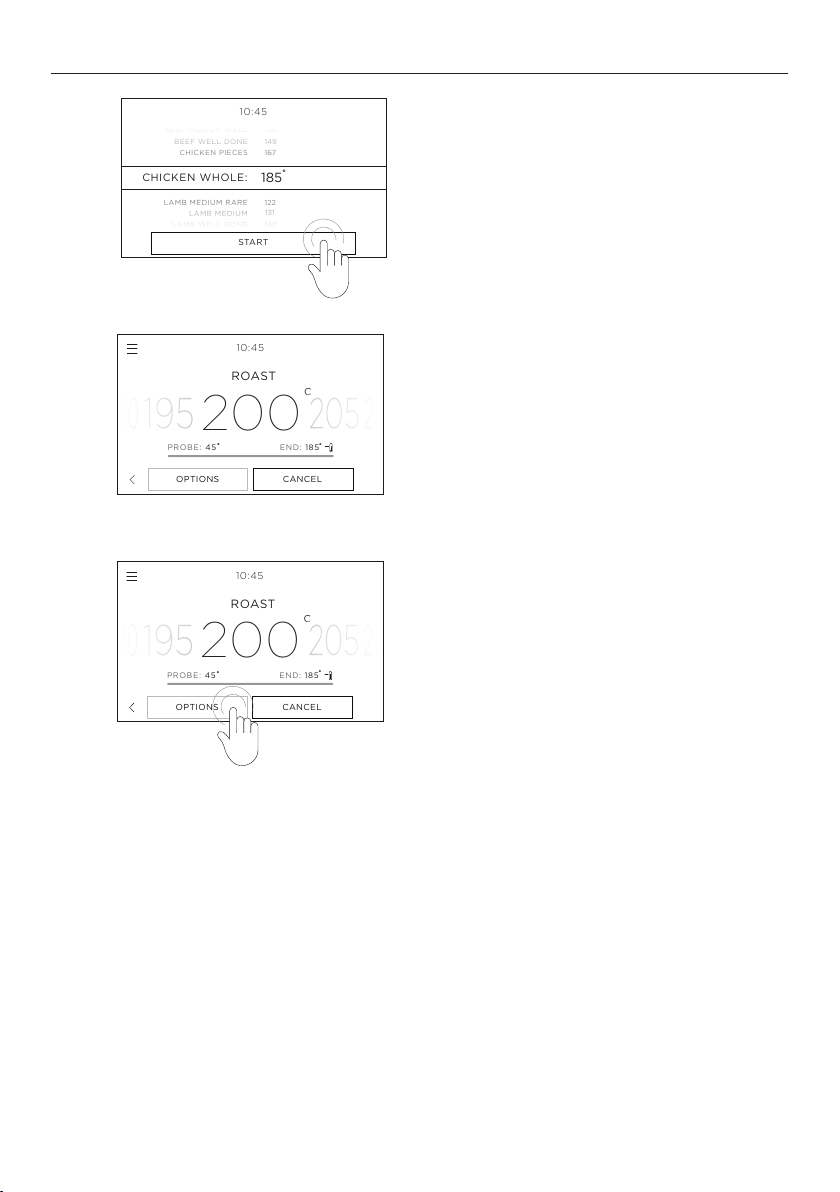
COOKING OPTIONS | FOOD PROBE
OPTIONS
CANCEL
ROAST
10:45
END:
185oPROBE:
45
o
C
200
OPTIONS
CANCEL
ROAST
10:45
END:
185oPROBE:
45
OPTIONS
CANCEL
ROAST
10:45
END:
185oPROBE:
45
o
o
C
200
C
200
DELAYED
COOK
AUTO
OFF
FOOD
PROBE
OPTIONS
OPTIONS
STA RT
10:45
ROAST
10:45
STA RT
CHICKEN WHOLE:
LAMB MEDIUM RARE
LAMB MEDIUM
LAMB WELL DONE
CHICKEN PIECES
BEEF WELL DONE
BEEF MEDIUM WELL
185
167
140
149
131
135
122
o
C
200
5
6
7
Scroll to select a food type and adjust the
temperature if desired. Select STA R T to begin.
FOOD PROBE is now set.
Your oven will cook until the set temperature
is reached and then turn off automatically.
To edit or cancel
Touch
OPTIONS and select FOOD PROBE at any
point to edit or cancel.
When the end time is reached
The oven will automatically turn off and a
tone will sound.
30
Page 31
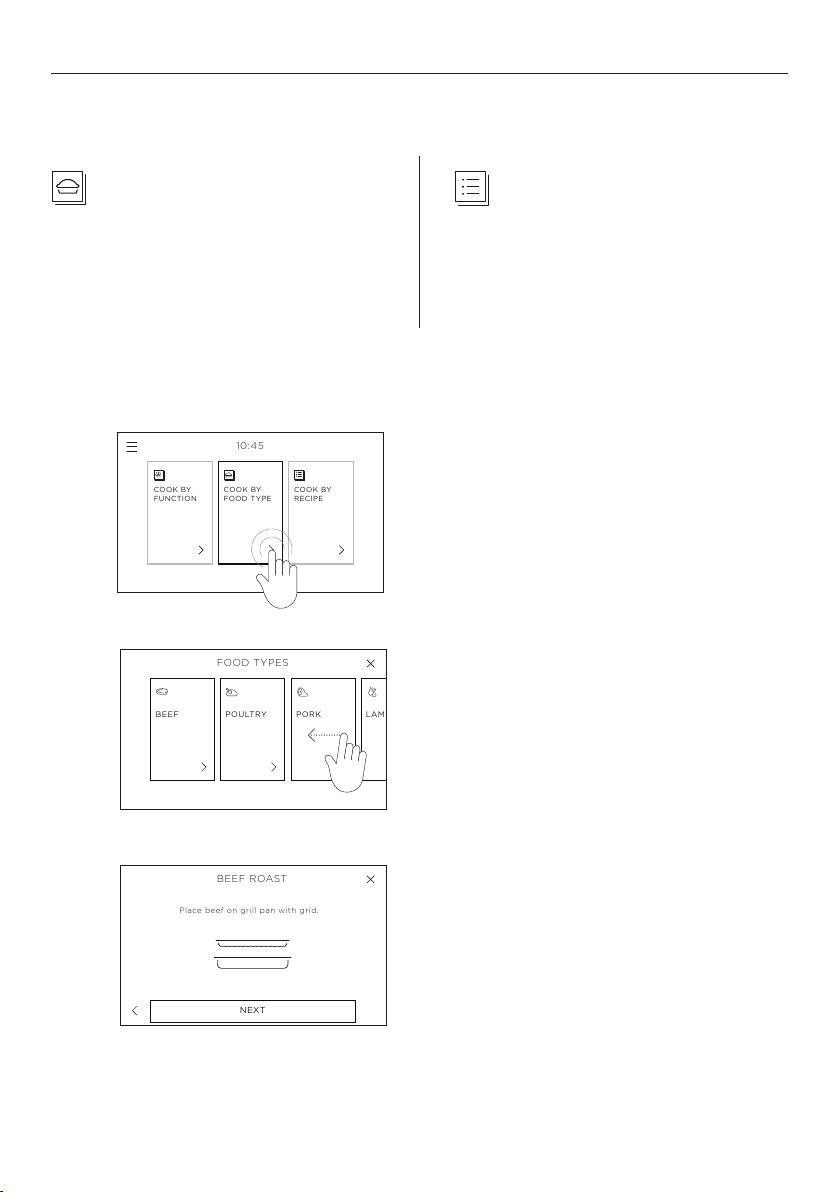
GUIDED COOKING
10:45
COOK BY
FUNCTION
COOK BY
FOOD TYPE
COOK BY
RECIPE
FOOD TYPES
BEEF
POULTRY
PORK
LAM
FOOD TYPES
BEEF
POULTRY
PORK
LAM
BEEF ROAST
Place beef on grill pan with grid.
NEXT
Your oven comes with guided cooking features that help you choose the optimal oven
settings, accessories and methods to get the best results:
COOK BY FOOD TYPE
Optimum oven settings, shelf positions,
cookware and accessories for cooking a
particular type of food or cut of meat.
Using COOK BY FOOD TYPE
1
2
COOK BY RECIPE
A collection of recipes that have been
specifically designed for and tested in
this style of oven.
From the home screen, select COOK BY
FOOD TYPE
.
Scroll through the various food types and
select the type of food you want to cook.
For more information touch the description
underneath each food type.
3
Follow the instructions onscreen for
what accessories and cookware to use
and how to set up your oven.
31
Page 32
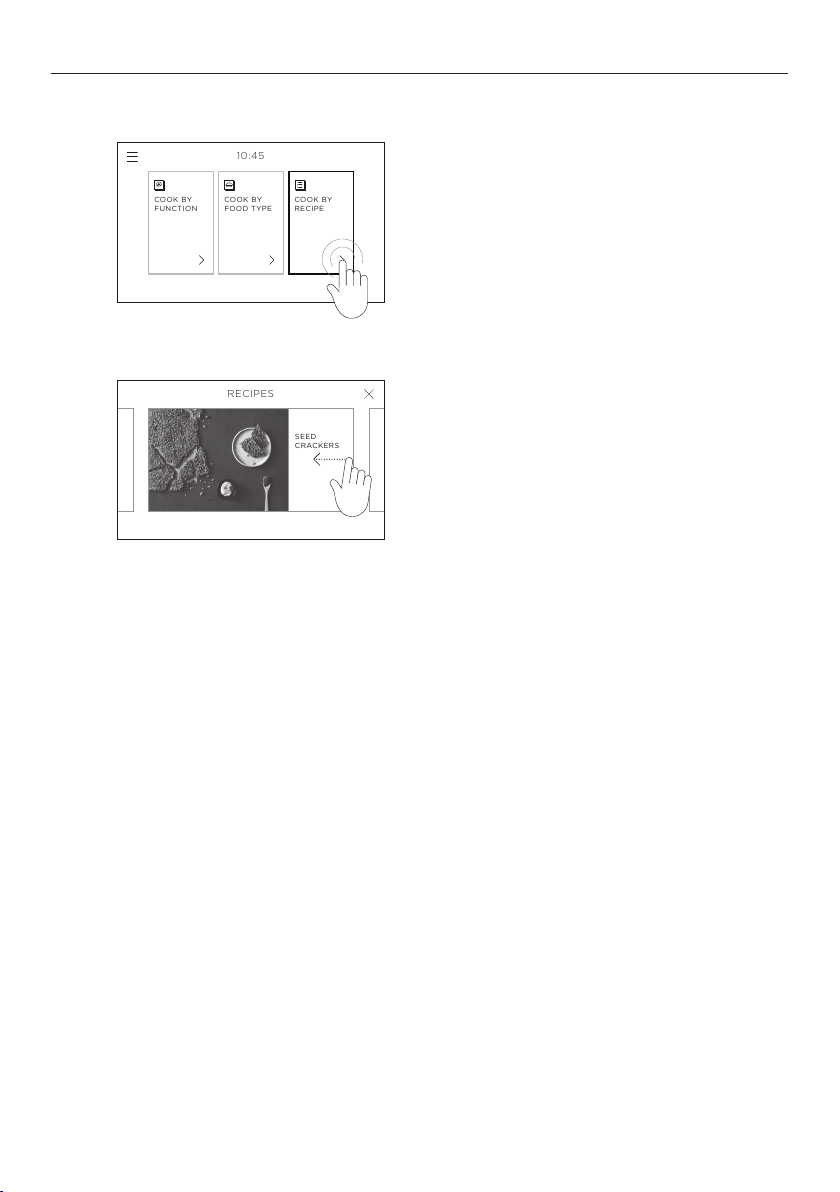
Using COOK BY RECIPE
10:45
COOK BY
FUNCTION
COOK BY
FOOD TYPE
COOK BY
RECIPE
10:45
COOK BY
FUNCTION
COOK BY
FOOD TYPE
COOK BY
RECIPE
SEED
CRACKERS
RECIPES
GUIDED COOKING
1
2
Select COOK BY RECIPE.
Scroll to look through the recipe collection
and select your favourite.
Follow the instructions onscreen for
ingredients and method, and how to set up
your oven.
32
Page 33
COOKING GUIDE
General guidelines
This freestanding cooker has been designed to utilise its four elements and rear
fan in different combinations to provide you with enhanced performance. The wide
freestanding cooker of functions, allows you to cook all food types to perfection.
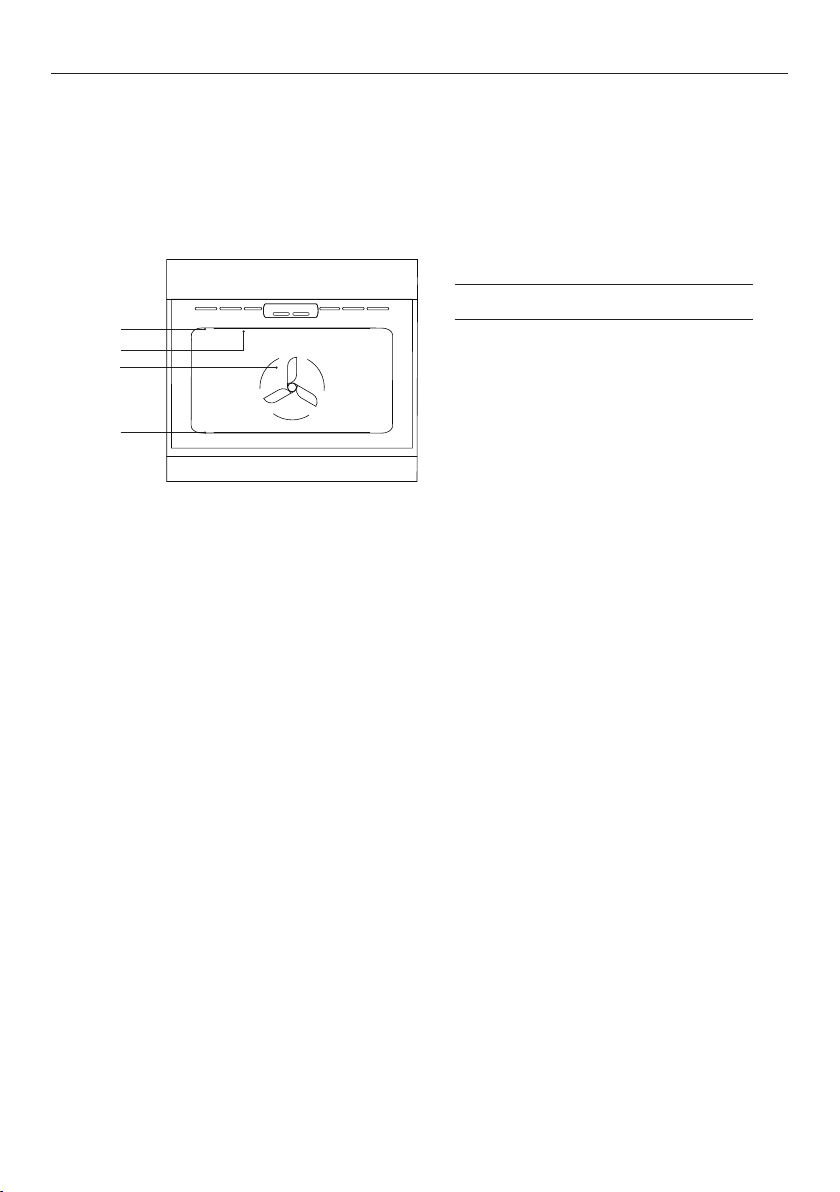
Oven elements
1
2
3
1 upper outer element
2 upper inner element
3 rear element (concealed)
4
4 lower element (concealed)
IMPORTANT!
Use all the functions with the oven door closed.
Baking
z
For best results when baking, always pre-heat your oven. The screen will show a red
progress bar while the oven is heating up.
z
Single shelf cooking: place your baking on a shelf that will position the top of your pan
near the centre of the oven.
z
Multi shelf cooking: Always leave a space between shelves to allow the air to circulate.
Grilling
z
Always grill with the oven door completely shut.
z
Always keep a close watch on your food to avoid charring or burning.
z
If you use glass or ceramic pans, be sure they can withstand high oven temperatures.
z
For thinner cuts of meat, or for toasting or browning foods, use a higher shelf position.
z
Thicker cuts of meats should be grilled on lower shelves or at a lower grill setting to
ensure even cooking.
Roasting
z
The ROAST function is designed to brown the outside of the meat, but still keep the
inside moist and juicy.
z
Boneless, rolled or stuffed roasts require longer than roasts containing bones. Poultry
should be well cooked with the juices running clear and a minimum internal temperature
of 75°C (165°F).
z
Always roast meat fat side up.
z
If using a roasting bag or a covered roast dish, do not use the ROAST function.
33
Page 34

COOKING GUIDE
Reheating
z
Never reheat food more than once.
z
Use Bake to reheat food, or follow the instructions in COOK BY FOOD TYPE.
z
Always reheat food to piping hot, or to a minimum internal temperature of 85°C (185°F).
This reduces the risk of contamination.
z
Reheat food in a dish with a lid or cover tightly with foil.
z
Once hot, use the WARM function to keep the food warm.
Dehydrating
z
Use the DEHYDRATE function to preserve food and create healthy snacks.
z
For best results, use the grill pan with grill rack insert. Ensure food is laid flat and is not
overlapping. If dehydrating meat, turn it over halfway through to ensure even drying.
z
Store dehydrated food in an airtight container after it’s completely cooled.
Dough proofing
z
Use the RAPID PROOF function to proof dough for breadmaking and pizza.
z
Place dough in a lightly oiled bowl and cover with plastic wrap or a clean, damp cloth.
z
Position in the centre of the oven.
z
To prevent overproofing check the dough every 30 minutes.
34
Page 35
COOKING GUIDE
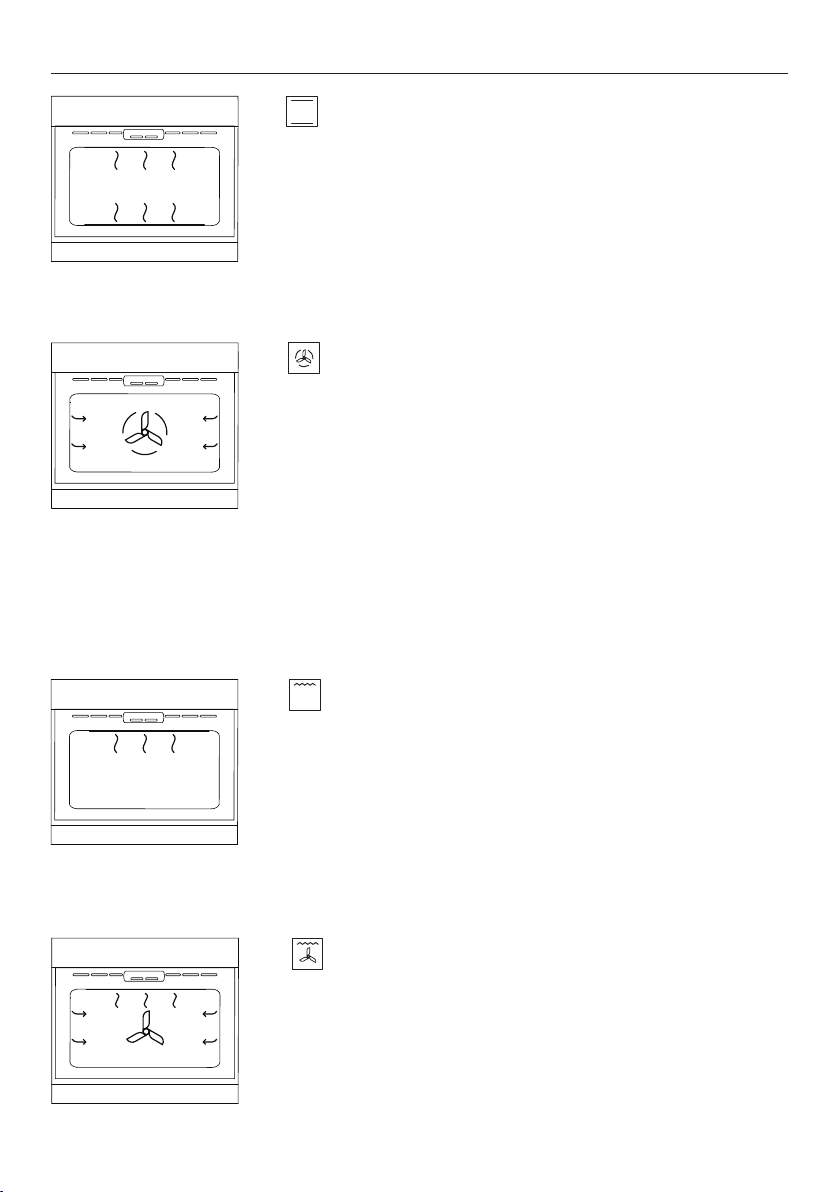
MAXI BROIL BAKE CONVECTION BROIL
BAKE
upper outer and lower elements
Ideal for:
z
foods that require a longer cooking time, eg rich fruit cake,
brownies, or bread.
z
Retains moisture.
z
Ideal for cakes and foods that require baking for a long
time or at low temperatures.
z
This function is not suitable for multi-shelf cooking.
TRUE CONVECTION
fan plus rear element
Ideal for:
multi-shelf cooking, eg biscuits, cookies, scones, muffins and
cupcakes.
z
Hot air is blown into the cavity, providing a consistent
temperature at all levels.
z
Always leave a gap between trays to allow air to move
freely. This ensures food on the lower tray can still brown.
z
If converting a recipe from BAKE to TRUE CONVECTION, we
recommend that you decrease either the bake time and/or
the temperature by approximately 20°C (70°F), especially
for items with longer bake times.
MAXI GRILL
upper inner and outer elements
Ideal for:
toasting bread or for top-browning to finish off dishes.
z
Intense radiant heat is delivered from both top elements.
z
There are 9 steps between LO and HI (100% power).
z
For best results allow oven to heat for 5 minutes
before grilling.
z
The dial halo* will remain red while using the grill function.
CONVECTION GRILL
fan plus upper outer and inner elements
Ideal for:
whole chicken, beef tenderloin or grilling fish or steak.
z
Uses the intense heat from the elements for top-browning
and the fan to ensure even cooking of foods.
z
Meat, poultry and vegetables cook beautifully; food is crisp
and brown on the outside while the inside remains moist.
35
Page 36
COOKING GUIDE
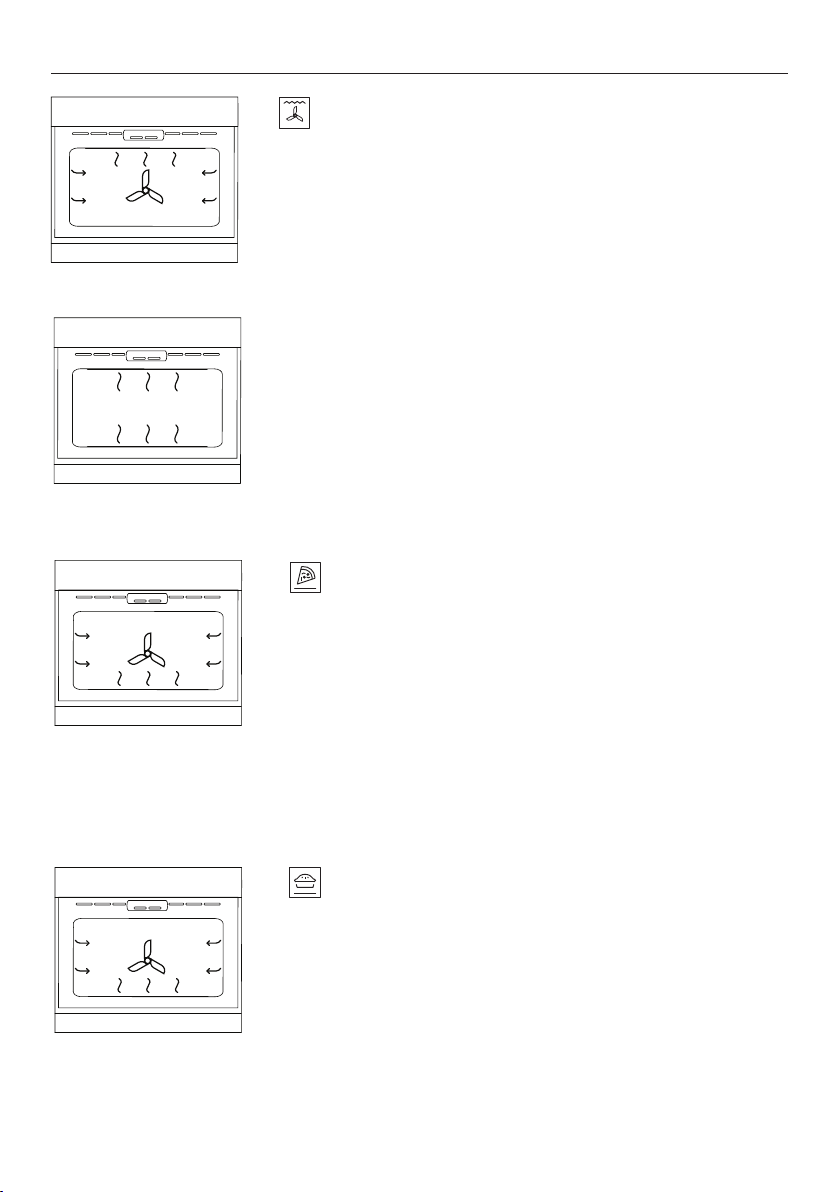
ROAST
fan plus upper and lower elements
Ideal for:
roasting meat and vegetables.
This is a two-step program.
z
Searing:
An initial 20-minute stage that crisps and browns the roast,
and caramelises the outside of the meat.
z
Cooking at preset temperature:
After searing, the temperature will decrease to your preset
level for the remainder of the cook time, producing a
tender and juicy roast.
z
The oven does not need preheating.
z
If desired, use the grill pan and grid, or place vegetables
under the roast to allow the juices to drain away from
your meat. This will allow the hot air to circulate under
the meat as well.
PIZZA BAKE
fan plus lower element
Ideal for:
crisp-based pizzas
z
The fan circulates heat from the lower element throughout
the entire oven.
z
Excellent for cooking pizza as it crisps the base beautifully
without overcooking the topping.
z
For best results, pre-heat a pizza stone for at least 1 hour
and bake on oven shelf position 1 or 2.
36
PASTRY BAKE
fan plus lower element
Ideal for:
sweet and savoury pastry foods and delicate foods
that require a crisp base and some top-browning,
eg frittata, quiche.
z
The fan circulates heat from the lower element throughout
the oven.
z
Provides intense heat to the base of foods and allows
gentle top-browning.
Page 37
COOKING GUIDE
MAXI BROIL BAKE CONVECTION BROIL
MAXI BROIL BAKE CONVECTION BROIL
TRUE CONVECTION
CONVECTION BAKE
PASTRY BAKE
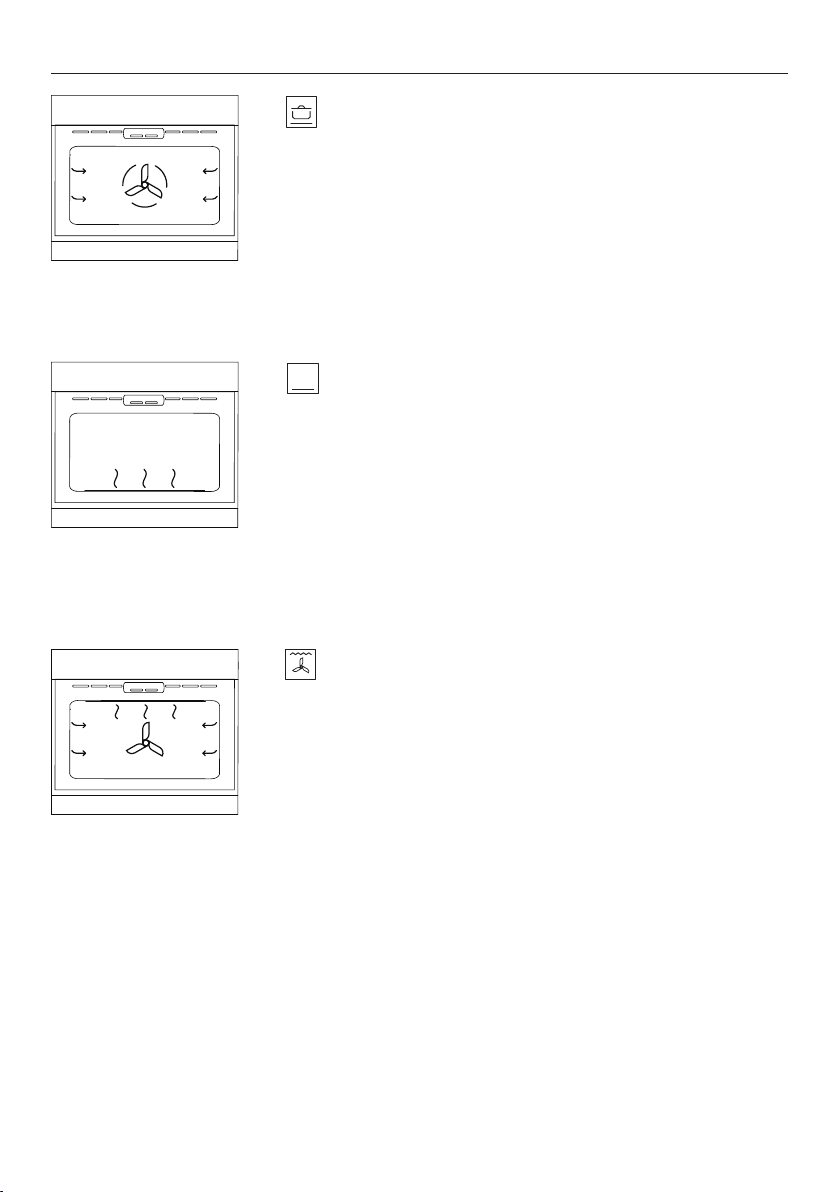
SLOW COOK
fan plus rear element
Ideal for:
slow-cooked dishes such as casseroles, stews and braises.
z
The fan circulates heat from the rear element to gently
cook food.
z
This function has low energy consumption.
z
The oven does not need preheating.
CLASSIC BAKE
lower element
Ideal for:
dishes that require delicate baking and have a pastry base, like
custard tarts, pies, quiches and cheesecake.
z
Heat comes from the lower element only.
z
This is the traditional baking function, suitable for recipes
that were developed in conventional ovens
z
Bake using only one shelf at a time.
AIR FRY
fan plus outer and inner elements
Ideal for:
food cooked from frozen, or battered and crumbed food that
would usually be deep fried.
z
Replicates the conditions used in an air fryer.
z
A healthier way of frying which crisps food while using less
oil. For best results, coat food with 1-2 tablespoons of oil.
z
For pre-packaged food: if the manufacturer’s cooking
advice suggests using a function that isn’t fan-based,
decrease temperature by 20°C (70°F)
z
Single shelf cooking: cook in the upper part of the oven,
but not at the highest shelf position.
37
Page 38
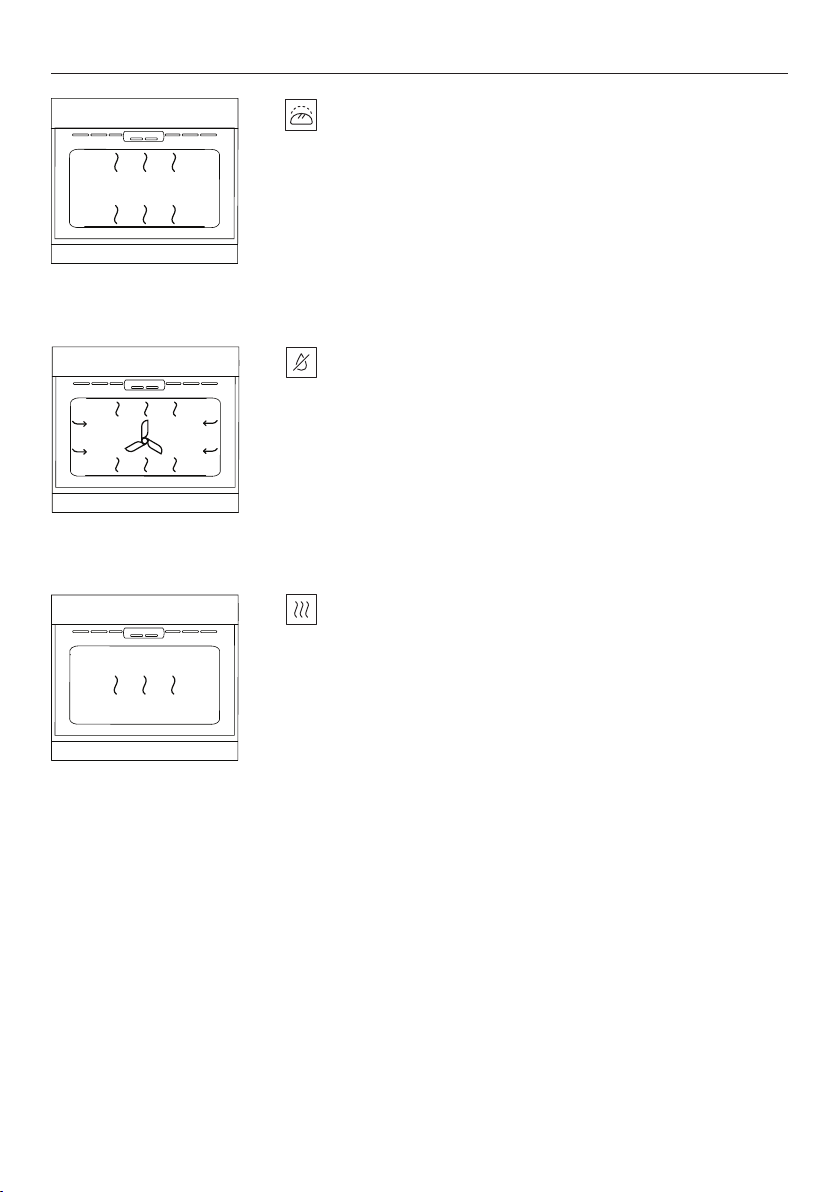
COOKING GUIDE
PASTRY BAKE
CONVECTION BAKE
PASTRY BAKE
RAPID PROOF
upper outer and lower elements
z
Gentle heat is generated from the upper and
lower elements.
z
Provides the optimum warm and draft-free environment for
proving yeast dough.
z
This method provides a faster proof time than at
room temperature.
DEHYDRATE
fan plus rear element
Ideal for:
Ideal for drying meat, fruit, vegetables and herbs, such as beef
jerky and fruit leather.
z
Gently circulates air, providing a consistent low heat for
dehydrating and drying food.
WARM
upper outer and lower elements plus venting
38
z
Provides a constant low heat of less than 90°C (195°F).
z
Use to keep cooked food hot, or to warm plates and
serving dishes.
z
To reheat food from cold, use another function or COOK
BY FOOD TYPE
WARM, as this function alone will not bring cold food up to
to heat the food piping hot, then change to
a high enough temperature to kill any harmful bacteria.
Page 39
INDUCTION COOKWARE
IMPORTANT!
The quality of your cookware can affect cooking performance. Only use inductioncompatible cookware that has been specifically designed for induction cooking.
Look for the induction symbol on the packaging or the bottom of the pan.
Suitable cookware material:
z
stainless steel - with a magnetic base
or core
z
aluminium and copper - with a
magnetic base or core
z
cast iron
z
steel
z
enamelled steel.
Unsuitable cookware material:
z
pure stainless steel
z
aluminium or copper - without a
magnetic base
z
glass
z
wood
z
porcelain
z
ceramic or earthenware.
To check if cookware material, carry out a magnet test:
Move a magnet across the base of the pan. If the magnet is attracted, the pan is induction
suitable. Ensure attraction is consistent across the base of the pan. If there are gaps, such
as an indented manufacturer’s logo, then the performance will be impaired.
If you do not have a magnet, fill the pan with some water and follow steps on page 42. If
does not flash and the water is heating, pan is suitable.
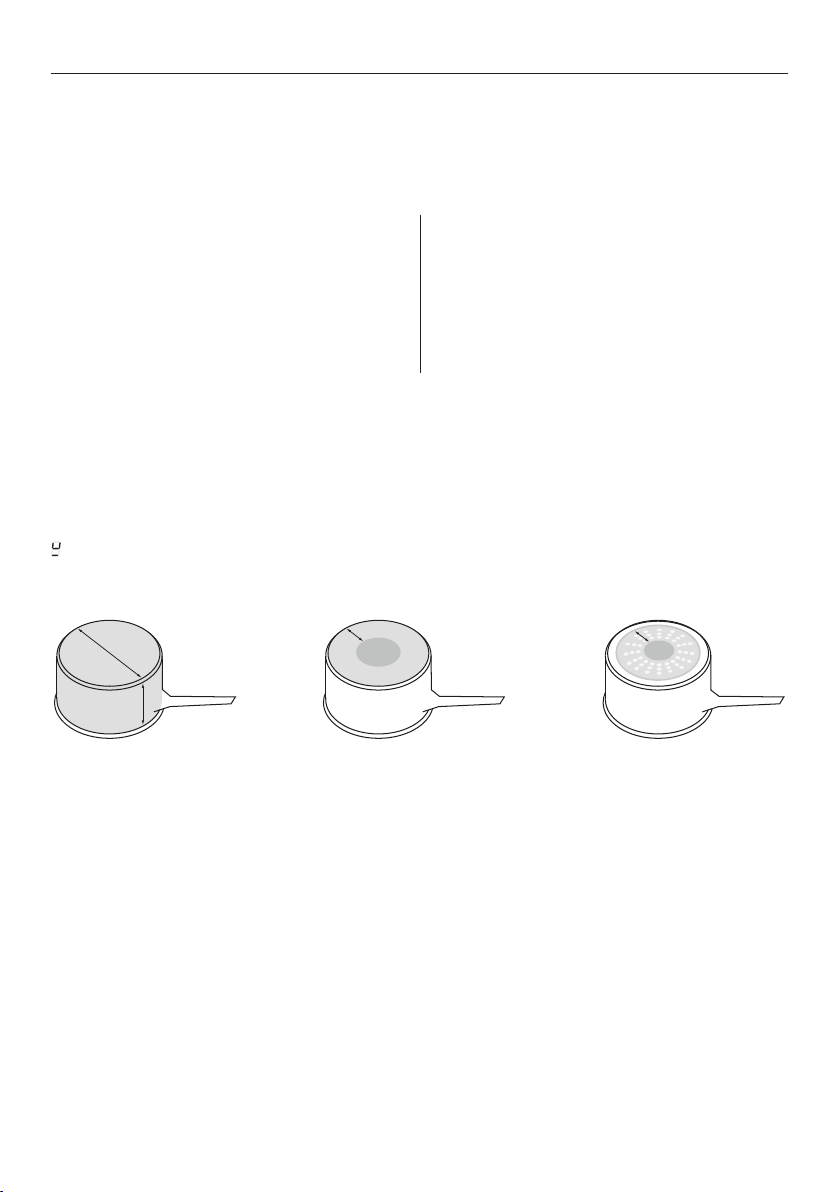
Quick heating
High content of
ferromagnetic material.
Heating is consistent
across the base and
continues up the sides
of pan.
Average heating
Reduced area of
ferromagnetic material.
Reduced zone of
heating, results in poor
cooking performance
and slower heating.
Slow heating
Very limited area of
ferromagnetic material.
this type of pot is good
for very delicate tasks
as heating is very slow.
Other cookware considerations
Ensure the base of your cookware is smooth, sits flat against the glass, and is similar in size
as the cooking zone. A small pot on a large cooking zone may not be detected. Always
centre your pan on the cooking zone and lift pans off the cooktop – do not slide, or they
may scratch the glass.
39
Page 40
2 2
2 2
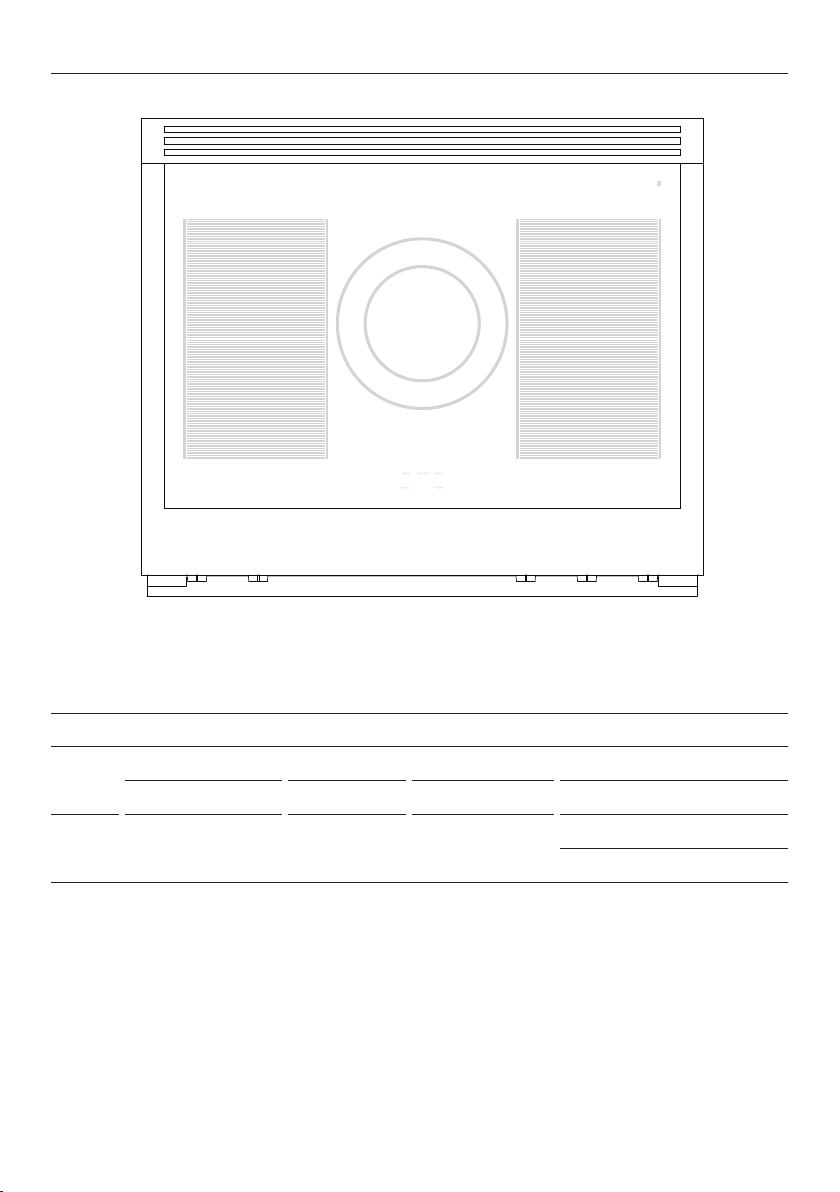
RIV3-915 induction zones
COOKTOP USE
1
RIV3-915
ZONE POWER POWERBOOST RECOMMENDED MINIMUM PAN SIZE
Inner zone 1850 W 3000 W 125mm
1
Dual zone 2600 W 5500 W 250mm
Unbridged: 120mm
Bridged: 250mm
40
Smartzone 2100 W 3700 W
2
Page 41
COOKTOP USE
OFF A
9 8 7
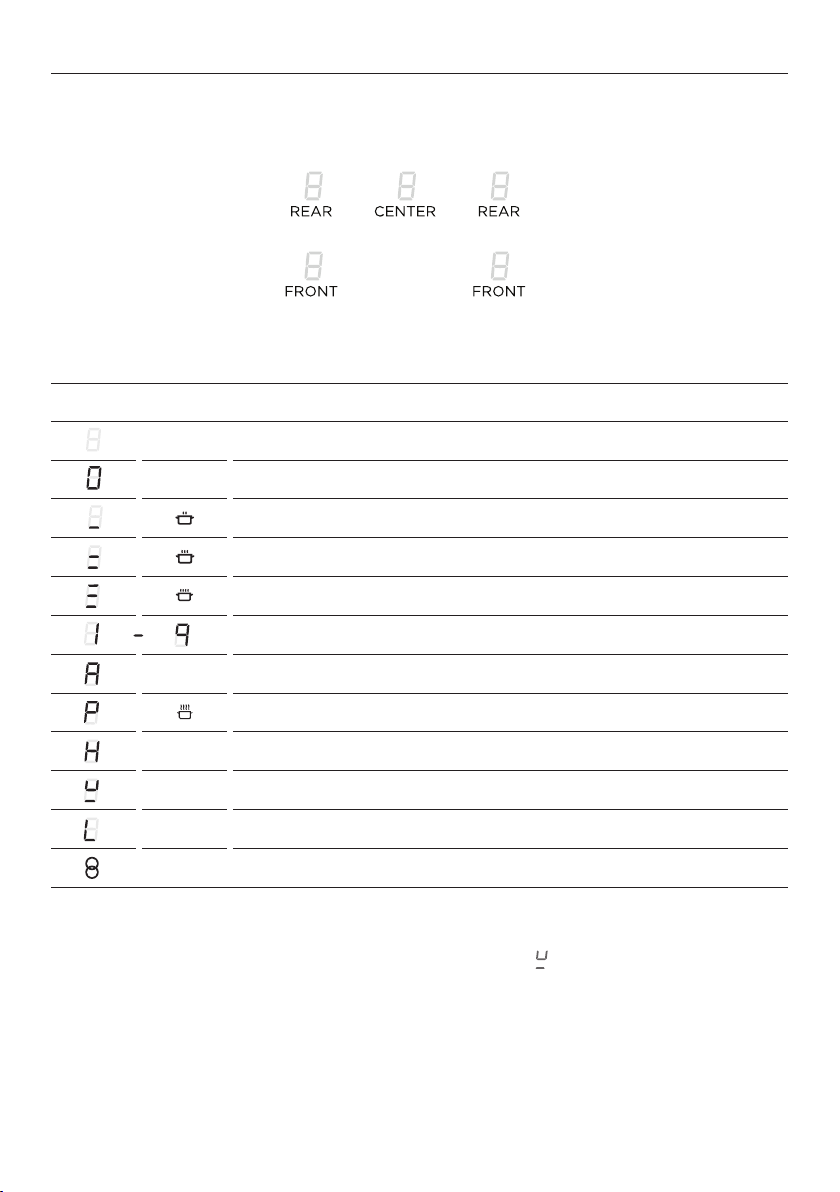
At the front of the induction surface is the display for each individual cooking zone. Each
zone display is activated by it’s corresonding control dial.
RIV3-915 induction zone display
ICON MEANING
Cooking zone off (not activated)
Cooking zone on (activated but not operating).
GentleHeat low setting
GentleHeat medium setting
GentleHeat simmer setting
Power levels
Auto RapidHeat feature
PowerBoost feature
Hot Surface indicator
Pan detection indicator
Childlock
Bridged zone indicator
If no suitable cookware is detected on the selected cooking zone, the cooktop will
automatically turn off after 10 minutes. If the display flashes alternately with the heat
setting this indicates:
z
cookware has not been placed on the correct cooking zone,
z
cookware is not suitable for induction cooking, or
z
cookware is too small or not properly centred on the cooking zone.
41
Page 42
COOKTOP USE
Selecting and using a cooking zone
Note:
dim when the surface has cooled down to a safe temperature.
1
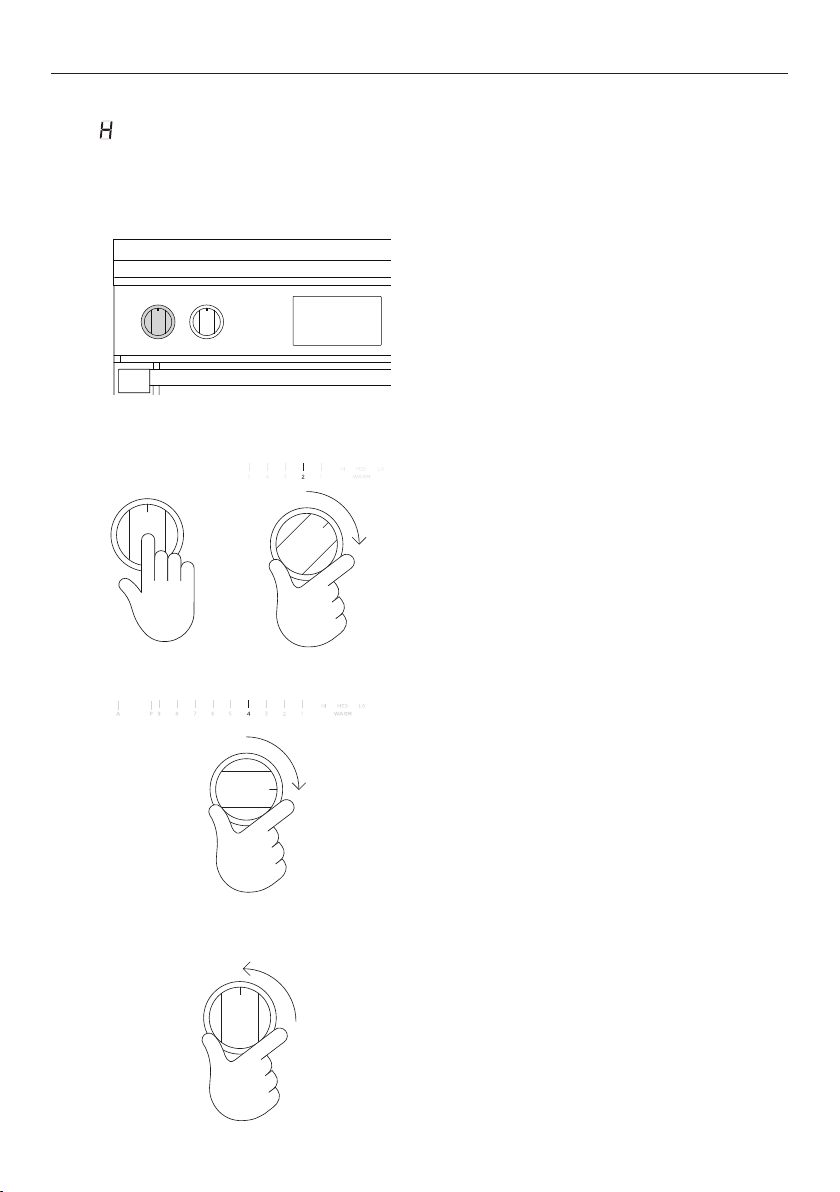
will show in the display of any cooking zones that are too hot to touch. This will
Place your pan onto the centre of your
desired cooking zone. Identify the dial that
corresponds to the selected cooking zone.
2
3
4
Push dial in and turn clockwise to set the
cooktop to the desired heat level.
To adjust the heat level during cooking,
turn the dial clockwise to any heat setting
between
Each cooking zone can also be set to one of
three WARM levels; HI (high), MED (medium)
or LO (low). These settings provide a
consistent low heat that ensures cooked
food remains hot.
When you have finished cooking, turn the
dial anti-clockwise back to the off position.
9 and 1.
42
Page 43

LOCKING THE COOKTOP CONTROLS
The cooktop control dials can be locked for cleaning and to prevent unintended use. When
the cooktop is locked the controls and cooktop display will remain unresponsive.
LOCKING THE COOKTOP
Ensure all cooking zones have been
turned to OFF. Push in and turn the
control dials for the two left cooking
zones counter clockwise to A and hold
until appears in the cooking display.
UNLOCKING THE COOKTOP
To unlock the cooktop, push in and turn
the control dials for the two left cooking
zones counter clockwise to A and hold
until disappears in the cooking display.
Your cooktop is now unlocked.
43
Page 44
SMARTZONES
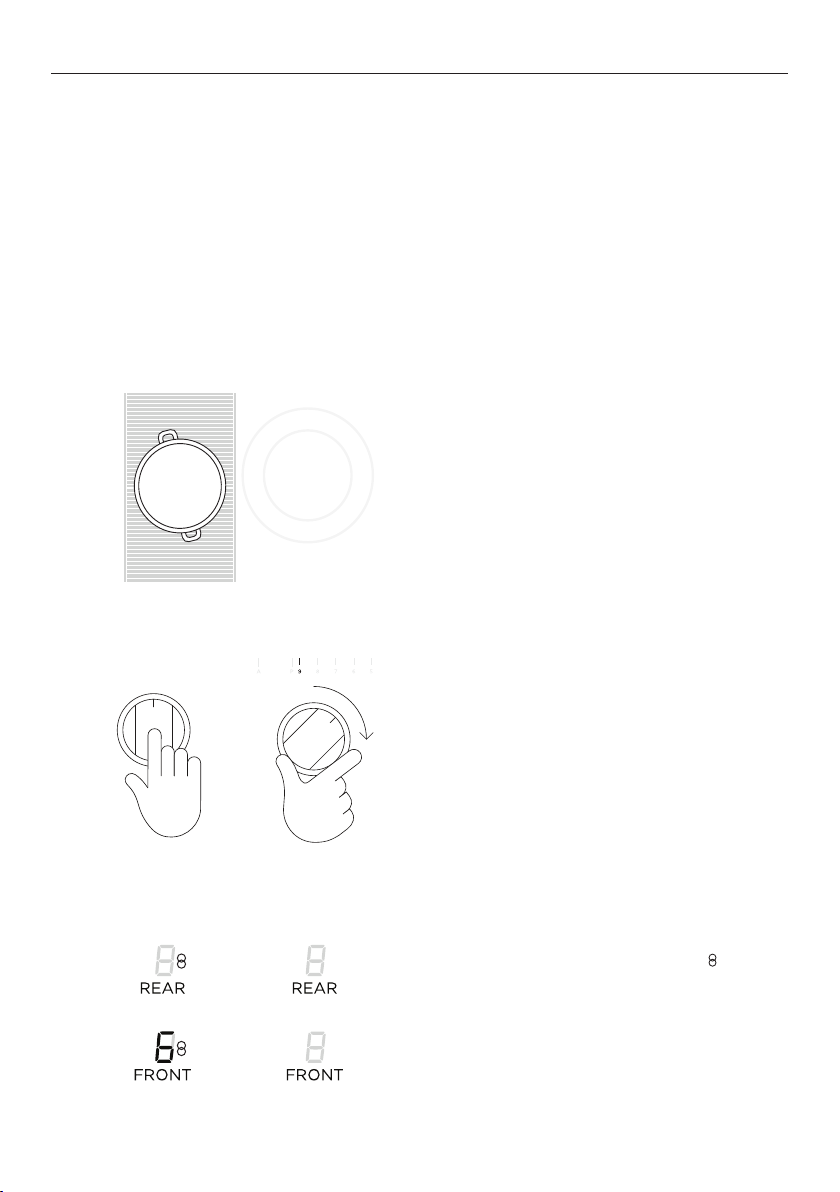
SmartZone links two cooking zones and controls them as one giving you the flexibility to
use large pans and griddles and easily handle bigger food items like pancakes.
IMPORTANT!
When a SmartZone is activated, the entire zone will heat up. To avoid burns, ensure
cutlery and magnetic items are never left on the cooktop.
Bridging SmartZones
The bridging zone function allows you to use two SmartZones together giving you a
larger cooking area. Your cookware will need to cover both cooking zones.
z
There may be a cooler area in the centre of the cooktop between the cooking zones.
You may need to move food around the pan to ensure even cooking.
z
When using bridging zones it is not possible to use the PowerBoost function.
1
2
3
Place your pan on the cooktop over the two
zones you wish to use, covering both zones.
Push in and turn both control dials for the
selected cooking zones clockwise to the
highest heat setting (
Turn both dials to
in the displays. The front cooking zone
display will show the heat setting.
Use the front cooking zone control dial to
adjust the heat setting for the bridged zone,
adjusting the rear zone will cancel bridging.
9).
P and hold until appears
44
Page 45
POWERBOOST
This feature enables you to sear meat or bring liquid to the boil very quickly. When a
cooking zone is set for PowerBoost, it uses more than 100% of the rated power of that
particular cooking zone, resulting in a boost of intense heat.
It is not possible to set PowerBoost for all cooking zones at the same time or if cooking
zones are bridged.
IMPORTANT!
PowerBoost heats food and liquids very quickly. Do not leave the cooktop unattended
when using this feature.
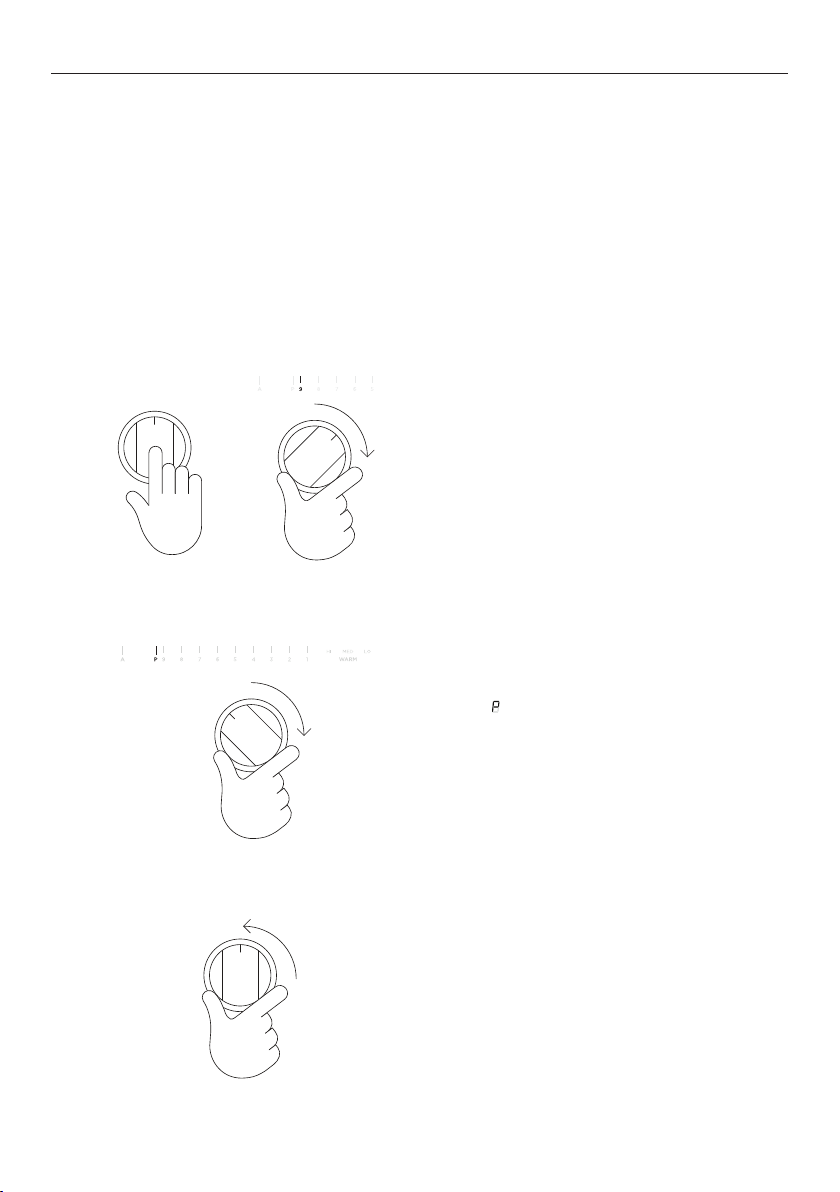
Setting a PowerBoost
1
2
3
Push dial in and turn clockwise to set the
cooktop to the highest heat level (9).
From this setting, turn and hold the dial at
P until appears in the display.
PowerBoost will remain on for a maximum
of 10 minutes. After 10 minutes the cooking
zone will automatically reduce its heat to
setting
When you have finished using PowerBoost,
turn the dial anti-clockwise to a lower heat
setting or back to the off position.
9.
45
Page 46
POWERBOOST
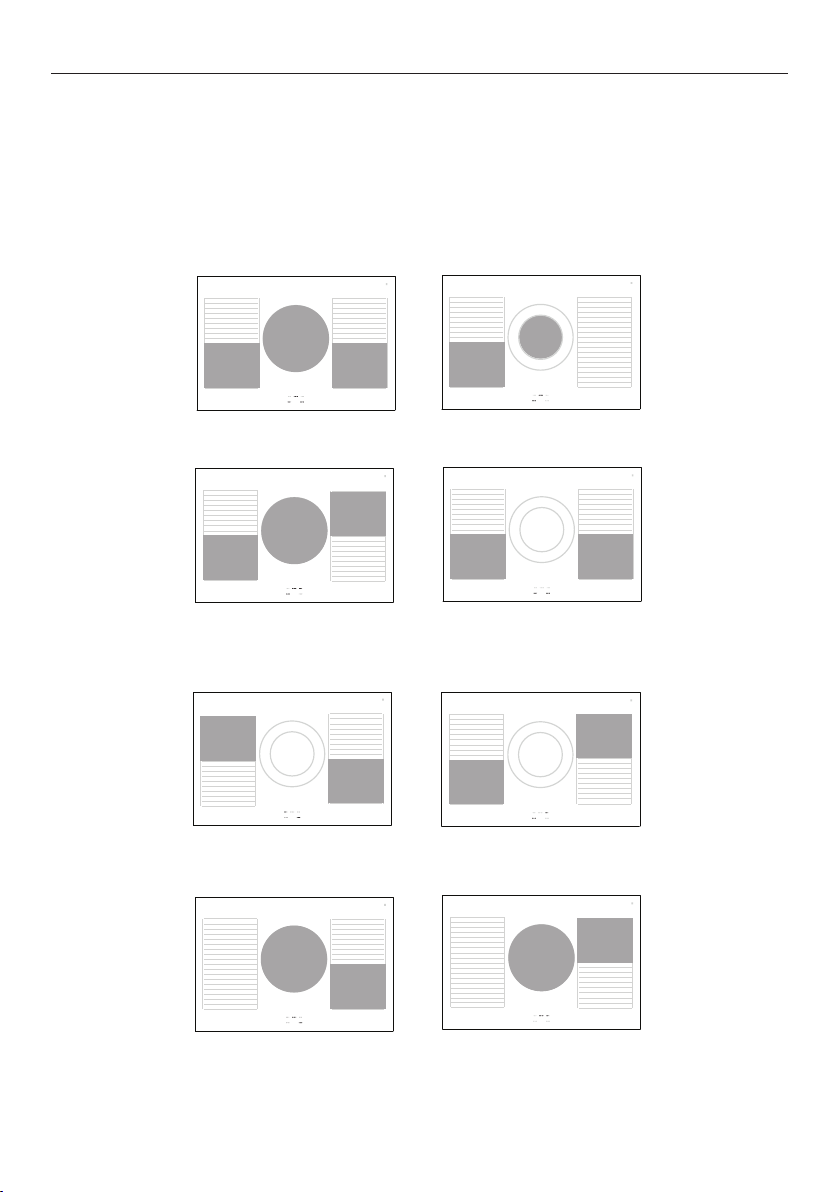
You can set two or three cooking zones for PowerBoost, as long as one is not behind
the other.
The following are examples of zones that can operate in PowerBoost mode simultaneously
without reduced power level. Other combination not shown below will result in
reduced power.
46
Page 47
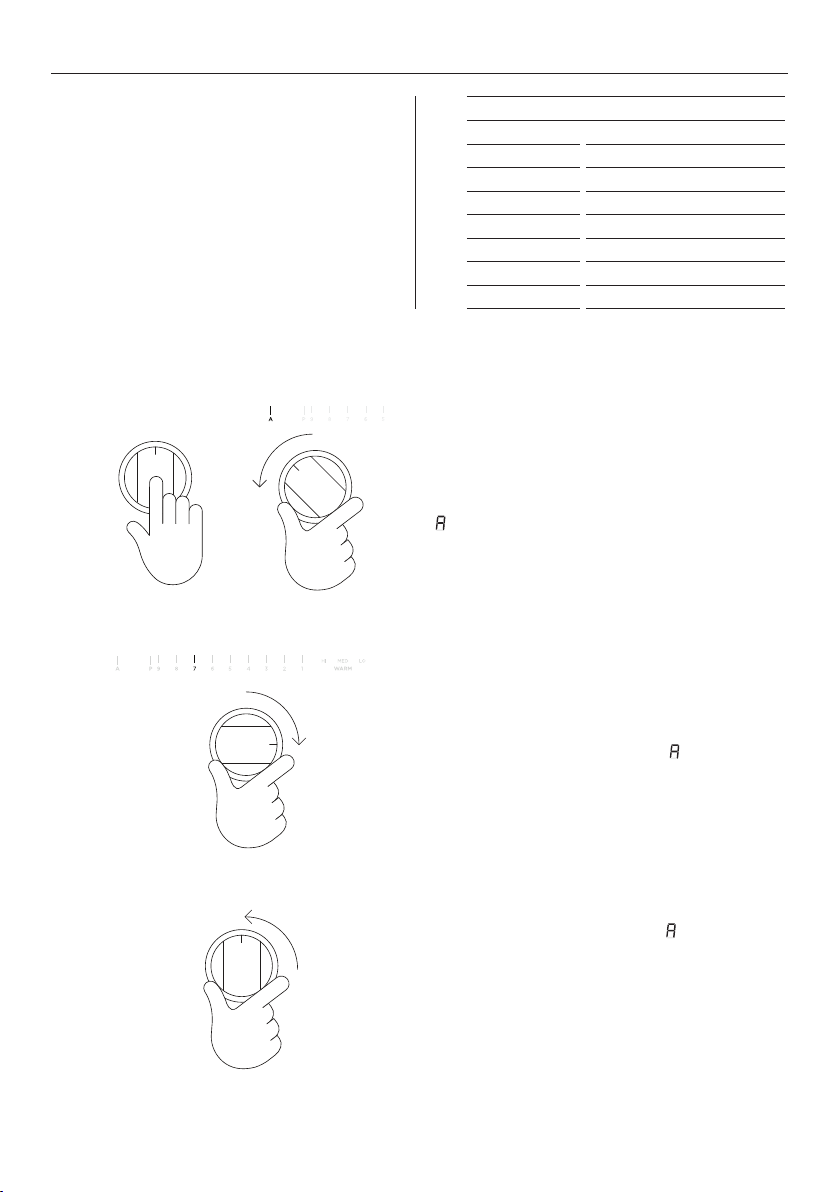
AUTO RAPIDHEAT
This feature lets you rapidly heat food
or liquid then automatically reduce
the temperature to a pre-selected
heat setting.
The amount of time the cooking zone will
rapidly heat for depends on the selected
heat setting.
Setting Auto RapidHeat
1
HEAT SETTING APPROXIMATE TIME AT RAPID HEAT
1 40 seconds
2 1 minute
3 2 minutes
4 3 minutes
5 4 minutes
6 7 minutes
7 2 minutes
8 3 minutes
Push in and turn control dial
counterclockwise to A. Hold dial at A until
appears in the cooking zone display.
2
3
Turn the control dial to the desired heat
setting. The heat setting and
in the display.
When RapidHeat is finished, will
stop flashing and the temperature will
automatically reduce to the selected
heat setting.
To cancel Auto RapidHeat turn the control
dial to a lower heat setting, back to the off
position or to
9.
will alternate
47
Page 48

AUTO RAPIDHEAT
Setting Auto RapidHeat bridging zone
1
2
3
Follow the guidance on page 41 to bridge
the desired cooking zones.
Turn the control dial for the front cooking
zone to
alternating in the cooking zone display.
The bridged zone is now set for
Auto RapidHeat.
To cancel bridging, turn the control dial
back to the off position.
A. Hold dial at A until begins
48
Page 49
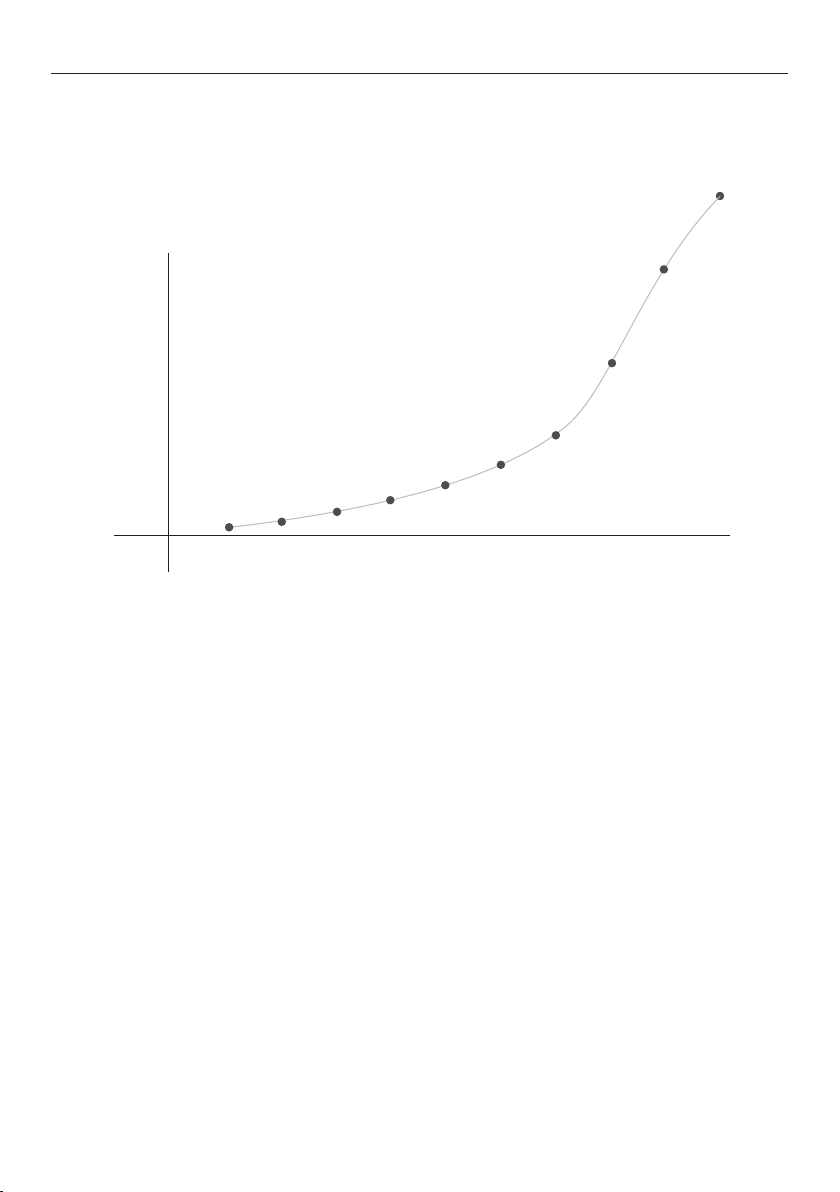
HEAT SETTINGS
The settings below are guidelines only. The exact setting will depend on several factors,
including your cookware and the amount you are cooking. Experiment with the cooktop to
find the settings that best suit your needs.
100
80
60
40
20
Percentage of rated power %
0
1 2 3 4 5 6 7 8 9 P
Heat setting
49
Page 50

USER PREFERENCE SETTINGS
The settings menu allows you to adjust your user preferences to:
z
Change the time
z
Change the clock format (12 hours, 24 hours or off)
z
Display the temperature in degrees Celsius or Fahrenheit
z
Adjust the volume of audio feedback
z
Turn timer alarms on or off
z
Turn audio tones on or off
z
Operate in Sabbath mode
z
Change the language of the display
z
Manage your WiFi connection
z
Adjust the brightness of the display
z
Restore all settings to factory original
IMPORTANT!
z
You cannot change the settings when your oven is cooking or has any automatic
cooking options set.
z
Tones and alarms will still sound for faults if audio settings are turned off.
50
Page 51
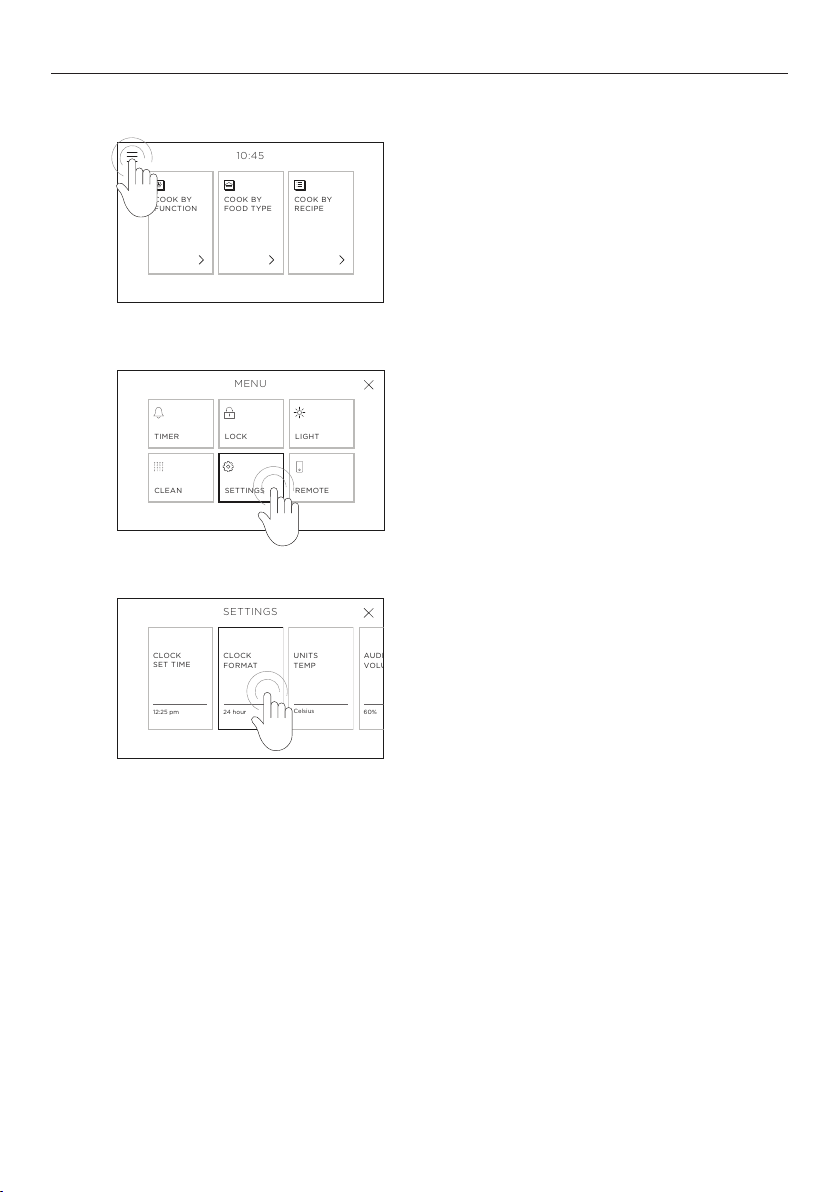
Changing the settings
10:45
COOK BY
FUNCTION
COOK BY
FOOD TYPE
COOK BY
RECIPE
10:45
COOK BY
FUNCTION
COOK BY
FOOD TYPE
COOK BY
RECIPE
MENU
TIMER
LOCK
LIGHT
CLEAN
SETTINGS
REMOTE
10:45
COOK BY
FUNCTION
COOK BY
FOOD TYPE
COOK BY
RECIPE
MENU
TIMER
LOCK
LIGHT
CLEAN
SETTINGS
REMOTE
SETTINGS
CLOCK
SET TIME
CLOCK
FORMAT
UNITS
TEMP
AUDIO
VOLUME
12:25 pm
24 hour
Celsius
60%
USER PREFERENCE SETTINGS
1
2
3
Touch the menu icon in the top left corner
of the screen.
SETTINGS.
Select
Select the setting you want to change,
adjust as needed then select
CONFIRM.
51
Page 52
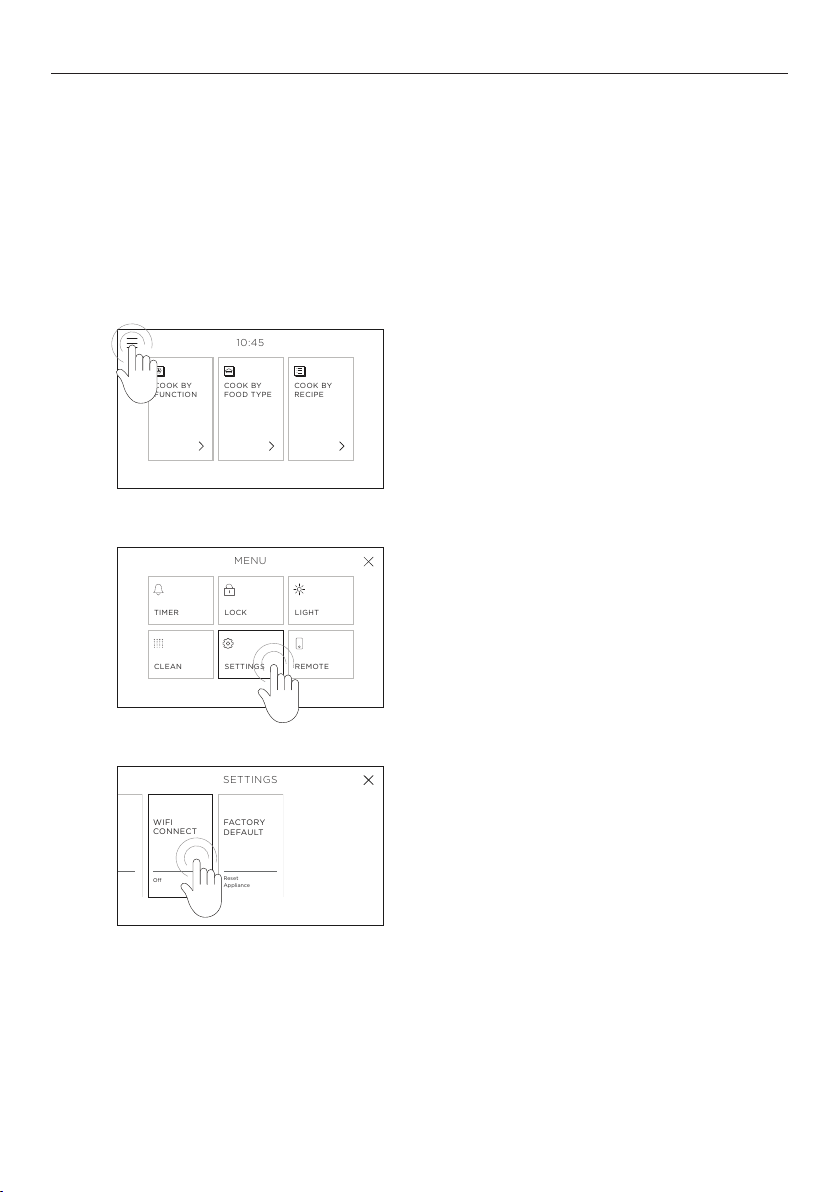
WIFI CONNECTION AND REMOTE MODE
10:45
COOK BY
FUNCTION
COOK BY
FOOD TYPE
COOK BY
RECIPE
10:45
COOK BY
FUNCTION
COOK BY
FOOD TYPE
COOK BY
RECIPE
MENU
TIMER
LOCK
LIGHT
CLEAN
SETTINGS
REMOTE
10:45
COOK BY
FUNCTION
COOK BY
FOOD TYPE
COOK BY
RECIPE
MENU
TIMER
LOCK
LIGHT
CLEAN
SETTINGS
REMOTE
WIFI
CONNECT
O
FACTORY
DEFAULT
Reset
Appliance
SETTINGS
Your oven can be connected to your home wireless network and operated remotely using
the FISHER & PAYKEL app.
Getting started
z
Ensure your home WiFi network is turned on.
z
You will be given step by step guidance on both your oven and mobile device.
z
It may take up to 10 minutes to connect your oven.
Connecting to your home wifi
1
2
3
Touch the menu icon in the top left corner
of the screen.
Select SETTINGS.
Select
WIFI CONNECT and follow the
onscreen guidance.
On your mobile device:
1 Download the
FISHER & PAYKEL app from www.fisherpaykel.com/connect
2 Register and create an account.
3 Add your appliance and set up the WiFi connection.
52
Page 53
WIFI CONNECTION AND REMOTE MODE
10:45
COOK BY
FUNCTION
COOK BY
FOOD TYPE
COOK BY
RECIPE
10:45
COOK BY
FUNCTION
COOK BY
FOOD TYPE
COOK BY
RECIPE
MENU
TIMER
LOCK
LIGHT
CLEAN
SETTINGS
REMOTE
10:45
COOK BY
FUNCTION
COOK BY
FOOD TYPE
COOK BY
RECIPE
MENU
TIMER
LOCK
LIGHT
CLEAN
SETTINGS
REMOTE
CONFIRM
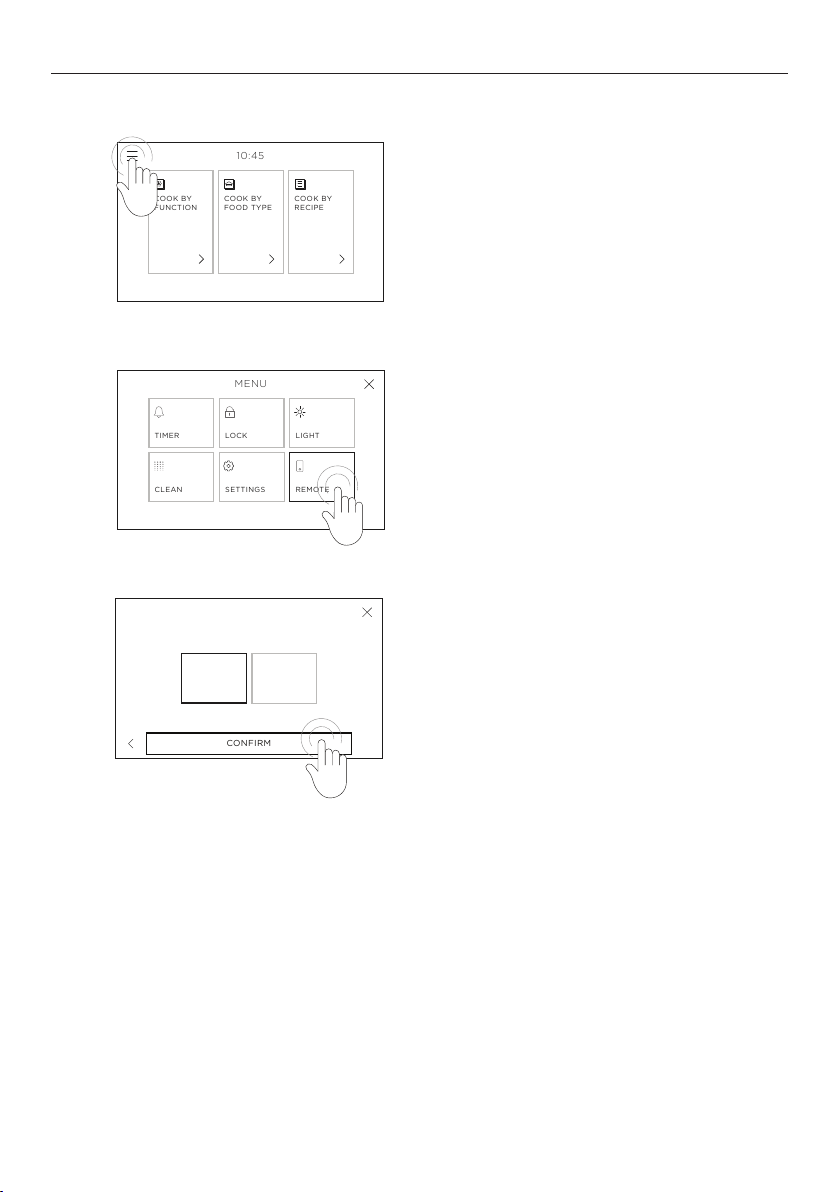
Enabling Remote Mode
1
2
3
REMOTE
ON OFF
Touch the menu icon in the top left corner
of the screen.
REMOTE.
Select
Select ON then press CONFIRM.
REMOTE MODE
is now enabled.
53
Page 54
SABBATH MODE | OVEN
AUDIO
ALARMS
AUDIO
TONES
SABBATH
MODE
DISPLAY
LANGUAGE
SETTINGS
On
OnOEnglish
10:45
STA RT
HEAT:
12
111510
14
9
13
h
AUDIO
ALARMS
AUDIO
TONES
SABBATH
MODE
DISPLAY
LANGUAGE
SETTINGS
On
OnOEnglish
SABBATH
MODE SET
10:45
STA RT
HEAT:
12
111510
14
9
13
h
AUDIO
ALARMS
AUDIO
TONES
SABBATH
MODE
DISPLAY
LANGUAGE
SETTINGS
On
OnOEnglish
This setting is designed for religious faiths
that observe a ‘no work’ requirement on
the Sabbath and applies to the oven only.
While your oven is in Sabbath Mode
it will not have the usual accurate
temperature control:
HEAT
LEVEL
Low 75 – 100 170 – 210
Moderate 155 – 180 310 – 360
High 185 – 210 360 – 410
APPROXIMATE
TEMP (°C)
APPROXIMATE
TEMP (°F)
APPLICATION
Keep hot food
warm
Reheat cooked
food from cold
Cooking raw
food
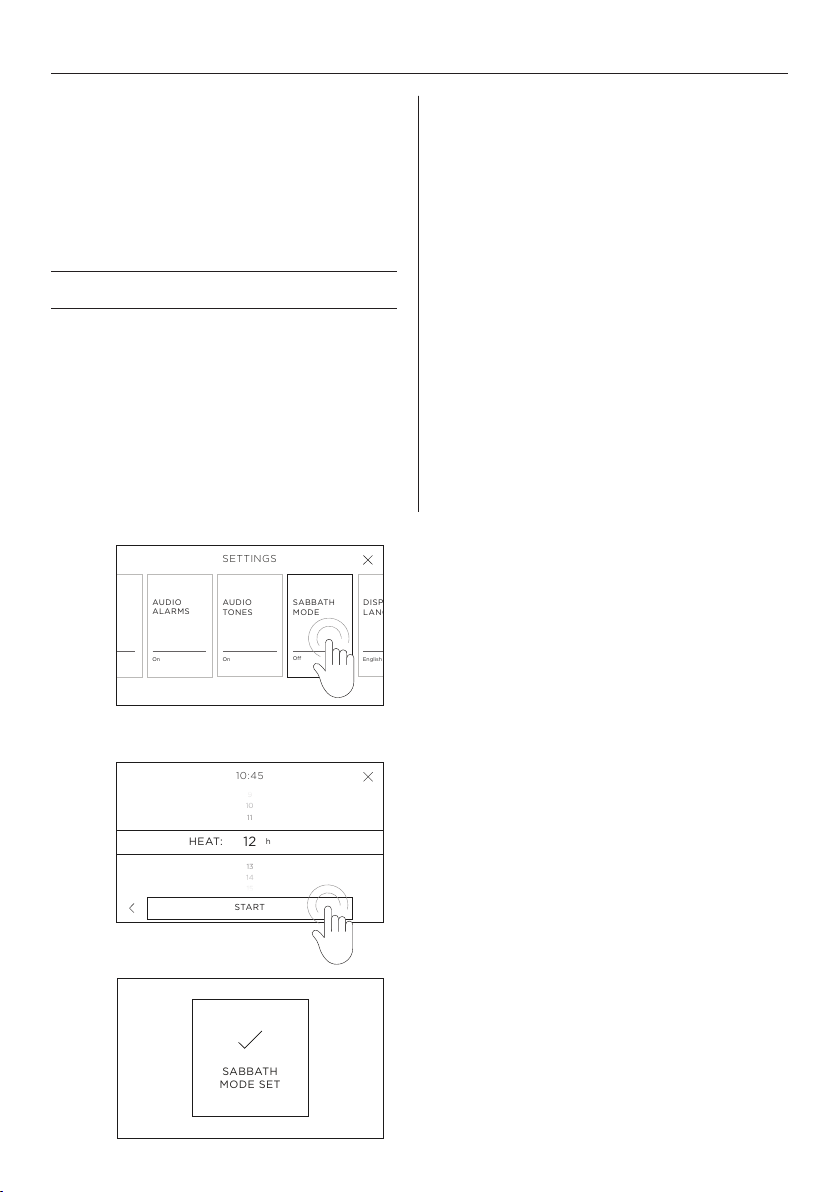
Setting Sabbath Mode
1
While your oven is in Sabbath Mode:
z
the oven will not react to any actions
z
lights, fans and display will not respond
to the door opening
z
if the door is open for too long, this
may result in loss of temperature
z
no tones or alarms will sound and alert
codes or temperature changes will not
be displayed
z
the oven light can be set to remain
either on or off
z
the oven will remain in Sabbath Mode
until cancelled
z
CLASSIC BAKE is the only
function available
z
Wifi will be disconnected
z
To maintain the cavity temperature
minimise the number of door openings
In the settings menu select
SABBATH MODE
and follow the instructions on the screen.
54
2
3
Set your desired heating level and select
whether you want the oven light
ON or OFF
during cooking.
Scroll to set your desired cook time and
then select
STA R T . You can set the oven to
heat for up to 74 hours.
Sabbath Mode is now set.
The oven will heat for the set length of
time and then turn off.
The oven will remain in Sabbath Mode
until it is cancelled.
Page 55
Cancelling Sabbath Mode
Press and hold to cancel
SABBATH MODE
SABBATH
MODE SET
10:45
STA RT
HEAT:
12
11
15
10
14
9
13
h
AUDIO
ALARMS
AUDIO
TONES
SABBATH
MODE
DISPLAY
LANGUAGE
SETTINGS
On
OnOEnglish
Press and hold to cancel
SABBATH MODE
SABBATH MODE
CANCELLED
SABBATH
MODE SET
10:45
STA RT
HEAT:
12
11
15
10
14
9
13
h
AUDIO
ALARMS
AUDIO
TONES
SABBATH
MODE
DISPLAY
LANGUAGE
SETTINGS
On
OnOEnglish
SABBATH MODE | OVEN
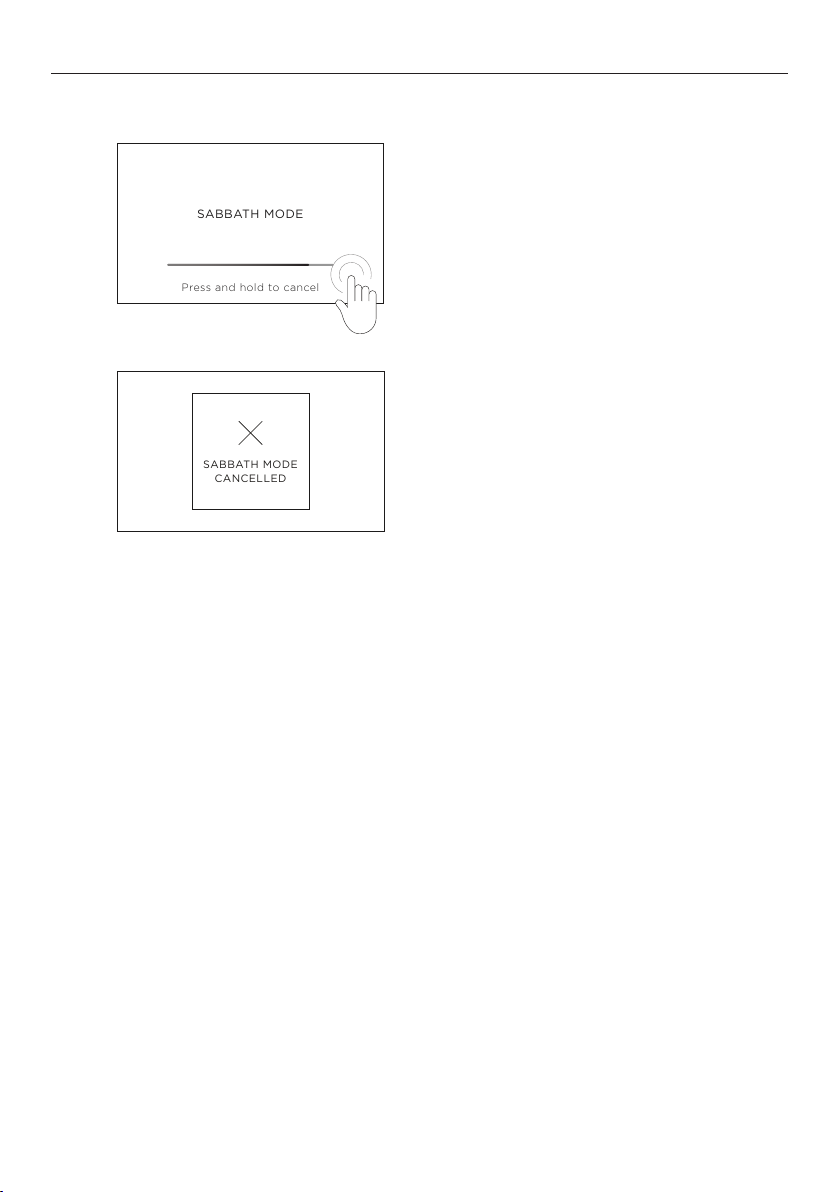
1
2
Touch and hold the screen until the bar fills.
SABBATH MODE CANCELLED will appear and
you can now use your oven normally.
Oven operation during Sabbath Mode has been developed in collaboration with Star-K (USA - www.star-k.org), KF-FedTech (Federation of
Synagogues, UK - www.federation.org.uk/fed-tech/) and Mehadrin Limited (Australia – www.mehadrink.com). Further information for using the
product in compliance with Jewish Law can be found on their websites
55
Page 56

CARE AND CLEANING
ALWAY S NEVER
• Read these instructions and the 'Safety and warnings'
section before you start cleaning your freestanding
cooker.
• Before cleaning or removing any part, make sure
that everything on the freestanding cooker has been
turned off.
• Unless suggested otherwise in the chart following,
allow any part to cool to a safe temperature before
cleaning. If you do need to handle a warm or hot
part take extreme care. Wear long protective mitts to
avoid burns from steam or hot surfaces.
• Try using any cleaner on a small area first, to ensure it
doesn’t stain.
• See the pages following this chart for instructions
on removing and replacing different parts of the
freestanding cooker for cleaning or maintenance.
• Ensure the anti-tip device is re-engaged if you move
the freestanding cooker for cleaning. Failure to do this
may result in the oven tipping which may cause death.
• Use aerosol cleaners until the freestanding
cooker has completely cooled. The
propellant substance in these cleaners
could catch fire in the presence of heat.
• Let soiling or grease accumulate anywhere
in or on the freestanding cooker. This will
make future cleaning more difficult and
may present a fire hazard.
• Use any abrasive or harsh cleaners, cloths,
scouring pads or steel wool. These will
scratch your freestanding cooker and
damage its appearance.
• Use a steam cleaner to clean any part of
the freestanding cooker.
• Lift the black grill and griddle frames off
the cooktop.
Manual cleaning
WHAT? HOW? IMPORTANT!
Door frame exterior
Control panel
Back trim
Control dials
Oven handles
Toe kick
56
• Soften any stubborn stains
using a hot soapy cloth before
cleaning with a solution of mild
detergent and hot water. Wipe
dry with a microfiber cloth.
• For extra shine, use a suitable
stainless steel cleaner and
polish, following manufacturer’s
instructions. Always rub the
stainless steel in the direction of
the polish lines.
• Wipe with a damp cloth using a
solution of mild detergent and
hot water then dry thoroughly
with microfiber cloth.
• If desired, the dials can be
removed for cleaning. Before
removing, ensure that dial is set
to OFF. Remove only one dial
at a time ensuring that you refit
completely and correctly.
• Always read the label to ensure
your stainless steel cleaner does
not contain chlorine compounds
as these are corrosive and may
damage the appearance of
your cooktop.
• Do not use stainless steel cleaner
on the dials, oven handles, or the
toe kick. These are not stainless
steel parts and their surface may be
damaged by stainless steel cleaner.
• When cleaning the back trim and
the top of the oven door, ensure
liquid does not run down the vents.
• Do not use stainless steel cleaner
on these parts, as doing so may
damage their coating.
• The dials are not interchangeable:
if removed for cleaning, do so one
at a time. This is to ensure that they
are replaced correctly.
Page 57

CARE AND CLEANING
WHAT? HOW? IMPORTANT!
Enamel
oven interior –
light soiling
Enamel
oven interior –
stubborn soiling
Side racks
Oven shelves To remove stubborn soiling, scrub
Grill pan and rack Pre-soak any stubborn soiling
Oven door glass
(interior)
Oven door glass
(exterior)
Oven door gasket Avoid cleaning this part.
Wipe with a damp cloth and
a solution of hot water and
mild detergent then dry with a
soft cloth.
Note: the oven door may be
removed for ease of access.
SELF CLEAN cycle. See
Use the
'Using Self Clean' for instructions.
Pre-soak any stubborn, soiling,
then clean with a solution of mild
detergent and hot water and wipe
dry with a microfiber cloth. These
parts are dishwasher safe.
with a damp, soap-filled, nonabrasive pad, then wipe dry.
Apply a chrome cleaner with a
damp sponge or cloth following
manufacturer instructions. the
wipe and dry.
in a solution of mild detergent
and hot water. Wash by hand or
in a dishwasher.
This will be cleaned during a
SELF CLEAN cycle. Wipe down
with hot water to loosen stains
before starting
Clean using a soft cloth and
a mixture of warm water and
dishwashing liquid or glass cleaner.
To remove large food particles,
dampen a sponge with hot water
and gently wipe — do not rub
Press a towel gently on the gasket
to dry.
SELF CLEAN.
• To prevent soiling from becoming
‘baked on’, we recommend
removing any easy-to-reach spills,
from the enamel after each use.
• This will reduce the need for using
SELF CLEAN cycle frequently.
the
Don’t use oven cleaners in the cavity.
Oven cleaners are caustic and
may permanently stain or damage
some surfaces.
Do not wash the main oven shelves in
the dishwasher - doing so will remove
the lubricating grease in the slides,
stopping them from running smoothly.
Do not use oven cleaners or any
other harsh/abrasive cleaners, cloths,
scouring pads to clean These scratch
the glass, which can result in the glass
cracking and shattering.
Do not use any cleaning agent on
the gasket.
The gasket is essential for a good
seal. Take care not to rub, displace, or
damage it.
57
Page 58

CARE AND CLEANING
WHAT? HOW? IMPORTANT!
Everyday soiling on
glass (fingerprints,
marks, stains left by
food or non-sugary
spillovers on the glass)
Boil overs, melts, acidic
sauces or marinades and
hot sugary spills on the
glass
Switch the power to the cooktop
off at the wall. Apply cooktop
cleaner to a clean lint-free cloth
and rub gently while the glass is
still warm (but not hot!). Rinse
and wipe dry with a clean cloth or
paper towel.
Switch the power to the cooktop
back on at the wall.
Remove these immediately with
a fish slice, palette knife or razor
blade scraper suitable for ceramic
glass cooktops, but beware of hot
cooking zone surfaces:
Switch the power to the cooktop
off at the wall.
Hold the blade or utensil at a 30o
angle and scrape the soiling or spill
to a cool area of the cooktop.
Clean the soiling or spill up with a
dish cloth or paper towel.
• When the power to the cooktop
is switched off, there will be no
‘hot surface’ indication but the
cooking zone may still be hot!
Take extreme care.
• Heavy-duty scourers, some nylon
scourers and harsh/abrasive
cleaning agents may scratch the
glass. Always read the label to
check if your cleaner or scourer
is suitable.
• Never leave cleaning residue
on the cooktop: the glass may
become stained.
• Remove stains left by melts and
sugary food or spillovers as soon
as possible. If left to cool on the
glass, they may be difficult to
remove or even permanently
damage the glass surface.
• Cut hazard: when the safety
cover is retracted, the blade in
a scraper is razor-sharp. Use
with extreme care and always
store safely and out of reach of
children.
58
Page 59
CARE AND CLEANING
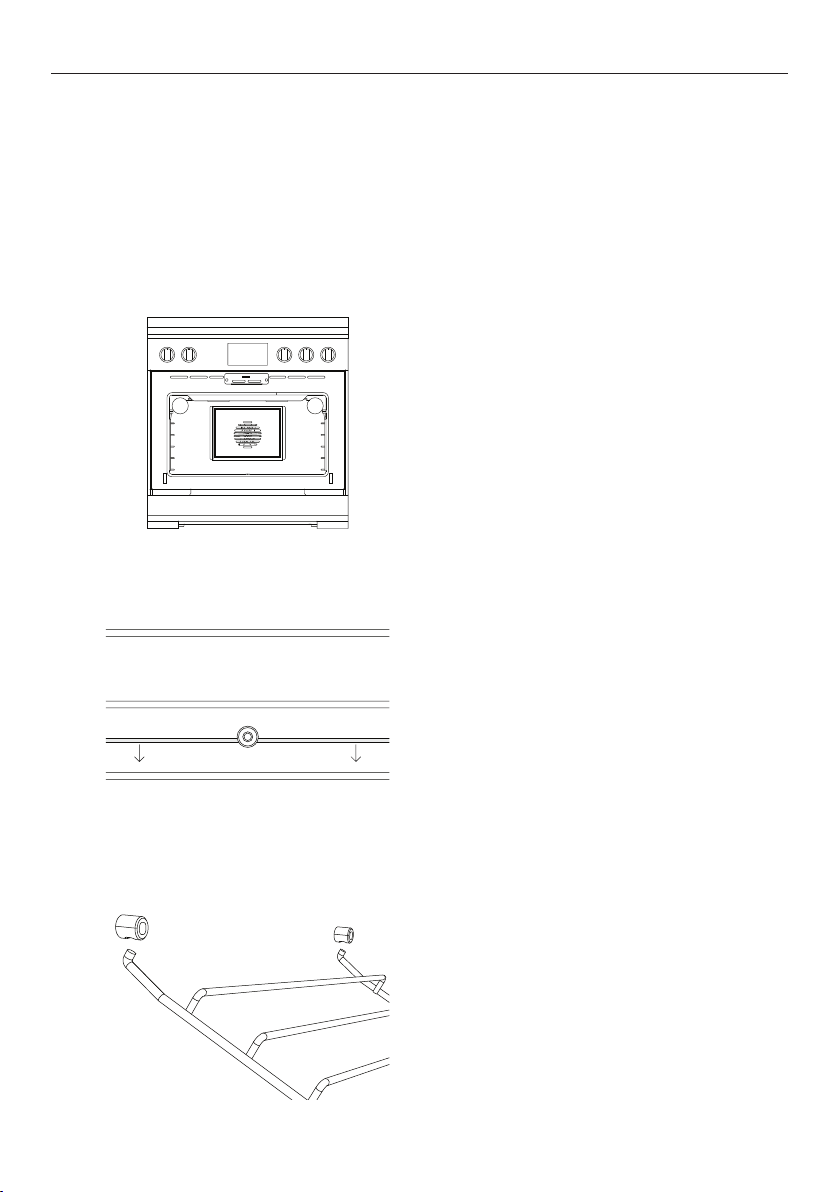
Removing the side racks
Remove the side racks to make cleaning the oven easier. The side racks must be removed
before using the
SELF CLEAN function.
IMPORTANT!
Always turn the oven off at the wall first. Ensure the oven has cooled down completely
before starting.
1
2
3
Slide out all shelves and remove.
Gently pull down on the retaining wire
from underneath the lock stud. The
retaining wire will pop out. Unscrew
the fixing nut and set aside.
Swing the bottom of the side rack up
towards the center of the oven until it
is almost horizontal. Slide the prongs
at the top out of the mounting slots.
59
Page 60
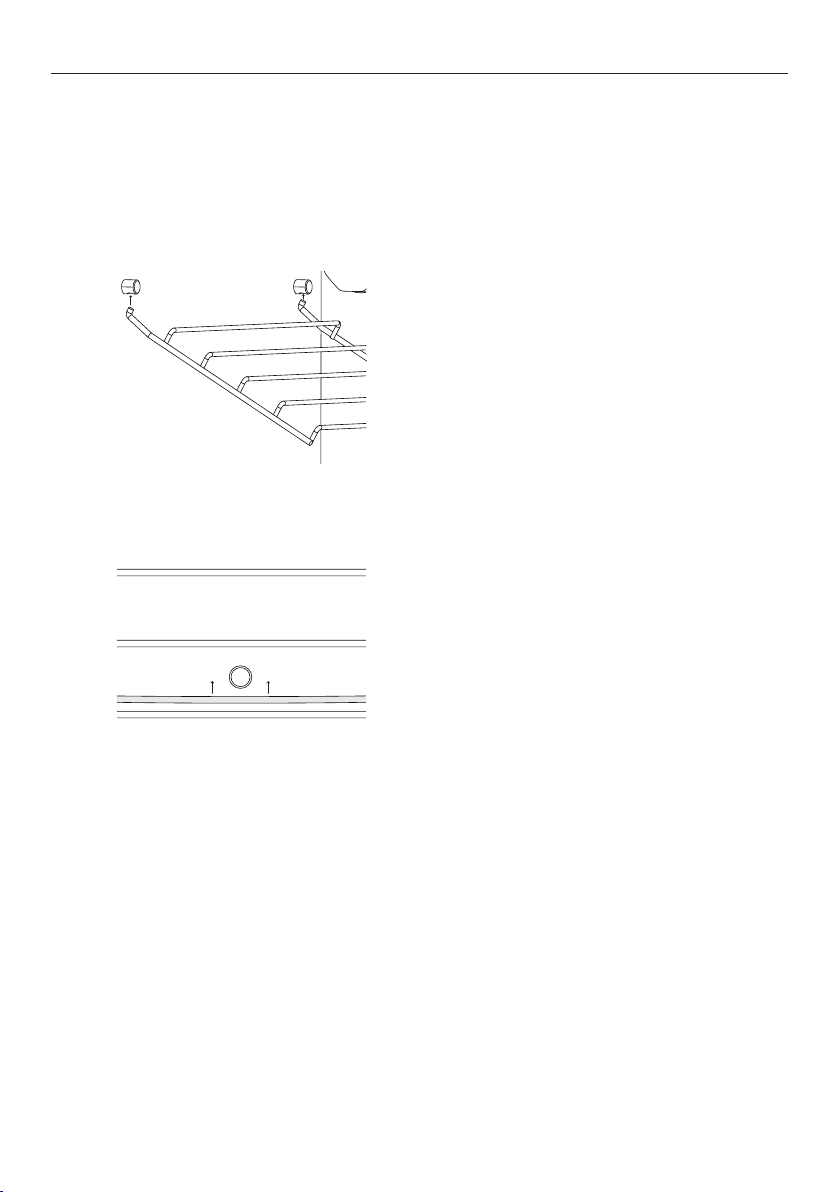
CARE AND CLEANING
Refitting the side racks
IMPORTANT!
Always turn the oven off at the wall first. Ensure the oven has cooled down completely
before starting.
Supporting the side rack from
1
2
underneath, hold it almost horizontally
and locate the prongs into the
mounting slots.
Ensure the prongs are fully inserted
into the slots, then lower the side rack
carefully and gently push the retaining
wire underneath the lock stud.
60
Page 61
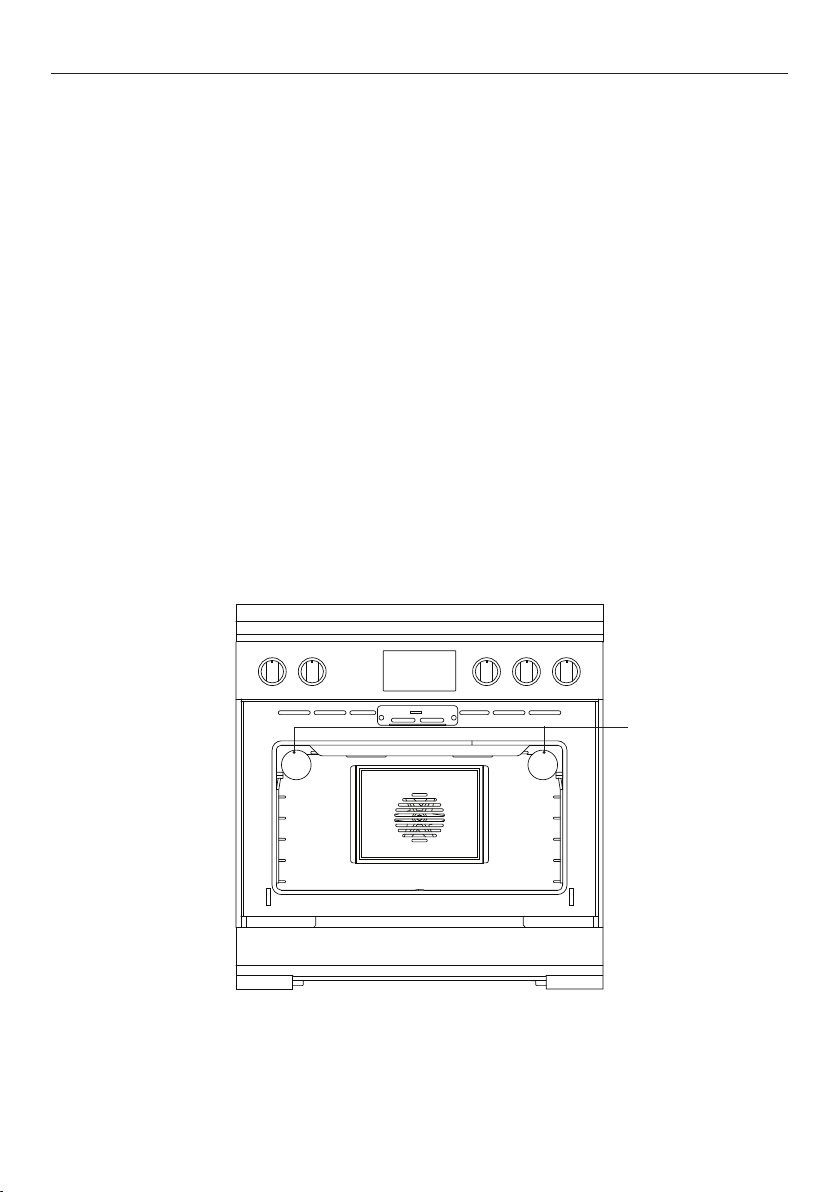
CARE AND CLEANING
Replacing the oven light bulbs
IMPORTANT!
Use a 40 W, 120 V appliance light bulb for replacement. Do not use a standard light bulb
in any oven, the heat will break it.
Changing the bulb
1 Allow the oven (including the lamp cover and the bulb) to cool completely.
2 Remove any shelves that may get in the way.
3 Remove the door if the lamp will be hard to reach.
4 Turn the power supply to the freestanding cooker off at the main fuse or circuit
breaker panel. If you don’t know how to do this, contact an electrician.
IMPORTANT!
Failure to disconnect the freestanding cooker from the power supply may result in death
or electrical shock.
5 Remove the lamp cover: turn it counterclockwise to unscrew.
6 Remove the faulty bulb and replace with a new 40 W appliance light bulb.
7 Replace the lamp cover: turn it clockwise to tighten.
8 Turn the power supply to the freestanding cooker back on at the main fuse or circuit
breaker panel.
Lamp covers
61
Page 62
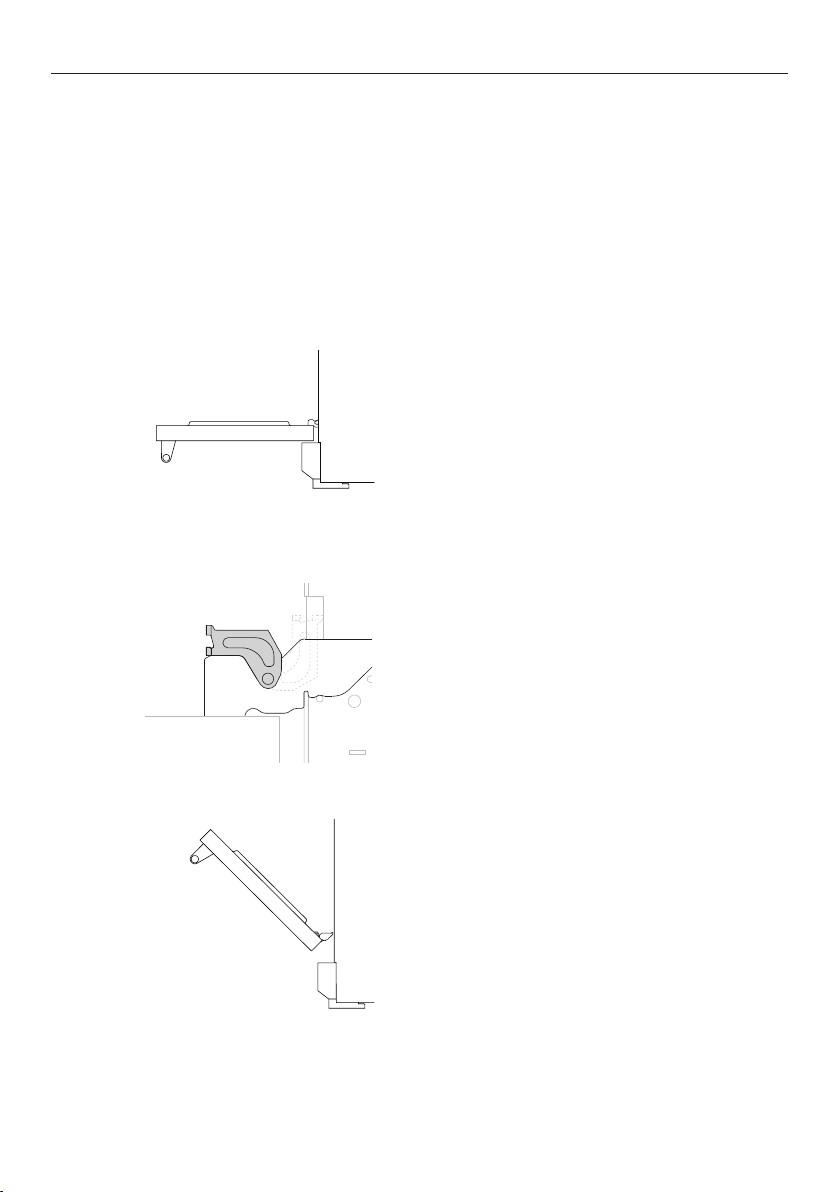
CARE AND CLEANING
Removing and refitting the oven door
IMPORTANT!
z
Take care, the oven door is heavy.
z
Do not lift the oven door by its handle. Doing so may damage the door.
z
Ensure the oven and the door are cool before you begin to remove the door.
z
Before removing the door, ensure there is a large enough clear, protected surface
in the kitchen to rest the door on.
To remove the door
Open the door completely.
1
62
2
3
Open the hinge locks fully on both sides.
Holding the door on both sides, lift door
back up to 45° and carefully pull the door
out and away from the hinges.
Page 63
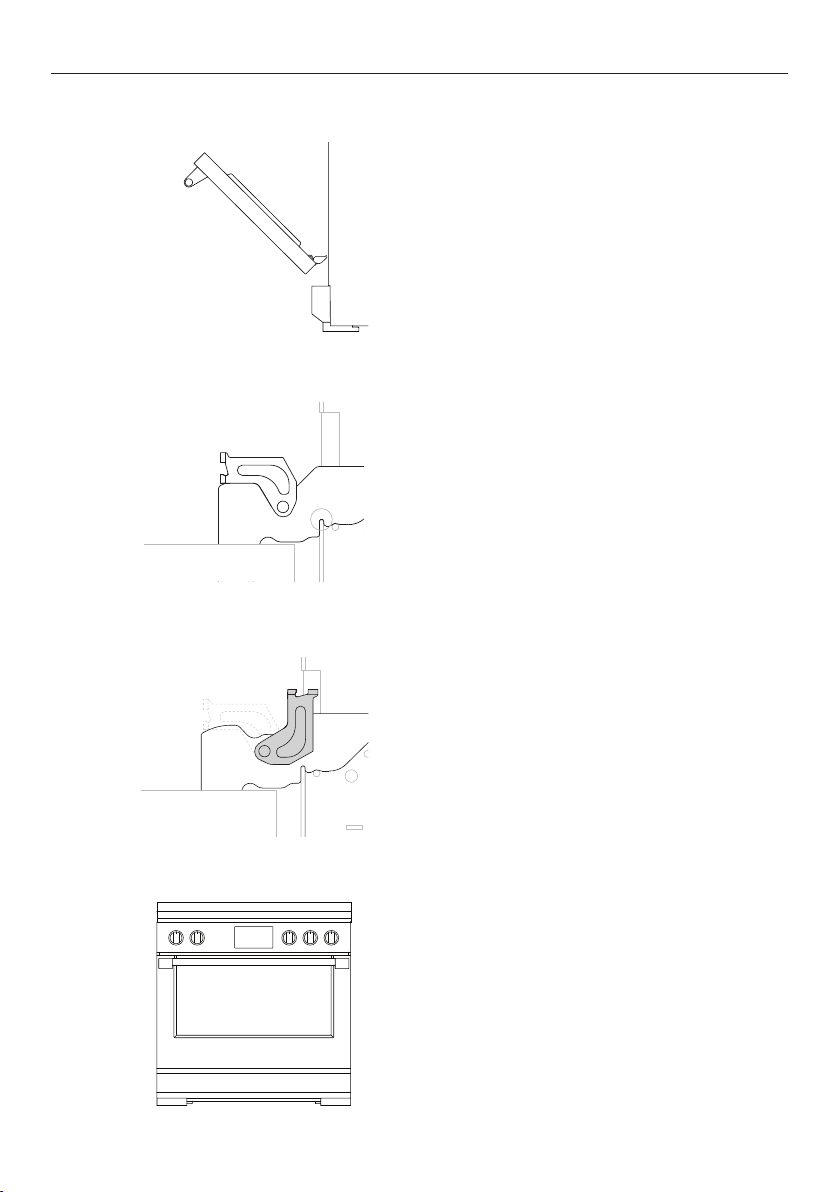
To refit the door
1
CARE AND CLEANING
Holding the door at 45°, carefully align the
hinge tongues with the hinge slots. Push
the door in until you feel the latches locate
into position on each side.
2
3
4
Open the door completely and ensure both
hinges are secured by the correct notches.
Rotate the locks up into the closed
position ensuring they rest inside the slots
completely. Note: Incorrect installation will
prevent door from correctly sealing.
Close the oven door ensuring that when
closed, the door is vertical and parallel to
any surrounding cabinetry.
63
Page 64
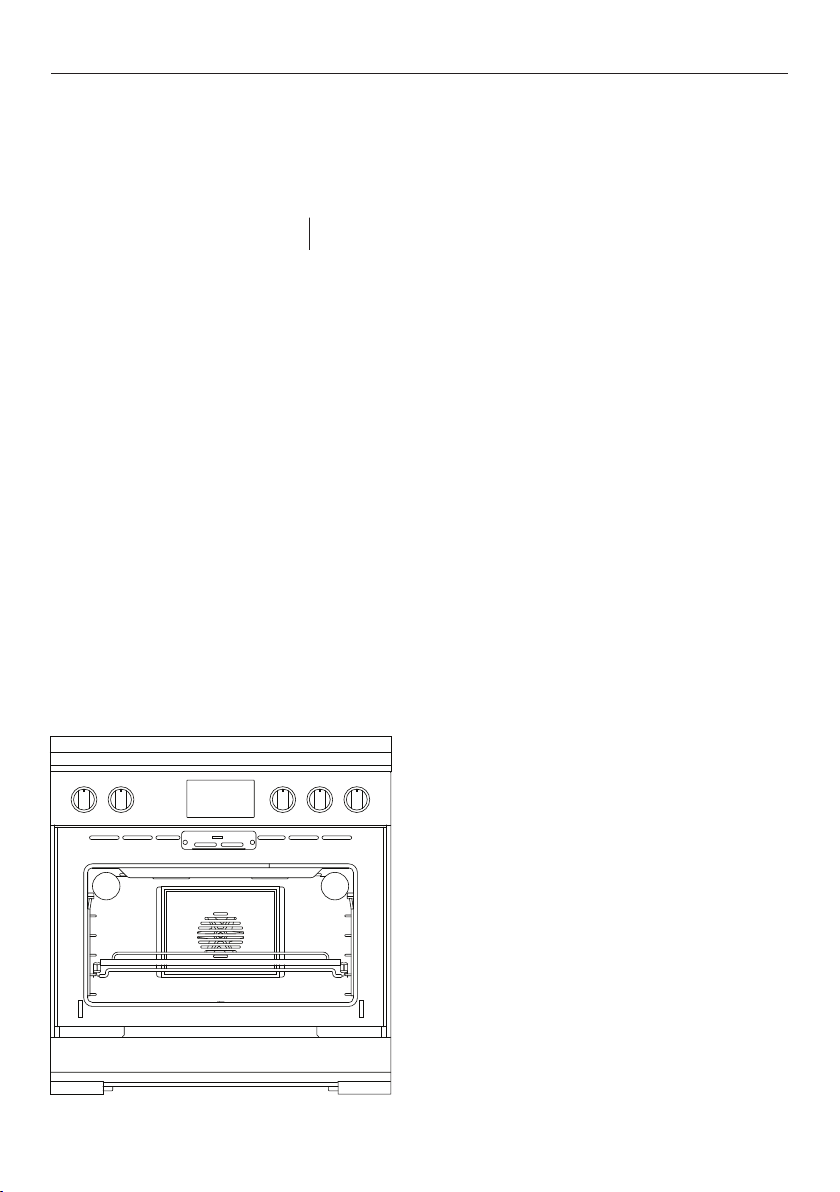
USING SELF CLEAN
Self Clean takes care of the mess and grime that is traditionally associated with oven
cleaning. The extremely high temperature of the pyrolytic clean cycle burns off and breaks
down grease and grime deposits. All that is left is a small amount of ash that can easily be
wiped up.
There are two clean cycles available:
STANDARD CLEAN (5hr 20 min)
For normal or heavy soiling
LIGHT CLEAN (4hr 20min)
For light soiling
IMPORTANT!
z
You must clean the inside glass door panel BEFORE starting a clean cycle. Failure to do
so may result in permanent staining or marking of the door glass.
See 'Care and cleaning' for our recommendations on how to do this.
z
Do not use oven cleaners, any degreasing cleaners, or oven liners.
z
Remove all oven shelves, trays, bakeware and utensils from the oven before starting
a clean cycle. If left in the oven they will be permanently damaged; items made from
combustible material (eg wood, fabric, plastic) may even catch fire.
z
Do not use your oven to clean miscellaneous parts.
z
Make sure the room is well ventilated.
z
Before starting a clean cycle, make sure you move any pet birds to another, closed and
well-ventilated room. Some pet birds are extremely sensitive to the fumes given off
during a clean cycle, and may die if left in the same room.
z
During a clean cycle, the oven reaches higher temperatures than it does for cooking.
Under such conditions, the surfaces may get hotter than usual and children should be
kept away.
z
The oven door will be locked during the clean cycle.
z
If there are cracks or flaws on any of the oven door glass panes, if the oven seal is
damaged or worn, or if the door does not close properly, do not start a clean cycle.
Contact a Fisher & Paykel trained and supported service technician or Customer Care.
Before you start
1 Remove all shelves, accessories and
utensils.
2 Wipe up any spills, and along the inner
edge of the oven surface around the
seal. Failure to do so may discolor the
oven surface.
Avoid cleaning the seal itself as this may
cause damage.
3 Check the inner glass pane of the oven
door. If it has soiling on it, you will need
to clean it manually before starting a
Clean cycle. For instructions, see 'Care
and cleaning'.
If soiling is left on the glass, it will
become burnt on during the clean cycle,
making it very difficult to remove.
4 Close the oven door firmly.
64
Page 65
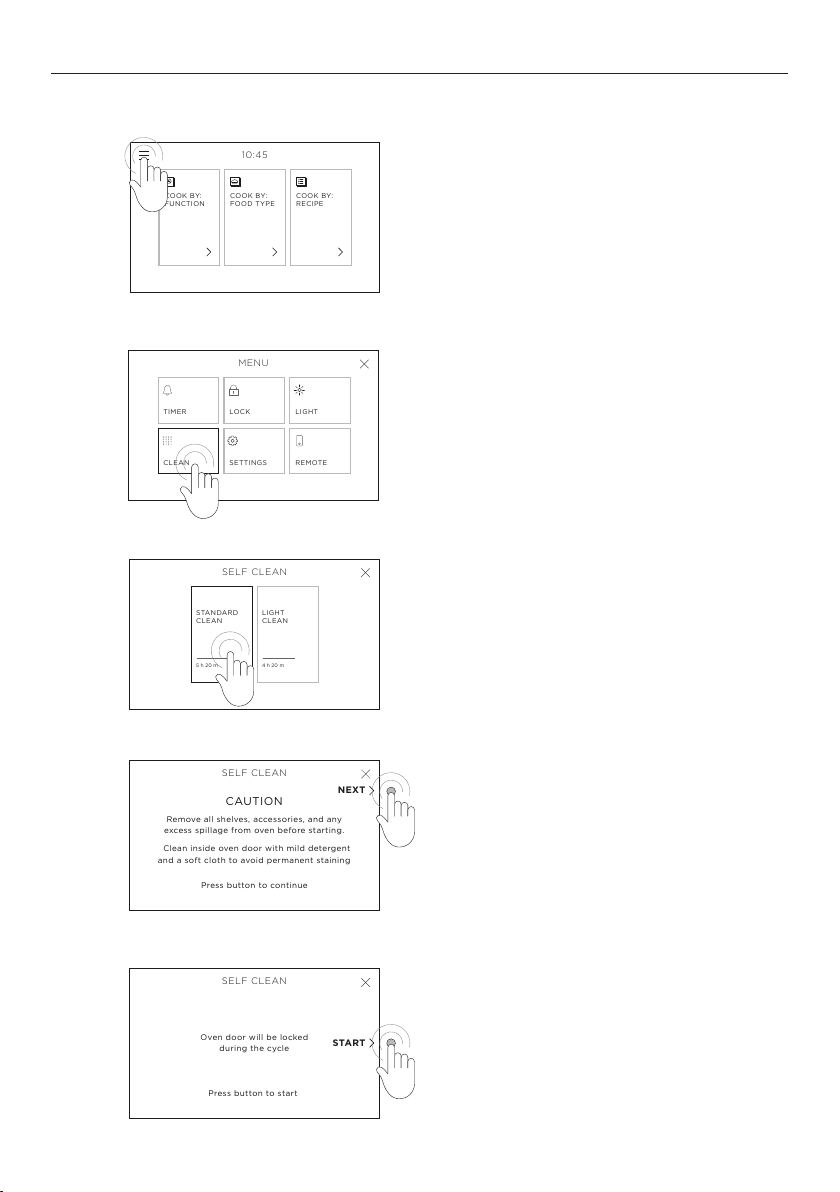
Setting Self Clean
10:45
COOK BY:
FUNCTION
COOK BY:
FOOD TYPE
COOK BY:
RECIPE
11:15
REMAINING:
30 m
END:
14:15
SELF CLEAN
CANCEL
10:45
COOK BY:
FUNCTION
COOK BY:
FOOD TYPE
COOK BY:
RECIPE
MENU
TIMER
LOCK
LIGHT
CLEAN
SETTINGS
REMOTE
SELF CLEAN
COMPLETE
11:15
REMAINING:
30 m
END:
14:15
SELF CLEAN
CANCEL
10:45
COOK BY:
FUNCTION
COOK BY:
FOOD TYPE
COOK BY:
RECIPE
MENU
TIMER
LOCK
LIGHT
CLEAN
SETTINGS
REMOTE
STANDARD
CLEAN
LIGHT
CLEAN
4 h 20 m
5 h 20 m
SELF CLEAN
SELF CLEAN
COMPLETE
11:15
REMAINING:
30 m
END:
14:15
SELF CLEAN
CANCEL
Clean inside oven door with mild detergent
and a soft cloth to avoid permanent staining
Remove all shelves, accessories, and any
excess spillage from oven before starting.
CAUTION
Press button to continue
SELF CLEAN
NEXT
SELF CLEAN
COMPLETE
11:15
REMAINING:
30 m
END:
14:15
SELF CLEAN
CANCEL
Clean inside oven door with mild detergent
and a soft cloth to avoid permanent staining
Remove all shelves, accessories, and any
excess spillage from oven before starting.
CAUTION
Press button to continue
SELF CLEAN
NEXT
SELF CLEAN
COMPLETE
11:15
REMAINING:
30 m
END:
14:15
SELF CLEAN
CANCEL
Press button to start
SELF CLEAN
Oven door will be locked
during the cycle
START
Clean inside oven door with mild detergent
and a soft cloth to avoid permanent staining
Remove all shelves, accessories, and any
excess spillage from oven before starting.
CAUTION
Press button to continue
SELF CLEAN
NEXT
USING SELF CLEAN
1
2
3
Touch the menu icon in the top left corner
of the screen.
CLEAN.
Select
Select
STANDARD CLEAN or LIGHT CLEAN.
4
5
Follow the on-screen instructions and
press the button to the right of the screen
to continue.
Press the button to the right of the screen to
start the clean cycle.
For your safety, the oven door will be locked
shut during the cycle. If the door is not shut
properly or is reopened before Self Clean
starts, the cycle will be cancelled.
65
Page 66
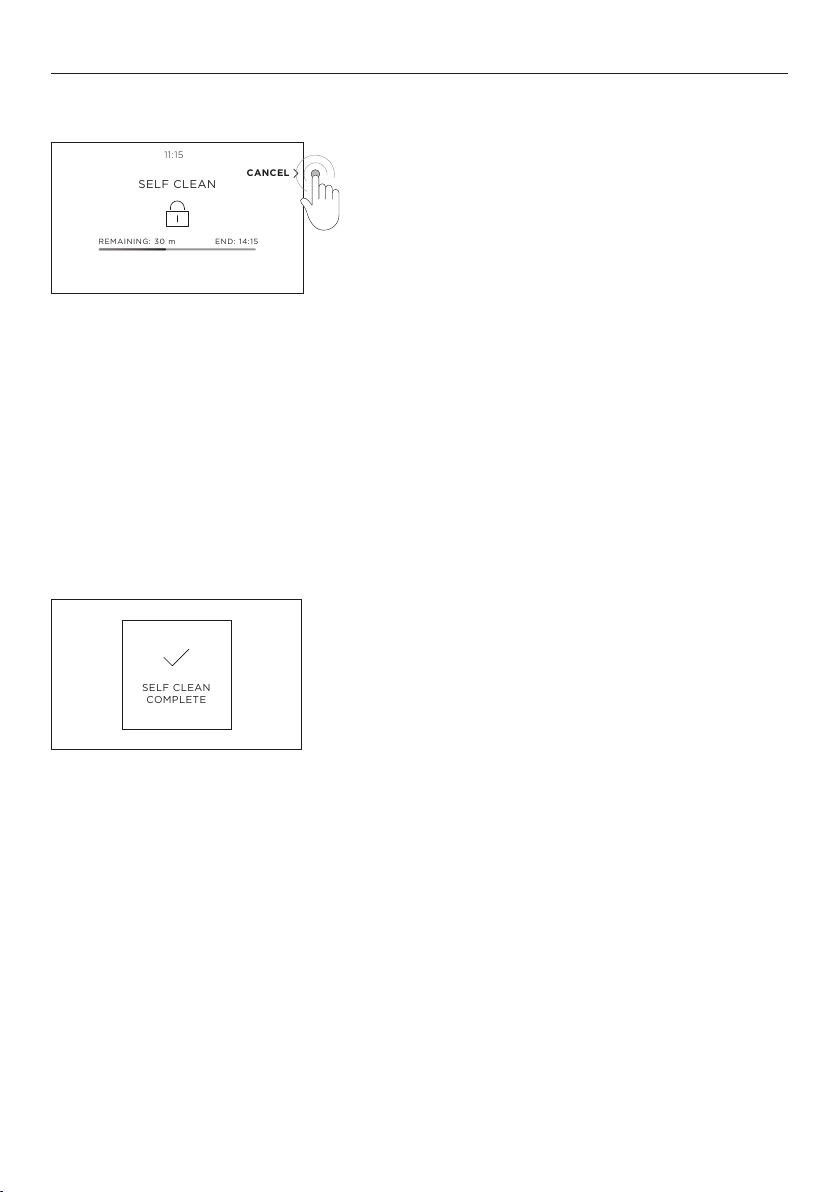
USING SELF CLEAN
SELF CLEAN
COMPLETE
10:45
REMAINING:
30 m
END:
11:15
SELF CLEAN
CANCEL
11:15
REMAINING:
30 m
END:
14:15
SELF CLEAN
CANCEL
Cancelling Self Clean
Press the button to the right of the screen at
any point during the clean cycle to cancel.
IMPORTANT!
z
The oven door will not unlock until the oven has cooled to a safe temperature.
DO NOT turn off the mains power supply to the oven (wall switch). Turning off the
power while the oven is too hot may damage the oven and its surrounding cabinetry.
z
We do not recommend cancelling Self Clean then immediately starting another cycle.
When Self Clean is finished
You need to:
z
z
z
z
z
66
SELF CLEAN COMPLETE will show in the
display. Touch the display to clear.
wait for the oven to cool down completely
remove the grey ash with a small brush or damp cloth
wipe out the oven with a clean, damp cloth
dry with a clean, lint-free cloth, and
replace the oven shelves.
Page 67

TROUBLESHOOTING
If there is a problem with your oven, please check the following points before
contacting your local Fisher & Paykel trained and supported service technician or the
Customer Care Centre.
General
PROBLEM POSSIBLE CAUSES WHAT TO DO
The oven does not work
(no heating)
The oven does not work
but the screen is on.
One of the oven lights
does not come on, but the
oven works.
The oven controls are
unresponsive.
The oven is not heating. The door is not properly closed
A glass pane in the
oven door has cracked,
chipped, or shattered.
I can feel hot air blowing
out of the vents after I
have turned the oven off.
The oven fan comes on
when I select a function
that does not use a fan
(eg BAKE)
No power supply (oven light and
dial halos do not come on)
The oven is in Demo Mode. Call Customer Care.
The oven light bulb(s) have blown. Replace the light bulb(s). See
The light bulb is loose. Ensure bulb is secure See 'Care
The oven light has been turned off. Go to the menu in the top
The control panel is locked. Touch and hold the screen
or it is opened too frequently
during cooking.
Incorrect cleaning or the
edge of the glass hitting
against something.
This is normal. For safety reasons the cooling fans
This is normal. The fan comes on
while the oven is preheating. It
may turn off when the oven has
reached the set temperature.
Ensure the circuit breaker hasn’t
tripped and there is no power
outage in your area. If there is a
power outage, you cannot use the
oven until power is restored.
'Replacing the oven light bulbs' for
instructions.
and cleaning' for instructions.
left corner of the screen and
select LIGHT.
to unlock.
The heating elements are disabled
while the door is open. Ensure the
door is properly closed and avoid
opening it during cooking.
You must NOT use the oven.
Contact a Fisher & Paykel trained
and supported service technician
or Customer Care
will continue to run even when you
have turned the oven off. The fans
will switch off automatically when
the oven has cooled.
Wait until the red heating bar on
the screen disappears: the oven
will then be ready to use.
67
Page 68

TROUBLESHOOTING
General
PROBLEM POSSIBLE CAUSES WHAT TO DO
The oven has reached the
set temperature but the
temperature dial halo is
still red.
The oven sounds a tone
when I try to set the
temperature below a
certain temperature.
The temperature dial halo
never turns white when I
use GRILL/BROIL.
Fan noise and warm
air coming from the
freestanding cooker
during and after use.
Condensation around oven
(eg on control panel or
top of oven door.)
Steam coming from
vents at the back of the
freestanding cooker.
The oven door does not
align with the control
panel or cabinetry.
Temperature is not
calibrated correctly.
The fan does not come on
in a convection mode.
Uneven baking Oven not correctly preheated. Ensure the dial halo has changed
The halo around the dial
alternates between white
and orange during use
The oven is set to MAXI Grill. This is normal. The dial halo will
stay red whenever this function is
in use as the grill element is always
heating.
This is normal: for food safety
reasons, the oven functions
have factory-set minimum
temperature settings.
This is normal: the halo stays red
to indicate that the grill element
provides instant radiant heat.
A cooling fan in the freestanding
cooker runs to prevent the oven
door and control panel from
overheating.
Food has high moisture
content or the local climate is
contributing to condensation.
Moisture from food evaporating
during cooking.
The oven door has been installed
incorrectly and the hinges are
misaligned within the slots.
Door is not sealing correctly. Re-install the door. See 'Removing
Technical fault Contact your Authorized Service
Unsuitable or incorrectly
arfreestanding cookerd bakeware.
The oven needs to heat
periodically to maintain the set
temperature during use
Select a different temperature
or try a different function that is
designed for low temperatures.
This is normal and requires
no action.
If there is frequent or excessive
condensation, ensure that
cabinetry around the freestanding
cooker is moisture-proof.
This is normal, especially if you are
cooking large quantities of food
using a CONVECTION mode
Re-install the door. See 'Removing
and refitting the oven door'
for instructions.
and refitting the oven door'
for instructions.
Center or Customer Care.
to red before beginning.
See 'Baking' for advice.
This is normal.
68
Page 69

TROUBLESHOOTING
Self Clean
PROBLEM POSSIBLE CAUSES WHAT TO DO
During Self Clean, the
oven is louder than usual.
The screen shows no time
remaining but the oven
door will not open.
I have cancelled Self Clean
but cannot use the oven:
• the door will not open
• the screen is still
counting down or
showing no time
remaining
• the controls are
unresponsive
The oven screen shows A2
or A3.
There is a power cut
during Self Clean.
Excessive smoking and/
or flames inside the oven
during a CLEAN cycle.
Brief glowing inside the
oven during SELF CLEAN.
The dial halos on the
secondary oven flash
white
The dial halos on the main
oven flash red
The oven door won’t open The door is locked because
This is normal: the oven’s cooling
fans operate at their highest speed.
The oven door is locked because
the oven is still too hot to be used
for cooking.
This is normal.
If the oven is still too hot to be
used for cooking the door will stay
locked until it has cooled down.
See section 'Alert codes'
for instructions.
Power cut. The heating elements are
Combustible material (eg wooden
board or utensil) or excessive food
soils left in the oven.
Heavy soiling is being removed This is normal and requires
SELF CLEAN is running in the main
oven
The secondary oven is in use A
cycle is underway or the
CLEAN
oven has not yet cooled.
SELF
Wait until Self Clean has finished.
If you cancelled a cycle part
way through, the oven still
needs to cool down before it
can be used. The oven door will
automatically unlock.
Wait until the cool-down phase
has finished. A long tone will
sound and the oven door will
automatically unlock when the
oven is ready to use.
Depending on when the clean
cycle was cancelled, the cool-down
may take up to 45 minutes.
Follow the instructions on
the screen.
disabled while the door is open.
The door will remain locked
until the oven has cooled to a
safe temperature.
Follow the instructions under 'Using
Self Clean' Do not disconnect
the freestanding cooker from the
power supply at the circuit breaker.
The cooling fan is needed to cool
the freestanding cooker.
no action.
Wait until the SELF CLEAN cycle has
finished or follow the instructions
in 'Setting Self Clean'.
SELF CLEAN cycle cannot run
when the secondary oven is in use.
Turn the the dials of the secondary
OFF.
oven to
See instructions in
'Using Self Clean'.
69
Page 70

TROUBLESHOOTING
Cooktop
PROBLEM POSSIBLE CAUSES WHAT TO DO
The cooktop cannot
be turned on.
The touch controls are
unresponsive.
The touch controls are
difficult to operate.
The display flashes
and there is a
Er03
continuous beep.
No power. Make sure the cooktop is
connected to the power
supply and that it is switched
on at the wall. Check
whether there is a power
outage in your home or area.
If you’ve checked everything
and the problem persists,
call your Authorised Service
Centre or Customer Care.
The controls are locked. Unlock the controls. See
section ‘Using your induction
cooktop’ for instructions.
There may be a slight film of
water over the controls or
you may be using the tip of
your finger when touching the
controls.
Liquid has spilled onto the
touch control area.
There are objects (eg utensils)
on the touch control area.
Several touch controls are
registering continuous contact
(eg due to someone resting
their hand or arm on the touch
control area).
Make sure the touch control
area is dry and use the ball
of your finger when touching
the controls.
Switch the power to the
cooktop off at the wall and
see ‘Care and cleaning’ for
instructions
Remove the objects from the
touch control area.
Remove the cause of
continuous contact.
Pans do not become
hot. The heat setting
display comes on, but
the
does not flash
when I remove a pan.
-0- shows in the
timer display when I
turn on the cooktop.
70
The cooktop is in ‘Display
mode’
Contact Customer Care or
your Authorised Service
Centre.
Page 71

TROUBLESHOOTING
Cooktop
PROBLEM POSSIBLE CAUSES WHAT TO DO
The glass is being
scratched.
The touch controls are
unresponsive.
The touch controls are
difficult to operate.
The glass is being
scratched.
The display flashes
and there is a
Er03
continuous beep.
Rough-edged cookware. Use cookware with flat and
smooth bases. See ‘Choosing
the right cookware’.
Unsuitable, abrasive scourer or
cleaning products being used.
The controls are locked. Unlock the controls. See
There may be a slight film of
water over the controls or
you may be using the tip of
your finger when touching the
controls.
Rough-edged cookware. Use cookware with flat and
Unsuitable, abrasive scourer or
cleaning products being used.
Liquid has spilled onto the
touch control area.
There are objects (eg utensils)
on the touch control area.
See ‘Care and cleaning’.
section ‘Using your induction
cooktop’ for instructions.
Make sure the touch control
area is dry and use the ball
of your finger when touching
the controls.
smooth bases. See ‘Choosing
the right cookware’.
See ‘Care and cleaning’.
Switch the power to the
cooktop off at the wall and
see ‘Care and cleaning’ for
instructions
Remove the objects from the
touch control area.
Several touch controls are
registering continuous contact
(eg due to someone resting
their hand or arm on the touch
control area).
Remove the cause of
continuous contact.
71
Page 72

TROUBLESHOOTING
Cooktop
PROBLEM POSSIBLE CAUSES WHAT TO DO
Some pans make
crackling or clicking
noises.
The cooktop makes
a low humming noise
when used on a high
heat setting (especially
PowerBoost).
Fan noise coming from
the cooktop.
The heat setting will not
increase. The display
flashes and the cooktop
beeps when I try to
increase the heat.
Pans do not become hot
and
appears in the
display.
This may be caused by the
construction of your
cookware (layers of different
metals vibrating differently).
This is caused by the
technology of induction
cooking.
A cooling fan built into
your cooktop has come on
to prevent the electronics
from overheating. It may
continue to run even after
you’ve turned the cooktop
off.
Other cooking zones are
in use and cooktop is at
maximum power.
The cooktop cannot detect
the pan because it is not
suitable for induction
cooking.
This is normal for induction
cookware and does not
indicate a fault.
This is normal, but the
noise should quieten down
or disappear completely
when you decrease the
heat setting.
This is normal and needs
no action. Do not switch
the power to the cooktop
off at the wall while the
fan is running.
Reduce the heat setting
for other cooking zones.
See section ‘Using multiple
cooking zones.’
Use cookware suitable for
induction cooking. See
section ‘Choosing the right
cookware’.
P flashes in the display
when you are trying to set
PowerBoost.
The cooktop or a cooking
zone has turned itself off
unexpectedly, a tone
sounds and an error code
is displayed (typically Er
following by two digits).
72
The cooktop cannot detect
the pan because it is too
small for the cooking zone or
not properly centred on it.
PowerBoost is temporarily
unavailable because the
cooktop needs to protect
itself from overheating.
Technical fault. Please note down the error
Centre the pan and make
sure that its base matches
the size of the cooking
zone.
Allow the cooktop to cool
down.
letters and numbers,
switch the power to the
cooktop off at the wall, and
contact your Authorised
Service Centre or Customer
Care with the error code
information.
Page 73

ALERT CODES
If there is a problem, the oven will automatically suspend all oven functions, beep five times
and display an alert code.
IMPORTANT!
Do not turn off the mains power supply to the oven (wall switch) if you get an alert code,
unless the instructions in the chart following specifically instruct you to. There are cooling
fans within the oven which are needed to cool the oven’s components. Turning off the
power while the oven is too hot may damage the oven and its surrounding cabinetry.
What to do if an alert code is displayed
1 If the beeping hasn’t stopped already, touch the display and press the little audio
button in the bottom right to mute it.
2 Make a note of the alert code displayed. You may need this information.
3 Follow the instructions on the screen to resolve the problem.
4 If you can fix the problem and the alert code does not reappear, you may continue
using your oven.
If you can’t fix the problem yourself or the alert code reappears and the problem persists:
wait until the cooling fans have stopped and the oven has completely cooled down, then
turn the power to the oven off at the wall and contact a Fisher & Paykel trained and
supported service technician or Customer Care with the alert code information.
ALERT CODE POSSIBLE CAUSES WHAT TO DO
A1
A2
A3
F
+ number
The oven
has overheated.
Door lock error:
the door cannot
be locked after
you have started a
Self Clean cycle.
Door lock error:
the door cannot
be unlocked after
a Self Clean cycle
has finished.
Technical fault. • Note down the alert code.
• Allow the oven to cool down.
• Once the oven has cooled down and the door has
unlocked, the alert code will disappear. You can now use
the oven.
• Turn the power to the oven off at the wall and on again.
• Wait approximately 10 seconds. This will allow the door
lock to return to its initial position.
• Set the clock. See 'Setting the clock' and 'First use'
for instructions.
• Try starting a Self Clean cycle again, making sure that you
close the door firmly. See 'Setting Self Clean'.
• Turn the power to the oven off at the wall and on again.
• Gently press the door a few times to help the door
lock disengage.
• If this doesn’t help and the alert code reappears,
contact a Fisher & Paykel trained and supported service
technician or Customer Care.
• Wait until the cooling fans have stopped and the oven
has completely cooled down.
• Turn the power to the oven off at the wall.
• Contact a Fisher & Paykel trained and supported service
technician or Customer Care.
73
Page 74

WARRANTY AND SERVICE
Before you call for service or assistance
Check the things you can do yourself. Refer to the installation instructions and your user
guide and check that:
z
Your product is correctly installed.
z
You are familiar with its normal operation.
If after checking these points you still need assistance or parts, please refer to the Service
& Warranty book for warranty details and your nearest Service Center, Customer Care, or
contact us through our website www.fisherpaykel.com
Complete and keep for safe reference:
Mode
Serial No.
Purchase Date
Purchaser
Dealer
Suburb
Town
Country
74
Page 75

Page 76

FISHERPAYKEL.COM
© Fisher & Paykel Appliances 2024. All rights reserved.
The models shown in this guide may not be available in all markets
The product specifications in this guide apply to the specific products and
models described at the date of issue. Under our policy of continuous product
improvement, these specifications may change at any time.
For current details about model and specification availability in your country,
please go to our website or contact your local Fisher&Paykel dealer.
and are subject to change at any time.
41829A 02.24
 Loading...